Yamaha Psr S700 Owners Manual S900/S700 Owner's
Psr-S700-Owners-Manual yamaha-psr-s700-owners-manual-134258
PSR-S900/S700 Owner's Manual psrs900_en_om_b1
PSR-S900 to the manual dc7d9064-4124-494a-b6af-3958e71d4a59
Yamaha Corporation PSR-S900 Owner's Manual psrs900_en_om_b1 Yamaha Corporation - PSR-S900 - Owner's Manual
Yamaha Corporation PSR-S700 Owner's Manual psrs900_en_om_b1 Yamaha Corporation - PSR-S700 - Owner's Manual
2014-12-13
: Yamaha Psr-S700-Owners-Manual yamaha-psr-s700-owners-manual-134258 pdf
Open the PDF directly: View PDF ![]() .
.
Page Count: 224 [warning: Documents this large are best viewed by clicking the View PDF Link!]
- Table of Contents
- What can you do with the PORTATONE?
- Panel Controls
- Playing the Keyboard
- Setting Up
- Handling the Floppy Disk Drive (FDD) and Floppy Disks
- Handling the USB Storage Device (USB Flash Memory/Floppy Disk, etc)
- Quick Guide
- Playing the Demos
- Operations in Basic Displays
- Playing Voices
- Practicing with the Preset Songs
- Playing Backing Parts with the performance assistant Technology
- Playing Accompaniment with the Auto Accompaniment Feature (Style Playback)
- The Multi Pads
- Voice Effects
- Calling Up Ideal Setups for Each Song (Music Finder)
- Singing Along with Song Playback (Karaoke) or Your Own Performance
- Recording Your Performance as Audio (USB Audio Recorder) (PSR-S900)
- Basic Operation
- Using, Creating and Editing Voices
- Using, Creating and Editing the Auto Accompaniment Styles
- The Multi Pads
- Registering and Recalling Custom Panel Setups - Registration Memory
- Using, Creating and Editing Songs
- Connecting the PSR-S900/S700 Directly to the Internet
- Connecting the Instrument to the Internet
- Accessing the Special Website
- Operations in the Special Website
- Scrolling the Display
- Following Links
- Entering Characters
- Return to the Previous Web Page
- Refreshing a Web Page/Canceling Loading of a Web Page
- Purchasing and Downloading Data
- Registering Bookmarks of Your Favorite Pages
- Opening a Bookmarked Page
- About the Internet Settings Display
- Changing the Home Page
- Initializing Internet Settings
- Glossary of Internet Terms
- Using a Microphone (PSR-S900)
- Using Your Instrument with Other Devices
- Connecting Audio & Video Devices
- Using External Audio Devices for Playback (1 [OUTPUT] jacks)
- Playing External Audio Devices with the Built-in Speakers (2 [AUX IN] jacks)
- Showing the Instrument’s Display Contents on a Separate TV Monitor (3 [VIDEO OUT] terminal) (PSR-S900)
- Connecting a Microphone or Guitar (4 [MIC/LINE IN] Jack) (PSR-S900)
- Using the Footswitch or Foot Controller (5 [FOOT PEDAL 1/2] jacks)
- Assigning Specific Functions to Each Foot Pedal
- Connecting External MIDI Devices (6 [MIDI] terminals)
- Connecting to a computer, USB device, and the Internet
- What is MIDI?
- MIDI Settings
- Connecting Audio & Video Devices
- Troubleshooting
- Specifications
- Index
- Panel Button Chart

EN
OWNER'S MANUAL

PLEASE KEEP THIS MANUAL
This product utilizes batteries or an external power supply (adapter). DO
NOT connect this product to any power supply or adapter other than one
described in the manual, on the name plate, or specifically recom-
mended by Yamaha.
WARNING:
Do not place this product in a position where anyone could
walk on, trip over, or roll anything over power or connecting cords of any
kind. The use of an extension cord is not recommended! If you must use
an extension cord, the minimum wire size for a 25’ cord (or less) is 18
AWG. NOTE: The smaller the AWG number, the larger the current han-
dling capacity. For longer extension cords, consult a local electrician.
This product should be used only with the components supplied or; a
cart, rack, or stand that is recommended by Yamaha. If a cart, etc., is
used, please observe all safety markings and instructions that accom-
pany the accessory product.
SPECIFICATIONS SUBJECT TO CHANGE:
The information contained in this manual is believed to be correct at the
time of printing. However, Yamaha reserves the right to change or modify
any of the specifications without notice or obligation to update existing
units.
This product, either alone or in combination with an amplifier and head-
phones or speaker/s, may be capable of producing sound levels that
could cause permanent hearing loss. DO NOT operate for long periods
of time at a high volume level or at a level that is uncomfortable. If you
experience any hearing loss or ringing in the ears, you should consult an
audiologist.
IMPORTANT: The louder the sound, the shorter the time period before
damage occurs.
Some Yamaha products may have benches and / or accessory mounting
fixtures that are either supplied with the product or as optional accesso-
ries. Some of these items are designed to be dealer assembled or
installed. Please make sure that benches are stable and any optional fix-
tures (where applicable) are well secured BEFORE using.
Benches supplied by Yamaha are designed for seating only. No other
uses are recommended.
NOTICE:
Service charges incurred due to a lack of knowledge relating to how a
function or effect works (when the unit is operating as designed) are not
covered by the manufacturer’s warranty, and are therefore the owners
responsibility. Please study this manual carefully and consult your dealer
before requesting service.
ENVIRONMENTAL ISSUES:
Yamaha strives to produce products that are both user safe and environ-
mentally friendly. We sincerely believe that our products and the produc-
tion methods used to produce them, meet these goals. In keeping with
both the letter and the spirit of the law, we want you to be aware of the
following:
Battery Notice:
This product MAY contain a small non-rechargeable battery which (if
applicable) is soldered in place. The average life span of this type of bat-
tery is approximately five years. When replacement becomes necessary,
contact a qualified service representative to perform the replacement.
This product may also use “household” type batteries. Some of these
may be rechargeable. Make sure that the battery being charged is a
rechargeable type and that the charger is intended for the battery being
charged.
When installing batteries, do not mix batteries with new, or with batteries
of a different type. Batteries MUST be installed correctly. Mismatches or
incorrect installation may result in overheating and battery case rupture.
Warning:
Do not attempt to disassemble, or incinerate any battery. Keep all batter-
ies away from children. Dispose of used batteries promptly and as regu-
lated by the laws in your area. Note: Check with any retailer of
household type batteries in your area for battery disposal information.
Disposal Notice:
Should this product become damaged beyond repair, or for some reason
its useful life is considered to be at an end, please observe all local,
state, and federal regulations that relate to the disposal of products that
contain lead, batteries, plastics, etc. If your dealer is unable to assist
you, please contact Yamaha directly.
NAME PLATE LOCATION:
The name plate is located on the bottom of the product. The model num-
ber, serial number, power requirements, etc., are located on this plate.
You should record the model number, serial number, and the date of pur-
chase in the spaces provided below and retain this manual as a perma-
nent record of your purchase.
Model
Serial No.
Purchase Date
SPECIAL MESSAGE SECTION
92-BP
(bottom)
3
PSR-S900/S700 Owner’s Manual
PRECAUTIONS
PLEASE READ CAREFULLY BEFORE PROCEEDING
* Please keep this manual in a safe place for future reference.
WARNING
Always follow the basic precautions listed below to avoid the possibility of serious injury or even death from electrical
shock, short-circuiting, damages, fire or other hazards. These precautions include, but are not limited to, the following:
• Only use the voltage specified as correct for the instrument. The required
voltage is printed on the name plate of the instrument.
•(PSR-S900) Use the specified adaptor (PA-300B/PA-300 or an equivalent
recommended by Yamaha) only. Using the wrong adaptor can result in damage
to the instrument or overheating.
•(PSR-S700) Use the specified adaptor (PA-301/PA-300B/PA-300 or an
equivalent recommended by Yamaha) only. Using the wrong adaptor can result
in damage to the instrument or overheating.
•Check the electric plug periodically and remove any dirt or dust which may have
accumulated on it.
•Do not place the AC adaptor cord near heat sources such as heaters or radiators,
and do not excessively bend or otherwise damage the cord, place heavy objects
on it, or place it in a position where anyone could walk on, trip over, or roll
anything over it.
• Do not open the instrument or attempt to disassemble the internal parts or
modify them in any way. The instrument contains no user-serviceable parts. If it
should appear to be malfunctioning, discontinue use immediately and have it
inspected by qualified Yamaha service personnel.
• Do not expose the instrument to rain, use it near water or in damp or wet
conditions, or place containers on it containing liquids which might spill into
any openings.
• Never insert or remove an electric plug with wet hands.
• Do not put burning items, such as candles, on the unit.
A burning item may fall over and cause a fire.
• If the AC adaptor cord or plug becomes frayed or damaged, or if there is a
sudden loss of sound during use of the instrument, or if any unusual smells or
smoke should appear to be caused by it, immediately turn off the power switch,
disconnect the adaptor plug from the outlet, and have the instrument inspected
by qualified Yamaha service personnel.
CAUTION
Always follow the basic precautions listed below to avoid the possibility of physical injury to you or others, or damage
to the instrument or other property. These precautions include, but are not limited to, the following:
• When removing the electric plug from the instrument or an outlet, always hold
the plug itself and not the cord.
• Unplug the AC power adaptor when not using the instrument, or during
electrical storms.
•Do not connect the instrument to an electrical outlet using a multiple-connector.
Doing so can result in lower sound quality, or possibly cause overheating in the
outlet.
•Do not expose the instrument to excessive dust or vibrations, or extreme cold or
heat (such as in direct sunlight, near a heater, or in a car during the day) to
prevent the possibility of panel disfiguration or damage to the internal
components.
• Do not use the instrument in the vicinity of a TV, radio, stereo equipment,
mobile phone, or other electric devices. Otherwise, the instrument, TV, or radio
may generate noise.
• Do not place the instrument in an unstable position where it might accidentally
fall over.
• Before moving the instrument, remove all connected adaptor and other cables.
• When setting up the product, make sure that the AC outlet you are using is
easily accessible. If some trouble or malfunction occurs, immediately turn off
the power switch and disconnect the plug from the outlet. Even when the power
switch is turned off, electricity is still flowing to the product at the minimum
level. When you are not using the product for a long time, make sure to unplug
the power cord from the wall AC outlet.
• Use only the stand specified for the instrument. When attaching the stand, use
the provided screws only. Failure to do so could cause damage to the internal
components or result in the instrument falling over.
•Do not place objects in front of the instrument’s air vent, since this may prevent
adequate ventilation of the internal components, and possibly result in the
instrument overheating.
Power supply/AC power adaptor
Do not open
Water warning
Fire warning
If you notice any abnormality
Power supply/AC power adaptor
Location
(3)-10
PSR-S900/S700 Owner’s Manual
4
• Before connecting the instrument to other electronic components, turn off the
power for all components. Before turning the power on or off for all
components, set all volume levels to minimum. Also, be sure to set the volumes
of all components at their minimum levels and gradually raise the volume
controls while playing the instrument to set the desired listening level.
• When cleaning the instrument, use a soft, dry cloth. Do not use paint thinners,
solvents, cleaning fluids, or chemical-impregnated wiping cloths.
• Do not insert a finger or hand in any gaps on the instrument.
• Never insert or drop paper, metallic, or other objects into the gaps on the panel
or keyboard. If this happens, turn off the power immediately and unplug the
power cord from the AC outlet. Then have the instrument inspected by qualified
Yamaha service personnel.
•Do not place vinyl, plastic or rubber objects on the instrument, since this might
discolor the panel or keyboard.
•Do not rest your weight on, or place heavy objects on the instrument, and do not
use excessive force on the buttons, switches or connectors.
•
Do not use the instrument/device or headphones for a long period of time at a
high or uncomfortable volume level, since this can cause permanent hearing loss.
If you experience any hearing loss or ringing in the ears, consult a physician.
Saving and backing up your data
• The data of the types listed below are lost when you turn off the power to the
instrument. Save the data to the USER tab display (page 27), or USB storage
device (USB flash memory/floppy disk, etc).
•Recorded/Edited Songs (page 43, 147, 162)
•Created/Edited Styles (page 118)
•Edited Voices (page 99)
•Memorized One Touch Settings (page 51)
•Edited MIDI settings (page 204)
Moreover, the above-mentioned data can be saved all at once. Refer to page 81.
Data in the USER tab display (page 27) may be lost due to malfunction or
incorrect operation. Save important data to a USB storage device (USB flash
memory/floppy disk, etc).
When you change settings in a display page and then exit from that page,
System Setup data (listed in the Parameter Chart of the Data List
downloadable from the web) is automatically stored. However, this edited
data is lost if you turn off the power without properly exiting from the relevant
display. Refer to page 5 for how to obtain the Data List.
Yamaha cannot be held responsible for damage caused by improper use or modifications to the instrument, or data that is lost or destroyed.
Always turn the power off when the instrument is not in use.
Even when the power switch is in the “STANDBY” position, electricity is still flowing to the instrument at the minimum level. When you are not using the instrument for a long
time, make sure you unplug the AC power adaptor from the wall AC outlet.
Connections
Maintenance
Handling caution
Saving data
(3)-10

PSR-S900/S700 Owner’s Manual
5
Thank you for purchasing this Yamaha PORTATONE!
We recommend that you read this manual carefully so that you can fully take advantage of the advanced and
convenient functions of the instrument.
We also recommend that you keep this manual in a safe and handy place for future reference.
About this Owner’s Manual and Data List
This manual consists of the following sections.
Owner’s Manual
Introduction (page 12).......................... Please read this section first.
Quick Guide (page 24)......................... This section explains how to use the basic functions.
Basic Operation (page 66).................... This section explains how to use the basic operations including display-
based controls.
Reference (page 83) ............................. This section explains how to make detailed settings for the various func-
tions.
Appendix (page 210)............................ This section contains additional information such as Troubleshooting and
Specifications.
Data List
The Data List contains various important preset content lists such as Voices, Styles, Effects, as well as MIDI-
related information. The Data List is available for downloading from the Yamaha Manual Library.
Yamaha Manual Library
http://www.yamaha.co.jp/manual/
•The illustrations and LCD screens as shown in this owner’s manual are for instructional purposes only, and may appear somewhat different
from those on your instrument.
•The example Operation Guide displays shown in this Manual are taken from the PSR-S900, and in English.
• Copying of the commercially available musical data including but not limited to MIDI data and/or audio data is strictly prohibited except
for your personal use.
•This device is capable of using various types/formats of music data by optimizing them to the proper format music data for use with the
device in advance. As a result, this device may not play them back precisely as their producers or composers originally intended.
• Some of the preset songs have been edited for length or arrangement, and may not be exactly the same as the original.
•The mandolin and pan flute, shown in the displays of the PSR-S900/S700, are on display at the Hamamatsu Museum of Musical Instru-
ments.
• (PSR-S900) This product is manufactured under license of U.S. Patents No. 5231671, No. 5301259, No. 5428708, and No. 5567901 of
IVL Audio Inc.
•The bitmap fonts used in this instrument have been provided by and are the property of Ricoh Co., Ltd.
•This product utilizes NF, an embedded Internet browser from ACCESS Co., Ltd. NF is used with the patented LZW, licensed
from Unisys Co., Ltd. NF may not be separated from this product, nor may it be sold, lent or transferred in any way. Also, NF
may not be reverse-engineered, reverse-compiled, reverse-assembled or copied.
This software includes a module developed by the Independent JPEG Group.
• All other trademarks are the property of their respective holders.
This product incorporates and bundles computer programs and contents in which Yamaha owns copyrights or with respect to which it has
license to use others’ copyrights. Such copyrighted materials include, without limitation, all computer software, style files, MIDI files,
WAVE data, musical scores and sound recordings. Any unauthorized use of such programs and contents outside of personal use is not per-
mitted under relevant laws. Any violation of copyright has legal consequences. DON’T MAKE, DISTRIBUTE OR USE ILLEGAL COPIES.
PSR-S900/S700 Owner’s Manual
6
Accessories
Guide to Yamaha Online Member Product User Registration
Accessory CD-ROM for Windows
Owner’s Manual
Accessory CD-ROM for Windows Installation Guide
Music Rest
AC Power Adaptor
PSR-S900: PA-300B or an equivalent*
PSR-S700: PA-301 or an equivalent*
*May not be included depending on your particular area. Please check with your Yamaha dealer.
PSR-S900
The followings are the titles, credits and copyright notices for two (2)
of the songs pre-installed in this instrument:
Beauty And The Beast
from Walt Disney's BEAUTY AND THE BEAST
Lyrics by Howard Ashman
Music by Alan Menken
© 1991 Walt Disney Music Company and Wonderland Music Com-
pany, Inc.
All Rights Reserved Used by Permission
Can't Help Falling In Love
from the Paramount Picture BLUE HAWAII
Words and Music by George David Weiss, Hugo Peretti and Luigi
Creatore
Copyright © 1961; Renewed 1989 Gladys Music (ASCAP)
Worldwide Rights for Gladys Music Administered by Cherry Lane
Music Publishing Company, Inc.
International Copyright Secured All Rights Reserved
PSR-S700
The followings are the titles, credits and copyright notices for two (2)
of the songs pre-installed in this instrument:
Beauty And The Beast
from Walt Disney's BEAUTY AND THE BEAST
Lyrics by Howard Ashman
Music by Alan Menken
© 1991 Walt Disney Music Company and Wonderland Music Com-
pany, Inc.
All Rights Reserved Used by Permission
Hey Jude
Words and Music by John Lennon and Paul McCartney
Copyright © 1968 Sony/ATV Songs LLC
Copyright Renewed
All Rights Administered by Sony/ATV Music Publishing, 8 Music
Square West, Nashville, TN 37203
International Copyright Secured All Rights Reserved

PSR-S900/S700 Owner’s Manual
7
Table of Contents
Introduction
What can you do with the PORTATONE? ....... 12
Panel Controls ................................................. 14
Playing the Keyboard ...................................... 16
Power Supply ............................................... 16
Powering Up ................................................ 17
Setting Up ....................................................... 18
Music Rest ................................................... 18
Using Headphones ....................................... 18
Changing the Display Language .................. 19
Display Settings ........................................... 19
Handling the Floppy Disk Drive (FDD) and
Floppy Disks .................................................... 22
Handling the USB Storage Device (USB Flash
Memory/Floppy Disk, etc) .............................. 23
Quick Guide
Playing the Demos .......................................... 24
Operations in Basic Displays ........................... 26
Operation of the Main Display ............................. 26
Operation of the File Selection Display ................. 27
Operation of the Function Display ........................ 28
Playing Voices ................................................. 30
Playing Preset Voices ............................................ 30
Practicing with the Preset Songs .................... 36
Playing Back and Listening to Songs Before
Practicing ............................................................. 36
Displaying Music Notation (Score) ....................... 39
Muting the Right- or Left-hand Part Viewing the
Score .................................................................... 40
Practicing with the Repeat Playback Function ....... 42
Recording Your Performance ................................ 43
Playing Backing Parts with the performance
assistant Technology ....................................... 44
Playing Accompaniment with the Auto
Accompaniment Feature (Style Playback) ...... 46
Playing “Mary Had a Little Lamb” with the Auto
Accompaniment Feature ...................................... 46
The Multi Pads ................................................ 52
Playing the Multi Pads .......................................... 52
Using Chord Match .............................................. 53
Voice Effects .................................................... 53
Applying Harmony to Your Right-hand Melody
(HARMONY/ECHO) .............................................. 54
Calling Up Ideal Setups for Each Song
(Music Finder) ................................................. 55
Calling up the panel settings to match the Style
(Repertoire) .......................................................... 56
Singing Along with Song Playback (Karaoke)
or Your Own Performance .............................. 57
Connecting a Microphone (PSR-S900 only) .......... 57
Singing with the Lyrics Display ............................. 58
Convenient Functions for Karaoke ........................ 59
Convenient Functions for Singing Along with Your
Own Performance ................................................ 61
Recording Your Performance as Audio
(USB Audio Recorder) (PSR-S900) .................. 63
Recording Your Performance as Audio .................. 63
Playing Back the Recorded Performance ............... 65
Basic Operation
Selecting Message Language .......................... 66
The Messages Shown in the Display .............. 66
Instant Selection of the Displays
—Direct Access ................................................ 67
Basic Displays (Main Display and File Selection
Display) ............................................................ 68
Main Display ........................................................ 68
File Selection Display Configuration and Basic
Operation ............................................................. 69
File/Folder Operations in the File Selection Display ... 72
Restoring the Factory-programmed Settings ... 79
Restoring the Factory-programmed System .......... 79
Restoring the Factory-programmed Settings
Independently by Item ......................................... 79
Saving and Recalling Your Original Settings as a
Single File ............................................................. 80
Data Backup .................................................... 81
Backup procedure ................................................ 81
Reference
Using, Creating and Editing Voices ..83
Voice Characteristics ....................................... 83
Playing Different Voices Simultaneously ........ 84
Keyboard Parts (Right 1, Right 2, Left) .................. 84
Playing Two Voices Simultaneously
(Right 1 and 2 Parts) ............................................ 85
Playing Different Voices with the Left and Right
Hands (Right 1 and Left Parts) .............................. 86
Changing Pitch ................................................ 87
Transpose ............................................................. 87
Fine-tuning the Pitch of the Entire Instrument ...... 87
Scale Tuning ......................................................... 87
Selecting the Harmony/Echo type .................. 89
Editing the Volume and Tonal Balance
(MIXING CONSOLE) ........................................ 91
Basic Procedure .................................................... 91
Voice Creating—Voice Set .............................. 99
Basic Procedure .................................................... 99
Creating Your Original Organ Flutes Voices ........ 103

PSR-S900/S700 Owner’s Manual
8
Using, Creating and Editing the
Auto Accompaniment Styles ........ 106
Style Characteristics ...................................... 106
Selecting a Chord Fingering Type ................ 106
Playing Only the Rhythm Channels of a
Style ............................................................... 107
Style Playback-related Settings ..................... 109
Split Point Settings ....................................... 110
Editing the Volume and Tonal Balance of the
Style (MIXING CONSOLE) ............................ 111
Convenient Music Finder feature ................. 111
Searching the Records ........................................ 111
Creating a Set of Favorite Records ...................... 113
Editing Records .................................................. 114
Saving the Record .............................................. 115
Style Creator ................................................. 118
Style Structure .................................................... 118
Creating a Style .................................................. 118
Editing the Created Style .................................... 124
The Multi Pads ............................. 132
Multi Pad Creating (Multi Pad Creator) ....... 132
Multi Pad Realtime Recording ............................ 132
Multi Pad Step Recording (EDIT) ........................ 133
Multi Pad Editing (Multi Pad Creator) ......... 134
Registering and Recalling Custom
Panel Setups
— Registration Memory ............... 135
Registering and Saving Custom Panel
Setups ............................................................ 135
Recalling the Registered Panel Setups ......... 136
Deleting an Unneeded Panel Setup/Naming a
Panel Setup ........................................................ 137
Disabling Recall of Specific Items
(Freeze Function) ............................................... 138
Calling Up Registration Memory Numbers in Order
— Registration Sequence ................................... 138
Using, Creating and Editing
Songs ............................................ 140
Compatible Song Types ................................ 140
Operations for Song Playback ...................... 141
Adjusting the Volume Balance and Voice
Combination, etc. (MIXING CONSOLE) ....... 144
Practicing Songs with the Guide Functions .. 145
Selecting the Guide Function Type ..................... 145
Recording Your Performance to MIDI .......... 147
Recording Methods ............................................ 147
Editing a Recorded Song .................................... 162
Connecting the PSR-S900/S700
Directly to the Internet ............... 171
Connecting the Instrument to the Internet . 171
Accessing the Special Website ...................... 172
Operations in the Special Website ............... 172
Scrolling the Display ........................................... 172
Following Links ................................................... 173
Entering Characters ............................................ 173
Return to the Previous Web Page ........................ 173
Refreshing a Web Page/Canceling Loading of a
Web Page ........................................................... 174
Purchasing and Downloading Data .................... 174
Registering Bookmarks of Your Favorite Pages .... 175
Opening a Bookmarked Page ............................. 176
About the Internet Settings Display .................... 178
Changing the Home Page .................................. 181
Initializing Internet Settings ................................ 182
Glossary of Internet Terms ........................... 183
Using a Microphone (PSR-S900) ..184
Editing Vocal Harmony Parameters .............. 184
Adjusting the Microphone and Harmony
Sound ............................................................ 187
Talk Setting ................................................... 191
Using Your Instrument with Other
Devices .........................................193
Connecting Audio & Video Devices .............. 193
Using External Audio Devices for Playback
(1
[OUTPUT] jacks) ........................................... 193
Playing External Audio Devices with the Built-in
Speakers (2
[AUX IN] jacks) ............................... 193
Showing the Instrument’s Display Contents on a
Separate TV Monitor
(3
[VIDEO OUT] terminal) (PSR-S900) ............... 194
Connecting a Microphone or Guitar
(4
[MIC/LINE IN] Jack) (PSR-S900) .................... 194
Using the Footswitch or Foot Controller
(5
[FOOT PEDAL 1/2] jacks) .............................. 194
Assigning Specific Functions to Each Foot Pedal .. 195
Connecting External MIDI Devices
(6
[MIDI] terminals) .......................................... 198
Connecting to a computer, USB device,
and the Internet ............................................ 198
Connecting a Computer
(6
[MIDI] and 7
[USB TO HOST] terminals) ...... 198
Connecting to a USB-type LAN Adaptor and USB
Storage Device
(8
via the [USB TO DEVICE] terminal) ................ 199
Connecting to the Internet (9
[LAN] Port) ......... 200
What is MIDI? ................................................ 201
MIDI Settings ................................................ 204
Basic Operation .................................................. 204
Pre-Programmed MIDI Templates ....................... 206
MIDI System Settings ......................................... 207
MIDI Transmit Settings ....................................... 207
MIDI Receive Settings......................................... 208
Setting the Bass Note for Style Playback via MIDI
Receive ............................................................... 209
Setting the Chord Type for Style Playback via MIDI
Receive ............................................................... 209

PSR-S900/S700 Owner’s Manual
9
Using
Your
Instrument
with
Other
Devices
Introduction
Quick Guide
Basic Operation
Using, Creating and Editing the Auto
Accompaniment Styles
The Multi Pads
Using, Creating and Editing Songs
Using a Microphone (PSR-S900)
Connecting the PSR-S900/S700 Directly
to the Internet
Appendix
Registering and Recalling Custom Panel Setups
Reference
Using, Creating and Editing Voices
Using Your Instrument with Other
Devices
Appendix
Troubleshooting ............................................ 210
Specifications ................................................ 215
Index .............................................................. 217
Panel Button Chart ....................................... 220
PSR-S900/S700 Owner’s Manual
10
Application Index
Starting up before turning the power on
• Setting up the music rest.......................................................................................................................................... page 18
• Connecting headphones.......................................................................................................................................... page 18
•Turning the power on/off ......................................................................................................................................... page 17
Listening to the PSR-S900/S700
• Playing the Demos .................................................................................................................................................. page 24
• Playing songs........................................................................................................................................................... page 36
– Playing a Preset Song ........................................................................................................................................... page 36
–Turning parts (channels) of the Song on/off......................................................................................................... page 146
– Adjusting the balance between the Song and keyboard...................................................................................... page 144
• Playing Styles ........................................................................................................................................................ page 106
– Playing Preset Styles............................................................................................................................................. page 46
–Turning parts (channels) of the Style on/off ......................................................................................................... page 108
– Adjusting the balance between the Style and keyboard...................................................................................... page 111
• Playing the Multi Pads ............................................................................................................................................. page 52
Playing the Keyboard
• Selecting a Voice (RIGHT1) and playing the keyboard ............................................................................................. page 84
• Playing two or three Voices simultaneously ............................................................................................................. page 85
• Playing different Voices with the left and right hands ............................................................................................... page 86
• Playing the drum/percussion Voices......................................................................................................................... page 83
• Super Articulation voices (PSR-S900)....................................................................................................................... page 83
•Mega Voices ............................................................................................................................................................ page 83
• Setting the touch sensitivity of the keyboard ............................................................................................................ page 33
•Turning Initial Touch on or off for each keyboard part (RIGHT1, 2, LEFT)................................................................. page 53
• Setting the Modulation wheel for each keyboard part (RIGHT 1, 2, LEFT)................................................................ page 33
Practicing the keyboard performance
• Using the Metronome.............................................................................................................................................. page 34
• Displaying and playing along with the music notation of the song during playback................................................. page 39
Selecting the programs of the PSR-S900/S700
•Voices ..................................................................................................................................................................... page 83
• Styles..................................................................................................................................................................... page 106
• Multi Pad banks..................................................................................................................................................... page 132
• Songs .................................................................................................................................................................... page 140
• Music Finder records...................................................................................................................................... pages 55, 111
• Registration Memory bank..................................................................................................................................... page 138
• Registration Memory number ................................................................................................................................ page 138
• One Touch Setting numbers..................................................................................................................................... page 51
• Harmony/Echo types ............................................................................................................................................... page 89
• MIDI templates...................................................................................................................................................... page 206
• Effect types .............................................................................................................................................................. page 95
•Vocal Harmony types (PSR-S900) .......................................................................................................................... page 184
• Master EQ types ...................................................................................................................................................... page 97
Using the LCD display
• Understanding and using the Main display.............................................................................................................. page 26
•Viewing the Song Lyrics on the LCD display ............................................................................................................ page 58
•Viewing the Song Score on the LCD display ............................................................................................................ page 39
•Viewing text files on the LCD display (PSR-S900) .................................................................................................... page 58
• Showing the display contents on a separate TV monitor (PSR-S900) ...................................................................... page 194
Playing Style chords with your left hand and melodies with your right
• Learning how to play specific chord types..............................................................Chord Tutor .............................. page 50
• Learning how to play (indicate) chords for Style playback.......................................Chord Fingering........................ page 50

PSR-S900/S700 Owner’s Manual 11
• Applying automatic harmony or echo to your right-hand melodies.........................Harmony/Echo ......................... page 89
•Automatically changing the chords of the Multi Pads with your left-hand play........Chord Match ............................ page 53
Instantly selecting custom panel settings
• Calling up ideal panel setups..................................................................................Music Finder ................... pages 55, 111
• Changing setups to match the Style ........................................................................One Touch Setting .................... page 51
•Saving and recalling custom panel setups...............................................................Registration Memory .............. page 135
Creating Voices, Styles, Songs, and more
• Creating your original Voices..................................................................................Voice Set .................................. page 99
• Creating your original Organ Flutes Voices .............................................................Voice Set ................................ page 103
• Creating your original Styles...................................................................................Style Creator........................... page 118
• Creating your original Songs.................................................................................................................................... page 43
– MIDI recording of your keyboard performance ........................................................................................... pages 43, 147
– Inputting notes one by one..................................................................................Song Creator .......................... page 153
– Inputting and editing ..........................................................................................Song Creator .......................... page 162
•Audio Recording ..................................................................................................................................................... page 63
• Creating your original Multi Pads............................................................................Multi Pad Creator ................... page 132
• Creating a Registration Memory bank.................................................................................................................... page 138
• Creating new Music Finder records ....................................................................................................................... page 113
• Creating new Vocal Harmony types (PSR-S900)..................................................................................................... page 184
• Creating new Effect types ........................................................................................................................................ page 95
• Creating custom Master EQ settings......................................................................................................................... page 97
Controlling and adjusting the pitch
• Adjusting the overall pitch of the PSR-S900/S700 ...................................................Master Tune.............................. page 87
•Tuning the individual notes of the keyboard ...........................................................Scale Tune ................................ page 87
• Adjusting the octave of the keyboard....................................................................................................................... page 93
•Transposing notes (Master Transpose, Keyboard Transpose, Song Transpose) ............................................................ page 61
• Setting [TRANSPOSE] button to independently control separate parts ..................................................................... page 93
• Using the PITCH BEND wheel ................................................................................................................................ page 33
• Using the MODULATION wheel............................................................................................................................. page 33
Singing with a connected microphone (PSR-S900)
• Connecting a microphone to the instrument................................................................................................... pages 57, 194
•Automatically applying vocal harmonies to your voice...........................................Vocal Harmony ........................ page 60
• Singing while following along with the Lyrics on the display ................................................................................... page 58
• Singing while following along with the Lyrics on a separate TV monitor .................................................................. page 59
• Singing with the Guide functions and Song playback ............................................................................................ page 145
• Using the Talk Setting ........................................................................................................................................... page 191
• Matching the Song Transpose setting to a comfortable singing pitch ........................................................................ page 61
• Matching the Keyboard Transpose setting to a comfortable singing pitch ................................................................. page 87
Live performance tips and techniques
• Assigning specific panel operations/functions for foot control................................................................................ page 195
• Calling up Registration Memory numbers in custom-set order ................................Registration Sequence ............ page 138
• Using a foot pedal to change Registration Memory numbers ................................................................................. page 195
• Using the Fade In/Out ..................................................................................................................................... pages 48, 49
Group performance tips and techniques
• Independently transposing the Song and keyboard pitch to match your singing range ............................................. page 59
•Tuning the overall sound of the PSR-S900/S700 to match other instruments ............................................................ page 87
• Synchronizing the PSR-S900/S700 to other MIDI instruments................................................................................ page 207
Other Tips
• Registering your name to the PSR-S900/S700 .......................................................................................................... page 21
• Importing custom icons for Voice/Style/Song indications in the Selection display .................................................... page 76
• Displaying the bank select and program numbers in the Voice Selection display ................................................... page 209
PSR-S900/S700 Owner’s Manual
12
Introduction
What can you do with the PORTATONE?
SONG
Playback previously
recorded songs
(page 36, 57, 141)
Enjoy a wide variety of
preset songs as well as
songs on commercially
available disks.
DEMO
Explore the Demos (page 24)
These not only showcase the
stunning voices and styles of the
instrument, they introduce you to
the various functions and features —
and give you hands-on experience
using the PSR-S900/S700!
STYLE
Back up your performance with Auto
Accompaniment (page 46, 106)
Playing a chord with your left hand automati-
cally plays the auto accompaniment backing.
Select an accompaniment style — such as pop,
jazz, Latin, etc. — and let the PORTATONE be
your backing band!
Vocal Harmony (PSR-S900)
Add automatic vocal backing to
your singing (page 184)
The amazing Vocal Harmony feature (on
the PSR-S900) automatically produces
backup vocal harmonies for lead vocals
that you sing into a microphone. You can
even change the gender of the harmony
voices — for example, letting you add
female backup to your own male voice
(or vice versa).
LCD
The large LCD (together with the
various panel buttons) provides
comprehensive and easy-to-
understand control of the
instrument’s operations.
The lyrics, music scores (PSR-
S900/S700), and text data (PSR-
S900) can also be displayed in
the LCD.
DIGITAL RECORDING
Record your performances (page 43, 147)
With the powerful and easy-to-use song
recording features, you can record your own
keyboard performances, and create your own
complete, fully orchestrated compositions —
which you can then save to the USER drive or a
USB storage device for future recall.
And since the recorded data is MIDI, you can
easily edit your songs, too.

13
PSR-S900/S700 Owner’s Manual
Introduction
LAN USB
TO DEVICE TO HOST
MIDI FOOT PEDAL
IN OUT 12
VIDEO OUT
MUSIC FINDER
Call up the perfect
accompaniment style
(page 55, 111)
If you know what song you want to
play, but you don’t know which style
or voice would be right for it, let the
Music Finder help you. Just select the
song title, and the instrument
automatically calls up the most
appropriate style and voice.
Connect directly to the Internet
(page 171), and get related information
on records, or download and add your
favorite records to the instrument.
VOICE
Enjoy a huge variety of realistic voices
(page 30, 83)
The PSR-S900/S700 features a wealth of
exceptionally authentic and dynamic voices —
including piano, strings, woodwinds, and more!
The instrument also has Mega Voices (PSR-
S900/S700) and Super Articulation voices
(PSR-S900). Mega Voices feature different
performance sounds of the same instrument
in different velocity ranges — designed
specifically for recorded MIDI data. Super
Articulation voices are similar to Mega
Voices, but with greater playability and
expressive realtime control.
Organ Flutes
Craft your own organ
voices (page 103)
This special function not only
gives you a full set of rich and
luscious organ sounds, it also
lets you create your own
original organ voices, just as
on a traditional organ, by
increasing and decreasing the
flute footages, and adding
percussive sounds.
USB TO HOST terminal
Make music with a computer
— quickly and easily (page 198)
Dive in and take advantage of the
wide world of computer music
software. Connections and setup
are exceptionally easy, and you
can play back your computer
recorded parts with different
instrument sounds — all from a
single instrument!
USB TO DEVICE
terminal
Connect the instrument
to the USB storage device
(page 199)
Connecting the USB storage
device (such as USB flash
memory and hard disk drive)
to this terminal lets you save
various types of data created
on the instrument.
Multi Pads
Add spice to your performance with
special dynamic phrases (page 52, 132)
By simply pressing one of the Multi Pads,
you can play short rhythmic or melodic
phrases. You can also create your original
Multi Pad phrases by recording them
directly from the keyboard.
INTERNET
Connect directly to the
Internet (page 171)
Access the special Yamaha
website and take advantage of
the various music services
available there.
USB Audio Recorder
(PSR-S900)
Record entire
performances as audio
data (page 63)
Connect a guitar or
microphone and record
your playing and singing
together with the sounds of
the instrument—all mixed
down to a stereo audio
recording, and
conveniently saved to a
USB storage device.
PSR-S900/S700 Owner’s Manual
14
Introduction
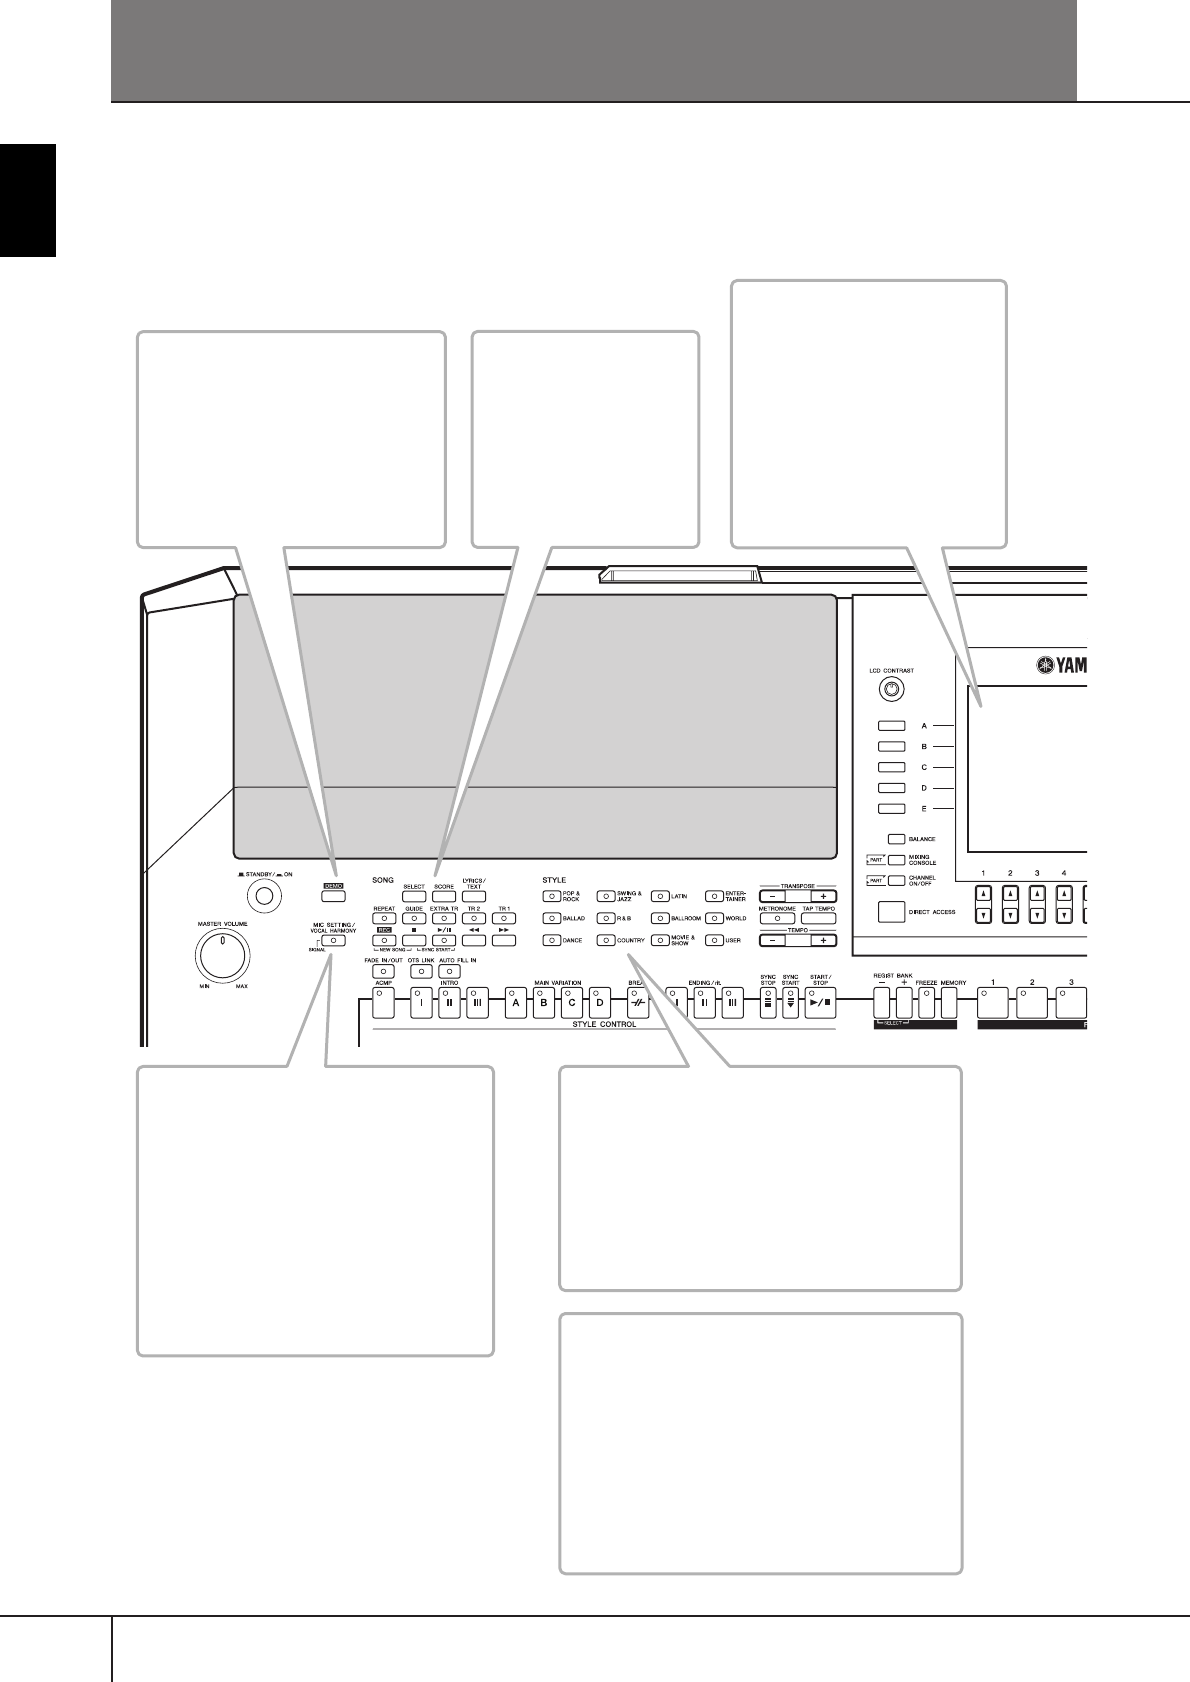
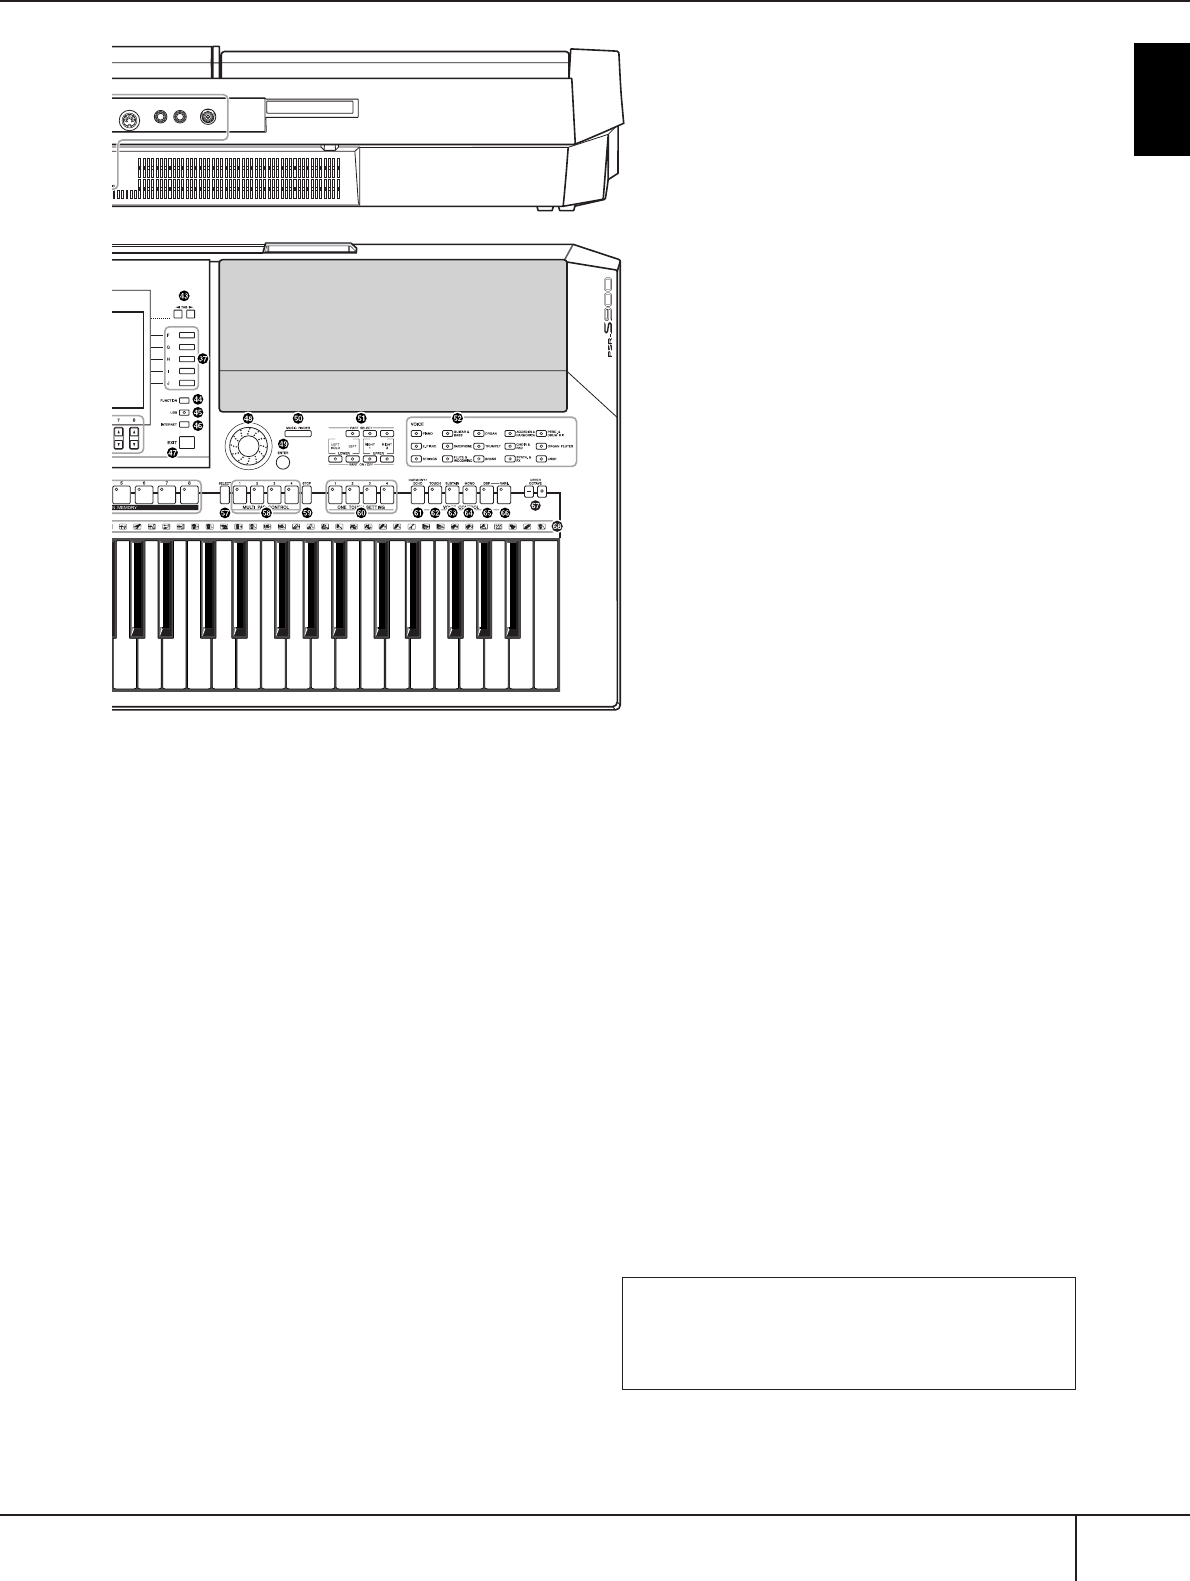
Panel Controls
STANDBY/ON
1[STANDBY/ON] switch.................................................... P. 17
VOLUME
2[MASTER VOLUME] dial.................................................. P. 17
WHEEL
3[PITCH BEND] wheel ...................................................... P. 33
4[MODULATION] wheel................................................... P. 33
PHONES
5[PHONES] ....................................................................... P. 18
DEMO
6[DEMO] button................................................................ P. 24
MIC.
7[MIC SETTING/VOCAL HARMONY] button (PSR-S900)
........................................................................................ P. 59
SONG
8[SELECT] button............................................................... P. 36
9[SCORE] button ............................................................... P. 39
0[LYRICS/TEXT] button (PSR-S900)..................................... P. 58
[LYRICS] button (PSR-S700)............................................. .P. 58
A[REPEAT] button............................................................... P. 42
B[GUIDE] button ............................................................... P. 40
C[EXTRA TR] button ......................................................... P. 147
D[TR 2] button ................................................................... P. 42
E[TR 1] button ................................................................... P. 40
F[REC] button .................................................................... P. 43
G[J] (STOP) button......................................................... P. 37
H[F/K] (PLAY/PAUSE) button....................................... P. 36
I[G]/[H] (REW/FF) buttons......................................... P. 142
STYLE
JSTYLE buttons .................................................................. P. 46
TRANSPOSE
K[–] [+] buttons .................................................................. P. 59
METORONOME
L[METRONOME] button.................................................... P. 34
TAP TEMPO
M[TAP TEMPO] button........................................................ P. 48
TEMPO
N[–] [+] buttons .................................................................. P. 34
FADE IN/OUT
O[FADE IN/OUT] button..................................................... P. 48
STYLE CONTROL
P[OTS LINK] button ...........................................................P. 51
Q[AUTO FILL IN] button..................................................... P. 49
R[ACMP] button................................................................. P. 47
SINTRO [I]/[II]/[III] buttons................................................. P. 48
TMAIN VARIATION [A]/[B]/[C]/[D] buttons........................ P. 49
U[BREAK] button ................................................................ P. 49
VENDING/rit. [I]/[II]/[III] buttons ........................................ P. 49
W[SYNC STOP] button ........................................................ P. 49
X[SYNC START] button....................................................... P. 48
Y[START/STOP] button ....................................................... P. 48
LAN USB
TO DEVICE TO HOST IN
C1 D1 E1 F1 G1 A1 B1 C2 D2 E2 F2 G2 A2 B2 C3 D3 E3 F
3
See page 193
15
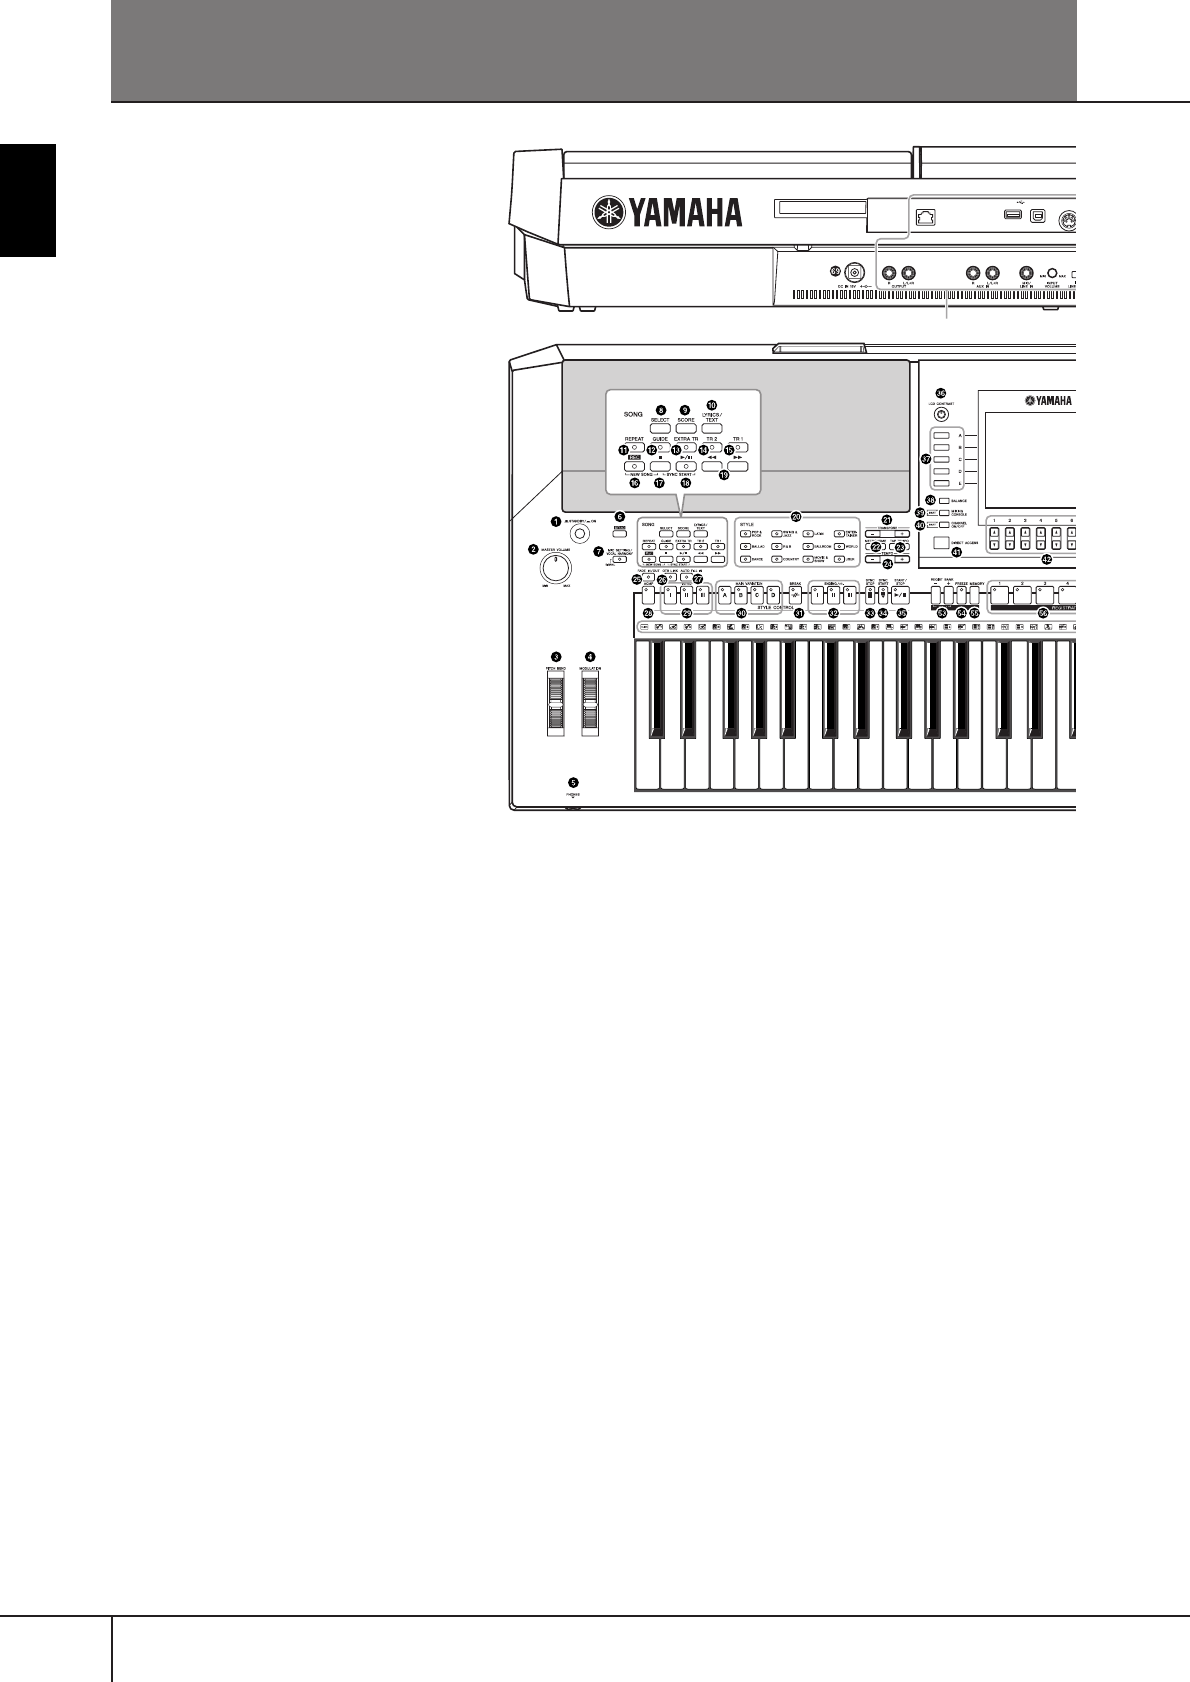
PSR-S900/S700 Owner’s Manual
Introduction
Z[LCD CONTRAST] knob .................................................. P. 19
[[A]–[J] buttons.................................................................. P. 26
\[BALANCE] button........................................................... P. 41
][MIXING CONSOLE] button............................................ P. 91
^[CHANNEL ON/OFF] button ................................. P. 108, 146
a[DIRECT ACCESS] button................................................. P. 67
b[1
π†
]–[8
π†
] buttons ................................................ P. 26
cTAB [
√
][
®
] buttons......................................................... P. 27
d[FUNCTION] button........................................................ P. 28
e[USB] button.................................................................... P. 71
f[INTERNET] button ........................................................ P. 171
g[EXIT] button.................................................................... P. 27
hDATA ENTRY dial ............................................................ P. 71
i[ENTER] button................................................................ P. 71
MUSIC FINDER
j[MUSIC FINDER] button.................................................. P. 55
PART
k[PART SELECT], [PART ON/OFF] buttons ......................... P. 84
VOICE
lVOICE buttons ................................................................. P. 30
REGISTRATION MEMORY
mREGIST BANK [–]/[+] buttons......................................... P. 136
n[FREEZE] button............................................................. P. 138
o[MEMORY] button ......................................................... P. 135
p[1]–[8] buttons............................................................... P. 135
MULTI PAD CONTROL
q[SELECT] button ............................................................. P. 134
r[1]–[4] buttons ............................................................... P. 134
s[STOP] button ................................................................ P. 132
ONE TOUCH SETTING
t[1]–[4] buttons ................................................................. P. 51
VOICE CONTROL
u[HARMONY/ECHO] button ....................................... P. 53, 89
v[TOUCH] button .............................................................. P. 53
w[SUSTAIN] button............................................................. P. 53
x[MONO] button............................................................... P. 53
y[DSP] button .................................................................... P. 53
z[VARI.] button .................................................................. P. 53
UPPER OCTAVE
{UPPER OCTAVE [–]/[+] buttons........................................ P. 68
|Drum Kit icons....................................... Data List (See page 5)
REAR PANEL
}DC IN (terminal) .............................................................. P. 16
M
IDI FOOT PEDAL
OUT 12
VIDEO OUT
G3 A3 B3 C4 D4 E4 F4 G4 A4 B4 C5 C6D5 E5 F5 G5 A5 B5
•For quick reference, also see the alphabetically
sorted “Panel Button Chart” on page 220.
•For information on the jacks and connectors
located on the rear panel, see page 193.
PSR-S900/S700 Owner’s Manual
16
Introduction
Playing the Keyboard
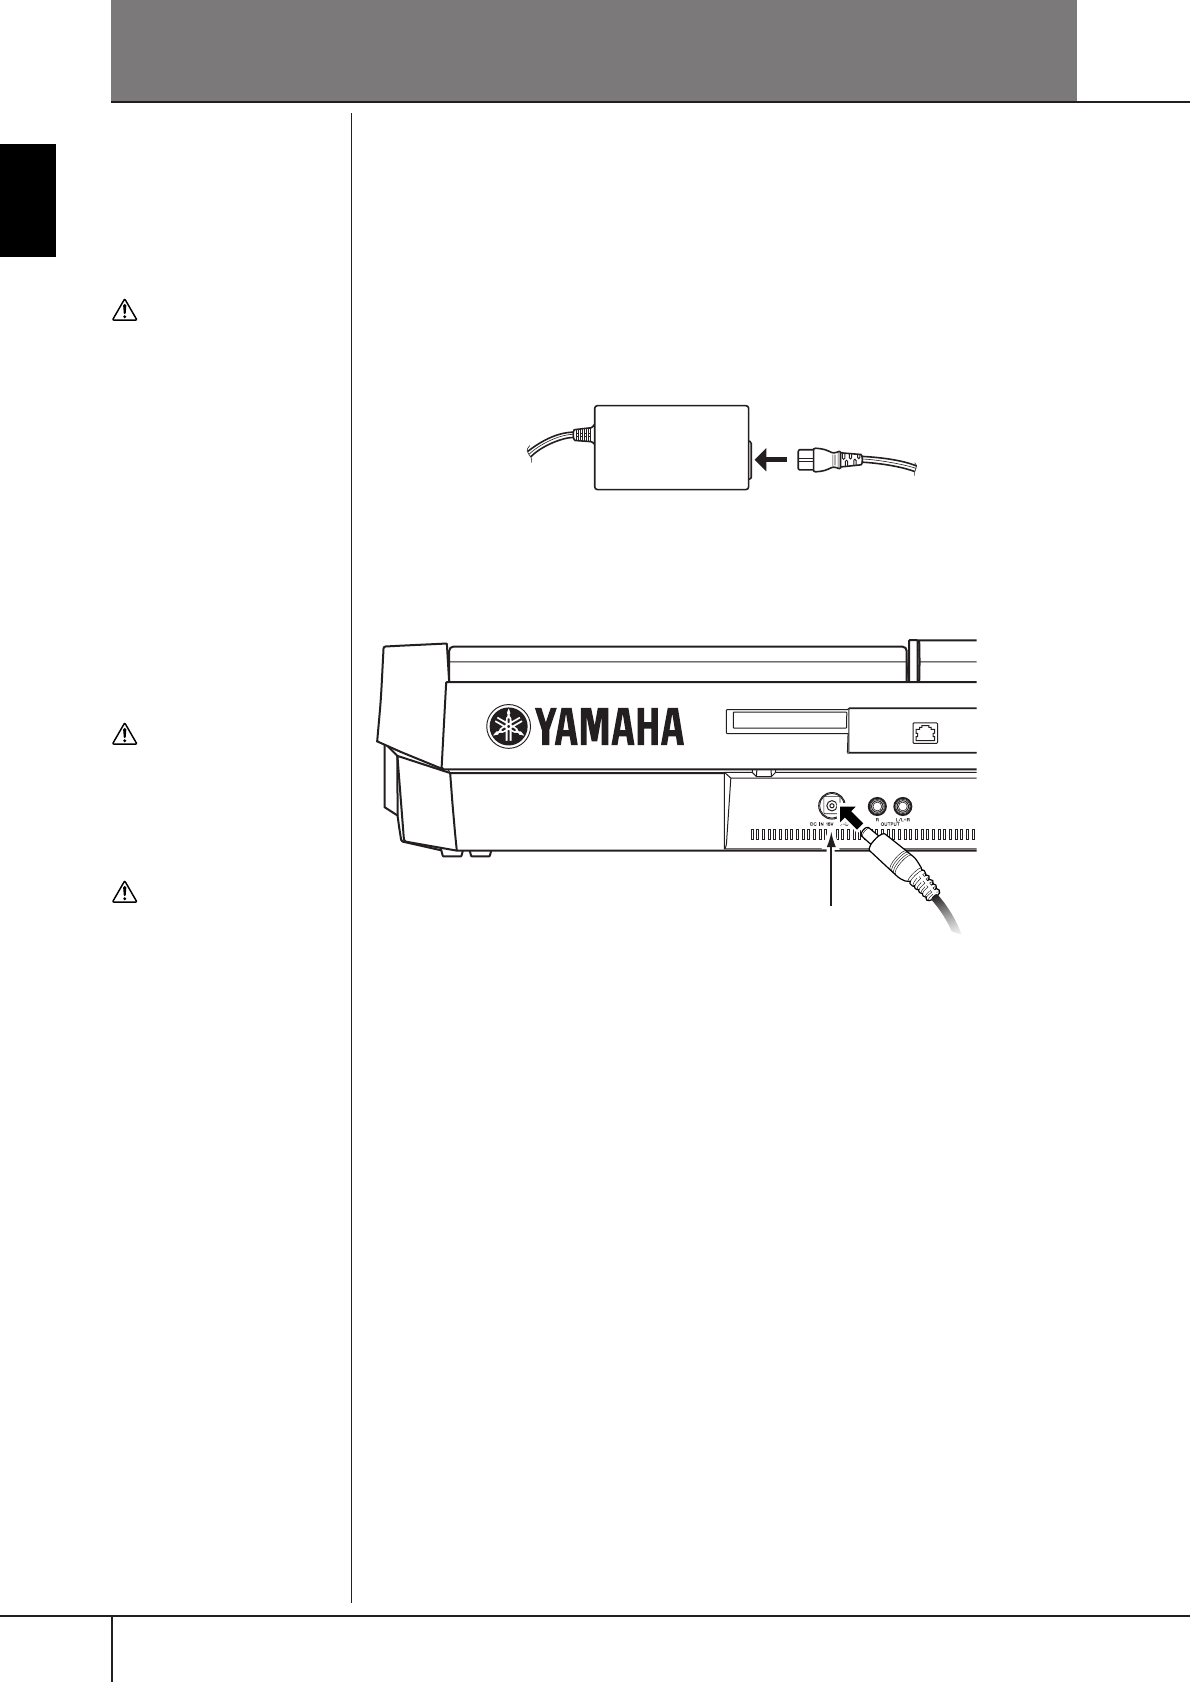
Power Supply
1Make sure that the instrument’s STANDBY/ON switch is set to
STANDBY (off).
2Connect one end of the AC cable to the power adaptor.
3Connect the power adaptor’s DC plug to the instrument’s DC IN ter-
minal on the rear panel.
4Connect the other end (normal AC plug) to the nearest electrical out-
let.
WARNING
• (PSR-S900) Use the speci-
fied adaptor (PA-300B/PA-
300 or an equivalent recom-
mended by Yamaha) only.
• (PSR-S700) Use the speci-
fied adaptor (PA-301/PA-
300B/PA-300 or an equiva-
lent recommended by
Yamaha) only.
•(PSR-S900/S700) The use of
an incompatible adaptor
may cause irreparable dam-
age to the PSR-S900/S700,
and may even pose a seri-
ous shock hazard! ALWAYS
UNPLUG THE AC ADAPTOR
FROM THE AC POWER OUT-
LET WHEN THE PSR-S900/
S700 IS NOT IN USE.
CAUTION
Never interrupt the power sup
-
ply (e.g. unplug the AC adap-
tor) during any PSR-S900/S700
record operation! Doing so can
result in a loss of data.
CAUTION
Even when the switch is in the
“STANDBY” position, electric-
ity is still flowing to the
instrument at a minimum
level. When not using the
PSR-S900/S700 for an
extended period of time, be
sure to unplug the AC power
adaptor from the wall AC out-
let.
LAN
To electrical outlet
DC IN

PSR-S900/S700 Owner’s Manual 17
Introduction
Powering Up
n
Before you switch your PSR-S900/S700 on or off, first turn down the volume of any connected audio
equipment.
1Press the [STANDBY/ON] switch.
The main display appears in the display.
When you’re ready to turn off the power, press the [STANDBY/ON]
switch again.
2Setting the volume
Use the [MASTER VOLUME] dial to adjust the volume to an appropriate
level.
CAUTION
In order to avoid possible
damage to the speakers or
other connected electronic
equipment, always switch on
the power of the PSR-S900/
S700 before switching on the
power of the amplified speak-
ers or mixer and amplifier.
Likewise, always switch off
the power of the PSR-S900/
S700 after switching off the
power of the amplified speak-
ers or mixer and amplifier.
Air Vents
CAUTION
This instrument has special air vents in the top panel (see below) and rear panel. Do not
place objects where they might block the air vent, since this may prevent adequate ven-
tilation of the internal components, and possibly result in the instrument overheating.
Air Vents
PSR-S900/S700 Owner’s Manual
18
Introduction
Setting Up
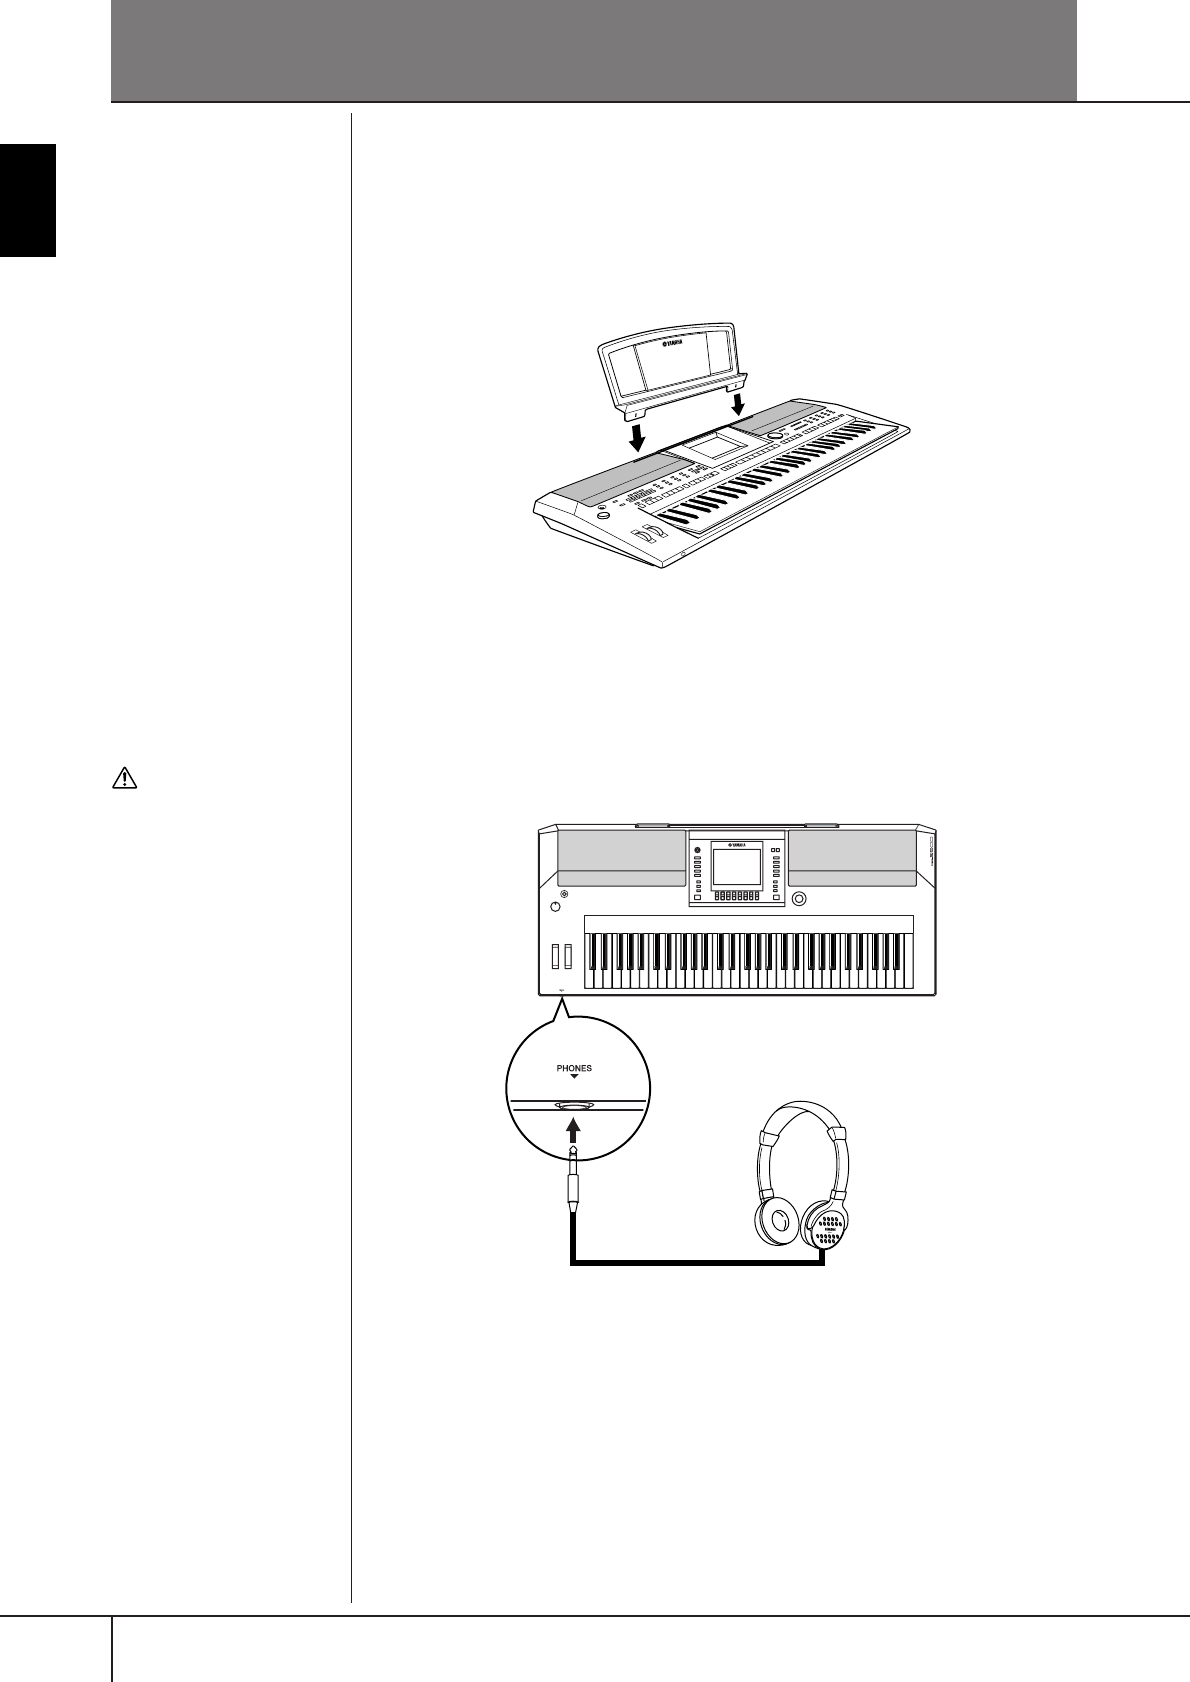
Music Rest
The PSR-S900/S700 is supplied with a music rest that can be attached to the instru-
ment by inserting it into the slot at the rear of the control panel.
Using Headphones
Connect a pair of headphones to the [PHONES] jack. The internal stereo speaker
system is automatically shut off when a pair of head phones is plugged into the
[PHONES] jack.
CAUTION
Do not listen with the head-
phones at high volume for
long periods of time. Doing
so may cause hearing loss.
PSR-S900/S700 Owner’s Manual 19
Introduction
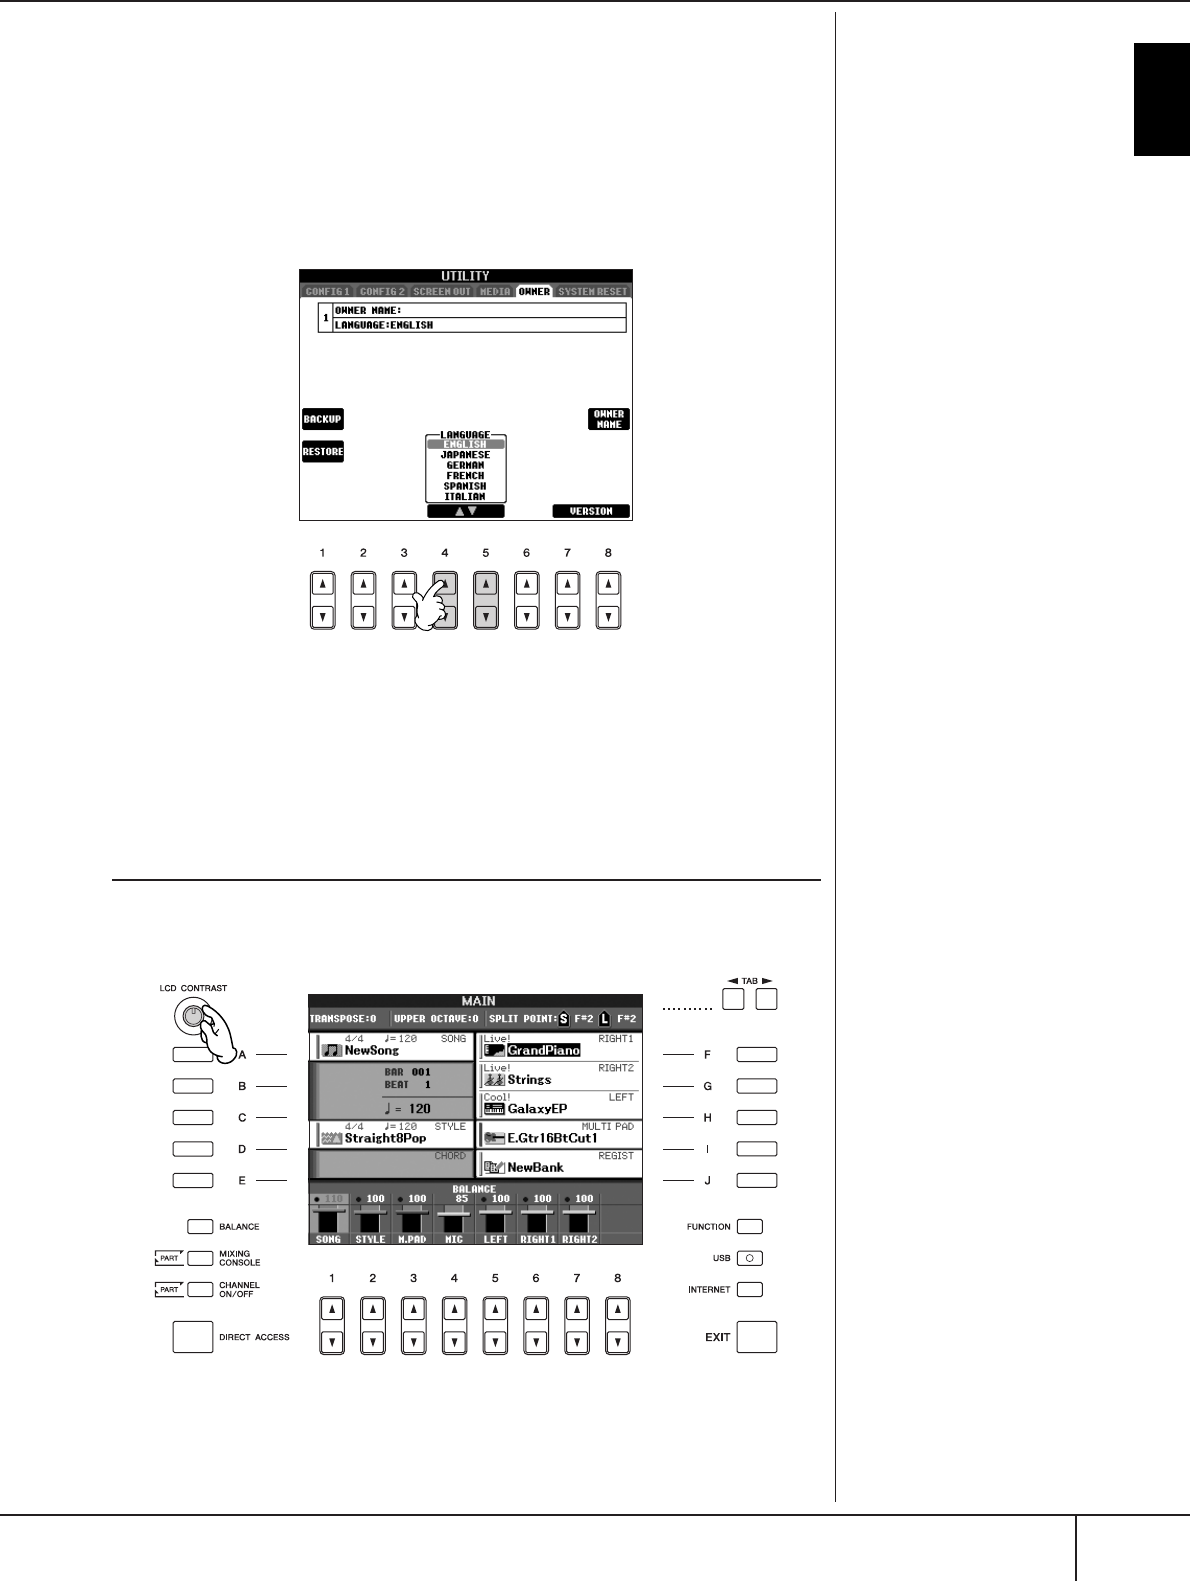
Changing the Display Language
This determines the language used in the display for messages, file names, and
character input.
1Call up the operation display.
[FUNCTION] → [J] UTILITY → TAB[
√
][
®
] OWNER
2Press the [4
ππ
ππ††
††
]/[5
ππ
ππ††
††
] button to select a language.
Display Settings
Adjusting the Contrast of the Display
You can adjust the contrast of the display by turning the [LCD CONTRAST] knob
located to the left of the display.
PSR-S900/S700 Owner’s Manual
20
Introduction
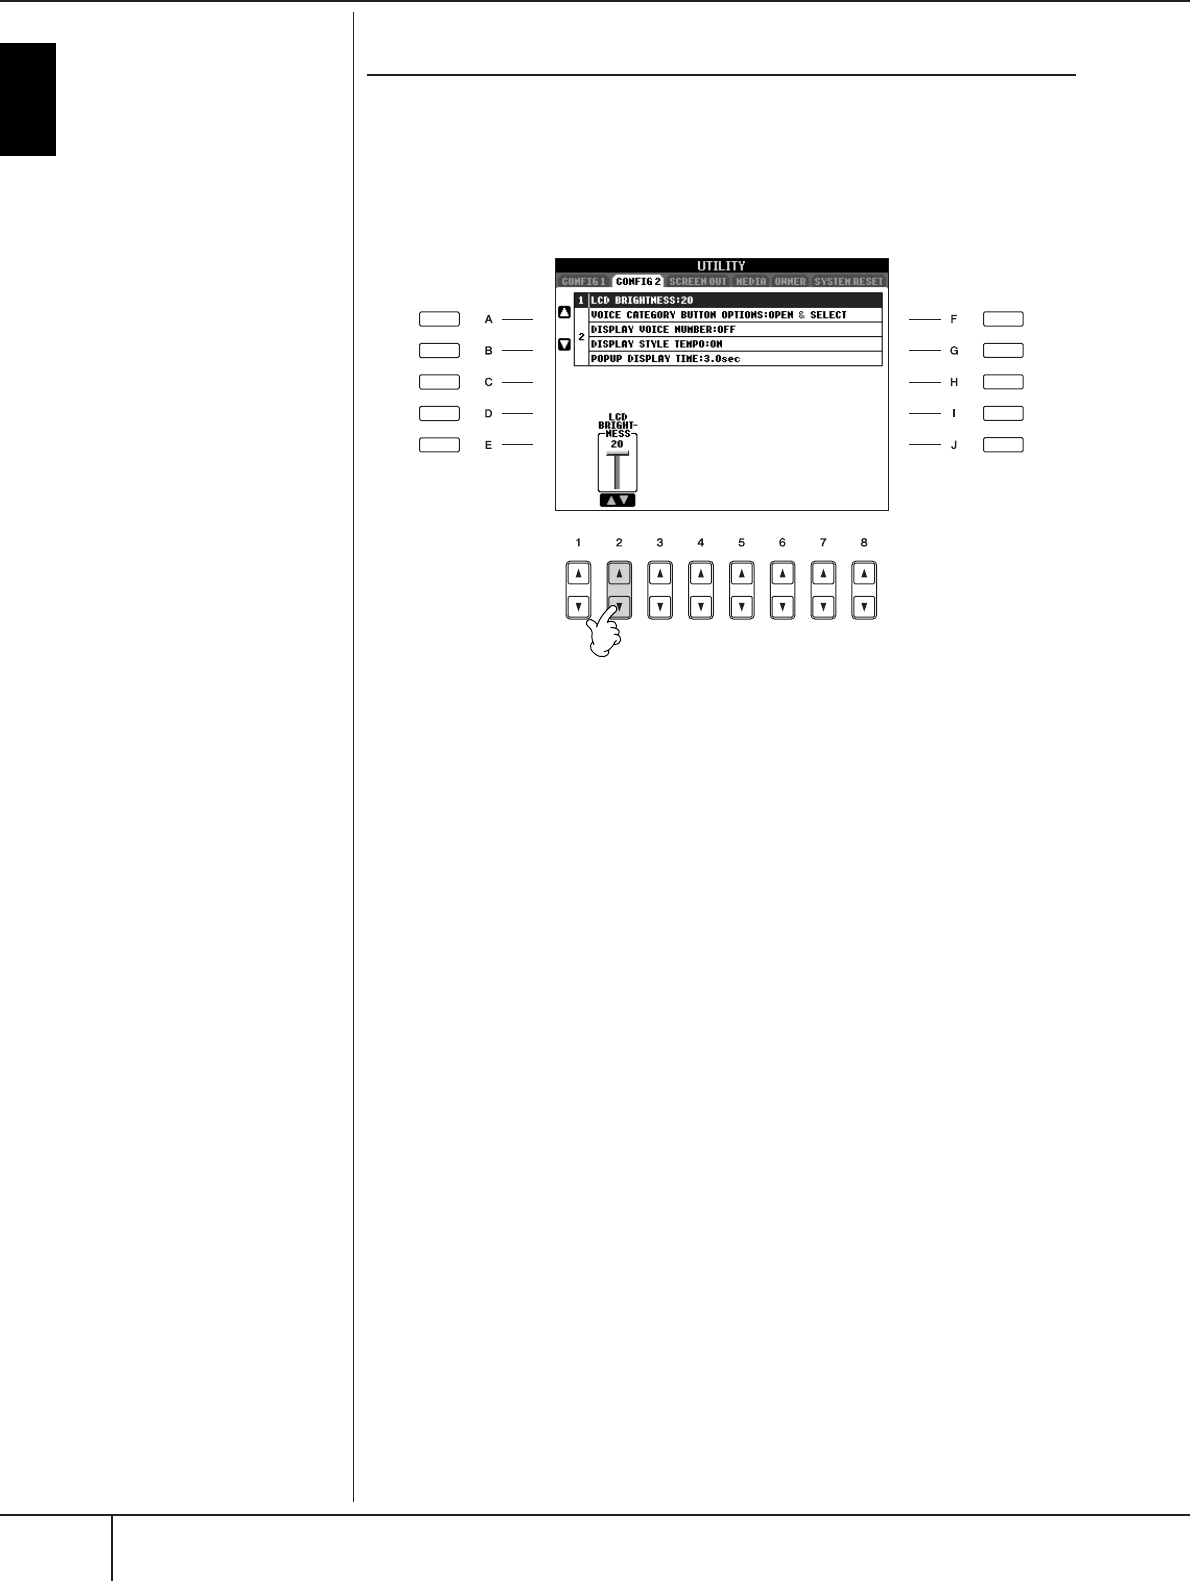
Adjusting the Brightness of the Display
Adjust the brightness of the display.
1Call up the operation display.
[FUNCTION] → [J] UTILITY → TAB[
√
][
®
] CONFIG 2
2Press the [2
ππ
ππ††
††
] button to adjust the brightness of the display.

PSR-S900/S700 Owner’s Manual 21
Introduction
Entering the Owner Name in the Opening Dis-
play
You can have your name appear in the opening display (the display that appears
when the power is turned on).
1Call up the operation display.
[FUNCTION] → [J] UTILITY → TAB[
√
][
®
] OWNER
2Press the [I] (OWNER NAME) button and call up the Owner Name dis-
play.
Refer to page 77 for character-entry details.
(Example display from PSR-S900)
Displaying the version number
To check the version number of this instrument, press the [7
π†
]/
[8
π†
] (VERSION) buttons in the display in step 1 above. Press the [EXIT]
or [8
π†
] button to return to the original display.
PSR-S900/S700 Owner’s Manual
22
Introduction
Handling the Floppy Disk Drive (FDD) and Floppy Disks
An optional floppy disk drive UD-FD01 can be connected
to this instrument. It lets you save original data you’ve cre-
ated on the instrument to floppy disk, and allows you to
load data from floppy disk to the instrument.
Be sure to handle floppy disks and treat the disk drive with
care. Follow the important precautions below.
Floppy Disk Compatibility
• 3.5" 2DD and 2HD type floppy disks can be used.
Formatting a Floppy Disk
•If you find that you are unable to use new, blank disks or
old disks that have been used with other devices, you
may need to format them. For details on how to format a
disk, see page 72. Keep in mind that all data on the disk
will be lost after formatting. Make sure to check before-
hand whether or not the disk contains important data.
n
Floppy disks formatted on this device may or may not be usable as
is on other devices.
Inserting/Removing Floppy Disks
Inserting a Floppy Disk into the Disk
Drive:
• Hold the disk so that the label of the disk is facing
upward and the sliding shutter is facing forward, towards
the disk slot. Carefully insert the disk into the slot, slowly
pushing it all the way in until it clicks into place and the
eject button pops out.
n
Never insert anything but floppy disks into the disk drive. Other
objects may cause damage to the disk drive or floppy disks.
Removing a Floppy Disk
• After checking that the instrument is not accessing* the
floppy disk (checking that the use lamp on the floppy
disk drive is off), firmly press the eject button at the
upper right of the disk slot all the way in.
When the floppy disk is ejected, pull it out of the drive. If
the floppy disk cannot be removed because it is stuck,
do not try to force it, but instead try pressing the eject
button again, or try re-inserting the disk and attempt to
eject it again.
* Access of the disk indicates an active operation, such as
recording, playback, or deletion of data.
If a floppy disk is inserted while the power is on, the disk is
automatically accessed, since the instrument checks whether
the disk has data.
• Be sure to remove the floppy disk from the disk drive
before turning off the power. A floppy disk left in the
drive for extended periods can easily pick up dust and
dirt that can cause data-read and -write errors.
Cleaning the Disk Drive Read/Write
Head
• Clean the read/write head regularly. This instrument
employs a precision magnetic read/write head which,
after an extended period of use, will pick up a layer of
magnetic particles from the disks used that will eventu-
ally cause read and write errors.
•To maintain the disk drive in optimum working order
Yamaha recommends that you use a commercially-avail-
able dry-type head cleaning disk to clean the head about
once a month. Ask your Yamaha dealer about the avail-
ability of proper headcleaning disks.
About Floppy Disks
Handle floppy disks with care, and fol-
low these precautions:
• Do not place heavy objects on a disk or bend or apply
pressure to the disk in any way. Always keep floppy disks
in their protective cases when they are not in use.
•Do not expose the disk to direct sunlight, extremely high
or low temperatures, or excessive humidity, dust or liq-
uids.
• Do not open the sliding shutter and touch the exposed
surface of the floppy disk inside.
•Do not expose the disk to magnetic fields, such as those
produced by televisions, speakers, motors, etc., since
magnetic fields can partially or completely erase data on
the disk, rendering it unreadable.
•Never use a floppy disk with a deformed shutter or hous-
ing.
•Do not attach anything other than the provided labels to
a floppy disk. Also make sure that labels are attached in
the proper location.
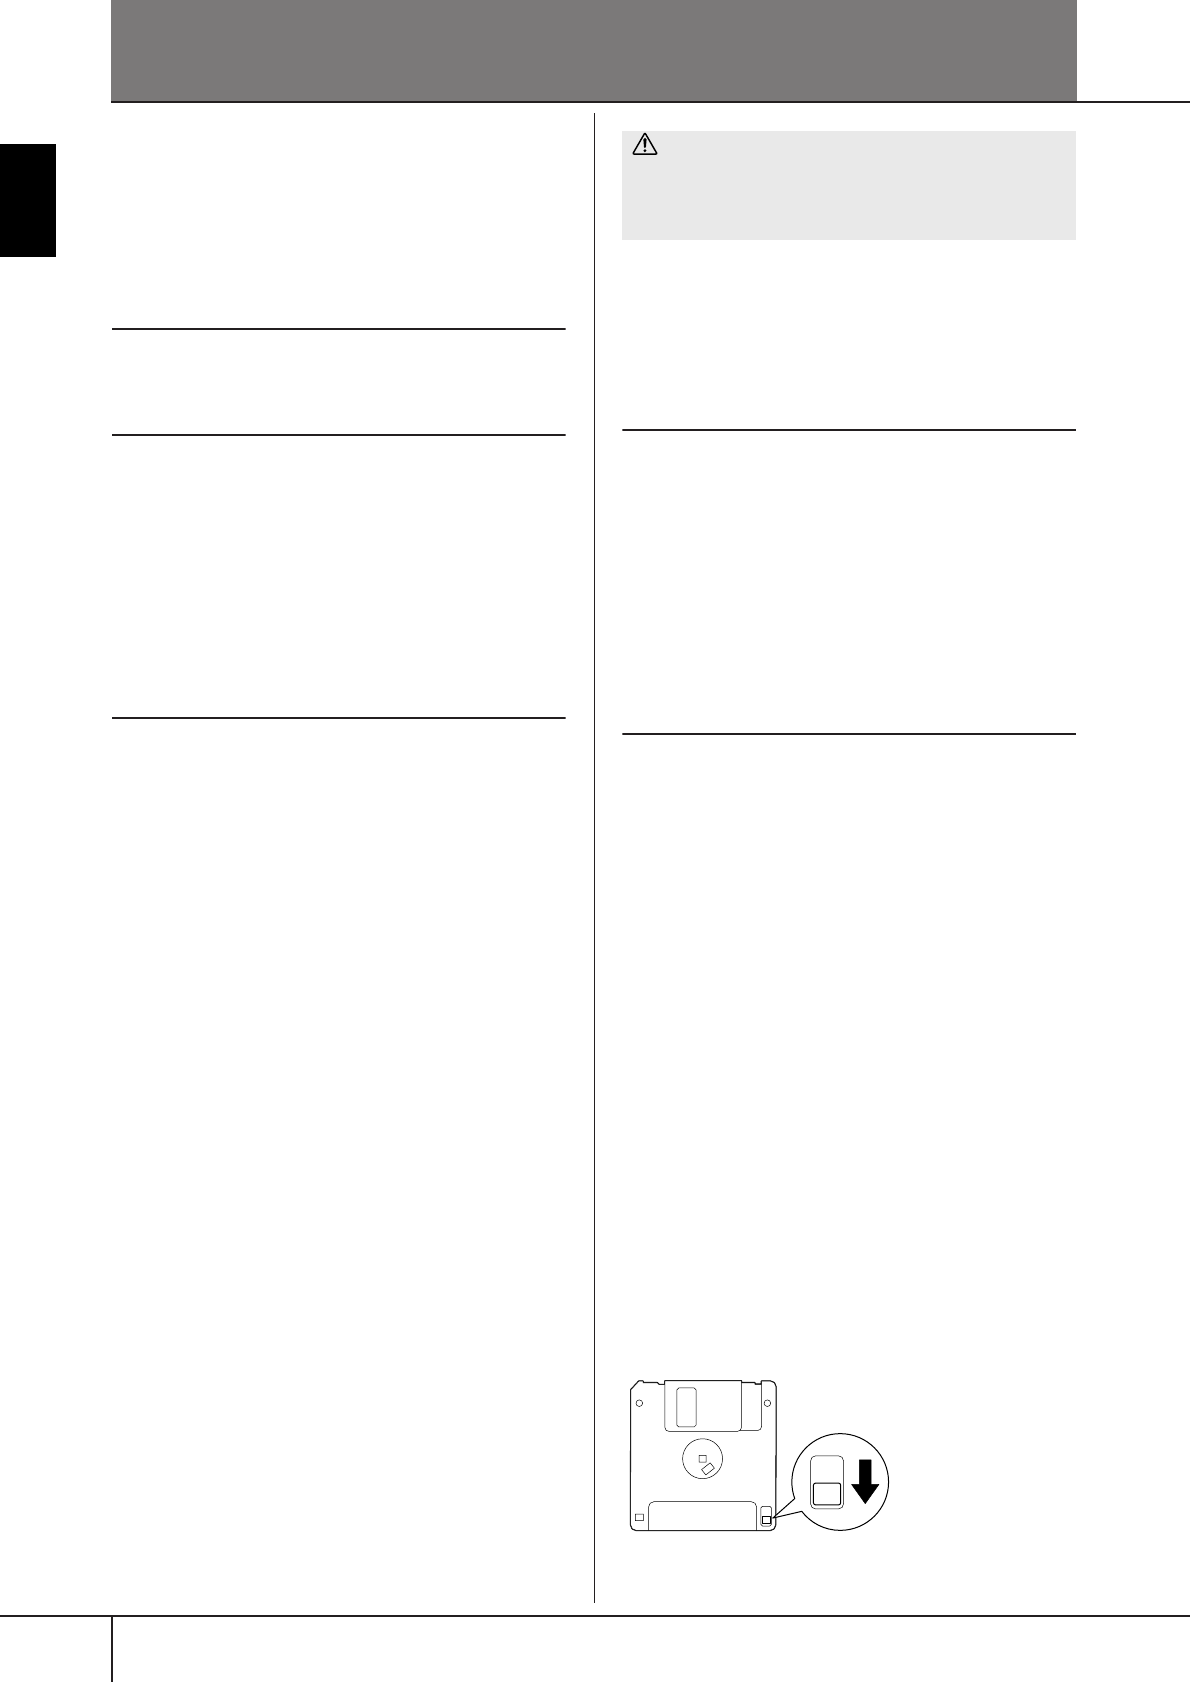
To Protect Your Data (Write-protect Tab):
•To prevent accidental erasure of important data, slide the
disk's write-protect tab to the “protect” position (tab
open). When saving data, make sure that the disk's
write-protect tab is set to the “overwrite” position (tab
closed).
CAUTION
Do not remove the floppy disk or turn off the instrument
itself while the disk is being accessed.
Doing so may result not only in loss of data on the disk
but also damage to the floppy disk drive.
Write-protect tab open
(protect position)
PSR-S900/S700 Owner’s Manual 23
Introduction
Handling the USB Storage Device (USB Flash Memory/Floppy Disk, etc)
This instrument features a built-in [USB TO DEVICE] termi-
nal. By connecting the instrument to a USB storage device
with a standard USB cable, you can save data you’ve cre-
ated to the connected device, as well as read data from the
connected device. Be sure to handle USB storage device
with care. Follow the important precautions below.
nFor more information about the handling of USB stor-
age device, refer to the owner’s manual of the USB stor-
age device.
Compatible USB storage devices
• Up to two USB storage devices, such as a floppy disk
drive, hard disk drive, CD-ROM drive, flash memory
reader/writer, etc., can be connected to the [USB TO
DEVICE] terminal. (If necessary, use a USB hub. The
number of USB storage devices that can be used with
musical instruments simultaneously even when a USB
hub is used is a maximum of two.) This instrument can
recognize up to four drives in one USB storage device.
Other USB devices such as a computer keyboard or
mouse cannot be used.
•The instrument does not necessarily support all commer-
cially available USB storage devices. Yamaha cannot
guarantee operation of USB storage devices that you
purchase. Before purchasing USB storage devices,
please consult your Yamaha dealer, or an authorized
Yamaha distributor (see list at end of the Owner’s Man-
ual) for advice, or visit the following web page:
http://music.yamaha.com/homekeyboard/
nAlthough CD-R/RW drives can be used to read data to
the instrument, they cannot be used for saving data.
Formatting USB storage media
• When a USB storage device is connected or media is
inserted, a message may appear prompting you to format
the device/media. If so, execute the Format operation.
Using USB Storage Devices
• When connecting a USB storage device to the [USB TO
DEVICE], make sure that the connector on the device is
appropriate and that it is connected in the proper direc-
tion. Before removing the media from the device, make
sure that the instrument is not accessing data (such as in
the Save, Copy and Delete operations).
• If you are connecting two or three devices at the same
time (such as two USB storage devices and a LAN adap-
tor), you should use a USB hub device. The USB hub
must be self-powered (with its own power source) and
the power must be on. Only one USB hub can be used.
If an error message appears while using the USB hub,
disconnect the hub from the instrument, then turn on the
power of the instrument and re-connect the USB hub.
•Though the instrument supports the USB 1.1 standard,
you can connect and use a USB 2.0 storage device with
the instrument. However, note that the transfer speed is
that of USB 1.1.
To protect your data (write-protect):
To prevent important data from being inadvertently erased,
apply the write-protect provided with each storage device
or media. If you are saving data to the USB storage device,
make sure to disable write-protect.
CAUTION
The format operation overwrites any previously existing
data. Make sure that the media you are formatting does
not contain important data. Proceed with caution, espe-
cially when connecting multiple USB storage medias.
CAUTION
Avoid frequently turning the power on/off to the USB
storage device, or connecting/disconnecting the cable
too often. Doing so may result in the operation of the
instrument “freezing” or hanging up. While the instru-
ment is accessing data (such as in the Save, Copy and
Delete operations), do NOT unplug the USB cable, do
NOT remove the media from the device, and do NOT turn
the power off to either device. Doing so may corrupt the
data on either or both devices.

PSR-S900/S700 Owner’s Manual
24
Quick Guide
Quick Guide
Playing the Demos
The Demos are more than just songs — they also provide helpful, easy-to-understand introductions to the
features, functions and operations of the instrument. In a way, the Demos are an interactive “mini-man-
ual”— complete with sound demonstrations and text showing what it can do for you.
1Call up the operation display.
[FUNCTION] → [J]UTILITY → TAB[
√
][
®
] OWNER
2Press the [4
ππ
ππ††
††
]/[5
ππ
ππ††
††
] buttons
to select the desired language.
Demos will play back continuously until
stopped.
When the Demo stops, the display returns
to the MAIN display.
1Select the desired Language.
2Press the [DEMO] button to start the Demos.
3Press the [EXIT] button to stop the Demo playback.
Quick Guide
PSR-S900/S700 Owner’s Manual 25
Showing Specific Demo Topics
To return back to the previous display,
press the [J] (Play Overview Demo) but-
ton.
When the Demo has more
than one screen.
Press [1
π†
]–[8
π†
] but-
tons corresponding to the
screen number.
1Press the [7ππ
ππ††
††]/[8ππ
ππ††
††] buttons in the Demo display to call up the specific Demo
menu.
2Press one of the [A]–[H] buttons to show a specific Demo.
3Press the [EXIT] button to exit from the Demos.

Quick Guide
PSR-S900/S700 Owner’s Manual
26
Operations in Basic Displays
To start with, you should know a little about the basic displays that appear in the Quick Guide. There are
three basic displays:
Main display ➤See below.
File selection display ➤page 27
Function display ➤page 28
Operation of the Main Display
The Main display shows the basic settings and important information for the instrument (It is the same display that
appears when the instrument is turned on.).You can also call up display pages related to the displayed function from
the Main display.
nAbout information in the Main display
See page 68.
1[A]–[J] buttons
The [A]–[J] buttons correspond to the
settings indicated next to the buttons.
For example, press the [F] button, and
the Voice (RIGHT 1) selection display
will appear in the display.
2[1
ππ
ππ††
††
]–[8
ππ
ππ††
††
] buttons
The [1
π†
]–[8
π†
] buttons corre-
spond to the parameters which are
indicated above the buttons.
For example, pressing the [1
π
] but-
ton will increase the Song (page 36)
volume.
3[DIRECT ACCESS] and [EXIT]
buttons
Here’s a convenient way to return to
the Main display from any other dis-
play: Simply press the [DIRECT
ACCESS] button, then the [EXIT] button.
1 1
23
3
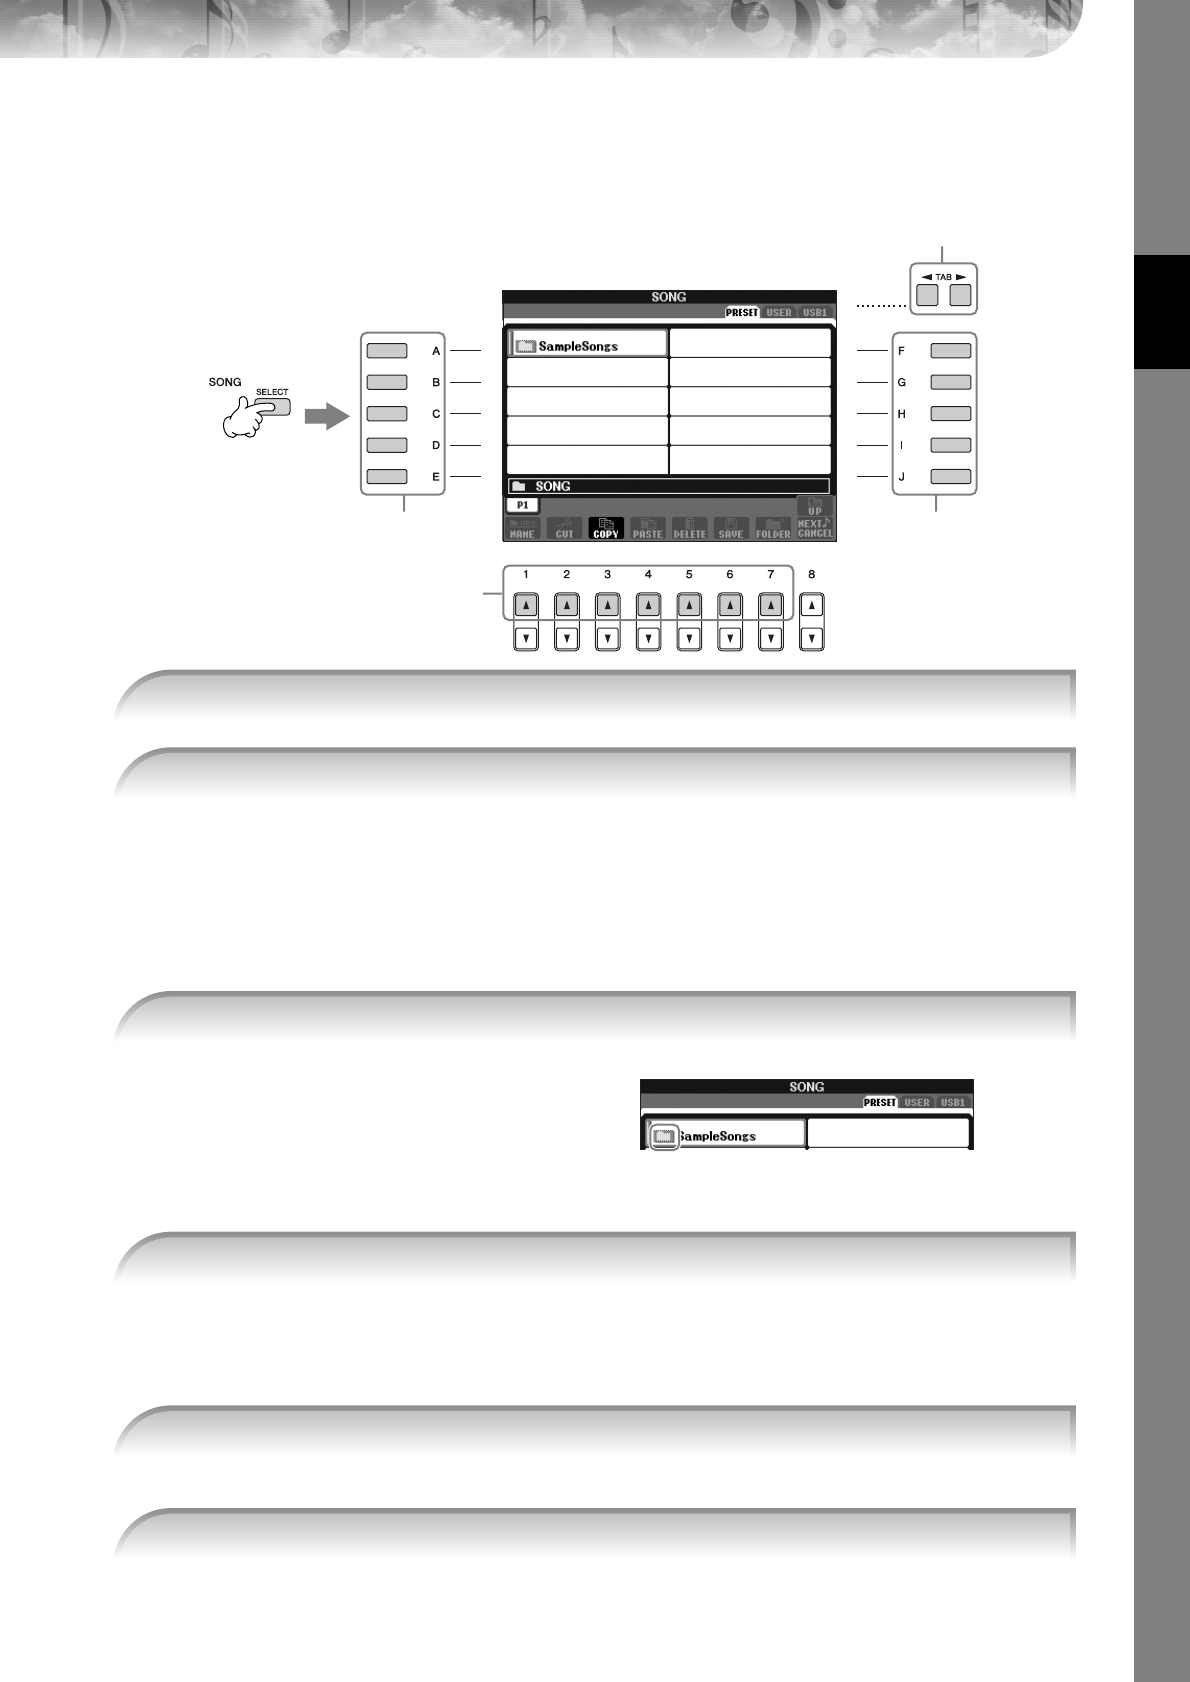
Quick Guide
PSR-S900/S700 Owner’s Manual 27
Operation of the File Selection Display
In the File Selection display, you can select the Voice (page 30)/Song (page 36)/Style (page 46), etc.
In the example here, we’ll call up and use the Song Selection display.
About PRESET/USER/USB
PRESET .............. Internal memory to which the preprogrammed data are installed as preset data.
USER ................. Internal memory that allows both reading and writing of data.
USB ...................USB storage device, such as USB flash memory/floppy disk drive, etc., which is connected
to the [USB TO DEVICE] terminal.
nHereafter in this manual, any USB storage device such as USB flash memory/floppy disk drive, etc. will be referred to as
“USB storage device.”
Several Songs may be together in a
folder. In this case, the folder(s) will
appear in the display (see the illustration
at right). Press one of the [A]–[J] buttons
to select a folder.
Press the [8
π
] (UP) button to call up
the next highest level folder.
When the drive contains more than ten Songs, the display is divided up into several pages. The page indica-
tions are shown at the bottom of the display. Press one of the [1
π
]–[7
π
] buttons to select a page.
nThe number of pages shown varies depending on the selection display of the Voices/Songs/Styles. Press the button corre-
sponding to “P1, P2 ...” in the display.
You can also select a Song by using the DATA ENTRY dial, then press the [ENTER] button to execute.
1
3,
53,
5
2
4
1Press the SONG [SELECT] button to call up the Song Selection display.
2Press the TAB [
√
][
®
] buttons to select the desired drive (PRESET/USER/USB).
3Select a folder (if necessary).
4Select a page (if the display has several pages).
5Press one of the [A]–[J] buttons to select a Song.
6Press the [EXIT] button to return to the previous display.

Quick Guide
PSR-S900/S700 Owner’s Manual
28
Operation of the Function Display
In the Function display, you can make detailed settings.
In the example here, we’ll call up and use the keyboard touch sensitivity setting display.
Categories of detailed settings are shown.
When the selected category is further
divided into sub-categories, the tab(s)
will be shown in the display.
nOn the PSR-S700, “2 S.ART” shown in
the illustration at right is displayed as
“2 VOLUME.”
When the setting is further divided into
additional settings, a list will be shown
in the display.
1Press the [FUNCTION] button.
2Press the [D] button to select the category CONTROLLER.
3Press the TAB [
√
][
®
] buttons to select the KEYBOARD/PANEL tab.
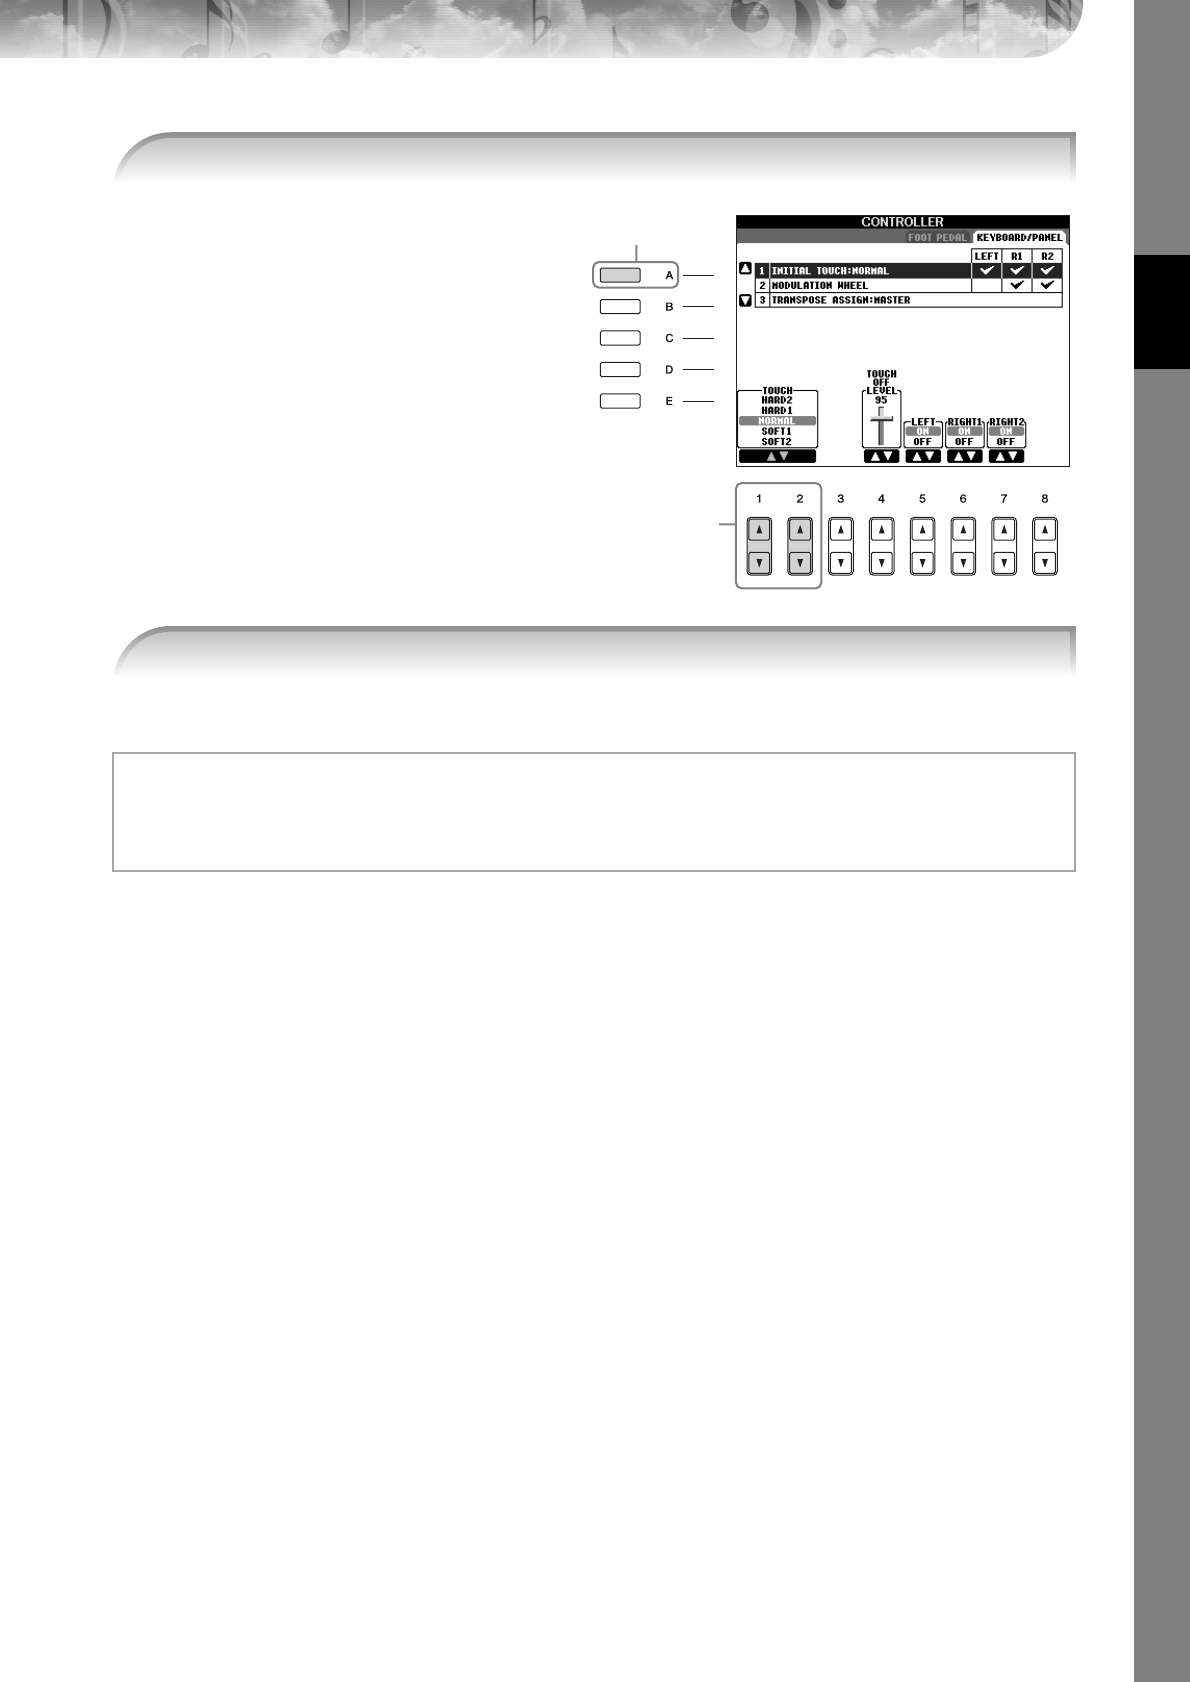
Quick Guide
PSR-S900/S700 Owner’s Manual 29
For details on the touch sensitivity settings, see page 33.
4Press the [A] button to select the “1 INITIAL TOUCH.”
4
5
5Press the [1
ππ
ππ††
††
]/[2
ππ
ππ††
††
] button to select touch sensitivity for the keyboard.
Throughout this manual, arrows are used in the instructions, indicating in shorthand the process of calling up certain
displays and functions.
For example, the instructions above can be indicated in shorthand as: [FUNCTION] → [D] CONTROLLER → TAB
[
√
][
®
] KEYBOARD/PANEL → [A] 1 INITIAL TOUCH.
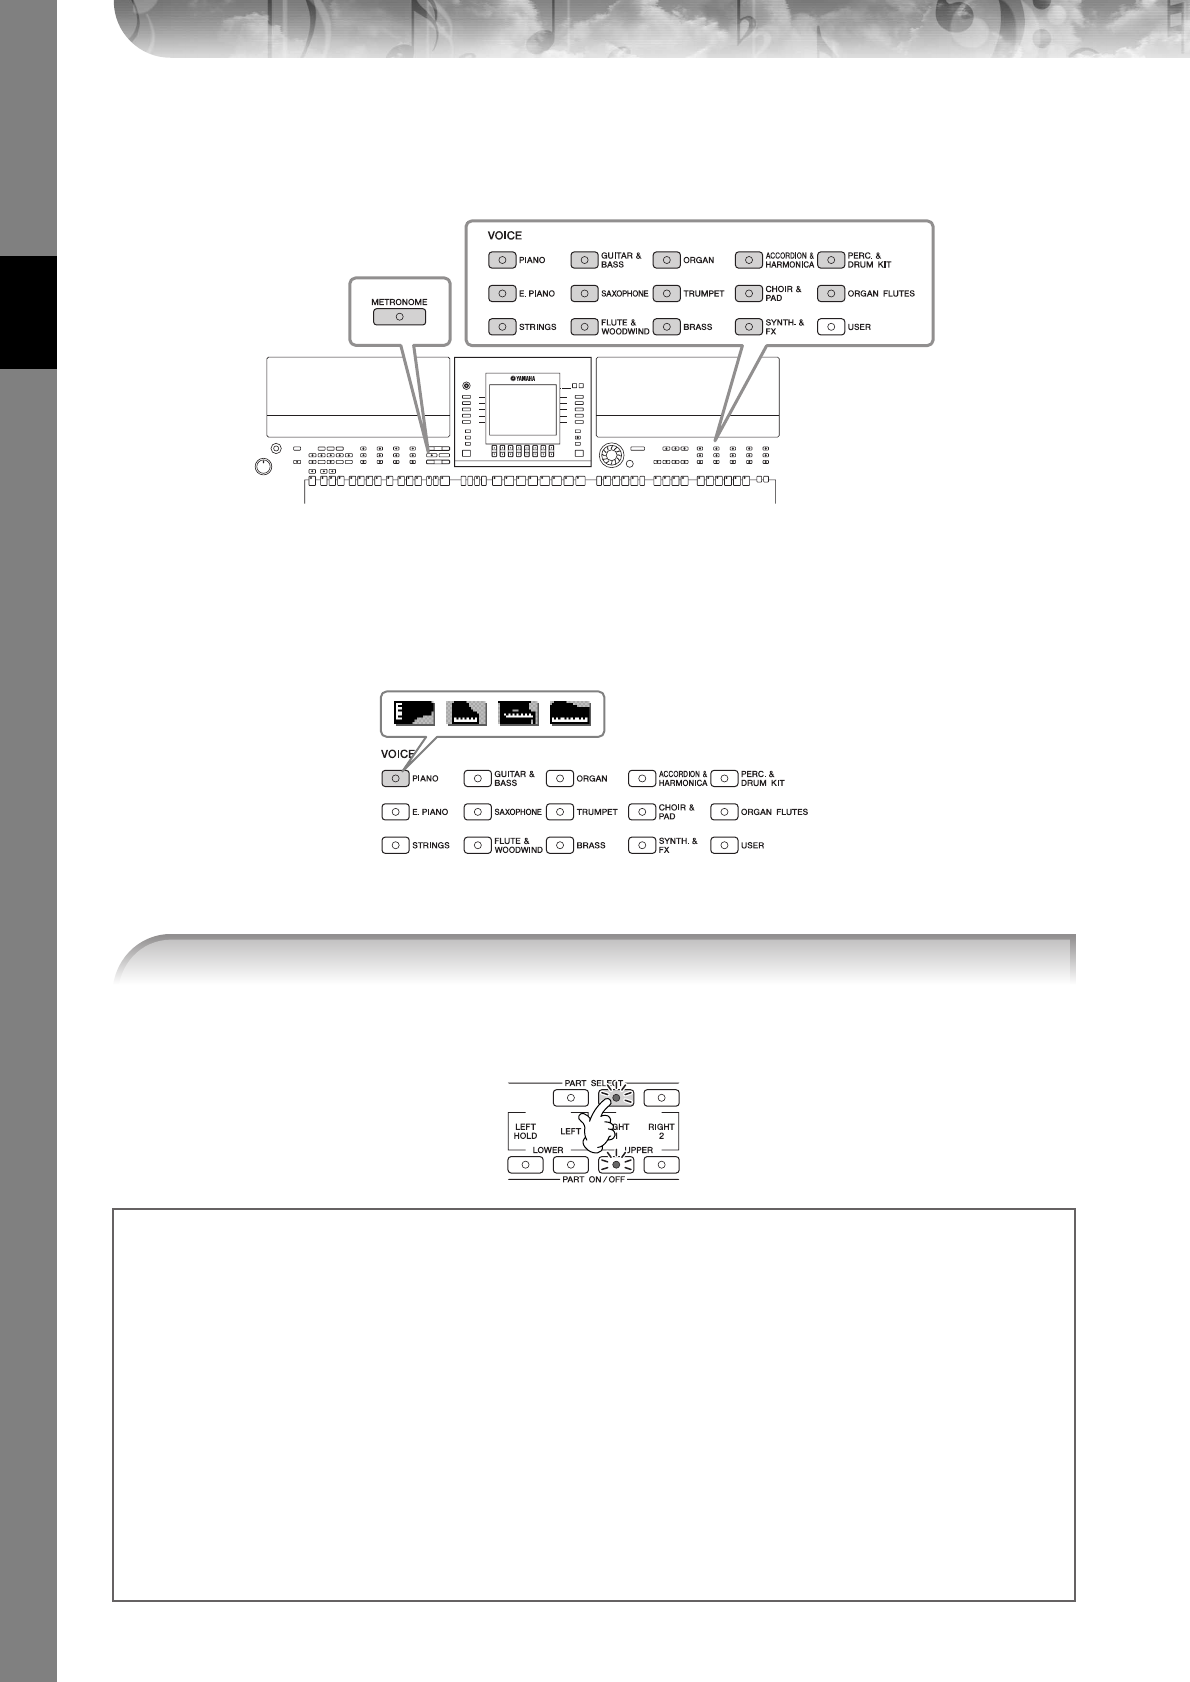
Quick Guide
PSR-S900/S700 Owner’s Manual
30
Playing Voices
The instrument features a wide variety of exceptionally realistic Voices, including piano, guitar, strings, wind
instruments and more.
Playing Preset Voices
The preset Voices are categorized and contained in appropriate folders. Voice buttons on the panel correspond to the
categories of the preset Voices. For example, press the [PIANO] button to display various piano Voices.
nAbout the various Voices
Refer to the Voice List in the Data List available at the Yamaha website. (See page 5.)
The Voice selected here is for the RIGHT 1 part. For the Voice part, see page 84.
Make sure that the PART ON/OFF [RIGHT1] button is also turned on. If it is turned off, the right-hand part
will not sound.
[METRONOME] button
(page 34)
VOICE buttons (page 30)
1Press the PART SELECT [RIGHT1] button to call up the Voice selection display.
Determining how the Voice selection display is opened (when one of the VOICE category selection
buttons is pressed).
You can select how the Voice selection display is opened (when one of the VOICE category selection buttons is pressed).
1Call up the operation display.
[FUNCTION] → [J] UTILITY → TAB [
√
][
®
] CONFIG 2
2Select the [B] (2 VOICE CATEGORY BUTTON OPTIONS) button, and use the [1
π†
]/[2
π†
] buttons to change
how the Voice selection display is opened.
•OPEN&SELECT:
Opens the Voice selection display with the top (first) voice of the voice category automatically selected
(when one of the VOICE category selection buttons is pressed). With the default settings, the OPEN&SELECT
function is turned on.
•OPEN ONLY:
Opens the Voice selection display with the currently selected voice (when one of the VOICE category selec-
tion buttons is pressed).
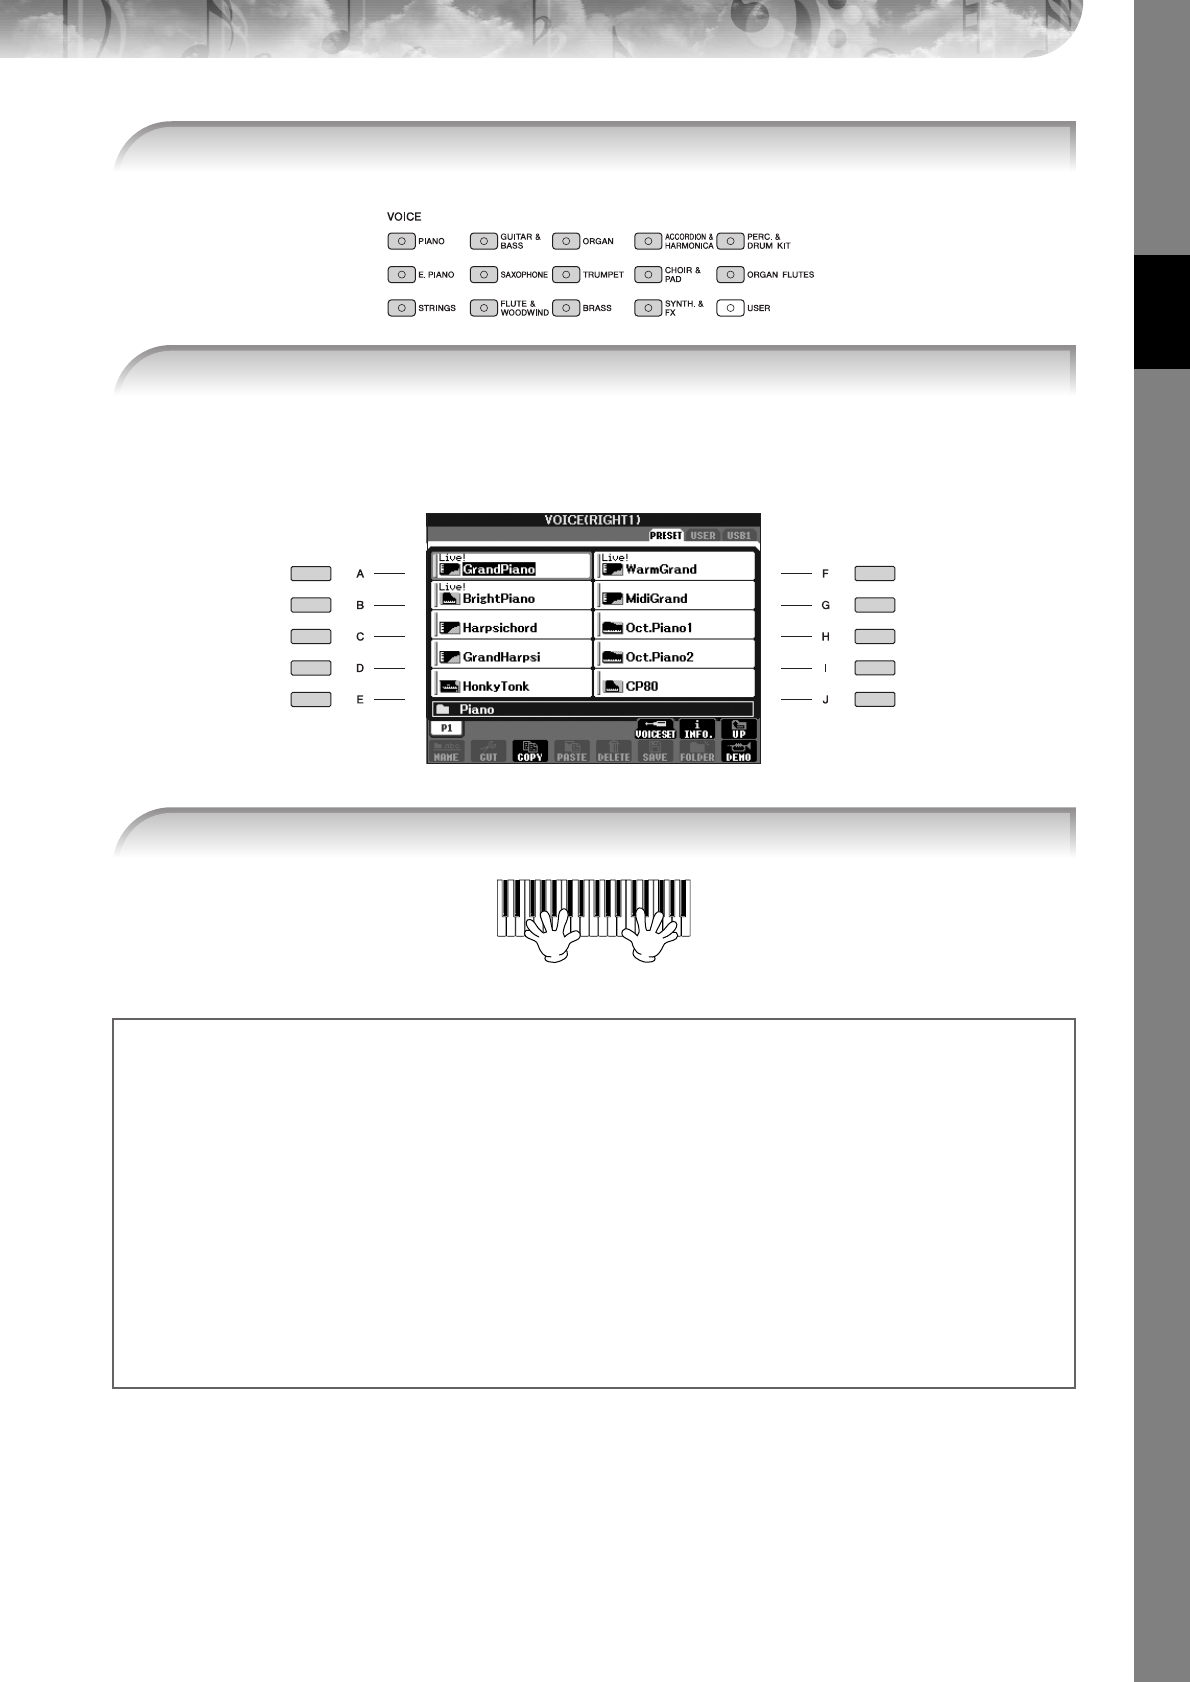
Quick Guide
PSR-S900/S700 Owner’s Manual 31
•The Voice type and its defining characteristics are indicated above the Preset Voice name. For details on the character-
istics, see page 83.
•You can call up the information for the selected Voice by pressing the [7
π
] (INFORMATION) button. (PSR-S900 only)
•You can instantly jump back to the Main display by “double-clicking” on one of the [A]–[J] buttons.
2Press one of the VOICE buttons to select a Voice category and call up the Voice selec-
tion display.
3Press one of the [A]–[J] buttons to select the desired Voice.
n
4Play the keyboard.
Recalling your favorite Voices easily
The instrument has a huge amount of high-quality Voices, covering an exceptionally broad range of instrument
sounds—making it perfect for virtually every musical application. However, the sheer number of Voices may seem
overwhelming at first. To easily recall your favorite Voice, there are two methods:
●Save your favorite Voice to the USER display in the Voice Selection display and recall it by using
the VOICE [USER] button
1Copy your favorite Voices from the Preset drive to the User drive.
Refer to page 74 for details on the copy operation.
2Press the Voice [USER] button to call up the Voice Selection display and press one of the [A]–[J] buttons to
select the desired Voice.
●Register your favorite Voice to Registration Memory and recall it with the REGISTRATION MEM-
ORY [1]–[8] buttons
Refer to page 135 for details on Registration Memory operations.
Quick Guide
PSR-S900/S700 Owner’s Manual
32
Playing the Voice Demos
To listen to the various Voices and hear how they sound especially in context, listen to the demo songs for each Voice.
1In the Voice Selection display (page 31 step 3), press the [8
††
††
] (DEMO) button to start
the Demo for the selected Voice.
2To stop the Demo, press the [8
††
††
] (DEMO) button again.
Selecting percussion sounds
When one of the Drum Kit Voices in the [PERCUSSION & DRUM KIT] group is selected, you can play various drums and
percussion instrument sounds on the keyboard. Details are given in the Drum List provided in the Data List (page 5).
To check which “Standard Kit 1” percussion sounds are assigned to each key, look at the Drum Kit icons printed below
the keys (page 15).
Selecting sound effects
You can play individual sound effects, such as bird chirps and ocean sounds from the keyboard. The sound effects are
categorized as “GM&XG”/“GM2.”
1Press the PART SELECT [RIGHT 1] button to call up the Voice selection display.
2Press the [8
π
] (UP) button to call up the Voice categories.
3Press the [2
π
] button to display page 2.
4Press the [E]/[F] button to select “GM&XG”/“GM2.”
5Press the [2
π
] button to display page 2.
6Press the [F] button to select “SoundEffect.”
7Press one of the [A]–[J] buttons to select the desired sound effect.
8Play the keyboard.
Selecting GM/XG/GM2 Voices
nFor details on the Voice allocation format, see page 204.
You can select the GM/XG/GM2 Voices directly via the panel operation. Perform steps 1–4 described in the “Selecting
sound effects” above, select the desired category, then select the desired voice.
Playing different Voices simultaneously
The instrument can play different Voices simultaneously (page 84).
• Layering two different Voices
This is useful for creating rich and thick sounds.
• Setting separate Voices for the left and right sections of the keyboard
You can play different Voices with the left and right hands. For example, you can set up the keyboard to play the
bass Voice with your left hand and the piano Voice with your right hand.
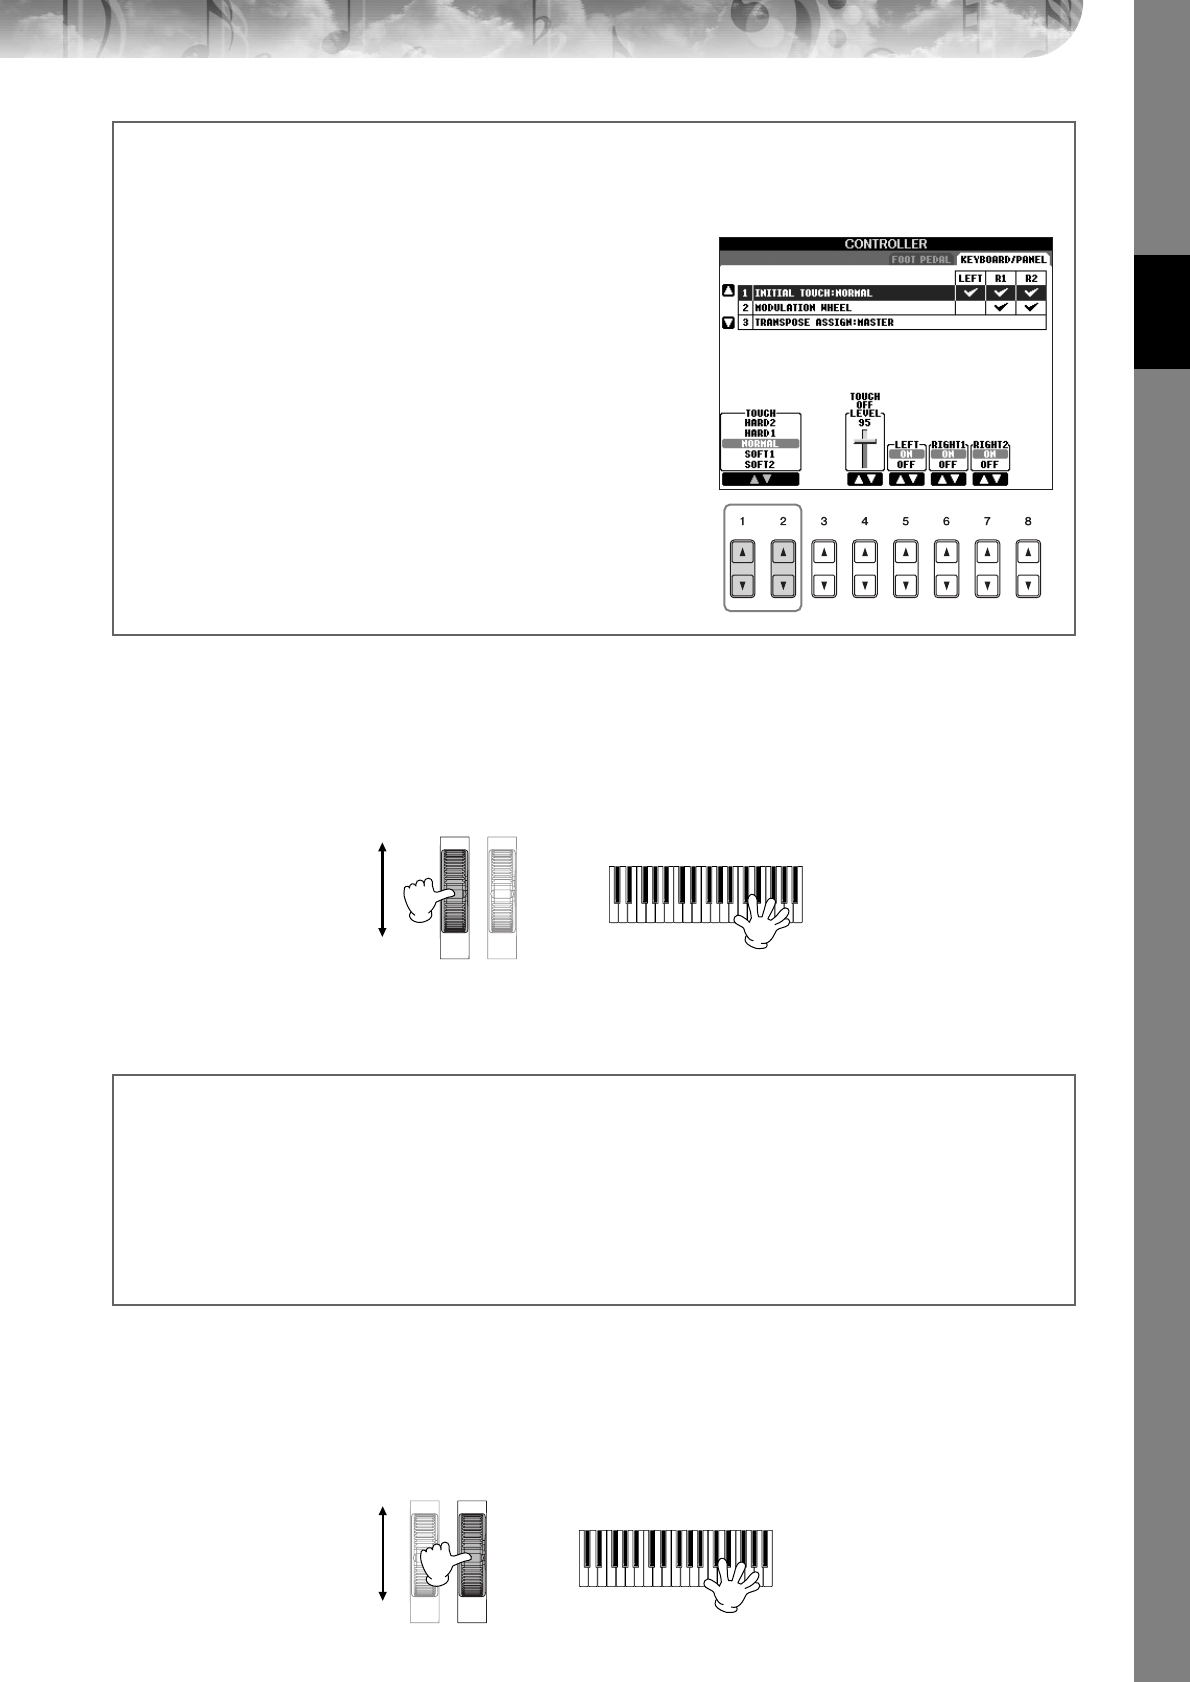
Quick Guide
PSR-S900/S700 Owner’s Manual 33
Using the Pitch Bend Wheel
Use the PITCH BEND wheel to bend notes up (roll the wheel away from you) or down (roll the wheel toward you)
while playing the keyboard. The Pitch Bend is applied to all the keyboard parts (RIGHT 1, 2 and LEFT). The PITCH
BEND wheel is self-centering and will automatically return to normal pitch when released.
• If the Pitch Bend range is set to more than 1200 cents (1 octave) via MIDI, the pitch of some voices may not be raised or lowered
completely.
•The effects caused by using the PITCH BEND Wheel will not be applied to the LEFT part when the Chord Fingering type is set to
the one other than “FULL KEYBOARD” or “AI FULL KEYBOARD” with the [ACMP] and PART ON/OFF [LEFT] turned on.
Using the Modulation Wheel
The Modulation function applies a vibrato effect to notes played on the keyboard. This is applied to all the keyboard
parts (RIGHT 1, 2 and LEFT). Moving the MODULATION wheel down (towards MIN) decreases the depth of the effect,
while moving it up (towards MAX) increases it.
Setting the touch sensitivity of the keyboard
You can adjust the touch response of the instrument (how the sound responds to the way you play the keys). The touch
sensitivity type becomes the common setting for all Voices.
1Call up the operation display:
[FUNCTION] → [D] CONTROLLER → TAB [
√
][
®
] KEYBOARD/
PANEL → [A] 1 INITIAL TOUCH
2Press the [1
π†
]/[2
π†
] buttons to specify the touch response.
HARD 2 ..... Requires strong playing to produce high volume. Best
for players with a heavy touch.
HARD 1 ..... Requires moderately strong playing for high volume.
NORMAL... Standard touch response.
SOFT 1....... Produces high volume with moderate playing strength.
SOFT 2....... Produces relatively high volume even with light play-
ing strength. Best for players with a light touch.
• This setting does not change the weight of the keyboard.
•When you do not want to apply touch sensitivity, set Touch to OFF for
the corresponding parts by pressing the [5
†
]–[7
†
] buttons. When
Touch is set to OFF, you can specify the fixed volume level by press-
ing the [4
π†
] button.
•The touch sensitivity settings may have no effect with certain voices.
n
PITCH BEND
MODULATION
n
The maximum pitch bend range can be changed via the following instructions.
1Call up the display for setting the Pitch Bend Range.
[MIXING CONSOLE] → TAB [
√
][
®
] → TUNE → [H] PITCH BEND RANGE
2Set each of the Pitch Bend Range of the keyboard part by using the [5
π†
]/[6
π†
]/[7
π†
] button.
[5
π†
] button..........Sets the Pitch Bend Range of the LEFT part.
[6
π†
] button..........Sets the Pitch Bend Range of the RIGHT1 part.
[7
π†
] button..........Sets the Pitch Bend Range of the RIGHT2 part.
PITCH BEND
MODULATION
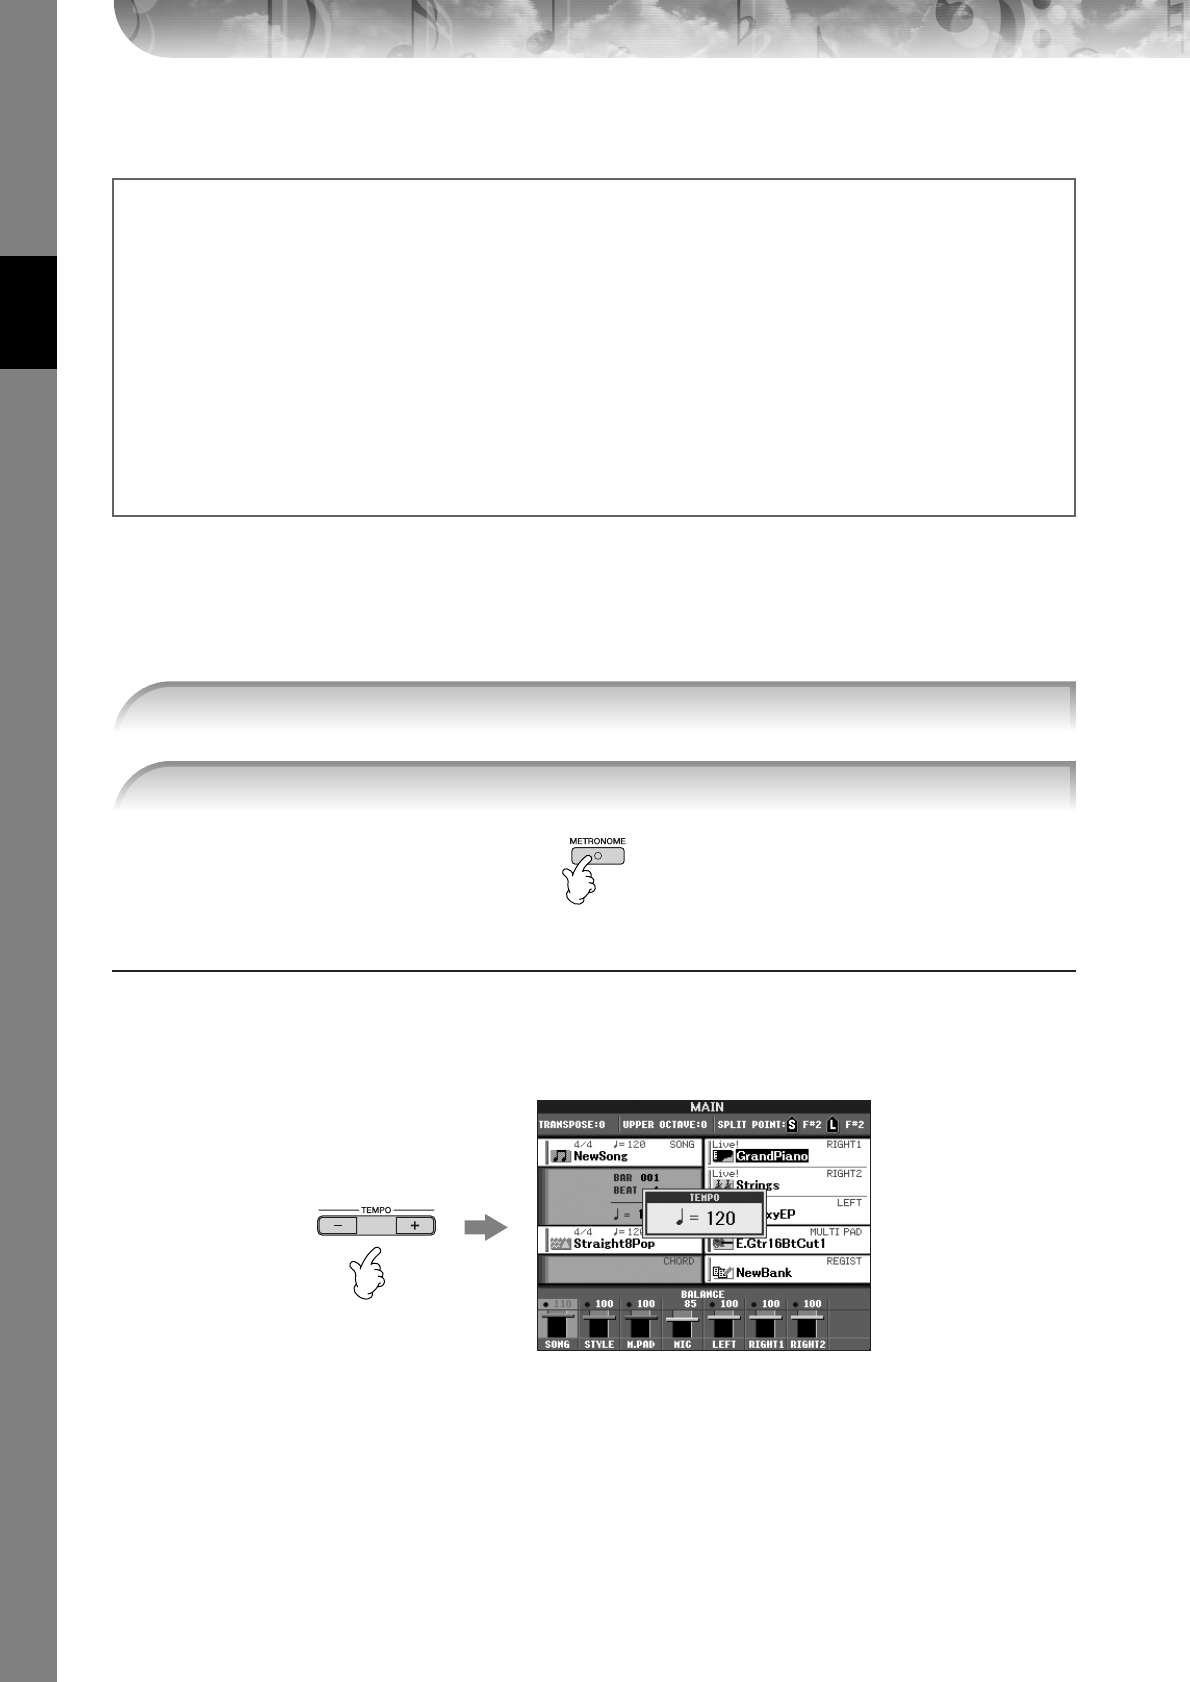
Quick Guide
PSR-S900/S700 Owner’s Manual
34
•To avoid accidently applying modulation, make sure the MODULATION Wheel is set at MIN before you start playing.
•The effects caused by using the MODULATION wheel will not be applied to the LEFT part when the Chord Fingering type is set to
the one other than “FULL KEYBOARD” or “AI FULL KEYBOARD” with the [ACMP] and PART ON/OFF [LEFT] turned on.
Using the Metronome
The metronome provides a click sound, giving you an accurate tempo guide when you practice, or letting you hear and
check how a specific tempo sounds.
Adjusting the Tempo or Setting the Time Signature of the Metronome Sound
■Adjusting the Metronome Tempo
1Press the TEMPO [–]/[+] button to call up the pop-up tempo setting display.
2Press the TEMPO [–]/[+] buttons to set the tempo.
Pressing and holding either button lets you continuously increase or decrease the value.
You can also use the DATA ENTRY dial to adjust the value. To reset the tempo, press the TEMPO [–]/[+] but-
tons simultaneously.
nAbout the Tempo display
The number in the display indicates how many quarter-note beats there are in one minute. The range is between 5 and
500. The higher the value, the faster the tempo.
3Press the [EXIT] button to close the Tempo display.
n
You can set whether the effects caused by the MODULATION Wheel will be applied or not to each of the key-
board part.
1Call up the display.
[FUNCTION] → [D] CONTROLLER → TAB [
√
][
®
] → KEYBOARD/PANEL → [A]/[B] 2 MODULATION WHEEL
2Set whether the effects caused by the MODULATION Wheel will be applied or not to each of the keyboard
part by using the [5
π†
]/[6
π†
]/[7
π†
] button.
[5
π†
] button..........Sets whether the effects caused by the MODULATION Wheel will be applied or not to the
LEFT part.
[6
π†
] button..........Sets whether the effects caused by the MODULATION Wheel will be applied or not to the
RIGHT1 part.
[7
π†
] button..........Sets whether the effects caused by the MODULATION Wheel will be applied or not to the
RIGHT2 part.
1Press the METRONOME button to start the metronome.
2To stop the metronome, press the METRONOME button again.
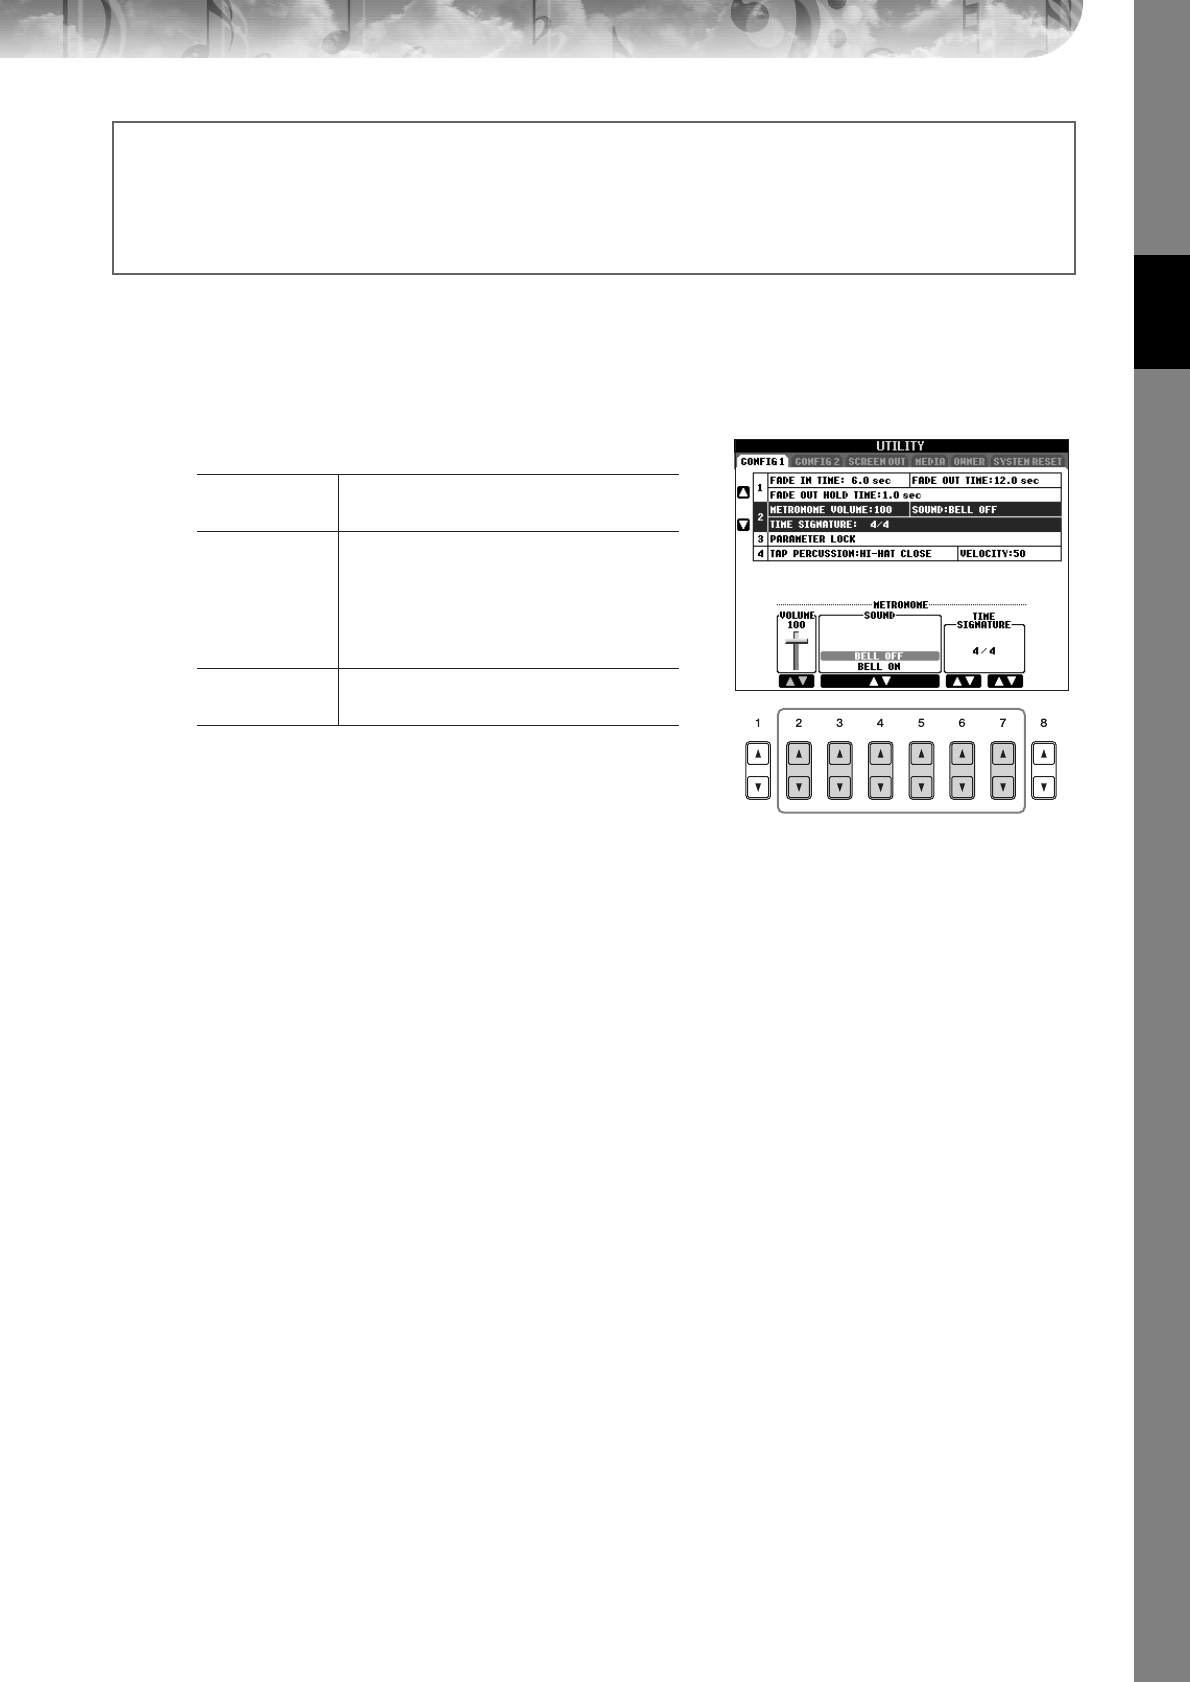
Quick Guide
PSR-S900/S700 Owner’s Manual 35
■Determine the Metronome Time Signature and Other Settings
1Call up the operation display:
[FUNCTION] → [J] UTILITY → TAB [
√
][
®
] CONFIG 1 → [B] 2 METORONOME
2Set the parameters by pressing the [2
ππ
ππ††
††
]–[7
ππ
ππ††
††
]
buttons.
VOLUME Determines the level of the metronome
sound.
SOUND Determines which sound is used for the met-
ronome.
Bell Off............... Conventional metronome
sound, with no bell.
Bell On............... Conventional metronome
sound, with bell.
TIME
SIGNATURE
Determines the time signature of the metro-
nome sound.
Set the Popup Display Time
1Call up the operation display.
[FUNCTION]
→
[J] UTILITY
→
TAB [
√
][
®
]
CONFIG 2
2Select the [B] (2 POPUP DISPLAY TIME) button, and use the [7
π†
]/[8
π†
] buttons to set the time.
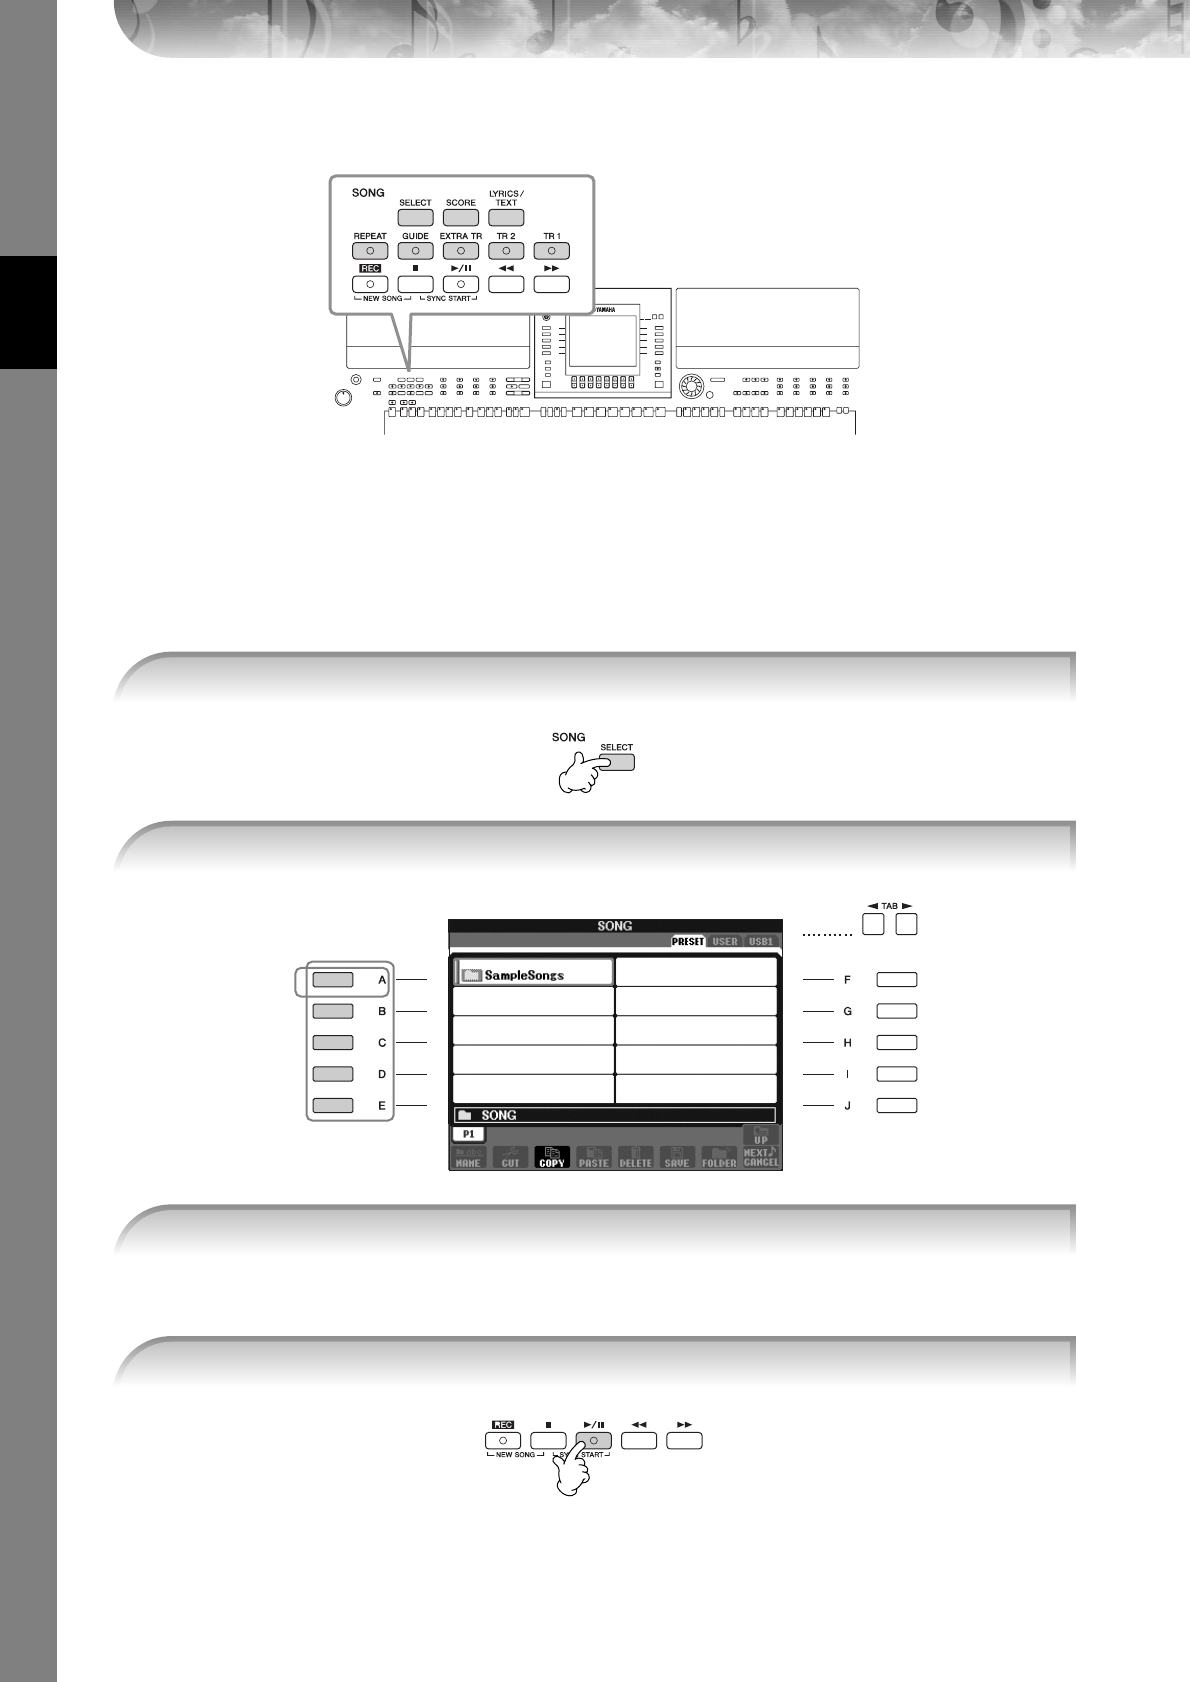
Quick Guide
PSR-S900/S700 Owner’s Manual
36
Practicing with the Preset Songs
nSong
In this manual, the word “Song” refers to performance data.
Playing Back and Listening to Songs Before Practicing
The instrument includes several preset Songs. This section covers basic information on playing back the preset Songs.
You can also select the file by using the DATA ENTRY dial, then press the [ENTER] button to execute.
nYou can instantly jump back to the Main display by “double-clicking” on one of the [A]–[E] buttons.
1Press the SONG [SELECT] button to call up the Song selection display.
2Press the [A] button to select the Sample Song category.
3
2
3Press one of the [A]–[E] buttons to select the desired Song.
4Press the SONG [F/K] (PLAY/PAUSE) button to start playback.
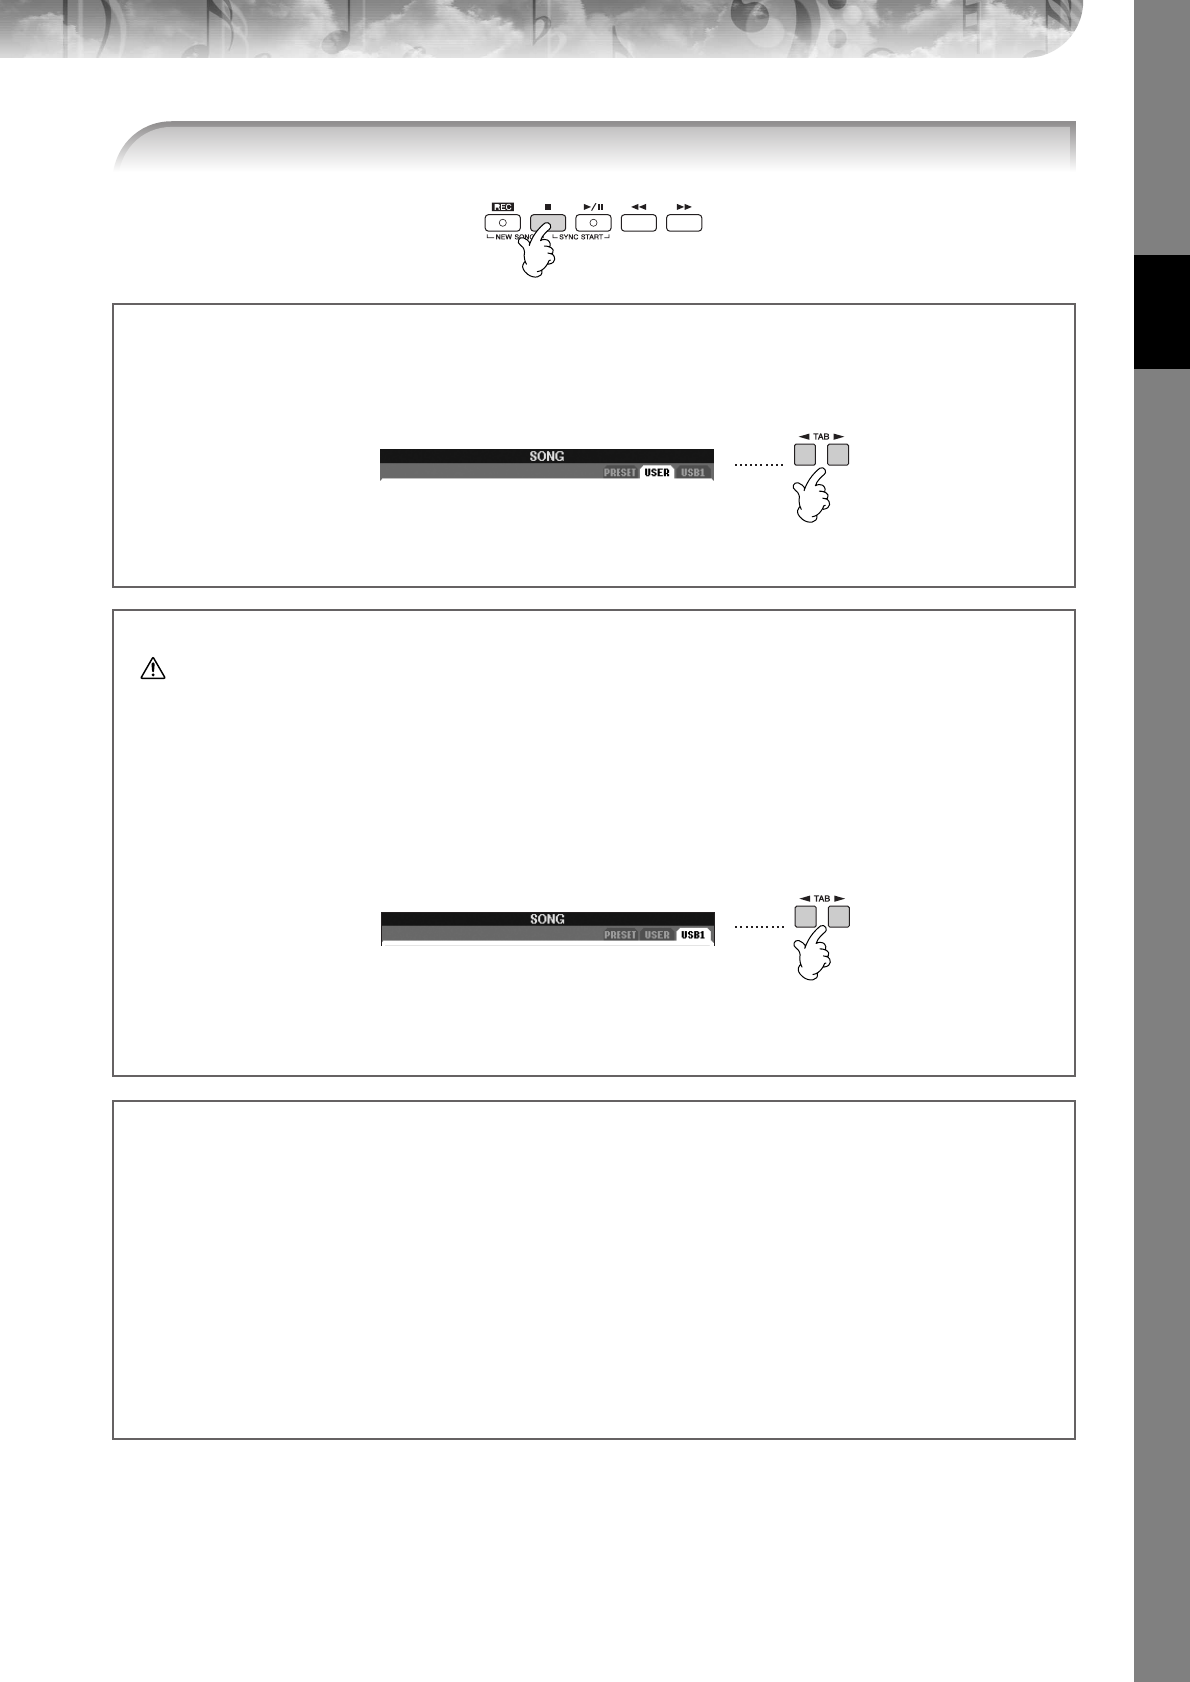
Quick Guide
PSR-S900/S700 Owner’s Manual 37
5Press the SONG [J] (STOP) button to stop playback.
Playing Songs saved to USER (page 73)
1Press the SONG [SELECT] button to call up the Song selection display.
2Press the TAB [
√
][
®
] buttons to select the USER tab.
3Press one of the [A]–[J] buttons to select the desired Song.
Playing Songs saved to a USB storage device (page 73)
CAUTION
Before using a USB storage device, be sure to read “Handling the USB Storage Device (USB Flash Memory/Floppy Disk,
etc)” on page 23.
1Connect the USB storage device to the [USB TO DEVICE] terminal.
2Press the SONG [SELECT] button to call up the Song selection display.
3Press the TAB [
√
][
®
] buttons to select the USB tab (“USB1”/“USB2”), corresponding to the USB storage device
you inserted in Step 1.
The indication “USB1”/“USB2” will be displayed depending on the number of the connected devices.
4Use the [A]–[J] buttons to select a Song.
nYou can also select a specified file in the USB storage device by pressing the [USB] button.
[USB] → [A] SONG → [A]–[J]
Playing Songs in sequence
You can play all Songs in a folder continuously.
1Select a Song in the desired folder.
2Call up the operation display.
[FUNCTION] → [B] SONG SETTING
3Press the [H] (REPEAT MODE) button to select “ALL.”
4Press the SONG [F/K] (PLAY/PAUSE) button to start playback.
All Songs in the folder play back continuously, in order.
5Press the SONG [J] (STOP) button to stop continuous playback.
6To turn off the Song sequence playback, press the [H] button to select “OFF” in the display in step 2.
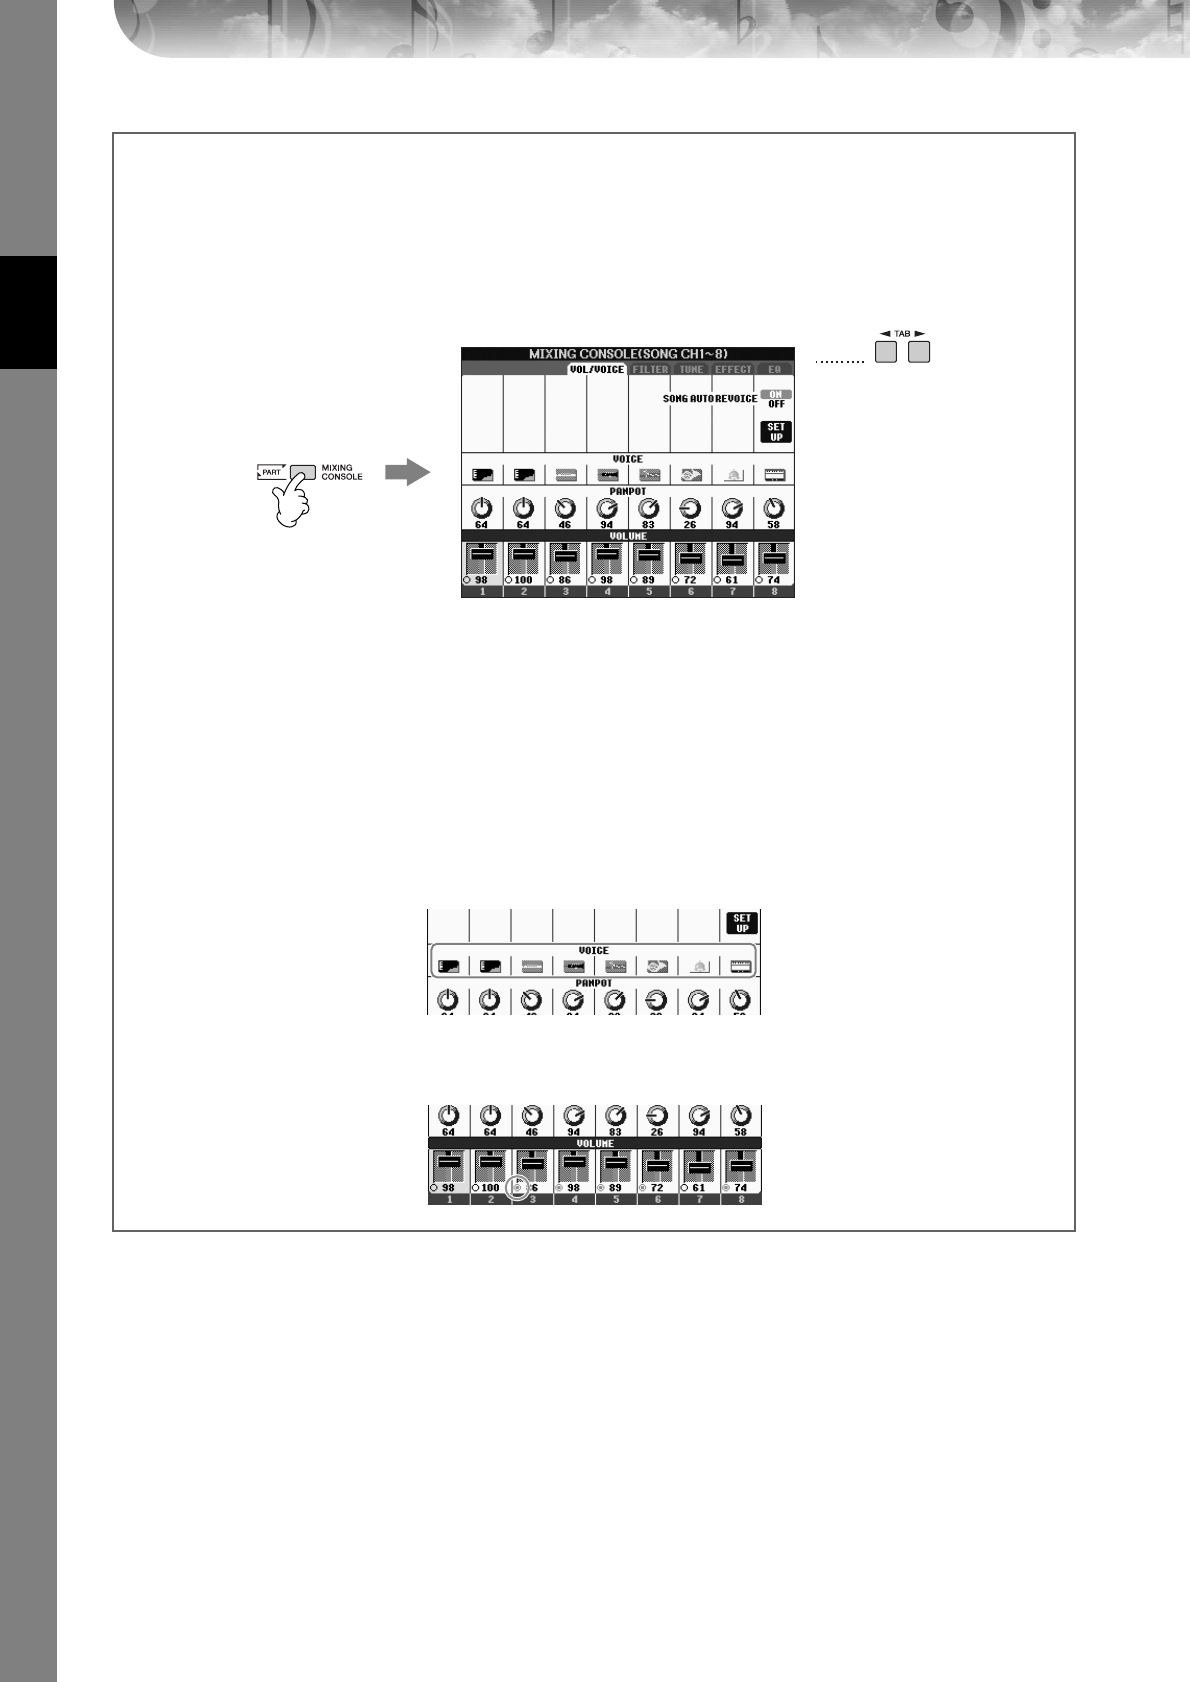
Quick Guide
PSR-S900/S700 Owner’s Manual
38
Boost the volume of the part to be practiced
On the instrument, a single Song can contain separate data for up to sixteen MIDI channels. Specify the channel for
practicing and increase the playback volume for the channel.
1Select a Song. The method for selecting a Song is the same as “Playing Back and Listening to Songs Before Practic-
ing” (page 36 step 1–3).
2Press the [MIXING CONSOLE] button to call up the MIXING CONSOLE display.
3Press the TAB [
√
][
®
] buttons to select the VOL/VOICE tab.
4Press the [MIXING CONSOLE] button until “MIXING CONSOLE (SONG CH1-8)” is shown at the top of the dis-
play.
5Press the [E]/[J] button to select “VOLUME.”
6To raise the level of the desired channel(s), press the appropriate buttons [1
π†
]–[8
π†
].
If the desired channel is not shown in the MIXING CONSOLE (SONG CH1-8) display, press the [MIXING CON-
SOLE] button to call up the MIXING CONSOLE (SONG CH9-16) display.
If you don’t know which channel’s volume to raise:
• Look at the illustrations of the instruments indicated below “VOICE.”
• Look at the channel indicators, which light as the Song plays back. Watching these as you listen can show you
which channel you wish to boost.
3
2,
4

Quick Guide
PSR-S900/S700 Owner’s Manual 39
Displaying Music Notation (Score)
You can view the music notation of the selected Song. We suggest that you read through the music notation before
starting to practice.
•The instrument can display the music notation of commercially-available music data or your recorded Songs.
•The displayed notation is generated by the instrument based on the Song data. As a result, it may not be exactly the same as com-
mercially available sheet music of the same song—especially when displaying notation of complicated passages or many short
notes.
•The notation functions cannot be used to create Song data by inputting notes. For information on creating Song data, see
page 147.
nLook through the entire score before playing back the Song
Press the TAB [
√
][
®
] buttons to select subsequent pages.
You can also use the footswitch to select subsequent pages (page 196).
The “ball” bounces along through the score, indicating the current position.
Changing the Notation Display
You can change the notation display as desired to suit your personal
preferences.
1Press the [SCORE] button to display the music nota-
tion.
nThe music notation at right is for instructional purposes only,
and the song depicted is not one of the preset Songs on your
instrument.
2Change the following settings as desired.
●Changing the size of the music notation
Press the [7
π†
] button to change the size of the music
notation.
●Displaying only right-hand part/left-hand part
notation
Press the [1
π†
]/[2
π†
] button to disable display of
the left-hand part/right-hand part.
●Customizing the notation display
• Display the note name at the left of the note
1Press the [5
ππ
ππ††
††
] (NOTE) button to display the note name.
2Press the [8
ππ
ππ††
††
] (SET UP) button to call up the detailed setting display.
3Press the [6
†
] (NOTE NAME) button to select “Fixed Do.”
4Press the [8
ππ
ππ
] (OK) button to apply the setting.
•Turn on the note colors (PSR-S900 only)
Press the [6
π†
] button to turn the COLOR on.
nAbout the note colors
These colors are fixed for each note and cannot be changed.
C: red, D: yellow, E: green, F: orange, G: blue, A: purple, and B: gray
●Increase the number of measures in the display
You can increase the number of measures that will be displayed by decreasing the other items to be dis-
played (part, lyrics, chords, etc.).
Use the [1
π†
]–[4
π†
] buttons to turn off the items you want not to be displayed.
n
1Select a Song (page 36).
2Press the [SCORE] button to display the music notation.
3Press the SONG [F/K] (PLAY/PAUSE) button to start playback.
4Press the SONG [J] (STOP) button to stop playback.
Quick Guide
PSR-S900/S700 Owner’s Manual
40
Set the detailed parameters of the view type as desired.
1Press the [8
ππ
ππ††
††
] (SET UP) button to call up the detailed setting display.
2Press the [1
ππ
ππ††
††
]–[6
ππ
ππ††
††
] buttons to set the view type.
3Press the [8
ππ
ππ
] (OK) button to apply the setting.
nSave the notation view settings
The notation view settings can be saved as part of a Song (page 166).
Muting the Right- or Left-hand Part Viewing the Score
The Guide function indicates the notes you should play, when you should play them, and how long you should hold
them down. You can also practice at your own pace—since the accompaniment waits for you to play the notes cor-
rectly. Here, mute the right- or left-hand part and try practicing the part.
Practicing the Right-hand Part (TRACK 1)
LEFT CH/RIGHT CH
Determines which MIDI channel in the Song data is used for the left-hand/right-hand part. This set-
ting returns to AUTO when a different Song is selected.
AUTO
The MIDI channels in the Song data for the right- and left-hand parts are assigned automatically—
setting the parts to the same channel as the channel which is specified in the [FUNCTION] →
[B] SONG SETTING.
1–16
Assigns the specified MIDI channel (1–16) to each of the left- and right-hand parts.
OFF (LEFT CH only)
No channel assignment: This disables display of the left-hand key range.
KEY SIGNATURE This lets you enter key signature changes in the middle of a song, at the stopped position. This menu
is useful when the selected Song contains no key signature settings for displaying notation.
QUANTIZE
This gives you control over the note resolution in the notation, letting you shift or correct the timing
of all displayed notes so that they line up to a particular note value. Make sure to select the smallest
note value used in the song.
NOTE NAME
Selects the type of the note name indicated at the left of the note in the notation from among the fol-
lowing three types. The settings here are available when the NOTE parameter in “Display the note
name at the left of the note” step 1 is set to ON.
A, B, C
Note names are indicated as letters (C, D, E, F, G, A, B).
FIXED DO
Note names are indicated in solfeggio and differ depending on the selected language.
The language is specified in LANGUAGE of the OWNER display (page 19).
MOVABLE DO
Note names are indicated in solfeggio according to the scale intervals, and as such are relative to
the key. The root note is indicated as Do. For example, in the key of G major the root note of “So”
would be indicated as “Do.” As with “Fixed Do,” the indication differs depending on the selected
language.
1Select a Song (page 36), then press the [SCORE] button to call up the Score display.
2Turn the [GUIDE] button on.
2
3
4

Quick Guide
PSR-S900/S700 Owner’s Manual 41
The indicator of the [TR 1] button goes out. You can now play that part by yourself.
Practice the muted part viewing the Score display.
nAdjusting the tempo
Refer to page 34.
Quickly changing tempo during a performance (Tap function)
The tempo can also be changed during Song playback by tapping the [TAP TEMPO] button twice at the desired tempo.
3Press the SONG [TR 1] button to mute the right-hand part.
4Press the SONG [F/K] (PLAY/PAUSE) button to start playback.
5Press the SONG [J] (STOP) button to stop playback.
6Turn the [GUIDE] button off.
Adjusting the volume balance between the Song and the keyboard
This lets you adjust the volume balance between Song playback and the sound you play on the keyboard.
1Press the [BALANCE] button to call up the volume balance display.
2To adjust the Song volume, press the [1
π†
] button. To adjust the keyboard (RIGHT 1) volume, press the [6
π†
]
button.
3Press the [EXIT] button to close the volume balance display.
nAbout keyboard parts (Right 1, Right 2, Left)
See page 84.
22
1
3
Other guide functions
The initial setting “Follow Lights” was used in the instructions “Muting the Right- or Left-hand Part Viewing the Score” on
page 40. There are additional functions in the Guide feature, as described below.
To select a guide function, see page 145.
For keyboard performance
• Any Key
This lets you practice the timing of playing the keys.
For Karaoke
• Karao-Key
This automatically controls the timing of Song playback to match your singing—a convenient feature for singing
along with your keyboard performance.
•Vocal CueTIME (PSR-S900)
This automatically controls the timing of the accompaniment to match the melody (pitch) of your singing—allow-
ing you to practice singing with the correct pitch.
Quick Guide
PSR-S900/S700 Owner’s Manual
42
Practicing the Left-hand Part (TRACK 2) Viewing the Score
The indicator of the [TR 2 (L)] button goes out. You can now play that part by yourself.
Practicing with the Repeat Playback Function
The Song Repeat functions can be used to repeatedly play back a Song or a specific range of measures in a Song. This
is useful for repeated practicing of difficult-to-play phrases.
Playing Back a Song Repeatedly
1Select a Song (page 36).
2Press the [REPEAT] button to turn on Repeat playback.
3Press the SONG [F/K] (PLAY/PAUSE) button to start playback.
The Song will be played back repeatedly until you press the SONG [J] (STOP) button.
4Press the SONG [J] (STOP) button to stop playback.
5Press the [REPEAT] button to turn off Repeat playback.
Specifying a Range of Measures and Playing them Back Repeat-
edly (A-B Repeat)
1Select a Song (page 36).
2Press the SONG [F/K] (PLAY/PAUSE) button to start playback.
3Specify the repeat range.
Press the [REPEAT] button at the starting point (A) of the range to be repeated. Press the [REPEAT] button
again at the ending point (B). After an automatic lead-in (to help guide you into the phrase), the range from
Point A to Point B is played back repeatedly.
nInstantly returning to Point A
Regardless of whether the Song is playing back or is stopped, pressing the [J] (STOP) button returns to Point A.
4Press the SONG [J] (STOP) button to stop playback.
5Press the [REPEAT] button to turn off Repeat playback.
1,2 Follow the same steps as in “Practice the right-hand part (TR 1)” on page 40.
3Press the [TR 2] button to mute the left-hand part.
4Press the SONG [F/K] (PLAY/PAUSE) button to start playback and practice the
muted part.
5Press the SONG [J] (STOP) button to stop playback.
6Turn the [GUIDE] button off.
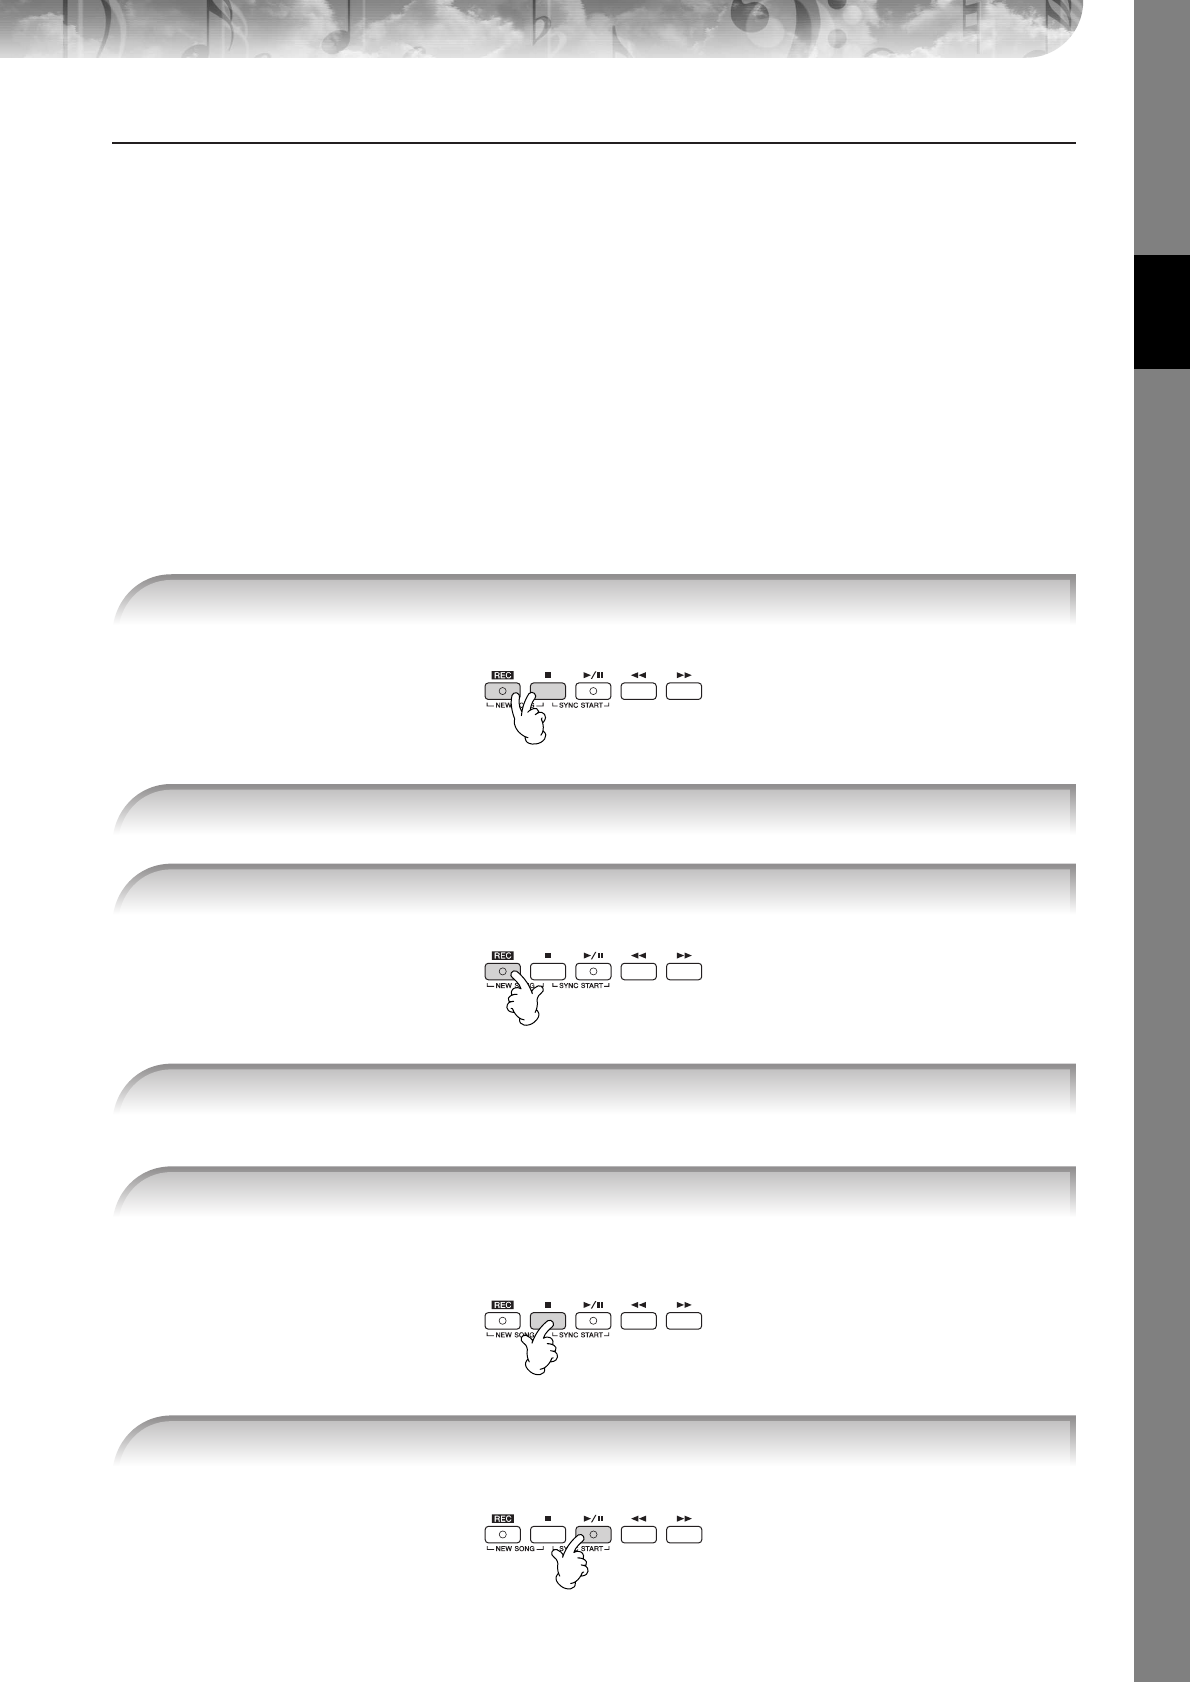
Quick Guide
PSR-S900/S700 Owner’s Manual 43
Other Methods for Specifying the A–B Repeat Range
●Specifying the repeat range while Songs are stopped
1Press the [H] (Fast Forward) button to advance to the Point A location.
2Press the [REPEAT] button to specify Point A.
3Press the [H] (Fast Forward) button to advance to the Point B location.
4Press the [REPEAT] button again to specify Point B.
●Specifying the repeat range between Point A and the end of the Song
Specifying only Point A results in repeat playback between Point A and the end of the Song.
Recording Your Performance
Record your performance by using the Quick Recording feature. This is an effective practice tool, allowing you to easily
compare your own performance to the original song you are practicing. You can also use it to practice duet pieces by
yourself, if you have your teacher or partner record his or her part beforehand.
A blank Song for recording is automatically set.
Recording begins automatically as soon as you play a note on the keyboard.
A message prompting you to save the recorded performance appears. To close the message, press the [EXIT]
button.
1Press the [REC] and [J] (STOP) buttons simultaneously.
2Select a Voice (page 30). The selected Voice will be recorded.
3Press the [REC] button.
4Start recording.
5Press the SONG [J] (STOP) button to stop recording.
6Press the SONG [F/K] (PLAY/PAUSE) button to play back the recorded performance.

Quick Guide
PSR-S900/S700 Owner’s Manual
44
1Press the SONG [SELECT] button to call up the Song selection display.
2Press the TAB [
√
][
®
] buttons to select the appropriate tab (USER, USB, etc.) to which you want to
save the data. Select USER to save the data to internal memory, or select USB to save the data to a
USB storage device.
3Press the [6
††
††
] (SAVE) button to call up the file naming display.
4Enter the file name (page 77).
5Press the [8
ππ
ππ
] (OK) button to save the file.
To cancel the Save operation, press the [8
†
] (CANCEL) button.
CAUTION
The recorded song will be lost if you change to another Song or you turn the power off without executing the Save oper-
ation.
Playing Backing Parts with the performance
assistant Technology
This feature makes it exceptionally easy to play the backing parts along with Song playback.
nBefore using performance assistant technology
To use the performance assistant technology, the Song must contain chord data. If the Song contains this data, the current chord name
will be displayed in the Main display during Song playback, letting you easily check whether the Song contains chord data or not.
In these example instructions, use the Songs in the “SampleSongs” folder.
[FUNCTION] → [B] SONG SETTING
7Save the recorded performance.
When the following message appears: “Song” changed. Save?/“Song” speichern?/
“Song” modifié. Sauv.?/“Song” cambiado. ¿Guardar?/Salvare “Song”?
The recorded data has not yet been saved. To save the data, press the [G] (YES) button to open the Song selection dis-
play and save the data (see above). To cancel the operation, press the [H] (NO) button.
Playing Songs saved to USER or a USB storage device.
Refer to page 37.
1Select a Song (page 36).
2Call up the operation display.
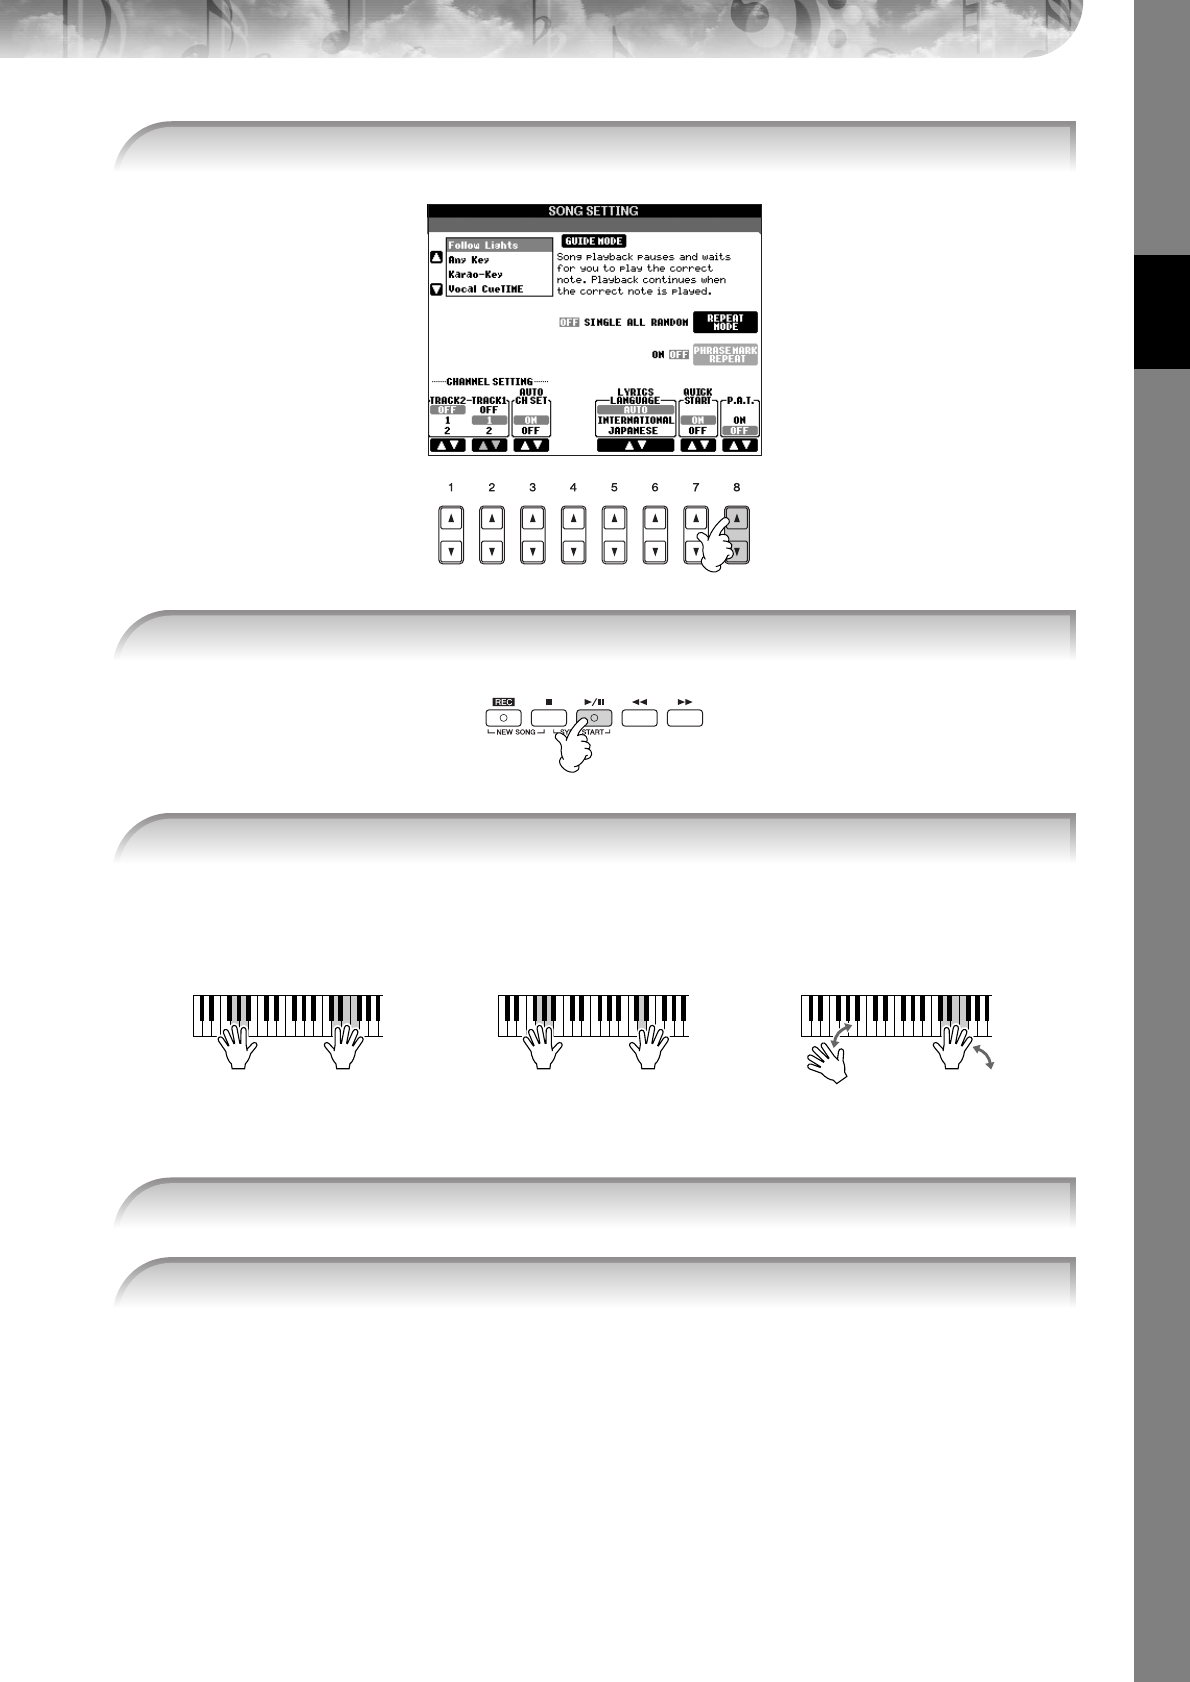
Quick Guide
PSR-S900/S700 Owner’s Manual 45
The instrument automatically matches your performance on the keyboard to the Song playback and chords,
no matter what keys you play. It even changes the sound according to the way you play. Try playing in the
three different ways below.
3Press the [8
ππ
ππ††
††
] button to turn the [P.A.T.] (Performance Assistant) on.
4Press the SONG [F/K] (PLAY/PAUSE) button to start playback.
5Play the keyboard.
Playing the left and right hand together
(method 1).
Playing the left and right hand together
(method 2).
Playing the left hand and right hand
alternately.
Play three notes at the
same time with your
right hand.
Play several notes one after
the other with different fin-
gers of your right hand.
Play three notes at the
same time with your
right hand.
●● ●
6Press the SONG [J] (STOP) button to stop playback.
7Press the [8
ππ
ππ††
††
] button to turn the [P.A.T.] (Performance Assistant) off.
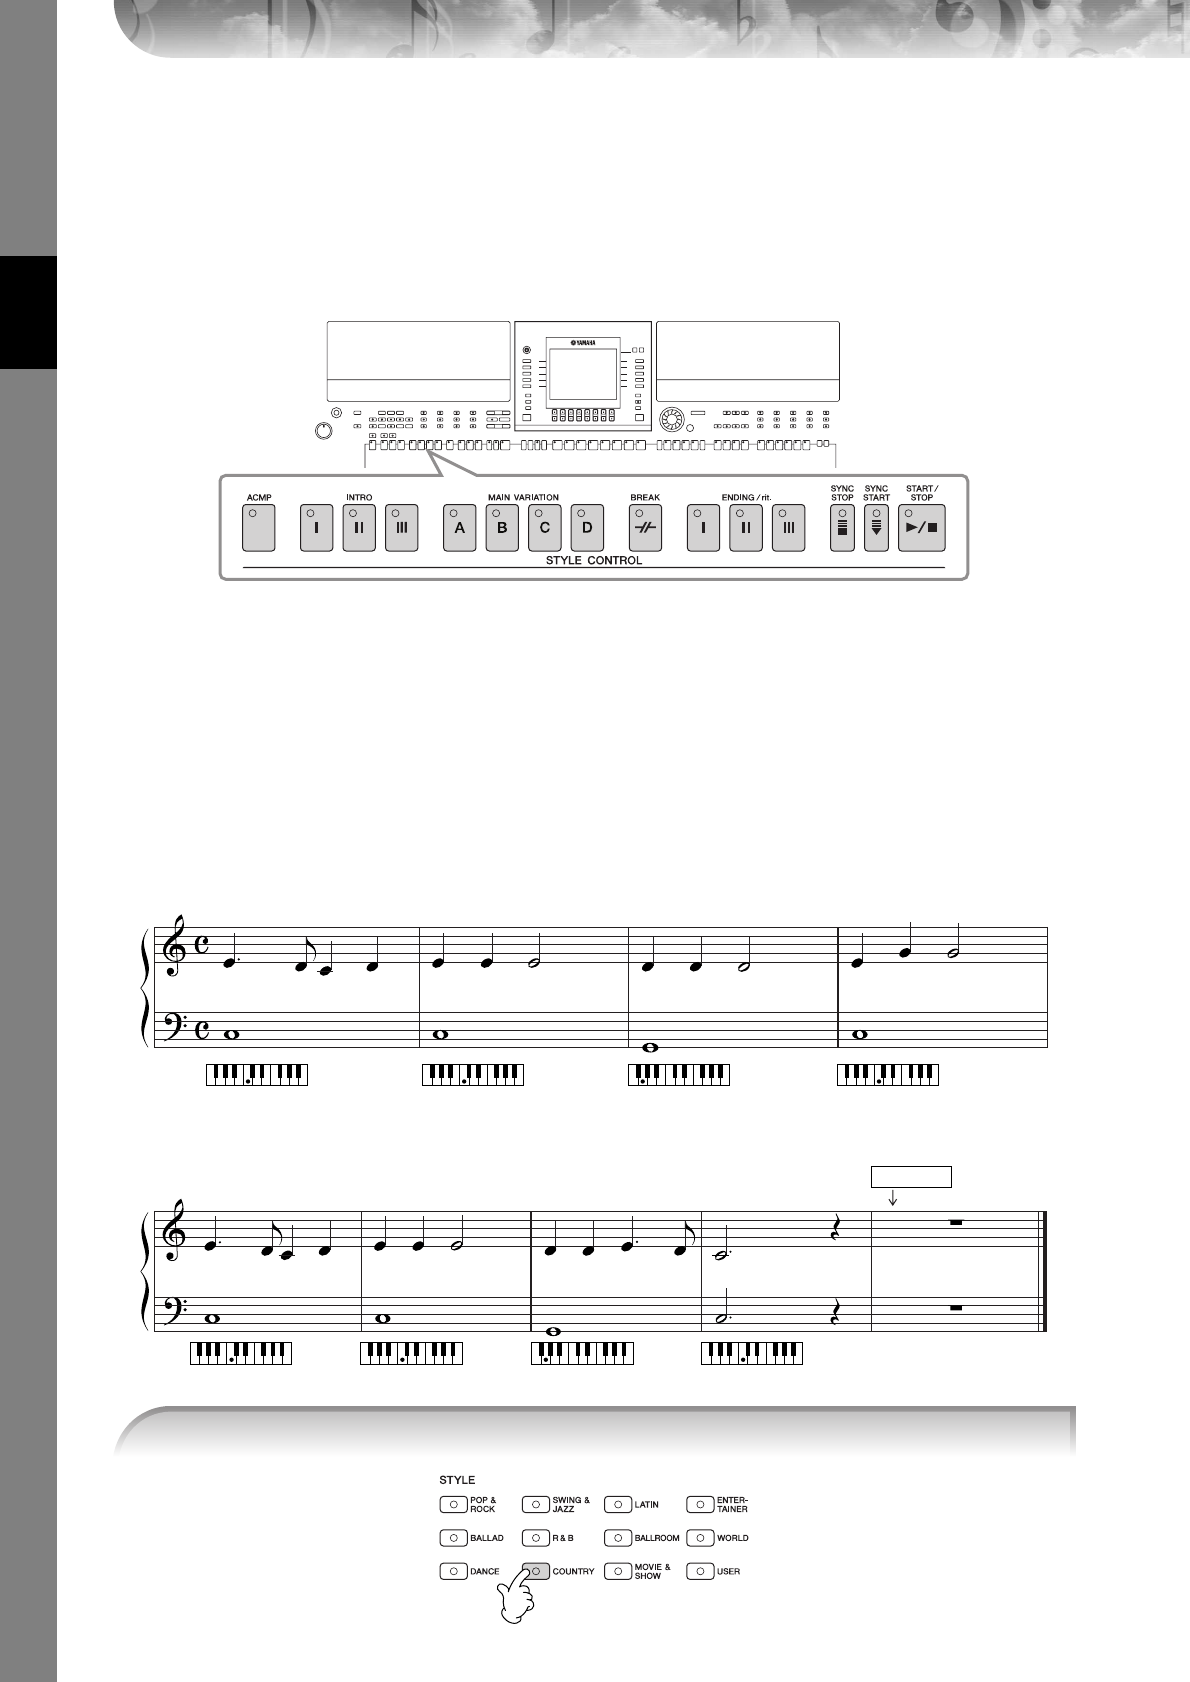
Quick Guide
PSR-S900/S700 Owner’s Manual
46
Playing Accompaniment with the Auto Accom-
paniment Feature (Style Playback)
The Auto Accompaniment features let you produce automatic accompaniment playback simply by playing
“chords” with your left hand. This lets you automatically recreate the sound of a full band or orchestra—even if
you’re playing by yourself. The Auto Accompaniment sound is made up of the rhythm patterns of the Styles. The
Styles of the instrument cover a wide range of different musical genres including pop, jazz, and many others.
Playing “Mary Had a Little Lamb” with the Auto
Accompaniment Feature
122 233 35
1 1 1
321 2 3 2 3 2 1
1 1 4 1
4
CCGC
C
GCC
MARY HAD A LITTLE LAMB
Traditional
Style: Country Pop
Ending
1Press the STYLE CONTROL “COUNTRY” button.

Quick Guide
PSR-S900/S700 Owner’s Manual 47
•The Style type and its defining characteristics are indicated above the Preset Style name. For details on the character-
istics, see page 106.
•When the [7
π
] (REPERTOIRE) button is pressed after selecting a Style, you can call up the custom panel settings (for
voices and tempos, etc.) designed to best match the selected Style. For details on Repertoire, see page 56. To return to
the previous display, press the [EXIT] button.
•You can instantly jump back to the Main display by “double-clicking” on one of the [A]–[J] buttons.
Use the left-hand section (lower part) of the keyboard to play the chords for sounding the Auto Accompaniment.
Try playing chords with your left hand and play a melody with your right hand.
nChord Fingerings
There are seven different fingering methods you can use to specify chords (page 106).
Enabling tempo display above Style name
You can select whether the tempo is displayed above the Style name or not.
1Call up the operation display.
[FUNCTION] → [J] UTILITY → TAB [
√
][
®
] CONFIG 2
2Select the [B] (2 DISPLAY STYLE TEMPO) button, and use the [5
π†
]/[6
π†
] buttons to switch the tempo dis-
play on/off.
• ON:
Tempo is displayed above the Style name.
With the default settings, the Display Style Tempo function is on.
• OFF:
Tempo is not displayed above the Style name.
2Press one of the [A]–[J] buttons to select a Style “CountryPop.”
n
3Press the [ACMP] button to turn on Auto Accompaniment.
53 4 6
4Press the [SYNC START] button to set Auto Accompaniment to standby—letting you
simultaneously start the accompaniment as soon as you start playing.
5As soon as you play a chord with your left hand, the Auto Accompaniment starts.
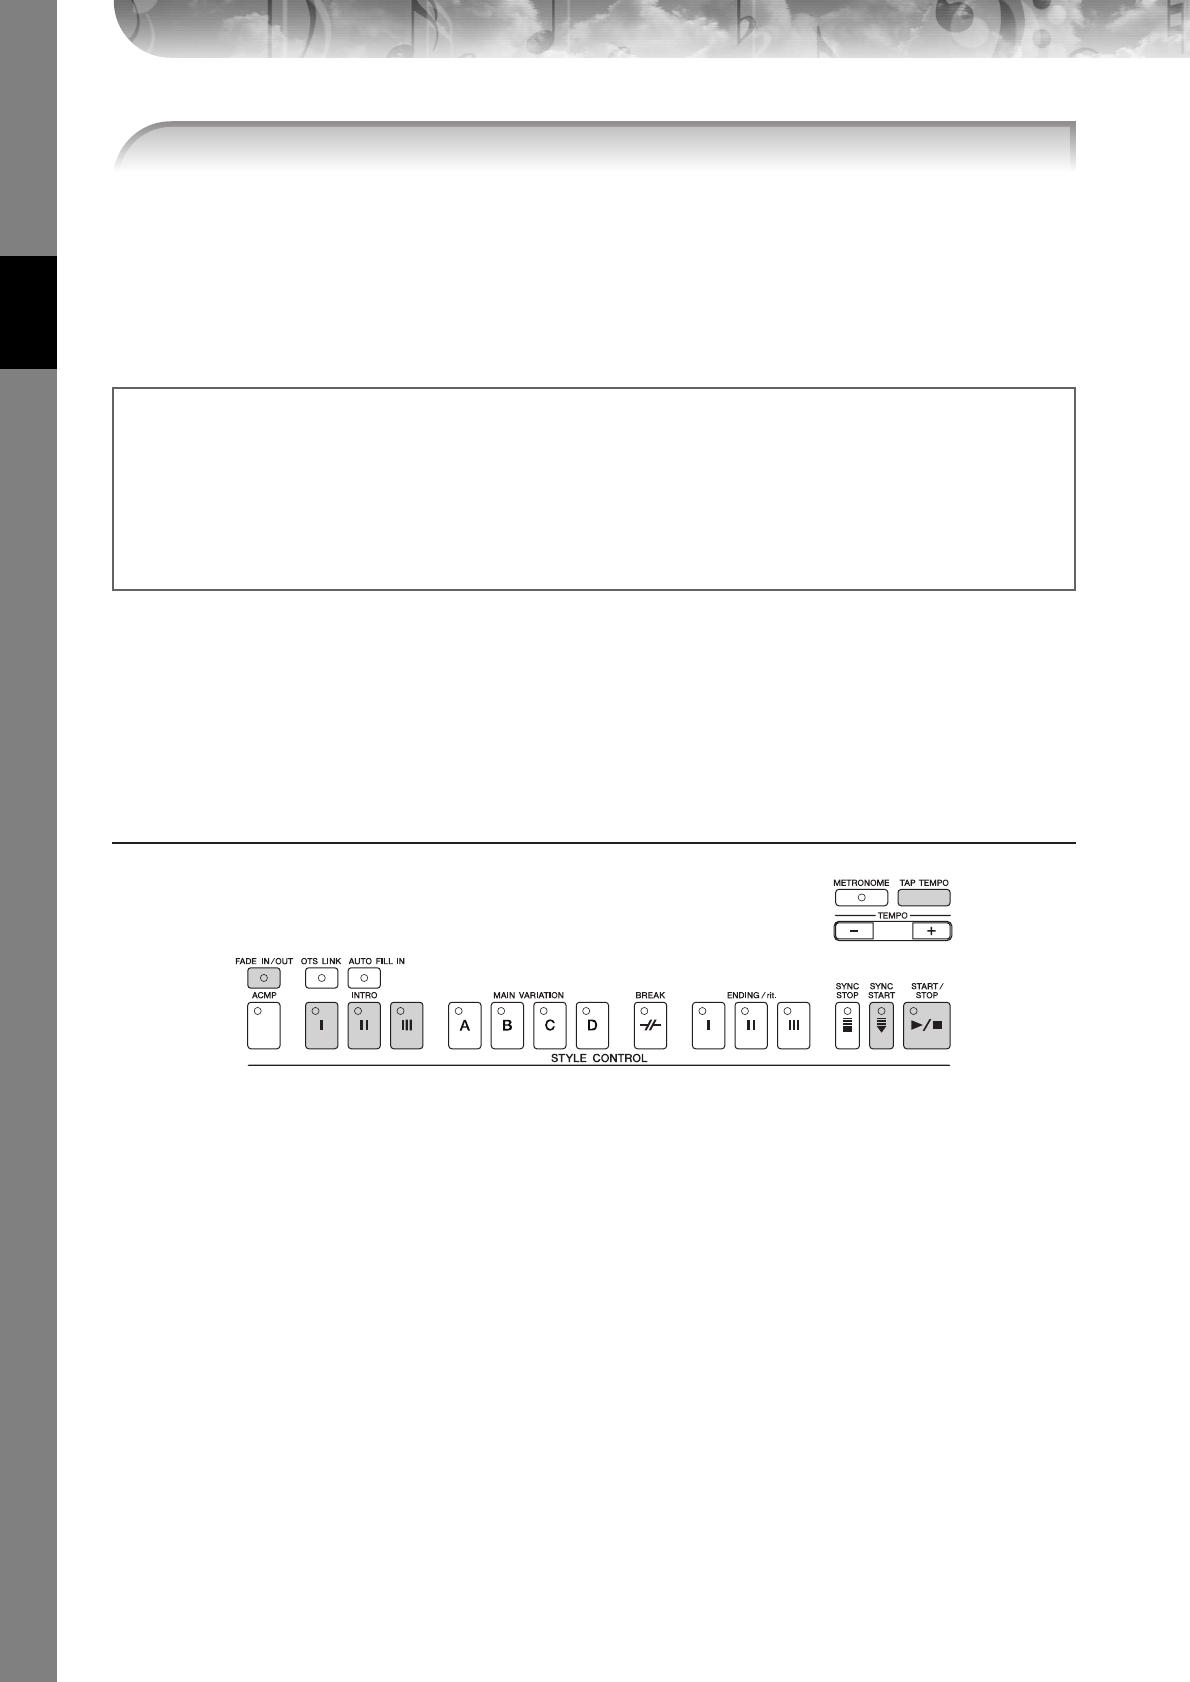
Quick Guide
PSR-S900/S700 Owner’s Manual
48
When Ending playback is finished, the Style automatically stops.
•About the various Styles
Refer to the Style List in the Data List available at the Yamaha website. (See page 5.)
•Quickly changing the Style tempo during a performance (Tap function)
The tempo can also be changed during playback by tapping the [TAP TEMPO] button twice at the desired tempo.
•Specifying the split point (the border between the right- and left-hand range)
See page 110.
•Turns touch response on/off for the Style playback (Style Touch)
See page 109.
Pattern Variation
While you play, you can automatically add specially created intros and endings, as well as variations in the rhythm/
chord patterns, for more dynamic, professional-sounding performances. There are several different auto accompani-
ment pattern variations for each situation: starting your performance, during your performance, and ending your per-
formance. Try out the variations and combine them freely.
To Start Playing
●Start/Stop
Styles start playing back as soon as the STYLE CONTROL [START/STOP] button is pressed.
●Intro
This is used for the beginning of the song. Each preset Style features three different intros. When the intro finished play-
ing, accompaniment shifts to the Main section (see “Main” in the “During Style playback”).
Press one of the INTRO [I]–[III] buttons before starting Style playback and press the STYLE CONTROL [START/STOP]
button to start Style playback.
●Synchro Start
This lets you start playback as soon as you play the keyboard.
Press the [SYNC START] button when Style playback is stopped and play a chord in the chord section of the keyboard
to start Style playback.
●Fade In
The Fade In produces smooth fade-ins when starting the Style.
Press the [FADE IN/OUT] button when Style playback is stopped and press the STYLE CONTROL [START/STOP] button
to start Style playback.
●Tap
Tap out the tempo and automatically start the Style at that tapped speed. Simply tap (press/release) the [TAP TEMPO]
button (four times for a 4/4 time signature), and the Style playback starts automatically at the tempo you tapped.
nThe particular drum sound and the velocity (loudness) of the sound when the Tap function is used can be selected in the following
display.
[FUNCTION] → [J] UTILITY →TAB [
√
][
®
] CONFIG 1 → [B] 4 TAP
6Automatically play an appropriate ending by pressing any of the [ENDING/rit.] but-
tons, at the point in the score (page 46) indicated by “Ending.”
n
Adjusting the volume balance between the Style and the keyboard
This lets you adjust the volume balance between Style playback and the sound you play on the keyboard.
1Press the [BALANCE] button to call up the volume balance display.
2To adjust the Style volume, press the [2
π†
] button. To adjust the keyboard (RIGHT 1) volume, press the [6
π†
]
button.
3Press the [EXIT] button to close the volume balance display.

Quick Guide
PSR-S900/S700 Owner’s Manual 49
During Style Playback
●Main
This is used for playing the main part of the Song. It plays an accompaniment pattern of several measures, and repeats
indefinitely. Each preset Style features four different patterns.
Press one of the MAIN [A]–[D] buttons during Style playback.
●Fill In
The fill-in sections let you add dynamic variations and breaks in the rhythm of the accompaniment, to make your per-
formance sound even more professional.
Turn on the [AUTO FILL IN] button before starting Style playback or during playback. Then, simply press one of the
MAIN VARIATION (A, B, C, D) buttons as you play, and the selected fill-in section plays automatically (AUTO FILL),
spicing up the auto accompaniment. When the fill-in is finished, it leads smoothly into the selected main section (A, B,
C, D).
Even when [AUTO FILL IN] button is turned off, pressing the same button of the currently playing section automatically
plays a fill-in before returning to the same main section.
●Break
This lets you add dynamic breaks in the rhythm of the accompaniment, to make your performance sound even more
professional.
Press the [BREAK] button during Style playback.
To Finish Playing
●Start/stop
Styles stop as soon as the STYLE CONTROL [START/STOP] button is pressed.
●Ending
This is used for the ending of the Song. Each preset Style features three different endings. When the ending is finished,
the Style stops automatically.
Press one of the ENDING/rit. [I]–[III] buttons during Style playback. You can have the ending gradually slow down
(ritardando) by pressing the same ENDING/rit. button again while the ending is playing back.
nIf you press the ENDING/rit. [I] button in the middle of your performance, a fill-in automatically plays before the ENDING/rit. [I].
●Fade Out
The Fade Out produces smooth fade-outs when stopping the Style.
Press the [FADE IN/OUT] button during Style playback.
nFor details on setting the fade-in and fade-out time, see page 108.
Others
●Synchro Stop
When Synchro Stop is on, you can stop and start the Style anytime you want by simply releasing or playing the keys (in
the chord section of the keyboard). This is a great way to add dramatic breaks and accents to your performance.
Press the [SYNC STOP] button before starting the Style playback.
•Enable Synchro Stop by pressing/releasing keys (Synchro Stop Window)
See page 109.
•Fixing the section pattern to either Intro or Main (Section Set)
For example, you can set this function to Intro to conveniently have an Intro play automatically whenever you select a Style
(page 110).
n
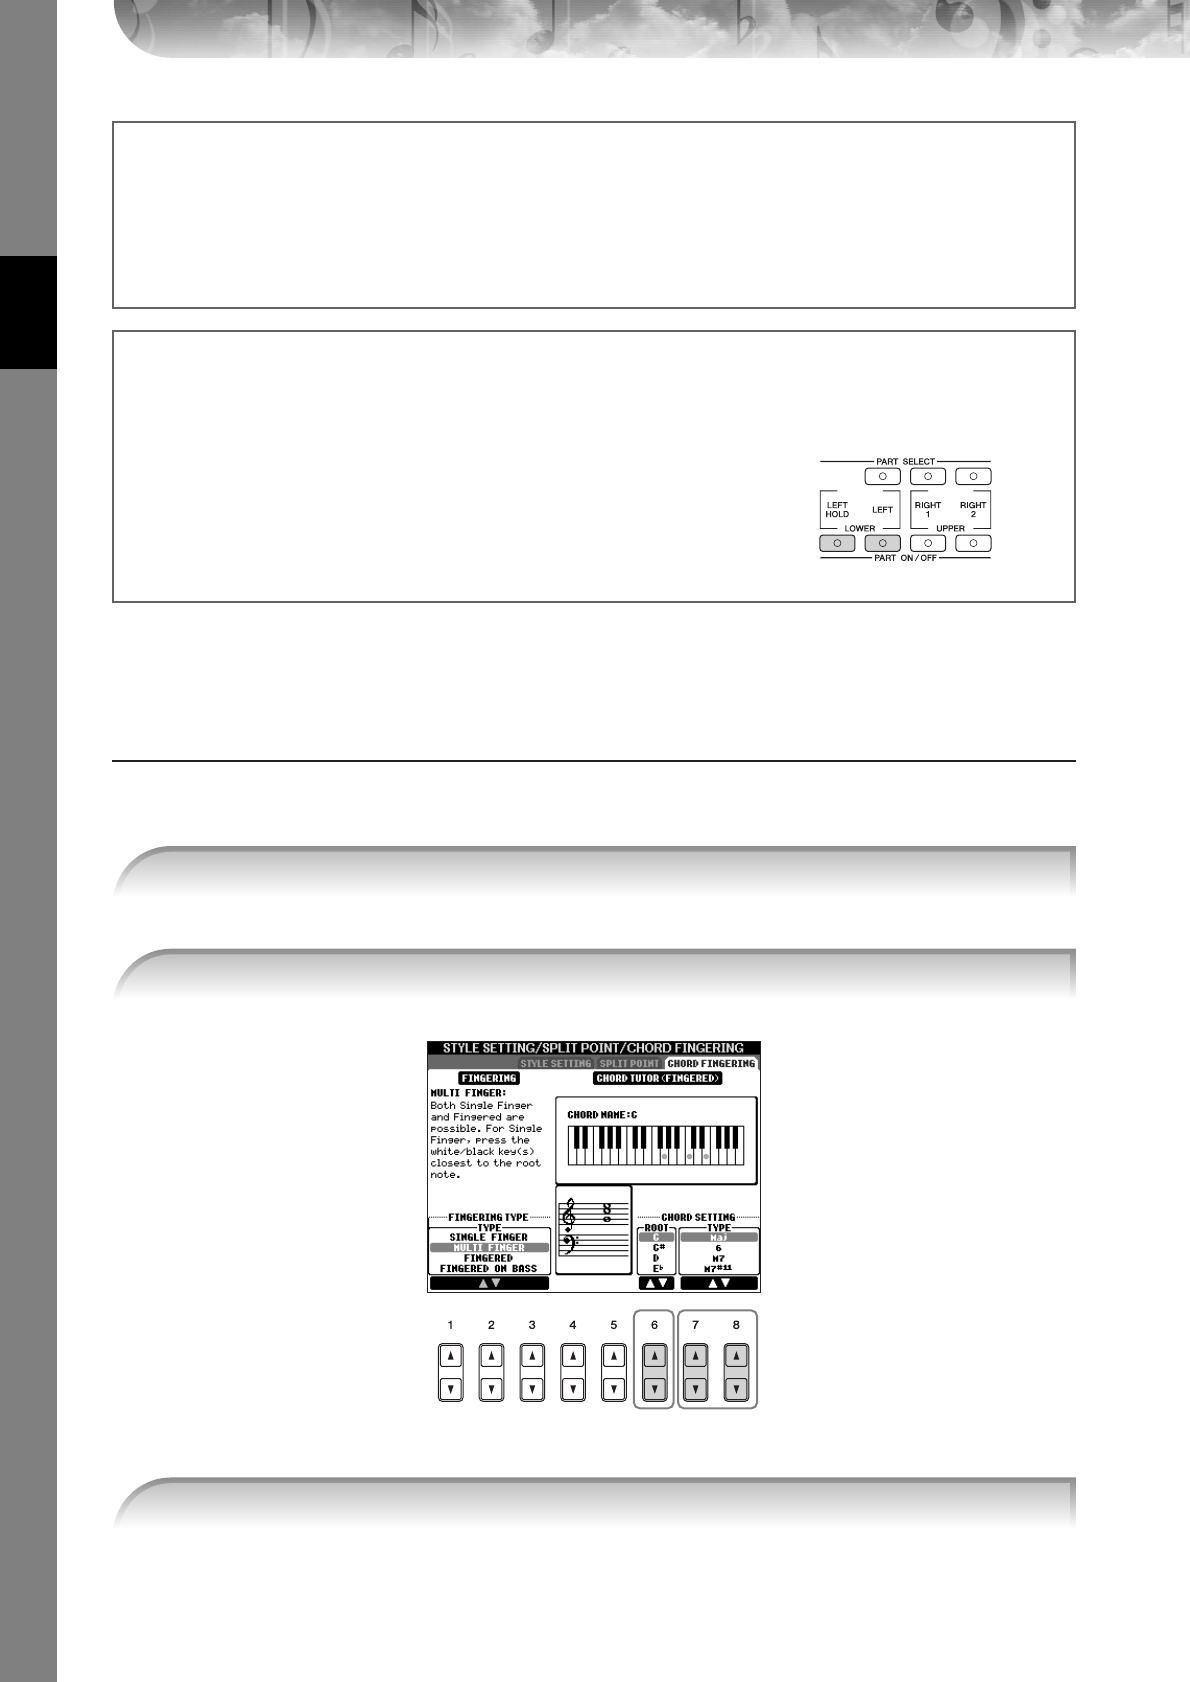
Quick Guide
PSR-S900/S700 Owner’s Manual
50
Learning How to Play (Indicate) Chords for Style Playback
Learning the Notes to Play for Certain Chords
If know the name of a chord but don’t know how to play it, you can have the instrument show you the notes to play
(Chord Tutor function).
[FUNCTION] → [C] STYLE SETTING/SPLIT POINT/CHORD FINGERING → TAB[√][®] CHORD FINGERING
The notes you need to play to make the selected chord are shown in the display.
nThe notes that are displayed correspond to Fingered, no matter which fingering type is selected (page 107).
About the section button (INTRO/MAIN/ENDING, etc.) lamps
• Green
The section is not selected.
• Red
The section is currently selected.
• Off
The section contains no data and cannot be played.
Holding the LEFT part Voice (Left Hold)
This function causes the LEFT part Voice to be held even when the keys are released. Non-decaying voices such as
strings are held continuously, while decay-type voices such as piano decay more slowly (as if the sustain pedal has
been pressed).
1Press the PART ON/OFF [LEFT] button to turn the left-hand part on.
2Press the [LEFT HOLD] button to turn the Left Hold function on.
21
1Call up the operation display.
2Press the [6
ππ
ππ††
††
] button to select the root note.
23
3Press the [7
ππ
ππ††
††
]/[8
ππ
ππ††
††
] button to select the chord type.
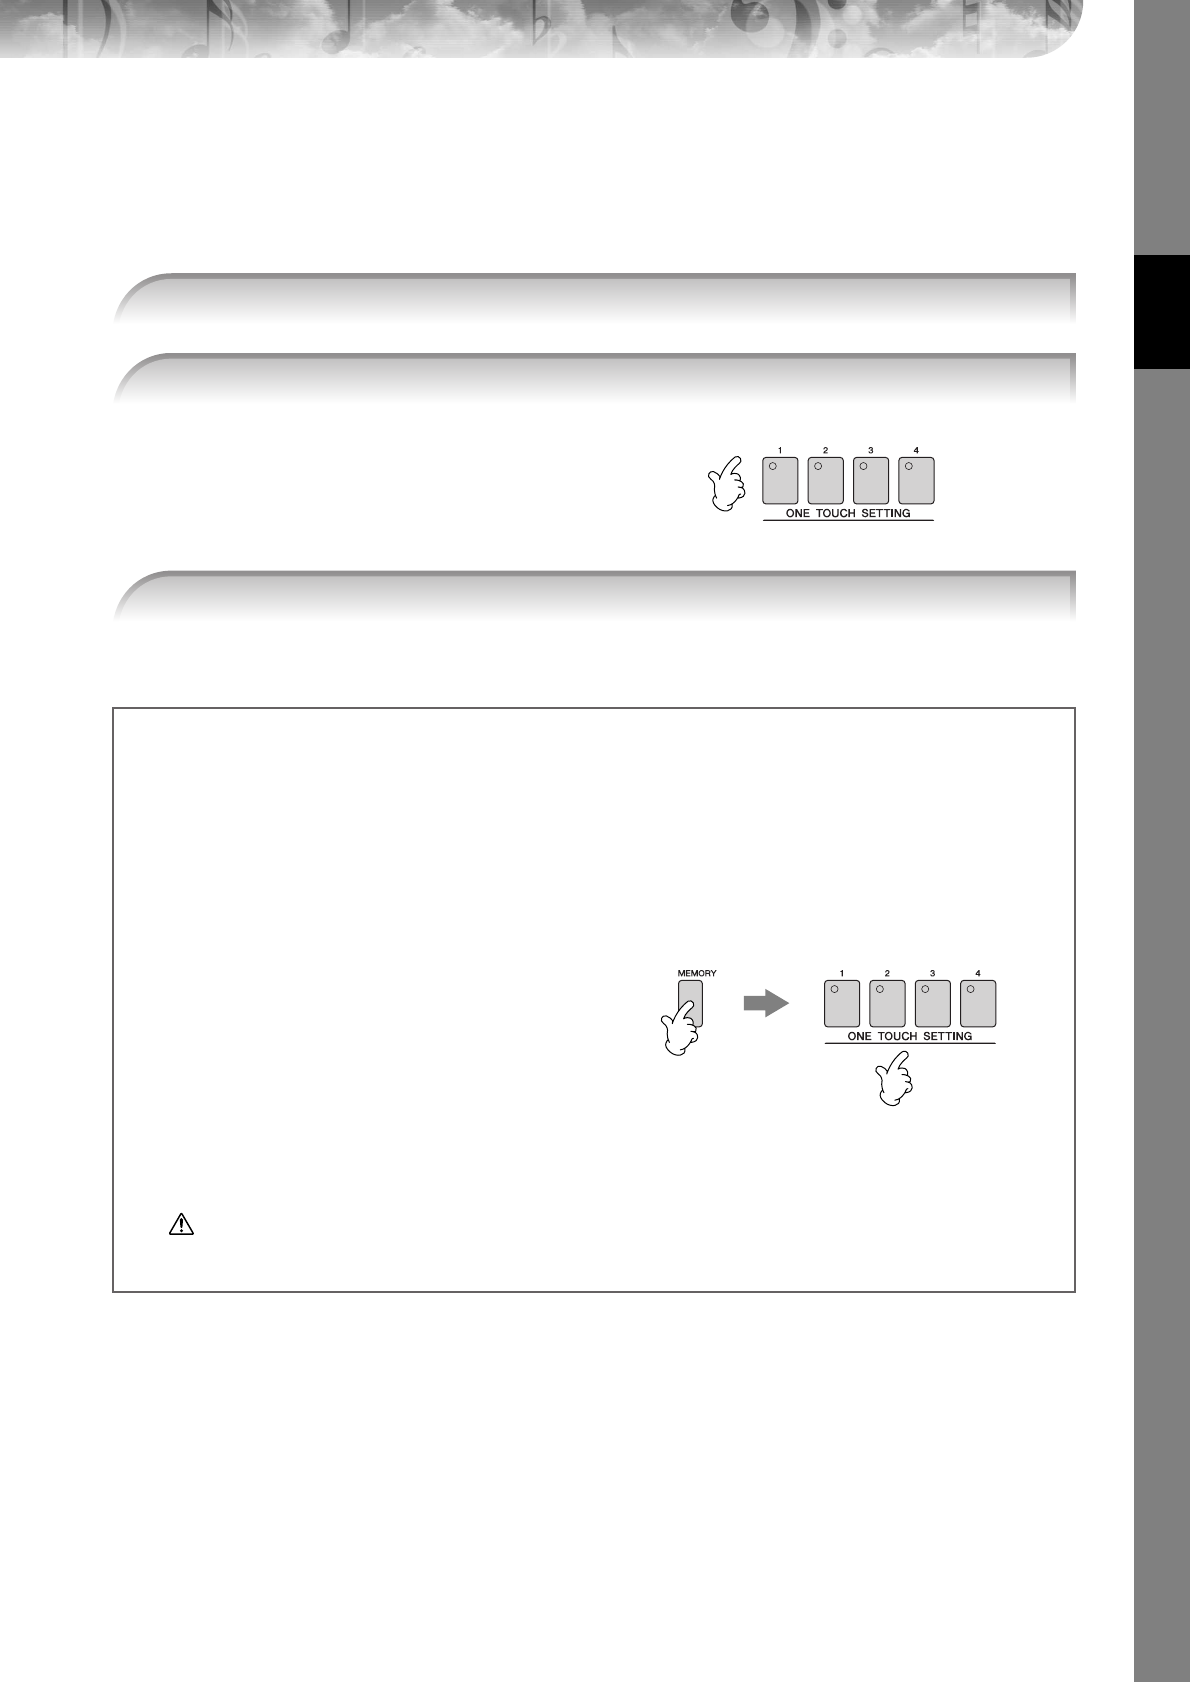
Quick Guide
PSR-S900/S700 Owner’s Manual 51
Appropriate Panel Settings for the Selected Style—One Touch
Setting
One Touch Setting is a powerful and convenient feature that automatically calls up the most appropriate panel settings
(Voices or effects, etc.) for the currently selected Style, with the touch of a single button. If you’ve already decided
which Style you wish to use, you can have One Touch Setting automatically select the appropriate Voice for you.
Not only does this instantly call up all the
settings (Voices, effects, etc.) that match the
current Style—it also automatically turns on
ACMP and SYNC START, so that you can
immediately start playing the Style.
nParameter Lock
You can “lock” specific parameters (e.g., effect, split point, etc.) to make them selectable only via the panel controls
(page 137).
1Select a Style (page 46).
2Press one of the ONE TOUCH SETTING [1]–[4] buttons.
3As soon as you play a chord with your left hand, the selected Style starts.
Helpful hints for using One Touch Setting
● Automatically changing One Touch Settings with the Main sections (OTS Link)
The convenient OTS (One Touch Setting) Link function lets you automatically have One Touch Settings change when
you select a different Main section (A–D).To use the OTS Link function, press the [OTS LINK] button.
nSetting the timing for OTS changes
The One Touch Settings can be set to change with the sections in one of two different timings (page 109).
● Memorizing the panel settings to the OTS
You can also create your own One Touch Setting setups.
1Set up the panel controls (such as Voice, Style, effects,
and so on) as desired.
2Press the [MEMORY] button.
3Press one of the ONE TOUCH SETTING [1]–[4] buttons.
As it is possible to save the panel settings with another
file (step 4), register it in a favorite number from 1 to 4.
A message appears in the display prompting you to save
the panel settings.
4Press the [F] (YES) button to call up the Style selection display and save the panel settings as a Style file (page 73).
CAUTION
The panel settings memorized to each OTS button will be lost if you change the Style or turn the power off without
executing the Save operation.
23
Quick Guide
PSR-S900/S700 Owner’s Manual
52
The Multi Pads
The Multi Pads can be used to play a number of short pre-recorded rhythmic and melodic sequences that can be used
to add impact and variety to your keyboard performances.
Multi Pads are grouped in Banks or four each. The PSR-S900/S700 features a variety of Multi Pad Banks in a variety of
different musical genres.
Playing the Multi Pads
Select pages using the [1
π
]–[7
π
] buttons that correspond to “P1, P2...” in the display, then use the [A]–[J]
buttons to select the desired bank.
The corresponding phrase (in this case, for Pad 1) starts playing back in its entirety as soon as the pad is
pressed. To stop it, press and release the [STOP] button.
Simply tap any of the Multi Pads at any time to play back the corresponding phrase at the currently set
tempo. You can even play two, three, or four Multi Pads at the same time. Pressing the pad during its play-
back will stop playing and begin playing from the top again.
1Press the MULTI PAD CONTROL [SELECT] button to call up the Multi Pad Bank selection
display, then select the desired Bank.
2Press any of the MULTI PAD CONTROL [1]–[4] buttons to play the Multi Pad phrase.
● About the color of the Multi Pads
• Green: Indicates that the corresponding pad contains data (phrase).
• Red: Indicates that the corresponding pad is playing back.
● Multi Pad data
There are two types of Multi Pad data. Some types will play back once and stop when they reach to the end. Others
will play back repeatedly until you press the [STOP] button.
● Stopping playback of the Multi Pads
•To stop all pads, press and release the [STOP] button.
•To stop specific pads, simultaneously hold down the [STOP] button and press the pad or pads you wish to stop.
Quick Guide
PSR-S900/S700 Owner’s Manual 53
Using Chord Match
Many of the Multi Pad phrases are melodic or chordal and you can have these phrases automatically change chords as
you do with your left hand. While a style is playing back and [ACMP] is on, simply play a chord with your left hand
and press any of the Multi Pads — Chord Match changes the pitch to match the chords you play. You can also use this
with the style stopped (with the Stop Accompaniment function). Keep in mind that some Multi Pads are not affected by
Chord Match.
Voice Effects
The PSR-S900/S700 features a sophisticated multi-processor effect system which can add extraordinary depth and
expression to your sound. This effect system can be turned on or off by using the following buttons.
• HARMONY/ECHO
The Harmony/Echo types are applied to the right-hand Voices. Refer to “Applying Harmony to Your Right-
hand Melody” on page 54.
•TOUCH
This button turns the touch response of the keyboard on or off. When OFF, the same volume is produced
no matter how strongly or softly you play the keyboard.
• SUSTAIN
When this Sustain function is on, all notes played on the keyboard (RIGHT 1/2 parts only) have a longer
sustain. You can also set the sustain depth (page 102).
• MONO
When this button is on, the part’s Voice is played monophonically (only one note at a time). Using the
MONO mode lets you play single, lead sounds (such as brass instruments) more realistically. It also lets
you expressively control the Portamento effect (depending on the selected Voice) by playing legato.
When this button is off, the part’s Voice played polyphonically.
nPortamento
Portamento is a function that creates a smooth transition in pitch from the first note played on the keyboard to the next.
The portamento time (the pitch transition time) can be set via the MIXING CONSOLE display (page 93).
•DSP/DSP VARI.
With the digital effects built into the instrument, you can add ambience and depth to your music in a vari-
ety of ways—such as adding reverb that makes you sound like you are playing in a concert hall.
•The DSP switch is used to turn the DSP (Digital Signal Processor) effect on or off for the currently
selected keyboard part.
•The DSP VARI. (Variation) switch is used to change between variations of the DSP effect. You could use
this while you play, for example, to change the rotating speed (slow/fast) of the rotary speaker effect.
nDSP
Stands for Digital Signal Processor (or Processing). DSP changes and enhances the audio signal in the digital realm to
produce a wide range of effects.
+
In this example, the phrase for Pad 1
will be transposed into F major
before playing back. Try out other
various chord types while playing the
Multi Pads.
Chord
section
These three effect systems are applied
to the currently selected keyboard part
(RIGHT 1, 2, or LEFT).
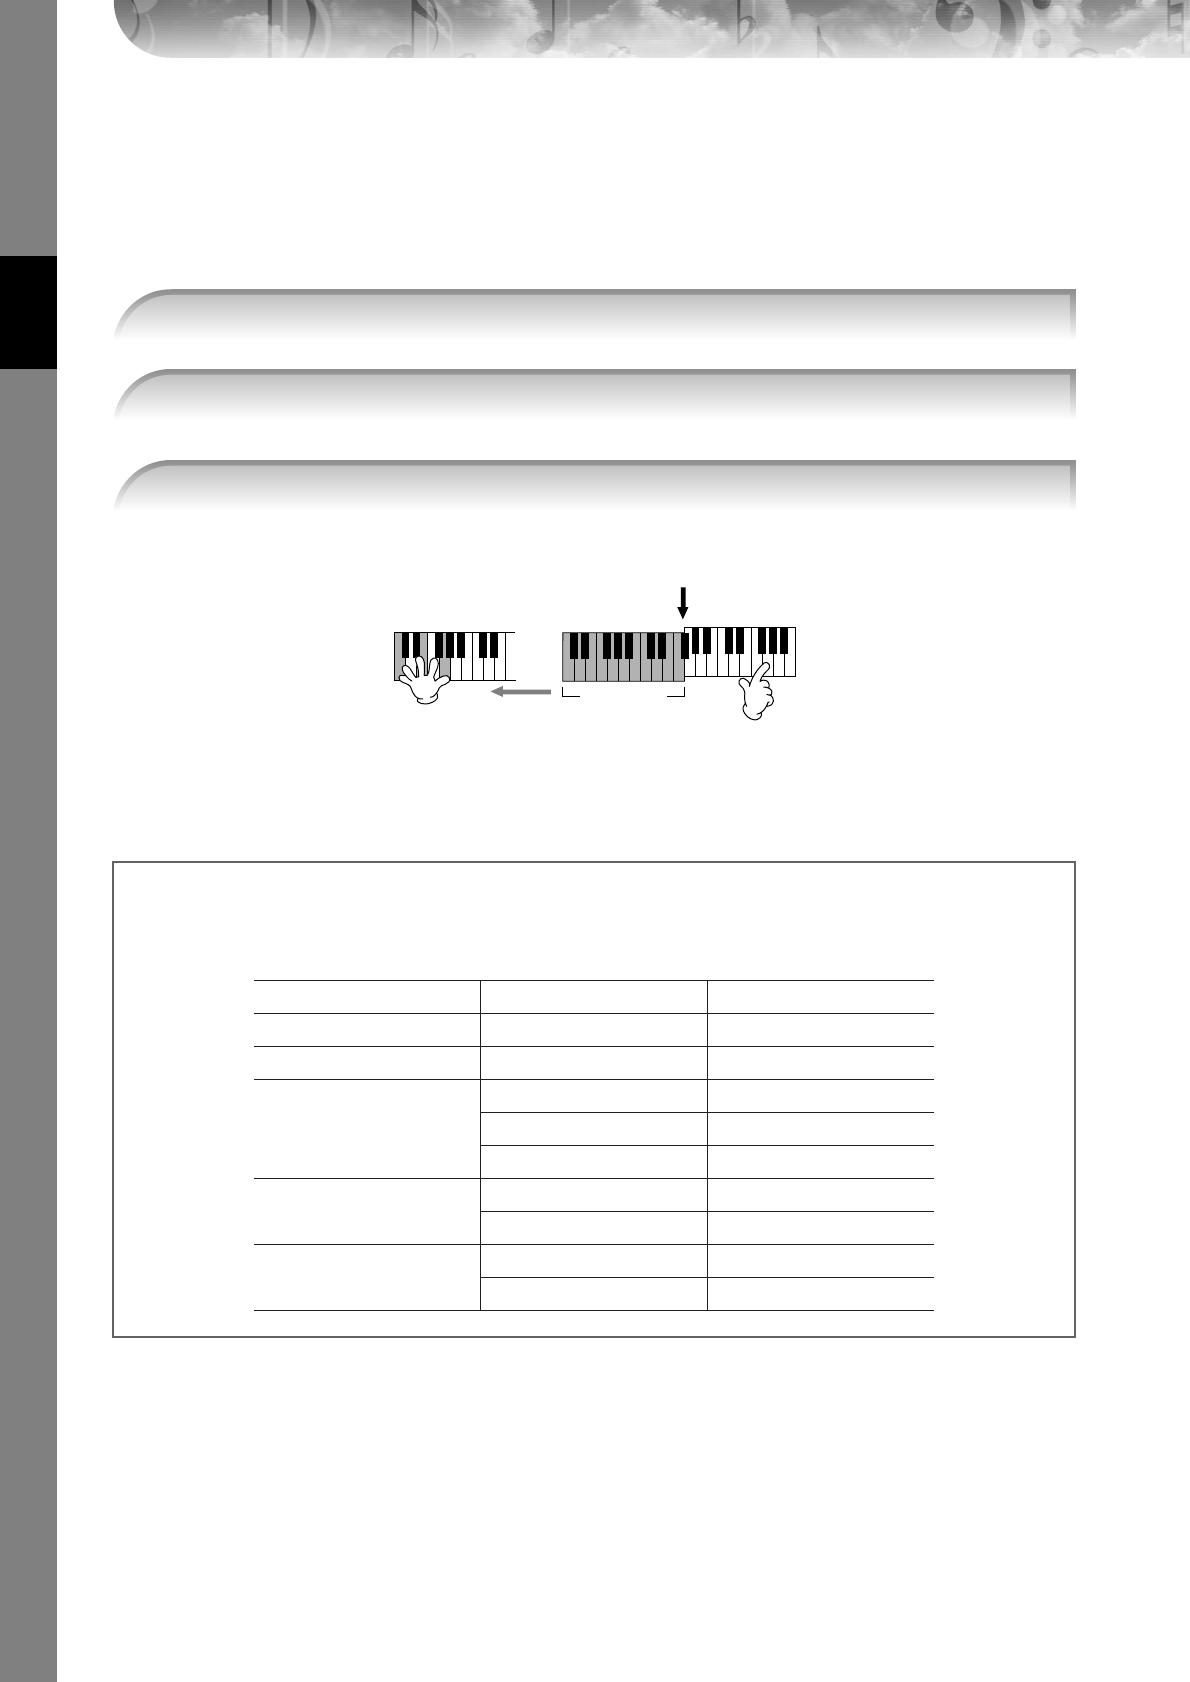
Quick Guide
PSR-S900/S700 Owner’s Manual
54
Applying Harmony to Your Right-hand Melody
(HARMONY/ECHO)
Among the Voice Effects, Harmony is one of the most impressive. It automatically adds harmony parts to the notes you
play with your right hand—immediately giving you a more full and professional sound. For details on the Harmony/
Echo types, see page 89. An optional foot pedal can also be used to turn the effect on and off (page 194).
You can also use the Harmony effect with the style stopped (with the Stop Accompaniment function;
page 109). Simply hold down a chord with your left hand and play a melody with your right. Since the Har-
mony effect is added by detecting chords, if you play a melody with your right hand before playing any
chord, no Harmony effect is added to the notes.
1Turn the [Harmony/Echo] button on.
2Turn on both the [ACMP] button and [SYNC START] button (page 47) and make sure
that the RIGHT 1 part is on (page 30).
3Play a chord with your left hand to start the style (page 47) and play some notes in
the right-hand range of the keyboard.
Split Point
Chord
section
In this example, harmony
notes in the scale of C major
(the chord played in the left
hand) are automatically
added to the notes played in
the Chord section right-hand
range of the keyboard.
Try out Harmony/Echo with some of the voices below...
Many of the voices have been automatically set to play certain Harmony/Echo types that match the particular voice.
Try out some of the voices below—playing chords with your left hand and melodies with your right—and listen to the
various Harmony and Echo effects.
Category Voice Name Harmony/Echo Type
Piano Live! GrandPiano Standard Trio
Accordion & Harmonica TuttiAccordion Country Trio
Strings
Live! Strings Block
ChamberStrings 4-way Open
Harp Strum
Guitar & Bass Cool! PowerLead RockDuet
Cool! ElectricGtr CountryDuet
Perc. & Drum Kit Vibraphone Trill
Timpani Tremolo
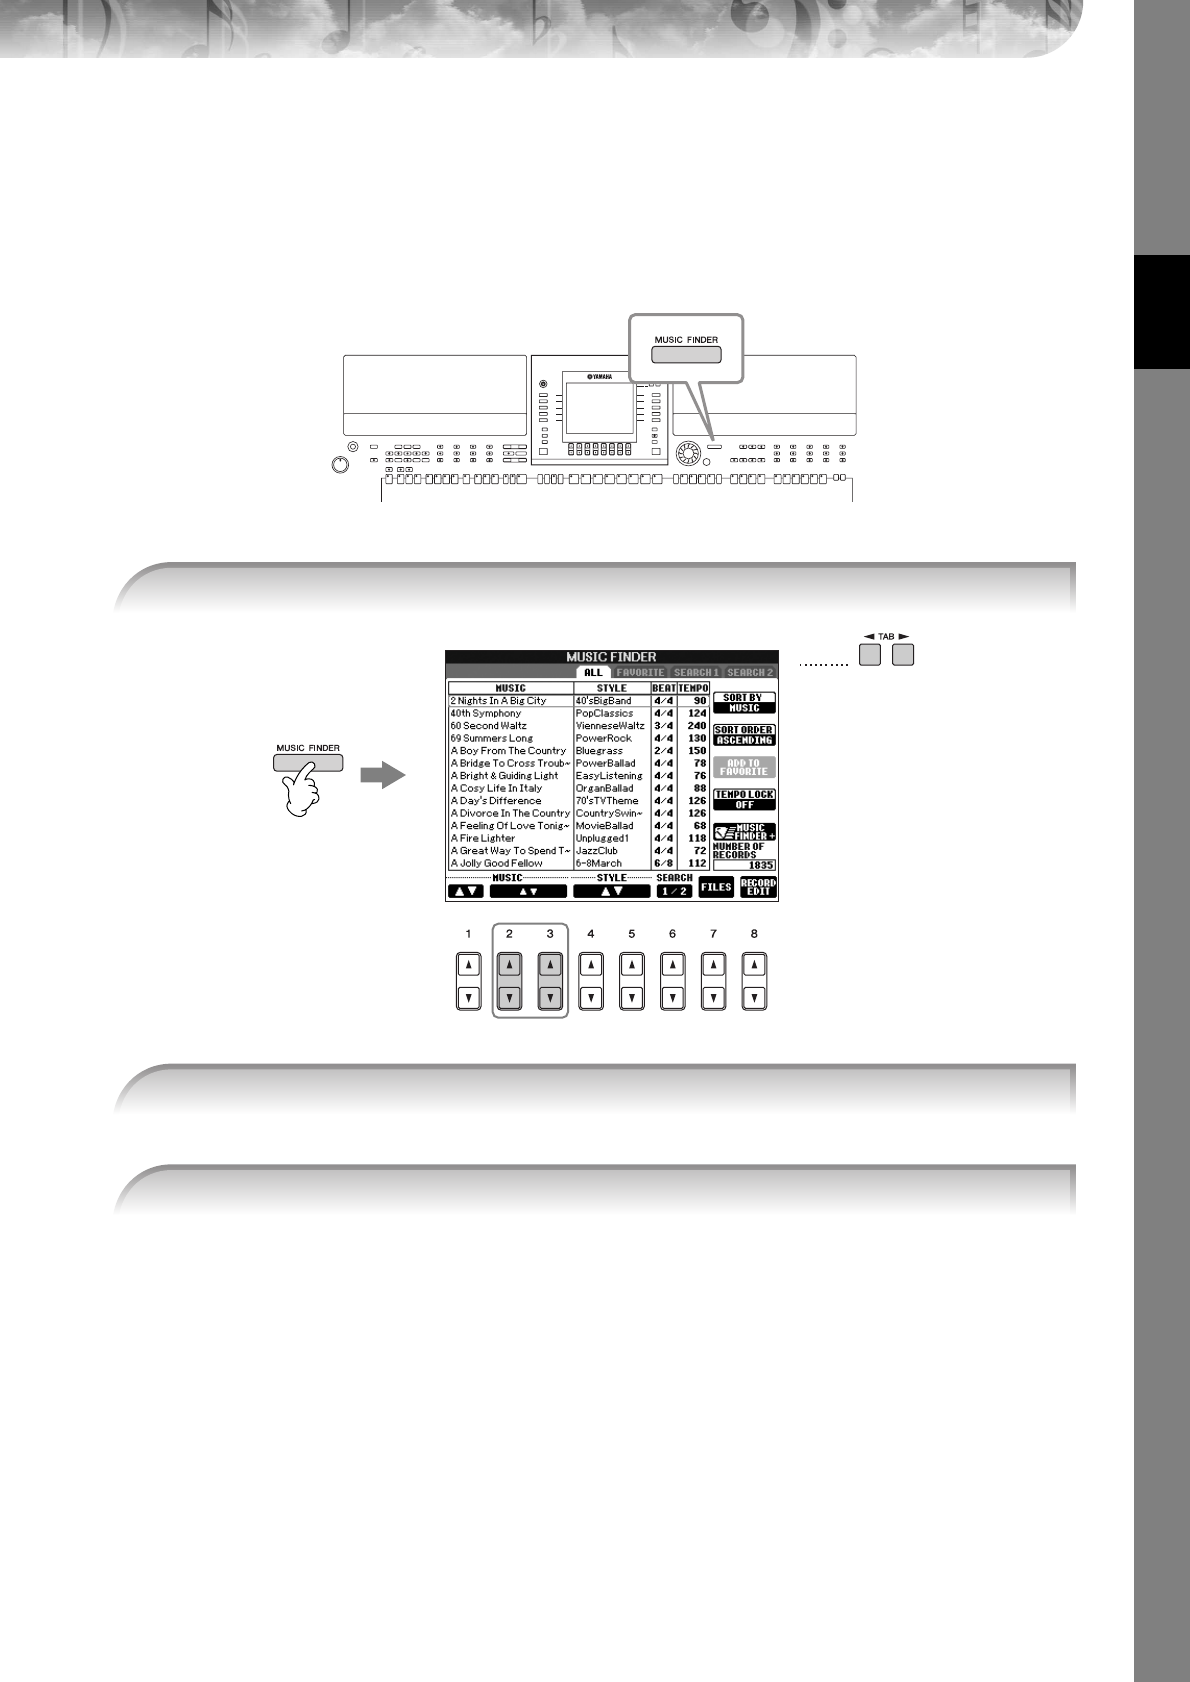
Quick Guide
PSR-S900/S700 Owner’s Manual 55
Calling Up Ideal Setups for Each Song
(Music Finder)
If you want to play in a certain genre of music but don’t know which Style and Voice settings would be appropriate, the
convenient Music Finder function can help you out. Simply select the desired music genre from among the Music Finder
“Records,” and the instrument automatically makes all appropriate panel settings to let y ou play in that music style.
A new record can be created by editing the currently selected one (page 114).
nThe data (records) of the Music Finder are not the same as Song data and cannot be played back.
The ALL tab contains the preset records.
•You can also select the desired record by using the DATA ENTRY dial, then press the [ENTER] button to execute.
•Searching the records
The Music Finder is also equipped with a convenient search function that lets you enter a song title or keyword — and
instantly call up all the records that match your search criteria (page 111).
•MUSIC ...............Contains the song title or music genre that describes each record, letting you easily
find the desired music style.
nSkipping up or down through the song alphabetically
When sorting records by song title, use the [1
π†
] button to skip up or down through the songs
alphabetically. Simultaneously press the [
π†
] buttons to move the cursor to the first record.
•STYLE.................This is the preset Style assigned to the record.
nSkipping up or down through the Style alphabetically
When sorting records by Style name, use the [4
π†
]/[5
π†
]
button to skip up or down through the
Styles alphabetically. Simultaneously press the [
π†
] buttons to move the cursor to the first record.
•BEAT ..................This is the time signature registered to each record.
•TEMPO ..............This is the assigned tempo setting for the record.
1Press the [MUSIC FINDER] button to call up the MUSIC FINDER display.
1
2
3
2Press the TAB [
√
][
®
] buttons to select the ALL tab.
3Select the desired record by using the following four search categories.
To select a record, press the [2
ππ
ππ††
††
]/[3
ππ
ππ††
††
] buttons
n
Quick Guide
PSR-S900/S700 Owner’s Manual
56
Notice that the panel settings have been automatically changed to match the music genre of the selected
record.
•Tempo Lock
Tempo Lock function lets you avoid changing the Tempo during Style playback when selecting another record. To turn on the
Tempo Lock function, press the [I] (TEMPO LOCK) button in the Music Finder display.
•Parameter Lock
You can “lock” specific parameters (e.g., effect, split point, etc.) to make them selectable only via the panel controls (page 137).
Calling up the panel settings to match the Style
(Repertoire)
The convenient Repertoire function automatically calls up the most appropriate panel settings (voice number, etc.) for
the currently selected Style.
nThe Repertoire function is valid for Styles in the “PRESET”/“USER” tab. The Repertoire function cannot be used for Styles
saved to a USB storage device. To use the Repertoire function, save the desired Style in “USER” tab.
The panel settings that match the Style under selection is searched according to the record group of the
Music Finder. The list of the search results is shown on the “SEARCH 2” display of the Music Finder.
CAUTION
When the result of searching the record in the “SEARCH 2” display has already been shown, the searched result is
lost.
4Play the keyboard.
n
1Select the desired Style for which you want to call up the panel settings from the
“PRESET”/“USER” tab on Style selection display.
2Press the [7
ππ
ππ
] (REPERTOIRE) button.
3Press the [2
ππ
ππ††
††
]–[3
ππ
ππ††
††
] buttons to select the desired panel settings.
Sorting the records
Press the [F] (SORT BY) button to sort the records.
• MUSIC .................. The record is sorted by song title.
• STYLE.................... The record is sorted by Style name.
• BEAT ..................... The record is sorted by beat.
• TEMPO ................. The record is sorted by tempo.
Changing the order of the records
Press the [G] (SORT ORDER) button to change the order of the records (ascending or descending).

Quick Guide
PSR-S900/S700 Owner’s Manual 57
Singing Along with Song Playback (Karaoke) or
Your Own Performance
If the selected song has lyric data, you can have the lyrics shown in the display by playing back the song.
Sing the song while viewing the lyrics on the display. Since the PSR-S900 is equipped with the MIC/LINE IN
jack, you can sing a song using a microphone.
Connecting a Microphone (PSR-S900 only)
nAlways set the INPUT VOLUME to minimum when nothing is con-
nected to the [MIC/LINE IN] jack. Since the [MIC/LINE IN] jack is
highly sensitive, it may pick up and produce noise even when
nothing is connected.
Adjust the control while checking the SIGNAL lamp. The SIGNAL lamp is
located at the [MIC SETTING/VOCAL HARMONY] button at the left side of
the top panel. This lamp lights to indicate that an audio signal is being
received. Make sure to adjust the control so the lamp lights in green. Make
sure that the lamp does not light in red, since this indicates that the input
level is too high.
Disconnecting the microphone
1
Set the [INPUT VOLUME] knob on the rear panel of the instrument to the minimum position.
2Disconnect the microphone from the [MIC/LINE IN] jack.
nSet the [INPUT VOLUME] knob to the minimum position before turning off the power.
1Make sure you have a conventional dynamic microphone.
2Set the [INPUT VOLUME] knob on the rear panel of the instrument to the minimum
position.
3Connect the microphone to the [MIC/LINE IN] jack.
2,53 4
4Set the [LINE MIC] switch to “MIC.”
5(For microphones having a power source, turn on the power first.) Adjust the [INPUT
VOLUME] knob while singing into the microphone.
Quick Guide
PSR-S900/S700 Owner’s Manual
58
Singing with the Lyrics Display
Try singing while playing back a Song containing lyric data
When the Text display appears, press the [1
†
] (LYRICS) button to display the lyrics. (PSR-S900)
Sing while following along with the lyrics on the display. The color of the lyrics changes as the Song plays.
•When the lyrics are unreadable
You may need to change the Lyrics Language setting to “International” or “Japanese” in the Song Setting display ([FUNCTION] → [B]
SONG SETTING), if the lyrics shown are garbled or unreadable. This setting can be memorized as part of the Song data (page 166).
•Changing the Lyrics Background Picture (PSR-S900)
You can change the background picture of the Lyrics display. Press the [7
π†
]/[8
π†
] (BACKGROUND) button in the Lyrics dis-
play to call up the Lyrics picture selection display for the available picture files and select the desired one. Press the [EXIT] button
to return to the previous display.
•Changing the lyrics
You can change the lyrics as desired (page 170).
1Select a Song (page 36).
2Press the [LYRICS/TEXT] button (PSR-S900) / [LYRICS] button (PSR-S700) to display
the lyrics.
3Press the SONG [F/K] (PLAY/PAUSE) button to start playback.
4Press the SONG [J] (STOP) button to stop playback.
n
Displaying Text (PSR-S900)
This feature lets you show text files (created on a computer) in the display of the instrument, enabling various
useful possibilities, such as the showing of lyrics, chord names, and text notes.
1Connect the USB storage device containing the text file to [USB TO DEVICE] terminal.
2Press the [LYRICS/TEXT] button to display the text.
When the lyrics are displayed, press the [1
†
] (TEXT) button to display the text.
3Press the [5
π†
]/[6
π†
] (TEXT FILE) buttons to call up the Text selection display.
4Press the TAB [
√
][
®
] buttons to select the desired TAB.
5Double-click one of the [A]–[J] buttons to select a text file.
If the text is long, use the TAB [
√
][
®
] buttons to select other pages.
nAn optional foot pedal can also be used to turn pages (page 194).
The following additional settings are available in the TEXT display:
LYRICS ..........................................Switches the screen to the Lyrics display.
CLEAR...........................................Clears the text from the display (the text data itself is not erased).
F (FIXED) 11 pt (point)–
P (PROPORTIONAL) 16 pt............Determines the text type (fixed or proportional) and font size.
TEXT FILE......................................Opens the Text selection display.
BACK GROUND...........................Allows changing of the background picture of the text display, as in the Lyrics
display described above. The background setting is common for both the Lyr-
ics display and Text display.
•The text file, which is copied in the USER tab can be showed.
• Line feed (or “carriage return”) is not automatically performed in the instrument. If a sentence is not displayed in its
entirety because of limitations in the screen space, execute the line feed on your computer.
• When the background color is specified in the song data, the BACKGROUND setting cannot be changed.
n
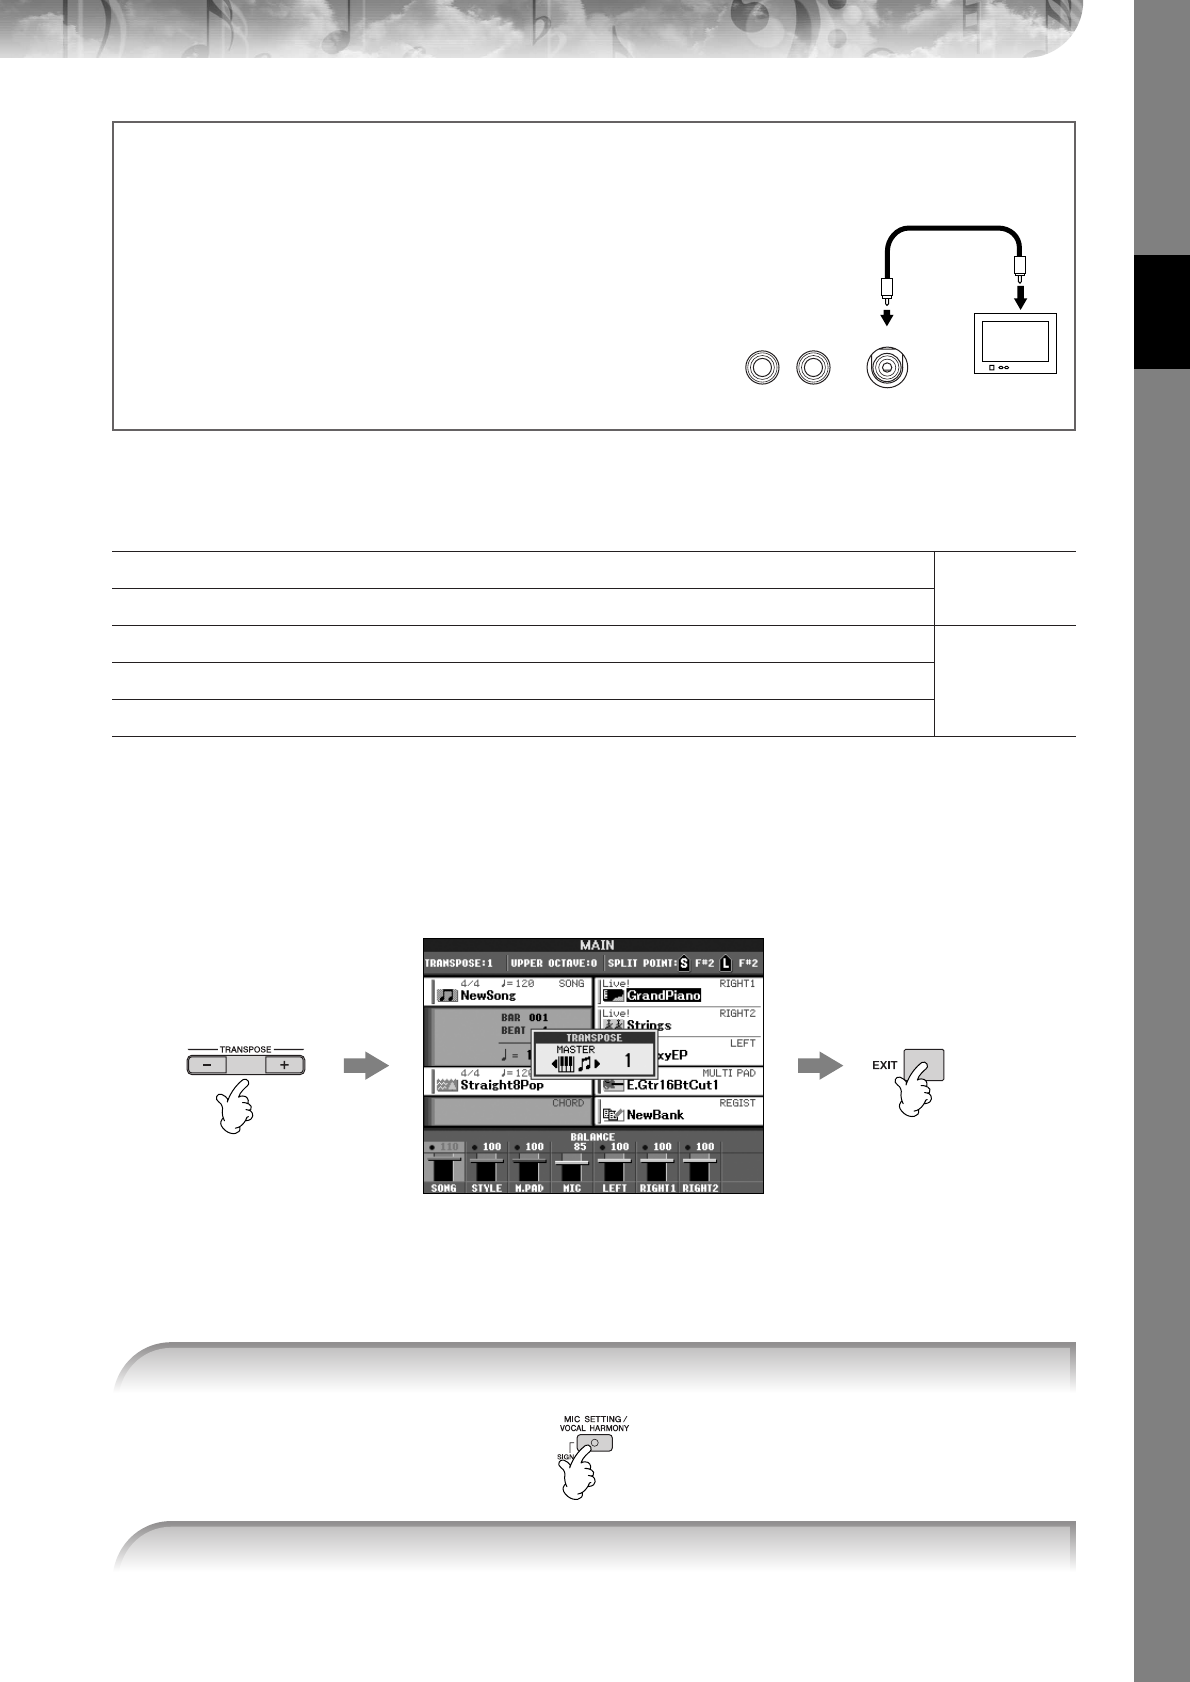
Quick Guide
PSR-S900/S700 Owner’s Manual 59
Convenient Functions for Karaoke
Transpose
You can use this to adjust the key of the Song if it is too high or low.
•Transposing the Song key up................ Press the TRANSPOSE [+] button.
•Transposing the Song key down........... Press the TRANSPOSE [–] button.
• Resetting the transposition ................... Press the TRANSPOSE [+][–] buttons simultaneously.
Applying Effects to Your Voice (PSR-S900)
You can also apply various effects to your voice.
nSelecting an effect type
You can select the effect type in the Mixing Console (page 95).
Adjusting the tempo ➤page 34
PSR-S900/S700
Transpose ➤See below.
Applying Effects to Your Voice ➤See below.
PSR-S900Adding Harmony Vocals to Your Voice ➤page 60
Practicing Singing with Proper Pitch (Vocal CueTIME) ➤page 146
FOOT PEDAL
12
VIDEO OUT
Displaying the lyrics/text on an external TV monitor (PSR-S900)
The lyrics indicated on the display can also be output via the VIDEO OUT terminal.
1Use an appropriate video cable to connect the [VIDEO OUT] connec-
tor of the PSR-S900 to the VIDEO INPUT connector on the TV monitor.
2Set the external television/video monitor signal (NTSC or PAL) used by
your video equipment, if necessary.
1Call up the operation display.
[FUNCTION] → [J] UTILITY→ TAB [
√
][
®
]SCREEN OUT
2Press the [1
π†
] button to select the external television/video
monitor signal. Rear panel of the instrument
1Press the [MIC SETTING/VOCAL HARMONY] button to call up the Mic Setting display.
2Press the [4
ππ
ππ††
††
]/[5
ππ
ππ††
††
] buttons to turn the effect on.
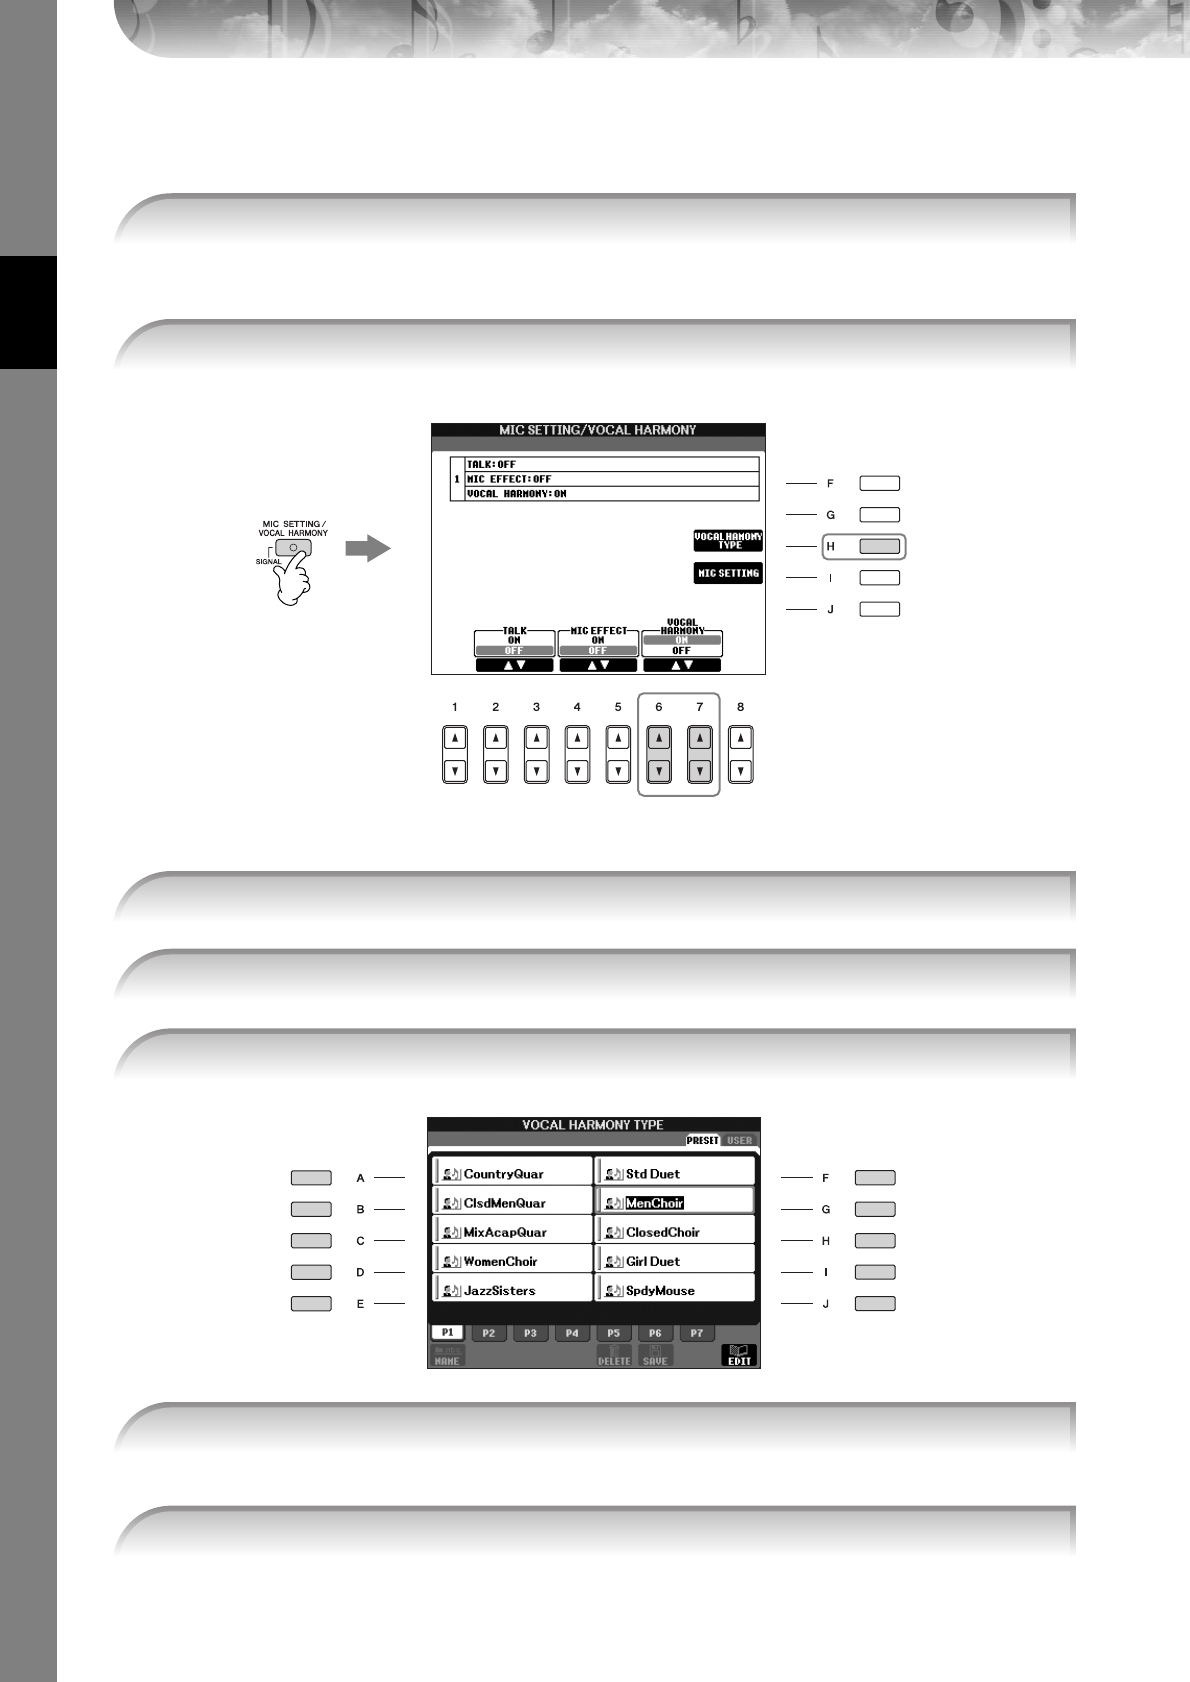
Quick Guide
PSR-S900/S700 Owner’s Manual
60
Adding Harmony Vocals to Your Voice (PSR-S900)
You can also automatically apply various harmony vocals to your voice.
If the Song contains this data, the current chord name will be displayed in the Main display during Song
playback, letting you easily check whether the Song contains chord data or not.
For details on the Vocal Harmony types, refer to the Data List available at the Yamaha website. (See page 5.)
The harmony is applied to your voice according to the chord data.
1Select a Song which contains chord data (page 36).
2Press the [MIC SETTING/VOCAL HARMONY] button to call up the harmony vocals
(Vocal Harmony) Setting display.
2
3
4
3Press the [6
ππ
ππ††
††
]/[7
ππ
ππ††
††
] buttons to turn the harmony vocals (Vocal Harmony) on.
4Press the [H] button to call up the Vocal Harmony selection display.
5Press one of the [A]–[J] buttons to select a Vocal Harmony type.
6Press the [ACMP] button to turn on Auto Accompaniment.
7Press the SONG [F/K] (PLAY/PAUSE) button and sing into the microphone.
Quick Guide
PSR-S900/S700 Owner’s Manual 61
Convenient Functions for Singing Along with Your
Own Performance
Changing the Key (Transpose)
You can match both the Song and your keyboard performance to a certain key. For example, the Song data is in F, but
you feel most comfortable singing in D, and you are accustomed to playing the keyboard part in C. To match up the
keys, set the Master Transpose to “0,” the Keyboard Transpose to “2,” and the Song Transpose to “-3.” This brings the
keyboard part up and the song data down to your desired singing key.
[FUNCTION] → [D] CONTROLLER → TAB [
√
][
®
] KEYBOARD/PANEL → [B] TRANSPOSE ASSIGN
The following types are available. Select the one most suited to your purpose.
● KEYBOARD
Transpose pitch of the keyboard played Voices and Style playback (controlled by what you play in the chord
section of the keyboard).
● SONG
Transposes the pitch of Song playback.
● MASTER
Transpose the overall pitch of the instrument.
You can set the value in semitone steps.
To reset the transpose value, press the [+][–] buttons simultaneously.
Changing the Key (Transpose) ➤See below. PSR-S900/S700
Displaying the Music Score on the Instrument and the Lyrics on TV ➤page 62
PSR-S900
Making Announcements Between Songs ➤page 62
Controlling Playback Timing by Your Voice (Karao-Key) ➤page 146 PSR-S900/S700
Adjusting the microphone and Song volume (PSR-S900)
You can adjust the volume balance between the Song playback and the microphone.
1Press the [BALANCE] button to call up the Volume Balance display.
2To adjust the microphone volume, press the [4
π†
] button.
To adjust the Song volume, press the [1
π†
] button.
3Press the [EXIT] button to close the volume balance display.
1Call up the operation display.
2Press the [4
ππ
ππ††
††
]/[5
ππ
ππ††
††
] button to select the desired transpose type.
3Press the TRANSPOSE [–]/[+] button to transpose.
4Press the [EXIT] button to close the TRANSPOSE display.
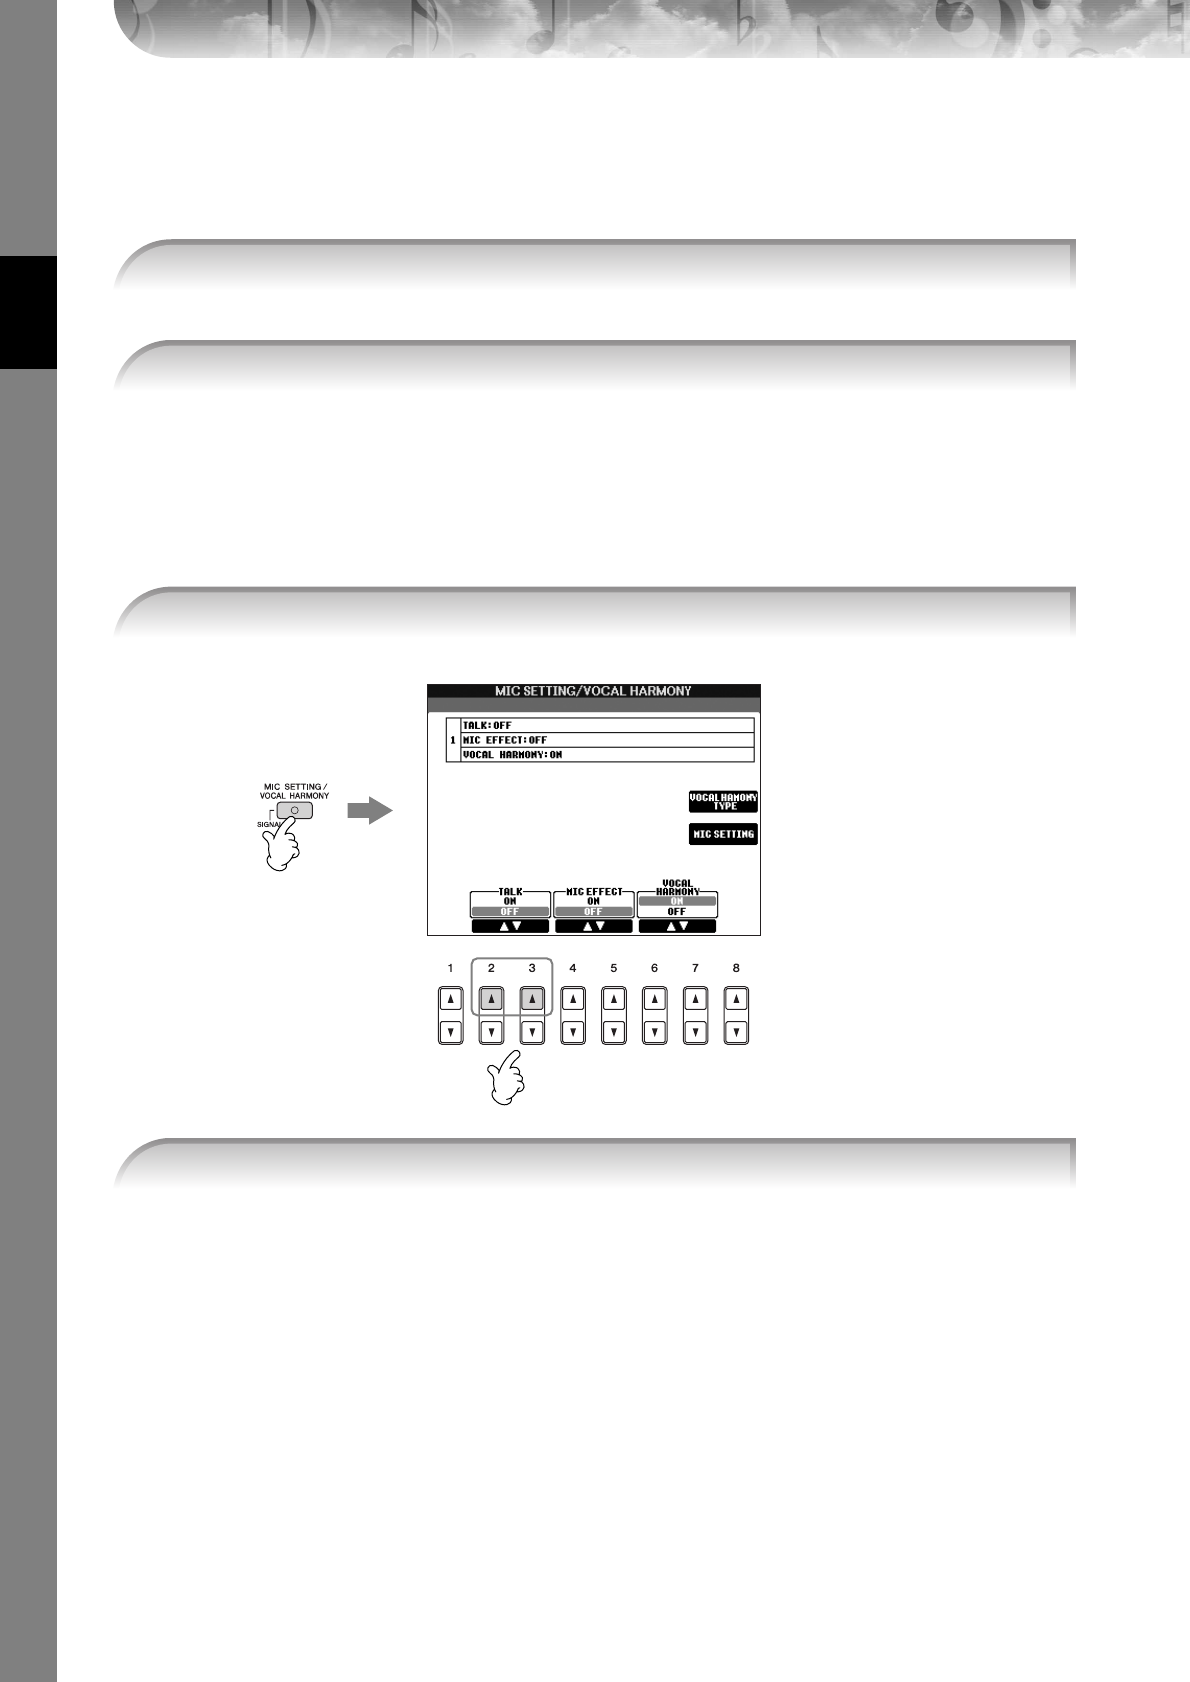
Quick Guide
PSR-S900/S700 Owner’s Manual
62
Displaying the Music Score on the Instrument and the Lyrics on
TV (PSR-S900)
This convenient sing-along function lets you have the music score shown on the display of the instrument (for your
playing purposes), while only the lyrics are shown on a separate TV monitor (page 59) so your audience can sing along.
[FUNCTION] → [J] UTILITY → TAB [
√
][
®
]SCREEN OUT
Making Announcements Between Songs (PSR-S900)
This function is ideal for making announcements between your singing performances. When singing a song, several
effects are usually assigned to the MIC Setup. When speaking to your audience, however, these effects may sound dis-
turbing or unnatural. Whenever the TALK function is turned on, effects are automatically turned off.
nTalk settings can be customized as well, allowing you to add any desired effects to your voice as you speak to your audi-
ence (page 191).
1Call up the operation display.
2Press the [3
ππ
ππ
]/[4
ππ
ππ
] button to select LYRICS/TEXT.
1Before your performance, press the [MIC SETTING/VOCAL HARMONY] button to call
up the MIC SETTING/VOCAL HARMONY display.
2
1
2Press the [2
ππ
ππ
]/[3
ππ
ππ
] (TALK) button to turn the function on.
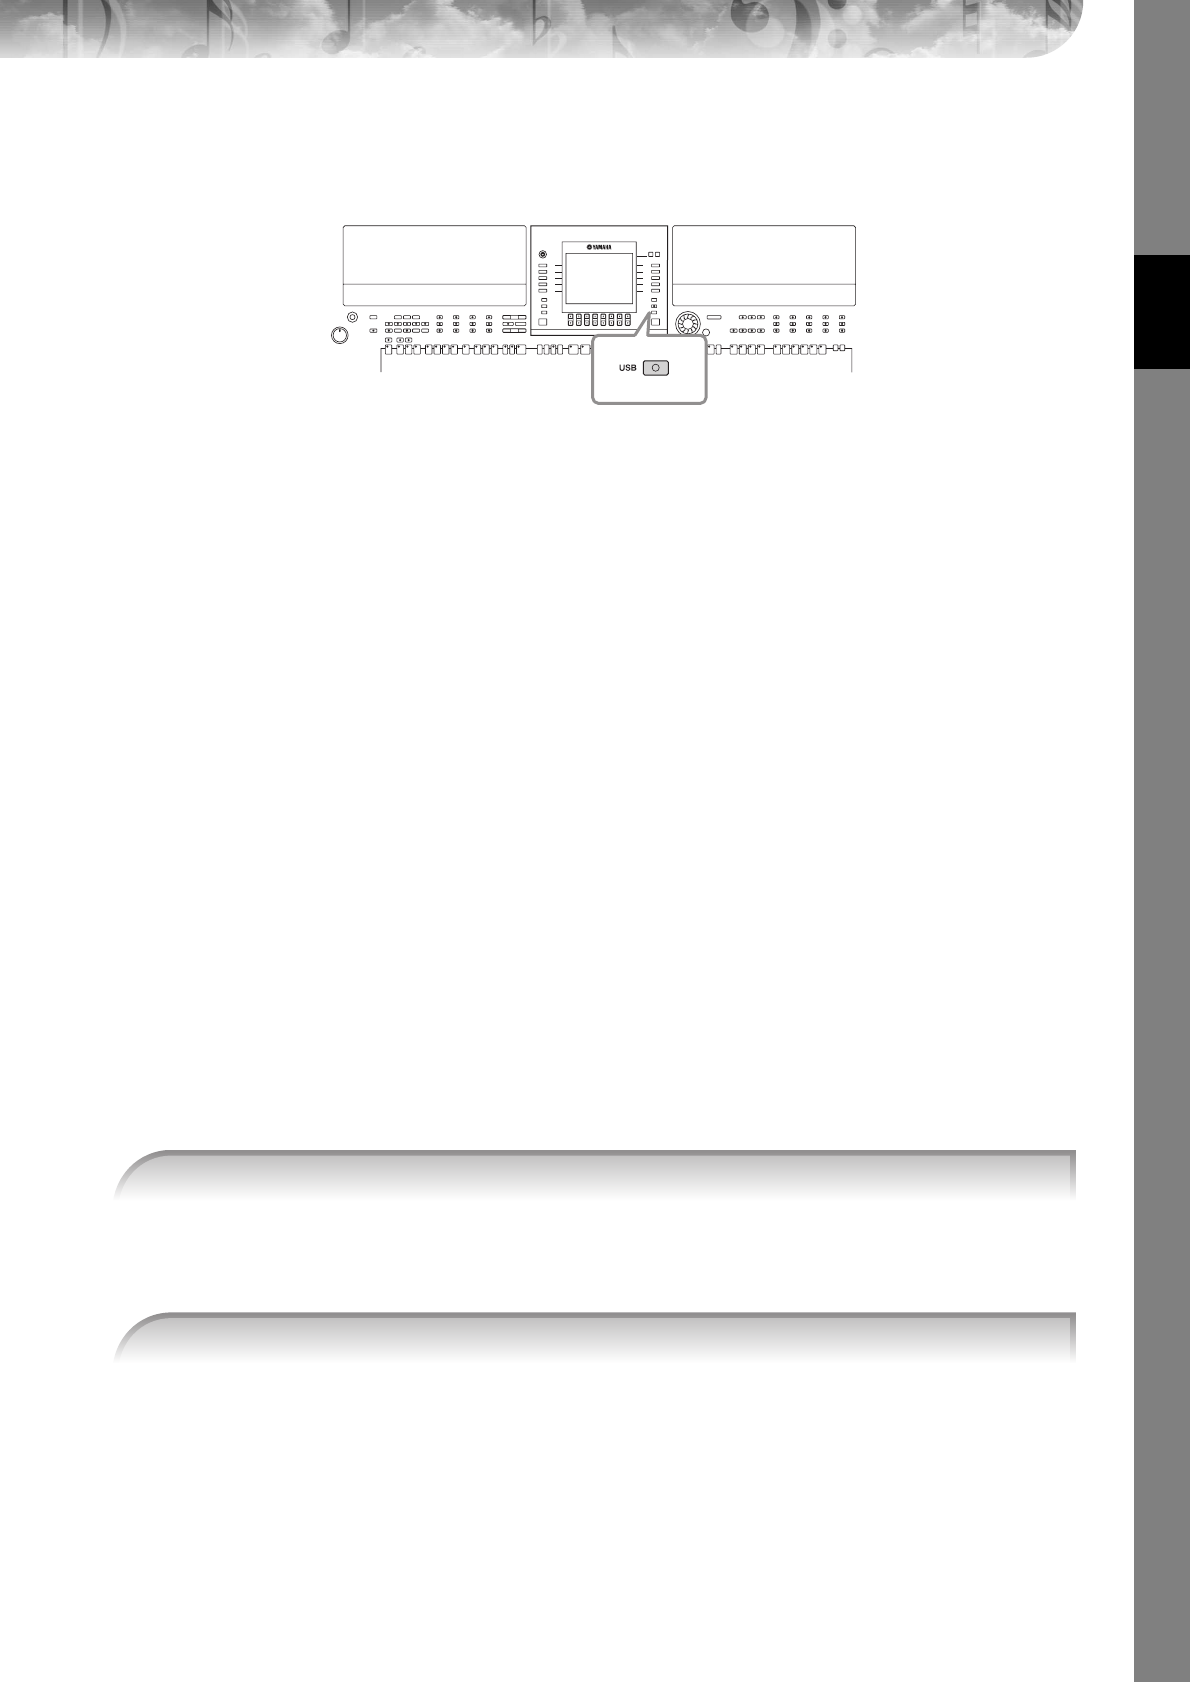
Quick Guide
PSR-S900/S700 Owner’s Manual 63
Recording Your Performance as Audio
(USB Audio Recorder) (PSR-S900)
Here you’ll learn how to record your performance as audio data to a USB storage device. For example, by connecting a gui-
tar, microphone or other device to the instrument, you can record an ensemble performance of guitar and keyboard
together or record yourself singing along with Song playback. The performance data is saved as a WAV file of conventional
CD quality (44.1 kHz/16 bit). Since it is possible to play back the file on computer, a listener doesn’t need to have the par-
ticular instrument in order to hear the performance. This makes it possible to easily share your performances and recordings
with your friends via e-mail, record your own CDs, or upload the recordings to websites for many others to enjoy as well.
Recording methods on the instrument include MIDI recording as well as audio recording. F or details about the difference
between audio and MIDI recording, see page 201. For specific instructions on MIDI recording, refer to page 147.
•In order to record your own original CD, you’ll need a CD-R drive (or compatible device). Refer to the manual that came with your
specific computer for details.
• When you attach a recorded file in an e-mail message, make sure the file size is small enough to be sent.
The following sounds can be recorded.
• Internal tone generator of the instrument.
Keyboard parts (Right 1, Right 2, Left), Song parts, Style parts
• Input from a microphone, guitar or other instrument (via the [MIC/LINE IN] jack).
• Input from another audio device, such as a CD player, MP3 player or the like (via the [MIC/LINE IN] jack).
nSongs protected by copyright, such as preset songs, and the metronome sound cannot be recorded.
The recorded data using this function is saved as:
•Stereo WAV data
• 44.1 kHz sample rate/16 bit resolution
Recording Your Performance as Audio
Now, try recording a performance of your singing along with Song playback with a connected microphone. The maxi-
mum amount of recording time is 80 minutes, though this may differ depending on the capacity of the particular USB
storage device.
Here, you’ll also see by example how to sing along with accompaniment/Style playback. To set the Style, go
on to step 6 (page 48).
•To record your performance by USB Audio Recorder, use the compatible USB flash memory. When the USB flash
memory is not compatible, it is not likely to be able to record/playback normally.
• Before using a USB storage device, be sure to read “Handling the USB Storage Device (USB Flash Memory/Floppy
Disk, etc)” on page 23.
n
1Set the desired Voice, etc. which you want to use for your performance, and connect
a microphone. (For information on setting the Voice, see page 30; for connecting a
microphone, see page 57.)
2Connect the USB storage device to the [USB TO DEVICE] terminal.
n

Quick Guide
PSR-S900/S700 Owner’s Manual
64
The following information is indicated on the PROPERTY display.
• DRIVE NAME ...................................... Number of the USB storage device (USB 1, USB 2, etc.)
• ALL SIZE .............................................. Size of USB storage device
• FREE AREA........................................... Available recording space on the USB storage device
• POSSIBLE TIME.................................... Available time for recording
Press the [F] (OK)/[EXIT] button to close the PROPERTY display.
nThe USB storage device of “USB1” is selected as the recording destination when multiple USB storage devices are connected. To
check the number of the USB storage device (USB1 and USB2, etc.), press the [A]/[B]/[F]/[G] button on the display of step 4, and
change the tab. Press the [EXIT] button to return to the previous display.
When recording begins, the “RECORDING” indication on the display changes to red (PSR-S900), and the
elapsed recording time is displayed.
CAUTION
Avoid frequently connecting/disconnecting the USB storage device, or turning the power on/off too often. Doing so
may corrupt the USB storage device data or the recording data.
The file name is automatically named (and is always given a new, unique name), and a message indicating
the file name is displayed.
nThe recording operation continues, even if you close the Recording display by pushing the [EXIT] button. To stop the
recording, press the [J] (STOP) button on the Recording display.
3Press the [USB] button.
4
3
4Press the [E] (USB AUDIO RECORDER) button to call up the recording display
(USB AUDIO RECORDER display).
5If necessary, press the [E] (PROPERTY) button to call up the Property display, then
check the information of the USB storage device.
56,7
6Start recording by pressing the [J] (REC) button, then start your performance.
7Stop recording by pressing the [J] (STOP) button.
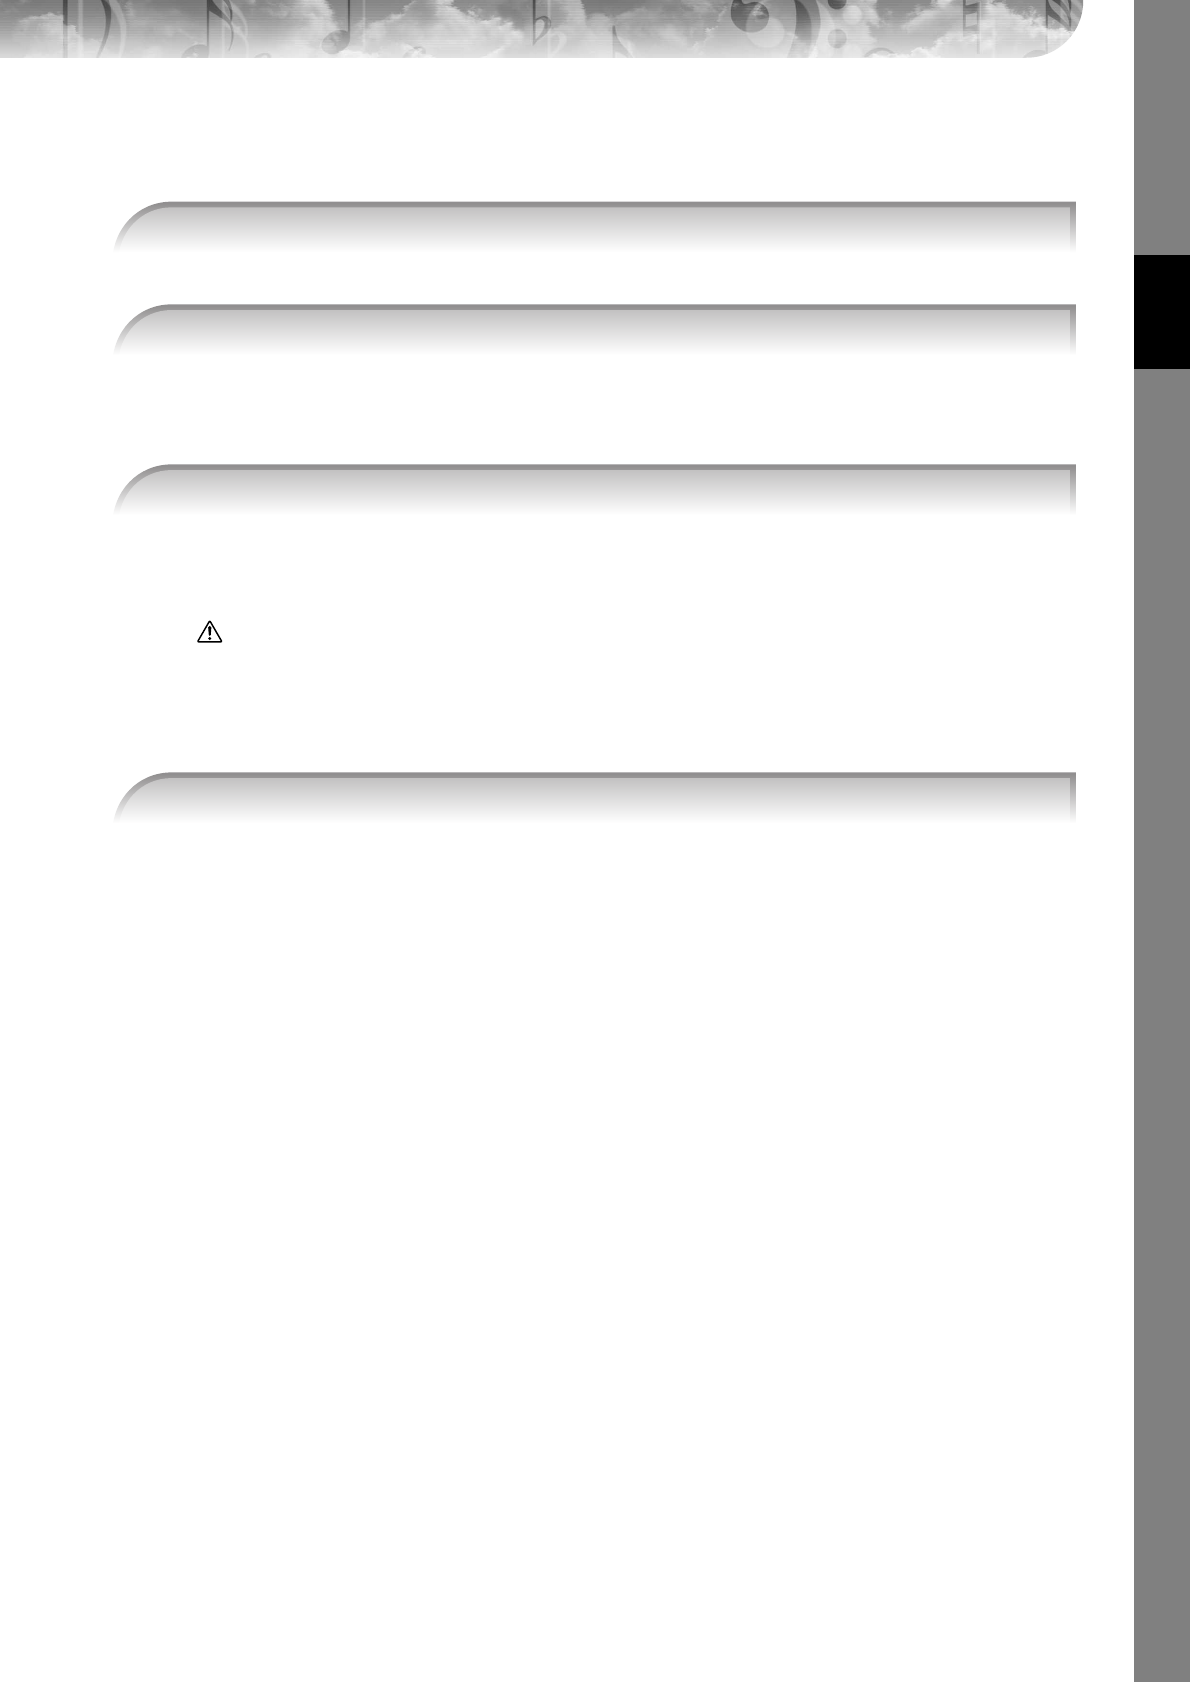
Quick Guide
PSR-S900/S700 Owner’s Manual 65
Playing Back the Recorded Performance
Play back the recorded performance.
[USB] → [E] USB AUDIO RECORDER
The file recorded is selected in step 1-7 (page 63). For information about the operation method to change the
name of the displayed file or to delete a file, see the section “File/Folder Operations in the File Selection Dis-
play” on page 72. However, the operation that copies/moves file/folder to the User tab cannot be done here.
The song is played back from the beginning, and the display indicates the auditioning process. This display
closes automatically when auditioning is stopped. Press the [G] (CANCEL) or [EXIT] button to stop audition-
ing.
CAUTION
Avoid frequently connecting/disconnecting the USB storage device, or turning the power on/off too often. Doing so
may corrupt the USB storage device data or the auditioning data.
nAudio recording is processed internally so auditioning volume will be appropriate when played on a computer. There-
fore, the playback sound might be distorted if you record at too high a volume. In this case, lower and adjust the volume
of each part with Volume Balance display (page 41) and the Mixing Console (page 91), etc., and try recording again.
1Call up the USB AUDIO RECORDER display.
2
Press the [7
ππ
ππ††
††
]/[8
ππ
ππ††
††
] (AUDITION) button to display the audio files (WAV data)
saved to the connected USB storage device.
3Press one of the [A]-[J] buttons corresponding to the file you want to listen to, then
press the [8
††
††
] (AUDITION) button.
4Press the [EXIT] button to return to the USB AUDIO RECORDER display shown in step 4
of “Recording Your Performance as Audio” on the previous page.
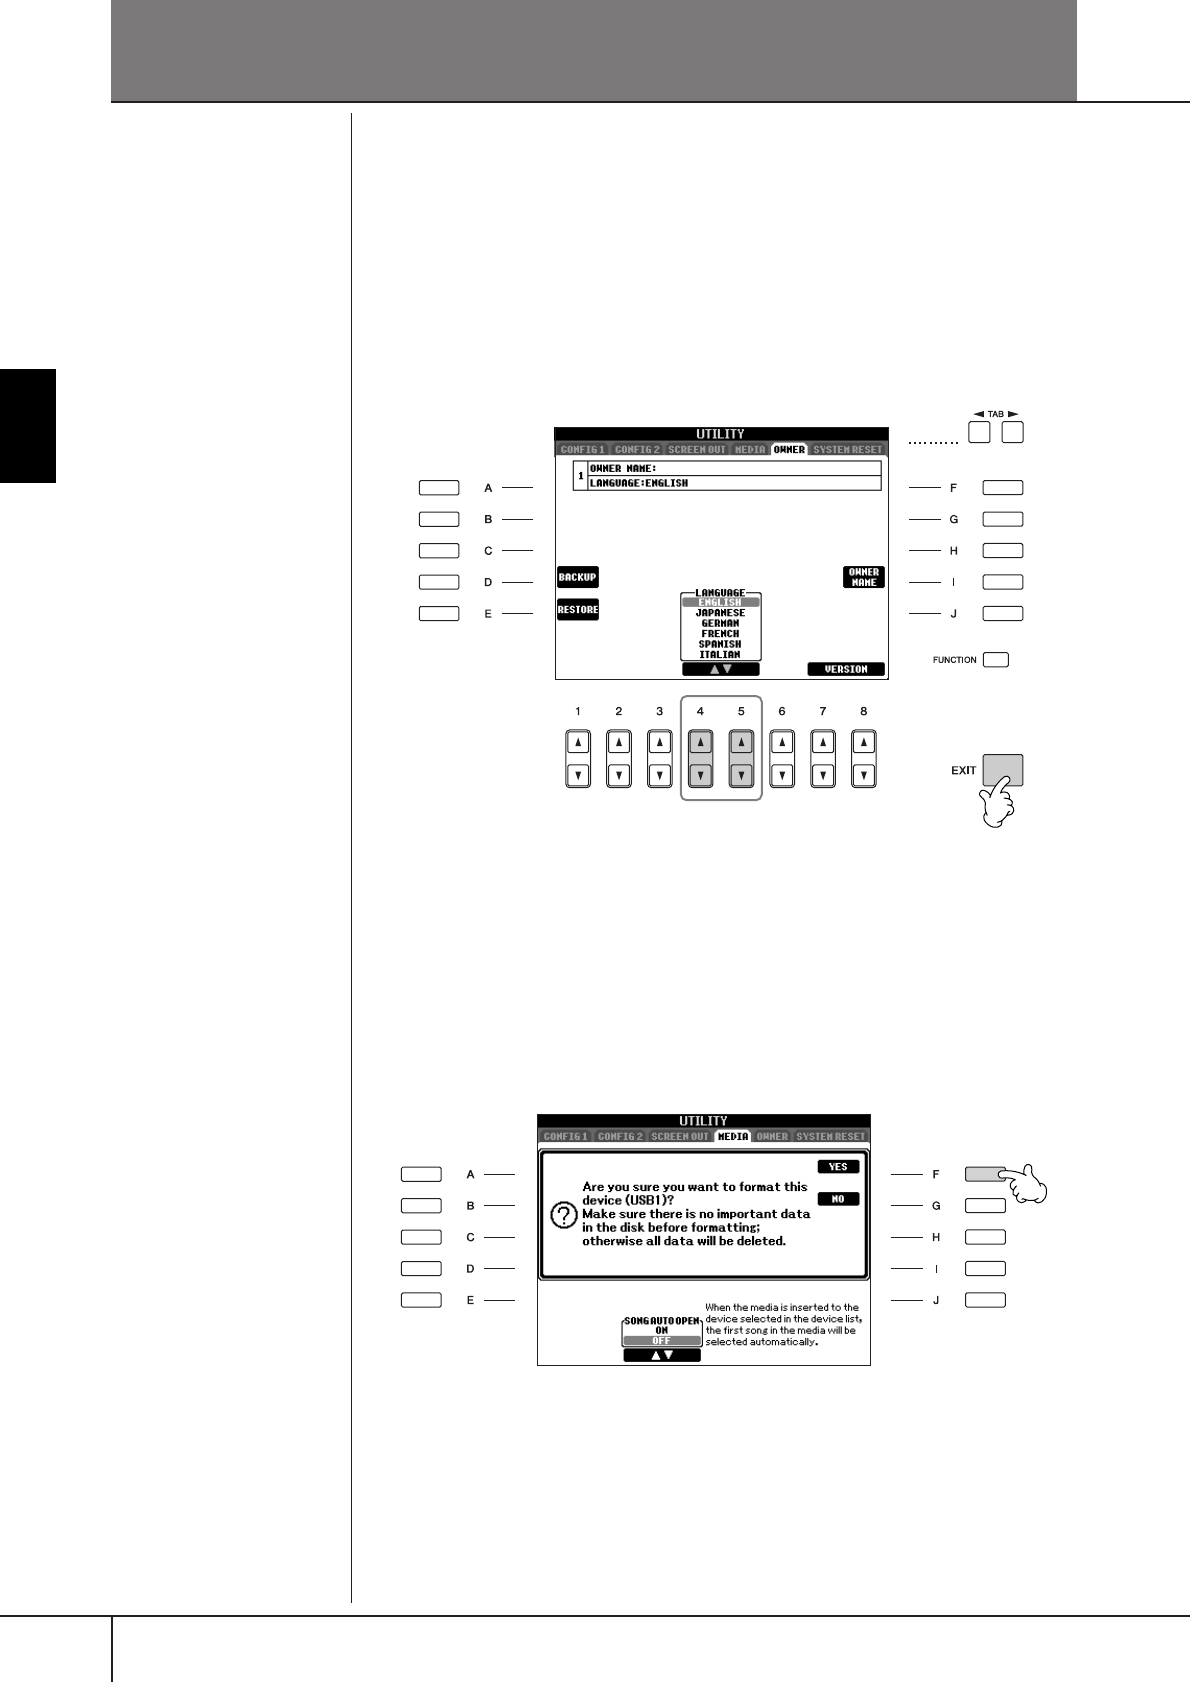
PSR-S900/S700 Owner’s Manual
66
Basic Operation
Basic Operation
Selecting Message Language
You can select the desired language of the display messages.
1Call up the operation display.
[FUNCTION] → [J] UTILITY → TAB [
√
][
®
] OWNER
2Use [4
ππ
ππ††
††
]/[5
ππ
ππ††
††
] (LANGUAGE) buttons to select the language.
3Press the [EXIT] button to return to the previous display.
The Messages Shown in the Display
A message (information or confirmation dialog) sometimes appears on the screen
to facilitate operation. When the message appears, simply press the appropriate
button.
The language selected here is
also used for various “Mes-
sages” shown during operations.
23
In this example, press the [F] (YES) button
to start formatting the USB storage device
(USB flash memory, floppy disk, etc.).
Basic Operation
Instant Selection of the Displays—Direct Access
PSR-S900/S700 Owner’s Manual 67
Instant Selection of the Displays—
Direct Access
With the convenient Direct Access function, you can instantly call up the desired
display—with just a single additional button press.
1Press the [DIRECT ACCESS] button.
A message appears in the display prompting you to press the appropriate
button.
2Press the button corresponding to the desired setting display to
instantly call up that display.
Refer to the Data List for a list of the displays that can be called up with the
Direct Access function. The Data List is available at the Yamaha website.
(See page 5.)
Example of calling up the Guide function display
Press the [DIRECT ACCESS] button, then press the [GUIDE] button.
1
2
Returning to the Main display
Here’s a convenient way to return to the Main display from any other dis-
play: Simply press the [DIRECT ACCESS] button, then the [EXIT] button.
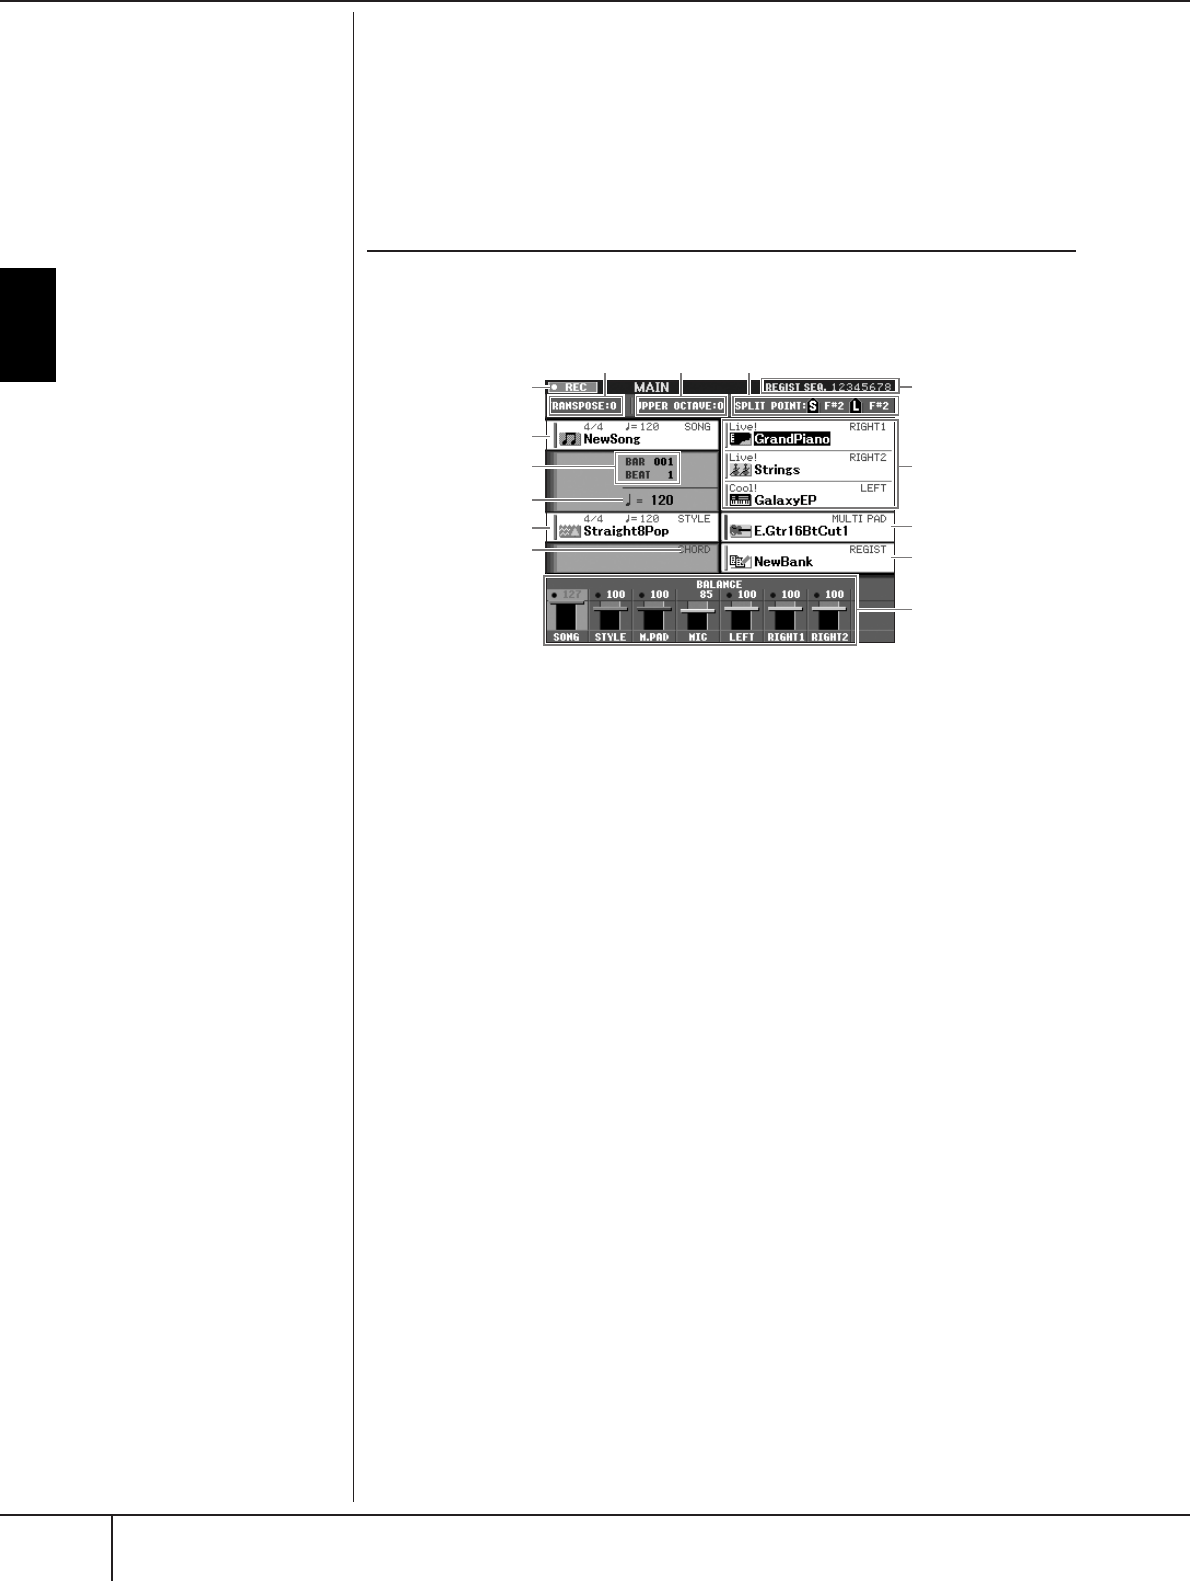
Basic Operation
Basic Displays (Main Display and File Selection Display)
PSR-S900/S700 Owner’s Manual
68
Basic Displays (Main Display and File
Selection Display)
There are two basic display types – Main and Selection. Here are explanations of
each display segment and its basic operation.
Main Display
The Main display shows the current basic settings of the instrument such as the cur-
rently selected Voice and Style, allowing you to see them at a single glance. The
Main display is the one you’ll usually see when you play the keyboard.
1Song name and related information
Displays the currently selected Song name, time signature and tempo.
If the Song contains the chord data, the current chord name will be displayed in the
“CHORD” segment (see 5 below).
Pressing the [A] button calls up the Song Selection display (page 36).
2BAR/BEAT (current position of the Song or Style)
Displays the current position of the Song or bar and beat number from playback start of the Style.
3Tempo
Displays the current tempo of the Song or Style.
4Style name and related information
Displays the currently selected Style name, time signature and tempo. Pressing the [D]
button calls up the Style Selection display (page 46).
5Current chord name
If the [ACMP] button is set to On, the chord specified in the chord section of the key-
board will be displayed.
6Transpose
Displays the amount of transposition in semitone units (page 59).
7Octave
The [UPPER OCTAVE] buttons allow the pitch of the keyboard to be shifted down or up
in octave steps. This shows the amount that the octave value is shifted.
8Split Point
Split Points are specific positions (notes) on the keyboard that divide the keyboard into
separate sections. There are two kinds of Split Points: “A”, which separates the chord sec-
tion from the rest of the keyboard, and “L”, which divides the left-hand and right-hand
sections.
9Recording status of USB Audio recorder (PSR-S900)
While recording, a “REC” indication appears.
)Registration Sequence
Appears when the Registration Sequence is active (page 138).
R
eturn
i
ng to t
h
e
M
a
i
n
di
sp
l
ay
Here’s a convenient way to
return to the Main display from
any other display: Simply press
the [DIRECT ACCESS] button,
then the [EXIT] button. 1
2
3
4
5
678
#
@
!
9
$
)
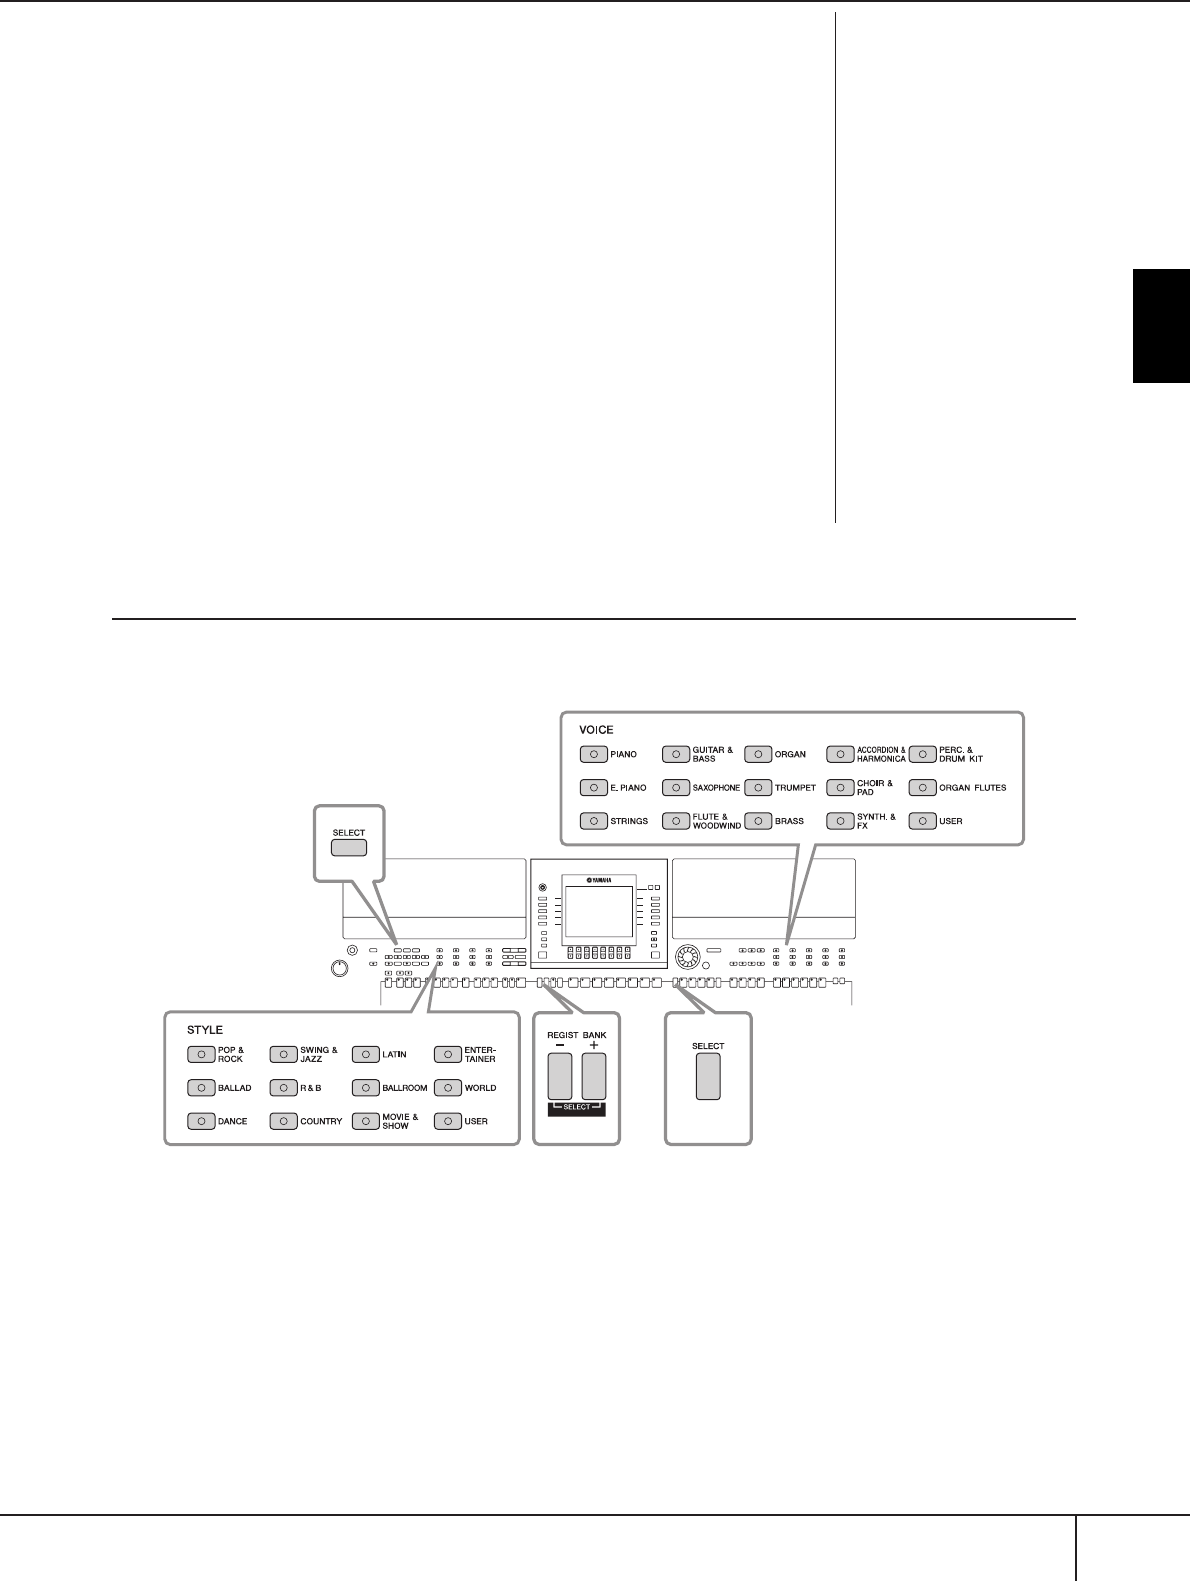
Basic Operation
Basic Displays (Main Display and File Selection Display)
PSR-S900/S700 Owner’s Manual 69
!Voice name
• RIGHT 1 (indicated at the right edge of the display):
Voice name currently selected for the RIGHT 1 part (page 84).
• RIGHT 2 (indicated at the right edge of the display):
Voice name currently selected for the RIGHT 2 part (page 84).
• LEFT (indicated at the right edge of the display):
Voice name currently selected for the LEFT part (page 84).
When the Left Hold function is ON, an “H” indication appears (page 50).
Pressing one of the [F], [G] and [H] buttons calls up the Voice Selection display for each
part (page 31).
@Multi Pad Bank name
Indicates the names of the selected Multi Pad Banks (page 132). Pressing the [I] button
calls up the Multi Pad Bank Selection display (page 133).
#Registration Memory Bank name
Displays the currently selected Registration Memory Bank name.
Pressing the [J] button calls up the Registration Memory Bank Selection display (page 136).
When the Freeze function is ON, an “F” indication appears (page 138).
$Volume Balance
Displays the volume balance among the parts.
Adjust the volume balance among the parts by using the [1
π†
]–[8
π†
] buttons.
File Selection Display Configuration and Basic Operation
The File Selection display appears when you press one of the buttons shown below. From here you can select
Voices, Styles, and other data.
VOICE category
selection buttons
SONG SELECT
button
MULTI PAD
SELECT button
STYLE category
selection buttons
REGIST. BANK
buttons

Basic Operation
Basic Displays (Main Display and File Selection Display)
PSR-S900/S700 Owner’s Manual
70
File Selection Display Configuration
• Location (drive) of data
• Data files and folders
The data, both pre-programmed and your own original, are saved as “files.”
You can drop files into a folder.
Preset
Location where pre-programmed
(preset) data is stored.
User
Location where recorded or
edited data is saved.
USB
Location where data on USB storage device
(USB flash memory, floppy disk, etc.) is saved.
Hereafter in this manual, any USB storage device such as USB flash memory, floppy disk drive, etc. will
be referred to as “USB storage device.”
Folder
Folder
Icon
File
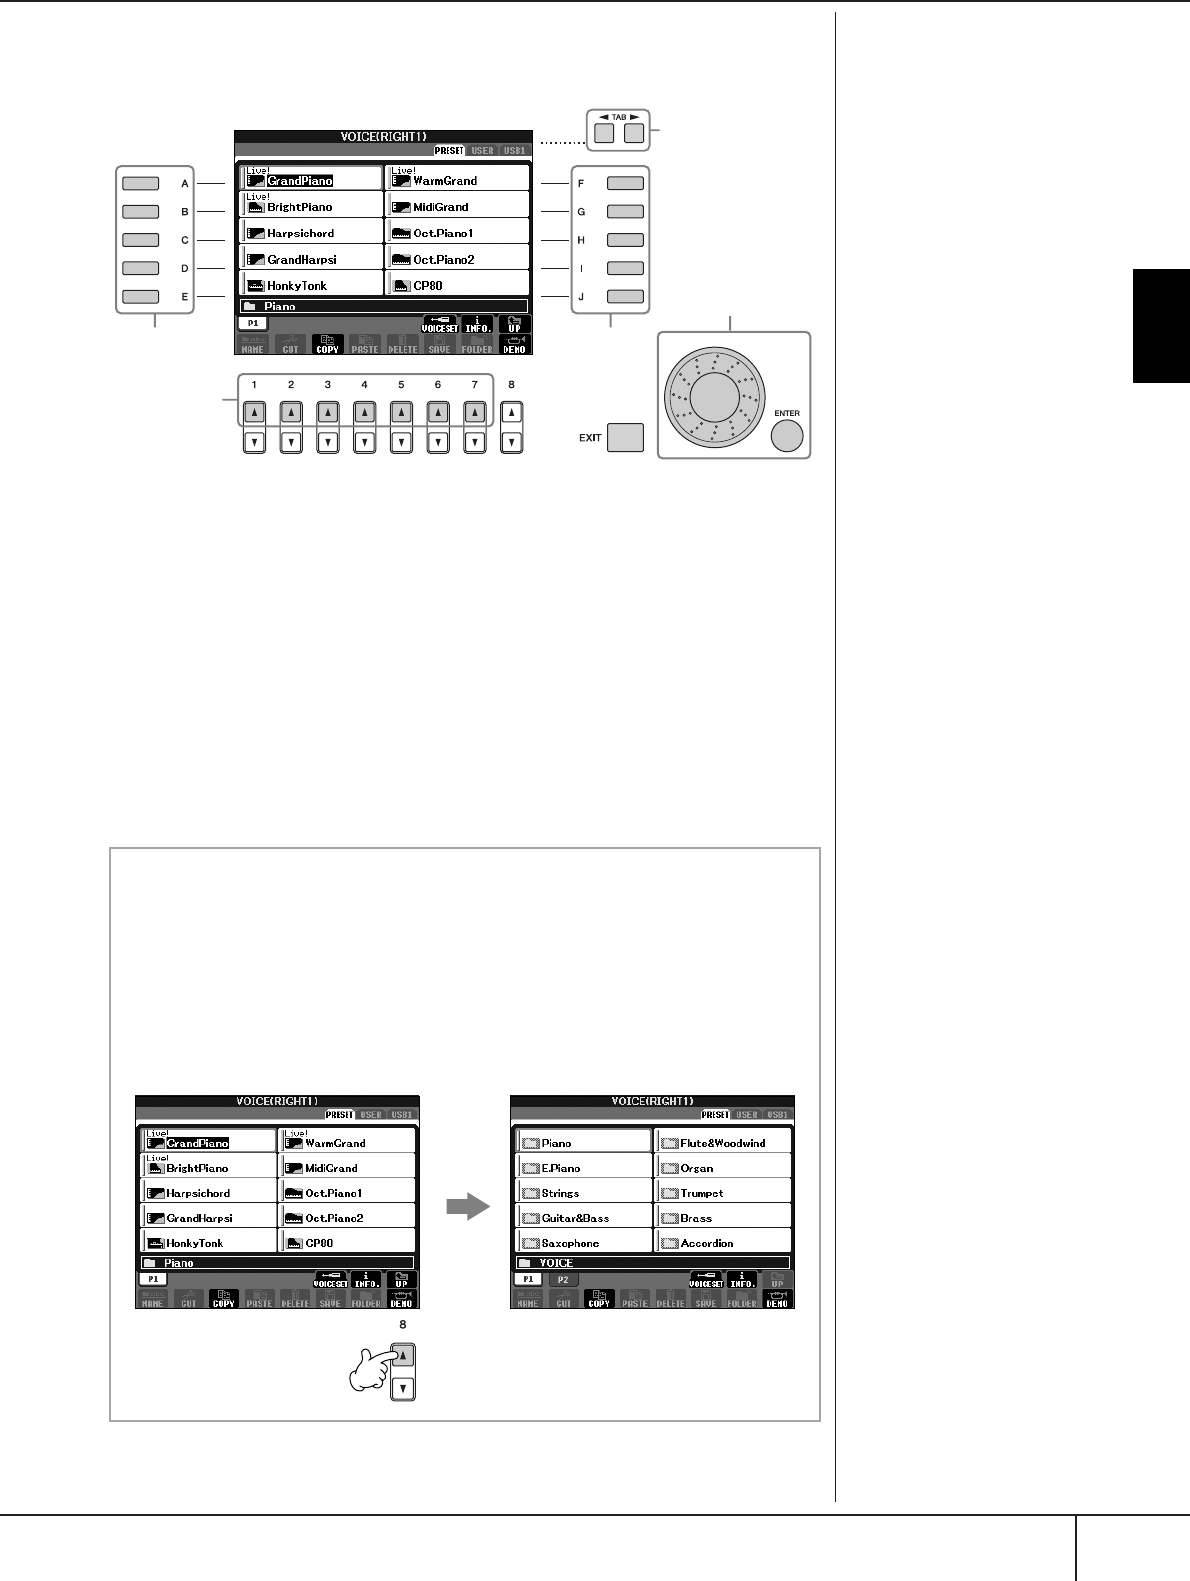
Basic Operation
Basic Displays (Main Display and File Selection Display)
PSR-S900/S700 Owner’s Manual 71
File Selection Display Basic Operation
1Select the tab containing the desired file by using the TAB [
√
][
®
]
buttons.
2Select the page containing the desired file by using the [1
ππ
ππ
]–[7
ππ
ππ
]
buttons.
3Select the file. There are two ways to do so.
• Press one of the [A]–[J] buttons.
• Select the file by using the DATA ENTRY dial, then press the [ENTER] but-
ton to execute.
4Press the [EXIT] button to return to the previous display.
Selecting a file saved to the
USB storage device.
You can also select a specified
file in the USB storage device by
pressing the [USB] button.
[USB] → [A] SONG/[B] STYLE/
[F] VOICE/[G] MULTI PAD →
[A]–[J]
The number of pages shown var-
ies depending on the selection
display of the Voices/Songs/
Styles. Press the corresponding
button to “P1, P2 ...” in the dis-
play.
When other pages follow, the
“NEXT” button appears, and for
the previous page, the “PREV”
button appears.
2
4
1
33
3
This display shows the
Voice files in a folder.
The next highest level — in this case,
folder — is shown. Each folder shown
in this display contains appropriately
categorized Voices.
Closing the current folder and calling up the next highest
level folder
To close the current folder and call up the next highest level folder,
press the [8
π
] (UP) button.
Example of the PRESET Voice Selection display
The PRESET Voice files are categorized and contained in appropriate
folders.
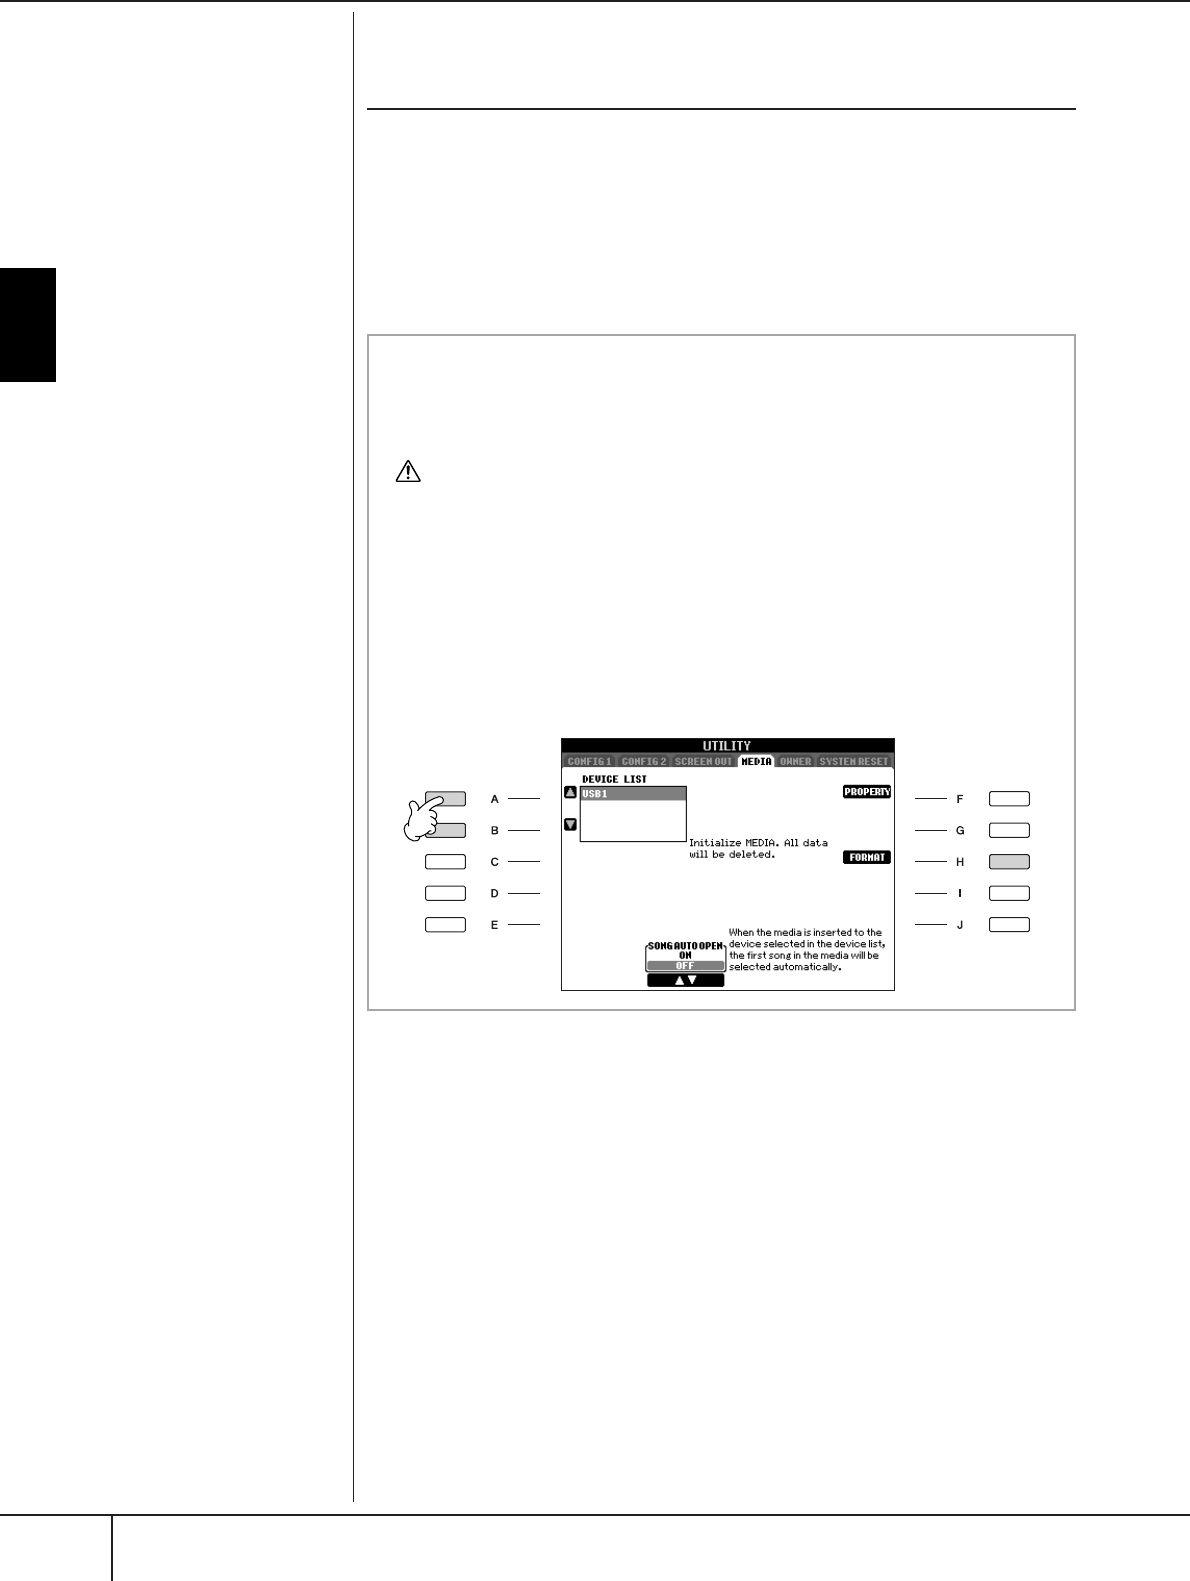
Basic Operation
Basic Displays (Main Display and File Selection Display)
PSR-S900/S700 Owner’s Manual
72
File/Folder Operations in the File Selection
Display
•Saving Files .............................................................................................page 73
• Copying Files/Folders (Copy & Paste)....................................................... page 74
•Moving Files (Cut & Paste)....................................................................... page 75
• Deleting Files/Folders..............................................................................page 75
• Renaming Files/Folders............................................................................ page 76
• Selecting Custom Icons for Files (shown at the left of file name) .............. page 76
• Creating a New Folder ............................................................................page 77
• Entering characters.................................................................................. page 77
The indications USB 1, USB 2,
etc. will be displayed depending
on the number of the connected
devices.
3
4
Formatting USB storage media
When a USB storage device is connected or media is inserted, a message
may appear prompting you to format the device/media. If so, execute the
format operation.
CAUTION
The format operation deletes any previously existing data. Make sure that the media you
are formatting does not contain important data. Proceed with caution, especially when
connecting multiple USB storage medias.
1Insert a USB storage device for formatting into the [USB TO DEVICE].
2Call up the operation display.
[FUNCTION] → [J] UTILITY → TAB [
√
][
®
] MEDIA
3Press the [A]/[B] buttons to select the USB device to be formatted
from the device list.
4Press the [H] button to format the device/media.
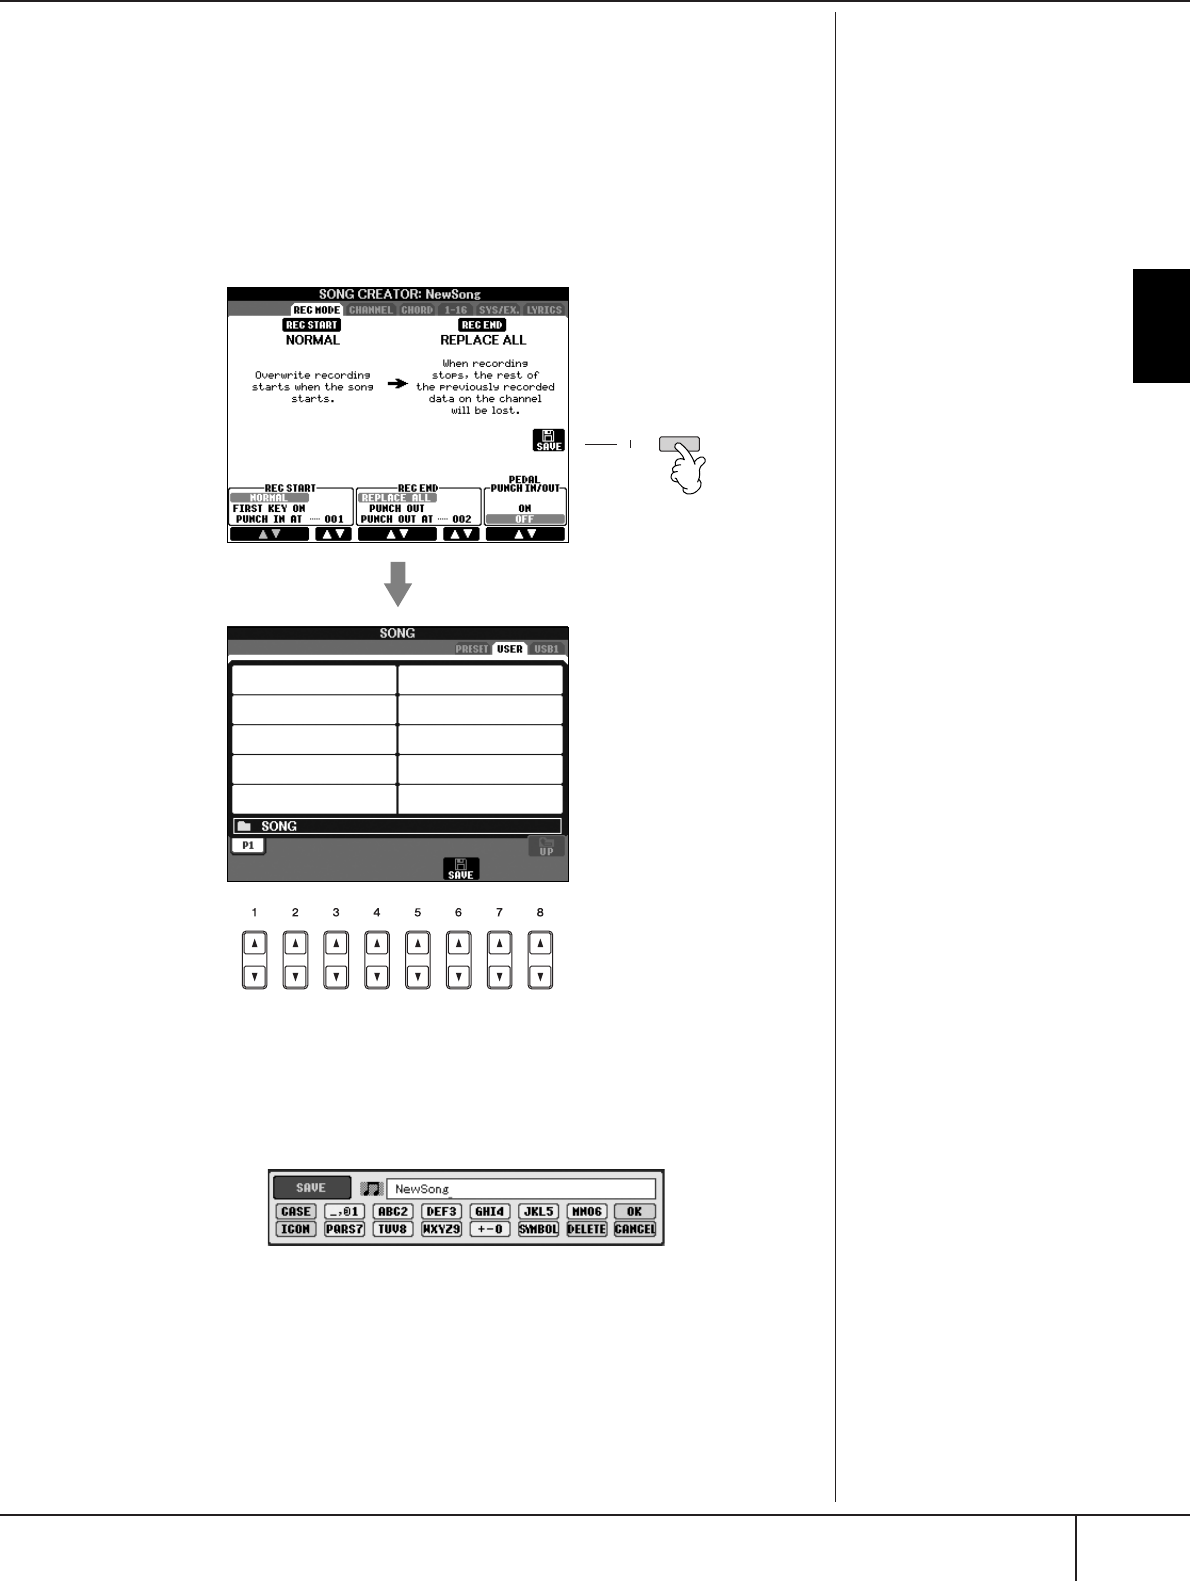
Basic Operation
Basic Displays (Main Display and File Selection Display)
PSR-S900/S700 Owner’s Manual 73
Saving Files
This operation lets you save your original data (such as Songs and Voices you’ve
created) to a file.
1After you’ve created a Song or Voice in the relevant SONG CREATOR
or VOICE SET display, press the [SAVE] display button.
The File Selection display for the corresponding data appears. Keep in mind
that the Save operation is executed from the File Selection display.
2Select the appropriate tab (USER, USB, etc.) to which you want to
save the data by using the TAB [
√
][
®
] buttons.
3Press the [6
††
††
] (SAVE) button to call up the file naming display.
4Enter the file name (page 77).
5Press the [8
ππ
ππ
] (OK) button to save the file.
If you want to cancel the Save operation, press the [8
†
] (CANCEL) button.
The saved file will be automatically located at the appropriate position
among the files in alphabetical order.
Internal memory (User tab
displays) capacity
The internal memory capacity of
the instrument is about 1.4MB
(PSR-S900)/560KB (PSR-S700).
This capacity applies to all file
types, including Voice, Style,
Song, and Registration data files.
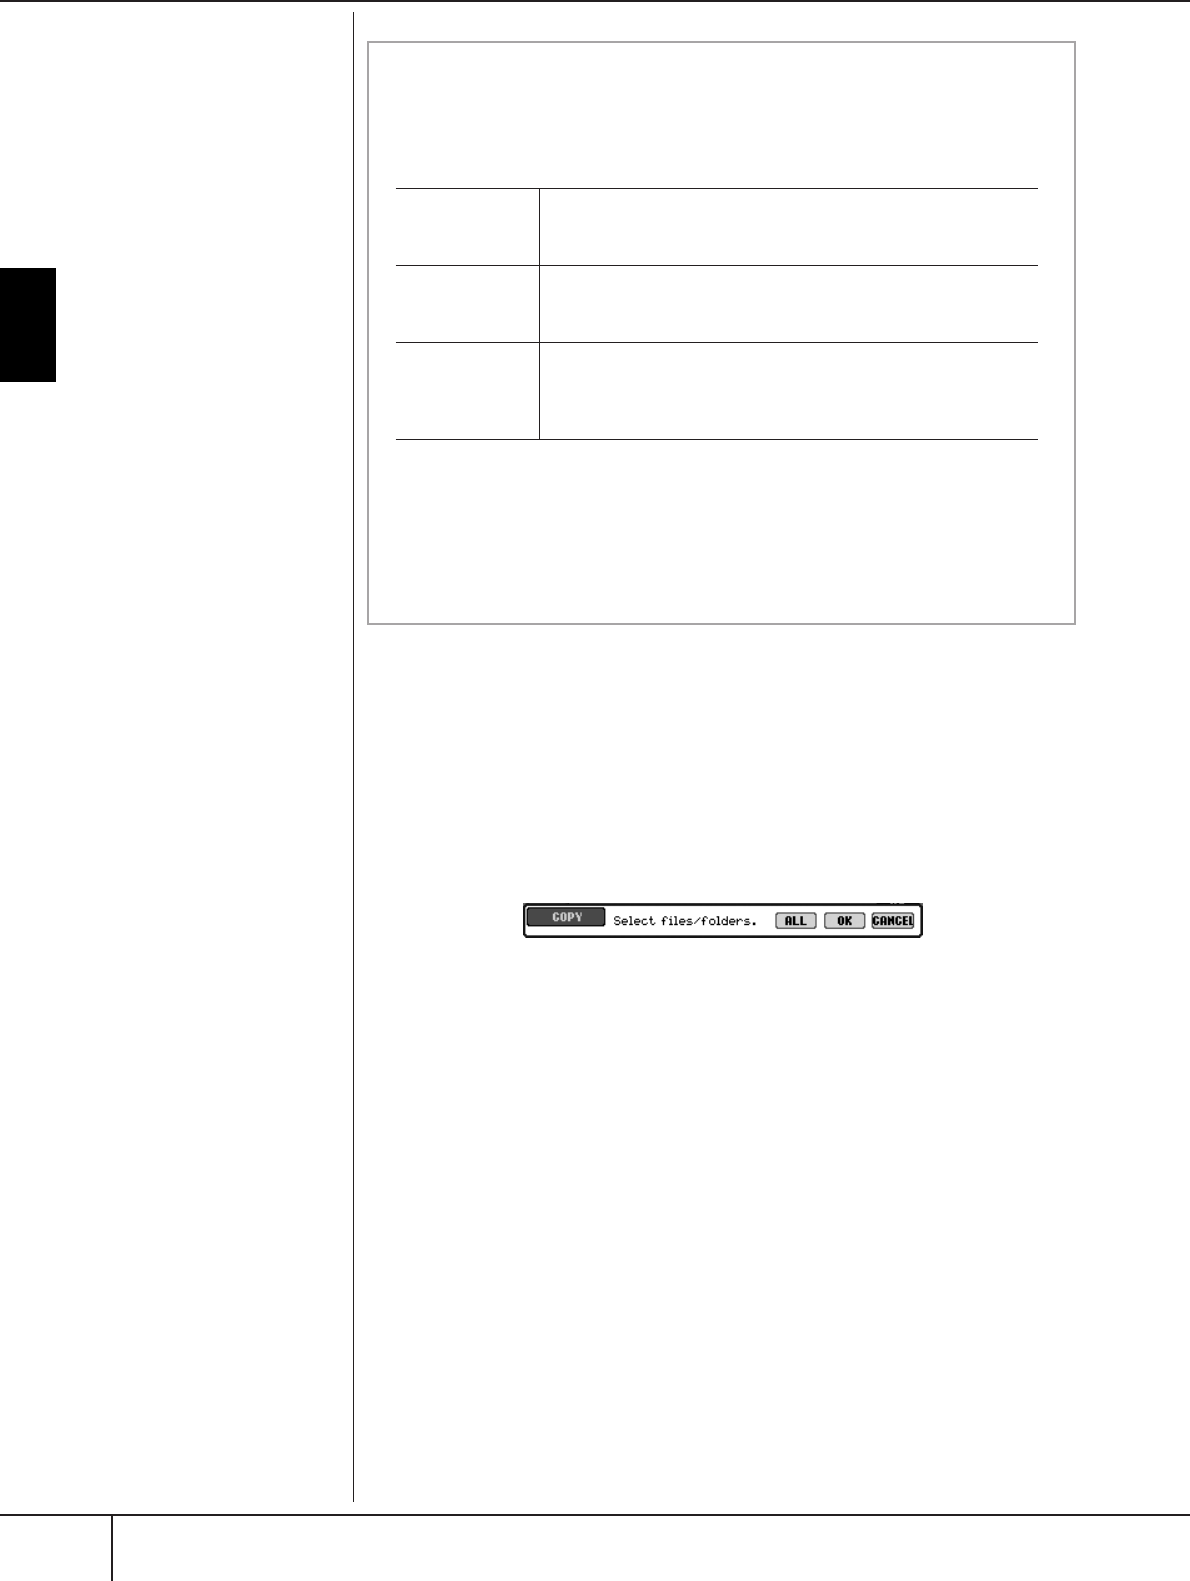
Basic Operation
Basic Displays (Main Display and File Selection Display)
PSR-S900/S700 Owner’s Manual
74
Copying Files/Folders (Copy & Paste)
This operation lets you copy a file/folder and paste it to another location (folder).
1Call up the display containing the file/folder you want to copy.
2Press the [3
††
††
] (COPY) button to copy the file/folder.
The pop-up window for the Copy operation appears at the bottom of the dis-
play.
3Press one of the [A]–[J] buttons corresponding to the desired file/
folder.
To cancel the selection, press the same [A]–[J] button again.
■ Selecting all files/folders
Press the [6
†
] (ALL) button to select all files/folders indicated on the cur-
rent display including the other pages.
To cancel the selection, press the [6
†
] (ALL OFF) button again.
4Press the [7
†
] (OK) button to confirm the file/folder selection.
To cancel the Copy operation, press the [8
†
] (CANCEL) button.
5Select the destination tab (USER, USB) to paste the file/folder, by
using the TAB [
√
][
®
] buttons.
6Press the [4
††
††
] (PASTE) button to paste the file/folder.
The folder/file copied and pasted appears on the display at the appropriate
position among the files in alphabetical order.
Restrictions for protected Songs
Commercially available song data may be copy protected to prevent illegal
copying or accidental erasure. They are marked by the indications at the
upper left side of the file names. The indications and relevant restrictions
are detailed below.
Note for “Prot. 2 Orig” and “Prot. 2 Edit” Song file operation
Make sure to save the “Prot. 2 Edit” Song to the same folder containing its
original “Prot. 2 Orig” Song. Otherwise the “Prot. 2 Edit” Song cannot be
played back. Also, if you move a “Prot. 2 Edit” Song, be sure to move its
original “Prot. 2 Orig” Song to the same location (folder) at the same time.
Prot. 1 Indicates Preset Songs saved to the User tab display, Disk Orchestra
Collection (DOC) Songs, and Disklavier Piano Soft Songs. These
cannot be copied/moved/saved to USB storage device.
Prot. 2 Orig Indicates Yamaha-protection-formatted Songs. These cannot be
copied. These can be moved/saved only to the USER tab display
and USB storage device.
Prot. 2 Edit Indicates edited “Prot. 2 Orig” Songs. Make sure to save these to
the same folder containing the corresponding “Prot. 2 Orig” Song.
These cannot be copied. These can be moved/saved only to the
USER tab display and USB storage device.
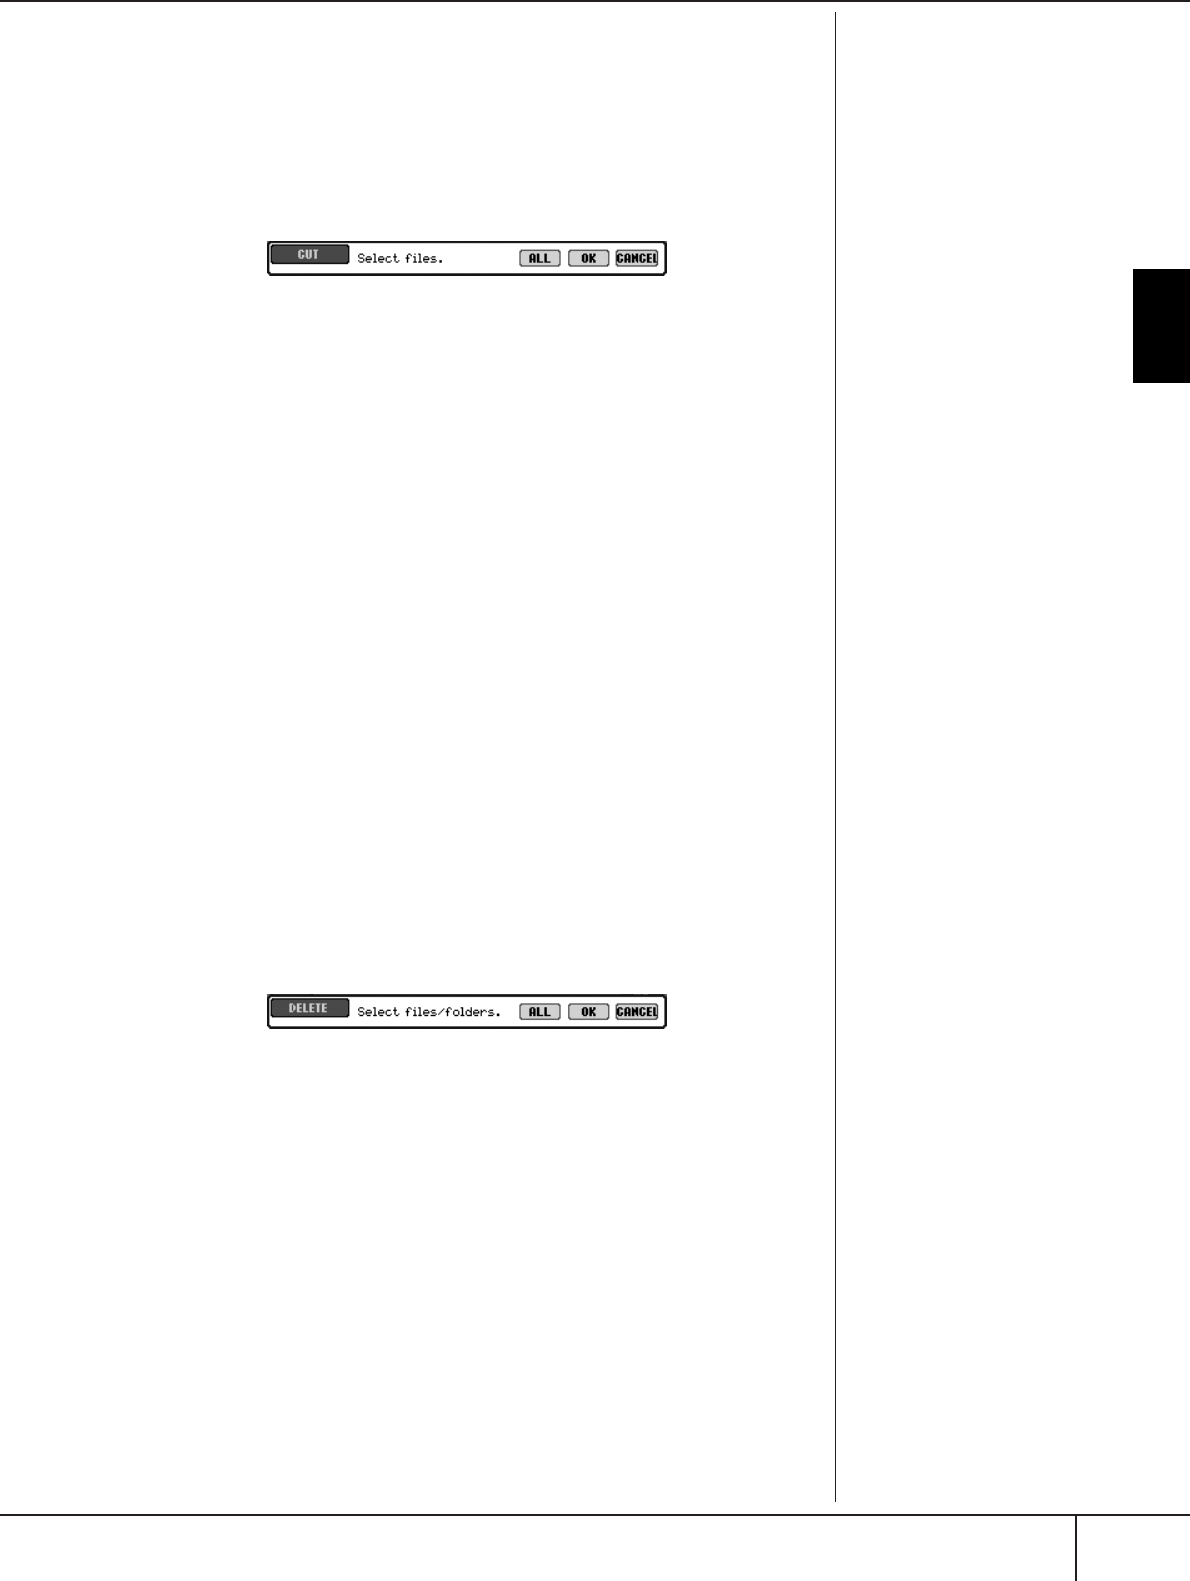
Basic Operation
Basic Displays (Main Display and File Selection Display)
PSR-S900/S700 Owner’s Manual 75
Moving Files (Cut & Paste)
This operation lets you cut a file and paste it to another location (folder).
1Call up the display containing the file you want to move.
2Press the [2
††
††
] (CUT) button to cut the file.
The pop-up window for the Cut operation appears at the bottom of the display.
3Press one of the [A]–[J] buttons corresponding to the desired file.
To cancel the selection, press the same [A]–[J] button again.
■ Selecting all files
Press the [6
†
] (ALL) button to select all files indicated on the current dis-
play including the other pages.
To cancel the selection, press the [6
†
] (ALL OFF) button again.
4Press the [7
††
††
] (OK) button to confirm the file selection.
To cancel the Cut operation, press the [8
†
] (CANCEL) button.
5Select the destination tab (USER, USB) to which the file is to be
pasted, by using the TAB [
√
][
®
] buttons.
6Press the [4
††
††
] (PASTE) button to paste the file.
The file moved and pasted appears on the display at the appropriate position
among the files in alphabetical order.
Deleting Files/Folders
This operation lets you delete a file/folder.
1Call up the display containing the file/folder you want to delete.
2Press the [5
††
††
] (DELETE) button.
The pop-up window for the Delete operation appears at the bottom of the
display.
3Press one of the [A]–[J] buttons corresponding to the desired file/
folder.
To cancel the selection, press the same [A]–[J] button again.
■ Selecting all files/folders
Press the [6
†
] (ALL) button to select all files/folders indicated on the cur-
rent display including the other pages.
To cancel the selection, press the [6
†
] (ALL OFF) button again.
4Press the [7
†
] (OK) button to confirm the file/folder selection.
To cancel the Delete operation, press the [8
†
] (CANCEL) button.
5Follow the on-display instructions.
YES ........................Delete the file/folder
YES ALL .................Delete all selected files/folders
NO ........................Leave the file/folder as is without deleting
CANCEL ................Cancel the Delete operation
Deleting all data in a USB
storage device at once
Formatting a USB storage device
completely erases all data on the
USB storage device (page 72).

Basic Operation
Basic Displays (Main Display and File Selection Display)
PSR-S900/S700 Owner’s Manual
76
Renaming Files/Folders
This operation lets you rename files/folders.
1Call up the display containing the file/folder you want to rename.
2Press the [1
††
††
] (NAME) button.
The pop-up window for the Rename operation appears at the bottom of the
display.
3Press one of the [A]–[J] buttons corresponding to the desired file/
folder.
4Press the [7
††
††
] (OK) button to confirm the file/folder selection.
To cancel the Rename operation, press the [8
††
††
] (CANCEL) button.
5Input the name (characters) of the selected file or folder (page 77).
The renamed folder/file appears on the display at the appropriate position
among the files in alphabetical order.
6Press the [8
ππ
ππ
] (OK) button to actually enter the new name.
Selecting Custom Icons for Files (Shown at the
Left of File Name)
You can select custom icons for files (shown at the left of file name).
1–4 Operations are the same as the above “Renaming Files/Folders”
section.
5Press the [1
††
††
] (ICON) button to call up the ICON display.
6Select the icon by using the [A]–[J] buttons or [3
ππ
ππ††
††
]–[5
ππ
ππ††
††
] but-
tons.
The ICON display includes several pages. Press the TAB [
√
][
®
] buttons to
select different pages.
To cancel the operation, press the [8
†
] (CANCEL) button.
7Press the [8
ππ
ππ
] (OK) button to apply the selected icon.
8Press the [8
ππ
ππ
] (OK) button to actually enter the new name.

Basic Operation
Basic Displays (Main Display and File Selection Display)
PSR-S900/S700 Owner’s Manual 77
Creating a New Folder
This operation lets you create new folders. Folders can be created, named and
organized as desired, making it easier to find and select your original data.
1Call up the page of the File Selection display for which you wish to
create a new folder.
2Press the [7
††
††
] (FOLDER) button to call up the naming display for a
new folder.
3Input the name of the new folder (see below).
Entering Characters
The instructions that follow show you how to enter characters in naming your files/
folders and when inputting the Keyword for Music Finder function/website. The
method is much the same as inputting names and numbers to a conventional
mobile phone. Entering characters should be done in the display shown below.
1Change the type of character by pressing the [1
ππ
ππ
] button.
• If you select a language other than Japanese as the Language
(page 66), the following different types of characters are available:
CASE......................Alphabet (capital letters, half size), numbers (half
size), marks (half size)
case .......................Alphabet (lowercase letters, half size), numbers (half
size), marks (half size)
• If you select Japanese as the Language (page 66), the following
different types of characters and sizes can be entered:
(kana-kan) ...Hiragana and Kanji, marks (full size)
(kana) ............Katakana (normal size), marks (full size)
(kana) ..............Katakana (half size), marks (half size)
A B C.....................Alphabet (capital and small letters, full size), num-
bers (full size), marks (full size)
ABC.......................Alphabet (capital and small letters, half size), num-
bers (half size), marks (half size)
2Use the DATA ENTRY dial to move the cursor to the desired position.
3Press the [2
ππ
ππ††
††
]–[6
ππ
ππ††
††
] and [7
ππ
ππ
] buttons, corresponding to the
character you wish to enter.
Entering letters, numerals and symbols can be done by moving the cursor or
pressing one of the character entry buttons. Alternately, you can wait for a
short time and the characters will be entered automatically.
For details on entering characters, refer to the following section, step 4.
A new folder cannot be made in
the PRESET tab.
Folder directories for the
USER tab display
In the USER tab display, folder
directories can contain up to
four levels. The maximum total
number of files and folders
which can be stored is 730 (360
for the PSR-S700), but this may
differ depending on the length of
the file names. The maximum
number of files/folders which
can be stored in a folder in the
USER tab is 250.
Depending on the display for
character entry you are working
in, some types of characters can-
not be entered.
Even if you select Japanese as the
Language, when you enter the
characters in the lyrics editing
display (page 170), the Internet
Setting display (page 178), or
website, the type of characters
“CASE”/“case” may be entered.
The following half-size marks
cannot be entered for a file/
folder name.
\ / : * ? " < > |
When entering a password for a
website or the WEP key for wire-
less LAN connection, the charac-
ters are converted to asterisks (*)
for security purposes.
Several different characters are assigned to each button, and
the characters change each time you press the button.

Basic Operation
Basic Displays (Main Display and File Selection Display)
PSR-S900/S700 Owner’s Manual
78
4Press the [8
ππ
ππ
] (OK) button to actually enter the new name and
return to the previous display.
• Deleting characters
Move the cursor to the character you wish to delete by using the DATA
ENTRY dial, and press the [7
†
] (DELETE) button. To delete all charac-
ters on the line at once, press and hold the [7
†
] (DELETE) button.
• Entering special character marks (Japanese “ ” and “ ”)
Select a character to which a character mark is to be added and press
the [6
†
] button before actual entry of the character.
• Entering marks
1After actually entering a character by moving the cursor, press the
[6
†
] button to call up the mark list.
2Use the DATA ENTRY dial to move the cursor to the desired mark,
then press the [8
π
] (OK) button.
• Entering numbers
First, select one of the following: “A B C” (full-size alphabet), “ABC”
“CASE” (half-size capital alphabet) and “case” (half-size lowercase
alphabet). Then, press and hold down the appropriate button, [2
π†
]–
[5
π†
], [6
π
] and [7
π
] button, for a while, or press it repeatedly until
the desired number is selected.
• Inserting a Character
1Move the cursor to the desired position.
Use the same operation as in “Deleting Characters” above.
2Press the [2
π†
]–[6
π†
], or [7
π
] buttons to enter numbers and
symbols.
3Press the [8
π
] (OK) button to enter characters.
• Entering a Space
1Move the cursor to the desired position.
Use the same operation as in “Deleting Characters” above.
2Press [6
†
] button to call up the mark list.
3Make sure the cursor is at the beginning space (blank) of the mark list,
and press the [8
π
] (OK) button.
• Converting into Kanji (Japanese language)
When the input “hiragana” characters are shown in reverse display
(highlighted), press the [1
π
]/[ENTER] button one or several times to
convert the characters into the appropriate kanji. To actually enter the
change, press the [1
π
]/[8
π
] (OK) button or enter the next character.
When the input “hiragana” characters are shown in reverse dis-
play (highlighted):
• Re-converting the characters into other kanji
Press the [1
π
]/[ENTER] button.
• Changing the reversed area
Use the DATA ENTRY dial.
• Changing the converted kanji back to “hiragana”
Press the [7
†
] (DELETE) button.
• Clearing the reversed area at once
Press the [8
†
] (CANCEL) button.
• Entering the “hiragana” itself (without converting it)
Press the [8
π
] (OK) button.
• Canceling the character-entering operation
Press the [8
†
] (CANCEL) button.
I
n t
h
e case o
f
c
h
aracters w
hi
c
h
are not accompanied by special
character marks (with the excep-
tion of kanakan and half-size
katakana), you can call up the
mark list by pressing the [6
†
]
button after selecting a charac-
ter (before actual entry of a char-
acter).

Basic Operation
Restoring the Factory-programmed Settings
PSR-S900/S700 Owner’s Manual 79
Restoring the Factory-programmed
Settings
Restoring the Factory-programmed System
While holding the C6 key (right-most key on the keyboard), turn the [POWER] but-
ton ON.
This operation has the same result as and is a shortcut for the System Setup restore
operation explained in step 2 of the following section.
Restoring the Factory-programmed Settings
Independently by Item
1Call up the operation display.
[FUNCTION] → [J] UTILITY → TAB [
√
][
®
] SYSTEM RESET
2Select items by pressing the [1
ππ
ππ††
††
]–[3
ππ
ππ††
††
] buttons.
3Checkmark the box of the item to be reset to the factory pro-
grammed settings by pressing the [4
ππ
ππ
] button.
4Press the [D] button to execute the Factory Reset operation for all
checkmarked items.
Th
e operat
i
on o
f
restor
i
ng t
h
e
factory-programmed settings
does not affect the Internet Set-
tings. To reset the Internet Set-
tings, refer to page 182.
CAUTION
This operation deletes all your
original data for the respec-
tive item (MIDI SETUP, USER
EFFECT, MUSIC FINDER, and
FILES&FOLDERS).
SYSTEM SETUP
Restores the System Setup parameters to the original factory settings. Refer to
the Data List for details about which parameters belong to the System Setup.
The Data List is available at the Yamaha website. (See page 5.)
MIDI SETUP Restores the MIDI settings including the MIDI templates on the User tab dis-
play to the original factory status.
USER EFFECT Restores the User Effect settings including the user effect types, user master
EQ types, and user vocal harmony types (PSR-S900) created via the Mixing
Console display to the original factory settings.
MUSIC FINDER Restores the Music Finder data (all records) to the original factory settings.
FILES&FOLDERS Deletes all files and folders stored in the User tab display.
REGIST Temporarily deletes the current Registration Memory settings of the selected
Bank. The same can be done also by turning the [POWER] button ON while
holding the B5 key (right-most B key on the keyboard).
3
4
2
Basic Operation
Restoring the Factory-programmed Settings
PSR-S900/S700 Owner’s Manual
80
Saving and Recalling Your Original Settings as
a Single File
For the items below, you can save your Original Settings as a Single File for future recall.
1Make all desired settings on the instrument.
2Call up the operation display.
[FUNCTION] → [J] UTILITY → TAB [
√
][
®
] SYSTEM RESET
3Press one of the [F]–[I] buttons to call up the relevant display for sav-
ing your data.
4Select one of the tabs (other than the PRESET) by pressing the TAB
[
√
][
®
] buttons.
Note that the file in the PRESET tab display is the file of factory-programmed
settings. If you select it, the factory-programmed settings for the respective
item will be restored. (This is the same results as on page 79 “Restoring the
Factory-programmed Settings Independently by Item.”)
5Save your file (page 73).
6To recall your file, select the tab and page to which you’ve saved the
file (same tab and page as specified in step 4), and press the corre-
sponding [A]–[J] button.
SYSTEM SETUP Parameters set on the various displays such as the [FUNCTION] → UTILITY
and microphone setting display are handled as a single System Setup file.
Refer to the Data List for details on which parameters belong to the System
Setup. The Data List is available at the Yamaha website. (See
page 5
.)
MIDI SETUP The MIDI settings including the MIDI templates on the User tab display are
handled as a single file.
USER EFFECT The User Effect settings including the user effect types, user master EQ
types, and user vocal harmony types (PSR-S900) created via the Mixing
Console displays are managed as a single file.
MUSIC FINDER
All the preset and created records of the Music Finder are handled as a single file.

Basic Operation
Data Backup
PSR-S900/S700 Owner’s Manual 81
Data Backup
For maximum data security Yamaha recommends
that you copy or save your important data to a USB
storage device. This provides a convenient backup if
the internal memory is damaged.
The backup procedure is different for the data types
in 1, 2, and 3 above.
Backup procedure
1Insert/connect the backup USB storage
device (destination).
2Call up the display containing the desired
file to be copied.
Song:
Press the SONG [SELECT] button.
Style:
Press one of the STYLE buttons.
Multi Pad:
Press the MULTI PAD CONTROL [SELECT] button.
Registration Memory Bank:
Press the REGIST BANK [+] and [–] buttons
simultaneously.
Voice:
Press one of the VOICE buttons.
3Select the USER tab by using the TAB
[
√
][
®
] buttons.
4Press the [3
††
††
] (COPY) button to copy the
file/folder.
The pop-up window for the Copy operation
appears at the bottom of the display.
5Press the [6
††
††
] (ALL) button to select all
files/folders indicated on the current dis-
play and all other pages.
To cancel the selection, press the [6
†
] (ALL
OFF) button again.
6Press the [7
††
††
] (OK) button to confirm the
file/folder selection.
To cancel the Copy operation, press the [8
†
]
(CANCEL) button.
7Select the destination USB tab to which
the file/folder is to be copied, by using the
TAB [
√
][
®
] buttons.
8Press the [4
††
††
] (PASTE) button to paste
the file/folder.
1Insert/connect the backup USB storage
device (destination).
2Call up the operation display.
[FUNCTION] → [J] UTILITY → TAB [
√
][
®
]
SYSTEM RESET
3Press one of the [F]–[I] buttons to call up
the relevant display for saving your data.
4Select the appropriate USB tab to which
you want to save the data by using the
TAB [
√
][
®
] buttons.
5Save your data (page 73).
Data that can be saved
1Song*, Style, Multi Pad, Registration Memory
Bank and Voice
2Music Finder Record, Effect**, MIDI Template
and System File
* Protected Songs (those with a “Prot.1/Prot.2” indi-
cation at the upper left of the file name) cannot be
saved.
However, Songs with a “Prot.2” indication can be
moved (cut-and-paste operation) to a USB flash
memory.
**Effect data includes the following:
- Edited or saved data in the Mixing Console
“EFFECT/EQ.”
- Edited or saved data of the Vocal Harmony type
(PSR-S900 only).
3All data listed in 1 and 2 above
1 Song, Style, Multi Pad, Registration
Memory Bank and Voice Data
2 Music Finder Record, Effect, MIDI Tem-
plate and System Data
If a message appears indicating data
cannot be copied
Protected Songs (“Prot. 1/Prot.2” is indicated
at the upper left side of the file names) are
included in the copied files. These protected
Songs cannot be copied. However, Songs
with a “Prot.2” indication can be moved (cut-
and-paste operation) to a USB flash memory.
Basic Operation
Data Backup
PSR-S900/S700 Owner’s Manual
82
1Insert/connect the backup USB storage
device (destination).
2Call up the operation display.
[FUNCTION] → [J] UTILITY → TAB [
√
][
®
]
OWNER
3Press the [D] (BACKUP) button to save
the data to the USB storage device.
To restore the data, press the [E] (RESTORE)
button in step 3 above.
• It takes a few minutes to complete the backup/restore
operation.
• Backup data which has not been created on the PSR-
S900/S700 cannot be restored.
CAUTION
Move the Protected Songs which are saved to the USER dis-
play before restoring. If the songs are not moved, the oper-
ation deletes the data.
3 All data listed in 1 and 2
n
PSR-S900/S700 Owner’s Manual 83
Reference Using, Creating and Editing Voices
Reference
Using, Creating and Editing Voices
Voice Characteristics
The Voice type and its defining characteristics are indicated above the Preset Voice
name.
Reference to Quick Guide pages
Playing Voices ................................................................................ page 30
Playing Preset Voices............................................................... page 30
Using the Pitch Bend Wheel.................................................... page 33
Using the Modulation Wheel ................................................. page 33
Using the Metronome ............................................................ page 34
Voice Effects .................................................................................. page 53
Mega Voices Compatibility
Mega Voices are not compatible
with other models. Any song/
style data you’ve created on the
PSR-S900/S700 using the Mega
Voices will not sound properly
when played back on other
instruments.
S. Articulation!
(PSR-S900)
The Super Articulation voices sound remarkably authentic and natural,
featuring the unique performance characteristics of each instrument—
for example, guitar scratching sounds or the legato phrasing of wind
instruments. They provide many of the same benefits as the MegaVoices
(see below), but with greater playability and expressive control in real
time. To effectively play these natural sounds in performance of certain
voices, you may need to use the pedal or footswitch. For details on how
to best play each voice, call up the Information window (pressing the
[7
π
] button in the Voice Selection display).
Mega Voice The Mega Voices are not intended to be played from the keyboard. They
are primarily designed for use with recorded MIDI sequence data (such
as songs and styles). Some of the guitar and bass Voices in particular
have been created as Mega Voices.
What makes Mega Voices special is their use of velocity switching. Nor-
mal Voices use velocity switching, too—to make the sound quality and/
or level of a Voice according to how strongly or softly you play it. This
makes the instrument’s Voices sound authentic and natural. However,
with Mega Voices, each velocity range (the measure of your playing
strength) has a completely different sound.
For example, a Mega guitar Voice includes the sounds of various perfor-
mance techniques. In conventional instruments, different Voices having
those sounds would be called up via MIDI and played in combination
to achieve the desired effect. However, now with Mega Voices, a con-
vincing guitar part can be played with just a single Voice, using specific
velocity values to play the desired sounds.
Because of the complex nature of these Voices and the precise veloci-
ties need to play the sounds, they’re not intended for playing from the
keyboard. They are, however, very useful and convenient when creating
MIDI data—especially when you want to avoid using several different
Voices just for a single instrument part.
Live! These acoustic instrument sounds were sampled in stereo, to produce a
truly authentic, rich sound—full of atmosphere and ambience.
Cool! These Voices capture the dynamic textures and subtle nuances of elec-
tric instruments—thanks to a huge amount of memory and some very
sophisticated programming.
Sweet! These acoustic instrument sounds also benefit from Yamaha’s sophisti-
cated technology—and feature a sound so finely detailed and natural,
you’ll swear you’re playing the real thing!
Drums Various drum and percussion sounds are assigned to individual keys,
letting you play the sounds from the keyboard.
SFX Various special effect sounds are assigned to individual keys, letting you
play the sounds from the keyboard.
Organ Flutes! This authentic organ Voice lets you use the Voice Set to adjust the vari-
ous footages and craft your own original organ sounds. See page 103
for details.

Using, Creating and Editing Voices
Playing Different Voices Simultaneously
PSR-S900/S700 Owner’s Manual
84
Playing Different Voices Simultaneously
The PSR-S900/S700 keyboard features various functions and performance conve-
niences that are simply unavailable on an acoustic instrument. It allows you to play
several different Voices together in a layer, or play one Voice with your left hand
while you play a different Voice (or even two layered Voices!) with your right.
Keyboard Parts (Right 1, Right 2, Left)
Voices can be assigned independently to each keyboard part: Right 1, Right 2, and
Left. You can combine these parts by using the PART ON/OFF buttons to create a
rich, ensemble sound.
Keyboard Part Combinations
■Playing a single Voice (Right 1 part)
You can play a single Voice over the entire keyboard range. This is used for nor-
mal performance—for example, with the piano Voice.
■Playing two Voices simultaneously (Right 1 and 2 parts)
You can simulate a melody duet or combine two similar Voices to create a thicker sound.
Refer to page 85 for Voice selection operations for the Right 2 part.
■
Playing different Voices with the left and right Hands (Right 1 and Left parts)
You can play different Voices with the left and right hands. For example, try play-
ing the bass Voice with your left hand and the piano Voice with your right.
Refer to page 86 for Voice selection operations for the Left part.
■Playing three different Voices with the left and right Hands (Right 1, 2
and Left parts)
You can combine these three parts to create a rich, ensemble sound.
Adjusting the volume balance
among parts
Adjust the volume balance
among the parts in the BALANCE
display (page 41).
Specifying the split point (the
border between the right-
and left-hand range)
See page 110.
Right 1 part
Right 2 part
Right 1 part
Left part Right 1 part
Left part Right 1 part
Right 2 part
Playing Different Voices Simultaneously
PSR-S900/S700 Owner’s Manual 85
Using, Creating and Editing Voices
Playing Two Voices Simultaneously (Right 1
and 2 Parts)
You can play two Voices simultaneously with the Right 1 and 2 parts.
1Make sure the PART ON/OFF [RIGHT 1] button is turned on.
2Press the PART ON/OFF [RIGHT 2] button to turn it on.
3Press one of the VOICE buttons to call up the Voice selection display
for the Right 2 part.
4Press the TAB [
√
] button to select the PRESET display.
5Press one of the [A]–[J] buttons to select a Voice.
6Play the keyboard.
7Press the PART ON/OFF [RIGHT 2] button again to turn it off.
For the selected part, the name
of the currently selected Voice is
highlighted (reverse display) in
the Main display.
Quickly selecting Voices for
Right 1 and 2 parts
You can quickly select the Right
1 and 2 part Voices, just from the
Voice buttons. Press and hold
one Voice button, then press
another. The Voice of the first
pressed button is automatically
set for the Right 1 part, while the
Voice of the second pressed but-
ton is set for the Right 2 part.
4
5
5
Switching the Right 2 part
on/off with a pedal
You can use a pedal to switch the
Right 2 part on/off (when the
Right 2 part is appropriately
assigned; page 195). This is use-
ful for turning the Right 2 part on
and off while you play.
Using, Creating and Editing Voices
Playing Different Voices Simultaneously
PSR-S900/S700 Owner’s Manual
86
Playing Different Voices with the Left and
Right Hands (Right 1 and Left Parts)
You can play different Voices with the Left and Right Hands (Right 1 and Left parts).
1Make sure the PART ON/OFF [RIGHT 1] button is turned on.
2Press the PART ON/OFF [LEFT] button to turn it on.
3Press one of the VOICE buttons to call up the Voice selection display
for the Left part.
4Press the TAB [
√
] button to select the PRESET display.
5Press one of the [A]–[J] buttons to select a Voice.
6Play the keyboard.
7Press the PART ON/OFF [LEFT] button again to turn it off.
For the selected part, the name
of the currently selected Voice is
highlighted (reverse display) in
the Main display.
4
5
5
Switching the Left part on/off
with a pedal
You can use a pedal to switch the
Left part on/off (when the Left
part is appropriately assigned;
page 195). This is useful for turn-
ing the Left part on and off while
you play.
Specifying the split point (the
border between the right-
and left-hand range)
See page 110.

Changing Pitch
PSR-S900/S700 Owner’s Manual 87
Using, Creating and Editing Voices
Changing Pitch
Transpose
Transpose the pitch of the keyboard up or down (in semitones).
•Transposing during performance
You can easily set the desired transposition of the overall sound of the instru-
ment by pressing the TRANSPOSE [–]/[+] buttons.
•Transposing before performance
Change the transpose settings in the MIXING CONSOLE display. You can set the
transposition for the keyboard pitch (KBD), song playback (SONG), or overall
sound of the instrument (MASTER), respectively.
1Call up the operation display.
[MIXING CONSOLE] → TAB [
√
][
®
] TUNE
2Use the [1
ππ
ππ††
††
]–[3
ππ
ππ††
††
] buttons to set the transposition.
Fine-tuning the Pitch of the Entire Instrument
You can fine-tune the pitch of the entire instrument—useful when you play the
PSR-S900/S700 along with other instruments or CD music.
1Call up the operation display.
[FUNCTION] → [A] MASTER TUNE/SCALE TUNE → TAB [
√
][
®
] MASTER
TUNE
2Use the [4
ππ
ππ††
††
]/[5
ππ
ππ††
††
] buttons to set the tuning.
Press the 4 or 5’s [
π
] and [
†
] buttons simultaneously to reset the value to
the factory setting of 440.0 Hz.
Scale Tuning
You can select various scales for playing in custom tunings for specific historical
periods or music genres.
1Call up the operation display.
[FUNCTION] → [A] MASTER TUNE/SCALE TUNE → TAB [
√
][
®
] SCALE
TUNE
2Select the desired part for which you want to set the scale by using
the [6
ππ
ππ††
††
]/[7
ππ
ππ††
††
] buttons.
Checkmark the box by pressing the [8
π
] button.
3Use the [A]/[B] buttons to select the desired scale.
The tuning of each note for the currently selected scale is indicated in the
keyboard illustration at the upper right of the display.
Please note that the Tune func-
tion does not affect the Drum Kit
or SFX Kit Voices.
Hz (Hertz):
This unit of measurement refers
to the frequency of a sound and
represents the number of times a
sound wave vibrates in a second.
Using, Creating and Editing Voices
Changing Pitch
PSR-S900/S700 Owner’s Manual
88
4Change the following settings as necessary.
•Tuning the individual notes of the keyboard (TUNE)
1Press the [3
ππ
ππ††
††
] button to select the note for tuning.
2Use the [4
ππ
ππ††
††
]/[5
ππ
ππ††
††
] buttons to set the tuning in cents.
• Determines the base note for each scale.
Press the [2
π†
] button to select the base note.
When the base note is changed, the pitch of the keyboard is transposed,
yet maintains the original pitch relationship between the notes.
Preset Scale Types
Tuning values for Preset Scales (base note: C) (in cents)
* In the display, the rounded off value is shown.
Cent:
In musical terms a “cent” is 1/
100th of a semitone. (100 cents
equal one semitone.)
Instantly recalling the desired
scale
Register the desired scale to the
Registration Memory. Be sure to
checkmark the SCALE item when
registering (page 135). EQUAL
TEMPERAMENT
The pitch range of each octave is divided equally into twelve parts, with
each half-step evenly spaced in pitch. This is the most commonly used
tuning in music today.
PURE MAJOR
PURE MINOR
These tunings preserve the pure mathematical intervals of each scale,
especially for triad chords (root, third, fifth). You can hear this best in
actual vocal harmonies – such as choirs and a cappella singing.
PYTHAGOREAN This scale was devised by the famous Greek philosopher and is created
from a series of perfect fifths, which are collapsed into a single octave.
The 3rd in this tuning are slightly unstable, but the 4th and 5th are
beautiful and suitable for some leads.
MEAN-TONE This scale was created as an improvement on the Pythagorean scale, by
making the major third interval more “in tune.” It was especially popu-
lar from the 16th century to the 18th century. Handel, among others,
used this scale.
WERCKMEISTER
KIRNBERGER
This composite scale combines the Werckmeister and Kirnberger sys-
tems, which were themselves improvements on the mean-tone and
Pythagorean scales. The main feature of this scale is that each key has
its own unique character. The scale was used extensively during the
time of Bach and Beethoven, and even now it is often used when per-
forming period music on the harpsichord.
ARABIC Use these tunings when playing Arabic music.
CC#DEbEFF#GAbABbB
EQUAL TEM-
PERAMENT 0 00 00 0000000
PURE MAJOR 0 -29.7 3.9 15.6 -14.1 -2.3 -9.4 2.3 -27.3 -15.6 18.0 -11.7
PURE MINOR 0 33.6 3.9 15.6 -14.1 -2.3 31.3 2.3 14.1 -15.6 18.0 -11.7
PYTHAGOREAN
0 14.1 3.9 -6.3 7.8 -2.3 11.7 2.3 15.6 6.3 -3.9 10.2
MEAN-TONE 0 -24.2 -7.0 10.2 -14.1 3.1 -20.3 -3.1 -27.3 -10.2 7.0 -17.2
WERCKMEISTER
0 -10.2 -7.8 -6.3 -10.2 -2.3 -11.7 -3.9 -7.8 -11.7 -3.9 -7.8
KIRNBERGER 0 -10.2 -7.0 -6.3 -14.1 -2.3 -10.2 -3.1 -7.8 -10.2 -3.9 -11.7
ARABIC 1 00-50.0 0 0 0 0 0 0 -50.0 0 0
ARABIC 2 0000-50.0 0 0 0 0 0 0 -50.0
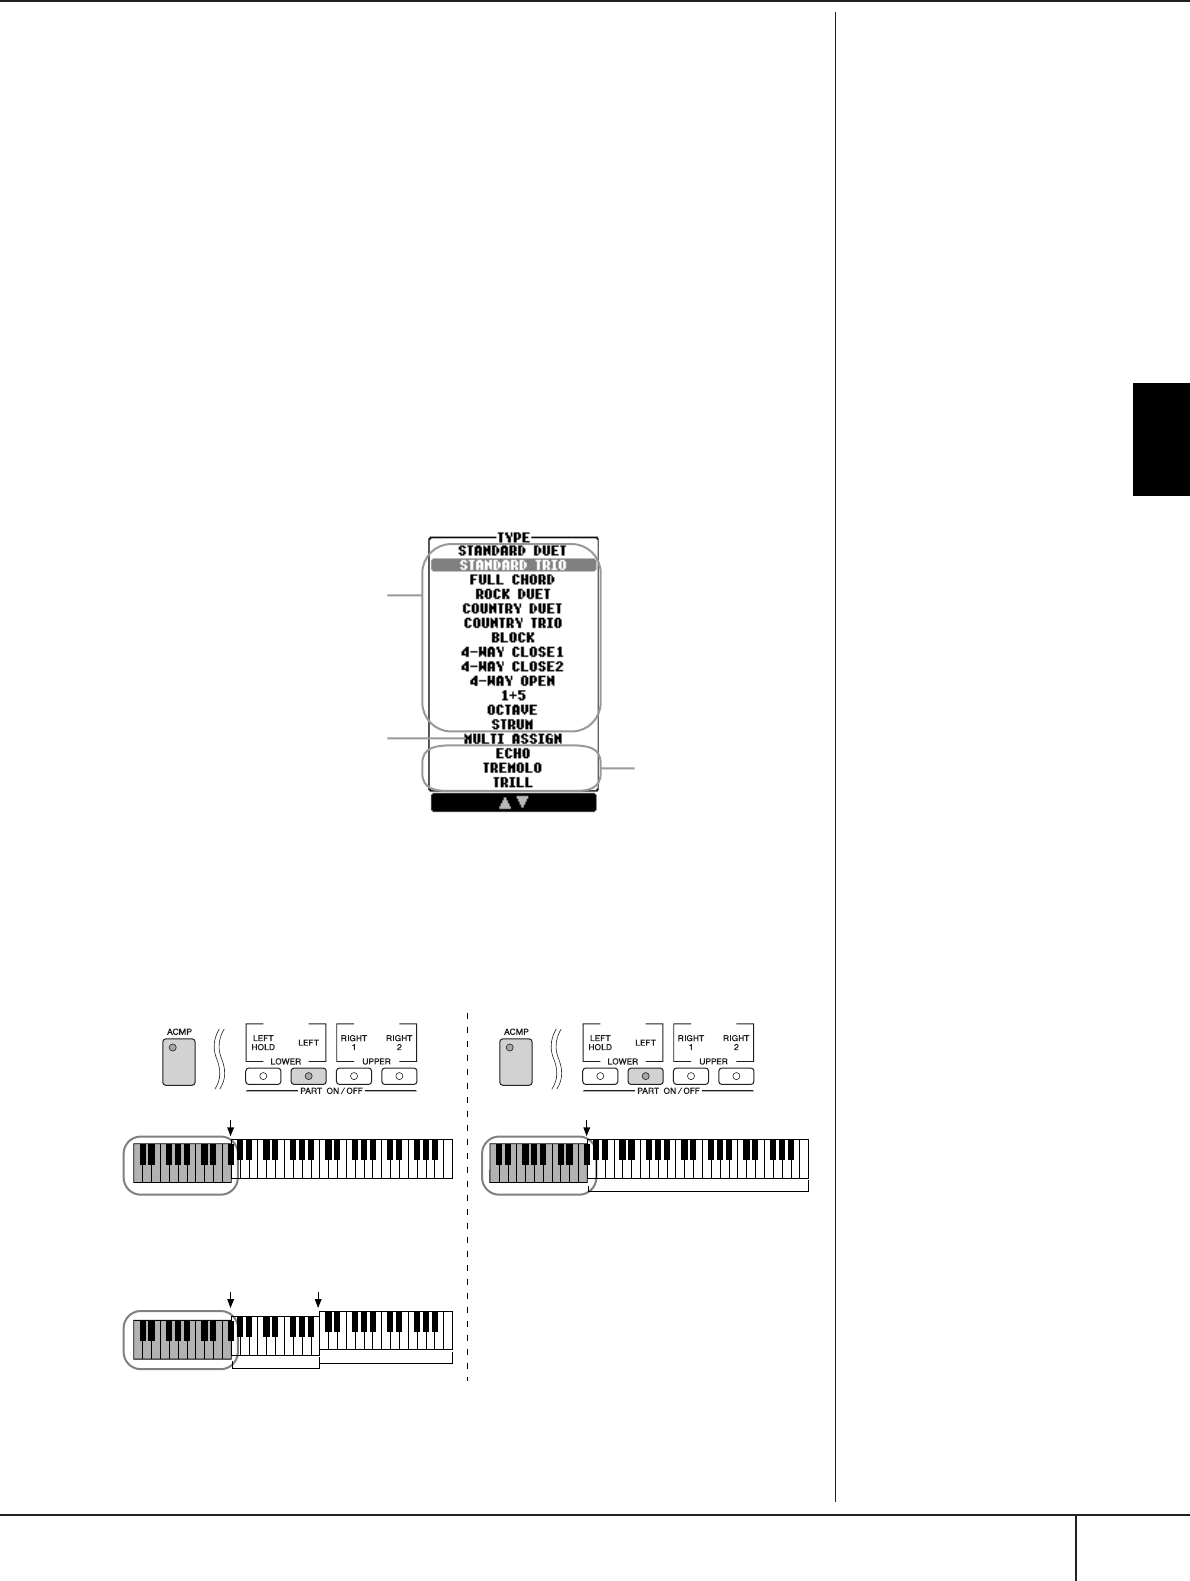
Selecting the Harmony/Echo type
PSR-S900/S700 Owner’s Manual 89
Using, Creating and Editing Voices
Selecting the Harmony/Echo type
You can select the desired Harmony/Echo effect from a variety of types.
1Turn the [Harmony/Echo] button on.
2Call up the operation display.
[FUNCTION] → [H] HARMONY/ECHO
3Use the [1
ππ
ππ††
††
]–[3
ππ
ππ††
††
] buttons to select the Harmony/Echo type.
4Use the [4
ππ
ππ††
††
]–[8
ππ
ππ††
††
] buttons to select various Harmony/Echo set-
tings (page 90).
The available settings differ depending on the Harmony/Echo type.
Harmony/Echo Types
The Harmony/Echo types are divided into the following groups, depending on the
particular effect applied.
●Harmony Types
When one of the Harmony Types is selected, the Harmony effect is applied to
notes played in the right-hand section of the keyboard according to the type
selected above and the chord specified in the chord section of the keyboard
shown below.
Echo Types
These types apply echo
effects to notes played in
the right-hand section of
the keyboard in time with
the currently set tempo.
Harmony Types
These types apply the harmony
effect to notes played in the
right-hand section of the key-
board according to the chord
specified in the left-hand sec-
tion of the keyboard. (Note that
the “1+5” and “Octave” settings
are not affected by the chord.)
Multi Assign Type
This type applies a special effect
to chords played in the right-
hand section of the keyboard.
Canceling the chord sound
for the harmony effect
This cancels the sound of the
chord played in the chord range
of the keyboard—letting you
hear only the Harmony effect.
Set [ACMP] to On, set [SYNC
START] to Off, and select “Off”
for the Stop Accompaniment
parameter.
Split point Split point
Chord section for Style playback and
Harmony effect
Left Voice and
chord section for
Harmony effect
Split Point
(for Style)
Split Point
(for keyboard Voice)
Right 1
Right 2
Voices
Chord section
for Style
playback and
Harmony effect
Left Voice Right 1
Right 2
Voices
Using, Creating and Editing Voices
Selecting the Harmony/Echo type
PSR-S900/S700 Owner’s Manual
90
●Multi Assign Type
Multi Assign effect automatically assigns notes played simultaneously in the right-hand
section of the keyboard to separate parts (Voices). Both of the keyboard part [RIGHT
1] and [RIGHT 2] should be turned on when using the Multi Assign effect. The Right 1
and Right 2 Voices are alternately assigned to the notes in the order you play.
●Echo Types
When one of the Echo Types is selected, the corresponding effect (echo, tremolo,
trill) is applied to the note played in the right-hand section of the keyboard in time
with the currently set tempo, regardless of the [ACMP] and the LEFT part on/off sta-
tus. Keep in mind that Trill works when you hold down two notes on the keyboard
simultaneously (last two notes if more than two notes are held), and it plays those
notes alternately.
Harmony/Echo Settings
VOLUME This parameter is available for all types with the exception of “Multi
Assign.” It determines the level of the harmony/echo notes generated by
the Harmony/Echo effect.
SPEED This parameter is only available when Echo, Tremolo, or Trill is selected
in Type above. It determines the speed of the Echo, Tremolo, and Trill
effects.
ASSIGN This parameter is available for all types with the exception of “Multi
Assign.” This lets you determine the keyboard part via which the har-
mony/echo notes will be sounded.
CHORD NOTE
ONLY
This parameter is available when one of the Harmony Types is selected.
When this is set to “ON,” the Harmony effect is applied only to the note
(played in the right-hand section of the keyboard) that belongs to a
chord played in the chord section of the keyboard.
TOUCH LIMIT This parameter is available for all types with the exception of “Multi
Assign.” It determines the lowest velocity value at which the harmony
note will sound. This allows you to selectively apply the harmony by
your playing strength, letting you create harmony accents in the mel-
ody. The harmony effect is applied when you play the key strongly
(above the set value).
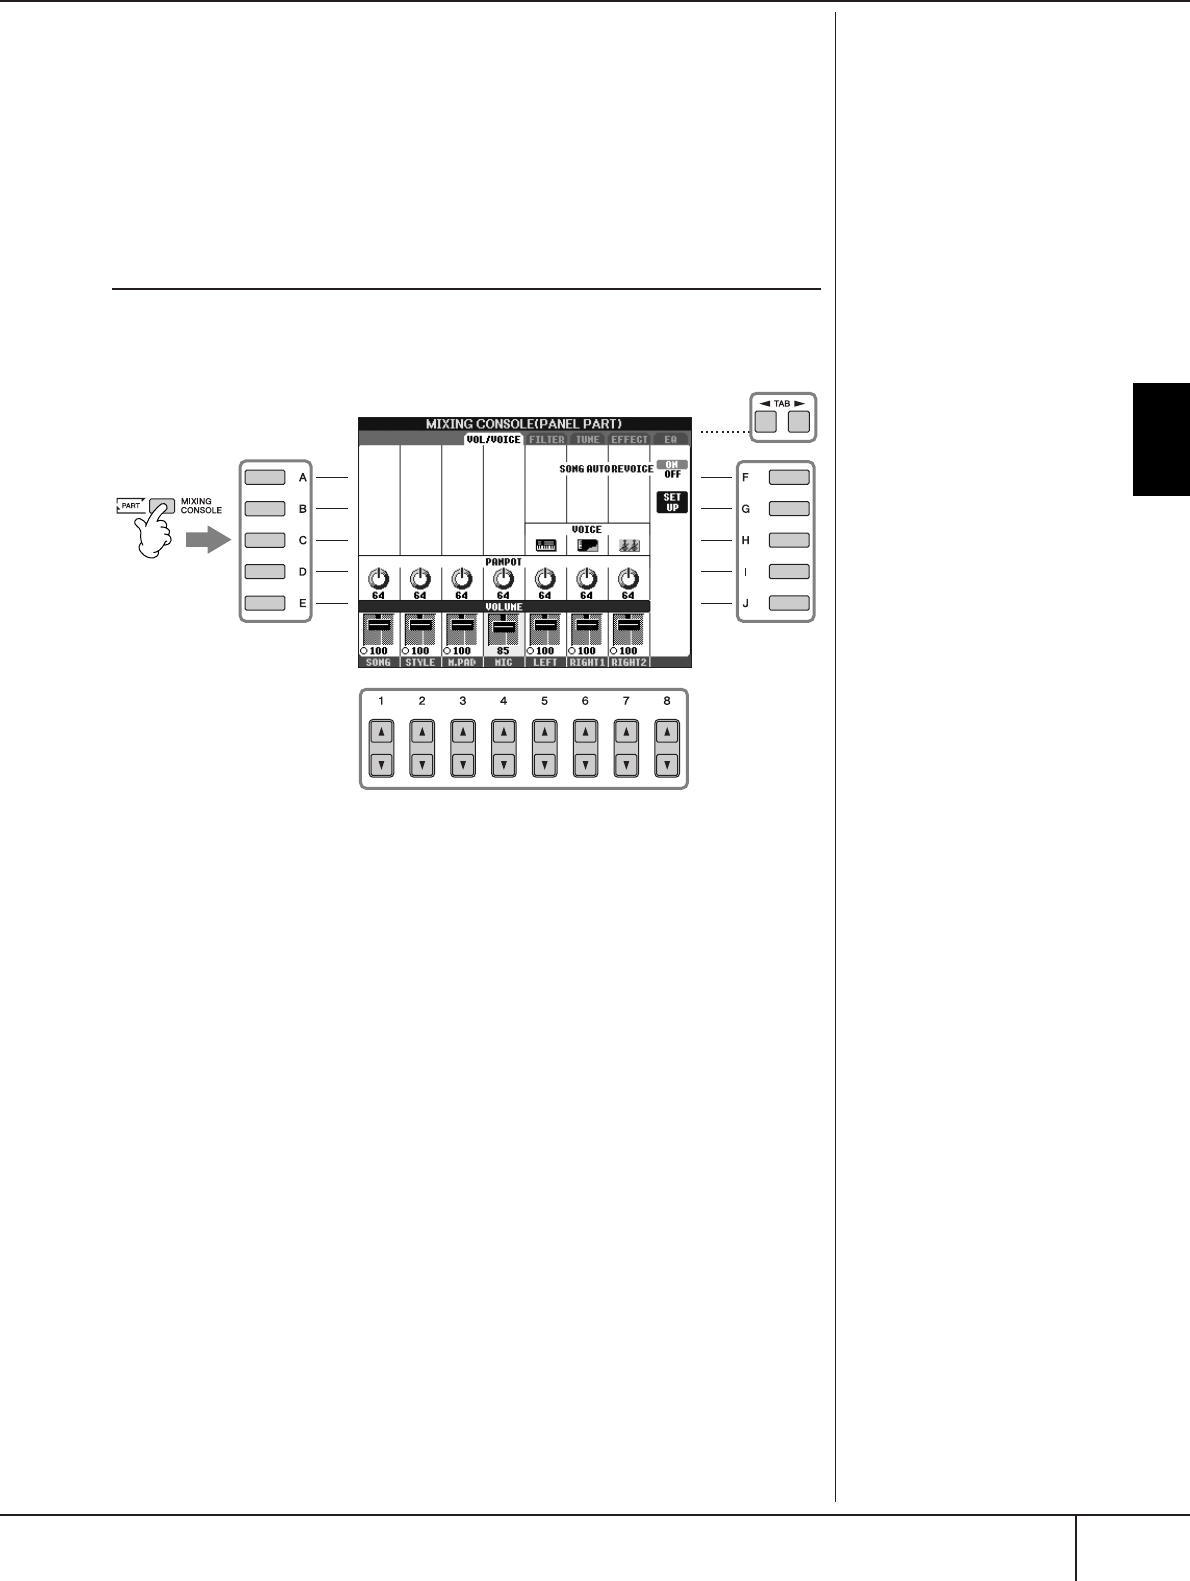
Editing the Volume and Tonal Balance (MIXING CONSOLE)
PSR-S900/S700 Owner’s Manual 91
Using, Creating and Editing Voices
Editing the Volume and Tonal Balance
(MIXING CONSOLE)
The Mixing Console gives you intuitive control over aspects of the keyboard parts
and Song/Style channels, including volume balance and the timbre of the sounds.
It lets you adjust the levels and stereo position (pan) of each Voice to set the opti-
mum balance and stereo image, and lets you set how the effects are applied.
Basic Procedure
1Press the [MIXING CONSOLE] button to call up the MIXING CON-
SOLE display.
2Use the TAB [
√
][
®
] buttons to call up the relevant setting display.
For information on the available parameters, see the section “Adjustable
items (parameters) in the MIXING CONSOLE displays” on page 92.
3Press the [MIXING CONSOLE] button repeatedly to call up the MIX-
ING CONSOLE display for the relevant parts.
The MIXING CONSOLE displays actually consist of several different
part displays. The part name is indicated at the top of the display. The
various MIXING CONSOLE displays alternate among the following:
PANEL PART display → STYLE PART display → SONG CH 1-8 display →
SONG CH 9-16 display
4Press one of the [A]–[J] buttons to select the desired parameter.
5Use the [1
ππ
ππ††
††
]–[8
ππ
ππ††
††
] buttons to set the value.
1, 3
5
44
2
Ab
out
P
arts
See below.
Instantly setting all parts to
the same value
Once you’ve selected a parame-
ter in step 4, you can instantly
set the same value to all other
parts. To do this, simultaneously
hold down one of the [A]–[J] but
-
tons, and use the [1]–[8] buttons
or the DATA ENTRY dial.

Using, Creating and Editing Voices
Editing the Volume and Tonal Balance (MIXING CONSOLE)
PSR-S900/S700 Owner’s Manual
92
6Save your MIXING CONSOLE settings.
• Saving the PANEL PART display settings
Register them to Registration Memory (page 135).
• Saving the STYLE PART display settings
Save them as Style data.
1Call up the operation display.
[FUNCTION] → [F] DIGITAL REC MENU
2Press the [B] button to call up the STYLE CREATOR display.
3Press the [EXIT] button to close the RECORD display.
4Press the [I] (SAVE) button to call up the Style Selection display for sav-
ing your data, then save it (page 73).
• Saving the SONG CH 1-8/9-16 display settings
First register the edited settings as part of the Song data (SET UP), then save
the Song.
See the SONG CREATOR → CHANNEL display → SETUP item explana-
tion on page 166.
Adjustable Items (parameters) in the MIXING CONSOLE Dis-
plays
The following explanations cover the available items (parameters) in the MIXING
CONSOLE displays.
VOL/VOICE
About Parts
PANEL PART
In the PANEL PART display of the MIXING CONSOLE, you can indepen-
dently adjust the level balance among the Keyboard parts (RIGHT 1, RIGHT
2 and LEFT), SONG, STYLE, MULTI PAD, and MIC parts (PSR-S900). The part
components are the same as those that appear in the display when you press
the panel [BALANCE] button.
STYLE PART
A Style consists of eight separate channels. Here you can adjust the level
balance among these eight channels or parts. These part components are the
same as those that appear in the display when you press the panel [CHAN-
NEL ON/OFF] button to call up the STYLE display.
SONG CH 1-8/9-16
A Song consists of sixteen separate channels. Here you can adjust the level
balance among these sixteen channels or parts. These part components are
the same as those that appear in the display when you press the panel
[CHANNEL ON/OFF] button to call up the SONG display.
•The RHY2 channel in the
STYLE PART display can only
be assigned to Drumkit Voices
and SFX kit Voices.
• When playing GM song data,
channel 10 (in the SONG CH
9-16) can only be used for a
Drum Kit Voice.
SONG AUTO REVOICE See page 94.
VOICE Allows you to re-select the Voices for each part. When the Style
channels are called up, neither Organ Flutes Voices nor User
Voices can be selected. When the Song channels are called up,
User Voices cannot be selected.
PANPOT Determines the stereo position of the selected part (channel).
VOLUME Determines the level of each part or channel, giving you fine
control over the balance of all the parts.
Editing the Volume and Tonal Balance (MIXING CONSOLE)
PSR-S900/S700 Owner’s Manual 93
Using, Creating and Editing Voices
FILTER
TUNE
EFFECT
EQ (Equalizer)
HARMONIC CONTENT Allows you to adjust the resonance effect (page 101) for each
part.
BRIGHTNESS Determines the brightness of the sound for each part by adjusting
the cutoff frequency (page 101).
PORTAMENTO TIME Portamento is a function that creates a smooth transition in pitch
from the first note played on the keyboard to the next. The
Portamento Time determines the pitch transition time. Higher
values result in a longer pitch change time. Setting this to “0”
results in no effect. This parameter is available when the selected
keyboard part is set to Mono (page 100).
PITCH BEND RANGE Determines the range of the PITCH BEND in semitones for each
keyboard part (when a pedal is assigned to this function).
OCTAVE Determines the range of the pitch change in octaves for each
keyboard part.
TUNING Determines the pitch of each keyboard part.
TRANSPOSE Allows you to set the transposition for the keyboard pitch (KEY-
BOARD), Song playback (SONG), or overall sound of the instru-
ment (MASTER), respectively.
TYPE Select the desired effect type (page 95). After editing various
parameters for the selected effect type, you can save it as an orig-
inal effect.
REVERB Adjusts the amount of the Reverb sound for each part or chan-
nel.
CHORUS Adjusts the amount of the Chorus sound for each part or chan-
nel.
DSP Adjusts the amount of the DSP sound for each part or channel.
TYPE Select the desired EQ type to suit the type of music and the per-
formance environment (page 97). This affects the overall sound
of the instrument.
EDIT For editing the EQ (page 98).
EQ HIGH Determines the center frequency of the high EQ band that is
attenuated/boosted for each part.
EQ LOW Determines the center frequency of the low EQ band that is
attenuated/boosted for each part.
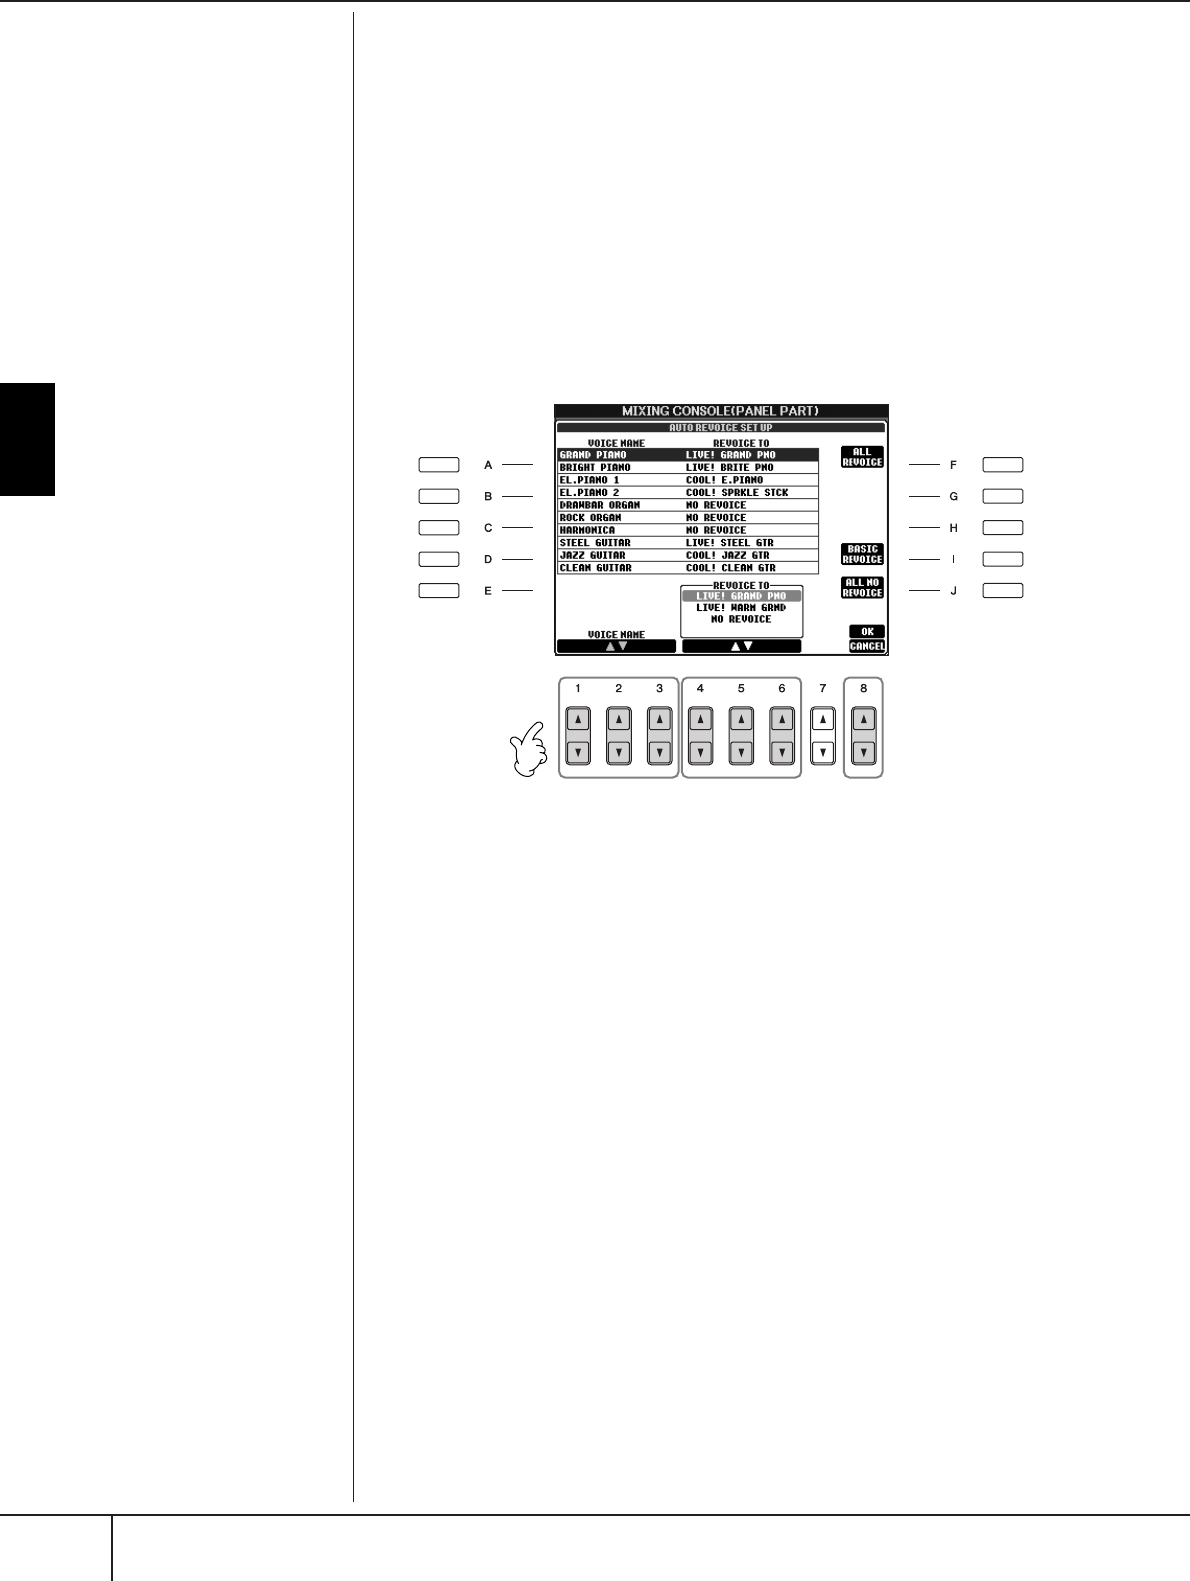
Using, Creating and Editing Voices
Editing the Volume and Tonal Balance (MIXING CONSOLE)
PSR-S900/S700 Owner’s Manual
94
Song Auto Revoice
This feature lets you use the high-quality sounds of the instrument to full advantage
with XG-compatible song data. When you play back any commercially available
XG song data or that created on other instruments, you can use Auto Revoice to
automatically assign the specially created Voices of the PSR-S900/S700 (Live!,
Cool!, etc.) instead of the conventional XG Voices of the same type.
1–3 Same operation as in the “Basic Procedure” on page 91. In step 2,
select the VOL/VOICE tab.
4Press the [G] (SETUP) button to call up the AUTO REVOICE SETUP dis-
play.
5Use the [1
ππ
ππ††
††
]–[3
ππ
ππ††
††
] buttons to select the Voice to be replaced.
6Use the [4
ππ
ππ††
††
]–[6
ππ
ππ††
††
] buttons to select the Voice for replacing the
XG selected in step 5.
Several different Revoice settings are available by using the [F]/[I]/[J] but-
tons, for conveniently calling up the recommended Revoice settings in one
action.
ALL REVOICE: Replaces all of the replaceable XG Voices with the
high-quality Voices of the PSR-S900/S700.
BASIC REVOICE: Replaces only the recommended Voices that are suit-
able for playing back the song.
ALL NO REVOICE: All Voices are returned to the original XG Voices.
7Press the [8
ππ
ππ
] (OK) button to apply your Revoice settings.
To cancel the Revoice operation, press the [8
†
] (CANCEL) button.
8In the VOL/VOICE tab display, press the [F] button to set SONG AUTO
REVOICE to ON.
56 7
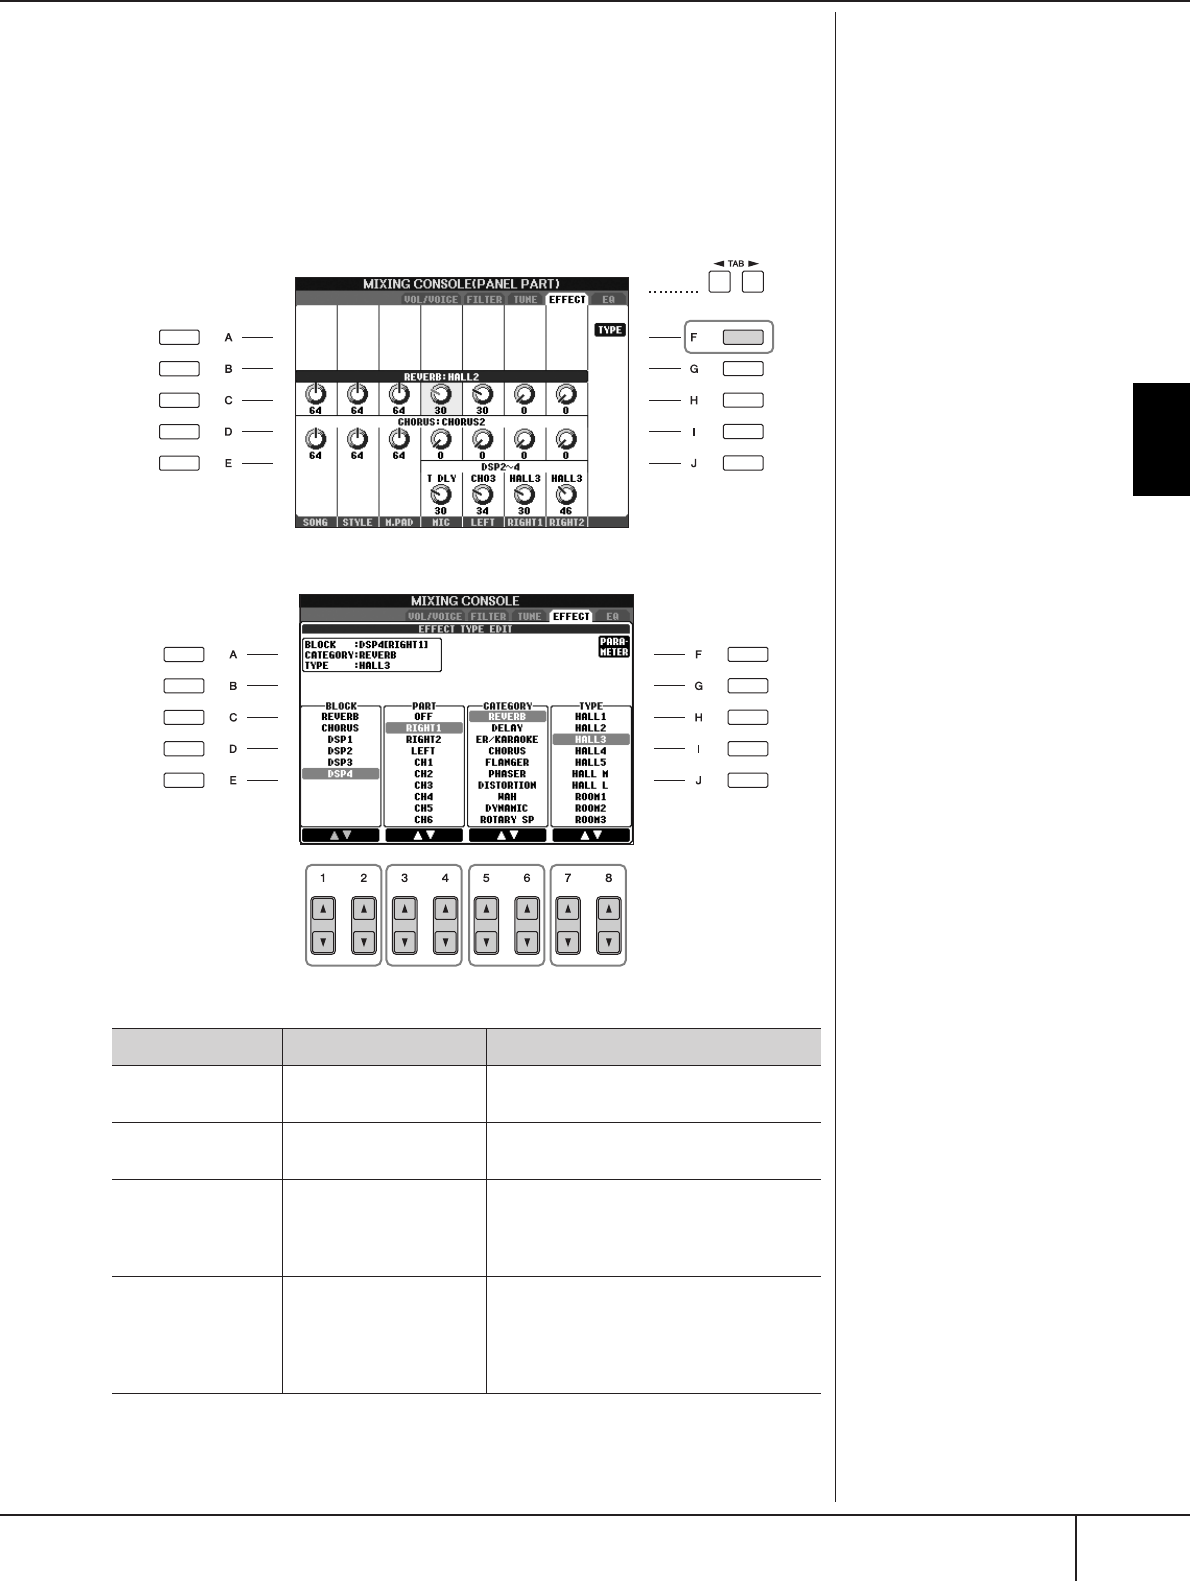
Editing the Volume and Tonal Balance (MIXING CONSOLE)
PSR-S900/S700 Owner’s Manual 95
Using, Creating and Editing Voices
Effect Type
■Selecting an Effect type
1–3 Same operation as in the “Basic Procedure” on page 91. In step 2,
select the EFFECT tab.
4Press the [F] (TYPE) button to call up the Effect Type selection display.
5Use the [1
ππ
ππ††
††
]/[2
ππ
ππ††
††
] buttons to select the effect BLOCK.
6Use the [3
ππ
ππ††
††
]/[4
ππ
ππ††
††
] buttons to select the part to which you want
to apply the effect.
DSP:
Stands for Digital Signal Proces-
sor (or Processing). DSP changes
and enhances the audio signal in
the digital realm to produce a
wide range of effects.
Effect Block Effect-applicable parts Effect characteristics
REVERB All parts Reproduces the warm ambience of playing
in a concert hall or jazz club.
CHORUS All parts Produces a rich “fat” sound as if several
parts are being played simultaneously.
DSP1 STYLE PART
SONG CHANNNEL 1–16
In addition to the Reverb and Chorus types,
the instrument has special DSP effects, that
include additional effects usually used for a
specific part, such as distortion and tremolo.
DSP2
DSP3
DSP4
RIGHT 1, RIGHT 2, LEFT,
SONG CHANNEL 1-16
Microphone sound*
(PSR-S900)
Any unused DSP blocks are automatically
assigned to the appropriate parts (channels)
as needed.
* Handled only by DSP4.
5678

Using, Creating and Editing Voices
Editing the Volume and Tonal Balance (MIXING CONSOLE)
PSR-S900/S700 Owner’s Manual
96
7Use the [5
ππ
ππ††
††
]/[6
ππ
ππ††
††
] buttons to select the effect CATEGORY.
8Use the [7
ππ
ππ††
††
]/[8
ππ
ππ††
††
] buttons to select the effect TYPE.
If you want to edit the effect parameters, go on to the next operation.
■Editing and Saving the effect
9Press the [F] (PARAMETER) button to call up the display for editing
the effect parameters.
10 If you have selected one of the DSP 2-4 effect blocks in step 5:
You can edit its standard parameters as well as its variation parameter.
To select the standard type of parameters, press the [B] button. To select its
variation parameter, press the [E] button.
11 Select one of the parameters you want to edit by using the [4
ππ
ππ††
††
]/
[5
ππ
ππ††
††
] buttons.
Available parameters differ depending on the selected Effect type.
12 Adjust the value for the selected parameter by using the [6
ππ
ππ††
††
]/
[7
ππ
ππ††
††
] buttons.
If you have selected the REVERB, CHORUS or DSP1 effect block in step 5:
Adjust the Effect Return Level by pressing [8
π†
] button.
13 Press the [I] (SAVE) button to call up the display for saving your origi-
nal effect.
Re-selecting the Effect block,
category and type
Use the [1
π†
]–[3
π†
] but-
tons. The re-selected effect con-
figuration is displayed at the
upper left side box in the display.
13
10
10
11 12
Effect Return Level:
Determines the level or amount
of effect applied.
This is set for all parts or channels.
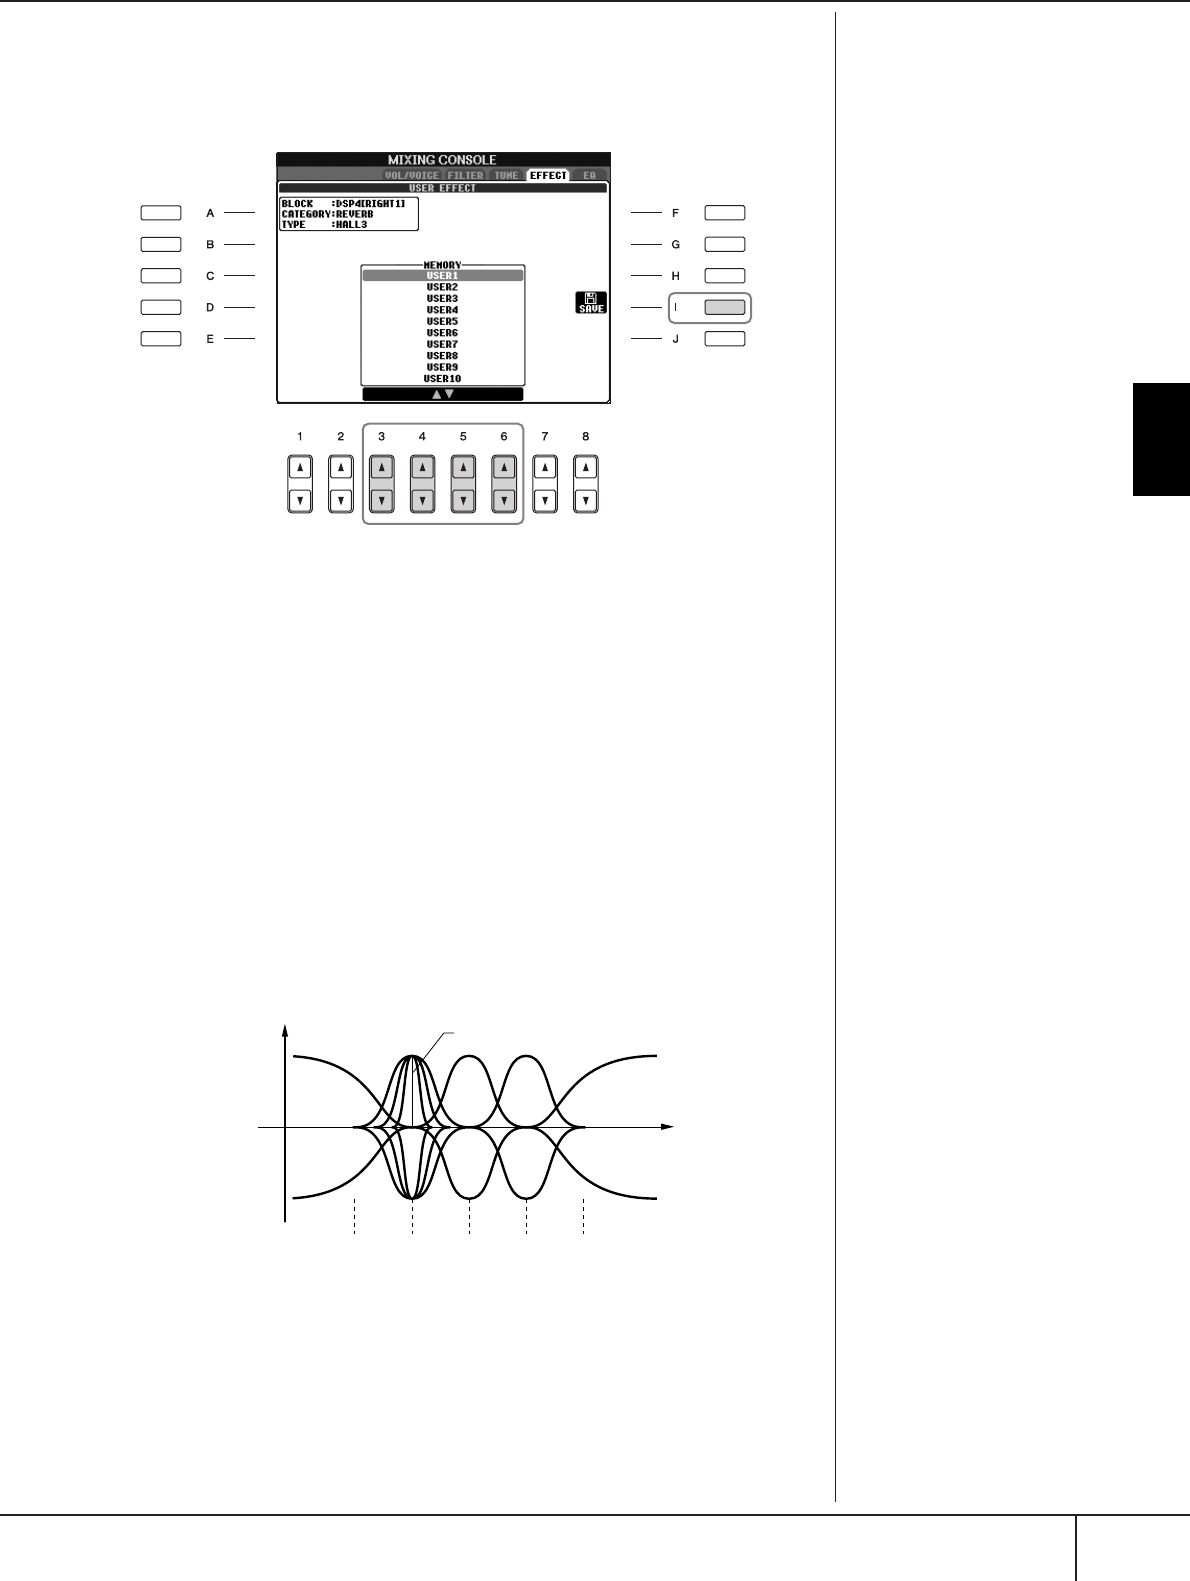
Editing the Volume and Tonal Balance (MIXING CONSOLE)
PSR-S900/S700 Owner’s Manual 97
Using, Creating and Editing Voices
14 Use the [3
ππ
ππ††
††
]–[6
ππ
ππ††
††
] buttons to select the destination for saving
the effect.
The maximum number for effects that can be saved differs depending on the
effect block.
15 Press the [I] (SAVE) button to save the effect (page 73).
When recalling the saved effect, use the same procedure as in step 8.
EQ (Equalizer)
Equalizer (also called “EQ”) is a sound processor that divides the frequency spec-
trum into multiple bands that can be boosted or cut as required to tailor the overall
frequency response. Usually an equalizer is used to correct the sound from speak-
ers to match the special character of the room. For example, you can cut some of
the low range frequencies when playing in large spaces where the sound is too
“boomy,” or boost the high frequencies in rooms and close spaces where the sound
is relatively “dead” and free of echoes. The instrument possesses a high-grade five-
band digital EQ. With this function, a final effect—tone control can be added to the
output of your instrument. You can select one of the five preset EQ settings in the
EQ display. You can even create your own custom EQ settings by adjusting the fre-
quency bands, and save the settings to one of two User Master EQ types.
■Select a Preset EQ type
1–3 Same operation as in the “Basic Procedure” on page 91. In step 2,
select the EQ tab.
4Use the [A]/[B] buttons to select a preset EQ type to suit your perfor-
mance (music style or environment).
15
14
0
Gain
5 bands →
Bandwidth
(also called “Shape” or “Q”)
Freq (Frequency)
EQ1 EQ2 EQ3 EQ4 EQ5
LOW LOW MID MID HIG MID HIGH
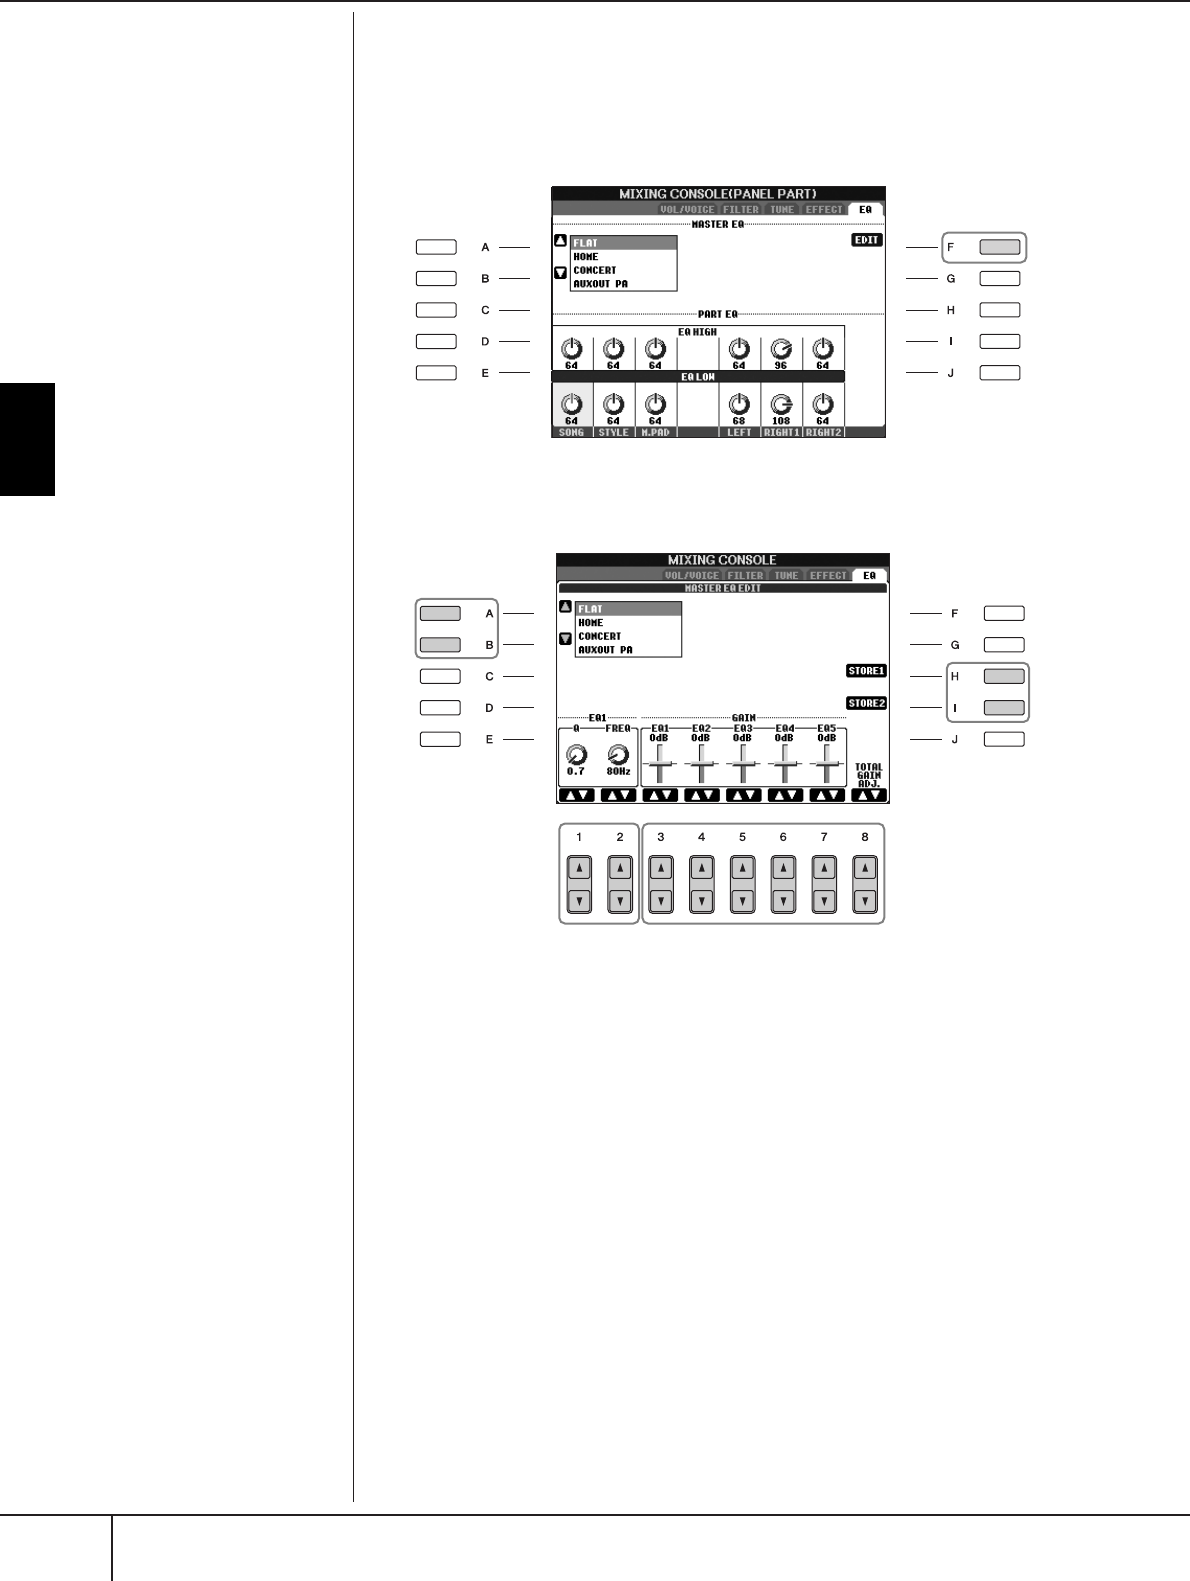
Using, Creating and Editing Voices
Editing the Volume and Tonal Balance (MIXING CONSOLE)
PSR-S900/S700 Owner’s Manual
98
If you want to edit the EQ parameters, go on to the next operation.
■Editing and Saving the selected EQ
5Press the [F] (EDIT) button to call up the MASTER EQ EDIT display.
6Use the [A]/[B] buttons to select a preset EQ type.
7Use the [3
ππ
ππ††
††
]–[7
ππ
ππ††
††
] buttons to boost or cut each of the five
bands.
Use the [8
π†
] button to boost or cut all the five bands at the same time.
8Adjust the Q (bandwidth) and the FREQ (center frequency) of the
band selected in step 7.
• Bandwidth (also called “Shape” or “Q”)
Use the [1
π†
]button. The higher the value of Q, the narrower the band
width.
• FREQ (center frequency)
Use the [2
π†
]button. The available FREQ range is different for each
band.
9Press the [H] or [I] (STORE 1 or 2) button to save the edited EQ type
(page 73).
Up to two types of EQ can be created and saved. When recalling the saved
EQ type, use the same procedure as in step 6.
6
9
87
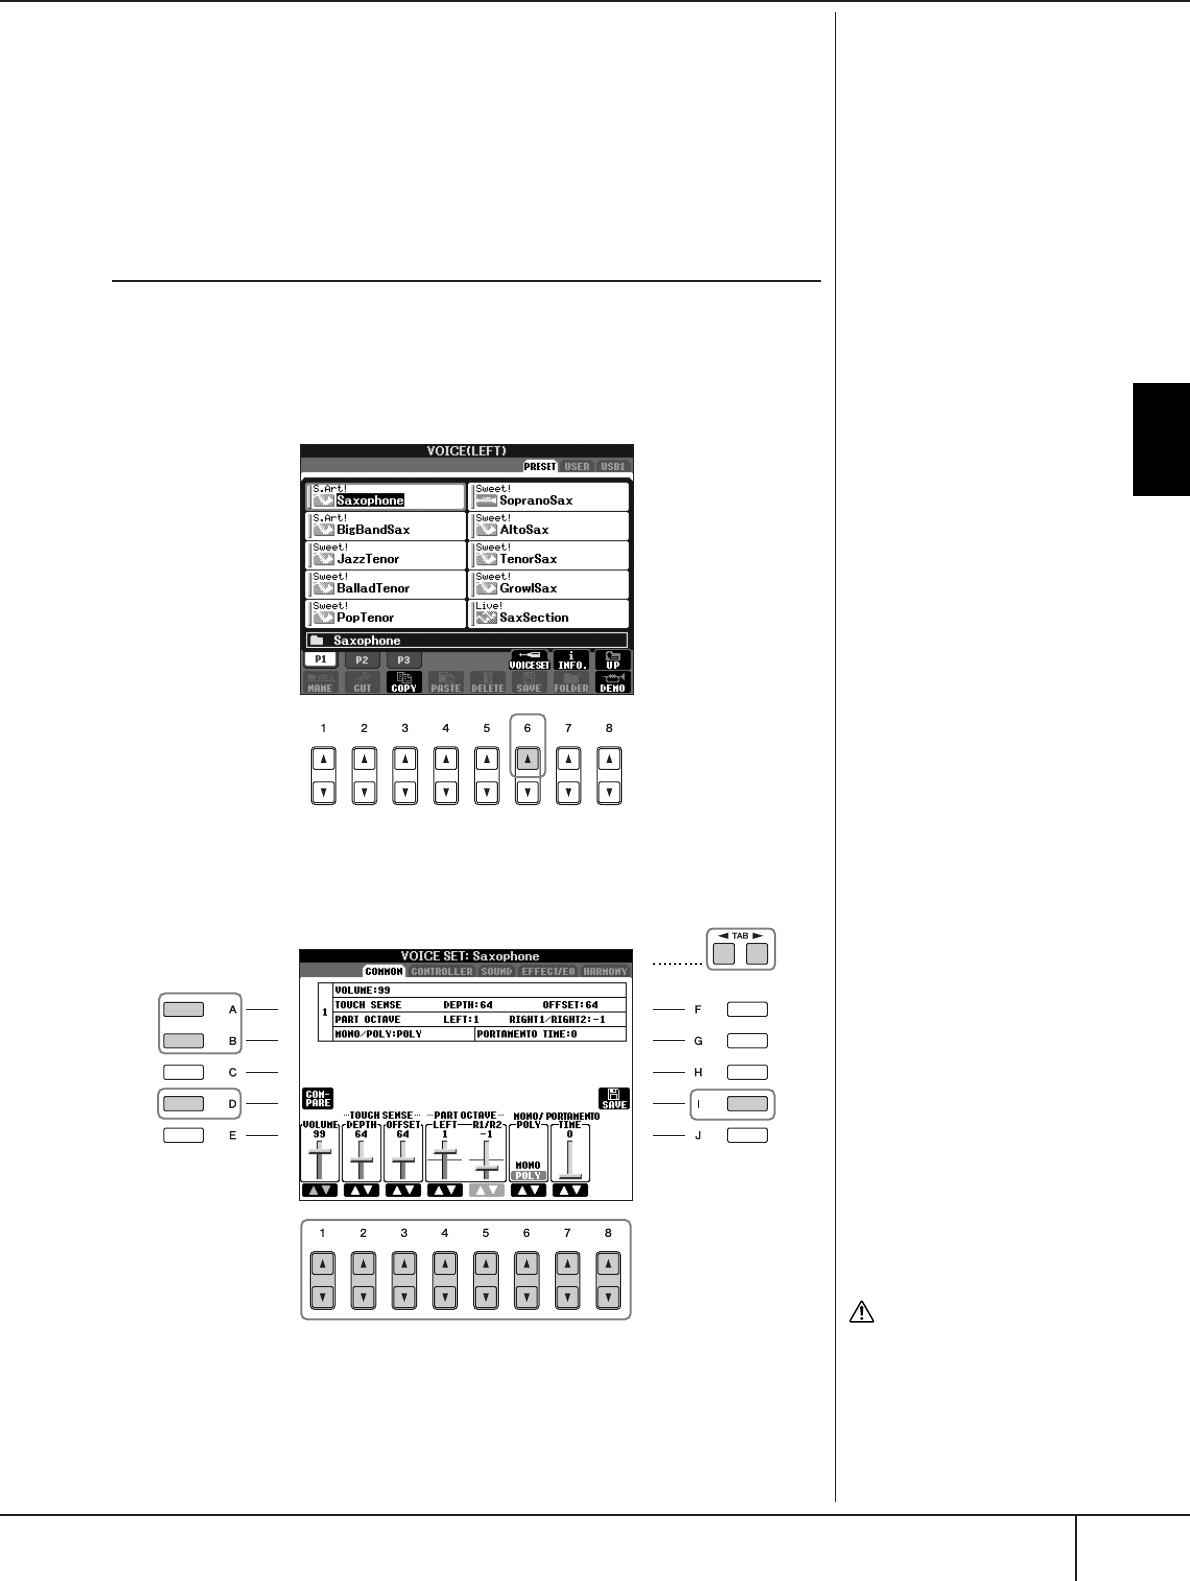
Voice Creating—Voice Set
PSR-S900/S700 Owner’s Manual 99
Using, Creating and Editing Voices
Voice Creating—Voice Set
The PSR-S900/S700 has a Voice Set feature that allows you to create your own
Voices by editing some parameters of the existing Voices. Once you’ve created a
Voice, you can save it as a User Voice to the USER/(USB) display for future recall.
The editing method is different for the ORGAN FLUTES Voices and for other
Voices.
Basic Procedure
1Select the desired Voice (other than an Organ Flutes Voice)
(page 31).
2Press the [6
ππ
ππ
] (VOICE SET) button to call up the VOICE SET display.
3Use the TAB [
√
][
®
] buttons to call up the relevant setting display.
For information on the available parameters, see the “Editable Parameters in
the VOICE SET Displays” on page 100.
4As necessary, use the [A]/[B] buttons to select the item (parameter)
to be edited.
5Use the [1
ππ
ππ††
††
]–[8
ππ
ππ††
††
] buttons to edit the Voice.
Editing the ORGAN FLUTES
Voices
The editing method is different
for the ORGAN FLUTES Voices
compared to other Voices. For
instructions on editing the
ORGAN FLUTES Voices, see
page 103.
CAUTION
If you select another Voice
without saving the settings,
the settings will be lost. If you
wish to store the settings
here, make sure to save the
settings as a User Voice before
selecting another Voice or
turning the power off.
4
6
3
7
5
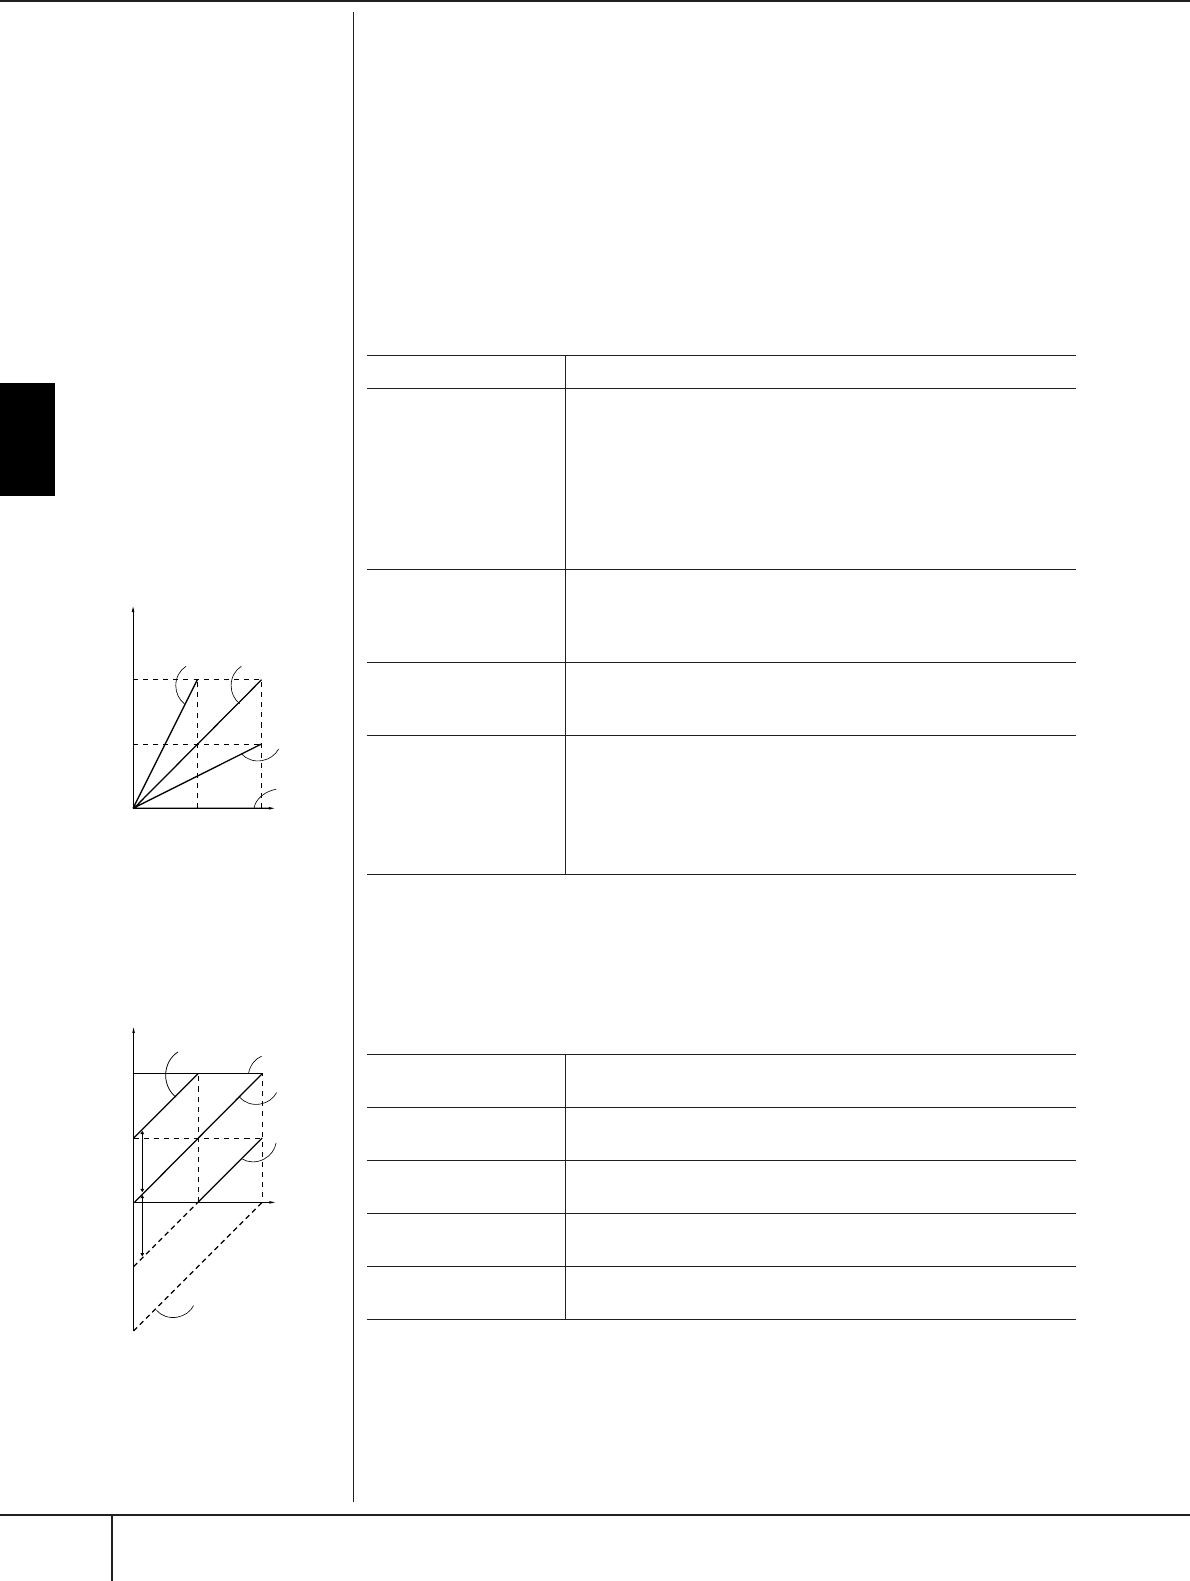
Using, Creating and Editing Voices
Voice Creating—Voice Set
PSR-S900/S700 Owner’s Manual
100
6Press the [D] (COMPARE) button to compare the sound of the edited
Voice with the unedited Voice.
7Press the [I] (SAVE) button to save your edited Voice (page 73).
Editable Parameters in the VOICE SET Displays
The following covers in detail the editable parameters that are set in the displays
explained in step 3 of the “Basic Procedure” on page 99. The Voice Set parameters
are organized into five different displays. The parameters in each display are
described separately, below. These are also treated as part of the Voice Set parame-
ters (page 105), which are automatically called up when the Voice is selected.
COMMON
CONTROLLER
MODULATION
The MODULATION wheel can be used to modulate the parameters below as well
as the pitch (vibrato). Here, you can set the degree to which the pedal modulates
each of the following parameters.
The available parameters differ
depending on the Voice.
Changes to velocity curve
according to Touch sensitivity
TOUCH SENSE DEPTH
Changes to velocity curve
according to VelDepth (with Off-
set set to 64)
TOUCH SENSE OFFSET
Changes to velocity curve
according to VelOffset (with
Depth set to 64)
127
127
64
64
0
A
ctual Velocity
f
or tone generator
Depth=127
(twice)
Depth=32
(half)
Depth=64
(normal)
Depth=0
Received Velocity
(Actual KeyOn speed)
64
127
0127
64
Actual Velocity
for tone generator
Offset=96 (+64) Offset=127
(+127)
Offset=64
(normal)
Offset=32
(-64)
Received
Velocity
(Actual
KeyOn speed)
Offset=0 (-127)
Depends on
offset
Depends on
offset
VOLUME Adjusts the volume of the current edited Voice.
TOUCH SENSE
Adjusts the touch sensitivity (velocity sensitivity), or how greatly the
volume responds to your playing strength.
DEPTH
Determines the velocity sensitivity, or how much the level of the
voice changes in response to your playing strength (velocity).
OFFSET
Determines the amount by which received velocities are adjusted
for the actual velocity effect.
PART OCTAVE Shifts the octave range of the edited Voice up or down in octaves.
When the edited Voice is used as any of the RIGHT 1-2 parts, the
R1/R2 parameter is available; when the edited Voice is used as the
LEFT part, the LEFT parameter is available.
MONO/POLY Determines whether the edited Voice is played monophonically or
polyphonically. This setting can also be made from the VOICE
CONTROL “MONO” button on the panel (page 53).
PORTAMENTO TIME Sets the portamento time when the edited Voice is set to “MONO”
above.
nPortamento Time:
The Portamento Time determines the pitch transition time. Portamento is
a function that creates a smooth transition in pitch from the first note
played on the keyboard to the next.
FILTER Determines the degree to which the pedal modulates the Filter Cut-
off Frequency. For details about the filter, see page 101.
AMPLITUDE Determines the degree to which the pedal modulates the amplitude
(volume).
LFO PMOD Determines the degree to which the pedal modulates the pitch, or
the vibrato effect.
LFO FMOD Determines the degree to which the pedal modulates the Filter
modulation, or the wah effect.
LFO AMOD Determines the degree to which the pedal modulates the amplitude,
or the tremolo effect.
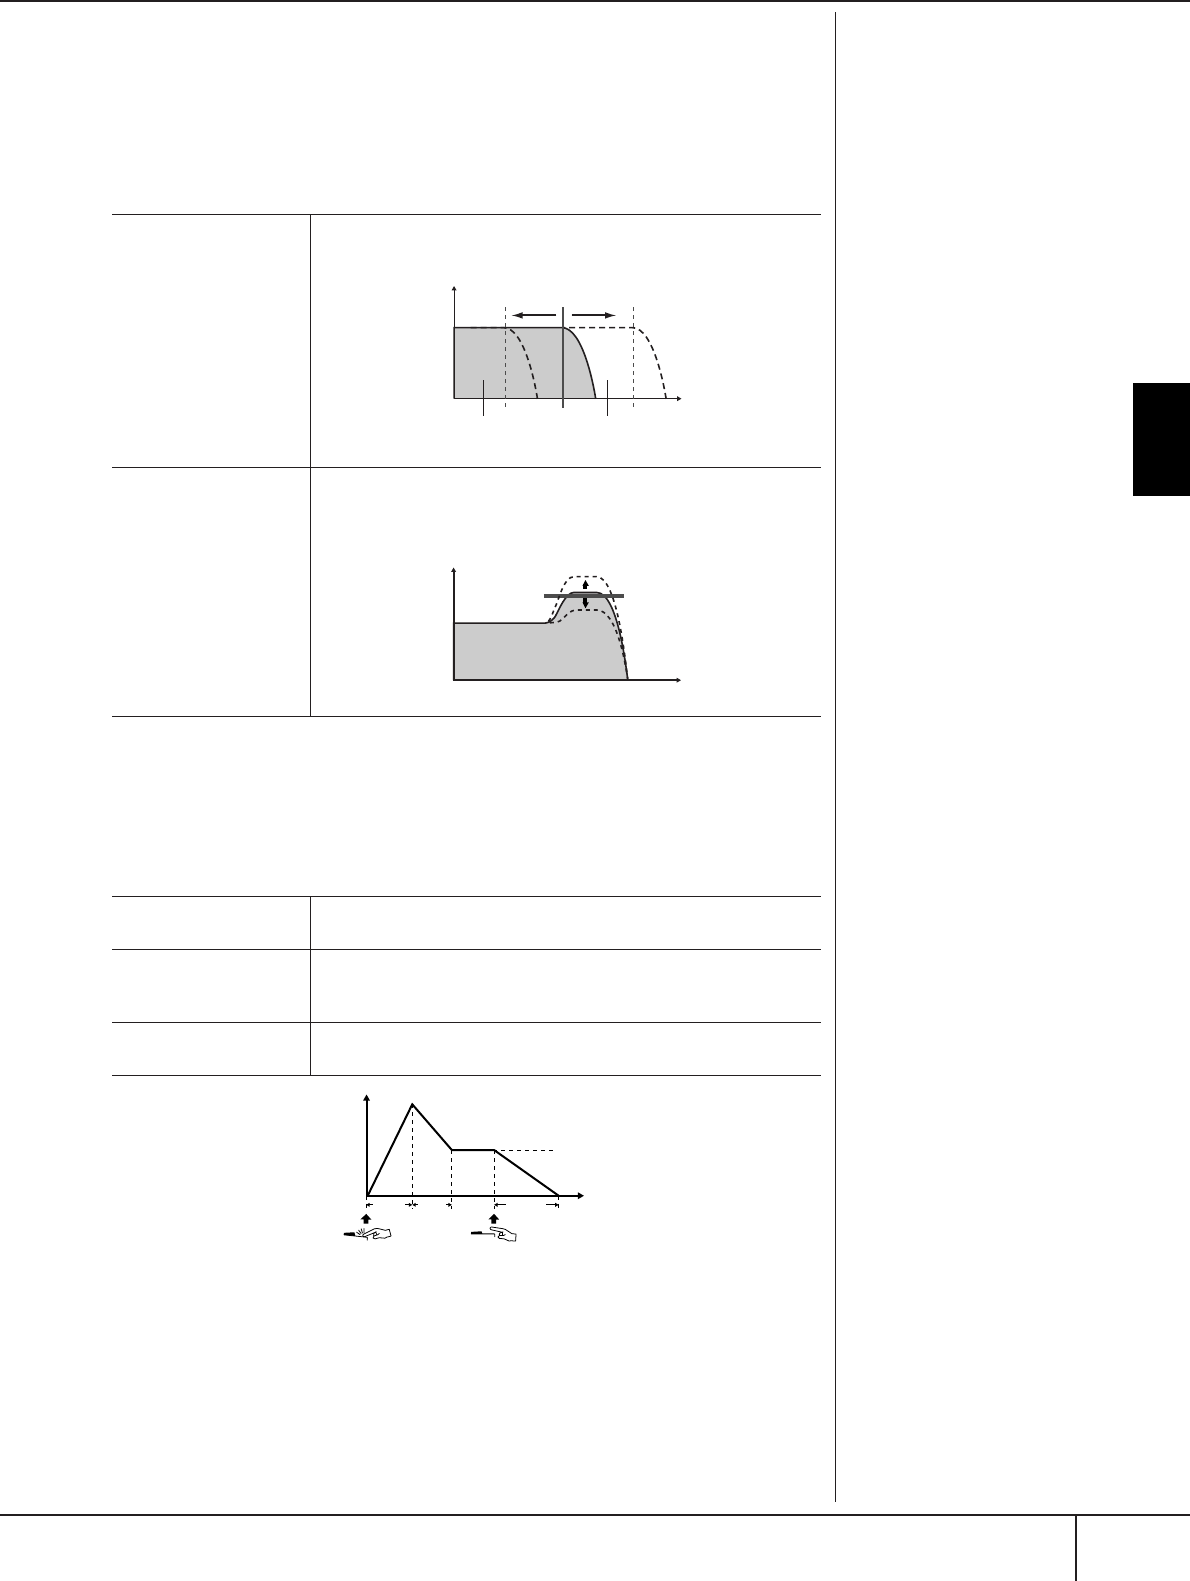
Voice Creating—Voice Set
PSR-S900/S700 Owner’s Manual 101
Using, Creating and Editing Voices
SOUND
● FILTER
Filter is a processor that changes the timbre or tone of a sound by either blocking
or passing a specific frequency range. The parameters below determine the overall
timbre of the sound by boosting or cutting a certain frequency range. In addition to
making the sound either brighter or mellower, Filter can be used to produce elec-
tronic, synthesizer-like effects.
● EG
The EG (Envelope Generator) settings determine how the level of the sound
changes in time. This lets you reproduce many sound characteristics of natural
acoustic instruments—such as the quick attack and decay of percussion sounds, or
the long release of a sustained piano tone.
BRIGHTNESS Determines the cutoff frequency or effective frequency range of the
filter (see diagram). Higher values result in a brighter sound.
HARMONIC CONTENT Determines the emphasis given to the cutoff frequency (resonance),
set in BRIGHTNESS above (see diagram). Higher values result in a
more pronounced effect.
ATTACK Determines how quickly the sound reaches its maximum level after
the key is played. The lower the value, the quicker the attack.
DECAY Determines how quickly the sound reaches its sustain level (a
slightly lower level than maximum). The lower the value, the
quicker the decay.
RELEASE Determines how quickly the sound decays to silence after the key is
released. The lower the value, the quicker the decay.
Volume
Cutoff frequency
These frequencies are
“passed” by the filter.
Frequency (pitch)
Cutoff range
Volume
Frequency (pitch)
Resonance
Level
Sustain level
Time
Key on Key off
ATTACK DECAY RELEASE
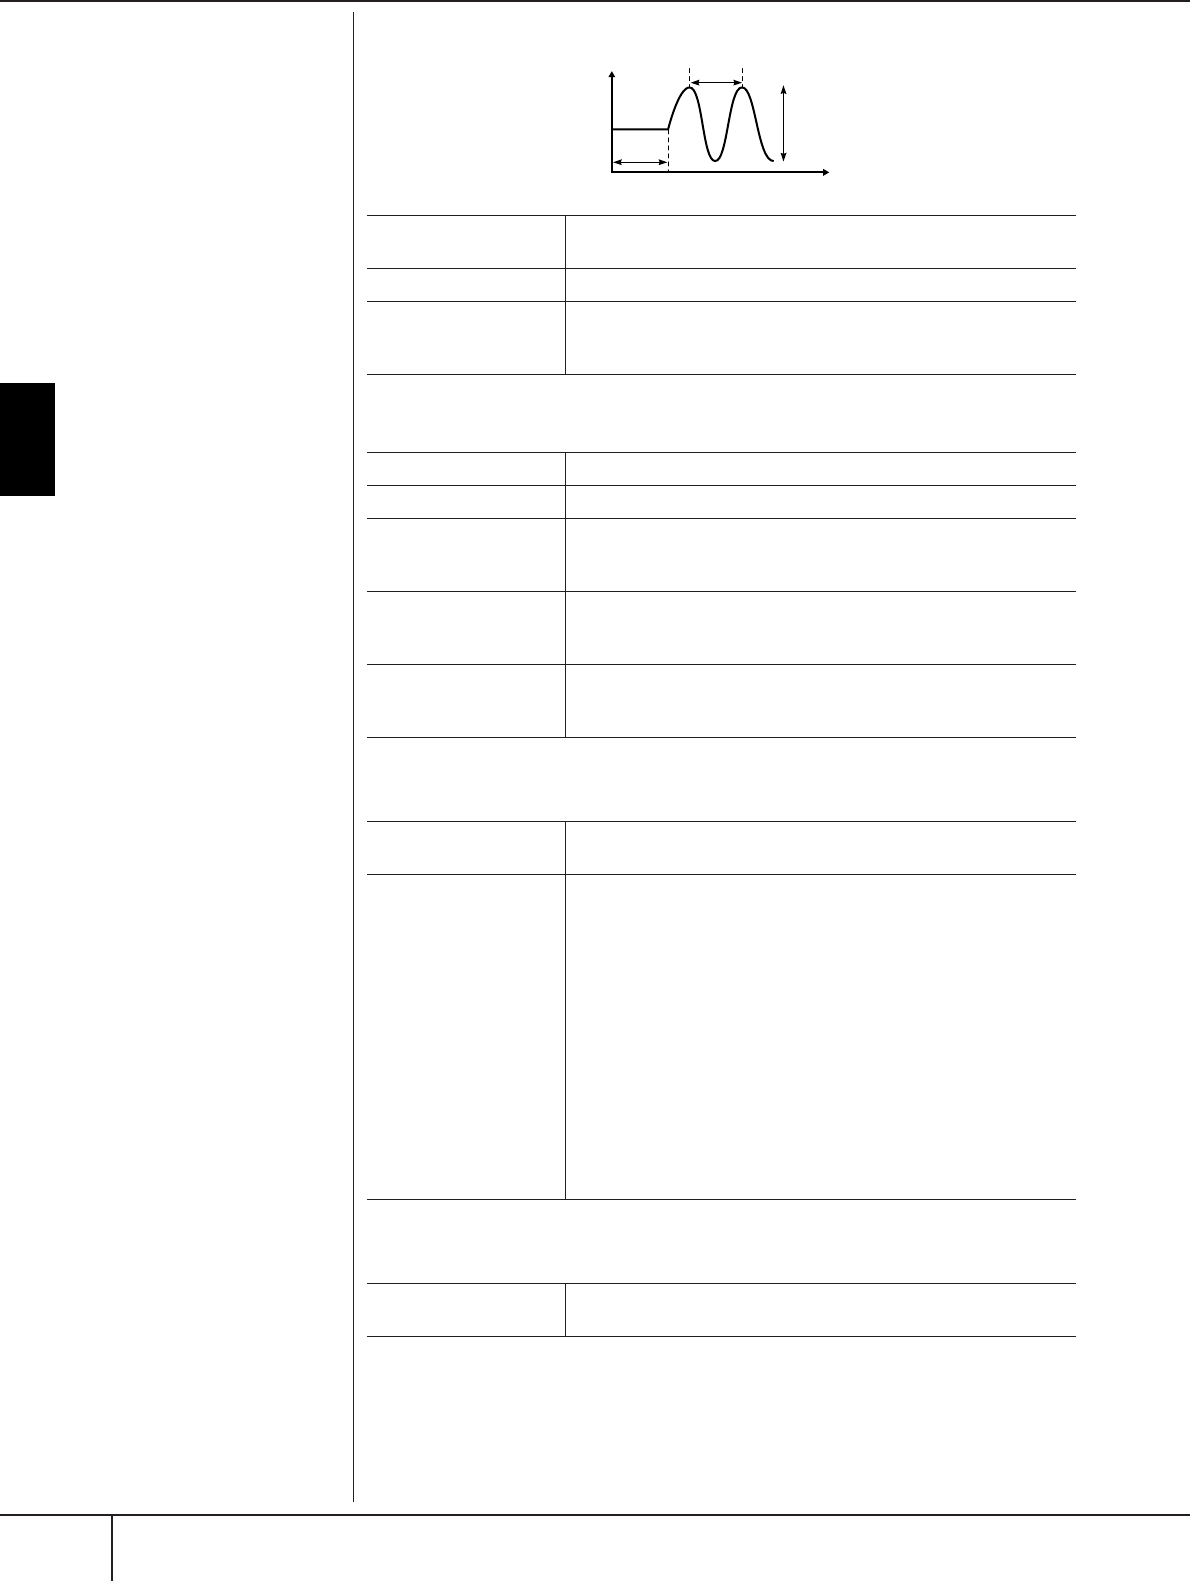
Using, Creating and Editing Voices
Voice Creating—Voice Set
PSR-S900/S700 Owner’s Manual
102
● VIBRATO
EFFECT/EQ
1. REVERB DEPTH/CHORUS DEPTH/DSP DEPTH
2. DSP
3. EQ
HARMONY
Harmony sets the Right 1 and 2 parts together. Press the PART SELECT [RIGHT 1]
button before you set it.
This has the same settings as the display of “Selecting the Harmony/Echo type” on
page 89 in step 2.
Vibrato:
A quavering, vibrating sound
effect that is produced by regu-
larly modulating the pitch of the
Voice.
DEPTH Determines the intensity of the Vibrato effect. Higher settings result
in a more pronounced Vibrato.
SPEED Determines the speed of the Vibrato effect.
DELAY Determines the amount of time that elapses between the playing of
a key and the start of the Vibrato effect. Higher settings increase the
delay of the Vibrato onset.
REVERB DEPTH Adjusts the reverb (page 95) depth.
CHORUS DEPTH Adjusts the chorus (page 95) depth.
DSP DEPTH Adjusts the DSP (page 95) depth.
If you want to re-select the DSP type, you can do so in the DSP
menu explained below.
DSP ON/OFF Determines whether the DSP is on or off.
This setting can also be made from the VOICE CONTROL “DSP”
button on the panel (page 53).
PANEL SUSTAIN Determines the sustain level applied to the edited voice when the
VOICE CONTROL [SUSTAIN] button on the panel is turned on
(page 53).
DSP TYPE Selects the DSP effect category and type. Select a type after select-
ing a category.
VARIATION Two variations are provided for each DSP type.
Here, you can edit the VARIATION on/off status and variation-
parameter value setting.
ON/OFF
The factory-programmed assignments are set to variation-off for all
Voices (standard variation of DSP is assigned). If you select VARIA-
TION ON here, a variation of the DSP effect is assigned to the
Voice. The variation parameter value can be adjusted in the
VALUE menu explained below. This setting can also be made from
the VOICE CONTROL “DSP VARI.” button on the panel (page 53).
This button is effective only when the [DSP] button is on.
PARAMETER
Displays the variation parameter.
VALUE
Adjusts the value of the DSP variation parameter.
EQ LOW/HIGH These determine the Frequency and Gain of the Low and High EQ
bands.
Pitch
Time
SPEED
DEPTH
DELAY

Voice Creating—Voice Set
PSR-S900/S700 Owner’s Manual 103
Using, Creating and Editing Voices
Creating Your Original Organ Flutes Voices
The PSR-S900/S700 features a variety of lush, dynamic organ Voices that you can
call up with the [ORGAN FLUTES] button. It also gives you the tools to create your
own original organ sounds by using the Voice Set function. Just as on a traditional
organ, you can create your own sounds by adjusting the levels of the flute footages.
Basic Procedure
1Select the desired Organ Flutes Voice to be edited (page 31).
2In the ORGAN FLUTES Voice Selection display, press the [6
ππ
ππ
] (FOOT-
AGE) button to call up the VOICE SET [ORGAN FLUTES] display.
3Use the TAB [
√
][
®
] buttons to call up the relevant setting display.
For information on the available parameters, see the “Editable Parameters in
the VOICE SET [ORGAN FLUTES] displays” on page 104.
4If you select the EFFECT/EQ tab display, use the [A]/[B] buttons to
select the parameter to be edited.
6
4
5
5
5
3
(When selecting
the EFFECT/EQ
tab display.)

Using, Creating and Editing Voices
Voice Creating—Voice Set
PSR-S900/S700 Owner’s Manual
104
5Use the [A]–[D], [F]–[H] and [1
ππ
ππ††
††
]–[8
ππ
ππ††
††
] buttons to edit the
Voice.
6Press the [I] (SAVE) button to save your edited ORGAN FLUTES Voice
(page 73).
Editable Parameters in the VOICE SET [ORGAN FLUTES] displays
The following covers in detail the editable parameters that are set in the displays
explained in step 3 of the “Basic Procedure.” The Organ Flutes parameters are
organized into three different pages. The parameters in each page are described
separately, below. These are also treated as part of the Voice Set parameters
(page 105), which are automatically called up when the Voice is selected.
FOOTAGE, VOLUME/ATTACK (common parameters)
FOOTAGE
CAUTION
If you select another Voice
without saving the settings,
the settings will be lost. If you
wish to store the settings
here, make sure to save the
settings as a User Voice before
selecting another Voice or
turning the power off.
ORGAN TYPE Specifies the type of organ tone generation to be simulated: Sine or
Vintage.
ROTARY SP SPEED Alternately switches between the slow and fast rotary speaker
speeds when a rotary speaker effect is selected for the Organ Flutes
(see “EFFECT/EQ” DSP TYPE parameter on page 102), and the Voice
Effect DSP (page 102) is turned on (this parameter has the same
effect as the Voice Effect VARIATION ON/OFF parameter).
VIBRATO ON/OFF Alternately turns the vibrato effect for the Organ Flutes Voice ON or
OFF.
VIBRATO DEPTH Sets the Vibrato depth to one of three levels: 1 (low), 2 (mid), or 3
(high).
Footage:
The term “footage” is a reference
to the sound generation of tradi-
tional pipe organs, in which the
sound is produced by pipes of
different lengths (in feet).
16' ← → 5 1/3' Which footage (16' or 5 1/3') is operated with the [1
π†
] button can
be switched by pressing the [D] button.
16'–1' Determines the basic sound of the organ flutes. The longer the pipe, the
lower the pitch of the sound. Hence, the 16' setting determines the low-
est pitched component of the Voice, while the 1' setting determines the
highest pitched component. The higher the value of the setting, the
greater the volume of the corresponding footage. Mixing various vol-
umes of the footages lets you create your own distinctive organ sounds.

Voice Creating—Voice Set
PSR-S900/S700 Owner’s Manual 105
Using, Creating and Editing Voices
VOLUME/ATTACK
EFFECT/EQ
Same parameters as in the VOICE SET “EFFECT/EQ” tab display explained on
page 102.
VOL Adjusts the overall volume of the Organ Flutes. The longer the
graphic bar, the greater the volume.
RESP Affects both the attack and release (page 101) portion of the sound,
increasing or decreasing the response time of the initial swell and
release, based on the FOOTAGE controls. The higher the value, the
slower the swell and release.
VIBRATO SPEED Determines the speed of the vibrato effect controlled by the Vibrato
On/Off and Vibrato Depth on the previous page.
MODE The MODE control selects between two modes: FIRST and EACH.
In the FIRST mode, attack is applied only to the first notes played
and held simultaneously; while the first notes are held, any subse-
quently played notes have no attack applied. In the EACH mode,
attack is applied equally to all notes.
4', 2 2/3', 2' These determine the attack sound volume of the ORGAN FLUTE
Voice. The 4', 2-2/3' and 2' controls increase or reduce the volume
of attack sound at the corresponding footages. The longer the
graphic bar, the greater the attack sound volume.
LENG Affects the attack portion of the sound producing a longer or shorter
decay immediately after the initial attack. The longer the graphic
bar, the longer the decay.
Disabling automatic selection of Voice Sets (effects, etc.)
Each Voice is linked to its related parameter settings that are indicated in the
VOICE SET displays, including effects and EQ. Usually these settings are
automatically called up when a Voice is selected. However, you can also
disable this feature by the operation in the relevant display as explained
below.
For example, if you want to change the Voice yet keep the same Harmony
effect, set the HARMONY/ECHO parameter to OFF (in the display explained
below).
You can set these independently by keyboard part and parameter group.
1Call up the operation display.
[FUNCTION] → [E] REGIST.SEQUENCE/FREEZE/VOICE SET → TAB [
√
][
®
]
VOICE SET
2Use the [A]/[B] buttons to select a keyboard part.
3Use the [4
ππ
ππ††
††
]–[7
ππ
ππ††
††
] buttons to enable/disable automatic calling
up of the settings (ON or OFF) independently for each parameter
group.
Refer to the Data List for a list of parameters contained in each parameter
group. The Data List is available at the Yamaha website. (See page 5.)
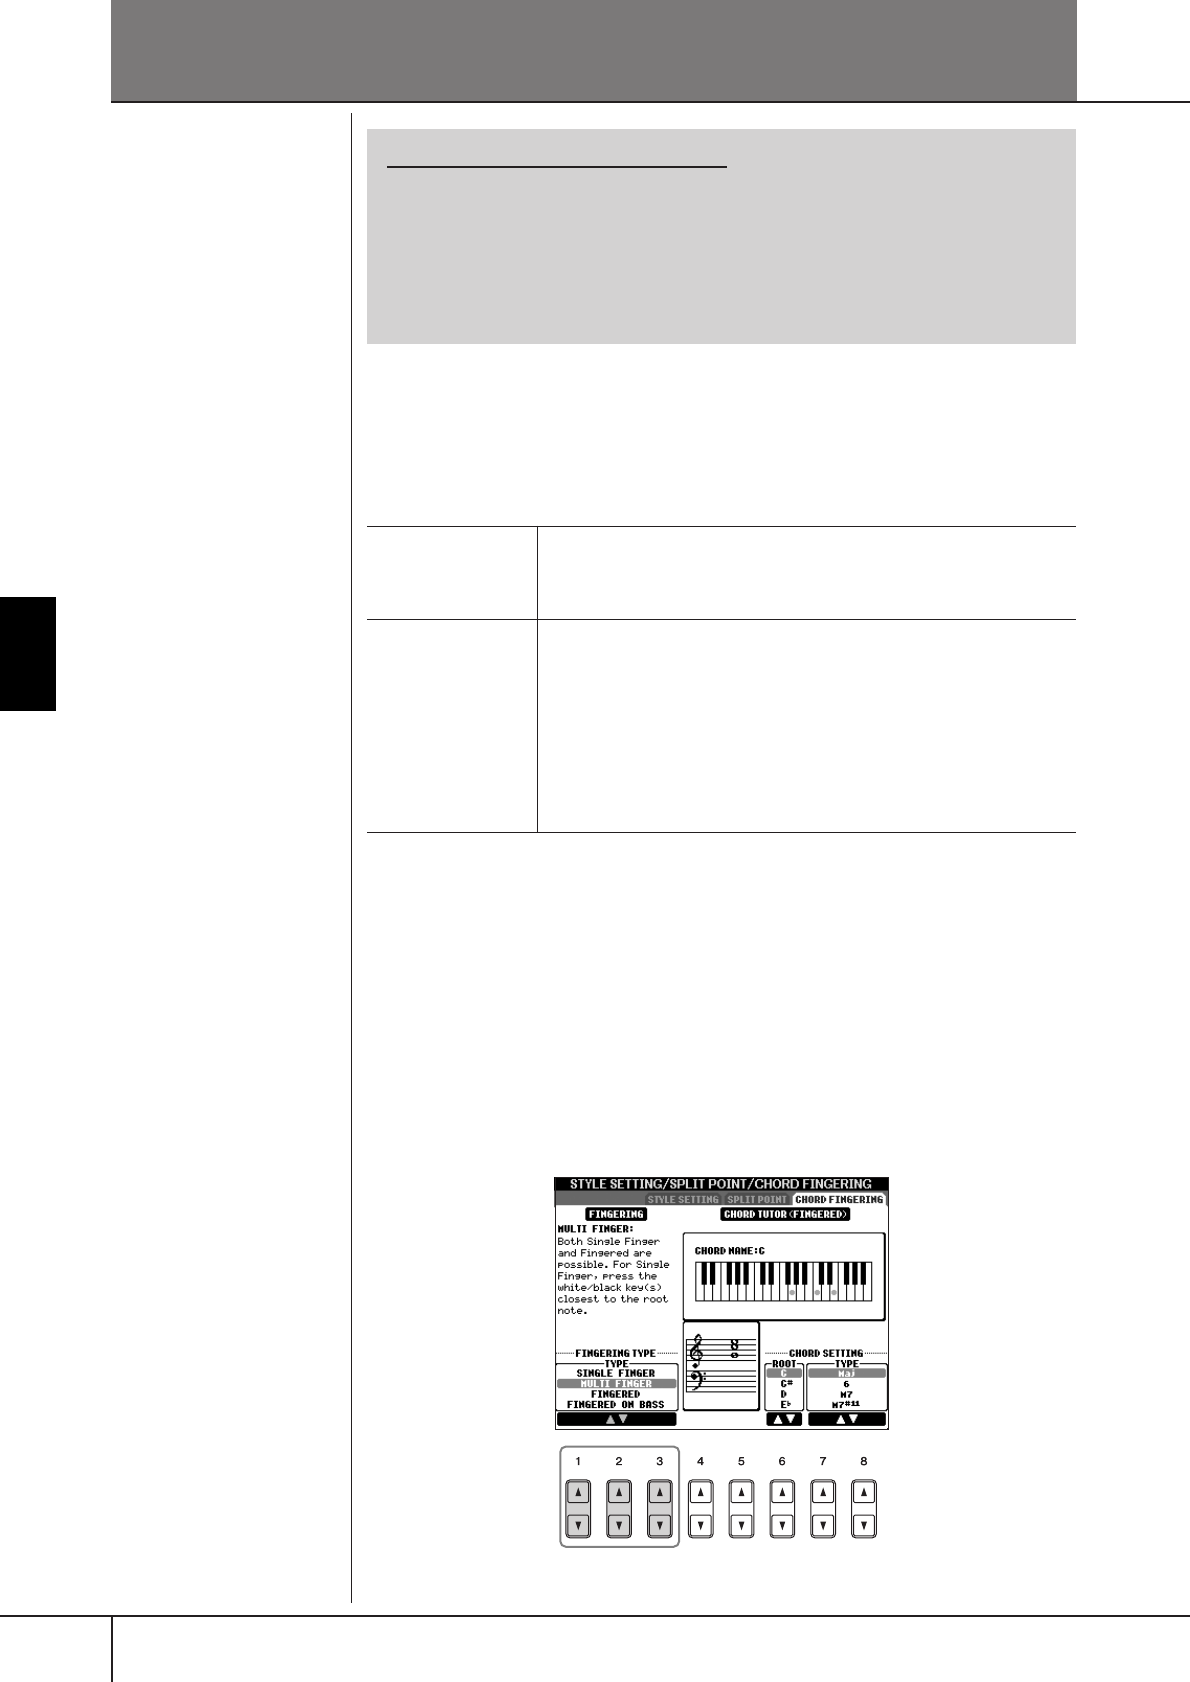
PSR-S900/S700 Owner’s Manual
106
Using, Creating and Editing the Auto Accompaniment Styles
Using, Creating and Editing the Auto Accompaniment Styles
Style Characteristics
The Style type and its defining characteristics are indicated above the Preset Style
name.
Selecting a Chord Fingering Type
Style playback can be controlled by the chords you play in the chord section of the
keyboard. There are seven types of fingerings.
1Call up the operation display.
[FUNCTION] → [C] STYLE SETTING/SPLIT POINT/CHORD FINGERING →
TAB [
√
][
®
] CHORD FINGERING
2Press the [1
ππ
ππ††
††
]–[3
ππ
ππ††
††
] buttons to select a fingering.
Reference to Quick Guide pages
Playing “Mary Had a Little Lamb” with the Auto
Accompaniment Feature..................................................................... page 46
Pattern Variation ...................................................................... page 48
Learning How to Play (Indicate) Chords for Style Playback ...... page 50
Appropriate Panel Settings for the Selected Style
(One Touch Setting) ................................................................. page 51
Pro
These Styles provide professional and exciting arrangements combined
with perfect playability. The resulting accompaniment exactly follows the
chords of the player. As a result, your chord changes and colorful harmo-
nies are instantly transformed into lifelike musical accompaniment.
Session These Styles provide even greater realism and authentic backing by
mixing in original chord types and changes, as well as special riffs with
chord changes, with the Main sections. These have been programmed
to add “spice” and a professional touch to your performances of certain
songs and in certain genres. Keep in mind, however, that the Styles may
not necessarily be appropriate—or even harmonically correct—for all
songs and for all chord playing. In some cases for example, playing a
simple major triad for a country song may result in a “jazzy” seventh
chord, or playing an on-bass chord may result in inappropriate or unex-
pected accompaniment.
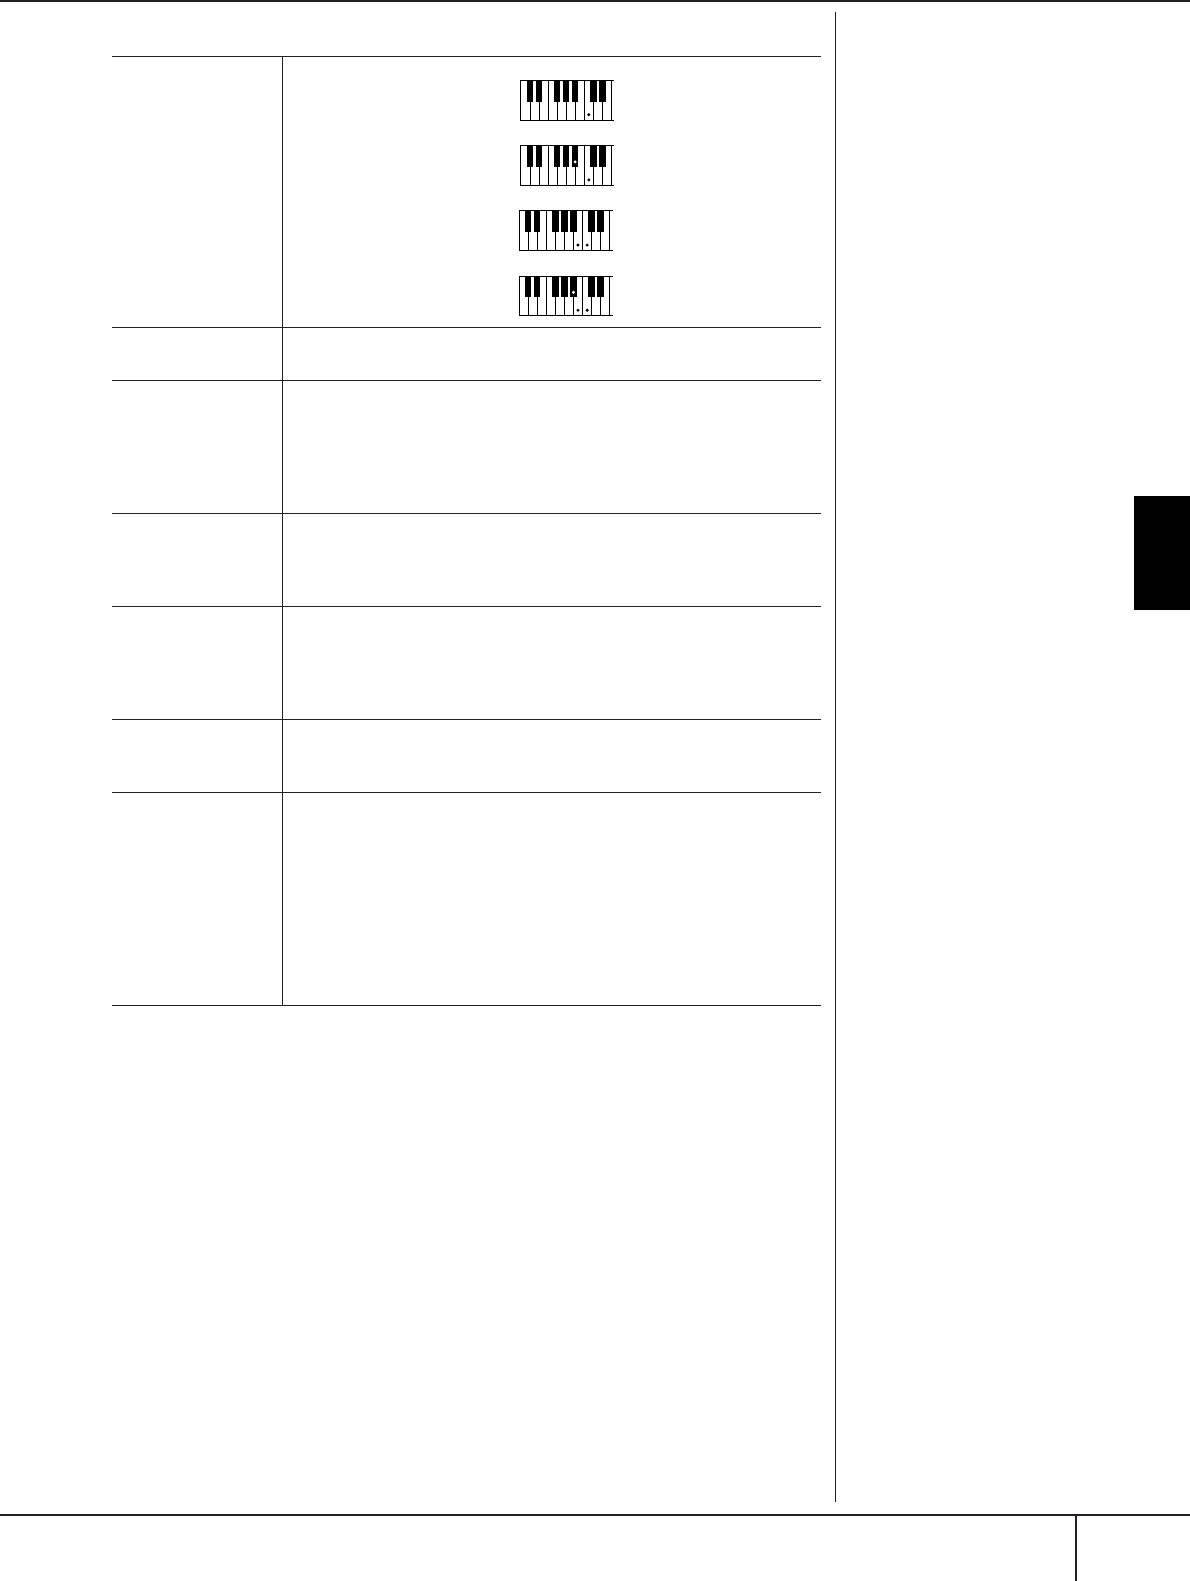
Playing Only the Rhythm Channels of a Style
PSR-S900/S700 Owner’s Manual 107
Using, Creating and Editing the Auto Accompaniment Styles
Playing Only the Rhythm Channels
of a Style
Rhythm is one of the most important parts of a Style. Try to play the melody along
with just the rhythm. You can sound different rhythms for each Style. Keep in mind,
however, that not all Styles contain rhythm channels.
1Select a Style (page 46).
2Press the [ACMP] to turn Auto Accompaniment off.
3Press the STYLE CONTROL [START/STOP] button to play back the
rhythm channels.
AI:
Artificial Intelligence
Starting the rhythm with Sync
Start
You can also start the rhythm
simply by playing the keyboard,
if Sync Start is enabled (turn on
the [SYNC START] button).
SINGLE FINGER Makes it simple to produce
orchestrated accompani-
ment using major, seventh,
minor and minor-seventh
chords by pressing a mini-
mum number of keys on the
Chord section of the key-
board. This type is available
only for Style playback.
The abbreviated chord fin-
gerings described at right are
used:
MULTI FINGER Automatically detects Single Finger or Fingered chord fingerings, so you
can use either type of fingering without having to switch fingering types.
FINGERED Lets you finger your own chords on the Chord section of the keyboard,
while the instrument supplies appropriately orchestrated rhythm, bass,
and chord accompaniment in the selected Style. The Fingered type rec-
ognizes the various chord types which are listed on the Data List avail-
able at the Yamaha website (page 5) and can be looked up using the
Chord Tutor function (page 50).
FINGERED ON
BASS
Accepts the same fingerings as the Fingered, but the lowest note played
in the Chord section of the keyboard is used as the bass note, allowing
you to play “on bass” chords (in the Fingered mode the root of the
chord is always used as the bass note).
FULL KEYBOARD Detects chords in the entire key range. Chords are detected in a way
similar to Fingered, even if you split the notes between your left and
right hands—for example, playing a bass note with your left hand and a
chord with your right, or by playing a chord with your left hand and a
melody note with your right.
AI FINGERED Basically the same as Fingered, with the exception that less than three
notes can be played to indicate the chords (based on the previously
played chord, etc.).
AI FULL KEYBOARD When this advanced fingering type is engaged, the instrument will auto-
matically create appropriate accompaniment while you play just about
anything, anywhere on the keyboard using both hands. You don’t have
to worry about specifying the Style chords. Although the AI Full Key-
board type is designed to work with many songs, some arrangements
may not be suitable for use with this feature. This type is similar to Full
Keyboard, with the exception that less than three notes can be played to
indicate the chords (based on the previously played chord, etc.). 9th,
11th and 13th chords cannot be played. This type is available only for
Style playback.
Cm
C
Cm7
C7
For a major chord,
press the root key only.
For a minor chord,
simultaneously press the root
key and a black key to its left.
For a seventh chord,
simultaneously press the root
key and a white key to its left.
For a minor-seventh chord,
simultaneously press the root key and
both a white and black key to its left.

Using, Creating and Editing the Auto Accompaniment Styles
Playing Only the Rhythm Channels of a Style
PSR-S900/S700 Owner’s Manual
108
4Press the STYLE CONTROL [START/STOP] button to stop the rhythm.
Turning channels of the Style on/off
A Style contains eight channels: RHY1 (Rhythm 1) – PHR2 (Phrase 2). You
can add variations and change the feeling of a Style by selectively turning
channels on/off as the Style plays.
1Press the [CHANNEL ON/OFF] button to call up the CHANNEL ON/
OFF display.
When the STYLE tab is not selected, press the [CHANNEL ON/OFF] but-
ton again.
2Press the [1
††
††
]–[8
††
††
] buttons to turn the channels on or off.
To listen to only one instrument by itself, hold down the appropriate but-
ton for the channel to set the channel to SOLO. To cancel SOLO, simply
press the appropriate channel button again.
Playing the chords in free tempo (without Style playback)
You can have the accompaniment chords sound without playing back the
Style, by setting [ACMP] to on (see page 109, Stop Accompaniment), and
[SYNC START] to off. For example, if MULTI FINGER is selected
(page 107), you can perform with your own pace while sounding the
chord by pressing the chord section of the keyboard with your one finger.
Setting the fade in/out time
You can set the time of the fade in and fade out (pages 48, 49).
1Call up the operation display.
[FUNCTION] → [J] UTILITY → TAB[
√
][
®
] CONFIG 1 → [A] FADE IN/
OUT/HOLD TIME
2Set the parameters by using the [3
ππ
ππ††
††
]–[5
ππ
ππ††
††
] buttons.
FADE IN TIME Determines the time it takes for the volume to fade in, or go from
minimum to maximum.
FADE OUT
TIME
Determines the time it takes for the volume to fade out, or go
from maximum to minimum.
FADE OUT
HOLD TIME
Determines the time the volume is held at 0 following the fade out.
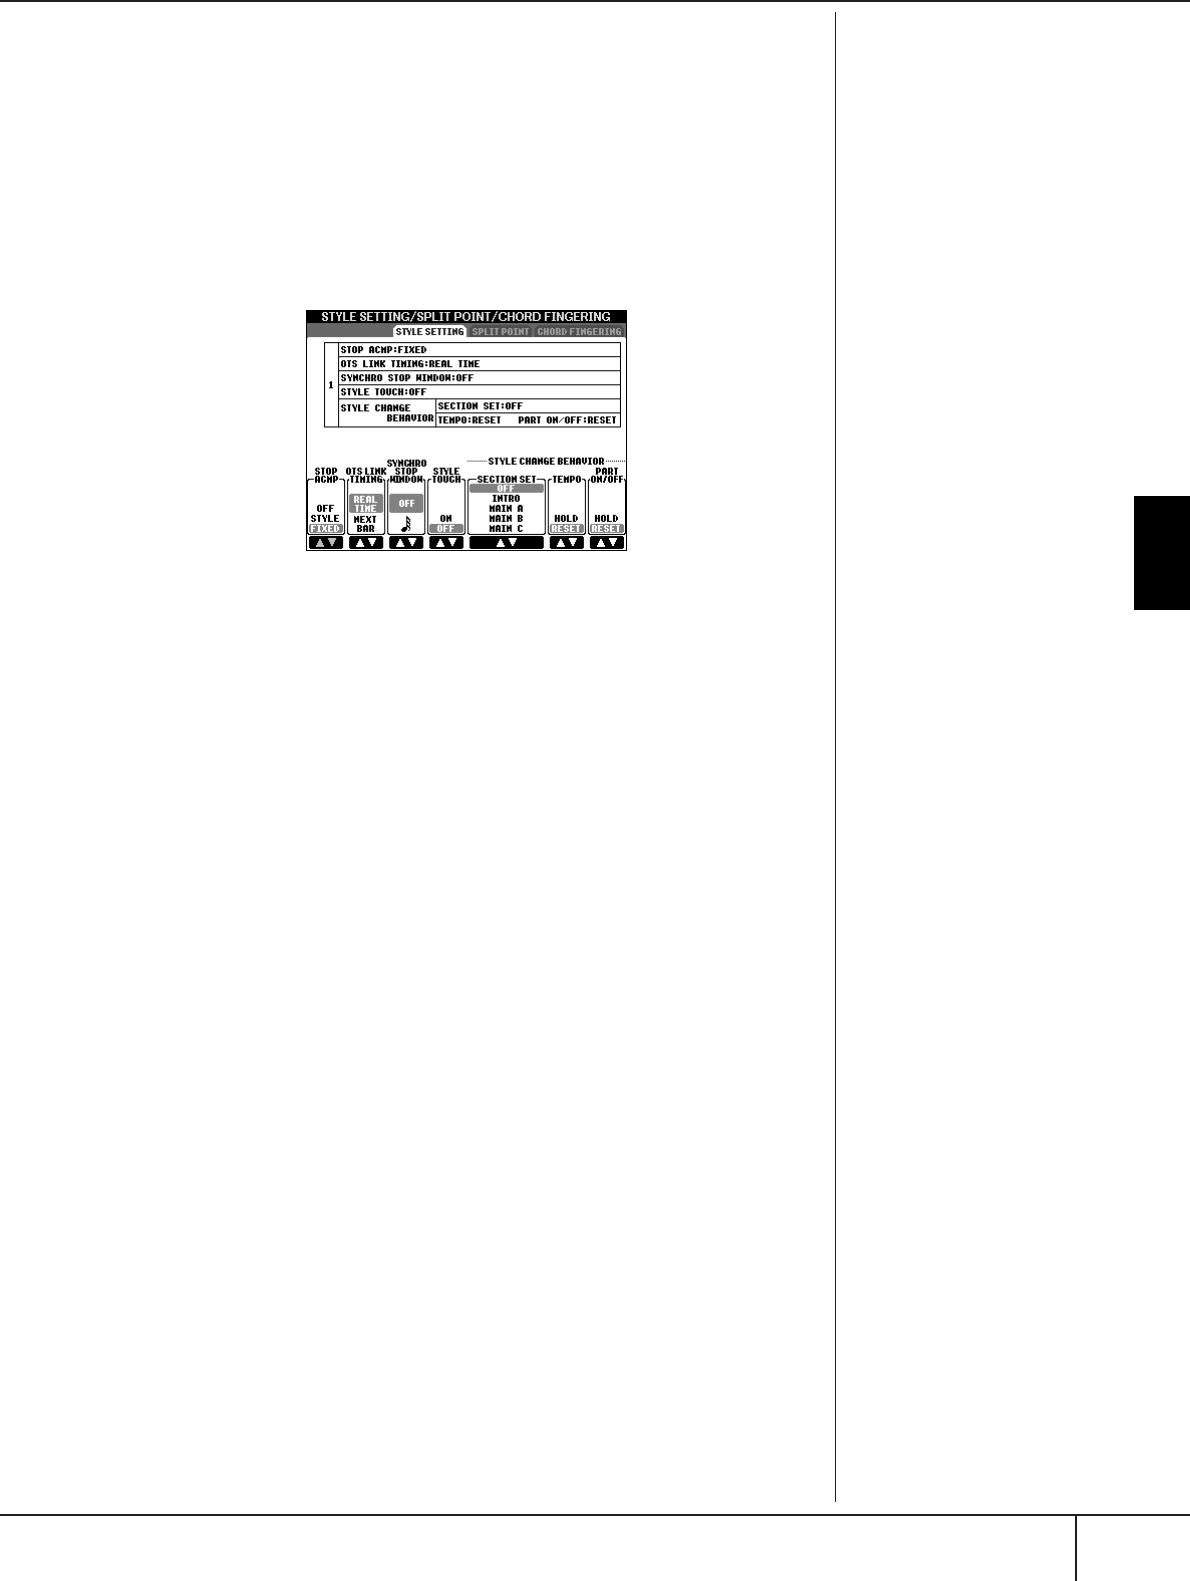
Style Playback-related Settings
PSR-S900/S700 Owner’s Manual 109
Using, Creating and Editing the Auto Accompaniment Styles
Style Playback-related Settings
The PSR-S900/S700 has a variety of Style playback functions which can be
accessed in the display below.
1Call up the operation display.
[FUNCTION] → [C] STYLE SETTING/SPLIT POINT/CHORD FINGERING →
TAB[
√
][
®
] STYLE SETTING
2Use the [1
ππ
ππ††
††
]–[8
ππ
ππ††
††
] buttons for each setting.
• Stop Accompaniment
When [ACMP] is turned on and [SYNC START] is off, you can play chords in the
chord section of the keyboard with the Style stopped, and still hear the accompa-
niment chord. In this condition—called “Stop Accompaniment”—any valid
chord fingerings are recognized and the chord root/type are shown in the display.
Here, you can determine whether the chord played in the chord section will
sound or not in the Stop Accompaniment status.
OFF...............................The chord played in the chord section will not sound.
STYLE...........................The chord played in the chord section will sound via the
Voices of the selected Style.
FIXED ...........................The chord played in the chord section will sound via the
specified Voice, regardless of the selected Style.
• OTS Link Timing
This applies to the OTS Link function (page 51). This parameter determines the
timing in which the One Touch Settings change with the MAIN VARIATION [A]–
[D] change. (The [OTS LINK] button must be on.)
Real Time.....................One Touch Setting is immediately called up when you
press a MAIN VARIATION button.
Next Bar ......................One Touch Setting is called up at the next measure, after
you press a MAIN VARIATION button.
• Synchro Stop Window
This determines how long you can hold a chord before the Synchro Stop function
is automatically cancelled. When the [SYNC STOP] button is turned on and this
is set to a value other than “OFF,” this automatically cancels the Synchro Stop
function if you hold a chord for longer than the time set here. This conveniently
resets Style playback control to normal, letting you release the keys and still have
the Style play. In other words, if you release the keys sooner than the time set
here, the Synchro Stop function works.
• Style Touch
Turns touch response for the Style playback on/off. When this is set to “ON,” the
Style volume changes in response to your playing strength in the chord section of
the keyboard.
Data that is recorded when
recording a Song
Please note that both the Voice
that is sounded and the chord
data will be recorded when set
to “STYLE,” and only the chord
data will be recorded when set
to “OFF” or “FIXED.”
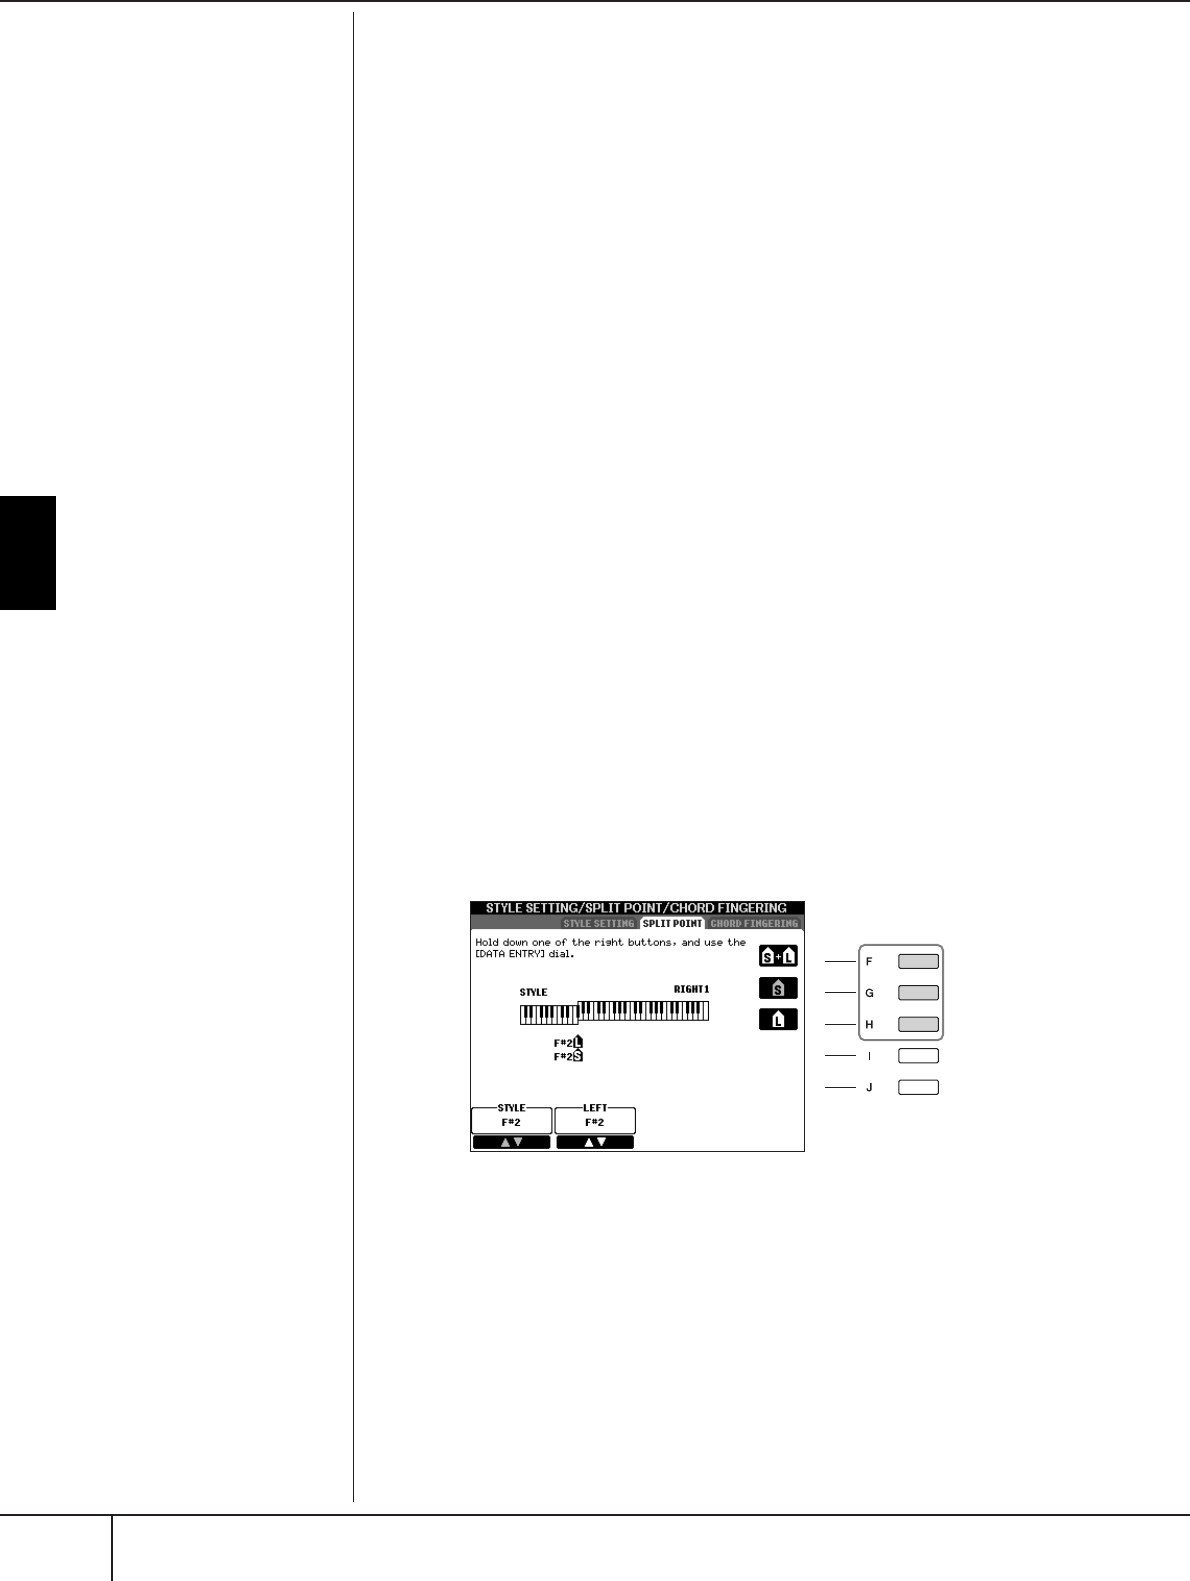
Using, Creating and Editing the Auto Accompaniment Styles
Split Point Settings
PSR-S900/S700 Owner’s Manual
110
• Style Change Behavior
There are three types as shown below.
Section Set
Determines the default section that is automatically called up when selecting differ-
ent Styles (when Style playback is stopped). When set to “OFF” and Style playback
is stopped, the active section is maintained even if the different Style is selected.
When any of the MAIN A-D sections is not included in the Style data, the nearest
section is automatically selected. For example, when MAIN D is not contained in
the selected Style, MAIN C will be called up.
Tempo
This determines whether the tempo changes or not when you change Styles dur-
ing Style playback.
HOLD ..........................The tempo setting of the previous Style is maintained.
RESET...........................The tempo changes to that of the initial default tempo
for the selected Style.
Part On/Off
This determines whether the Style Channel On/Off status changes or not when
you change Styles during Style playback.
HOLD
..........................The Style Channel On/Off status of the previous Style is
maintained.
RESET...........................All Style Channels are set to On.
Split Point Settings
These are the settings (there are two Split Points) that separate the different sec-
tions of the keyboard: the Chord section, the LEFT part section and the RIGHT 1
and 2 section. The two Split Point settings (below) are specified as note names.
1Call up the operation display.
[FUNCTION] → [C] STYLE SETTING/SPLIT POINT/CHORD FINGERING →
TAB [
√
][
®
] SPLIT POINT
2Use the [F]–[H] buttons to set the Split Point.
• Split Point (S)—separates the Chord section for Style playback from the
section(s) for playing Voices (RIGHT 1, 2 and LEFT)
• Split Point (L)—separates the two sections for playing Voices, LEFT and
RIGHT 1- 2.
These two settings can be set to the same note (as in the default) or two different
notes as desired.
2
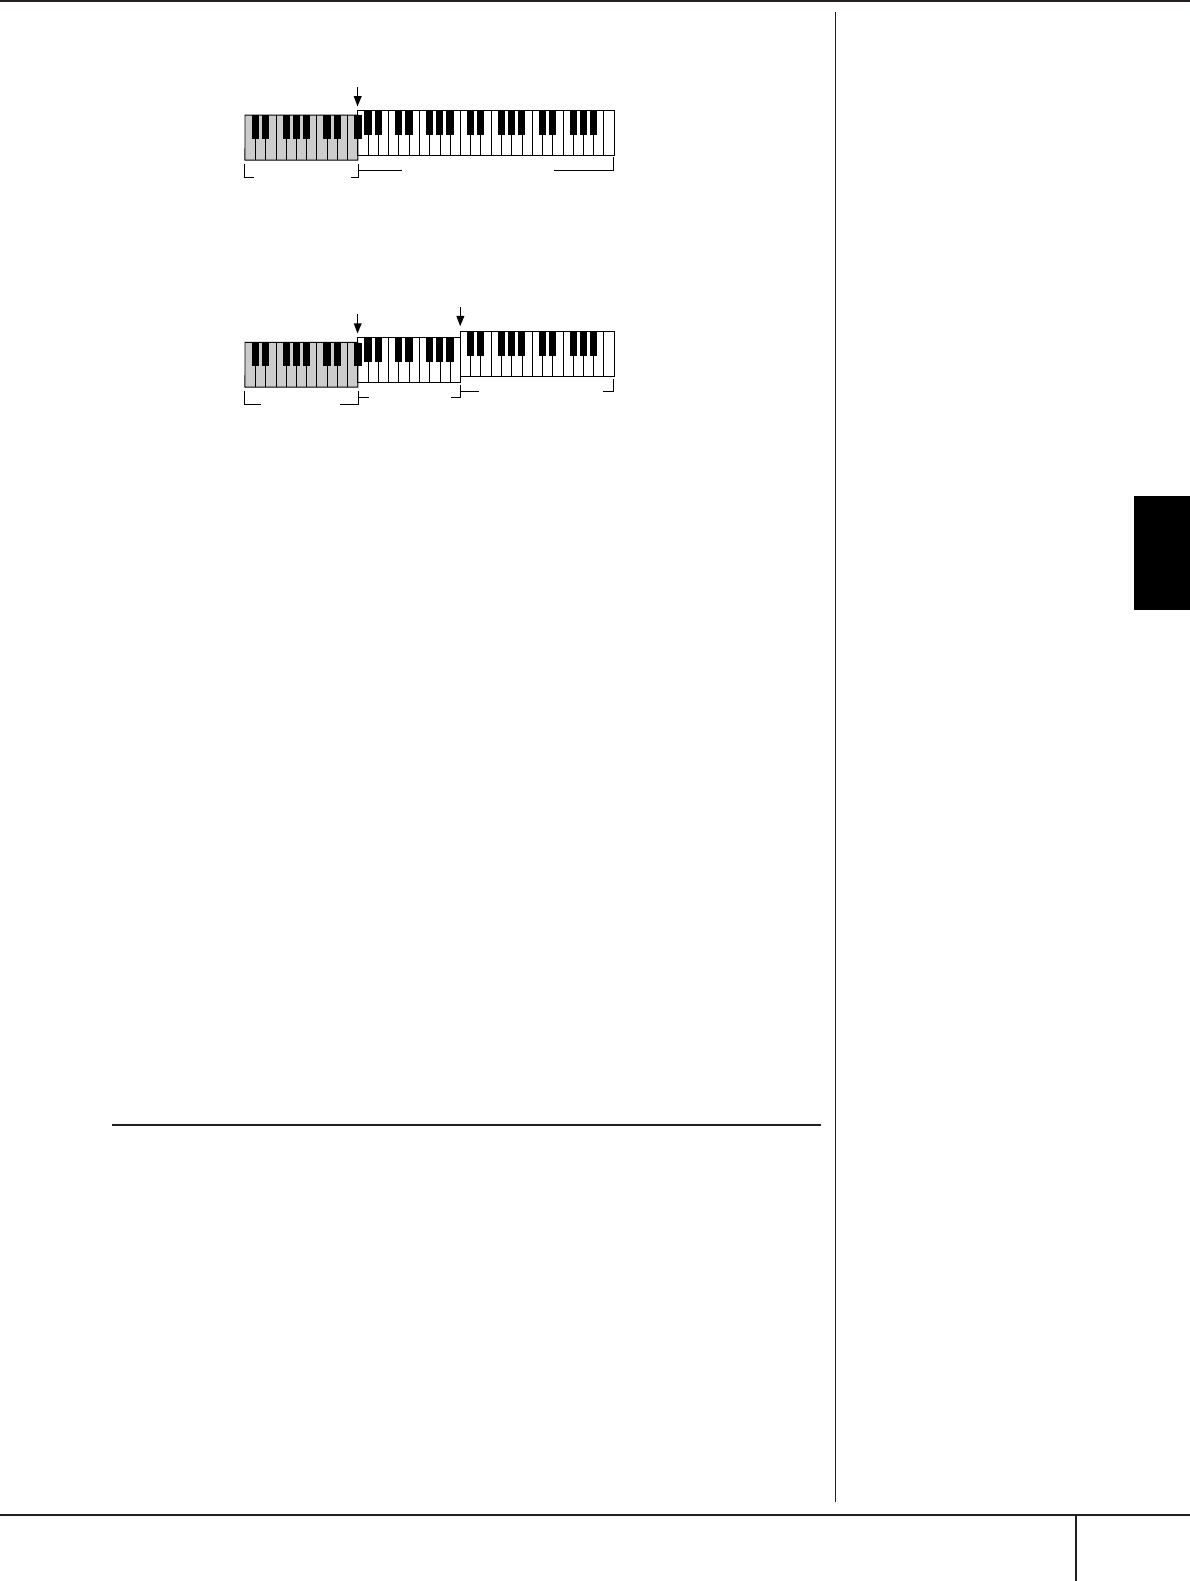
Editing the Volume and Tonal Balance of the Style (MIXING CONSOLE)
PSR-S900/S700 Owner’s Manual 111
Using, Creating and Editing the Auto Accompaniment Styles
Split Point (L) cannot be set lower than Split Point (S), and Split Point (S) cannot be
set higher than Split Point (L).
Editing the Volume and Tonal Bal-
ance of the Style (MIXING CONSOLE)
You can set various mixing-related parameters of the Style. (See “Adjustable items
(parameters) in the MIXING CONSOLE displays” on page 92.) Call up the “STYLE
PART” display in step 3 of the Basic Procedure in “Editing the Volume and Tonal
Balance (MIXING CONSOLE)” on page 91, and follow the instructions.
Convenient Music Finder feature
Music Finder (page 55) is a convenient feature that calls up pre-programmed panel
settings (for Voices, Styles, etc.) that match the song or type of music you want to
play. The records of the Music Finder can be searched and edited.
Searching the Records
You can search the records by specifying a song name or keyword, using the
Search function of the Music Finder. You can also save your favorite records in the
FAVORITE display.
1Press the [MUSIC FINDER] button to call up the MUSIC FINDER dis-
play.
2Press the TAB [
√
][
®
] buttons to select the ALL tab.
The ALL tab display contains all the preset Records.
Specifying the Split Point by
note name
Press the [1
π†
]–[4
π†
]
but-
tons. You can specify the Split
Point of the Voice and chord sec-
tion of the keyboard by using
STYLE in the display, and you can
specify the Split Point of the left
and right Voices by using LEFT.
Setting the Split Point (S) and the Split Point (L) to the same note
Setting the Split Point (S) and the Split Point (L) to different notes
Press the [F] (S+L) button and rotate the DATA ENTRY dial.
Split Point (S+L)
Chord section +
Voice LEFT
Voice RIGHT 1and 2
Press the [H] (S) button or the [G] (L) button and rotate the DATA ENTRY dial.
Split Point (S) Split Point (L)
Chord section Voice LEFT Voice RIGHT 1and 2
Using, Creating and Editing the Auto Accompaniment Styles
Convenient Music Finder feature
PSR-S900/S700 Owner’s Manual
112
3Press the [6
ππ
ππ
] (SEARCH 1) button to call up the Search display.
4Enter the search criteria.
• Search by song title or music genre (MUSIC) or keyword
1Press the [A] (MUSIC)/[B](KEYWORD) button to call up the character
entry display.
2Enter the song title or music genre, or the keyword (page 77).
• Search by Style name
1Press the [C] (STYLE) button to call up the Style selection display.
2Use the [A]–[J] buttons to select a Style.
3Press the [EXIT] button to return to the search display.
• Adding other Search Criteria
You can specify other search criteria in addition to the song name/keyword/Style
name.
BEAT.............................Select the beat (time signature) you want to use in your
performance by pressing the [D] button. All beat settings
are included in the search if you select ANY.
SEARCH AREA..............Select the pages to be included in the search by pressing
the [E] button. (These correspond to the tabs at the top
of the Music Finder display.)
TEMPO.........................Set the range of the tempo you want to use in your per-
formance by using the [1
π†
]/[2
π†
] (TEMPO) but-
tons.
GENRE .........................Select the desired music genre by using the [5
π†
]/
[6
π†
] (GENRE) buttons.
Clear the search criteria
To clear the entered Music/Key-
word/Style, press the [F]/[G]/[H]
(CLEAR) button.
Entering several different key-
words
You can search several different
keywords simultaneously by
inserting a separator (comma)
between each.
Convenient Music Finder feature
PSR-S900/S700 Owner’s Manual 113
Using, Creating and Editing the Auto Accompaniment Styles
5Press the [8
ππ
ππ
] (START SEARCH) button to start the search.
The Search 1 display appears, showing the results of the search. To cancel
searching, press the [8
†
] (CANCEL) button.
Creating a Set of Favorite Records
As convenient as the Search function is in plumbing the depths of the Music Finder
records, you may want to create a “folder” of favorite records—so you can quickly
call up those Styles and settings you use most often in your performance.
1Select the desired record from the Music Finder display.
2Press the [H] (ADD TO FAVORITE) button to add the selected record
to the FAVORITE display.
3Call up the FAVORITE display by using the TAB [
√
][
®
] buttons, and
check to see if the record has been added.
Deleting Records from the FAVORITE Display
1Select the record you want to delete from the FAVORITE display.
2Press the [H] (DELETE FROM FAVORITE) button.
Searching other music genres
When you want to search other music genres, press the [6
†
] (SEARCH 2)
button in the Music Finder display. The search result is displayed in the
SEARCH 2 display.
Calling up the panel settings to match the style (REPERTOIRE)
When searching by style name, the same search result is obtained even if the
search is done by using the Repertoire function. See page 56 for details.
Using, Creating and Editing the Auto Accompaniment Styles
Convenient Music Finder feature
PSR-S900/S700 Owner’s Manual
114
Editing Records
You can create a new record by editing the currently selected record. The newly
created records are automatically saved in the internal memory.
1Select the desired record to be edited in the Music Finder display.
2Press the [8
ππ
ππ††
††
] (RECORD EDIT) button to call up the Edit display.
3Edit the record as desired.
• Editing the song name/keyword/Style name
Input each item in the same way as done in the Search display (page 112).
• Changing the Tempo
Press the [1
π†
] (TEMPO) button.
• Memorizing the Section (Intro/Main/Ending)
Use the [2
π†
]/[4
π†
] buttons to select the section that will automatically be
called up set when the record is selected. This is useful, for example, when you
want to have a selected Style automatically be set up to start with an Intro sec-
tion.
• Editing the Genre
Select the desired genre by using the [5
π†
]/[6
π†
] (GENRE) buttons. When
creating a new genre, press the [7
π†
] (GENRE NAME) button and input the
genre name. (page 77)
• Deleting the Currently Selected Record
Press the [I] (DELETE RECORD) button.
• Canceling and Quitting the Edit functions
Press the [8
†
] (CANCEL) button.
4To enter the edited record to the FAVORITE display, press the [E]
(FAVORITE) button to turn on the FAVORITE.
5Enter the edits you’ve made to the record as described below.
• Creating a new record
Press the [J] (NEW RECORD) button. The record is added to the ALL display. If
you’ve entered the record to the FAVORITE display in step 4 above, the record is
added to both the ALL display and the FAVORITE display.
• Overwriting an existing record
Press the [8
π
] (OK) button. If you set the record as a Favorite in step 4 above,
the record is added to the FAVORITE display. When you edit the record in the
FAVORITE display, the record is overwritten.
CAUTION
You can also change a preset
record to create a new one. If
you want to keep the original
preset, make sure to change
the name and register the
edited record as a new record
(see step 5, page 114).
Keep in mind that the Beat set-
ting made here is only for the
Music Finder search function;
this does not affect the actual
Beat setting of the Style itself.
The maximum number of
records is 2500 (PSR-S900)/
1200 (PSR-S700), including
internal records.

Convenient Music Finder feature
PSR-S900/S700 Owner’s Manual 115
Using, Creating and Editing the Auto Accompaniment Styles
Saving the Record
The Music Finder feature handles all the Records including the presets and addi-
tionally created records as a single file. Keep in mind that individual records (panel
setups) cannot be handled as separate files.
1Call up the Save display.
[MUSIC FINDER] → TAB [
√
][
®
] ALL → [7
π†
] (FILES)
2Press the TAB [
√
][
®
] buttons to select the location for saving (USER/
USB).
3Press the [6
††
††
] button to save the file (page 73).
All records are saved together as a single file.
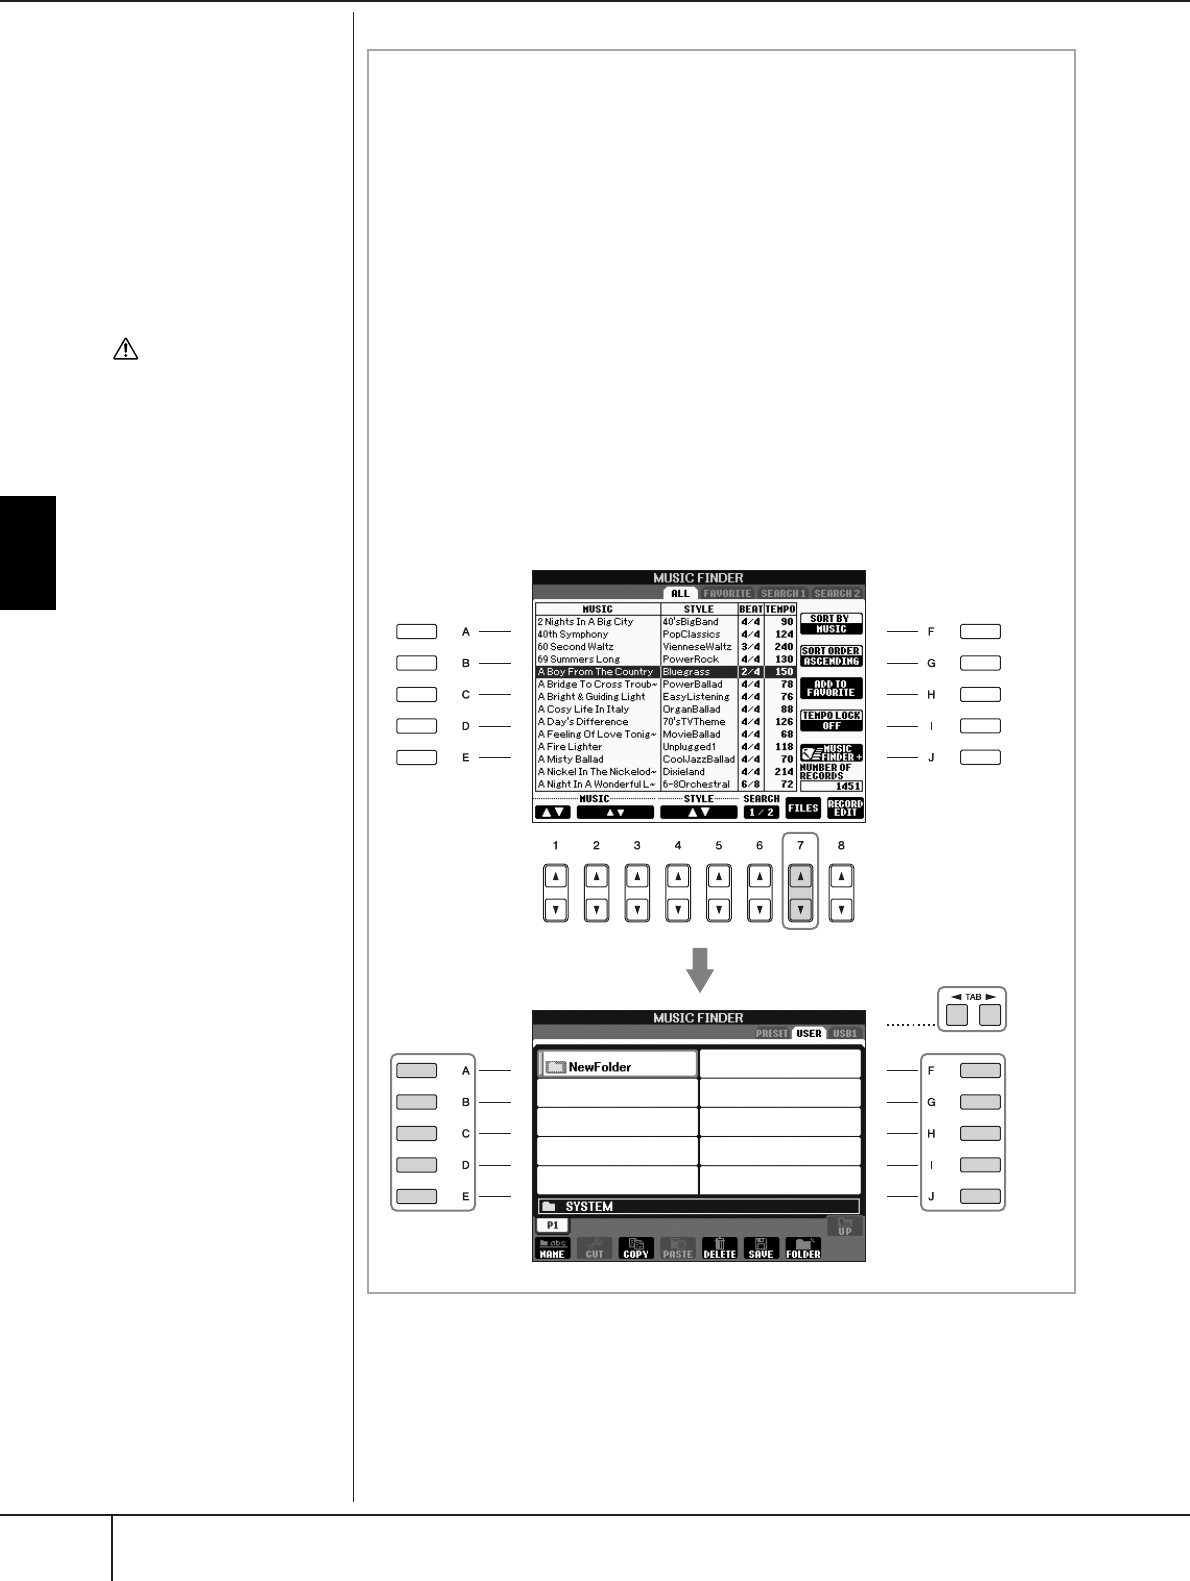
Using, Creating and Editing the Auto Accompaniment Styles
Convenient Music Finder feature
PSR-S900/S700 Owner’s Manual
116
CAUTION
Selecting “REPLACE” auto-
matically deletes all your orig-
inal records from internal
memory and replaces them
with the factory Music Finder
data.
When you download a file to
delete all Music Finder records
from the web (page 117) and
execute it, make sure that all
important data has been
archived to another location
beforehand.
Restoring the Music Finder
Data
You can restore the instrument’s
Music Finder to its original fac-
tory settings (page 79).
Calling up Music Finder Records Saved to USER/USB
To call up the Music Finder records you’ve saved to USER/USB, follow the
instructions below.
1Call up the [MUSIC FINDER] display.
[MUSIC FINDER] → TAB [
√
][
®
] ALL
2Press the [7
ππ
ππ††
††
] (FILES) button to open the File selection display of
the Music Finder.
3Use the TAB [
√
][
®
] buttons to select USER/USB.
4Press the [A]–[J] buttons to select the desired Music Finder file.
When the file is selected, a message is displayed according to the content
of the file. Press the desired button.
• REPLACE
All Music Finder records currently in the instrument are deleted and
replaced with the records of the selected file.
• APPEND
The records called up are added to the records currently in the instrument.
Execute the operation to call up the Music Finder file. Select “CANCEL” to
abort this operation.
2
3
4
4
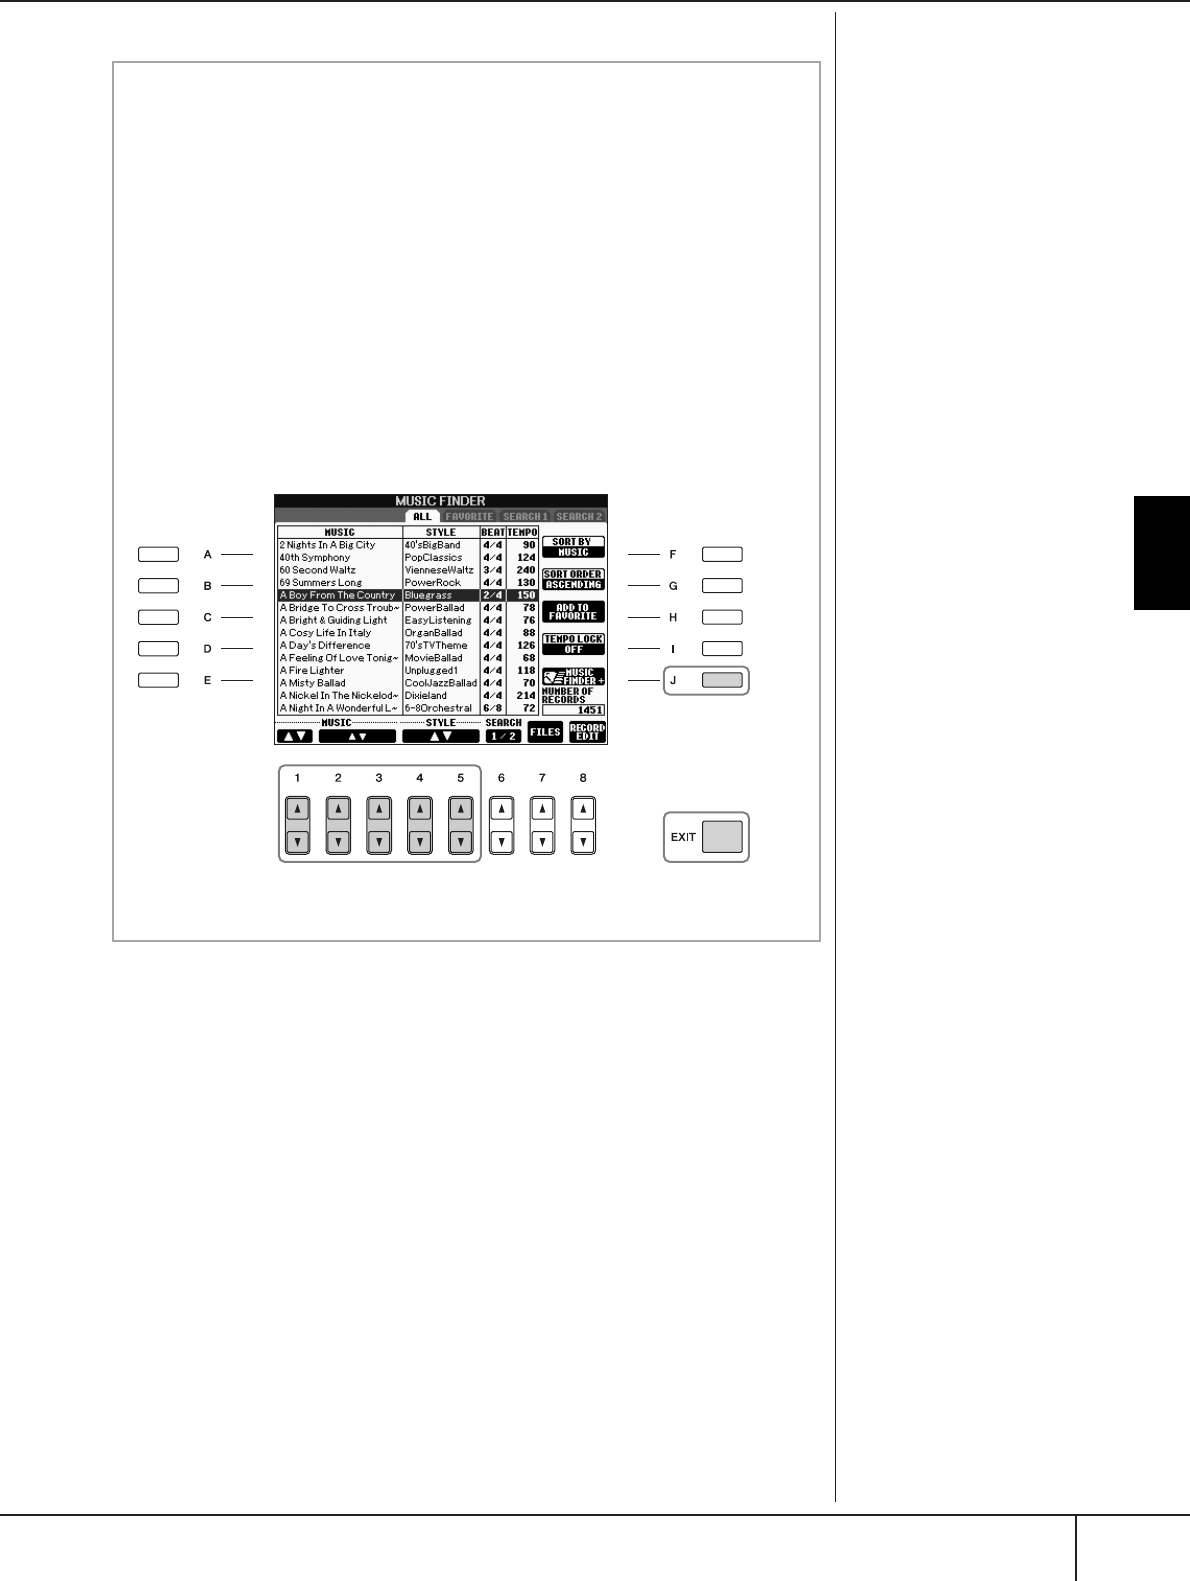
Convenient Music Finder feature
PSR-S900/S700 Owner’s Manual 117
Using, Creating and Editing the Auto Accompaniment Styles
The available contents of the
Music Finder Plus service are
subject to change.
Viewing information about Music Finder records
(Music Finder Plus)
This service provides information on Music Finder records that you may be
interested in. It also provides song downloads for your particular instru-
ment as well as downloadable Music Finder records you can load to your
instrument. For more details about this service, go to the following website.
http://music.yamaha.com/idc
1Make sure that you’re connected to the Internet (page 174), and
press the [MUSIC FINDER] button to call up the MUSIC FINDER dis-
play.
2Use the [1
ππ
ππ††
††
]–[5
ππ
ππ††
††
] buttons in the display to select the record
whose information you want to view on the Web.
You can also use the DATA ENTRY dial to make the selection. After select-
ing with the dial, press [ENTER].
3Press the [J] (MUSIC FINDER +) button to open the Web page.
4Press the [EXIT] button to exit the browser screen and return to the
MUSIC FINDER display.
3
4
2

Using, Creating and Editing the Auto Accompaniment Styles
Style Creator
PSR-S900/S700 Owner’s Manual
118
Style Creator
You can create your own styles—recording them by yourself or by combining the
internal Style data. The created Styles can be edited.
Style Structure
Styles are made up of fifteen different sections and each section has eight separate
channels. With the Style Creator feature, you can create a Style by separately
recording the channels, or by importing pattern data from other existing Styles.
Creating a Style
You can use one of the three different methods described below to create a Style.
The created Styles can also be edited (page 124).
■Realtime Recording ➤ See page 119
This method lets you record the Style by simply playing the instrument. You can
select an internal Style that most closely matches your image of the Style you want
to create and then re-record parts of the Style as desired, or you can create a new
Style from scratch.
■Step Recording ➤ See page 122
This method is like writing music notation on paper, since it allows you to enter
each note or individually, and specify its length.
This allows you to create a Style without having to play the parts on the instrument,
since you can enter each event manually.
■Style Assembly ➤ See page 123
This convenient feature lets you create composite Styles by combining various pat-
terns from the internal preset Styles. For example, if you want to create your own
original 8-beat Style, you could take rhythm patterns from the “70’s 8Beat” Style,
use the bass pattern from “60’s Rock1” Style and import the chord patterns from the
“Cool8Beat” Style—combining the various elements to create one Style.
Style
Section
Four different
Fill-ins are
available.
Channel
Rhythm 1
Rhythm 2
Bass
Chord 1
Chord 2
Pad
Phrase 1
Phrase 2
Rhythm 1
Rhythm 2
Bass
Chord 1
Chord 2
Pad
Phrase 1
Phrase 2
Rhythm 1
Rhythm 2
Bass
Chord 1
Chord 2
Pad
Phrase 1
Phrase 2
Rhythm 1
Rhythm 2
Bass
Chord 1
Chord 2
Pad
Phrase 1
Phrase 2
60’s Rock1
70’s 8Beat Cool8Beat

Style Creator
PSR-S900/S700 Owner’s Manual 119
Using, Creating and Editing the Auto Accompaniment Styles
Realtime Recording (BASIC)
Create a single Style by recording the individual channels one-by-one, using
realtime recording.
Realtime Recording Characteristics
• Loop Recording
Style playback repeats the rhythm patterns of several measures in a “loop,” and
Style recording is also done using loops. For example, if you start recording with
a two-measure main section, the two measures are repeatedly recorded. Notes
that you record will play back from the next repetition (loop), letting you record
while hearing previously recorded material.
• Overdub Recording
This method records new material to a channel already containing recorded
data, without deleting the original data. In Style recording, the recorded data is
not deleted, except when using functions such as Rhythm Clear (page 121) and
Delete (page 120). For example, if you start recording with a two-measure MAIN
section, the two measures are repeated many times. Notes that you record will
play back from the next repetition, letting you overdub new material to the loop
while hearing previously recorded material.
When creating a Style based on an existing internal Style, overdub recording is
applied only to the rhythm channels. For all other channels (except rhythm),
delete the original data before recording.
When using realtime recording based on the internal Styles:
1Select the desired Style to serve as the basis for recording/editing
(page 46).
When creating a new Style from scratch, press the [C] (NEW STYLE) button
from the display shown in step 5 below.
2Call up the operation display.
[FUNCTION] → [F] DIGITAL REC MENU
3Press the [B] button to call up the Style Creator display.
4Use the TAB [
√
][
®
] buttons, then select the BASIC tab to call up the
RECORD display.
5Call up the display for selecting sections, etc. by pressing the [EXIT]
button.
When recording channels BASS-
PHR2 based on an internal Style,
delete the original data before
recording. Overdub recording is
not possible on channels BASS-
PHR2.
When the RECORD display (chan
-
nel indication) at the lower part of
the STYLE CREATOR display dis-
appears, you can press the [F]
(REC CH) button to re-display it.
Overdub recording possible. Overdub recording not possible.
Delete the data before recording.
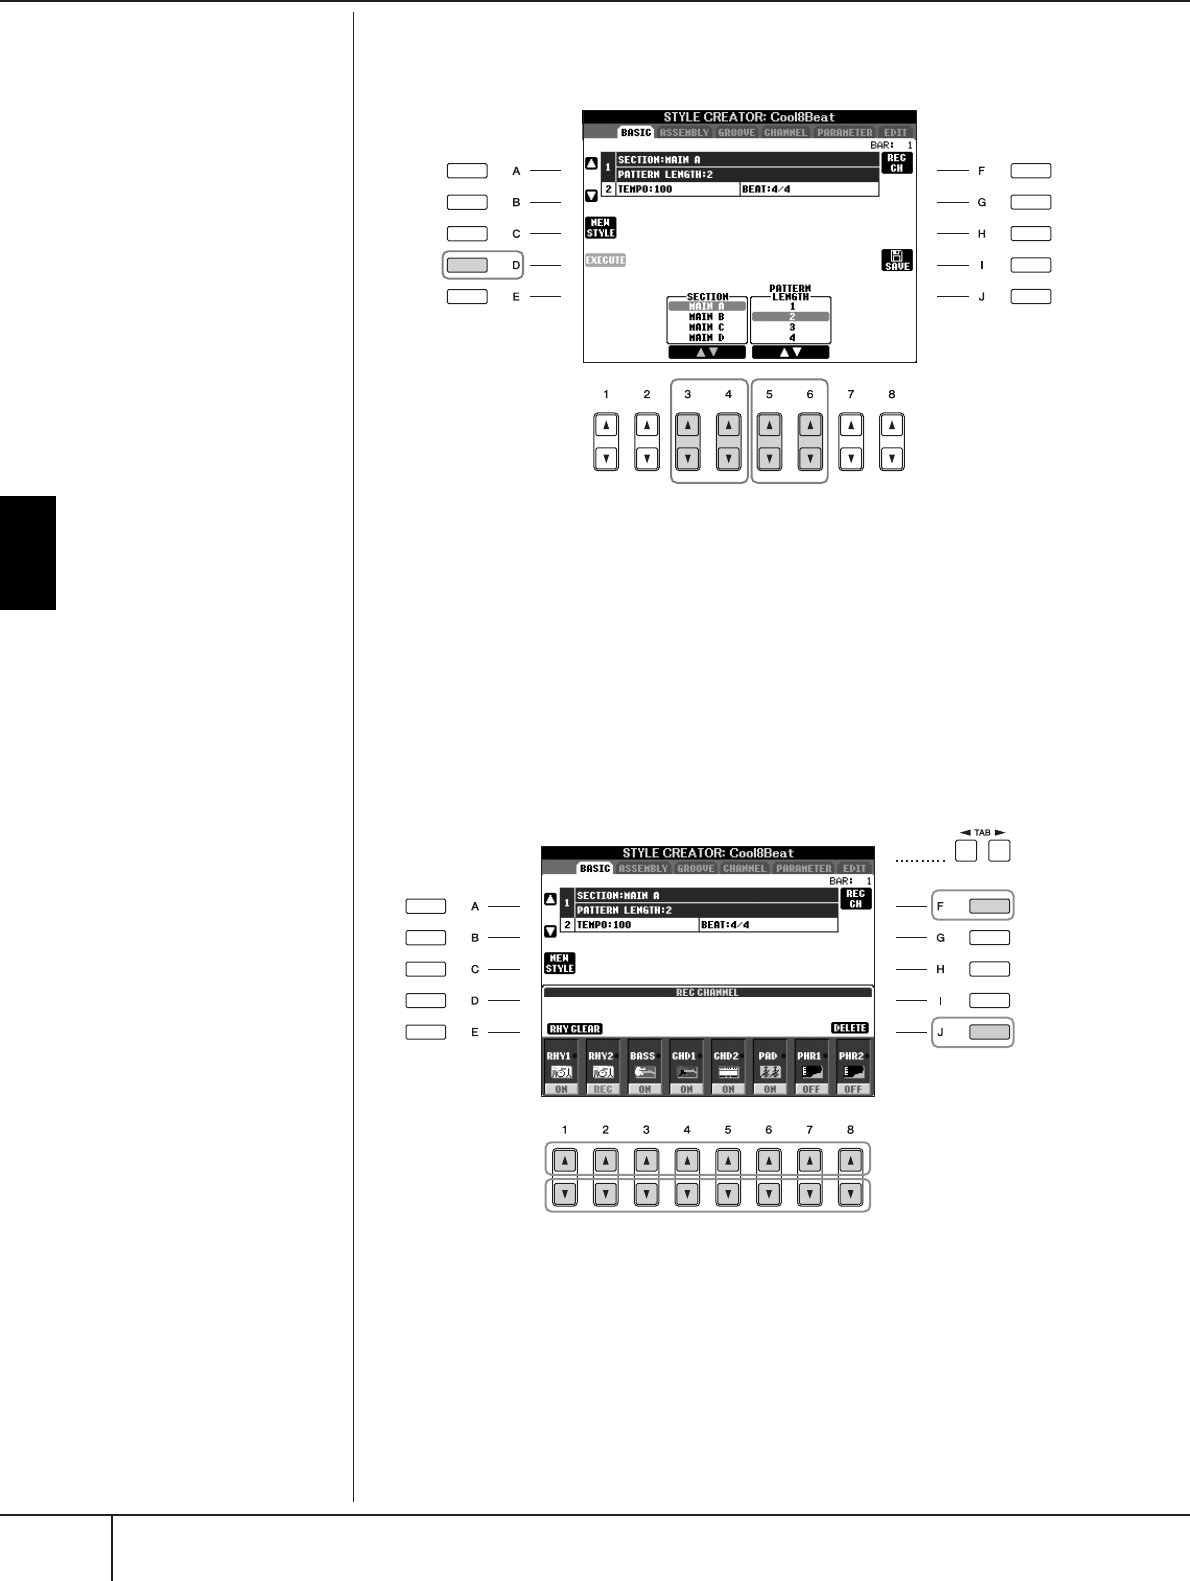
Using, Creating and Editing the Auto Accompaniment Styles
Style Creator
PSR-S900/S700 Owner’s Manual
120
6Use the [3
ππ
ππ††
††
]/[4
ππ
ππ††
††
] buttons to select the section (page 118) to
be recorded.
7Use the [5
ππ
ππ††
††
]/[6
ππ
ππ††
††
] buttons to determine the length (number of
measures) of the selected section.
Actually enter the specified length for the selected section by pressing the
[D] (EXECUTE) button.
8Specify the channel to be recorded by simultaneously holding down
the [F] (REC CH) button and pressing the appropriate numbered but-
ton, [1
††
††
]–[8
††
††
].
To cancel the selection, press the appropriate numbered button [1
†
]–[8
†
]
again.
9Call up the Voice Selection display by using the [1
ππ
ππ
]–[8
ππ
ππ
]
buttons
and select the desired Voice for the corresponding recording channels.
Press the [EXIT] button to return to the previous display.
10 To delete a channel, simultaneously hold down the [J] (DELETE) but-
ton and press the appropriate numbered button, [1
ππ
ππ
]–[8
ππ
ππ
].
You can cancel the deletion by pressing the same numbered button again,
before releasing your finger from the [J] button.
Specifying sections from the
panel buttons
You can specify the sections to
be recorded by using the Section
buttons ([INTRO]/[MAIN]/[END-
ING], etc.) on the panel. Pressing
one of the Section buttons calls
up the SECTION display. Change
the sections by using the
[6
π†
]/[7
π†
] buttons and
execute the selection by pressing
the [8
π
] button.
The INTRO 4/ENDING 4 sec-
tions cannot be specified with
the panel controls.
Muting specific channels dur-
ing recording
Turn off the desired channels by
pressing the [1
†
]–[8
†
] buttons.
Recordable Voices
•RHY1 channel:
Any except Organ Flute and S.
Articulation Voices are record-
able.
•RHY2 channel:
Only drum/SFX kits are record-
able.
•BASS-PHR2 channels:
Any except Organ Flute Voices,
Drum/SFX kits, and S. Articulation
Voices are recordable. (Preset
Organ Flute Voices can be
selected only on the LCD display.)
67-1
7-2
8
9
8
10
Style Creator
PSR-S900/S700 Owner’s Manual 121
Using, Creating and Editing the Auto Accompaniment Styles
11 Start recording by pressing the Style Control [START/STOP] button.
Playback of the specified section starts. Since the accompaniment pattern
plays back repeatedly in a loop, you can record individual sounds one by
one, listening to the previous sounds as they play. For information on
recording to channels other than the rhythm channels (RHY1, 2), refer to the
section “Rules when recording non-rhythm channels” (see below).
12 To continue recording with another channel, simultaneously hold
down the [F] (REC CH) button and press the appropriate [1
††
††
]–[8
††
††
]
button to specify the channel, then play the keyboard.
13 Stop recording by pressing the Style Control [START/STOP] button.
14 Call up the display for selecting sections, etc. by pressing the [EXIT]
button.
15 Press the [I] (SAVE) button to call up the Style Selection display to
save your data.
Save the data in the Style Selection display (page 73).
Deleting the recorded rhythm
channel (RHY 1, 2)
To delete a specific instrument
sound, simultaneously hold
down the [E] (RHY CLEAR) but-
ton (from the display where the
recorded channels are shown)
and press the appropriate key.
CAUTION
The recorded Style will be lost
if you change to another Style
or you turn the power off
without executing the Save
operation (page 73).
Any desired chord or chord pro-
gression can be used for the
INTRO and ENDING sections.
Changing the Source Chord
If you want to record the pattern
with a Source Chord other than
CM7, set the PLAY ROOT and
PLAY CHORD parameters on the
PARAMETER page (page 128)
before recording.
Rules when recording non-rhythm channels
• Use only the CM7 scale tones when recording the BASS and PHRASE
channels (i.e., C, D, E, G, A, and B).
• Use only the chord tones when recording the CHORD and PAD chan-
nels (i.e., C, E, G, and B).
Using the data recorded here, the auto accompaniment (Style playback) is
appropriately converted depending on the chord changes you make dur-
ing your performance. The chord which forms the basis for this note con-
version is called the Source Chord, and is set by default to CM7 (as in the
example illustration above). You can change the Source Chord (its root and
type) from the PARAMETER display on page 128. Keep in mind that when
you change the Source Chord from the default CM7 to another chord, the
chord notes and recommended notes will also change. For details on
chord notes and recommended notes, see page 129.
CRC CRC
C = Chord notes
C, R = Recommended notes
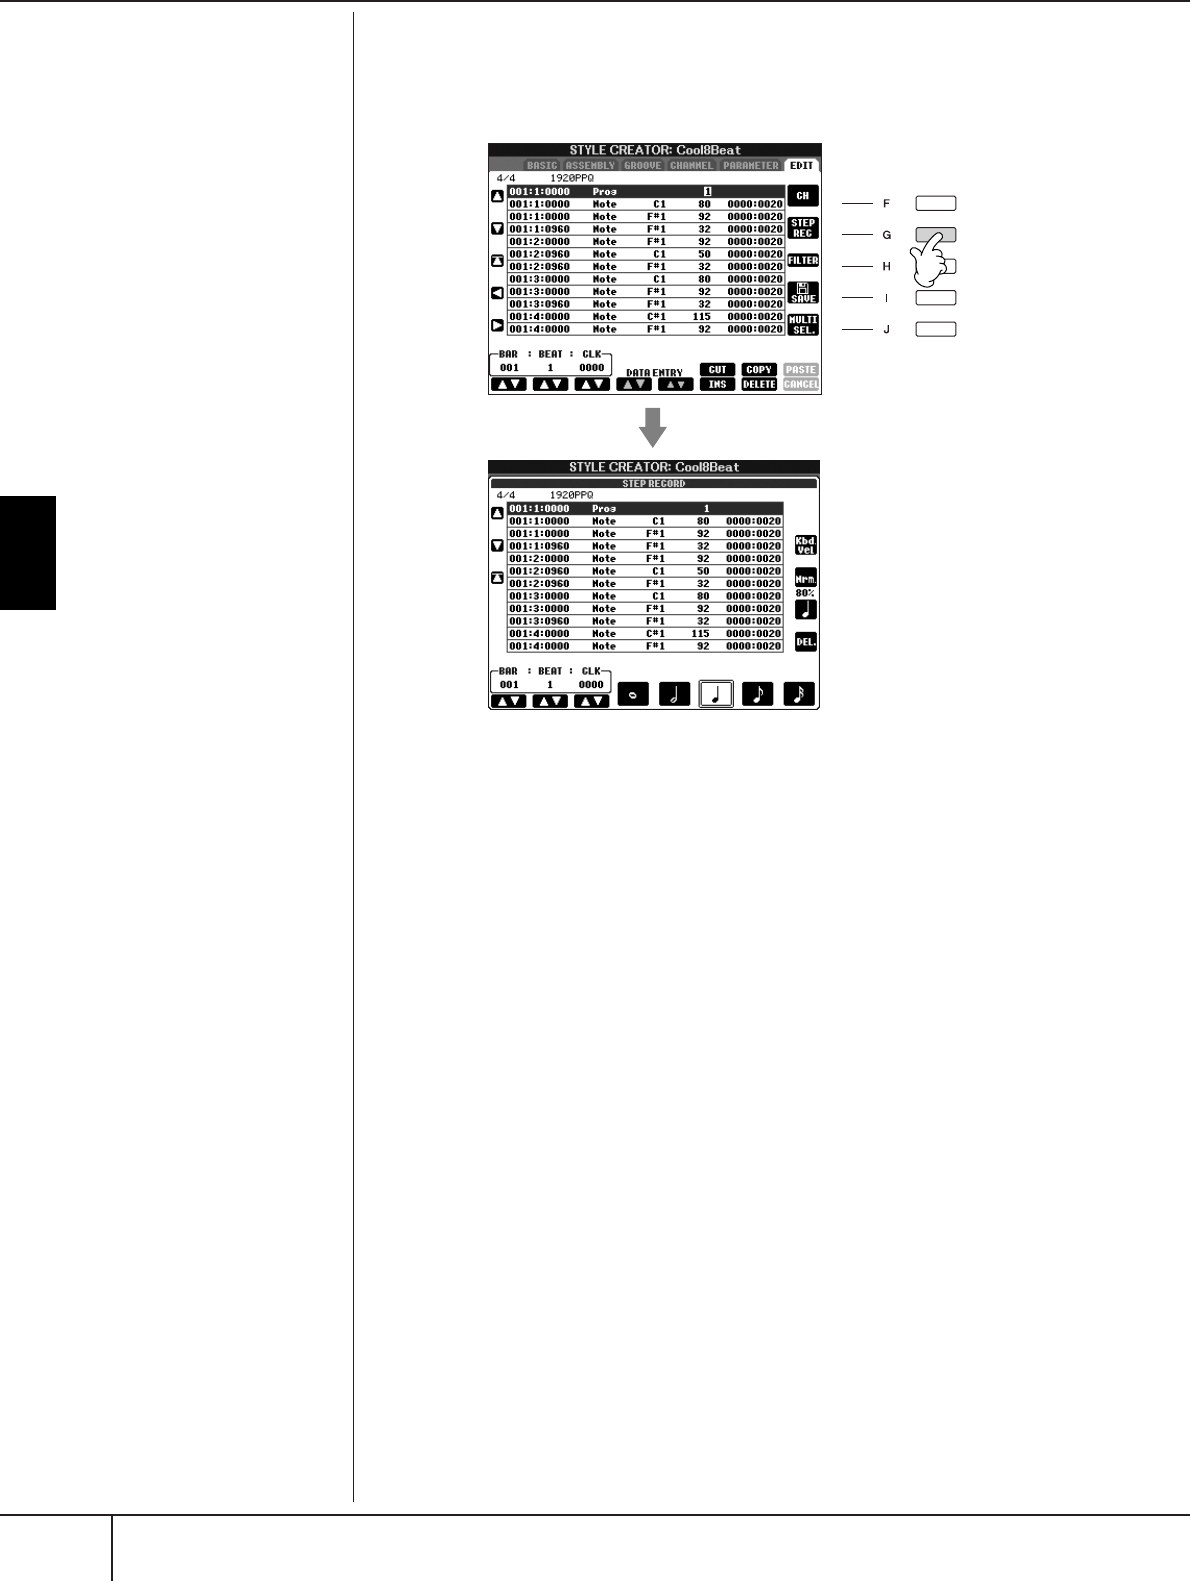
Using, Creating and Editing the Auto Accompaniment Styles
Style Creator
PSR-S900/S700 Owner’s Manual
122
Step Recording (EDIT)
The explanation here applies when selecting the EDIT tab in step 4 of “Realtime
Recording” (page 119).
In the EDIT display, you can record notes with absolutely precise timing. This Step
Recording procedure is essentially the same as that for Song Recording (page 152),
with the exception of the points listed below:
• In the Song Creator, the End Mark position can be changed freely; in the Style Cre-
ator, it cannot be changed. This is because the length of the Style is automatically
fixed, depending on the selected section. For example, if you create a Style based on
a section of four measures length, the End Mark position is automatically set to the
end of the fourth measure, and cannot be changed in the Step Recording display.
• Recording channels can be changed in the Song Creator 1-16 tab display; how-
ever, they cannot be changed in the Style Creator. Select the recording channel
in the BASIC tab display.
• In the Style Creator, the channel data can be entered and System Exclusive data
can be edited (delete, copy, or move). You can switch between the two by press-
ing the [F] button. However, Chord, Lyrics, and System Exclusive data cannot be
entered.
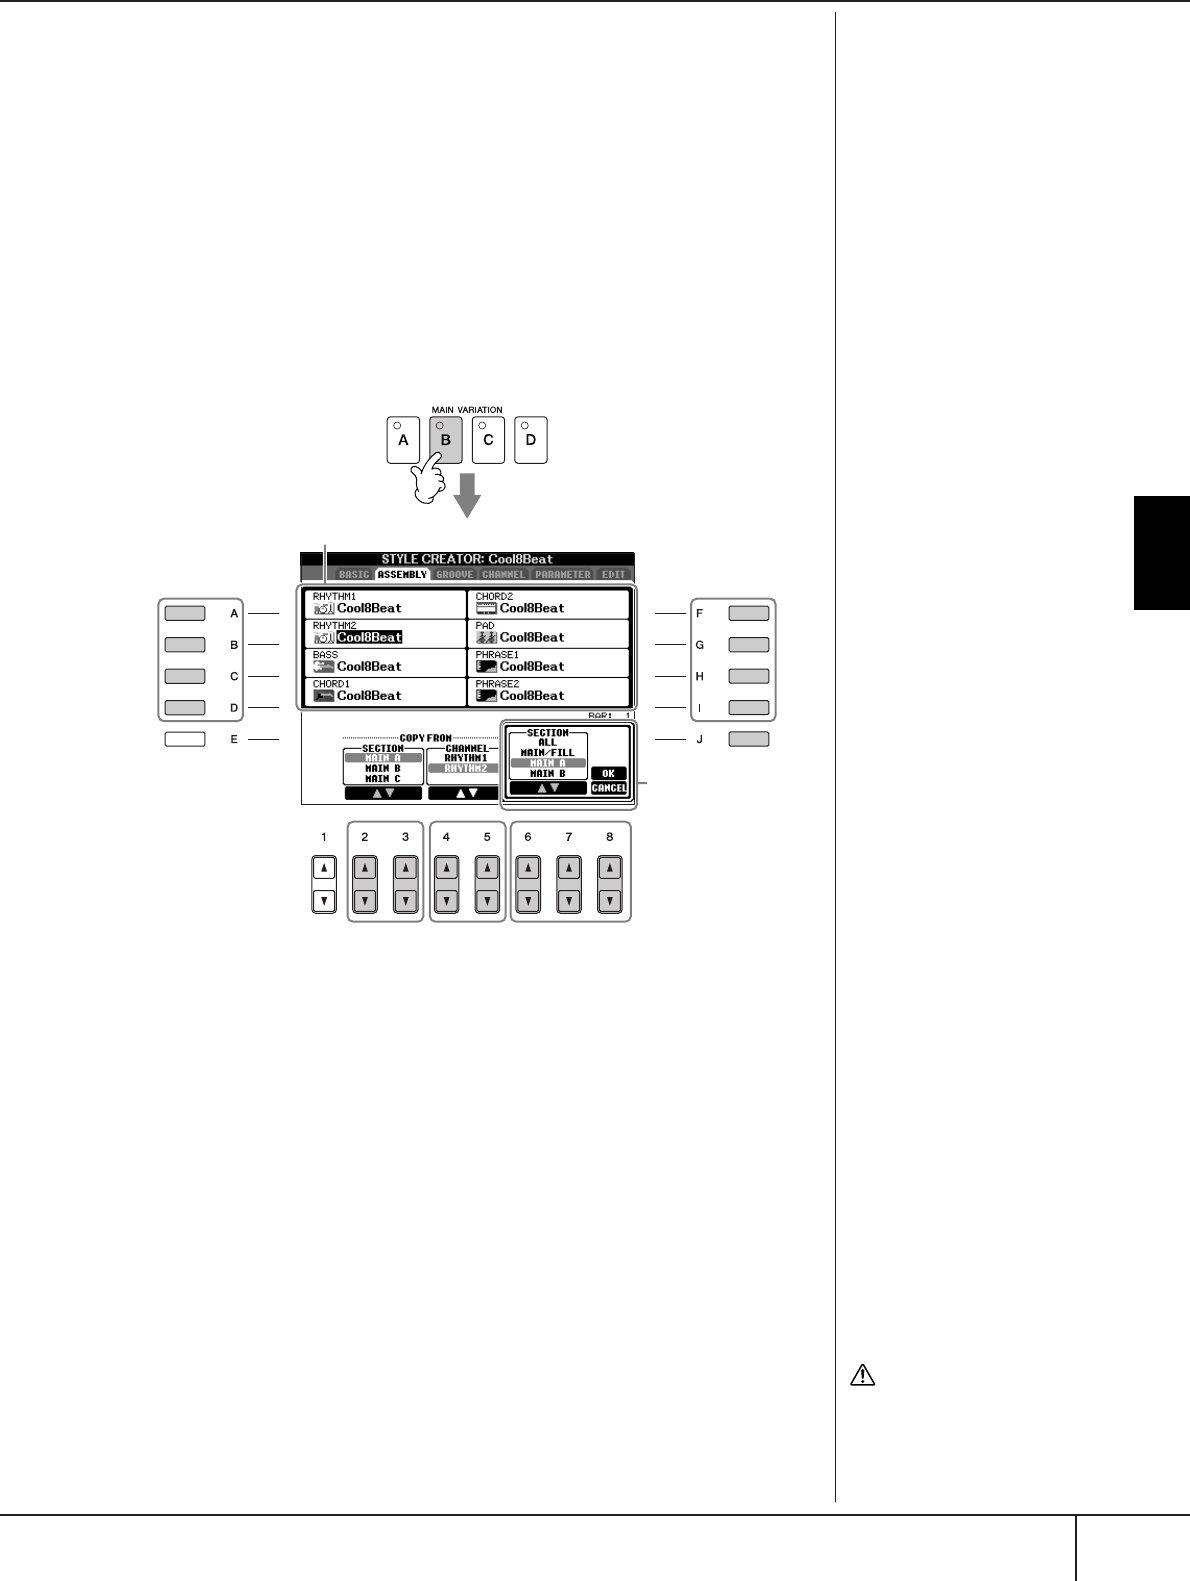
Style Creator
PSR-S900/S700 Owner’s Manual 123
Using, Creating and Editing the Auto Accompaniment Styles
Style Assembly (ASSEMBLY)
Style Assembly allows you to create a single Style by mixing the various patterns
(channels) from existing internal Styles.
1Select the basic Style, then call up the display for Style Assembly.
The operation steps are the same as steps 1–4 in “Realtime recording”
(page 119). In step 4, select the ASSEMBLY tab.
2Select the desired section (Intro, Main, Ending, etc.) for your new
Style.
Call up the SECTION display by pressing one of the Section buttons
([INTRO]/[MAIN]/[ENDING], etc.) on the panel. Change the section as
desired by using the [6
π†
]/[7
π†
] buttons and execute the operation by
pressing the [8
π
] (OK) button.
3Select the channel for which you wish to replace the pattern by using
the [A]–[D] and [F]–[I] buttons. Call up the Style Selection display by
pressing the same button again. Select the Style containing the pat-
tern you want to replace in the Style Selection display.
To return to the previous screen, press the [EXIT] button after selecting the
Style.
4Select the desired section of the newly imported Style (chosen in step
3 above) by using the [2
ππ
ππ††
††
]/[3
ππ
ππ††
††
] (SECTION) buttons.
5Select the desired channel for the section (chosen in step 4 above) by
using the [4
ππ
ππ††
††
]/[5
ππ
ππ††
††
] (CHANNEL) buttons.
Repeat steps 3–5 above to replace the patterns of other channels.
6Press the [J] (SAVE) button to call up the Style Selection display, and
save your data from the display (page 73).
33
6
52-2
2-1
4
Section display
Indicates the channels that make up the section.
You cannot select the SECTION
INTRO 4/ENDING 4 directly via
the panel operation.
CAUTION
The recorded Style will be lost
if you change to another Style
or you turn the power off
without executing the Save
operation (page 73).
Using, Creating and Editing the Auto Accompaniment Styles
Style Creator
PSR-S900/S700 Owner’s Manual
124
Editing the Created Style
You can edit the Style you’ve created by using Realtime recording, Step recording
and/or Style Assembly.
Basic Operation for Editing Styles
1Select a Style to be edited.
2Call up the operation display.
[FUNCTION] → [F] DIGITAL REC MENU
3Call up the Style Creator/Edit display by pressing the [B] button.
4Press the TAB[
√
][
®
] buttons to select a tab.
• Changing the Rhythmic Feel (GROOVE) ➤ See page 125
These versatile features give you a wide variety of tools for changing the
rhythmic feel of your created Style.
• Editing Data for each Channel (CHANNEL) ➤ See page 127
The editing features let you delete data as desired and apply quantize set-
tings for each channel in the Style data.
• Making Style File Format Settings (PARAMETER) ➤ See page 128
For playback of your created Style, you can decide how notes will be con-
verted and sounded for the accompaniment when changing chords in the
chord section of the keyboard.
5Edit the selected Style.
Playing the Style During Style Assembly
While you are assembling a Style, you can play back the Style and select
the method of playback. Use the [6
π†
]/[7
π†
] (PLAY TYPE) buttons in
the Style Assembly display to select the playback method.
• SOLO
Mutes all but the selected channel in the ASSEMBLY tab display. Any
channels set to ON in the RECORD display on the BASIC page are played
back simultaneously.
•ON
Plays back the selected channel in the ASSEMBLY tab display. Any chan-
nels set to something other than OFF in the RECORD display on the BASIC
page are played back simultaneously.
• OFF
Mutes the selected channel in the ASSEMBLY tab display.
Selecting a file saved to the
USB storage device.
You can also select a specified
file in the USB storage device by
pressing the [USB] button.
[USB] → [B] STYLE → [A]–[J]

Style Creator
PSR-S900/S700 Owner’s Manual 125
Using, Creating and Editing the Auto Accompaniment Styles
Changing the Rhythmic Feel (GROOVE)
The explanation here applies when you select the GROOVE tab in step 4 of “Basic
Operation for Editing Styles” (page 124).
1Press the [A]/[B] button to select the edit menu (page 126).
2Use the [1
ππ
ππ††
††
]–[8
ππ
ππ††
††
] buttons to edit the data.
For details on editable parameters, see page 126.
3Press the [D] (EXECUTE) button to actually enter the edits for each
display.
After the operation is completed, you can execute the edition and this but-
ton changes to “UNDO,” letting you restore the original data if you’re not
satisfied with the Groove or Dynamics results. The Undo function only has
one level; only the previous operation can be undone.
4Press the [I] (SAVE) button to call up the Style Selection display to
save your data.
Save the data in the Style Selection display (page 73).
1
2
34
CAUTION
The edited Style will be lost if
you change to another Style
or you turn the power off
without executing the Save
operation (page 73).

Using, Creating and Editing the Auto Accompaniment Styles
Style Creator
PSR-S900/S700 Owner’s Manual
126
■GROOVE
This lets you add swing to the music or change the “feel” of the beat by making
subtle shifts in the timing (clock) of the Style. The Groove settings are applied to all
channels of the selected Style.
■DYNAMICS
This changes the velocity/volume (or accent) of certain notes in the Style playback.
The Dynamics settings are applied to each channel or all channels of the selected
Style.
ORIGINAL BEAT Specifies the beats to which Groove timing is to be applied. In other
words, if “8 Beat” is selected, Groove timing is applied to the 8th notes;
if “12 Beat” is selected, Groove timing is applied to 8th-note triplets.
BEAT CONVERTER Actually changes the timing of the beats (specified in the ORIGINAL
BEAT parameter above) to the selected value. For example, when
ORIGINAL BEAT is set to “8 Beat” and BEAT CONVERTER is set to “12,”
all 8th notes in the section are shifted to 8th-note triplet timing. The
“16A” and “16B” Beat Converter which appear when ORIGINAL BEAT
is set to “12 Beat” are variations on a basic 16th-note setting.
SWING Produces a “swing” feel by shifting the timing of the back beats,
depending on the ORIGINAL BEAT parameter above. For example, if
the specified ORIGINAL BEAT value is “8 Beat,” the Swing parameter
will selectively delay the 2nd, 4th, 6th, and 8th beats of each measure
to create a swing feel. The settings “A” through “E” produce different
degrees of swing, with “A” being the most subtle and “E” being the most
pronounced.
FINE Selects a variety of Groove “templates” to be applied to the selected
section. The “PUSH” settings cause certain beats to be played early,
while “HEAVY” settings delay the timing of certain beats. The numbered
settings (2, 3, 4, 5) determine which beats are to be affected. All beats
up to the specified beat—but not including the first beat—will be
played early or delayed (for example, the 2nd and 3rd beats, if “3” is
selected). In all cases, “A” types produce minimum effect, “B” types
produce medium effect, and “C” types produce maximum effect.
CHANNEL Selects the desired channel (part) to which Dynamics is to be applied.
ACCENT TYPE Determines the type of accent applied—in other words, which notes in
the part(s) are emphasized with the Dynamics settings.
STRENGTH Determines how strongly the selected Accent Type (above) will be
applied. The higher the value, the stronger the effect.
EXPAND/COMP. Expands or compresses the range of velocity values. Values higher than
100% expand the dynamic range, while values lower than 100% com-
press it.
BOOST/CUT Boosts or cuts all velocity values in the selected section/channel. Values
above 100% boost the overall velocity, while values below 100%
reduce it.
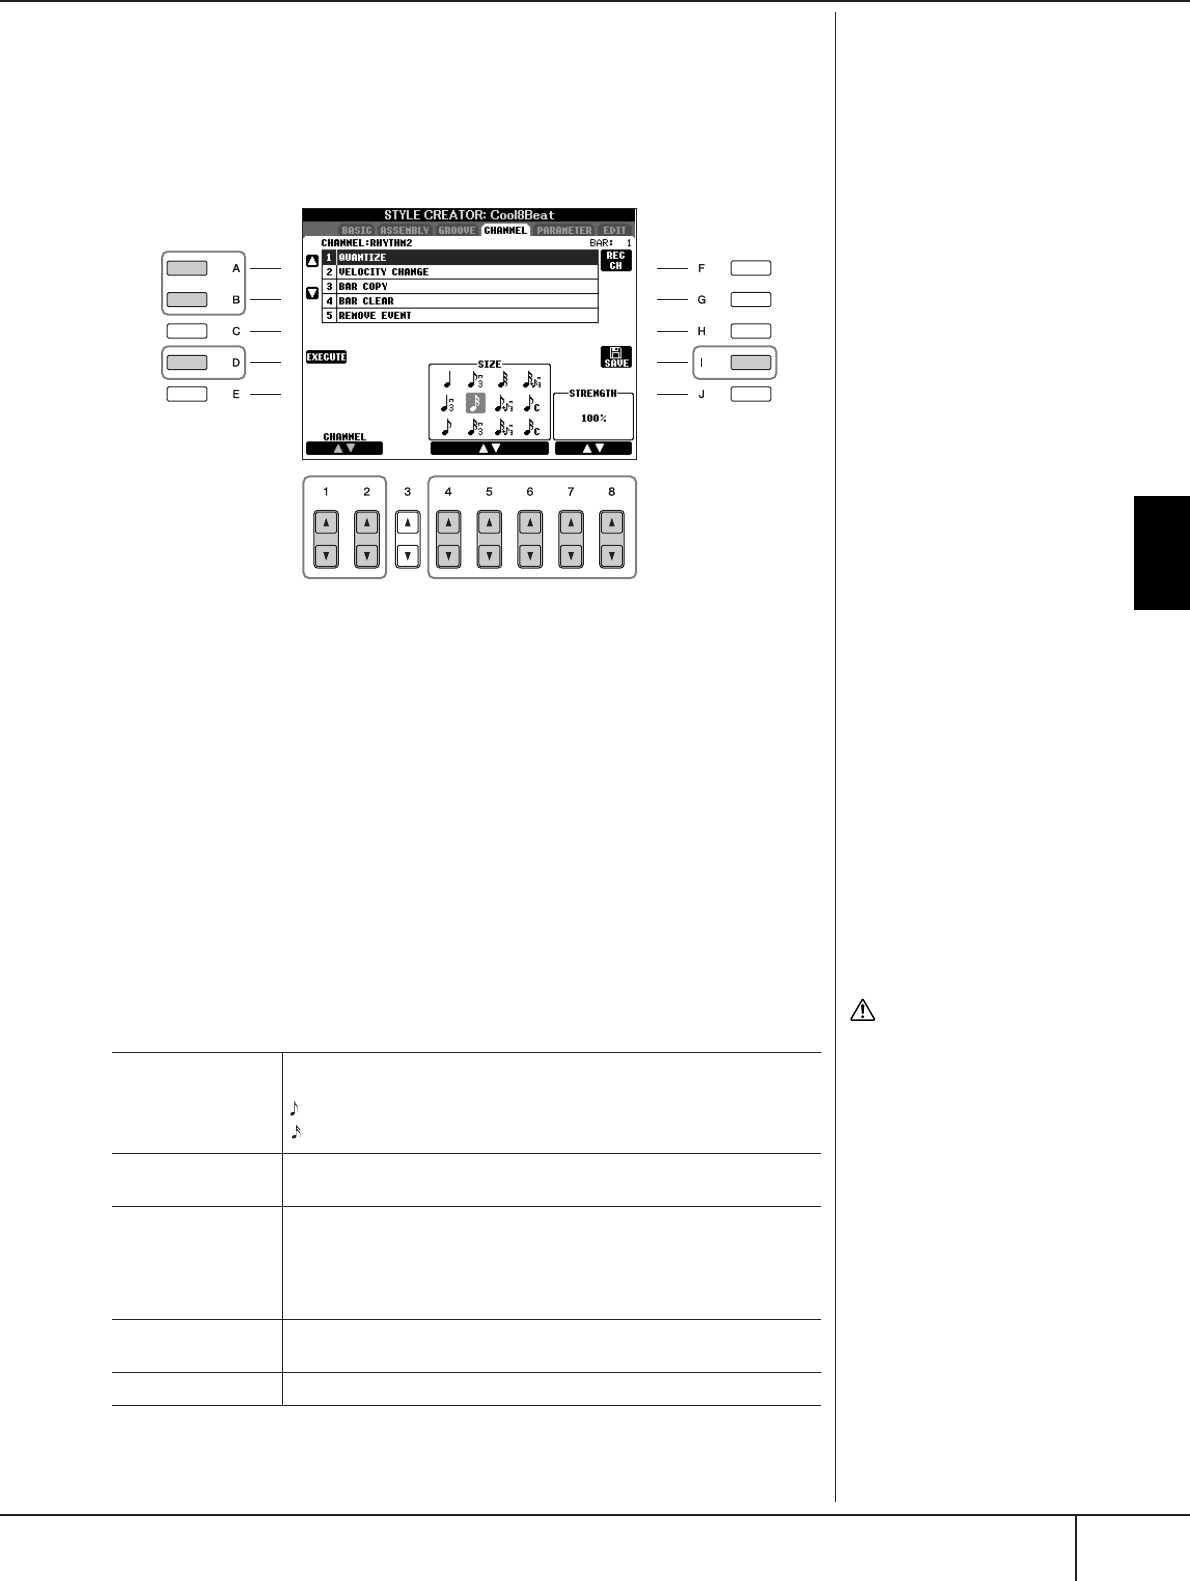
Style Creator
PSR-S900/S700 Owner’s Manual 127
Using, Creating and Editing the Auto Accompaniment Styles
Editing Data for Each Channel (CHANNEL)
The explanation here applies when you select the CHANNEL tab in step 4 of
“Basic Operation for Editing Styles” (page 124).
1Press the [A]/[B] button to select the edit menu (see below).
2Use the [1
ππ
ππ††
††
]/[2
ππ
ππ††
††
] (CHANNEL) buttons to select the channel to
be edited.
The selected channel is shown at the upper left of the display.
3Use the [4
ππ
ππ††
††
]–[8
ππ
ππ††
††
] buttons to edit the data.
For details on editable parameters, see below.
4Press the [D] (EXECUTE) button to actually enter the edits for each
display.
After the operation is completed, you can execute the edition and this but-
ton changes to [UNDO], letting you restore the original data if you’re not
satisfied with the results of the edit. The Undo function only has one level;
only the previous operation can be undone.
5Press the [I] (SAVE) button to call up the Style Selection display to
save your data.
Save the data in the Style Selection display (page 73).
3
1
2
45
CAUTION
The edited Style will be lost if
you change to another Style
or you turn the power off
without executing the save
operation.
QUANTIZE Same as in the Song Creator (page 165), with the exception of the two
additional available parameters below.
Eighth notes with swing
Sixteenth notes with swing
VELOCITY
CHANGE
Boosts or cuts the velocity of all notes in the specified channel, accord-
ing to the percentage specified here.
BAR COPY This function allows data to be copied from one measure or group of
measures to another location within the specified channel. SOURCE
specifies the first (TOP) and last (LAST) measures in the region to be
copied. DEST specifies the first measure of the destination location, to
which the data is to be copied.
BAR CLEAR This function clears all data from the specified range of measures within
the selected channel.
REMOVE EVENT This function lets you remove specific events from the selected channel.
C
C
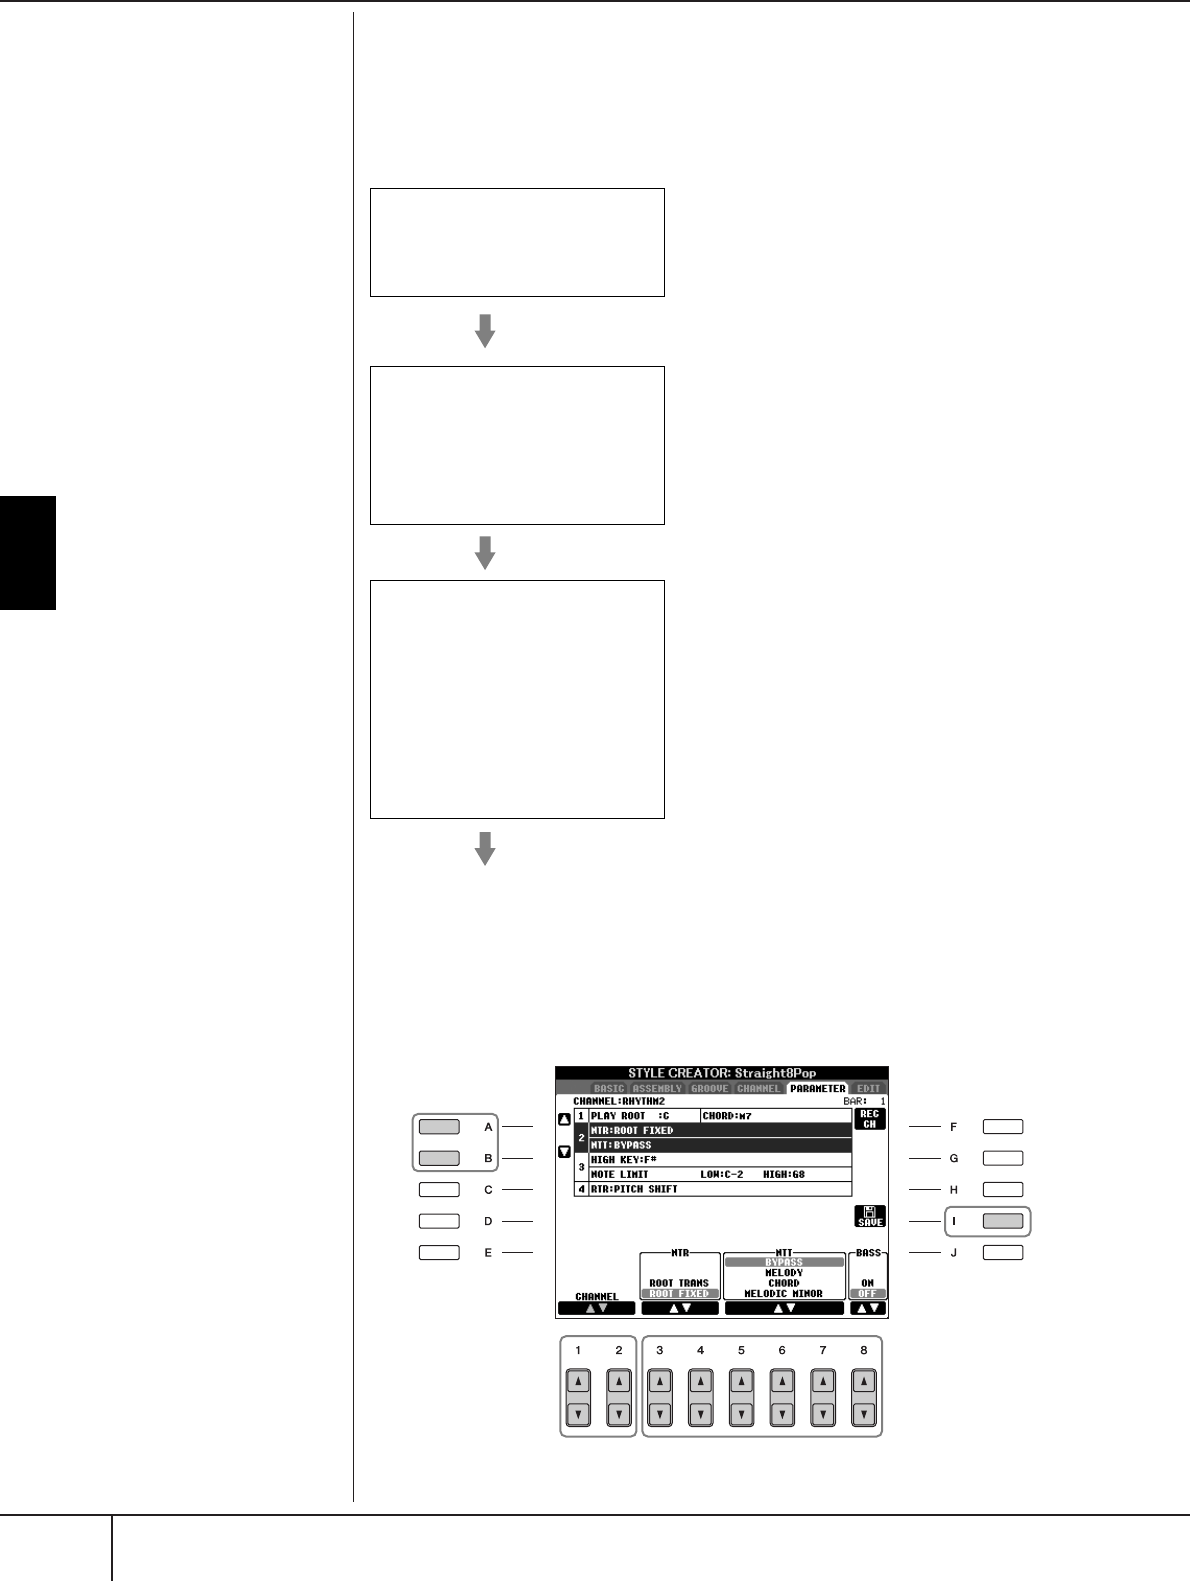
Using, Creating and Editing the Auto Accompaniment Styles
Style Creator
PSR-S900/S700 Owner’s Manual
128
Making Style File Format Settings (PARAMETER)
Special Parameter Settings Based on Style File
Format
The explanation here applies when you select the PARAMETER tab in step 4 of
“Basic Operation for Editing Styles” (page 124).
1Press the [A]/[B] button to select the edit menu (page 129).
Editing of Style File Format data
is related only to note conver-
sion. Editing the rhythm chan-
nels has no effect.
The Style File Format (SFF) combines all of Yamaha’s auto
accompaniment (Style playback) know-how into a single
unified format. By using the Style Creator, you can take
advantage of the power of the SFF format and freely create
your own Styles.
The chart shown at left indicates the process by which the
Style is played back. (This does not apply to the rhythm
track.) These parameters can be set via the Style Creator
feature.
• Source Pattern
There are a variety of possibilities for Style playback
notes, depending on the particular root note and chord
type that are selected. The Style data is appropriately con-
verted depending on the chord changes you make during
your performance. This basic Style data that you create
with the Style Creator is referred to as the “Source Pat-
tern.”
• Note Transposition
This parameter group features two parameters that deter-
mine how the notes of the Source Pattern are to be con-
verted in response to chord changes.
• Other Settings
Using the parameters of this group, you can fine-tune how
Style playback responds to the chords you play. For exam-
ple, the Note Limit parameter allows you to have the
Voices of the Style sound as realistic as possible by shift-
ing the pitch to an authentic range—ensuring that no
notes sound outside the natural range of the actual instru-
ment (e.g., very low notes of a piccolo sound).
Source Pattern
SOURCE ROOT
(Chord Root setting of a Source Pattern)
SOURCE CHORD
(Chord Type setting of a Source Pattern)
Note Transposition
NTR
(Note Transposition Rule applied to the
Chord Root change)
NTT
(Note Transposition Table applied to the
Chord Type change)
Chord change via the
chord section of the
keybaord.
Other Settings
HIGH KEY
(Upper limit of the octaves of the note
transposing caused by the Chord Root
change)
NOTE LIMIT (Note range in which the
note is sounded)
RTR
(Retrigger Rules that determine how
notes held through chord changes will be
handled)
Output
3
1
2
4
Style Creator
PSR-S900/S700 Owner’s Manual 129
Using, Creating and Editing the Auto Accompaniment Styles
2Use the [1
ππ
ππ††
††
]/[2
ππ
ππ††
††
] (CHANNEL) buttons to select the channel to
be edited.
The selected channel is shown at the upper left of the display.
3Use the [3
ππ
ππ††
††
]–[8
ππ
ππ††
††
] buttons to edit the data.
For details on editable parameters, see below.
4Press the [I] (SAVE) button to call up the Style Selection display to
save your data.
Save the data in the Style Selection display (page 73).
■PLAY ROOT/CHORD
These settings determine the original key of the source pattern (i.e., the key used
when recording the pattern). The default setting of CM7 (with a Play Root of “C”
and a Chord Type of “M7”), is automatically selected whenever the preset data is
deleted prior to recording a new Style, regardless of the Source Root and Chord
included in the preset data. When you change Source Root/Chord from the default
CM7 to another chord, the chord notes and recommended notes will also change,
depending on the newly selected chord type.
When the Play Root is C:
■NTR (Note Transposition Rule)
This determines the relative position of the root note in the chord, when converted
from the Source Pattern in response to chord changes.
CAUTION
The edited Style will be lost if
you change to another Style
or you turn the power off
without executing the Save
operation.
Auditioning Your Style with a
Specific Chord
Normally in the Style Creator,
you can hear your original Style-
in-process with the Source Pat-
tern. However, there is a way to
hear it played by a specific chord
and root. To do this, set NTR to
“Root Fixed,” NTT to “Bypass,”
and NTT BASS to “OFF” then
change the newly displayed
“Play Root” and “Play Chord”
parameters to the desired set-
tings.
ROOT TRANS
(Root Transpose)
When the root note is transposed, the
pitch relationship between notes is
maintained. For example, the notes
C3, E3 and G3 in the key of C become
F3, A3 and C4 when they are trans-
posed to F. Use this setting for chan-
nels that contain melody lines.
ROOT FIXED The note is kept as close as possible to
the previous note range. For example,
the notes C3, E3 and G3 in the key of
C become C3, F3 and A3 when they
are transposed to F. Use this setting for
channels that contain chord parts.
CR CR
C
Cm
CR CCR
C
Cm
6
CCR
CC
Cm
7
CR
RRCCC
Cm
b5
7
CC RC
CC
7
Cm
(9)(9)
CR CC
CC
7
Cm
(11)
CR C CR
C
CmM
7
CC RC
C
Cm
CCC
C
7
C
CC RC C
C
7
CmM
(9)
CR
CCR
Cdim
CR R RC
CCR
Cdim
7
CCC C
C
C
(9)
7
CRC
CC
C
b5
7
CRC CR
CC
C
(#11)
7
CCC
C
C sus
4
7
CRC CR
CM
CRC C CR
CM
7
CCC C CR
7
CM
(9)
CCC C RC
C
(9)
6
CRC
RCR
Caug
CRC C RC
CM
6
CRC C CR
C
7
CM
(#11)
CCC CR
CM
add9
CRC CC
C
C
(13)
7
CCC
CC
C
(b9)
7
C
C
1+8
CC
C
1+5
CCC
RCC
C
(#9)
7
CRC
RCC
C aug
7
CRC CRR
C
CM aug
7
CCCR
RCC
C
(b13)
7
CR CC
Csus
4
CCR CR
C
1+2+5
C = Chord notes C, R = Recommended notes
When playing a
C major chord.
When playing an F
major chord.
When playing a C
major chord.
When playing an
F major chord.

Using, Creating and Editing the Auto Accompaniment Styles
Style Creator
PSR-S900/S700 Owner’s Manual
130
■NTT (Note Transposition Table)
This sets the note transposition table for the source pattern.
■NTT BASS ON/OFF
The channels for which this is set to ON will be played back by the bass root note,
when the on-bass chord is recognized by the instrument.
■HIGH KEY
This sets the highest key (upper octave limit) of the note transposition for the chord
root change. Any notes calculated to be higher than the highest key are transposed
down to the next lowest octave. This setting is available only when the NTR param-
eter (page 129) is set to “Root Trans.”
BYPASS When NTR is set to ROOT FIXED, the transposition table used does not
do any note conversion. When NTR is set to ROOT TRANS, the table
used only converts the root note.
MELODY Suitable for melody line transposition. Use this for melody channels
such as Phrase 1 and Phrase 2.
CHORD Suitable for chord transposition. Use this for the Chord 1 and Chord 2
channels, especially when they contain piano or guitar-like chordal
parts.
MELODIC MINOR When the played chord changes from a major to a minor chord, this
table lowers the third interval in the scale by a semitone. When the
chord changes from a minor to a major chord, the minor third interval is
raised by a semitone. Other notes are not changed. Use this for melody
channels of Sections which respond only to major/minor chords, such
as Intros and Endings.
MELODIC MINOR
5th
In addition to the Melodic Minor transposition above, augmented and
diminished chords affect the 5th note of the Source Pattern.
HARMONIC
MINOR
When the played chord changes from a major to a minor chord, this
table lowers the third and sixth intervals in the scale by a semitone.
When the chord changes from a minor to a major chord, the minor
third and flatted sixth intervals are raised by a semitone. Other notes are
not changed. Use this for chord channels of Sections which respond
only to major/minor chords, such as Intros and Endings.
HARMONIC
MINOR 5th
In addition to the Harmonic Minor transposition above, augmented and
diminished chords affect the 5th note of the Source pattern.
NATURAL MINOR When the played chord changes from a major to a minor chord, this
table lowers the third, sixth and seventh intervals in the scale by a
semitone. When the chord changes from a minor to a major chord, the
minor third, flatted sixth and flatted seventh intervals are raised by a
semitone. Other notes are not changed. Use this for chord channels of
Sections which respond only to a Major/minor chord such as Intros and
Endings.
NATURAL MINOR
5th
In addition to the Natural Minor transposition above, augmented and
diminished chords affect the 5th note of the Source pattern.
DORIAN When the played chord changes from a major to a minor chord, this
table lowers the third and seventh intervals in the scale by a semitone.
When the chord changes from a minor to a major chord, the minor
third and flatted seventh intervals are raised by a semitone. Other notes
are not changed. Use this for chord channels of Sections which respond
only to a Major/minor chord such as Intros and Endings.
DORIAN 5th In addition to the Dorian transposition above, augmented and dimin-
ished chords affect the 5th note of the Source pattern.
CM
C3-E3-G3
FM
F3-A3-C4
F#M
F#2-A#2-C#3
C#M
C#3-F3-G#3
Example — When the highest key is F.
Root changes
Notes played
Style Creator
PSR-S900/S700 Owner’s Manual 131
Using, Creating and Editing the Auto Accompaniment Styles
■NOTE LIMIT
This sets the note range (highest and lowest notes) for voices recorded to the style
channels. By judicious setting of this range, you can ensure that the voices sound
as realistic as possible — in other words, that no notes outside the natural range
are sounded (e.g., high bass sounds or low piccolo sounds). The actual notes that
sound are automatically shifted to the set range.
■RTR (Retrigger Rule)
These settings determine whether notes stop sounding or not and how they change
pitch in response to chord changes.
STOP The notes stop sounding.
PITCH SHIFT The pitch of the note will bend without a new attack to match the type
of the new chord.
PITCH SHIFT TO
ROOT
The pitch of the note will bend without a new attack to match the root
of the new chord.
RETRIGGER The note is retriggered with a new attack at a new pitch corresponding
to the next chord.
RETRIGGER TO
ROOT
The note is retriggered with a new attack at the root note of the next
chord. However, the octave of the new note remains the same.
CM
E3-G3-C4
FM
High Limit
Low Limit
F3-A3-C4
C#M
F3-G#3-C#4
Example — When the lowest note is C3 and the highest is D4.
Root changes
Notes played
PSR-S900/S700 Owner’s Manual
132
The Multi Pads
The Multi Pads
Multi Pad Creating (Multi Pad Cre-
ator)
This feature lets you create your original Multi Pad phrases, and also allows you to
edit existing Multi Pad phrases to create your own.
Multi Pad Realtime Recording
1Select a Multi Pad Bank to be edited or created (page 134).
2Call up the operation display.
[FUNCTION] → [F] DIGITAL REC MENU
3Press the [C] button to call up the Multi Pad Creator display.
4Press the TAB [
√
] button to select the RECORD tab.
5Press any of the [A], [B], [F], and [G] buttons to select a Multi Pad to
be edited or created.
If you want to create the Multi Pad data from scratch, press the [C] button to
call up an empty bank.
6Press the [H] (REC) button to enter the recording standby status for
the Multi Pad selected in step 5.
7Start recording.
Recording begins automatically as soon as you play the keyboard.
You can also start recording by pressing the STYLE CONTROL [START/
STOP] button. This lets you record as much silence as you want before the
start of the Multi Pad phrase.
If Chord Match is set to on for the Multi Pad to be recorded, you should
record using the notes of the C major seventh scale (C, D, E, G, A and B).
8Stop recording.
Press the [H] (STOP) button or the panel MULTI PAD [STOP] button or the
STYLE CONTROL [START/STOP] button to stop recording when you've fin-
ished playing the phrase.
Reference to Quick Guide pages
The Multi Pads .............................................................................. page 52
CRC CRC
C = Chord note
C, R = Recommended note
T
o ensure t
h
at your repeate
d
rhythmic phrases play back in a
perfect loop, be careful to stop
recording right on the very last
beat of the phrase, just before the
“one” of the next measure. If it is
difficult to get a good loop, you
may want to use the Step Record
functions on the EDIT page.
Multi Pad Creating (Multi Pad Creator)
PSR-S900/S700 Owner’s Manual 133
The Multi Pads
9Listen back to your newly recorded phrase, by pressing the appropri-
ate MULTI PAD button, [1]–[4]. To re-record the phrase, repeat steps
6–8.
10 Turn Repeat of each pad On or Off by using the [1
ππ
ππ††
††
] - [4
ππ
ππ††
††
] but-
tons.
If the Repeat parameter is on for the selected pad, playback of the corre-
sponding pad will continue until the MULTI PAD [STOP] button is pressed.
If the Repeat parameter is off for the selected pad, playback will end auto-
matically as soon as the end of the phrase is reached.
When you press the Multi Pads of which the Repeat is turned on during Song
or Style playback, playback will start and repeat in sync with the beat.
11 Turn Chord Match of each pad On or Off by using the [5
ππ
ππ††
††
]–
[8
ππ
ππ††
††
] buttons.
If the Chord Match parameter is on for the selected pad, the corresponding
pad is played back according to the chord specified in the chord section of
the keyboard generated by turning [ACMP] on, or specified in the LEFT
voice section of the keyboard generated by turning [LEFT] on (when turning
the [ACMP] off).
12 Press the [D] button, then enter a name for each Multi Pad by
(page 134).
13 Press the [I] button, then save the Multi Pad data as a Bank contain-
ing a set of four Pads to the USER drive or USB storage device
(page 70).
Multi Pad Step Recording (EDIT)
Step Recording can be executed in the EDIT page. After selecting a Multi Pad in
step 5 of the Multi Pad Realtime Recording on page 132, press the TAB [
√
][
®
]
buttons to select the EDIT tab. The EDIT page indicates the Event list that lets you
record notes with absolutely precise timing. This Step Recording procedure is
essentially the same as that for Song Recording (pages 152–161), with the excep-
tion of the points listed below:
•There is no menu for switching channels, since Multi Pads contain data for only a
single channel.
•In the Multi Pad Creator, only the channel events can be entered and the System
Exclusive messages can be edited. Chord and Lyrics events are not available. You
can switch between the two types of Event Lists by pressing the [F] button.
M
u
l
t
i
P
a
d
s
i
n
di
cate
d
w
i
t
h
t
h
e
f
o
l
-
lowing icon (hand on fretboard)
are created with special note
transpositions to produce the
natural chord voicing of the gui-
tar. Because of this, if the Chord
Match setting is set to off, the
Multi Pads may not sound appro-
priately.

Multi Pad Editing (Multi Pad Creator)
PSR-S900/S700 Owner’s Manual
134
The Multi Pads
Multi Pad Editing (Multi Pad Creator)
1Press the MULTI PAD CONTROL [SELECT] button to call up the Multi
Pad Bank selection display, then select a Bank to be edited on the
USER drive.
2Press the [8
††
††
] button to call up the [MULTI PAD EDIT] display, then
select a Pad to be edited by pressing any of the [A], [B], [F], and [G]
buttons.
3Edit each of the Multi Pads as desired.
• Naming
Press the [1
†
] button then change the name of each Multi Pad (page 76).
• Copying
Press the [3
†
] button, select the Multi Pad to be copied, select the desti-
nation location, then execute the Copy operation by pressing the [4
†
]
button (page 74).
• Deleting
Press the [5
†
] button then delete the unnecessary Multi Pad (page 75).
The number above the Pad name corresponds
to the MULTI PAD [1]–[4] buttons.
PSR-S900/S700 Owner’s Manual 135
Registering and Recalling Custom Panel Setups
Registering and Recalling Custom Panel Setups — Registration Memory
The Registration Memory function allows you to save (or “register”) virtually all
panel settings to a Registration Memory button, and then instantly recall your cus-
tom panel settings by pressing a single button. The registered settings for eight Reg-
istration Memory buttons should be saved as a single Bank (file).
Registering and Saving Custom
Panel Setups
Registering Custom Panel Setups
1Set up the panel controls (such as Voice, Style, effects, and so on) as
desired.
Refer to the Data List for a list of parameters that can be registered with the
Registration Memory function. The Data List is available at the Yamaha
website. (See page 5.)
2Press the REGISTRATION MEMORY [MEMORY] button. The display
for selecting the items to be registered appears.
Only the items selected here will be registered. (TEXT and MIC SETTING are
not shown in the PSR-S700 display.)
3Press the [2
ππ
ππ††
††
]–[7
ππ
ππ††
††
] buttons to select items.
To cancel the operation, press the [I] (CANCEL) button.
4Enter or remove the checkmark in the box of the item to determine
whether the item should be registered or not, by pressing the
[8
ππ
ππ††
††
] button.
5Press one of the REGISTRATION MEMORY [1]–[8] buttons to register
your settings.
It is recommended that you select a button whose lamp is not lit in red or
green. Buttons that are lit in red or green, already contain the panel setup
data. Any panel setup previously registered to the selected REGISTRATION
MEMORY button (lamp lights in green or red) will be erased and replaced
by the new settings.
6Register various panel setups to other buttons by repeating steps 1–5.
About the lamp status:
Off.............. no data registered
On (green)...data registered, but
not currently selected
On (red)......data registered, and
currently selected
Deleting an unneeded panel
setup
See page 137.
Deleting all eight current
panel setups
To delete all the eight current
panel setups, turn the [POWER]
button ON while holding the B5
key (right-most B key on the key-
board).
When recalling registration set-
ups, you can also select the
items to be recalled or not, even
if you selected all items when
registering (page 138).
2
43
5
Recalling the Registered Panel Setups
PSR-S900/S700 Owner’s Manual
136
Registering and Recalling Custom Panel Setups
Saving the Registered Panel Setups
You can save all the eight registered panel setups as a single Registration Memory
Bank file.
1Press the REGIST BANK [+] and [–] buttons simultaneously to call up
the REGISTRATION BANK Selection Display.
2Press the [6
††
††
] button to save the Bank file (page 73).
Recalling the Registered Panel Setups
1Press the REGIST BANK [+] and [–] buttons simultaneously to call up
the REGISTRATION BANK Selection Display.
2Press one of the [A]–[J] buttons to select a bank.
3Press one of the green-lit numbered buttons ([1]–[8]) in the Registra-
tion Memory section.
Bank 1
Bank 2
Bank 3
Bank 4
R
eg
i
strat
i
on
M
emory
d
ata
compatibility
In general, Registration Memory
data (Bank files) is compatible
among the models PSR-S900/
S700. However, the data may
not be perfectly compatible,
depending on the specifications
of each model.
1 2
Ab
out reca
lli
ng setups
f
rom a
USB storage device
When recalling the setups
including Song/Style file selec-
tion from a USB storage device,
make sure that the appropriate
USB storage device including the
registered Song/Style is con-
nected into the [USB TO
DEVICE] terminal.
2
3
Recalling the Registered Panel Setups
PSR-S900/S700 Owner’s Manual 137
Registering and Recalling Custom Panel Setups
Deleting an Unneeded Panel Setup/Naming a
Panel Setup
The panel setups can be deleted or named individually as desired.
1Press the REGIST BANK [+] and [–] buttons simultaneously to call up
the REGISTRATION BANK Selection Display.
2Press one of the [A]–[J] buttons to select a bank to be edited.
3Press the [8
††
††
] (EDIT) button to call up the REGISTRATION EDIT Dis-
play.
4Edit the panel setups.
• Deleting a panel setup
Press the [5
†
] button to delete a panel setup (page 75).
• Renaming a panel setup
Press the [1
†
] button to rename a panel setup (page 76).
5Press the [8
ππ
ππ
] (UP) button to return to the REGISTRATION BANK
Selection display.
Parameter Lock
You can “lock” specific parameters (e.g., effect, split point, etc.) to make
them selectable only via the panel control—in other words, instead of via
Registration Memory, One Touch Setting, Music Finder, Song or incoming
MIDI data, etc.
1Call up the Parameter Lock display.
[FUNCTION] →→
→→ [J] UTILITY →→
→→ TAB [
√
][
®
] →→
→→ CONFIG 1 →→
→→ [B] 3 PARAM-
ETER LOCK
2Select the desired parameter by using the [1
ππ
ππ††
††
]–[7
ππ
ππ††
††
]buttons,
then lock it with the [8
ππ
ππ
] (OK) button.
T
he number above the
fi
le name corresponds
t
o the REGISTRATION
M
EMORY [1]–[8] but-
t
ons.

Recalling the Registered Panel Setups
PSR-S900/S700 Owner’s Manual
138
Registering and Recalling Custom Panel Setups
Disabling Recall of Specific Items
(Freeze Function)
Registration Memory lets you recall all the panel setups you made with a single
button press. However, there may be times that you want certain items to remain
the same, even when switching Registration Memory setups. For example, you may
want to switch Voices or effect settings while keeping the same accompaniment
Style. This is where the Freeze function comes in handy. It lets you maintain the set-
tings of certain items and leave them unchanged, even when selecting other Regis-
tration Memory buttons.
1Call up the operation display.
[FUNCTION] → [E] REGIST SEQUENCE/FREEZE/VOICE SET →
TAB [
√
][
®
] FREEZE
2Press the [2
ππ
ππ††
††
]–[7
ππ
ππ††
††
] buttons to select items.
3Enter checkmarks for the items to be “Frozen” (i.e., to remain
unchanged), by pressing the [8
ππ
ππ††
††
] button.
4Press the [EXIT] button to exit from the operation display.
5
Press the [FREEZE] button on the panel to turn the Freeze function on.
Calling Up Registration Memory Numbers in
Order — Registration Sequence
As convenient as the Registration Memory buttons are, there may be times during a
performance when you want to quickly switch between settings — without having
to take your hands from the keyboard. The convenient Registration Sequence func-
tion lets you call up the eight setups in any order you specify, by simply using the
TAB [
√
][
®
] buttons or the pedal as you play.
1Select the desired Registration Memory bank to program a sequence
(page 136).
2Call up the operation display.
[FUNCTION] → [E] REGIST SEQUENCE/FREEZE/VOICE SET →
TAB [
√
][
®
] REGISTRATION SEQUENCE
3If you intend to use a pedal to switch Registration Memory settings,
specify here how the pedal will be used—to advance or to reverse
through the sequence.
Use the [C] button to select the pedal for advancing through the sequence.
Use the [D] button to select the pedal for reversing through the sequence.
CAUTION
Settings in the REGISTRATION
FREEZE display are automati-
cally saved to the instrument
when you exit from this dis-
play. However, if you turn the
power off without exiting
from this display, the settings
will be lost.
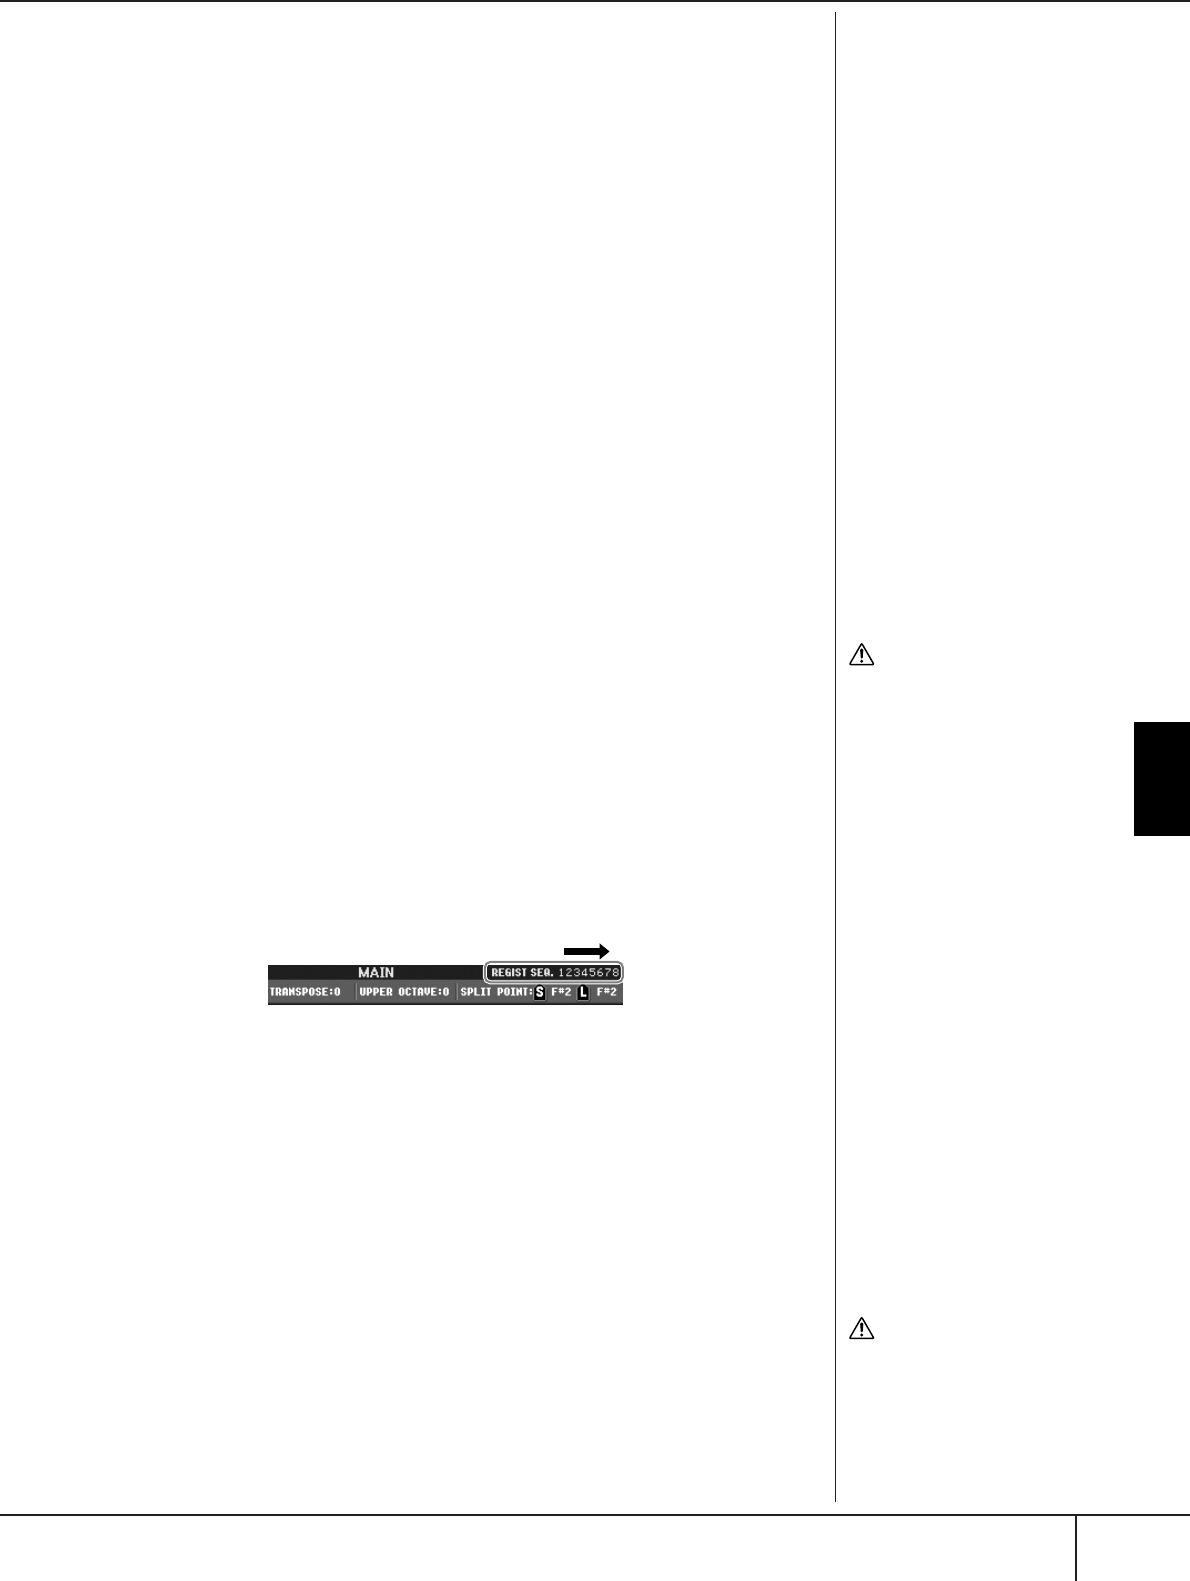
Recalling the Registered Panel Setups
PSR-S900/S700 Owner’s Manual 139
Registering and Recalling Custom Panel Setups
4Use the [E] button to determine how Registration Sequence behaves
when reaching the end of the sequence (SEQUENCE END).
STOP .....................Pressing the TAB [
®
] button or the “advance” pedal has
no effect. The sequence is “stopped.”
TOP .......................The sequence starts again at the beginning.
NEXT BANK...........The sequence automatically moves to the beginning of
the next Registration Memory Bank in the same folder.
5Program the Sequence order.
The numbers shown at the lower part of the display correspond to the REG-
ISTRATION MEMORY [1]–[8] buttons on the panel.
Program the Sequence order from left to right.
Press one of the REGISTRATION MEMORY [1]–[8] button on the
panel, then press the [6
ππ
ππ††
††
] (INSERT) button to input the number.
• Replacing the number
Press the [5
π†
] (REPLACE) button to replace the number at the cursor
position with the currently selected Registration Memory number.
• Deleting the number
Press the [7
π†
] (DELETE) button to delete the number at the cursor
position.
• Deleting all numbers
Press the [8
π†
] (CLEAR) button to delete all numbers in the sequence.
6Press the [F] button to turn the Registration Sequence function on.
7
Press the [DIRECT ACCESS] button, then the [EXIT] button to return to
the Main display and confirm whether the Registration Memory num-
bers are called up according to the sequence programmed above.
•Use the TAB [
®
] button to call up the Registration Memory numbers in the
order of the sequence, or use the TAB [
√
] button to call them up in
reverse order. The TAB [
√
][
®
] buttons can only be used for Registration
Sequence when the Main display is called up.
•When pedal operation has been set in step 3, you can use a pedal to select
the Registration Memory numbers in order. The pedal can be used for Reg-
istration Sequence no matter which display is called up (except for the dis-
play in step 3).
Saving the Registration Sequence Settings
The settings for the Sequence order and how Registration Sequence behaves when
reaching the end of the sequence (SEQUENCE END) are included as part of the
Registration Memory Bank file. To store your newly programmed Registration
Sequence, save the current Registration Memory Bank file.
1Press the REGIST BANK [+] and [–] buttons simultaneously to call up
the REGISTRATION BANK Selection display.
2Press the [6
††
††
] button to save the Bank file (page 73).
CAUTION
Settings in the REGISTRATION
SEQUENCE display are auto-
matically saved to the instru-
ment when you exit from this
display. However, if you turn
the power off without exiting
from this display, the settings
will be lost.
Returning to the first
Sequence in one action
In the Main display, press the
TAB [
√
] and [
®
] buttons simul-
taneously. This cancels the cur-
rently selected Sequence
number (the box indicator at the
top right goes out). The first
Sequence will be selected by
pressing one of the TAB [
√
][
®
]
buttons or by pressing the pedal.
The Registration Sequence is indicated at the top
right of the Main display, letting you confirm the
currently selected number.
CAUTION
Keep in mind that all Registra-
tion Sequence data is lost
when changing Registration
Memory Banks, unless you’ve
saved it with the Registration
Memory Bank file.

PSR-S900/S700 Owner’s Manual
140
Using, Creating and Editing Songs
Using, Creating and Editing Songs
Compatible Song Types
The PSR-S900/S700 can play back the following Song types.
Preset Songs
Songs in the Song Selection PRESET display.
Your Own Recorded Songs
These are Songs which you’ve recorded (page 43, page 147) and saved to the
USER/USB display. (USB is available when you connect a USB storage device such
as a USB flash memory/floppy disk drive to the instrument.)
Commercially Available Song Data
A variety of song data for the instrument can be downloaded from the Yamaha
website, and even more titles are available commercially as Disk Songs. Disk
Songs are available when you connect the optional floppy disk drive to the instru-
ment. The instrument is compatible with the Song disks (floppy disks) that bear the
following marks:
Reference to Quick Guide Pages
Practicing with the Preset Songs .................................................. page 36
Playing Back and Listening to Songs Before Practicing ............ page 36
Displaying Music Notation (Score) .......................................... page 39
Muting the Right- or Left-hand Part Viewing the Score ............. page 40
Practicing by Using the Repeat Playback Function .................. page 42
Recording Your Performance.................................................... page 43
Singing Along with Song playback (Karaoke) or Your
Own Performance.......................................................................... page 57
Connecting a Microphone (PSR-S900).................................... page 57
Singing with the Lyrics Display................................................ page 58
Displaying Text (PSR-S900)...................................................... page 58
Convenient Functions for Karaoke........................................... page 59
Convenient Functions for Singing Along with Your
Own Performance ................................................................... page 61
Recording Your Performance as Audio
(USB Audio Recorder) (PSR-S900)................................................. page 63
Before using a USB storage
device, be sure to read “Han-
dling the USB Storage Device
(USB Flash Memory/Floppy
Disk, etc)” on page 23.
Before using a floppy disk and
the disk slot, be sure to read
“Handling floppy disks” on
page 22.
Commercially available music
data is subject to protection by
copyright laws. Copying com-
mercially available data is strictly
prohibited, except for your own
personal use.
See page 203 for information on
the types of Song data that can
be played on the instrument.

Using, Creating and Editing Songs
Operations for Song Playback
PSR-S900/S700 Owner’s Manual 141
Operations for Song Playback
This section explains detailed operations and functions related to Song playback
which are not covered in the “Quick Guide.”
■Starting/Stopping a Song
Press the SONG [F/K] (PLAY/PAUSE) button to start Song playback, and press
the SONG [J] (STOP) button to stop. In addition, there are several other conve-
nient ways to start/stop a Song.
Starting Playback
Synchro Start
You can start playback as soon as you start playing the keyboard.
While playback is stopped, simultaneously press the SONG [J] (STOP) and
[F/K] (PLAY/PAUSE) buttons simultaneously.
To cancel the Synchro Start function, simultaneously press the SONG [J] (STOP)
and [F/K] (PLAY/PAUSE) buttons simultaneously once again.
Tap function
This useful function lets you press the [TAP TEMPO] button to tap out the tempo
and automatically start the Song at that tapped speed. Simply tap (press/release) the
button (four times for a 4/4 time signature) while the instrument is in Synchro Start
standby mode, and the Song playback starts automatically at the tempo you
tapped.
Fade In
The [FADE IN/OUT] button can be used to produce smooth fade-ins when starting
the Song playback. To produce fade-ins, press the [FADE IN/OUT] button while
playback is stopped and then press the SONG [F/K] (PLAY/PAUSE) button to
start playback.
Stopping Playback
Fade Out
The [FADE IN/OUT] button can be used to produce smooth fade-outs when stop-
ping the Song playback. Press the [FADE IN/OUT] button at the beginning of the
phrase you want to fade out.
Depending on the particular
Song data, the Style will also
play back at the same time.
Set the Fade In/Out time
The times of the fade-in and fade-out can be set independently. For details,
refer to page 108.

Using, Creating and Editing Songs
Operations for Song Playback
PSR-S900/S700 Owner’s Manual
142
■Top/Pause/Rewind/Fast Forward
Moving to the top position of the Song
Press the SONG [J] (STOP) button, regardless of whether the Song is stopped or
playing back.
Pausing the Song
Press the SONG [F/K] (PLAY/PAUSE) button during Song playback. Press the
SONG [F/K] (PLAY/PAUSE) button again and the Song will resume from the
current position.
Moving back and forth (rewind and fast forward)
1Press the SONG [G] (REW) or SONG [H] (FF) button to move back
and forth (rewind and fast forward).
It calls up a pop-up window showing the current measure number in the
Main display.
For Songs containing Phrase Marks, you can use the [G/H] (REW/FF)
buttons to navigate through the Phrase Marks in the Song. If you don’t want
to set the Song position by the phrase marks, press the [E] button and select
“BAR” in the window showing the Song position.
2Press the [EXIT] button to close the pop-up window showing the cur-
rent measure number (or Phrase Mark number).
■Repeat Playback/Chain Playback
1Call up the operation display.
[FUNCTION] → [B] SONG SETTING
2Set the parameters related to the Repeat Playback by using the [H]/[I]
buttons. The available parameters are shown below.
Phrase Mark:
Phrase Mark is a pre-pro-
grammed marker in certain Song
data, which specifies a certain
location (set of measures) in the
Song.
REPEAT MODE OFF
Plays through the selected Song, then stops.
SINGLE
Plays through the selected Song repeatedly.
ALL
Continues playback through all the Songs in the folder
containing the current Song repeatedly.
RANDOM
Randomly and repeatedly plays back all Songs in the
folder containing the current Song.
PHRASE MARK REPEAT For Songs containing Phrase Marks, you can set Repeat
Playback to “ON” or “OFF.” When this is on, the part corre-
sponding to the specified Phrase Mark number is repeatedly
played back. The steps for specifying the Phrase Mark num-
ber are the same as in the steps 1–2 of the section “Moving
back and forth (rewind and fast forward)” (see above).
For Songs not containing
Phrase Marks
For Songs containing
Phrase Mark

Using, Creating and Editing Songs
Operations for Song Playback
PSR-S900/S700 Owner’s Manual 143
■Queuing the Next Playback Song
While a Song is playing back, you can queue up the next Song for playback. This is
convenient for chaining it to the next Song smoothly during stage performance.
Select the Song you want play next in the Song Selection display, while a Song is
playing back.
The “NEXT” indication appears at the upper right of the corresponding Song name.
To cancel this setting, press the [8
†
] (Cancel) button.
■Using the Auto Accompaniment Features with the
Song Playback
When playing back a Song and a Style at the same time, channels 9–16 in the Song
data are replaced with style channels — allowing you to play the accompaniment
parts of the Song yourself. Try playing chords along with the Song playback as
shown in the instructions below.
1Select a Song (page 36).
2Select a Style (page 46).
3Press the STYLE CONTROL [ACMP] button to turn on the Auto
Accompaniment function.
4Press the STYLE CONTROL [SYNC START] button to enable standby —
letting you simultaneously start the accompaniment as soon as you
start playing.
5Press the SONG [FF
FF/KK
KK] (PLAY/PAUSE) button to start playback.
6Play chords along with the Song.
The chord name is indicated in the Main display. To return to the Main dis-
play, press the [DIRECT ACCESS] button, then press the [EXIT] button.
When the Song playback is stopped, the Style playback is also stopped at the same
time.
•Tempo for playing back a Song and a Style at the same time
When playing back a Song and a Style at the same time, the tempo value set in
the Song is automatically used.
Parameter Lock
You can “lock” specific parame-
ters (e.g., effect, split point, etc.)
to make them selectable only via
the panel controls (page 137).
For songs without chord data,
the chord name will not be dis-
played in the Main display dur-
ing Song playback.
Playing Songs with the Quick Start function
With the default settings, the Quick Start function is turned on. On some
commercially available Song data, certain settings related to the Song
(such as voice selection, volume, etc.) are recorded to the first measure,
before the actual note data. When Quick Start is set to “ON,” the instru-
ment reads all initial non-note data of the Song at the highest possible
speed, then automatically slows down to the appropriate tempo at the first
note. This allows you to start playback as quickly as possible, with a mini-
mum pause for reading of data. When Quick Start is set to “ON,” a Song is
played back directly from the first note (which may be in the middle of a
measure). If you want to play from the beginning of the measure that has
silence prior to the first note, turn Quick Start “OFF.”
1Call up the operation display.
[FUNCTION] → [B] SONG SETTING
2Press the [7
††
††
] (QUICK START) buttons to turn the Quick Start
“OFF.”

Using, Creating and Editing Songs
Adjusting the Volume Balance and Voice Combination, etc. (MIXING CONSOLE)
PSR-S900/S700 Owner’s Manual
144
Adjusting the Volume Balance and
Voice Combination, etc. (MIXING
CONSOLE)
You can set the mixing-related parameters of a Song. Refer to the section “Adjust-
able items (parameters) in the MIXING CONSOLE display” on page 92. Call up the
“SONG CH 1–8” or “SONG CH 9–16” display in step 3 of the Basic Procedure in
“Editing the Volume Balance and Voice Combination (MIXING CONSOLE)” on
page 91. Below are two operation examples.
Adjusting the Volume Balance of Each Channel
1Select a Song (page 36).
2Press the [MIXING CONSOLE] button to call up the MIXING CON-
SOLE display.
3Select the [VOL/VOICE] tab by pressing the TAB [
√
][
®
] buttons.
4Press the [MIXING CONSOLE] button repeatedly to call up the display
of “SONG CH 1–8” or “SONG CH 9–16.”
5Press the [J] button to select the “VOLUME.”
6Adjust the volume balance of each channel by using the [1
ππ
ππ††
††
]–
[8
ππ
ππ††
††
] buttons.
7You can save the volume settings to the Song in the Setup operation
of the SETUP (page 166).
Make sure to checkmark the “VOICE” item in step 2 of the Setup procedure.
Reading Song data automatically when inserting a USB
storage device
You can have the instrument automatically call up the first Song (not con-
tained in a folder) on a USB storage device, as soon as the device is con-
nected to the [USB TO DEVICE] terminal.
1Call up the operation display.
[FUNCTION] → [J] UTILITY → TAB [
√
][
®
] MEDIA
2Press the [3
ππ
ππ
]/[4
ππ
ππ
] (SONG AUTO OPEN) button to select “ON.”
About the [SONG CH 1–8]/
[SONG CH 9–16] displays
A Song consists of 16 separate
channels. Separate settings can
be made for each of the 16 chan-
nels in the MIXING CONSOLE
display. Adjust the parameters in
the SONG CH 1-8 or SONG CH
9-16 display respectively. Usu-
ally, CH 1 is assigned to the [TR
1] button, CH 2 is assigned to
the [TR 2] button, and CH 3-16
are assigned to the [EXTRA TR]
button, respectively.
Press the [C]/[H] (VOICE) but-
tons in step 5 to select the Voice
which you want to change. Then,
press one of the [1
π†
] to
[8
π†
] buttons to call up the
Voice selection display for the
channel.
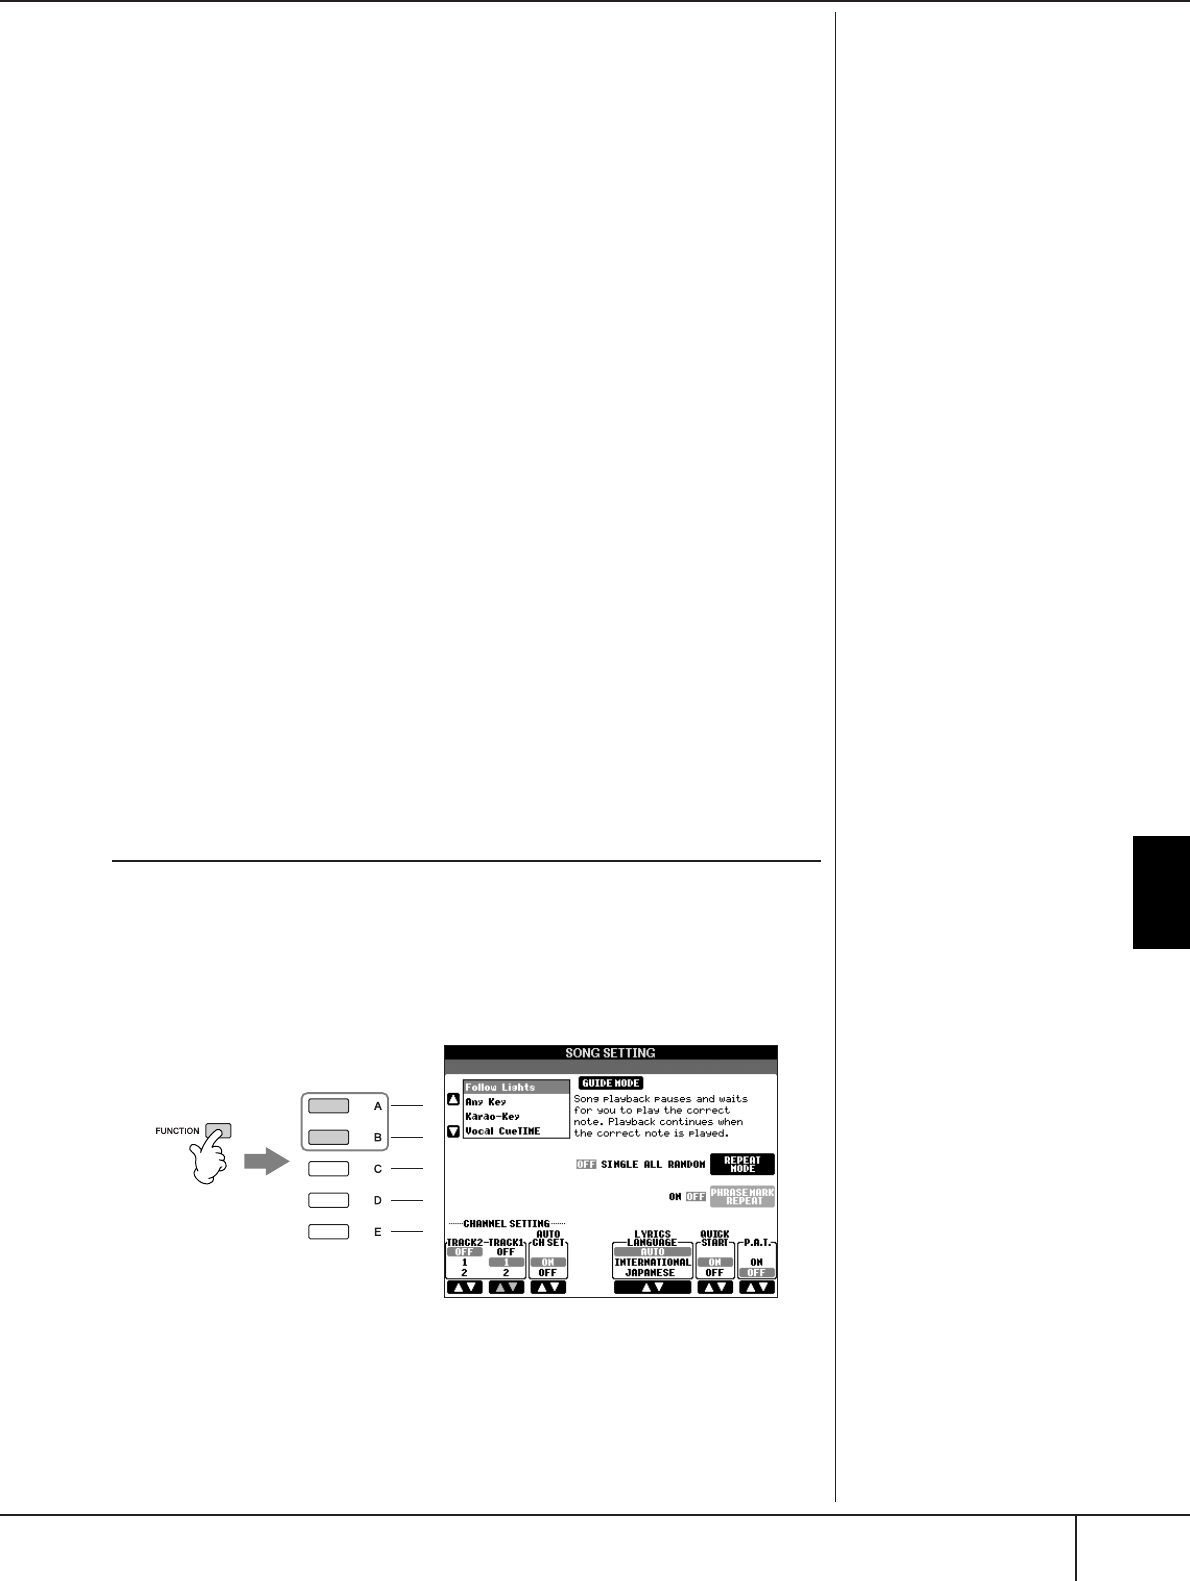
Using, Creating and Editing Songs
Practicing Songs with the Guide Functions
PSR-S900/S700 Owner’s Manual 145
Changing Voices
1–4 The operation steps are the same as in the “Adjusting the Volume
Balance of Each Channel” (see page 144).
5Press the [H] button to select the “VOICE.”
6Press one of the [1
ππ
ππ††
††
]–[8
ππ
ππ††
††
] buttons to call up the Voice selec-
tion display for the channel.
7Press one of the [A]–[J] buttons to select a Voice.
8You can save the changed Voice selection to the Song in the Setup
operation (page 166).
Make sure to checkmark the “VOICE” item in step 2 of the Setup procedure.
Practicing Songs with the Guide
Functions
The Guide functions provide convenient learning and practicing tools to help you
master the instrument. By pressing the [SCORE] button, you can have the notation
of the song displayed, showing the notes you should play and when you should
play them, for ease in learning. The PSR-S900 also features convenient vocal prac-
tice tools that automatically adjust the timing of Song playback to match your vocal
performance (when singing into a connected microphone.)
Selecting the Guide Function Type
1Call up the setting display:
[FUNCTION] → [B] SONG SETTING
2Use the [A]/[B] buttons to select the desired Guide function type. The
following types are available.
3Select a song, call up the Score display (by pressing the [SCORE] but-
ton), then play the keyboard.
Saving the Guide settings in
the SONG SETTING display
You can save the Guide settings
as a part of the Song data
(page 166). For Songs to which
Guide settings have been saved,
the Guide function will be auto-
matically turned on and the
related settings will be recalled
when the Song is selected.
2
1
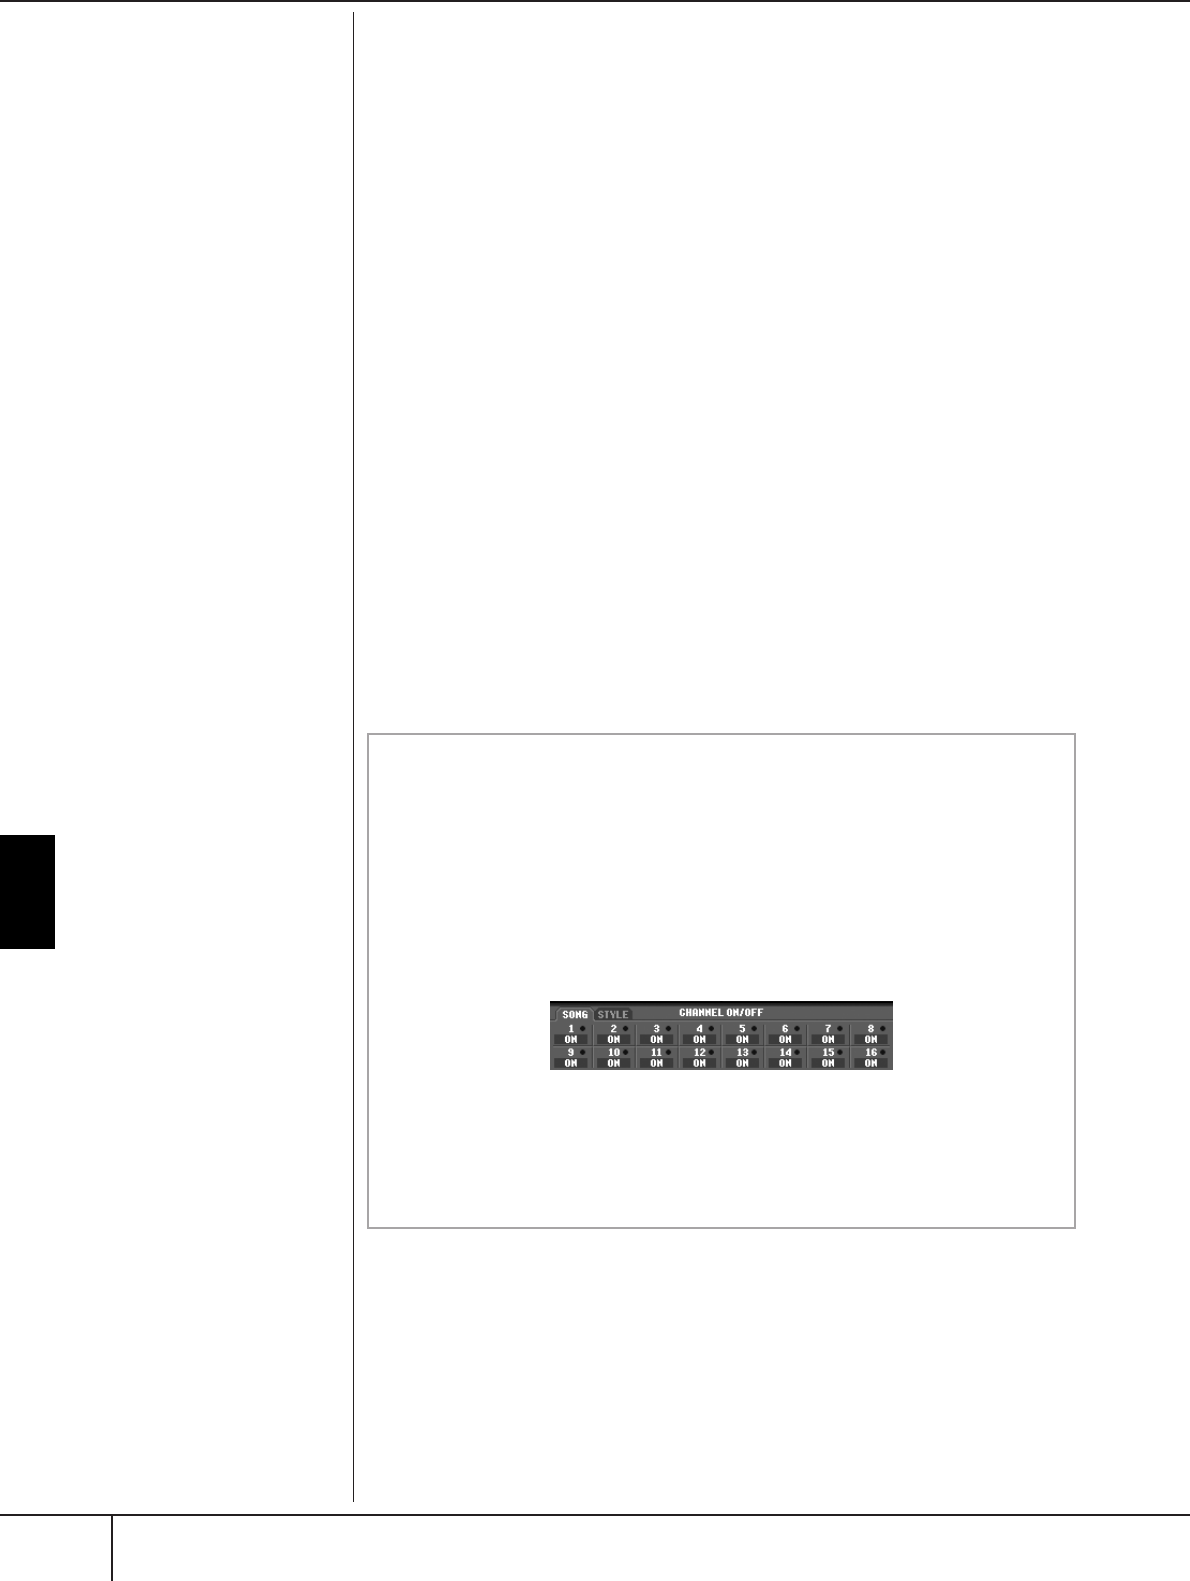
Using, Creating and Editing Songs
Practicing Songs with the Guide Functions
PSR-S900/S700 Owner’s Manual
146
For Keyboard Performance
Follow Lights
When this is selected, Song playback pauses, waiting for you to play the notes cor-
rectly. When you play the correct notes, Song playback continues. Follow Lights
was developed for the Yamaha Clavinova series. This function is used for practicing
purposes, with built-in lamps on the Clavinova keyboard indicating the notes to be
played. Even though the PSR-S900/S700 does not have these lamps, you can use
the same function by following the indications in the displayed notation with the
Song Score function.
Any Key
With this function, you can play the melody of a Song just by pressing a single key
(any key is OK) in time with the rhythm. Song playback pauses and waits for you to
play any key. Simply play a key on the keyboard in time with music and the Song
playback continues.
For Singing
Karao-key
This function lets you control the Song playback timing with just one finger, while
you sing along. This is useful for singing to your own performance.
Song playback pauses, waiting for you to sing. Simply play a key on the keyboard
and the Song playback continues.
Vocal CueTIME (PSR-S900)
This function lets you practice singing with the proper pitch.
Song playback pauses, waiting for you to sing. When you sing with proper pitch,
Song playback continues.
Turning playback channels of the Song on and off
A Song consists of 16 separate channels. You can independently turn each
channel of the selected Song playback on or off. Usually, CH 1 is assigned to
[TR 1] button, CH 2 is assigned to [TR 2] button, and CH 3–16 are assigned
to the [EXTRA TR] button.
1Press the [CHANNEL ON/OFF] button to call up the Song CHANNEL
ON/OFF display.
If the display shown below does not appear, press the [CHANNEL ON/OFF]
button again.
2Use the [1
ππ
ππ††
††
]–[8
ππ
ππ††
††
] buttons to turn each channel on or off.
If you want to play back only one particular channel (muting all other chan-
nels), press and hold down one of the [1
ππ
ππ††
††
]–[8
ππ
ππ††
††
] buttons correspond-
ing to the desired channel. To cancel solo playback, press the same button
again.

Using, Creating and Editing Songs
Recording Your Performance to MIDI
PSR-S900/S700 Owner’s Manual 147
Recording Your Performance to MIDI
You can record your own performances and save them to the User tab display or a
USB storage device. Several different recording methods are available:
Quick Recording which lets you record performance conveniently and quickly,
Multi track Recording which lets you record several different parts to multiple
channels, and Step Recording which lets you enter notes one by one. And since the
recorded data is MIDI, you can easily edit your songs, too.
For details on MIDI, see page 201, “What is MIDI?”
For details on USB Audio Recording (PSR-S900 only), see page 63.
Recording Methods
There are three methods as shown below.
You can also edit Songs after they’ve been recorded (page 162).
For example, you can edit specific notes one by one, or you can use the Punch In/
Out function to re-record a specific part.
Quick Recording
This lets you conveniently and quickly record your performance.
1Press the SONG [REC] and SONG [JJ
JJ] (STOP) buttons simulta-
neously.
A blank Song (“New Song”) is called up for recording.
T
h
e microp
h
one input signa
l
cannot be recorded here, but
can be recorded using the Audio
Recording function (page 63).
Internal memory (User tab
displays) capacity
The internal memory capacity of
the instrument is about 1.4MB
(PSR-S900)/560KB (PSR-S700).
This capacity applies to all file
types, including Voice, Style,
Song, and Registration data files.
Quick Recording
➤ See below.
This convenient and simple recording method lets you quickly
record your performance—useful, for example, in recording solo
piano pieces. You can record to the [TR 1 (R)] or [TR 2 (L)] but-
ton, and also to the [EXTRA TR (STYLE)] track, which can be
used for recording at the same time.
Multi track Recording
➤ page 149
This lets you record a whole Song including several different
instrument parts, to create the sound of a full band or orchestra.
Record the performance of each instrument part one by one
and create fully orchestrated compositions. You can also record
over already-recorded parts of an existing Song (Preset Song or
a Song on USB storage device) with your own performance.
Step Recording
➤ page 152
This method lets you compose your performance by “writing”
it down one event at a time. This is a non-realtime, manual
recording method – similar to writing music notation onto
paper. You can input notes, chords and other events one by
one (realtime performance is not needed).
R
ea
l
t
i
me
R
ecor
di
ng
S
tep
R
ecor
di
ng

Using, Creating and Editing Songs
Recording Your Performance to MIDI
PSR-S900/S700 Owner’s Manual
148
2Make the desired panel settings for your keyboard performance.
Below are some example settings you may want to try.
• Recording the RIGHT 2 and/or LEFT parts
The [RIGHT 2] and/or [LEFT] keyboard parts should be turned on. Select
the voice for each keyboard part (RIGHT 2, LEFT) by calling up the Voice
selection display (page 85, page 86).
• Recording Styles
1Select a Style (page 46).
2Set the tempo for recording by pressing the TEMPO [–] [+] buttons, as
necessary.
• Using Registration Memory panel setups
Press one of the REGISTRATION MEMORY [1–8] buttons (page 135).
3While holding the SONG [REC] button, press the SONG TRACK but-
tons to be recorded.
• Recording your performance
Press the SONG [TR 1] button for the right-hand part recording, and/or the
SONG [TR 2] button for the left-hand part recording.
• Recording Styles/Multi Pads
Press the SONG [EXTRA TR (STYLE)] button.
• Recording your performance and the Style/Multi Pad playback
simultaneously
Press the SONG [TR 1]/[TR 2] buttons and the SONG [EXTRA TR (STYLE)]
button.
4Start recording.
There are several different ways you can start recording.
• Starting by playing the keyboard
If you’ve selected the SONG [TR 1]/[TR 2] buttons in step 3, play in the
right-hand section of the keyboard (page 84). If you’ve selected the SONG
[EXTRA TR (STYLES)] button in step 3, play in the left-hand (chord) section
of the keyboard (page 110). Recording begins automatically as soon as
you play a note on the keyboard.
• Starting by pressing the SONG [F/K] (PLAY/PAUSE) button
If you start recording in this way, “empty” data is recorded until you play a
note on the keyboard. This is useful for starting a Song with a short one-or
two-beat pick-up or lead-in.
• Starting by pressing the STYLE CONTROL [START/STOP] button.
In this case the rhythm parts (channels) of the Style begin playing back and
recording starts simultaneously.
The RIGHT 2 and/or LEFT parts
are recorded onto separate
tracks.
Using the metronome
You can record your perfor-
mance while playing back the
metronome (page 34). However,
the metronome sound is not
recorded.
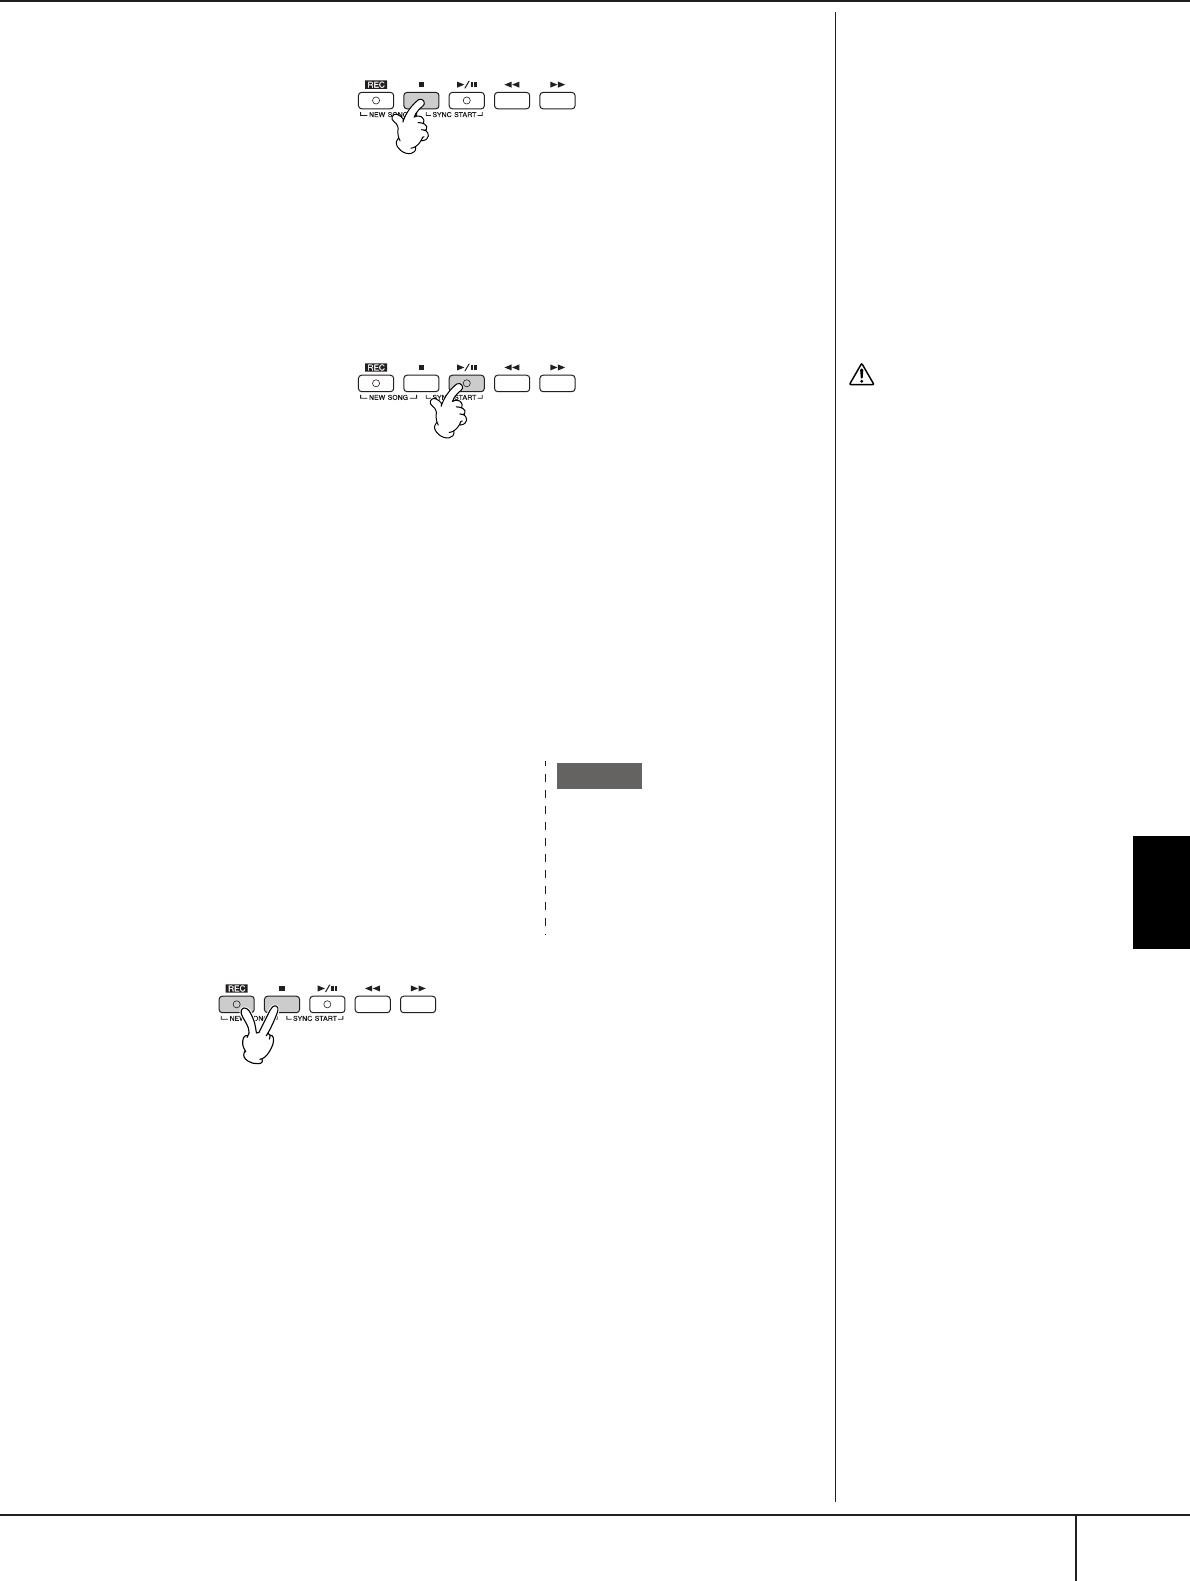
Using, Creating and Editing Songs
Recording Your Performance to MIDI
PSR-S900/S700 Owner’s Manual 149
5Press the SONG [J] (STOP) button to stop recording.
When recording is finished, a message prompting you to save the recorded
performance data appears. To close the message, press the [EXIT] button.
See step 7 for instructions on saving your recording.
6Listen to your newly recorded performance. Press the SONG [F/
K] (PLAY/PAUSE) button to play back the performance you just
recorded.
7Press the SONG [SELECT] button to call up the Song Selection display
for saving your data, then save the data in the Song Selection display
(page 73).
Multi Track Recording
A Song consists of 16 separate channels. With this method, you can record data to
each channel independently, one by one. Both Keyboard and Style parts can be
recorded.
1Press the SONG [REC] and SONG [J]
(STOP) buttons simultaneously.
A blank Song (“New Song”) is called up
for recording.
Select Voices for recording the keyboard
parts (RIGHT 1, RIGHT 2, and/or LEFT)
(page 30, page 85, page 86). Select a Style
and a Multi Pad Bank for recording also,
as necessary (page 46, page 52).
Pausing and restarting your
recording
To pause recording, press the
SONG [F/K] (PLAY/PAUSE)
button during recording. To
restart recording, follow the
operations shown below.
•For recording to [TR 1]/[TR 2],
press the SONG [F/K]
(PLAY/PAUSE) button.
•For recording to [EXTRA TR],
press the STYLE CONTROL
[SYNC START] button, then
play in the chord section of the
keyboard.
CAUTION
The recorded Song data will
be lost if you select another
Song or turn the power to the
instrument off without exe-
cuting the Save operation
(page 73).
About Channels
See page 151.
Recording the keyboard RIGHT 2
part to the channel 2
Press the PART SELECT [RIGHT 2]
button to call up the Voice selection
display, and select a Voice for the
RIGHT 2 part. Also be sure to turn the
PART ON/OFF [RIGHT 2] button on.
Example
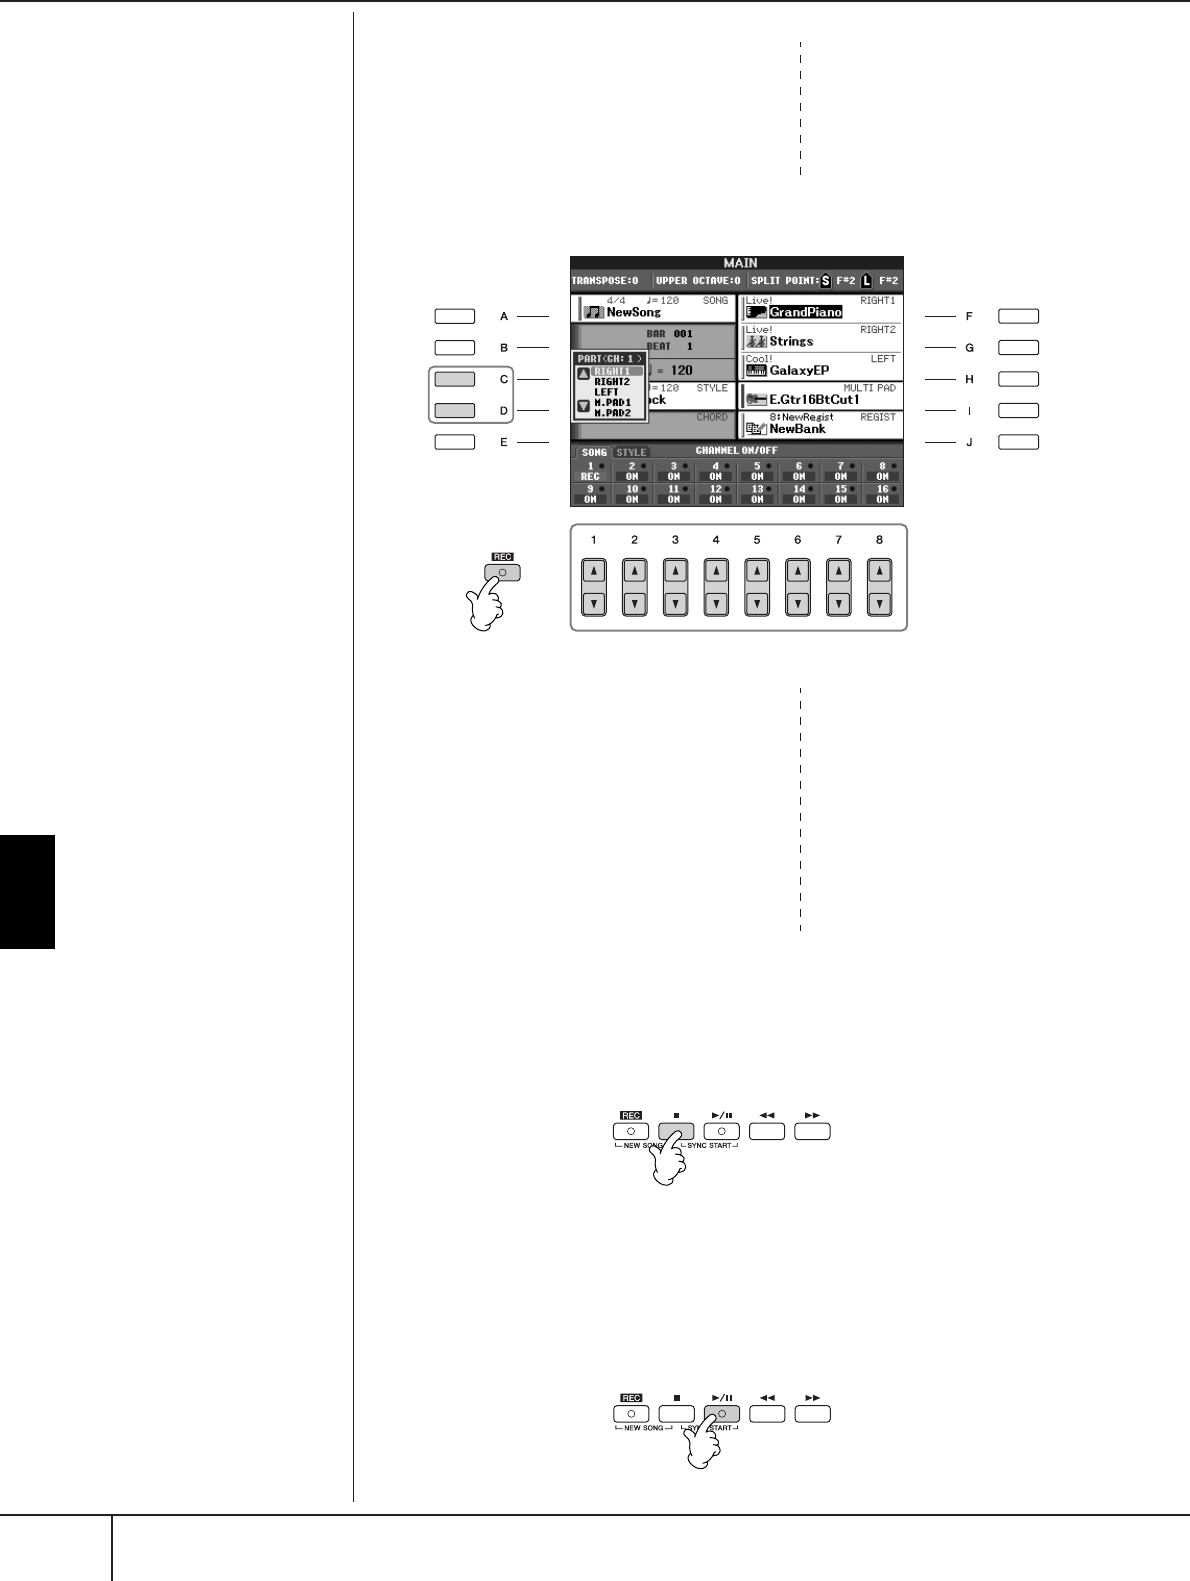
Using, Creating and Editing Songs
Recording Your Performance to MIDI
PSR-S900/S700 Owner’s Manual
150
2While holding the SONG [REC] button,
press the [1
ππ
ππ††
††
]–[8
ππ
ππ††
††
] buttons to
set the desired channels to “REC.”
Normally, the keyboard parts should be
recorded to channels 1–4, the Multi Pads
should be recorded to 5–8, and the Styles
should be recorded to channels 9–16. To
cancel the channel selection, press the SONG [REC] button again.
3Use the [C]/[D] buttons to select the
desired part for the channel to be
recorded.
This determines which part—keyboard or
Style (Rhythm 1/2, Bass, etc.) or Multi Pad
—is recorded to each of the channels
selected in step 2. Default channel/part
assignments are shown in the section
“About Song channels” (page 151).
To close the Part selection display, press
the [EXIT] button.
4Start recording.
The method for starting is the same as in step 4 of Quick Recording
(page 148).
5Press the SONG [J] (STOP) button to stop recording.
When recording is finished, a message appears prompting you to save the
recorded performance appears. To close the message, press the [EXIT] but-
ton. For instructions on saving Song data, see step 8.
6Listen to your newly recorded performance. Press the SONG [F/
K] (PLAY/PAUSE) button to playback the performance you just
recorded.
Sett
i
ng a
ll
o
f
t
h
e 5–16 c
h
an-
nels to “REC” simultaneously
While holding the SONG [REC]
button, press the SONG [EXTRA
TR] button.
When selecting the MIDI part
• Setting a single channel to
MIDI
All incoming data received via
any of the MIDI channels 1-16
is recorded. When using an
external MIDI keyboard or
controller to record, this lets
you record without having to
set the MIDI transmit channel
on the external device.
• Setting several channels to
MIDI
When using an external MIDI
keyboard or controller to
record, this records data only
over the set MIDI channel—
meaning the external device
must also be set to the same
channel.
Recording each channel with
the same tempo
Use the Metronome function
(page 34) to record each channel
with the same tempo. Keep in
mind that the metronome sound
is not recorded.
Pausing and restarting your
recording
See page 148.
While holding the SONG [REC] but-
ton, press the [2
π
] button to set the
channel 2 to “REC.”
+
3
2
Press the [D] button to select
the “RIGHT2.”
Using, Creating and Editing Songs
Recording Your Performance to MIDI
PSR-S900/S700 Owner’s Manual 151
7To record another channel, repeat steps 2 through 6.
8Press the SONG [SELECT] button to call up the Song Selection display
for saving your data, then save the data in the Song Selection display
(page 73).
CAUTION
The recorded Song data will
be lost if you select another
Song or turn the power to the
instrument off without exe-
cuting the Save operation
(page 73).
About Song channels
Default channel/part assignments are shown below.
About keyboard parts
There are three keyboard parts, RIGHT 1, RIGHT 2 and LEFT. As the
default, the RIGHT 1 part is assigned to each of the channels 1–4. Nor-
mally, the keyboard parts should be recorded to the channels 1–4.
About Style parts
As the default, each of the Style parts is assigned to the channels 9–16,
respectively as shown above. Normally, the Style parts should be recorded
to the channels 9–16.
RHYTHM ......... This is the basic part of the Style, containing the drum and
percussion rhythm patterns. Usually one of the drum kits
is used.
BASS ................ The bass part uses various appropriate instrument sounds
to match the style.
CHORD ........... This is the rhythmic chord backing, commonly used with
piano or guitar Voices.
PAD ................. This part is used for sustained instruments such as strings,
organ, choir, etc.
PHRASE ........... This part is used for punchy brass stabs, arpeggiated
chords, and other extras that make the accompaniment
more interesting.
About Multi Pad parts
As the default, each of the Multi Pads is assigned to the channels 5–8,
respectively as shown above.
1
2
3
4
5
6
7
8
RIGHT1
RIGHT1
RIGHT1
RIGHT1
M.Pad1
M.Pad2
M.Pad3
M.Pad4
9
10
11
12
13
14
15
16
RHYTHM1
RHYTHM2
BASS
CHORD1
CHORD2
PAD
PHRASE1
PHRASE2
Channels ChannelsDefault Parts Keyboard parts
Keyboard
Parts
Style parts
Multi
Pad
parts
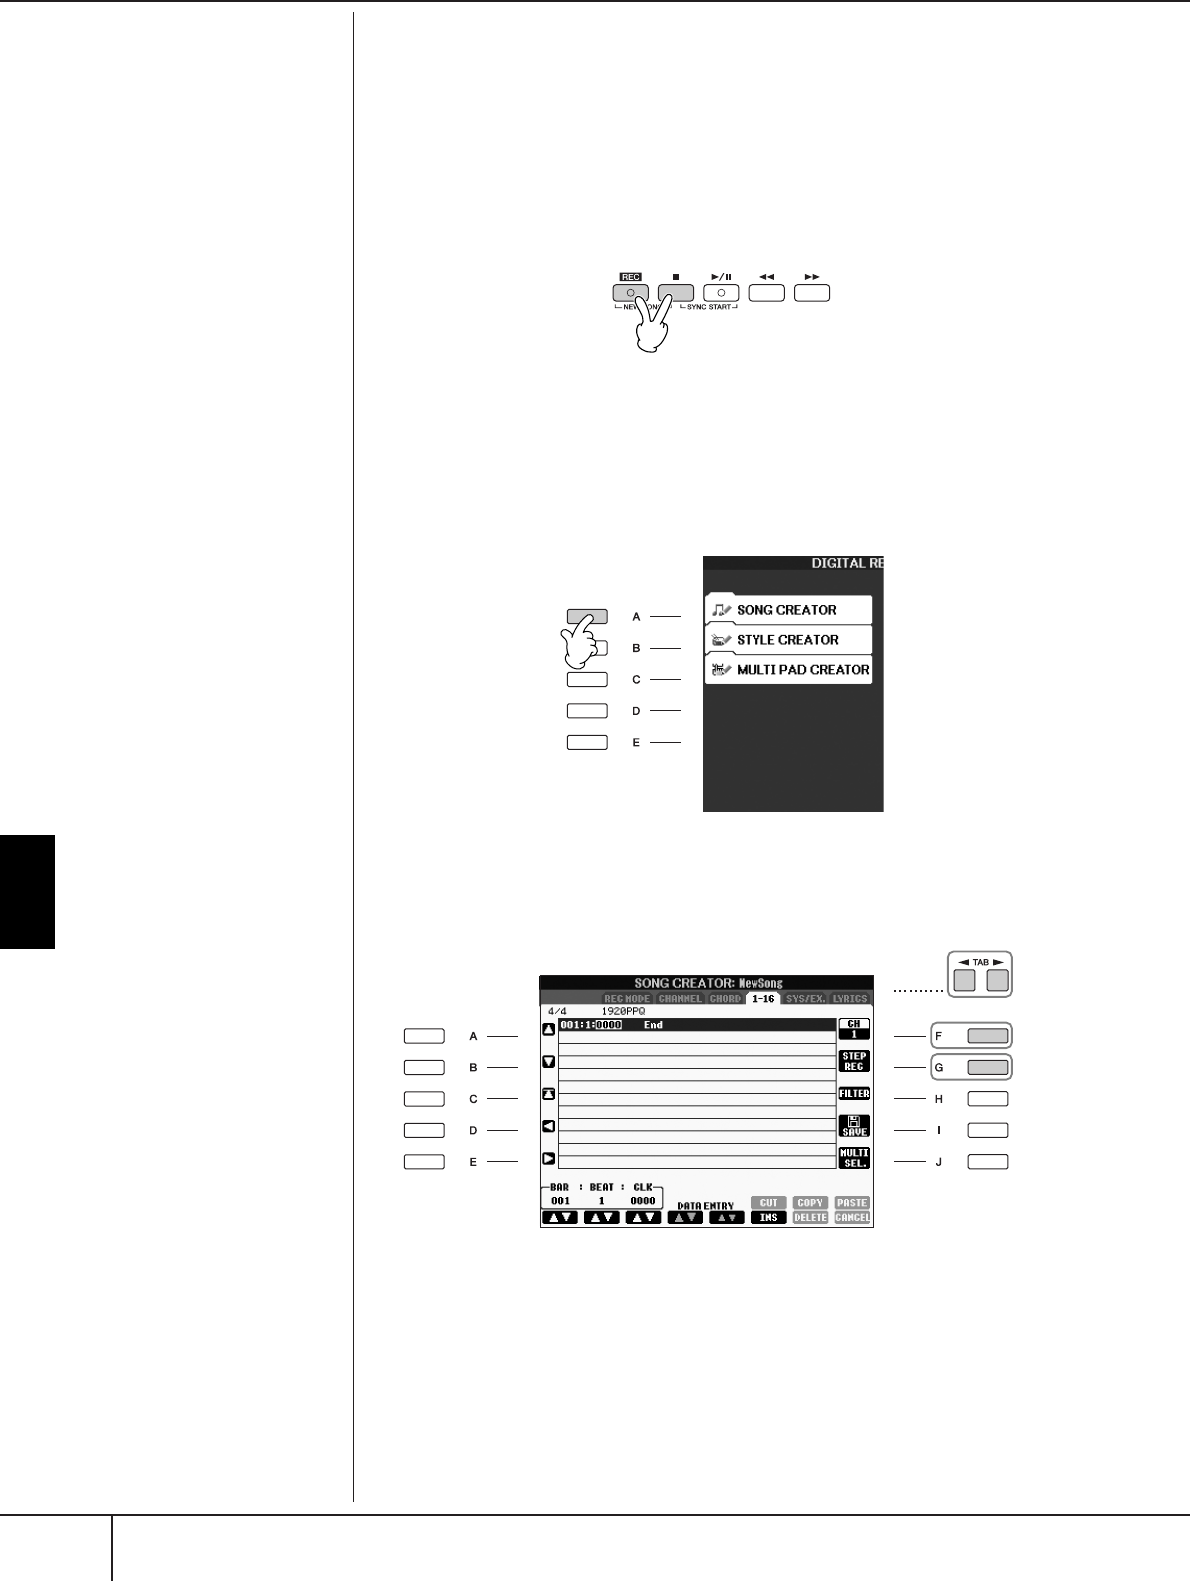
Using, Creating and Editing Songs
Recording Your Performance to MIDI
PSR-S900/S700 Owner’s Manual
152
Step Recording
This method lets you record regular music data such as melodies and chords.
Basic Operations for Step Recording
1Press the SONG[REC] and SONG[J] (STOP) buttons simultaneously.
A blank Song (“New Song”) is called up for recording.
2Call up the operation display.
[FUNCTION] → [F] DIGITAL REC MENU
3Press the [A] button to call up the Song Creator display for recording/
editing a Song.
4Select the appropriate tab by using the TAB [
√
][
®
] buttons.
For recording melodies .............. Select the [1–16] tab.
For recording chords .................. Select the [CHORD] tab.
5If you select the “1–16” tab in step 4, press the [F] button to select the
channel for recording.
6Press the [G] button to call up the STEP RECORD display.
7Start Step Recording.
For recording melodies .............. See page 153.
For recording chords .................. See page 160.
6
5
4
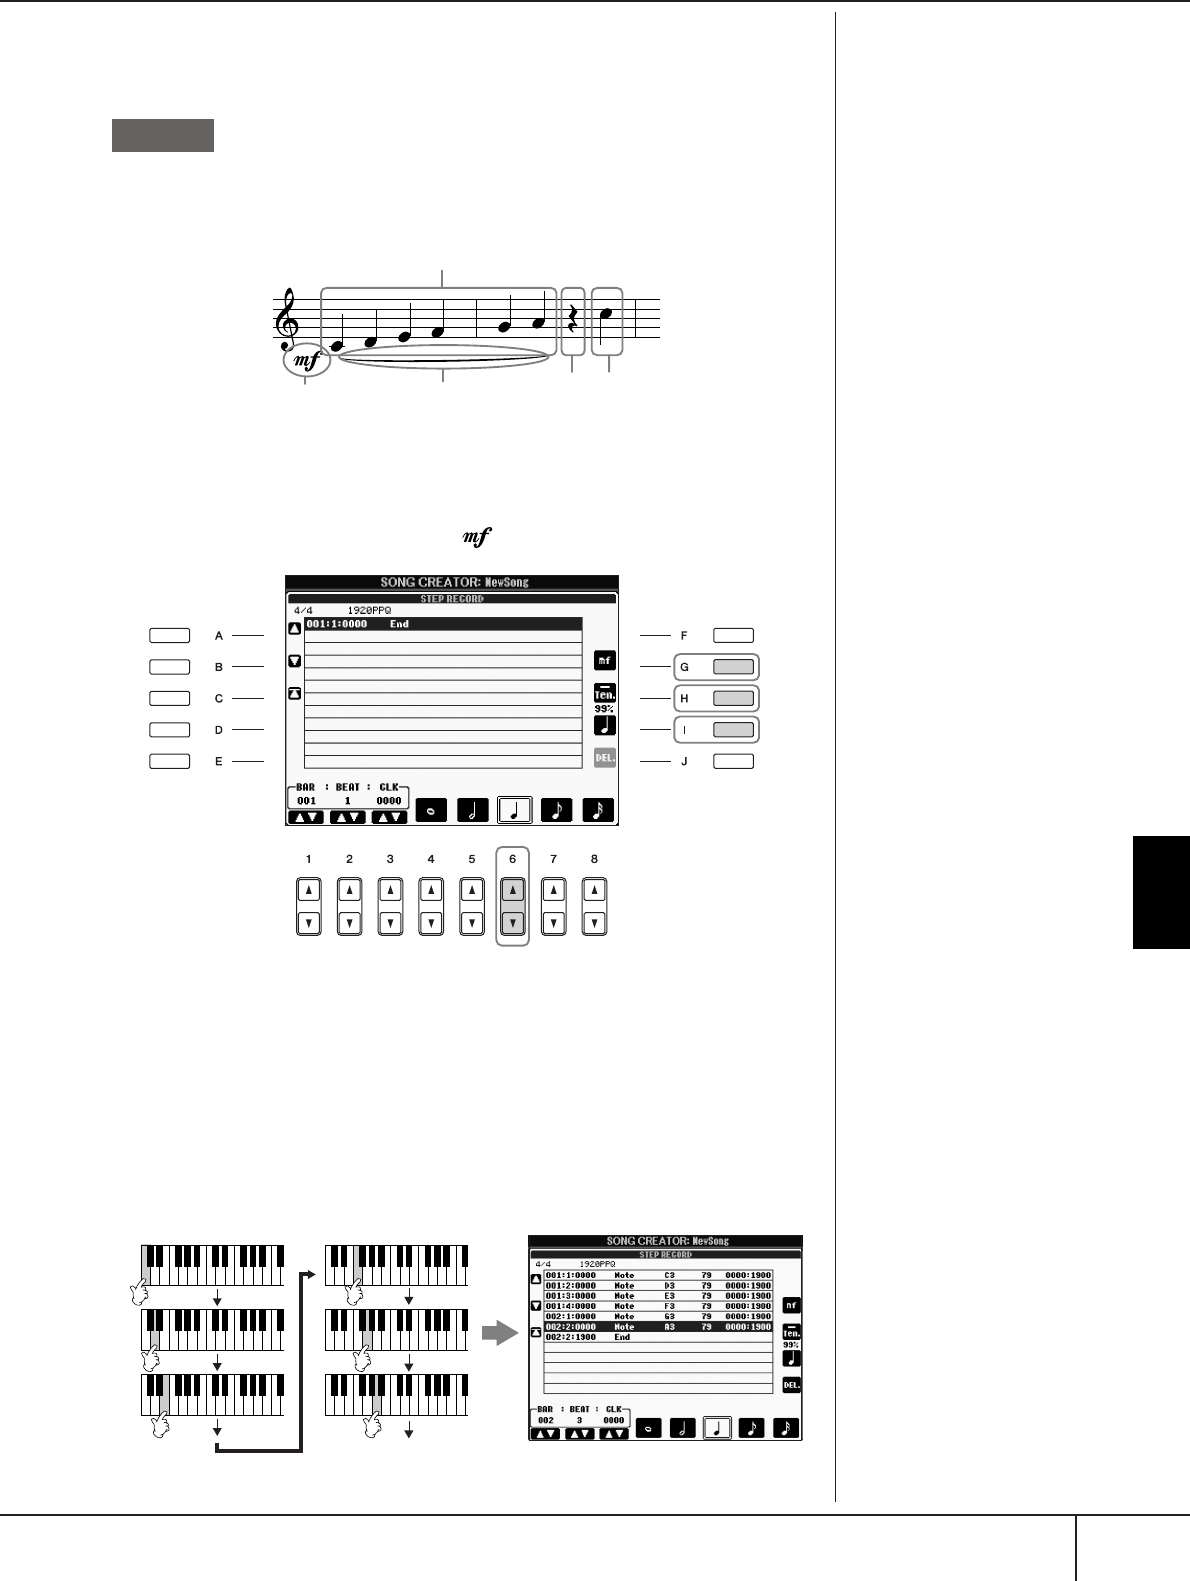
Using, Creating and Editing Songs
Recording Your Performance to MIDI
PSR-S900/S700 Owner’s Manual 153
Recording Melodies
This section explains how to step-record notes, using three music score examples.
The explanations here apply to step 7 of the section “Basic Operations for Step
Recording” on page 152.
Select the Voice for recording after calling up the Step Record display.
1Press the [G] button to select “ .”
2Press the [H] button to select “Tenuto.”
3Press the [I] button to select “normal” note type.
4Press the [6
ππ
ππ††
††
] button to select the quarter-note length.
5Play the keys C3, D3, E3, F3, G3, and A3 in order, according to the
notation example.
Since the music score displayed
on the instrument is generated
from the recorded MIDI data, it
may not appear exactly the same
as shown here.
About the items which can be
selected via the [G] [H] [I] but-
tons
See page 155.
Example 1
126 7
3–5
* The numbers shown in the notation correspond to the following opera-
tion step numbers.
4
1
2
3
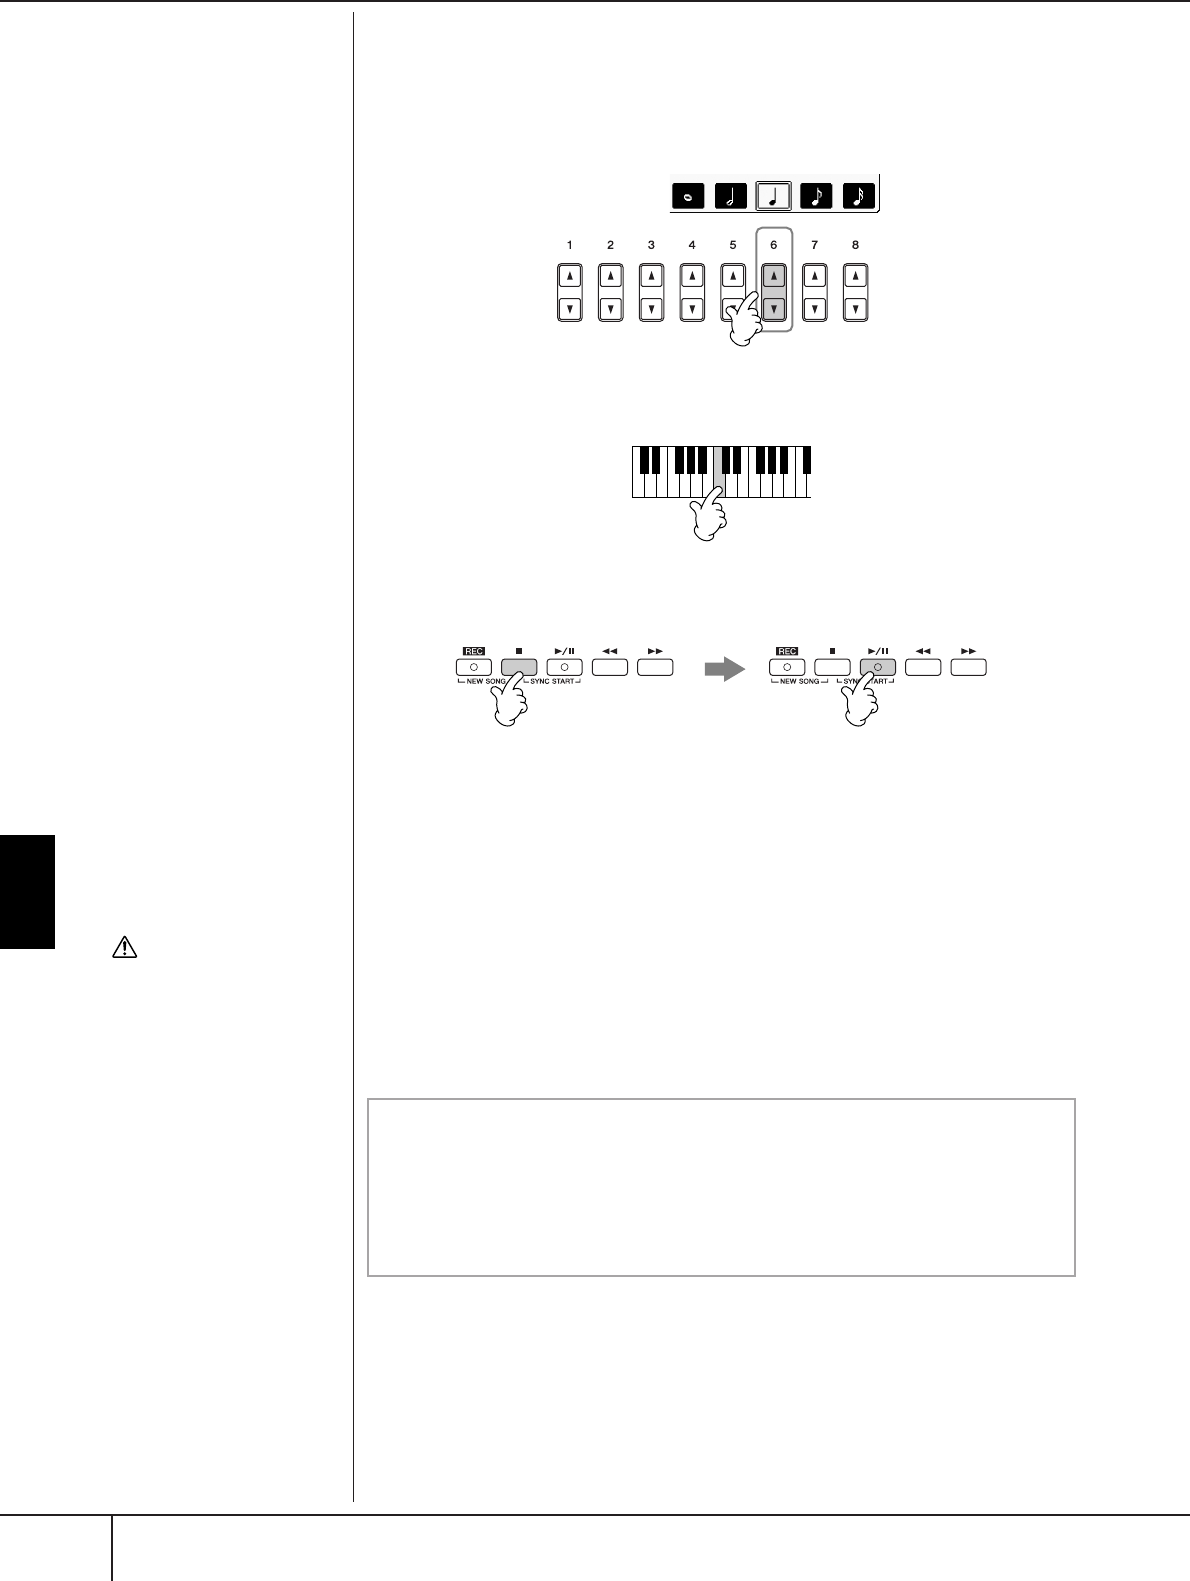
Using, Creating and Editing Songs
Recording Your Performance to MIDI
PSR-S900/S700 Owner’s Manual
154
6Press the [6
ππ
ππ††
††
] button to enter a quarter-note rest.
To enter the rest, use the [4
ππ
ππ††
††
]–[8
ππ
ππ††
††
] buttons. (Press the button once to
select the rest value, and once again to actually enter it.) A rest having spec-
ified note length will be entered.
7Play the C4 key.
8Press the SONG [J] (STOP) button to move the cursor to the begin-
ning of the Song.
9Press the SONG [F/K] (PLAY/PAUSE) button to hear the newly
entered notes.
10 Press the [EXIT] button to exit from the Step Record display.
If you want, you can also edit already recorded Songs in the same manner
(page 162).
11 Press the [I] (SAVE) button to call up the Song Selection display for
saving your data, then save the data in the Song Selection display
(page 73).
89
CAUTION
The recorded Song data will
be lost if you select another
Song or turn the power to the
instrument off without exe-
cuting the Save operation
(page 73).
Move the cursor to the begin-
ning of the Song.
Press the SONG [J] (STOP)
button during recording.
Deleting data
Mistakenly entered notes can be deleted.
1Use the [A]/[B] buttons in the STEP RECORD display (page 152) to
select the data you want to delete.
2Press the [J] (DELETE) button to delete the selected data.

Using, Creating and Editing Songs
Recording Your Performance to MIDI
PSR-S900/S700 Owner’s Manual 155
About velocity
Velocity is determined by how
strongly you play the keyboard.
The more strongly you play the
keyboard, the higher the velocity
value and the louder the sound.
The velocity value can be speci-
fied within a range from 1 to
127. The higher the velocity
value, the louder the sound
becomes.
About items which can be selected via the [G] [H] [I] buttons
in the Step Record display
[G] button ........... Determines the velocity (loudness) of the note to
be entered.
[H] button ........... Determines the gate time (note length) of the note to
be entered.
[I] button ............. Determines the note type to be entered. Pressing the
button alternately switches the note selectors (at the
bottom of the display) among three basic note values:
normal, dotted and triplet.
Kbd.Vel
fff
ff
f
mf
mp
p
pp
ppp
127
111
95
79
63
47
31
15
Items Velocity to be recorded
Actual velocity you play the keyboard with
Normal
Tenuto
Staccato
Staccatissimo
Manual
80%
99%
40%
20%
Items Gate time to be recorded
The gate time (note length) can be set to any
desired percentage by using the DATA
ENTRY dial.
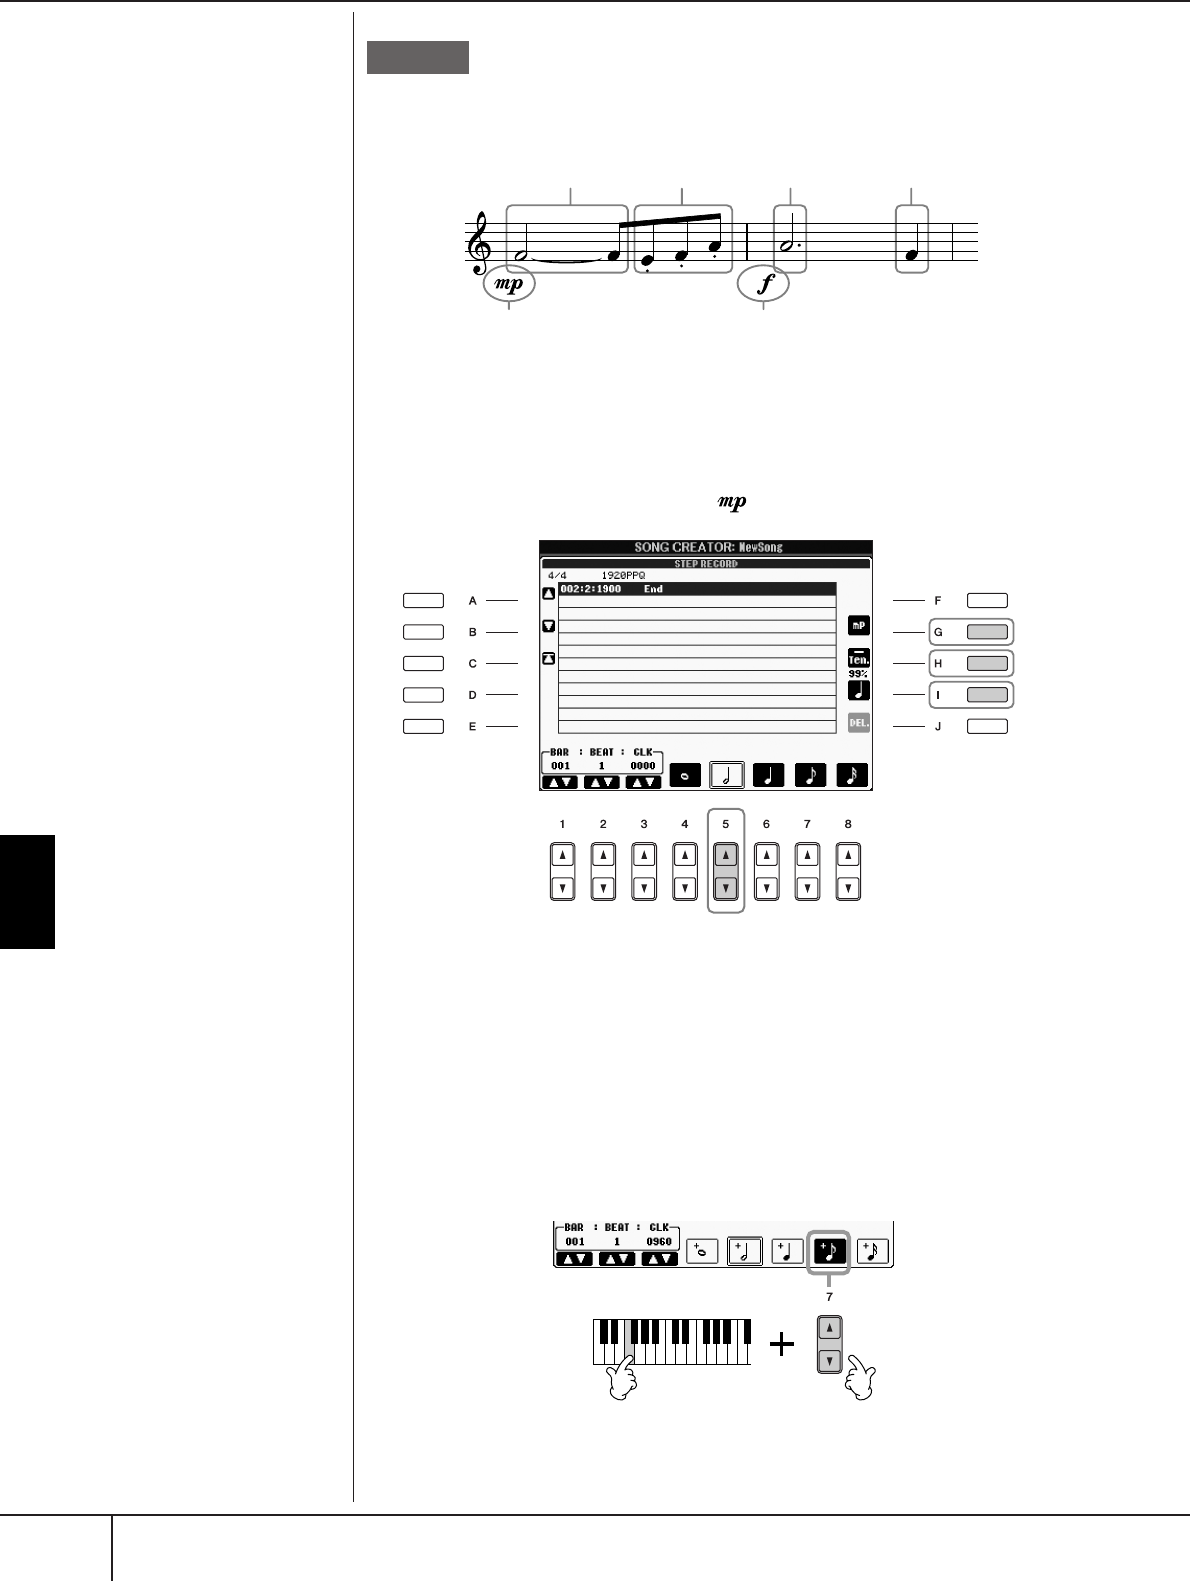
Using, Creating and Editing Songs
Recording Your Performance to MIDI
PSR-S900/S700 Owner’s Manual
156
The explanations here apply to step 7 of the “Basic Operations for Step Recording”
on page 152.
In this example, keep in mind that one of the steps involves holding down a key on
the keyboard while executing the operation.
Select the Voice for recording after calling up the Step Record display.
1Press the [G] button to select “ .”
2Press the [H] button to select “Tenuto.”
3Press the [I] button to select “normal” note type.
4Press the [5
ππ
ππ††
††
] button to select the half-note length.
5While holding F3 on the keyboard, press the [7
ππ
ππ††
††
] button.
Before you go on to step 6, release the F3 key and the [7
π†
] button.
Example 2
Since the music score displayed
on the instrument is generated
from the recorded MIDI data, it
may not appear exactly the same
as shown here. 1
2–5 10–13 14–16
6–8
9
* The numbers shown in the sheet correspond to the following operation
step numbers.
A
b
out t
h
e
i
tems w
hi
c
h
can
b
e
selected via the [G] [H] [I] but-
tons
See page 155.
4
1
2
3

Using, Creating and Editing Songs
Recording Your Performance to MIDI
PSR-S900/S700 Owner’s Manual 157
6After releasing the F3 key, press the [H] button to select “Staccato.”
7Press the [7
ππ
ππ††
††
] button to select the eighth-note length.
8Play the keys E3, F3, and A3 in order, according to the notation exam-
ple.
9Press the [G] button to select “ .”
10 Press the [H] button to select “Tenuto.”
11 Press the [I] button to select “dotted.”
12 Press the [5
ππ
ππ††
††
] button to select the dotted half-note length.
13 Play the A3 key on the keyboard, as specified in the example.
14 Press the [I] button to select “normal” note type.
15 Press the [6
ππ
ππ††
††
] button to select the quarter-note length.
16 Play the F3 key on the keyboard, as specified in the example.
17 Press the SONG [J] (STOP) button to move the cursor to the begin-
ning of the Song.
18 Press the SONG [F/K] (PLAY/PAUSE) button to hear the newly
entered notes.
19 Press the [EXIT] button to exit from the Step Record display.
You can also edit the Songs you’ve recorded as necessary (page 162).
20 Press the [I] (SAVE) button to call up the Song Selection display for
saving your data, then save the data in the Song Selection display
(page 73).
17 18
CAUTION
The recorded Song data will
be lost if you select another
Song or turn the power to the
instrument off without exe-
cuting the Save operation
(page 73).
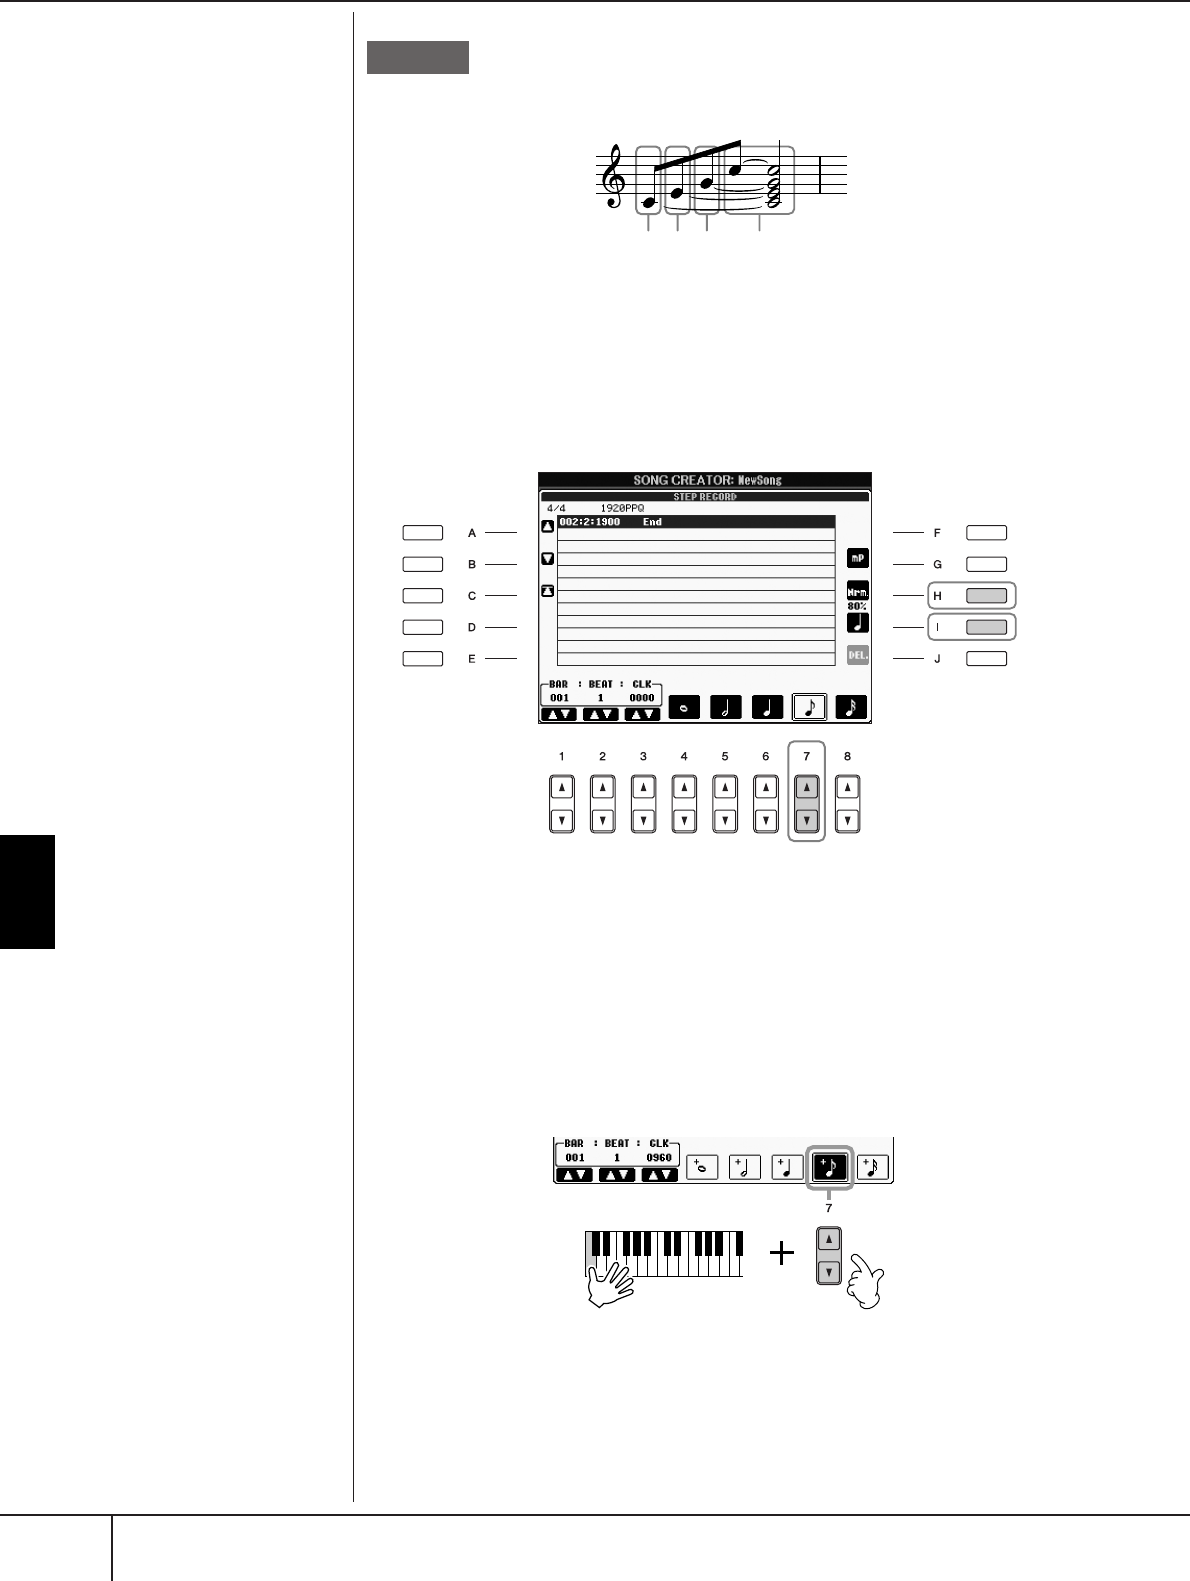
Using, Creating and Editing Songs
Recording Your Performance to MIDI
PSR-S900/S700 Owner’s Manual
158
The explanations here apply to step 7 of the “Basic Operations for Step Recording”
on page 152.
In this example, keep in mind that one of the steps involves holding down a key on
the keyboard while executing the entire operations.
Select the Voice for recording after calling up the Step Record display.
1Press the [H] button to select “Normal.”
2Press the [I] button to select “normal” note type.
3Press the [7
ππ
ππ††
††
] button to select the eighth note.
4While holding C3 key on the keyboard, press the [7
ππ
ππ††
††
] button.
Do not release the C3 key yet. Keep holding it while executing the following
steps.
Example 3
Since the music score displayed
on the instrument is generated
from the recorded MIDI data, it
may not appear exactly the same
as shown here. 1–4 5 6 7
* The numbers shown in the sheet correspond to the following
operation step numbers.
A
b
out t
h
e
i
tems w
hi
c
h
can
b
e
selected via the [G] [H] [I] but-
tons
See page 155.
3
1
2
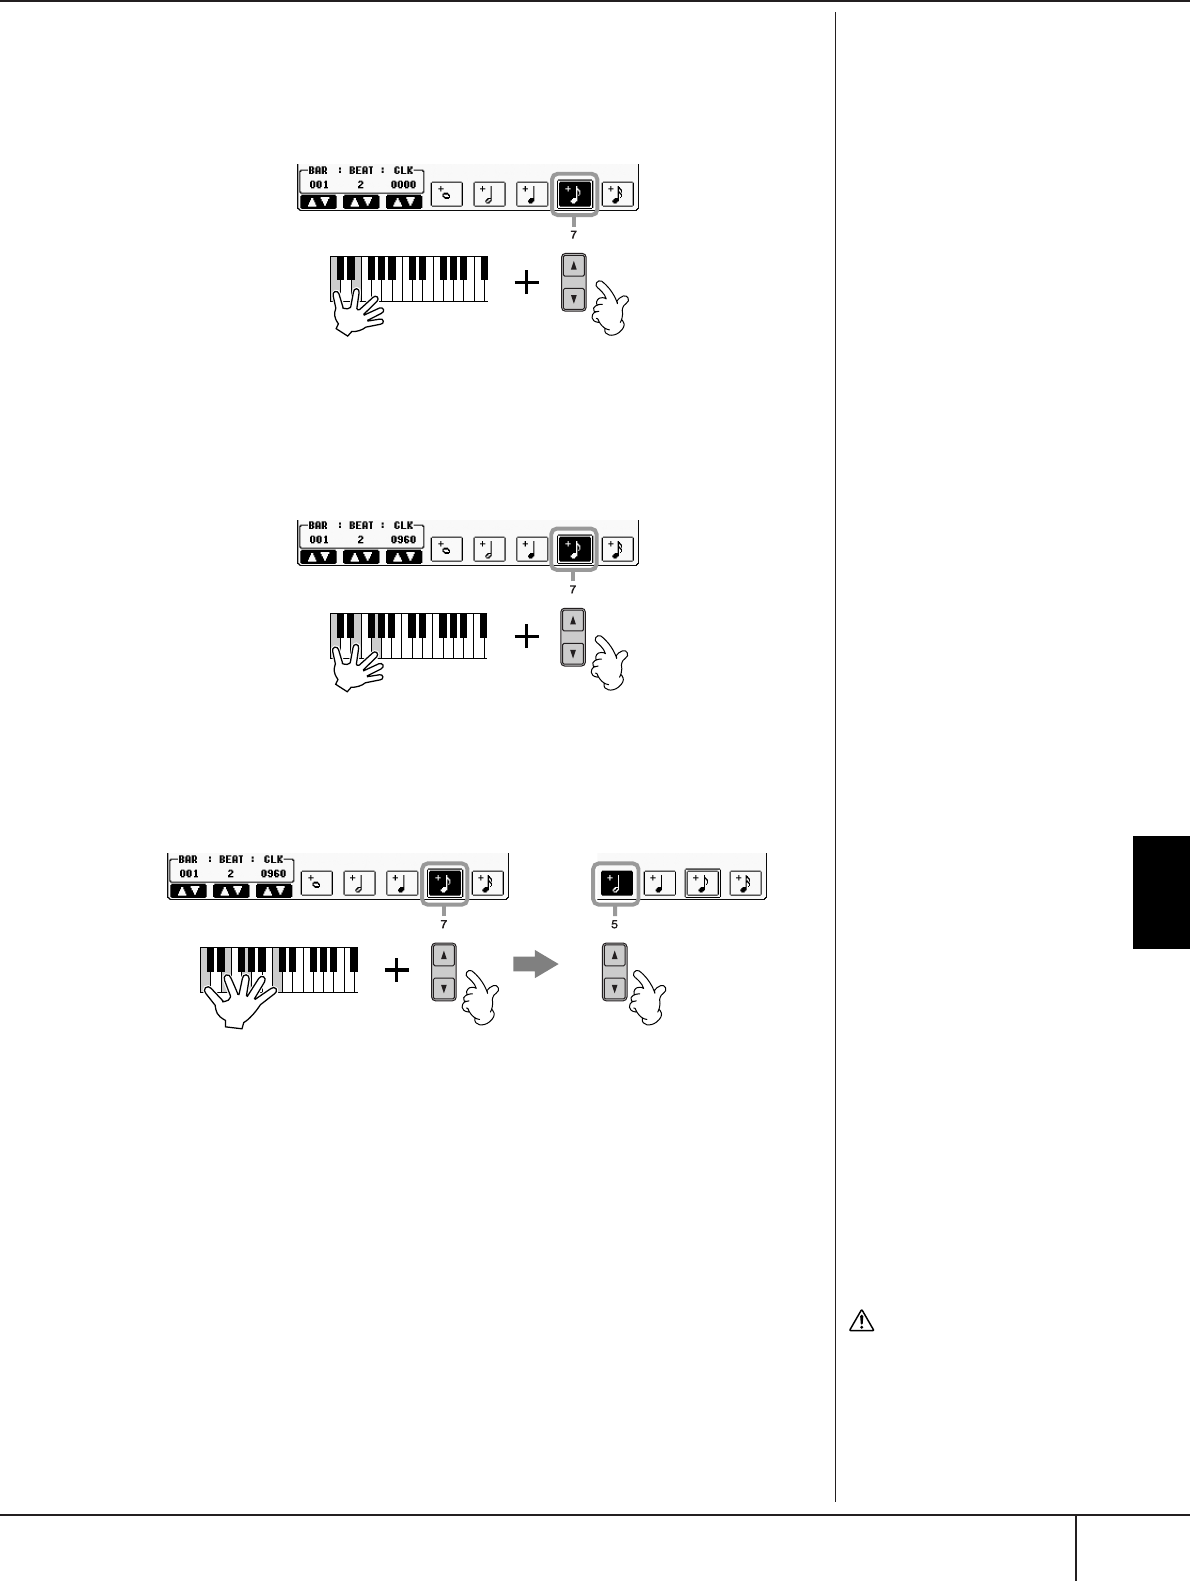
Using, Creating and Editing Songs
Recording Your Performance to MIDI
PSR-S900/S700 Owner’s Manual 159
5While holding the C3 and E3 keys on the keyboard, press the [7
ππ
ππ††
††
]
button.
Do not release the C3 and E3 keys yet. Keep holding them while executing
the following steps.
6While holding the C3, E3 and G3 keys on the keyboard, press the
[7
ππ
ππ††
††
] button.
Do not release the C3, E3 and G3 keys yet. Keep holding them while exe-
cuting the following steps.
7While holding the C3, E3, G3 and C4 keys on the keyboard, press the
[7
ππ
ππ††
††
] button, and successively press the [5
ππ
ππ††
††
] button.
After you press the [5
ππ
ππ††
††
] button, release the keys.
8Press the SONG [J] (STOP) button to move the cursor to the begin-
ning of the Song.
9Press the SONG [F/K] (PLAY/PAUSE) button to hear the newly
entered notes.
10 Press the [EXIT] button to exit from the Step Record display.
If you want, you can also edit already recorded Songs in the same manner
(page 162).
11 Press the [I] (SAVE) button to call up the Song Selection display for
saving your data, then save the data in the Song Selection display
(page 73).
CAUTION
The recorded Song data will
be lost if you select another
Song or turn the power to the
instrument off without exe-
cuting the Save operation
(page 73).

Using, Creating and Editing Songs
Recording Your Performance to MIDI
PSR-S900/S700 Owner’s Manual
160
Recording Chords
You can record Chords and Sections (Intro, Main, Ending, and so on) one at a time
with precise timing. These instructions show how to record chord changes using
the Step Record function.
The explanations here apply to step 7 of the “Basic Operations for Step Recording”
on page 152.
1Make sure the STYLE CONTROL [AUTO FILL IN] button is set to OFF,
then press the STYLE CONTROL [MAIN VARIATION A] button.
2Press the [5
ππ
ππ††
††
] button to select the half-note length.
3Play the chords C, F and G in the chord section of the keyboard.
4Press the STYLE CONTROL [BREAK] button.
CF GFG7 C
2,3 5,6 8,9
147
*The numbers shown in the notation correspond to the following operation step
numbers.
MAIN A
BREAK
MAIN B
G
F
C
2
3
1
G7
F
4
6
5
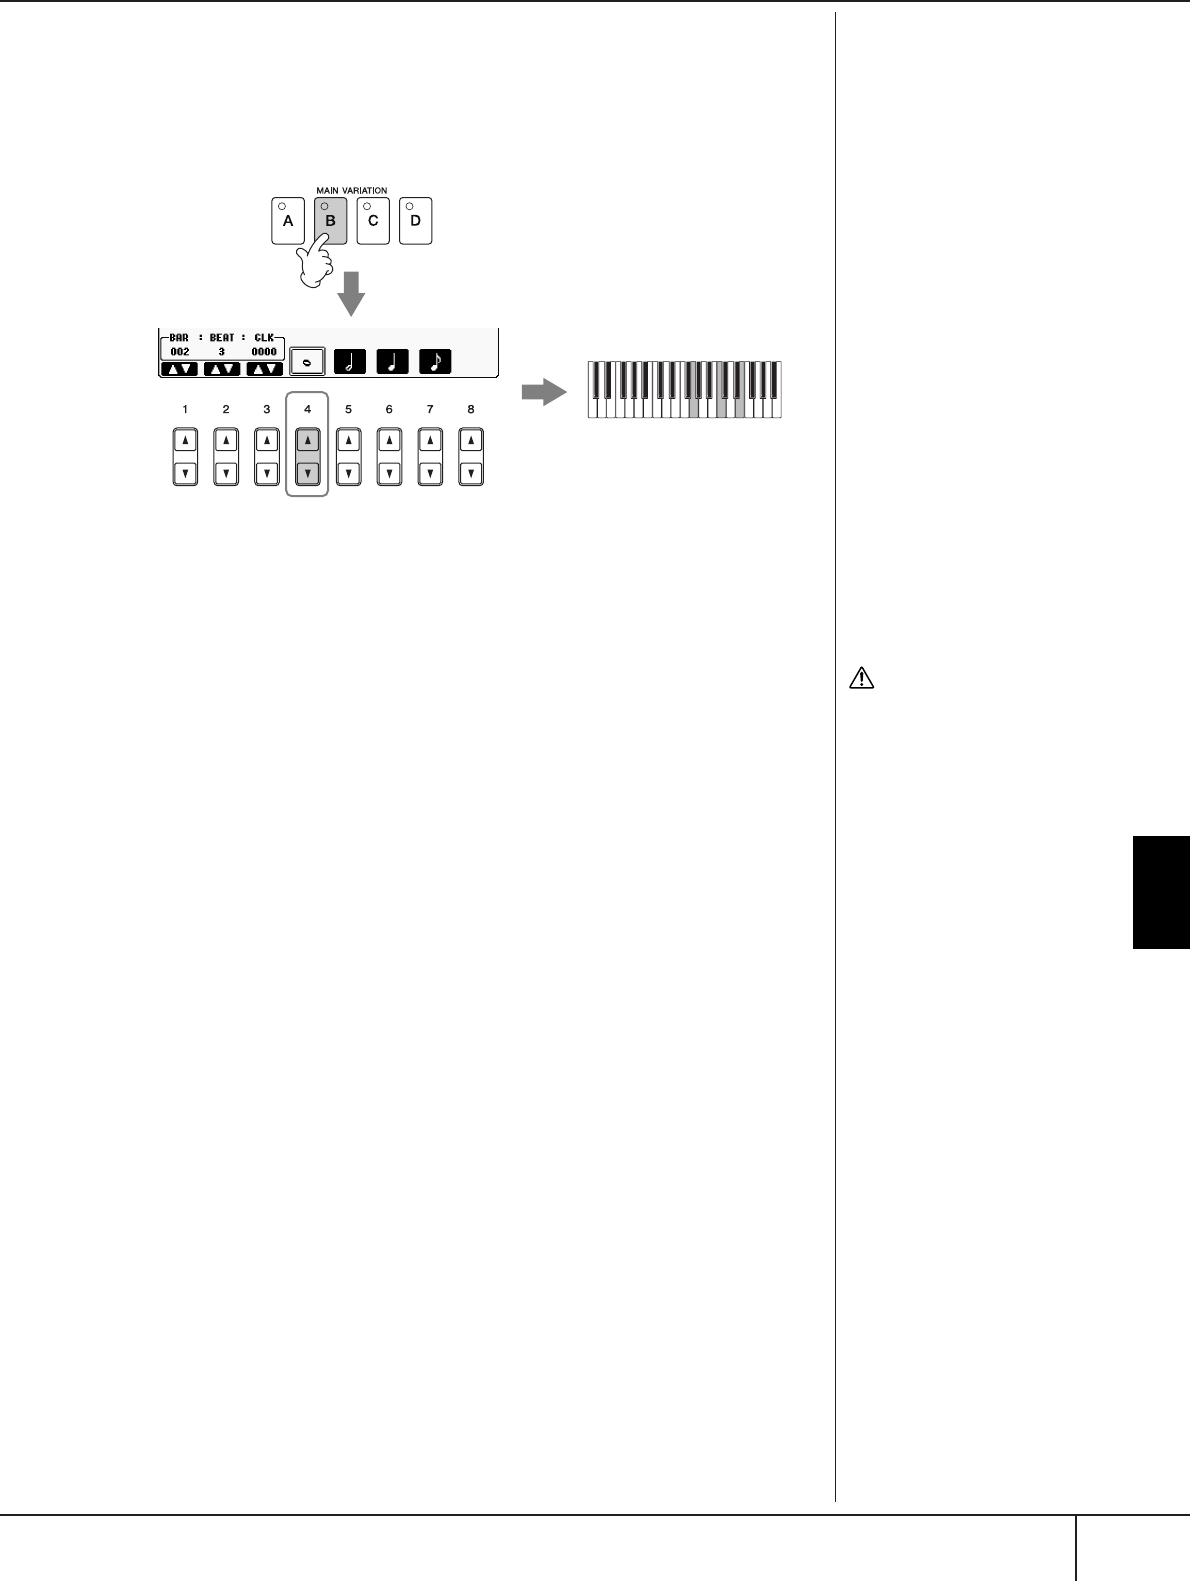
Using, Creating and Editing Songs
Recording Your Performance to MIDI
PSR-S900/S700 Owner’s Manual 161
5Press the [6
ππ
ππ††
††
] button to select the quarter-note length.
6Play the chords F, and G7 in the chord section of the keyboard
7Press the STYLE CONTROL [MAIN VARIATION B] button.
8Press the [4
ππ
ππ††
††
] button to select the whole-note length.
9Play the chord C in the chord section of the keyboard.
10 Press the SONG [J] (STOP) button to move the cursor to the begin-
ning of the Song.
11 Press the SONG [F/K] (PLAY/PAUSE) button to hear the newly
entered notes.
12 Press the [EXIT] button to exit from the Step Record display.
If you want, you can also edit already recorded Songs in the same manner
(page 162).
13 Press the [F] (EXPAND) button to convert the input chord change
data into the Song data.
14 Press the [I] (SAVE) button to call up the Song Selection display for
saving your data, then save the data in the Song Selection display
(page 73).
C
9
8
7
CAUTION
The recorded Song data will
be lost if you select another
Song or turn the power to the
instrument off without exe-
cuting the Save operation
(page 73).
Deleting data
Mistakenly entered notes can be
deleted (page 154).
Entering fill-ins
Turn the STYLE CONTROL
[AUTO FILL IN] button to ON,
and simply press one of the
STYLE CONTROL [MAIN VARI-
ATION (A, B, C, D)] buttons.
(The appropriate fill-in section
plays and then automatically
goes to the selected [MAIN
VARIATION (A, B, C, D)] pattern
playback.)

Using, Creating and Editing Songs
Recording Your Performance to MIDI
PSR-S900/S700 Owner’s Manual
162
Editing a Recorded Song
You can edit the Songs you’ve recorded with any recording method — Quick
Recording, Multi Track Recording, or Step Recording.
Basic Editing Operation
1Select a Song for editing.
2Call up the operation display.
[FUNCTION] → [F] DIGITAL REC MENU
3Press the [A] button to call up the SONG CREATOR display to record
or edit Songs.
4Select the appropriate tab by using the TAB [
√
][
®
] buttons and edit
the Song.
• Re-Recording a Specific Section
— Punch In/Out (REC MODE) .............................................. page 163
This lets you re-record a specific section of a Song.
• Editing Channel Events (CHANNEL) .................................... page 164
This lets you edit the channel events. For example, you can delete data or
transpose notes by channel.
• Editing Note or Chord Events (CHORD, 1–16) .................... page 167
This lets you change or delete the recorded notes or chords.
• Editing System Event (SYS/EX.) ........................................... page 169
This lets you change the tempo or the time signature.
• Editing Lyrics (LYRICS).......................................................... page 170
This lets you change the Song name or lyrics events.
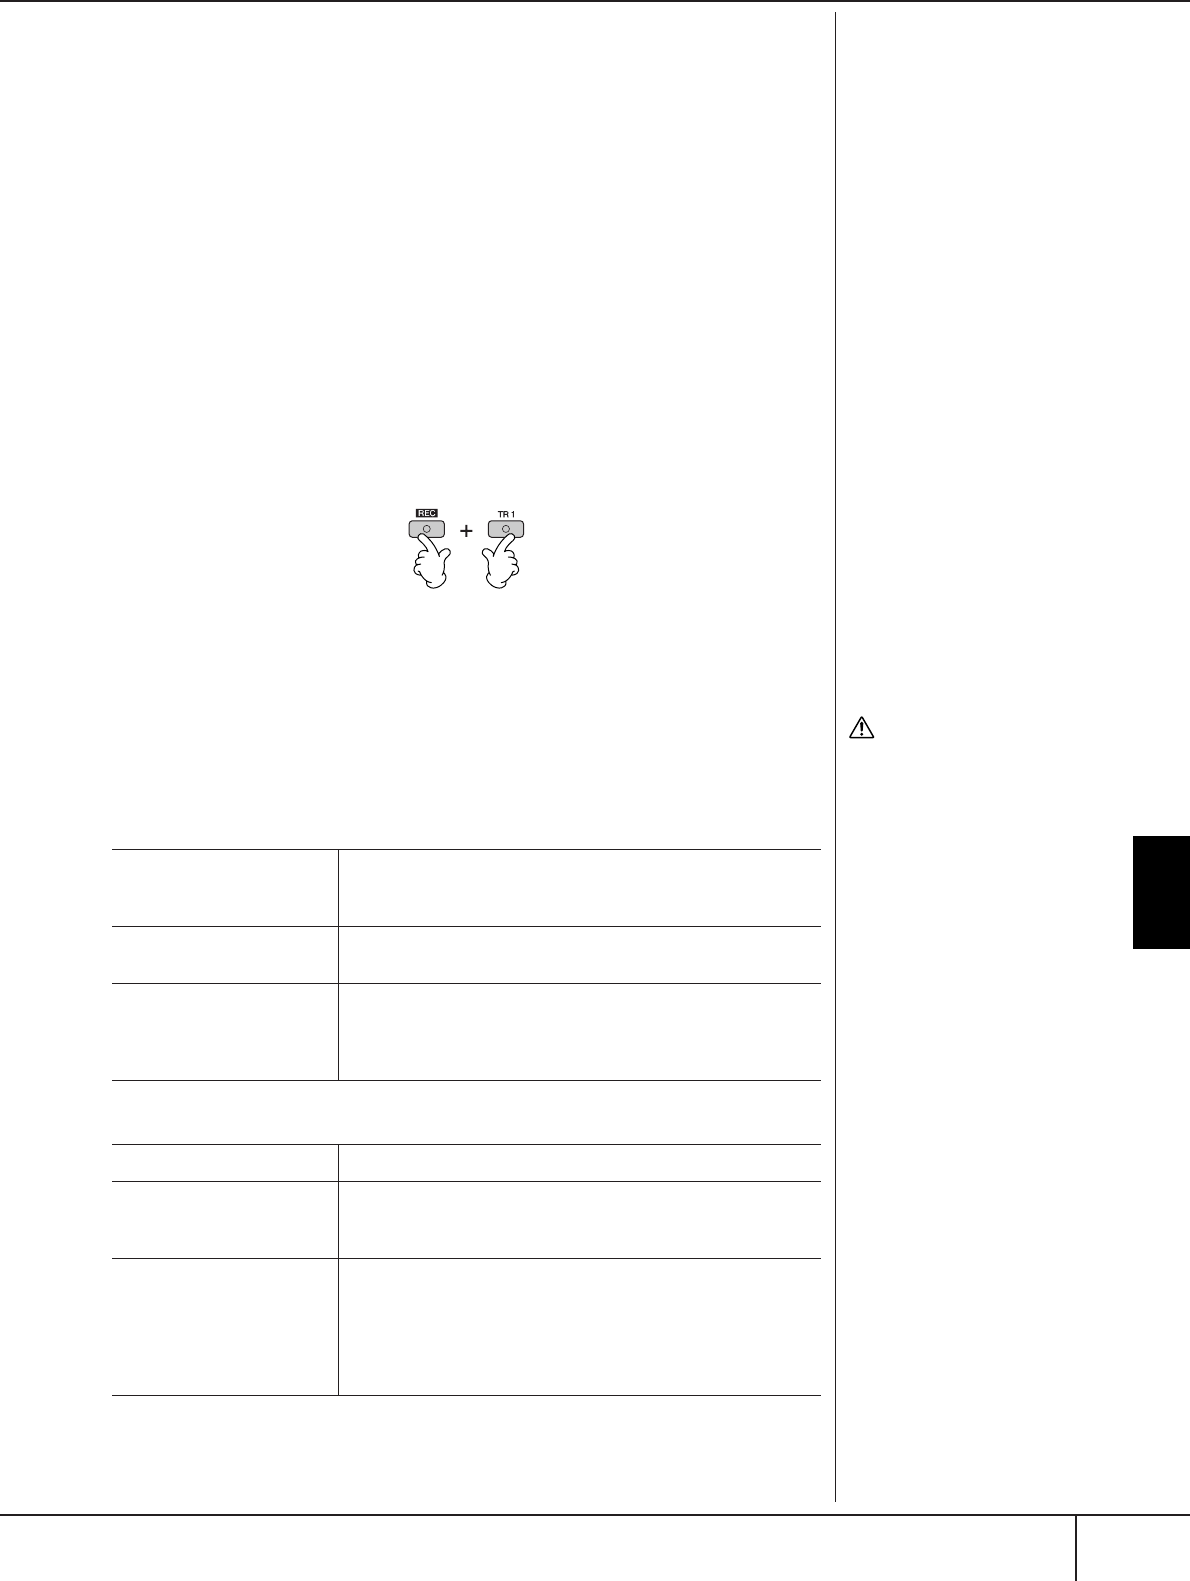
Using, Creating and Editing Songs
Recording Your Performance to MIDI
PSR-S900/S700 Owner’s Manual 163
Re-Recording a Specific Section—Punch In/
Out (REC MODE)
When re-recording a specific section of an already-recorded Song, use the Punch
IN/OUT function. In this method, only the data between the Punch In point and
the Punch Out point is overwritten with the newly recorded data. Keep in mind
that the notes before and after the Punch In/Out points are not recorded over,
although you will hear them play back normally to guide you in the Punch In/Out
timing. You can specify the Punch In and Punch Out points as measure numbers
beforehand for automatic operation, or manually execute the Punch In/Out record-
ing by using a Foot Pedal or simply by playing the keyboard.
The explanations here apply to the REC MODE display in step 4 of the “Basic Edit-
ing Operation” on page 162.
1Use the [1
ππ
ππ††
††
]–[6
ππ
ππ††
††
] buttons to determine the settings for re-
recording (see below).
2While holding the SONG [REC] button, press the desired track but-
ton.
3Press the SONG [F/K] (PLAY/PAUSE) button to start playback.
Play the keyboard at the Punch In point and stop recording at the
Punch Out point.
4Press the [I] (SAVE) button to call up the Song Selection display for
saving your data, then save the data in the Song Selection display
(page 73).
■PUNCH IN settings
■PUNCH OUT settings
CAUTION
The recorded Song data will
be lost if you select another
Song or turn the power to the
instrument off without exe-
cuting the Save operation
(page 73).
NORMAL Overwrite recording starts when pressing the SONG [F/K]
(PLAY/PAUSE) button or when you play the keyboard in the
Synchro Standby mode.
FIRST KEY ON The Song plays back normally, then starts overwrite recording as
soon as you play the keyboard.
PUNCH IN AT The Song plays back normally up to the beginning of the indi-
cated Punch In measure, then starts overwrite recording at that
point. You can set the Punch In measure by pressing the [3
π†
]
button.
REPLACE ALL This deletes all data after the point at which recording is stopped.
PUNCH OUT The Song position at which recording is stopped is regarded as
the Punch Out point. This setting maintains all data after the
point at which recording is stopped.
PUNCH OUT AT Actual overwrite recording continues until the beginning of the
specified Punch Out measure (set with the corresponding display
button), at which point recording stops and normal playback
continues. This setting maintains all data after the point at which
recording is stopped. You can set the Punch Out measure by
pressing the [6
π†
] buttons.
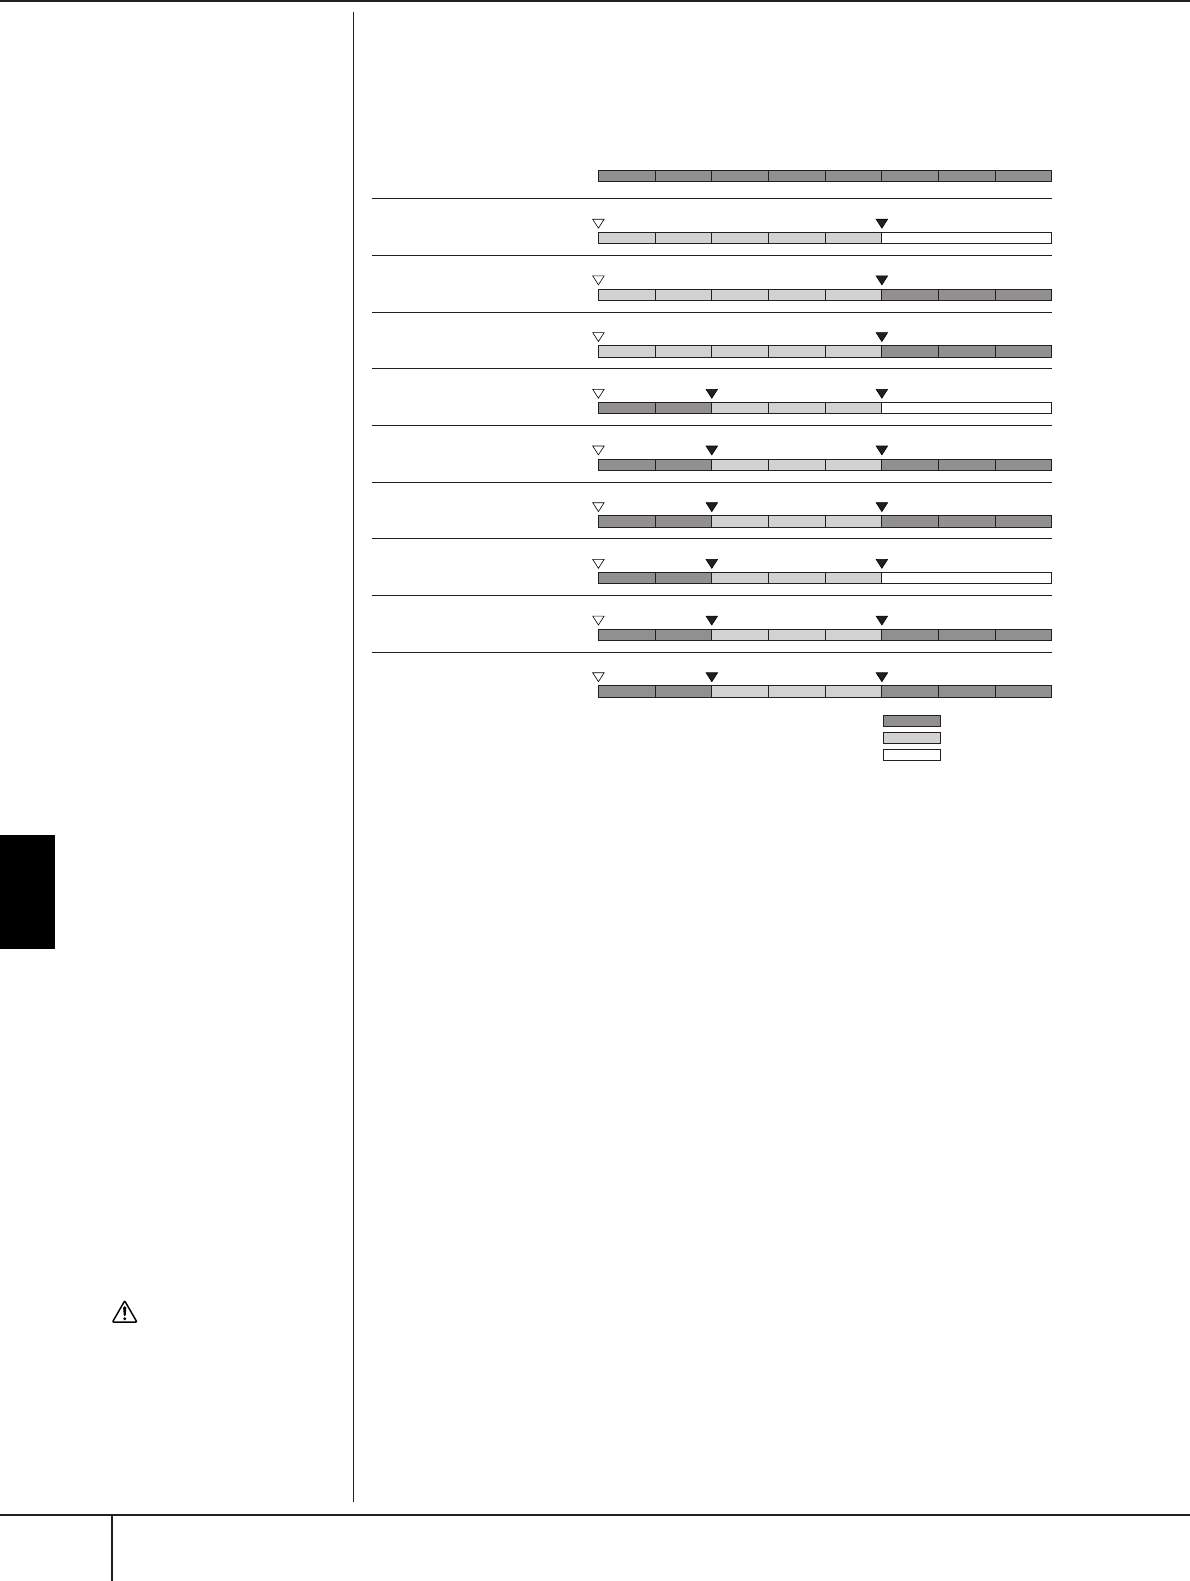
Using, Creating and Editing Songs
Recording Your Performance to MIDI
PSR-S900/S700 Owner’s Manual
164
Examples of re-recording with various Punch In/Out settings
This instrument features several different ways you use the Punch In/Out function.
The illustrations below indicate a variety of situations in which selected measures
in an eight-measure phrase are re-recorded.
■Pedal Punch In/Out settings
When this is set to ON, you can use the Foot Pedal 2 to control the punch-in and
punch-out points. While a Song is playing back, pressing (and holding) the Foot
Pedal 2 instantly enables Punch In recording, while releasing the pedal stops
recording (Punch Out).You can press and release the Foot Pedal 2 as often as you
want during playback, to punch in/out of overwrite recording. Note that the current
function assignment of the Foot Pedal 2 is cancelled when the Pedal Punch In/Out
function is set to ON.
Editing Channel Events (CHANNEL)
The explanations here apply to the CHANNEL tab display in the step 4 of the Basic
Editing Operation on page 162.
1Use the [A]/[B] buttons to select the Edit menu (page 165).
2Use the [1
ππ
ππ††
††
]–[8
ππ
ππ††
††
] buttons to edit the data.
For information on the available parameters, see page 165.
3Press the [D] (EXECUTE) button to execute the operation for the cur-
rent display.
After the operation (with the exception of the SETUP menu display) is com-
pleted, this button changes to “UNDO”, letting you restore the original data
if you are not satisfied with the Operation results. The Undo function only
has one level; only the immediate operation can be undone.
12345678
12345
12345678
12345678
12345
12345678
12345678
12345
12345678
8
1234567
PUNCH IN setting
PUNCH OUT setting
NORMAL
REPLACE ALL
NORMAL
PUNCH OUT
NORMAL
PUNCH OUT AT=006
FIRST KEY ON
REPLACE ALL
FIRST KEY ON
PUNCH OUT
FIRST KEY ON
PUNCH OUT AT=006
PUNCH IN AT=003
REPLACE ALL
PUNCH IN AT=003
PUNCH OUT
PUNCH IN AT=003
PUNCH OUT AT=006
Original data
Start overwrite recording *1
Start overwrite recording *1
Start overwrite recording *1
Play back (Original data) Play the keyboard to
start overwrite recording
Play the keyboard to
start overwrite recording
Play the keyboard to
start overwrite recording
Start overwrite recording
Start overwrite recording
Start overwrite recording
Stop recording *2
Play back (Original data)
Play back (Original data)
Play back (Original data)
Play back (Original data)
Play back (Original data)
Stop recording *2
Stop overwrite recording/Play original data
Stop recording *2
Stop recording *2
Stop overwrite recording/Play original data
Stop recording *2
Stop recording *2
Stop overwrite recording/Play original data
*1 To avoid overwriting measures 1-2, start recording from measure 3
*2 To stop recording, press the [REC] button at the end of measure 5.
Previously recorded data
Newly recorded data
Deleted data
CAUTION
The recorded Song data will
be lost if you select another
Song or turn the power to the
instrument off without exe-
cuting the Save operation
(page 73).
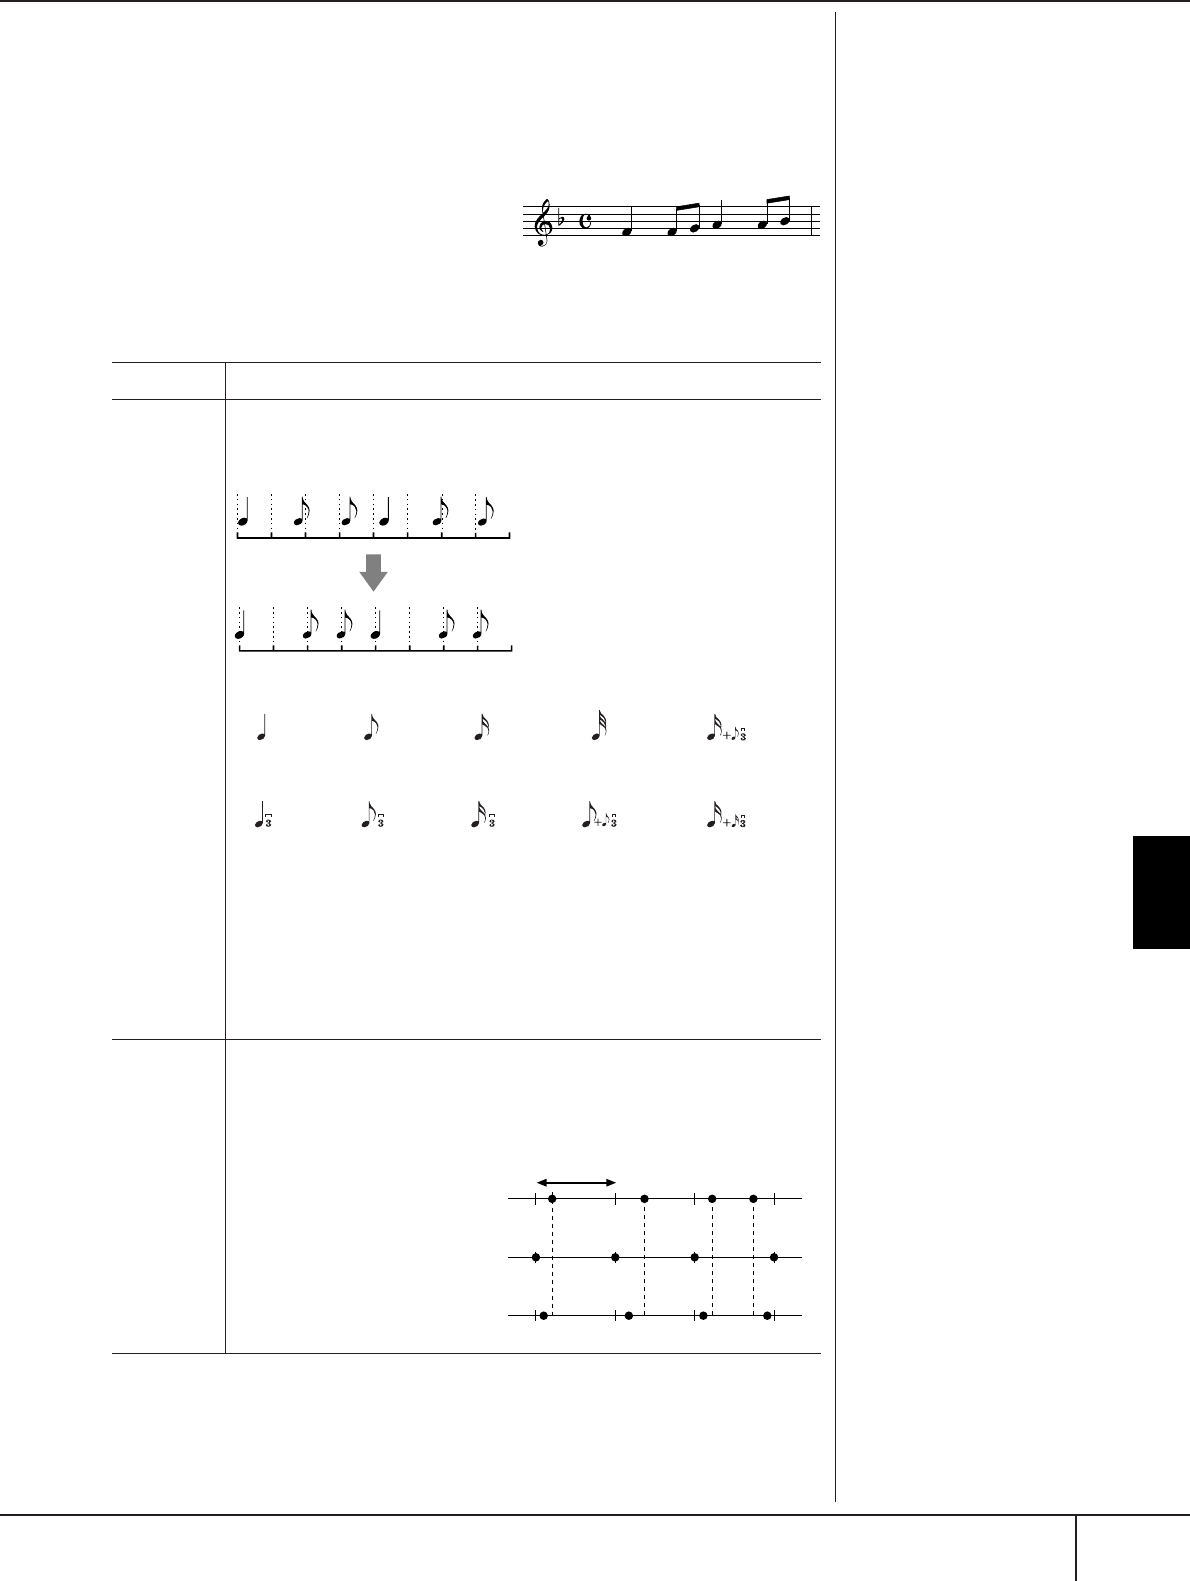
Using, Creating and Editing Songs
Recording Your Performance to MIDI
PSR-S900/S700 Owner’s Manual 165
4Press the [I] (SAVE) button to call up the Song Selection display for
saving your data, then save the data in the Song Selection display
(page 73).
■QUANTIZE menu
The Quantize function allows you to align
the timing of all the notes in a channel. For
example, if you record the musical phrase
shown at right, you may not play it with
absolute precision, and your performance
may have been slightly ahead of or behind
the precise timing. Quantize is a conve-
nient way of correcting for this.
■Deleting the data of the specified channel (DELETE menu)
You can delete the data of the specified channel in the Song. Select the channel
whose data to be deleted by using the [1
π†
]–[8
π†
] buttons, then press the [D]
(EXECUTE) button to execute the operation.
About Quantize size (resolu-
tion)
The Quantize size or resolution
is the number of clocks per quar-
ter note.
CHANNEL Determines the channel in the Song to be quantized.
SIZE Selects the quantize size (resolution). For optimum results, you should set the
Quantize size to the shortest note value in the channel. For example, if eighth
notes are the shortest in the channel, you should use eighth note as the Quantize
size.
Settings
The three Quantize settings marked with asterisks (*) are exceptionally conve-
nient, since they allow you to quantize two different note values at the same
time. For example, when the straight eighth notes and eighth notes triplet are
contained in the same channel, if you quantize by the straight eighth notes, all
notes in the channel are quantized to straight eighth notes—completely elimi-
nating any triplet feel. However, if you use the eighth note + eighth note triplet
setting, both the straight and triplet notes will be quantized correctly.
STRENGTH Determines how strongly the notes will be quantized. A setting of 100% pro-
duces exact timing. If a value less than 100% is selected, notes will be moved
toward the specified quantization beats according to the specified percentage.
Applying less than 100% quantization lets you preserve some of the “human”
feel in the recording.
After eighth note quantization
quarter
note
eighth note sixteenth
note
thirty-second
note
sixteenth note
+ eighth note
triplet*
quarter
note triplet
eighth note
triplet
sixteenth
note triplet
eighth note
+ eighth
note triplet*
sixteenth
note + six-
teenth triplet*
Quarter-note length
Original data
Quantizing strength=100
Quantizing strength=50

Using, Creating and Editing Songs
Recording Your Performance to MIDI
PSR-S900/S700 Owner’s Manual
166
■Mixing (merging) the data of the specified two channels (MIX menu)
This function lets you mix the data of the two channels and place the results in a
different channel. It also lets you copy the data from one channel to another.
■CHANNEL TRANSPOSE menu
This allows you to transpose the recorded data of individual channels up or down
by a maximum of two octaves in semitone increments.
To display the channels 9–16
Press the [F] button to toggle between the two channel displays — Channels 1–8,
and Channels 9–16.
Transposing to the same value for all channels simultaneously
While holding the [G] (ALL CH) button, press one of the [1
π†
]–[8
π†
] buttons.
SETUP menu
The current settings of the Mixing Console (page 91) displays and other panel set-
tings can be recorded to the top position of the Song as the Setup data. The Mixing
Console and panel settings recorded here are automatically recalled when the
Song starts.
■Setup recording procedure
1Call up the operation display.
[FUNCTION] → [F] DIGITAL REC MENU → [A] SONG CREATOR → TAB
[
√
][
®
] CHANNEL → [B] SET UP
2Use the [1
ππ
ππ††
††
]–[7
ππ
ππ††
††
] buttons to determine the settings to be
automatically called up when the Song starts.
3Checkmark the selected item by pressing the [8
ππ
ππ
] button.
4Press the [D] (EXECUTE) button to execute the SETUP recording oper-
ation.
SOURCE 1 Selects the channel (1–16) to be mixed. All MIDI events in the
selected channel are copied to the destination channel.
SOURCE 2 Selects the channel (1–16) to be mixed. Only note events in the
selected channel are copied to the destination channel. In addi-
tion to the values 1–16, there is a “COPY” setting that allows you
to copy the data from Source 1 to the destination channel. If
“COPY” is selected here, the data from Source 1 is copied to the
destination channel. (The original channel data is maintained.)
DESTINATION Selects the channel into which the mix or copy results will be
placed.
SONG Records the tempo setting and all settings made from the Mixing
Console.
KEYBOARD VOICE Records the panel settings including the Voice selection of the
keyboard parts (RIGHT1, 2, and LEFT) and their on/off status.
Panel settings recorded here are same as the ones memorized to
the One Touch Setting. This can be recorded at any point in a
Song (the other items in this chart can be recorded only to the
top position of the Song).
SCORE SETTING Records the settings in the Score display.
GUIDE SETTING Records the settings of the Guide functions including the Guide
ON/OFF setting.
LYRICS SETTING Records the settings in the Lyrics display.
MIC SETTING
(PSR-S900)
Records the microphone and the Vocal Harmony settings in the
Mixing Console display (page 91).

Using, Creating and Editing Songs
Recording Your Performance to MIDI
PSR-S900/S700 Owner’s Manual 167
5
Press the [I] (SAVE) button to call up the Song Selection display for saving
your data, then save the data in the Song Selection display (page 73).
Editing Note or Chord Events (CHORD, 1–16)
The explanations here apply to the CHORD and 1–16 tab displays in step 4 of the
Basic Editing Operation on page 162.
1When the 1–16 tab display is elected, press the [F] button to select
the channel to be edited.
2Move the cursor to the desired data.
To move the cursor up or down ..............................Use the [A]/[B] button.
To move the cursor to the top data..........................Press the [C] button.
To move the cursor by Measure/Beat/Clock units ....Use the [1
π†
]–
[3
π†
] buttons.
3Edit the data.
Editing the data line by line
Use the [6
π†
]–[8
π
] buttons to cut/copy/paste/insert/delete the
events.
Editing each parameter of the data
1Use the [D]/[E] buttons to select the parameter to be edited.
2Use the [4
π†
]/[5
π†
] buttons to edit the parameter value. The
DATA ENTRY dial can also be used. To actually enter an edited value,
simply move the cursor away from the parameter.
To restore the original value, press the [8
†
] (CANCEL) button before move
the cursor.
4When the CHORD tab display is selected, press the [F] (EXPAND) but-
ton to convert the data into Song data.
5Press the [I] (SAVE) button to call up the Song Selection display for
saving your data, then save the data in the Song Selection display
(page 73).
CAUTION
The recorded Song data will be
lost if you select another Song
or turn the power to the instru-
ment off without executing the
Save operation (page 73).
Se
l
ect
i
ng mu
l
t
i
p
l
e
li
nes o
f
data
While holding the [J] (MULTI
SELECT) button, press the [A]/[B]
buttons.
Displaying specific types of
event (FILTER)
You can select the event types to
be displayed in the [CHORD]
and [1-16] tab displays. This is
convenient, for example, when
you wish to have only the note
events shown (page 169).
CAUTION
The recorded Song data will
be lost if you select another
Song or turn the power to the
instrument off without exe-
cuting the Save operation
(page 73).
Chord and Section data recorded
with Realtime Recording cannot
be indicated and edited on this
display.
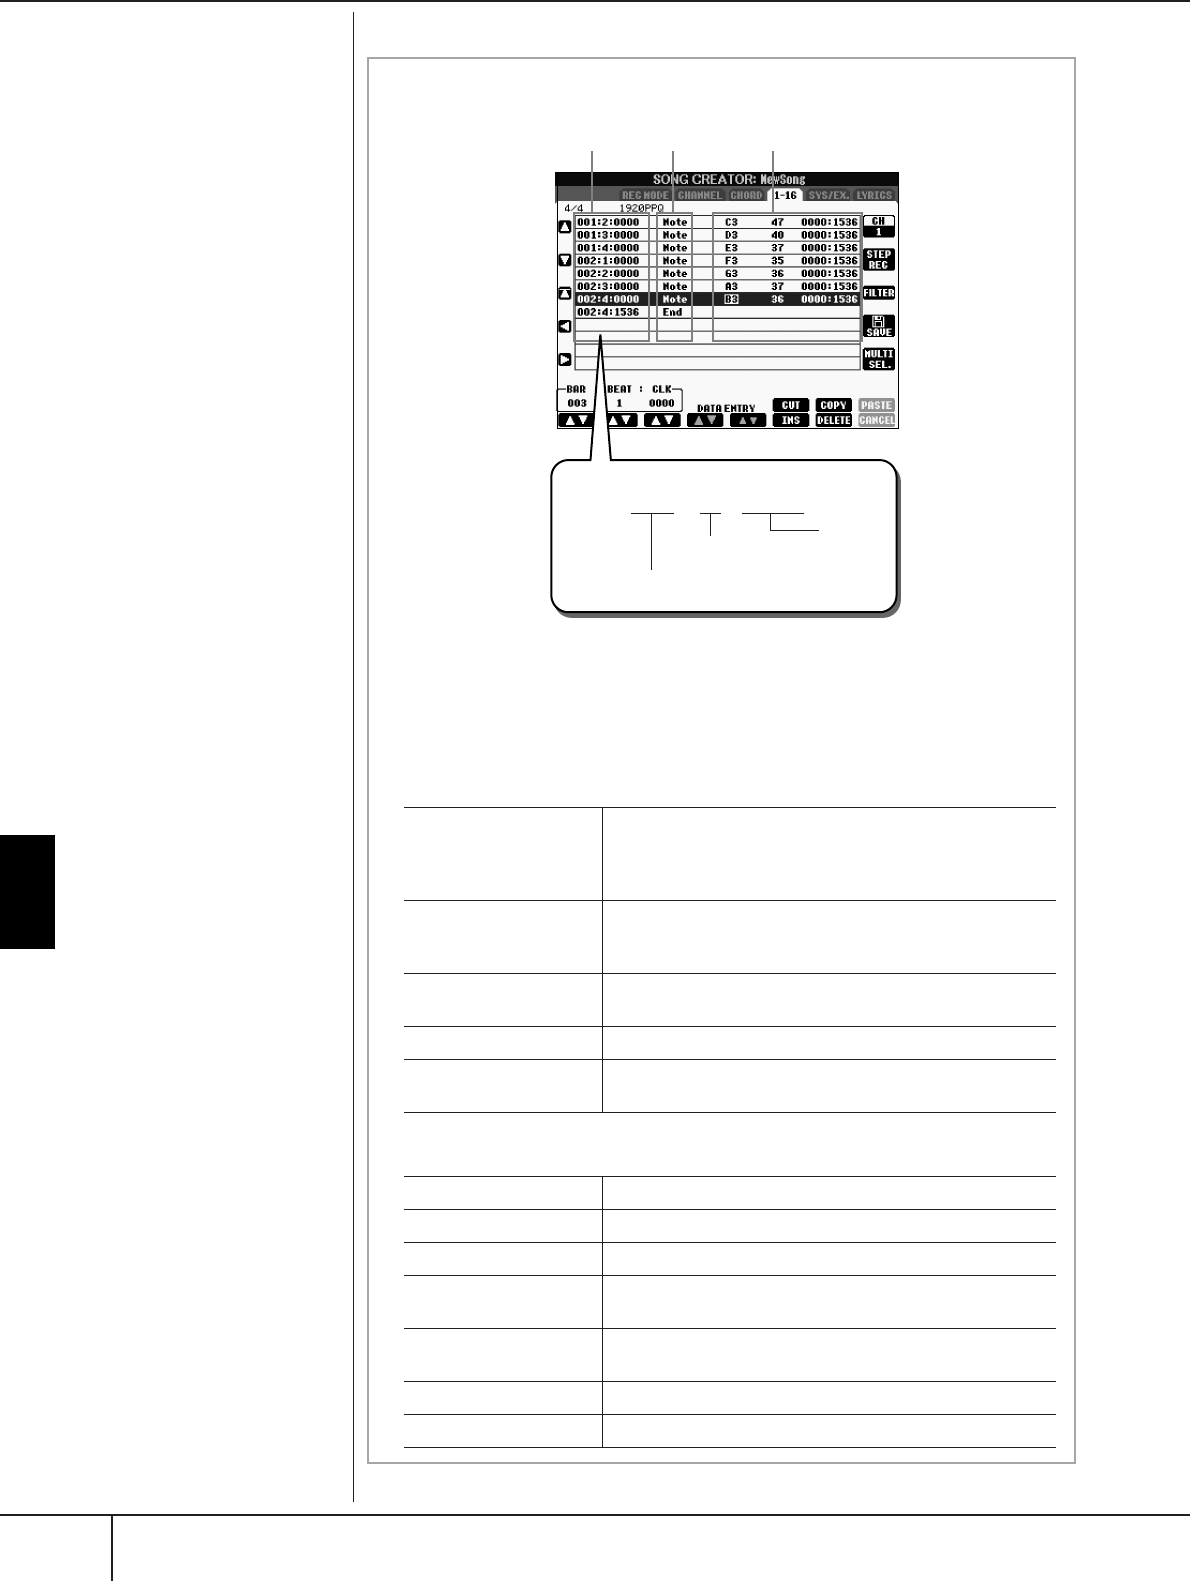
Using, Creating and Editing Songs
Recording Your Performance to MIDI
PSR-S900/S700 Owner’s Manual
168
About Clock
A unit of note resolution. The
Quantize size is the number of
clocks per quarter note. On the
PSR-S900/S700, one clock is
equal to 1/1920th of a quarter
note.
About the events shown in the display
12 3
001 : 1 : 1440
Example
Measure number (BAR)
Beat Clock
1Indicates the location (position) of the corresponding event. Same as the indication
at the lower left of the display.
2Indicates the event types (see below).
3Indicates the event values.
Event types shown on the 1–16 tab display
Event types shown on the CHORD tab display
Note The individual note of a Song. Includes the note number
which corresponds to the key which was played, plus a
velocity value based on how hard the key is played, and the
gate time value (the length of a note).
Ctrl (Control Change) Settings to control the Voice, such as volume, pan, filter and
effect depth (edited via the Mixing Console described on
page 91), etc.
Prog
(Program Change)
MIDI program change number for selecting a Voice.
P.Bnd (Pitch Bend) Data for changing the pitch of a Voice continuously.
A.T. (Aftertouch) This event is generated when pressure is applied to a key
after the note is played.
Style Style
Tempo tempo
Chord chord root, chord type, on bass chord
Sect Accompaniment Style Section (Intro, Main, Fill In, Break,
Ending)
OnOff On/off status for each part (channel) of the Accompaniment
Style
CH.Vol Volume for each part (channel) of the Accompaniment Style
S.Vol Overall volume of the Accompaniment Style

Using, Creating and Editing Songs
Recording Your Performance to MIDI
PSR-S900/S700 Owner’s Manual 169
Displaying Specific Types of Events (FILTER)
In the edit displays various types of events are shown. It may sometimes be difficult
to pinpoint the ones you want to edit. This is where the Filter function comes in
handy. It lets you determine which event types will be shown in the edit displays.
1Press the [H] (FILTER) button in the edit displays.
2Select the event type by using the [2
ππ
ππ††
††
]–[5
ππ
ππ††
††
] buttons.
3Checkmark (show) or remove the checkmark for the selected item by
using the [6
ππ
ππ††
††
]/[7
ππ
ππ††
††
] buttons.
[H](ALL ON)...............Checkmarks for all event types.
[I] (NOTE/CHORD).....Selects only NOTE/CHORD data.
[J] (INVERT) ................Reverses the checkmark settings for all boxes. In
other words, this enters checkmarks to all boxes that
were previously unchecked and vice versa.
4Press the [EXIT] button to execute the settings.
Pressing the [C]–[E] buttons calls up the respective Filter displays as shown below.
MAIN .........................Call up the Main Filter display.
CTRL CHG .................Call up the Control Change Filter display.
STYLE .........................Call up the Accompaniment Style Filter Display.
Editing System Exclusive Events (SYS/EX.)
The explanations here apply to the [SYS/EX] tab display in step 4 of the Basic Edit-
ing Operation on page 162.
From this display, you can edit recorded System Exclusive events, which do not
belong to a specific channel, such as tempo and beat (time signature). The opera-
tions here are basically the same as those in the section “Editing Note or Chord
Events” on page 167.
System Events
Press the [I] (SAVE) button to call up the Song Selection display for saving your
data, then save the data in the Song Selection display (page 73). CAUTION
The recorded Song data will
be lost if you select another
Song or turn the power to the
instrument off without exe-
cuting the Save operation
(page 73).
ScBar (Score Start Bar) Determines the top measure of a Song.
Tempo Determines the tempo value.
Time (Time Signature) Determines the time signature.
Key (Key Signature) Determines the key signature, as well as the major/minor set-
ting, for the music score shown on the display.
XGPrm (XG Parameters) Allows you to make various detailed changes to the XG parame-
ters. Refer to the “MIDI Data Format” in the Data List for details.
The Data List is available at the Yamaha website. (See
page 5
.)
SysEx (System Exclusive)
Displays the System Exclusive data in the Song. Keep in mind
that you cannot create new data or change the contents of the
data here; however, you can delete, cut, copy, and paste the data.
Meta (Meta Event) Displays the SMF meta events in the Song. Keep in mind that
you cannot create new data or change the contents of the data
here; however, you can delete, cut, copy, and paste the data.
Using, Creating and Editing Songs
Recording Your Performance to MIDI
PSR-S900/S700 Owner’s Manual
170
Editing Lyrics (LYRICS)
The explanations here apply to the LYRICS tab display in step 4 of the Basic Editing
Operation on page 162. From this display, you can edit the recorded Lyrics events.
The operations here are basically the same as in the section “Editing Note or Chord
Events” on page 167.
Lyrics Events
Inputting and Editing Lyrics
1Use the [4
ππ
ππ††
††
]/[5
ππ
ππ††
††
](DATA ENTRY) buttons to call up the lyrics
editing display.
Operations are the same as in the section “Entering Characters” (page 77).
2Press the [I] (SAVE) button to call up the Song Selection display for
saving your data, then save the data in the Song Selection display
(page 73).
Name Allows you to enter the Song name.
Lyrics Allows you to enter lyrics.
Codes CR
Enters a line break in the lyrics text.
LF
Unavailable on the instrument. On some MIDI devices, this
event may delete the currently displayed lyrics and display the
next set of lyrics.
CAUTION
The recorded Song data will
be lost if you select another
Song or turn the power to the
instrument off without exe-
cuting the Save operation
(page 73).
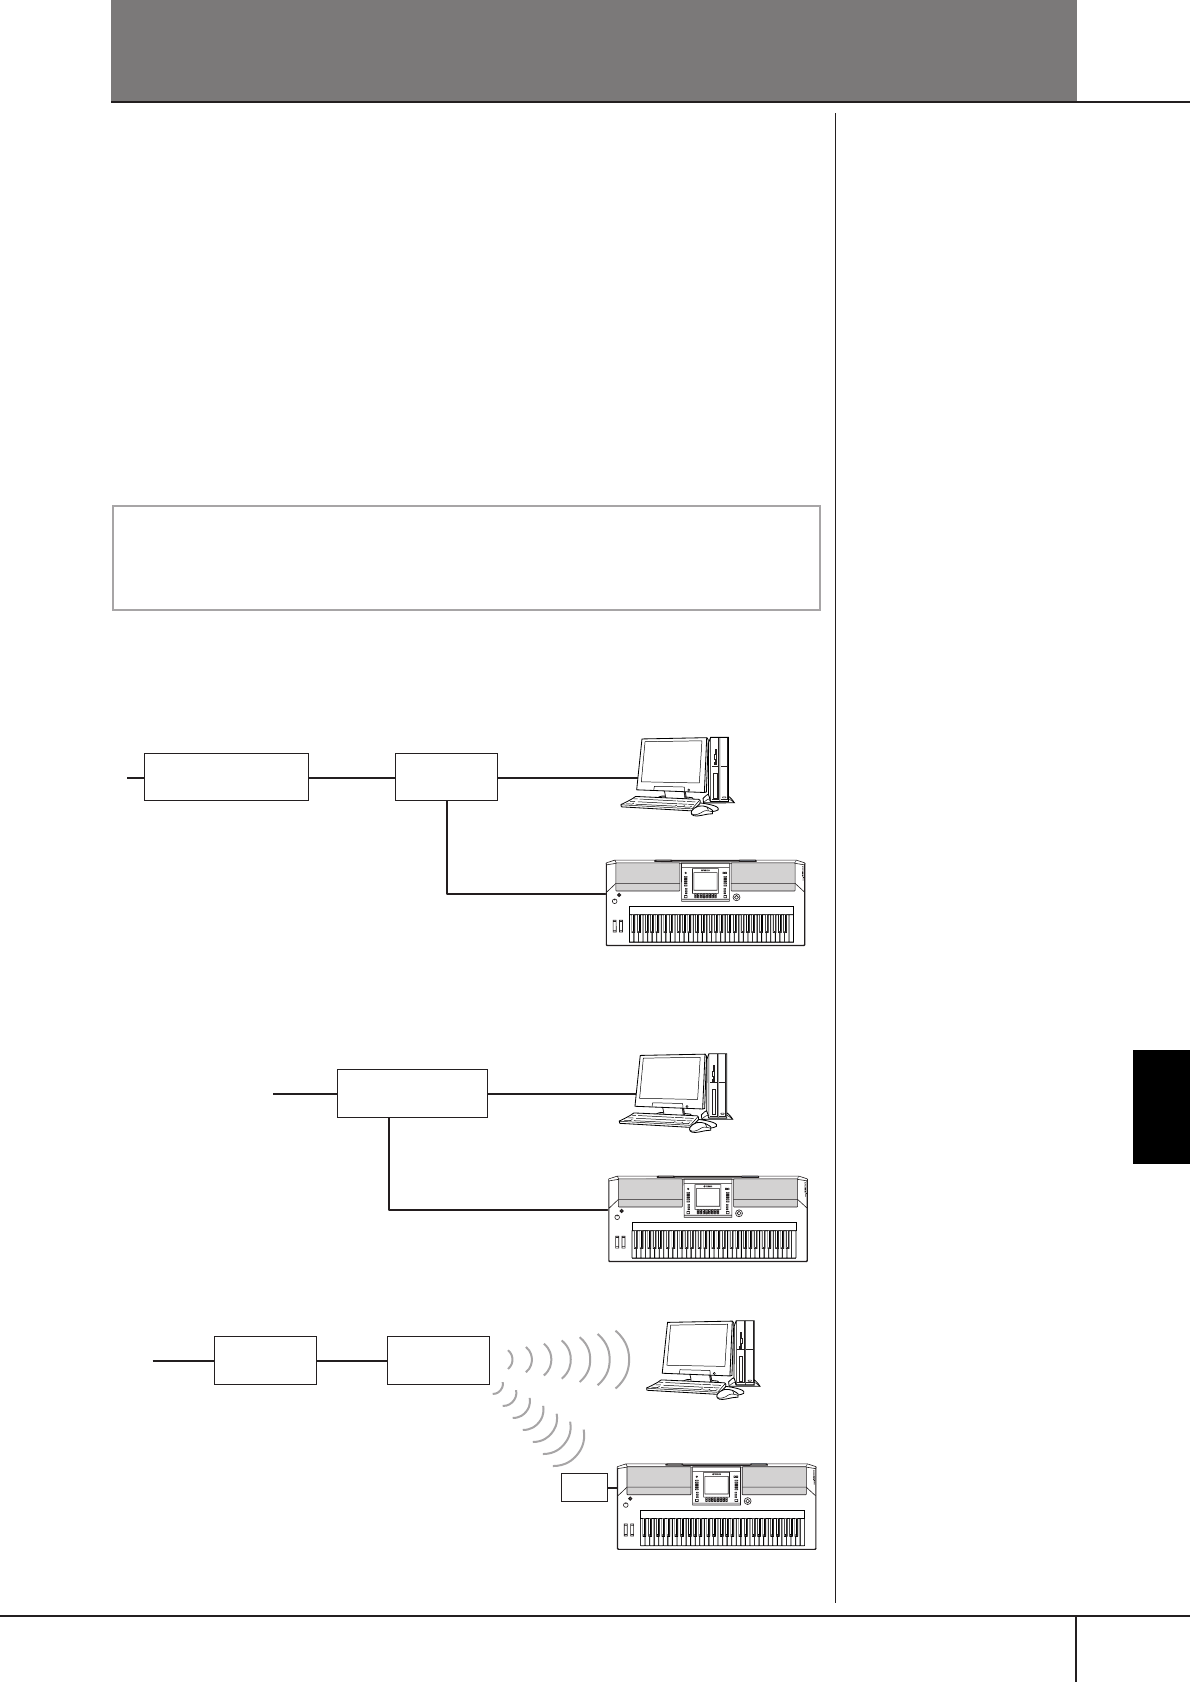
PSR-S900/S700 Owner’s Manual 171
Connecting the PSR-S900/S700 Directly to the Internet
Connecting the PSR-S900/S700 Directly to the Internet
You can purchase and download Song data and other types of data from the spe-
cial website by directly connecting to the Internet. This section contains terms
related to computers and online communications. If there are some terms you are
unfamiliar with, refer to the Internet Glossary (page 183).
Connecting the Instrument to the
Internet
You can connect the instrument to a full-time online connection (ADSL, optical
fiber, cable Internet, etc.) via a router or a modem equipped with a router. For spe-
cific instructions on connecting (as well as information on compatible LAN adap-
tors, routers, etc.), refer to the Yamaha website
(http://music.yamaha.com/homekeyboard).
To use the Internet connection, you will first need to subscribe to an Internet ser-
vice or provider.
Connection example 1:
Connecting by cable (using a modem without router)
Connection example 2:
Connecting by cable (using a modem with router)
Connection example 3: Wireless connection
The special website can be
opened when directly connect-
ing to the Internet.
Depending on the Internet con-
nection, you may not be able to
connect to two or more devices
(for example, a computer and
the instrument), depending on
the contract with the provider.
This means you cannot connect
with the PSR-S900/S700. If in
doubt, check your contract or
contact your provider.
Connect the LAN cable to the
LAN port.
Some types of modems require
an optional hub network for
simultaneously connecting to
several devices (such as com-
puter, musical instrument, etc.).
Connect the LAN cable to the
LAN port.
Connect the Wireless Game
Adaptor to the LAN port.
A USB wireless LAN adaptor
also can be used.
Use a computer to connect to the Internet and get online before connect-
ing the instrument, since no modem or router settings can be made from
the instrument itself.
Modem*
No router capability
Router
Cable type
LAN cable
LAN port
* Here, “modem” refers to an ADSL modem, optical network unit (ONU) or cable modem.
LAN cable
ADSL modem
Router capability
LAN cable
LAN port
LAN cable
Modem* Access point
Wireless Game Adaptor
* Here, “modem” refers to an ADSL modem, optical network unit (ONU) or cable modem.
LAN port
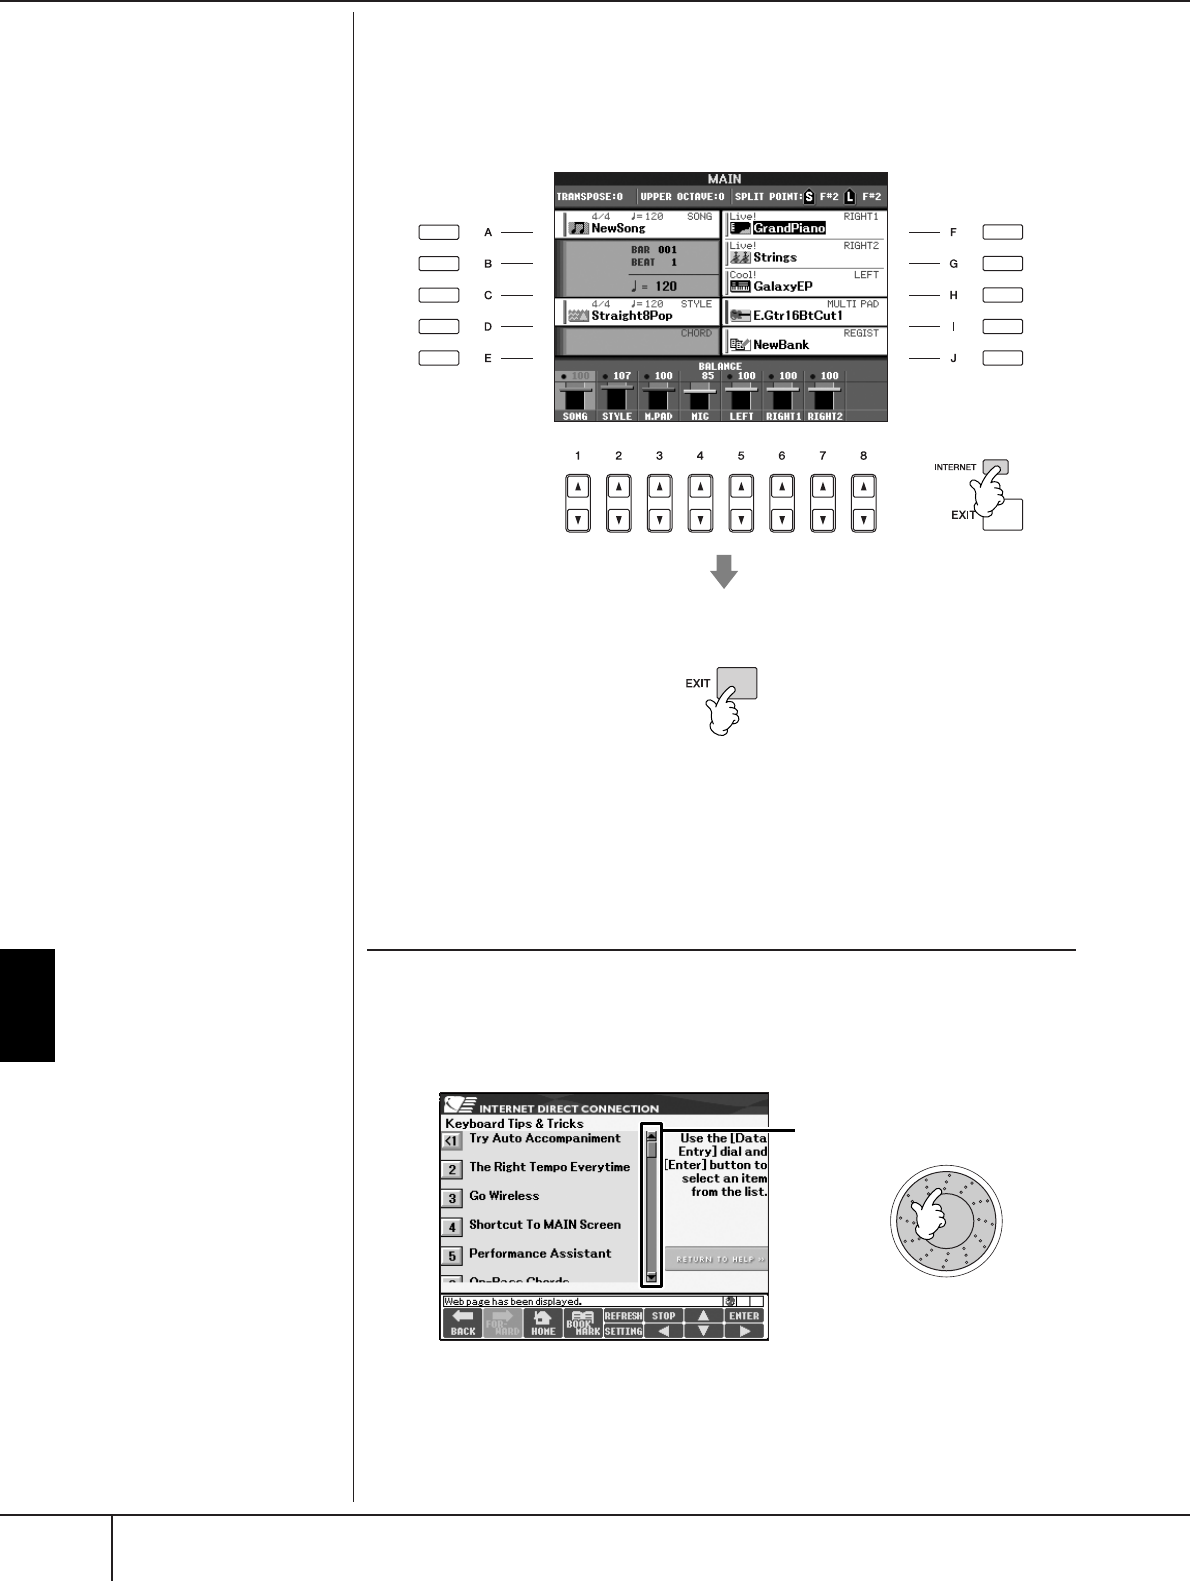
Connecting the PSR-S900/S700 Directly to the Internet
Accessing the Special Website
PSR-S900/S700 Owner’s Manual
172
Accessing the Special Website
From the special website, you can audition and purchase Song data, among other
things. To access the site, press the [INTERNET] button while the instrument is con-
nected to the Internet.
To close the website display and return to the operation display of the instrument,
press the [EXIT] button.
Operations in the Special Website
Scrolling the Display
When the size of the web page is too large to be shown at one time in the browser
display of the instrument, a scroll bar appears at the right side of the display. Use
the DATA ENTRY dial to scroll through the display and view those parts of the page
that are not shown.
Scroll bar
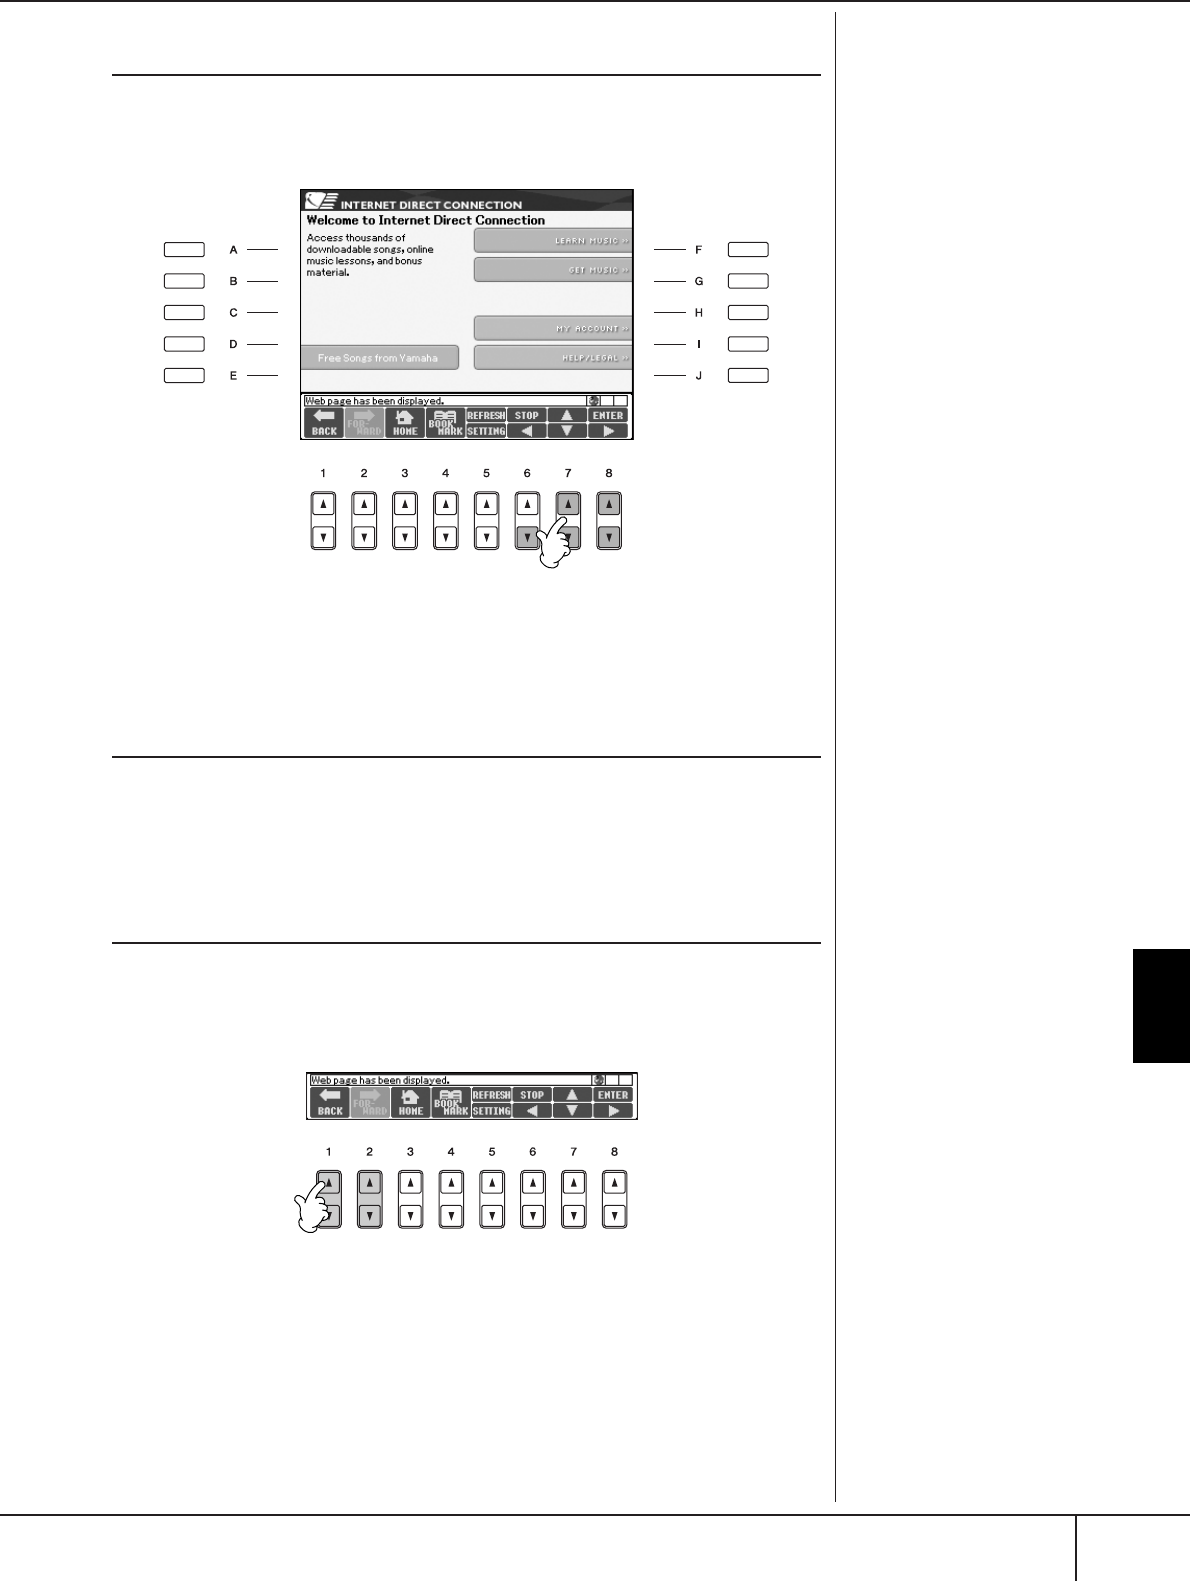
Connecting the PSR-S900/S700 Directly to the Internet
Operations in the Special Website
PSR-S900/S700 Owner’s Manual 173
Following Links
When there is a link in the page, it is shown as a button or in colored text, etc. To
select the link, press the [6
†
]/[7
π†
]/[8
†
] buttons. Press the [8
π
] (ENTER) but-
ton to actually call up the link destination.
You can also select and call up links by using the DATA ENTRY dial and pressing
the [ENTER] button.
Entering Characters
See page 77, “Entering Characters,” for instructions on entering characters within
the website, for inputting a password or searching for data.
Return to the Previous Web Page
To return to a previously selected web page, press the [1
π†
] (BACK) button. To
return to the page selected before pressing the [1
π†
] (BACK) button, press the
[2
π†
] (FORWARD) button.
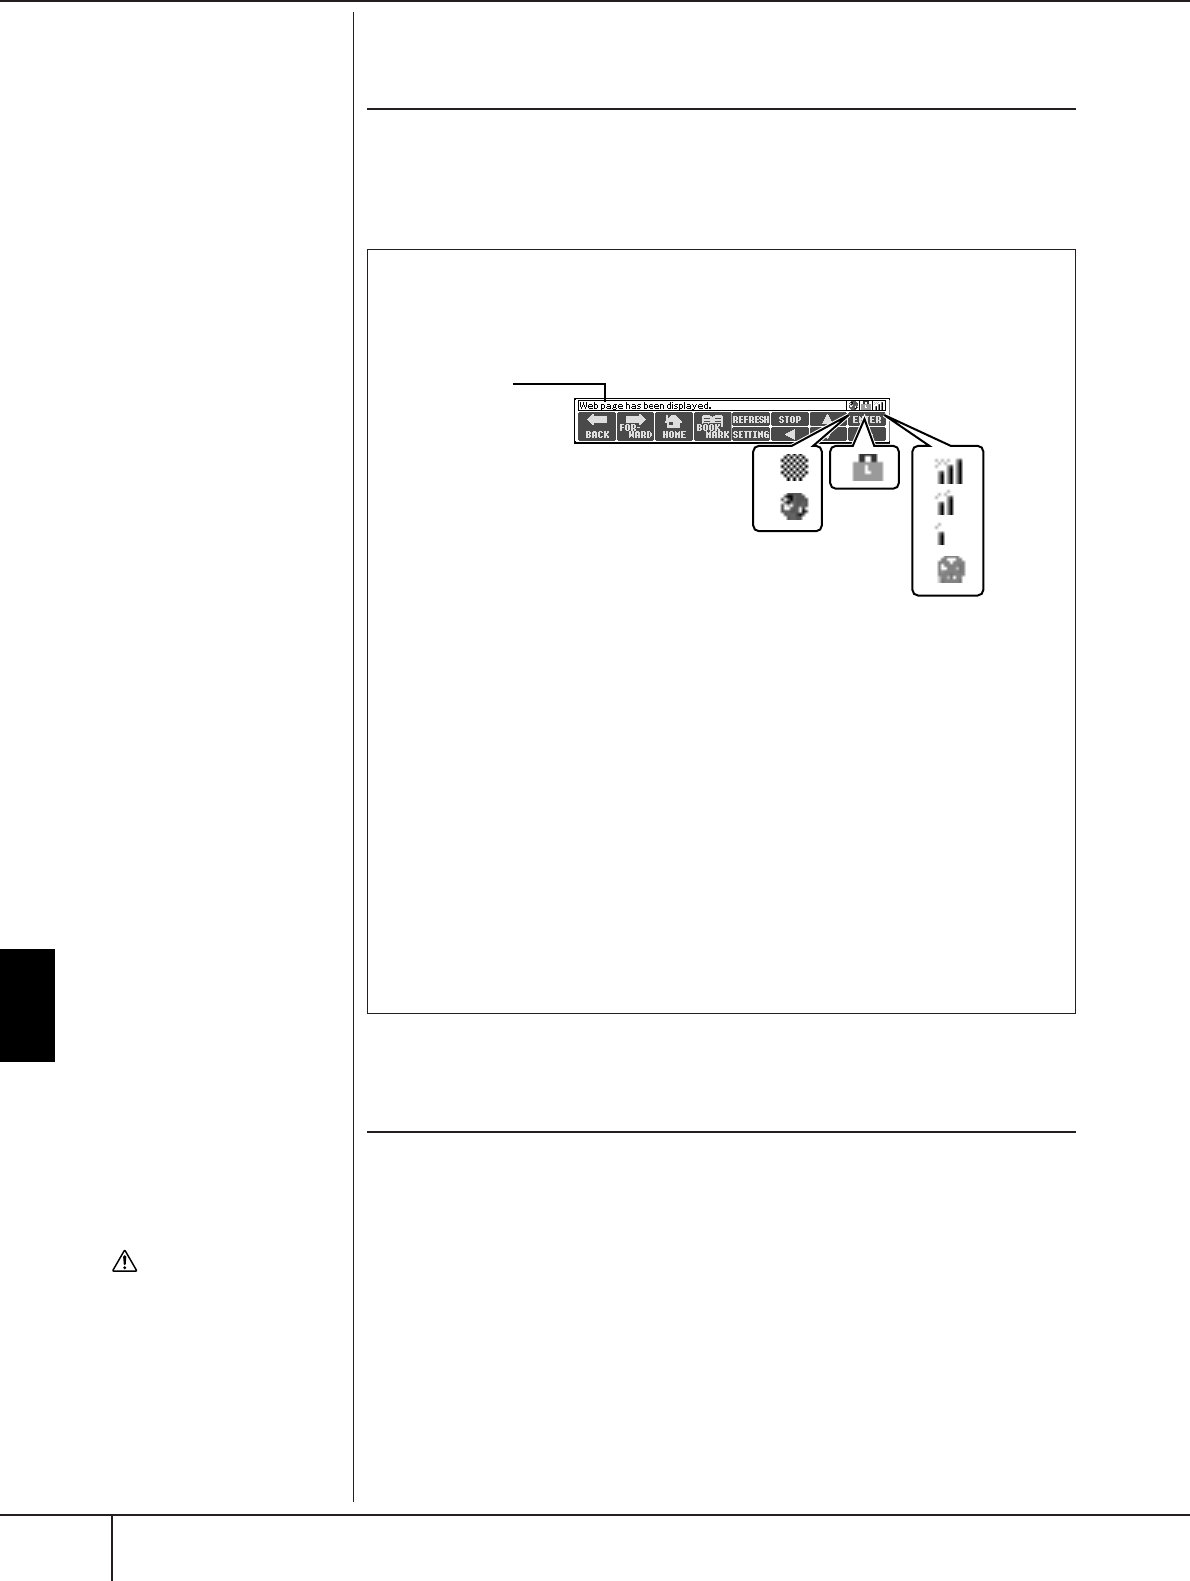
Connecting the PSR-S900/S700 Directly to the Internet
Operations in the Special Website
PSR-S900/S700 Owner’s Manual
174
Refreshing a Web Page/Canceling Loading of
a Web Page
To refresh a web page (to make sure you have the latest version of the page, or to
try reloading), press the [5
π
] (REFRESH) button.
To cancel loading of a page (if the page is taking too long to open), press the [6
π
]
(STOP) button.
Purchasing and Downloading Data
You can purchase and download Song data (for playback on this instrument) and
other types of data from the special website. For details on purchasing and down-
loading data, refer to the instructions on the site itself.
Operation after purchase and download
When downloading is completed, a message appears asking you whether or not to
open the File Selection display. Select “YES” to call up the File Selection display,
from which you can select the downloaded data. To return to the Internet display,
select “NO.” When the File Selection display is open, press the [8
π
] (UP) button
to call up the next highest level folder.
SSL:
SSL (Secure Sockets Layer) is an
industry-standard method for
protecting web communications
by using data encryption and
other tools.
CAUTION
The Purchased data will be
lost if you turn the power to
the instrument off during
download.
Monitoring the Internet Connection Status
The messages and icons at the bottom right of the Internet display indicate
the current Internet connection status.
2
13 4
Message
The following three messages are displayed according to the loading status of
the web page.
“Disconnected”
This appears when the instrument is not connected with the Internet. When
this message is displayed, the web page cannot be seen. Icon 1 is displayed.
“Now opening web page...”
The web page is being loaded. Icon 2 flashes.
“Web page has been displayed.”
Loading of the web page is completed, and the page is displayed completely.
Icon 2 stops flashing. When the displayed web page uses SSL, icon 3 is dis-
played, and information is encrypted for communication.
Strength of the reception is displayed in 4 when connecting to the Internet by
wireless LAN. When reception is weak, move the instrument near the access
point to improve reception.

Connecting the PSR-S900/S700 Directly to the Internet
Operations in the Special Website
PSR-S900/S700 Owner’s Manual 175
Download Destination
The download destination depends on the use of storage media, as
described below.
• When a USB storage device is connected to the instrument during pur-
chase:
The downloaded data is saved in the “MyDownloads” folder in the USB
tab display of the File Selection display. To close the folder and call up
the next highest level folder, press the [8
π
] (UP) button in the File
Selection display.
•When a USB storage device is not connected to the instrument during pur-
chase:
The downloaded data is saved in the “MyDownloads” folder in the User
tab display of the File Selection display. To close the folder and call up
the next highest level folder, press the [8
π
] (UP) button in the File
Selection display.
Registering Bookmarks of Your Favorite Pages
You can “bookmark” the page you’re viewing, and set up a custom link so the page
can be instantly called up in the future.
1With the desired page currently selected, press the [4
ππ
ππ††
††
] (BOOK-
MARK) button. The Bookmark display appears, showing a list of the
currently saved bookmarks.
The title of the currently selected web page registered to the selected book-
mark is shown below the list.
2Call up the display for registering bookmarks by pressing the [3
ππ
ππ††
††
]
(ADD) button.
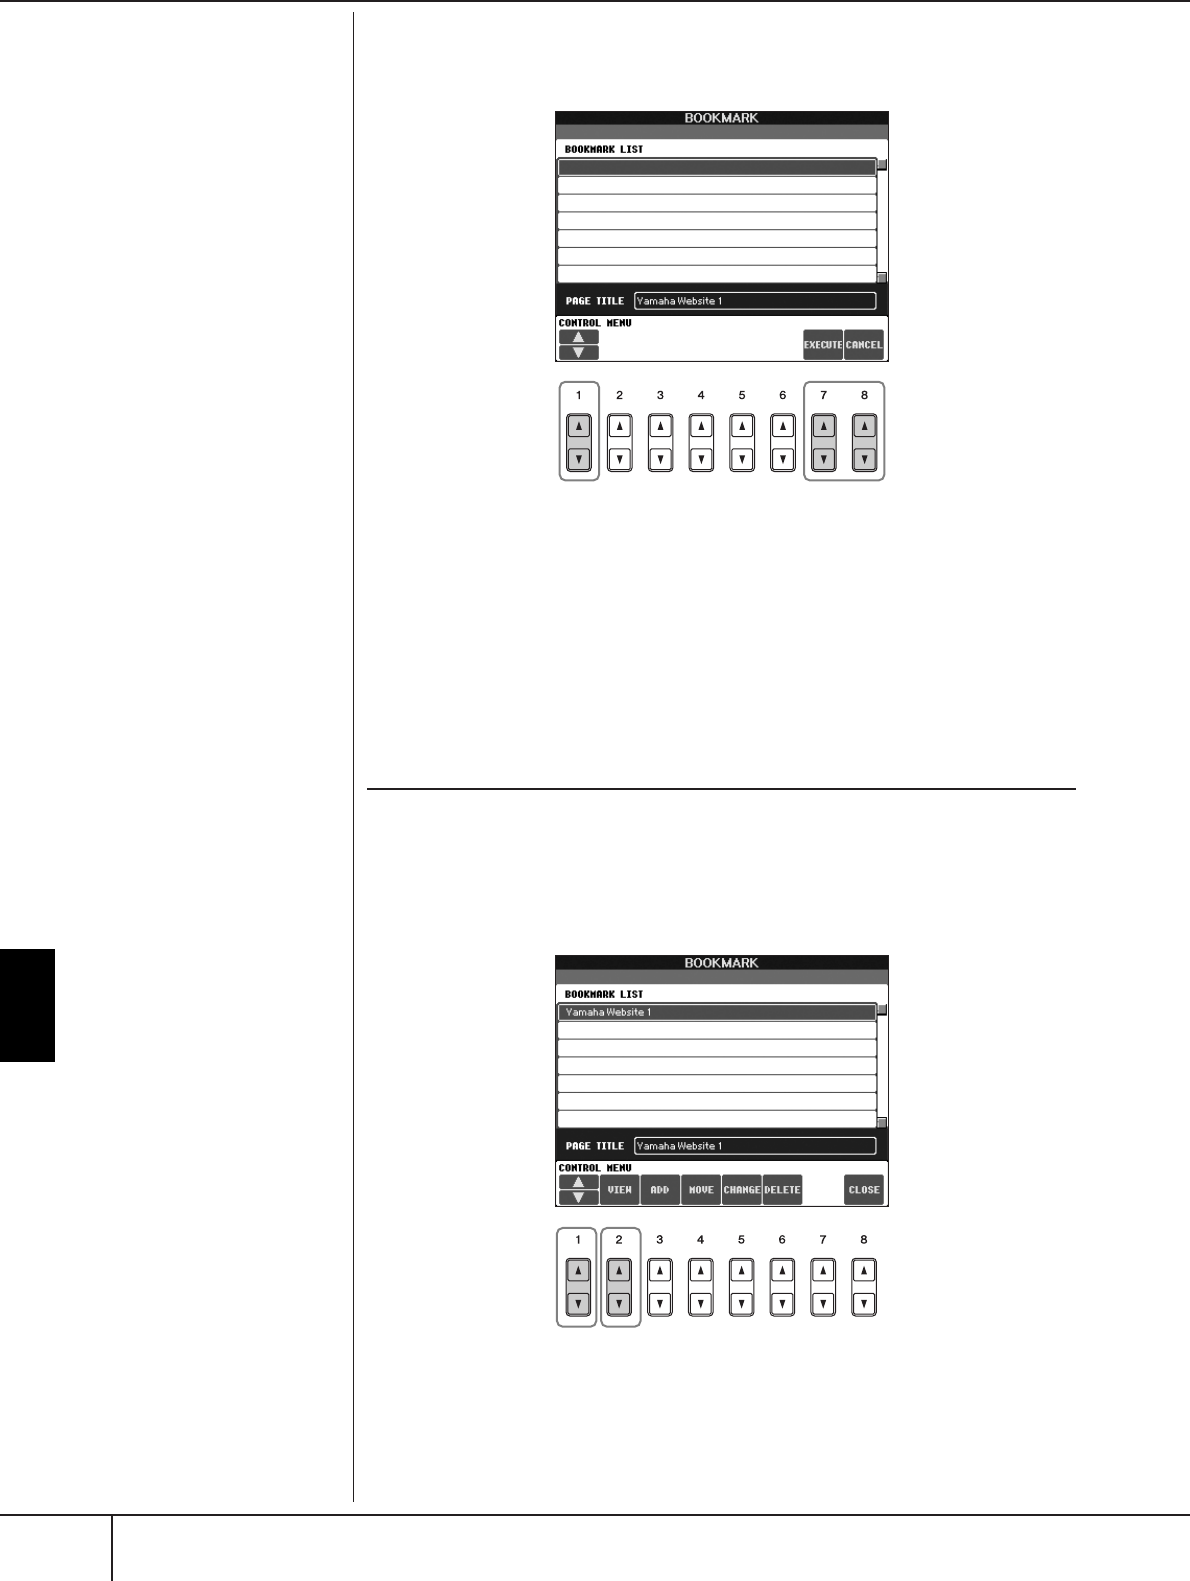
Connecting the PSR-S900/S700 Directly to the Internet
Operations in the Special Website
PSR-S900/S700 Owner’s Manual
176
3Select the position of the new bookmark by pressing the [1
ππ
ππ††
††
] (
ππ
ππ
/
††
††
) button.
4To save the bookmark, press the [7
ππ
ππ††
††
] (EXECUTE) button, or press
the [8
ππ
ππ††
††
] (CANCEL) button to cancel.
5To return to the browser, press the [8
ππ
ππ††
††
] (CLOSE) button.
Opening a Bookmarked Page
1Press the [4
ππ
ππ††
††
] (BOOKMARK) button to call up the Bookmark dis-
play.
2Press the [1
ππ
ππ††
††
] (
ππ
ππ
/
††
††
) button to select the desired bookmark.
3Press the [2
ππ
ππ††
††
] (VIEW) button to open the page of the selected
bookmark.
34
23
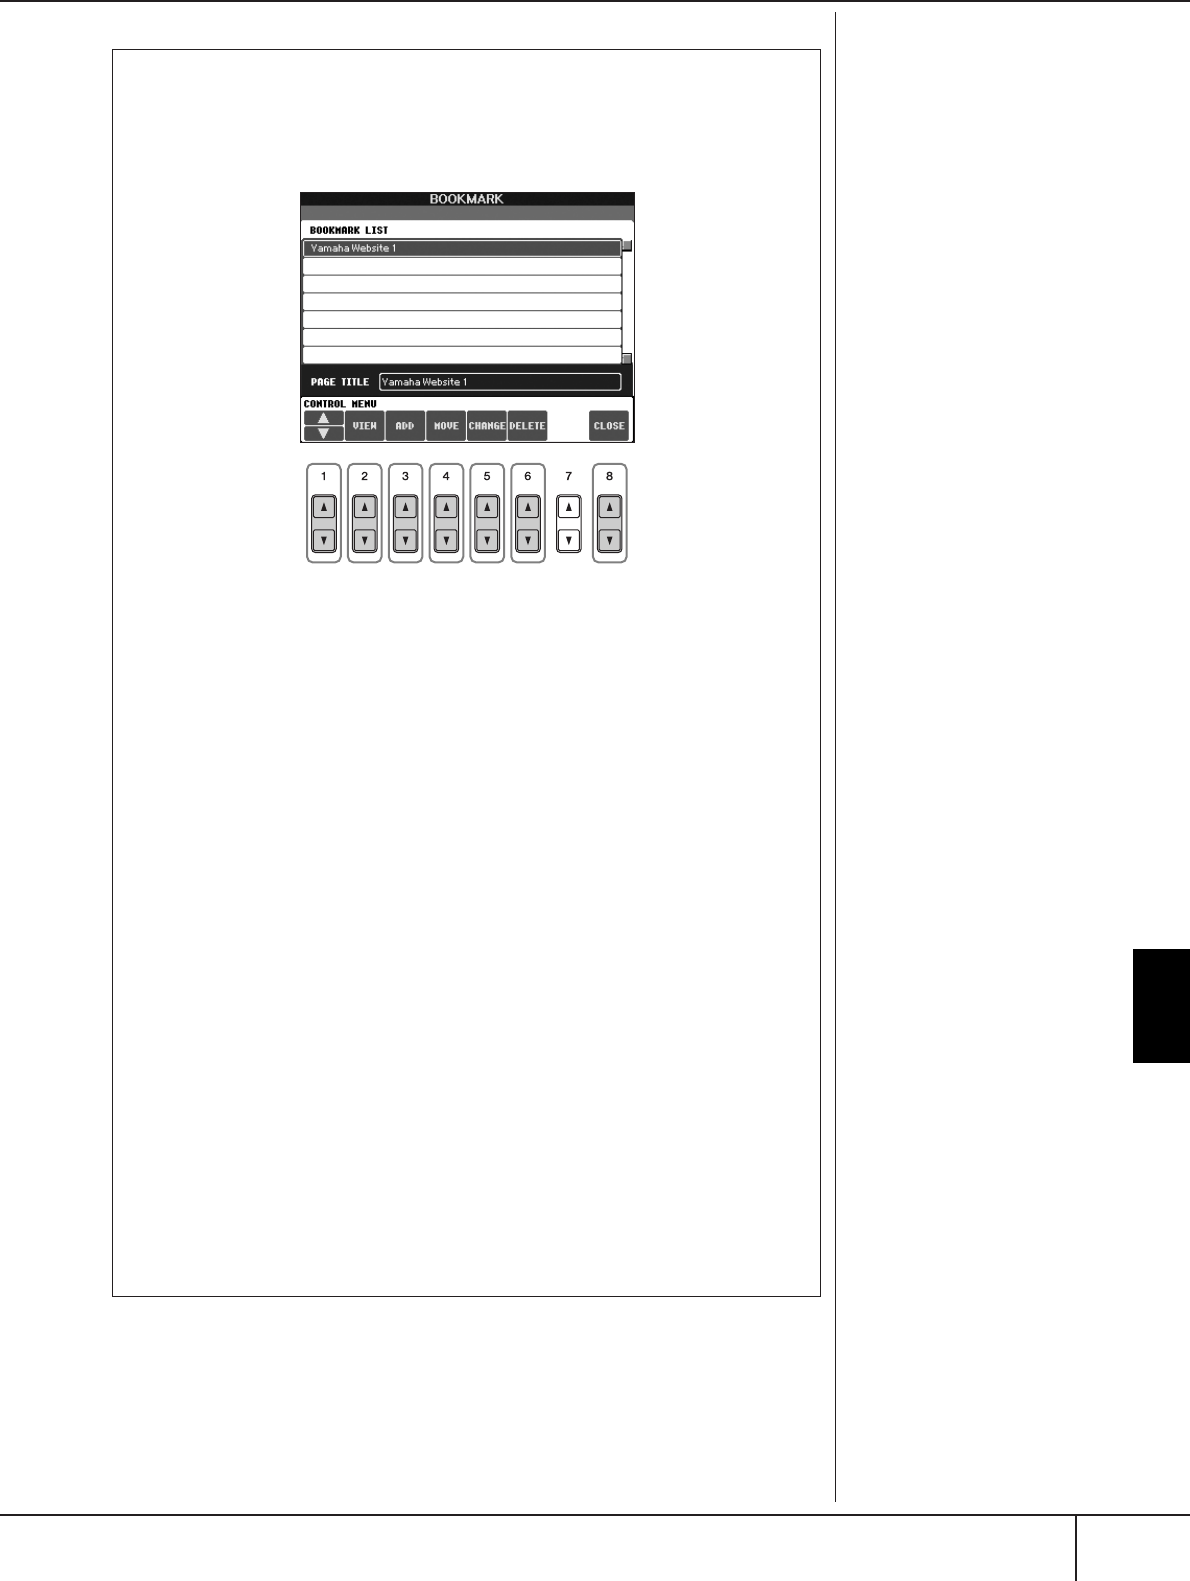
Connecting the PSR-S900/S700 Directly to the Internet
Operations in the Special Website
PSR-S900/S700 Owner’s Manual 177
Editing Bookmarks
From the Bookmark display, you can change the names and rearrange the
order of your bookmarks, as well as delete unnecessary bookmarks from
the list.
123456 7
1
ππ
ππ
/
††
††
Moves the selection position in the Bookmark list.
2View
Opens the web page of the selected bookmark.
3Add
Used when saving a bookmark (page 175).
4Move
Changes the order of the bookmarks.
1Select the bookmark you wish to move, then press the [4
ππ
ππ††
††
]
(MOVE) button.
The lower part of the display changes, letting you select the new posi-
tion for the bookmark.
2Select the intended position by pressing the [1
ππ
ππ††
††
] (
ππ
ππ
/
††
††
)
button.
3Move the bookmark to the selected position by pressing the
[7
ππ
ππ††
††
] (EXECUTE) button.
5Changing names
Changes the name of the selected bookmark. Pressing the [5
π†
] (CHANGE) but-
ton calls up the display for entering characters. For details on entering characters,
see page 77.
6Delete
Deletes the selected bookmark from the Bookmark list.
7Close
Closes the Bookmark display and returns to the browser display.
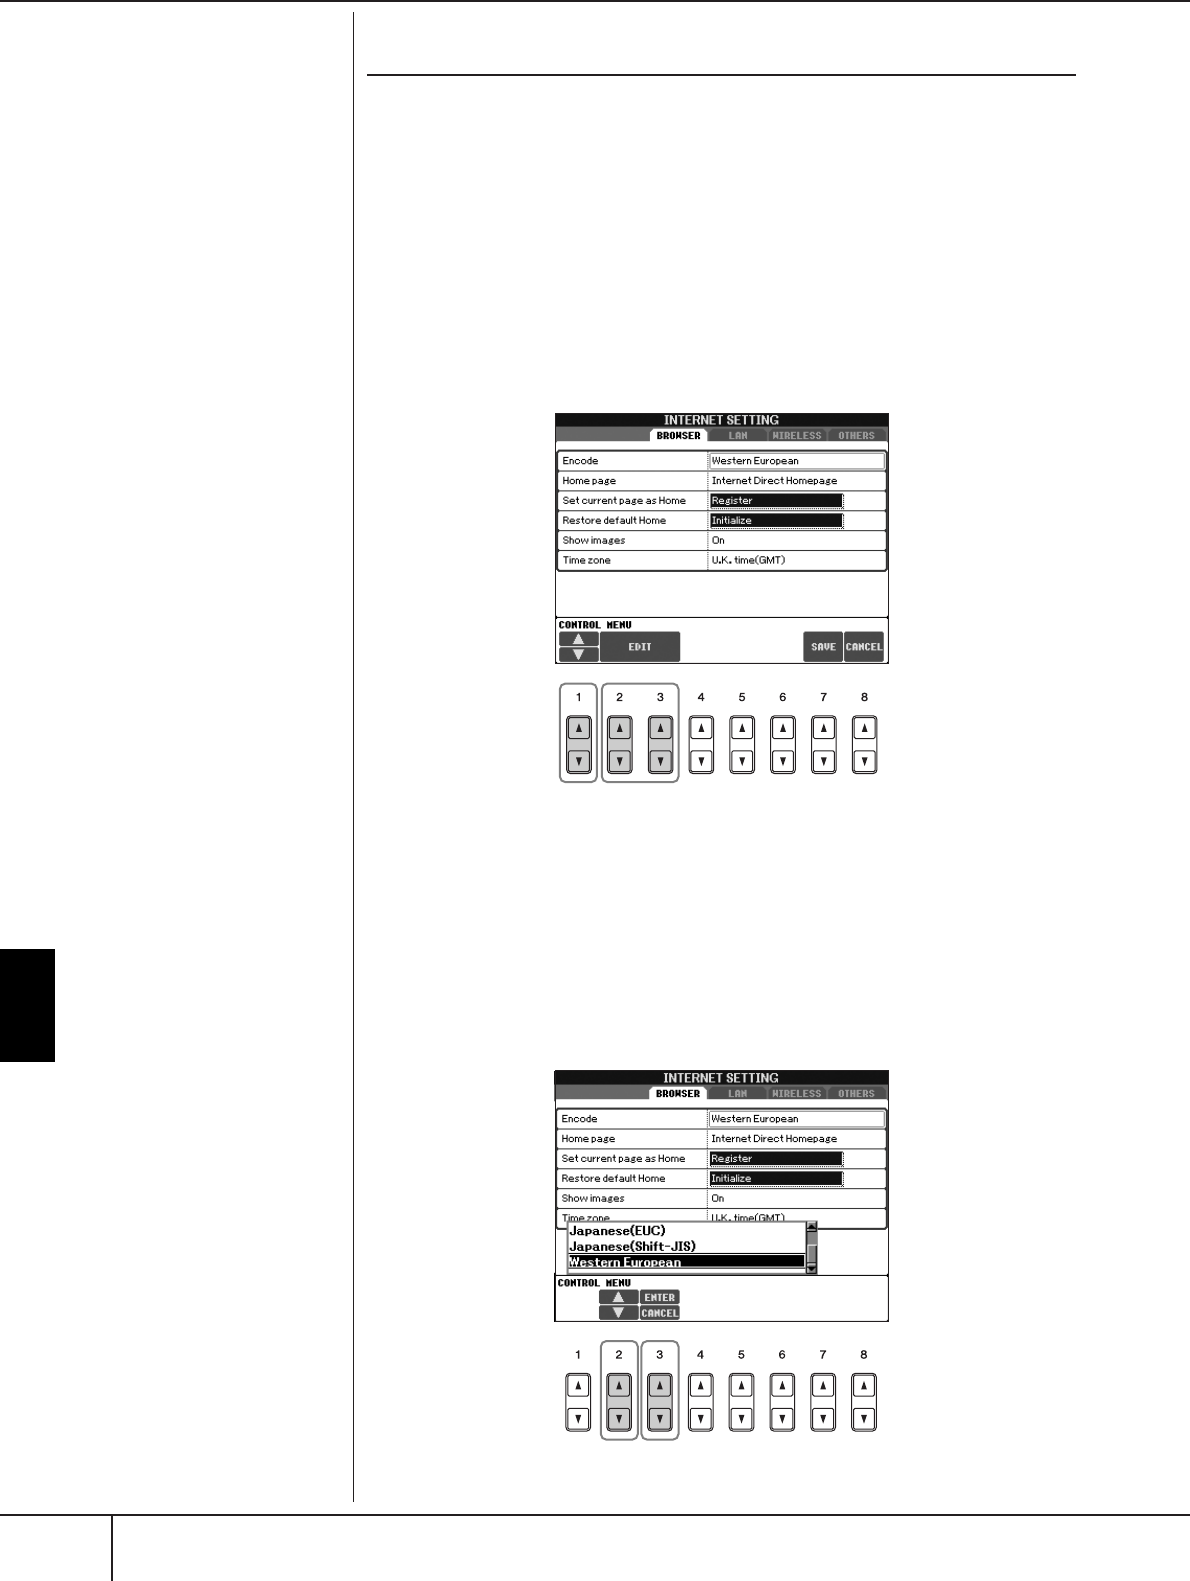
Connecting the PSR-S900/S700 Directly to the Internet
Operations in the Special Website
PSR-S900/S700 Owner’s Manual
178
About the Internet Settings Display
From the Internet Settings display, you can make various settings related to the
Internet connection, including preferences for the menus and displays. The Internet
Settings display has four sub-displays: Browser, LAN, Wireless LAN, and Others.
Basic Operation
1
Press the [5
††
††
] (SETTING) button to call up the Internet Setting display.
2Press the TAB [
√
][
®
] buttons to select the desired display.
3Select the desired item by pressing the [1
ππ
ππ††
††
] (
ππ
ππ
/
††
††
) button.
4To call up the relevant Edit display, press the [2
ππ
ππ††
††
]/[3
ππ
ππ††
††
] (EDIT)
button.
For some items, the Edit display may not be shown, but the setting or change
may be executed.
5Press the [2
ππ
ππ††
††
] (
ππ
ππ
/
††
††
) button to select the setting or change the
value.
This can also be done by using the DATA ENTRY dial.
4
3
Entering Characters
When the character input dis-
play is opened, you can enter
characters. (Refer to “Entering
Characters” on page 77.)
56
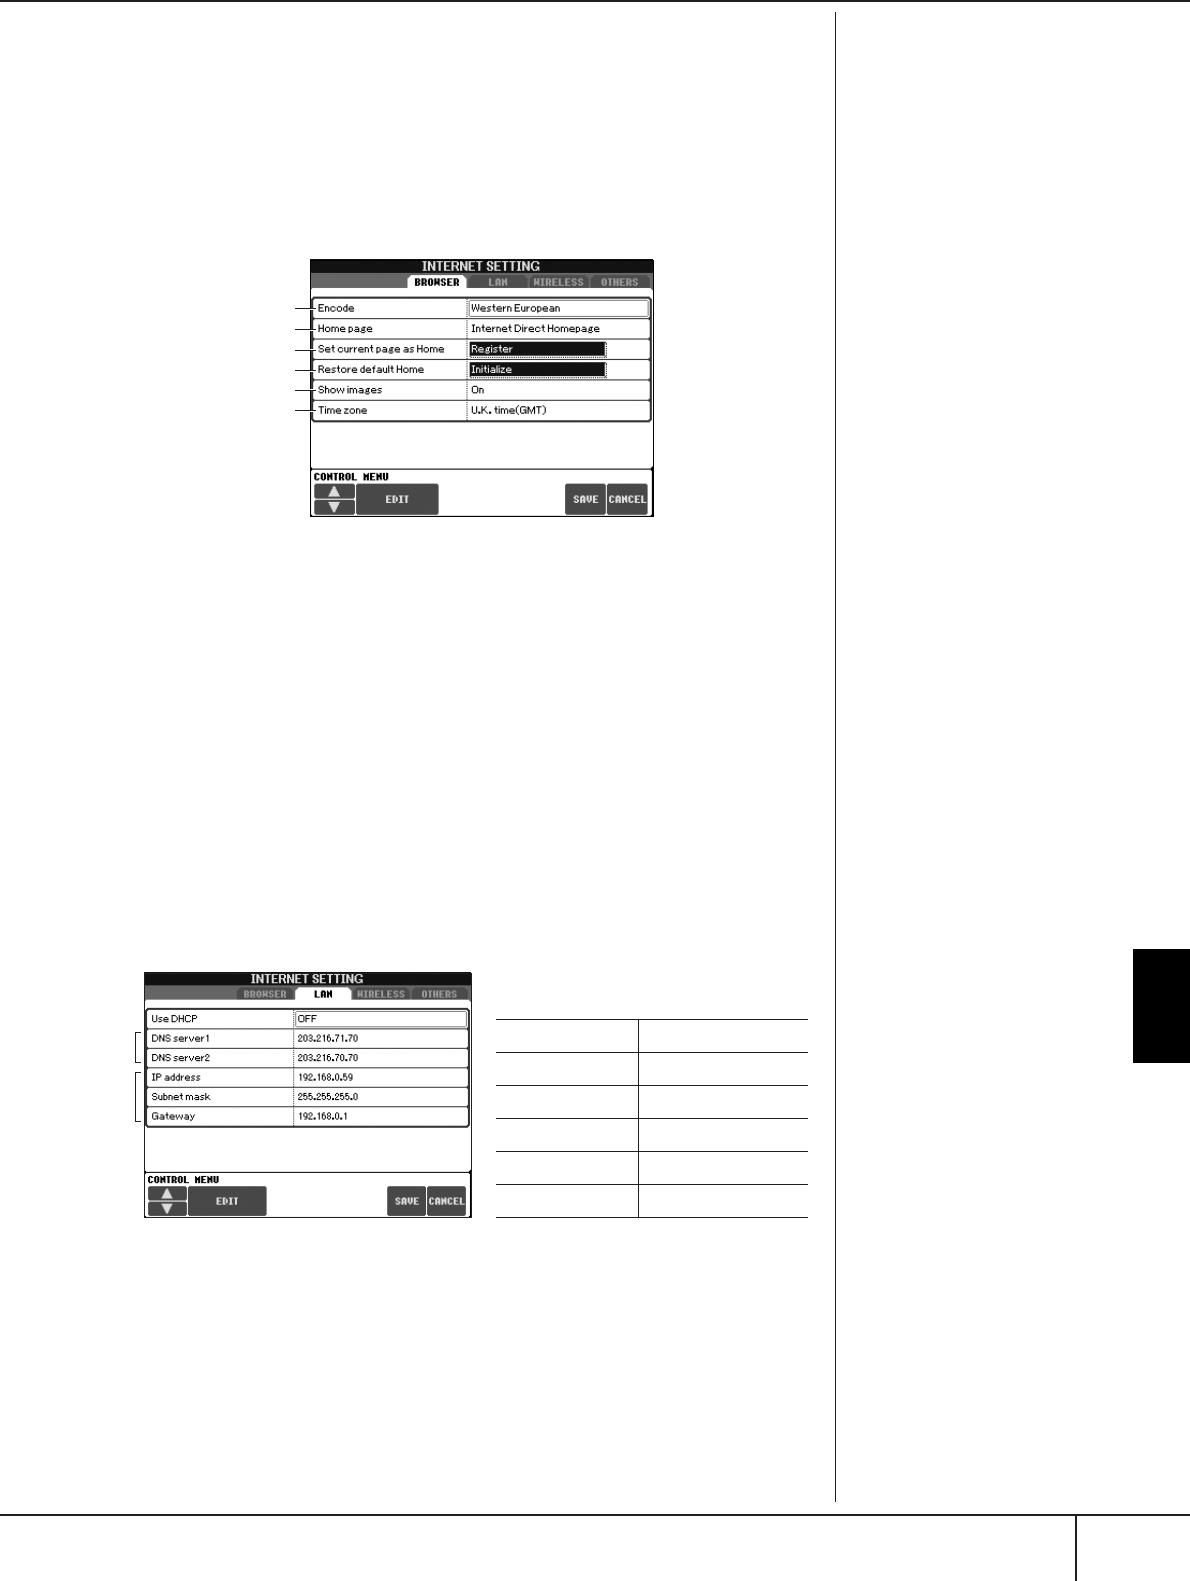
Connecting the PSR-S900/S700 Directly to the Internet
Operations in the Special Website
PSR-S900/S700 Owner’s Manual 179
6To execute the setting, press the [3
ππ
ππ
] (ENTER) button. To cancel,
press the [3
††
††
] (CANCEL) button.
7To actually apply all settings changed in the Internet Settings display,
press the [7
ππ
ππ††
††
] (SAVE) button.
To cancel, press the [8
ππ
ππ††
††
] (CANCEL) button.
Browser
LAN
1
2
5
6
3
4
1
Encode
Selects the character code encoding for the browser.
2Home page
Shows and allows editing the title of the web page registered as the Home page.
3Set current page as Home
For details, refer to “Changing the Home Page” on page 181.
4Restore default Home
Restores the home page setting.
5Show images
Image data and pictures in the web page are shown in the browser when this is set
to on. Image data is not shown when this is set to off.
6Time zone
This determines the time setting for the browser.
1
2
3
Make a written note of the settings here, in
case you have to enter them again.
Use DHCP
DNS server1
DNS server2
IP address
Subnet mask
Gateway
1Use DHCP
Determines whether or not DHCP is used.
2DNS server 1/DNS server 2
These determine the addresses of the primary and secondary DNS servers. These
settings must be made when “Use DHCP” above is set to “ON (set DNS manu-
ally)” or “OFF.”
3IP address/Subnet mask/Gateway
These settings are available only when DHCP is not used. The settings here are: IP
address, subnet mask, and gateway server address. These settings must be made
when “Use DHCP” above is set to “OFF.”
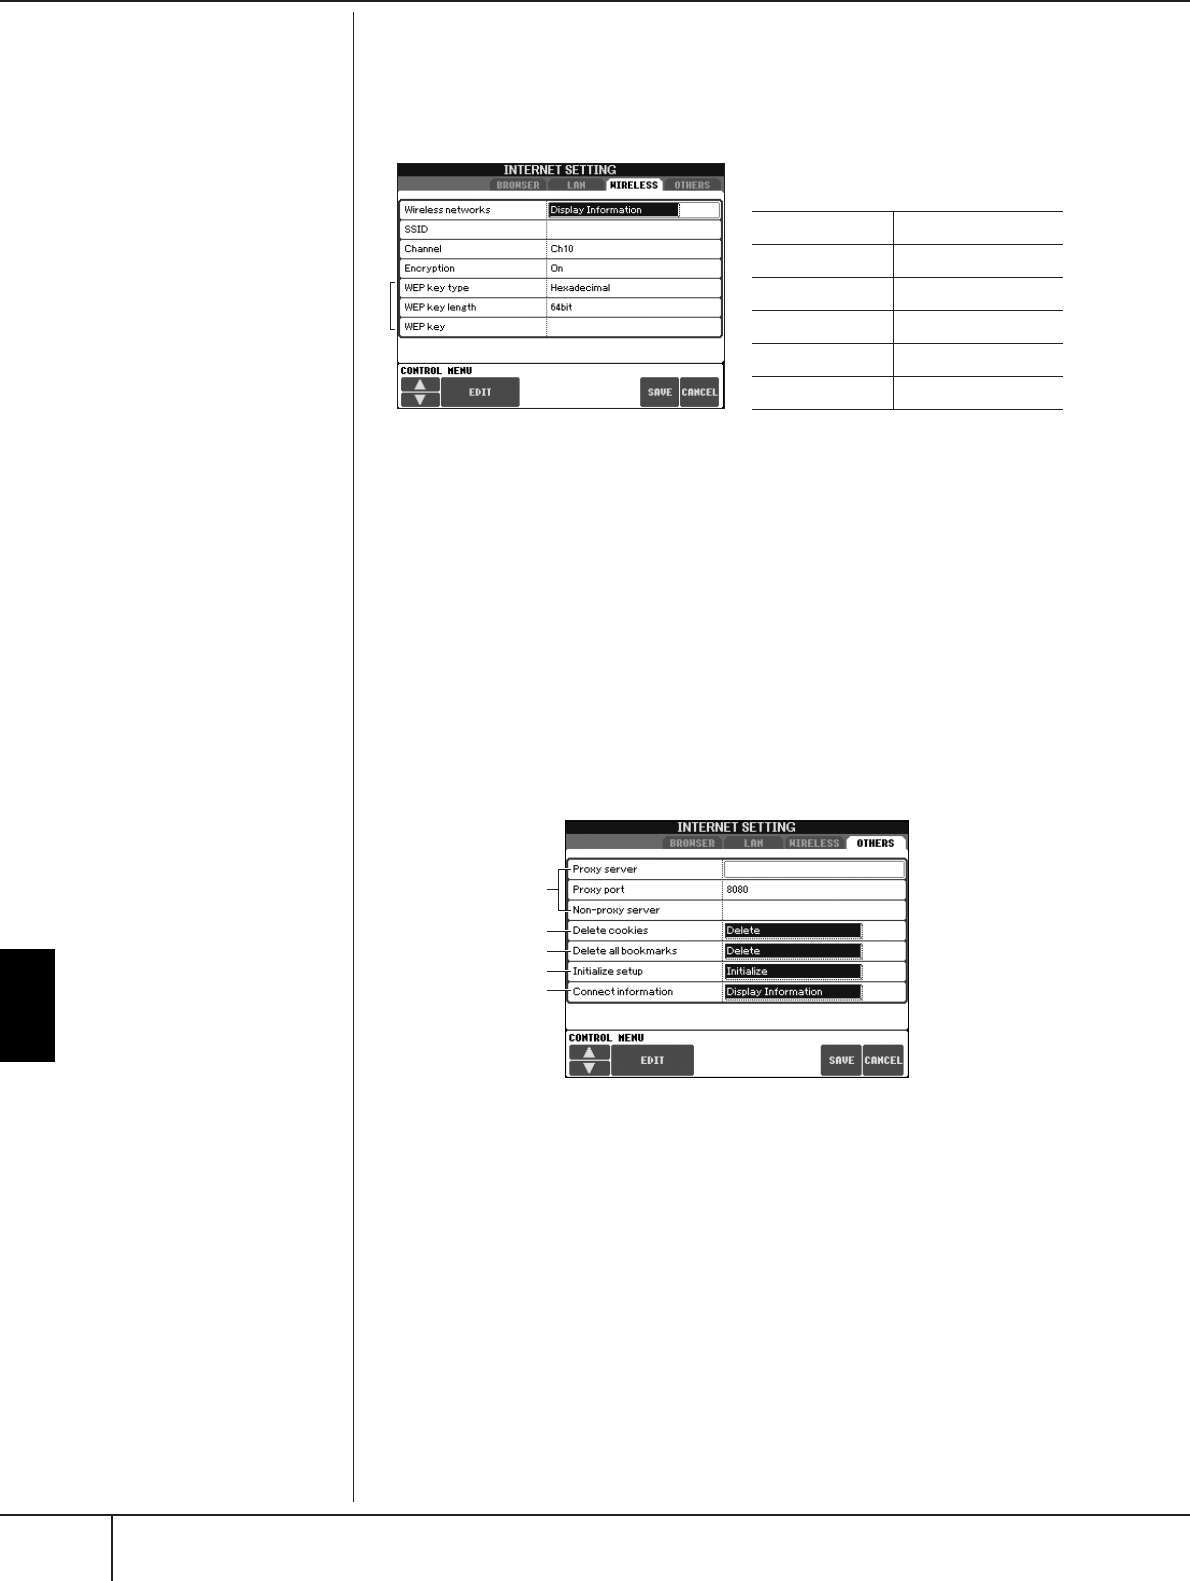
Connecting the PSR-S900/S700 Directly to the Internet
Operations in the Special Website
PSR-S900/S700 Owner’s Manual
180
Wireless LAN
These settings here are only necessary when using a USB wireless LAN adaptor. For
a wireless LAN setup, make sure to set both the LAN settings on the previous page
and the Wireless LAN settings below.
Others
The Wireless LAN settings are
not necessary when using the
Wireless Game Adaptor. 1
2
3
4
5
Make a written note of the settings here, in
case you have to enter them again.
SSID
Channel
Encryption
WEP key type
WEP key length
WEP key
1Wireless Networks
Determines whether or not Wireless Networks are displayed.
2SSID
Determines the SSID setting.
3Channel
Determines the channel.
4Encryption
Determines whether or not the data is encrypted.
5WEP key type/WEP key length/WEP key
These settings are available only when Encryption above is enabled. These set the
type and length of the encryption key.
2
3
4
5
1
1Proxy server/Proxy port/Non-proxy server
Determines the proxy server name, port number and the host name for the non-
proxy server. The settings here are only necessary when using a proxy server.
2Delete cookies
Deletes the information of all saved cookies.
3Delete all bookmarks
Deletes all saved bookmarks.
4Initialize setup
Restores all settings in the Internet Settings displays to their defaults. See “Initializ-
ing Internet Settings” on page 182.
5Connection information
Shows detailed information on the current connection.
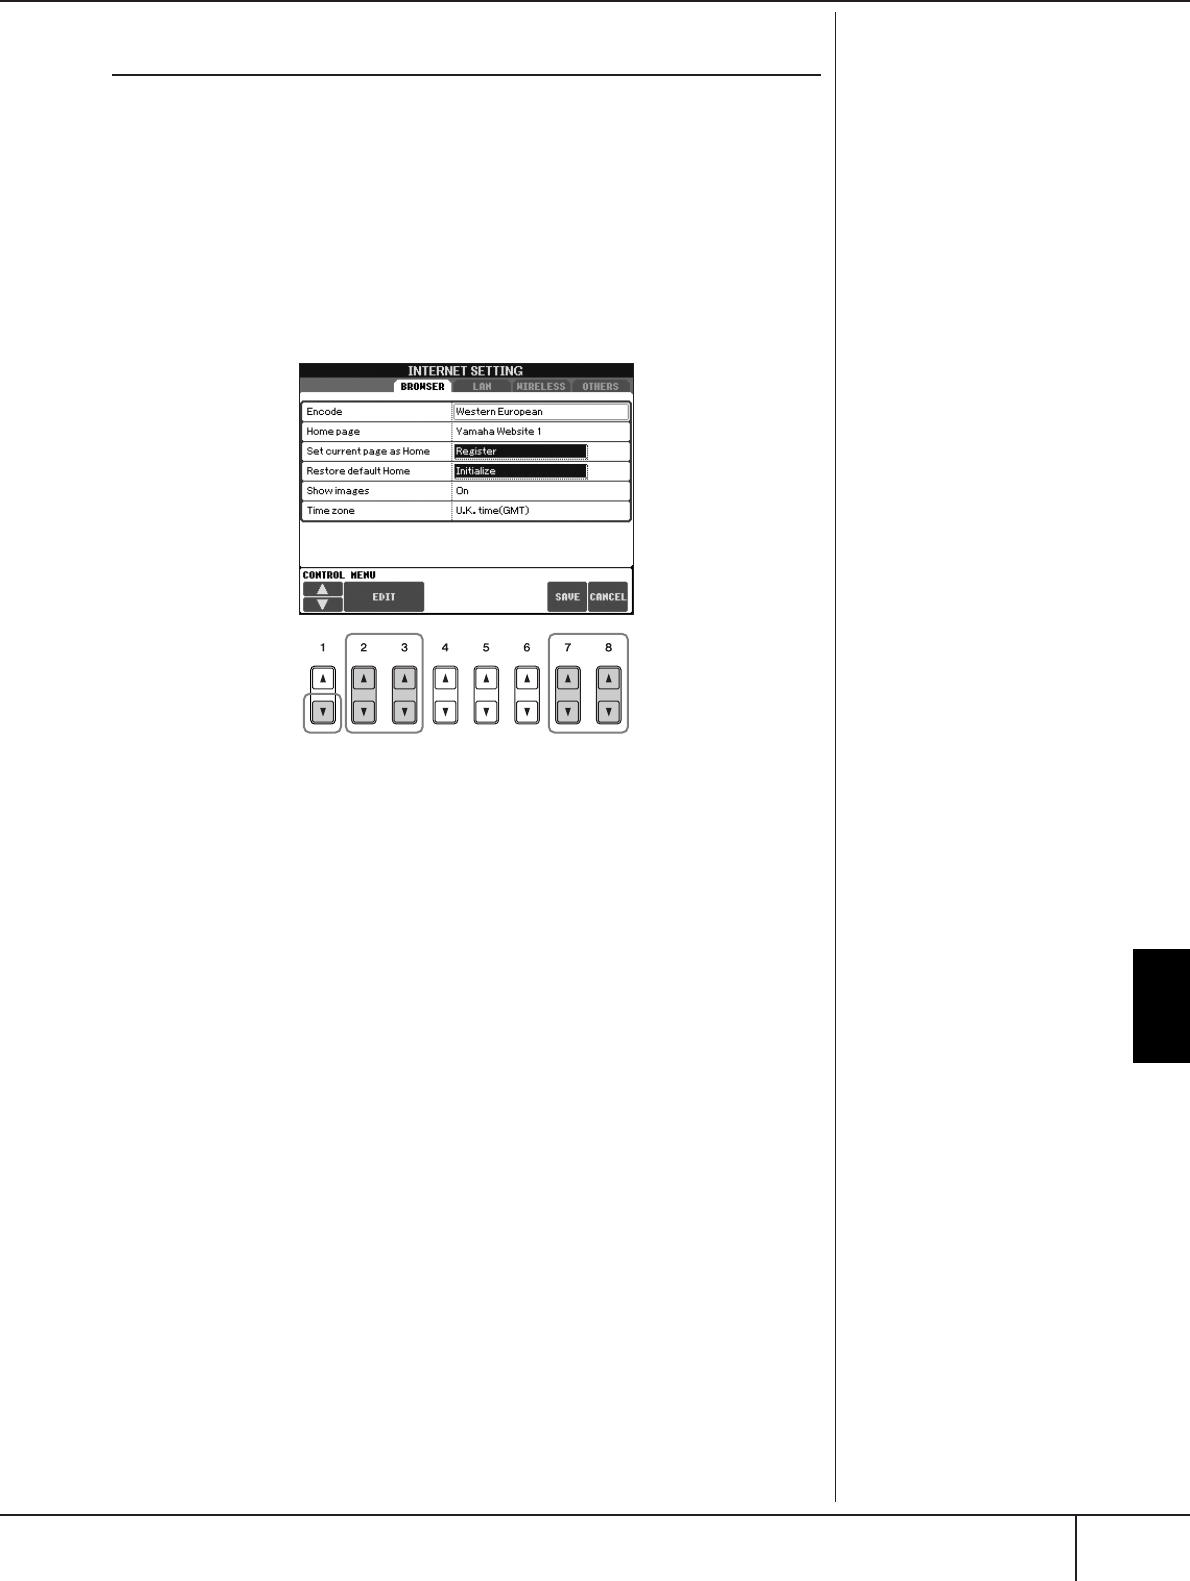
Connecting the PSR-S900/S700 Directly to the Internet
Operations in the Special Website
PSR-S900/S700 Owner’s Manual 181
Changing the Home Page
In the default condition, the top page of the special website is automatically set to
be the Home page for the browser. However, you can specify any desired page on
the site to be the Home page.
1Open the page you wish to set as your new Home page.
2Press the [5
††
††
] (SETTING) button to call up the Internet Setting dis-
play.
3Press the TAB [
√
][
®
] buttons to select the BROWSER tab.
4Press the [1
††
††
] (
††
††
) button to select the setting “Set current page as
Home.”
5Use the [2
ππ
ππ††
††
]/[3
ππ
ππ††
††
] (EDIT) buttons to actually set the selected
page as your new Home page.
6To return to the browser, press the [7
ππ
ππ††
††
] (SAVE) button.
To cancel, press the [8
ππ
ππ††
††
] (CANCEL) button.
45 6
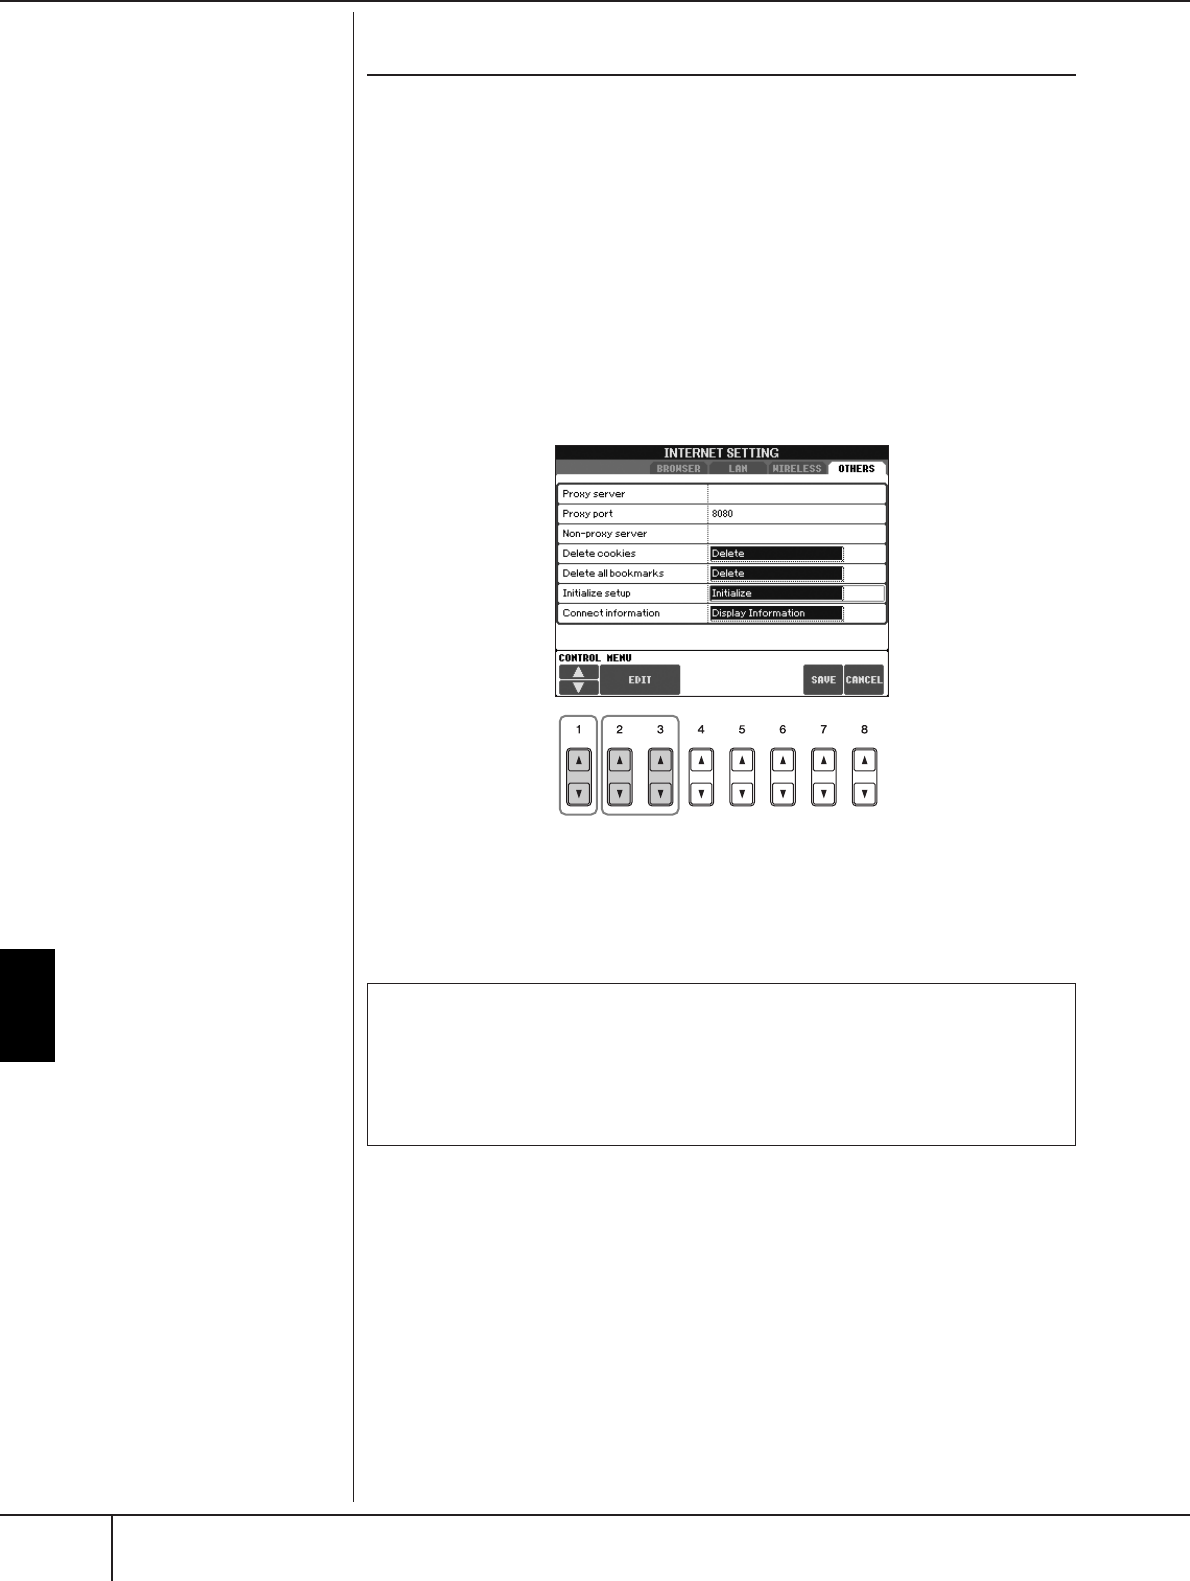
Connecting the PSR-S900/S700 Directly to the Internet
Operations in the Special Website
PSR-S900/S700 Owner’s Manual
182
Initializing Internet Settings
The settings of the Internet function are not initialized when using the Initialize
operation of the instrument; Internet settings must be initialized separately, as
explained here. Initializing will reset to the default values not only the settings of
the browser, but also all settings you have made in the Internet Settings displays
(except for the cookies and bookmarks), including those related to Internet connec-
tion.
1Press the [5
††
††
] (SETTING) button to call up the Internet Settings dis-
play.
2Press the TAB [
√
][
®
] buttons to select the OTHERS tab.
3Press the [1
ππ
ππ††
††
] (
ππ
ππ
/
††
††
) button to select “Initialize.”
4Use the [2
ππ
ππ††
††
]/ [3
ππ
ππ††
††
] (EDIT) buttons to initialize the Internet set-
tings.
34
Sometimes cookies contain per-
sonal information. Delete cookies/bookmarks
Cookies and bookmarks are still remain after executing the initialize oper-
ation above.
To delete the cookies or bookmarks, use the appropriate operations in the
OTHERS tab display (page 180).
Connecting the PSR-S900/S700 Directly to the Internet
Glossary of Internet Terms
PSR-S900/S700 Owner’s Manual 183
Glossary of Internet Terms
Broadband An Internet connection technology/service (such as ADSL and optical fiber) that allows for high-speed, high-
volume data communication.
Browser The software used to search for, access, and view web pages. For this instrument, this refers to the display that
shows the contents of the web pages.
Cookie A system that records certain information that the user transfers when visiting a website and using the Inter-
net. The function is similar to a preference file in a conventional computer program, in that it “remembers”
certain information such as your user name and password, so you don’t have to re-enter the information each
time you visit the site.
DHCP This is a standard or protocol by which IP addresses and other low-level network configuration information
can be dynamically and automatically assigned each time connection is made to the Internet.
DNS A system that translates names of computers connected to a network to their corresponding IP addresses.
Download Transferring data over a network, from a larger “host” system to a smaller “client” system's hard drive or other
local storage device—much like copying files from your hard disk drive to a floppy disk. For this instrument,
this refers to the process of transferring Song and other data from a website to the instrument.
Gateway A system which links different networks or systems, and makes possible data transfer and conversion despite
differing communications standards.
Home page The first page shown when opening a browser and connecting to the Internet. This phrase is also used to
mean the “front screen” or top page of a website.
Internet A huge network made up of networks, the Internet allows high-speed data transfer among computers, mobile
phones and other devices.
IP address A string of numbers assigned to each computer connected to a network, and indicating the device’s location
on the network.
LAN Short for Local Area Network, this is a data-transfer network that connects a group of computers at a single
location (such as an office or home) by means of a special cable.
Link Location information in other sentences and images, etc. that are under buttons and character strings on a
web page. When the place with the link is clicked, the page selection jumps to the relevant link.
Modem
A device which connects and allows data transfer between a conventional telephone line and a computer. It con-
verts the digital signals from the computer to analog audio for sending over the phone line, and vice versa.
NTP
Short for Network Time Protocol, a standard for setting the internal system clock of the computer over a network.
For this instrument, the internal clock of the computer is used to specify the valid time/date for cookies and SSL.
Provider A communications business that offers Internet connection services. In order to connect to the Internet, it is
necessary to contract to a provider.
Proxy
A proxy server is a server that all computers on a local network have to go through before accessing informa-
tion on the Internet. It intercepts all or designated requests to the real server to see if it can fulfill the requests
itself. If not, it forwards the request to the real server. Proxy servers are used to improve performance and
speed, and to filter requests, usually for security and to prevent unauthorized access to an internal network.
Router
A device for connecting multiple computer networks. For example, a router is necessary when connecting several
computers in a house or office, and allow them to all access the Internet and share data. A router is usually con-
nected between a modem and a computer, although some modems have a built-in router.
Server A hardware system or computer used as a central point for a network, providing access to files and services.
Site
Short for “website,” this refers to the group of web pages that are opened together. For example, the collection
of web pages whose addresses begin with “http://www.yamaha.com/” is referred to as the Yamaha site.
SSID This is an identification name for specifying a particular network over a wireless LAN connection. Communi-
cation is possible only between terminals with matching SSID names.
SSL Short for Secure Sockets Layer, a standard for transmitting confidential data such as credit card numbers over
the Internet.
Subnet mask A setting used to divide a large-scale network into several smaller networks.
URL Short for Uniform Resource Locator, a string of characters used to identify and link to specific websites and
pages on the Internet. A complete URL usually starts with the characters “http://.”
Web page Refers to each individual page that makes up a website.
Wireless LAN A LAN connection that allows data transfer through a wireless, cable-free connection.
Wireless Game
Adaptor (Wireless
Ethernet Con-
verter or Bridge)
Device that allows easy wireless connection with digital consumer electronic devices, printers, and game
machines, etc. equipped with LAN ports.
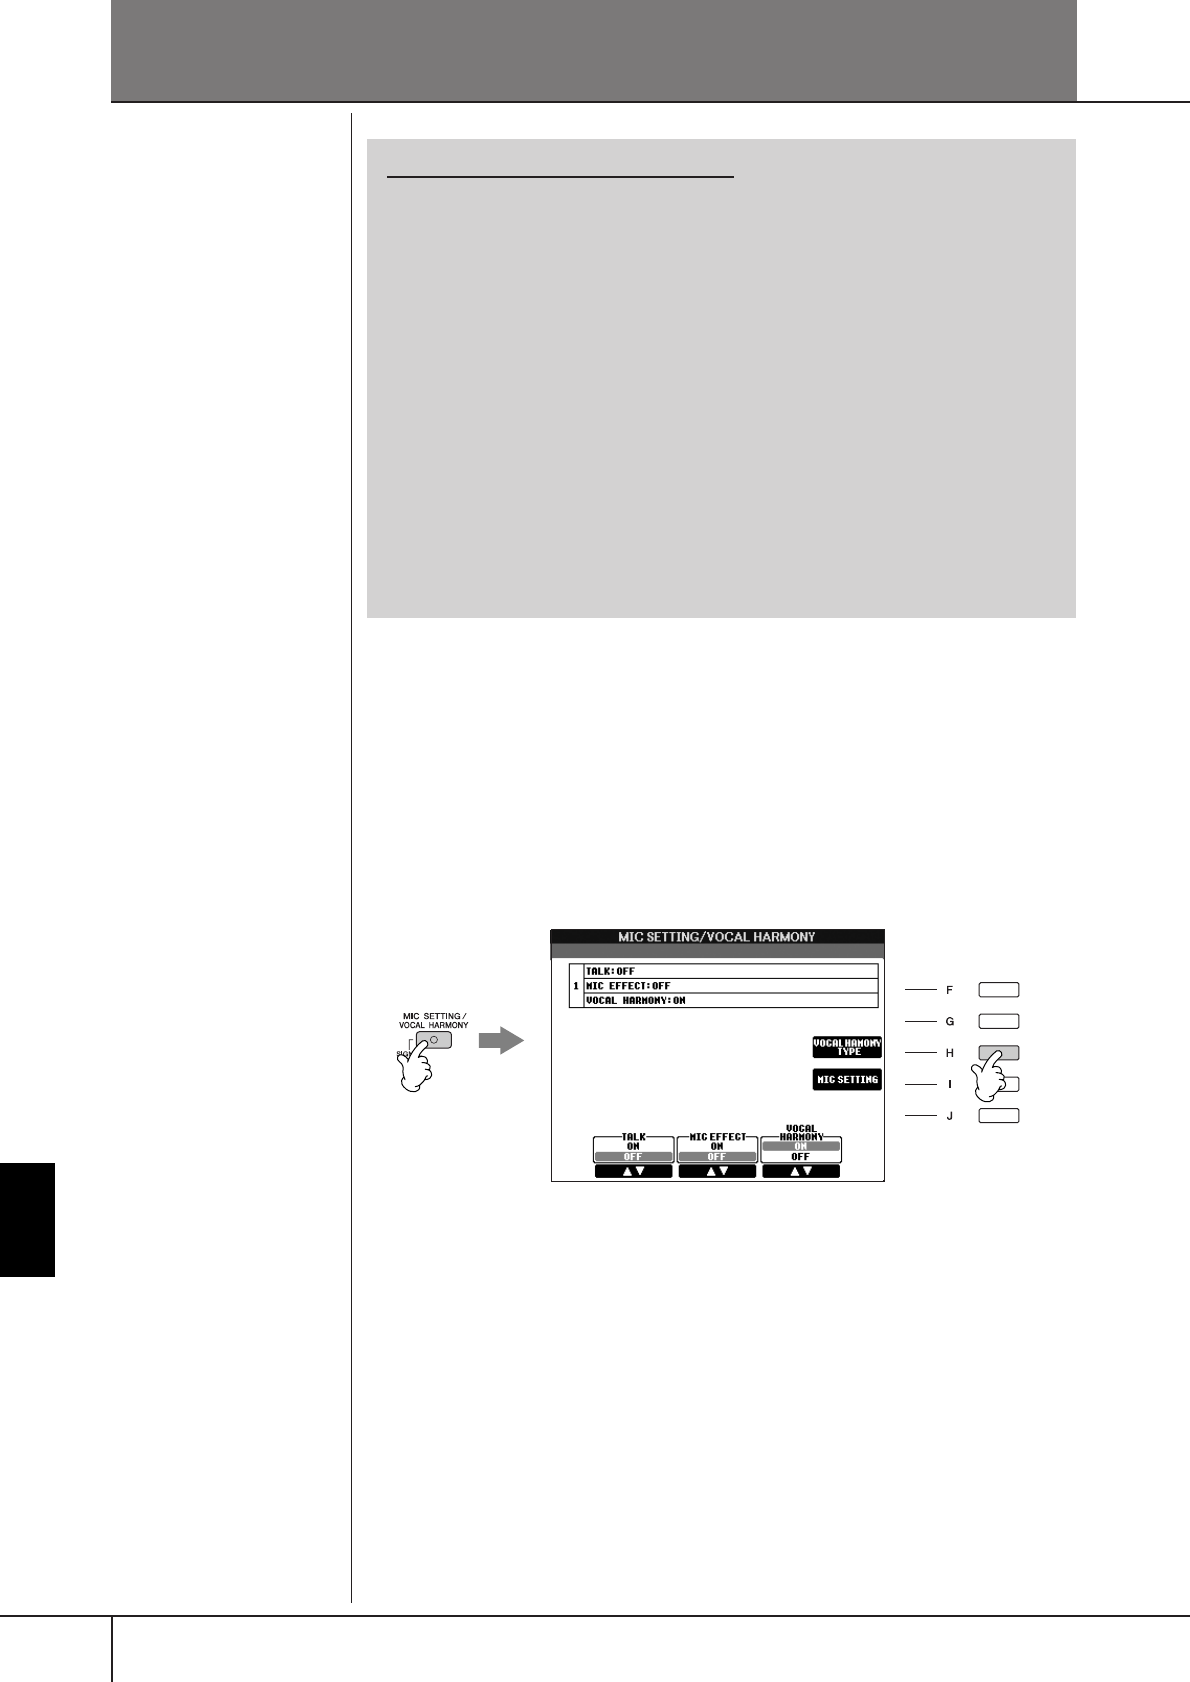
PSR-S900/S700 Owner’s Manual
184
Using a Microphone (PSR-S900)
Using a Microphone (PSR-S900)
Editing Vocal Harmony Parameters
This section explains briefly how to create your own Vocal Harmony (page 60)
types, and lists the detailed parameters for editing. Up to ten Vocal Harmony types
can be created and saved.
1Press the [MIC SETTING/VOCAL HARMONY] button.
2Press the [H] (VOCAL HARMONY TYPE) button to call up the VOCAL
HARMONY TYPE selection display.
Reference to Quick Guide pages
Singing Along with Song Playback (Karaoke)
or Your Own Performance............................................................ page 57
Connecting a Microphone........................................................... page 57
Singing with the Lyrics Display ................................................... page 58
Convenient Functions for Karaoke .............................................. page 59
Adjusting the tempo ................................................................ page 34
Transpose ................................................................................ page 59
Applying effects to Your Voice.................................................. page 59
Adding Harmony Vocals to Your Voice..................................... page 60
Practicing Singing with Proper Pitch (Vocal CueTIME)........... page 145
Convenient Functions for Singing Along
with Your Own Performance....................................................... page 61
Changing the Key (Transpose).................................................. page 61
Displaying the Music Score on Instrument and Lyrics on TV .... page 62
Making Announcements Between Songs ................................. page 62
Controlling Playback Timing by Your Voice (Karao-Key) ......... page 146
12
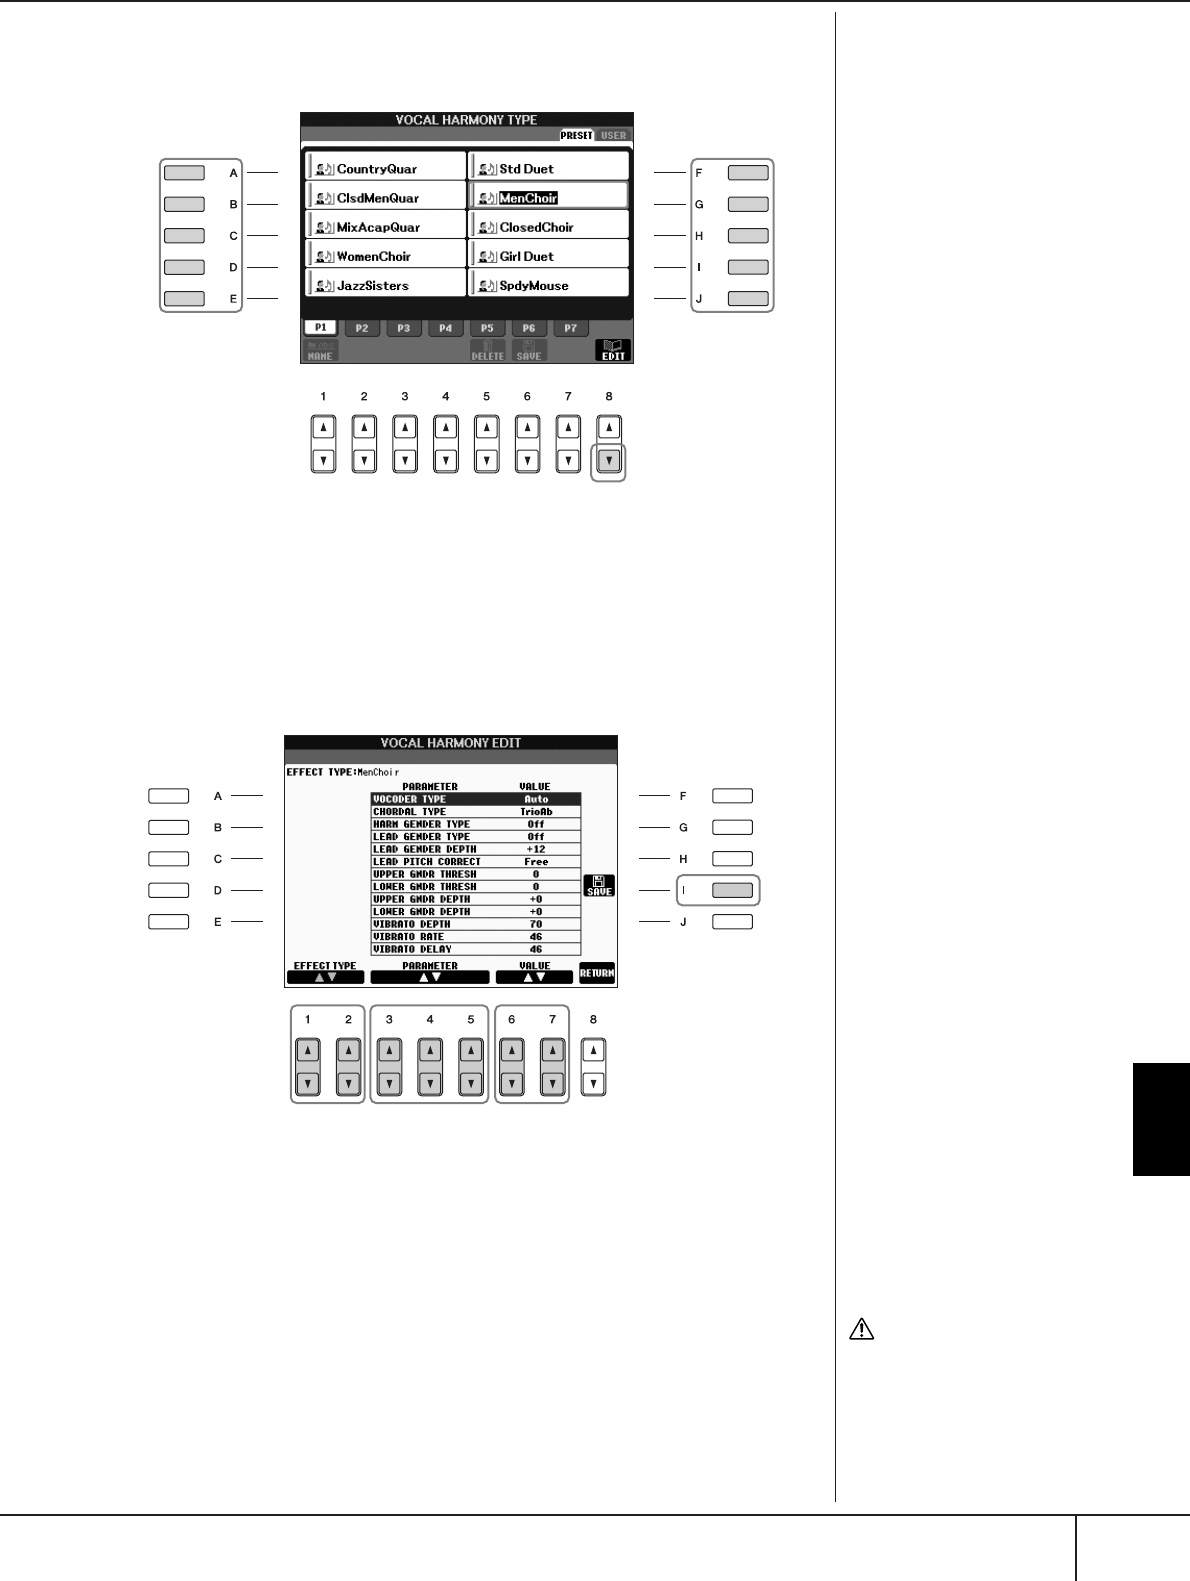
Using a Microphone (PSR-S900)
Editing Vocal Harmony Parameters
PSR-S900/S700 Owner’s Manual 185
3Press one of the [A]–[J] buttons to select a Vocal Harmony type to be
edited.
4Press the [8
††
††
] (EDIT) button to call up the VOCAL HARMONY EDIT
display.
5If you want to re-select the Vocal Harmony type, use the [1
ππ
ππ††
††
]/
[2
ππ
ππ††
††
] buttons.
Or you can re-select the Vocal Harmony type by pressing the [8
π†
]
(RETURN) button to return to the Vocal Harmony selection display.
6Use the [3
ππ
ππ††
††
]–[5
ππ
ππ††
††
] buttons to select the parameter (page 186)
you want to edit.
7Set the value of the parameter selected above.
8Press the [I] (SAVE) button to save your edited Vocal Harmony type
(page 73).
33
4
56 7
8
CAUTION
The settings here will be lost
if you change to another
Vocal Harmony type or you
turn the power off without
executing the Save operation.
Using a Microphone (PSR-S900)
Editing Vocal Harmony Parameters
PSR-S900/S700 Owner’s Manual
186
Editable Parameters in the VOCAL HARMONY EDIT Display
VOCODER TYPE Determines how the harmony notes are applied to the micro-
phone sound when the Harmony mode (page 190) is set to
“VOCODER.”
CHORDAL TYPE Determines how the harmony notes are applied to the micro-
phone sound when the Harmony mode (page 190) is set to
“CHORDAL.”
HARMONY GENDER TYPE Determines whether the gender of the harmony sound is
changed or not.
Off
The gender of the harmony sound is not changed.
Auto
The gender of the harmony sound is changed automatically.
LEAD GENDER TYPE Determines whether and how the gender of the lead vocal sound
(i.e., the direct microphone sound) will be changed. Please note
that the number of harmony notes differs depending on the
selected type. When set to Off, three harmony notes are pro-
duced. Other settings produce two harmony notes.
Off
No gender change occurs.
Unison
No gender change occurs. You can adjust the LEAD GENDER
DEPTH below.
Male
The corresponding gender change is applied to the lead vocal.
Female
The corresponding gender change is applied to the lead vocal.
LEAD GENDER DEPTH Adjusts the degree of lead vocal gender change. This is available
when the LEAD GENDER TYPE above is set to other than Off.
The higher the value, the more “feminine” the harmony voice
becomes. The lower the value, the more “masculine” the voice.
LEAD PITCH CORRECT This parameter is only effective when the LEAD GENDER TYPE
above is set to other than Off. When Smooth or Hard is selected,
the pitch of the lead vocal is shifted in precise semitone steps.
UPPER GENDER THRESH-
OLD
Gender change will occur when the harmony pitch reaches or
exceeds the specified number of semitones above the lead vocal
pitch.
LOWER GENDER THRESH-
OLD
Gender change will occur when the harmony pitch reaches or
exceeds the specified number of semitones below the lead vocal
pitch.
UPPER GENDER DEPTH Adjusts the degree of gender change applied to harmony notes
higher than the UPPER GENDER THRESHOLD. The higher the
value, the more “feminine” the harmony voice becomes. The
lower the value, the more “masculine” the voice.
LOWER GENDER DEPTH Adjusts the degree of gender change applied to harmony notes
lower than the LOWER GENDER THRESHOLD. The higher the
value, the more “feminine” the harmony voice becomes. The
lower the value, the more “masculine” the voice.
VIBRATO DEPTH Sets the depth of vibrato applied to the harmony sound. Also
affects the lead vocal sound when the LEAD GENDER TYPE
above is set to other than Off.
VIBRATO RATE Sets the speed of the vibrato effect. Also affects the lead vocal
sound when the LEAD GENDER TYPE above is set to other than
Off.
VIBRATO DELAY Specifies the length of the delay before the vibrato effect begins
when a note is produced. Higher values result in a longer delay.

Using a Microphone (PSR-S900)
Adjusting the Microphone and Harmony Sound
PSR-S900/S700 Owner’s Manual 187
Adjusting the Microphone and Har-
mony Sound
1Press the [MIC SETTING/VOCAL HARMONY] button.
2Press the [I] (MIC SETTING) button to call up the MICROPHONE SET-
TING display.
HARMONY1/2/3 VOLUME Sets the volume of the first (lowest), second, and third (highest)
harmony notes.
HARMONY1/2/3 PAN Specifies the stereo (pan) position of the first (lowest), second,
and third (highest) harmony notes.
Random
The stereo position of the sound will change randomly when-
ever the keyboard is played. This is effective when the Har-
mony mode (page 190) is set to “VOCODER” or “CHORDAL.”
L63>R – C – L<R63
A setting of L63>R pans the sound hard left, while C is at cen-
ter, and L<R63 is at hard right.
HARMONY1/2/3 DETUNE Detunes the first (lowest), second, and third (highest) harmony
notes by the specified number of cents.
PITCH TO NOTE When this is set to “ON,” you can “play” the voices of the instru-
ment with your voice. (The instrument tracks the pitch of your
voice and converts it to note data for the tone generator. Keep in
mind, however, that dynamic changes in your voice do not affect
the volume of the tone generator.)
PITCH TO NOTE PART Determines which of the instrument parts will be controlled by
the lead vocal when the Pitch to Note parameter is “ON.”
2
1
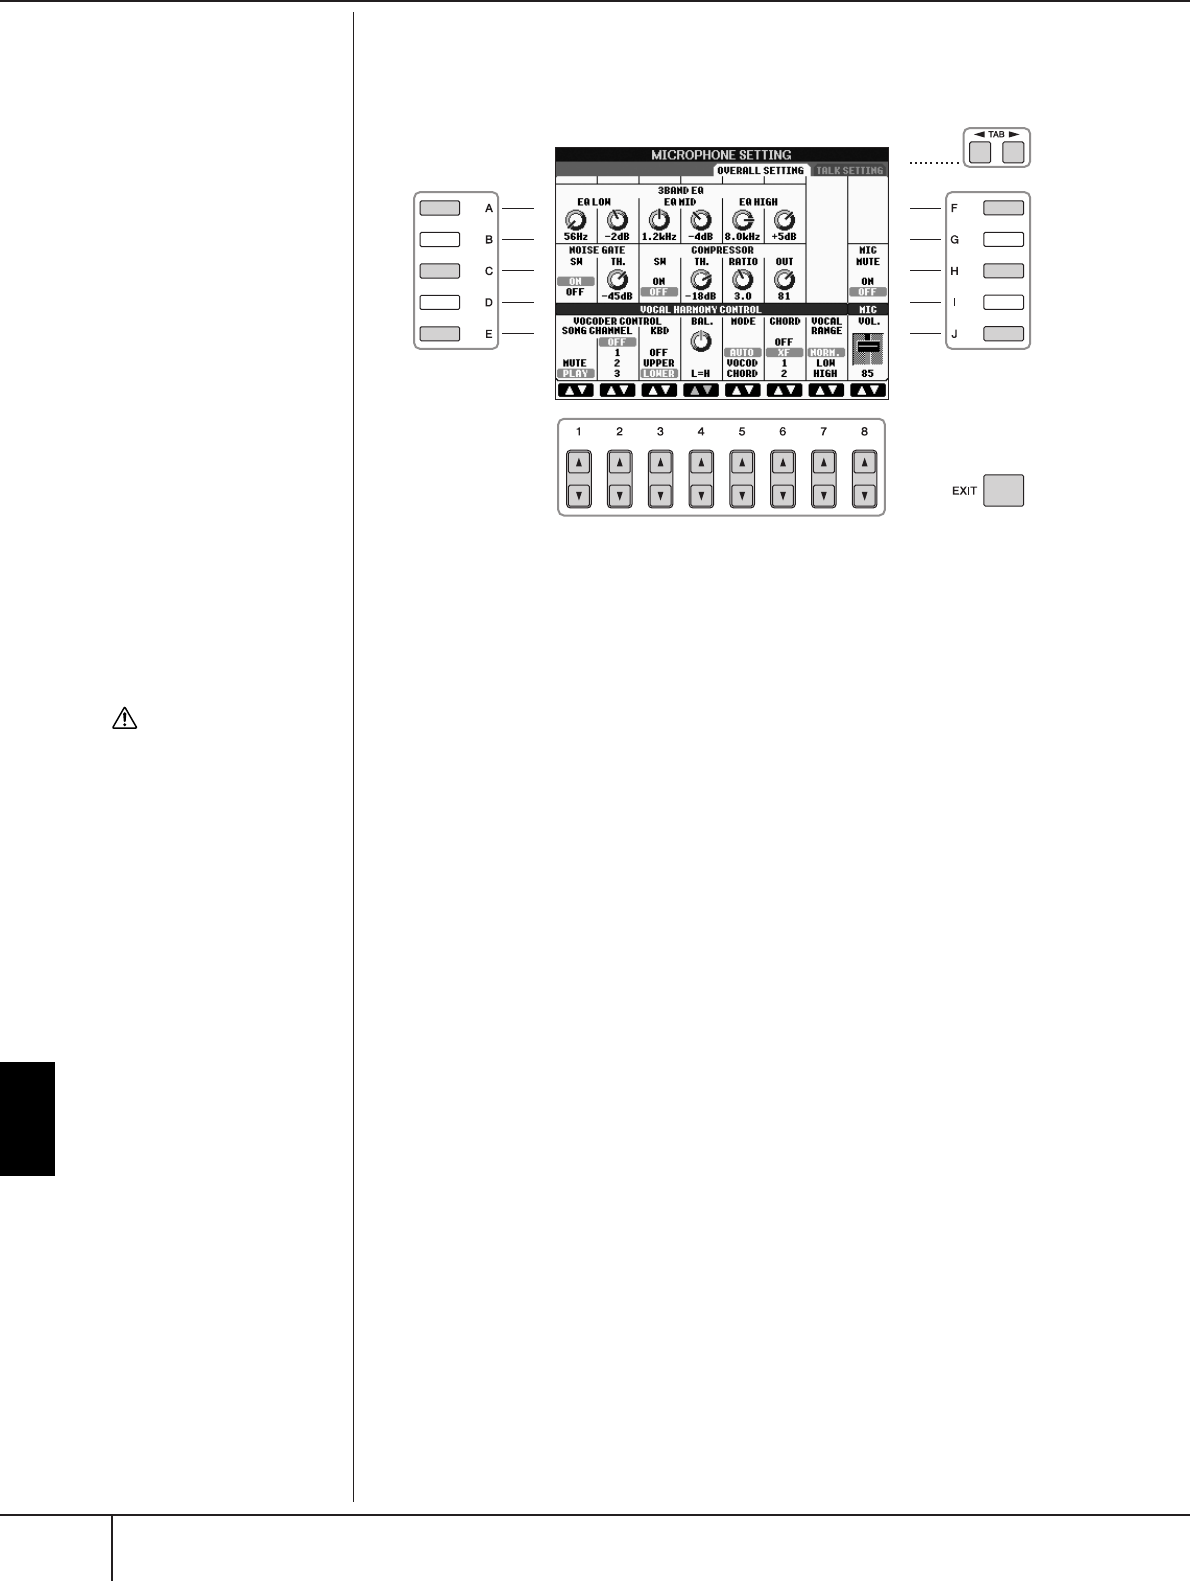
Using a Microphone (PSR-S900)
Adjusting the Microphone and Harmony Sound
PSR-S900/S700 Owner’s Manual
188
3Press the TAB [
√
][
®
] buttons to select the OVERALL SETTING tab dis-
play.
4Use the [A]–[J] buttons to select the item (parameter) (see below) to
be adjusted.
5Use the [1
ππ
ππ††
††
]–[8
ππ
ππ††
††
] buttons to set the value.
6Press the [EXIT] button to exit from the MICROPHONE SETTING dis-
play.
Adjustable Items (Parameters) in the OVERALL SETTING Tab
Display
■3BAND EQ
EQ (Equalizer) is a processor that divides the frequency spectrum into multiple
bands, which can be boosted or cut as required to tailor the overall frequency
response. The instrument features a high-grade three-band (LOW, MID and HIGH)
digital equalizer function for the microphone sound.
•Hz
Adjusts the center frequency of the corresponding band.
•dB
Boosts or cuts the level of the corresponding band by up to 12 dB.
■NOISE GATE
This effect mutes the input signal when the input from the microphone falls below
a specified level. This effectively cuts off extraneous noise, allowing the desired sig-
nal (vocal, etc.) to pass.
• SW (Switch)
This turns the Noise Gate on or off.
• TH. (Threshold)
This adjusts the input level at which the gate begins to open.
5
44
6
3
CAUTION
Settings in the OVERALL SET-
TING tab display are automat-
ically saved to the instrument
when you exit from the dis-
play. However, if you turn the
power off without exiting
from this display, the settings
will be lost.
Using a Microphone (PSR-S900)
Adjusting the Microphone and Harmony Sound
PSR-S900/S700 Owner’s Manual 189
■COMPRESSOR
This effect holds down the output when the input signal from the microphone
exceeds a specified level. This is especially useful for smoothing out vocals that
have widely varying dynamics. It effectively “compresses” the signal, making soft
parts louder and loud parts softer.
• SW (Switch)
This turns the Compressor on or off.
• TH. (Threshold)
This adjusts the input level at which compression begins to be applied.
•RATIO
This adjusts the compression ratio.
• OUT
This adjusts the final output level.
■VOCAL HARMONY CONTROL
The following parameters determine how the harmony is controlled.
• VOCODER CONTROL
The Vocal Harmony effect in Vocoder mode (page 190) is controlled by note
data—the notes you play on the keyboard and/or the notes of the song data. This
parameter lets you determine which notes are used to control the harmony.
• BAL.
This lets you set the balance between the lead vocal (your own voice) and Vocal
Harmony. Raising this value increases the volume of the Vocal Harmony and
decreases that of the lead vocal.
When this is set to L<H63 (L: Lead Vocal, H: Vocal Harmony), only the Vocal
Harmony is output; when it is set to L63>H, only the lead vocal is output.
SONG CHANNEL MUTE/PLAY
When set to “MUTE,” the channel selected below (to control
Harmony) is muted (turned off) during song playback.
OFF/Channels 1–16
When set to “OFF,” song data control over harmony is turned
off. When set to one of the values 1–16, note data (played
from a song on the PSR-S900 or an external MIDI sequencer)
contained on the corresponding channel is used to control the
harmony. This setting is linked to the HARMONY CH setting in
the SONG SETTING display (page 145).
KEYBOARD OFF
Keyboard control over harmony is turned off.
UPPER
Notes played to the right of the split point control the har-
mony.
LOWER
Notes played to the left of the split point control the harmony.
Using a Microphone (PSR-S900)
Adjusting the Microphone and Harmony Sound
PSR-S900/S700 Owner’s Manual
190
• MODE
All of the Vocal Harmony types fall into one of three modes, which produce har-
mony in different ways. The harmony effect is dependent on the selected Vocal
Harmony mode, and this parameter determines how the harmony is applied to
your voice. The three modes are described below.
• CHORD
The following parameters determine which data in a recorded song is used for
chord detection.
• VOCAL RANGE
Set this to obtain the most natural vocal harmony, depending on your voice.
■MIC
The following parameters determine how the microphone sound is controlled.
• MUTE
When set to ON, the microphone sound is turned off.
• VOLUME
Adjusts the output volume of the microphone sound.
AUTO When the [ACMP] or [LEFT] is set to ON and if chord data exists
in the song, the mode is automatically set to CHORDAL. In all
other cases, the mode is set to VOCODER.
VOCODER The harmony notes are determined by the notes you play on the
keyboard and/or song data. You can specify whether the Vocoder
effect is controlled by your keyboard performance or by the Song
data (page 189).
CHORDAL The harmony notes are determined by the following three types
of chord: chords played in the chord section of the keyboard
(with the [ACMP] turned on), chords played in the LEFT Voice
section of the keyboard (with the [ACMP] turned off and the
[LEFT] turned on), and chords contained in song data for control-
ling the harmony. (Not available if the song does not contain any
chord data.)
OFF Chords are not detected from the song data.
XF Chords of XF format are used for the Vocal Harmony.
1–16 Chords are detected from note data in the specified song chan-
nel.
Normal Normal setting
Low Setting for lower voice. This setting is also appropriate for growl-
ing and shouting.
High Setting for higher voice. This setting is also appropriate for sing-
ing close to the microphone.
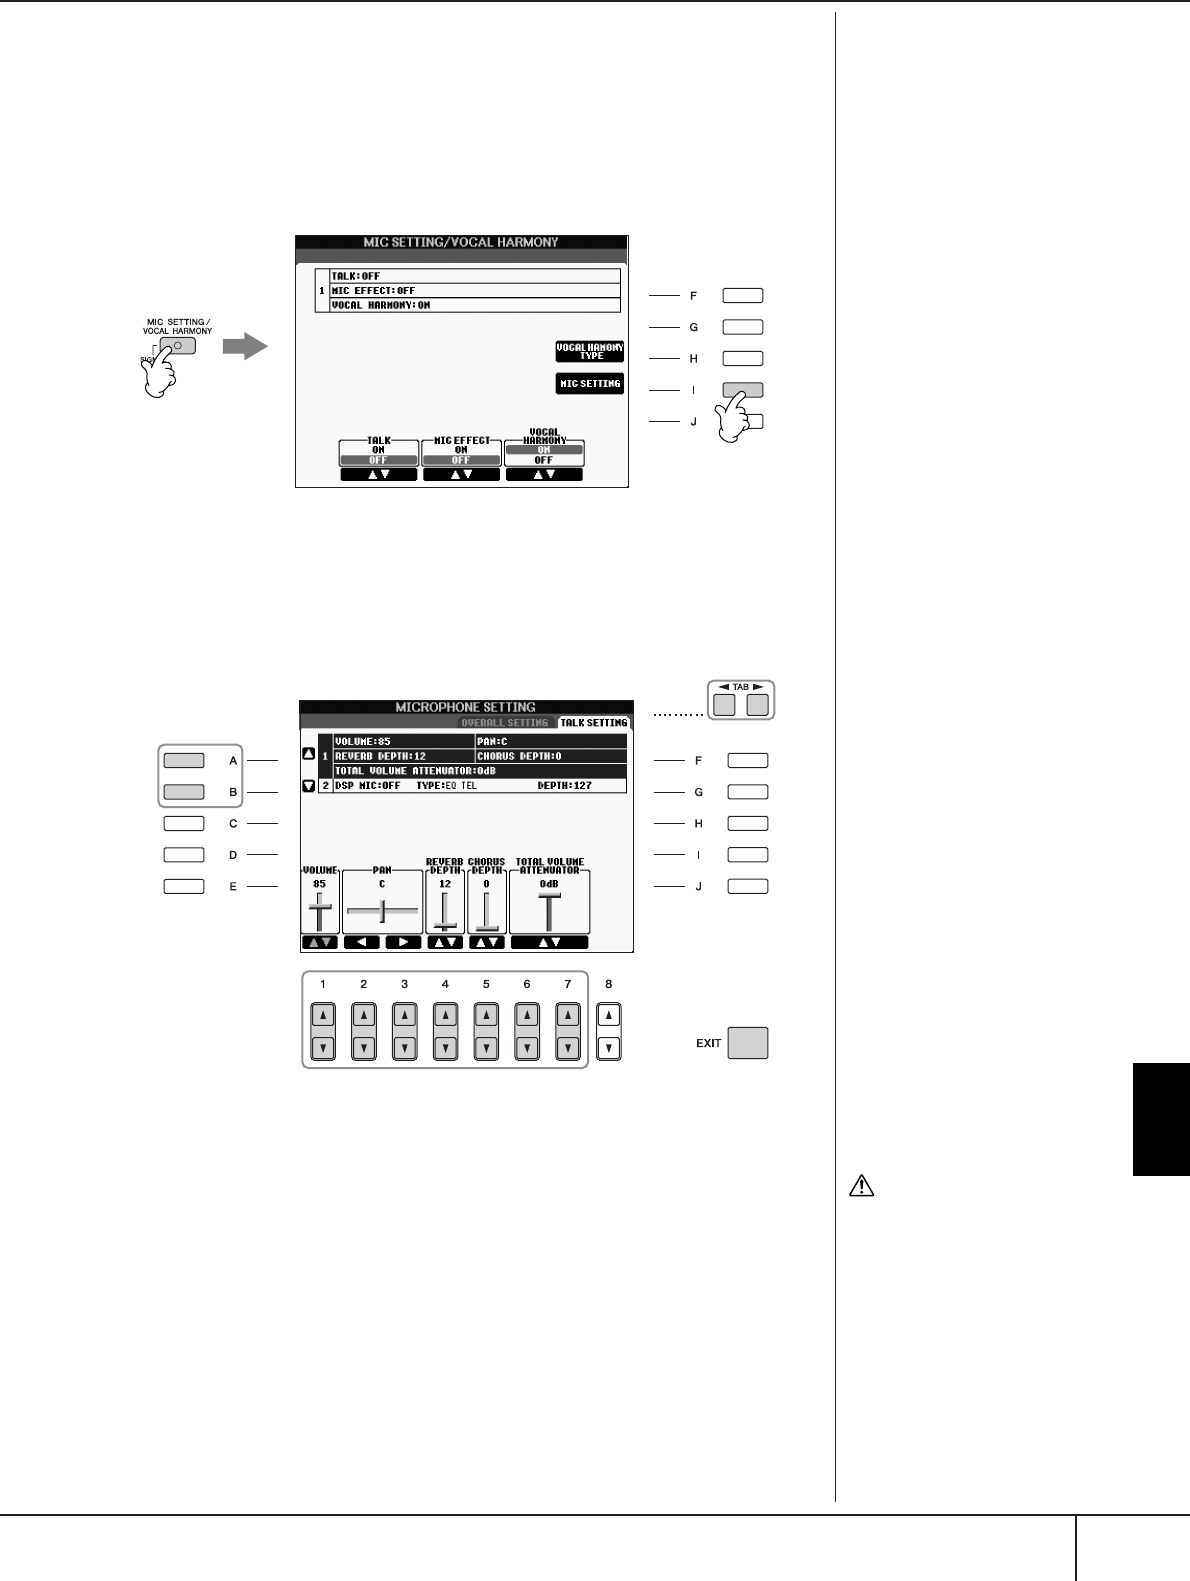
Using a Microphone (PSR-S900)
Talk Setting
PSR-S900/S700 Owner’s Manual 191
Talk Setting
This function lets you have special settings for making announcements between
songs, separate from the settings for your singing performance.
1Press the [MIC SETTING/VOCAL HARMONY] button to call up the
MIC SETTING/VOCAL HARMONY display.
2Press the [I] (MIC SETTING) button to call up the MICROPHONE SET-
TING display.
3Press the TAB [
√
][
®
] buttons to select the TALK SETTING tab display.
4Use the [A]/[B] buttons to select the item (parameter) (page 192) to
be set.
5Use the [1
ππ
ππ††
††
]–[7
ππ
ππ††
††
] buttons to set the value.
6Press the [EXIT] button to exit from the MICROPHONE SETTING dis-
play.
2
1
5
4
6
3
CAUTION
Settings in the TALK SETTING
tab display are automatically
saved to the instrument when
y
ou exit from the display.
However, if you turn the
power off without exiting
from this display, the settings
will be lost.
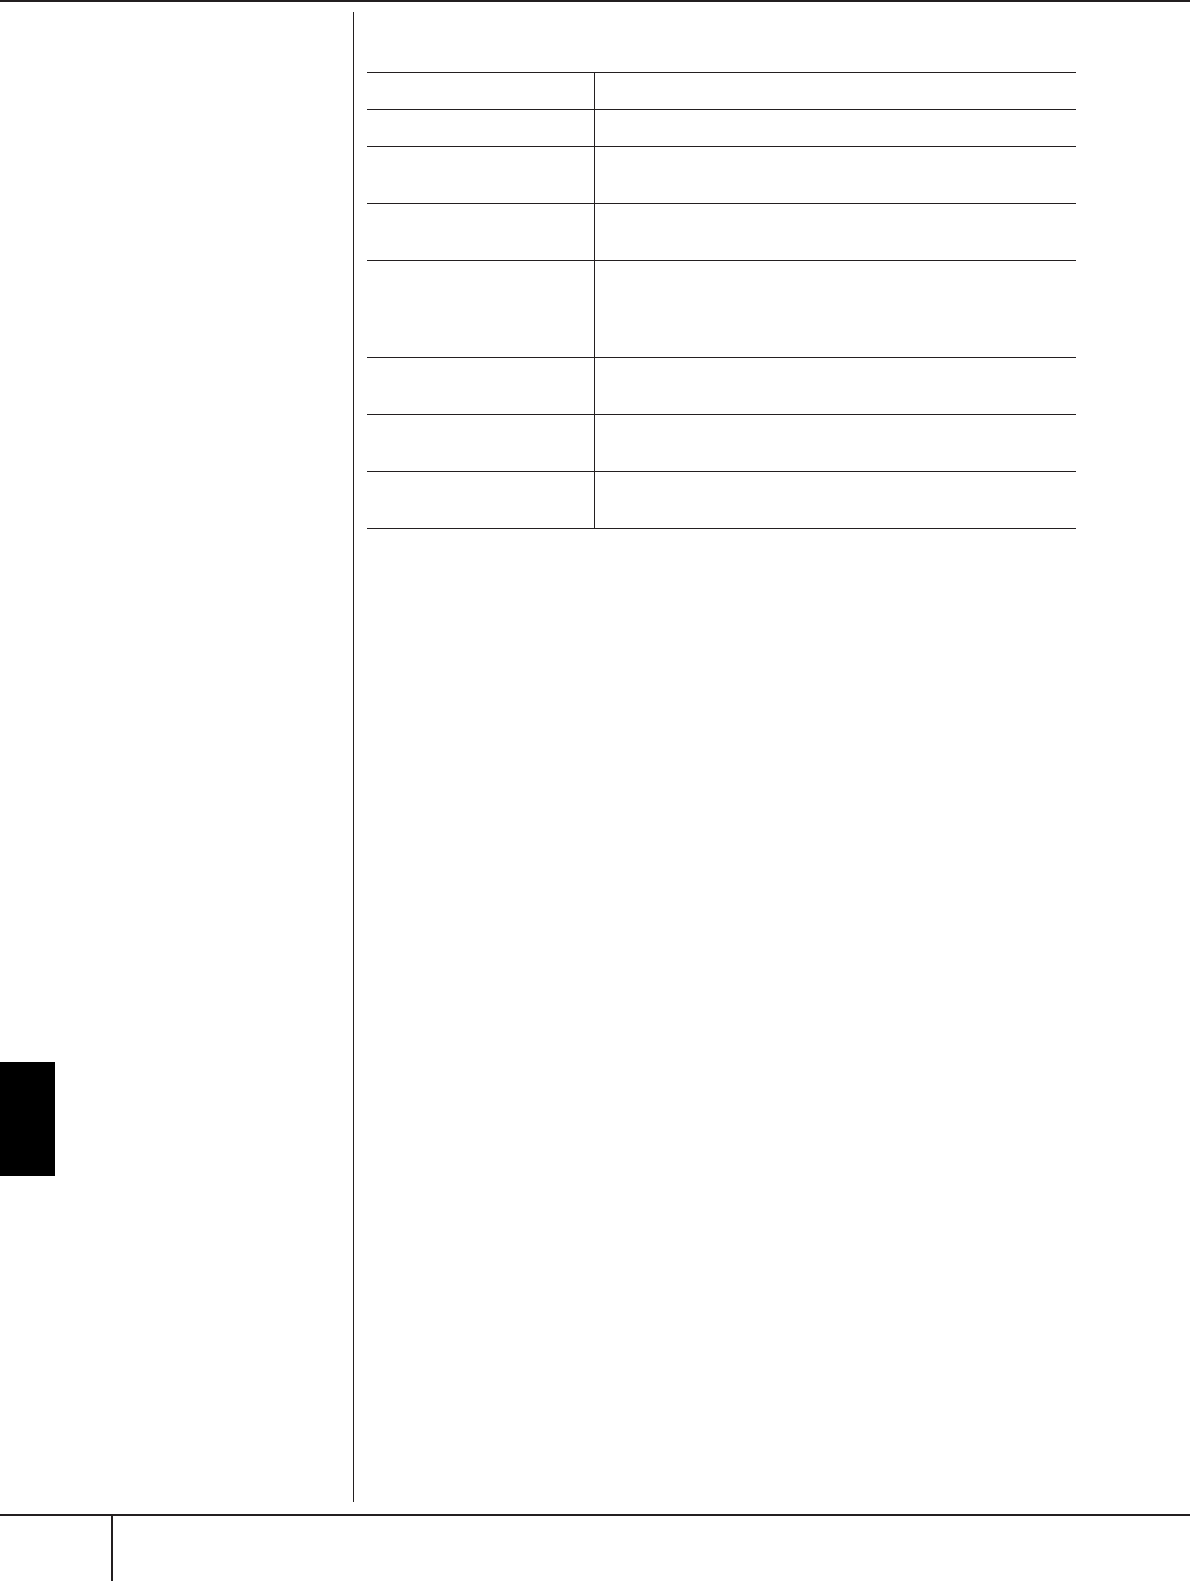
Using a Microphone (PSR-S900)
Talk Setting
PSR-S900/S700 Owner’s Manual
192
Adjustable Items (Parameters) in the TALK SETTING Tab Display
VOLUME This determines the output volume of the microphone sound.
PAN This sets the stereo pan position of the microphone sound.
REVERB DEPTH This sets the depth of the reverb effects applied to the micro-
phone sound.
CHORUS DEPTH This sets the depth of the chorus effects applied to the micro-
phone sound.
TOTAL VOLUME
ATTENUATOR
This determines the amount of attenuation to be applied to the
overall sound (excepting the microphone input)—allowing you
to effectively adjust the balance between your voice and the
overall instrument sound.
DSP MIC ON/OFF This turns the DSP effect applied to the microphone sound ON
or OFF.
DSP MIC TYPE This selects the type of DSP effect to be applied to the micro-
phone sound.
DSP MIC DEPTH This sets the depth of the DSP effect applied to the microphone
sound.
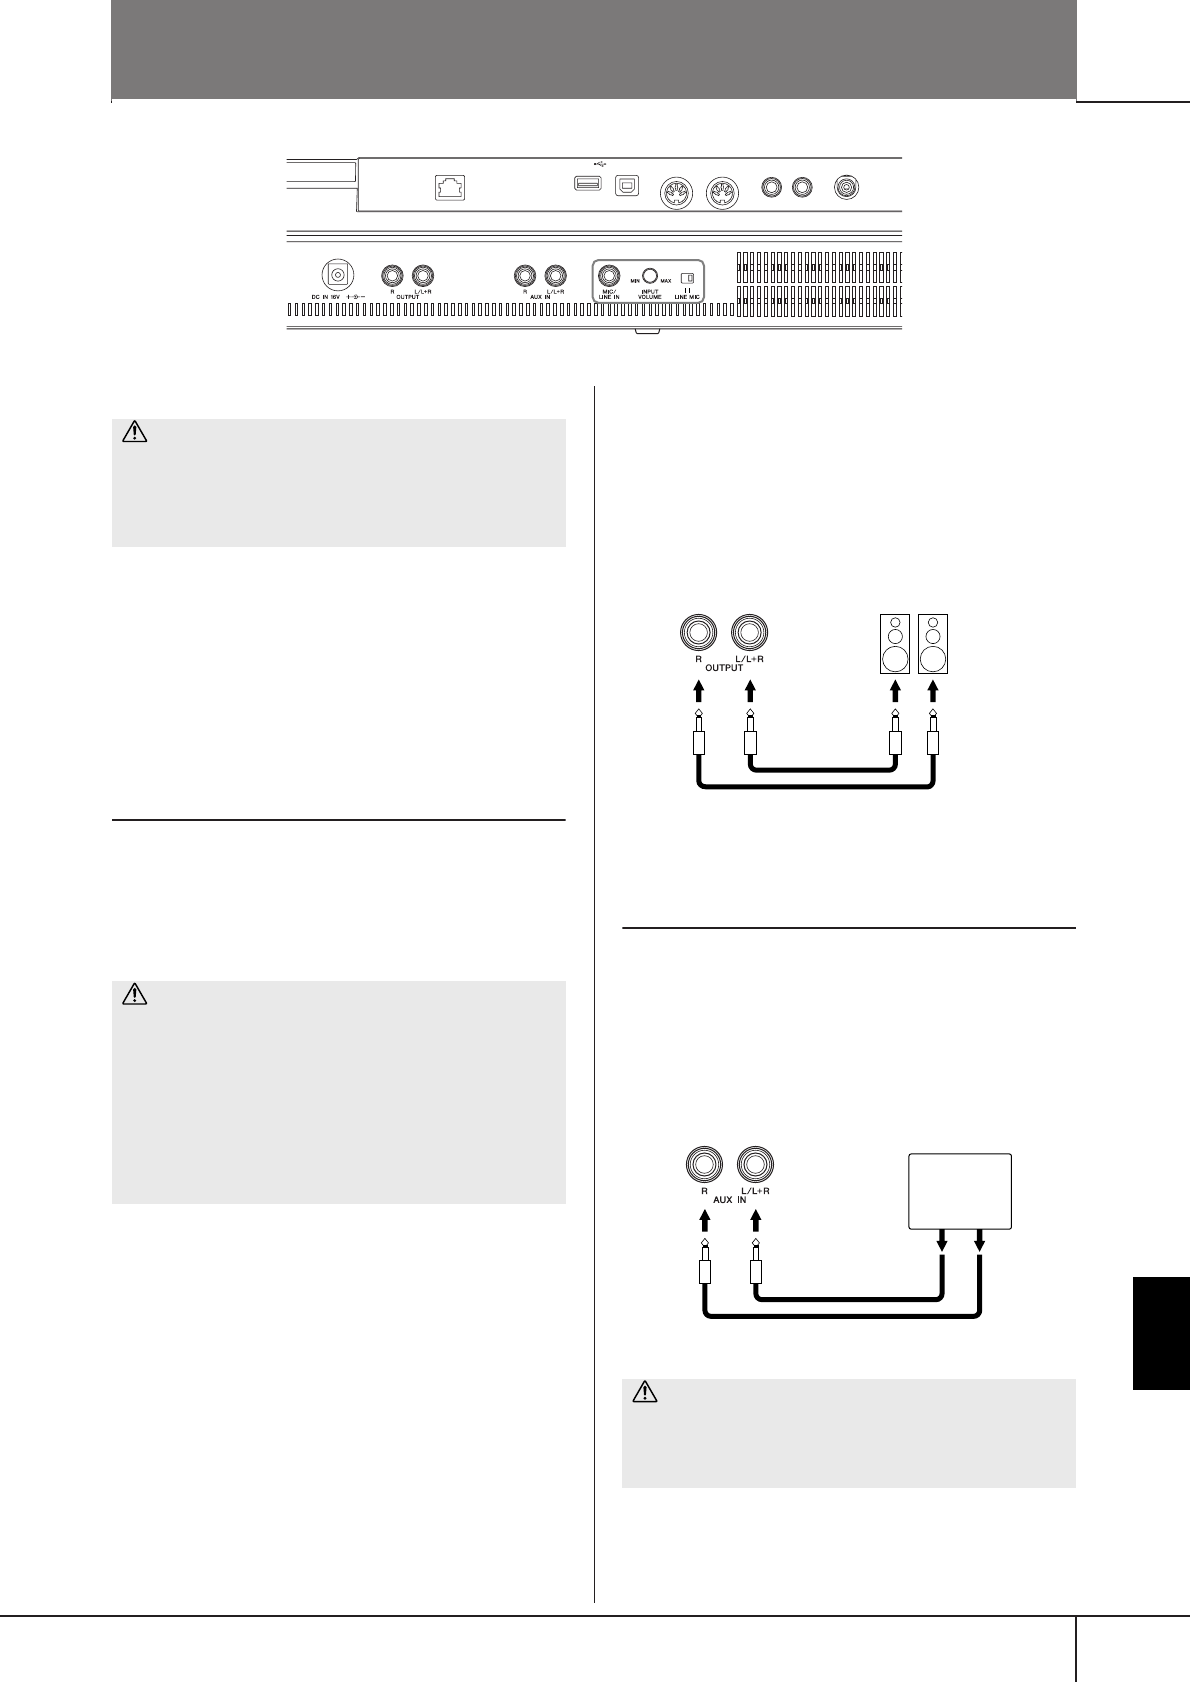
PSR-S900/S700 Owner’s Manual 193
Using Your Instrument with
Other Devices
Using Your Instrument with Other Devices
Connecting Audio & Video
Devices
n
Use audio cables and adaptor plugs having no (zero) resistance.
Using External Audio Devices for Play-
back (1 [OUTPUT] jacks)
You can connect these jacks to a stereo system to
amplify the instrument’s sound. The microphone or gui-
tar sound connected to the instrument’s [MIC/LINE IN]
jack is output at the same time. Use audio cables for
connection as shown in the diagrams. These jacks are
located on the underside jacks panel of the instrument.
When these are connected, you can use the instrument’s
[MASTER VOLUME] control to adjust the volume of the
sound output to the external device. Connect the instru-
ment’s OUTPUT [L/L+R]/[R] jacks (standard phone
jacks) and the input jacks of a pair of powered speakers
using appropriate audio cables. Use only the [L/L+R]
jack for connection with a monaural device.
Playing External Audio Devices with the
Built-in Speakers (2 [AUX IN] jacks)
The stereo outputs from another instrument can be con-
nected to these jacks, allowing the sound of an external
instrument to be reproduced via the instrument’s speak-
ers. Connect the output jacks (LINE OUT etc.) of an
external synthesizer or the tone generator module and
the instrument’s AUX IN [L/L+R]/[R] jacks using appro-
priate audio cables.
n
•Use only the [L/L+R] jack for connection with a monaural device.
•The instrument’s [MASTER VOLUME] setting affects the input
signal from the [AUX IN] jacks.
LAN USB
TO DEVICE TO HOST
MIDI FOOT PEDAL
IN OUT 12
VIDEO OUT
124
356789
P. 199
P. 193
P. 198 P. 194 P. 194
P. 193 P. 194
P. 200 P. 198
CAUTION
Before connecting the instrument to other electronic
components, turn off the power of all the components.
Also, before turning any components on or off, make sure
to set all volume levels to minimum (0). Otherwise, elec-
trical shock or damage to the components may occur.
CAUTION
• When the instrument’s sound is output to an external
device, first turn on the power to the instrument, then
to the external device. Reverse this order when you turn
the power off.
•Do not route the output from the [OUTPUT] jacks to the
[AUX IN] jacks. If you make this connection, the signal
input at the [AUX IN] jacks is output from the [OUTPUT]
jacks. These connections could result in a feedback loop
that will make normal performance impossible, and
may even damage both pieces of equipment.
CAUTION
When the sound of an external device is output to the
instrument, first turn on the power to the external device,
then to the instrument. Reverse this order when you turn
the power off.
Instrument Powered speakers
Input jack
Phone plug
(standard)
Phone plug
(standard)
Audio cable
Instrument
Synthesizer
Tone generator
Phone plug
(standard)
Audio cable
Pin plug
LINE OUT
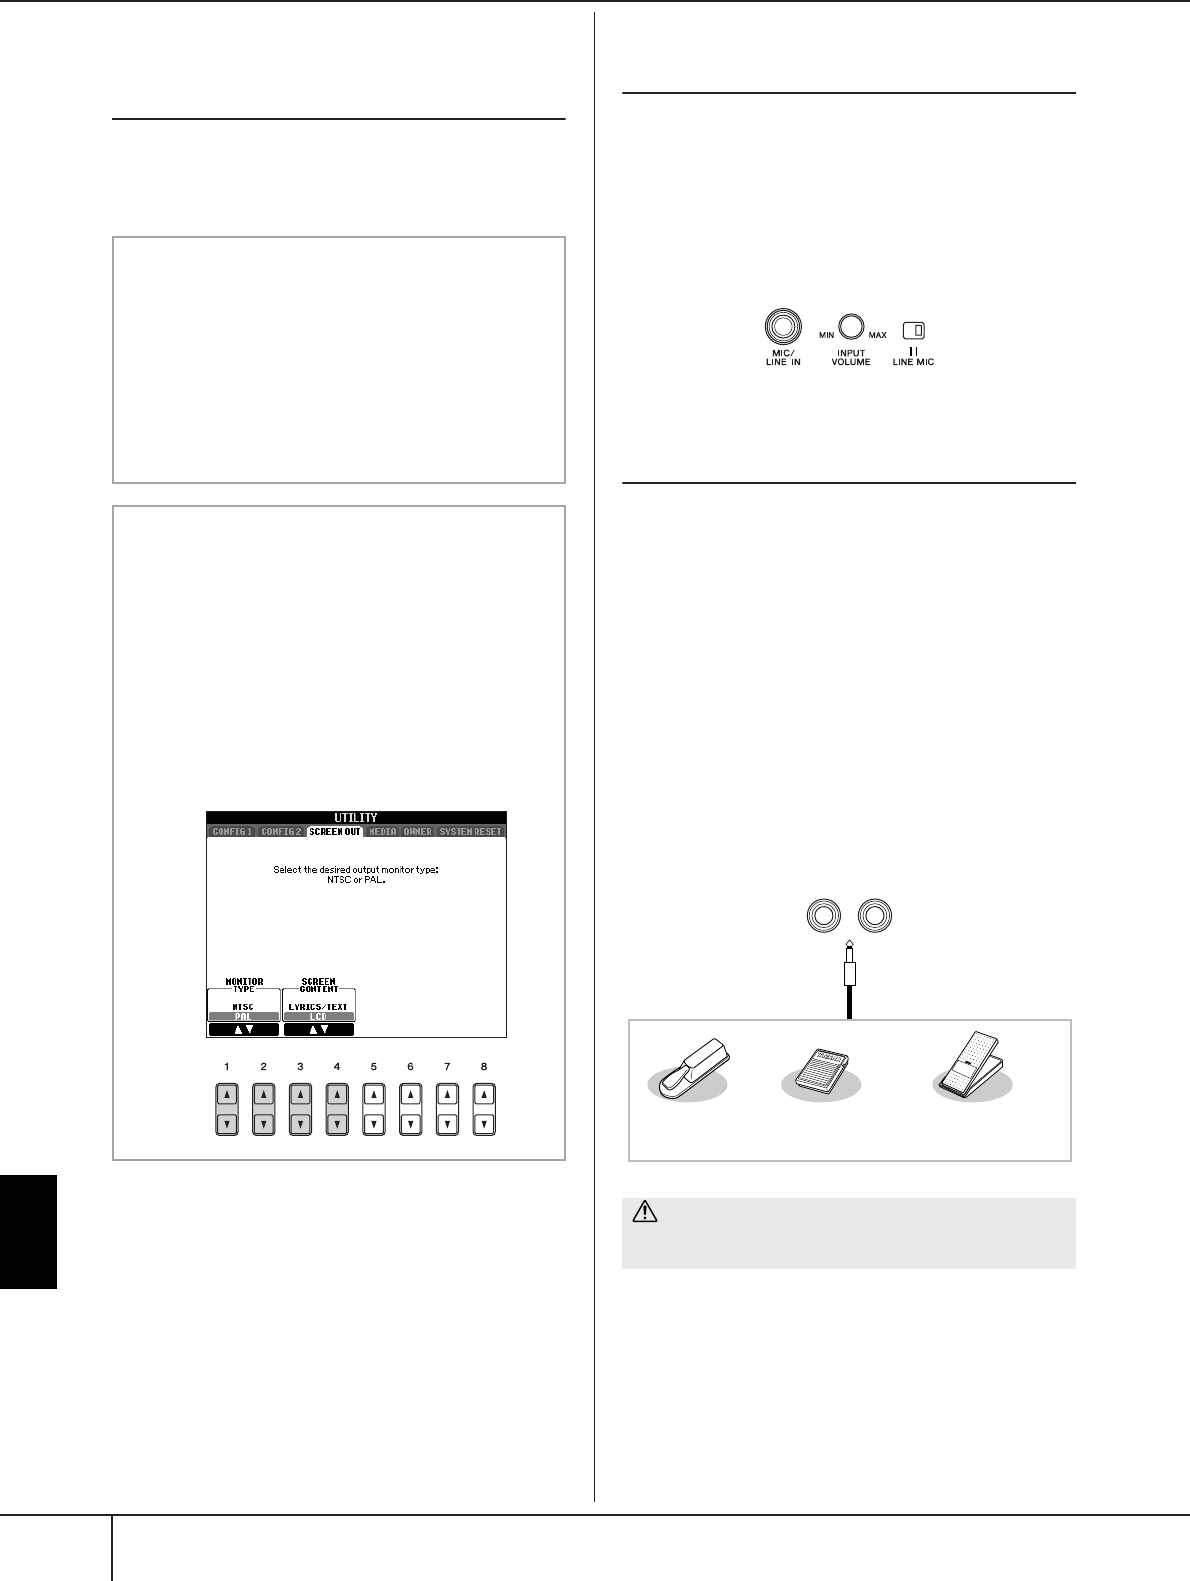
Using Your Instrument with
Other Devices
PSR-S900/S700 Owner’s Manual
194
Showing the Instrument’s Display Con-
tents on a Separate TV Monitor
(3 [VIDEO OUT] terminal) (PSR-S900)
Connect the instrument to an external TV monitor, and
you can have the current display contents, lyrics (for
group sing-alongs and the like, or text files) displayed
on the TV. For instructions on connecting, see page 59.
Connecting a Microphone or Guitar
(4 [MIC/LINE IN] Jack) (PSR-S900)
By connecting a microphone to the [MIC/LINE IN] jack
(standard 1/4" phone jack), you can enjoy singing along
with Song playback (KARAOKE) or with your own per-
formance. The instrument outputs your vocals or guitar
sounds through the built-in speakers. For instructions on
connecting, see page 57. Please note that when con-
necting devices of high output level, make sure to set
the [LINE MIC] switch to “LINE.”
Using the Footswitch or Foot Controller
(5 [FOOT PEDAL 1/2] jacks)
Two FOOT PEDAL jacks can be used via the following
functions at the initial default setting (factory setting).
• FOOT PEDAL 1 jack
Plug an optional Yamaha FC4 or FC5 footswitch into
this jack and use it to switch sustain on and off. The
footswitch functions like the damper pedal on a piano
— press for sustain, release for normal sound.
• FOOT PEDAL 2 jack
(PSR-S900) Plug an optional Yamaha Footswitch FC4 or
FC5 into this jack and use it to control the Super Articu-
lation Voices (page 83).
(PSR-S700) Plug an optional Yamaha FC7 foot controller
into this jack and use it to change the volume as you
play the instrument (expression function).
n
• Set the NTSC or PAL to correspond to the standard used by
your video equipment.
•When LYRICS/TEXT is selected as the contents of the Screen
Out signal, only the lyrics of the song or text files are output
via VIDEO OUT, regardless of the display that is called up
on the instrument.
•Avoid looking at the television or video monitor for pro-
longed periods of time since doing so could damage your
eyesight. Take frequent breaks and focus your eyes on dis-
tant objects to avoid eyestrain.
Video out settings
1Call up the operation display.
[FUNCTION] → [J] (UTILITY) → TAB [
√
][
®
]
SCREEN OUT
2Select the video equipment standard “NTSC”
or “PAL” by using the [1
ππ
ππ††
††
]/[2
ππ
ππ††
††
] but-
tons. Select the contents of the Video Out
signal—the current display contents (LCD)
or lyrics/text (LYRICS/TEXT)—by using the
[3
ππ
ππ††
††
]/[4
ππ
ππ††
††
] buttons.
CAUTION
Make sure to connect or disconnect the pedal only when
the power is off.
FOOT PEDAL
12
Foot Pedals
Footswitch FC4
(optional)
Footswitch FC5
(optional)
Foot Controller FC7
(optional)
Connecting Audio & Video Devices
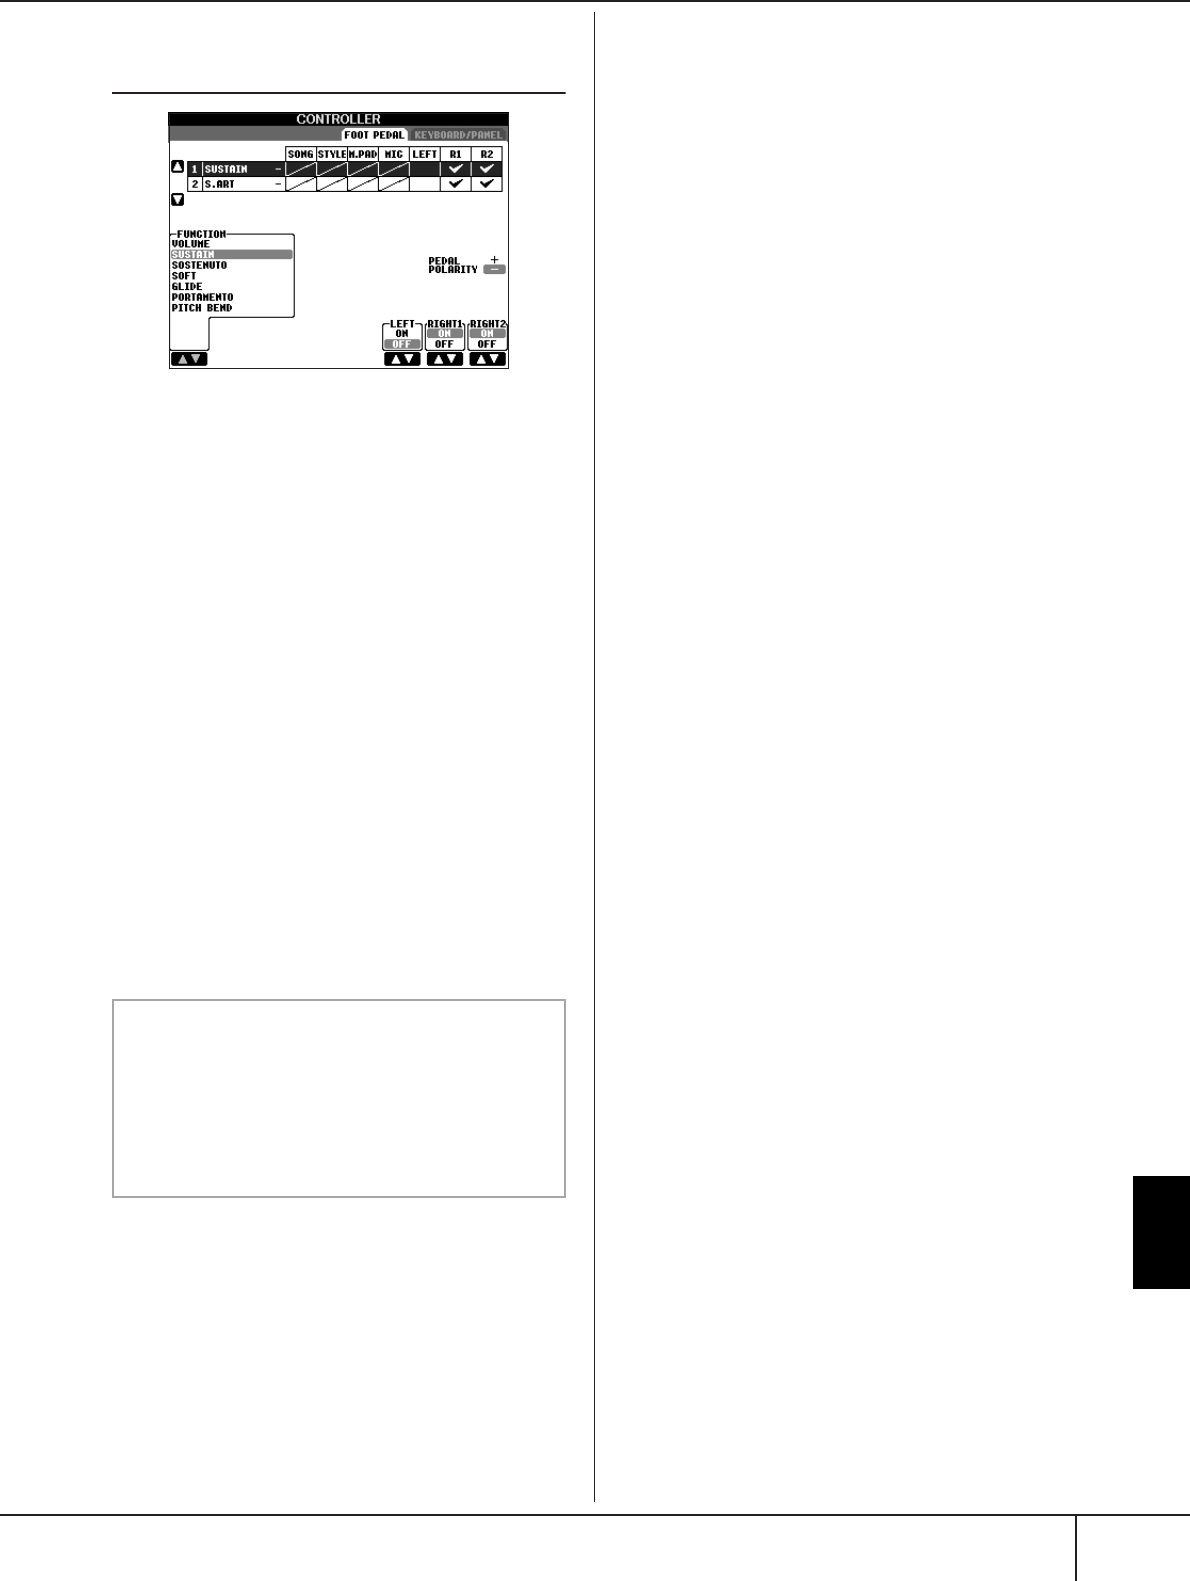
Using Your Instrument with
Other Devices
PSR-S900/S700 Owner’s Manual 195
Assigning Specific Functions to Each
Foot Pedal
The functions assigned by default to the connected foot-
switch or foot controller can be changed—for example,
letting you use the footswitch to start/stop Style play-
back, or use the foot controller to produce pitch bends.
1Call up the operation display.
[FUNCTION] → [D] CONTROLLER → TAB [
√
][
®
]
FOOT PEDAL
2Use the [A]/[B] buttons to select one of the two
foot pedals to which the function is to be
assigned.
3Use the [1
ππ
ππ††
††
] button to select the functions to
be assigned to the pedal specified in step 2.
Details on the pedal functions are listed below.
4Use the [2
ππ
ππ††
††
]–[8
ππ
ππ††
††
] buttons to set the
details of the selected functions.
The available parameters differ depending on the
function selected in step 3. Details on the parameters
are given on page 196.
5Check that the desired function is controllable
with the pedal by actually pressing the pedal.
nWhen you use the pedals to switch Registration Memory
settings (page 138), these settings are invalid.
Set the polarity of the pedal
Pedal on/off operation may differ depending on the partic-
ular pedal you’ve connected to the instrument. For exam-
ple, pressing down on one pedal may turn the selected
function on, while pressing a different make/brand of
pedal may turn the function off. If necessary, use this set-
ting to reverse the control. Press the [I] (PEDAL POLAR-
ITY) button to switch the polarity.
Using the Footswitch or Foot Controller ([AUX PEDAL] jack)

Using Your Instrument with
Other Devices
PSR-S900/S700 Owner’s Manual
196
Details on the pedal functions are listed here. For functions indicated with “*“, use only the foot controller; proper
operation cannot be done with a footswitch.
Assignable Pedal Functions
VOLUME* Allows you to use a foot controller to control the volume.
SUSTAIN Allows you to use a pedal to control the sustain. When you press and hold the pedal,
all notes played on the keyboard have a longer sustain. Releasing the pedal immedi-
ately stops (damps) any sustained notes.
SOSTENUTO Allows you to use a pedal to control the Sostenuto effect. If you play a note or chord on
the keyboard and press the pedal while holding the note(s), the notes will sustain as
long as the pedal is held. However, all subsequent notes will not sustain. This makes it
possible to sustain a chord, for example, while other notes are played staccato.
SOFT Allows you to use a pedal to control the Soft effect. Pressing this pedal reduces the vol-
ume and changes the timbre of the notes you play. This is effective only for certain
appropriate Voices.
GLIDE When the pedal is pressed, the pitch changes, and then returns to normal pitch when
the pedal is released.
PORTAMENTO The portamento effect (a smooth slide between notes) can be produced while the pedal
is pressed. Portamento is produced when notes are played legato style (i.e., a note is
played while the preceding note is still held). Portamento Time can also be adjusted
from the Mixing Console (page 93).
PITCH BEND* Allows you to bend the pitch of notes up or down by using the pedal.
MODULATION* Applies a vibrato effect to notes played on the keyboard. Moreover, various effects can
be added to the S. Articulation Voice (PSR-S900) (page 83). The effect becomes deeper
when pressing down the foot controller. You can turn this function on/off for each key-
board part on this display.
S.ARTICULATION (PSR-S900) When you use a S. Articulation voice that has an effect assigned to the pedal/
footswitch, you can enable the effect by pressing the pedal/footswitch. You can turn this
function on/off for each keyboard part on this display.
DSP VARIATION Switches Voice Effect DSP VARIATION on and off.
HARMONY/ECHO Switches the HARMONY/ECHO Voice Effect on and off.
VOCAL HARMONY (PSR-S900) Switches the Vocal Harmony function on and off.
TALK (PSR-S900) Switches the MIC SETTING Talk function on and off.
SCORE PAGE+ While the song is stopped, you can turn to the next score page.
SCORE PAGE– While the song is stopped, you can turn to the previous score page.
LYRICS PAGE+ While the song is stopped, you can turn to the next lyrics page.
LYRICS PAGE– While the song is stopped, you can return to the last lyrics page.
TEXT PAGE+ (PSR-S900) You can turn to the next text page.
TEXT PAGE– (PSR-S900) You can return to the last text page.
SONG PLAY/PAUSE Same as the SONG [F/K] (PLAY/PAUSE) button.
STYLE START/STOP Same as the STYLE CONTROL [START/STOP] button.
TAP TEMPO Same as the [TAP TEMPO] button.
SYNCHRO START Same as the [SYNC START] button.
SYNCHRO STOP Same as the [SYNC STOP] button.
INTRO1–3 Same as the [INTRO I-III] buttons.
MAIN A–D Same as the [MAIN VARIATION A-D] buttons.
FILL DOWN Plays a fill-in, which is automatically followed by the Main section of the button on the
immediate left.
FILL SELF Plays a fill-in.
FILL BREAK Plays a break.
Using the Footswitch or Foot Controller ([FOOT PEDAL] jack)
Using Your Instrument with
Other Devices
PSR-S900/S700 Owner’s Manual 197
n
The Sostenuto and Portamento functions will not affect the Organ Flute Voices, even if they have been assigned to the Foot Pedals.
Adjustable Parameters for Each Function
The parameters below correspond to buttons [2
π†
]–[8
π†
], and their availability depends on the selected control
type. For example, if SUSTAIN is selected as the type, the parameters “RIGHT 1,” “RIGHT 2” and “LEFT” automatically
appear in the display.
FILL UP Plays a fill-in, which is automatically followed by the Main section of the button on the
immediate right.
ENDING1–3 Same as the [ENDING/rit. I-III] buttons.
FADE IN/OUT Same as the [FADE IN/OUT] button.
FINGERED/FING ON BASS The pedal alternately switches between the Fingered and On Bass modes (page 106).
BASS HOLD While the pedal is pressed, the Accompaniment Style bass note will be held even if the
chord is changed during Style playback. If the fingering is set to “AI FULL KEYBOARD,”
the function does not work.
PERCUSSION The pedal plays a percussion instrument selected by the [4
π†
]–[8
π†
] buttons. You
can use the keyboard to select the desired percussion instrument.
RIGHT1 ON/OFF Same as the PART ON/OFF [RIGHT 1] button.
RIGHT2 ON/OFF Same as the PART ON/OFF [RIGHT 2] button.
LEFT ON/OFF Same as the PART ON/OFF [LEFT] button.
OTS+ Calls up the next One Touch Setting.
OTS– Calls up the previous One Touch Setting.
SONG, STYLE, MIC*, M.PAD, LEFT,
RIGHT1, RIGHT2
These specify the part(s) that will be affected by the pedal.
* Available only on the PSR-S900.
UP/DOWN When GLIDE or PITCH BEND is selected, this determines whether the pitch change is
raised or lowered.
RANGE When GLIDE or PITCH BEND is selected, this determines the range of the pitch
change, in semitones. Linked to the Mixing Console → Pitch Bend Range (page 93) set-
ting.
ON SPEED When GLIDE is selected, this determines the speed of the pitch change, when the pedal
is pressed.
OFF SPEED When GLIDE is selected, this determines the speed of the pitch change, when the pedal
is released.
KIT When PERCUSSION is assigned to the pedal, all available drum kits are shown here,
letting you select the particular drum kit used for the pedal.
PERCUSSION When PERCUSSION is assigned to the pedal, all sounds of the selected drum kit (in KIT
above) are shown here. This determines the particular instrument sound assigned to the
pedal.
Using the Footswitch or Foot Controller ([AUX PEDAL] jack)
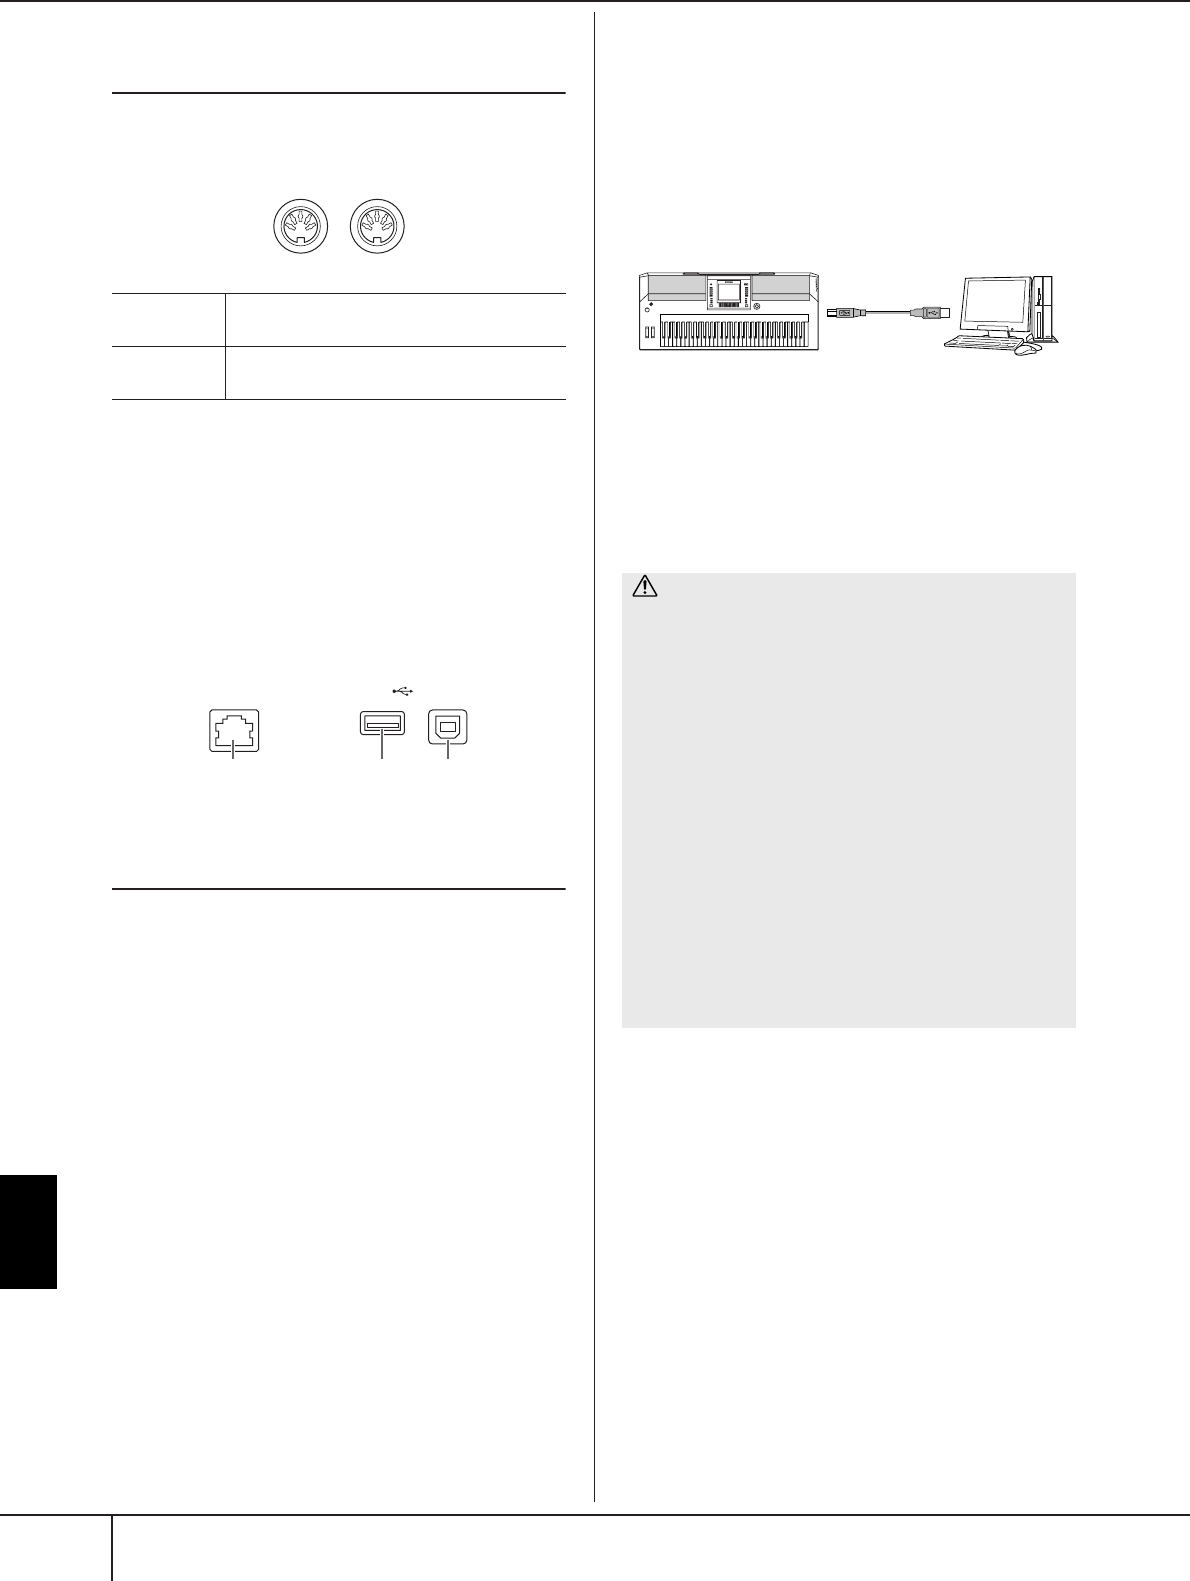
Using Your Instrument with
Other Devices
PSR-S900/S700 Owner’s Manual
198
Connecting External MIDI Devices
(6 [MIDI] terminals)
Use the built-in [MIDI] terminals and standard MIDI
cables to connect external MIDI devices.
For a general overview of MIDI and how you can effec-
tively use it, refer to the following sections:
•What is MIDI?..............................................page 201
•What You Can Do With MIDI.......................page 203
•MIDI Settings...............................................page 204
Connecting to a computer,
USB device, and the Internet
Connecting a Computer (6 [MIDI] and
7 [USB TO HOST] terminals)
By connecting a computer to the [USB TO HOST] or
[MIDI] terminals, you can transfer data between the
instrument and the computer via MIDI, and take advan-
tage of sophisticated computer music programs. Keep in
mind that you also need to install an appropriate USB-
MIDI driver.
The instructions below explain how to connect and use
the terminals.
n
If you are using a computer that has a USB interface, we recom-
mend that you connect the computer and the instrument by USB,
rather than by MIDI.
n
Driver
A driver is software that provides a data-transfer interface between
the computer’s operating system and a connected hardware
device. You need to install a USB-MIDI driver to connect the com-
puter and the instrument. Refer to the separate Installation Guide
(page 4).
(This explanation is divided into two parts, covering the
two connections: connection to the [USB TO HOST]
terminal and connection to the [MIDI] terminal.)
• Connecting to the [USB TO HOST] terminal
When connecting the instrument to the computer via
USB, use a standard USB cable (having the USB logo)
to connect the [USB TO HOST] terminal on the
instrument to the USB terminal of the computer. Then,
install the USB-MIDI driver.
n
About the [USB TO HOST] and [USB TO DEVICE] terminals
There are two different types of USB terminals on the instrument:
[USB TO HOST] and [USB TO DEVICE]. Take care not to confuse
the two terminals and the corresponding cable connectors.
Be careful to connect the proper plug in the proper direction.
Explanations on the [USB TO DEVICE] terminal follow in the next
section.
n
•The instrument will begin transmission a short time after the
USB connection is made.
• When using a USB cable to connect the instrument to your
computer, make the connection directly without passing
through a USB hub.
•For information on setting up your sequence software, refer to
the owner’s manual of the relevant software.
MIDI IN Receives MIDI messages from an external
MIDI device.
MIDI OUT Transmits MIDI messages generated by the
instrument.
MIDI
IN OUT
LAN USB
TO DEVICE TO HOST
789
CAUTION
Precautions when using the [USB TO HOST] terminal
When connecting the computer to the [USB TO HOST] termi-
nal, make sure to observe the following points. Failing to do so
risks freezing the computer and corrupting or losing data. If the
computer or the instrument freezes, turn the power to the
instrument off and restart the computer.
• Before connecting the computer to the [USB TO HOST] ter-
minal, exit from any power-saving mode of the computer
(such as suspended, sleep, standby), and quit any open appli-
cation software, also turns off the power to the instrument.
• Execute the following before turning the power to the instru-
ment off or unplugging the USB cable to/from the instrument/
computer.
- Quit any open application software on the computer.
- Make sure that data is not being transmitted from the
instrument. (Data is transmitted only by playing notes on
the keyboard or playing back a song.)
•While a USB device is connected to the instrument, you
should wait for six seconds or more between these
operations: When turning the power of the instrument
off then on again, or when alternately connecting/dis-
connecting the USB cable.
Instrument
USB cable
Connecting external MIDI devices ([MIDI] terminals)/Connecting a Computer or USB Device

Using Your Instrument with
Other Devices
PSR-S900/S700 Owner’s Manual 199
• Connection by [MIDI] terminals
There are two ways to connect the instrument via
MIDI to a computer. If you have a MIDI interface built
into your computer, connect the MIDI OUT terminal
of the computer interface to the [MIDI IN] terminal of
the instrument, and connect the [MIDI OUT] terminal
of the instrument to the MIDI IN terminal of the inter-
face.
The second connection possibility involves a sepa-
rate, external MIDI interface connected to the com-
puter via a USB port or a serial port (modem or
printer terminal). Using standard MIDI cables, con-
nect the MIDI OUT terminal of the external interface
to the [MIDI IN] terminal of the instrument, and con-
nect the [MIDI OUT] terminal of the instrument to the
MIDI IN terminal of the interface.
n
Make sure to use the appropriate MIDI interface for your com-
puter.
Connecting to a USB-type LAN Adaptor
and USB Storage Device
(8 via the [USB TO DEVICE] terminal)
There are two ways of using the [USB TO DEVICE] ter-
minal.
■By connecting the USB-type LAN adaptor, you can
directly access special Internet websites for down-
loading music data (page 171).
■By connecting the instrument to a USB storage
device with a standard USB cable, you can save data
you’ve created to the connected device, as well as
read data from the connected device.
n
About the [USB TO HOST] and [USB TO DEVICE] terminals
There are two different types of USB terminals on the instrument:
[USB TO HOST] and [USB TO DEVICE]. Take care not to confuse
the two terminals and the corresponding cable connectors.
Be careful to connect the proper plug in the proper direction.
Explanations on the [USB TO HOST] terminal can be found in the
previous section.
Using USB Storage Devices
This type is used to connect the instrument to a USB
storage device, and allows you to save data you’ve cre-
ated to the connected device, as well as read data from
the connected device. The following description gener-
ally explains about how to connect and use them.
Before using a USB storage device, be sure to read
“Handling the USB Storage Device (USB Flash Mem-
ory/Floppy Disk, etc)” on page 23.
1Connect the USB storage device to the [USB TO
DEVICE] terminal with a standard USB cable.
2After that, exit once from the selection display
then return to the display (or press the Tab
switch buttons [
√
] and [
®
] simultaneously from
the selection display). The USB tabs (USB 1, USB
2, etc.) are automatically called up, allowing you
to save files and play back music data from the
devices.
n
Checking remaining memory on the USB storage device
You can check this in the display called up by the following oper-
ation:
[FUNCTION] → [J] UTILITY → TAB [
√
][
®
] MEDIA
Select the device by using the [A]/[B] buttons in this display and
press [F] (PROPERTY).
n
Even with a computer connected to the [USB TO HOST] terminal
and a USB storage device connected to the [USB TO DEVICE] ter-
minal, you cannot access the USB storage device from the com-
puter via the instrument.
Instrument
MIDI cable
[MIDI IN]
terminal
[MIDI OUT]
terminal
Computer with MIDI
interface installed
[MIDI OUT]
terminal
[MIDI IN]
terminal
Instrument
MIDI cable
[MIDI IN]
terminal
[MIDI OUT]
terminal
MIDI interface
Computer
USB port or serial
port (modem or
printer terminal)
Formatting USB storage media
For details, see page 72.
CAUTION
The format operation overwrites any previously existing data.
Proceed with caution.
Connecting a Computer or USB Device
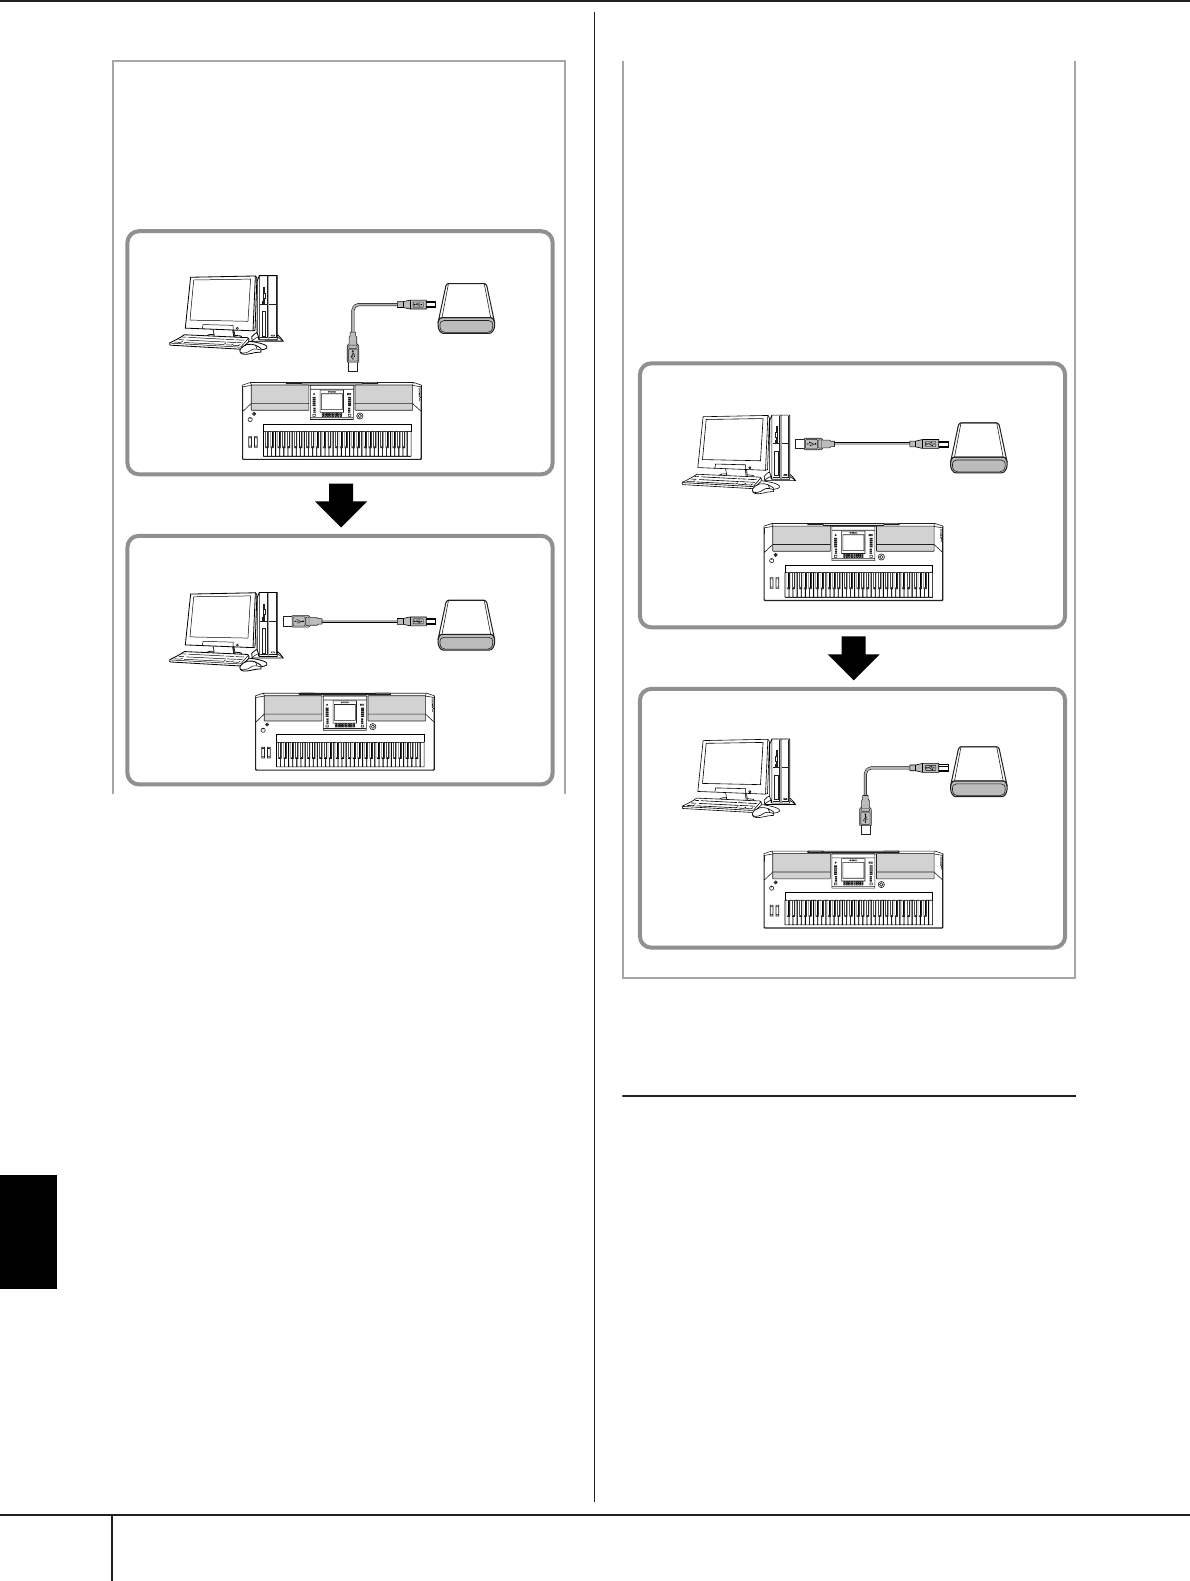
Using Your Instrument with
Other Devices
PSR-S900/S700 Owner’s Manual
200
Connecting to the Internet
(9 [LAN] Port)
There are three ways to use the [LAN] port to access
special Internet websites, and download song data, etc.
See page 171 for instructions on connecting.
Backing up your data to a computer
■Backing up the instrument data to a computer
Once you’ve saved data to a USB storage device, you can
copy the data to the hard disk of your computer, then
archive and organize the files as desired. Simply recon-
nect the device as shown below.
Instrument
Instrument
Computer
Computer
USB storage device
USB storage device
USB TO DEVICE terminal
Saves internal data to a USB storage device.
Disconnect the USB storage device from the instrument and
connect it to the computer
Backing up data to a computer and organizing files/folders
Copying files from a computer hard disk to a
USB storage device
Files contained on the hard disk of a computer can be
transferred to the instrument by first copying them to the
storage media, then connecting the storage device to the
instrument.
Not only files created on the instrument itself but also
Standard MIDI files and Style File-formatted Style files cre-
ated on other devices can be copied to a USB storage
device from the hard disk of the computer. Once you’ve
copied the data, connect the device to the [USB TO
DEVICE] terminal of the instrument, and play back the
data on the instrument.
Copying the files of the hard disk of the computer to the USB
storage device
Computer
USB storage device
Instrument
Instrument
Computer
USB storage device
Reading files on the USB storage device from the instrument
[USB TO DEVICE] terminal
Disconnect the USB storage
device from the computer and
connect it to the instrument
Connecting a Computer or USB Device

Using Your Instrument with
Other Devices
PSR-S900/S700 Owner’s Manual 201
What is MIDI?
Put simply, MIDI is a data transfer standard that allows
easy and comprehensive control among electronic/digi-
tal music instruments and other devices. To get a better
idea of what MIDI does, let’s first consider acoustic
instruments, such as a grand piano and a classical gui-
tar. With the piano, you strike a key, and a hammer
inside hits some strings and plays a note. With the gui-
tar, you directly pluck a string and the note sounds.
But how does a digital instrument go about playing a
note?
As shown in the illustration above, in an electronic
instrument the sampled note (previously recorded note)
stored in the tone generator section (electronic circuit)
is played based on information received from the key-
board.
Now, let’s examine what happens when we playback a
recording. When you play back a music CD (for exam-
ple, a solo piano recording), you’re hearing the actual
sound (vibration in air) of the acoustic instrument. This
is called audio data, to distinguish it from MIDI data.
In the above example, the actual acoustic sounds of the
pianist’s performance are captured in the recording as
audio data, and this is recorded to CD. When you play
back that CD on your audio system, you can hear the
actual piano performance. The piano itself is not neces-
sary, since the recording contains the actual sounds of
the piano, and your speakers reproduce them.
n
In the case of digital instruments, the audio signals are sent
through output jacks (such as [AUX OUT]) on the instrument.
The “controller” and “tone generator” in the illustration
above are equivalent to the piano in our acoustic exam-
ple. Here, the player’s performance on the keyboard is
captured as MIDI song data (see illustration below). In
order to record the audio performance on an acoustic
piano, special recording equipment is needed. How-
ever, since the PSR-S900/S700 features a built-in
sequencer that lets you record performance data, this
recording equipment is unnecessary. Instead, your digi-
tal instrument allows you to both record and play back
the data.
However, we also need a sound source to produce the
audio, which eventually comes from your speakers. The
tone generator of the instrument fills this function. The
recorded performance is reproduced by the sequencer,
playing back the song data, using a tone generator
capable of accurately producing various instrument
sounds — including that of a piano. Looked at in
another way, the relation of the sequencer and the tone
generator is similar to that of the pianist and the piano
— one plays the other. Since digital instruments handle
playback data and the actual sounds independently, we
can hear our piano performance played by another
instrument, such as guitar or violin.
n
Even though it is a single musical instrument, the PSR-S900/S700
can be thought of as containing several electronic components: a
controller, a tone generator, and a sequencer.
RL
Acoustic guitar note
production Digital instrument note pro-
duction
Pluck a string and the
body resonates the
sound.
Based on playing information
from the keyboard, a sampled
note stored in the tone generator
is played through the speakers.
Playing the key board
Internal amp Internal amp
Tone generator
(Electric circuit)
Recording Playback
Recording and playing back the performance of an
acoustic instrument (audio data)
Recording and play back the performance of a digital
instrument (MIDI data)
Controller (keyboard, etc.)
Recording Playback
USB storage
device
USB storage
device
Tone Generator
Sequencer
Tone generator
Sequencer
Keyboard performance (MIDI data)
What is MIDI
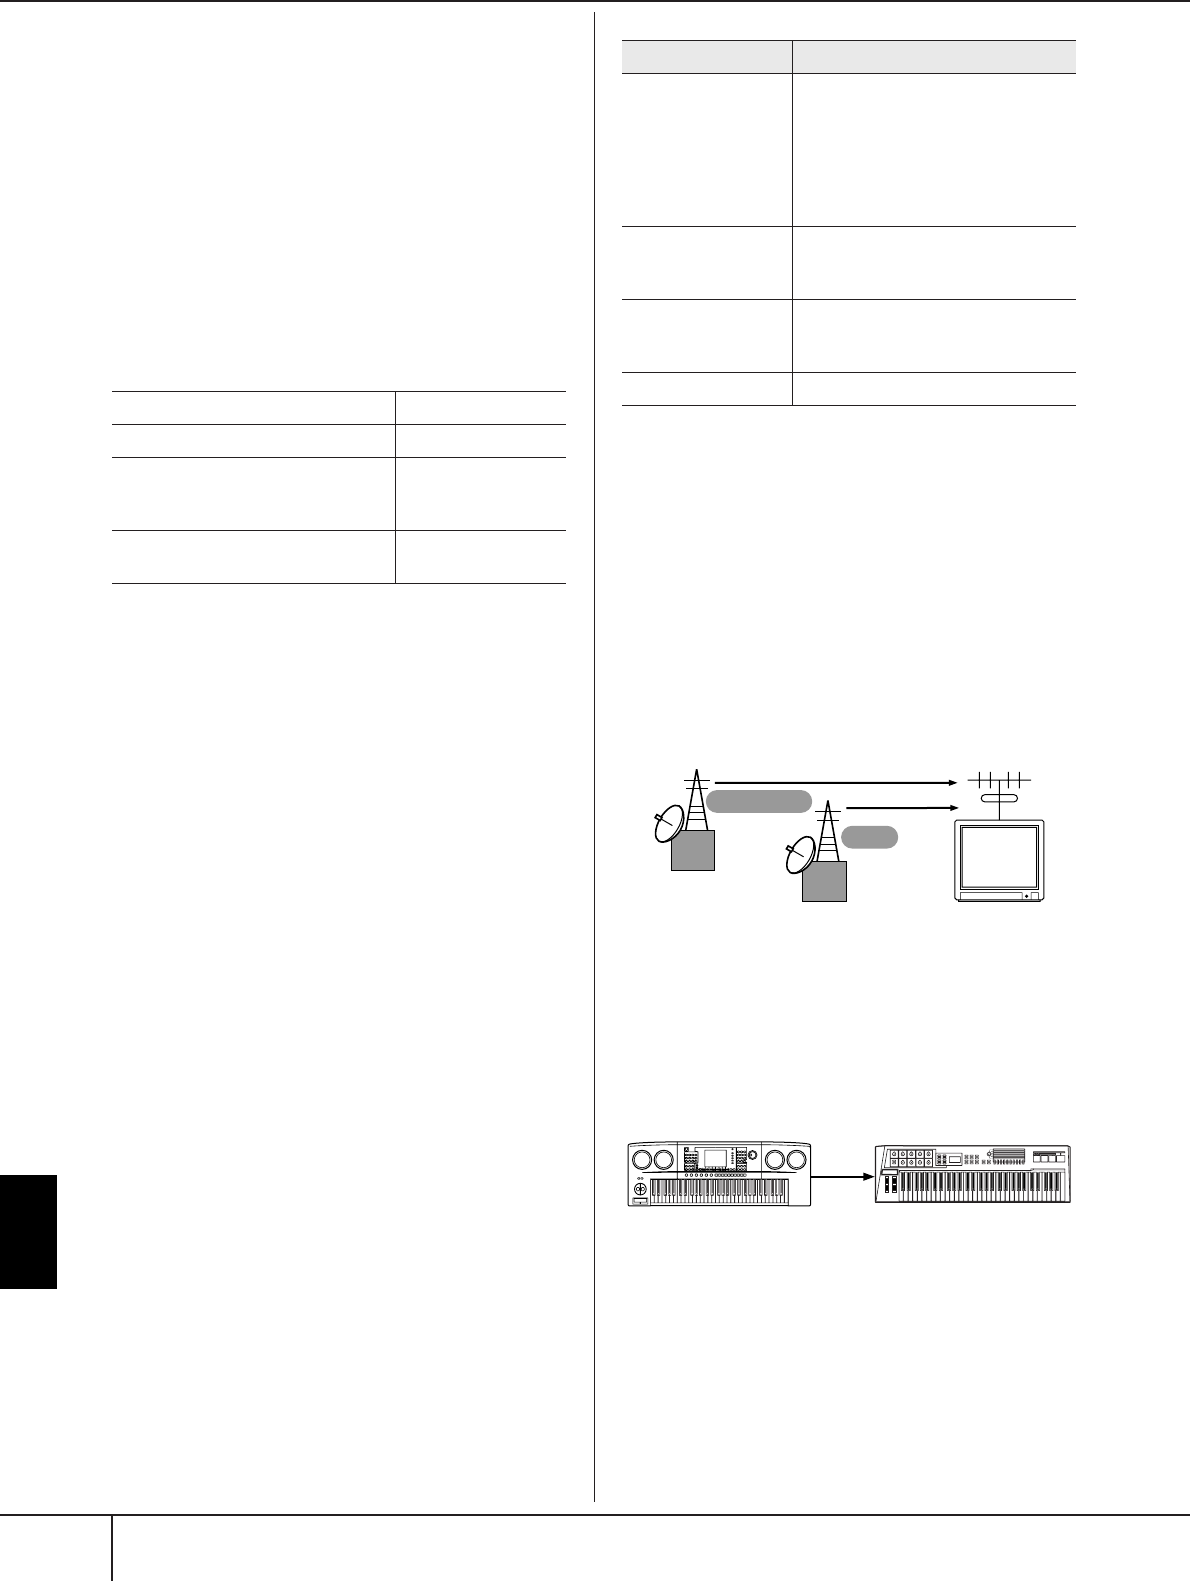
Using Your Instrument with
Other Devices
PSR-S900/S700 Owner’s Manual
202
What is MIDI?
Finally, we’ll take a look at the actual data that gets
recorded and that serves as the basis for playing the
sounds. For example, let’s say you play a “C” quarter
note using the grand piano sound on the instrument’s
keyboard. Unlike an acoustic instrument that puts out a
resonated note, the electronic instrument puts out infor-
mation from the keyboard such as “with what voice,”
“with which key,” “about how strong,” “when was it
pressed” and “when was it released.” Then each piece
of information is changed into a number value and sent
to the tone generator. Using these numbers as a basis
for sound generation, the tone generator plays the
stored sampled note.
Example Keyboard Data
Panel operations on the instrument, such as playing the
keyboard and selecting voices, are processed and
stored as MIDI data. The auto accompaniment Styles
and Songs also consist of MIDI data.
MIDI is an acronym that stands for Musical Instrument
Digital Interface, which allows electronic musical
instruments to communicate with each other, by send-
ing and receiving compatible Note, Control Change,
Program Change and various other types of MIDI data,
or messages.
The instrument can control a MIDI device by transmit-
ting note related data and various types of controller
data. The instrument can be controlled by incoming
MIDI messages which automatically determine the tone
generator mode, select MIDI channels, voices and
effects, change parameter values and of course play the
voices specified for the various parts.
n
MIDI data has the following advantages over audio data:
•The amount of data is much less.
•The data can be effectively and easily edited, even to the point
of changing voices and transforming the data.
MIDI messages can be divided into two groups: Chan-
nel messages and System messages.
Channel Messages
The PSR-S900/S700 is an electronic instrument that can
handle 16 MIDI channels (or reception of 32 channels
for MIDI data reception when using the [USB] termi-
nal). This is usually expressed as “it can play 16 instru-
ments at the same time.” Channel messages transmit
information such as Note ON/OFF, Program Change,
for each of the 16 channels.
n
The performance data of all Songs and Styles is handled as MIDI
data.
MIDI Channels
MIDI performance data is assigned to one of sixteen
MIDI channels. Using these channels, 1–16, the perfor-
mance data for sixteen different instrument parts can be
simultaneously sent over one MIDI cable.
Think of the MIDI channels as TV channels. Each TV
station transmits its broadcasts over a specific channel.
Your home TV set receives many different programs
simultaneously from several TV stations and you select
the appropriate channel to watch the desired program.
MIDI operates on the same basic principle. The trans-
mitting instrument sends MIDI data on a specific MIDI
channel (MIDI Transmit Channel) via a single MIDI
cable to the receiving instrument. If the receiving instru-
ment’s MIDI channel (MIDI Receive Channel) matches
the Transmit Channel, the receiving instrument will
sound according to the data sent by the transmitting
instrument.
n
The instrument’s keyboard and internal tone generator are also
connected by MIDI. → LOCAL CONTROL (page 207)
For example, several parts or channels can be transmit-
ted simultaneously, including the Style data (as shown
on the next page).
Voice number (with what voice) 01 (grand piano)
Note number (with which key) 60 (C3)
Note on (when was it pressed)
and
note off (when was it released)
Timing expressed
numerically
(quarter note)
Velocity
(strength at which it was played)
120 (strong)
Message Name Operation/Panel Setting
Note ON/OFF Messages which are generated when
the keyboard is played. Each mes-
sage includes a specific note num-
ber which corresponds to the key
which is pressed, plus a velocity
value based on how hard the key is
played.
Program Change For selecting Voices (with control
change bank select MSB/LSB set-
tings)
Control Change Volume, panpot (Mixing Console),
MODULATION Wheel operation
etc.
Pitch Bend PITCH BEND Wheel operation
1
2
2
NEWS
Weather report
NEWS
MIDI Transmit channel 2 MIDI Receive channel 2
MIDI
cable
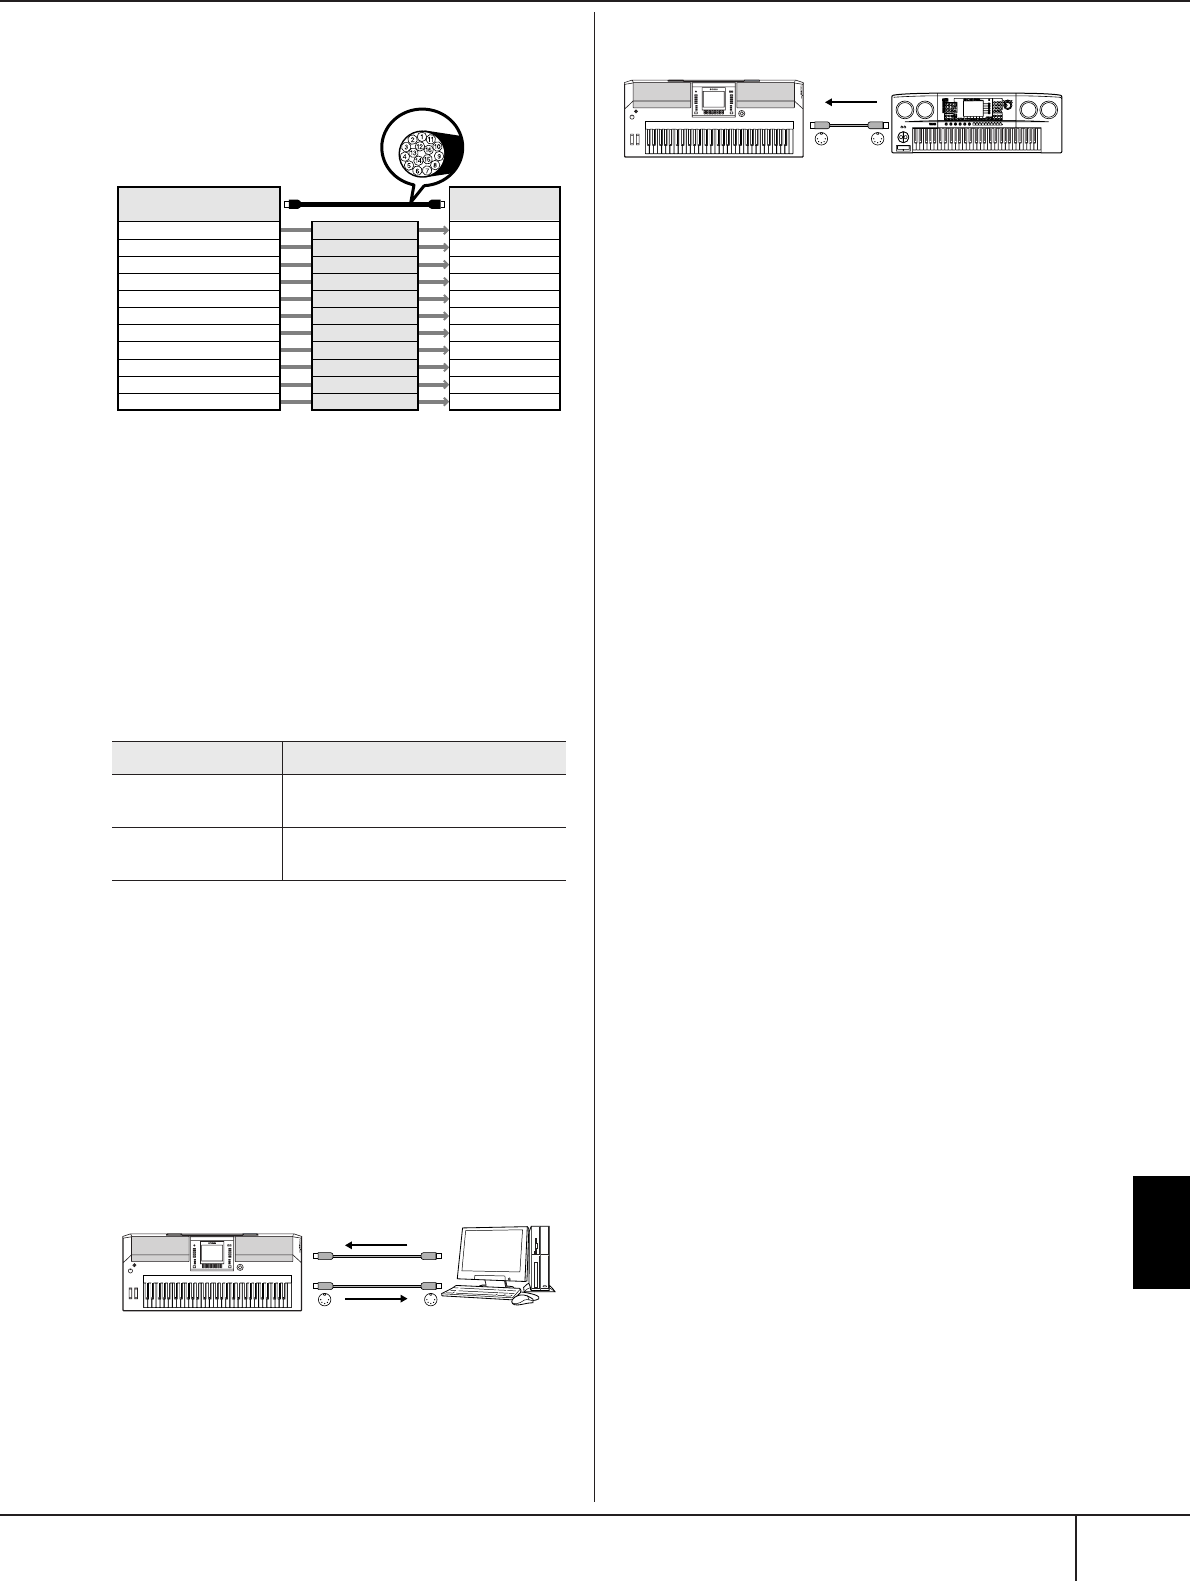
Using Your Instrument with
Other Devices
PSR-S900/S700 Owner’s Manual 203
What is MIDI?
Example: Recording a performance with the auto accompa-
niment (Style playback) sound of the instrument to an exter-
nal sequencer
As you can see, it is essential to determine which data is
to be sent over which MIDI channel when transmitting
MIDI data (page 207).
The instrument also allows you to determine how the
received data is played back (page 208).
System Messages
This is data that is used in common by the entire MIDI
system. These include System Exclusive messages for
transferring data unique to each instrument manufac-
turer and Realtime messages for controlling the MIDI
device.
The messages transmitted/received by the PSR-S900/
S700 are shown in the MIDI Data Format and MIDI
Implementation Chart in the Data List. The Data List is
available at the Yamaha website. (See page 5.)
What You Can Do With MIDI
■Record your performance data (1–16 channels) using
the auto accompaniment features on an external
sequencer (or computer with sequencer software).
After recording, edit the data with the sequencer,
then play it back on the instrument.
When you want to use the instrument as an XG-com-
patible multi-timbral tone generator, set the receive part
for MIDI channels 1-16 to “SONG” in MIDI/USB 1 in
MIDI Receive (page 208).
■Controlling from an external MIDI keyboard
MIDI Data Compatibility
This section covers basic information on data compati-
bility: whether or not other MIDI devices can playback
the data recorded by PSR-S900/S700, and whether or
not the PSR-S900/S700 can playback commercially
available song data or song data created for other
instruments or on a computer. Depending on the MIDI
device or data characteristics, you may be able to play
back the data without any problem, or you may have to
perform some special operations before the data can be
played back. If you run into problems playing back
data, please refer to the information below.
Sequence Formats
Song data is recorded and stored in a variety of different
systems, referred to as “sequence formats.”
Playback is only possible when the sequence format of
the Song data matches that of the MIDI device. The
PSR-S900/S700 is compatible with the following for-
mats.
● SMF (Standard MIDI file)
This is the most common sequence format. Standard
MIDI Files are generally available as one of two types:
Format 0 or Format 1. Many MIDI devices are compati-
ble with Format 0, and most commercially available
software is recorded as Format 0.
•The PSR-S900/S700 is compatible with both Format 0
and Format 1.
• Song data recorded on the PSR-S900/S700 is auto-
matically saved as SMF Format 0.
● ESEQ
This sequence format is compatible with many of
Yamaha’s MIDI devices, including the PSR-S900/S700
series instruments. This is a common format used with
various Yamaha software.
•The PSR-S900/S700 is compatible with ESEQ.
● XF
The Yamaha XF format enhances the SMF (Standard
MIDI File) format with greater functionality and open-
ended expandability for the future. The PSR-S900/S700
is capable of displaying lyrics when an XF file contain-
ing lyric data is played. (SMF is the most common for-
mat used for MIDI sequence files. The PSR-S900/S700 is
compatible with SMF Formats 0 and 1, and records
“song” data using SMF Format 0.)
● Style File
The Style File Format (SFF) combines all of Yamaha’s
auto accompaniment know-how into a single unified
format.
Message Name Operation/Panel Setting
System Exclusive
Message
Effect type settings (Mixing Console),
etc.
Realtime Messages Clock setting,
Start/stop operation
MIDI cable
Channel 1
Channel 2
Channel 3
Channel 4
Channel 5
Channel 6
Channel 7
Channel 8
Channel 9
Channel 10
Channel 11
External sequencer
Track 2
Track 3
Track 4
Track 5
Track 6
Track 7
Track 8
Track 9
Track 10
Track 11
PSR-S900/S700 track
(channel)
RIGHT 1
RIGHT 2
LEFT
STYLE instrument
STYLE instrument
STYLE instrument
STYLE instrument
STYLE instrument
STYLE instrument
STYLE instrument
STYLE instrument
MIDI IN MIDI OUT
MIDI OUT MIDI IN
Instrument
MIDI receive
MIDI transmit Computer or
Sequencer
MIDI IN MIDI OUT
Instrument
MIDI receive
Using Your Instrument with
Other Devices
PSR-S900/S700 Owner’s Manual
204
MIDI Settings
Voice Allocation Format
With MIDI, Voices are assigned to specific numbers,
called “program numbers.” The numbering standard
(order of voice allocation) is referred to as the “voice
allocation format.”
Voices may not play back as expected unless the voice
allocation format of the song data matches that of the
compatible MIDI device used for playback. The PSR-
S900/S700 is compatible with the following formats.
n
Even if the devices and data used satisfy all the conditions above,
the data may still not be completely compatible, depending on the
specifications of the devices and particular data recording meth-
ods.
● GM System Level 1
This is one of the most common voice allocation for-
mats.
Many MIDI devices are compatible with GM System
Level 1, as is most commercially available software.
● GM System Level 2
“GM System Level 2” is a standard specification that
enhances the original “GM System Level 1” and
improves Song data compatibility. It provides for
increased polyphony, greater voice selection, expanded
voice parameters, and integrated effect processing.
● XG
XG is a major enhancement of the GM System Level 1
format, and was developed by Yamaha specifically to
provide more Voices and variations, as well as greater
expressive control over Voices and effects, and to
ensure compatibility of data well into the future.
Song data recorded on the PSR-S900/S700 using Voices
in the XG category is XG-compatible.
● DOC (Disk Orchestra Collection)
This voice allocation format is compatible with many of
Yamaha’s MIDI devices, including the PSR-S900/S700
series instruments.
● GS
GS was developed by the Roland Corporation.
In the same way as Yamaha XG, GS is a major enhance-
ment of the GM specifically to provide more Voices and
Drum kits and their variations, as well as greater expres-
sive control over Voices and effects.
MIDI Settings
In this section, you can make MIDI-related settings for
the instrument. The PSR-S900/S700 gives you a set of
ten pre-programmed templates that let you instantly and
easily reconfigure the instrument to match your particu-
lar MIDI application or external device. Also, you can
edit the pre-programmed templates and save up to ten
of your original templates to the USER display. You can
then save all these original templates as a single file to
USB storage devices, in the MIDI SETUP selection dis-
play (called up by pressing [FUNCTION] → [J] UTILITY
→ TAB [
√
][
®
] SYSTEM RESET).
Basic Operation
1Call up the operation (MIDI template selection)
display.
Function → [I] MIDI
2To use the pre-programmed templates or to edit
them
Press the TAB [
√
] button to select the PRESET dis-
play. Press one of the [A]-[J] buttons to select a MIDI
template.
To use the templates already saved to the USER
display or to edit them
Press the TAB [
®
] button to select the USER display.
Press one of the [A]-[J] buttons to select a MIDI tem-
plate.
3To edit a template, press the [8
††
††
] (EDIT) but-
ton to call up the MIDI display for editing.
The individual parameters settings are shown for the
selected template. Here you can edit each parame-
ter.

Using Your Instrument with
Other Devices
PSR-S900/S700 Owner’s Manual 205
MIDI Settings
4Use the TAB [
√
][
®
] buttons to call up the rele-
vant setting display.
5When you’ve finished editing, press the [EXIT]
button to return to the MIDI template selection
display (PRESET or USER).
6Select the USER tab display to save the data by
using the TAB [
√
][
®
] buttons (page 73).
SYSTEM display MIDI System Settings (page 207)
TRANSMIT display MIDI Transmission Settings
(page 207)
RECEIVE display MIDI Reception Settings (page 208)
BASS display Settings for the bass note of chord
for Style playback via MIDI recep-
tion data (page 209)
CHORD DETECT
display
Settings for the chord type for Style
playback via MIDI reception data
(page 209)
Using Your Instrument with
Other Devices
PSR-S900/S700 Owner’s Manual
206
MIDI Settings
Pre-Programmed MIDI Templates
Template name Description
All Parts Transmits all parts including the keyboard parts (RIGHT 1, 2, and LEFT), with the
exception of Song parts.
KBD & STYLE Basically the same as “All Parts” with the exception of how keyboard parts are man-
aged. The right-hand parts are handled as “UPPER” instead of RIGHT 1 and 2 and the
left-hand part is handled as “LOWER.”
Master KBD In this setting, the instrument functions as a “master” keyboard, playing and controlling
one or more connected tone generators or other devices (such as a computer/
sequencer).
Song All transmit channels are set to correspond to Song channels 1–16. This is used to play
Song data with an external tone generator and to record Song data to an external
sequencer.
Clock Ext Playback (Song or Style) synchronizes with an external MIDI clock instead of the instru-
ment’s internal clock. This template should be used when you wish to set the tempo on
the MIDI device connected to the instrument.
MIDI Accord 1 MIDI accordions allow you to transmit MIDI data and play connected tone generators
from the keyboard and bass/chord buttons of the accordion. This template lets you play
melodies from the keyboard and control Style playback on the instrument with the left-
hand buttons.
MIDI Accord 2 Basically the same as “MIDI Accord 1” above, with the exception that the chord/bass
notes you play with your left hand on the MIDI Accordion are recognized also as MIDI
note events.
MIDI Pedal 1 MIDI pedal units allow you play connected tone generators with your feet (especially
convenient for playing single note bass parts). This template lets you play/control the
chord root in Style playback with a MIDI pedal unit.
MIDI Pedal 2 This template lets you play the bass part for Style playback by using a MIDI pedal unit.
MIDI OFF No MIDI signals are sent or received.

Using Your Instrument with
Other Devices
PSR-S900/S700 Owner’s Manual 207
MIDI Settings
MIDI System Settings
The explanations here apply to the SYSTEM display to
be called up in step 4 of the “Basic Operation” on
page 204.
■LOCAL CONTROL
Turns the Local Control for each part on or off. When
Local Control is set to “ON,” the keyboard of the instru-
ment controls its own (local) internal tone generator,
allowing the internal voices to be played directly from
the keyboard. If you set Local to “OFF,” the keyboard
and controllers are internally disconnected from the
instrument’s tone generator section so that no sound is
output when you play the keyboard or use the control-
lers. For example, this allows you to use an external
MIDI sequencer to play the instrument’s internal voices,
and use the instrument keyboard to record notes to the
external sequencer and/or play an external tone genera-
tor.
■Clock setting, etc.
● CLOCK
Determines whether the instrument is controlled by its
own internal clock or a MIDI clock signal received from
an external device. INTERNAL is the normal Clock set-
ting when the instrument is being used alone or as a
master keyboard to control external devices. If you are
using the instrument with an external sequencer, MIDI
computer, or other MIDI device, and you want to syn-
chronize it to that device, set this parameter to the
appropriate setting: MIDI, USB 1, or USB 2. In this case,
make sure that the external device is connected prop-
erly (e.g., to the instrument’s MIDI IN terminal), and that
it is properly transmitting a MIDI clock signal. When
this is set for control by an external device (MIDI, USB
1 or USB 2), the Tempo is indicated as “Ext.” in the
Main display.
● TRANSMIT CLOCK
Turns MIDI clock (F8) transmission on or off. When set
to OFF, no MIDI clock or Start/Stop data is transmitted
even if a Song or Style is played back.
● RECEIVE TRANSPOSE
Determines whether or not the instrument’s transpose
setting (page 61) is applied to the note events received
by the instrument via MIDI.
● START/STOP
Determines whether incoming FA (start) and FC (stop)
messages affect Song or Style playback.
■MESSAGE SW
● SYS/EX.
The “Tx” setting turns MIDI transmission of MIDI Sys-
tem Exclusive messages on or off. The “Rx” setting turns
MIDI reception and recognition of MIDI System Exclu-
sive messages generated by external equipment on or
off.
● CHORD SYS/EX.
The “Tx” setting turns MIDI transmission of MIDI chord
exclusive data (chord detect. root and type) on or off.
The “Rx” setting turns MIDI reception and recognition
of MIDI chord exclusive data generated by external
equipment on or off.
MIDI Transmit Settings
The explanations here apply to the TRANSMIT display
to be called up in step 4 of the “Basic Operation” on
page 204. This determines which parts will be sent as
MIDI data and over which MIDI channel the data will
be sent.
Operation
Select the part to be transmitted and the channel via
which the selected part will be transmitted. You can also
determine the types of data to be sent.
●With the exception of the next two parts, the
configuration of the parts is the same as those
already explained elsewhere in this manual.
• UPPER
The keyboard part played on the right side of the key-
board from the Split Point for the Voices (RIGHT1 and/
or 2).
• LOWER
The keyboard part played on the left side of the keyboard
from the Split Point for the Voices. This is not affected by
the on/off status of the [ACMP] button.
SYSTEM display
TRANSMIT display

Using Your Instrument with
Other Devices
PSR-S900/S700 Owner’s Manual
208
MIDI Settings
●Tx MONITOR
The dots corresponding to each channel (1-16) flash
briefly whenever any data is transmitted on the chan-
nel(s).
n
When different parts are assigned to the same transmit
channel
If the same transmit channel is assigned to several different parts,
the transmitted MIDI messages are merged to a single channel —
resulting in unexpected sounds and possible glitches in the con-
nected MIDI device.
n
About the protected Songs
Write-protected Songs cannot be transmitted even if the proper
Song channels 1–16 are set to be transmitted.
■MIDI messages which can be transmitted or
received (recognized)
The following MIDI messages can be set on the TRANS-
MIT/RECEIVE display.
•Note (Note events).......................................page 168
•CC (CONTROL CHANGE) ..........................page 168
•PC (PROGRAM CHANGE)...........................page 168
•PB (Pitch Bend)............................................page 168
•AT (Aftertouch).............................................page 168
MIDI Receive Settings
The explanations here apply to the RECEIVE display to
be called up in step 4 of the “Basic Operation” on
page 204. This determines which parts will receive
MIDI data and over which MIDI channels the data will
be received.
Operation
Select the channel to be received and the part via which
the selected channel will be received. You can also
determine the types of data to be received.
●The PSR-S900/S700 can receive MIDI messages
over 32 channels (16 channels x 2 ports) by USB
connection.
●With the exception of the next two parts, the
configuration of the parts is the same as those
already explained elsewhere in this manual.
• KEYBOARD
The received note messages control the instrument’s
keyboard performance.
• EXTRA PART 1-5
There are five parts specially reserved for receiving
and playing MIDI data. Normally, these parts are not
used by the instrument itself. The PSR-S900/S700 can
be used as a 32-channel multi-timbral tone generator
by using these five parts in addition to the general
parts (except for the microphone sound).
●Rx MONITOR
The dots corresponding to each channel (1–16) flash
briefly whenever any data is received on the channel(s).
n
Parameter Lock
You can “lock” specific parameters (e.g., effect, split point, etc.) to
make them selectable only via the panel controls (page 137).
■MIDI transmission/reception via the USB ter-
minal and MIDI terminals
The relationship between the [MIDI] terminals and the
[USB] terminal which can be used for transmitting/
receiving 32 channels (16 channels x 2 ports) of the
MIDI messages is as follows:
RECEIVE display
MIDI/USB1
01–16
USB2
01–16
USB2USB1
MIDI/USB 01–16
[MIDI IN] jack
MIDI reception MIDI transmission
[USB TO
HOST] jack
[MIDI OUT] jack
[USB TO
HOST] jack
Port
handling
Merge
Merge
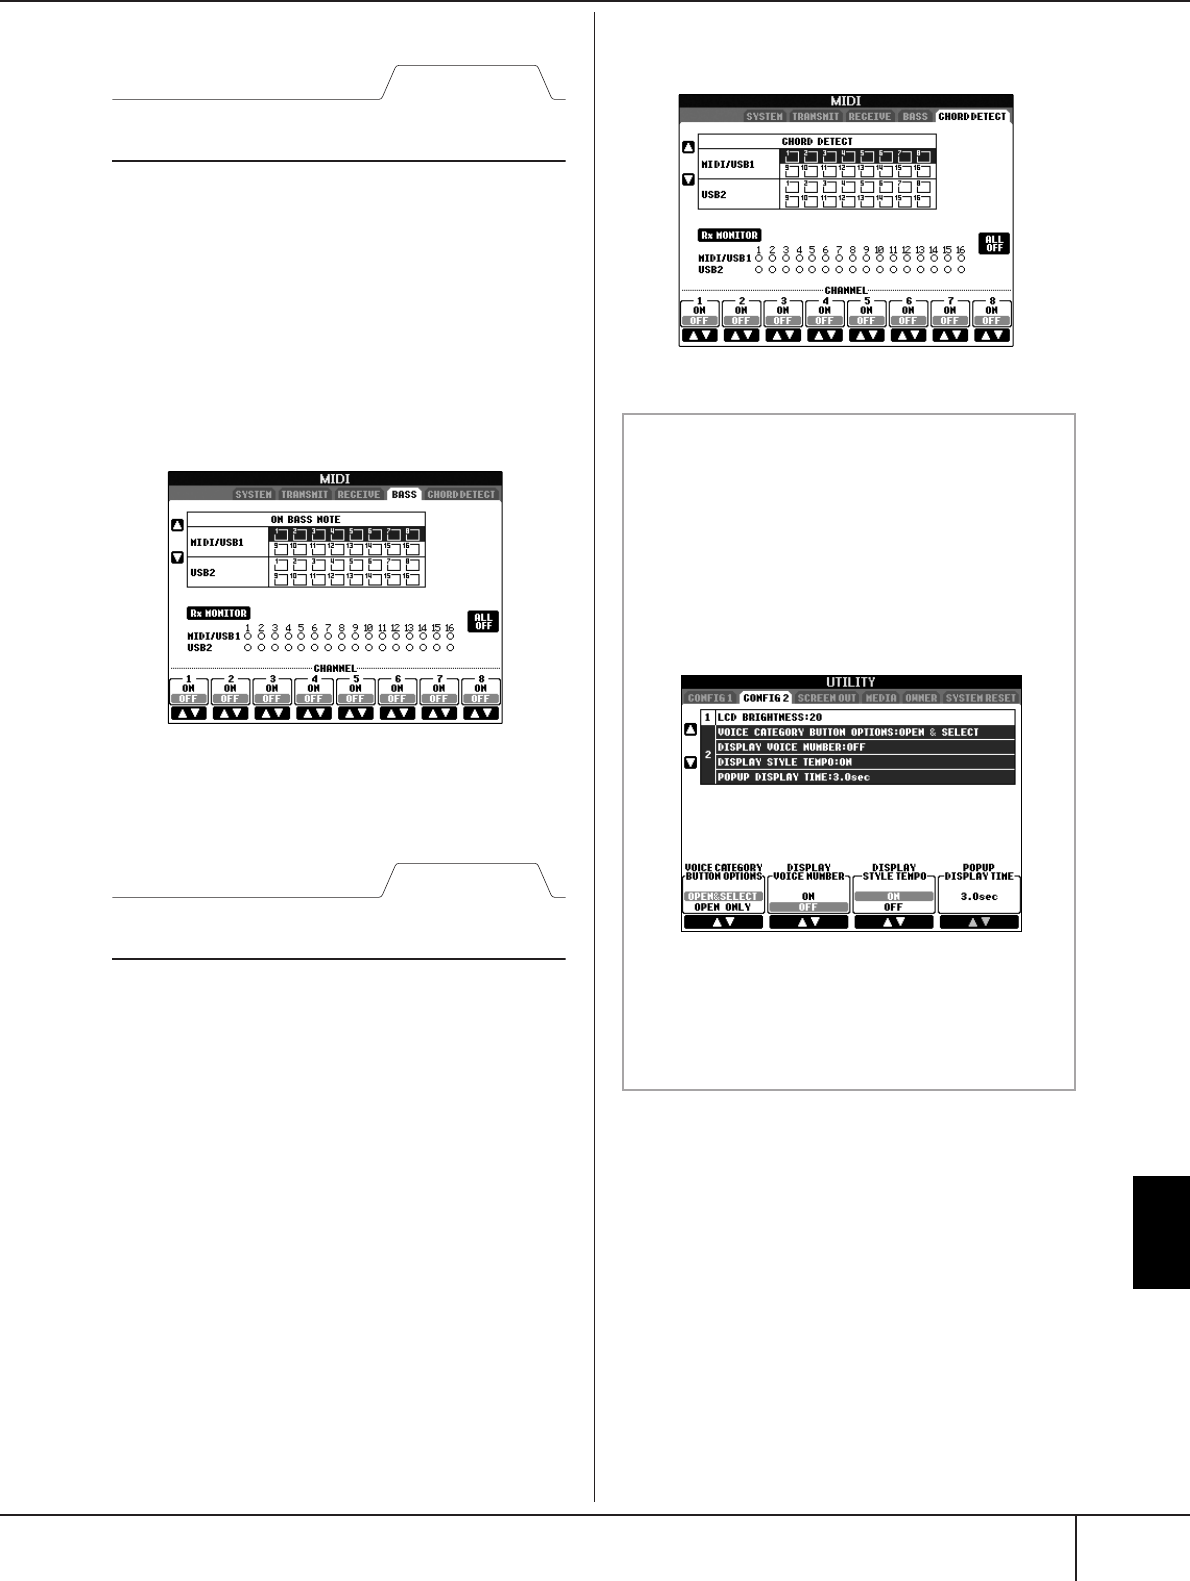
Using Your Instrument with
Other Devices
PSR-S900/S700 Owner’s Manual 209
MIDI Settings
Setting the Bass Note for Style Playback
via MIDI Receive
The explanations here apply to the BASS display to be
called up in step 4 of the “Basic Operation” on
page 204.
These settings let you determine the bass note for Style
playback, based on the note messages received via
MIDI. The note on/off messages received at the chan-
nel(s) set to “ON” are recognized as the bass note of the
chord of Style playback. The bass note will be detected
regardless of the [ACMP] or split point settings. When
several channels are simultaneously set to “ON,” the
bass note is detected from merged MIDI data received
over the channels.
Operation
Select the channel and set the “ON/OFF” for that chan-
nel. Use the All OFF item to set all channels to OFF.
Setting the Chord Type for Style Play-
back via MIDI Receive
The explanations here apply to the CHORD DETECT
display to be called up in step 4 of the “Basic Opera-
tion” on page 204.
These settings let you determine the chord type for Style
playback, based on the note messages received via
MIDI. The note on/off messages received at the chan-
nel(s) set to “ON” are recognized as the notes for
detecting chords in Style playback. The chords to be
detected depend on the fingering type. The chord type
will be detected regardless of the [ACMP] or split point
settings. When several channels are simultaneously set
to “ON,” the chord type is detected from merged MIDI
data received over the channels.
The operation procedure is basically the same as that of
the BASS display.
BASS display
CHORD DETECT display
Displaying the Voice Program Change Number
Determines whether or not the Voice bank and number
are shown in the Voice selection display. This is useful
when you want to check which bank select MSB/LSB val-
ues and program change number you need to specify
when selecting the Voice from an external MIDI device.
You can set this in the display called up by the following
operations: [FUNCTION] → [J] UTILITY →TAB [
√
][
®
]
CONFIG 2. Switch the DISPLAY VOICE NUMBER menu
ON and OFF.
n
•The numbers displayed here start from “1.” Accordingly the
actual MIDI program change numbers are one lower, since
that number system starts from “0.”
• For the GS Voices, this feature is not available (the program
change numbers are not shown).

PSR-S900/S700 Owner’s Manual
210
Appendix
Appendix
Troubleshooting
The instrument does not turn on.
• Securely insert the female plug into the socket on the
instrument, and the male plug into a proper AC outlet.
A click or pop is heard when the power is turned on
or off.
•Electrical current is being applied to the instrument. This
is normal.
Noise is heard from the instrument’s speakers.
• Noise may be heard if a mobile phone is used near the
instrument or if the phone is ringing. Turn off the mobile
phone, or use it further away from the instrument.
The letters in the display cannot be read, because the
display is too bright (or dark).
• Use the [LCD CONTRAST] knob to adjust for optimum
visibility.
• Adjust the brightness of the display (page 20).
The overall volume is too low, or, no sound is heard.
•The master volume may be set too low. Set it to an
appropriate level with the [MASTER VOLUME] dial.
• All keyboard parts are set to off. Use the PART ON/OFF
[RIGHT 1]/[RIGHT 2]/[LEFT] button to turn it on.
•The volume of the individual parts may be set too low.
Raise the volume in the BALANCE display (page 41).
• Make sure the desired channel is set to ON (page 108).
• Headphones are connected, disabling the speaker out-
put. Unplug the headphones.
•The [FADE IN/OUT] button is on, muting the sound.
Press the [FADE IN/OUT] button to turn the function off.
• Make sure the Local Control function is set to ON
(page 207).
Not all simultaneously played notes sound.
•You are probably exceeding the maximum polyphony
(page 215) of the instrument. When the maximum
polyphony is exceeded, the earliest played notes will
stop sounding, letting the latest played notes sound.
The keyboard volume is lower than the Song/Style
playback volume.
•The volume of the keyboard parts may be set too low.
Raise the volume in the BALANCE display (page 41).
Keys do not sound at the proper pitch.
• Make sure the Performance Assistant function is off on
the operation display (page 44).
Certain notes sound at the wrong pitch.
The Scale parameter has probably been set to some-
thing other than “Equal,” changing the tuning system of
the keyboard. Make sure “Equal” is selected as the
Scale in the Scale Tune display (page 87).
– There is a slight difference in sound quality among
different notes played on the keyboard.
– Some Voices have a looping sound.
– Some noise or vibrato is noticeable at higher
pitches, depending upon the voice.
•This is normal and is a result of the instrument’s sam-
pling system.
Some Voices will jump an octave in pitch when played
in the upper or lower registers.
•This is normal. Some voices have a pitch limit which,
when reached, causes this type of pitch shift.
The Main display does not appear even when turning
the power on.
•This may occur if a USB storage device has been
installed to the instrument. Installation of some USB stor-
age device may result a long interval between turning
the power on and appearance of the Main display. To
avoid this, turn the power on after disconnecting the
device.
Some characters of the file/folder name are garbled.
•The language settings have been changed. Set the appro-
priate language for the file/folder name (page 19).
An existing file is not shown.
•The file extension (.MID, etc.) may have been changed
or deleted. Manually rename the file, adding the appro-
priate extension, on a computer.
The data contained in the USB storage device is not
shown on the instrument itself.
•Data files with names of more than 50 characters cannot
be handled by the instrument. Rename the file, reducing
the number of characters to 50 or less.
How can I stop the demo?
• Press the [EXIT] button.
Overall
Files/Folders
Demo

PSR-S900/S700 Owner’s Manual 211
Appendix
The Voice selected from the Voice Selection display
does not sound.
• Check whether or not the selected part is turned on
(page 84).
•To select the Voice for the right-hand key range, press the
PART SELECT [RIGHT 1] button. For the Voice to be lay-
ered in the right-hand range, press the PART SELECT
[RIGHT 2] button. To select the Voice for the left-hand
key range, press the PART SELECT [LEFT] button.
The sound seems strange or different than expected
when changing a rhythm Voice (drum kit, etc.) of the
Style or Song from the Mixer.
• When changing the rhythm/percussion Voices (drum
kits, etc.) of the Style and Song from the VOICE parame-
ter, the detailed settings related to the drum voice are
reset, and in some cases you may be unable to restore
the original sound. In the case of Song playback, you
can restore the original sound by returning to the begin-
ning of the Song and playing back from that point. In the
case of Style play, you can restore the original sound by
selecting the same Style again.
Tremolo/Trill cannot be applied to the Organ Flute
Voice.
•This is normal; Tremolo and Trill settings in the Har-
mony/Echo display are not effective for Organ Flute
Voices.
The Harmony function does not operate.
• Harmony cannot be used with the Full Keyboard or AI
Full Keyboard fingering modes. Select an appropriate
fingering mode (page 107).
When a Voice is changed, the previously selected
effect is changed.
•Each Voice has its own suitable preset settings, which are
automatically recalled when the corresponding Voice
Set parameters are turned on (page 105).
The Voice produces excessive noise.
• Certain Voices may produce noise, depending on the
Harmonic Content and/or Brightness settings in the FIL-
TER page of the Mixing Console display (page 93).
The sound is distorted or noisy.
•The volume may be turned up too high. Make sure all
relevant volume settings are appropriate.
•This may be caused by certain effects. Try canceling all
unnecessary effects, especially distortion-type effects
(page 95).
•Adjust the sound using the [8
π†
] (TOTAL GAIN ADJ.)
buttons from the display shown in step 6 of “Editing and
Saving the selected EQ” (page 98), if you are using the
Master EQ.
• Some filter resonance settings in the VOICE SET display
(page 101) can result in distorted sound. Adjust these
settings if necessary.
•Noise may occur depending on the settings made in the
Filter display of the Mixing Console. Adjust the Har-
monic Content or Brightness controls in the Filter display
(page 93).
The sound does not change when replacing Voices
with the Song Auto Revoice feature.
• Depending on the particular Song data, there are some
instances where Song Auto Revoice has no effect, even
when replacing Voices.
The sound of the Voice doesn’t change, even when
editing the Voice.
•Keep in mind that adjustments made to the parameters
may not make much change in the actual sound depend-
ing on the original settings of the Voice.
Voices other than those in the Preset display cannot
be selected for Step recording.
•This is normal.
Style playback does not start.
•Make sure to press the STYLE CONTROL [START/STOP]
button.
•MIDI Clock may be set to “EXTERNAL.” Make sure this is
set to “INTERNAL” (page 207).
Only the rhythm channel plays.
• Make sure the Auto Accompaniment function is turned
on; press the [ACMP] button.
•You may be playing keys in the right hand range of the
keyboard. Make sure to play keys in the chord range of
the keyboard.
Styles cannot be selected.
• If the size of the Style data is large (about 120 KB or
greater), the Style cannot be selected because the data is
too large to be ready by the instrument.
The desired chord is not recognized or output by the
auto accompaniment.
•You may not be playing the correct keys for indicating
the chord. Refer to “Chord Types Recognized in the Fin-
gered Mode” of the Data List. The Data List is available
at the Yamaha website. (See page 5.)
•You may be playing the keys according to a different fin-
gering mode, and not the one currently selected. Check
the accompaniment mode, and play the keys according
to the selected mode (page 107).
Synchro Stop cannot be turned on.
• Synchro Stop cannot be turned on when the fingering
mode is set to “Full Keyboard” or “AI Full Keyboard,” or
when the [ACMP] button is set to off. Make sure the fin-
gering mode is set to something besides “Full Keyboard”
or “Al Full Keyboard” and set the [ACMP] button to on.
Auto accompaniment chords are recognized regard-
less of the split point or where chords are played on
the keyboard.
•This is normal if the fingering mode is set to “Full Key-
board” or “AI Full Keyboard.” If either of these is
selected, chords are recognized over the entire range of
the keyboard, irrespective of the split point setting. If
desired, select a different fingering mode (page 107).
Voice
Style

PSR-S900/S700 Owner’s Manual
212
Appendix
When playing back one Style and selecting another,
the newly selected Style doesn’t play at the proper
Tempo.
•You can select whether the appropriate tempo will be
called up automatically or not by using the TEMPO
parameter in the STYLE CHANGE BEHAVIOR function.
Starting a Song while playing back a Style stops Style
playback.
This is because Song playback has priority. The two ways
shown below let you play back a Style and Song simulta-
neously.
• Set the Song to Synchro Start standby, then start the
Style.
• Start the Style playback after playing back a Song.
The level balance of the various Parts becomes wrong
or unexpected sounds are output when selecting a
Style or a Voice after selecting a Song.
•The level balance of the Parts can change and unex-
pected sounds can be produced because of the effects
applied to each Part.
The “Off” setting is not shown for the Play Type
parameter in the Assembly (Style Creator) feature.
•The selected section is set to record enable. Release the
recording assignment by pressing the appropriate [1
†
]-
[8
†
] button in the recording channel display (TAB [
√
]
button → BASIC tab → [F] REC CH).
The channels BASS-PHR2 cannot be edited in Channel
Edit.
•This is normal; BASS-PHR2 channels of the Preset Styles
cannot be edited.
The Song/Style registered to the Registration Mem-
ory cannot be called up.
• If the registered Song/Style is contained on USB storage
device and the USB storage device is not connected to
the instrument, the Song/Style cannot be called up. Con-
nect the appropriate USB storage device containing the
Song/Style data.
The order for calling up Registration Memory settings
is not shown on the Registration Sequence setting
display.
•The bank containing the Registration has not been
selected. Select the appropriate bank (page 136).
When using the Freeze function of the Registration
Memory, the On/Off setting of the Left Part does not
change even when changing the Registration Mem-
ory setting.
•The Left Part On/Off setting is included in the Style
group. Remove the checkmark from “STYLE” in the
Freeze setting display (page 138).
Even though a Registration Memory setting contain-
ing a User/USB voice is selected, the File Selection dis-
play shows a Preset Voice.
•This is normal; even with the Preset Voice shown, the
actual sounding Voice is the selected User/USB Voice.
When a User/USB Voice is saved to the User/USB drive,
the actual data is divided into two separate types: 1) the
source Preset Voice itself, and 2) the parameter settings
as set in the Voice Set. When you recall a Registration
Memory setting containing a User/USB Voice, the instru-
ment selects the Preset voice (on which the User/USB
Voice is based), then applies the relevant parameter set-
tings to it—so that your original User/USB Voice is
sounded.
Songs cannot be selected.
•This may be because the language settings have been
changed. Set the appropriate language for the Song file
name.
• If the size of the Song data is large (about 300 KB or
greater), the Song cannot be selected because the data is
too large to be read by the instrument.
Song playback does not start.
• “New Song” (a blank Song) has been selected. Make
sure to select an appropriate Song in the Song Selection
display (page 36).
• Make sure to press the SONG [F/K] (PLAY/PAUSE)
button.
•The Song has been stopped at the end of the Song data.
Return to the beginning of the Song by pressing the
SONG [J] (STOP) button.
• In the case a Song to which write-protect has been
applied (“Prot. 2 Edit” is shown at the upper left of the
Song name), the original file may not be in the same
folder. It cannot be played back unless the original file
(showing “Prot.2 Orig” at the upper left of the Song
name) is in the same folder.
• In case of a Song to which write-protect has been
applied (“Prot. 2 Edit” is shown at the upper left of the
Song name), the original file name may have been
changed. Rename the file with the original file name (so
that “Prot.2 Orig” is shown at the upper left of the Song
name).
• In case of a Song to which write-protect has been
applied (“Prot. 2 Edit” is shown at the upper left of the
Song name), the file icon may have been changed. Songs
to which write-protect has been applied cannot be
played back when the file icon of the original has been
changed.
•MIDI Clock may be set to “EXTERNAL.” Make sure this is
set to “INTERNAL” (page 207).
Song playback stops before the Song is finished.
•The Guide function is turned on. (In this case, playback
is “waiting” for the correct key to be played.) Press the
[GUIDE] button to turn off the guide function.
Registration memory
Song

PSR-S900/S700 Owner’s Manual 213
Appendix
The Song last selected before turning off the power is
no longer available.
• If the Song last selected before turning off the power is
contained in a USB storage device, you’ll need to recon-
nect the same USB storage device to call up the Song
again.
The measure number is different from that of the
score in the Song Position display, shown by pressing
the [G]/[H] (REW/FF) buttons.
•This happens when playing back music data for which a
specific, fixed tempo is set.
In the AB Repeat function, the B point cannot be set.
•The A point has not been set. Set the B point only after
setting the A point.
When playing back a Song, some channels do not
play.
• Playback of these channels may be set to “OFF.” Turn
playback on for those channels that are set to “OFF”
(page 146).
A Song to which write-protect has been applied
(“Prot. 2 Edit” is shown at the upper left of the Song
name) cannot be moved to an external media such as
a SmartMedia card or floppy disk.
•A Song to which write-protect has been applied cannot
be moved to an external media such as SmartMedia/
floppy disk, etc. Use the [USB TO DEVICE] terminal to
move the song to a USB flash memory device connected
to this instrument.
The melody still plays back, even when specifying
Track 1 as the part to be muted for one-handed prac-
tice.
•A part other than the melody part has been assigned to
Track 1. Reassign the channel containing the melody to
Track 1 (page 145).
When displaying the music score, long notes that
have been entered, such as whole notes and ties, are
not displayed correctly.
• Long notes, such as whole notes and ties, may not be
shown in the music score display exactly as they were
entered. Selecting “Tenuto” by pressing the [H] button
before inputting each note in the Step Record display
(page 153) may solve the problem.
The tempo, beat, measure and music notation is not
displayed correctly.
• Some Song data for the instrument has been recorded
with special “free tempo” settings. For such Song data,
the tempo, beat, measure and music notation will not be
displayed correctly.
The note name partially obscures the note in the dis-
play.
• When several notes occur close to each other, the note
name may obscure the note at left.
The music score of the right-hand/left-hand part is
not displayed.
•The appropriate channels have not been assigned to the
right-hand and left-hand parts. Set the Track 1 and Track
2 channels to “AUTO” (page 145).
The notation in the display is cut off, with the middle
of a measure starting on the next line.
• When all the notes of a measure cannot fit on one line,
the remaining notes in the measure are carried over to
the next line.
Dotted notes are indicated as rests.
•This is normal; sometimes dotted notes are indicated as
rests.
Chords are not displayed.
•If the selected Song does not contain chord data, chords
are not displayed.
Lyrics are not displayed.
•If the selected Song does not contain lyric data, lyrics are
not displayed.
Some of the lyrics overlap each other.
•This happens for Songs containing many lyrics.
The Lyrics Background setting cannot be changed.
• When the background color is specified in the song
data, the Lyrics Background setting cannot be changed.
Guide
Score
Lyrics (Karaoke)

PSR-S900/S700 Owner’s Manual
214
Appendix
Performance assistant technology does not work
appropriately.
• Press the SONG [J] (STOP) button to stop Song play-
back, then set the [ACMP] and PART ON/OFF [LEFT] to
off. Finally, restart the Song.
The instrument display contents cannot be sent via
video out and do not show on an external monitor.
• Make sure that the NTSC or PAL setting corresponds to
the standard of your particular video equipment
(page 194).
Some flashing parallel lines appear in the television or
video monitor.
•Occasionally some flashing parallel lines may appear in
the television or video monitor. This does not necessarily
indicate that the monitor is malfunctioning. For optimum
results, try adjusting the color settings on the monitor
itself.
The monitor you are using may not show the instru-
ment's display contents as expected.
•Keep in mind that even after adjusting all settings as rec-
ommended, the monitor you are using may not show the
instrument's display contents as expected (e.g., the dis-
play contents may not fit on the screen, the characters
may not be completely clear, or the colors may be incor-
rect).
The microphone input signal cannot be recorded.
•The microphone input signal cannot be recorded by
Song/Style recording. Use the USB Audio Recorder func-
tion (page 63).
Harmony can be heard in addition to the microphone
sound.
•Vocal Harmony is set to “ON.” Turn Vocal Harmony off
(page 60).
The Vocal Harmony effect sounds distorted or out-of-
tune.
Your vocal microphone may be picking up extraneous
sounds, such as the Style sound from the instrument. In
particular, bass sounds can cause mistracking of the Vocal
Harmony. To remedy this:
• Sing as closely to the microphone as possible.
• Use a directional microphone.
•Turn down the Master volume, Style volume, or Song
volume control (page 41).
•Separate the microphone from the external speakers as
much as possible.
• Cut the Low band via the 3 Band EQ function in the
MICROPHONE SETTING display (page 188).
• Raise the microphone input level (TH) via the Com-
pressor function in the MICROPHONE SETTING dis-
play (page 189).
Appropriate harmony notes are not produced by the
Vocal Harmony feature.
• Make sure you are using the appropriate method to
specify the harmony notes for the current Vocal Har-
mony mode (page 190).
The message “This drive is busy now.” appeared, and
then the recording was aborted.
• Make sure to use a compatible USB storage device
(page 23).
• Make sure that the USB storage device has enough
memory (page 199).
•If you are using a USB memory device to which data has
already been recorded, check first that no important data
remains on the device, then format it (page 72) and try
recording again.
Performance assistant technology
Video out (PSR-S900)
Microphone/Vocal harmony (PSR-S900)
USB Audio Recorder (PSR-S900)

PSR-S900/S700 Owner’s Manual 215
Appendix
Specifications
PSR-S900 PSR-S700
Sound Source AWM Stereo Sampling
Keyboard 61 keys (C1–C6 with Initial Touch)
Display 320 X 240 dots QVGA Color LCD 320 x 240 dots QVGA B/W LCD
Music Score, Lyrics YES
Text YES —
Voice
Polyphony (max) 128 96
Voice Selection
392 voices + 480 XG voices
19 Drum/SFX Kits + GM2 + GS
voices for GS Song playback
317 voices + 480 XG voices
16 Drum/SFX Kits + GM2 + GS
voices for GS Song playback
S. Articulation! Voice 23 —
Mega Voice 15 10
Live! Voice 20 14
Cool! Voice 26 18
Sweet! Voice 22 11
Organ Flutes! Voice 10 10
Regular Voice 276 254
Voice Editing (Voice Set) YES
Effects
Effect Blocks Reverb/Chorus/DSP 6
Microphone 1 —
Effect Types
Reverb/Chorus/DSP
Reverb: 34 Preset + 3 User
Chorus: 29 Preset + 3 User
DSP 1: 191 Preset + 3 User
DSP 2-4: 106 Preset + 10 User
Master EQ 5 Preset + 2 User
Part EQ 28 Parts
Vocal Harmony 60 Preset + 10 User —
Accompani-
ment Style
Accompaniment Styles 305 205
Pro Styles 281 193
Session Styles 24 12
Mega Voice/Style YES
Fingering Single Finger, Fingered, Fingered On Bass, Multi Finger, AI Fingered,
Full Keyboard, AI Full Keyboard
Style Creator YES
OTS (One Touch Setting) 4 for each Style
OTS Link YES
Music Finder Preset YES
Edit YES
RAM Capacity 120 KB
Song
Preset Songs 5 samples
Guide Follow Lights, Any Key, Karao-Key,
Vocal CueTIME Follow Lights, Any Key, Karao-Key
Performance assistant technology YES
Recording Quick Recording, Multi Recording, Step Recording, Song Editing
Record Channels 16
RAM Capacity 300 KB
USB Audio Recorder YES —
Multi Pad Preset 4 Pads ✕ 95 Banks 4 Pads ✕ 80 Banks
Internet Direct Connection LAN Port, Wireless Game Adaptor (via LAN Port),
External Adaptor (via USB to DEVICE)
PSR-S900/S700 Owner’s Manual
216
Appendix
*Specifications and descriptions in this owner’s manual are for information purposes only. Yamaha Corp. reserves the right to
change or modify products or specifications at any time without prior notice. Since specifications, equipment or options
may not be the same in every locale, please check with your Yamaha dealer.
Memory
Device
USB Flash Memory YES
Floppy Disk (2HD, 2DD) External Adaptor (via USB TO DEVICE)
Hard Disk External Adaptor (via USB TO DEVICE)
Flash Memory (Internal) 1.4 MB 560 KB
Memory Card (SmartMedia, etc.) External Adaptor (via USB TO DEVICE)
Tempo
Tempo Range 5 - 500, Tap Tempo
Metronome Yes
Sound Bell on/off
Registration
Memory
Buttons 8
Regist. Sequence / Freeze YES
Others
Demo YES
Language for Display 6 Languages (English, Japanese, German, French, Spanish, Italian)
Direct Access YES
Transpose Keyboard/Song/Master
Scale Type 9
Computer
Connection
USB to HOST YES
USB to DEVICE YES
Other Connectors
PHONES, MIDI (IN, OUT), FOOT PEDAL (1, 2), AUX IN (R, L/L+R),
OUTPUT (R, L/L+R), LAN
MIC (INPUT VOLUME,
MIC/LINE IN), VIDEO OUT —
Pedal Functions
VOLUME, SUSTAIN, SOSTENUTO, SOFT, GLIDE, PORTAMENTO,
PITCHBEND, MODULATION, S.ARTICULATION (PSR-S900),
DSP VARIATION, SONG PLAY/PAUSE, STYLE START/STOP, etc.
Amplifiers/
Speakers
Amplifiers 12 W ✕ 2
Speakers (12 cm + 4 cm (dome)) ✕ 2 (12 cm + 5 cm) ✕ 2
Power Consumption 40 W 35 W
Dimensions [W ✕ D ✕ H] 1003 mm ✕ 433 mm ✕ 148 mm (39 5/8" ✕ 17 1/8" ✕ 5 7/8")
Weight 11.5 kg (25 lbs., 5 5/8 oz)
Optional
accessories
Headphones HPE-150/HPE-30
Footswitch FC4/FC5
Foot Controller FC7
Floppy Disk Drive UD-FD01
AC Power Adaptor PA-300B/PA-300
Keyboard stand
L-6/L-7
(The exterior size of the PSR-900/700 is beyond the limits as described in
the L-6 Assembly Instructions. However, we have determined through
tests that the stand can be safely used for the instrument.)
PSR-S900 PSR-S700

PSR-S900/S700 Owner’s Manual 217
Appendix
Index
Numerics
1–16 .................................................................. 152, 162
A
A-B Repeat ...................................................................42
AI ...............................................................................107
AI FINGERED .............................................................107
AI FULL KEYBOARD ..................................................107
Any key ......................................................................146
ARABIC ........................................................................88
ASSEMBLY .................................................................123
Auto Accompaniment Feature ......................................46
AUTO REVOICE SETUP ...............................................94
B
Back Ground (Lyrics) ....................................................58
BALANCE .....................................................................41
BASIC .........................................................................119
BASS ..........................................................................209
BOOKMARK ..............................................................175
Brightness .....................................................................20
Browser ......................................................................179
C
Chain Playback ..........................................................142
CHANNEL ......................................................... 127, 162
CHANNEL ON/OFF ...................................................108
Characters ....................................................................77
CHORD ............................................................ 152, 162
CHORD DETECT .......................................................209
CHORD FINGERING .................................................106
Chord Tutor function ....................................................50
COMMON .................................................................100
CONFIG 1 .....................................................35, 48, 108
CONFIG 2 ........................................................... 20, 209
Connection Status ......................................................174
Contrast ........................................................................19
CONTROLLER ............................................................100
Cool! ............................................................................83
COPY ...........................................................................74
CUT .............................................................................75
D
Data List .........................................................................5
DELETE ........................................................................75
Demo ...........................................................................24
Demo (Voice) ...............................................................32
[DEMO] button ............................................................12
[DIGITAL RECORDING] button ...................................12
Direct Access ...............................................................67
DOC (Disk Orchestra Collection) ...............................204
Drums ..........................................................................83
E
EDIT ...........................................................................122
Edit (Bookmarks) ........................................................177
Edit (Effect) ...................................................................96
Edit (EQ) .......................................................................98
Edit (Lyrics) .................................................................162
Edit (Music Finder) .....................................................114
Edit (OTS) .....................................................................51
Edit (Song) ..................................................................162
Edit (Style) ..................................................................124
Edit (Vocal Harmony) .................................................184
Edit (Voice) ...................................................................99
EFFECT .........................................................................93
Effect (microphone) ......................................................59
Effect Return Level ........................................................96
Effect Type ...................................................................95
EFFECT/EQ .................................................................102
Entering characters .......................................................77
EQ (Equalizer) ..............................................................93
EQUAL TEMPERAMENT ..............................................88
ESEQ ..........................................................................203
EXIT .............................................................................71
F
Factory Reset ................................................................79
Factory-programmed Settings .......................................79
FADE IN/OUT (Song) .................................................141
FADE IN/OUT (Style) ....................................................48
Fade In/Out time ........................................................141
FADE IN/OUT/HOLD TIME ........................................108
Fast forward ...............................................................142
Favorite ......................................................................113
File ...............................................................................70
File Selection Display ............................................ 27, 72
File Selection Display Basic Operation .........................71
File Selection Display Configuration .............................70
File/Folder Operations ..................................................72
FILTER ................................................................. 93, 169
FINGERED .................................................................107
FINGERED ON BASS .................................................107
Flash Memory ..............................................................23
Folder ...........................................................................70
Follow lights ...............................................................146
FOOT PEDAL .............................................................195
FOOTAGE ......................................................... 103, 104
Format ..........................................................................72
FREEZE .......................................................................138
FULL KEYBOARD ......................................................107
Function display ...........................................................28
G
Glossary of Internet Terms ..........................................183
GM System Level 1 ....................................................204
GM System Level 2 ....................................................204
GROOVE ...................................................................125
GS ..............................................................................204
Guide .................................................................. 40, 145
H
HARMONY ................................................................102
HARMONY/ECHO .......................................................89
Headphones .................................................................18
Home Page ................................................................181
Hz ................................................................................87
I
ICON ...........................................................................76
Initializing Internet Settings ........................................182
Internet Direct Connection .........................................171
Internet Settings ..........................................................178

PSR-S900/S700 Owner’s Manual
218
Appendix
K
Karaoke ........................................................................57
Karao-key ...................................................................146
Keyboard Parts .............................................................84
KEYBOARD/PANEL ............................................... 33, 61
KIRNBERGER ...............................................................88
L
LAN ...........................................................................179
Language ......................................................................19
LCD .............................................................................12
Left ...............................................................................84
Left Hold ......................................................................50
Live! .............................................................................83
Lyrics .................................................................. 58, 170
M
Main Display ......................................................... 26, 68
MASTER TUNE .............................................................87
[MASTER VOLUME] dial ..............................................17
MEAN-TONE ...............................................................88
MEDIA ........................................................72, 144, 199
Mega Voice ..................................................................83
MELODIC MINOR .....................................................130
Messages ......................................................................66
Metronome ..................................................................34
MIC SETTING .............................................................187
Microphone ........................................................ 57, 187
MIDI ..........................................................................201
MIDI recording .................................................... 43, 147
MIDI Settings ..............................................................204
MIDI Templates ..........................................................206
MIXING CONSOLE ......................................................91
Modulation Wheel .......................................................33
MULTI FINGER ..........................................................107
Multi Pad Creator .......................................................132
Multi Pads ....................................................................13
Multi track recording ..................................................147
Music Finder ................................................................55
Music Rest ....................................................................18
N
NAME ..........................................................................76
Notation .......................................................................39
O
One Touch Setting .......................................................51
One-Handed Practice ...................................................40
Organ Flutes ........................................................ 83, 103
Others (Internet Settings) .............................................180
OTS Link ......................................................................51
OTS Link Timing ........................................................109
OVERALL SETTING ....................................................188
Owner Name ...............................................................21
P
PANEL PART ................................................................92
PARAMETER ..............................................................128
Part ..............................................................................84
PASTE ................................................................... 74, 75
Pause .........................................................................142
Pedal polarity .............................................................195
percussion sounds ........................................................32
performance assistant technology .................................44
Phrase Mark ...............................................................142
Pitch .............................................................................87
Pitch Bend Wheel ........................................................33
Portamento Time ........................................................100
Practice Function .......................................................145
PRESET .........................................................................27
Pro .............................................................................106
PROPERTY .................................................................199
Prot. 1 ..........................................................................74
Prot. 2 Edit ...................................................................74
Prot. 2 Orig ..................................................................74
PURE MAJOR ...............................................................88
PURE MINOR ..............................................................88
PYTHAGOREAN ..........................................................88
Q
QUANTIZE ................................................................127
Quick Recording ........................................................147
QUICK START ............................................................143
R
RANDOM ..................................................................142
Realtime Recording ....................................................118
REC MODE ................................................................162
RECEIVE .....................................................................208
Record .........................................................................43
Record (Song) .............................................................147
Record (Style) .............................................................118
REGISTRATION MEMORY .........................................135
REGISTRATION SEQUENCE ......................................138
REPEAT MODE ................................................... 37, 142
Repertoire ....................................................................56
Revoice ........................................................................94
Rewind .......................................................................142
Right 1 .........................................................................84
Right 2 .........................................................................84
S
SAVE ............................................................................73
Save (Music Finder) ....................................................115
SCALE TUNE ................................................................87
Score ............................................................................39
Search (Music Finder Records) ...................................111
Section Set .................................................................110
Session .......................................................................106
Set the polarity of the pedal ........................................195
SFX ...............................................................................83
SINGLE FINGER .........................................................107
SMF (Standard MIDI file) ............................................203
Song ...................................................................... 12, 36
SONG CH 1-8/9-16 .....................................................92
Song channels ............................................................151
SOUND .....................................................................101
Sound effects ................................................................32
[STANDBY/ON] switch ......................................... 12, 17
Step Recording .................................................. 118, 147
Stop ACMP .................................................................109

PSR-S900/S700 Owner’s Manual 219
Appendix
Style ...................................................................... 12, 46
Style Assembly ...........................................................118
Style Change Behavior ...............................................110
Style Creator ...............................................................118
Style File Format (SFF) ................................................203
STYLE PART ........................................................ 92, 151
STYLE SETTING/SPLIT POINT ....................................109
Style Structure ............................................................118
Style Touch ................................................................109
Super Articulation ........................................................83
Sweet! ..........................................................................83
Synchro Start (Song) ...................................................141
Synchro Start (Style) ......................................................48
Synchro Stop ................................................................49
Synchro Stop Window ................................................109
SYS/EX. .......................................................................162
SYSTEM ......................................................................207
T
TALK ............................................................................62
TALK SETTING ...........................................................191
Tap function ...............................................................141
TAP TEMPO .................................................................48
Tempo ..........................................................................34
Text ..............................................................................58
Time Signature .............................................................35
Top ............................................................................142
TOUCH ................................................................ 33, 53
TRANSMIT .................................................................207
Transpose ........................................................59, 61, 87
TUNE ...........................................................................93
U
UP ................................................................................71
USB Audio Recorder ....................................................63
USB Storage Device .....................................................23
[USB TO DEVICE] terminal ..........................................13
[USB TO HOST] terminal .............................................13
USER ............................................................................27
V
Vibrato .......................................................................102
VIDEO OUT .................................................................59
Vocal CueTIME ..........................................................146
Vocal Harmony ................................................... 60, 184
VOCAL HARMONY EDIT ................................. 185, 186
VOCAL HARMONY TYPE ..........................................184
Voice .................................................................... 30, 83
VOICE buttons .............................................................13
Voice Program Change Number .................................209
Voice Set ......................................................................99
VOL/VOICE ..................................................................92
Volume balance ...........................................................41
VOLUME/ATTACK .....................................................104
W
WERCKMEISTER ..........................................................88
Wireless Game Adaptor ..................................... 171, 183
Wireless LAN .............................................................180
X
XF ..............................................................................203
XG .............................................................................204
Appendix
PSR-S900/S700 Owner’s Manual
220
Panel Button Chart
The position of the button on the panel can be confirmed by the Panel Controls (page 14).
Number
[1
π†
]–[8
π†
]...................................................................... b
A
[A]–[J]............................................................................ [
[ACMP] ......................................................................... R
[AUTO FILL IN] ............................................................. Q
B
[BALANCE].................................................................... \
[BREAK]......................................................................... U
C
[CHANNEL ON/OFF] .................................................... ^
D
DATA ENTRY dial ......................................................... h
[DEMO]......................................................................... 6
[DIRECT ACCESS].......................................................... a
Drum Kit Icons .............................................................. |
[DSP]............................................................................. y
E
ENDING/rit. [I]/[II]/[III] .................................................. V
[ENTER]......................................................................... i
[EXIT] ............................................................................ g
[EXTRA TR].................................................................... C
F
[FADE IN/OUT] ............................................................. O
[FREEZE]........................................................................ n
[FUNCTION]................................................................. d
G
[GUIDE] ........................................................................ B
H
[HARMONY/ECHO]...................................................... u
I
[INTERNET] ................................................................... f
INTRO [I]/[II]/[III]........................................................... S
L
[LCD CONTRAST]......................................................... Z
[LYRICS/TEXT] (PSR-S900) ............................................. 0
[LYRICS] (PSR-S700) ...................................................... 0
M
MAIN VARIATION [A]/[B]/[C]/[D]................................. T
[MASTER VOLUME] ...................................................... 2
[MEMORY].................................................................... o
[METRONOME] ............................................................ L
MIC SETTING/VOCAL HARMONY ............................... 7
[MIXING CONSOLE]..................................................... ]
[MODULATION] wheel ................................................ 4
[MONO] ....................................................................... x
MULTI PAD CONTROL [1]–[4] ..................................... r
MULTI PAD CONTROL [SELECT].................................. q
MULTI PAD CONTROL [STOP] .................................... s
[MUSIC FINDER]........................................................... j
O
ONE TOUCH SETTING [1]–[4] ..................................... t
[OTS LINK].................................................................... P
P
[PART SELCT], [PART ON/OFF]..................................... k
[PITCH BEND] wheel .................................................... 3
R
REGIST BANK [–]/[+]..................................................... m
REGISTRATION MEMORY [1]–[8]................................. p
[REPEAT] ....................................................................... A
S
[SCORE] ........................................................................ 9
SONG [F/K] (PLAY/PAUSE) ................................... H
SONG [G]/[H] (REW/FF) ......................................... I
SONG [J] (STOP) ..................................................... G
SONG [REC] ................................................................ F
SONG [SELECT] ............................................................ 8
[STANDBY/ON] ............................................................ 1
STYLE buttons................................................................ J
STYLE CONTROL [START/STOP] .................................. Y
[SUSTAIN]..................................................................... w
[SYNC START]............................................................... X
[SYNC STOP] ................................................................ W
T
TAB [
√
][
®
]................................................................... c
[TAP TEMPO] ................................................................ M
TEMPO [–]/[+] ............................................................... N
[TOUCH] ...................................................................... v
[TR 1] ............................................................................ E
[TR 2] ............................................................................ D
TRANSPOSE [–][+] ........................................................ K
U
UPPER OCTAVE [–][+] .................................................. {
[USB]............................................................................. e
V
[VARI.] .......................................................................... z
VOICE buttons............................................................... l

Limited Warranty
90 DAYS LABOR 1 YEAR PARTS
Yamaha Corporation of America, hereafter referred to as Yamaha, warrants to the original consumer of a product included in the cate-
gories listed below, that the product will be free of defects in materials and/or workmanship for the periods indicated. This warranty is
applicable to all models included in the following series of products:
PSR SERIES OF PORTATONE ELECTRONIC KEYBOARDS
If during the first 90 days that immediately follows the purchase date, your new Yamaha product covered by this warranty is found to
have a defect in material and/or workmanship, Yamaha and/or its authorized representative will repair such defect without charge for
parts or labor.
If parts should be required after this 90 day period but within the one year period that immediately follows the purchase date, Yamaha
will, subject to the terms of this warranty, supply these parts without charge. However, charges for labor, and/or any miscellaneous
expenses incurred are the consumers responsibility. Yamaha reserves the right to utilize reconditioned parts in repairing these products
and/or to use reconditioned units as warranty replacements.
THIS WARRANTY IS THE ONLY EXPRESS WARRANTY WHICH YAMAHA MAKES IN CONNECTION WITH THESE
PRODUCTS. ANY IMPLIED WARRANTY APPLICABLE TO THE PRODUCT, INCLUDING THE WARRANTY OF MER-
CHANT ABILITY IS LIMITED TO THE DURATION OF THE EXPRESS WARRANTY. YAMAHA EXCLUDES AND
SHALL NOT BE LIABLE IN ANY EVENT FOR INCIDENTAL OR CONSEQUENTIAL DAMAGES.
Some states do not allow limitations that relate to implied warranties and/or the exclusion of incidental or consequential damages.
Therefore, these limitations and exclusions may not apply to you.
This warranty gives you specific legal rights. You may also have other rights which vary from state to state.
CONSUMERS RESPONSIBILITIES
If warranty service should be required, it is necessary that the consumer assume certain responsibilities:
1. Contact the Customer Service Department of the retailer selling the product, or any retail outlet authorized by Yamaha to sell the
product for assistance. You may also contact Yamaha directly at the address provided below.
2. Deliver the unit to be serviced under warranty to: the retailer selling the product, an authorized service center, or to Yamaha with an
explanation of the problem. Please be prepared to provide proof purchase date (sales receipt, credit card copy, etc.) when requesting
service and/or parts under warranty.
3. Shipping and/or insurance costs are the consumers responsibility.* Units shipped for service should be packed securely.
*Repaired units will be returned PREPAID if warranty service is required within the first 90 days.
IMPORTANT: Do NOT ship anything to ANY location without prior authorization. A Return Authorization (RA) will be
issued that has a tracking number assigned that will expedite the servicing of your unit and provide a tracking system if
needed.
4. Your owners manual contains important safety and operating instructions. It is your responsibility to be aware of the contents of this
manual and to follow all safety precautions.
EXCLUSIONS
This warranty does not apply to units whose trade name, trademark, and/or ID numbers have been altered, defaced, exchanged
removed, or to failures and/or damages that may occur as a result of:
1. Neglect, abuse, abnormal strain, modification or exposure to extremes in temperature or humidity.
2. Improper repair or maintenance by any person who is not a service representative of a retail outlet authorized by Yamaha to sell the
product, an authorized service center, or an authorized service representative of Yamaha.
3. This warranty is applicable only to units sold by retailers authorized by Yamaha to sell these products in the U.S.A., the District of
Columbia, and Puerto Rico. This warranty is not applicable in other possessions or territories of the U.S.A. or in any other country.
Please record the model and serial number of the product you have purchased in the spaces provided below.
Model________________________ Serial #_____________________________ Sales Slip #_____________________________
Purchased from______________________________________________________ Date__________________________________
(Retailer)
YAMAHA CORPORATION OF AMERICA
Electronic Service Division
6600 Orangethorpe Avenue
Buena Park, CA 90620
KEEP THIS DOCUMENT FOR YOUR RECORDS. DO NOT MAIL!

* This applies only to products distributed by YAMAHA CORPORATION OF AMERICA. (class B)
(standby)
FCC INFORMATION (U.S.A.)
1. IMPORTANT NOTICE: DO NOT MODIFY THIS UNIT!
This product, when installed as indicated in the instruc-
tions contained in this manual, meets FCC require-
ments. Modifications not expressly approved by
Yamaha may void your authority, granted by the FCC, to
use the product.
2. IMPORTANT: When connecting this product to acces-
sories and/or another product use only high quality
shielded cables. Cable/s supplied with this product
MUST be used. Follow all installation instructions. Fail-
ure to follow instructions could void your FCC authori-
zation to use this product in the USA.
3. NOTE: This product has been tested and found to com-
ply with the requirements listed in FCC Regulations,
Part 15 for Class “B” digital devices. Compliance with
these requirements provides a reasonable level of
assurance that your use of this product in a residential
environment will not result in harmful interference with
other electronic devices. This equipment generates/
uses radio frequencies and, if not installed and used
according to the instructions found in the users manual,
may cause interference harmful to the operation of
other electronic devices. Compliance with FCC regula-
tions does not guarantee that interference will not occur
in all installations. If this product is found to be the
source of interference, which can be determined by
turning the unit “OFF” and “ON”, please try to eliminate
the problem by using one of the following measures:
Relocate either this product or the device that is being
affected by the interference.
Utilize power outlets that are on different branch (circuit
breaker or fuse) circuits or install AC line filter/s.
In the case of radio or TV interference, relocate/reorient
the antenna. If the antenna lead-in is 300 ohm ribbon
lead, change the lead-in to co-axial type cable.
If these corrective measures do not produce satisfac-
tory results, please contact the local retailer authorized
to distribute this type of product. If you can not locate
the appropriate retailer, please contact Yamaha Corpo-
ration of America, Electronic Service Division, 6600
Orangethorpe Ave, Buena Park, CA90620
The above statements apply ONLY to those products
distributed by Yamaha Corporation of America or its
subsidiaries.
OBSERVERA!
Apparaten kopplas inte ur växelströmskällan (nätet)
så länge som den ar ansluten till vägguttaget, även
om själva apparaten har stängts av.
ADVARSEL: Netspæendingen til dette apparat er
IKKE afbrudt, sålæenge netledningen siddr i en
stikkontakt, som er t endt — også selvom der or
slukket på apparatets afbryder.
VAROITUS: Laitteen toisiopiiriin kytketty
käyttökytkin ei irroita koko laitetta verkosta.
This product contains a high intensity lamp that con-
tains a small amount of mercury. Disposal of this
material may be regulated due to environmental
considerations.
For disposal information in the United States, refer
to the Electronic Industries Alliance web site:
www.eiae.org
(mercury)* This applies only to products distributed by
YAMAHA CORPORATION OF AMERICA.
* This applies only to products distributed by
YAMAHA CORPORATION OF AMERICA.
COMPLIANCE INFORMATION STATEMENT
(DECLARATION OF CONFORMITY PROCEDURE)
Responsible Party : Yamaha Corporation of America
Address : 6600 Orangethorpe Ave., Buena Park,
Calif. 90620
Telephone : 714-522-9011
Type of Equipment : Electronic Keyboard
Model Name : PSR-S900/S700
This device complies with Part 15 of the FCC Rules.
Operation is subject to the following two conditions:
1) this device may not cause harmful interference, and
2) this device must accept any interference received including
interference that may cause undesired operation.
See user manual instructions if interference to radio reception is
suspected.
(FCC DoC)
IMPORTANT NOTICE FOR THE UNITED KINGDOM
Connecting the Plug and Cord
IMPORTANT. The wires in this mains lead are coloured in accor-
dance with the following code:
BLUE : NEUTRAL
BROWN : LIVE
As the colours of the wires in the mains lead of this apparatus
may not correspond with the coloured makings identifying the
terminals in your plug proceed as follows:
The wire which is coloured BLUE must be connected to the ter-
minal which is marked with the letter N or coloured BLACK.
The wire which is coloured BROWN must be connected to the
terminal which is marked with the letter L or coloured RED.
Making sure that neither core is connected to the earth terminal
of the three pin plug.
• This applies only to products distributed
by Yamaha-Kemble Music (U.K.) Ltd.
(2 wires)

HEAD OFFICE Yamaha Corporation, Pro Audio & Digital Musical Instrument Division
Nakazawa-cho 10-1, Hamamatsu, Japan 430-8650
Tel: +81-53-460-3273
[PK] 39
For details of products, please contact your nearest Yamaha
representative or the authorized distributor listed below.
Pour plus de détails sur les produits, veuillez-vous adresser à Yamaha ou
au distributeur le plus proche de vous figurant dans la liste suivante.
Die Einzelheiten zu Produkten sind bei Ihrer unten aufgeführten
Niederlassung und bei Yamaha Vertragshändlern in den jeweiligen
Bestimmungsländern erhältlich.
Para detalles sobre productos, contacte su tienda Yamaha más cercana
o el distribuidor autorizado que se lista debajo.
CANADA
Yamaha Canada Music Ltd.
135 Milner Avenue, Scarborough, Ontario,
M1S 3R1, Canada
Tel: 416-298-1311
U.S.A.
Yamaha Corporation of America
6600 Orangethorpe Ave., Buena Park, Calif. 90620,
U.S.A.
Tel: 714-522-9011
MEXICO
Yamaha de México S.A. de C.V.
Calz. Javier Rojo Gómez #1149,
Col. Guadalupe del Moral
C.P. 09300, México, D.F., México
Tel: 55-5804-0600
BRAZIL
Yamaha Musical do Brasil Ltda.
Rua Joaquim Floriano, 913 - 4' andar, Itaim Bibi,
CEP 04534-013 Sao Paulo, SP. BRAZIL
Tel: 011-3704-1377
ARGENTINA
Yamaha Music Latin America, S.A.
Sucursal de Argentina
Viamonte 1145 Piso2-B 1053,
Buenos Aires, Argentina
Tel: 1-4371-7021
PANAMA AND OTHER LATIN
AMERICAN COUNTRIES/
CARIBBEAN COUNTRIES
Yamaha Music Latin America, S.A.
Torre Banco General, Piso 7, Urbanización Marbella,
Calle 47 y Aquilino de la Guardia,
Ciudad de Panamá, Panamá
Tel: +507-269-5311
THE UNITED KINGDOM
Yamaha-Kemble Music (U.K.) Ltd.
Sherbourne Drive, Tilbrook, Milton Keynes,
MK7 8BL, England
Tel: 01908-366700
IRELAND
Danfay Ltd.
61D, Sallynoggin Road, Dun Laoghaire, Co. Dublin
Tel: 01-2859177
GERMANY
Yamaha Music Central Europe GmbH
Siemensstraße 22-34, 25462 Rellingen, Germany
Tel: 04101-3030
SWITZERLAND/LIECHTENSTEIN
Yamaha Music Central Europe GmbH,
Branch Switzerland
Seefeldstrasse 94, 8008 Zürich, Switzerland
Tel: 01-383 3990
AUSTRIA
Yamaha Music Central Europe GmbH,
Branch Austria
Schleiergasse 20, A-1100 Wien, Austria
Tel: 01-60203900
CZECH REPUBLIC/SLOVAKIA/
HUNGARY/SLOVENIA
Yamaha Music Central Europe GmbH,
Branch Austria, CEE Department
Schleiergasse 20, A-1100 Wien, Austria
Tel: 01-602039025
POLAND
Yamaha Music Central Europe GmbH
Sp.z. o.o. Oddzial w Polsce
ul. 17 Stycznia 56, PL-02-146 Warszawa, Poland
Tel: 022-868-07-57
THE NETHERLANDS/
BELGIUM/LUXEMBOURG
Yamaha Music Central Europe GmbH,
Branch Benelux
Clarissenhof 5-b, 4133 AB Vianen, The Netherlands
Tel: 0347-358 040
FRANCE
Yamaha Musique France
BP 70-77312 Marne-la-Vallée Cedex 2, France
Tel: 01-64-61-4000
ITALY
Yamaha Musica Italia S.P.A.
Viale Italia 88, 20020 Lainate (Milano), Italy
Tel: 02-935-771
SPAIN/PORTUGAL
Yamaha-Hazen Música, S.A.
Ctra. de la Coruna km. 17, 200, 28230
Las Rozas (Madrid), Spain
Tel: 91-639-8888
GREECE
Philippos Nakas S.A. The Music House
147 Skiathou Street, 112-55 Athens, Greece
Tel: 01-228 2160
SWEDEN
Yamaha Scandinavia AB
J. A. Wettergrens Gata 1
Box 30053
S-400 43 Göteborg, Sweden
Tel: 031 89 34 00
DENMARK
YS Copenhagen Liaison Office
Generatorvej 6A
DK-2730 Herlev, Denmark
Tel: 44 92 49 00
FINLAND
F-Musiikki Oy
Kluuvikatu 6, P.O. Box 260,
SF-00101 Helsinki, Finland
Tel: 09 618511
NORWAY
Norsk filial av Yamaha Scandinavia AB
Grini Næringspark 1
N-1345 Østerås, Norway
Tel: 67 16 77 70
ICELAND
Skifan HF
Skeifan 17 P.O. Box 8120
IS-128 Reykjavik, Iceland
Tel: 525 5000
OTHER EUROPEAN COUNTRIES
Yamaha Music Central Europe GmbH
Siemensstraße 22-34, 25462 Rellingen, Germany
Tel: +49-4101-3030
Yamaha Corporation,
Asia-Pacific Music Marketing Group
Nakazawa-cho 10-1, Hamamatsu, Japan 430-8650
Tel: +81-53-460-2312
TURKEY/CYPRUS
Yamaha Music Central Europe GmbH
Siemensstraße 22-34, 25462 Rellingen, Germany
Tel: 04101-3030
OTHER COUNTRIES
Yamaha Music Gulf FZE
LOB 16-513, P.O.Box 17328, Jubel Ali,
Dubai, United Arab Emirates
Tel: +971-4-881-5868
THE PEOPLE’S REPUBLIC OF CHINA
Yamaha Music & Electronics (China) Co.,Ltd.
25/F., United Plaza, 1468 Nanjing Road (West),
Jingan, Shanghai, China
Tel: 021-6247-2211
HONG KONG
Tom Lee Music Co., Ltd.
11/F., Silvercord Tower 1, 30 Canton Road,
Tsimshatsui, Kowloon, Hong Kong
Tel: 2737-7688
INDONESIA
PT. Yamaha Music Indonesia (Distributor)
PT. Nusantik
Gedung Yamaha Music Center, Jalan Jend. Gatot
Subroto Kav. 4, Jakarta 12930, Indonesia
Tel: 21-520-2577
KOREA
Yamaha Music Korea Ltd.
8F, 9F, Dongsung Bldg. 158-9 Samsung-Dong,
Kangnam-Gu, Seoul, Korea
Tel: 080-004-0022
MALAYSIA
Yamaha Music Malaysia, Sdn., Bhd.
Lot 8, Jalan Perbandaran, 47301 Kelana Jaya,
Petaling Jaya, Selangor, Malaysia
Tel: 3-78030900
PHILIPPINES
Yupangco Music Corporation
339 Gil J. Puyat Avenue, P.O. Box 885 MCPO,
Makati, Metro Manila, Philippines
Tel: 819-7551
SINGAPORE
Yamaha Music Asia Pte., Ltd.
#03-11 A-Z Building
140 Paya Lebor Road, Singapore 409015
Tel: 747-4374
TAIWAN
Yamaha KHS Music Co., Ltd.
3F, #6, Sec.2, Nan Jing E. Rd. Taipei.
Taiwan 104, R.O.C.
Tel: 02-2511-8688
THAILAND
Siam Music Yamaha Co., Ltd.
891/1 Siam Motors Building, 15-16 floor
Rama 1 road, Wangmai, Pathumwan
Bangkok 10330, Thailand
Tel: 02-215-2626
OTHER ASIAN COUNTRIES
Yamaha Corporation,
Asia-Pacific Music Marketing Group
Nakazawa-cho 10-1, Hamamatsu, Japan 430-8650
Tel: +81-53-460-2317
AUSTRALIA
Yamaha Music Australia Pty. Ltd.
Level 1, 99 Queensbridge Street, Southbank,
Victoria 3006, Australia
Tel: 3-9693-5111
NEW ZEALAND
Music Houses of N.Z. Ltd.
146/148 Captain Springs Road, Te Papapa,
Auckland, New Zealand
Tel: 9-634-0099
COUNTRIES AND TRUST
TERRITORIES IN PACIFIC OCEAN
Yamaha Corporation,
Asia-Pacific Music Marketing Group
Nakazawa-cho 10-1, Hamamatsu, Japan 430-8650
Tel: +81-53-460-2312
NORTH AMERICA
CENTRAL & SOUTH AMERICA
EUROPE
AFRICA
MIDDLE EAST
ASIA
OCEANIA

U.R.G., Pro Audio & Digital Musical Instrument Division, Yamaha Corporation
Printed in China
703APAP4.3-02B1
© 2007 Yamaha Corporation
WH65940
Yamaha Home Keyboards Home Page (English only)
http://music.yamaha.com/homekeyboard
Yamaha Manual Library
http://www.yamaha.co.jp/manual/
