Yamaha RX A720 Quick Guide
User Manual: Yamaha RX-A720 Quick Guide
Open the PDF directly: View PDF ![]() .
.
Page Count: 4
1
Quick Guide for Useful Functions
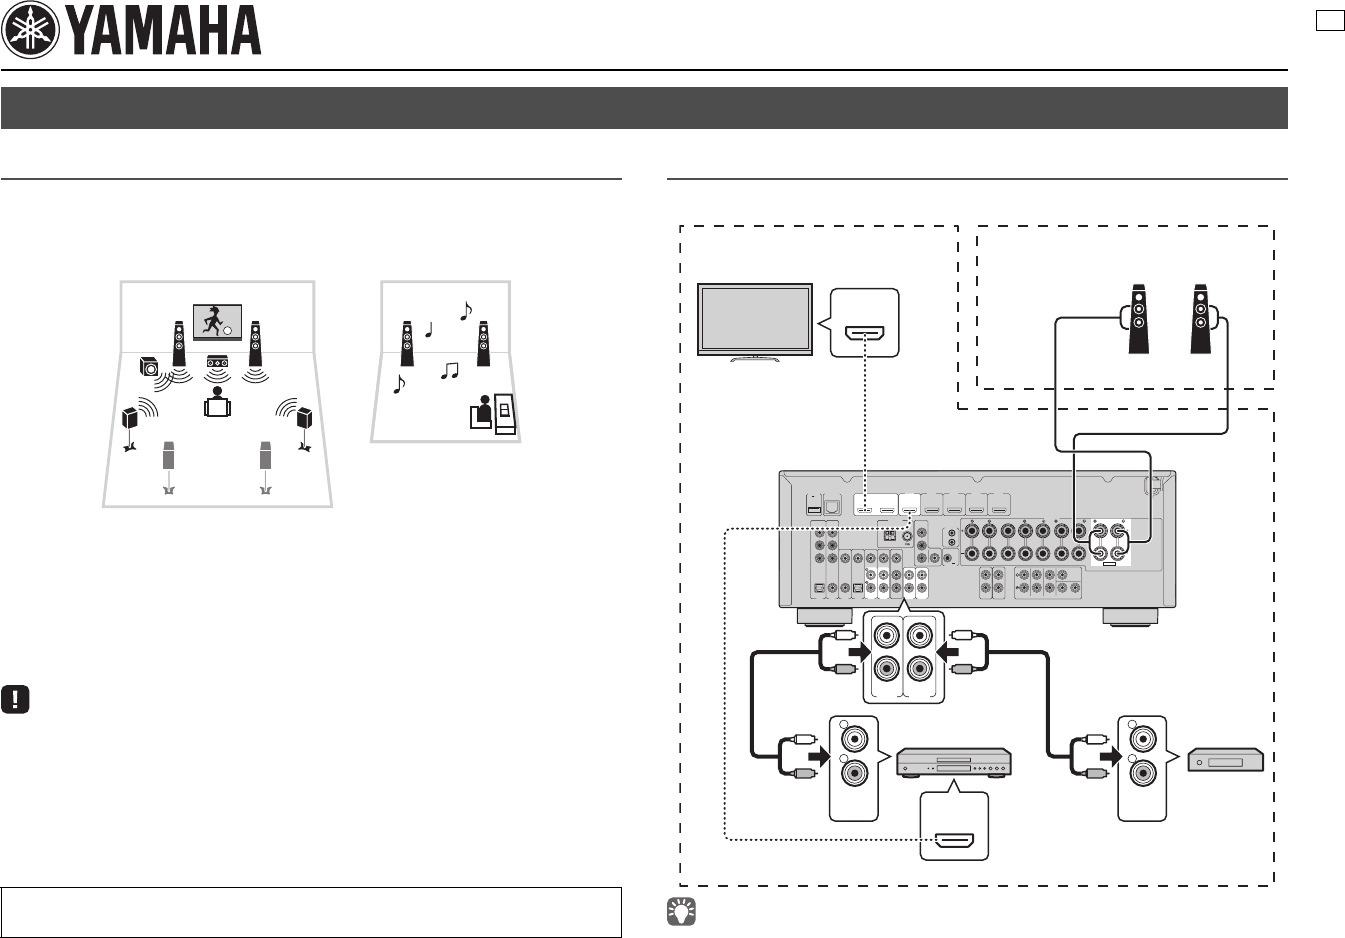
What is the multi-zone function?
The multi-zone function allows you to play back different input sources in the room
where the unit is installed (main zone) and in another room (Zone2). For example, while
you are watching TV in the living room (main zone), another person can listen to radio in
the study room (Zone2).
You can select the following input sources for Zone2:
• Audio sources input from the HDMI or digital audio input jacks cannot be output to Zone2.
• AirPlay is available in Zone2 only when Airplay playback is ongoing in the main zone.
This guide explains how to set up a Zone2 system using the unit’s internal amplifier.
This will enable you to use the 5.1-channel speaker system in the main zone and
2-channel speaker system in Zone2 simultaneously. (When Zone2 output is disabled,
you can use the 7.1-channel speaker system in the main zone.)
For more information, refer to the Owner’s Manual in the supplied CD-ROM.
Preparations
■Connection overview
• For information on how to connect speakers or a TV in the main zone, refer to the Easy Setup Guide.
Multi-zone function
• Analog audio input
(AV 5–6, AUDIO 1–2, V-AUX [RX-A820 only])
• TUNER (FM/AM radio)
• USB (including iPod)
• SERVER
•AirPlay
• Network streaming services
(available on some models)
• The illustrations of the main unit and remote control may be different from the actual product depending
on the model.
Living room (main zone)
Study room (Zone2)
FRONT CENTER SURROUND
SINGLE
SURROUND BACK/BI AMP
ZONE 2/PRESENCE
EXTRA SP
COMPONENT
AV 1 AV 2 AV 3 AV 4 AV 5
AUDIO 1 AUDIO 2
AV
OUT
AV 6
VIDEO
VIDEO
OPTICAL OPTICAL
(TV)
COAXIAL COAXIAL
COMPONENT
VIDEO
VIDEO
P
B
Y
MONITOR OUT
OUT
IN
REMOTE
TRIGGER OUT
AUDIO
OUT
ZONE 2
OUT
FRONT
SURROUND SUR. BACK
PRE OUT
SINGLE CENTER
SUBWOOFER
12
P
R
P
B
Y
P
R
HDMI 1
(BD/DVD)
NETWORKDC OUT
5V
0.5A
(NET)
HDMI 4 HDMI 5HDMI 3HDMI 2
ANTENNA
(RADIO)
HDMI
12
OUT
ARC
FM
AM
SPEAKERS
12V
0.1A
HDMI IN
HDMI
OUT
AUDIO
OUT
R
L
AUDIO
OUT
R
L
AUDIO 1 AUDIO 2
L
R
L
R
L
R
L
R
Left Right
TV Speakers
BD/DVD player CD player
Already connected
(refer to Easy Setup Guide)
Zone2Main zone
The unit (rear)
Already connected
(refer to Easy Setup Guide)
U
2
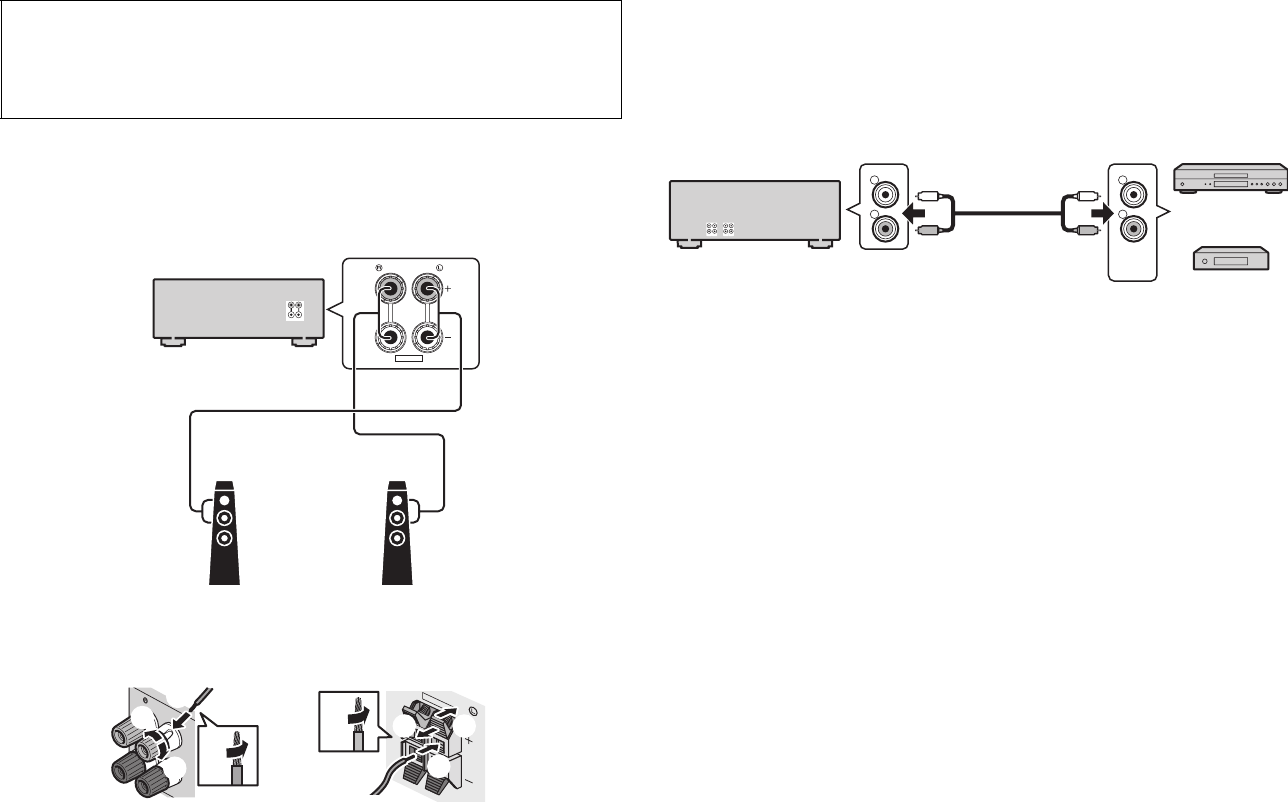
■Connections
1Connect the speaker in Zone2 to the EXTRA SP terminals with
speaker cables.
The type of the speaker terminals varies depending on the model.
2Connect the playback devices (such as BD/DVD players and CD
players) in the main zone to the analog stereo input jacks with stereo
pin cables.
Only analog audio sources (including FM/AM radio), and USB and network
sources can be output to Zone2. To listen to the playback of an external device
in Zone2, you need to connect the device to the analog audio input jacks.
3Connect the power cable to an AC wall outlet.
To operate the unit and external devices from Zone2
You can operate the unit and external devices from Zone2 using the supplied remote
control if you connect an infrared signal receiver/emitter to the unit’s REMOTE IN/OUT
jacks. For details, refer to the Owner's Manual in the supplied CD-ROM.
Caution
• Before connecting the speakers, remove the unit’s power cable from the AC wall outlet.
• Ensure that the core wires of the speaker cable do not touch each other or come into contact with the
unit’s metal areas. This may damage the unit or the speakers.
• Connect the speakers with the correct polarity.
EXTRA SP
ZONE 2/PRESENCE
EXTRA SP terminals
Left
Speakers (Zone2)
Right
The unit (rear)
ZONE 2/PRESENCE
aa
b
d
c
+ (red)
- (black)
(Rotate-type) (Push-type)
E
2/
PRESENCE
EXTRA SP
aa b
c
d+ (red)
- (black)
AUDIO
OUT
R
L
R
L
L
R
L
R
AV 5–6 jacks
AUDIO 1–2 jacks BD/DVD player
CD player
The unit (rear)
3
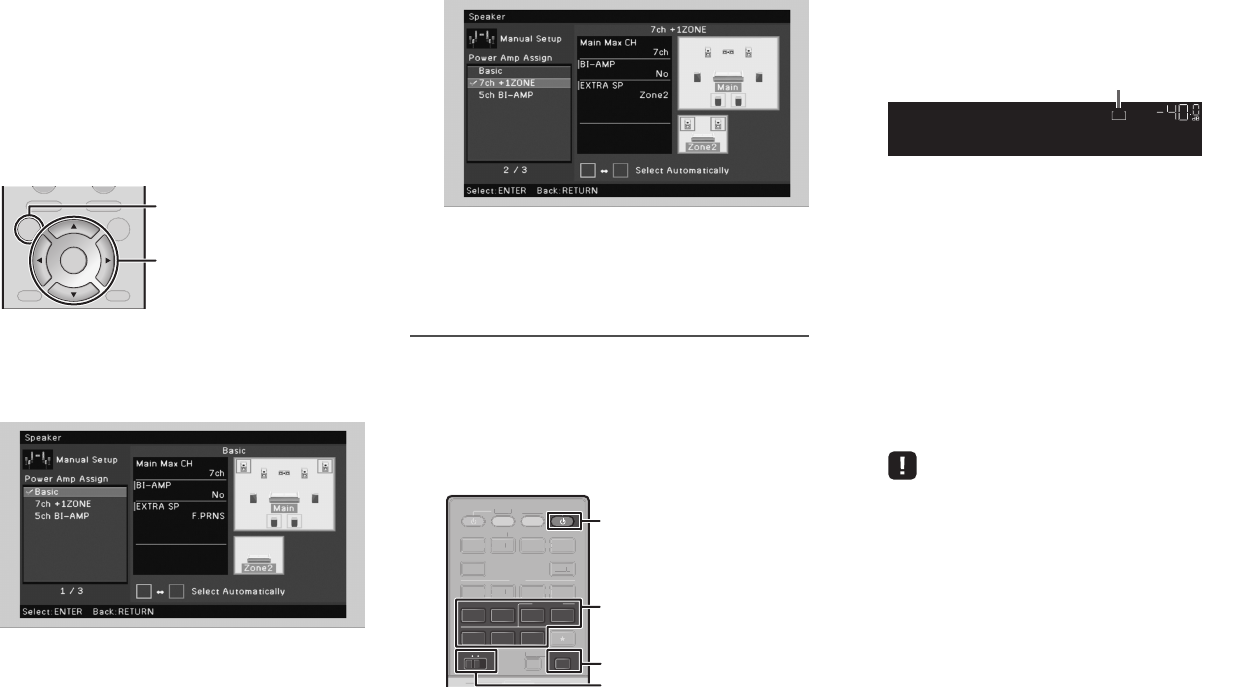
■Zone2 setup
Use the supplied remote control to set the Zone2
function.
1Turn on the unit and TV.
2Switch the TV input to display video from
the unit.
3Press ON SCREEN to display the
on-screen menu on the TV.
4Use the cursor keys and ENTER to select
“Setup” → “Speaker” → “Manual Setup”
→ “Power Amp Assign”.
5Use the cursor keys to select
“7ch +1ZONE” and press ENTER.
6Press ON SCREEN to exit from the
on-screen menu.
Controlling Zone2
Follow the procedure below to enable Zone2 output and
select an input source for Zone2.
1Set MAIN/ZONE2 to “ZONE2”.
This changes the zone (main zone or Zone2)
that is controlled by the remote control.
2Press RECEIVER z.
Each time you press the key, Zone2 output is
enabled or disabled.
When Zone2 output is enabled, “ZONE2” lights
up in the front display.
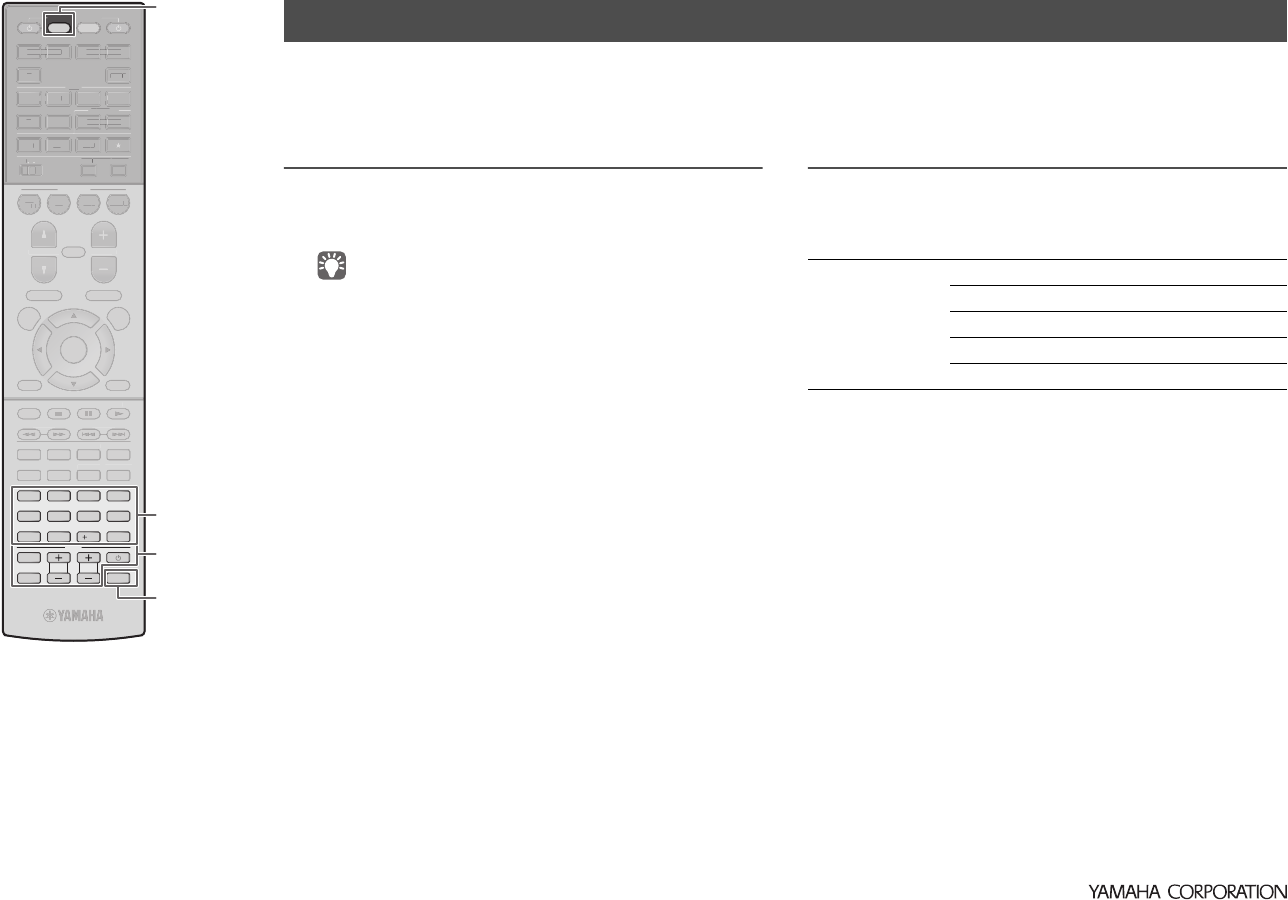
3Use the following keys to select an input
source.
AV 5–6: AV 5–6 (AUDIO) jacks
AUDIO 1–2: AUDIO 1–2 jacks
V-AUX: (RX-A820 only)
VIDEO AUX (AUDIO) jacks (on the front panel)
TUNER: FM/AM radio
USB: USB jack (on the front panel)
NET: NETWORK jack (press repeatedly to
select a desired network source)
• You cannot select USB and network sources exclusively for
each zone. For example, if you select “SERVER” for Zone2
when “USB” is selected for the main zone, the input source for
the main zone also switches to “SERVER”.
4Start playback on the external device or
select a radio station.
For details about the playback operation, refer to
the instruction manual for the external device or
Owner’s Manual on the supplied CD-ROM.
DISPLAYRETURN
ENTER
ON
SCREEN OPTION
TOP MENU
POP-UP/MENU
DI
S
PLA
Y
RETURN
O
PTI
O
N
TO
P MEN
U
P
O
P-
U
P
/
ME
N
U
ON SCREEN
ENTER
Cursor keys
NET
PARTY HDMI OUT
TUNER
MAIN
ZONE 2
USB
SCENE
SOURCE
RECEIVER
HDMI
AV
AUDIO
5
65
V-AUX
1234
12
12
34
PART
Y
SC
EN
E
SO
UR
C
E
R
E
C
EIVE
R
HDMI
AV
5
V
-A
U
X
1
2
3
4
1
2 3
4
HDMI OUT
MAIN/ZONE2
AV 5–6
AUDIO 1–2
TUNER
USB
NET
RECEIVER z
Zone2On
VOL.
2
ZONE
Lights up
© 2012 Yamaha Corporation Printed in Malaysia ZD15800
TV VOL TV CH
TV
INPUT
MUTE
CODE SET
90
10
ENT
MEMORY
5687
1234
MOVIE
ENHANCER
TUNING PRESET
BAND
DISPLAYRETURN
ENTER
ON
SCREEN OPTION
TOP MENU
MUTE
PROGRAM VOLUME
POP-UP/MENU
PURE DIRECT
STRAIGHT
INFO SLEEP
MUSIC
NET
PARTY HDMI OUT
TUNER
MAIN
ZONE 2
USB
MODE
SCENE
BD
DVD TV
NET
RADIO
SOURCE
RECEIVER
HDMI
AV
AUDIO
5
65
V-AUX
1234
12
12
34
SUR. DECODE
M
O
V
I
E
ENHAN
C
E
R
T
U
NIN
G
P
RE
S
E
T
BAN
D
DI
S
PL
A
Y
RETURN
ENTE
R
ON
SC
RE
E
N
O
PTI
ON
TO
P MEN
U
MUTE
PR
OG
RAM V
O
L
U
M
E
PO
P-
U
P
/
ME
N
U
P
U
RE DIRE
CT
S
TRAI
G
H
T
INF
O
S
LE
E
P
M
USI
C
NE
T
PART
YH
DMI
OUT
TUNE
R
MAIN
ZO
NE
2
US
B
MO
D
E
SCEN
E
BD
DV
D
TV
NE
T
RADI
O
RECEIVE
R
HDM
I
A
V
A
UDI
O
5
6
5
V
-
AU
X
1
2
3
4
1
2
1
2
3
4
SU
R. DE
COD
E
CODE SET
TV z
SOURCE
By registering the remote control code for your TV, you can operate it with the remote control of the unit.
For information on how to register remote control codes for other external devices, refer to Owner’s Manual in the supplied CD-ROM.
Registering the remote control code
1Use “Remote Control Code Search” in the supplied
CD-ROM to find your TV’s remote control code.
• If there are multiple remote control codes, register the first code in the list. If
that does not work, try the other codes.
2Press CODE SET.
SOURCE blinks twice.
Perform each of the following steps within 1 minute.
Otherwise, the setting will be canceled. If this happens,
repeat from Step 2.
3Press TV z.
4Use the numeric keys to enter the 4-digit remote
control code.
Once the remote control code is successfully registered, SOURCE
blinks twice.
If it blinks six times, registration has failed. Repeat from Step 2.
TV operations
Once you have registered the remote control code for your TV, you
can control it using the TV operation keys, regardless of the input
source selected on the unit.
Controlling your TV with the remote control of the unit
TV operation keys
INPUT Switches the video inputs of the TV.
MUTE Mutes the audio output of the TV.
TV VOL Adjust the volume of the TV.
TV CH Switch the channels of the TV
TV zTurns on/off the TV.
Numeric keys
TV operation keys
