Yamaha RXV2065 UserUpdate Instruction__V__rev8 RX V2065 FIRMWARE UPDATE VERSION 033.103.026 (USA )
User Manual: Yamaha RX-V2065 FIRMWARE UPDATE VERSION 033.103.026 (USA )
Open the PDF directly: View PDF ![]() .
.
Page Count: 7

Firmware Update Procedure for RX-V2065
Page.1 of 7
August, 2009
Subject: RX-V2065 Firmware Update ver. 033.103.026
Yamaha is pleased to offer this firmware update to ensure the best possible
performance for your Yamaha RX-V2065 AV Receiver.
This firmware adds compatibility with Music CAST2 and optional video assign menu to
the input of AV3, AV4, AUDIO1 and AUDIO2.
The following pages contain the firmware update instructions for RX-V2065. You can
easily update to the latest firmware by either using an USB thumb drive or through
internet. In order to properly execute the update, read all instructions carefully. The
following links will also lead you directly to the beginning of each individual section of
the instructions.
NOTE: Performing this update will RESET ALL THE SETTINGS of your
receiver back to factory default.
9 Click here to confirm your current firmware version.
9 Click here to firmware update by USB. (USB thumb drive required)
Update by Network is recommended if your receiver is connected to the internet.
9 Click here to firmware update by Network. (Internet connection required)
9 Click here to confirm updated firmware version
9 Click here for troubleshooting.
< IMPORTANT NOTICE >
Do not attempt to update your Yamaha receiver using any other data file except those provided
directly from the Yamaha website or through your network connection.
Follow the instructions carefully and do not attempt any other procedures not specified in the
instructions provided by Yamaha.
Improperly updated products may cause improper operation, and any parts or service required
to restore proper operation will not be covered under the Yamaha Limited Warranty.
Firmware Update Procedure for RX-V2065
Page.2 of 7
Confirming Firmware Version
Below are the procedures to confirm your firmware version.
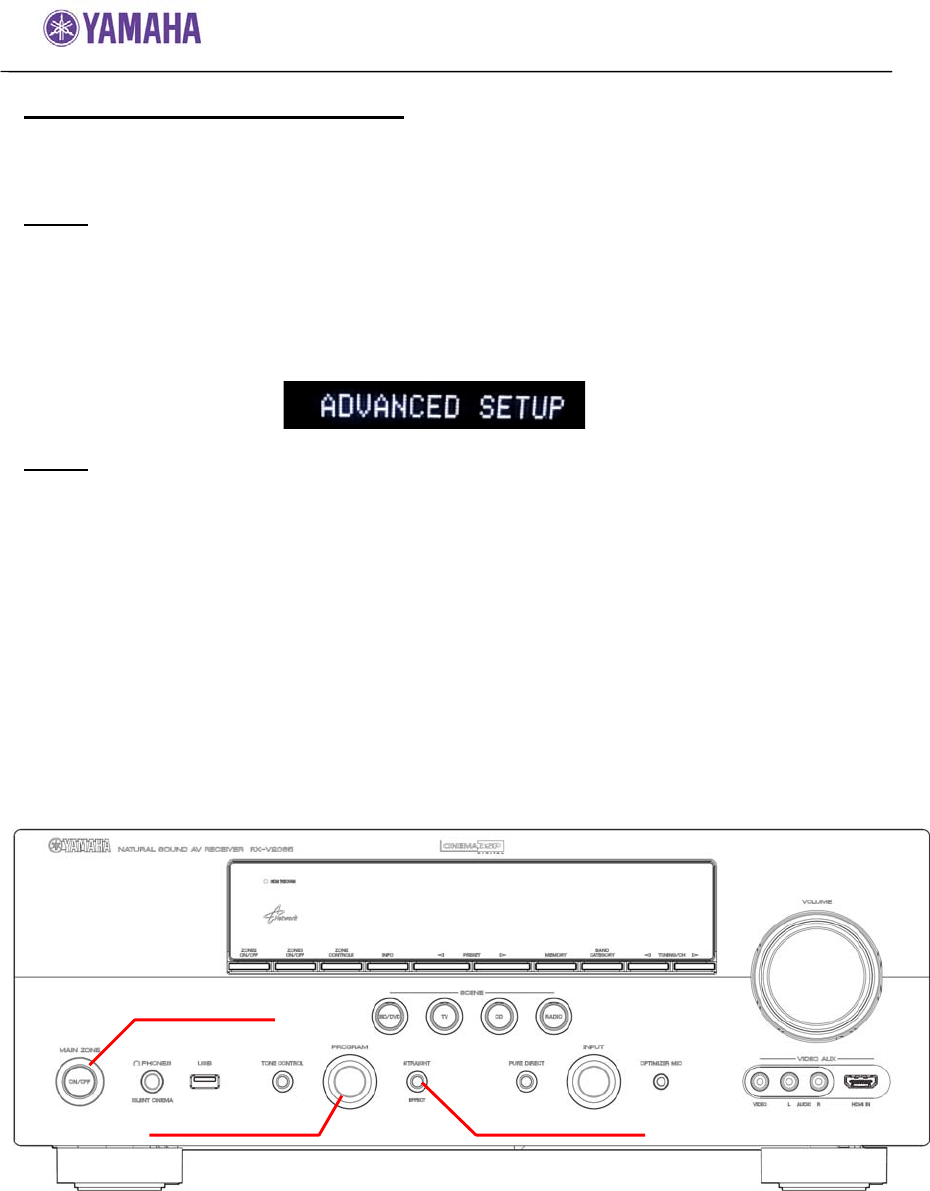
Step1 Enter ADVANCED SETUP mode
Confirm that your receiver is powered off. (Standby condition)
While pressing the STRAIGHT button, press (and release) the MAIN ZONE
button and keep depressing the STRAIGHT button until “ADVANCED
SETUP” appears on the front panel display.
(Note: “ADVANCED SETUP” is displayed only for a few seconds.)
Step2 Select Version display from the menu
Rotate the PROGRAM selector counterclockwise and select “VER”.
Latest version would be “VER033.103.026”.
If your receiver’s version is lower than above, perform firmware update
described in the following pages.
If “ERROR” appears, refer to the troubleshooting methods on page 7 to
recover.
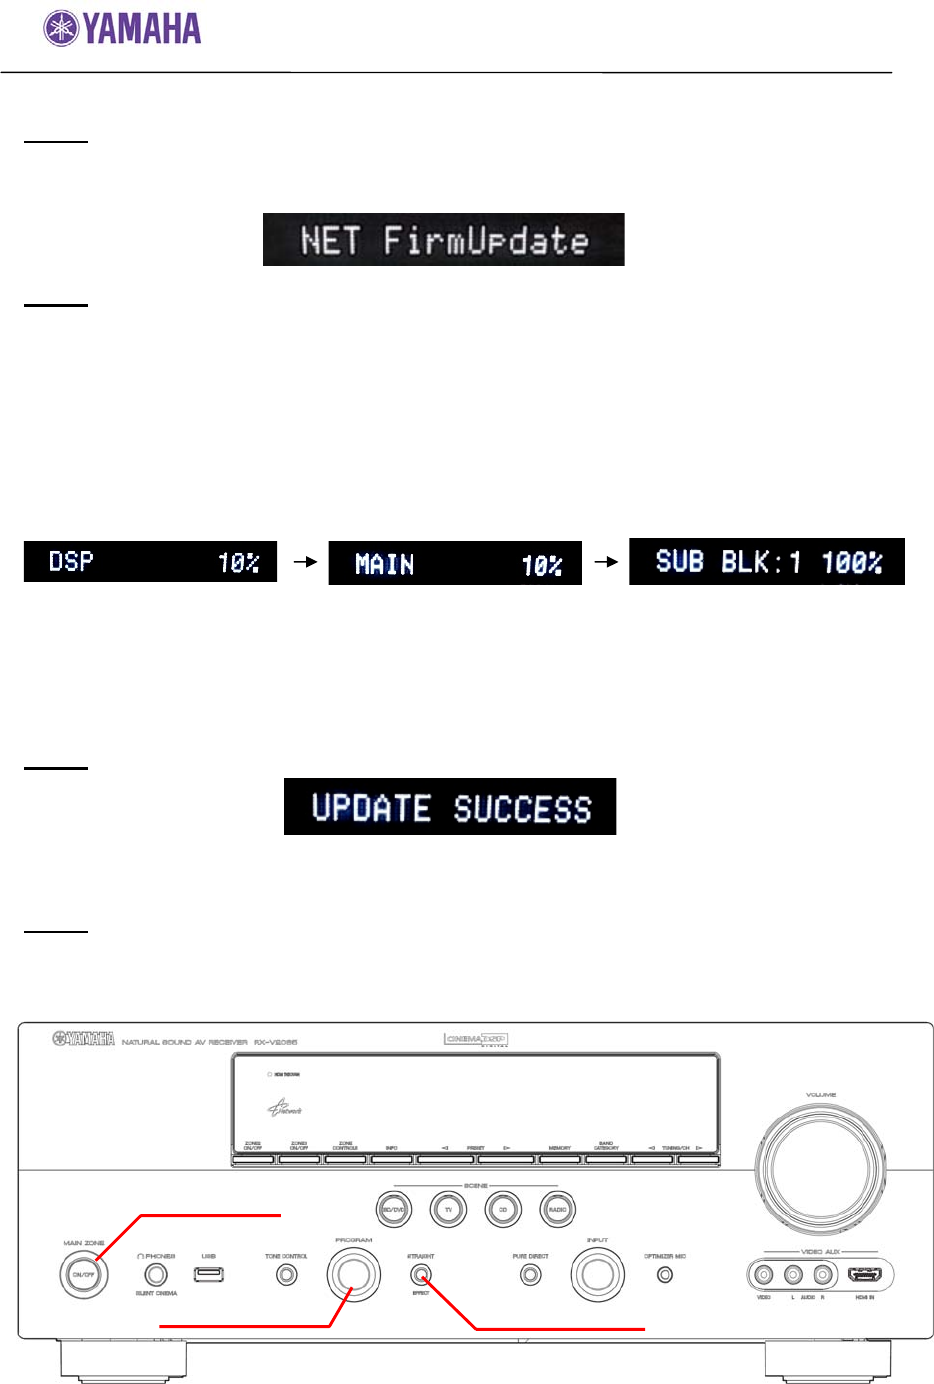
MAIN ZONE
PROGRAM STRAIGHT
Firmware Update Procedure for RX-V2065
Page.3 of 7
Firmware Update by USB
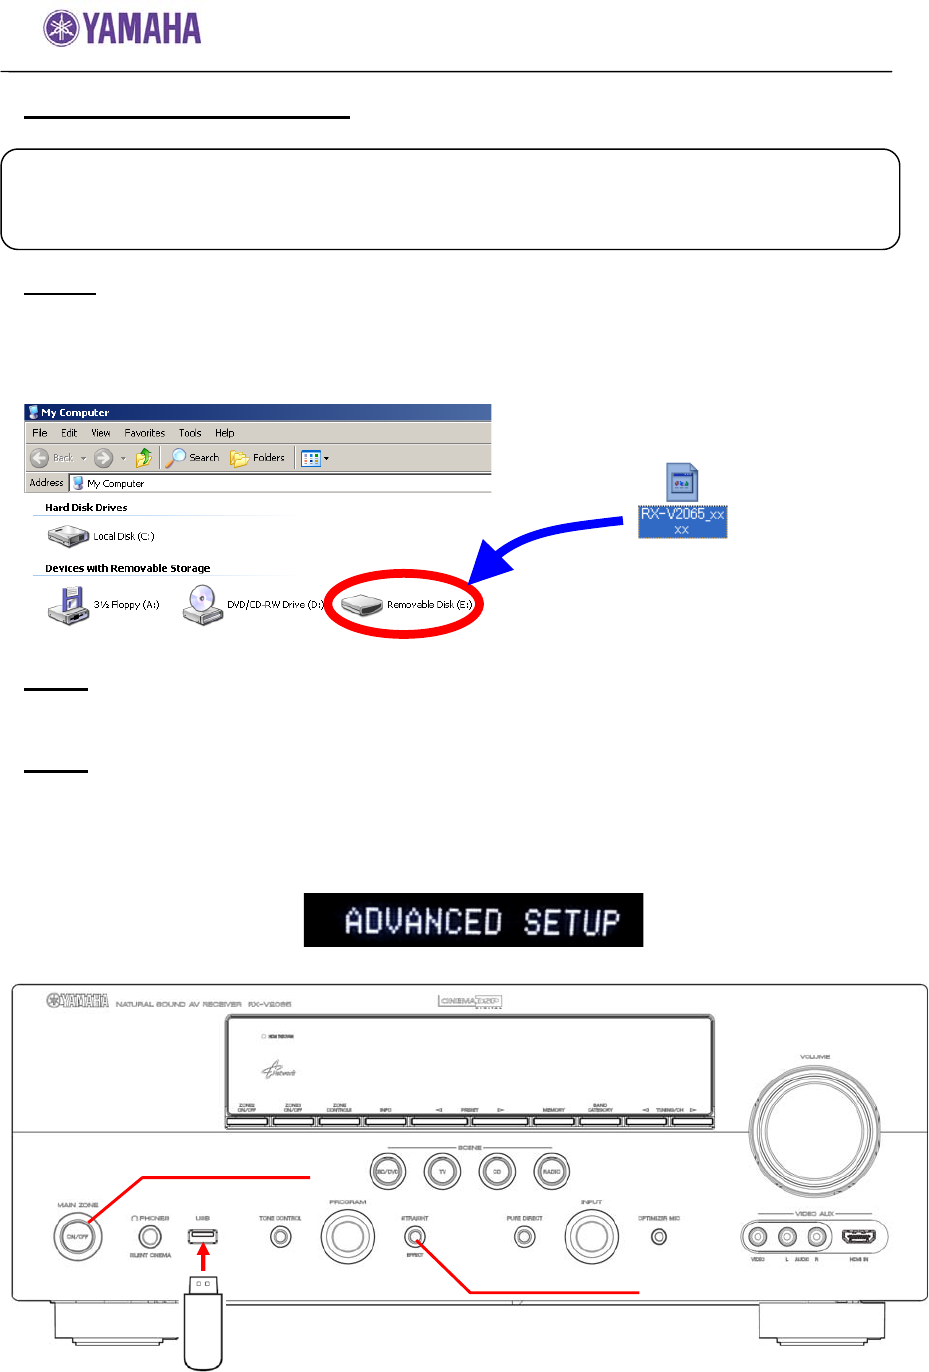
Step1 Prepare USB thumb drive for the update
Download and copy the firmware, “RX-V2065_xxxx.bin” into the root
directory of the USB thumb drive.
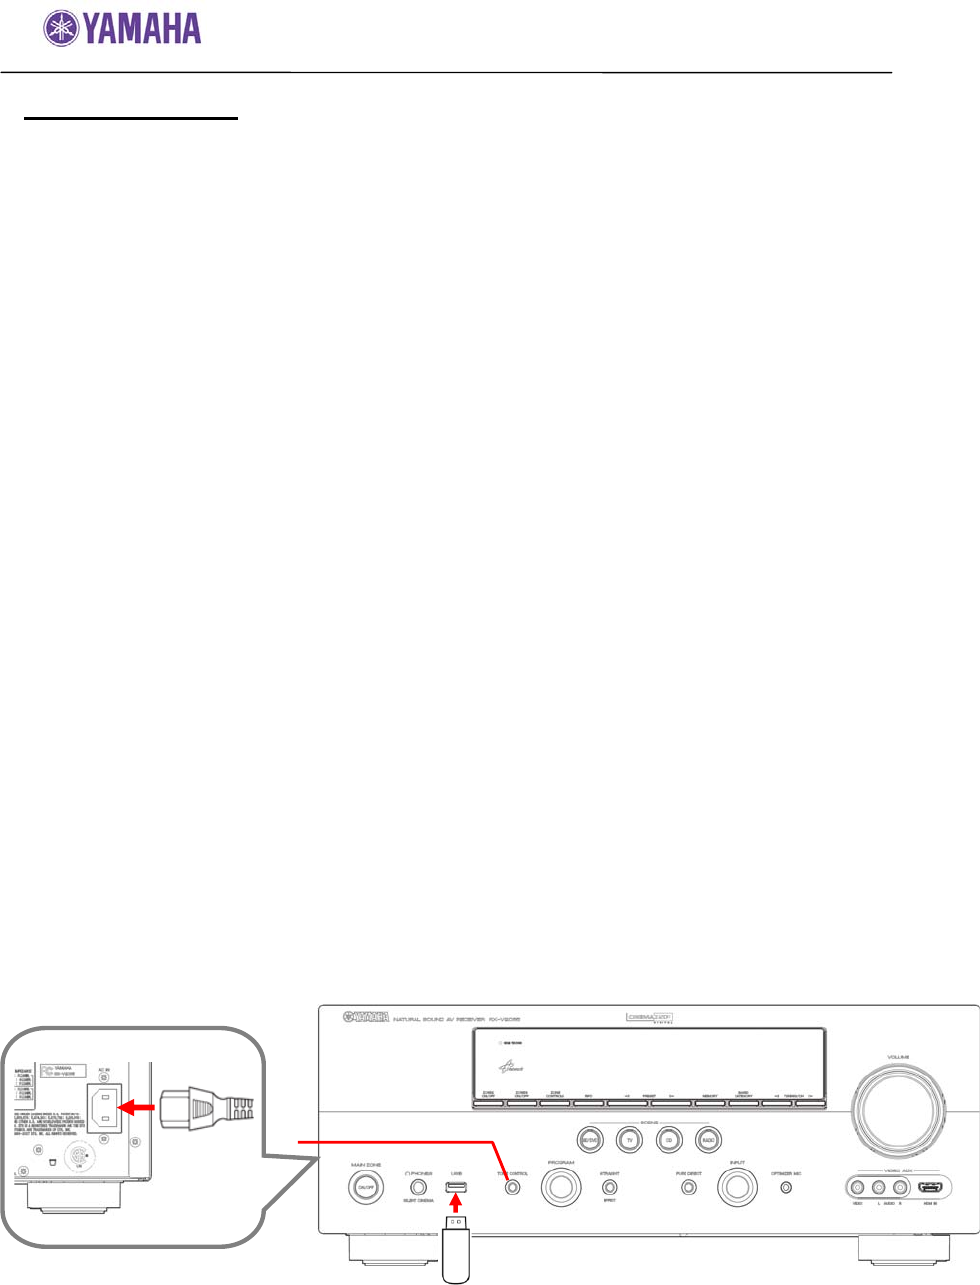
Step2 Power off the receiver. (Standby condition). Then, insert the USB thumb
drive to the USB terminal located on the front panel.
Step3 Enter ADVANCED SETUP mode
While pressing the STRAIGHT button, press (and release) the MAIN ZONE
ON/OFF button and keep depressing the STRAIGHT button until
“ADVANCED SETUP” appears on the front panel display.
(Note: “ADVANCED SETUP” is displayed only for a few seconds.)
Requirement: - USB thumb drive, with enough free space to store over 16 MB.
(File system with FAT16 or FAT32 format)
- Firmware file provided by YAMAHA,”RX-V2065_xxxx.bin”.
Drag & Drop the file into USB drive.
MAIN ZONE
STRAIGHT
USB Drive
Firmware Update Procedure for RX-V2065
Page.4 of 7
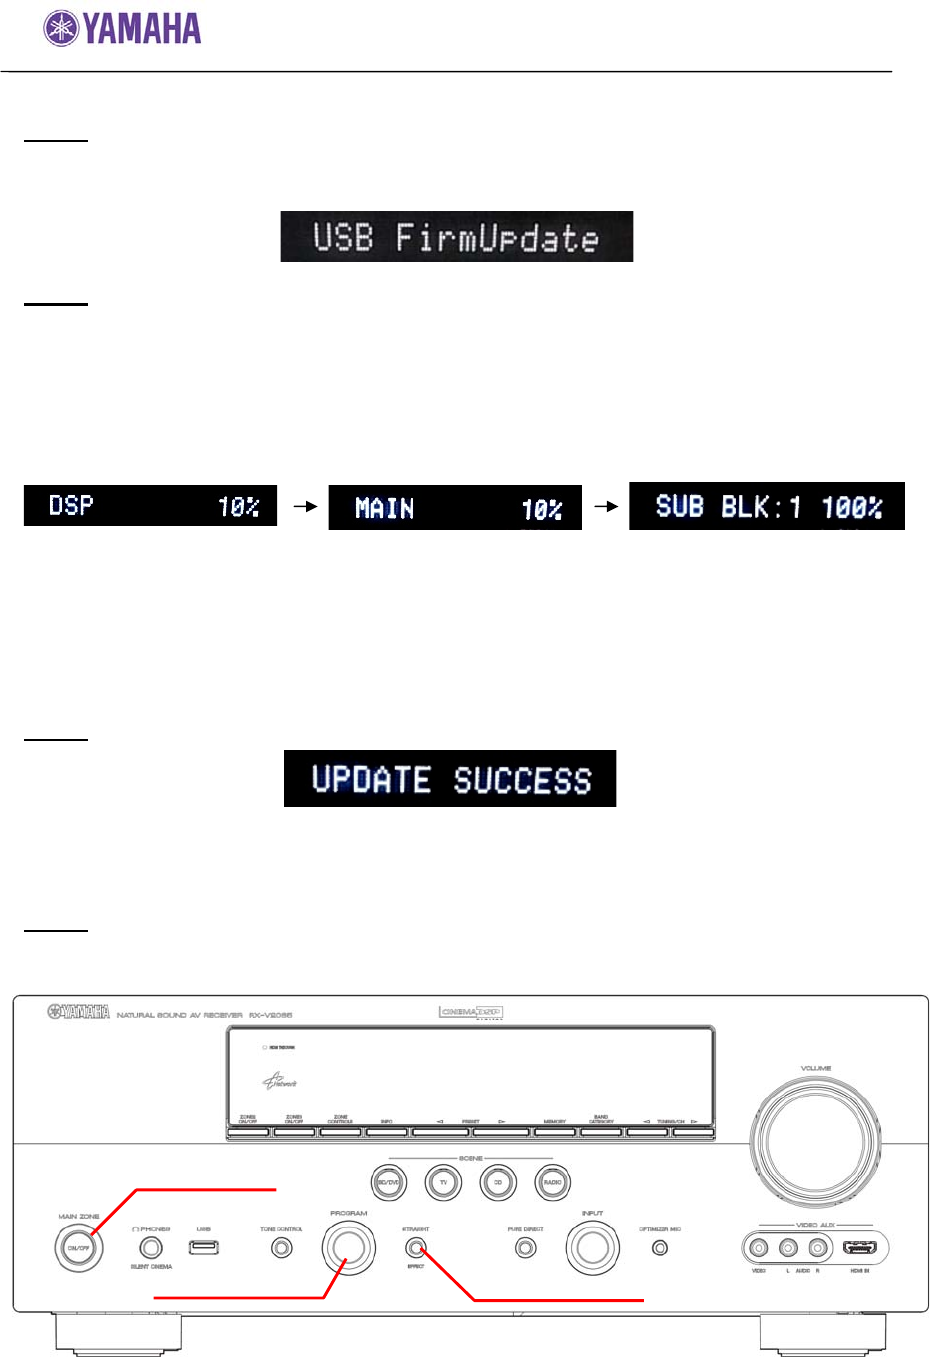
Step4 Select “USB FirmUpdate” from the menu
Rotate the PROGRAM selector counterclockwise and select
“USB FirmUpdate ”.
Step5 Start firmware update
Press STRAIGHT button to start update.
NOTE: Be aware that performing this update will clear all your receiver
setting back to factory default.
Firmware reprogramming in progress
CAUTION! DO NOT interrupt power or remove the USB thumb drive during the
update.
In case the power is accidentally cut off resulting in a condition where you
can’t recover normal operation, refer to troubleshooting method CASE#3
on page 7.
Step6 When completed, “UPDATE SUCCESS” appears on the display.
Turn off the power of the receiver by pressing MAIN ZONE button.
Remove USB thumb drive.
Step7 Check updated firmware version
Enter Advanced Setup mode and select “VER” on the menu.
(See “Confirming Firmware Version section” for details)
MAIN ZONE
STRAIGHT
PROGRAM
Firmware Update Procedure for RX-V2065
Page.5 of 7
Firmware Update by Network
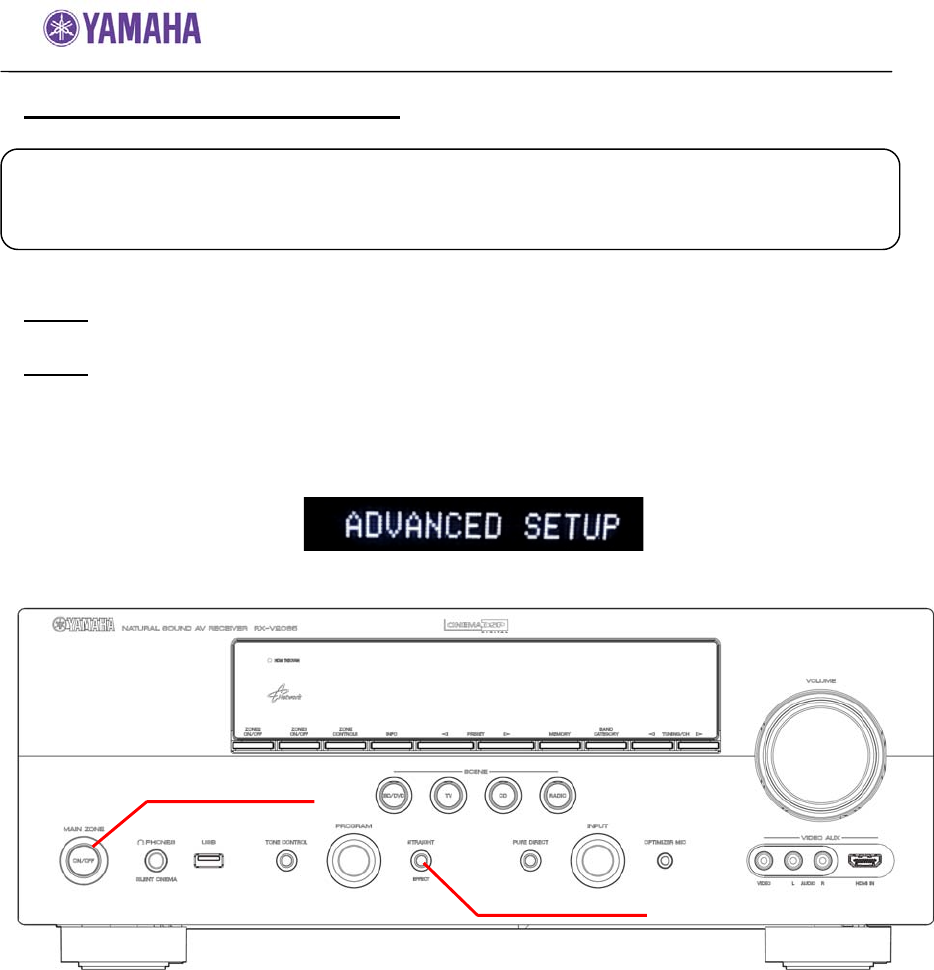
Step1 Power off the receiver. (Standby condition).
Step2 Enter ADVANCED SETUP mode
While pressing the STRAIGHT button, press (and release) the MAIN ZONE
ON/OFF button and keep depressing the STRAIGHT button until
“ADVANCED SETUP” appears on the front panel display.
(Note: “ADVANCED SETUP” is displayed only for a few seconds.)
Requirement: Internet connection
Your receiver is connected to the internet if you can receive
internet radio stations. (see owner’s manual for details)
MAIN ZONE
STRAIGHT
Firmware Update Procedure for RX-V2065
Page.6 of 7
Step3 Select “NET FirmUpdate” from the menu
Rotate the PROGRAM selector counterclockwise and select
“NET FirmUpdate ”.
Step4 Start firmware update
Press STRAIGHT button to start update. “CHECKING….” will appear.
NOTE: Be aware that performing this update will clear all your receiver
setting back to factory default.
If “UPDATE UNAVAIL” appears, this means your receiver is already
up-to-date. In this case, power off to exit from Advanced Setup.
Firmware reprogramming in progress
Caution! DO NOT interrupt power during the update.
In case the power is accidentally cut off resulting in a condition where you
can’t recover normal operation, refer to troubleshooting method CASE#3
on page 7.
Step5 When completed, “UPDATE SUCCESS” appears on the display.
Turn off the power of the receiver by pressing MAIN ZONE button.
Step6 Check updated firmware version
Enter Advanced Setup mode and select “VER” on the menu.
(See “Confirming Firmware Version” section for details)
MAIN ZONE
STRAIGHT
PROGRAM
Firmware Update Procedure for RX-V2065
Page.7 of 7
Troubleshooting
Case #1: “UPDATE FAIL” appeared during the USB update.
Cause: For some reason, the receiver can’t read the firmware data.
For your solution, please check the following;
9 USB drive is securely connected to the receiver.
9 USB drive is inserted before the receiver is powered on for the update.
9 The firmware data, RX-V2065_xxxx.bin is stored in the root directory of
the USB drive.
9 There is no other data but the firmware data in the USB drive.
9 No folders are created in the USB drive.
Else,
Retry the update using another USB drive.
Case #2: Error message appeared during the Network update.
“UPDATE FAIL” Solution: Perform USB update (See page 3)
“VER.CHECK ERR” Solution: Check your network environment
Case #3: Firmware update doesn’t start for other reasons.
Receiver doesn’t power up after the update.
Or, “ERROR” appeared when confirming the firmware version.
To recover, perform following alternative USB update method
1. Unplug the AC power cable from the back of the receiver.
2. Insert the USB thumb drive into the USB terminal located on the front panel.
(The firmware must be downloaded and copied into the USB drive in prior)
3. Press and hold the TONE CONTROL button and keep it pressed while you plug
the AC power cable back into the receiver again. “FILE READING” will appear
on the front display. Then, release the TONE CONTROL button.
4. The update will start automatically.
5. When “UPDATE SUCCESS” appears on the display, firmware update is
completed. Power off the receiver and remove the USB thumb drive.
6. Confirm updated firmware version.
TONE CONTROL
USB Drive
