Yamaha YXR70FX RHINO FUEL INJECTION 700FI OWNER'S MANUAL User To The Bfc3955e 4717 45de 8fae 8badd43b74de
User Manual: Yamaha YXR70FX to the manual
Open the PDF directly: View PDF ![]() .
.
Page Count: 178 [warning: Documents this large are best viewed by clicking the View PDF Link!]
- RHINO FUEL INJECTION 700FI YXR70FX OWNER'S MANUAL
- INTRODUCTION
- IMPORTANT MANUAL INFORMATION
- IMPORTANT NOTE ABOUT USE
- CONTENTS
- LOCATION OF THE WARNING AND SPECIFICATION LABELS
- SAFETY INFORMATION
- DESCRIPTION
- INSTRUMENT AND CONTROL FUNCTIONS
- FOR YOUR SAFETY - PRE-OPERATION CHECKS
- OPERATION
- BASIC GUIDE FOR SAFE USE
- LEARNING TO OPERATE YOUR VEHICLE
- Personal protective equipment
- Practice for new Rhino users
- Getting ready to ride
- Turning
- Accelerating
- Braking
- Engine braking
- Leaving the vehicle
- Parking on a flat area
- Parking on a slope
- Loading
- Operation on different surfaces and terrains
- Hills
- Uphill
- Downhill
- Rough terrain
- Pavement
- Water
- Loose terrain/slippery terrain
- Brush or wooded areas
- Encountering obstacles
- PERIODIC MAINTENANCE AND ADJUSTMENT
- Owner's manual and tool kit
- Periodic maintenance chart for the emission control system
- General maintenance and lubrication chart
- Hood
- Console
- Engine oil and oil filter cartridge
- To change the engine oil (with or without oil filter cartridge replacement)
- Final gear oil
- Differential gear oil
- Coolant
- Axle boots
- Spark plug inspection
- Cleaning the air filter element
- Drive select lever box check hose
- V-belt cooling duct check hose
- V-belt case drain plug
- Cleaning the spark arrester
- Valve clearance
- Brakes
- Checking the front and rear brake pads
- Checking the parking brake pads
- Checking the brake fluid level
- Brake fluid replacement
- Checking the brake pedal
- Parking brake lever free play adjustment
- Brake light switch adjustment
- Cable inspection and lubrication
- Brake pedal and accelerator pedal lubrication
- Rear knuckle upper and lower pivot lubrication
- Steering shaft lubrication
- Wheel removal
- Tire replacement
- Wheel installation
- Battery
- Battery maintenance
- Jump-starting
- Fuse replacement
- Replacing a headlight bulb
- Headlight beam adjustment
- Tail/brake light bulb replacement
- Troubleshooting
- Troubleshooting charts Starting problems or poor engine performance
- CLEANING AND STORAGE
- SPECIFICATIONS
- CONSUMER INFORMATION
5B4-F8199-10LIT-11626-21-58
READ THIS MANUAL CAREFULLY!
It contains important safety information.
YXR70FX
OWNER’S MANUAL
DIC2342
EBU00776

EVU00010
INTRODUCTION
Congratulations on your purchase of the Yamaha YXR70FX. It represents the result of many
years of Yamaha experience in the production of fine sporting, touring, and pace-setting racing
vehicles. With the purchase of this Yamaha, you can now appreciate the high degree of crafts-
manship and reliability that have made Yamaha a leader in these fields.
This manual will provide you with a good basic understanding of the features and operation of this
vehicle. It also includes basic maintenance and inspection procedures. If you have any questions
regarding the operation or maintenance of your vehicle, please consult a Yamaha dealer.
WARNING
Please read this manual carefully before operating this vehicle. Do not attempt to operate
this vehicle until you have attained adequate knowledge of its controls and operating fea-
tures. Regular inspections and careful maintenance, along with good operating tech-
niques, will help ensure that you safely enjoy the capabilities and reliability of this vehicle.
EE.book Page 1 Thursday, September 6, 2007 4:28 PM
EVU00021
IMPORTANT MANUAL INFORMATION
FAILURE TO FOLLOW THE WARNINGS CONTAINED IN THIS MANUAL CAN RESULT IN SE-
RIOUS INJURY OR DEATH.
Particularly important information is distinguished in this manual by the following notations:
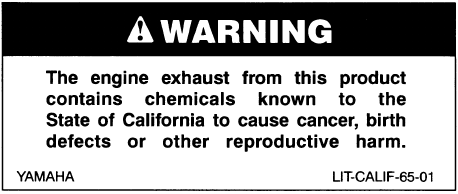
*Product and specifications are subject to change without notice.
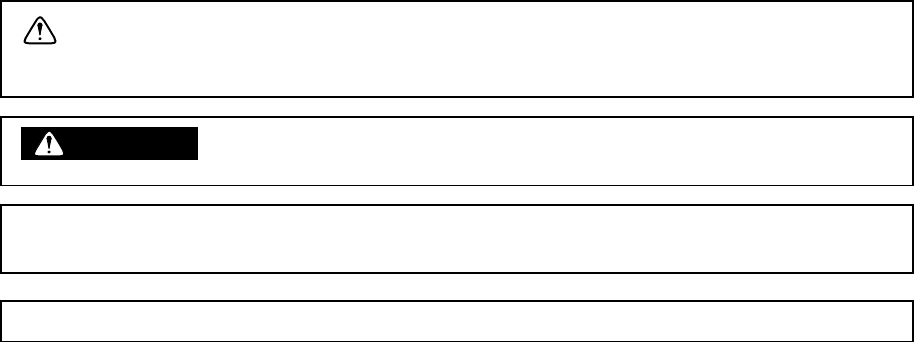
This is the safety alert symbol. It is used to alert you to potential
personal injury hazards. Obey all safety messages that follow this
symbol to avoid possible injury or death.
WARNING A WARNING indicates a hazardous situation which, if not avoided,
could result in death or serious injury.
NOTICE A NOTICE indicates special precautions that must be taken to
avoid damage to the vehicle or other property.
TIP A TIP provides key information to make procedures easier or clearer.
EE.book Page 1 Thursday, September 6, 2007 4:28 PM

EVU00030
IMPORTANT NOTE ABOUT USE
●This vehicle is designed and manufactured for off-road use only. Use on public streets,
roads, or highways is not only illegal in most areas, it also increases the risk of an acci-
dent involving other vehicles. This vehicle does not meet federal motor vehicle safety
standards for on-road use.
●Check the laws and regulations in force before choosing where to operate this vehicle.
It is illegal to operate this vehicle on public lands where vehicles its size are prohibited.
●This vehicle complies with almost all state off-highway noise level and spark arrester
laws and regulations.
YXR70FX
OWNER’S MANUAL
©2007 by Yamaha Motor Corporation,
U.S.A.
1st edition, August 2007
All rights reserved. Any reprinting or
unauthorized use without the written
permission of
Yamaha Motor Corporation,
U.S.A. is expressly prohibited.
Printed in U.S.A.
P/N LIT-11626-21-58
EE.book Page 2 Thursday, September 6, 2007 4:28 PM

EVU00050
CONTENTS
LOCATION OF THE WARNING
AND SPECIFICATION LABELS....... 1-1
SAFETY INFORMATION.................. 2-1
DESCRIPTION ................................. 3-1
INSTRUMENT AND CONTROL
FUNCTIONS ..................................... 4-1
Main switch...................................... 4-1
Indicator and warning lights ............ 4-2
Multi-function meter unit.................. 4-5
Switches ........................................ 4-11
Accelerator pedal .......................... 4-13
Brake pedal ................................... 4-13
Parking brake lever ....................... 4-14
Drive select lever........................... 4-15
Fuel tank cap................................. 4-15
Doors ............................................. 4-16
Seats ............................................. 4-16
Seat belts....................................... 4-17
1
2
3
4
Glove compartment .......................4-18
Cup holders....................................4-18
Cargo bed ......................................4-19
Front and rear shock absorber
adjustment ...................................4-21
Trailer hitch bracket and
receiver ........................................4-23
Auxiliary DC jack............................4-23
FOR YOUR SAFETY –
PRE-OPERATION CHECKS ............5-1
Front and rear brakes ......................5-3
Fuel ..................................................5-4
Engine oil .........................................5-6
Coolant.............................................5-7
Final gear oil ....................................5-7
Differential gear oil...........................5-7
Accelerator pedal.............................5-8
Seat belts .........................................5-8
Steering............................................5-8
Fittings and fasteners ......................5-8
Lights................................................5-9
Switches...........................................5-9
5
EE.book Page 1 Thursday, September 6, 2007 4:28 PM

Control cables ................................. 5-9
Tires ................................................ 5-9
OPERATION..................................... 6-1
Engine break-in............................... 6-1
Starting the engine.......................... 6-2
Drive select lever operation and
reverse driving............................... 6-4
On-Command four-wheel-drive
switch and differential gear lock
switch ............................................ 6-6
Parking ............................................ 6-8
Loading ........................................... 6-9
BASIC GUIDE FOR SAFE USE....... 7-1
KNOW YOUR VEHICLE................. 7-1
Driver requirements ........................ 7-3
Passenger requirements................. 7-4
Occupant protection system ........... 7-4
Protective structure ......................... 7-6
Seat belts ........................................ 7-6
Doors............................................... 7-9
Passenger handholds ..................... 7-9
Seat and hip restraints ..................7-10
Floorboard .....................................7-11
Steering wheel...............................7-11
LEARNING TO OPERATE
YOUR VEHICLE..........................7-12
Personal protective equipment......7-12
Practice for new Rhino users ........7-13
Getting ready to ride......................7-14
Turning...........................................7-15
Accelerating...................................7-16
Braking...........................................7-16
Engine braking...............................7-16
Leaving the vehicle........................7-17
Parking on a flat area ....................7-17
Parking on a slope.........................7-17
Loading..........................................7-18
Operation on different surfaces
and terrains..................................7-18
Hills ................................................7-19
Uphill..............................................7-20
Downhill .........................................7-21
Rough terrain.................................7-22
Pavement ......................................7-22
6
7
EE.book Page 2 Thursday, September 6, 2007 4:28 PM

Water ............................................. 7-22
Loose terrain/slippery terrain......... 7-23
Brush or wooded areas ................. 7-24
Encountering obstacles................. 7-24
PERIODIC MAINTENANCE AND
ADJUSTMENT.................................. 8-1
Owner’s manual and tool kit............ 8-2
Periodic maintenance chart for the
emission control system................ 8-4
General maintenance and
lubrication chart ............................. 8-5
Hood ................................................ 8-7
Console ........................................... 8-9
Engine oil and oil filter cartridge .... 8-10
Final gear oil.................................. 8-16
Differential gear oil......................... 8-19
Coolant .......................................... 8-21
Axle boots...................................... 8-23
Spark plug inspection.................... 8-24
Cleaning the air filter element ....... 8-26
Drive select lever box check
hose............................................. 8-31
V-belt cooling duct check hose......8-32
V-belt case drain plug ....................8-32
Cleaning the spark arrester ...........8-33
Valve clearance .............................8-34
Brakes............................................8-34
Checking the front and rear brake
pads .............................................8-34
Checking the parking brake
pads .............................................8-35
Checking the brake fluid level........8-36
Brake fluid replacement.................8-37
Checking the brake pedal..............8-37
Parking brake lever free play
adjustment ...................................8-38
Brake light switch adjustment ........8-39
Cable inspection and lubrication....8-40
Brake pedal and accelerator
pedal lubrication...........................8-41
Rear knuckle upper and lower
pivot lubrication............................8-41
Steering shaft lubrication ...............8-43
Wheel removal...............................8-43
Tire replacement............................8-44
8
EE.book Page 3 Thursday, September 6, 2007 4:28 PM

Wheel installation.......................... 8-45
Battery........................................... 8-46
Battery maintenance..................... 8-47
Jump-starting ................................ 8-48
Fuse replacement ......................... 8-51
Replacing a headlight bulb ........... 8-53
Headlight beam adjustment.......... 8-55
Tail/brake light bulb
replacement ................................ 8-56
Troubleshooting ............................ 8-58
Troubleshooting charts ................. 8-59
CLEANING AND STORAGE............ 9-1
A. Cleaning...................................... 9-1
B. Storage ....................................... 9-2
SPECIFICATIONS.......................... 10-1
CONSUMER INFORMATION ........ 11-1
Identification number records ....... 11-1
NOISE REGULATION .................. 11-4
MAINTENANCE RECORD........... 11-5
YAMAHA MOTOR
CORPORATION, U.S.A.
SIDE × SIDE VEHICLE LIMITED
WARRANTY................................11-6
YAMAHA EXTENDED SERVICE
(Y.E.S.) ........................................11-7
9
10
11
EE.book Page 4 Thursday, September 6, 2007 4:28 PM
1-1
EVU00060
1-
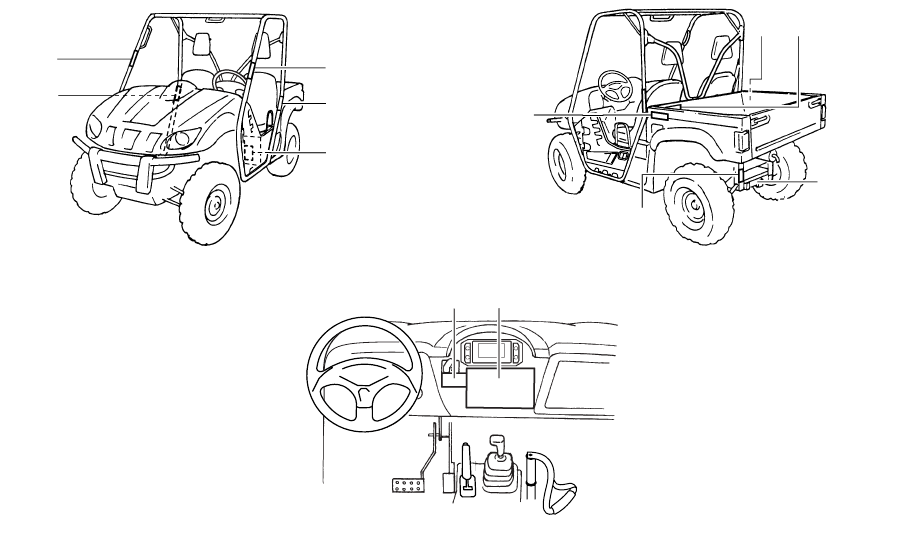
LOCATION OF THE WARNING AND
SPECIFICATION LABELS
1
3
2
3
4
90
5
8
7
65
EE.book Page 1 Thursday, September 6, 2007 4:28 PM
1-2
1
2
3
4
5
6
7
8
9
10
11
12
13
14
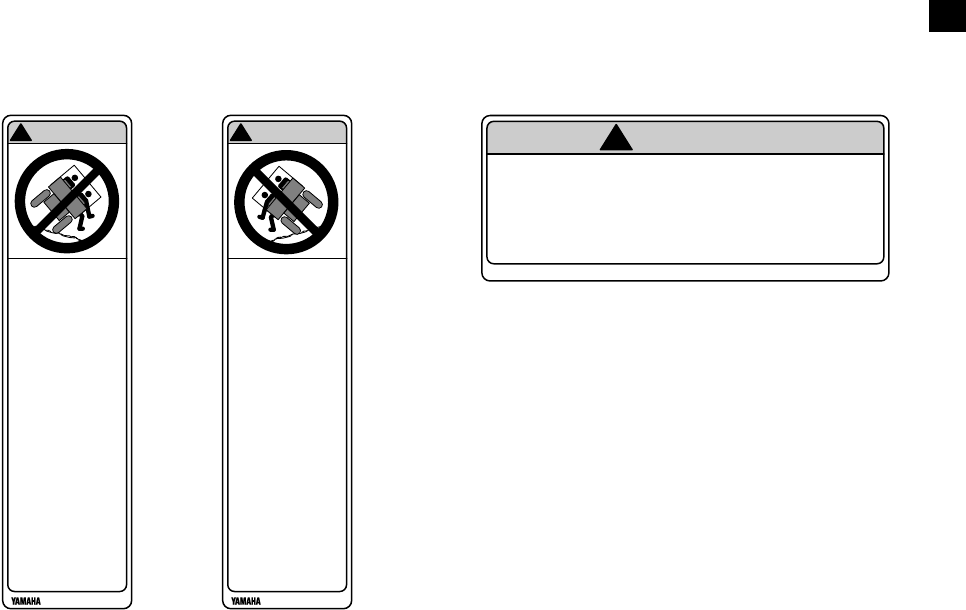
Read and understand all of the labels on your vehicle. They contain important information for safe
and proper operation of your vehicle.
Never remove any labels from your vehicle. If a label becomes difficult to read or comes off, a re-
placement label is available from your Yamaha dealer.
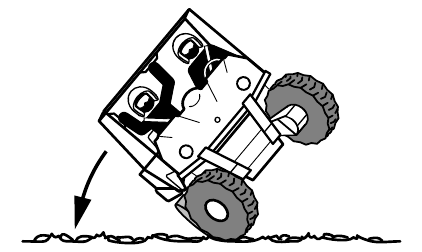
12 3
Any part of your
body (arms, legs,
or head) outside of
the vehicle can be
crushed by the
cage/frame.
If you think or feel
that the vehicle
may tip or roll,
brace your feet on
the floorboards,
and keep your
hands on the
handholds.
Do not try to stop a
vehicle tipover
using your arm or
leg.
5B4-K7762-00
WARNING
!
Any part of your
body (arms, legs,
or head) outside of
the vehicle can be
crushed by the
cage/frame.
If you think or feel
that the vehicle
may tip or roll,
brace your feet on
the floorboards,
and keep your
hands on the
steering wheel.
Do not try to stop a
vehicle tipover
using your arm or
leg.
5B4-K7761-00
WARNING
!
YAMAHA 5B4-K8483-00
Do not rest hands on door or hip restraint
bar. To avoid injury, keep hands completely
inside the vehicle by holding the steering
wheel or handholds.
WARNING
!
EE.book Page 2 Thursday, September 6, 2007 4:28 PM
1-3
45
YAMAHA 5B4-F1696-00
WARNING
!
Keep hands, body, and other
people away from pinch points
when lowering bed. Do not hold
the cage/frame while closing bed.
YAMAHA 5B4-K7764-00
WARNING
!
EE.book Page 3 Thursday, September 6, 2007 4:28 PM
1-4
67
YAMAHA 5UG-F151J-00
MAX 7.3 INCH
(185MM)
EE.book Page 4 Thursday, September 6, 2007 4:28 PM
1-5
89
YAMAHA 5B4-F1558-00
Head Helmet and eye protection.
Body Seatbelt and protective clothing.
Hands Inside vehicle and holding the
handholds or steering wheel.
Feet On floorboard, ready to brace,
and door closed.
EE.book Page 5 Thursday, September 6, 2007 4:28 PM

1-6
0
•
•
•
•
•
•
•
•
•
•
DRIVER
UNDER
16
YAMAHA 5B4-F1568-01
WARNING
!
EE.book Page 6 Thursday, September 6, 2007 4:28 PM

2-1
SAFETY INFORMATION
EVU00070
Be a responsible owner
As the vehicle’s owner, you are responsible for the safe and proper operation of your Rhino.
While understanding all parts of this manual are important for vehicle ownership, be sure to read
this chapter and the instructions in Chapter 7 before operating the Rhino. Also use these two
chapters and the labels on the vehicle to instruct new operators and passengers. Do not allow
anyone else to operate your vehicle or ride as a passenger if you are unsure that he/she is willing
and able to follow these instructions.
Get to know your vehicle
This off-road vehicle will handle and maneuver differently from cars, ATVs, go-carts, golf-cars and
grounds-keeping vehicles. Follow these instructions to reduce your risk of an accident and to re-
duce the risk of serious injury or death in the event of an accident.
EE.book Page 1 Thursday, September 6, 2007 4:28 PM

2-2
1
2
3
4
5
6
7
8
9
10
11
12
13
14
Before you operate the Rhino
●Prepare yourself and your passenger:
•This vehicle is intended for use only by an operator 16 or older with a valid motor vehicle li-
cense.
•This vehicle is designed to carry the driver and one passenger. Never carry passengers in
the cargo bed.
•Both driver and passenger should wear seat belts properly.
•Both driver and passenger must be able to put both feet flat on the floorboard while seated
upright with their backs against the seat backs. Passenger must be able to reach and hold
the handholds within the cage/frame.
•Both driver and passenger should wear an approved motorcycle helmet that fits properly.
Both driver and passenger should also wear eye protection (goggles or a face shield),
gloves, over-the-ankle boots, long-sleeved shirt or jacket, and long pants.
•Do not drive or ride as passenger after using drugs or alcohol.
DRIVER
UNDER
16
EE.book Page 2 Thursday, September 6, 2007 4:28 PM
2-3
Prepare your vehicle
Perform the pre-operation checks each time you use the vehicle to make sure it is in safe operat-
ing condition. Failure to inspect or maintain the vehicle properly increases the possibility of an ac-
cident or equipment damage. See pages 5-1–5-2 for a list of pre-operation checks.
Prepare your load or trailer
Carrying loads, towing a trailer, or pulling objects can affect handling, stability, and risk of overturn
or other accidents.
•Read Chapter 6 before loading, towing, or pulling objects.
•Do not overload the vehicle or trailer. Refer to label in cargo bed for cargo bed load limit. Re-
fer to label next to hitch for tongue weight and trailer load limits.
•Keep weight in the cargo bed centered side to side, and as low and as far forward as pos-
sible.
•Secure cargo so that it will not shift – a loose load could change handling unexpectedly or be
thrown forward and strike occupants.
EE.book Page 3 Thursday, September 6, 2007 4:28 PM
2-4
While using the Rhino
●Keep your body completely inside the vehicle at all times. Keep both hands on the steering
wheel. Be sure passenger is seated, belted, and holding onto the handholds. Close doors be-
fore driving. Any part of your body (arms, legs, and head) outside the vehicle can be struck by
objects your vehicle is passing or crushed by the vehicle cage/frame in a rollover accident.
●Watch for branches, brush, or other hazards that could enter the vehicle.
●Abrupt maneuvers or aggressive driving, even on flat, open areas, can cause loss of control,
including rollovers. The Rhino has higher ground clearance and other features to handle rug-
ged terrain, and, as a result, can overturn in situations where some other vehicles may not.
EE.book Page 4 Thursday, September 6, 2007 4:28 PM
2-5
●Avoid rollovers:
•Use care when turning:
•Turning the steering wheel too far or too fast can result in a rollover.
•Avoid sideways sliding, skidding, or fishtailing, and never do donuts.
•Slow down before entering a turn and avoid hard braking in a turn.
•When making tight turns from a stop or at slow speeds, avoid sudden or hard accelera-
tion.
EE.book Page 5 Thursday, September 6, 2007 4:28 PM
2-6
•Drive straight up and down inclines, not across them. If crossing a hill is unavoidable, drive
slowly and turn downhill immediately if you feel the vehicle may tip.
•Avoid paved surfaces. Turn gradually and go slowly if you must drive on pavement. This ve-
hicle is designed for off-road use only.
●If you think or feel that the vehicle may tip or roll, keep your body completely inside the protec-
tive structure of the vehicle:
•Brace yourself by pressing your feet firmly on the floorboards and keep a firm grip on the
steering wheel or handholds.
•Do not put your hands or feet outside of the vehicle for any reason. Your arm or leg could be
crushed.
•Do not try to stop a vehicle tipover using your arm or leg.
●Do not operate this vehicle on any public street, road, or highway, even if dirt or gravel.
●Do not operate the vehicle in fast-flowing water or water deeper than 33 cm (13 in). If you must
cross shallow, slow-moving water, choose your path carefully to avoid sharp drop-offs, large
rocks, or slippery surfaces. Operating this vehicle through deep or fast-flowing water can lead
to loss of control or overturn. To reduce your risk of drowning or other injuries, use care when
crossing through water.
EE.book Page 6 Thursday, September 6, 2007 4:28 PM
2-7
●When loaded with cargo or towing a trailer:
•Reduce speed, operate in low gear only, and allow more room to stop.
•Avoid hills and rough terrain. Use extreme caution when towing or carrying a load on in-
clines.
•Load trailer properly and use extra care when towing or pulling.
●Do not tow or pull objects from any part of the vehicle other than the trailer hitch bracket or
winch (if installed).
EE.book Page 7 Thursday, September 6, 2007 4:28 PM
2-8
Avoid carbon monoxide poisoning
All engine exhaust contains carbon monoxide, a deadly gas. Breathing carbon monoxide can
cause headaches, dizziness, drowsiness, nausea, confusion, and eventually death.
Carbon monoxide is a colorless, odorless, tasteless gas which may be present even if you do not
see or smell any engine exhaust. Deadly levels of carbon monoxide can collect rapidly and you
can quickly be overcome and unable to save yourself. Also, deadly levels of carbon monoxide
can linger for hours or days in enclosed or poorly-ventilated areas. If you experience any symp-
toms of carbon monoxide poisoning, leave the area immediately, get fresh air, and SEEK MEDI-
CAL TREATMENT.
●Do not run engine indoors. Even if you try to ventilate engine exhaust with fans or open win-
dows and doors, carbon monoxide can rapidly reach dangerous levels.
●Do not run engine in poorly ventilated or partially enclosed areas such as barns, garages, or
carports.
●Do not run engine outdoors where engine exhaust can be drawn into a building through open-
ings such as windows and doors.
EE.book Page 8 Thursday, September 6, 2007 4:28 PM
2-9
Genuine Yamaha Accessories
Choosing accessories for your Rhino is an important decision. Genuine Yamaha Accessories,
which are available only from a Yamaha dealer, have been designed, tested, and approved by
Yamaha for use on your Rhino.
Many companies with no connection to Yamaha manufacture parts and accessories or offer other
modifications for Yamaha vehicles. Yamaha is not in a position to test the products that these af-
termarket companies produce. Therefore, Yamaha can neither endorse nor recommend the use
of accessories not sold by Yamaha or modifications not specifically recommended by Yamaha,
even if sold and installed by a Yamaha dealer.
Aftermarket parts, accessories, and modifications
While you may find aftermarket products similar in design and quality to genuine Yamaha Acces-
sories, recognize that some aftermarket accessories or modifications are not suitable because of
potential safety hazards to you or others. Installing aftermarket products or having other modifica-
tions performed to your Rhino that change any of the vehicle’s design or operation characteristics
can put you and others at greater risk of serious injury or death. You are responsible for injuries
related to changes in the vehicle.
EE.book Page 9 Thursday, September 6, 2007 4:28 PM
2-10
Aftermarket tires and rims
The tires and rims that came with your Rhino were designed to match the performance capabili-
ties and to provide the best combination of handling, braking, and comfort. Other tires, rims, sizes,
and combinations may not be appropriate. Refer to pages 8-43–8-46 for tire specifications and
more information on replacing your tires.
EE.book Page 10 Thursday, September 6, 2007 4:28 PM
3-1
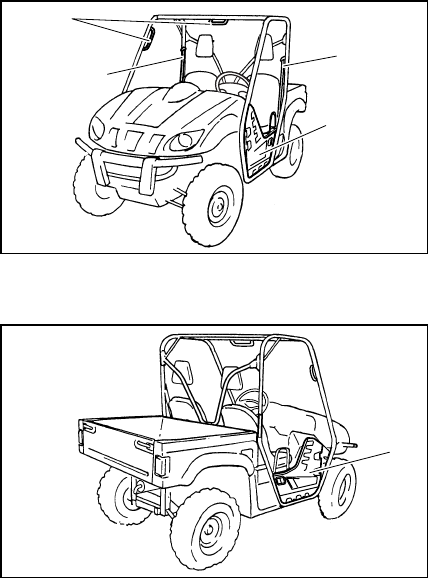
EVU00080
1-
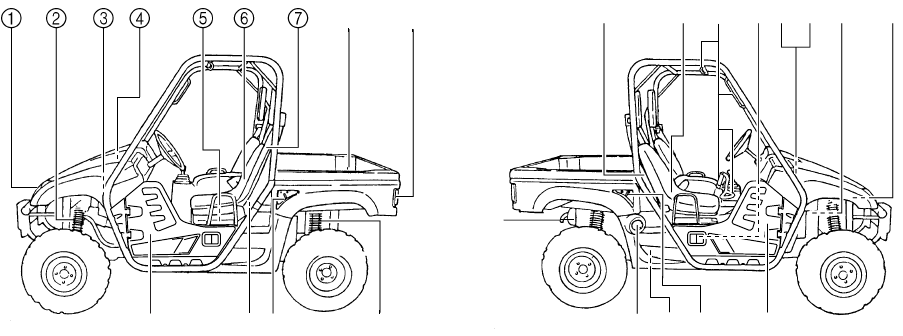
DESCRIPTION
1. Headlights
2. Front shock absorber assembly
3. Brake fluid reservoir
4. Air filter element
5. V-belt case
6. Driver seat
7. Driver seat belt
8. Cargo bed
9. Tail/brake lights
10. Rear shock absorber assembly
11. Cargo bed release levers
12. Spark plug
13. Door
CBA 0
89
14. Spark arrester
15. Passenger seat belt
16. Passenger seat
17. Passenger handhold
18. Engine oil dipstick
19. Battery
20. Fuses
21. Coolant reservoir
22. Radiator cap
23. Oil filter cartridge
24. Fuel tank cap
HGFEIJKL
ACMN
D
EE.book Page 1 Thursday, September 6, 2007 4:28 PM
3-2
1
2
3
4
5
6
7
8
9
10
11
12
13
14
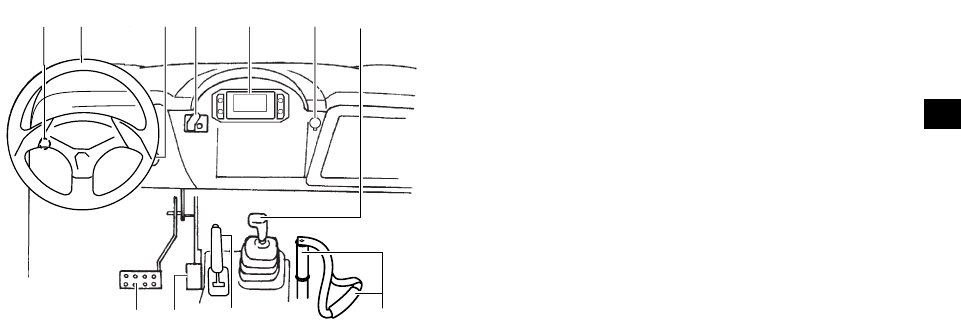
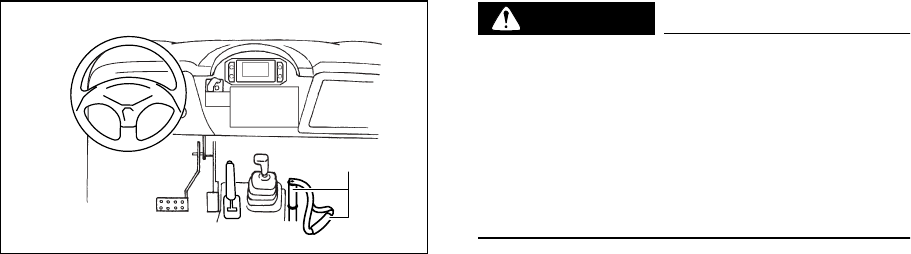
25. Light switch
26. Steering wheel
27. Main switch
28. On-Command four-wheel-drive and differential gear lock switches
29. Multi-function meter unit
30. Auxiliary DC jack
31. Drive select lever
32. Parking brake lever
33. Accelerator pedal
34. Brake pedal
The vehicle you have purchased may differ
slightly from those shown in the figures of this
manual.
QR
OPST
WX G
U
V
EE.book Page 2 Thursday, September 6, 2007 4:28 PM
4-1
EVU00130
1-
INSTRUMENT AND CONTROL
FUNCTIONS
EVU00140
Main switch
1. Main switch
Functions of the respective switch positions
are as follows:
ON:
All electrical circuits are supplied with
power, and the headlights and tail-
lights come on when the light switch is
on.
OFF:
All electrical circuits are switched off.
The key can be removed in this posi-
tion.
START:
The electric starter is engaged by
turning and holding the key in this po-
sition. Release the key when the en-
gine starts.
O
F
F
O
N
S
T
A
R
T
1
OFF
ON
START
EE.book Page 1 Thursday, September 6, 2007 4:28 PM
4-2
1
2
3
4
5
6
7
8
9
10
11
12
13
14
EVU00150
Indicator and warning lights
1. On-Command differential gear lock indicator light
“DIFF. LOCK”
2. Low-range indicator light “L”
3. High-range indicator light “H”
4. Neutral indicator light “N”
5. Reverse indicator light “R”
6. Parking brake indicator light “P”
7. On-Command four-wheel-drive/differential gear lock
indicator “”/“”
8. Coolant temperature warning light “”
9. Engine trouble warning light “”
EVU01131
On-Command differential gear lock indica-
tor light “DIFF. LOCK”
This indicator light and the On-Command dif-
ferential gear lock indicator in the display
come on when the On-Command differential
gear lock switch is set to the “LOCK” position.
When the switch is set to “LOCK”, the On-
Command differential gear lock indicator light
will flash until the differential gear is locked.
EVU01140
Low-range indicator light “L”
This indicator light comes on when the drive
select lever is in the “L” position.
EVU01150
High-range indicator light “H”
This indicator light comes on when the drive
select lever is in the “H” position.
1
2
3
4
5
6
8
9
7
DIFF.
LOCK
EE.book Page 2 Thursday, September 6, 2007 4:28 PM
4-3
EVU00170
Neutral indicator light “N”
This indicator light comes on when the drive
select lever is in the “N” position.
5B410001
Reverse indicator light “R”
This indicator light comes on when the drive
select lever is in the “R” reverse position.
EVU00210
Parking brake indicator light “P”
This indicator light comes on when the park-
ing brake is applied.
EVU01161
On-Command four-wheel-drive/differential
gear lock indicator “”/“”
The On-Command four-wheel-drive indicator
“” comes on when the On-Command four-
wheel-drive switch is set to the “4WD” posi-
tion.
The On-Command differential gear lock indi-
cator “” in the On-Command four-wheel-
drive indicator also comes on when the On-
Command differential gear lock switch is set
to the “LOCK” position.
●Due to the synchronizing mechanism in the
differential gear case, the four-wheel-drive
indicator may not come until the vehicle
starts moving.
●When the On-Command differential gear
lock switch is set to “LOCK”, the indicator
“” will flash until the differential gear is
locked.
DIFF.
LOCK
DIFF.
LOCK
DIFF.
LOCK
EE.book Page 3 Thursday, September 6, 2007 4:28 PM

4-4
5B410002
Coolant temperature warning light “”
If the coolant temperature reaches a specified
level, this light comes on to warn that the cool-
ant temperature is too hot. If the light comes
on during operation, stop the engine as soon
as it is safe to do so and allow the engine to
cool down for about 10 minutes.
(See page 8-60.)
The electrical circuit of the warning light can
be checked by turning the key to “ON”. If the
warning light does not come on, have a
Yamaha dealer check the electrical circuit.
NOTICE
●The engine may overheat if the vehicle
is overloaded. If this happens, reduce
the load to specification.
●After restarting, make sure that the light
is out. Continuous use while the light is
on may cause damage to the engine.
5B410003
Engine trouble warning light “”
This warning light comes on or flashes when
an electrical circuit monitoring the engine is
defective. When this occurs, have a Yamaha
dealer check the self-diagnosis system. (See
page 4-10 for an explanation of the self-diag-
nosis device.)
The electrical circuit of the warning light can
be checked by turning the key to “ON”. If the
warning light does not come on, then go off,
have a Yamaha dealer check the electrical
circuit.
EE.book Page 4 Thursday, September 6, 2007 4:28 PM
4-5
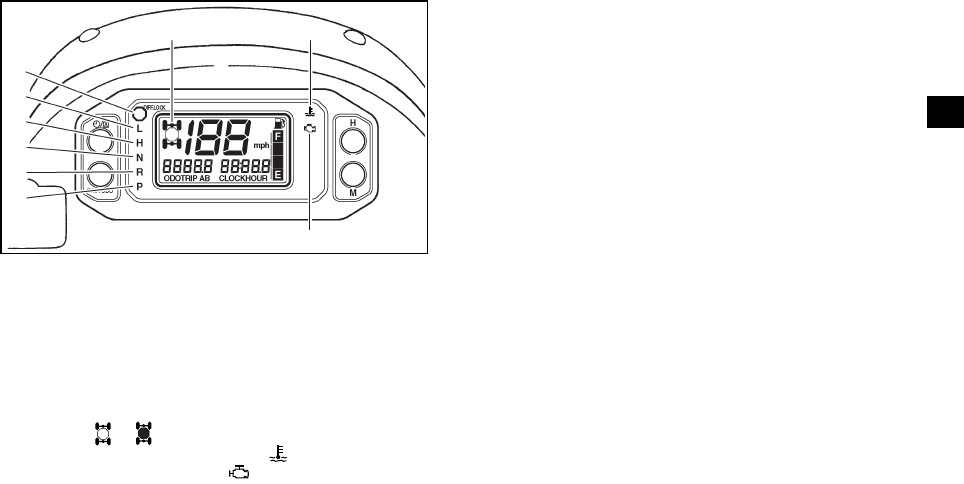
5B410004
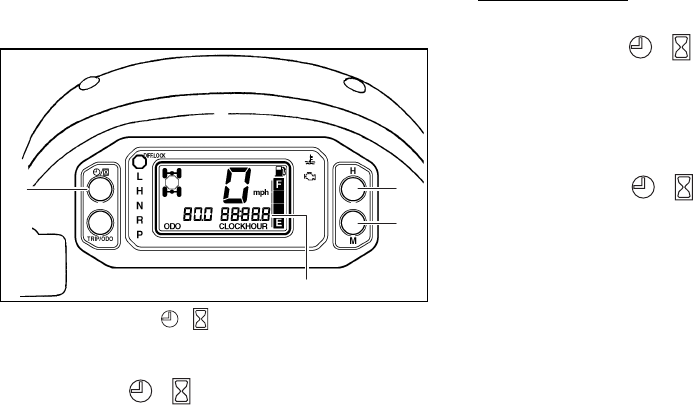
Multi-function meter unit
1. Speedometer 2. Fuel meter
3. “H” button 4. “M” button
5. Clock/Hour meter/Voltage display
6. Odometer/Tripmeter A/Tripmeter B
7. “TRIP/ODO” button 8. Clock/Hour button “/”
The multi-function meter unit is equipped with
the following:
●a speedometer (which shows the riding
speed)
●an odometer (which shows the total dis-
tance traveled)
●two tripmeters (which show the distance
traveled since they were last set to zero)
●a clock
●an hour meter (which shows the total time
the key has been turned to “ON”)
●a voltage display (which shows the battery
voltage)
●a fuel meter
●a self-diagnosis device
12
3
4
56
7
8
EE.book Page 5 Thursday, September 6, 2007 4:28 PM
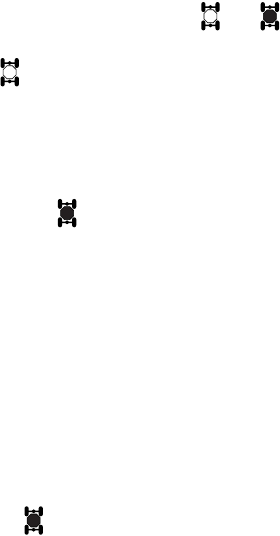
4-6
Odometer and tripmeter modes
1. Odometer/Tripmeter A/Tripmeter B
2. “TRIP/ODO” button
Pushing the “TRIP/ODO” button switches the
display between the odometer mode “ODO”
and the tripmeter modes “A” and “B” in the fol-
lowing order:
ODO → TRIP A → TRIP B → ODO
To reset a tripmeter, select it by pushing the
“TRIP/ODO” button, and then hold the “TRIP/
ODO” button for at least three seconds. The
tripmeters can be used to estimate the dis-
tance that can be traveled with a full tank of fu-
el. This information will enable you to plan
future fuel stops.
To switch the display between “mph” and
“km/h”, push and hold the “TRIP/ODO” button
while turning the key to “ON”.
1
2
EE.book Page 6 Thursday, September 6, 2007 4:28 PM
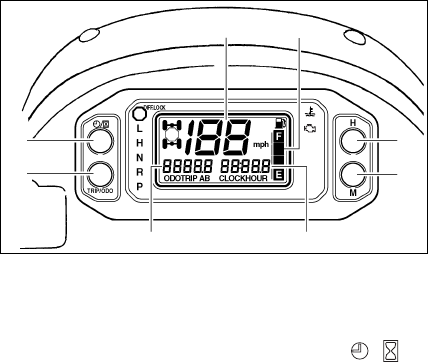
4-7
Clock, hour meter and voltage display
modes
1. Clock/Hour button “/”
2. “H” button 3. “M” button
4. Clock/Hour meter/Voltage display
Pushing the “/” button switches the dis-
play between the clock mode “CLOCK”, the
hour meter mode “HOUR”, and the voltage
display mode “btry” in the following order:
CLOCK → HOUR → btry → CLOCK
To set the clock
1. Set the display to the clock.
2. Push the “/” button until the clock
starts flashing.
3. Set the hours by pushing the “H” button.
4. Set the minutes by pushing the “M” but-
ton.
5. Push the “/” button, and then re-
lease it to start the clock.
4
12
3
EE.book Page 7 Thursday, September 6, 2007 4:28 PM

4-8
Voltage display mode
This display shows the battery voltage.
“btry” appears for 1 second when the voltage
display mode is first selected, and then the
battery voltage is shown.
If the battery voltage is less than 10 volts, “LO”
is displayed and if the voltage is above 16
volts, “HI” is displayed.
N
OTICE
If the voltage display indicates “LO” or
“HI”, there may be trouble with the battery
charging circuit or the battery may be
faulty. If “LO” or “HI” appears in the dis-
play, have a Yamaha dealer check or repair
the vehicle.
EE.book Page 8 Thursday, September 6, 2007 4:28 PM
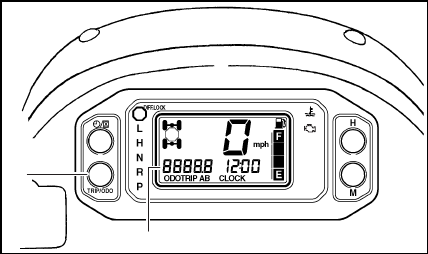
4-9
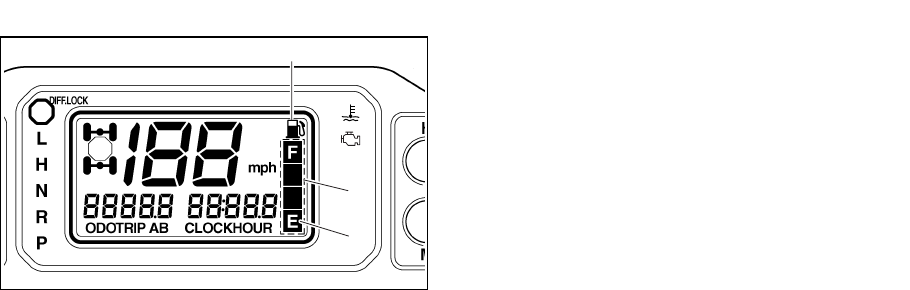
Fuel meter
1. Fuel level warning indicator
2. Fuel meter 3. “E” segment
The fuel meter indicates the amount of fuel in
the fuel tank. The display segments of the fuel
meter disappear from “F” (full) towards “E”
(empty) as the fuel level decreases. When the
“E” segment disappears and the fuel level
warning indicator flashes, refuel as soon as
possible.
TIP
This fuel meter is equipped with a self-diagno-
sis system. If the electrical circuit is defective,
all the display segments and fuel level warn-
ing indicator will start flashing. If this occurs,
have a Yamaha dealer check the electrical
circuit.
1
2
3
EE.book Page 9 Thursday, September 6, 2007 4:28 PM
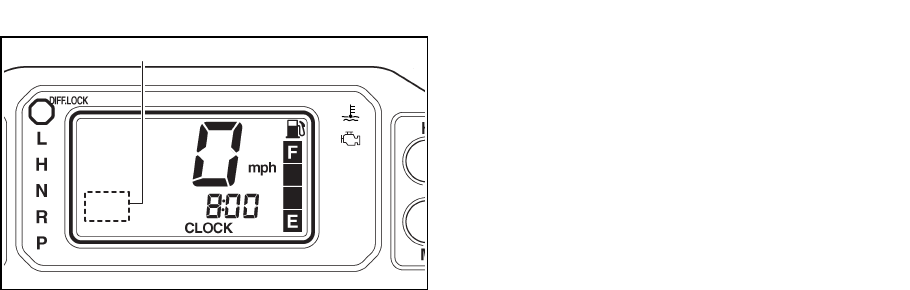
4-10
Self-diagnosis device
1. Error code display
This model is equipped with a self-diagnosis
device for various electrical circuits.
If any of those circuits are defective, the en-
gine trouble warning light will come on or
flash, and then the multi-function display will
indicate a two-digit error code.
If the multi-function display indicates such an
error code, note the code number, and then
have a Yamaha dealer check the vehicle.
N
OTICE
If the multi-function display indicates an
error code, the vehicle should be checked
as soon as possible in order to avoid en-
gine damage.
1
EE.book Page 10 Thursday, September 6, 2007 4:28 PM
4-11
EVU00230
Switches
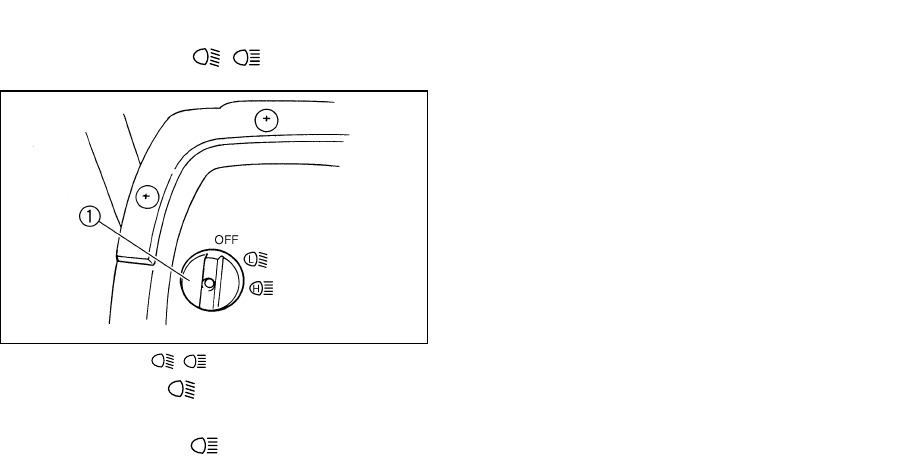
EVU00240
Light switch “OFF/ / ”
1. Light switch “OFF/ / ”
Set the switch to “” to turn on the low beam
and the taillights.
Set the switch to “” to turn on the high
beam and the taillights.
Set the switch to “OFF” to turn off all the lights.
NOTICE
Do not use the headlights with the engine
turned off for an extended period of time.
The battery may discharge to the point
that the starter motor will not operate
properly. If this should happen, remove
the battery and recharge it.
LH
LH
L
H
EE.book Page 11 Thursday, September 6, 2007 4:28 PM
4-12
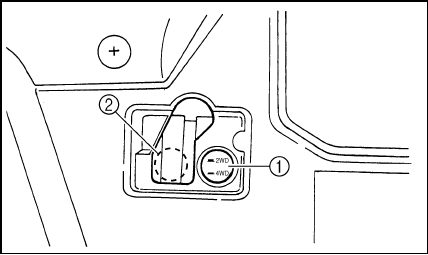
EVU01183
On-Command four-wheel-drive and differ-
ential gear lock switches
1. On-Command four-wheel-drive switch “2WD”/“4WD”
2. On-Command differential gear lock switch “4WD”/“LOCK”
This vehicle is equipped with an On-Com-
mand four-wheel-drive switch “2WD”/“4WD”
and a differential gear lock switch “4WD”/
“LOCK”. Select the appropriate drive accord-
ing to terrain and conditions.
●Two-wheel drive (“2WD”): Power is sup-
plied to the rear wheels only.
●Four-wheel drive (“4WD”): Power is sup-
plied to the rear and front wheels.
●Four-wheel drive with the differential gear
locked (“4WD-LOCK”): Power is supplied
to the rear and front wheels with the differ-
ential gear locked. Unlike the 4WD mode,
all wheels turn at the same speed regard-
less of traction.
EE.book Page 12 Thursday, September 6, 2007 4:28 PM
4-13
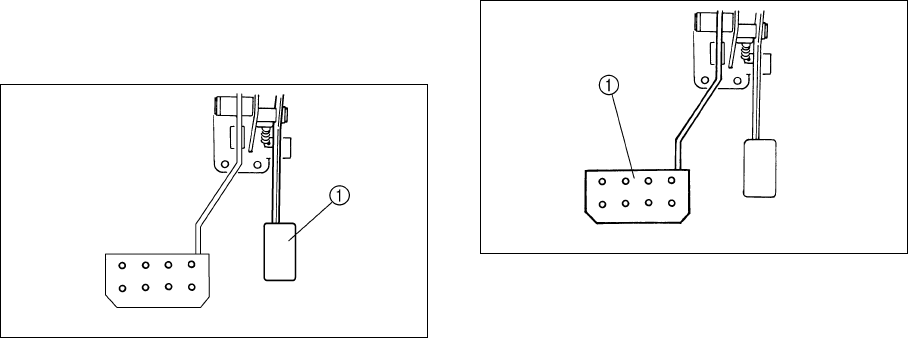
EVU00260
Accelerator pedal
Press the accelerator pedal down to increase
engine speed. Spring pressure returns the
pedal to the rest position when released. Al-
ways check that the accelerator pedal returns
normally before starting the engine.
1. Accelerator pedal
EVU00270
Brake pedal
Press the brake pedal to slow or stop the ve-
hicle.
1. Brake pedal
EE.book Page 13 Thursday, September 6, 2007 4:28 PM
4-14
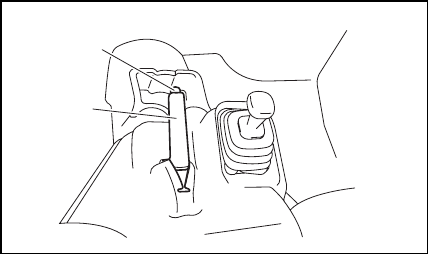
EVU00280
Parking brake lever
The parking brake lever is located at the right
side of the driver’s seat. It will help keep the
vehicle from moving while parked.
To set the parking brake, pull the lever up
completely.
To release the parking brake, pull up on the
lever, press the release button, and then push
the lever all the way down.
Spring pressure helps return the lever to the
released position. 1. Parking brake lever 2. Release button
1
2
EE.book Page 14 Thursday, September 6, 2007 4:28 PM
4-15
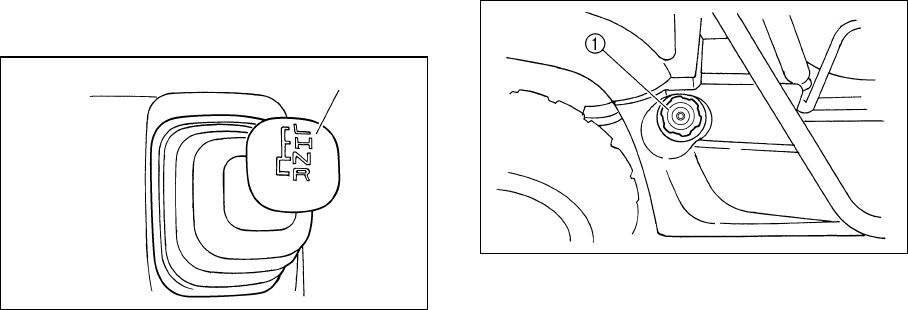
EVU00290
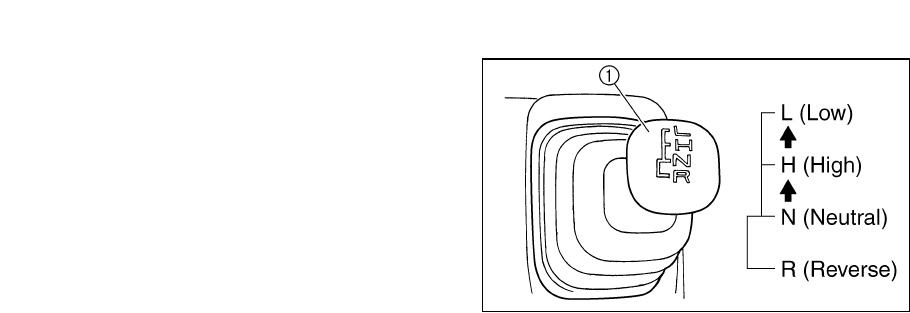
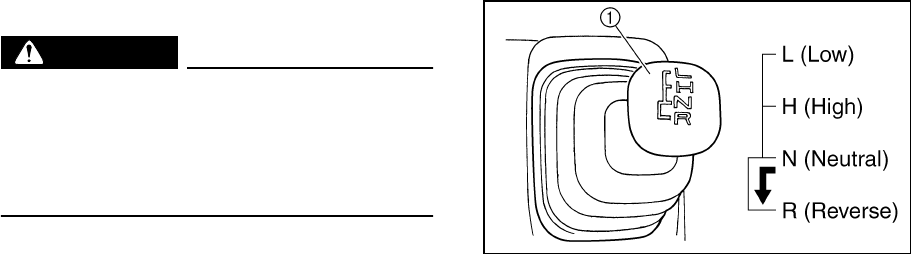
Drive select lever
The drive select lever is used to shift the vehi-
cle into the low, high, neutral, and reverse po-
sitions. (Refer to pages 6-4–6-5 for the drive
select lever operation.)
1. Drive select lever
EVU00300
Fuel tank cap
Remove the fuel tank cap by turning it coun-
terclockwise.
1. Fuel tank cap
1
EE.book Page 15 Thursday, September 6, 2007 4:28 PM
4-16
Doors
To open a door, simply pull the latch outward.
To close a door, push or pull the door inward
until it is securely latched. Be sure the door is
SECURELY LATCHED AFTER CLOSING IT.
1. Latch 2. Door
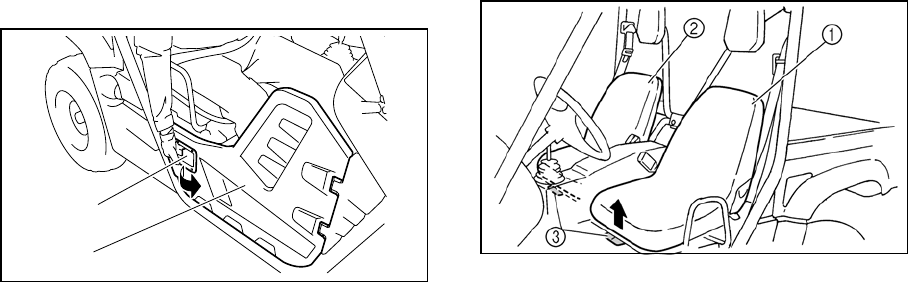
EVU00330
Seats
To remove a seat, pull its seat lock lever up-
ward, lift the front of the seat, and then slide
the seat forward and up.
1. Driver seat 2. Passenger seat
3. Seat lock lever (× 2)
1
2
EE.book Page 16 Thursday, September 6, 2007 4:28 PM
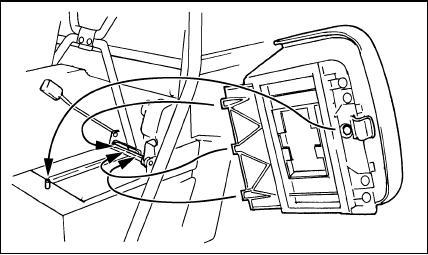
4-17
To install a seat, insert the projections on the
rear of the seat into the seat holders and push
down on the seat at the front. Make sure the
seats are securely latched. WARNING! A
loose seat could cause the operator to
lose control, or cause the operator or pas-
senger to fall.
EVU00340
Seat belts
This vehicle is equipped with three-point seat
belts for both the operator and the passenger.
Always wear the seat belts properly while
riding in the vehicle. See pages 7-6–7-8 for
more information.
EE.book Page 17 Thursday, September 6, 2007 4:28 PM
4-18
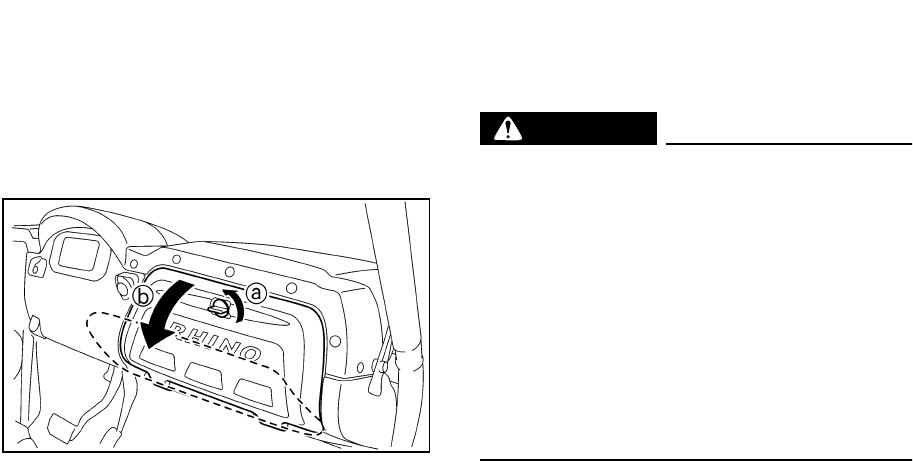
EVU01191
Glove compartment
NOTICE
To protect from damage, do not put metal
products, like tools or sharply edged prod-
ucts, directly in the glove compartment. If
they must be stored, wrap them in appro-
priate cushioning material.
a. Unlock. b. Open.
5B410005
Cup holders
Be sure to tightly close the cap of any plastic
bottle before placing it in a cup holder.
Some plastic bottles may not fit into the cup
holders depending on their size and shape.
WARNING
●While the vehicle is moving, do not
place any open or glass containers in
the cup holders; otherwise, the con-
tents may spill and the glass contain-
ers may break.
●Do not place any items, other than
cups or plastic bottles, in the cup
holders; otherwise, they may be
thrown about and possibly injure peo-
ple in the vehicle during sudden brak-
ing or an accident.
EE.book Page 18 Thursday, September 6, 2007 4:28 PM

4-19
1. Storage/cup holder (× 1) 2. Cup holder (× 2)
EVU00351
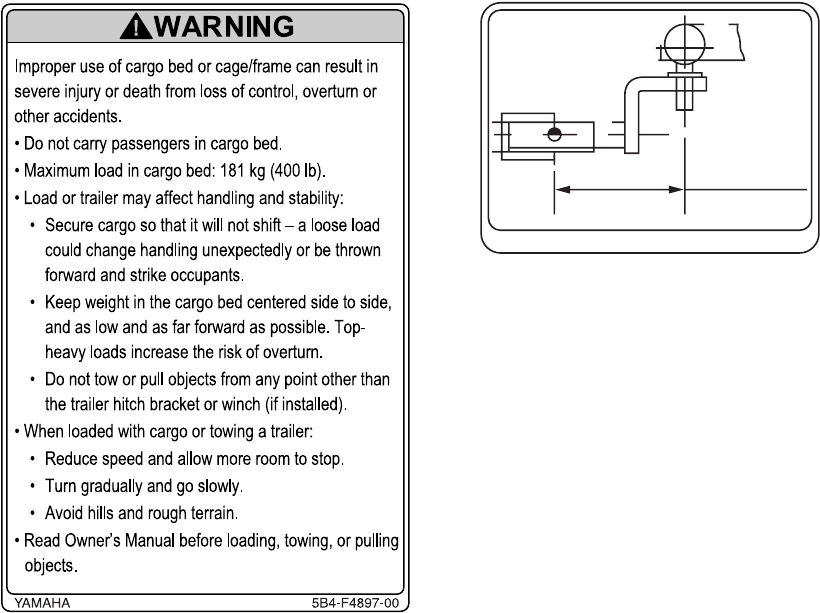
Cargo bed
1. Cargo bed 2. Tailgate
3. Cargo hook (× 4)
For additional loading information, see pages
6-9–6-11.
21
Maximum load limit: 181 kg (400 lb)
EE.book Page 19 Thursday, September 6, 2007 4:28 PM
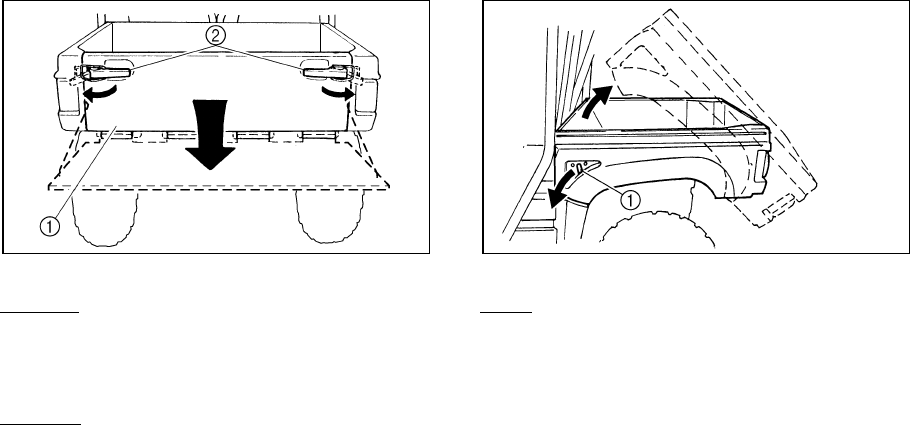
4-20
Opening and closing the tailgate
1. Tailgate 2. Latch (× 2)
To open
Unhook the latches, and then lower the tail-
gate.
To close
Place the tailgate in the original position, and
then hook the latches.
Lifting and lowering the cargo bed
1. Cargo bed release lever
To lift
Push down the cargo bed release lever on the
left or right side of the vehicle, and then slowly
lift up the cargo bed until it stops.
EE.book Page 20 Thursday, September 6, 2007 4:28 PM

4-21
To lower
With hands and fingers clear of pinch points,
lower the cargo bed slowly to its original posi-
tion and be sure it is locked into place.
WARNING! Keep hands, body, and other
people away from pinch points when low-
ering bed. Do not hold onto the cage/frame
while closing the bed.
5B410006
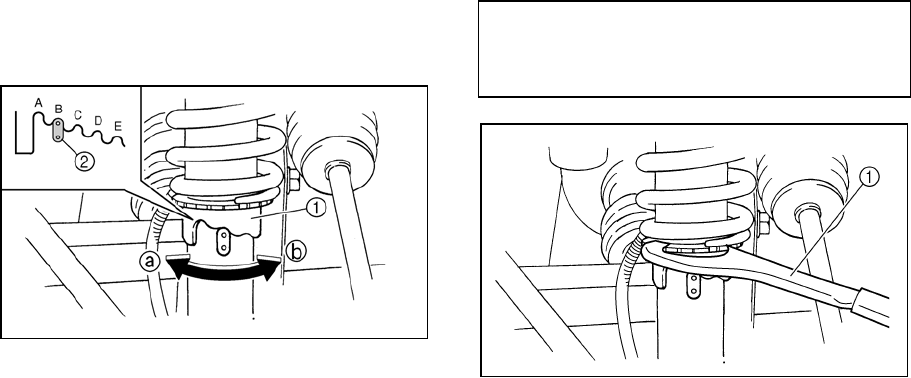
Front and rear shock absorber adjustment
The spring preload can be adjusted to suit the
operating conditions. You can reduce preload
for a softer ride, or increase preload if frequent
bottoming occurs or when carrying loads.
WARNING
Always adjust the shock absorbers on the
left and right sides to the same setting. Un-
even adjustment can cause poor handling
and loss of stability, which could lead to
an accident.
NOTICE
Frequent or severe bottoming can cause
increased wear or damage to the vehicle.
The rear wheels need to be removed to adjust
the rear shock absorber assemblies. (See
pages 8-43–8-46 for wheel removal and in-
stallation procedures.)
EE.book Page 21 Thursday, September 6, 2007 4:28 PM
4-22
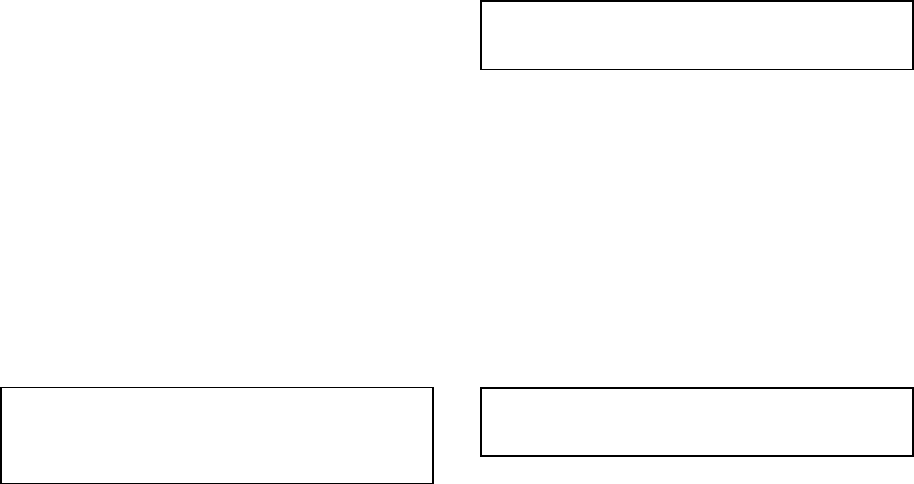
Adjust the spring preload as follows:
To increase the spring preload, turn the ad-
justing ring in direction a.
To decrease the spring preload, turn the ad-
justing ring in direction b.
1. Spring preload adjusting ring
2. Position indicator
A special wrench can be obtained at a
Yamaha dealer to make this adjustment.
1. Special wrench
Standard position: B
A- Minimum (soft)
E- Maximum (hard)
EE.book Page 22 Thursday, September 6, 2007 4:28 PM
4-23
EVU00370
Trailer hitch bracket and receiver
This vehicle is equipped with a trailer hitch
bracket and a 5 cm (2 in) receiver for a stan-
dard trailer hitch. Trailer towing equipment
can be obtained at a Yamaha dealer. (See
pages 6-9–6-11 for precaution information.)
1. Trailer hitch bracket 2. Receiver
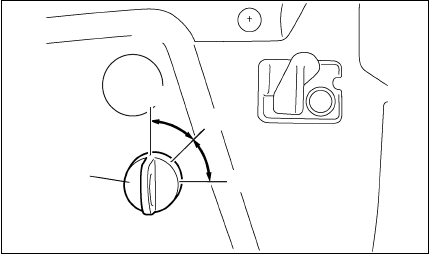
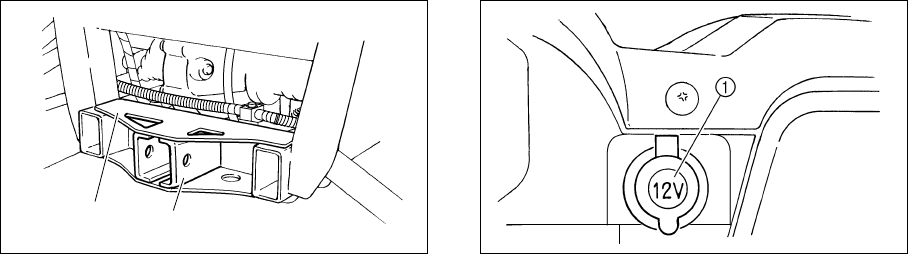
EVU00380
Auxiliary DC jack
The auxiliary DC jack is located at the right
side of the front panel. The auxiliary DC jack
can be used for suitable work lights, radios,
etc. The auxiliary DC jack should only be used
when the engine is running.
1. Auxiliary DC jack cap
1. Set the light switch to “OFF”.
2. Start the engine. (See pages 6-2–6-3.)
3. Open the auxiliary DC jack cap, and then
insert the accessory power plug into the
jack.
2
1
EE.book Page 23 Thursday, September 6, 2007 4:28 PM
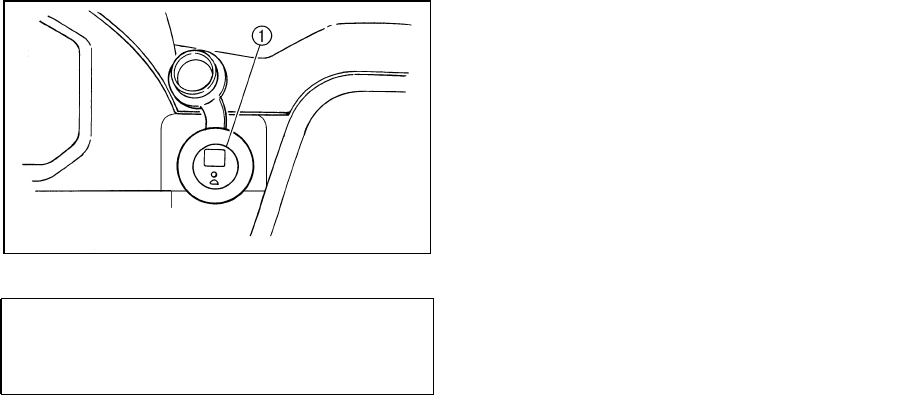
4-24
1. Auxiliary DC jack
4. When the auxiliary DC jack is not being
used, cover it with the cap.
N
OTICE
●Do not use accessories requiring more
than the maximum capacity stated
above. This may overload the circuit
and cause the fuse to blow.
●If accessories are used without the en-
gine running, the battery will lose its
charge and engine starting may become
difficult.
●Do not use an automotive cigarette
lighter or other accessories with a plug
that gets hot, because the jack can be
damaged.
Maximum rated capacity for the auxiliary
DC jack:
DC 12 V, 120 W (10 A)
EE.book Page 24 Thursday, September 6, 2007 4:28 PM

5-1
EVU01200
1-
FOR YOUR SAFETY – PRE-OPERATION CHECKS
Inspect your vehicle each time you use it to make sure the vehicle is in safe operating condition.
Always follow the inspection and maintenance procedures and schedules described in the Own-
er’s Manual.
WARNING
Failure to inspect or maintain the vehicle properly increases the possibility of an accident
or equipment damage. Do not operate the vehicle if you find any problem. If a problem
cannot be corrected by the procedures provided in this manual, have the vehicle inspect-
ed by a Yamaha dealer.
Before using this vehicle, check the following points:
ITEM ROUTINE PAGE
Brakes •Check operation, free play, fluid level, and fluid leakage.
•Fill with DOT 4 brake fluid if necessary.
5-3, 8-34–8-37,
8-39–8-40
Parking brake •Check for proper operation, condition, and free play. 8-38–8-39
Fuel •Check fuel level.
•Fill with fuel if necessary. 5-4–5-5
Engine oil •Check oil level.
•Fill with oil to proper level if necessary. 5-6, 8-10–8-15
Coolant reservoir •Check coolant level.
•Fill with coolant if necessary. 5-7, 8-21–8-22
EE.book Page 1 Thursday, September 6, 2007 4:28 PM

5-2
1
2
3
4
5
6
7
8
9
10
11
12
13
14
Final gear oil/
Differential gear oil •Check for leakage. 5-7, 8-16–8-21
Accelerator pedal •Check for proper accelerator pedal operation. 5-8
Seat belts •Check for proper operation and belt wear. 5-8
Steering •Check for proper operation. 5-8
Fittings and fasteners •Check all fittings and fasteners. 5-8
Lights and switches •Check for proper operation. 5-9, 8-53–8-57
Wheels and tires •Check tire pressure and for wear and damage. 5-9–5-11, 8-43–8-46
Axle boots •Check for damage. 8-23
ITEM ROUTINE PAGE
EE.book Page 2 Thursday, September 6, 2007 4:28 PM

5-3
EVU00390
Front and rear brakes
Brake pedal
Check for correct brake pedal free play. If the
brake pedal free play is incorrect, have a
Yamaha dealer adjust it. (See page 8-37.)
Check the operation of the brake pedal. It
should move smoothly and there should be a
firm feeling when the brakes are applied. If
not, have the vehicle inspected by a Yamaha
dealer.
Brake fluid level
Check the brake fluid level. Add fluid if neces-
sary. (See pages 8-36–8-37.)
Brake fluid leakage
Check to see if any brake fluid is leaking out of
the pipe joints or the brake fluid reservoir. Ap-
ply the brakes firmly for one minute. If there is
any leakage, have the vehicle inspected by a
Yamaha dealer.
Brake operation
Check the operation of the brakes at the start
of every ride. Test the brakes at slow speed
after starting out to make sure they are work-
ing properly. If the brakes do not provide prop-
er braking performance, inspect the brake
system. (See pages 8-34–8-35, 8-37–8-40.)
Recommended brake fluid: DOT 4
EE.book Page 3 Thursday, September 6, 2007 4:28 PM

5-4
EVU00400
Fuel
Make sure there is sufficient gasoline in the
tank.
WARNING
Gasoline and gasoline vapors are ex-
tremely flammable. To avoid fires and ex-
plosions and to reduce the risk of injury
when refueling, follow these instructions.
1. Before refueling, turn off the engine and
be sure that driver and passenger are
outside the vehicle.
Never refuel while smoking, or while in
the vicinity of sparks, open flames, or oth-
er sources of ignition such as the pilot
lights of water heaters and clothes dry-
ers.
2. Do not overfill the fuel tank. Because fuel
expands when it heats up, heat from the
engine or the sun can cause fuel to spill
out of the fuel tank.
3. Wipe up any spilled fuel immediately.
4. Be sure the fuel tank cap is closed se-
curely.
WARNING
Gasoline is poisonous and can cause inju-
ry or death. Handle gasoline with care.
Never siphon gasoline by mouth. If you
should swallow some gasoline or inhale a
lot of gasoline vapor, or get some gasoline
in your eyes, see your doctor immediately.
If gasoline spills on your skin, wash with
soap and water. If gasoline spills on your
clothing, change your clothes.
Your Yamaha engine has been designed to
use regular unleaded gasoline with a pump
octane number ([R+M]/2) of 86 or higher, or
research octane number of 91 or higher. If
knocking or pinging occurs, use a different
brand of gasoline or premium unleaded fuel.
Unleaded fuel will give you longer spark plug
life and reduced maintenance cost.
EE.book Page 4 Thursday, September 6, 2007 4:28 PM

5-5
Gasohol
There are two types of gasohol: gasohol con-
taining ethanol and that containing methanol.
Gasohol containing ethanol can be used if
ethanol content does not exceed 10%. Gaso-
hol containing methanol is not recommended
by Yamaha because it may cause fuel system
damage or vehicle performance problems.
Portable gas containers
If you carry a portable gas can in the bed of
the Rhino, be sure to secure it with the cap
tightened before driving the vehicle.
Always place a portable gas container on the
ground before filling it. Before removing the
container cap, touch the container with the
gas dispenser nozzle. Keep gas dispenser
nozzle in contact with container inlet when fill-
ing. WARNING! Never refill a fuel container
in the bed of any vehicle. Fire may result
from a build-up of static electricity. The
discharge of this build-up while refueling
can cause a spark and ignite the gasoline.
Recommended fuel:
Unleaded gasoline only
Fuel tank capacity:
30.0 L (6.60 Imp gal, 7.93 US gal)
EE.book Page 5 Thursday, September 6, 2007 4:28 PM
5-6
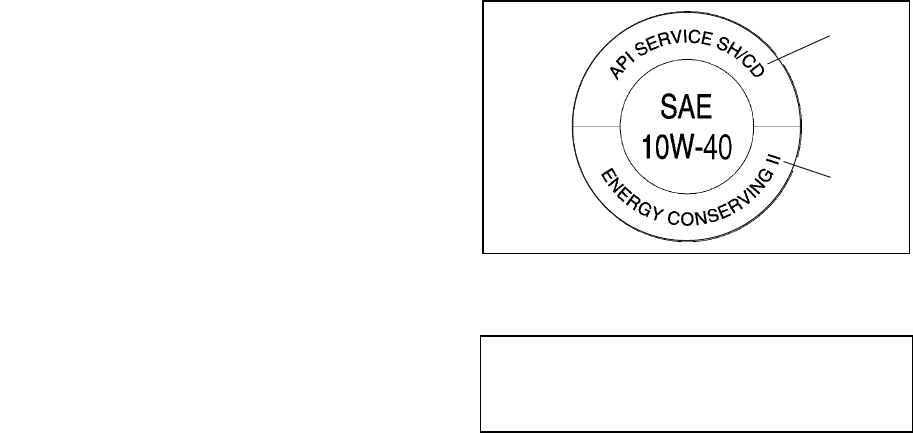
EVU00410
Engine oil
Make sure the engine oil is at the specified
level. Add oil as necessary. (See pages 8-10–
8-15.)
NOTICE
●In order to prevent clutch slippage
(since the engine oil also lubricates the
clutch), do not mix any chemical addi-
tives with oil. Do not use oils with a die-
sel specification of “CD” or oils of a
higher quality than specified. In addi-
tion, do not use oils labeled “ENERGY
CONSERVING II” or higher.
●Make sure that no foreign material en-
ters the crankcase.
1. “CD” specification
2. “ENERGY CONSERVING II”
Recommended engine oil type and
quantity:
See page 10-2.
1
2
EE.book Page 6 Thursday, September 6, 2007 4:28 PM
5-7
EVU00420
Coolant
Check the coolant level in the coolant reser-
voir when the engine is cold (the coolant level
will vary with engine temperature).
The coolant level is satisfactory if it is between
the minimum and maximum level marks on
the coolant reservoir. If the coolant level is at
or below the minimum level mark, add addi-
tional coolant to bring the level up to maxi-
mum level mark. If coolant is not available,
add distilled water. Change the coolant every
two years. (See pages 8-21–8-22 for details.)
NOTICE
Hard water or salt water is harmful to the
engine. You may use soft water if you can-
not get distilled water.
EVU00430
Final gear oil
Make sure the final gear oil is at the specified
level. Add oil as necessary. (See pages 8-16–
8-18 for details.)
If desired, an SAE 80W90 hypoid gear oil may
be used for all conditions.
TIP
TIP
GL-4 is a quality and additive rating; GL-5 or
GL-6 rated hypoid gear oils may also be used.
EVU00440
Differential gear oil
Make sure the differential gear oil is at the
specified level. Add oil as necessary. (See
pages 8-19–8-21 for details.)
Coolant reservoir capacity
(up to the maximum level mark):
0.32 L (0.28 Imp qt, 0.34 US qt)
Recommended oil:
SAE 80 API GL-4 Hypoid gear oil
Recommended oil:
SAE 80 API GL-4 Hypoid gear oil
EE.book Page 7 Thursday, September 6, 2007 4:28 PM
5-8
EVU00450
Accelerator pedal
Check to see that the accelerator pedal oper-
ates correctly. It must operate smoothly and
spring back to the idle position fully when re-
leased. Have a Yamaha dealer repair as nec-
essary for proper operation.
EVU00460
Seat belts
Make sure that the seat belts are not frayed,
torn, stretched, or damaged. The seat belt
must move smoothly when pulled out and re-
tract on its own when released. It must also
lock up when quickly pulled out. The latch
plate should click securely into the buckle and
release when the release button is pushed
firmly. Wash off any dirt or mud that could af-
fect operation. Have a Yamaha dealer repair
as necessary for proper operation.
A crash can damage the restraint systems in
your vehicle. A damaged restraint system
may not properly protect the person using it,
resulting in serious injury or death in a crash.
To help make sure your restraint systems are
working properly after a crash, have them in-
spected and any necessary replacements
made as soon as possible.
EVU01230
Steering
Park on level ground. Turn the steering wheel
right and left. Check for excessive free play,
abnormal noises, or a rough feeling. Have a
Yamaha dealer repair as necessary for proper
operation.
EVU00470
Fittings and fasteners
Always check the tightness of chassis fittings
and fasteners before a ride. Take the vehicle
to a Yamaha dealer or refer to the Service
Manual for correct tightening torque.
EE.book Page 8 Thursday, September 6, 2007 4:28 PM
5-9
EVU00480
Lights
Check the headlights and tail/brake lights to
make sure they are in working condition. Re-
pair as necessary for proper operation.
EVU00490
Switches
Check the operation of all switches. Have a
Yamaha dealer repair as necessary for proper
operation.
Control cables
When riding in cold weather, always make
sure all control cables work smoothly before
you begin riding. WARNING! Control cables
can freeze in cold weather and you could
be unable to control the vehicle.
EVU00500
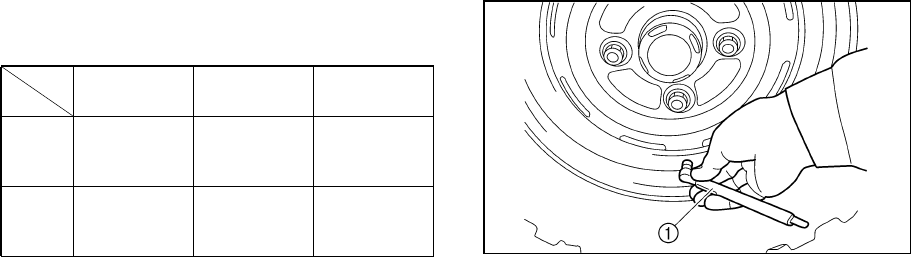
Tires
Check tire pressure regularly to make sure it
is at the recommended specifications. Also
check for wear and damage.
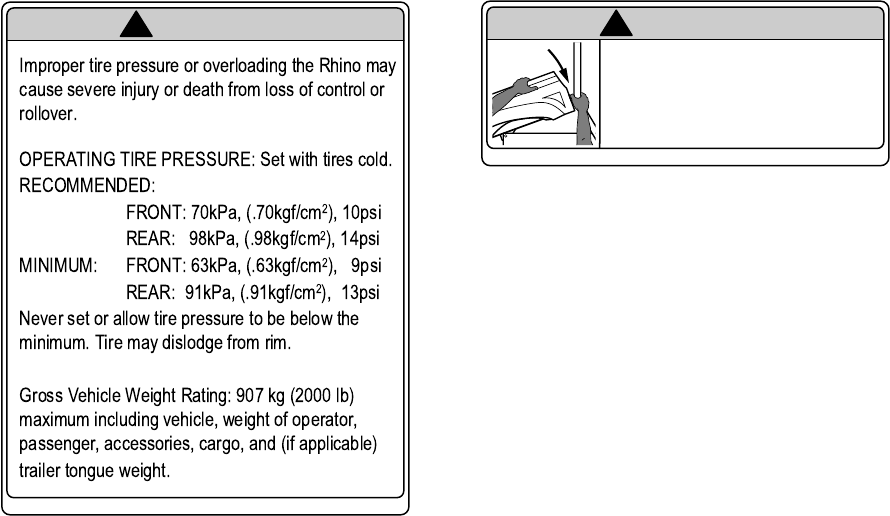
EVU00510
Tire pressure
Use the tire pressure gauge to check and ad-
just tire pressures when the tires are cold. Tire
pressures must be equal on both sides.
WARNING! Operation of this vehicle with
improper tire pressure may cause severe
injury or death from loss of control or roll-
over. Tire pressure below the minimum
specified could also cause the tire to dis-
lodge from the rim under severe riding
conditions.
EE.book Page 9 Thursday, September 6, 2007 4:28 PM
5-10
Set tire pressures to the following specifica-
tions:
ACE-02E
The tire pressure gauge is included as stan-
dard equipment. Make two measurements of
the tire pressure and use the second reading.
Dust or dirt in the gauge could cause the first
reading to be incorrect.
1. Tire pressure gauge
Recommended
pressure Minimum Maximum
Front
70 kPa
(0.70 kgf/cm2,
10 psi)
63 kPa
(0.63 kgf/cm2,
9 psi)
77 kPa
(0.77 kgf/cm2,
11 psi)
Rear
98 kPa
(0.98 kgf/cm2,
14 psi)
91 kPa
(0.91 kgf/cm2,
13 psi)
105 kPa
(1.05 kgf/cm2,
15 psi)
EE.book Page 10 Thursday, September 6, 2007 4:28 PM
5-11
EVU00520
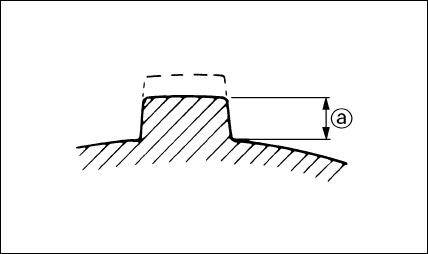
Tire wear limit
When the tire groove decreases to 3 mm
(0.12 in) due to wear, replace the tire.
a. Tire wear limit
EE.book Page 11 Thursday, September 6, 2007 4:28 PM

6-1
1
2
3
4
5
6
7
8
9
10
11
12
13
14
EVU00530
1-
OPERATION
Read the Owner’s Manual carefully to be-
come familiar with all controls. If there is a
control or function you do not understand, ask
your Yamaha dealer.
WARNING
Failure to familiarize yourself with the con-
trols can lead to loss of control, which
could cause an accident or injury.
Engine break-in
There is never a more important period in the
life of your vehicle than the period between
zero and 20 hours.
For this reason, we ask that you read the fol-
lowing material carefully. Because the engine
is brand new, you must not put an excessive
load on it for the first several hours of opera-
tion. During the first 20 hours, the various
parts in the engine wear and polish them-
selves to achieve the correct operating clear-
ances.
During this period, prolonged full-throttle oper-
ation or any condition that might result in ex-
cessive engine heating must be avoided.
However, momentary (2–3 seconds maxi-
mum) full-throttle operation under load does
not harm the engine.
EE.book Page 1 Thursday, September 6, 2007 4:28 PM

6-2
Each full-throttle acceleration sequence
should be followed with a substantial rest pe-
riod for the engine, by cruising at lower r/min
so the engine can rid itself of the temporary
build-up of heat. If any abnormality is noticed
during this period, consult a Yamaha dealer.
0–10 hours:
Avoid continuous operation above half-throt-
tle. Allow a cooling-off period of five to ten
minutes after every hour of operation. Vary
the speed of the vehicle from time to time. Do
not operate it at one set throttle position.
10–20 hours:
Avoid prolonged operation above three-quar-
ter throttle.
After break-in:
The vehicle may now be operated normally.
5B410007
Starting the engine
1. Turn the main switch to “ON”.
NOTICE
The coolant temperature warning light and
engine trouble warning light should come
on, then go off.
If a warning light does not go off, see page
4-4 for the corresponding warning light
circuit check.
2. Apply the brake pedal.
3. Shift the drive select lever into the neutral
position.
●When the drive select lever is in the
neutral position, the neutral indicator
light should come on. If the neutral in-
dicator light does not come on, ask a
Yamaha dealer to inspect the electric
circuit.
EE.book Page 2 Thursday, September 6, 2007 4:28 PM

6-3
●The engine can be started in any gear
if the brake is applied. However, it is
recommended to shift into neutral be-
fore starting the engine.
4. With your foot off the accelerator pedal,
start the engine by turning the key to
“START”.
If the engine fails to start, release the key, and
then try starting it again. Wait a few seconds
before the next attempt. Each attempt should
be as short as possible, to preserve battery
energy. NOTICE: Do not crank the engine
more than 5 seconds on each attempt, or
starter damage could occur. Wait at least 5
seconds between each operation of the
electric starter to let it cool.
Do not turn the key to the “START” position
with the engine running, or damage to the
electric starter may result.
TIP
For maximum engine life, never accelerate
hard when the engine is cold!
EE.book Page 3 Thursday, September 6, 2007 4:28 PM
6-4
Drive select lever operation and reverse
driving
NOTICE
Do not shift without coming to a complete
stop and waiting for the engine to return to
normal idle speed. Damage to the engine
or drive train may occur.
Shifting: neutral to high and high to low
1. Stop the vehicle. Take your foot off the
accelerator pedal.
2. Apply the brake pedal, then shift by mov-
ing the drive select lever along the shift
guide. Make sure that the drive select le-
ver is completely shifted into position.
1. Drive select lever
3. Release the brake pedal and press the
accelerator pedal gradually.
EE.book Page 4 Thursday, September 6, 2007 4:28 PM
6-5
Shifting: neutral to reverse
WARNING
Before you shift into reverse, make sure
there are no obstacles or people behind
you. When it is safe to proceed, go slowly.
Hitting an obstacle or person could result
in serious injury or death.
1. Stop the vehicle. Take your foot off the
accelerator pedal and check behind you.
2. Apply the brake pedal.
3. Shift from neutral to reverse or vice versa
by moving the drive select lever along the
shift guide.
●When in reverse, the reverse indicator
light should be on. Due to the synchro-
nizing mechanism in the engine, the
light may not come on until the vehicle
starts moving.
●If the light does not come on, ask a
Yamaha dealer to inspect the reverse
indicator light electrical circuit.
1. Drive select lever
4. Check behind the vehicle for people or
obstacles, and then release the brake
pedal.
5. Press the accelerator pedal gradually
and continue to watch to the rear while
backing.
EE.book Page 5 Thursday, September 6, 2007 4:28 PM
6-6
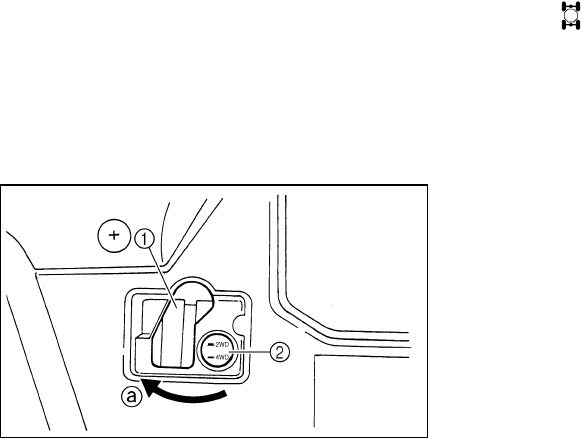
5B410009
On-Command four-wheel-drive switch and
differential gear lock switch
You may notice that the vehicle handles dif-
ferently in 2WD, 4WD, and 4WD-LOCK
(“DIFF. LOCK”). For example, you should ex-
pect that the vehicle will require more effort to
turn in 4WD-LOCK (“DIFF. LOCK”). Always
stop the vehicle before changing between
2WD and 4WD or 4WD and 4WD-LOCK
(“DIFF-LOCK”).
1. Differential gear lock lever
2. On-Command four-wheel-drive switch “2WD”/“4WD”
“2WD”/“4WD”
To change from 2WD to 4WD, stop the vehi-
cle, and then set the switch to “4WD”. When
the vehicle is in 4WD, the four-wheel-drive in-
dicator “” will come on in the multi-function
display. To change from 4WD to 2WD, stop
the vehicle, be sure the differential gear lock
lever is set to position a, and then set the
switch to “2WD”.
EE.book Page 6 Thursday, September 6, 2007 4:28 PM
6-7
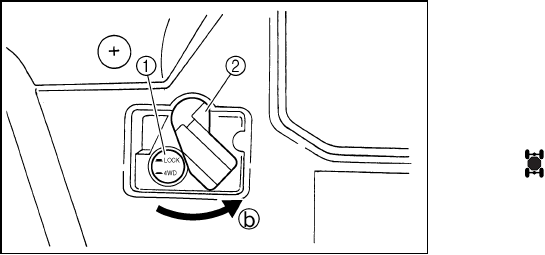
On-Command differential gear lock switch
“4WD”/“LOCK”
1. On-Command differential gear lock switch “4WD”/“LOCK”
2. Differential gear lock lever
To lock the differential gear in 4WD, stop the
vehicle, make sure the On-Command four-
wheel-drive switch is set to “4WD”, move the
differential gear lock lever to position b, and
then set the switch to “LOCK”. When the dif-
ferential gear is locked, the differential gear
lock indicator light (“DIFF. LOCK”) will come
on along with the differential gear lock indica-
tor “” in the multi-function display. To re-
lease the differential gear lock, stop the
vehicle and set the switch to “4WD”.
●When the switch is set to “LOCK”, the dif-
ferential gear lock indicator and indicator
light will flash until the differential gear is
locked.
●When the indicator and indicator light are
flashing, turning the steering wheel back
and forth will help the differential gear lock
to engage.
DIFF.
LOCK
EE.book Page 7 Thursday, September 6, 2007 4:28 PM
6-8
●Driving before the differential gear lock is
properly engaged (e.g., when the indicator
and indicator light are flashing) will cause
the engine speed to be limited until en-
gagement is complete.
EVU01210
Parking
When parking, stop the engine and shift the
drive select lever into the neutral position. Ap-
ply the parking brake to help prevent the vehi-
cle from rolling. See pages 7-17–7-18 for
more information on parking and parking on a
slope.
EE.book Page 8 Thursday, September 6, 2007 4:28 PM

6-9
EVU00630
Loading
Take extra precautions when driving with a
load or trailer. Follow these instructions and
always use common sense and good judg-
ment when carrying cargo or towing a trailer.
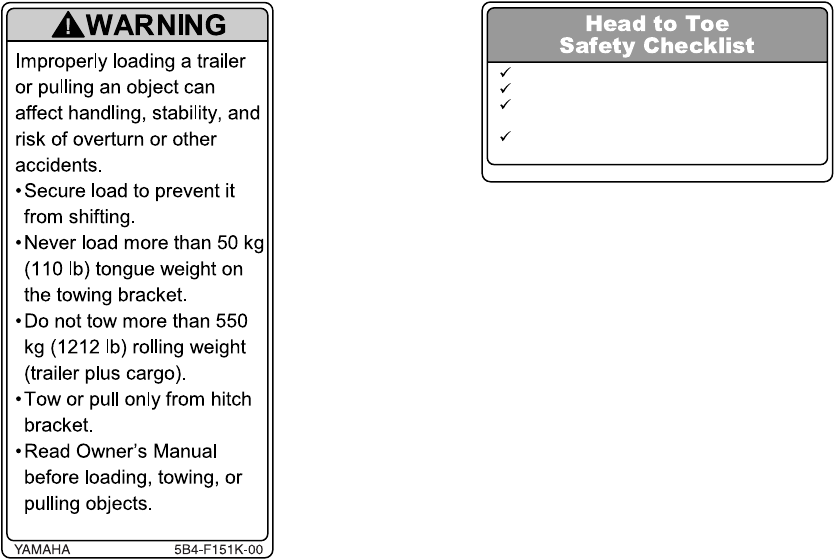
Prepare your load or trailer
WARNING
Improper loading or towing can increase
the risk of loss of control, an overturn, or
other accident:
●Do not exceed the Maximum Loading
Limits for the vehicle (see box or vehi-
cle labeling).
●Keep weight in the cargo bed centered
side to side, and as low and as far for-
ward as possible. Top-heavy loads in-
crease the risk of overturn. Be sure
cargo is secured – a loose load could
change handling unexpectedly or
strike occupants.
●Do not exceed the maximum tongue
weight.
●Make sure the load does not interfere
with your control or ability to see
where you are going.
●Tie down cargo in the trailer securely.
Make sure cargo in the trailer cannot
move around. A shifting load can
cause an accident.
EE.book Page 9 Thursday, September 6, 2007 4:28 PM

6-10
Use the hooks equipped on the cargo bed to
tie down loads.
Choose a trailer hitch drawbar designed for
use with a 5 cm (2 in) receiver. (See page
4-23 for more information.)
You can measure tongue weight with a bath-
room scale. Put the tongue of the loaded trail-
er on the scale with the tongue at hitch height.
Adjust the load in the trailer, if necessary, to
reduce the weight on hitch. If you are carrying
cargo and towing a trailer, include the tongue
weight in the maximum vehicle load limit.
MAXIMUM LOADING LIMIT
●Vehicle loading limit (total weight of
cargo, operator, passenger and
accessories and tongue weight):
367 kg (809 lb)
●Cargo bed: 181 kg (400 lb)
●Trailer hitch:
Pulling load (total weight of trailer and
cargo): 550 kg (1,212 lb)
Tongue weight (vertical weight on trailer
hitch point): 50 kg (110 lb)
EE.book Page 10 Thursday, September 6, 2007 4:28 PM

6-11
Operating when loaded with cargo or tow-
ing a trailer
Drive more slowly than you would without a
load. The more weight you carry, the slower
you should go. Although conditions vary, it is
good practice to keep the vehicle in low gear
whenever you are carrying heavier loads or
when towing a trailer.
WARNING
Carrying loads or towing a trailer can in-
crease the risk of loss of control, an over-
turn, or other accident. To reduce the risk
of an accident:
●Reduce speed, operate in low gear
only, and allow more room to stop. A
heavier vehicle takes longer to stop.
●Avoid hills and rough terrain. Choose
terrain carefully. Use extreme caution
when towing or carrying a load on in-
clines.
●Turn gradually and go slowly.
Pulling something other than a trailer
Yamaha recommends that loads be transport-
ed in the bed or in a trailer. If you need to
move an object a short distance use a winch
and follow the winch manufacturer’s instruc-
tions.
If you choose to use something other than a
winch use extreme caution, follow the manu-
facturer’s instructions for that product, and
only attach to the hitch or hitch bracket of the
Rhino. WARNING! Improperly pulling can
cause serious injury or death. Never ex-
ceed the Pulling Load limit of the Rhino.
Avoid pulling on inclines.
Pulling objects on the ground can be more
hazardous than pulling a trailer. It may be dif-
ficult to predict how the load will affect vehicle
operation. That effect could also change de-
pending upon terrain or what obstacles might
be in the object’s path.
EE.book Page 11 Thursday, September 6, 2007 4:28 PM
7-1
5B410010
1-
BASIC GUIDE FOR SAFE
USE
As a Rhino owner you are responsible for the
safe and proper operation of this vehicle.
Read this chapter and review the safety in-
structions in Chapter 2 before operating the
vehicle. Use these chapters and the labels on
the vehicle to instruct new operators and pas-
sengers. Do not allow anyone else to operate
the vehicle or ride as a passenger if you are
unsure that he/she is willing and able to follow
these instructions.
WARNING
Follow these instructions to reduce your
risk of an accident and to reduce the risk
of serious injury or death in the event of an
accident.
KNOW YOUR VEHICLE
This off-road vehicle will handle and maneu-
ver differently from cars, ATVs, go-carts, golf-
cars and grounds-keeping vehicles. The
Rhino has higher ground clearance and other
features to handle rugged terrain, and, as a
result, can overturn in situations where some
vehicles may not. This would include vehicles
made primarily for pavement, roads, im-
proved paths, or grounds-keeping. If you do
not use care in maneuvering the Rhino, you
can cause it to roll over even on flat, open ar-
eas.
EE.book Page 1 Thursday, September 6, 2007 4:28 PM

7-2
1
2
3
4
5
6
7
8
9
10
11
12
13
14
Doing things with a Rhino that some people
do for thrills in other vehicles (such as side-
ways sliding, skidding, fishtailing, or donuts)
have led to side rollovers. These rollovers can
result in crushed limbs and other serious inju-
ries or death to drivers or passengers.
As the owner/operator, it is your responsibility
to protect yourself and your passenger from
accidents, including rollovers. The Rhino has
many features, including a protective struc-
ture and seat belts, to help protect occupants,
but the best way to avoid injuries is to avoid
accidents. There is a risk of injury or death in
any accident, even with these safety features.
EE.book Page 2 Thursday, September 6, 2007 4:28 PM
7-3
Driver requirements
●This vehicle is intended for use only by an
operator 16 or older with a valid motor vehi-
cle license.
●The driver must be able to place both feet
flat on the floorboard while seated upright
with his/her back against the seat back.
●Do not drive after using drugs or alcohol.
Remove the ignition key when the vehicle is
not in use to prevent unauthorized use of the
machine.
Parents:
Many states have implemented new motor
vehicle licensing requirements for young driv-
ers. These requirements are in response to
the disproportionately high rate of crashes in-
volving youthful drivers. As with automobiles,
to promote safe driving behaviors, you should
supervise younger drivers and consider set-
ting rules and putting limits on how, when, and
where the Rhino can be used.
DRIVER
UNDER
16
EE.book Page 3 Friday, September 7, 2007 3:50 PM
7-4
Passenger requirements
This vehicle is designed for the operator and
one passenger. Carrying passengers improp-
erly can lead to serious injury or death. As the
operator, you are responsible for your pas-
senger.
●Your passenger must be able to place both
feet on the floorboard while seated upright
with his/her back against the seat back.
●Allow only one passenger in the vehicle
and only in the passenger seat. Do not car-
ry any other passengers. Do not carry pas-
sengers in the cargo bed.
●Do not allow someone to ride as a passen-
ger who has been using drugs or alcohol.
Occupant protection system
1. Passenger handhold 2. Seat belt
3. Door
1. Door
1
2
2
3
1
EE.book Page 4 Thursday, September 6, 2007 4:28 PM
7-5
1. Passenger handhold
WARNING
Do not make changes to the occupant pro-
tection system. If you install aftermarket
products or have your vehicle modified,
you may put yourself and others at greater
risk of serious injury or death. You are re-
sponsible for any such changes to the ve-
hicle.
The Rhino comes with a variety of features to
help reduce the risk of driver and passenger
injury. These features work together, and
when properly used, these features will help
protect the occupants in the event of an acci-
dent. If these features are not used properly,
they can cause injury.
1
EE.book Page 5 Thursday, September 6, 2007 4:28 PM
7-6
Protective structure
The vehicle cage/frame provides a protective
structure that helps limit intrusions by branch-
es or other objects and may reduce your risk
of injury in accidents. The protective structure
will not protect occupants in all rollovers or ac-
cidents.
Body parts outside of vehicle can be struck by
passing objects or crushed during vehicle roll-
over. Do not put your hands or feet outside of
the vehicle for any reason. Do not hold onto
the door, cage/frame or hip restraint bar.
Wear your seat belt and helmet.
If you think or feel that the vehicle may tip or
roll, do not put your hands or feet outside the
vehicle for any reason. You will not be able to
stop the vehicle from tipping over using your
body. Any part of your body (arms, legs, or
head) outside of the vehicle can be crushed
by the vehicle cage/frame.
Seat belts
Seat belts should be worn by both driver and
passenger. Driver must be sure that the pas-
senger is belted before driving.
●Be sure the seat belt is not twisted, is
close-fitting across the hips and chest,
and is latched securely.
●Do not wear the lap belt across the abdo-
men or stomach.
●Do not put the shoulder belt behind the
back.
Failure to use seat belts properly may lead to
an increased likelihood and severity of injury.
EE.book Page 6 Thursday, September 6, 2007 4:28 PM
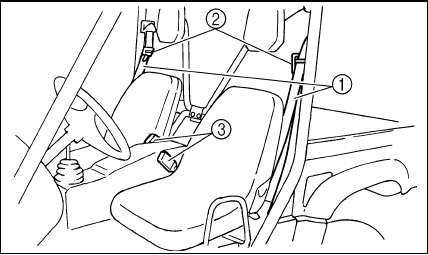
7-7
An unbelted occupant may strike the interior
of the vehicle, the protective structure, or oth-
er objects in an accident or during operation.
You may also fall completely out or be partial-
ly ejected from the vehicle, which may lead to
being crushed between the ground and the
vehicle. Wearing the seat belt helps you re-
main in the vehicle – the doors and handholds
are not a substitute for using a seat belt.
A crash can damage the restraint systems in
your vehicle. A damaged restraint system
may not properly protect the person using it,
resulting in serious injury or death in a crash.
To help make sure your restraint systems are
working properly after a crash, have them in-
spected and any necessary replacements
made as soon as possible.
1. Seat belt (× 2) 2. Latch plate (× 2)
3. Buckle (× 2)
To wear the seat belt properly, do the follow-
ing:
1. Hold the latch plate as you pull the belt
across your lap and chest. Make sure the
belt is not twisted and is not caught on
any portion of the vehicle, your clothing,
or any equipment you are carrying.
EE.book Page 7 Thursday, September 6, 2007 4:28 PM
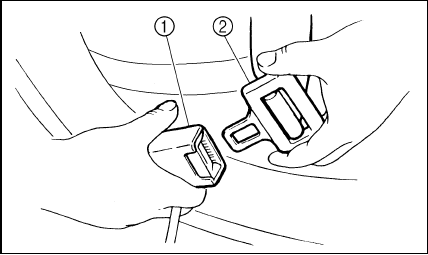
7-8
2. If the latch plate is not positioned in the
correct location along the seat belt,
squeeze the latch plate ends together
along its long edges in order to more eas-
ily adjust its location up or down along the
length of the belt.
3. Push the latch plate into the buckle until it
clicks. Pull up on the latch plate to make
sure it is secure.
1. Buckle 2. Latch plate
4. Put the lap portion of the belt low on your
hips. Pull up on the shoulder part so the
belt is snug across your hips.
5. Position the shoulder belt over your
shoulder and across your chest. The
shoulder belt should fit against your
chest. If it is loose, pull the belt out all the
way and then let it retract.
6. To release the buckle, firmly press the re-
lease button.
EE.book Page 8 Thursday, September 6, 2007 4:28 PM
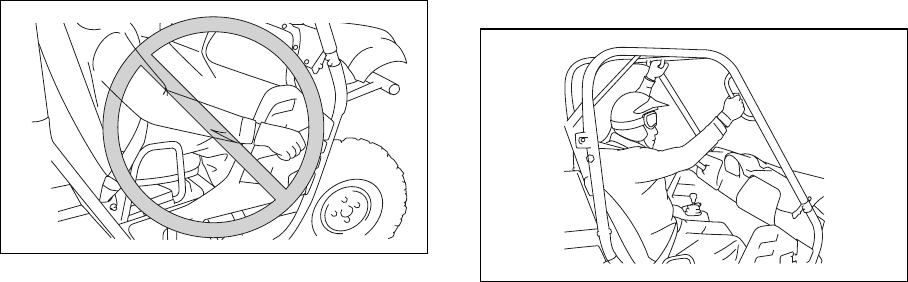
7-9
Doors
The doors are designed to reduce the likeli-
hood that you will stick your leg out to stop the
vehicle from tipping over or for any other rea-
son in a rollover. The doors may also reduce
intrusion of objects into the occupant area.
Make sure the door is securely latched before
operation. Do not place your arm or hand on
the door during operation. Your hand or arm
may be struck by objects or crushed against
outside objects or the ground during a roll-
over.
Passenger handholds
Handholds are provided to grip during opera-
tion to maintain proper position and balance.
Holding onto the handholds helps to reduce
the likelihood that the passenger puts a hand
outside the vehicle if the vehicle begins to tip.
There are two handholds on the protective
structure and two handholds on the passen-
ger’s left side, for the right and left hands.
The driver should make sure the passenger is
holding onto the handholds with both hands
before operating the vehicle.
EE.book Page 9 Thursday, September 6, 2007 4:28 PM
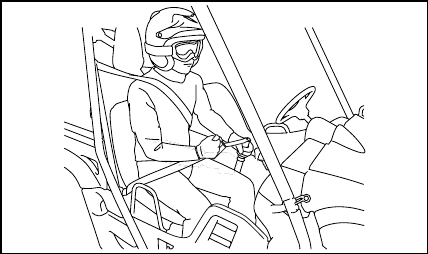
7-10
Seat and hip restraints
The seat and hip restraints are designed to
help keep you in the vehicle. Do not hold onto
hip restraint bar when the vehicle is moving.
Your hand or arm may be struck by objects or
crushed against outside objects or the ground
during a rollover.
EE.book Page 10 Thursday, September 6, 2007 4:28 PM
7-11
Floorboard
The floorboard allows you to brace your feet,
which helps you keep your body in the vehicle
in the event of an accident or rollover. Keep
your feet on the floorboard during operation.
Steering wheel
Keep both hands on the steering wheel. Do
not hold the steering wheel with your thumbs
inside the rim. Keep your palms on the out-
side of the steering wheel. Similar to other off-
road vehicles, if the Rhino hits a deep rut or
large obstacle, the steering wheel could brief-
ly jerk in one direction or back and forth as the
tires and vehicle respond to the obstacle. This
quick motion could injure your thumbs or wrist
if your thumbs or hand(s) are inside the steer-
ing wheel. Grip the steering wheel so that
your thumbs will not be hit by the spokes. As
an example, see the illustration.
EE.book Page 11 Thursday, September 6, 2007 4:28 PM
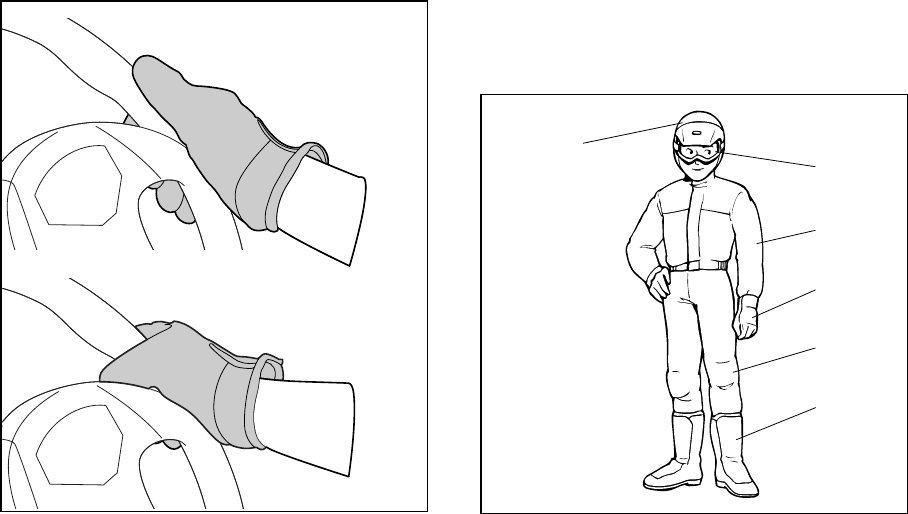
7-12
LEARNING TO OPERATE YOUR VEHICLE
Personal protective equipment
1. Approved motorcycle helmet
2. Eye protection 3. Long-sleeved shirt or jacket
4. Gloves 5. Long pants
6. Over-the-ankle boots
CORRECT GRIP EXAMPLE
INCORRECT GRIP EXAMPLE
1
2
3
4
5
6
EE.book Page 12 Thursday, September 6, 2007 4:28 PM
7-13
Both driver and passenger should wear the
following to reduce risk of injury in an acci-
dent:
●Approved motorcycle helmet that fits prop-
erly
●Eye protection (goggles, helmet face
shield, or protective eyewear)
●Over-the-ankle boots, gloves, long-sleeved
shirt or jacket, and long pants
An approved helmet and other personal pro-
tective equipment can help in a variety of
ways, including:
●Reduce the severity of injuries if any part of
you is outside the vehicle cage/frame pro-
tective structure during a rollover.
●Help protect you if outside objects intrude
inside the vehicle during operation.
●Help protect you in the event of vehicle im-
pact with an obstacle.
Wear eye protection when operating or riding
the vehicle to reduce the risk of a serious ac-
cident or injury. Eye protection, such as a face
shield or goggles, may reduce the risk of for-
eign material getting in your eyes and help
prevent loss of vision.
Practice for new Rhino users
You should become familiar with the perfor-
mance characteristics of the vehicle in a large,
flat area that is free of obstacles and other ve-
hicles. Practice controlling the accelerator
pedal, brakes, steering, and drive select lever.
Drive at slow speeds with gradual accelera-
tion and turning. Practice smooth throttle ap-
plication. Practice slowing down before
turning. Practice maintaining a steady throttle
through the turn. Avoid higher speeds until
you are thoroughly familiar with the operation
of your vehicle. Remember, driving aggres-
sively or making abrupt maneuvers even on
flat, open areas can cause side rollovers.
EE.book Page 13 Thursday, September 6, 2007 4:28 PM
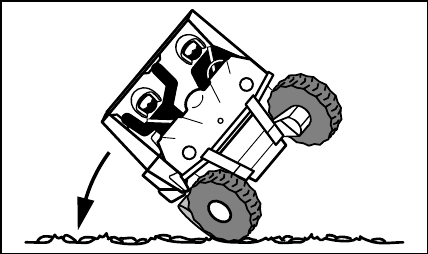
7-14
Become familiar with the way the vehicle feels
in low and high ranges, first in two-wheel drive
(2WD) and then in four-wheel drive (4WD)
and four-wheel drive with the differential
locked (DIFF. LOCK). Steering may take
more effort in 4WD with the differential locked
(DIFF. LOCK). Also practice driving in re-
verse.
Take the time to learn basic operation of the
vehicle before attempting more difficult ma-
neuvers.
Getting ready to ride
Perform the Pre-Operation Checks on pages
5-1–5-11. Follow the instructions starting on
pages 6-2–6-3 to start the engine.
EE.book Page 14 Thursday, September 6, 2007 4:28 PM
7-15
Turning
Use care in turns – turning the steering wheel
too far or too fast can result in loss of control
or a rollover. Slow down before entering turns.
When making tight turns from a standstill or at
slow speeds, avoid sudden or hard accelera-
tion. Driving aggressively or making abrupt
maneuvers even on flat, open areas can
cause side rollovers. Avoid sideways sliding,
skidding, or fishtailing, and never do donuts. If
you feel the Rhino begin to slide sideways or
fishtail during a turn, steer into the direction of
the slide, if possible, and gradually let off the
accelerator pedal to regain directional control
and avoid rollover. For example, if you feel the
back of the vehicle start to slide to your right,
steer to the right.
If you think or feel that the vehicle may tip or
roll, keep your body completely inside the pro-
tective structure of the vehicle:
●Brace yourself by pressing your feet firmly
on the floorboards and keep a firm grip on
the steering wheel or handholds.
●Do not put your hands or feet outside of the
vehicle for any reason. Do not try to stop a
tipover using your arm or leg.
EE.book Page 15 Thursday, September 6, 2007 4:28 PM
7-16
Accelerating
With the engine idling in neutral and your foot
on the brake, shift the drive select lever into
low or high. NOTICE: Do not shift from low
to high or vice versa without coming to a
complete stop and waiting for the engine
to return to normal idle speed – damage to
the engine or drive train may occur. Then
release the parking brake. Press the accel-
erator pedal slowly and smoothly. The centrif-
ugal clutch will engage and the vehicle will
begin to accelerate.
Avoid higher speeds and sudden or hard ac-
celeration until you are thoroughly familiar
with the operation of your vehicle. Avoid sud-
den or hard acceleration in any turn.
Braking
When slowing down or stopping, take your
foot off the accelerator pedal and press the
brake pedal smoothly. Improper use of the
brakes can cause the tires to lose traction, re-
ducing control of the vehicle and increasing
the possibility of an accident.
Braking ability is affected by type of terrain. In
most cases, gradual application of the brakes
is more effective than abrupt braking, particu-
larly on loose surfaces, such as gravel. Al-
ways allow for greater braking distance on
rough, loose, or slippery surfaces.
Engine braking
Engine compression braking is designed to
assist you when operating your Rhino off-
road. With this feature, the engine helps slow
the vehicle down after you take your foot off
the accelerator. Engine braking is more no-
ticeable in 4WD. Application of vehicle brakes
provides additional stopping power.
EE.book Page 16 Thursday, September 6, 2007 4:28 PM
7-17
Leaving the vehicle
Do not get out of the vehicle while the engine
is running and the drive select lever is in any
gear. There is a risk of injury because:
●Children or others may accidentally press
the accelerator pedal.
●Objects tossed into the vehicle may strike
the accelerator pedal.
●The parking brake may not keep the vehi-
cle from accelerating.
Unwanted vehicle movement can cause seri-
ous injury or death, and it may be dangerous
to try to stop the vehicle.
Parking on a flat area
When parking on a flat area, stop the engine
and shift the drive select lever into the neutral
position. Apply the parking brake to help pre-
vent the vehicle from rolling.
Parking on a slope
The parking brake acts only on the rear
wheels when in 2WD. For the parking brake to
take effect on all four wheels, shift to 4WD
Diff. Lock before stopping the engine.
If you park on a hill that is too steep the vehi-
cle may roll out of control. Never park on hills
that are so steep you cannot walk up them
easily. If you must park on an incline follow
these instructions:
1. Bring the vehicle to a stop by applying the
brakes.
2. Put the vehicle in 4WD Diff. Lock.
3. Turn the engine off.
EE.book Page 17 Thursday, September 6, 2007 4:28 PM
7-18
4. With the brake pedal applied, set the
parking brake.
5. Block the front and rear wheels with
rocks or other objects.
Loading
The total weight of operator, passenger, ac-
cessories, cargo, trailer tongue weight, and
the vehicle itself must not exceed 907 kg
(2,000 lb). Vehicle loading can affect han-
dling. See “Loading” on pages 6-9–6-11.
Operation on different surfaces and
terrains
Go slowly and proceed with caution when op-
erating on an unfamiliar surface or terrain.
This vehicle may handle differently in certain
types of terrains or on certain surfaces. You
may come upon hidden rocks, bumps, or
holes without enough time to react. To avoid
loss of control or rollover, always be alert to
changing surfaces or terrain when operating
the vehicle.
The Rhino has higher ground clearance and
other features to handle rugged terrain, and
as a result, can overturn in situations where
some vehicles may not. Abrupt maneuvers or
aggressive driving can cause loss of control,
including rollovers – even on flat, open areas.
These rollovers can result in crushed limbs
and other serious injuries or death to drivers
or passengers.
EE.book Page 18 Thursday, September 6, 2007 4:28 PM
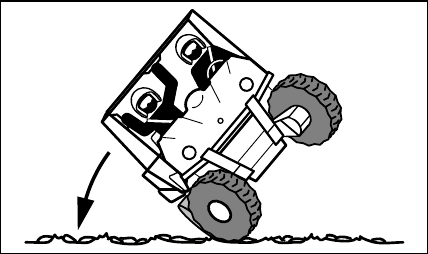
7-19
Hills
Choose carefully which hills you attempt to
climb or descend. Avoid hills with slippery sur-
faces or those where you will not be able to
see far enough ahead of you. Use common
sense and remember that some hills are too
steep for you to climb or descend. Use proper
driving techniques to avoid rearward, forward,
or sideways rollovers on hills and slopes.
Drive straight up and down inclines, not
across them. If crossing a hill is unavoidable,
drive slowly. Turn downhill immediately if you
feel the vehicle may tip.
If you think or feel the Rhino may tip or
roll:
●Brace yourself by pressing your feet firmly
on the floorboards and keep a firm grip on
the steering wheel or handholds.
●Do not put your hands or feet outside of the
vehicle for any reason.
EE.book Page 19 Thursday, September 6, 2007 4:28 PM
7-20
Uphill
Do not attempt to climb hills until you have
mastered basic maneuvers on flat ground.
Drive straight up hills, and avoid crossing the
side of a hill, which increases your risk of roll-
over. Practice first on gentle slopes before at-
tempting steeper hills. Always check the
terrain carefully before attempting any hill.
To climb a hill, you need traction, momentum,
and steady throttle. For more traction and
control for climbing steeper and/or rougher
slopes, shift into low gear and select 4WD or
4WD Diff. Lock. Travel fast enough to main-
tain momentum, but not so fast that you can-
not react to changes in the terrain as you
climb.
Slow down when you reach the crest of the hill
if you cannot see clearly what is on the other
side – there could be another person, an ob-
stacle, or a sharp drop-off.
If you start to lose traction or momentum
when climbing, and decide you will be unable
to continue, use the brakes to stop. Do not at-
tempt to turn the vehicle around. With your
foot on the brake pedal, look behind you and
plan your descent. Shift the drive select lever
into reverse so you can use engine braking to
slow your descent. Release the brake and be-
gin to coast down the hill. Use engine braking
as much as possible, gently applying the
brakes when necessary.
EE.book Page 20 Thursday, September 6, 2007 4:28 PM
7-21
Downhill
Check the terrain carefully before going
downhill. When possible, choose a path that
lets you drive your vehicle straight downhill.
Choose your path carefully and drive slowly
enough to be able to react to obstacles that
you encounter.
For more traction and control, before going
down steeper and/or rougher slopes, shift into
low gear and select 4WD or 4WD Diff. Lock.
Engine braking will help you go downhill slow-
ly. Go as slowly as possible. If you begin to go
too fast, apply the brakes gently. Avoid hard
application of the brakes, which could cause
the vehicle to slide.
If you are sliding or skidding, try to steer in the
direction the vehicle is sliding, to regain con-
trol. For example, if you feel the back of the
vehicle start to slide to your right, steer to the
right.
If you must turn on the hill to avoid an obsta-
cle, do so slowly and carefully. If the vehicle
starts to tip, immediately steer in the downhill
direction if there are no obstacles in your path.
As you regain proper balance, gradually steer
again in the direction you want to go.
EE.book Page 21 Thursday, September 6, 2007 4:28 PM
7-22
Rough terrain
Operation over rough terrain should be done
with caution.
●Look for and avoid obstacles that could
cause damage to the vehicle or could lead
to a rollover or accident.
●Do not drive in a way that will get the Rhino
airborne, as injury, loss of control, and
damage to the vehicle could occur.
Pavement
This vehicle is designed for off-road use only.
Avoid paved surfaces. Turn gradually and go
slowly if you must drive on pavement.
Water
If you must cross shallow, slow-moving water
up to the depth of the vehicle’s floorboards,
choose your path carefully to avoid sharp
drop-offs, large rocks, or slippery surfaces
that could cause the vehicle to overturn. Nev-
er operate through water deeper than 33 cm
(13 in) or fast-flowing water. Choose a path
where both your entrance into and exit point
from the water is a gradual incline. Determine
the water depth and currents before crossing.
Operating this vehicle through deep or fast-
flowing water can lead to loss of control or
overturn. To reduce your risk of drowning or
other injuries, use care when crossing
through water.
Wet brakes may have reduced effectiveness.
After leaving the water, test your brakes. If
necessary, apply the brakes several times to
let friction dry out the linings.
EE.book Page 22 Thursday, September 6, 2007 4:28 PM

7-23
NOTICE
After driving your vehicle in water, be sure
to drain the trapped water by removing the
check hose at the bottom of the air filter
case, the V-belt cooling duct check hose,
the drive select lever box check hose and
the V-belt case drain plug. Wash the vehi-
cle in fresh water if it has been operated in
salt water or muddy conditions.
Loose terrain/slippery terrain
When driving on slippery terrain, including
wet, muddy, or icy conditions, as well as loose
gravel, be aware that you could begin skid-
ding or sliding. To avoid loss of control, slow
down and put the Rhino in 4WD before driving
on a slippery surface and plan your path to
avoid making abrupt maneuvers.
If you feel the Rhino begin to slide sideways or
fishtail during a turn, steer into the direction of
the slide if possible, to regain directional con-
trol. For example, if you feel the back of the
vehicle start to slide to your right, steer to the
right.
EE.book Page 23 Thursday, September 6, 2007 4:28 PM
7-24
Brush or wooded areas
When operating in areas with brush or trees,
watch carefully on both sides and above the
vehicle for obstacles such as branches that
the vehicle might hit, causing an accident.
Watch for brush that might enter the vehicle
as you pass and strike you or the passenger.
Never hold onto the cage/frame. The passen-
ger should always hold onto the handholds
with both hands.
The muffler and other engine parts become
extremely hot during operation and remain
hot after the engine has stopped. To reduce
the risk of fire during operation or after leaving
the vehicle, do not let brush, grass and other
materials collect under the vehicle, near the
muffler or exhaust pipe, or next to other hot
parts. Check under the vehicle after operating
in areas where combustible materials may
have collected. Do not idle or park the vehicle
in long dry grass or other dry ground cover.
Encountering obstacles
If you cannot go around an obstacle, such as
a fallen tree or a ditch, stop the vehicle where
it is safe to do so. Set the parking brake and
get out to inspect the area thoroughly. Look
from both your approach side and exit side. If
you believe you can continue safely, choose
the path that will allow you to get over the ob-
stacle and at as close to a right angle as pos-
sible to minimize vehicle tipping. Go only fast
enough to maintain your momentum but still
give yourself plenty of time to react to chang-
es in conditions.
If there is any question about your ability to
maneuver safely over the obstacle, you
should turn around if the ground is flat and you
have the room or back up until you find a less
difficult path.
EE.book Page 24 Thursday, September 6, 2007 4:28 PM
8-1
EVU00650
1-
PERIODIC MAINTENANCE AND
ADJUSTMENT
Periodic inspection, adjustment, and lubrica-
tion will keep your vehicle in the safest and
most efficient condition possible.
Safety is an obligation of the vehicle owner/
operator. The most important points of vehicle
inspection, adjustment, and lubrication are ex-
plained on the following pages.
WARNING
Failure to properly maintain the vehicle or
performing maintenance activities incor-
rectly may increase your risk of injury or
death during service or while using the ve-
hicle. If you are not familiar with vehicle
service, have a Yamaha dealer perform
service.
WARNING
Turn off the engine when performing main-
tenance unless otherwise specified.
●A running engine has moving parts
that can catch on body parts or cloth-
ing and electrical parts that can cause
shocks or fires.
●Running the engine while servicing
can lead to eye injury, burns, fire, or
carbon monoxide poisoning – possi-
bly leading to death. See page 2-8 for
more information about carbon mon-
oxide.
EE.book Page 1 Thursday, September 6, 2007 4:28 PM

8-2
1
2
3
4
5
6
7
8
9
10
11
12
13
14
EVU00660
Owner’s manual and tool kit
You are recommended to put this owner’s
manual in the vinyl bag and always carry it un-
derneath the driver seat as shown. Put the
owner’s tool kit and tire pressure gauge in the
space beside the battery.
1. Owner’s manual
1. Owner’s tool kit 2. Tire pressure gauge
The service information included in this man-
ual is intended to provide you, the owner, with
the necessary information for completing your
own preventive maintenance and minor re-
pairs.
The tools provided in the owner’s tool kit are
sufficient for this purpose, except that a torque
wrench is also necessary to properly tighten
nuts and bolts.
21
EE.book Page 2 Thursday, September 6, 2007 4:28 PM
8-3
If you do not have a torque wrench available
during a service operation requiring one, take
your vehicle to a Yamaha dealer to check the
torque settings and adjust them as necessary.
EE.book Page 3 Thursday, September 6, 2007 4:28 PM
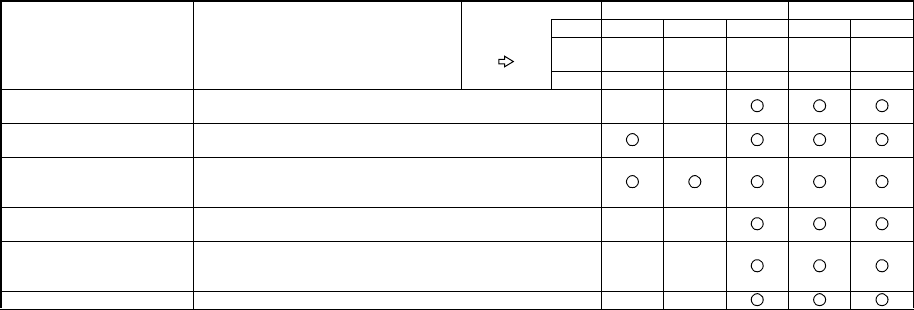
8-4
EVU01640
Periodic maintenance chart for the emission control system
●For vehicles not equipped with an odometer or hour meter, follow the month maintenance in-
tervals.
●For vehicles equipped with an odometer or an hour meter, follow the km (mi) or hours mainte-
nance intervals. However, keep in mind that if the vehicle isn’t used for a long period of time,
the month maintenance intervals should be followed.
●Items marked with an asterisk should be performed by a Yamaha dealer as they require spe-
cial tools, data and technical skills.
ITEM ROUTINE
Whichever
comes first
INITIAL EVERY
month136612
km
(mi)
320
(200)
1,200
(750)
2,400
(1,500)
2,400
(1,500)
4,800
(3,000)
hours 20 75 150 150 300
Fuel line* •Check fuel hose for cracks or damage.
•Replace if necessary.
Valves* •Check valve clearance.
•Adjust if necessary.
Spark plug
•Check condition.
•Adjust gap and clean.
•Replace if necessary.
Crankcase breather
system*
•Check breather hose for cracks or damage.
•Replace if necessary.
Exhaust system*
•Check for leakage.
•Tighten if necessary.
•Replace gasket(s) if necessary.
Spark arrester •Clean.
EE.book Page 4 Thursday, September 6, 2007 4:28 PM
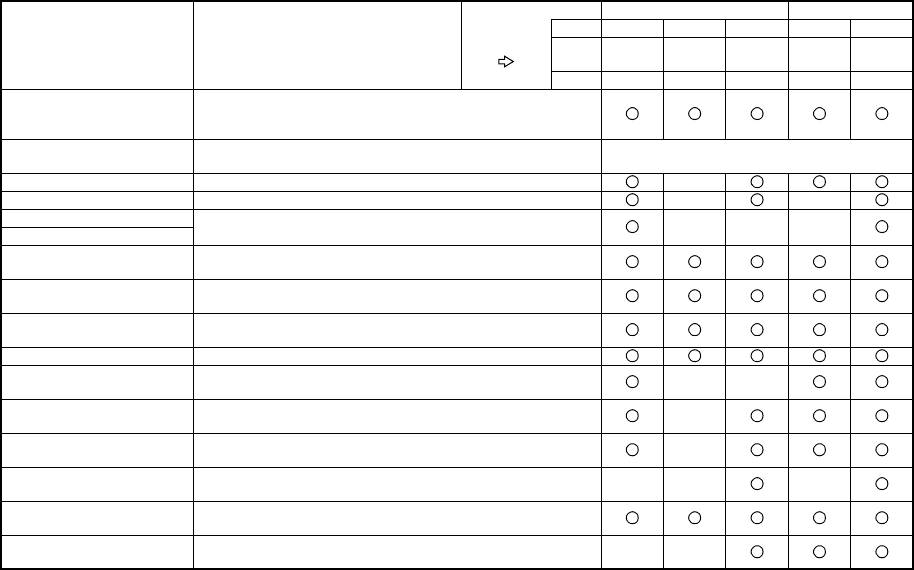
8-5
EVU01650
General maintenance and lubrication chart
ITEM ROUTINE
Whichever
comes first
INITIAL EVERY
month136612
km
(mi)
320
(200)
1,200
(750)
2,400
(1,500)
2,400
(1,500)
4,800
(3,000)
hours 20 75 150 150 300
Cooling system
•Check coolant leakage.
•Repair if necessary.
•Replace coolant every 24 months.
Air filter element •Clean.
•Replace if necessary.
Every 20–40 hours
(More often in wet or dusty areas.)
Engine oil •Replace (warm engine before draining).
Engine oil filter cartridge •Replace.
Final gear oil •Check oil level/oil leakage.
•Replace.
Differential gear oil
Front brake* •Check operation/brake pad wear/fluid leakage/see page 8-6.
•Correct if necessary. Replace pads if worn to the limit.
Rear brake* •Check operation/brake pad wear/fluid leakage/see page 8-6.
•Correct if necessary. Replace pads if worn to the limit.
Parking brake* •Check operation and free play/brake pad wear.
•Correct if necessary. Replace pads if worn to the limit.
Accelerator pedal* •Check operation and free play.
V-belt* •Check operation.
•Check for wear, cracks, or damage.
Wheels* •Check balance/damage/runout.
•Repair if necessary.
Wheel bearings* •Check bearing assemblies for looseness/damage.
•Replace if damaged.
Front and rear
suspension*
•Check operation and for leakage.
•Correct if necessary.
Steering system* •Check operation and for looseness/Replace if damaged.
•Check toe-in/Adjust if necessary.
Rear upper and lower
knuckle pivots* •Lubricate with lithium-soap-based grease.
EE.book Page 5 Thursday, September 6, 2007 4:28 PM

8-6
Recommended brake fluid: DOT 4
Brake fluid replacement:
●Replace the brake fluid when disassembling the master cylinder or caliper.
●Check the brake fluid level regularly and add fluid as required.
●Replace the oil seals on the inner parts of the master cylinder and caliper every two years.
●Replace the brake hoses every four years, or if cracked or damaged.
Drive shaft universal joint* •Lubricate with lithium-soap-based grease.
Engine mount* •Check for cracks or damage.
•Check bolt tightness.
Front and rear axle boots* •Check operation.
•Replace if damaged.
Stabilizer bushings* •Check for cracks or damage.
Fittings and fasteners* •Check all chassis fittings and fasteners.
•Correct if necessary.
ITEM ROUTINE
Whichever
comes first
INITIAL EVERY
month136612
km
(mi)
320
(200)
1,200
(750)
2,400
(1,500)
2,400
(1,500)
4,800
(3,000)
hours 20 75 150 150 300
EE.book Page 6 Thursday, September 6, 2007 4:28 PM
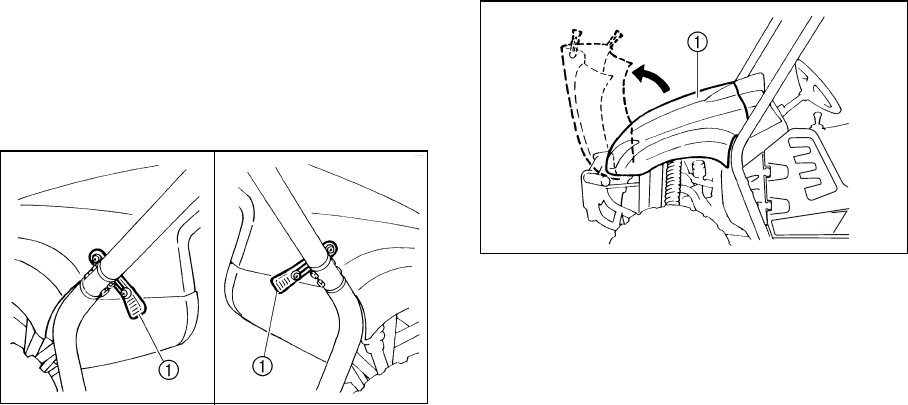
8-7
EVU00680
Hood
To open
Unhook the hood latches, and then slowly tilt
the hood up until it stops.
1. Latch (× 2)
1. Hood
EE.book Page 7 Thursday, September 6, 2007 4:28 PM
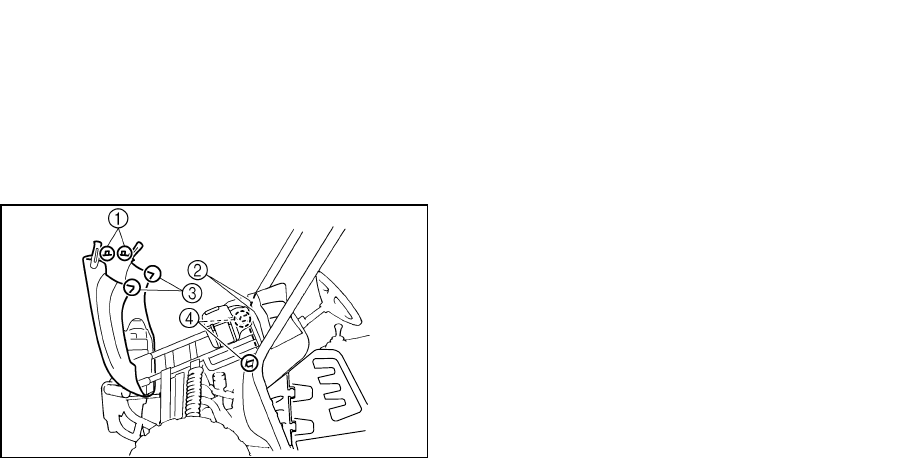
8-8
To close
Lower the hood slowly to its original position,
and then hook the hood latches. Secure pro-
jections 1 on the rear of the hood into slots 2
on the back of the instrument panel. Secure
slots 3 on the side of the hood around
projections 4 on the frame.
1. Projection (× 2) 2. Slot (× 2)
3. Slot (× 2) 4. Projection (× 2)
N
OTICE
●Make sure that all cables and wires are
in place when closing the hood.
●Do not drive the vehicle with the hood
open, unlatched, or removed.
EE.book Page 8 Thursday, September 6, 2007 4:28 PM

8-9
5B410011
Console
To remove
1. Remove the seats. (See pages 4-16–
4-17 for seat removal and installation
procedures.)
2. Remove the parking brake lever boot.
3. Pull the console forward and upward (the
drive select lever boot will come loose).
To ease removal of the console, shift the
drive select lever into the low gear “L” po-
sition.
1. Console
To install
1. Place the console in its original position.
2. Install the parking brake lever boot.
3. Install the seats.
NOTICE
●Be sure to position the seat belt buckles
to the outside of the console.
●When installing the console, be sure not
to pinch the cables or wires.
●Make sure that the groove at the bottom
of the parking brake lever boot and the
drive select lever boot fits securely
around the edge of the hole in the con-
sole.
1
EE.book Page 9 Thursday, September 6, 2007 4:28 PM
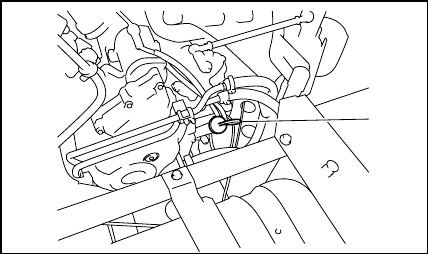
8-10
5B410012
Engine oil and oil filter cartridge
Check engine oil level before each operation.
In addition, change the oil and the oil filter car-
tridge at the intervals specified in the periodic
maintenance and lubrication chart.
To check the engine oil level
1. Park the vehicle on a level surface.
2. Remove the console. (See page 8-9 for
console removal and installation proce-
dures.)
3. Check the engine oil level on a cold en-
gine. If the engine was started before
checking the oil level, be sure to warm up
the engine sufficiently, and then wait at
least ten minutes until the oil settles for
an accurate reading.
4. Remove the dipstick, and then wipe it off
with a clean rag.
1. Dipstick
1
EE.book Page 10 Thursday, September 6, 2007 4:28 PM
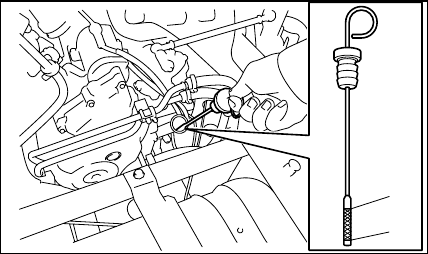
8-11
5. Insert the dipstick completely into the oil
filler hole, and then remove it again to
check the oil level. The engine oil should
be between the minimum and maximum
level marks.
1. Maximum level mark 2. Minimum level mark
6. If the engine oil is at or below the mini-
mum level mark, add sufficient oil of the
recommended type to raise it to the cor-
rect level.
7. Insert the dipstick completely into the oil
filler hole.
8. Reinstall the console.
1
2
EE.book Page 11 Thursday, September 6, 2007 4:28 PM
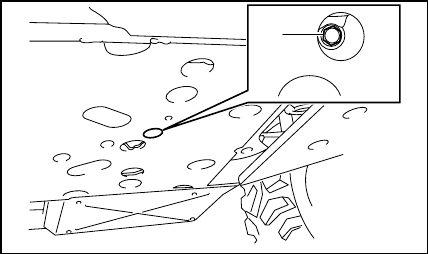
8-12
To change the engine oil (with or without
oil filter cartridge replacement)
1. Park the vehicle on a level surface.
2. Remove the console. (See page 8-9 for
console removal and installation proce-
dures.)
3. Start the engine, warm it up for several
minutes, and then turn it off.
4. Place an oil pan under the engine to col-
lect the used oil, and then remove the
dipstick.
5. Remove the engine oil drain bolt to drain
the oil from the crankcase.
1. Engine oil drain bolt
Skip steps 6–10 if the oil filter cartridge is not
being replaced.
6. Lift the cargo bed up. (See pages 4-20–
4-21 for cargo bed lifting and lowering
procedures.)
1
EE.book Page 12 Thursday, September 6, 2007 4:28 PM

8-13
7. Remove the oil filter cartridge with an oil
filter wrench. An oil filter wrench is avail-
able from a Yamaha dealer. Make sure
that the O-ring is removed together with
the oil filter cartridge. If the O-ring re-
mains attached to the crankcase, oil leak-
age may occur.
1. Oil filter cartridge 2. Oil filter wrench
8. Apply a light coat of clean engine oil to
the O-ring of the new oil filter cartridge.
Make sure the O-ring is seated properly.
1. O-ring
9. Install the new oil filter cartridge with an
oil filter wrench, and then tighten it to the
specified torque with a torque wrench.
1
2
Tightening torque:
Oil filter cartridge:
17 Nm (1.7 m·kgf, 12 ft·lbf)
EE.book Page 13 Thursday, September 6, 2007 4:28 PM
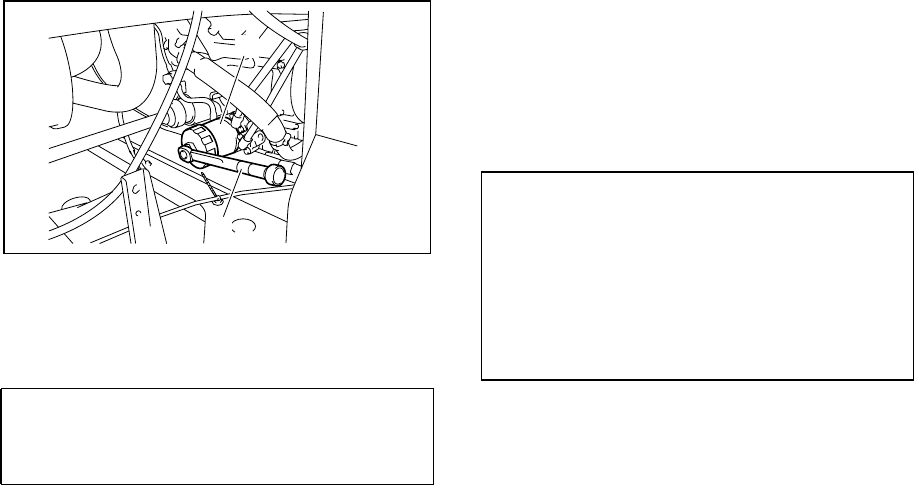
8-14
1. Oil filter cartridge 2. Torque wrench
10. Lower the cargo bed.
11. Reinstall the engine oil drain bolt, and
then tighten it to the specified torque.
12. Refill with the specified amount of recom-
mended engine oil, and then insert the
dipstick completely into the oil filler hole.
NOTICE: Be sure to wipe off spilled oil
on any parts after the engine and ex-
haust system have cooled down.
Tightening torque:
Engine oil drain bolt:
30 Nm (3.0 m·kgf, 22 ft·lbf)
1
2
Recommended engine oil:
See page 10-2.
Oil quantity:
Without oil filter cartridge replacement:
2.00 L (1.76 Imp qt, 2.11 US qt)
With oil filter cartridge replacement:
2.10 L (1.85 Imp qt, 2.22 US qt)
EE.book Page 14 Thursday, September 6, 2007 4:28 PM
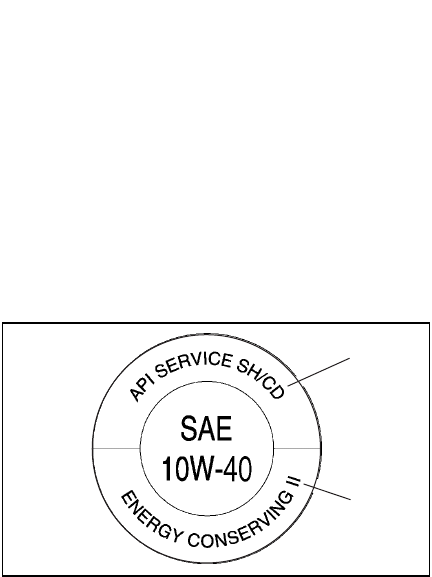
8-15
NOTICE
●In order to prevent clutch slippage
(since the engine oil also lubricates the
clutch), do not mix any chemical addi-
tives with oil. Do not use oils with a die-
sel specification of “CD” or oils of a
higher quality than specified. In addi-
tion, do not use oils labeled “ENERGY
CONSERVING II” or higher.
●Make sure that no foreign material en-
ters the crankcase.
1. “CD” specification
2. “ENERGY CONSERVING II”
13. Start the engine, and then let it idle for
several minutes while checking it for oil
leakage. If oil is leaking, immediately turn
the engine off and check for the cause.
14. Turn the engine off, wait at least ten min-
utes, and then check the oil level and cor-
rect it if necessary.
15. Reinstall the console.
1
2
EE.book Page 15 Thursday, September 6, 2007 4:28 PM
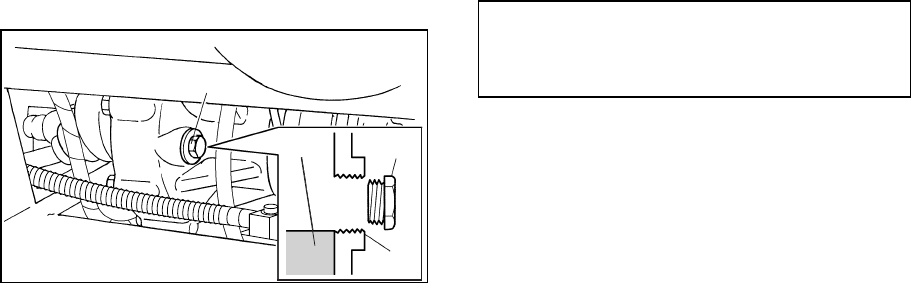
8-16
5B410013
Final gear oil
Checking the final gear oil level
1. Park the vehicle on a level surface.
2. Remove the oil filler bolt, and then check
the oil level in the final gear case. The oil
level should be at the brim of the filler
hole.
1. Final gear oil filler bolt 2. Final gear oil
3. Correct oil level
3. If the oil is below the brim of the filler hole,
add sufficient oil of the recommended
type to raise it to the correct level.
NOTICE: Be sure no foreign material
enters the final gear case.
4. Reinstall the oil filler bolt, and then tight-
en it to the specified torque.
1
21
3
Tightening torque:
Final gear oil filler bolt:
23 Nm (2.3 m·kgf, 17 ft·lbf)
EE.book Page 16 Thursday, September 6, 2007 4:28 PM
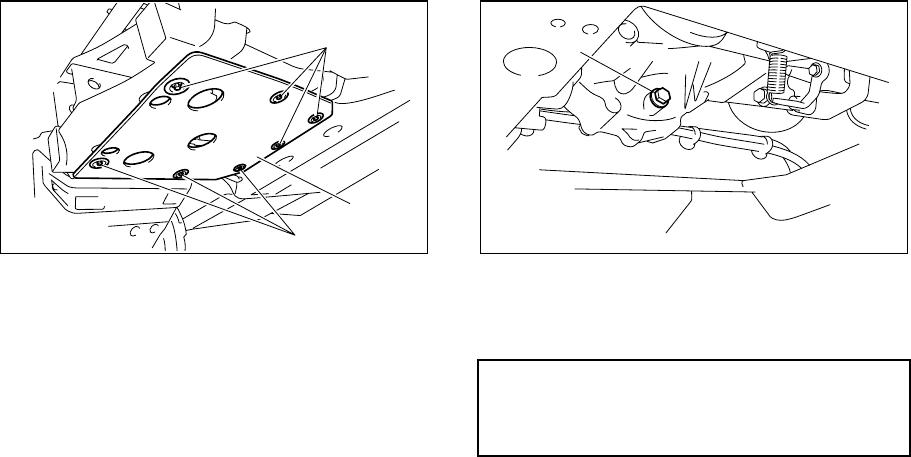
8-17
Changing the final gear oil
1. Park the vehicle on a level surface.
2. Remove the final gear case guard by re-
moving the bolts and the collars.
1. Final gear case guard 2. Bolt and collar (× 7)
3. Place a container under the final gear
case to collect the used oil.
4. Remove the oil filler bolt and the drain
bolt to drain the oil.
1. Final gear oil drain bolt
5. Reinstall the drain bolt, and then tighten it
to the specified torque.
2
1
2
Tightening torque:
Final gear oil drain bolt:
20 Nm (2.0 m·kgf, 14 ft·lbf)
1
EE.book Page 17 Thursday, September 6, 2007 4:28 PM

8-18
6. Refill with the recommended final gear oil
up to the brim of the filler hole. NOTICE:
Be sure no foreign material enters the
final gear case.
7. Reinstall the oil filler bolt, and then tight-
en it to the specified torque.
8. Check for oil leakage. If oil leakage is
found, check for the cause.
9. Install the final gear case guard by install-
ing the bolts and the collars, and then
tightening the bolts to the specified
torque.
Recommended oil:
SAE 80 API GL-4 Hypoid gear oil
Oil quantity:
0.25 L (0.22 Imp qt, 0.26 US qt)
Tightening torque:
Final gear oil filler bolt:
23 Nm (2.3 m·kgf, 17 ft·lbf)
Tightening torque:
Final gear case guard bolt:
7 Nm (0.7 m·kgf, 5.1 ft·lbf)
EE.book Page 18 Thursday, September 6, 2007 4:28 PM
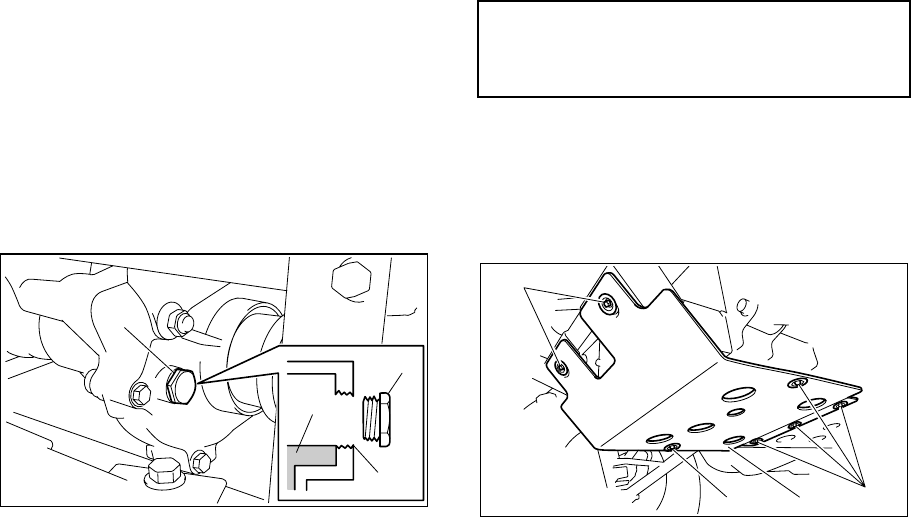
8-19
5B410014
Differential gear oil
Checking the differential gear oil level
1. Park the vehicle on a level surface.
2. Remove the differential gear oil filler bolt
and check the oil level. It should be up to
the brim of the filler hole. If the level is
low, add sufficient oil of the recommend-
ed type to raise it to the specified level.
NOTICE: Be sure no foreign material
enters the differential gear case.
1. Differential gear oil filler bolt
2. Correct oil level 3. Differential gear oil
3. Reinstall the differential gear oil filler bolt,
and then tighten it to the specified torque.
Changing the differential gear oil
1. Park the vehicle on a level surface.
2. Remove the differential gear case guard
by removing the bolts and the collars.
1. Differential gear case guard
2. Bolt and collar (× 7)
1
2
3
1
Tightening torque:
Differential gear oil filler bolt:
23 Nm (2.3 m·kgf, 17 ft·lbf)
1
2
22
EE.book Page 19 Thursday, September 6, 2007 4:28 PM
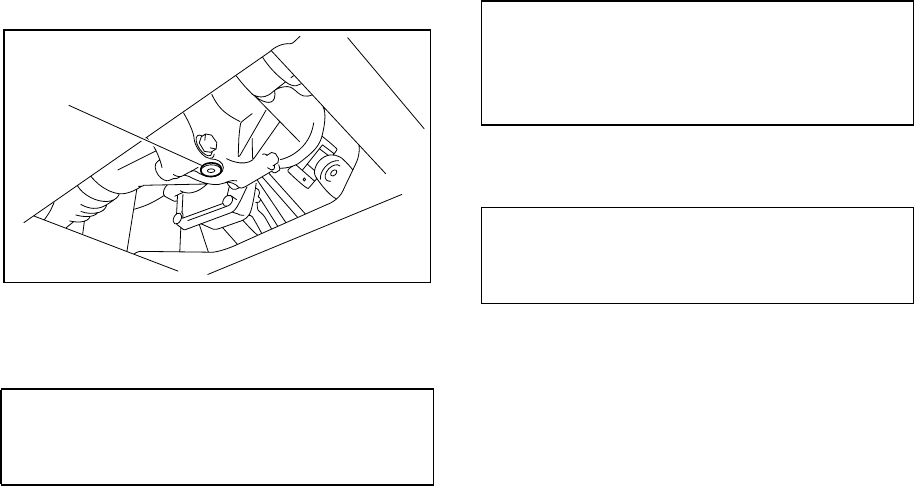
8-20
3. Place a container under the differential
gear case to collect the used oil.
4. Remove the differential gear oil filler bolt
and differential gear oil drain bolt to drain
the oil.
1. Differential gear oil drain bolt
5. Reinstall the differential gear oil drain
bolt, and tighten it to the specified torque.
6. Refill the differential gear case with the
recommended oil. NOTICE: Be sure no
foreign material enters the differential
gear case.
7. Reinstall the differential gear oil filler bolt,
and then tighten it to the specified torque.
8. Check for oil leakage. If oil leakage is
found, check for the cause.
Tightening torque:
Differential gear oil drain bolt:
9.8 Nm (0.98 m·kgf, 7.1 ft·lbf)
1
Recommended oil:
SAE 80 API GL-4 Hypoid gear oil
Oil quantity:
0.18 L (0.16 Imp qt, 0.19 US qt)
Tightening torque:
Differential gear oil filler bolt:
23 Nm (2.3 m·kgf, 17 ft·lbf)
EE.book Page 20 Thursday, September 6, 2007 4:28 PM
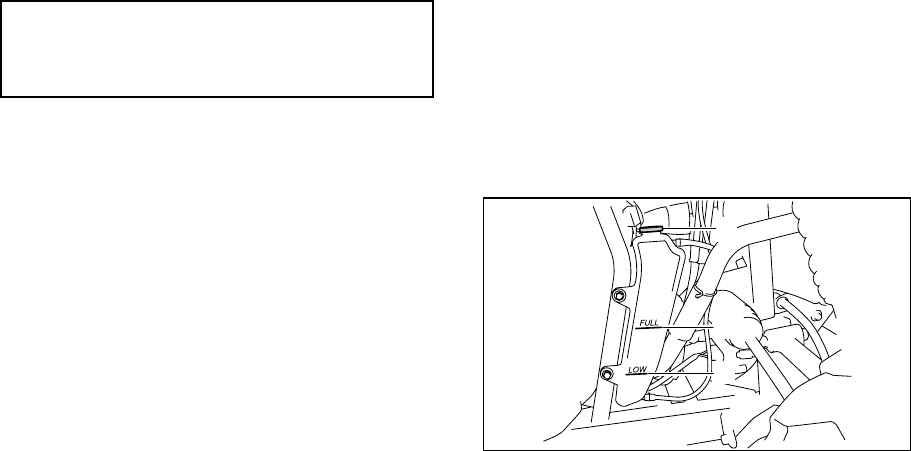
8-21
9. Install the differential gear case guard by
installing the bolts and the collars, and
then tightening the bolts to the specified
torque.
5B410015
Coolant
The coolant level should be checked before
each ride.
Checking the coolant level
1. Park the vehicle on a level surface.
2. Check the coolant level in the coolant
reservoir when the engine is cold as the
coolant level varies with engine tempera-
ture. The coolant should be between the
minimum and maximum level marks.
1. Coolant reservoir cap
2. Maximum level mark 3. Minimum level mark
Tightening torque:
Differential gear case guard bolt:
7 Nm (0.7 m·kgf, 5.1 ft·lbf)
1
2
3
EE.book Page 21 Thursday, September 6, 2007 4:28 PM

8-22
3. If the coolant is at or below the minimum
level mark, remove the reservoir cap,
add coolant to the maximum level mark,
reinstall the reservoir cap.
Changing the coolant
The coolant must be changed by a Yamaha
dealer at the intervals specified in the periodic
maintenance and lubrication chart.
Adding water instead of coolant lowers the
antifreeze content of the coolant. If water is
used instead of coolant, have a Yamaha deal-
er check the antifreeze content of the coolant
as soon as possible.
The radiator fan is automatically switched on
or off according to the coolant temperature in
the radiator.
N
OTICE
Mix antifreeze with distilled water only.
However, if distilled water is not available,
soft water may be used for refilling.
If your vehicle overheats, see page 8-60 for
instructions.
Coolant reservoir capacity
(up to the maximum level mark):
0.32 L (0.28 Imp qt, 0.34 US qt)
EE.book Page 22 Thursday, September 6, 2007 4:28 PM
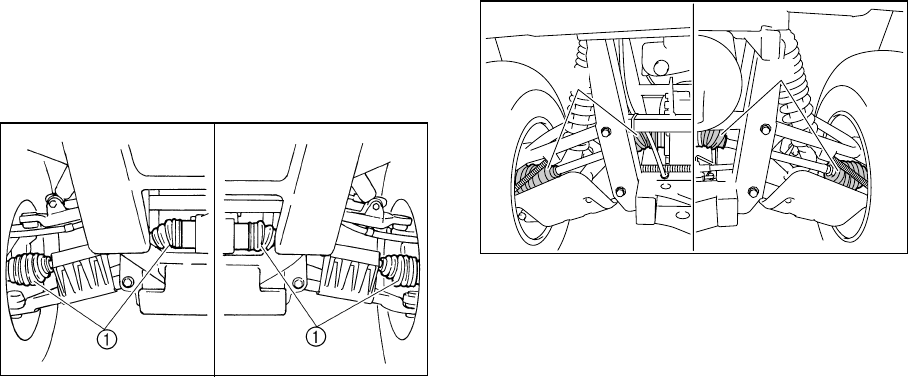
8-23
EVU00740
Axle boots
Check the protective boots for holes or tears.
If any damage is found, have them replaced
by a Yamaha dealer.
1. Front axle boot (× 2 each side)
1. Rear axle boot (× 2 each side)
11
EE.book Page 23 Thursday, September 6, 2007 4:28 PM
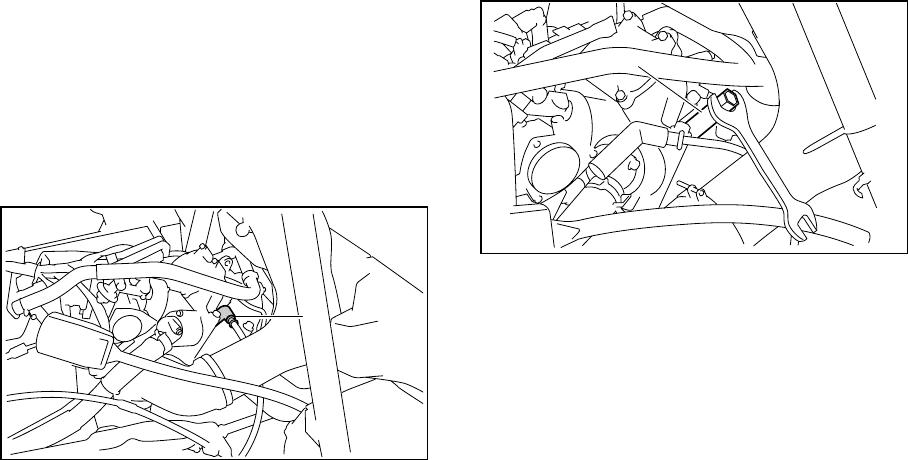
8-24
EVU00750
Spark plug inspection
Removal
1. Remove the console. (See page 8-9 for
console removal and installation proce-
dures.)
2. Remove the spark plug cap.
1. Spark plug cap
3. Use the spark plug wrench in the tool kit
to remove the spark plug as shown.
1. Spark plug wrench
1
1
EE.book Page 24 Thursday, September 6, 2007 4:28 PM
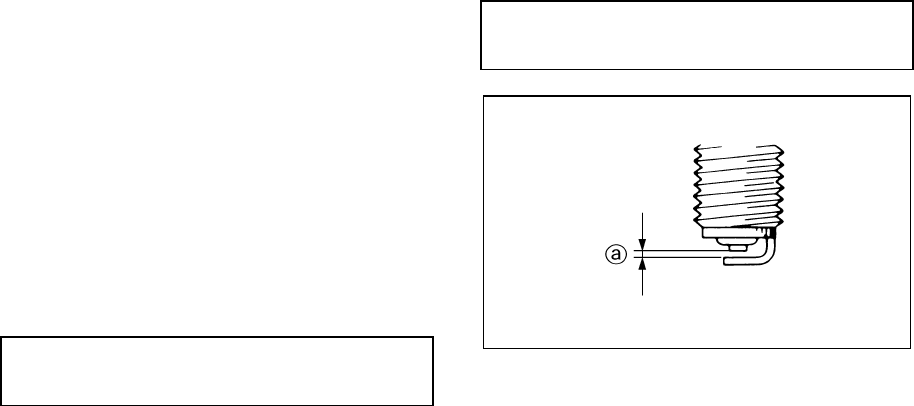
8-25
Inspection
The spark plug is an important engine compo-
nent and is easy to inspect. The condition of
the spark plug can indicate the condition of
the engine.
The ideal color of the porcelain insulator
around the center electrode is a medium-to-
light tan for a vehicle that is being ridden nor-
mally.
You should periodically remove and inspect
the spark plug because heat and deposits will
cause the spark plug to slowly break down
and erode. If electrode erosion becomes ex-
cessive, or if carbon and other deposits are
excessive, you should replace the spark plug
with the specified plug.
Installation
1. Measure the electrode gap with a wire
thickness gauge and, if necessary, adjust
the gap to specification.
a. Spark plug gap
2. Clean the surface of the spark plug gas-
ket and its mating surface, and then wipe
off any grime from the spark plug
threads.
Specified spark plug:
CPR7EA-9 (NGK)
Spark plug gap:
0.8–0.9 mm (0.031–0.035 in)
EE.book Page 25 Thursday, September 6, 2007 4:28 PM
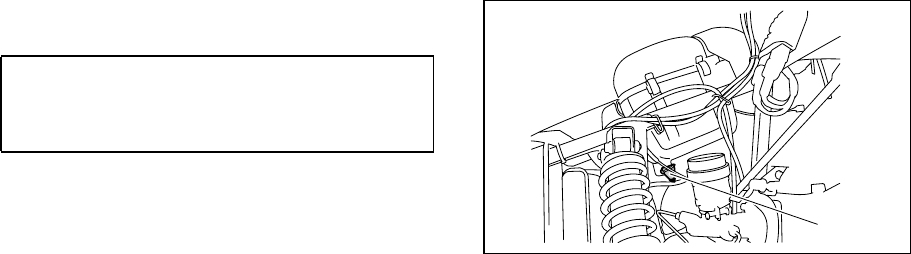
8-26
3. Install the spark plug and tighten it to the
specified torque. If a torque wrench is not
available when you are installing the
spark plug, a good estimate of the correct
torque is one-quarter to one-half turn
past finger tight. Have the spark plug
tightened to the specified torque as soon
as possible.
4. Install the spark plug cap.
5. Reinstall the console.
5B410016
Cleaning the air filter element
There is a check hose at the bottom of the air
filter case and at the bottom of the air duct un-
der the case. If dust or water collects in a
check hose, empty the hose and clean the air
filter element and air filter case.
1. Air filter case check hose
Tightening torque:
Spark plug:
12.5 Nm (1.25 m·kgf, 9.0 ft·lbf)
1
EE.book Page 26 Thursday, September 6, 2007 4:28 PM
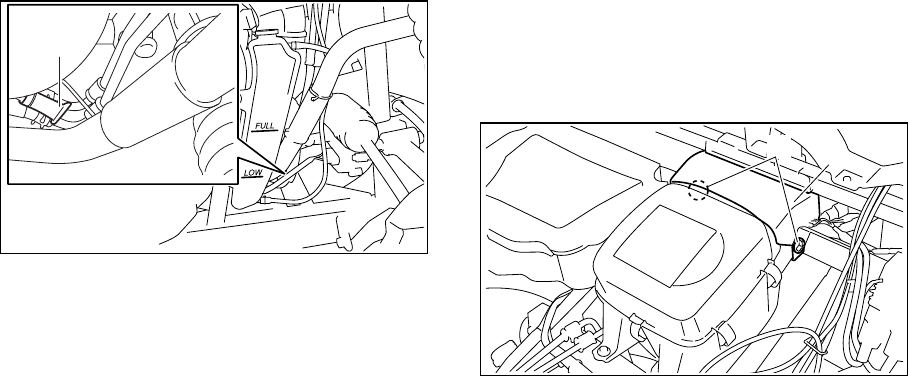
8-27
1. Air filter case check hose
1. Open the hood. (See pages 8-7–8-8 for
hood opening and closing procedures.)
2. Remove the air intake duct shroud by re-
moving the quick fastener screws.
1. Quick fastener screw (× 2)
2. Air intake duct shroud
1
12
EE.book Page 27 Thursday, September 6, 2007 4:28 PM
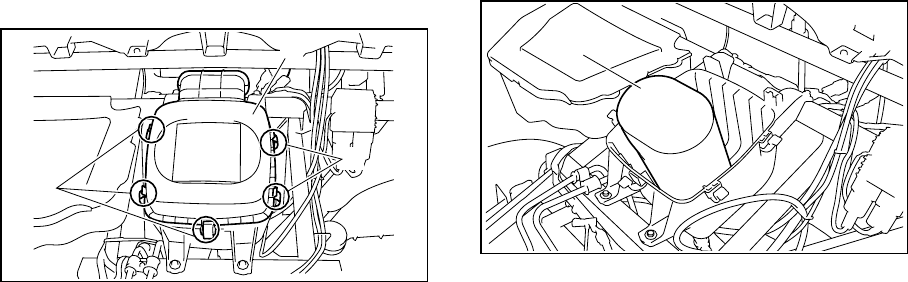
8-28
3. Remove the air filter case cover by un-
hooking the holders.
1. Air filter case cover holder (× 5)
2. Air filter case cover
4. Remove the air filter element.
1. Air filter element
1
1
21
EE.book Page 28 Thursday, September 6, 2007 4:28 PM
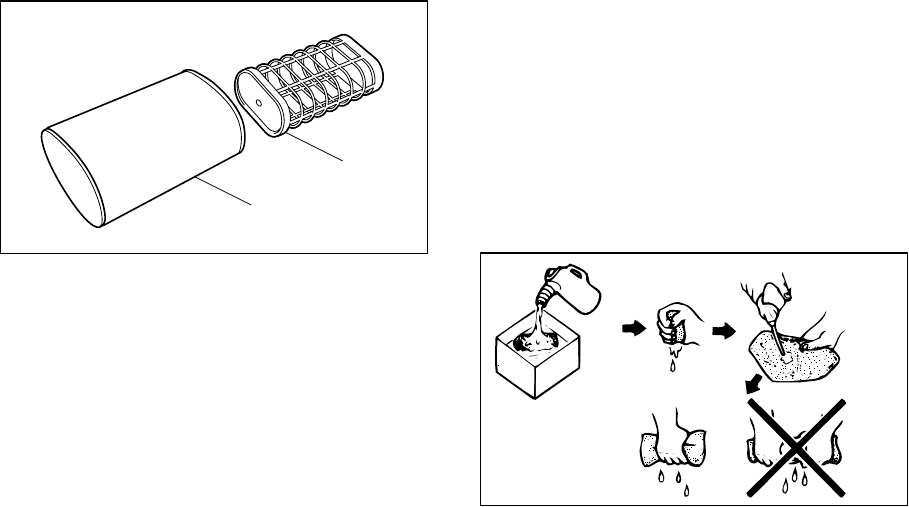
8-29
5. Remove the sponge material from its
frame.
1. Air filter frame 2. Sponge material
6. Wash the sponge material gently but
thoroughly in parts cleaning solvent.
WARNING! Using gasoline or other
flammable solvents to clean the air fil-
ter element can cause a fire or explo-
sion, which could lead to serious
injury.
7. Squeeze the excess solvent out of the
sponge material. NOTICE: Do not twist
the sponge material when squeezing
it.
2
1
EE.book Page 29 Thursday, September 6, 2007 4:28 PM
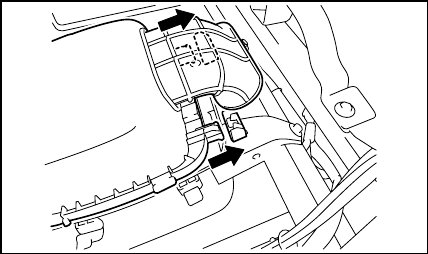
8-30
8. Wash the sponge material in warm soapy
water to remove remaining solvent, then
rinse thoroughly with plain warm water.
9. Squeeze excess water out of the sponge
material. NOTICE: Do not twist the
sponge material when squeezing it.
10. Allow the sponge material to dry thor-
oughly. Inspect the sponge material and
replace it if damaged.
11. Thoroughly apply Yamaha foam air filter
oil or other quality liquid foam air filter oil
(not spray type) to the sponge material.
The sponge material should be wet but
not dripping.
12. Pull the sponge material over its frame.
13. Reinstall the air filter element.
14. Insert the projections on the air filter case
cover into the holders on the air filter
case, and then install the air filter case
cover by hooking the holders onto the
cover.
15. Install the air intake duct shroud by in-
stalling the quick fastener screws.
16. Close the hood.
EE.book Page 30 Thursday, September 6, 2007 4:28 PM
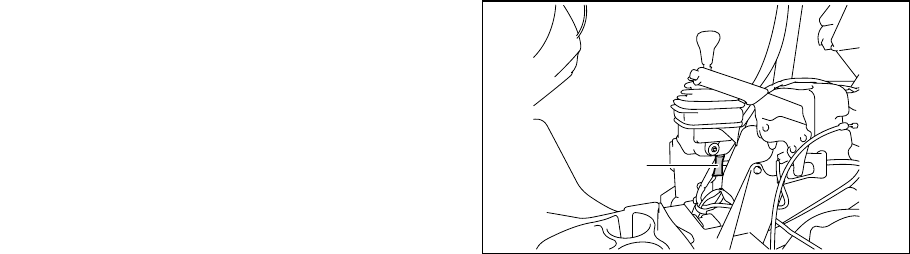
8-31
The air filter element should be cleaned every
20–40 hours. It should be cleaned and lubri-
cated more often if the vehicle is operated in
extremely dusty areas. Each time air filter ele-
ment maintenance is performed, check the air
inlet to the air filter case for obstructions.
Check the air filter element rubber joint to the
throttle body and manifold fittings for an air-
tight seal. Tighten all fittings securely to avoid
the possibility of unfiltered air entering the en-
gine.
NOTICE
Never operate the engine with the air filter
element removed. This will allow unfiltered
air to enter, causing rapid engine wear and
possible engine damage. Additionally, op-
eration without the air filter element will af-
fect the fuel injection system with
subsequent poor performance and possi-
ble engine overheating.
2P512001
Drive select lever box check hose
The drive select lever box check hose is locat-
ed under the console. (See page 8-9 for con-
sole removal and installation procedures.) If
dust or water collects in the drive select lever
box check hose, remove the hose and clean
it.
1. Drive select lever box check hose
1
EE.book Page 31 Thursday, September 6, 2007 4:28 PM
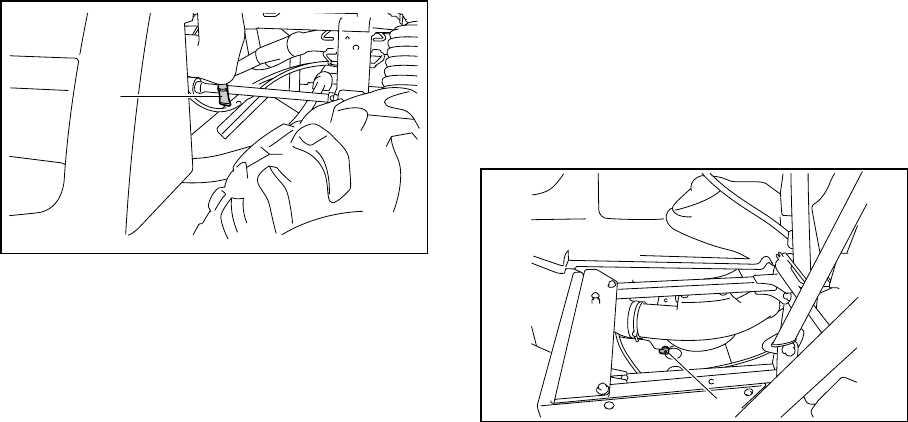
8-32
5B410017
V-belt cooling duct check hose
The V-belt cooling duct check hose is located
under the cargo bed. If dust or water collects
in the V-belt cooling duct check hose, remove
the hose and clean it.
1. V-belt cooling duct check hose
EVU00780
V-belt case drain plug
The V-belt case drain plug is located under
the driver seat. (See pages 4-16–4-17 for seat
removal and installation procedures.)
After riding in water deep enough to allow wa-
ter to enter the V-belt case, remove the drain
plug to drain any water from the case.
If water drains from the V-belt case after re-
moving the drain plug, have a Yamaha dealer
inspect the vehicle, as the water may affect
other engine parts.
1. V-belt case drain plug
1
1
EE.book Page 32 Thursday, September 6, 2007 4:28 PM
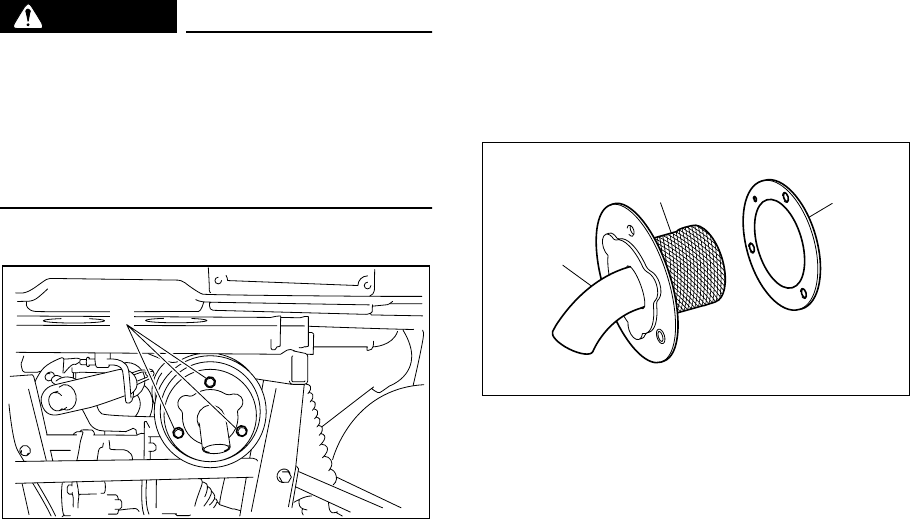
8-33
5B410018
Cleaning the spark arrester
WARNING
Hot exhaust system may cause burns. To
avoid burns or fires, make sure that the en-
gine is stopped and the exhaust system is
cool before cleaning spark arrester. Do not
start the engine while cleaning the exhaust
system.
1. Remove the bolts.
1. Bolt (× 3)
2. Remove the tailpipe by pulling it out of
the muffler, and then remove the gasket.
3. Tap the tailpipe lightly, and then use a
wire brush to remove any carbon depos-
its from the spark arrester portion of the
tailpipe and inside of the tailpipe housing.
1. Tailpipe 2. Spark arrester 3. Gasket
4. Install the gasket, and then insert the
tailpipe into the muffler and align the bolt
holes.
5. Install the bolts and tighten them to the
specified torque.
1
3
1
2
EE.book Page 33 Thursday, September 6, 2007 4:28 PM

8-34
Valve clearance
The correct valve clearance changes with
use, resulting in improper fuel/air supply or
engine noise. To prevent this, the valve clear-
ance must be adjusted regularly. This adjust-
ment however, should be left to a professional
Yamaha service technician.
Brakes
Replacement of brake components requires
professional knowledge. Brake service should
be performed by a Yamaha dealer.
WARNING
Operating with improperly serviced or ad-
justed brakes could lead to a loss in brak-
ing ability and an accident.
5B410019
Checking the front and rear brake pads
Each brake pad is provided with wear indica-
tor grooves, which allow you to check the
brake pad wear without having to disassem-
ble the brake. To check the brake pad wear,
check the wear indicator grooves. If a brake
pad has worn to the point that the wear indica-
tor grooves have almost disappeared, have a
Yamaha dealer replace the brake pads as a
set.
Tightening torque:
Tailpipe bolt:
10 Nm (1.0 m·kgf, 7.2 ft·lbf)
EE.book Page 34 Thursday, September 6, 2007 4:28 PM
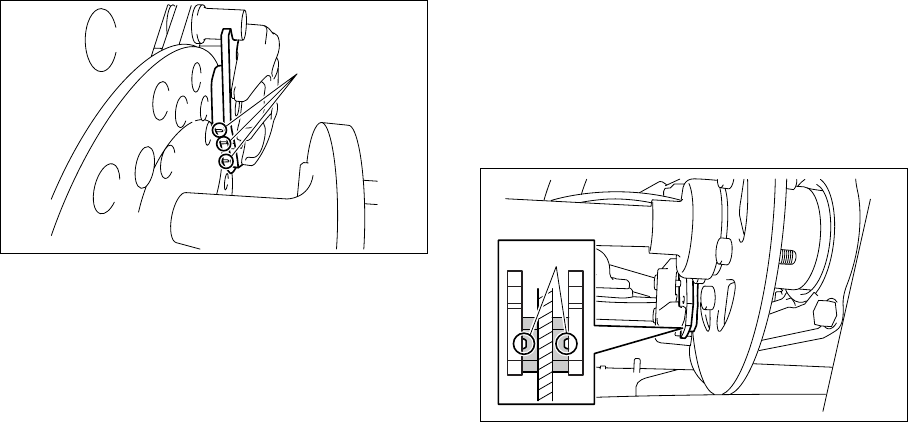
8-35
The wheels need to be removed to check the
brake pads. (See pages 8-43–8-46 for wheel
removal and installation procedures.)
1. Brake pad wear indicator groove
5B410020
Checking the parking brake pads
Each brake pad is provided with two wear in-
dicator grooves, which allow you to check the
brake pad wear without having to disassem-
ble the brake. To check the brake pad wear,
check the wear indicator grooves. If a brake
pad has worn to the point that a wear indicator
groove almost appears, have a Yamaha deal-
er replace the brake pads as a set.
1. Brake pad wear indicator groove
1
1
EE.book Page 35 Thursday, September 6, 2007 4:28 PM
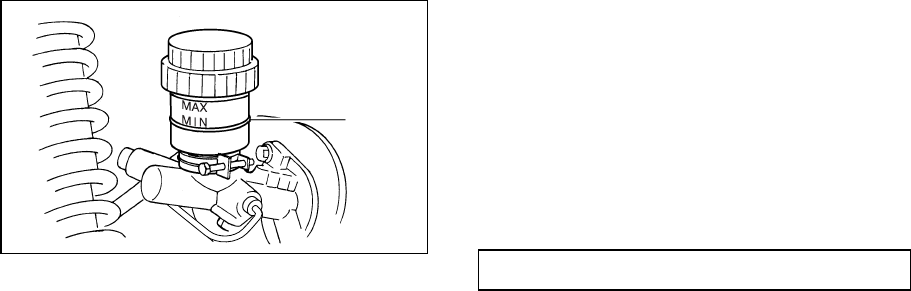
8-36
EVU00850
Checking the brake fluid level
1. Minimum level mark
Insufficient brake fluid may allow air to enter
the brake system, possibly causing the
brakes to become ineffective.
Before riding, check that the brake fluid is
above the minimum level mark and replenish,
if necessary. A low brake fluid level may indi-
cate worn brake pads and/or brake system
leakage. If the brake fluid level is low, be sure
to check the brake pads for wear and the
brake system for leakage.
The brake fluid reservoir is located under the
hood. (See pages 8-7–8-8 for hood opening
and closing procedures.)
Observe these precautions:
●When checking the fluid level, make sure
the top of the brake fluid reservoir is level.
●Use only the recommended quality brake
fluid. Otherwise, the rubber seals may de-
teriorate, causing leakage and poor braking
performance.
●Refill with the same type of brake fluid. Mix-
ing fluids may result in a harmful chemical
reaction and lead to poor braking perfor-
mance.
●Be careful that water does not enter the
brake fluid reservoir when refilling. Water
will significantly lower the boiling point of
the fluid and may result in vapor lock.
1
Recommended brake fluid: DOT 4
EE.book Page 36 Thursday, September 6, 2007 4:28 PM
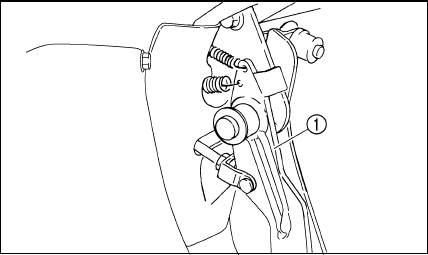
8-37
●Brake fluid may deteriorate painted surfac-
es or plastic parts. Always clean up spilled
fluid immediately.
●Have a Yamaha dealer inspect the brake
system if the brake fluid level goes down.
EVU00860
Brake fluid replacement
Complete fluid replacement should be done
only by trained Yamaha service personnel.
Have a Yamaha dealer replace the following
components during periodic maintenance or
when they are damaged or leaking.
●Replace the oil seals every two years.
●Replace the brake hoses every four years.
EVU01220
Checking the brake pedal
Have a Yamaha dealer check the brakes at
the intervals specified in the periodic mainte-
nance and lubrication chart. There should be
no free play in the brake pedal. The brakes
should operate smoothly and there should be
no brake drag. If the brakes feel soft or
spongy, this could indicate air in the brake
system. Have a Yamaha dealer check the
brake system if necessary.
1. Brake pedal
EE.book Page 37 Thursday, September 6, 2007 4:28 PM
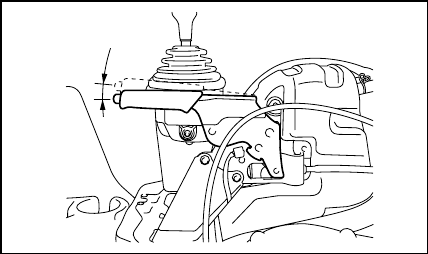
8-38
EVU00870
Parking brake lever free play adjustment
Periodically check the parking brake lever free
play and adjust it if necessary.
1. Shift the drive select lever into low gear
“L”.
2. Remove the seats. (See pages 4-16–
4-17 for seat removal and installation
procedures.)
3. Remove the console. (See page 8-9 for
console removal and installation proce-
dures.)
4. Check the parking brake lever free play.
The maximum free play is equal to one
click of the parking brake lever. If neces-
sary, adjust the free play as follows.
a. Parking brake lever free play
5. The parking brake lever must be re-
leased when checking and adjusting the
parking brake lever free play.
6. Loosen the locknut.
a
EE.book Page 38 Thursday, September 6, 2007 4:28 PM
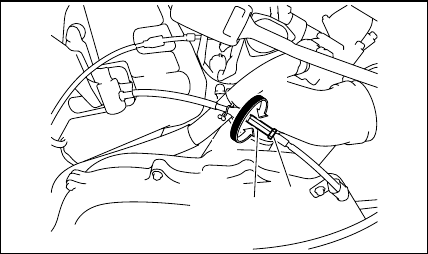
8-39
1. Locknut 2. Adjusting nut
7. Turn the adjusting nut in direction a to
increase the free play or in direction b to
decrease the free play.
8. Tighten the locknut.
9. Reinstall the console.
10. Reinstall the seats.
EVU00880
Brake light switch adjustment
The brake light switch, which is activated by
the brake pedal, is properly adjusted when the
brake light comes on just before braking takes
effect. If necessary, adjust the brake light
switch as follows.
1. Open the hood. (See pages 8-7–8-8 for
hood opening and closing procedures.)
2. Turn the adjusting nut while holding the
brake light switch in place. To make the
brake light come on earlier, turn the ad-
justing nut in direction a. To make the
brake light come on later, turn the adjust-
ing nut in direction b.
3. Close the hood.
a
b
1
2
EE.book Page 39 Thursday, September 6, 2007 4:28 PM
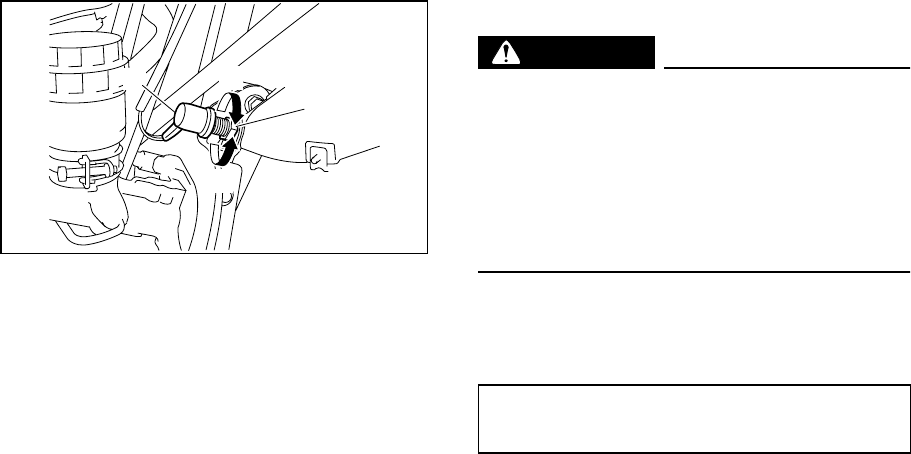
8-40
1. Brake light switch 2. Adjusting nut
EVU00890
Cable inspection and lubrication
WARNING
Damaged cables could restrict operation,
which may cause an accident or injury. In-
spect control cables frequently and re-
place damaged cables. Corrosion can
result when the outer covering of control
cables becomes damaged. Cables can
also become frayed or kinked.
Lubricate the cable ends. If the cables do not
operate smoothly, ask a Yamaha dealer to re-
place them.
1a
b
2
Recommended lubricant:
Lithium-soap-based grease
EE.book Page 40 Thursday, September 6, 2007 4:28 PM
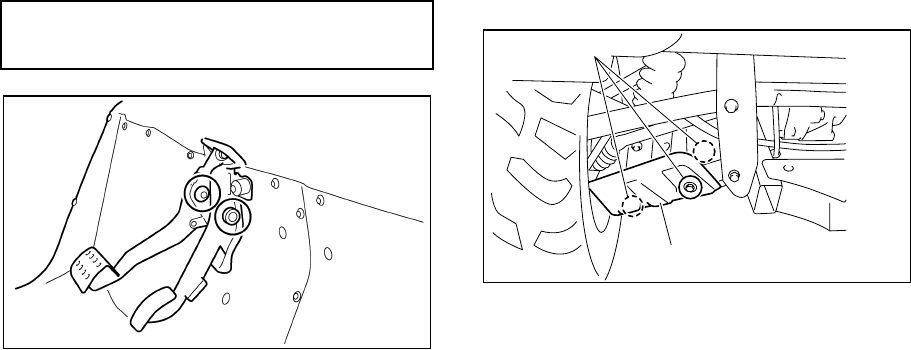
8-41
EVU00900
Brake pedal and accelerator pedal
lubrication
Lubricate the pivoting parts.
5B410021
Rear knuckle upper and lower pivot
lubrication
1. Remove the lower arm protector by re-
moving the bolts.
1. Bolt (× 3) 2. Lower arm protector
Recommended lubricant:
Lithium-soap-based grease 1
2
EE.book Page 41 Thursday, September 6, 2007 4:28 PM
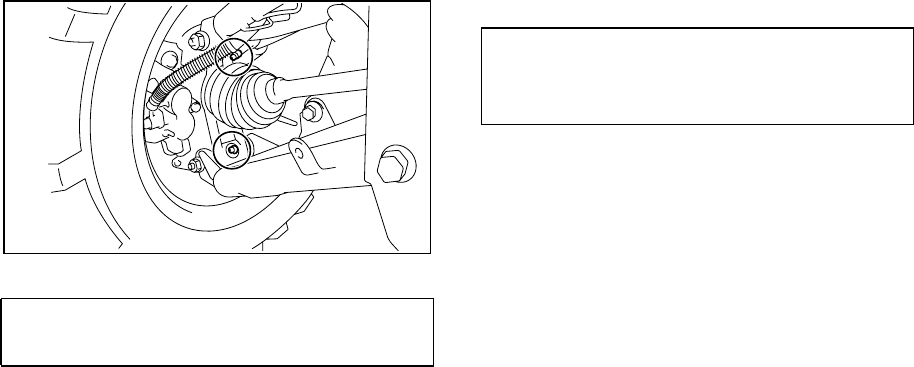
8-42
2. Lubricate the knuckle upper and lower
pivots with a grease gun.
3. Install the lower arm protector by install-
ing the bolts and tightening them to the
specified torque.
Recommended lubricant:
Lithium-soap-based grease
Tightening torque:
Lower arm protector:
7 Nm (0.7 m·kgf, 5.1 ft·lbf)
EE.book Page 42 Thursday, September 6, 2007 4:28 PM
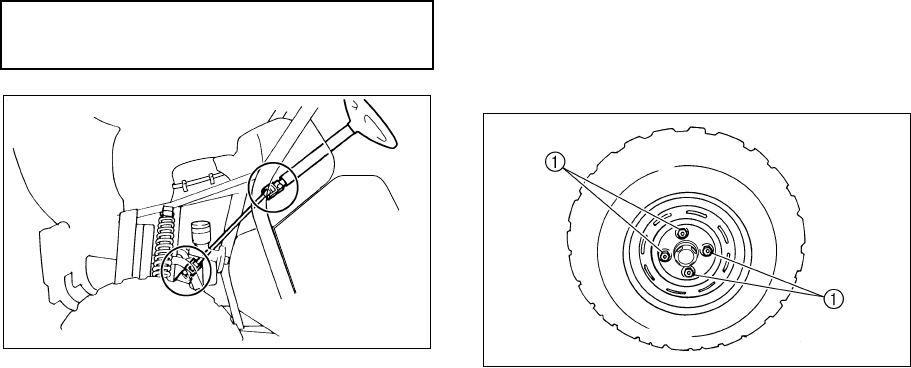
8-43
EVU00920
Steering shaft lubrication
Lubricate the pivot points.
EVU00930
Wheel removal
1. Loosen the wheel nuts.
2. Elevate the vehicle and place a suitable
stand under the frame.
3. Remove the nuts from the wheel.
4. Remove the wheel.
1. Nut (× 4)
Recommended lubricant:
Lithium-soap-based grease
EE.book Page 43 Thursday, September 6, 2007 4:28 PM
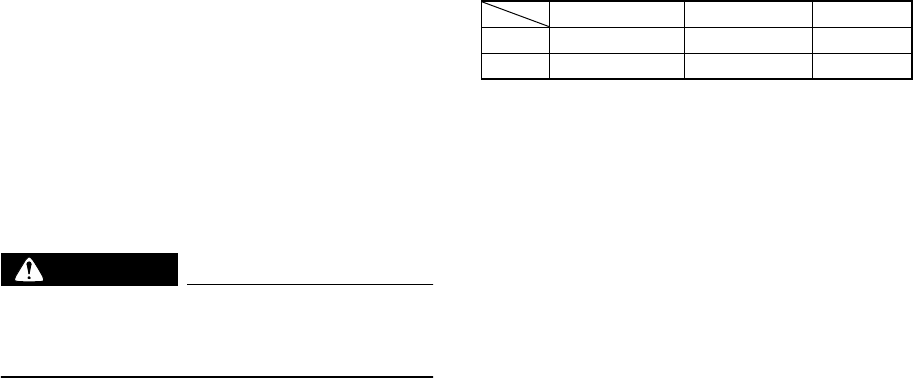
8-44
Tire replacement
Always use the same size and type of tires
recommended in this owner’s manual. The
tires that came with your Rhino were de-
signed to match the performance capabilities
and to provide the best combination of han-
dling, braking, and comfort. It is best to re-
place all four tires at the same time. If that is
not possible, you must replace the tires in
pairs (front or rear) with tires of the same size
and type as the originals. Never replace just
one tire.
WARNING
Installing improper tires on your Rhino
can affect handling and stability. This can
cause a loss of control.
The tires listed below have been approved by
Yamaha Motor Manufacturing Corporation of
America for this model.
Manufacturer Size Type
Front MAXXIS 25 × 8-12NHS M951Y
Rear MAXXIS 25 × 10-12NHS M952Y
EE.book Page 44 Thursday, September 6, 2007 4:28 PM
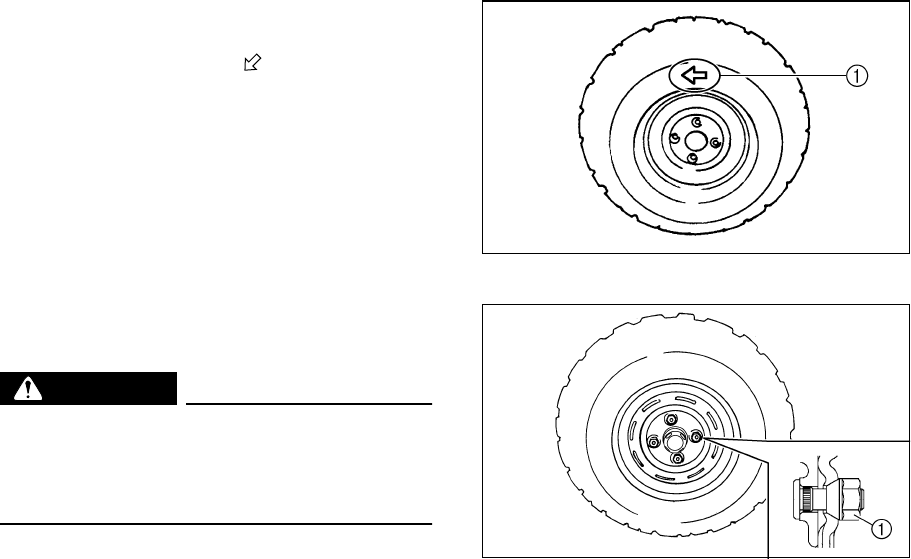
8-45
EVU00940
Wheel installation
1. Install the wheel and the nuts.
●The arrow mark on the tire must
point toward the rotating direction of
the wheel.
●Tapered nuts are used for both the
front and rear wheels. Install the nuts
with their tapered side towards the
wheel.
2. Lower the vehicle so that the wheel is on
the ground.
3. Tighten the wheel nuts to the specified
torque.
WARNING
Do not reverse the rims on the Rhino to
widen the track width. Installing wheels
improperly increases the risk of wheel fail-
ure and accidents.
1. Arrow mark
1. Tapered nut
EE.book Page 45 Thursday, September 6, 2007 4:28 PM

8-46
EVU00950
Battery
This vehicle is equipped with a sealed-type
battery. Therefore it is not necessary to check
the electrolyte or add distilled water in the bat-
tery.
If the battery seems to have discharged, con-
sult a Yamaha dealer.
N
OTICE
Do not try to remove the sealing caps of
the battery cells. You may damage the bat-
tery.
Wheel nut torque:
Front: 55 Nm (5.5 m·kgf, 40 ft·lbf)
Rear: 55 Nm (5.5 m·kgf, 40 ft·lbf)
EE.book Page 46 Thursday, September 6, 2007 4:28 PM

8-47
WARNING
Avoid battery contact with skin, eyes, or
clothing. Shield eyes when working near
batteries. Keep out of reach of children.
You could be poisoned or severely burned
by the sulfuric acid in battery electrolyte.
In case of accidental contact with battery
electrolyte:
EXTERNAL: Flush with water.
INTERNAL: Drink large quantities of water
or milk. Follow with milk of magnesia,
beaten egg, or vegetable oil. Get prompt
medical attention.
EYES: Flush with water for 15 minutes and
get prompt medical attention.
WARNING
Batteries may produce explosive gases.
Ventilate when charging or using in a
closed space. Keep batteries away from
sparks, flames, cigarettes, or other sourc-
es of ignition.
EVU00960
Battery maintenance
1. If the vehicle will not be used for a month
or longer, remove the battery and store it
in a cool, dark place. Completely re-
charge the battery before reinstallation.
NOTICE
_
A special battery charger (constant volt-
age/ampere or constant voltage) is re-
quired for recharging a sealed-type
battery. Using a conventional battery
charger may shorten the battery life.
_
2. Always make sure the connections are
correct when putting the battery back in
the vehicle.
EE.book Page 47 Thursday, September 6, 2007 4:28 PM
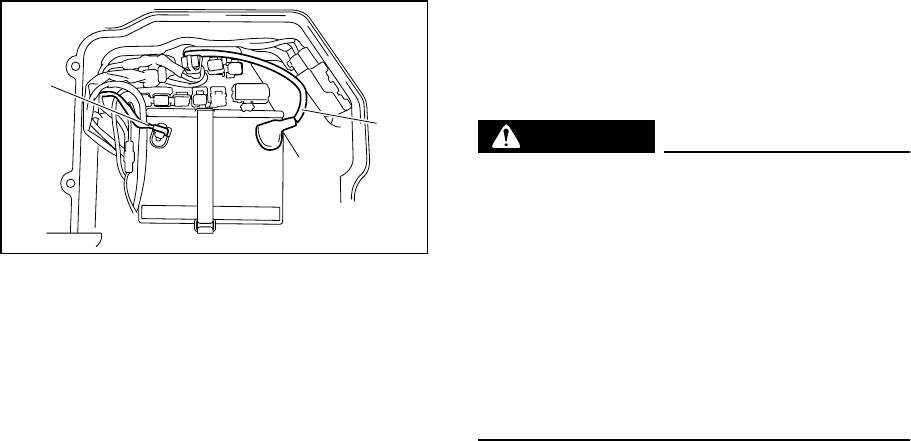
8-48
1. Negative battery lead (black)
2. Positive battery lead (red)
5B410022
Jump-starting
Jump-starting the vehicle should be avoided.
The battery should be removed and charged
instead.
WARNING
To avoid battery explosion and/or serious
damage to the electrical system:
●Do not connect the negative lead of
the jumper cable to the negative termi-
nal of the battery
●Do not touch the positive lead of the
jumper cable to the negative lead.
●Do not reverse the polarity of the
jumper cables when connecting to the
batteries.
2
1
EE.book Page 48 Thursday, September 6, 2007 4:28 PM

8-49
However, if the vehicle must be jump-started,
proceed as follows.
1. Turn the key to “OFF”.
2. Open the hood. (See pages 8-7–8-8 for
hood opening and closing procedures.)
3. Remove the battery compartment cover.
(See pages 8-51–8-52 for battery com-
partment cover removal and installation
procedures.)
4. Remove the console. (See page 8-9 for
console removal and installation proce-
dures.)
5. Using a charged 12-volt battery, connect
the positive lead of the jumper cable to
the positive terminal of the battery in the
vehicle and the other end of the positive
lead to the positive terminal of the
charged battery.
1. Jumper cable positive lead
6. Connect the negative lead of the jumper
cable to the negative terminal of the
charged battery and the other end of the
negative lead to an unpainted metal sur-
face of the crankcase to be started.
1
EE.book Page 49 Thursday, September 6, 2007 4:28 PM
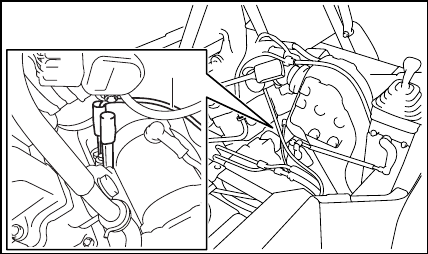
8-50
1. Jumper cable negative lead
7. Start the engine. (Refer to “Starting the
engine” on pages 6-2–6-3.)
8. After the engine starts, disconnect the
negative lead of the jumper cable from
the crankcase and charged battery, and
then disconnect the positive lead of the
jumper cable from the charged battery
and the battery in the vehicle.
9. Reinstall the console.
10. Reinstall the battery compartment cover.
11. Close the hood.
1
EE.book Page 50 Thursday, September 6, 2007 4:28 PM
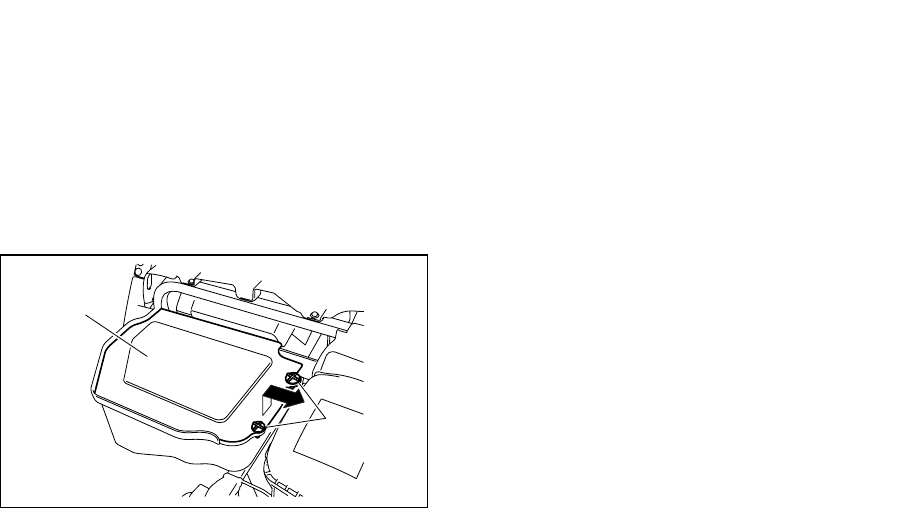
8-51
5B410023
Fuse replacement
The main fuse, the fuel injection system fuse,
and the fuse box are located under the hood.
(See pages 8-7–8-8 for hood opening and
closing procedures.)
If a fuse is blown, turn off the main switch and
install a new fuse of the specified amperage.
If a fuse is blown, replace it as follows.
1. Remove the quick fastener screws.
2. Remove the battery compartment cover
by lifting it up and pulling it out.
1. Quick fastener screw (× 2)
2. Battery compartment cover
Turn the key to “OFF” and turn off the electri-
cal circuit in question.
NOTICE
To prevent accidental short-circuiting,
turn off the main switch when checking or
replacing a fuse.
3. Remove the blown fuse, and then install
a new fuse of the specified amperage.
WARNING! Always use a fuse of the
specified amperage. Never use any
material in place of the proper fuse.
Using an improper fuse can cause
damage to the electrical system and
may lead to a fire.
1
2
EE.book Page 51 Thursday, September 6, 2007 4:28 PM

8-52
1. Fuel injection system spare fuse
2. Fuel injection system fuse
3. Main fuse 4. Headlight fuse “HEAD”
5. Signaling system fuse “SIGNAL”
6. Auxiliary DC jack fuse “TERMINAL”
7. Four-wheel-drive motor fuse “DIFF”
8. Ignition fuse “IGNITION”
9. Backup fuse “BACK UP” (for odometer and clock)
10.Spare fuse (× 3) 11. Radiator fan fuse “FAN”
4. Turn the key to “ON” and turn on the
electrical circuit in question to check if the
device operates.
5. If the fuse blows again immediately, have
a Yamaha dealer check the electrical
system.
6. Reinstall the battery compartment cover
by installing the quick fastener screws.
7. Close the hood.
12 3 7
9
456 8
A
@
0
Specified fuses:
Main fuse: 40.0 A
Fuel injection system fuse: 10.0 A
Headlight fuse: 15.0 A
Ignition fuse: 10.0 A
Auxiliary DC jack fuse: 10.0 A
Signaling system fuse: 10.0 A
Four-wheel-drive motor
fuse: 10.0 A
Radiator fan fuse: 25.0 A
Backup fuse: 10.0 A
EE.book Page 52 Thursday, September 6, 2007 4:28 PM
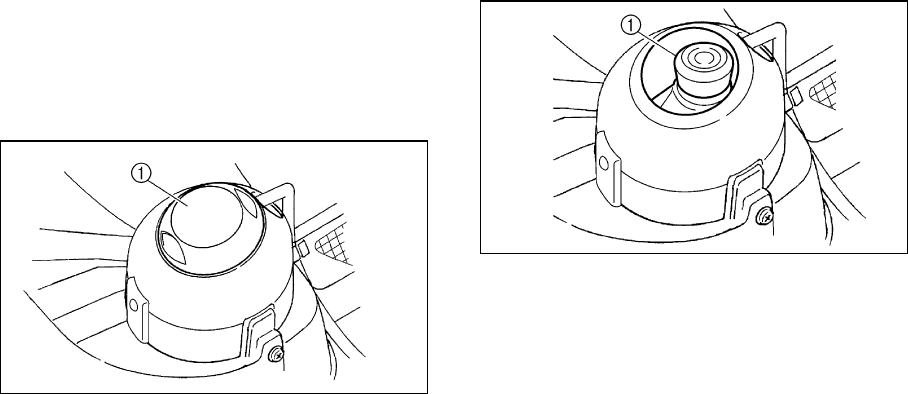
8-53
EVU01670
Replacing a headlight bulb
If a headlight bulb burns out, replace it as fol-
lows.
1. Lift the hood up. (See pages 8-7–8-8 for
hood opening and closing procedures.)
2. Remove the cover at the rear of the
headlight by pulling it off.
1. Cover at the rear of the headlight
3. Remove the headlight bulb holder cover
by pulling it off.
1. Headlight bulb holder cover
EE.book Page 53 Thursday, September 6, 2007 4:28 PM
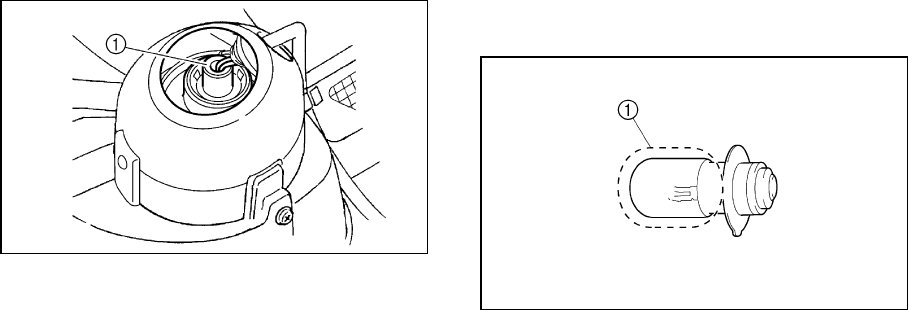
8-54
4. Remove the headlight bulb holder by
pushing it in and turning it counterclock-
wise.
1. Headlight bulb holder
5. Wait for the headlight bulb to cool before
touching or removing it. Remove the bulb
by pulling it out.
6. Insert a new headlight bulb into the bulb
holder by pushing it in.
1. Do not touch the glass part of the bulb.
EE.book Page 54 Thursday, September 6, 2007 4:28 PM
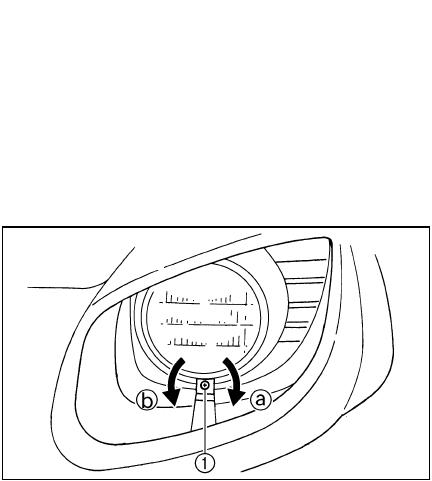
8-55
7. Reinstall the bulb holder by pushing it in
and turning it clockwise.
Reinstall the bulb holder cover and the
cover at the rear of the headlight.
NOTICE: Make sure the headlight bulb
holder cover is securely fitted over the
bulb holder and seated properly.
8. Close the hood.
9. Adjust the headlight beam if necessary.
EVU00990
Headlight beam adjustment
NOTICE
It is advisable to have a Yamaha dealer
make this adjustment.
To raise the beam, turn the adjusting screw in
direction a.
To lower the beam, turn the adjusting screw in
direction b.
1. Headlight beam adjusting screw
EE.book Page 55 Thursday, September 6, 2007 4:28 PM
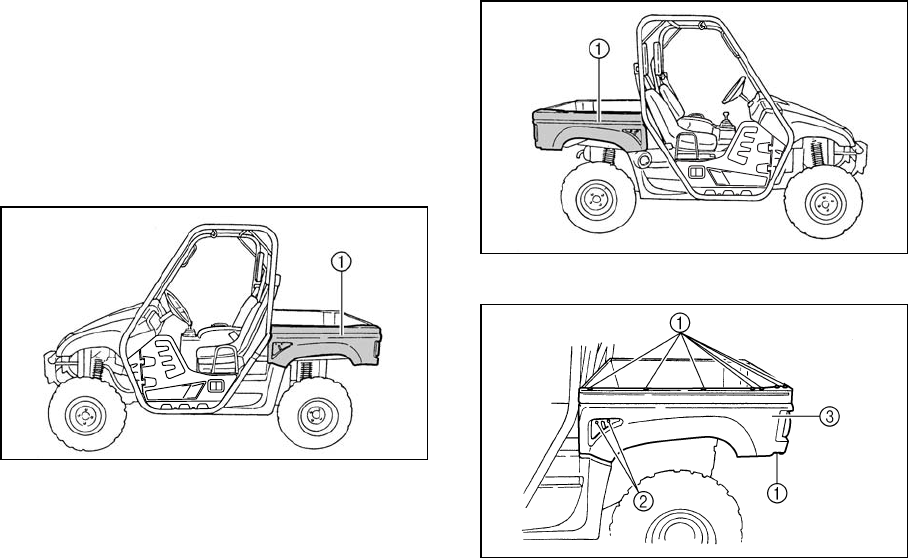
8-56
EVU01000
Tail/brake light bulb replacement
If a tail/brake light bulb burns out, replace it as
follows:
1. Remove the quick fastener screws and
bolts from panel A (if replacing the left
tail/brake light bulb) or panel B (if replac-
ing the right tail/brake light bulb).
1. Panel A
1. Panel B
1. Quick fastener screw (× 8) 2. Bolt (× 2)
3. Panel A
EE.book Page 56 Thursday, September 6, 2007 4:28 PM
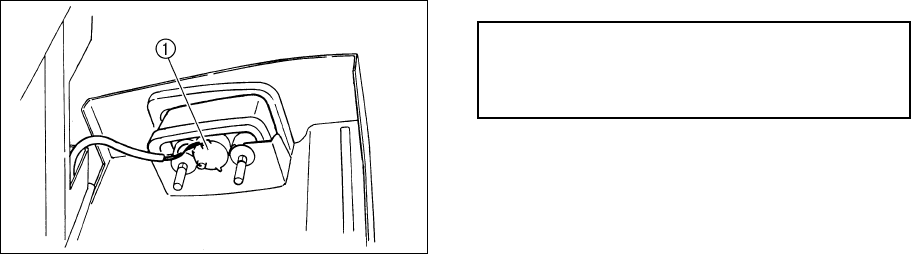
8-57
2. Lift the cargo bed up. (See pages 4-20–
4-21 for cargo bed lifting and lowering
procedures.)
3. Remove the panel (panel A or B).
4. Remove the bulb holder (together with
the bulb) by turning it counterclockwise.
1. Tail/brake light bulb holder
5. Push the defective bulb in and turn it
counterclockwise to remove it from the
bulb holder.
6. Push a new bulb in and turn it clockwise
to install in the bulb holder.
7. Reinstall the bulb holder (together with
the bulb) by turning it clockwise.
8. Install the panel.
9. Lower the cargo bed.
10. Reinstall the quick fastener screws and
bolts, and then tighten the bolts to the
specified torque.
Tightening torque:
Panel bolt:
7 Nm (0.7 m·kgf, 5.1 ft·lbf)
EE.book Page 57 Thursday, September 6, 2007 4:28 PM

8-58
EVU01010
Troubleshooting
Although Yamaha vehicles receive an inspec-
tion before shipment from the factory, trouble
may occur during operation. Any problem in
the fuel, compression, or ignition systems can
cause poor starting and loss of power. The
troubleshooting chart describes a quick, easy
procedure for making checks. If your vehicle
requires any repair, take it to a Yamaha deal-
er.
The skilled technicians at a Yamaha dealer-
ship have the tools, experience, and know-
how to properly service your vehicle. Use only
genuine Yamaha parts on your vehicle. Imita-
tion parts may look like Yamaha parts, but
they are often inferior. Consequently, they
have a shorter service life and can lead to ex-
pensive repair bills.
WARNING
When checking the fuel system, do not
smoke and make sure there are no open
flames or sparks in the area, including pi-
lot lights from water heaters or furnaces.
Gasoline or gasoline vapors can ignite or
explode, causing severe injury or property
damage.
EE.book Page 58 Thursday, September 6, 2007 4:28 PM
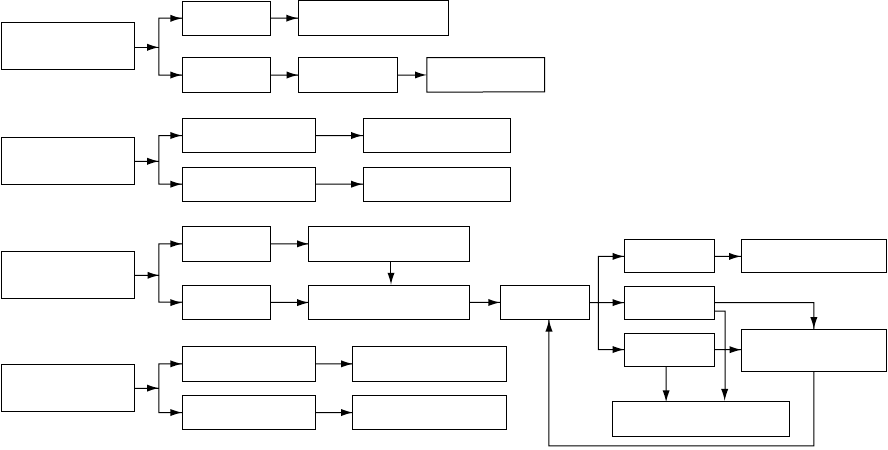
8-59
5B410024
Troubleshooting charts
Starting problems or poor engine performance
1. Fuel
Check if there is fuel
in the fuel tank.
There is fuel.
Restart the engine.
No fuel. Supply fuel.
2. Compression
Use the electric
starter to see if
there is compression.
There is compression. Compression normal.
No compression. Ask a Yamaha dealer to
inspect.
3. Ignition
Remove the
spark plug and
check the electrodes.
Wet Wipe clean with dry cloth.
Dry Attach spark plug cap and
ground to chassis.
Use the
electric starter.
Spark is good. Ignition system is
normal.
Spark is weak.
Adjust the spark plug gap
or replace the spark plug.
No spark.
Ask a Yamaha dealer to
inspect.
4. Battery
Use the electric starter.
Engine turns over
quickly. Battery is good.
Engine turns over
slowly.
Check the connections,
recharge.
Check the compression.
EE.book Page 59 Thursday, September 6, 2007 4:28 PM

8-60
Engine overheating
Wait for the engine to cool before removing the radiator cap. WARNING! If the engine is not
cool when removing the radiator cap, hot fluid and steam could blow out under pressure
and burn you. Place a thick rag over the cap and remove the cap slowly to allow any remaining
pressure to escape.
If it is difficult to get the recommended coolant, tap water can be used temporarily, provided that
it is changed to the recommended coolant as soon as possible.
Wait until the
engine has cooled.
Check the coolant level in the
coolant reservoir and/or radiator.
Level is OK.
Level is low, check the
cooling system for leakage.
No
leakage.
Leakage.
Ask a Yamaha dealer to inspect
and repair the cooling system.
Add coolant. (See the text below.)
Restart the engine. If the engine overheats again, ask a
Yamaha dealer to inspect and/or repair the cooling system.
EE.book Page 60 Thursday, September 6, 2007 4:28 PM
9-1
EVU01030
1-
CLEANING AND STORAGE
A. Cleaning
Frequent, thorough cleaning of your vehicle
will not only enhance its appearance but will
improve its general performance and extend
the useful life of many components.
1. Before cleaning the vehicle:
a. Block off the end of the exhaust pipe
to prevent water entry. A plastic bag
and strong rubber band may be used.
b. Make sure the spark plug and all filler
caps are properly installed.
2. If the engine case is excessively greasy,
apply degreaser with a paint brush. Do
not apply degreaser to the wheel axles.
3. Rinse the dirt and degreaser off with a
garden hose. Use only enough pressure
to do the job. WARNING! Test the
brakes after washing. Apply the
brakes several times at slow speeds
to let friction dry out the linings. Wet
brakes may have reduced stopping
ability, increasing the chance of an ac-
cident. NOTICE: Excessive water
pressure may cause water seepage
and deterioration of wheel bearings,
brakes, transmission seals and elec-
trical devices. Many expensive repair
bills have resulted from improper
high-pressure detergent applications,
such as those available in coin-oper-
ated car washers.
EE.book Page 1 Thursday, September 6, 2007 4:28 PM

9-2
1
2
3
4
5
6
7
8
9
10
11
12
13
14
4. Once the majority of the dirt has been
hosed off, wash all surfaces with warm
water and mild, detergent-type soap. An
old toothbrush or bottle brush is handy for
hard-to-get-at places.
5. Rinse the vehicle off immediately with
clean water and dry all surfaces with a
clean chamois towel or soft, absorbent
cloth.
6. Clean the seats with a vinyl upholstery
cleaner to keep the covers pliable and
glossy.
7. Automotive-type wax may be applied to
all painted and chrome-plated surfaces.
Avoid combination cleaner-waxes. Many
contain abrasives which may scratch the
paint or protective finish. When finished,
start the engine and let it idle for several
minutes.
5B410025
B. Storage
Long term storage (60 days or more) of your
vehicle will require some preventive proce-
dures to guard against deterioration. Make
any necessary repairs before storing the vehi-
cle.
After thoroughly cleaning the vehicle, prepare
for storage as follows:
1. Fill the fuel tank with fresh fuel and add
the specified amount of Yamaha Fuel
Stabilizer and Conditioner or equivalent
product. Operate the vehicle for at least
5 minutes to distribute treated fuel
through the fuel system.
Specified amount:
1 oz of stabilizer to each gallon of fuel (or
7.5 ml of stabilizer to each liter of fuel)
EE.book Page 2 Thursday, September 6, 2007 4:28 PM
9-3
2. Remove the spark plug, pour about one
tablespoon of SAE 10W-40 or 20W-50
motor oil in the spark plug hole and rein-
stall the spark plug. Ground the spark
plug wire and turn the engine over sever-
al times to coat the cylinder wall with oil.
3. Lubricate all control cables.
4. Block up the frame to raise all wheels off
the ground.
5. Tie a plastic bag over the exhaust pipe
outlet to prevent moisture from entering.
6. If storing in a humid or salt-air atmo-
sphere, coat all exposed metal surfaces
with a light film of oil. Do not apply oil to
any rubber parts or the seat covers.
7. Remove the battery and charge it. Store
it in a dry place and recharge it once a
month. Do not store the battery in an ex-
cessively warm or cold place [less than
0°C (30 °F) or more than 30 °C (90 °F)].
Use of fuel stabilizer and conditioner elimi-
nates the need to drain the fuel system. Con-
sult a Yamaha dealer if the fuel system needs
to be drained.
EE.book Page 3 Thursday, September 6, 2007 4:28 PM

10-1
1
2
3
4
5
6
7
8
9
10
11
12
13
14
EVU01050
1-
SPECIFICATIONS
Model YXR70FX
Dimensions:
Overall length 2,885 mm (113.6 in)
Overall width 1,385 mm (54.5 in)
Overall height 1,853 mm (73.0 in)
1,901 mm (74.8 in) (Special Edition model)
Seat height 818 mm (32.2 in)
Wheelbase 1,910 mm (75.2 in)
Ground clearance 280 mm (11.0 in)
Minimum turning radius 3,900 mm (154 in)
Basic weight:
With oil and full fuel tank 540.0 kg (1,190 lb)
Engine:
Engine type Liquid cooled 4-stroke, SOHC
Cylinder arrangement Forward-inclined single cylinder
Displacement 686.0 cm3
Bore × stroke 102.0 × 84.0 mm (4.02 × 3.31 in)
Compression ratio 9.20:1
Starting system Electric starter
Lubrication system Wet sump
EE.book Page 1 Thursday, September 6, 2007 4:28 PM
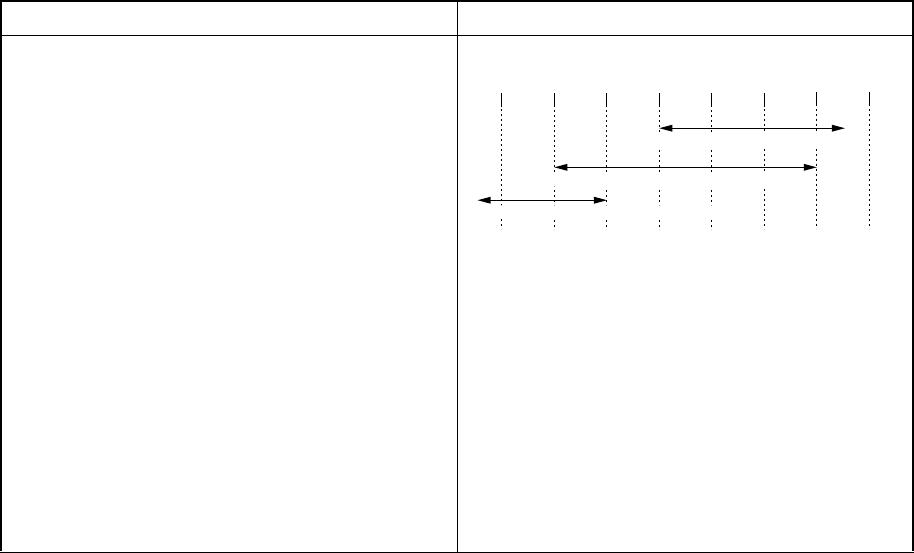
10-2
Engine oil:
Type:
Recommended engine oil classification API service SG type or higher, JASO standard MA
Quantity:
Without oil filter cartridge replacement 2.00 L (1.76 Imp qt, 2.11 US qt)
With oil filter cartridge replacement 2.10 L (1.85 Imp qt, 2.22 US qt)
Model YXR70FX
010 30 50 70 90 110 130 ˚F
-20 -10 0 10 20 30 40 50 ˚C
YAMALUBE 4 (10W-40) or SAE 10W-40
YAMALUBE 4-CW (5W-30) or SAE 5W-30
YAMALUBE 4 (20W-50) or SAE 20W-50
NOTICE
In order to prevent clutch slippage (since the en-
gine oil also lubricates the clutch), do not mix any
chemical additives with oil. Do not use oils with a
diesel specification of “CD” or oils of a higher qual-
ity than specified. In addition, do not use oils la-
beled “ENERGY CONSERVING II” or higher.
EE.book Page 2 Thursday, September 6, 2007 4:28 PM

10-3
Final gear case oil:
Type SAE80 API GL-4 Hypoid gear oil
Quantity 0.25 L (0.22 Imp qt, 0.26 US qt)
Differential gear case oil:
Type SAE80 API GL-4 Hypoid gear oil
Quantity 0.18 L (0.16 Imp qt, 0.19 US qt)
Radiator capacity (including all routes): 2.35 L (2.07 Imp qt, 2.48 US qt)
Air filter:
Air filter element Wet element
Fuel:
Type Unleaded gasoline only
Fuel tank capacity 30.0 L (6.60 lmp gal, 7.93 US gal)
Throttle body:
Type/quantity 41EHS/1
Manufacturer MIKUNI
Spark plug:
Type/manufacturer CPR7EA-9/NGK
Spark plug gap 0.8–0.9 mm (0.031–0.035 in)
Clutch type: Wet, centrifugal automatic
Model YXR70FX
EE.book Page 3 Thursday, September 6, 2007 4:28 PM

10-4
Transmission:
Primary reduction system V-belt
Secondary reduction system Shaft drive
Secondary reduction ratio 41/21 × 17/12 × 33/9 (10.142)
Transmission type V-belt automatic
Operation Right hand operation
Reverse gear 23/14 × 28/23 (2.000)
Sub transmission ratio low 31/16 (1.938)
high 31/21 (1.476)
Chassis:
Frame type Steel tube frame
Caster angle 5.0°
Trail 26.0 mm (1.02 in)
Tire:
Ty p e Tu b e l e s s
Size front 25 × 8-12NHS
rear 25 × 10-12NHS
Wheel:
Type Panel wheel
Cast wheel (Special Edition model)
Rim size front 12 × 6.0AT
rear 12 × 7.5AT
Model YXR70FX
EE.book Page 4 Thursday, September 6, 2007 4:28 PM

10-5
Brakes:
System Front and rear unified
Type front Dual disc brake
rear Dual disc brake
Operation Foot operation
Suspension:
Front suspension Double wishbone
Rear suspension Double wishbone
Shock absorber:
Front shock absorber Coil spring/oil damper
Rear shock absorber Coil spring/oil damper
Wheel travel:
Front wheel travel 185 mm (7.3 in)
Rear wheel travel 185 mm (7.3 in)
Electrical:
Ignition system Transistorized coil ignition (digital)
Generator system AC magneto
Battery type U1L-11
Battery capacity 12 V 28.0 Ah
Headlight type: Krypton bulb
Model YXR70FX
EE.book Page 5 Thursday, September 6, 2007 4:28 PM
10-6
Bulb voltage, wattage × quantity:
Headlight 12 V 30.0 W/30.0 W × 2
Tail/brake light 12 V 5.0 W/21.0 W × 2
Indicator lights:
Neutral indicator light LED
Reverse indicator light LED
Coolant temperature warning light LED
Engine trouble warning light LED
Parking brake indicator light LED
On-Command four-wheel-drive/differential gear
lock indicator
LCD
On-Command differential gear lock indicator light LED
High-range indicator light LED
Low-range indicator light LED
Model YXR70FX
EE.book Page 6 Thursday, September 6, 2007 4:28 PM
10-7
Specified fuses:
Main fuse 40.0 A
Fuel injection system fuse 10.0 A
Headlight fuse 15.0 A
Ignition fuse 10.0 A
Auxiliary DC jack fuse 10.0 A
Four-wheel-drive motor fuse 10.0 A
Signaling system fuse 10.0 A
Backup fuse 10.0 A
Radiator fan fuse 25.0 A
Model YXR70FX
EE.book Page 7 Thursday, September 6, 2007 4:28 PM
11-1
1-
CONSUMER INFORMATION
EVU00090
Identification number records
Record the key identification number, vehicle
identification number, and model label infor-
mation in the spaces provided for assistance
when ordering spare parts from a Yamaha
dealer or for reference, in case the vehicle is
stolen.
1. KEY IDENTIFICATION NUMBER:
ACA-02E
2. VEHICLE IDENTIFICATION NUMBER:
ACA-02E
3. MODEL LABEL INFORMATION:
ACA-01E
EE.book Page 1 Thursday, September 6, 2007 4:28 PM
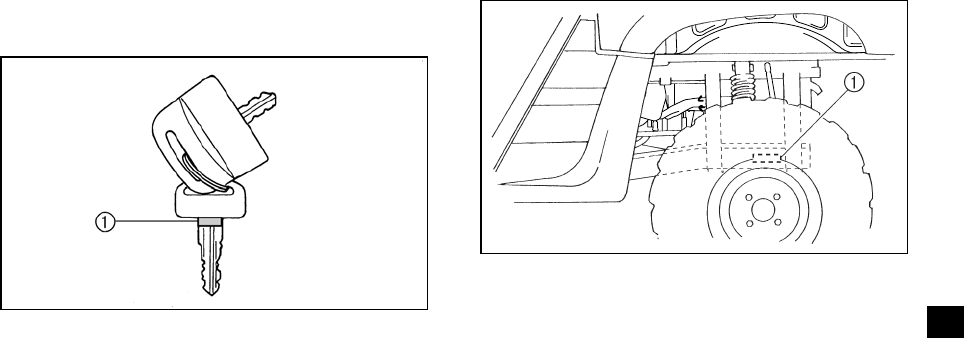
11-2
1
2
3
4
5
6
7
8
9
10
11
12
13
14
EVU00100
Key identification number
The key identification number is stamped on
the key, as shown in the following illustration.
This number can be used for ordering a new
key.
1. Key identification number
EVU00110
Vehicle identification number
The vehicle identification number is stamped
into the frame.
1. Vehicle identification number
The vehicle identification number is used to
identify your vehicle.
EE.book Page 2 Thursday, September 6, 2007 4:28 PM
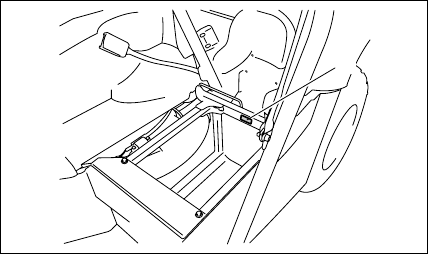
11-3
EVU00121
Model label
The model label is affixed to the frame under
the driver seat. Record the information on this
label in the space provided. This information
will be needed to order spare parts from your
Yamaha dealer.
1. Model label
1
EE.book Page 3 Thursday, September 6, 2007 4:28 PM

11-4
EVU01060
NOISE REGULATION
TAMPERING WITH NOISE CONTROL SYSTEM PROHIBITED:
Federal law prohibits the following acts or the causing thereof: (1) The removal or rendering inop-
erative by any person other than for purposes of maintenance, repair, or replacement of any de-
vice or element of design incorporated into any new vehicle for the purpose of noise control prior
to its sale or delivery to the ultimate purchaser or while it is in use or (2) the use of the vehicle after
such device or element of design has been removed or rendered inoperative by any person.
“AMONG THOSE ACTS PRESUMED TO CONSTITUTE TAMPERING ARE THE ACTS LISTED
BELOW.”
These acts include tampering with the following systems; i.e., modification, removal, etc.
Exhaust system
Muffler
Exhaust pipe
Silencer
Intake system
Air cleaner case
Air cleaner element
Intake duct
EE.book Page 4 Thursday, September 6, 2007 4:28 PM

11-5
EVU01070
MAINTENANCE RECORD
Copies of work orders and/or receipts for parts you purchase and install will be required to docu-
ment maintenance done in accordance with the warranty. The chart below is printed only as a re-
minder to you that the maintenance work is required. It is not acceptable proof of maintenance
work.
MAINTENANCE
INTERVAL DATE OF
SERVICE MILEAGE SERVICING DEALER
NAME AND ADDRESS REMARKS
month km (mi) hours
1 320 (200) 20
3 1,200 (750) 75
6 2,400 (1,500) 150
12 4,800 (3,000) 300
18 7,200 (4,500) 450
24 9,600 (6,000) 600
30 12,000 (7,500) 750
36 14,400 (9,000) 900
42 16,800 (10,500) 1,050
48 19,200 (12,000) 1,200
54 21,600 (13,500) 1,350
60 24,000 (15,000) 1,500
EE.book Page 5 Thursday, September 6, 2007 4:28 PM

11-6
EVU01081
YAMAHA MOTOR CORPORATION, U.S.A. SIDE × SIDE VEHICLE LIMITED WARRANTY
Yamaha Motor Corporation, U.S.A. hereby warrants
that new Yamaha Side × Side vehicles purchased
from an authorized Yamaha Side × Side Vehicle
dealer in the continental United States will be free
from defects in material and workmanship for the
period of time stated herein, subject to certain stated
limitations.
GENERAL EXCLUSIONS from this warranty shall
include any failures caused by:
a.
b.
c.
d.
e.
f.
g.
Competition or racing use.
Installation of parts or accessories that are not
qualitatively equivalent to genuine Yamaha parts.
Abnormal strain, neglect, or abuse.
Lack of proper maintenance.
Accident or collision damage.
Modification to original parts.
Damage due to improper transportation.
YAMAHA MOTOR CORPORATION, U.S.A. MAKES
NO OTHER WARRANTY OF ANY KIND, EXPRESSED
OR IMPLIED. ALL IMPLIED WARRANTIES OF
MERCHANTABILITY AND FITNESS FOR A
PARTICULAR PURPOSE WHICH EXCEED THE
OBLIGATIONS AND TIME LIMITS STATED IN THIS
WARRANTY ARE HEREBY DISCLAIMED BY
YAMAHA MOTOR CORPORATION, U.S.A. AND
EXCLUDED FROM THIS WARRANTY.
SOME STATES DO NOT ALLOW LIMITATIONS ON
HOW LONG AN IMPLIED WARRANTY LASTS, SO
THE ABOVE LIMITATION MAY NOT APPLY TO YOU.
ALSO EXCLUDED FROM THIS WARRANTY ARE
ANY INCIDENTAL OR CONSEQUENTIAL DAMAGES
INCLUDING LOSS OF USE. SOME STATES DO
NOT ALLOW THE EXCLUSION OR LIMITATION OF
INCIDENTAL OR CONSEQUENTIAL DAMAGES, SO
THE ABOVE EXCLUSION MAY NOT APPLY TO YOU.
THIS WARRANTY GIVES YOU SPECIFIC LEGAL
RIGHTS, AND YOU MAY ALSO HAVE OTHER
RIGHTS WHICH VARY FROM STATE TO STATE.
THE PERIOD OF WARRANTY for YXR OR YXP
Yamaha Side × Side vehicles shall be six (6) months
from the date of purchase, with no mileage limitation.
MODELS EXCLUDED FROM WARRANTY include
those used for non-Yamaha-authorized renting,
leasing, or other commercial purposes.
DURING THE PERIOD OF WARRANTY any
authorized Yamaha Side × Side Vehicle dealer will for
free of charge, repair or replace, at Yamaha’s option,
any part adjudged defective by Yamaha due to faulty
workmanship or material from the factory. Parts used
in warranty repairs will be warranted for the balance
of the product’s warranty period. All parts replaced
under warranty become property of Yamaha Motor
Corporation, U.S.A.
SPECIFIC EXCLUSIONS from this warranty shall
include parts replaced due to normal wear or routine
maintenance; such as spark plugs, oil, oil filter, air
filter, and brake pads.
Operate and maintain the Side × Side vehicle as
specified in the appropriate Owner’s Manual, and
Give notice to an authorized Yamaha Side × Side
Vehicle dealer of any and all apparent defects
within ten (10) days after discovery, and make the
machine available at that time for inspection and
repairs at such dealer’s place of business.
THE CUSTOMER’S RESPONSIBILITY under this
warranty shall be to:
WARRANTY TRANSFER: To transfer the warranty
from the original purchaser to any subsequent
purchaser(s), it is imperative that the Side × Side
vehicle be inspected and registered for warranty by
an authorized Yamaha Side × Side Vehicle dealer. In
order for this warranty to remain in effect, this
inspection and registration must take place within ten
(10) days after transfer of ownership to the
subsequent purchaser. A reasonable dealer-imposed
fee may be charged for this inspection.
EMISSION CONTROL SYSTEM WARRANTY
Yamaha Motor Corporation, U.S.A. also warrants to
the ultimate purchaser and each subsequent
purchaser of each 2006 and later model Yamaha Side
× Side vehicle covered by this warranty that the
vehicle is designed, built, and equipped so as to
conform at the time of sale with all U.S. emissions
standards applicable at the time of manufacture and
that it is free from defects in materials and
workmanship which would cause it not to meet these
standards within the period listed immediately below.
Failures other than those resulting from defects in
material or workmanship which arise solely as a
result of owner abuse and/or lack of proper
maintenance are not covered by this
warranty.
ALL MODELS
Thirty (30) months from the original purchase date
1.
2.
EE.book Page 6 Thursday, September 6, 2007 4:28 PM
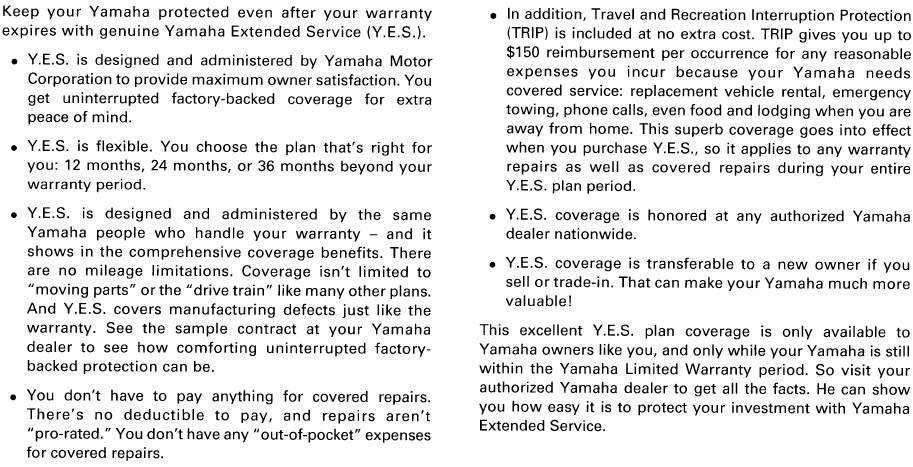
11-7
EVU01090
YAMAHA EXTENDED SERVICE (Y.E.S.)
EE.book Page 7 Thursday, September 6, 2007 4:28 PM
11-8
EE.book Page 8 Thursday, September 6, 2007 4:28 PM
B6-yoko.fm Page 1 Wednesday, March 8, 2006 10:46 AM
B6-yoko.fm Page 1 Wednesday, March 8, 2006 10:46 AM
PRINTED IN USA
2007.09-6.5×1 CR
(E)
DIC2342
YAMAHA MOTOR CO., LTD.
