Yamaha Guide DG STOMP Quick Start Dgstomp 2
User Manual: Yamaha DG STOMP Quick Start
Open the PDF directly: View PDF ![]() .
.
Page Count: 20
- Cover
- Table of Contents
- Introduction
- Front Panel
- Back Panel
- Using The Tuner
- Auditioning Sounds
- Changing Patches - GBN
- Changing Groups/Banks
- Selecting An Amp Type
- Selecting A Speaker Type
- Selecting An Effect
- Effects List
- Tap Tempo Delay
- Using Effect Mode
- Using An Expression Pedal
- Programming The Wah
- Connecting A MIDI Pedalboard
- Saving Patches Via MIDI
- Re-Initialization
© 2001 Yamaha Corporation of America 6600 Orangethorpe Avenue Buena Park, CA 90620 (714) 522-9011 www.yamaha.com
PUREPURETONETONE ISIS JUSTJUST AA STOMP AWAYSTOMP AWAY

TABLE OFTABLE OF CONTENTSCONTENTS
INTRODUCTIONINTRODUCTION ............................................................................................... Page 1
PANELPANEL OVERVIEWOVERVIEW ............................................................................................. Page 2
TUNING THETUNING THE GUITARGUITAR ....................................................................................... Page 4
AUDITIONINGAUDITIONING SOUNDSSOUNDS .................... ................................................................ Page 5
CHANGINGCHANGING PATCHESPATCHES ...................................................................................... Page 6
SELECTING AN AMPSELECTING AN AMP TYPETYPE ................................................................................... Page 8
SELECTING A SPEAKER CABINETSELECTING A SPEAKER CABINET .......................................................................... Page 10
SELECTINGSELECTING ANAN EFFECTEFFECT.......................................................................................... Page 11
EFFECT MODE EFFECT MODE ................................................................................................... Page 13
USINGUSING ANAN EXPRESSIONEXPRESSION PEDALPEDAL ............................................................................ Page 14
PROGRAMMINGPROGRAMMING THE WAHTHE WAH ............................................................................... Page 15
USINGUSING AA MIDIMIDI FOOTFOOT CONTROLLERCONTROLLER ....................................................................... Page 16
SAVINGSAVING PATCHESPATCHES TOTO ANAN EXTERNALEXTERNAL DEVICE DEVICE ......................................................... Page 17
RE-INITIALIZATIONRE-INITIALIZATION ........................................................................................... Page 18
© 2001 Yamaha Corporation of America 6600 Orangethorpe Avenue Buena Park, CA 90620 (714) 522-9011 www.yamaha.com
YAMAHAYAMAHA DGDG STOMPSTOMP
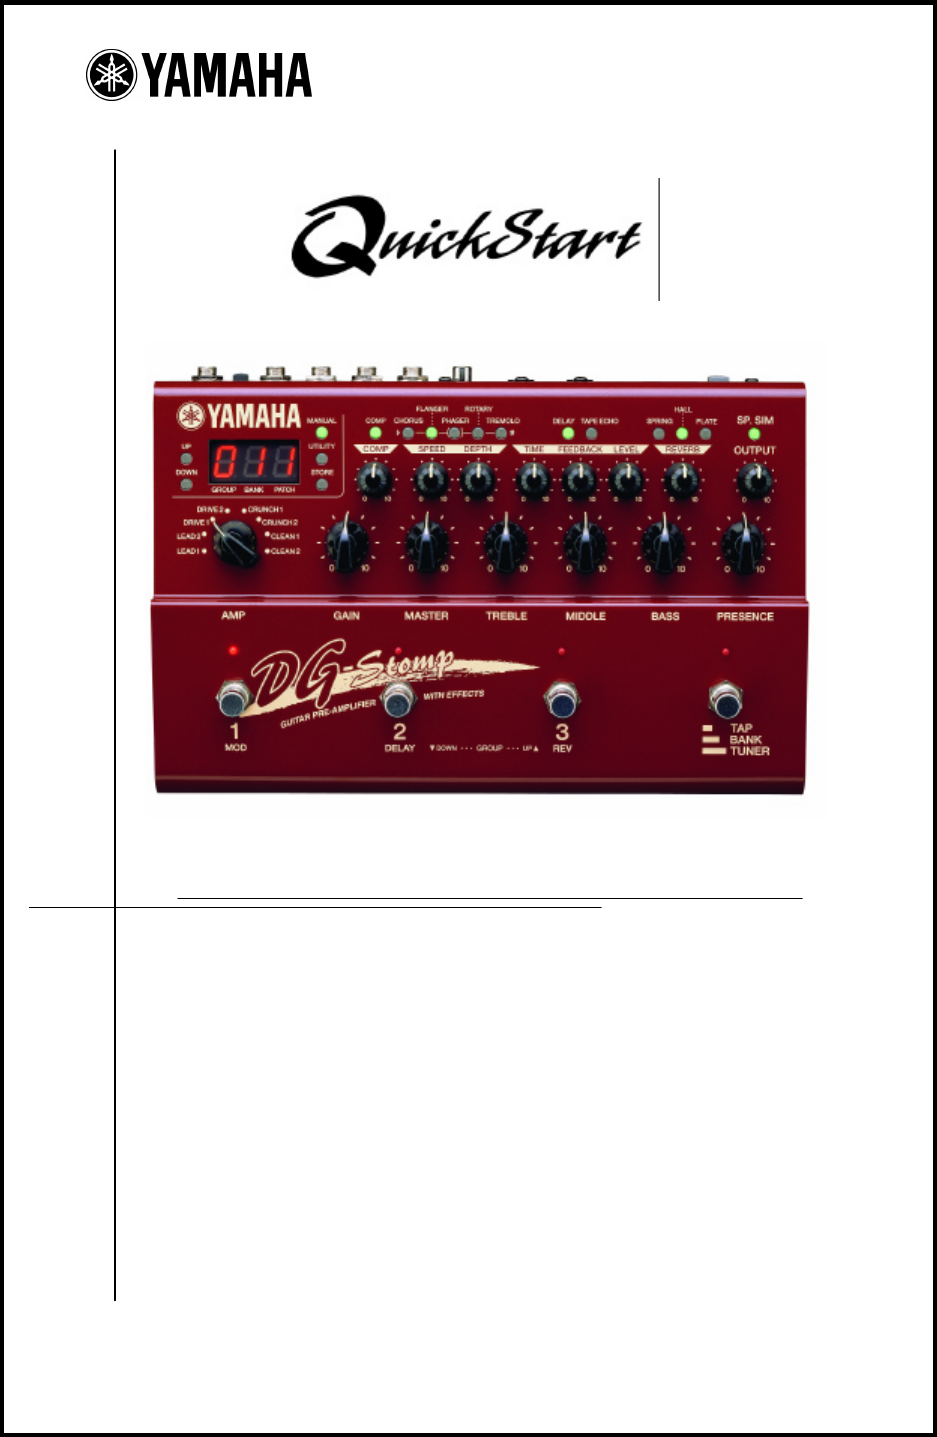
The DG Stomp is an innovative digital preamp with multiple effects in a rugged stomp box design.
In addition to capturing the world’s greatest tube amp tones, this powerful processor provides state-
of-the-art multiple effects such as Compressor, Chorus, Flanger, Phaser, Rotary, Tremolo, Tape Echo,
Reverb, Wah, 16 Speaker Simulations, and much more.
PRODUCTPRODUCT FEATURESFEATURES
11
mRugged Stomp Box Design
m180 Patch Locations (90 User/90 Preset)
m8 Modern and Vintage Amp Types
m16 Modern and Vintage Speaker Cabinet Types
m14 Effects (Compression, Modulation, Delay, Reverb, Wah)
mGuitar Tuner
mTap Tempo Delay
mExpression Pedal Input
mBuilt-In Pedalboard
mDigital Output
mMIDI In/Out
$499.00$499.00
MSRPMSRP

22
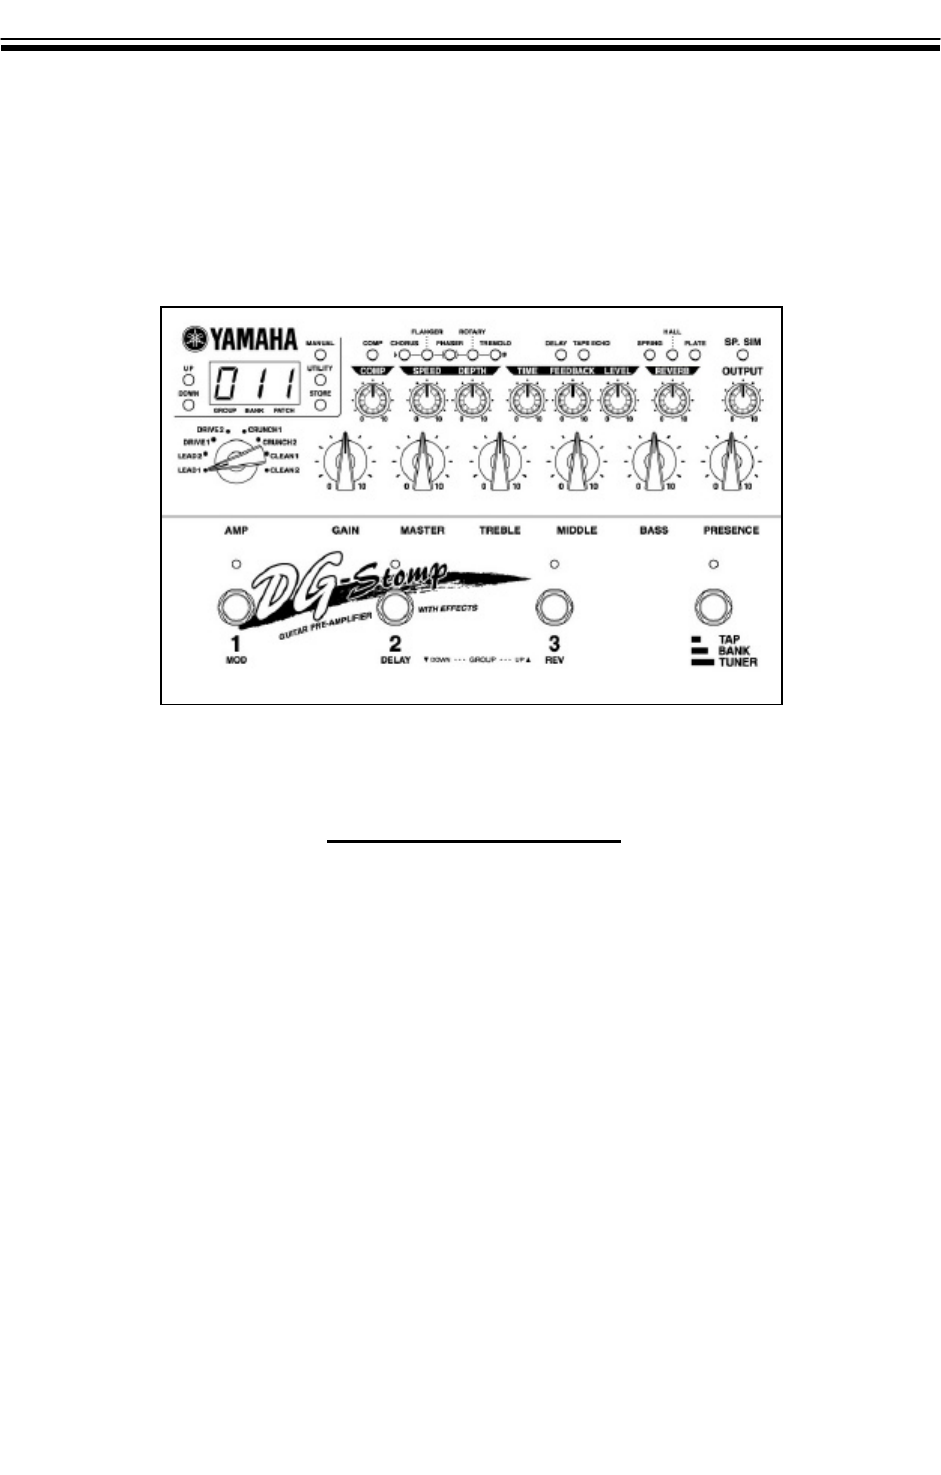
PANEL OVERVIEW PANEL OVERVIEW
Designed for the recording and peforming guitarist, a simple row of knobs and buttons makes pro-
gramming a breeze. The DG Stomp top panel is divided into three sections:
FOOTSWITCHESFOOTSWITCHES
DISPLAYDISPLAY and EFFECTS and EFFECTS
PREAMP and TONEPREAMP and TONE CONTROLSCONTROLS
The bottom section features four footswitches that allow you to change patches, turn effects on and
off, access the tuner, and use Tap Tempo Delay.
The middle section features an amp selector for choosing 1 of 8 amp types and tone control knobs
for guitar-friendly editing of the preamp sound.
The upper section features the main display, global buttons including manual, utility, and store - plus
effects buttons and knobs for easy editing of the effects and speaker cabinet types.
33
PANELPANEL OVERVIEW (Cont.)OVERVIEW (Cont.)
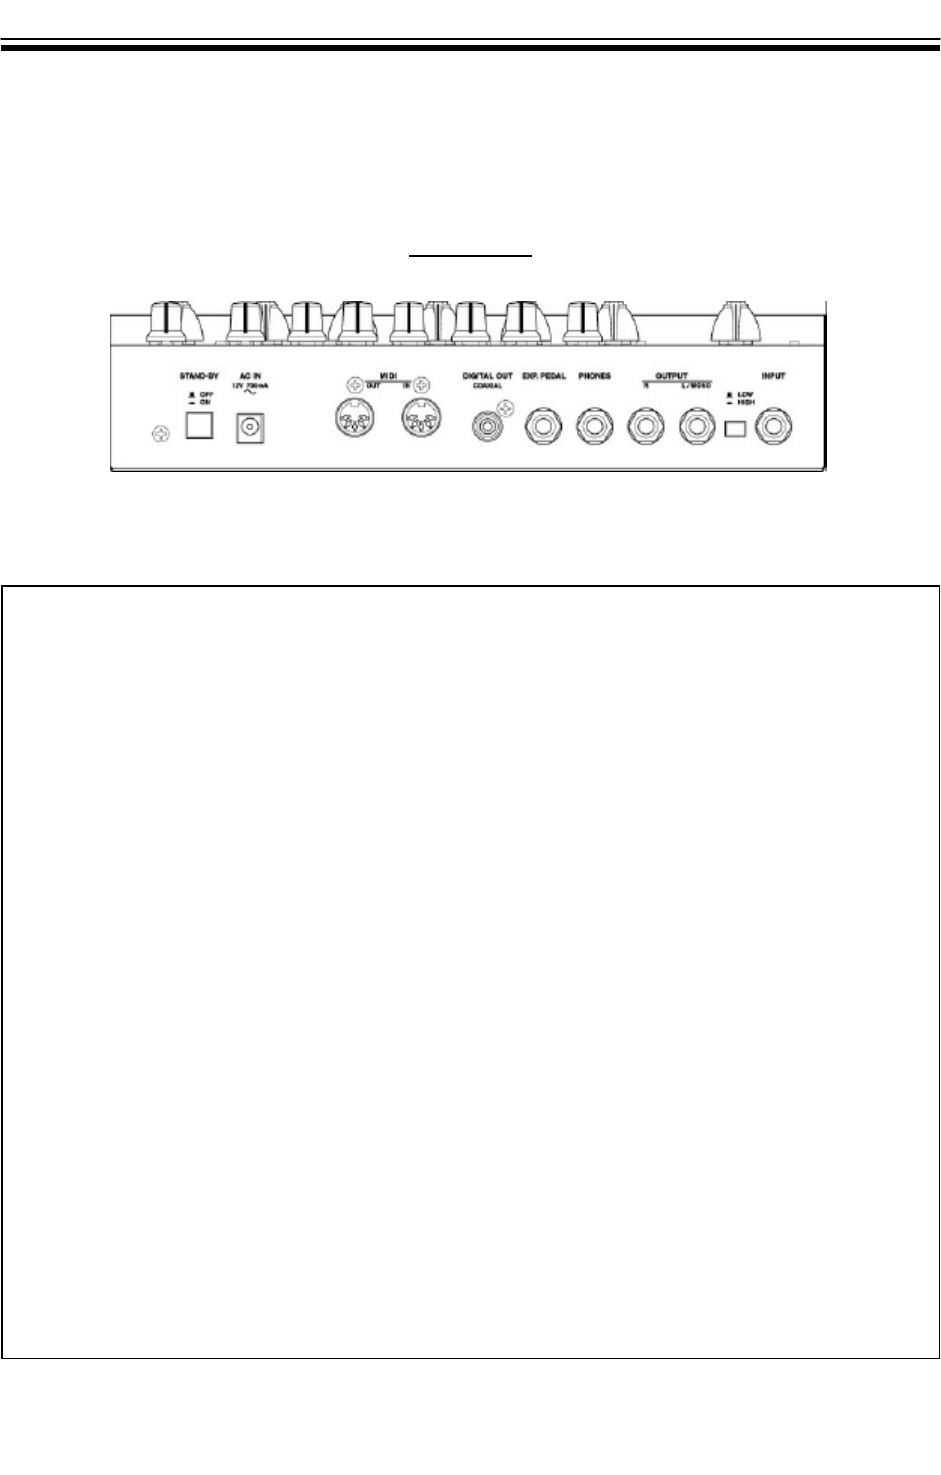
The back panel features analog, digital, and MIDI connections, power switch, input attenuato, and
an AC adapter connection. Analog inputs and outputs require 1/4” audio cables, MIDI In and Out
use standard MIDI cables, and the digital output requires a coaxial cable.
POWERPOWER BUTTONBUTTON For turning the power ON or OFF
AC ADAPTER INPUTAC ADAPTER INPUT For connecting a Yamaha AC-10 1000ma power adapter
MIDIMIDI OUTPUTOUTPUT For connecting a MIDI cable to MIDI INPUT of an external MIDI device
MIDIMIDI INPUTINPUT For connecting a MIDI cable from the MIDIOUTPUT of an external
MIDI device
DIGITALDIGITAL OUTPUTOUTPUT For connecting a coaxial cable to digital input on an external digital
mixer or recorder
EXPRESSIONEXPRESSION INPUTINPUT For connecting an expression pedal such as a Yamaha FC-7
HEADPHONEHEADPHONE INPUTINPUT For connecing a pair of headphones
STEREOSTEREO OUTPUTSOUTPUTS For connecting to STEREO INPUT on an external mixer, power amp or
two guitar amplifiers
INPUTINPUT ATTENUATORATTENUATOR For adjusting the INPUT LEVEL from high output or low output guitar
pickups
GUITARGUITAR INPUTINPUT For connecting a 1/4” guitar audio cable from the guitar
BACK PANELBACK PANEL
44
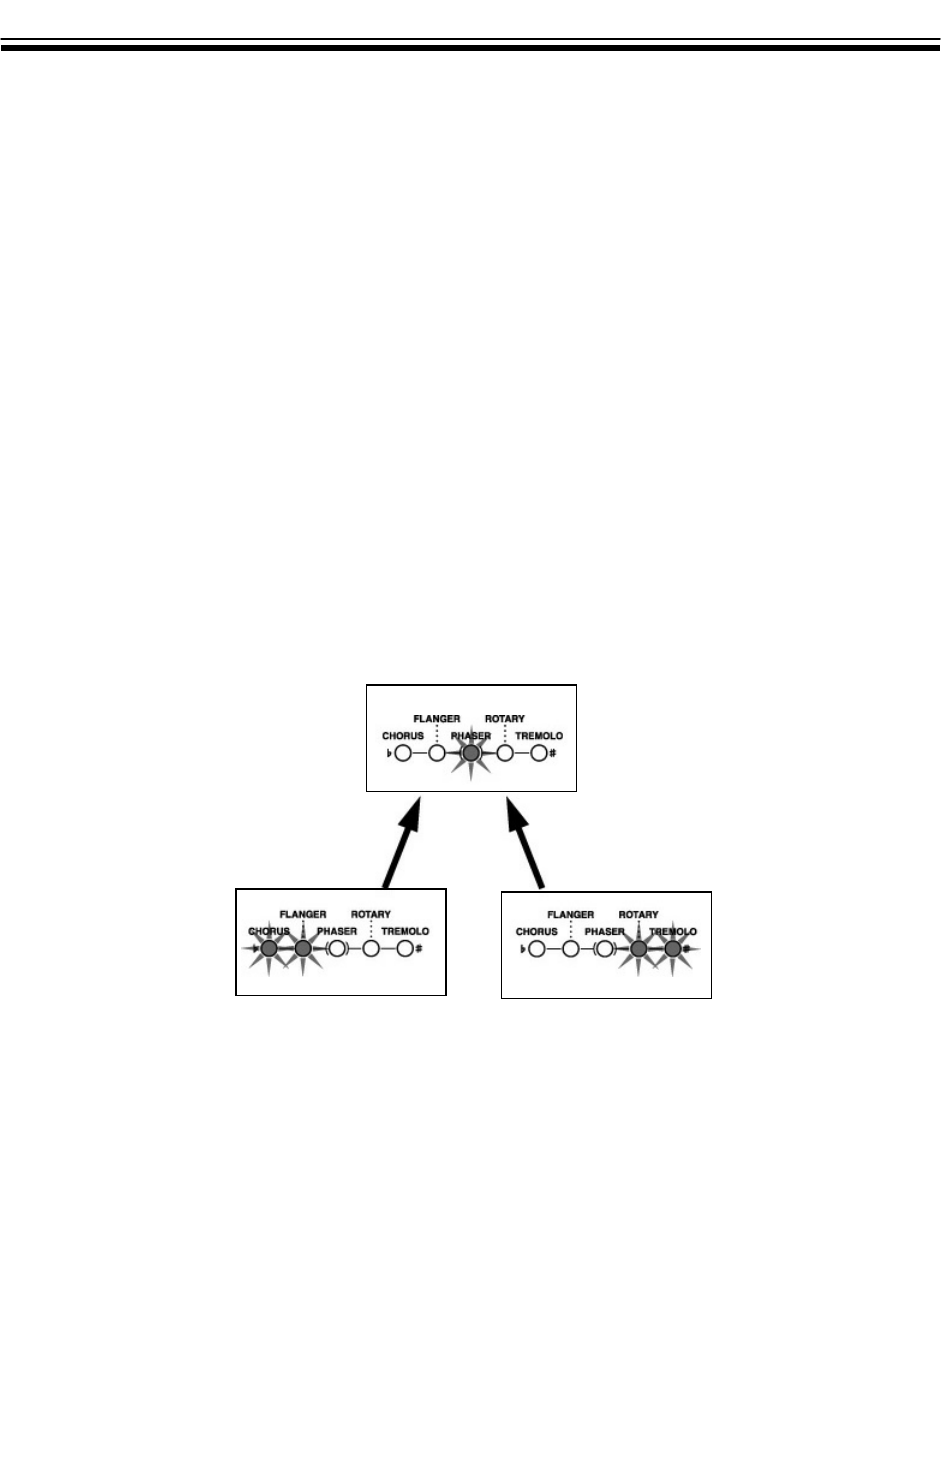
USINGUSING THETHE TUNERTUNER
The built-in chromatictuner allows you to tune easily. The modulation effect buttons light up when
the tuning mode is activated.
1. Press the [TUNER] footswitch and hold it down for 1 second.
2. Pick an open guitar string.
3. You will notice the note name appear in the display, and the modulation buttons
begin blinking.
4. If tuned sharp, the [ROTARY] and/or [TREMOLO] light will appear.
5. If tuned flat, the [FLANGER] and/or [CHORUS] light will appear.
6. When in tune, the [PHASER] light will appear.
7. Press the [TUNER] footswitch again when guitar tuning is complete. This will return
you to the [PLAY] mode.
IN TUNEIN TUNE
FLAT bFLAT b SHARP #SHARP #
55
AUDITIONING SOUNDSAUDITIONING SOUNDS
The Yamaha DG Stomp includes 180 patch locations (sounds) created by world-renowned guitarists
Kenny Greenberg and Jerry McPherson.
USINGUSING THETHE BUTTONSBUTTONS
To audition the sounds with the UP and DOWN buttons:
1. Press the [UP] button for Patch Increment.
2. Press the [DOWN] button for Patch Decrement
3. Press and Hold the [UP] button for Group Increment.
4. Press and Hold the [DOWN] button for Group Decrement
Here’s just a few of the 180 patches in the DG Stomp. Check ‘em out!
NO.
PATCH NAME
EFFECTS
SP SIM
STYLE
011 True Brit LEAD2 DELAY British 4x12 British Anniversary stack
012
LA clean
CLEAN2
CHORUS
DELAY
SPRING
British 4x12
Rich Clean Sound
013
Follow Me
DRIVE1
COMP
TAPE ECHO
Modern 4x12
Rock
021
Mellow Man
CLEAN1
COMP
HALL
American 1x12
Jazz
022
George Town
CRUNCH1
COMP
ROTARY
DELAY
YAMAHA 1x12
60s-style rhythm with rotary
023
Large Muff
LEAD1
CHORUS
DELAY
HALL
Hybrid 2x12
Smooth Lead Sound
031
Space Ranger
LEAD2
PHASER
DELAY
HALL
Experimental
032
Black Sunday
LEAD1
FLANGER
British 4x12
Heavy Metal
033
Funky Flange
CLEAN1
COMP
FLANGER
DELAY
Modern 1x12
Funk
111
LEAD1
HALL
American 1x12
Rock/Fusion Fat Lead Sound
112
Van Hallo
LEAD2
DELAY
American 4x12
Heavy Metal
113
Punchy Drive
DRIVE1
SPRING
American 1x12
Rock Blues
PATCHPATCH DEMODEMO
66
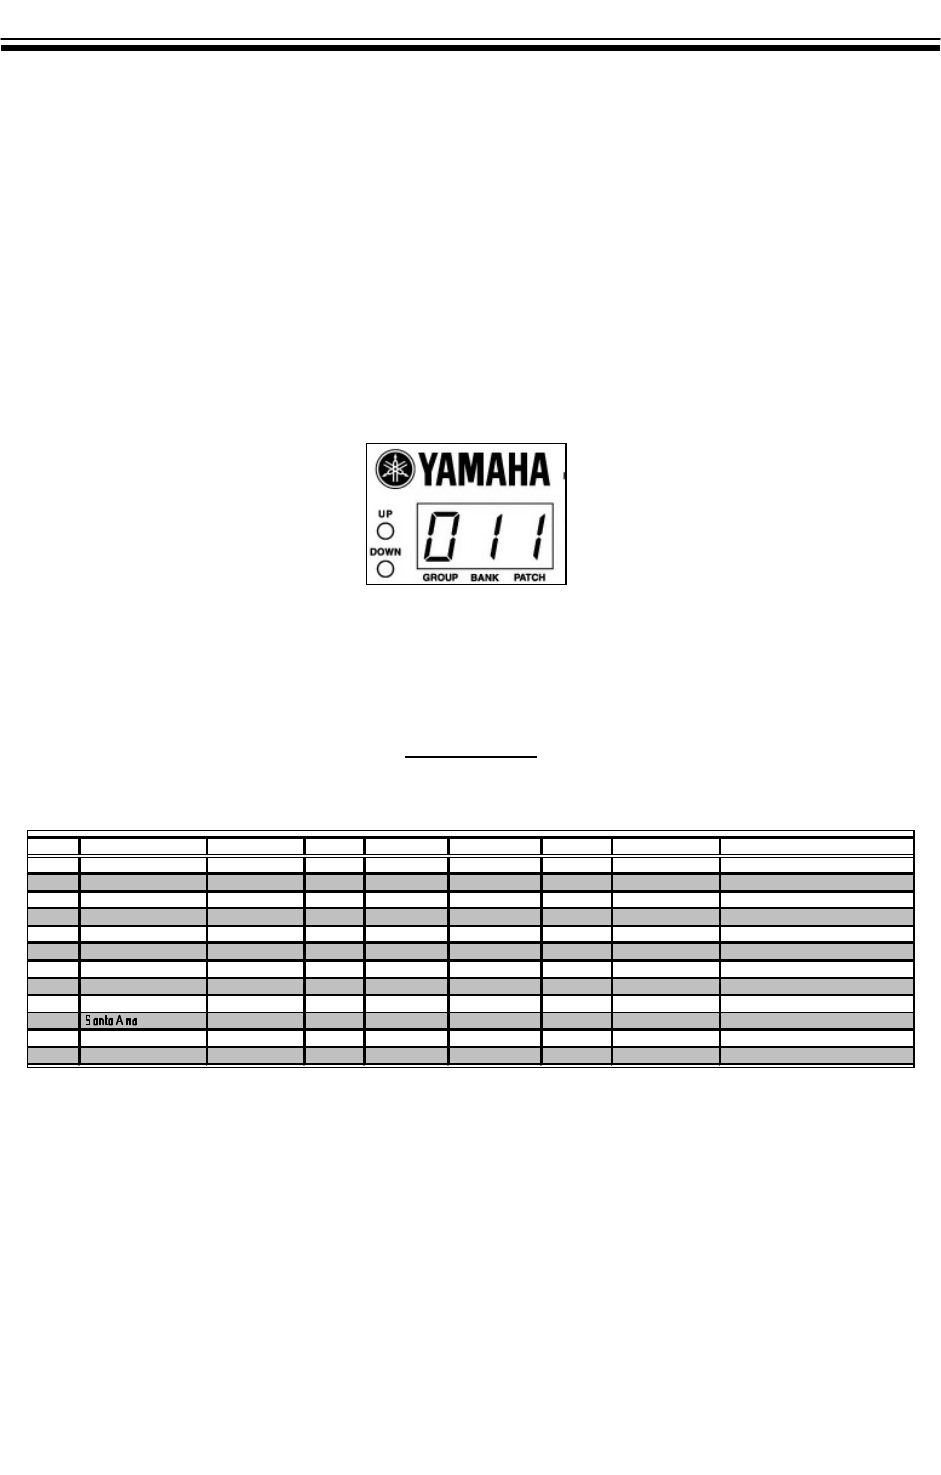
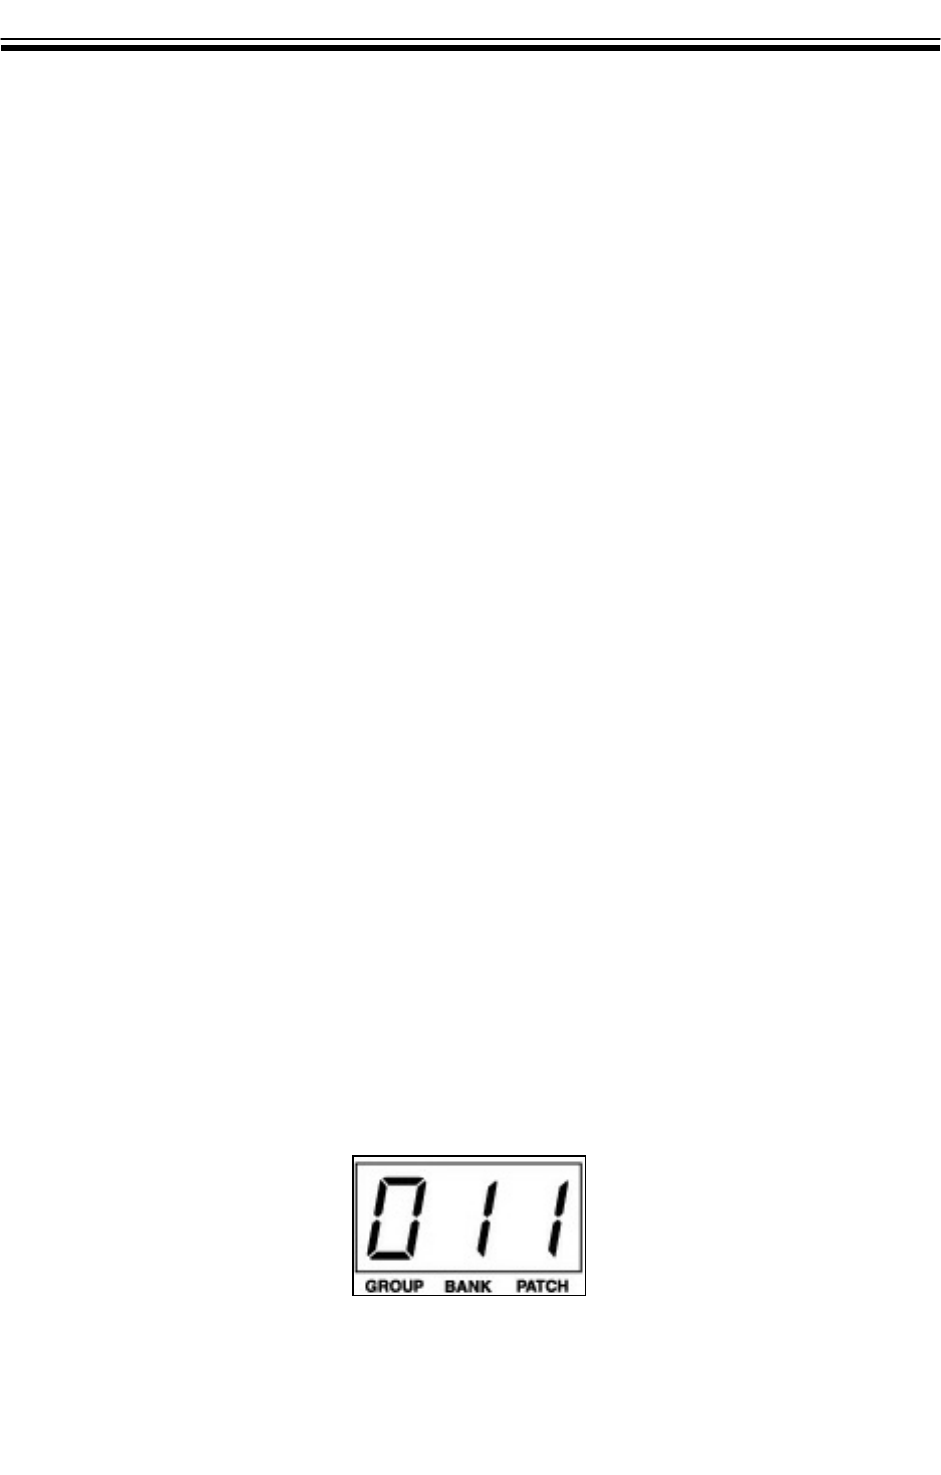
CHANGINGCHANGING PATCHESPATCHES
Patch NumbersPatch Numbers
Each patch in the DG Stomp is represented with three digit numbers such as [111]. The first number
is the Group, second number is the Bank, and the third number is the Patch.
To select patch numbers:
1. Press footswitch number 1 to call up the first patch:
[011] Group 0/Bank 1/Patch 1
2. Press footswitch number 2 to call up the second patch:
[012] Group 0/Bank 1/Patch 2
3. Press footswitch number 3 to call up the third patch:
[013] Group 0/Bank 1/Patch 3
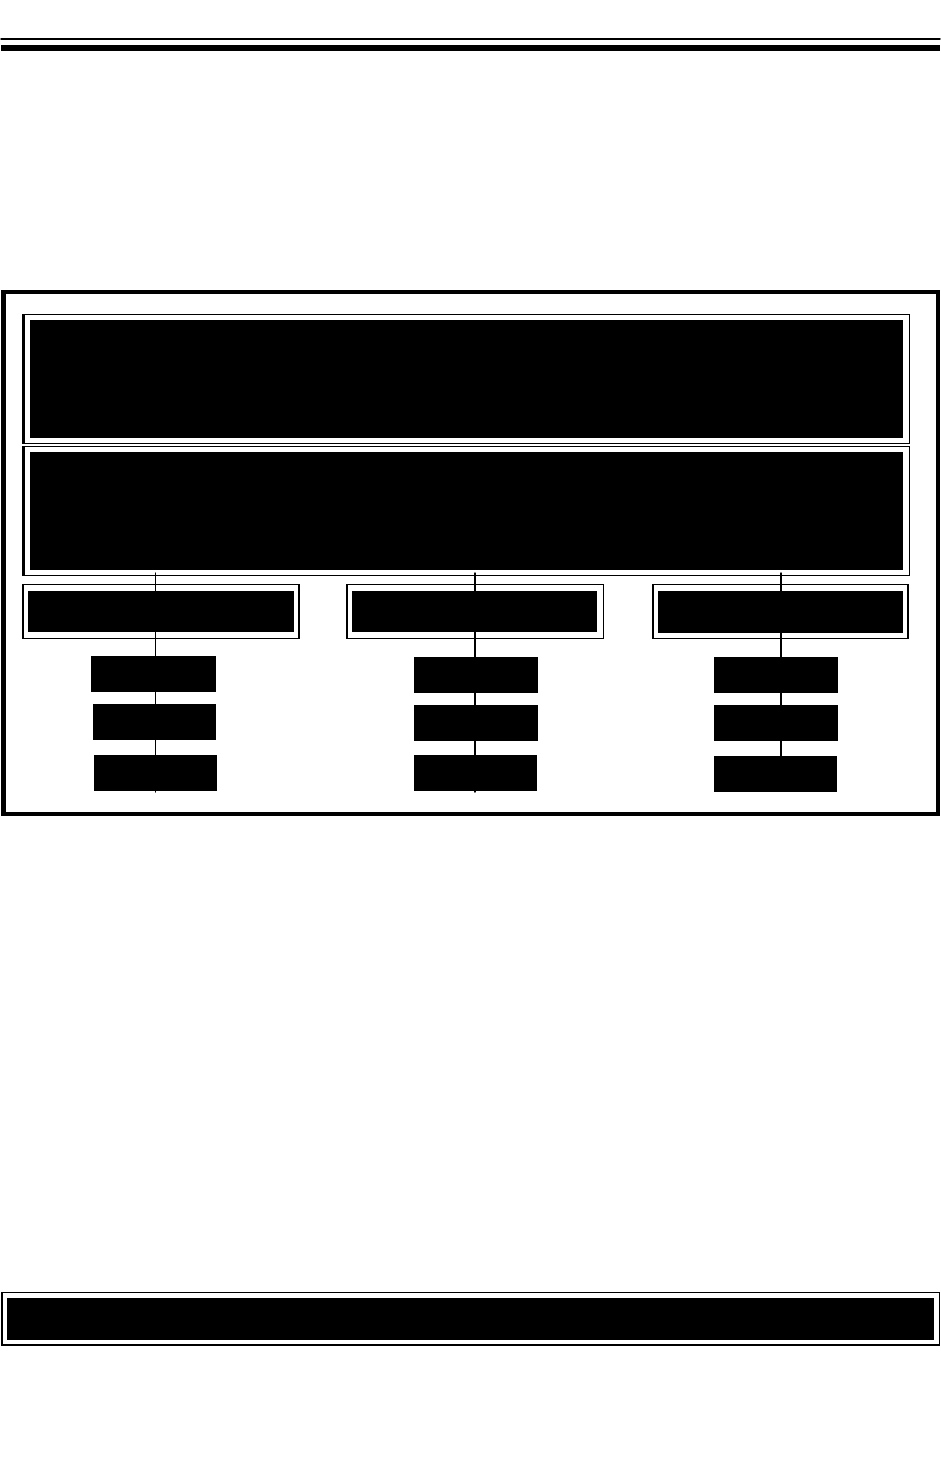
The patches are arranged in two areas: 90 User and 90 Preset. Each of the 90 patch sets are stored
into 10 GroupsGroups consisting of 3 BanksBanks with 3 PatchesPatches in each. This format is commonly used in order
to access larger numbers of patches using a limited number of footswitches.
PATCH 1PATCH 1
BANK 2BANK 2 BANK 3BANK 3
PATCH 2PATCH 2
PATCH 3PATCH 3
PATCH 1PATCH 1
PATCH 2PATCH 2
PATCH 3PATCH 3
PATCH 1PATCH 1
PATCH 2PATCH 2
PATCH 3PATCH 3
BANK 1BANK 1
10 USER GROUPS 10 USER GROUPS
90 User + 90 Preset = 180 Total Patches
10 PRESET GROUPS 10 PRESET GROUPS
Group Bank NumbersGroup Bank Numbers
77
CHANGINGCHANGING PATCHESPATCHES (Cont.)(Cont.)
BanksBanks
The DG Stomp includes 3 Patches in each of the 3 Banks. The first 3 patches are located in the
first bank, while additional patches are stored in the remaining two banks. To access additional
banks:
1. Hold footswitch number 4 down for 1 second to access the next [BANK].
2. Press footswitch 2 to select [BANK 2].
3. Press footswitch number 1 to select first patch in [BANK 2]:
[021] Group 0/Bank 2/Patch 1
4. Press footswitch number 2 to select second patch in [BANK 2]:
[022] Group 0/Bank 2/Patch 2
5. Press footswitch number 3 to select third patch in [BANK 2]:
[023] Group 0/Bank 2/Patch 3
6. Hold footswitch number 4 down for 1 second to access the next [BANK].
7. Press footswitch 3 to select [BANK 3].
8. Press footswitch number 1 to select first patch in [BANK 3]:
[031] Group 0/Bank 3/Patch 1
9. Press footswitch number 2 to select second patch in [BANK 3]:
[032] Group 0/Bank 3/Patch 2
10. Press footswitch number 3 to select third patch in [BANK 3]:
[033] Group 0/Bank 3/Patch 3
GroupsGroups
The DG Stomp contains 10 User Groups and 10 Preset Groups. The User Groups are located from
[011] to [933] and can be changed and used to store your custom sounds. The Preset Groups are
located from [0.11] to [9.33], and can be distinguished by a small dot after the first number.
To change the Groups:
1. To select the next series of patchs and bank, you must change [GROUPS].
2. Hold footswitch number 4 down for 1 second.
3. Hold footswitch number 2 down to access [GROUP DOWN[ or footswitch 3 for [GROUP UP].
4. Release footswitch when the desired group number is located
5. Press footswitch number 1 to select [BANK 1] in the new group.
6. Press footswitch number 1 to select [PATCH 1] in the new bank.
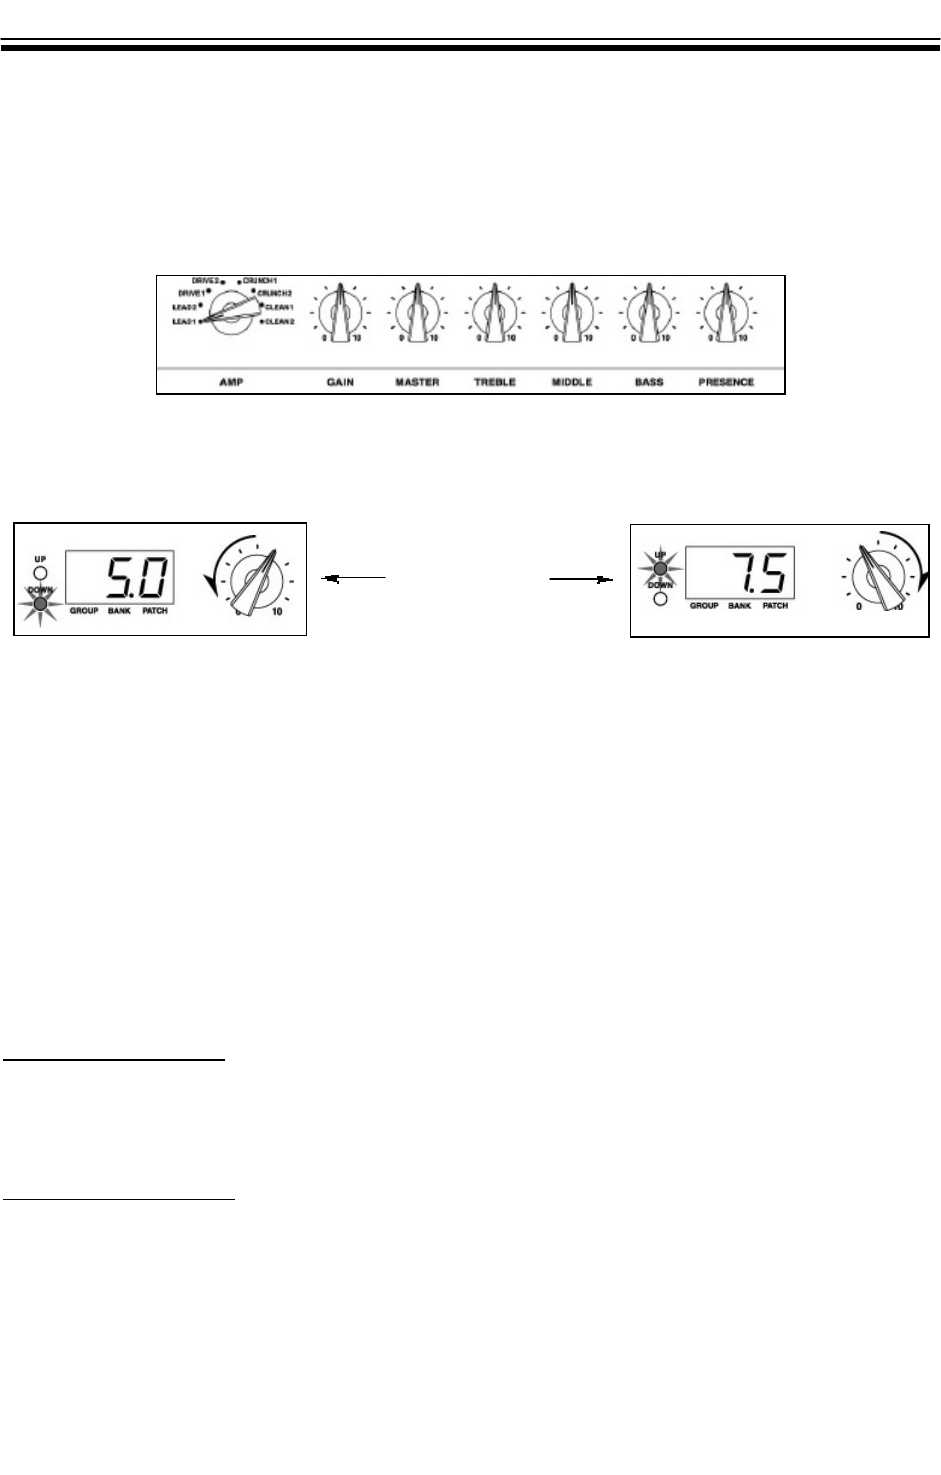
AMPAMP TYPES TYPES
The Yamaha DG Stomp includes 8 of the world’s greatest modern and vintage amplifier types and
14 effects including various types of modulation, delay, and reverb. The amp types and tone controls
can be selected and/or edited using a simple row of knobs and buttons.
NORMALORMAL MODEMODE
There are two modes used to edit parameters. The first is Normal Mode:
When editing an existing patch in real time, there will be a point that must be reached while turning
the knob, before your new setting will take effect . The [UP] or [DOWN] button will light up at the
same time the parameter value flashes in the display until you reach the point of the preset param-
eter. Once you reach that point, your new setting will take effect, the button light will stop flashing,
and the display will show the new parameter value.
MANUALMANUAL MODEMODE
The second and most popular method of editing is called [MANUALMODE]. You can edit the pre-
amp and effects in real time much like a stompbox. Once you engage Manual Mode, all of the
parameters reflect the existing position of the knobs and NOT the preset patch.
Selecting An Amp TypeSelecting An Amp Type
1. Press MANUAL button.
2. Turn the PREAMP selector knob to one of the 8 pre-amp types (see AMP DESCRIPTION).
Using The Tone ControlsUsing The Tone Controls
1. You can shape the tone of each amp type with the designated knob. Grab the knob and turn it
to the desired position. Simple!
88
PREAMP KNOBSPREAMP KNOBS
Up/Down
Indicators

99
AMPAMP DESCRIPTIONSDESCRIPTIONS
Lead 1Lead 1
The first amp type is similar to a classic British stack. Great for high gain, classic rock sound.
Lead 2Lead 2
With more dip in the midrange, fatter lows, and screamin’ highs, Lead 2 is killer for modern heavy-
rock sounds.
Drive 1Drive 1
Awesome tone for a classic rock rhythm sound with more midrange and a classic small box sound.
Drive 2Drive 2
Shimmering highs, punchy midrange, and rich low end. Use this for all styles of rock and blues.
Crunch 1Crunch 1
A warm, versatile American crunch sound. Great for all styles!
Crunch 2Crunch 2
Sweet, vintage tone that really boogies! Excellent for expressive guitar solos with the right amount
of gain.
Clean 1Clean 1
Rich, vibrant sound perfect for a wide variety of clean sounds.
Clean 2Clean 2
Cool midrange punch, nice touch of overdrive lends this amp type to blues, country, and funk styles.
Clean 2 is similar to a classic American combo amp.
SPEAKER CABINETSSPEAKER CABINETS
1. Press the [UTILITY] button, then set the amp selector switch to the [CRUNCH2] position.
2. Use the [UP/DOWN] buttons to select [SP SIM] mode:
[GLb] - The speaker simulator is always on.
[PrG] - The speaker simulator is switched [ON/OFF] according to the patch setting.
[oFF] - The speaker simulator is always off.
3. Press the [UTILITY] button again to return to [PLAY] mode.
4.. While holding the [SP SIM] button down, press the [UTILITY] button.
5. To select speaker simulation type use the [ [UP or DOWN] buttons.
6. Press the [UTILITY] button again to return to [PLAY] mode.
When connecting a guitar preamp directly to a mixer, speaker simulation is required for achieving a
live speaker cabinet type sound. The DG Stomp includes 16 of the world’s greatest modern and vin-
tage speaker cabinet types that can be used with any of the 8 amp models. The speaker cabinet
models (see SPEAKERCABINETDESCRIPTION) include various types of 1x12, 2x10, 2x12, 4x10, and
4x12 types:
1010
SPEAKER CABINET DESCRIPTIONSSPEAKER CABINET DESCRIPTIONS
The DG Stomp is home to some of the world’s finest effects including Compression, Modulation,
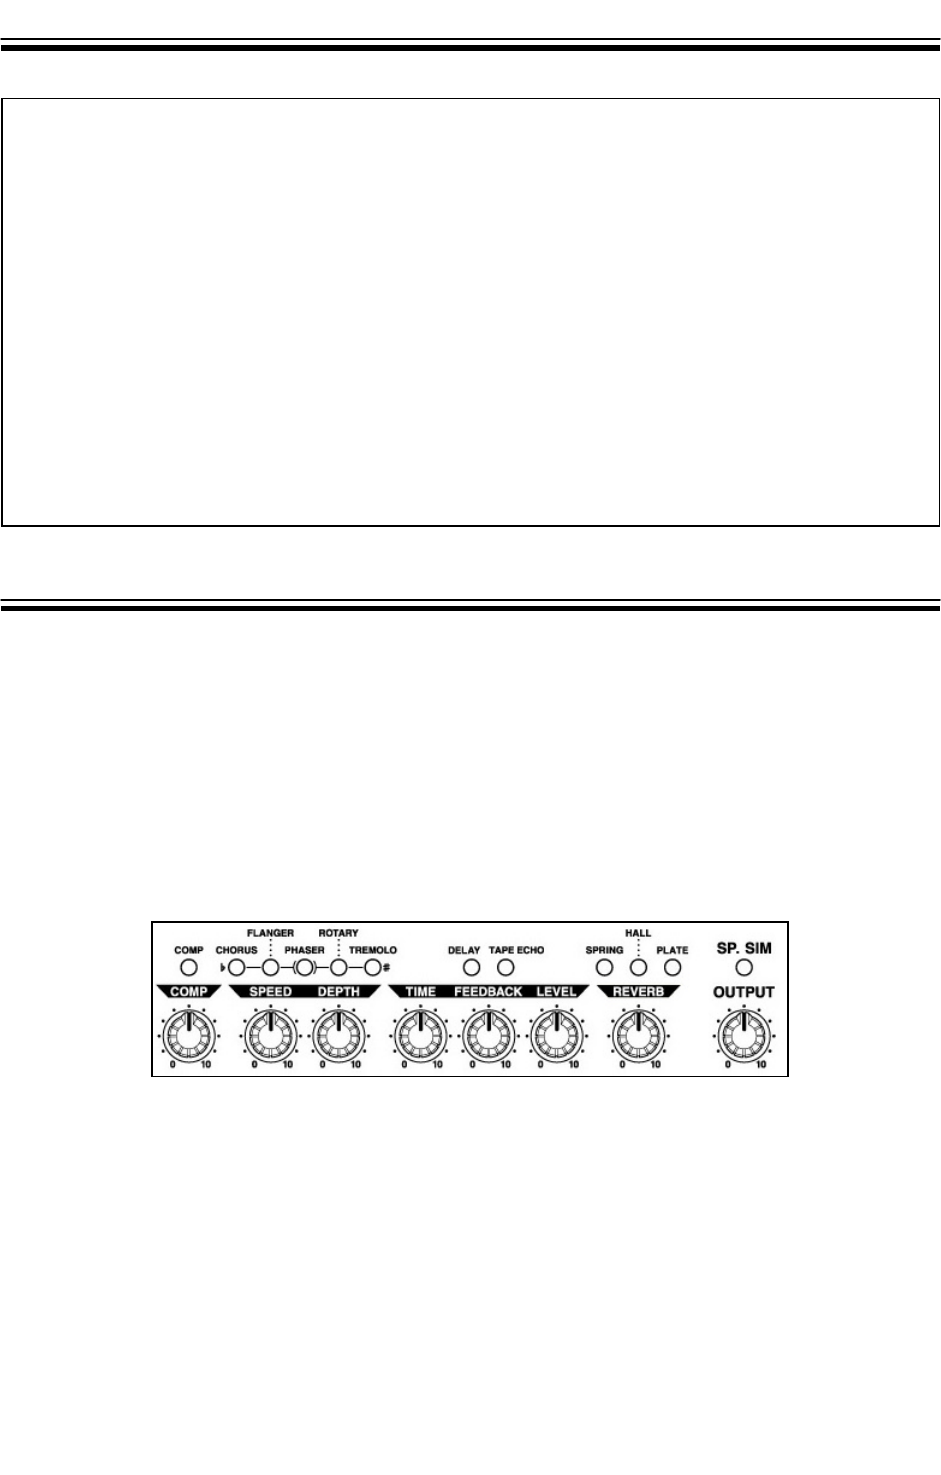
Delay, Reverb, and Wah. Each can be easily edited using the buttons and knobs.
1. Locate the desired effect.
2. Press the button. When lit, the effect is turned ON; and when not lit, the effect is OFF.
3. Turn the knob to change the desired parameter.
4. Using the [UP or DOWN] button, select the patch number you want to store your changes in.
5. Press [STORE] once, then [STORE] again.
ADDITIONAL EFFECTS PARAMETERSADDITIONAL EFFECTS PARAMETERS
The DG Stomp features two additional parameters for the Chorus, Flanger, Phaser, Tremolo, and
Rotary. You can access these parameters by holding the effects button down while turning the
two knobs in the modulation effects block.
1. Locate the LED that is lit for the desired effect.
2. Press the designated button for the desired effect. When lit, the effect is on; and
when not lit, the effect is off.
Effects Knobs and ButtonsEffects Knobs and Buttons
EFFECTSEFFECTS
A42 :A42 : American Modern 4x12
b42 : b42 : British Classic 4x12
m42 : m42 : Modern 4x12
Y42 : Y42 : YAMAHA 4x12
H42 : H42 : Hybrid 4x12
A22 :A22 : American Modern 2x12
b22 : b22 : British Classic 2x12
m22 :m22 : American Vintage 2x12
Y22 : Y22 : YAMAHA 2x12
H22 : H22 : Hybrid 2x12
A12 : A12 : American Modern 1x12
m12 : m12 : Modern 1x12
Y12 : Y12 : YAMAHA 1x12
H12 :H12 : Hybrid 1x12
410 :410 : American Vintage 4x10
210 : 210 : Amercian Vintage 2x10

1111
EFFECTS DESCRIPTIONEFFECTS DESCRIPTION
CompressorCompressor
Adds a nice smooth characteristic and sustain to heavy gain leads and ultra clean, rhythimic sounds.
ChorusChorus
Rich, stunning chorus similar to vintage analog chorus effects.
FlangerFlanger
Great dramatic effect with sweeping modulation movement.
PhaserPhaser
Awesome for funk or rock lead styles.
RotaryRotary
Dual speeds, high and low speaker spinning sound!
TremoloTremolo
Sounds like that old Trem Amp from the 1960s.
Hi Fi DelayHi Fi Delay
Contemporay delay sound with lots of highs.
Tape EchoTape Echo
Vintage delay, with roll off on the high end, similar to tape based echoes from years past.
Spring ReverbSpring Reverb
Great model of vintage spring reverb without the spring noise!
Hall ReverbHall Reverb
Stunning reverb with long decay.
Plate ReverbPlate Reverb
Sweet reverb with medium decay.
WahWah
Programmable parameters allow modern and vintage style wah using an optional Yamaha FC7
expression pedal.
1212
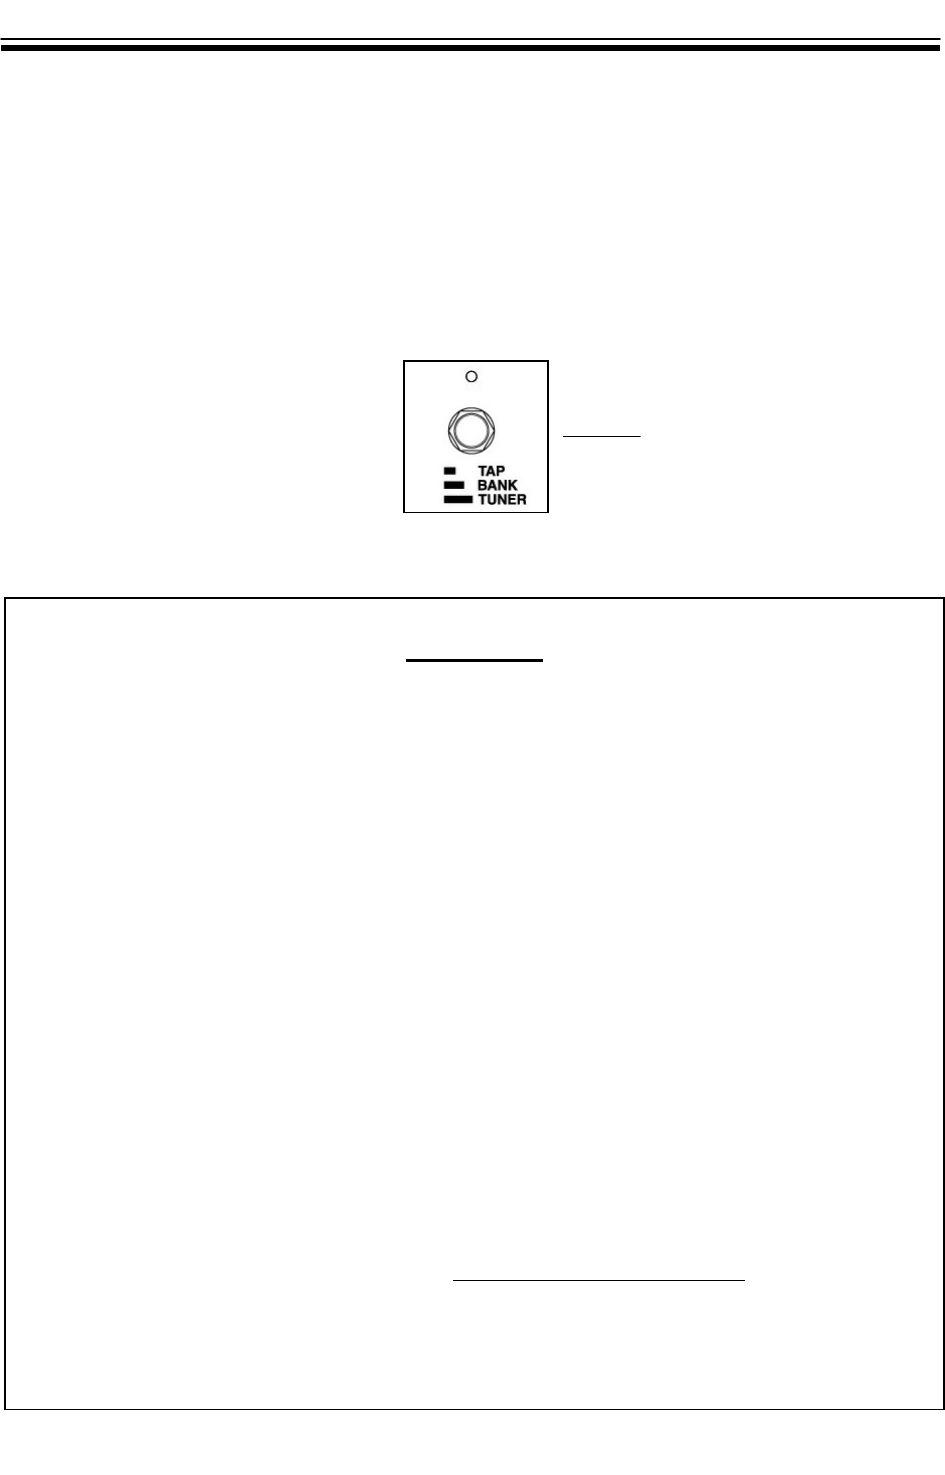
TAPTAP TEMPOTEMPO DELAYDELAY
The Tap Tempo Delay allows you to set the tempo (speed) of the delay effect in real time with
one of the footswitches.
To use Tap Tempo Delay:
1. Turn the DELAY to the ON position or select a patch with delay.
2. Step on the tap tempo switch, four times to the desired tempo.
3. You will notice the red light above the switch begin to blink to the tempo you tapped.
COOLCOOL TIP:TIP:
SOUNDSOUND ONON SOUNDSOUND DELAYDELAY
You can achieve an interesting type of sound-on-sound delay using the delay and expression pedal
assigned to specific parameters of the delay.
1. Turn the [DELAY] effect ON on by pressing the [TAPE ECHO] button.
2. Turn the [DELAY TIME] knob up to 10.
3. Turn the [DELAY FEEDBACK] knob up to 10.
4. Turn the [DELAYLEVEL] knob to the “2 o’clock” position.
5. Play a guitar riff once. After you have played the lick, it will start repeating.
6. Turn the [DELAY LEVEL] knob from “2 o'clock” back to "0".
7. Begin playing over the repeating lick.
After you played the "lick" using the [Clean 2] amp setting, turn the amp select dial to [LEAD 1] and
solo over the clean lick with a distortion sound. Make sure you don't select another memory patch
when doing this, or your "looped lick" that is repeating will disappear.
HANDSHANDS FREEFREE CONTROLCONTROL
Try using an expression pedal for hands free control of the DELAY LEVEL. See the section of this
guide on USINGAN EXPRESSION PEDAL.
The [DELAY LEVEL] control can be assigned to a Yamaha FC7 expression pedal. When pushed down
3/4 of the way, it will simulate the “2'oclock” setting of the [DELAY LEVEL] knob, allowing you to play
your riff, back it off all the way, so the "level" setting goes to "0" and play over your lick.
Tap Tempo SwitchTap Tempo Switch
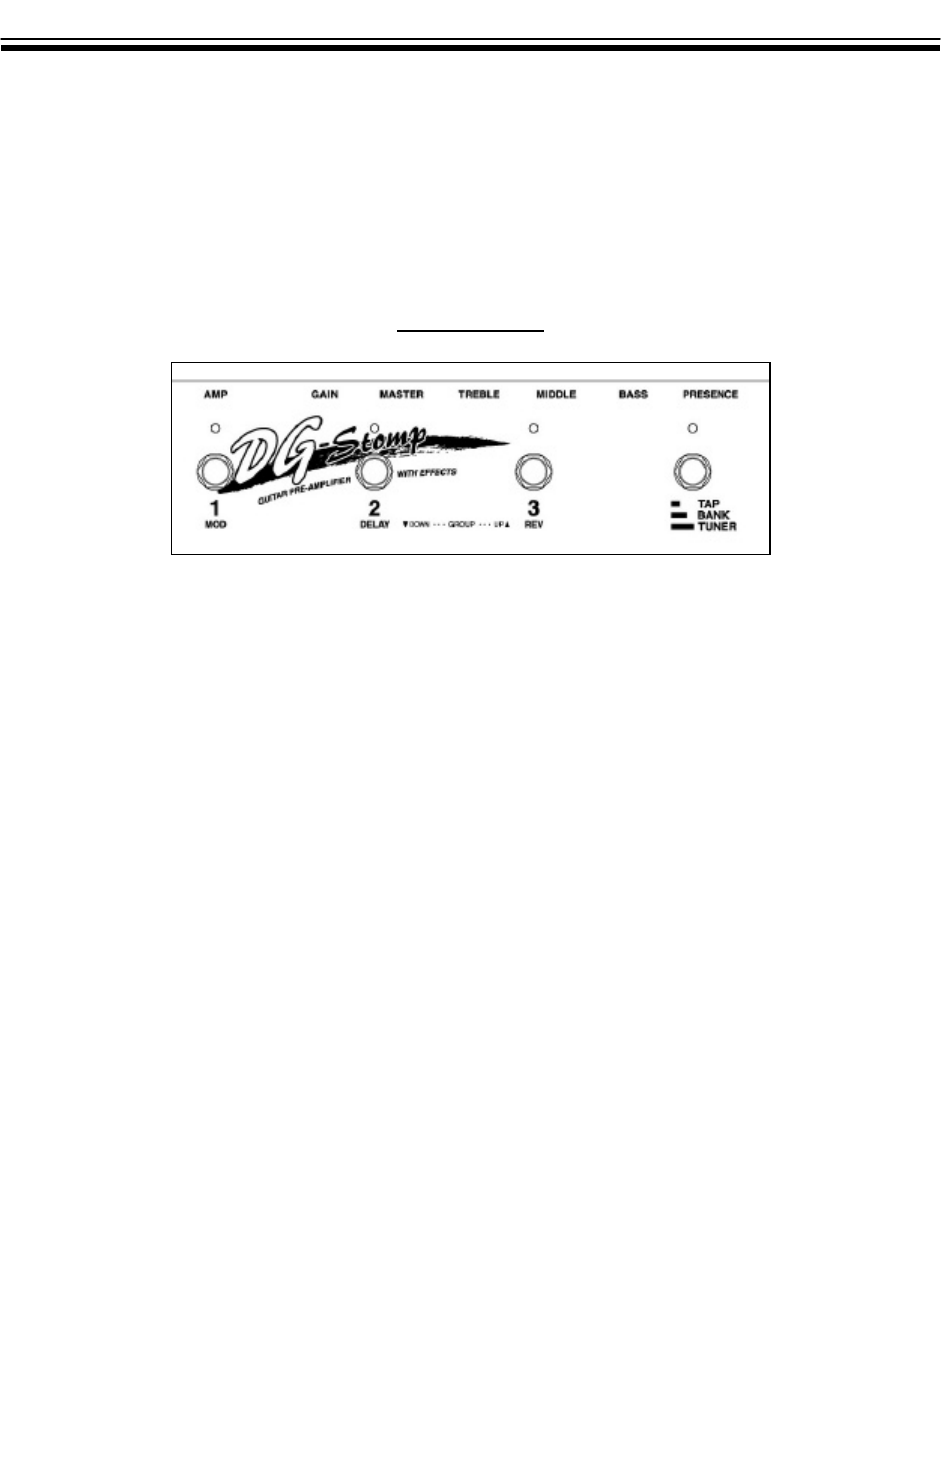
EFFECTEFFECT MODEMODE
Effect mode allows you to use three of the footswitches to turn effects on and off. While in the EFFECT
MODE, pedals 1 through 3 are dedicated to Modulation, Delay, and Reverb ON and OFF functions.
You can also use the footswitches for changing patches, accessing the tuner and controlling Tap
Tempo Delay.
FOOTSWITCHESFOOTSWITCHES
To assign the global function for effects mode:
1. Press the [UTILITY] button.
2. Turn the [AMP SELECT] knob to [LEAD 1] selection.
3. Press the UP or DOWN buttons to change the display to read [EFF]
4. Once you notice [EFF] appear in the display, the footswitches will now be assigned
to turn the effects on and off.
5. Press [UTILITY] to return to [PLAY MODE].
6. Press the first footswitch to see Modualtion Light appear. The effect will be on.
7. Press the second footswitch for Delay and the third switch for Reverb.
1313
1414
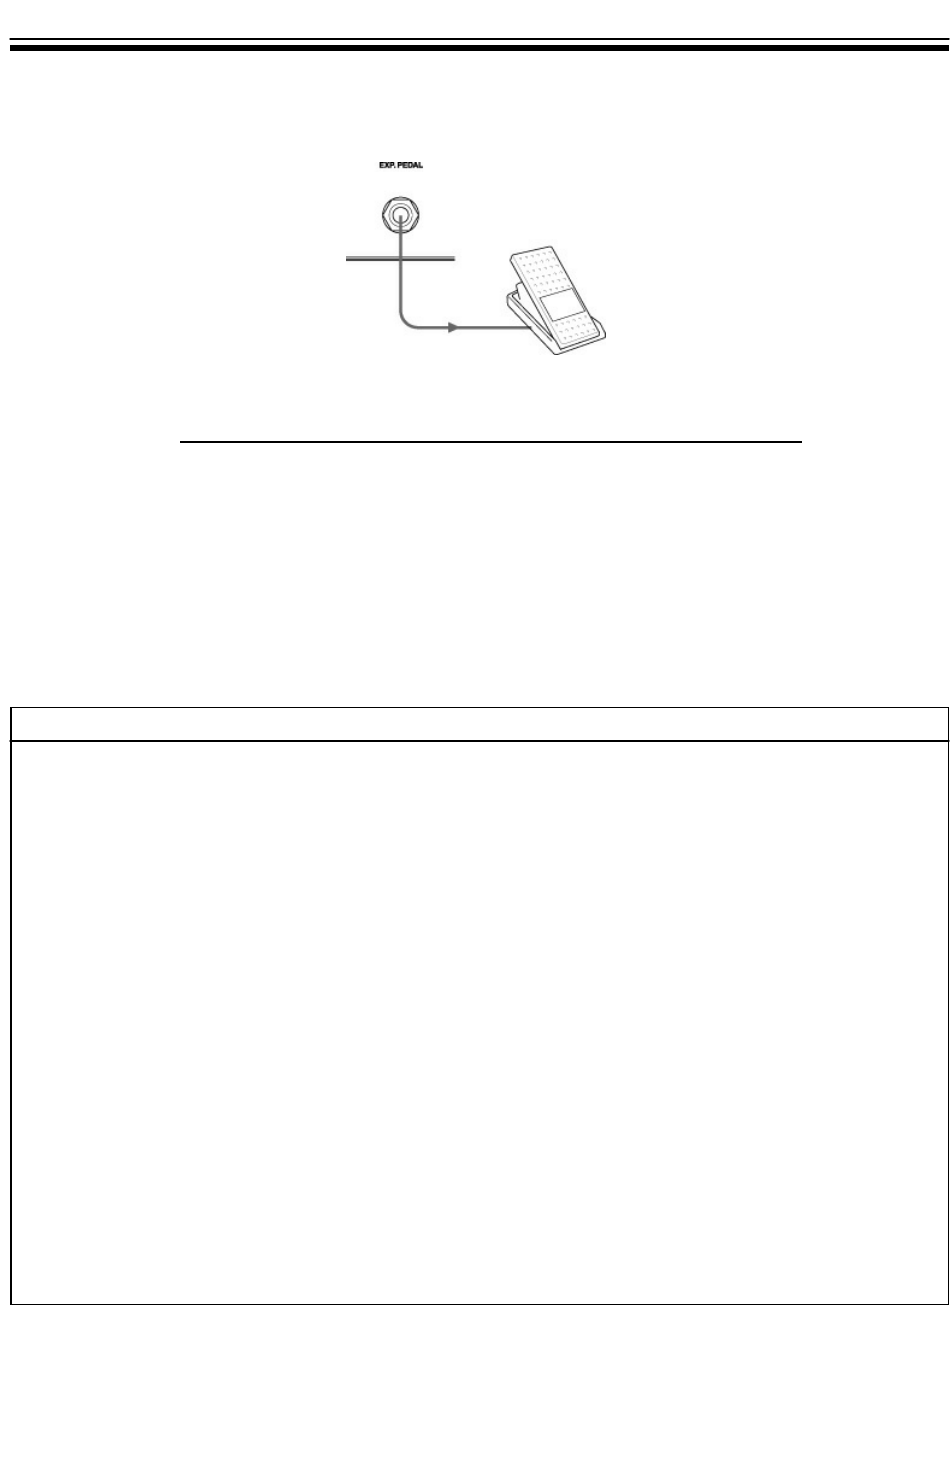
USING AN EXPRESSIONUSING AN EXPRESSION PEDAL PEDAL
The DG Stomp can also be used in conjunction with an optional Yamaha FC7 Expression Pedal for
real time control of the effects, preamp, and wah.
SELECTING SELECTING ADDITIONALADDITIONAL PARAMETERSPARAMETERS
UUHUUH Use as a wah pedal
b.Prb.Pr Volume (pre preamp)
A.PrA.Pr Volume (post preamp)
A.rEA.rE Volume (post reverb)
trEtrE Tone Control (TREBLE)
nndnnd Tone Control (MIDDLE)
bASbAS Tone Control (BASS)
PrEPrE Tone Control (PRESENCE)
CPCP Compressor Effect’s COMP setting
SPdSPd Modulation Effect’s SPEED setting
dPtdPt Modulation Effect’s DEPTH setting
SP2SP2 The secondary parameter of the Modulation Effect’s SPEED knob
dP2dP2 The secondary parameter of the Modulation Effect’s DEPTH knob
titi Delay Effect’s TIME setting
FbFb Delay Effect’s FEEDBACK setting
LELE Delay Effect’s LEVEL setting
rErE Reverb Effect’s LEVEL setting
OFFOFF Off (no control)
USINGUSING ANAN EXPRESSIONEXPRESSION PEDAL PEDAL
You can assign a Yamaha FC-7 expression pedal to control up to 8 effects at once.
1. Plug the FC7 into the Exp. Pedal INPUT jack.
2. Simultaneously hold down [MANUAL] and [UTITLITY] buttons. [Ctl] will appear in the display.
3. Press the [COMP] button to view control numbers. The FC7 can control up to 8 parameters.
Use the [UP/DOWN] buttons to select amount of parameters to be controlled.
4. Press the [CHORUS] button, use [UP/DOWN] buttons to select [EP].
5. Press the [FLANGER] button, use [UP/DOWN] buttons to select the desired effect to be
controlled by the FC7 (See below).
6. Press the [PHASER] button, use [UP/DOWN] buttons to select a minimum control value of [00.0]
7. Press the [ROTARY] button, use [UP/DOWN] buttons to select a maximum control value of [10.0]
8. Press [UTILITY] button to return to [PLAY] mode.

1515
PROGRAMMINGPROGRAMMING THE WAHTHE WAH
The DG Stomp also allows you to control Wah Wah using the same expression pedal. When using
a Yamaha FC7 you can have the WAH turned on, but will not be activated until you press down hard
on the toe position. The pedal will lightly click and turn the wah effect on.
To patch the expression pedal for controlling the wah, use the following procedure:
PROGRAMMINGPROGRAMMING ANAN EXPRESSIONEXPRESSION PEDALPEDAL TOTO CONTROLCONTROL WAHWAH
1. Plug the FC7 into the Exp. Pedal INPUT jack.
2. While in PLAY mode, press the MANUAL and UTILITY buttons simultaneously.
“CEL” will appear in the display.
3. Press the [COMP] button. By using the [UP and DOWN] buttons, you can choose
from one of the eight wah patch control settings.
4. Press the [CHORUS] button. With the [UP and DOWN] buttons, scroll choose “EP”
for the Expression Pedal. “EP” will appear in the display.
5. Press the [FLANGER] button. With the [UP] and DOWN buttons, scroll and choose
[UUH] for [WAH] pedal. [UUH] will appear in the display.
6. Press the [PHASER] button to set the minimum parameter value. Use the [UP and
DOWN] buttons to set values.
7. Press the [ROTARY] button to set the maximum parameter value. Use the [UP and
DOWN] buttons to set values.
8. Press the [UTILITY] button to return to play mode. The [WAH] will now be ready for
use.
NOTE: NOTE: You can turn the Wah ON/OFF by pressing on the toe of the expression
pedal until it clicks.

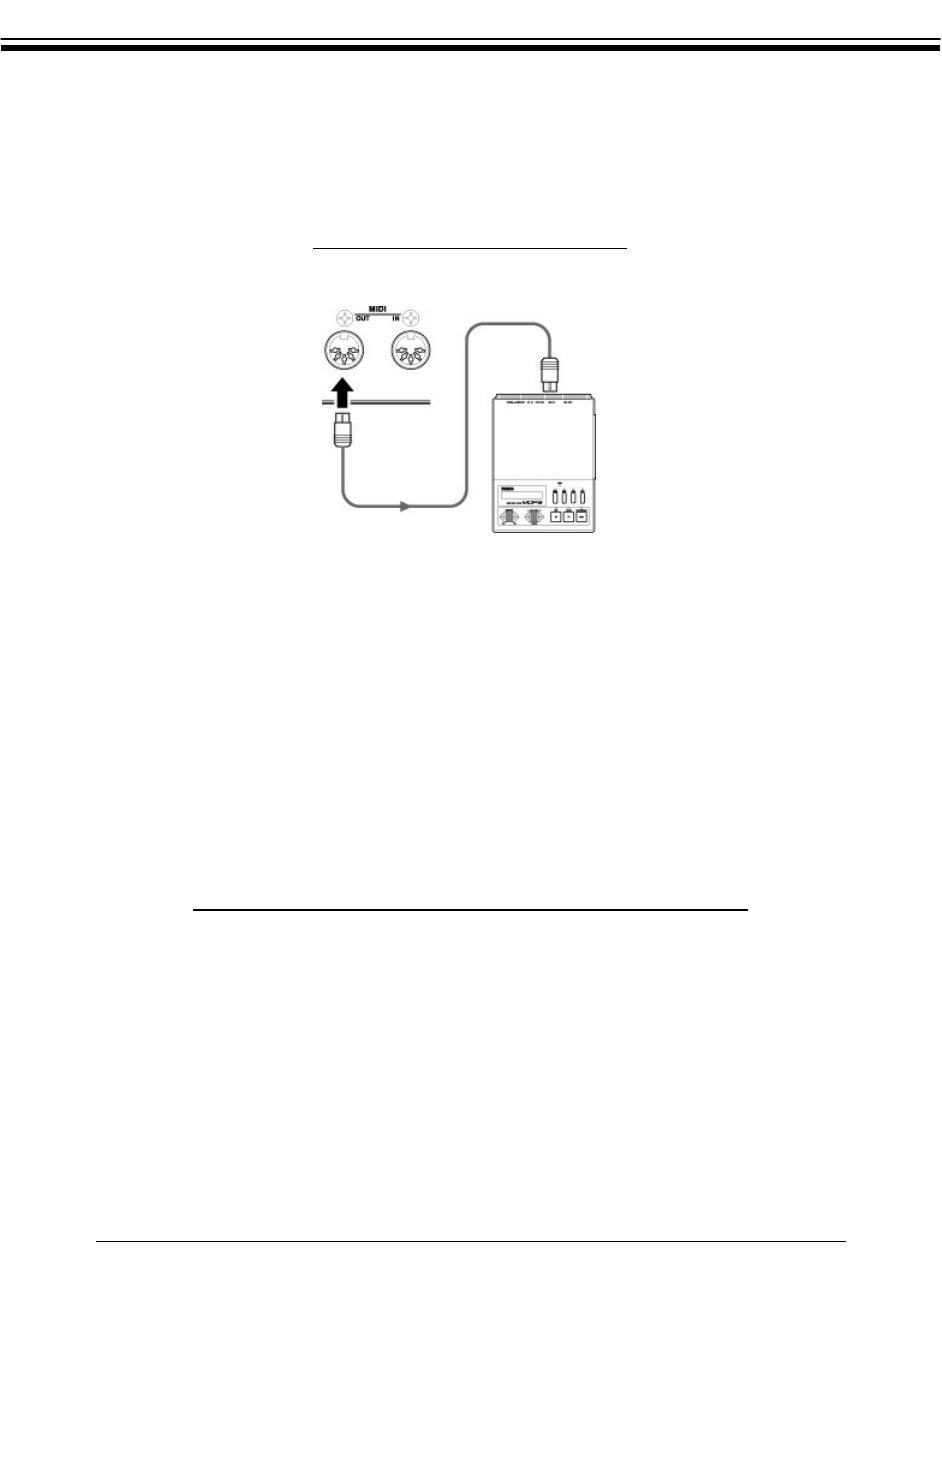
CONNECTINGCONNECTING AA MIDIMIDI PEDALBOARDPEDALBOARD
Although the DG Stomp has a built-in footcontroller, you can connect a MIDI pedalboard such as
the Yamaha MFC10 for even more control and flexibility. The MFC10 includes 10 footswitches for
changing patches, a function switch for changing controller modes, and an expression pedal for
controlling volume and other parameters via MIDI.
To connect an MFC10 MIDI Foot Controller to the DG Stomp:
1. Connect a MIDI cable from MIDIOUT on the pedalboard to MIDI IN on the DG Stomp.
2. Press footswitch number 1 on the pedalboard to call up patch [011] on the DGStomp.
3. Press footwitch number 2 on the MIDI pedalboard to call up patch [012] and so on.
NOTE:NOTE:
One advantage of having an MFC10 is that you can have instant access to 10 patches at a time
(instead of 3) before having to press the function pedal to get to the next round of patches.
1616
YAMAHAYAMAHA MFC10 MIDIMFC10 MIDI PEDALBOARDPEDALBOARD
1717
SAVINGSAVING PATCHES VIAPATCHES VIA MIDIMIDI
If you enjoy creating sounds and want to back them down, you can do so via MIDI with an exter-
nal sequencer such as the Yamaha MDF3 MIDIData Filer. With the MDF3, you can save the 90
user patches onto a floppy disk and re-load them at a future time.
1. Connect a MIDI cable from MIDIOUTon the DG Stomp to MIDIINon the Yamaha MDF3 or
MIDI sequencer.
2. Press the [UTILITY] button and set the amp selector knob to the [Lead 2] position, [nnd] will
appear in the display.
3. Press the [TAPE ECHO] button. [ALL] will appear in the display.
4. Press RECORD/PLAY on the external sequencer.
5. Press the [STORE] button to dump all 90 of the user patches from the DG Stomp.
YOU CAN ALSO SAVE INDIVIDUAL PATCHES TO AN EXTERNAL SEQUENCER:
1. Press the [SPRING] button and select the patch number you want to save using the [UP/DOWN]
button.
2. Press RECORD/PLAY on the external sequencer.
3. Press the [STORE] button to save the individual patch.
4. Press STOP on the sequencer. The DG Stomp will return to [PLAY] mode once the data has
been sent.
YAMAHAYAMAHA MDF3 MIDIMDF3 MIDI DATA DATA FILERFILER
Saving Patches To The MDF3Saving Patches To The MDF3
Loading Patches From The MDF3Loading Patches From The MDF3
All current data in the 90 user locations will be erased after re-loading patches.All current data in the 90 user locations will be erased after re-loading patches.
1. Connect a MIDI cable from MIDIOUTon theMDF3 to MIDI INon the DG Stomp.
2. Press PLAY on the external sequencer.
3. The data will immediately overwrite any existing data in the 90 User Patche locations.

1818
RE-INTIALIZATIONRE-INTIALIZATION
The process of re-initializing returns the DG Stomp to its original factory settings.
1. Turn the POWER OFF.
2. Hold down the [UP] and [DOWN] buttons simultaneously and turn the POWER ON.
3. The DG Stomp should now return to the original factory settings.
ALLALL INFORMATION STOREDINFORMATION STORED ININ THETHE USERUSER GROUPSGROUPS WILLWILL BEBE ERASED AFTER RE-INITIALIIZINGERASED AFTER RE-INITIALIIZING
