Yamaha PSR S500 Owner's Manual Psrs500 En Om A1
User Manual: Yamaha PSR-S500 Owner's Manual
Open the PDF directly: View PDF ![]() .
.
Page Count: 122 [warning: Documents this large are best viewed by clicking the View PDF Link!]
- Cover
- PRECAUTIONS
- Logos
- Accessories
- Special Features of the PSR-S500
- Setting Up
- Panel Controls and Terminals
- Quick Guide
- Backup and Initialization
- Basic Operation and Displays
- Reference
- Appendix
- Index
Owner’s Manual
EN

2PSR-S500 Owner’s Manual
PLEASE KEEP THIS MANUAL
This product utilizes batteries or an external power supply (adapter).
DO NOT connect this product to any power supply or adapter other
than one described in the manual, on the name plate, or specifically
recommended by Yamaha.
This product should be used only with the components supplied or; a
cart, rack, or stand that is recommended by Yamaha. If a cart, etc., is
used, please observe all safety markings and instructions that accom-
pany the accessory product.
SPECIFICATIONS SUBJECT TO CHANGE:
The information contained in this manual is believed to be correct at the
time of printing. However, Yamaha reserves the right to change or mod-
ify any of the specifications without notice or obligation to update exist-
ing units.
This product, either alone or in combination with an amplifier and head-
phones or speaker/s, may be capable of producing sound levels that
could cause permanent hearing loss. DO NOT operate for long periods
of time at a high volume level or at a level that is uncomfortable. If you
experience any hearing loss or ringing in the ears, you should consult
an audiologist.
IMPORTANT: The louder the sound, the shorter the time period before
damage occurs.
NOTICE:
Service charges incurred due to a lack of knowledge relating to how a
function or effect works (when the unit is operating as designed) are not
covered by the manufacturer’s warranty, and are therefore the owners
responsibility. Please study this manual carefully and consult your
dealer before requesting service.
ENVIRONMENTAL ISSUES:
Yamaha strives to produce products that are both user safe and envi-
ronmentally friendly. We sincerely believe that our products and the pro-
duction methods used to produce them, meet these goals. In keeping
with both the letter and the spirit of the law, we want you to be aware of
the following:
Battery Notice:
This product MAY contain a small non-rechargeable battery which (if
applicable) is soldered in place. The average life span of this type of
battery is approximately five years. When replacement becomes neces-
sary, contact a qualified service representative to perform the replace-
ment.
This product may also use “household” type batteries. Some of these
may be rechargeable. Make sure that the battery being charged is a
rechargeable type and that the charger is intended for the battery being
charged.
When installing batteries, do not mix batteries with new, or with batter-
ies of a different type. Batteries MUST be installed correctly. Mis-
matches or incorrect installation may result in overheating and battery
case rupture.
Warning:
Do not attempt to disassemble, or incinerate any battery. Keep all bat-
teries away from children. Dispose of used batteries promptly and as
regulated by the laws in your area. Note: Check with any retailer of
household type batteries in your area for battery disposal information.
Disposal Notice:
Should this product become damaged beyond repair, or for some rea-
son its useful life is considered to be at an end, please observe all local,
state, and federal regulations that relate to the disposal of products that
contain lead, batteries, plastics, etc. If your dealer is unable to assist
you, please contact Yamaha directly.
NAME PLATE LOCATION:
The name plate is located on the bottom of the product. The model
number, serial number, power requirements, etc., are located on this
plate. You should record the model number, serial number, and the date
of purchase in the spaces provided below and retain this manual as a
permanent record of your purchase.
Model
Serial No.
Purchase Date
SPECIAL MESSAGE SECTION
92-BP (bottom)

PSR-S500 Owner’s Manual 3
1. IMPORTANT NOTICE: DO NOT MODIFY THIS UNIT!
This product, when installed as indicated in the instructions con-
tained in this manual, meets FCC requirements. Modifications not
expressly approved by Yamaha may void your authority, granted by
the FCC, to use the product.
2. IMPORTANT: When connecting this product to accessories and/
or another product use only high quality shielded cables. Cable/s
supplied with this product MUST be used. Follow all installation
instructions. Failure to follow instructions could void your FCC
authorization to use this product in the USA.
3. NOTE: This product has been tested and found to comply with the
requirements listed in FCC Regulations, Part 15 for Class “B” digital
devices. Compliance with these requirements provides a reason-
able level of assurance that your use of this product in a residential
environment will not result in harmful interference with other elec-
tronic devices. This equipment generates/uses radio frequencies
and, if not installed and used according to the instructions found in
the users manual, may cause interference harmful to the operation
of other electronic devices. Compliance with FCC regulations does
not guarantee that interference will not occur in all installations. If
this product is found to be the source of interference, which can be
determined by turning the unit “OFF” and “ON”, please try to elimi-
nate the problem by using one of the following measures:
Relocate either this product or the device that is being affected by
the interference.
Utilize power outlets that are on different branch (circuit breaker or
fuse) circuits or install AC line filter/s.
In the case of radio or TV interference, relocate/reorient the
antenna. If the antenna lead-in is 300 ohm ribbon lead, change the
lead-in to co-axial type cable.
If these corrective measures do not produce satisfactory results,
please contact the local retailer authorized to distribute this type of
product. If you can not locate the appropriate retailer, please contact
Yamaha Corporation of America, Electronic Service Division, 6600
Orangethorpe Ave, Buena Park, CA90620
The above statements apply ONLY to those products distributed by
Yamaha Corporation of America or its subsidiaries.
FCC INFORMATION (U.S.A.)
* This applies only to products distributed by YAMAHA CORPORATION OF AMERICA. (class B)
OBSERVERA!
Apparaten kopplas inte ur växelströmskällan (nätet) så länge som den
ar ansluten till vägguttaget, även om själva apparaten har stängts av.
ADVARSEL: Netspæendingen til dette apparat er IKKE afbrudt,
sålæenge netledningen siddr i en stikkontakt, som er t endt — også
selvom der or slukket på apparatets afbryder.
VAROITUS: Laitteen toisiopiiriin kytketty käyttökytkin ei irroita koko
laitetta verkosta.
(standby)
This product contains a high intensity lamp
that contains a small amount of mercury.
Disposal of this material may be regulated
due to environmental considerations.
For disposal information in the United States, refer to
the Electronic Industries Alliance web site:
www.eiae.org
(mercury)* This applies only to products distributed by
YAMAHA CORPORATION OF AMERICA.
IMPORTANT NOTICE FOR THE UNITED KINGDOM
Connecting the Plug and Cord
IMPORTANT. The wires in this mains lead are coloured in accor-
dance with the following code:
BLUE : NEUTRAL
BROWN : LIVE
As the colours of the wires in the mains lead of this apparatus
may not correspond with the coloured makings identifying the ter-
minals in your plug proceed as follows:
The wire which is coloured BLUE must be connected to the ter-
minal which is marked with the letter N or coloured BLACK.
The wire which is coloured BROWN must be connected to the
terminal which is marked with the letter L or coloured RED.
Making sure that neither core is connected to the earth terminal
of the three pin plug.
• This applies only to products distributed by Yamaha-Kemble
Music (U.K.) Ltd.
(2 wires)
* This applies only to products distributed by
YAMAHA CORPORATION OF AMERICA.
COMPLIANCE INFORMATION STATEMENT
(DECLARATION OF CONFORMITY PROCEDURE)
Responsible Party : Yamaha Corporation of America
Address : 6600 Orangethorpe Ave., Buena Park, Calif.
90620
Telephone : 714-522-9011
Type of Equipment : Electronic Keyboard
Model Name : PSR-S500
This device complies with Part 15 of the FCC Rules.
Operation is subject to the following conditions:
1) this device may not cause harmful interference, and
2) this device must accept any interference received including
interference that may cause undesired operation.
See user manual instructions if interference to radio reception is
suspected.
(FCC DoC)
4PSR-S500 Owner’s Manual
(3)-10 1/2
PRECAUTIONS
PLEASE READ CAREFULLY BEFORE PROCEEDING
* Please keep this manual in a safe place for future reference.
WARNING
Always follow the basic precautions listed below to avoid the possibility of serious injury or even death from electrical
shock, short-circuiting, damages, fire or other hazards. These precautions include, but are not limited to, the following:
•Only use the voltage specified as correct for the instrument. The required voltage
is printed on the name plate of the instrument.
• Use the specified adaptor (PA-300, PA-301 or an equivalent recommended by
Yamaha) only. Using the wrong adaptor can result in damage to the instrument
or overheating.
•Check the electric plug periodically and remove any dirt or dust which may have
accumulated on it.
•Do not place the AC adaptor cord near heat sources such as heaters or radiators,
and do not excessively bend or otherwise damage the cord, place heavy objects
on it, or place it in a position where anyone could walk on, trip over, or roll
anything over it.
• Do not open the instrument or attempt to disassemble the internal parts or
modify them in any way. The instrument contains no user-serviceable parts. If it
should appear to be malfunctioning, discontinue use immediately and have it
inspected by qualified Yamaha service personnel.
• Do not expose the instrument to rain, use it near water or in damp or wet
conditions, or place containers on it containing liquids which might spill into
any openings.
• Never insert or remove an electric plug with wet hands.
• Do not put burning items, such as candles, on the unit.
A burning item may fall over and cause a fire.
• If the AC adaptor cord or plug becomes frayed or damaged, or if there is a
sudden loss of sound during use of the instrument, or if any unusual smells or
smoke should appear to be caused by it, immediately turn off the power switch,
disconnect the adaptor plug from the outlet, and have the instrument inspected
by qualified Yamaha service personnel.
CAUTION
Always follow the basic precautions listed below to avoid the possibility of physical injury to you or others, or damage
to the instrument or other property. These precautions include, but are not limited to, the following:
• When removing the electric plug from the instrument or an outlet, always hold
the plug itself and not the cord.
• Unplug the AC power adaptor when not using the instrument, or during
electrical storms.
•Do not connect the instrument to an electrical outlet using a multiple-connector.
Doing so can result in lower sound quality, or possibly cause overheating in the
outlet.
•Do not expose the instrument to excessive dust or vibrations, or extreme cold or
heat (such as in direct sunlight, near a heater, or in a car during the day) to
prevent the possibility of panel disfiguration or damage to the internal
components.
•Do not use the instrument in the vicinity of a TV, radio, stereo equipment, mobile
phone, or other electric devices. Otherwise, the instrument, TV, or radio may
generate noise.
• Do not place the instrument in an unstable position where it might accidentally
fall over.
• Before moving the instrument, remove all connected adaptor and other cables.
•When setting up the product, make sure that the AC outlet you are using is easily
accessible. If some trouble or malfunction occurs, immediately turn off the
power switch and disconnect the plug from the outlet. Even when the power
switch is turned off, electricity is still flowing to the product at the minimum
level. When you are not using the product for a long time, make sure to unplug
the power cord from the wall AC outlet.
• Use only the stand specified for the instrument. When attaching the stand or
rack, use the provided screws only. Failure to do so could cause damage to the
internal components or result in the instrument falling over.
Power supply/AC power adaptor
Do not open
Water warning
Fire warning
If you notice any abnormality
Power supply/AC power adaptor
Location

PSR-S500 Owner’s Manual 5
(3)-10 2/2
• Before connecting the instrument to other electronic components, turn off the
power for all components. Before turning the power on or off for all components,
set all volume levels to minimum. Also, be sure to set the volumes of all
components at their minimum levels and gradually raise the volume controls
while playing the instrument to set the desired listening level.
• When cleaning the instrument, use a soft, dry cloth. Do not use paint thinners,
solvents, cleaning fluids, or chemical-impregnated wiping cloths.
• Never insert or drop paper, metallic, or other objects into the gaps on the panel
or keyboard. If this happens, turn off the power immediately and unplug the
power cord from the AC outlet. Then have the instrument inspected by qualified
Yamaha service personnel.
• Do not place vinyl, plastic or rubber objects on the instrument, since this might
discolor the panel or keyboard.
•Do not rest your weight on, or place heavy objects on the instrument, and do not
use excessive force on the buttons, switches or connectors.
• Do not use the instrument/device or headphones for a long period of time at a
high or uncomfortable volume level, since this can cause permanent hearing
loss. If you experience any hearing loss or ringing in the ears, consult a
physician.
Saving and backing up your data
• The panel settings and some other types of data are not retained in memory
when you turn off the power to the instrument. Save data you want to keep to the
Registration Memory (page 67.)
Saved data may be lost due to malfunction or incorrect operation.
Save important data to a USB storage device/or other external device such as a
computer. (pages 76, 87)
Backing up the USB storage device/external media
•To protect against data loss through media damage, we recommend that you
save your important data onto two USB storage devices/external media.
Always turn the power off when the instrument is not in use.
Even when the power switch is in the “STANDBY” position, electricity is still flowing to the instrument at the minimum level. When you are not using the instrument for a long
time, make sure you unplug the AC power adaptor from the wall AC outlet.
● Trademarks
• The bitmap fonts used in this instrument have been provided by and are the property of Ricoh Co., Ltd.
•Windows is the registered trademarks of Microsoft® Corporation.
• The company names and product names in this Owner’s Manual are the trademarks or registered trademarks of their respective companies.
Connections
Maintenance
Handling caution
Saving data
Yamaha cannot be held responsible for damage caused by improper use or modifications to the instrument, or data that is lost or destroyed.
The illustrations and LCD screens as shown in this owner’s manual are for instructional purposes only, and may appear somewhat different from those on
your instrument.
6PSR-S500 Owner’s Manual
GM System Level 1
“GM System Level 1” is an addition to the MIDI standard which ensures that any GM-compatible music
data can be accurately played by any GM-compatible tone generator, regardless of manufacturer. The GM
mark is affixed to all software and hardware products that support GM System Level.
XGlite
As its name implies, “XGlite” is a simplified version of Yamaha’s high-quality XG tone generation format.
Naturally, you can play back any XG song data using an XGlite tone generator. However, keep in mind that
some songs may play back differently compared to the original data, due to the reduced set of control
parameters and effects.
XF
The Yamaha XF format enhances the SMF (Standard MIDI File) standard with greater functionality and
open-ended expandability for the future. The instrument is capable of displaying lyrics when an XF file con-
taining lyric data is played.
STYLE FILE
The Style File Format is Yamaha’s original style file format which uses a unique conversion system to pro-
vide high-quality automatic accompaniment based on a wide range of chord types.
USB
USB is an abbreviation for Universal Serial Bus. It is a serial interface for connecting a computer with
peripheral Devices. It allows “hot swapping” (connecting peripheral devices while the power to the com-
puter is on).
Logos
This product incorporates and bundles computer programs and contents in which Yamaha owns copyrights or with respect to which it
has license to use others’ copyrights. Such copyrighted materials include, without limitation, all computer software, style files, MIDI
files, WAVE data, musical scores and sound recordings. Any unauthorized use of such programs and contents outside of personal use
is not permitted under relevant laws. Any violation of copyright has legal consequences. DON’T MAKE, DISTRIBUTE OR USE
ILLEGAL COPIES.
Copying of the commercially available musical data including but not limited to MIDI data and/or audio data is strictly prohibited
except for your personal use.

PSR-S500 Owner’s Manual 7
Congratulations and thank you for purchasing the Yamaha PSR-S500
PortaTone!
Please read this owner’s manual carefully before using the instrument
in order to take full advantage of its various features.
Make sure to keep this manual in a safe and handy place even after you
finish reading, and refer to it often when you need to better understand
an operation or function.
The instrument package includes the following items. Please check that you have them all.
• Music rest
• Accessory CD-ROM
• Owner’s manual (this book)
•AC Power Adaptor (May not be included depending on your particular area.
Please check with your Yamaha dealer.)
Accessories
8PSR-S500 Owner’s Manual
Special Features of the PSR-S500
■Play a Variety of Instrument Voices Page 17
The instrument voice that sounds when you play the keyboard can be
changed to violin, flute, harp, or any of an extensive range of voices. You
can change the mood of a song written for piano, for example, by using vio-
lin to play it instead. Experience a whole new world of musical variety.
■Save and Recall Panel Settings to Registration Memory Page 67
This convenient function lets you save a ‘snapshot’ of your custom panel
settings—up to 64 complete “Registrations.” These can be called up
instantly any time you need them—perfect for making broad sound/effect
changes when playing live!
8 banks x 8 presets = 64 Registrations
■Play Along with Styles Page 23
Want to play with full accompaniment? Try the auto-accompaniment
Styles. The accompaniment styles provide the equivalent of a full backing
band covering wide variety of styles from waltzes to 8-beat to samba … and
much more. Select a style that matches the music you want to play, or
experiment with new styles to expand your musical horizons.
■Easy Performance with Music Notation Display Page 30
When you play back a song, the corresponding score will be shown on the
display as the song plays. This is a great way to learn how to read music. If
the song contains lyric and chord data*, the lyrics and chords will also appear
on the score display.
*No lyrics or chords will appear on the display if the song you are using with the score display func-
tion does not contain the appropriate lyric and chord data.
■
Save and Load Data to USB Flash Memory or Computer
Pages 73 and 83
These data organization tools let you store your original User songs or cus-
tom panel settings (Registration Memory) to a USB Flash Memory device
or a computer, then load the data back to the instrument as needed.
PSR-S500 Owner’s Manual 9
Logos........................................................................................ 6
Accessories .............................................................................. 7
Special Features of the PSR-S500 .......................................... 8
Setting Up 10
Power Requirements.............................................................. 10
Connecting Headphones (PHONES/OUTPUT Jack) ............. 10
Connecting a Footswitch (SUSTAIN Jack)............................. 10
Connecting to a Computer (USB Terminal)............................ 11
Turning the Power On ............................................................ 11
Changing the Display language ............................................. 12
Adjusting the LCD CONTRAST control.................................. 12
Panel Controls and Terminals 14
Front Panel............................................................................. 14
Rear Panel ............................................................................. 15
Quick Guide
Playing Songs 16
Try playing a variety of Instrument Voices 17
Select and Play a Voice ......................................................... 17
Playing Two Voices Simultaneously—DUAL.......................... 18
Playing Different Voices with the Left and Right Hands
—LEFT .............................................................................. 19
Playing Drum Kits................................................................... 21
Playing Styles 22
Select a Styles Rhythm .......................................................... 22
Playing Along with a Style ...................................................... 23
Playing Auto-accompaniment Chords .................................... 25
Playing with the Music Database 26
Using Songs 27
Selecting and Listening to a Song.......................................... 27
Song Fast Forward, Fast Reverse, and Pause ...................... 28
Types of Songs ...................................................................... 29
Displaying the Song Score ..................................................... 30
Displaying the Lyrics............................................................... 31
Recording Your Own Performance 32
Track Configuration ................................................................ 32
Quick Recording Procedure ................................................... 33
Multi-track Recording Procedure............................................ 34
Song Clear—Deleting User Songs......................................... 37
Track Clear—Deleting a Specified Track From a User Song. 38
Backup and Initialization 39
Backup ................................................................................... 39
Initialization............................................................................. 39
Basic Operation and Displays 40
Basic Operation...................................................................... 40
The Displays........................................................................... 42
MAIN Display Items................................................................ 43
Reference
Playing with the Effects 44
Adding Harmony..................................................................... 44
Changing the Reverb Type .................................................... 45
Changing the Chorus Type .................................................... 46
Panel Sustain ......................................................................... 47
Adding DSP............................................................................ 47
Pitch Bend .............................................................................. 48
Using Various Functions 49
Playing with the metronome ...................................................49
Using Tap Start....................................................................... 51
Touch Response ....................................................................51
EQ settings .............................................................................52
Pitch Controls .........................................................................53
Changing the pitch of the instrument in octaves.....................54
Style (Auto Accompaniment) Functions 55
Pattern Variation (sections) ....................................................55
One Touch Setting..................................................................58
Variation Change and OTS (OTS LINK)................................. 58
Setting the Split Point .............................................................59
Playing a Style with Chords but without Rhythm
(Stop Accompaniment) ...................................................... 60
Adjusting the Style Volume.....................................................60
Chord Basics ..........................................................................61
User Style ...............................................................................63
Playing Styles Using the Entire Keyboard ..............................63
Song Settings 64
Song Volumes ........................................................................64
Changing the Tempo ..............................................................64
A-B Repeat .............................................................................65
Muting Independent Song Parts .............................................66
Memorize Your Favorite Panel Settings 67
Saving to the Registration Memory ........................................67
Recalling a Registration Memory............................................ 68
Registration Clear—Deleting a Specified Registration
Memory.............................................................................. 69
The Functions 70
Selecting and Setting Functions .............................................70
Using USB Flash Memory 73
USB Flash Memory ................................................................73
Using USB Flash Memory ......................................................74
Formatting USB Flash Memory ..............................................75
Saving Data ............................................................................76
Convert a User Song to SMF Format and Save..................... 77
Loading User Files and Style Files .........................................78
Deleting Data from USB Flash Memory .................................79
Playing Songs Saved to USB Flash Memory .........................79
Connections 80
Connectors .............................................................................80
Connection to a USB Storage Device ....................................80
Connecting a Personal Computer ..........................................82
Transferring Performance Data to and from a Computer .......83
Initial Send.............................................................................. 84
Transferring Data Between the Computer and Instrument..... 85
Accessory CD-ROM Installation Guide 88
Important Notices about the CD-ROM.................................... 88
CD-ROM Contents .................................................................89
System Requirements ............................................................90
Software Installation ...............................................................90
Appendix
Troubleshooting...................................................................... 95
Messages ..............................................................................96
Voice List ................................................................................98
Drum Kit List .........................................................................104
Style List ...............................................................................107
Music Database List .............................................................108
Effect Type List..................................................................... 110
MIDI Implementation Chart................................................... 114
MIDI Data Format .................................................................116
Specifications .......................................................................117
Index..................................................................................... 118
Contents
10 PSR-S500 Owner’s Manual
Setting Up
Be sure to do the following operations
BEFORE turning on the power.
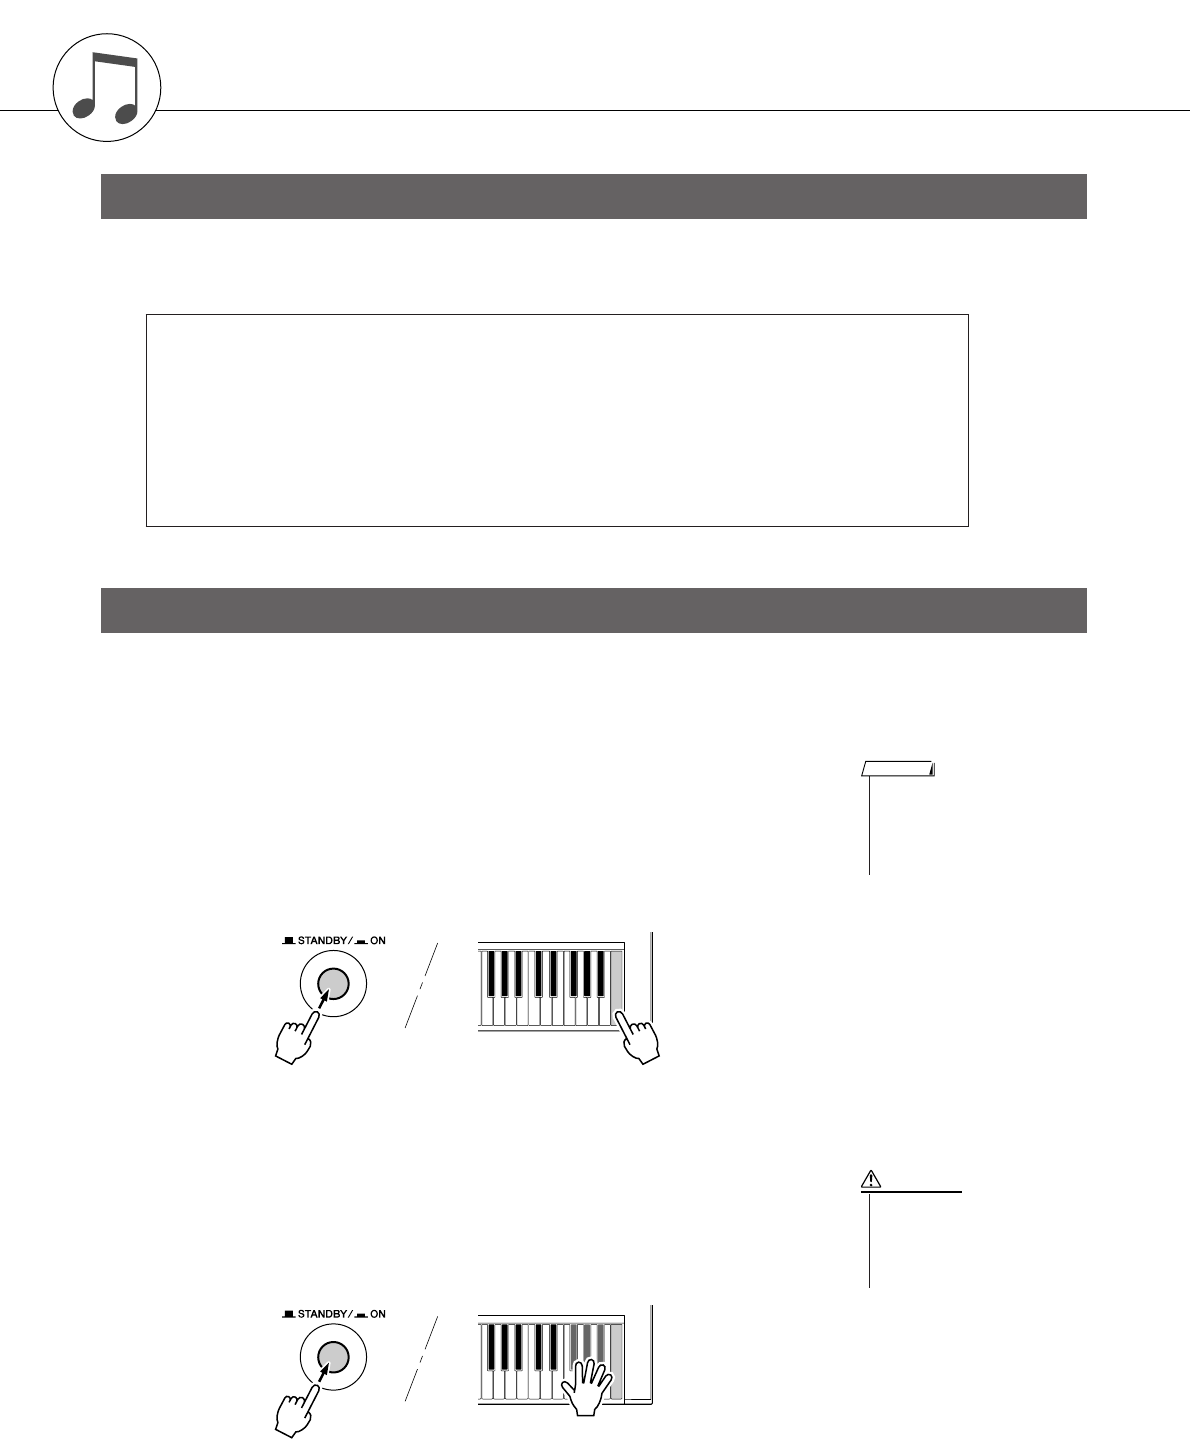
Make sure that the [STANDBY/ON] switch of the
instrument is set to STANDBY.
Connect the AC adaptor (PA-300, PA-301 or other
adaptor specifically recommended by Yamaha) to the
power supply jack.
Plug the AC adaptor into an AC outlet.
Make all necessary connections below
BEFORE turning the power on.
The instrument speakers are automatically shut off
when a plug is inserted into this jack. The PHONES/
OUTPUT jack also functions as an external output. You
can connect the PHONES/OUTPUT jack to a keyboard
amplifier, stereo system, mixer, tape recorder, or other
line-level audio device to send the instrument’s output
signal to that device.
The sustain function lets you produce a natural sustain
as you play by pressing a footswitch. Plug the Yamaha
FC4 or FC5 footswitch into this jack and use it to switch
sustain on and off.
Power Requirements
• Use ONLY a Yamaha PA-300 or PA-301 AC Power Adaptor (or
other adaptor specifically recommended by Yamaha) to power
your instrument from the AC mains. The use of other adaptors
may result in irreparable damage to both the adaptor and the
instrument.
•Unplug the AC Power Adaptor when not using the instrument,
or during electrical storms.
CAUTION
PA-300 or
PA-301 AC outlet
Connecting Headphones (PHONES/OUTPUT Jack)
Connecting a Footswitch (SUSTAIN Jack)
•Avoid listening with the headphones at high volume for long peri-
ods of time; doing so may not only result in ear fatigue, it may be
damaging to your hearing.
•To prevent damage to the speakers, set the volume of the external
devices at the minimum setting before connecting them. Failure to
observe these cautions may result in electric shock or equipment
damage. Also, be sure to set the volumes of all devices at their
minimum levels and gradually raise the volume controls while
playing the instrument to set the desired listening level.
CAUTION
• Make sure that the footswitch plug is properly connected to the SUS-
TAIN jack before turning on the power.
• Do not press the footswitch while turning the power on. Doing this
changes the recognized polarity of the footswitch, resulting in reversed
footswitch operation.
NOTE
Setting Up
PSR-S500 Owner’s Manual 11
Connect the instrument’s USB terminal to the USB ter-
minal of a computer, and you can transfer performance
data and song files between the two (page 85). To use
the USB data-transfer features you’ll need to do the fol-
lowing:
• First, make sure the POWER switch on the instru-
ment is set to OFF, then use a USB cable to con-
nect the instrument to the computer. After making
the connections, turn the instrument’s power on.
• Install the USB MIDI driver on your computer.
Installation of the USB-MIDI driver is described on
page 90.
Turn down the volume by turning the [MASTER VOL-
UME] control to the left and press the [STANDBY/ON]
switch to turn on the power. Press the [STANDBY/ON]
switch again to turn the power OFF.
Backup data in the flash memory is loaded to the instru-
ment when the power is turned on. If no backup data
exists on flash memory, all instrument settings are
restored to the initial factory defaults when the power is
turned on.
Connecting to a Computer (USB Terminal) Turning the Power On
• Even when the switch is in the “STANDBY” position, electricity is
still flowing to the instrument at the minimum level. When you are
not using the instrument for a long time, make sure you unplug the
AC power adaptor from the wall AC outlet.
CAUTION
•Never attempt to turn the power off when a “Writing..” message is
shown in the display. Doing so can damage the flash memory and
result in a loss of data.
CAUTION
Setting Up
12 PSR-S500 Owner’s Manual
This instrument allows you to select English or Japa-
nese as the display language. The default display lan-
guage is English, but if you switch to Japanese the
lyrics, file names and some messages will be displayed
in Japanese where appropriate.
Press the [FUNCTION] button.
Press the CATEGORY [ ] and [ ] buttons a num-
ber of times until the “Language” item appears.
The currently selected display language will appear
below the “Language” item.
Select a display language.
The [+] button selects English and the [-] button
selects Japanese.
The language selection will be stored in the internal
flash memory so that it is retained even when the
power is turned off.
Press the [EXIT] button to return to the MAIN dis-
play.
Adjust the LCD CONTRAST control on the rear panel
of the instrument for optimum display legibility.
Changing the Display language
f
r
The currently
selected lan-
guage
Language item
Adjusting the LCD CONTRAST control
Setting Up
PSR-S500 Owner’s Manual 13
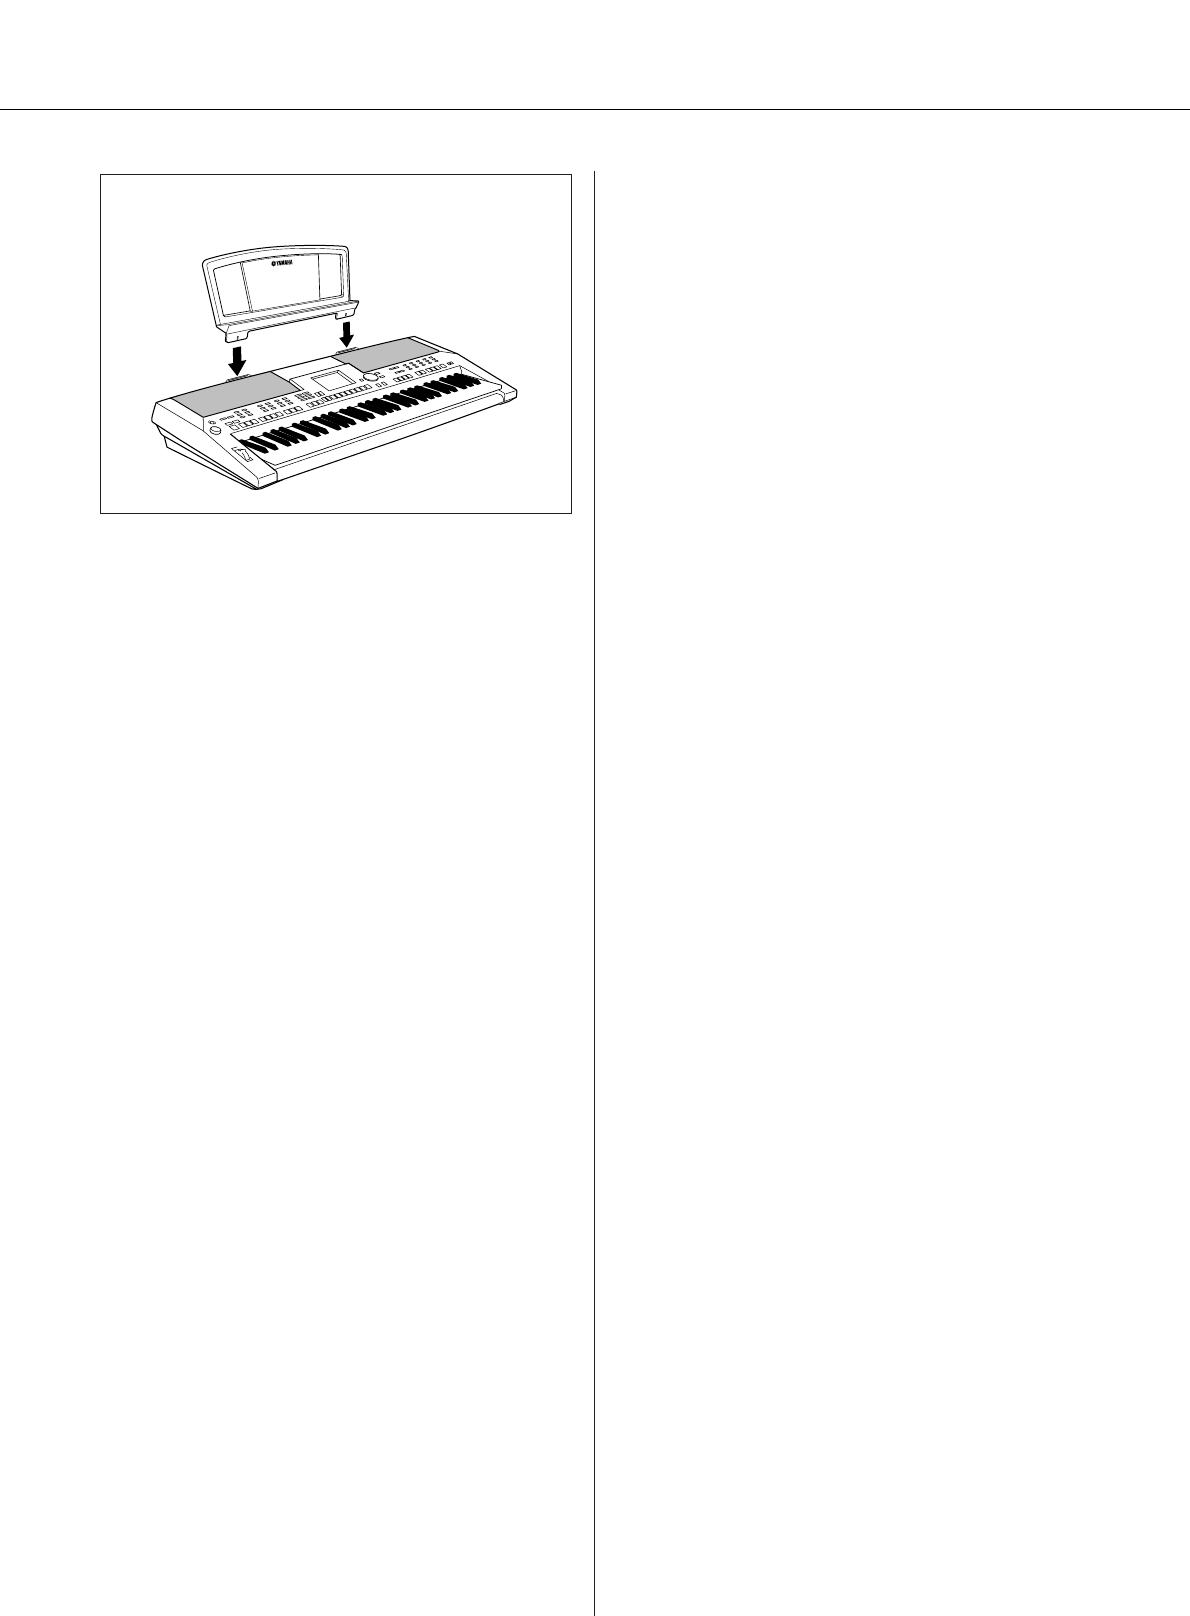
● Music Rest
Insert the music rest
into the slots as
shown.
14 PSR-S500 Owner’s Manual
Panel Controls and Terminals
q[STANDBY/ON] switch .................... page 16
w[MASTER VOLUME] control.... pages 16, 40
e[DEMO] button................................. page 16
r[SONG MODE] button ..................... page 27
tSONG
[PRESET], [USER], [USB] buttons
..................................................... page 27
[SCORE] button ............................ page 30
[LYRICS] button ............................ page 31
[REC] button ................................. page 33
ySTYLE............................................... page 22
uSTYLE CONTROL
[OTS LINK] button ........................ page 58
[AUTO FILL IN] button.................. page 55
[ACMP] button .............................. page 23
INTRO [I]–[III] buttons .................. page 55
MAIN VARIATION [A]–[D] buttons
..................................................... page 55
ENDING/rit. [I]–[III] buttons .......... page 55
[SYNC STOP] button .................... page 57
[SYNC START] button .......... pages 23, 56
[START/STOP] button........... pages 22, 41
iSONG CONTROL
[r] button.................................... page 28
[f] button .................................... page 28
[A B] button .............................. page 65
[] button..................................... page 28
[>/■] button...........................pages 28, 41
oTRANSPOSE [+] and [-] buttons.... page 53
!0 [METRONOME] button.................... page 49
!1 [TAP TEMPO] button ....................... page 51
!2 TEMPO [+] and [-] buttons.............. page 49
!3 [REGIST/TRACK] button................. page 66
!4 [MEMORY] button ........................... page 67
!5 REGIST BANK [+] and [-] buttons.. page 67
!6 REGISTRATION MEMORY [1]–[8]
buttons............................................. page 67
!7 Display ......................................pages 12, 42
!8 [EXIT] button ................................... page 42
Front Panel
q
w
ert y o
!0 !1
!2
!5
u
@9
!3 !4
i
Panel Controls and Terminals
PSR-S500 Owner’s Manual 15
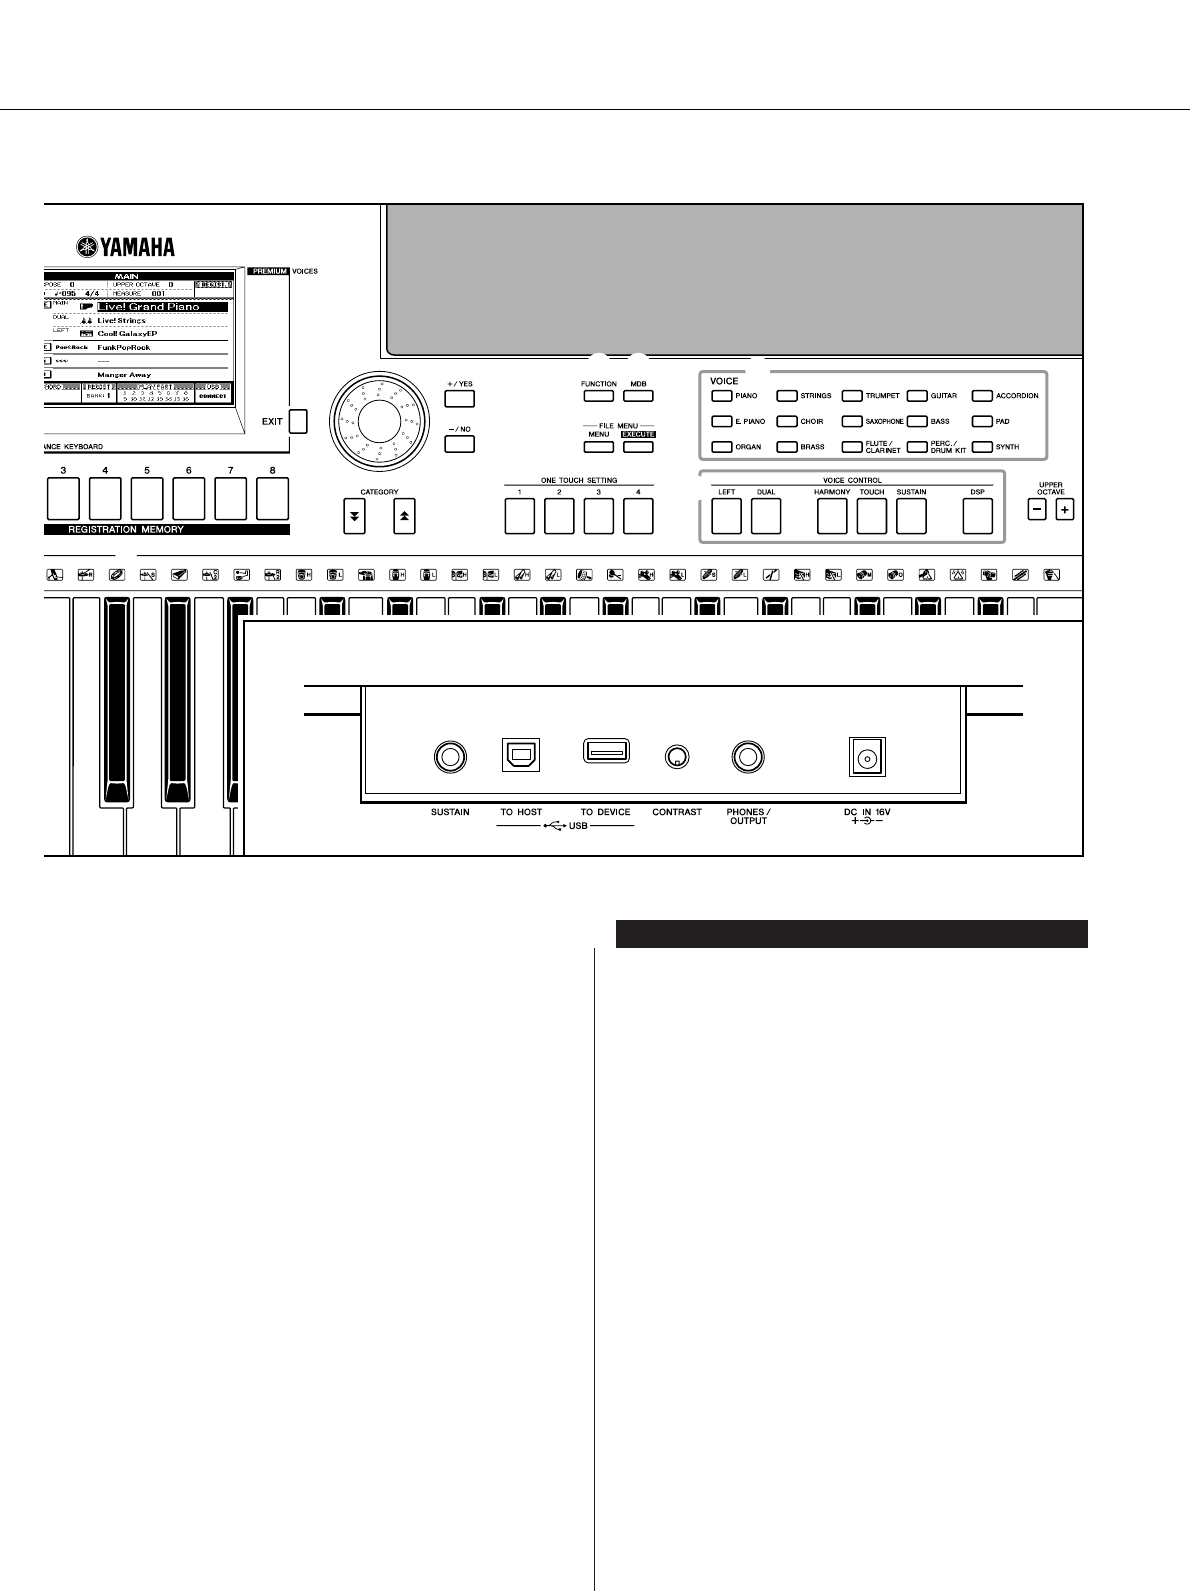
!9 Dial.................................................... page 41
@0 [+/YES] and [-/NO] buttons ............. page 41
@1 CATEGORY [ ] and [ ] buttons ... page 41
@2 [FUNCTION] button ......................... page 70
@3 [MDB] button ................................... page 26
@4 FILE MENU [MENU] and
[EXECUTE] buttons................. pages 74, 75
@5 ONE TOUCH SETTING [1]–[4]
buttons ............................................. page 58
@6 VOICE ............................................... page 17
@7 VOICE CONTROL
[LEFT] button................................ page 19
[DUAL] button ............................... page 18
[HARMONY] button ...................... page 44
[TOUCH] button ............................ page 51
[SUSTAIN] button ......................... page 47
[DSP] button.................................. page 47
@8 UPPER OCTAVE [+] and [-] buttons
.......................................................... page 54
@9 [PITCH BEND] wheel....................... page 48
#0 SUSTAIN jack................................... page 10
#1 USB TO HOST and TO DEVICE
terminals.......................................... page 80
#2 CONTRAST knob ............................ page 12
#3 PHONES/OUTPUT jack ................... page 10
#4 DC IN 16V jack................................. page 10
@6
!6
!7
@2 @3
@7
@8
@4
@0
@5
!9
!8
@1
#0 #1 #2 #3 #4
Rear Panel
f
r
Rear Panel
16 PSR-S500 Owner’s Manual
Q
u
i
c
k
G
u
i
d
e
Playing Songs
This instrument include a Demonstration Song. Let’s start by playing
the Demonstration Song.
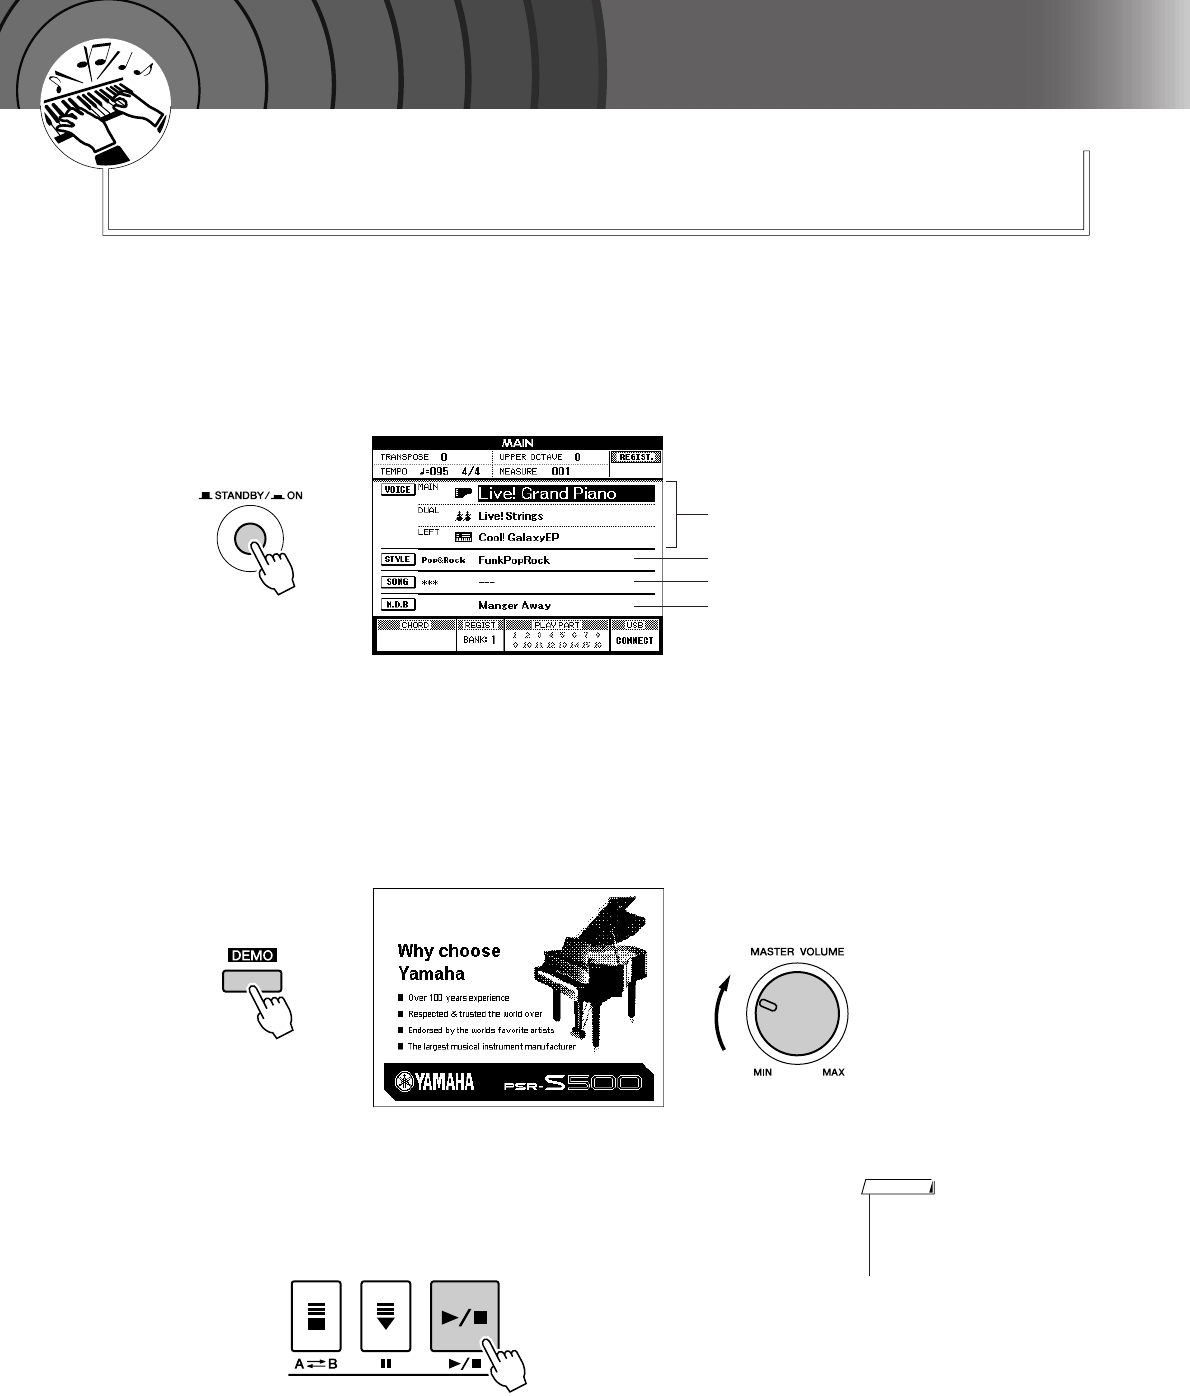
1Press the [STANDBY/ON] button until it locks in the ON
position.
The Main display appears in the LCD.
2Press the [DEMO] button to start the Demo.
The Demo display appears in the LCD.
Gradually raise the [MASTER VOLUME] control while playing the
instrument to set the desired listening level.
The Demo Song will restart when playback reaches the end.
3Press the [>>
>>/■] button to stop Demo.
Operation automatically returns to the Main display.
STYLE name
SONG name
Music Database name
VOICE name
• The [DEMO] button doesn’t
function when the Demo Cancel
function is set to enable. (See
page 72.)
NOTE
Quick Guide
PSR-S500 Owner’s Manual 17
Q
u
i
c
k
G
u
i
d
e
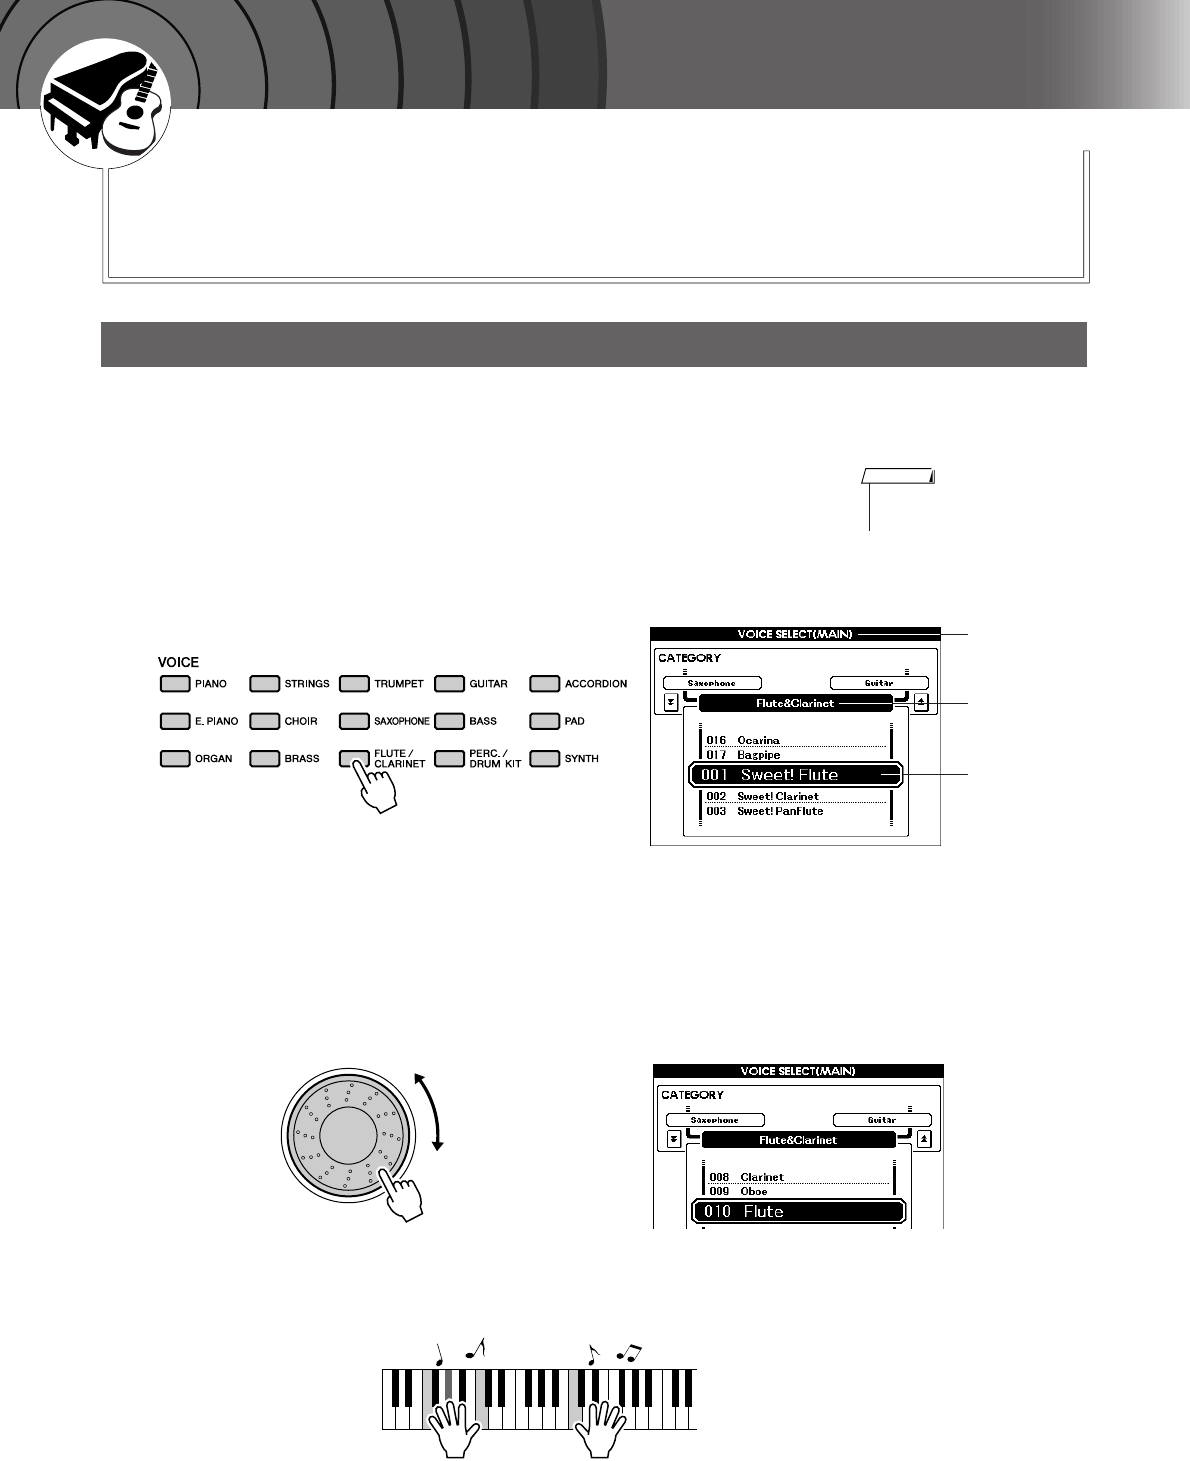
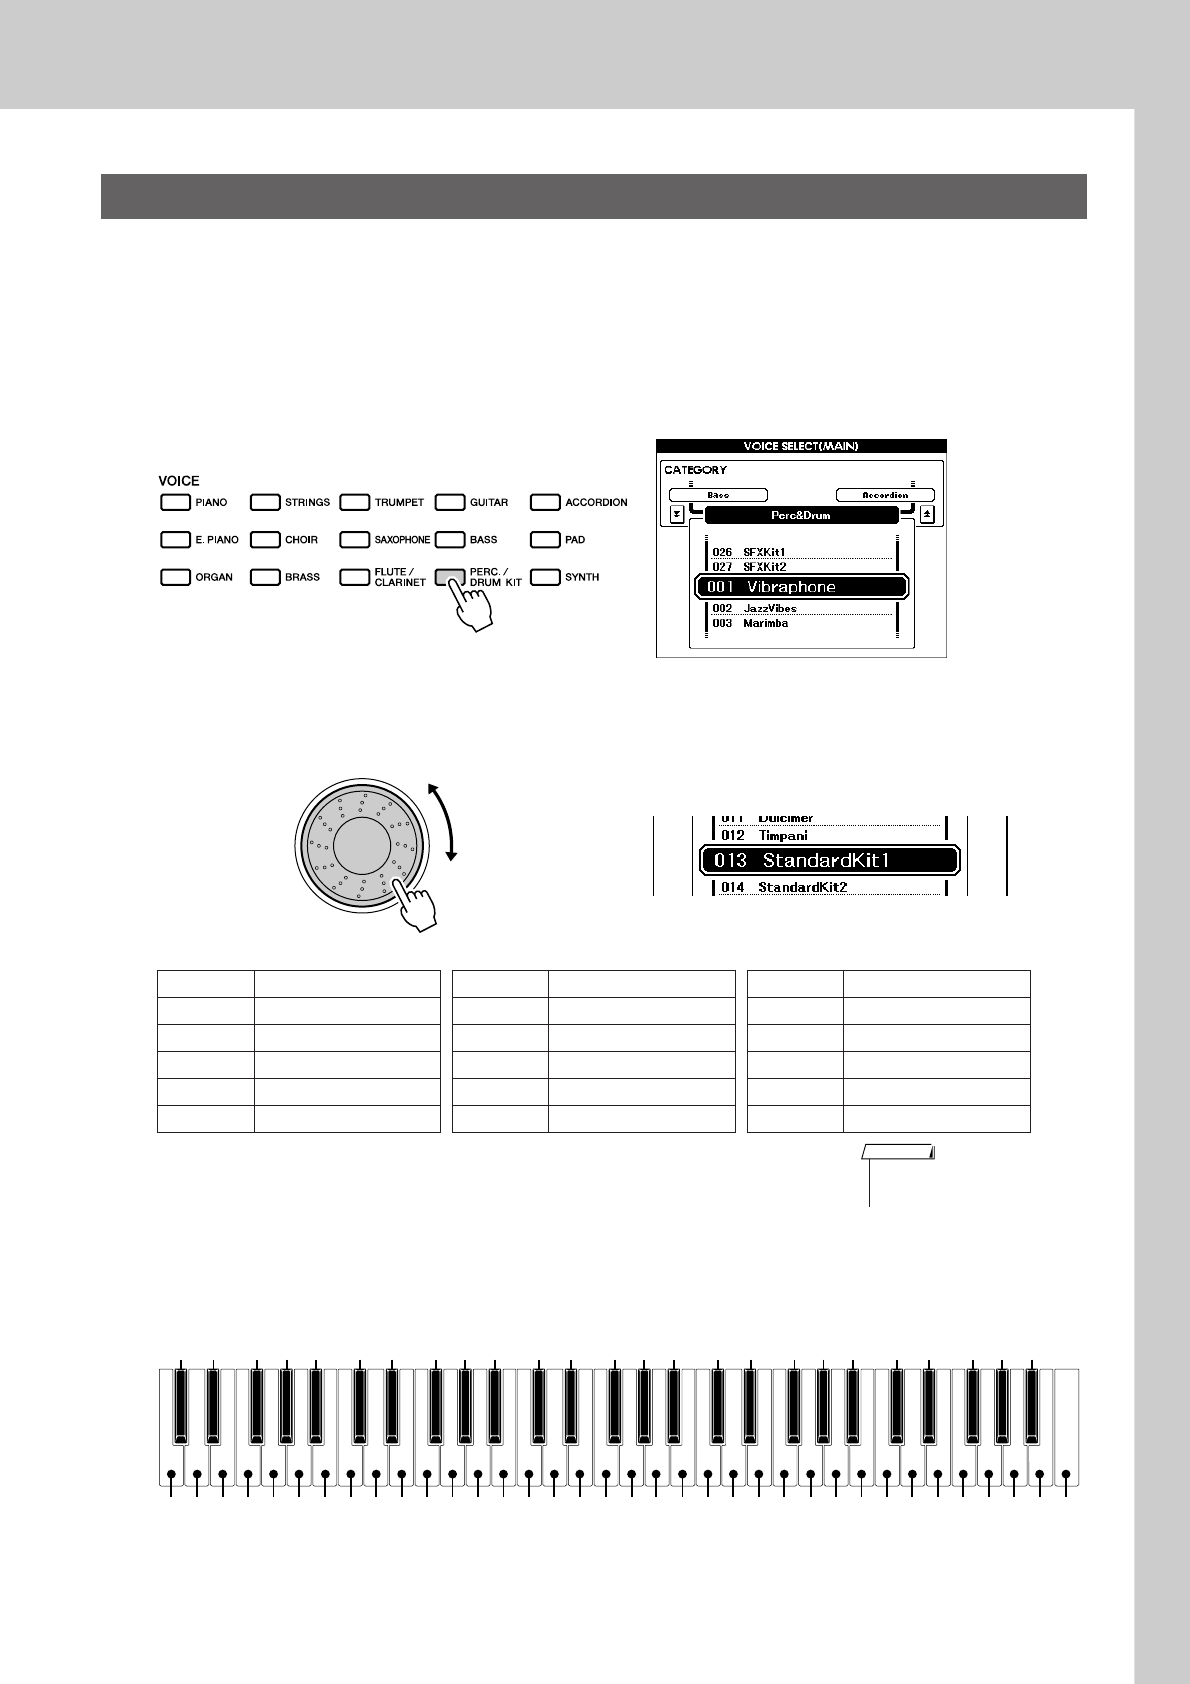
Try playing a variety of Instrument Voices
In addition to piano, organ, and other “standard” keyboard instruments,
this instrument has a large range of realistic Voices—including guitar,
bass, strings, sax, trumpet, drums and percussion, sound effects, and a
wide variety of other musical sounds.
In this operation, you’ll select a Main Voice and play it on the keyboard.
1Select and press the desired Voice category button in the
Voice section.
The Main Voice selection display will appear.
The currently selected category name, Voice number and name will be
highlighted.
For this example, select the “Flute&Clarinet” category.
2Select the Voice you want to play.
Look at the highlighted Voice name and rotate the dial. The available
Voices will be selected and displayed in sequence. The Voice selected
here becomes the Main Voice.
For this example, select the “010 Flute” Voice.
3Play the keyboard.
Try selecting and playing a variety of Voices.
Press the [EXIT] button to return to the MAIN display.
Select and Play a Voice
•To change the Voice category,
press another category button.
NOTE
MAIN VOICE
selection display
Current
selected Voice
CATEGORY
name
Try playing a variety of Instrument Voices
18 PSR-S500 Owner’s Manual
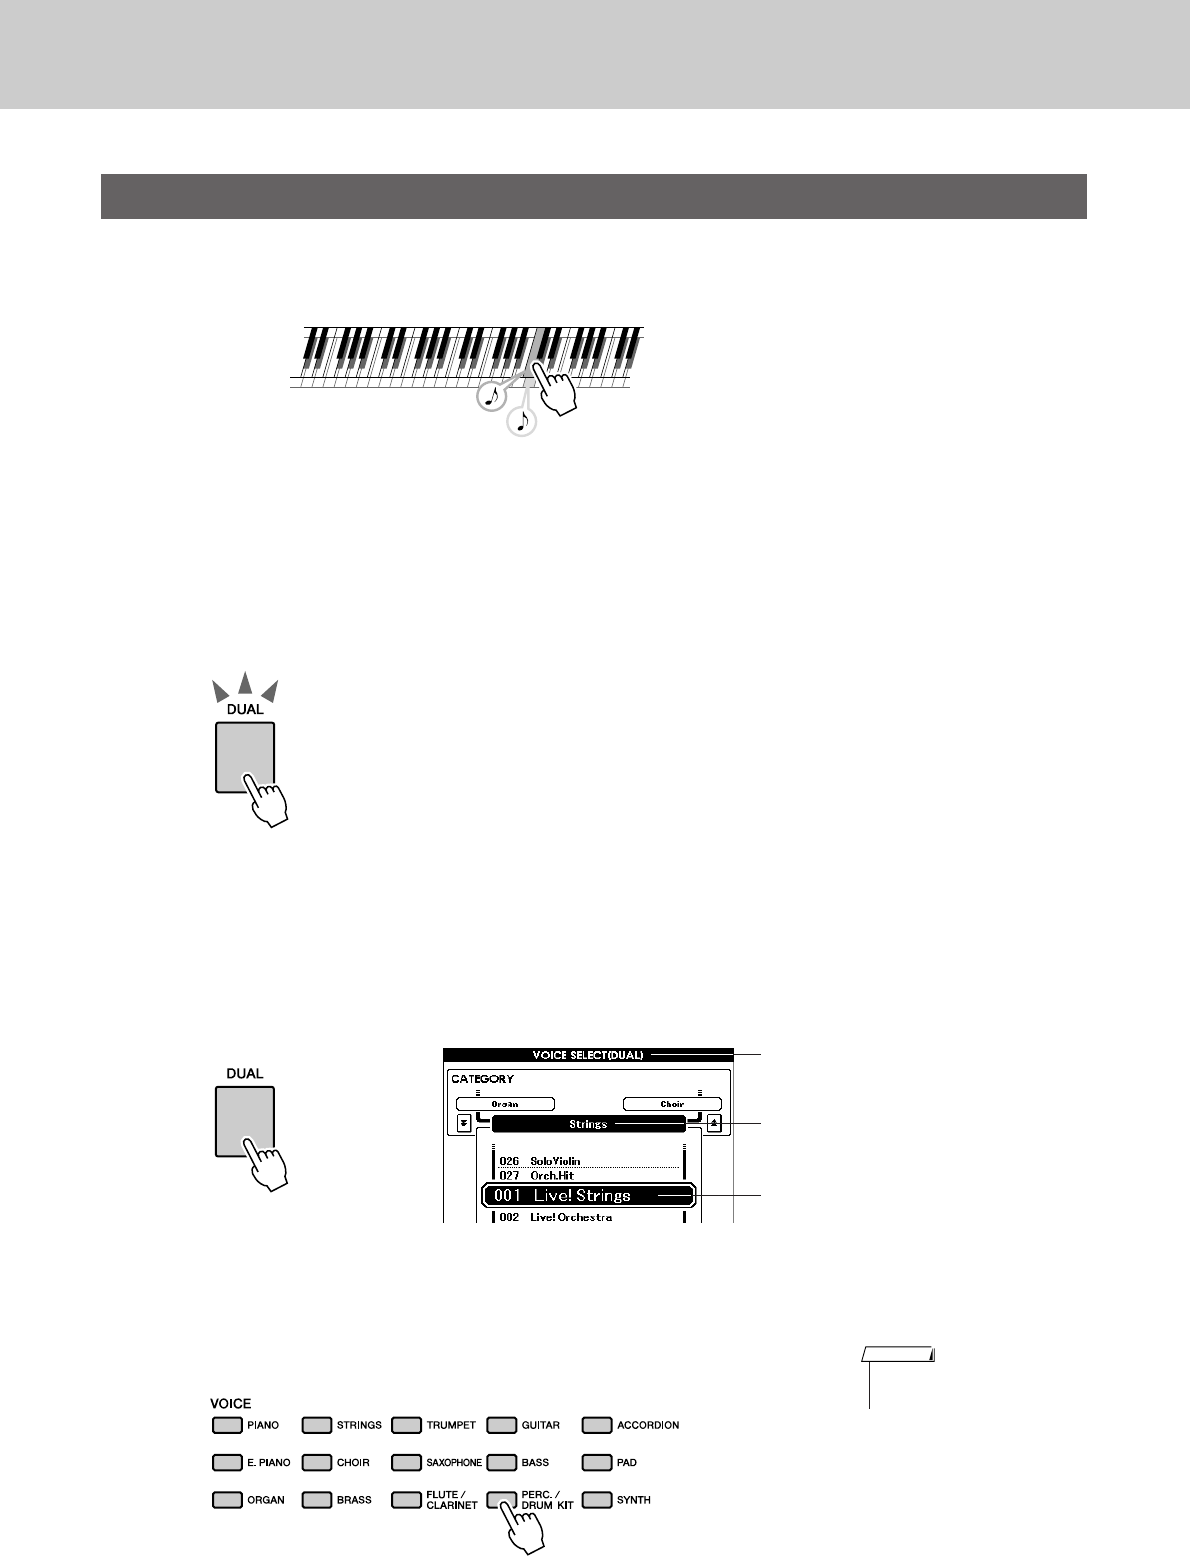
This lets you select a second Voice which you can play in addition to the Main Voice.
The second Voice is known as the “Dual” Voice.
1Press the [DUAL] button.
The [DUAL] button turns the Dual Voice on or off.
When Dual Voice is turned on, the [DUAL] button is lit.
The currently selected Dual Voice will sound in addition to the Main
Voice when you play the keyboard.
2Press and hold the [DUAL] button for longer than a sec-
ond.
The Dual Voice selection display appears.
The currently selected category name, Voice number and name will be
highlighted.
3Select and press the desired Voice category button in the
Voice section.
For this example, select the “PERCUSSION/DRUM” category.
Playing Two Voices Simultaneously—DUAL
Two Voices will sound at the same time.
[DUAL] button is lit
Hold for longer
than a second
Dual Voice selection display
The currently selected category
The currently selected Dual Voice
•To change the Voice category,
press another category button.
NOTE
Try playing a variety of Instrument Voices
PSR-S500 Owner’s Manual 19
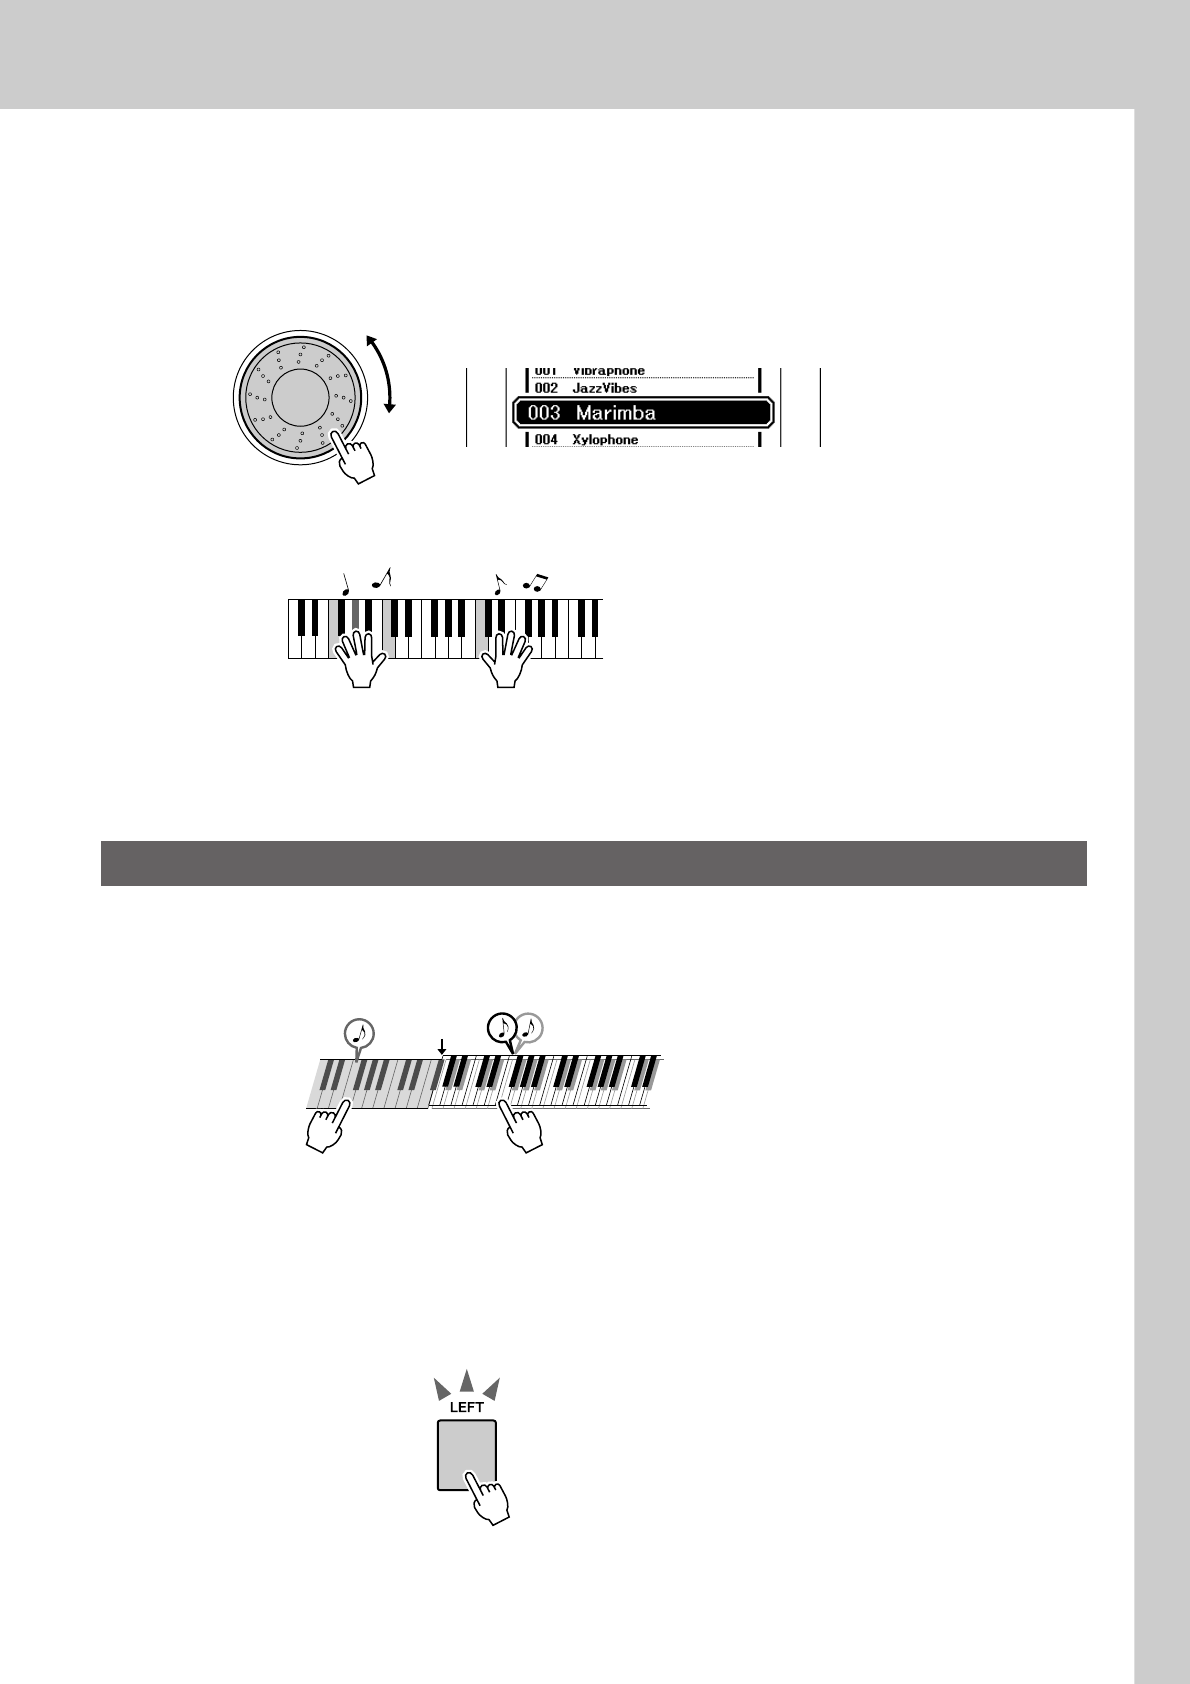
4Select the Voice you want to play.
Look at the highlighted Voice name and rotate the dial. The available
Voices will be selected and displayed in sequence. The Voice selected
here becomes the Dual Voice.
For this example, select the “003 Marimba” Voice.
5Play the keyboard.
Try selecting and playing a range of Dual Voices.
Press the [EXIT] button to return to the MAIN display.
In the Left mode you can play different Voices from the keys to the left and right of the keyboard “split
point.” The Main and Dual Voices can be played to the right of the split point, while the Voice played to the
left of the split point is the Left Voice. The split point setting can be changed as required (page 59).
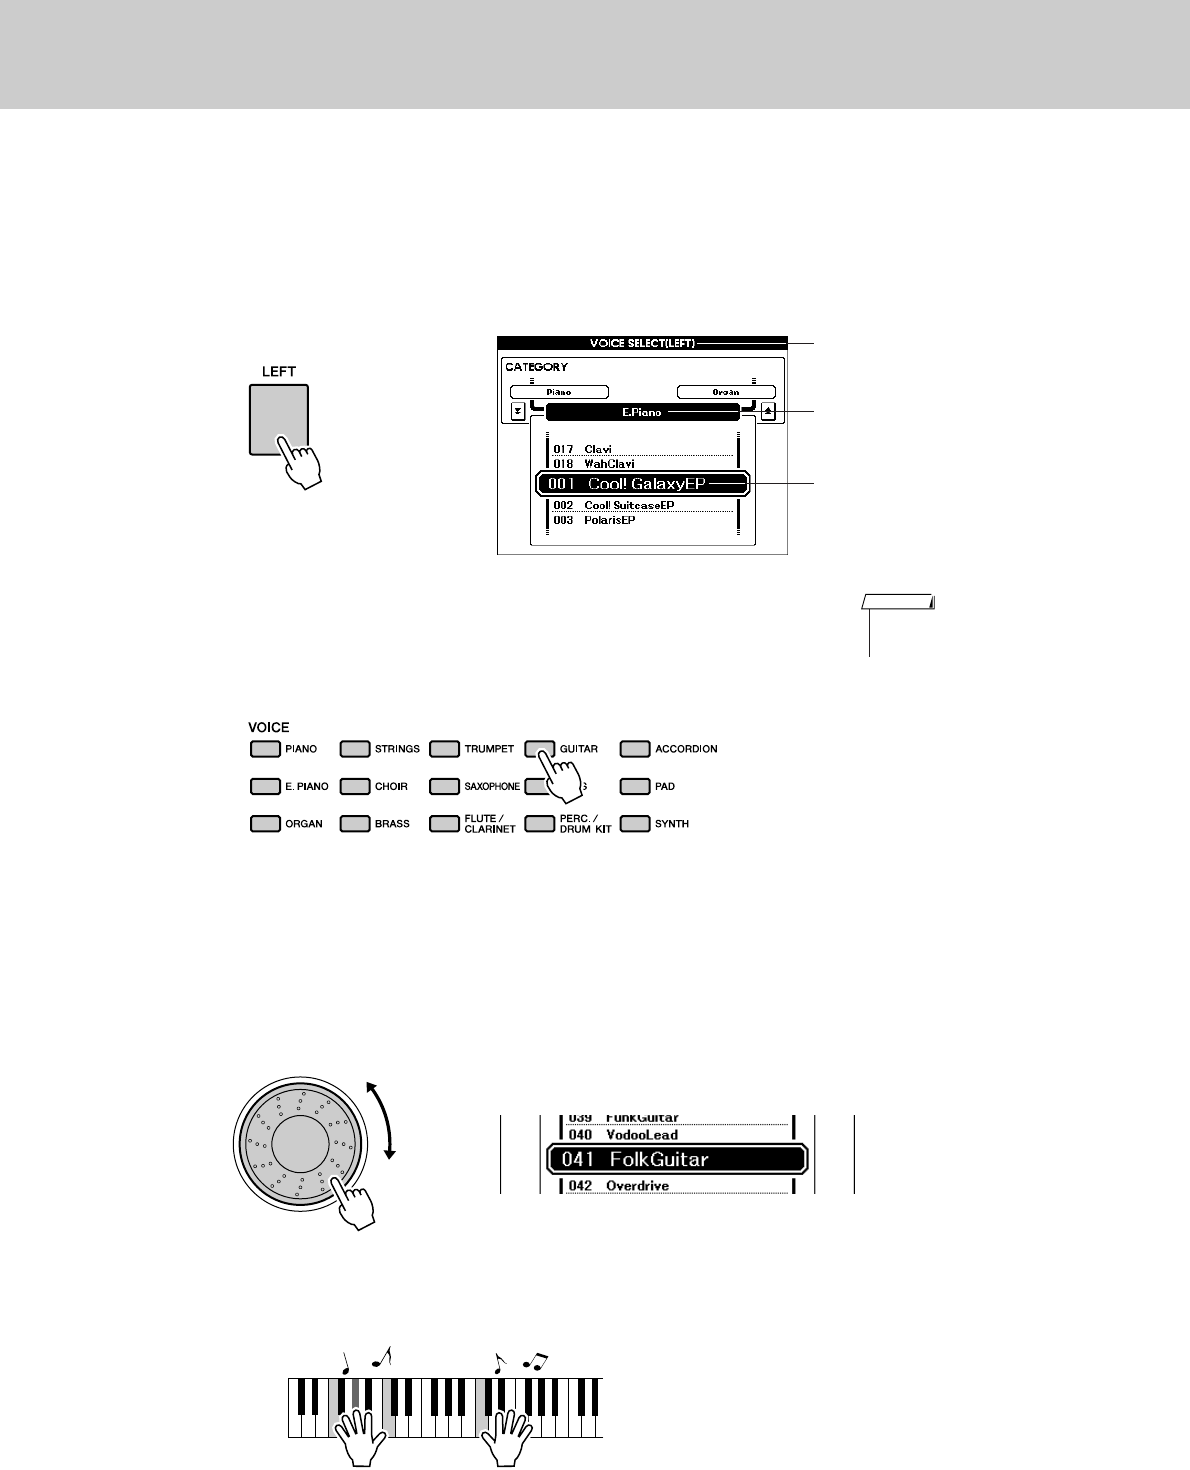
1Press the [LEFT] button.
The [LEFT] button turns the left Voice on or off. The currently selected
Left Voice will sound when you play keys to the left of the keyboard
split point.
Playing Different Voices with the Left and Right Hands—LEFT
Main Voice and Dual VoiceLeft Voice
Split point
[LEFT] button is lit
Try playing a variety of Instrument Voices
20 PSR-S500 Owner’s Manual
2Press and hold the [LEFT] button for longer than a sec-
ond.
The LEFT Voice selection display will appear.
The currently selected category name, Voice number and name will be
highlighted.
3Select and press the desired Voice category button in the
VOICE section.
For this example, select the “GUITAR” category.
4Select the Voice you want to play.
Look at the highlighted Voice name and rotate the dial. The available
Voices will be selected and displayed in sequence. The Voice selected
here becomes the Left Voice.
For this example, select the “041 FolkGuitar” Voice.
5Play the keyboard.
Try playing the selected Left Voice.
Press the [EXIT] button to return to the MAIN display.
The currently selected Left Voice
Left Voice selection display
Hold for longer
than a second
The currently selected category
•To change the Voice category,
press another category button.
NOTE
Try playing a variety of Instrument Voices
PSR-S500 Owner’s Manual 21
Drum Kits are collections of drum and percussion instruments. When you select a violin or other normal
instrument—as a Main Voice, for example—all keys produce the sound of the same violin, only at different
pitches. If you select a Drum Kit as the Main Voice, however, each key produces the sound of a different
drum or percussion instrument.
1Press the [PERC./DRUM KIT] button.
The “PERC./DRUM KIT” category appears.
2Rotate the dial and select the Drum Kit you want to play
(013–027).
Voice numbers 001–012 are percussion numbers.
Drum Kits List
3Play each key and enjoy the Drum Kit.
A good Drum Kit to start out with is 013, Standard Kit 1.
Example: 013 Standard Kit 1
Playing Drum Kits
Voice No. Drum Kit name Voice No. Drum Kit name Voice No. Drum Kit name
013 Standard Kit 1 018 Rock Kit 023 Cuban Kit
014 Standard Kit 2 019 Electronic Kit 024 Pop Latin Kit
015 Jazz Kit 020 Analog Kit 025 Arabic Kit
016 Brush Kit 021 Dance Kit 026 SFX Kit 1
017 Room Kit 022 Symphony Kit 027 SFX Kit 2
• See the Drum Kit List on page
104.
NOTE
Ride Cymbal 1
Tambourine
Cowbell
Vibraslap
Bongo L
Hi-Hat Open
Crash Cymbal 1
Hand Clap
Hi-Hat Closed
Hi-Hat Pedal
Open Rim Shot
Side Stick
Castanet
Sticks
Brush Tap
Brush Slap
Conga H Open
Timbale L
Agogo L
Maracas
Guiro Short
Claves
Cuica Mute
Tr iangle Mute
Shaker
Chinese Cymbal
Ride Cymbal Cup
Splash Cymbal
Crash Cymbal 2
Ride Cymbal 2
Bongo H
Conga H Mute
Mid Tom L
Mid Tom H
High Tom
Snare Tight
Floor Tom L
Low Tom
Floor Tom H
Kick Tight
Kick
Snare
Snare Roll
Snare Soft
Kick Soft
Seq Click H
Brush Swirl
Brush Tap Swirl
Conga L
Timbale H
Agogo H
Cabasa
Samba Whistle H
Samba Whistle L
Guiro Long
Wood Block H
Wood Block L
Cuica Open
Tr iangle Open
Jingle Bells
Bell Tree
C3
22 PSR-S500 Owner’s Manual
Q
u
i
c
k
G
u
i
d
e
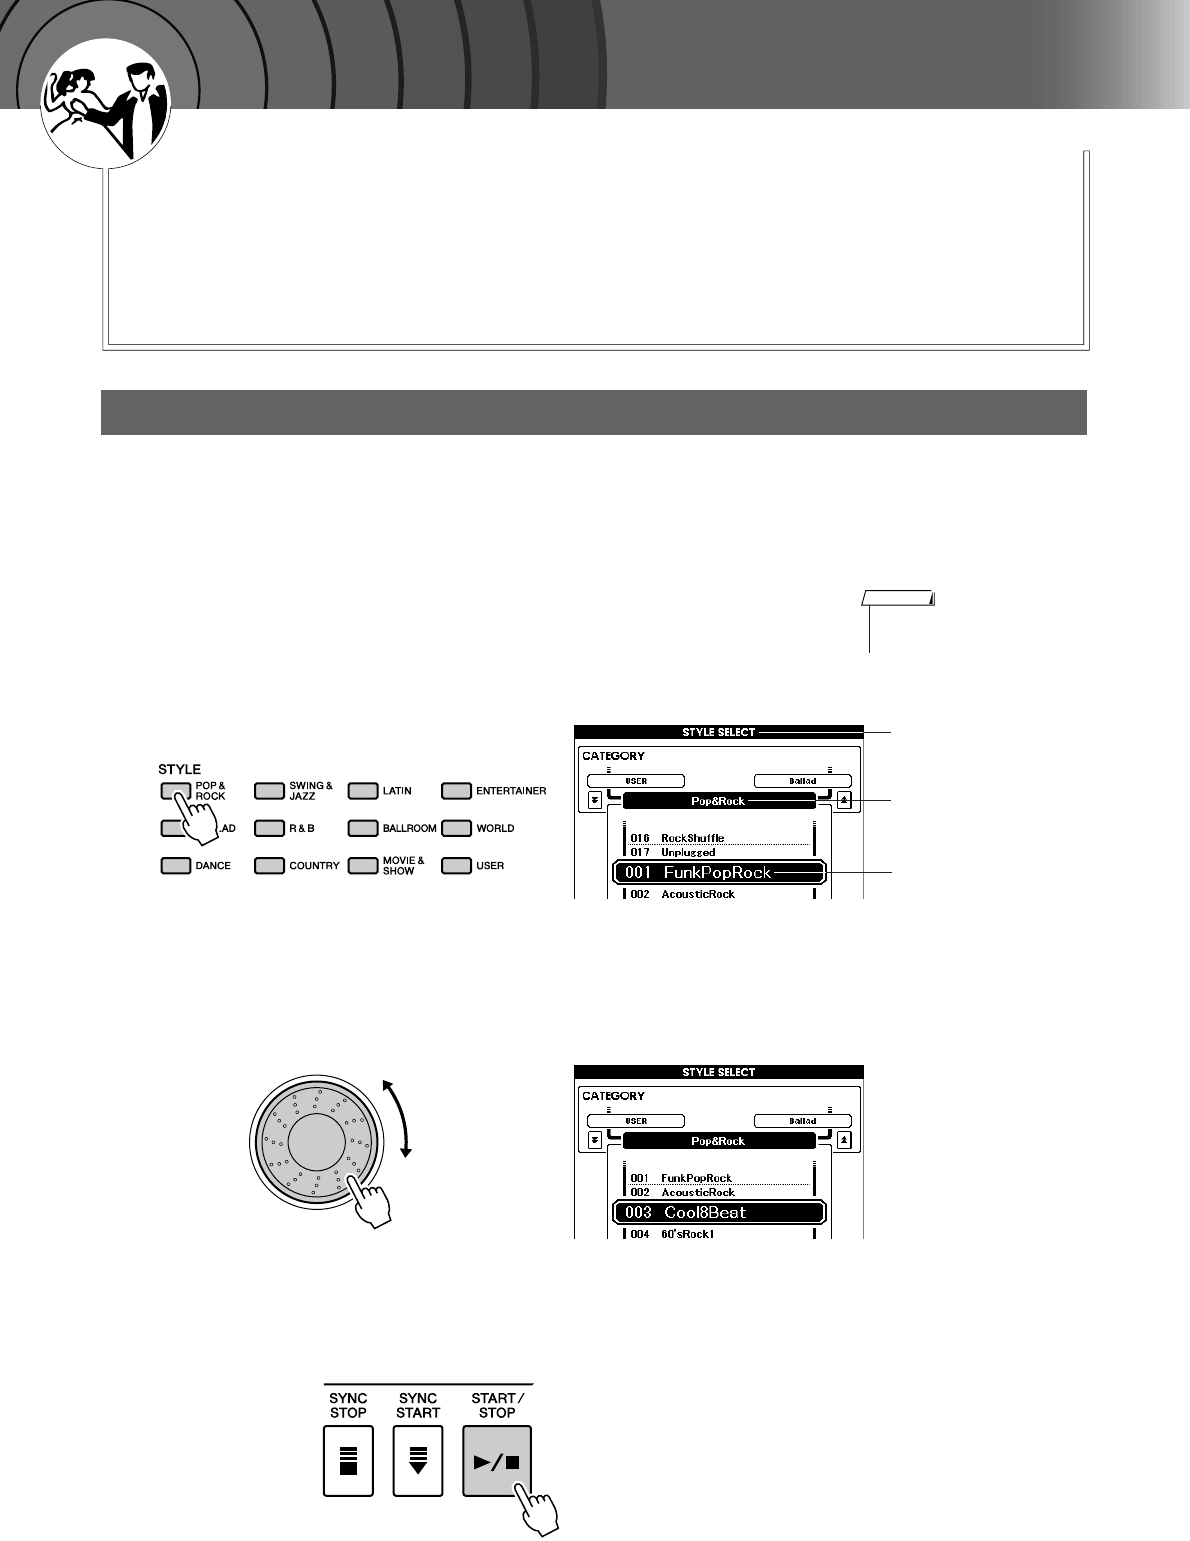
Playing Styles
This instrument includes an auto-accompaniment feature that plays
appropriate “Styles” (rhythm + bass + chord accompaniment) when you
play left-hand chords.
You can select from 150 different Styles covering a range of musical
genres and time signatures (see page 107 for a complete list of the avail-
able Styles). Here’s how you can use the auto-accompaniment feature.
Most Styles include a rhythm part. You can select from a wide variety of rhythmic types—rock, blues,
samba, and many, many more. Let’s begin by listening to just the basic rhythm. The rhythm part is played
using percussion instruments only.
1Select and press the desired Style category button in the
Style section.
The Style selection display appears.
The currently selected category name, Voice number and name will be
highlighted.
2Select the Style you want to play.
Look at the highlighted Voice name and rotate the dial. The available
Styles will be selected and displayed in sequence.
See the Style list on page 107.
3Press the [START/STOP] button.
The Style rhythm will start playing.
To stop playback, press the [START/STOP] button again.
Select a Styles Rhythm
•To change the Style category,
press another category button.
NOTE
Style selection display
The currently
selected Style
The currently
selected category
Playing Styles
PSR-S500 Owner’s Manual 23
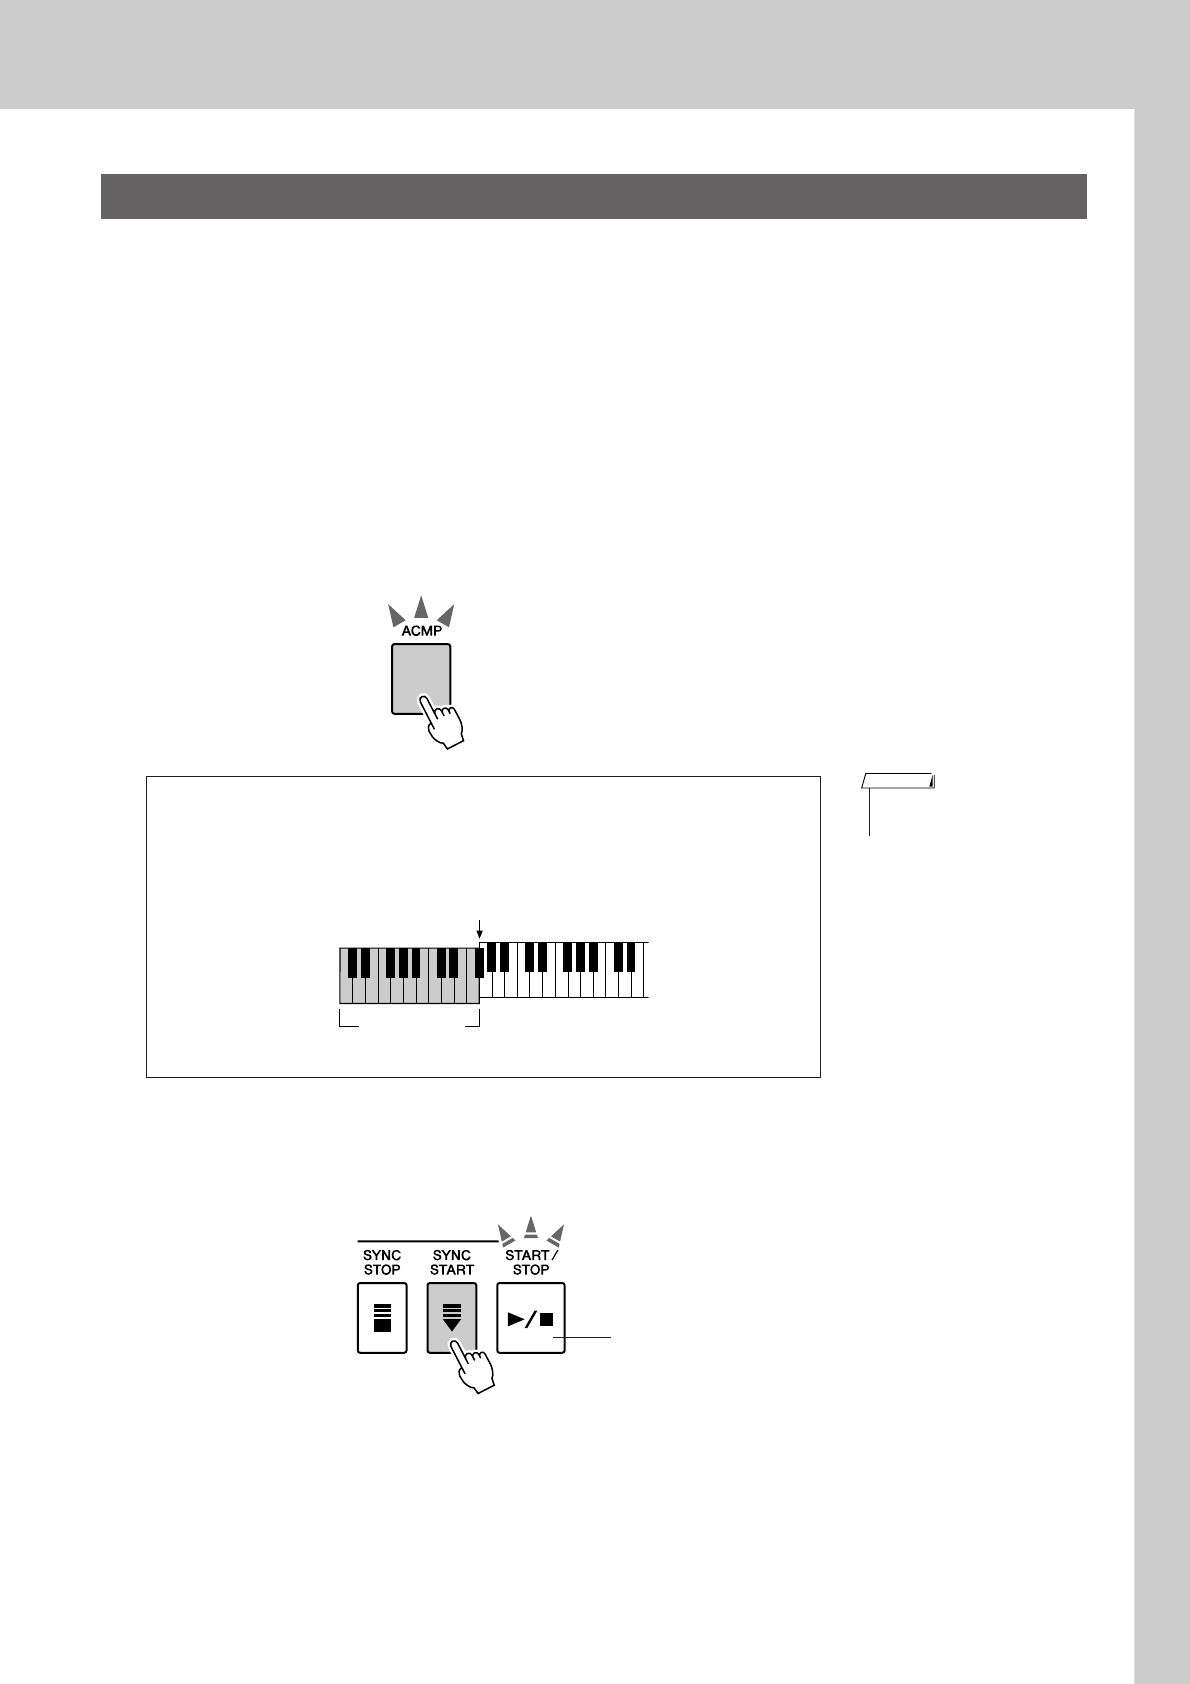
You learned how to select a Style rhythm on the preceding page.
Here we’ll see how to add bass and chord accompaniment to the basic rhythm to produce a full, rich accom-
paniment that you can play along with.
1Select and press the desired Style category button in the
Style section.
Press the [EXIT] button to return to the Main display.
2Turn automatic accompaniment on.
Press the [ACMP] button.
Pressing this button a second time will turn automatic accompaniment
off.
3Turn Sync Start on.
Press the [SYNC START] button to turn the Sync Start function on.
When Sync Start is on, the bass and chord accompaniment included in a
Style will start playing as soon as you play a note to left of the keyboard
split point. To cancel or disable Sync Start, press the button a second
time to turn the Sync Start function off.
Playing Along with a Style
●When automatic accompaniment is on ...
The area of the keyboard to the left of the split point (54: F#2) becomes the
“auto accompaniment region” and is used only for specifying the
accompaniment chords.
[ACMP] button is lit.
• The Split point can be changed
as required; refer to page 59.
NOTE
Split point (54: F#2)
Auto accompa-
niment region
Flashes when Sync Start is on.
Playing Styles
24 PSR-S500 Owner’s Manual
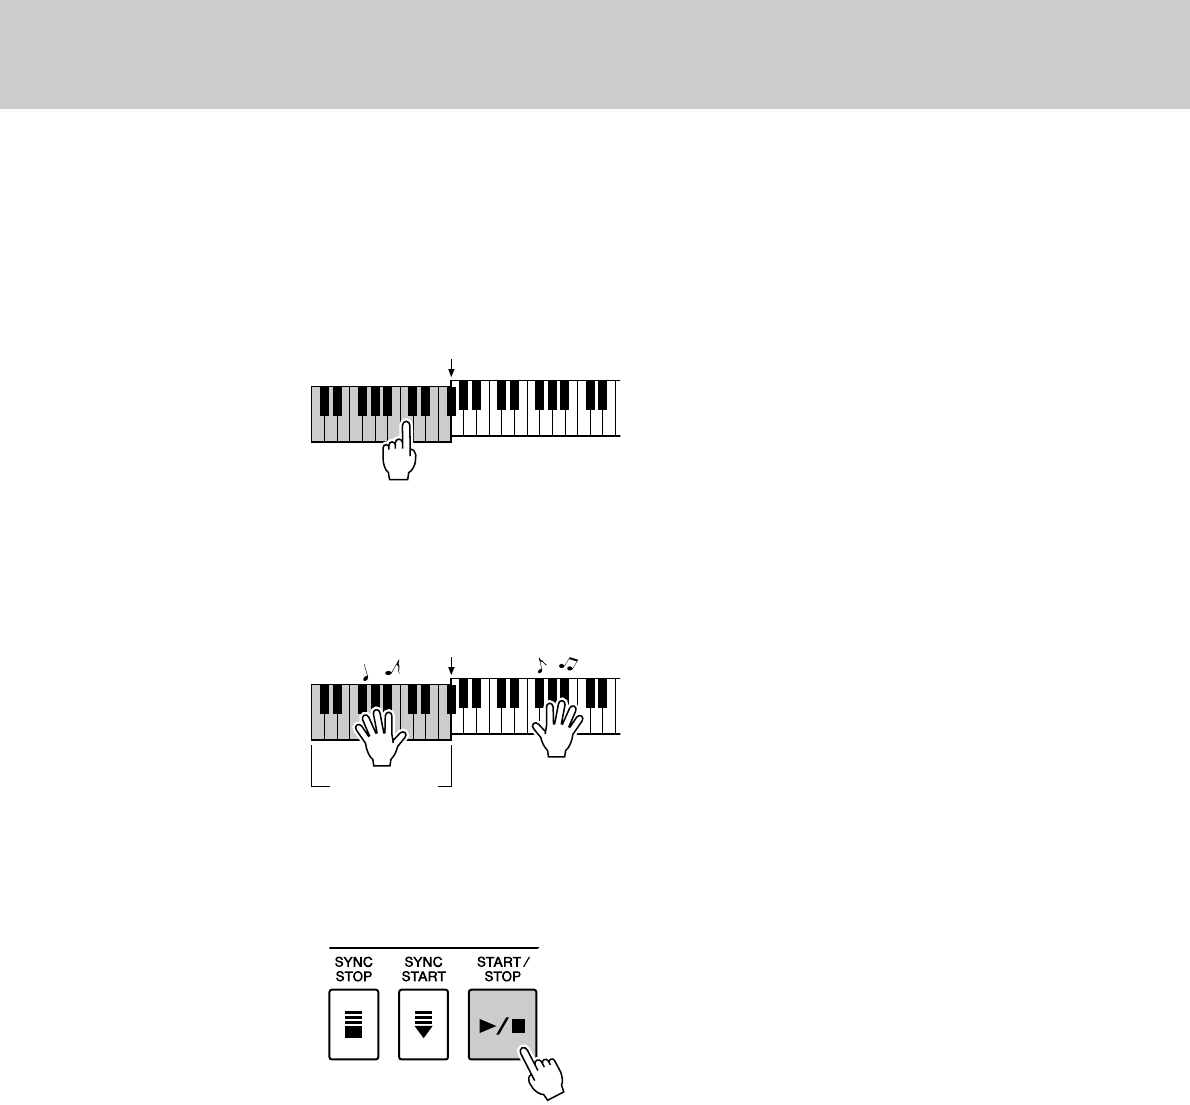
4Play a left-hand chord to start the Style.
You can still “play” chords even if you don’t actually know any chords.
This instrument will recognize even a single note as a chord. Try play-
ing from one to three notes at the same time to the left of the split point.
The chord will change according to the left-hand notes you play.
5Play a variety of left-hand chords while playing a melody
with your right hand.
6Press the [START/STOP] button to stop Style playback
when you’re done.
You can switch Style “sections” to add variety to the accompaniment.
Refer to “Pattern Variation (sections)” on page 55.
Split point
Auto accompa-
niment region
Split point
Playing Styles
PSR-S500 Owner’s Manual 25
There are two ways of playing auto-accompaniment chords:
●Easy Chords
●Standard Chords
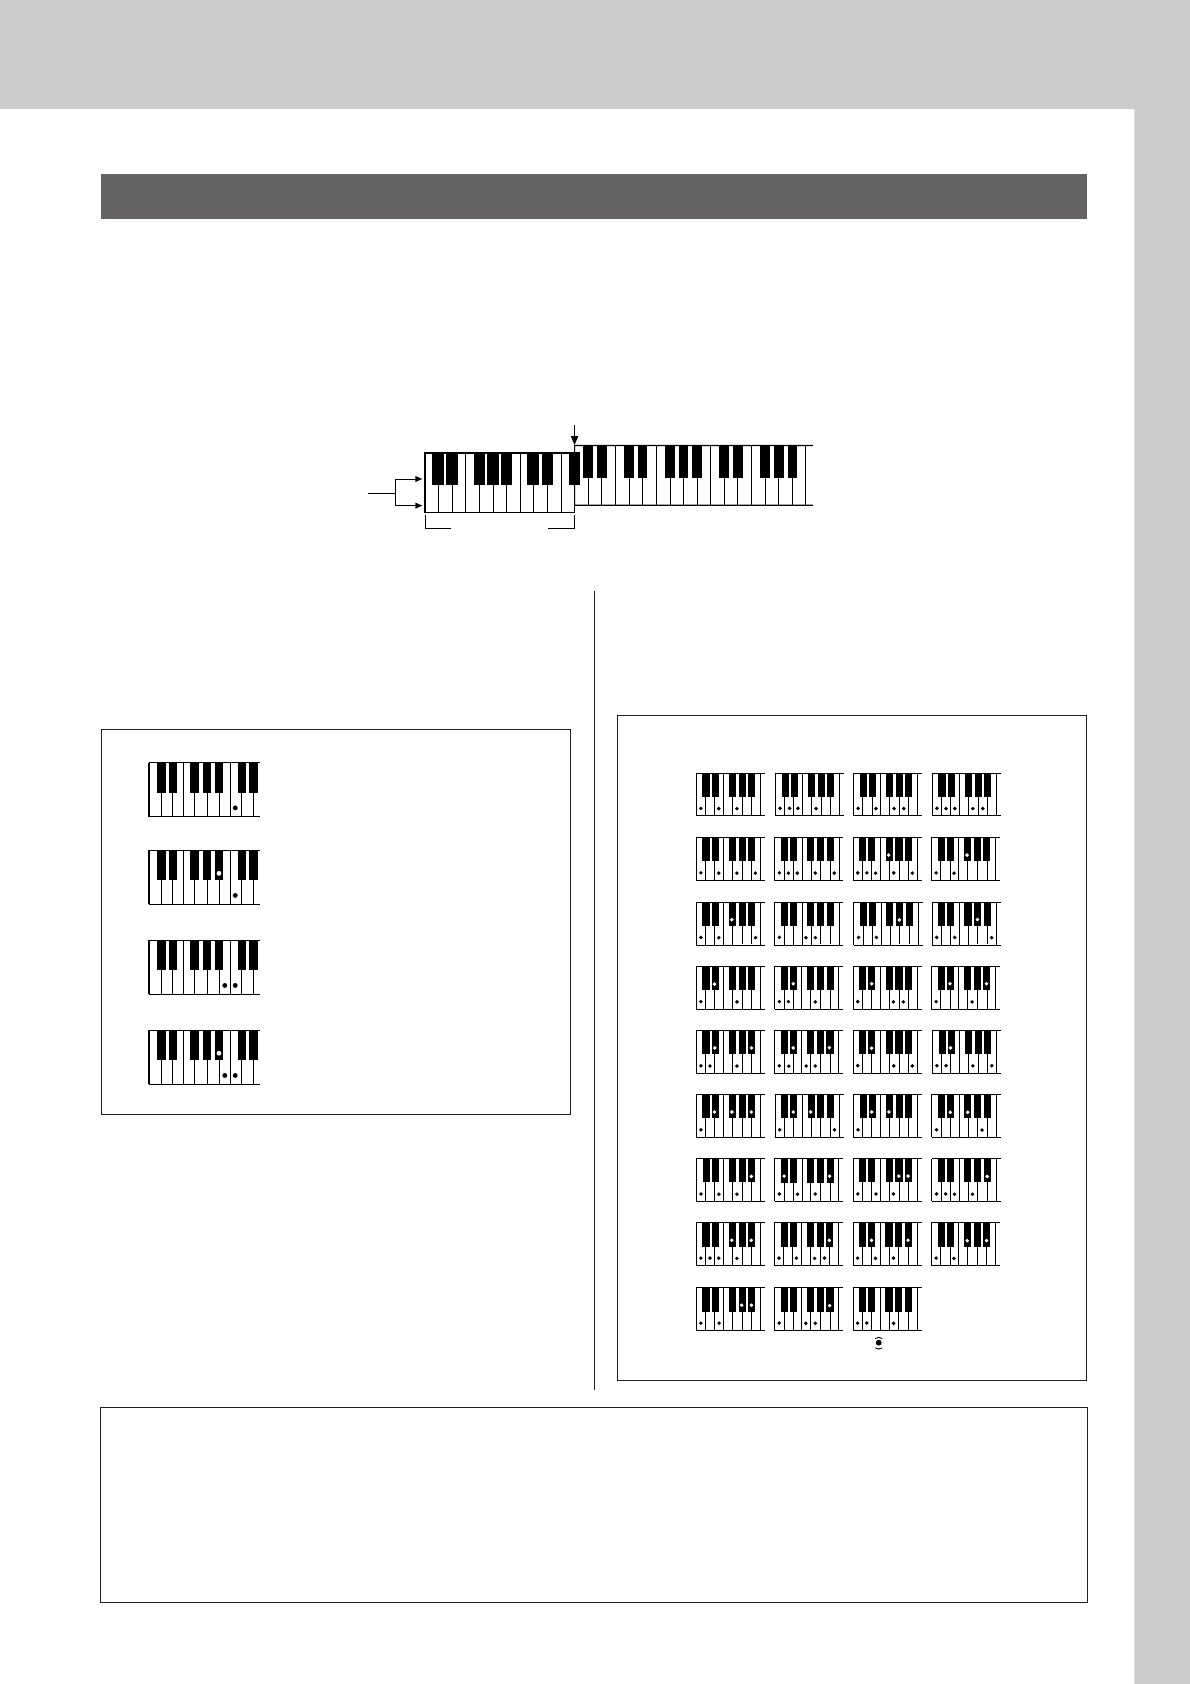
The instrument will automatically recognize the different chord types.
The keyboard to the left of the split point (default: 54/F#2) becomes the “accompaniment range.” Play the
accompaniment chords in this area of the keyboard.
■Easy Chords ● ● ● ● ● ● ● ● ● ● ● ● ● ● ● ●
This method lets you easily play chords in the
accompaniment range of the keyboard using only
one, two, or three fingers.
■Standard Chords ● ● ● ● ● ● ● ● ● ● ● ● ●
This method lets you produce accompaniment by
playing chords using normal fingerings in the
accompaniment range of the keyboard.
Playing Auto-accompaniment Chords
C
D
b
E
b
F
#
G
#
B
b
D
b
E
b
F
#
DEFGABCDEF
Split point (default: 54/F#2)
Root notes and the
corresponding keys
Accompani-
ment range
•To play a major chord
Press the root note of the chord.
C
Cm
C7
Cm7
•To play a minor chord
Press the root note together with the
nearest black key to the left of it.
•To play a seventh chord
Press the root note together with the
nearest white key to the left of it.
•To play a minor seventh chord
Press the root note together with the
nearest white and black keys to the
left of it (three keys altogether).
( ) ( )
( )
( )
( )
( )
( )
( )
( ) ( )
( )
( )
( )
( )
( )
( )
( )
( )
( )
CmM7
CM7
C6
Csus4 Caug CM7aug
C7aug C7sus4 Csus2
C7
Cm
Cdim Cdim7
C7
CmM7
(9)
CM7
(9)
Cm7
(9)
C7
(b9)C7
(b13)
Cm7
(11)
CM7
(#11)C(b5)
(9)
C6
Cm add9
(9)
C7
(#11)
C7
(#9)
C7
(13)
C7
Cm6 Cm7
C
(b5)
CM7
(b5)
Cm7
(b5)CmM7
(b5)
Cadd9
●How to play Standard Chords [Example for “C” chords]
* Notes enclosed in parentheses ( ) are optional; the chords
will be recognized without them.
●Multi Fingering and Full Keyboard
These let you select the accompaniment section of the keyboard for chord playing. (See the “Chord Fingering” section
in the Function Setting List on page 71.)
Multi Fingering: As explained above, the keys to the left of the split point (default: 54, F#2) become the
accompaniment range. This method lets you play the accompaniment chords in the specified area of the
keyboard, and is set as the default for the instrument.
Full Keyboard: This lets you play the accompaniment chords freely from anywhere on the keyboard.
26 PSR-S500 Owner’s Manual
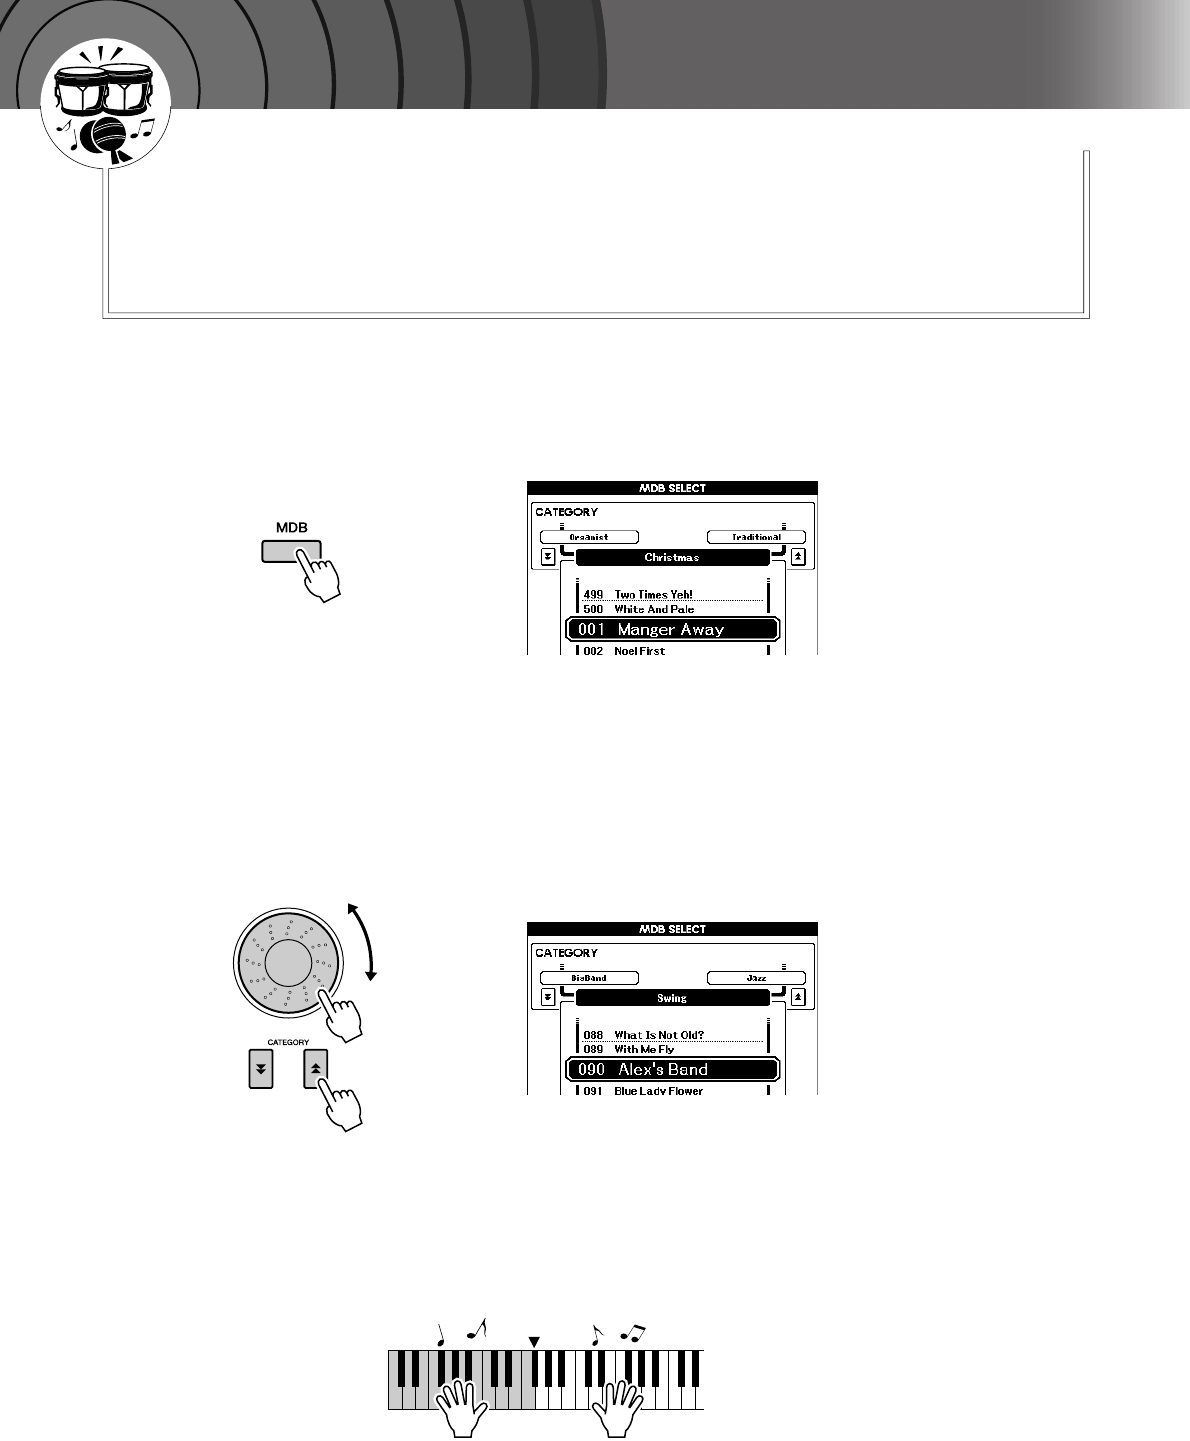
1Press the [MDB] button.
The music database selection display will appear.
The currently selected category name, MDB number and name will be
highlighted.
2Select the desired Music Database which matches the
music style or type you want to play.
Press [ ], [ ] category button when changing the MDB category.
Referring to the Music Database List on page 108 of the manual, use the
dial to select a music database. Select one that matches the music style
of the Song you intend to play.
For this example select “090 Alex’s Band” in the Swing category.
3Play the chords with your left hand and the melody with
your right.
The swing Style will start playing when you play a left-hand chord to
the left of the split point (page 23). Refer to page 25 for information
about playing chords.
You can check the assigned Voice and Style at this point by pressing the
[EXIT] button to return to the MAIN display.
4Press the [>>
>>/■] button to stop playback.
f
r
Split Point
Q
u
i
c
k
G
u
i
d
e
Playing with the Music Database
You want to play music in your favorite Style, but you’re not sure how to
select the best Voice and Style for the type of music you want to play, sim-
ply select the appropriate Style from the Music Database. The panel set-
tings will automatically be adjusted for the ideal combination of sounds
and Style!
PSR-S500 Owner’s Manual 27
Q
u
i
c
k
G
u
i
d
e
Using Songs
With this instrument the term “Song” refers the data that makes
up a piece of music.
In this section we’ll learn how to select and play Songs.
1Select and press one of the Song category buttons, which
corresponds to the type of Song you want to listen to.
[PRESET] : Five preset Songs are available here.
[USER] : This contains your recorded Songs and Songs loaded from
computer.
[USB] : This contains USB Songs when a USB flash memory
device is connected to the DEVICE terminal.
The Song selection display will appear.
The currently selected Song number and name will be highlighted.
2Select a Song.
Use the dial to select the Song you want to listen to.
Selecting and Listening to a Song
Listen See Record
Song
(Score) (Lyrics)
• When the instrument is in the
Song mode, the [SONG MODE]
button is lit. When Style mode is
enabled, the button is not lit.
NOTE
Song Selection
display
Currently
selected Song
Using Songs
28 PSR-S500 Owner’s Manual
3Listen to the Song.
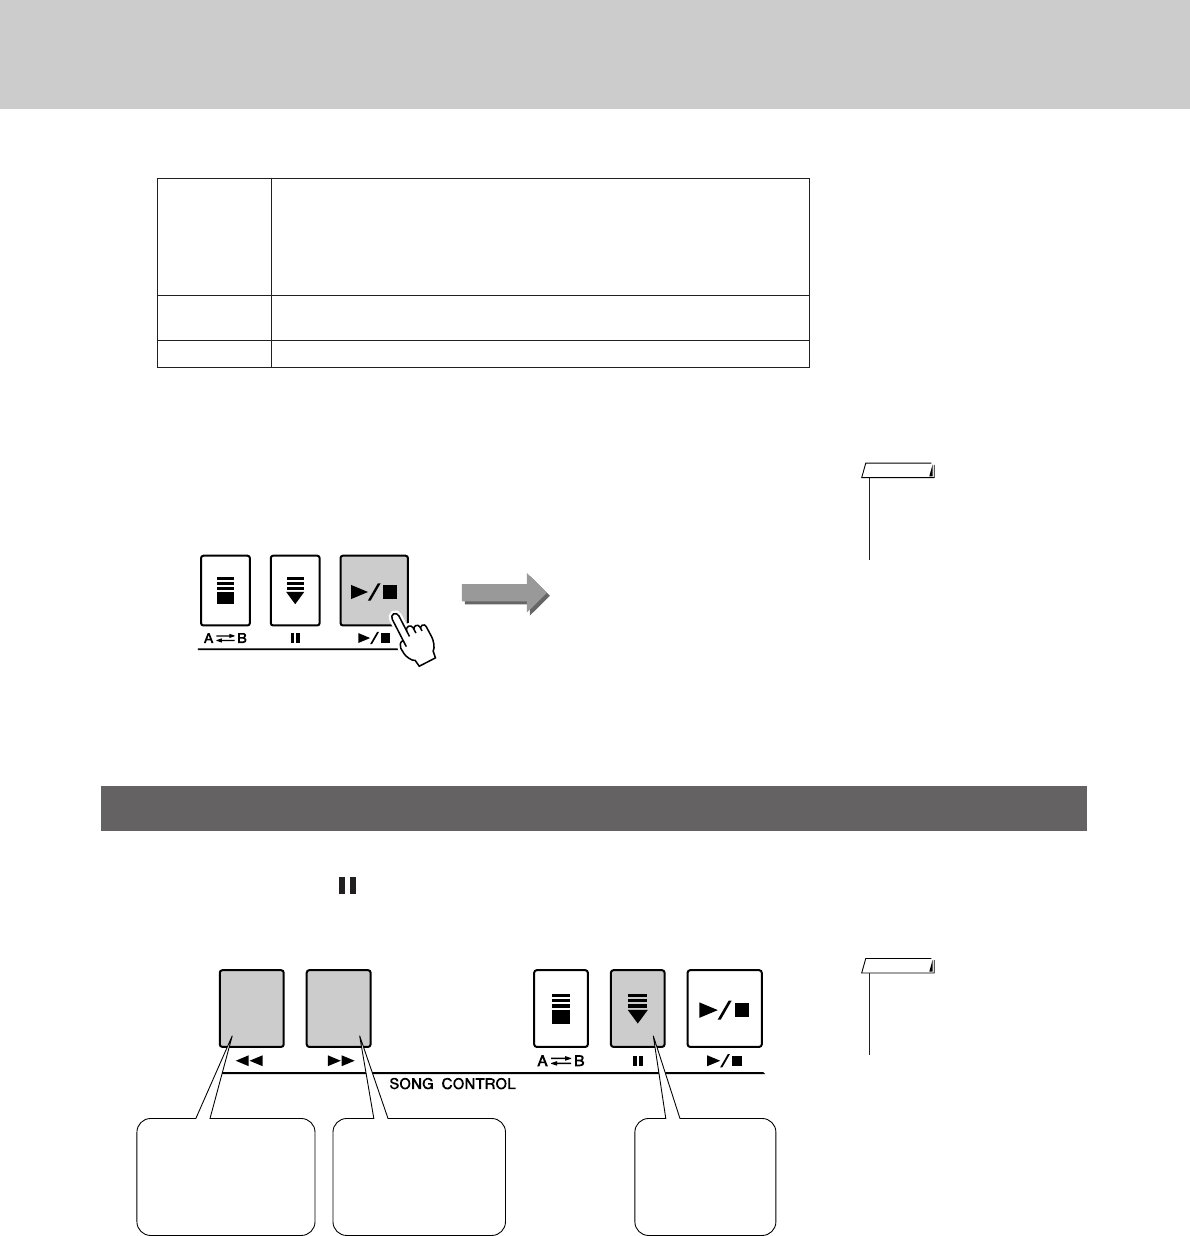
Press the [>/■] button to begin playback of the selected Song.
You can stop playback at any time by pressing the [>/■] button again.
These are just like the transport controls on a cassette deck or CD player, letting you fast forward [f],
rewind [r], and pause [ ] playback of the Song.
PRESET
Built-in Songs
1 Annie Laurie (Traditional)
2 Oh, Susanna (Sunny Skylar, S. Foster)
3 Little Brown Jug (Traditional)
4Waltz Op.18 (F. Chopin)
5 Piano Concerto No.21 2nd Mov. (W.A. Mozart)
USER User Songs (Songs you record yourself) or Songs transferred from a
computer (pages 85–87)
USB Songs in a USB flash memory connected to the instrument (page 74)
Song Fast Forward, Fast Reverse, and Pause
• Some of the preset songs have
been edited for length or
arrangement, and may not be
exactly the same as the original.
NOTE
Song start
PAUSE
Press the pause
button to pause
playback.
REW
Press the fast reverse
button to rapidly return
to an earlier point in
the Song.
FF
Press the fast forward
button to rapidly skip
ahead to a later point
in the Song.
• When an A-B repeat range is
specified, the fast reverse and
forward function will only work
within that range.
NOTE
Using Songs
PSR-S500 Owner’s Manual 29
The following four types of Songs can be used by this instrument.
●Preset Songs (the five Songs built into the instrument)............... Preset Song numbers 001–005.
●User Songs (recordings of your own performances) ................... USER Song numbers 001–005.
●Loaded Songs (Song data loaded from computer) ...................... USER Song numbers 006–
●USB Songs (Song data in the USB flash memory) ...................... Song numbers 001–.
The chart below shows the basic operation flow for using the preset Songs, user Songs, loaded Songs and
USB Song from storage to playback.
Types of Songs
PRESET USER USB
Record
(page 32)
Connect USB TO DEVICE
terminal and Save/Load
(page 80)
Connect USB TO HOST
terminal and Transfer
(page 85)
Your own performance Song Song
Song Song Song
Computer USB flash memory
Song Storage location.
Preset Songs
(001–005)
User Songs
(001–005)
User Songs
(loaded Songs)
(006–)
USB Songs
(001–)
SMF conversion
Save/Load
The five Songs
built into the
instrument.
Play
•Different internal memory areas are used to store user Songs and loaded Song files
transferred from a computer. User Songs cannot be directly transferred to the loaded
Song area of the internal memory, and vice versa.
NOTE
Using Songs
30 PSR-S500 Owner’s Manual
This instrument is capable of display the scores (notation) of Songs.
Scores are displayed for the preset Songs. Scores can also be displayed for Songs loaded from computer as
well as Songs played back from USB flash memory.
Although User Songs you record yourself cannot display a score as is, they can be converted to SMF (Stan-
dard MIDI File) format and stored to USB flash memory, from where they can be played with score display.
(Refer to “Convert a User Song to SMF Format and Save” on page 77.)
1Select a Song.
Follow steps 1 and 2 of the procedure described on page 27.
2Press the [SCORE] button and a single-staff score will
appear.
There are two types of score display: single-staff and double-staff.
These are alternately selected each time the [SCORE] button is pressed.
3Press the [>>
>>/■] button.
The Song will begin playing. The triangular cursor will move across the
top of the score to indicate the current location.
4To return to the MAIN display, press the [EXIT] button.
Displaying the Song Score
• Both chords and lyrics will be
shown in single-staff score dis-
play of a Song that includes
chord and lyric data.
•When there are many lyrics in a
Song, they may be displayed in
two rows a measure.
• Some lyrics or chords may be
abbreviated if the selected Song
has a lot of lyrics.
• Small notes that are hard to
read may be easier to read after
you use the quantize function
(page 72).
NOTE
Single-staff
Double-staff
Melody score
Marker
Chord
Lyrics
• No lyrics are shown in double-
staff display.
NOTE
Using Songs
PSR-S500 Owner’s Manual 31
If a Song contains lyric data, the lyrics can be made to appear on the display.
No lyrics will be displayed for a Song that contains no lyric data, even if the [LYRICS] button is pressed.
1Select a Song.
Follow steps 1 and 2 of the procedure described on page 27.
Try to select the Preset SONG 001–002.
2Press the [LYRICS] button.
The title, lyricist, and composer of the Song will appear on the display.
3Press the [>>
>>/■] button.
The Song will play back while the lyrics and chords are shown on the
display. The lyrics will be highlighted to show the current location in the
Song.
■Preset Songs That Can be Used For Lyrics Display
Displaying the Lyrics
Song No. Song Name
001 Annie Laurie
002 Oh, Susanna
• If the lyrics display shows gar-
bled characters, try changing
the display language (page 12).
NOTE
• Songs downloaded from the
Internet or commercially avail-
able Song files, including XF for-
mat files (page 6), are
compatible with the lyrics dis-
play features as long as they are
standard MIDI file format files
containing lyric data. Lyrics dis-
play may not be possible with
some files.
NOTE
Song title, Lyricist, Composer
Lyrics and Chord

32 PSR-S500 Owner’s Manual
Q
u
i
c
k
G
u
i
d
e
Recording Your Own Performance
You can record up to five of your own performances and save them as
user Songs 001 through 005.
These Songs can be played in the same manner as the preset Songs.
Once your performances have been saved as user Songs, they can be
converted to SMF (Standard MID File) format files and saved to USB flash
memory (page 77) and used with the score display function. This means
that when inspiration strikes and you create a great melody, you can save
it in both listenable and written score form.
■Recordable data
You can record to a total of 9 tracks: 8 melody tracks and 1 Style (chord) track.
Each track can be recorded individually.
●Melody Track [1]–[8]....... Record the melody or other parts, such as
bass.
●Style Track [ACMP] ........ Record the Rhythm and Chord.
■Recording methods
●Quick Recording.............. Immediately start recording by pressing the
[REC] button. (see page 33)
●Multi Recording............... Specify the Song or Part number and then
start recording. (see page 34)
Generally, Song data consists of 16 tracks. On this instrument, you can record your performance step-by-
step to each of tracks 1–8. For example, you can select the Main Voice for recording to Track 1, then set the
Dual Voice to Track 2, and so on. (When the Quick Recording mode is selected, the playing parts and their
corresponding tracks are set automatically.)
■Recording track
When Multi track recording is selected, you can specify the recording track
[1]–[8] and accompaniment track.
In this instrument, data cannot be recorded to tracks [9]–[16]. However, in the
case of Songs loaded from computer, if the Song has data in tracks [9]–[16],
you can playback and mute these tracks as desired. (See page 66.)
Track Configuration
• Up to approximately 10,000
notes can be recorded, if you
record only to the melody
tracks.
• Up to approximately 5,400
chord changes can be
recorded, if you record only to
the accompaniment track.
•User Songs as such cannot pro-
duce score display, but they can
be converted to SMF (Standard
MIDI File) format and stored to
USB flash memory (page 77),
from which they can be played
with score display.
•Even if you change the Voice
during recording, the DSP type
will not be changed and the
original DSP type will still be
applied.
NOTE
Recording Your Own Performance
PSR-S500 Owner’s Manual 33
You can easily start recording your performance by simply pressing the [REC] button. In this case, the track
number and part number of tracks are set automatically.
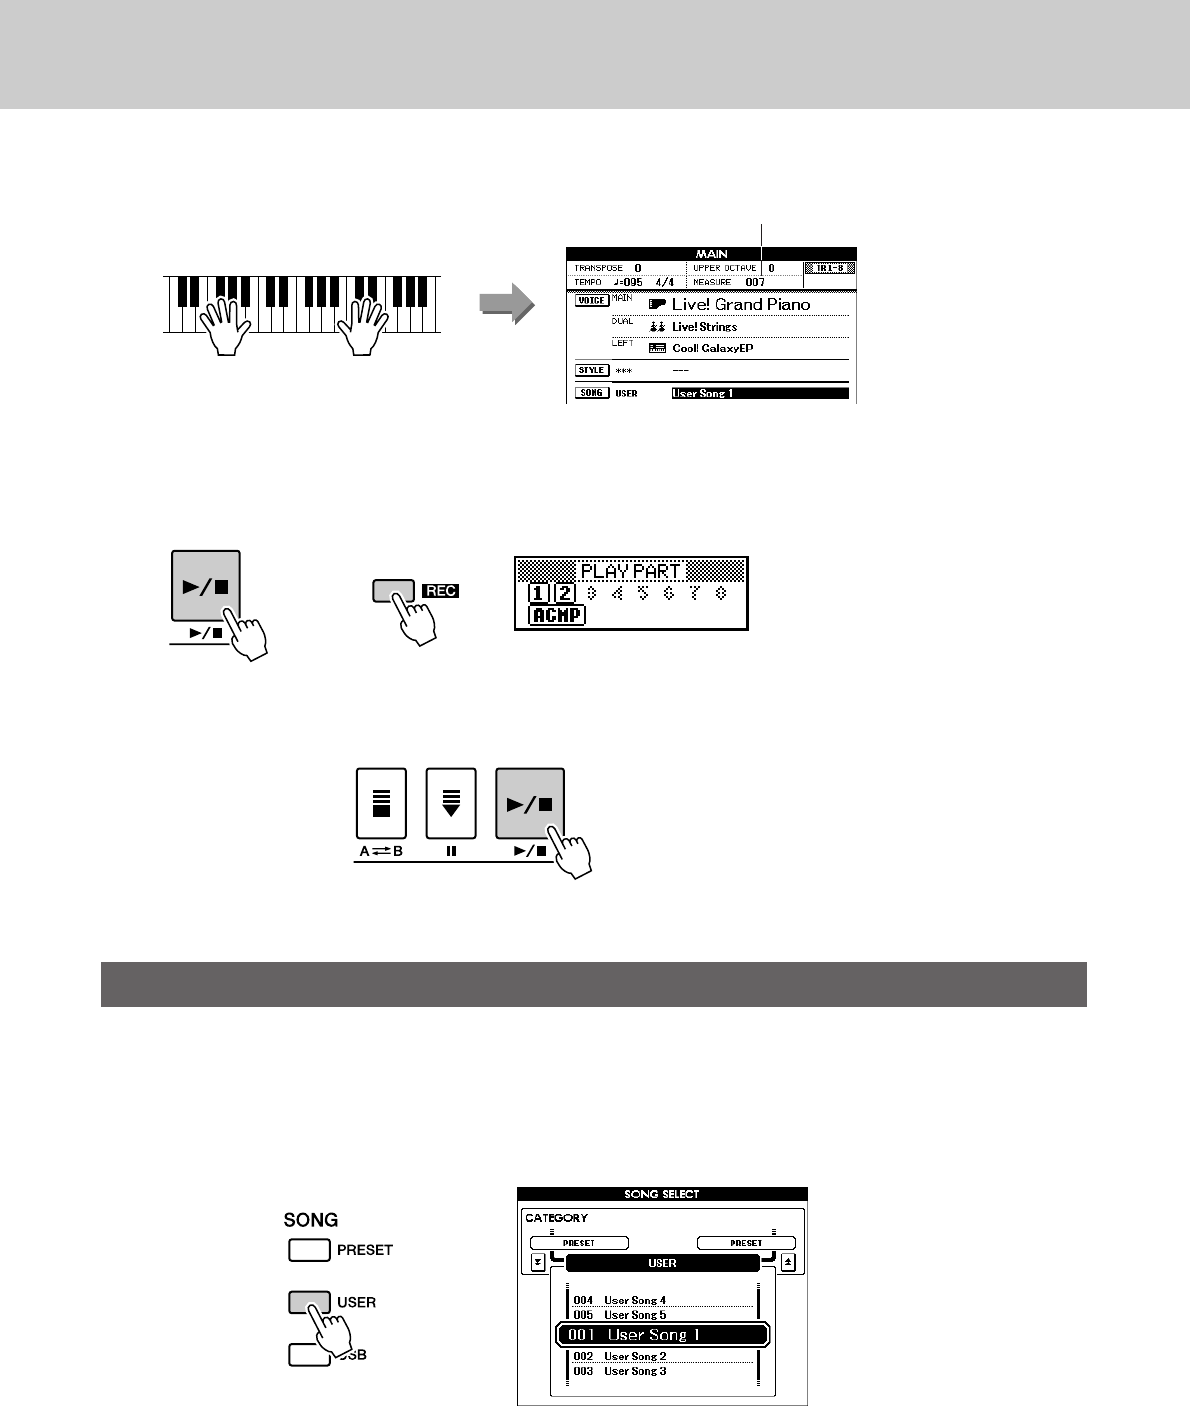
1Press the [REC] button.
The User Song number for recording will be selected automatically and
tracks [1]–[3] will be set to record ready mode. Performance parts are as
follow:
If accompaniment is set to ON before pressing [REC] button, accompa-
niment track will be also set to recording ready mode automatically.
Make sure to turn the Dual Voice or Left Voice on when recording the
Dual Voice or Left Voice.
Quick Recording Procedure
Track 1 Main Voice part
Track 2 Dual Voice part
Track 3 Left Voice part
Track ACMP Accompaniment part
Melody or other parts Chord
parts
Tr a c k
1
Tr a c k
2
Tr a c k
3
Tr a c k
4
Tr a c k
5
Tr a c k
6
Tr a c k
7
Tr a c k
8
Tr a c k
ACMP
Main
Voice
part
Dual
Voice
part
Left
Voice
part
Other parts Style
Example: Part settings in Multi Recording
Specify track(s)
and record
•You can manually select the
recorded user Song number if
you select it before pressing the
[REC] button.
NOTE
REC ready
Recording Your Own Performance
34 PSR-S500 Owner’s Manual
2Recording will start when you play the keyboard.
3Stop recording by pressing the [>>
>>/■] or [REC] button.
Track numbers containing recorded data are indicated with framed rect-
angles.
4Press the [>>
>>/■] button to play back the recording.
You can set the recorded user Song number and the parts for tracks individually.
1From the MAIN display press the [USER] button, then use
the dial to select the user Song number (001–005) you
want to record to.
Multi-track Recording Procedure
Start
recording
Current measure number
or
Recording Your Own Performance
PSR-S500 Owner’s Manual 35
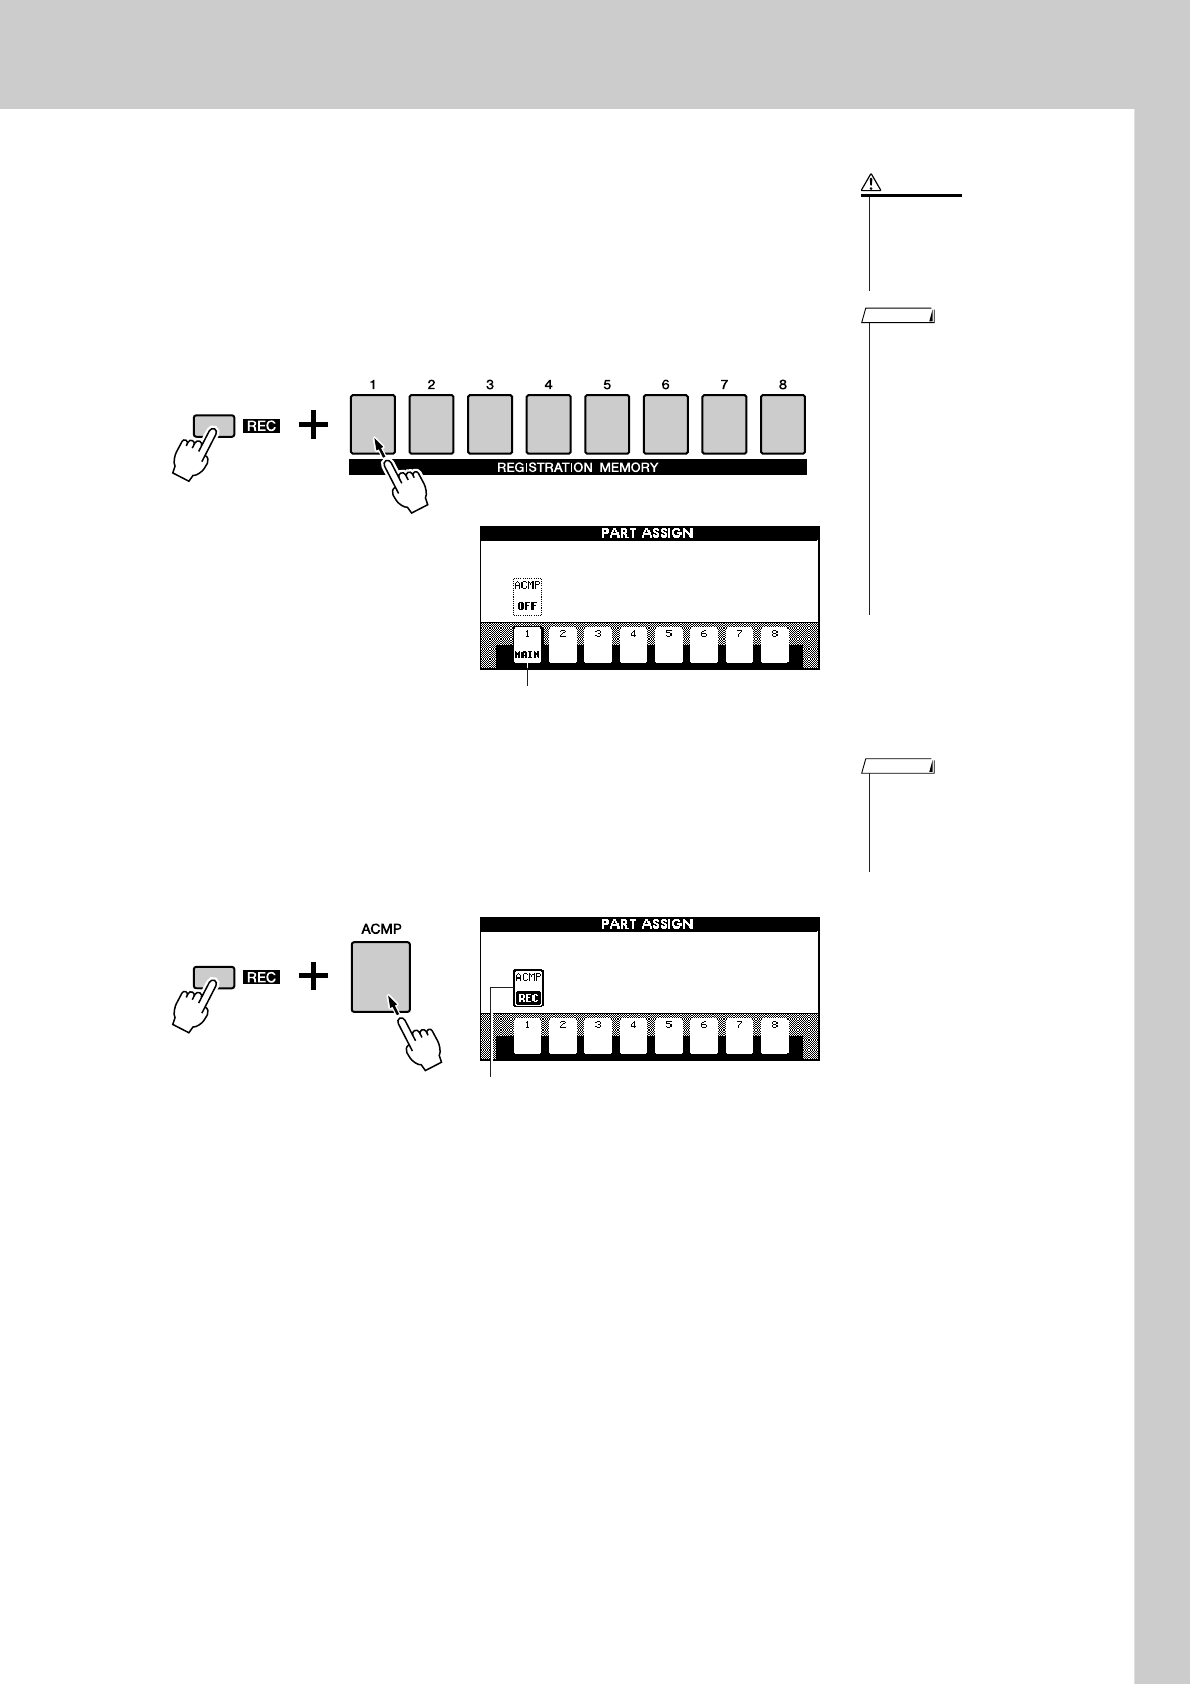
2Select the recording part for each track (Part Assign).
◆Selecting the part for the Melody track (tracks 1–8)
While holding down the [REC] button, press one of the track buttons
[1]–[8] until the desired part is shown at the track button. Each time you
press the button, the part is changed in order (such as MAIN, DUAL,
LEFT) in the Main display.
◆Selecting the part for the Accompaniment track
While holding down the [REC] button, press the [ACMP] button. The
REC indication will be highlighted in the display and operation will be
set to record ready mode.
•When ACMP track is set to REC
ON, the accompaniment will be
automatically set to ON.
• When press the [REC] button
during accompaniment on, the
ACMP track will be automati-
cally set to REC ON.
•ACMP ON/OFF does not
change while recording is in
progress.
• An assigned part cannot be
specified to another track.
•A maximum of three melody
tracks can be recorded simulta-
neously.
NOTE
• If you record your perfor-
mance to a track that con-
tains previous data, the
previous data will be overwrit-
ten by the new data.
CAUTION
Press and hold
Track 1 is MAIN part.
• If you want to cancel the record
ready mode of a track, simulta-
neously hold down the [REC]
button and press again the track
button you want to cancel.
NOTE
Press and hold
ACMP is set to record ready mode.
Recording Your Own Performance
36 PSR-S500 Owner’s Manual
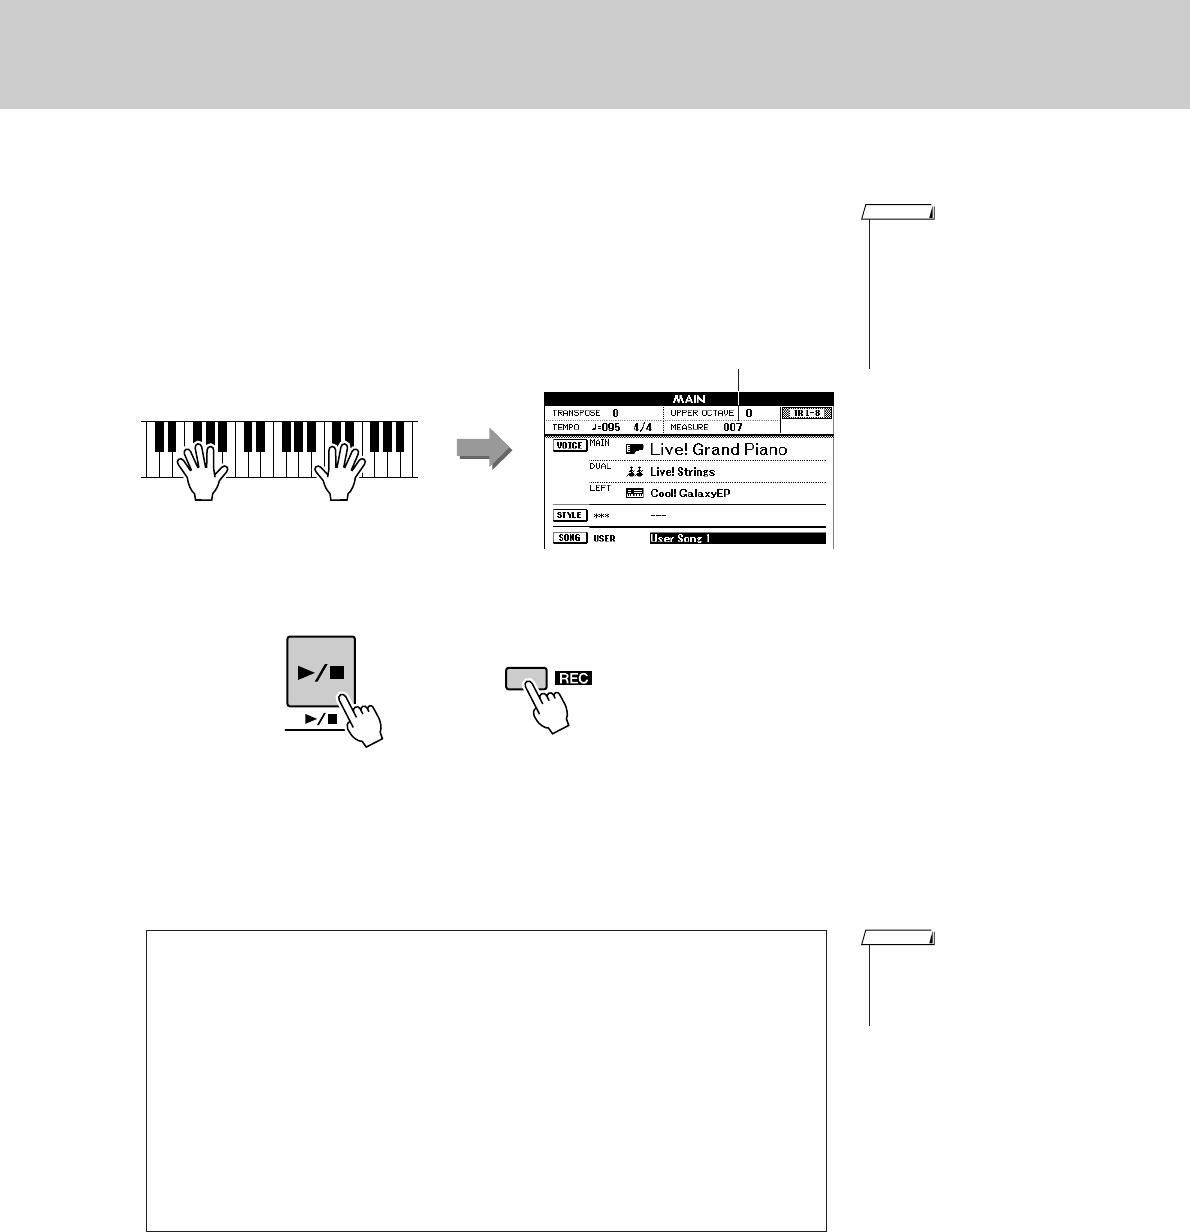
3Recording will start when you play the keyboard.
You can also start recording by pressing the [>/■] button.
Press the [EXIT] button, and the measure number is shown in the Main
display.
When recording is started, the display automatically returns to the Main
display.
4Stop recording by pressing the [>/■] or [REC] button.
Alternately, if you press one of the ENDING/rit. [I]–[III] buttons while
recording the ACMP track, an appropriate ending pattern will play and
then recording will stop. When recording stops, the current measure
number will return to 001 and the recorded track numbers in the display
will be shown in a box border.
5After the recording is completed:
◆Play the User Song
The operation is the same as that for Preset Songs (see page 27).
1Press the [USER] button.
2The current Song number/name will be highlighted—use the dial
to select the user Song (001 to 005) you want to play.
3Press the [>/■] button.
◆Save the User Song to USB flash Memory (see page 76)
◆Convert the Song data to SMF format and then save to
USB flash Memory (see page 77)
■To Record Other Tracks.
Repeat steps 2 through 4 to record any of the remaining tracks.
You can listen to the previously recorded tracks by pressing the appropriate [1]–
[8] buttons while recording. Previously recorded track numbers are shown in a
box border.
You can also mute previously recorded tracks (the muted tracks will not appear
in the display) while recording new tracks (page 66).
■Redo the Recording
Simply select the track you want to re-record for recording in the normal way.
The newly recorded material will overwrite the previous data.
• When Song memory is full, a
corresponding message is
shown in the display and record-
ing will be stopped. In this case,
delete any unnecessary Song
data by using Song clear or
track clear then start recording
again. (See page 37.)
NOTE
Start
recording
Current measure number
or
• Press the [REGIST/TRACK]
button a number of times until
the “TR 1–8” item appears on
the display.
NOTE
Recording Your Own Performance
PSR-S500 Owner’s Manual 37
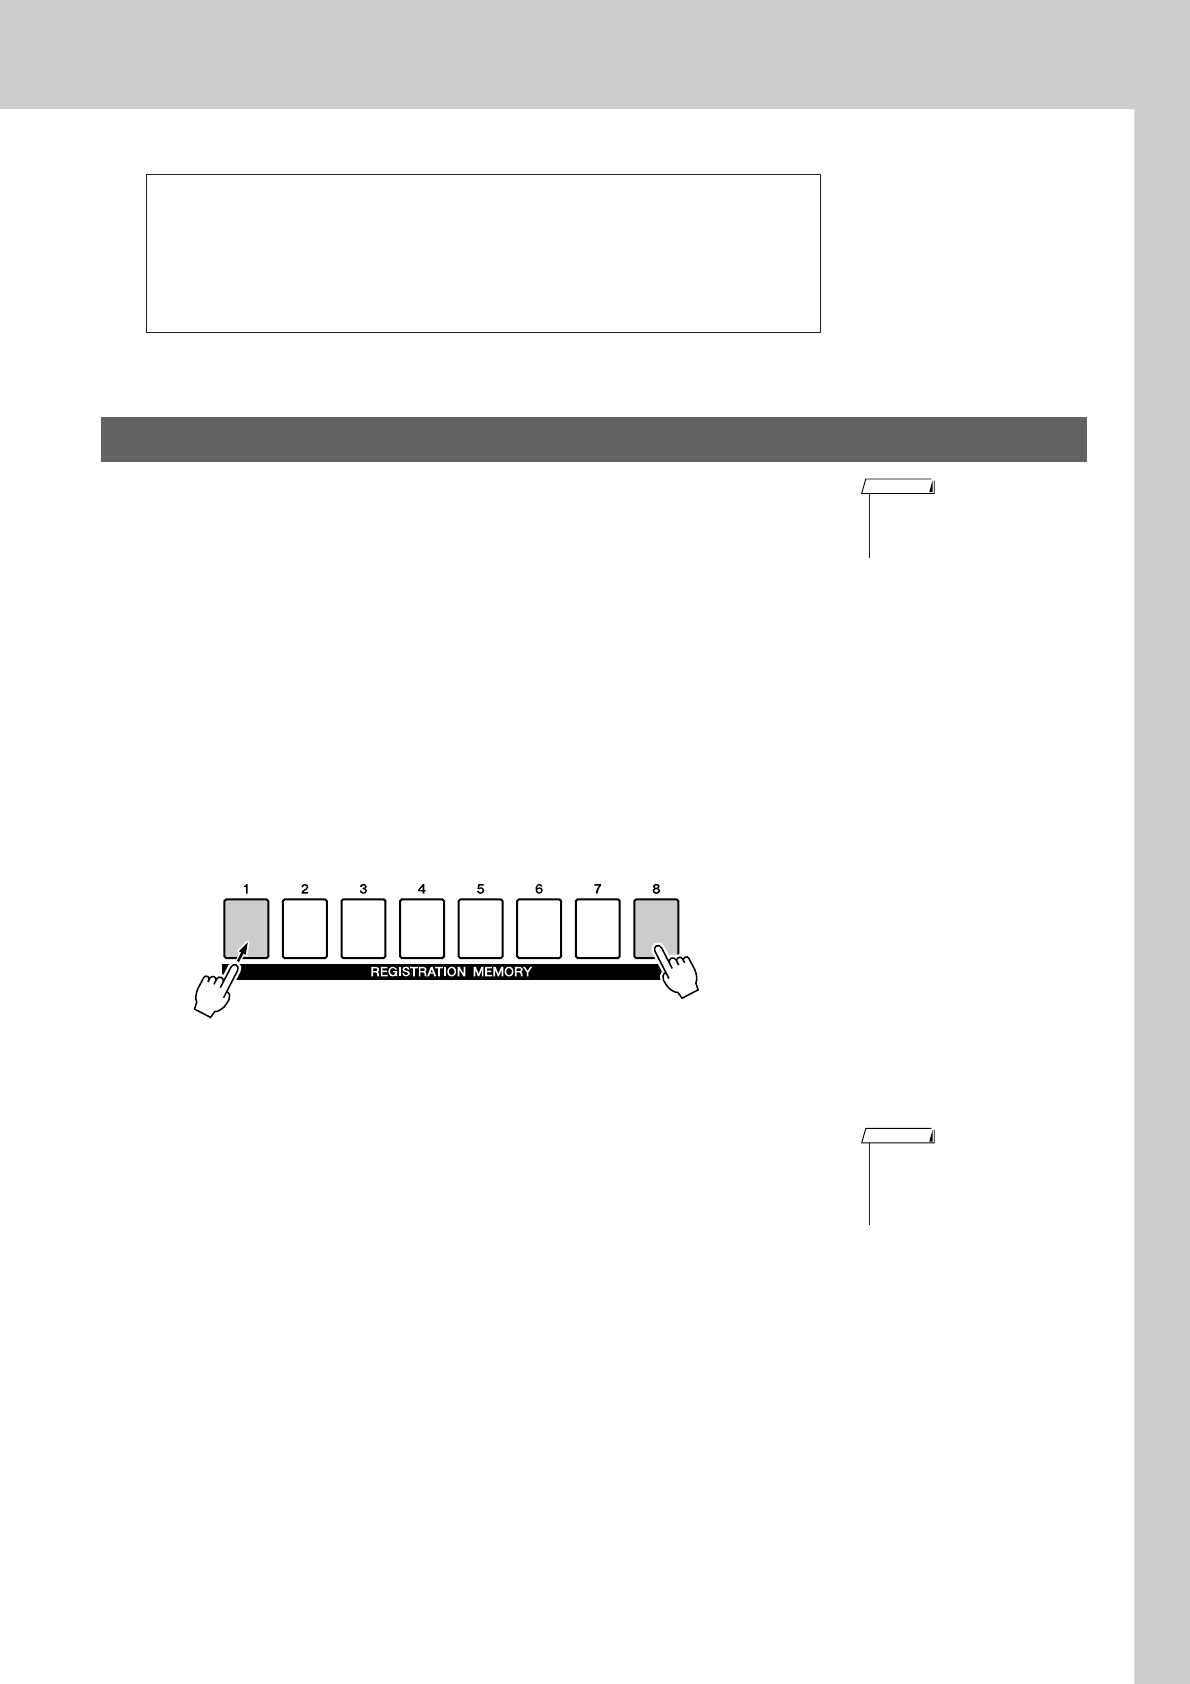
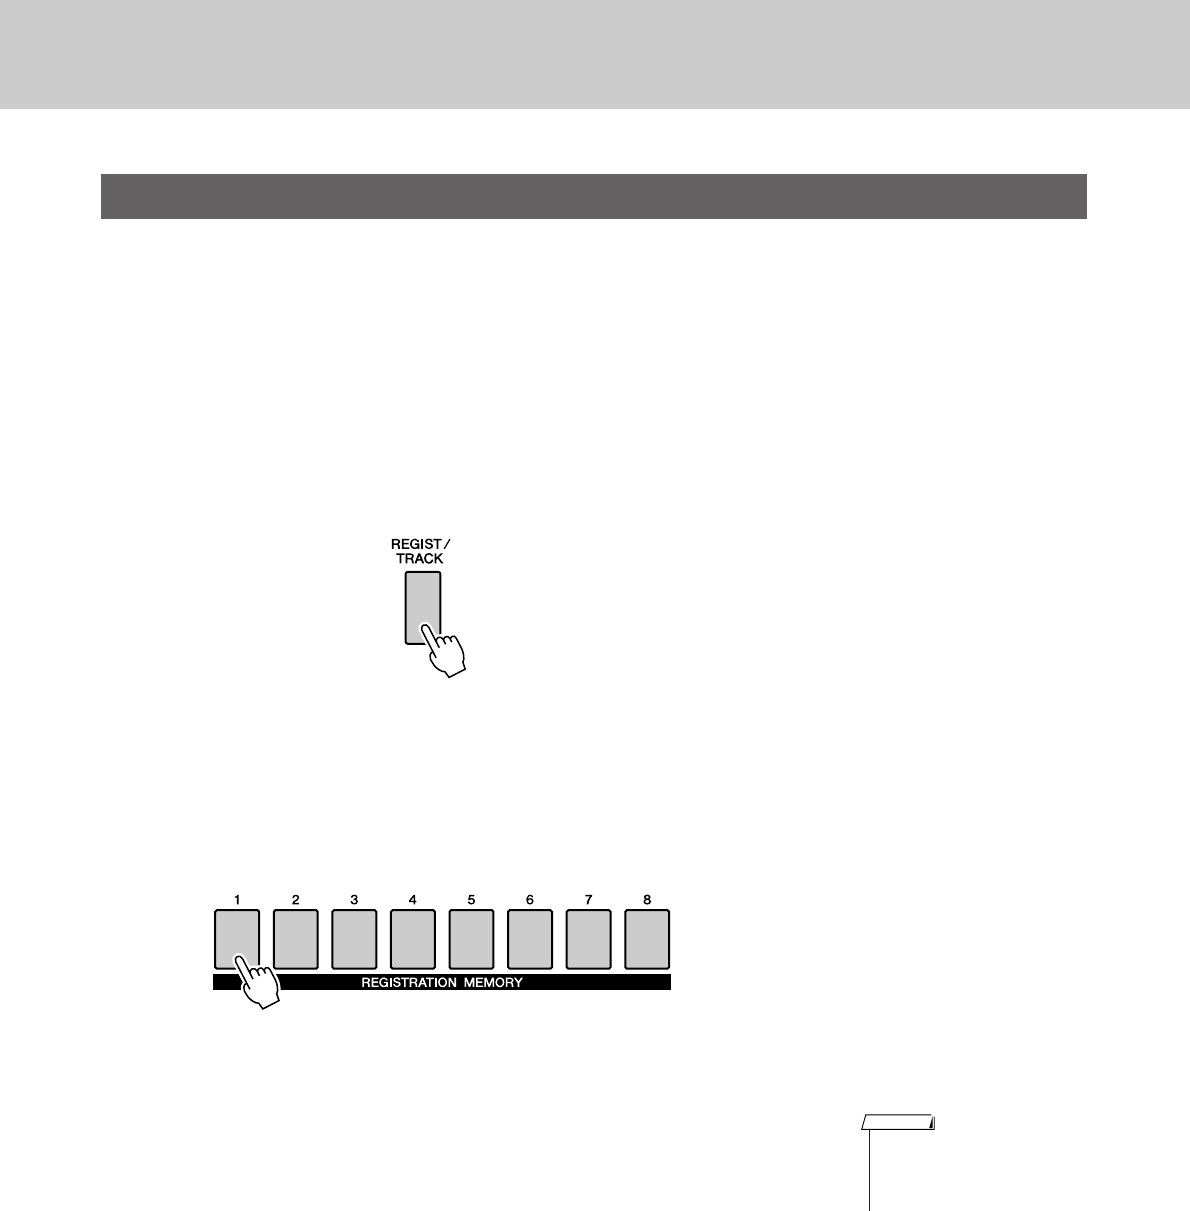
This function clears an entire user Song (all tracks).
1From the MAIN display, select the user Song (001 to 005)
you want to clear.
2
Press the [REGIST/TRACK] button a number of times until
the “TR 1–8” item appears on the display.
3
Press and hold the REGISTRATION MEMORY [1] button for
longer than a second while holding the REGISTRATION
MEMORY [8] button.
A confirmation message will appear on the display.
4Press the [+/YES] button.
A confirmation message will appear again on the display.
You can cancel the clear operation by pressing the [-/NO] button.
5Press the [+/YES] button again to clear the Song.
The clear-in-progress message will appear briefly on the display while
the Song is being cleared.
●Not recorded data
The following data is recorded before the beginning of the Song. Even if you
change the data while recording is in progress, the data is not recorded.
Reverb type, Chorus type, DSP type, DSP send level, Dry level, Style
number, Style volume, Time signature
Song Clear—Deleting User Songs
• If you want to clear a single,
specified track, refer to the Track
Clear operation on page 38.
NOTE
Hold for longer than a second Press and hold
•To execute the Song Clear func-
tion press the [+/YES] button.
Press [-/NO] to cancel the Song
Clear operation.
NOTE
Recording Your Own Performance
38 PSR-S500 Owner’s Manual
This function lets you delete a specified track from a User Song.
1From the MAIN display select the User Song (001 to 005)
you want to clear.
2Press the [REGIST/TRACK] button a number of times until
the item you want to clear appears.
The item changes in order from “REGIST.” to “TR 1–8” to “ACMP.
TR”. Select the desired track: “TR 1–8” or “ACMP. TR”.
3Press and hold the REGISTRATION MEMORY track button
([1] to [8]) corresponding to the track you want to clear for
longer than a second.
A confirmation message will appear on the display.
4Press the [+/YES] button.
A confirmation message will appear again on the display.
You can cancel the clear operation by pressing the [-/NO] button.
5Press the [+/YES] button again to clear the Song.
The clear-in-progress message will appear briefly on the display while
the track is being cleared.
Track Clear—Deleting a Specified Track From a User Song
Hold for longer than a second.
•To execute the Track Clear func-
tion press the [+/YES] button.
Press [-/NO] to cancel the Track
Clear operation.
NOTE
PSR-S500 Owner’s Manual 39
Backup and Initialization
The following data items are automatically saved as backup data in the internal memory even if you turn the
power off. To recall the default settings and data, use the Initialization operation.
This function erases all backup data in the instrument's internal memory and restores the initial default set-
tings and data.
The following initialization procedures are provided.
■Backup Clear ● ● ● ● ● ● ● ● ● ● ● ● ● ● ● ● ● ● ● ● ● ● ● ● ● ● ● ● ● ● ● ●
To clear data backed up to the internal memory, simultaneously hold the
highest white key on the keyboard and turn the power on by pressing the
[STANDBY/ON] switch. The backed up data will be erased and the
default values restored.
■MEMORY Clear ● ● ● ● ● ● ● ● ● ● ● ● ● ● ● ● ● ● ● ● ● ● ● ● ● ● ● ● ● ●
To clear the Song data or Style file that has been transferred to the inter-
nal memory from a computer, simultaneously hold the highest white key
on the keyboard and the three highest black keys and then turn the
power on by pressing the [STANDBY/ON] switch.
Backup
●Backup parameters
• USER Song
• Style file
• Registration memory
• Auto Fill In On/Off
• Each parameters in the function display:
Tuning, Split point, Touch sensitivity, Style volume, Song volume, Metronome volume,
Demo cancel, Language, Master EQ type, Chord fingering
Initialization
•Language settings for the instru-
ment cannot be changed in this
operation. If you want to change
the language, use the Function
settings.
NOTE
• When you execute the Clear
operation, Song data you
have purchased will also be
cleared. Be sure to save any
important data to a computer.
CAUTION
40 PSR-S500 Owner’s Manual
Basic Operation and Displays
Overall PSR-S500 control is based on the following simple operations.
Basic Operation
1
Use the category buttons to select a CATEGORY.
2
Use the dial to select an item or value.
3
Starting/stopping a Song or Style.
1 1 3 2 1
Display
(pages 42, 43)
●Volume Adjustment
Adjusts the volume of the
sound heard via the instru-
ment’s speakers or a pair of
headphones plugged into
the PHONES jack.
Rotate coun-
terclockwise
to lower the
volume.
Rotate clock-
wise to
increase the
volume.
Song
category
Style
category
Voice
category
1 Use category buttons to select a CATEGORY.
●Song category
Select the Song category you want to play
●Style category
Select the Style category you want to play
●Voice category
Select the Voice category you want to play
* If you want to change the category, press another category button or use the Category [ ], [ ] button.
f
r
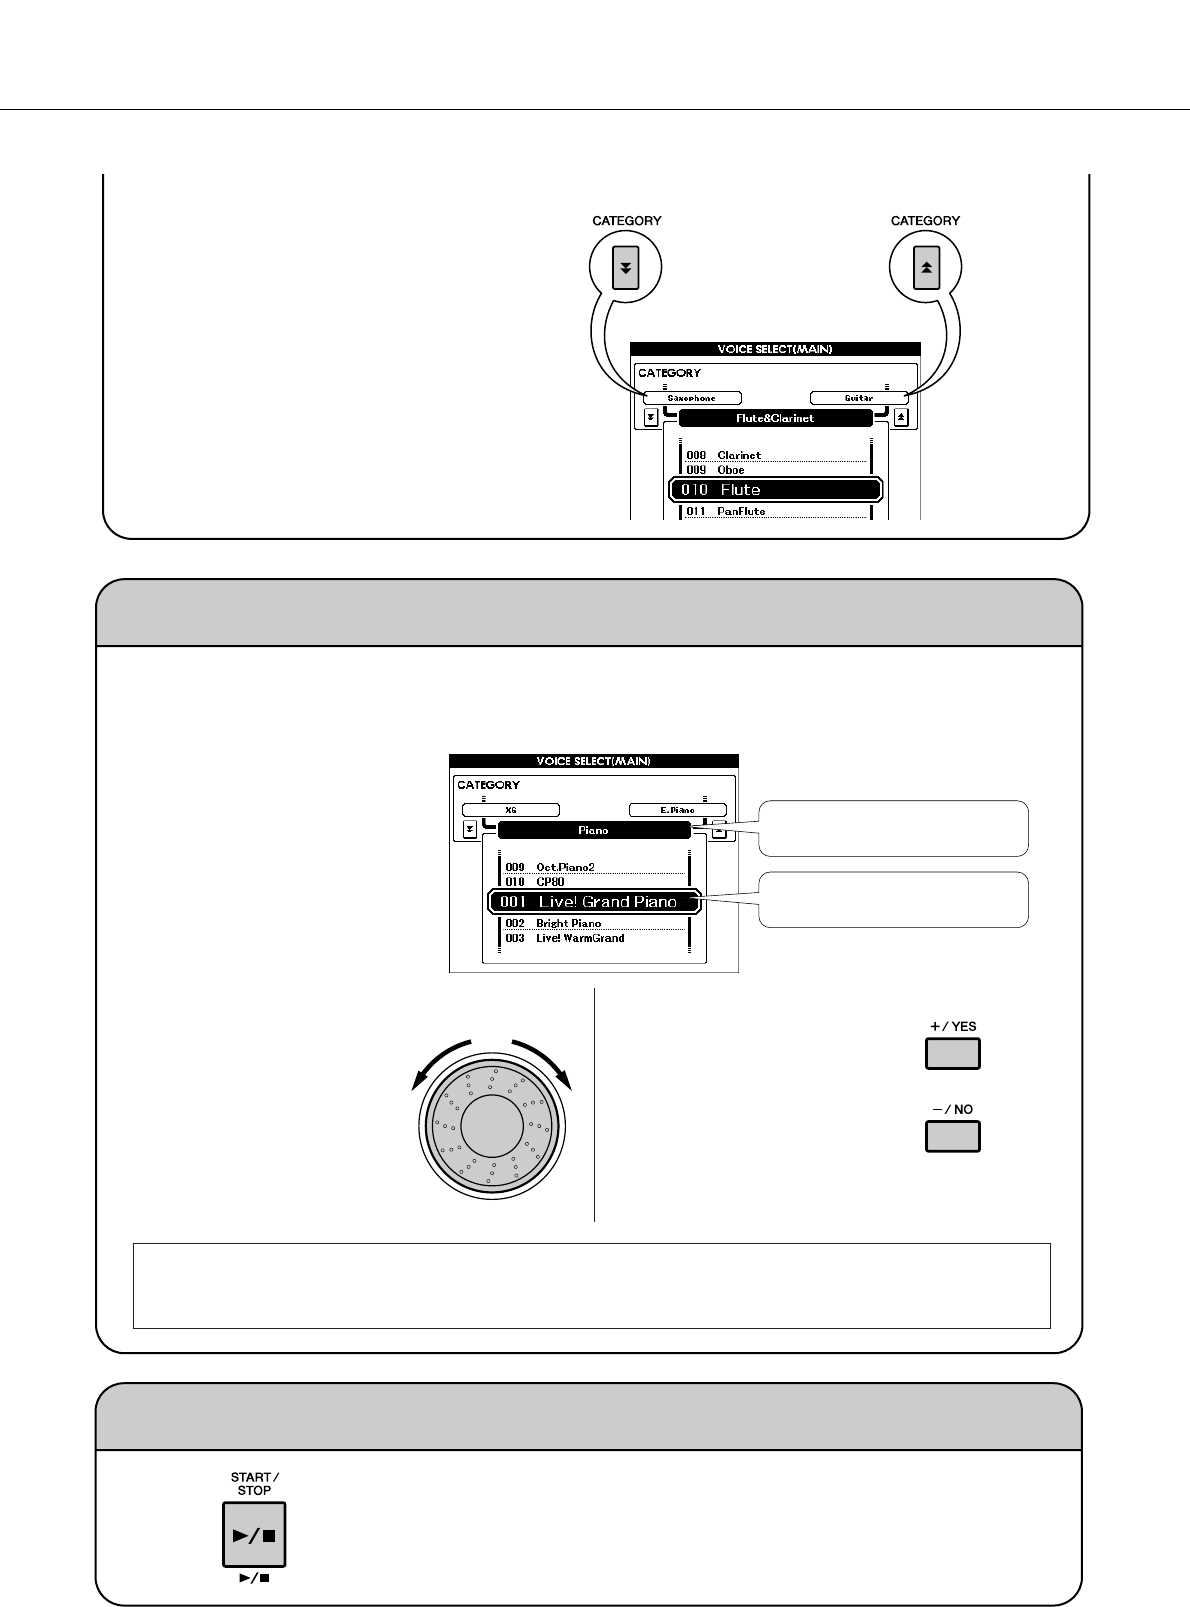
Basic Operation and Displays
PSR-S500 Owner’s Manual 41
3 Starting/stopping a Song or Style.
Press the [START/STOP] button after selecting the Song cate-
gory or Style category to start playback of the selected Song or
Style (rhythm).
●Category buttons [ ], [ ]
You can change the category after
you’ve selected a Song, Style or
Voice category.
Pressing these buttons allow you to
step in sequence through the catego-
ries.
f
r
2 Use the dial to select an item or value.
When you select the category such as Song, Style or Voice, the selected category name and item is
shown on the display. The item can be changed by using the dial or the [+/YES], [-/NO] buttons.
●Dial
Rotate the dial clockwise to
increase the value of the
selected item, or counter-
clockwise to decrease its
value. Rotate the dial to con-
tinuously increase or decrease
the value.
Currently selected category name
Currently selected item
●[+/YES], [-/NO] buttons
Press the [+/YES] button
briefly to increment the value
by 1, or press the [-/NO] button
briefly to decrement the value
by 1. Press and hold either but-
ton to continuously increment
or decrement the value in the
corresponding direction.
Decrease Increase
Press
briefly to
decrement.
Press
briefly to
increment.
In most procedures described throughout this owner’s manual, the dial is recommended for selection sim-
ply because it is the easiest and most intuitive selection method. Please note however, that most items or
values that can be selected using the dial can also be selected using the [+/YES] and [-/NO] buttons.
Example: Voice selection display
Previous category Next category
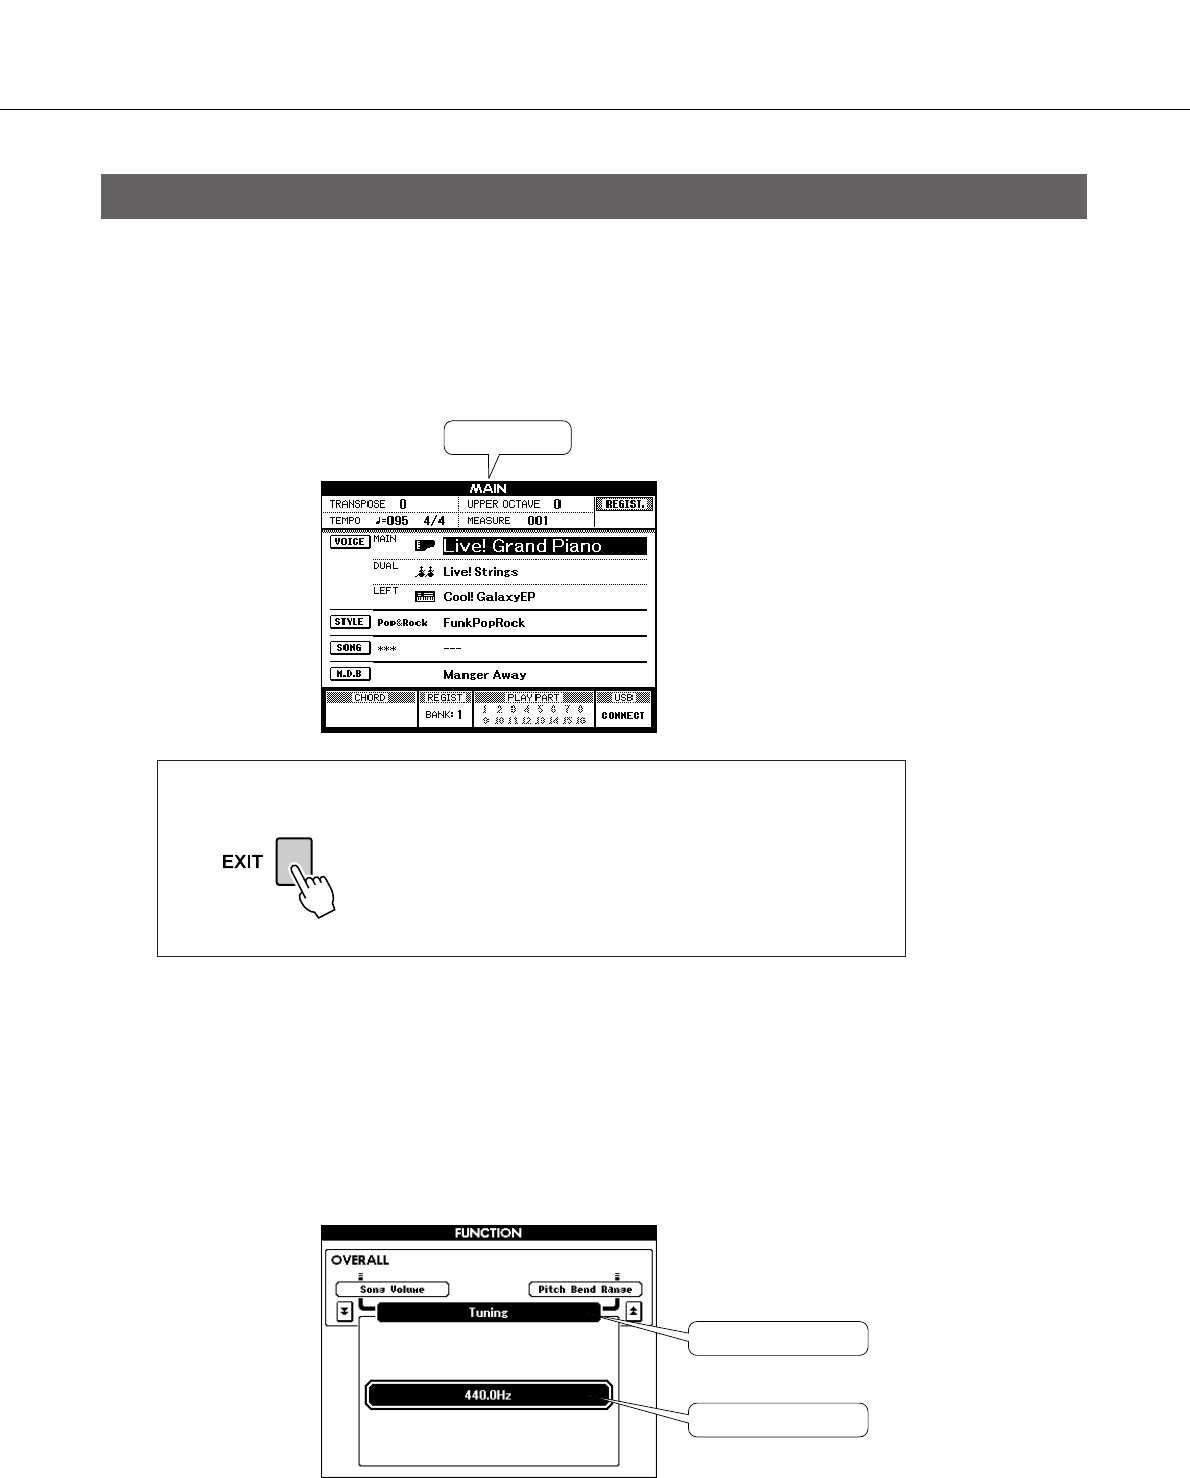
Basic Operation and Displays
42 PSR-S500 Owner’s Manual
●Display names
The display provides important, easy-to-understand indications for performing all operations.
The name of the current display appears at the top of the display.
You can see the “MAIN” indication at the top on the display.
●MAIN Display
●FUNCTION display (page 70)
The FUNCTION display provides access to 49 utility functions. The FUNCTION display appears when the
[FUNCTION] button is pressed.
In the FUNCTION display you can use the CATEGORY [ ] and [ ] buttons (page 41) to select 49 differ-
ent function items.
Press the CATEGORY button(s) as many times as necessary until the required function appears. You can
then use the dial or the [+/YES] and [-/NO] buttons to adjust the value of the function as required.
The Displays
Call up the Main display
Most basic operations are carried out from the
instrument’s MAIN display.
You can return to the MAIN display from any other
display by pressing the [EXIT] button near the lower
right corner of the display panel.
Title
f
r
Function item
Value
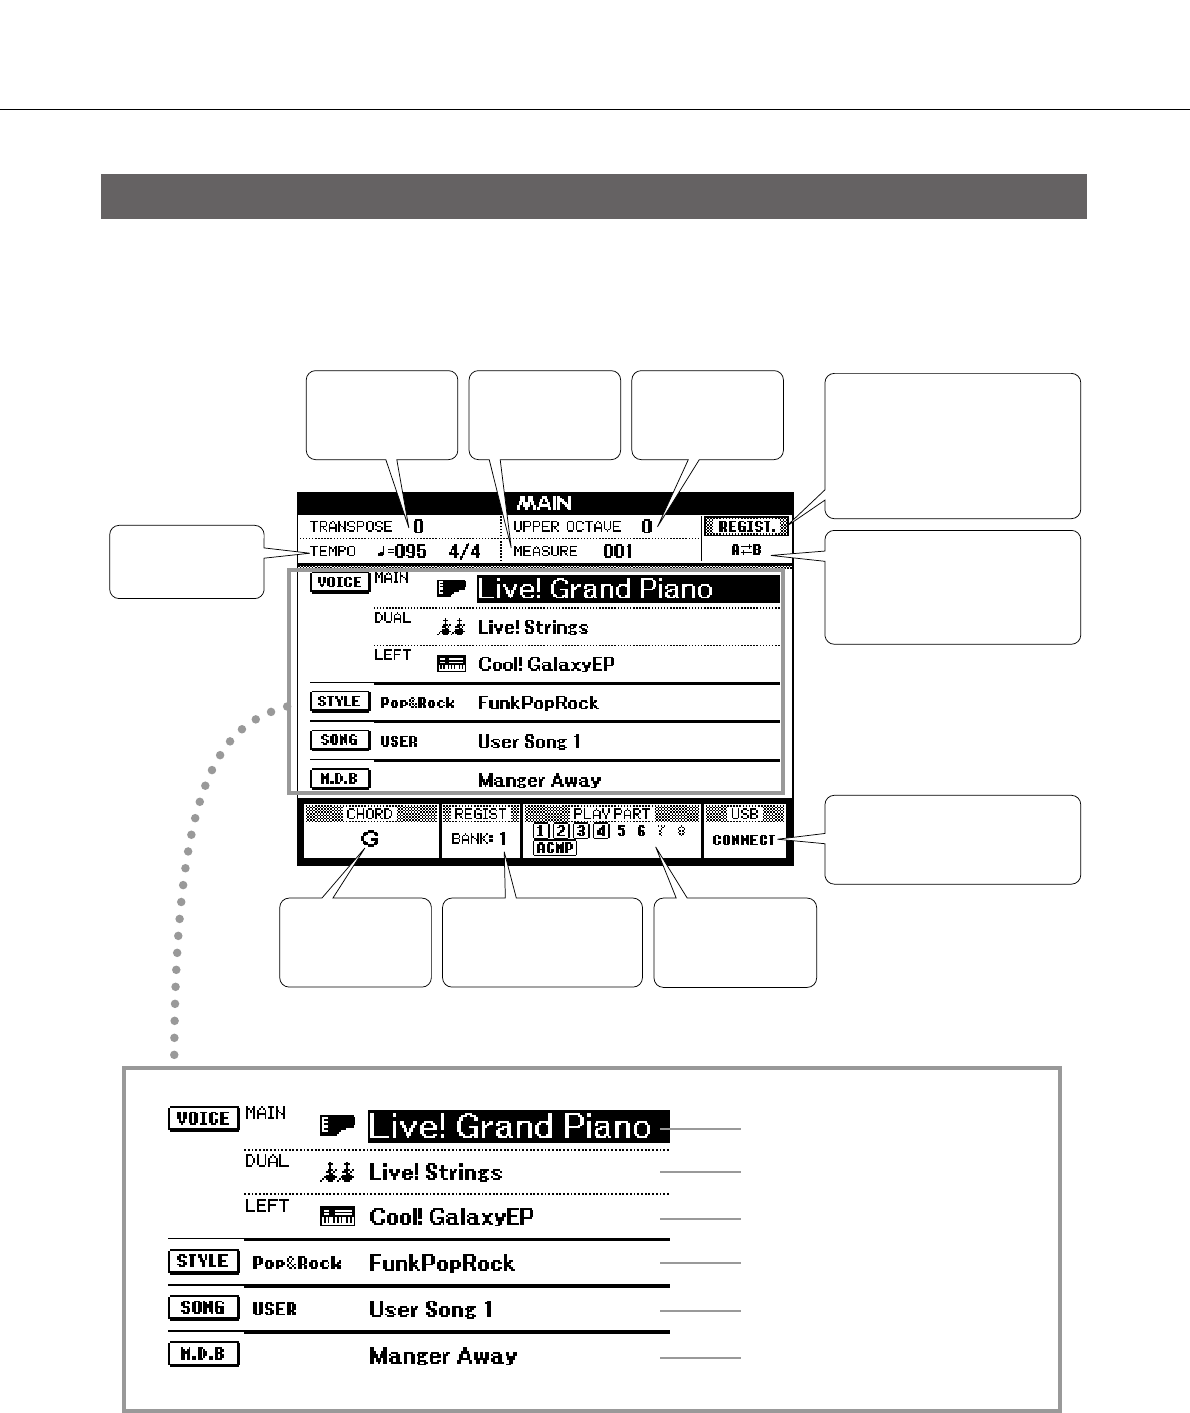
Basic Operation and Displays
PSR-S500 Owner’s Manual 43
The MAIN display shows all of the current basic settings: Song, Style, Voice.
It also includes a range of indicators that show the on/off status of a range of functions.
MAIN Display Items
Tempo
(page 49, 51)
Transpose
(page 53)
Measure number
(page 36)
OCTAVE
(page 54)
REGISTRATION memory /
Song track indication
Shows currently selected item:
REGIST., TR 1–8, TR 9–16 or
ACMP (page 66)
A-B Repeat
Appears when the Repeat
function is on for Song play-
back. (page 65)
USB status
(page 74)
Chord Display
(page 25)
Registration memory
bank status
(page 67)
Song track status
(page 66)
Main Voice (page 17)
Dual Voice (page 18)
Left Voice (page 19)
Style (page 22)
Song (page 27)
Music Database (page 26)
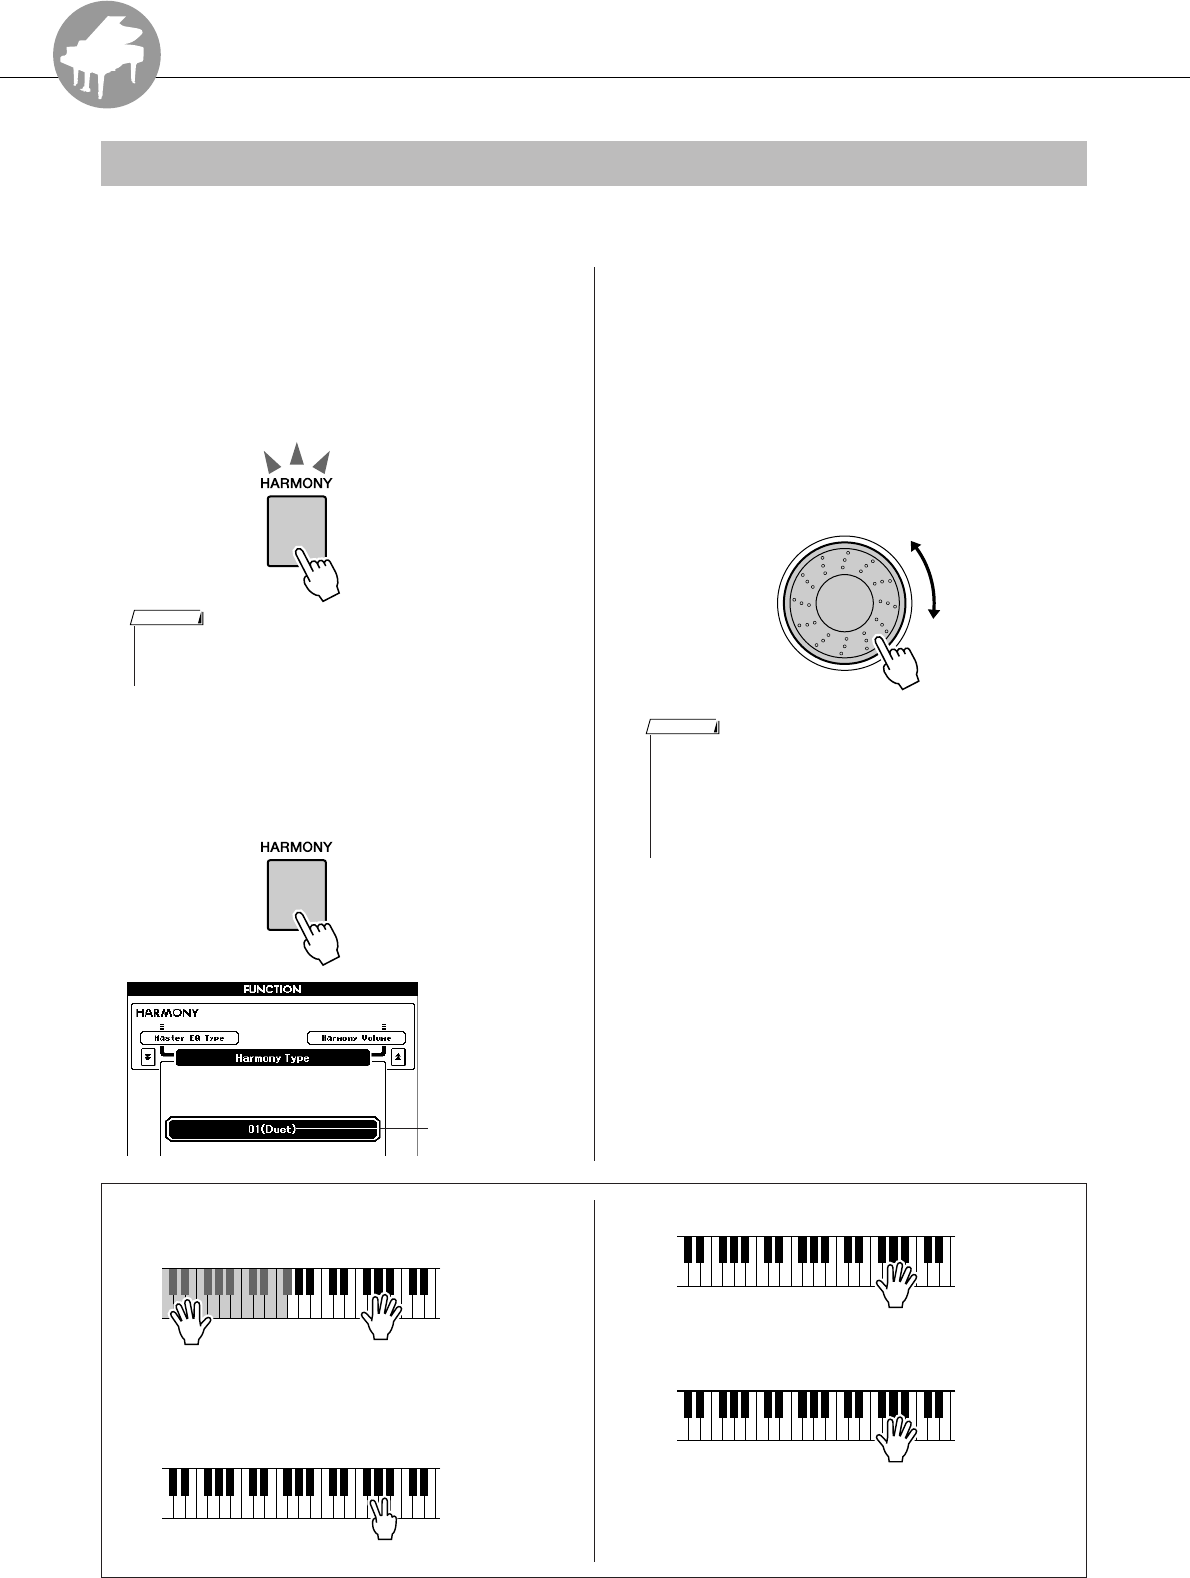
R
e
f
e
r
e
n
c
e
44 PSR-S500 Owner’s Manual
Playing with the Effects
This feature adds Harmony, Tremolo or Echo effects to the Main Voice.
1Press the [HARMONY] button to turn
the Harmony function on.
The [HARMONY] button lights indicating that
Harmony is on.
To turn Harmony off, press the [HARMONY]
button again.
2Press and hold the [HARMONY] button
for longer than a second.
The currently selected Harmony type will be
displayed.
3Use the dial to select a Harmony type.
Refer to the Effect Type List on page 110 for
information about the available Harmony
types.
Try playing the keyboard with the Harmony
function. The effect and operation of each Har-
mony type is different—for details, refer to the
section below “How to sound each Harmony
Type” as well as the Effect Type List.
Adding Harmony
• When you press the [HARMONY] button to turn this feature on, the
appropriate Harmony type for the currently selected Main Voice is
automatically selected.
NOTE
Hold for longer
than a second
Currently selected
Harmony type.
• The Harmony notes can be added only to the Main Voice, not to
Dual or Left Voices.
•The keys left of the Split Point of the keyboard produce no Harmony
notes when the Auto Accompaniment is on (ACMP ON lights).
•When chord fingering is set to Full Keyboard, the Harmony function
is turned off automatically.
NOTE
●How to sound each Harmony Type
• Harmony types 01 to 05
• Harmony types 06 to 12 (Trill)
Press the right-hand keys while playing chords in the
Auto Accompaniment range of the keyboard when the
Auto Accompaniment is on (page 23).
Hold down two keys.
• Harmony types 13 to 19 (Tremolo)
• Harmony types 20 to 26 (Echo)
You can adjust the Harmony Volume in the
Function Settings (page 72).
Keep holding down the keys.
Keep holding down the keys.
Reference
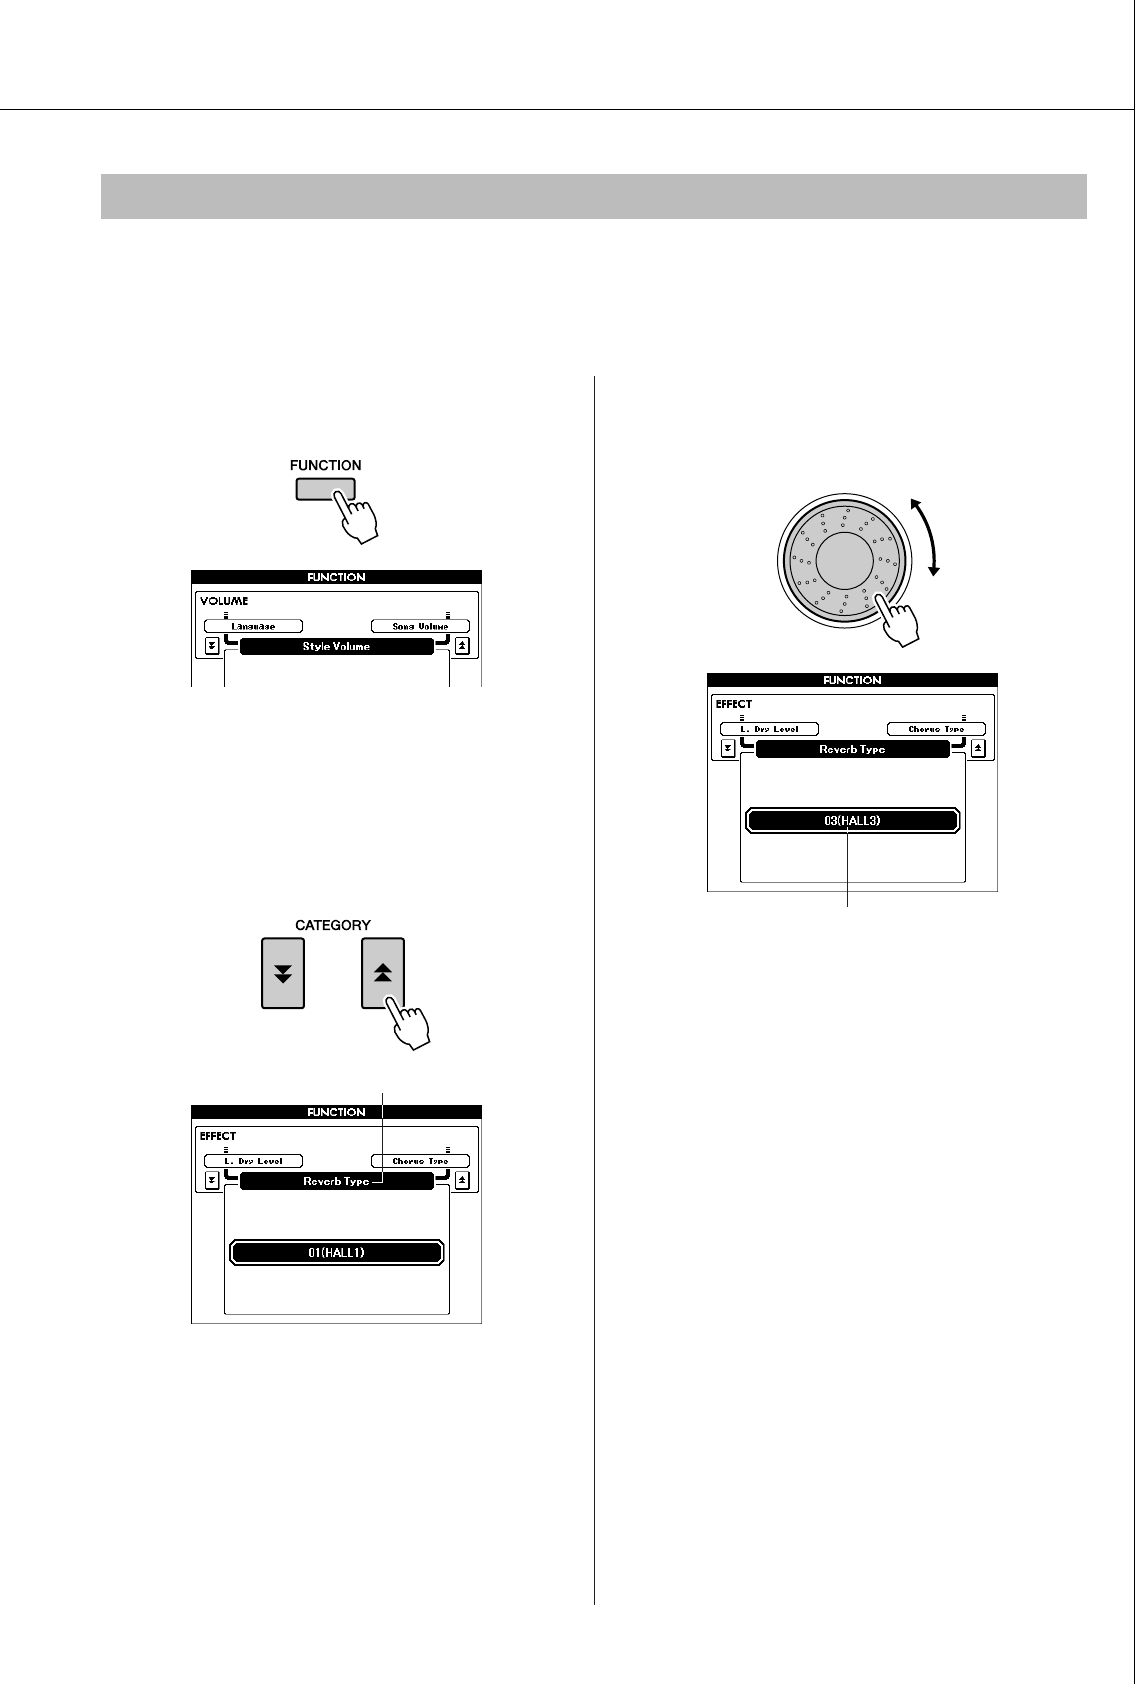
Playing with the Effects
PSR-S500 Owner’s Manual 45
Reverb enhances the sound of the Voices with the rich ambience of a concert hall.
When you select a Style or Song the optimum reverb type for the Voice used is automatically selected. If
you want to select a different reverb type, use the operation described below.
1Press the [FUNCTION] button to call up
the FUNCTION display.
2Press the CATEGORY [ ] and [ ] but-
tons as many times as necessary to call
up Reverb Type.
The currently selected Reverb Type will be dis-
played.
3Use the dial to select a Reverb Type.
You can check the sound of the selected Reverb
Type by playing the keyboard.
Refer to the Effect Type List on page 110 for
information about the available Reverb Types.
●Adjusting the Reverb Level
You can individually adjust the amount of reverb
that is applied to the Main, Dual, and Left Voices.
(See page 71).
Changing the Reverb Type
f
r
Reverb Type
Selected Reverb Type
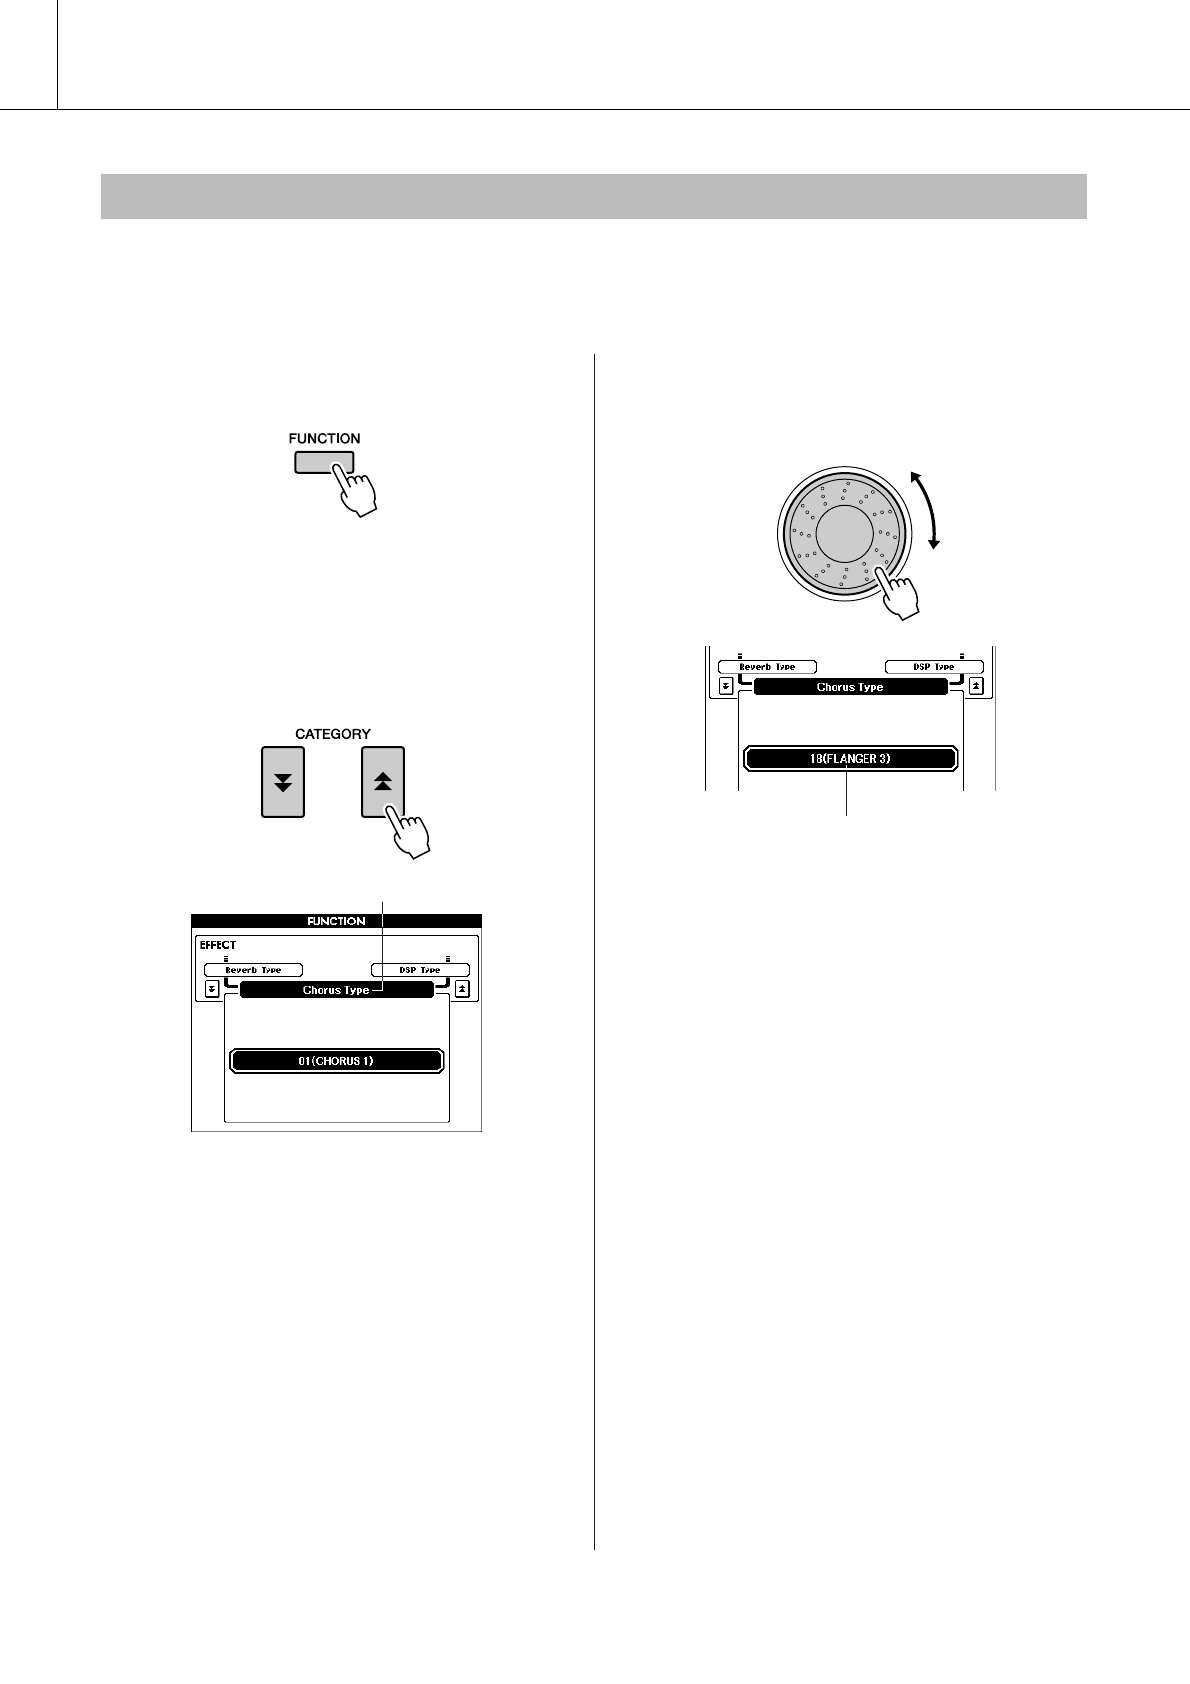
Playing with the Effects
46 PSR-S500 Owner’s Manual
The Chorus effect creates a thick sound that is similar to many of the same Voices being played in unison.
When you select a Style or Song the optimum chorus type for the Voice used is automatically selected. If
you want to select a different Chorus Type, use the procedure described below.
1Press the [FUNCTION] button to call up
the FUNCTION display.
2Press the CATEGORY [ ] and [ ] but-
tons as many times as necessary to call
up Chorus Type.
The currently selected Chorus Type will be dis-
played.
3Use the dial to select a Chorus Type.
You can check the sound of the selected Chorus
Type by playing the keyboard.
Refer to the Effect Type List on page 111 for
information about the available Chorus Types.
●Adjusting the Chorus Level
You can individually adjust the amount of Chorus
that is applied to the Main, Dual, and Left Voices.
(See page 71).
Changing the Chorus Type
f
r
Chorus Type
Selected Chorus Type
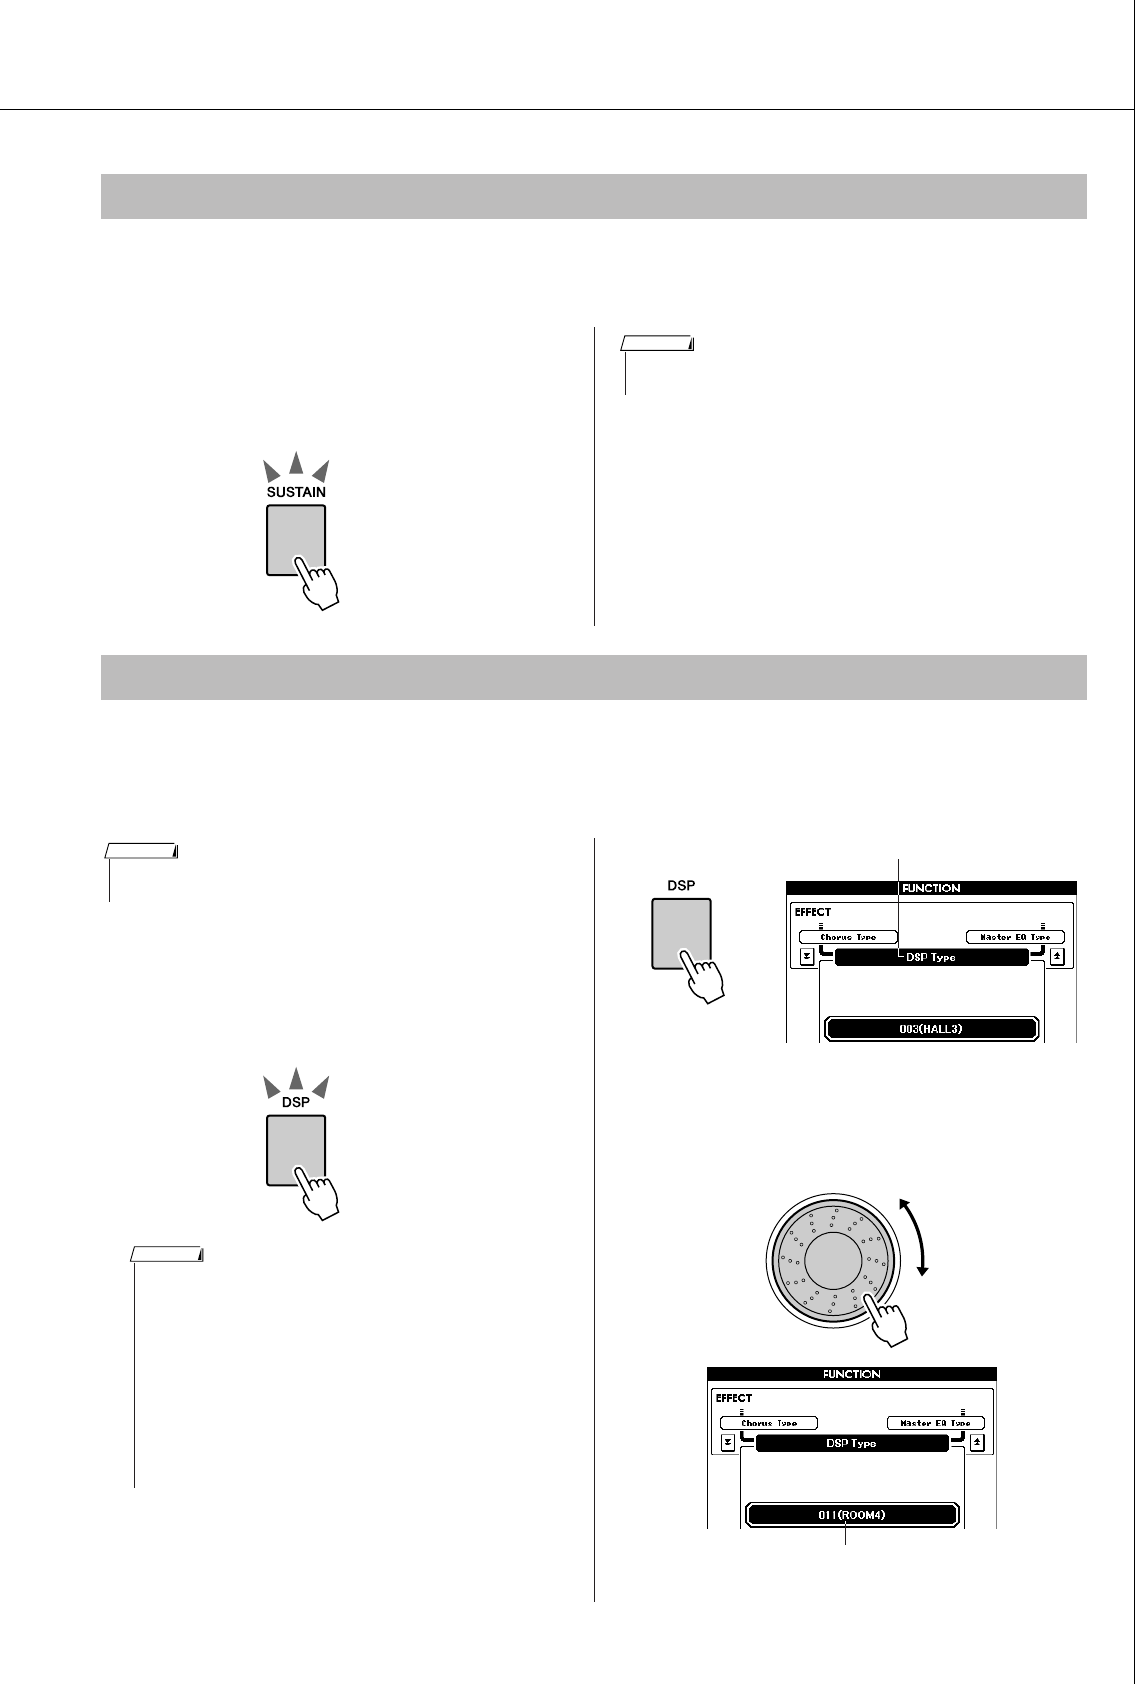
Playing with the Effects
PSR-S500 Owner’s Manual 47
This function adds sustain to the keyboard Voices. Use it when you want to add sustain to the Voices at all
times, regardless of footswitch operation. The sustain function does not affect the Left Voice.
Press the [SUSTAIN] button to turn the
sustain function on.
The [SUSTAIN] button lights indicating that
Sustain is on.
A total of 178 DSP effects can be added to the Main, Dual and Left Voices. These range from reverb-like
ambience effects to distortion and other dynamic processing tools that let you enhance the sound, or com-
pletely transform it.
1Use the [DSP] button to turn the DSP
function on.
The [DSP] button lights indicating that DSP is on.
To turn DSP off, press the [DSP] button again.
2Press and hold the [DSP] button for
longer than a second.
The currently selected DSP type will be dis-
played.
3Use the dial to select a DSP type.
Refer to the DSP Type List on page 111 for
information about the available DSP types.
Panel Sustain
•For certain Voices, the sustain effect may not be obvious or audible,
even when the panel sustain function is turned on.
NOTE
Adding DSP
•DSP is term of abbreviated form of Digital Signal Processor and it uses a
micro processor to change the audio in various ways.
NOTE
[DSP] button lights
when DSP is on.
•When DSP is turned on, the optimum DSP type for the current Voice
is automatically selected.
• The volume of the currently playing Voice changes when turning
DSP on or off. This is not a malfunction. The amount of change dif-
fers depending on the selected Voice.
•The DSP type is an overall setting—only one type can be selected.
For this reason, when you play a newly loaded Song or Style, for
example, the currently playing Voices may not sound as expected.
This is normal, since the Song or Style has its own DSP type which
replaces any selection you’ve made before loading. A similar phe-
nomenon occurs when you use the [
f
], [
r
] buttons or A-B
Repeat function during song playback.
NOTE
Hold for longer
than a second
DSP Type
Currently selected DSP type.
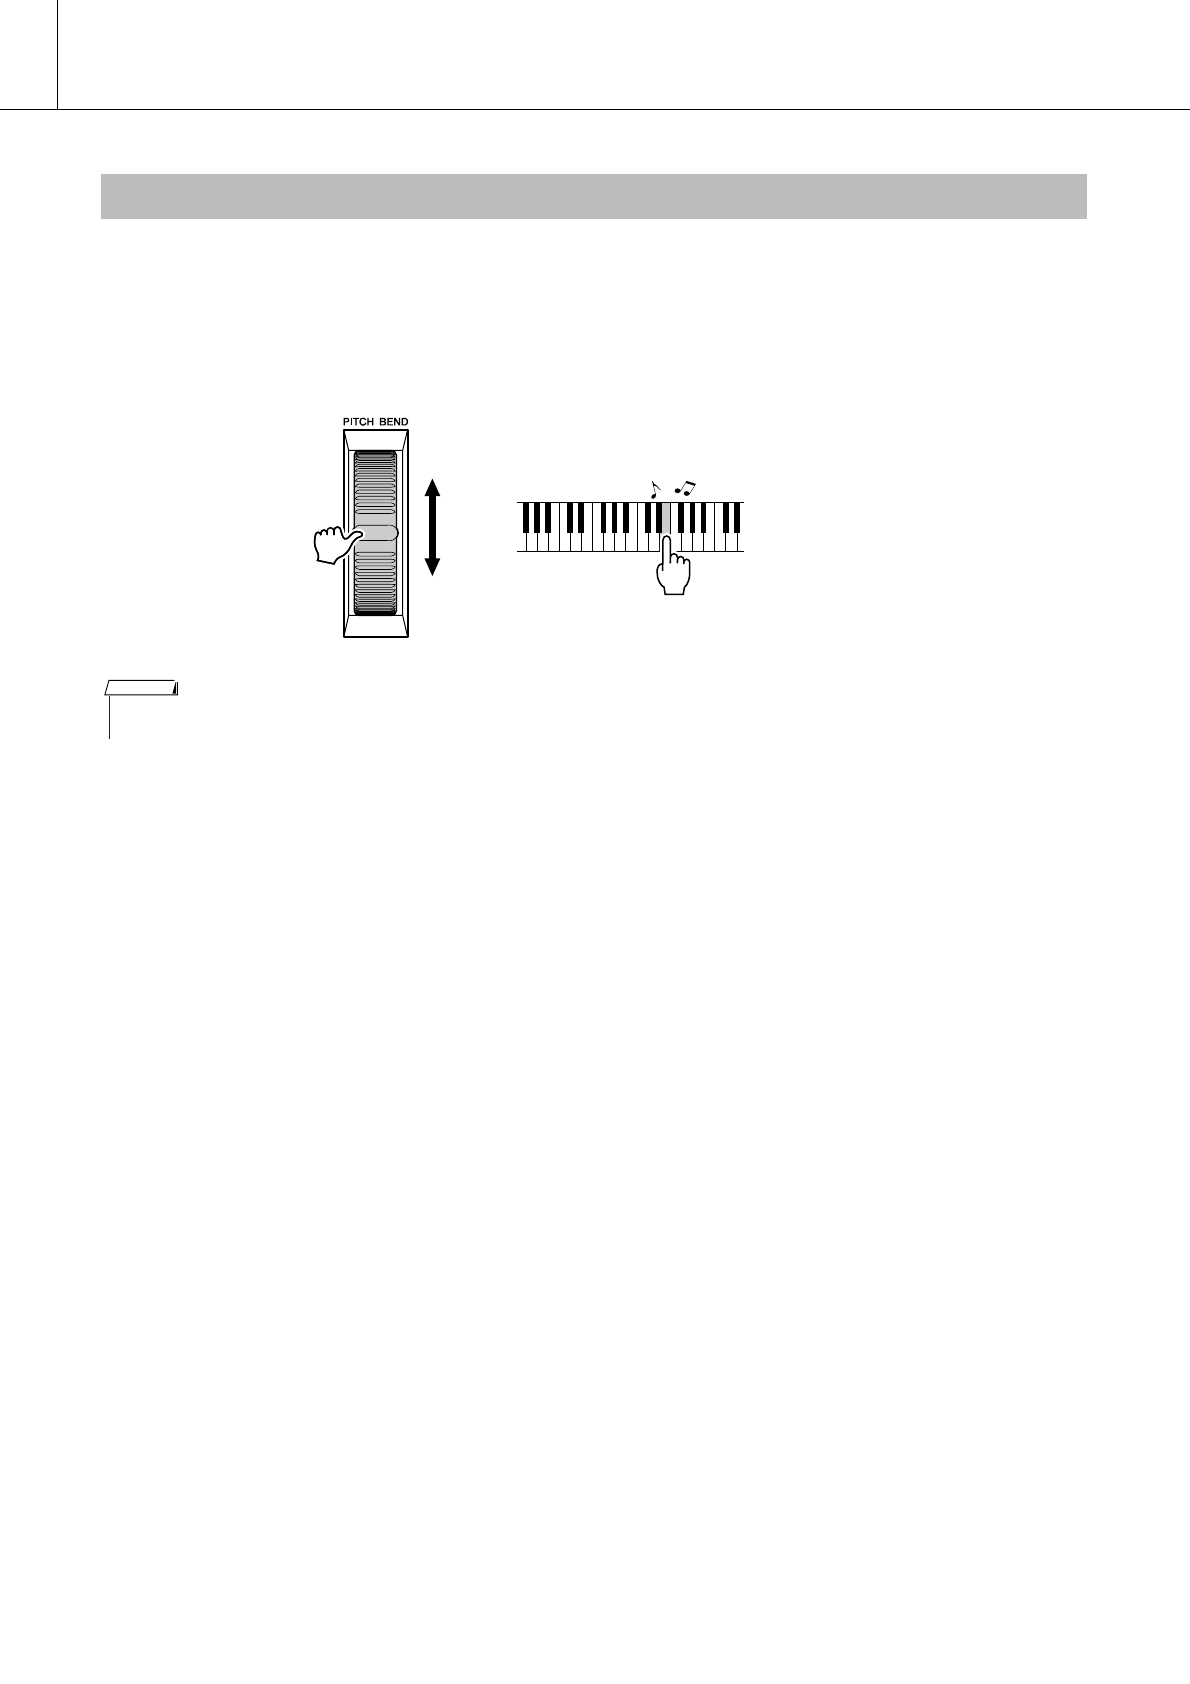
Playing with the Effects
48 PSR-S500 Owner’s Manual
The pitch bend wheel can be used to add smooth pitch variations to notes you play on the keyboard. Roll
the wheel upward to raise the pitch, or downward to lower the pitch. If you use this feature with a Voice
such as the “042 Overdriven” guitar Voice (page 17), you can produce remarkably realistic string-bending
effects.
You can change the amount of pitch bend produced by the wheel, as described on page 71.
Pitch Bend
• Pitch Bend is not applied to the Left Voice when accompaniment is
turned on.
NOTE
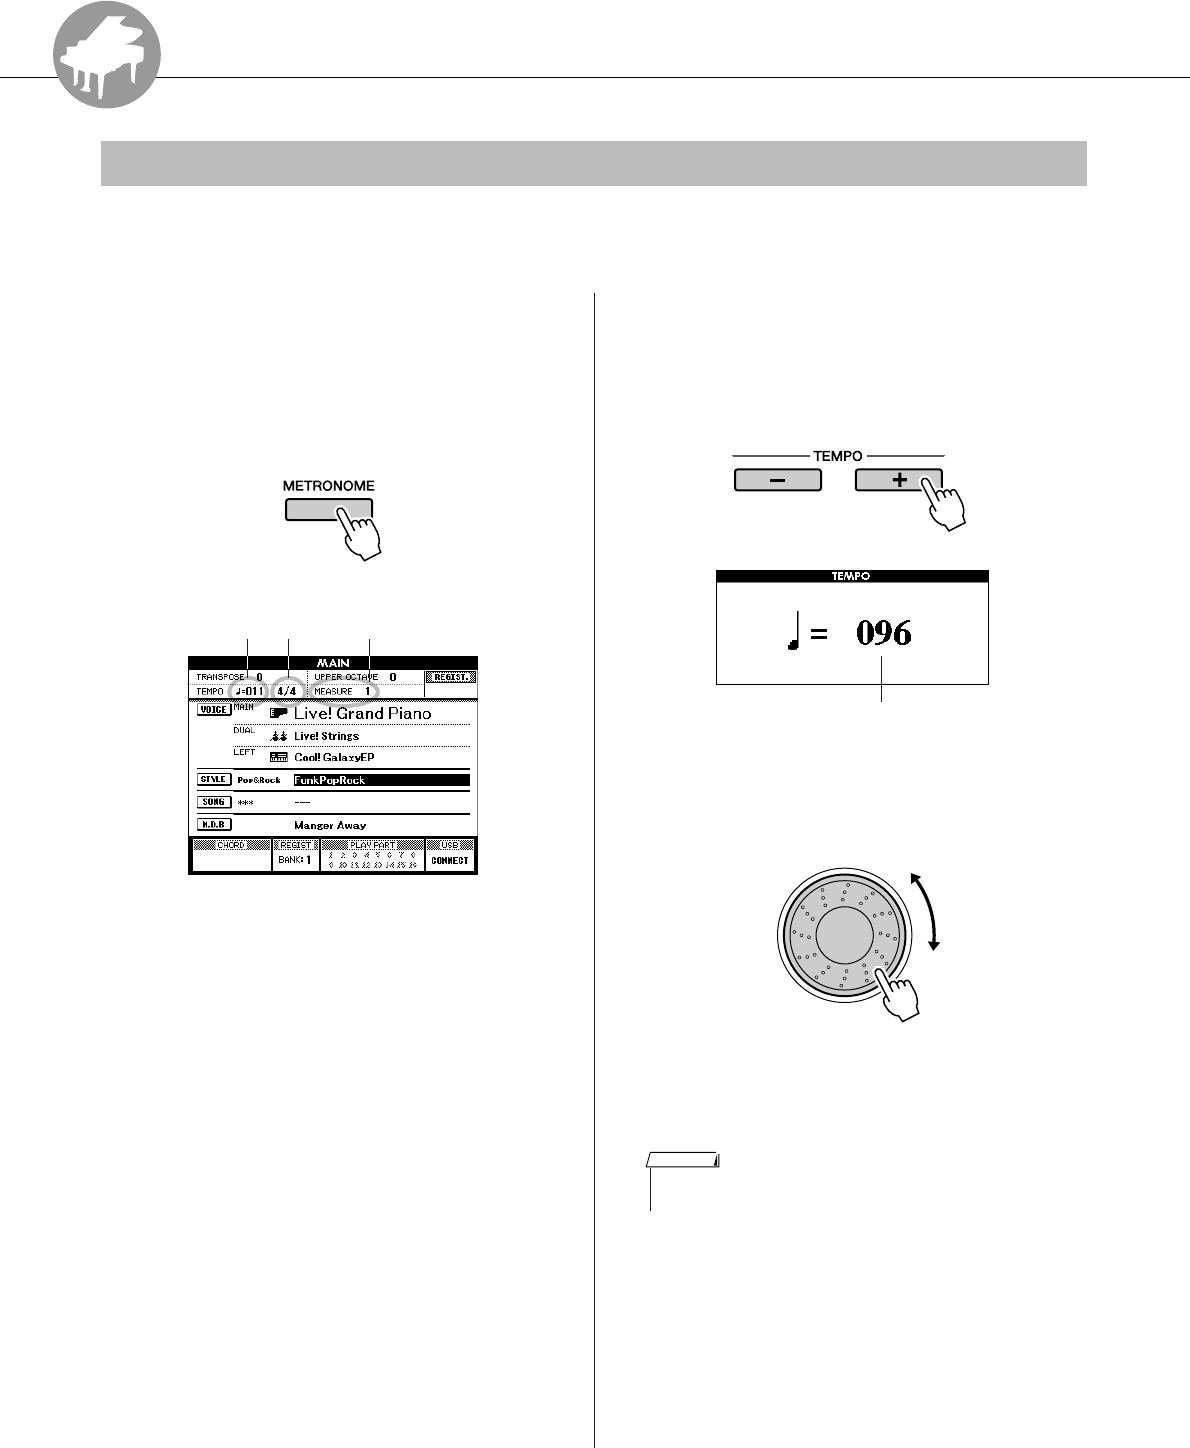
R
e
f
e
r
e
n
c
e
PSR-S500 Owner’s Manual 49
Using Various Functions
This instrument includes a metronome with adjustable tempo and time signature. Play and set the tempo
that is most comfortable for you.
■Turn the metronome on● ● ● ● ● ● ● ●
Press the [METRONOME] button to start
the metronome.
To stop the metronome, press the [METRO-
NOME] button again.
■Set the metronome tempo● ● ● ● ● ●
1Press the TEMPO [+]/[-] button to call up
the tempo setting and use the buttons
to raise or lower the tempo.
2Use the dial to select a tempo from 11 to
280.
Press the [EXIT] button to return to the Main
display.
Playing with the metronome
Beat numberTempo
Time
Signature
Tempo value
• The tempo can be changed by either pressing the TEMPO [+]/[-]
buttons repeatedly or holding them down.
NOTE
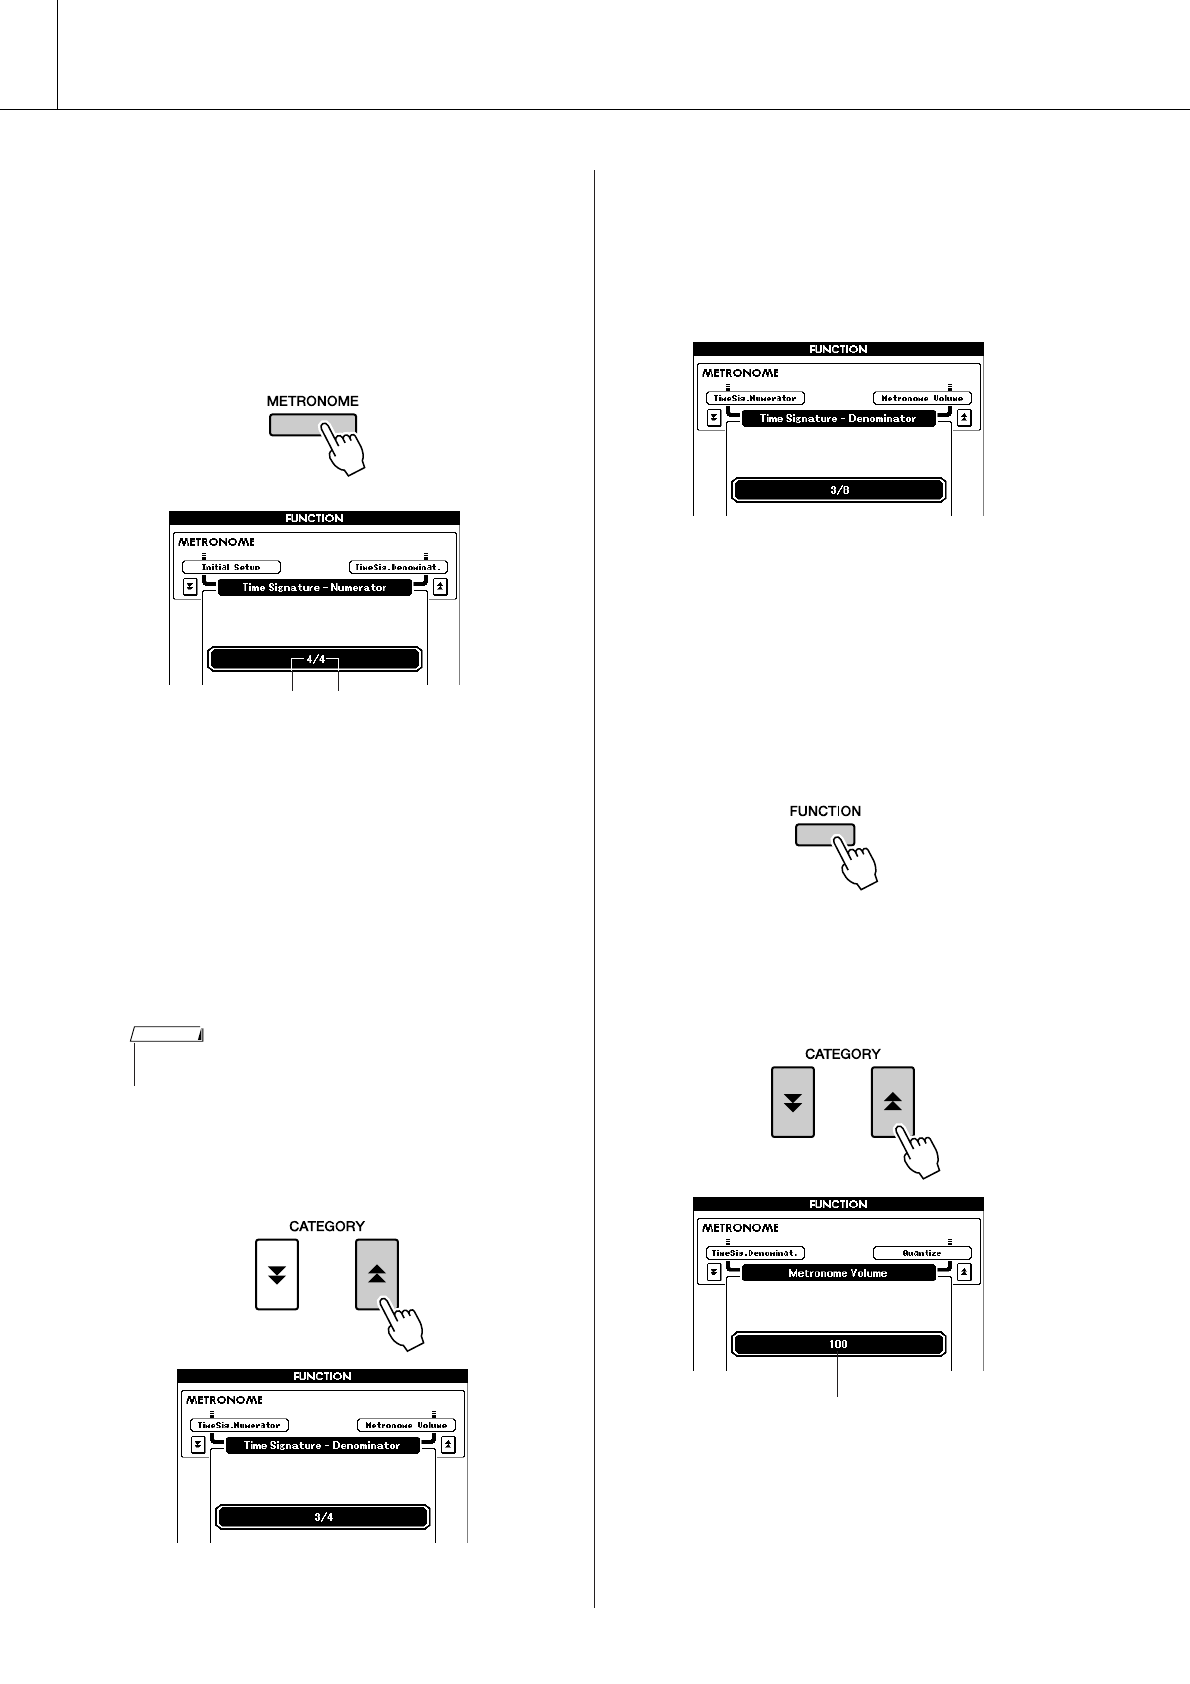
Using Various Functions
50 PSR-S500 Owner’s Manual
■Changing the Time Signature ● ● ●
In this example we’ll set up a 3/8 time signature.
1Press and hold the [METRONOME] but-
ton for longer than a second.
The currently selected time signature is dis-
played.
2Use the dial to select the number of
beats per measure.
A chime will sound on the first beat of each
measure, while a metronome “click” will sound
on all others. You can also set the time signa-
ture to “00,” in which case the chime will not
sound and the “click” sound will be heard on
all beats. Up to 60 can be set. Select 3 for this
example.
3Press the CATEGORY [ ] button once to
call up the Time Signature Denominator
display.
4Use the dial to select a beat length.
Select the required length for each beat: 2, 4, 8,
or 16 (half note, quarter note, eighth note, or
16th note). For this example, select 8. The time
signature should now be set to 3/8.
Press the [METRONOME] button to confirm
the settings.
■Adjusting the Metronome Volume
1Press the [FUNCTION] button.
2Press the CATEGORY [ ] and [ ] but-
tons as many times as necessary to call
up Metronome Volume.
3Use the dial to set the metronome vol-
ume.
Hold for longer
than a second
Note value (the note value
or length of one beat)
Number of beats
per measure
• When playing the Song or Style the beat value cannot be changed,
since the beat is synchronized to the selected Song or Style.
NOTE
f
f
r
Metronome volume
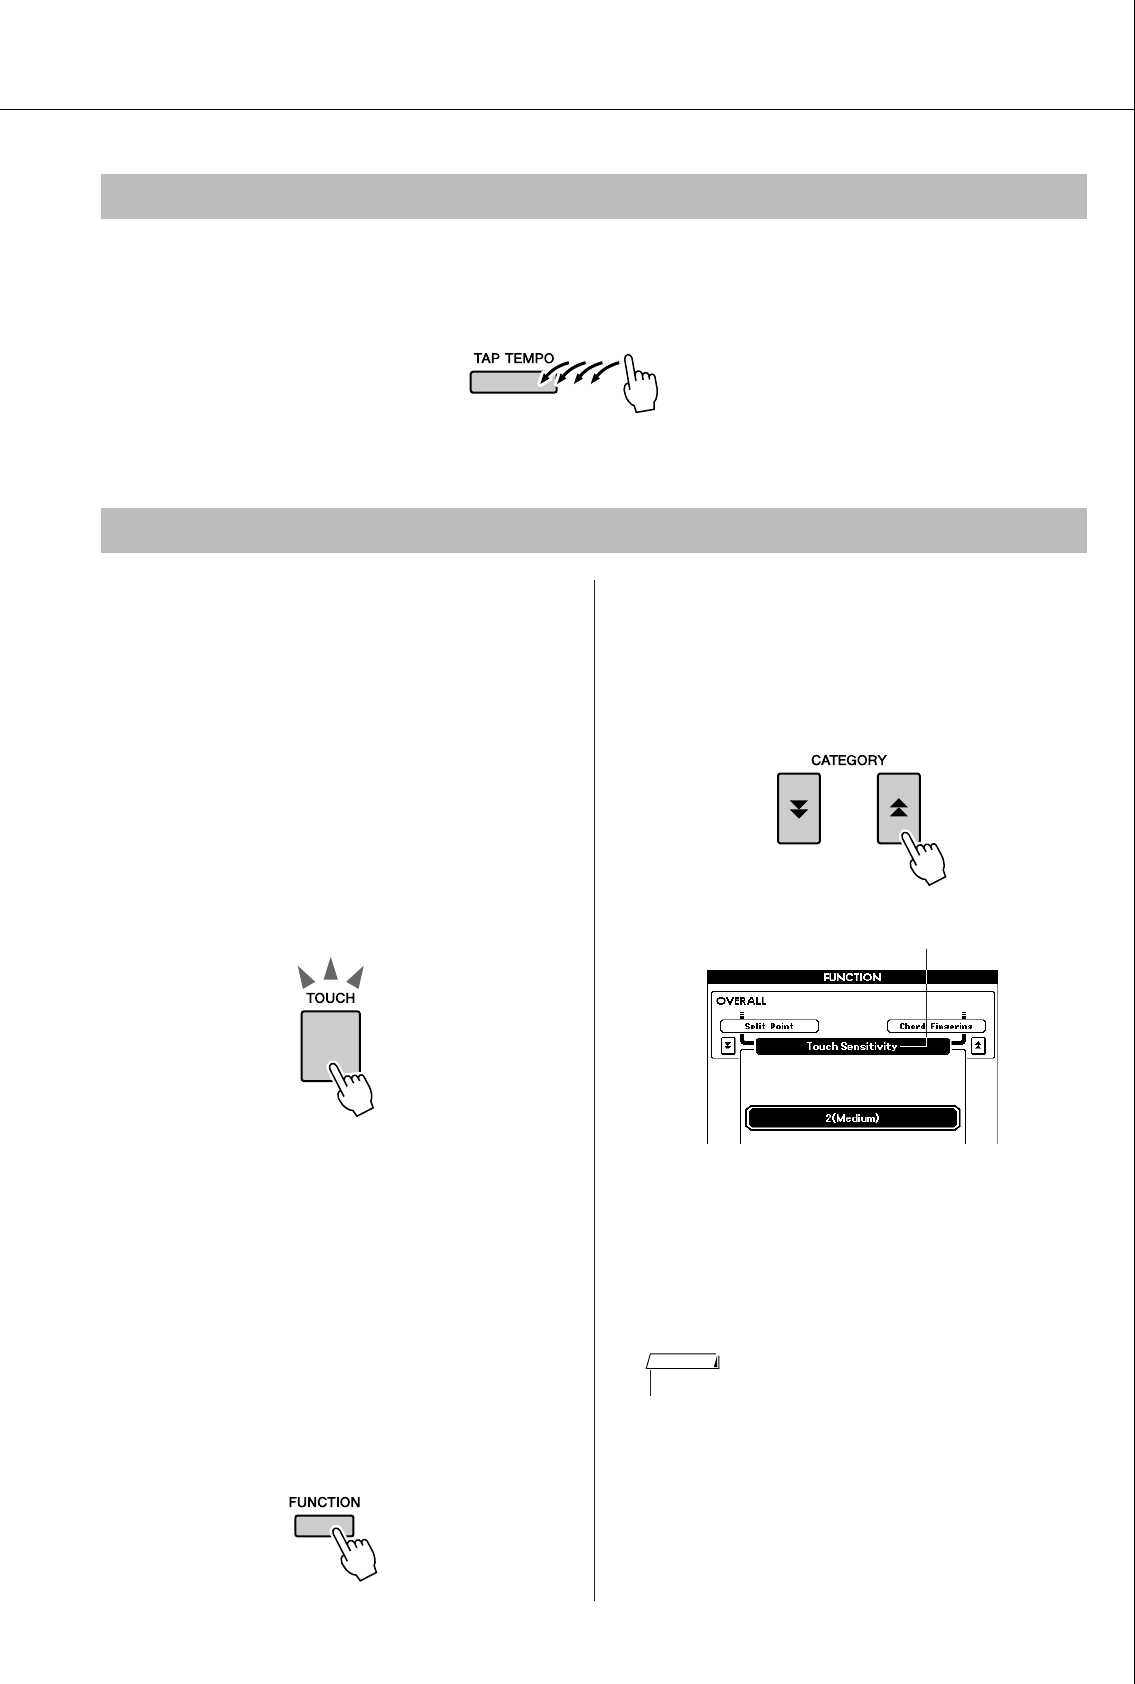
Using Various Functions
PSR-S500 Owner’s Manual 51
You can also set the tempo by simply tapping the [TAP TEMPO] button at the required tempo—four times
for time signatures in 4, and three times for time signatures in 3.
You can change the tempo during Song or Style playback by pressing the button just twice.
■
Turning Touch Response on/off
● ●
Keyboard Touch Response can be turned on by
pressing the [TOUCH] button.
When Touch Response is on you can control the
volume of notes according to how hard you play
the keys.
The [TOUCH] button lights indicating Touch
Response is turned on.
To turn Touch Response off, press the [TOUCH]
button again.
When Touch Response is off, the same volume will
be produced no matter how hard or soft you play
the keys.
■Adjusting the Touch Response
Sensitivity ● ● ● ● ● ● ● ● ● ● ● ● ● ● ● ● ● ●
The sensitivity of the keyboard’s Touch Response
can be adjusted in three steps (1–3). The higher the
number, the greater the volume variation produced
by the variation in how hard you play the keys—
i.e., the keyboard becomes more “sensitive.”
1Press the [FUNCTION] button to call up
the FUNCTION display.
2Press the CATEGORY [ ] and [ ] but-
tons as many times as necessary to call
up Touch Sensitivity.
The name of the currently selected sensitivity
number is displayed.
3Use the dial to select a Touch Sensitiv-
ity setting between 1 and 3. Higher val-
ues produce greater (easier) volume
variation in response to keyboard
dynamics—i.e., greater sensitivity.
Using Tap Start
Touch Response
[TOUCH] button lights
indicating when Touch
Response is turned on.
f
r
Touch Sensitivity
• The initial default setting is 2.
NOTE
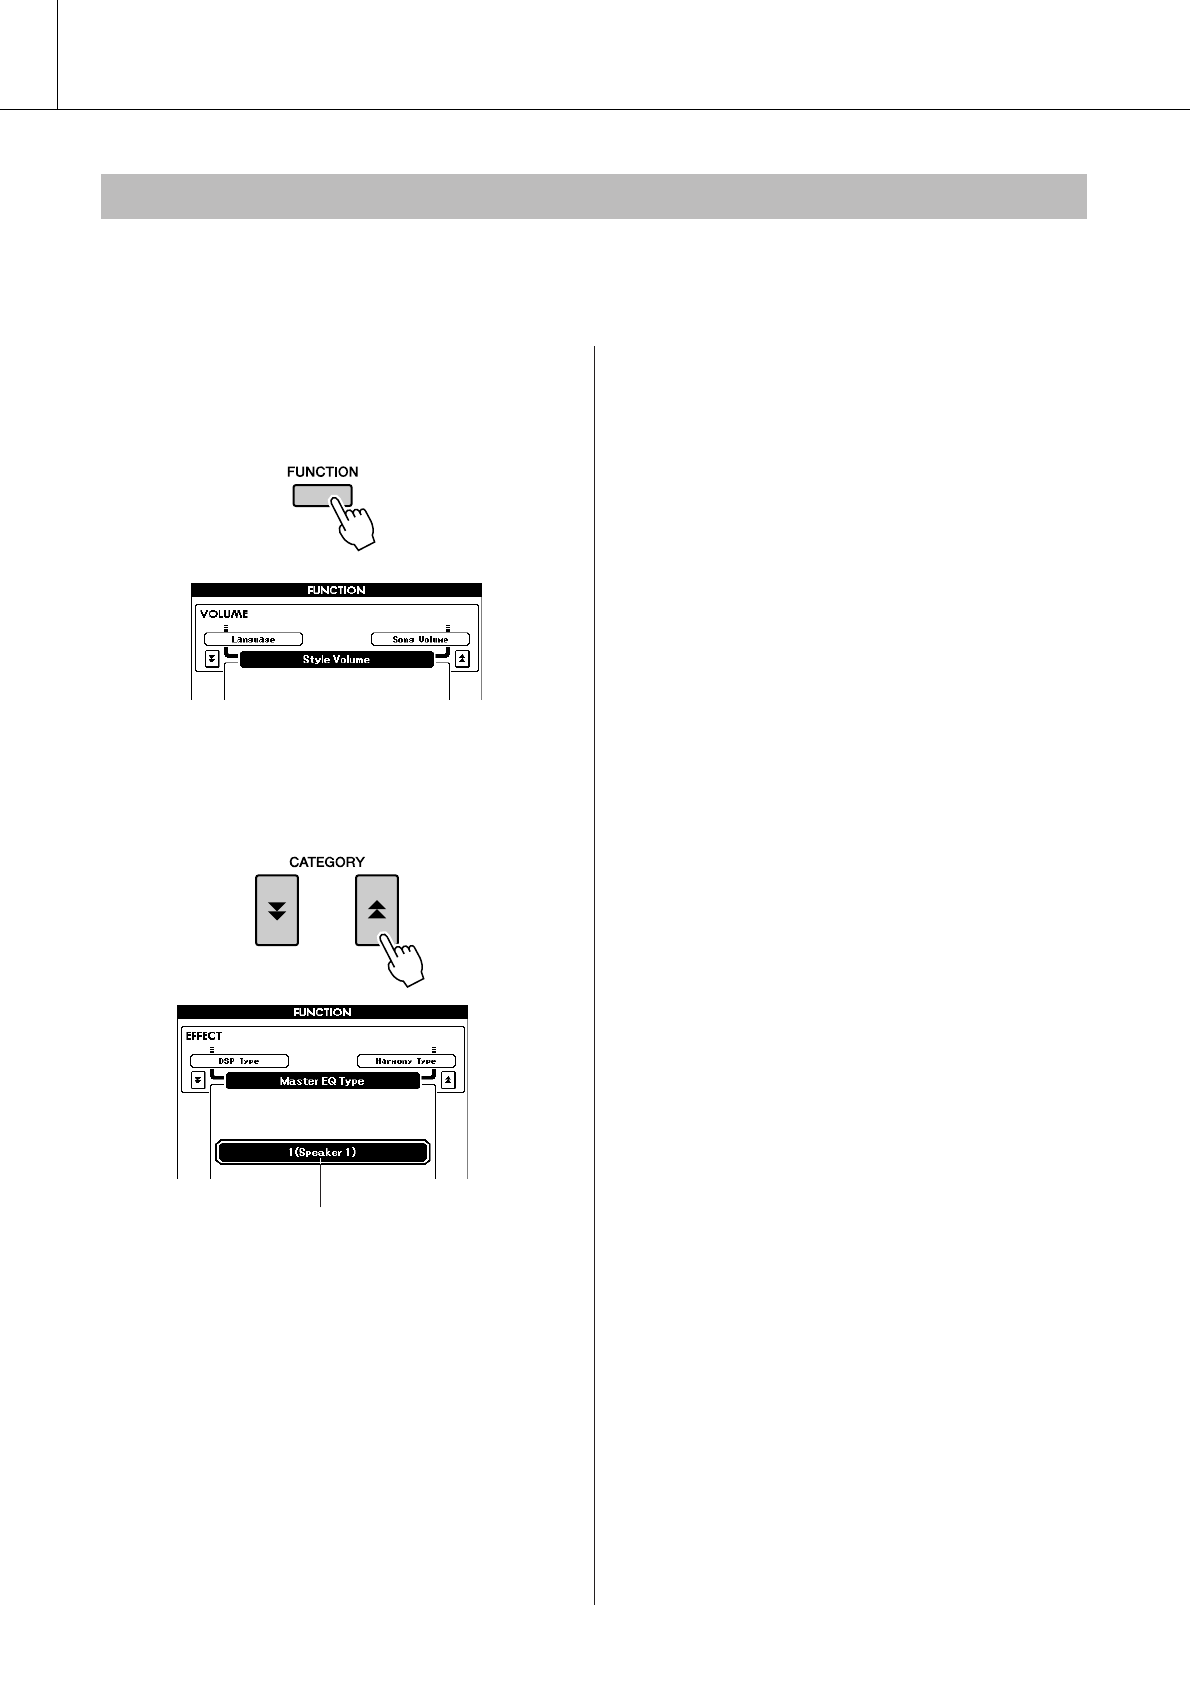
Using Various Functions
52 PSR-S500 Owner’s Manual
Five pre-programmed EQ settings are available. Settings 1 and 2 are best for listening via the instrument’s
built-in speakers, setting 3 is for headphones, and settings 4 and 5 are ideal for listening via external speak-
ers or when connecting to an external mixer.
1Press the [FUNCTION] button.
The currently selected function will appear in
the display.
2Press the CATEGORY [ ] and [ ] but-
tons as many times as necessary to call
up Master EQ Type.
3Use the dial to select an EQ Setting for
the best sound.
EQ settings
f
r
The currently selected EQ type will appear.
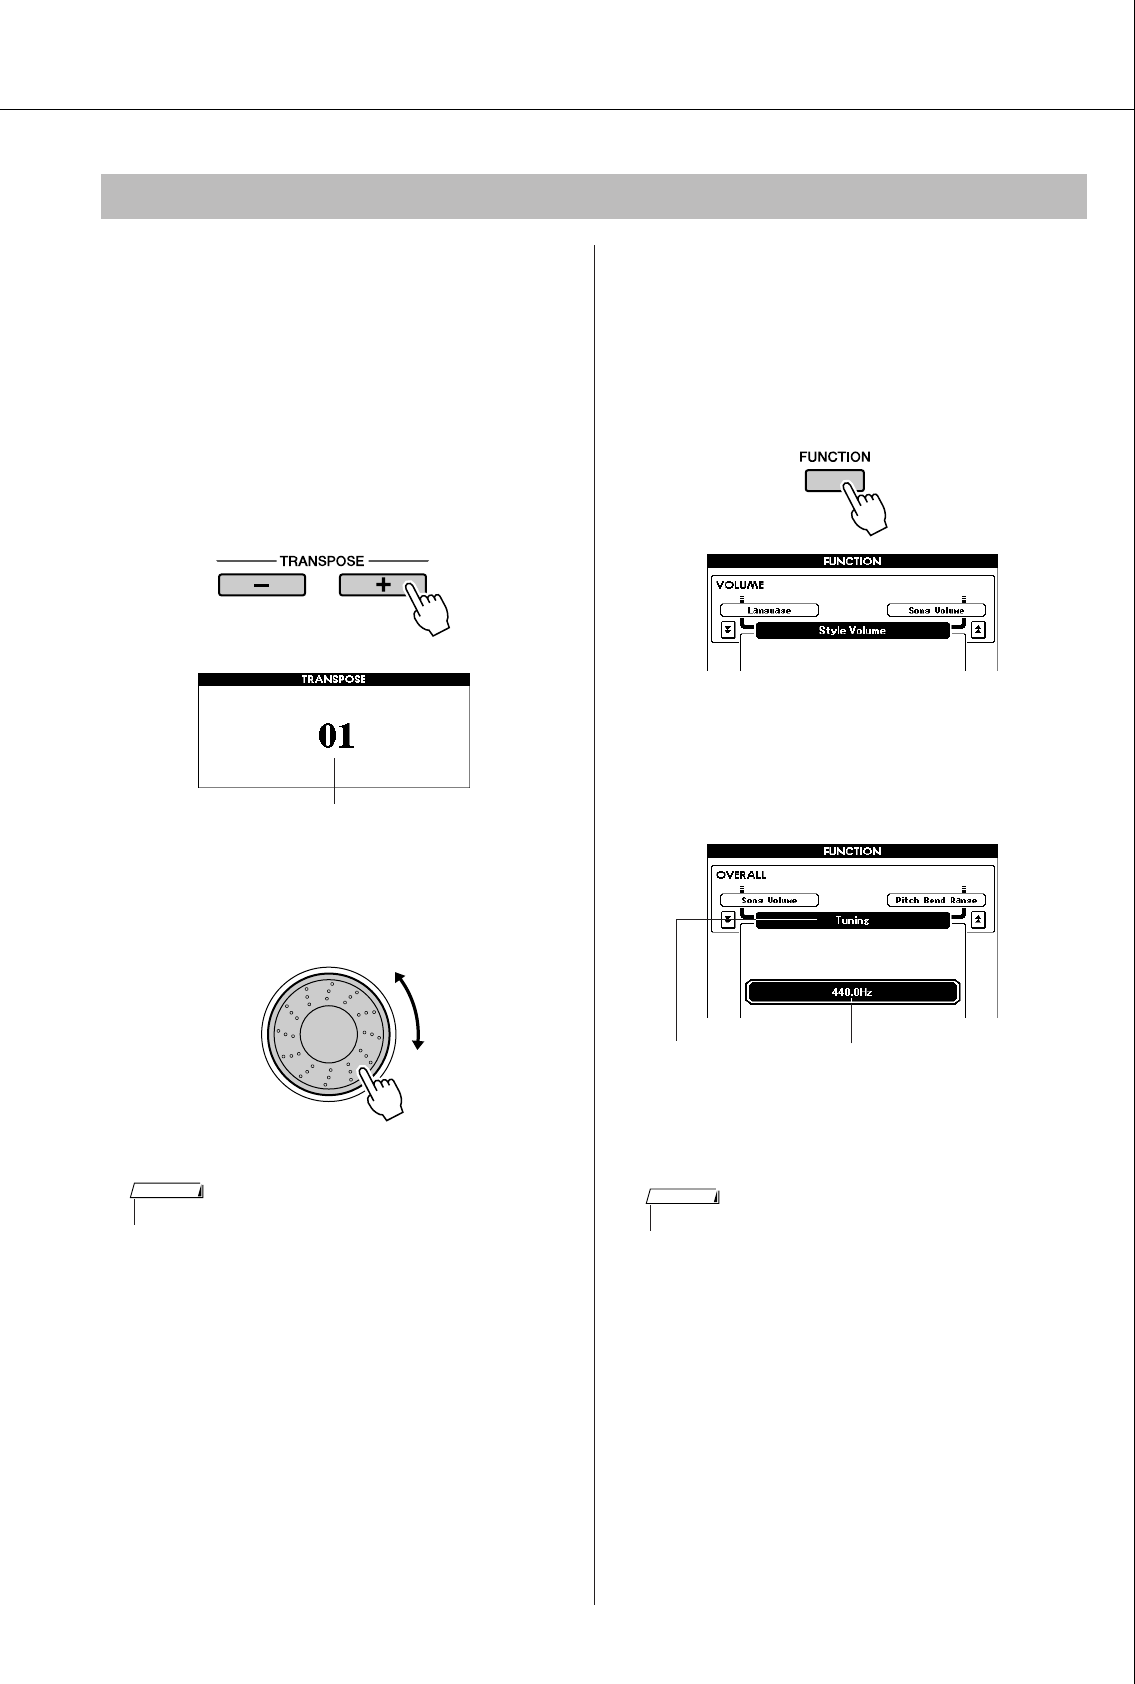
Using Various Functions
PSR-S500 Owner’s Manual 53
◆Large Pitch Changes (Transpose)
The overall pitch of the instrument can be shifted
up or down by a maximum of one octave in
semitone increments.
1Press one of the TRANSPOSE [+]/[-]
buttons.
The value is shown in the display, indicating
the amount of transposition over or below the
normal value.
2Use the dial to set the transpose value
between -12 and +12 as required.
Press the [EXIT] button to return to the Main
display.
Pressing the TRANSPOSE [+]/[-] buttons
allows single-step changes. Pressing and hold-
ing either TRANSPOSE [+]/[-] button continu-
ously increases or decreases the value.
◆Small Pitch Changes (Tuning)
The overall tuning of the instrument can be shifted
up or down by a maximum of 1 semitone in
approximately 0.2-Hz steps. The default setting is
440 Hz.
1Press the [FUNCTION] button.
2Press the CATEGORY [ ] and [ ] but-
tons as many times as necessary to call
up Tuning.
3Use the dial to set the tuning value
between 415.3–466.2Hz as required.
Pitch Controls
Current value
• This setting does not affect Drum Kit Voices.
NOTE
f
r
The range is 415.3–466.2 HzTuning
• This setting does not affect Drum Kit Voices.
NOTE
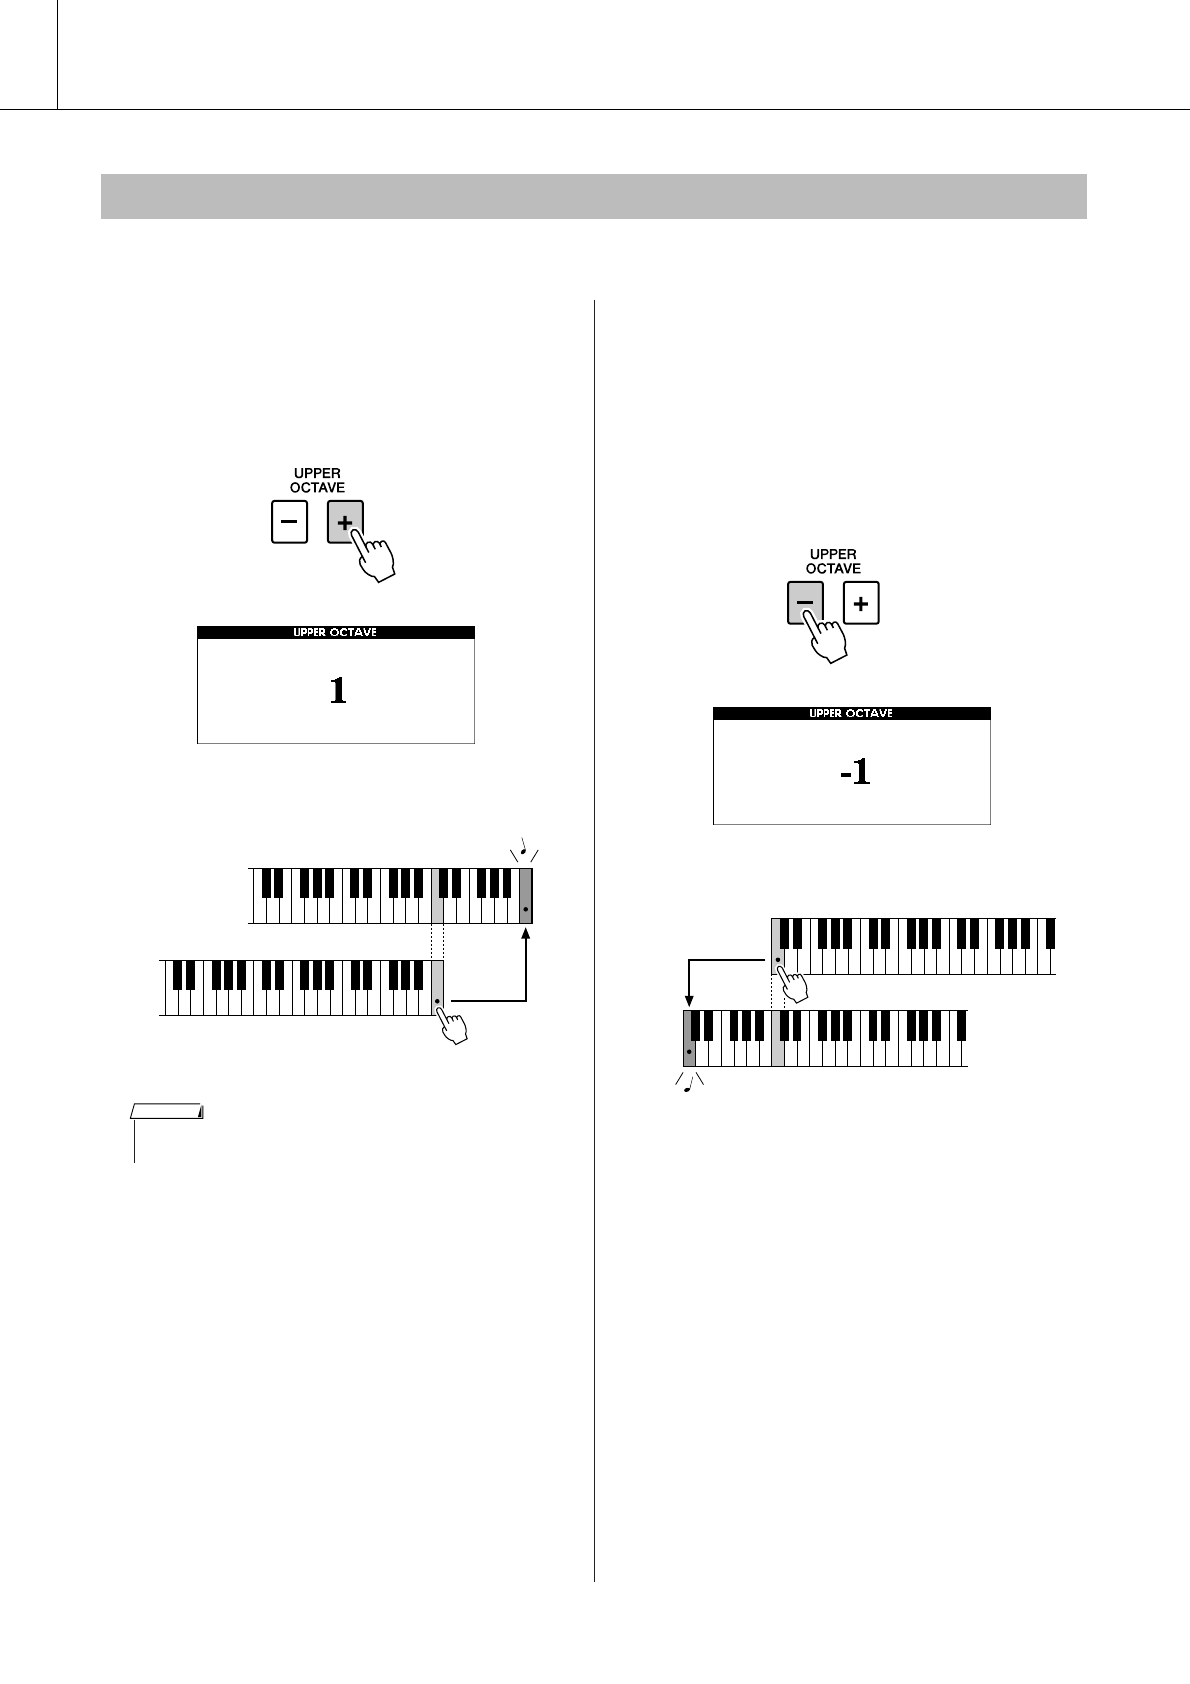
Using Various Functions
54 PSR-S500 Owner’s Manual
You can change the playing pitch of the Main and Dual Voices in octave intervals.
1Press the UPPER OCTAVE [+] button to
raise the pitch by one octave.
The newly changed value is shown in the LCD.
Press the [EXIT] button to return to the Main
display.
2Press the UPPER OCTAVE [-] button to
lower the pitch by one octave.
The newly changed value—now one octave
lower—is shown in the LCD.
Press the UPPER OCTAVE [-] button again to
lower the pitch one more octave.
Press the [EXIT] button to return to the Main
display.
Changing the pitch of the instrument in octaves
● In the case of UPPER OCTAVE +1 One octave up
•When a Drum Kit is selected, each percussion Voice assigned to the
keyboard are shifted in location but not pitch.
NOTE
● In the case of UPPER OCTAVE -1
One octave down
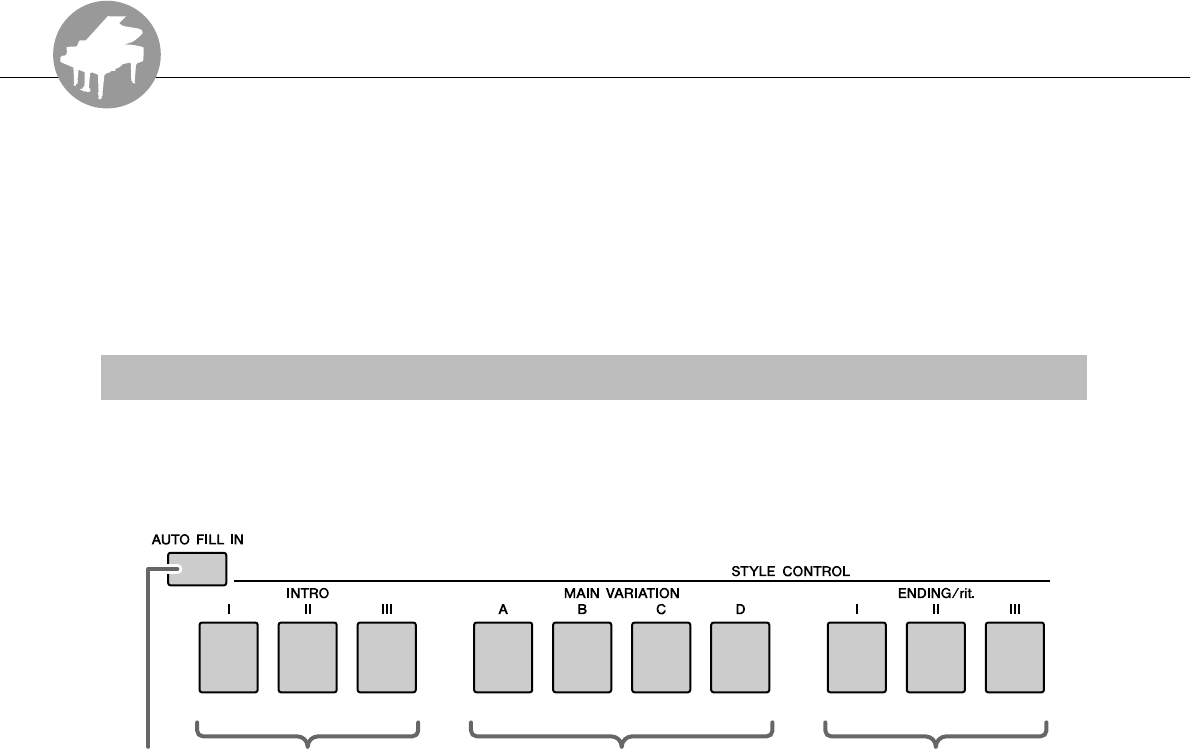
R
e
f
e
r
e
n
c
e
PSR-S500 Owner’s Manual 55
Style (Auto Accompaniment) Functions
Basic operation of the Style (Auto Accompaniment) feature is described on page 22 of
the Quick Guide.
Included here is information on how you can play the Styles in various ways, how to
adjust the Style volume, how you can play chords using the Styles, and more.
The instrument features a wide variety of Style “sections” that allow you to vary the arrangement of the
accompaniment to match the Song you are playing.
●INTRO section
This is used for the beginning of the Song. When the intro finishes playing, accompani-
ment shifts to the main section. The length of the intro (in measures) differs depending on
the selected Style.
●MAIN VARIATION section
This is used for playing the main part of the Song. It plays a main accompaniment pattern,
and repeats indefinitely until another section’s button is pressed. There are four variations
on the basic pattern (A–D), and the Style playback sound changes harmonically based on
the chords you play with your left hand.
●ENDING section
This is used for the ending of the Song. When the ending is finished, the Auto Accompani-
ment stops automatically. The length of the ending (in measures) differs depending on the
selected Style.
●AUTO Fill-in section
This is automatically added before the current section changes to a newly selected section.
Pattern Variation (sections)
Main variationIntroFill-in Ending
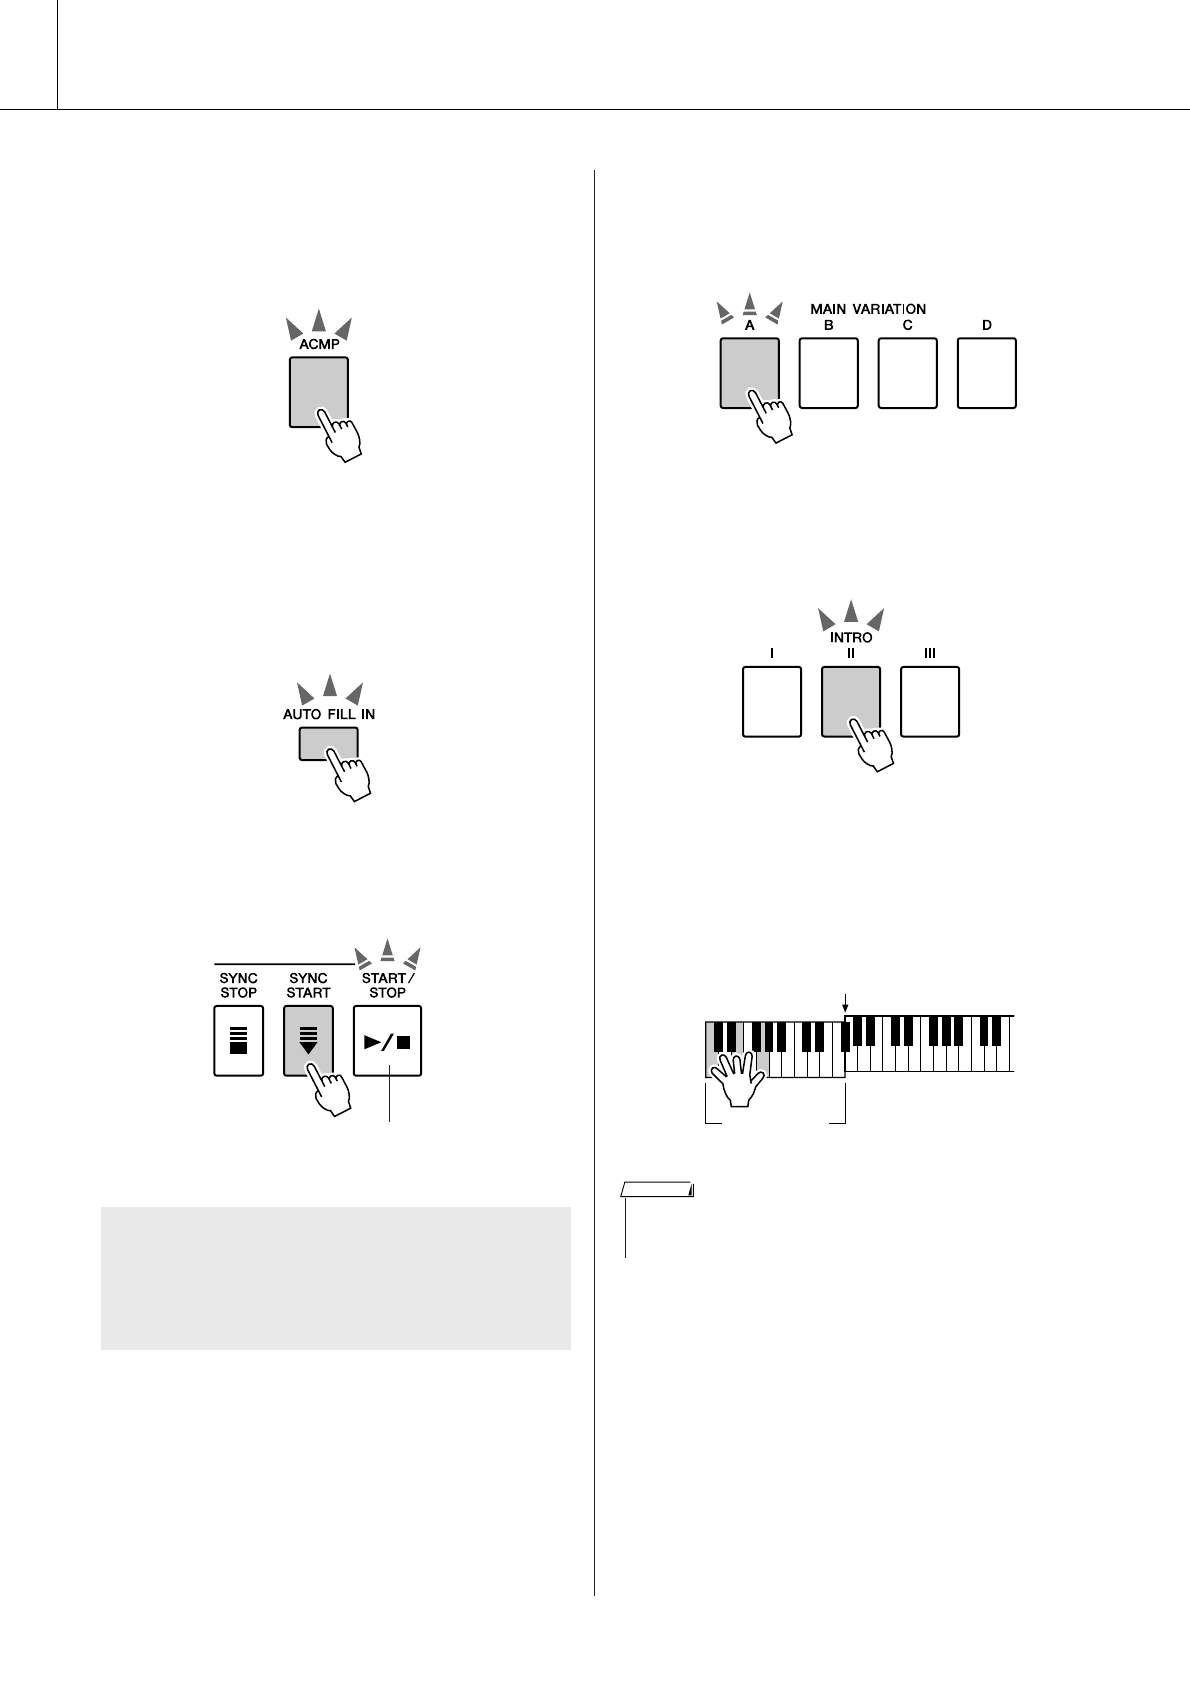
Style (Auto Accompaniment) Functions
56 PSR-S500 Owner’s Manual
1Select the desired Style. (See page 22.)
2Press the [ACMP] button to turn Auto
Accompaniment on.
3Press the [AUTO FILL IN] button to turn
the Auto Fill In function on.
The initial default setting for Auto Fill In is
“on.”
4Press the [SYNC START] button to turn
Synchro Start on.
5Press one of the MAIN VARIATION [A]–
[D] buttons.
The selected Main Variation button flashes.
6Press one of the INTRO [I]–[III] buttons.
The selected Intro button lights.
7Play a chord in the accompaniment
range and start the Intro section.
Try playing a C major chord. (See “Playing
Auto-accompaniment Chords” on page 25.)
●Synchro Start
When Synchro Start is on you, can start the
Style by playing any key in the accompani-
ment range of the keyboard.
The [ACMP] button
lights when ACMP
is turned on.
The [SYNC START] button
flashes indicating Synchro
Start is engaged.
Auto Accompa-
niment range
Split Point
•The Baroque Air Style in the MOVIE & SHOW category does not have a
Rhythm part, so there is no rhythm sound for this Style. Also, this Style
does not have a Fill-In section.
NOTE
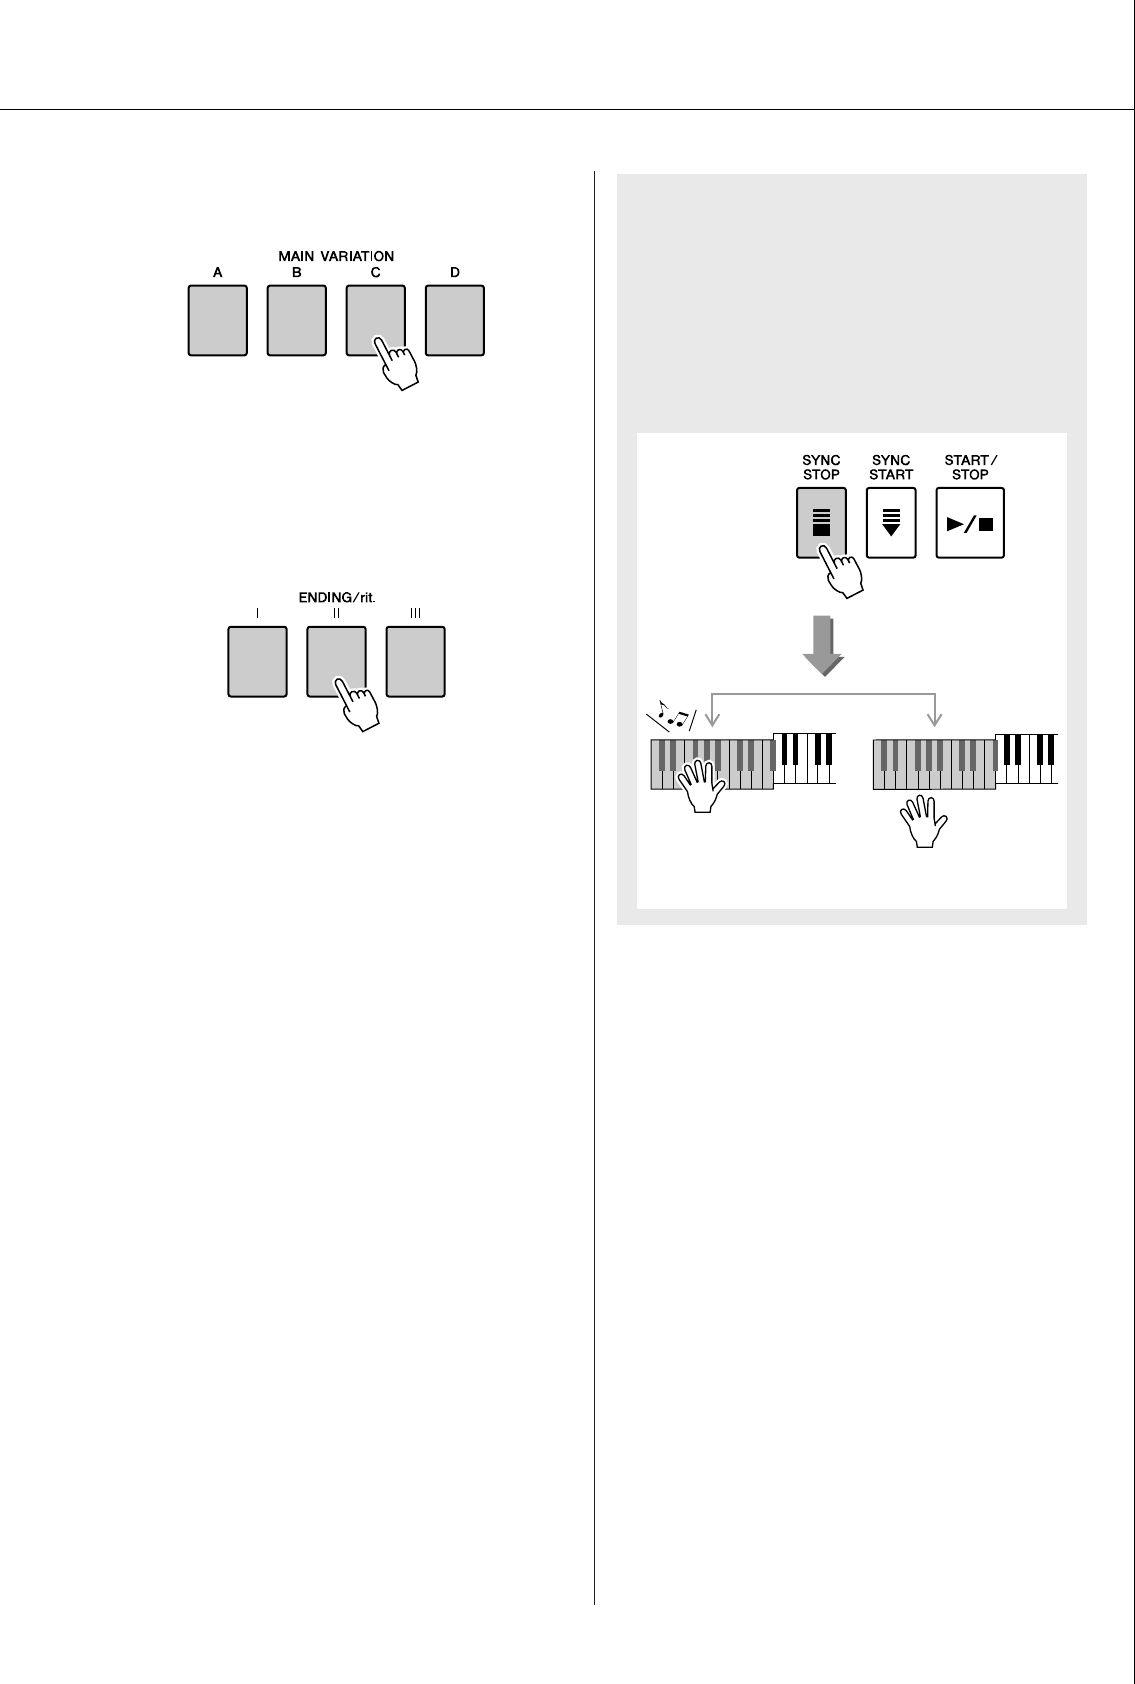
Style (Auto Accompaniment) Functions
PSR-S500 Owner’s Manual 57
8Press one of the MAIN VARIATION [A]–
[D] buttons.
When the fill-in is finished, it leads smoothly
into the selected Main section A–D.
9Press one of the ENDING/rit. [I]–[III] but-
tons.
This switches to the Ending section.
When the Ending is finished, the Auto Accom-
paniment stops automatically.
You can have the Ending gradually slow down
(ritardando) by pressing one of the ENDING/
rit. [I]–[III] buttons again while the Ending is
playing back.
●Synchro Stop
When this function is selected, the accompa-
niment Style will only play while you are
playing chords in the accompaniment range
of the keyboard.
Style playback will stop when you release the
keys. To turn the function on, press the
[SYNC STOP] button.
The Style will play while
you are playing the keys
Style playback will stop
when you release the keys
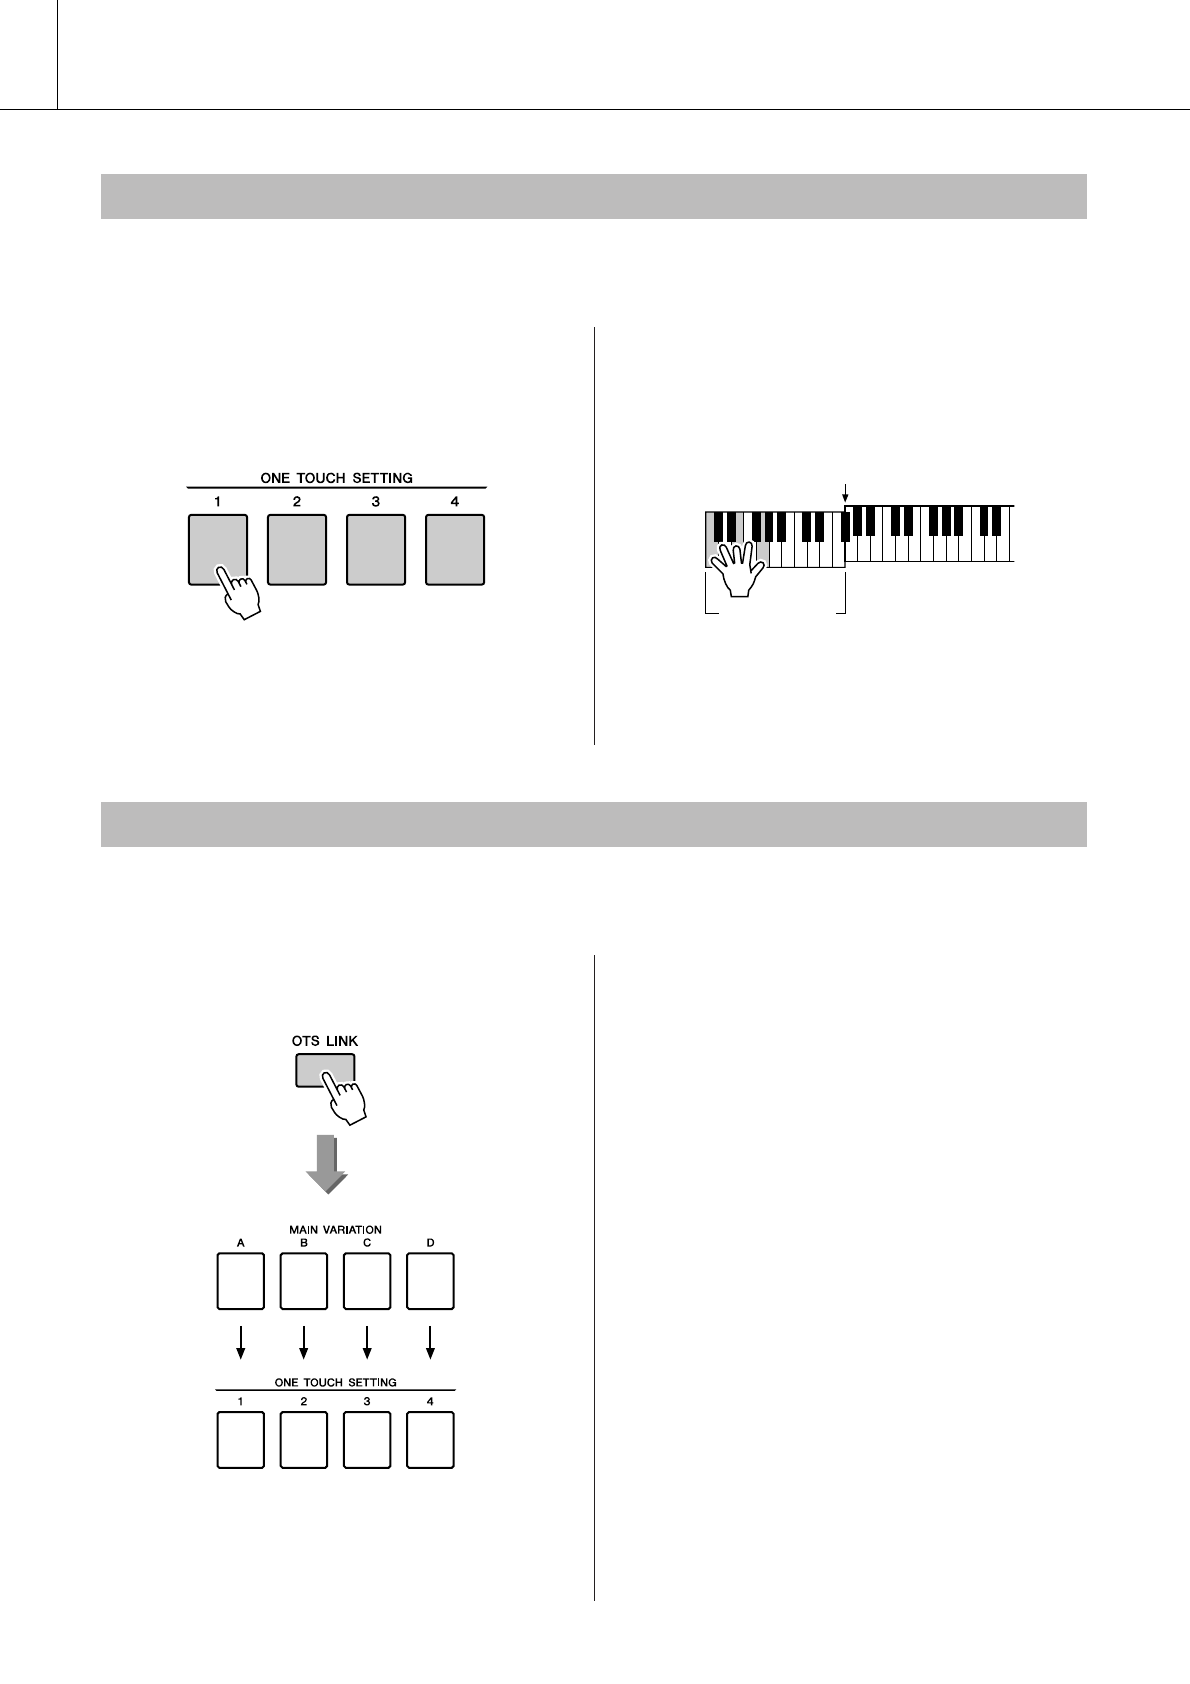
Style (Auto Accompaniment) Functions
58 PSR-S500 Owner’s Manual
Sometimes selecting the ideal Voice to play with a Song or Style can be confusing. The One Touch Setting
feature automatically selects four ideally matched Voices for the Style you’ve selected.
1Select the desired Style. (See page 22.)
2Press one of the ONE TOUCH SETTING
[1]–[4] buttons.
3Play the chord in the accompaniment
range and start the Style.
Try selecting other ONE TOUCH SETTING
[1]–[4] buttons and listen to the results.
When change the MAIN VARIATION [A]–[D] to other MAIN VARIATION [A]–[D] during OTS LINK is
on, OTS 1–4 automatically change the number according to the selected variation number. (see below)
Press the [OTS LINK] button to turn on
the OTS link.
One Touch Setting
Auto Accompani-
ment range
Split Point
Variation Change and OTS (OTS LINK)
Automatically
change
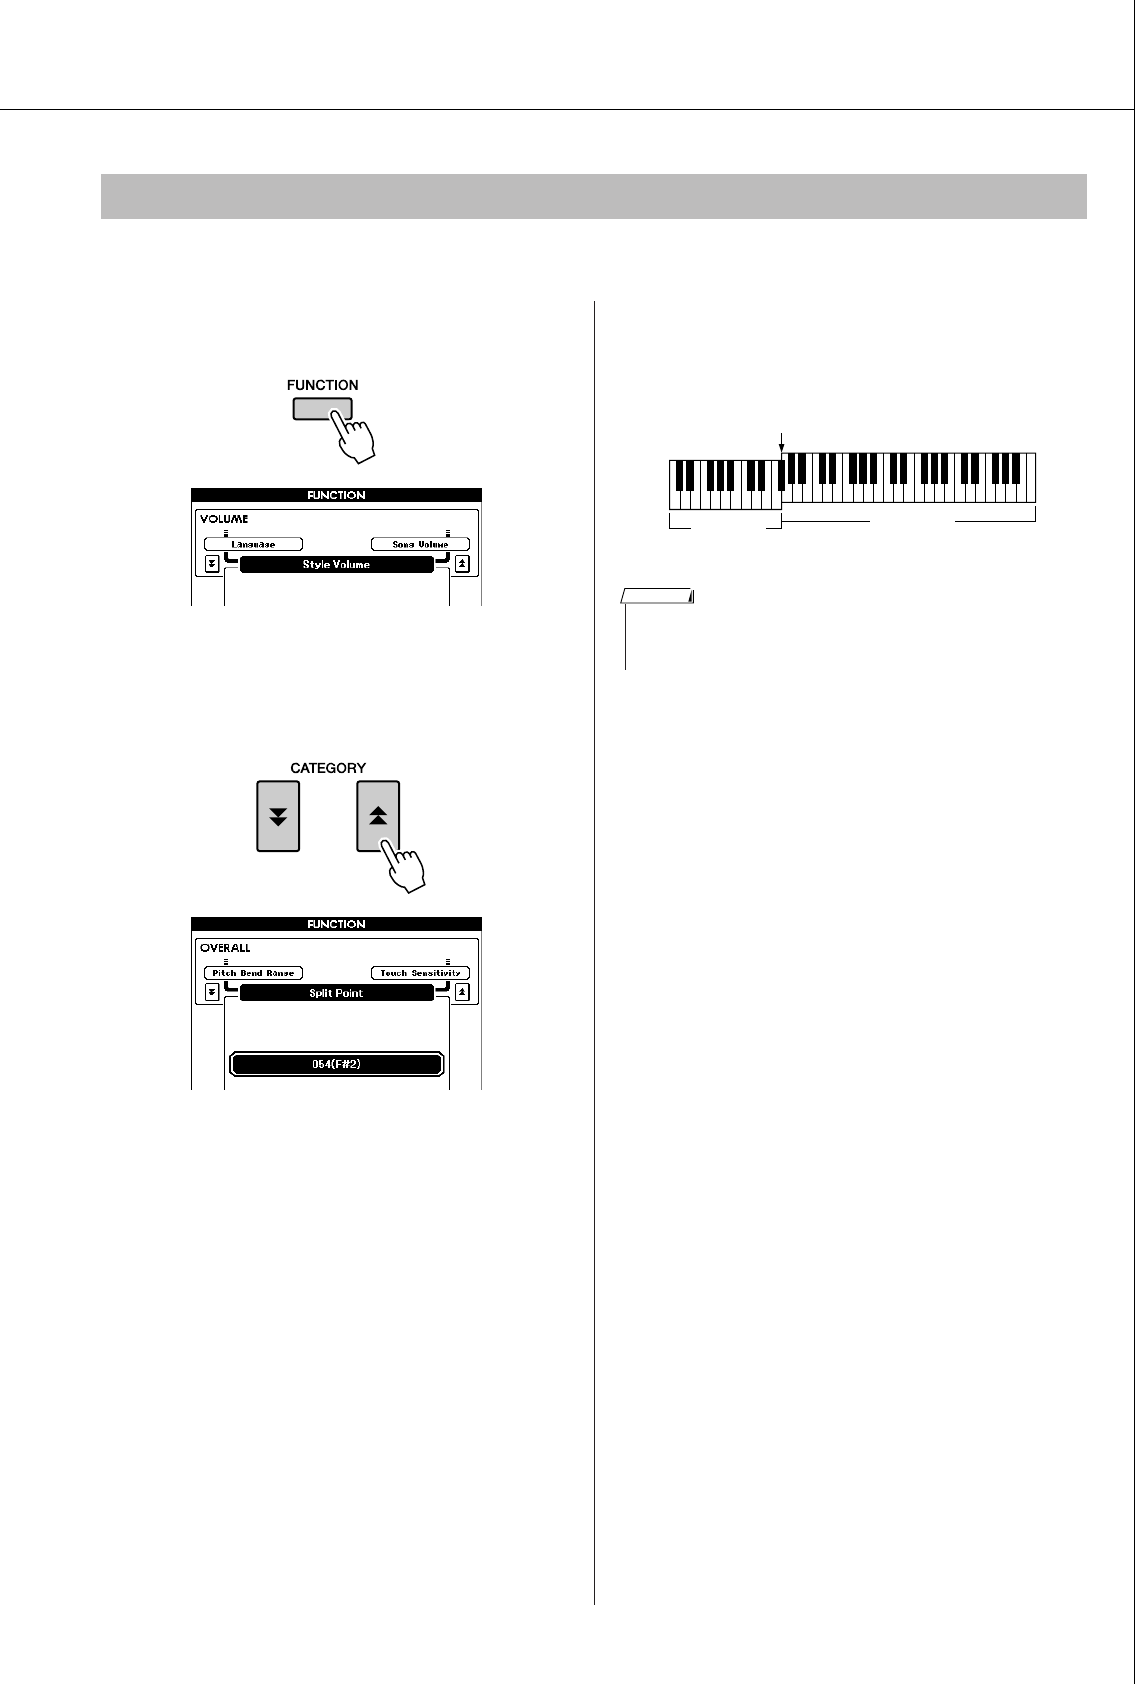
Style (Auto Accompaniment) Functions
PSR-S500 Owner’s Manual 59
The initial default Split Point is key number 54 (the F#2 key), but you can change it to another key using the
procedure described below.
1Press the [FUNCTION] button.
2Use the CATEGORY [ ] and [ ] but-
tons as many times as necessary to call
up Split Point.
3Use the dial to set the Split Point to any
key from 000 (C-2) through 127 (G8).
Setting the Split Point
f
r
Split Point (54: F#2)
Main Voice
Left Voice
• Changing the Split Point here also changes the Auto Accompaniment
Split Point.
• The Left Voice sounds when the split-point key is played.
NOTE
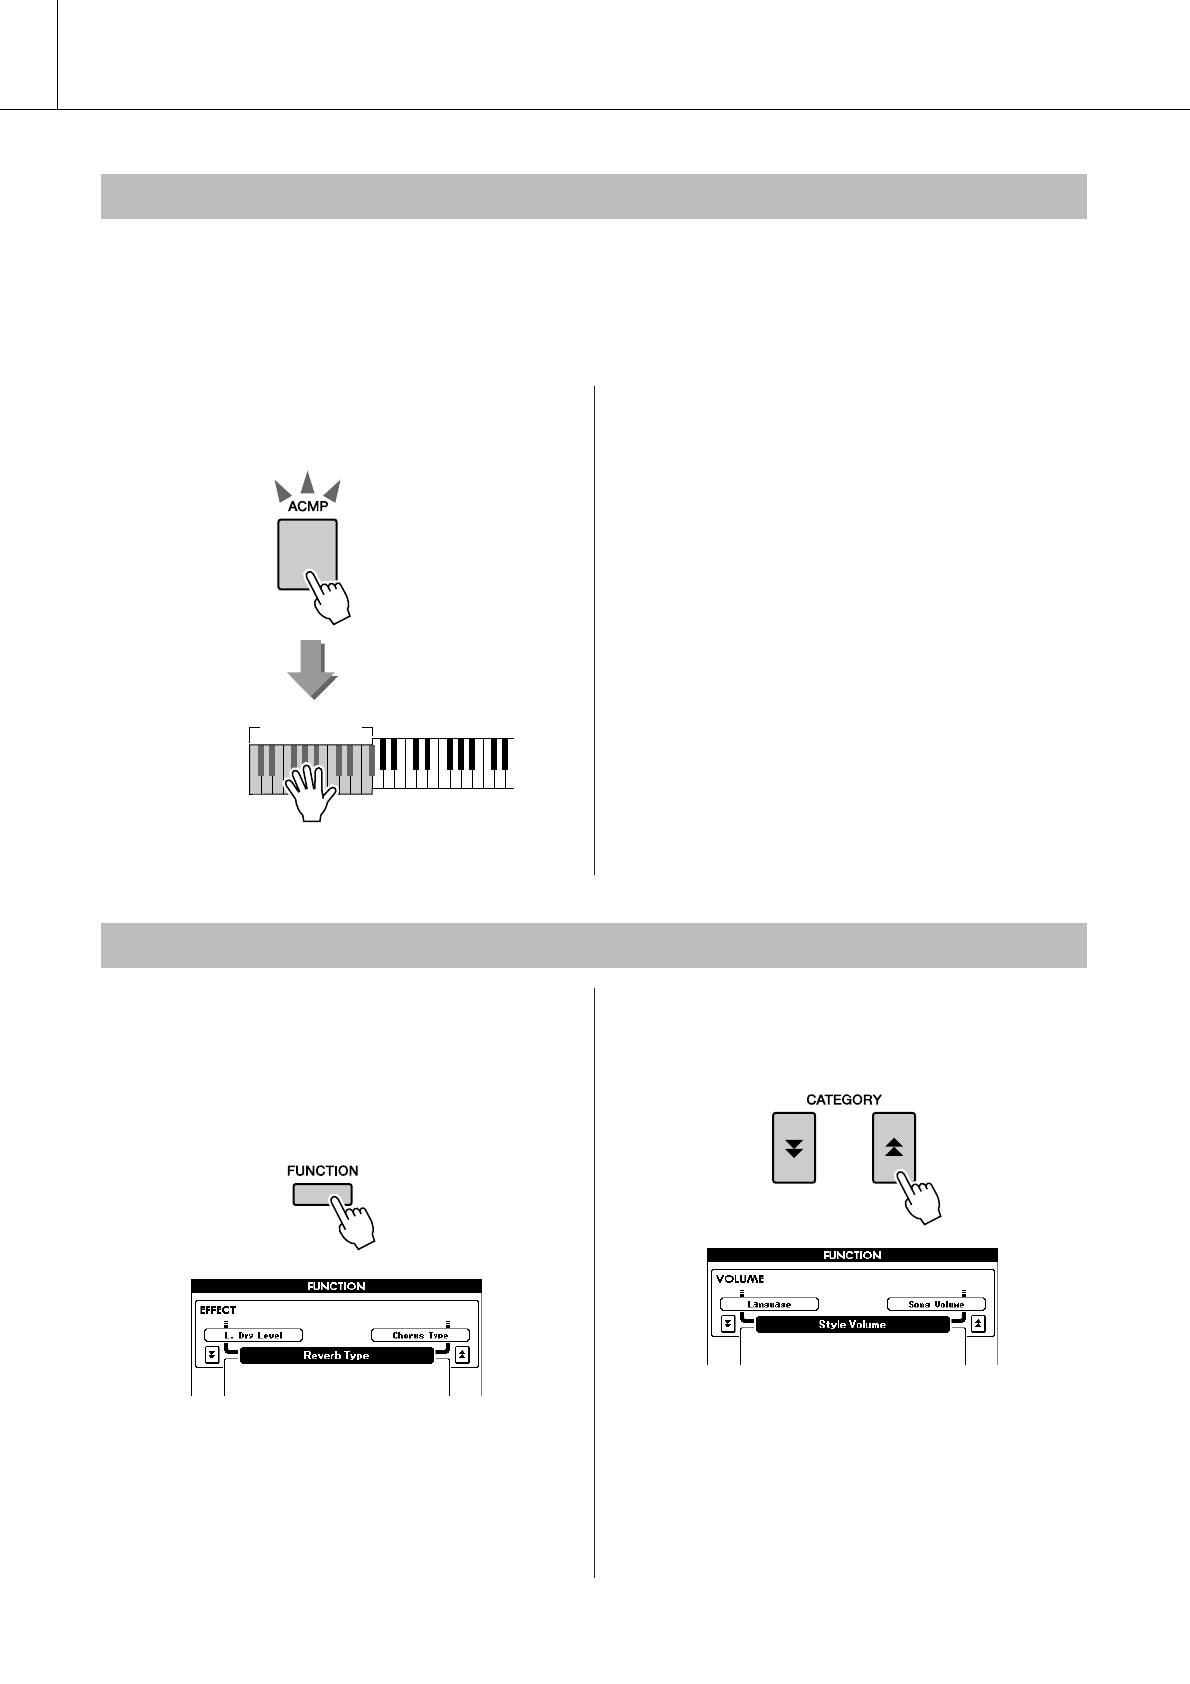
Style (Auto Accompaniment) Functions
60 PSR-S500 Owner’s Manual
When Auto Accompaniment is on (ACMP button lights) and Synchro Start is off, you can play chords in
the left-hand accompaniment range of the keyboard while the Style is stopped and still hear the accompani-
ment chords. This is called “Stop Accompaniment,” and any of the chord fingerings recognized by the
instrument can be used (page 25).
Select a Style, then press the [ACMP] but-
ton to turn Auto Accompaniment on.
If the instrument is in the Song mode,
press one of the Style category buttons to
enter the Style mode. (page 22)
1Press the [FUNCTION] button.
2Use the CATEGORY [ ] and [ ] but-
tons as many times as necessary to call
up Style Volume.
3Use the dial to set the Style Volume
between 000 and 127.
Playing a Style with Chords but without Rhythm (Stop Accompaniment)
Auto Accompa-
niment range
[ACMP] button lights
Adjusting the Style Volume
f
r
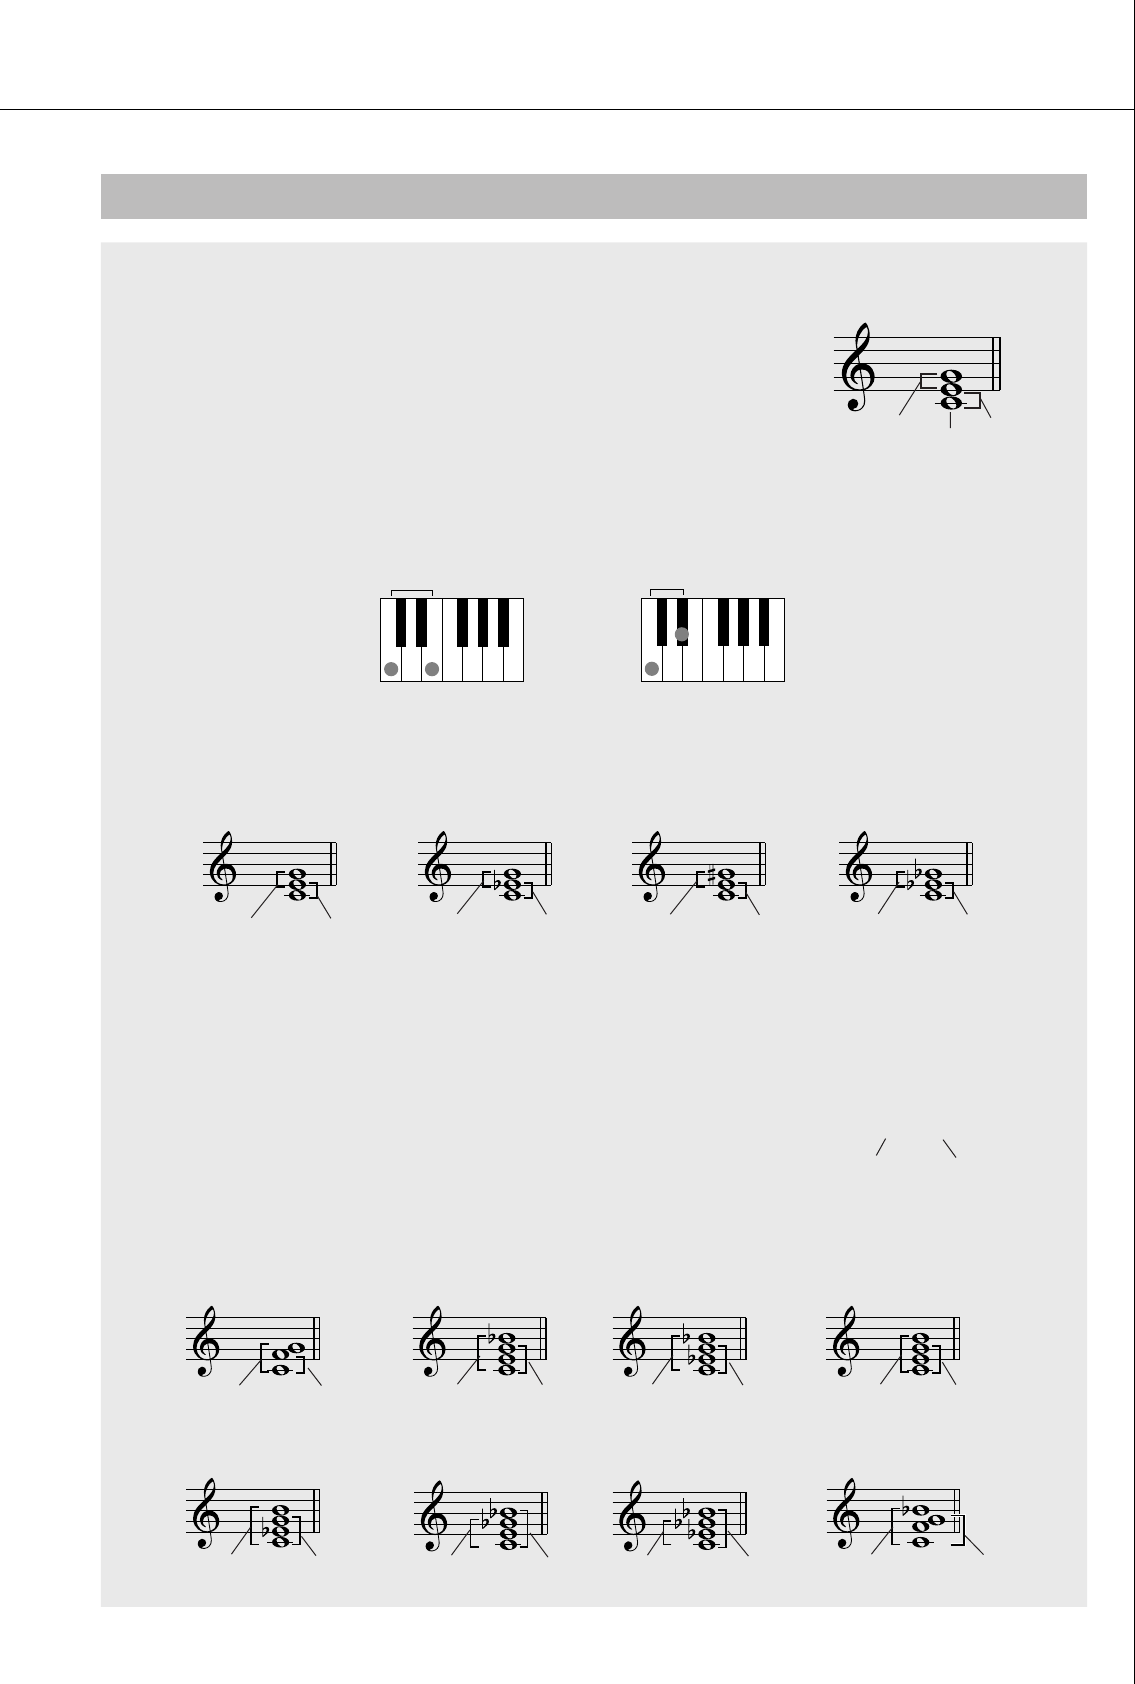
Style (Auto Accompaniment) Functions
PSR-S500 Owner’s Manual 61
Two or more notes played together constitute a “chord”.
The most basic chord type is the “triad” consisting of three notes: the
root, third, and fifth degrees of the corresponding scale. A C major
triad, for example, is made up of the notes C (the root), E (the third
note of the C major scale), and G (the fifth note of the C major scale).
In the C major triad shown above, the lowest note is the “root” of the
chord (this is the chord’s “root position” ... using other chord notes for the lowest note results in “inver-
sions”). The root is the central sound of the chord, which supports and anchors the other chord notes.
The distance (interval) between adjacent notes of a triad in root position is either a major or minor third.
The lowest interval in our root-position triad (between the root and the third) determines whether the
triad is a major or minor chord, and we can shift the highest note up or down by a semitone to produce
two additional chords, as shown below.
The basic characteristics of the chord sound remain intact even if we change the order of the notes to
create different inversions. Successive chords in a chord progression can be smoothly connected, for
example, by choosing the appropriate inversions (or chord “voicings”).
● Reading Chord Names
Chord names tell you just about everything you need to know about a
chord (other than the inversion/voicing). The chord name tells you what
the root of the chord is, whether it is a major, minor, or diminished
chord, whether it requires a major or flatted seventh, what alterations or
tensions it uses ... all at a glance.
● Some Chord Types (These are just some of the “Standard” chord types recognized by the PSR-S500.)
Chord Basics
3rd 3rd
Root
Major third–four half steps (semitones) Minor third–three half steps (semitones)
CMCmCaug Cdim
Major chord Minor chord Augmented chord Diminished chord
Minor 3rd Major 3rd Major 3rd Minor 3rd Major 3rd Major 3rd Minor 3rd Minor 3rd
Cm
Root note Chord type
Csus4 C7Cm7 CM7
C7
(b5)Cm7
(b5)C7sus4
CmM7
Suspended 4 th 7 th Minor 7 th Major 7 th
7 th, suspended 4 th
Minor 7 th, flatted 5 th
7 th, flatted 5 th
Minor/major 7 th
Perfect 5 th Perfect 4 th Flatted 7 th Major chord Flatted 7 th Minor chord Major 7 th Major chord
Major 7 th Minor chord Flatted 5 th 7 th chord Flatted 5 th Minor 7 th chord Flatted 7 th Suspended
4 th chord
Style (Auto Accompaniment) Functions
62 PSR-S500 Owner’s Manual
■Recognized Standard Chords● ● ● ● ● ● ● ● ● ● ● ● ● ● ● ● ● ● ● ● ● ● ● ● ● ● ● ● ● ● ● ● ● ● ●
All chords in the chart are “C-root” chords.
Chord Name/[Abbreviation] Normal Voicing Chord (C) Display
Major [M] 1 - 3 - 5 C
Add ninth [(9)] 1 - 2 - 3 - 5 Cadd9
Sixth [6] 1 - (3) - 5 - 6 C6
Sixth ninth [6(9)] 1 - 2 - 3 - (5) - 6 C69
Major seventh [M7] 1 - 3 - (5) - 7 CM7
Major seventh ninth [M7(9)] 1 - 2 - 3 - (5) - 7 CM79
Major seventh add sharp eleventh [M7(#11)] 1 - (2) - 3 - #4 - 5 - 7 or
1 - 2 - 3 - #4 - (5) - 7 CM7#11
Flatted fifth [(b5)] 1 - 3 - b5C
b5
Major seventh flatted fifth [M7b5] 1 - 3 - b5 - 7 CM7b5
Suspended fourth [sus4] 1 - 4 - 5 Csus4
Augmented [aug] 1 - 3 - #5Caug
Major seventh augmented [M7aug] 1 - (3) - #5 - 7 CM7aug
Minor [m] 1 - b3 - 5 Cm
Minor add ninth [m(9)] 1 - 2 - b3 - 5 Cm add9
Minor sixth [m6] 1 - b3 - 5 - 6 Cm6
Minor seventh [m7] 1 - b3 - (5) - b7Cm7
Minor seventh ninth [m7(9)] 1 - 2 - b3 - (5) - b7Cm79
Minor seventh add eleventh [m7(11)] 1 - (2) - b3 - 4 - 5 - (b7) Cm711
Minor major seventh [mM7] 1 - b3 - (5) - 7 CmM7
Minor major seventh ninth [mM7(9)] 1 - 2 - b3 - (5) - 7 CmM79
Minor seventh flatted fifth [m7b5] 1 - b3 - b5 - b7Cm7b5
Minor major seventh flatted fifth [mM7b5] 1 - b3 - b5 - 7 CmM7b5
Diminished [dim] 1 - b3 - b5Cdim
Diminished seventh [dim7] 1 - b3 - b5 - 6 Cdim7
Seventh [7] 1 - 3 - (5) - b7 or
1 - (3) - 5 - b7C7
Seventh flatted ninth [7(b9)] 1 - b2 - 3 - (5) - b7C7b9
Seventh add flatted thirteenth [7(b13)] 1 - 3 - 5 - b6 - b7C7b13
Seventh ninth [7(9)] 1 - 2 - 3 - (5) - b7C79
Seventh add sharp eleventh [7(#11)] 1 - (2) - 3 - #4 - 5 - b7 or
1 - 2 - 3 - #4 - (5) - b7C7#11
Seventh add thirteenth [7(13)] 1 - 3 - (5) - 6 - b7C713
Seventh sharp ninth [7(#9)] 1 - #2 - 3 - (5) - b7C7#9
Seventh flatted fifth [7b5] 1 - 3 - b5 - b7C7b5
Seventh augmented [7aug] 1 - 3 - #5 - b7C7aug
Seventh suspended fourth [7sus4] 1 - 4 - (5) - b7C7sus4
Suspended second [sus2] 1 - 2 - 5 Csus2
C
C
(
9
)
C6
(9)
C6
CM7
CM7
(9)
CM7
(#11)
C(b5)
CM7
(b5)
Csus4
Caug
CM7aug
Cm
(9)
Cm
Cm6
Cm7
Cm7
(9)
Cm7
(11)
CmM7
CmM7
(9)
Cm7
(b5)
CmM7
(b5)
Cdim
Cdim7
C7
C7
(b9)
C7
(b13)
(9)
C7
(#11)
C7
(13)
C7
(#9)
C7
C7b5
C7aug
C7sus4
Csus2
• Notes in parentheses can be omitted.
•Playing two same root keys in the adjacent octaves produces accompa-
niment based only on the root.
•A perfect fifth (1 + 5) produces accompaniment based only on the root
and fifth which can be used with both major and minor chords.
•The chord fingerings listed are all in “root” position, but other inversions
can be used—with the following exceptions: m7, m7
b
5, 6, m6, sus4,
aug, dim7, 7
b
5, 6(9), sus2.
NOTE
•Inversion of the 7sus4 and m7(11) chords are not recognized if the
notes shown in parentheses are omitted.
• The auto accompaniment will sometimes not change when related
chords are played in sequence (e.g. some minor chords followed by the
minor seventh).
•Two-note fingerings will produce a chord based on the previously played
chord.
NOTE
Style (Auto Accompaniment) Functions
PSR-S500 Owner’s Manual 63
This instrument features 11 internal Style categories, but it also allows you to import additional Styles
(only those with an “.sty” extension) that you’ve downloaded from the Internet or gotten from other
sources, and load them into a User Style and use them in the same way as the internal Styles.
For details on loading a Style file, see “
Loading User Files and Style Files
” on page
78
.
In order to load a Style file it is necessary to first either transfer the Style file to the instrument from a com-
puter, or connect a USB flash memory containing the Style file to the USB TO DEVICE connector. Refer to
“Transferring Performance Data to and from a Computer” on page 83 for details on the file transfer proce-
dure.
If you are using a USB flash memory device, refer to “Loading User Files and Style Files” on page 78.
In “Playing Along with a Style” on page 23 we described two methods of playing Styles (Multi, Full Key-
board) in which chords were either detected only to the left of the keyboard Split Point or over the entire
keyboard. By making the settings described below, chord detection for Style accompaniment occurs over
the entire range of the keyboard, allowing for even more dynamic Style performance. In this mode only
chords played in the normal way (page 25) can be detected.
1Press the [ACMP] button for longer than
a second.
2Use the dial to select 2 “FullKeyboard”.
User Style
Playing Styles Using the Entire Keyboard
Hold for longer
than a second
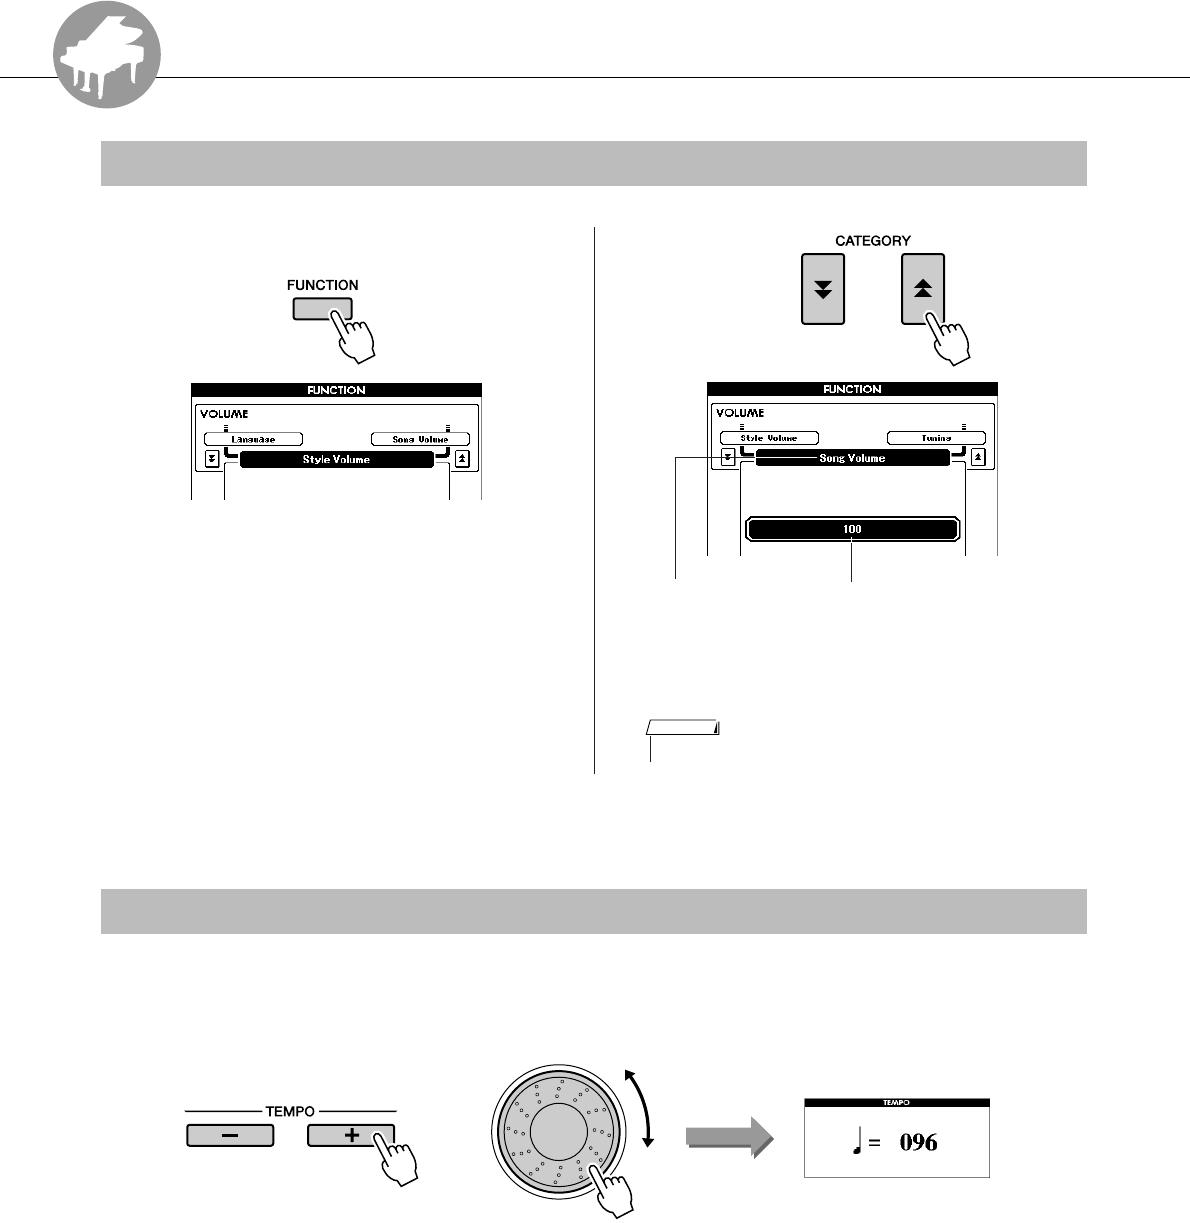
R
e
f
e
r
e
n
c
e
64 PSR-S500 Owner’s Manual
Song Settings
1Press the [FUNCTION] button.
2Use the CATEGORY [ ] and [ ] but-
tons as many times as necessary to call
up Song Volume.
3Use the dial to set the Song volume
between 000 and 127.
When playing the Song you can change the tempo as required. Press the TEMPO [+]/[-] buttons. The tempo
display will appear and you can use the dial or the TEMPO [+]/[-] buttons to set to tempo to anywhere from
011 and 280 quarter-note beats per minute.
You can return to the original tempo by simultaneously pressing both the TEMPO [+] and [-] buttons.
Press the [EXIT] button to return to the Main display.
Pressing the TEMPO [+]/[-] buttons allows single-step changes. Pressing and holding either button contin-
uously increases or decreases the value.
Song Volumes
f
r
Can be set between 000 and 127Song Volume
• Song volume can be adjusted while a Song is selected.
NOTE
Changing the Tempo
or

Song Settings
PSR-S500 Owner’s Manual 65
You can specify a section of a Song—“A” is the start point and “B” is the end point—for repeat playback.
The A-B Repeat function is also very convenient for practicing when used along with the score display fea-
tures of the instrument (page 30).
1Play the Song (page 27) and press the
[A B] button at the beginning of the
section you want to repeat (the “A”
point).
2Press the [A B] button a second time
at the end of the section you want to
repeat (the “B” point).
3The specified A-B section of the Song
will now play repeatedly.
You can cancel A-B repeat playback at any
time by pressing the [A B] button.
A-B Repeat
AB
Point A
Point B
• The repeat start and end points can be specified in one-measure
increments.
• The current measure number is shown in the display during play-
back.
• If you want to set the start point “A” at the very beginning of the
Song press the [A B] button before starting playback of the
Song.
NOTE
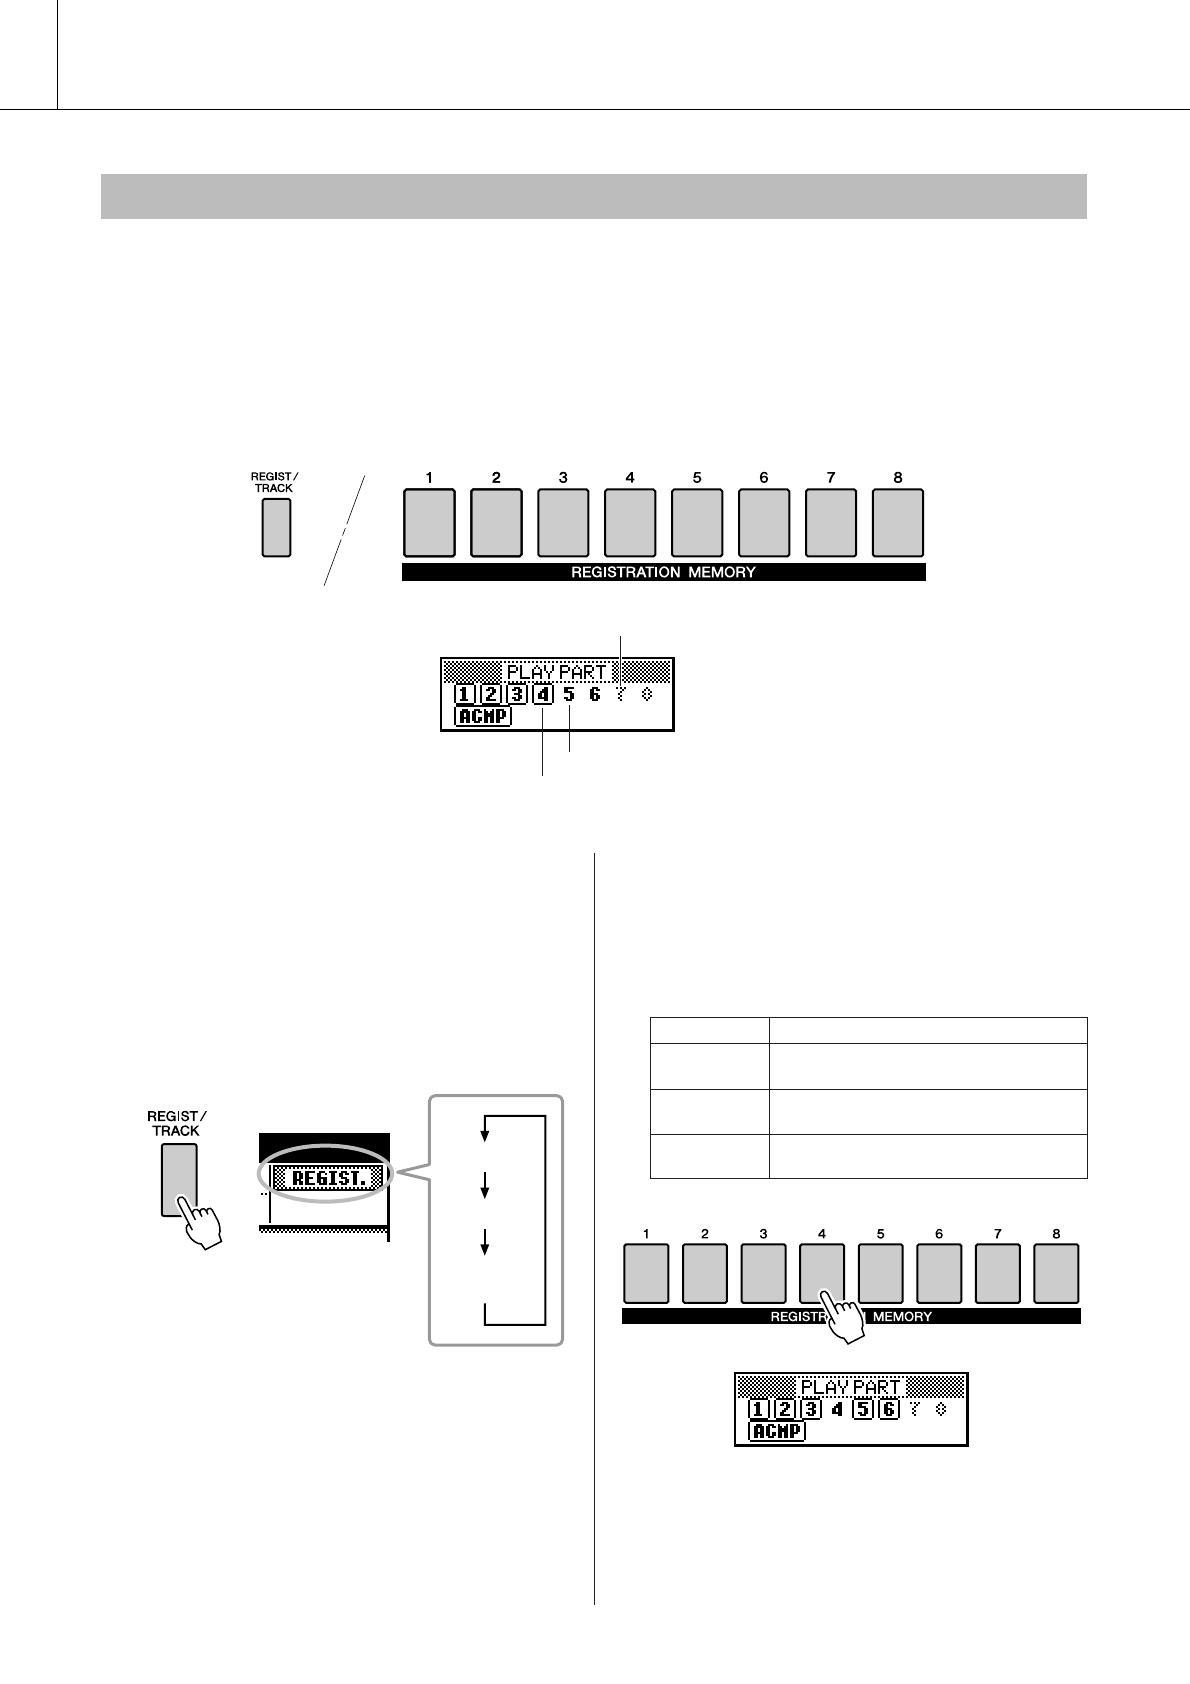
Song Settings
66 PSR-S500 Owner’s Manual
Each “track” of a Song plays a different part of the Song—melody, percussion, accompaniment, etc.
You can mute individual tracks and play the muted part on the keyboard yourself, or simply mute tracks
other than the ones you want to listen to.
Use the [REGIST/TRACK] button to select the TR 1–8, TR 9–16 or ACMP.TR and use the REGISTRA-
TION MEMORY [1]–[8] buttons to mute or un-mute the corresponding tracks ([1]–[8], [9]–[16] or
ACMP). The border around the track number in the display disappears when that track is muted.
Refer to page 32 for information about the Song track configuration.
1Press the [REGIST/TRACK] button until
the desired track is shown on the dis-
play, and then select the track.
The following items appear on the display
when you press the [REGIST/TRACK] button.
“REGIST” ➝ “TR 1–8” ➝ “TR 9–16” or
“ACMP.TR”
2Press the desired REGISTRATION MEM-
ORY [1]–[8] buttons to set the mute
track.
To cancel the mute, press the appropriate REG-
ISTRATION MEMORY [1]–[8] buttons again.
Muting Independent Song Parts
Track number without border ... Track contains data but is muted.
Track number with border ... Track contains data and is not muted.
No track number ... No data.
REGIST.
TR 1 – 8
TR 9 – 16
(ACMP. TR)
Display Setting
TR 1–8 Specify the mute tracks of 1–8 by press-
ing the [1]–[8] buttons.
TR 9–16 Specify the mute tracks of 9–16 by
pressing the [1]–[8] buttons.
ACMP.TR Specify the mute track of ACMP by
pressing the [1] button.
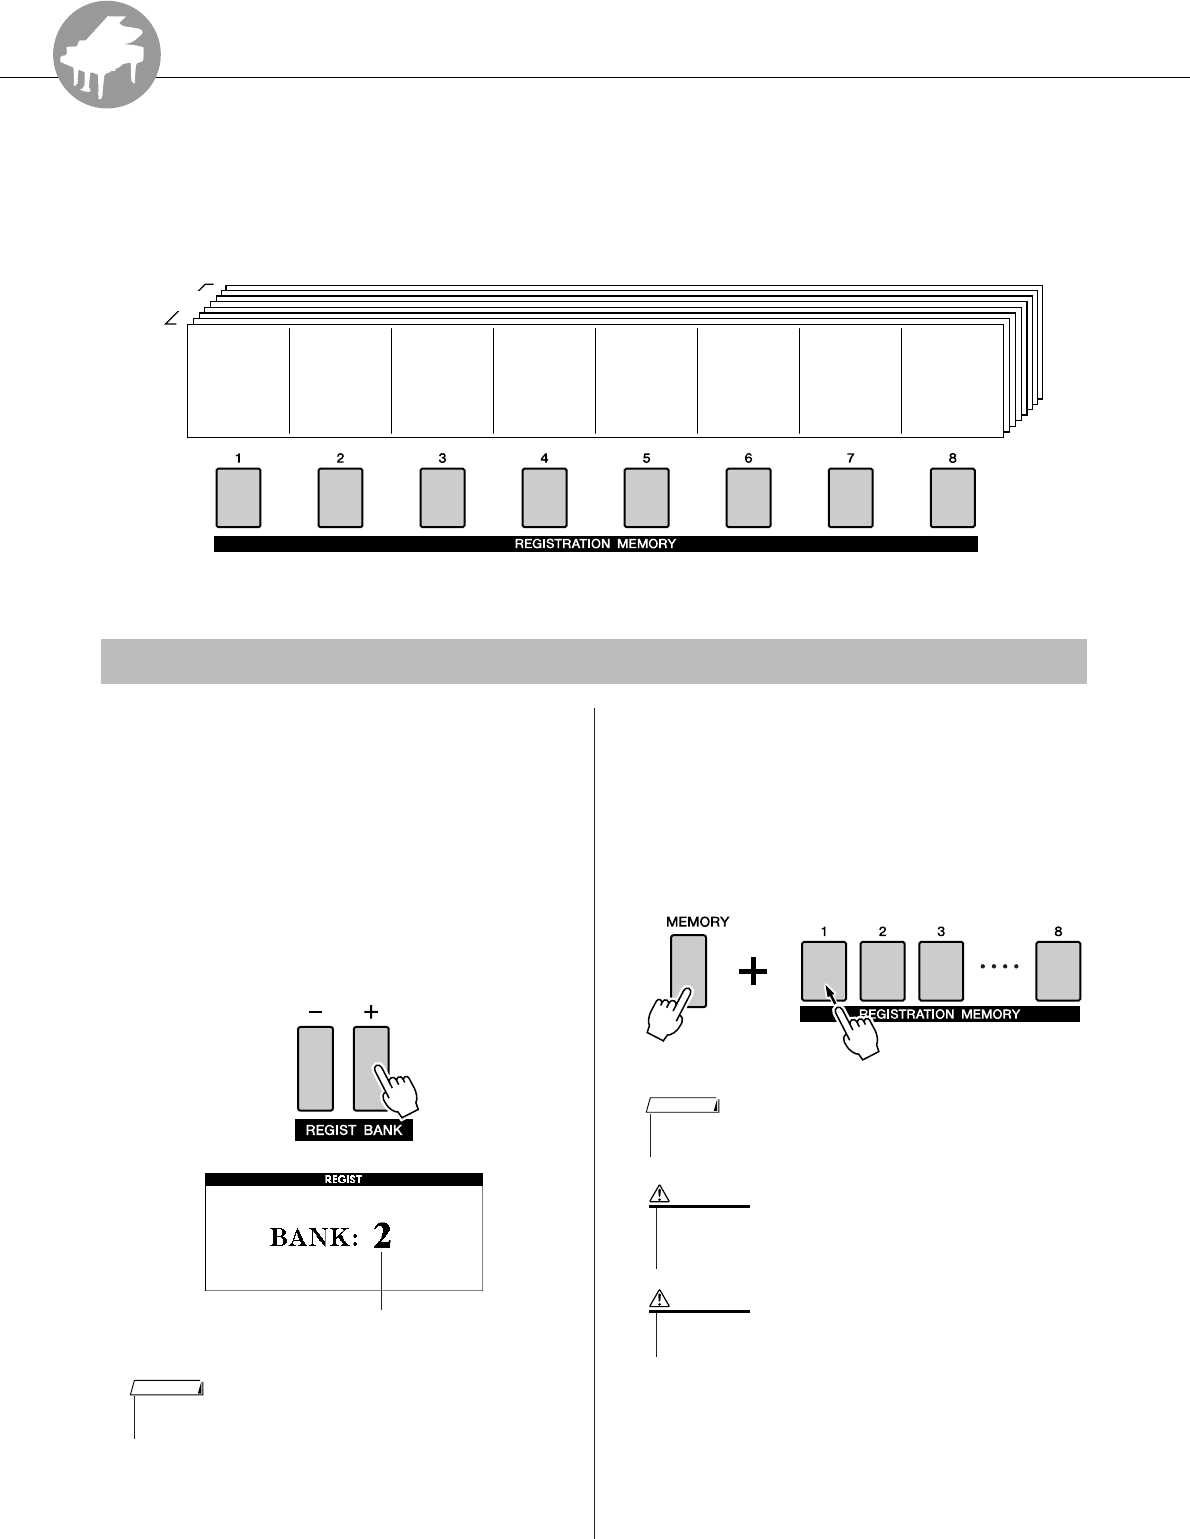
R
e
f
e
r
e
n
c
e
PSR-S500 Owner’s Manual 67
Memorize Your Favorite Panel Settings
This instrument has a Registration Memory feature that lets you save your favorite set-
tings for easy recall whenever they’re needed. Up to 64 complete setups can be saved
(8 banks of 8 setups each).
1Set the panel controls as required—
select a Voice, accompaniment Style,
etc.
2Press the REGIST BANK [+]/[-] buttons
until the desired bank number is shown
on the display.
You can also use the dial in the Bank Select
display.
3To store the current panel settings,
simultaneously hold down the [MEM-
ORY] button and press one of the REG-
ISTRATION MEMORY [1]–[8] buttons.
The button corresponding to the stored Regis-
tration lights.
8 Banks
Memory 1
Up to 64 presets (eight banks of eight each) can be memorized.
Memory 2 Memory 3 Memory 4 Memory 5 Memory 6 Memory 7 Memory 8
Saving to the Registration Memory
Bank number
• Data cannot be saved to the registration memory during Song play-
back.
NOTE
•You can also save your panel settings memorized to registration
memory button into USB flash memory as a user file (see page 76).
NOTE
• If you select a Registration Memory number that already con-
tains data, the previous data is deleted and overwritten by the
new data.
CAUTION
• Do not turn off the power while saving settings to the registra-
tion memory, otherwise the data may be damaged or lost.
CAUTION
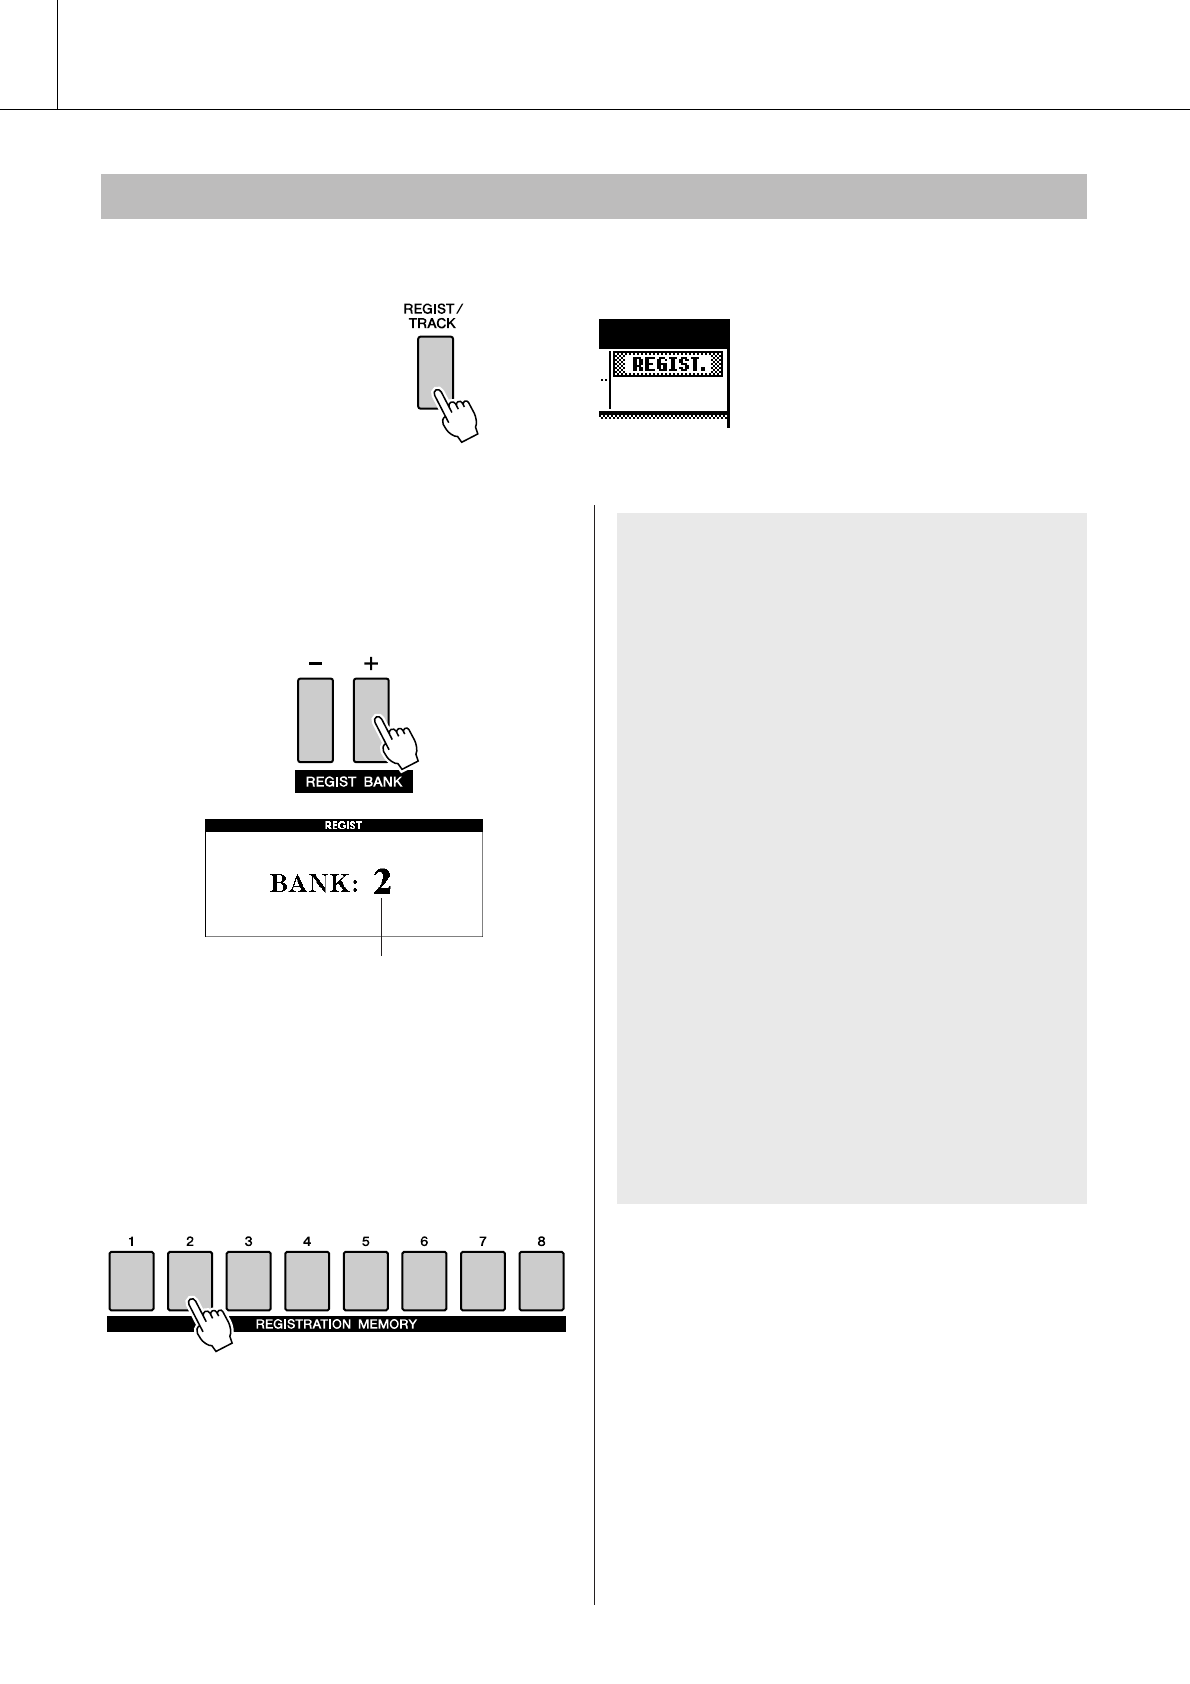
Memorize Your Favorite Panel Settings
68 PSR-S500 Owner’s Manual
Make sure that “REGIST” appears in the display (press the [REGIST/TRACK] button until it is shown).
1Press the REGIST BANK [+]/[-] button to
select the desired bank.
You can also use the dial to select the bank
number.
2Press the REGISTRATION MEMORY
button, [1]–[8], containing the settings
you want to recall. The panel controls
will be instantly set accordingly.
The button to which the data is stored lights in
green and the currently set button is in red.
Recalling a Registration Memory
Bank number
●Settings that can be saved to the Regis-
tration Memory
• Style settings*
Style number, Auto Accompaniment ON/OFF,
Split Point, Style settings (Main A/B), Style Vol-
ume, Tempo, Chord Fingering, Upper Octave
•Voice settings
Main Voice setting (Voice number, Volume,
Octave, Pan, Reverb Level, Chorus Level), Dual
Voice settings (Dual ON/OFF, Voice number,
Volume, Octave, Pan, Reverb Level, Chorus
Level), Left Voice settings (Left ON/OFF, Voice
number, Volume, Octave, Pan, Reverb Level,
Chorus Level)
• Effect settings
Reverb Type, Chorus Type, Panel Sustain ON/
OFF
• Harmony settings
Harmony ON/OFF, Harmony Type, Harmony
Volume
• Other settings
Transpose, Pitch Bend Range, Upper Octave
*Style settings are not available for Registration Memory
when using the Song features.
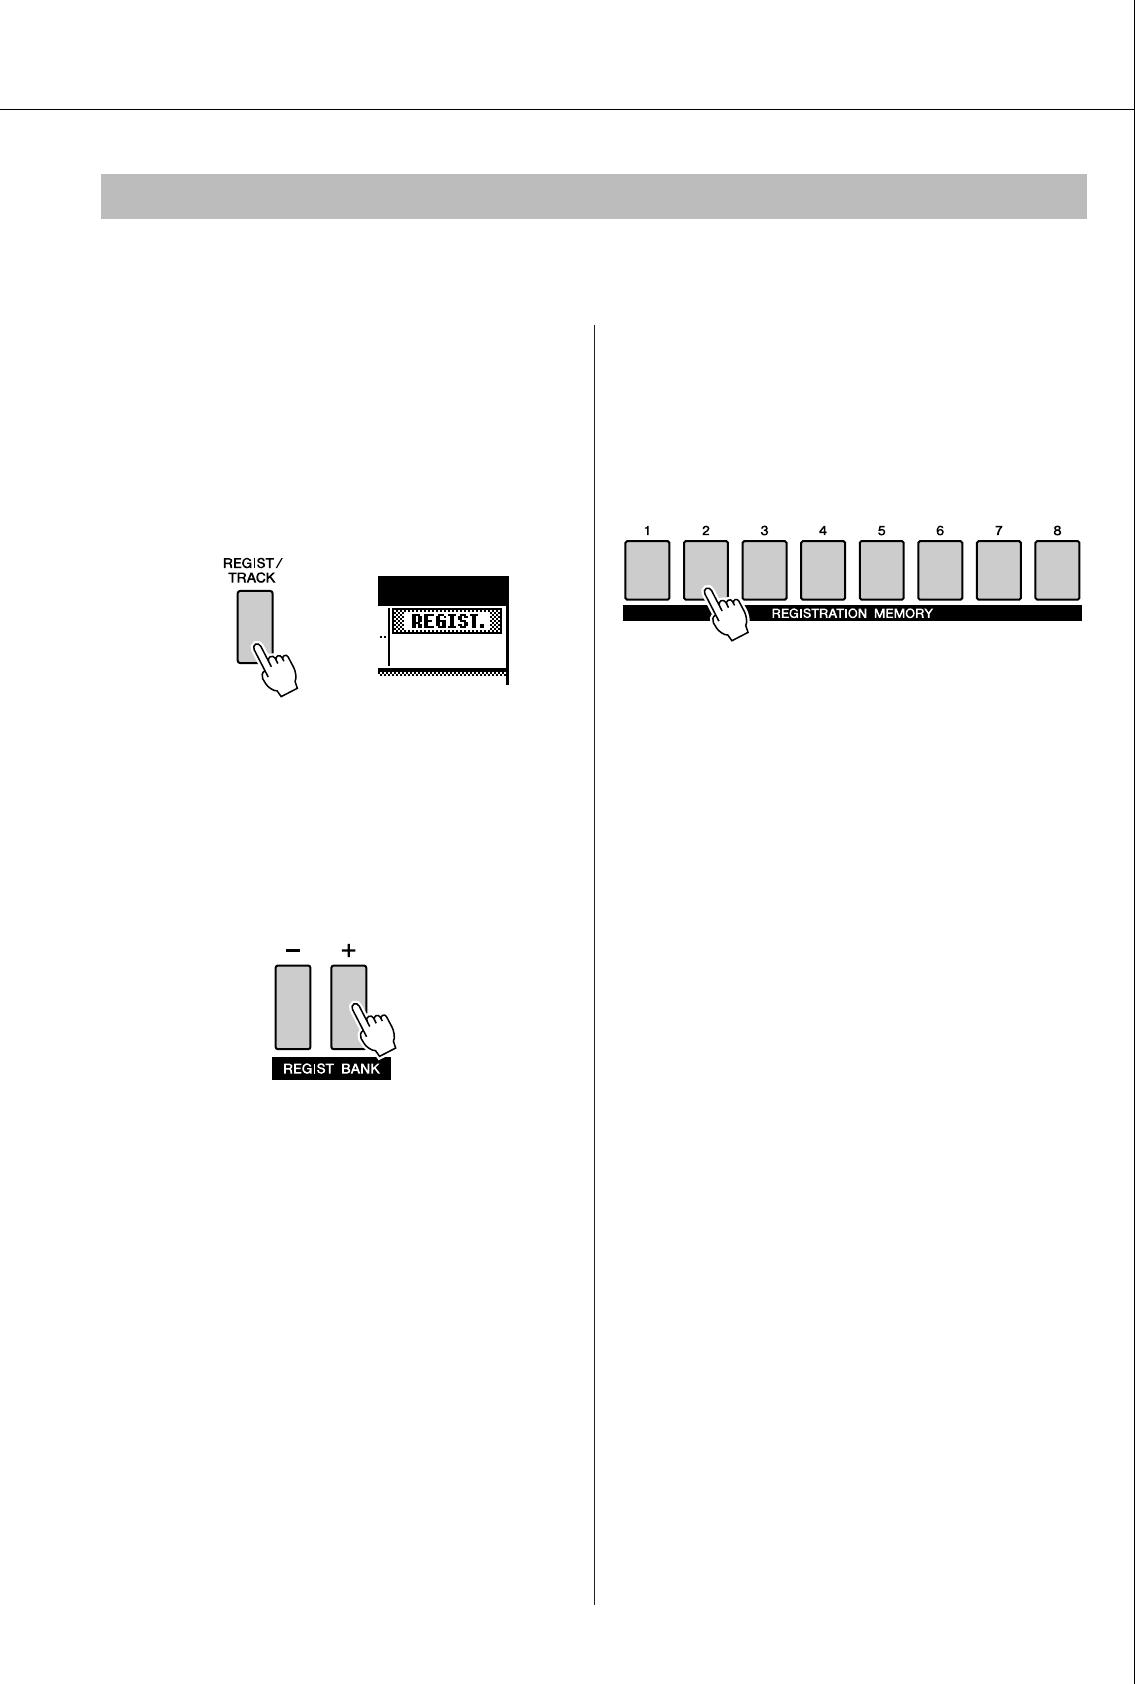
Memorize Your Favorite Panel Settings
PSR-S500 Owner’s Manual 69
Keep in mind that groups of data cannot be deleted or cleared from the instrument at a single time.
1Press the [REGIST/TRACK] button a
number of times until the “REGIST.”
item appears.
The item changes in order from “REGIST.” to
“TR 1–8” to “ACMP.TR”.
This step is not necessary if the instrument is in
the Style mode.
2Press the [REGIST/BANK] button a
number of times until the desired bank
number appears.
The Registration Memory button is lit in green
if Registration data is stored to the memory.
3Press and hold the REGISTRATION
MEMORY button corresponding to the
Registration you want to clear for
longer than a second.
A confirmation message will appear on the dis-
play.
4Press the [+/YES] button.
A confirmation message will appear again on
the display.
You can cancel the clear operation by pressing
the [-/NO] button.
5Press the [+/YES] button again to clear
a Registration Memory.
The clear-in-progress message will appear
briefly on the display while the Song is being
cleared.
Registration Clear—Deleting a Specified Registration Memory
Hold for longer
than a second

R
e
f
e
r
e
n
c
e
70 PSR-S500 Owner’s Manual
The Functions
The “Functions” provide a wide range of both detailed and overall instrument parame-
ters, such as adjusting the tuning, setting the split point, and editing the voices and
effects.
There are 49 function parameters in all.
1Find the function you want to set in the
list that begins on page 71.
2Press the [FUNCTION] button.
3Select a function. Press the CATEGORY
[] and [ ] buttons as many times as
necessary until the function’s display
name appears in the display.
Take a look at the function list starting on page
71.
The name of the previous item in the list
appears to the upper left, and the name of the
next item in the list appears to the upper right
of the currently selected item.
4Use the dial or the [+/YES] and [-/NO]
buttons, to set the parameters.
The [+/YES] and [-/NO] buttons are used to
make ON/ OFF type settings: [+/YES] = ON,
[-/NO] = OFF.
In some cases, pressing the [+/YES] button
will execute the selected function, and press-
ing [-/NO] will cancel the selection.
Press the [+/YES] and [-/NO] buttons simulta-
neously to recall the default setting (excepting
the initial setup of MIDI).
Selecting and Setting Functions
f
r
Previous item
Function
group Next item
Current selected item Parameter
• Increment value by 1.
•ON
•Execute
• Decrement value by 1.
• OFF
• Cancel
Press these simulta-
neously to recall the
default setting.
The Functions
PSR-S500 Owner’s Manual 71
■Function Setting List
Group Function Item
Display Indication
Range/Settings Description
VOLUME Style Volume Style Volume 000–127 Determines the volume of the Style.
Song Volume Song Volume 000–127 Determines the volume of the Song.
OVERALL Tuning Tuning 415.3–466.2 Sets the pitch of the instrument’s sound in approxi-
mately 0.2Hz increments.
Pitch Bend
Range
Pitch Bend Range 01–12 Sets the pitch bend range in semitone increments.
Split Point Split Point 000–127 (C-2–G8) Determines the highest key for the Split voice and
sets the Split “point”—in other words, the key that
separates the Split (lower) and Main (upper) voices.
The Split Point setting and Accompaniment Split
Point setting are automatically set to the same value.
Touch Sensitivity Touch Sensitivity 1 (Soft),
2 (Medium),
3 (Hard)
Determines the sensitivity of the feature.
Chord Fingering Chord Fingering 1 (Multi Finger),
2 (FullKeyboard)
Sets the chord detection mode. In the Multi Finger
mode both normal chords and simple chords played
to the left of the split point are detected. In the Full
Keyboard mode normal chords played anywhere on
the keyboard will be detected, and the notes played
will sound as well.
MAIN
VOICE
Volume Main Volume 000–127 Determines the volume of the Main voice.
Octave Main Octave -2–+2 Determines the octave range for the Main voice.
Pan Main Pan 000 (left)–
64 (center)–
127 (right)
Determines the pan position of the Main voice in the
stereo image. The value “0” results in the sound
being panned full left; the value “127” results in the
sound being panned full right.
Reverb Level Main Reverb
Level
000–127 Determines how much of the Main voice’s signal is
sent to the Reverb effect.
Chorus Level Main Chorus
Level
000–127 Determines how much of the Main voice’s signal is
sent to the Chorus effect.
DSP Level Main DSP Level 000–127 Determines how much of the Main voice’s signal is
sent to the DSP effect.
Dry Level Main Dry Level 000–127 Determines how much of the Main Voice’s unproc-
essed signal sounds (no Reverb, Chorus or DSP
effect processing).
DUAL
VOICE
Volume Dual Volume 000–127 Determines the volume of the Dual voice.
Octave Dual Octave -2–+2 Determines the octave range for the Dual voice.
Pan Dual Pan 000 (left)–
64 (center)–
127 (right)
Determines the pan position of the Dual voice in the
stereo image. The value “0” results in the sound
being panned full left; the value “127” results in the
sound being panned full right.
Reverb Level Dual Reverb
Level
000–127 Determines how much of the Dual voice’s signal is
sent to the Reverb effect.
Chorus Level Dual Chorus
Level
000–127 Determines how much of the Dual voice’s signal is
sent to the Chorus effect.
DSP Level Dual DSP Level 000–127 Determines how much of the Dual voice’s signal is
sent to the DSP effect.
Dry Level Dual Dry Level 000–127 Determines how much of the Dual Voice’s unproc-
essed signal sounds (no Reverb, Chorus or DSP
effect processing).
LEFT VOICE Volume Left Volume 000–127 Determines the volume of the Left voice.
Octave Left Octave -2–+2 Determines the octave range for the Left voice.
Pan Left Pan 000 (left)–
64 (center)–
127 (right)
Determines the pan position of the Left voice in the
stereo image. The value “0” results in the sound
being panned full left; the value “127” results in the
sound being panned full right.
Reverb Level Left Reverb Level 000–127 Determines how much of the Left voice’s signal is
sent to the Reverb effect.
Chorus Level Left Chorus Level 000–127 Determines how much of the Left voice’s signal is
sent to the Chorus effect.
DSP Level Left DSP Level 000–127 Determines how much of the Left voice’s signal is
sent to the DSP effect.
Dry Level Left Dry Level 000–127 Determines how much of the Left Voice’s unproc-
essed signal sounds (no Reverb, Chorus or DSP
effect processing).
The Functions
72 PSR-S500 Owner’s Manual
*All these settings can be conveniently reset to their initial default values by pressing the [+/YES] and [-/NO] buttons simultaneously. (The exception to
this is Initial Send, which is an operation, not a setting.)
EFFECT Reverb Type Reverb Type 01–26 Determines the Reverb type, including off (26). (See
the list on page 110)
Chorus Type Chorus Type 1–31 Determines the Chorus type, including off (31). (See
the list on page 111)
DSP Type DSP Type 001–179 Determines the DSP type, including off (179). (See
the list on page 111)
Master EQ Type Master EQ Type 1 (Speaker 1),
2 (Speaker 2),
3 (Headphones),
4 (Line Out 1),
5 (Line Out 2)
Sets the equalizer applied to the instrument output
(including speakers, headphones or other output) for
optimum sound in different listening situations.
HARMONY Harmony Type Harmony Type 01–26 Determines the Harmony type. (See the list on page
110)
Harmony Volume Harmony
Volume
000–127 Determines the volume of the Harmony effect.
PC MODE PC Mode PC Mode PC1/PC2/OFF Optimizes the MIDI settings for connecting to a com-
puter (page 84).
MIDI Local ON/OFF Local ON/OFF Determines whether the instrument’s keyboard con-
trols the internal tone generator (ON) or not (OFF).
(page 83)
External Clock
ON/OFF
External Clock ON/OFF Determines whether the instrument synchronizes to
the internal clock (OFF) or an external clock (ON).
(page 83)
Keyboard Out Keyboard Out ON/OFF Determines whether keyboard performance data of
the instrument is transmitted (ON) or not (OFF).
Style Out Style Out ON/OFF Determines whether Style data is transmitted (ON)
via USB TO HOST or not (OFF) during Style play-
back.
Song Out Song Out ON/OFF Determines whether Song data is transmitted (ON)
via USB TO HOST or not (OFF) during Song play-
back.
Initial Setup Initial Setup YES/NO Allows you to instantly send a data ‘snapshot’ of all
panel settings to a computer or sequencer. Press [+/
YES] to send, or press [-/NO] to cancel.
METRO-
NOME
Time Signature
Numerator
Time Signature
Numerator
00–60 Determines the time signature of the Metronome.
Time Signature
Denominator
Time Signature
Denominator
2, 4, 8, 16 Sets the length of each metronome beat.
Volume Metronome
Volume
000–127 Determines the volume of the Metronome.
SCORE Quantize Quantize 1 (1/4 note),
2 (1/4 note triplet),
3 (1/8 note),
4 (1/8 note triplet),
5 (1/16 note),
6 (
1/16 note triplet
),
7 (1/32 note),
8 (1/32 note triplet)
Depending on the song data, you can make the
score more readable by adjusting the timing of the
notes. This determines the minimum timing resolu-
tion used in the song. For example, if there are both
quarter notes and eighth notes in the song, you
should set this value to “eighth note.” Any notes or
rests shorter than this value will not be shown in the
score.
Right-Part Right-Part GuideTrack 1–16 Determines the guide track number for your right
hand lesson. The setting is only effective for songs in
SMF format 0 transferred from USB flash memory.
Left-Part Left-Part GuideTrack 1–16 Determines the guide track number for your left hand
lesson. The setting is only effective for songs in SMF
format 0 transferred from USB flash memory.
UTILITY Demo Cancel Demo Cancel ON/OFF Determines whether Demo cancel is enabled or not.
When this is set to ON, the Demo Song will not play,
even if the [DEMO] button is pressed.
LANGUAGE Language Language English/Japanese Determines the display language for the demo dis-
plays, song file names, lyrics and certain display
messages. All other messages and names are dis-
played in English. When this is set to Japanese, the
file names are displayed in the Japanese font. The
lyrics display follows the language setting originally
made in the song data; however, when no such set-
ting exists, the setting here is used.
Group Function Item
Display Indication
Range/Settings Description

R
e
f
e
r
e
n
c
e
PSR-S500 Owner’s Manual 73
Using USB Flash Memory
USB flash memory is a memory medium used for storing data.
When a USB flash memory device is inserted in this instrument’s USB TO DEVICE ter-
minal, user songs created on the instrument and the registered settings can be saved
to or loaded from the device. USB flash memory can also be used to transfer song data
downloaded from the Internet to the instrument. Furthermore, user songs saved to
USB flash memory in MIDI file format can also be used with these features.
In this section we’ll look at the procedures for setting up and formatting USB flash
memory devices, as well as for saving and loading data to and from them.
Before using a USB device, read through the “Precautions when using the USB TO DEVICE terminal” sec-
tion on page 82. For information about USB devices compatible with the instrument, see “Connection to a
USB Storage Device” on page 80.
If you don’t have a USB flash memory device, you will need to purchase one (or
more, as needed).
The instrument does not necessarily support all commercially available USB storage
devices. Yamaha cannot guarantee operation of USB storage devices that you pur-
chase.
Before purchasing a USB storage device, please consult your Yamaha dealer, or an
authorized Yamaha distributor (see list at end of the Owner’s Manual) for advice.
USB Flash Memory
●To protect your data (write-protect switch)
Some USB flash memory devices are equipped with a write-protect switch. To prevent accidental era-
sure of important data saved in USB flash memory, slide the write-protect switch on the device to the
“protect” position. When saving data, make sure that the write-protect switch is set to the “overwrite”
position.
Using USB Flash Memory
74 PSR-S500 Owner’s Manual
1Connect a USB flash memory to the
USB TO DEVICE terminal, being careful
to insert it in the proper direction. (Do
not try to force an improper connec-
tion.)
2Check that the “CONNECT” message is
shown in the MAIN display.
You can go to the FILE CONTROL display
from which you can access USB flash memory
operations by pressing the [MENU] button
from this display.
(Do not press this button now, but only when
instructed to in the sections below.)
Using USB Flash Memory
• In order to play songs copied to a USB flash memory from a
computer or other device, the songs must be stored either in
the USB flash memory’s root directory or a first-level/second-
level folder in the root directory. Songs stored in these location
can be selected and played as USB song (page 28). Songs
stored in third-level-folders created inside a second-level folder
cannot be selected and played by this instrument.
USB flash memory (Root)
Can be
selected/
played.
Cannot be
selected/
played.
Song
File
Song
File
Song
File
Song
Folder
Song
Folder
Song
Folder
root
IMPORTANT Menu Reference Page
Format 75
Save 76
SMF Save 77
Load 78
Delete 79
A message (information or confirmation
dialog) sometimes appears in the display to
facilitate operation. Refer to the “Messages”
section on page 96 for an explanation of each
message.
CONNECT
• No sound will be produced if you play the keyboard while the FILE
CONTROL display is showing. Also, in this state only buttons related
to file functions will be active.
NOTE
• The FILE CONTROL display will not appear in any of the following
cases:
• During style or song playback.
• While data is being loaded from a USB flash memory.
NOTE
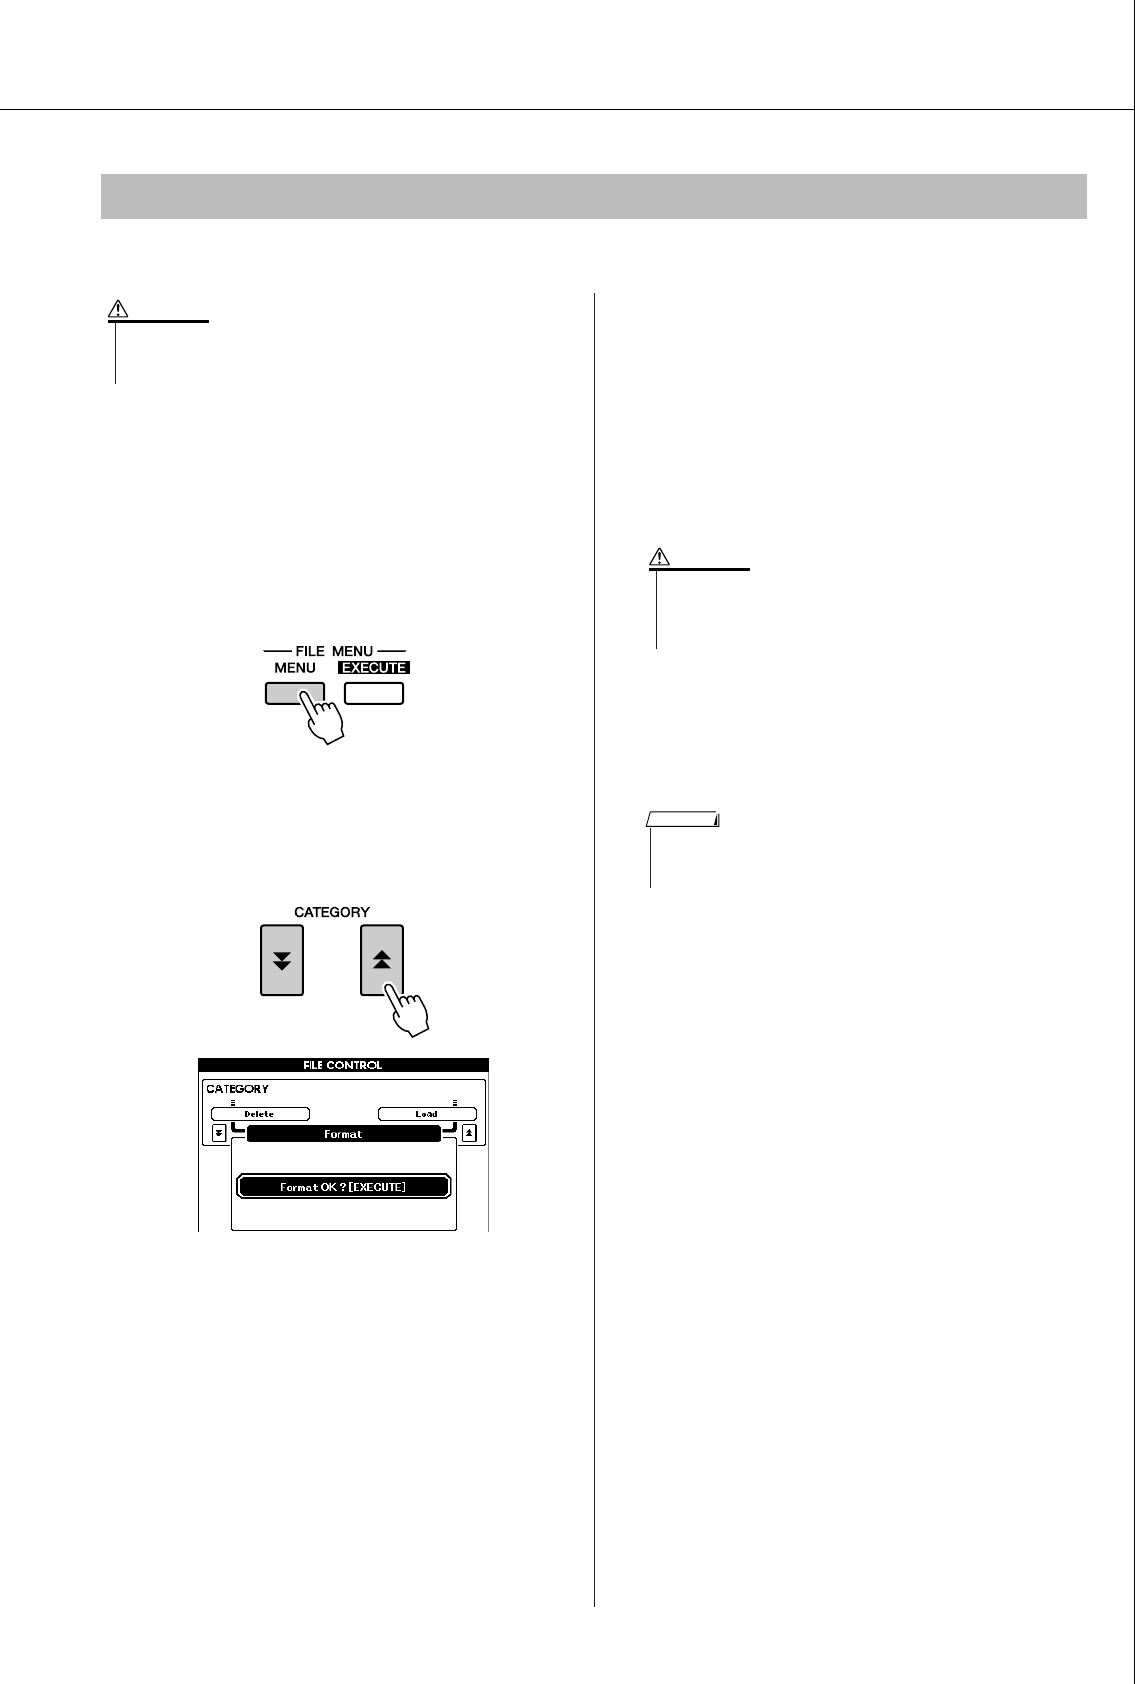
Using USB Flash Memory
PSR-S500 Owner’s Manual 75
A new USB flash memory device must be formatted before it can be used by this instrument.
1After connecting the USB flash memory
to be formatted to the instrument’s USB
TO DEVICE terminal, check that the
“CONNECT” message is shown in the
MAIN display.
2Press the FILE MENU [MENU] button.
3Use the CATEGORY [ ] and [ ] but-
tons to select the Format item.
The display prompts you for confirmation.
4Press the [EXECUTE] button and the
display prompts you for confirmation.
You can press the [-/NO] button at this point to
cancel the operation.
5Press the [EXECUTE] button again, or
the [+/YES] button, and the format oper-
ation will begin.
6A message appears in the display indi-
cating that the operation is complete.
Press the [EXIT] button to return to the MAIN
display.
Formatting USB Flash Memory
•If you format a USB flash memory that already contains data, all of
the data will be erased. Be careful not to erase important data
when using the format function.
CAUTION
f
r
• Once the format-in-progress message appears in the display,
the format operation cannot be canceled. Never turn off the
power or remove the USB flash memory device during this
operation.
CAUTION
•If the USB flash memory device has been write-protected, an appro-
priate message will appear in the display and you will not be able to
execute the operation.
NOTE
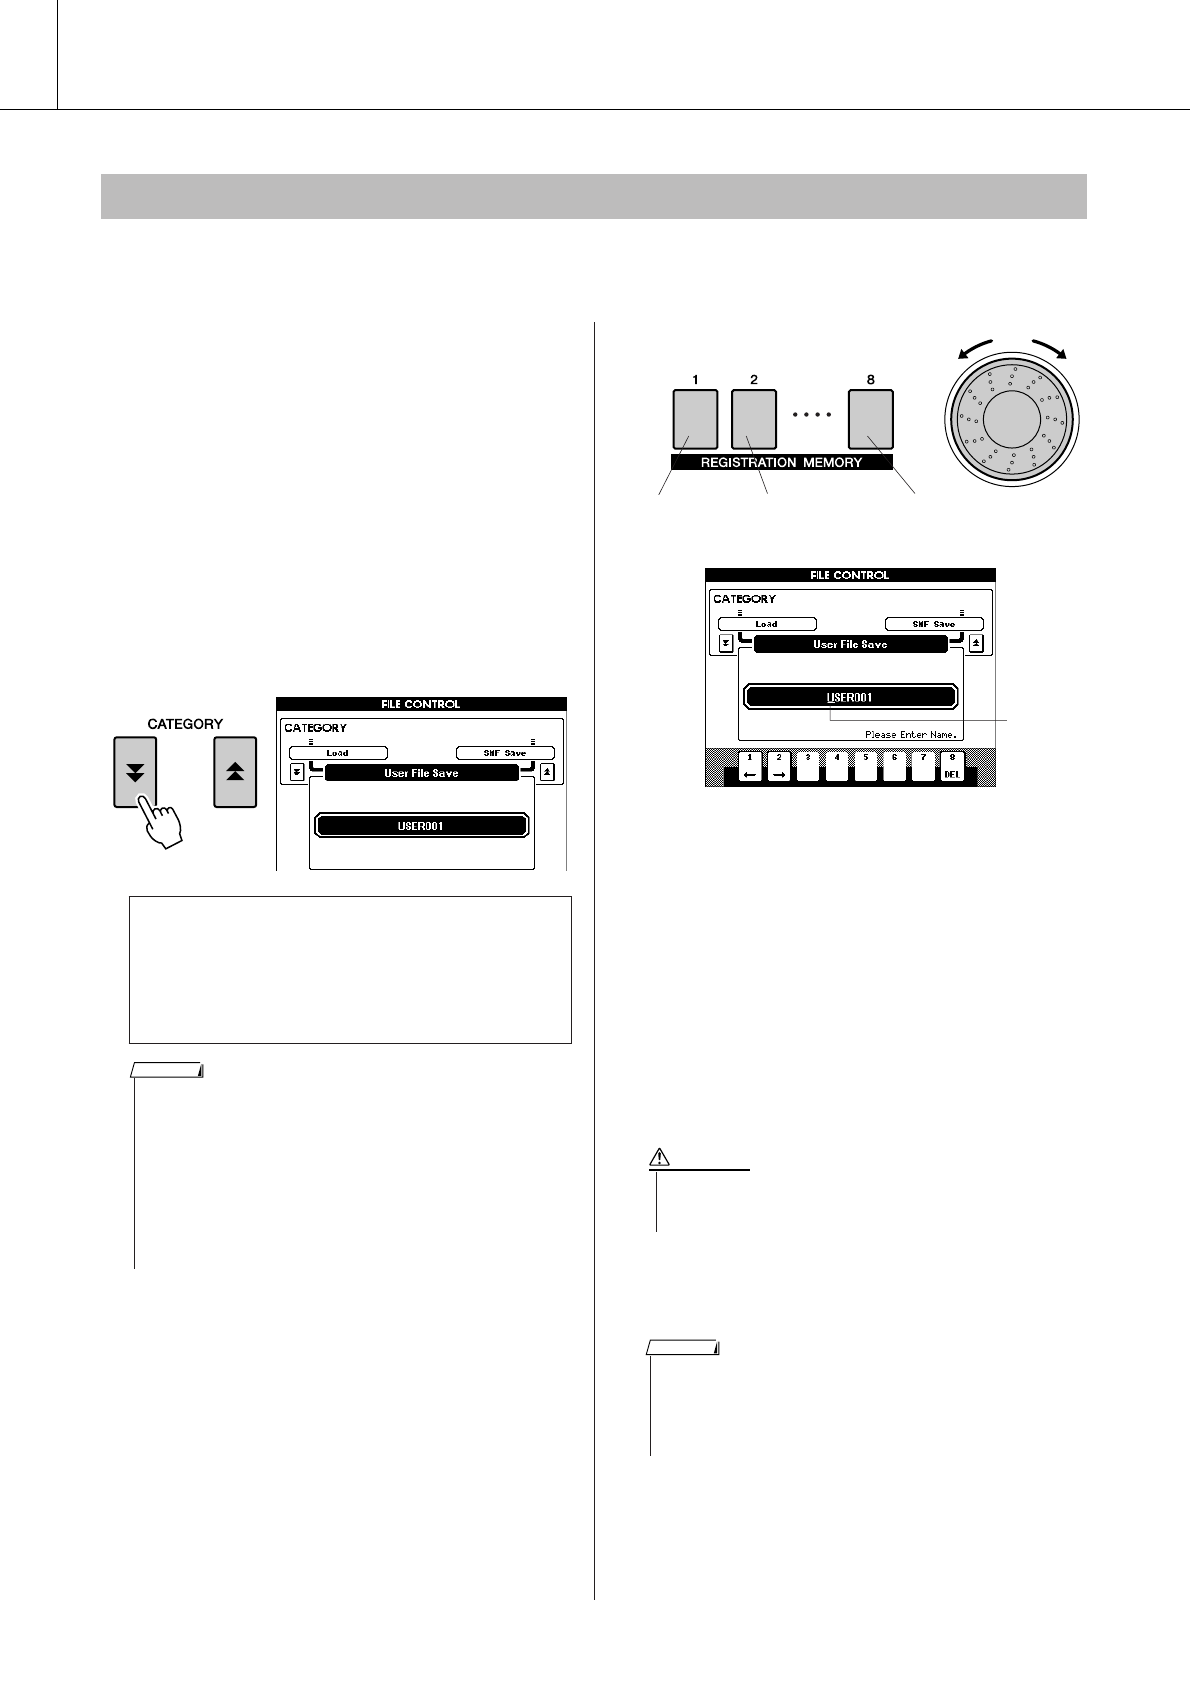
Using USB Flash Memory
76 PSR-S500 Owner’s Manual
Three types of data are saved to one “User File” by this operation: user song, style file, and registration mem-
ory data. When you save a “User File” the style file and registration memory are also saved automatically.
1Make sure that a appropriately format-
ted USB flash memory device has been
properly connected to the instrument’s
USB TO DEVICE terminal, and that a
“CONNECT” message is shown in the
MAIN display.
2Press the FILE MENU [MENU] button.
3Use the CATEGORY [ ] and [ ] but-
tons to locate the User File Save item.
A default file name will automatically be cre-
ated.
4Press the [EXECUTE] button. A cursor
will appear below the first character in
the file name.
5Change the file name as necessary.
•The [1] button moves the cursor to the left,
and the [2] button moves it to the right.
• Use the dial to select a character for the cur-
rent cursor location.
•The [8] button deletes the character at the cur-
sor location.
6Press the [EXECUTE] button. The dis-
play prompts you for confirmation.
You can cancel the save operation at this point
by pressing the [-/NO] button.
7Press the [EXECUTE] button again, or
the [+/YES] button, and the save opera-
tion will begin.
The user song will be stored to the USER FILE
folder in the USB flash memory device.
8Press the [EXIT] button to return to the
MAIN display.
Saving Data
●To Overwrite an Existing File
If you want to overwrite a file that already exists
on the USB flash memory device, use the dial or
the [+/YES] and [-/NO] buttons to select the
file, then skip ahead to step 6.
f
r
• If the USB flash memory has been write-protected, an appropriate
message will appear in the display and you will not be able to exe-
cute the operation.
•If there is not enough capacity left on the USB flash memory device
to save the data, an appropriate message will appear in the display
and you will not be able to save the data. Erase unwanted files from
the USB flash memory device to make more memory available
(page 79), or use a different USB device.
•Refer to the “Messages” list on page 96 for other possible errors that
might prevent you from completing the operation.
NOTE
Cursor
Cursor
right
Delete
character
Cursor
left
Select
characters
•Once the save-in-progress message appears in the display, the
operation cannot be canceled. Never turn off the power or
remove the USB flash memory device during this operation.
CAUTION
•If an existing filename is specified the display prompts you for confir-
mation. Press [EXECUTE] or [+/YES] if it is OK to overwrite the file,
or [-/NO] to cancel.
• The amount of time it will take to perform the save operation
depends on the particular USB flash memory device you are using.
NOTE
Using USB Flash Memory
PSR-S500 Owner’s Manual 77
This operation converts a user song (song numbers 001–005) to SMF Format 0 and saves the file to USB
flash memory.
1Make sure that a properly formatted
USB flash memory device has been
properly connected to the instrument’s
USB TO DEVICE terminal, and that the
“CONNECT” message is shown in the
MAIN display.
2Press the FILE MENU [MENU] button.
3Use the CATEGORY [ ] and [ ] but-
tons to locate the SMF Save item.
The SOURCE FILE—a user song name—will
be highlighted.
4Use the dial to select the source user
song.
You can press the [+/YES] and [-/NO] buttons
simultaneously to select the first user song.
5Press the [EXECUTE] button.
The DESTINATION SONG will be high-
lighted, and a default name will appear for the
converted song file.
6Press the [EXECUTE] button. A cursor
will appear below the first character in
the file name.
7Change the file name as necessary.
Refer to “Saving Data” on page 76 for filename
entry.
8Press the [EXECUTE] button. The dis-
play prompts you for confirmation.
You can cancel the save operation at this point
by pressing the [-/NO] button.
9Press the [EXECUTE] button again, or
the [+/YES] button, and the save opera-
tion will begin.
The user song will be stored to the USER FILE
folder in the USB flash memory device.
10
A message appears in the display indi-
cating that the operation is complete.
Press the [EXIT] button to return to the
MAIN display.
Convert a User Song to SMF Format and Save
●What is SMF (Standard MIDI File)?
The SMF (Standard MIDI File) format is one of the
most common and widely compatible sequence
formats used for storing sequence data. There are
two variations: Format 0 and Format 1. A large
number of MIDI devices are compatible with SMF
Format 0, and most commercially available MIDI
sequence data is provided in SMF Format 0.
f
r
The source user song name.
●To Overwrite an Existing File
If you want to overwrite a file that already exists
on the USB flash memory device, use the dial or
the [+/YES] and [-/NO] buttons to select the
file, then skip ahead to step 7.
The name of the file to be savedCursor
•Once the save-in-progress message appears in the display, the
operation cannot be canceled. Never turn off the power or
remove the USB flash memory during this operation.
CAUTION
• If an existing filename is specified, the display prompts you for con-
firmation. Press [EXECUTE] or [+/YES] if it is OK to overwrite the
file, or [-/NO] to cancel.
• The amount of time it will take to perform the save operation
depends on the particular USB flash memory device you are using.
NOTE
Using USB Flash Memory
78 PSR-S500 Owner’s Manual
User files and style file residing on a USB flash memory can be loaded to the instrument.
1With the USB flash memory device con-
taining the file you want to load con-
nected to the USB TO DEVICE
connector, check that the “CONNECT”
message is shown in the MAIN display.
2Press the FILE MENU [MENU] button.
3Use the CATEGORY [ ] and [ ] but-
tons to locate the Load item.
4Use the dial to select the user file or
style file you want to load.
All user files in the USB flash memory device
will be displayed first, followed by the style
files.
5Press the [EXECUTE] button. The dis-
play prompts you for confirmation.
You can cancel the load operation at this point
by pressing the [-/NO] button.
6Press the [EXECUTE] button again, or
the [+/YES] button, and the load opera-
tion will begin.
7A message appears in the display indi-
cating that the operation is complete.
Press the [EXIT] button to return to the MAIN
display.
Loading User Files and Style Files
•Save important data to a USB flash memory before loading data
that will overwrite it.
CAUTION
f
r
• Style files must be located in the root directory. Style files located
within folders will not be recognized.
NOTE
•Once the load-in-progress message appears in the display, the
operation cannot be canceled. Never turn off the power or
remove the USB flash memory during this operation.
CAUTION
Using USB Flash Memory
PSR-S500 Owner’s Manual 79
This procedure deletes selected user files and SMF files from a USB flash memory device.
1Make sure that the USB flash memory
device containing the file(s) you want to
delete has been properly connected to
the instrument’s USB TO DEVICE termi-
nal, and that the “CONNECT” is shown
in the MAIN display.
2Press the FILE MENU [MENU] button.
3Use the CATEGORY [ ] and [ ] but-
tons to locate the Delete item.
4Select the file you want to delete.
You can press the [+/YES] and [-/NO] buttons
simultaneously to select the first song or user
file on the USB flash memory.
5Press the [EXECUTE] button. The dis-
play prompts you for confirmation.
You can cancel the delete operation at this
point by pressing the [-/NO] button.
6Press the [EXECUTE] button again, or
the [+/YES] button, and the delete oper-
ation will begin.
7A message appears in the display indi-
cating that the operation is complete.
Press the [EXIT] button to return to the MAIN
display.
1Make sure that the USB flash memory
device containing the song you want to
play has been properly connected to
the instrument’s USB TO DEVICE termi-
nal, and that the “CONNECT” is shown
in the MAIN display.
2Press the [USB] button.
3Use the dial to select the song you want
to play.
4Press the [>>
>>/■] button.
Deleting Data from USB Flash Memory
f
r
• Once the delete-in-progress message appears in the display,
the operation cannot be canceled. Never turn off the power or
remove the USB flash memory during this operation.
CAUTION
• If the USB flash memory has been write-protected, an appropriate
message will appear in the display and you will not be able to exe-
cute the operation.
NOTE
Playing Songs Saved to USB Flash Memory
R
e
f
e
r
e
n
c
e
80 PSR-S500 Owner’s Manual
Connections
qUSB TO HOST terminal
This terminal allows direct connection to a per-
sonal computer. Refer to “Connecting a Per-
sonal Computer” on page 82 for more
information.
wUSB TO DEVICE terminal
This terminal allows connection to USB stor-
age devices. Refer to “Connection to a USB
Storage Device” below.
By connecting the instrument to a USB storage device, you can save data you’ve created, as well as read or
play the data from the connected device.
■Compatible USB storage
devices ● ● ● ● ● ● ● ● ● ● ● ● ● ● ● ● ● ● ● ●
A USB storage device, such as a floppy disk drive
and flash memory can be connected to the USB TO
DEVICE terminal. Other USB devices such as a
computer keyboard or mouse cannot be used.
Before purchasing USB storage devices, please
consult your Yamaha dealer, or an authorized
Yamaha distributor (see list at end of the Owner’s
Manual) for advice.
■Connection to a USB storage
device ● ● ● ● ● ● ● ● ● ● ● ● ● ● ● ● ● ● ● ● ●
Connectors
w
q
Connection to a USB Storage Device
•Avoid frequently turning the power on/off to the USB storage
device, or connecting/disconnecting the cable too often. Doing so
may result in the operation of the instrument “freezing” or hang-
ing up. While the instrument is accessing data (such as in the
Save and Delete operations), do NOT unplug the USB cable, do
NOT remove the media from the device, and do NOT turn the
power off to either device. Doing so may corrupt the data on either
or both devices.
CAUTION
• Some USB memory devices may require more current than the
instrument can supply, causing the instrument’s over-current pro-
tection function to be activated and making it impossible to use
the device. If this occurs “OverCurrent” will appear in the lower-
right area of the MAIN display. To restore normal operation
remove the USB device from the USB TO DEVICE connector and
turn the instrument’s power off and then back on again.
CAUTION
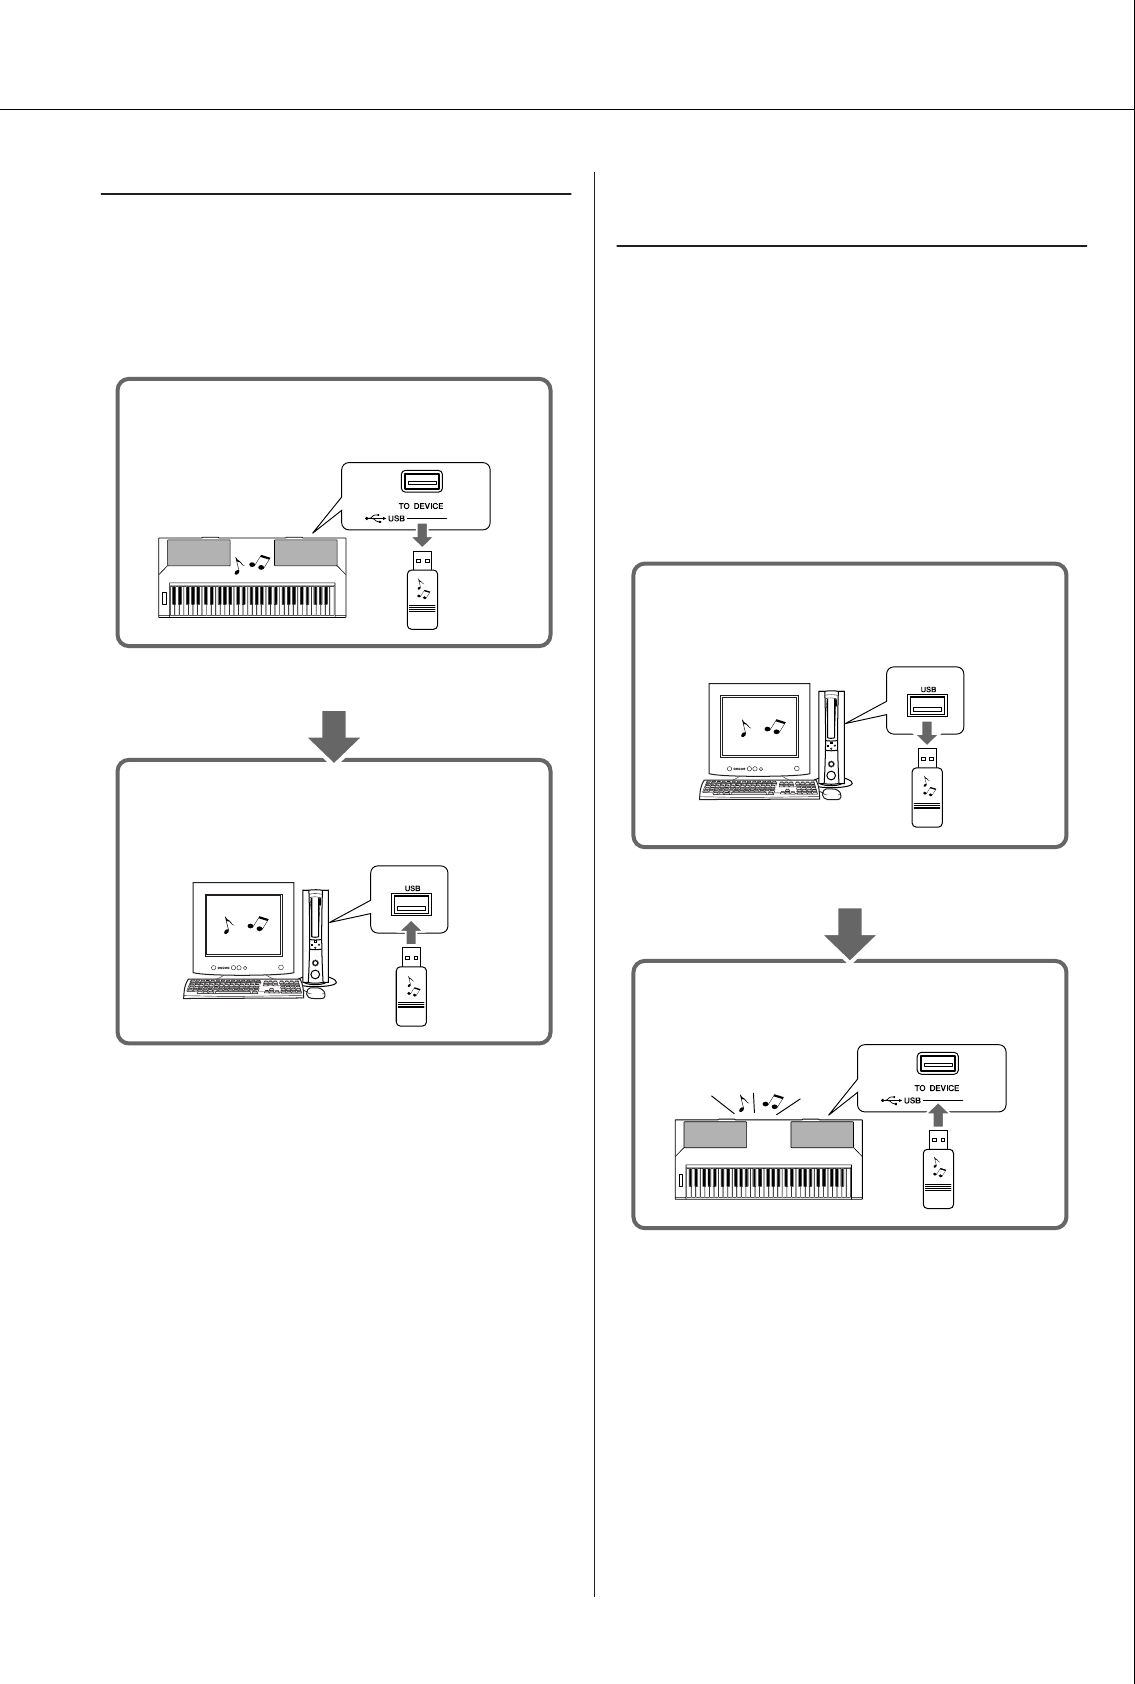
Connections
PSR-S500 Owner’s Manual 81
Backing up the instrument data to a computer
Once you’ve saved data to a USB flash memory
device, you can copy the data to the hard disk of
your computer, then archive and organize the files
as desired. Simply reconnect the device as shown
below.
Copying files from a computer hard disk to
USB flash memory and then playing back the
songs on the instrument
Files on a computer’s hard disk can be transferred
to the instrument by first copying them to a USB
flash memory device, then connecting/inserting the
media to the instrument. User files, style files and
MIDI songs can be copied to a USB flash memory
device from the hard disk of the computer. Once
you’ve copied the data, connect the device to the
USB TO DEVICE terminal of the instrument and
play back the MIDI songs, or load the user file or
style file on the instrument.
Saves internal data to a USB flash memory.
USB TO DEVICE terminal
Instrument
USB flash
memory
Disconnect the USB flash memory device from the
computer and connect it to the instrument.
Backing up data to a computer and
organizing files/folders
USB terminal
Computer
USB flash
memory
Copying files from the computer’s hard disk to
the USB storage device
Instrument
Disconnect the USB storage device from the
computer and connect it to the instrument.
USB flash
memory
USB flash
memory
Computer
USB TO DEVICE terminal
Reading files on the USB storage device
from the instrument
USB terminal
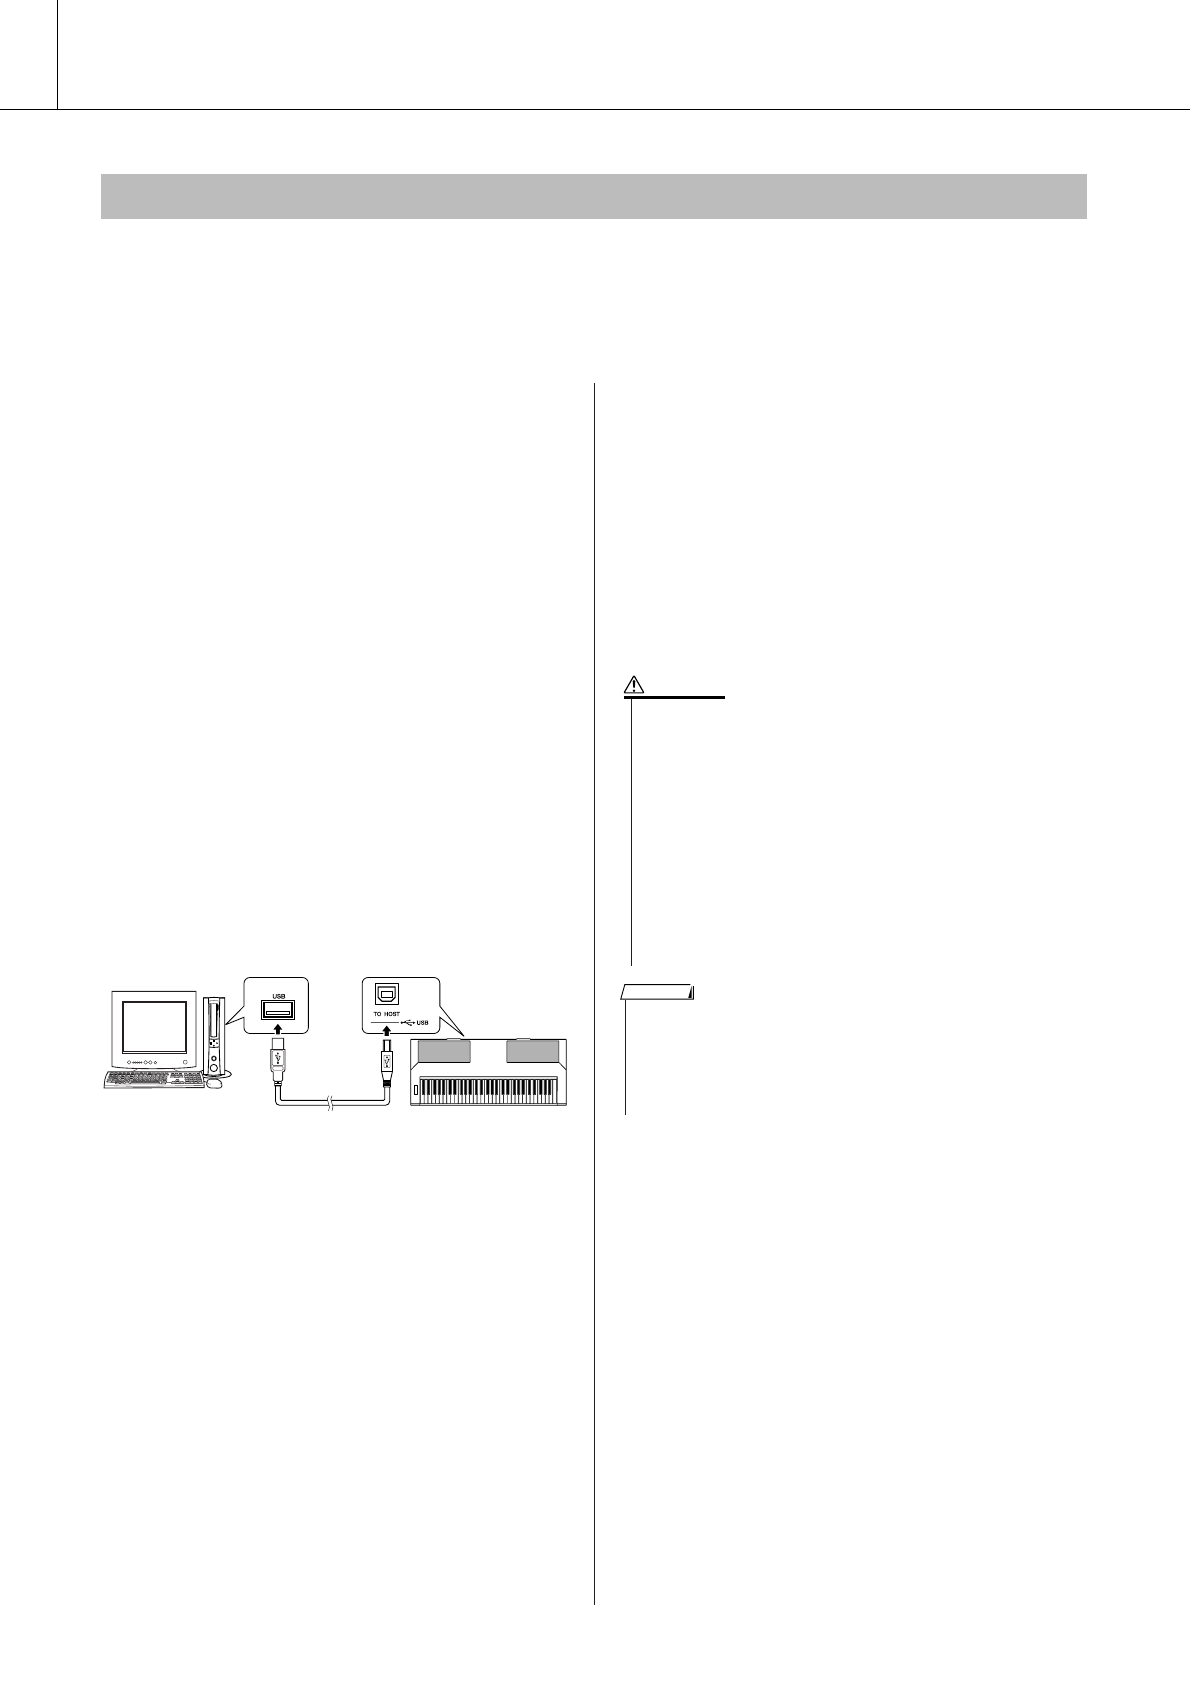
Connections
82 PSR-S500 Owner’s Manual
The following functions become available when this instrument is connected to a computer.
●Performance data can be transferred between the instrument and the computer (page 83).
●Files can be transferred between the instrument and the computer (page 85).
The connection procedure is as follows:
1Install the USB-MIDI driver on your
computer.
The USB-MIDI driver is included on the CD-
ROM.
Installation of the USB MIDI driver is
described on pages 91–92.
2
Connect the USB terminal of the com-
puter to the USB terminal on the instru-
ment using a standard USB cable (USB
cable sold separately).
The supplied CD-ROM also includes a Musicsoft
Downloader application that allows you to transfer
song files from your computer to the instrument’s
flash memory. For instructions about how to install
Musicsoft Downloader and how to transfer song
files, see pages 85, 92.
■USB Precautions
Please observe the following precautions when
connecting the instrument to a computer via a USB
cable.
Failure to do so can cause the instrument and/or the
computer to hang up (freeze), possibly causing
corruption or loss of data.
If the instrument or computer does hang up, turn
the power to both devices off and then on again,
and restart the computer.
Connecting a Personal Computer
USB cable
Instrument
Computer USB TO HOST terminal
•Wake the computer from a sleep/suspended/standby mode before
connecting the USB cable.
• Connect the USB cable to the instrument and computer before
turning power to the instrument on.
• Check the following points before turning the instrument’s power
on or off, and before plugging or unplugging the USB cable.
• Quit all applications.
• Make sure that no data transfer is in progress. (Data is trans-
ferred whenever you play the keyboard or play a song.)
• Allow at least 6 seconds between turning the instrument’s power
on and off, and between plugging and unplugging the USB cable.
• Directly connect the instrument to the computer using a single
USB cable. Do not use a USB hub.
CAUTION
• The Musicsoft Downloader application may not be able to access the
instrument in the following cases:
• During style playback.
• During song playback.
•During a file control operation (while the FILE CONTROL display is
showing).
NOTE
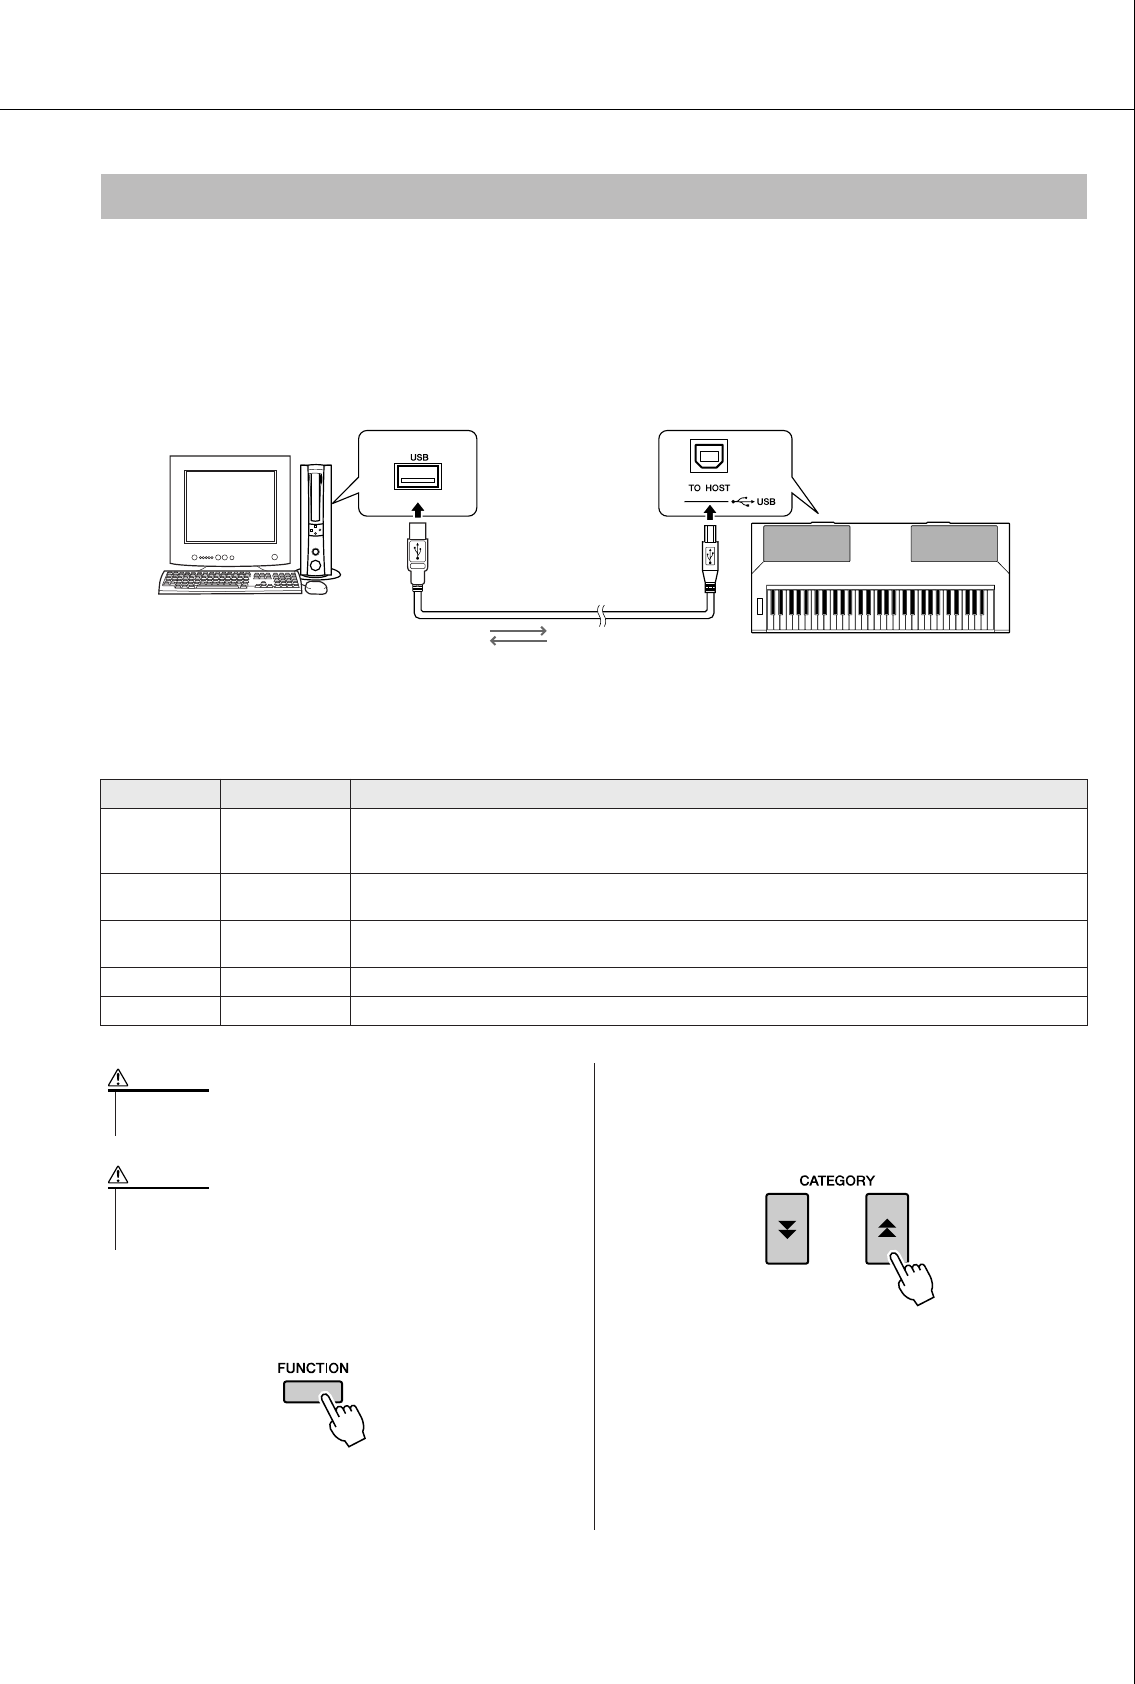
Connections
PSR-S500 Owner’s Manual 83
By connecting the instrument to a computer, the instrument’s performance data can be used on the com-
puter, and performance data from the computer can be played on the instrument.
●When the instrument is connected with computer,
it transmits/receives performance data.
■MIDI settings ● ● ● ● ● ● ● ● ● ● ● ● ● ● ● ● ● ● ● ● ● ● ● ● ● ● ● ● ● ● ● ● ● ● ● ● ● ● ● ● ● ● ● ● ● ● ● ●
These settings pertain to performance data transmission and reception.
1Press the [FUNCTION] button.
2
Use the CATEGORY [ ] and [ ] buttons
to select the item you want to change its
value.
3Use the dial to select ON or OFF.
Transferring Performance Data to and from a Computer
Item Range/Settings Description
Local ON/OFF
Local control determines whether or not notes played on the instrument are sounded by its internal
tone generator system: the internal tone generator is active when local control is on, and inactive when
local control is off.
External Clock ON/OFF These settings determine whether the instrument is synchronized to its own internal clock (OFF), or to
a clock signal from an external device (ON).
Keyboard Out ON/OFF These settings determine whether keyboard performance data of the instrument is transmitted (ON) or
not (OFF).
Style Out ON/OFF These settings determine whether Style data is transmitted (ON) or not (OFF) during Style playback.
Song Out ON/OFF These settings determine whether Song data is transmitted (ON) or not (OFF) during Song playback.
USB cable
USB terminalUSB terminal
Instrument
Computer
• If you can’t get any sound out of the instrument, this may be the
most likely cause.
CAUTION
•If External Clock is ON and no clock signal is being received from
an external device, the song, style, and metronome functions will
not start.
CAUTION
f
r
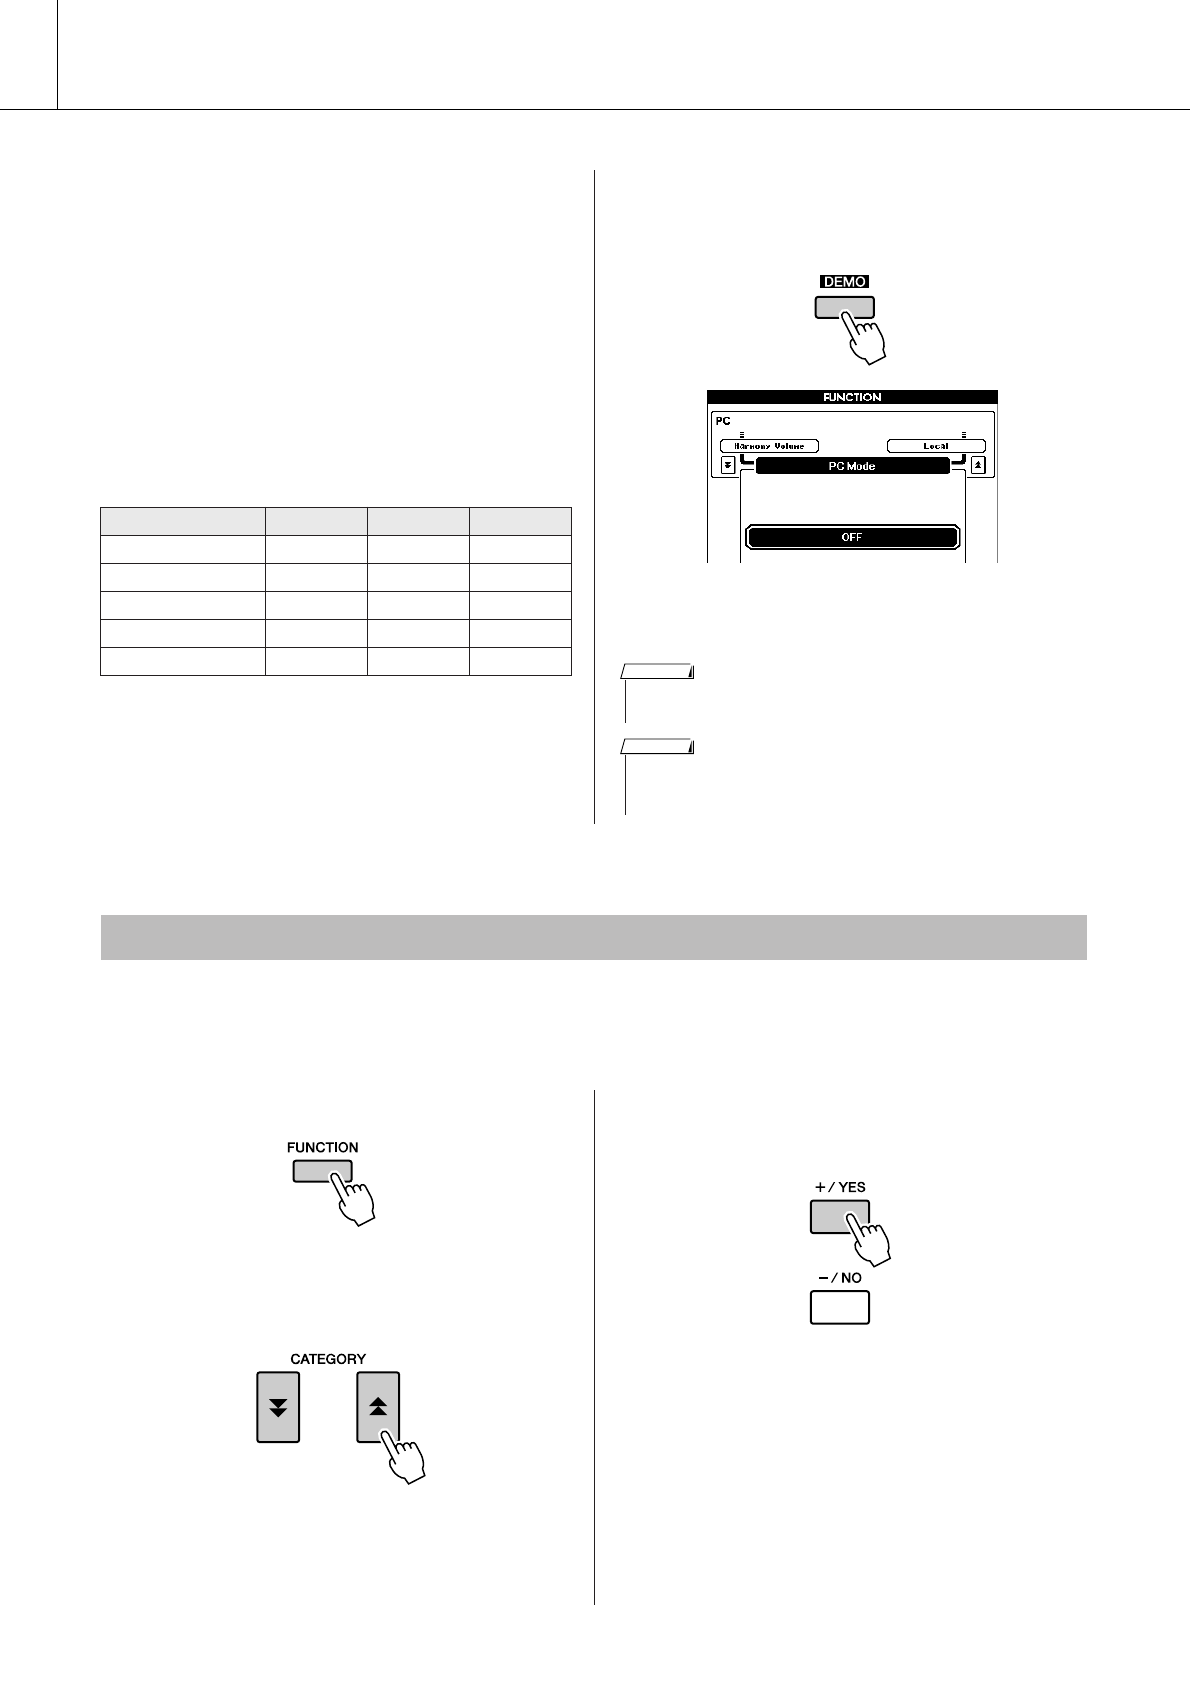
Connections
84 PSR-S500 Owner’s Manual
■PC Mode ● ● ● ● ● ● ● ● ● ● ● ● ● ● ● ● ● ● ●
A number of MIDI settings need to be made when
you want to transfer performance data between the
computer and the instrument. The PC Mode item
can conveniently make multiple settings for you in
one operation. Three settings are available: PC1,
PC2, and OFF.
This setting is not necessary when transferring
song or backup files between the computer and the
instrument.
* Set the PC mode to PC2 when using Digital Music Note-
book.
1Press and hold the [DEMO] button for
longer than a second so that the PC
Mode item appears.
2Use the dial to select PC1, PC2, or OFF.
This function lets you send the panel setup data to a computer. Before you record performance data to a
sequencer application running on your computer, it is a good idea to first send and record the panel setup
data before the actual performance data.
1Press the [FUNCTION] button.
2Use the CATEGORY [ ] and [ ] but-
tons to select the Initial Setup item.
3Press [+/YES] to send, or press [-/NO]
to cancel.
PC1 PC2* OFF
Local OFF OFF ON
External Clock ON OFF OFF
Song Out OFF OFF OFF
Style Out OFF OFF OFF
Keyboard Out OFF ON ON
Hold for longer
than a second
• When the PC2 setting is selected the instrument’s style, song, demo,
song recording, and lesson features cannot be used.
NOTE
•You can also access the PC Mode item by first pressing the [FUNC-
TION] button and then using the CATEGORY [ ] and [ ] buttons to
locate it (page 70).
f
r
NOTE
Initial Send
f
r
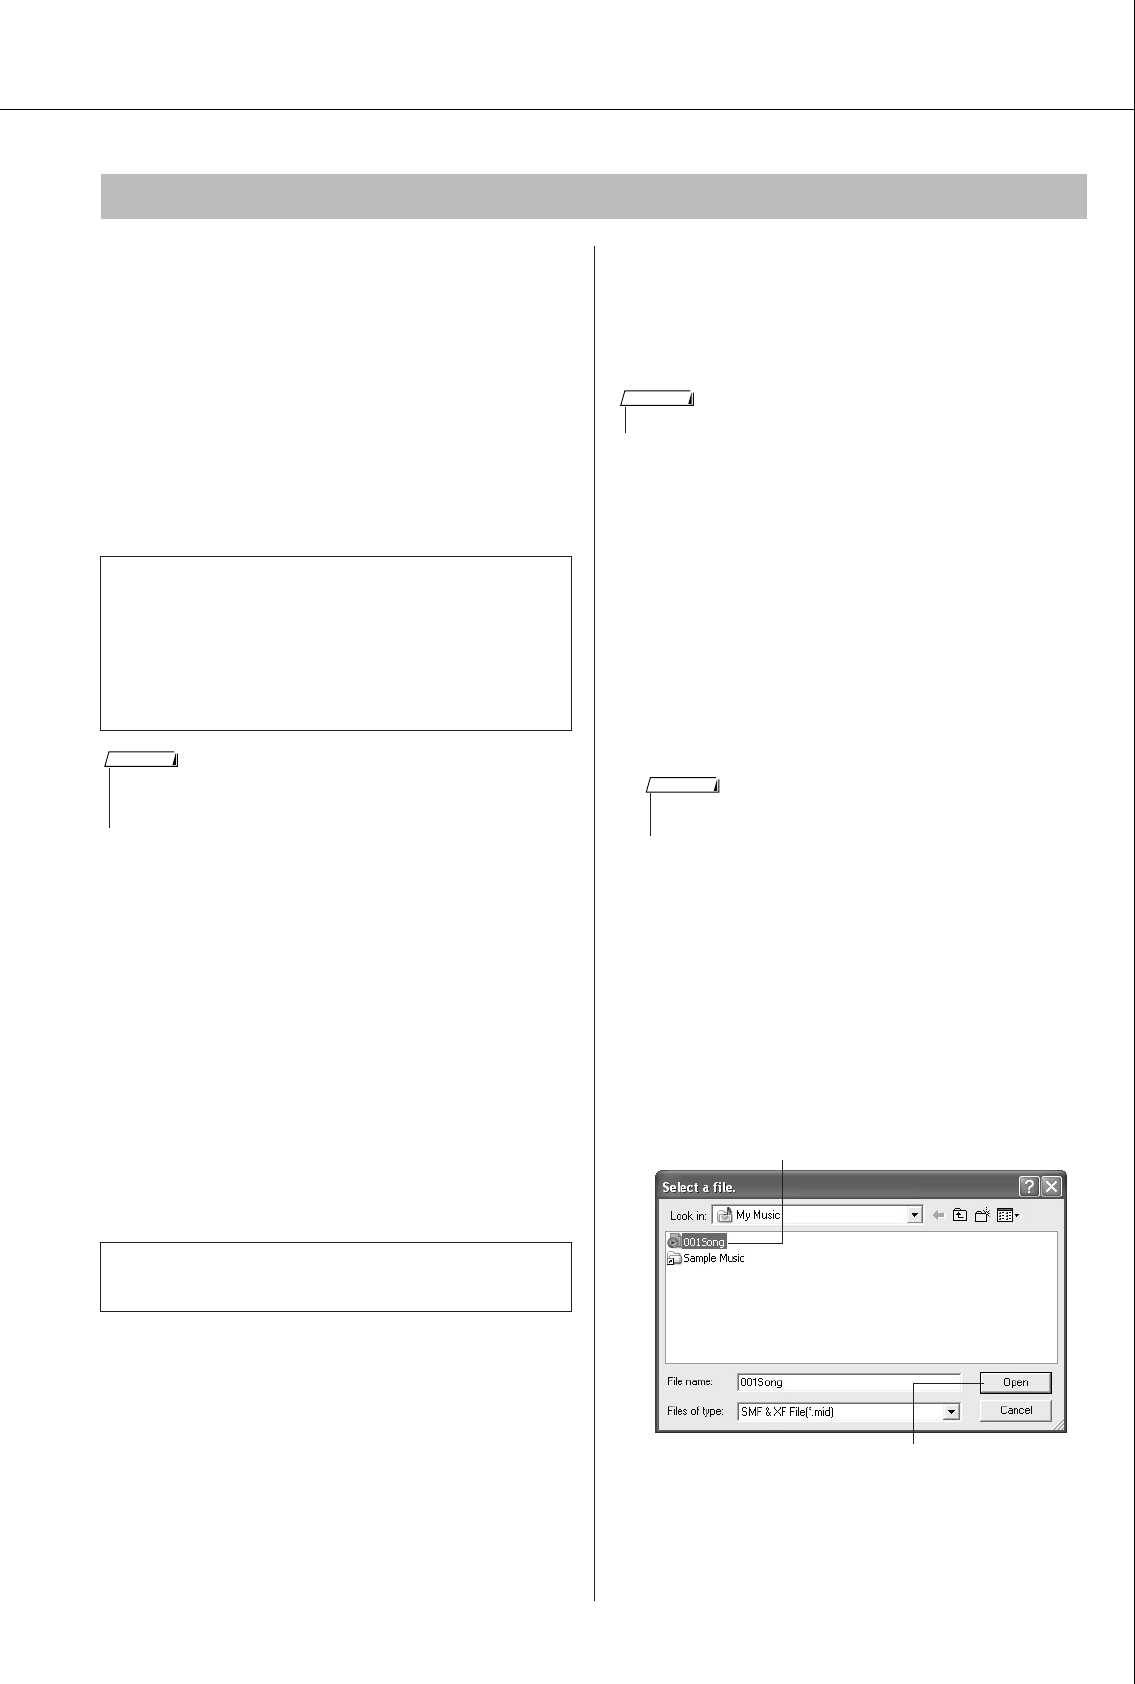
Connections
PSR-S500 Owner’s Manual 85
MIDI songs and Style files stored to a computer
can be transferred to the instrument.
Backup files can also be transferred from the
instrument to the computer and back.
In order to transfer songs between your computer
and the instrument you will need to install the
Musicsoft Downloader application and the USB
MIDI Driver included on the Accessory CD-ROM
on your computer. Refer to the Accessory CD-
ROM Installation Guide on page 88 for installation
details.
■With the Musicsoft Downloader
You Can ● ● ● ● ● ● ● ● ● ● ● ● ● ● ● ● ● ● ● ●
●Transfer MIDI songs you have downloaded from
the Internet or created on your computer from the
computer to the instrument’s flash memory.
⇒Refer to the procedure described
below.
●Backup files can be transferred from the instru-
ment to a computer and back.
⇒Refer to the procedure described on
page 87.
■Use Musicsoft Downloader to
Transfer Songs from the Com-
puter to the Instrument’s Flash
Memory ● ● ● ● ● ● ● ● ● ● ● ● ● ● ● ● ● ● ● ●
1Install the Musicsoft Downloader and
USB MIDI driver to your computer, then
connect the computer and the instru-
ment (page 90).
2After selecting the language, double-
click the Musicsoft Downloader short-
cut icon that is created on the desktop.
This will launch the Musicsoft
Downloader application and the main
window will appear.
3Click the “Add File” button and the Add
File window will appear.
4Click the button to the right of “Look in”
and select the folder from the drop-
down menu that appears. Double-click
the “SongData” Folder on the window.
Select the file you want to transfer to
the instrument, and click “Open”.
Transferring Data Between the Computer and Instrument
●Data that can be transferred from a computer
• Song Capacity (max.): 512 songs total
• Data Capacity: Internal memory 811 KB
• Data Format: SMF format 0, SMF format 1,
style file (extension: .sty),
Backup File
Use the Musicsoft Downloader application with
Internet Explorer 5.5 or higher.
•Even if the number of songs transferred is less than 512, if the amount of
data exceeds 811 KB, the song data cannot be transferred to the instru-
ment.
NOTE
• If a Song or Style is being played, stop playback before proceeding.
NOTE
•The instrument cannot be operated while the Musicsoft Downloader
is running.
NOTE
q Click a Song file
w Click “Open”
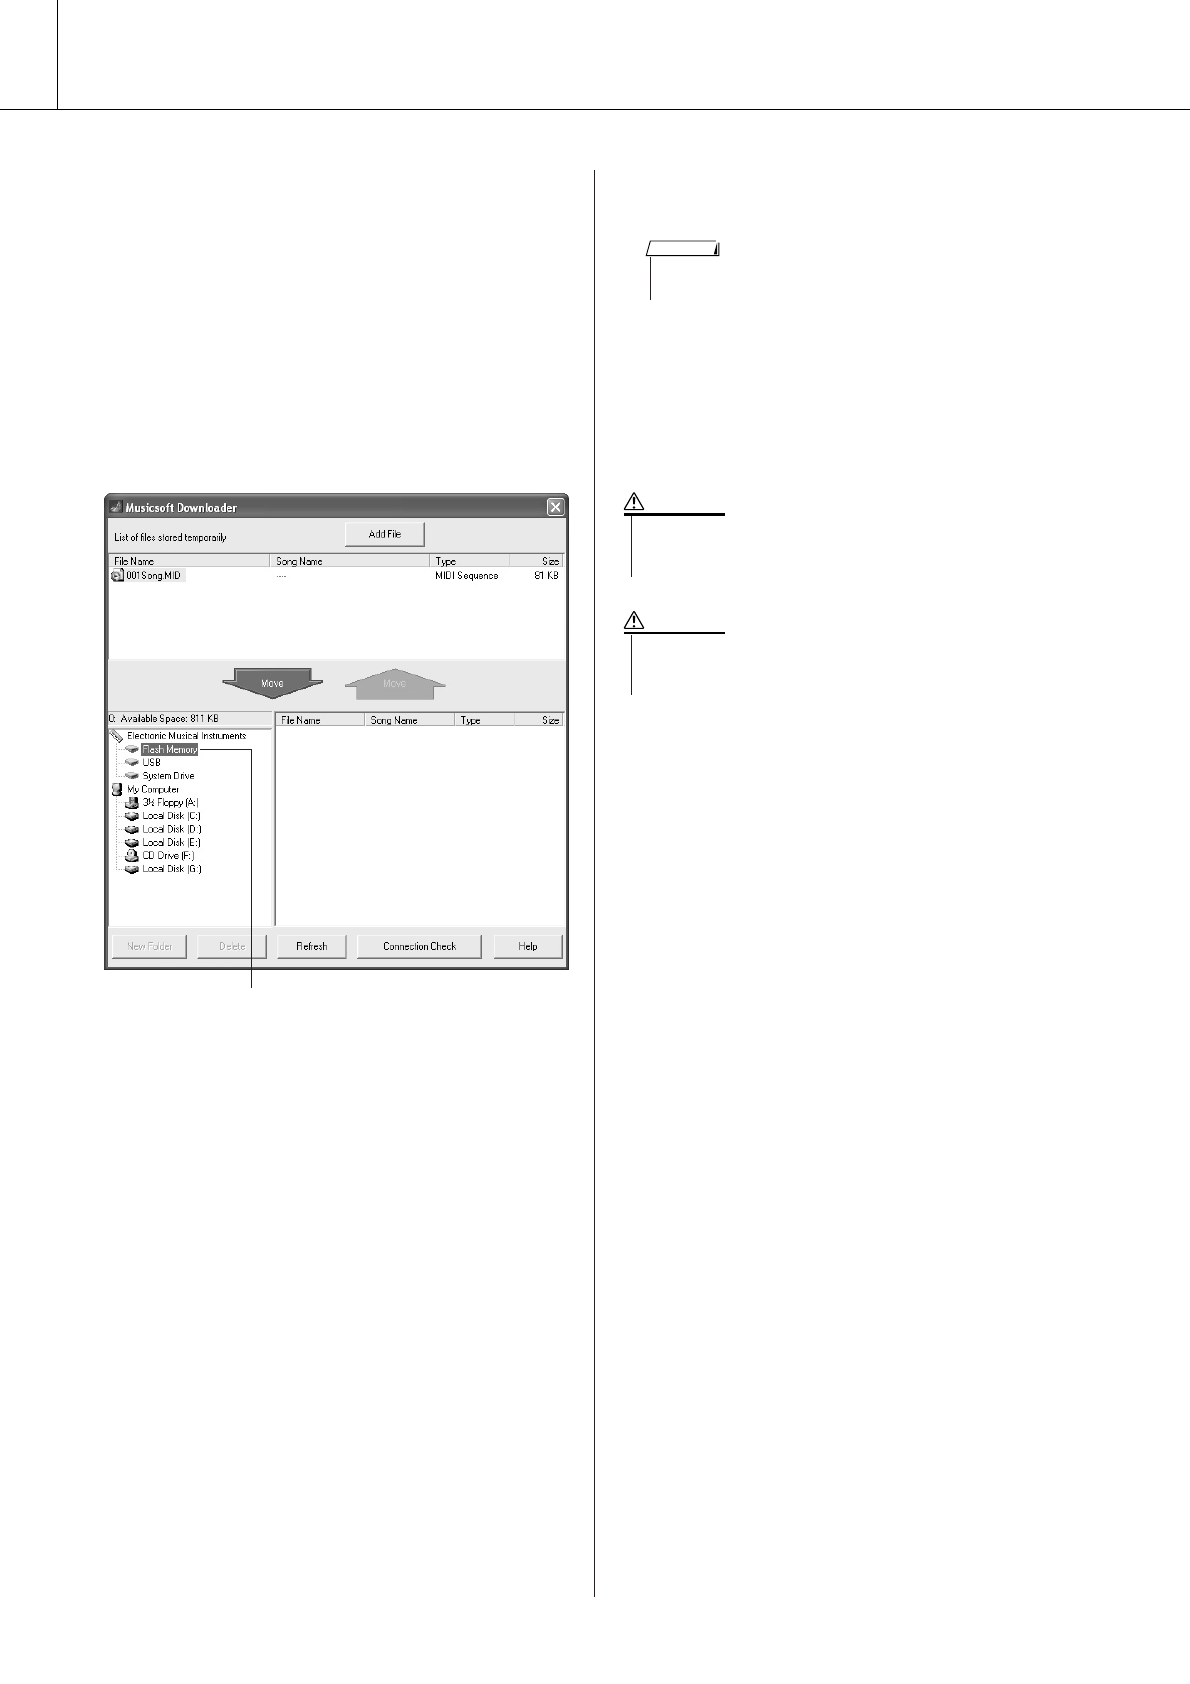
Connections
86 PSR-S500 Owner’s Manual
5A copy of the selected MIDI song file
will appear in the “List of files stored
temporarily” at the top of the window.
The memory medium will also be dis-
played at the bottom of the window to
specify the destination for the transfer.
Click “Instrument,” and then “Flash
memory.”
“Flash memory” here refers to the internal
memory of the instrument.
6After selecting the file in the “List of
files stored temporarily,” click the down-
ward [Move] button and a confirmation
message will appear. Click [OK] and the
song will be transferred from the “List
of files stored temporarily” to the
instrument’s memory.
7Close the window to close the
Musicsoft Downloader.
8To playback a song stored in the mem-
ory of the instrument, press the [USER]
button. Use the dial to select the song
you want to play, then press the [>>
>>/■]
button to start playback.
q Click “Electronic Musical Instruments”,
and then “Flash Memory”
•Before playing back the song transferred from your computer, make
sure to close the Musicsoft Downloader program.
NOTE
• Do not unplug the USB cable during a data transfer. Not only will
the data not be transferred and saved, but operation of the mem-
ory media may become unstable and its contents may disappear.
CAUTION
•Stored data can be lost due to equipment malfunction or improper
operation. For safety we recommend that you keep a copy of all
important data stored on your computer.
CAUTION
Connections
PSR-S500 Owner’s Manual 87
■Transferring Backup files from
the Instrument to a Computer ● ●
You can use the Musicsoft Downloader to transfer
Backup files containing backup data (page
39
),
including the five User Songs stored on the instru-
ment, to a computer. If you click “Electronic Musi-
cal Instruments” in the Musicsoft Downloader
display, and then “System Drive,” a file named
“PSR-S500.BUP” will appear in the lower right
corner of the Musicsoft Downloader display. This
is the backup file. For details about how to transfer
backup files using the Musicsoft Downloader
application, refer to the Online help in the applica-
tion.
• Preset Song data cannot be transmitted from the instrument.
NOTE
• The backup data, including the five User Songs’ is transmitted/
received as a single file. As a result, all backup data will be over-
written every time you transmit or receive. Keep this in mind when
transferring data.
CAUTION
•Do not rename the backup file on the computer. If you do so it will
not be recognized when transferred to the instrument.
CAUTION
●Using Songs with Notation
In order to use songs with notation (SMF format 0
only) transferred from a computer for lessons and
practice, you’ll need to specify which channels are
to be played back as the right-hand and left-hand
parts.
1Press the [USER] button and select the song
residing in internal memory for which you want
to set the guide track.
2Press the [FUNCTION] button.
3Use the CATEGORY [ ] and [ ] buttons to
select the R-Part or L-Part item.
4Use the dial to select the channel you want to
play back as the specified right- or left-hand
part.
We recommend that you select channel 1 for the
right-hand part and channel 2 for the left-hand part.
f
r

R
e
f
e
r
e
n
c
e
88 PSR-S500 Owner’s Manual
Accessory CD-ROM Installation Guide
This CD-ROM is copy-protected. Yamaha makes no representations or warranties with regard to any problems
while attempting to copy the CD-ROM or software and cannot be held responsible for the results of attempts to
copy the data.
• The software and this owner’s manual are the exclusive copyrights of Yamaha Corporation.
•Use of the software and this manual is governed by the license agreement which the purchaser fully agrees to upon
breaking the seal of the software packaging. (Please read carefully the Software Licensing Agreement on page 94 of
this manual before installing the application.)
• Copying of the software or reproduction of this manual in whole or in part by any means is expressly forbidden
without the written consent of the manufacturer.
•Yamaha makes no representations or warranties with regard to the use of the software and documentation and can-
not be held responsible for the results of the use of this manual and the software.
• This disk is a CD-ROM. Do not attempt to play the disk on an audio CD player. Doing so may result in irreparable
damage to your audio CD player.
• Future upgrades of application and system software and any changes in specifications and functions will be
announced separately.
• The screen displays as illustrated in this owner’s manual are for instructional purposes, and may appear somewhat
different from the screens which appear on your computer.
●Data Types
This CD-ROM includes application software. Please refer to page 90 for software installation instructions.
●Operating System (OS)
The applications in this CD-ROM are provided in versions for Windows operating systems.
SPECIAL NOTICES
Important Notices about the CD-ROM
• Do not attempt to play this CD-ROM on an audio CD player. The
result high-volume noise can potentially cause hearing damage or
damage your CD player and speakers.
CAUTION
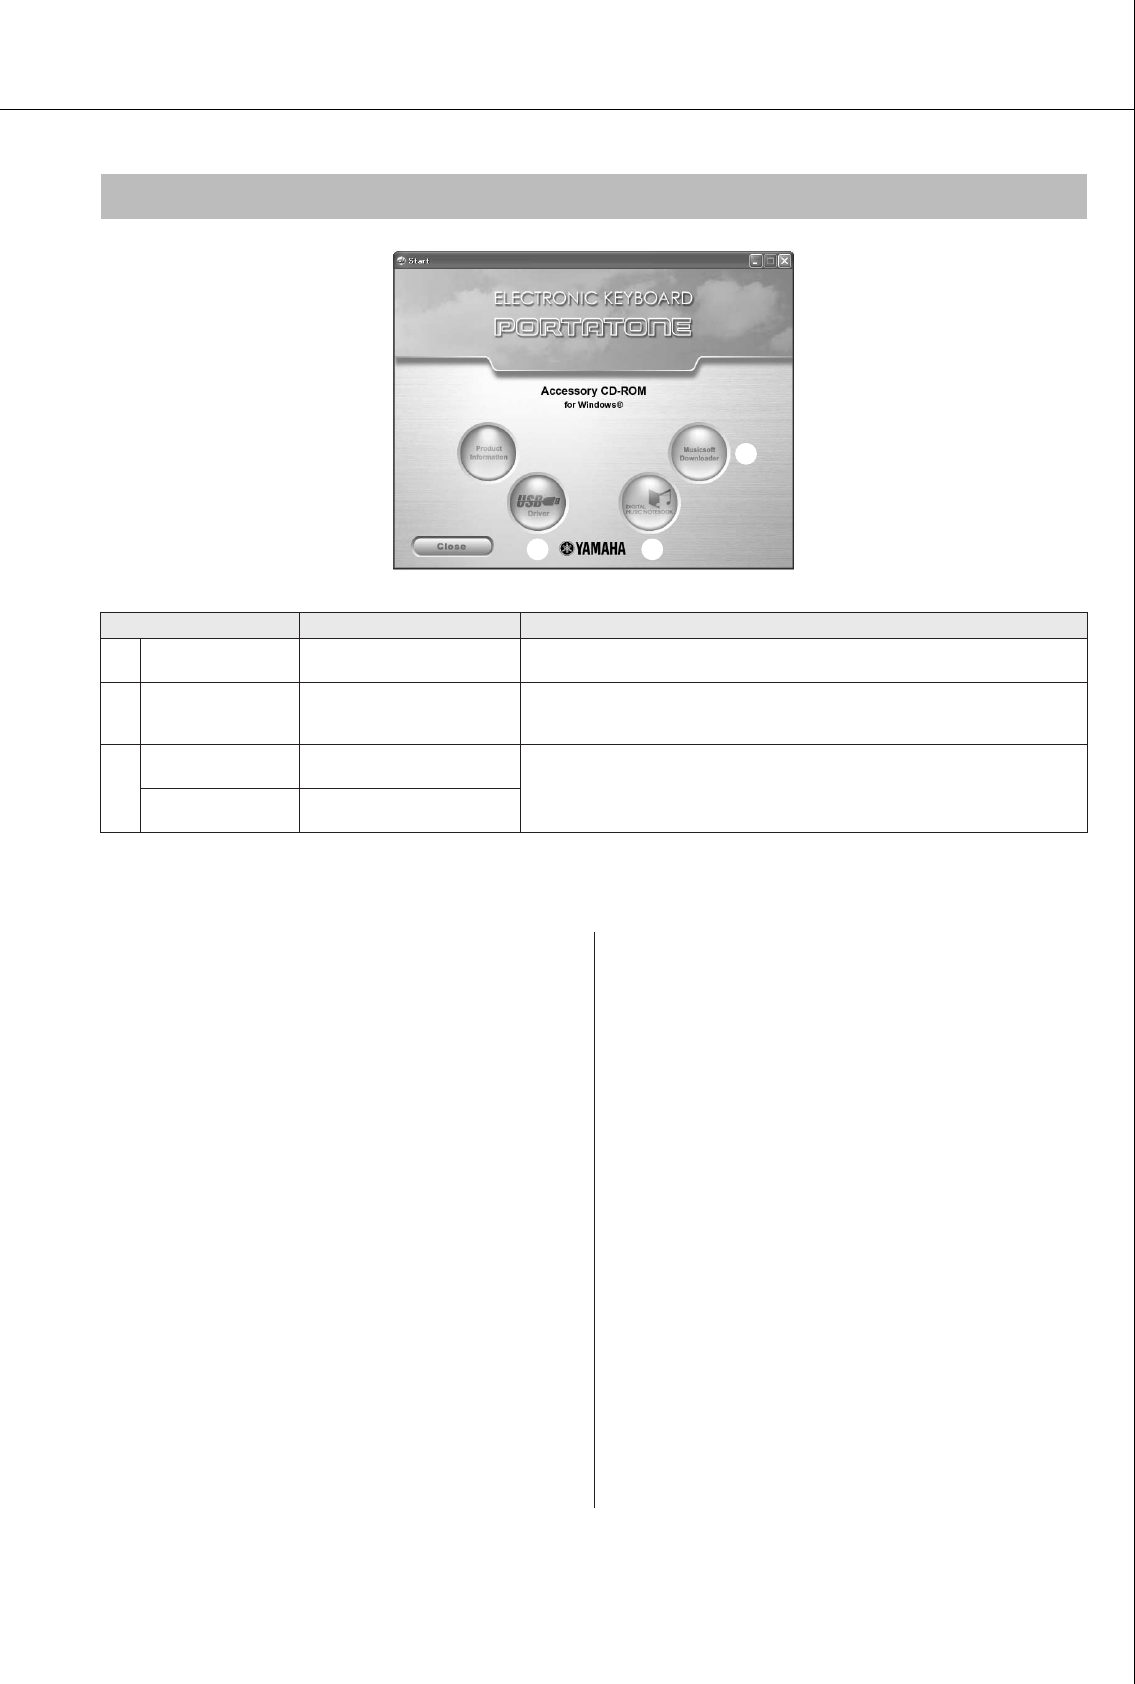
Accessory CD-ROM Installation Guide
PSR-S500 Owner’s Manual 89
■Using the CD-ROM ● ● ● ● ● ● ● ● ● ● ●
Please read the Software License Agreement
on page 94 before opening the CD-ROM pack-
age.
1Check the system requirements to
make sure that the software will run on
your computer.
2Insert the included CD-ROM into the
CD-ROM drive.
After you set the language, the start window
will appear on the display.
3Install the USB MIDI driver to the com-
puter.
Refer to “Installing the USB-MIDI Driver” on
page 90 for installation and setup instructions.
4Connect the instrument to the com-
puter. The connection procedure is
described on page 82.
5Install the software.
Musicsoft Downloader:
See page 92.
6Launch the software.
For further software operation refer to the online
help supplied with the software.
Refer to the “Troubleshooting” on page 93 when
you have trouble with installing the driver.
CD-ROM Contents
q
e w
Folder Name Application / Data Name Contents
qMSD_ Musicsoft Downloader This application can be used to transfer data between computer and
instrument’s memory.
wDMN_FlashDemo Flash Demo
Digital Music Notebook is an educational content that lets you enjoy music
while learning. Full motion demo software which introduces all features of the
Digital Music Notebook.
e
USB-MIDI Driver
(Windows 98/Me) This driver software is necessary to connect MIDI devices to your computer
via USB.
USBdrv2k USB-MIDI Driver
(Windows 2000/XP)
Accessory CD-ROM Installation Guide
90 PSR-S500 Owner’s Manual
■
Installing the USB-MIDI Driver
● ● ● ●
In order to be able to communicate with and use
MIDI devices connected to your computer, the
appropriate driver software must be properly
installed on your computer.
The USB-MIDI driver allows sequence software
and similar applications on your computer to trans-
mit and receive MIDI data to and from MIDI
devices via a USB cable.
• Windows 98/Me installation ➔ page 91.
• Windows 2000 installation ➔ page 91.
• Windows XP installation ➔ page 92.
System Requirements
Application/Data OS CPU Memory Hard Disk Display
Musicsoft Downloader
Windows 98SE/Me/2000/
XP Home Edition/
XP Professional
233 MHz or higher; Intel®
Pentium®/Celeron®
processor family
64 MB or more
(256 MB or more
is recommended)
at least 128 MB of
free space (at least
512 MB of free
space is
recommended)
800 x 600
HighColor
(16-bit)
USB Driver for Windows
98/Me Windows 98/Me 166 MHz or higher; Intel®
Pentium®/Celeron®
processor family
32 MB or more
(64 MB or more is
recommended)
at least 3 MB of free
space —
USB Driver for Windows
2000/XP
Windows 2000/XP Home
Edition/XP Professional
Digital Music Notebook Windows® XP
Professional Edition,
SP1a more
Windows® XP Home
Edition, SP1a more
Windows 2000
Professional, SP4 more
400MHz or higher; Intel®
Pentium®/Celeron®
Processor family (1GHz
or more is recommended)
128 MB or more
(256 MB or more
is recommended)
at least 50 MB of
free space
1024 x 768
HighColor
(16-bit)
Digital Music Notebook
(Requirements for
playing content with
video included.)
1GHz or higher; Intel®
Pentium®/Celeron®
Processor family (1.4GHz
or more is recommended)
256 MB or more
Software Installation
●Uninstall (Removing the Software)
Installed software can be removed from your
computer as follows:
From the Windows Start menu select Start →
Settings → Control panel → Add or Remove
Applications → Install and Uninstall. Select the
item you want to remove and click [Add or
Remove]. Follow the on-screen instructions to
remove the selected software.
• The actual names of the menu items and buttons will depend on
the OS version you are using.
NOTE
Check the drive name of the CD-ROM drive you
will be using (D:, E:, Q: etc.) The drive name is
displayed beside the CD-ROM icon in your “My
Computer” folder. The root directory of the CD-
ROM drive will be D:\ , E:\ , or Q:\ , respectively.
Driver
USB Cable
MIDI device
Computer
Sequence
software
Accessory CD-ROM Installation Guide
PSR-S500 Owner’s Manual 91
Installing the driver on Windows 98/Me
1Start the computer.
2Insert the supplied CD-ROM into the CD-
ROM drive. A start window will appear
automatically.
3First, make sure the POWER switch on
the instrument is set to OFF, then use a
USB cable to connect the USB terminal of
the computer to the USB connector of the
instrument. When the instrument is
turned on, the computer automatically
displays the “Add New Hardware Wizard.
Otherwise, refer to “Troubleshooting” in
the “Accessory CD-ROM Installation
Guide” section of the Owner’s Manual.
For Windows Me users, check the radio button to
the left of “Automatic search for a better driver
(Recommended)” and click [Next]. The system
automatically starts searching and installing the
driver. Proceed to Step 8. If the system does not
detect the driver, select “Specify the location of
the driver (Advanced)” and specify the CD-ROM
drive’s root directory to install the driver and click
[Next]. Execute the installation by following the
onscreen instructions and proceed to Step 8.
4Click [Next].
The window enables you to select the search
method.
5Check the radio button to the left of
“Search for the best driver for your
device. (Recommended)”. Click [Next].
The window enables you to select a location in
which to install the driver.
6Check the “Specify a location” box, click
“Browse..”, then specify the root direc-
tory of the CD-ROM drive and continue
the installation. The CD-ROM drive letter
may vary depending on your computer’s
configuration.
7When the system detects the driver on
the CD-ROM and is ready for installation,
it is shown as a message on the screen.
Make sure that the “YAMAHA USB MIDI
Driver” is listed, and click [Next]. The sys-
tem starts the installation.
8When installation is complete, a message
indicating so appears. Click [Finish].
The driver has been installed.
Installing the driver on Windows 2000
1Start the computer and use the “Adminis-
trator” account to log into Windows 2000.
2Select [My Computer] ➔ [Control Panel]
➔ [System] ➔ [Hardware] ➔ [Driver Sign-
ing] ➔ [File Signature Verification], and
check the radio button to the left of
“Ignore—Install all files, regardless of file
signature” and click [OK].
3Insert the supplied CD-ROM into the CD-
ROM drive. A start window will appear
automatically.
4
First, make sure the POWER switch on the
MIDI device is set to OFF, then use a USB
cable to connect the MIDI device to the
computer. After making the connections,
turn on the power of the MIDI device. The
system automatically launches the Found
New Hardware Wizard.
Otherwise, refer to “Troubleshooting” in the
“Accessory CD-ROM Installation Guide” section
of the Owner’s Manual. Click [Next]. (Some
computers may take a while to display the Wizard
window.)
5Select the radio button for “Search for a
suitable driver for my device [recom-
mended]”, then click [Next].
6Check the “CD-ROM drives” check box,
deselect all other check boxes, then click
[Next].
7Deselect the “Install one of the other driv-
ers”, then click [Next].
8When the installation is complete, the
Wizard displays “Completing the Found
New Hardware Wizard”.
Click [Finish]. (Some computers may take a
while to display the Wizard window.)
9Restart the computer.
The USB-MIDI driver installation is complete.
• If you are using Windows Me, skip Step 4–7.
NOTE
• Some computers may take about ten seconds to show this screen
after the installation is complete.
NOTE
• If the Wizard panel informs you that “The software you are about to
install does not contain a Microsoft digital signature”, click [Yes].
NOTE
• If the system prompts you to insert the Windows CD-ROM during
detection of the drivers, point to the “USBdrv2k_” folder (e.g.,
D:\USBdrv2k_) and continue the installation.
NOTE
Accessory CD-ROM Installation Guide
92 PSR-S500 Owner’s Manual
Installing the driver on Windows XP
1Start the computer and use the “Adminis-
trator” account to log into Windows.
2Select [Start] ➔ [Control Panel]. If the
control panel appears as “Pick a cate-
gory”, click “Switch to Classic View” in
the upper left of the window. All control
panels and icons will be displayed.
3Go to [System] ➔ [Hardware] ➔ [Driver
Signing Options] and check the radio but-
ton to the left of “Ignore” and click [OK].
4Click the [OK] button to close System
Properties, and then click “X” in the upper
right of the window to close the Control
Panel.
5Insert the supplied CD-ROM into the CD-
ROM drive. A start window will appear
automatically.
6First, make sure the POWER switch on
the MIDI device is set to OFF, then use a
USB cable to connect the MIDI device to
the computer. After making the connec-
tions, turn on the power of the MIDI
device.
The system launches the Found New
Hardware Wizard automatically. Other-
wise, refer to “Troubleshooting” in the
“Accessory CD-ROM Installation Guide”
section of the Owner’s Manual. If the sys-
tem displays “Found New Hardware” in
the lower right corner, wait until Wizard
windows is displayed. (Some computers
may take a while to display the window.)
If the Wizard window prompts you to specify
whether or not to connect to Windows Update,
select the radio button for “No, not this time”,
then click [Next].
7Select the radio button for “Install the
software automatically (recommended)”,
then click [Next].
8When the installation is complete, the
Wizard displays “Completing the Found
New Hardware Wizard”.
Click [Finish]. (Some computers may take a
while to display the Wizard window.)
9Restart the computer.
If the system displays “Found New Hardware” in
the lower right corner, wait until the Wizard win-
dow is displayed. (Some computers may take a
while to display the Wizard window.)
The USB-MIDI driver installation is complete.
■Installing the Musicsoft
Downloader and Digital
Music Notebook Applications● ● ●
1Insert the Accessory CD-ROM into your
computer’s CD-ROM drive. The start win-
dow will appear automatically showing
software applications.
2Click [Musicsoft Downloader] or [Digital
Music Notebook].
3Click the [install] button or [Digital Music
Notebook Download] button, and follow
the onscreen instructions to install the
software.
For Digital Music Notebook operating instruc-
tions see the help menu: launch the Digital Music
Notebook application and click “Help”.
For Musicsoft Downloader operating instructions
see the Help menu: launch the Musicsoft
Downloader application and click “Help”.
*You can obtain the latest version of the Musicsoft
Downloader at the following Internet URL.
http://music.yamaha.com/download/
• If during the installation the system displays “...has not passed Win-
dows Logo testing to verify its compatibility with Windows XP”, click
[Continue Anyway].
NOTE
•You will need to log in with administrator (root) privileges in
order to install Musicsoft Downloader on a computer running
Windows 2000 or XP.
•You will need to log in with administrator (root) privileges in
order to install Digital Music Notebook on a computer running
Windows 2000 or XP.
IMPORTANT
• When installing the Digital Music Notebook, make sure that
Internet Explorer 6.0 (with SP1) or higher is installed to your
computer.
IMPORTANT
• Credit card settlement is required to purchase Digital Music
Notebook content. Credit card processing may not be possible
for some areas, so please check with your local authorities to
make sure that your credit card can be used.
IMPORTANT
• If the start window does not appear automatically, double click your
“My Computer” folder to open it. Right-click the CD-ROM icon and
select “Open” from the pop-up menu. Double click “Start.exe” and
proceed to step 2, below.
NOTE
• Only Musicsoft Downloader can be used to transfer files between
this instrument and a computer. No other file transfer application
can be used.
IMPORTANT
Accessory CD-ROM Installation Guide
PSR-S500 Owner’s Manual 93
■Troubleshooting
• Is the USB cable connected correctly?
Check the USB cable connection. Disconnect the
USB cable, then connect it again.
• Is the USB function enabled on your com-
puter?
When you connect the instrument to the
computer for the first time, if the “Add New
Hardware Wizard” does not appear, the USB
function on the computer may be disabled.
Perform the following steps.
1Select [Control Panel] ➔ [System] ➔
[Device Manager] (for Windows 98/Me), or
select [Control Panel]* ➔ [System] ➔
[Hardware] ➔ [Device Manager] (for Win-
dows 2000/XP).
* Classic View only in Windows XP.
2Make sure that no “!” or “x” marks appear
at “Universal serial bus controller” or
“USB Root Hub”. If you see an “!” or “x”
mark, the USB controller is disabled.
• Is any unknown device registered?
If driver installation fails, the instrument will be
marked as an “Unknown device”, and you will
not be able to install the driver. Delete the
“Unknown device” by following the steps below.
1Select [Control Panel] ➔ [System] ➔
[Device Manager] (for Windows 98/Me), or
select [Control Panel]* ➔ [System] ➔
[Hardware] ➔ [Device Manager] (for Win-
dows 2000/XP).
* Classic View only in Windows XP.
2Look for “Other devices” in the menu
“View devices by type”.
3If you find “Other devices”, double-click it
to extend the tree to look for “Unknown
device”. If one appears, select it and click
the [Remove] button.
4Remove the USB cable from the instru-
ment, and make the connection again.
5Install the driver again.
• Windows 98/Me users... see page 91
• Windows 2000 users..... see page 91
• Windows XP users........ see page 92
•Did you install the driver? (page 90)
• Is the USB cable connected correctly?
•Are the volume settings of the instrument,
playback device, and application program set
to the appropriate levels?
•Have you selected an appropriate port in the
sequence software?
•Are you using the latest USB MIDI driver?
The latest driver can be downloaded from the
following web site.
http://music.yamaha.com/download/
• Does your computer satisfy the system
requirements?
• Is any other application or device driver run-
ning?
• Do not suspend the computer while the MIDI
application is running.
If you are using Windows 2000, you may not be
able to suspend/resume normally, depending on
the particular environment (USB Host
Controller, etc.). Even so, simply disconnecting
and connecting the USB cable will allow you to
use the instrument functions again.
[Windows Me/98]
1When the instrument is recognized cor-
rectly, double-click “System” in the Con-
trol Panel to open the System window.
2Double-click the “Device Manager” tab,
select “YAMAHA USB MIDI Driver” and
delete it.
3Use the MS-DOS prompt or Explorer to
delete the following three files.
The driver cannot be installed. When controlling the instrument from
your computer via USB, the instrument
does not operate correctly or no sound
is heard.
Playback response is delayed.
Cannot suspend or resume the com-
puter correctly.
How can I delete or re-install the driver?

Accessory CD-ROM Installation Guide
94 PSR-S500 Owner’s Manual
4Disconnect the USB cable.
5Restart the computer.
6Re-install the driver.
ATTENTION
SOFTWARE LICENSE AGREEMENT
PLEASE READ THIS SOFTWARE LICENSE AGREEMENT (“AGREE-
MENT”) CAREFULLY BEFORE USING THIS SOFTWARE. YOU ARE
ONLY PERMITTED TO USE THIS SOFTWARE PURSUANT TO THE
TERMS AND CONDITIONS OF THIS AGREEMENT. THIS AGREEMENT
IS BETWEEN YOU (AS AN INDIVIDUAL OR LEGAL ENTITY) AND
YAMAHA CORPORATION (“YAMAHA”).
BY BREAKING THE SEAL OF THIS PACKAGE YOU ARE AGREEING TO
BE BOUND BY THE TERMS OF THIS LICENSE. IF YOU DO NOT AGREE
WITH THE TERMS, DO NOT INSTALL, COPY, OR OTHERWISE USE THIS
SOFTWARE.
1. GRANT OF LICENSE AND COPYRIGHT
Yamaha hereby grants you the right to use one copy of the software program(s)
and data (“SOFTWARE”) accompanying this Agreement. The term SOFT-
WARE shall encompass any updates to the accompanying software and data.
The SOFTWARE is owned by Yamaha and/or Yamaha’s licensor(s), and is pro-
tected by relevant copyright laws and all applicable treaty provisions. While
you are entitled to claim ownership of the data created with the use of SOFT-
WARE, the SOFTWARE will continue to be protected under relevant copy-
rights.
•You may use the SOFTWARE on a single computer.
•You may make one copy of the SOFTWARE in machine-readable form for
backup purposes only, if the SOFTWARE is on media where such backup
copy is permitted. On the backup copy, you must reproduce Yamaha’s copy-
right notice and any other proprietary legends that were on the original copy
of the SOFTWARE.
•You may permanently transfer to a third party all your rights in the SOFT-
WARE, provided that you do not retain any copies and the recipient reads
and agrees to the terms of this Agreement.
2. RESTRICTIONS
•You may not engage in reverse engineering, disassembly, decompilation or
otherwise deriving a source code form of the SOFTWARE by any method
whatsoever.
•You may not reproduce, modify, change, rent, lease, or distribute the SOFT-
WARE in whole or in part, or create derivative works of the SOFTWARE.
•You may not electronically transmit the SOFTWARE from one computer to
another or share the SOFTWARE in a network with other computers.
•You may not use the SOFTWARE to distribute illegal data or data that vio-
lates public policy.
•You may not initiate services based on the use of the SOFTWARE without
permission by Yamaha Corporation
Copyrighted data, including but not limited to MIDI data for songs, obtained
by means of the SOFTWARE, are subject to the following restrictions which
you must observe.
• Data received by means of the SOFTWARE may not be used for any com-
mercial purposes without permission of the copyright owner.
• Data received by means of the SOFTWARE may not be duplicated, trans-
ferred, or distributed, or played back or performed for listeners in public
without permission of the copyright owner.
• The encryption of data received by means of the SOFTWARE may not be
removed nor may the electronic watermark be modified without permission
of the copyright owner.
3. TERMINATION
This Agreement becomes effective on the day that you receive the SOFT-
WARE and remains effective until terminated. If any copyright law or provi-
sions of this Agreement is violated, the Agreement shall terminate
automatically and immediately without notice from Yamaha. Upon such ter-
mination, you must immediately destroy the licensed SOFTWARE, any
accompanying written documents and all copies thereof.
4. LIMITED WARRANTY ON MEDIA
As to SOFTWARE sold on tangible media, Yamaha warrants that the tangible
media on which the SOFTWARE is recorded will be free from defects in mate-
rials and workmanship under normal use for a period of fourteen (14) days
from the date of receipt, as evidenced by a copy of the receipt. Yamaha’s entire
liability and your exclusive remedy will be replacement of the defective media
if it is returned to Yamaha or an authorized Yamaha dealer within fourteen days
with a copy of the receipt. Yamaha is not responsible for replacing media dam-
aged by accident, abuse or misapplication. TO THE FULLEST EXTENT
PERMITTED BY LAW, YAMAHA EXPRESSLY DISCLAIMS ANY
IMPLIED WARRANTIES ON THE TANGIBLE MEDIA, INCLUDING THE
IMPLIED WARRANTIES OF MERCHANTABILITY AND FITNESS FOR
A PARTICULAR PURPOSE.
5. DISCLAIMER OF WARRANTY ON SOFTWARE
You expressly acknowledge and agree that use of the SOFTWARE is at your
sole risk. The SOFTWARE and related documentation are provided “AS IS”
and without warranty of any kind. NOTWITHSTANDING ANY OTHER
PROVISION OF THIS AGREEMENT, YAMAHA EXPRESSLY DIS-
CLAIMS ALL WARRANTIES AS TO THE SOFTWARE, EXPRESS, AND
IMPLIED, INCLUDING BUT NOT LIMITED TO THE IMPLIED WAR-
RANTIES OF MERCHANTABILITY, FITNESS FOR A PARTICULAR
PURPOSE AND NON-INFRINGEMENT OF THIRD PARTY RIGHTS.
SPECIFICALLY, BUT WITHOUT LIMITING THE FOREGOING,
YAMAHA DOES NOT WARRANT THAT THE SOFTWARE WILL MEET
YOUR REQUIREMENTS, THAT THE OPERATION OF THE SOFTWARE
WILL BE UNINTERRUPTED OR ERROR-FREE, OR THAT DEFECTS IN
THE SOFTWARE WILL BE CORRECTED.
6. LIMITATION OF LIABILITY
YAMAHA’S ENTIRE OBLIGATION HEREUNDER SHALL BE TO PER-
MIT USE OF THE SOFTWARE UNDER THE TERMS HEREOF. IN NO
EVENT SHALL YAMAHA BE LIABLE TO YOU OR ANY OTHER PER-
SON FOR ANY DAMAGES, INCLUDING, WITHOUT LIMITATION, ANY
DIRECT, INDIRECT, INCIDENTAL OR CONSEQUENTIAL DAMAGES,
EXPENSES, LOST PROFITS, LOST DATA OR OTHER DAMAGES ARIS-
ING OUT OF THE USE, MISUSE OR INABILITY TO USE THE SOFT-
WARE, EVEN IF YAMAHA OR AN AUTHORIZED DEALER HAS BEEN
ADVISED OF THE POSSIBILITY OF SUCH DAMAGES. In no event shall
Yamaha’s total liability to you for all damages, losses and causes of action
(whether in contract, tort or otherwise) exceed the amount paid for the SOFT-
WARE.
7. THIRD PARTY SOFTWARE
Third party software and data (“THIRD PARTY SOFTWARE”) may be
attached to the SOFTWARE. If, in the written materials or the electronic data
accompanying the Software, Yamaha identifies any software and data as
THIRD PARTY SOFTWARE, you acknowledge and agree that you must
abide by the provisions of any Agreement provided with the THIRD PARTY
SOFTWARE and that the party providing the THIRD PARTY SOFTWARE is
responsible for any warranty or liability related to or arising from the THIRD
PARTY SOFTWARE. Yamaha is not responsible in any way for the THIRD
PARTY SOFTWARE or your use thereof.
•Yamaha provides no express warranties as to the THIRD PARTY SOFT-
WARE. IN ADDITION, YAMAHA EXPRESSLY DISCLAIMS ALL
IMPLIED WARRANTIES, INCLUDING BUT NOT LIMITED TO THE
IMPLIED WARRANTIES OF MERCHANTABILITY AND FITNESS FOR
A PARTICULAR PURPOSE, as to the THIRD PARTY SOFTWARE.
•Yamaha shall not provide you with any service or maintenance as to the
THIRD PARTY SOFTWARE.
•Yamaha is not liable to you or any other person for any damages, including,
without limitation, any direct, indirect, incidental or consequential damages,
expenses, lost profits, lost data or other damages arising out of the use, mis-
use or inability to use the THIRD PARTY SOFTWARE.
8. GENERAL
This Agreement shall be interpreted according to and governed by Japanese
law without reference to principles of conflict of laws. Any dispute or proce-
dure shall be heard before the Tokyo District Court in Japan. If for any reason
a court of competent jurisdiction finds any portion of this Agreement to be
unenforceable, the remainder of this Agreement shall continue in full force and
effect.
9. COMPLETE AGREEMENT
This Agreement constitutes the entire agreement between the parties with
respect to use of the SOFTWARE and any accompanying written materials
and supersedes all prior or contemporaneous understandings or agreements,
written or oral, regarding the subject matter of this Agreement. No amend-
ment or revision of this Agreement will be binding unless in writing and
signed by a fully authorized representative of Yamaha.
•To delete these files using Explorer, select “Folder Options” from
the Tool (View) menu, and select “Show all files (and folders).”
• \WINDOWS\INF\OTHER\1039.INF
• \WINDOWS\SYSTEM\Xgusb.drv
• \WINDOWS\SYSTEM\Ymidusb.sys
NOTE
PSR-S500 Owner’s Manual 95
Troubleshooting
Problem Possible Cause and Solution
When the instrument is turned on or off, a popping
sound is temporarily produced.
This is normal and indicates that the instrument is receiving electrical
power.
When using a mobile phone, noise is produced.
Using a mobile phone in close proximity to the instrument may pro-
duce interference. To prevent this, turn off the mobile phone or use it
further away from the instrument.
There is no sound even when the keyboard is
played or when a song or style is being played
back.
Check that nothing is connected to the PHONES/OUTPUT jack on
the rear panel. When a set of headphones is plugged into this jack,
no sound is output.
Check the Local Control on/off. (See page 83.)
Is the FILE CONTROL display showing? The instrument’s keyboard,
etc., will not produce any sound while the FILE CONTROL display is
showing. Press the [EXIT] button to return to the MAIN display.
The style or song does not play back when the
[START/STOP] button is pressed.
Is External Clock set to ON? Make sure External Clock is set to OFF;
refer to “External Clock” on page 83.
The style does not sound properly.
Make sure that the Style Volume (page 71) is set to an appropriate
level.
Is the split point set at an appropriate key for the chords you are play-
ing? Set the split point at an appropriate key (page 59).
Is the [ACMP] button lit? If it is not lit, press the [ACMP] button so it
lights.
No rhythm accompaniment plays when the
[START/STOP] button is pressed after selecting
the BaroqueAir Style in the MOVIE & SHOW cate-
gory.
This is not a malfunction. Style BaroqueAir Style does not have a
Rhythm part, so there is no rhythm sound for this Style. Also, this
Style does not have a Fill-In section. The other parts will begin play-
ing when you play a chord in the accompaniment.
Not all of the voices seem to sound, or the sound
seems to be cut off.
The instrument is polyphonic up to a maximum of 32 notes. If the
Dual voice or Split voice is being used and a style or song is playing
back at the same time, some notes/sounds may be omitted (or “sto-
len”) from the accompaniment or song.
The footswitch (for sustain) seems to produce the
opposite effect. For example, pressing the
footswitch cuts off the sound and releasing it sus-
tains the sounds.
The polarity of the footswitch is reversed. Make sure that the
footswitch plug is properly connected to the SUSTAIN jack before
turning on the power.
The sound of the voice changes from note to note.
This is normal. The AWM tone generation method uses multiple
recordings (samples) of an instrument across the range of the key-
board; thus, the actual sound of the voice may be slightly different
from note to note.
The Demo display is shown in Japanese, and/or
there are Japanese characters in the display mes-
sages.
Make sure the Language setting in the FUNCTION display is set to
English. (See page 12)
The ACMP indicator does not appear when the
[ACMP] button is pressed.
Always press desired style category button first when you are going
to use any style-related function.
There is no harmony sound.
The harmony effects (01–26) behave differently according to their
type. Types 01–05 function when style playback is on, chords are
played in the accompaniment range of the keyboard, and a melody is
played in the right-hand range. Types 06–26 will function whether
style playback is on or off. For types 06–12 you need to play two
notes at the same time.
Appendix

96 PSR-S500 Owner’s Manual
Messages
LCD Message Comment
Access error! Indicates the failure in reading or writing from/to the media or the flash
memory.
All Memory Clearing... Displayed while erasing all data in the flash memory. Never turn the power
off during data transmission.
Are you sure? Confirms whether Song Clear or Track Clear is executed or not.
Backup Clearing... Displayed while clearing the back-up data in the flash memory.
Cancel Displayed when the transmission of Initial Send is cancelled.
Clearing... Displayed while executing Song Clear or Track Clear of the user songs.
Com Mode
Displayed when the Musicsoft Downloader is started on the PC connected
to the keyboard. This will not be displayed while the instrument is played
back.
Completed Indicates the specified job completion such as data saving and transmis-
sion.
Copy File Displayed while copying a file in the Musicsoft Downloader.
Create Directory Displayed while creating a folder in the Musicsoft Downloader application.
Data Error! Displayed when the user song contains illegal data.
Delete File Displayed while deleting a file in the Musicsoft Downloader.
Delete OK ? Confirms whether the Delete job is executed or not.
Delete Directory Displayed while deleting a folder in the Musicsoft Downloader.
Deleting... Displayed while the delete function is engaged.
End Displayed when the transmission of Initial Send has been completed.
Error! Displayed when writing has failed.
File information area is not large enough. Indicates that saving data in the media cannot be executed since the total
number of files have become too many.
File is not found. Indicates there is no file.
File too large. Loading is impossible. Indicates that loading data cannot be executed since the file data is too
large.
Flash Clearing... Displayed while clearing the song or style data transmitted to the internal
flash memory.
Format OK ? [EXECUTE] Confirms whether formatting the media is executed or not.
Formatting... Displayed while formatting.
Load OK ? Confirms whether loading is executed or not.
Loading... Displayed while loading data.
Media capacity is full. Displayed when saving data cannot be executed since the media memory
becomes full.
Memory Full Displayed when the internal memory becomes full during song recording.
Move File Displayed while moving a file in the Musicsoft Downloader.
Now Writing...
(Don’t turn off the power now, otherwise
the data may be damaged.)
Displayed while writing data in the memory. Never turn the power off while
writing. Doing so may result in data loss.
Overwrite ? Confirms whether overwriting is executed or not.
Please Wait... Displayed when executing the jobs that take some time, such as displaying
scores and lyrics.
Rename File Displayed while rewriting the file name in the Musicsoft Downloader.
Save OK ? Confirms whether saving is executed or not.
Saved data is not found. Displayed when the data to be saved doesn’t exist.
Messages
PSR-S500 Owner’s Manual 97
Saving... Displayed while saving data in the memory. Never turn the power off while
saving. Doing so may result in data loss.
Send OK? Confirms whether the data transmission is executed or not.
Sending... Displayed while transmitting data.
Since the media is in use now, this
function is not available.
Indicates that the file control function is currently unavailable since the
media is being accessed.
Sure ? [YES/NO] Reconfirms whether each operation is executed or not.
The limit of the media has been reached. Indicates that saving data cannot be executed since the folder/directory
structure has become too complicated.
The media is not formatted. Indicates the inserted media has not been formatted.
The media is write-protected. Indicates that the inserted media cannot be written since it is write-pro-
tected. Set to the write-protect switch to the “overwrite” position before use.
The song data is too large to be
converted to notation.
Indicates that the score cannot be displayed since the song data is too
large.
There are too many files. Indicates that saving data cannot be executed since the total number of files
exceeds the capacity.
This function is not available now. Indicates the designated function is not available since the instrument is
executing another job.
[nnn] file name Indicates the file name of the currently transmitting. “nnn” indicates the
receiving block.
LCD Message Comment
•Not all the messages are listed in the table: the messages neces-
sary to be explained only.
NOTE
98 PSR-S500 Owner’s Manual
Voice List
■Maximum Polyphony ● ● ● ● ● ● ● ● ● ● ● ● ● ● ● ● ● ●
The instrument has 32-note maximum polyphony. This means
that it can play a maximum of up to 32 notes at once, regard-
less of what functions are used. Auto accompaniment uses a
number of the available notes, so when auto accompaniment
is used the total number of available notes for playing on the
keyboard is correspondingly reduced. The same applies to the
Split Voice and Song functions. If the maximum polyphony is
exceeded, earlier played notes will be cut off and the most
recent notes have priority (last note priority).
●Panel Voice List
•The Voice List includes MIDI program change numbers for
each voice. Use these program change numbers when
playing the instrument via MIDI from an external device.
• Program Numbers 001 to 128 directly relate to MIDI Pro-
gram Change Numbers 000 to 127. That is, Program Num-
bers and Program Change Numbers differ by a value of 1.
Remember to take this into consideration.
• Some voices may sound continuously or have a long
decay after the notes have been released while the sus-
tain pedal (footswitch) is held.
NOTE
Voice
No.
Bank Select
MIDI
Program
Change#
(1–128)
Voice Name
MSB
(0–127)
LSB
(0–127)
Piano
10113 1 Live! Grand Piano
20112 2 Bright Piano
30114 1 Live! WarmGrand
40112 7 Harpsichord
50113 7 GrandHarpsi
60112 4 HonkyTonk
70112 3 MidiGrand
80113 4 Oct.Piano1
90114 4 Oct.Piano2
10 0 113 3 CP80
E.Piano
10114 5 Cool! GalaxyEP
20118 5 Cool! SuitcaseEP
30115 5 PolarisEP
40118 6 JazzChorus
50113 6 HyperTines
60119 5 Cool! E.Piano
70120 5 PhaseEP
80116 6 NewTines
90112 5 FunkEP
10 0 112 6 DX Modern
11 0 116 5 VintageEP
12 0 114 6 VenusEP
13 0 115 6 ModernEP
14 0 113 5 TremoloEP
15 0 117 6 SuperDX
16 0 117 5 StageEP
17 0 112 8 Clavi
18 0 113 8 WahClavi
Organ
10118 19 Cool! Organ
20117 17 Cool! JazzOrgan
30117 19 Cool! RotorOrgan
40115 19 Cool! FullRocker
50118 17 StadiumOrg
60116 19 RotaryDrive
70112 19 RockOrgan1
80113 18 DanceOrgan
90112 17 JazzOrgan1
10 0 114 19 PurpleOrg
11 0 118 18 Elec.Organ
12 0 115 17 DrawbarOrg
13 0 113 17 JazzOrgan2
14 0 113 19 RockOrgan2
15 0 112 18 ClickOrgan
16 0 119 17 GospelOrg
17 0 115 18 MellowDraw
18 0 116 17 BrightDraw
19 0 116 18 60'sOrgan
20 0 120 17 JazzOrgan3
21 0 114 17 Tibia 16+4
22 0 114 18 Tibia Full
23 0 113 20 ChapelOrgn1
24 0 114 20 ChapelOrgn2
25 0 115 20 ChapelOrgn3
26 0 112 20 PipeOrgan
27 0 112 21 ReedOrgan
Strings
10117 50 Live! Strings
20116 50 Live! Orchestra
30122 50 Allegro Strings
40114 49 Symphon.Str
50113 41 Sweet! Violin
60112 49 Strings
70113 49 OrchStrings
80112 52 AnalogStrs
90112 50 ChamberStrs
10 0 116 49 BowStrings
11 0 113 50 SlowStrings
12 0 112 45 TremoloStrs
13 0 115 50 MarcatoStrs
14 0 112 51 SynStrings1
15 0 112 46 PizzStrings
16 0 112 42 Viola
17 0 112 43 Cello
18 0 112 44 Contrabass
19 0 112 47 Harp
20 0 113 47 Hackbrett
21 0 112 111 Fiddle
22 0 112 106 Banjo
23 0 112 105 Sitar
24 0 112 108 Koto
25 0 112 107 Shamisen
26 0 112 41 SoloViolin
27 0 112 56 Orch.Hit
Choir
10112 55 AirChoir
20113 54 GothicVox
30118 89 SweetHeaven
40121 89 DreamHeaven
50112 53 Choir
60112 54 VoxHumana
Brass
10117 63 Live! PopBrass
20118 63 Hyper Brass
30116 63 OctaveBrass
40112 61 Live! FrenchHorns
50115 67 BrassCombo
60112 62 BrassSection
70125 62 Sforzando
80121 62 BigBrass
90113 60 BallroomBrs
10 0 120 62 BrightBrass
11 0 116 62 MellowBrass
12 0 113 63 80'sBrass
13 0 123 62 SoftBrass
Voice
No.
Bank Select
MIDI
Program
Change#
(1–128)
Voice Name
MSB
(0–127)
LSB
(0–127)
Voice List
Voice List
PSR-S500 Owner’s Manual 99
14 0 114 62 FullHorns
15 0 118 58 SmoothTromb
16 0 115 62 HighBrass
17 0 113 64 OberBrass
18 0 122 62 TrumpetEns
19 0 119 62 MellowHorns
20 0 113 62 BigBandBrs
21 0 118 62 PopBrass
22 0 112 64 AnalogBrs
23 0 113 58 Trb.Section
24 0 117 62 SmallBrass
25 0 114 64 SoftAnalog
26 0 115 63 FunkyAnalog
27 0 114 63 TechnoBrass
28 0 112 63 SynthBrass
Trumpet
10115 57 Sweet! Trumpet
20117 58 Sweet! Trombone
30116 57 JazzTrumpet
40112 57 SoloTrumpet
50113 57 FlugelHorn
60116 58 Trombone
70115 58 SoftTromb
80112 58 SoloTromb
90114 58 MellowTromb
10 0 112 60 MutedTrump
11 0 113 59 BaritonHorn
12 0 114 59 BaritonHit
13 0 112 59 Tuba
14 0 113 34 AlpBass
Saxophone
10117 67 Sweet! TenorSax
20114 66 Sweet! AltoSax
30113 65 Sweet! SopranoSax
40118 67 GrowlSax
50112 68 BaritoneSax
60112 65 SopranoSax
70112 67 TenorSax
80112 66 AltoSax
90113 67 WoodwindEns
Flute&Clarinet
10114 74 Sweet! Flute
20114 72 Sweet! Clarinet
30113 76 Sweet! PanFlute
40112 70 EnglishHorn
50112 71 Bassoon
60115 74 Class.Flute
70112 73 Piccolo
80112 72 Clarinet
90112 69 Oboe
10 0 112 74 Flute
11 0 113 74 PanFlute
12 0 112 79 Whistle
13 0 112 76 EthnicFlute
14 0 112 78 Shakuhachi
15 0 112 75 Recorder
16 0 112 80 Ocarina
17 0 112 110 Bagpipe
Guitar
10116 25 Dynamic Nylon
20117 26 Steel Guitar
30115 27 Cool! JazzGuitar
40114 29 Cool! Elec.Gtr
50114 26 Sweet! Mandolin
60118 26 Dyno Steel
70117 29 Cool! Stratsphere
80125 28 Cool! VintageLead
90113 26 12Strings Guitar
10 0 115 31 Cool! PowerLead
11 0 116 26 Dynamic Steel
Voice
No.
Bank Select
MIDI
Program
Change#
(1–128)
Voice Name
MSB
(0–127)
LSB
(0–127)
12 0 117 30 Cool! BluesGuitar
13 0 112 28 Cool! CleanGuitar
14 0 115 25 Classic Guitar
15 0 115 28 PedalSteel
16 0 116 30 RockGuitar
17 0 126 28 VintageStrum
18 0 117 31 PowerChord
19 0 117 28 60'sClean
20 0 119 27 SmoothLead
21 0 115 30 VintageAmp
22 0 113 31 CrunchGtr
23 0 115 26 CampfireGtr
24 0 118 28 SolidGuitar
25 0 123 28 VintageOpen
26 0 115 29 VintageMute
27 0 114 30 LeadGuitar
28 0 124 28 ChorusGtr
29 0 120 28 VintageTrem
30 0 113 27 OctaveGtr
31 0 114 28 DeepChorus
32 0 113 28 TremoloGtr
33 0 114 31 HeavyStack
34 0 122 28 WahGuitar
35 0 112 31 Distortion
36 0 119 28 Elec.12Str
37 0 113 30 FeedbackGtr
38 0 112 29 MutedGuitar
39 0 113 29 FunkGuitar
40 0 116 31 VodooLead
41 0 112 26 FolkGuitar
42 0 112 30 Overdrive
Bass
10114 34 Cool! FingerBass
20112 33 Aco.Bass
30112 35 PickBass
40112 36 Cool! Fretless
50112 37 SlapBass
60114 40 SubBass
70114 39 HardBass
80112 39 ResoBass
90113 36 SuperFretles
10 0 113 37 FusionBass
11 0 114 33 Bass&Cymbal
12 0 112 40 AnalogBass
13 0 116 40 DrySynBass
14 0 115 40 80'sSynBass
15 0 113 39 HiQBass
16 0 112 38 FunkBass
17 0 115 39 ClickBass
18 0 112 34 MellowFinger
Perc&Drum
10112 12 Vibraphone
20113 12 JazzVibes
30112 13 Marimba
40112 14 Xylophone
50112 115 SteelDrums
60112 9 Celesta
70112 10 Glocken
80112 11 MusicBox
90112 15 TubularBell
10 0 112 109 Kalimba
11 0 112 16 Dulcimer
12 0 112 48 Timpani
13 127 0 1 StandardKit1
14 127 0 2 StandardKit2
15 127 0 33 JazzKit
16 127 0 41 BrushKit
17 127 0 9 RoomKit
18 127 0 17 RockKit
19 127 0 25 ElectroKit
Voice
No.
Bank Select
MIDI
Program
Change#
(1–128)
Voice Name
MSB
(0–127)
LSB
(0–127)
Voice List
100 PSR-S500 Owner’s Manual
20 127 0 26 AnalogKit
21 127 0 28 DanceKit
22 127 0 49 SymphonyKit
23 126 0 41 CubanKit
24 126 0 44 PopLatinKit
25 126 0 36 ArabicKit
26 126 0 1 SFXKit1
27 126 0 2 SFXKit2
Accordion
10112 22 Musette
20117 22 Steirisch
30113 22 TuttiAccrd
40115 22 SmallAccrd
50116 22 Accordion
60112 24 TangoAccrd
70113 24 Bandoneon
80114 22 SoftAccrd
90113 23 ModernHarp
10 0 114 23 BluesHarp
Pad
10113 95 Insomnia
20115 90 NeoWarmPad
30113 100 CyberPad
40112 96 Wave2001
50112 100 Atmosphere
60112 92 XenonPad
70112 95 Equinox
80112 89 Fantasia
90112 93 DX Pad
10 0 113 89 Symbiont
11 0 114 89 Stargate
12 0 112 90 Area51
13 0 113 90 DarkMoon
14 0 115 95 Ionosphere
15 0 115 89 GoldenAge
16 0 114 95 Solaris
17 0 117 89 Millennium
18 0 114 90 Dunes
Synth
10122 82 Oxygen
20123 82 Matrix
30120 82 WireLead
40113 81 HipLead
50117 81 HopLead
60116 82 FireWire
70115 82 Analogon
80114 82 Blaster
90115 85 Skyline
10 0 112 81 SquareLead
11 0 112 82 Saw.Lead
12 0 118 81 TinyLead
13 0 121 82 FunkyLead
14 0 114 85 Paraglide
15 0 112 85 Portatone
16 0 113 82 BigLead
17 0 117 82 Warp
18 0 119 82 Fargo
19 0 113 85 Adrenaline
20 0 112 99 Stardust
21 0 112 84 AeroLead
22 0 114 81 MiniLead
23 0 113 88 Impact
24 0 113 99 SunBell
25 0 112 88 UnderHeim
26 0 116 81 HiBias
27 0 115 81 Vinylead
Voice
No.
Bank Select
MIDI
Program
Change#
(1–128)
Voice Name
MSB
(0–127)
LSB
(0–127)
Voice List
PSR-S500 Owner’s Manual 101
●XGlite Voice/XGlite Optional Voice* List
Voice
No.
Bank Select
MIDI
Program
Change#
(1–128)
Voice Name
MSB
(0–127)
LSB
(0–127)
XG
100 1Grand Piano
201 1Grand Piano KSP
3040 1 Piano Strings
4041 1 Dream
500 2Bright Piano
601 2Bright Piano KSP
700 3Electric Grand Piano
801 3Electric Grand Piano KSP
9032 3 Detuned CP80
10 0 0 4 Honky-tonk Piano
11 0 1 4 Honky-tonk Piano KSP
12 0 0 5 Electric Piano 1
13 0 1 5 Electric Piano 1 KSP
14 0 32 5 Chorus Electric Piano 1
15 0 0 6 Electric Piano 2
16 0 1 6 Electric Piano 2 KSP
17 0 32 6 Chorus Electric Piano 2
18 0 41 6 DX + Analog Electric Piano
19 0 0 7 Harpsichord
20 0 1 7 Harpsichord KSP
21 0 35 7 Harpsichord 2
22 0 0 8 Clavi
23 0 1 8 Clavi KSP
24 0 0 9 Celesta
25 0 0 10 Glockenspiel
26 0 0 11 Music Box
27 0 64 11 Orgel
28 0 0 12 Vibraphone
29 0 1 12 Vibraphone KSP
30 0 0 13 Marimba
31 0 1 13 Marimba KSP
32 0 64 13 Sine Marimba
33 0 97 13 Balimba
34 0 98 13 Log Drums
35 0 0 14 Xylophone
36 0 0 15 Tubular Bells
37 0 96 15 Church Bells
38 0 97 15 Carillon
39 0 0 16 Dulcimer
40 0 35 16 Dulcimer 2
41 0 96 16 Cimbalom
42 0 97 16 Santur
43 0 0 17 Drawbar Organ
44 0 32 17 Detuned Drawbar Organ
45 0 33 17 60's Drawbar Organ 1
46 0 34 17 60's Drawbar Organ 2
47 0 35 17 70's Drawbar Organ 1
48 0 37 17 60's Drawbar Organ 3
49 0 40 17 16+2'2/3
50 0 64 17 Organ Bass
51 0 65 17 70's Drawbar Organ 2
52 0 66 17 Cheezy Organ
53 0 67 17 Drawbar Organ 2
54 0 0 18 Percussive Organ
55 0 24 18 70's Percussive Organ
56 0 32 18 Detuned Percussive Organ
57 0 33 18 Light Organ
58 0 37 18 Percussive Organ 2
59 0 0 19 Rock Organ
60 0 64 19 Rotary Organ
61 0 65 19 Slow Rotary
62 0 66 19 Fast Rotary
63 0 0 20 Church Organ
64 0 32 20 Church Organ 3
65 0 35 20 Church Organ 2
66 0 40 20 Notre Dame
67 0 64 20 Organ Flute
68 0 65 20 Tremolo Organ Flute
69 0 0 21 Reed Organ
70 0 40 21 Puff Organ
71 0 0 22 Accordion
72 0 0 23 Harmonica
73 0 32 23 Harmonica 2
74 0 0 24 Tango Accordion
75 0 64 24 Tango Accordion 2
76 0 0 25 Nylon Guitar
77 0 43 25 Velocity Guitar Harmonics
78 0 96 25 Ukulele
79 0 0 26 Steel Guitar
80 0 35 26 12-string Guitar
81 0 40 26 Nylon & Steel Guitar
82 0 41 26 Steel Guitar with Body Sound
83 0 96 26 Mandolin
84 0 0 27 Jazz Guitar
85 0 32 27 Jazz Amp
86 0 0 28 Clean Guitar
87 0 32 28 Chorus Guitar
88 0 0 29 Muted Guitar
89 0 40 29 Funk Guitar
90 0 41 29 Muted Steel Guitar
91 0 45 29 Jazz Man
92 0 0 30 Overdriven Guitar
93 0 43 30 Guitar Pinch
94 0 0 31 Distortion Guitar
95 0 40 31 Feedback Guitar
96 0 41 31 Feedback Guitar 2
97 0 0 32 Guitar Harmonics
98 0 65 32 Guitar Feedback
99 0 66 32 Guitar Harmonics 2
100 0 0 33 Acoustic Bass
101 0 40 33 Jazz Rhythm
102 0 45 33 Velocity Crossfade Upright Bass
103 0 0 34 Finger Bass
104 0 18 34 Finger Dark
105 0 40 34 Bass & Distorted Electric Guitar
106 0 43 34 Finger Slap Bass
107 0 45 34 Finger Bass 2
108 0 65 34 Modulated Bass
109 0 0 35 Pick Bass
110 0 28 35 Muted Pick Bass
111 0 0 36 Fretless Bass
112 0 32 36 Fretless Bass 2
113 0 33 36 Fretless Bass 3
114 0 34 36 Fretless Bass 4
115 0 0 37 Slap Bass 1
116 0 32 37 Punch Thumb Bass
117 0 0 38 Slap Bass 2
118 0 43 38 Velocity Switch Slap
119 0 0 39 Synth Bass 1
120 0 40 39 Techno Synth Bass
121 0 0 40 Synth Bass 2
122 0 6 40 Mellow Synth Bass
123 0 12 40 Sequenced Bass
124 0 18 40 Click Synth Bass
125 0 19 40 Synth Bass 2 Dark
*126 0 40 40 Modular Synth Bass
127 0 41 40 DX Bass
128 0 0 41 Violin
129 0 8 41 Slow Violin
130 0 0 42 Viola
131 0 0 43 Cello
132 0 0 44 Contrabass
133 0 0 45 Tremolo Strings
134 0 8 45 Slow Tremolo Strings
135 0 40 45 Suspense Strings
136 0 0 46 Pizzicato Strings
137 0 0 47 Orchestral Harp
138 0 40 47 Yang Chin
Voice
No.
Bank Select
MIDI
Program
Change#
(1–128)
Voice Name
MSB
(0–127)
LSB
(0–127)
Voice List
102 PSR-S500 Owner’s Manual
139 0 0 48 Timpani
140 0 0 49 Strings 1
141 0 3 49 Stereo Strings
142 0 8 49 Slow Strings
143 0 35 49 60's Strings
144 0 40 49 Orchestra
145 0 41 49 Orchestra 2
146 0 42 49 Tremolo Orchestra
147 0 45 49 Velocity Strings
148 0 0 50 Strings 2
149 0 3 50 Stereo Slow Strings
150 0 8 50 Legato Strings
151 0 40 50 Warm Strings
152 0 41 50 Kingdom
153 0 0 51 Synth Strings 1
154 0 0 52 Synth Strings 2
155 0 0 53 Choir Aahs
156 0 3 53 Stereo Choir
157 0 32 53 Mellow Choir
158 0 40 53 Choir Strings
159 0 0 54 Voice Oohs
160 0 0 55 Synth Voice
161 0 40 55 Synth Voice 2
162 0 41 55 Choral
163 0 64 55 Analog Voice
164 0 0 56 Orchestra Hit
165 0 35 56 Orchestra Hit 2
166 0 64 56 Impact
167 0 0 57 Trumpet
168 0 32 57 Warm Trumpet
169 0 0 58 Trombone
170 0 18 58 Trombone 2
171 0 0 59 Tuba
172 0 0 60 Muted Trumpet
173 0 0 61 French Horn
174 0 6 61 French Horn Solo
175 0 32 61 French Horn 2
176 0 37 61 Horn Orchestra
177 0 0 62 Brass Section
178 0 35 62 Trumpet & Trombone Section
179 0 0 63 Synth Brass 1
180 0 20 63 Resonant Synth Brass
181 0 0 64 Synth Brass 2
182 0 18 64 Soft Brass
183 0 41 64 Choir Brass
184 0 0 65 Soprano Sax
185 0 0 66 Alto Sax
186 0 40 66 Sax Section
187 0 0 67 Tenor Sax
188 0 40 67 Breathy Tenor Sax
189 0 0 68 Baritone Sax
190 0 0 69 Oboe
191 0 0 70 English Horn
192 0 0 71 Bassoon
193 0 0 72 Clarinet
194 0 0 73 Piccolo
195 0 0 74 Flute
196 0 0 75 Recorder
197 0 0 76 Pan Flute
198 0 0 77 Blown Bottle
199 0 0 78 Shakuhachi
200 0 0 79 Whistle
201 0 0 80 Ocarina
202 0 0 81 Square Lead
203 0 6 81 Square Lead 2
204 0 8 81 LM Square
205 0 18 81 Hollow
206 0 19 81 Shroud
207 0 64 81 Mellow
208 0 65 81 Solo Sine
Voice
No.
Bank Select
MIDI
Program
Change#
(1–128)
Voice Name
MSB
(0–127)
LSB
(0–127)
209 0 66 81 Sine Lead
210 0 0 82 Sawtooth Lead
211 0 6 82 Sawtooth Lead 2
212 0 8 82 Thick Sawtooth
213 0 18 82 Dynamic Sawtooth
214 0 19 82 Digital Sawtooth
215 0 20 82 Big Lead
216 0 96 82 Sequenced Analog
217 0 0 83 Calliope Lead
218 0 65 83 Pure Lead
219 0 0 84 Chiff Lead
220 0 0 85 Charang Lead
221 0 64 85 Distorted Lead
222 0 0 86 Voice Lead
223 0 0 87 Fifths Lead
224 0 35 87 Big Five
225 0 0 88 Bass & Lead
226 0 16 88 Big & Low
227 0 64 88 Fat & Perky
228 0 65 88 Soft Whirl
229 0 0 89 New Age Pad
230 0 64 89 Fantasy
231 0 0 90 Warm Pad
232 0 0 91 Poly Synth Pad
233 0 0 92 Choir Pad
234 0 66 92 Itopia
235 0 0 93 Bowed Pad
236 0 0 94 Metallic Pad
237 0 0 95 Halo Pad
238 0 0 96 Sweep Pad
239 0 0 97 Rain
240 0 65 97 African Wind
241 0 66 97 Carib
242 0 0 98 Sound Track
243 0 27 98 Prologue
244 0 0 99 Crystal
245 0 12 99 Synth Drum Comp
246 0 14 99 Popcorn
247 0 18 99 Tiny Bells
248 0 35 99 Round Glockenspiel
249 0 40 99 Glockenspiel Chimes
250 0 41 99 Clear Bells
251 0 42 99 Chorus Bells
252 0 65 99 Soft Crystal
253 0 70 99 Air Bells
254 0 71 99 Bell Harp
255 0 72 99 Gamelimba
256 0 0 100 Atmosphere
257 0 18 100 Warm Atmosphere
258 0 19 100 Hollow Release
259 0 40 100 Nylon Electric Piano
260 0 64 100 Nylon Harp
261 0 65 100 Harp Vox
262 0 66 100 Atmosphere Pad
263 0 0 101 Brightness
264 0 0 102 Goblins
265 0 64 102 Goblins Synth
266 0 65 102 Creeper
267 0 67 102 Ritual
268 0 68 102 To Heaven
269 0 70 102 Night
270 0 71 102 Glisten
271 0 96 102 Bell Choir
272 0 0 103 Echoes
273 0 0 104 Sci-Fi
274 0 0 105 Sitar
275 0 32 105 Detuned Sitar
276 0 35 105 Sitar 2
277 0 97 105 Tamboura
278 0 0 106 Banjo
Voice
No.
Bank Select
MIDI
Program
Change#
(1–128)
Voice Name
MSB
(0–127)
LSB
(0–127)
Voice List
PSR-S500 Owner’s Manual 103
The voice number with an asterisk (*) is XGlite optional voice.
279 0 28 106 Muted Banjo
280 0 96 106 Rabab
281 0 97 106 Gopichant
282 0 98 106 Oud
283 0 0 107 Shamisen
284 0 0 108 Koto
285 0 96 108 Taisho-kin
286 0 97 108 Kanoon
287 0 0 109 Kalimba
288 0 0 110 Bagpipe
289 0 0 111 Fiddle
290 0 0 112 Shanai
291 0 0 113 Tinkle Bell
292 0 96 113 Bonang
293 0 97 113 Altair
294 0 98 113 Gamelan Gongs
295 0 99 113 Stereo Gamelan Gongs
296 0 100 113 Rama Cymbal
297 0 0 114 Agogo
298 0 0 115 Steel Drums
299 0 97 115 Glass Percussion
300 0 98 115 Thai Bells
301 0 0 116 Woodblock
302 0 96 116 Castanets
303 0 0 117 Taiko Drum
304 0 96 117 Gran Cassa
305 0 0 118 Melodic Tom
306 0 64 118 Melodic Tom 2
307 0 65 118 Real Tom
308 0 66 118 Rock Tom
309 0 0 119 Synth Drum
310 0 64 119 Analog Tom
311 0 65 119 Electronic Percussion
312 0 0 120 Reverse Cymbal
313 0 0 121 Fret Noise
314 0 0 122 Breath Noise
315 0 0 123 Seashore
316 0 0 124 Bird Tweet
317 0 0 125 Telephone Ring
318 0 0 126 Helicopter
319 0 0 127 Applause
320 0 0 128 Gunshot
321 64 0 1 Cutting Noise
322 64 0 2 Cutting Noise 2
323 64 0 4 String Slap
324 64 0 17 Flute Key Click
325 64 0 33 Shower
326 64 0 34 Thunder
327 64 0 35 Wind
328 64 0 36 Stream
329 64 0 37 Bubble
330 64 0 38 Feed
331 64 0 49 Dog
332 64 0 50 Horse
333 64 0 51 Bird Tweet 2
334 64 0 56 Maou
335 64 0 65 Phone Call
336 64 0 66 Door Squeak
337 64 0 67 Door Slam
338 64 0 68 Scratch Cut
339 64 0 69 Scratch Split
340 64 0 70 Wind Chime
341 64 0 71 Telephone Ring 2
342 64 0 81 Car Engine Ignition
343 64 0 82 Car Tires Squeal
344 64 0 83 Car Passing
345 64 0 84 Car Crash
346 64 0 85 Siren
347 64 0 86 Train
348 64 0 87 Jet Plane
Voice
No.
Bank Select
MIDI
Program
Change#
(1–128)
Voice Name
MSB
(0–127)
LSB
(0–127)
349 64 0 88 Starship
350 64 0 89 Burst
351 64 0 90 Roller Coaster
352 64 0 91 Submarine
353 64 0 97 Laugh
354 64 0 98 Scream
355 64 0 99 Punch
356 64 0 100 Heartbeat
357 64 0 101 Footsteps
358 64 0 113 Machine Gun
359 64 0 114 Laser Gun
360 64 0 115 Explosion
361 64 0 116 Firework
Voice
No.
Bank Select
MIDI
Program
Change#
(1–128)
Voice Name
MSB
(0–127)
LSB
(0–127)
104 PSR-S500 Owner’s Manual
Drum Kit List
Voice No. 13 14 17 18 19 20
MSB (0–127) / LSB (0–127) / PC (1–128) 127/000/001 127/000/002 127/000/009 127/000/017 127/000/025 127/000/026
Keyboard MIDI Key
Off
Alternate
Note Standard Kit 1 Standard Kit 2 Room Kit Rock Kit Electronic Kit Analog Kit
Note# Note Note# Note
25 C#013C#-1 3 Surdo Mute
26 D 0 14 D -1 3 Surdo Open
27 D#015D#-1 Hi Q
28 E 0 16 E -1 Whip Slap
29 F 0 17 F -1 4 Scratch H
30 F#018F#-1 4 Scratch L
31 G 0 19 G -1 Finger Snap
32 G#020G#-1 Click Noise
33 A 0 21 A -1 Metronome Click
34 A#022A#-1 Metronome Bell
35 B 0 23 B -1 Seq Click L
36 C 1 24 C 0 Seq Click H
37 C#125C#0 Brush Tap
38 D 1 26 D 0 O Brush Swirl
39 D#127D#0 Brush Slap
40 E 1 28 E 0 O Brush Tap Swirl Reverse Cymbal Reverse Cymbal
41 F 1 29 F 0 O Snare Roll Snare Roll 2
42 F#130F#0 Caanet Hi Q 2 Hi Q 2
43 G 1 31 G 0 Snare Soft Snare Soft 2 Snare Noisy Snare Snappy Electro Snare Noisy 4
44 G#132G#0 Sticks
45 A 1 33 A 0 Kick Soft Kick Tight 2 Kick 3 Kick Tight 2
46 A#134A#0 Open Rim Shot
Open Rim Shot H Short
47 B 1 35 B 0 Kick Tight Kick Tight Short Kick 2 Kick Gate Kick Analog Short
48 C 2 36 C 1 Kick Kick Short Kick Gate Kick Gate Heavy Kick Analog
49 C#237C#1 Side Stick Side Stick Analog
50 D 2 38 D 1 Snare Snare Short Snare Snappy Snare Rock Snare Noisy 2 Snare Analog
51 D#239D#1 Hand Clap
52 E 2 40 E 1 Snare Tight Snare Tight H Snare Tight Snappy Snare Rock Rim Snare Noisy 3 Snare Analog 2
53 F 2 41 F 1 Floor Tom L Tom Room 1 Tom Rock 1 Tom Electro 1 Tom Analog 1
54 F#242F#11Hi-Hat Closed
Hi-Hat Closed Analog
55 G 2 43 G 1 Floor Tom H Tom Room 2 Tom Rock 2 Tom Electro 2 Tom Analog 2
56 G#244G#11Hi-Hat Pedal
Hi-Hat Closed Analog 2
57 A 2 45 A 1 Low Tom Tom Room 3 Tom Rock 3 Tom Electro 3 Tom Analog 3
58 A#246A#11Hi-Hat Open Hi-Hat Open Analog
59 B 2 47 B 1 Mid Tom L Tom Room 4 Tom Rock 4 Tom Electro 4 Tom Analog 4
60 C 3 48 C 2 Mid Tom H Tom Room 5 Tom Rock 5 Tom Electro 5 Tom Analog 5
61 C#349C#2 Crash Cymbal 1 Crash Analog
62 D 3 50 D 2 High Tom Tom Room 6 Tom Rock 6 Tom Electro 6 Tom Analog 6
63 D#351D#2 Ride Cymbal 1
64 E 3 52 E 2 Chinese Cymbal
65 F 3 53 F 2 Ride Cymbal Cup
66 F#354F#2 Tambourine
67 G 3 55 G 2 Splash Cymbal
68 G#356G#2 Cowbell Cowbell Analog
69 A 3 57 A 2 Crash Cymbal 2
70 A#358A#2 Vibraslap
71 B 3 59 B 2 Ride Cymbal 2
72 C 4 60 C 3 Bongo H
73 C#461C#3 Bongo L
74 D 4 62 D 3 Conga H Mute Conga Analog H
75 D#463D#3 Conga H Open Conga Analog M
76 E 4 64 E 3 Conga L Conga Analog L
77 F 4 65 F 3 Timbale H
78 F#466F#3 Timbale L
79 G 4 67 G 3 Agogo H
80 G#468G#3 Agogo L
81 A 4 69 A 3 Cabasa
82 A#470A#3 Maracas Maracas 2
83 B 4 71 B 3 O Samba While H
84 C 5 72 C 4 O Samba While L
85 C#573C#4 Guiro Short
86 D 5 74 D 4 O Guiro Long
87 D#575D#4 Claves Claves 2
88 E 5 76 E 4 Wood Block H
89 F 5 77 F 4 Wood Block L
90 F#578F#4 Cuica Mute Scratch H 2 Scratch H 2
91 G 5 79 G 4 Cuica Open Scratch L 2 Scratch L 3
92 G#580G#42Triangle Mute
93 A 5 81 A 4 2 Triangle Open
94 A#582A#4 Shaker
95 B 5 83 B 4 Jingle Bells
96 C 6 84 C 5 Bell Tree
97 C#685C#5
98 D 6 86 D 5
99 D#687D#5
100 E 6 88 E 5
101 F 6 89 F 5
102 F#690F#5
103 G 6 91 G 5
•“ ” indicates that the drum sound is the same as “Standard Kit 1”.
• Each percussion voice uses one note.
• The MIDI Note # and Note are actually one octave lower than keyboard Note # and Note. For example, in
“128: Standard Kit 1”, the “Seq Click H” (Note# 36/Note C1) corresponds to (Note# 24/Note C0).
•Key Off: Keys marked “O” stop sounding the instant they are released.
•Voices with the same Alternate Note Number (*1 ... 4) cannot be played simultaneously. (They are designed
to be played alternately with each other.)
•*: XGlite optional kit.
Drum Kit List
E1
F1 F#1
G1
G#1
A1
A#1
B1
C1
D#1
D1
C#1
E2
F2 F#2
G2
G#2
A2
A#2
B2
C2
D#2
D2
C#2
E3
F3 F#3
G3
G#3
A3
A#3
B3
C3
D#3
D3
C#3
E4
F4 F#4
G4
G#4
A4
A#4
B4
C4
D#4
D4
C#4
E5
F5 F#5
G5
G#5
A5
A#5
B5
C5
D#5
D5
C#5
C6
Drum Kit List
PSR-S500 Owner’s Manual 105
Voice No. 13 21 15 16 22
MSB (0–127) / LSB (0–127) / PC (1–128) 127/000/001 127/000/28 127/000/033 127/000/041 127/000/049
Keyboard MIDI Key
Off
Alternate
Note Standard Kit 1 Dance Kit* Jazz Kit Brush Kit Symphony Kit
Note# Note Note# Note
25 C#013C#-1 3 Surdo Mute Kick Dance 1
26 D 0 14 D -1 3 Surdo Open Kick Dance 2
27 D#015D#-1 Hi Q
28 E 0 16 E -1 Whip Slap
29 F 0 17 F -1 4 Scratch H Scratch Dance 1
30 F#018F#-1 4 Scratch L Scratch Dance 2
31 G 0 19 G -1 Finger Snap
32 G#020G#-1 Click Noise
33 A 0 21 A -1 Metronome Click Dance Percussion 1
34 A#022A#-1 Metronome Bell Reverse Dance 1
35 B 0 23 B -1 Seq Click L Dance Percussion 2
36 C 1 24 C 0 Seq Click H Hi Q Dance 1
37 C#125C#0 Brush Tap Snare Aanalog 3
38 D 1 26 D 0 O Brush Swirl Vinyl Noise
39 D#127D#0 Brush Slap Snare Analog 4
40 E 1 28 E 0 O Brush Tap Swirl Reverse Cymbal
41 F 1 29 F 0 O Snare Roll Reverse Dance 2
42 F#130F#0 Caanet Hi Q 2
43 G 1 31 G 0 Snare Soft Snare Techno Snare Jazz H Brush Slap 2
44 G#132G#0 Sticks Snare Dance 1
45 A 1 33 A 0 Kick Soft Kick Techno Q Kick Soft 2
46 A#134A#0 Open Rim Shot Rim Gate
47 B 1 35 B 0 Kick Tight Kick Techno L Gran Cassa
48 C 2 36 C 1 Kick Kick Techno Kick Jazz Kick Small Gran Cassa Mute
49 C#237C#1 Side Stick Side Stick Analog
50 D 2 38 D 1 Snare Snare Clap Snare Jazz L Brush Slap 3 Band Snare
51 D#239D#1 Hand Clap Dance Clap
52 E 2 40 E 1 Snare Tight Snare Dry Snare Jazz M Brush Tap 2 Band Snare 2
53 F 2 41 F 1 Floor Tom L Tom Analog 1 Tom Jazz 1 Tom Brush 1 Tom Jazz 1
54 F#242F#11Hi-Hat Closed Hi-Hat Closed Analog3
55 G 2 43 G 1 Floor Tom H Tom Analog 2 Tom Jazz 2 Tom Brush 2 Tom Jazz 2
56 G#244G#11Hi-Hat Pedal Hi-Hat Closed Analog 4
57 A 2 45 A 1 Low Tom Tom Analog 3 Tom Jazz 3 Tom Brush 3 Tom Jazz 3
58 A#246A#11Hi-Hat Open Hi-Hat Open Analog 2
59 B 2 47 B 1 Mid Tom L Tom Analog 4 Tom Jazz 4 Tom Brush 4 Tom Jazz 4
60 C 3 48 C 2 Mid Tom H Tom Analog 5 Tom Jazz 5 Tom Brush 5 Tom Jazz 5
61 C#349C#2 Crash Cymbal 1 Crash Analog Hand Cymbal
62 D 3 50 D 2 High Tom Tom Analog 6 Tom Jazz 6 Tom Brush 6 Tom Jazz 6
63 D#351D#2 Ride Cymbal 1 Hand Cymbal Short
64 E 3 52 E 2 Chinese Cymbal
65 F 3 53 F 2 Ride Cymbal Cup
66 F#354F#2 Tambourine Tambourine Analog
67 G 3 55 G 2 Splash Cymbal
68 G#356G#2 Cowbell Cowbell Analog
69 A 3 57 A 2 Crash Cymbal 2 Hand Cymbal 2
70 A#358A#2 Vibraslap Vibraslap Analog
71 B 3 59 B 2 Ride Cymbal 2 Ride Analog Hand Cymbal 2 Short
72 C 4 60 C 3 Bongo H Bongo Analog H
73 C#461C#3 Bongo L Bongo Analog L
74 D 4 62 D 3 Conga H Mute Conga Analog H
75 D#463D#3 Conga H Open Conga Analog M
76 E 4 64 E 3 Conga L Conga Analog L
77 F 4 65 F 3 Timbale H
78 F#466F#3 Timbale L
79 G 4 67 G 3 Agogo H
80 G#468G#3 Agogo L
81 A 4 69 A 3 Cabasa
82 A#470A#3 Maracas Maracas 2
83 B 4 71 B 3 O Samba While H
84 C 5 72 C 4 O Samba While L
85 C#573C#4 Guiro Short
86 D 5 74 D 4 O Guiro Long
87 D#575D#4 Claves Claves 2
88 E 5 76 E 4 Wood Block H Dance Percussion 3
89 F 5 77 F 4 Wood Block L Dance Percussion 4
90 F#578F#4 Cuica Mute Dance Breath 1
91 G 5 79 G 4 Cuica Open Dance Breath 2
92 G#580G#42Triangle Mute
93 A 5 81 A 4 2 Triangle Open
94 A#582A#4 Shaker
95 B 5 83 B 4 Jingle Bells
96 C 6 84 C 5 Bell Tree
97 C#685C#5
98 D 6 86 D 5
99 D#687D#5
100 E 6 88 E 5
101 F 6 89 F 5
102 F#690F#5
103 G 6 91 G 5
E1
F1 F#1
G1
G#1
A1
A#1
B1
C1
D#1
D1
C#1
E2
F2 F#2
G2
G#2
A2
A#2
B2
C2
D#2
D2
C#2
E3
F3 F#3
G3
G#3
A3
A#3
B3
C3
D#3
D3
C#3
E4
F4 F#4
G4
G#4
A4
A#4
B4
C4
D#4
D4
C#4
E5
F5 F#5
G5
G#5
A5
A#5
B5
C5
D#5
D5
C#5
C6
Drum Kit List
106 PSR-S500 Owner’s Manual
E1
F1 F#1
G1
G#1
A1
A#1
B1
C1
D#1
D1
C#1
E2
F2 F#2
G2
G#2
A2
A#2
B2
C2
D#2
D2
C#2
E3
F3 F#3
G3
G#3
A3
A#3
B3
C3
D#3
D3
C#3
E4
F4 F#4
G4
G#4
A4
A#4
B4
C4
D#4
D4
C#4
E5
F5 F#5
G5
G#5
A5
A#5
B5
C5
D#5
D5
C#5
C6
Voice No. 13 26 27 25 23 24
MSB (0–127) / LSB (0–127) / PC (1–128) 127/000/001 126/000/001 126/000/002 126/000/36 126/000/41 126/000/44
Keyboard MIDI Key
Off
Alternate
Note Standard Kit 1 SFX Kit 1 SFX Kit 2 ArabicKit* CubanKit* PopLatinKit*
Note# Note Note# Note
25 C#013C#-1 3 Surdo Mute
26 D 0 14 D -1 3 Surdo Open
27 D#015D#-1 Hi Q
28 E 0 16 E -1 Whip Slap
29 F 0 17 F -1 4 Scratch H
30 F#018F#-1 4 Scratch L Hand Clap
31 G 0 19 G -1 Finger Snap
32 G#020G#-1 Click Noise
33 A 0 21 A -1 Metronome Click
34 A#022A#-1 Metronome Bell Conga H Tip Conga H Tip
35 B 0 23 B -1 Seq Click L Conga H Heel Conga H Heel
36 C 1 24 C 0 Seq Click H Nakarazan Dom Conga H Open Conga H Open
37 C#125C#0 Brush Tap Cabasa Conga H Mute Conga H Mute
38 D 1 26 D 0 O Brush Swirl Nakarazan Edge Conga H Slap Open Conga H Slap Open
39 D#127D#0 Brush Slap Hager Dom Conga H Slap Conga H Slap
40 E 1 28 E 0 O Brush Tap Swirl Hager Edge Conga H Slap Mute Conga H Slap Mute
41 F 1 29 F 0 O Snare Roll Bongo H Conga L Tip Conga L Tip
42 F#130F#0 Caanet Bongo L Conga L Heel Conga L Heel
43 G 1 31 G 0 Snare Soft Conga H Mute Conga L Open Conga L Open
44 G#132G#0 Sticks Conga H Open Conga L Mute Conga L Mute
45 A 1 33 A 0 Kick Soft Conga L Conga L Slap Open Conga L Slap Open
46 A#134A#0 Open Rim Shot Zagrouda H Conga L Slap Conga L Slap
47 B 1 35 B 0 Kick Tight Zagrouda L Conga L Slide Conga L Slide
48 C 2 36 C 1 Kick Cutting Noise Phone Call Kick Soft Bongo H Open 1 finger Bongo H Open 1 finger
49 C#237C#1 Side Stick Cutting Noise 2 Door Squeak Bongo H Open 3 finger Bongo H Open 3 finger
50 D 2 38 D 1 Snare Door Slam Snare Soft Bongo H Rim Bongo H Rim
51 D#239D#1 Hand Clap ring Slap Scratch Cut Arabic Hand Clap Bongo H Tip Bongo H Tip
52 E 2 40 E 1 Snare Tight Scratch H 3 Snare Bongo H Heel Bongo H Heel
53 F 2 41 F 1 Floor Tom L Wind Chime Bongo H Slap Bongo H Slap
54 F#242F#11Hi-Hat Closed Telephone Ring 2 Bongo L Open 1 finger Bongo L Open 1 finger
55 G 2 43 G 1 Floor Tom H Bongo L Open 3 finger Bongo L Open 3 finger
56 G#244G#11Hi-Hat Pedal Bongo L Rim Bongo L Rim
57 A 2 45 A 1 Low Tom Bongo L Tip Bongo L Tip
58 A#246A#11Hi-Hat Open Bongo L Heel Bongo L Heel
59 B 2 47 B 1 Mid Tom L Bongo L Slap Bongo L Slap
60 C 3 48 C 2 Mid Tom H Timbale L Open Timbale L Open
61 C#349C#2 Crash Cymbal 1
62 D 3 50 D 2 High Tom
63 D#351D#2 Ride Cymbal 1
64 E 3 52 E 2 Chinese Cymbal Flute Key Click Car Engine Ignition Crash Cymbal 2
65 F 3 53 F 2 Ride Cymbal Cup Car Tires Squeal Duhulla Dom Paila L Paila L
66 F#354F#2 Tambourine Car Passing Timbale H Open Timbale H Open
67 G 3 55 G 2 Splash Cymbal Car Crash Duhulla Tak
68 G#356G#2 Cowbell Siren
69 A 3 57 A 2 Crash Cymbal 2 Train Duhulla Sak
70 A#358A#2 Vibraslap Jet Plane Claves
71 B 3 59 B 2 Ride Cymbal 2 arship Doff Dom Paila H Paila H
72 C 4 60 C 3 Bongo H Bur Katem Dom Cowbell Top Cowbell Top
73 C#461C#3 Bongo L Roller Coaer Katem Tak
74 D 4 62 D 3 Conga H Mute Submarine Katem Sak
75 D#463D#3 Conga H Open Katem Tak
76 E 4 64 E 3 Conga L Doff Tak Guiro Short Guiro Short
77 F 4 65 F 3 Timbale H Tabla Dom Guiro Long Guiro Long
78 F#466F#3 Timbale L Tabla Tak1
79 G 4 67 G 3 Agogo H Tabla Tik
80 G#468G#3 Agogo L Shower Laugh Tabla Tak2 Tambourine Tambourine
81 A 4 69 A 3 Cabasa Thunder Scream Tabla Sak
82 A#470A#3 Maracas Wind Punch Tabla Roll of Edge
83 B 4 71 B 3 O Samba While H ream Heartbeat Tabla Flam
84 C 5 72 C 4 O Samba While L Bubble Footeps Sagat 1 Maracas Maracas
85 C#573C#4 Guiro Short Feed Tabel Dom Shaker Shaker
86 D 5 74 D 4 O Guiro Long Sagat 3 Cabasa Cabasa
87 D#575D#4 Claves Tabel Tak Cuica Mute
88 E 5 76 E 4 Wood Block H Sagat 2 Cuica Open
89 F 5 77 F 4 Wood Block L Rik Dom
90 F#578F#4 Cuica Mute Rik Tak 2
91 G 5 79 G 4 Cuica Open Rik Finger 1
92 G#580G#42Triangle Mute Rik Tak 1
93 A 5 81 A 4 2 Triangle Open Rik Finger 2 Triangle Mute
94 A#582A#4 Shaker Rik Brass Tremolo Triangle Open
95 B 5 83 B 4 Jingle Bells Rik Sak
96 C 6 84 C 5 Bell Tree Dog Machine Gun Rik Tik Bell Tree
97 C#685C#5 Horse Laser Gun
98 D 6 86 D 5 Bird Tweet 2 Explosion
99 D#687D#5 Firework
100 E 6 88 E 5
101 F 6 89 F 5
102 F#690F#5
103 G 6 91 G 5 Maou
PSR-S500 Owner’s Manual 107
Style List
Style No. Style Name
Pop&Rock
1 FunkPopRock
2 AcousticRock
3 Cool8Beat
4 60'sRock1
5 60'sRock2
6 VintageGtrPop
7 60'sGuitarPop
8 70's8Beat
9 90'sGuitarPop
10 KoolShuffle
11 BubblegumPop
12 BritPopSwing
13 JazzPop
14 HardRock
15 RootRock
16 RockShuffle
17 Unplugged
Ballad
1 8BeatAdria
2 OrganBallad
3 PianoBallad
4 8BeatBallad
5 EPBallad
6 6-8Modern
7 Chillout
8 NewR&BBallad
9 16BeatBallad
10 PowerBallad
11 EasyBallad
Dance
1 Ibiza
2 TechnoParty
3 DiscoHouse
4 DiscoPhilly
5 70'sDisco
6 80'sDisco
7 DreamDance
8 House
9 FrenchHouse
10 Garage
11 ClassicHipHop
12 NewHipHop
13 HipHopGroove
14 LatinDJ's
Swing&Jazz
1 OrchBigBand
2 OrchestraSwing1
3 OrchestraSwing2
4 BigBandFast
5 BigBandShuffle
6 MidnightSwing
7 JumpJive
8 OrganGroove
9 JazzClub
10 Five-Four
11 JazzWaltzFast
12 Dixieland
13 Ragtime
14 Charleston
R&B
1 BluesRock
2 BluesBallad
3 Soul
4 FranklySoul
5 6-8Soul
6 SoulBrothers
7 OldiesR&R
8 60'sRock&Roll
9 Rock&Roll
10 Twist
11 GospelSisters
12 WorshipMed
13 DetroitPop
14 ModernR&B
15 ComboBoogie
Country
1 NewCountry
2 CountryHits
3 CountryBallad
4 CountryPop
5 CountryShuffle
6 Country2-4
7 FingerPickin
8 Bluegrass
9 Hoedown
10 CountryWaltz
Latin
1 BrazilianSamba
2 FastBossa
3 Beguine
4 Mambo
5 Salsa
6 Calypso
7 Merengue
8 Bachata
9 CubanSon
10 RumbaIsland
11 RumbaFlamenca
12 HappyReggae
13 LatinDisco
Ballroom
1 VienneseWaltz
2 EnglishWaltz
3 Slowfox
4 Foxtrot
5 Quickstep
6 Tango
7 Swingfox
8 Pasodoble
9 Samba
10 ChaChaCha
Style No. Style Name
11 Rumba
12 Jive
13 OrganSwing
14 OrganSamba
15 OrganQuickstep
16 9-8Waltz
17 TraditionalWaltz
Movie&Show
1 70'sTVTheme
2 Sci-fiMarch
3 WildWest
4 SaturdayNight
5 Showtune
6 Moonlight6-8
7 ClassicPianoBld
8 BaroqueAir
9 OrchestralBolero
10 OrchestralMarch
11 ChristmasSwing
12 ChristmasWaltz
Entertainer
1 DiscoFox
2 DiscoHands
3 AlpBallad
4 ScandSlowRock
5 ScandShuffle
6 70'sFrenchHit
7 SchlagerPop
8 SchlagerBeat
9 SchlagerPolka
10 PolkaPop
11 Tijuana
12 Carnival
13 PubPiano
World
1 IrishDance
2 SpanishPaso
3 FrenchMusette
4 OrientalPop
5 Sirtaki
6 PopFlamenco
7 Reel
8 Jig
9 Tarantella
10 OberPolka
11 OberWaltzer
12 GermanMarch
13 USMarch
14 6-8March
Style No. Style Name
Style List
108 PSR-S500 Owner’s Manual
Music Database List
No. MDB Name
Christmas
1 Manger Away
2 Noel First
3 Rednosed Rudolph
4 Silent Christmas
5 Wonderful Time
Traditional
6 Abide This Hymn
7 Ave Maria NoMore
8 Can Can Orpheus
9 Moulin Heart
10 Texas YellowRose
Showtime
11 Dance Lord
12 For Cabaret!
13 Night Time
14 NoBusiness Like!
15 The Cat's Memory
16 The Great Times
World
17 Beautiful Sun
18 Close Your Face
19 Goodbye Roma
20 I Land In Sun
21 La Cucarumba
22 La Maison Viens
23 Latin Cuccuru
24 Musette De Reine
25 PopulaireChanson
26 Ya Salama
Screen Theme
27 Ark Raider March
28 Be A Muppet!
29 Bills Barnacles
30 Does It Better
31 Escape Great!
32 Fighting Stars
33 Large Country
34 Mind Read?
35 Mi-Re-Do
36 My Favorites!
37 ParadiseConquest
38 SevenMagnificent
39 Some Day Prince
40 Starsky Cops
41 Tie, Hat, Tails
42 Under Sea
Pop Classics
43 24 Hour Tulsa
44 Afternoon Sun
45 All On My Own
46 At Broadway
47 Bend And Shape
48 Boxing Song
49 Broken Heart
50 Can HelpYourself
51 Chance Take
52 Complete Eclipse
53 Day Is Perfect
54 Dont Break Heart
55 Easier To Say It
56 Friends Help
57 Girl Wants Bobby
58 Girl, Brown Eyes
59 Heartache Beat
60 Holiday Summer
61 I'm Your Venus
62 John B's Sloop
63 Lane Of Pennies
64 Lost Religion
65 Love Somebody
66 Loves YouSheDoes
67 Need Somebody
68 Nice Paradise
69 Not Usual
70 Raindrop Walk
71 Ride Ticket
72 Sally Mustang
73 Sky Spirits
74 Spin The Wheel
75 Still Standing
76 Suzie Wake Up
77 Sweet Lord Song
78 Thanks For Music
79 This Is My Party
80 Together n Happy
BigBand
81 Big Band Patrol
82 Bugle Boy Boogie
83 L For Love
84 Savoy Stompin'
85 Tasty Honey
86 Tramp Lady
87 Wail, Jump, Jive
88 What Is Not Old?
89 With Me Fly
Swing
90 Alex's Band
91 Blue Lady Flower
92 Bye Blues, Bye
93 Charles On
94 Coffee Cream
95 Get Out Of Bed
96 Hopes High
97 Just Chickens!
98 My Shadow And Me
99 Not Forgettable
100 Not Misbehaving
101 Out Of Your Kick
102 Ragtime Tiger
103 Safari Swing
104 Smiling Swing
105 Tap Dancing Bo
106 Two Foot Five
107 Whole Thing Off
Jazz
108 Not Decided
109 Wild Cat Dixie
110 Winners Easy
Oldies
111 Baby Be Mine
112 Breathe Air
113 Diana's Twist
114 Doll's Alive!
115 Don't Want Milk
116 Down Town
117 Final Waltz
118 Girl From Uptown
119 Golden Silence
120 Guitar Apache
121 Hard Breakup
122 Have I Got It?
123 He Kiss Crystal
124 Heaven Steps
No. MDB Name
125 I'm A Pola!
126 Land Wonderful!
127 Lips Are Lucky
128 Lonely Night
129 Magic Puff
130 Marina's Song
131 Me Please
132 Mend A Chino
133 Motion Of Poetry
134 No Love Feeling
135 Pete Retite
136 Pillow Tears
137 Saw Her Standing
138 Star Of Movie
139 Teenie Bikini
140 The Ghetto
141 Tomorrow Love Me
142 Tonight, Hey
143 Twisting Again
144 Walk Right To
145 Woman's Pretty!
146 WordsAren't Easy
147 You & You Alone
148 You Sorry Now?
Disco
149 Babylon Rivers
150 Born Alive Disco
151 Brown Girl Ring
152 Celebrate
153 Cool Daddy Disco
154 Day Difference
155 Dee Eye S C Oh!
156 Disco Hustle
157 Fever At Night
158 Fire Relight
159 Good Feel
160 I Love That Boat
161 It's A Tragedy!
162 Keepin' Alive
163 Navy Disco
164 Never Give Up
165 Philadelphia
166 Swedish Queen
167 Theme Of Love
168 Train Of Love
169 Why Am See A?
170 Youre Everything
Party Time
171 Aga Doo
172 Big Samba Bamboo
173 Blankenesenolop
174 Dancing Bird
175 Drink Cider
176 Hands Up Party
177 Kreuzberg
178 Louie My Brother
179 Mexican Trumpet
180 The Bucklehuck
Rock&Roll
181 All Shaken Up
182 Beethoven Rock
183 Blue Shoes
184 Clock Rock
185 Don't Hurry Love
186 Great Fire Balls
187 I'm A Wanderer
188 Let's Sue Peggy
No. MDB Name
189 Music Rock&Roll
190 Rock & Roll Jail
191 Shouting Twist
192 Twist Play
R&B/Gospel
193 Admire
194 Baby Groove
195 Dont Get Excited
196 It's Soul, Man!
197 Man Love Woman
198 Road End
199 See You Again
200 Soul Thought
201 The Rivers Side
Classical
202 Classical Maria
203 Danube Blue
204 Dream Of Love
205 Dreams Forgotten
206 G String Air
207 Gladiators Entry
208 In The Key Of F
209 March Radetzky
210 Skaters Dance
211 Sonata Moonlight
212 Third Etude
Dance Floor
213 Back Singer
214 Catch 22
215 First Sight
216 Ibiza Adagio
217 It's So Horny
218 Janeiro Samba
219 Kids
220 Life Is High
221 London, Ready
222 Move Up
223 Once More
224 Rose Desert
225 She Believes
Country
226 Back On The Road
227 Blue Bonanza
228 Boy Country
229 Country Road
230 Forever On Mind
231 Hi, Mary
232 I'm Lonesome
233 Lucille Left Me
234 Nuts
235 Only Need You
236 Road Of The King
237 Special Orange
238 Waltz Tennessee
Ballroom
239 A Band Ah!
240 All Goes
241 Balls Of Fire
242 Band Strike
243 Besame
244 Bird Is Yellow
245 Brazil
246 Cherry And Apple
247 Cope Cabana
248 Crazy LittleLove
249 Cumban El
250 Cumparsita Tango
No. MDB Name
Music Database List
Music Database List
PSR-S500 Owner’s Manual 109
251 Espana Viva
252 Eyes Of Green
253 Face Dance Music
254 Free Best Things
255 Green Mountain
256 Hear Music
257 Heaven Blue
258 He's Got To Go
259 High Moon
260 Holiday Home
261 I Won't Be Cruel
262 Jealous Tango
263 Jeeps Creepers
264 Knife, Mack
265 Lift Yourself Up
266 Moon Waltz
267 Not On Sunday
268 Nothing But Love
269 Nuts Rhythm
270 Old House
271 Old St. Bernards
272 On Your Street
273 Partner Change
274 Perfidious One
275 Portugal April
276 Quando Samba
277 Sandman
278 Say Magnifique!
279 Spanish Dance
280 Tango Blue
281 Teddy Is A Bear
282 Tied Ribbon
283 Tiny Hotel
284 Walk In Love
285 When Smiling
286 ZingHeart String
Latin
287 A More
288 Bananaboat Comes
289 Corazon un Tengo
290 Don't Worry!
291 Eyes From Spain
292 Flea From Spain
293 Frenetic Beguine
294 GuitarFor Volare
295 Guntanamea
296 Italian Mambo
297 Jamaica Goodbye
298 Luminous
299 Mambo Jamming
300 Mentiroso Es
301 More Than
302 Nada Mas Que
303 Phone Me
304 Samba One Note
305 Start TheBeguine
306 Taxi In Tijuana
Ballad
307 A Hero
308 At Once Ballad
309 Back Forever
310 Ballad For Woman
311 Beneath My Wings
312 Change My Love
313 Eyes Of Blue
314 Fly Away One Day
315 Friends Are For
No. MDB Name
316 Hard To SaySorry
317 Hi, Greetings
318 I T'Aime
319 I'm Saving Love
320 Know Me Now
321 Leave Me Now
322 Live Without You
323 London Streets
324 Love's Glory
325 Make Love To You
326 San Francisco
327 Up We Belong
328 When We Touch
329 Wind On Candle
330 You Inspire
331 You'll Be Here
332 Your True Color
Sing-alongs
333 Brown Knees
334 Danny's Boy
335 Espana Viva
336 Iron Is Old!
337 My Clementine
338 My Dads ADustman
339 My Man Is Old
340 Old Smokey
341 Silver Lining
342 Smile Irish Eyes
343 Song For Susanna
344 Song Sideboard
345 Tipperary Way
Schlager
346 Autobahnpolka
347 Blind Passenger
348 Capri Beat
349 Deep Love
350 Glaube An Wunder
351 Goodbye Amor
352 I Have Sad Love
353 In Ewigkeit
354 Italian Guy
355 Mexican Fiesta
356 Moscow City
357 No Tears
358 Oh Maria
359 Paloma Pop
360 Spanish Island
361 The Little House
362 Where Is Love?
363 Wonderful Blonde
Family
364 Necessary Bear
365 Noisy Old Car?
Easy Listening
366 Balloon Bossa
367 Beyond Ocean
368 Farewell
369 MakeThrough Rain
370 Mother!
371 New World
372 Portugal InApril
373 Raindrop Head
374 Something Silly!
375 The Wind And Me
376 Town Durham
March & Polka
377 Bogey March
No. MDB Name
378 Double Eagle
379 Polka Is Happy!
380 Post Washington
381 Rosa
382 Stripes andStars
383 Teddy Picnic
384 Trombones Parade
385 Vienna Forever
All Time Hits
386 All Of My Loving
387 At Heart Young
388 Away And Up
389 Born Smiling
390 Don't Be Bad
391 Game Makes Tears
392 Guitar Wheels
393 Hard Day AtNight
394 Heaven, Too Much
395 I Hold Your Hand
396 Letters Of Love
397 Lover's A Dream
398 Make Thru Night
399 Mrs. Robin's Son
400 My Shell Swing
401 My Tears Go By
402 Ones Are Young
403 Please Do Love
404 Simple Heart
405 Tender Love
406 Throw Love Away
407 Troubled Water
408 Two Times Yeh!
409 Un-Till
410 Walking Boots
411 Wind Blowing
412 Woods Of Norway
413 Yellow Sub
Rock
414 Alabama's Home
415 Born To Be Mild
416 Dave On The Road
417 Get Satisfied
418 Jumping Rock
419 Keep Thinking
420 Last Countdown
421 Need To Be Free
422 Tiger's Eye
423 Velvet Is Black
424 Whatever YouRock
Waltz
425 Ani Waltz
426 Charmaine Waltz
427 Daisy's Bicycle
428 Dutch Tulip
429 Dutch Windmill
430 FascinationWaltz
431 Fledermaus
432 Is It True Love?
433 Lover Waltz
434 Raggy Three Four
435 Remember?
436 Samson's Girl
437 Snow Waltz
438 Somewhere Love
439 Spring Voices
440 The Little Pub
441 Waltz Cuckoo
No. MDB Name
442 Waltz Emperor
443 Waltz Of Amore
444 Waltz To Skate
445 Whatever Will Be
Instrumentals
446 Birds At Night
447 Black AndWhite
448 Four Plus One
449 Invites
450 Lonely Piper
451 Maple Ragtime
452 Piece Of Funk
453 Round The World
454 String Holiday
455 Yak This Sax
Modern Pop
456 All Change
457 Always Rain OnMe
458 Angle of Charlie
459 Flame Eternal
460 Girl BelongsToMe
461 Go Love Way
462 I'm Torn
463 In The Family
464 It's Only Words
465 Life Groove
466 Life's Walk
467 Light For Love
468 Love Part Time
469 Maroon Love
470 Only Need Love
471 Perhaps Emma
472 Rollercoaster
473 Sorry To Say
474 Sure Of That?
475 Swinging Sultan
476 Tell Her All
477 Thing Called Lve
478 Time Riding
479 Took So Long
480 Why Marry Her?
Latin Pop
481 Dance Morning
Pop Ballads
482 Crazy MissingYou
483 Dont Let The Sun
484 No Matter What
485 One More Year?
486 World Heal
487 World We Are
Worship
488 God Is Mighty
Organist
489 Bamba Party
490 Cat Groove
491 El Ranchero
492 Face Of A Child
493 Guide Me Home
494 Hi Dolly
495 Samba Cavaquinho
496 Side To Side
497 Steam TrainSamba
498 Tico Samba
499 Two Times Yeh!
500 White And Pale
No. MDB Name
110 PSR-S500 Owner’s Manual
Effect Type List
● Harmony Types
● Reverb Types
No. Type Description
01 Duet Harmony types 01–05 are pitch-based and add one-, two- or three-note harmonies to the single-
note melody played in the right hand. These types sound when chords are played in the auto
accompaniment range of the keyboard. These Harmony types will also work when playing songs
that contain chord data.
02 Trio
03 Block
04 Country
05 Octave
06 Tr ill 1/4 note
Types 6–26 are rhythm-based effects and add embellishments or delayed repeats in
time with the auto accompaniment. These types sound whether the auto accompani-
ment is on or not; however, the actual speed of the effect depends on the Tempo setting
(page 64). The individual note values in each type let you synchronize the effect pre-
cisely to the rhythm. Triplet settings are also available: 1/6 = quarter-note triplets, 1/12 =
eighth-note triplets, 1/24 = sixteenth-note triplets.
•The Trill effect Types (06–12) create two-note trills (alternating notes) when two notes
are held.
• The Tremolo effect Types (13–19) repeat all held notes (up to four).
• The Echo effect Types (20–26) create delayed repeats of each note played.
07 Tr ill 1/6 note
08 Tr ill 1/8 note
09 Tr ill 1/12 note
10 Tr ill 1/16 note
11 Tr ill 1/24 note
12 Tr ill 1/32 note
13 Tremolo 1/4 note
14 Tremolo 1/6 note
15 Tremolo 1/8 note
16 Tremolo 1/12 note
17 Tremolo 1/16 note
18 Tremolo 1/24 note
19 Tremolo 1/32 note
20 Echo 1/4 note
21 Echo 1/6 note
22 Echo 1/8 note
23 Echo 1/12 note
24 Echo 1/16 note
25 Echo 1/24 note
26 Echo 1/32 note
No. Type Description MSB LSB
1 HALL1
Reverb simulating the acoustics of a hall.
10
2 HALL2 116
3 HALL3 117
4 HALL4 118
5 HALL5 11
6 HALL M 16
7 HALL L 17
8ROOM1
Reverb simulating the acoustics of a room
216
9ROOM2 217
10 ROOM3 218
11 ROOM4 219
12 ROOM5 20
13 ROOM6 21
14 ROOM7 22
15 ROOM S 25
16 ROOM M 26
17 ROOM L 27
18 STAGE1
Reverb suitable for a solo instrument.
316
19 STAGE2 317
20 STAGE3 30
21 STAGE4 31
22 PLATE1
Reverb simulating a plate reverb unit.
416
23 PLATE2 417
24 PLATE3 40
25 GM PLATE 47
26 NO EFFECT No effect. 00
3
3
3
3
3
3
3
3
3
Effect Type List
Effect Type List
PSR-S500 Owner’s Manual 111
● Chorus Types
● DSP Types
No. Type Description MSB LSB
1 CHORUS1
Conventional chorus program with rich, warm chorusing.
66 17
2 CHORUS2 66 8
3 CHORUS3 66 16
4 CHORUS4 66 1
5 CHORUS5 65 2
6 CHORUS6 65 0
7 CHORUS7 65 1
8 CHORUS8 65 8
9 GM CHORUS1 65 3
10 GM CHORUS2 65 4
11 GM CHORUS3 65 5
12 GM CHORUS4 65 6
13 FB CHORUS 65 7
14 CELESTE1 A 3-phase LFO adds modulation and spaciousness to the sound. 66 0
15 CELESTE2 66 2
16 FLANGER1
Adds a sweeping effect to the sound.
67 8
17 FLANGER2 67 16
18 FLANGER3 67 17
19 FLANGER4 67 1
20 FLANGER5 67 0
21 GM FLANGER 67 7
22 SYMPHONIC1 Adds more stages to the modulation of Celeste. 68 16
23 SYMPHONIC2 68 0
24 PHASER1
Cyclically modulates the phase to add modulation to the sound.
72 0
25 PHASER2 72 8
26 EP PHASER1 72 17
27 EP PHASER2 72 18
28 EP PHASER3 72 16
29 ENS DETUNE Chorus effect without modulation, created by adding a slightly pitch-shifted sound. 87 0
30 ROTARY SP5 Simulates a rotary speaker. 66 18
31 NO EFFECT No effect. 00
No. Type Description MSB LSB
1 HALL1
Reverb simulating the acoustics of a hall.
10
2 HALL2 116
3 HALL3 117
4 HALL4 118
5 HALL5 11
6 HALL M 16
7 HALL L 17
8ROOM1
Reverb simulating the acoustics of a room.
216
9ROOM2 217
10 ROOM3 218
11 ROOM4 219
12 ROOM5 20
13 ROOM6 21
14 ROOM7 22
15 ROOM S 25
16 ROOM M 26
17 ROOM L 27
18 STAGE1
Reverb suitable for a solo instrument.
316
19 STAGE2 317
20 STAGE3 30
21 STAGE4 31
22 PLATE1
Reverb simulating a plate reverb unit.
416
23 PLATE2 417
24 PLATE3 40
25 GM PLATE 47
26 CHORUS1
Conventional chorus program with rich, warm chorusing.
66 17
27 CHORUS2 66 8
28 CHORUS3 66 16
29 CHORUS4 66 1
30 CHORUS5 65 2
31 CHORUS6 65 0
32 CHORUS7 65 1
33 CHORUS8 65 8
34 GM CHORUS1 65 3
35 GM CHORUS2 65 4
36 GM CHORUS3 65 5
37 GM CHORUS4 65 6
38 FB CHORUS 65 7
39 CELESTE1 A 3-phase LFO adds modulation and spaciousness to the sound. 66 0
40 CELESTE2 66 2
Effect Type List
112
PSR-S500 Owner’s Manual
41 SYMPHONIC1 Adds more stages to the modulation of Celeste. 68 16
42 SYMPHONIC2 68 0
43 ENS DETUNE Chorus effect without modulation, created by adding a slightly pitch-shifted sound. 87 0
44 KARAOKE1
Echo for karaoke.
20 0
45 KARAOKE2 20 1
46 KARAOKE3 20 2
47 ER1 This effect isolates only the early reflection components of the reverb. 90
48 ER2 91
49 GATE REVERB Simulation of gated reverb. 10 0
50 REVERS GATE Simulation of gated reverb played back in reverse. 11 0
51 EQ DISCO Equalizer effect that boosts both high and low frequencies, as is typical in most disco
music. 76 16
52 EQ TEL Equalizer effect that cuts both high and low frequencies, to simulate the sound heard
through a telephone receiver. 76 17
53 2BAND EQ Stereo EQ which emphasizes low and high frequencies. 77 0
54 3BAND EQ Mono EQ which emphasizes low and high frequencies, and attenuates mid-range frequen-
cies. 76 0
55 HM ENHANCE1 Adds new harmonics to the input signal to make the sound stand out. 81 16
56 HM ENHANCE2 81 0
57 ST 3BAND EQ Stereo EQ which emphasizes low and high frequencies, and attenuates mid-range fre-
quencies. 76 18
58 FLANGER1
Adds a sweeping effect to the sound.
67 8
59 FLANGER2 67 16
60 FLANGER3 67 17
61 FLANGER4 67 1
62 FLANGER5 67 0
63 GM FLANGER 67 7
64 DYN FLANGER Dynamically controlled flanger. 110 0
65 DELAY LCR1 Produces three delayed sounds: L, R and C (center). 516
66 DELAY LCR2 50
67 DELAY LR Produces two delayed sounds: L and R. Two feedback delays are provided. 6 0
68 ECHO Two delayed sounds (L and R), and independent feedback delays for L and R. 7 0
69 CROSS DELAY The feedback of the two delayed sounds is crossed. 8 0
70 DIST HEAVY Heavy distortion. 73 0
71 ST DIST Stereo distortion. 73 8
72 COMP+DIST1 Since a Compressor is included in the first stage, steady distortion can be produced
regardless of changes in input level.
73 16
73 COMP+DIST2 73 1
74 OVERDRIVE Adds mild distortion to the sound. 74 0
75 OVERDRIVE2 74 9
76 ST OD Stereo Overdrive. 74 8
77 DIST HARD
Hard-edge distortion.
75 16
78 DIST HARD2 75 22
79 DIST HARD3 75 25
80 DIST SOFT
Soft, warm distortion.
75 17
81 DIST SOFT2 75 23
82 DIST SOFT3 75 26
83 ST DIST HARD Hard-edge stereo distortion. 75 18
84 ST DIST SOFT Soft, warm soft distortion. 75 19
85 V_DIST HARD Distortion which simulates vintage tube and fuzz sounds. 98 0
86 V_DIST SOFT 98 2
87 AMP SIM1 A simulation of a guitar amp. 75 0
88 AMP SIM2 75 1
89 ST AMP1
Stereo amp simulator.
75 20
90 ST AMP2 75 21
91 ST AMP3 75 8
92 ST AMP4 75 24
93 ST AMP5 75 27
94 DST+DELAY1 Distortion and Delay are connected in series. 95 16
95 DST+DELAY2 95 0
96 OD+DELAY1 Overdrive and Delay are connected in series. 95 17
97 OD+DELAY2 95 1
98 CMP+DST+DLY1 Compressor, Distortion and Delay are connected in series. 96 16
99 CMP+DST+DLY2 96 0
100 CMP+OD+DLY1 Compressor, Overdrive and Delay are connected in series. 96 17
101 CMP+OD+DLY2 96 1
102 V_DST H+DLY V Distortion and Delay are connected in series. 98 1
103 V_DST S+DLY 98 3
104 MBAND COMP This effect independently compresses the level of certain frequency bands in the sound. 105 0
105 COMPRESSOR Holds down the output level when a specified input level is exceeded. A sense of attack
can also be added to the sound. 83 0
106 NOISE GATE Gates the audio signal when the audio signal falls below a specified level. 84 0
107 VCE CANCEL Attenuates the audio in the center position. 85 0
108 AMBIENCE Blurs the stereo positioning of the sound to add spatial width. 88 0
109 TALKING MOD Adds a vowel sound to the input signal. 93 0
110 LO-FI Degrades the audio quality of the input signal. 94 0
111 DYN FILTER Dynamically controlled filter. 109 0
112 ISOLATOR Attenuates the level of audio signals only at mid-range frequencies. 115 0
No. Type Description MSB LSB
Effect Type List
PSR-S500 Owner’s Manual
113
• Effect types cannot be adjusted, except for the following:
Reverb level, Chorus level, DSP level on page 71
(For example, delay time cannot be changed in DELAY LCR1).
• The actual effect may not be audible depending on the particular Voice.
113 PHASER1
Cyclically modulates the phase to add modulation to the sound.
72 0
114 PHASER2 72 8
115 EP PHASER1 72 17
116 EP PHASER2 72 18
117 EP PHASER3 72 16
118 DYN PHASER 111 0
119 PITCH CHG1
Changes the pitch of the input signal.
80 16
120 PITCH CHG2 80 0
121 PITCH CHG3 80 1
122 ROTARY SP1
Simulates a rotary speaker.
69 16
123 ROTARY SP2 71 17
124 ROTARY SP3 71 18
125 ROTARY SP4 70 17
126 ROTARY SP5 66 18
127 ROTARY SP6 69 0
128 ROTARY SP7 71 22
129 ROTARY SP8 69 17
130 ROTARY SP9 69 18
131 ROTARY SP10 71 23
132 ROTARY SP11 71 24
133 ROTARY SP12 70 20
134 ROTARY SP13 66 19
135 ROTARY SP14 69 19
136 ROTARY SP15 69 20
137 ROTARY SP16 71 25
138 2WAY ROT SP 86 0
139 DST+ROT SP Distortion and rotary speaker connected in series. 69 1
140 DST+2ROT SP Distortion and 2-way rotary speaker connected in series. 86 1
141 OD+ROT SP Overdrive and rotary speaker connected in series. 69 2
142 OD+2ROT SP Overdrive and 2-way rotary speaker connected in series. 86 2
143 AMP+ROT SP Amp simulator and rotary speaker connected in series. 69 3
144 AMP+2ROT SP Amp simulator and 2-way rotary speaker connected in series. 86 3
145 DUAL ROT SP1 Rotary speaker simulation with speed switching. 99 0
146 DUAL ROT SP2 99 1
147 AUTO PAN1
Several panning effects that automatically shift the sound position (left, right, front, back).
71 16
148 AUTO PAN2 71 0
149 EP AUTOPAN 71 21
150 AUTO PAN3 71 1
151 TREMOLO1
Rich Tremolo effect with both volume and pitch modulation.
70 16
152 TREMOLO2 71 19
153 TREMOLO3 70 0
154 EP TREMOLO 70 18
155 GT TREMOLO1 71 20
156 GT TREMOLO2 70 19
157 VIBE VIBRATE Vibraphone effect. 119 0
158 AUTO WAH1 Cyclically modulates the center frequency of a wah filter. 78 16
159 AUTO WAH2 78 0
160 AT WAH+DST1 The output of an Auto Wah can be distorted by Distortion. 78 17
161 AT WAH+DST2 78 1
162 AT WAH+OD1 The output of an Auto Wah can be distorted by Overdrive. 78 18
163 AT WAH+OD2 78 2
164 TOUCH WAH1
Changes the center frequency of a wah filter according to the input level.
82 0
165 TOUCH WAH2 82 8
166 TOUCH WAH3 82 20
167 TC WAH+DST1 The output of an Touch Wah can be distorted by Distortion. 82 16
168 TC WAH+DST2 82 1
169 TC WAH+OD1 The output of an Touch Wah can be distorted by Overdrive. 82 17
170 TC WAH+OD2 82 2
171 CLAVI TC WAH Clavinet Touch Wah. 82 18
172 CLAVI TC WAH2 82 21
173 EP TC WAH EP Touch Wah 82 19
174 EP TC WAH2 82 22
175 WH+DST+DLY1 Wah, Distortion and Delay are connected in series. 97 16
176 WH+DST+DLY2 97 0
177 WH+OD+DLY1 Wah, Overdrive and Delay are connected in series. 97 17
178 WH+OD+DLY2 97 1
179 NO EFFECT No effect. 00
No. Type Description MSB LSB
114 PSR-S500 Owner’s Manual
MIDI Implementation Chart
YAMAHA [ Portable Keyboard ] Date:18-Jul-2006
Model PSR-S500 MIDI Implementation Chart Version:1.0
Transmitted Recognized Remarks
Function...
Basic Default 1 - 16 1 - 16
Channel Changed x x
Default 3 3
Mode Messages x x
Altered ************** x
Note 0 - 127 0 - 127
Number : True voice ************** 0 - 127
Velocity Note ON o 9nH,v=1-127 o 9nH,v=1-127
Note OFF x 9nH,v=0 x
After Key's x x
Touch Ch's x x
Pitch Bend o 0-24 semi o 0-24 semi
0,32 o o Bank Select
1,11,84 x *1 o
6,38 o o Data Entry
7,10 o o
Control 64 o o Sustain
71 x *1 o Harmonic Content
Change 72 o o Release Time
73 x *1 o Attack Time
74 x *1 o Brightness
91,93,94 o o Effect Depth
96-97 x *1 o RPN Inc,Dec
100-101 o o RPN LSB,MSB
MIDI Implementation Chart

MIDI Implementation Chart
PSR-S500 Owner’s Manual 115
Prog o 0 - 127 o 0 - 127
Change : True # **************
System Exclusive o o
: Song Pos. x x
Common : Song Sel. x x
: Tune x x
System : Clock o o
Real Time: Commands o o
Aux :All Sound OFF x o(120,126,127)
:Reset All Cntrls x o(121)
:Local ON/OFF x o(122)
:All Notes OFF x o(123-125)
Mes- :Active Sense o o
sages:Reset x x
*1 Refer to #2 on page 116.
Mode 1 : OMNI ON , POLY Mode 2 : OMNI ON ,MONO o : Yes
Mode 3 : OMNI OFF, POLY Mode 4 : OMNI OFF,MONO x : No

116 PSR-S500 Owner’s Manual
MIDI Data Format
NOTE:
1 By default (factory settings) the instrument ordinarily functions
as a 16-channel multi-timbral tone generator, and incoming
data does not affect the panel voices or panel settings. How-
ever, the MIDI messages listed below do affect the panel
voices, auto accompaniment, and songs.
• MIDI Master Tuning
• System exclusive messages for changing the Reverb Type
and Chorus Type.
2 Messages for these control change numbers cannot be trans-
mitted from the instrument itself. However, they may be trans-
mitted when playing the accompaniment, song or using the
Harmony effect.
3 Exclusive
<GM System ON> F0H, 7EH, 7FH, 09H, 01H, F7H
• This message automatically restores all default settings for
the instrument, with the exception of MIDI Master Tuning.
<MIDI Master Volume> F0H, 7FH, 7FH, 04H, 01H, ll, mm, F7H
• This message allows the volume of all channels to be
changed simultaneously (Universal System Exclusive).
•The values of “mm” is used for MIDI Master Volume. (Values
for “ll” are ignored.)
<MIDI Master Tuning> F0H, 43H, 1nH, 27H, 30H, 00H, 00H,
mm, ll, cc, F7H
• This message simultaneously changes the tuning value of
all channels.
• The values of “mm” and “ll” are used for MIDI Master Tuning.
• The default value of “mm” and “ll” are 08H and 00H, respec-
tively. Any values can be used for “n” and “cc”.
<Reverb Type> F0H, 43H, 1nH, 4CH, 02H, 01H, 00H, mmH,
llH, F7H
• mm : Reverb Type MSB
• ll : Reverb Type LSB
Refer to the Effect Type List (page 110) for details.
<Chorus Type> F0H, 43H, 1nH, 4CH, 02H, 01H, 20H, mmH,
llH, F7H
• mm : Chorus Type MSB
• ll : Chorus Type LSB
Refer to the Effect Type List (page 111) for details.
<DSP Type> F0H, 43H, 1nH, 4CH, 02H, 01H, 40H, mmH, llH,
F7H
• mm : DSP Type MSB
• ll : DSP Type LSB
Refer to the Effect Type List (page 111) for details.
4When the accompaniment is started, an FAH message is trans-
mitted. When accompaniment is stopped, an FCH message is
transmitted. When the clock is set to External, both FAH
(accompaniment start) and FCH (accompaniment stop) are rec-
ognized.
5 Local ON/OFF
<Local ON> Bn, 7A, 7F
<Local OFF> Bn, 7A, 00
Value for “n” is ignored.
MIDI Data Format

PSR-S500 Owner’s Manual 117
Specifications
Keyboards
• 61 Standerd-size keys (C1–C6), with Touch Response.
Display
• 320 x 240 dots LCD display (backlit)
Setup
• STANDBY/ON
• MASTER VOLUME: MIN–MAX
• LCD CONTRAST
Panel Controls
• DEMO, SONG MODE
• SONG-PRESET, SONG-USER, SONG-USB, SONG-SCORE,
SONG-LYRICS, SONG-REC
• STYLE CATEGORY, VOICE CATEGORY
• TRANSPOSE [-] [+], METRONOME, TAP TEMPO, TEMPO [-]
[+]
• OTS LINK, AUTO FILL IN, ACMP, INTRO [1]–[3], MAIN VARI-
ATION [A]–[D], ENDING/rit. [1]–[3] (REW) (FF), A-B REPEAT
(SYNC STOP), PAUSE (SYNC START), START/STOP
•REGIST/TRACK, MEMORY, REGIST BANK [-] [+], REGISTRA-
TION MEMORY [1]–[8], EXIT, CATEGORY [ ] [ ], Dial,
[+/YES] [-/NO]
•FUNCTION, MDB, FILE MENE-MENU, FILE MENE-EXECUTE,
ONE TOUTCH SETTING [1]–[4], LEFT, DUAL, HARMONY,
TOUCH, SUSTAIN, DSP, UPPER OCTAVE [-] [+]
Realtime Control
• Pitch Bend Wheel
Voice
• 283 Panel Voices + 361 XGlite voices + 15 Drum/SFX Kits
• Polyphony: 32
• LEFT
• DUAL
Style
• 150 Preset Styles + 1 User Style File
• Style Control: ACMP ON/OFF, SYNC STOP, SYNC START,
START/STOP, INTRO [1]–[3], MAIN VARIA-
TION [A]–[D], ENDING/rit. [1]–[3], AUTO FILL IN
• Fingering: Multi Finger, Full Keyboard
• Style Volume
Music Database
• 500
Registration Memory
•8 banks x 8 memories
• Regist Clear
Function
• VOLUME: Style Volume, Song Volume
• OVERALL: Tuning, Pitch Bend Range, Split Point, Touch
Sensitivity, Chord Fingering
• MAIN VOICE: Volume, Octave, Pan, Reverb Level,
Chorus Level, DSP Level, Dry Level
• DUAL VOICE: Volume, Octave, Pan, Reverb Level,
Chorus Level, DSP Level, Dry Level
• LEFT VOICE: Volume, Octave, Pan, Reverb Level,
Chorus Level, DSP Level, Dry Level
•EFFECT: Reverb Type, Chorus Type, DSP Type, Master
EQ Type
• HARMONY: Harmony Type, Harmony Volume
• PC: PC Mode
• MIDI: Local On/Off, External Clock, Keyboard Out,
Style Out, Song Out, Initial Setup
• METRONOME: Time Signature Numerator, Time Signature
Denominator, Metronome Volume
• SCORE: Quantize, Right-Part, Left-Part
•UTILITY: Demo Cancel
•LANGUAGE: Language
Effects
• Harmony: 26 types
• Reverb: 25 types
• Chorus: 30 types
• DSP: 178 types
Song
•5 Preset Songs + 5 User Songs + USB Memory
• Song Clear, Track Clear
• Song Volume
• Song Control: A-B REPEAT, PAUSE, REW, FF, START/STOP
Recording
• Song
User Song: 5 Songs
Recording Tracks: 1, 2, 3, 4, 5, 6, 7, 8, STYLE
MIDI
• Local On/Off
• Initial Setup
• External Clock
• Keyboard Out
• Style Out
• Song Out
Auxiliary jacks
• PHONES/OUTPUT, DC IN 16V, USB TO HOST,
USB TO DEVICE, SUSTAIN
Amplifier
• 12W + 12W
Speakers
• 12cm x 2 + 3cm x 2
Power Consumption
• 25W
Power Supply
• Adaptor: Yamaha PA-301 or PA-300 AC power adaptor
Dimensions (W x D x H)
• 946 x 402 x 130 mm (37-1/4" x 15-7/8" x 5-1/8")
Weight
• 7.5kg (16 lbs., 9 oz.)
Supplied Accessories
• Music Rest
• Accessory CD-ROM
• Owner’s Manual
•AC Power adaptor (May not be included depending on your par-
ticular area.)
* Specifications and descriptions in this owner’s manual are for infor-
mation purposes only. Yamaha Corp. reserves the right to change or
modify products or specifications at any time without prior notice.
Since specifications, equipment or options may not be the same in ev-
ery locale, please check with your Yamaha dealer.
f
r
Optional Accessories
• Headphones: HPE-150
• Keyboard Stand: L6
• Footswitch: FC4/FC5
Specifications

118 PSR-S500 Owner’s Manual
+/YES, -/NO button ...................... 15, 41
>/■ button.............................. 14, 28, 41
button ........................................ 14, 28
AB button................................. 14, 65
f button...................................... 14, 28
r button ..................................... 14, 28
A
A-B Repeat.......................................... 65
Accessories............................................ 7
ACMP button ................................ 14, 23
Auto Accompaniment Region............. 23
AUTO FILL IN button........................ 14
Auto Fill-in.......................................... 55
B
Backup................................................. 39
Backup Clear....................................... 39
Backup File (Transfer) ........................ 87
Bank .................................................... 67
Beat ..................................................... 50
C
Category ............................ 17, 22, 27, 40
Category and buttons ........... 15, 41
CD-ROM......................................... 7, 88
Chord................................. 23, 25, 61–62
Chord Fingering ............................ 25, 63
Chorus ................................................. 46
Chorus Type ...................................... 111
Clear (Song Track).............................. 38
Clear (User Song)................................ 37
Computer................................. 81–83, 85
Contrast ............................................... 12
CONTRAST knob......................... 12, 15
D
DC IN 16V jack ............................ 10, 15
Delete (File Menu) .............................. 79
DEMO button................................ 14, 16
Demo Cancel....................................... 72
Demo Song.......................................... 16
Dial................................................ 15, 41
Display ................................................ 42
Drum Kit ............................................. 21
Drum Kit List .................................... 104
DSP ..................................................... 47
DSP button .................................... 15, 47
DSP Type .......................................... 111
DUAL button ................................ 15, 18
Dual Voice .......................................... 18
Dual Voice Chorus level ..................... 71
Dual Voice Dry Level ......................... 71
Dual Voice DSP Level.........................71
Dual Voice Octave...............................71
Dual Voice Pan ....................................71
Dual Voice Reverb Level ....................71
Dual Voice Volume .............................71
E
Effect Type List .................................110
Ending..................................................55
ENDING/rit. I–III buttons .............14, 55
EXECUTE button (File Menu)......15, 75
EXIT button ...................................14, 42
External Clock .....................................83
External Song.......................................29
F
FF.........................................................28
File Control..........................................74
FILE MENU, EXECUTE button...15, 75
FILE MENU, MENU button ...15, 74–75
File Save (File Menu) ..........................76
Flash Clear ...........................................39
Flash Memory......................................29
Footswitch............................................10
Format (File Menu)..............................75
Fullkeyboard ........................................63
FUNCTION button........................15, 70
FUNCTION display.............................42
Function Settings ...........................70–72
H
Harmony ..............................................44
HARMONY button........................15, 44
Harmony Type .............................44, 110
Harmony Volume ................................72
Headphones..........................................10
I
Initial Send...........................................84
Initial Setup..........................................84
Initialization.........................................39
INTRO I–III buttons ......................14, 55
K
Keyboard Out.......................................83
L
Language..............................................12
LEFT button...................................15, 19
Left Part ...............................................87
Left Voice ............................................19
Left Voice Chorus Level......................71
Left Voice Dry Level .......................... 71
Left Voice DSP Level ......................... 71
Left Voice Octave ............................... 71
Left Voice Pan..................................... 71
Left Voice Reverb Level ..................... 71
Left Voice Volume.............................. 71
Load (File Menu)................................. 78
Loaded Song........................................ 29
Local.................................................... 83
Lyrics................................................... 31
LYRICS button.............................. 14, 31
M
Main..................................................... 55
MAIN A–D buttons....................... 14, 55
MAIN Display..................................... 42
MAIN VARIATION (Style) ............... 55
Main Voice.......................................... 17
Main Voice Chorus Level ................... 71
Main Voice Dry Level......................... 71
Main Voice DSP Level........................ 71
Main Voice Octave.............................. 71
Main Voice Pan................................... 71
Main Voice Reverb level..................... 71
Main Voice Volume ............................ 71
Master EQ Type .................................. 52
MASTER VOLUME control .. 11, 14, 40
MDB button................................... 15, 26
Measure ............................................... 36
MEMORY button.......................... 14, 67
MENU button (File Menu)...... 15, 74–75
Message (LCD) ................................... 96
Metronome .......................................... 49
METRONOME button............ 14, 49–50
Metronome Volume ............................ 50
MIDI.................................................... 83
MIDI Data Format............................. 116
MIDI Implementation Chart.............. 114
Multi Recording .................................. 34
Music Database ................................... 26
Music Database List .......................... 108
Music Rest........................................... 13
Mute..................................................... 66
O
Octave.................................................. 54
One Touch Setting (OTS).................... 58
ONE TOUCH SETTING 1–4 buttons
................................................... 15, 58
Options .............................................. 117
OTS LINK button.......................... 14, 58
P
Part Assign .......................................... 35
f
r
Index

Index
PSR-S500 Owner’s Manual 119
PAUSE ................................................ 28
PC........................................................ 84
PHONES/OUTPUT jack............... 10, 15
Pitch Bend ........................................... 48
Pitch Bend Range................................ 71
PITCH BEND wheel..................... 15, 48
Power Adaptor .................................... 10
PRESET button ............................. 14, 27
Preset Song.......................................... 29
Q
Quantize .............................................. 72
Quick Recording ................................. 33
R
REC button.................................... 14, 33
Record ................................................. 32
REGIST BANK +, - buttons ......... 14, 67
REGIST/TRACK button............... 14, 66
Registration Memory .......................... 67
REGISTRATION MEMORY
1–8 buttons ................................ 14, 67
Repeat (A-B Repeat) ........................... 65
Reverb ................................................. 45
Reverb Type ...................................... 110
REW.................................................... 28
Right Part ............................................ 87
S
Score.................................................... 30
SCORE button............................... 14, 30
Section................................................. 55
SMF (Standard MIDI File).................. 77
SMF Save ............................................ 77
SOFTWARE LICENSE AGREEMENT
......................................................... 94
Song............................................... 27–29
SONG category buttons ................ 14, 27
Song Clear........................................... 37
Song Memory................................ 32, 35
SONG MODE button.................... 14, 27
Song Out.............................................. 83
Song Volume....................................... 64
Specifications .................................... 117
Split Point...................................... 19, 59
STANDBY/ON switch.................. 11, 14
START/STOP button .............. 14, 22, 41
Stop Accompaniment .......................... 60
Store (Registration) ............................. 67
Style............................................... 22, 55
STYLE category buttons............... 14, 22
Style File ............................................. 63
Style List ........................................... 107
Style Out.............................................. 83
Style Volume .......................................60
SUSTAIN (Footswitch) .......................10
Sustain (Panel) .....................................47
SUSTAIN button ...........................15, 47
SUSTAIN jack...............................10, 15
SYNC START button..............14, 23, 56
SYNC STOP button.......................14, 57
Synchro Start........................................56
Synchro Stop........................................57
T
Tap Start...............................................51
TAP TEMPO button ......................14, 51
Tempo ..................................................64
TEMPO +, - buttons ................14, 49, 64
Time Signature.....................................50
TOUCH button ..............................15, 51
Touch Sensitivity .................................51
Track ..............................................32, 66
Track Clear ..........................................38
Transfer..........................................85, 87
Transpose.............................................53
TRANSPOSE +, - buttons .............14, 53
Troubleshooting (Installation Guide)...93
Troubleshooting (Instrument)..............95
Tuning..................................................53
U
UPPER OCTAVE +, - buttons ......15, 54
USB......................................................80
USB button ....................................14, 27
USB MIDI Driver ..........................91–92
USB Song ............................................29
USB TO DEVICE terminal .....15, 74, 80
USB TO HOST terminal..........15, 80, 82
USER (Song) button ......................14, 27
USER (Style) button ............................63
User File.........................................76, 78
User Song.......................................29, 32
User Style.............................................63
V
Voice....................................................17
VOICE category buttons................15, 17
Voice List.............................................98
Volume.................................................40
X
XGlite.....................................................6

120 PSR-S500 Owner’s Manual
Limited Warranty
90 DAYS LABOR 1 YEAR PARTS
Yamaha Corporation of America, hereafter referred to as Yamaha, warrants to the original consumer of a product included in the categories listed
below, that the product will be free of defects in materials and/or workmanship for the periods indicated. This warranty is applicable to all models
included in the following series of products:
PSR SERIES OF PORTATONE ELECTRONIC KEYBOARDS
If during the first 90 days that immediately follows the purchase date, your new Yamaha product covered by this warranty is found to have a defect
in material and/or workmanship, Yamaha and/or its authorized representative will repair such defect without charge for parts or labor.
If parts should be required after this 90 day period but within the one year period that immediately follows the purchase date, Yamaha will, subject
to the terms of this warranty, supply these parts without charge. However, charges for labor, and/or any miscellaneous expenses incurred are the
consumers responsibility. Yamaha reserves the right to utilize reconditioned parts in repairing these products and/or to use reconditioned units as
warranty replacements.
THIS WARRANTY IS THE ONLY EXPRESS WARRANTY WHICH YAMAHA MAKES IN CONNECTION WITH THESE PRODUCTS. ANY
IMPLIED WARRANTY APPLICABLE TO THE PRODUCT, INCLUDING THE WARRANTY OF MERCHANT ABILITY IS LIMITED TO
THE DURATION OF THE EXPRESS WARRANTY. YAMAHA EXCLUDES AND SHALL NOT BE LIABLE IN ANY EVENT FOR
INCIDENTAL OR CONSEQUENTIAL DAMAGES.
Some states do not allow limitations that relate to implied warranties and/or the exclusion of incidental or consequential damages. Therefore, these
limitations and exclusions may not apply to you.
This warranty gives you specific legal rights. You may also have other rights which vary from state to state.
CONSUMERS RESPONSIBILITIES
If warranty service should be required, it is necessary that the consumer assume certain responsibilities:
1. Contact the Customer Service Department of the retailer selling the product, or any retail outlet authorized by Yamaha to sell the product for
assistance. You may also contact Yamaha directly at the address provided below.
2. Deliver the unit to be serviced under warranty to: the retailer selling the product, an authorized service center, or to Yamaha with an explanation
of the problem. Please be prepared to provide proof purchase date (sales receipt, credit card copy, etc.) when requesting service and/or parts
under warranty.
3. Shipping and/or insurance costs are the consumers responsibility.* Units shipped for service should be packed securely.
*Repaired units will be returned PREPAID if warranty service is required within the first 90 days.
IMPORTANT: Do NOT ship anything to ANY location without prior authorization. A Return Authorization (RA) will be issued that has
a tracking number assigned that will expedite the servicing of your unit and provide a tracking system if needed.
4. Your owners manual contains important safety and operating instructions. It is your responsibility to be aware of the contents of this manual and
to follow all safety precautions.
EXCLUSIONS
This warranty does not apply to units whose trade name, trademark, and/or ID numbers have been altered, defaced, exchanged removed, or to
failures and/or damages that may occur as a result of:
1. Neglect, abuse, abnormal strain, modification or exposure to extremes in temperature or humidity.
2. Improper repair or maintenance by any person who is not a service representative of a retail outlet authorized by Yamaha to sell the product, an
authorized service center, or an authorized service representative of Yamaha.
3. This warranty is applicable only to units sold by retailers authorized by Yamaha to sell these products in the U.S.A., the District of Columbia,
and Puerto Rico. This warranty is not applicable in other possessions or territories of the U.S.A. or in any other country.
Please record the model and serial number of the product you have purchased in the spaces provided below.
Model___________________________ Serial #________________________________ Sales Slip #________________________________
Purchased from____________________________________________________________ Date______________________________________
(Retailer)
YAMAHA CORPORATION OF AMERICA
Electronic Service Division
6600 Orangethorpe Avenue
Buena Park, CA 90620
KEEP THIS DOCUMENT FOR YOUR RECORDS. DO NOT MAIL!
For details of products, please contact your nearest Yamaha
representative or the authorized distributor listed below.
Pour plus de détails sur les produits, veuillez-vous adresser à Yamaha ou
au distributeur le plus proche de vous figurant dans la liste suivante.
Die Einzelheiten zu Produkten sind bei Ihrer unten aufgeführten
Niederlassung und bei Yamaha Vertragshändlern in den jeweiligen
Bestimmungsländern erhältlich.
Para detalles sobre productos, contacte su tienda Yamaha más cercana
o el distribuidor autorizado que se lista debajo.
CANADA
Yamaha Canada Music Ltd.
135 Milner Avenue, Scarborough, Ontario,
M1S 3R1, Canada
Tel: 416-298-1311
U.S.A.
Yamaha Corporation of America
6600 Orangethorpe Ave., Buena Park, Calif. 90620,
U.S.A.
Tel: 714-522-9011
MEXICO
Yamaha de México S.A. de C.V.
Calz. Javier Rojo Gómez #1149,
Col. Guadalupe del Moral
C.P. 09300, México, D.F., México
Tel: 55-5804-0600
BRAZIL
Yamaha Musical do Brasil Ltda.
Rua Joaquim Floriano, 913 - 4' andar, Itaim Bibi,
CEP 04534-013 Sao Paulo, SP. BRAZIL
Tel: 011-3704-1377
ARGENTINA
Yamaha Music Latin America, S.A.
Sucursal de Argentina
Viamonte 1145 Piso2-B 1053,
Buenos Aires, Argentina
Tel: 1-4371-7021
PANAMA AND OTHER LATIN
AMERICAN COUNTRIES/
CARIBBEAN COUNTRIES
Yamaha Music Latin America, S.A.
Torre Banco General, Piso 7, Urbanización Marbella,
Calle 47 y Aquilino de la Guardia,
Ciudad de Panamá, Panamá
Tel: +507-269-5311
THE UNITED KINGDOM
Yamaha-Kemble Music (U.K.) Ltd.
Sherbourne Drive, Tilbrook, Milton Keynes,
MK7 8BL, England
Tel: 01908-366700
IRELAND
Danfay Ltd.
61D, Sallynoggin Road, Dun Laoghaire, Co. Dublin
Tel: 01-2859177
GERMANY
Yamaha Music Central Europe GmbH
Siemensstraße 22-34, 25462 Rellingen, Germany
Tel: 04101-3030
SWITZERLAND/LIECHTENSTEIN
Yamaha Music Central Europe GmbH,
Branch Switzerland
Seefeldstrasse 94, 8008 Zürich, Switzerland
Tel: 01-383 3990
AUSTRIA
Yamaha Music Central Europe GmbH,
Branch Austria
Schleiergasse 20, A-1100 Wien, Austria
Tel: 01-60203900
CZECH REPUBLIC/SLOVAKIA/
HUNGARY/SLOVENIA
Yamaha Music Central Europe GmbH,
Branch Austria, CEE Department
Schleiergasse 20, A-1100 Wien, Austria
Tel: 01-602039025
POLAND
Yamaha Music Central Europe GmbH
Sp.z. o.o. Oddzial w Polsce
ul. 17 Stycznia 56, PL-02-146 Warszawa, Poland
Tel: 022-868-07-57
THE NETHERLANDS/
BELGIUM/LUXEMBOURG
Yamaha Music Central Europe GmbH,
Branch Benelux
Clarissenhof 5-b, 4133 AB Vianen, The Netherlands
Tel: 0347-358 040
FRANCE
Yamaha Musique France
BP 70-77312 Marne-la-Vallée Cedex 2, France
Tel: 01-64-61-4000
ITALY
Yamaha Musica Italia S.P.A.
Viale Italia 88, 20020 Lainate (Milano), Italy
Tel: 02-935-771
SPAIN/PORTUGAL
Yamaha-Hazen Música, S.A.
Ctra. de la Coruna km. 17, 200, 28230
Las Rozas (Madrid), Spain
Tel: 91-639-8888
GREECE
Philippos Nakas S.A. The Music House
147 Skiathou Street, 112-55 Athens, Greece
Tel: 01-228 2160
SWEDEN
Yamaha Scandinavia AB
J. A. Wettergrens Gata 1
Box 30053
S-400 43 Göteborg, Sweden
Tel: 031 89 34 00
DENMARK
YS Copenhagen Liaison Office
Generatorvej 6A
DK-2730 Herlev, Denmark
Tel: 44 92 49 00
FINLAND
F-Musiikki Oy
Kluuvikatu 6, P.O. Box 260,
SF-00101 Helsinki, Finland
Tel: 09 618511
NORWAY
Norsk filial av Yamaha Scandinavia AB
Grini Næringspark 1
N-1345 Østerås, Norway
Tel: 67 16 77 70
ICELAND
Skifan HF
Skeifan 17 P.O. Box 8120
IS-128 Reykjavik, Iceland
Tel: 525 5000
OTHER EUROPEAN COUNTRIES
Yamaha Music Central Europe GmbH
Siemensstraße 22-34, 25462 Rellingen, Germany
Tel: +49-4101-3030
Yamaha Corporation,
Asia-Pacific Music Marketing Group
Nakazawa-cho 10-1, Hamamatsu, Japan 430-8650
Tel: +81-53-460-2312
TURKEY/CYPRUS
Yamaha Music Central Europe GmbH
Siemensstraße 22-34, 25462 Rellingen, Germany
Tel: 04101-3030
OTHER COUNTRIES
Yamaha Music Gulf FZE
LB21-128 Jebel Ali Freezone
P.O.Box 17328, Dubai, U.A.E.
Tel: +971-4-881-5868
THE PEOPLE’S REPUBLIC OF CHINA
Yamaha Music & Electronics (China) Co.,Ltd.
25/F., United Plaza, 1468 Nanjing Road (West),
Jingan, Shanghai, China
Tel: 021-6247-2211
HONG KONG
Tom Lee Music Co., Ltd.
11/F., Silvercord Tower 1, 30 Canton Road,
Tsimshatsui, Kowloon, Hong Kong
Tel: 2737-7688
INDONESIA
PT. Yamaha Music Indonesia (Distributor)
PT. Nusantik
Gedung Yamaha Music Center, Jalan Jend. Gatot
Subroto Kav. 4, Jakarta 12930, Indonesia
Tel: 21-520-2577
KOREA
Yamaha Music Korea Ltd.
Tong-Yang Securities Bldg. 16F 23-8 Yoido-dong,
Youngdungpo-ku, Seoul, Korea
Tel: 02-3770-0660
MALAYSIA
Yamaha Music Malaysia, Sdn., Bhd.
Lot 8, Jalan Perbandaran, 47301 Kelana Jaya,
Petaling Jaya, Selangor, Malaysia
Tel: 3-78030900
PHILIPPINES
Yupangco Music Corporation
339 Gil J. Puyat Avenue, P.O. Box 885 MCPO,
Makati, Metro Manila, Philippines
Tel: 819-7551
SINGAPORE
Yamaha Music Asia Pte., Ltd.
#03-11 A-Z Building
140 Paya Lebor Road, Singapore 409015
Tel: 747-4374
TAIWAN
Yamaha KHS Music Co., Ltd.
3F, #6, Sec.2, Nan Jing E. Rd. Taipei.
Taiwan 104, R.O.C.
Tel: 02-2511-8688
THAILAND
Siam Music Yamaha Co., Ltd.
891/1 Siam Motors Building, 15-16 floor
Rama 1 road, Wangmai, Pathumwan
Bangkok 10330, Thailand
Tel: 02-215-2626
OTHER ASIAN COUNTRIES
Yamaha Corporation,
Asia-Pacific Music Marketing Group
Nakazawa-cho 10-1, Hamamatsu, Japan 430-8650
Tel: +81-53-460-2317
AUSTRALIA
Yamaha Music Australia Pty. Ltd.
Level 1, 99 Queensbridge Street, Southbank,
Victoria 3006, Australia
Tel: 3-9693-5111
NEW ZEALAND
Music Houses of N.Z. Ltd.
146/148 Captain Springs Road, Te Papapa,
Auckland, New Zealand
Tel: 9-634-0099
COUNTRIES AND TRUST
TERRITORIES IN PACIFIC OCEAN
Yamaha Corporation,
Asia-Pacific Music Marketing Group
Nakazawa-cho 10-1, Hamamatsu, Japan 430-8650
Tel: +81-53-460-2312
NORTH AMERICA
CENTRAL & SOUTH AMERICA
EUROPE
AFRICA
MIDDLE EAST
ASIA
OCEANIA
HEAD OFFICE Yamaha Corporation, Digital Musical Instruments Division
Nakazawa-cho 10-1, Hamamatsu, Japan 430-8650
Tel: +81-53-460-3273
[PK] 37

U.R.G., Digital Musical Instruments Division
© 2006 - 2011 Yamaha Corporation
WH27920 103PO***.*-01A1
Printed in China
Yamaha Global Home
http://www.yamaha.com/
Yamaha Manual Library
http://www.yamaha.co.jp/manual/
