Yamaha Tyros4 Owner’s Manual Owner's En Om B0
User Manual: Yamaha Tyros4 Owner's Manual
Open the PDF directly: View PDF ![]() .
.
Page Count: 126 [warning: Documents this large are best viewed by clicking the View PDF Link!]
- Cover
- PRECAUTIONS
- Included Accessories
- About the Manuals
- Main Features
- Panel Controls and Terminals
- Starting Up
- Basic Operations
- 1 Voices – Playing the Keyboard –
- 2 Styles – Playing Rhythm and Accompaniment –
- Playing a Style with the Auto Accompaniment
- Operating Style Playback
- Calling up the Panel Settings to Match the Style (Repertoire)
- Appropriate Panel Settings for the Selected Style (One Touch Setting)
- Turning Style Parts On/Off and Changing Voices
- Adjusting the Volume Balance Between the Style and Keyboard
- 3 Songs – Recording Your Performances and Creating Songs –
- 4 Multi Pads – Adding Musical Phrases to Your Performance –
- 5 Music Finder – Calling Up Ideal Panel Settings (Voice, Style, etc.) for Each Song –
- 6 Registration Memory – Saving and Recalling Custom Panel Setups –
- 7 Audio Recorder/Player – Recording and Playback Audio Files –
- 8 Vocal Harmony – Adding Harmony Vocals and Synth Vocoder to Your Singing –
- 9 Mixing Console – Editing the Volume and Tonal Balance –
- 10 Internet Direct Connection – Connecting the Instrument Directly to the Internet –
- 11 Connections – Using Tyros4 with Other Devices –
- 12 Utility – Making Global Settings –
- Appendix
- Index

2Tyros4 Owner’s Manual
PRODUCT SAFETY MARKINGS: Yamaha electronic
products may have either labels similar to the graphics
shown below or molded/stamped facsimiles of these graph-
ics on the enclosure. The explanation of these graphics
appears on this page. Please observe all cautions indicated
on this page and those indicated in the safety instruction
section.
The exclamation point within the equilat-
eral triangle is intended to alert the user to
the presence of important operating and
maintenance (servicing) instructions in
the literature accompanying the product.
The lightning flash with arrowhead sym-
bol, within the equilateral triangle, is
intended to alert the user to the presence
of uninsulated “dangerous voltage”
within the product’s enclosure that may
be of sufficient magnitude to constitute a
risk of electrical shock.
IMPORTANT NOTICE: All Yamaha electronic products
are tested and approved by an independent safety testing
laboratory in order that you may be sure that when it is
properly installed and used in its normal and customary
manner, all foreseeable risks have been eliminated. DO
NOT modify this unit or commission others to do so unless
specifically authorized by Yamaha. Product performance
and/or safety standards may be diminished. Claims filed
under the expressed warranty may be denied if the unit is/
has been modified. Implied warranties may also be
affected.
SPECIFICATIONS SUBJECT TO CHANGE: The
information contained in this manual is believed to be cor-
rect at the time of printing. However, Yamaha reserves the
right to change or modify any of the specifications without
notice or obligation to update existing units.
ENVIRONMENTAL ISSUES: Yamaha strives to produce
products that are both user safe and environmentally
friendly. We sincerely believe that our products and the pro-
duction methods used to produce them, meet these goals. In
keeping with both the letter and the spirit of the law, we
want you to be aware of the following:
Battery Notice: This product MAY contain a small non-
rechargeable battery which (if applicable) is soldered in
place. The average life span of this type of battery is
approximately five years. When replacement becomes nec-
essary, contact a qualified service representative to perform
the replacement.
Warning: Do not attempt to recharge, disassemble, or
incinerate this type of battery. Keep all batteries away from
children. Dispose of used batteries promptly and as regu-
lated by applicable laws. Note: In some areas, the servicer
is required by law to return the defective parts. However,
you do have the option of having the servicer dispose of
these parts for you.
Disposal Notice: Should this product become damaged
beyond repair, or for some reason its useful life is consid-
ered to be at an end, please observe all local, state, and fed-
eral regulations that relate to the disposal of products that
contain lead, batteries, plastics, etc.
NOTICE: Service charges incurred due to lack of knowl-
edge relating to how a function or effect works (when the
unit is operating as designed) are not covered by the manu-
facturer’s warranty, and are therefore the owners responsi-
bility. Please study this manual carefully and consult your
dealer before requesting service.
NAME PLATE LOCATION: The graphic below indi-
cates the location of the name plate. The model number,
serial number, power requirements, etc., are located on this
plate. You should record the model number, serial number,
and the date of purchase in the spaces provided below and
retain this manual as a permanent record of your purchase.
Model
Serial No.
Purchase Date
92-469-q (rear)
SPECIAL MESSAGE SECTION
CAUTION
RISK OF ELECTRIC SHOCK
DO NOT OPEN
CAUTION: TO REDUCE THE RISK OF ELECTRIC SHOCK.
DO NOT REMOVE COVER (OR BACK).
NO USER-SERVICEABLE PARTS INSIDE.
REFER SERVICING TO QUALIFIED SERVICE PERSONNEL.
Tyros4 Owner’s Manual 3
1 Read these instructions.
2 Keep these instructions.
3 Heed all warnings.
4 Follow all instructions.
5 Do not use this apparatus near water.
6 Clean only with dry cloth.
7 Do not block any ventilation openings. Install in accor-
dance with the manufacturer’s instructions.
8 Do not install near any heat sources such as radiators,
heat registers, stoves, or other apparatus (including
amplifiers) that produce heat.
9 Do not defeat the safety purpose of the polarized or
grounding-type plug. A polarized plug has two blades
with one wider than the other. A grounding type plug
has two blades and a third grounding prong. The wide
blade or the third prong are provided for your safety. If
the provided plug does not fit into your outlet, consult
an electrician for replacement of the obsolete outlet.
10 Protect the power cord from being walked on or pinched
particularly at plugs, convenience receptacles, and the
point where they exit from the apparatus.
11 Only use attachments/accessories specified by the
manufacturer.
12 Use only with the cart, stand, tri-
pod, bracket, or table specified by
the manufacturer, or sold with the
apparatus. When a cart is used,
use caution when moving the
cart/apparatus combination to
avoid injury from tip-over.
13 Unplug this apparatus during
lightning storms or when unused for long periods of
time.
14 Refer all servicing to qualified service personnel. Ser-
vicing is required when the apparatus has been dam-
aged in any way, such as power-supply cord or plug is
damaged, liquid has been spilled or objects have fallen
into the apparatus, the apparatus has been exposed to
rain or moisture, does not operate normally, or has been
dropped.
(UL60065_03)
IMPORTANT SAFETY INSTRUCTIONS
WARNING
TO REDUCE THE RISK OF FIRE OR ELECTRIC SHOCK, DO NOT EXPOSE THIS APPARATUS TO RAIN OR MOISTURE.
4Tyros4 Owner’s Manual
PRECAUTIONS
PLEASE READ CAREFULLY BEFORE PROCEEDING
* Please keep this manual in a safe place for future reference.
WARNING
Always follow the basic precautions listed below to avoid the possibility of serious injury or even death from electrical
shock, short-circuiting, damages, fire or other hazards. These precautions include, but are not limited to, the following:
• Do not place the power cord near heat sources such as heaters or
radiators, and do not excessively bend or otherwise damage the
cord, place heavy objects on it, or place it in a position where
anyone could walk on, trip over, or roll anything over it.
• Only use the voltage specified as correct for the instrument. The
required voltage is printed on the name plate of the instrument.
• Use only the supplied power cord/plug.
• Check the electric plug periodically and remove any dirt or dust
which may have accumulated on it.
• Be sure to connect to an appropriate outlet with a protective
grounding connection. Improper grounding can result in electrical
shock.
• This instrument contains no user-serviceable parts. Do not attempt
to disassemble or modify the internal components in any way. If it
should appear to be malfunctioning, discontinue use immediately
and have it inspected by qualified Yamaha service personnel.
• Do not expose the instrument to rain, use it near water or in damp or
wet conditions, or place containers on it containing liquids which
might spill into any openings. If any liquid such as water seeps into
the instrument, turn off the power immediately and unplug the
power cord from the AC outlet. Then have the instrument inspected
by qualified Yamaha service personnel.
• Never insert or remove an electric plug with wet hands.
• Do not put burning items, such as candles, on the unit.
A burning item may fall over and cause a fire.
• When one of the following problems occur, immediately turn off the
power switch and disconnect the electric plug from the outlet. Then
have the device inspected by Yamaha service personnel.
• The power cord or plug becomes frayed or damaged.
• It emits unusual smells or smoke.
• Some object has been dropped into the instrument.
• There is a sudden loss of sound during use of the instrument.
CAUTION
Always follow the basic precautions listed below to avoid the possibility of physical injury to you or others, or damage
to the instrument or other property. These precautions include, but are not limited to, the following:
• Do not connect the instrument to an electrical outlet using a
multiple-connector. Doing so can result in lower sound quality, or
possibly cause overheating in the outlet.
• Always connect the three-pin attachment plug to a properly
grounded power source. (For more information about the main
power supply, see page 16.)
• When removing the electric plug from the instrument or an outlet,
always hold the plug itself and not the cord. Pulling by the cord can
damage it.
• Remove the electric plug from the outlet when the instrument is not
to be used for extended periods of time, or during electrical storms.
• Do not place the instrument in an unstable position where it might
accidentally fall over.
• Before moving the instrument, remove all connected cables.
• When setting up the product, make sure that the AC outlet you are
using is easily accessible. If some trouble or malfunction occurs,
immediately turn off the power switch and disconnect the plug from
the outlet. Even when the power switch is turned off, electricity is
still flowing to the product at the minimum level. When you are not
using the product for a long time, make sure to unplug the power
cord from the wall AC outlet.
• Use only the stand specified for the instrument. When attaching the
stand, use the provided screws only. Failure to do so could cause
damage to the internal components or result in the instrument
falling over.
Power supply/Power cord
Do not open
Water warning
Fire warning
If you notice any abnormality
Power supply/Power cord
Location
(7)-1 1/2

Tyros4 Owner’s Manual 5
• Before connecting the instrument to other electronic components,
turn off the power for all components. Before turning the power on
or off for all components, set all volume levels to minimum.
• Be sure to set the volumes of all components at their minimum
levels and gradually raise the volume controls while playing the
instrument to set the desired listening level.
• Do not insert a finger or hand in any gaps on the instrument.
• Never insert or drop paper, metallic, or other objects into the gaps
on the panel or keyboard.
• Do not rest your weight on, or place heavy objects on the
instrument, and do not use excessive force on the buttons, switches
or connectors.
• Do not use the instrument/device or headphones for a long period of
time at a high or uncomfortable volume level, since this can cause
permanent hearing loss. If you experience any hearing loss or
ringing in the ears, consult a physician.
Always turn the power off when the instrument is not in use.
NOTICE
To avoid the possibility of damage to the product, data or other property, follow the notices below.
Handling and Maintenance
• Do not use the instrument in the vicinity of a TV, radio, stereo equipment, mobile phone, or other electric devices. Otherwise, the instrument, TV,
or radio may generate noise.
• Do not expose the instrument to excessive dust or vibrations, or extreme cold or heat (such as in direct sunlight, near a heater, or in a car during
the day) to prevent the possibility of panel disfiguration or damage to the internal components.
• Do not place vinyl, plastic or rubber objects on the instrument, since this might discolor the panel or keyboard.
• When cleaning the instrument, use a soft cloth. Do not use paint thinners, solvents, cleaning fluids, or chemical-impregnated wiping cloths.
Saving data
Saving and backing up your data
• The data of the types listed below are lost when you turn off the power to the instrument. Save the data to the User drive or appropriate external
media (page 57).
• Created/Edited Voices (page 45)
• Created/Edited Styles (page 54)
• Memorized One Touch Settings (page 54)
• Recorded/Edited Songs (page 63)
• Created Multi Pads (page 65)
• Edited MIDI Settings (page 104)
Data in the User drive (page 25) may be lost due to malfunction or incorrect operation. Save important data to an external media.
Data in the internal hard disk drive may be lost due to malfunction or incorrect operation. We recommend that you backup any necessary data to
computer by using the USB Storage Mode (page 103).
Backing up the USB storage device/external media
• To protect against data loss through media damage, we recommend that you save your important data onto two USB storage devices/external
media.
Connections
Handling caution
Yamaha cannot be held responsible for damage caused by improper use or modifications to the instrument, or data that is lost or destroyed.
When you change settings in a display page and then exit from that page, System Setup data (listed in the Parameter Chart of the Data List
downloadable from the web) is automatically stored. However, this edited data is lost if you turn off the power without properly exiting from the
relevant display. Refer to page 8 how to obtain the Data List.
(7)-1 2/2
6Tyros4 Owner’s Manual
Information
About copyrights
• Copying of the commercially available musical data including but not limited to MIDI data and/or audio data is strictly prohibited except for your personal
use.
• This product incorporates and bundles computer programs and contents in which Yamaha owns copyrights or with respect to which it has license to use
others’ copyrights. Such copyrighted materials include, without limitation, all computer software, style files, MIDI files, WAVE data, musical scores and
sound recordings. Any unauthorized use of such programs and contents outside of personal use is not permitted under relevant laws. Any violation of copy-
right has legal consequences. DON’T MAKE, DISTRIBUTE OR USE ILLEGAL COPIES.
About functions/data bundled with the instrument
• Some of the preset songs have been edited for length or arrangement, and may not be exactly the same as the original.
• This device is capable of using various types/formats of music data by optimizing them to the proper format music data for use with the device in advance.
As a result, this device may not play them back precisely as their producers or composers originally intended.
• The photos of the harpsichord, bandneon, hackbrett, music box, dulcimer and cimbalom, shown in the displays of the Tyros4, are courtesy of the Gakki
Shiryokan (Collection for organolgy), Kunitachi College of Music.
• The following instruments, shown in the displays of the Tyros4, are on display at the Hamamatsu Museum of Musical Instruments:
balafon, gender, kalimba, kanoon, santur, gamelan gong, harp, hand bell, bagpipe, banjo, carillon, mandolin, oud, pan flute, pungi, rabab, shanai, sitar,
steel drum, tambra.
• The bitmap fonts used in this instrument have been provided by and are the property of Ricoh Co., Ltd.
• This product utilizes NF, an embedded Internet browser from ACCESS Co., Ltd. NF is used with the patented LZW, licensed from Uni-
sys Co., Ltd. NF may not be separated from this product, nor may it be sold, lent or transferred in any way. Also, NF may not be
reverse-engineered, reverse-compiled, reverse-assembled or copied.
This software includes a module developed by the Independent JPEG Group.
• This product can be used to import/record analog audio signals through the MIC, and can also record your keyboard performance and playback of MIDI
song data into digital audio signals of WAV format. If you use any copyrighted material in your recording, even if you add your own performance, the copying
or public playback of that material, other than for your own personal use, is strictly prohibited.
• MPEG Layer-3 audio coding technology licensed from Fraunhofer IIS and Thomson.
About this manual
• The illustrations and LCD screens as shown in this manual are for instructional purposes only, and may appear somewhat different from those on your
instrument.
• Windows is a registered trademark of Microsoft® Corporation in the United States and other countries.
• Apple, Mac and Macintosh are trademarks of Apple Inc., registered in the U.S. and other countries.
• The company names and product names in this manual are the trademarks or registered trademarks of their respective companies.
Copyright Notice
The following is the title, credits, and copyright notices for the song pre-installed in this instrument.
Achy Breaky Heart (Don’t Tell My Heart)
Words and Music by Don Von Tress
Copyright © 1991 UNIVERSAL - MILLHOUSE MUSIC
All Rights Reserved Used by Permission
Beauty And The Beast
from Walt Disney’s BEAUTY AND THE BEAST
Lyrics by Howard Ashman
Music by Alan Menken
© 1991 Walt Disney Music Company and Wonderland Music Company, Inc.
All Rights Reserved Used by Permission
The serial number of this product may be found on the bottom of the
unit. You should note this serial number in the space provided below
and retain this manual as a permanent record of your purchase to aid
identification in the event of theft.
Model No.
Serial No.
(bottom)

Tyros4 Owner’s Manual 7
Congratulations!
You are the proud owner of an extraordinary electronic keyboard.
The Yamaha Tyros4 combines the most advanced tone generation technology with
state-of-the-art digital electronics and features to give you stunning sound quality
with maximum musical versatility.
In order to make the most of your Tyros4’s features and vast performance
potential, we urge you to read the manual thoroughly while trying out the various
features described. Keep the manual in a safe place for later reference.
Included Accessories
•AC power cord
• Music rest and brackets
•CD-ROM
• Owner’s Manual
• Installation Guide
• My Yamaha Product User Registration
* The PRODUCT ID on the sheet will be needed when you fill out the User Registration form.
-About the included CD-ROM
The accompanying CD-ROM features special software for use with the instrument. The contents of the CD-ROM are:
• USB-MIDI Driver
Enables MIDI communication and control between the instrument and the computer.
• Voice Editor
Enables you to edit the Tyros4 Voices on your computer and create your original Voices.
For details, see the separate Installation Guide or the online manual included with the software.
Never attempt to play back the CD-ROM on an audio CD player. Doing so may result in damage to your
hearing as well as to your CD player/audio speaker.
CAUTION
Included Accessories
8Tyros4 Owner’s Manual
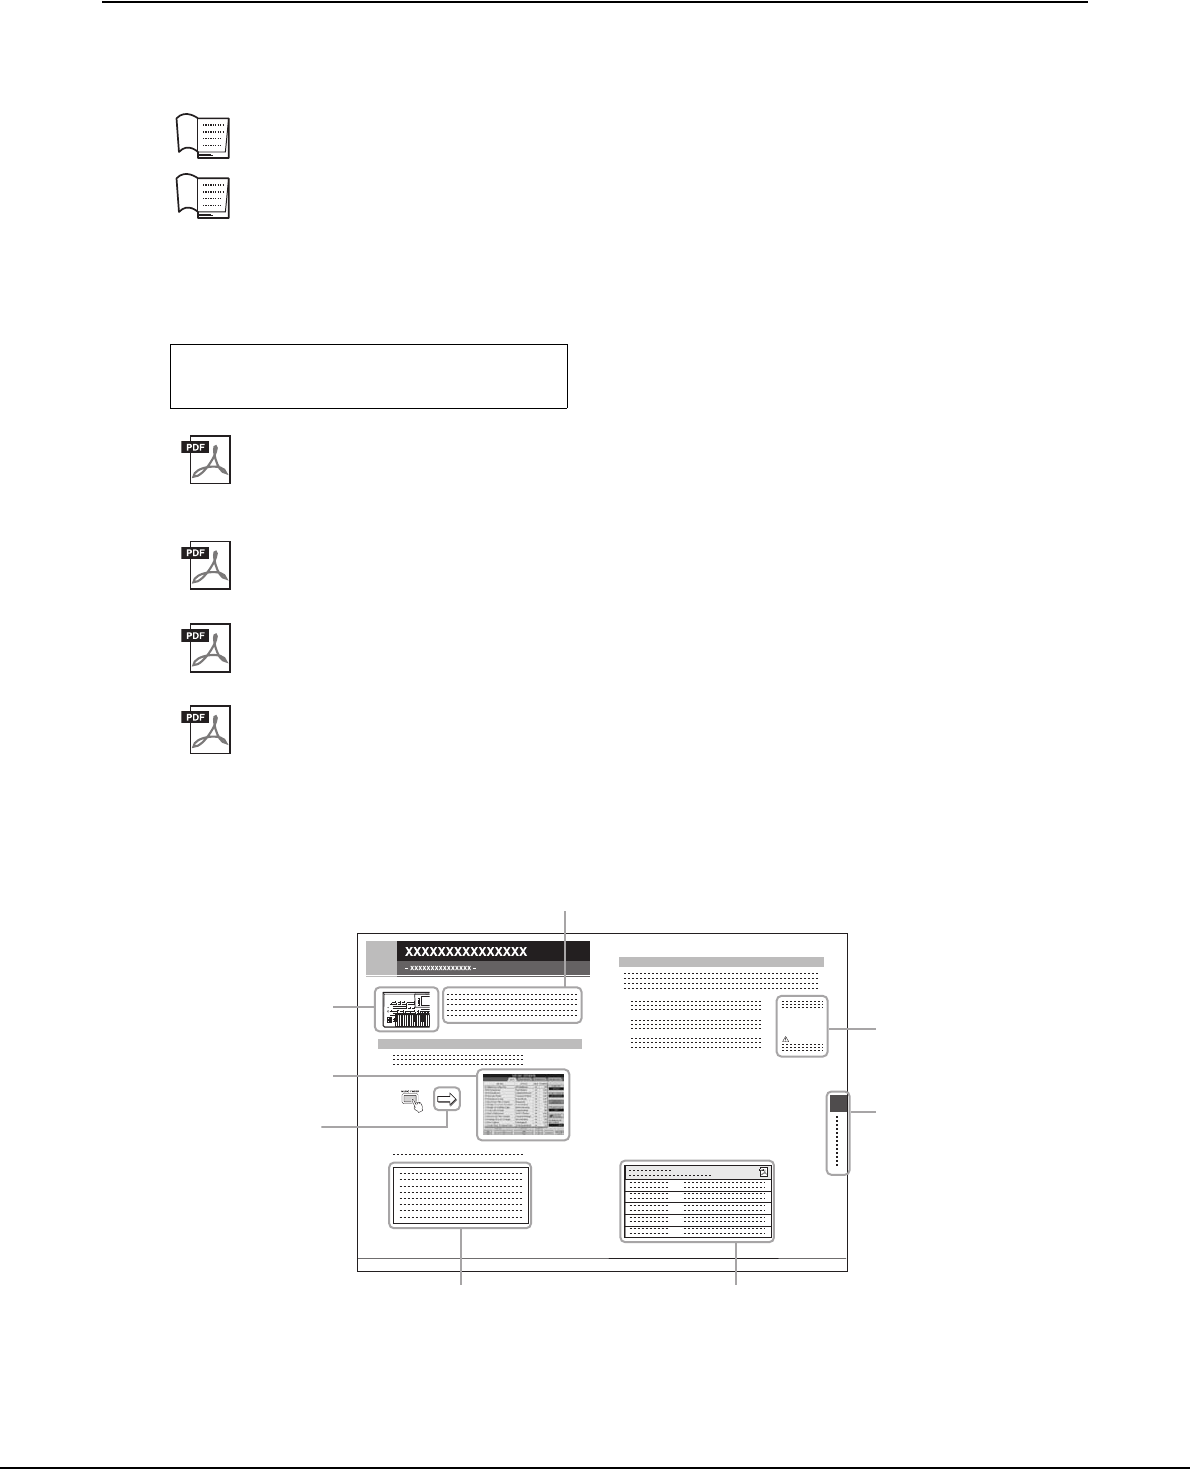
About the Manuals
This instrument has the following documents and instructional materials.
Included Documents
Owner’s Manual (this book)
Provides overall explanations of the Tyros4 basic functions. See “How to use this Owner’s Manual” below.
Installation Guide
Explains how to install the USB-MIDI Driver and the Voice Editor software included in the CD-ROM.
Online Materials (Downloadable from the web)
The following instructional materials are available for downloading from the Yamaha Manual Library. Access the
Yamaha Manual Library, then enter your model name, Tyros4 in the Model Name area to search the manuals.
Reference Manual (only in English, French and German)
Explains advanced features of the Tyros4, not explained in the Owner’s Manual. For example, you can learn
how to create original Voices, Styles, Songs or Multi Pads, or find detailed explanations of specific parame-
ters.
Data List
Contains various important preset content lists such as Voices, Styles, Effects, as well as MIDI-related infor-
mation.
Internet Connection Guide (only in English, French, German and Spanish)
Explains how to connect the instrument to the Internet in detail, in order to use the Internet Direct Connec-
tion function.
MIDI Basics (only in English, French, German and Spanish)
If you want to know more about MIDI and how to use it, refer to this introductory book.
How to use this Owner’s Manual
Yamaha Manual Library
http://www.yamaha.co.jp/manual/
1
1
2
3
2
Shows the location of but-
tons which are explained in
the chapter.
Display examples are shown
in English.
Provides additional helpful
information in the frame.
Provides an overview of
the chapter contents.
Provides supplemen-
tary notes and detailed
information.
Introduces advanced features related
to the chapter contents.
Detailed explanations are provided in
the Reference Manual.
Chapter title for navigating
through the manual.
Throughout this manual,
arrows are used in the
instructions, indicating in
shorthand the process of
calling up certain displays
and functions.
Tyros4 Owner’s Manual 9
Main Features
-Extraordinarily expressive and realistic Voices
The Tyros4 has an expanded and enhanced set of exceptionally authentic Voices, and gives you the means to play these Voices
more naturally and with greater expressiveness. In particular, the instrument has many new Super Articulation Choir Voices,
with amazingly realistic and natural human voice sounds—giving you even more expressive capability.
-Powerful, professional Auto Accompaniment Styles
The Styles of the Tyros4 have been vastly enhanced with the expert use of new Super Articulation and Super Articulation 2
Voices. Greater and more expressive variations in the MegaVoices have been employed as well, particularly in the Scat and
Gospel Voices.
-Dynamic and Versatile Vocal Harmony feature—with Synth Vocoder
The newly enhanced Vocal Harmony 2 (VH2) (page 82) processing engine delivers superior sound, lightning-fast processing,
and comprehensive, flexible control of the harmonies applied to your singing voice. It also has a Synth Vocoder feature, provid-
ing the dynamic, popular vocoder effect for a variety of luscious and even other-worldly sounds. Moreover, the rear-panel
combo jack lets you easily connect either XLR mic cables or 1/4" phone plug.
-Voice expandability
Tyros4 is an open-ended instrument that lets you continually expand the available content for your creative explorations.
Yamaha has a special website (http://music-tyros.com/) featuring Premium Voices, Waves, Songs and Styles, etc. (called Pre-
mium Pack data) that can be purchased and loaded to the Tyros4. (In order to use the additional Waves and Voices you pur-
chased, you’ll need to install the optional Flash Memory Expansion Module.)
-Audio recording and playback
Tyros4 lets you record your performances as audio data (page 75), with two different methods, Simple (quick and easy record-
ing to a single audio track) and Multi Track (overdub recording for complex songs). Since the created audio data is saved in
WAV file format, you can edit your recordings on computer and share it over the Internet or burn your own original CD. The
instrument also allows you to play back MP3 data.
-Convenient, easy-to-use Music Finder function
With the enormous wealth of data available on the instrument (including your own Song and Audio data), the Music Finder
function (page 66) lets you instantly find and call up what you need. Not only can you get ideal setups (Voice, Style, etc.) for
each song—searching by song title/genre—you can also easily retrieve your original Song and Audio data (registered before-
hand). Additional new panel settings for the Tyros4 can be directly downloaded from the Internet.
-Enhanced features for directly connecting to the Internet
The Tyros4 can also be directly connected to the Internet with the Internet Direct Connection function (page 90), allowing you
to download special content without the need for a computer. Enhancements include a convenient, easy-to-use IDC Setup Wiz-
ard, as well as new security options, with WPA2 and WPA.
The Tyros4 is compatible with the following formats.
“GM (General MIDI)” is one of the most common Voice allocation formats. “GM System Level 2” is a standard spec-
ification that enhances the original “GM” and improves Song data compatibility. It provides for increased polyphony,
greater Voice selection, expanded Voice parameters, and integrated effect processing.
XG is a major enhancement of the GM System Level 1 format, and was developed by Yamaha specifically to provide
more Voices and variations, as well as greater expressive control over Voices and effects, and to ensure compatibility
of data well into the future.
GS was developed by the Roland Corporation. In the same way as Yamaha XG, GS is a major enhancement of the
GM specifically to provide more Voices and Drum kits and their variations, as well as greater expressive control over
Voices and effects.
The Yamaha XF format enhances the SMF (Standard MIDI File) standard with greater functionality and open-ended
expandability for the future. The Tyros4 is capable of displaying lyrics when an XF file containing lyric data is
played.
“SFF (Style File Format)” is an original Style file format by Yamaha which uses a unique conversion system to pro-
vide high-quality automatic accompaniment based on a wide range of chord types. “SFF GE (Guitar Edition)” is an
enhanced format of SFF, which features improved note transposition for guitar tracks.
“AEM” is the trademark of Yamaha’s leading-edge tone generation technology. For information on AEM, refer to
page 37.
About the Manuals • Main Features

10 Tyros4 Owner’s Manual
Contents
Included Accessories ............................................................................................................................... 7
About the Manuals ................................................................................................................................... 8
Main Features .......................................................................................................................................... 9
Panel Controls and Terminals 12
Starting Up 16
Power Supply......................................................................................................................................... 16
Turning the Power On............................................................................................................................ 16
Raising the Display Panel ...................................................................................................................... 17
Changing the Display Language............................................................................................................ 17
Playing the Demo................................................................................................................................... 18
Basic Operations 19
Display-based Controls.......................................................................................................................... 19
The Messages Shown in the Display..................................................................................................... 22
Instant Selection of the Displays—Direct Access .................................................................................. 22
Main Display Configuration .................................................................................................................... 23
File Selection Display Configuration ...................................................................................................... 24
File Management ................................................................................................................................... 28
Entering Characters ............................................................................................................................... 31
Restoring the Factory-programmed Settings ......................................................................................... 32
Data Backup .......................................................................................................................................... 32
1Voices – Playing the Keyboard –33
Playing Preset Voices ............................................................................................................................ 33
Purchasing and Installing Premium Pack Data...................................................................................... 38
Transposing the Pitch of the Keyboard.................................................................................................. 39
Using the Wheels................................................................................................................................... 39
Adding Articulation Effects to Super Articulation Voices........................................................................40
Applying Voice Effects ........................................................................................................................... 42
Creating Your Original Organ Flutes Voices.......................................................................................... 44
2Styles – Playing Rhythm and Accompaniment –46
Playing a Style with the Auto Accompaniment....................................................................................... 46
Operating Style Playback....................................................................................................................... 48
Calling up the Panel Settings to Match the Style (Repertoire)............................................................... 50
Appropriate Panel Settings for the Selected Style (One Touch Setting)................................................ 51
Turning Style Parts On/Off and Changing Voices..................................................................................52
Adjusting the Volume Balance Between the Style and Keyboard.......................................................... 53
3Songs – Recording Your Performances and Creating Songs –55
Creating a Song (Quick Recording) ....................................................................................................... 55
Saving Files ........................................................................................................................................... 57
Playback of Songs ................................................................................................................................. 58
Displaying Music Notation (Score)......................................................................................................... 60
Displaying Lyrics (Text).......................................................................................................................... 60
Using Song Position Markers................................................................................................................. 61
Turning Song Channels On/Off.............................................................................................................. 62
4Multi Pads – Adding Musical Phrases to Your Performance –64
Playing the Multi Pads ........................................................................................................................... 64
Using the Multi Pad Synchro Start Function .......................................................................................... 65
Using Chord Match ................................................................................................................................ 65
Tyros4 Owner’s Manual 11
Contents
5Music Finder – Calling Up Ideal Panel Settings (Voice, Style, etc.) for Each Song –66
Selecting the Desired Song from among the Panel Settings ................................................................. 68
Searching the Panel Settings................................................................................................................. 69
Registering the Song/Audio data (SONG/AUDIO)................................................................................. 70
6Registration Memory – Saving and Recalling Custom Panel Setups –72
Registering Your Panel Setups.............................................................................................................. 72
Saving the Registration Memory as a Bank file ..................................................................................... 73
7Audio Recorder/Player – Recording and Playback Audio Files –75
Recording Your Performance ................................................................................................................ 76
Audio Data Playback.............................................................................................................................. 80
Additional Multi Track options — Converting an Audio File (.wav/.mp3) to a Multi Track recording
file (.aud) ................................................................................................................................................ 81
8Vocal Harmony – Adding Harmony Vocals and Synth Vocoder to Your Singing –82
Using Vocal Harmony ............................................................................................................................ 83
Using Synth Vocoder ............................................................................................................................. 85
9Mixing Console – Editing the Volume and Tonal Balance –86
Basic Procedure..................................................................................................................................... 86
Master Compressor ............................................................................................................................... 88
10 Internet Direct Connection – Connecting the Instrument Directly to the Internet –90
Entering the Internet Direct Connection Function .................................................................................. 90
Connecting the Instrument to the Internet.............................................................................................. 90
Operations in the Special Website......................................................................................................... 92
11 Connections – Using Tyros4 with Other Devices –94
Connecting a Microphone ...................................................................................................................... 94
Connecting Audio Devices..................................................................................................................... 96
Connecting a Separate TV Monitor/Computer Monitor.......................................................................... 98
Connecting Footswitches/Foot Controllers ............................................................................................ 99
Connecting a USB Storage Device...................................................................................................... 100
Connecting to the Internet.................................................................................................................... 101
Connecting to a Computer................................................................................................................... 102
Connecting External MIDI Devices ...................................................................................................... 104
12 Utility – Making Global Settings –105
Basic Procedure................................................................................................................................... 105
Appendix 106
Installing the Optional Speakers .......................................................................................................... 106
Installing the Optional Flash Memory Expansion Module .................................................................... 108
Troubleshooting ................................................................................................................................... 110
Panel Button Chart............................................................................................................................... 113
Specifications....................................................................................................................................... 116
Index .................................................................................................................................................... 118
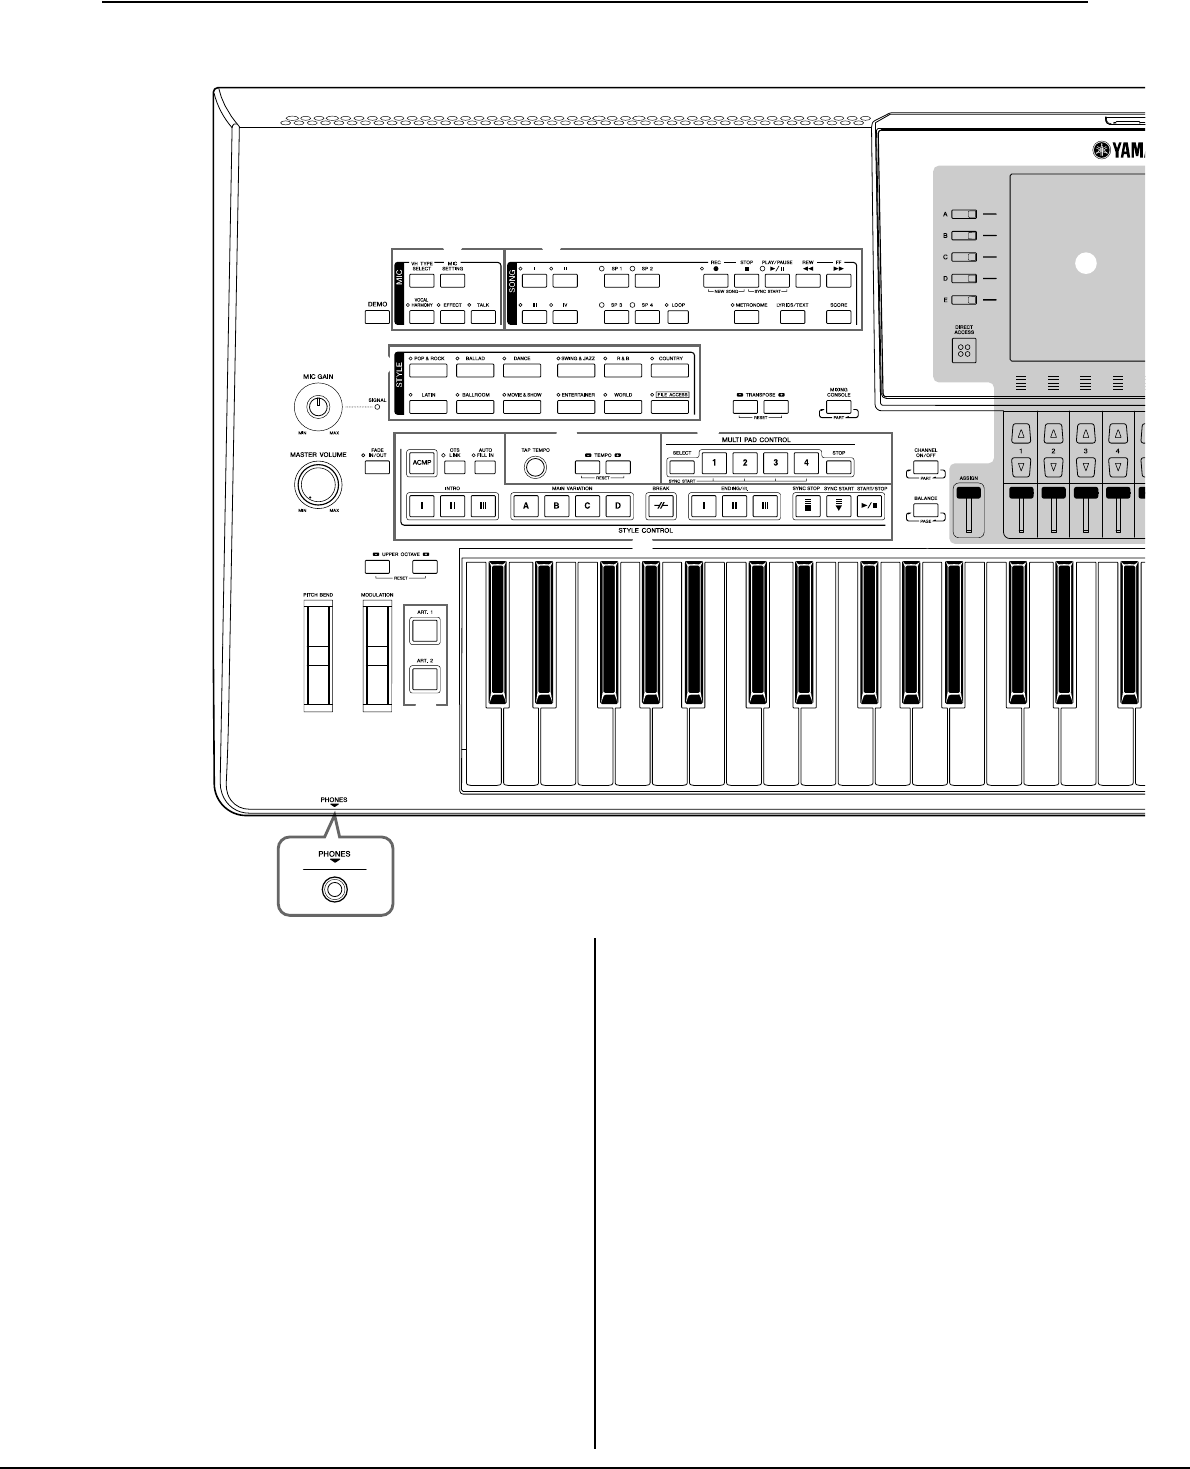
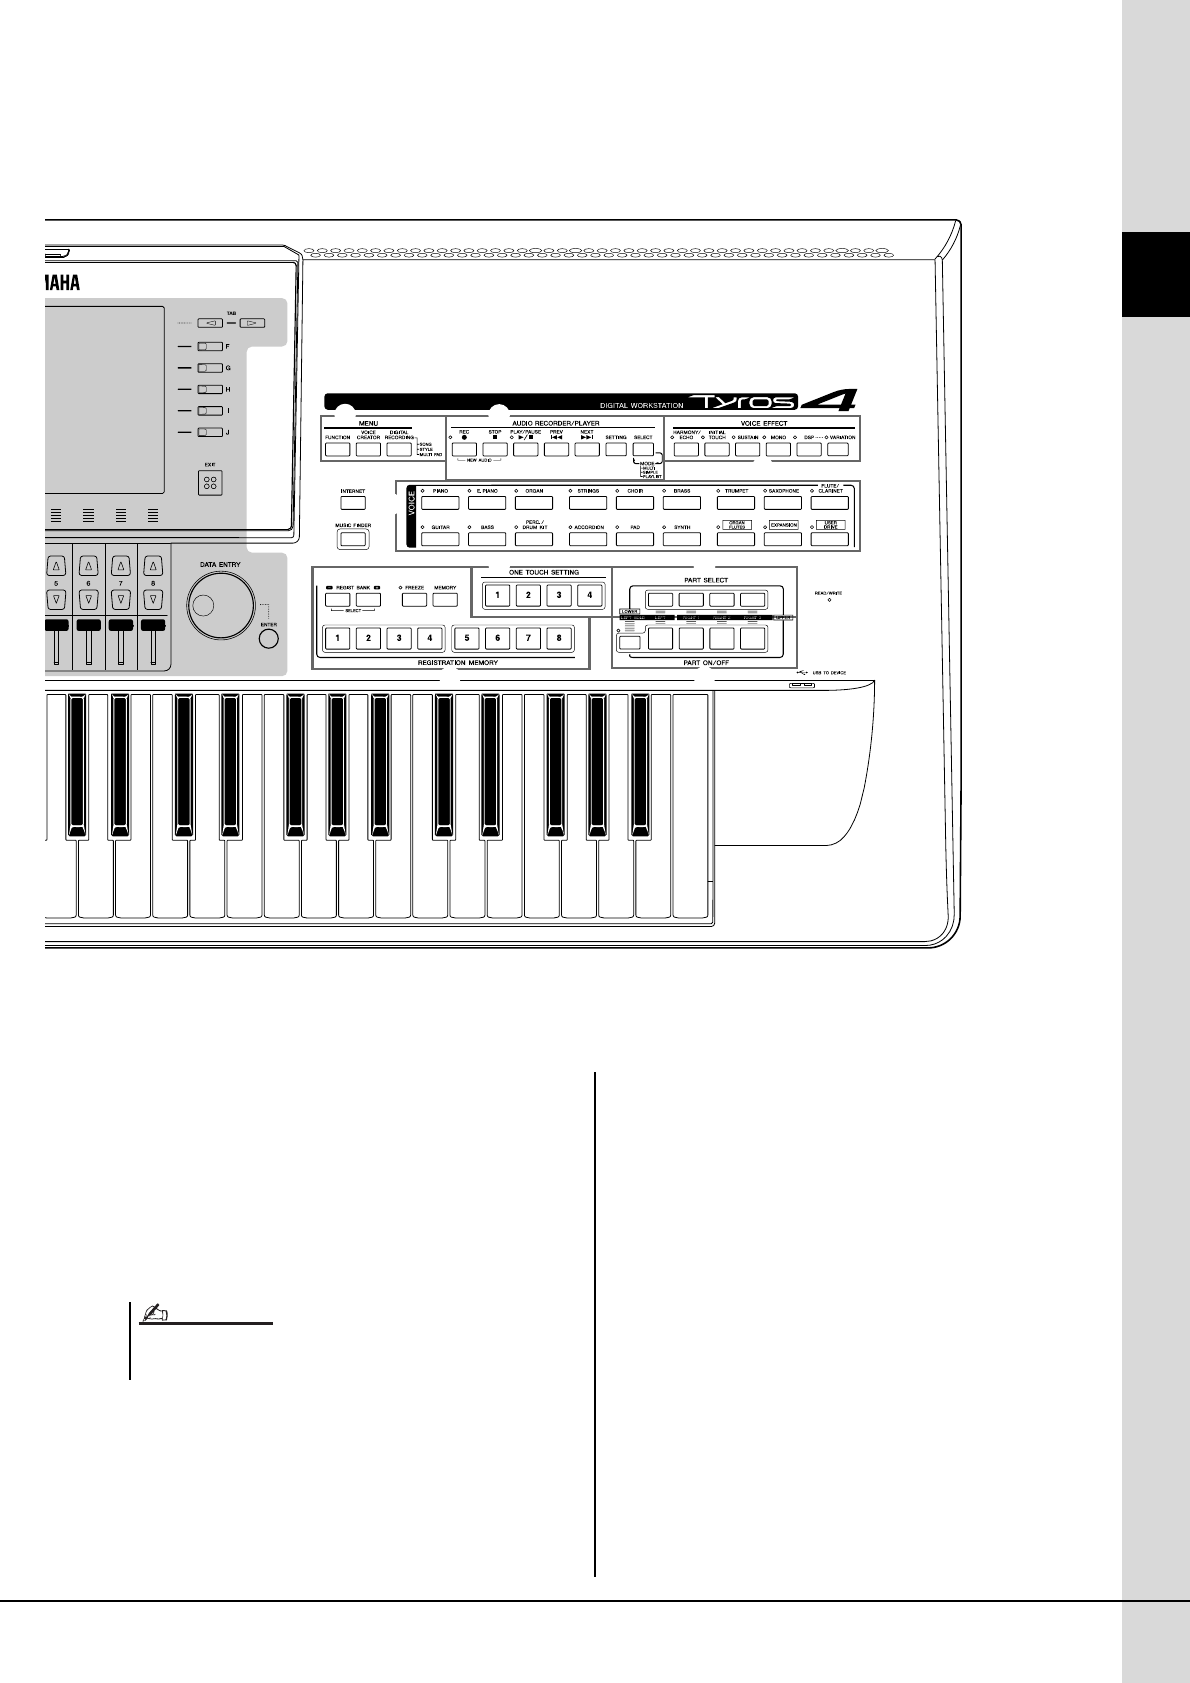
12 Tyros4 Owner’s Manual
Panel Controls and Terminals
Top Panel
qMIC GAIN control...........................................Page94
Adjust the input sensitivity from the MIC jack.
wMASTER VOLUME control ......................... Page16
Adjusts the overall volume.
eDEMO button................................................... Page18
Plays the Demo.
rFADE IN/OUT button......................................Page49
Controls fade in/out of the Style/Song playback.
tUPPER OCTAVE buttons ...............................Page39
Shifts the pitch of the keyboard in octave steps.
yPITCH BEND wheel ........................................Page39
Bends the pitch of the keyboard played sound up or
down.
uMODULATION wheel.....................................Page40
Applies a vibrato effect, etc.
iART. 1/ART. 2 buttons.....................................Page40
Controls Super Articulation Voices.
oPHONES jack................................................... Page15
For connecting a pair of headphones.
!0 MIC buttons ..................................................... Page83
Adds some effects to Microphone input.
!1 SONG buttons .................................................. Page55
Selects a Song and controls Song playback.
!2 STYLE category selection buttons ................. Page46
Selects a Style.
!3 STYLE CONTROL buttons ........................... Page48
Controls Style playback.
!4 TEMPO buttons............................................... Page49
Controls the tempo for Style, Song and Metronome
playback.
!5 MULTI PAD CONTROL buttons .................. Page64
Selects and plays a rhythmic or melodic Multi Pad
phrase.
!6 TRANSPOSE buttons ..................................... Page39
Transposes the pitch in semitone steps.
q
wr
!2 !6
!5
!4
!3 !9
!8
@0
!7
e
!0 !1
t
y
o
ui
C1 D1 E1 F1 G1 A1 B1 C2 D2 E2 F2 G2 A2 B2 C3 D3 E3 F3
Tyros4 Owner’s Manual 13
Panel Controls and Terminals
!7 MIXING CONSOLE button...........................Page86
Controls over aspects of keyboard, Style and Song
parts.
!8 CHANNEL ON/OFF button ................... Pages 52, 62
Turns channels of Style/Song on or off.
!9 BALANCE button.................................... Pages 53, 80
Adjusts the volume balance among each part.
@0 LCD and related controls ................................Page19
@1 MENU buttons (See Reference Manual on website.)
Lets you make some advanced settings and create your
original Voices, Styles, Songs and Multi Pads.
@2 AUDIO RECORDER/PLAYER buttons........Page76
Records your performance in audio format.
@3 VOICE EFFECT buttons................................Page42
Applies some effects to the keyboard performance.
@4 INTERNET button .......................................... Page90
Accesses to Internet website.
@5 MUSIC FINDER button ................................. Page68
Searches the appropriate panel settings or desired song.
@6 VOICE category selection buttons ................. Page33
Selects a Voice.
@7 REGISTRATION MEMORY buttons........... Page72
Registers and recalls panel setups.
@8 ONE TOUCH SETTING buttons .................. Page51
Calls up the appropriate panel settings for the Style.
@9 PART SELECT buttons .................................. Page33
Selects a keyboard part.
#0 PART ON/OFF buttons ................................... Page34
Turns the keyboard parts on or off.
#1 USB TO DEVICE terminal........................... Page100
For connecting USB storage device.
@1 @2
@3
@6
@4
@5
@7
@8 @9
#0
#1
G3 A3 B3 C4 D4 E4 F4 G4 A4 B4 C5 D5 E5 F5 G5 A5 B5 C6
Remove the transparent protective film that was applied to the display prior
to shipment from the factory.
NOTE
14 Tyros4 Owner’s Manual
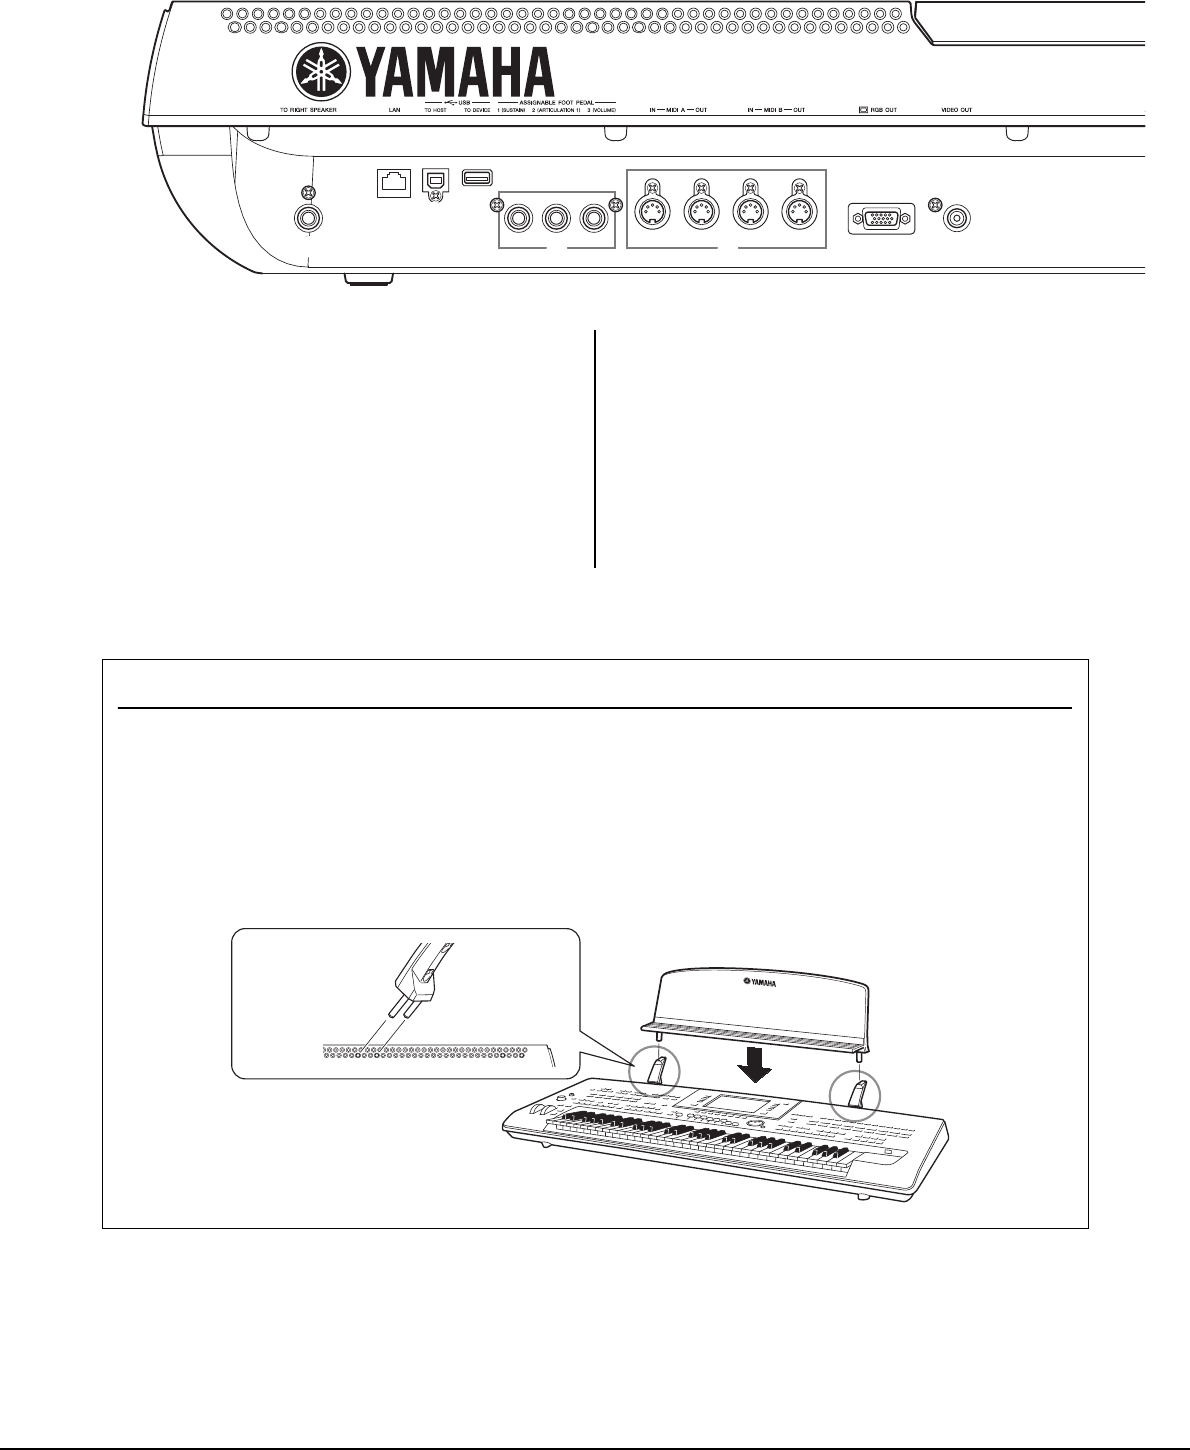
Rear Panel
qTO RIGHT SPEAKER jack ......................... Page106
For connecting an optional set of speakers.
wLAN terminal ...................................................Page91
For connecting a LAN cable.
eUSB TO HOST terminal ...............................Page102
For connecting to computer.
rUSB TO DEVICE terminal...........................Page100
For connecting a USB storage device.
tASSIGNABLE FOOT PEDAL jacks ............. Page99
For connecting Footswitches and/or Foot controllers.
yMIDI terminals .............................................. Page104
For connecting external MIDI devices.
uRGB OUT terminal ......................................... Page98
For connecting a computer monitor.
iVIDEO OUT terminal..................................... Page98
For connecting a television or video monitor.
q
w e r
t y u i
Attaching the Music Rest
Check carefully that all parts (two music rest brackets and one music rest) are included before following the instructions
below.
1Attach the two music rest brackets to the inside slot on the rear panel.
2Attach the music rest to the brackets.
1
2
Use the inside slots
(as shown).
Tyros4 Owner’s Manual 15
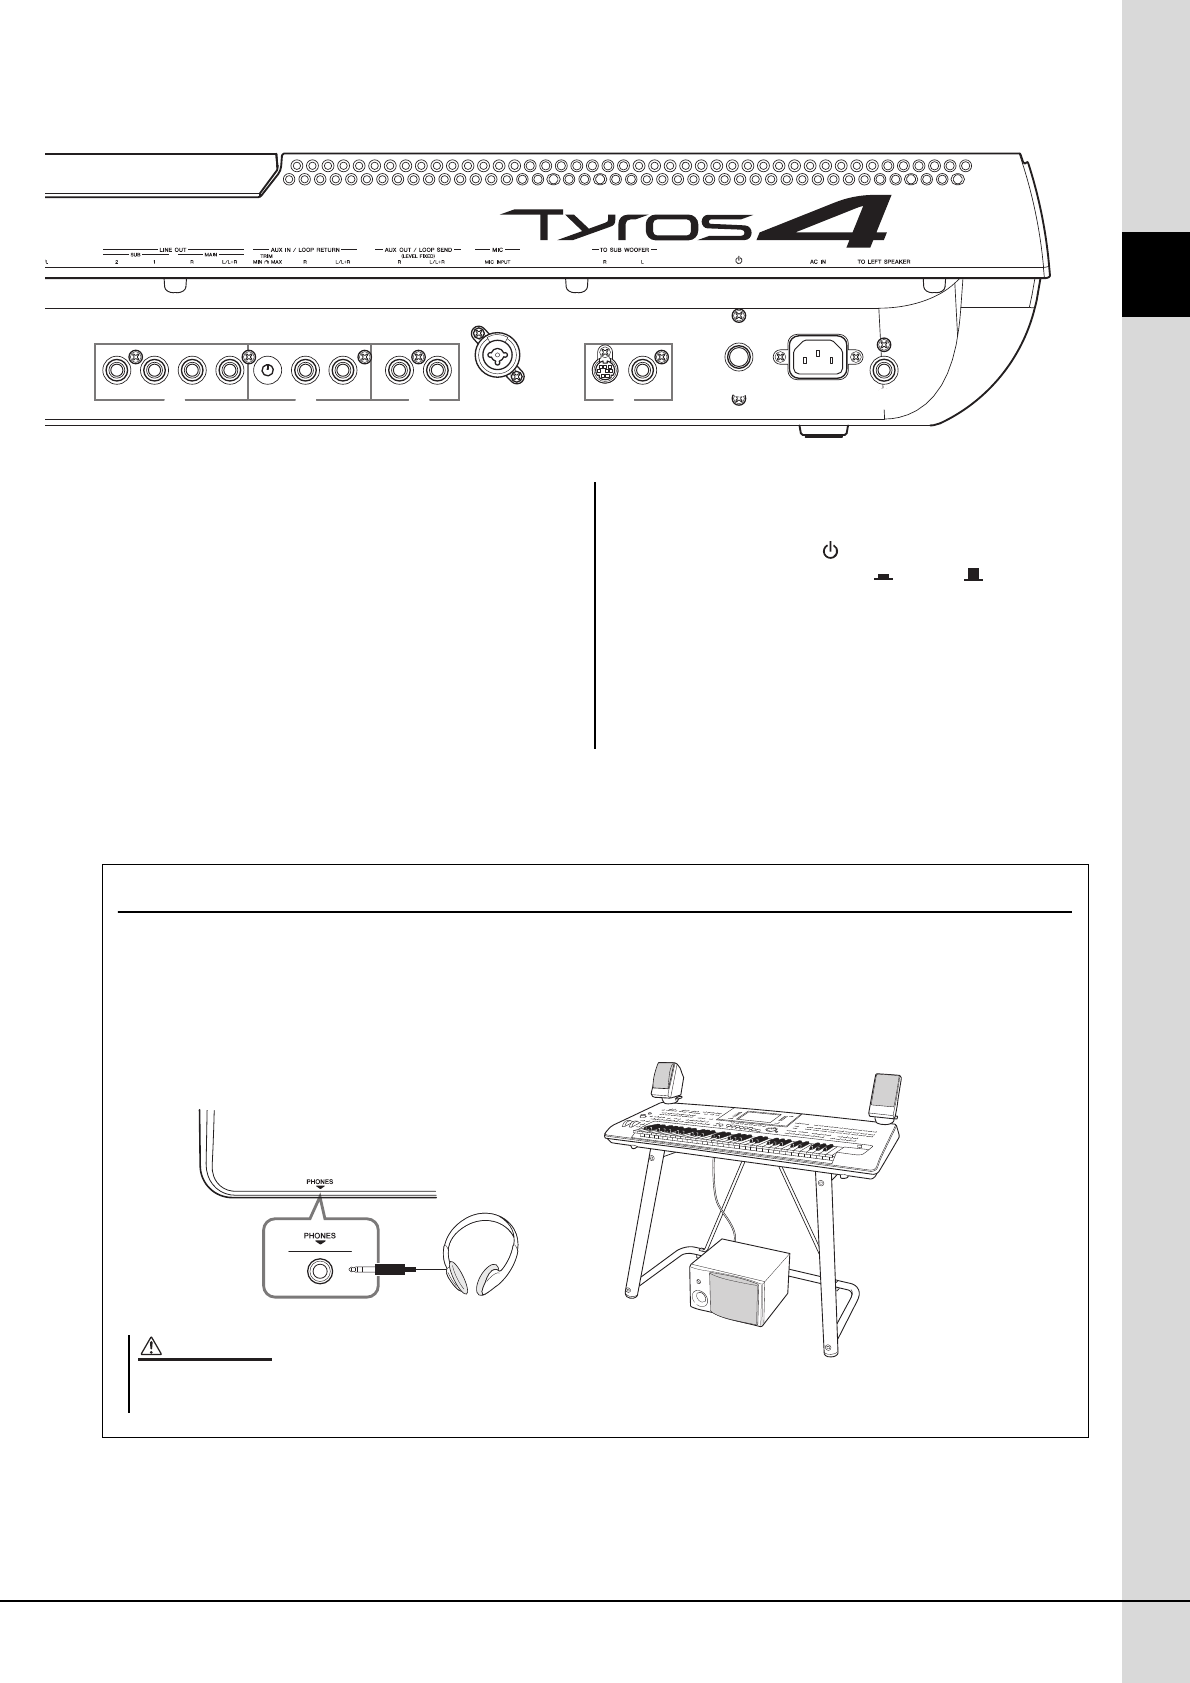
Panel Controls and Terminals
oLINE OUT jacks ..............................................Page96
For connecting external audio devices.
!0 AUX IN/LOOP RETURN jacks .....................Page97
For connecting external audio devices.
!1 AUX OUT/LOOP SEND jacks .......................Page97
For connecting external audio devices.
!2 MIC jack ...........................................................Page94
Combo jack* for connecting microphone.
(*: Combo jack accepts either XLR or 1/4" phone plug
connectors.)
!3 TO SUB WOOFER jacks.............................. Page107
For connecting an optional set of speakers.
!4 Power on/off switch ( ) .................................. Page16
Turn the Tyros4’s power on ( ) or off ( ).
!5 AC IN terminal................................................. Page16
For connecting the supplied power cord.
!6 TO LEFT SPEAKER jack............................ Page106
For connecting an optional set of speakers.
o !0 !1 !2 !3 !4 !5 !6
Connecting Headphones or Optional Speaker
Since the Tyros4 has no built-in speakers, you’ll need to monitor the sound of the instrument by using external equip-
ment. Connect a set of headphones to the [PHONES] jack or use the speaker system, such as the optional TRS-MS04
speakers. For instructions on installing the TRS-MS04 to the Tyros4, see page 106. For instructions on connecting other
speakers, see page 96.
Shown here is the optional
L-7S Keyboard Stand.
Do not listen with the headphones at high volume for long periods
of time. Doing so may cause hearing loss.
CAUTION
16 Tyros4 Owner’s Manual
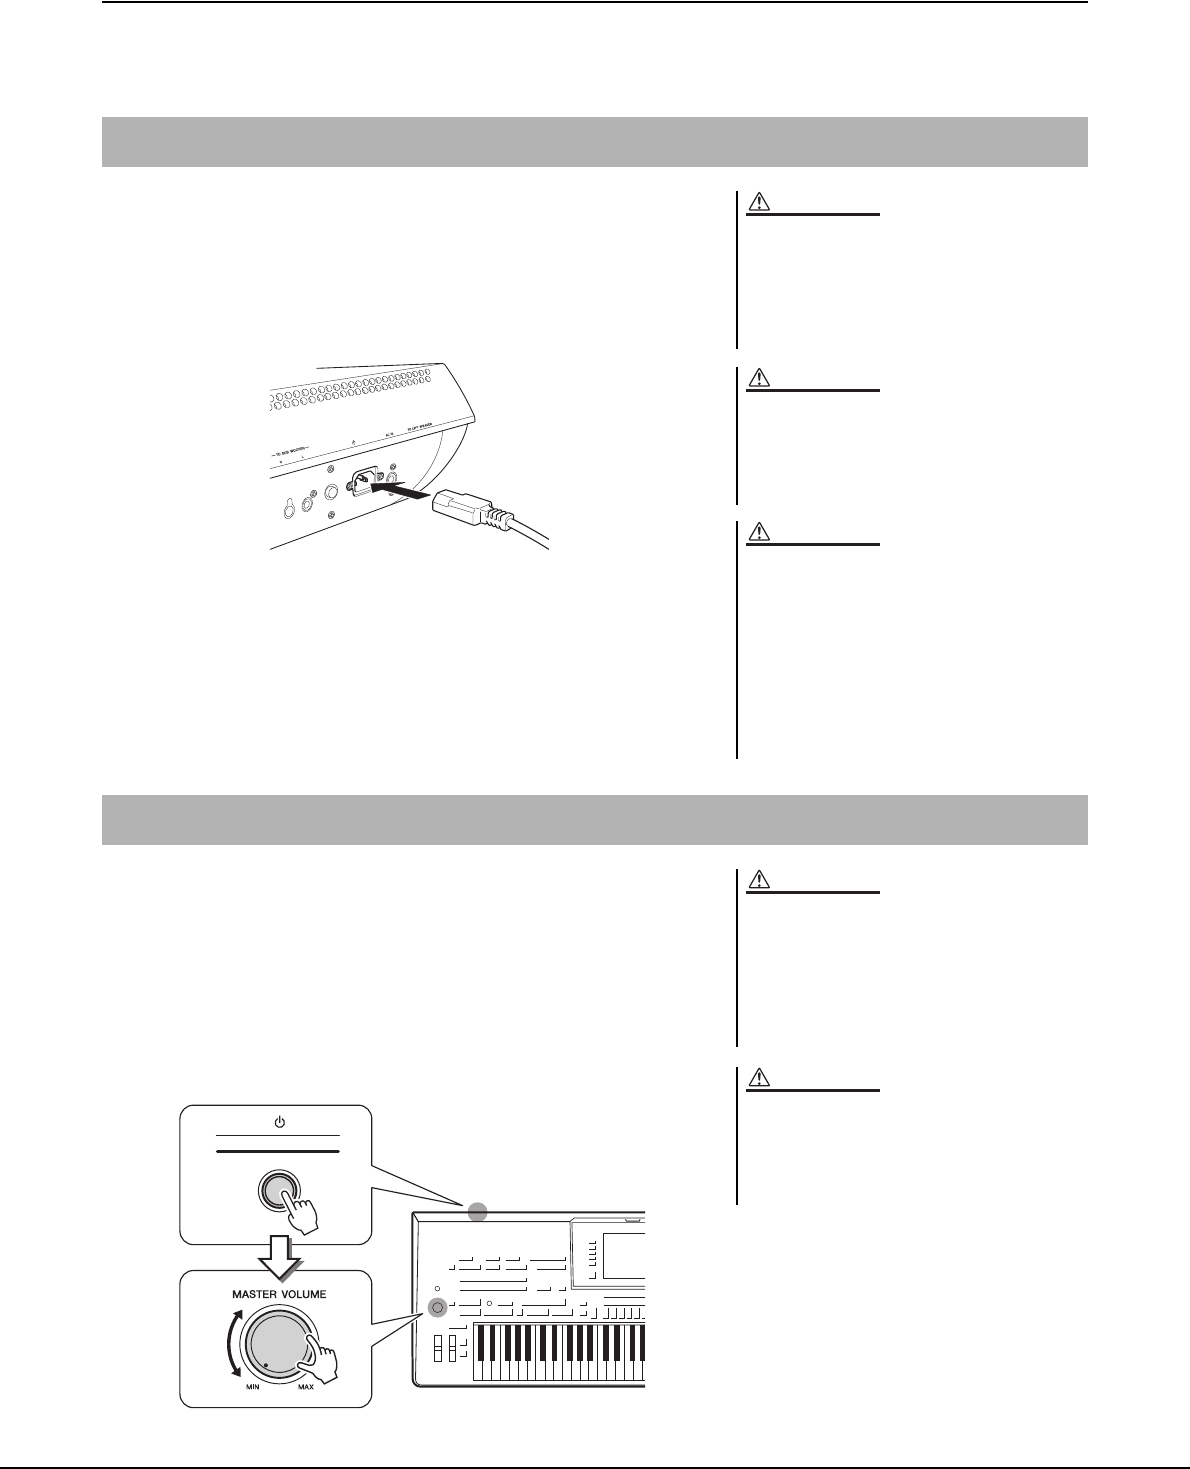
Starting Up
This section contains information about setting up your Tyros4 and preparing to play. Be sure to read through
this section carefully before turning the power on.
1Make sure the power on/off switch on the Tyros4 is
set to off.
2Connect the supplied power cord to the AC IN termi-
nal on the instrument’s rear panel.
3Connect the other end of the power cord to an AC
outlet.
Make sure your Tyros4 meets the voltage requirement for the coun-
try or region in which it is being used.
Before you switch your Tyros4 on or off, make sure that the MASTER
VOLUME and MIC GAIN are set to “MIN” and the volume of any con-
nected audio equipment is turned down.
1Press the power on/off switch on the rear panel.
2Use the [MASTER VOLUME] dial to adjust the vol-
ume to an appropriate level.
Power Supply
Make sure your Tyros4 is rated for the AC voltage
supplied in the area in which it is to be used (as
listed on the bottom). Connecting the unit to the
wrong AC supply can cause serious damage to the
internal circuitry and may even pose a shock haz-
ard!
Use only the AC power cord supplied with the
Tyros4. If the supplied cord is lost or damaged and
needs to be replaced, contact your Yamaha dealer.
The use of an inappropriate replacement can pose
a fire and shock hazard!
The type of AC power cord provided with the Tyros4
may be different depending on the country in which
it is purchased (a third prong may be provided for
grounding purposes). Improper connection of the
grounding conductor can create the risk of electri-
cal shock. Do NOT modify the plug provided with
the Tyros4. If the plug will not fit the outlet, have a
proper outlet installed by a qualified electrician. Do
not use a plug adapter which defeats the grounding
conductor.
WARNING
WARNING
WARNING
Turning the Power On
In order to avoid possible damage to the speakers
or other connected electronic equipment, always
switch on the power of the Tyros4 before switching
on the power of the amplified speakers or mixer
and amplifier. Likewise, always switch off the
power off the Tyros4 after switching off the power of
the amplified speakers or mixer and amplifier.
Even when the power switch is turned off, electric-
ity is still flowing to the instrument at the minimum
level. When you are not using the instrument for a
long time, make sure you unplug the power cord
from the wall AC outlet.
CAUTION
CAUTION
1
2
Tyros4 Owner’s Manual 17
Starting Up
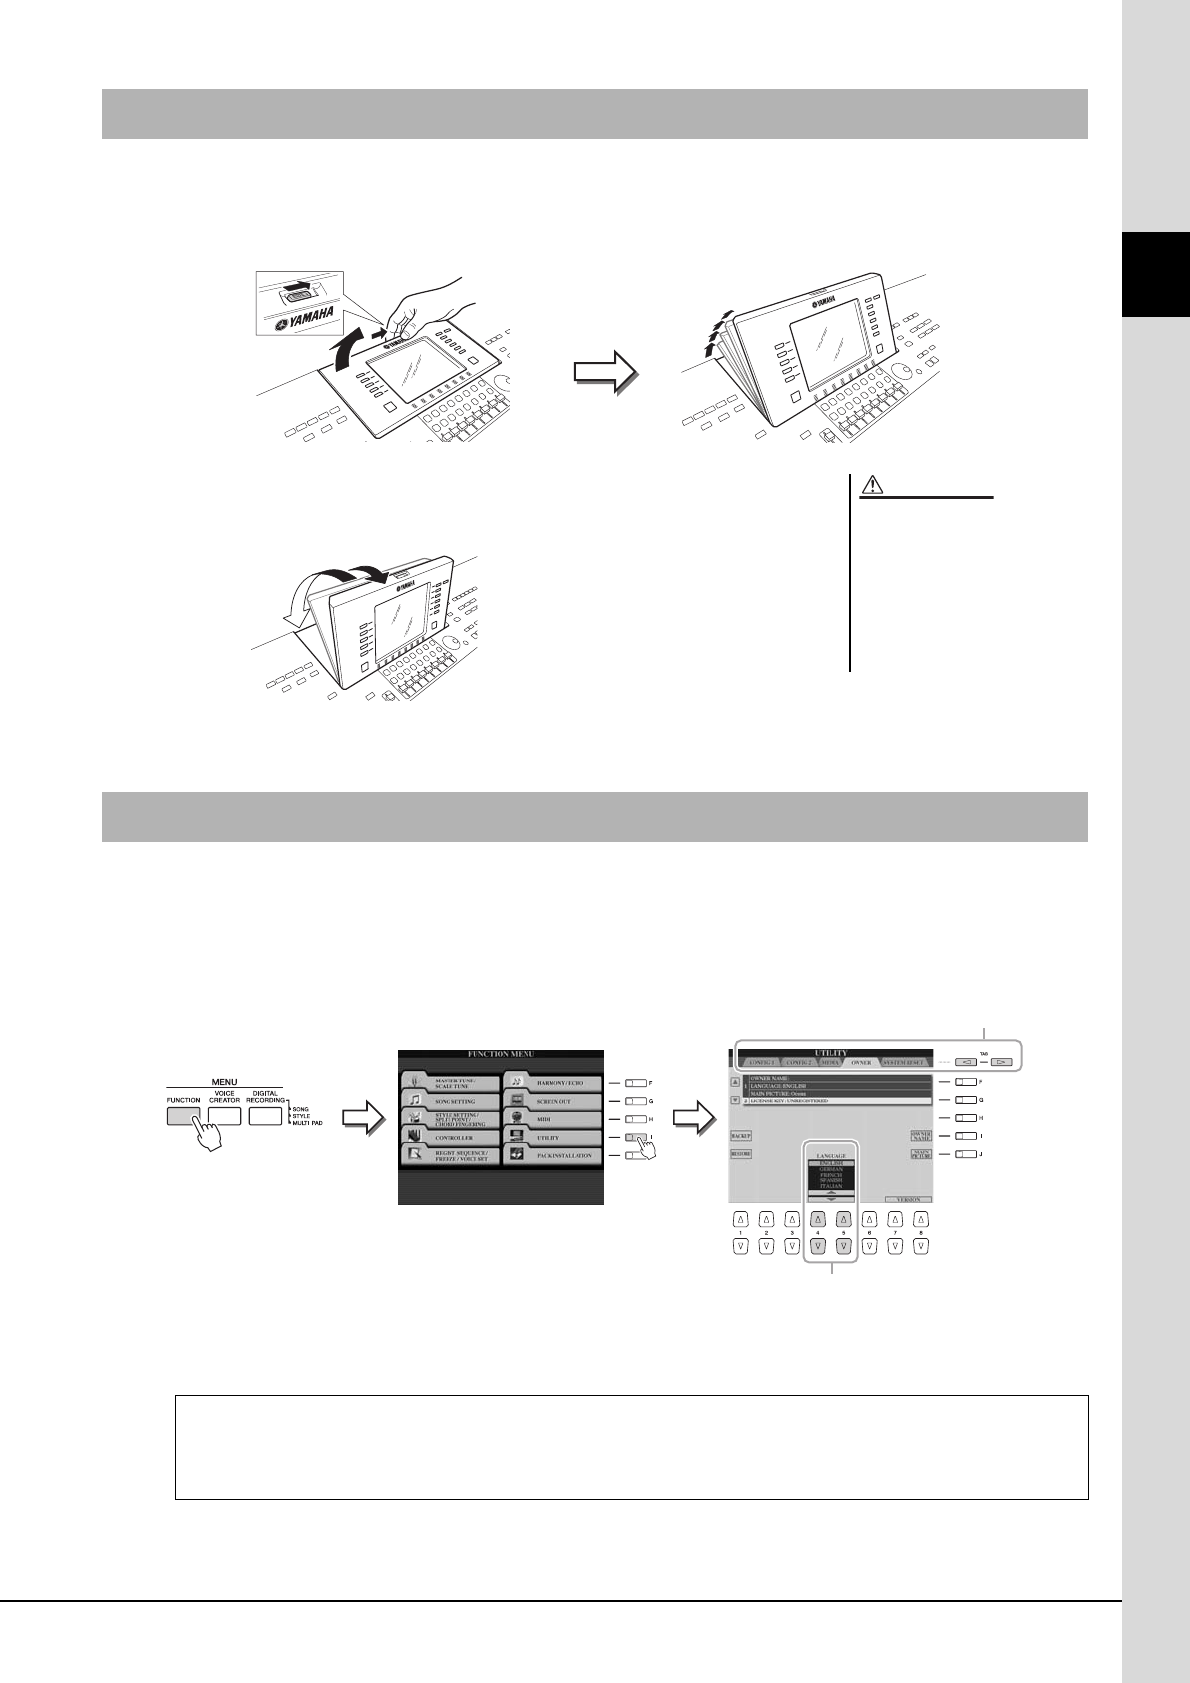
Unfasten the lock located at the back of the display panel. Then lift the panel and tilt it toward you. The panel will click
as you tilt in back; these clicks are the four latched positions. Once you’ve set it to a satisfactory position, release the
panel. It will gently fall back to the nearest latched position.
To return the panel to its closed and locked position, gently pull it back toward you until
the position is vertical, then push it down until it locks into place.
This determines the language used in the display for messages, file names, and character input.
1Call up the operation display.
[FUNCTION] [I] UTILITY TAB [ ][] OWNER
2Use [4 ]/[5 ] buttons to select the desired language.
Raising the Display Panel
Looking at the display for a long
period of time in the dark may
cause eyestrain or damage to
your eyesight. Make sure to use
the instrument with as much
ambient light as possible and
also take adequate breaks and
rest from use.
CAUTION
Changing the Display Language
1
2
Display the version number
To check the version number of this instrument, press the [7 ]/[8 ] (VERSION) buttons in the display
in step 2 above. Press the [EXIT] button or [8 ] button to return to the original display.
18 Tyros4 Owner’s Manual
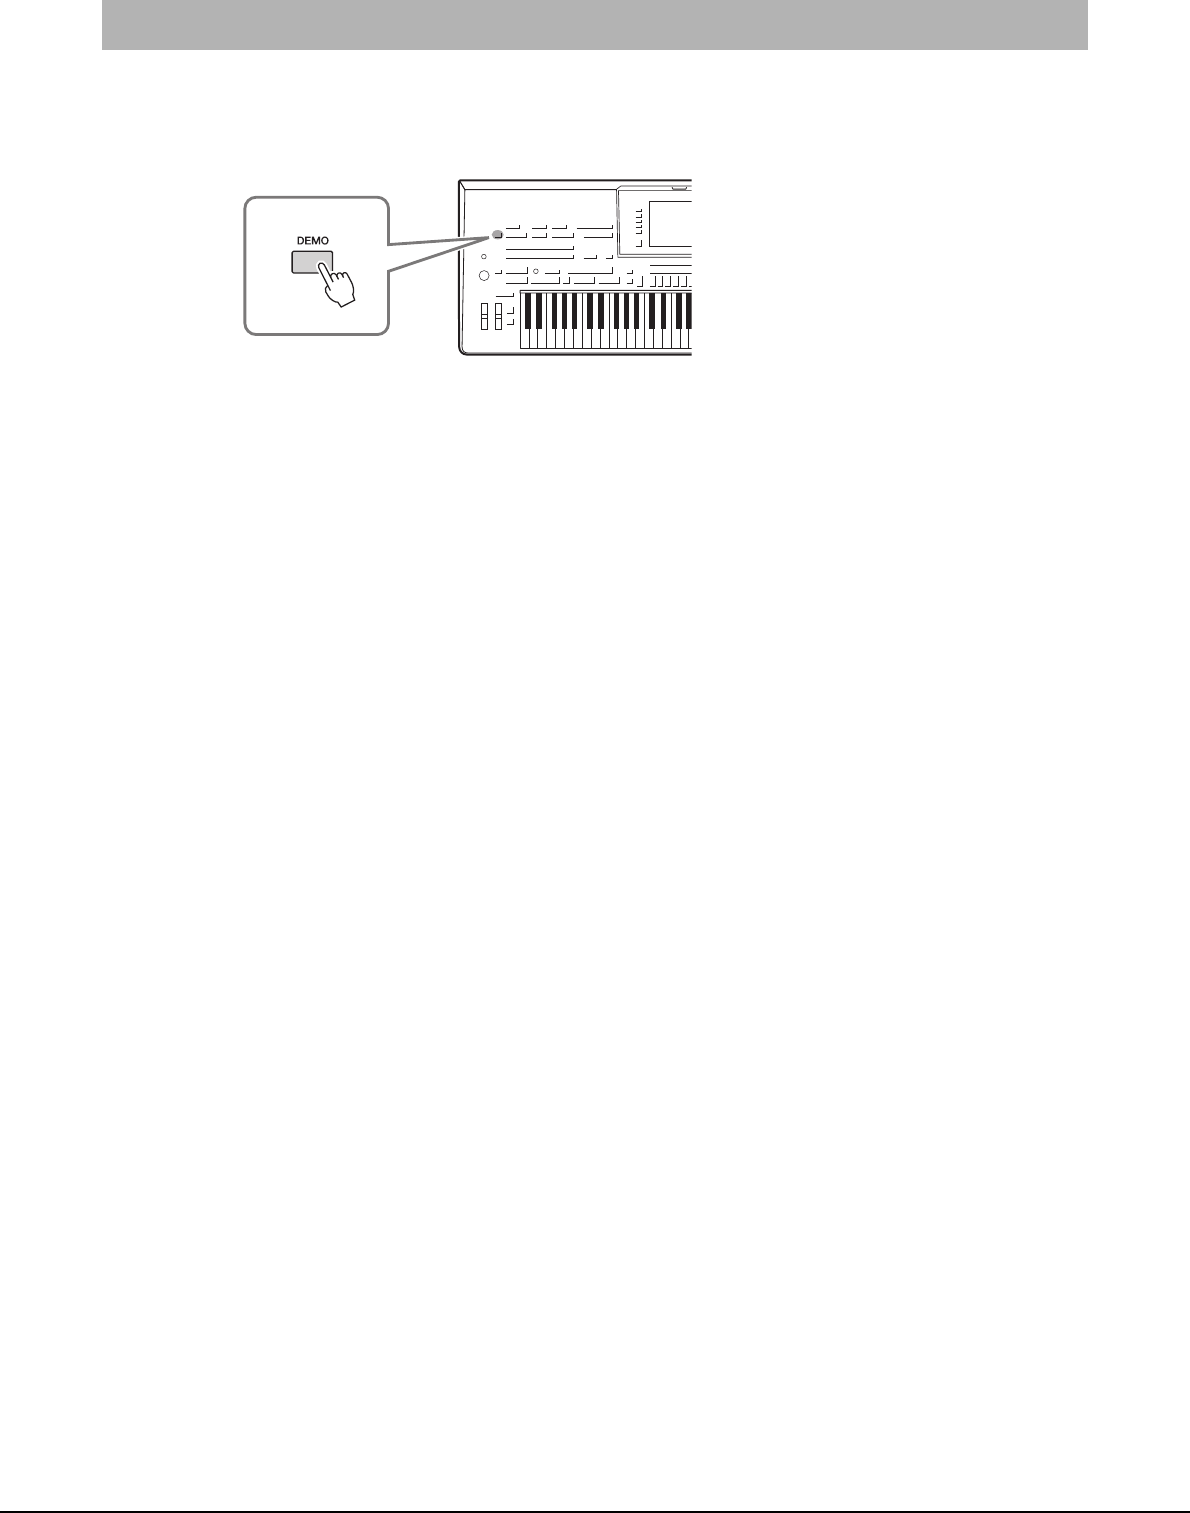
Overview Demo will play back continuously, calling up the various displays in sequence.
1Press the [DEMO] button to start the Demo.
2Press the [EXIT] button to exit from the Demo.
Playing the Demo
Tyros4 Owner’s Manual 19
Basic Operations
Basic Operations
The LCD provides comprehensive at-a-glance information on all current settings.
The displayed menu can be selected or changed by the controls around the LCD.
[A]–[J] buttons
The [A]–[J] buttons are used to select the corresponding menu.
Display-based Controls
TAB [][] buttons
(page 20)
[A]–[J] buttons
(see below)
[EXIT] button
(page 21)
[DATA ENTRY] dial and
[ENTER] button (page 21)
[1]–[8] sliders (page 20)
[ASSIGN] slider
(page 20)
[1 ]–[8 ] buttons
(page 20)
[DIRECT ACCESS]
button (page 22)
[A]–[J] buttons
(see below)
In the File Selection display (page 24),
the [A]–[J] buttons can be used to select
the corresponding respective files.
The [G], [H] and [I] buttons are used to
select the corresponding parameter.
The [A] and [B] buttons
are used to move the
cursor up or down.
-Example 1
-Example 2
20 Tyros4 Owner’s Manual
TAB [][] buttons
These buttons are used mainly to change the Pages of displays that have “tabs” at the top.
[ASSIGN] slider
When the Footage Page of the Organ Flutes Voice is shown, this
slider is used to adjust the footage lever of 16’ (page 44).
When other displays are shown, this slider is used to adjust the key-
board volume (page 53) directly during your performance, by
default.
[1]–[8] sliders
In the footage Page of the Organ Flutes Voice, these sliders are used to adjust the footages.
In other displays, these sliders are used to adjust settings (up or down correspondingly) for functions shown directly
above them, only when the menu is shown in a knob or slider shape.
[1 ]–[8 ] buttons
The [1 ]–[8 ] buttons are used to make selections or adjust settings (up or down correspondingly) for functions
shown directly above them.
You can freely change the function
assigned to the [ASSIGN] slider:
[FUNCTION] [D] CONTROLLER
TAB [][] ASSIGN SLIDER.
NOTE
Footage levers of 5 1/3’–
1’ can be adjusted by the
[1]–[8] sliders.
Knob or slider in the
display can be adjusted
by the corresponding
[1]–[8] slider.
If a menu appears in
this section of the dis-
play, use the [1 ]–
[8 ] buttons.
If list of the menu
appears, use the
[1 ]–[8 ] button to
select the desired item.
If a menu appears in
this section of the dis-
play, use the [1 ]–
[8 ] buttons.
If a parameter appears
in slider (or knob) form,
use the [1 ]–
[8 ] button to adjust
the value.
Tyros4 Owner’s Manual 21
Basic Operations
[DATA ENTRY] dial and [ENTER] button
Depending on the selected LCD display, the [DATA ENTRY] dial can be used in the following two ways.
-Selecting files (Voice, Style, Song, and so on)
When one of the File Selection displays (page 24) is shown, you can use the [DATA ENTRY] dial and the [ENTER] but-
ton to select a file (Voice, Style, Song, and so on).
-Adjusting the parameter values
In addition to using sliders, you can conveniently use the [DATA ENTRY] dial in tandem with the [1 ]–[8 ] but-
tons to adjust parameters indicated in the display.
This convenient technique also works well with pop-up parameters such as Tempo and Transpose. Simply press the
appropriate button (ex., TEMPO [+]), then rotate the [DATA ENTRY] dial and press [ENTER] to close the window.
[EXIT] button
No matter where you are in the Tyros4 display hierarchy, the [EXIT] button will return
you to the next highest level or to the previously indicated display.
Press the [EXIT] button several times returns the Tyros4 to the default Main display
(page 23)—the same display that appears when the power is turned on.
Rotate the [DATA ENTRY]
dial to move the cursor. Press the [ENTER] button
to actually select the high-
lighted file.
Select the desired parameter with the
appropriate [1 ]–[8 ] button.
Rotate the [DATA ENTRY] dial to
adjust the selected parameter.
22 Tyros4 Owner’s Manual
A message (information or confirmation dialog) sometimes appears on the screen to facilitate operation. When the mes-
sage appears, simply press the appropriate button.
With the convenient Direct Access function, you can instantly call up the desired display—with just a single additional
button press.
1Press the [DIRECT ACCESS] button.
A message appears in the display prompting you to press the appropriate button.
2Press the button (or move the slider, wheel or connected pedal)
corresponding to the desired setting display to instantly call up
that display.
For example, pressing the [ACMP] button calls up the display in which the Chord
Fingering type for accompaniment playback can be set.
Refer to the Data List for a list of the displays that can be called up with the Direct
Access function. The Data List is available at the Yamaha website. (See page 8.)
The Messages Shown in the Display
Instant Selection of the Displays—Direct Access
Tyros4 Owner’s Manual 23
Basic Operations
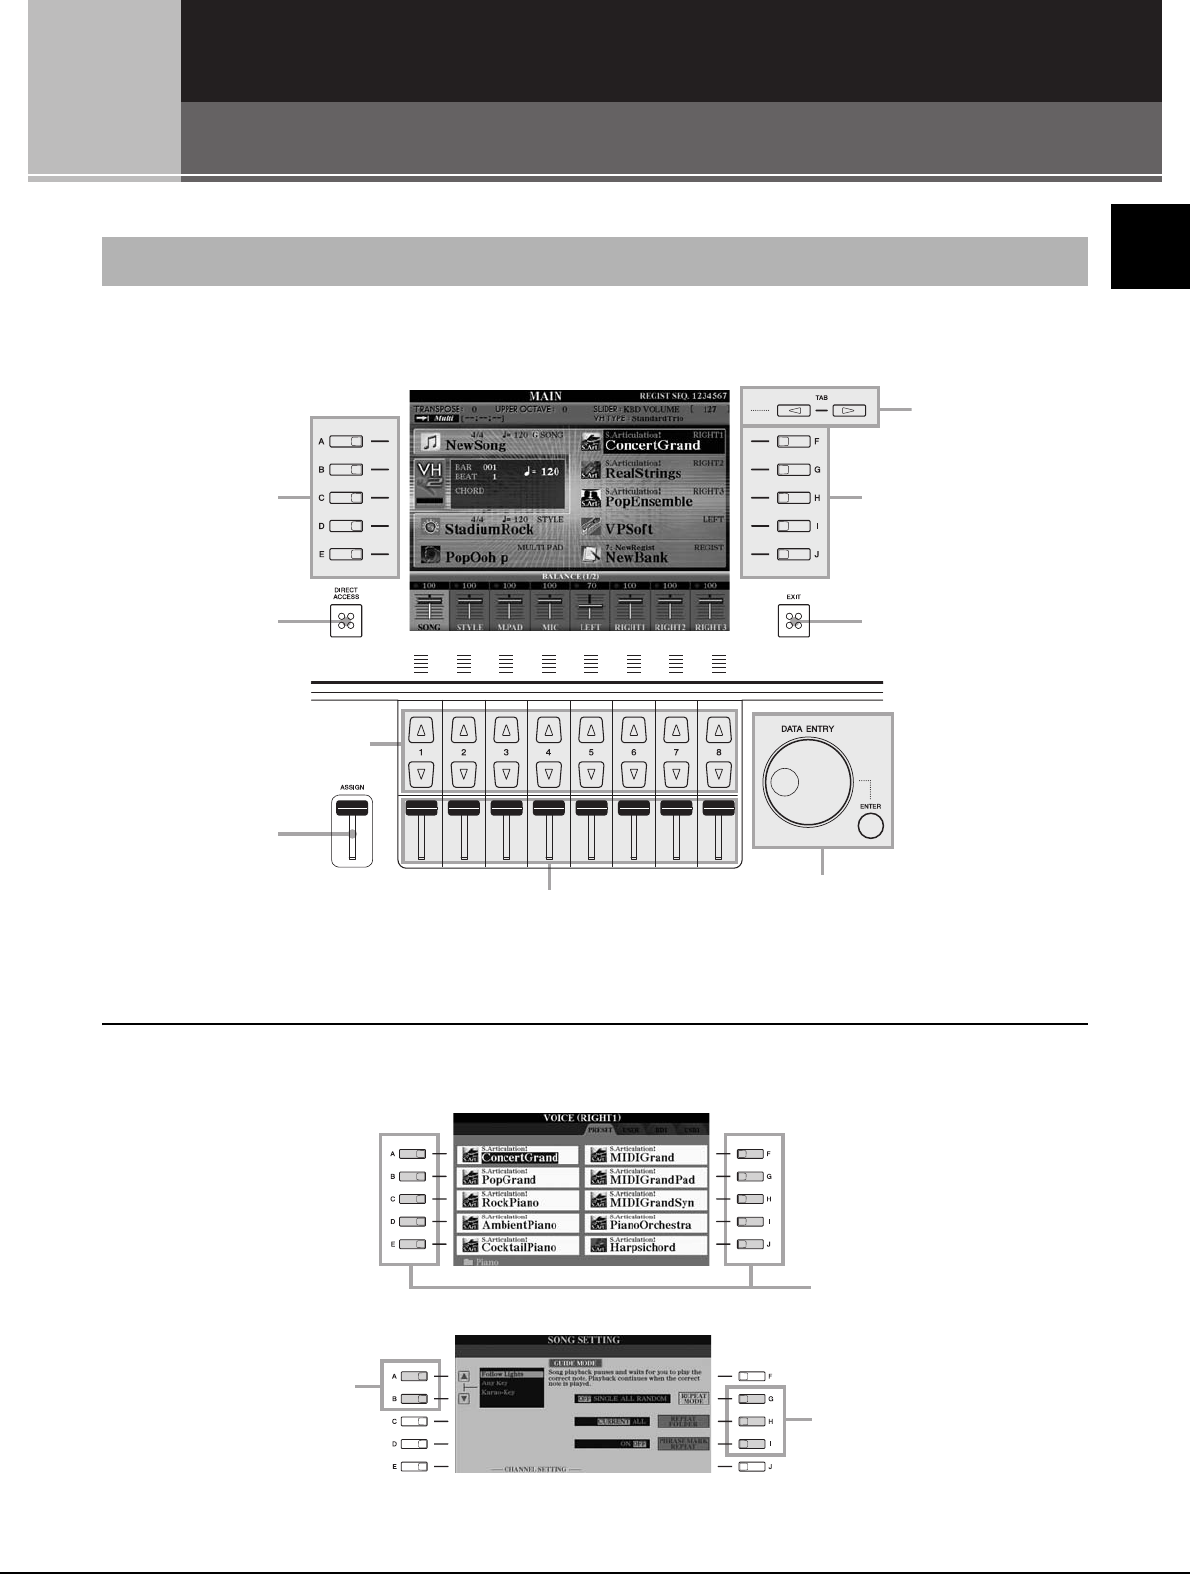
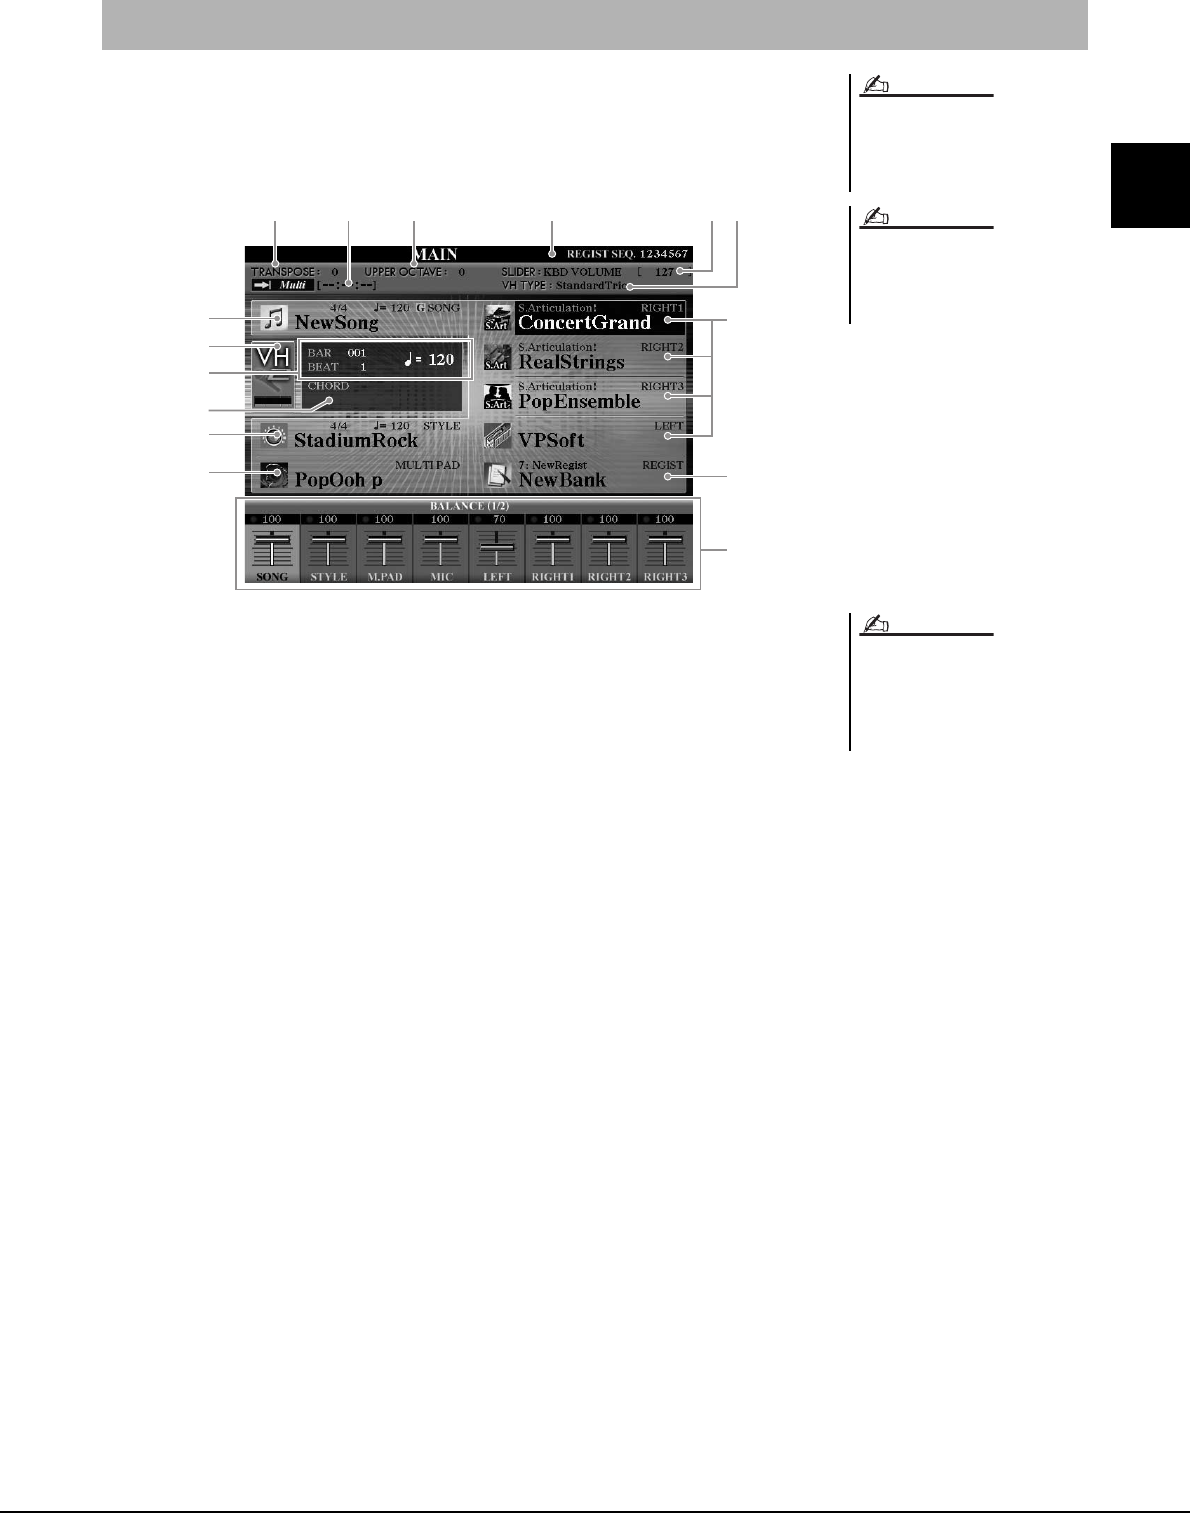
The display that appears when the power is turned on is the Main display.
The Main display shows the current basic settings such as the currently selected Voice and
Style, allowing you to see them at a single glance. The Main display is the one you’ll usu-
ally see when you play the keyboard.
qSong name and related information
Displays the currently selected Song name, time signature and tempo.
Pressing the [A] button calls up the Song Selection display (page 58).
wMIC Input level indicator
When the microphone is connected, this indicates the input level.
Pressing the [B]/[C] buttons calls up the Vocal Harmony Type Selection display.
eBAR/BEAT/TEMPO
Displays the current position (bar/beat/tempo) in Style playback or Song playback.
rCurrent chord name
When the [ACMP] button is set to On, the chord specified in the chord section of the
keyboard will be displayed.
When the Song containing the chord data is played, the current chord name will be dis-
played.
tStyle name and related information
Displays the currently selected Style name, time signature and tempo. Pressing the [D]
button calls up the Style Selection display (page 46).
yMulti Pad Bank name
Displays the names of the selected Multi Pad Banks. Pressing the [E] button calls up the
Multi Pad Bank Selection display (page 64).
uVoice name
Displays the Voice names currently selected for RIGHT 1, RIGHT 2, RIGHT 3 and
LEFT parts.
Pressing one of the [F], [G], [H] and [I] buttons calls up the Voice Selection display for
each part (page 34).
iRegistration Memory Bank name
Displays the currently selected Registration Memory Bank name and Registration Mem-
ory number.
Pressing the [J] button calls up the Registration Memory Bank Selection display
(page 73).
oTranspose
Displays the amount of transposition in semitone units (page 39).
Main Display Configuration
Here’s a convenient way to return to the
Main display from any other display:
Simply press the [DIRECT ACCESS]
button, then the [EXIT] button.
When turning on the power, a message
may appear at top left of the Main dis-
play indicating the Expansion Voices
are being loaded.
NOTE
NOTE
o !2 !4!0 !1
u
i
!5
r
w
e
y
t
q
!3
When the Guide function is ON on the
SONG SETTING display, a “G” indica-
tion appears next to q. For information
on the Guide function, see the Reference
Manual, Chapter 3.
NOTE
24 Tyros4 Owner’s Manual
!0 Audio Song information
Displays information for the selected audio file (mode, file name and time).
!1 Upper Octave
Displays the amount that the octave value is shifted (page 39).
!2 Registration Sequence
Appears when the Registration Sequence is active.
!3 ASSIGN slider function
Displays the function (parameter) assigned to the ASSIGN slider and its value (page 20).
!4 Vocal Harmony Type
Displays the currently selected Vocal Harmony Type.
!5 Volume Balance
Displays the volume balance among the parts.
Adjust the volume balance among the parts by using the [1 ]–[8 ] buttons or
sliders.
The File Selection display is for selecting Voices, Styles, and other data. The File Selection display appears when you
press one of the VOICE or STYLE category selection buttons, MULTI PAD CONTROL [SELECT] button, etc.
File Selection Display Configuration
SONG selection
buttons
MULTI PAD CONTROL
[SELECT] button
REGIST BANK
selection buttons
AUDIO RECORDER/PLAYER
[SELECT] button
[VH TYPE
SELECT] button
STYLE category
selection buttons
VOICE category
selection buttons
Tyros4 Owner’s Manual 25
Basic Operations
qLocation (drive) of data
• PRESET ......................Location where pre-programmed (preset) data is stored.
• USER ...........................Location where recorded or edited data is saved.
• HD................................Location where data is saved to an internal hard disk drive.
• USB ..............................Location where data on USB storage device (flash memory,
etc.) is saved. This appears only when USB storage
device(s) is connected to the [USB TO DEVICE] terminal
(page 100).
wSelectable data (files)
The files that can be selected on this display are shown. If more than 10 files exist, the
page numbers (P1, P2 ...) are shown below the files. Pressing the corresponding button
([1 ], [2 ], etc.) changes the display page. When other pages follow, the “Next” button
appears, and for the previous page, the “Prev.” button appears.
eFile/folder operation menu
You can save and manage your data files (copy, move, delete, etc.) from this menu. For
detailed instructions, refer to pages 28, 57.
w
q
e
Hereafter in this manual, any USB stor-
age device such as USB flash memory,
etc. will be referred to as “USB storage
device.”
The data, both pre-programmed and
your own original, are saved as “files.”
The number of pages shown varies
depending on the Selection display.
NOTE
NOTE
NOTE
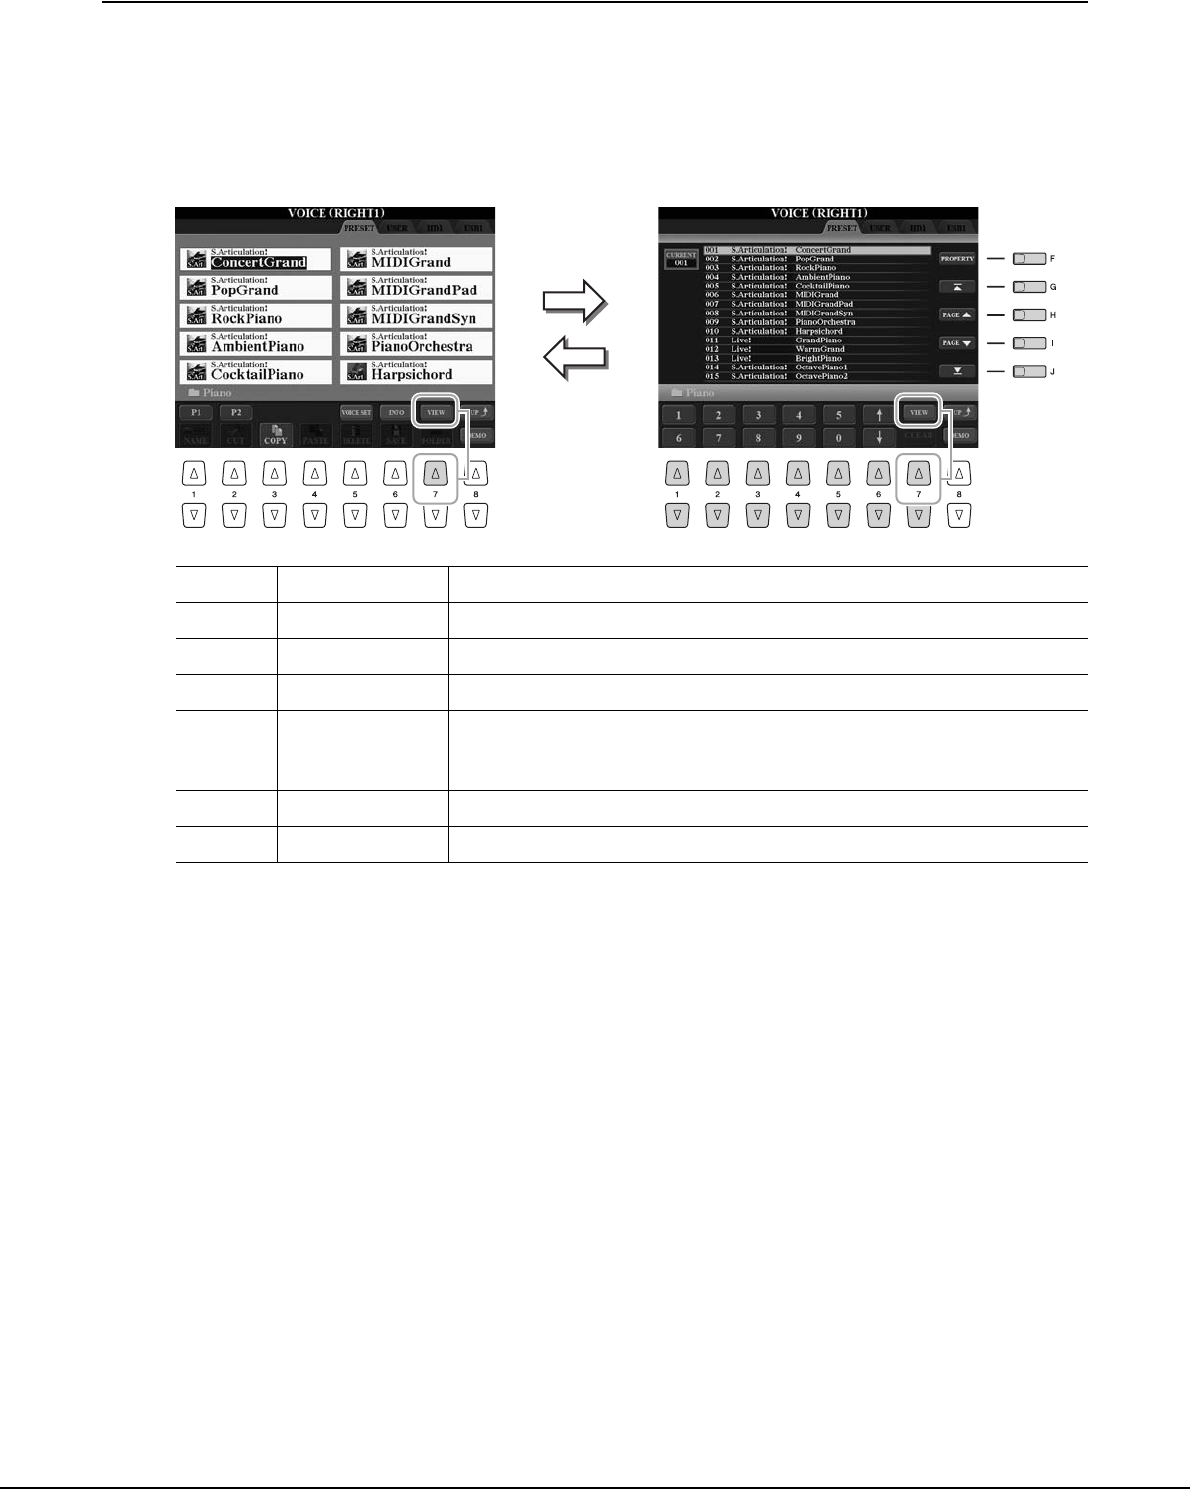
Closing the current folder and calling up the next highest level folder
In the PRESET display, several data (files) are contained together in a folder. You can also organize your original data
in the USER/HD/USB display by creating several new folders (page 28).
To close the current folder and call up the next highest level folder, press the [8 ] (UP) button.
Example of the PRESET Voice Selection display
The PRESET Voice files are categorized and contained in appropriate folders.
This display shows the Voice
files in a folder.
The next highest level—in this case,
folder—is shown. Each folder shown in
this display contains appropriately cate-
gorized Voices.
26 Tyros4 Owner’s Manual
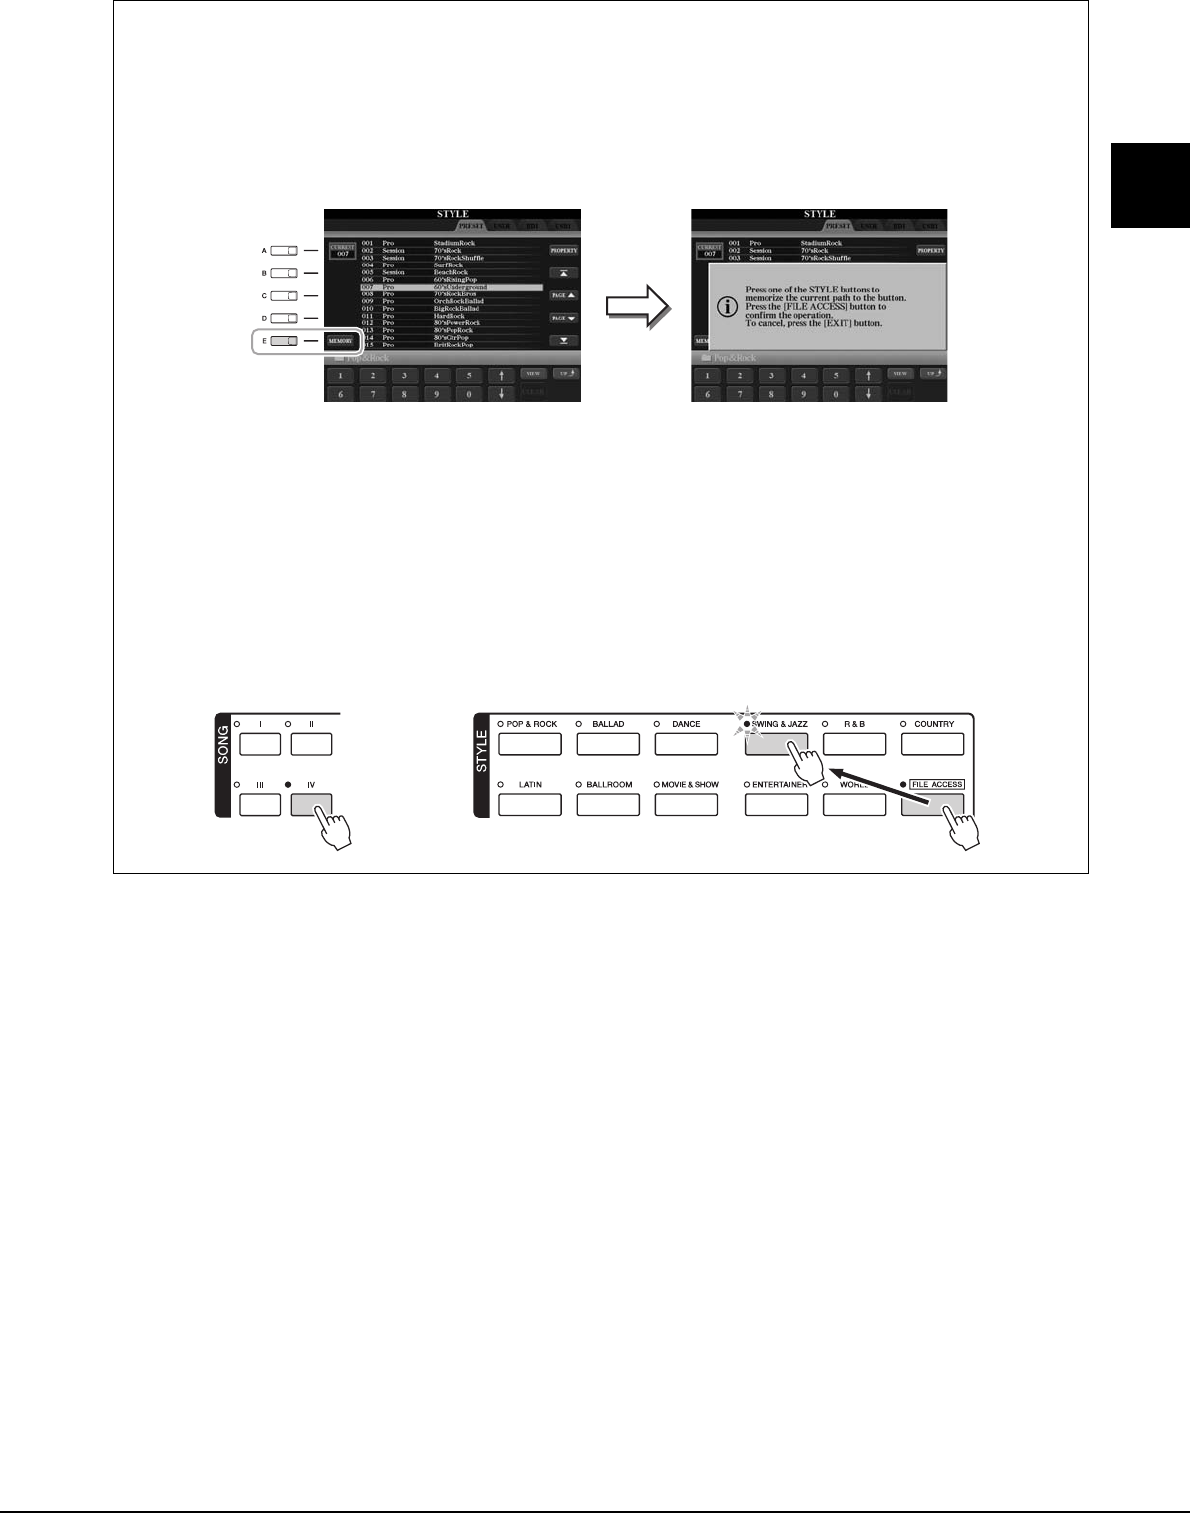
Changing the File Selection Display View
The File Selection display actually has two different view types. One is Normal View, which we’ve seen up until this
point. The other is List View, which lets you open files according to their numbers. Since the Tyros4 has many files
spread out over several pages, number input in List View may be quicker and more convenient—providing you know the
number of the file.
Switch between the two types by pressing the [7 ] (VIEW) button.
[F] PROPERTY Shows the property of the drive/folder/file.
[G] (TOP) Moves the cursor to the top of this list (path).
[H]/[I] PAGE UP/DOWN Scrolls by pages up/down through the list (path).
[J] (END) Moves the cursor to the end of this list (path).
[1 ]–
[5 ]
(Number Input) Input the desired number. To select Voice number 012, for example, press the buttons
corresponding to “1” and “2” in sequence, and press the [ENTER] button. Entering
one-digit numbers is done in the same way.
[6 ] (UP/DOWN) Selects the next or previous file.
[7 ] CLEAR Press this to cancel the number you’ve input.
File Selection display—Normal View (page 25) File Selection display—List View (see below)
Tyros4 Owner’s Manual 27
Basic Operations
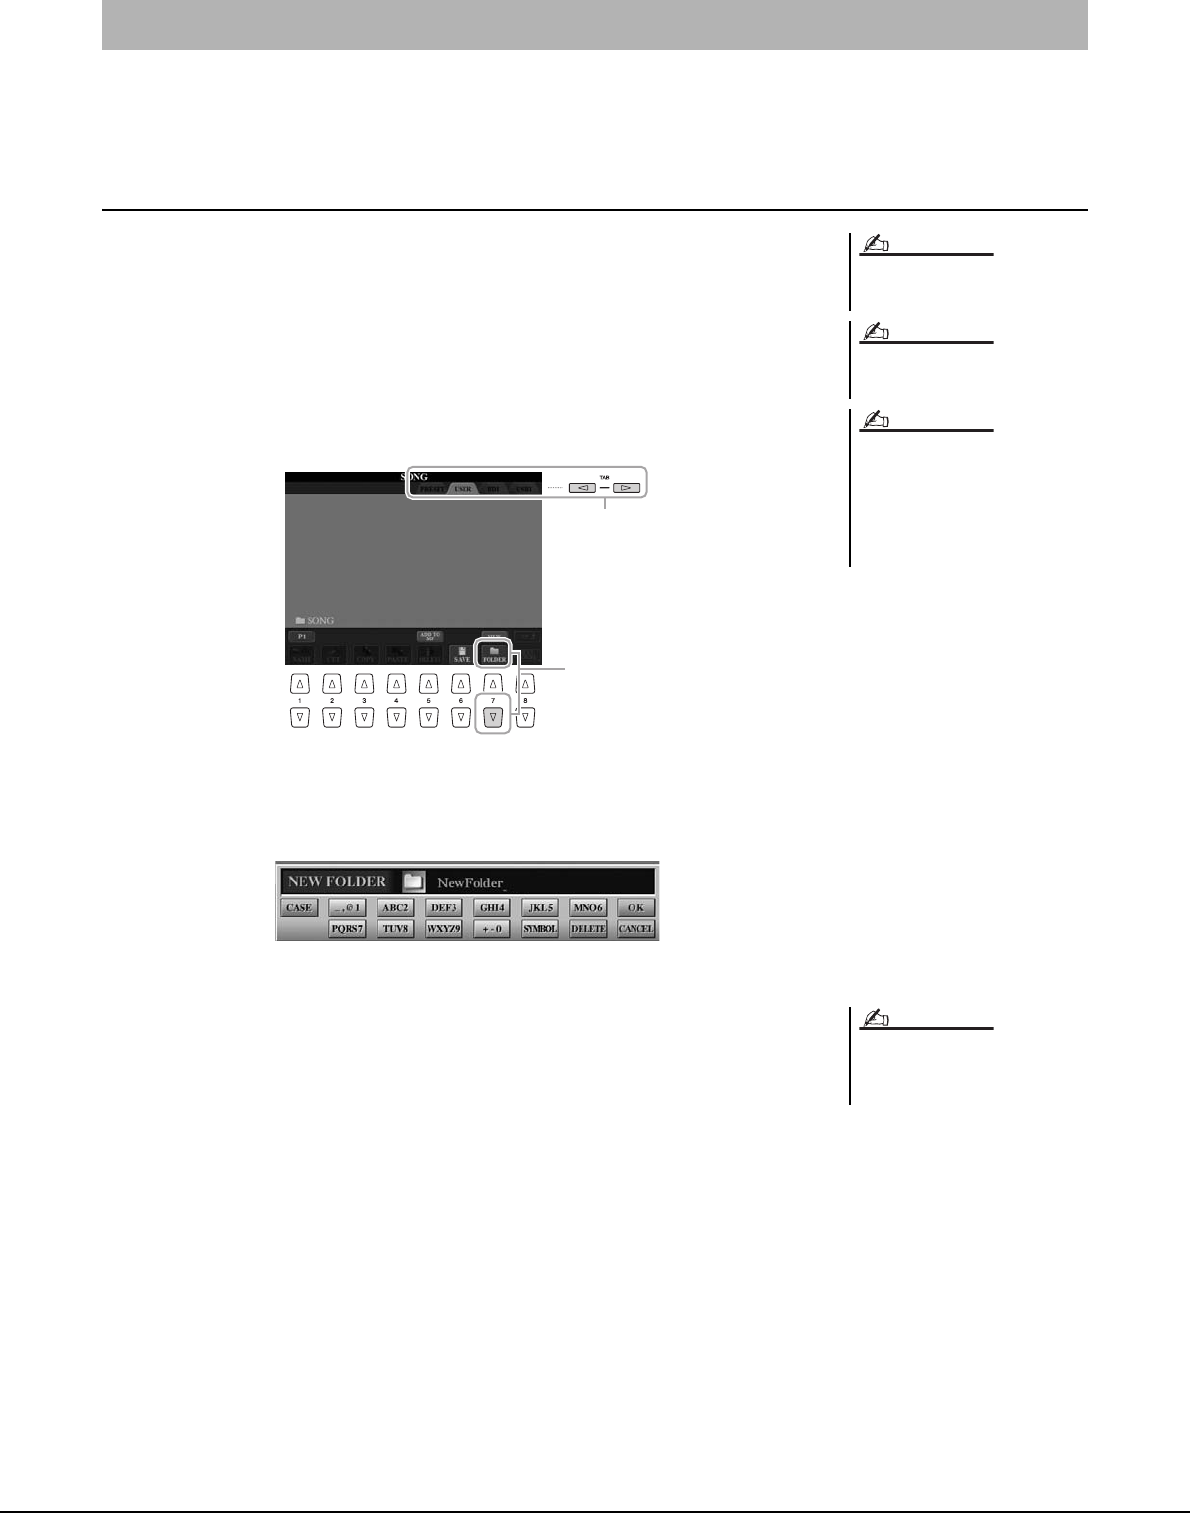
Memorizing Song/Style paths
The File Selection display for Songs and Styles lets you memorize the path of specific Song/Style to one of the panel
buttons. Even if your data is scattered across the drive in a complex hierarchy of folders and paths, you can instantly
call up a specific file—no matter how deeply hidden—with a single button-press.
1In the List View display, select the Song/Style to be memorized, then press the [E] (MEMORY) button.
2Press one of the SONG [I]–[IV] buttons (for Songs) or one of the STYLE category selection buttons other than
[FILE ACCESS] button (for Styles).
The path is memorized to the selected button.
3Exit from the Song/Style Selection display by pressing the [EXIT] button, then call up the memorized path.
To call up the memorized path for a Song, simply press the appropriate SONG button selected in step 2.
To call up the memorized path for a Style, first turn on the [FILE ACCESS] button, then press the appropriate
STYLE button selected in step 2.
28 Tyros4 Owner’s Manual
If you’ve saved a lot of files to a USER, HD or USB drive, it may be difficult to find the desired file quickly. To make it
easier to find the files you want, you can organize your files in folders, rename the files, delete unnecessary files, etc.
These operations are done in the File Selection display.
Creating a New Folder
This operation lets you create new folders. Folders can be created, named and organized as
desired, making it easier to find and select your original data.
1In the file selection display, select the appropriate tab (USER,
HD or USB) to which you want to save the data by using the
TAB [][] buttons.
If you want to create a new folder within the existing folder, also select the folder
here.
2Press the [7 ] (FOLDER) button to call up the naming display
for a new folder.
3Input the name of the new folder (see page 31).
File Management
A new folder cannot be made in the
PRESET tab.
The maximum number of files/folders
which can be stored in a folder is 500.
In the USER tab display, folder directo-
ries can contain up to four levels. The
maximum total number of files/folders
which can be stored differs depending
on the file size and the length of the file/
folder names.
NOTE
NOTE
NOTE
2
1
The following marks cannot be entered
for a file/folder name.
¥ / : * ? " < > |
NOTE
Tyros4 Owner’s Manual 29
Basic Operations
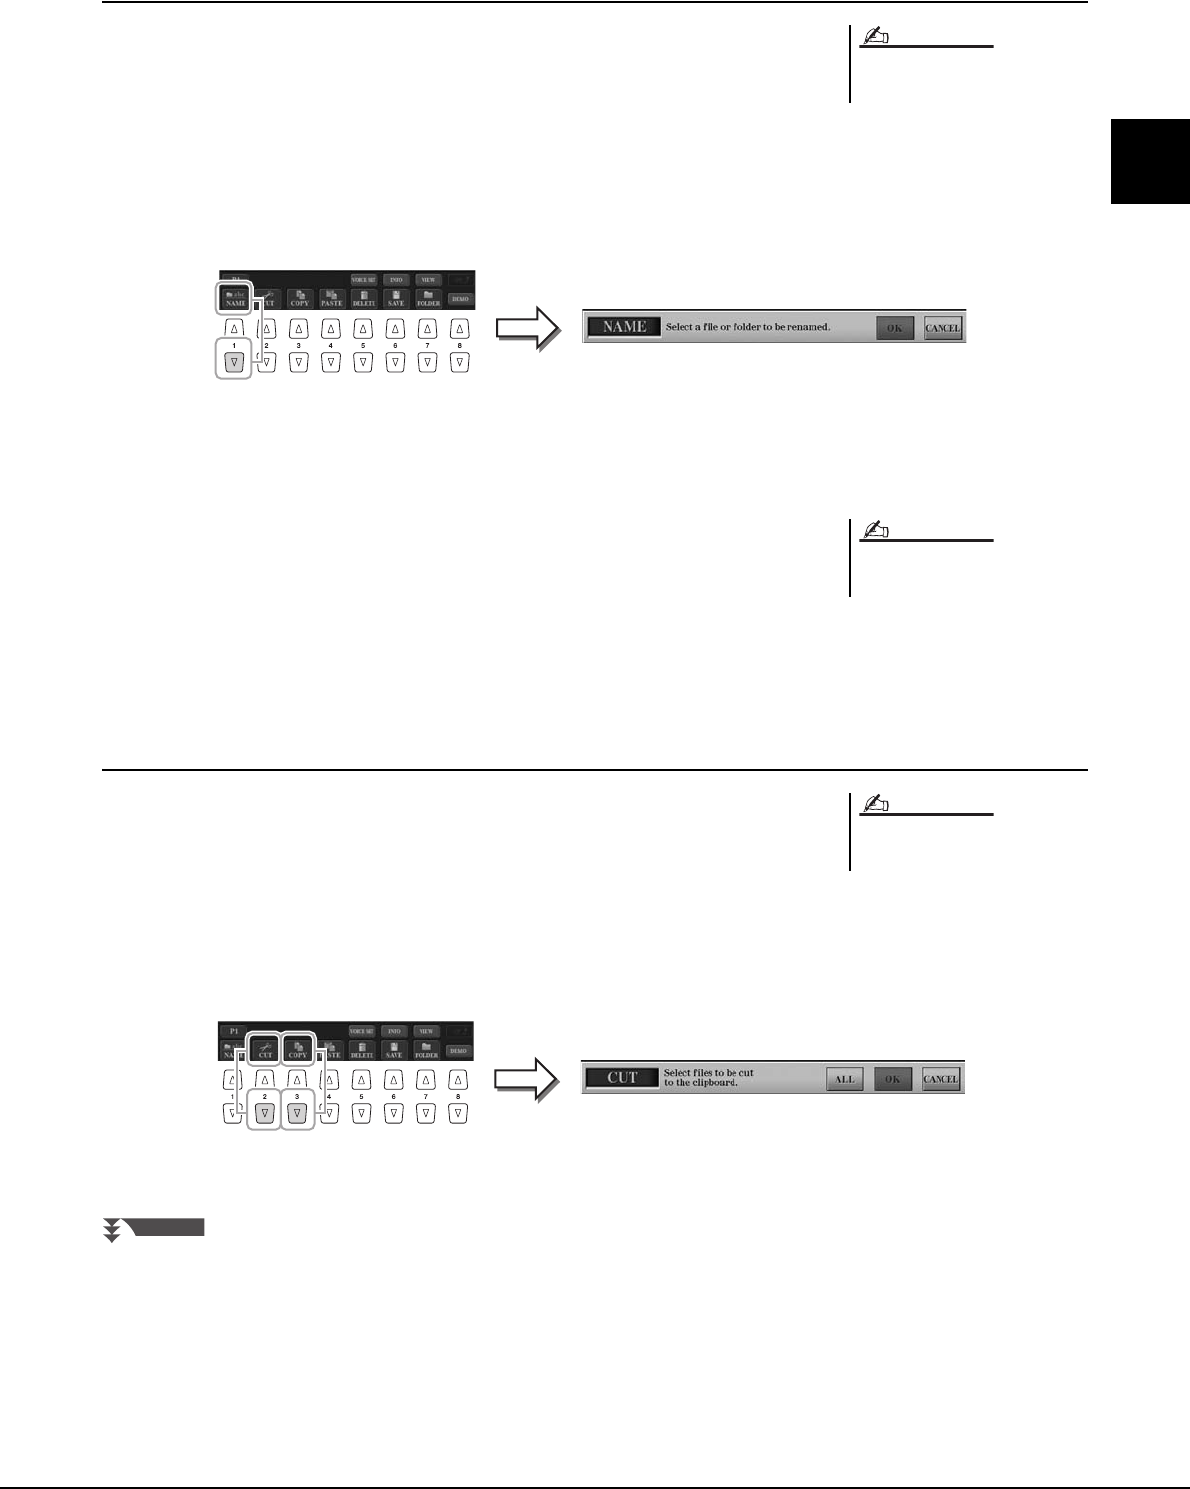
Renaming Files/Folders
This operation lets you rename files/folders.
1Call up the display containing the file/folder you want to
rename.
2Press the [1 ] (NAME) button.
The pop-up window for the Rename operation appears at the bottom of the dis-
play.
3Press one of the [A]–[J] buttons corresponding to the desired
file/folder.
4Press the [7 ] (OK) button to confirm the file/folder selection.
5Input the name (characters) of the selected file or folder
(page 31).
The renamed file/ folder appears on the display at the appropriate position among
the files in alphabetical order.
Copying or Moving Files
This operation lets you copy or cut a file and paste it to another location (folder).
You can also copy a folder (but not move it) by using the same procedure.
1Call up the display containing the file/folder you want to copy.
2Press the [3 ] (COPY) button to copy or [2 ] (CUT) to move.
The pop-up window for the Cut operation appears at the bottom of the display.
Files in the PRESET tab cannot be
renamed.
NOTE
To cancel the Rename operation, press
the [8 ] (CANCEL) button.
NOTE
Files in the PRESET tab cannot be
moved. They can only be copied.
NOTE
NEXT PAGE
30 Tyros4 Owner’s Manual
3Press one of the [A]–[J] buttons corresponding to the desired
file/folder.
To cancel the selection, press the same [A]–[J] button again.
Press the [6 ] (ALL) button to select all files/folders indicated on the current dis-
play including the other pages. To cancel the selection, press the [6 ] (ALL
OFF) button again.
4Press the [7 ] (OK) button to confirm the file/folder selection.
5Select the destination tab (USER, HD or USB) to paste the file/
folder, by using the TAB [][] buttons.
If necessary, select the destination folder by using the [A]–[J] buttons.
6Press the [4 ] (PASTE) button to paste the file/folder selected
in step 3.
The pasted file/folder appears on the display at the appropriate position among the
files in alphabetical order.
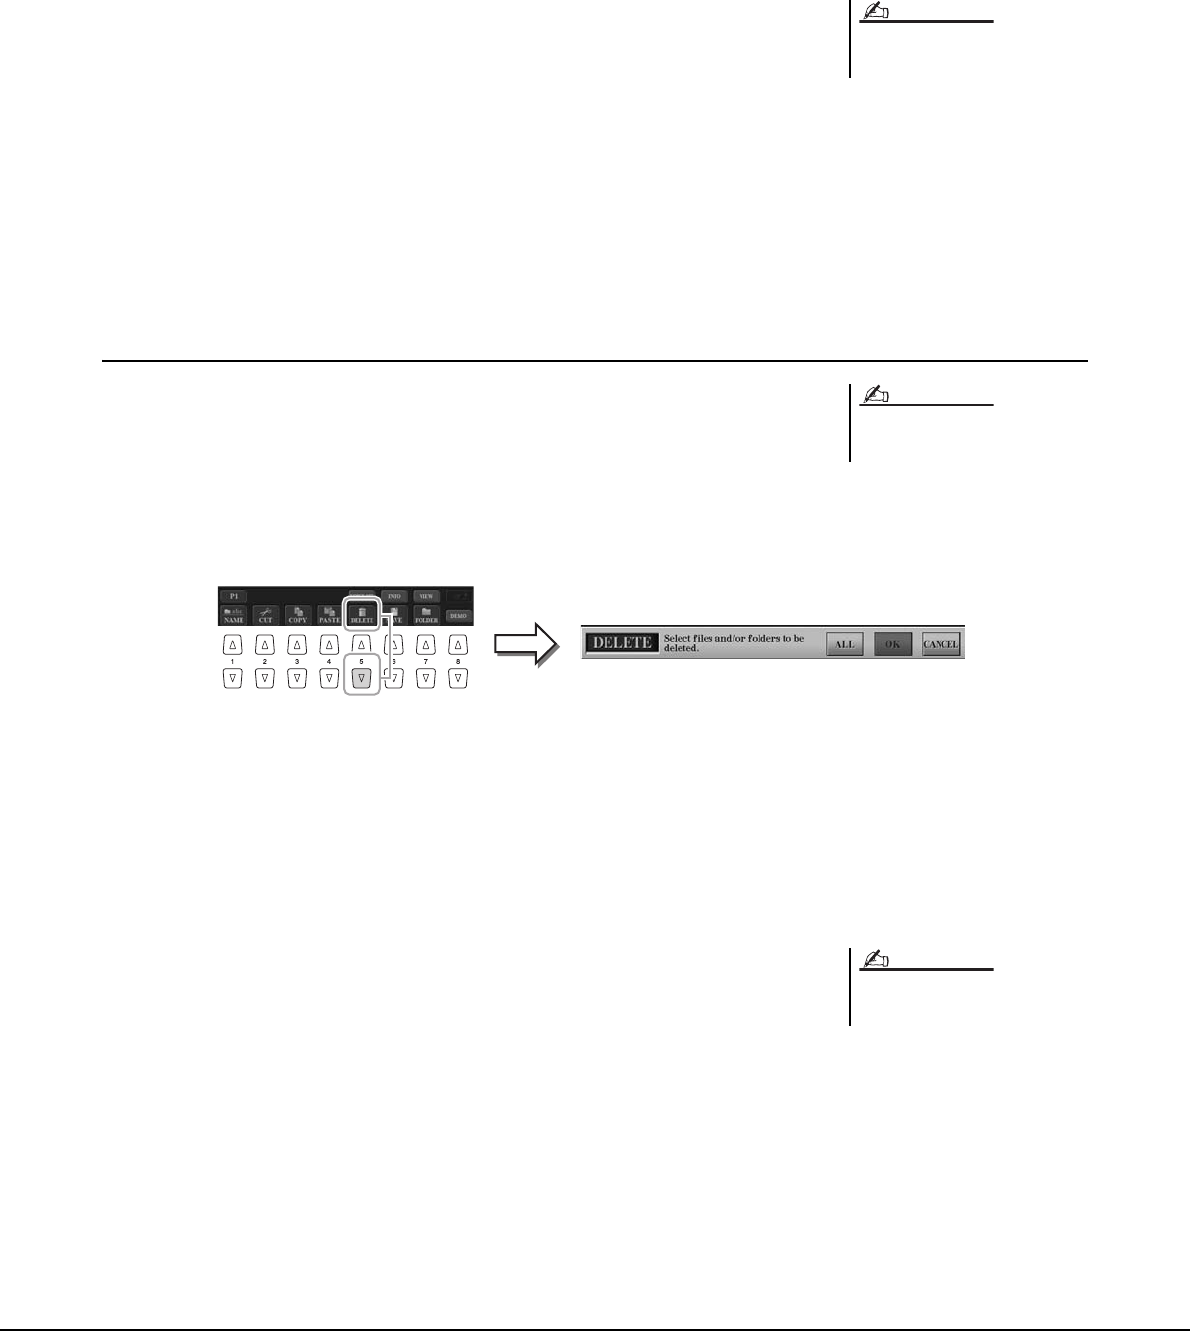
Deleting Files/Folders
This operation lets you delete a file/folder.
1Call up the display containing the file/folder you want to delete.
2Press the [5 ] (DELETE) button.
The pop-up window for the Delete operation appears at the bottom of the display.
3Press one of the [A]–[J] buttons corresponding to the desired
file/ folder.
To cancel the selection, press the same [A]–[J] button again.
Press the [6 ] (ALL) button to select all files/folders indicated on the current dis-
play including the other pages. To cancel the selection, press the [6 ] (ALL
OFF) button again.
4Press the [7 ] (OK) button to confirm the file/folder selection.
5Follow the on-display instructions.
• YES ......................Delete the file/folder
• YES ALL .............Delete all selected files/folders
• NO........................Leave the file/folder as is without deleting
• CANCEL .............Cancel the Delete operation
To cancel the Copy operation, press the
[8 ] (CANCEL) button.
NOTE
Files in the PRESET tab cannot be
deleted.
NOTE
To cancel the Delete operation, press
the [8 ] (CANCEL) button.
NOTE
Tyros4 Owner’s Manual 31
Basic Operations
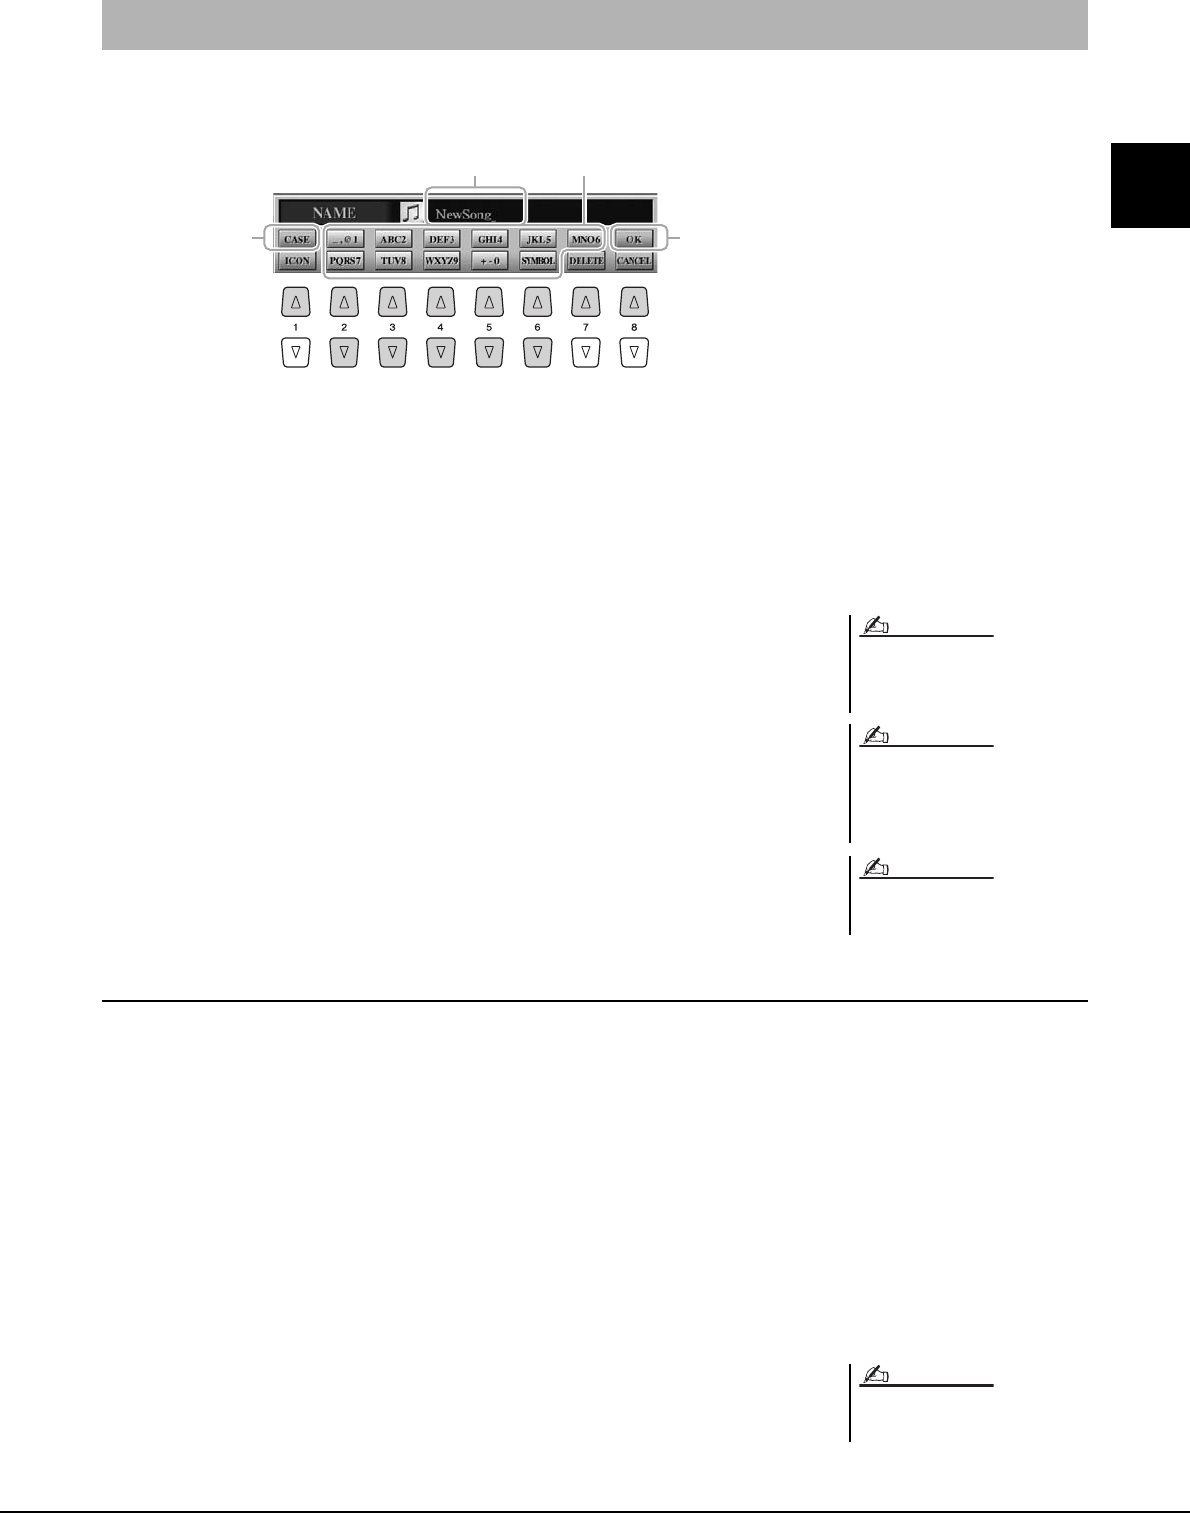
The instructions that follow show you how to enter characters for naming your files/folders, inputting keywords, etc.
Entering characters should be done in the display shown below.
1Change the type of character by pressing the [1 ] button.
• CASE ...................capital letters, numbers, marks
• case.......................lowercase letters, numbers, marks
2Use the [DATA ENTRY] dial to move the cursor to the desired
position.
3Press the [2 ]–[6 ] and [7 ] buttons, corresponding to
the character you wish to enter.
To actually enter the selected character, move the cursor or press another letter-
input button. Alternately, you can wait for a short time and the characters will be
entered automatically.
For details on entering characters, refer to “Other character-entry operations”
below.
4Press the [8 ] (OK) button to actually enter the new name and
return to the previous display.
Other character-entry operations
-Deleting characters
Move the cursor to the character you wish to delete by using the [DATA ENTRY] dial, and
press the [7 ] (DELETE) button. To delete all characters on the line at once, press and
hold the [7 ] (DELETE) button.
-Entering marks or space
1Press the [6 ] (SYMBOL) button to call up the mark list.
2Use the [DATA ENTRY] dial to move the cursor to the desired mark or space, then
press the [8 ] (OK) button.
-Selecting custom icons for files (shown at left of file name)
1Press the [1 ] (ICON) button to call up the ICON SELECT display.
2Select the icon by using the [A]–[J] buttons, [3 ]–[5 ] buttons or [DATA
ENTRY] dial. The ICON display includes several pages. Press the TAB [][] but-
tons to select different pages.
3Press the [8 ] (OK) button to apply the selected icon.
Entering Characters
2 3
1 4
Several different characters are assigned to each button,
and the characters change each time you press the button.
The file name can contain up to 41 char-
acters and the folder name can contain
up to 50 characters.
When entering a password for a website
or the key for wireless LAN connection,
the characters are converted to asterisks
(*) for security purposes.
To cancel the character-entering opera-
tion, press the [8 ] (CANCEL) button.
NOTE
NOTE
NOTE
To cancel the operation, press the [8
] (CANCEL) button.
NOTE
32 Tyros4 Owner’s Manual
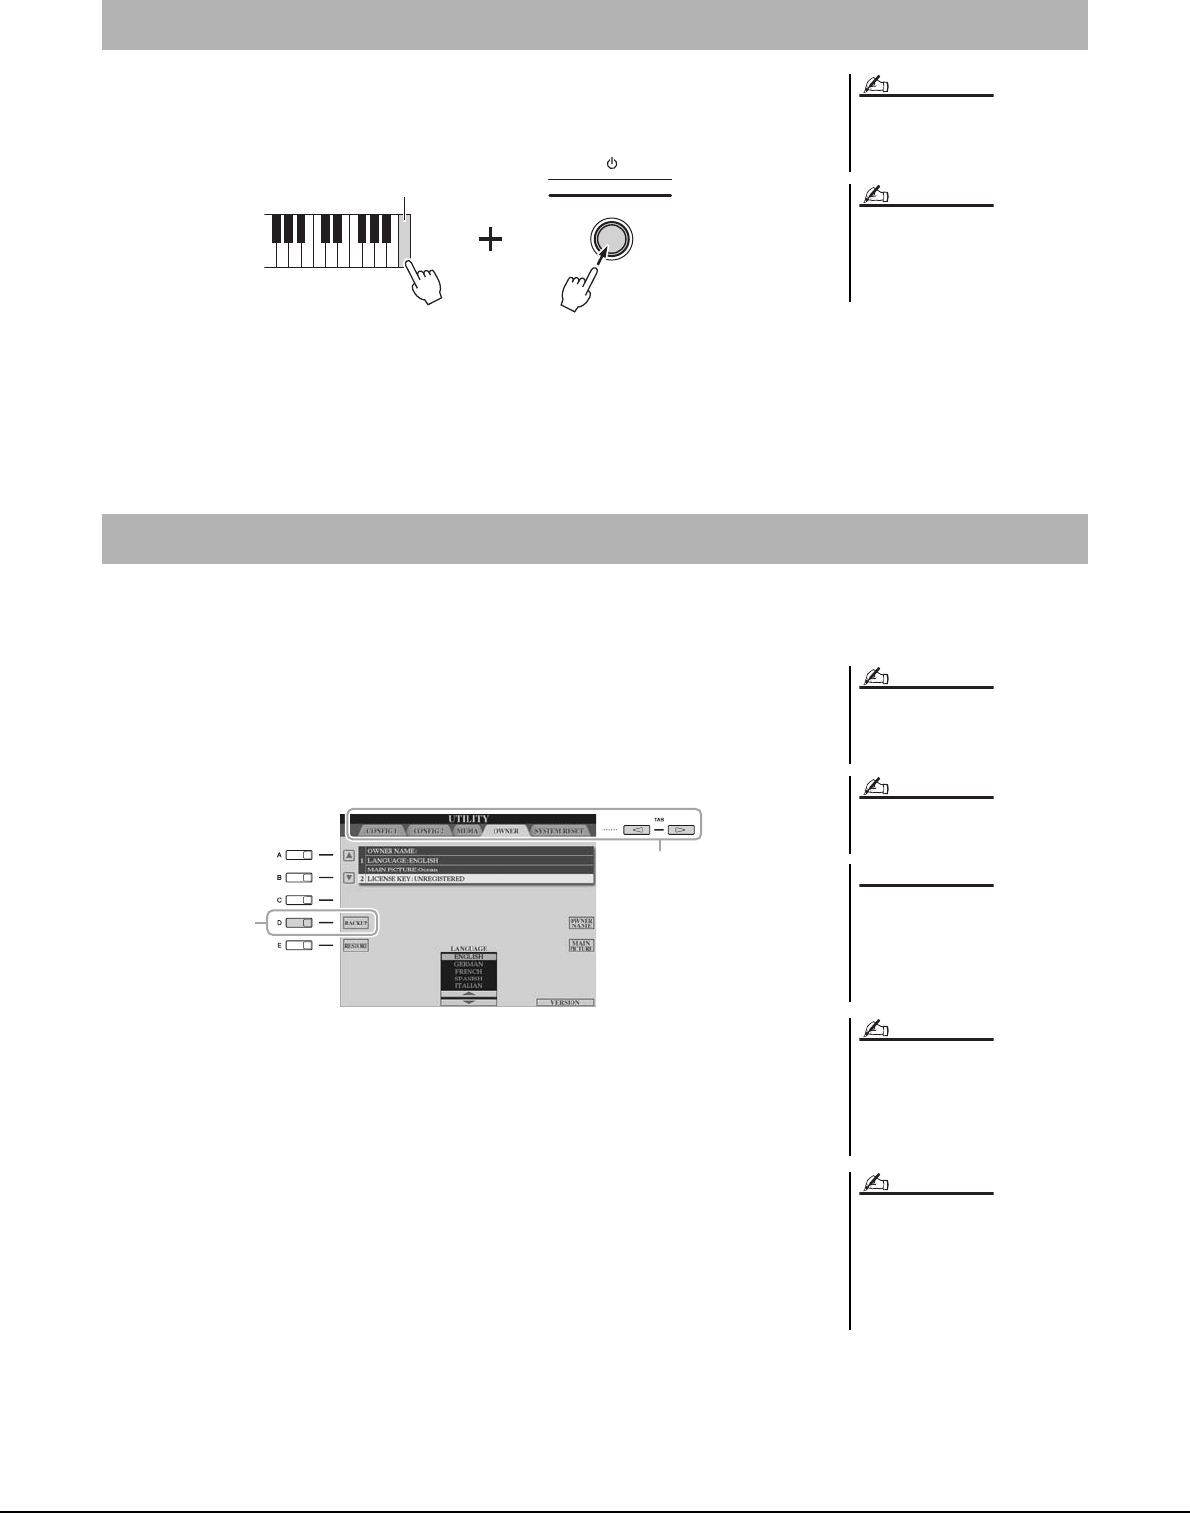
While holding the C6 key (right-most key on the keyboard), turn the power switch on.
This restores the all settings (except Internet Settings) to the factory default.
You can also restore a specified setting to the factory default value, or save/load your own
reset settings. Call up the operation display: [FUNCTION] [I] UTILITY TAB
[][] SYSTEM RESET. For details, refer to the Reference Manual on the website.
For maximum data security Yamaha recommends that you copy or save your important data to a USB storage device.
This provides a convenient backup if the internal memory is damaged.
1Insert/connect the backup USB storage device (destination).
2Call up the operation display.
[FUNCTION] [I] UTILITY TAB [ ][] OWNER
3Press the [D] (BACKUP) button to save the data to the USB stor-
age device.
To restore the data, press the [E] (RESTORE) button in this display. When the
operation is complete, the instrument will be restarted automatically.
Restoring the Factory-programmed Settings
If you want to initialize only the Regis-
tration Memory settings, turn the power
switch on while holding the B5 key.
To reset the Internet Settings, call up the
operation display: [INTERNET] [5
] SETTING [A] NETWORK SET-
TINGS [E] INITIALIZE SET UP.
NOTE
NOTE
C6
Data Backup
Before using a USB storage device, be
sure to read “Connecting a USB Storage
Device” on page 100.
Completing the backup/restore opera-
tion may take a few minutes.
Move the Protected Songs which
are saved to the USER display
before restoring. If the songs are
not moved, the operation deletes
the data.
To save the Song, Style, Multi Pad, Reg-
istration Memory Bank and Voice inde-
pendently, execute the Copy & Paste
operation from the File Selection dis-
play (page 29).
To save the Music Finder Record, Effect,
MIDI Template and System File, call up
the operation display: [FUNCTION]
[I] UTILITY TAB [][] SYSTEM
RESET. For more information, refer to
the Reference Manual on the website.
NOTE
NOTE
NOTICE
NOTE
NOTE
2
3
Tyros4 Owner’s Manual 33
1
1
1
Voices – Playing the Keyboard –
Voices
– Playing the Keyboard –
The Tyros4 features a wide variety of exceptionally realistic instrumen-
tal Voices, including piano, guitar, strings, brass, wind instruments and
more.
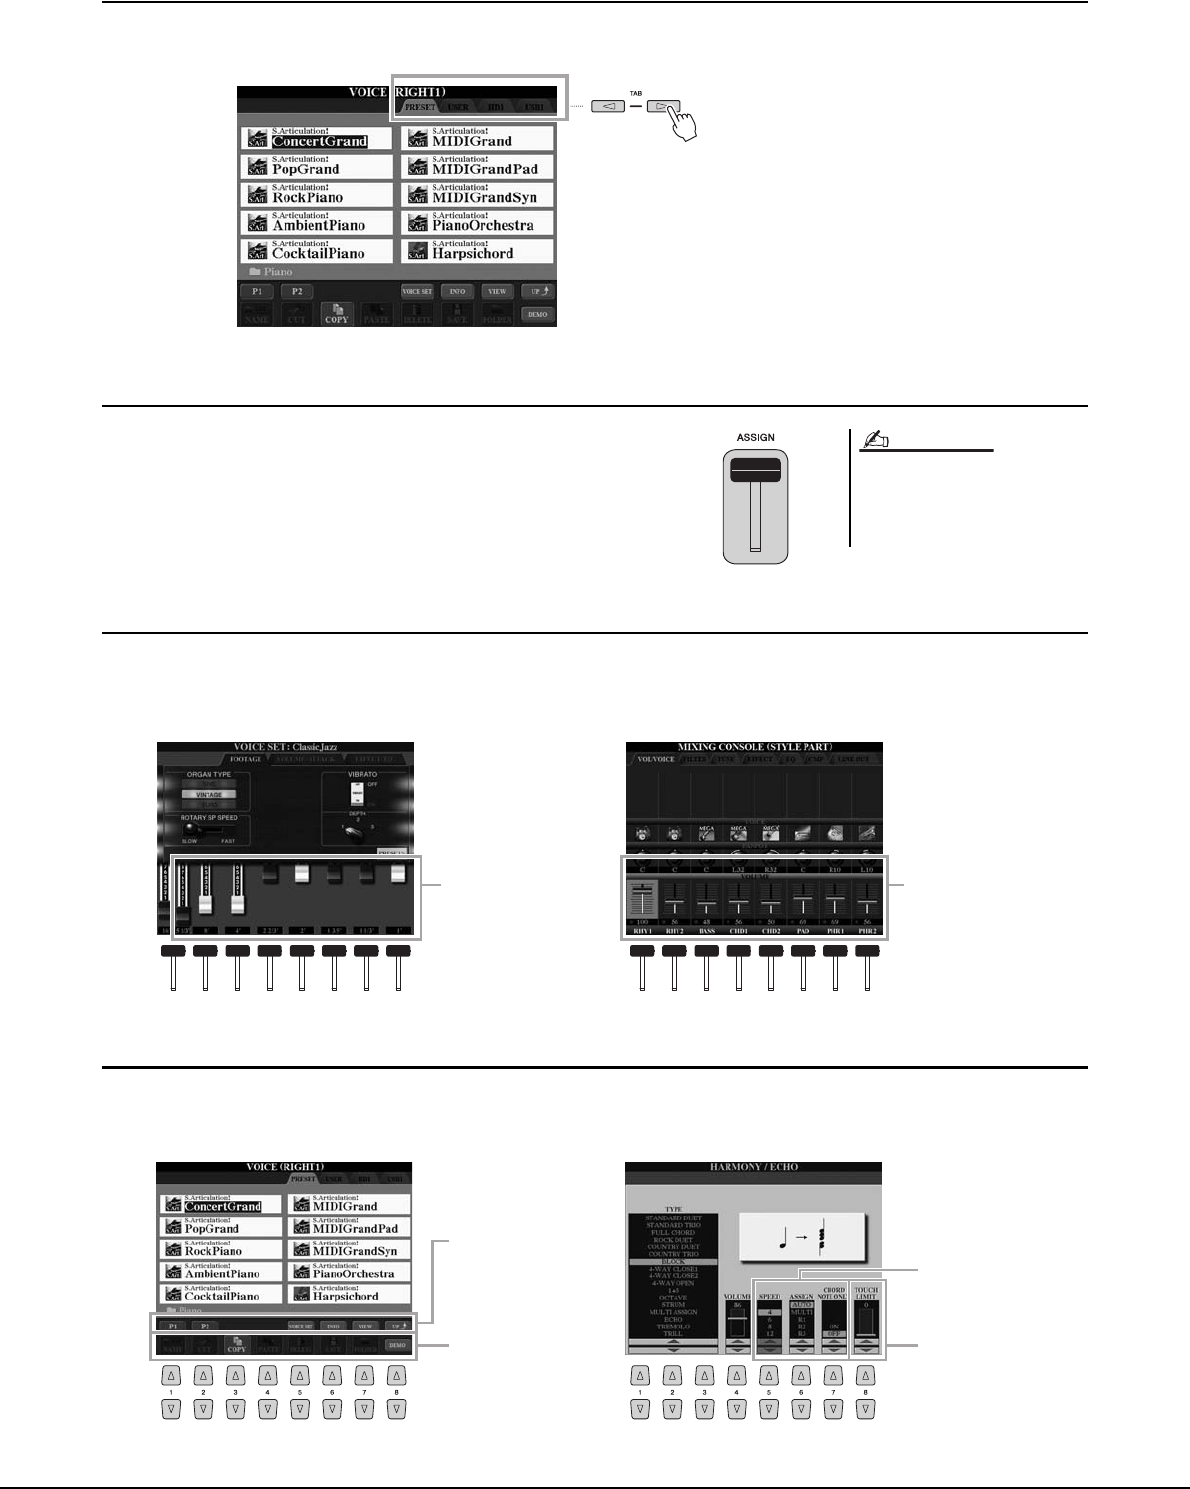
Selecting a Voice (RIGHT 1) and playing the keyboard
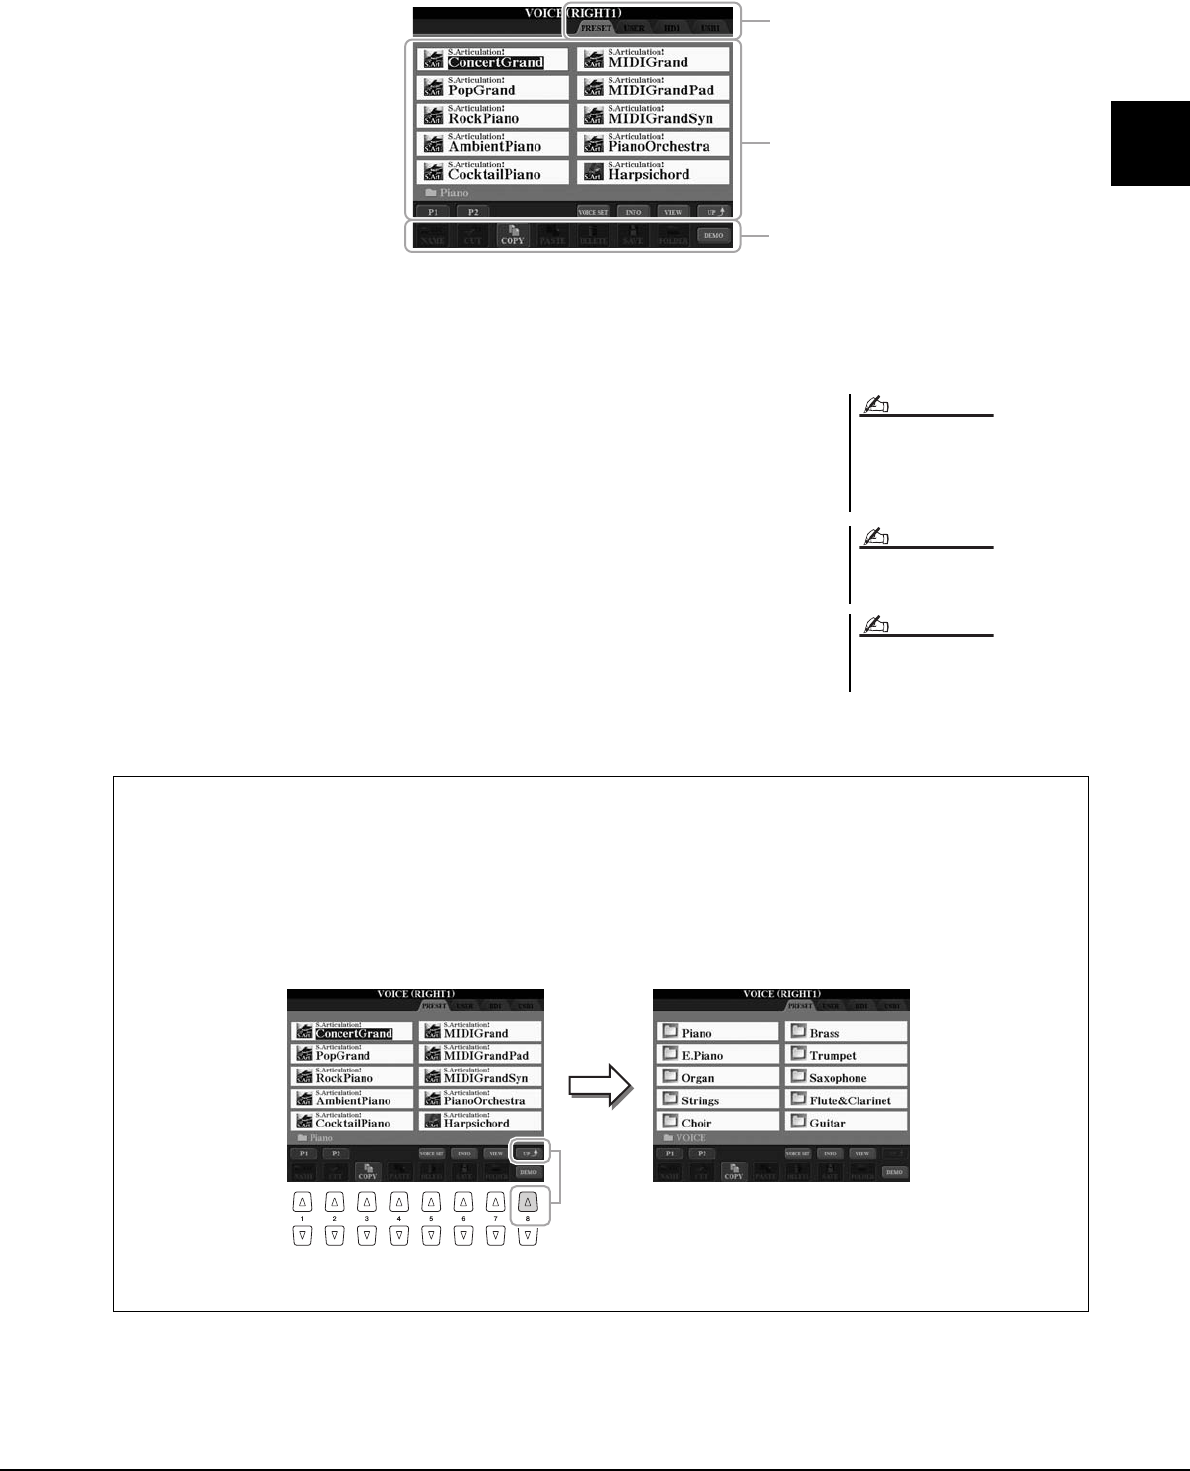
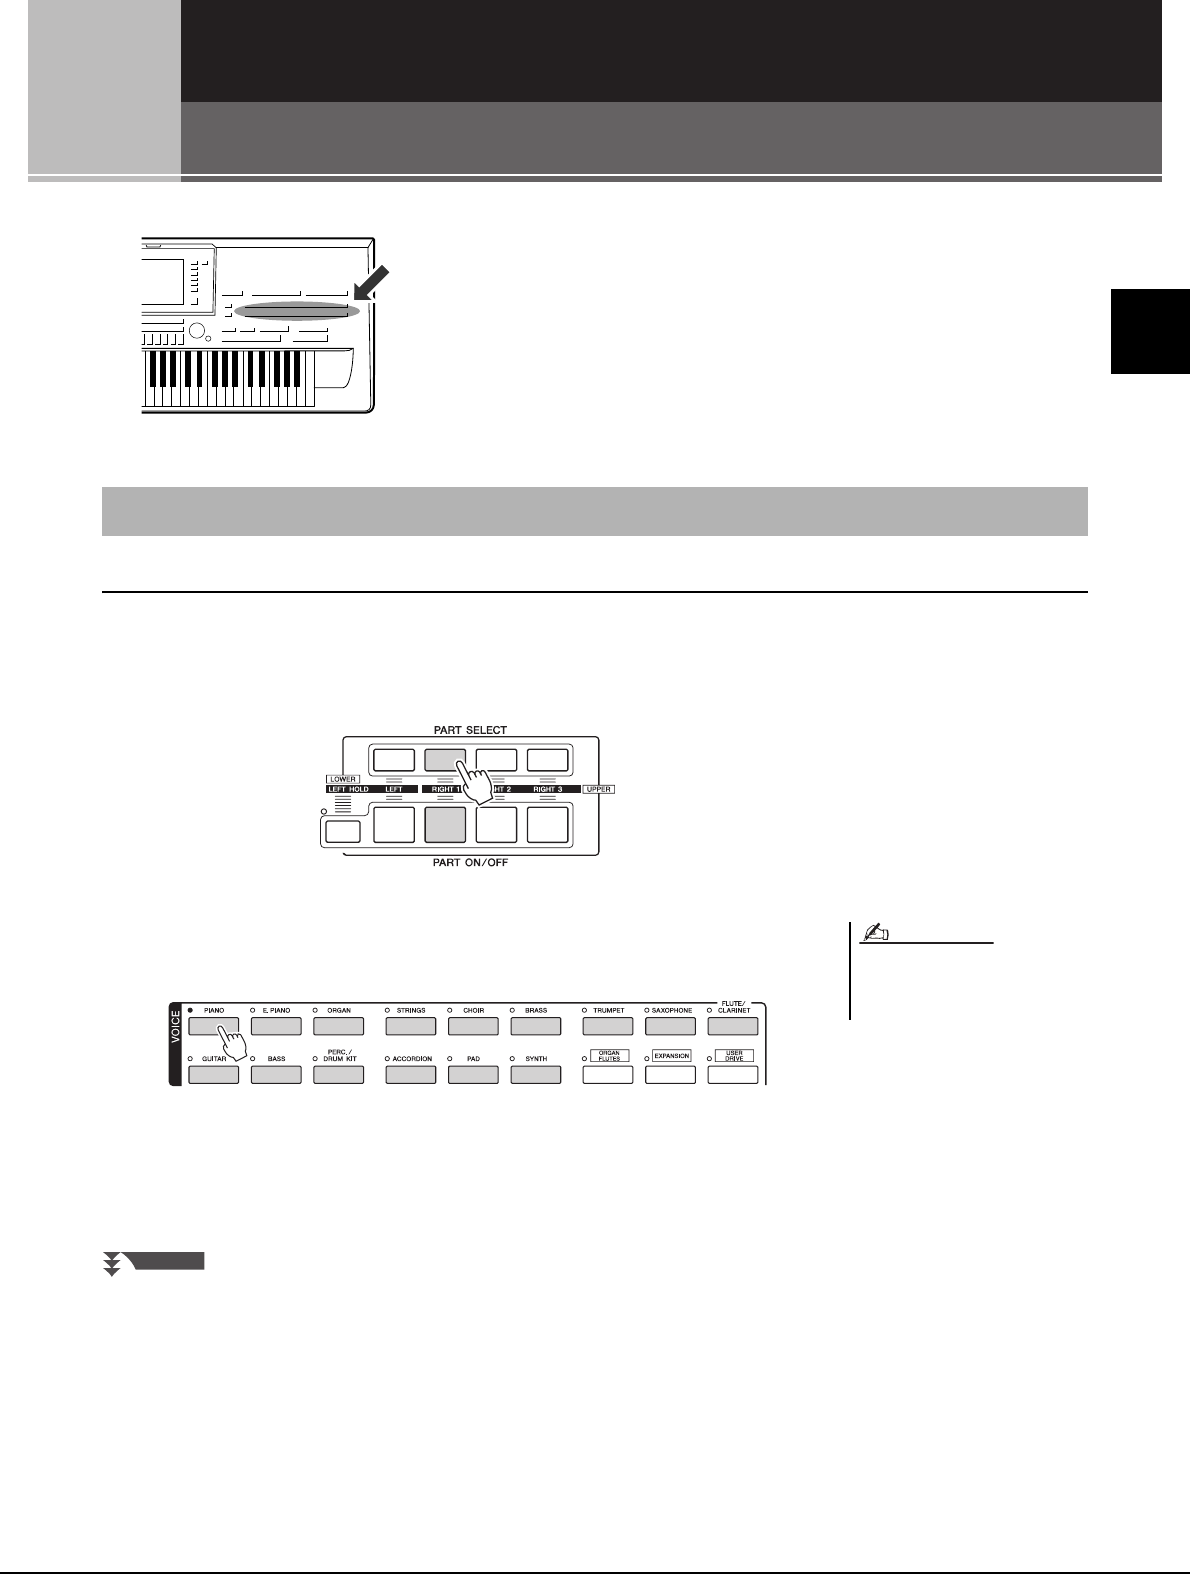
1Press the PART SELECT [RIGHT 1] button.
Make sure that the PART ON/OFF [RIGHT1] button is also turned on. If it is
turned off, the right-hand part will not sound.
2Press one of the VOICE category selection buttons to select a
Voice category and call up the Voice Selection display.
The preset Voices are categorized and contained in appropriate folders. Voice but-
tons on the panel correspond to the categories of the preset Voices. For example,
press the [PIANO] button to display various piano Voices.
Playing Preset Voices
For more information on the VOICE cat-
egory selection buttons, refer to
page 36.
NOTE
NEXT PAGE
34 Tyros4 Owner’s Manual
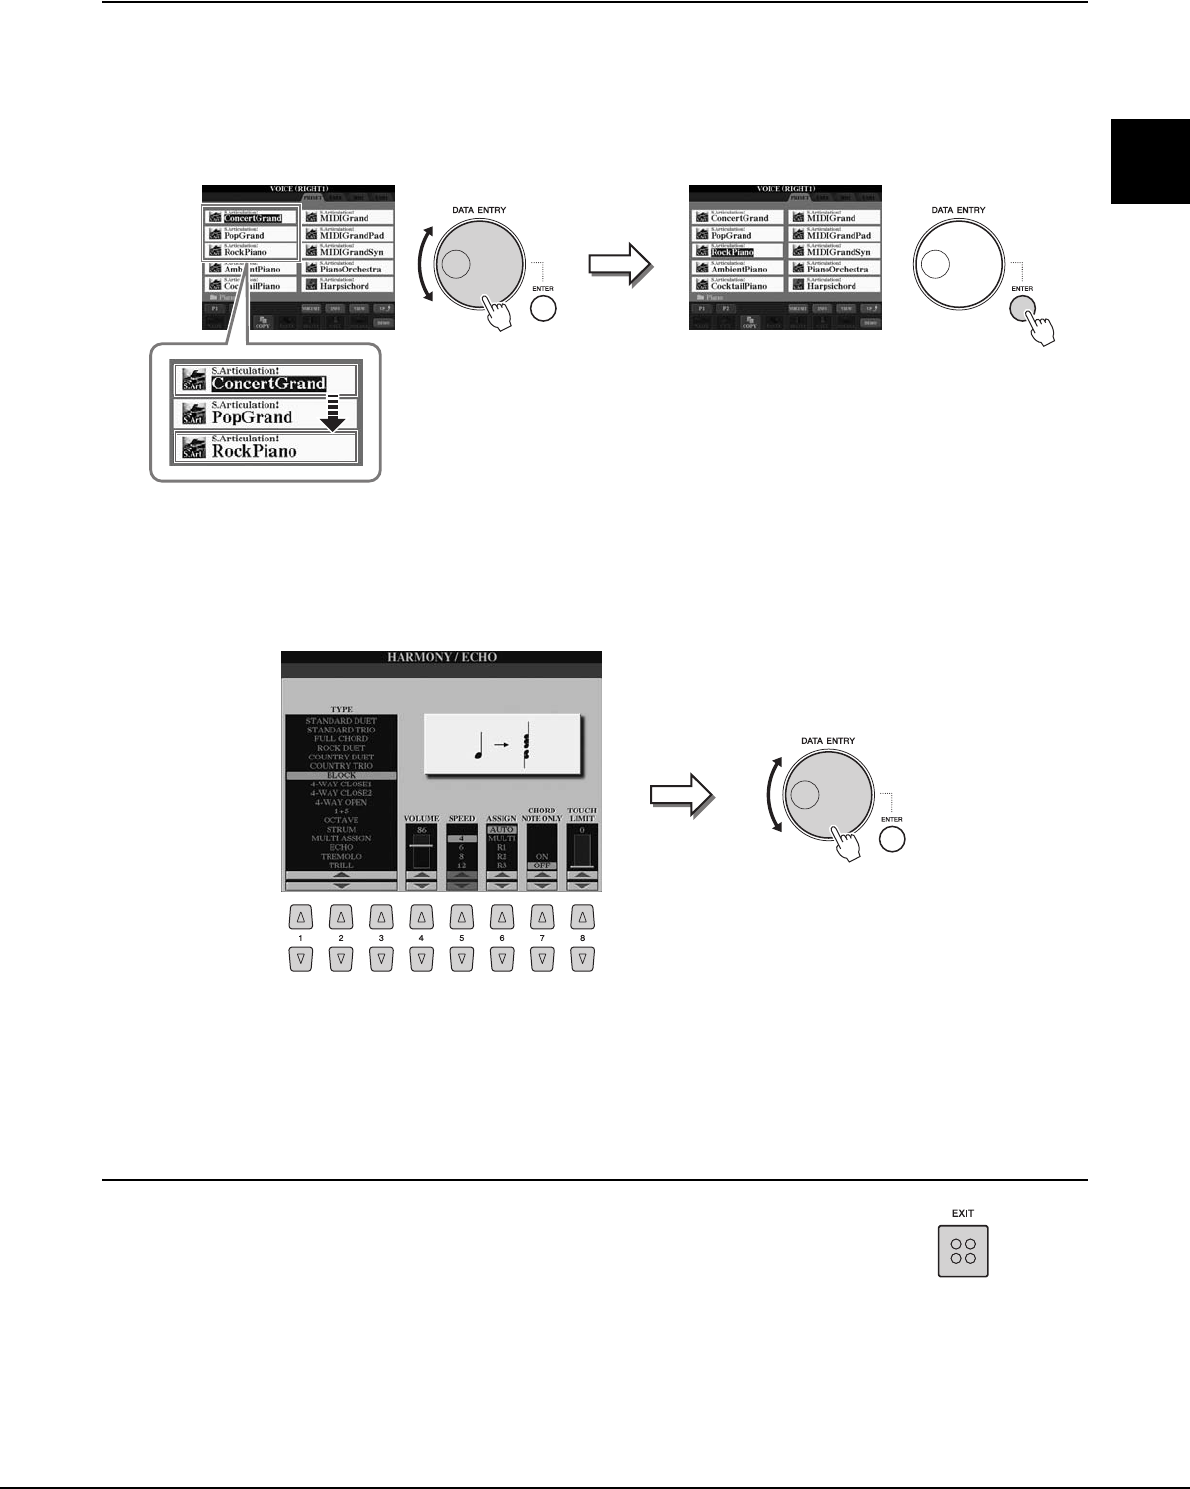
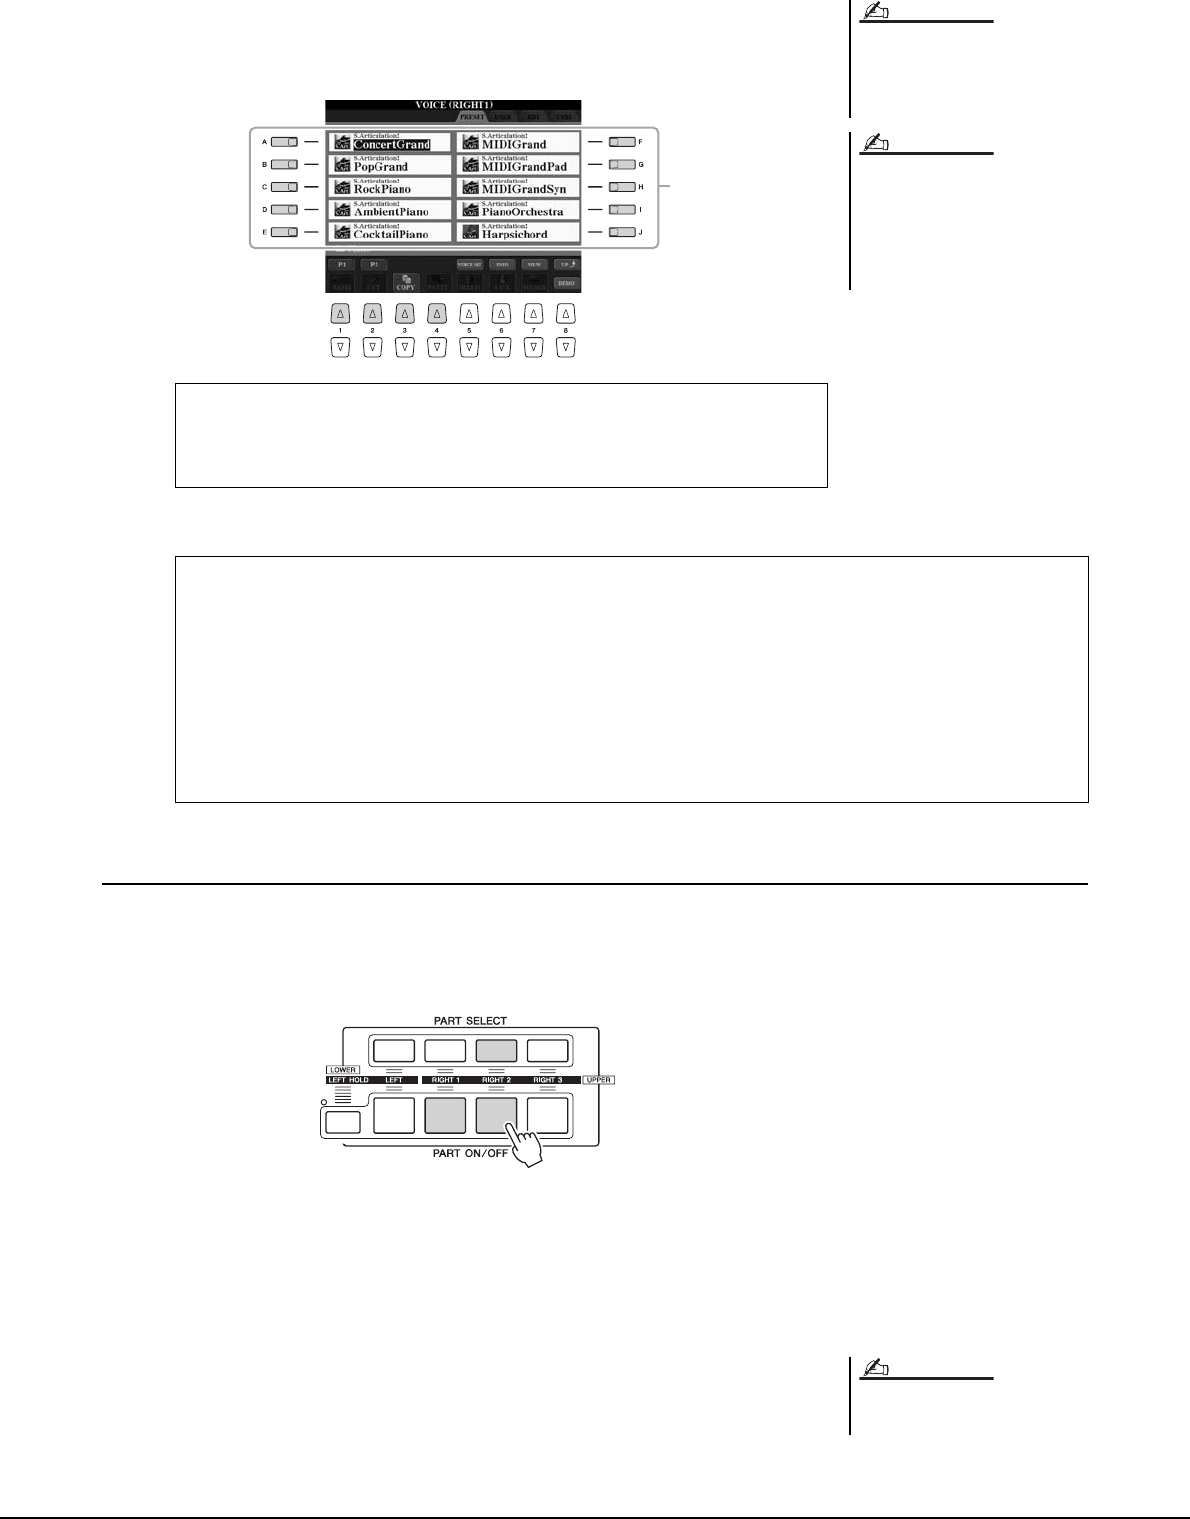
3Press one of the [A]–[J] buttons to select the desired Voice.
To call up the other display pages, press one of the [1 ]–[4 ] buttons or press
the same VOICE button again.
4Play the keyboard.
Playing Two or Three Voices Simultaneously
1Make sure that PART ON/OFF [RIGHT 1] button is turned on.
2Press the PART ON/OFF [RIGHT 2] button to turn it on.
3Press one of the VOICE category selection buttons to call up
the Voice Selection display for the Right 2 part.
4Press one of the [A]–[J] buttons to select the desired Voice.
5Play the keyboard.
The Voice selected for RIGHT 1 (page 33) and the Voice selected here are
sounded simultaneously in a layer.
Voice RIGHT 3 can be set in the same way described above, by using the [RIGHT
3] button instead.
The Voice type and its defining charac-
teristics are indicated above the Preset
Voice name. For details on the charac-
teristics, see page 36.
You can call up the information for the
selected Voice by pressing the [6 ]
(INFO) button (Some Voices do not
have the information display.) To close
the information display, press any panel
button.
NOTE
NOTE
3
To listen to the demo songs for each Voice
Press the [8 ] (DEMO) button to start the Demo for the selected Voice. To
stop the demo, press the [8 ] button again.
Recalling your favorite Voices easily
The Tyros4 has a huge amount of high-quality Voices, covering an exceptionally broad range of instrument
sounds—making it perfect for virtually every musical application. However, the sheer number of Voices may
seem overwhelming at first. By using the [USER DRIVE] button, you can easily recall your favorite Voice.
1Copy your favorite Voice from the Preset drive to the User drive.
Refer to page 29 for details on the copy operation.
2Press the [USER DRIVE] button to call up the User drive of the Voice Selection display, then press one
of the [A]–[J] buttons to select the desired Voice.
You can save the settings to Registra-
tion Memory. See page 72.
NOTE
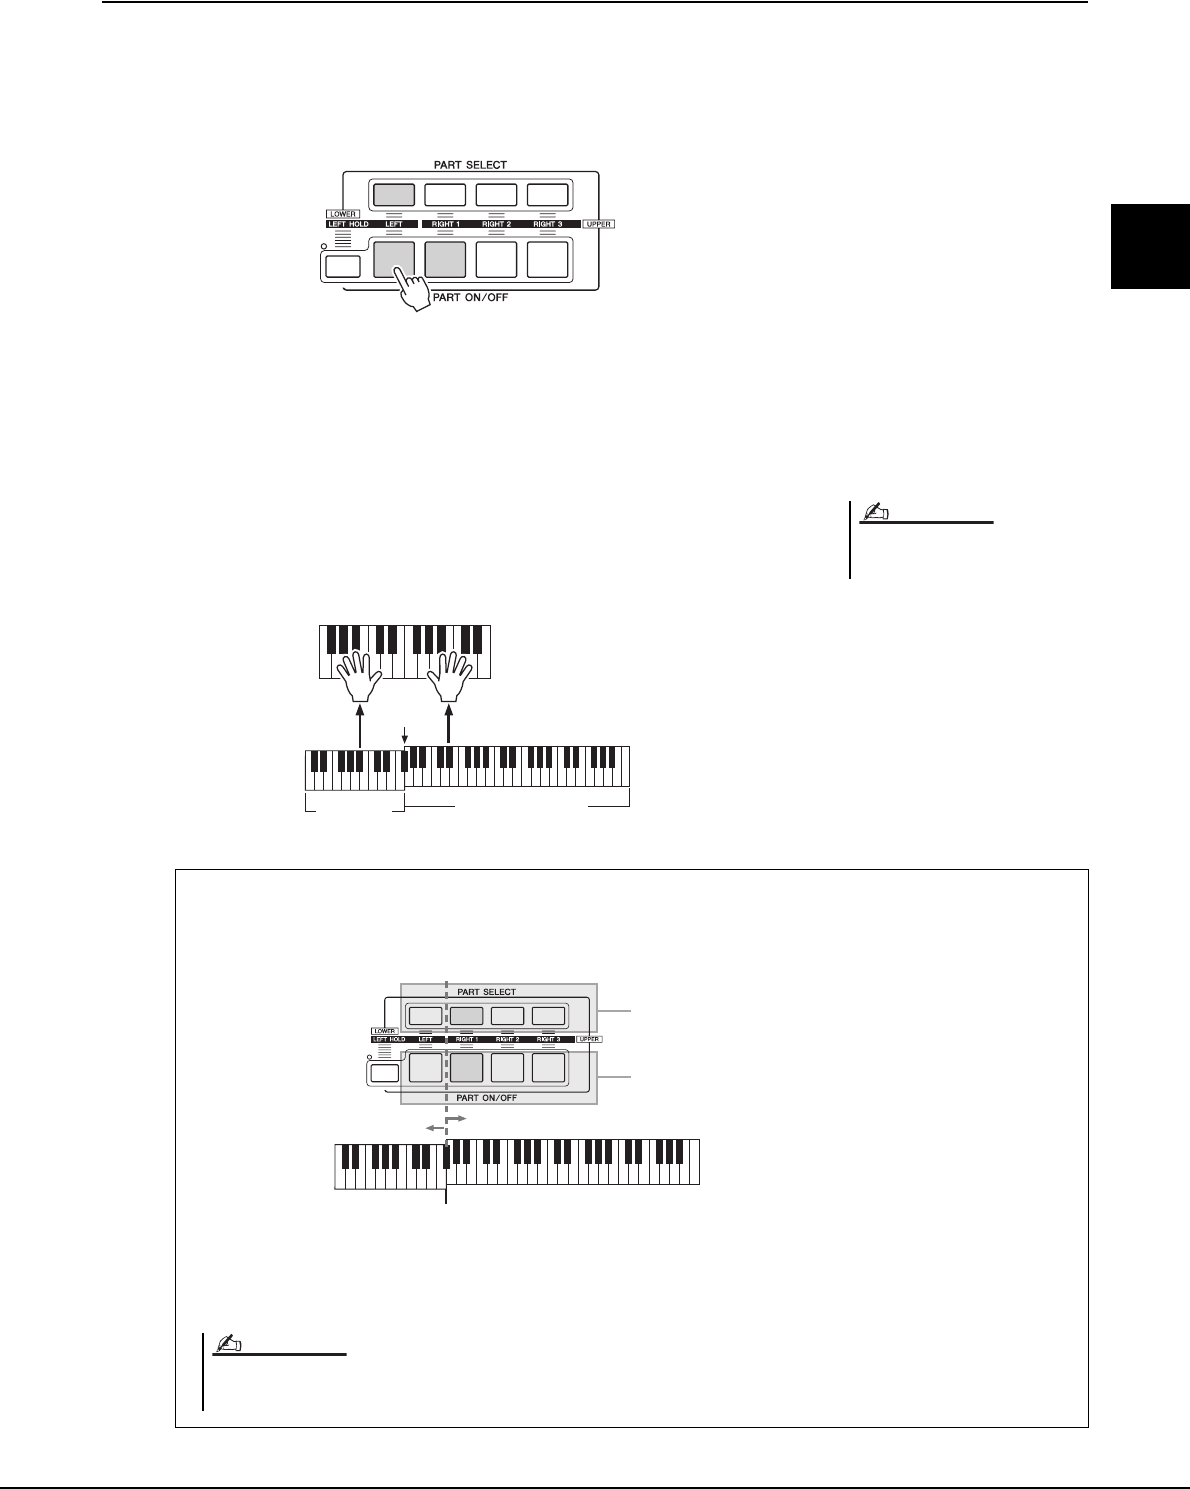
Tyros4 Owner’s Manual 35
1
Voices – Playing the Keyboard –
Playing Different Voices with the Left and Right Hands
1Make sure that some of PART ON/OFF [RIGHT 1]–[RIGHT 3]
buttons are turned on.
2Press the PART ON/OFF [LEFT] button to turn it on.
3Press one of the VOICE category selection buttons to call up
the Voice Selection display for the Left part.
4Press one of the [A]–[J] buttons to select the desired Voice.
5Play the keyboard.
The notes you play with your left hand sound one Voice (LEFT Voice selected
above), while the notes you play with your right sound a different Voices (RIGHT
1–3 Voices).
You can save the settings to Registra-
tion Memory. See page 72.
NOTE
Split Point
Voice RIGHT 1, 2, 3
(UPPER)
Voice LEFT
(LOWER)
Keyboard Parts
Voices can be assigned independently to each of the four keyboard parts: Right 1, Right 2, Right 3 and Left.
You can combine these parts by using the PART ON/OFF buttons to create a rich, ensemble sound.
When the LEFT part is off, the RIGHT 1–3 Voices can be played over the entire keyboard. When the LEFT
part is on, keys lower than F#2 (the Split Point) are set for playing the LEFT part and those higher than the
Split Point are set for playing the RIGHT 1–3 parts.
You can confirm the currently selected part by checking which
lamp of the PART SELECT buttons is lit. To select the desired
keyboard part, press the corresponding part button.
If you want to turn a specified part on, press the
desired PART ON/OFF button.
Upper section of the keyboard
Split Point (F#2)
Lower section of the keyboard
To change the Split Point, press: [FUNCTION] [C] STYLE SETTING/SPLIT POINT/CHORD FINGERING TAB [][] SPLIT
POINT. For more information, refer to the Reference Manual on the website.
NOTE
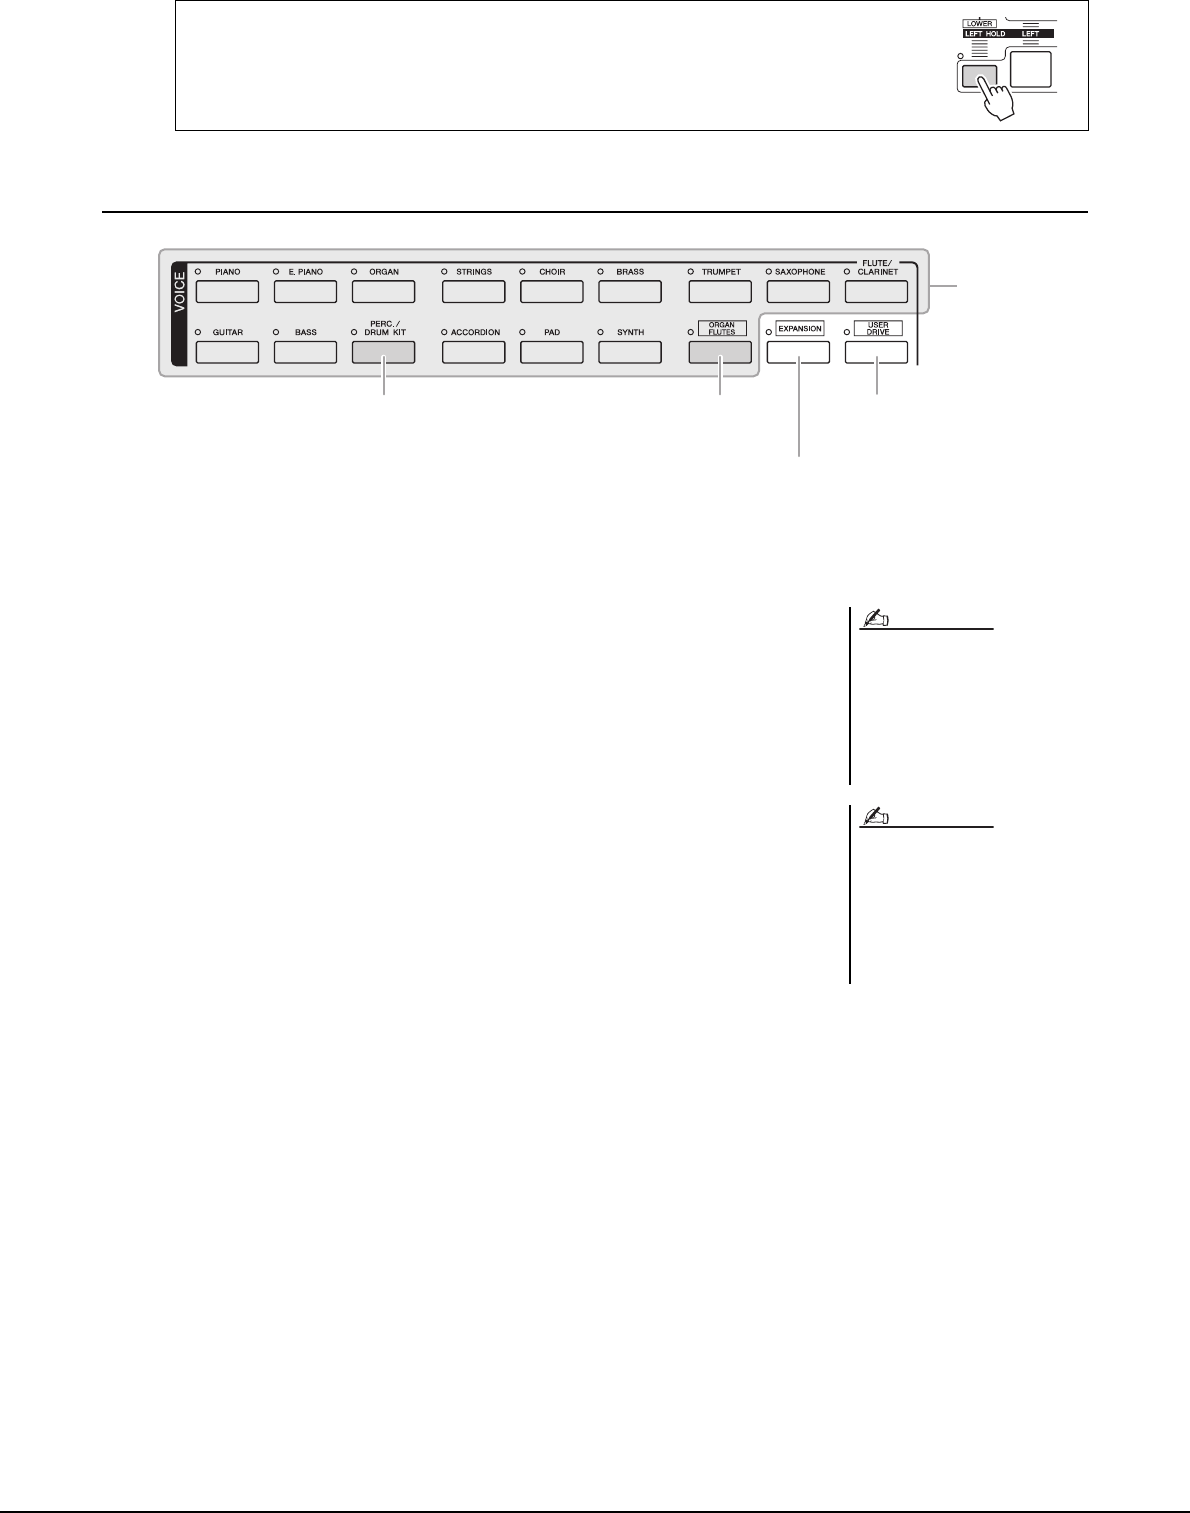
36 Tyros4 Owner’s Manual
Voice Types
Voice Characteristics
The Voice type and its defining characteristics are indicated above the Voice name—Live!,
Cool!, Sweet!, etc.. For detailed explanation, refer to the Reference Manual.
In this section, only Mega Voice and Super Articulation Voices (SA and SA2) are
explained. These Voices have special characteristics you should be aware of, and they
require specific performance techniques to bring out all of their expressive qualities.
-MegaVoices
What makes MegaVoices special is their use of velocity switching. Each velocity
range (the measure of your playing strength) has a completely different sound.
For example, a guitar MegaVoice includes the sounds of various performance
techniques. In conventional instruments, different Voices having those sounds
would be called up via MIDI and played in combination to achieve the desired
effect. However, now with MegaVoices, a convincing guitar part can be played
with just a single Voice, using specific velocity values to play the desired sounds.
Because of the complex nature of these Voices and the precise velocities need to
play the sounds, they’re not intended for playing from the keyboard. They are,
however, very useful and convenient when creating MIDI data—especially when
you want to avoid using several different Voices just for a single instrument part.
Holding the LEFT part Voice (Left Hold)
This function causes the LEFT part Voice to be held even when the keys are released. Non-
decaying Voices such as strings are held continuously, while decay-type Voices such as piano
decay more slowly (as if the sustain pedal has been pressed).
Preset Voices
[USER DRIVE] button
(page 34)
Organ Flutes Voices
(page 44)
Expansion Voices
This is used for calling up Custom Voices (your original Voices
created with the Voice Creator function), or Premium Voices
(obtained via the Internet at our special website). For details,
refer to the section “Purchasing and Installing Premium Pack
Data” (page 38).
Percussion/Drum Voices
When one of the Voices is selected from this button, you can
play various drums and percussion instruments or SFX
(sound effects) sounds on the keyboard. Details are given in
the Drum List provided in the Data List on the website.
MegaVoices, SA and SA2 Voices are
only compatible with other models
which have those three types of Voices
installed. Any Song, Style or Multi Pads
data you’ve created on the Tyros4 using
these Voices will not sound properly
when played back on other instruments.
MegaVoices, SA and SA2 Voices sound
differently depending on the keyboard
range, velocity, touch, etc. Hence, if you
apply HARMONY/ECHO effect, change
the transpose setting or change the
Voice Set parameters, unexpected or
undesired sounds may result.
NOTE
NOTE
Tyros4 Owner’s Manual 37
1
Voices – Playing the Keyboard –
-Super Articulation Voices
The word “articulation” in music usually refers to the transition or continuity
between notes. This is often reflected in specific performance techniques, such as
staccato, legato and slur. Two types of Voices—Super Articulation (SA) Voices
and Super Articulation 2 (SA2) Voices—enable you to create these subtle musical
expressions, simply by how you play.
SA Voices (S.Articulation!)
The SA Voices provide many of same benefits as the MegaVoices, but with
greater playability and expressive control in real time.
For example, with the Saxophone Voice, if you play a C and then a D in a
very legato way, you will hear the note change seamlessly, as though a saxo-
phone player played it in a single breath. Similarly with the Concert Guitar
Voice, the D note would sound as a “hammer on”, without the string being
plucked again.
Depending on how you play, other effects such as subtle sound produced
when the keys are released or sustain sound that occur when you press the
damper pedal of a grand piano (for the Grand Piano Voice), shake or breath
noises (for the Trumpet Voice), or finger noises (for the Guitar Voice) will be
produced.
SA2 Voices (S. Articulation2!)
For wind instrument Voices and Violin Voices, a special technology called
AEM has been used, which features detailed samples of special expressive
techniques used on those specific instruments—to bend or slide into notes, to
“join” different notes together, or to add expressive nuances at the end of a
note, etc.
You can add these articulations by playing legato or non-legato, or by jump-
ing in pitch by around an octave. For example, using the Clarinet Voice, if
you hold a C note and play the Bb above, you’ll hear a glissando up to the Bb.
Some “note off” effects are also produced automatically when you hold a
note for over a certain time.
Each SA2 Voice has its own default vibrato setting, so that when you select a
SA2 Voice, the appropriate vibrato is applied regardless of the Modulation
wheel position. You can adjust the vibrato by moving the Modulation wheel.
You can also use the [ART. 1]/[ART. 2] buttons to add articulations to the SA and
SA2 Voices (page 40).
For details on how to best play each SA and SA2 Voice, call up the information
window (pressing the [6 ] (INFO) button in the Voice Selection display.)
For more information on AEM technol-
ogy, see below.
NOTE
The characteristics of SA2 Voices
(default vibrato setting and articulation
effects applied by the [ART] buttons) are
effective for real-time performance;
however, these effects may not be com-
pletely reproduced when you play back
a Song which has been recorded using
SA2 Voices.
NOTE
AEM Technology
When you play the piano, pressing a “C” key produces a definite and relatively fixed C note. When you play a
wind instrument, however, a single fingering may produce several different sounds depending on the breath
strength, the note length, the adding of trills or bend effects, and other performance techniques. Also, when
playing two notes continuously—for example “C” and “D”—these two notes will be smoothly joined, and not
sound independent as they would on a piano.
AEM (Articulation Element Modeling) is the technology for simulating this characteristic of instruments. Dur-
ing performance, the most appropriate sound samples are selected in sequence in real time, from huge quanti-
ties of sampled data. They are smoothly joined and sounded—as would naturally occur on an actual acoustic
instrument.
This technology to smoothly join different samples enables the application of realistic vibrato. Conventionally
on electronic musical instruments, vibrato is applied by moving the pitch periodically. AEM technology goes
much further by analyzing and disaggregating the sampled vibrato waves, and smoothly joins the disaggre-
gated data in real time during your performance. If you move the Modulation wheel when you play the SA2
Voice (using AEM technology), you can also control the depth of the vibrato, while maintaining its realistic
quality.
38 Tyros4 Owner’s Manual
By accessing the special website with your computer, you can purchase Premium Voices,
Songs and Styles, etc. (called Premium Pack data). This data can be installed to the instru-
ment and used to expand the creative potential.
On your computer, access the following special website.
http://music-tyros.com/
In the process of purchasing Premium Pack data, a license key may be needed. This means
you should register your instrument’s ID to the website to use the Premium Pack data on
your instrument. For the steps of the registration, follow the instructions on the website.
License Key management
On the “2 LICENSE KEY” display called up via [FUNCTION] [I] UTILITY TAB
[] [] OWNER [B] LICENSE KEY, you can manage the license key by using the
following menus.
Purchasing and Installing Premium Pack Data
Among the Premium Pack data,
the data of the Premium Voices,
Songs, Styles, etc. will be
installed to the internal hard disk
(HD) drive, while the Waves mak-
ing up the Voices will be installed
to the optional Flash Memory
Expansion Module. If you want to
purchase Premium Voices from
the special website, make sure to
install the optional Flash Memory
Expansion Module (pages 108-
109).
IMPORTANT
The original ID included in the
instrument will differ depending
on the serial number of each
instrument.
IMPORTANT
[I] EXPORT Exports the instrument’s ID to the USB flash memory.
[J] IMPORT Imports the license key which has been issued from the website
from USB flash memory to the instrument.
[E] CLEAR Deletes the license key registered in the instrument.
If you delete the license key, the data you bought previously
will become unusable.
NOTICE
Tyros4 Owner’s Manual 39
1
Voices – Playing the Keyboard –
The TRANSPOSE [-]/[+] buttons transpose the overall pitch of the instrument (the key-
board sound, Style playback, Song playback, and so on) in semitone steps. Press the [+]
and [-] buttons simultaneously to instantly reset the transpose value to 0.
The UPPER OCTAVE [-]/[+] buttons allow the pitch of the RIGHT 1–3 parts to be shifted
up or down by one octave. Press the [+] and [-] buttons simultaneously to instantly reset
the octave value to 0.
Using the Pitch Bend Wheel
Use the PITCH BEND wheel to bend notes up (roll the wheel away from you) or down
(roll the wheel toward you) while playing the keyboard. The Pitch Bend is applied to all
the keyboard parts (RIGHT 1–3 and LEFT). The PITCH BEND wheel is self-centering
and will automatically return to normal pitch when released.
The maximum pitch bend range can be changed on the Mixing Console display: [MIX-
ING CONSOLE] TAB [][] TUNE [H] PITCH BEND RANGE.
Transposing the Pitch of the Keyboard
The Transpose functions do not affect
the Drum Kit or SFX Kit Voices.
You can also change the transpose set-
tings in the MIXING CONSOLE display:
[MIXING CONSOLE] TAB [][]
TUNE [1 ]–[3 ] TRANS-
POSE.
NOTE
NOTE
Default Pitch setting
By default, the reference pitch of the entire instrument is set to 440.0 Hz, and the scale to equal temperament. You can
change the pitch and scale from [FUNCTION] [A] MASTER TUNE/SCALE TUNE. You can also adjust the pitch
for each part (keyboard parts, Style parts and Song parts) on the TUNE page of the Mixing Console display (page 86).
For details, refer to the Reference Manual on the website.
Using the Wheels
The effects caused by using the PITCH
BEND Wheel may not be applied to the
LEFT part during Style playback
depending on the Style setting.
NOTE
40 Tyros4 Owner’s Manual
Using the Modulation Wheel
The Modulation function applies a vibrato effect to notes played on the keyboard. By
default, this is applied to the keyboard parts (RIGHT 1–3 and LEFT). Moving the MODU-
LATION wheel down (toward you) decreases the depth of the effect, while moving it up
(away from you) increases it.
You can set whether the effects caused by the MODULATION Wheel will be applied or
not to each of the keyboard part: [FUNCTION] [D] CONTROLLER TA B [][]
KEYBOARD/PANEL [A]/[B] 3 MODULATION WHEEL.
With the [ART. 1]/[ART. 2] buttons, you can add articulation effects and characteristic
instrument performance sounds to your playing. When you select a SA or SA2 Voice, the
[ART. 1] and/or [ART. 2] buttons may light in blue. Pressing a lit button adds articulation.
(Pressing a button which is not lit has no effect.)
Three examples of effects are introduced to the following.
-Example 1
Pressing the available [ART] button triggers different playing effects, separate from your
keyboard playing. For example, pressing the [ART] button for a SA saxophone Voice can
produce breath noise or key noise, while doing the same for a SA guitar Voice can produce
fret noise or body-tapping sound. You can effectively intersperse these into the notes as
you play.
While the articulation effect sounds, the button lights in red.
Depending on the selected Voice, the
MODULATION wheel may control vol-
ume, filter or some other parameter
instead of vibrato.
To avoid accidentally applying modula-
tion, make sure the MODULATION
Wheel is set at minimum (down) posi-
tion before you start playing.
The effects caused by using the MODU-
LATION wheel may not be applied to the
LEFT part during Style playback
depending on the Style setting.
NOTE
NOTE
NOTE
Adding Articulation Effects to Super Articulation Voices
The applied articulation effect differs
depending on the selected Voice. For
details, refer to the Information display
called up by pressing the [6 ] (INFO)
button on the Voice Selection display.
NOTE
Articulation
Sound
RedBlue
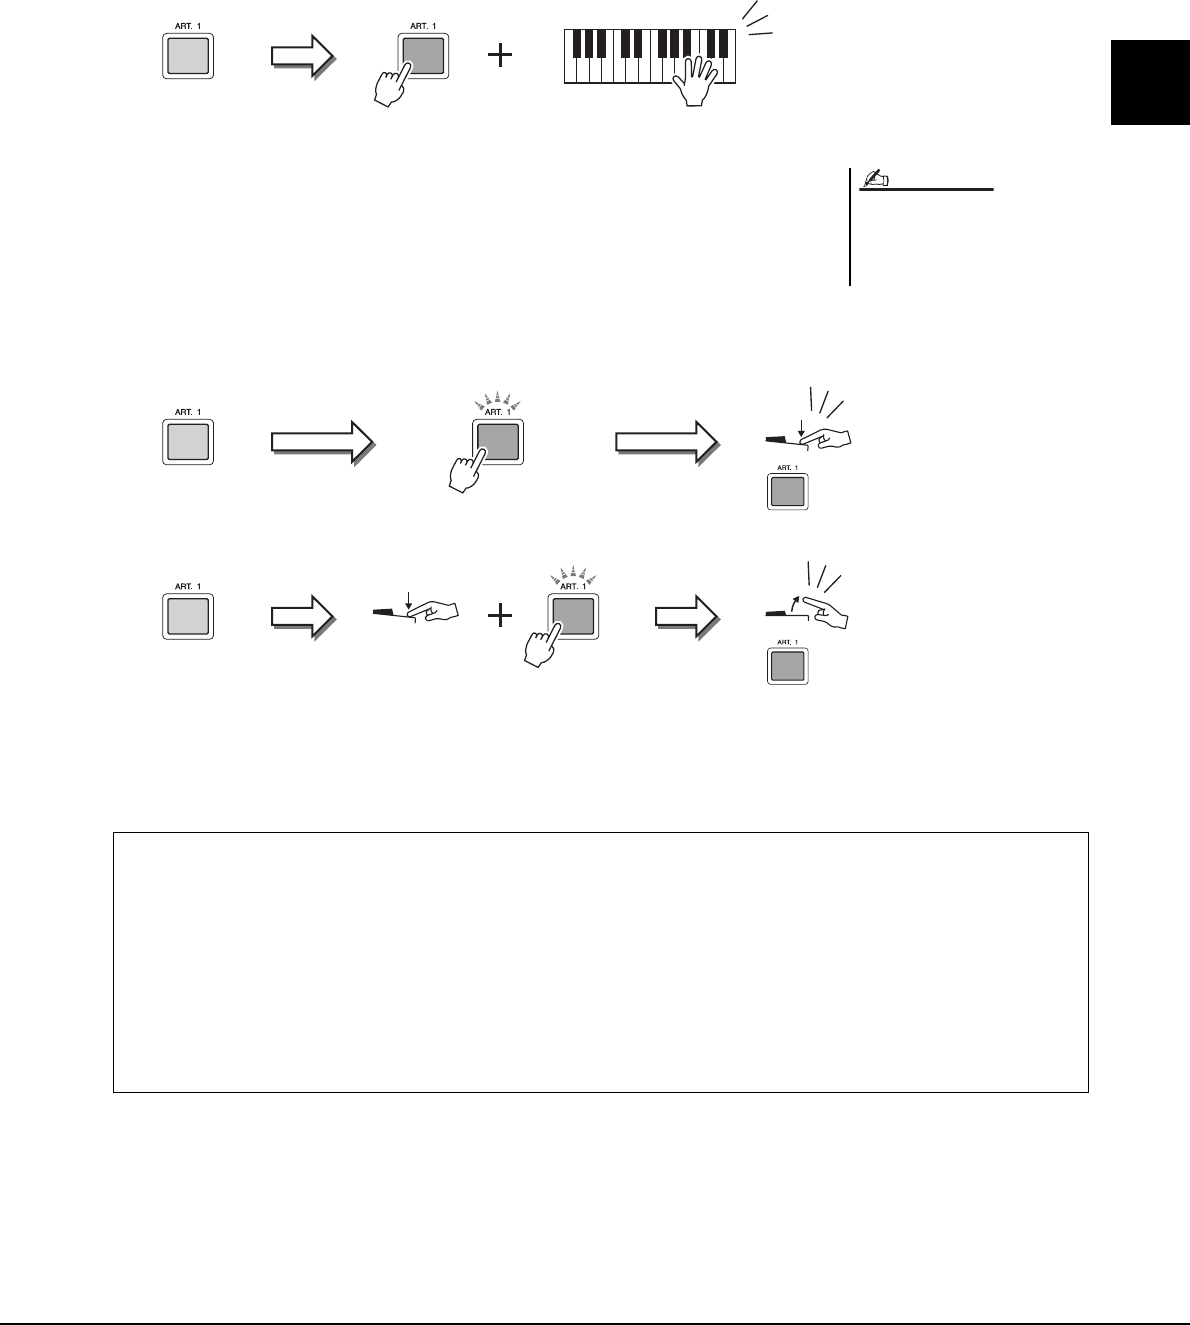
Tyros4 Owner’s Manual 41
1
Voices – Playing the Keyboard –
-Example 2
Playing the keyboard while holding down the available [ART] button changes the nature
of Voice. For example, in the case of the NylonGuitar Voice in GUITAR category, holding
down the [ART. 1] button lets you play harmonics for the guitar Voice. Releasing the but-
ton returns the Voice to normal.
The button lights in red while it is being held down.
-Example 3
When an SA2 Voice is selected, pressing the available [ART] button and playing/releasing
a note enables you to add articulation effects, such as bend up/down, glissando up/down,
brass fall, etc.
When you press the available [ART] button, it will flash in red until the effect is finished
playing. You can cancel by pressing the button again while it flashes. Just after you press/
release the note and articulation effect sounds, the button lights in red.
Example 3 effects can also be used as the same manner as Example 2. Holding an [ART]
button (the button flashes in red) and playing/releasing a note enables you to add the artic-
ulation effect several times in succession.
Articulation
Sound
RedBlue
Keeping with the realistic response of
the original instruments, the effects
applied vary depending on the range
you are playing in.
NOTE
Articulation
Sound
Red
(flashing)
Blue
Key on
Key off
Articulation
Sound
Red
(lit)
Red
(lit)
Red
(flashing)
Blue
Notice for when Super Articulation Voices are selected for multiple parts
When you select SA/SA2 Voices for two or more keyboard parts, using an [ART] button simultaneously affects all
parts on which SA/SA2 Voices are selected.
When a Example 3 effect is assigned to both the Right and Left parts and an [ART] button flashes in red (standby sta-
tus), playing only one part (for example Right part) adds an articulation effect to only the Right part. Since the other
part (Left part) is kept in standby status, the button continues flashing. To cancel the standby status, you need to play
the keyboard in the Left part range. (Pressing the flashing button cannot cancel standby status, because this can cancel
the standby of the Left part but turns the Right part to standby again.)
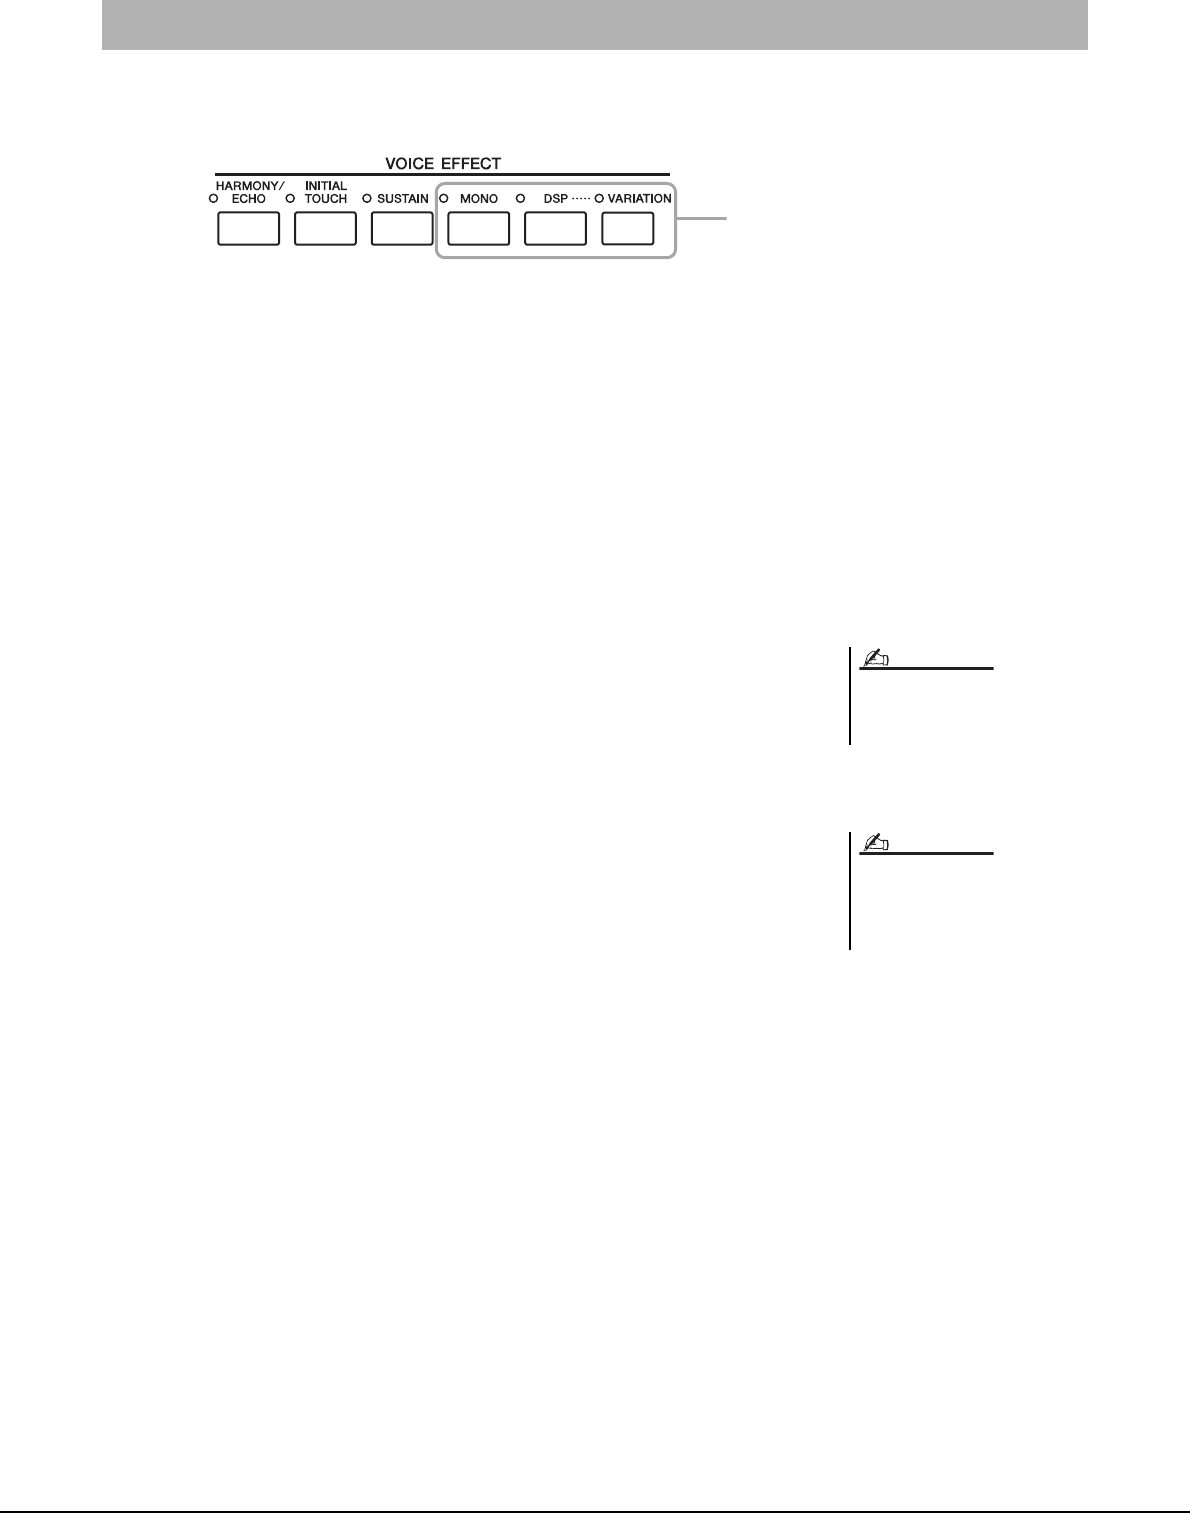
42 Tyros4 Owner’s Manual
The Tyros4 features a sophisticated multi-processor effect system which can add extraordinary depth and expression to
your sound. This effect system can be turned on or off by using the following buttons.
-HARMONY/ECHO
The Harmony/Echo types are applied to the right-hand Voices. Refer to “Applying Har-
mony to Your Right-hand Melody” on page 43.
-INITIAL TOUCH
This button turns the touch response of the keyboard on or off. When OFF, the same vol-
ume is produced no matter how strongly or softly you play the keyboard.
-SUSTAIN
When this Sustain function is on, all notes played on the keyboard with right-hand part
(RIGHT 1, 2, 3) have a longer sustain.
-MONO
When this button is on, the part’s Voice is played monophonically (only one note at a
time). Using the MONO mode lets you play single, lead sounds (such as brass instru-
ments) more realistically. It also lets you expressively control the Portamento effect
(depending on the selected Voice) by playing legato.
When this button is off, the part’s Voice played polyphonically.
-DSP/DSP VARIATION
With the digital effects built into the instrument, you can add ambience and depth to your
music in a variety of ways—such as adding reverb that makes you sound like you are play-
ing in a concert hall.
The [DSP] button is used to turn the DSP (Digital Signal Processor) effect on or off for the
currently selected keyboard part.
The [VARIATION] button is used to change between variations of the DSP effect. You
could use this while you play, for example, to change the rotating speed (slow/fast) of the
rotary speaker effect.
Applying Voice Effects
These three effect systems are applied
to the currently selected keyboard part
(RIGHT 1, 2, 3, or LEFT)
Portamento is a function that creates a
smooth transition in pitch from the first
note played on the keyboard to the next.
NOTE
The effect type can be changed. On the
Voice Selection display, select [5 ]
(VOICE SET) TAB [][] EFFECT/
EQ [A]/[B] 2 DSP.
NOTE
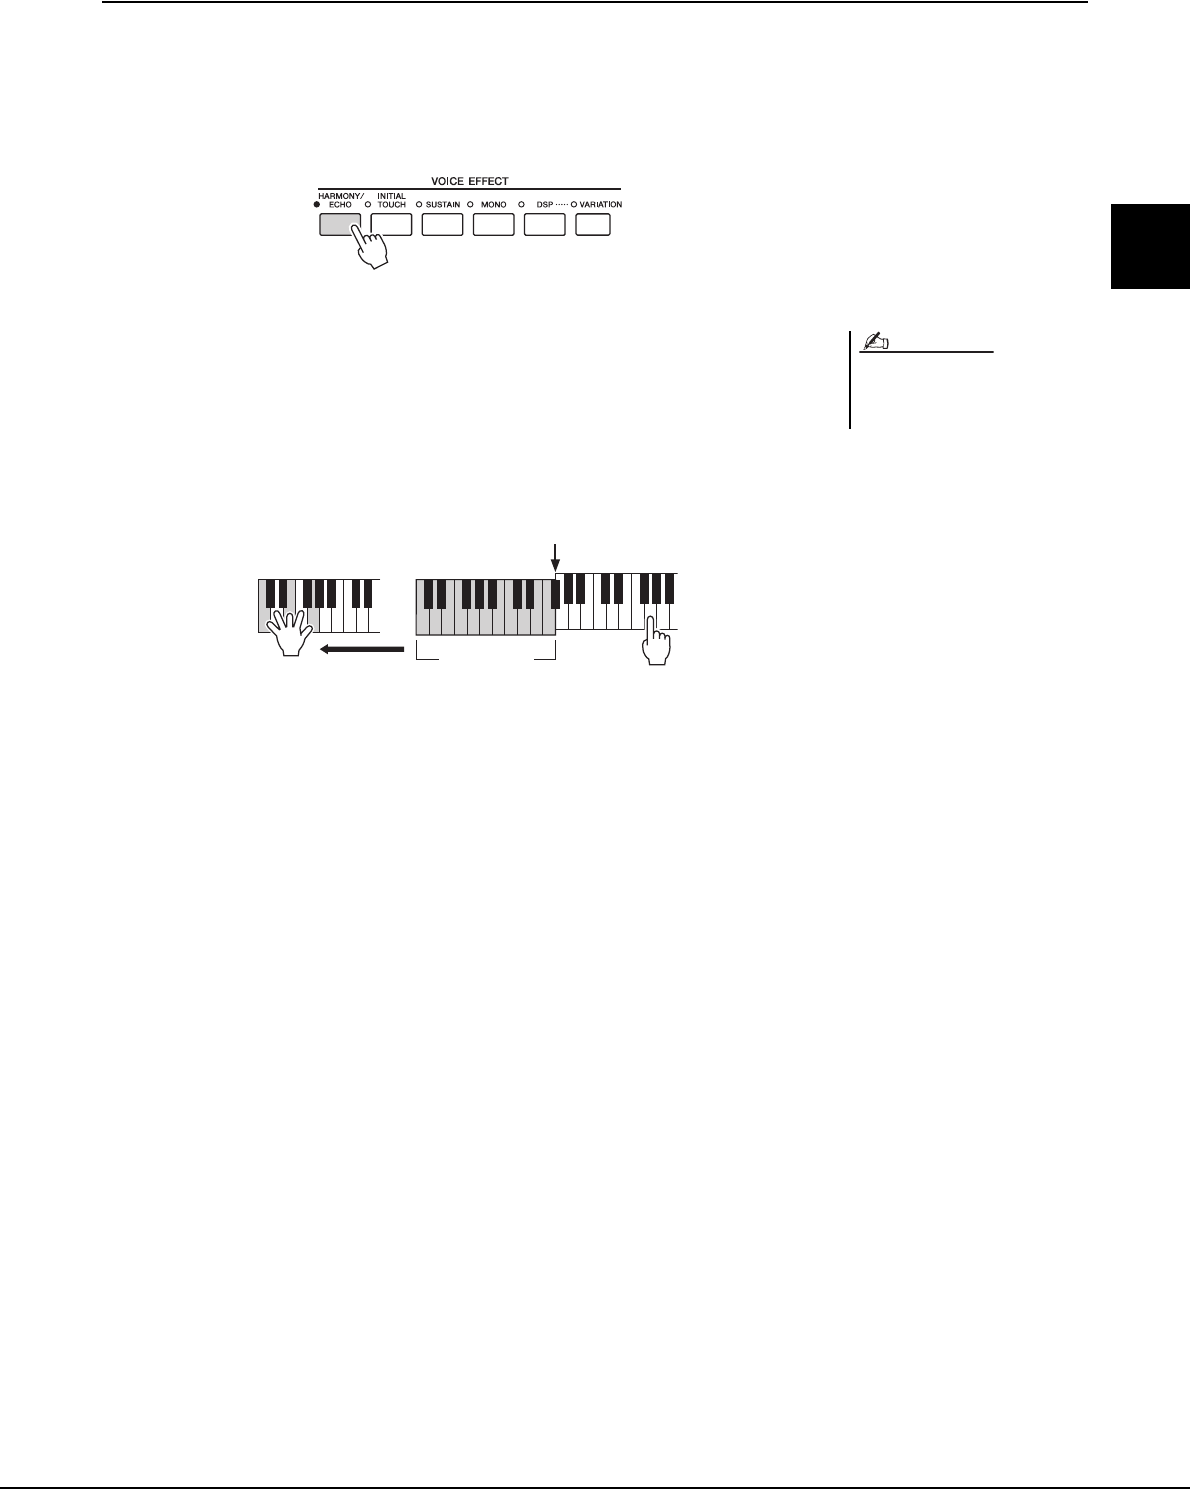
Tyros4 Owner’s Manual 43
1
Voices – Playing the Keyboard –
Applying Harmony to Your Right-hand Melody (HARMONY/ECHO)
Among the Voice Effects, Harmony is one of the most impressive. It automatically adds
harmony parts to the notes you play with your right hand—immediately giving you a more
full and professional sound.
1Turn the [HARMONY/ECHO] button on.
2Turn on both the [ACMP] button and [SYNC START] button
(pages 46–47) and make sure that the RIGHT 1 part is on
(page 33).
3Play a chord with your left hand to start the Style (page 47) and
play some notes in the right-hand range of the keyboard.
You can also use the Harmony effect with the Style stopped. Simply hold down a
chord with your left hand and play a melody with your right.
Many of the Voices have been automatically set to play certain Harmony/Echo
types that match the particular Voice. Try out some of Voices. You can also change
the Harmony/Echo type: [FUNCTION] [F] HARMONY/ECHO.
Depending on the harmony/echo type,
harmony will be applied even when the
[ACMP] button is off.
NOTE
In this example, harmony notes in the scale of
C major (the chord played in the left hand) are
automatically added to the notes played in the
right-hand range of the keyboard.
Split Point
Chord section
44 Tyros4 Owner’s Manual
The Tyros4 uses advanced digital technology to recreate the legendary sound of vintage organs. Just as on a traditional
organ, you can create your own sound by increasing and decreasing the levels of the flute footages.
1Press the [ORGAN FLUTES] button.
The FOOTAGE Page of the Organ Flutes Voice is called up.
2Use the [ASSIGN] slider and [1]–[8] sliders to adjust the footage
settings.
The footage settings determine the basic sound of the organ flutes. The term “foot-
age” is a reference to the sound generation of traditional pipe organs, in which the
sound is produced by pipes of different lengths (in feet).
If you want, you can select the Organ type, change the Rotary Speaker speed and
adjust the Vibrato setting, by using the [A]–[C] and [F]–[H] buttons.
3Press the [I] (PRESETS) button to return to the Organ Flutes
Voice Selection display.
Creating Your Original Organ Flutes Voices
You can also use the [1 ]–[8
] buttons to adjust the footages 5
1/3’–1’.
When this display is shown, the func-
tion assigned to the ASSIGN controller
does not work. The ASSIGN slider
works only to adjust the 16’ footage.
NOTE
NOTE
2
About the VOLUME/ATTACK Page and EFFECT/EQ
Page, see the Reference Manual on the website.
[A]/[B] ORGAN TYPE Specifies the type of organ tone generation to be simulated: Sine, Vintage or Euro.
[C] ROTARY SP
SPEED
Alternately switches between the slow and fast rotary speaker speeds when a rotary
speaker effect is selected for the Organ Flutes (DSP TYPE parameter in the EFFECT/
EQ Page), and the VOICE EFFECT [DSP] button is turned on.
[F] VIBRATO OFF Alternately turns the vibrato effect for the Organ Flutes Voice ON or OFF.
[G] VIBRATO ON
[H] VIBRATO DEPTH Sets the Vibrato depth to one of three levels: 1 (low), 2 (mid), or 3 (high).
[I] PRESETS Opens the File Selection display of the Organ Flutes Voices for selecting a preset
Organ Flutes Voice.
NEXT PAGE
Tyros4 Owner’s Manual 45
1
Voices – Playing the Keyboard –
4Use the TAB [][] buttons to select the location to which your
Organ Flutes Voice will be saved.
5Press the [6 ] (SAVE) button to save your edited Organ Flutes
Voice (pag e 57). The settings will be lost if you
select another Voice or turn the
power to the instrument off with-
out executing the Save operation.
NOTICE
Advanced Features
Refer to the Reference Manual on the website, Chapter 1.
Selecting GM/XG or other Voices from the
Panel: Voice Selection display [8 ] (UP) [2 ] (P2)
Effect-related settings:
• Setting the touch sensitivity of the keyboard:
• Selecting the Harmony/Echo type:
[FUNCTION] [D] CONTROLLER TAB [][] KEYBOARD/PANEL
[FUNCTION] [F] HARMONY/ECHO
Pitch-related settings:
• Fine-tuning the pitch of the entire instrument
• Scale Tuning:
• Changing the part assignment of the
TRANSPOSE buttons:
[FUNCTION] [A] MASTER TUNE/SCALE TUNE TAB [][] MASTER TUNE
[FUNCTION] [A] MASTER TUNE/SCALE TUNE TA B [ ][] SCALE TUNE
[FUNCTION] [D] CONTROLLER TAB [][] KEYBOARD/PANEL [A]/[B] 4
TRANSPOSE ASSIGN
Editing Voices (Voice Set):
• Disabling automatic selection of Voice Sets
(effects, etc.):
Voice Selection display [5 ] (VOICE SET)
[FUNCTION] [E] REGIST SEQUENCE/FREEZE/VOICE SET TAB [][]
VOICE SET
Editing Organ Flutes parameters: [ORGAN FLUTES] TAB [][] VOLUME/ATTACK or EFFECT/EQ
Creating Custom Voices (Voice Creator):
• Importing the Wave Data to the Optional
Expansion Module:
• Creating Normal Voices (Custom Voice):
• Creating Drum Voices (Custom Drum Voice):
• Re-Editing a Custom Voice:
• Editing an Expansion Voice Bank:
• Saving your Custom Voice to a Library:
• Loading a single Additional Voice to the
Tyro s 4 :
• Loading an Expansion Voice Bank (Library)
to the Tyros4:
• Editing a Custom Voice on your computer:
[VOICE CREATOR]
[E] (EXPANSION MODULE)
[I] (IMPORT)
(Select a Normal Voice)
[VOICE CREATOR]
[G] CUSTOM VOICE ASSEMBLY
(Select a Drum Voice) [VOICE CREATOR] [G] CUSTOM VOICE ASSEMBLY
[EXPANSION] (Select a Custom Voice) [VOICE CREATOR] [G] CUSTOM
VOICE ASSEMBLY
[VOICE CREATOR] [B] LIBRARY EDIT
[VOICE CREATOR] [C] LIBRARY SAVE
[VOICE CREATOR] [D] INDIVIDUAL LOAD
[VOICE CREATOR] [A] LIBRARY LOAD
[VOICE CREATOR] [F] CUSTOM VOICE EDIT via PC
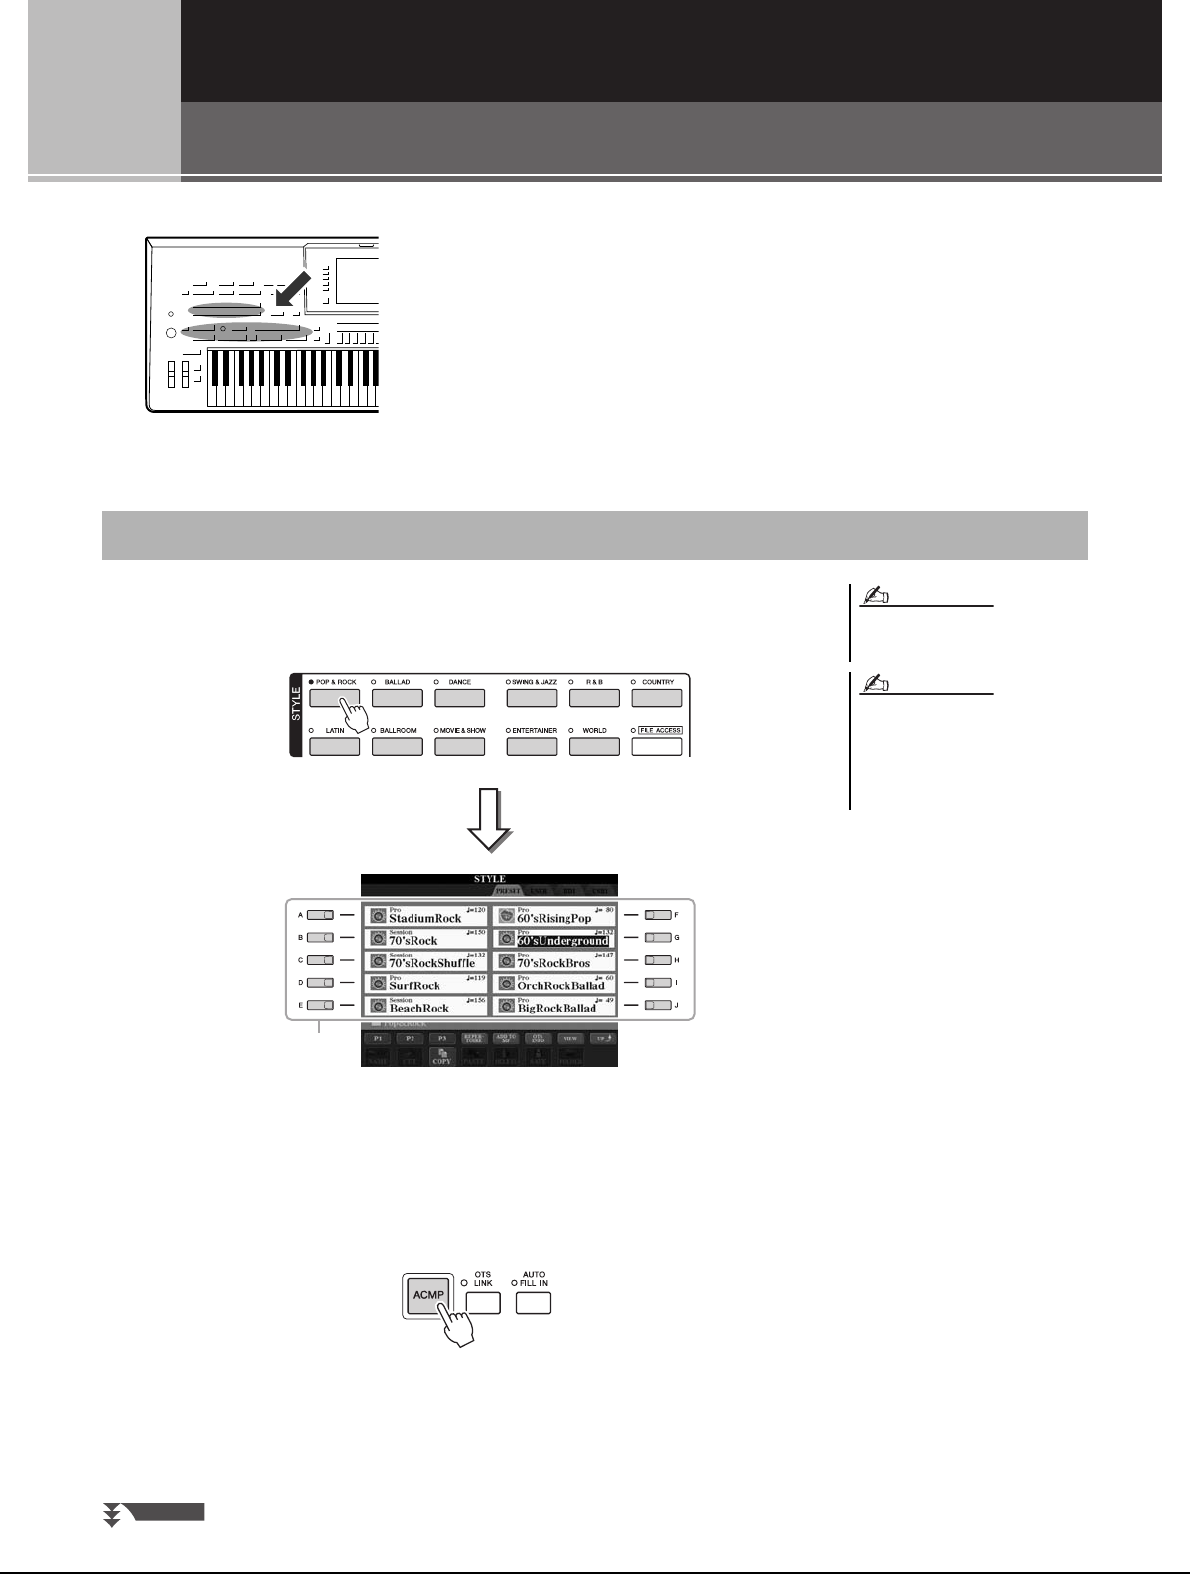
46 Tyros4 Owner’s Manual
2
2
Styles
– Playing Rhythm and Accompaniment –
The Tyros4 features a variety of accompaniment and rhythmic backing
patterns (called “Styles”) in a variety of different musical genres
including pop, jazz, and many others. The Style features Auto Accom-
paniment, letting you produce automatic accompaniment playback
simply by playing “chords” with your left hand. This lets you automat-
ically recreate the sound of a full band or orchestra—even if you’re
playing by yourself.
1Press one of the STYLE category selection buttons to call up
the Style Selection display.
2Press one of the [A]–[J] buttons to select the desired Style.
Pressing one of the [1 ]–[3 ] buttons or pressing the same STYLE button
again can call up the other display page.
3Press the [ACMP] button to turn on the Auto Accompaniment.
The specific left-hand section of the keyboard (page 35) becomes the Chord sec-
tion, and chords played in this section are automatically detected and used as a
basis for fully automatic accompaniment with the selected Style.
Playing a Style with the Auto Accompaniment
The SA and SA2 Voices are also avail-
able in the Style of the Tyros4.
The Style Selection display lets you
memorize the path of specific Style to
one of the panel buttons. For informa-
tion on memorizing Style path, refer to
page 27.
NOTE
NOTE
2
NEXT PAGE
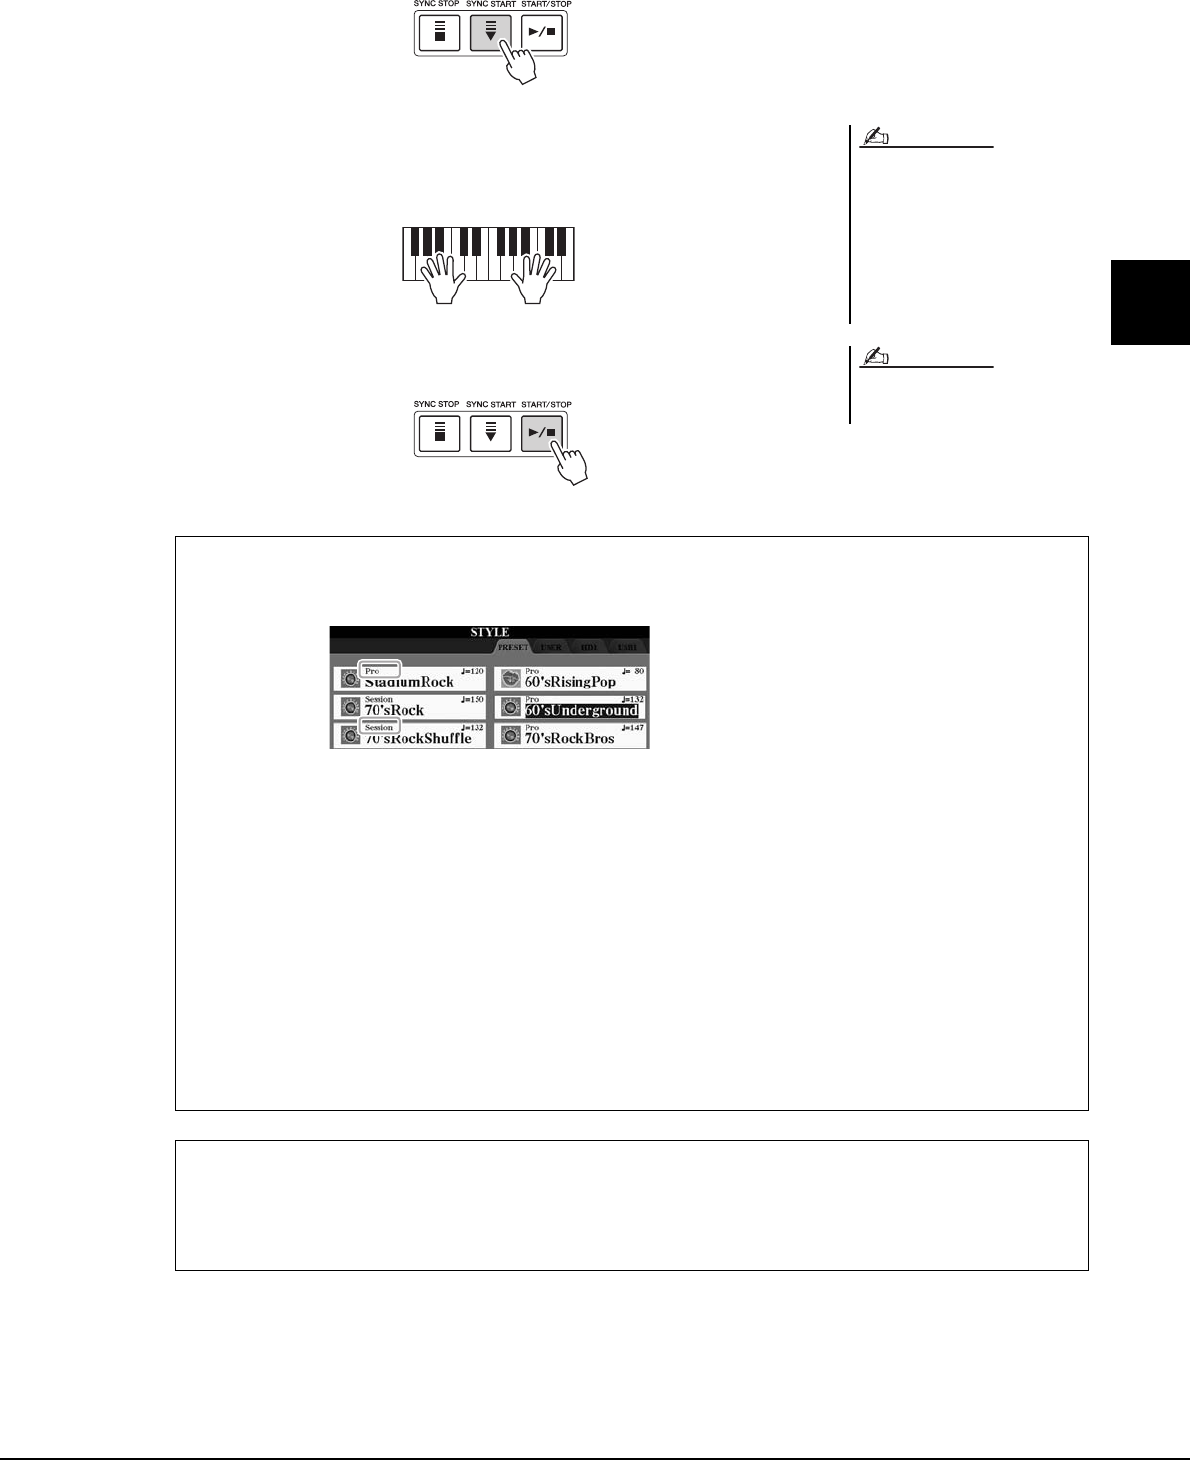
Tyros4 Owner’s Manual 47
2
Styles – Playing Rhythm and Accompaniment –
4Press the [SYNC START] button to enable synchronized start.
5As soon as you play a chord with your left hand, the selected
Style starts.
Try playing chords with your left hand and play melody with your right hand.
6Press the [START/STOP] button to stop Style playback.
If you want to know which key you need
to play to make certain chords, call up
the CHORD FINGERING display:
[FUNCTION] [C] STYLE SETTING/
SPLIT POINT/CHORD FINGERING
TAB [][] CHORD FINGERING.
For more information, refer to the Refer-
ence Manual on the website.
You can transpose the Style (accompa-
niment). See page 39.
NOTE
NOTE
Style Characteristics
The Style type and its defining characteristics are indicated above the Preset Style name.
•Pro: These Styles provide professional and exciting arrangements combined with perfect playability. The
resulting accompaniment exactly follows the chords of the player. As a result, your chord changes and col-
orful harmonies are instantly transformed into lifelike musical accompaniment.
•Session: These Styles provide even greater realism and authentic backing by mixing in original chord types
and changes, as well as special riffs with chord changes, with the Main sections. These have been pro-
grammed to add “spice” and a professional touch to your performances of certain songs and in certain
genres. Keep in mind, however, that the Styles may not necessarily be appropriate—or even harmonically
correct—for all songs and for all chord playing. In some cases for example, playing a simple major triad
for a country song may result in a “jazzy” seventh chord, or playing an on-bass chord may result in inap-
propriate or unexpected accompaniment.
•Free Play: These Styles are characterized by rubato performance. You can perform freely with remarkably
expressive accompaniment, without being constrained by a strict tempo.
Style file compatibility
The Tyros4 uses the SFF GE file format (page 9). The Tyros4 can play back existing SFF files, but they will be
saved in the SFF GE format when the file is saved (or pasted) in the Tyros4. Please keep in mind that the saved
file can only be played back on instruments that are compatible with the SFF GE format.
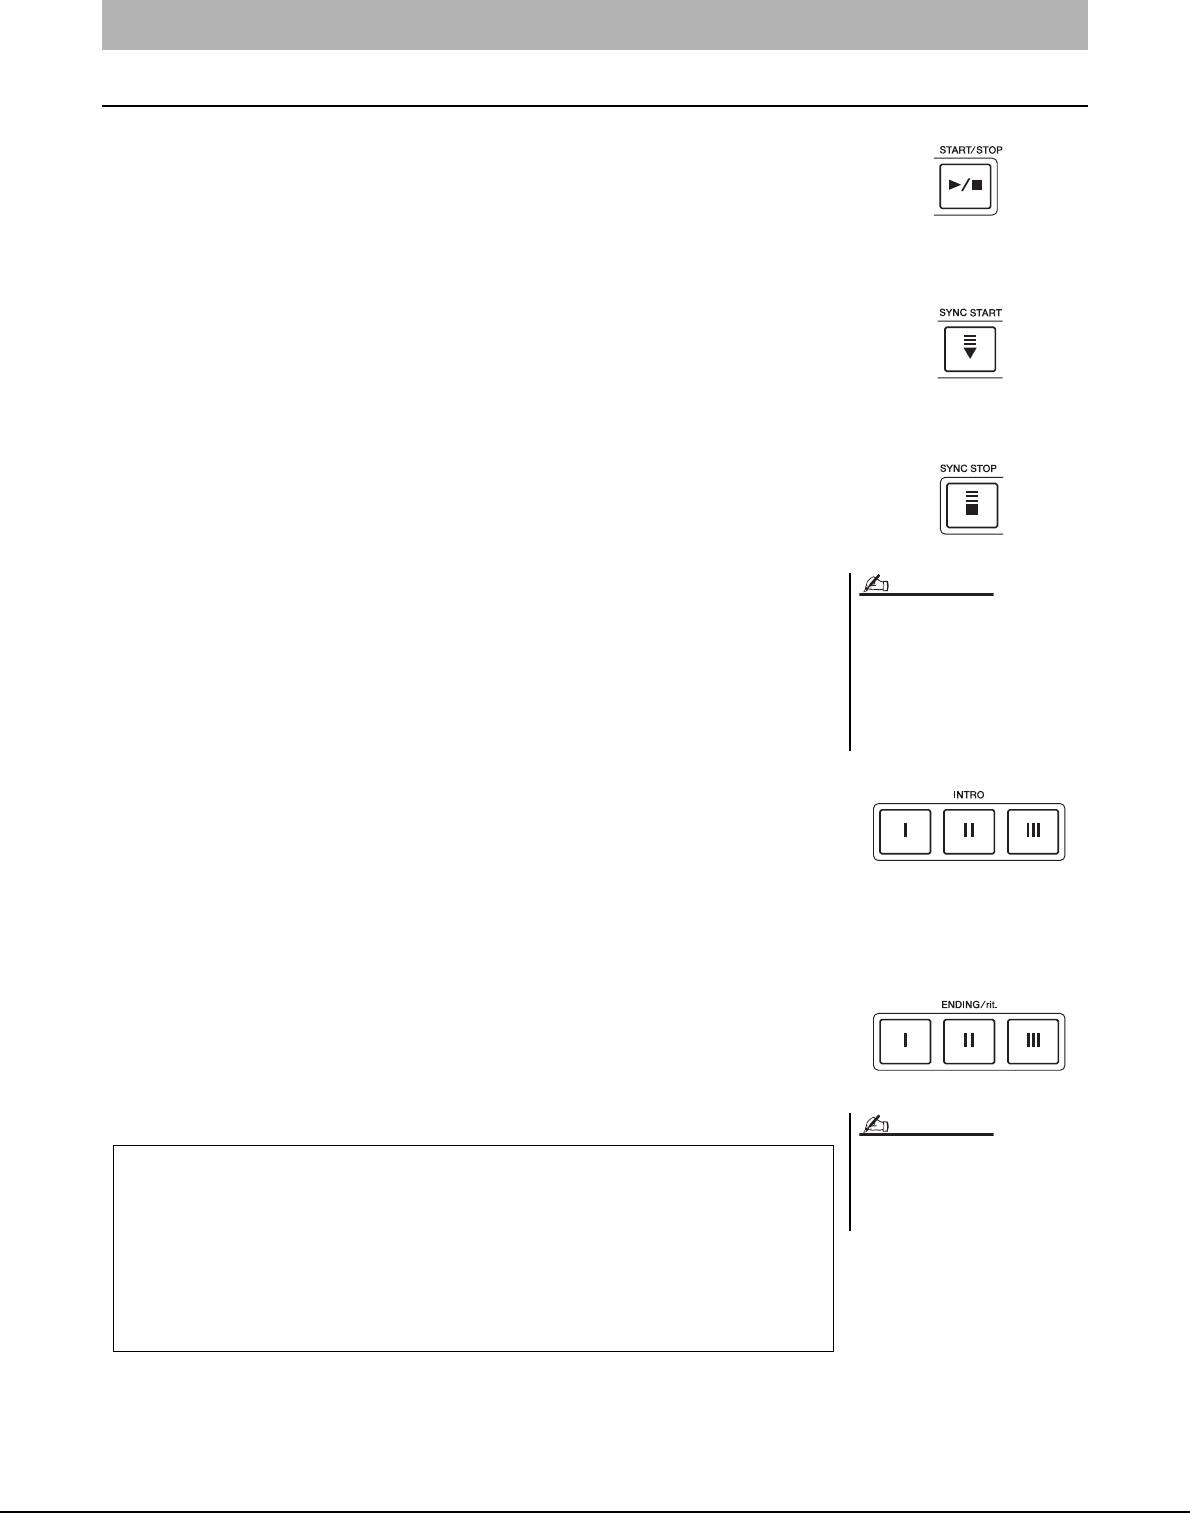
48 Tyros4 Owner’s Manual
To Start/Stop Playing
-[START/STOP] button
Style starts playing back as soon as the [START/STOP] button is pressed. To stop play-
back, press the button again.
-[SYNC START] button
This puts the Style playback in “standby.” The Style starts playing back when you press
any note on the keyboard (when [ACMP] is off) or you play a chord with your left hand
(when [ACMP] is on). When you start the Style playback with the [SYNC START] button,
pressing this button again stops playback and puts the playback in “standby” again.
-[SYNC STOP] button
You can start and stop the Style anytime you want by simply playing or releasing the keys
in the chord section of the keyboard. Make sure that the [ACMP] button is on, press the
[SYNC STOP] button, then play the keyboard.
-INTRO [I]–[III] buttons
The Tyros4 features three different Intro sections to add an introduction before starting the
Style playback. After pressing one of the INTRO [I]–[III] buttons, start playback by using
the [START/STOP] button or [SYNC START] button. When the Intro finishes playing, the
Style playback automatically shifts to the Main section.
-ENDING/rit. [I]–[III] buttons
The Tyros4 features three different Ending sections to add an ending before stopping Style
playback. When you press one of the Ending [I]–[III] buttons while Style is playing back,
the Style will automatically stop after the ending is played. You can have the ending gradu-
ally slow down (ritardando) by pressing the same ENDING button once again, while the
ending is playing.
Operating Style Playback
When the fingering mode is set to “Full
Keyboard” or “AI Full Keyboard,” Syn-
chro Stop cannot be turned on.
To change the fingering mode:
[FUNCTION] [C] STYLE SETTING/
SPLIT POINT/CHORD FINGERING
TAB [][] CHORD FINGERING
NOTE
If you press the ENDING/rit. [I] button
when the Style is playing, a fill-in auto-
matically plays before the ENDING/rit
[I].
NOTE
About the lamp status of the section buttons (INTRO/MAIN VARIATION/
BREAK/ENDING)
•Red: The section is currently selected.
•Red (flashing): The section will be played next, following the currently selected sec-
tion.
•Blue: The section contains data but not currently selected.
•Off: The section contains no data and cannot be played.
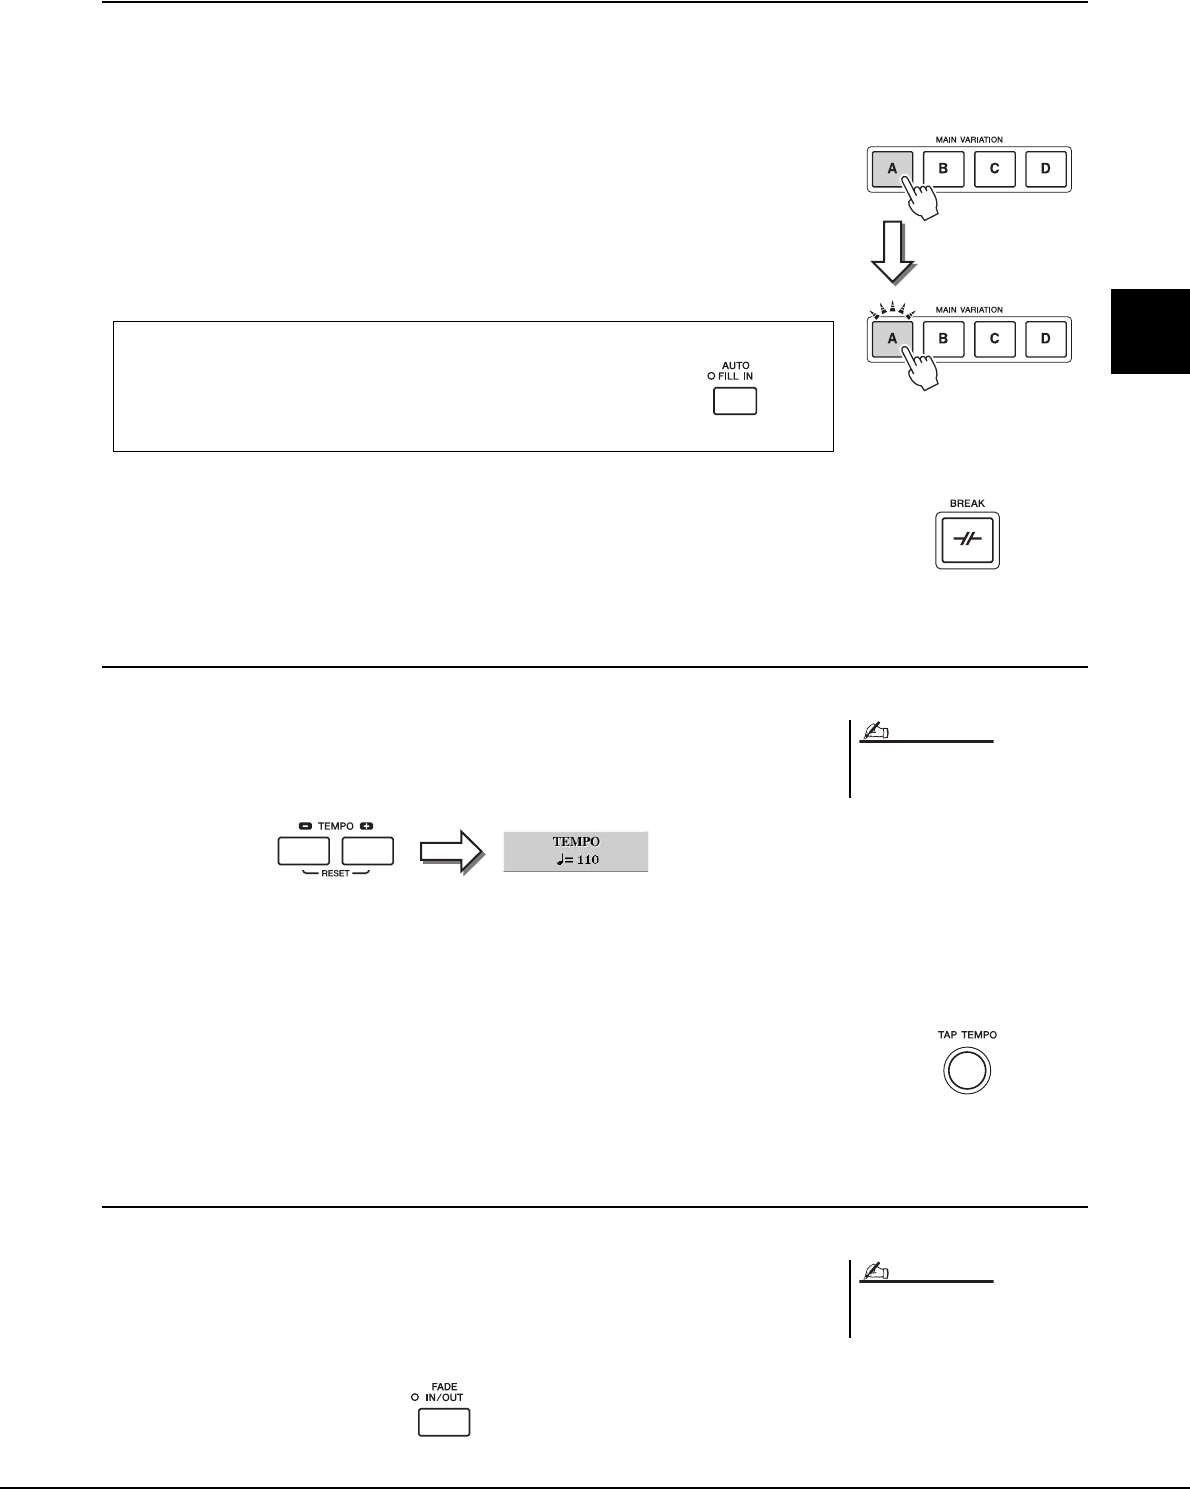
Tyros4 Owner’s Manual 49
2
Styles – Playing Rhythm and Accompaniment –
Changing Pattern Variation (Sections) During Style playback
Each Style features four different Main sections, four Fill-in sections and a Break section. By using these sections effec-
tively, you can easily make your performance sound more dynamic and professional. The section can be freely changed
while the Style is playing back.
-MAIN VARIATION [A]–[D] buttons
Press one of the MAIN VARIATION [A]–[D] buttons to select the desired Main section
(the button lights in red). Each is an accompaniment pattern of a few measures or more and
it plays indefinitely. Pressing the selected MAIN VARIATION button again plays an
appropriate fill-in pattern to spice up the rhythm and break the repetition. After the fill-in
finishes playing, it leads smoothly into the Main section.
-[BREAK] button
This lets you add dynamic breaks in the rhythm of the accompaniment. Press the [BREAK]
button during Style playback. When the one-measure Break pattern finishes playing, the
Style playback automatically shifts to the Main section.
Adjusting the Tempo
-[TEMPO] button
By pressing the TEMPO [-] or [+] button, you can decrease/increase the tempo over a
range of 5–500. While the TEMPO pop-up is shown on the display, you can also use the
[DATA ENTRY] dial to adjust the value.
Pressing the TEMPO [-]/[+] buttons simultaneously resets the tempo to the default value
(programmed for each Style).
-[TAP TEMPO] button
During Style playback, you can change the tempo by tapping the [TAP TEMPO] button
twice at the desired tempo.
When the Style is stopped, tapping the [TAP TEMPO] button (four times for a 4/4 time sig-
nature) starts Style playback at the tempo you tapped.
Fading In/Out
-[FADE IN/OUT] button
This produces smooth fade-ins and fade-outs when starting/stopping playback. Press the
[FADE IN/OUT] button when playback is stopped and press the [START/STOP] button to
start playback with a fade in. To stop the playback with a fade out, press the [FADE IN/
OUT] button during playback.
AUTO FILL function
When the [AUTO FILL IN] button is turned on, pressing any of
the Main [A]–[D] buttons as you play automatically plays fill-in
section.
Selected Main
section’s lamp is
lit in red
Selected Fill In
section’s lamp
flashes in red
This operation is common for Song
playback (page 58).
NOTE
This operation is common for Song
playback (page 58).
NOTE
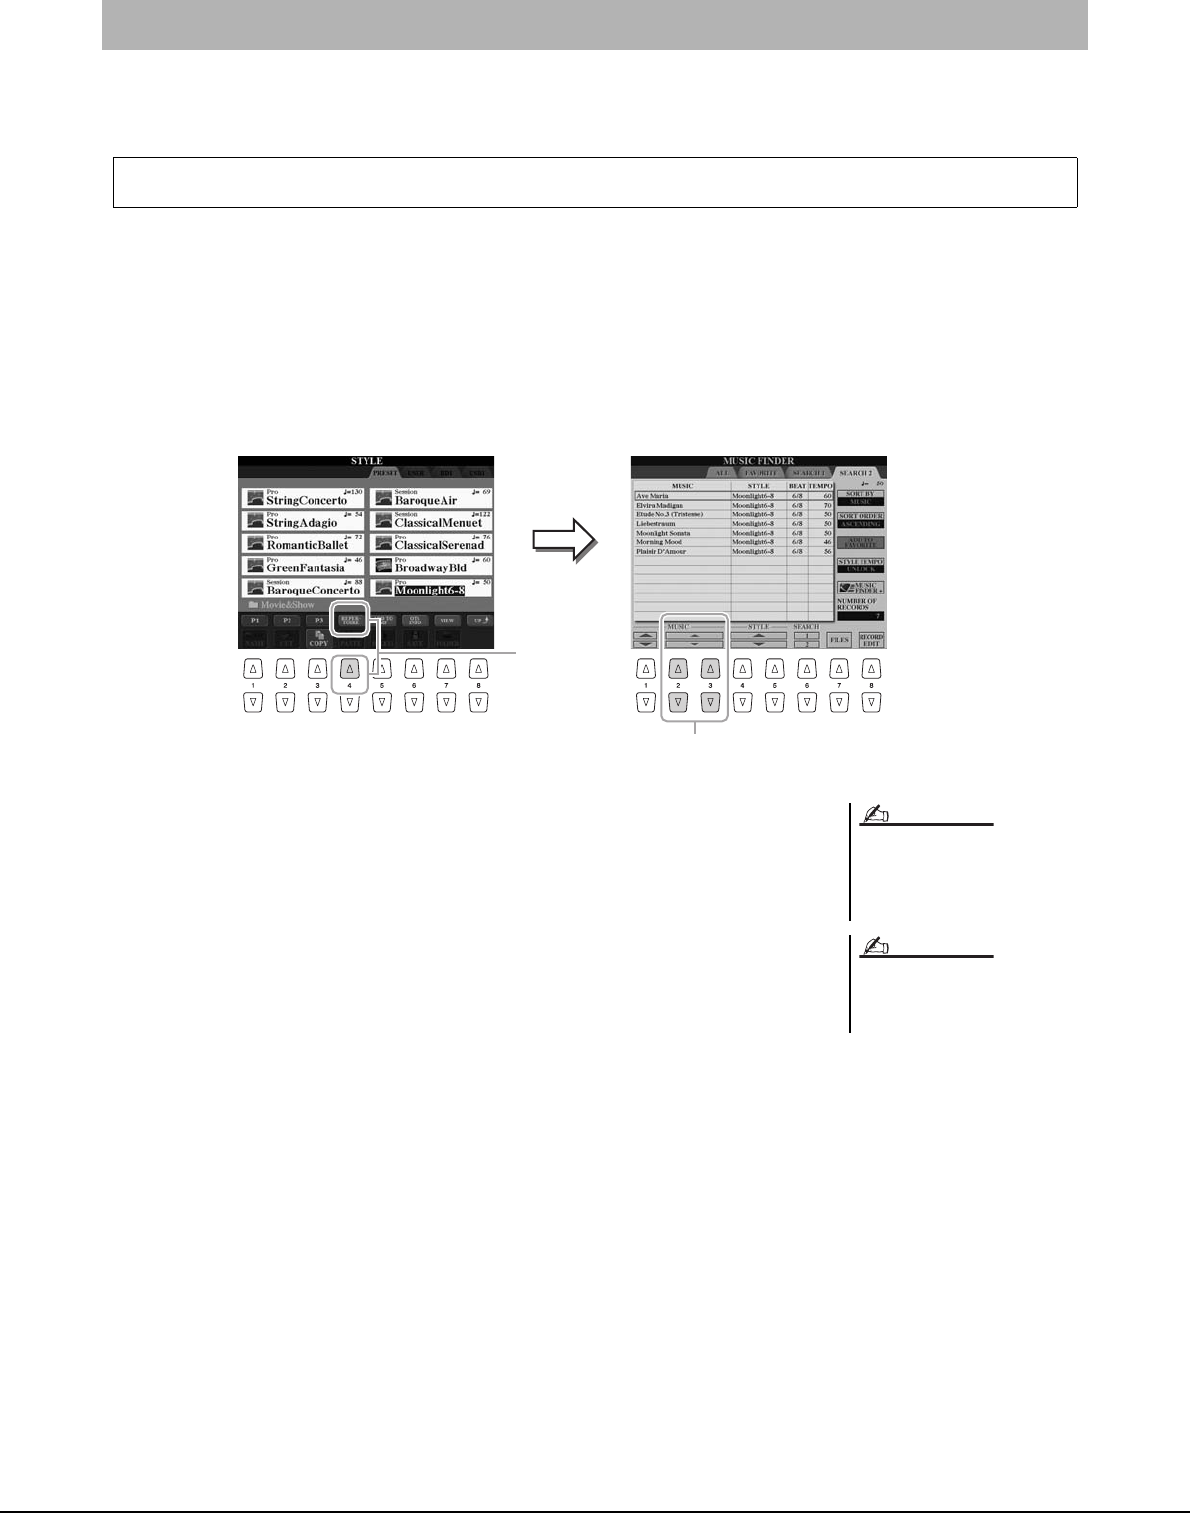
50 Tyros4 Owner’s Manual
The convenient Repertoire function automatically calls up the most appropriate panel settings (Voice number, etc.) for
the currently selected Style.
1Select the desired Style on Style Selection display (steps 1–2
on page 46).
2Press the [4 ] (REPERTOIRE) button.
Various appropriate panel settings matching the selected Style will be shown in the
display.
3Use the [2 ]–[3 ] buttons to select the desired panel set-
ting.
Calling up the Panel Settings to Match the Style (Repertoire)
Before using the Repertoire function, you need to import Music Finder records (see instructions on page 66).
3
2
The settings shown here are Music
Finder Records. You can choose addi-
tional settings by using the Music
Finder feature (page 68).
Depending on the particular selected
Style, there may not be any panel set-
tings in the Repertoire function.
NOTE
NOTE

Tyros4 Owner’s Manual 51
2
Styles – Playing Rhythm and Accompaniment –
One Touch Setting is a powerful and convenient feature that automatically calls up the most appropriate panel settings
(Voices or effects, etc.) for the currently selected Style, with the touch of a single button. If you’ve already decided which
Style you wish to use, you can have One Touch Setting automatically select the appropriate Voice for you.
1Select a Style (steps 1–2 on page 46).
2Press one of the ONE TOUCH SETTING [1]–[4] buttons.
Not only does this instantly call up all the settings (Voices, effects, etc.) that match the current Style, it also auto-
matically turns on ACMP and SYNC START, so that you can immediately start playing the Style.
3As soon as you play a chord with your left hand, the selected
Style starts.
Each Style has four One Touch Setting setups. Press other ONE TOUCH SET-
TING [1]–[4] button to try out other setups.
Confirming the One Touch Setting contents
You can check the information of the One Touch Setting [1]–[4] assigned to currently selected Style.
1In the Style Selection display, press the [6 ] (OTS INFO) but-
ton to call up the Information display.
2Press the [F] (CLOSE) button to close the Information display.
Appropriate Panel Settings for the Selected Style (One Touch Setting)
You can also create your own One
Touch Setting setups. For details, refer
to the Reference Manual on the website.
NOTE
Automatically changing One Touch Settings with the Main sections
The convenient OTS (One Touch Setting) Link function lets you automatically
have One Touch Settings change when you select a different Main section
(A–D). The Main sections A, B, C and D correspond to One Touch Settings 1, 2,
3 and 4 respectively. To use the OTS Link function, turn the [OTS LINK] button on.
You can change the timing in which the One Touch Settings change with MAIN VARIATION [A]–[D] change. Refer to the Reference
Manual on the website.
NOTE
You can also call up the Information
display by pressing the [DIRECT
ACCESS] button then pressing one of
the ONE TOUCH SETTING [1]–[4] but-
tons.
NOTE
1
2
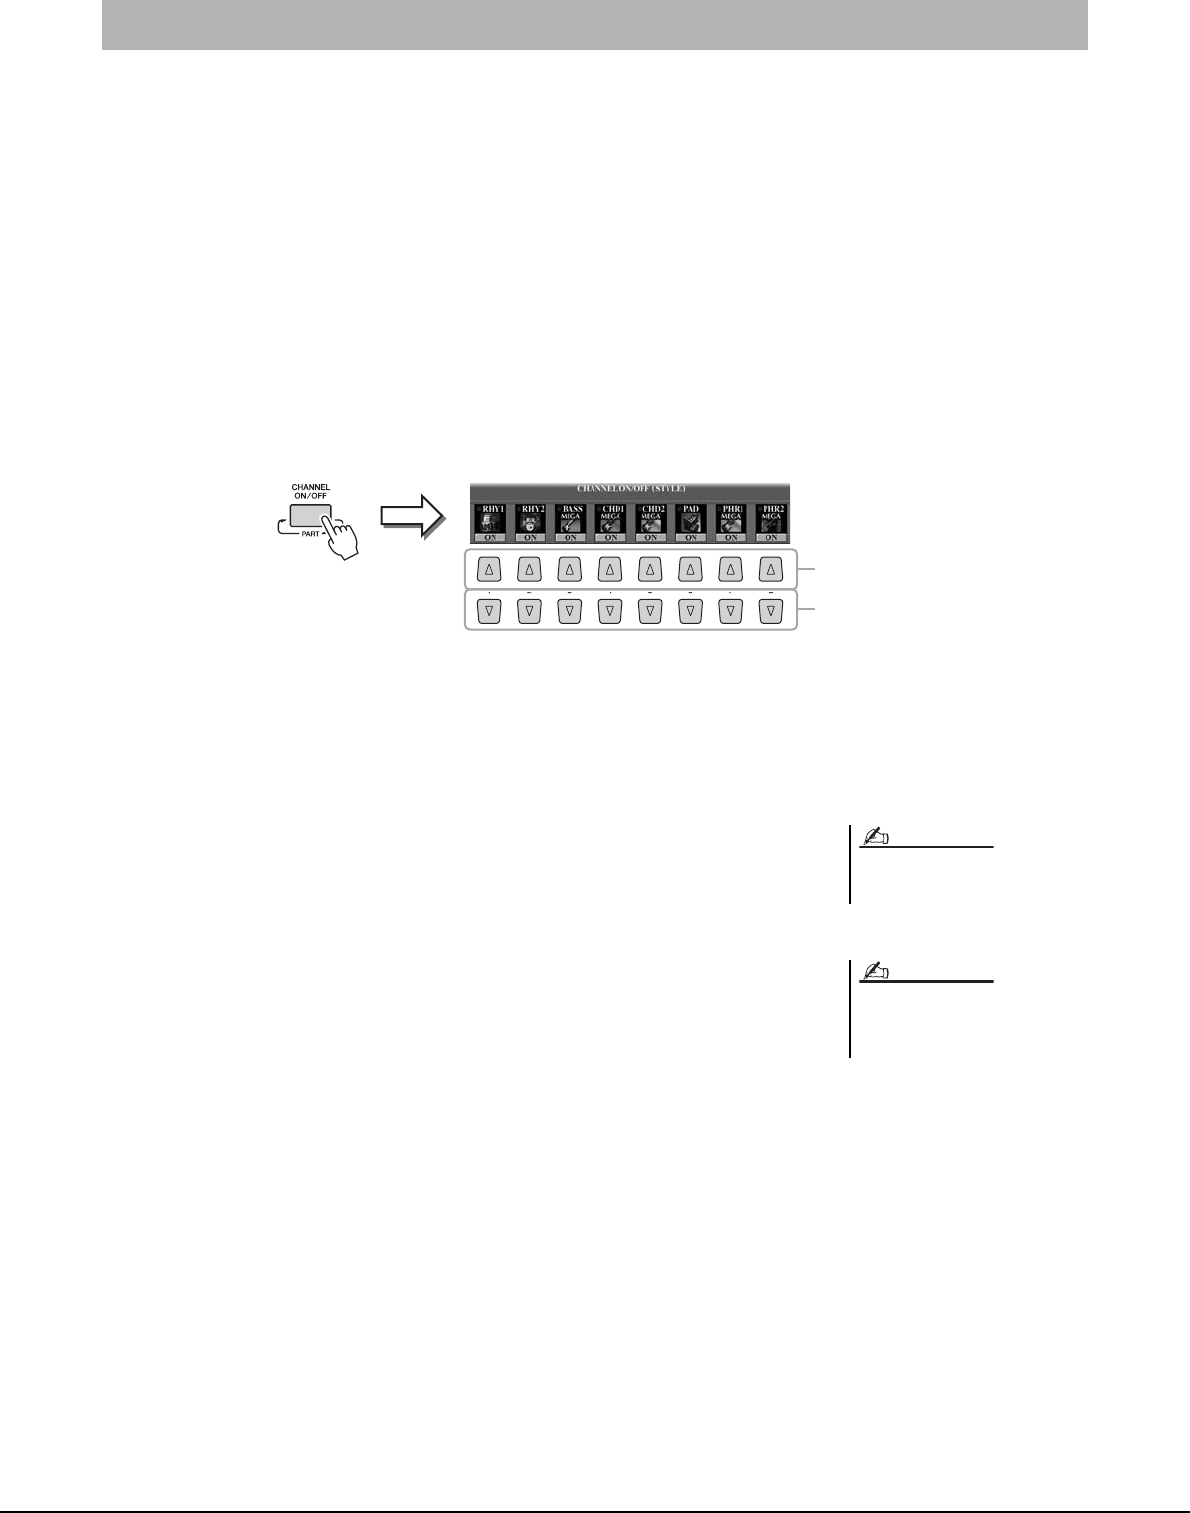
52 Tyros4 Owner’s Manual
A Style contains eight channels: RHY1 (Rhythm 1)–PHR2 (Phrase 2) below. You can add variations and change the feel-
ing of a Style by selectively turning channels on/off as the Style plays.
-Style channels
• RHY1/2 (Rhythm 1/2).....These are the basic parts of the Style, containing the drum and percussion rhythm patterns.
• BASS.................................The bass part uses various appropriate instrument sounds to match the Style.
• CHD1/2 (Chord 1/ 2).......These are the rhythmic chord backing, commonly used with piano or guitar Voices.
• PAD ..................................This part is used for sustained instruments such as strings, organ, choir, etc.
• PHR1/2 (Phrase1/2) ........These parts are used for punchy brass stabs, arpeggiated chords, and other extras that make
the accompaniment more interesting.
1Press the [CHANNEL ON/OFF] button once or twice to call up
the CHANNEL ON/OFF (STYLE) display.
2Press the [1 ]–[8 ] buttons to turn the channels on or off.
To listen to only one channel by itself, hold down the appropriate button for the
channel to set the channel to SOLO. To cancel SOLO, simply press the appropriate
channel button again.
3If necessary, press the [1 ]–[8 ] buttons to change the Voice
for the corresponding channel.
The Voice Selection display is called up from which you can select the Voice to be
used for the channel. See page 34.
4Press the [EXIT] button to close the CHANNEL ON/OFF display.
Turning Style Parts On/Off and Changing Voices
3
2
You can save the settings here to Regis-
tration Memory. See page 72.
NOTE
When the Main display is shown, the
CHANNEL ON/OFF display cannot be
closed.
NOTE
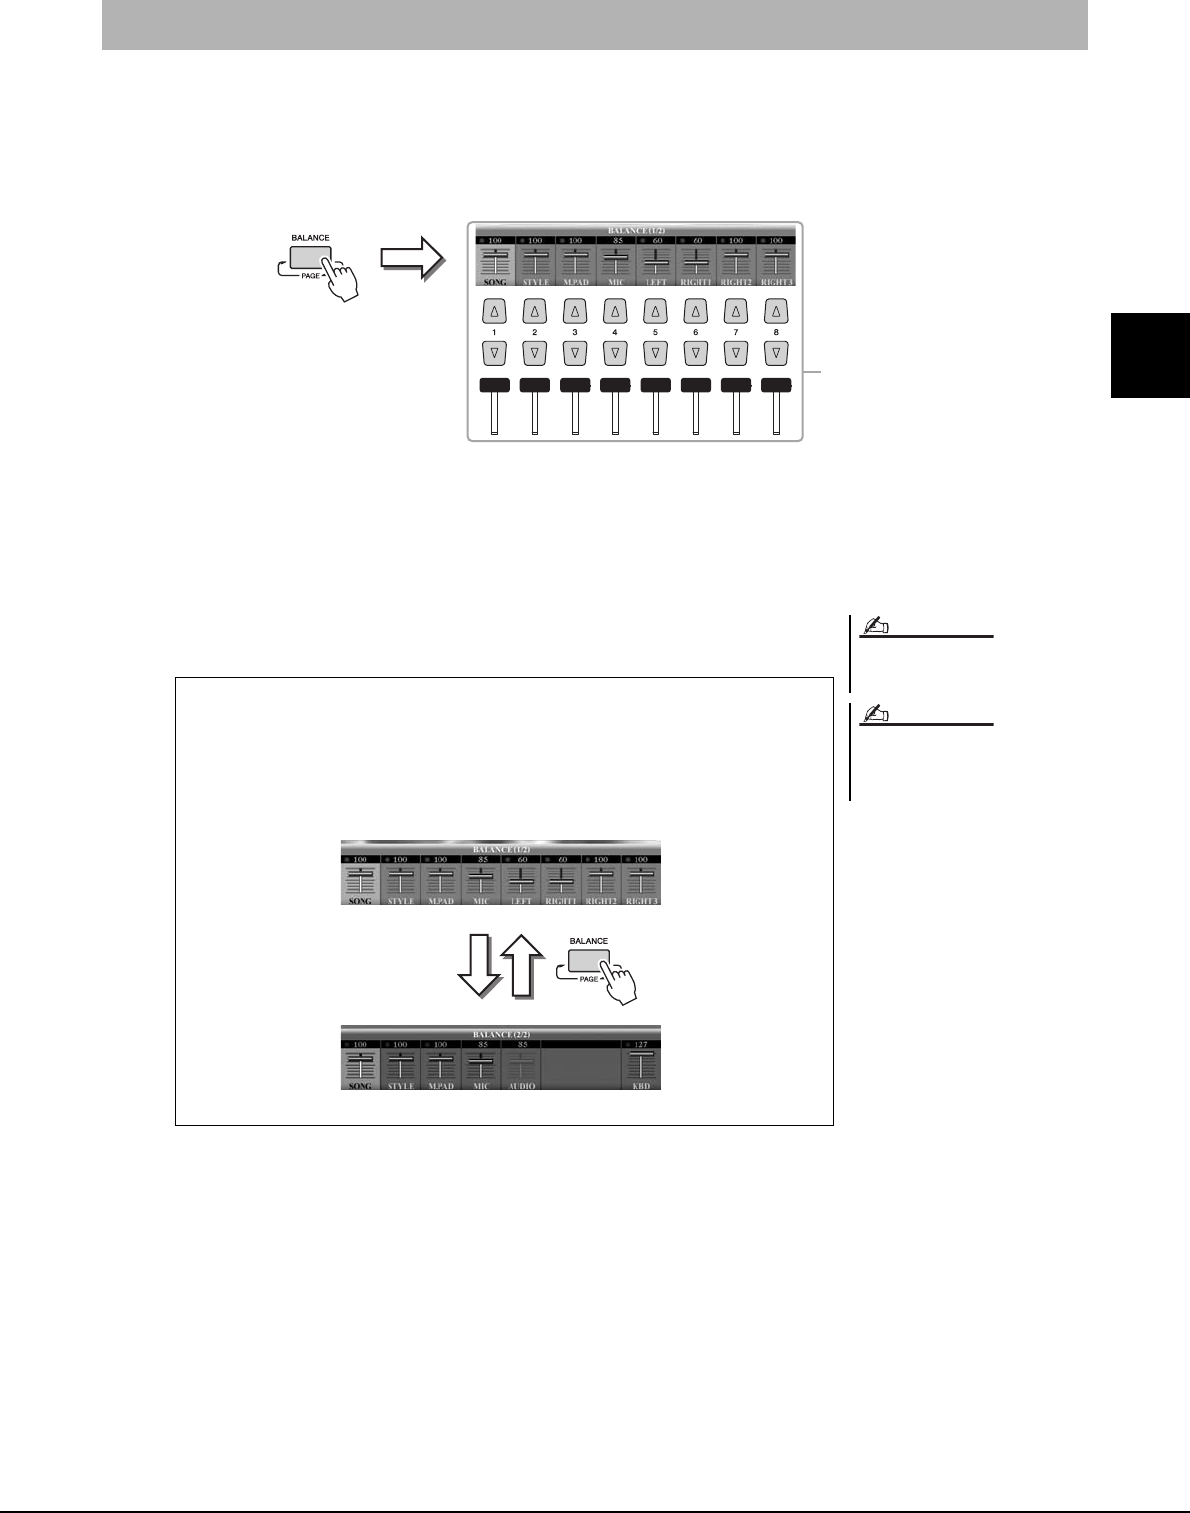
Tyros4 Owner’s Manual 53
2
Styles – Playing Rhythm and Accompaniment –
You can adjust the volume balance between Style playback and the sound you play on the keyboard.
1Press the [BALANCE] button to call up the BALANCE (1/2) dis-
play.
2Adjust the Style volume by using the [2 ] slider or buttons.
Using the [1 ]–[8 ] sliders or buttons, you can adjust the volume of Song,
Style, Multi Pad, MIC and keyboard parts.
3Press the [EXIT] button to close the BALANCE display.
Adjusting the Volume Balance Between the Style and Keyboard
2
When the Main display is shown, the
BALANCE display cannot be closed.
In the Mixing Console display, you can
adjust the volume for each Style part.
See page 89.
NOTE
NOTE
About the BALANCE display
Pressing the [BALANCE] button again calls up the BALANCE (2/2) display.
In this display, you can also adjust the volume of Audio Recorder/Player (by
[5] slider or buttons) and overall keyboard parts (by [8] slider or buttons).
BALANCE (1/2)
BALANCE (2/2)
54 Tyros4 Owner’s Manual
Advanced Features
Refer to the Reference Manual on the website, Chapter 2.
Selecting the Chord Fingering type: [FUNCTION] [C] STYLE SETTING/SPLIT POINT/CHORD FINGERING
TAB [][] CHORD FINGERING
Style playback related settings: [FUNCTION] [C] STYLE SETTING/SPLIT POINT/CHORD FINGERING
TAB [][] STYLE SETTING
Split Point settings: [FUNCTION] [C] STYLE SETTING/SPLIT POINT/CHORD FINGERING
TAB [][] SPLIT POINT
Memorizing the Original One Touch Setting: [MEMORY] + ONE TOUCH SETTING [1]–[4]
Creating/Editing Styles (Style Creator):
• Realtime Recording:
• Step Recording:
• Style Assembly:
• Editing the Rhythmic Feel:
• Editing Data for Each Channel:
• Making Style File Format Settings:
[DIGITAL RECORDING] [B] STYLE CREATOR
TAB [][] BASIC
TAB [][] EDIT [G] STEP REC
TAB [][] ASSEMBLY
TAB [][] GROOVE
TAB [][] CHANNEL
TAB [][] PARAMETER

Tyros4 Owner’s Manual 55
3
Songs – Recording Your Performances and Creating Songs –
3
3
Songs
– Recording Your Performances and Creating Songs –
The Tyros4 not only lets you play back commercially available MIDI
songs, but also allows you to create your original songs by recording
your performance. The recorded performance is made up of 16 parts
(channels)—Keyboard parts, Multi Pad parts and Style Playback parts
as shown below—and saved as a MIDI song. This chapter explains
how to quickly and easily record your performance as a MIDI song,
and shows you how to play back MIDI songs on the instrument.
Before starting recording, make the desired panel settings for your keyboard performance—selecting a Voice, Style, etc.
1Press the SONG [REC] button and the [STOP] button simultane-
ously.
A blank Song for recording is automatically set.
2Press the SONG [REC] button.
This enables recording of all Tyros4 parts, according to the default MIDI channel
assignments (shown in the chart above).
3Start recording.
Recording begins automatically as soon as you play a note on the keyboard, start
Style playback or start Multi Pad playback.
4Press the SONG [STOP] button to stop recording.
A message prompting you to save the recorded performance appears. To close the
message, press the [EXIT] button.
Creating a Song (Quick Recording)
Ch. 1
Right1
Ch. 2
Left
Ch. 3
Right2
Ch. 4
Right3
Ch. 5
M.Pad1
Ch. 6
M.Pad2
Ch. 7
M.Pad3
Ch. 8
M.Pad4
Ch. 9
Rhy1
Ch. 10
Rhy2
Ch. 11
Bass
Ch. 12
Chd1
Ch. 13
Chd2
Ch. 14
Pad
Ch. 15
Phr1
Ch. 16
Phr2
Keyboard Parts Multi Pad Parts Style Parts
MIDI Channel Assignments (for Quick Recording)
When recording without Style playback,
turning the [METRONOME] on makes
your recording sessions much more
efficient. The Metronome tempo can be
adjusted by TEMPO [-]/[+] buttons.
NOTE
NEXT PAGE
56 Tyros4 Owner’s Manual
5Press the SONG [PLAY/PAUSE] button to play back the
recorded performance.
6Save the recorded performance as a Song.
Press one of the SONG [I]–[IV] buttons and call up the Song Selection display.
The recorded Song can be saved in the Song Selection display. Refer to “Saving
Files” on page 57 for instructions.
The recorded Song will be lost if
you change to another Song or
you turn the power off without
executing the save operation.
By default, pressing the SONG [I] button
calls up the PRESET Page and pressing
one of the [II]–[IV] buttons calls up the
USER Page.
NOTICE
NOTE
Multi Recording
A Song consists of 16 separate channels. With this method, you can record data to each channel independently,
one by one. You can also freely change the channel/part assignments with the Multi recording.
The procedure is basically the same as that of “Creating a Song (Quick Recording)”, with the following
instructions substituted for step 2 on page 55.
While holding down the SONG [REC] button, press the [1 ]–[8 ] buttons to set the desired
channels to “REC.” Then assign the desired part to the channel by using the [C]/[D] buttons.
If you want to record the Right 1 part to channel 1, for example, press the [1 ] button while holding down the
[REC] button to set the channel 1 to “REC.” Then use the [C]/[D] buttons to select “RIGHT 1.”
After proceeding with steps 3–5, re-select other channels and record other parts as desired.
Tyros4 Owner’s Manual 57
3
Songs – Recording Your Performances and Creating Songs –
This operation lets you save your original data (such as Songs you’ve recorded and Voices you’ve edited) to a file. The
explanations here apply when you save your recorded performance as a Song file.
1In the Song selection display, select the appropriate tab (USER,
HD or USB) to which you want to save the data by using the
TAB [][] buttons.
2Press the [6 ] (SAVE) button to call up the file naming display.
3Enter the file name (page 31).
Even if you skip this step, you can rename the file at any time after saving
(page 29).
4Press the [8 ] (OK) button to save the file.
The saved file will be automatically located at the appropriate position among the
files in alphabetical order.
Saving Files
1
2
If you want to cancel the Save operation,
press the [8 ] (CANCEL) button.
NOTE
58 Tyros4 Owner’s Manual
You can play back the following types of Songs.
• Preset Songs (in the PRESET Page of the Song Selection display)
• Your own recorded Songs (saved to the USER/HD/USB Page)
• Commercially available Song data: SMF (Standard MIDI File) or ESEQ
1Press any of the SONG [I]–[IV] buttons to call up the Song
Selection display.
2Press the TAB [][] buttons to select the location of the
desired Song.
If you want to playback of Song in the USB storage device, connect the USB stor-
age device containing MIDI Song data to the USB TO DEVICE terminal before-
hand.
3Select the desired Song by using the [A]–[J] buttons.
You can also select a Song by using the [DATA ENTRY] dial, then press the
[ENTER] button to execute.
4Press the SONG [PLAY/PAUSE] button to start playback.
5Press the SONG [STOP] button to stop playback.
Playback of Songs
For information on compatible data for-
mats, refer to page 9.
The Song Selection display lets you
memorize the path of specific Song to
one of the panel buttons. For informa-
tion on memorizing Song path, refer to
page 27.
NOTE
NOTE
2
You can instantly jump back to the Main
display by “double-clicking” on one of
the [A]–[J] buttons.
NOTE
Queuing the next Song for playback
While a Song is playing back, you can queue up the next Song for playback.
This is convenient for chaining it to the next Song smoothly during stage per-
formance. Select the Song you want play next in the Song Selection display,
while a Song is playing back. The “NEXT” indication appears at the upper
right of the corresponding Song name. To cancel this setting, press the [8 ]
(NEXT CANCEL) button.
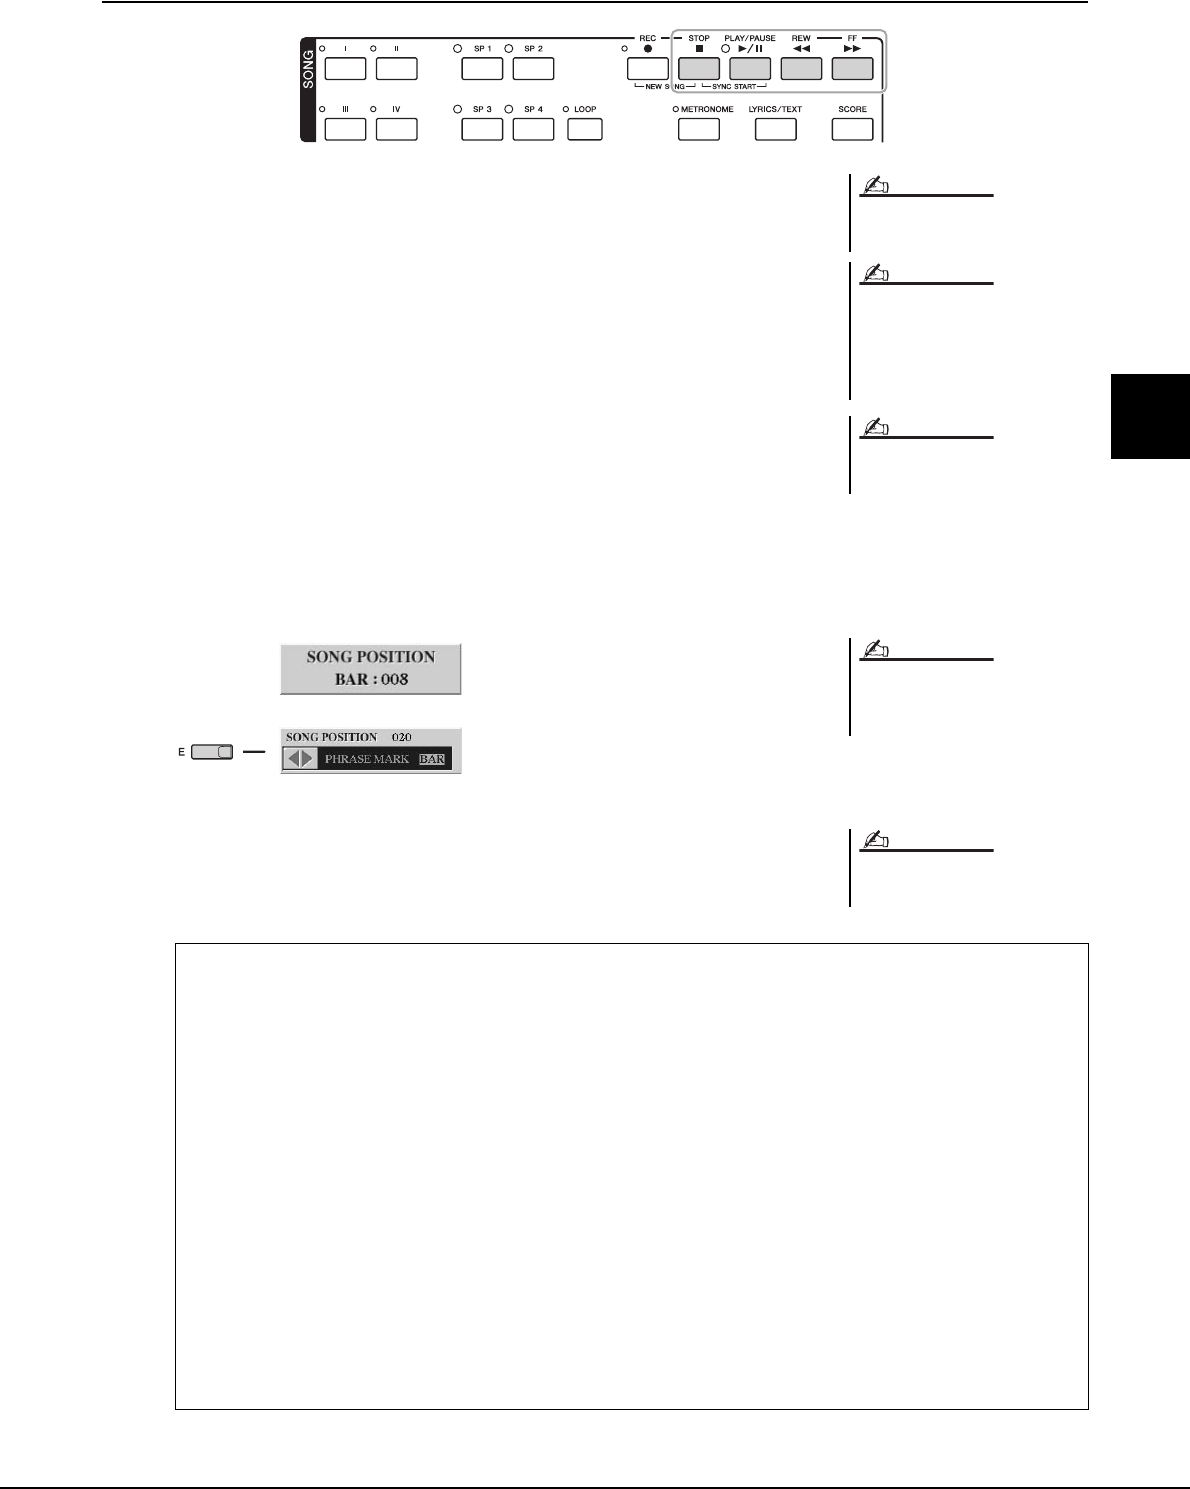
Tyros4 Owner’s Manual 59
3
Songs – Recording Your Performances and Creating Songs –
Operations During Playback
• Synchro Start .....You can start playback as soon as you start playing the key-
board. While playback is stopped, hold down the SONG
[STOP] button and press the [PLAY/PAUSE] button.
To cancel the Synchro Start function, hold down the SONG
[STOP] button and press the [PLAY/PAUSE] button once
again.
• Pause ...................Press the [PLAY/PAUSE] button. Pressing it again resumes
Song playback from the current position.
• Rewind/Fast Forward
........................Press the [REW] or [FF] button once to move back/forward
one measure. Hold the [REW] or [FF] button to scroll back-
ward/forward continuously.
Pressing the [REW] or [FF] button calls up a pop-up window showing the current
measure number (or Phrase Mark number) in the display. While the Song Position
pop-up is shown on the display, you can also use the [DATA ENTRY] dial to
adjust the value.
-Adjusting the Tempo
Same procedure as with Style tempo. See page 49.
You can have Song playback fade in/out
or change the tempo (page 49).
You can adjust the Song volume bal-
ance between the Song and Keyboard.
See page 53. In the Mixing Console
display, you can adjust the volume for
each Song part. See page 89.
You can also turn the specific part(s) on
or off. See page 62.
NOTE
NOTE
NOTE
Phrase Mark is a pre-programmed
marker in a certain Song data, which
specifies a certain location in the Song.
NOTE
For Songs not containing Phrase Marks
For Songs containing Phrase Marks
You can switch between BAR and PHRASE
MARK by pressing the [E] button.
You can transpose the Song playback.
See page 39.
NOTE
Restrictions for protected Songs
Commercially available Song data may be copy protected to prevent illegal copying or accidental erasure.
They are marked by the indications at the upper left side of the file names. The indications and relevant restric-
tions are detailed below.
•Prot. 1: Indicates Preset Songs saved to the User drive. These cannot be copied/moved/saved to external
devices.
•Prot. 2 Orig: Indicates Yamaha-protection-formatted Songs. These cannot be copied. These can be moved/
saved only to the User drive and USB storage devices with ID.
•Prot. 2 Edit: Indicates edited “Prot. 2 Orig” Songs. Make sure to save these to the same folder containing the
corresponding “Prot. 2 Orig” Song. These cannot be copied. These can be moved/saved only to the User
drive and USB storage devices with ID.
Note for “Prot. 2 Orig” and “Prot. 2 Edit” Song file operation
Make sure to save the “Prot. 2 Edit” Song to the same folder containing its original “Prot. 2 Orig” Song. Oth-
erwise the “Prot. 2 Edit” Song cannot be played back. Also, if you move a “Prot. 2 Edit” Song, be sure to move
its original “Prot. 2 Orig” Song to the same location (folder) at the same time.
For information about compatible USB storage devices for saving protected Songs, visit the Yamaha website.
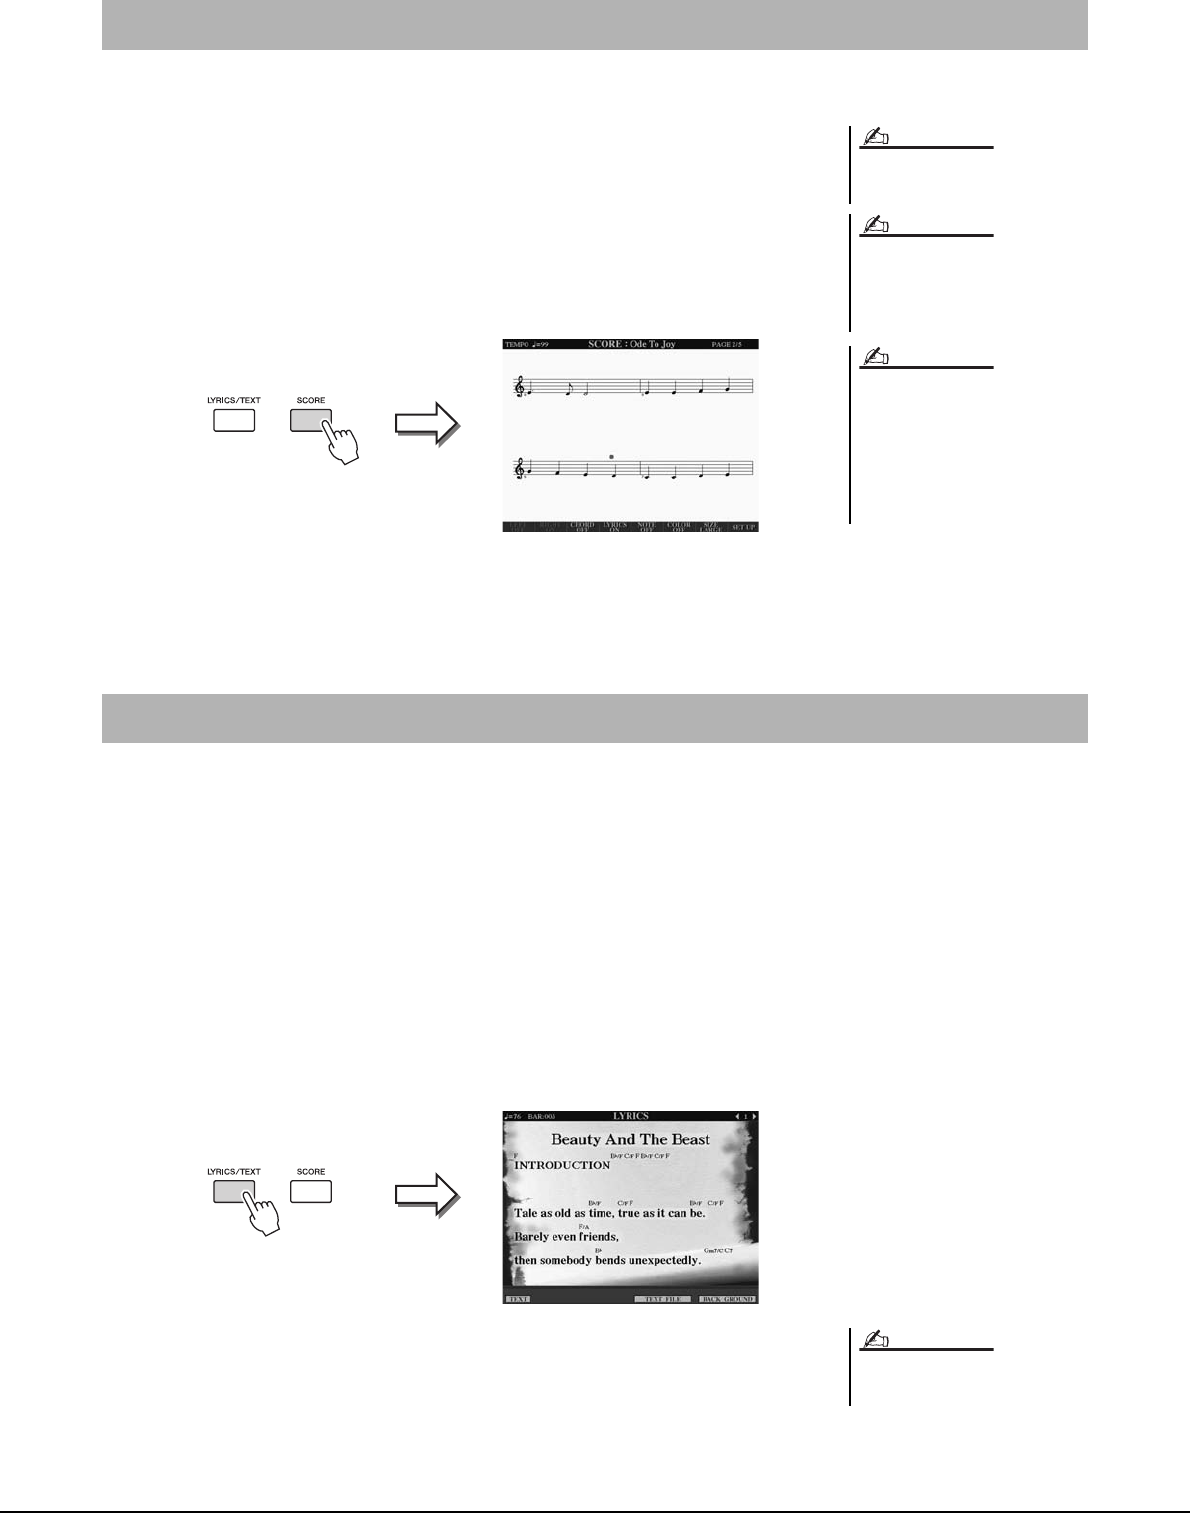
60 Tyros4 Owner’s Manual
You can view the music notation (score) of the selected Song.
1Select a Song (steps 1–3 on page 58).
2Press the [SCORE] button to call up the Score display.
You can look through the entire notation by using the TAB [][] buttons when
the Song playback is stopped.
As starting playback, the “ball” bounces along through the score, indicating the
current position.
You can change the displayed notation style by using the [1 ]–[8 ] but-
tons. For details, refer to the Reference manual on the website.
When the selected Song contains lyric data, you can view it on the Tyros4 display during playback. Even if the Song
doesn’t contain lyrics data, you can view the lyrics on the display by loading the text file (.txt) created on a computer via
USB storage device. Displaying text enables various useful possibilities, such as the showing of lyrics, chord names, and
text notes.
1Select a Song (steps 1–3 on page 58).
2Press the [LYRICS/TEXT] button to call up the Lyrics display.
When the Song data contains lyrics data, the lyrics are shown on the display. You
can look through the entire lyrics by using the TAB [][] buttons when the
Song playback is stopped. As Song playback starts, the color of the lyrics changes,
indicating the current position.
When you want to view the text file created on your computer, press the [5 ]/
[6 ] (TEXT FILE) button to select the desired text file, then press the [1 ]
(TEXT) button to display the selected file.
For more information about the Lyrics display, refer to the Reference manual on
the website.
Displaying Music Notation (Score)
The instrument can display the music
notation of your recorded Songs.
The instrument cannot display the
music notation of commercially-avail-
able music data excepting those data
that specifically allow score display.
The displayed notation is generated by
the Tyros4 based on the Song data. As a
result, it may not be exactly the same as
commercially available sheet music of
the same Song—especially when dis-
playing notation of complicated pas-
sages or many short notes.
NOTE
NOTE
NOTE
Displaying Lyrics (Text)
The Lyrics (text) can be displayed on the
external monitor. See page 98.
NOTE
Tyros4 Owner’s Manual 61
3
Songs – Recording Your Performances and Creating Songs –
Song Position markers (SP 1–SP 4) can be placed in the Song data. This not only lets you navigate quickly and easily
through the Song data, but also lets you set up convenient playback loops—allowing you to create dynamic Song
arrangements “on the fly,” as you perform.
Entering Song Position Markers
1Select a Song and start playing back (steps 1–4 on page 58).
2When the Song reaches the point you wish to enter a marker,
double-click (press twice quickly) one of the [SP 1]–[SP 4] but-
tons during playback.
The corresponding button flashes in green, and the marker for that button is
entered to the 1st beat of the appropriate measure.
Continue to enter other markers in the same way.
3Stop song playback by pressing the [STOP] button.
4Save the Song (page 57).
Jumping to a Marker During Playback
Simply pressing the one of the [SP 1]–[SP 4] buttons during song playback jumps to the corresponding position, after the
current played measure reaches its end. (The button will blink in red, indicating that playback jump is ready.) You can
cancel the jump by pressing the same SP button again before the actual jump.
Starting Playback from a Specific Marker
First press the desired SP button (while song playback is stopped), then press the [PLAY/PAUSE] button.
Using Song Position Markers
If a marker has already been entered to
the button, the lamp is lit in green or
red. Double-clicking on the button will
set the marker to a new song position.
You can also enter the marker when the
Song playback is stopped at the desired
position, by double-clicking any of the
[SP 1]–[SP 4] buttons. The marker is
entered at the top of the current mea-
sure.
NOTE
NOTE
The entered marker settings will
be lost if you change to another
Song or you turn the power off
without executing the save opera-
tion.
NOTICE
About the lamp status of the SP buttons
•Red: The Song Position has been passed and song playback continues to the next
Song Position.
•Green: Song Position is memorized to the button.
•Off: Song Position is not memorized to the button.
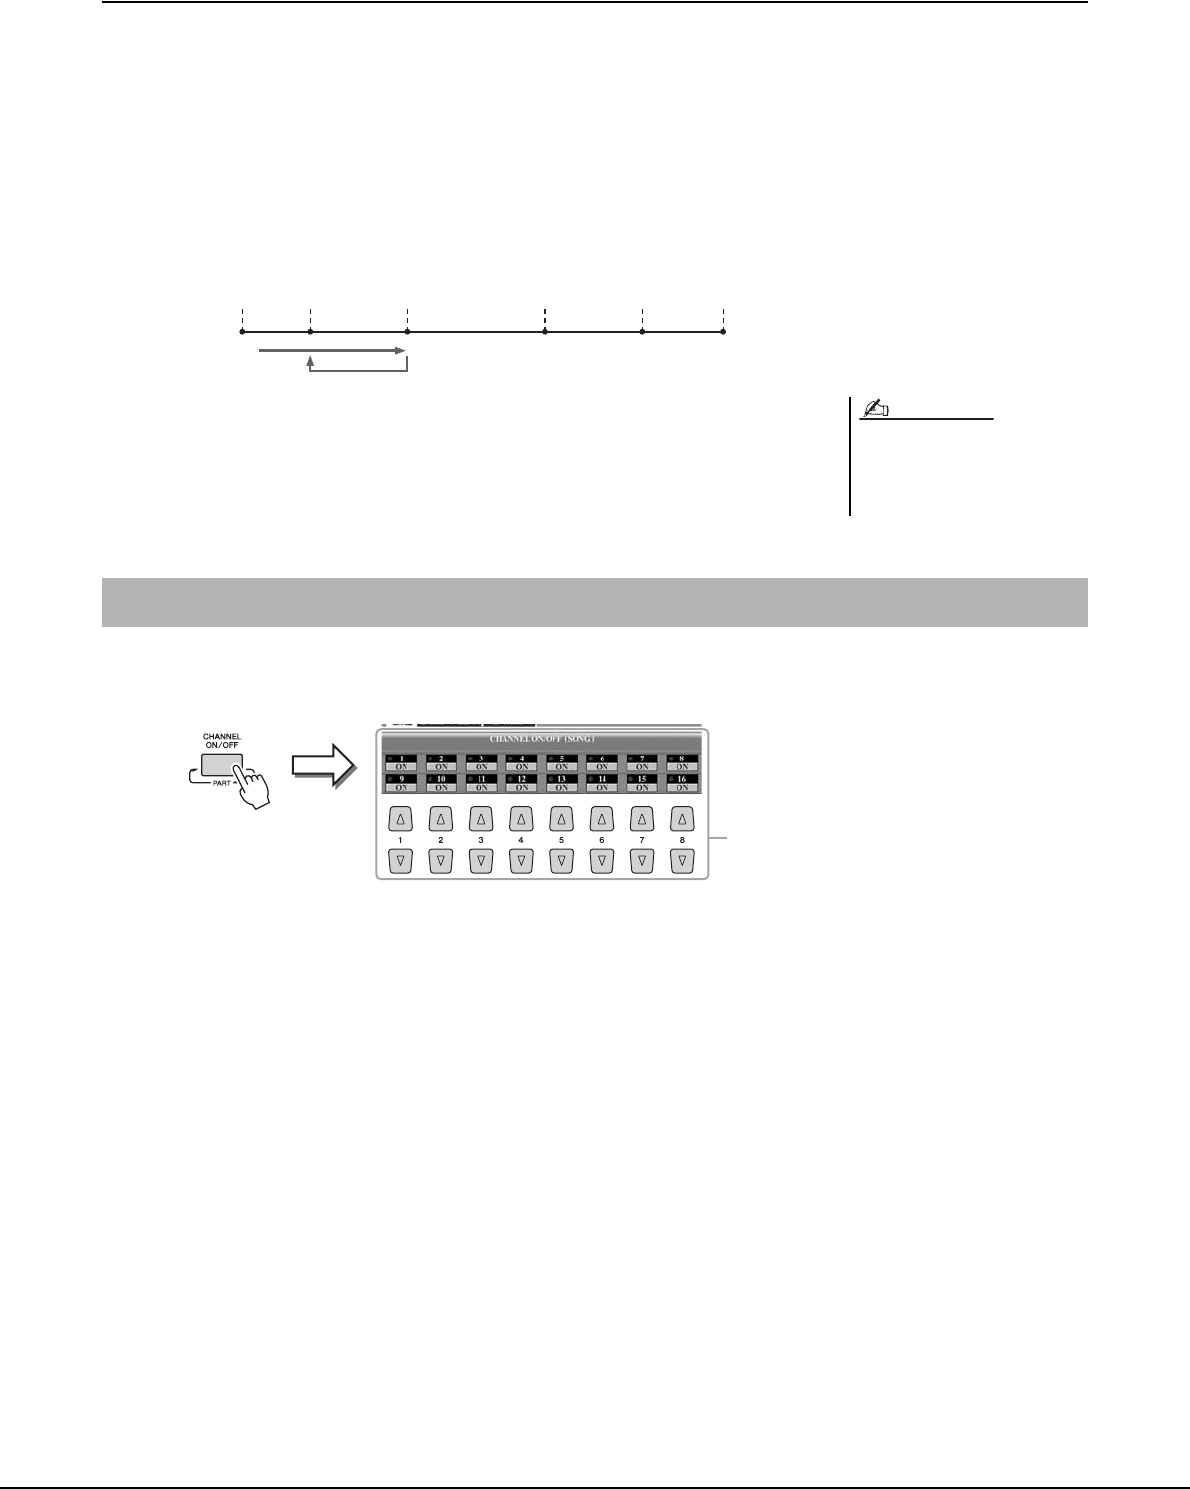
62 Tyros4 Owner’s Manual
Using Markers in Loop Playback
In this section, the loop playback method is explained as an example of loop playback between SP 1 and SP 2.
1Press the [PLAY/PAUSE] button to start playback from the top
of the Song.
2After passing the [SP 1] point, press the [LOOP] button to turn
the loop function on.
The Song plays back up to the [SP 2] point, then goes back to [SP 1] and loops
between the two points.
3To turn the loop function off, press the [LOOP] button again.
When you turn it off, playback continues past the [SP 2] point.
1Press the [CHANNEL ON/OFF] button once or twice to call up
the CHANNEL ON/OFF (SONG) display.
2Use the [1 ]–[8 ] button to turn each channel on or off.
If you want to play back only one particular channel (solo playback), press and
hold down one of the [1 ]–[8 ] buttons corresponding to the desired
channel. Only the selected channel is turned to on and others are off. To cancel
solo playback, press the same button again.
Top of
the song [SP 1] End of
the song
[SP 2] [SP 3] [SP 4]
You can play multiple Songs repeatedly:
[FUNCTION] [B] SONG SETTING
[H] REPEAT FOLDER. For details, refer
to the Reference Manual.
NOTE
Turning Song Channels On/Off
2
Tyros4 Owner’s Manual 63
3
Songs – Recording Your Performances and Creating Songs –
Advanced Features
Refer to the Reference Manual on the website, Chapter 3.
Editing Music Notation settings: [SCORE] [1 ]–[8 ] buttons
Editing Lyrics/Text display settings: [LYRICS/TEXT] [1 ]–[8 ] buttons
Using the Auto Accompaniment Features with
the Song Playback:
[ACMP] STYLE CONTROL [SYNC START]
SONG [STOP] + [PLAY/PAUSE] STYLE CONTROL [START/STOP]
Song Playback related parameters:
• Keyboard and Vocal Practice Using the Guide
Function:
• Playing Backing Parts with the Performance
Assistant Technology:
[FUNCTION] [B] SONG SETTING
[A]/[B] GUIDE MODE
[8 ] P.A.T.
Creating/Editing Songs (Song Creator):
• Recording Melodies (Step Recording):
• Recording Chords (Step Recording):
• Re-Recording a Specific Section
—Punch In/Out:
• Editing Channel Events:
• Editing Chord events, Notes, System Exclusive
events and Lyrics:
[DIGITAL RECORDING] [A] SONG CREATOR
TAB [][] 1–16
TAB [][] CHORD
TAB [][] REC MODE
TAB [][] CHANNEL
TAB [][] CHORD, 1–16, SYS/EX. or LYRICS
64 Tyros4 Owner’s Manual
4
4
Multi Pads
– Adding Musical Phrases to Your Performance –
The Multi Pads can be used to play a number of short pre-recorded
rhythmic and melodic sequences that can be used to add impact and
variety to your keyboard performances.
Multi Pads are grouped in Banks of four each. The Tyros4 features a
variety of Multi Pad Banks in a variety of different musical genres.
1Press the MULTI PAD CONTROL [SELECT] button to call up the
Multi Pad Bank Selection display, then select the desired bank.
Select pages using the [1 ]–[6 ] buttons that correspond to “P1, P2...” in the
display or pressing the MULTI PAD CONTROL [SELECT] button repeatedly,
then use the [A]–[J] buttons to select the desired bank.
2Press any of the MULTI PAD CONTROL [1]–[4] buttons to play a
Multi Pad phrase.
The corresponding phrase (in this case, for Pad 1) starts playing back in its entirety
at the currently set tempo. You can even play two or more Multi Pads at the same
time.
3Press the [STOP] button to stop playback of the Multi Pad(s).
If you want to stop specific pads, simultaneously hold down the [STOP] button
and press the pad(s) you wish to stop.
Playing the Multi Pads
1
1
There are two types of Multi Pad data.
Some types will play back once and
stop when they reach to the end. Others
will be play back repeatedly.
Pressing the pad during its playback
will stop playing and begin playing from
the top again.
NOTE
NOTE
About the color of the Multi Pads
•Blue: Indicates that the corresponding pad contains data (phrase).
•Red: Indicates that the corresponding pad is playing back.
•Red (flashing): Indicates that the corresponding pad is in standby (Synchro
Start). Refer to page 65 for using the Synchro Start function.
•Off: Indicates the corresponding pad contains no data and cannot be played.
Tyros4 Owner’s Manual 65
4
Multi Pads – Adding Musical Phrases to Your Performance –
While holding the MULTI PAD CONTROL [SELECT] button, press one of the MULTI PAD CONTROL [1]–[4] buttons
to put the Multi Pad playback in standby. The corresponding button will flash in red. You can even play two, three, or
four Multi Pads at the same time.
The Multi Pad currently set to standby will start playing when you play back a Style, press
any note on the keyboard (when [ACMP] is off), or play a chord with your left hand (when
[ACMP] is on). If you put the Multi Pad in standby during Song/Style playback, pressing
any note on the keyboard will start the Multi Pad playback at the top of next bar.
When two or more Multi Pads are in standby, pressing one of them simultaneously starts
all Multi Pads that are set to standby.
To cancel Synchro Start, while holding the MULTI PAD CONTROL [SELECT] (or
[STOP]) button, press one of the [1]–[4] buttons. Pressing the MULTI PAD CONTROL
[STOP] button once cancels Synchro Start of all buttons.
Many of the Multi Pad phrases are melodic or chordal and you can have these phrases automatically change chords along
with the chords you play with your left hand. When the [ACMP] is on or LEFT part is on, simply play a chord with your
left hand and press any of the Multi Pads—Chord Match changes the pitch to match the chords you play. Keep in mind
that some Multi Pads are not affected by Chord Match.
In this example, the phrase for Pad 1 will be transposed into F major before playing back. Try out other various chord
types while playing the Multi Pads.
Using the Multi Pad Synchro Start Function
Using Chord Match
Advanced Features
Refer to the Reference Manual on the website, Chapter 4.
Multi Pad creating (Multi Pad Creator): [DIGITAL RECORDING] [C] MULTI PAD CREATOR
Multi Pad editing: Multi Pad Bank Selection display [8 ] (EDIT)
Chord Section
66 Tyros4 Owner’s Manual
5
5
Music Finder
– Calling Up Ideal Panel Settings (Voice, Style, etc.) for Each Song –
If you want to play in a certain genre of music but don’t know which
Style and Voice settings would be appropriate, the convenient Music
Finder function can help you out. Simply select the desired music
genre (or song title) from among the Music Finder panel settings, and
the instrument automatically makes all appropriate panel settings to let
you play in that music style. Moreover, by registering the Song/Audio
data saved in various places into Music Finder, the instrument can eas-
ily call up the relevant data from the song title. The Music Finder Plus
function gives you the added capability, by connecting the instrument
to the Internet, of searching for and adding desired panel settings and
song data via the Internet to the instrument.
Before using a USB storage device, be
sure to read “Connecting a USB Storage
Device” on page 100.
Replacing automatically over-
writes all your records (panel set-
tings/song data shown in the
MUSIC FINDER display). Make
sure that all important data has
been saved to the USER or USB in
the File Section display (step 4 as
described at left).
NOTE
NOTICE
Loading panel settings from the website
As a factory default, some sample records (panel settings) are provided in the Music
Finder. By downloading many panel settings from Yamaha website and importing them
to the instrument, you can use the Music Finder function more conveniently and effec-
tively. Moreover, the Repertoire function (page 50) can also be enhanced by importing
the panel settings. Before using the Music Finder function, we recommend that you
load the panel settings from the website following the instructions below.
http://services.music.yamaha.com/musicfinder/
1Download the Music Finder panel settings file from the website to the USB stor-
age device.
2Connect the USB storage device which contains the panel settings file to the
[USB TO DEVICE] terminal of the instrument.
3Press the [MUSIC FINDER] button to call up the MUSIC FINDER display.
4Press the [7 ] (FILES) button to call up the File Selection display.
4

Tyros4 Owner’s Manual 67
5
Music Finder – Calling Up Ideal Panel Settings (Voice, Style, etc.) for Each Song –
Even after replacing the Music Finder
records, you can restore them to their
original factory settings by selecting the
“MusicFinderPreset” file in PRESET
display of the step.
NOTE
5Use the TAB [][] buttons to call up the USB display containing the panel set-
tings file downloaded from the website.
6Press the button which corresponds to the file to display the message for selecting
REPLACE/APPEND of the panel settings.
7Press the [F] (REPLACE) button to delete all records currently in the instrument
and replace them with the records of the selected file.
Press the [G] (YES) button at the confirmation prompt.
8Press the [F] (YES) button in the message display (indicating completion of the
replace operation) to call up the MUSIC FINDER display.
By checking the number of records in the MUSIC FINDER display, you can con-
firm the record has been replaced.
The number of records
For information on registering the
Song/Audio data to the Music Finder,
refer to page 70.
NOTE
About the Music Finder Records
Each data which can be called up from the MUSIC FINDER display is called a
“record.” There are three following different records.
•Panel Settings: Setting data, such as Styles, Voices, etc.
•Song (SONG): Song data which is registered to the Music Finder from the Song
Selection display (page 70)
•Audio (AUDIO): Audio data which is registered to the Music Finder from the Audio
(Simple) File Selection display (page 70)
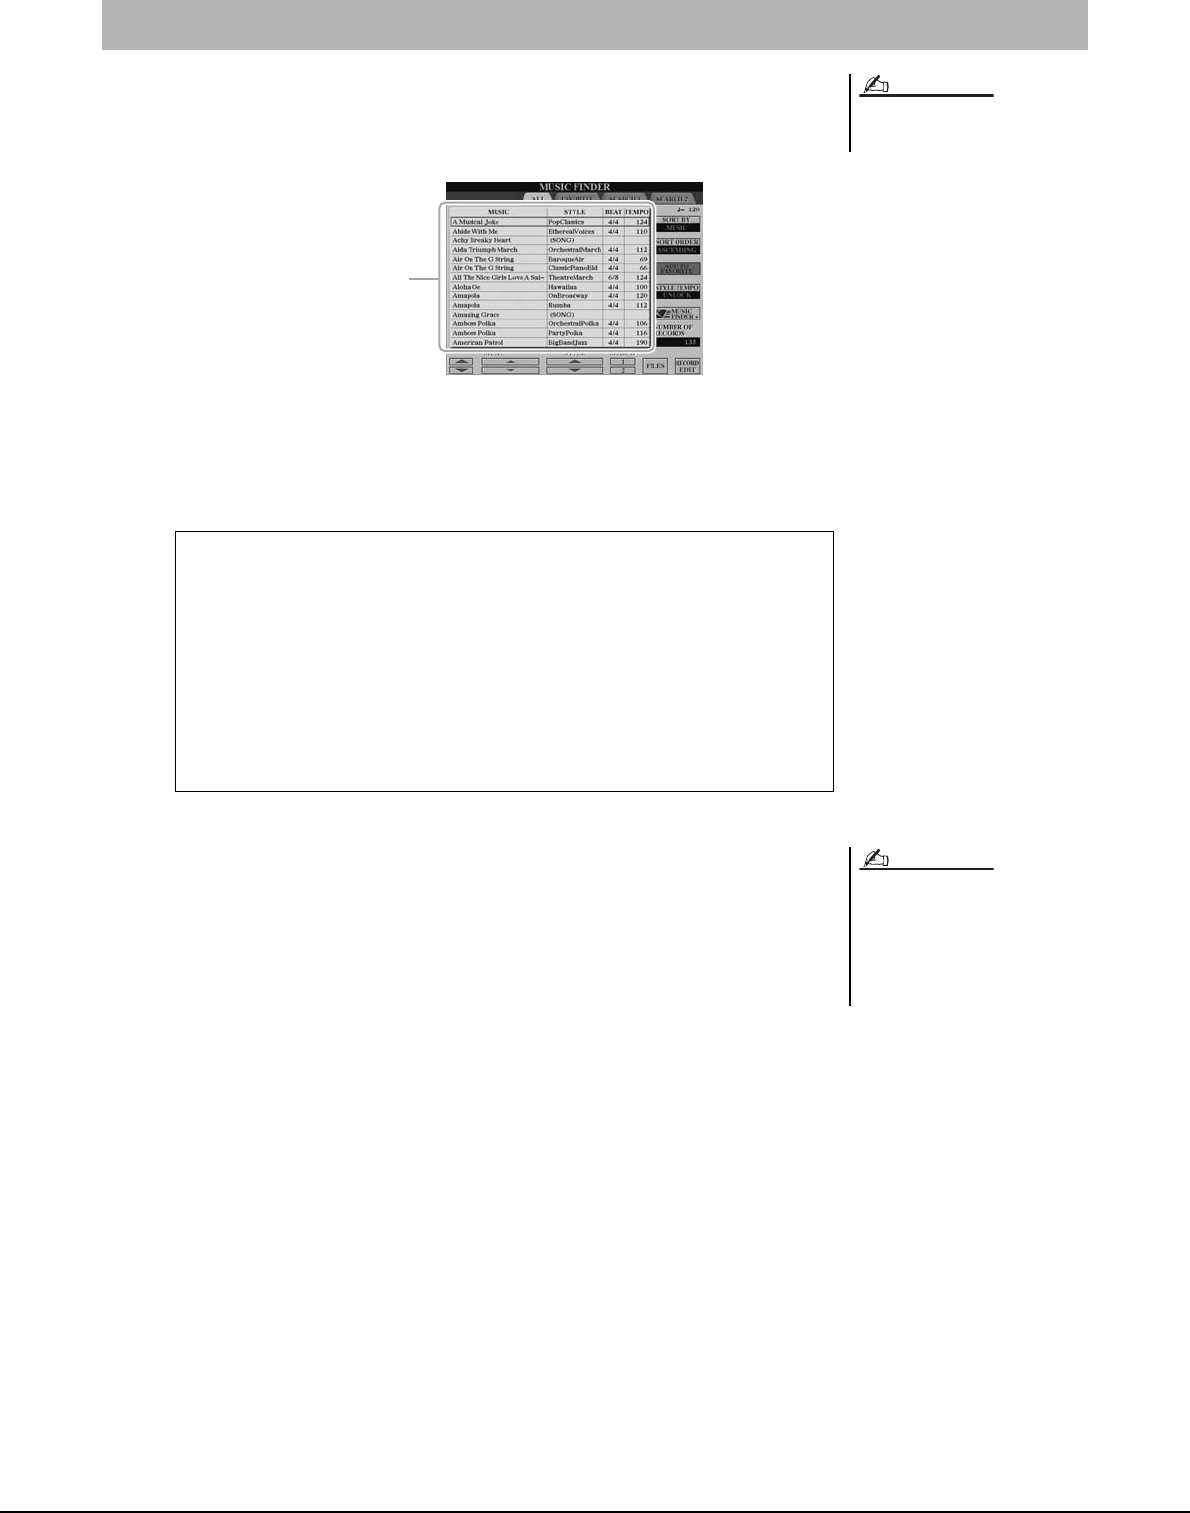
68 Tyros4 Owner’s Manual
1Press the [MUSIC FINDER] button to call up the MUSIC FINDER
display.
In the ALL display, all the records are shown.
2Use the [2 ]/[3 ] buttons to select the desired Panel Set-
tings.
You can also use the [DATA ENTRY] dial and the [ENTER] button.
3Play the chords in the left-hand section (page 35) of the key-
board.
Selecting the Desired Song from among the Panel Settings
Refer to page 71 for information on
selecting SONG and AUDIO records.
NOTE
Sorting the records
Press [F] (SORT BY) button to sort the records by MUSIC, STYLE, BEAT
and TEMPO. Press the [G] (SORT ORDER) button to change the order of the
records (ascending or descending).
When sorting records by MUSIC, you can use the [1 ] button to skip up or
down through the songs alphabetically. When sorting records by STYLE, you
can use the [4 ]/[5 ] button to skip up or down through the Styles
alphabetically. Simultaneously press the [] and [] buttons to move the cur-
sor to the first record.
Shows the song title
(MUSIC) and information
of the Style assigned to
the panel settings.
If you want to avoid changing the Tempo
during Style playback when selecting
another record, turn on the Tempo Lock
function by pressing the [I] (STYLE
TEMPO) button in the Music Finder dis-
play.
NOTE
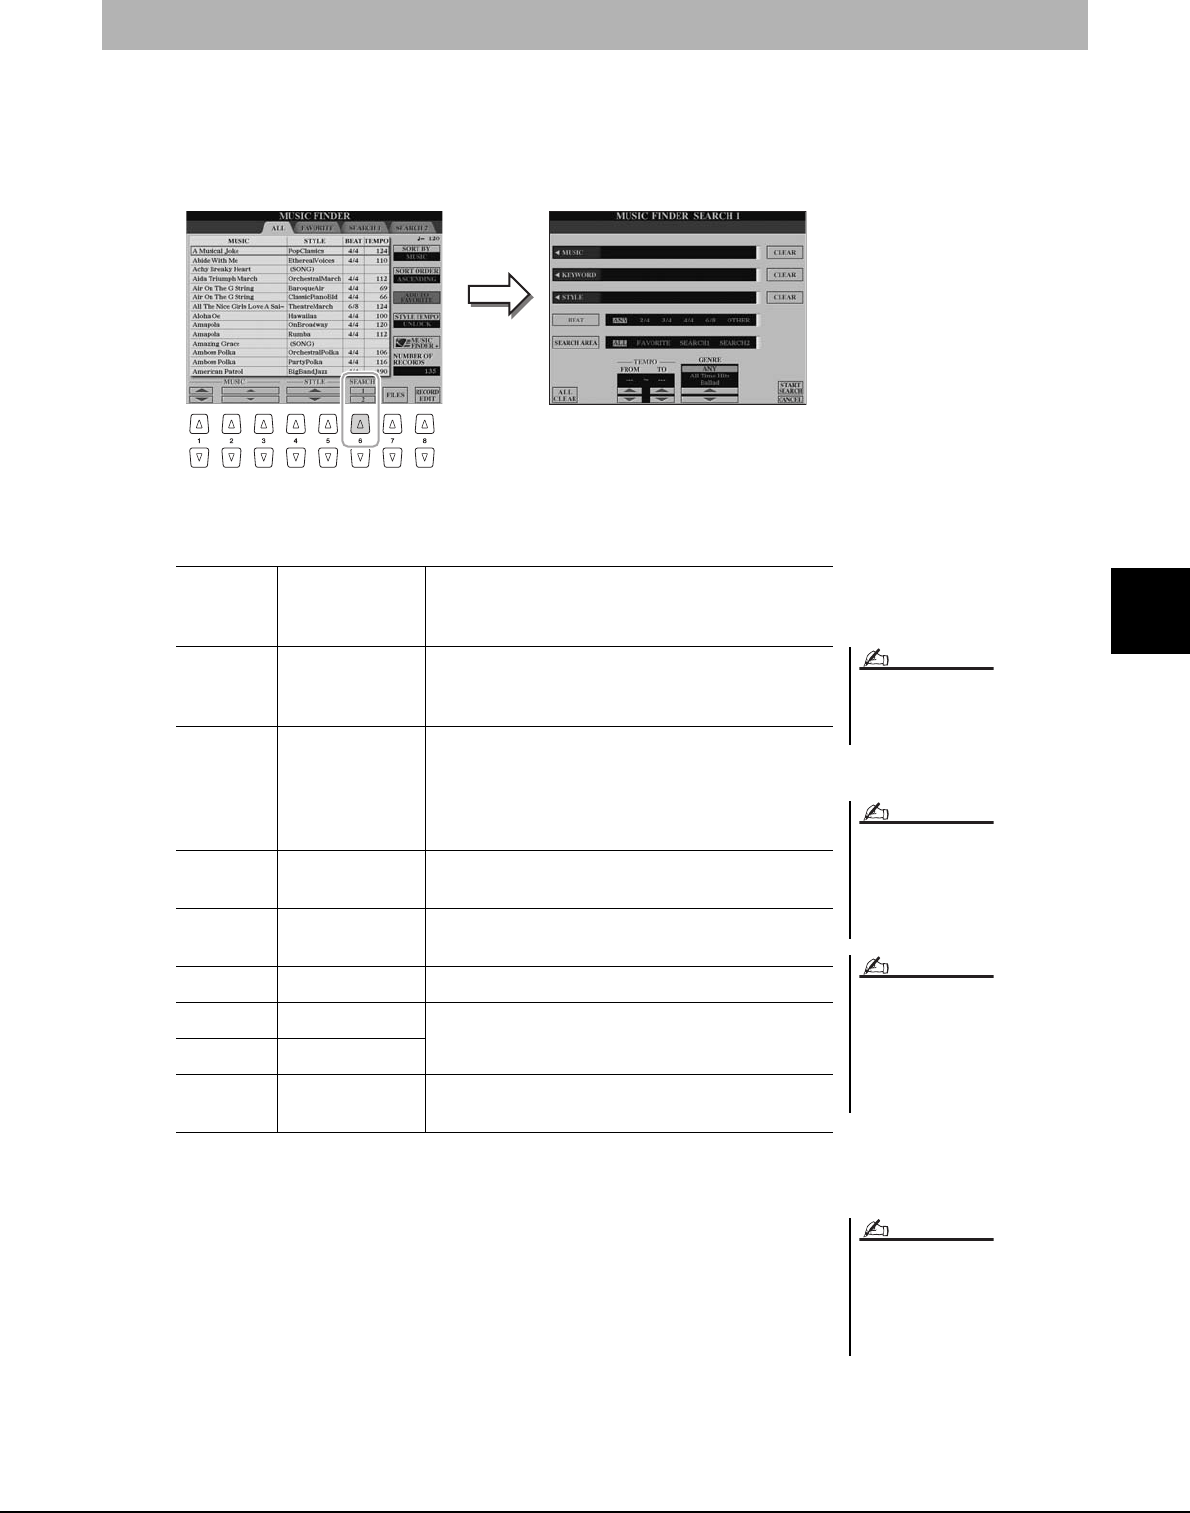
Tyros4 Owner’s Manual 69
5
Music Finder – Calling Up Ideal Panel Settings (Voice, Style, etc.) for Each Song –
You can search the records by specifying a song title or keyword, using the Search function of the Music Finder.
1From the ALL page of the MUSIC FINDER display, press the [6
] (SEARCH 1) button to call up the Search display.
2Enter the search criteria.
To cancel searching, press the [8 ] (CANCEL) button.
3Press the [8 ] (START SEARCH) button to start the search.
The Search 1 display appears, showing the results of the search.
Searching the Panel Settings
You can search several different Key-
words simultaneously by inserting a
separator (comma) between each.
If you select a beat of 2/4 or 6/8, a Style
suitable for performing a song in 2/4
and 6/8 beat can be searched, but the
actual Style is created by using a 4/4
beat.
When searching Song/Audio files
(page 67), it is necessary to set the
search criteria as follows.
STYLE: Blank
BEAT: ANY
TEMPO: “---” - “---”
NOTE
NOTE
NOTE
[A] MUSIC Searches by song title. Pressing the [A] button calls
up the pop-up window to enter the song title. To clear
the entered Music, press the [F] (CLEAR) button.
[B] KEYWORD Searches by keyword. Pressing the [B] button calls
up the pop-up window to enter the keyword. To clear
the entered Keyword, press the [G] (CLEAR) button.
[C] STYLE Searches by Style. Pressing the [C] button calls up
the Style Selection display. After selecting the
desired Style, press the [EXIT] button to return back
to the Search display. To clear the entered Style, press
the [H] (CLEAR) button.
[D] BEAT Specifies the time signature for the search. All beat
settings are included in the search if you select ANY.
[E] SEARCH
AREA
Selects a specific location (the tab of the upper part of
the MUSIC FINDER display) for searching.
[1 ] ALL CLEAR Clears all entered search criteria.
[3 ] TEMPO FROM Sets the range of the tempo you want to use for the
search.
[4 ]TEMPO TO
[5 ]/
[6 ]
GENRE Selects the desired music genre.
If you wish to search another criteria,
press the [6 ] (SEARCH 2) button in
the Music Finder display. The search
result is displayed in the SEARCH 2
display.
NOTE
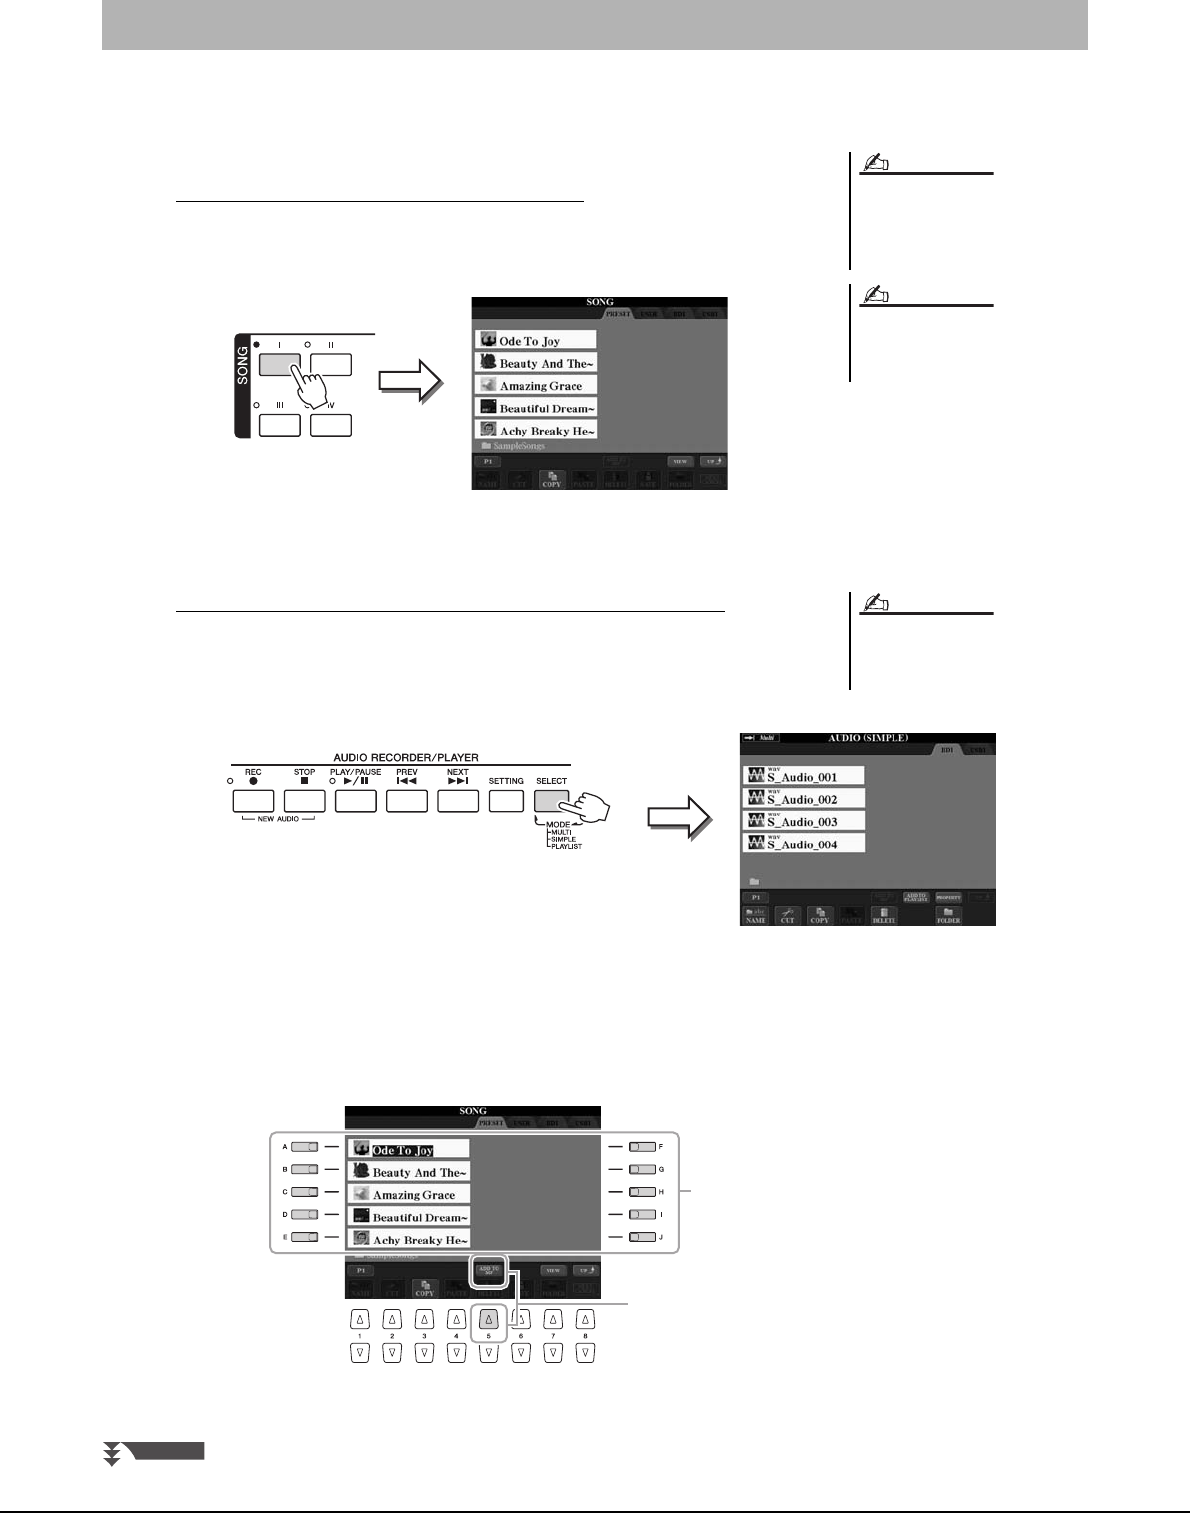
70 Tyros4 Owner’s Manual
By registering the song (Song/Audio) data saved in various places (Song Selection display: page 58; Audio (Simple) File
Selection display: page 80) into Music Finder, the instrument can call up song data easily from the song title.
1Display the song data.
Song data (SONG) in the Song Selection display
1-1 Press any of the SONG [I]–[IV] buttons to display the song data (Song file)
in the SONG Selection display.
1-2 Press the TAB [][] buttons to select the location of the desired Song.
Audio data (AUDIO) in the Audio (Simple) File Selection display
1-1 Press the AUDIO RECORDER/PLAYER [SELECT] button several times to
display the song data (Audio file) in the Audio (Simple) File Selection dis-
play.
1-2 Press the TAB [][] buttons to select the location of the desired Audio.
2Press the [A] – [J] buttons corresponding to the desired file.
Registering the Song/Audio data (SONG/AUDIO)
If you want to register the Song/Audio
data of the USB storage device, connect
the USB storage device containing the
data to the [USB TO DEVICE] terminal.
Before using a USB storage device, be
sure to read “Connecting a USB Storage
Device” on page 100.
NOTE
NOTE
Multi Track recording files cannot be
registered into Music Finder. Only WAV
and MP3 files can be registered.
NOTE
2
3
NEXT PAGE
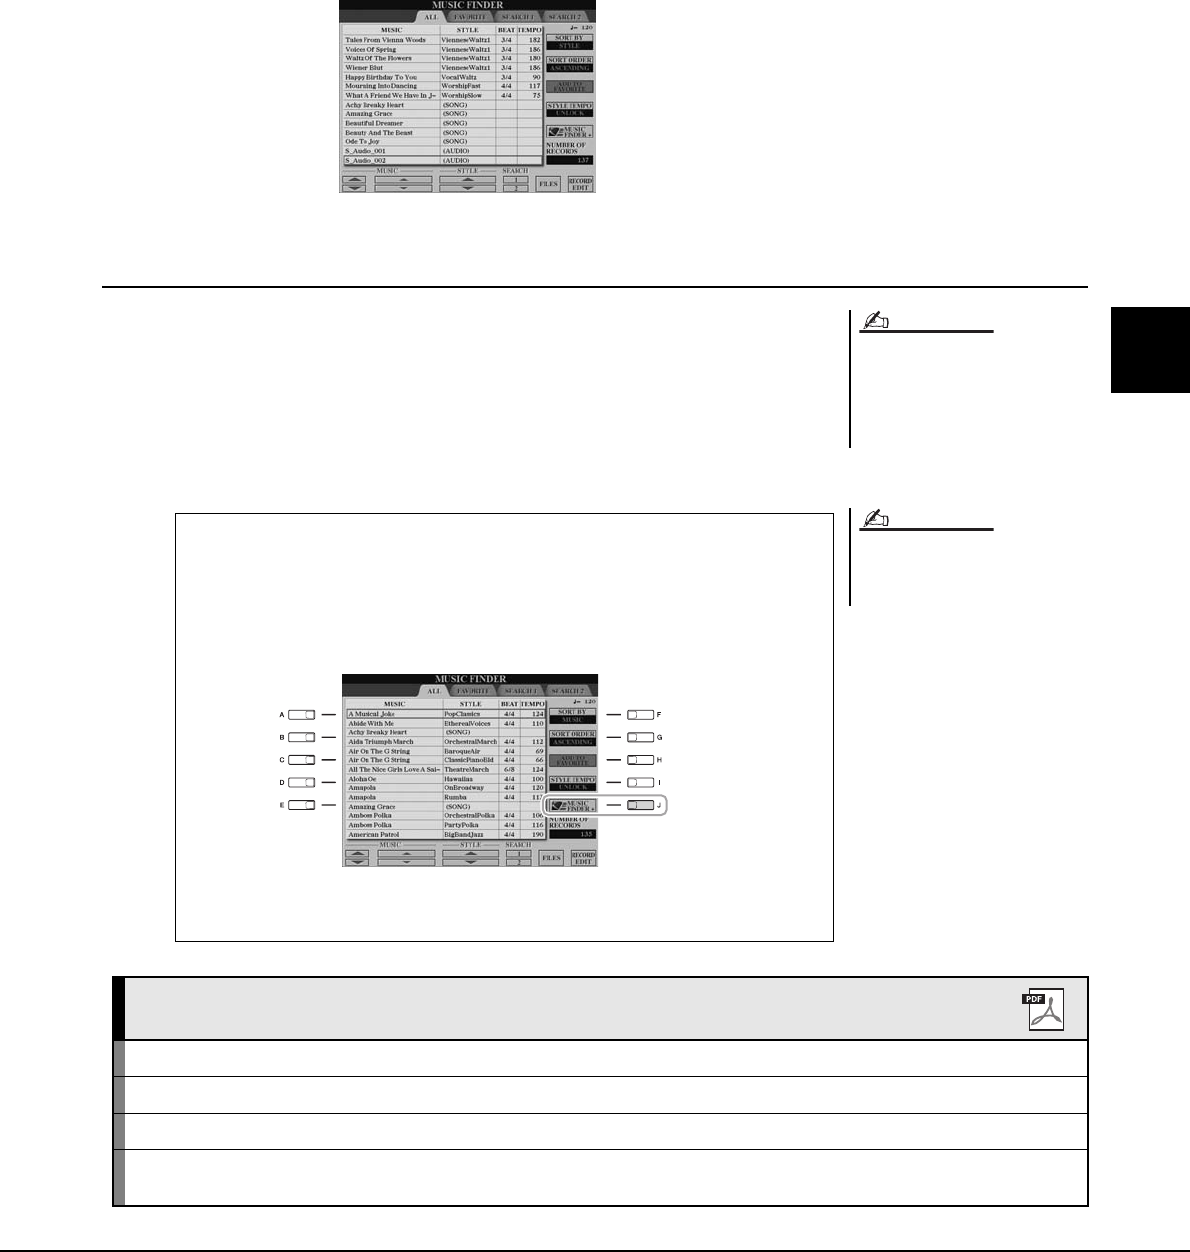
Tyros4 Owner’s Manual 71
5
Music Finder – Calling Up Ideal Panel Settings (Voice, Style, etc.) for Each Song –
3Press the [5 ] (ADD TO MF) button to register the selected
data to Music Finder.
The display automatically changes to the Music Finder Record Edit display.
4Press [8 ] (OK) button to start the registration.
Press the [8 ] (CANCEL) button to cancel the registration.
5Check the song data is added in the MUSIC FINDER display.
The song data is shown as SONG or AUDIO in the STYLE column.
Recalling the registered song data from Music Finder
You can recall the registered song data in the same way as done in the “Selecting the
Desired Song from among the Panel Settings” and “Searching the Panel Settings”
(page 69).
• To play back the recalled Song data, press the SONG [PLAY/PAUSE] button after
selecting the SONG record.
• To play back the recalled Audio data, press the AUDIO RECORDER/PLAYER [PLAY/
PAUSE] button after selecting the AUDIO record.
If you want to play back Song/Audio
data in the USB storage device, connect
the USB storage device containing the
data to the [USB TO DEVICE] terminal
beforehand.
The available contents of the Music
Finder Plus service are subject to
change.
NOTE
NOTE
Added convenience using the Internet (Music Finder+)
This service gives you the capability, by connecting the instrument to the
Internet, of searching for and adding desired panel settings and song data via
the Internet to the instrument. Let’s connect the instrument to the Internet, and
press the [J] (MUSIC FINDER+) button on the MUSIC FINDER display!
For more details about this service, refer to the following website.
http://services.music.yamaha.com/musicfinder/
Advanced Features
Refer to the Reference Manual on the website, Chapter 5.
Creating a Set of Favorite Records: [MUSIC FINDER] TAB [][] ALL [H] (ADD TO FAVORITE)
Editing Records: [MUSIC FINDER] [8 ] (RECORD EDIT)
Saving the Record as a Single File: [MUSIC FINDER] [7 ] (FILES)
Viewing Record Information on the Internet
(MUSIC FINDER Plus): [MUSIC FINDER] [J] (MUSIC FINDER +)
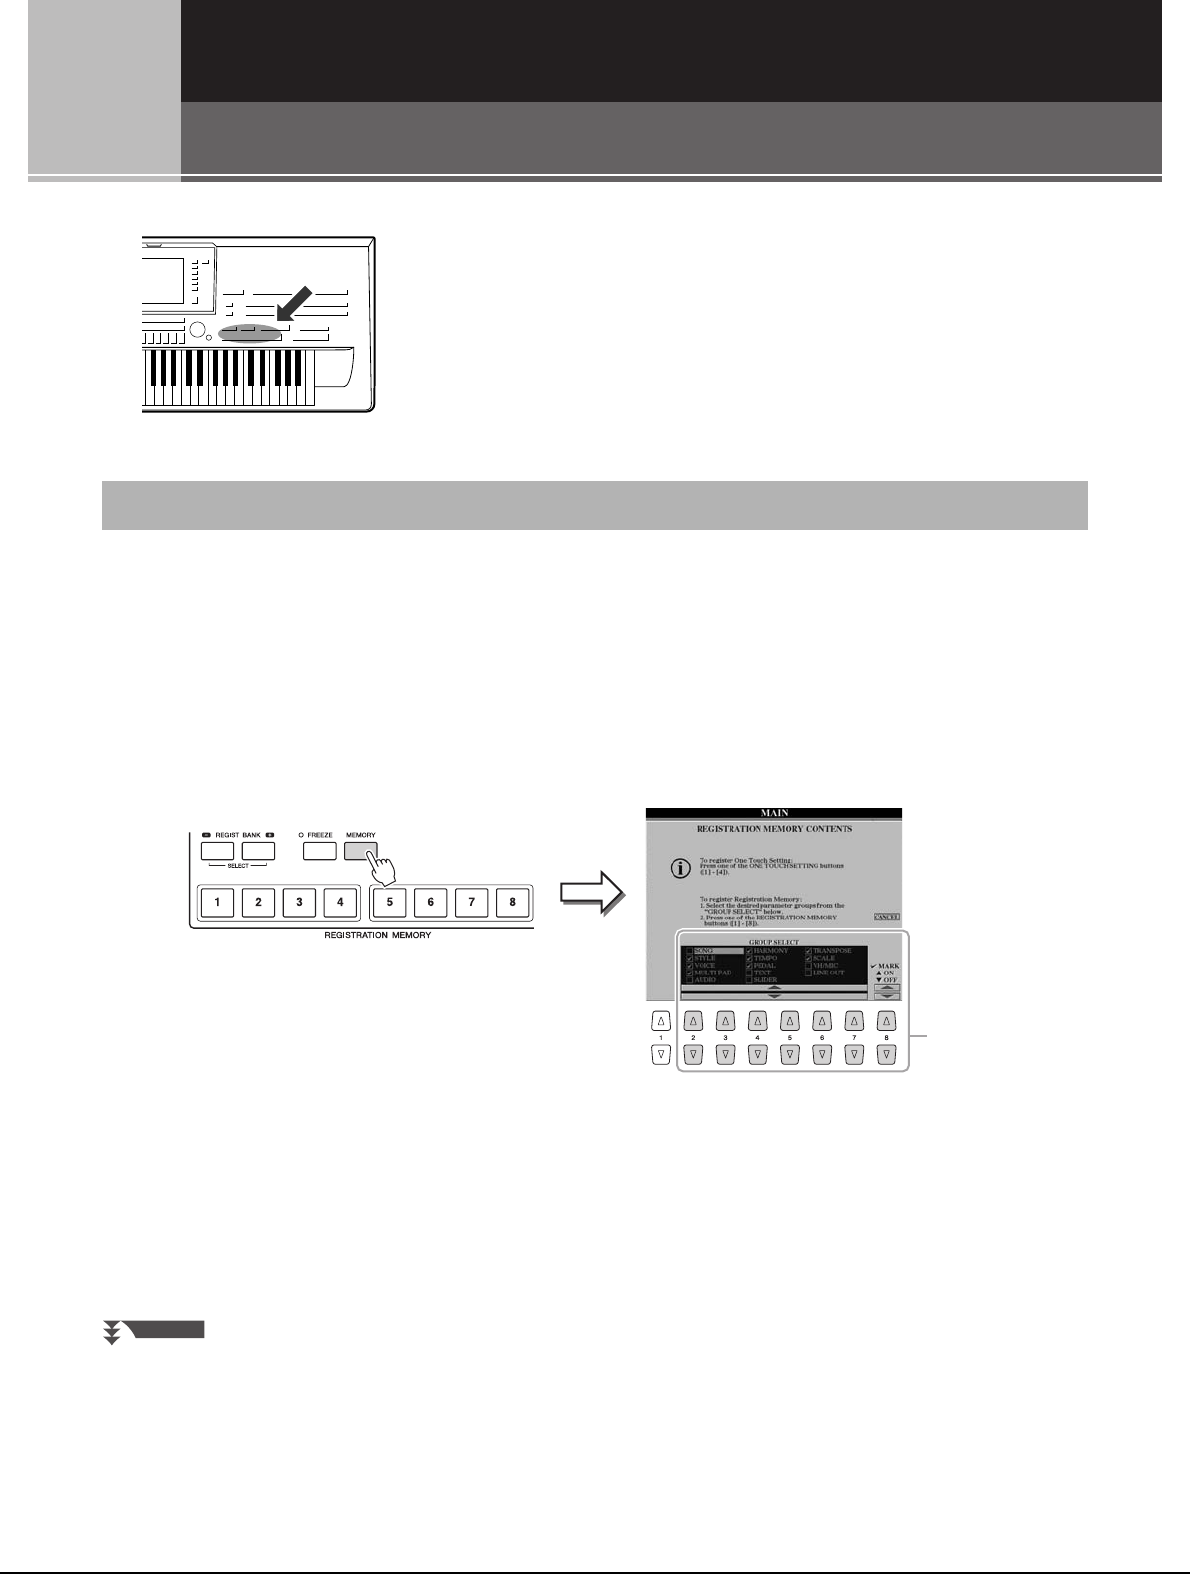
72 Tyros4 Owner’s Manual
6
6
Registration Memory
– Saving and Recalling Custom Panel Setups –
The Registration Memory function allows you to save (or “register”)
virtually all panel settings to a Registration Memory button, and then
instantly recall your custom panel settings by simply pressing a single
button. The registered settings for eight Registration Memory buttons
should be saved as a single Bank (file).
1Set up the panel controls (such as Voice, Style, effects, and so
on) as desired.
Refer to the separate Data List for a list of parameters that can be registered with
the Registration Memory function.
2Press the [MEMORY] button above the REGISTRATION MEM-
ORY section.
The display for selecting the items to be registered appears.
3Determine the items you want to register.
Select the desired item by using the [2 ]–[7 ] buttons, then enter or
remove the checkmark by using the [8 ] (MARK ON)/ [8 ] (MARK OFF) but-
tons.
To cancel the operation, press the [I] (CANCEL) button.
Registering Your Panel Setups
3
NEXT PAGE
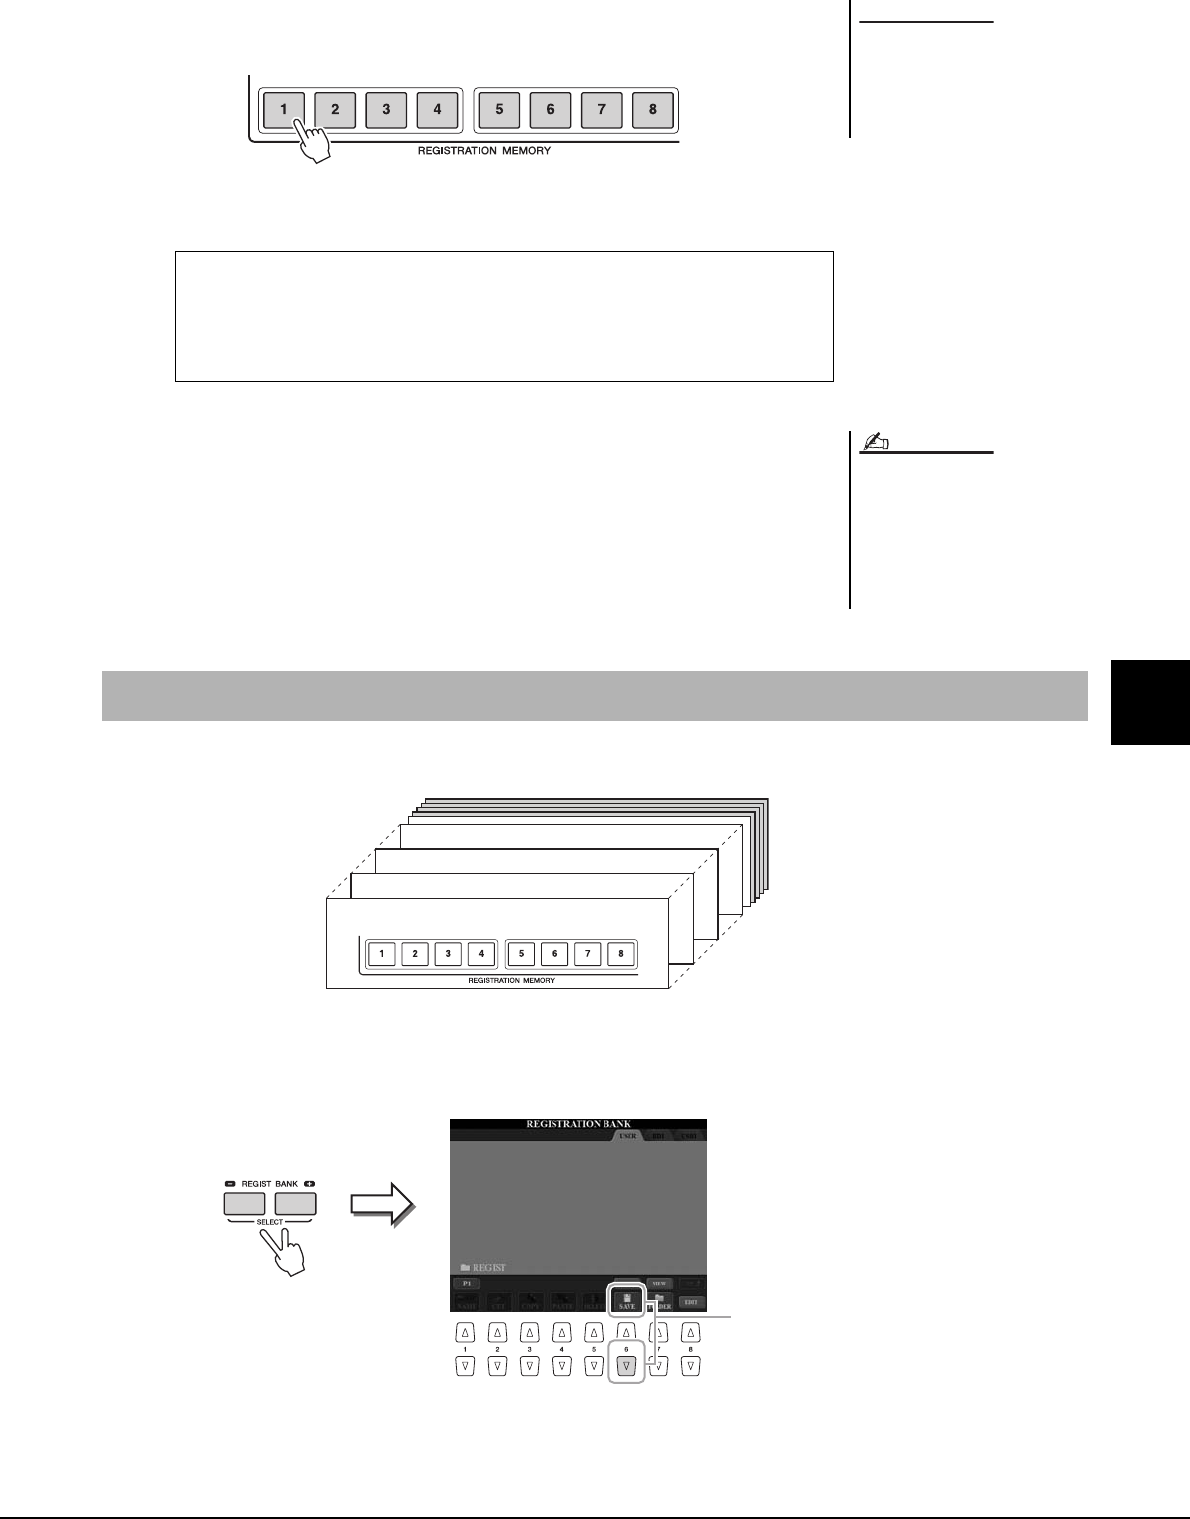
Tyros4 Owner’s Manual 73
6
Registration Memory – Saving and Recalling Custom Panel Setups –
4Press one of the REGISTRATION MEMORY [1]–[8] buttons to
which you wish to memorize the panel setup.
The memorized button becomes red, which indicates the number button contains
data and its number is selected.
5Register various panel setups to other buttons by repeating
steps 1–4.
The registered panel setups can be recalled by simply pressing the desired number
button.
You can save all the eight registered panel setups as a single Registration Memory Bank file.
1Press the REGIST BANK [+] and [-] buttons simultaneously to
call up the Registration Bank Selection Display.
2Press the [6 ] (SAVE) button to save the Bank file (page 57).
If you select the button whose
lamp is lit in red or blue here, the
panel setup previously memo-
rized to the button will be erased
and replaced by the new settings.
NOTICE
About the lamp status
•Red: Data registered and currently selected
•Blue: Data registered but not currently selected
•Off: No data registered
The panel setups registered in the num-
bered buttons are preserved even when
you turn off the power. If you want to
delete all the eight current panel setups,
turn the power switch on while holding
the B5 key (right-most B key on the key-
board) or refer to page 32.
NOTE
Saving the Registration Memory as a Bank file
Bank 01
Bank 02
Bank 03
Bank 04
2
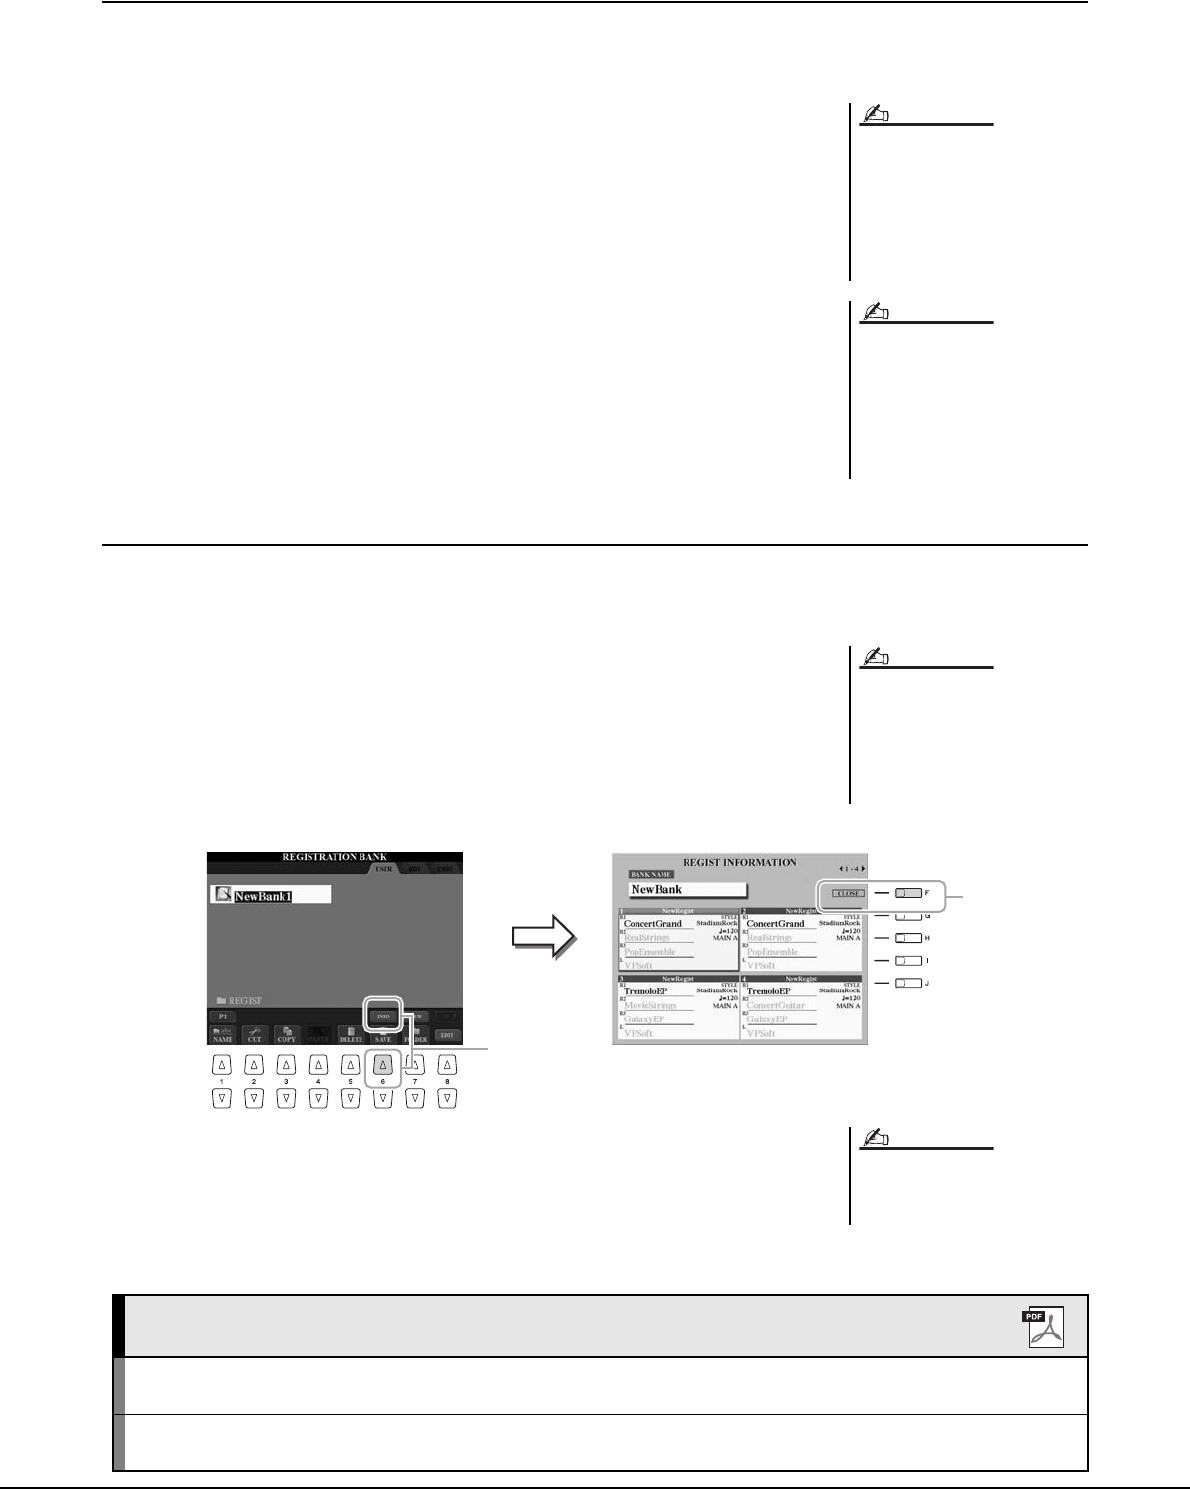
74 Tyros4 Owner’s Manual
Recalling a Registered Panel Setup
The saved Registration Memory Bank files can be recalled by using the REGIST BANK [-]/[+] buttons or the following
procedure.
1Press the REGIST BANK [+] and [-] buttons simultaneously to
call up the REGISTRATION BANK Selection Display.
2Press one of the [A]–[J] buttons to select a Bank.
You can also use the [DATA ENTRY] dial and the [ENTER] button to select a
Bank.
3Press one of the blue-lit numbered buttons ([1]–[8]) in the Reg-
istration Memory section.
Confirming the Registration Memory Information
You can call up the information display to take a look which Voices and Style are memorized to the [1]–[8] buttons of a
Registration Memory Bank.
1Simultaneously press the REGIST BANK [+] and [-] buttons to
call up the Registration Bank Selection display, then use the
[A]–[J] buttons to select the desired Bank.
You can also use the [DATA ENTRY] dial and the [ENTER] button to select a
Bank.
2Press the [6 ] (INFO) button to call up the information display.
By using the TAB [][] buttons, you can switch between the two information
display pages: information for the Registration Memory [1]–[4] buttons and infor-
mation for the [5]–[8] buttons.
3Press the [F] (CLOSE) button to close the information display.
When recalling the setups including
Song/Style file selection from a USB
storage device, make sure that the
appropriate USB storage device includ-
ing the registered Song/Style is con-
nected into the [USB TO DEVICE]
terminal.
Turning the [FREEZE] button on dis-
ables recall of specific item(s). To use
this function, you need to select the
item(s) not to be recalled by accessing
[FUNCTION] [E] REGIST
SEQUENCE/FREEZE/VOICE SET TAB
[][] FREEZE.
NOTE
NOTE
You can instantly call up the information
display of the currently selected Regis-
tration Memory Bank by pressing the
[DIRECT ACCESS] button and one of
the REGISTRATION MEMORY [1]–[8]
buttons in sequence.
NOTE
3
2
The grayed Voice indicates that the cor-
responding Voice part is off, while black
indicates the part is on.
NOTE
Advanced Features
Refer to the Reference Manual on the website, Chapter 6.
Disabling recall of specific items (Freeze): [FUNCTION] [E] REGIST SEQUENCE/FREEZE/VOICE SET TAB [ ][]
FREEZE
Calling up Registration Memory numbers in
order (Registration Sequence):
[FUNCTION] [E] REGIST SEQUENCE/FREEZE/VOICE SET TAB [ ][]
REGISTRATION SEQUENCE
Tyros4 Owner’s Manual 75
7
7
7
Audio Recorder/Player – Recording and Playback Audio Files –
Audio Recorder/Player
– Recording and Playback Audio Files –
The Tyros4 lets you record your performances as audio data to internal
hard disk drive via the two different recording modes, Simple and
Multi Track.
With Simple recording, you can record your performance using the
desired Voices, Styles, Multi Pads and microphone sound quickly and
easily to an audio file. This mode is intuitive and fast.
With Multi Track recording, you can record your performance several
times to make up the complete song. For example, 1) record your key-
board performance to the Main track, 2) record your vocal via the
microphone to the Sub track, then 3) merge the audio data in the Sub
track to the Main track via the Bounce recording operation.
The created audio data can be saved in WAV file format, allowing you
to edit your performance data on computer then share it with your
friends over the Internet or by burning your own original CD.
File formats that can be used:
Mode File extension Available
location
Various recording
methods
(Bounce,
Punch In/Out, etc.)
Simple Recording .wav (WAV format: 44.1 kHz sample rate, 16 bit resolution, stereo) Internal HDD,
USB flash
memory
No
Playback .wav (WAV format: 44.1 kHz sample rate, 16 bit resolution, stereo)
.mp3 (MPEG-1 Audio Layer-3: 44.1/48.0 kHz sample rate, 64–320
kbps and variable bit rate, mono/stereo)
Multi
Track
Recording .aud (Tyros4 original: 44.1 kHz sample rate, 16 bit resolution, stereo) Internal HDD Yes
Playback .aud (Tyros4 original: 44.1 kHz sample rate, 16 bit resolution, stereo)
• The .aud file saved with the Multi Track recording can be played back only on the Tyros4.
• If you want to convert the .aud file to the .wav file (Simple recording file), perform the instructions below.
1Select the desired .aud file on the Audio (Multi) File selection display (steps 1–2 on
page 80).
2Press the AUDIO RECORDER/PLAYER [SETTING] button to call up the Multi
Track Recorder display.
3Press the [J] (MIXDOWN) button convert to the .wav file.
For details, refer to step 15 on page 79.
IMPORTANT
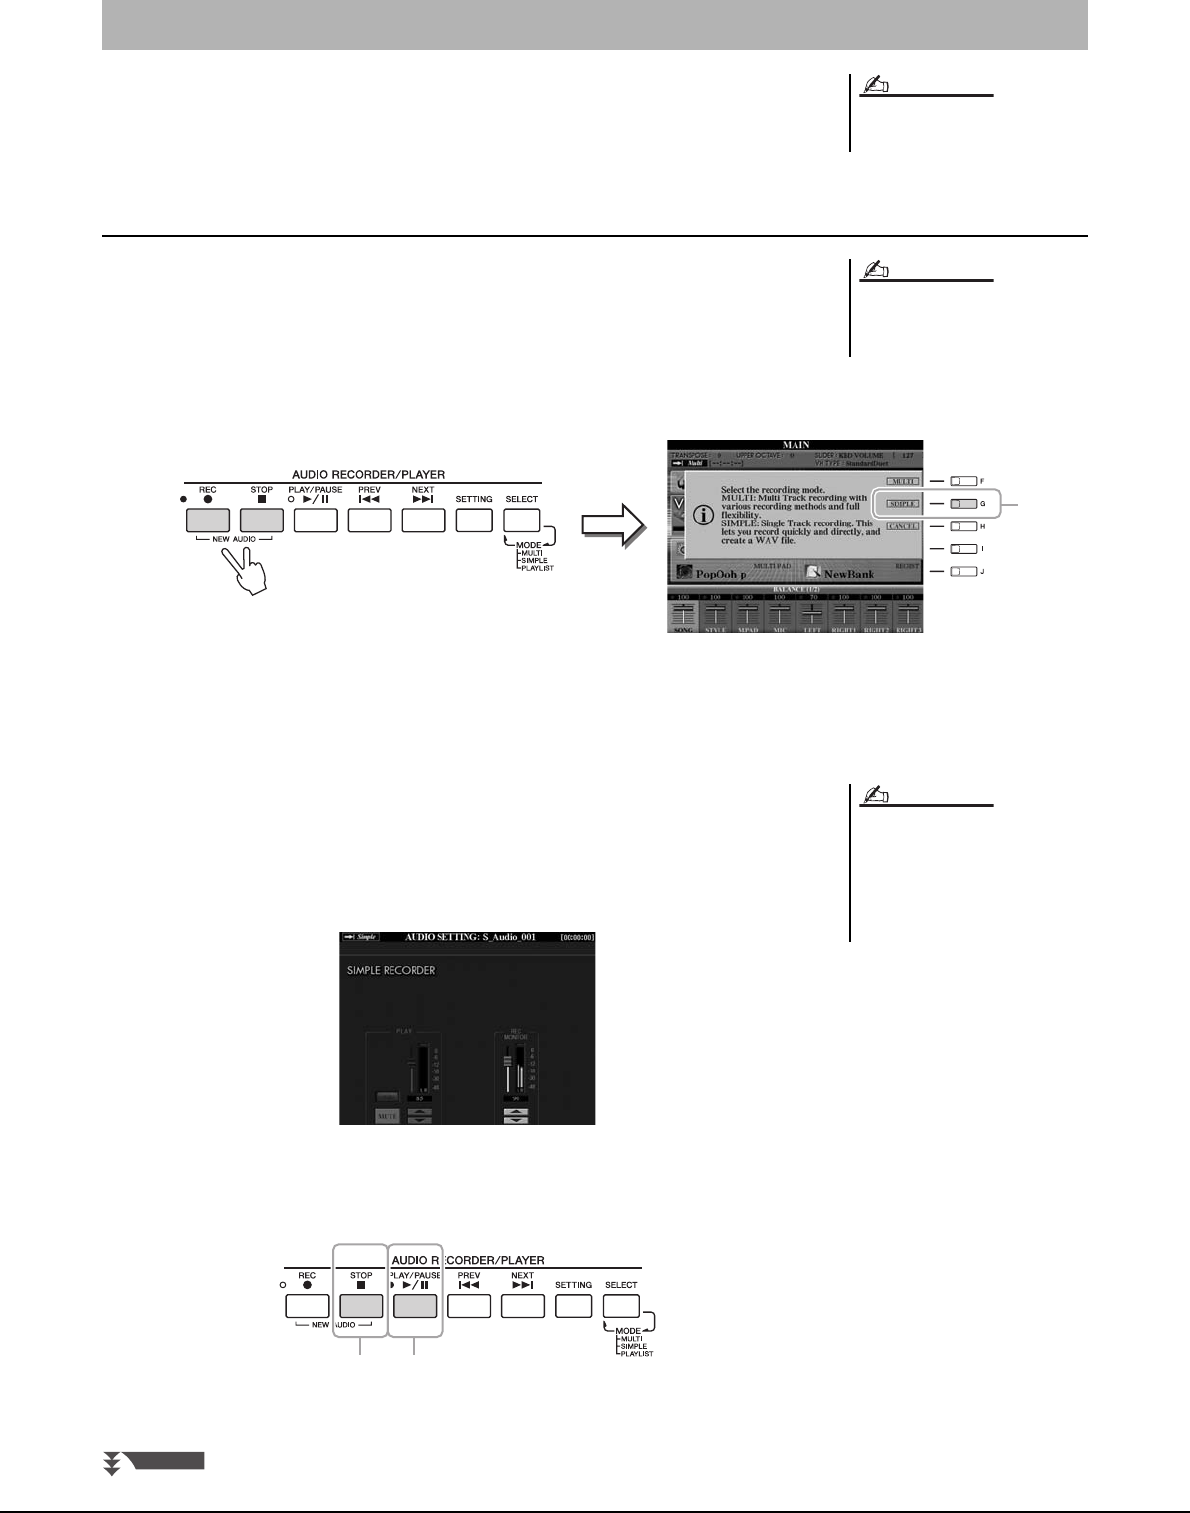
76 Tyros4 Owner’s Manual
The following sounds can be recorded.
• Internal sound of the Tyros4 (Keyboard parts (Right 1, Right 2, Right 3, Left), Multi Pad,
Song parts, Style parts)
• Input from a microphone (via the [MIC] jack)
Simple Recording
1Set the desired Voice, Style, etc. for your recording.
For instructions on selecting a Voice, see page 33. For instructions on selecting a
Style and using auto accompaniment, see page 46.
2Press the AUDIO RECORDER/PLAYER [REC] and [STOP] but-
tons simultaneously.
3Press the [G] (SIMPLE) button then press the [G] (OK) button to
call up the Simple Recorder display.
This operation will create a new empty audio file named “S_Audio_***.WAV.”
4Before recording, check the recording levels on the REC MONI-
TOR meter by playing the Voice, Style, etc., and adjust them
accordingly by using the [6 ] buttons or sliders.
Adjust the control so that the volume doesn’t constantly go into the “red” and light
up the indicator.
5Press the [PLAY/PAUSE] button to start recording.
Immediately after this operation, start and record your performance.
Recording Your Performance
Input from the [AUX IN] jacks cannot be
recorded.
NOTE
Up to 80 minutes can be recorded con-
tinuously in a single recording opera-
tion.
NOTE
3
“NEW AUDIO” means that a new empty
audio file is to be created.
•Press the 6’s [] and [] buttons
simultaneously to instantly reset the
recording volume to 90.
•If you call up a different display, press
the [SETTING] button to return to the
Simple Recorder display.
NOTE
65, 7
NEXT PAGE
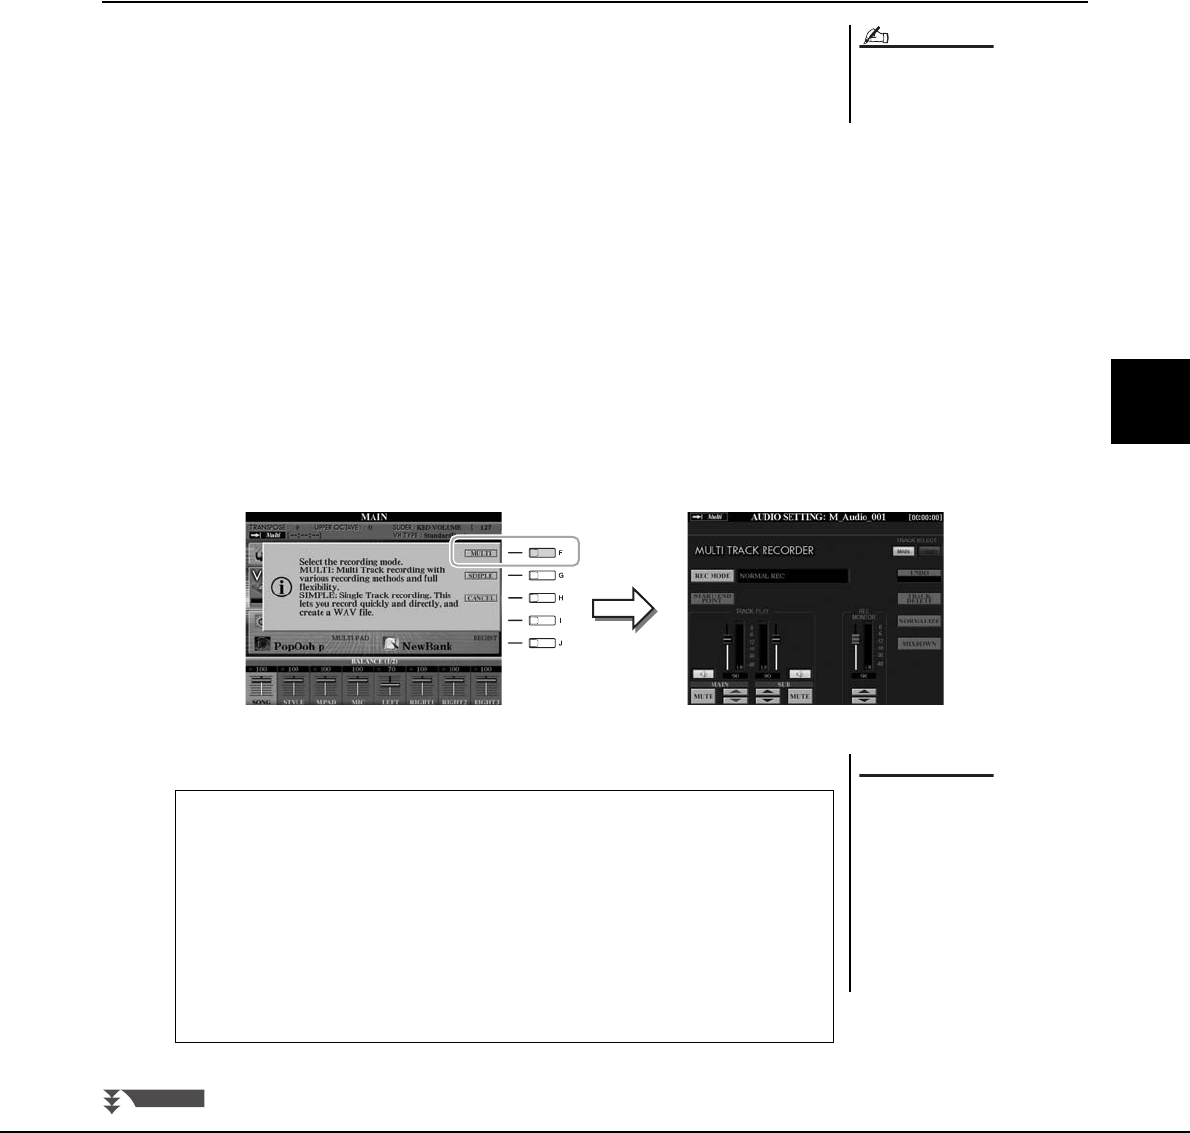
Tyros4 Owner’s Manual 77
7
Audio Recorder/Player – Recording and Playback Audio Files –
6When your performance is finished, press the [STOP] button to
stop recording.
7To hear your new recording, press the [PLAY/PAUSE] button.
If you want to add a different phrase to the already-recorded data, press the
AUDIO RECORDER/PLAYER [REC] button followed by the [F] (YES) to call
up the Multi Track Recorder display, then go to step 5 of “Multi Track Recording”
on page 78.
8Press the [EXIT] button to exit from the Simple Recorder dis-
play.
Multi Track Recording
This section covers the basic procedure of Multi Track recording. The operation steps are
more complicated than Simple Recording on page 76, but they can be summarized as fol-
lows: 1) Record your keyboard performance to the Main track, 2) record your vocal sound
to the Sub track, and 3) merge the Sub track to the Main track to complete the entire song
by using the Bounce recording operation.
1Before turning the power on, connect a microphone to the
Tyros4.
For information on the connection, refer to “Connecting a Microphone” on
page 94.
2Turn the power on then execute Steps 1 and 2 in “Simple
Recording” on page 76.
3Press the [F] (MULTI) button then press the [G] (OK) button to
call up the Multi Track Recorder display.
This operation will create a new empty audio file named “M_Audio_***.AUD.”
4Execute Steps 4–7 in “Simple Recording” on pages 76–77.
Up to 80 minutes can be recorded con-
tinuously in a single recording opera-
tion.
NOTE
The data is automatically saved in
the internal HDD, but you may
want to backup your data from
time to time. Copying is the easi-
est way to do this. However, since
copying within a folder in the HDD
is not possible, you need to cre-
ate a new folder.
For details on file management,
see page 28.
NOTICE
Undo/Redo
If you’ve made a mistake or you’re not completely satisfied with your perfor-
mance, you can press the Undo function to erase the take and try again.
1Press the [G] (UNDO) button.
The latest recording that you made is cancelled. If you want to restore
the operation, press the [G] (REDO) button.
2Press the [REC] button to enable recording.
3Start again with Step 4 in “Multi Track Recording”.
NEXT PAGE
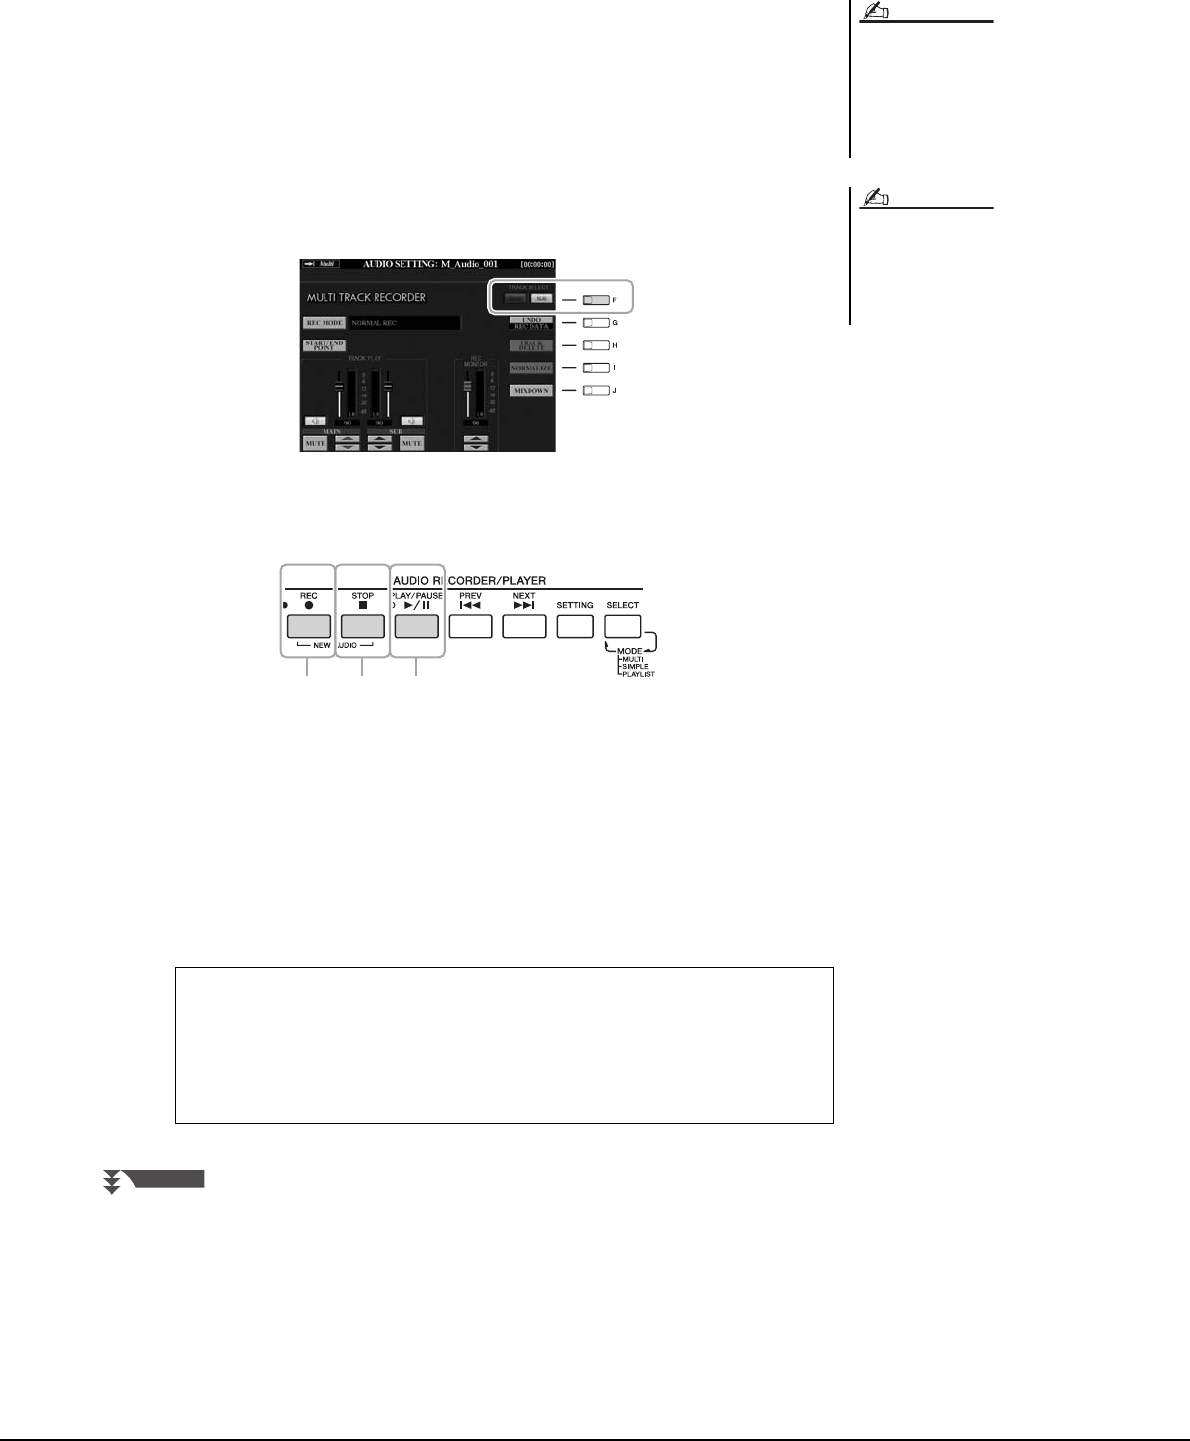
78 Tyros4 Owner’s Manual
Next, let’s record your singing to the Sub track. You can record your vocals while listening
to playback of the Main track.
5Practice the part (sing into the microphone) to check the level
and adjust the recording volume on the REC MONITOR meter
by using the [6 ] buttons or sliders.
Adjust so that the volume doesn’t constantly go into the “red” and light up the
indicator. If it does, you may have to turn the microphone input level down a bit.
For information on turning the microphone input level down, refer to page 95.
6Press the [F] (TRACK SELECT) button to select “SUB” as desti-
nation.
7Press the [REC] button to enable recording.
8Press the [PLAY/PAUSE] button to start recording.
Immediately after this operation, start singing along with the Main track playback.
9When your performance is finished, press the [STOP] button to
stop recording.
10 To hear your new recording, press the [PLAY/PAUSE] button.
•Press the 6’s [] and [] buttons
simultaneously to instantly reset the
recording volume to 90.
•If you call up a different display, press
the [SETTING] button to return to the
Multi Track Recorder display.
NOTE
Make sure that the RECORDING MODE
(upper left of the display) is set to
“NORMAL REC” here. For details on the
RECORDING MODE, refer to the Refer-
ence Manual.
NOTE
Adjusting the volume balance
On the TRACK PLAY meter, you can adjust the volume of Main and Sub
tracks separately. Use the [2 ]/[3 ] buttons or sliders to adjust the
Main/Sub track volume. By using the [1 ]/[4 ] buttons, you can also
mute the Main/Sub tracks.
97 8, 10
NEXT PAGE
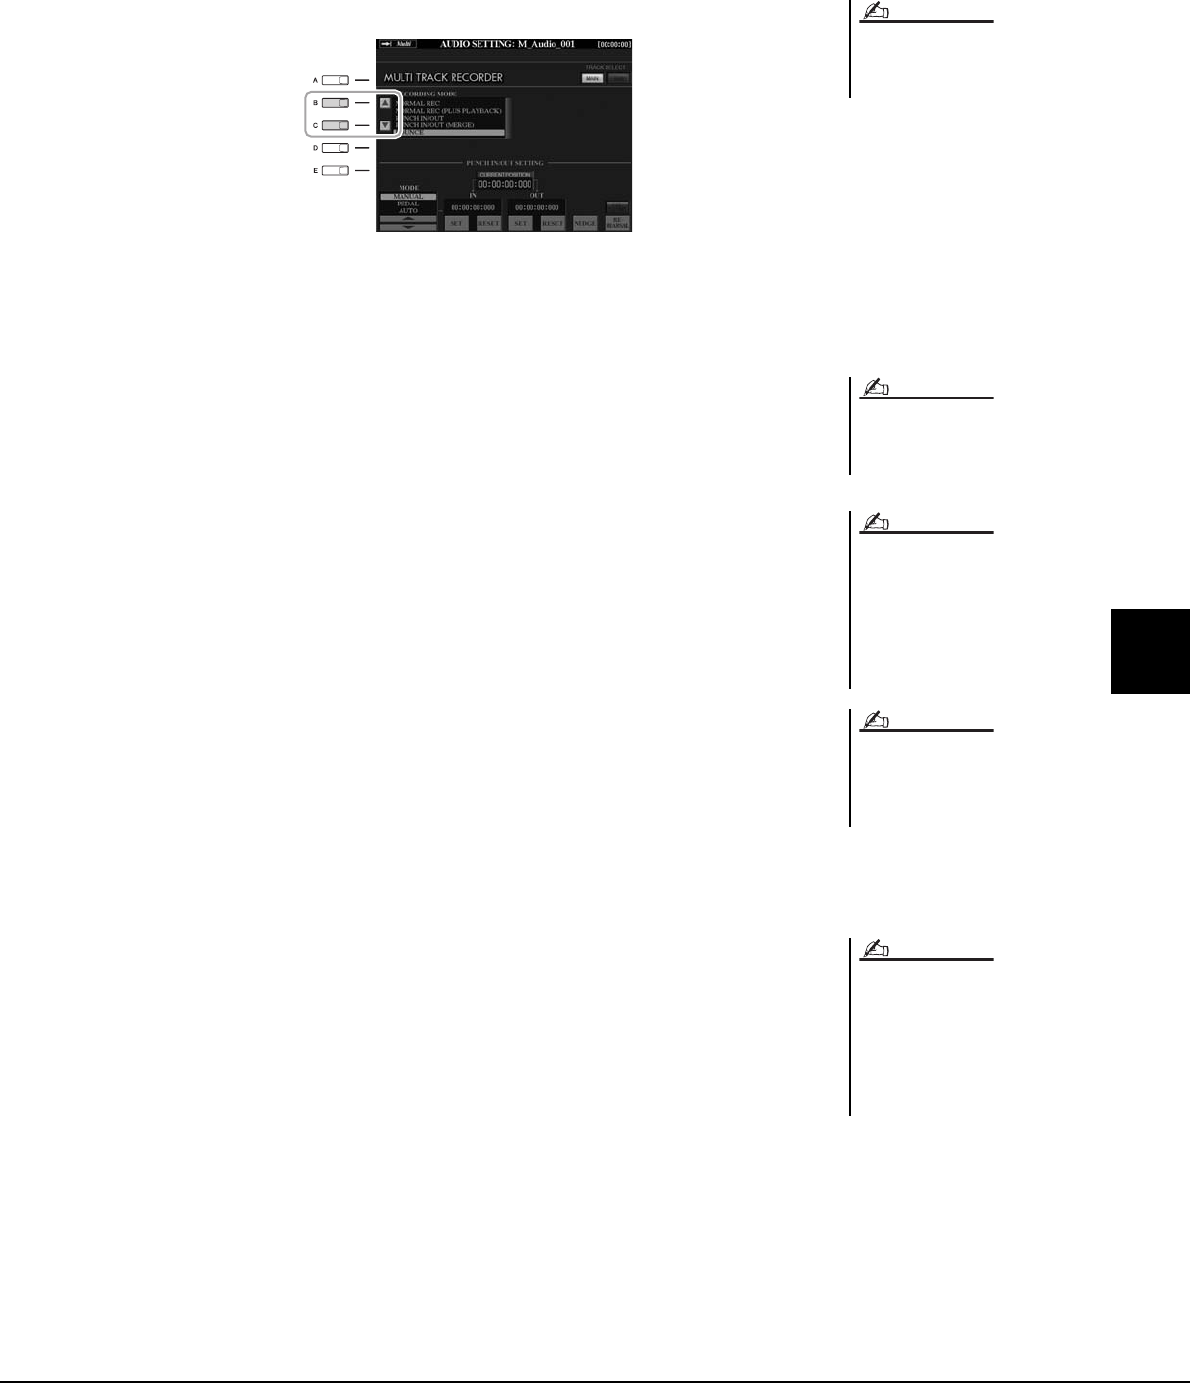
Tyros4 Owner’s Manual 79
7
Audio Recorder/Player – Recording and Playback Audio Files –
Next, mix all data from the Main track and Sub track to one track (Main track). This pro-
cedure (below) is called Bounce recording.
11 Press the [B] (RECORDING MODE), and then use the [B]/[C]
buttons to select “BOUNCE.”
After selection, press the [EXIT] button to return to the previous display.
12 Press the [REC] button then press the [G] (YES) button.
If you do not want to delete the recorded data of the Sub track, press the [H] (NO)
button instead of the [G] (YES) button above.
13 Press the [PLAY/PAUSE] button to start Bounce recording.
All data in Main and Sub tracks are mixed and recorded to the Main track. When
playback of the Main and Sub tracks is finished, Bounce recording automatically
stops.
14 To hear your new recording, press the [PLAY/PAUSE] button.
The Sub track is now empty, you can continue recording another part to the Sub
track, repeating Steps 5–10 on page 78.
If you did not delete the recorded data of the Sub track in Step 12, the data of Sub
track is recorded to both Main and Sub tracks. To avoid duplicate playback of Sub
track, press the [4 ] (MUTE) button in the Multi Track Recorder display.
15 If necessary, convert the Multi Track recording file (.aud) to a
Simple recording file (.wav).
15-1 Press the [J] (MIXDOWN) button to call up the MIXDOWN display.
15-2 If necessary, press the [B] (FILE NAME) button, change the file name,
then press the [8 ] (OK) button.
15-3 If necessary, press the [C] (SAVE TO) button, use the TAB [][] and
[A]–[J] buttons to select the destination (to which the converted file is to
be saved), then press the [8 ] (OK) button.
15-4 Press the [G] (START) button to start playback.
As soon as playback is finished, conversion from .aud to .wav will be
started.
16 Press the [EXIT] button to exit from the Multi Track Recorder
display.
When the Recording Mode is set to
“BOUNCE,” the selected track is auto-
matically changed to Main.
NOTE
If you sing or play the keyboard during
Bounce recording, your performance is
also recorded to the Main track.
NOTE
•The Multi Track recording file (.aud)
can be played back only on the
Tyros4.
•The .aud file saved with the Multi
Track recording can be converted to
.wav file format (Simple recording
file) by using the Mixdown function.
The converted .wav file allows playback
on devices other than the Tyros4, and
also playback on the Tyros4 from the
USB flash memory.
NOTE
NOTE
•If you want to save the file to a USB
flash memory, connect the USB flash
memory to the [USB TO DEVICE] ter-
minal.
•Before using a USB flash memory, be
sure to read “Connecting a USB Stor-
age Device” on page 100.
NOTE
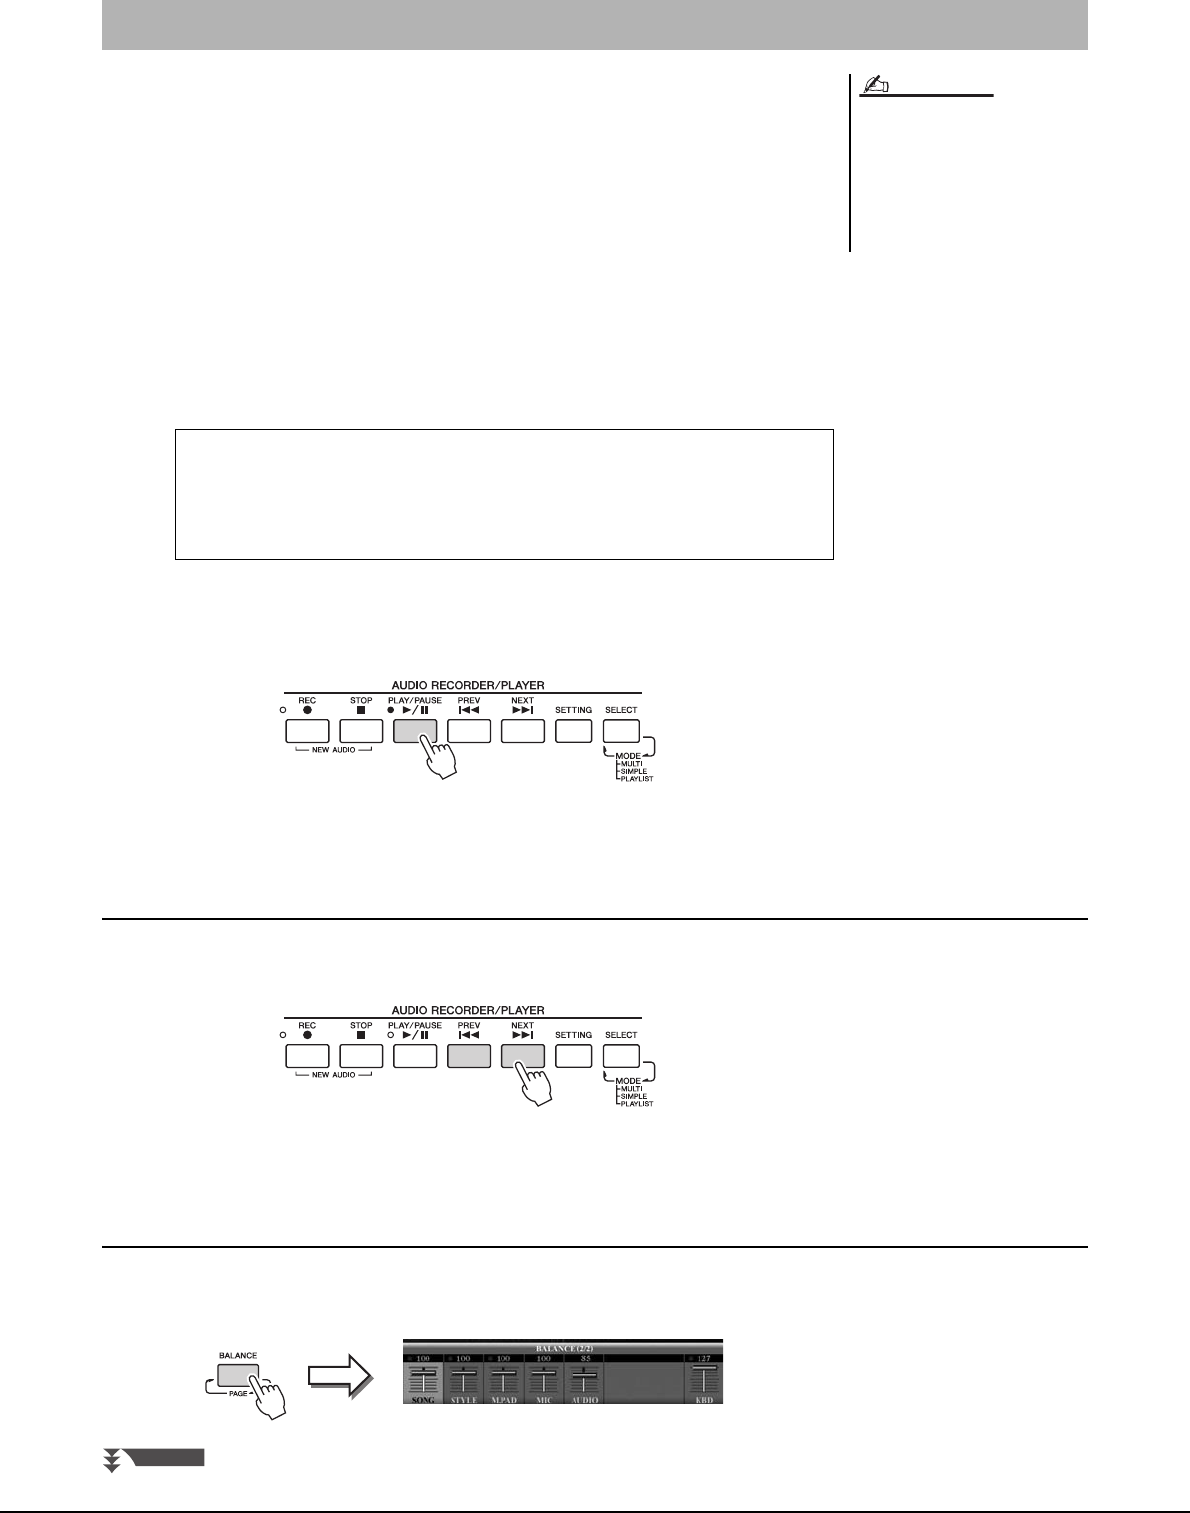
80 Tyros4 Owner’s Manual
Refer to page 75 for the file formats that can be played back on the Tyros4.
1Press the AUDIO RECORDER/PLAYER [SELECT] button several
times to call up the desired Audio File selection display (AUDIO
(MULTI), AUDIO (SIMPLE) or PLAYLIST).
The Simple and Multi Track files can be added to the Playlist, and from within the
Playlist mode, the Simple and Multi Track files can be freely played back. For
information on the Playlist display, refer to the Reference Manual on the website.
2Use the TAB [][] buttons to select the location (HD or USB),
then use the [A]–[J] buttons to select the desired audio file.
You can also select an audio file by using the [DATA ENTRY] dial, then press the
[ENTER] button to execute.
3Press the AUDIO RECORDER/PLAYER [PLAY/PAUSE] button to
start playback.
To stop playback, press the [STOP] button.
For details on organizing your files in folders, renaming files, deleting unnecessary
files, etc., see page 28.
Selecting the Previous/Next Audio Song
Press the AUDIO RECORDER/PLAYER [PREV]/[NEXT] button. This only selects the
previous/next song in the same folder level.
Keep in mind that these buttons cannot be used when the AUDIO SETTING display is
shown.
Adjusting the Playback Volume
1Press the [BALANCE] button once or twice to call up the BAL-
ANCE (2/2) display.
Audio Data Playback
•If you want to play back the audio data
of a USB flash memory, connect the
USB flash memory containing the
data to the [USB TO DEVICE] termi-
nal.
•The instrument cannot play back DRM
protected files.
NOTE
Confirming the Audio Information
By pressing the [7 ] (INFO) button here, you can check the information (file
name, path, sample rate etc.) of the selected red-framed file. To close the
Information display, press the [F] (OK) button.
NEXT PAGE
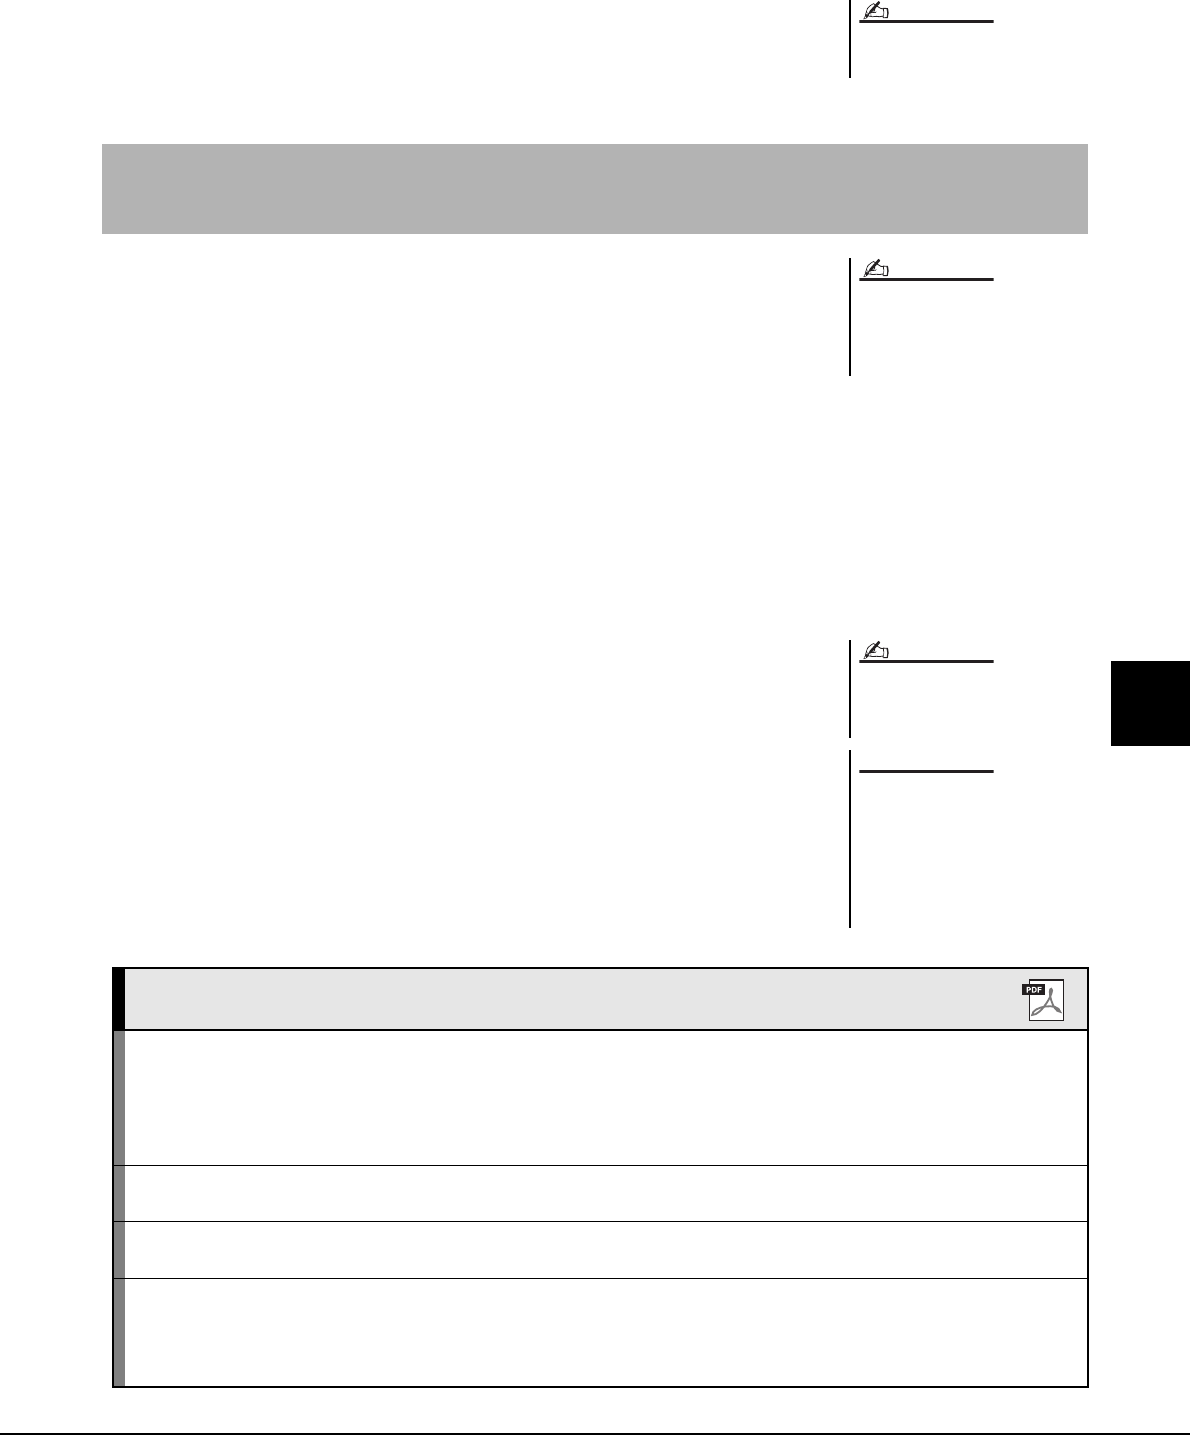
Tyros4 Owner’s Manual 81
7
Audio Recorder/Player – Recording and Playback Audio Files –
2Use the [5 ] slider or buttons to adjust the AUDIO (Audio
Recorder/Player) playback volume.
3Press the [EXIT] button to close the BALANCE display.
You can convert audio files (.wav/.mp3), such as commercially available samples, loops,
sound effects, etc., to a Multi Track recording file (.aud) – allowing you to work with the
two tracks or use the various recording methods of the instrument (Bounce, Punch In/Out,
etc.).
1Connect the USB flash memory containing the audio file to the
USB TO DEVICE terminal.
2Press the AUDIO RECORDER/PLAYER [SELECT] button several
times to call up the Audio (Simple) File Selection display.
3Use the TAB [][] buttons to select the USB flash memory,
then use the [A]–[J] buttons to select the desired audio file.
4Press the [REC] button then press the [F] (YES) button to call
up the Multi Track Recorder display.
The conversion of the audio files (.wav/.mp3) to the Main track of the Multi Track
recording file (.aud) is completed.
5Execute the same operations from Step 6 in “Multi Track
Recording” on page 78.
When the Main display is shown, the
BALANCE display cannot be closed.
NOTE
Additional Multi Track options — Converting an Audio File (.wav/.mp3) to
a Multi Track recording file (.aud)
Audio files that can be converted must
be no longer than 80 minutes. For
details on file types, refer to “File for-
mats that can be used:” on page 75.
NOTE
The conversion time to a Multi Track
recording file depends on the size of the
audio file (.wav/.mp3).
If the same file name already
exists, a message appears
prompting you to overwrite.
Selecting [YES] converts the file
and overwrites the Main track.
The data of Sub track will be
deleted.
NOTE
NOTICE
Advanced Features
Refer to the Reference Manual on the website, Chapter 7.
Editing the Recorded Data (Multi Track Record-
ing File):
•Normalize:
• Adjusting the volume:
• Deleting a track:
AUDIO RECORDER/PLAYER [SELECT] (select a recorded data)
[SETTING]
[I] NORMALIZE
[1 ]–[4 ] buttons
[H] TRACK DELETE
Re-recording the Multi Track Recording File: AUDIO RECORDER/PLAYER [SELECT] (select a recorded data)
[SETTING] [B]/[C] REC MODE
Setting the Start/End Points of the Audio
(Multi Track Recording File):
AUDIO RECORDER/PLAYER [SELECT] (select a recorded data)
[SETTING] [C] START/END POINT
Playlist Mode:
• Creating a Playlist:
• Playing a Playlist:
AUDIO RECORDER/PLAYER [SELECT] (Select an audio data) [6 ]
(ADD TO PLAYLIST)
AUDIO RECORDER/PLAYER [SELECT]
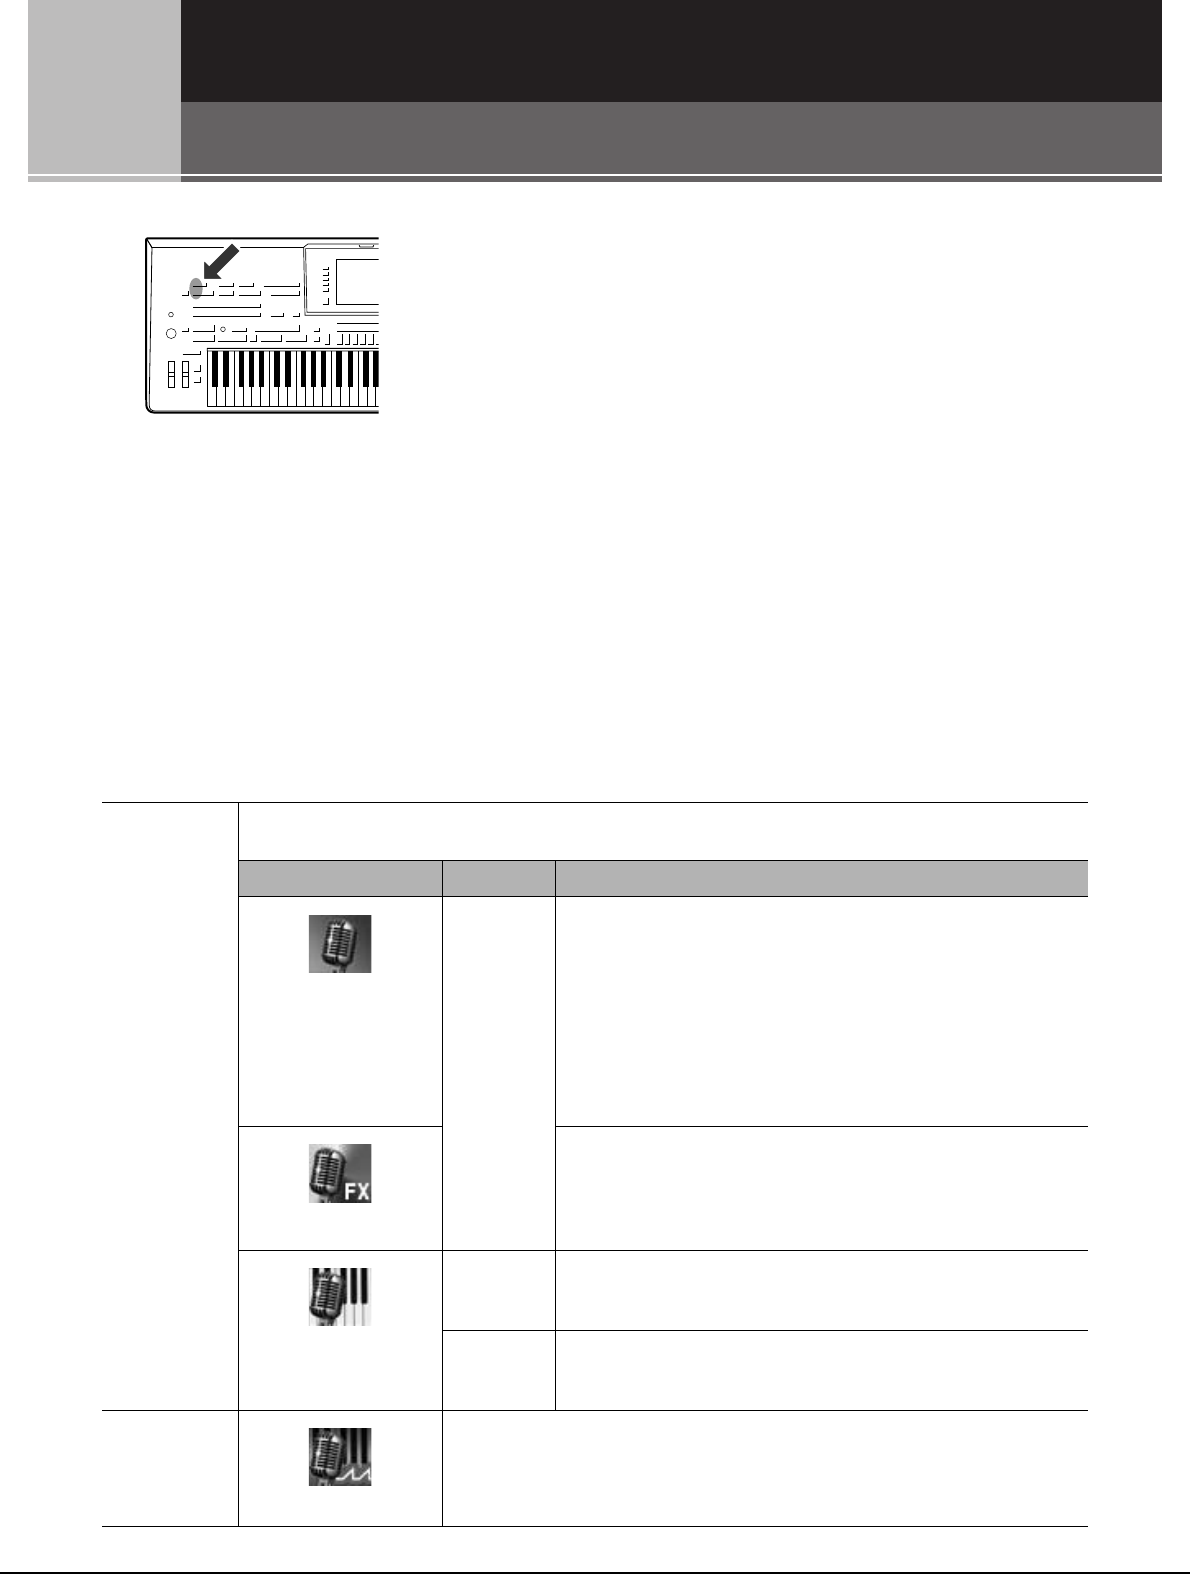
82 Tyros4 Owner’s Manual
8
8
Vocal Harmony
– Adding Harmony Vocals and Synth Vocoder to Your Singing –
The Vocal Harmony feature lets you automatically apply harmony
vocals in three different sub-modes (Chordal, Vocoder and Vocoder-
Mono) to your voice as you sing into the connected microphone.
Newly enhanced for the Tyros4, Vocal Harmony features a new har-
mony‐generating engine (called VH2) that provides extraordinarily
realistic harmonies, quickly and accurately tracking the pitch of your
singing, and effectively maintaining the natural qualities of your voice
in the harmony parts.
Included in the feature is a Synth Vocoder effect, also newly enhanced for the Tyros4. Synth Vocoder lets you
graft the unique characteristics of your voice onto synthesizer and other sounds, for unusual machine‐like or
robotic effects, as well as luscious choir sounds, which you can control with your own singing and playing.
The Synth Vocoder is a complex effect that mimics the workings of the human voice. This effect extracts the nat-
ural filter characteristics of the voice from the microphone input and recreates the vocal formants by the use of
multiple band pass filters. The machine-like ‘robot’ voice is created by passing the pitched sounds of musical
instruments (such as a synthesizer sound) through the filters.
Both Vocal Harmony and Synth Vocoder have an extensive set of detailed parameters, giving you comprehen-
sive, flexible control of the sound.
VH2 Structure
The sub-mode of each Type can be edited. For information on editing, refer to the Reference Manual on the website.
Vocal Harmony
Mode
Lets you automatically apply harmony vocals in three different sub modes (Chordal, Vocoder and Vocoder-Mono) to
your voice as you sing into the connected microphone.
Icon Sub-mode Effect
(Microphone)
Chordal The harmony notes are determined by the following three types of chord
control:
1Chords played in the chord section of the keyboard (with the
[ACMP] turned on.)
2Chords played in the LEFT Voice section of the keyboard
(with the [ACMP] turned off and [LEFT] turned on.)
3Chords contained in Song data for controlling the harmony.
(Not available if the Song does not contain any chord data.)
(Microphone with FX)
The harmony notes are determined in the same way as in Microphone
above. However, effects such as Vocal Doubler and Short Delay are
applied. Harmony may or may not be applied depending on the selected
type. (If harmony is not applied, the [VOCAL HARMONY] button is
not lit.)
(Microphone and key-
board)
Vocoder The harmony notes are determined by the notes you play on the key-
board and/or Song data. You can specify whether the Vocoder effect is
controlled by your keyboard performance or by the Song data.
Vocoder-
Mono
The harmony notes are determined in the same way as in Vocoder
above. However for the Mono mode, the harmonies apply only to the
sound of the last-pressed key.
Synth Vocoder
Mode
(Microphone and carrier)
Lets you graft the unique characteristics of your voice onto synthesizer and other
sounds, for unusual machine‐like or robotic effects, as well as luscious choir sounds,
which you can control with your own singing and playing.
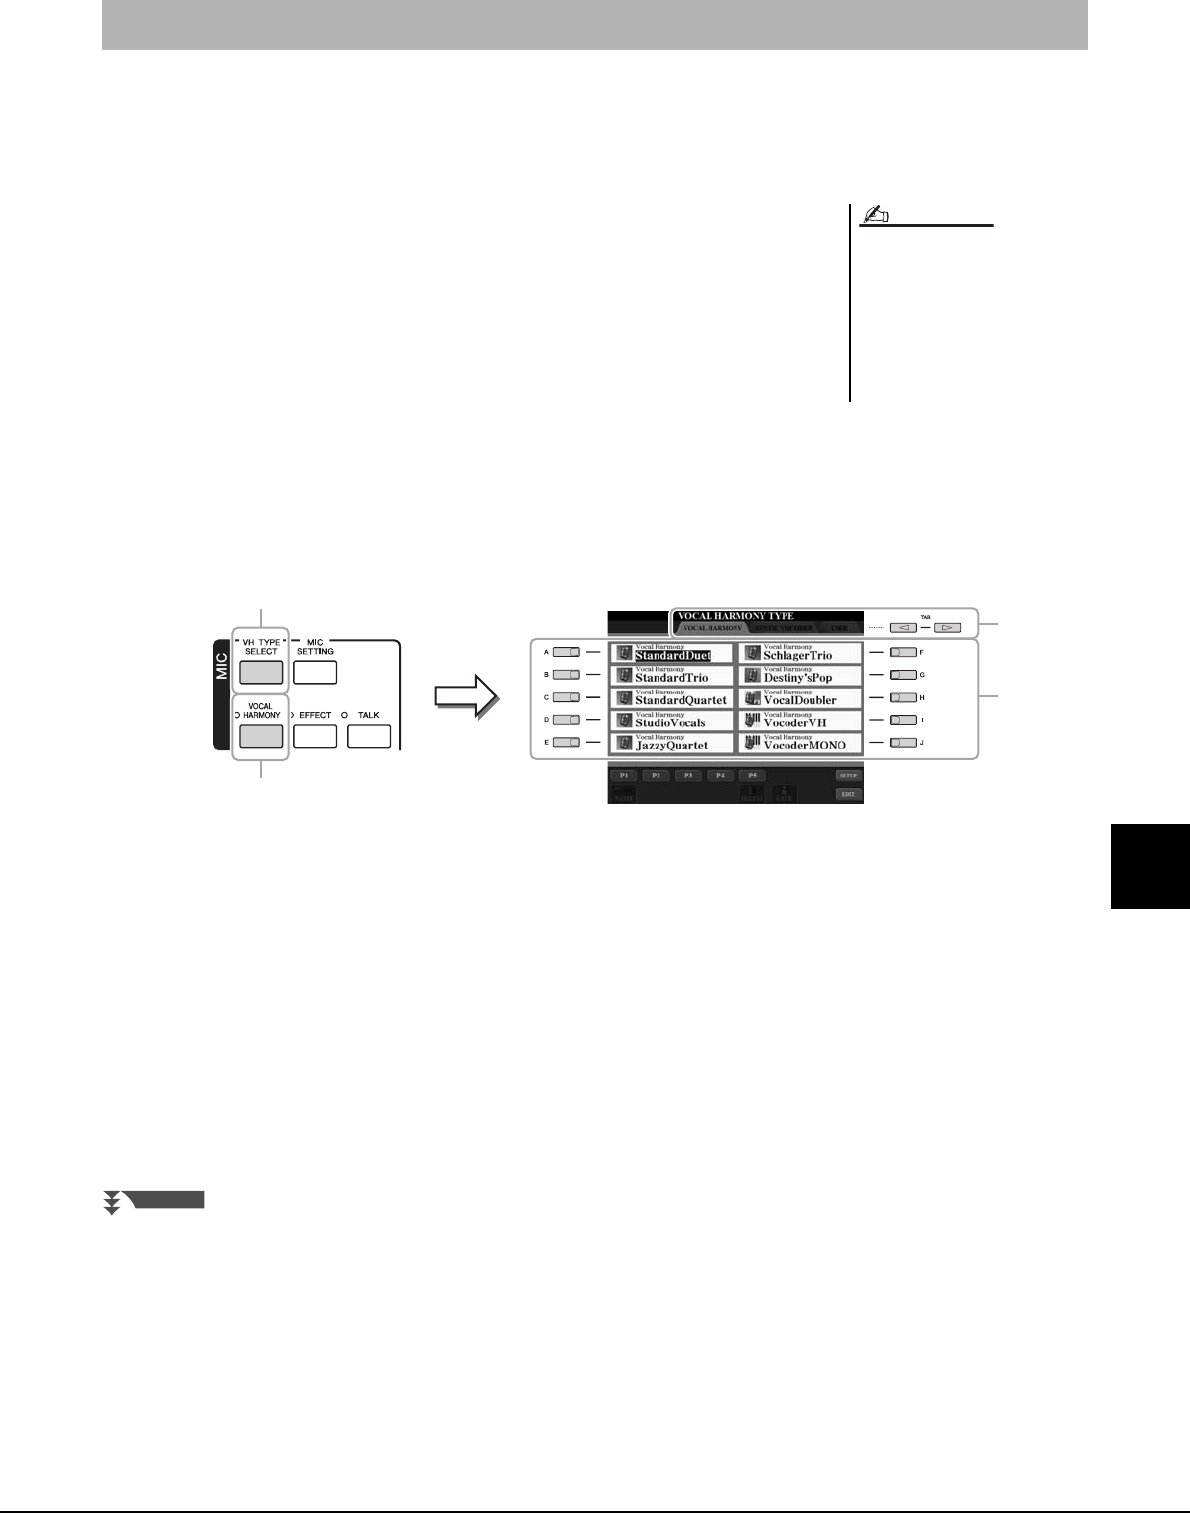
Tyros4 Owner’s Manual 83
8
Vocal Harmony – Adding Harmony Vocals and Synth Vocoder to Your Singing –
The main use for Vocal Harmony is in live performance. Not only does the Tyros4 give you professional quality instru-
mental accompaniment as you play, it also lets you add professional quality vocal harmonies to your singing—as you
perform! The three different Vocal Harmony sub-modes (Chordal, Vocoder and Vocoder-Mono) produce harmony in dif-
ferent ways.
1Connect a microphone to the Tyros4, then adjust the [MIC
GAIN] while singing into the microphone.
For information on the connection, refer to “Connecting a Microphone” on pages
94–95.
2From the Main display, adjust the balance of the microphone
(MIC) sound with the other sounds of the instrument (i.e.,
Song, Style, Voices, Audio Recorder/Player, Multi Pads, etc.).
Use the [BALANCE] button to switch between the two Balance pages. (See
page 53.)
3Press the [VH TYPE SELECT] button to call up the Vocal Har-
mony Type Selection display.
4Use the TAB [][] buttons to select the VOCAL HARMONY
tab.
5Use the [A]–[J] buttons to select the desired Vocal Harmony
type.
To call up the other display pages for further selections, press one of the [1 ]–[5
] buttons or press the [VH TYPE SELECT] button again.
6If necessary, press the [VOCAL HARMONY] button to turn the
function on.
Using Vocal Harmony
You may find that the microphone
sound is distorted. If so, try adjusting
the sound, making sure that the INPUT
LEVEL meter does not light in orange or
red in the MIC SETTING display (called
up by pressing the [MIC SETTING] but-
ton). For details on the input level, refer
to the Reference Manual, Chapter 11.
NOTE
3
6
5
4
NEXT PAGE
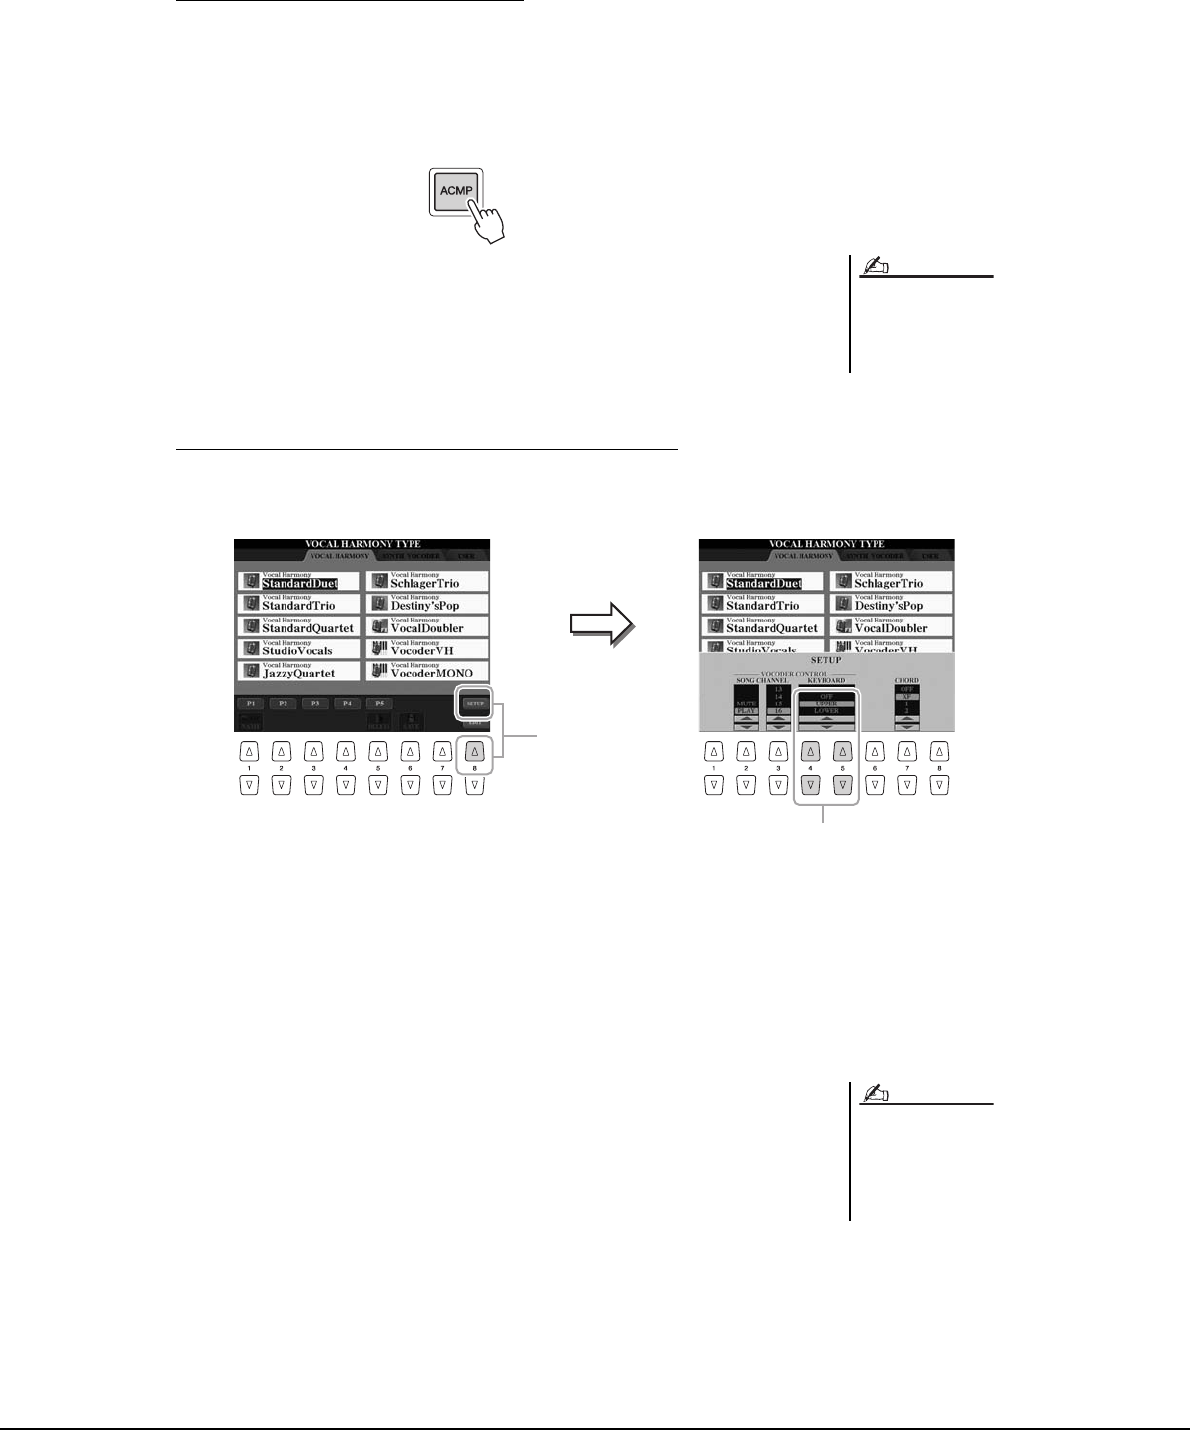
84 Tyros4 Owner’s Manual
7Follow the steps below, depending on which Type (and sub-
mode) you selected.
If you selected one of the Chordal Types:
The harmony of the Chordal Types can be controlled in three different ways (as
explained in the VH2 Structure chart on page 82). These instructions use the first
way.
7-1 Turn the [ACMP] button on.
7-2 Play and hold down chords in the chord section of the keyboard as you sing
along with the accompaniment.
Vocal harmonies based on your own voice are applied to your singing,
according to the chords you play.
If you selected one of the Vocoder or Vocoder-Mono Types:
7-1 Call up the SETUP window in the display by pressing the [8 ] button.
7-2 Use the [4 ]/[5 ] buttons to change the Keyboard setting (OFF,
UPPER, LOWER), if necessary.
Select UPPER if you want to have the Vocoder processing on your right-
hand-played part; select LOWER to have the Vocoder effect on your left-
hand part. For more information on the Keyboard setting to control the
Vocoder effect, refer to the Reference manual on the website.
7-3 Play melodies on the keyboard, and speak into the microphone as you play.
You’ll notice that you don’t actually have to sing pitched notes. The
Vocoder effect takes the words you say and applies them to the pitch of the
instrument sounds.
If you selected a Type having an “FX”
icon, your voice will be processed with
effects, but may not have harmonies
applied.
NOTE
7-2
7-1
For Vocoder Types, the effect is applied
to a maximum of three notes of the
chord you play; for Vocoder-Mono, the
effect is only applied to single notes
(last note played).
NOTE
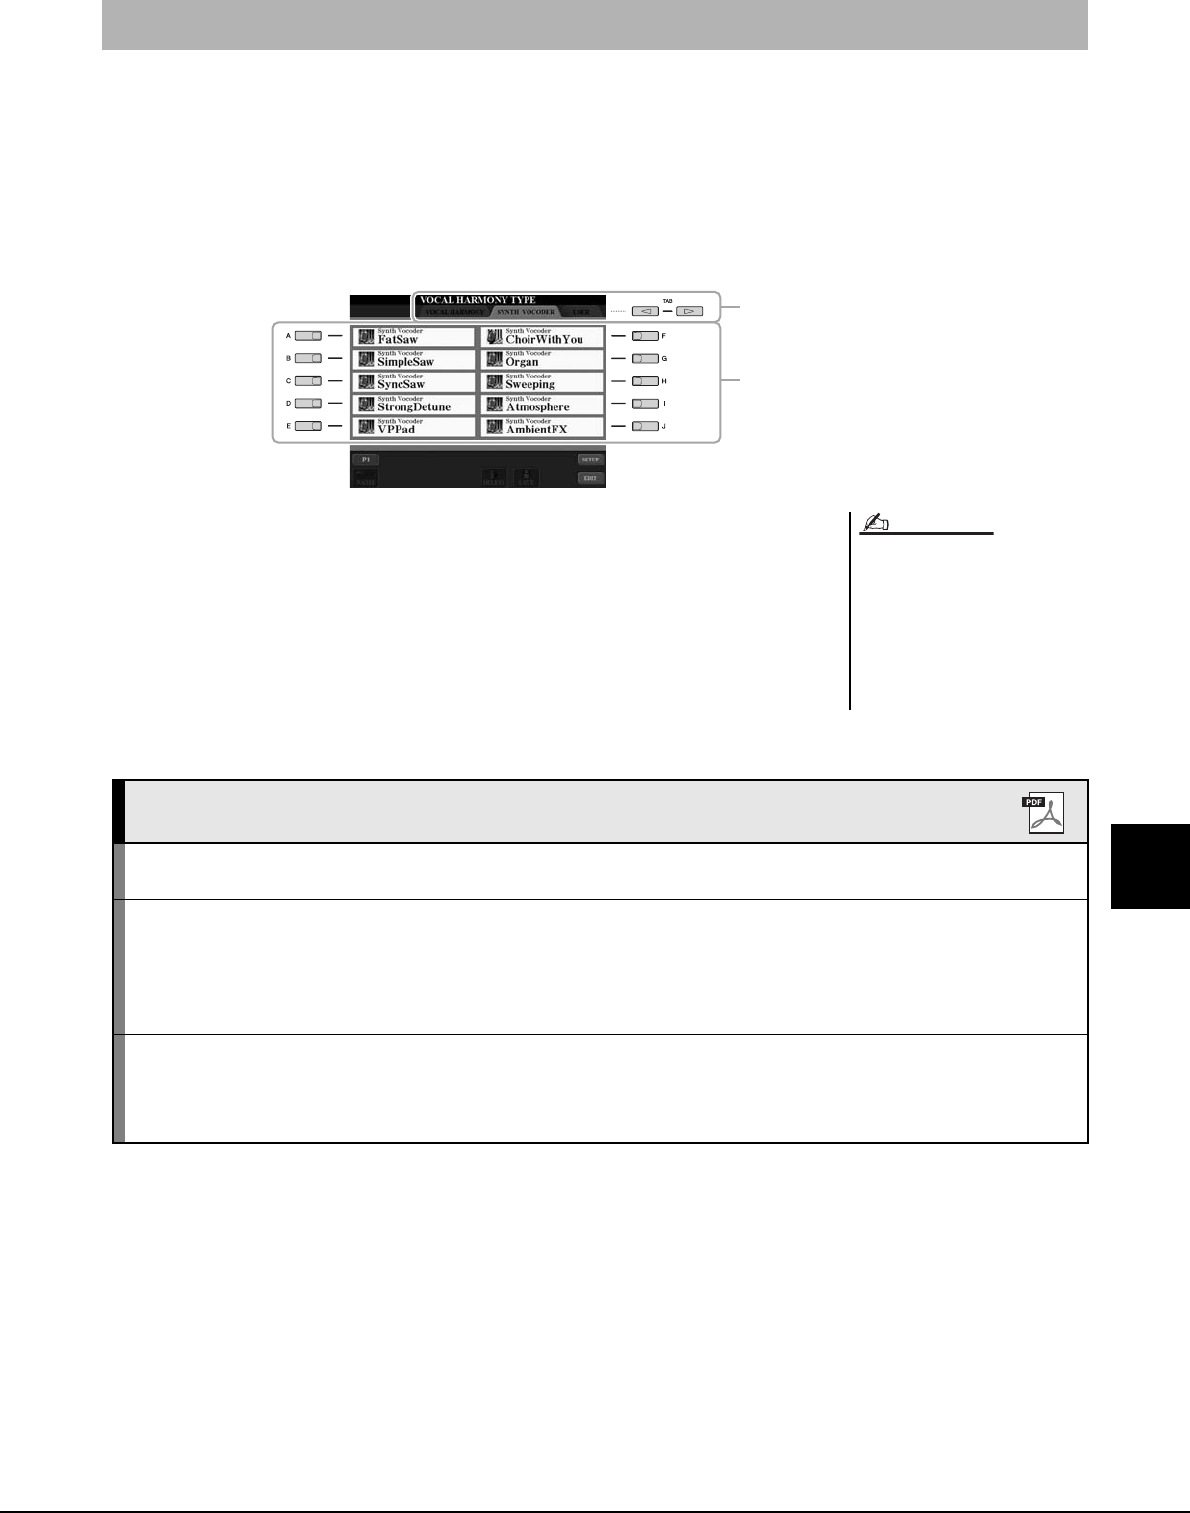
Tyros4 Owner’s Manual 85
8
Vocal Harmony – Adding Harmony Vocals and Synth Vocoder to Your Singing –
These are special effects that graft the characteristics of your voice onto synthesizer and other sounds, for unusual
machine‐like or robotic effects, as well as unique choir sounds, which you can control with your own singing and play-
ing. Here’s how you can use them.
1Execute steps 1–3 in “Using Vocal Harmony” on page 83.
2From the Vocal Harmony Type Selection display, use the TAB
[][] buttons to select the SYNTH VOCODER tab.
3Use the [A]–[J] buttons to select the desired Synth Vocoder
type.
4If necessary, press the [VOCAL HARMONY] button to turn the
function on.
5Try holding down a note on the keyboard and speak or sing
into the microphone.
Also, try changing notes as you say/sing different words, hitting a separate note for
each word.
Using Synth Vocoder
3
2
You can change the Keyboard setting
(OFF/UPPER/LOWER), determining
which part of the keyboard (or Song)
controls the harmony. Press [VH TYPE
SELECT] [8 ] (SETUP) [4
]/[5 ] (KEYBOARD). For
details, refer to the Reference manual on
the website.
NOTE
Advanced Features
Refer to the Reference Manual on the website, Chapter 8.
Setting up the Vocal Harmony Control parame-
ters: [VH TYPE SELECT] [8 ] (SETUP)
Editing the Vocal Harmony Types:
• Editing the Overview Tab Parameters:
• Editing the Part Tab Parameters:
• Editing the Detail Tab Parameters:
[VH TYPE SELECT] TA B [ ][] Vocal Harmony (select a Vocal Harmony
type) [8 ] (EDIT)
TAB [][] Overview
TAB [][] Part
TAB [][] Detail
Editing the Synth Vocoder Types:
• Editing the Overview Tab Parameters:
• Editing the Detail Tab Parameters:
[VH TYPE SELECT] TA B [ ][] Synth Vocoder (select a Synth Vocoder
type [8 ] (EDIT)
TAB [][] Overview
TAB [][] Detail
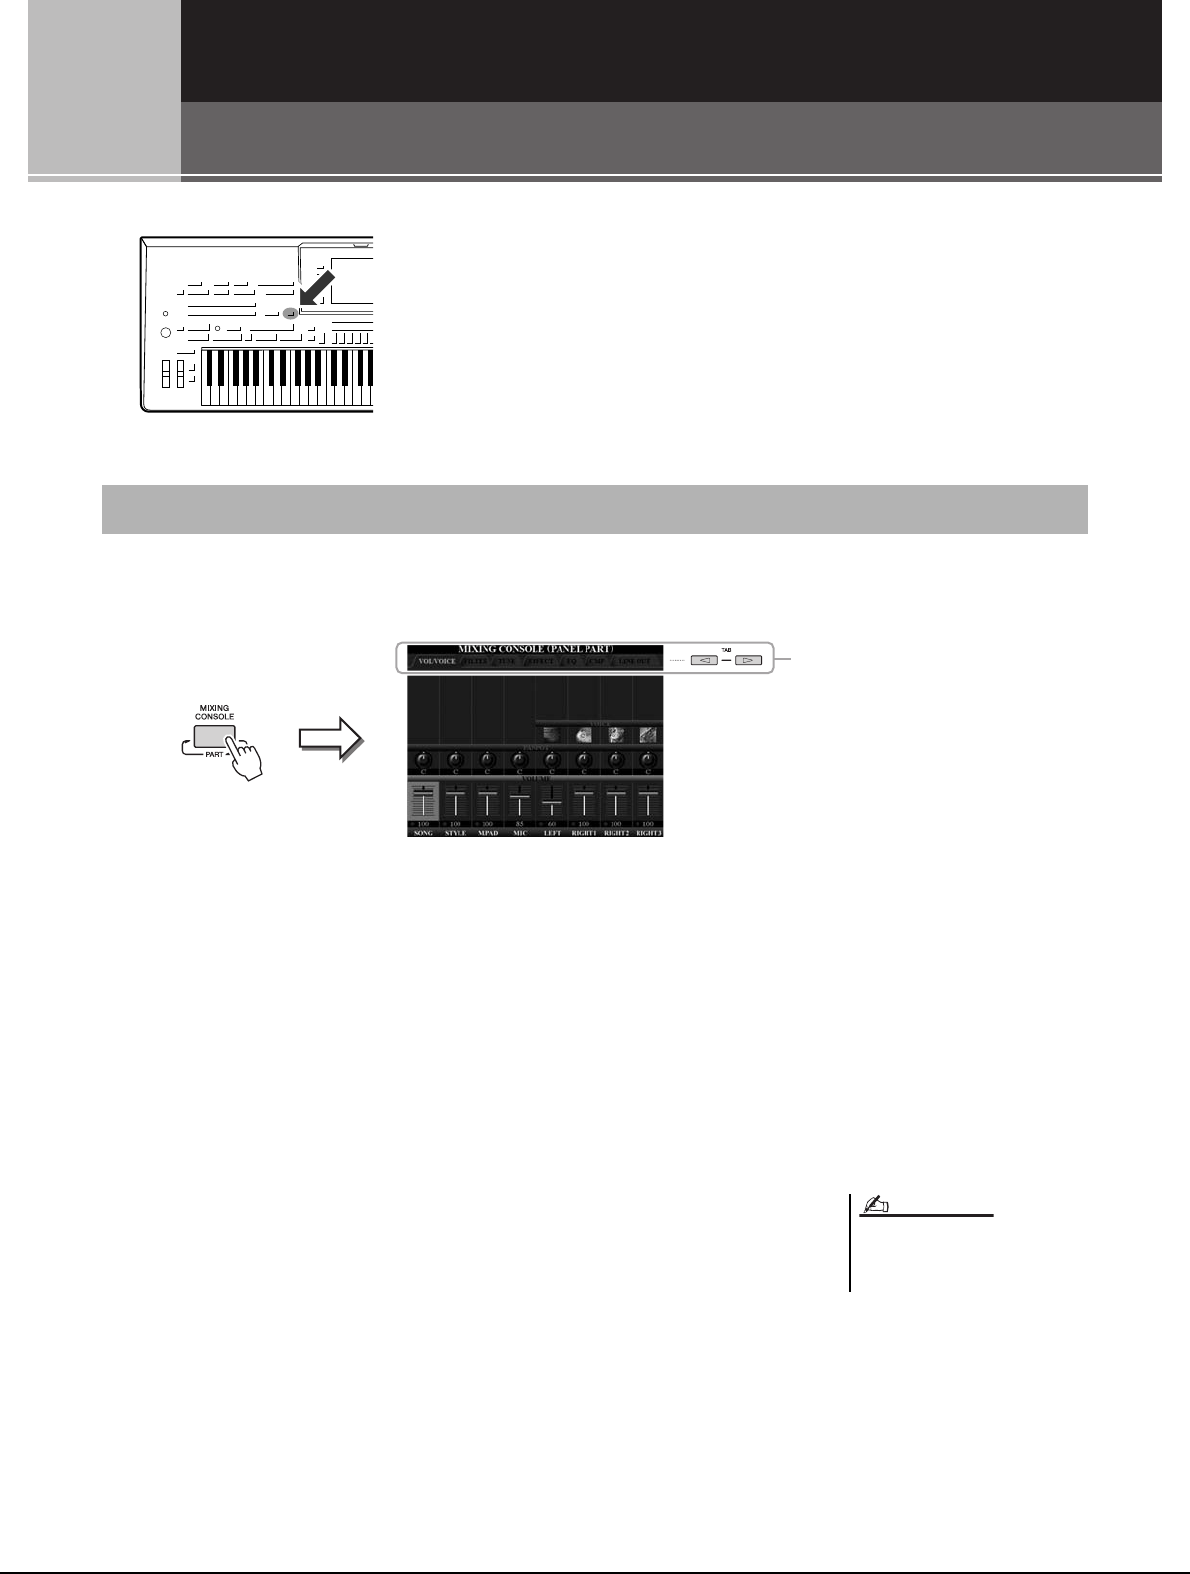
86 Tyros4 Owner’s Manual
9
9
Mixing Console
– Editing the Volume and Tonal Balance –
There are many components that make up the overall sound of the
Tyros4. These include MIDI sequence data from the Styles, Songs, and
Multi Pads, and audio input from a microphone, as well as the various
parts of your keyboard performance. The Mixing Console gives you
control over the volume and pan settings of each of these components-
and some other settings as well—letting you fine-tune the overall
sound of the Tyros4.
1Press the [MIXING CONSOLE] button to call up the MIXING
CONSOLE display.
2Use the TAB [][] buttons to call up the desired page.
For details about each display Page, refer to the Reference Manual on the website.
• VOL/VOICE .......Changes the Voice for each part and adjusts panning and
volume for each part.
• FILTER ...............Adjusts the Harmonic Content (resonance) and sound
brightness.
• TUNE...................Pitch-related settings (tuning, transpose, etc.).
• EFFECT ..............Selects effect type and adjusts its depth for each part.
• EQ ........................Adjusts equalization parameters to correct the tone or timbre
of the sound.
• CMP.....................This is the Master Compressor setting which determines the
dynamics of overall sound. See page 88.
• LINE OUT ..........You can specify the output of each part to any of the LINE
OUT jacks. For Drum Parts, you can even select specific
instruments to be output through any LINE OUT jack.
Basic Procedure
2
The Master Compressor is not applied
to audio playback and Metronome
sound.
NOTE
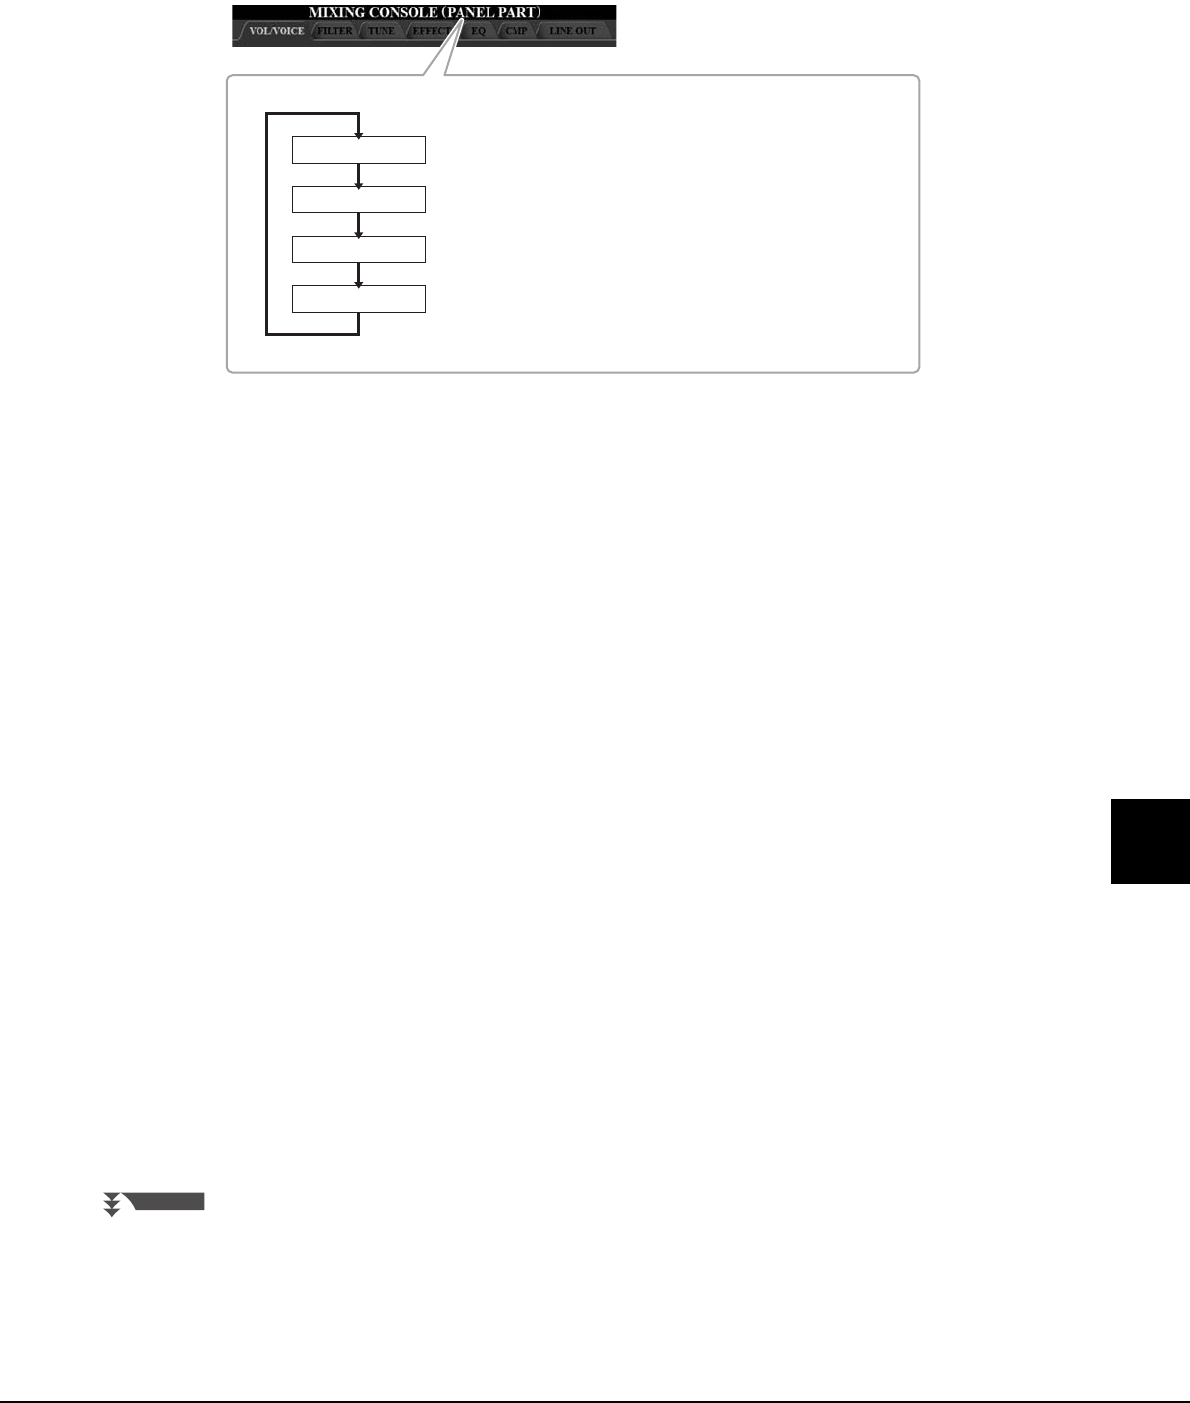
Tyros4 Owner’s Manual 87
9
Mixing Console – Editing the Volume and Tonal Balance –
3Press the [MIXING CONSOLE] button repeatedly to call up the
MIXING CONSOLE display for the relevant parts.
The part name is indicated at the top of the display.
4Use the [A]–[J] buttons to select a parameter, then use the
[1]–[8] sliders/buttons to set the value for each part.
5Save your MIXING CONSOLE settings.
• To save the PANEL PART display settings:
Register them to Registration Memory (page 72).
• To save the STYLE PART display settings:
Save them as Style data.
1Call up the operation display.
[DIGITAL RECORDING] [B] STYLE CREATOR
2Press the [EXIT] button to close the RECORD display.
3Press the [I] (SAVE) button to call up the Style Selection display for saving
your data, then save it (page 57).
• To save the SONG CH 1–8/9–16 display settings:
First register the edited settings as part of the Song data (SETUP), then save the
Song.
1Call up the operation display.
[DIGITAL RECORDING] [A] SONG CREATOR
2Use the TAB [][] buttons to select the CHANNEL Page.
3Use the [A]/[B] buttons to select “SETUP”.
4Press the [D] (EXECUTE) button.
5Press the [I] button to call up the Song Selection display for saving your
data, then save it (page 57).
PANEL PART
STYLE PART
SONG CH 1-8
SONG CH 9-16
Keyboard parts (Right 1, 2, 3, Left), Song, Style, Multi Pad, MIC
Rhythm 1, 2, Bass, Chord 1, 2, Pad, Phrase 1, 2
Song channels 1–8
Song channels 9–16
NEXT PAGE
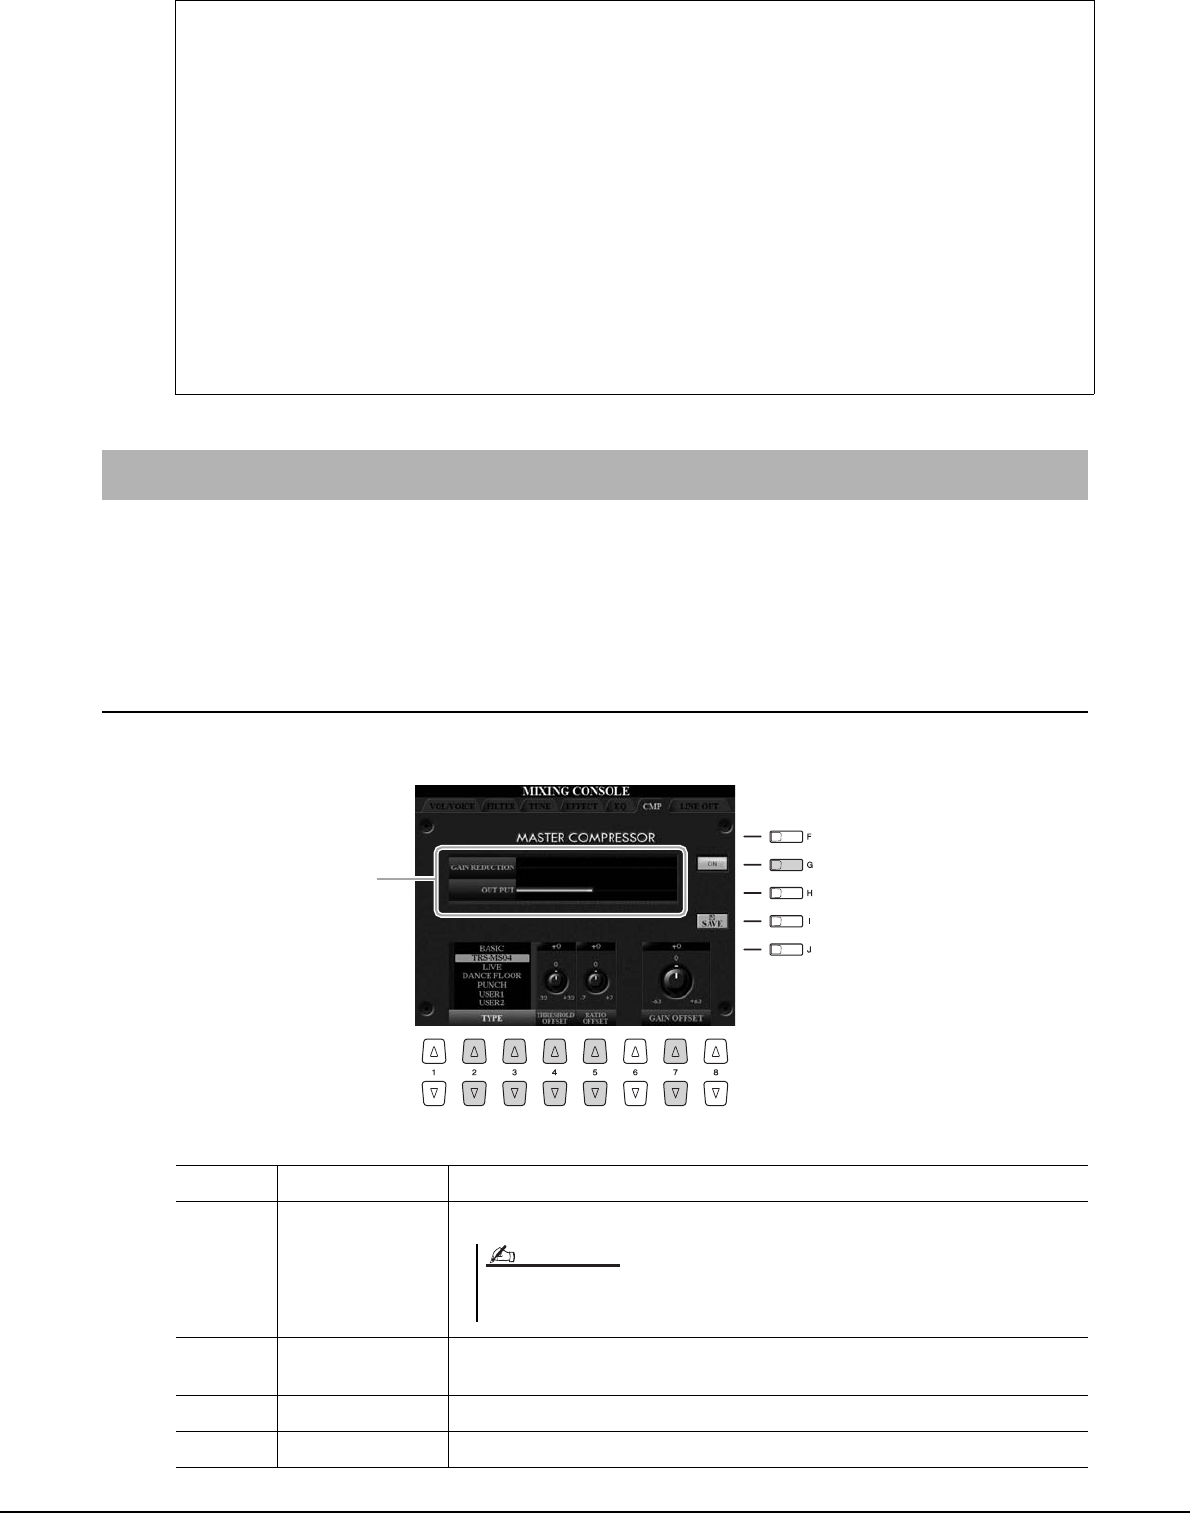
88 Tyros4 Owner’s Manual
Compressor is an effect commonly used to limit and compress the dynamics (softness/loudness) of an audio signal. For
signals that vary widely in dynamics, such as vocals and guitar parts, it “squeezes” the dynamic range, effectively making
soft sounds louder and loud sounds softer. When used with gain to boost the overall level, this creates a more powerful,
more consistently high-level sound.
Editing Master Compressor Settings
Select the [CMP] tab in step 2 on page 86.
Create your own original Drum Voices then save as Style data
The Mixing Console function (KIT EDIT) lets you to create original Drum Voices using the Preset Drum
Voices of the rhythm channel (Style Part).
Moreover, by changing the Preset Drum Voices with the created Drum Voices, you can save them as Style data.
1Call up the VOL/VOICE page for Style part (steps 1–3 on pages 86–87).
2Press the [C]/[H] buttons to select “VOICE.”
3Use the [1 ] (RHY1)/[2 ] (RHY2) buttons to select the desired rhythm channel to create the original
Drum Voice.
4Press the [5 ] (KIT EDIT) button.
For detailed information on the KIT EDIT function , refer to the Reference Manual on the website,
Chapter 1.
5Save them as Style data.
Follow the steps “To save the STYLE PART display settings:” on page 87.
Master Compressor
Displays the Gain
Reduction (compressed
level) and output level.
[G] ON/OFF Turns the Master Compressor effect on or off.
[2 ]/
[3 ]
TYPE Selects a Master Compressor type.
[4 ] THRESHOLD
OFFSET
Determines the threshold (minimum level at which compression starts).
[5 ] RATIO OFFSET Determines the ratio of compression (how much the dynamic range is compressed).
[7 ] GAIN OFFSET Determines the output level.
By default, the type is set to “TRS-MS04” (the most appropriate setting for use with the
optional TRS-MS04 speaker system).
NOTE
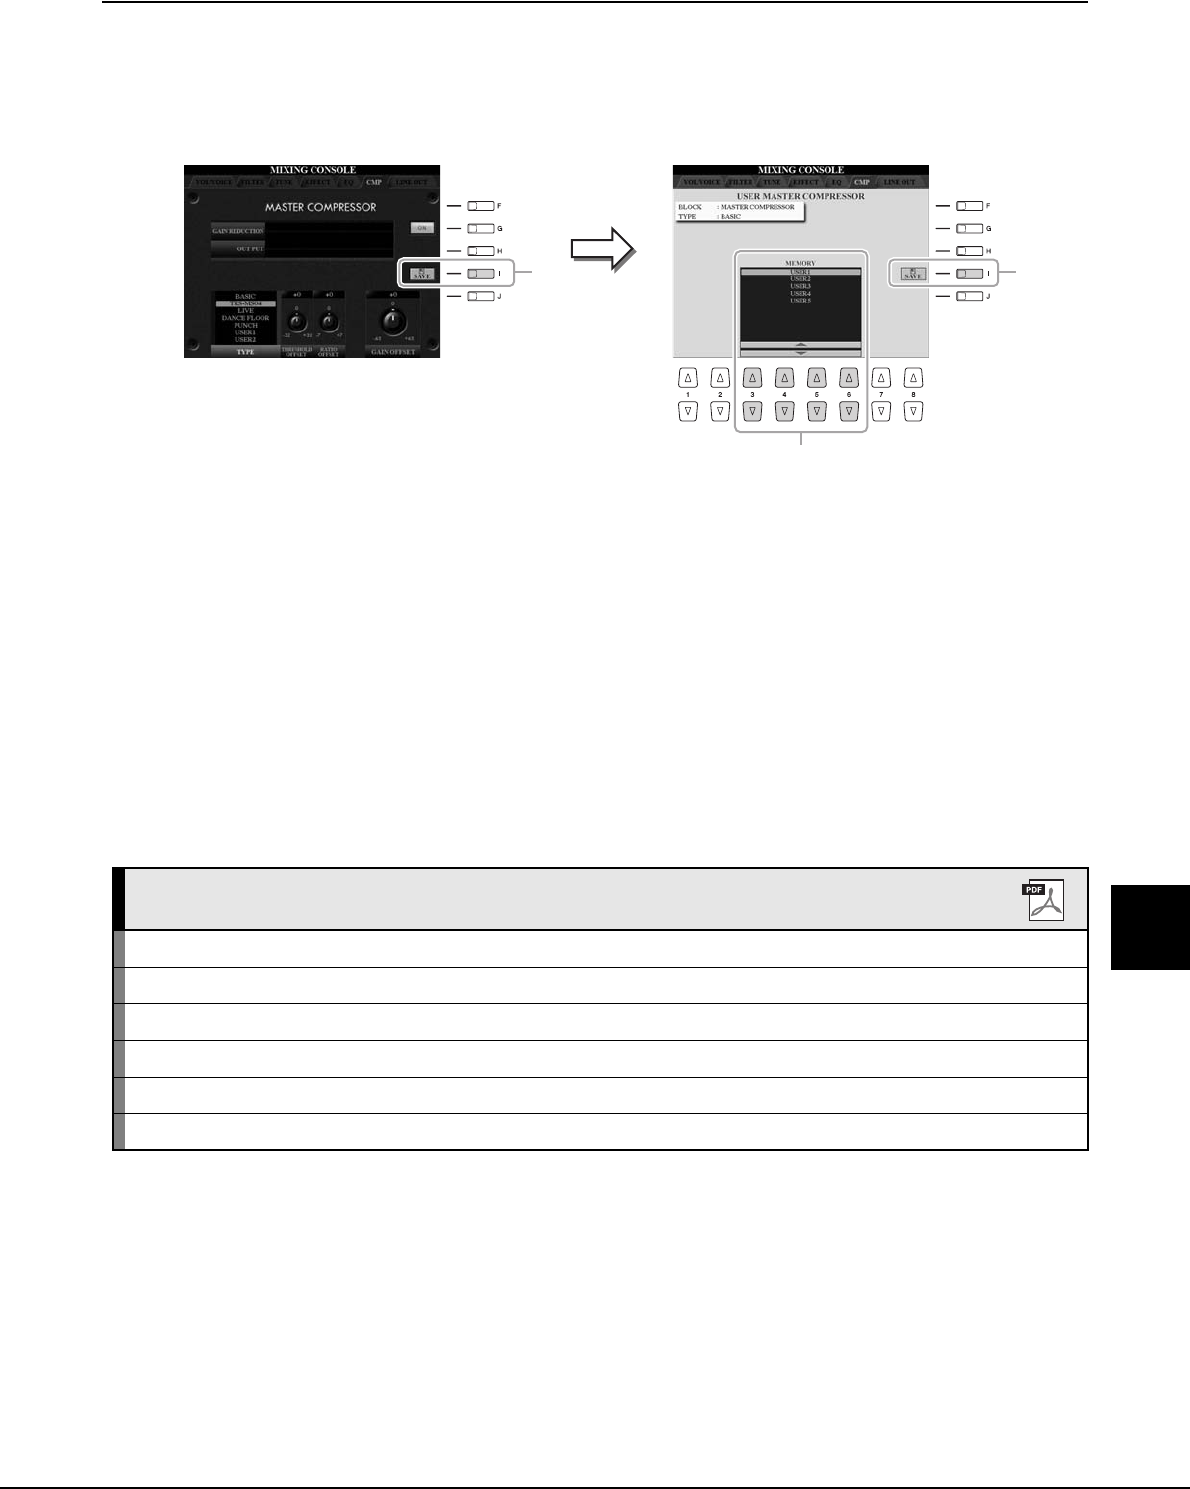
Tyros4 Owner’s Manual 89
9
Mixing Console – Editing the Volume and Tonal Balance –
Saving Master Compressor Settings
The Master Compressor settings you have edited on page 88 can be saved as the User Compressor type.
1Press the [I] (SAVE) button to enter the USER MASTER COM-
PRESSOR display.
2Select the destination to which the User Master compressor is
to be stored, by using the [3 ]–[6 ] buttons.
3Press the [I] (SAVE) button to open the SAVE display.
4Enter the name of the edited Compressor type (page 31), then
press the [8 ] (OK) button.
5Press the [EXIT] button to return to the previous display.
The saved Compressor type is shown in the TYPE selection at the bottom left of
the display.
2
3
1
Advanced Features
Refer to the Reference Manual on the website, Chapter 9.
Editing VOL/VOICE parameters: MIXING CONSOLE display TAB [][] VOL/VOICE
Editing FILTER parameters: MIXING CONSOLE display TAB [][] FILTER
Editing TUNE parameters: MIXING CONSOLE display TAB [][] TUNE
Changing an Effect type: MIXING CONSOLE display TAB [][] EFFECT [F] TYPE
Editing EQ parameters: MIXING CONSOLE display TAB [][] EQ
LINE OUT Settings: MIXING CONSOLE display TAB [][] LINE OUT

90 Tyros4 Owner’s Manual
10
10
Internet Direct Connection
– Connecting the Instrument Directly to the Internet –
You can purchase and download Song data and other types of data
from the special website by directly connecting to the Internet. This
section provides the overview of the Internet Direct Connection. For
specific instructions on connecting and Internet-related terms, refer to
the Internet Connection Guide, which can be downloaded from the
Yamaha Manual Library website.
Press the [INTERNET] button. If the instrument is connected to the Internet, the special website appears on the display.
If it is not connected, first connect by referring to the section “Connecting the Instrument to the Internet” below.
To quit the Internet Direct Connection function and return to the operation display of the
instrument, press the [EXIT] button.
You can connect the instrument to a full-time online connection (ADSL, optical fiber,
cable Internet, etc.) via a router or a modem equipped with a router. (To use the Internet
connection, you will first need to subscribe to an Internet service or provider.) Use a com-
puter to connect to the Internet and get online before connecting the instrument, since no
modem or router settings can be made from the instrument itself.
The setting procedure differs depending on your connecting environment (devices for con-
nection, etc.). For more information, refer to the Internet Connection Guide.
Entering the Internet Direct Connection Function
Only the special website can be opened
when the instrument is directly con-
nected to the Internet.
NOTE
Connecting the Instrument to the Internet
Depending on the Internet connection,
the number of connectable devices may
be limited. This may mean that your
instrument cannot be connected to the
Internet. If in doubt, check your contract
or contact your provider.
NOTE
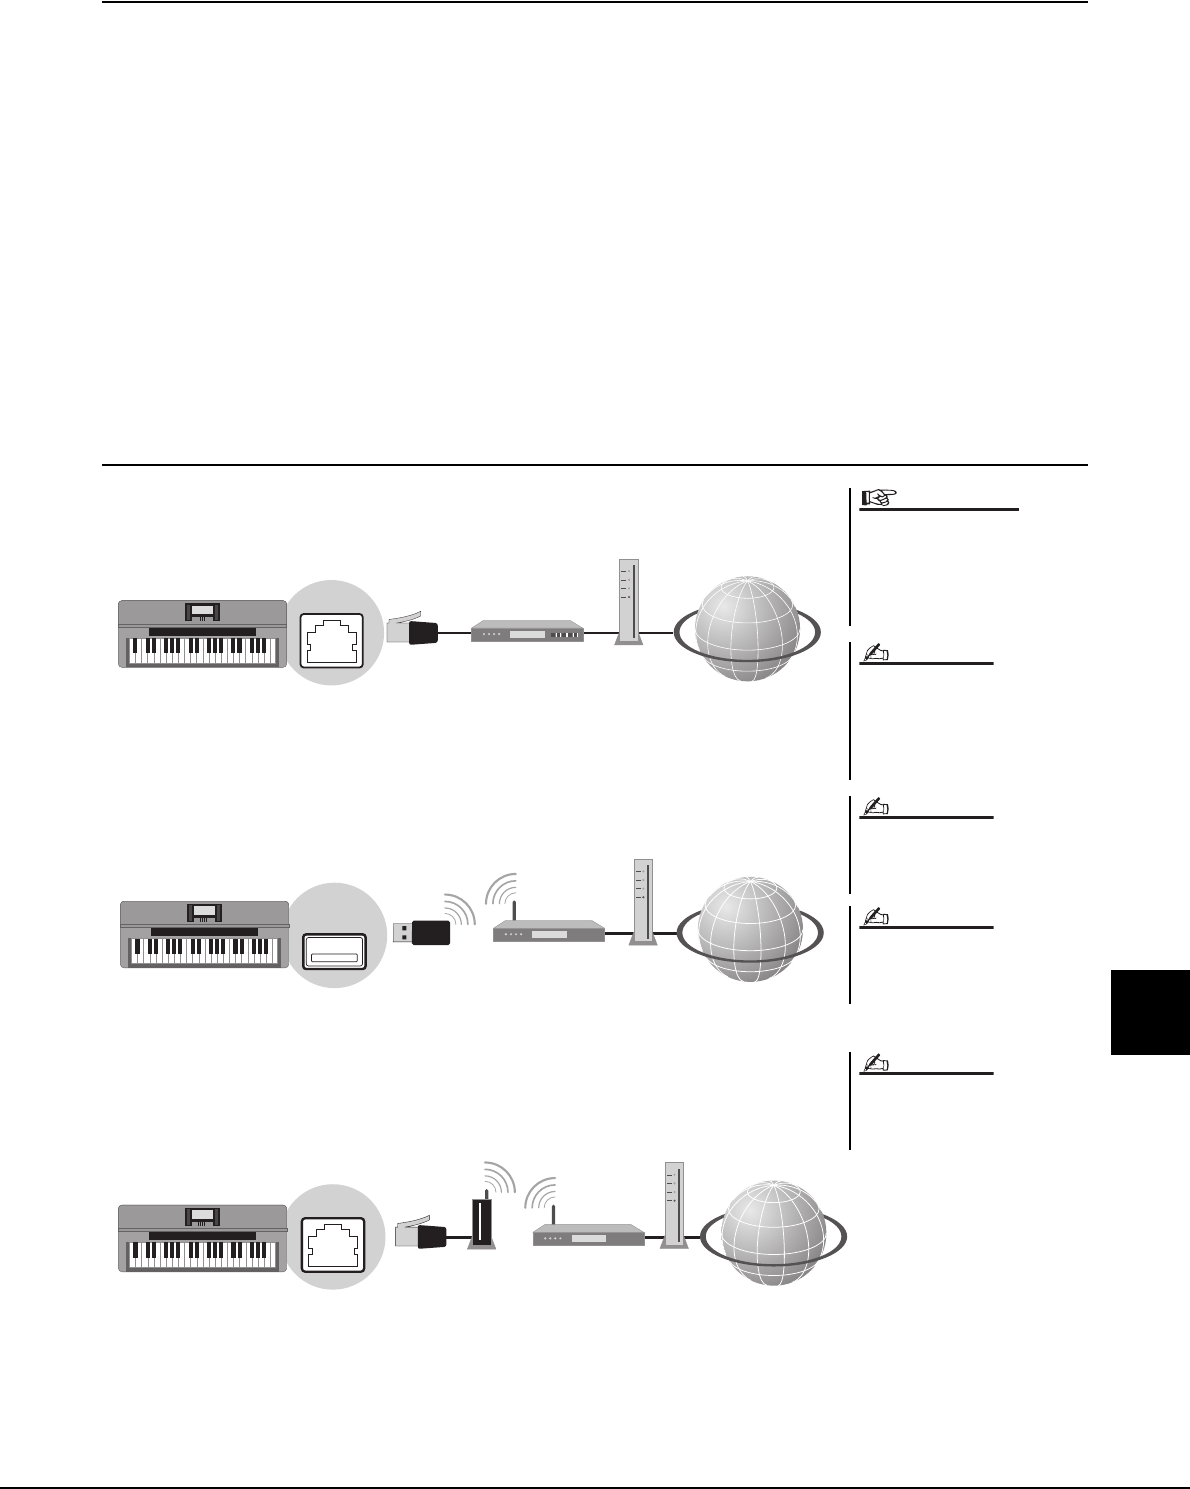
Tyros4 Owner’s Manual 91
10
Internet Direct Connection – Connecting the Instrument Directly to the Internet –
Viewing the Internet Connection Guide
You can view the Internet Connection Guide on the computer’s browser. (The computer must be connected to the inter-
net.)
1Access the Manual Library website on the computer browser.
Click “Manual Library” from the menu of included CD-ROM, or enter the follow-
ing URL directly.
http://www.yamaha.co.jp/manual/
2Enter your model name (Tyros4) in the Model Name area, then
click “Search.”
3Click “Internet Connection Guide” from Search Results.
Connection Examples
-Connection example 1:
LAN Cable Connection
-Connection example 2:
Wireless LAN Connection Using USB LAN Adaptor
-Connection example 3:
Wireless LAN Connection Using Wireless Game Adaptor
Due to EU regulations, users
within Europe should use an STP
(shielded twisted pair) cable to
prevent electromagnetic interfer-
ence.
Some types of modems require an
optional hub network for simultane-
ously connecting to several devices
(such as computer, musical instrument,
etc.).
When you are using a modem with
router, connect the instrument to the
modem by LAN cable.
Before removing the LAN cable from the
LAN terminal, make sure that the instru-
ment is not accessing the Internet.
IMPORTANT
NOTE
NOTE
NOTE
Modem
Router
LAN
cable
LAN
terminal
Internet
*Here, “modem” refers to an ADSL modem, optical network unit (ONU) or cable modem.
USB TO
DEVICE
terminal
Access point
with router
USB wireless
LAN adaptor
*Here, “modem” refers to an ADSL modem, optical network unit (ONU) or cable modem.
Internet
Modem
Two [USB TO DEVICE] terminals are
provided: one on the front panel and the
other on the rear panel.
NOTE
LAN
terminal
*Here, “modem” refers to an ADSL modem, optical network unit (ONU) or cable modem.
Internet
Modem
Access point
with router
LAN
cable
Wireless
game
adaptor

92 Tyros4 Owner’s Manual
After connecting the instrument to the internet, use these operations to take advantage of Internet services directly from
the instrument.
Following Links
By using the [DATA ENTRY] dial and [ENTER] button, you can follow links and navigate through the website. You can
also use the [6 ]/[7 ]/[8 ] buttons and the [8 ] (ENTER) button instead of the [DATA ENTRY] dial and
[ENTER] button. Also, depending on the specific pages, the [A]–[J] buttons can be used to select corresponding links on
the display.
Return to the Previous Web Page/Refreshing a Web Page
Use the [1 ] (BACK)/[2 ] (FORWARD) buttons to navigate through previously selected web pages. You can
also use the TAB [][] buttons instead of the [1 ] (BACK)/[2 ] (FORWARD) buttons. To return to the top
page of the special website, press the [3 ] (HOME) button.
Press the [5 ] (REFRESH) button to reload a web page and press the [6 ] (STOP) to cancel loading.
Operations in the Special Website
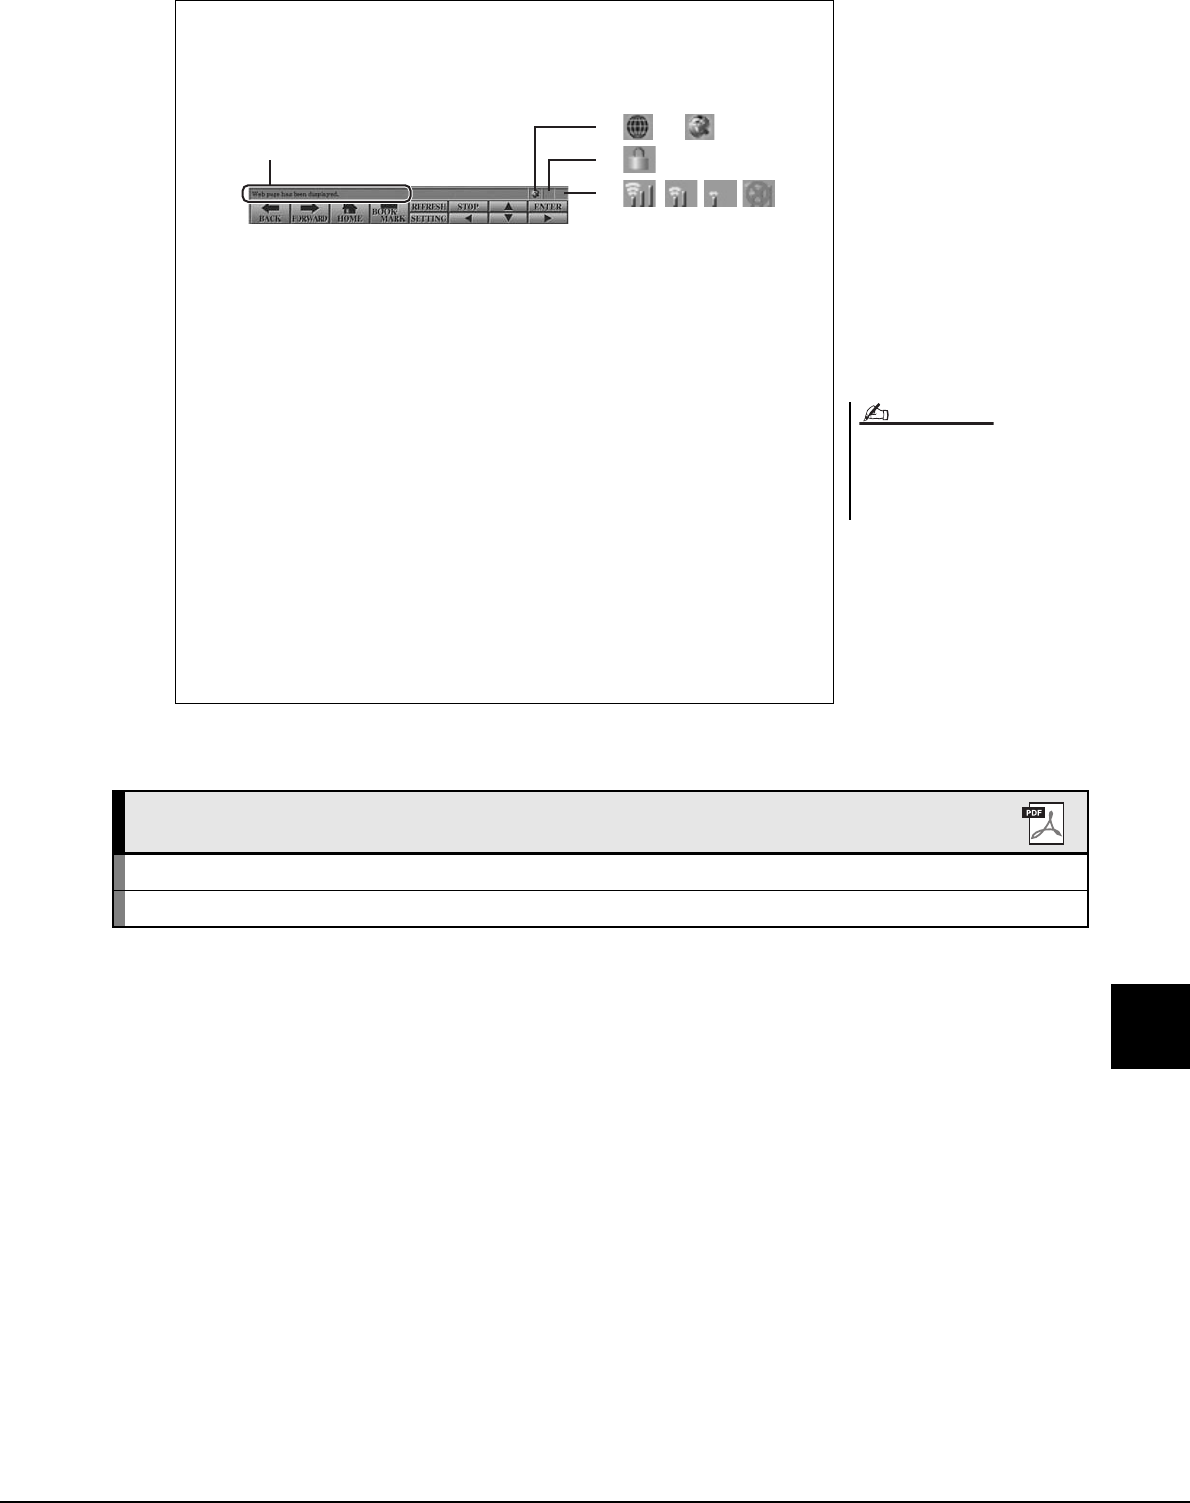
Tyros4 Owner’s Manual 93
10
Internet Direct Connection – Connecting the Instrument Directly to the Internet –
SSL (Secure Sockets Layer) is an
industry-standard method for protecting
web communications by using data
encryption and other tools.
NOTE
Monitoring the Internet Connection Status
The messages and icons at the bottom right of the Internet display indicate the
current Internet connection status.
The following three messages are displayed according to the loading status of
the web page.
•Disconnected.: This appears when the instrument is not connected with the
Internet. When this message is displayed, the web page cannot be seen.
Icon q is displayed.
•Now opening web page...: The web page is being loaded. Icon w flashes.
•Web page has been displayed.: Loading of the web page is completed, and
the page is displayed completely. Icon w stops flashing. When the dis-
played web page uses SSL, icon e is displayed, and information is
encrypted for communication.
Strength of the reception is displayed in r when connecting to the Internet by
wireless LAN. When reception is weak, move the instrument near the access
point to improve reception.
q
e
r
w
Message
Advanced Features
Refer to the Reference Manual on the website, Chapter 10.
Editing the Browser settings: [INTERNET] [5 ] SETTING [D] BROWSER SETTINGS
Registering bookmarks of your favorite pages: [INTERNET] [4 ] BOOKMARK [3 ] ADD
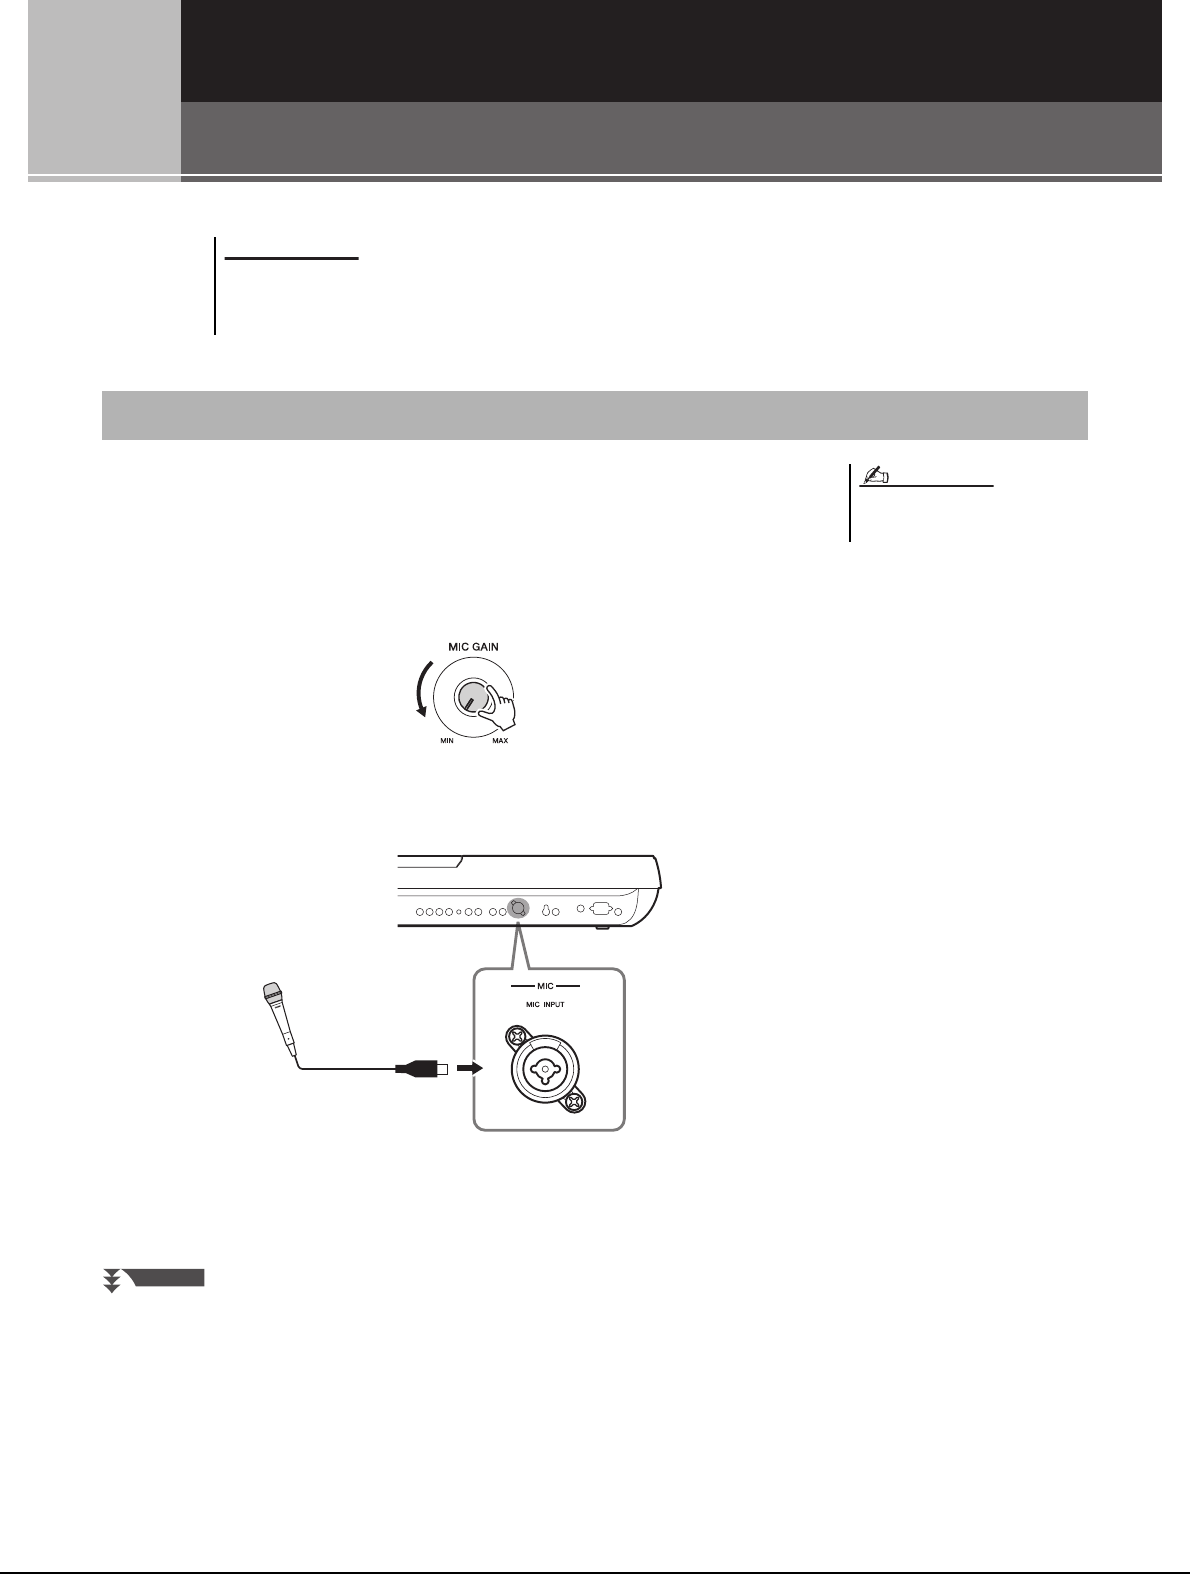
94 Tyros4 Owner’s Manual
11
11
Connections
– Using Tyros4 with Other Devices –
By connecting a microphone, you can enjoy singing along with your keyboard perfor-
mance or with Song playback (KARAOKE), as well as recording your vocal performance
using the Audio Recorder function. Make sure you have a conventional dynamic micro-
phone.
1Before turning the power on, set the [MIC GAIN] to “MIN.”
2Connect a microphone to the [MIC] jack.
3Turn the power on.
Before connecting the instrument to other electronic components, turn off the power of all components. Also,
before turning any components on or off, make sure to set all volume levels to minimum (0). Otherwise, elec-
trical shock or damage to the components may occur.
Connecting a Microphone
NOTICE
A dynamic microphone with an imped-
ance of 250 ohms is recommended.
NOTE
The combo jack accepts
either XLR or 1/4" phone
plug connectors.
NEXT PAGE
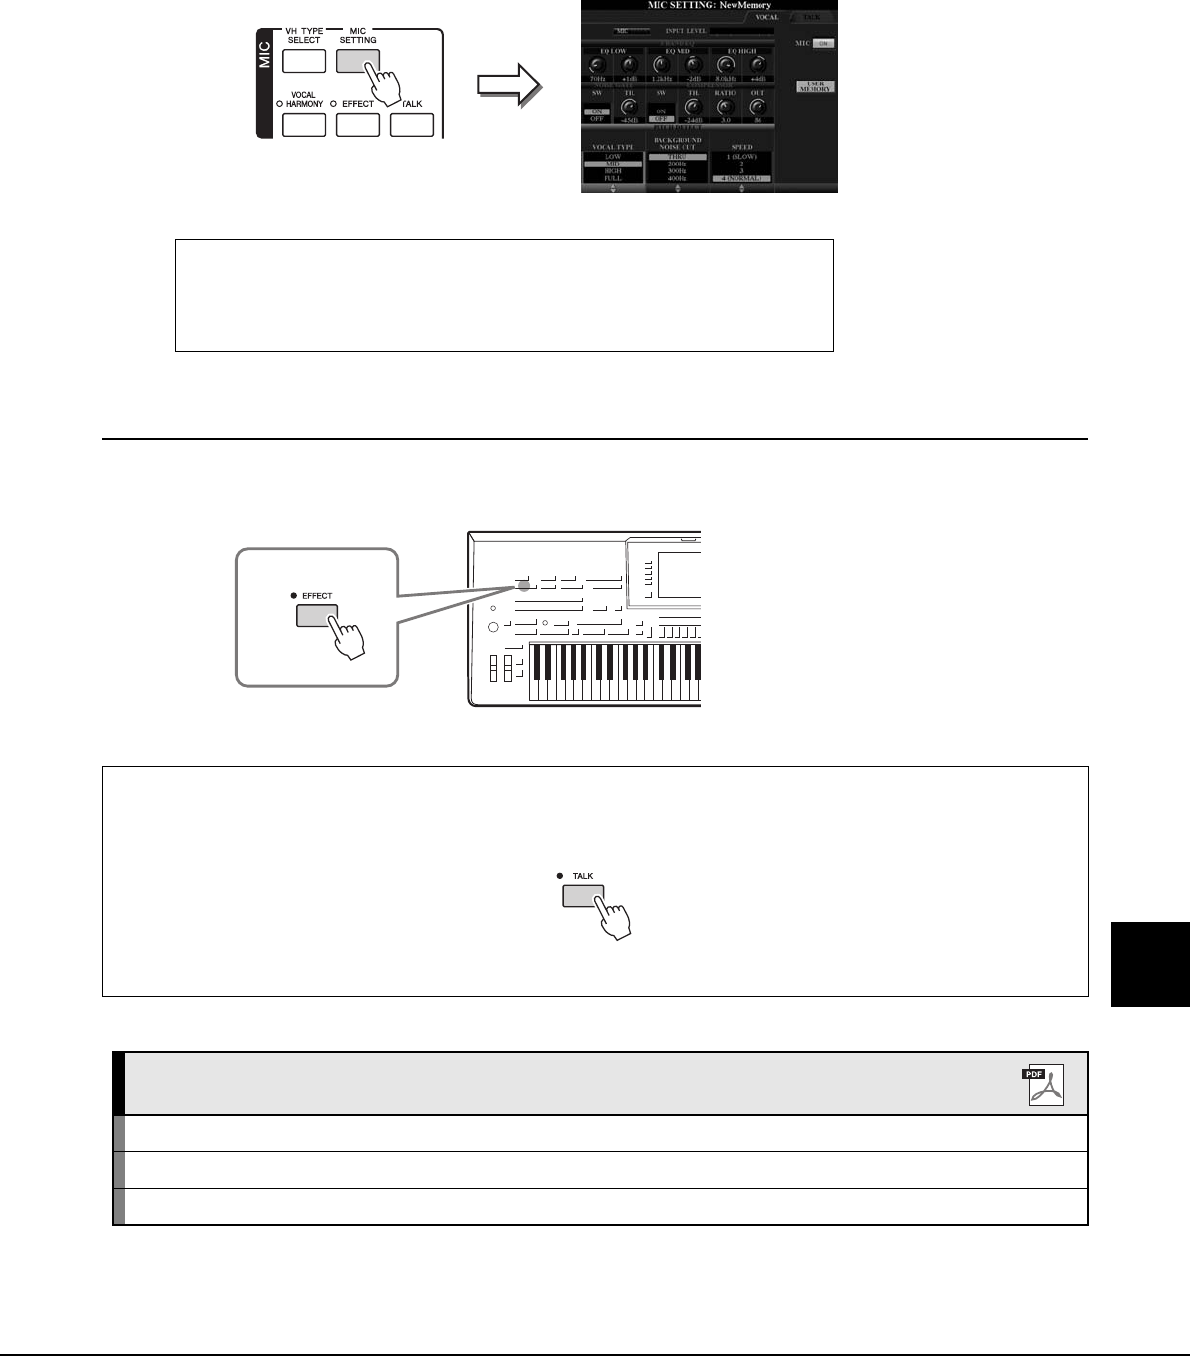
Tyros4 Owner’s Manual 95
11
Connections – Using Tyros4 with Other Devices –
4Adjust the [MIC GAIN] while singing into the microphone.
Adjust the controls so that the INPUT LEVEL meter lights in green or yellow on
the MIC SETTING display (called up by pressing the [MIC SETTING] button).
Make sure that the meter does not light in orange or red, since this indicates that
the input level is too high.
Adding Vocal Effects to The Microphone Sound
Use the [EFFECT] button to determine the on/off setting of the effect applied to the microphone. For information on set-
ting the effect, refer to the Reference manual on the website.
Disconnecting the microphone
1Set the [MIC GAIN] to “MIN.”
2Disconnect the microphone from the Tyros4.
Using the Talk function
Turning the [TALK] button on lets you temporarily cancel the vocal harmony and change the microphone settings to a
more natural, less processed sound. This is especially useful when you talk between songs during a performance.
You can also change the Talk settings to suit your preferences. For details, refer to the Reference Manual on the website.
Advanced Features
Refer to the Reference Manual on the website, Chapter 11.
Vocal settings: [MIC SETTING] TAB [][] VOCAL
Talk settings: [MIC SETTING] TAB [][] TALK
Saving the Microphone Settings: [MIC SETTING] [H] USER MEMORY [6 ] SAVE
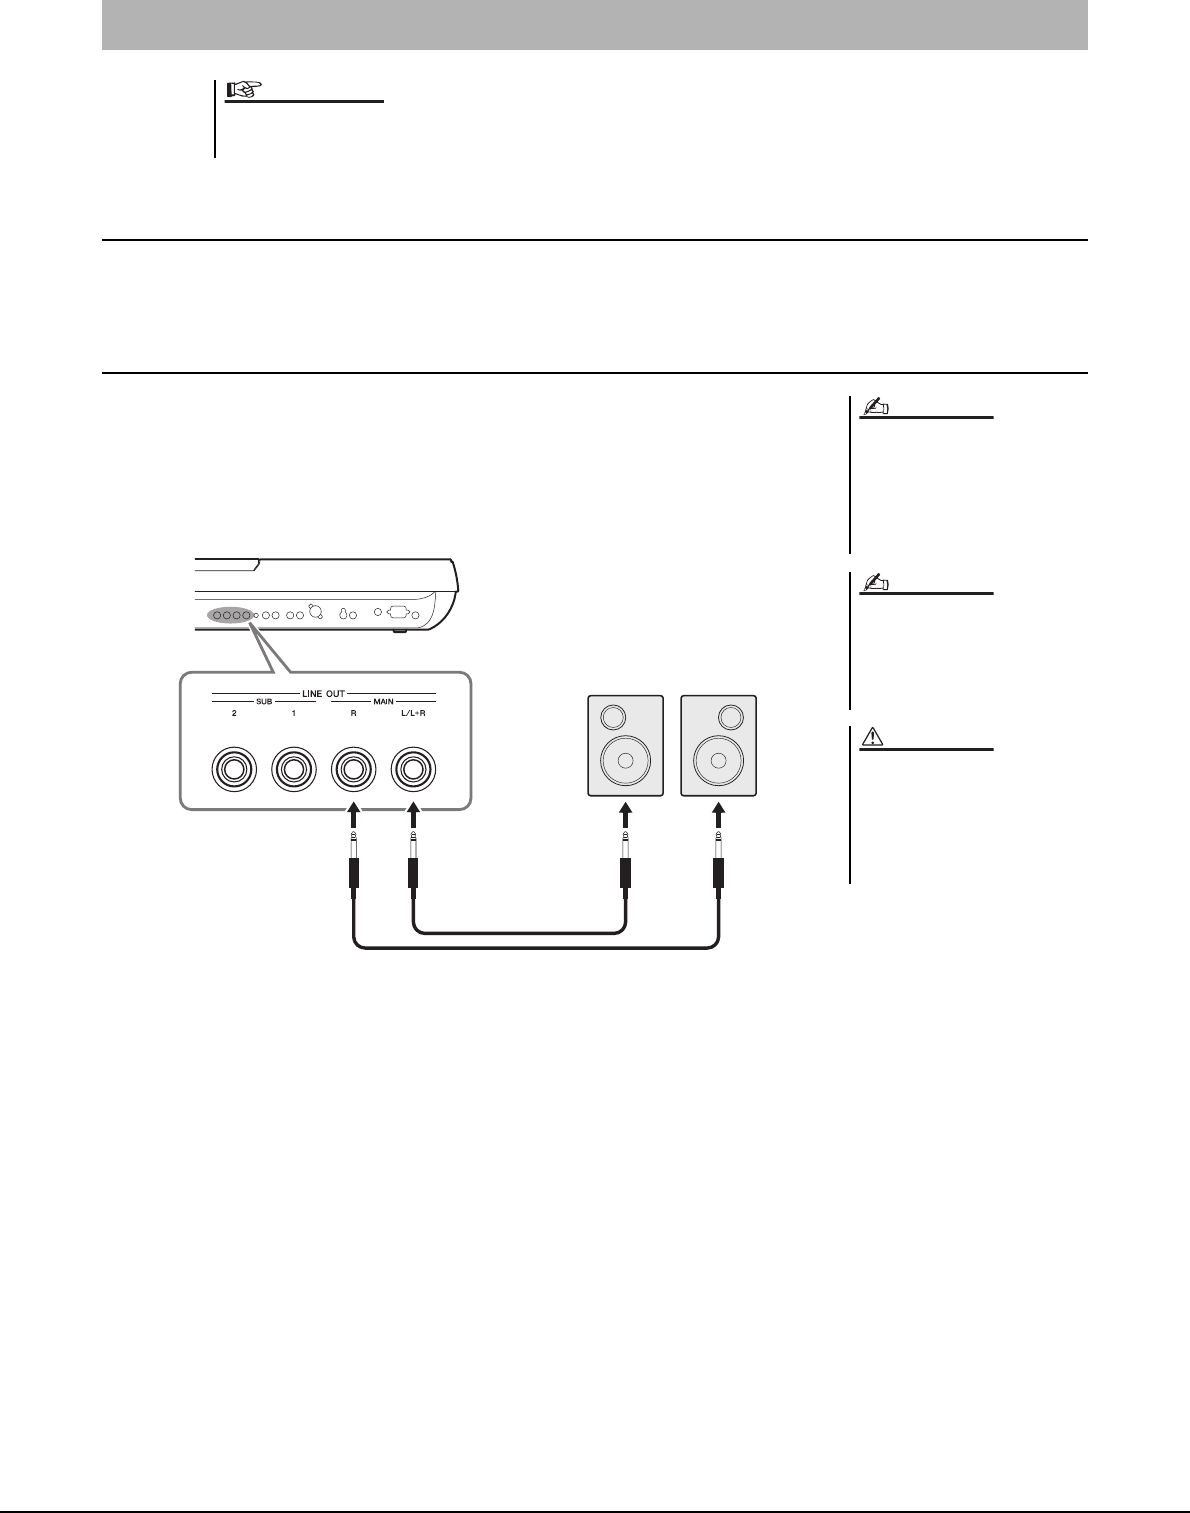
96 Tyros4 Owner’s Manual
Connecting the Optional Yamaha TRS-MS04 Speaker
Use the [TO RIGHT SPEAKER], [TO LEFT SPEAKER] and [TO SUB WOOFER L/R] jacks. See page 106.
Using External Audio Devices for Playback
The [LINE OUT] jacks are used to send the Tyros4 output to a keyboard amplifier, stereo
sound system or mixing console. If you are connecting the Tyros4 to a mono sound sys-
tem, use only the [L/L+R] jack. When only this jack is connected (using a standard phone
plug), the left and right channels are combined and output through this jack—allowing
you have a mono mix of the Tyros4’s stereo sound.
Connecting Audio Devices
Since the Tyros4 has no built-in speakers, you need to monitor its sound output via external audio equipment.
Alternatively, you could use a pair of headphones (page 15).
IMPORTANT
You can send a specific part to desired
LINE OUT jack(s). The operation display
can be called up: [MIXING CONSOLE]
TAB [][] LINE OUT. For details,
refer to the Reference Manual on the
website.
You can also use the [AUX OUT/LOOP
SEND] jacks instead [LINE OUT] jacks.
However, the output volume from [AUX
OUT/LOOP SEND] cannot be controlled
by MASTER VOLUME.
When the Tyros4’s sound is output
to an external device, first turn on
the power to the Tyros4, then to
the external device. Reverse this
order when you turn the power
off.
NOTE
NOTE
CAUTION
Phone plug
(standard)
Phone plug
(standard)
Input jack
Audio cable
Powered speakers
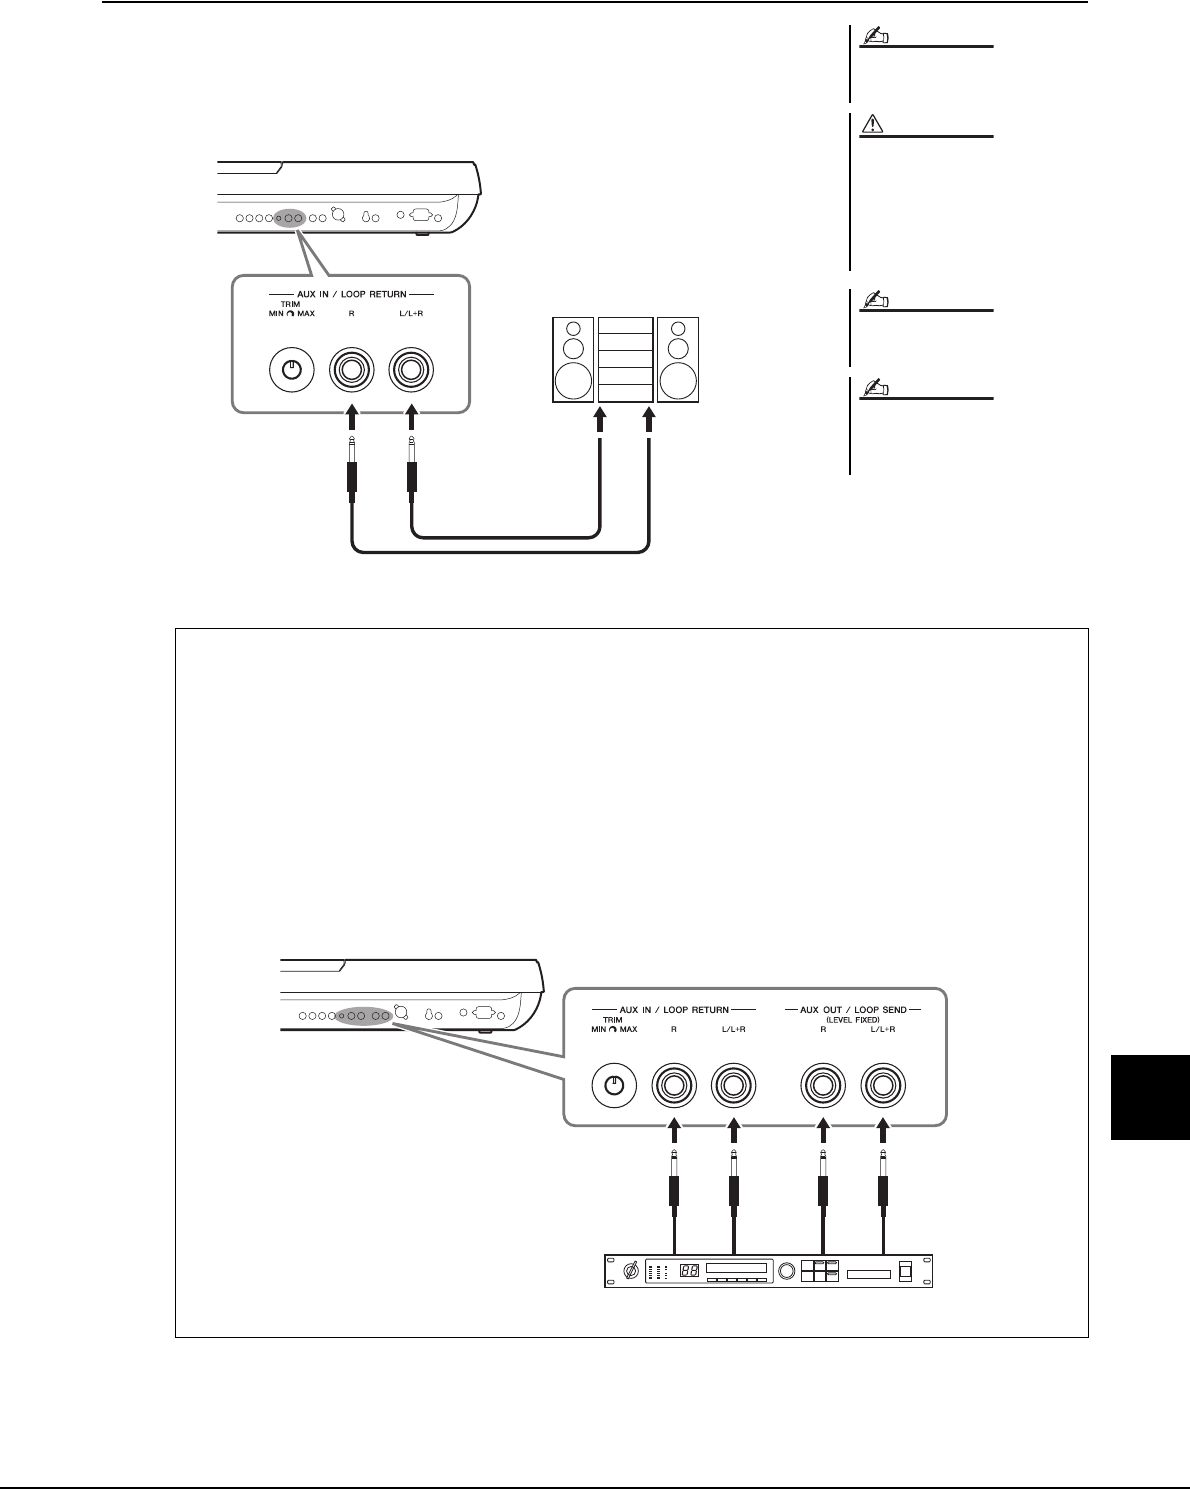
Tyros4 Owner’s Manual 97
11
Connections – Using Tyros4 with Other Devices –
Playing External Audio Devices with the Tyros4
You can connect the output jacks of an external device (such as CD player, MP3 player,
tone generator etc.) to the instrument’s AUX IN [L/L+R]/[R] jacks, letting you hear the
sound of that device through the headphones or optional Yamaha TRS-MS04 speaker of
the Tyros4.
If you want to connect a Microphone to
the [MIC] jack, refer to page 94.
When the sound of an external
device is output to the Tyros4,
first turn on the power to the
external device, then to the
Tyros4. Reverse this order when
you turn the power off.
Use only the [L/L+R] jack for connec-
tion with a monaural device.
The instrument’s [MASTER VOLUME]
setting affects the input signal from the
[AUX IN] jacks.
NOTE
CAUTION
NOTE
NOTE
Phone plug
(standard)
LINE OUT
Audio cable
CD player, MP3 player,
tone generator
[AUX IN/LOOP RETURN] and [AUX OUT/LOOP SEND] jacks
The [AUX OUT/LOOP SEND] jacks can be used either as AUX OUT or LOOP SEND, and can be selected
from the Function menu: [FUNCTION] [I] UTILITY TAB [][] CONFIG 2. The sound is output at a
fixed level, regardless of the [MASTER VOLUME] control setting. Use the [AUX OUT] jacks to output the
Tyros4 sound through an external audio system, or to record the sound with an external audio recorder. Con-
nect the [AUX OUT] jacks of the Tyros4 to the [AUX IN] jacks of the audio system using appropriate audio
cables. When these are used as LOOP SEND jacks, you can route the output of the Tyros4 to an external signal
processor, and return the processed signal back to the instrument via the [AUX IN/LOOP RETURN] jacks—
letting you apply your own favorite effects to the overall sound.
The TRIM control allows the input sensitivity of the AUX IN [L/L+R] and [R] (LOOP RETURN) jacks to be
adjusted for optimum level matching with the connected equipment.
Audio
cable
Example of Loop Send
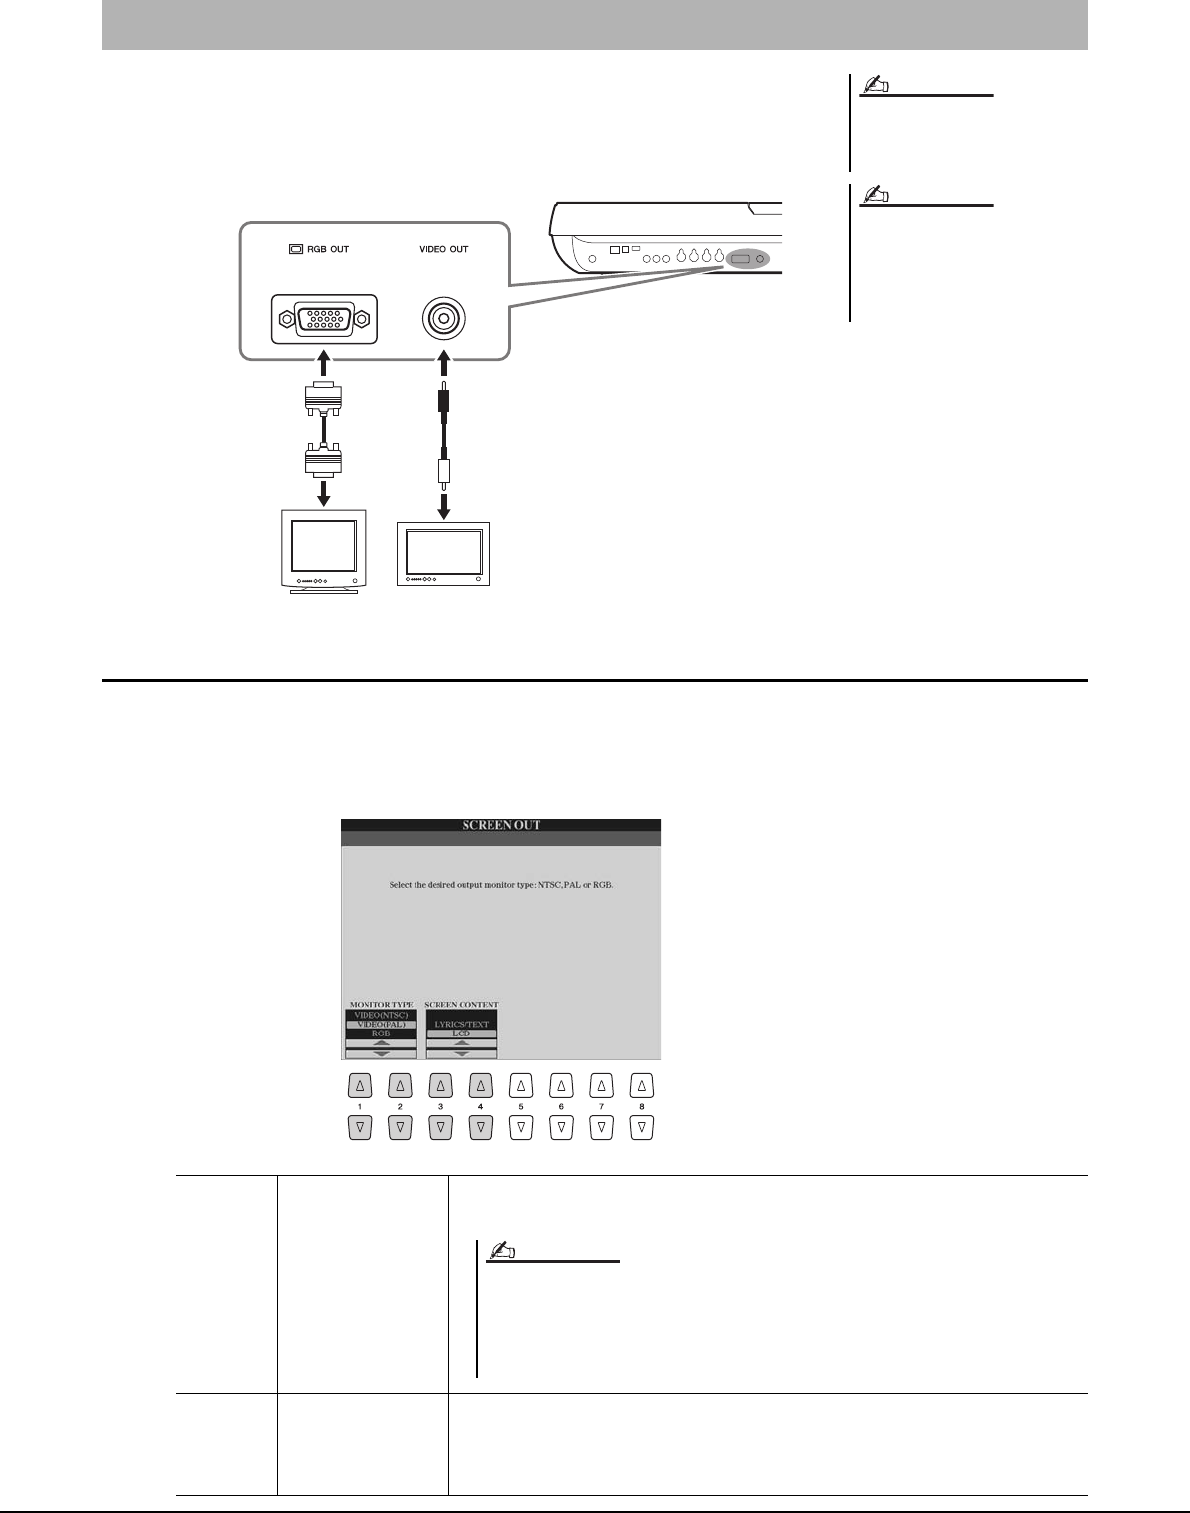
98 Tyros4 Owner’s Manual
You can connect the Tyros4 directly to an external monitor for displaying the lyrics and
chords of your song data on a large screen. There are two kinds of output connectors: RGB
OUT (for a computer monitor) and VIDEO OUT (for a TV or video monitor). The RGB
OUT terminal delivers higher resolution than the VIDEO OUT jack.
Screen Out Settings
1Call up the operation display.
[FUNCTION] [G] SCREEN OUT
2Set the monitor type and screen contents.
Connecting a Separate TV Monitor/Computer Monitor
If the display is not aligned properly in
the computer monitor, change the set-
tings on the monitor itself.
Avoid looking at the monitor for pro-
longed periods of time since doing so
could damage your eyesight. Take fre-
quent breaks and focus your eyes on
distant objects to avoid eyestrain.
NOTE
NOTE
Mini D-Sub 15-pin RCA pin plug VIDEO IN
[1 ]/
[2 ]
MONITOR TYPE Selects the desired output monitor type. If you select VIDEO, set the NTSC or PAL to
correspond to the standard used by your video equipment.
[3 ]/
[4 ]
SCREEN
CONTENT
Determines the contents of the Video Out signal.
•LYRICS/TEXT: Only the lyrics of the song or text files are output, regardless of the
display that is called up on the instrument.
•LCD: The currently selected display is output.
The Tyros4’s default setting for the external television/video monitor signal is “PAL”
Depending on your particular locale, the standard may be different and the setting
should be changed accordingly. (For example, NTSC is generally used in North Amer-
ica.) Check the standard used by your television or video monitor, and if it is not PAL,
change the setting in the VIDEO OUT display to “NTSC.”
NOTE
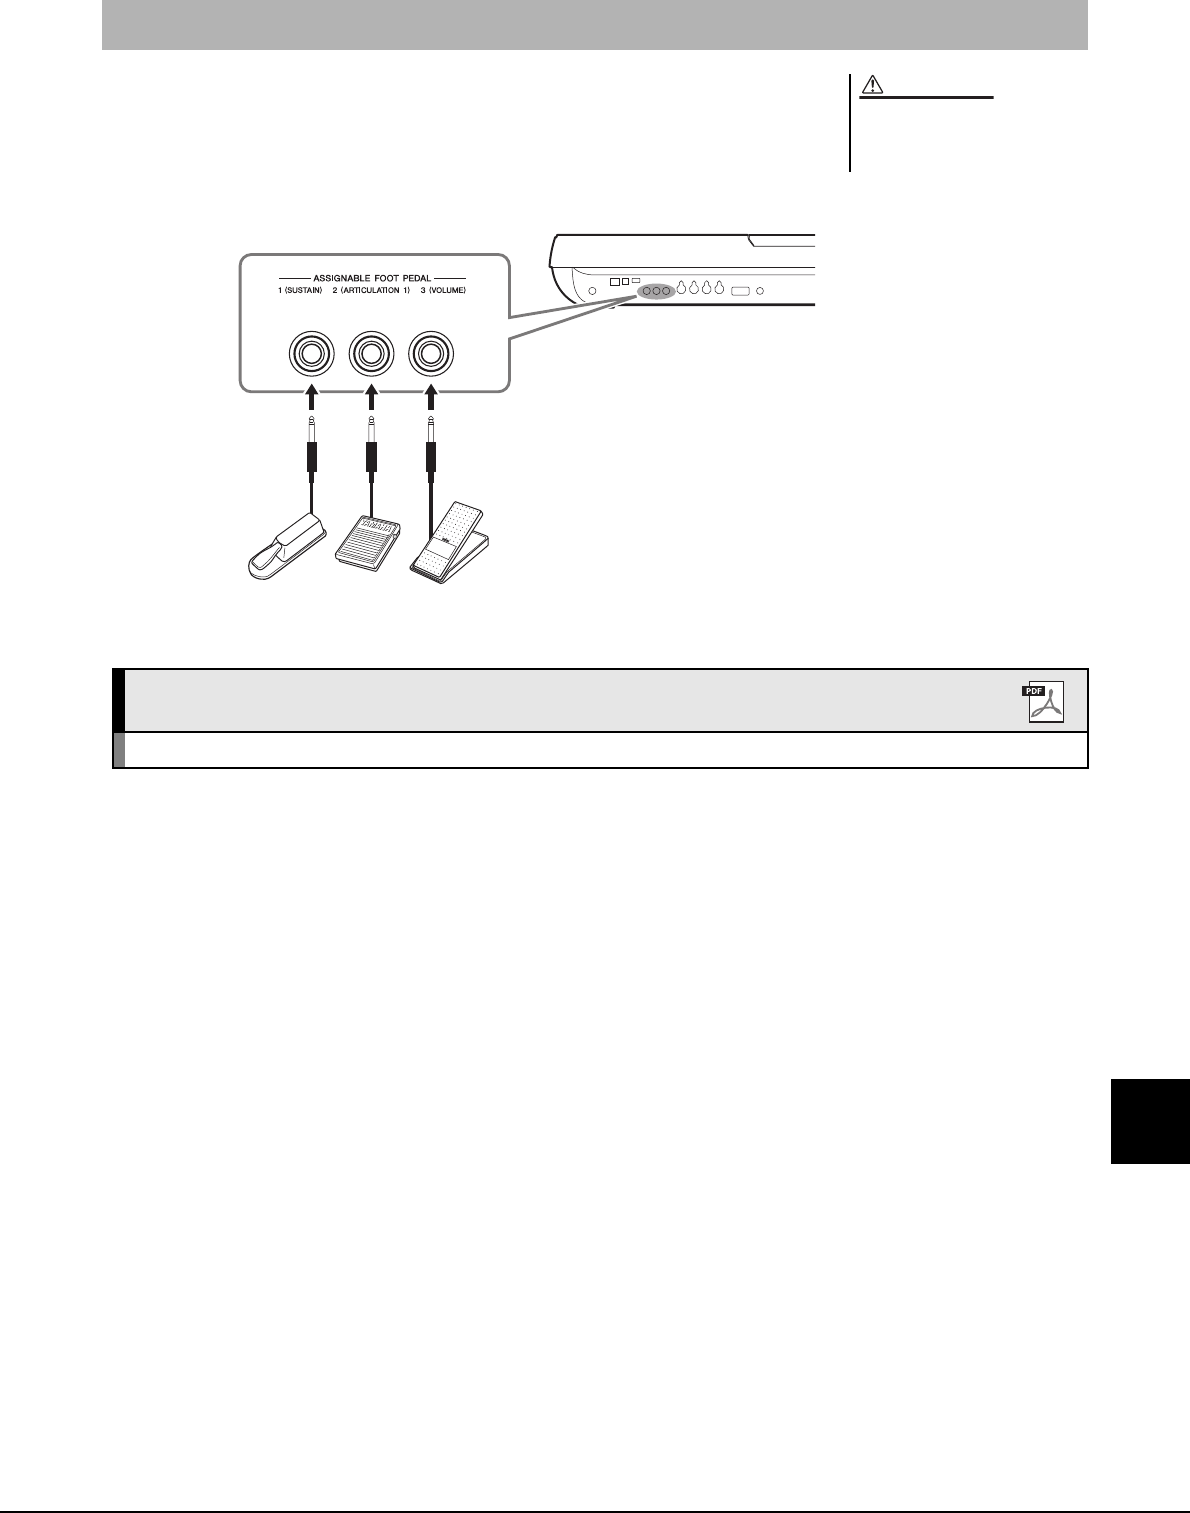
Tyros4 Owner’s Manual 99
11
Connections – Using Tyros4 with Other Devices –
One or two optional Yamaha FC4 or FC5 footswitches and an optional Yamaha FC7 Foot
Controller can be connected to one of these ASSIGNABLE FOOT PEDAL jacks.
By default, a foot pedal connected to jack 1 controls sustain, a foot pedal connected to jack
2 controls an articulation effect on a SA/SA2 Voice, and a foot pedal connected to jack 3
controls volume.
Connecting Footswitches/Foot Controllers
Make sure to connect or discon-
nect the pedal only when the
power is off.
CAUTION
FC4 FC5 FC7
Advanced Features
Refer to the Reference Manual on the website, Chapter 11.
Assigning specific functions to each foot pedal [FUNCTION] [D] CONTROLLER TA B [][] FOOT PEDAL
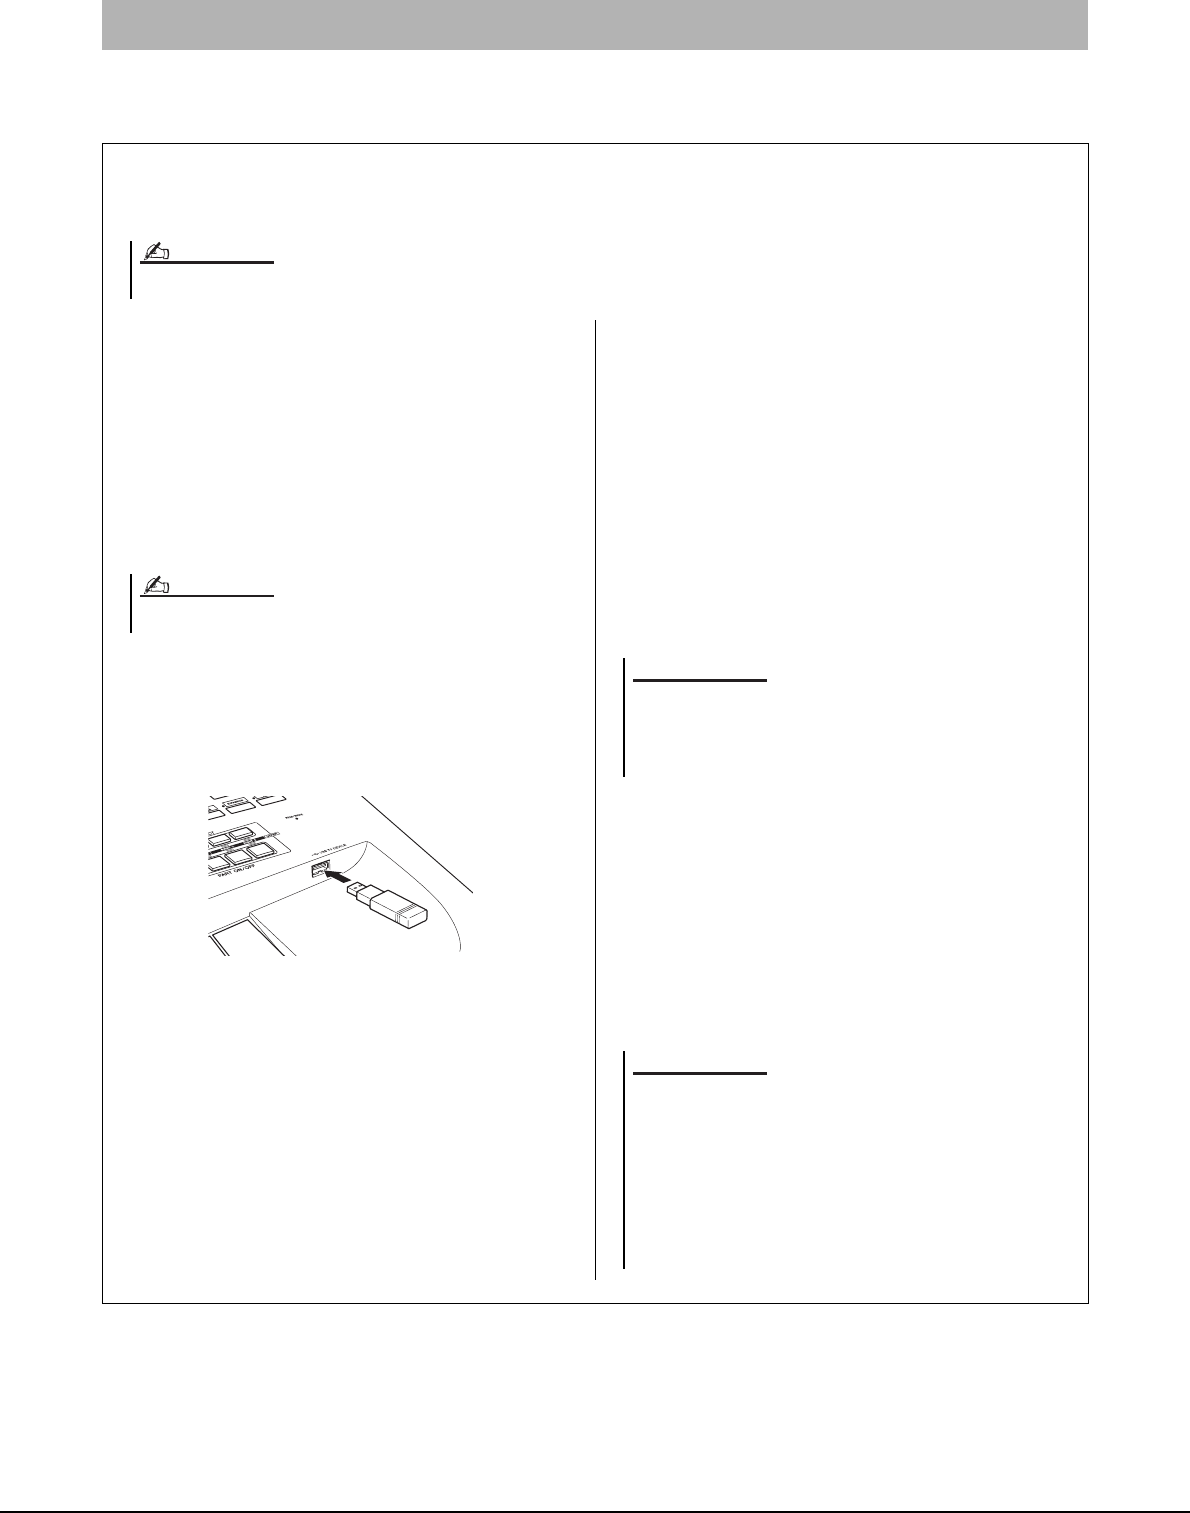
100 Tyros4 Owner’s Manual
By connecting the instrument to a USB storage device, you can save data you’ve created to the device, as well as read
data from it. Use the [USB TO DEVICE] terminal to connect a USB storage device.
Connecting a USB Storage Device
Precautions when using the [USB TO DEVICE] terminal
This instrument features a built-in [USB TO DEVICE] terminal. When connecting a USB device to the terminal, be
sure to handle the USB device with care. Follow the important precautions below.
-Compatible USB devices
• USB storage devices (flash memory, etc.)
• USB hub
• USB-LAN adaptor
The instrument does not necessarily support all commer-
cially available USB devices. Yamaha cannot guarantee
operation of USB devices that you purchase. Before pur-
chasing a USB device for use with this instrument, please
visit the following web page:
http://music-tyros.com/
-Connecting USB device
When connecting a USB device to the [USB TO
DEVICE] terminal, make sure that the connector on the
device is appropriate and that it is connected in the proper
direction.
• If you intend to connect two or three devices at the
same time to a terminal, you should use a USB hub
device. The USB hub must be self-powered (with its
own power source) and the power must be on. Only one
USB hub can be used. If an error message appears
while using the USB hub, disconnect the hub from the
instrument, then turn on the power of the instrument
and re-connect the USB hub.
-Using USB Storage Devices
By connecting the instrument to a USB storage device,
you can save data you’ve created to the connected device,
as well as read data from the connected device.
-The number of USB storage device to be used
Up to two USB storage devices can be connected to the
[USB TO DEVICE] terminal. (If necessary, use a USB
hub. The number of USB storage devices that can be used
simultaneously with musical instruments even when a
USB hub is used is a maximum of two.) This instrument
can recognize up to four drives in one USB storage
device.
-Formatting USB storage media
When a USB storage device is connected or media is
inserted, a message may appear prompting you to format
the device/media. If so, execute the Format operation
(page 101).
-To protect your data (write-protect)
To prevent important data from being inadvertently
erased, apply the write-protect function provided with
some storage devices and media. If you are saving data to
the USB storage device, make sure to disable write-pro-
tect.
-Connecting/removing USB storage device
Before removing the media from the device, make sure
that the instrument is not accessing data (such as in the
Save, Copy, Delete, Load and Format operations).
For more information about the handling of USB devices, refer to the owner’s manual of the USB device.
NOTE
Other USB devices such as a computer keyboard or mouse cannot be used.
NOTE
The format operation overwrites any previously existing data.
Make sure that the media you are formatting does not contain
important data. Proceed with caution, especially when connect-
ing multiple USB storage media.
NOTICE
Avoid frequently turning the power on/off to the USB storage
device, or connecting/disconnecting the device too often. Doing
so may result in the operation of the instrument “freezing” or
hanging up. While the instrument is accessing data (such as dur-
ing Save, Copy, Delete, Load and Format operations) or is mount-
ing the USB storage device (shortly after the connection), do NOT
unplug the USB connector, do NOT remove the media from the
device, and do NOT turn the power off to either device. Doing so
may corrupt the data on either or both devices.
NOTICE
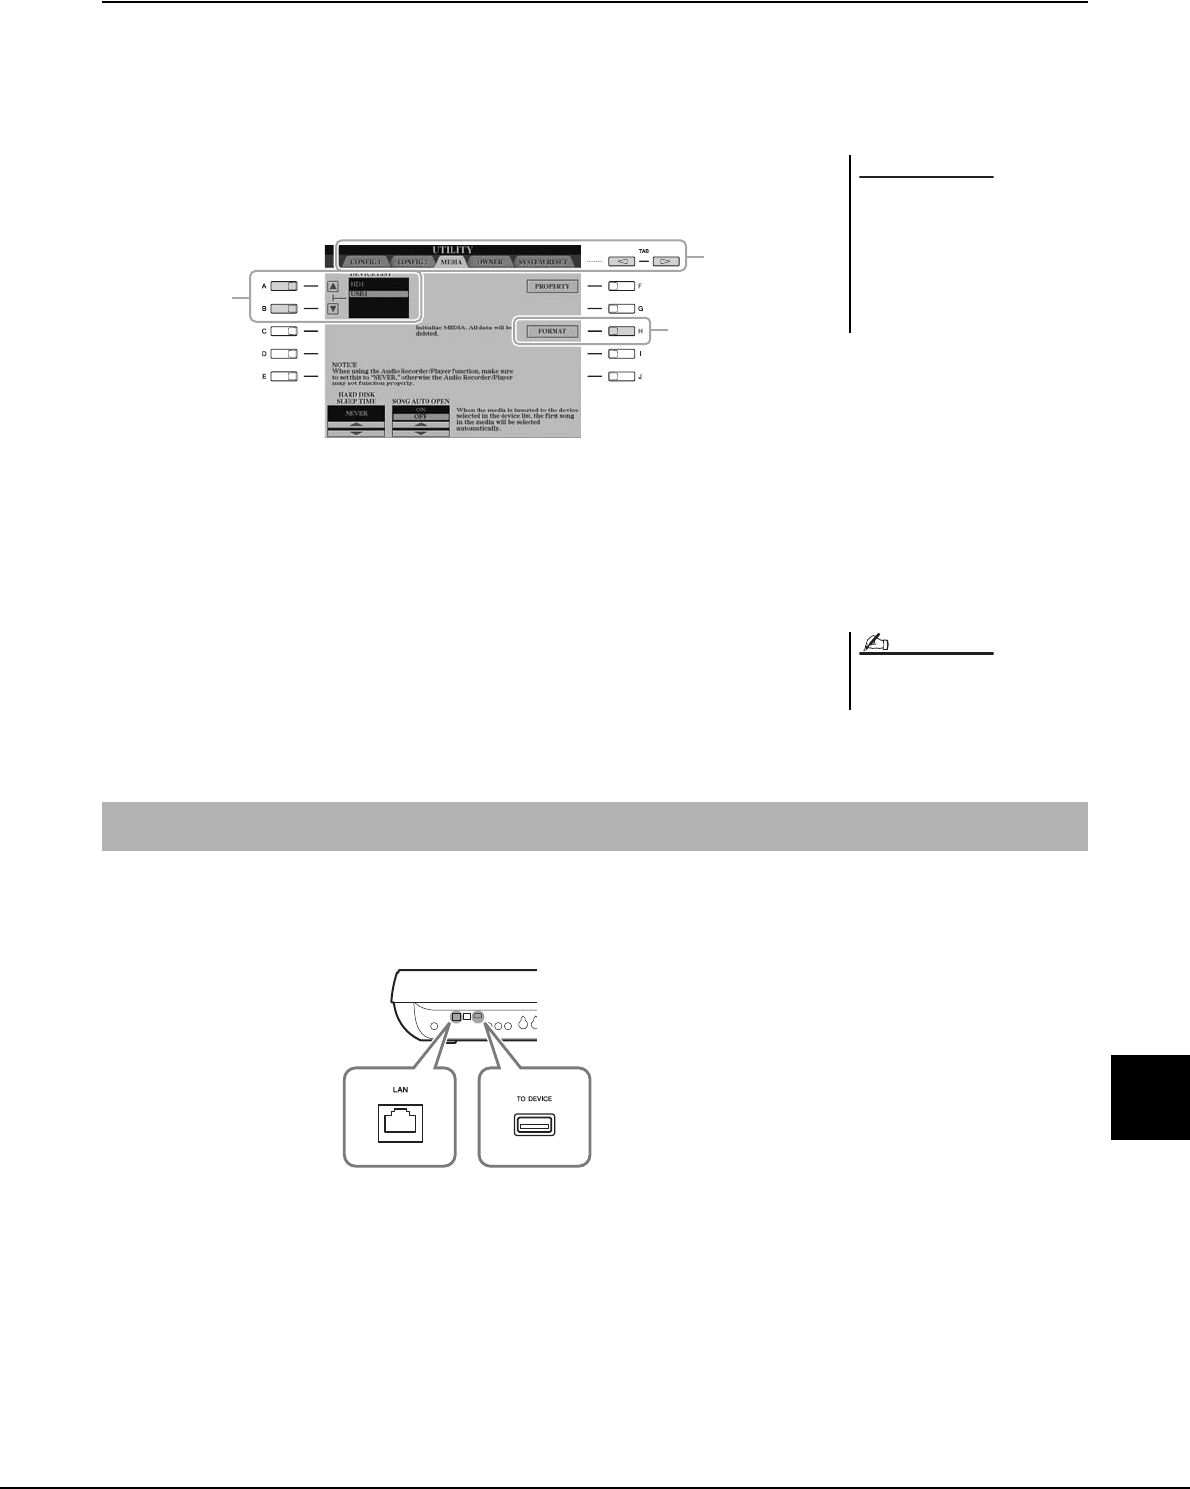
Tyros4 Owner’s Manual 101
11
Connections – Using Tyros4 with Other Devices –
Formatting a USB Storage Device or Internal Hard Disk Drive
To format a USB storage device or internal hard disk drive, execute the format operation.
If you want to format a USB storage device, make sure that a USB storage device is con-
nected to the [USB TO DEVICE] terminal beforehand.
1Call up the operation display.
[FUNCTION] [I] UTILITY TAB [ ][] MEDIA
2Press the [A]/[B] buttons to select the USB storage device or
internal HDD to be formatted from the device list.
The indications USB 1, USB 2, etc. will be displayed depending on the number of
the connected USB storage devices.
3Press the [H] (FORMAT) button to format the device/HDD.
By using the [LAN] or [USB TO DEVICE] terminal, you can connect the instrument to the Internet. For instructions on
connecting, refer to page 91 and Internet Connection Guide downloadable from the Yamaha website.
The format operation deletes any
previously existing data. Make
sure that the media you are for-
matting does not contain impor-
tant data. Proceed with caution,
especially when connecting mul-
tiple USB storage medias.
NOTICE
1
3
2
When the internal HDD is formatted, the
Tyros4 will be restarted automatically.
NOTE
Connecting to the Internet
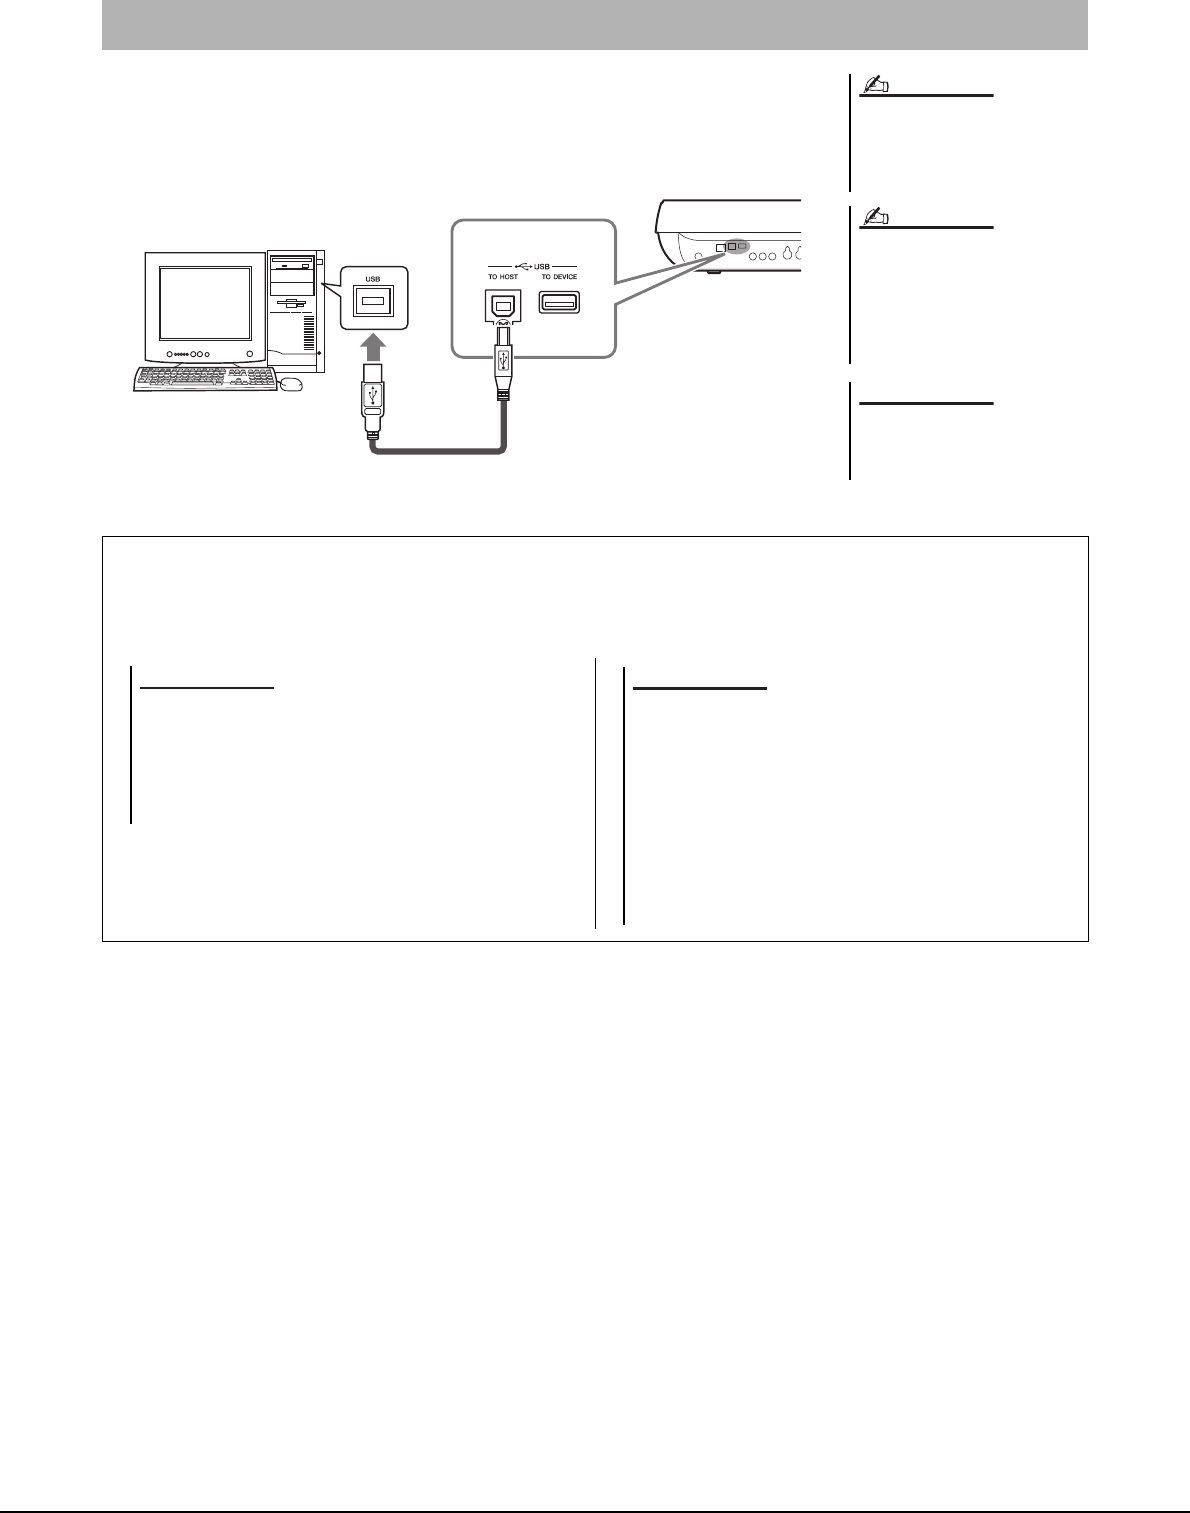
102 Tyros4 Owner’s Manual
By connecting a computer to the [USB TO HOST] terminal, you can transfer data between
the Tyros4 and the computer via MIDI, and use the computer to control, edit and organize
data on the Tyros4. For example, you can use the included Voice Editor program to edit
the Tyros4’s Custom Voices.
Connecting to a Computer
You need to install a USB-MIDI driver to
connect the computer and the instru-
ment. Refer to the separate Installation
Guide.
You can also use the MIDI IN/OUT ter-
minals to connect to a computer. In this
case, a USB-MIDI interface (such as the
Yamaha UX16) is needed. For more
information, refer to the owner’s manual
of the USB-MIDI interface.
Recognition of the computer and
Tyros4 connection takes a certain
amount of time.
NOTE
NOTE
NOTICE
A type
USB cable
B type
Precautions when using the [USB TO HOST] terminal
When connecting the computer to the [USB TO HOST] terminal, make sure to observe the following points. Failing to
do so risks freezing the computer and corrupting or losing the data. If the computer or the instrument freezes, restart the
application software or the computer OS, or turn the power to the instrument off then on again.
• Use an AB type USB cable of less than about 3 meters.
• Before connecting the computer to the [USB TO HOST] terminal,
exit from any power-saving mode of the computer (such as sus-
pended, sleep, standby).
• Before turning on the power to the instrument, connect the com-
puter to the [USB TO HOST] terminal.
NOTICE
• Execute the following before turning the power to the instru-
ment on/off or plugging/unplugging the USB cable to/from the
[USB TO HOST] terminal.
• Quit any open application software on the computer.
• Make sure that data is not being transmitted from the instru-
ment. (Data is transmitted only by playing notes on the key-
board or playing back a song.)
• While the computer is connected to the instrument, you should
wait for six seconds or more between these operations: (1)
when turning the power of the instrument off then on again, or
(2) when alternately connecting/disconnecting the USB cable.
NOTICE
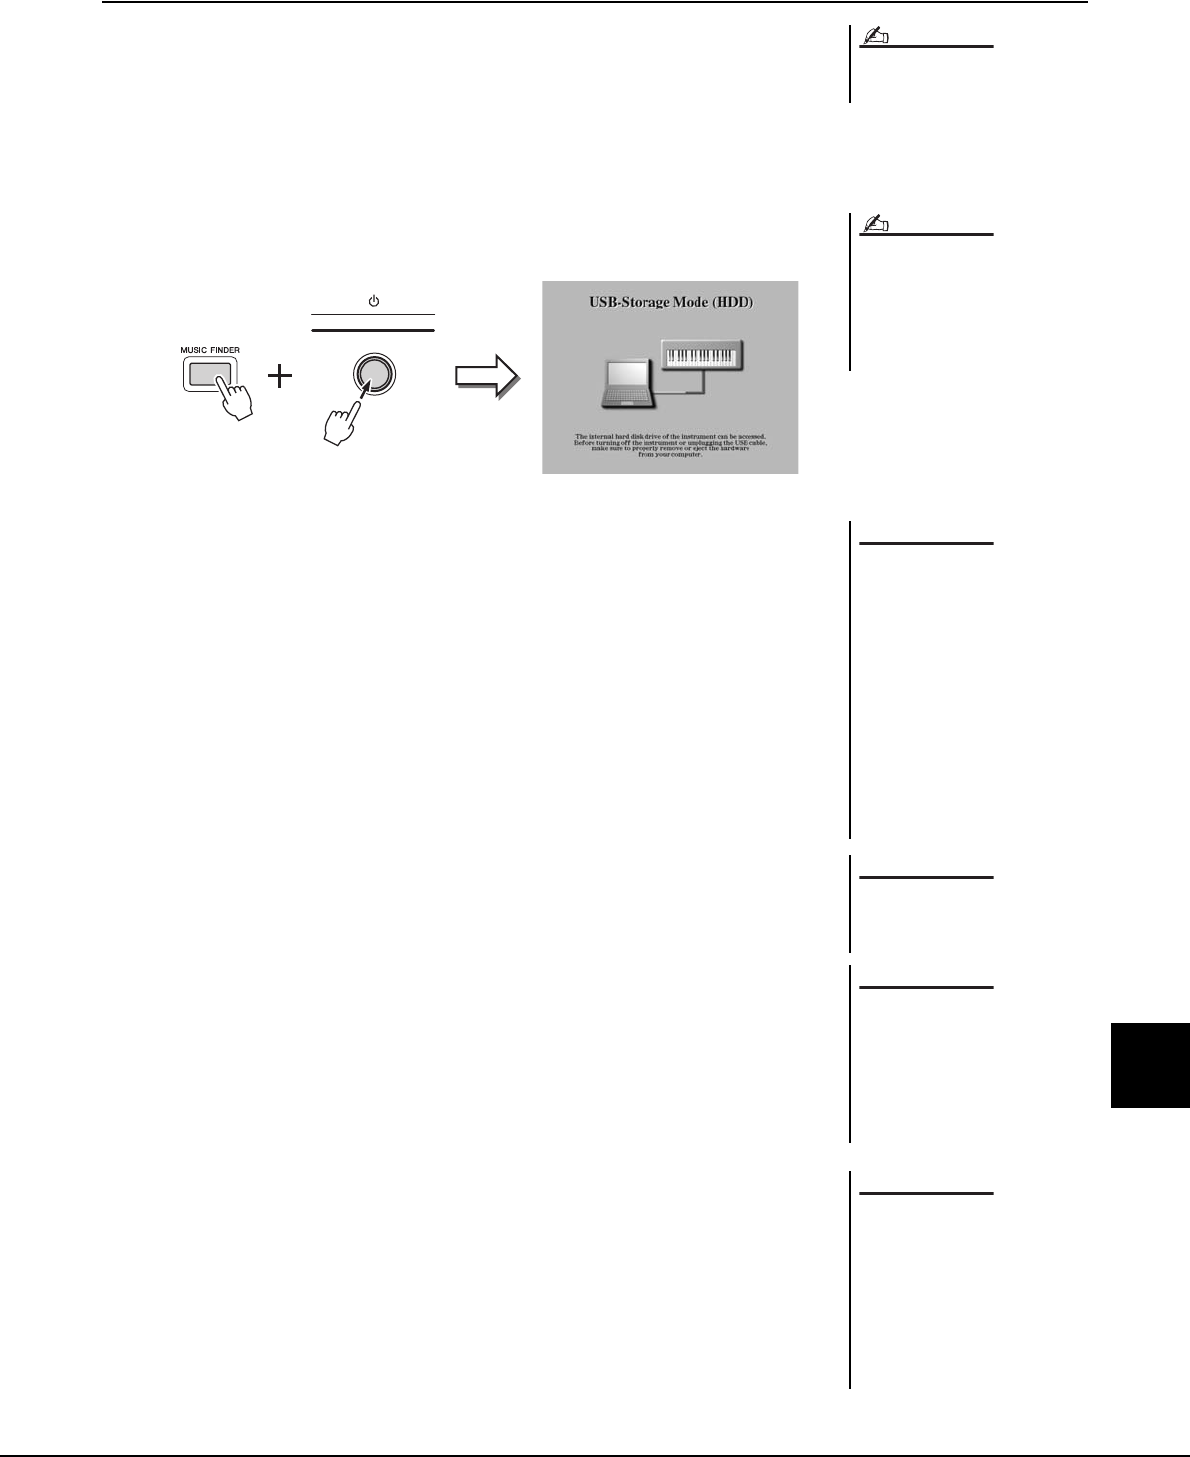
Tyros4 Owner’s Manual 103
11
Connections – Using Tyros4 with Other Devices –
Accessing an Internal Hard Disk Drive on the Tyros4 from the Computer
(USB Storage Mode)
When the USB Storage mode is selected, Wave files and Song files can be transferred
between the internal hard disk drive of the Tyros4 and the computer. In the “normal” mode
the USB connection can be used for MIDI control. The USB interface does not directly
handle audio signals.
1Turn the computer’s power on.
2Turn the Tyros4’s power on while holding the [MUSIC FINDER]
button.
3Manage files/folders in the internal hard disk drive of the Tyros4
by using the computer.
4Press the [EXIT] button to exit the USB storage mode and call
up the Main display.
The USB Storage Mode can be used
with Windows XP/Vista/7.
NOTE
You cannot operate the Tyros4 from the
panel while the USB storage mode is
engaged. Also, the Tyros4 cannot
receive MIDI signals or execute some
functions from the pedals while the
mode is engaged.
NOTE
Execute the following before turn-
ing the USB Storage mode on/ off.
• Close all application programs.
• If the USB Storage mode is off,
make sure that data is not being
transmitted from the Tyros4.
• If the USB Storage mode is
engaged, make sure that no file
reading or writing operation is
in progress.
• If the USB Storage mode is
engaged, safely remove the
Tyros4 from the Windows task-
bar.
Never disconnect the USB cable
or turn off the power while the
READ/WRITE lamp is on.
Do not format the hard disk drive
or change the volume label from a
computer when accessing the
drive via the USB storage mode. If
you do this, the drive may not be
able to be used in the Audio
Recorder/Player function.
Do not access the AUDIO REC.
ROOT folder containing the audio
files that you have created with
the Audio Recorder function. If
you access the folder or make
changes to it (moving the folder
or copying some files in the
folder, etc.), your important data
will be deleted or damaged.
NOTICE
NOTICE
NOTICE
NOTICE
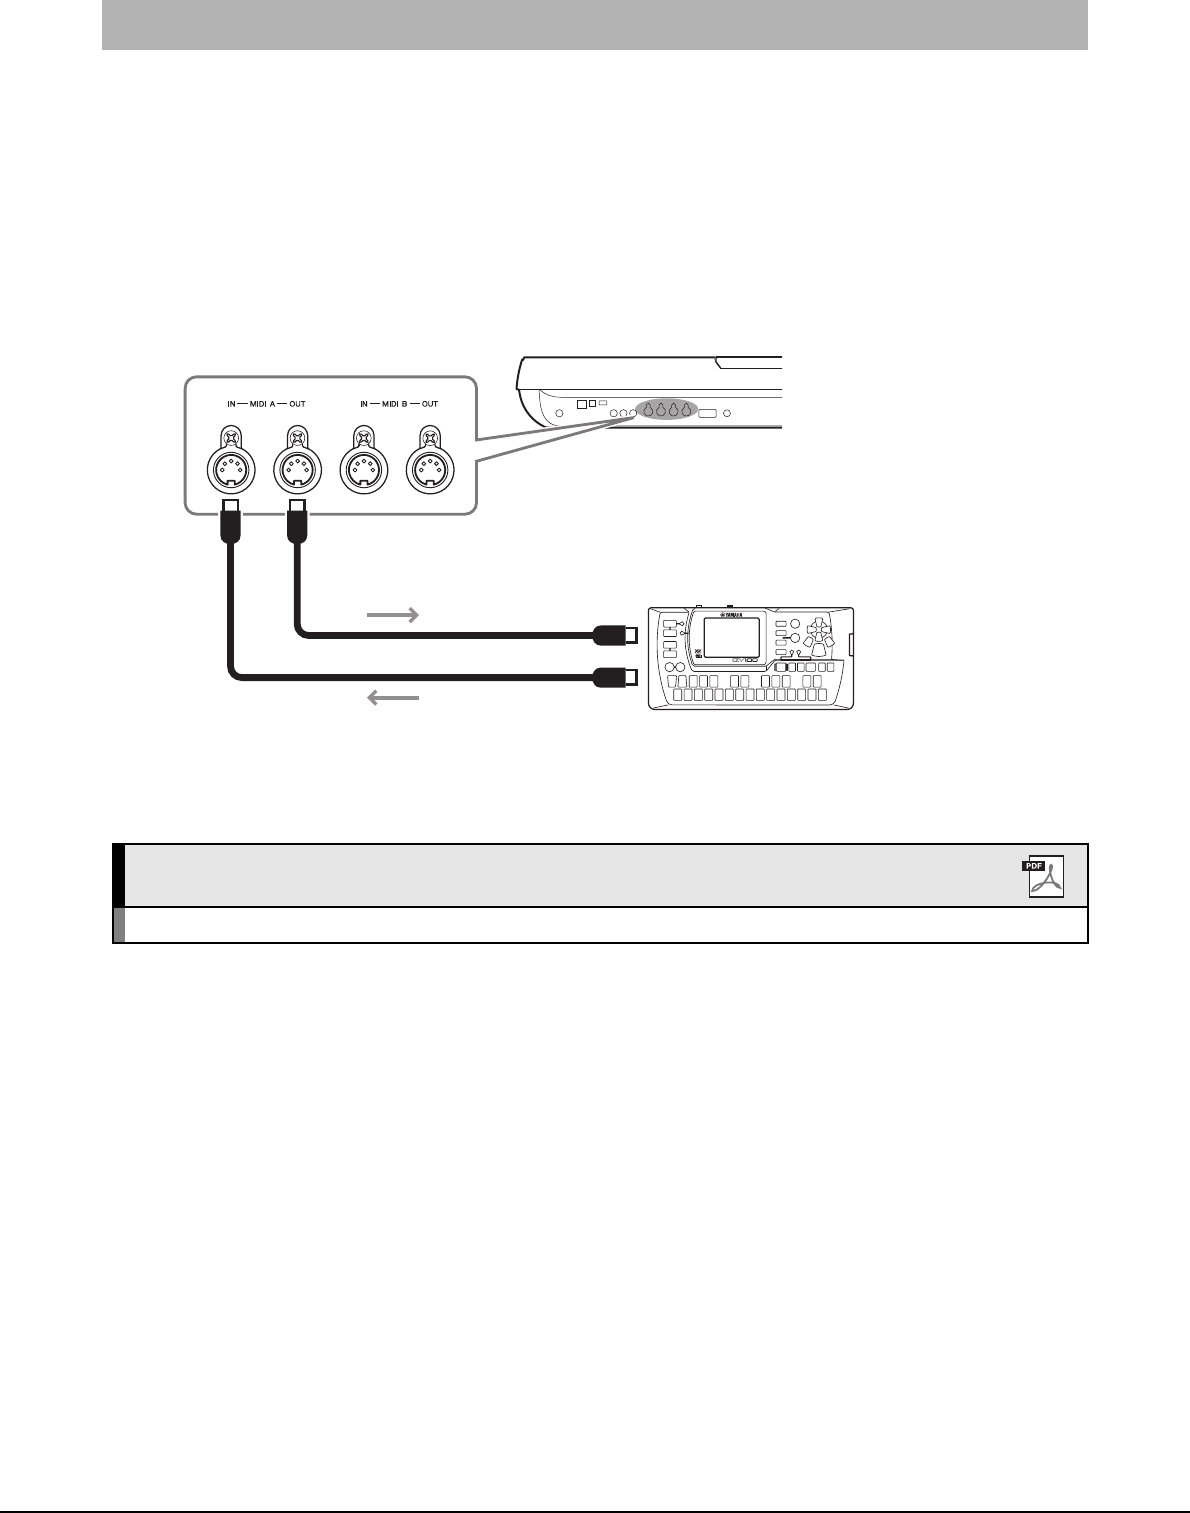
104 Tyros4 Owner’s Manual
The sophisticated MIDI functions give you powerful tools to expand your music performance and creation possibilities.
Use the [MIDI] terminals and standard MIDI cables to connect external MIDI devices (keyboard, sequencer, etc.)
• MIDI IN...............Receives MIDI messages from another MIDI device. Two
ports (A, B) are provided and each can receive MIDI mes-
sages of 16 channels.
• MIDI OUT ..........Transmits MIDI messages generated by the Tyros4 to
another MIDI device. Two ports (A, B) are provided and
each can transmit MIDI messages of 16 channels.
Connecting External MIDI Devices
MIDI IN
MIDI transmit
MIDI OUT
MIDI receive
(playback)
MIDI IN
MIDI OUT
MIDI device
Advanced Features
Refer to the Reference Manual on the website, Chapter 11.
MIDI settings: [FUNCTION] [H] MIDI [8] EDIT
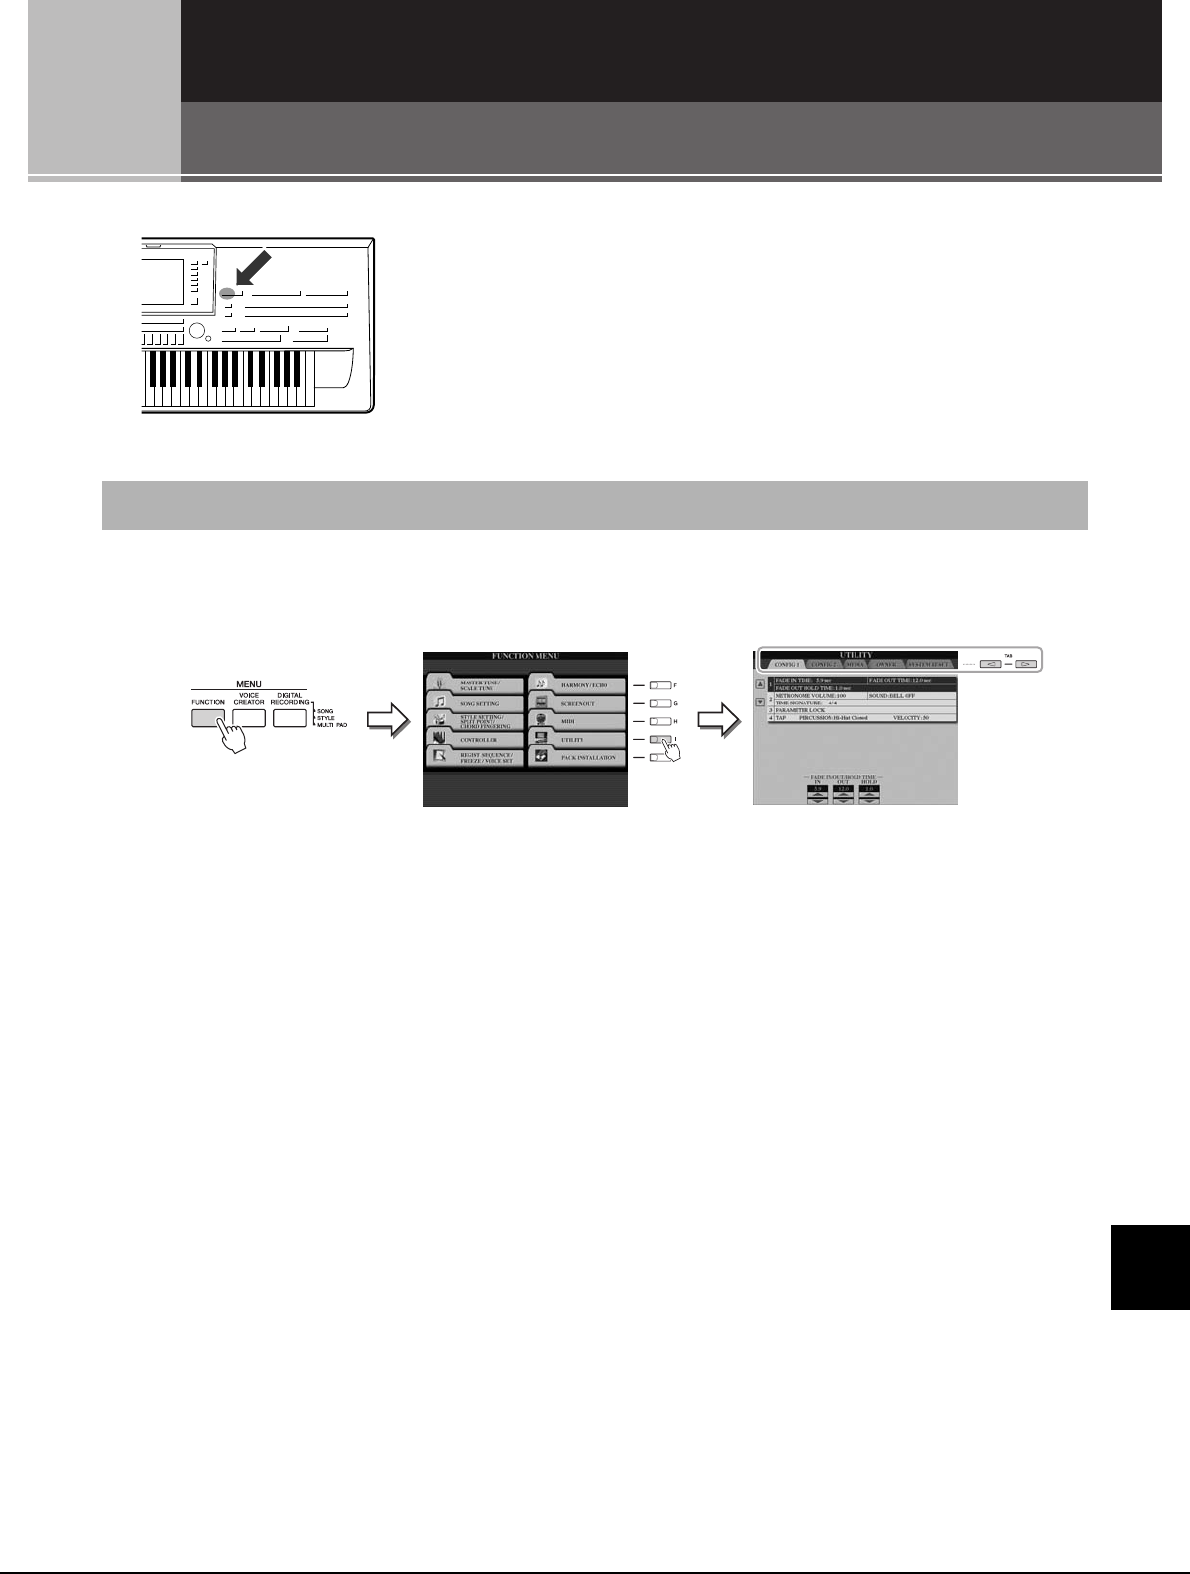
Tyros4 Owner’s Manual 105
12
12
12
Utility – Making Global Settings –
Utility
– Making Global Settings –
The Utility section in the Function menu provides a variety of conve-
nient tools and settings for the Tyros4. These include general settings
that affect the entire instrument, as well as detailed settings for specific
functions. Also included are data reset functions and storage media
control, such as disk formatting.
1Call up the operation display.
[FUNCTION] [I] UTILITY
2Use the TAB [][] buttons to call up desired page.
• CONFIG1.................. General settings such as Fade in/out time, Metronome
sound, Tap Tempo sound, etc.
• CONFIG2.................. General settings such as speaker output, pop-up display
time, SA2 auto articulation etc.
• MEDIA ...................... Settings related to installed media (hard disk drive or
USB storage device). You can format the media in this
page (page 101).
• OWNER..................... Settings of Owner name, Message language (page 17)
and background of the Main display. Parameter setting
backup/restore operations (page 32) and server authen-
tication can also be done in this page.
• SYSTEM RESET ..... Resets the settings of the instrument.
3If necessary, use the [A]/[B] buttons to select the desired
parameter.
4Change the settings by using the [1 ]–[8 ] buttons or
execute the operation by using the [A]–[J] buttons.
For details of the Utility settings, refer to the Reference Manual on the website.
Basic Procedure
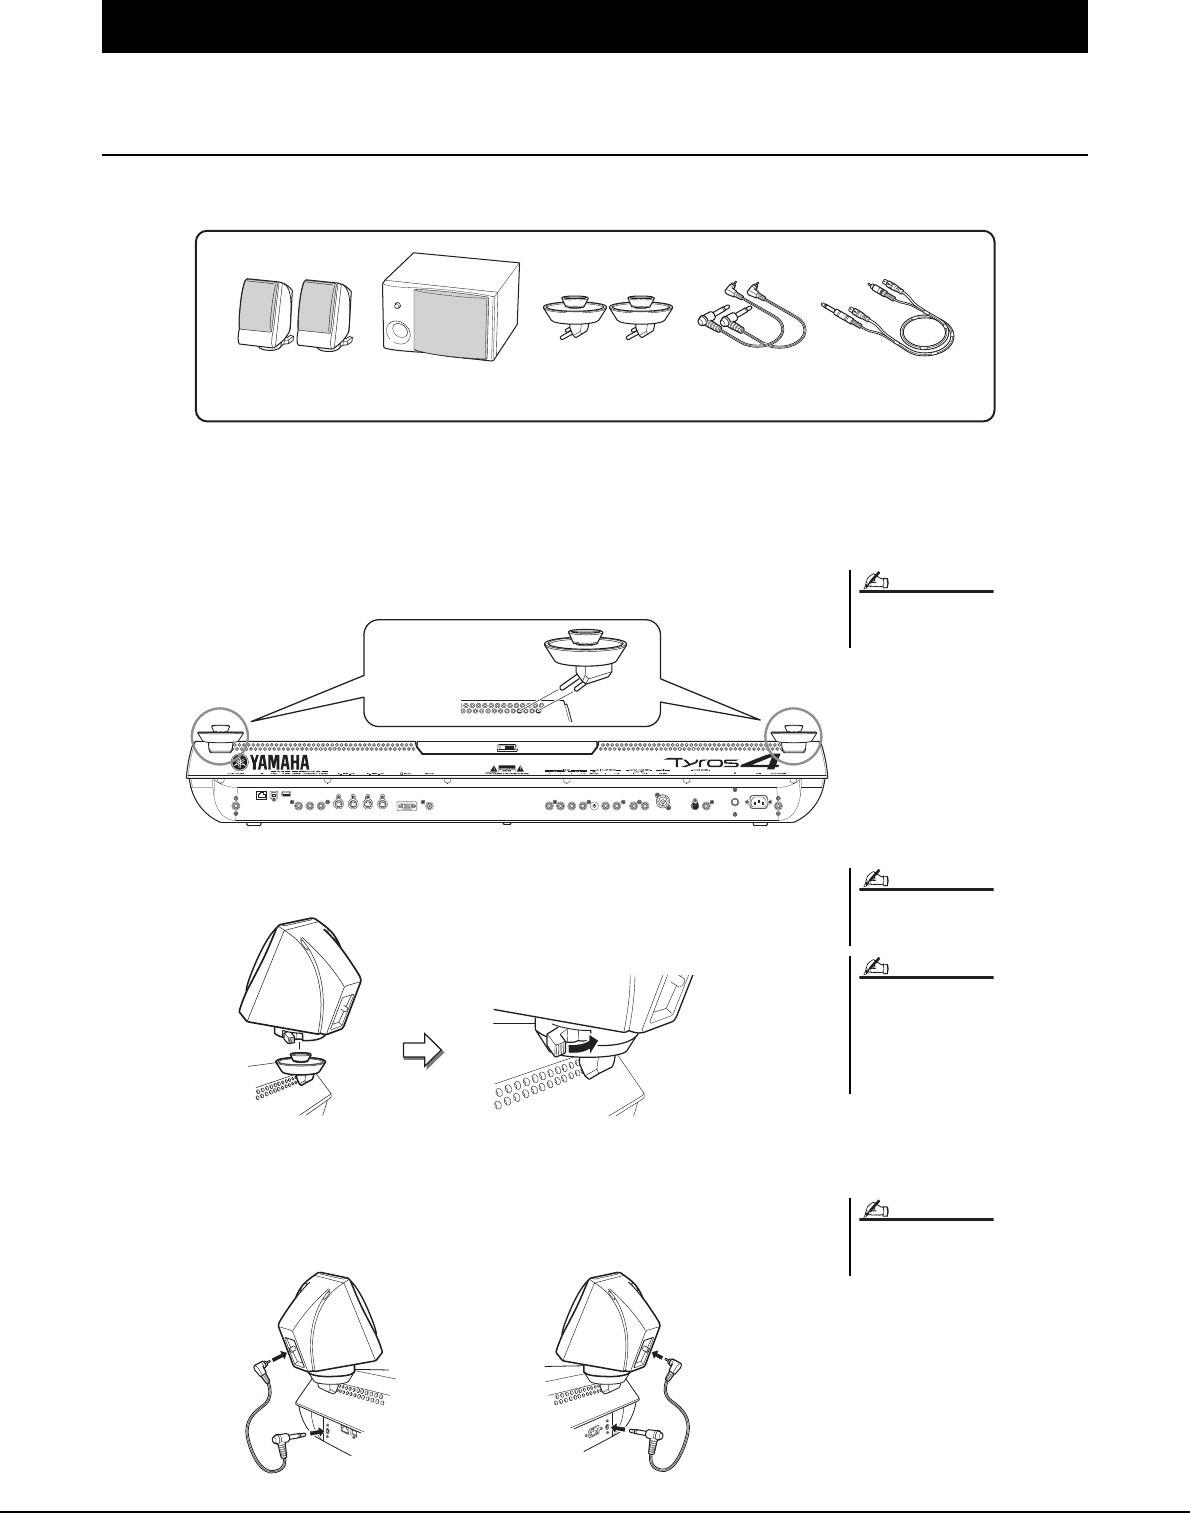
106 Tyros4 Owner’s Manual
Installing the Optional Speakers
Make sure that you have all of the parts below, included in the TRS-MS04 speaker package.
1Turn the Tyros4’s power off, and disconnect the AC power cord.
Also, make sure to disconnect the keyboard from any other
external devices.
2Insert the two speaker brackets to the rear panel of the Tyros4.
3Fasten the satellite speakers to the left and right brackets.
4Use the RCA pin cables to connect the speakers to the respec-
tive outputs on the Tyros4.
Appendix
Satellite
speakers (2)
Subwoofer
speaker (1)
Speaker
brackets (2)
RCA pin
cables (2)
RCA pin/8-pin
combination cable (1)
Either bracket can be inserted to either
location.
NOTE
Use the outside
slots (as shown).
Either speaker can be placed on either
bracket.
If you want to change the direction of
the satellite speaker, unfasten it from the
bracket by rotating the lever, then adjust
the speaker position as desired, and
fasten it to the bracket again.
NOTE
NOTE
Place the speaker on
the bracket.
Adjust the direction of the speaker as desired,
then fasten it securely to the bracket.
Either cable can be used for either loca-
tion.
NOTE
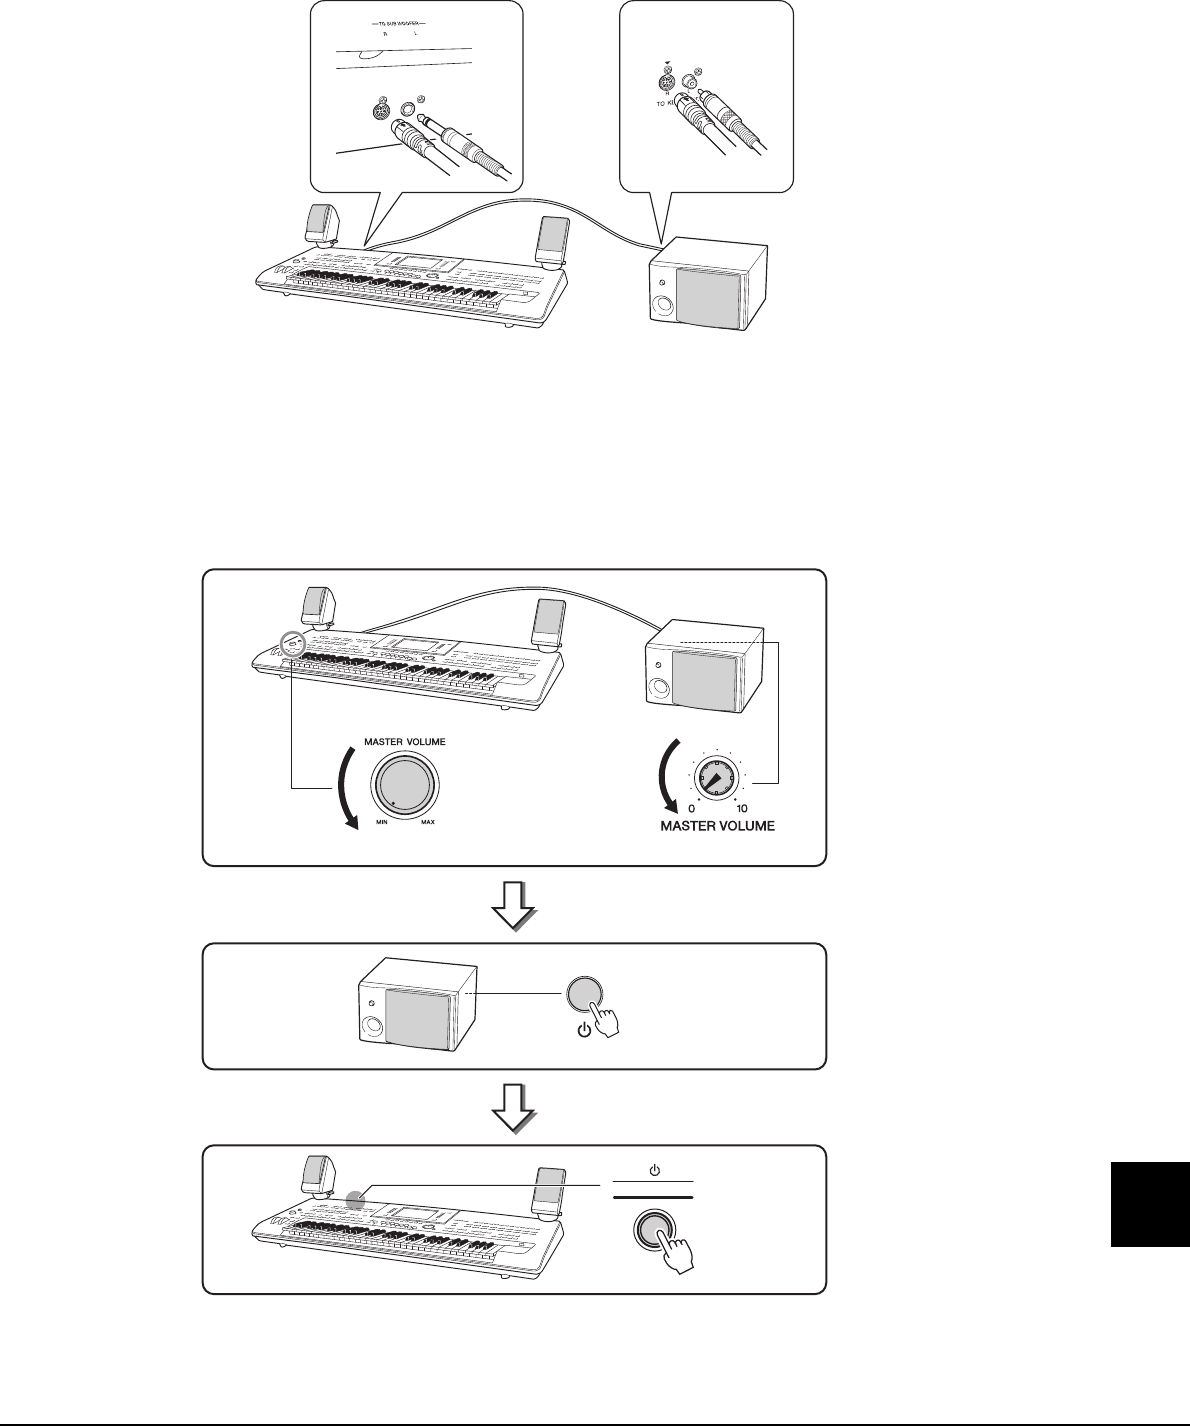
Tyros4 Owner’s Manual 107
Installing the Optional Speakers
5Use the RCA pin/8-pin combination cable to connect the sub-
woofer speaker to the respective outputs on the Tyros4.
6Connect the power plugs of the Tyros4 and the subwoofer to an
appropriate AC outlet.
7First, set the volume controls (MASTER VOLUME on the Tyros4
and MASTER VOLUME on the subwoofer) to minimum. Finally,
turn on the power of the subwoofer, then the Tyros4.
8Adjust the volume controls (MASTER VOLUME on the Tyros4
and MASTER VOLUME on the subwoofer) to appropriate levels.
Tyros4 Sub-Woofer
Turn the subwoofer on
(from the rear panel).
Turn the
Tyros4 on.
(Rear panel)
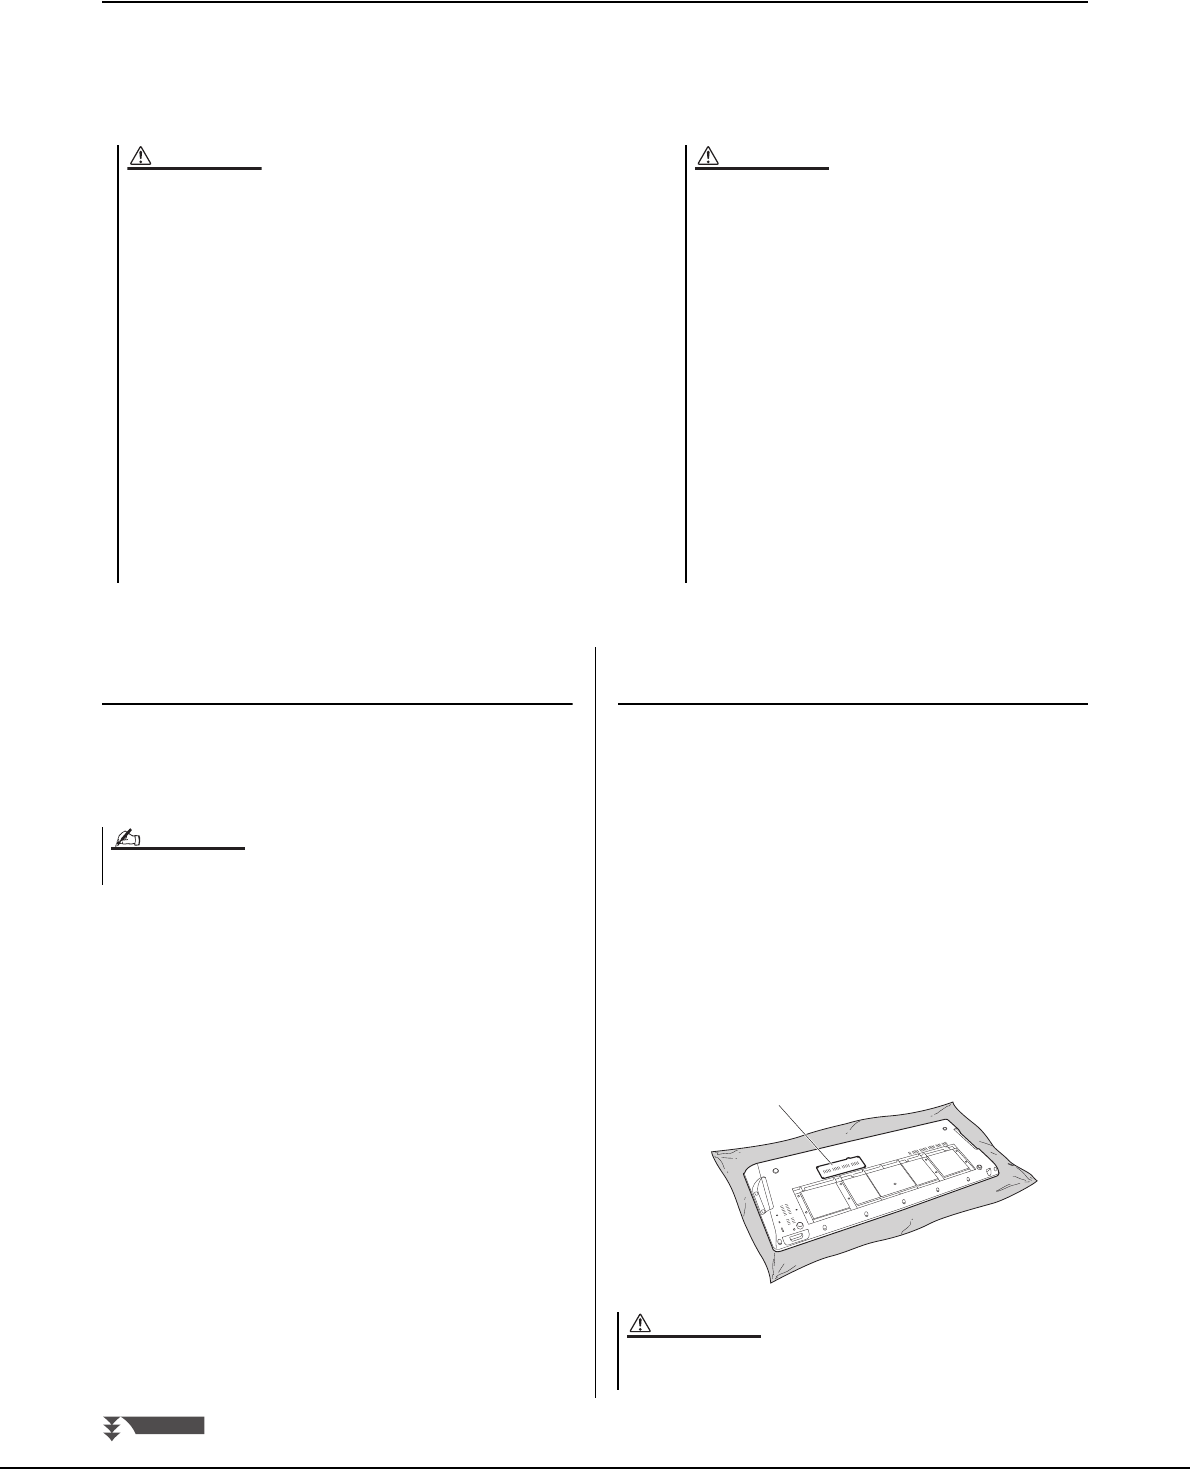
108 Tyros4 Owner’s Manual
Installing the Optional Flash Memory Expansion Module
Installing an optional flash memory expansion module to the Tyros4 allows you to import Wave files on a USB storage
device or hard disk drive, letting you create your own original Voices, Normal Voices and Drum Voices. (For information
on creating original Voices, refer to the Reference Manual on the website.) This section explains how to install an expan-
sion module to the Tyros4.
• Do not touch the exposed metal parts in the circuit
board. Touching these parts may result in a faulty con-
tact.
• Be careful not to misplace any of the screws since all of
them are used.
• Be careful of static electricity. Static electricity dis-
charge can damage the module or the instrument.
Before you handle the module, to reduce the possibility
of static electricity, touch some unpainted metal surface
or a ground wire on a device that is grounded.
• Do not use any screws other than what are installed on
the instrument.
• It is recommended that you wear gloves to protect your
hands from metallic projections on the optional unit and
other components. Touching leads or the connector with
bare hands may cause finger cuts, and may also result in
poor electrical contact or electrostatic damage.
• Handle the optical unit with care. Dropping or subjecting
it to any kind of shock may cause damage or result in a
malfunction.
CAUTION
• Before beginning installation, switch off the power to the Tyros4 and con-
nected peripherals, and unplug them from the power outlet. Installation or
removal of any devices should be started ONLY after the instrument (and the
optional hardware) returns to normal room temperature. Then remove all
cables connecting the Tyros4 to other devices. (Leaving the power cord con-
nected while working can result in electric shock. Leaving other cables con-
nected can interfere with work.)
• Be careful not to drop any screws inside the instrument during installation
(this can be prevented by keeping the optional unit and cover away from the
instrument while attaching). If this does happen, be sure to remove the
screw(s) from inside the instrument before turning the power on. Loose screws
inside the instrument can cause improper operation or serious damage. If you
are unable to retrieve a dropped screw, consult your Yamaha dealer for
advice.
• Install the optional unit carefully as described in the procedure below.
Improper installation can cause shorts which may result in irreparable damage
and pose a fire hazard.
• Do not disassemble, modify, or apply excessive force to board areas or the
connector on an optional module unit. Bending or tampering with the board
and connector may lead to electric shock, fire, or equipment failures.
WARNING
Compatible Flash Memory Expansion
Modules
Two types of the module are available as follows:
• FL512M ........... Features a memory size of 512 MB.
• FL1024M ......... Features a memory size of 1024 MB.
Flash Memory Expansion Module
Installation
Before following the steps below, make sure you have
appropriate module, a Philips screwdriver and ample
space to work.
1Turn the Tyros4’s power off, and discon-
nect any cables including AC power cord
from the keyboard.
Also make sure to close the LCD panel and discon-
nect the Tyros4 from any connected external devices.
2Turn the Tyros4 face down on a blanket
or some soft surface, giving you direct
access to the bottom of the instrument.
In the Tyros4, one socket is available.
NOTE
Since the instrument is heavy, this procedure should not be done
alone, but by two or three people.
Cover
CAUTION
NEXT PAGE
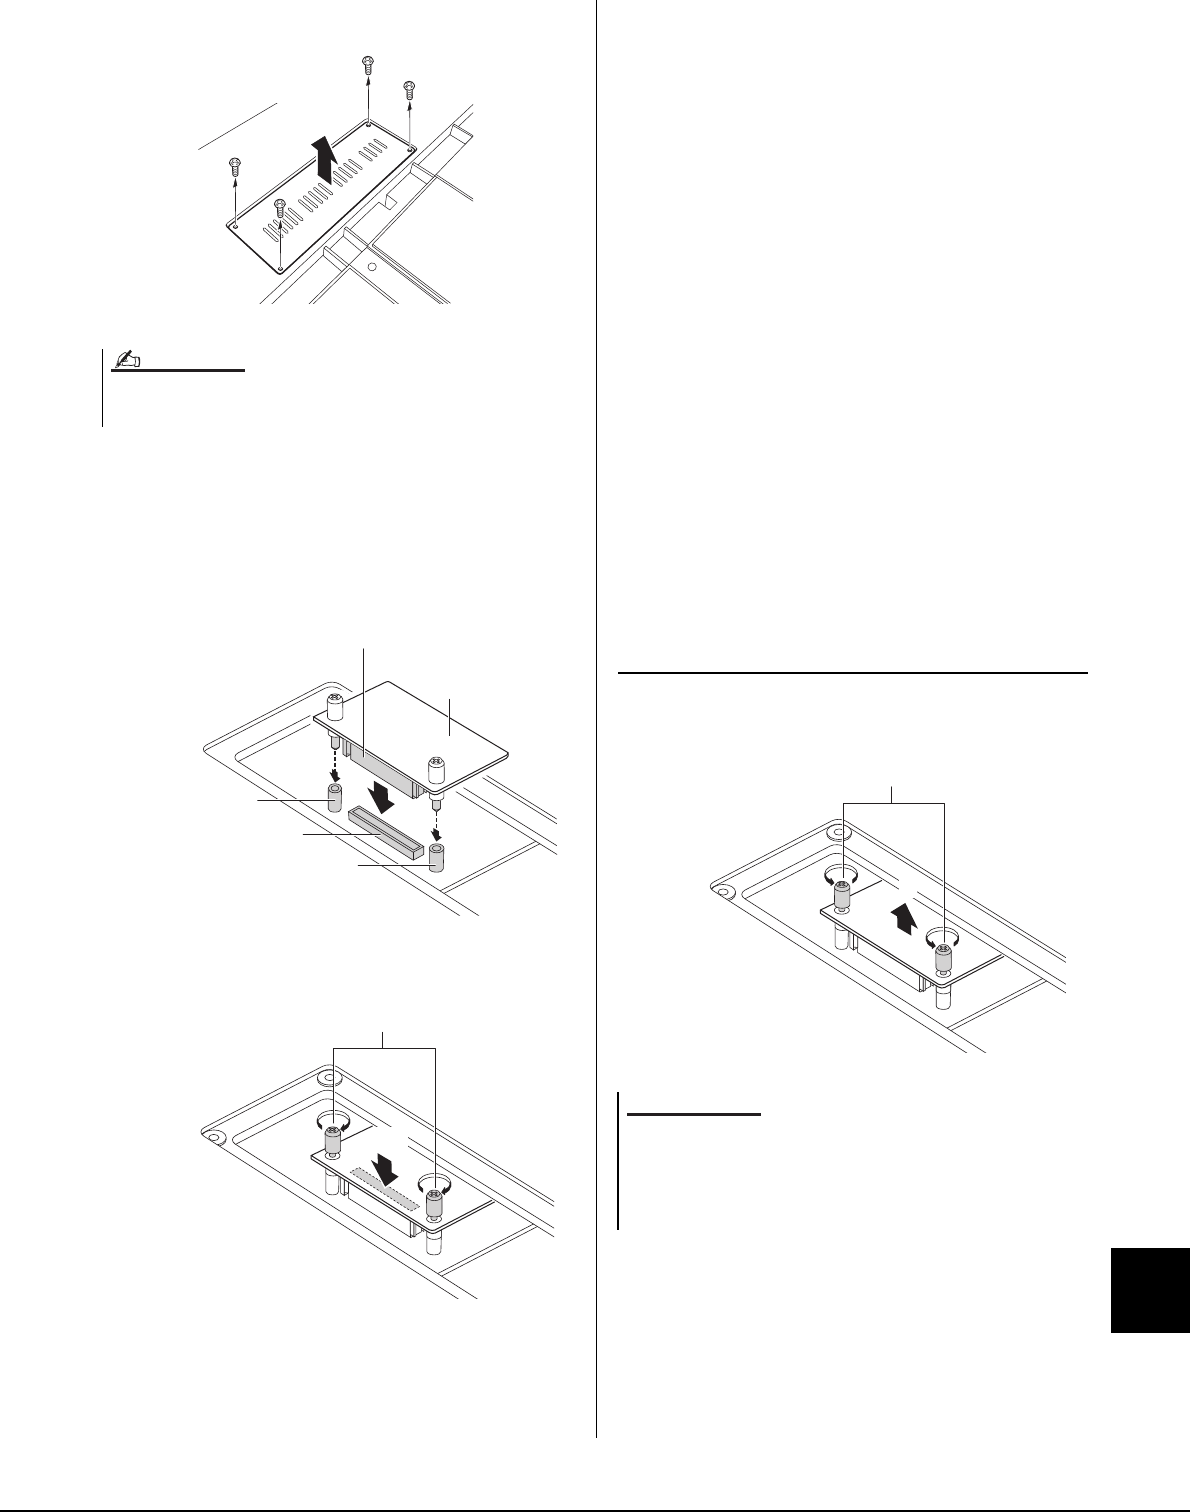
Tyros4 Owner’s Manual 109
Installing the Optional Flash Memory Expansion Module
3Remove the four screws from the cover.
4Insert the module into the socket by fol-
lowing the procedure below.
4-1 Insert the module vertically in the socket and
position the screws (of the module) to the
female screws respectively.
4-2 Press the top of the connector as shown, then
push the connector firmly into the socket.
4-3 Tighten each screw of the module to each
female screw of the Tyros4 with your hand as
shown.
5Re-install the cover you removed in step
3, in reverse order.
6Check that the installed module is func-
tioning properly.
6-1 Set the Tyros4 right-side up, and then turn the
power on.
6-2 Call up the Format operation display.
[VOICE CREATOR] [E] EXPANSION
MODULE
6-3 Execute the Format operation following the
messages on the display.
If the module has been installed properly, the appro-
priate available memory size is indicated in the
PROPERTY display.
([VOICE CREATOR] [E] EXPANSION MOD-
ULE [7 ]–[8 ] PROPERTY)
Removing Flash Memory Expansion
Module
1Loosen both the screws with your hand
as shown below.
2Pull the module vertically out of the
socket.
3Attach the cover to the bottom panel.
Keep the removed screws in a safe place. They will be used when reattaching the
cover to the instrument after installation.
(Rear side)
NOTE
Flash Memory
Expansion Module
Connector
Female screw
Socket
Female screw
(Rear side)
4-3
4-2
• If you cannot loosen the screws with your hand, use a Phillips
screwdriver. In this case, be careful NOT to scratch the module or
the Tyros4.
• Be careful NOT to drop the screws inside the instrument when loos-
ening them.
1
2
NOTICE
110 Tyros4 Owner’s Manual
Troubleshooting
Overall
A click or pop is heard when the power is
turned on or off.
This is normal. Electrical current is being applied to the instrument.
Noise is heard from the instrument. Noise may be heard if a mobile phone is used near the instrument or if the phone is
ringing. Turn off the mobile phone, or use it further away from the instrument.
In the LCD display, there are some black
points (unlit) or white points (always lit).
These are the result of defective pixels and occasionally occur in TFT-LCDs; they do
not indicate a problem in operation.
There is a slight difference in sound quality
among different notes played on the keyboard.
This is normal and is a result of the instrument’s sampling system.
Some Voices have a looping sound.
Some noise or vibrato is noticeable at higher
pitches, depending upon the Voice.
The overall volume is too low, or, no sound is
heard.
The master volume may be set too low. Set it to an appropriate level with the [MASTER
VOLUME] control.
All keyboard parts are set to off. Use the PART ON/OFF [RIGHT 1]/[RIGHT 2]/[RIGHT
3]/[LEFT] button to turn it on (page 35).
The volume of individual parts may be set too low. Raise the volume in the BALANCE
display (page 53).
Make sure the desired channel is set to on in the CHANNEL display (pages 52, 62).
Headphones are connected, disabling the speaker output. Unplug the headphones.
If volume control is assigned to the [ASSIGN] slider or foot controller, set it to an appro-
priate level.
The [FADE IN/OUT] button is on, muting the sound. Press the [FADE IN/OUT] button to
turn the function off.
A plug is inserted in the LOOP SEND jacks. Unplug the LOOP SEND jacks.
Connect the footswitch to the appropriate jack.
Check whether the external speaker is connected and the volume control is adjusted
properly (pages 96, 106).
The sound is distorted or noisy. The volume may be turned up too high. Make sure all relevant volume settings are
appropriate.
This may be caused by certain effects or filter resonance settings. Check the effect or
filter settings and change them accordingly, referring to the Reference Manual on the
website.
Not all simultaneously played notes sound. You are probably exceeding the maximum polyphony of the instrument. The instrument
can play up to 128 notes at the same time including RIGHT 1/RIGHT 2/RIGHT 3/LEFT
Voices, Style, Song, and Multi Pad notes. When the maximum polyphony is exceeded,
the least important notes (such as soft notes and notes currently decaying) will stop
sounding first.
The keyboard volume is lower than the Style/
Song playback volume.
The volume of the keyboard parts may be set too low. Raise the volume in the BAL-
ANCE display (page 53).
The [ASSIGN] slider may be set to a low level. (By default, keyboard volume is
assigned to the [ASSIGN] slider.) Set it to an appropriate level.
The Main display does not appear even when
turning the power on.
This may occur if a USB storage device has been installed to the instrument. Installa-
tion of some USB storage devices may result a long interval between turning the power
on and appearance of the Main display. To avoid this, turn the power on after discon-
necting the device.
Some characters of the file/folder name are
garbled.
The language settings have been changed. Set the appropriate language for the file/
folder name (page 17).
An existing file is not shown. • The file extension (.MID, etc.) may have been changed or deleted. Manually rename
the file, adding the appropriate extension, on a computer.
• Data files with names of more than 50 characters cannot be handled by the instru-
ment. Rename the file, reducing the number of characters to 50 or less.
The Premium Pack data cannot be purchased. Before purchasing the Premium Pack data, obtain the license key (page 38).
Tyros4 Owner’s Manual 111
Troubleshooting
Voice
The Voice selected from the Voice Selection
display does not sound.
Check whether or not the selected part is turned on (page 35).
A strange “flanging” or “doubling” sound
occurs. The sound is slightly different each
time the keys are played.
The RIGHT 1 and RIGHT 2 parts are set to “ON,” and both parts are set to play the
same Voice. Turn off the RIGHT 2 part or change the Voice of one of the parts.
The sound is slightly different each time the
keys are played.
If you are routing the MIDI OUT on the Tyros4 to a sequencer and back to the MIDI IN,
you may need to set Local Control setting to “off” in the SYSTEM Page of the MIDI dis-
play (page 114).
Some Voices will jump an octave in pitch when
played in the upper or lower registers.
This is normal. Some voices have a pitch limit which, when reached, causes this type
of pitch shift.
Style
The Style does not start even when the
[START/STOP] button is pressed.
The Rhythm channel of the selected Style may not contain any data. Turn the [ACMP]
button on and play the left-hand section on the keyboard to sound the accompaniment
part of the Style.
Only the rhythm channel plays. • Make sure the Auto Accompaniment function is turned on; press the [ACMP] button.
• You may be playing keys in the right hand range of the keyboard. Make sure to play
keys in the chord range of the keyboard.
Styles in a USB storage device cannot be
selected.
If the size of the Style data is large (about 120 KB or greater), the Style cannot be
selected because the data is too large to be ready by the instrument.
Style playback seems to “skip” when the key-
board is played.
You are probably exceeding the maximum polyphony of the instrument. The instrument
can play up to 128 notes at the same time—including RIGHT 1/RIGHT 2/RIGHT 3/
LEFT Voices, Style, Song, and Multi Pad notes. When the maximum polyphony is
exceeded, the least important notes (such as soft notes and notes currently decaying)
will stop sounding first.
Style does not change even when a different
chord is played, or the chord is not recognized.
Play the performance on the left-hand section of the keyboard.
The vibrato effect applied when a Style is
recorded sounds different when it is played
back.
This may occur when you use a Style with certain SA2 Voices which have their own
default vibrato value. Depending on the Modulation wheel position, the default vibrato
value may be recorded or the modulation wheel value may be recorded, regardless of
the actual vibrato sound you have played. To remedy this:
Before starting to record the Style, operate the Modulation wheel once and change it to
the position of the amount of vibrato effect you want to record.
Song
Songs cannot be selected. If the size of the Song data is large (about 300 KB or greater), the Song cannot be
selected because the data is too large to be read by the instrument.
Song playback does not start. The Song has been stopped at the end of the Song data. Return to the beginning of the
Song by pressing the SONG [STOP] button.
In the case a Song to which write-protect has been applied (“Prot. 2 Edit” is shown at
the upper left of the Song name):
• The original file may not be in the same folder. It cannot be played back unless the
original file (showing “Prot.2 Orig” at the upper left of the Song name) is in the same
folder.
• The original file name may have been changed. Rename the file with the original file
name (so that “Prot.2 Orig” is shown at the upper left of the Song name).
• The file icon may have been changed. Songs to which write-protect has been applied
cannot be played back when the file icon of the original has been changed.
The measure number is different from that of
the score in the Song Position display, shown
by pressing the [REW]/[FF] buttons.
This happens when playing back music data for which a specific, fixed tempo is set.
When playing back a Song, some channels do
not play.
Playback of these channels may be set to off.
• Turn playback on for those channels that are set to off on CHANNEL ON/OFF
(SONG) (page 62).
• Change the SONG CHANNEL setting to “PLAY” (page 85).
The tempo, beat, measure and music notation
is not displayed correctly.
Some Song data for the instrument has been recorded with special “free tempo” set-
tings. For such Song data, the tempo, beat, measure and music notation will not be dis-
played correctly.
112 Tyros4 Owner’s Manual
The vibrato effect applied when a Song is
recorded sounds different when it is played
back.
This may occur when you use SA2 Voices which have their own default vibrato value.
Depending on the Modulation wheel position, the default vibrato value may be recorded
or the modulation wheel value may be recorded, regardless of the actual vibrato sound
you have played. To remedy this:
• Select a Voice AFTER you set the Modulation wheel to minimum (down) position.
• If you want to cancel the vibrato effect, set the Modulation wheel to minimum position
AFTER Song recording starts.
Audio Recorder/Player
Audio files cannot be selected. The file format may not be compatible with the instrument. The compatible formats are:
MP3 and WAV. The DRM protected files cannot be played back.
Recorded file is played back at a different vol-
ume compared to when it was recorded.
The audio playback volume has been changed. Setting the volume value to 90 plays
back the file as the same volume when it was recorded (page 80).
An audio song in the internal HDD cannot be
copied or cut.
The audio song file name (which contains the file path, internally) in the internal HDD
may be too long. Shorten the song name or copy/paste the file to a higher folder level.
In the Audio Recorder/Player function, an error
message appears and audio cannot be
recorded to the internal hard disk drive.
The data on the hard disk drive is fragmented and cannot be used as is. Since there is
no defragmentation function in the Audio Recorder/Player, the drive can only be defrag-
mented by formatting it. To do this, first back up the data to a computer by using the
USB storage mode (page 103), then format the drive, and finally copy the data back to
the drive (using the USB storage mode again). Performing this copy/restore operation
effectively defragments the drive, allowing you to use it again.
Mixing Console
The sound seems strange or different than
expected when changing a rhythm Voice
(drum kit, etc.) of the Style or Song from the
Mixer.
When changing the rhythm/percussion Voices (drum kits, etc.) of the Style and Song
from the VOICE parameter, the detailed settings related to the drum voice are reset,
and in some cases you may be unable to restore the original sound. In the case of
Song playback, you can restore the original sound by returning to the beginning of the
Song and playing back from that point. In the case of Style play, you can restore the
original sound by selecting the same Style again.
Microphone/Vocal Harmony
The microphone input signal cannot be
recorded.
The microphone input signal cannot be recorded by Song recording. Use the Audio
Recorder/Player function (page 76).
Harmony can be heard in addition to the
microphone sound.
Vocal Harmony is set to on. Turn Vocal Harmony off (page 83).
The Vocal Harmony effect sounds distorted or
out-of-tune.
Your vocal microphone may be picking up extraneous sounds, such as the Style sound
from the instrument. In particular, bass sounds can cause mistracking of the Vocal Har-
mony. To remedy this:
• Sing as closely to the microphone as possible.
• Use a directional microphone.
• Turn down the Master volume, Style volume, or Song volume control (pages 16, 53).
• Separate the microphone from the external speakers as much as possible.
ASSIGNABLE FOOT PEDAL jacks
The on/off setting of the footswitch connected
to the ASSIGNABLE FOOT PEDAL jack is
reversed.
Turn the instrument’s power off, then turn on again without pressing the footswitch.
AUX IN jacks
Sound input to the AUX IN jacks is interrupted. The output volume of the external device connected to this instrument is too low.
Increase the output volume of the external device. The volume level reproduced via this
instrument can be adjusted by using the [MASTER VOLUME] control.
USB TO HOST terminal/MIDI terminals
When connecting the instrument to a com-
puter, the computer freezes.
An old USB-MIDI driver which is incompatible with the instrument has been installed to
the computer. Disconnect the instrument from the computer and uninstall the old driver,
then install the latest USB-MIDI driver. The latest driver can be downloaded from
Yamaha website (http://music-tyros.com/).
Tyros4 Owner’s Manual 113
Panel Button Chart
Panel Button Chart
No.................................... Corresponds to the number in the “Panel Controls and Terminals” on page 12.
Button/Control............... Indicates the button/controller that you should use at first for entering the corresponding func-
tion.
Display............................ Indicates the display title (and tab title) called up by operating the button/controller.
Reference Manual ......... “-” indicates that the detailed information is described in the Reference Manual (download-
able from website).
No.
Button/Control Display Page
Reference
Manual
qMIC GAIN control — 94 —
wMASTER VOLUME
control —16—
e[DEMO] DEMO display 18 —
r[FADE IN/OUT] — 49 —
tUPPER OCTAVE [-]/[+] UPPER OCTAVE (pop-up) 39 —
yPITCH BEND wheel — 39 —
uMODULATION wheel — 40 —
i[ART. 1], [ART. 2] — 40 —
!0 MIC [VH TYPE SELECT] Vocal Harmony Type Selection display 83 -
[MIC SETTING] MIC SETTING display VOCAL 95 -
TA L K 9 5 -
[VOCAL HARMONY] — 83 —
[EFFECT] — 95 —
[TALK] — 95 —
!1 SONG [I]–[IV] Song Selection display 58 —
[SP 1]–[SP 4] — 61 -
[LOOP] — 62 —
[REC] — 55 —
[STOP] — 55, 58 —
[PLAY/PAUSE] — 58, 59 —
[REW]/[FF] SONG POSITION (pop-up) 59 -
[METRONOME] — 55 —
[LYRICS/TEXT] LYRICS or TEXT display 60 -
[SCORE] SCORE display 60 -
!2 STYLE [POP & ROCK]–
[WORLD] Style Selection display 46 —
[FILE ACCESS] — 27 —
!3 STYLE
CONTROL
[ACMP] — 46 —
[OTS LINK] — 51 —
[AUTO FILL IN] — 49 —
INTRO [I]–[III] — 48 —
MAIN VARIATION
[A]–[D] —49—
[BREAK] — 49 —
ENDING/rit. [I]–[III] — 48 —
[SYNC STOP] — 48 —
[SYNC START] — 48 —
[START/STOP] — 48 —
!4 TEMPO [TAP TEMPO] — 49 —
TEMPO [-]/[+] TEMPO (pop-up) 49 —
!5 MULTI PAD
CONTROL
[SELECT] Multi Pad Selection display 64 -
[1]–[4] — 64 —
[STOP] — 64 —
!6 TRANSPOSE [-]/[+] TRANSPOSE (pop-up) 39 —
114 Tyros4 Owner’s Manual
!7 [MIXING CONSOLE] MIXING CONSOLE display VOL/VOICE 86 -
FILTER 86 -
TUNE 39, 86 -
EFFECT 86 -
EQ 86 -
CMP 88 —
LINE OUT 86 -
!8 [CHANNEL ON/OFF] CHANNEL ON/OFF (pop-up) STYLE, SONG 52, 62 —
!9 [BALANCE] BALANCE (pop-up) 1/2, 2/2 53, 80 —
@0 TAB [][]— 20—
[A]–[J] — 19 —
[DIRECT ACCESS] — 22 —
[EXIT] — 21 —
ASSIGN slider — 20 —
[1]–[8] sliders — 20 —
[1 ]–[8 ]
buttons —20—
[DATA ENTRY] dial — 21 —
[ENTER] — 21 —
@1 MENU [FUNCTION] MASTER TUNE/SCALE TUNE MASTER TUNE 45 -
SCALE TUNE 45 -
SONG SETTING 63 -
STYLE SETTING/SPLIT POINT/
CHORD FINGERING
STYLE SETTING 54 -
SPLIT POINT 35, 54 -
CHORD
FINGERING 47, 54 -
CONTROLLER ASSIGN SLIDER 20 —
FOOT PEDAL 99 -
KEYBOARD/PANEL 40, 45 -
REGIST SEQUENCE/FREEZE/
VOICE SET
REGISTRATION
SEQUENCE 74 -
FREEZE 74 -
VOICE SET 45 -
HARMONY/ECHO 45 -
SCREEN OUT 98 —
MIDI SYSTEM – -
TRANSMIT – -
RECEIVE – -
BASS – -
CHORD DETECT – -
MFC10 – -
UTILITY CONFIG1 105 -
CONFIG2 105 -
MEDIA
101, 105
-
OWNER 17, 32,
38, 105 -
SYSTEM RESET 105 -
PAC K I N STA L L AT I O N 3 8 —
[VOICE CREATOR] LIBRARY LOAD 45 -
LIBRARY EDIT 45 -
LIBRARY SAVE 45 -
INDIVIDUAL LOAD 45 -
EXPANSION MODULE PRESET
EXP. 45 -
CUSTOM VOICE EDIT via PC 45 -
CUSTOM VOICE ASSEMBLY 45 -
No.
Button/Control Display Page
Reference
Manual

Tyros4 Owner’s Manual 115
Panel Button Chart
[DIGITAL
RECORDING]
SONG CREATOR REC MODE 63 -
CHANNEL 63 -
CHORD 63 -
1–16 63 -
SYS/EX. 63 -
LY R I C S 6 3 -
STYLE CREATOR BASIC 54 -
ASSEMBLY 54 -
GROOVE 54 -
CHANNEL 54 -
PA R A M E T E R 5 4 -
EDIT 54 -
MULTI PAD CREATOR RECORD 65 -
EDIT 65 -
@2 AUDIO
RECORDER/
PLAYER
[REC] AUDIO SETTING display
* Press the [REC] and [STOP] buttons simultaneously. 76 —
[STOP]
[PLAY/PAUSE] — 80 —
[PREV]/[NEXT] AUDIO POSITION (pop-up) 80 —
[SETTING] AUDIO SETTING display MULTI TRACK
RECORDER display 77 -
SIMPLE
RECORDER display 76 -
[SELECT] Audio Selection display AUDIO (MULTI),
AUDIO (SIMPLE),
PLAYLIST
80 -
@3 VOICE
EFFECT
[HARMONY/ECHO] — 42 —
[INITIAL TOUCH] — 42 —
[SUSTAIN] — 42 —
[MONO] — 42 —
[DSP] — 42 —
[VARIATION] — 42 —
@4 [INTERNET] Special Website (only when connected to the internet) 90 -
@5 [MUSIC FINDER] MUSIC FINDER display ALL 68 —
FAVORITE 71 -
SEARCH1 69 —
SEARCH2 69 —
@6 VOICE [PIANO]–[SYNTH] Voice Selection display (Preset Voices) 33 —
[ORGAN FLUTES] Organ Flutes Voice Set display FOOTAGE 44 —
VOLUME/ATTACK 45 -
EFFECT/EQ 45 -
[EXPANSION] Voice Selection display (Expansion Voices) 36 -
[USER DRIVE] Voice Selection display (USER) 34 —
@7 REGISTRA-
TION MEMORY
REGIST BANK [-]/[+] REGISTRATION BANK (pop-up) 74 —
[FREEZE] — 74 -
[MEMORY] REGISTRATION MEMORY CONTENTS display 72 —
[1]–[8] — 73 —
@8 ONE TOUCH
SETTING [1]–[4] — 51 -
@9 PART SELECT [LEFT]–[RIGHT 3] — 33 —
#0 PART ON/OFF [LEFT HOLD] — 36 —
[LEFT]–[RIGHT 3] — 34 —
No.
Button/Control Display Page
Reference
Manual
116 Tyros4 Owner’s Manual
Specifications
Keyboard Keys 61 keys (C1–C6) Initial Touch/Aftertouch
Type Organ (FSX)
Voice Polyphony (max) 128
Layer R1/R2/R3/L
Split Style (default point: F#2), Left (default point: F#2), Right 3 (default
point: G2)
Voices 993 Voices + 30 Organ Flutes + 480 XG Voices + 256 GM2 Voice + 44
Drum/SFX Kits
(And GS Voices for GS Song playback)
S.Articulation2!
(AEM technology)
15 (additional 15 for Styles)
[STRINGS] JazzViolin/CelticViolin
[TRUMPET] JazzTrumpet/ClassicTrumpet
[SAXOPHONE] PopSoprano/BalladSoprano/JazzSax/BreathySax
[FLUTE/CLARINET] Clarinet/BalladClarinet/RomanceClarinet/
IrishPipeAir/IrishPipeDance
[ACCORDION] Harmonica/BluesHarp
S.Articulation! 164
MegaVoice 43
Live! 101
Cool! 71
Sweet! 30
Organ Flutes! 30 Presets
Drums 44 (included SFX)
Voice Expandability Custom Voices Yes
Premium Voices Yes (optional flash memory expansion module is necessary)
Voice Set Yes
Style Styles 500
Format SFF GE
Control SYNC STOP, SYNC START, START/STOP, AUTO FILL IN
Section Intro x 3, Ending x 3, Main x 4, Fill In x 4, Break
Fingering Single Finger, Fingered, Fingered On Bass, Multi Finger, AI Fingered,
Full Keyboard, AI Full Keyboard
Style Creator Yes
RAM Capacity per a Style approx. 120 KB
OTS (One Touch Setting) 4 for each Style
Music Finder Preset Records
(Max.)
135
(2,500)
Music Finder Plus Yes
Song Preset Songs 5 Sample Songs
Control REC, STOP, PLAY/PAUSE, REW, FF, METRONOME
Recording Quick Recording, Multi Recording, Step Recording
Tr a ck s 16
RAM Capacity per a Song approx. 300 KB
Lyric Display Yes
Score Display Yes
Song Position Jump 4 point / Loop
Style/Song Control FADE IN/OUT, TAP TEMPO, TEMPO (5–500)
Pack Installation Ye s
Data Compatibility GM, XG, XF, SFF, SFF GE, GM2/GS (for Song Playback)
Audio Recorder/Player Tracks Play: 2 Stereo Track (Multi), 1 Stereo Track (Simple)
REC: 1 Stereo Track (Multi/Simple)
Control REC, STOP, PLAY/PAUSE, PREV, NEXT
File Format Play: .mp3 (MPEG-1 Audio Layer-3), .wav
REC: .wav
MultiPad Preset 164 banks x 4 Pads
Control Pad 1–4, STOP, SYNC START
Vocal Harmony Preset Vocal Harmony: 44
Synth Vocoder: 10
User 60
* The number is the total of Vocal Harmony and Synth Vocoder.
Vocal Effect 23
MIC SETTING USER MEMORY 10
Tyros4 Owner’s Manual 117
Specifications
* Specifications and descriptions in this owner’s manual are for information purposes only. Yamaha Corp. reserves the right to change or modify products or
specifications at any time without prior notice. Since specifications, equipment or options may not be the same in every locale, please check with your
Yamaha dealer.
Effects Reverb 44
Chorus 106
DSP1–DSP7 285
DSP8–DSP9 285 (for Style)
Master Compressor 5 Presets + 5 User settings
Master Equalizer 5 Presets + 2 User settings
Harmony/Echo Yes
Sustain Button Yes
Registration Memory Buttons 1–8
Control Bank select, Memory, Freeze, Registration Sequence
Control Pitch Bend Wheel Yes
Modulation Wheel Yes
Articulation Switch ART. 1, ART. 2
Sliders 9 (including 1 assignable)
Transpose -12–0–12 (Keyboard/Song/Master)
Tuning 414.8–440–466.8 Hz
Display 640 x 480 dots TFT VGA color 7.5 inch LCD
Language 5 languages (English, German, French, Spanish, Italian)
Tex t V i ew e r Yes
Wallpaper Customize Yes
Storage USB to Device
Internal Flash 6MB
Internal Hard Disk Drive 250GB or more
Terminals USB TO HOST USB 2.0 HighSpeed x 1
USB TO DEVICE USB 2.0 HighSpeed x 2 (Front/Back)
MIDI MIDI A (IN/OUT), MIDI B (IN/OUT)
FOOT PEDAL 1 (SUSTAIN), 2 (ARTICULATION 1), 3 (VOLUME), Function Assign-
able
Audio LINE OUT MAIN (L/L+R, R)
LINE OUT SUB (1, 2)
LOOP SEND (L/L+R, R) / AUX OUT (Level Fixed): Selectable
LOOP RETURN (L/L+R, R) / AUX IN (with TRIM control)
MIC (MIC INPUT)
PHONES
RGB OUT Yes
VIDEO OUT NTSC / PAL Composite
LAN Yes (100BASE-TX/10BASE-T)
For Option Speaker To Satellite Speaker (L/R), To Sub Woofer (L/R)
Power Supply AC IN
Dimensions [W x D x H] (without Music Rest) 1140 x 450 x 143 mm
Weight (without Music Rest) 14.5 kg
Optional Accessories Speaker TRS-MS04
Headphones HPE-150/HPE-160/HPE-170
Footswitch FC4/FC5
Foot Controller FC7
Flash Memory Expansion Module FL1024M/FL512M
MIDI Foot Controller MFC10
Keyboard Stand L-7S

118 Tyros4 Owner’s Manual
Index
Numerics
[1 ]–[8 ] buttons ............... 20
1–16 ........................................... 63
[1]–[8] sliders............................... 20
A
[A]–[J] ......................................... 19
AC IN.......................................... 16
Access point with router................ 91
ACMP......................................... 46
ADD TO FAVORITE..................... 71
ADD TO MF ................................ 71
AEM ....................................... 9, 37
ART. 1/ART. 2 ............................. 40
Articulation Effect ......................... 40
ASSEMBLY................................. 54
ASSIGN SLIDER ......................... 20
ASSIGNABLE FOOT PEDAL ........ 99
AUDIO (BALANCE display)........... 81
AUDIO (MULTI) ........................... 80
AUDIO (SIMPLE) ......................... 80
AUDIO RECORDER/PLAYER....... 76
Auto Accompaniment ................... 46
AUTO FILL IN.............................. 49
AUX IN/LOOP RETURN ............... 97
AUX OUT/LOOP SEND ................ 97
B
Backup ....................................... 32
BALANCE ............................. 53, 80
BASIC ........................................ 54
BASS.......................................... 52
Bookmark.................................... 93
Bounce Recording........................ 79
BREAK ....................................... 49
Break section............................... 49
BROWSER ................................. 93
C
CD-ROM....................................... 7
CHANNEL (Song Creator) ............ 63
CHANNEL (Style Creator)............. 54
CHANNEL ON/OFF (Song)........... 62
CHANNEL ON/OFF (Style) ........... 52
CHD1/2 (Chord 1/ 2) .................... 52
CHORD ...................................... 63
CHORD FINGERING ................... 54
Chord Match................................ 65
Chordal....................................... 82
CMP ........................................... 86
Computer (Connections) ............. 102
Computer Monitor ........................ 98
CONFIG1.................................. 105
CONFIG2.................................. 105
Connection.................................. 94
COPY......................................... 29
Custom Voice........................ 36, 45
CUSTOM VOICE ASSEMBLY....... 45
CUSTOM VOICE EDIT via PC ...... 45
CUT ........................................... 29
D
DATA ENTRY ............................. 21
Data List ....................................... 8
DELETE ..................................... 30
DEMO ........................................ 18
DEMO (Voice) ............................. 34
DIGITAL RECORDING..... 54, 63, 65
DIRECT ACCESS........................ 22
Drum Voice ................................. 36
DSP ........................................... 42
E
EFFECT ..................................... 86
EFFECT (Microphone) ................. 95
EFFECT/EQ................................ 45
Encryption................................... 93
ENDING/rit.................................. 48
ENTER ....................................... 21
Entering characters ...................... 31
EQ ............................................. 86
ESEQ ......................................... 58
EXIT........................................... 21
Expansion Module ..................... 108
Expansion Voice.......................... 36
F
Factory Reset.............................. 32
FADE IN/OUT ............................. 49
Fast Forward ............................... 59
FAVORITE.................................. 71
FF .............................................. 59
FILE ACCESS............................. 27
File Selection display.................... 24
FILES (Music Finder) ................... 71
Fill-in section ............................... 49
FILTER....................................... 86
Flash Memory Expansion Module 108
FOLDER (File Selection display) ... 28
Foot Controller............................. 99
FOOT PEDAL ............................. 99
Footage ...................................... 44
Footswitche................................. 99
FORMAT .................................. 101
FORMAT (Flash Memory
Expansion Module) ................. 109
Free Play .................................... 47
FREEZE ..................................... 74
FUNCTION ............................... 114
G
GAIN.......................................... 88
GM ........................................ 9, 45
GROOVE.................................... 54
GS ............................................... 9
Guide function ............................. 63
H
Harmony..................................... 82
HARMONY/ECHO ....................... 42
HD ............................................. 25
Headphones ............................... 15
I
ICON.......................................... 31
INDIVIDUAL LOAD...................... 45
INFO (Registration Memory) ......... 74
INFO (Voice) ......................... 34, 37
INITIAL TOUCH .......................... 42
Initialize (Factory Reset) ............... 32
INPUT LEVEL ............................. 95
INTERNET.................................. 90
Internet Connection Guide ........ 8, 91
Internet Direct Connection ............ 90
INTRO........................................ 48
K
Keyboard Part ............................. 35
KEYBOARD/PANEL .............. 40, 45
Kit Edit ....................................... 88
L
LAN cable................................... 91
LAN Cable Connection ................. 91
LAN terminal ............................... 91
Language ................................... 17
LCD ........................................... 13
Left Hold..................................... 36
LEFT part ................................... 35
LIBRARY EDIT............................ 45
LIBRARY LOAD .......................... 45
LIBRARY SAVE .......................... 45
LICENSE KEY ............................ 38
LINE OUT............................. 86, 96
List view ..................................... 26
Appendix

Tyros4 Owner’s Manual 119
Index
LOOP ......................................... 62
LOOP RETURN........................... 97
LOOP SEND ............................... 97
LYRICS (Song Creator) ................ 63
Lyrics (Song) ............................... 60
LYRICS/TEXT ............................. 60
M
Main display ................................ 23
Main section ................................ 49
Main track ................................... 77
MAIN VARIATION........................ 49
Master Compressor...................... 88
MASTER TUNE ..................... 39, 45
MASTER VOLUME ...................... 16
MEDIA.............................. 101, 105
MegaVoice .................................. 36
MEMORY (List view) .................... 27
MEMORY (Registration Memory)
......................................... 54, 72
MENU......................................... 13
Message ..................................... 22
METRONOME............................. 55
MFC10...................................... 114
MIC ............................................ 94
MIC GAIN ............................. 83, 94
MIC Input level indicator ............... 23
MIC SETTING ............................. 95
Microphone ........................... 77, 94
MIDI Basics................................... 8
MIDI Channel .............................. 55
MIDI IN ..................................... 104
MIDI OUT.................................. 104
MIXDOWN .................................. 79
MIXING CONSOLE ...................... 86
Modem ....................................... 91
Modulation Wheel ........................ 40
MONITOR TYPE.......................... 98
MONO ........................................ 42
MULTI (Audio Recorder/Player)..... 77
Multi Pad..................................... 64
MULTI PAD CONTROL ................ 64
Multi Pad Creator ......................... 65
Multi Track Recording................... 77
MUSIC FINDER........................... 66
MUSIC FINDER + ........................ 71
Music notation ............................. 60
Music rest ................................... 14
N
NAME......................................... 29
NEXT (Audio Recorder/Player) ...... 80
NEXT (Song playback) ................. 58
NEXT CANCEL ........................... 58
Normal view ................................ 26
Normalize ................................... 81
Number input............................... 26
O
ONE TOUCH SETTING................ 51
Optional speakers ...................... 106
ORGAN FLUTES......................... 44
ORGAN TYPE............................. 44
OTS INFO................................... 51
OTS LINK ................................... 51
OWNER.................. 17, 32, 38, 105
P
PAD ........................................... 52
Panel Button chart ..................... 113
PARAMETER (Style Creator)........ 54
PART ON/OFF ............................ 35
PART SELECT............................ 35
PASTE ....................................... 30
Pause......................................... 59
Percussion Voice ......................... 36
PHONES .................................... 15
PHR1/2 (Phrase1/2)..................... 52
Phrase Mark................................ 59
PITCH BEND RANGE .................. 39
Pitch Bend Wheel ........................ 39
PLAY/PAUSE (Audio Recorder/
Player)..................................... 80
PLAY/PAUSE (Song) ....... 56, 58–59
Playlist.................................. 80–81
Power......................................... 16
Powered speaker......................... 96
Premium Pack Data ..................... 38
Premium Voice ............................ 36
PRESET ..................................... 25
Preset Voice................................ 36
PRESETS (Organ Flutes) ............. 44
PREV ......................................... 80
Pro............................................. 47
PROPERTY ........................ 26, 109
Prot. 1 ........................................ 59
Prot. 2 Edit .................................. 59
Prot. 2 Orig ................................. 59
Protected Song............................ 59
Q
Quick Recording .......................... 55
R
RATIO........................................ 88
REC (Audio Recorder/Player) ....... 76
REC (Song) ................................ 55
REC MODE (Song Creator) .......... 63
REC MONITOR..................... 76, 78
Record (Music Finder).................. 67
RECORD EDIT ........................... 71
Recording ................................... 75
RECORDING MODE ................... 79
Redo .......................................... 77
Reference Manual ......................... 8
REFRESH .................................. 92
REGIST BANK ............................ 73
REGISTRATION MEMORY .......... 72
REGISTRATION SEQUENCE ...... 74
Repeat ....................................... 62
REPERTOIRE............................. 50
Re-recording ............................... 81
RESTORE .................................. 32
REW .......................................... 59
Rewind ....................................... 59
RGB OUT ................................... 98
RHY1/2 (Rhythm 1/2)................... 52
RIGHT 1–3 ................................. 35
ROTARY SP SPEED ................... 44
Router ........................................ 91
S
SA/SA2 ...................................... 37
SAVE ......................................... 57
SCALE TUNE ............................. 45
Score ......................................... 60
SCREEN CONTENT.................... 98
SCREEN OUT............................. 98
SEARCH .................................... 69
Section (Style)............................. 49
SELECT (Audio Recorder/
Player) .............................. 80–81
SELECT (Multi Pad)..................... 64
Session ...................................... 47
SETTING (Audio Recorder/Player) 76
SFF.............................................. 9
SFF GE .................................. 9, 47
SFX (sound effects) ..................... 36
SIMPLE (Audio Recorder/Player) .. 76
Simple Recording ........................ 76
SONG .................................. 55, 58
Song Creator .............................. 63
Song Position Marker................... 61
SONG SETTING ......................... 63
SORT BY.................................... 68
SORT ORDER ............................ 68

120 Tyros4 Owner’s Manual
SP (Song Position)....................... 61
Special Website ........................... 92
Specifications ............................ 116
SPLIT POINT .............................. 54
Split Point.................................... 35
SSL (Secure Sockets Layer) ......... 93
START/END POINT ..................... 81
START/STOP........................ 47–48
STEP REC .................................. 54
STOP (Audio Recorder/Player) 77–78
STOP (Multi Pad)......................... 64
STOP (Song)............................... 58
STYLE........................................ 46
Style Creator ............................... 54
Style File Format............................ 9
STYLE SETTING ......................... 54
STYLE TEMPO ........................... 68
Sub track .................................... 77
Super Articulation Voice.......... 37, 40
SUSTAIN .................................... 42
SYNC START.................. 43, 47–48
SYNC STOP ............................... 48
Synchro Start (Multi Pad) .............. 65
SYNTH VOCODER ...................... 85
SYS/EX....................................... 63
SYSTEM RESET ................. 32, 105
T
TAB............................................ 20
TALK .......................................... 95
TAP TEMPO ............................... 49
TEMPO....................................... 49
Text (Song) ................................. 60
THRESHOLD .............................. 88
TO LEFT SPEAKER................... 106
TO RIGHT SPEAKER................. 106
TO SUB WOOFER..................... 107
TRACK DELETE.......................... 81
TRACK SELECT.......................... 78
Transparent protective film ............ 13
TRANSPOSE .............................. 39
TRANSPOSE ASSIGN ................. 45
TRIM .......................................... 97
Troubleshooting ......................... 110
TRS-MS04 ................................ 106
TUNE ......................................... 86
TV monitor .................................. 98
U
Undo .......................................... 77
UP (File/Folder) ........................... 25
UPPER OCTAVE......................... 39
USB ........................................... 25
USB cable................................. 102
USB LAN Adaptor ........................ 91
USB storage device.................... 100
USB Storage Mode .................... 103
USB TO DEVICE ....................... 100
USB TO HOST .......................... 102
USB Wireless LAN Adaptor........... 91
USB-MIDI driver ........................ 102
USER ......................................... 25
USER DRIVE .............................. 34
Utility ........................................ 105
V
VARIATION ................................ 42
VERSION ................................... 17
VH TYPE SELECT....................... 83
Vibrato........................................ 40
VIBRATO (Organ Flutes) .............. 44
VIDEO OUT ................................ 98
VIEW.......................................... 26
VOCAL HARMONY................ 83, 85
Vocoder ...................................... 82
Vocoder-Mono............................. 82
VOICE........................................ 33
VOICE CREATOR ....................... 45
Voice Effect................................. 42
VOICE SET........................... 42, 45
Voice Type.................................. 36
VOL/VOICE ................................ 86
Volume ....................................... 53
Volume (Audio Recorder/Player) ... 80
VOLUME/ATTACK....................... 45
W
Wireless Game Adaptor................ 91
Wireless LAN Connection ............. 91
X
XF................................................ 9
XG ......................................... 9, 45
Tyros4 Owner’s Manual 121
Important Notice: Guarantee Information for customers in EEA* and Switzerland English
Wichtiger Hinweis: Garantie-Information für Kunden in der EWR* und der Schweiz Deutsch
Remarque importante: informations de garantie pour les clients de l’EEE et la Suisse Français
Belangrijke mededeling: Garantie-informatie voor klanten in de EER* en Zwitserland Nederlands
Aviso importante: información sobre la garantía para los clientes del EEE* y Suiza Español
Avviso importante: informazioni sulla garanzia per i clienti residenti nell’EEA* e in Svizzera Italiano
Aviso importante: informações sobre as garantias para clientes da AEE* e da Suíça Português
Σημαντική σημείωση: Πληροφορίες εγγύησης για τους πελάτες στον ΕΟΧ* και Ελβετία Ελληνικά
Viktigt: Garantiinformation för kunder i EES-området* och Schweiz Svenska
Viktig merknad: Garantiinformasjon for kunder i EØS* og Sveits Norsk
Vigtig oplysning: Garantioplysninger til kunder i EØO* og Schweiz Dansk
Tärkeä ilmoitus: Takuutiedot Euroopan talousalueen (ETA)* ja Sveitsin asiakkaille Suomi
Ważne: Warunki gwarancyjne obowiązujące w EOG* i Szwajcarii Polski
Důležité oznámení: Záruční informace pro zákazníky v EHS* a ve Švýcarsku Česky
Magyar
Oluline märkus: Garantiiteave Euroopa Majanduspiirkonna (EMP)* ja Šveitsi klientidele Eesti keel
Svarīgs paziņojums: garantijas informācija klientiem EEZ* un Šveicē Latviešu
Dėmesio: informacija dėl garantijos pirkėjams EEE* ir Šveicarijoje Lietuvių kalba
Dôležité upozornenie: Informácie o záruke pre zákazníkov v EHP* a Švajčiarsku Slovenčina
Pomembno obvestilo: Informacije o garanciji za kupce v EGP* in Švici Slovenščina
Важно съобщение: Информация за гаранцията за клиенти в ЕИП* и Швейцария
Български език
За подробна информация за гаранцията за този продукт на Yamaha и гаранционното обслужване в паневропейската зона на
ЕИП* и Швейцария или посетете посочения по-долу уеб сайт (на нашия уеб сайт има файл за печат), или се свържете с
представителния офис на Yamaha във вашата страна (следваща страница). * ЕИП: Европейско икономическо пространство
Limba română
http://europe.yamaha.com/warranty/
URL_3
Important Notice: Guarantee Information
for customers in European Economic Area
(EEA) and Switzerland
For detailed guarantee information about this Yamaha product, and Pan-EEA* and Switzerland warranty service, please either
visit the website address below (Printable file is available at our website) or contact the Yamaha representative office for your
country (next page). * EEA: European Economic Area
Für nähere Garantie-Information über dieses Produkt von Yamaha, sowie über den Pan-EWR*- und Schweizer Garantieservice, besuchen
Sie bitte entweder die folgend angegebene Internetadresse (eine druckfähige Version befindet sich auch auf unserer Webseite), oder
wenden Sie sich an den für Ihr Land zuständigen Yamaha-Vertrieb (nächste Seite). *EWR: Europäischer Wirtschaftsraum
Pour des informations plus détaillées sur la garantie de ce produit Yamaha et sur le service de garantie applicable dans l’ensemble
de l’EEE ainsi qu’en Suisse, consultez notre site Web à l’adresse ci-dessous (le fichier imprimable est disponible sur notre site
Web) ou contactez directement Yamaha dans votre pays de résidence (page suivante). * EEE : Espace Economique Européen
Voor gedetailleerde garantie-informatie over dit Yamaha-product en de garantieservice in heel de EER* en Zwitserland, gaat u
naar de onderstaande website (u vind een afdrukbaar bestand op onze website) of neemt u contact op met de vertegenwoordiging
van Yamaha in uw land (volgende pagina). * EER: Europese Economische Ruimte
Para una información detallada sobre este producto Yamaha y sobre el soporte de garantía en la zona EEE* y Suiza, visite la
dirección web que se incluye más abajo (la version del archivo para imprimir esta disponible en nuestro sitio web) o póngase en
contacto con el representante de Yamaha en su país (página siguiente). * EEE: Espacio Económico Europeo
Per informazioni dettagliate sulla garanzia relativa a questo prodotto Yamaha e l’assistenza in garanzia nei paesi EEA* e in
Svizzera, potete consultare il sito Web all’indirizzo riportato di seguito (è disponibile il file in formato stampabile) oppure contattare
l’ufficio di rappresentanza locale della Yamaha (pagina seguente). * EEA: Area Economica Europea
Para obter uma informação pormenorizada sobre este produto da Yamaha e sobre o serviço de garantia na AEE* e na Suíça,
visite o site a seguir (o arquivo para impressão está disponível no nosso site) ou entre em contato com o escritório de representa-
ção da Yamaha no seu país (próxima página). * AEE: Área Econômica Européia
Για λεπτομερείς πληροφορίες εγγύησης σχετικά με το παρόν προϊόν της Yamaha και την κάλυψη εγγύησης σε όλες τις χώρες του
ΕΟΧ και την Ελβετία, επισκεφτείτε την παρακάτω ιστοσελίδα (Εκτυπώσιμη μορφή είναι διαθέσιμη στην ιστοσελίδα μας) ή
απευθυνθείτε στην αντιπροσωπεία της Yamaha στη χώρα σας (επόμενη σελίδα). * ΕΟΧ: Ευρωπαϊκός Οικονομικός Χώρος
För detaljerad information om denna Yamahaprodukt samt garantiservice i hela EES-området* och Schweiz kan du antingen
besöka nedanstående webbaddress (en utskriftsvänlig fil finns på webbplatsen) eller kontakta Yamahas officiella representant i
ditt land (nästa sida). * EES: Europeiska Ekonomiska Samarbetsområdet
Detaljert garantiinformasjon om dette Yamaha-produktet og garantiservice for hele EØS-området* og Sveits kan fås enten ved å
besøke nettadressen nedenfor (utskriftsversjon finnes på våre nettsider) eller kontakte kontakte Yamaha-kontoret i landet der du
bor (neste side). *EØS: Det europeiske økonomiske samarbeidsområdet
De kan finde detaljerede garantioplysninger om dette Yamaha-produkt og den fælles garantiserviceordning for EØO* (og Schweiz)
ved at besøge det websted, der er angivet nedenfor (der findes en fil, som kan udskrives, på vores websted), eller ved at kontakte
Yamahas nationale repræsentationskontor i det land, hvor De bor (næste side). * EØO: Det Europæiske Økonomiske Område
Tämän Yamaha-tuotteen sekä ETA-alueen ja Sveitsin takuuta koskevat yksityiskohtaiset tiedot saatte alla olevasta nettiosoit-
teesta. (Tulostettava tiedosto saatavissa sivustollamme.) Voitte myös ottaa yhteyttä paikalliseen Yamaha-edustajaan (seuraavalla
sivulla). *ETA: Euroopan talousalue
Aby dowiedzieć się więcej na temat warunków gwarancyjnych tego produktu firmy Yamaha i serwisu gwarancyjnego w całym EOG* i
Szwajcarii, należy odwiedzić wskazaną poniżej stronę internetową (Plik gotowy do wydruku znajduje się na naszej stronie internetowej)
lub skontaktować się z przedstawicielstwem firmy Yamaha w swoim kraju (następna strona). * EOG — Europejski Obszar Gospodarczy
Podrobné záruční informace o tomto produktu Yamaha a záručním servisu v celém EHS* a ve Švýcarsku naleznete na níže
uvedené webové adrese (soubor k tisku je dostupný na našich webových stránkách) nebo se můžete obrátit na zastoupení firmy
Yamaha ve své zemi (další stránka). * EHS: Evropský hospodářský prostor
A jelen Yamaha termékre vonatkozó részletes garancia-információk, valamint az EGT*-re és Svájcra kiterjedő garanciális
szolgáltatás tekintetében keresse fel webhelyünket az alábbi címen (a webhelyen nyomtatható fájlt is talál), vagy pedig lépjen
kapcsolatba az országában működő Yamaha képviseleti irodával (következő oldal). * EGT: Európai Gazdasági Térség
Täpsema teabe saamiseks selle Yamaha toote garantii ning kogu Euroopa Majanduspiirkonna ja Šveitsi garantiiteeninduse kohta,
külastage palun veebisaiti alljärgneval aadressil (meie saidil on saadaval prinditav fail) või pöörduge Teie regiooni Yamaha
esinduse poole (järgmine lehekülg). * EMP: Euroopa Majanduspiirkond
Lai saņemtu detalizētu garantijas informāciju par šo Yamaha produktu, kā arī garantijas apkalpošanu EEZ* un Šveicē, lūdzu,
apmeklējiet zemāk norādīto tīmekļa vietnes adresi (tīmekļa vietnē ir pieejams drukājams fails) vai sazinieties ar jūsu valsti
apkalpojošo Yamaha pārstāvniecību (nākamā lappuse). * EEZ: Eiropas Ekonomikas zona
Jei reikia išsamios informacijos apie šį „Yamaha“ produktą ir jo techninę priežiūrą visoje EEE* ir Šveicarijoje, apsilankykite mūsų
svetainėje toliau nurodytu adresu (svetainėje yra spausdintinas failas) arba kreipkitės į „Yamaha“ atstovybę savo šaliai (kitas
puslapis). *EEE – Europos ekonominė erdvė
Podrobné informácie o záruke týkajúce sa tohto produktu od spoločnosti Yamaha a garančnom servise v EHP* a Švajčiarsku
nájdete na webovej stránke uvedenej nižšie (na našej webovej stránke je k dispozícii súbor na tlač) alebo sa obráťte na zástupcu
spoločnosti Yamaha vo svojej krajine (nasledujúca strana). * EHP: Európsky hospodársky priestor
Pentru informaţii detaliate privind acest produs Yamaha şi serviciul de garanţie Pan-SEE* şi Elveţia, vizitaţi site-ul la adresa de
mai jos (fişierul imprimabil este disponibil pe site-ul nostru) sau contactaţi biroul reprezentanţei Yamaha din ţara dumneavoastră
(pagina următoare). * SEE: Spaţiul Economic European
Za podrobnejše informacije o tem Yamahinem izdelku ter garancijskem servisu v celotnem EGP in Švici, obiščite
spletno mesto, ki je navedeno spodaj (natisljiva datoteka je na voljo na našem spletnem mestu), ali se obrnite na Yamahinega
predstavnika v svoji državi (naslednja stran). * EGP: Evropski gospodarski prostor
Fontos figyelmeztetés: Garancia-információk az EGT* területén és Svájcban élő vásárlók számára
Notificare importantă: Informaţii despre garanţie pentru clienţii din SEE* şi Elveţia

122 Tyros4 Owner’s Manual
e_list_2
Yamaha Representative Offices in Europe
AUSTRIA
Yamaha Music Europe GmbH
Branch Austria
Schleiergasse 20, A-1100 Wien Austria
Tel: +43 (0)1 602 03900
Fax: +43 (0)1 602 039051
BELGIUM
Yamaha Music Europe
Branch Benelux
Clarissenhof 5b NL, 4133 AB. Vianen
The Netherlands
Tel: +31 (0)347 358040
Fax: +31 (0)347 358060
BULGARIA
Yamaha Music Europe GmbH
Branch Austria (Central and Eastern Europe)
Schleiergasse 20, A-1100 Wien Austria
Tel: +43 (0)1 602 03900
Fax: +43 (0)1 602 039051
CYPRUS
NAKAS Music Cyprus Ltd.
31C Nikis Ave., 1086 Nicosia
Tel: +357 (0)22 510 477
Fax: +357 (0)22 511 080
CZECH REPUBLIC
Yamaha Music Europe GmbH
Branch Austria (Central and Eastern Europe)
Schleiergasse 20, A-1100 Wien Austria
Tel: +43 (0)1 602 03900
Fax: +43 (0)1 602 039051
DENMARK
YS Copenhagen Liaison Office
(Yamaha Scandinavia AB Filial Denmark)
Generatorvej 6A, 2730 Herlev, Denmark
Tel: +45 44 92 49 00
Fax: +45 44 54 47 09
ESTONIA
Yamaha Music Europe GmbH
Sp. z o.o. Oddział w Polsce
(Branch Poland)
ul. 17 Stycznia 56
PL-02-146 Warszawa Poland
Tel: +48 (0)22 500 29 25
Fax: +48 (0)22 500 29 30
FINLAND
(For Musical Instrument)
F - Musiikki OY
Kaisaniemenkatu 7, PL260
00101 Helsinki, Finland
Tel: +358 (0)9 618511
Fax: +358 (0)9 61851385
(For Pro Audio)
Yamaha Scandinavia AB
J A Wettergrens gata 1
Västra Frölunda, Sweden
(Box 300 53, 400 43 Goteborg
Sweden - Postal Address)
Tel: +46 (0)31 893400
Fax: +46 (0)31 454026
FRANCE
Yamaha Musique France
Zone d’activité de Pariest
7, rue Ambroise Croizat
77183 Croissy-Beaubourg, France
(B.P. 70, 77312 Marne la Vallée Cedex 2
France-Adresse postale)
Tel: +33 (0)1 64 61 4000
Fax: +33 (0)1 64 61 4079
GERMANY
Yamaha Music Europe GmbH
Siemensstr 22-34
D-25462 Rellingen, b. Hamburg, Germany
Tel: +49 (0)4101 3030
Fax: +49 (0)4101 303 77702
GREECE
PH. Nakas S.A.Music House/Service
19 KM Leoforos Lavriou
19002 Peania / Attiki, Greece
Tel: +30 (0)210 6686260
Fax: +30 (0)210 6686269
HUNGARY
Yamaha Music Europe GmbH
Branch Austria (Central and Eastern Europe)
Schleiergasse 20, A-1100 Wien Austria
Tel: +43 (0)1 602 03900
Fax: +43 (0)1 602 039051
ICELAND
(For Musical Instrument)
HLJODFAERAHUSID EHF
Sidumula 20
108 Reykjavik, Iceland
Tel: +354 525 50 50
Fax: +354 568 65 14
(For Pro Audio)
Yamaha Scandinavia AB
J A Wettergrens gata 1
Västra Frölunda, Sweden
(Box 300 53, 400 43 Goteborg
Sweden - Postal Address)
Tel: +46 (0)31 893400
Fax: +46 (0)31 454026
IRELAND (REPUBLIC OF IRELAND)
Yamaha Music UK Ltd.
Sherbourne Drive
Tilbrook, Milton Keynes MK7 8BL
United Kingdom
Tel: +353 (0) 1526 2449
Fax: +44 (0) 1908 369278
ITALY
Yamaha Musica Italia s.p.a.
Viale Italia 88
20020, Lainate (Milano), Italy
Tel: +39 (0)02 93577 1
Fax: +39 (0)02 937 0956
LATVIA
Yamaha Music Europe GmbH
Sp. z o.o. Oddział w Polsce
(Branch Poland)
ul. 17 Stycznia 56
PL-02-146 Warszawa Poland
Tel: +48 (0)22 500 29 25
Fax: +48 (0)22 500 29 30
LIECHTENSTEIN
Yamaha Music Europe GmbH, Rellingen,
Branch Switzerland in Zurich
Seefeldstrasse 94, CH-8008
Zürich, Switzerland
Tel: +41 (0)44 3878080
Fax: +41 (0)44 3833918
LITHUANIA
Yamaha Music Europe GmbH
Sp. z o.o. Oddział w Polsce
(Branch Poland)
ul. 17 Stycznia 56
PL-02-146 Warszawa Poland
Tel: +48 (0)22 500 29 25
Fax: +48 (0)22 500 29 30
LUXEMBOURG
Yamaha Music Europe
Branch Benelux
Clarissenhof 5b NL, 4133 AB. Vianen
The Netherlands
Tel: +31 (0)347 358040
Fax: +31 (0)347 358060
MALTA
Olimpus Music Ltd.
The Emporium, Level 3, St. Louis Street
Msida MSD06
Tel: +356 (0)2133 2093
Fax: +356 (0)2133 2144
NETHERLANDS
Yamaha Music Europe
Branch Benelux
Clarissenhof 5b NL, 4133 AB. Vianen
The Netherlands
Tel: +31 (0)347 358040
Fax: +31 (0)347 358060
NORWAY
YS Oslo Liaison Office
(Yamaha Scandinavia AB Filial Norway)
Grini Naeringspark 1
1361 Osteras, Norway
Tel: +47 67 16 77 70
Fax: +47 67 16 77 79
POLAND
YAMAHA Music Europe GmbH
Sp. z o.o. Oddział w Polsce
ul. 17 Stycznia 56
02-146 WARSZAWA/POLSKA
Tel: +48 (0)22 500 29 25
Fax: +48 (0)22 500 29 30
PORTUGAL
Yamaha Música Ibérica, S.A.U.
Sucursal Portuguesa
Rua Alfredo da Silva
2610-016 Amadora, Portugal
Tel: +351 214 704 330
Fax: +351 214 718 220
ROMANIA
Yamaha Music Europe GmbH
Branch Austria (Central and Eastern Europe)
Schleiergasse 20, A-1100 Wien Austria
Tel: +43 (0)1 602 03900
Fax: +43 (0)1 602 039051
SLOVAKIA
Yamaha Music Europe GmbH
Branch Austria (Central and Eastern Europe)
Schleiergasse 20, A-1100 Wien Austria
Tel: +43 (0)1 602 03900
Fax: +43 (0)1 602 039051
SLOVENIA
Yamaha Music Europe GmbH
Branch Austria (Central and Eastern Europe)
Schleiergasse 20, A-1100 Wien Austria
Tel: +43 (0)1 602 03900
Fax: +43 (0)1 602 039051
SPAIN
Yamaha Música Ibérica, S.A.U.
Ctra. de la Coruna km.17, 200
28230 Las Rozas de Madrid, Spain
Tel: +34 902 39 8888
Fax: +34 91 638 4660
SWEDEN
Yamaha Scandinavia AB
J A Wettergrens gata 1
Västra Frölunda, Sweden
(Box 300 53, 400 43 Goteborg
Sweden - Postal Address)
Tel: +46 (0)31 893400
Fax: +46 (0)31 454026
SWITZERLAND
Yamaha Music Europe GmbH, Rellingen,
Branch Switzerland in Zurich
Seefeldstrasse 94, CH-8008
Zürich, Switzerland
Tel: +41 (0)44 3878080
Fax: +41 (0)44 3833918
UNITED KINGDOM
Yamaha Music UK Ltd.
Sherbourne Drive
Tilbrook, Milton Keynes MK7 8BL
United Kingdom
Tel: +44 (0) 870 4445575
Fax: +44 (0) 1908 369278

Tyros4 Owner’s Manual 123
1-YEAR LIMITED WARRANTY
ON ARRANGER WORKSTATION KEYBOARDS
Thank you for selecting a YAMAHA product. YAMAHA products are designed and manufactured to provide a high level of
defect-free performance. Yamaha Corporation of America (“YAMAHA”) is proud of the experience and craftsmanship that goes
into each and every YAMAHA product. YAMAHA sells its products through a network of reputable, specially authorized deal-
ers and is pleased to offer you, the Original Owner, the following Limited Warranty, which applies only to products that have
been (1) directly purchased from YAMAHA’s authorized dealers in the fifty states of the USA and District of Columbia (the “War-
ranted Area”) and (2) used exclusively in the Warranted Area. YAMAHA suggests that you read the Limited Warranty thor-
oughly, and invites you to contact your authorized YAMAHA dealer or YAMAHA Customer Service if you have any questions.
Coverage: YAMAHA will, at its option, repair or replace the product covered by this warranty if it becomes defective, mal-
functions or otherwise fails to conform with this warranty under normal use and service during the term of this warranty, without
charge for labor or materials. Repairs may be performed using new or refurbished parts that meet or exceed YAMAHA specifi-
cations for new parts. If YAMAHA elects to replace the product, the replacement may be a reconditioned unit. You will be
responsible for any installation or removal charges and for any initial shipping charges if the product(s) must be shipped for
warranty service. However, YAMAHA will pay the return shipping charges to any destination within the USA if the repairs are
covered by the warranty. This warranty does not cover (a) damage, deterioration or malfunction resulting from accident, negli-
gence, misuse, abuse, improper installation or operation or failure to follow instructions according to the Owner’s Manual for
this product; any shipment of the product (claims must be presented to the carrier); repair or attempted repair by anyone other
than YAMAHA or an authorized YAMAHA Service Center; (b) any unit which has been altered or on which the serial number
has been defaced, modified or removed; (c) normal wear and any periodic maintenance; (d) deterioration due to perspiration,
corrosive atmosphere or other external causes such as extremes in temperature or humidity; (e) damages attributable to power
line surge or related electrical abnormalities, lightning damage or acts of God; or (f) RFI/EMI (Interference/noise) caused by
improper grounding or the improper use of either certified or uncertified equipment, if applicable. Any evidence of alteration,
erasing or forgery of proof-of-purchase documents will cause this warranty to be void. This warranty covers only the Original
Owner and is not transferable.
In Order to Obtain Warranty Service: Warranty service will only be provided for defective products within the War-
ranted Area. Contact your local authorized YAMAHA dealer who will advise you of the procedures to be followed. If this is not
successful, contact YAMAHA at the address, telephone number or website shown below. YAMAHA may request that you send
the defective product to a local authorized YAMAHA Servicer or authorize return of the defective product to YAMAHA for repair.
If you are uncertain as to whether a dealer has been authorized by YAMAHA, please contact YAMAHA’s Service Department
at the number shown below, or check Yamaha’s website at www.Yamaha.com. Product(s) shipped for service should be
packed securely and must be accompanied by a detailed explanation of the problem(s) requiring service, together with the
original or a machine reproduction of the bill of sale or other dated, proof-of-purchase document describing the product, as evi-
dence of warranty coverage. Should any product submitted for warranty service be found ineligible therefore, an estimate of
repair cost will be furnished and the repair will be accomplished only if requested by you and upon receipt of payment or
acceptable arrangement for payment.
Limitation of Implied Warranties and Exclusion of Damages: ANY IMPLIED WARRANTIES, INCLUDING WAR-
RANTIES OF MERCHANTABILITY AND FITNESS FOR A PARTICULAR PURPOSE SHALL BE LIMITED IN DURATION TO
THE APPLICABLE PERIOD OF TIME SET FORTH ABOVE. YAMAHA SHALL NOT BE RESPONSIBLE FOR INCIDENTAL
OR CONSEQUENTIAL DAMAGES OR FOR DAMAGES BASED UPON INCONVENIENCE, LOSS OF USE, DAMAGE TO
ANY OTHER EQUIPMENT OR OTHER ITEMS AT THE SITE OF USE OR INTERRUPTION OF PERFORMANCES OR ANY
CONSEQUENCES. YAMAHA’S LIABILITY FOR ANY DEFECTIVE PRODUCT IS LIMITED TO REPAIR OR REPLACEMENT
OF THE PRODUCT, AT YAMAHA’S OPTION. SOME STATES DO NOT ALLOW LIMITATIONS ON HOW LONG AN IMPLIED
WARRANTY LASTS OR THE EXCLUSION OR LIMITATION OF INCIDENTAL OR CONSEQUENTIAL DAMAGES, SO THE
ABOVE LIMITATION OR EXCLUSION MAY NOT APPLY TO YOU. This Warranty gives you specific legal rights, and you may
also have other rights which vary from state to state. This is the only express warranty applicable to the product specified
herein; Yamaha neither assumes nor authorizes anyone to assume for it any other express warranty.
If you have any questions about service received or if you need assistance in locating an authorized YAMAHA Servicer, please
contact:
CUSTOMER SERVICE
Yamaha Corporation of America
6600 Orangethorpe Avenue, Buena Park, California 90620-1373
Telephone: 800-854-1569
www.yamaha.com
Do not return any product to the above address without a written Return Authorization issued by YAMAHA.
©2009 Yamaha Corporation of America. Printed in U.S.A.
For details of products, please contact your nearest Yamaha
representative or the authorized distributor listed below.
Pour plus de détails sur les produits, veuillez-vous adresser à Yamaha ou
au distributeur le plus proche de vous figurant dans la liste suivante.
Die Einzelheiten zu Produkten sind bei Ihrer unten aufgeführten
Niederlassung und bei Yamaha Vertragshändlern in den jeweiligen
Bestimmungsländern erhältlich.
Para detalles sobre productos, contacte su tienda Yamaha más
cercana o el distribuidor autorizado que se lista debajo.
HEAD OFFICE Yamaha Corporation, Digital Musical Instruments Division
Nakazawa-cho 10-1, Naka-ku, Hamamatsu, Japan 430-8650
Tel: +81-53-460-3273
EKB52
CANADA
Yamaha Canada Music Ltd.
135 Milner Avenue, Scarborough, Ontario,
M1S 3R1, Canada
Tel: 416-298-1311
U.S.A.
Yamaha Corporation of America
6600 Orangethorpe Ave., Buena Park, Calif. 90620,
U.S.A.
Tel: 714-522-9011
MEXICO
Yamaha de México S.A. de C.V.
Calz. Javier Rojo Gómez #1149,
Col. Guadalupe del Moral
C.P. 09300, México, D.F., México
Tel: 55-5804-0600
BRAZIL
Yamaha Musical do Brasil Ltda.
Rua Joaquim Floriano, 913 - 4' andar, Itaim Bibi,
CEP 04534-013 Sao Paulo, SP. BRAZIL
Tel: 011-3704-1377
ARGENTINA
Yamaha Music Latin America, S.A.
Sucursal de Argentina
Olga Cossettini 1553, Piso 4 Norte
Madero Este-C1107CEK
Buenos Aires, Argentina
Tel: 011-4119-7000
PANAMA AND OTHER LATIN
AMERICAN COUNTRIES/
CARIBBEAN COUNTRIES
Yamaha Music Latin America, S.A.
Torre Banco General, Piso 7, Urbanización Marbella,
Calle 47 y Aquilino de la Guardia,
Ciudad de Panamá, Panamá
Tel: +507-269-5311
THE UNITED KINGDOM/IRELAND
Yamaha Music U.K. Ltd.
Sherbourne Drive, Tilbrook, Milton Keynes,
MK7 8BL, England
Tel: 01908-366700
GERMANY
Yamaha Music Europe GmbH
Siemensstraße 22-34, 25462 Rellingen, Germany
Tel: 04101-3030
SWITZERLAND/LIECHTENSTEIN
Yamaha Music Europe GmbH
Branch Switzerland in Zürich
Seefeldstrasse 94, 8008 Zürich, Switzerland
Tel: 01-383 3990
AUSTRIA
Yamaha Music Europe GmbH Branch Austria
Schleiergasse 20, A-1100 Wien, Austria
Tel: 01-60203900
CZECH REPUBLIC/SLOVAKIA/
HUNGARY/SLOVENIA
Yamaha Music Europe GmbH Branch Austria
Schleiergasse 20, A-1100 Wien, Austria
Tel: 01-602039025
POLAND/LITHUANIA/LATVIA/ESTONIA
Yamaha Music Europe GmbH
Branch Sp.z o.o. Oddzial w Polsce
ul. 17 Stycznia 56, PL-02-146 Warszawa, Poland
Tel: 022-868-07-57
THE NETHERLANDS/
BELGIUM/LUXEMBOURG
Yamaha Music Europe Branch Benelux
Clarissenhof 5-b, 4133 AB Vianen, The Netherlands
Tel: 0347-358 040
FRANCE
Yamaha Musique France
BP 70-77312 Marne-la-Vallée Cedex 2, France
Tel: 01-64-61-4000
ITALY
Yamaha Musica Italia S.P.A.
Viale Italia 88, 20020 Lainate (Milano), Italy
Tel: 02-935-771
SPAIN/PORTUGAL
Yamaha Música Ibérica, S.A.
Ctra. de la Coruna km. 17, 200, 28230
Las Rozas (Madrid), Spain
Tel: 91-639-8888
GREECE
Philippos Nakas S.A. The Music House
147 Skiathou Street, 112-55 Athens, Greece
Tel: 01-228 2160
SWEDEN
Yamaha Scandinavia AB
J. A. Wettergrens Gata 1, Box 30053
S-400 43 Göteborg, Sweden
Tel: 031 89 34 00
DENMARK
YS Copenhagen Liaison Office
Generatorvej 6A, DK-2730 Herlev, Denmark
Tel: 44 92 49 00
FINLAND
F-Musiikki Oy
Kluuvikatu 6, P.O. Box 260,
SF-00101 Helsinki, Finland
Tel: 09 618511
NORWAY
Norsk filial av Yamaha Scandinavia AB
Grini Næringspark 1, N-1345 Østerås, Norway
Tel: 67 16 77 70
ICELAND
Skifan HF
Skeifan 17 P.O. Box 8120, IS-128 Reykjavik, Iceland
Tel: 525 5000
RUSSIA
Yamaha Music (Russia)
Office 4015, entrance 2, 21/5 Kuznetskii
Most street, Moscow, 107996, Russia
Tel: 495 626 0660
OTHER EUROPEAN COUNTRIES
Yamaha Music Europe GmbH
Siemensstraße 22-34, 25462 Rellingen, Germany
Tel: +49-4101-3030
Yamaha Corporation,
Asia-Pacific Sales & Marketing Group
Nakazawa-cho 10-1, Naka-ku, Hamamatsu,
Japan 430-8650
Tel: +81-53-460-2317
TURKEY/CYPRUS
Yamaha Music Europe GmbH
Siemensstraße 22-34, 25462 Rellingen, Germany
Tel: 04101-3030
OTHER COUNTRIES
Yamaha Music Gulf FZE
LOB 16-513, P.O.Box 17328, Jubel Ali,
Dubai, United Arab Emirates
Tel: +971-4-881-5868
THE PEOPLE’S REPUBLIC OF CHINA
Yamaha Music & Electronics (China) Co.,Ltd.
2F, Yunhedasha, 1818 Xinzha-lu, Jingan-qu,
Shanghai, China
Tel: 021-6247-2211
HONG KONG
Tom Lee Music Co., Ltd.
11/F., Silvercord Tower 1, 30 Canton Road,
Tsimshatsui, Kowloon, Hong Kong
Tel: 2737-7688
INDIA
Yamaha Music India Pvt. Ltd.
5F Ambience Corporate Tower Ambience Mall Complex
Ambience Island, NH-8, Gurgaon-122001, Haryana, India
Tel: 0124-466-5551
INDONESIA
PT. Yamaha Music Indonesia (Distributor)
PT. Nusantik
Gedung Yamaha Music Center, Jalan Jend. Gatot
Subroto Kav. 4, Jakarta 12930, Indonesia
Tel: 21-520-2577
KOREA
Yamaha Music Korea Ltd.
8F, 9F, Dongsung Bldg. 158-9 Samsung-Dong,
Kangnam-Gu, Seoul, Korea
Tel: 080-004-0022
MALAYSIA
Yamaha Music Malaysia, Sdn., Bhd.
Lot 8, Jalan Perbandaran, 47301 Kelana Jaya,
Petaling Jaya, Selangor, Malaysia
Tel: 3-78030900
PHILIPPINES
Yupangco Music Corporation
339 Gil J. Puyat Avenue, P.O. Box 885 MCPO,
Makati, Metro Manila, Philippines
Tel: 819-7551
SINGAPORE
Yamaha Music Asia Pte., Ltd.
#03-11 A-Z Building
140 Paya Lebor Road, Singapore 409015
Tel: 747-4374
TAIWAN
Yamaha KHS Music Co., Ltd.
3F, #6, Sec.2, Nan Jing E. Rd. Taipei.
Taiwan 104, R.O.C.
Tel: 02-2511-8688
THAILAND
Siam Music Yamaha Co., Ltd.
4, 6, 15 and 16th floor, Siam Motors Building,
891/1 Rama 1 Road, Wangmai,
Pathumwan, Bangkok 10330, Thailand
Tel: 02-215-2626
OTHER ASIAN COUNTRIES
Yamaha Corporation,
Asia-Pacific Sales & Marketing Group
Nakazawa-cho 10-1, Naka-ku, Hamamatsu,
Japan 430-8650
Tel: +81-53-460-2317
AUSTRALIA
Yamaha Music Australia Pty. Ltd.
Level 1, 99 Queensbridge Street, Southbank,
Victoria 3006, Australia
Tel: 3-9693-5111
NEW ZEALAND
Music Works LTD
P.O.BOX 6246 Wellesley, Auckland 4680,
New Zealand
Tel: 9-634-0099
COUNTRIES AND TRUST
TERRITORIES IN PACIFIC OCEAN
Yamaha Corporation,
Asia-Pacific Sales & Marketing Group
Nakazawa-cho 10-1, Naka-ku, Hamamatsu,
Japan 430-8650
Tel: +81-53-460-2317
NORTH AMERICA
CENTRAL & SOUTH AMERICA
EUROPE
AFRICA
MIDDLE EAST
ASIA
OCEANIA
1. IMPORTANT NOTICE: DO NOT MODIFY THIS UNIT!
This product, when installed as indicated in the instructions con-
tained in this manual, meets FCC requirements. Modifications not
expressly approved by Yamaha may void your authority, granted by
the FCC, to use the product.
2. IMPORTANT: When connecting this product to accessories and/
or another product use only high quality shielded cables. Cable/s
supplied with this product MUST be used. Follow all installation
instructions. Failure to follow instructions could void your FCC
authorization to use this product in the USA.
3. NOTE: This product has been tested and found to comply with the
requirements listed in FCC Regulations, Part 15 for Class “B” digital
devices. Compliance with these requirements provides a reason-
able level of assurance that your use of this product in a residential
environment will not result in harmful interference with other elec-
tronic devices. This equipment generates/uses radio frequencies
and, if not installed and used according to the instructions found in
the users manual, may cause interference harmful to the operation
of other electronic devices. Compliance with FCC regulations does
* This applies only to products distributed by YAMAHA CORPORATION OF AMERICA. (class B)
not guarantee that interference will not occur in all installations. If
this product is found to be the source of interference, which can be
determined by turning the unit “OFF” and “ON”, please try to elimi-
nate the problem by using one of the following measures:
Relocate either this product or the device that is being affected by
the interference.
Utilize power outlets that are on different branch (circuit breaker or
fuse) circuits or install AC line filter/s.
In the case of radio or TV interference, relocate/reorient the
antenna. If the antenna lead-in is 300 ohm ribbon lead, change the
lead-in to co-axial type cable.
If these corrective measures do not produce satisfactory results,
please contact the local retailer authorized to distribute this type of
product. If you can not locate the appropriate retailer, please con-
tact Yamaha Corporation of America, Electronic Service Division,
6600 Orangethorpe Ave, Buena Park, CA90620
The above statements apply ONLY to those products distributed by
Yamaha Corporation of America or its subsidiaries.
FCC INFORMATION (U.S.A.)
IMPORTANT NOTICE FOR THE UNITED KINGDOM
Connecting the Plug and Cord
WARNING.: THIS APPARATUS MUST BE EARTHED IMPORTANT.
The wires in this mains lead are coloured in accordance with the fol-
lowing code:
GREEN-AND-YELLOW : EARTH
BLUE : NEUTRAL
BROWN : LIVE
As the colours of the wires in the mains lead of this apparatus may not
correspond with the coloured markings identifying the terminals in
your plug proceed as follows:
The wire which is coloured GREEN-and-YELLOW must be connected
to the terminal in the plug which is marked by the letter E or by the
safety earth symbol or colored GREEN or GREEN-and-YELLOW.
The wire which is coloured BLUE must be connected to the terminal
which is marked with the letter N or coloured BLACK.
The wire which is coloured BROWN must be connected to the terminal
which is marked with the letter L or coloured RED.
• This applies only to products distributed by Yamaha Music U.K. Ltd. (3 wires)
COMPLIANCE INFORMATION STATEMENT
(DECLARATION OF CONFORMITY PROCEDURE)
Responsible Party : Yamaha Corporation of America
Address :
6600 Orangethorpe Ave., Buena Park, Calif. 90620
Telephone : 714-522-9011
Type of Equipment : DIGITAL KEYBOARD
Model Name : TYROS4
This device complies with Part 15 of the FCC Rules.
Operation is subject to the following two conditions:
1) this device may not cause harmful interference, and
2) this device must accept any interference received including interfer-
ence that may cause undesired operation.
See user manual instructions if interference to radio reception is sus-
pected.
* This applies only to products distributed by
YAMAHA CORPORATION OF AMERICA.
(FCC DoC)
This product contains a high intensity lamp that contains
a small amount of mercury. Disposal of this material may
be regulated due to environmental considerations.
For disposal information in the United States, refer to the
Electronic Industries Alliance web site:
www.eiae.org
* This applies only to products distributed by
YAMAHA CORPORATION OF AMERICA.
(mercury)
Information for Users on Collection and Disposal of Old Equipment
This symbol on the products, packaging, and/or accompanying documents means that used electrical and electronic products should not be
mixed with general household waste.
For proper treatment, recovery and recycling of old products, please take them to applicable collection points, in accordance with your
national legislation and the Directives 2002/96/EC.
By disposing of these products correctly, you will help to save valuable resources and prevent any potential negative effects on human health
and the environment which could otherwise arise from inappropriate waste handling.
For more information about collection and recycling of old products, please contact your local municipality, your waste disposal service or
the point of sale where you purchased the items.
[For business users in the European Union]
If you wish to discard electrical and electronic equipment, please contact your dealer or supplier for further information.
[Information on Disposal in other Countries outside the European Union]
This symbol is only valid in the European Union. If you wish to discard these items, please contact your local authorities or dealer and ask for
the correct method of disposal.
(weee_eu)

Yamaha Home Keyboards Home Page
http://music.yamaha.com/homekeyboard/
Yamaha Manual Library
http://www.yamaha.co.jp/manual/
WU61880
U.R.G., Digital Musical Instruments Division
© 2010–2011 Yamaha Corporation
109PODH*.*-**B0
Printed in Japan
