Yamaha YT 2100 Owner's Manual Yt2100 De
User Manual: Yamaha YT-2100 Owner's Manual
Open the PDF directly: View PDF ![]() .
.
Page Count: 4
保証書
持込修理
この度はヤマハ・ギター/ベースオートチューナーをお買上げ戴きましてありがとうございました。
本書は、本書記載内容で修理を行なう事をお約束するものです。お買上げの日から下記期間中に故障が発生した
場合は、本書をご提示の上お買上げの販売店に修理をご依頼ください。(詳細は裏面をご覧ください)
ご販売店様へ ※印欄は必ずご記入してお渡しください。
修理(サービス)メモ
品名
保証期間
お客様
ギター/ベースオートチューナー
本体:お買上げの日から1ヶ年間
ご住所 〒
お名前 様
電 話 ( )
品番
※お買上げ日
店名
住所
電話
※
販
売
店
YT-2100
年 月 日
印
( )
内 容 担 当 者 印
年 月 日
弦打楽器営業部 営業課
〒430 静岡県浜松市中沢町10番1号 053-460-2431
GUITAR/BASS AUTO TUNER
OWNER’S MANUAL / MODE D’EMPLOI
BEDIENUNGSANLEITUNG / 取扱説明書
YT-2100
Printed in Hong Kong
■サービスについて
1. 保証期間
本機の保証期間は、ご購入(保証書による)
より満1ヶ年(現金・クレジット・月賦等による
区別はございません。また保証は日本国内
でのみ有効)と致します。
2. 保証期間中のサービス
保証期間中に万一故障が発生した場合、お
買い上げ店にご連絡頂きますと、技術者が
修理・調整致します。この際必ず保証書をご
提示ください。保証書なき場合にはサービス
料金を頂く場合もあります。
また、お買い上げ店より遠方に移転される場
合は、事前にお買い上げ店あるいは右記の
ヤマハ電気音響製品アフターサービス拠点
にご連絡ください。移転先におけるサービス
担当店をご紹介申し上げますと同時に、引
続き保証期間中のサービスを責任をもって
行なうよう手続き致します。
3. アフターサービス
満1ヶ年の保証期間を過ぎますとサービスは
有料となりますが、引き続き責任をもって
サービスをさせていただきます。そのほかご
不明の点などございましたら、お買い上げ店
あるいは右記のヤマハ電気音響製品アフ
ターサービス拠点までお問い合わせくださ
い。
弦打楽器営業部 営業課
〒430 静岡県浜松市中沢町10番1号
053-460-2433
ヤマハ電気音響製品アフターサービス拠点
〔修理受付および修理品お持込み窓口〕
北海道サービスセンター 〒064 札幌市中央区南十条西 1 丁目 1-50 ヤマハセンター内
TEL (011) 513-5036
仙台サービスセンター 〒983 仙台市若林区卸町 5-7 仙台卸商共同配送センター3F
TEL (022) 236-0249
首都圏サービスセンター 〒211 川崎市中原区木月 1184 TEL (044) 434-3100
東京サービスステーション* 〒108 東京都港区高輪 2-17-11 TEL (03) 5488-6625
(*お持込み修理窓口)
浜松サービスセンター 〒435 浜松市上西町 911 ヤマハ(株)宮竹工場内
TEL (053) 465-6711
名古屋サービスセンター 〒454
名古屋市中川区玉川町 2-1-2 ヤマハ(株)名古屋流通センター 3F
TEL (052) 652-2230
大阪サービスセンター 〒565 吹田市新芦屋下 1-16 ヤマハ(株)千里丘センター内
TEL (06) 877-5262
四国サービスステーション 〒760 高松市丸亀町 8-7 ヤマハ(株)高松店内
TEL (0878) 22-3045
広島サービスセンター 〒731-01 広島市安佐南区西原 6-14-14 TEL (082) 874-3787
九州サービスセンター 〒812 福岡市博多区博多駅前 2-11-4 TEL (092) 472-2134
[本社]
カスタマーサービス部 〒435 浜松市上西町 911 ヤマハ(株)宮竹工場内
TEL (053) 465-1158
弦打楽器営業部
〒430 浜松市中沢町 10番 1号 TEL (053) 460-2433
東京支店第2営業部
〒108 東京都港区高輪 2-17-11 TEL (03) 5488-5476
関東支店第2営業課
〒108 東京都港区高輪 2-17-11 TEL (03) 5488-1688
大阪支店第2営業1課
〒542 大阪市中央区南船場 3-12-9 (心斎橋プラザビル東館)
TEL (06) 252-5231
名古屋支店第2営業課
〒460 名古屋市中区錦 1-18-28 TEL (052) 201-5199
九州支店第2営業課
〒812 福岡市博多区博多駅前 2-11-4 TEL (092) 472-2130
北海道支店第2営業課
〒064 札幌市中央区南十条西 1丁目 1-50 (ヤマハセンター)
TEL (011) 512-6113
仙台支店第2営業課
〒980 仙台市青葉区大町 2-2-10 TEL (022) 222-6147
広島支店第2営業課
〒730 広島市中区紙屋町 1-1-18 (ヤマハビル)
TEL (082) 244-3749
※住所及び電話番号は変更になる場合があります。
ヤマハ株式会社国内楽器営業本部
安全へのこころがけ
火災・感電・人身傷害の危険を防止するには
∼以下の指示を必ず守ってください∼
この「安全へのこころがけ」は製品を安全に正しくお使いいただき、お
客様や他の人々への危害や財産への損害を未然に防止するために、
いろいろな絵表示を使って説明しています。
絵表示の意味をよく理解してから、本文をお読みください。
注意(危険・警告を含む)を促す内容があることを告げるものです。
禁止の行為を告げるものです。
行為を強制したり指示する内容
を告げるものです。
絵表示に
ついて
例: → 分解禁止
例: → 電源プラグをコン
セントから抜く
この機器を使用する前に、以下の指示と取扱説明書
をよく読んでください。
この機器を分解したり、改造したりしないでください。
火災、感電の原因となります。
修理/部品の交換などで、取扱説明書に書かれてい
る以外のことは、絶対にしないでください。必ずサー
ビスセンターに相談してください。
次のような場所での使用や保存はしないでくださ
い。火災、感電の原因となります。
●
温度が極端に高い場所(直射日光の当たる場
所、暖房機器の近く、発熱する機器の上など)
●水気の近く(風呂場、洗面台、濡れた床など)や
湿度の高い場所
●ホコリの多い場所
●振動の多い場所
※特に自動車内は直射日光などにより非常に高温
となります。この機器を車内に放置しないでくださ
い。
ACアダプター使用時、ACアダプターの電源プラグ
は、必ずAC100Vの電源コンセントに 差し 込 んでく
ださい。100V以外では火災、感電の原因となりま
す。
ACアダプター使用時、ACアダプターの電源コード
を無理に曲げたり、上に重いものを乗せたりしない
でください。電源コードに傷がつきます。火災、感電の
原因となります。
この機器に、異物(燃えやすいもの、硬貨、針金など)
や液体(水やジュースなど)を絶対に入れないでくだ
さい。火災、感電の原因となります。
次のような場合は、直ちに電源を切って、サービスセ
ンターに修理を依頼してください。
●ACアダプターの電源コードやプラグが破損し
たとき
●
異物が内部に入ったり、液体がこぼれたとき
●機器が(雨などで)濡れたとき
●機器に異常や故障が生じたとき
この機器は、正常な通気が妨げられ
ることの ない 所に設定して、使用して
くだ さ い 。
ACアダプターの電源コードをコン
セントに 抜き差しするときは、必ず電
源プラグを持ってくだ さ い 。
長時間使用しない場合は、ACアダ
プターの電源プラグをコンセントか
ら抜いてください。
使用後の乾電池は火中に捨てない
でください。一般のゴミとは分けて、
決められた場所に捨てましょう。
乾電池は表示された極性(+、−)を
間違えないようにしてください。間違
えますと乾電池の破れつや液もれに
よって、けがや周囲を汚損する原因
となることがあります。
ACアダプターは、指定のACアダプ
ターを使用してください。
本体を、故意に投げたり落としたりし
ないでください。本体の故障だけで
なく、思わぬけがの原因となることが
あります 。
乾電池は幼児の手の届かない場所
に保管してください。
この表示を無視して誤った取扱いをする
と、人が死亡又は重傷を負う危険の恐れ
がある内容を示しています。
この表示を無視して 誤った
取扱いをすると、人が障害を
負ったり、財産が損害を受け
る危険の恐れがある内容を
示しています。
注意警告
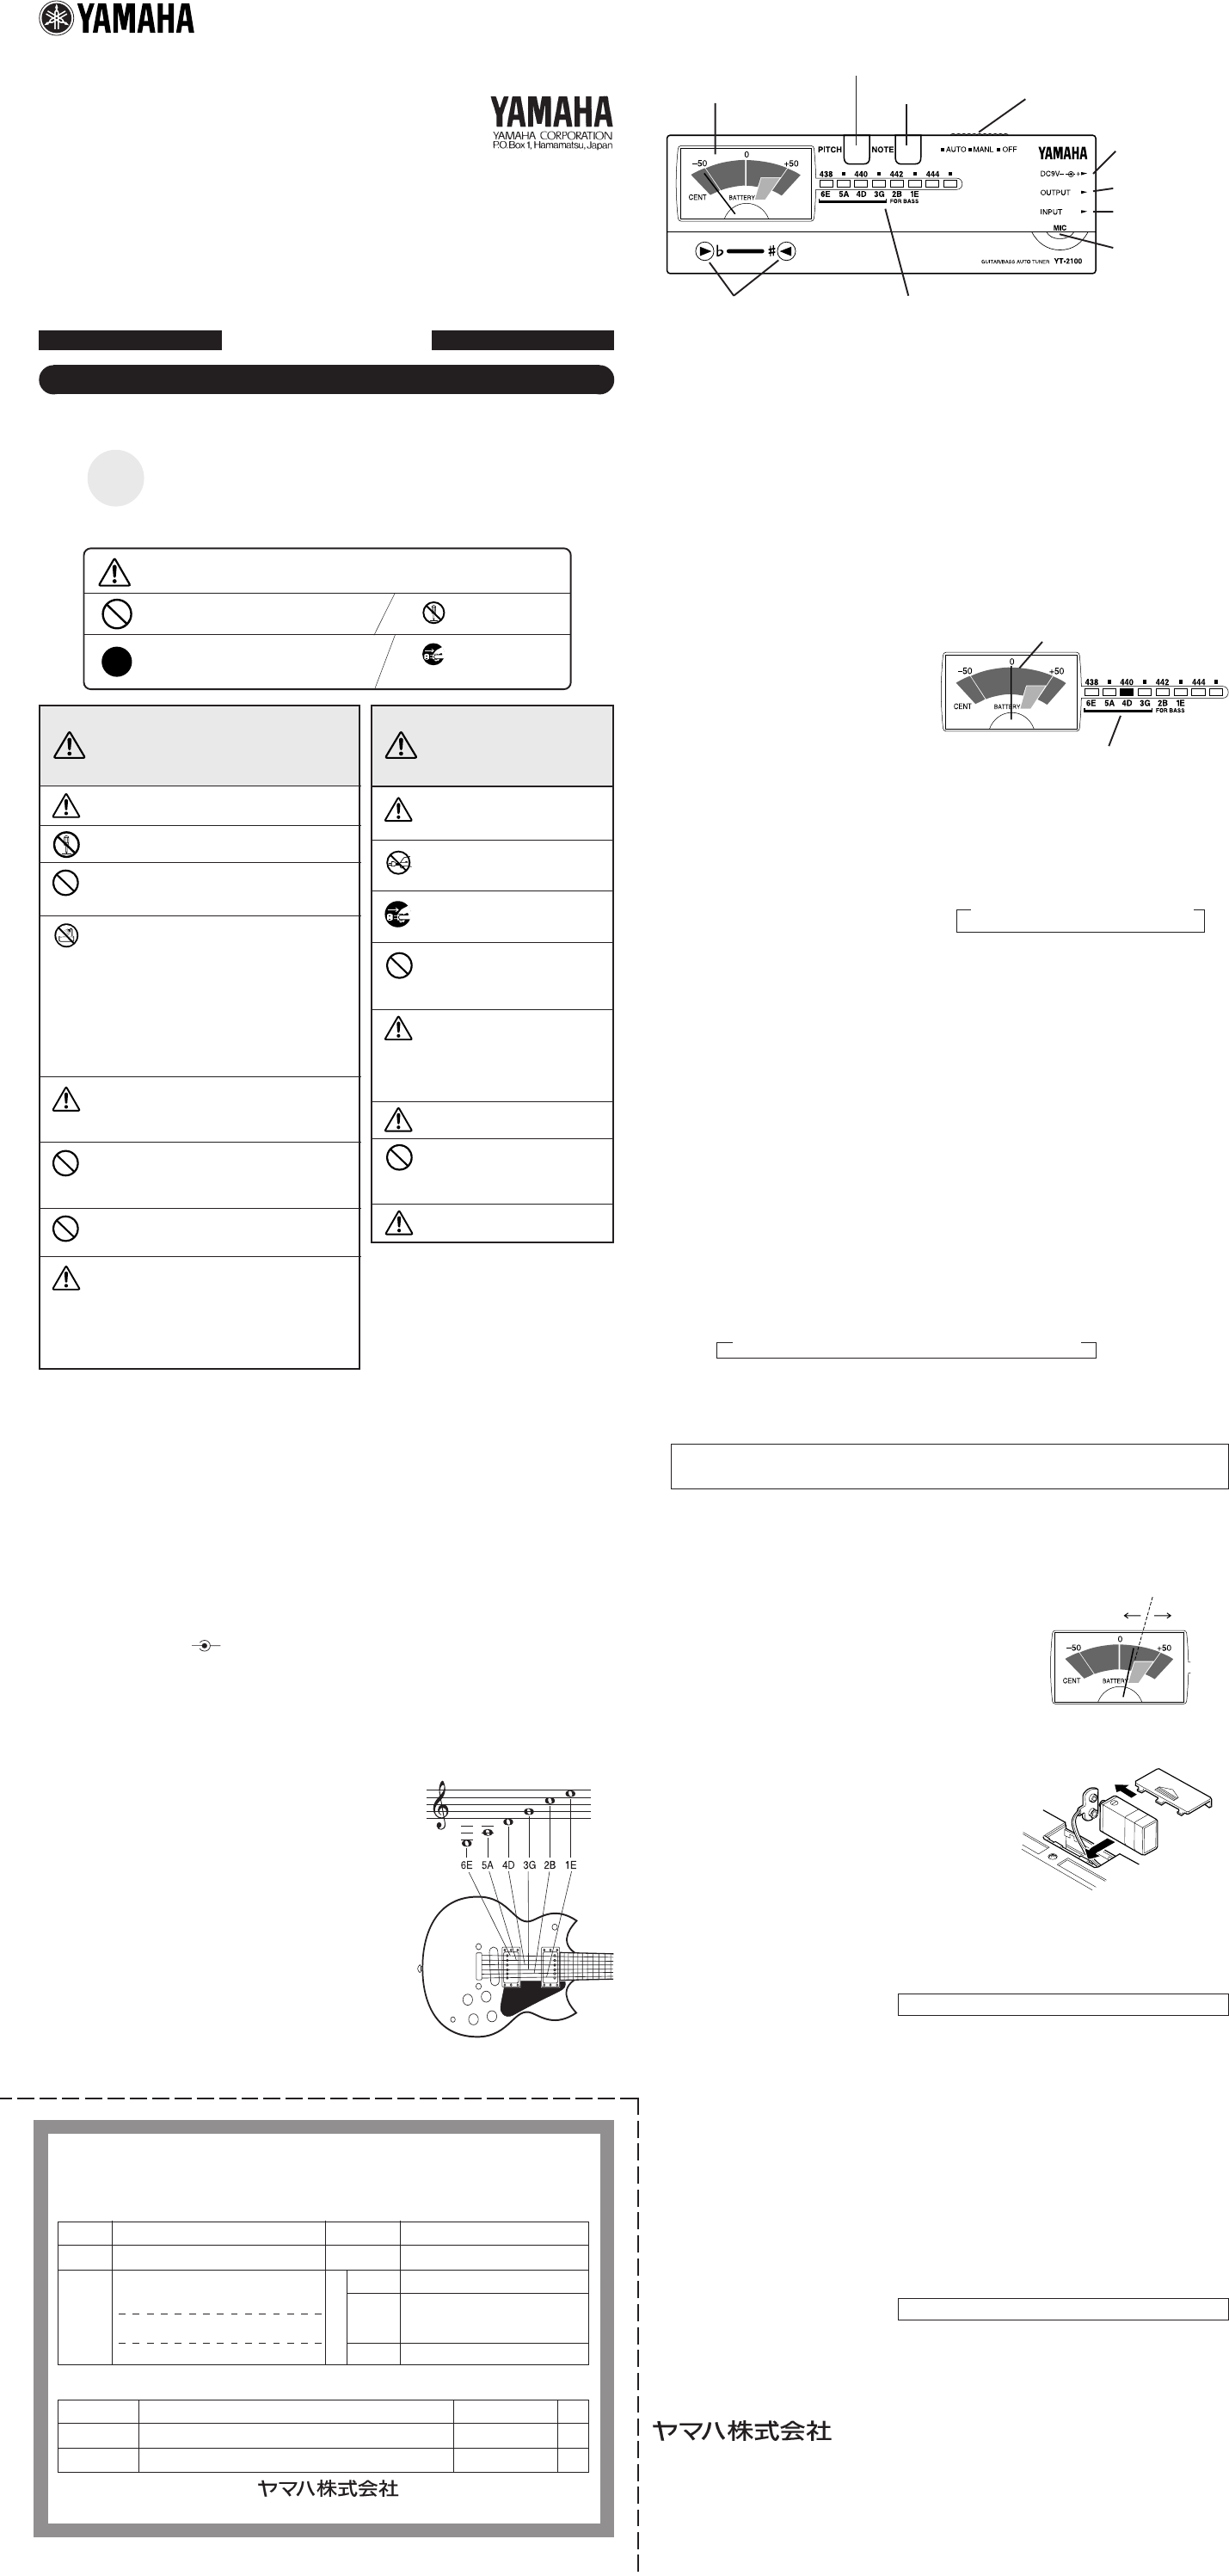
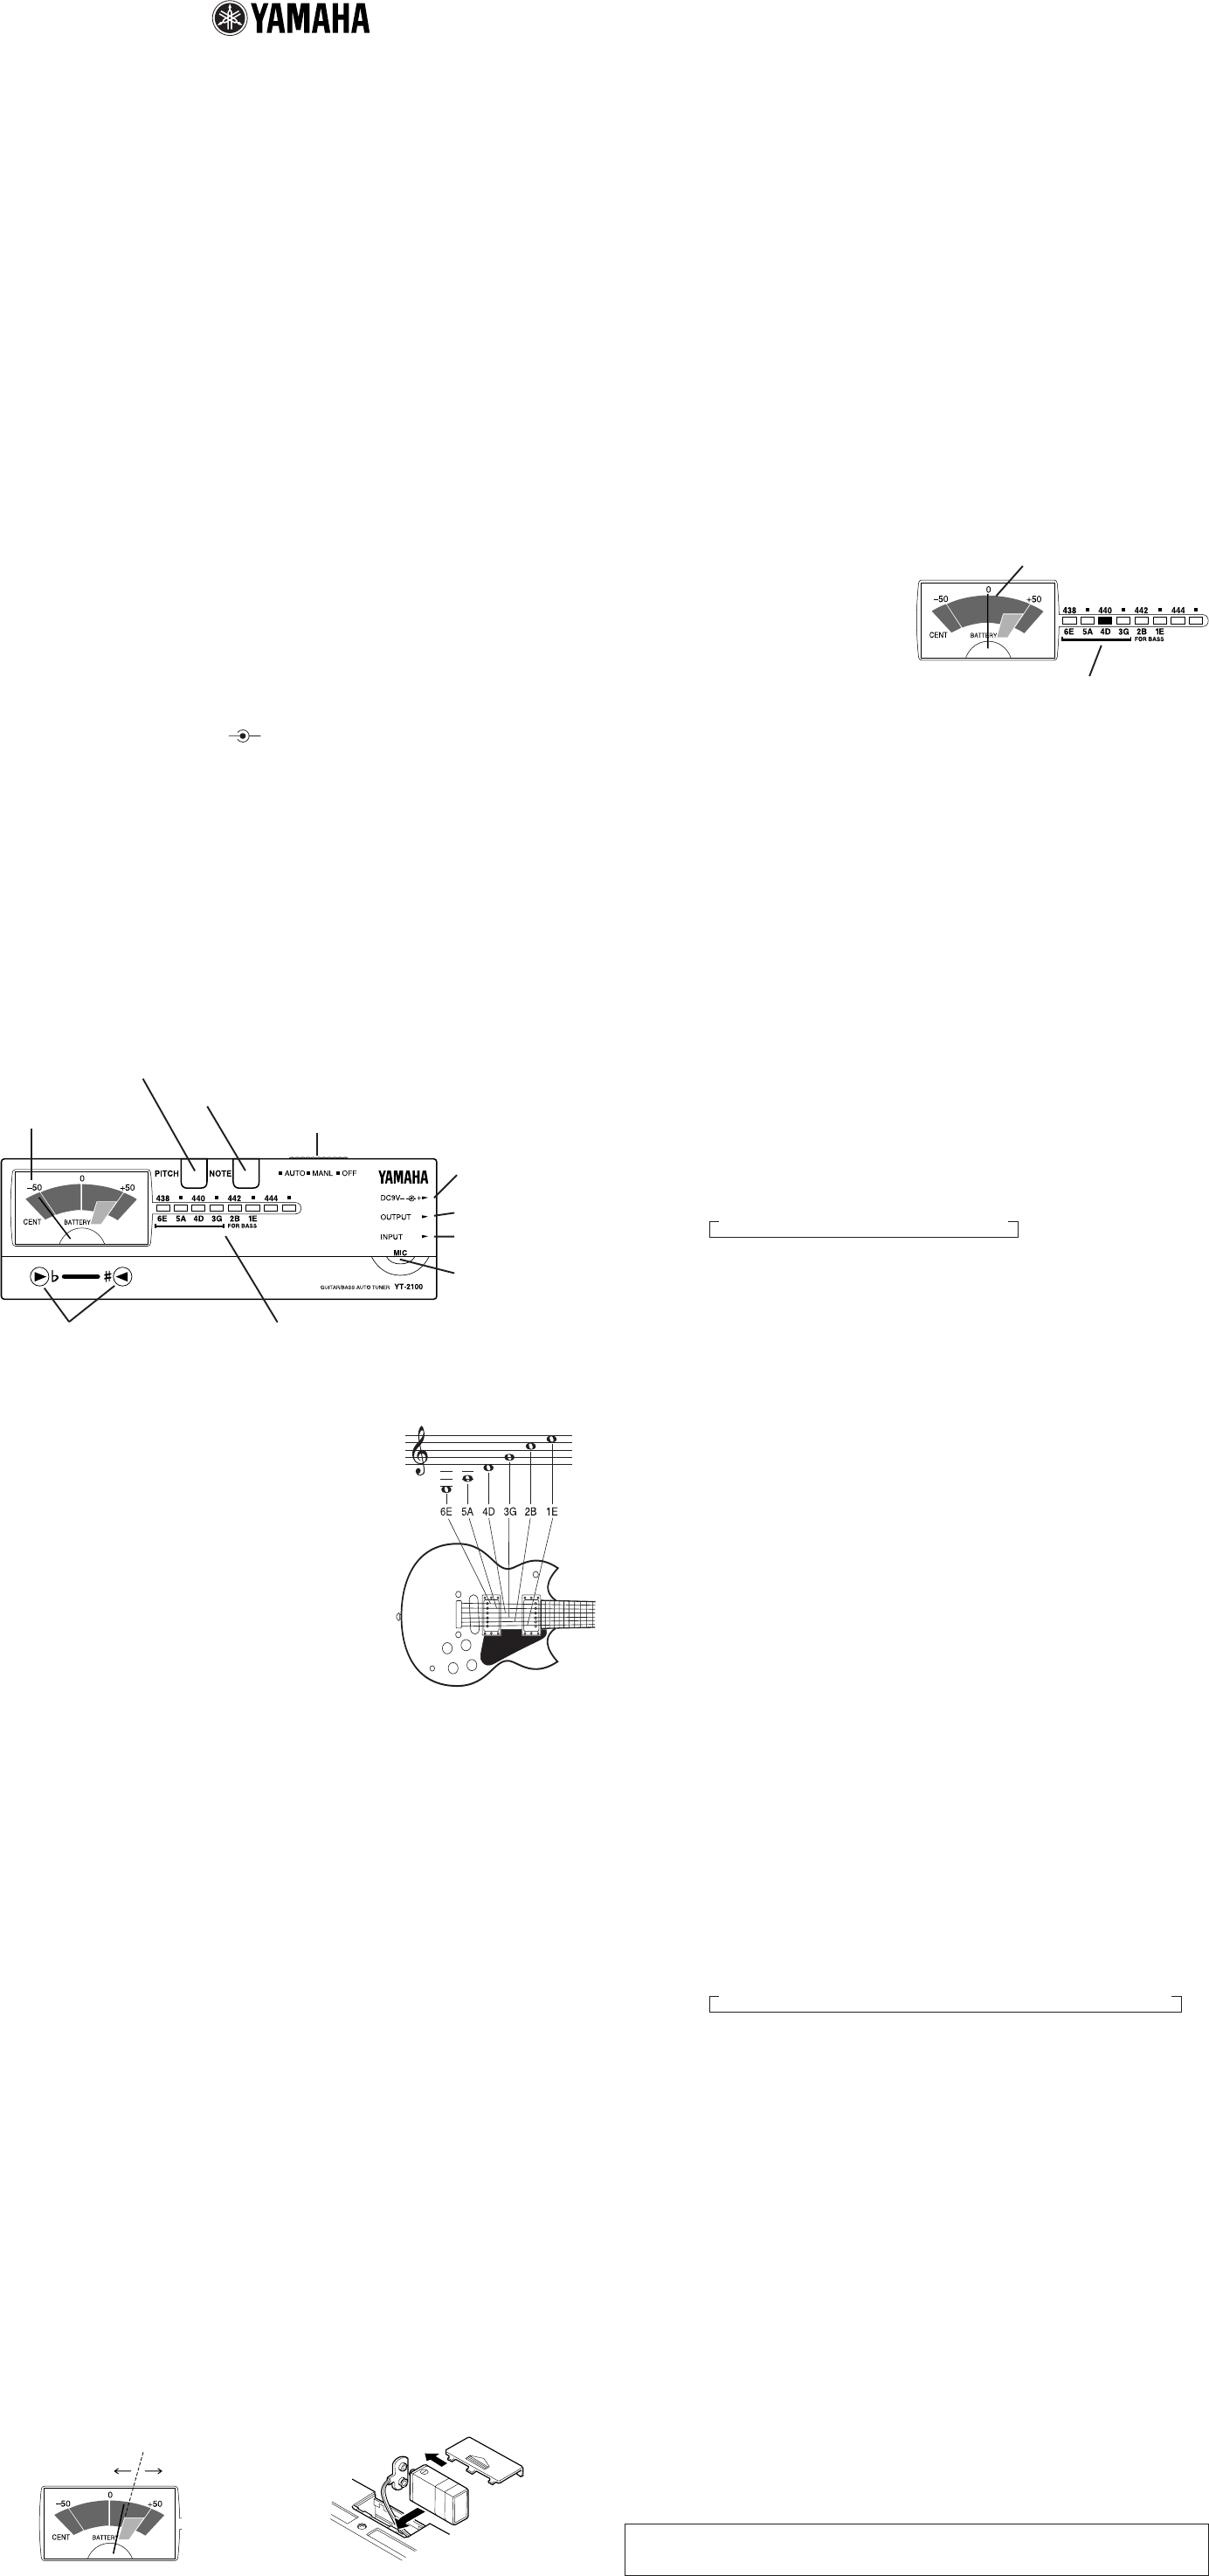
uマイクロホン
tチューニング ガイドyインジ ケーター
iINPUTジャック
oOUTPUTジャック
!0 DC9Vジャック
(入力用)
qパワースイッチ
eピッチスイッチ
wノートスイッチrメーター
このたびはヤマハ・ギ ター/ベースオートチューナー YT-2100をお買い求め
いただき、ありがとうござ います 。
お使いになる前に、この取扱説明書をよくお読みのうえ、正しくご 使 用ください 。また、
お読みになった後は、保証書と共に大切に保管してください。
■仕様
表示 :メーター、インジ ケーター、チューニングガイド
音名 : 6E, 5A, 4D, 3G, 2B, 1E
精度 :±1セント
標準ピッチ範囲
: A4=438∼445Hz (1Hzステップ)
付加機能 :バッテリーチェック機 能
端子 : INPUTジャック、OUTPUTジャック、DC9Vジャック
電源 : 6F22(006P)9V乾電池
別売ACアダプター(AC-05またはAC-320)
電池寿命 : 連続約9時間 (AUTOモード時)
外形寸法 :155(W)×48.5(H)×32.5(D)mm
重量 :159g(乾電池含む)
付属品 : 6F22 9V乾電池×1
※仕様および外観は、改良のため予告なく変更することがあります。
◆使用する場所
次のような場所でご使用になりますと、故障の原因
となります のでご 注意ください。
・直射日光の当たる場所
・温度や湿度が非常に高い場所や低い場所
・砂やホコリの 多い場所
◆電源について
・ YT-2100は、6F22(006P)乾電池または別売
のYAMAHA ACアダプターAC-05、AC-320
で作動します。他のACアダプターを使用された
場合、故障の原因となることがあります。
必ず極性の正しいもの(− +)をお使いく
ださい。
・ご使用にならない 時 は、必ずパワースイッチを
OFFにしておいてください。また、電池の液漏れを
防ぐため、長時間ご使用にならない時は、電池を
取り出してお いてください。
◆取り扱いはやさしく
スイッチなどに無理に力を加えたり、本体を落としま
すと故障の原因となりますのでご注意ください。
◆お手入れ
外装のお手入れの際は、必ず柔らかい布で乾拭きし
てください。ベンジンやシンナー系の液体、強燃性の
ポリッシャーなど は 絶 対にご 使 用に ならない でくださ
い。
◆保証書の手続き
製品をお買上げいただいた日より1年間は保証期間
となり、修理料金は無償とさせ ていただきます。ただ
し、保証書に販売店印、購入年月日の記入がありませ
んと、保証期間中でもサービスが有償となることが
あります。必ずお求めになった販売店で保証書の手
続きを行なった後、大切に保管してください。
■ご使用になる前に
■各部の名称
■チューニングの方法
●オートチューニング:(AUTO)
自動的にチューニングするモードです。音を入力すると、その音にいちばん近い基準音の音名と、基準になる音よ
り高い か低いかを表示します。
1. エレキギター/ベースの場合はINPUTジャックiにギターからのコードを接続します。(この時OUTPUT
ジャックoとアンプを接続しておけば、演奏中でもチューニングができます。)
アコースティックギターの場合は、内蔵マイクロホンuにギターのサウンドホールをできるだけ近づけま
す。
※ INPUTジャックiにプラグが接続されている時には、内蔵マイクロホンuは作動しません。
2. パワースイッチqを“AUTO”にセットし ま す 。
3.ピッチスイッチeを押して、標準となるA4のピッチ(438∼445Hz)を選択します。(“ピッチ設定”の項参
照)
4. チューニングしたい弦を弾くと、その弦の音名のインジケーターyが点灯します。(2本以上の弦を同時に弾
かないでください。)
5. その弦と違う音名のインジケーターが点灯した
場合は、ギターのペグ(糸巻)を回してその弦の
音名が点灯するようにします。
6. ギターのペグ(糸巻)を調節して、メー ター rの
中央(0)に針がくるようにします。チューニングガ
イドtのWだけが点灯した時はチューニングを
上げ、
Qだけが点灯した時は下げます。正しく
チューニングされた時には、
WとQの両方が点灯
します。
7. 他の弦も同様に4∼6の操作を繰り返してチュー
ニングをします。
●マニュアルチューニング:(MANL)
あらかじめ チューニング する弦(音名)をセットし ておいてからチューニングするモードです。
1. オートチューニングの場合と同様に、ギターを接続または内蔵マイクロホンに近づけます。
2. パワースイッチqを“MANL”にセットしま す 。
3.ピッチスイッチeを押して、標準となるA 4のピッチ(438∼445Hz)を選択します。(“ピッチ設定”の項参
照)
4. ノートスイッチwによりチューニングしたい
弦(音名)を選びます。
ノートスイッチwを押すごとに、右図の順で
弦名が変わります。
5. チューニングしたい弦を弾き、メー タ ー rの中央(0)に針がくるように、ギターのペグ(糸巻)を調節します。
正しくチューニングされた時には、チューニングガイドtのWとQの両方が点灯します。
6. 他の弦も同様に4, 5の操作を繰り返してチューニングをします。
6E → 5A → 4D → 3G → 2B → 1E
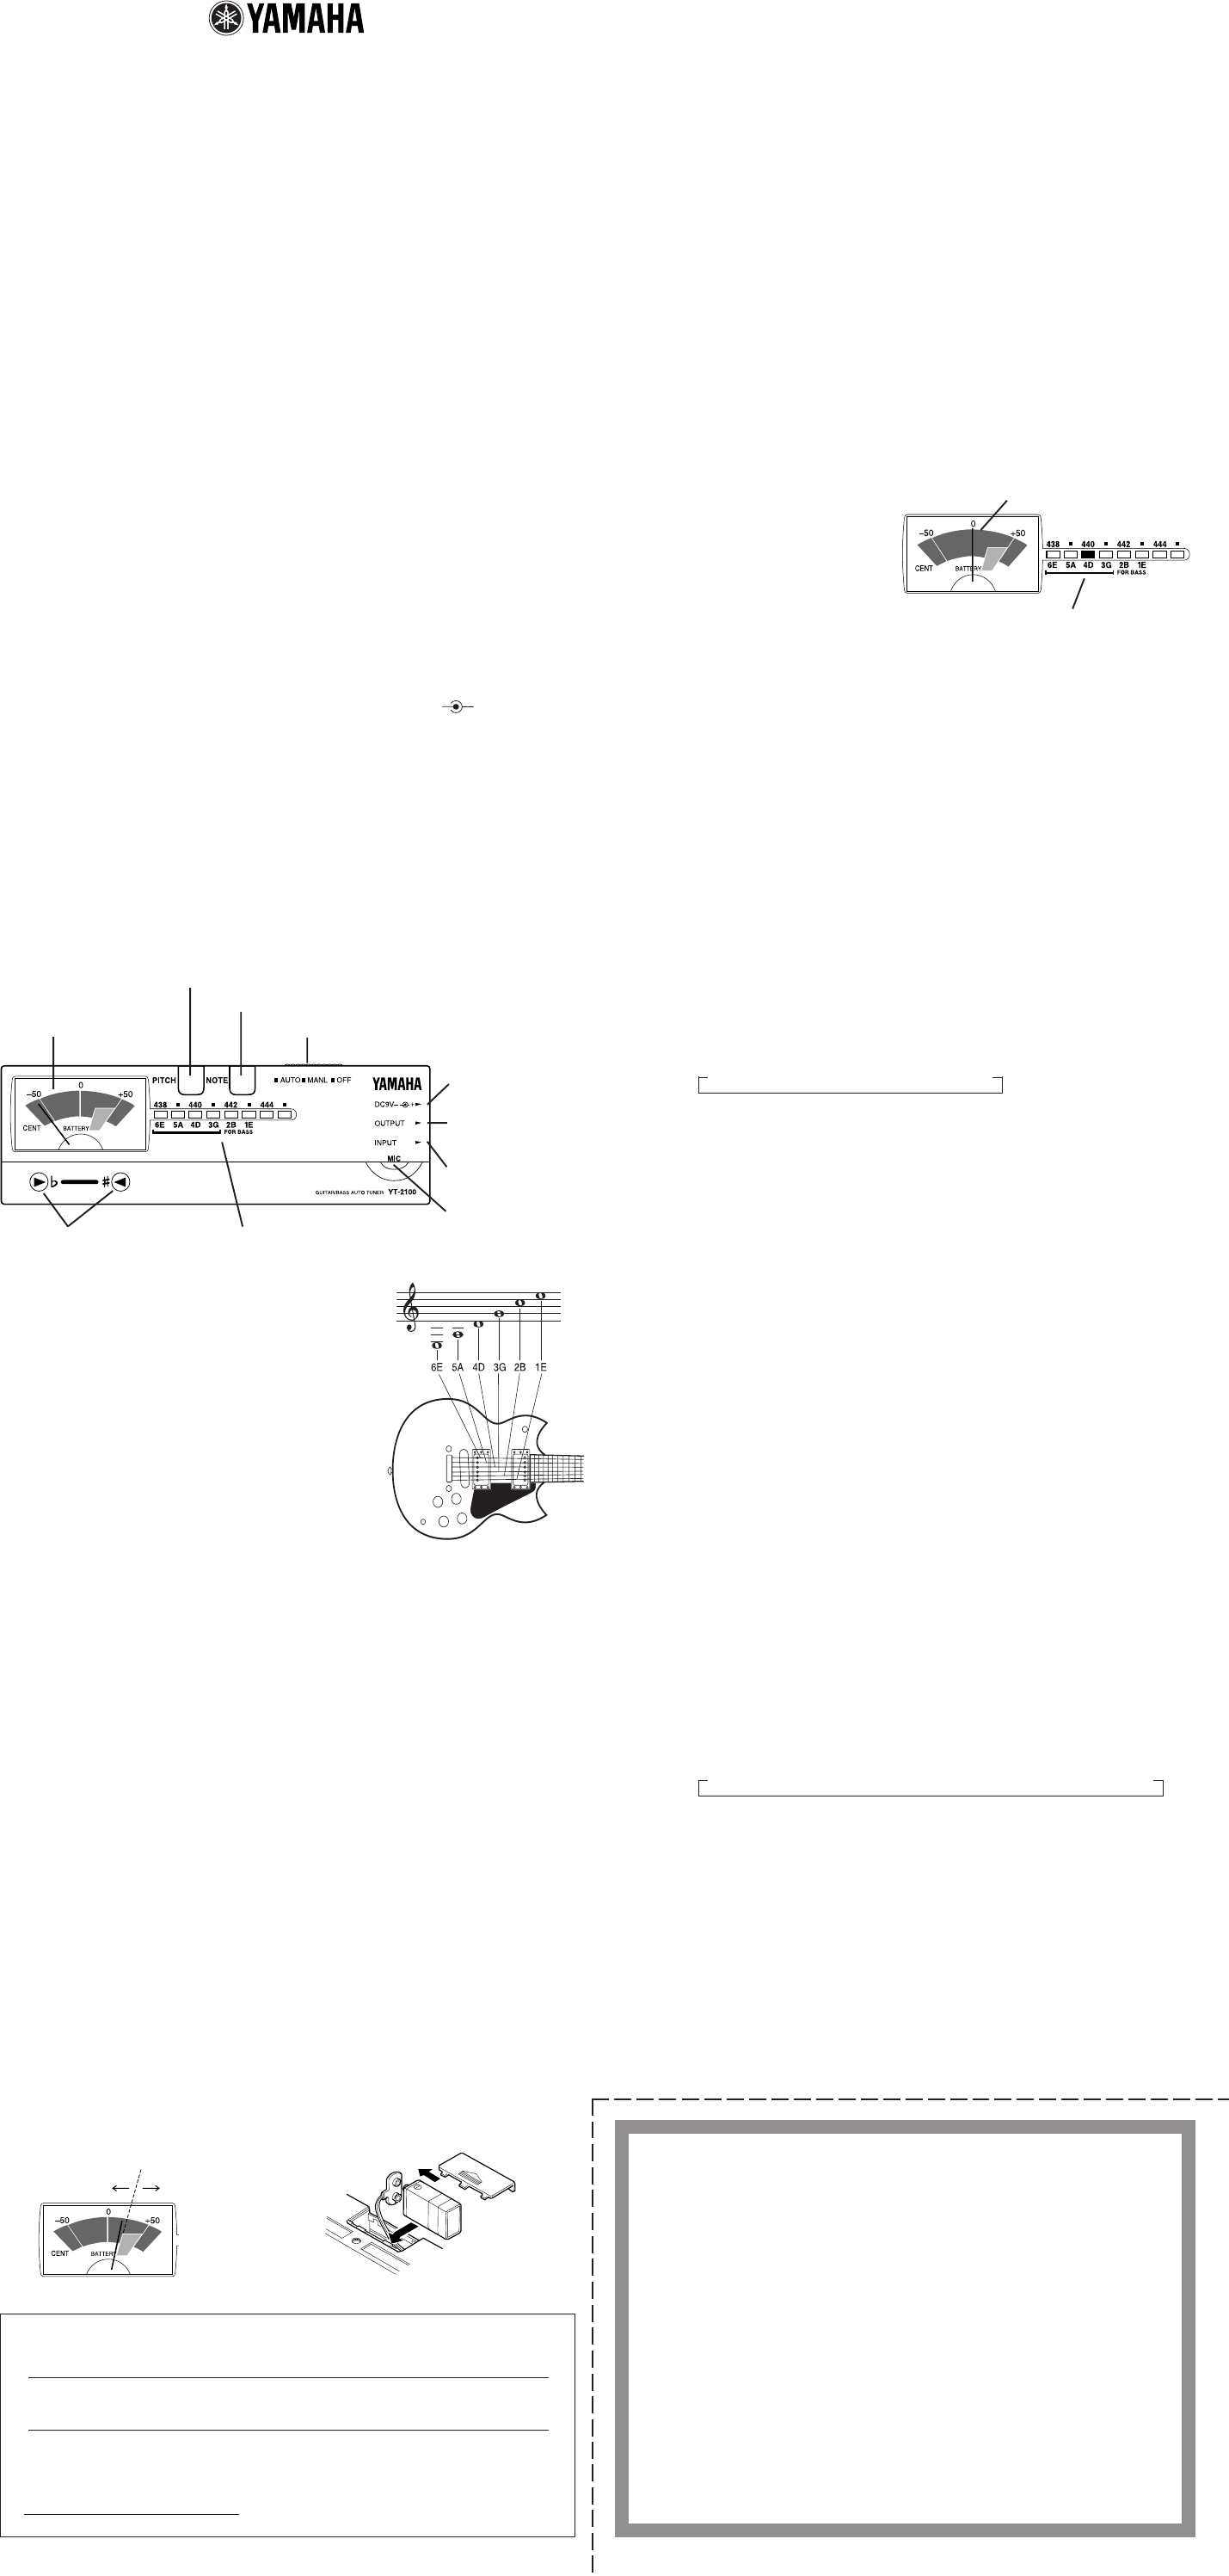
■ピッチ設定
標準となるピッチを設定します。各楽器のチューニングを合わせるために、ピアノの中央のラの音(A4=440Hz)
が標準ピッチとして用いられます。この標準ピッチは地 域や 時代によって多 少の誤 差があり、近年ではやや高めの
ピッチでチューニングされる事が 多くなっています。
438 → 439 → 440 → 441 → 442 → 443 → 444 → 445
■ピッチ設定の方法
1. パワースイッチqを“AUTO”または“MANL”にセットし ま す 。
2.ピッチスイッチeを1回押すと、現在設定され ている標準ピッチ(A4:438∼445Hz)を示すインジケー
ターyが点滅します。
3. インジケーターyの点滅中にピッチスイッチeを押して、希望する標準ピッチを設定します。
1回押すごとにインジケーターyの点滅位置が1ステップ(1Hz)ずつ移動します。
4.ピッチスイッチeを押す操作を止めた後、約2秒後に自動的にチューニングモードへ戻ります。
※パワースイッチqを“OFF”にするまで、設定された標準ピッチは“AUTO”、“MANL”いずれのモードでも
有効です。パワースイッチqを“OFF”から“AUTO”または“MANL”にすると、標準ピッチは 440 Hzにリ
セットさ れま す 。
標準ピッチ(A4)を一度セットし たら、あとは各弦(音名)とも、メータ ー rの中央(0)に針がくるようにチュー
ニングすればOKです。
図1
電池
残量不足
電池
残量OK
図2
■電池交換
●バッテリーチェック
パワースイッチを“OFF”から“AUTO”または“MANL”にした時、約
2秒間メーターにより電池の残量を表示します。この時、メーターの
指針が図1のようにBATTERYのバーより左側にある場合は電池が
消耗していますので、ただちに新しい電池と交換するか、当社指定の
ACアダプター(AC-05またはAC-320)をDC9Vジャック!0に接
続してご 使 用ください。
また、ご使用中にチューニングガイドの両方(W, Q)が点滅を始めま
したら、電池が消耗していますので、新し い 電 池と交換するか、当社
指定のACアダプター(上記)をご使用ください。
●電池交換の方法
図2のようにし て 電 池 を交 換します 。電池の+、−を間違えないよう
にしてください。
※電池を交換する時、または A C ア ダプターを接続する時には、必ず
パワースイッチqを“OFF”にしてから行なってください。
針が中央(0)にくるように
弾いた弦(音名)のインジケー
ターが点灯するように
Thank you for purchasing the YAMAHA YT-2100 Guitar/
Bass Auto Tuner.
Please read this manual thoroughly and keep it in a
safe place for future reference.
FCC INFORMATION (U.S.A.)
1. IMPORTANT NOTICE: DO NOT MODIFY THIS UNIT!
This product, when installed as indicated in the instructions contained in this manual, meets FCC
requirements. Modifications not expressly approved by Yamaha may void your authority, granted by
the FCC, to use the product.
2. IMPORTANT:
When connecting this product to accessories and/or another product use only high quality
shielded cables. Cable/s supplied with this product MUST be used. Follow all installation instructions.
Failure to follow instructions could void your FCC authorization to use this product in the USA.
3. NOTE:
This product has been tested and found to comply with the requirements listed in FCC Regula-
tions, Part 15 for Class ”B” digital devices. Compliance with these requirements provides a reasonable
level of assurance that your use of this product in a residential environment will not result in harmful
interference with other electronic devices. This equipment generates/uses radio frequencies and, if not
installed and used according to the instructions found in the users manual, may cause interference
harmful to the operation of other electronic devices. Compliance with FCC regulations does not guar-
antee that interference will not occur in all installations. If this product is found to be the source of
interference, which can be determined by turning the unit ”OFF” and ”ON”, please try to eliminate the
problem by using one of the following measures:
Relocate either this product or the device that is being affected by the interference.
Utilize power outlets that are on different branch (circuit breaker or fuse) circuits or install AC line filter/s.
In the case of radio or TV interference, relocate/reorient the antenna. If the antenna lead-in is 300 ohm
ribbon lead, change the lead-in to co-axial type cable.
If these corrective measures do not produce satisfactory results, please contact the local retailer
authorized to distribute this type of product. If you can not locate the appropriate, please contact
Yamaha Corporation of America, Electronic Service Division, 6600 Orangethorpe Ave, Buena Park, CA
90620
The above statements apply ONLY to those products distributed by Yamaha Corporations of America or
its subsidiaries.
THIS DIGITAL APPARATUS DOES NOT EXCEED THE “CLASS B” LIMITS FOR RADIO NOISE EMISSIONS FROM
DIGITAL APPARATUS SET OUT IN THE RADIO INTERFERENCE REGULATION OF THE CANADIAN DEPARTMENT
OF COMMUNICATIONS.
Bij dit produkt zijn batterijen geleverd. Wanneer
deze leeg zijn, moet u ze niet weggooien maar
inleveren als KCA.
■TUNING PROCEDURES
● Auto Tuning (AUTO)
In AUTO mode, the tuner will automatically select the note closest to
the tone input for tuning. This is convenient for tuning during musical
performances.
1. For electric guitars and basses, connect the guitar cord to the INPUT
jack i. (At this time, the OUTPUT jack o can be connected to an
amplifier in preparation for tuning during a performance.) For acoustic
guitars, place the guitar sound hole near the built-in microphone u.
*The built-in microphone u cannot be used when there is a plug in the
INPUT jack i.
2. Turn the power switch q to the “AUTO” position.
3. If desired, press the pitch switch e to select the standard A4 pitch.
(Refer to the Pitch Selection section for details.)
4. Pluck the string to be tuned. The appropriate indicator y will light
up for the tuning note. (Do not pluck two or more strings at the time.)
5. If the wrong indicator light is on, adjust the guitar tuning peg until the
correct light comes on.
6. Continue to adjust the tuning
peg until the VU meter r
needle rests in the middle (“0
cent”). If the note is flat, the
left tuning guide (W) will light.
If the note is raised, the right
tuning guide (Q) will light.
Adjust accordingly until both
tuning guides (W,Q) are lit.
At this point, the string is
correctly tuned.
7. Repeat steps 4 through 6 to tune the other strings.
● Manual Tuning (MANL)
In MANL mode, each note must be individually selected as needed.
This mode is most commonly used to tune instruments before musical
performances.
1. Similar to AUTO mode, connect the electric guitar or bass cord to
the INPUT jack i. For acoustic guitars, place the guitar sound hole
near the built-in microphone u.
2. Turn the power switch q to the “MANL” position.
3. If desired, press the pitch switch e to select the standard A4 pitch.
(Refer to the Pitch Selection section for details.)
4. Press the note switch w to select the desired tuning note. The
indicators y for the tuning notes will light in sequence (as shown in
the pattern below) each time the note switch is pressed.
6E →5A →4D →3G →2B →1E
5. Adjust the tuning peg until the VU meter r needle rests in the
middle (“0 cent”). If the note is flat, the left tuning guide (W) will
light. If the note is raised, the right tuning guide (Q) will light. Adjust
accordingly until both tuning guides (W,Q) are lit. At this point, the
string is correctly tuned.
6. Repeat steps 4 and 5 to tune the other strings.
GUITAR/BASS AUTO TUNER
YT-2100
OWNER’S MANUAL
■PRECAUTIONS
◆To prevent damage, do not use the tuner in the following locations:
• places where the unit will be in direct sunlight;
• places subject to temperature and humidity extremes;
• places that are sandy or dusty.
◆To power the tuner, use only a 6F22 or 006P 9V dry cell battery or
an optional YAMAHA AC-05UC or AC-320UC AC Adaptor. Other
power sources may damage the device.
*Before connecting the AC adaptor, make sure that the polarities of
the plug and the jack match ( – + ).
◆For maximum battery life, always be sure the tuner is turned OFF
when not in use.
◆To prevent possible damage due to leakage of battery fluid, remove
the battery from the tuner if it is not to be used for an extended
period of time.
◆Do not subject the tuner to strong physical shock or vibration. Do not
use excessive force on any of the parts.
◆Never use solvents such as benzine or thinner to clean the tuner.
Wipe clean with a soft, dry cloth.
u MICROPHONE
t TUNING GUIDES y INDICATORS
i INPUT JACK
o OUTPUT JACK
!0 DC 9V JACK
q POWER SWITCH
e PITCH SWITCH
w NOTE SWITCH
r VU METER
■COMPONENTS
■SPECIFICATIONS
Indicators : VU Meter, Indicator
LEDs,Tuning Guides
Tuning Notes : 6E, 5A, 4D, 3G, 2B, 1E
VU Meter Precision : ± 1 cent
Standard Pitch Range
: A4 = 438 Hz — 445 Hz
(1 Hz steps)
Added Function : Battery Check
Jacks : INPUT, OUTPUT, DC 9V
Power Source : 9V dry cell battery
(006P or 6F22) or YAMAHA
AC adaptor (AC-05UC or AC-
320UC)
Battery Life :Approx. 9 hours
Dimensions : 155 x 48.5 x 32.5 mm
(WxHxD) (6-1/8" x 1-15/16" x 1-1/4")
Weight : 159 g (5.6 oz) with battery
Accessory : 9V dry cell battery (6F22) x 1
*Specifications and external appearance are subject to change without
notice.
■BATTERY CHECK
For about 2 seconds after switching the power from “OFF” to “AUTO”
or “MANL”, the VU meter needle will indicate the charge remaining in
the battery. If the needle rests to the left of the battery check bar (refer
to Figure 1 below), the battery needs to be replaced.
As an additional check, if the battery runs low while the tuner is in use,
both tuning guide indicators (W,Q) will flash indicating that the battery
must be replaced.
For convenience, the tuner has a DC 9V jack; please use an optional
YAMAHA AC adaptor (AC-05UC or AC-320UC) wherever possible.
● Battery Change
The battery compartment is in the rear of the tuner. Remove the old
battery and replace it with a new one of the same type. Be careful to
connect the battery in the correct polarity.
*Always turn the power switch q to “OFF” before changing the battery
or connecting an AC adaptor.
(Figuare 2)(Figuare 1)
OKLOW
■PITCH SELECTION
Recently, it has become common to slightly raise the standard pitch
when tuning musical instruments. The standard pitch also depends on
the region and the era. To conform to the current standard and to
harmonize with other instruments, the standard pitch must be changed
from time to time.
■PITCH SELECTION METHOD
1. Turn the power switch q to the “MANL” or “AUTO” position.
2. Press the pitch switch e once to enter pitch selection mode. An
indicator y will flash at one of the standard pitch settings (A4: 438
— 445 Hz).
3. While the indicator y is flashing, press the pitch switch e. The
indicators y will flash in sequence (as shown in the pattern below)
each time the pitch switch is pressed. Each indicator y step represents
a 1 Hz change in standard pitch.
438 →439 →440 →441 →442 →443 →444 →445
4. Select the desired standard pitch. When the pitch switch e has not
been pressed for about 2 seconds, the tuner will automatically
return to tuning mode.
*Turning OFF the power switch q cancels the selected standard pitch.
When the power switch q is turned back on to the “AUTO” or “MANL”
position, the standard pitch automatically resets to A4: 440 Hz.
Adjust the tuning peg until the VU meter
needle rests in the middle (“0 cent”).
The appropriate indicator for the
plucked tuning note should lights up.
Nous vous remercions d’avoir porté votre choix sur l’ac-
cordeur automatique de guitare/basse YAMAHA YT-2100.
Nous vous prions de lire attentivement ce mode d’emploi
et de le conserver en lieu sûr pour toute référence future.
■MARCHE A SUIVRE
● Accord automatique (AUTO)
En mode AUTO, l’accordeur sélectionne automatiquement la note la
plus proche de la tonalité d’entrée pour réaliser l’accord. Ceci est
particulièrement commode pour accorder pendant une représentation.
1. Brancher le cordon de la guitare ou de la basse à la prise INPUT i
(la prise OUTPUT o peut alors être connectée à un amplificateur
afin de pouvoir accorder en cours de représentation). Dans le cas
d’une guitare acoutisque, placer l’ouverture près du micro intégré
u.
* Le micro intégré u ne peut pas être utilisé lorsque la prise INPUT i
est utilisée.
2. Mettre l’interrupteur d’alimentation POWER q sur la position “AUTO”.
3. Si besoin est, appuyer sur la touche PITCH e pour sélectionner la
hauteur standard A4 (se reporter à “Sélection de la hauteur” pour
plus de détails).
4. Pincer la corde à accorder. L’indicateur y approprié s’allume pour
la note d’accord (ne pas pincer plus d’une corde à la fois).
5. Si l’indicateur qui s’allume n’est pas le bon, accorder jusqu’à ce que
le bon indicateur s’allume.
6. Continuer à accorder jusqu’à
ce que l’aiguille du VU-mètre
r s’immobilise au milieu (“0
cent”). Si la note est plate, le
témoin d’accord gauche (W)
s’allume. Si la note est haute,
le témoin droit (Q) s’allume.
Accorder en conséquence
jusqu’à ce que les deux
témoins (W,Q) s’allument en
même temps. La corde est
alors correctement accordée.
7. Refaire les opérations 4 à 6 pour les autres cordes.
● Accord manuel (MANL)
En mode MANL, chaque note doit être sélectionnée individuellement
chaque fois que nécessaire. Cette méthode est la plus couramment
utilisée pour accorder un instrument avant une représentation.
1. Comme dans le cas du mode AUTO, brancher le cordon de la
guitare ou de la basse électrique à la prise INPUT i. Dans le cas
d’une guitare acoutisque, placer l’ouverture près du micro intégré
u.
2. Mettre l’interrupteur d’alimentation POWER q sur la position “MANL”.
3. Si besoin est, appuyer sur la touche PITCH e pour sélectionner la
hauteur standard A4 (se reporter à “Sélection de la hauteur” pour
plus de détails).
4. Appuyer sur la touche NOTE w pour sélectionner la note d’accord
souhaitée. Les indicateurs y de note d’accord s’allument l’un
après l’autre (dans l’ordre indiqué ci-après) à chaque pression de la
touche NOTE.
6E →5A →4D →3G →2B →1E
5. Accorder jusqu’à ce que l’aiguille du VU-mètre r s’immobilise au
milieu (“0 cent”). Si la note est plate, le témpoin d’accord gauche
(W) s’allume. Si la note est haute, le témoin droit (Q) s’allume.
Accorder en conséquence jusqu’à ce que les deux témoins (W,Q)
s’allument en même temps. La corde est alors correctement accordée.
6. Refaire les opérations 4 et 5 pour les autres cordes.
ACCORDEUR AUTOMATIQUE DE GUITARE/BASSE
YT-2100
MODE D’EMPLOI
■PRECAUTIONS
◆Afin de ne pas endommager l’accordeur ne pas l’utiliser dans des
endroits soumis aux conditions suivantes:
• plein soleil;
• humidité ou températures excessives;
• sable ou poussière.
◆Pour alimenter l’accordeur, utiliser une pile sèche 6F22 ou 006P de
9 volts ou un adaptateur secteur en option YAMAHA AC-05G ou AC-
320G.
*Avant de brancher, vérifier que la polarité de la fiche et celle de la
prise correspondent ( – + ).
◆Pour prolonger au maximum la durée de vie de la pile, toujours
mettre l’accordeur hors tension lorsqu’il n’est pas utilisé.
◆Pour prévenir tout endommagement éventuel de l’accordeur dû à
une fuite du liquide de la pile, enlever la pile lorsque l’accordeur ne
doit pas être utilisé pendant une période prolongée.
◆Ne pas soumettre l’accordeur à des chocs ou à des vibrations
importantes. Ne jamais le manipuler avec une force excessive.
◆Ne jamais utiliser de solvants, tels que de la benzine ou un diluant,
pour nettoyer l’accordeur. L’essuyer avec un chiffon propre et sec.
■FICHE TECHNIQUE
Indicateurs : VU-mètre, indicateurs à
LED, témoin d’accord
Notes d’accord : 6E, 5A, 4D, 3G, 2B, 1E
Précision du VU-mètre : ± 1 centième
Plage de hauteur standard
: A4 — 438 Hz à 445 Hz
(pas de 1 Hz)
Fonction supplémentaire
: Contrôle de la pile
Prises : INPUT, OUTPUT, DC 9V
Alimentation : Pile sèche de 9V
(006P ou 6F22) ou
adaptateur secteur
YAMAHA (AC-05G ou AC-320G)
Durée de vie de la pile :Env. 9 heures
Dimensions (L x H x P) : 155 x 48.5 x 32.5 mm
Poids : 159 g avec pile
Accessoires : Pile sèche de 9 V (6F22) x 1
* Les spécifications et l’aspect externe peuvent être modifiés sans aucun
avis.
Accorder jusqu’à ce que l’aiguille du VU-
mètre s’immobilise au milieu (“0 cent”).
L’indicateur correspondant à la note
d’accord pincée doit s’allumer.
LE PRESENT APPAREIL NUMERIQUE N'EMET PAS DE BRUITS RADIOELECTRIQUES DEPASSANT LES LIMITES
APPLICABLES AUX APPAREILS NUMERIQUES DE LA "CLASSE B" PRESCRITES DANS LE REGLEMENT SUR LE
BROUILLAGE RADIOELECTRIQUE EDICTE PAR LE MINISTERE DES COMMUNICATIONS DU CANADA.
■ORGANES
u MICROPHONE
t TEMOINS D’ACCORD
i PRISE D’ENTREE
o PRISE DE SORTIE
!0 PRISE DE 9 V CC
e TOUCHE DE HAUTEUR
y INDICATEURS
q INTERRUPTEUR D’ALIMENTATION
r VU-METRE
w TOUCHE DE NOTE
■CONTROLE DE LA PILE
Pendant environ 2 secondes après la mise sous tension, lorsque
l’interrupteur POWER q est mis sur “AUTO” ou “MANL”, l’aiguille du
VU-mètre indique la charge de la pile. Si l’aiguille vient se placer à
gauche de la barre de contrôle de la pile (voir la Figure 1 ci-dessous),
la pile doit être changée.
Par mesure de sécurité, si la pile devient trop faible pendant que
l’accordeur est en cours d’utilisation, les deux témoins d’accord (W,Q)
se mettent à clignoter pour indiquer que la pile doit être remplacée.
Pour des raisons de commodité, l’accordeur est pourvu d’une prise 9 V
CC; utiliser un adaptateur secteur YAMAHA (AC-05G ou AC-320G)
chaque fois que possible.
● Remplacement de la pile
Le logement de la pile est situé au dos de l’accordeur. Retirer la pile
usée et la remplacer par une pile neuve du même type. Faire très
attention de placer la pile en respectant les polarités.
*Toujours mettre q’interrupteur POWER 1 sur la position “OFF” avant
de remplacer la pile ou de connecter un adaptateur secteur.
(Figure 2)(Figure 1)
CORRECTBAS
■SELECTION DE LA HAUTEUR
Il est devenu habituel d’élever légèrement la hauteur standard pour
accorder un instrument musical. La hauteur standard varie également
selon les pays et les époques. Pour être conforme au goût du jour et
s’harmoniser avec d’autres instruments, la hauteur standard doit être
modifiée de temps en temps.
■MODE DE SÉLECTION DE LA HAUTEUR
1. Mettre l’interrupteur d’alimentation POWER q sur la position “AUTO”
ou “MANL”.
2. Appuyer une fois sur la touche PITCH e pour activer le mode de
sélection de hauteur. Un des indicateurs y correspondant à une
hauteur standard (A4: 438 à 445 Hz) clignote.
3. Pendant que l’indicateur y clignote, appuyer sur la touche PITCH
e. Les indicateurs y clignotent l’un après l’autre (dans l’ordre
indiqué ci-après) à chaque pression de la touche PITCH. Chaque
indicateur y représente une modification de la hauteur standard de
1 Hz.
438 →439 →440 →441 →442 →443 →444 →445
4. Sélectionner la hauteur standard souhaitée. Si la touche PITCH e
n’est pas sollicitée dans les 2 secondes environ, l’accordeur revient
automatiquement au mode d’accord.
*Le fait mettre l’interrupteur POWER q sur la position “OFF” annule
la hauteur standard sélectionnée. Lorsque l’interrupteur POWER q
est remis sur “AUTO” ou “MANL”, la hauteur standard A4: 440 Hz est
automatiquement rétablie
Vielen Dank für den Kauf des elektronischen Gitarren/
Baß-Stimmgeräts YT-2100 von Yamaha.
Bitte lesen Sie sich diese Anleitung vor Gebrauch durch
und bewahren Sie sie dann zur späteren Bezugnahme
an einem sicheren Ort auf.
■STIMMVORGANG
● Automatisches Stimmen
In der AUTO-Betriebsart wählt das Stimmgerät automatisch die dem
Eingabeton am nächsten liegende Note. Dies ist besonders praktisch
während Live-Konzerten.
1. Die E-Gitarre oder den Baß an die INPUT-Buchse i anschließen.
(Die OUTPUT-Buchse o kann zur Vorbereitung bereits mit einem
Verstärker verbunden sein.) Bei akustischen Gitarren das Schalloch
möglichst nahe an das Mikrofon u bringen.
*Bei beschalteter INPUT-Buchse i funktioniert das Mikrofon u nicht.
2. Den Betriebsschalter q in die Stellung AUTO schieben.
3. Falls gewünscht, mit der PITCH-Taste e die Bezugstonhöhe für
den Ton A4 wählen. (Einzelheiten, siehe unter Wahl der Bezugstonhöhe).
4. Die zu stimmende Saite anschlagen. Die entsprechende Notenanzeige
y leuchtet dadurch auf. (Keinesfalls mehr als eine Saite anschlagen).
5. Falls die falsche Notenanzeige aufleuchtet, am Stimmwirbel der
Gitarre drehen, bis die korrekte Note angezeigt wird.
6. Den Stimmwirbel weiterdrehen,
bis der Zeiger des VU-Meters
r in der Mitte (0 Cent) steht.
Falls der Eingabeton zu niedrig
ist, blinkt der linke Stimmzeiger
(W) auf. Bei zu hohem
Eingabeton spricht der rechte
Stimmzeiger (Q) an. Die Saite
stimmen, bis beide
Stimmzeiger (W,Q) gleichzeitig
leuchten. Damit hat die Saite
die korrekte Stimmung.
7. Die Schritte 4 bis 6 zum Stimmen der restlichen Saiten wiederholen.
● Manuelles Stimmen (MANL)
In der MANL-Betriebsart müssen die Noten zum Stimmen einzeln
gewählt werden. Diese Stimmbetriebsart empfiehlt sich besonders vor
Konzerten.
1. Wie beim AUTO-Stimmvorgang die E-Gitarre oder den Baß an die
INPUT-Buchse i anschließen. Bei akustischen Gitarren das Schalloch
möglichst nahe an das Mikrofon u bringen.
2. Den Betriebsschalter q in die Stellung MANL schieben.
3. Falls gewünscht, mit der PITCH-Taste e die Bezugstonhöhe für
den Ton A4 wählen. (Einzelheiten, siehe unter Wahl der Bezugstonhöhe).
4. Mit der NOTE-Taste w die zu stimmende Note wählen. Die Taste so
oft antippen, bis die Notenanzeige y für die zu stimmende Noten
aufleuchtet.
6E →5A →4D →3G →2B →1E
5. Den Stimmwirbel weiterdrehen, bis der Zeiger des VU-Meters r in
der Mitte (0 Cent) steht. Falls der Eingabeton zu niedrig ist, blinkt
der linke Stimmzeiger (W) auf. Bei zu hohem Eingabeton spricht der
rechte Stimmzeiger (Q) an. Die Saite stimmen, bis beide Stimmzeiger
(W,Q) gleichzeitig leuchten. Damit hat die Saite die korrekte Stimmung.
6. Die Schritte 4 bis 5 zum Stimmen der restlichen Saiten wiederholen.
ELEKTRONISCHES GITARREN/BASS-STIMMGERÄT
YT-2100
BEDIENUNGSANLEITUNG
■VORSICHTSMASSNAHMEN
◆Das Gerät vor den nachfolgenden Einflüssen schützen, um Schäden
zu verhindern:
• Direkte Sonneneinstrahlung
• Extreme Temperaturen oder Feuchtigkeit
• Übermäßiger Staub.
◆Zum Betrieb des YT-2100 nur eine 9 V Batterie der Kennung 6F22
oder 006P bzw. den getrennt erhältlichen Yamaha Netzadapter AC-
05G oder AC-320G verwenden. Andere Stromquellen können zu
Schäden führen.
*Vor dem Anschluß des Netzadapters sicherstellen, daß die Polarität
des Steckers mit der der Buchse übereinstimmt ( – + ).
◆Das Gerät nach Gebrauch stets ausschalten, um die Batterie zu
schonen.
◆Vor längerem Nichtgebrauch die Batterie entfernen, um Schäden
durch womöglich lecke Batterien zu verhindern.
◆Vor Stoß und Schlag schützen. Keinesfalls mit Gewalt handhaben.
◆Zum Reinigen keinesfalls Benzin oder Verdünner verwenden. Mit
einem trockenen, sauberen Tuch abwischen.
Bescheinigung des Importeurs
Hiermit wird bescheinigt, daß der / die / das
GUITAR/BASS AUTO TUNER Typ : YT-2100
(Gerät, Typ, Bezeichnung)
in Übereinstimmung mit den Bestimmungen der
VERFÜGUNG 1046/84
(Amtsblattverfügung)
funkentstört ist.
Der Deutschen Bundespost wurde das Inverkehrbringen dieses Gerätes angezeigt und die
Berechtigung zur Überprüfung der Serie auf Einhaltung der Bestimmungen eingeräumt.
YAMAHA Europa GmbH
Name des Importeurs
無償修理規定
1. 正常な使用状態(取扱説明書、本体貼り付けラベルなどの注意書に従った使用状態)で故障した場合には、
お買上げの販売店が無料修理を致します。
2. 保証期間内に故障して無料修理をお受けになる場合は、お買上げの販売店に商品と本書をご持参のうえご
依頼ください。
3. ご贈答品、ご転居後の修理についてお買上げ販売店にご依頼できない場合荷は、最寄りのヤマハ電気音響
製品アフターサービス拠点にお問い合わせください。
4. 保証期間内でも次の場合は有料となります。
(1) 本書のご提示がない場合。
(2) 本書にお買上げの年月日、お客様、お買上げの販売店の記入がない場合、及び本書の字句を書き替え
られた場合。
(3) 使用上の誤り、他の機器から受けた障害または不当な修理や改造による故障及び損傷。
(4) お買上げ後の移動、輸送、落下などによる故障及び損傷。
(5) 火災、地震、風水害、落雷、その他の天災地変、公害、塩害、異常電圧などによる故障及び損傷。
(6) 消耗部品の交換。
(7) お客様のご要望により出張修理を行なう場合の出張料金。
5. この保証書は日本国内においてのみ有効です。
This warranty is valid only in Japan.
6. この保証書は再発行致しませんので大切に保管してください。
※この保証書は本書に示した期間、条件のもとにおいて無料修理をお約束するものです。したがってこの保証
書によってお客様の法律上の権利を制限するものではありませんので、保証期間経過後の修理などについ
てご不明の場合は、お買上げの販売店、ヤマハ電気音響製品アフターサービス拠点にお問い合わせくださ
い。
■BATTERIEPRÜFUNG
Ungefähr 2 Sekunden nach Einschalten (AUTO oder MANL) zeigt der
VU-Meter die Batterieladung an. Falls der Zeiger links am BATTERY-
Balken steht (siehe Abb. 1 unten), sollte die Batterie ausgetauscht
werden.
Außerdem blinken beide Stimmzeiger (W,Q) bei schwach werdender
Batterie gleichzeitig, um beim Stimmen auf einen notwendigen
Batterieaustausch hinzuweisen.
Das YT-2100 verfügt außerdem über eine DC 9V Buchse, damit ein
getrennt erhältlicher Yamaha Netzadapter (AC-05G oder AC-320G)
zum Betreiben des Geräts verwendet werden kann.
● Batteriewechsel
Das Batteriefach befindet sich auf der Rückseite. Die alte Batterie
durch eine neue des gleichen Typs austauschen. Beim Anschließen
der Batterie auf korrekte Polung achten.
*Vor dem Wechseln der Batterie den Betriebsschalter q unbedingt auf
OFF stellen.
(Abb. 2)
(Abb. 1)
OKNiedrig
■BAUTEILE
t Stimmzeiger y Notenanzeigen
!0 Gleichspannungs-
buchse (DC 9V)
u Mikrofon (MIC.)
qBetriebsschalter
(AUTO/MANL/OFF)
w Notenschalter (NOTE)
e Tonhöhenschalter (PITCH)
r VU-Meter
■TECHNISCHE DATEN
Anzeigen : VU-Meter, LED-
Anzeigen, Stimmzeiger
Stimmnoten : 6E, 5A, 4D, 3G, 2B, 1E
VU-Meterpräzision : ± 1 Cent
Bezugstonhöhenbereich: A4= 438 Hz — 445 Hz
(1 Hz Schritte)
Zusatzfunktion : Batterieprüfung
Buchsen : INPUT, OUTPUT,
DC 9V
Stromversorgung : 9V Trockenzelle
(006P oder 6F22) oder
YAMAHA Netzadapter (AC-05G oder AC-320G)
Batterie-Lebensdauer :ca. 9 Stunden
Abmessungen (WxHxD) : 155 x 48.5 x 32.5 mm
Gewicht : 159 g mit Batterie
Zubehör : 9V Batterie (6F22) x 1
* Änderungen an Daten und Design vorbehalten.
■WAHL DER BEZUGSTONHÖHE
In der letzten Zeit wird die Bezugstonhöhe und damit die Tonlage von
Instrumenten oft geringfügig angehoben. Die Bezugstonhöhe unterscheidet
sich von Region zu Region und Ära zu Ära. Um ein Harmonisieren mit
anderen Instrumenten zu erlauben, kann die Bezugstonhöhe und die
Tonlage des YT-2100 modifiziert werden.
■WAHL DER BEZUGSTONHÖHE
1. Den Betriebsschalter q in die Stellung MANL oder AUTO schieben.
2. Durch Drücken von PITCH e auf Tonlagenwahl schalten. Eine
Anzeige der Bezugstonhöhe (A4: 438 — 445 Hz) blinkt dadurch.
3. Während Blinkens der Anzeige y, PITCH e so oft antippen, bis die
gewüschte Tonlagenanzeige für Ton A aufleuchtet (die Reihenfolge
ist unten gezeigt). Jede Anzeige repräsentiert hierbei eine Änderung
der Bezugstonhöhe um 1 Hz.
438 →439 →440 →441 →442 →443 →444 →445
4. Die gewünschte Tonlage wählen. WIrd die PITCH-Taste e ca. 2
Sekunden lang nicht betätigt, schaltet das YT-2100 automatische
auf Stimmbetrieb.
*Durch Ausschalten q wird die gewählte Tonlage rückgestellt. Beim
Einschalten (AUTO oder MANL) wird automatisch die Standardtonhöhe
von A4=440 Hz vorgewählt.
oAusgangsbuchse
(OUTPUT)
iEingangsbuchse
(INPUT)
Den Stimmwirbel weiterdrehen, bis
der Zeiger des VU-Meters in der
Mitte (0 Cent) steht.
Die Notenanzeige der
angeschlagenen Saite muß
leuchten.
