Yanfeng Visteon Automotive Electronics N18 Car Radio With Bluetooth User Manual USER A MANUAL N18 FCC
Yanfeng Visteon Automotive Electronics Co.,Ltd Car Radio With Bluetooth USER A MANUAL N18 FCC
Users Manual

User Quick Reference Guide
Product Name
Car Radio with Bluetooth
Product Models
N18
Product description
Car Radio with Bluetooth Module is equipment installed in a car to provide in-car entertainment
and information for the vehicle occupants. It consisted of a simple FM/AM/DAB radio, media
players and Bluetooth module. User can listen to FM/AM, DAB, USB and AUX audio by using the
equipment.
Technical Parameters
The supply voltage range for Nominal mode is from 9V to 16V.
The typical current consumption is less than 2A
Radio Frequency Bands:
BT: 2400~2483.5MHz
FM: 87.5-108.00MHz
AM: 522-1611KHz
DAB: 170-240MHz
Software Version: V4.1.3
Hardware Version: VPJNMF18C815BC
Manufacturing Factory Information
Manufacture:
Yanfeng Visteon Automotive Electronics Co.,Ltd.
Address:
300 Minolta Road Songjiang County Shanghai, China

User Quick Reference Guide
The detailed use guide for this device could be found in car user manual too.
On_User Status
When engine on, push POWER button will switch on radio to On_User Status
Temp_On Status
When engine off, push POWER button will switch on radio to Temp_On Status for 20 minutes.
After 20 minutes, radio will power off automatically.
OFF_User Status
When the radio is power on, one push of POWER button will change the radio to OFF_User
Status. The standby screen illuminates with clock. The radio’s BT link is no more active. Unit will
switch on if POWER button is pressed.
Radio Volume Adjustment
Increase Volume
Rotate on left knob will adjust radio volume level. Radio LCD will display the current volume level.
Rotate clockwise will increase radio volume.
Decrease Volume
Rotate anti-clockwise will decrease radio volume.
Mute and Vol 00 Status
When volume is decreased to 0 by rotating POWER button anti-clockwise (Vol 00), audio will be
muted and source will not have paused.
FM/AM Operation
Band Select
Short press RADIO button will switch to tuner mode.
Frequency Store
Store in Radio Source Screen
When in radio source screen, long press on preset number button (1-6) will store the current
station into corresponding preset.
Radio will output Roger Beep to indicate.
Store Presets in List Mode
When in list screen, long press on preset number button (1-6) will store the selected station to the
corresponding preset but not switch to it.
Radio will output Roger Beep to indicate.
Frequency Recall
Short press on preset number button will recall the preset station that stored in the button
Manual Tune
When in radio source screen, short press on <</>> button or Rotate the right knob will decrease /
increase the frequency in a step of 0.05MHz(FM) or 1KHz(AM).
Auto seek
When in radio source screen, long press on <</>> button will start continuous frequency scrolling
until the
button is released, and then tuner stops on the next/previous station with good field strength.

User Quick Reference Guide
Radio Stations List
Update FM list
Long press on RADIO button will update FM list.
List can also updated by SETUP.
Browse FM list and select station
When in radio source screen, rotate right knob or press it will enter FM list.
Then rotate right knob to browse the list and press it to select the station.
PS Name Display
If available, radio unit will display the radio’s PSNAME (Program Service Name). If it is not, radio
unit will display
frequency.
TA(Traffic Announcement)
When a traffic announcement comes in, the radio will display FM/DAB TA Screen. TA is played
automatically.
Press BACK button will exit TA.
Media Operation
USB/iPod Play Operation
If the radio is not in media mode, short press MEDIA button will switch to media mode.
Media Source Select
Short press MEDIA again
Track Up/Down
Short press on >> button will play the next track.
If current track play time <=3 sec, short press on << button will play the previous track.
If current track play time >3 sec, short press on << button will start to play from current track
beginning.
Fast Forward/Rewind
Long press <</>> button will play fast forward/rewind.
Browsing List Operation
When in music play screen, short press or rotate on the right knob will enter the browsing list.
Rotate on the right knob to choose one song and press it to play.

User Quick Reference Guide
When in browsing list, press BACK button will display the upper level menu on the screen,
or if the current folder is the root folder, Press BACK button will display the music play screen.
Quick Search of Browsing List
When in music play screen, press on preset #6 will start quick search feature.
Rotate on the right knob clockwise will change the initial from A
-Z and anti-clockwise will change from 9-0.
Press on the right knob will display songs beginning with selected letter.
Track ID3 Information Display
Select Information to Display
When in media play screen, short press DISP button, radio will display the track’s ID3 information in order:Artist
=>Album =>Play time => Artist…
Full Screen Display
When in media play screen, long press DISP button, radio will display the track’s ID3 information full screen.
AUX Operation
Multiple presses on MEDIA button to select AUX audio source.
In AUX mode, track up/track down/folder up/ folder down/fast forward/fast rewind/mix/
repeat operations will not be enabled.
Bluetooth(BT)Audio Operation
Devices not Supporting Browsing List or ID3 Display
In any menu, multiple presses on MEDIA button to change to BT audio source.
When cell phone has connected to the radio and supports A2DP profile,
Bluetooth audio can be selected.
If the BT device does not support browsing list or ID3 display, the BT audio screen will be:
Devices Supporting ID3 Display but not Browsing List
For devices that support ID3 display function, the BT audio screen will be:
If the device does not support Browsing list, the function of right knob will not be available.
Track up/down, Fast Forward/Rewind are still available.
Devices Supporting Browsing List and ID3 Display
If the device supports both browsing list and ID3 display, rotate on the right knob will enter
and browse the browsing list the same as the connected device.
When the radio is in the browsing list screen, rotate the right knob will move the highlight focus and browse the
list.
Bluetooth(BT)Telephone Operation
BT Menu
BT OFF Statues
When BT is OFF, press on TEL button will enter Bluetooth (BT) telephone menu with only two options: Settings,
Bluetooth.
Press on “Settings” option will enter Volume and Ringtone settings.
Press on BACK button will go back to the BT telephone menu.
When in BT telephone menu, Press on “Bluetooth” option will enter Bluetooth ON/OFF screen.

User Quick Reference Guide
BT ON Status but not connect the phone
If BT is ON and no BT device is connected to the radio, short press on TEL button will enter BT telephone menu
with the following screen.
The following operation item will be displayed in the menu:
Scan devices
Pair device
Settings
Bluetooth
These operations will be explained in the following chapters.
BT ON and Connect device status
If BT is ON and there is BT device connected to the radio, short press on TEL button will enter BT telephone
menu with the following screen.
The following operation item will be displayed in the menu:
Call List
Phonebook
Dial Number
Scan devices
Pair device
Sel. Device
Del. Device
Settings
Bluetooth
These operations will be explained in the following chapters.
Devices Connections
Devices Scanning
When BT in ON, select “Scan for Devices” will start BT devices scanning and the radio will display the following
screen.
When in “Search for BT Devices” screen, press on BACK button will cancel searching phone and go back to BT
phone menu.
If no device is founded, the screen will display as follows:
Or the screen will display:
Rotate and press the right knob to choose the device you want to pair on the list of BT Devices,the radio will
start pairing and display wait screen.
The password confirm screen will be either the following screen if the phone supports secure simple pairing
Or the password confirm screen will be:
Enter pin on the BT device to start pairing.
Timeout of entering PIN after 60 seconds will return to pair device menu.
Pairing in progress screen is as followed:
If the connection is interrupted or pairing timed out, pairing will fail.
Or on successful pairing, the radio will start connecting

User Quick Reference Guide
If the BT Device is not supported by the radio, or the connection is interrupted, or timed out, the connection will
fail.
Or after successful paring and connecting, the device will be connected.
Devices Pairing
In BT telephone menu, select “Pair device” to pair device.
If the radio is already paired five devices, it reaches the max number of paired devices.
In that case, the pairing will not start immediately and the following screen will be displayed:
When on the Max Device screen, press the right knob to enter Max Devices Question screen:
Choose YES on the question will delete a device, which will be explained in CH5.5.2.4.
Choose NO on the question will quit deleting and return to the main BT telephone menu.
If the radio does not pair max devices, select on “Pair device” will start device pairing and display either the
following screen.
Or the following screen:
Press on BACK button when cancel searching phone and return to BT phone menu.
Or after entering or confirming paring code, pairing starts. The result is the same as described in CH5.5.2.1.
Devices Select
In BT telephone menu, select “Sel. device ” to see list of paired devices.
Icons located near of the device name shows the function that the device supported:
for phone
for audio device(A2DP)
for phone with audio capability
Nothing displayed for BT Devices without HFP or A2DP.
Select one device to start connecting. The connection result is shown on the screen as described in CH5.5.2.1.
Devices Delete
In BT telephone menu, select “Del. device ” will display the paired devices.
Select the device you want to delete, and choose YES or NO to confirm or quit deleting.
Press YES to delete the device. And the radio will display the following screen.
After 3 seconds, the radio will return to BT telephone menu.
Call Operation
Call List
If telephone is connected, press TEL button will enter BT telephone menu like the following screen.
Press the right knob to enter the call list.
Rotate the right knob and push it to see Dialed/ Received /Missed list.
Press the right knob or the TEL button will call the person selected in the Dialed/Received/Missed list.
Phonebook
Download Phonebook
The phonebook will be automatically downloaded right after the device is connected to the radio.
Anytime you want to update the phonebook, with BT device connected, press on TEL button to enter the BT
telephone menu and select “Settings” option.

User Quick Reference Guide
Select “PB download” option to start downloading phonebook.
After 3 seconds, the screen will return to previous Audio source screen.
Once PB download is completed, radio will display the pop-up: "Phonebook Downloaded" with 3 seconds and
then return to previous audio source screen.
Browse Phonebook
In the BT telephone menu, select “Phonebook” option to enter phonebook.
If the phonebook is empty, the radio displays screen as following:
Or the radio will display phonebook screen.
Select the contact’s name to see his phone numbers.
The radio will display either of the following two screens:
Press on the right knob will call the selected phone number.
Select on END will quit calling.
Dial Number
When in BT telephone menu, select “Dial Number” option to start dialing
When in the dialing screen, rotate the right knob and push it to dial number and select CALL to call.
Backspace (arrow) is used to delete the number input latest.
Calls Incoming
Anytime a call comes in, the screen will display as follows.
Rotate the right knob and press it on the incoming call screen to answer/on hold/reject the call.
The rejected call screen as the following will be displayed for 3 seconds and then the radio will return to current
audio source.
The on hold screen is as the following:
Select to on the on hold screen to answer the incoming call or to reject the call.
When call is answered, radio will display call screen as following:
Rotate the right knob and press on it will end/on hold/handset the call or dial number.
Select on the call screen to end the incoming call.
Select on the call screen to change the incoming call to private mode, and the screen will be as following:
Select on “Handsfree” will return to handsfree mode and the screen will return to call screen.
Select on call screen to enter DTMF screen during the call.
Rotate the right knob to select the number characters and press it to enter number and press BACK button to
return to call screen.
2nd Incoming Call
If a second call comes in, radio will display as follows when in the incoming call screen:
Select to reject the second call and the radio will return to the first call screen.
Select to answer the second call, and the first call will be held on.
Select on call 2 screen to end the second call.
The screen will display the call ended screen temporally and then go back to call 1 screen.
Select on 2nd incoming call screen will change to the first incoming call screen and hold on the second incoming
Select will return to the second call and on hold the first call.

User Quick Reference Guide
Bluetooth Settings
Ring Volume
When the radio is on BT telephone menu, select “Settings” to enter Bluetooth settings menu.
Then select “Volume” option to enter volume-setting menu to adjust default volume of ringtone and call.
Rotate and push the right knob to choose Ringtone option in the volume-setting menu.
And then rotate the right knob anti-clockwise to decrease volume of ringtone or clockwise to increase.
The volume scales will change correspondingly.
Ringtone voice can also be adjusted by left knob when one call comes in.
Call Volume
Choose “Ongoing” option on the volume-setting menu to adjust volume of call. Rotate anti-clockwise to
decrease and clockwise to increase.
Call volume can also be adjusted by left knob during the phone call.
Ringtone Mode
In Bluetooth settings menu, select “Ringtone” option to choose the output device of ringtone.
Bluetooth ON/OFF
Press TEL button to enter BT (Bluetooth) telephone menu. And then choose “Bluetooth” option to turn on/turn
off Bluetooth.
Audio/Setup
Audio Settings
Press SETUP button to enter Setup menu
Select “Audio” option in Setup menu to enter Audio Setup menu.
Select ”Sound” option in the Audio Setup menu to adjust sound effect.
Rotate the right knob and press it to choose the effect you want to adjust in the Sound Menu
screen.
Then rotate the right knob to increase or decrease the value of selected item.
Press the button to set to different aux level in the AUX in screen. Radio will recall the new aux level
next time it
enters AUX In mode.
Noise will increase along with the speedup. Speed volume function may increase volume level
automatically to
equalize the noise increase.
Select “Speed Volume” option in Audio Setup menu to adjust its default volume level.
Rotate the right knob anti-clockwise/clockwise to decrease/increase the speed volume.
Select “Bass Boost” option in Audio Setup menu to turn on/off bass boost.
Select “Audio Default” option in Audio Setup menu; choose “Yes” to set the radio to default audio
settings.
Choose “Yes” option to set all audio options to default, or “No” to quit and return to the previous
menu.

User Quick Reference Guide
Clock Settings
In SETUP menu, select “Clock” option to enter Clock Setup menu
Select “Set time” option in Clock Setup menu to start setting time.The radio will show set clock screen.
Rrotate the right knob to adjust hour when the Hour text is flashing.
Then press the right knob to confirm and switch to set minute screen.
Rotate the right knob to adjust minute when the Minutes text is flashing.
Then press right knob to confirm and the radio will return to Clock Setup menu.
“ON/OFF” option in Clock Setup menu decides the clock display.
When the option is ON status, the clock shows on the screen whether the radio is On_User Status or
Off_User
Status.
When the option is OFF status, the clock doesn’t show on the screen whether the radio is On_User
Status or
Off_User Status.
“Clock Format” option decides the format of clock displayed on the screen. Rotate the right knob and
press it to
choose am/pm format or 24hr format.
The clock time from 0:00 to 11:59 in 24hr mode is displayed as 0:00am to 11:59am.
The clock time from 12:00 to 23:59 in 24hr mode is displayed as 0:00pm to 11:59 pm in am/pm mode.
Radio Settings
In SETUP menu, press “Radio” option to enter Radio Setup.
Enter “TA” option in the Radio setup menu to turn on/off TA function.
Choose ON to turn on TA, and TA icon displays on the screen.
Choose OFF to turn off TA, and TA icon will not display on the screen.
Enter “DAB Interrupt” option in the Radio Setup menu to choose DAB’s interrupt events.
Language Settings
Enter “Language” option in Setup Menu to select the language of the radio menu.
Restrictions on putting into service
Ensure that this device can be operated in at least one member state without infringing applicable
requirements on use of radio spectrum.
Installation instruction
Since this device will not sales to consumer directly, but will to car manufactory. So we will not provide
the installation instruction to consumer.
DAB(
((
(Digital Radio)
))
)Operation
DAB Band Select
Short press on RADIO button will switch to DAB1 or DAB2.
Radio Text Display
Press DISP button to display DAB radio text.

User Quick Reference Guide
Browse EPG List
Scroll the DAB menu to “EPG” option if available; Push the right knob to enter EPG list screen.
Scroll to one EPG radio; push the right knob to select. And program list will show on the screen
Intellitext Display
Select “Intellitext” option on DAB menu to enter Intellitext 1st level Screen.
Select one option by pushing the right knob, e.g. “News” to enter Intellitext 2nd level Screen.
Select one option, e.g. “Businesss” to see the full story.
User Quick Reference Guide
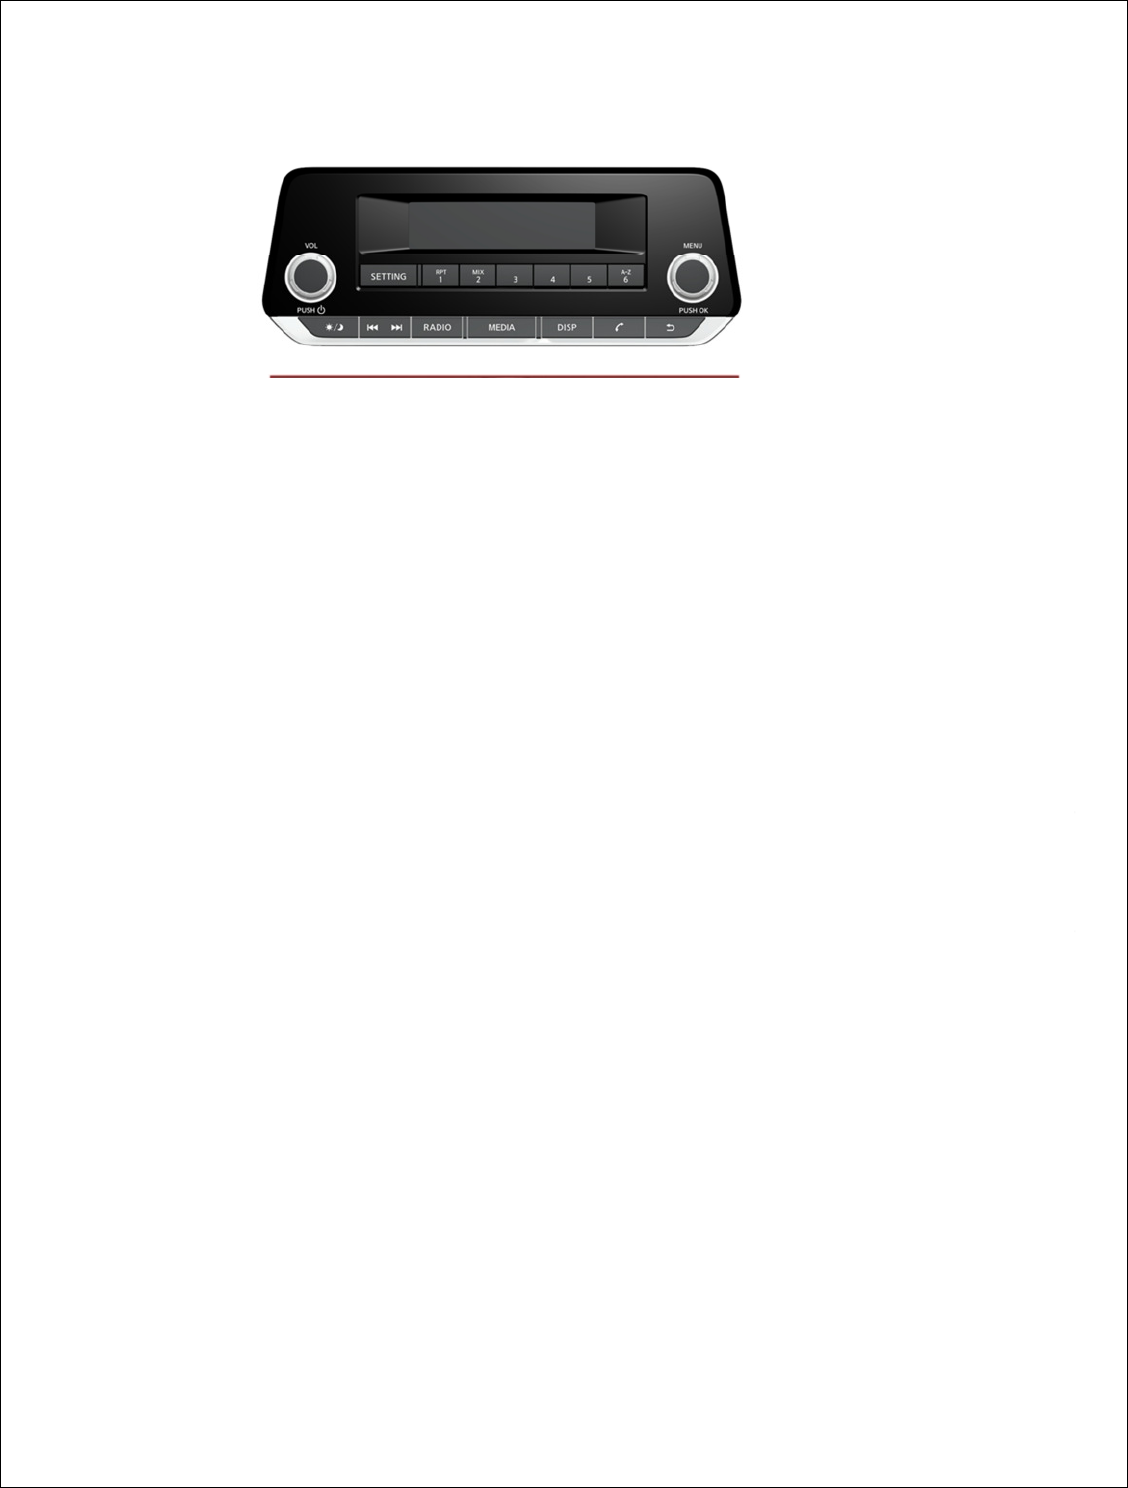
Button Usage Overview
Button 1~6:
Short press: recall a preset station.
Long press: save a radio station.
DISP button:
Enable Text function
Radio Button:
Short Press: Select the radio waveband source: FM1, FM2, DAB1, DAB2, AM.
Long Press: Update radio list.
Day/Night Button: Change the Da/Night mode
Left Knob Rotation: Volume change
Left Knob Push: Power ON/OFF
Right Knob Rotation: Item scroll
Right Knob Push: Item Select
Media Button:
Select the desired audio source USB1 → iPod → Bluetooth → AUX
SETTING button:
Enter/Exit SETUP menu.
TEL button:
Enter/Exit Tel menu.
Back button:
Back to last screen.
|<< and >>| Button:
Short Press:
- play the previous/next track.
- Increase/decrease the frequency in steps of 0.05MHz/1KHz.
Press and hold:
- Fast forward /rewind on a track of MP3 USB/iPod/iPhone
Play Mode
Repeat Play
Short press preset #1, radio will play current track repeatedly and display RPT icon on the screen.

User Quick Reference Guide
MIX Play
When the radio changed to MIX play mode, it will stop the current play and randomly play another
track. Then the radio will play all the tracks in random order and display MIX icon on the screen.
Select Play Mode
Short press on preset #1 will turn on RPT mode. Short press on preset #2 will turn on MIX mode.
Press again on the preset button will revert to normal play mode
Note
No sufficient ventilation distance needed
The use of apparatus: in tropical and moderate climates
Media Players Supported
The radio supports USB speed from low (1,5 Mbps) up to high speed (480 Mbps).
Connections to USB2.0 or USB OTG compliant devices up to high speed are supported. Radio
supports Mass
Storage Class Device – subclass 06 “SCSI Transparent”.
Radio supports device formatted in FAT (FAT16 and FAT32).
Radio supports device capacity up to the limitation defined in the FAT format specification. For
information only,
FAT32 formatted devices are limited to 2 Terabytes.
Radio supports all devices supporting Apple Accessory Protocol on USB link. It includes (and not
limited to):
- iPod Generation 5 devices
- iPod Classic I and II (Generation 6 and 7)
- iTouch Generation OS 1, 2, 3, 4 and next
- iPhone Generation OS 1, 2, 3, 4 and next
- iPod Nano (1G, 2G, 3G …)
- IPad 1, 2 and 3
Media Formats Supported
The radio supports media files only with the following file
extensions: .mp3, .wma, .acc, .m4a, .mp4.

User Quick Reference Guide
WARNING
1 Please note that changes or modifications not expressly approved by the party responsible for
compliance could void the user’s authority to operate the equipment.
2 Note: This equipment has been tested and found to comply with the limits for a Class B digital
device, pursuant to part 15 of the FCC Rules. These limits are designed to provide reasonable
protection against harmful interference in a residential installation. This equipment generates,
uses and can radiate radio frequency energy and, if not installed and used in accordance with
the instructions, may cause harmful interference to radio communications. However, there is
no guarantee that interference will not occur in a particular installation. If this equipment does
cause harmful interference to radio or television reception, which can be determined by turning
the equipment off and on, the user is encouraged to try to correct the interference by one or
more of the following measures:
—Reorient or relocate the receiving antenna.
—Increase the separation between the equipment and receiver.
—Connect the equipment into an outlet on a circuit different from that to which the receiver is
connected.
—Consult the dealer or an experienced radio/TV technician for help.