Yifang Digital Technology M1220KWP 2 in 1 PC User Manual
Shenzhen Yifang Digital Technology Co., Ltd. 2 in 1 PC
User Manual

1
Safety Precautions
Do not subject the device to severe impact or drop it from heights.
Do not use the device in extreme hot or cold, dusty or damp conditions. Do not
expose it to direct sunlight.
Avoid using the device near strong magnetic fields.
Normal functioning of the product may be disturbed by ESD. If so, simply reset
and restart the device following the instruction manual. During file transmission,
please handle with care and operate in a static-free environment.
Keep the device away from water and other liquids. In the event that water or
other liquids enter the device, power off the product immediately and clean the
device.
Do not use chemicals to clean the device in order to avoid corrosion. Clean it
with a dry cloth.
Do not install this equipment in a confined space such as a book case or similar
unit. The ventilation should not be impeded by covering the ventilation openings
with items such as newspaper, table-cloths, curtains etc.
No naked flame sources, such as lighted candles, should be placed on the
apparatus.
Attention should be drawn to environmental aspects of battery disposal.
Use the apparatus in moderate climates.
We are not responsible for damage or lost data caused by malfunction, misuse,
modification of the device or battery replacement.
Do not attempt to disassemble, repair or modify the product. This will invalidate
the warranty.
If the device will not be used for an extended period of time, please charge the
battery at least once per month to maintain battery life.
Charge the battery if:
a) The battery level icon displays (An empty battery)
b) The device powers off automatically when restarted.
c) There is no response when pressing keys with keys unlocked and battery full.
Do not interrupt the connection when the device is being formatted or
transferring files. Otherwise, data may be corrupted or lost.
When the device is used as a portable HD, please use only per the instructions.
Otherwise, permanent data loss could occur.
Please use and install data using the attachments/accessories provided and only
according to the manufacturer’s instruction.
Please refer to the information on the bottom of the device for electrical and
safety information before installing data or operating the device.
To reduce the risk of fire or electric shock, do not expose this device to rain or
moisture. The device should not be exposed to dripping or splashing. Never
place objects filled with liquids, such as vases, on the device.
There is danger of explosion if the battery is replaced incorrectly. Replace only
with the same or equivalent type.
2
The battery (battery or batteries or battery pack) should not be exposed to
excessive heat such as sunlight, fire or the like.
Please follow responsible procedures for battery disposal.
If the power adaptor disconnected from the device, the device will remain
operable as long as the battery has sufficient charge.
The power adaptor is a CLASS II apparatus with double insulation, and no
external ground is provided.
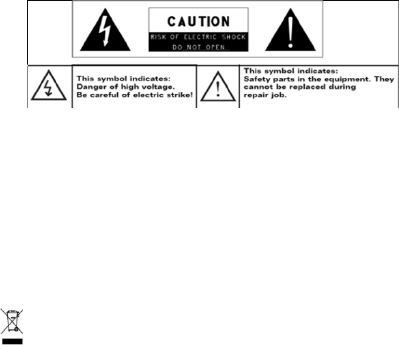
Safety symbol explanation:
- The lightning flash with arrowhead symbol within an equilateral triangle is
intended to alert the user to the presence of non-insulated “dangerous
voltage” within the product’s enclosure that may be of sufficient magnitude
to constitute a risk of electric shock.
- To reduce the risk of electric shock, do not remove the cover (or back) as
there are no user-serviceable parts inside. Refer servicing to qualified
personnel.
- The exclamation point within an equilateral triangle is intended to alert the
user to the presence of important operating and maintenance instructions in
the literature accompanying the device.
- Correct Disposal of this product. This marking indicates that this
product should not be disposed of with other household waste in the EU. To
prevent possible harm to the environment or human health from
uncontrolled waste disposal, recycle it responsibly to promote the
sustainable reuse of material resources. To dispose of your used device,
please use the return and collection systems available in your area or
contact the retailer where the product was purchased. They can take this
product for safe environmental recycling.
Note: For indoor use only.
CE in which countries where the product may be used freely: Germany, UK, Italy,
Spain, Belgium, Netherlands, Portugal, Greece, Ireland, Denmark, Luxembourg,
Austria, Finland, Sweden, Norway and Iceland.

3
Listening Cautions
This product respects the current regulations for limiting the output volume of
consumer audio devices to a safe level. By listening to your device with
headphones or earbuds at high volumes, you run the risk of permanent damage
to your ears. Even if you get used to listening at high volumes and it seems
normal to you, you still risk the possibility of damaging your hearing. Reduce the
volume of your device to a reasonable level to avoid permanent hearing damage.
If you hear ringing in your ears, reduce the volume or shut off your device. This
device has been tested with the supplied earphones. In order to preserve your
hearing, it is advised that you use only the following headphone models: the
earphones supplied with your device, or any other headphones that respect the
current regulations. Other types of headphones may produce higher volume
levels.(At full power ,the prolonged listening of the walkman can damage the ear
of the use)
Do not use while operating a motorized vehicle. It may create a traffic hazard
and is illegal in many areas.
You should use extreme caution or temporarily discontinue use in potentially
hazardous situations created by obstructed hearing.
Even if your headphones or earphones are the open-air type designed to let you
hear outside sounds, don’t turn up the volume so high that you can’t hear what’s
around you.
Sound can be deceiving. Over time your hearing “comfort level” adapts to higher
volumes of sound. What sounds “normal” can actually be loud and harmful to
your hearing. Guard against this by setting the volume of your device at a safe
level BEFORE your hearing adapts.
To establish a safe volume level:
a. Start your volume control at a low setting.
b. Slowly increase the sound until you can hear it comfortably and clearly,
and without distortion. Once you have established a comfortable sound
level, leave it there.
This manual may not reflect your actual device’s operation. All information is subject to change
without prior notification. Please follow your actual device’s operational procedures.
4
Table of Content
Safety Precautions ........................................................................... 1
Listening Cautions ............................................................................ 3
Packing Contents ............................................................................. 5
Features & Functionality ..................................................................... 5
Basic Connections ........................................................................... 6
Basic Operation ............................................................................... 8
Maintenance ................................................................................. 12
Major Specifications ....................................................................... 13
FCC Statement ............................................................................. 13
Frequently Asked Questions(FAQ) ....................................................... 14
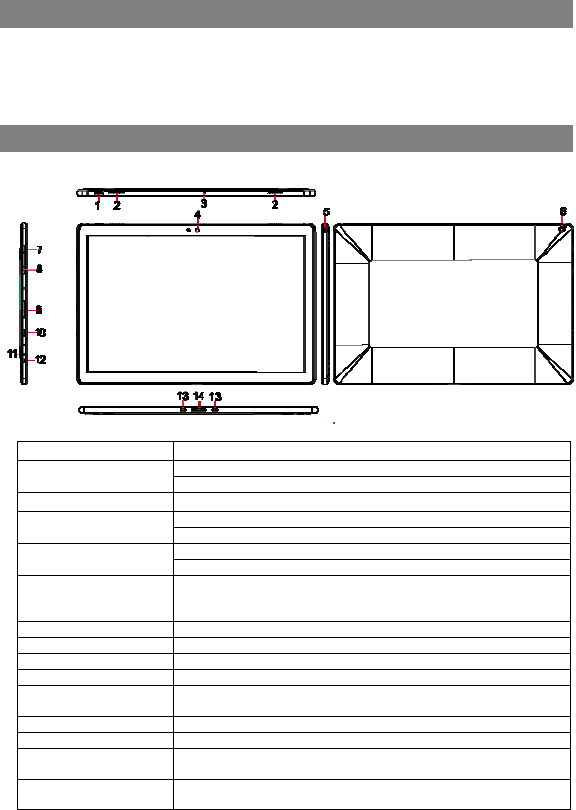
Cong
enclo
s
M
Ove
r
1.
2.
3.
4.
5.
6.
7.
V
8.
9.
1
0
1
1
1
2
1
3
(f
e
1
4
(f
e
ratulations! Whe
s
ed in the pack
a
M
ain Unit
●
r
view
Feature
Power button
Speake
r
Microphone
Front-facing came
Audio port (3.5 m
m
Rear camera
V
olume+ button
Volume- button
microSD card slot
0
. Micro-USB port
1
. Charging indicat
o
2
. DC-In socket
3
. Sustaining port
e
male)
4
. Pogo pin connec
t
e
male)
Packi
n
n you get your d
a
ge:
●
Power Adaptor
Features
&
Press and h
o
Press to tur
n
Provides au
d
Records so
u
Provides so
u
ra Capture a fr
o
Use while m
m
) Connect a
h
equipment t
o
phone calls.
Captures pi
c
Press to inc
r
Press to de
c
Reads and
w
Connect US
transferring
d
or
Indicates th
e
Connect the
Fix and sust
a
t
or Connect ext
e
5
n
g Conte
n
evice, be sure t
o
● Keyb
o
&
Functi
o
Functi
o
o
ld to turn the tabl
e
n
the display on or
o
d
io output.
u
nds
u
nd input while ma
k
o
nt view picture or
aking video calls.
h
eadset, headpho
n
o
listen to stereo
s
c
tures or videos.
r
ease volume
c
rease volume
w
rites files stored o
B devices, via an
o
d
ata, music, photo
s
e
battery-charge st
a
supplied power a
d
a
in the connection
e
rnal keyboard
n
ts
o
check the follo
w
o
ard ● Use
r
o
nality
o
nality
e
t on or off.
o
ff.
k
ing calls using we
b
record videos.
n
es, microphones,
s
ound, record audi
o
n a microSD card.
o
ptional USB conv
e
s
, videos, and so o
n
a
tus.
d
apter for charging
t
to external keyboa
w
ing items are
r
’s Manual
b
-based apps.
or other audio
o
, or make web
e
rsion cable, for
n
.
t
he battery.
rd.
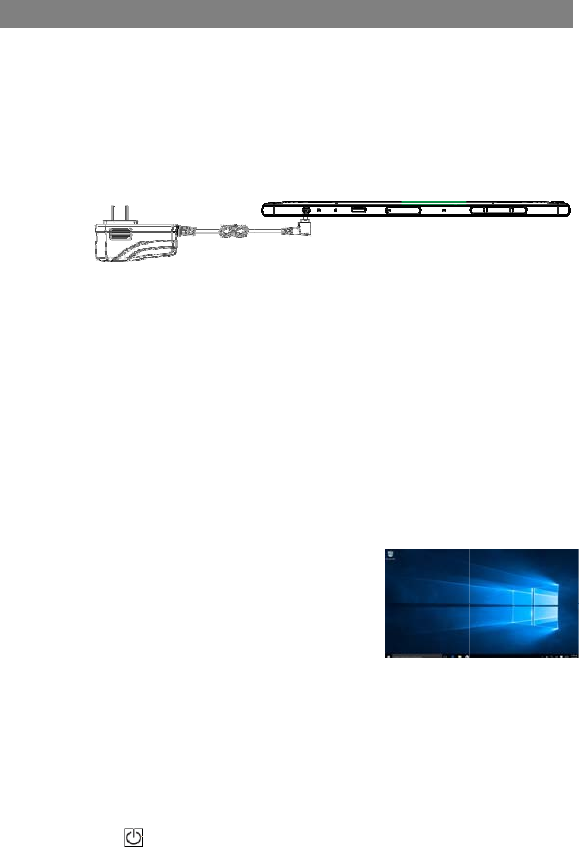
Cha
r
Note:
batte
r
The t
a
level
i
1.
P
2.
C
b
Cautio
n
1. Ch
a
2. Us
e
pow
e
Note:
1. The
2. A fu
l
3. Wh
e
batt
e
Tur
n
Note:
need
Pres
s
appe
a
Now
t
Note
:
you
w
Start
s
Tur
n
You
c
Usin
g
1.
P
2.
S
t
o
Usin
g
1.
T
2.
T
r
ging the tab
If using the tabl
e
r
y for more than
h
a
blet has a built-
i
s low.
P
lug the power a
d
C
onnect the pow
e
attery is fully ch
a
n
:
a
rge the battery i
n
e
only the suppli
e
e
r adapters may
s
battery is not ful
l
l
ly discharged b
a
e
n the battery is
b
e
ry has been full
y
n
ing On the T
a
This device ha
s
not perform Win
s
and hold the P
o
a
rs.
t
he tablet is rea
d
:
If the login scre
e
w
ill be taken dir
e
s
creen.
n
ing Off the
T
c
an turn off the t
a
g
the Power butt
o
P
ress and hold t
h
S
wipe-down the
s
o
turn off the tabl
g
Start menu:
T
ouch the Windo
w
T
ouch Power
→
Basic
C
let
e
t for the first ti
m
h
alf an hour bef
o
in rechargeable
d
apter into the D
e
r adapter to an
a
rged.
n
an ambient te
m
e
d power adapte
r
s
everely damag
e
l
y charged when
a
ttery takes abo
u
b
eing charged, t
h
y
charged, the L
E
a
blet
s
been equipped
dows setup aga
i
o
wer button for 2
d
y for use.
e
n is not enable
d
e
ctly from the lo
c
T
ablet
a
blet in two ways
o
n:
h
e Power button
f
s
hutdown confir
m
et.
w
s/ Start button
t
→
Shut down to
6
C
onnecti
o
m
e, or after a lon
g
o
re turning it on,
batter
y
. Charge
t
C-In socket.
electrical outlet
a
m
perature of 0 °
C
r
to charge your
e
your tablet.
you unpack yo
u
u
t 5 hours to fully
h
e LED indicato
r
E
D indicator ligh
t
with Windows 1
0
i
n before using f
o
seconds to turn
d
in Windows 10
,
c
k screen to th
e
:
f
or at least 4 se
c
m
ation screen to
t
o bring up Start
turn off the tabl
e
o
ns
g
period of idle ti
m
to ensure syste
m
t
he device when
a
nd charge the t
a
C
to 35 °C.
tablet. Using un
a
u
r tablet.
charge.
r
lights red, and
w
t
s orange.
0
system at the
f
o
r the first time.
on your tablet.
T
,
e
c
onds.
the bottom edg
e
menu.
e
t.
m
e, charge the
m
stability.
the battery
a
blet until the
a
uthorized
w
hen the
f
actory, so user
T
he lock screen
e
of the display
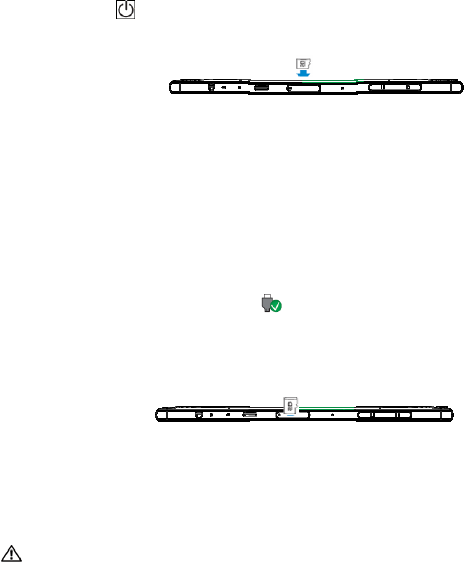
Tur
n
Usua
l
Optio
1.
To
2. T
o
Inse
1.
P
2.
A
3.
P
Re
m
Caut
i
in ap
p
befor
e
1.
T
s
2. T
3. T
c
c
c
4.
P
5.
S
Usi
n
You
c
W
heari
n
1.
C
2. I
n
l
e
Not
e
spe
a
Cau
t
tabl
e
n
ing On/Off s
c
l
ly, user can pre
s
nally, user can a
To
uch the Windo
w
o
uch Power
rting a micr
o
P
ick up a microS
A
lign the microS
D
P
ush the microS
D
m
oving a mic
r
i
on: Removing t
h
p
lication errors.
M
e
removing the
m
T
ouch the Tray b
u
creen.
ouch Safely Re
m
ouch Eject XXX
X
ard can be safel
y
ard cannot be r
e
omplete.
P
ress on the mic
r
S
lide the card ou
t
n
g Headphon
e
c
an connect a he
W
arning:
Listenin
g
n
g loss.
C
onnect headph
o
n
sert the earph
o
e
vel.
e
: When you co
n
a
kers on your ta
b
t
ion: To prevent
e
t, pull the conn
e
c
reen
s
s once the pow
e
lso use the Star
t
w
s/ Start button
t
→ Sleep to turn
o
SD card
D card.
D
card so that th
e
D
card into the c
a
r
oSD card
h
e microSD car
d
M
ake sure all sa
v
m
icroSD card.
u
tton in the notifi
m
ove Hardwar
e
X
SD Card. A m
y
removed. If a
w
e
moved, ensure
a
r
oSD card to rel
e
t
after it pops ou
t
e
s
adset or headph
g
to loud music
f
o
nes to the audi
o
o
nes in your ear
s
n
nect an audio d
e
b
let are muted a
u
damage to the
h
e
ctor instead of t
h
7
e
r button to turn
o
t
menu:
t
o bring up Start
off the screen.
e
pins are pointe
d
a
rd slot until it lo
c
d
while it is in us
e
v
e operations to
cation area in th
e
.
essage appears
w
arning messag
e
a
ll data transfers
e
ase it.
t
from the micro
S
ones to the audi
f
or an extended
p
o
port (3.5 mm)
o
s
and adjust the
e
vice to the 3.5
m
u
tomaticall
y
.
h
eadphones wh
e
h
e cable.
o
n/ off the scree
menu.
d
toward the car
d
c
ks into place.
e
may cause dat
a
the microSD ca
r
e lowe
r
-right cor
confirming that
t
e
appears statin
g
involving the mi
c
S
D card slot.
o port of your ta
b
p
eriod of time ca
o
n the tablet.
volume level t
o
m
m audio jack, t
h
e
n disconnecting
n displa
y
.
d
slot.
a
loss or result
r
d are complete
ner of the
t
he microSD
g
the microSD
c
roSD card are
b
let.
n lead to
o
a comfortable
h
e integrated
it from the
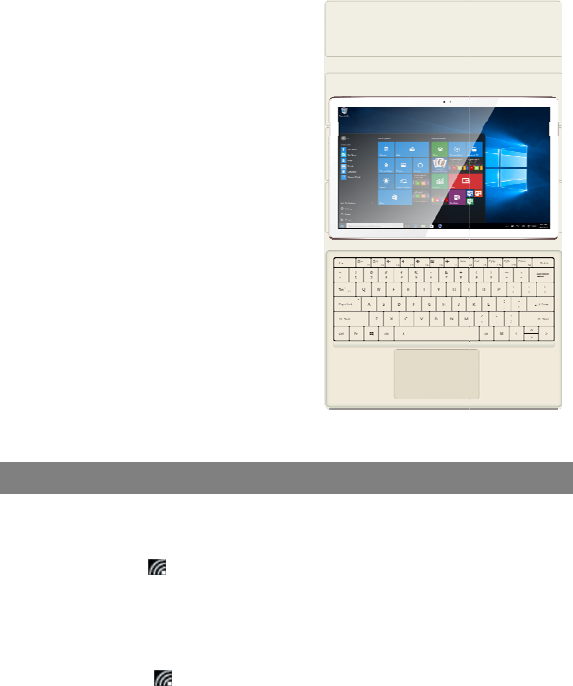
Con
n
For t
h
devic
e
dedic
a
conn
e
1.
P
a
2.
H
c
o
p
t
a
3.
A
t
h
4.
T
t
Note:
1.Thi
s
you c
2. W
h
the d
i
erect,
3. Si
n
Wi-
F
Turni
n
1.
T
t
o
2.
T
Conn
e
1.
T
s
2.
S
3. I
n
I
n
n
ecting the
K
h
e sake of using
e
is designed to
a
ted keyboard.
F
e
ct the keyboard
P
lace the dedicat
e
nd stable plane
(
H
old your tablet
w
onnector and th
e
n the keyboard
t
ositioning slots
a
a
blet.
A
s soon as the k
e
h
e tablet, it is re
a
T
o remove the k
e
need to push do
w
t
he keyboard wi
t
up with the othe
r
s
keyboard is a
p
an connect/disc
o
h
en the tablet ov
e
i
splay will be tur
n
the display will
b
n
ce the keyboar
d
F
i Setting
n
g On/Off Wi-Fi:
T
ouch WiFi icon
o
view the availa
T
ouch Available
W
e
cting to a netw
o
T
ouch Wi-Fi icon
creen to view th
e
S
elect an availab
l
n
put the passwo
r
n
ternet.
K
eyboard
convenience, th
i
be equipped wit
h
F
ollow these ste
p
to your tablet:
e
d keyboard on
a
(
e.g. desk);
w
ith two hands, a
e
two magnetic c
t
o the jack and
a
t the bottom of
t
e
yboard is conn
e
a
dy for use.
e
yboard from tab
w
n at the top ce
n
t
h one hand, the
n
r
hand gently.
p
lug-and-
p
lay de
v
o
nnect it anytim
e
e
rlaps on the ke
y
n
ed off; as soon
a
b
e turned on ag
a
d
is powered by t
h
Basic
in the notific
a
ble Wi-Fi netwo
r
W
i-Fi icon to tur
n
o
rk:
in the notifi
c
e
available Wi-Fi
l
e network from
t
r
d if necessary, t
8
i
s
h
a
p
s to
a
n even
lign the
ontacts
t
he
e
cted to
let, you
n
ter of
n
lift it
v
ice;
e
.
y
board,
a
s it is
a
in.
h
e tablet, it has
n
Operati
o
a
tion area in the
r
ks.
n
on/off Wi-Fi co
n
c
ation area in th
e
networks.
t
he list and touc
h
hen touch Conn
e
n
o built-in batter
y
o
n
lowe
r
-right corn
e
n
nection.
e
lowe
r
-right cor
n
h
Connect.
e
ct to start conn
e
y
inside.
e
r of the screen
n
er of the
e
cting to the
9
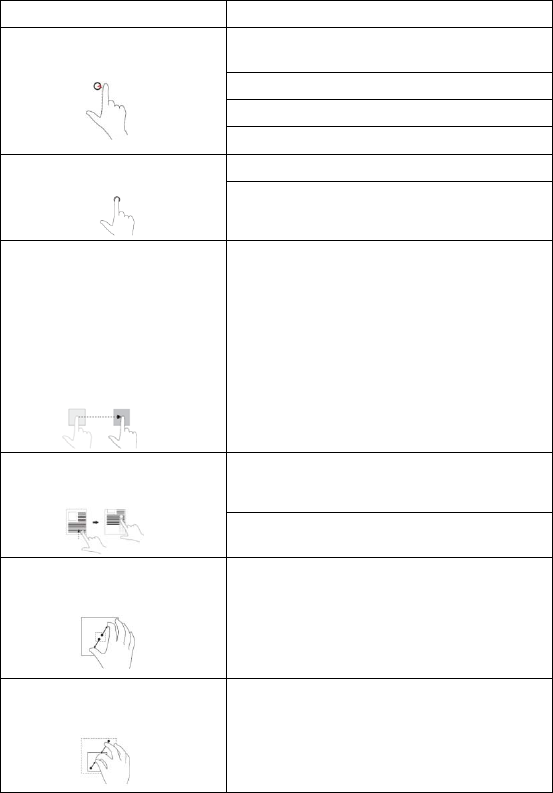
Gestures
Your tablet has a multi-touch display. You can touch the screen to operate the tablet.
Finger Gesture You can do
Touch
Tap gently on the display with your
fingertip.
Select items on the screen, including options,
entries, images, and icons.
Start apps.
Touch buttons on the screen.
Input text using the on-screen keyboard.
Touch and Hold
Touch and hold your finger on the
display.
Display detailed information about an item.
Open the context menu of an item to perform further
actions.
Drag
1. Touch and hold your finger on
an item on the screen.
2. Keeping your finger in contact
with the display, move your fingertip
to the desired location.
3. Take your finger off the display to
drop the item in the desired
location.
Move items such as images and icons on the screen.
Swipe or Slide
Move your finger in a vertical or
horizontal direction on the display.
Scroll through the Start screen, web pages, lists,
entries, photos, contacts, and so on.
Close an app. (Swipe the app to the bottom of the
display.)
Zoom in
Touch the display with two fingers
and then move the fingers apart.
Enlarge the view of an image or web page.
Zoom out
Touch the display with two fingers
and then move the fingers closer.
Reduce the view of an image or web page.
Scr
e
For o
p
portr
a
auto
m
Note
:
work
Loc
k
1.
C
2. T
C
3. T
Win
d
The
W
act a
s
and
o
Live
T
sport
s
The ti
email
s
frequ
e
Start
s
You
a
wallp
a
Note
:
o
r
Acc
e
Whe
n
the S
t
acce
s
wind
o
meth
o
1. Pr
e
2. To
u
Note
:
e
en Orientati
o
p
timal viewing e
x
a
it or landscape
f
m
atic screen rota
:
Some apps ma
y
only in one orie
n
k
ing the scre
e
C
hange the scre
e
ouch Action Ce
n
C
enter;
ouch Rotation l
o
d
ows 10 Sta
r
W
indows 10 Star
t
s
a shortcut to M
o
ther installed ap
T
iles on your Sta
s
updates, weat
h
le-based user in
t
s
, photos, musi
c
e
ntly viewed we
b
s
creen.
a
lso can persona
a
per.
:
Live Tiles can
b
r
Unpin from St
a
e
ssing the S
t
n
your computer
t
art screen appe
s
s the start scre
e
o
w or app, use a
n
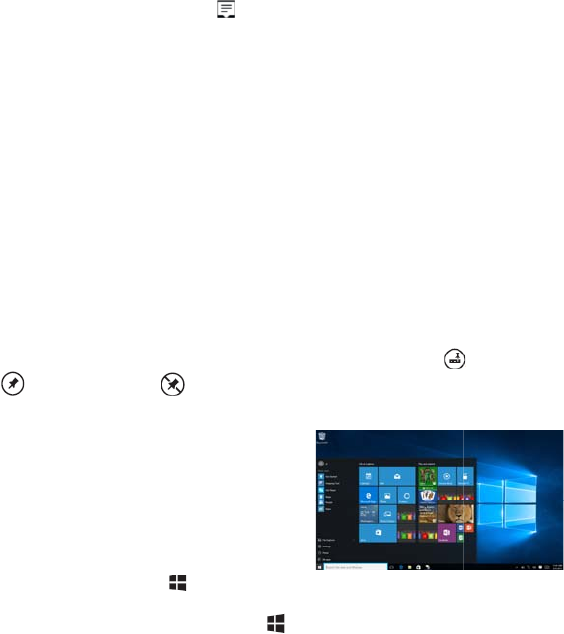
o
ds:
e
ss the Window
s
u
ch the Start but
t
:
The functionali
ty
o
n
x
perience, the s
c
f
ormat dependin
g
tion and lock th
e
y
not support au
n
tation.
e
n orientatio
e
n to the desired
n
te
r
button i
n
o
ck icon to lock
r
t Screen
t
screen display
s
ail, Microsoft Ed
g
ps.
rt screen chang
e
h
er updates, soc
i
t
erface gives yo
u
c
, videos, contac
t
b
sites. You can
p
lize the Start sc
r
b
e added or rem
o
a
rt options.
t
art screen
boots into Wind
o
ars by default. T
e
n from any othe
r
n
y of the followi
n
s
button.
t
on in the lo
w
ty
of the Start ic
on
10
c
reen orientation
g
on how you ho
e
screen in portr
a
tomatic screen
ro
n
orientation.
n
the notification
or unlock scree
n
s
a list of default
g
e, Weather ap
p
e
and update in
r
i
al-networking fe
u
direct access t
o
t
s, updates from
p
in your favorite
a
r
een by setting y
o
o
ved by using P
in
o
ws,
o
r
n
g
w
er left corner o
f
on
is same
a
changes autom
ld the tablet. Yo
u
a
it or landscape
m
ro
tation and are
d
area to access
t
n
rotation.
and custom Liv
e
p
, Calendar, Win
d
r
eal time to sho
w
eds, and so on.
o
your most rece
social-networki
n
a
pps as tiles to
c
o
ur favorite pictu
in
to taskbar
f
the screen.
a
s Windows butt
o
atically to
u
can disable
m
ode.
d
esigned to
t
he Action
e
Tiles, which
d
ows Store,
w
news and
ntly used apps,
n
g sites, and
c
ustomize the
re as the
, Pin to Start
on
.

11
Getting Started
Touch the Start icon to bring up the start menu, from which you can find a list
of Most used apps. Among the apps, Get Started is extremely useful for new
user of the newestWindows system-Windows 10,includes some video clips
introducing the new features of the newest system.
Narrator Mode
This is a featured function that is friendly for blind users. Narrator is a screen reader
that reads all elements on screen, like text and buttons.
1. Touch Start > Settings>Easy access>Narrator, then toggle the slider to turn on
Narrator.
2. To turn Narrator off with the touch screen, tap the Narrator slider, and then
double-tap anywhere on the screen.
Note: If you have a keyboard connected to the tablet, you can use turn on/off Narrator
mode by pressing down ESC+CapsLock buttons.
Synchronizing Your Tablet
If your computer has Microsoft Windows 10 installed, you can synchronize user
settings of your tablet with your computer using a Microsoft account. When you sign in
with your Microsoft account on your tablet, your settings, including internet browser
history, app settings, and personal files etc., are synchronized with other Windows 10
PCs and tablets computers.
On the tablet, access Action Center by touching button → All Settings →
Accounts → Sync your settings to switch your computer local account to your
Microsoft account.
Copy music, photos, and videos
1. Connect your tablet to a USB storage device with a Micro-USB cable, then
transfer files to or from the USB storage device.
2. After transferring files, use the Safely Remove Hardware wizard to remove the
USB storage device.

12
Maintenance
Cleaning Your Tablet
Caution:
Before you clean your tablet, disconnect all the cables and turn off the tablet. Clean
your tablet with a soft cloth dampened with water. Do not use liquid or aerosol
cleaners, which may contain flammable substances.
1. Turn off your tablet. For more information on turning off your tablet,
2. Disconnect any attached devices, headphones, and speakers from the tablet and
from their electrical outlets.
3. Moisten a soft, lint-free cloth with either water or a display cleaner, and wipe the
surface of the tablet until it is clean. Do not allow water from the cloth to seep
down to the tablet ports or buttons.
Caution:
1. To avoid damaging the tablet or display, do not spray cleaning solution directly
onto the display. Only use products specifically designed for cleaning displays
and follow the instructions included with the product.
2. Do not clean the keyboard with a moist cloth.
Resetting your tablet
If your PC isn’t running well, resetting it might help. This lets you choose to keep your
files or remove them, and then reinstall Windows.
To restore your tablet:
1. Touch button in the notification area to access the Action Center;
2. Touch All Settings →Update and security→ Recovery→ Reset this PC.
3. Touch Get started to choose an option from Keep my files or Remove every
thing.
4. You can have more choices if you select Advanced startup.
Note:
Apps installed from the Windows Store are automatically reinstalled after the refresh
is complete. Apps installed from sources other than the Windows Store are removed
and have to be manually installed. A list of apps removed during this process is
created on the desktop after the process is complete.
In shutdown status, user can press and hold Power & Vol- keys at the same time to
boot the device and enter Recovery mode, for the purpose of repairing or resetting
the system.
Caution:
Resetting your tablet erases all data from your tablet, including your account
configuration, apps, music, pictures, files, and so on. Make sure that you back up all
the required data before you proceed.
13
Major Specifications
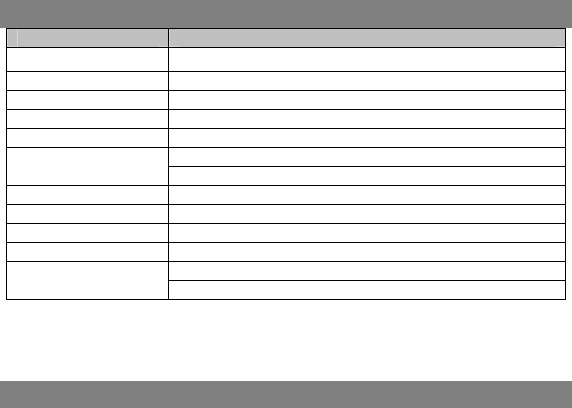
Item Descriptions
CPU View the system information for details*
Operation system Windows 10
DDR 4GB /8GB
Internal Memory EMMC: 64 GB/128GB
Expandable Memory Micro SD card: up to 64 GB
Interfaces USB 2.0 high speed /Micro SD (compatible SDHC, up to 128GB) card
3.5mm Earphone
Connection Agreement WiFi (802.11 a/b/g/n/ac); BT4.0
Front Webcam Front camera, 2.0 Mega Pixels; rear camera, 5.0 Mega Pixels
Bluetooth Support
Display Resolution,1920*1200 Pixels,12.2 inch LCD
Power Supply Rechargeable lithium battery;
AC adapter: DC-Out 12V/2.0 A
Note: * You can view the system properties as follows: Open the Control Panel, and
select System and Security → System.
FCC Statement
FCC Caution.
This device complies with part 15 of the FCC Rules. Operation is subject to the
following two conditions: (1) This device may not cause harmful interference, and (2)
this device must accept any interference received, including interference that may
cause undesired operation.
Any Changes or modifications not expressly approved by the party responsible for
compliance could void the user's authority to operate the equipment.
Note: This equipment has been tested and found to comply with the limits for a Class
B digital device, pursuant to part 15 of the FCC Rules. These limits are designed to
provide reasonable protection against harmful interference in a residential installation.
This equipment generates uses and can radiate radio frequency energy and, if not
installed and used in accordance with the instructions, may cause harmful
interference to radio communications. However, there is no guarantee that
interference will not occur in a particular installation. If this equipment does cause
harmful interference to radio or television reception, which can be determined by
turning the equipment off and on, the user is encouraged to try to correct the
interference by one or more of the following measures:
-Reorient or relocate the receiving antenna.
-Increase the separation between theequipment and receiver.
-Connect the equipment into an outlet on a circuit different from that to which the
receiver is connected.
-Consult the dealer or an experienced radio/TV technician for help.
The device has been evaluated to meet general RF exposure requirement. The
device can be used in portable exposure condition without restriction.

14
Frequently Asked Questions(FAQ)
Q: Why the battery does not charge. What to do?
A: There are 3 main possible reasons for this problem: bad connection, improper
temperature condition, damaged battery or adapter.
As for bad connection, user should:
1. Check all connectors to ensure proper connectivity.
2. Unplug the supplied AC power adapter from the wall and verify that the outlet is
functioning.
3. Check all cable connections, plug the adapter back into the tablet, and then plug back
into the wall outlet.
And for improper temperature condition, i.e. the tablet's temperature is below 0 °C or
higher than 35 °C, user should change the location and charge the battery in an ambient
temperature between 0 °C to 35 °C.
And if the battery or adapter has been damaged, contact an authorized reseller to replace
the battery or power adapter.
Q: My battery drains quickly even when the tablet is in Standby mode. What’s the
matter?
A: If the tablet is not in the range of a network it can connect to, the tablet continues to
send out signals to locate a base station and drains the battery. So, just temporarily turn
off the tablet, or move the tablet in range of a network it can connect to, or temporarily turn
off the wireless connection on your tablet.
In addition, if the tablet keeps checking for Windows updates even in Standby mode, the
battery will drain quickly too. It is normal in this case. User can disable it by selecting
“Never check for update”. However, it is not recommended. User should be cautious
before doing this.
Q: Tablet does not turn on, what to do?
A: It may be because the battery is completely discharged. Charge the tablet for at least 4
hours, and then press and hold the Power button for 3 seconds to turn on the tablet.
Q: Tablet is connected to the power adapter for charging, but still fails to turn on.
Why?
A: If the tablet has been idle for a long period of time, or has just been purchased and
used for the first time, its battery might be completely discharged. In this case it is
suggested that user should charge the battery for over half an hour before turning it on, so
as to guarantee the stability of its system
Q: Tablet does not turn off, what to do?
A: Press and hold the Power button for 10 s to perform a hard shut down.
Note: User will have to wait for about 8 seconds before turning on the tablet again after it
shuts down.
Q: Can blind people use this tablet freely?
A: Yes. This tablet supports a featured function designed for blind people-Narrator mode.
Narrator is a screen reader that reads all elements on screen, like text and buttons.
To enable Narrator mode, touch Start > Settings>Easy access>Narrator, then toggle the
slider to turn on Narrator.
In Narrator mode, every time you touch the screen, you will hear a voice telling you
the text or button you are touching.
15
Q: The touch screen seems not to respond properly to touches, what is the problem?
A: Perhaps you have enabled the Narrator mode on your tablet. You can touch Start >
Settings>Easy access>Narrator, then toggle the slider to turn off Narrator.
Or press ESC and CapsLock button at the same time to turn off Narrator mode.
Q: The system crashes, or the screen turns blue after startup. What can I do?
A: It may be because the system of the tablet has been damaged to some extent for
improper shut-down actions. In shutdown status, press and hold the Power and Vol-
button together to reboot the device and enter the Recovery mode, so as to repair or reset
the system.
After entering the Recovery mode, user will have to choose an option from the menu
before going on:
● Continue – Exit without doing anything and continue to Windows 10 system.
● Use a device- Refresh the system by using a USB device, network connection, or
Windows recovery DVD.
● Troubleshoot- Refresh or reset your PC or use advanced tools.
● Turn off your PC- do nothing and turn off the tablet.
Q: Fail to access the account for losing the password, what should I do?
A:1. Press and hold the Power button for 10 seconds to perform a hard shut down;
2.In shutdown status, press and hold the Power and Vol- button together to reboot the
device and enter the Recovery mode;
3.Select “Troubleshooting- Refresh or reset your PC or use advanced tools”.
Q: How to deal with the case that my tablet is not responding or behaving as
expected?
A:1. Reboot the tablet;
2. If it still not works, try resetting the tablet.
3. If the problem remains unsettled, contact the vendor’s support service.
Q: Touchscreen responds slowly or improperly, what’s wrong?
A: Perhaps the screen is dirty, and sometimes the protective cover prevents the tablet from
recognizing your inputs.
1. Moisten a soft, lint free cloth with either water or a display cleaner, and wipe the surface
of the tablet until it is clean. Do not allow water from the cloth to seep down to the tablet
ports or buttons.
2. Remove any protective covers from the touch screen.
Q: No wireless connection, how to set it up?
A:1. Check if the wireless radio is on. See Wi-Fi setting.
2.Try to get closer to the wireless access point.
3. Reset the wireless router if using a private network; open the browser to view the
landing page if using a public network.
Q: Slow Internet connections. How to make it faster?
A: The signal strength is not strong enough. Move your tablet to a different location for
better signal reception.
Q: Why the touch pad of the keyboard does not function?
A: There are two possible reasons for this problem. One is that the keyboard has not been
connected properly. If so, not only the touch pad, but also the other keys will not function.
For this case, reconnect the keyboard.
16
The second reason is that the touch pad has been deactivated. Press function keys to
activate it.
Q: When entering my password, I can’t input the characters I want. What’s the reason?
And in some area of the keyboard, letters can not be input, only numbers, why?
A: Once the FN+NumLk keys are pressed, the numeric keys will be locked or unlocked.
If they are locked, user can use them to enter numbers; if they are unlocked, user can
only use them to enter letters.
Q: The screen of the tablet PC turns completely dark suddenly. What’s wrong
with it? What can I do?
A: Once the remaining capacity of the battery is less than 4 %, the screen will turn black
automatically. It enters S4 mode (i.e. hibernating status). All running data will be saved
on the HDD. Under such circumstance, user can recharge the battery with the supplied
power adapter for about 5 minutes before rebooting it again.