Yifang Digital Technology NEXT5 nextbook, Android MID User Manual
Shenzhen Yifang Digital Technology Co., Ltd. nextbook, Android MID
user manual
1
Next5 Tablet
User Guide
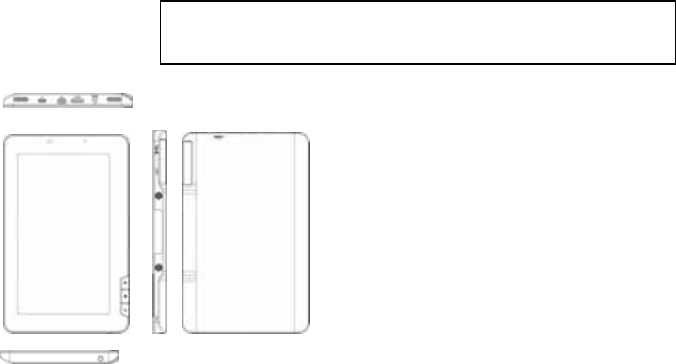
a. Built-in Speakers
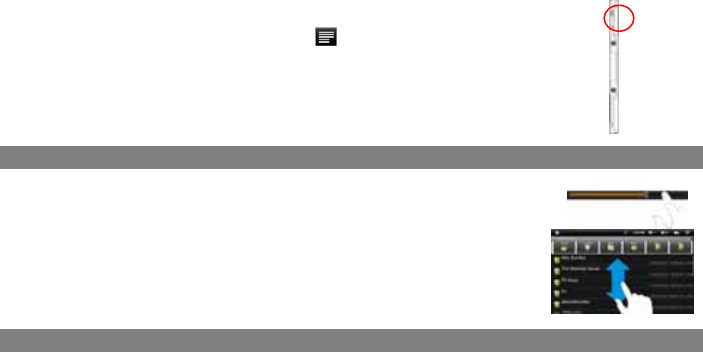
b. Power Button – press and hold to turn on or off the
device; briefly press to turn the screen on or off.
c. USB Port – connects to computer, USB flash drive or
keyboard through USB cable.
d. HDMI interface (optional) – connects to LCD or monitor
devices with HDMI port.
e. DC-IN port – connects to any standard electric source
through the provided AC adaptor.
f. Camera Lens (optional)
g. Touch Screen
h. Home – Go to the Home Screen.ESC – Return
i. Menu – Display menu options.
j. ESC – Return to the previous screen or directory.
k. Ultrasound and infrared sensor – capture handwritten
notes or drawings.
l. Memory Card /3G Card Slot – accommodates any
standard TF/MicroSD card or 3G card.
Note: DO NOT insert or remove the memory card when the device
is playing files or transferring data. That may cause errors.
m. Reset pin hole – reset the device if the unit freezes.
n. Earphone Port – connects to stereo earphones.
b
c
y This manual may not reflect your actual device’s operation. All information is subject to
change without prior notification. Please follow your actual device’s operational procedures.
y Optional functions specified in this manual are applicable for corresponding device models.
Please make sure your actual device has these optional functions, if not, just ignore them.
de
f
g
a
i
j
c
k
l
m
h
n
2
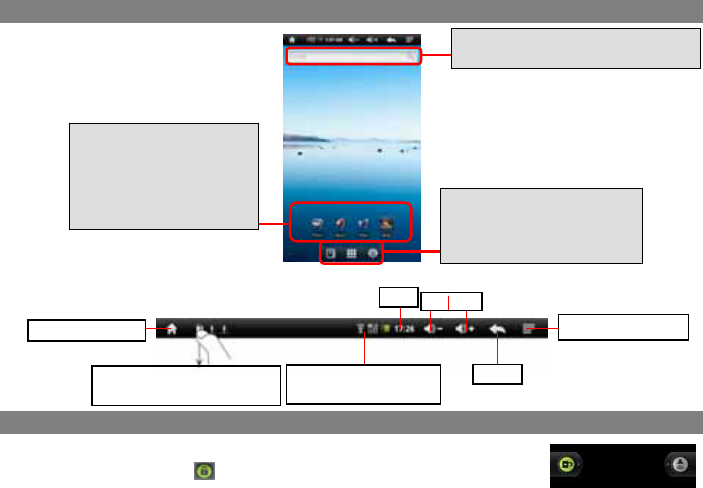
Home Screen
Top bar
Unlocking the Screen
The screen will be locked after the device is idle for a few seconds. You need to unlock the
screen by dragging the lock icon upward before you continue to use the device.
Address Inputting Field
Input a website address by tapping this field.
Default shortcuts
Tap on an icon to open the
corresponding application.
You can add or remove shortcuts,
see “Customizing the Home
Screen items” on the next page. Setting/Applications/Ebook
Reader icon
Shortcuts to system settings,
applications or eBook reader
Status icons: WiFi/3G
connection, battery, etc.
Time
Return
Dis
p
la
y
menu o
p
tions
Go to Home Screen
Drag the top bar downwards to
dis
p
la
y
the notification messa
g
e
V
OL
-
/
+
3
Customizing the Home Screen
You can customize the Home Screen by adding/removing shortcuts and widgets, changing the wallpaper.
y To add a Home Screen item (shortcuts, widgets, folders etc.), tap on the Menu icon and then select “Add” . You
can also hold your finger on the screen and then choose an item from the list.
y You can add a folder onto the Home Screen by holding your finger on the screen and then choose Folders Æ New
Folder. You can drag shortcuts or widgets to the folder.
To rename the folder, a) tap to open the folder, b) hold your finger on the title bar of the opened folder until the Rename
window pops up, c) input folder name.
y To move a Home Screen item, hold your finger onto it until it is highlighted, then drag it to the desired location, and
release it.
y To remove a Home Screen item, hold your finger onto it until it is highlighted, drag it to the recycle bin which turns from
the Application Tab, and then release your finger.
y To change the wallpaper, from the Home Screen, tap on the Menu icon , a list of options appears. Tap on
“Wallpaper” and then choose a picture as the desktop wallpaper.
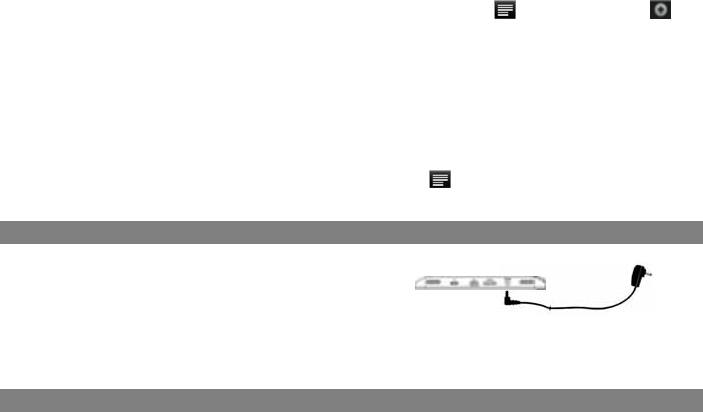
Charging Battery
Plug the AC adaptor to any standard wall outlet and the DC-IN port
of the MID.
y It takes about 5 hours to fully charge the battery.
y You can operate the device even when it is being charged. But for extended battery life,
it is suggested NOT to use the device when it is charging.
y It is recommended to charge the battery fully before you use the device for the first time.
y For maximum performance, lithium-ion batteries need to be used often. If you don’t use the device often, be sure to recharge the
battery at least once per month.
Transferring Files
(1) Connect the device to a computer with the supplied USB cable.
(2) When you find two removable disk drives that represent your unit and the memory card, copy files to them.
4
(3) After you have copied files, drag from the top bar downwards and then choose “Turn off USB Storage” to disconnect
the device from computer.
(4) Disconnect the device from the PC safely.
The pre-installed applications and Android OS occupy a considerable part of capacity – nearly more than 1GB, it is normal that
you see huge difference between available memory space and total capacity.
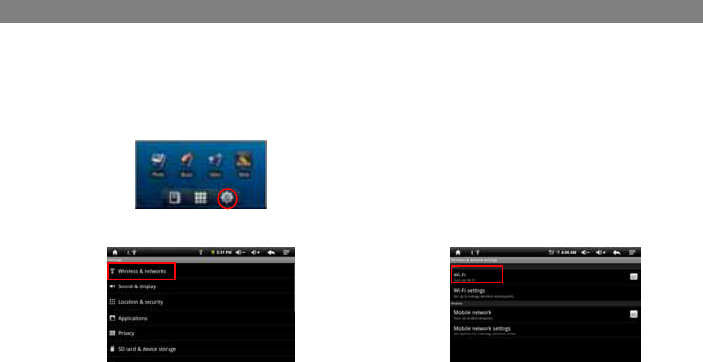
Connecting to the Internet
To access the Internet, first of all, you need to configure a wireless network.
z Configuring WiFi Network
For the configuration procedure to work, you need to be in a Wi-Fi zone that will allow you to connect to it. Every time Your
MID is in range of a network that you have already configured once, it will attempt to make a connection.
(1) Tap the Setting icon in the Home Screen.
(3) Tap “Wireless & Networks”.
(4) Tap on the “Wi-Fi” setting to turn it on.
(5) Select “Wi-Fi settings”. Your MID will scan automatically for available WiFi networks and display them. The list of
available networks shows all the wireless networks in range of your device.
5
(6) Choose a network from the list and then tap “Connect” to connect. Some network may be secured with password,
enter the password before connecting. If the connection is successful, the message Connected to…(WiFi Network
Name) will appear under the WIFI Setting.
z Configuring 3G Network (optional)
(1) Insert a 3G network card to the 3G card slot on the back of the device.
(2) Go to the Home Screen, tap on the Menu icon and then select “Settings”.
(3) In the “Settings” screen, select “Wireless & Networks”.
(4) Tap on the “Mobile Network” setting to turn the 3G network on. Optionally, youcan set the
network access point manually by selecting the “Mobile Network Setting” item.
Using the Touch Screen
y When watching a video or listening to music, you can tap the progression bar to go directly
to a different location in the video or song. You can also use your finger to drag the cursor in
the progression bar to another location in the video or song.
y In the file browsers (File, Music, Video, Photo, etc.), you can drag your finger up and
down to scroll the file list up and down.
y In the Web browser, you can scroll up and down by tapping on the page and dragging it
up or down (be careful not to tap a link until you are ready!).
y Tap the link to open the page.
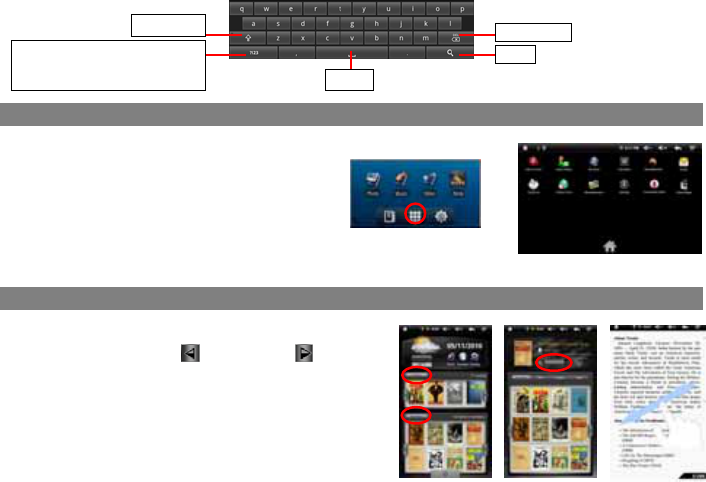
Using the Virtual Keyboard
Tapping on any text input field can open the virtual board. With the virtual keyboard, you can enter a website address or
any text required.
6
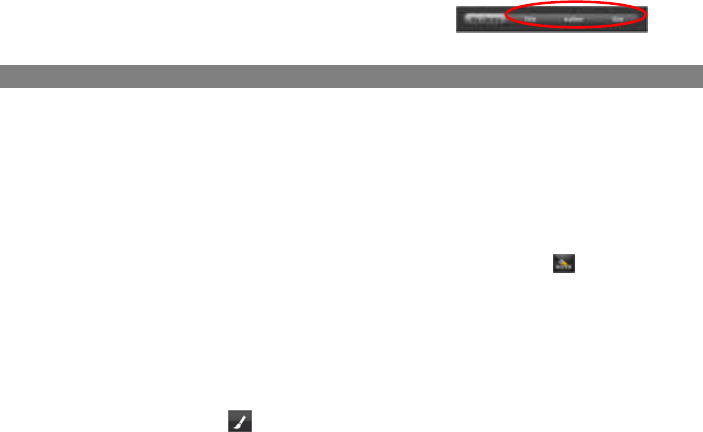
Playing Multimedia Files
(1) In the Home Screen, tap on the Application Tab to display all applications.
(2) Tap the application icons for music, video or photo
to open the corresponding application.
In the Video or Photo Mode, tapping anywhere on the
screen can display or hide the on-screen toolbar.
Some multimedia files may not play properly. That may caused by their incompatible
encoding format. Refer to the Technical Specifications for details about the supported file format.
Reading E-Books
z In the Home Screen, tap an e-book to start reading.
z Tapping on the Left Arrow or Right Arrow can scroll
left or right though the e-books.
z Tap “History” or “My Library” to open your library. In the library,
tap the ebook that you want to read, and then tap Continue
Read to start reading.
z In the history or e-book library, you can sort e-books by title,
author or file size by tapping on Title, Author or Size.
Caps Lock
Numbers and Symbols
y Holding your finger on this button
can change the Input Method. Space
Backs
p
ace
Ente
r
7
z To page up or down, slide your finger on the screen left and right.
Make sure your e-books are in format supported by the device. Supported
formats are PDF, EPUB, TXT, FB2, RTF, PDB.
Book covers for PDF, TXT, FB2, RTF and PDB files are all displayed the same since these files have no cover data usually.
Take Handwritten Drawings
With the provided digital pen, you can write or make drawings directly into the device.
1. Installing the iNote Application
Before you can write, the iNote application needs to be installed on your device firstly.
(1) Connect your device to computer through USB cable.
(2) Copy the iNote installation files from your computer to your device.
(3) Turn on the device, and locate the installation file with the explorer.
(4) Tap the installation to run it.
(5) Follow the on-screen instructions to install the iNote software. Once installed, an iNote icon should be added to
the applications.
2. Using the iNote Application
Create New Picture
(1) Run the iNote application. Choose the iNote icon from the applications to run the application.
(2) Choose the memory where you want to store the notes or drawings – SD card or Internal Memory, and then click “OK”
to confirm.
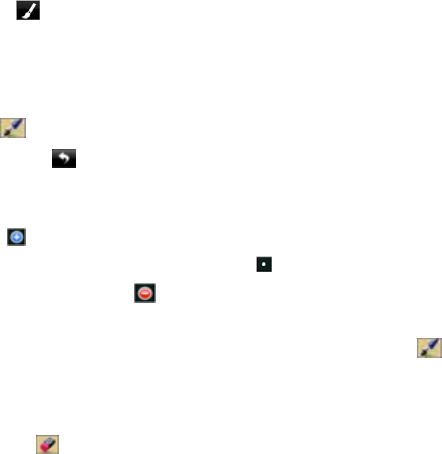
(3) Create a new picture. Tap the Pen to open the drawing board.
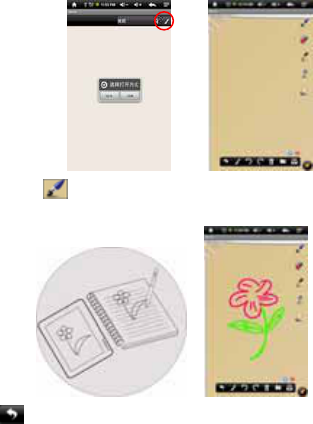
8
(4) Make drawings. Tap the Pen icon , and then draw a picture on a paper with your Digital Pen while watching the
screen. Also, you can slide your finger on the screen to make drawing.
(5) After you have done, click to exit and save your drawing. You drawing will be saved to the Photo Library.
Edit a Picture
You can edit an existing picture by adding annotations or sketching on the picture.
9
(1) Click the Open icon on the bottom toolbar.
(2) Select “Open a Picture”.
(3) Choose memory device from SD Card and Internal Memory, and then tap “OK” to confirm. A list of notes and drawings
should display.
(4) Choose a note or drawing file from the list and open it.
(5) Tap the Pen icon , and then sketch on the picture or add annotations.
(6) After you have done, click to exit and save the picture.
Add/Delete Picture
You can work on multiple pictures at the same time.
y Click the Add icon to open a new page for another picture. You can add up to 5 pages.
y When multiple pages are opening, you can click the white dot to go to the corresponding page.
y To delete one page, click the Minus icon .
Change Pen Width / Color
Before you start drawing, you can change the pen width or pen color by tapping the pen icon , sliding the dot icon to
adjust the width and selecting a color from the color matrix.
Erase Sketches
You can erase the sketches you have added.
(1) Select the “Eraser” tool .
(2) Use your finger to wipe the location you want to erase, or use your Digital Pen to hover to the location and then erase
it.

10
Clear Sketches
You can clear all sketches from the palette by clicking the icon.
Color Sampling
You can use the Color Picker to choose one color from the picture you are working on and then apply the color to new
sketches.
(1) Make drawings with the Digital Pen or your finger.
(2) Tap the Color Picker icon .
(3) Click on the sketch that you have done to draw its color.
(4) Create new sketches in the selected color with your Pen.
Change Background
You can change the background of the palette.
(1) Select the icon.
(2) Click the Left and Right Arrow to change the background.
Hide/Display the Toolbar
You can hide or display the tools like Pen, Eraser, Color Picker etc. by clicking the icon.
Save the Picture
When you are satisfied with your picture, you can click the icon and then choose “save picture” to save the picture.
Send the Picture
You can send your finished picture to your friend by e-mail.
11
(1) After you finished your picture, click the icon.
(2) Select “Send by mail” or “Send by mail(PDF)”(send by email as PDF attachment).
(3) Input the e-mail address you’d like to send to.
(4) Click “Send”.
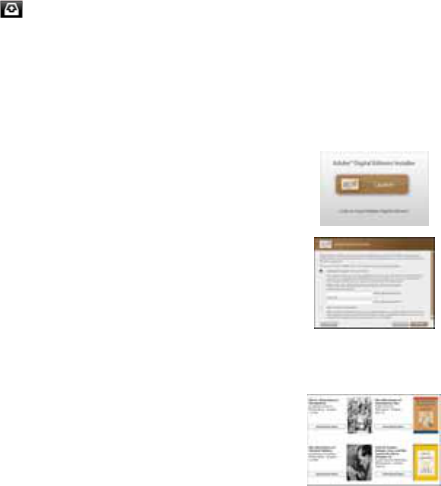
Download e-books with the Adobe Digital Edition (ADE) via PC
Once you have purchased e-books online, you need to transfer them to your MID using the Adobe Digital Editions
software which allows you to view and manage e-books protected by DRM license.
1. Access the website http://www.adobe.com/products/digitaleditions/, and then install the Adobe
Digital Edition software following the instructions online.
2. Authorize your computer with your Adobe ID and Password.
3. Activate your MID.
Connect your MID to computer with the USB cable and start up the Adobe Digital Editions.
Click “Authorize Device” to authorize your MID with your Adobe ID and Password.
The Adobe ID can be used only for six times. It should expire after 6 tries of authorizing device. Later on, you need to delete the
expired ID by pressing CTRL +SHIFT+D on the computer keyboard and then get a new one.
The device remembers the eBooks downloaded with the latest Adobe ID only, and will overwrite the eBooks downloaded with
the previous Adobe ID.
4. Download DRM-protected PDF files to your computer.
Access the Internet and search for e-books, search for your favorite e-books and download
them. If the e-book is protected by DRM, you should be prompted by DRM license
information. Click “Open” to start downloading the DRM-protected e-book.
12
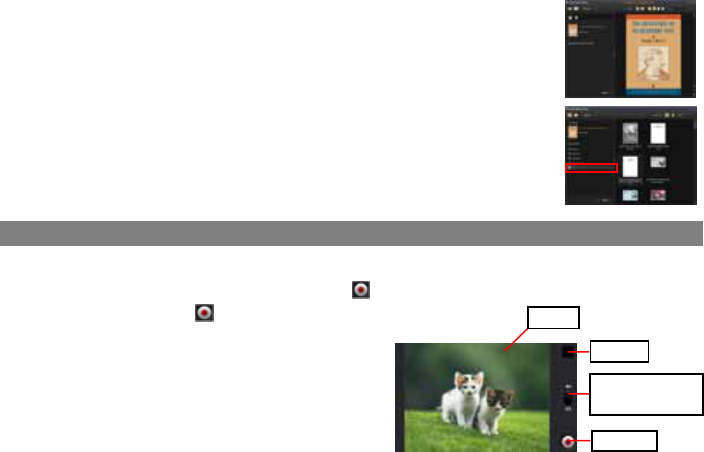
5. Click “Purchase”, and then you should see your downloaded e-book at the right panel of the
Adobe Digital Editions.
6. Connect your MID to the computer with the USB cable, and the Adobe Digital Editions should
recognize your MID.
7. Click “Purchase” to display your downloaded e-books and then drag them to your MID.
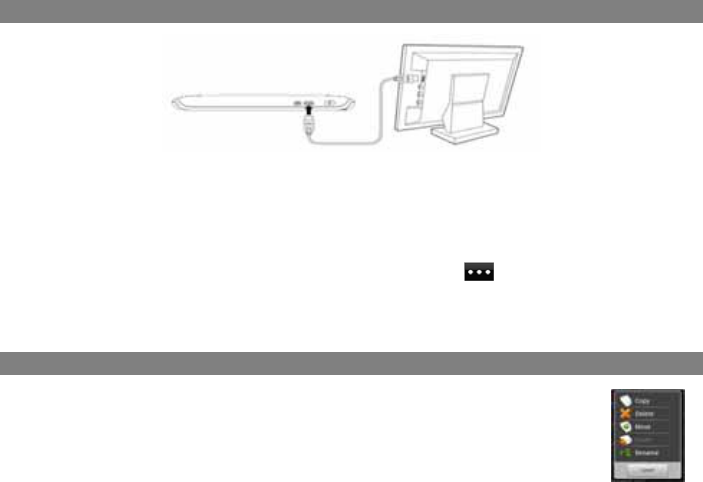
Using the Camcorder/Camera(optional)
The device features built-in VCR which allows you make video clips or take photos. Tap on the Application Tab to display
applications, and then select “Camcorder”/ “Camera” to enter the VCR/Photography mode.
z To start making video clips, tap on the Start/Stop button to start video recording.
z Tap on the Start/Stop button again to stop video recording or photographing.
z The video clip / photo can be previewed in the Preview
Window.
z To play the video clip that you have made, enter the Video
Player, and then tap the video.
z To view the photo that you have taken, enter the Photo
Viewer mode, and then tap the photo.
Preview
VCR/Photography
Mode Switch
Start/Sto
p
Screen
13
Connecting to TV(optional)
The device features a HDMI interface with which you can connect the device to digital audio devices, computer monitors
or digital televisions. HDMI connection can deliver high-definition audio and video quality.
To use the HDMI function on digital televisions,
(1) Make sure the visual device like digital television that the device connects has a HDMI interface also.
(2) Turn on the digital television, and switch its mode to HDMI.
(3) Connect the HDMI cable to the HDMI interface of the device and the digital television.
(4) Turn on the device, and play a video. When the video is playing, tap on the button to display the overlay menu.
Choose “HDMI” from the overlay menu, and then choose “Output to HDMI: 720p”.
(5) Enjoy the sharpest image quality on the wide screen of the connected visual device.
(6) To switch the image display to the device screen, tap on the device screen.
Copying, Moving, Deleting Files
y Enter the File Explorer mode, scroll up and down by sliding your finger to select the file/folder that you
want to copy, move or delete.
y To copy, move or delete a single file or folder, hold your finger on the file/folder until a pop-up menu
appears, and then select an option from the menu.
y To copy, move or delete multiple files or folders,
(1) Tap the Multi icon on the top bar.

14
(2) Tap one or more files and folders that you want.
(3) Tap the Editor icon to display the edit menu.
(4) Select an option from the pop-up menu.
To copy or move the file, navigate to the destination, select the Editor icon from the toolbar and then choose “Paste.”
Managing 3rd Party Applications
Your MID provides support to many useful third-party applications. You can purchase the applications to add more
functions to your device. They are available online at the Internet or directly on your product.
Install Applications
(1) Download the installation file to your computer. Make sure the file is in format of .apk which is supported by your MID
system.
(2) Connect your MID to computer with the USB cable.
(3) Copy the installation file to your MID.
(4) Disconnect your MID form the computer.
(5) Turn on your MID and enter the file explorer mode with the Explorer.
(6) Locate the installation file and open it.
(7) Follow the on-screen instructions to install the application.
(8) Once the application is installed successfully, you can find it in the application tab.
Some of the applications developed for Android mobile might not run properly in the MID. Please consult the respective software
developer for further information.
Uninstall Applications
(1) Go to the menu “Settings”Æ“Applications”Æ“Manage Applications”.
(2) Tab on the application that you want to uninstall.
(3) Tab on “Uninstall” to uninstall the application.
15
Troubleshooting
Reset this device
y In the event that the device freezes, you can force the device to shut down by holding the Power button for 15 seconds.
y If the Power button does not reset your device, use the “pinhole reset” button, located on the back the device.
Touch-screen Problems
If the touch-screen is not responding properly, try using the “Touch-Screen Calibration” settings screen.
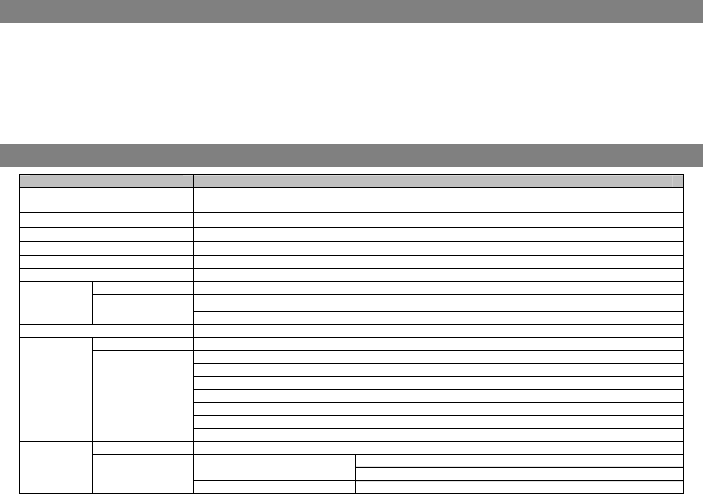
Specifications
Item Description
CPU Based on ARM926EJ (CPU+DPS) ; Main CPU frequency: 600MHz; Auxiliary CPU
Frequency(DSP digital command control): 560MHz
Built-in OS Android OS 2.1
Internal Memory 2GB(256MB for apps installation, 1.2GB for internal system use) or above
Memory Card type SD card: 1GB, 2GB, 4GB (SDHC), 8GB (SDHC)
Connection Agreement WiFi (802.11 b/g)
G-sensor Available (360°rotation)
File Format PDF/EPUB/TXT/FB2/PDB/RTF
PDF / EPUB Format: .Open; .Adobe DRM (For License)
E-Book Coding Format TXT / FB2/PDB/RTF Format: .Open
Photo Format JPEG(Baseline, Max.2Mpixels; BMP ; GIF(Static); PNG
File Format MP3/WMA/WAV/OGG/FLAC/APE/AAC
MP3(MPEG1/2/2.5 Audio Layer 1/2/3):8~48KHZ/8~320Kbps,CBR and VBR
WMA(Version 4, 4.1, 7, 8, 9):8~48KHZ/8~320Kbps
WAV(MS-ADPCM, IMA-ADPCM, PCM): 8~48KHZ
OGG(Q1- Q10): 8~48KHZ
FLAC(Q1- Q10): 8~48KHZ
APE(Version 3.95,3.97,3.98,3.99,normal and fast): 8~48KHZ
Audio Coding Format
AAC(ADIF, ATDS Header AAC-LC and AAC-HE): 8~48KHZ
File Format AVI, 3GP, MP4, RM, RMVB, FLV, MKV, MOV, WMV
1280*720/25FPS(Max) AVI(MPEG4
ASP/XVID/DIVX3/4/5) Audio Codec:MP1/MP2/MP3/AC3/AAC
Video Coding Format
3GP/MP4(H.264/H.263/MPE MPEG4/XVID/DIVX3/4/5:1280*720/25FPS(Max)

16
H.264:1280*720/25FPS(Max) G4/XVID/DIVX3/4/5) H.263:640*480/25FPS(Max)
Audio Codec:MP2/MP3/AC3/AAC/AMR
RM/RMVB(Real video
8/9/10) 1280*720/25FPS(Max)
Audio Codec:MP3/AAC
H.263: 720*480/25FPS (Max)
FLV(Sorenson H.263,
H.264) H.264: 1280*720/25FPS(Max)
Audio Codec:MP3/AAC
MPEG4/XVID/DIVX3/4/5: 1280*720/25FPS(Max)
MKV(H.264/MPEG4
ASP/XVID/DIVX3/4/5) H.264: 1280*720/25FPS(Max)
Audio Codec:MP1/MP2/MP3/AC3/AAC
MPEG4:1280*720/25FPS(Max)
MOV(MPEG4, H.264,
H.263) H.264:1280*720/25FPS(Max)
WMV WMV v9: 1280*720/25FPS(Max)
Battery Charge Time About 5 Hours
Battery Life About 9 hours of music playback, 6 hours of video playback, or 6 hours of web browsing.
Display 7.0-inch TFT LCD, Touchpad (resistive touch pad), 800X480 pixels.
SNR 90dB above
Frequency Response Range 20Hz—20KHz
Power Supply Rechargeable lithium-ion polymer battery;
AC Adapter: AC Input 100-240V~50/60Hz, DC Output 5V/2A
Storage Temp. -20 ℃~ +65℃
Ambient Temp. 0 ℃~ +50℃
Operation Relative Humidity 20% ~ 90%(40℃)
Storage Relative Humidity 20% ~ 93%(40℃)
17
FCC RF warning statement: The device has been evaluated to meet general RF exposure requirement.The
device can be used in portable exposure condition without restriction.
FCC Warning:
z This device complies with Part 15 of the FCC Rules. Operation is subject to the following two conditions:
z (1) this device may not cause harmful interference, and
z (2) this device must accept any interference received, including interference that may cause undesired
operation.
z Changes or modifications not expressly approved by the party responsible for compliance could void the
user's authority to operate the equipment.
z NOTE: This equipment has been tested and found to comply with the limits for a Class B digital device,
pursuant to Part 15 of the FCC Rules. These limits are designed to provide reasonable protection against
harmful interference in a residential installation. This equipment generates, uses and can radiate radio
frequency energy and, if not installed and used in accordance with the instructions, may cause harmful
interference to radio communications. However, there is no guarantee that interference will not occur in a
particular installation. If this equipment does cause harmful interference to radio or television reception,
which can be determined by turning the equipment off and on, the user is encouraged to try to correct the
interference by one or more of the following measures:
z -- Reorient or relocate the receiving antenna.
z -- Increase the separation between the equipment and receiver.
z -- Connect the equipment into an outlet on a circuit different from that to which the receiver is connected.
z -- Consult the dealer or an experienced radio/TV technician for help.