Yifang Digital Technology NXW9QC132 Tablet PC, nextbook User Manual Manual
Shenzhen Yifang Digital Technology Co., Ltd. Tablet PC, nextbook Manual
Contents
- 1. Manual
- 2. User Manual
Manual
1
Table of Content
This manual may not reflect your actual device’s operation. All information is subject to change without prior notification. Please follow your
actual device’s operational procedures.
Content ---------------------------------------------------------------------------------------------2
Features & Functionality ---------------------------------------------------------------------------2
Safety Precautions ---------------------------------------------------------------------------------2
Listening Cautions ----------------------------------------------------------------------------------3
Basic Connections ----------------------------------------------------------------------------------4
First Setup -----------------------------------------------------------------------------------------4
Create a child account ------------------------------------------------------------------------------4
Parental Control Settings --------------------------------------------------------------------------5
Basic Operation -------------------------------------------------------------------------------------8
Maintenance --------------------------------------------------------------------------------------- 11
Frequently Asked Questions (FAQ) ---------------------------------------------------------------- 12
Major Specifications ------------------------------------------------------------------------------- 13
FCC Statement ------------------------------------------------------------------------------------- 14
CONTENT
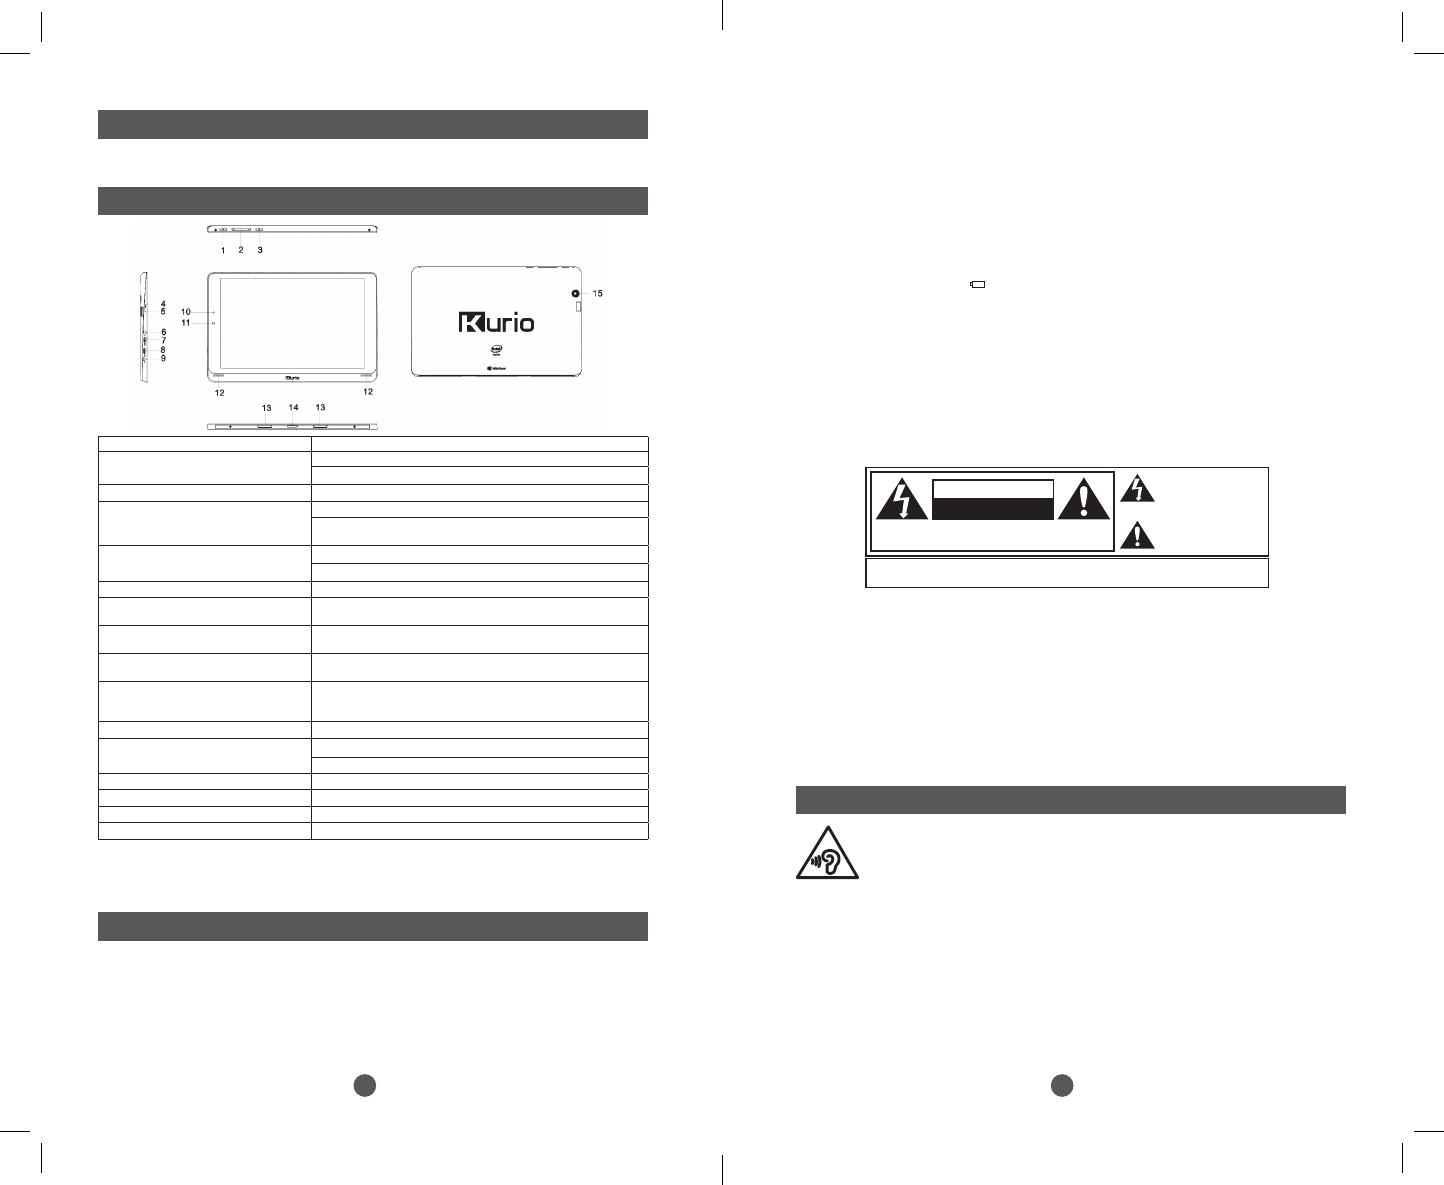
Features & Functionality
When you get your tablet, be sure to check the following items are enclosed:
• Main Unit • Keyboard • AC Adaptor • User Manual
Note:
1. The Micro USB port does not support connecting to a computer.
2. Cameras do not support zoom or face tracking functionality.
3. A USB keyboard and USB mouse can be connected to this tablet if necessary. USB adaptor (not provided) is required.
FEATURE FUNCTIONALITY
1. Power button Press and hold to turn the tablet on or off.
Press to turn the display on or off.
2. Volume+/- buttons Press to increase/decrease volume.
3. Windows button Press to open the Windows Start screen.
Press for quick access to the most recently used app or most
recently viewed screen.
4. Microphone Records sounds.
Provides sound input while making calls using web-based apps.
5. Micro SD card slot Read and write files stored on a Micro SD card.
6. Charging port Connect the supplied power adapter to provide power to the
tablet and charge the battery.
7. Micro HDMI port Connect TV via Micro HDMI cable (not included), for switching
the display to wider screen.
8. Micro USB port Connect USB devices, via an optional USB adapter cable, for
transferring data, music, photos, videos, etc.
9. Audio port (3.5 mm) Connect a headset, headphones, microphones, or other audio
equipment to listen to stereo sound, record audio, or make web
phone calls.
10. Charging indicator Indicates the battery-charge status.
11. Front-facing camera Capture a front view picture or record videos.
Use while making video calls.
12. Speaker Provides audio output.
13. Sustaining port (female) Fix and sustain the connection to external keyboard
14. Pogo pin connector (female) Connect external keyboard
15. Rear camera Capture pictures or videos
2
Listening Cautions
• This product respects the current regulations for limiting the output volume of consumer
audio devices to a safe level. By listening to your device with headphones or earbuds at high
volumes, you run the risk of permanent damage to your hearing. Even if you get used to
listening at high volumes and it seems normal to you, you still risk the possibility of damaging
your hearing. Reduce the volume of your device to a reasonable level to avoid permanent hearing
damage. If you hear ringing in your ears, reduce the volume or shut the device off.
• Do not use while operating a motorized vehicle. It may create a traffic hazard and is illegal in many areas.
• You should use extreme caution or temporarily discontinue use in potentially hazardous situations due to
obstructed hearing.
• Even if your headphones or earphones are the open-air type designed to let you hear outside
sounds, don’t turn up the volume so high that you can’t hear what’s around you.
• Sound can be deceiving. Over time your hearing “comfort level” adapts to higher volumes of sound. What
sounds “normal” can actually be loud and harmful to your hearing. Guard against this by setting the volume
of your device at a safe level BEFORE your hearing adapts.
To establish a safe volume level:
a. Start your volume control at a low setting.
b. Slowly increase the sound until you can hear it comfortably and clearly, and without
distortion. Once you have established a comfortable sound level, leave it there
3
Safety Precautions
• Clean your tablet with a soft cloth dampened with water. Do not use liquid or aerosol cleaners, which may
contain flammable substances. Do not clean the keyboard with a dampened cloth.
• Do not store or use the device in confined spaces, such as a book case. During operation, ventilation vents
must not be covered.
• Do not expose the device to open flames.
• Please dispose of the device in accordance to all laws and regulations applicable to your state.
• Do not expose the device to extreme temperatures.
• The user shall be solely responsible for any damages or lost data caused by misuse, malfunction, modification.
• Do not attempt to disassemble, repair, replace the batteries or modify the product. This will invalidate
the warranty. There is a danger of explosion if the battery is replaced incorrectly.
• If the device is not to be used for an extended period of time, charge the battery at least once per month as
to maintain battery life.
• Charge the battery if:
a) The battery level icon displays (An empty battery).
b) The device powers off automatically.
c) There is no response when pressing keys with keys unlocked and battery full.
• To avoid data being corrupted or lost, do not interrupt the connection when the device is being formatted
or when it is transferring files.
• To avoid data being corrupted or lost, please follow the instructions on this manual if using the device as an
external memory storage device.
• Before use, please refer to electrical safety information displayed on the bottom of the device.
• Do not expose the device and battery (battery or batteries or battery pack) to excessive heat sources, such
as sunlight, open flames, etc.
• If the power adaptor disconnected from the device, will remain operational while the battery has
sufficient charge.
• The power adaptor is a CLASS II apparatus with double insulation, and no external ground is provided.
• Safety symbol explanation:
- The lightning flash with arrowhead symbol within an equilateral triangle is intended to alert the user to
the presence of non-insulated “dangerous voltage” within the product’s enclosure that may be of sufficient
magnitude to constitute a risk of electric shock.
- To reduce the risk of electric shock, do not remove the cover (or back) as there are no user-serviceable
parts inside. Refer servicing to qualified personnel.
- The exclamation point within an equilateral triangle is intended to alert the user to the presence of
important operating and maintenance instructions in the literature accompanying the device.
- Correct Disposal of this product. This marking indicates that this product should not be
disposed of with other household waste in the EU. To prevent possible harm to the
environment or human health from uncontrolled waste disposal, recycle it responsibly to promote the
sustainable reuse of material resources. To dispose of your used device, please use the return and
collection systems available in your area or contact the retailer where the product was purchased. They can
take this product for safe environmental recycling.
WARNING
RISK OF ELECTRIC SHOCK
DO NOT OPEN
WARNING: TO REDUCE THE RISK OF ELECTRIC SHOCK DO NOT REMOVE
COVER OR BACK. NO USER-SERVICEABLE PARTS INSIDE. REFER SERVICING TO
QUALIFIED SERVICE PERSONNEL.
CAUTION: TO REDUCE THE RISK OF FIRE OR ELECTRIC SHOCK, DO NOT EXPOSE THIS
APPARATUS TO RAIN OR MOISTURE. DO NOT PLACE ANY OBJECTS FILLED WITH
LIQUIDS, SUCH AS VASES, ON THIS APPARATUS.
The lightning flash with arrow head
within a triangle is intended to tell
the user that parts inside the product
constitute a risk of electric shock to
people.
The exclamation point within a
triangle is intended to tell the user that
important operating and servicing
instructions are in the papers with the
appliance.
• Do not subject the device to severe impact. Do not drop it from heights.
• Do not use the device in extreme hot or cold, dusty or damp conditions. Do not expose it to direct sunlight.
• Avoid using the device near strong magnetic fields.
• Electro Static Discharge (ESD) may affect the performance of the device. Please restart the device, following
the instructions in this manual if necessary. Please handle with care and operate in a static-free environment.
• Do not expose device to water and other liquids. Please power off the device immediately and clean/dry
accordingly if water or other liquids come in contact with it. Do not expose this device to rain or moisture.
The device should not be exposed to dripping or splashing. Never place objects filled with liquids, such as
vases, on the device.
Basic Connections
First Setup
Charging the tablet
Note: If using the tablet for the first time, or after a long period of idle time, charge the battery for more than half an
hour before turning it on, to ensure system stability.
When the device is launched for the 1st time, user will have to follow the Windows setup procedure.
Parental supervision is recommended for the 1st setup.
Once the setup is completed, you will reach the Windows Start screen. In order to make sure the device is safe
for the kids, be sure to create a child’s account.
If no child’s account is created, the child will have full access to the tablet with no parental control.
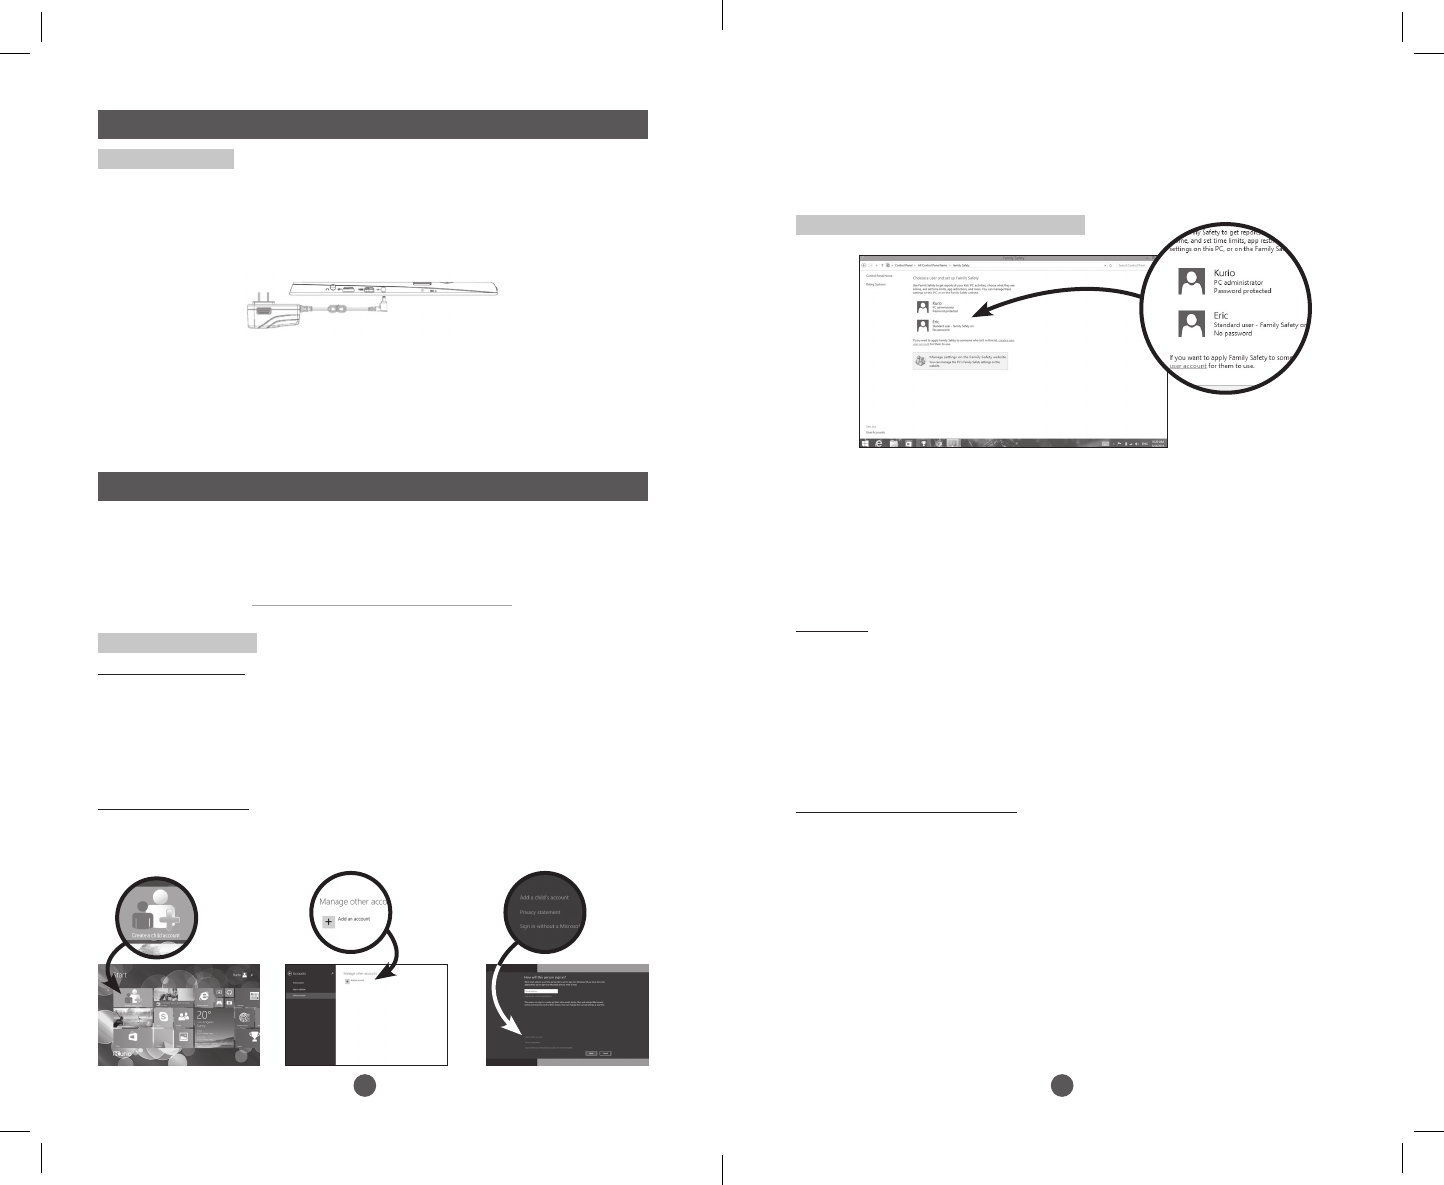
Parental Control Settings (Family Safety)
By monitoring your child’s accounts with Family Safety, you get a better sense of whether they’re finishing their
homework or spending too much time online. This info can help you set specific tablet activity limits for each
child, including when they’re allowed to use the tablet, which games and apps they can use, and which apps they
can see or download in the Windows Store.
You can set and manage all these limits on the web, from anywhere. Sign in to the Family Safety website, tap or
click the name of the child whose settings you want to change, and follow the instructions from there.
Note: You will not be able to manage the child account on the web if you don’t create the child’s account with a child’s
email address.
Set time limits
There are two ways to limit the time your child spends on the device. A time allowance determines how many
hours per day the child can use the device. For example, you might let them spend two hours a day on the device
during the week, but give them more time on weekends. A curfew sets hours when any device use is prohibited
(like after bedtime, or during school hours).
• Press Time limits, and then do one of the following:
- Press the Allowance tab, make sure that time allowance is turned on, and then choose the number of
hours and minutes that the child can use the device on weekdays and weekends.
- Press the Curfew tab, make sure that curfew hours are turned on, and then select blocks of time for each
day when the child isn’t allowed to use the device at all.
Set limits on the websites your child can visit
There are two ways to limit the Internet content your child is allowed to view. You can use web filtering to set
broad categories of sites that your child can visit. For example, you might allow them to see known child-friendly
and general-interest websites, while automatically blocking any sites that provide adult content. You can also
allow or block individual websites, or even specific pages within a site, by their web addresses or URLs.
• To filter all websites by category
1. Press Web filtering, and then tap or click Restriction level.
2. Make sure that web filtering is turned on, and then use the slider to choose which categories of websites
your child can visit.
• To allow or block specific websites
1. Press Web filtering, and then press Allow or block list.
2. Make sure that web filtering is turned on, enter a specific web address, and then press Allow or Block
as appropriate.
You can add multiple web addresses on this page, one at a time. You can also choose to apply the same
permissions for a website to multiple family members.
Create a child account
Why creating a child account?
Have peace of mind by controlling what your child can access on the device. You can the select additional limits
and permissions you would like your child to have, and interpret the activity reports you get about the use of this
device with confidence. The parental control is powered by Microsoft Family Safety.
If you ever wonder what your child is up to on the device and online, Family Safety can help. Family Safety lets
you know which websites child has visited and which apps and games they’ve used. You can also choose to block
or allow specific websites or other content, and even limit the amount of time they can spend on the tablet. With
Windows, you can help your child use the device responsibly.
How to create a child account?
Press on the icon
located on the Start Screen.
The tablet has a built-in Lithium-Polymer rechargeable battery. Charge the device when the battery level is low.
1. Plug the power adapter into the DC-In socket.
2. Connect the power adapter to an electrical outlet and charge the tablet until the battery is fully charged.
Note:
1. The battery may not be fully charged when you unpack your tablet.
2. A fully discharged battery takes about 5 hours to fully charge.
3. When the battery is being charged, the LED indicator lights orange, and when the battery has been fully charged,
the LED indicator lights green.
Caution:
1. Charge the battery in an ambient temperature between 0 °C to 35 °C.
2. Use only the supplied power adapter to charge your tablet. Using unauthorized power adapters may
severely damage it.
4 5
Press Add an account.Then press Add a child’s account.
Do one of the following:
• If your child already has an email address, enter it, press Next, and follow the instructions.
• If you want to get a new email address for your child, press Sign up for a new email address and follow
the instructions.
• If you want your child to sign in to this device only press Add a child’s account without email, and follow
the instructions.
6 7
Set restrictions on games and apps
Setting limits on the games and apps your child’s allowed to use is similar to setting their website restrictions:
you can set an age-and-content-based rating level for all games and for those apps they can see in or download
from the Windows Store, or you can allow or block specific, individual titles.
• To use Windows Store and game rating levels
1. Press Game restrictions, and then press Rating.
2. Make sure that restrictions are turned on, and then use the slider to choose a rating level. You can also
use a different game rating system if you prefer.
The Windows Store bases its download restrictions on a child’s game restrictions in Family Safety.
• To allow or block specific games
1. Press Game restrictions, and then press Game list. Make sure that game restrictions are turned on.
2. Select options for specific games as appropriate.
• To set other app restrictions
You can also decide whether to let your child use other apps and software, whether it’s downloaded from
the Windows Store or not.
1. Tap or click App restrictions.
2. Make sure that app restrictions are turned on, and then choose the available apps you want to allow or
block as appropriate.
Manage your child’s requests
Over time, the settings you apply to your family’s tablet activities can evolve. For example, your child might want
to download and play a new game everyone’s talking about, do some Internet research for a school project, or
get a little more tablet time to finish a homework assignment. In Family Safety, your child can send you email
requests for new apps, games, or websites they want permission to use. You can always deal with those requests
individually, but you can also manage them all in one place on the Family Safety website.
1. Press Requests.
Recent permission requests are organized according to category.
2. Next to each request, press the drop-down list under Response and choose an action.
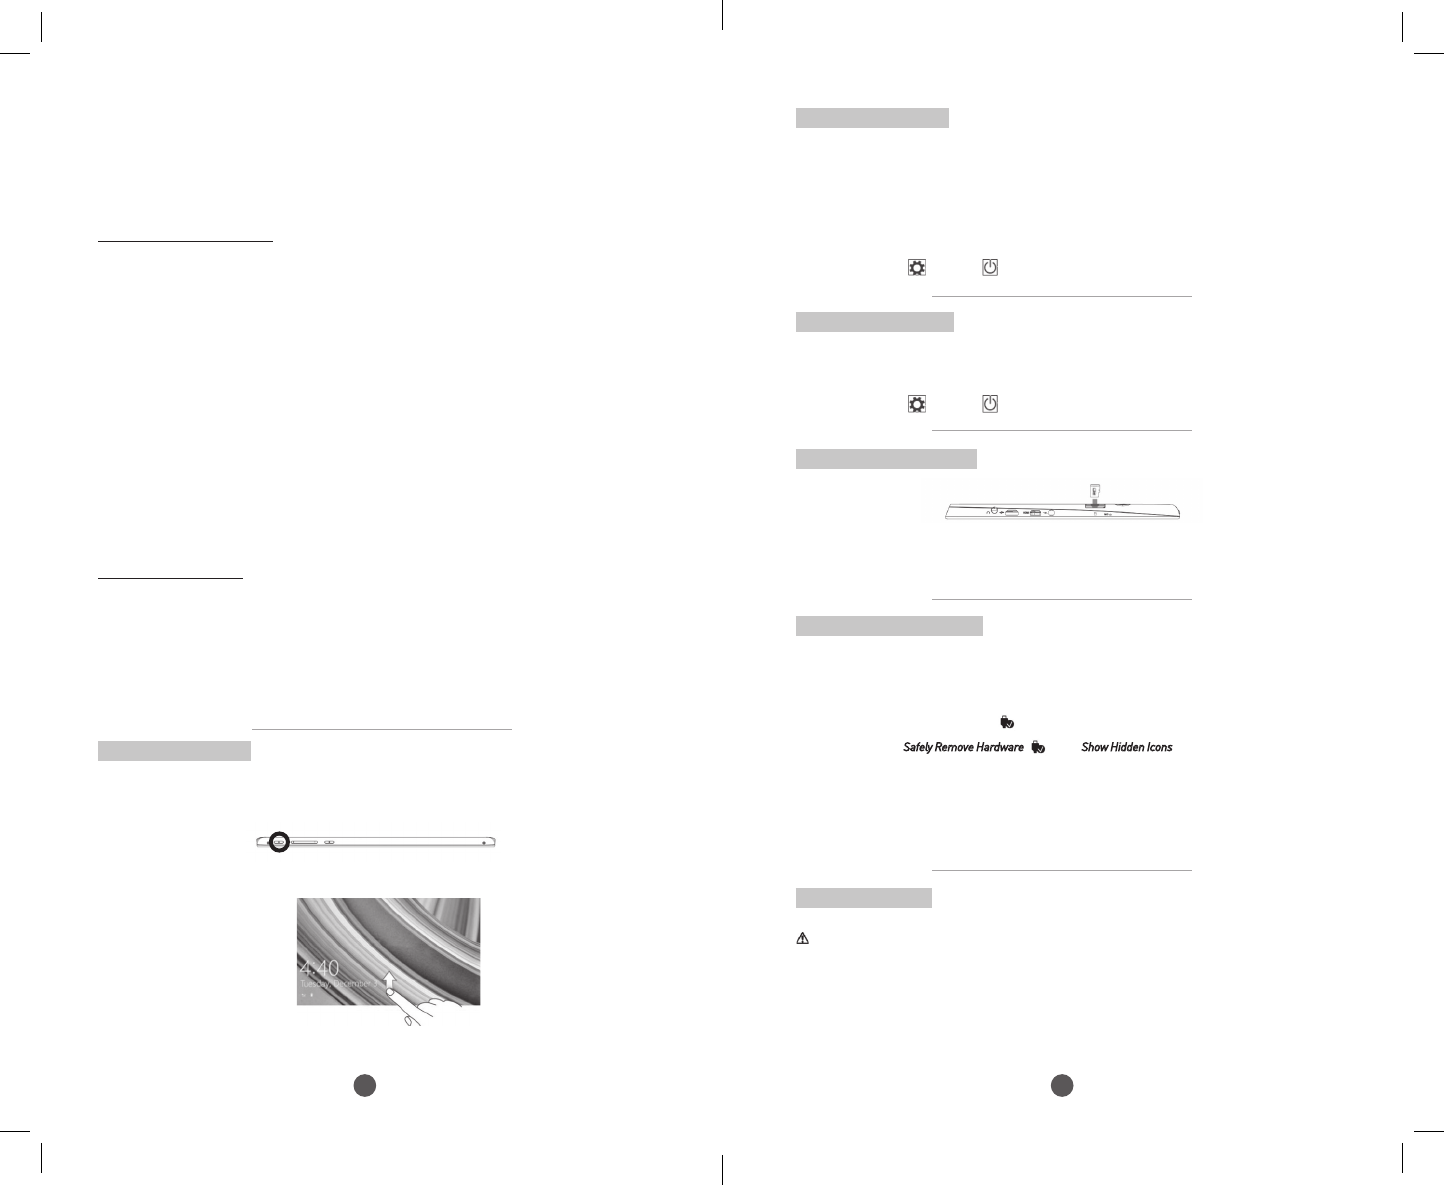
Turning On the Tablet
Note: This tablet is installed with Windows 8.1 system at the factory, so user only needs to complete the last steps of
the installation before using for the first time.
1. Press and hold the Power button for 2 seconds to turn on your tablet. The lock screen appears
2. Swipe-up your finger from the bottom of the display to switch to the login screen, and then enter
password to log in to Windows.
When the Windows Start screen is displayed, the tablet is ready for use.
Note: If the login screen is not enabled in Windows 8.1, you will be taken directly from the lock screen to the Start
screen.
Turning Off the Tablet
You can turn off the tablet in two ways:
• Using the Power button:
1. Press and hold the Power button for at least 4 seconds.
2. Swipe-down the shutdown confirmation screen to the bottom edge of the display to turn off the tablet.
• Using Charms:
1. Swipe-in from the right edge of the display to access Charms.
2. Touch Settings → Power → Shut down to turn off the tablet.
Turning On/Off screen
Usually, user can press the power button once to turn on/ off the screen display.
Optionally, user can also use Charms:
1. Swipe-in from the right edge of the display to access Charms.
2. Touch Settings → Power → Sleep to turn off the screen.
Using Headphones
You can connect a headset or headphones to the audio port of your tablet.
WARNING: Listening to loud music for an extended period of time can lead to hearing loss.
1. Connect headphones to the audio port (3.5 mm) on the tablet.
2. Insert the earphones in your ears and adjust the volume level to a comfortable level.
Note: When you connect an audio device to the 3.5 mm audio jack, the integrated speakers on your tablet are muted
automatically.
Caution:
To prevent damage to the headphones when disconnecting it from the tablet, pull the connector instead of
the cable
Inserting a Micro SD card
1. Pick up a Micro SD card.
2. Align the Micro SD card so that the pins are pointed toward the card slot.
3. Push the Micro SD card into the card slot.
Removing a Micro SD card
Caution:
Removing the Micro SD card while it is in use may cause data loss or result in application errors.
Make sure all save operations to the Micro SD card are complete before removing the Micro SD card.
1. Touch the Desktop tile to enter Desktop mode.
2. Touch Safely Remove Hardware in the notification area at the bottom-right corner of the screen.
Note: If you do not see Safely Remove Hardware , touch Show Hidden Icons to display all icons in the notification
area.
3. Touch Eject SD Memory Card. A message appears confirming that the Micro SD card can be
safely removed. If a warning message appears stating the Micro SD card cannot be removed, ensure all
data transfers involving the Micro SD card are complete.
4. Press on the Micro SD card to release it.
5. Slide the card out after it pops out from the Micro SD card slot.
• To allow or block file downloads
You can also limit what your child is able to download from the Internet, so that he or she doesn’t down-
load a virus or other software you don’t want.
1. Press Web filtering, and then tap or click Restriction level.
2. Make sure that web filtering is turned on. Under File downloads, select the Block file downloads from the
web check box to prevent your child from downloading apps, games, and other files from the Internet. (To
allow your child to download files, just clear the check box.)
Basic Operation
8 9
Wi-Fi Setting
• Turning On/Off Wi-Fi:
1. Swipe-in from the right edge of the display to access Charms.
2. Touch Settings → Network icon .
3. Swipe Wi-Fi icon left or right to turn Wi-Fi on or off.
• Connecting to a network:
1. Swipe-in from the right edge of the display to access Charms.
2. Touch Settings → Available .
3. Select an available network from the list and touch Connect.
Screen Orientation
For optimal viewing experience, the screen orientation changes automatically to portrait or landscape format
depending on how you hold the tablet. You can disable automatic screen rotation and lock the screen in portrait
or landscape mode.
Note: Some apps may not support automatic screen rotation and are designed to work only in one orientation.
• Locking the screen orientation
1. Change the screen to the desired orientation.
2. Swipe-in from the right edge of the display to access Charms.
3. Touch Settings → Screen .
4. Touch toggle to lock the screen orientation, or touch toggle to unlock the screen orientation.
Windows 8.1 Start Screen
The Windows 8.1 Start screen displays a list of default and custom Live Tiles, which act as shortcuts to Mail,
Windows Explorer, Weather app, Calendar, Windows Store, Internet Explorer, and other installed apps.
Live Tiles on your Start screen change and update in real time to show news and sports updates, weather
updates, social-networking feeds, etc.
The tile-based user interface gives you direct access to your most recently used apps, emails, photos, music,
videos, contacts, updates from social-networking sites, and frequently viewed websites. You can pin your favorite
apps as tiles to customize the Start screen.
You also can personalize the Start screen by setting your favorite picture as the wallpaper.
Note: Live Tiles can be added or removed by using Pin to taskbar , Pin to Start or Unpin from Start options.
Gestures
Your tablet has a multi-touch display. You can touch the screen to operate the tablet.
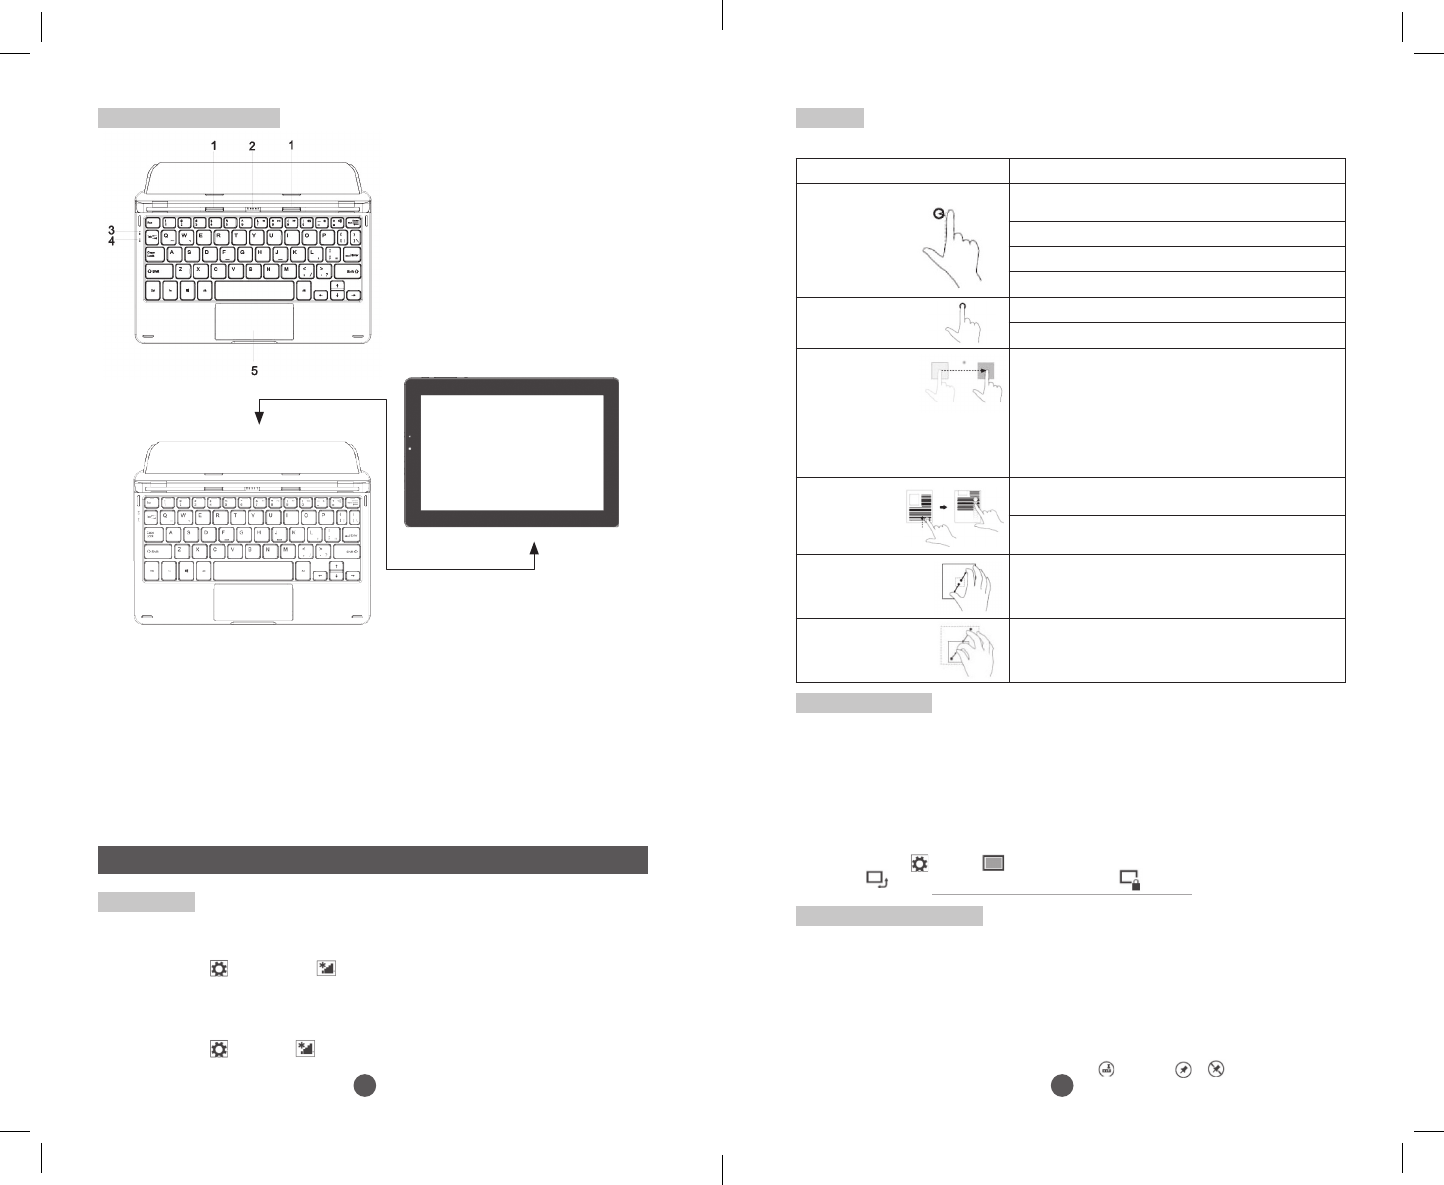
1. Latch-connects to the sustaining slot of the
tablet;
2. Pogo connector-connects to Pogo pin connector
on the tablet.
3. Power indicator
4. Capital Lock indictor
5. Touch pad
Connection
For the sake of user convenience, this device is designed to be equipped with a dedicated keyboard. Follow these
steps to connect the keyboard to your tablet:
1. Place the dedicated keyboard on an even and stable surface (e.g. desk);
2. Hold your tablet with two hands, align the connector and the two magnetic contacts on the keyboard to the
jack and positioning slots at the bottom of the tablet.
3. As soon as the keyboard is connected to the tablet, it is ready for use.
4. When you want to separate the tablet from the keyboard, just press down the keyboard with one hand and
lift gently the tablet with the other hand.
Note:
1.This keyboard is a plug-and-play device; you can connect/disconnect it anytime.
2. There is a white LED on the keyboard that lights on when the connection with the tablet is properly done.
4. Since the keyboard is powered by the tablet, it has no internal built-in battery.
Connecting the Keyboard
Overview
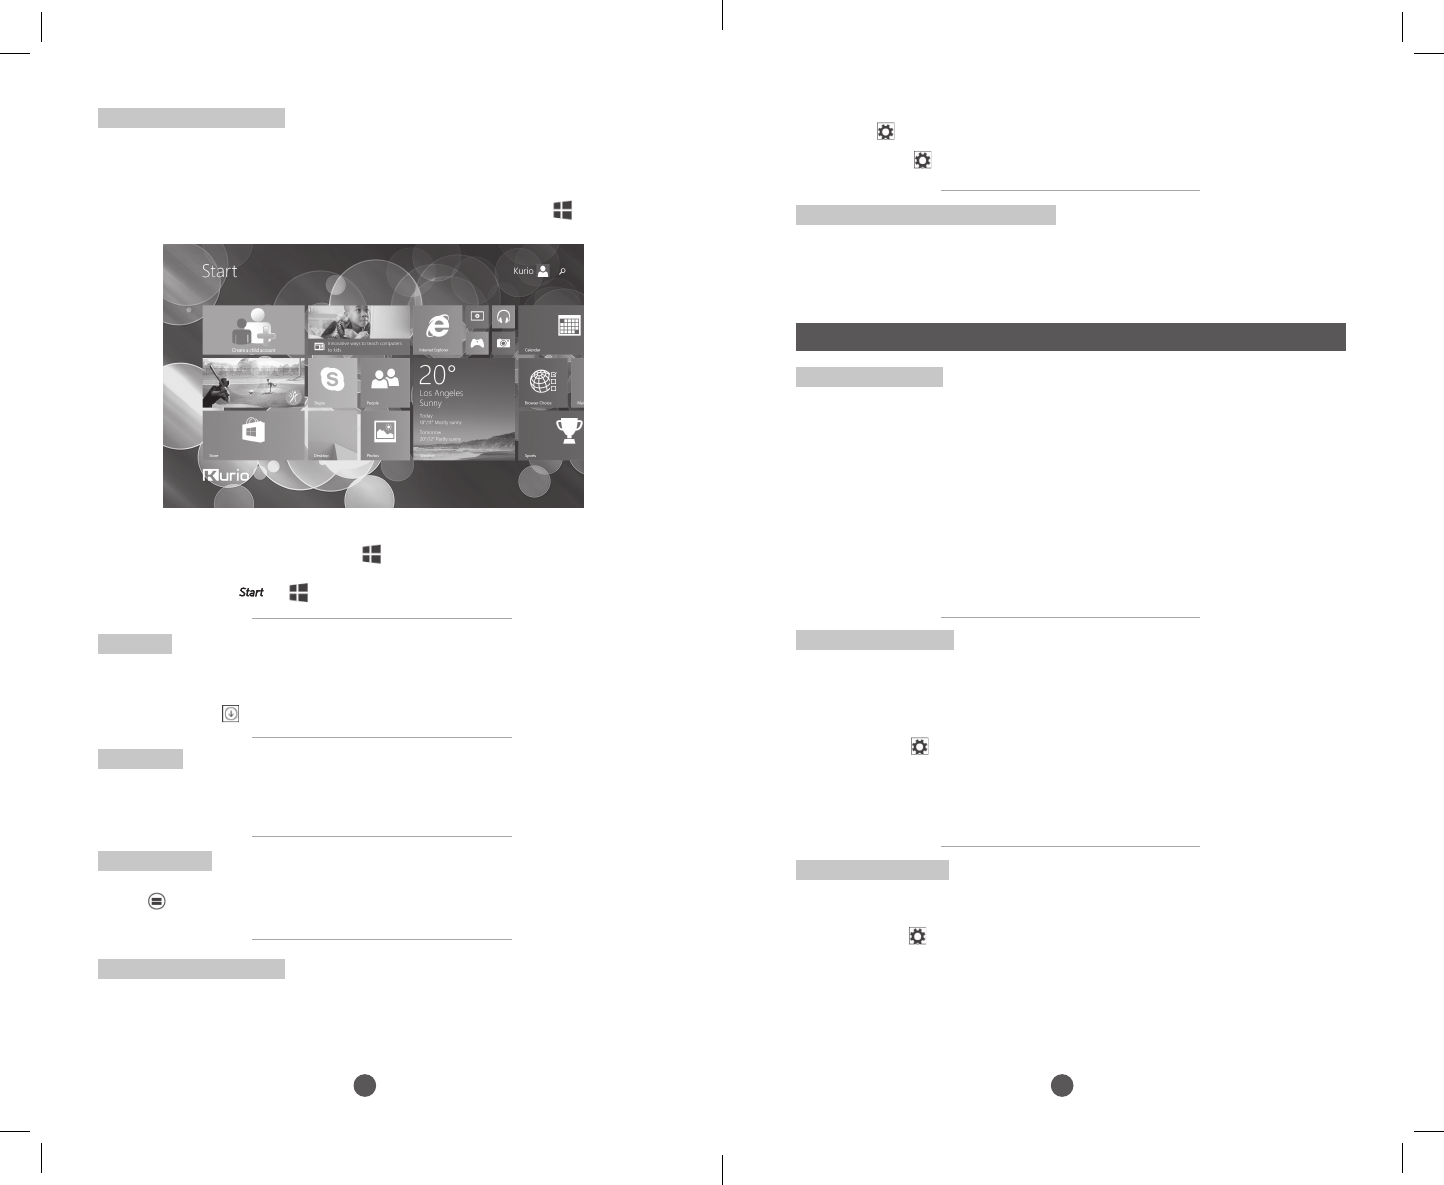
FINGER GESTURE YOU CAN DO
Touch
Tap gently on
the display with
your fingertip
Select items on the screen, including options, entries, images,
and icons.
Start apps.
Touch buttons on the screen.
Input text using the on-screen keyboard.
Touch and Hold
Touch and hold your
finger on the display.
Display detailed information about an item.
Open the context menu of an item to perform further actions.
Drag
1. Touch and hold your
finger on an item
on the screen.
2. Keeping your finger
in contact with the display, move your
fingertip to the desired location.
3. Take your finger off the display to
drop the item in the desired location.
Move items such as images and icons on the screen.
Swipe or Slide
Move your finger
in a vertical or
horizontal direction
on the display.
Scroll through the Start screen, web pages, lists, entries, pho-
tos, contacts, and so on.
Close an app. (Swipe the app to the bottom of the display.)
Zoom in
Touch the display with
two fingers and then
move the fingers apart.
Enlarge the view of an image or web page.
Zoom out
Touch the display with
two fingers and then
move the fingers closer.
Reduce the view of an image or web page.
10 11
Accessing the Start screen
When your computer boots into Windows, the Start screen appears by default. To access the start screen from
any other window or app, use any of the following methods.
Press the Windows button.
Swipe-in from the right edge of the display to access Charms, and then touch the Start icon . Copy music, photos, videos, and data
1. Connect your tablet to a USB storage device with a Micro USB to standard USB conversion cable, then
transfer files to or from the USB storage device.
2. After transferring files, use the Safely Remove Hardware wizard to remove the USB storage device.
Note: The Micro USB to standard USB conversion cable is sold separately and is not shipped with the tablet.
Cleaning Your Tablet
Caution:
Before you clean your tablet, disconnect all the cables and turn off the tablet. Clean your tablet with a soft
cloth dampened with water. Do not use liquid or aerosol cleaners, which may contain flammable subs-
tances.
1. Turn off your tablet.
2. Disconnect any attached devices, headphones, and speakers from the tablet and from their electrical
outlets.
3. Moisten a soft, lint-free cloth with either water or a display cleaner, and wipe the surface of the tablet until
it is clean. Do not allow water from the cloth to seep down to the tablet ports or buttons.
Caution:
1. To avoid damaging the tablet or display, do not spray cleaning solution directly onto the display. Only use
products specifically designed for cleaning displays and follow the instructions included with the product.
2. Do not clean the keyboard with a dampened cloth.
Swipe left
1. Swipe-in from the right edge of the display to show the charms. Charms provide access to the system
commands, such as Start, Search, Share, Devices, and Settings options.
2. From the Start screen, swiping left until you reach the end of the tile view will bring up the Apps icon.
Touch Apps icon to show an alphabetical list of all apps installed on your tablet.
Swipe right
1. Swipe-in quickly from the left edge of the display to switch the currently running apps.
2. Swipe-in slowly from the left edge of the display to show thumbnails of open apps.
3. Swipe-in and out on the left edge of the display to show a list of the most recently used apps.
Synchronizing Your Tablet
Using a Microsoft account
If your computer has Microsoft Windows 8.1 installed, you can synchronize user settings of your tablet with
your computer using a Microsoft account. When you sign in with your Microsoft account on your tablet, your
settings, including internet browser history, app settings, and personal files etc., are synchronized with
other Windows 8.1 PCs and tablets computers.
If you are at the Start screen, pressing the Start icon takes you to the most recently used app or most
recently viewed screen.
Note: The functionality of the Start icon is same as Windows button.
1. On the tablet, access Charms and click
Settings → Change PC Settings → Accounts → Your account → Connect to a Microsoft Account to
switch your computer local account to your Microsoft account.
2. Click Settings → Change PC Settings → OneDrive → Sync settings to see the options for
synchronizing your data and settings.
Swipe up/down
1. From Start screen, swipe-in from the bottom or top edge of the display to show the Customize
icon . Touch Customize to organize the tiles on your Start screen.
2. Swipe-in from the top to the bottom of an app to dock or close the app.
Maintenance
Refreshing your tablet
Refreshing your tablet will restore Windows to original factory settings without deleting any of your personal
files, installed apps from Windows Store, or personalization settings.
• To restore your tablet:
1. Swipe-in from the right edge of the display to access Charms.
2. Touch Settings → Change PC settings → Update and recovery → Recovery.
3. Touch Get started under Refresh your PC without affecting your files.
4. Read the warning and touch Next after you read the warning.
Note: Apps installed from the Windows Store are automatically reinstalled after the refresh is complete. Apps ins-
talled from sources other than the Windows Store are removed and have to be manually installed. A list of apps
removed during this process is created on the desktop after the process is complete.
Resetting your tablet
Resetting your tablet will return the system to original factory settings.
1. Swipe-in from the right edge of the display to access Charms.
2. Touch Settings → Change PC settings → Update and recovery → Recovery.
3. Touch Get started under Remove everything and reinstall Windows.
4. Read the warning and touch Next after you read the warning.
Caution:
Resetting your tablet erases all data from your tablet, including your account configuration, apps, music,
pictures, files, and so on. Make sure that you back up all the required data before you proceed.
Note: Only pre-installed apps will remain when you reset the tablet. In shutdown status, user can press and hold
Power +Vol- keys at the same time to boot the device and enter Recovery mode, for the purpose of repairing or
resetting the system.
12 13
Tech Support & Warranty Information
If you encounter any issue with your device, please do not return it to the store.
All of our products have a 1 Year Limited Warranty. In the unlikely event you experience any problems with
your Kurio, please review our FAQs & troubleshooting info or contact our tech support team for help at
www.kurioworld.com/support/
If the tech support team is unable to solve the issue, they will provide instructions regarding how to have
your Kurio serviced if it is under warranty.
Find more tips and information at WWW.KURIOWORLD.COM
Frequently Asked Questions (FAQ)
Major Specications
QUESTIONS ANSWERS
1. Why the battery does not charge?
What to do?
There are 3 main reasons for this problem: bad connection,
improper temperature condition, damaged battery or adapter.
To check for bad connection:
1. Check all connectors to ensure proper connectivity.
2. Unplug the supplied AC power adapter from the wall and
verify that the outlet is functioning.
3. Check all cable connections, plug the adapter back into the
tablet, and then plug pack into the wall.
If operating in improper temperature conditions, i.e. the tablet’s
temperature is below 0 °C or higher than 35 °C, user should
change the location and charge the battery in an ambient
temperature between 0 °C to 35 °C.
In case of damaged battery or adapter, contact an authorized
reseller to replace the battery or power adapter.
Note: The Charging LED indicator will light 4-5 seconds later
after the adapter has been connected to the tablet and the wall
outlet.
2. My battery drains quickly even when
the tablet is in Standby mode. What’s
the matter?
If the tablet is not in the range of a network it can connect to,
the tablet continues to send out signals to locate a base station
and drains the battery. So, just temporarily turn off the tablet,
or move the tablet in range of a network it can connect to, or
temporarily turn off the wireless connection on your tablet.
In addition, if the tablet keeps checking for Windows updates
even in Standby mode, the battery will drain quickly too. This
is the default setting, user can disable this by enabling “Never
check for update”. However, this operation is not recommended.
3. Tablet is connected to the power
adapter for charging, but still fails to
turn on. Why?
If the tablet has been idle for a long period of time, or has just
been purchased and used for the first time, its battery might
be completely discharged. In this case it is suggested that user
should charge the battery for over half an hour before turning it
on, so as to guarantee the stability of the system.
4. Tablet does not turn on, what to do? It may be because the battery is completely discharged. Charge
the tablet for over half an hour, and then press and hold the
Power button for 3 seconds to turn on the tablet.
5. Tablet does not turn off, what to do? Press and hold the Power button for 10 seconds to perform a
hard shut down.
Note: User will have to wait for about 8 seconds before turning
on the tablet again after it shuts down.
6. Tablet locks up, what should I do? Press and hold the Power button for 10 seconds to perform a
hard shut down.
7. How to deal with the case that my
tablet is not responding or behaving
as expected?
1. Reboot the tablet;
2. If it still not works, try refreshing the system.
3. If the problem remains unsettled, contact the vendor’s
support service.
Note: Refer to the section Maintenance> Refreshing your tablet
for detailed information on how to refreshing the tablet.
QUESTIONS ANSWERS
8. Tablet cannot boot into Windows,
what should I do?
Contact the vendor’s support service.
9. Why is the software or feature is not
working as expected?
Software updates may have been downloaded in the back-
ground. Restart your tablet by swiping-in from the right edge of
the display to access Charms and touch Settings → Power →
Restart to restart the tablet.
10. The device crashes, or the screen
turns blue after startup. What can
I do?
It may be because the system of the tablet has been damaged to
some extent for improper shut-down actions.
When shutdown, press and hold the Power and Vol- button
together to reboot the device and enter Recovery mode, so as to
repair or reset the system.
After entering Recovery mode, user will have to choose an
option from the menu before going on:
• Continue – Exit without doing anything and continue to
Windows 8.1 system.
• Use a device- Refresh the system by using a USB
device, network connection, or Windows recovery DVD.
• Troubleshoot- Refresh or reset your PC or use
advanced tools.
• Turn off your PC- do nothing and turn off the tablet.
11. Touchscreen responds slowly or
improperly, what’s wrong?
Perhaps the screen is dirty, and sometimes the protective cover
prevents the tablet from recognizing your inputs.
Moisten a soft, lint free cloth with either water or a display clea-
ner, and wipe the surface of the tablet until it is clean. Do not
allow water from the cloth to seep down to the tablet ports or
buttons. Remove any protective covers from the touchscreen.
12. No wireless connection, how to
set it up?
1. Check if the wireless radio is on. See Wi-Fi setting.
2. Try to get closer to the wireless access point.
3. Reset the wireless router if using a private network; open the
browser to view the landing page if using a public network.
13. Slow Internet connections.
How to make it faster?
The signal strength is not strong enough. Move your tablet to a
different location for better signal reception.
ITEM DESCRIPTIONS
CPU Intel BayTrail-T CR, Quad core/1.8GHz (Z3735G)
Operation system Windows 8.1
DDR 1GB
Internal Memory EMMC: 32GB
Expandable Memory Micro SD card: up to 64 GB
Interfaces USB 2.0 high speed /Micro SD (compatible SDHC, up to 64GB) card
3.5mm Earphone
Connection Agreement Wi-Fi (802.11 b/g/n); BT4.0
Front Webcam Front camera, 0.3 Mega Pixels; Rear camera, 2.0 Mega Pixels
Bluetooth Support
Display Resolution,1280*800 Pixels, 8.9 inch LCD IPS
Power Supply Rechargeable lithium battery, 4900mAh;
AC Adapter, DC output 5V/2 .5 A
Storage Temp. -20°C ~ +65°C
Ambient Temp. 0°C ~ +35°C
Operation RH 20% ~ 90% (40°C)
Storage RH 20% ~ 93% (40°C)
Exposure to Radio Frequency Energy
Copyrights
Restricted Use of Electronic Devices
Battery Specications / Cautions
14 15
Warning: Changes or modifications to this unit not expressly approved by the party responsible for
compliance could void the user’s authority to operate the equipment.
NOTE: This equipment has been tested and found to comply with the limits for a Class B digital device,
pursuant to Part 15 of the FCC Rules. These limits are designed to provide reasonable protection against
harmful interference in a residential installation. This equipment generates, uses and can radiate radio
frequency energy and, if not installed and used in accordance with the instructions, may cause harmful
interference to radio communications. However, there is no guarantee that interference will not occur in
a particular installation. If this equipment does cause harmful interference to radio or television reception,
which can be determined by turning the equipment off and on, the user is encouraged to try to
correct the interference by one or more of the following measures:
- Reorient or relocate the receiving antenna.
- Increase the separation between the equipment and receiver.
- Connect the equipment into an outlet on a circuit different from that to which the receiver is connected.
- Consult the dealer or experienced radio/TV technician for help.
RF exposure compliance with any body-worn accessory, which contains metal, was not tested and
certified, and use such body-worn accessory should be avoided.
This equipment complies with FCC radiation exposure limits set forth for an uncontrolled environment.
End user must follow the specific operating instructions for satisfying RF exposure compliance.
This transmitter must not be co-located or operating in conjunction with any other antenna or transmitter.
The portable device is designed to meet the requirements for exposure to radio waves established by the
Federal Communications Commission (USA). The SAR limit of USA (FCC) is 1.6 W/kg averaged over one
gram of tissue. This product has been tested and complies with this exposure limit. Please refer to the
physical device for applicable FCC ID.
«The use of electronic/electric devices may interfere with safe operation of some aircraft and can be restric-
ted with some airline companies. Please check with your airline company before traveling.
Kurio Smart has an Airplane Mode. Please go into the Networks Settings of the Windows Interface to switch
the device into Airplane Mode. All wireless connections will be turned off.»
Designation : 2661119
Battery electromechanical system : Polymer lithium battery
Country of origin : Zhangzhou city, Fujian province, China
Do not short-circuit / Do not discard into fire / Do not charge or expose in temperature over 60°C / Do not
disassemble / Do not open / Do not swallow
© Magma Mobile. All right reserved. Copyright © 2014, Nordcurrent. © Pixowl, Inc. Copryright © 2014
Toon Goggles, Inc. © 2012-2014 Fingersoft. Copyright © 2013-2015 KD Productions™. All rights reser-
ved. KD GROUP™, KD™, KD INTERACTIVE™, KURIO™, KD PRODUCTIONS™, the KD™ logo, the names, the
graphics, the musics and brands mentioned on this product are registered trademarks of KD GROUP™,
© Breakfirst. © ELESAPIENS Learning & Fun, S.L. All rights reserved. © Junior Explorers Inc. All Rights
Reserved. The Bluetooth® word mark and logos are registered trademarks owned by Bluetooth SIG, Inc.
and any use of such marks by CIDE Interactive is under lice nse. Other trademarks and trade names are
those of their respective owners. The terms HDMI and HDMI High-Definition Multimedia Interface, and the
HDMI Logo are trademarks or registered trademarks of HDMI Licensing LLC in the United States and other
countries. Intel, Intel Bay Trail and the Intel Inside logo are trademarks of Intel Corporation in the U.S. and/
or other countries. MicroSDHC Logo is a trademark of SD-3C, LLC. © Microsoft 2015.
This manual was correct and complete at the time of printing. However, new specifications and updates
can occur at any time without prior notice. No part of this manual may be copied, republished, reproduced,
transmitted or distributed in any way without prior written consent of KD Interactive. Any unauthorized
distribution of this manual is expressly forbidden.
KD Interactive may find it necessary to modify, amend or otherwise change or update this manual. We
reserve the right to do this at any time, without any prior notice. All specifications and features are subject
to change without notice. All screen shots shown are simulated and may not represent the actual screen on
production units sold to consumers.
Declaration of Conformity
Kidz Delight, Ltd.
1431 Opus Place Suite 110
Downers Grove
Illinois
IL 60515
United States of America
This device complies with Part 15 of the FCC Rules. Operation is subject to the following two conditions:
(1) this device may not cause harmful interference, and (2) this device must accept any interference
received, including interference that may cause undesired operation.
Product: Kurio Smart
Model: C15200
Xavier Ferrer Piera
Business Unit Manager Issue date: May, 30th 2015
16
Made in China - Printed in China
C15202US_KDIUS_QVC_AW_UM_01_150520
Imported by:
Kidz Delight, Ltd.
1431 Opus Place Suite 110
Downers Grove
Illinois
IL 60515
United States of America
2200
FCC Warning:
This device complies with Part 15 of the FCC Rules. Operation is subject to the following two
conditions: (1) this device may not cause harmful interference, and (2) this device must accept
any interference received, including interference that may cause undesired operation.
Warning: Changes or modifications to this unit not expressly approved by the party
responsible for compliance could void the user’s authority to operate the equipment.
NOTE: This equipment has been tested and found to comply with the limits for a
Class B digital device, pursuant to Part 15 of the FCC Rules. These limits are
designed to provide reasonable protection against harmful interference in a
residential installation. This equipment generates, uses and can radiate radio
frequency energy and, if not installed and used in accordance with the
instructions, may cause harmful interference to radio communications. However,
there is no guarantee that interference will not occur in a particular installation.
If this equipment does cause harmful interference to radio or television reception,
which can be determined by turning the equipment off and on, the user is
encouraged to try to correct the interference by one or more of the following
measures:
-- Reorient or relocate the receiving antenna.
-- Increase the separation between the equipment and receiver.
-- Connect the equipment into an outlet on a circuit different
from that to which the receiver is connected.
-- Consult the dealer or an experienced radio/TV technician for help.
The exposure standard for wireless devices employs a unit of measurement known as the
Specific Absorption Rate(SAR). The SAR limit set by the FCC is 1.6 W/kg. The highest
SAR level measured for this device is less than SAR limit, so this device meets the FCC
Requirement.
IC Caution:
RSS-Gen Issue 4 December 2014"&"CNR-Gen 4e éditionDécembre 2014:
- English:
This device complies with Industry Canada licence-exempt RSS standard(s).
Operation is subject to the following two conditions: (1) This device may not cause
interference, and (2) This device must accept any interference, including interference that may
cause undesired operation of the device.
- French:
Le présentappareilestconforme aux CNR d'Industrie Canada applicables aux appareils radio
exempts de licence. L'exploitationestautorisée aux deux conditions suivantes:
(1) l'appareil ne doit pas produire de brouillage, et
(2) l'utilisateur de l'appareildoit accepter tout brouillageradioélectriquesubi, mêmesi le
brouillage est susceptible d'encompromettre le fonctionnement.