Yifang Digital Technology SH101 Smart Gateway User Manual ZigBee Hub draft 20141120 new
Shenzhen Yifang Digital Technology Co., Ltd. Smart Gateway ZigBee Hub draft 20141120 new
User Manual
About
Thank yo
u
transform
more qu
e
888-415-
5
To set up
O
w
NEXTURN
+
u
for purchasing
your life and
m
e
stions, please
c
5
177 or visit us
a
your new NEXT
U
1
w
ner’s
M
+
Smart Kit
the NEXTURN
+
m
aking it easier
a
c
ontact our Cu
s
a
t www.nexturnu
s
U
RN+ Smart Kit
,
M
anual
+
Smart Kit! W
e
a
nd more conv
e
s
tomer Service
s
a.com
,
please follow b
e
e
hope this Kit
w
e
nient. If you ha
v
Representative
e
low instruction
s
w
ill
v
e
at
s
.
2
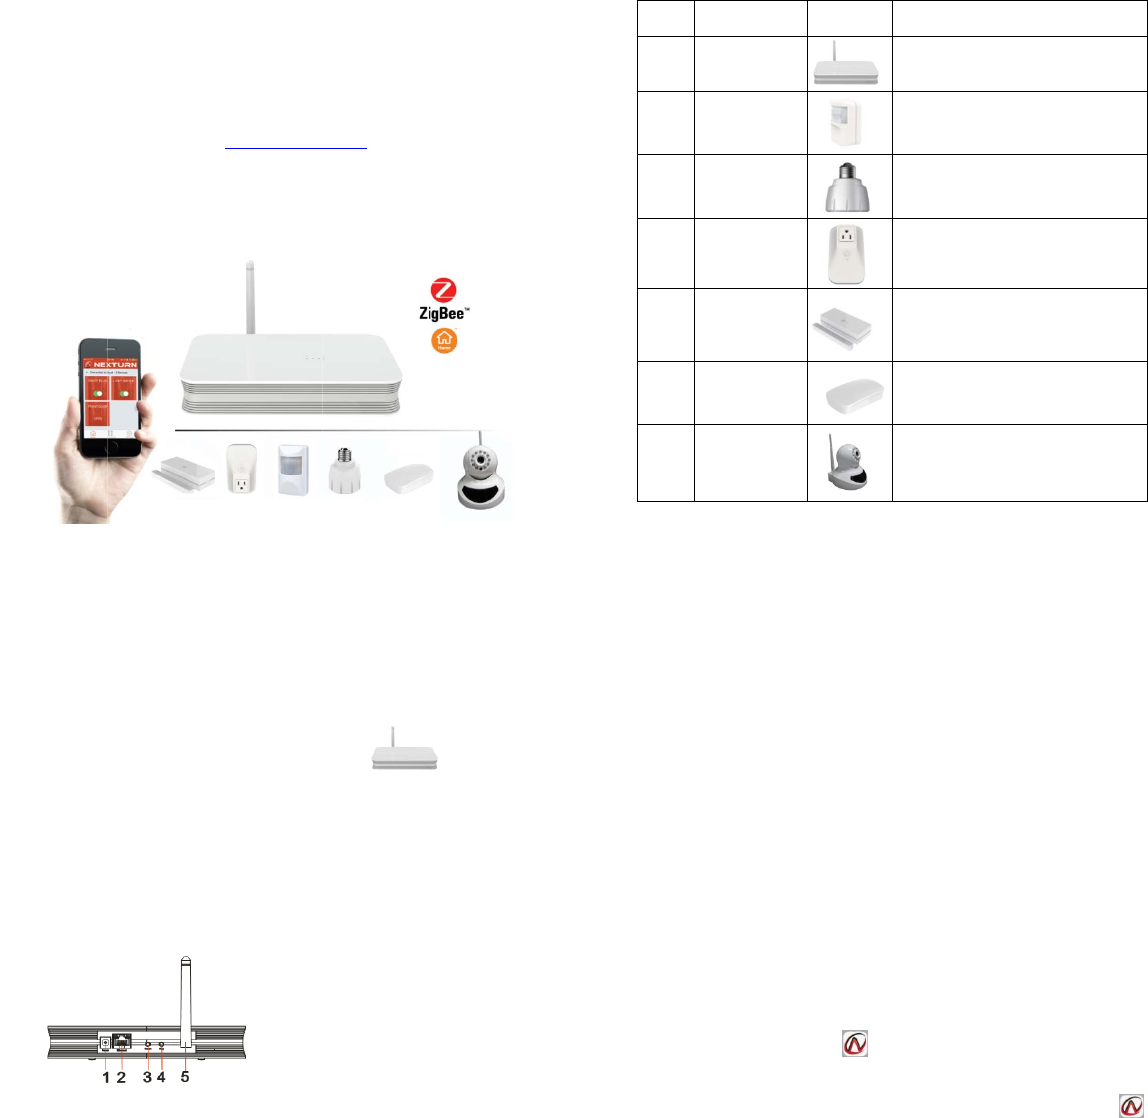
1. Packing Contents
Unpack your NEXTURN+ Smart Kit to check the following parts and
accessories are enclosed:
Box Content picture describe
①
X1 Smart
Zigbee
Gateway
Connect your smart kit to network
②
X1 IR motion
sensor
Detect any motion around sensor
③ X1 Smart
converter
Switch your bulb remotely
④ X1 Smart plug
Can be turn on/off remotely
⑤ X1 Door/
window sensor
Detect door/window open/close state
⑥ X1 wireless
switch
Switch smart converter and plug
4 1pcs Smart plug
⑦ X1 IP Camera
Remotely monitor your home or office
3
2. Getting Started
Step 1 Configure the Smart Gateway
Note: To setup your smart gateway, you need to get the following things
ready
● Available wireless network (WiFi Router)
● 1pcs Ethernet cable
● Smart phone or tablet
Features
Procedures
1. Open box ①,take out the gateway, and get a adapter which use for
gateway in box ②
1. Power socket--connect DC adapter for power supply;
2. Ethernet jack--connect Ethernet cable
3. Reset button--reset the device (restore factory defaults) if
necessary;
4. Register button – register gateway to network
5. Antenna
4
2. Check that the Internet access is available at your home;
3. Connect the attached power adapter to the Smart Gateway for power
supply.
4. Connect the smart gateway to the router via a Ethernet cable.
5. Push the register button to register gateway to network.
6. Connect smart phone or tablet to the WiFi router, which has been
connected with gateway.
Tips: Locate your smart kits within a range of 20 meters around the smart
gateway.
Step2 NEXTURN+ APP
1. Connect your smart phone or tablet to the WiFi router, which has been
connected with gateway, go to APP store to find “NEXTURN+” APP ,
download and install it in your smart phone or tablet.
2. Run “NEXTURN+” APP, star to register a new account, and
“NEXTURN+” will send a confirm email to you, confirm it to sign in
“NEXTURN+”
3. Then follow the APP guide, add gateway and other smart kit devices.
Tips: 1.smart kit devices will connect to zigbee gateway automatically when
you power them
2. If the device has been registered to another gateway before, use the
magnetic rod to touch the device at the designated point for seconds. The
network indicator blinks a few times, indicating it start to register to a new
gateway.
5
Step 3 Add the IR motion sensor to the Network
1.Open box ②,take out the IR motion sensor.
2. Install one AAA battery into it.
3. Fix the IR motion sensor to one available location (e.g. the wall).
4. Run the “NEXTURN+” APP, go to “find devices” page, tap “find device”
6
button, it will appear on the found device list. Select it and tap Register
button.
5. After done, you can detect any motion around sensor.
Step 4 Add the Smart converter to the Network
1.Open box ③,take out the smart converter
2. Remove the ordinary bulb at your home from the socket, then install the
smart bulb converter into the socket, and power on it.
3. Run the “NEXTURN+” APP, go to “find devices” page, tap “find device”
button, it will appear on the Found Device List. Select it and tap Register
button.
4. After done, you can turn on/ off your lamp with your smart phone.
Step 5 Add the Smart plug to the Network
1.Open box ④,take out the smart plug
2. Plug the Smart plug into a wall outlet to power it.
3. Run the “NEXTURN+” APP, go to “find devices” page, tap “find device”
button, it will appear on the Found Device List. Select it and tap Register
button.
4. After done, you can switch on/off the plug and monitor the data of the
current and power consumption etc.
7
Step 6 Add the door/window sensor to the Network.
1.Open box ⑤,take out the door/window sensor, and get one AAA battery
from box ②
Remarks: The door/window sensor assembly is made up of a main unit and a
magnetic bar.
2. Install one AAA battery into the mains unit.
3. Fix the mains unit to one available location (e.g. the wall), and the stick the
magnetic bar on the opposite location, such as the door or window.
Note: a. When fixing the main unit and the magnetic bar, make sure they
have been aligned in correct direction according to the marked orientation.
b. The normal responding distance between the two parts is no more
than 4mm.
4. Run the “NEXTURN+” APP, go to “find devices” page, tap “find device”
button, it will appear on the Found Device List. Select it and tap Register
button.
5. After done, you can monitor door/window open/close state
Note: To check the energy level of the battery, press the button on the mains
unit. If the LED is on, showing that the battery energy is sufficient; if the LED
fails to light, indicating that the battery has been exhausted, and should be
replaced with a new one.
Step 7 Add the wireless switch to the Network
1. Open box ⑥, take out the wireless switch, and get one AAA battery from
8
box ②
2. Install one AAA battery into the wireless switch
3. Run the “NEXTURN+” APP, go to “find devices” page, tap “find device”
button, it will appear on the Found Device List. Select it and tap Register
button.
4. After done, push down the top housing of the wireless switch to switch the
working status of the designated device.
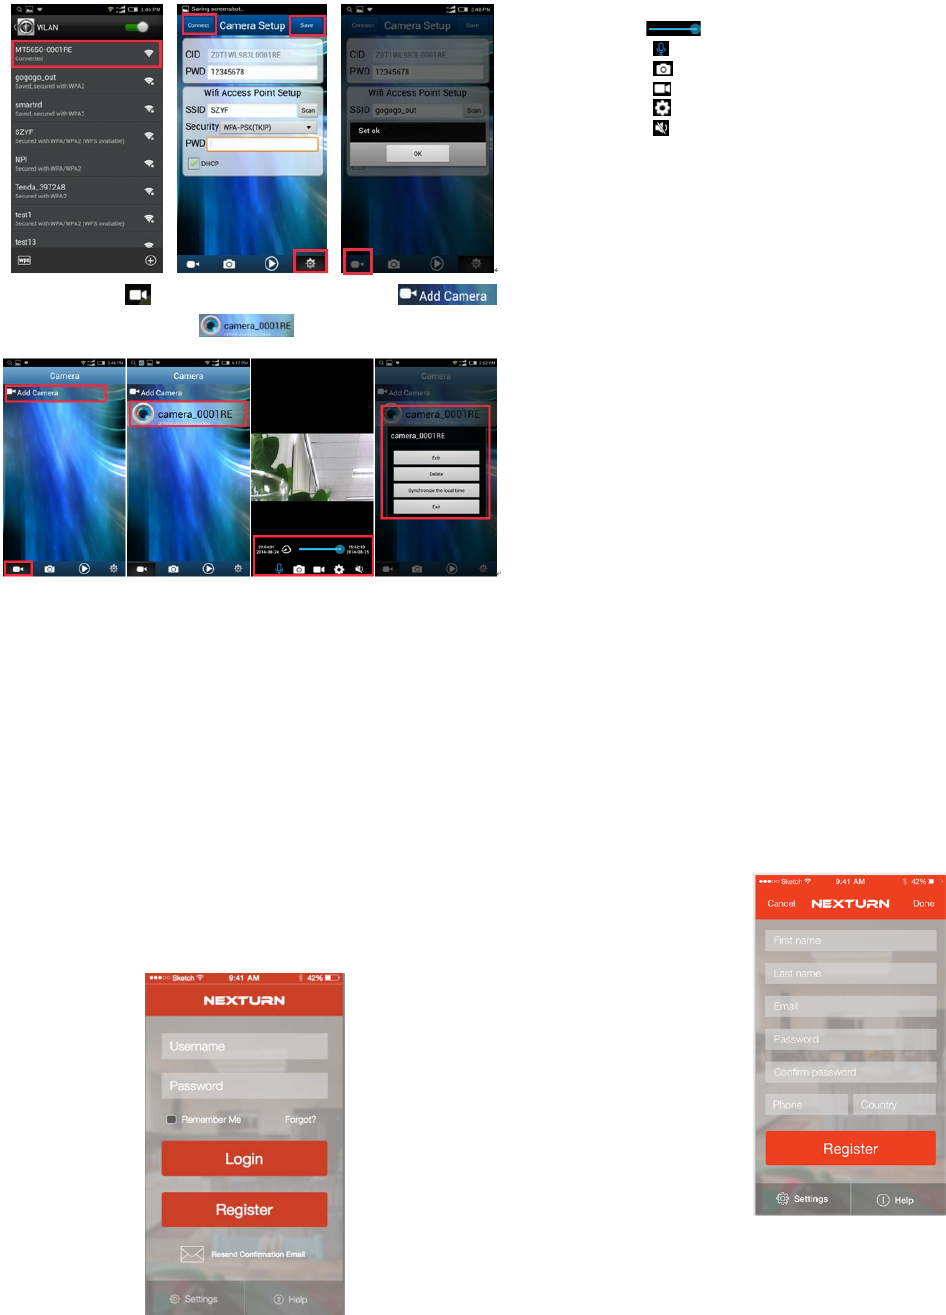
Step 8 Add the IP Camera to the Network
Open box ⑦,take out the gateway, and get a adapter which use for the
camera in box ②
1. Insert a TF card(4G+,class6+) into slot at camera back.
2. Go to APP store to find “nexturn cam” APP , download and install it
in your smart phone or tablet.
3 .Connect the IP camera to the attached power adapter, then press and
hold down the “Set” button for about5 seconds,The LED blink slowly a few
times, indicating the it is staying in network loading process;
4. Enter the W -LAN settings on your smart phone or tablet, then select the
item “MT5650-XXXXXX” from the list and tap to connect. then run “nexturn
cam” APP, tap , open "camera setup" page.tap , it will get the
camera CID automatically, and chose the WIFI router which smart gateway
has connected to, tap to finish setting.
9
4. After setting, tap to get back to “camera” page, tap to
connect camera, and then tap to view the on line video.
Note: 1.Holding your tap on the camera icon will allow you to edit camera
name, detect camera etc.
2. Rotate camera angle by sliding the screen of video.
10
3. Tap video screen to open or close operation bar
1) cloud playback bar
2) tap and hold to speak to camera
3) tap to take a picture and save in phone
4) save current video in phone
5) to set video resolution and frame rate
6) open or close video voice
4. If the video is clear enough, try to remote the lens, which is in the
front of the camera, to focus the camera.
11
Nexturn+ App Setup Guide
User Registration
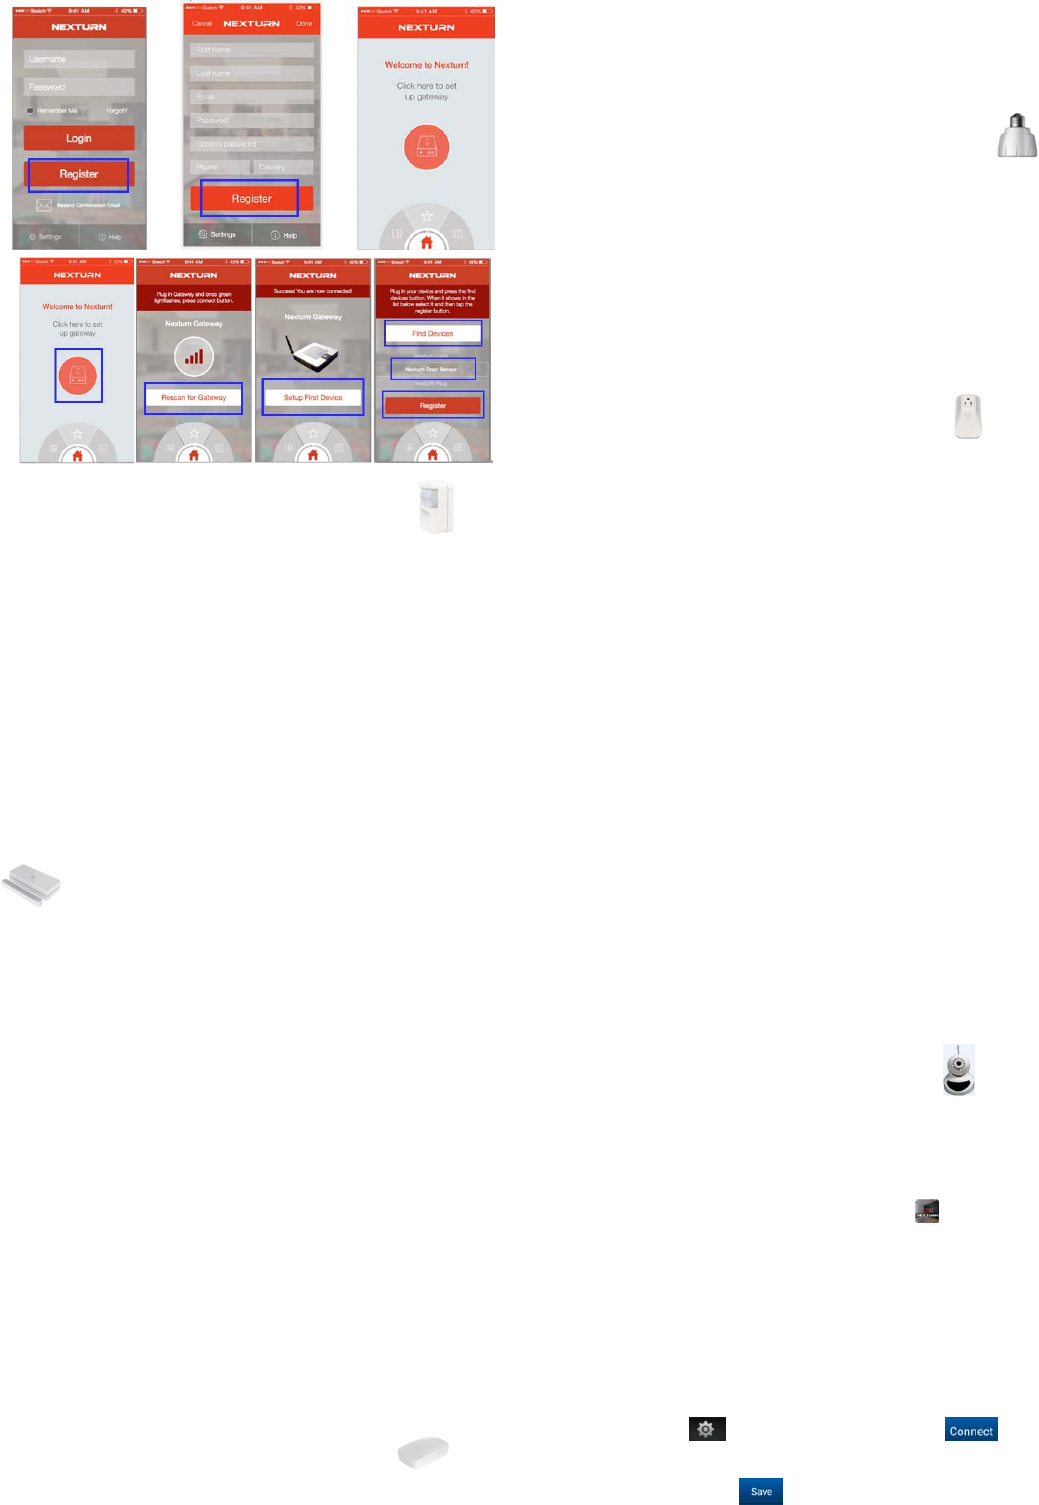
1. App startup page
On initial app startup tap Register button to create new Nexturn account. If
you already have an account, enter your account details in the fields and tap
the Login button.
12
2. Registration Page
On the registration page fill in all the fields, making sure to add your area
code to the phone number field. once completed tap the Register button to
create an account.
You will then receive an email, sent to the email address you provided,
letting you confirm your account information. This confirmation step is
required before you will be able to sign in to the app.
13
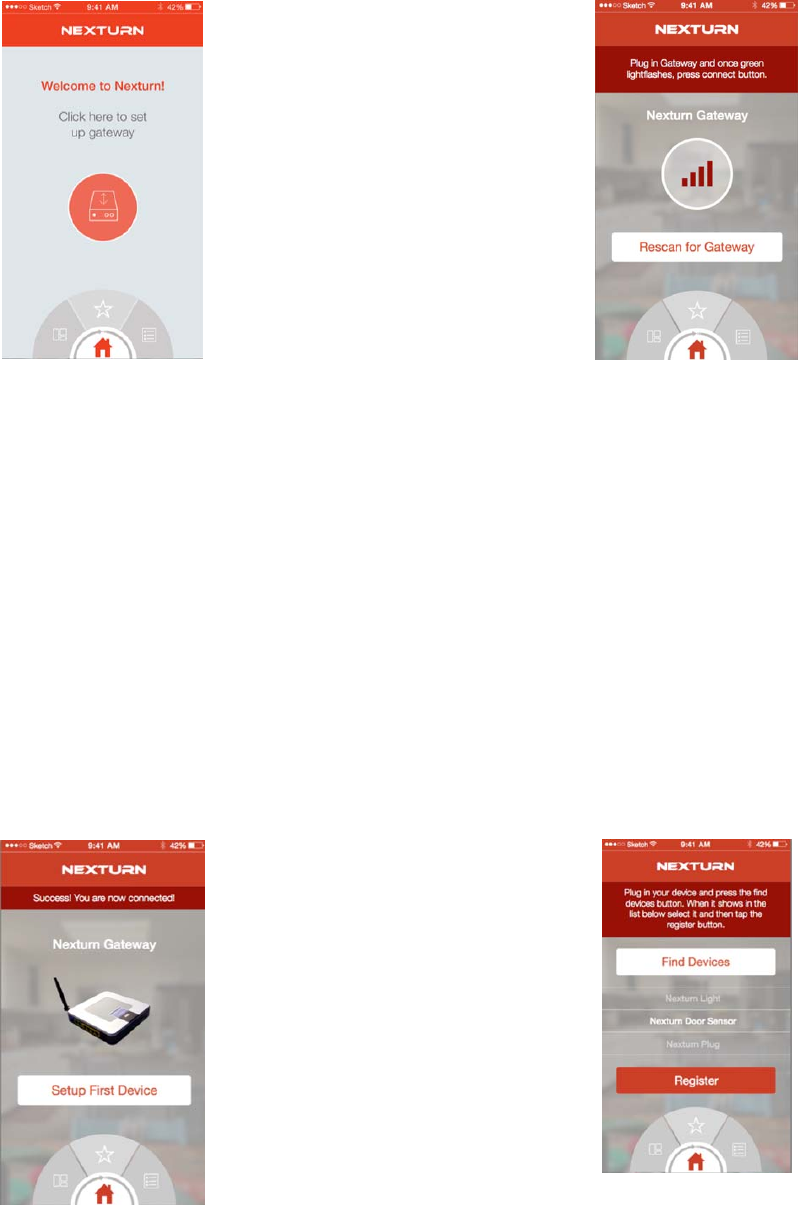
3. Gateway setup - Dashboard Page
Once you have confirmed your email and signed in to the app you will need
to setup your gateway. Tap the orange gateway symbol to begin this process.
14
4. Gateway Setup - Gateway Discovery Page
To connect your gateway, first plug in the power cord to the gateway and
then use the provided network cable to plug the gateway into your home
internet router. After a short period of time you will see a solid green light on
the gateway showing it is ready, the gateway icon should change from grey to
colored at this point indicating that your gateway is ready to be registered and
used. Tap the icon to register your gateway.
If you do not see your gateway, tap the rescan button and check that your
gateway is powered on and plugged in to your router correctly.
15
5. Successful Gateway Registration Page
Once your gateway is registered and ready to be used you will see this
success page. You can now access your dashboard to see any devices that
may be connected to your gateway already by pressing the Star Icon on the
navigation wheel.
If your gateway did not come with any devices connected, then you can setup
your first device by pressing the button under the gateway image.
16
6. Find Devices Page
The find devices page lets you find and select the device you want to register
to your Nexturn device. You can power on all your devices at the same time
for registration, but it is recommended that you power on devices one at a
time.
Once you have powered on a device, you should tap the Find Devices button
and wait a short period of time while the gateway searches for your new
devices. Once the device is found it will show in the list in the middle of the
page. You can only select one device to setup and register at a time, so
select the device you want to start with from the list and then tap the register
button.

17
If no devices show up, you may need to tap find devices again, or try
unplugging your device before repeating the previous steps.
7. Setup Device Page
The setup device page lets you take a picture of your device, name it and add
it to a room or a group. It will also automatically be added to a group with
similar devices (Smartplugs Group, Door Sensors Group)
Once you have named your device and completed any other choices
you may have wanted, you can tap the “Go to Dashboard” button to start
using your device.
18
8. Dashboard Page
The dashboard page shows your all of your devices and allows you to see
the device status as well as turn on and off powered devices.
In the top right of the screen is the Add button, tap this button to add new
devices, create groups/rooms and create scenes.
In the top left of the screen is your notification icon, tapping here will show
you the list of recent notifications from your devices.
Below the header bar is the status indicator, this area shows you how you’re
connected to your devices as well as how many devices in total are
registered to your account.
19
9. Navigation Wheel
The Navigation wheel is your primary way to get to the area of the app .you
care about at that instant. The wheel is normally half hidden and rotates with
the swipe of your finger. You can also drag up on the wheel to reveal the
whole wheel and select where you want to navigate in the app.
There are 6 sections for the wheel:
Top - The star takes you to your dashboard page
Top Right - The list takes you to your All Devices page
Bottom Right - The shopping cart takes you to the shopping page
Bottom - The Cog takes you to the settings page
Bottom Left - The puzzle piece takes you to the scenes page
Top Left - The Floor diagram takes you to your rooms/groups page
20
FCC Compliance
This device complies with Part 15 of the FCC Rules. Operation is subject to
the following two conditions:
(1)This device may not cause harmful interference, and
(2)This device must accept any interference received, including interference
that may cause undesired operation.
Warning: Changes or modifications to this unit not expressly approved
by the party responsible for compliance could void the user’s authority
to operate the equipment.
Note: This equipment has been tested and found to comply with the
limits for a Class B digital device, pursuant to Part 15 of the FCC Rules.
These limits are designed to provide reasonable protection against
harmful interference in a residential installation. This equipment generates,
uses and can radiate radio frequency energy and, if not installed and used
in accordance with the instructions, may cause harmful interference to radio
communications. However, there is no guarantee that interference will not
occur in a particular installation. If this equipment does cause harmful
interference to radio or television reception, which can be determined by
turning the equipment off and on, the user is encouraged to try to correct the
interference by one or more of the following measures:
21
● Reorient or relocate the receiving antenna.
● Increase the separation between the equipment and receiver.
● Connect the equipment into an outlet on a circuit different from that to which
the
receiver is connected.
● Consult the dealer or an experienced radio/TV technician for help.
“This equipment complies with FCC RF radiation exposure limits set forth for
an uncontrolled environment. This equipment should be installed and
operated with a minimum distance of 20 centimeters between the radiator
and your body.”