Yifang Digital Technology XN690 Mobile Digital Pen User Manual 10
Shenzhen Yifang Digital Technology Co., Ltd. Mobile Digital Pen 10
UserManual
Ც
Ც㜭ㅄ
⭘ᡧ
Smart Pen
User Manual
Model: XN690
11
78
Accessories
● Receiver ● Mini USB Cable ● Smart Pen
● Ink Refill ● Refill Extractor ● User Manual
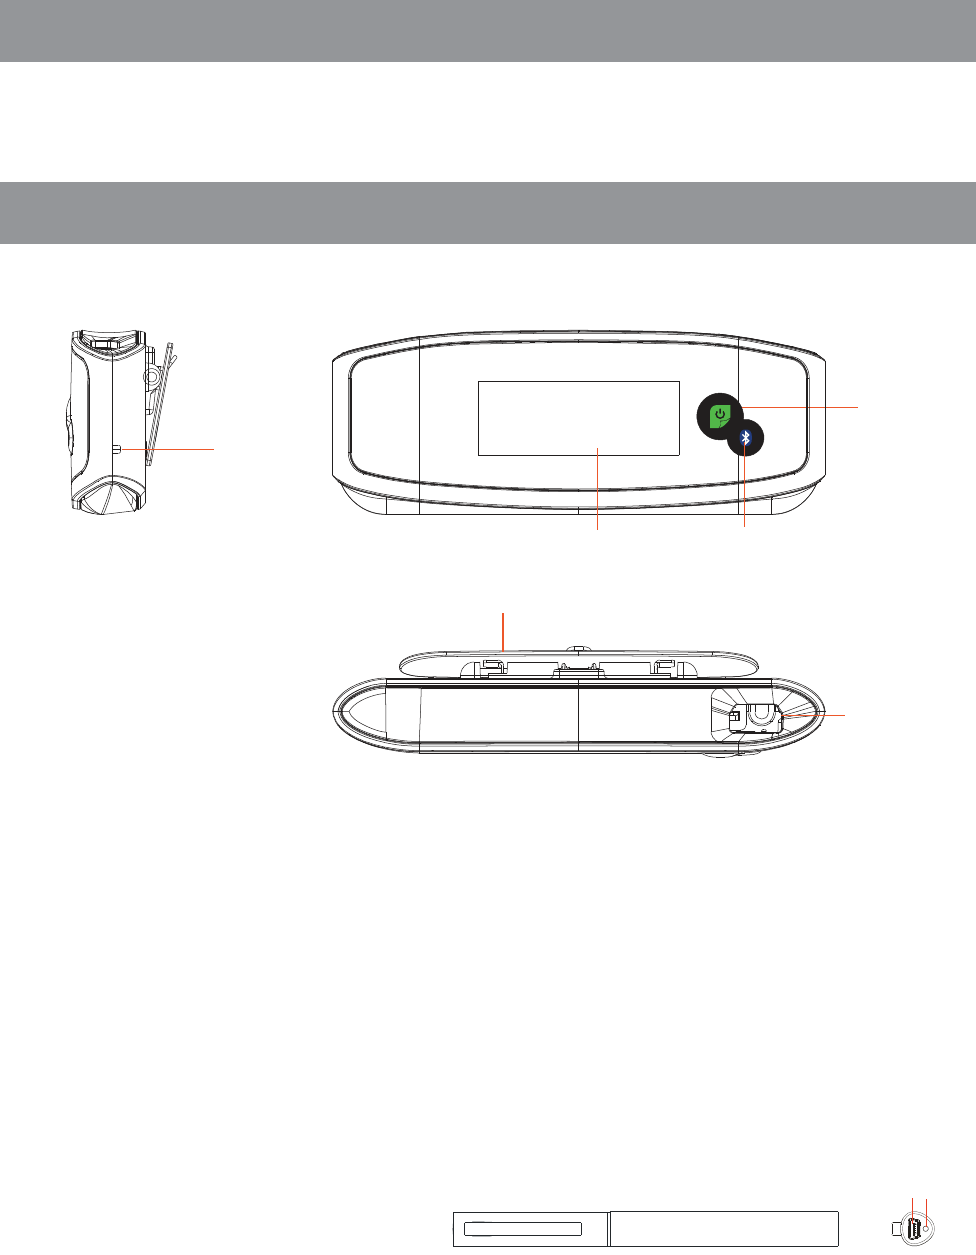
Overview of Receiver
Receiver
1. Reset hole- Reset and shut off the device with a needle penetrating inside
for about 3 seconds.
2. Clip-Clipthe A4 paper(default writing area).
3. Display- Indicates the current working status.
4. BlueTooth Connection
5. Power button- Press briefly to turn on the device and press and hold for
3s to power off the device.
6. Mini USB port- Connects with Mini USB cable for charging.
Smart Pen
7ˊ
ˊ
Mini USB port
Connect to PC via Mini USB
cable for charging.
a. Plug the USB cable into the mini USB port on the cap of the pen.
b. Connect the other end of the USB cable to the PC.
1
23
5
4
6
12
Note
˖
Disconnect the USB cable when the device has been charged for about 2
hours.
8ˊ
ˊ
LED indicator: LED is on during charging and will be off when battery has
been fully charged; and it will blink when the battery is low.
Note
˖
Please use the dedicated USB cable provided together with this pen to
connect the Receiver and the pen.
How to Use the Smart Pen
WARNING:
Do not attempt to open the pen. This may cause the
pen to malfunction.
1. Install Refill and Receiver
1) Inserting an Ink Refill into the Pen
Note: Make sure you use a refill that is similar to the original (Standard metal
refill: Φ2.35mm*67.0mm).
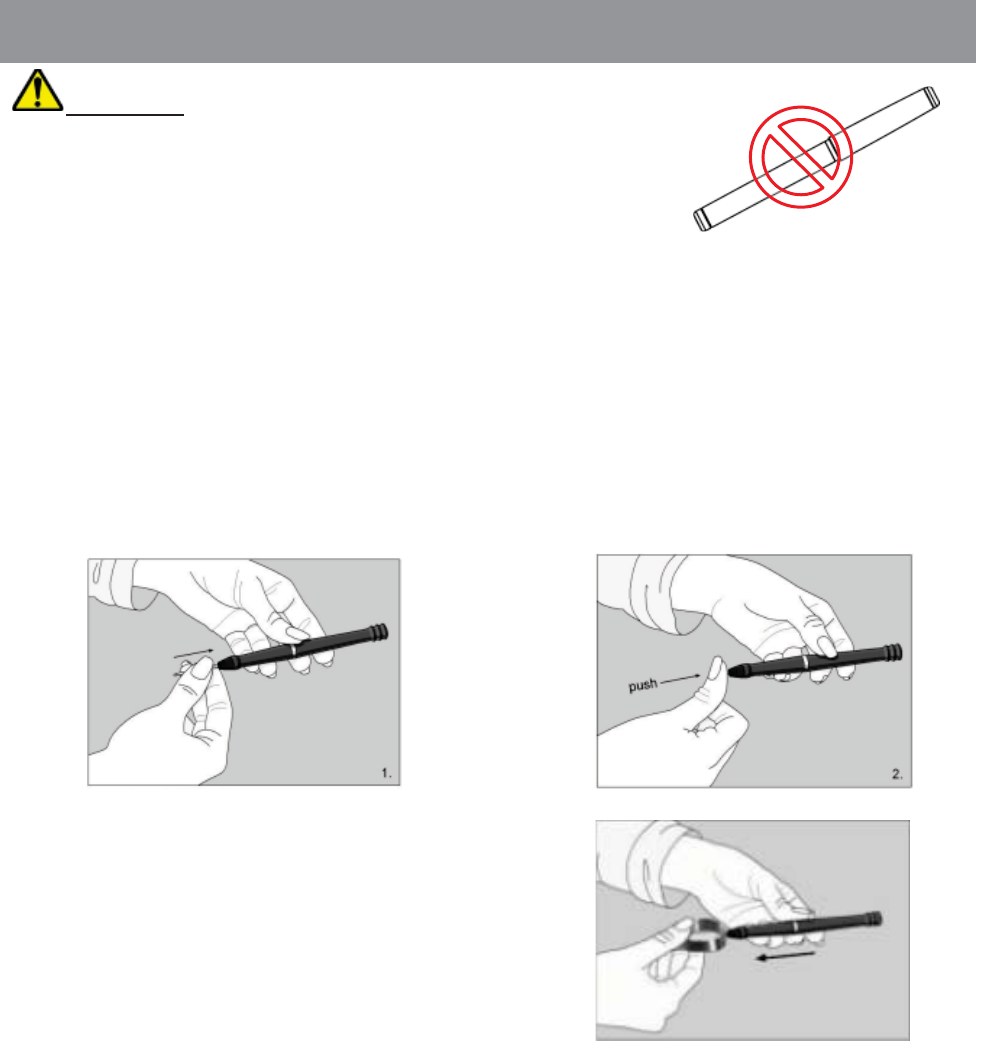
2) Taking out the refill with the extractor
a. Remove the cap off the pen.
b. Use the extractor to hold the refill.
c. Slightly pull the old refill out.
d. Insert a new refill inside the pen.
a. Slide the new refill into the tip of
the pen.
b. Gently press the new refill until it
is lodged securely in place.
13
3) Fix the receiver onto paper.
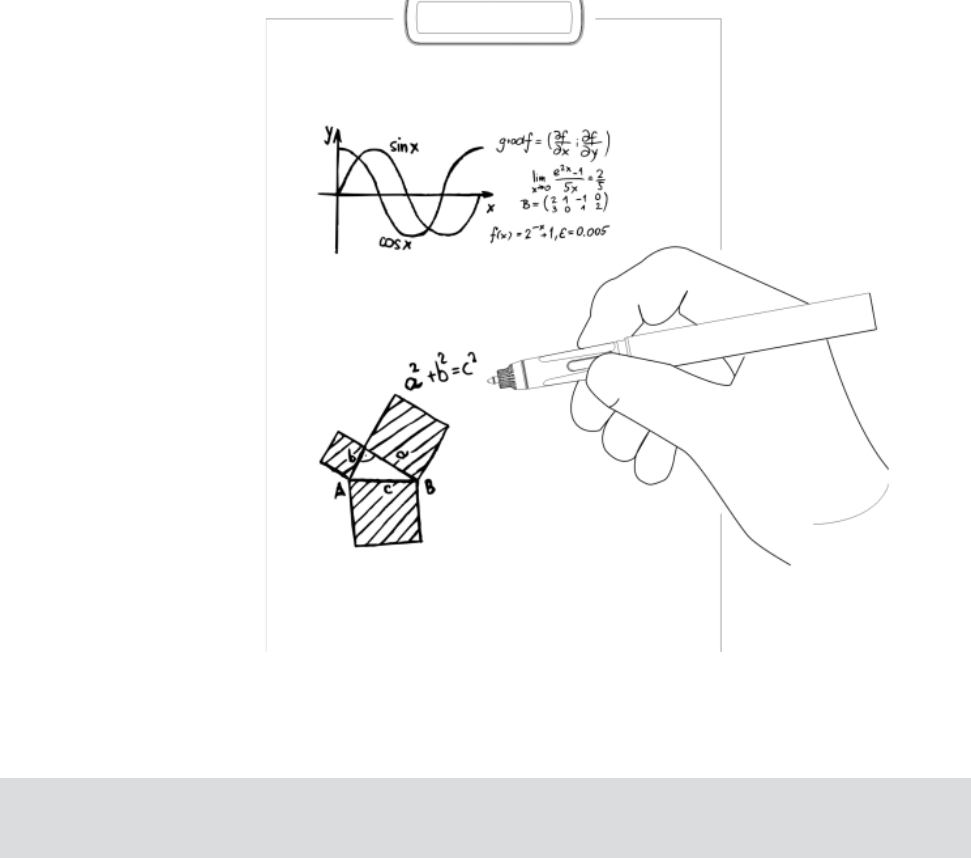
Clip the receiver on the top-center of A4 size paper. Hold the pen and write as
usual.
2. Application MemoPlus and NoteTaker
1) Function Description
The smart pen must be used together with the application MemoPlus on
mobile devices and a Windows PC. It can capture the handwritten notes in
JPEG format, and record the real-time writing process as a video clip that can
be shared to your social networks. But for MAC PC, NoteTaker, another
application similar to MemoPlus, must be used.
2) System Requirement
● iPhone 4s /iPad3 or above˄with iOS 8.0 or above˅
● Android 4.3 or above, with Bluetooth 4.0 LE
● Windows XP or above
● MAC˖OS 10.5 or above
3) Download & Installation
a. For mobile devices, go to the App Store or Google Play, search App with
name “MemoPlus”, then download and install the application to your phone.
b. For Windows and MAC PCˈdownload the application program at the
following directory˖
Windows system˖
http://www.efunsmart.com/download/MemoPlus_for_windows.rar
MAC system˖http://www.efunsmart.com/download/Note_Taker_for_MAC.rar
Install the programs as you do with other applications respectively on smart
phones, Windows PC or MAC PC.
14
3. How to use application MemoPlus or Notetaker
3.1 Use MemoPlus on mobile devices
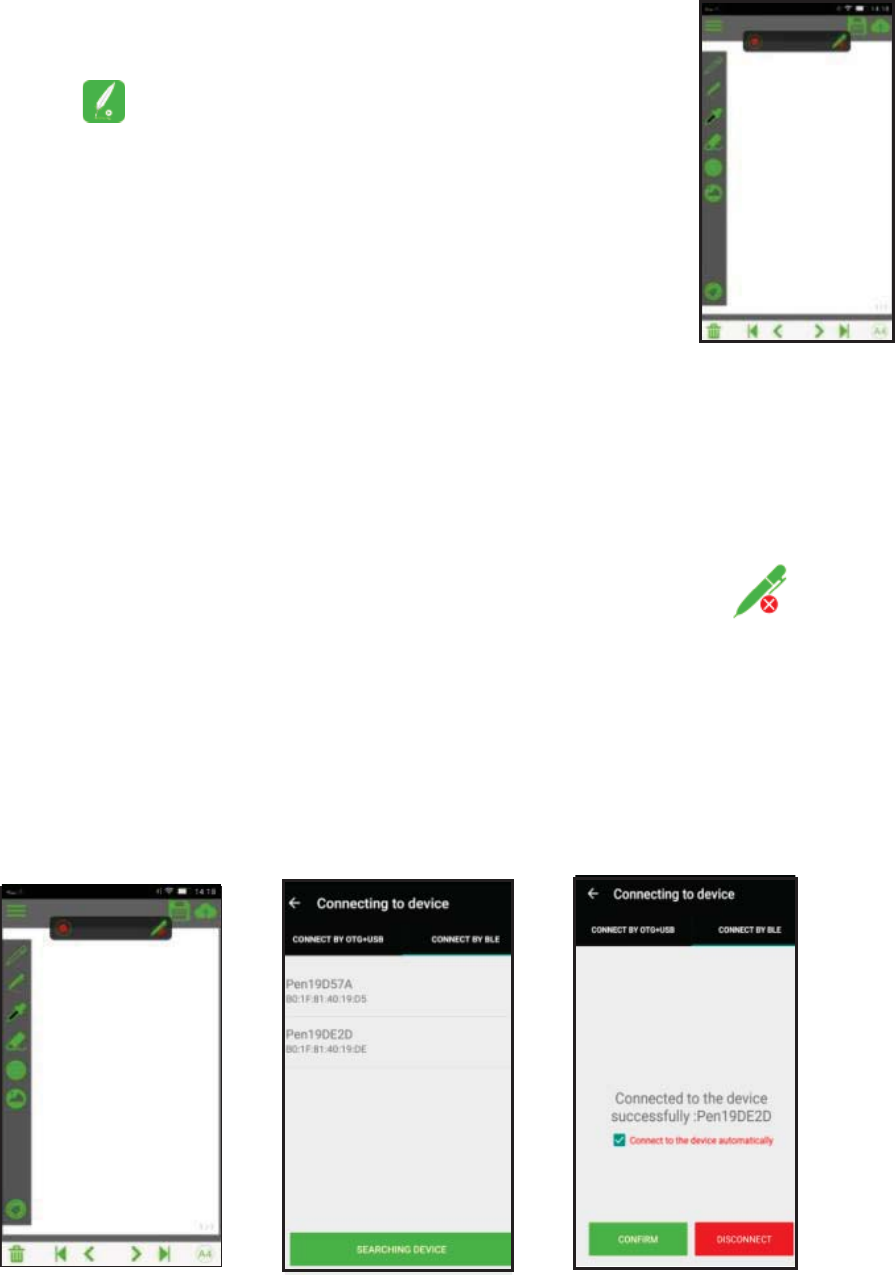
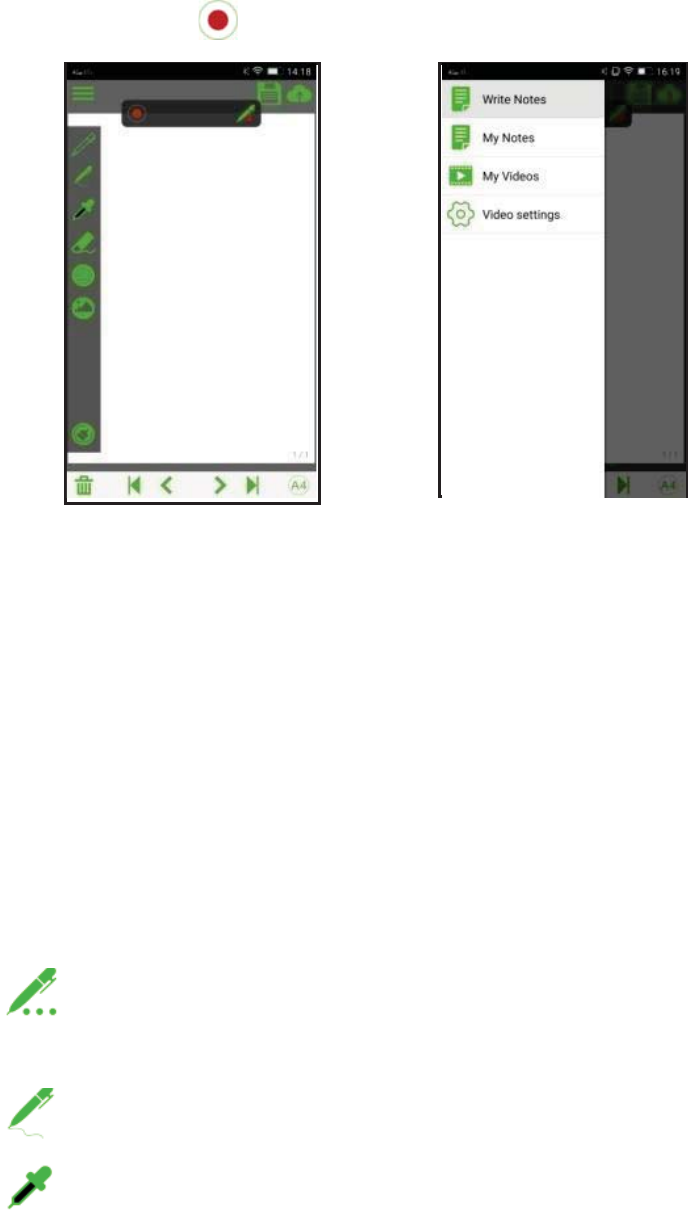
1) Open App
Find the App “MemoPlus”on your smart phone, and tap
the icon to open it, then it will enter the following
interface.
2) Configuration &Connection
Connect the receiver and your smart device via BT. This
smart pen can be connected to your Android or iOS device via BT˖
a. Turn on the BT connection respectively on your smart device and the
receiver;
b. Open the application MemoPlus on your smart device;
c. Enter the Home screen of the app, then find the tool button at the top
of the screen and tap on it to start scanning BT device available around.
˄Note˖This process may take about dozens of seconds.˅
d. Select the receiver from the device list and then tap “Connect” button.
e. As the connection is done, you can check the item “Connect to this device
automatically” (recommended) before tapping OK to finish the whole process.
15
3) Writing & Recording
After connectionˈenter the main interface, then you can create a new note by
tapping on “Write Notes”; if you want to record the writing process of your
note, press icon , and the video will be recorded in MP4 format.
Note:
a. Do not block the signal transmission between the pen and the receiver when
writing.
b. Make sure the pen is at least 2cm away from the receiver so that the sensor
can work normally.
c. Be sure to write with proper force to guarantee the high identification of the
writing.
4) Interface & Icon Description
Pen type˖Fountain Pen, Neutral Pen and Ball Pen. The calligraphy varies
in some way with different pen type.
Width type˖Fine, Medium and Wide.
Ink Color˖Black, White, Red, Green, Blue and Yellow.
Main Interface
Setting Interface

16
Eraser˖Used to clean the calligraphy.
Shapes˖Line, Rectangle (empty)ˈRectangle (filled)ˈCircle˄empty˅ˈCircles
˄filled˅.
Image˖Import image from local memory, Get picture from camera and
move the picture.
Save˖Save current note as a screenshot.
Upload: Upload notes to designated directory.
Clear˖Clear off the note on current page.
Delete˖Delete current page of note.
/ Previous/Next: Go to previous/ next page.
/ Home page/End page: Shift to the Home / End page.
/ Paper size: A4 / A5.
Menu˖Create a new note, Note screenshot, Video, and Video settings.
Share note book/note to share client
3.2 Using on Windows PC
1˅Installing MemoPlus
After downloading the program MemoPlus at this directory
http://www.efunsmart.com/download/Note_Manager_for_windows.rar ,
install it on the Windows PC.
2˅ Connecting and Configuration
a. Connect the receiver to the Windows PC or notebook via the dedicated
Mini USB cable.
b. On the desktop, double click the MemoPlus icon to open the program,
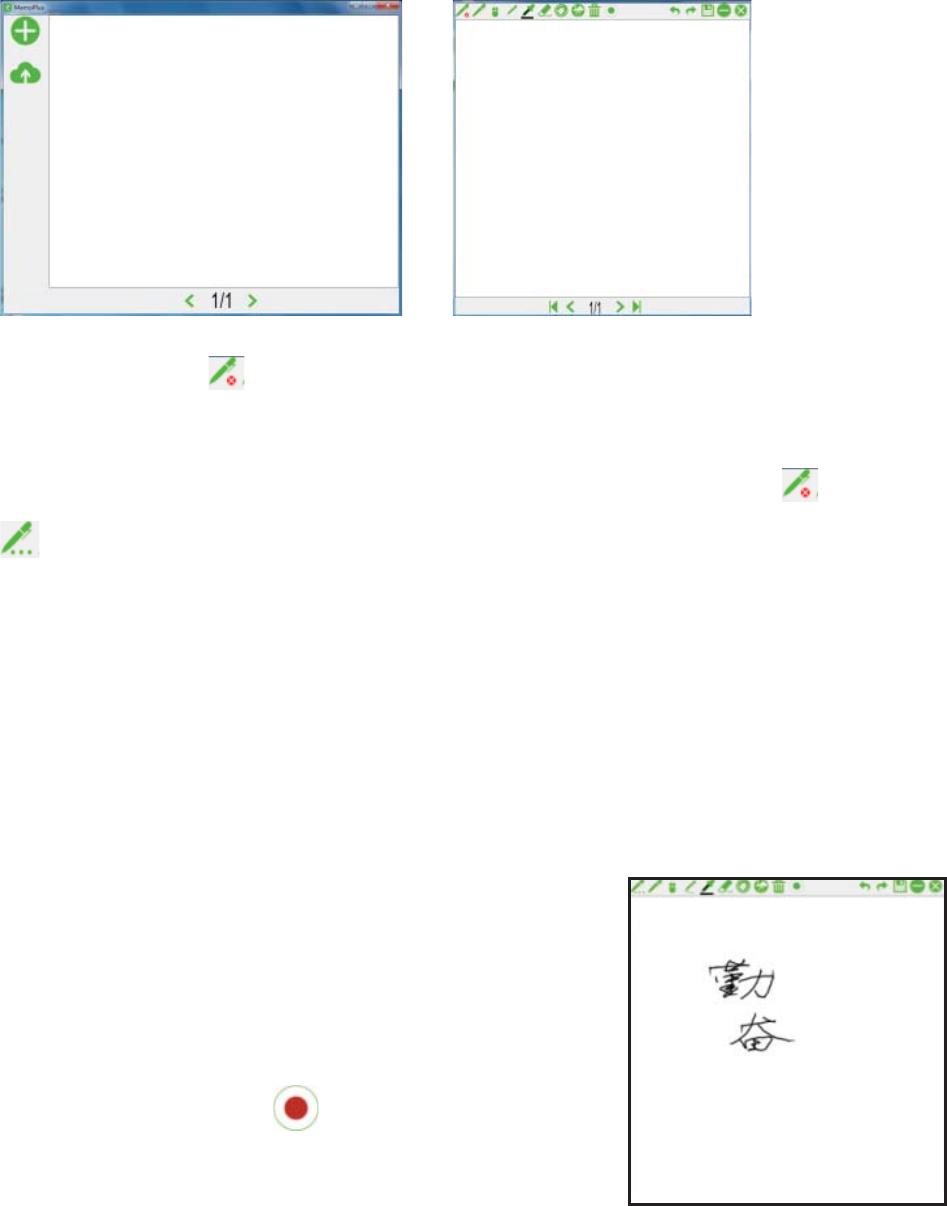
17
then click the “+” icon in the top left corner of the screen to create a new work
page.
c. View the icon to check whether the receiver has been connected to the
PC successfully. If the red crossing icon “X” remains, it indicates the connection
is not successful. Examine the USB connection until the icon turns into
in the end.
3˅
˅
Writing and Recording
Similar to the usage on the smart phones, you can use the smart pen on
Windows PC freely as well with the program MemoPlus.
a. Clip the receiver on the top center of a piece of paper (A4);
b. Press the Power button to turn on the device.
c. Write anything you like on a piece of paper
(sized A4 by default) with your handwritings
showing on the PC simultaneously. If you click
the Recording button before you making
notes, your writing process will be recorded as a
video clip.
18
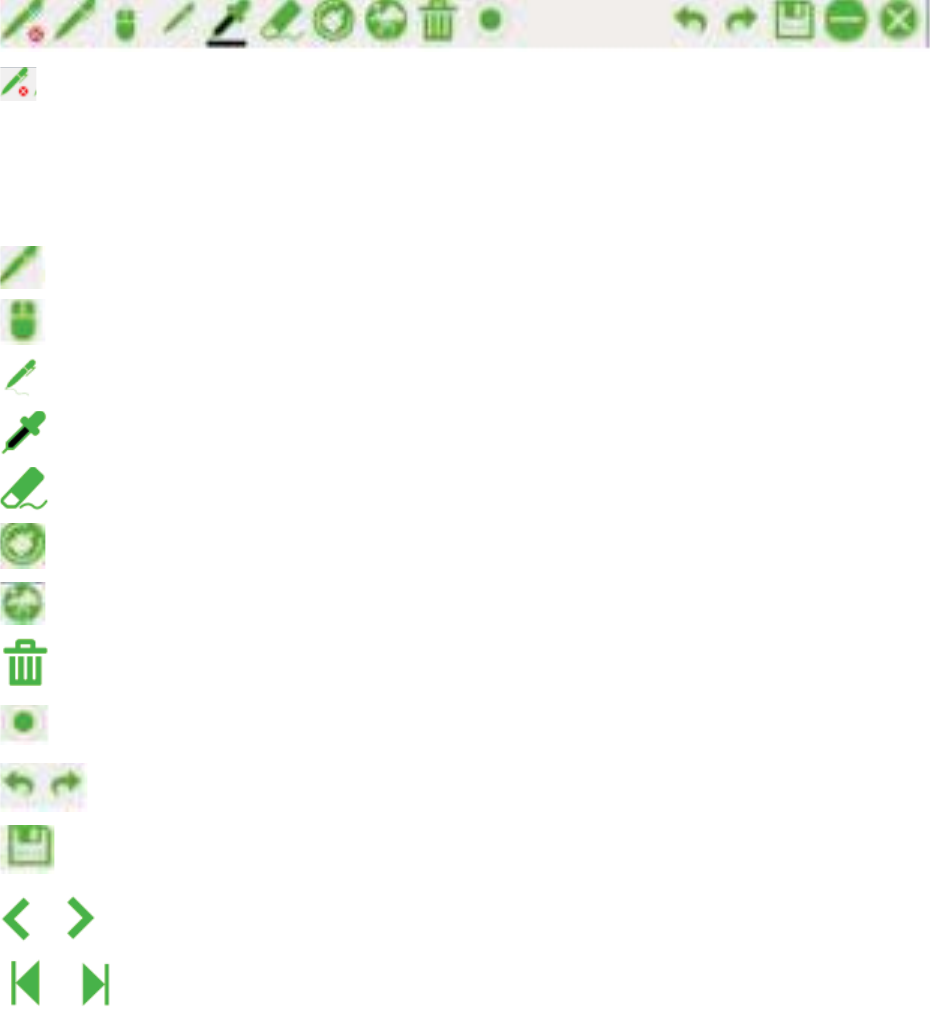
4˅Tool Bar description
˖Connection. The red cross “X” symbol indicates that the receiver has not
been connected to the PC successfully; once the connection is successful, the
cross “X” will disappear.
˖Pen mode, one work mode of the smart pen˗
˖Mouse mode, the other work mode of the smart pen˗
Width type˖Fine, Medium and Wide.
Ink Color˖Black, White, Red, Green, Blue and Yellow.
Eraser˖Used to clean the calligraphy.
Clear˖Clear off all the inks on current page.
Import˖load images from local sources.
Delete˖Delete current note page.
Record: Record writing process in MP4 format˗
˖Undo / Redo
˖Save: Save notes to designated location. / share notes to client by email
/ Previous/Next: Go to previous/ next page.
/ Home page/End page: Shift to the Home / End page.
3.3 Use the smart pen on a MAC PC
1) Open the program
Enter the application menu and find the shortcut of the program to open it.
Setting Preferences
Before you can start transferring your text from the Digital Pen, you first need
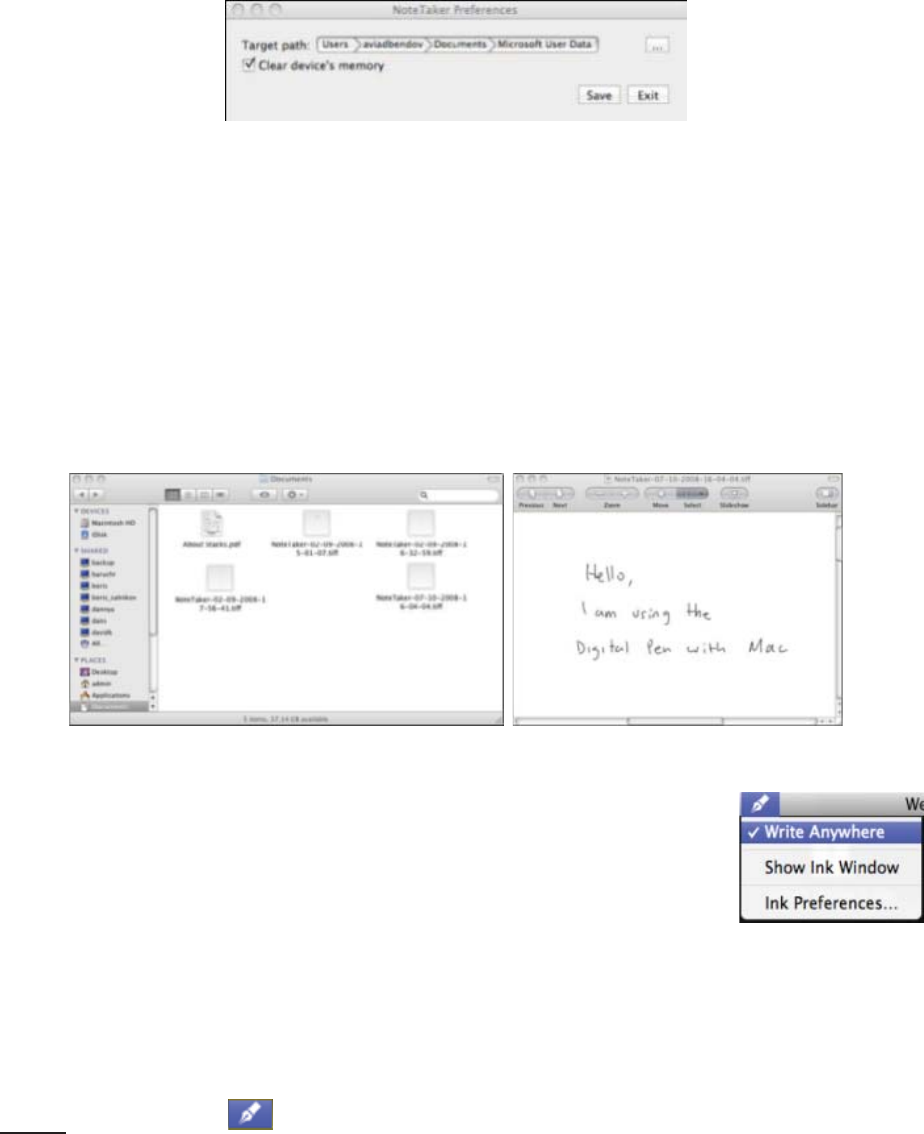
19
to decide where on your Mac’s hard drive you want to save your uploaded
notes from the Digital Pen.
Click on the NoteTaker Preferences icon to open the preference tool, and then
specify the path to the location on your Mac’s hard drive where TIFF images
from the Digital Pen will be saved.
2) Basic operation
a. Use the Digital Pen to capture and save your notes while you are away
from your Mac, in meetings or lectures.
b. Connect the Digital Pen to your Mac to upload the saved notes. The
notes are saved in TIFF format in the directory that you have specified.
Double click on the desired TIFF file in order to view the note.
c. While being connected to the Mac via the USB port,
the Digital Pen can be used as a Mouse and as a
Tablet input device for Mac ink applications. To use
the Digital Pen as a Tablet Input device, you first need
to enable this mode by clicking the Ink icon at the top bar of the MAC
desktop and then selecting “Write Anywhere”. If you deselect “Write
Anywhere”, your Digital Pen will work as a mouse only.
Note: If the ink icon cannot be seen, you can display it in the following way:
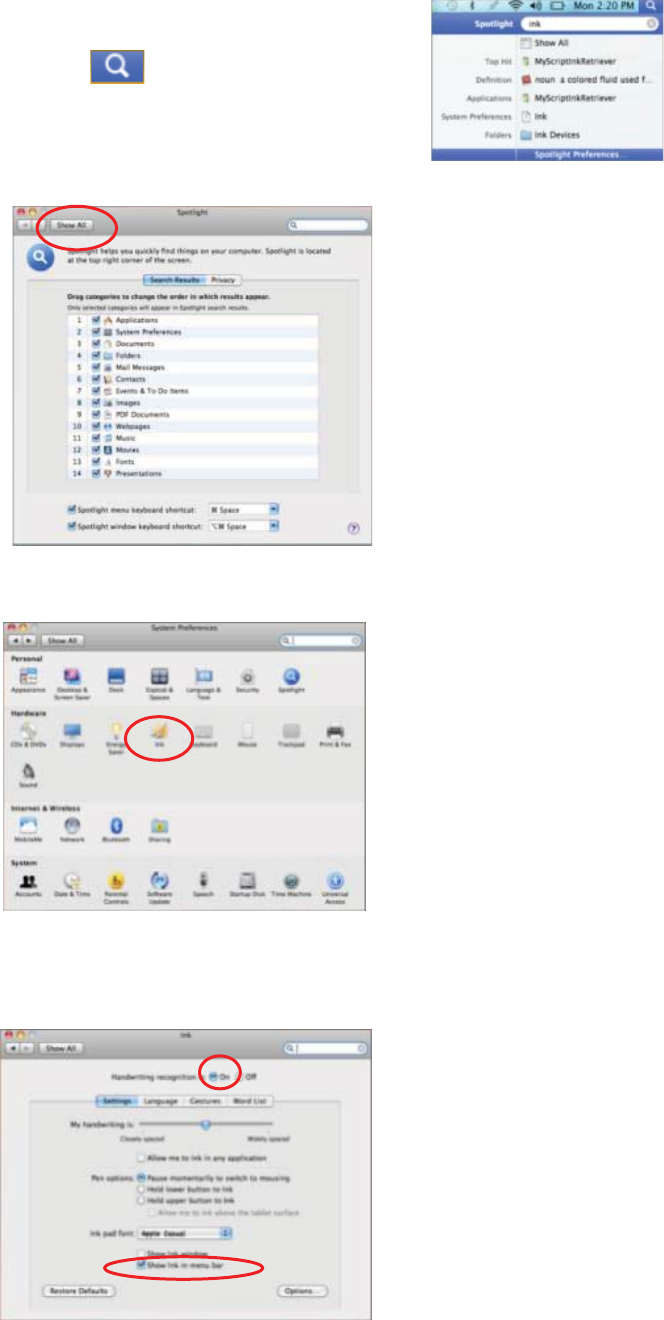
20
a) Connect the device to MAC through USB cable.
b) On the top-right bar, click and then input “ink”.
c) Select “Spotlight Preference”, and then choose “Show
All”.
d) Click “Ink”.
e) Set “Handwriting recognition” as “On” and select “Show ink in menu bar”. The
ink icon should appear on the toolbar.
21
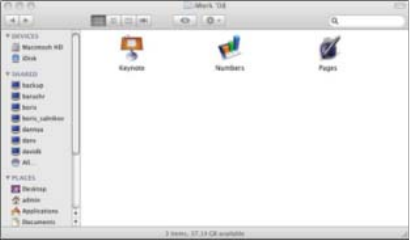
(4) Use the digital pen in applications such as iWork”08. You can write handwritten letters
on-line, and the Mac will convert it into text. The feature is available iWork Pages (word
processor), iWork Keynote (presentations) and iWork Numbers (spreadsheets).
Note: The Digital Pen can be also used for drawings inside applications such as Adobe Illustrator,
Photoshop, etc.
FCC Statement
This equipment has been tested and found to comply
with the limits for a Class B digital device, pursuant to
part 15 of FCC Rules. These limits are designed to
provide reasonable protection against harmful
interference in a residential installation. This
equipment generates and can radiate radio frequency
energy and, if not installed and used in accordance
with the instructions, may cause harmful interference
to radio communications. However, there is no
guarantee that interference will not occur in a
particular installation. If this equipment does cause
harmful interference to radio or television reception,
which can be determined by turning the equipment off
and on, the user is encouraged to try to correct
22
The interference by one or more of the following
measures:
Reorient or relocate the receiving antenna.
Increase the separation between the equipment and
receiver.
Connect the equipment into an outlet on a circuit
different from that to which the receiver is connected.
Consult the dealer or an experienced radio/TV
technician for help.
This device complies with Part 15 of FCC Rules.
Operation is subject to the following two conditions:
This device may not cause harmful interference, and
this device must accept any interference received,
including interference that may cause undesired
operation.
Note: The manufacturer is not responsible for any
radio or TV interference caused by unauthorized
modifications to this equipment. Such modifications
could void the user’s authority to operate this
equipment.
Caution: A ny changes or modifications to this device not
explicitly approved by manufacturer could void your
authority to operate this equipment.
23
exposure condition without restriction.
This equipment complies with FCC RF radiation
exposure limits set forth for an uncontrolled
environment. The device can be used in portable