Yulong Computer Telecommunication Scientific YL7560T Coolpad Flo, Coolpad 7560T, WCDMA/GSM/GPRS/EGPRS/WIFI/Bluetooth Mobile Phone User Manual
Yulong Computer Telecommunication Scientific (Shenzhen) Co. LTD Coolpad Flo, Coolpad 7560T, WCDMA/GSM/GPRS/EGPRS/WIFI/Bluetooth Mobile Phone
User Manual

User Manual
Model Name:Coolpad 7560T
FCC ID:R38YL7560T
IC:10367A-YL7560T
Coolpad FloTM
Network Access Manual

P a g e | 2
2
Table of Contents
REVISION HISTORY ................................................................. 4
PRECAUTIONS: ....................................................................... 4
GUIDE TO SAFETY AND EFFECTIVE USE .................................... 4
When using your device, charger and accessories: ...................................................................................................... 4
Flammable and Explosive Area ..................................................................................................................................... 5
Airplane ......................................................................................................................................................................... 5
Hospital ......................................................................................................................................................................... 5
Personal Medical device ............................................................................................................................................... 5
Vehicles ......................................................................................................................................................................... 5
Children Safety .............................................................................................................................................................. 5
Disused Battery ............................................................................................................................................................. 5
Usage of Original Accessories ....................................................................................................................................... 5
YOUR PHONE ......................................................................... 6
FUNCTIONS OF KEYS ............................................................... 6
CONVENTIONS USED IN THIS GUIDE ....................................... 6
1. GETTING YOU STARTED ...................................................... 7
Charging the battery ..................................................................................................................................................... 7
Power phone on & off ................................................................................................................................................... 7
Touch screen & typing directions .................................................................................................................................. 7
Other touch tips ............................................................................................................................................................ 7
2. MORE BASICS ..................................................................... 8
How your phone looks................................................................................................................................................... 8
Modifying phone sounds ............................................................................................................................................... 8
Changing other settings ................................................................................................................................................ 8
Screenshots ................................................................................................................................................................... 8
3. PHONE APPS MADE SIMPLE ................................................ 9
Making a call ................................................................................................................................................................. 9
Answering & redirecting calls ....................................................................................................................................... 9
...................................................................................................................................................................................... 9
Exploring the call log ..................................................................................................................................................... 9
Checking your voicemail ............................................................................................................................................... 9
4. TEXTING & KEYBOARD USE ............................................... 10
Entering & editing text ................................................................................................................................................ 10
Next-word suggestions ............................................................................................................................................... 10
5. CUSTOMIZING & USING YOUR COOLPAD FLOTM PHONE APPS11
Customizing your Home screen ................................................................................................................................... 11
Contact Book ............................................................................................................................................................... 11
Setting up & using Gmail ............................................................................................................................................ 11
Controlling your calendar ........................................................................................................................................... 11
Operating the alarm ................................................................................................................................................... 12
Managing your downloads ......................................................................................................................................... 12
6. PHONE SET-UP AND PHONE MANAGEMENT ..................... 13
Privacy settings & accounts ........................................................................................................................................ 13
Managing location history .......................................................................................................................................... 13

P a g e | 3
3
Managing sound, screen & sleep settings .................................................................................................................. 13
Notifications ................................................................................................................................................................ 13
Airplane mode ............................................................................................................................................................. 13
7. WIRELESS NETWORK SETTINGS ......................................... 14
Turning on Wi-Fi .......................................................................................................................................................... 14
Adding on a Wi-Fi network ......................................................................................................................................... 14
8. CONNECT TO BLUETOOTH ................................................. 15
Powering Bluetooth on/off ......................................................................................................................................... 15
Changing your phone’s Bluetooth name .................................................................................................................... 15
“Pairing” your phone with a Bluetooth device............................................................................................................ 15
Connecting to a Bluetooth device ............................................................................................................................... 15
“Un-pairing” or aligning a Bluetooth device ............................................................................................................... 15
Monitoring your phone’s data usage .......................................................................................................................... 15
9. CREATING & SHARING VIDEOS, PICTURES ......................... 16
Creating a video .......................................................................................................................................................... 16
Taking a photo ............................................................................................................................................................ 16
Sharing a video or photo ............................................................................................................................................. 16
10. DATA USAGE SETTINGS ................................................... 17
Manage your data usage settings .............................................................................................................................. 17
Setting a data usage limit warning ............................................................................................................................. 17
Setting your data usage limits .................................................................................................................................... 17
11. GOOGLE PLAY STORE ...................................................... 18
Accessing Play Store .................................................................................................................................................... 18
Google Play Settings ................................................................................................................................................... 18
12. USB FILE TRANSFERS ....................................................... 19
Windows transfer ........................................................................................................................................................ 19
13. OPTIMIZE YOUR PHONE’S BATTERY LIFE .......................... 20
Battery settings ........................................................................................................................................................... 20
14. COOLPAD FLO SPECS & HARDWARE ................................ 21
Declaration of Hazardous Substances ........................................................................................................................ 21
15. NET MONITOR ................................................................ 23
*20060606# ................................................................................................................................................................ 23
*20060601# ...............................................................................................................................
错误!未定义书签。
*20060602# ...............................................................................................................................
错误!未定义书签。
P a g e | 4
4
Revision History
Version
Number
Author
Description of Changes
Revision Dates
1.0
Dan Yang
Null
Null
Precautions:
1. This manual is exclusive to guide you to use your device.
2. Our company complies with the sustainable development strategy, so our company reserves all rights to modify
the functionalities, interfaces and appearances of the device without prior notice.
3. If there is any difference between the description in this manual and the actual product, please refer to your
mobile device for actuality.
4. Please turn your device off according to normal procedures. When your device is on or charging, please do not
uninstall the battery, or it may give rise to the risks of losing data or other negative cases. Please install Micro SD
card with correct direction in order to avoid damaging the card or your device.
5. As for more details or relevant downloads, please refer to http://www.coolpad.cn .
Guide to Safety and Effective Use
To use your device safely and effectively, please read the following information carefully before operating your
device.
Please answer the call or reduce volume before putting your device to your ear, so as to avoid impairment to
hearing.
When using your device, charger and accessories:
1. Switch off your device in any places where posted notices require you to do so or where use of your device is
forbidden (including airdrome, gas station and hospital, etc.)
2. Keep your device and all its parts and accessories out of the reach of children.
3. Keep your device and its accessories away from liquid or humidity areas.
4. Do not store your device in too hot or too cold areas.
5. Do not place your device near a flame, or a lighted cigar or cigarette.
6. Do not dye or paint your device.
7. Do not drop, throw or bend your device.
8. Do not store your device in a place where computer disks, credit cards, travel cards or other magnetic objects are
stored. Otherwise, the information stored on the disks or credit cards may be affected by your device.
9. Do not store your device or battery in areas that may get very hot (over 60°C) such as on the instrument panel of a
vehicle or windowsill or behind the glass sheet irradiated directly by sunlight.
10. Do not try to disassemble or repair your device or any other accessories without authorization.
11. Only use manufacturer-approved batteries and chargers to avoid potential danger.
12. Only use a slightly wet or antistatic cloth to clean your device, avoiding unpredictable damages to your device.
Never use a dry or electrostatic cloth, chemicals or detergents containing abrasive ingredients to clean your device,
as its covers may be damaged.
13. Some parts such as the liquid crystal display and camera are frangible, please take care and protect your device
from bumps or pressure. Do not put your device and other sharp objects together in order to avoid scratching screen
or your device.
P a g e | 5
5
14. In case your device, battery, charger or any accessory does not function normally, please take it to the nearest
authorized service center. Our qualified personnel will assist you in solving problems, and arrange repair if necessary.
Flammable and Explosive Area
When you enter flammable and explosive area (e.g. gas station) and its surrounding places, please power your device
off and obey by all safety signs and instructions. Few sparkles or radio waves may be generated by using your device
under such areas, which may cause explosion or fire.
Airplane
Power off your device or switch it to Airplane mode when on an airplane and obey by all safety signs and instructions
there. The radio wave generated by using your device may interference with the navigation devices and control
system on the plane, which makes the automatic control devices of the plane receive incorrect information and
perform wrong operations to raise danger and even crash.
Hospital
When you enter a hospital, please power off your device and comply with all safety signs and instructions. Under
such a place, the radio wave generated by your device may interface with the electronic medical device including the
pacemaker, which may put the patient’s life under danger.
Personal Medical device
Your device may impact pacemaker, hearing aids, cochlear implants and other implanted devices. Do not carry your
device in a breast pocket. When answer a call, should use the ear opposite to the pacemaker. Always keep 15cm
between your device and the pacemaker at minimum. If you have any reason to suspect that interference is taking
place, please power your device off immediately and carry it farther away from the pacemaker, what is more, please
consult your personal doctor for more details. As for hearing aids and other medical or implanted devices, please
consult their corresponding manufactures for details.
Vehicles
Always pay full attention to road safety when you are driving. If, the use of the ―hand-free‖ device is allowed by
driving terms, it is recommended you only use the hand-free kit applicable to your device; otherwise, you should pull
off the road and park before making/answering a call.
Children Safety
Please keep your device and all of its relevant accessories out of children’s touch. Do not let them play with your
device or its accessories. They may accidentally hurt themselves or other person and cause damage to your device or
accessories. Your device or its accessories may include detachable parts, which may present a choking hazard to
children.
Disused Battery
Do not dispose of the disused battery as the ordinary household waste. For correct disposing method, Confidential
please refer to local stipulations on disposal of disused electronic products.
Usage of Original Accessories
Charger: Connect the AC charger to the specified power outlet with the same mark. Make sure that the cable is
placed in proper position and protected from damages and pressure. To avoid risk of electronic shock, please
disconnect the charger from the power outlet before cleaning it. It is forbidden to use the charger outdoor or under
humid areas. Do not replace the cable or plug of the charger.
Battery: It is suggested that you charge the new battery (or one that has not been used for a long time) for 12 hours
at least (but NO more than 24 hours) before its use. When charging your battery, keep it in the temperature ranging
from -5℃ to +45℃. When the charge is done, please remove the charger or the charging cable. The maximum
performance of a new battery or one that has not been used for a long time can be achieved only after several
complete charge and discharge cycles. Please only use the original charger to charge your battery. Do not
short-circuit your battery. Do not dispose of your battery in a fire as it may explode.
P a g e | 6
6
Your Phone
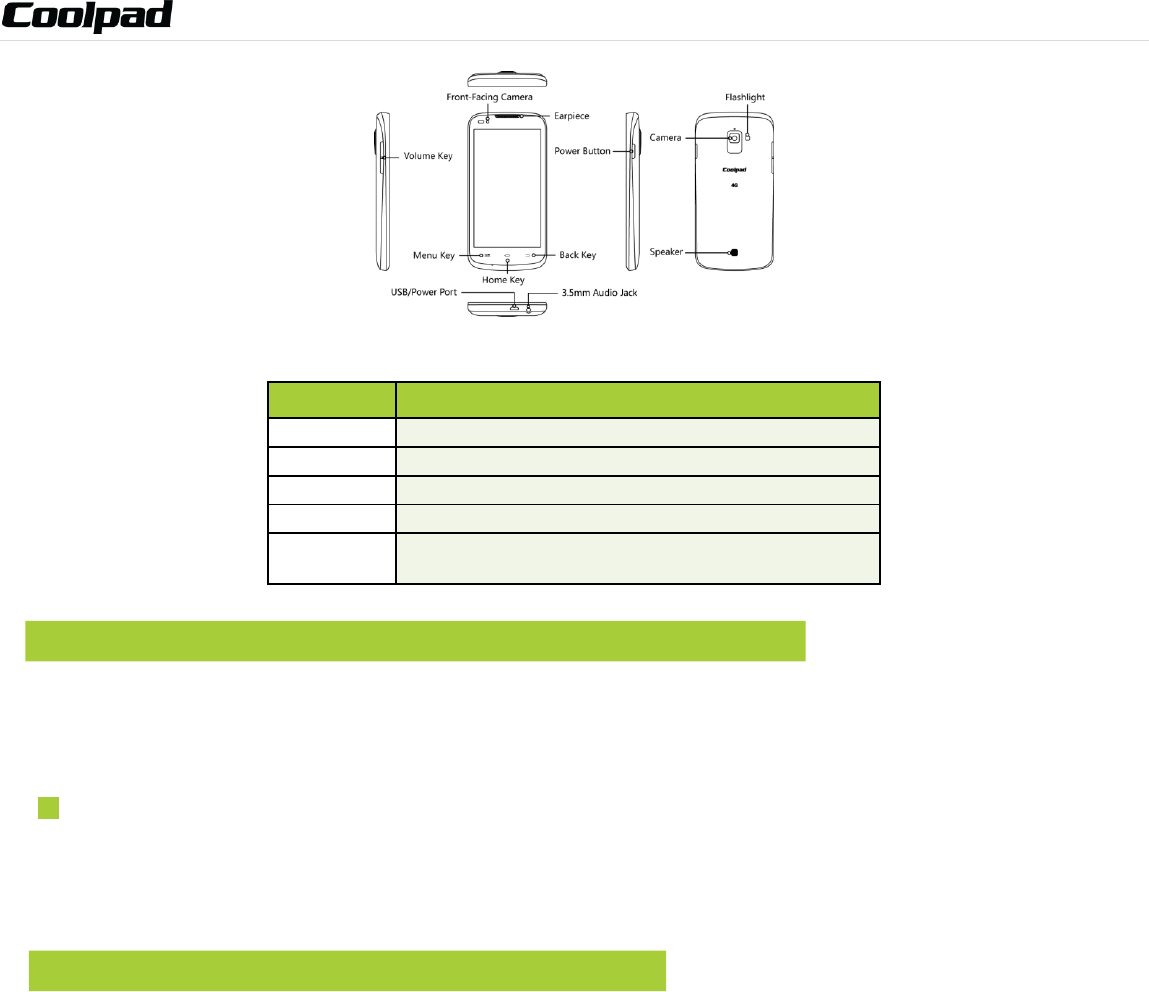
Functions of Keys
Keys
Functions
Menu Key
Tap the option interface to enable the Menu pop-up.
Home Key
Application interface returns to the Desktop.
Back Key
Return to the previous interface.
Volume Key
Adjust the volume of calls, ringtone, music and videos.
Power/Screen
Lock Key
Tapto turn off the background light. Tapto re-activatethe
phone.Press and hold to turn on or off the Power.
Conventions used in this guide
This indicates some important tips of using the phones, such as what to do and what to avoid to keep good
condition of the phone.
This explores different functionalities of an app or a setting.
Note: Touch Screen Menu, Home and Back are tap keys .
Note: This is a note or notification gives you additional
information on operating your phone.
P a g e | 7
7
1. Getting you started
Get off to a running start with your new Coolpad Flo
Charging the battery
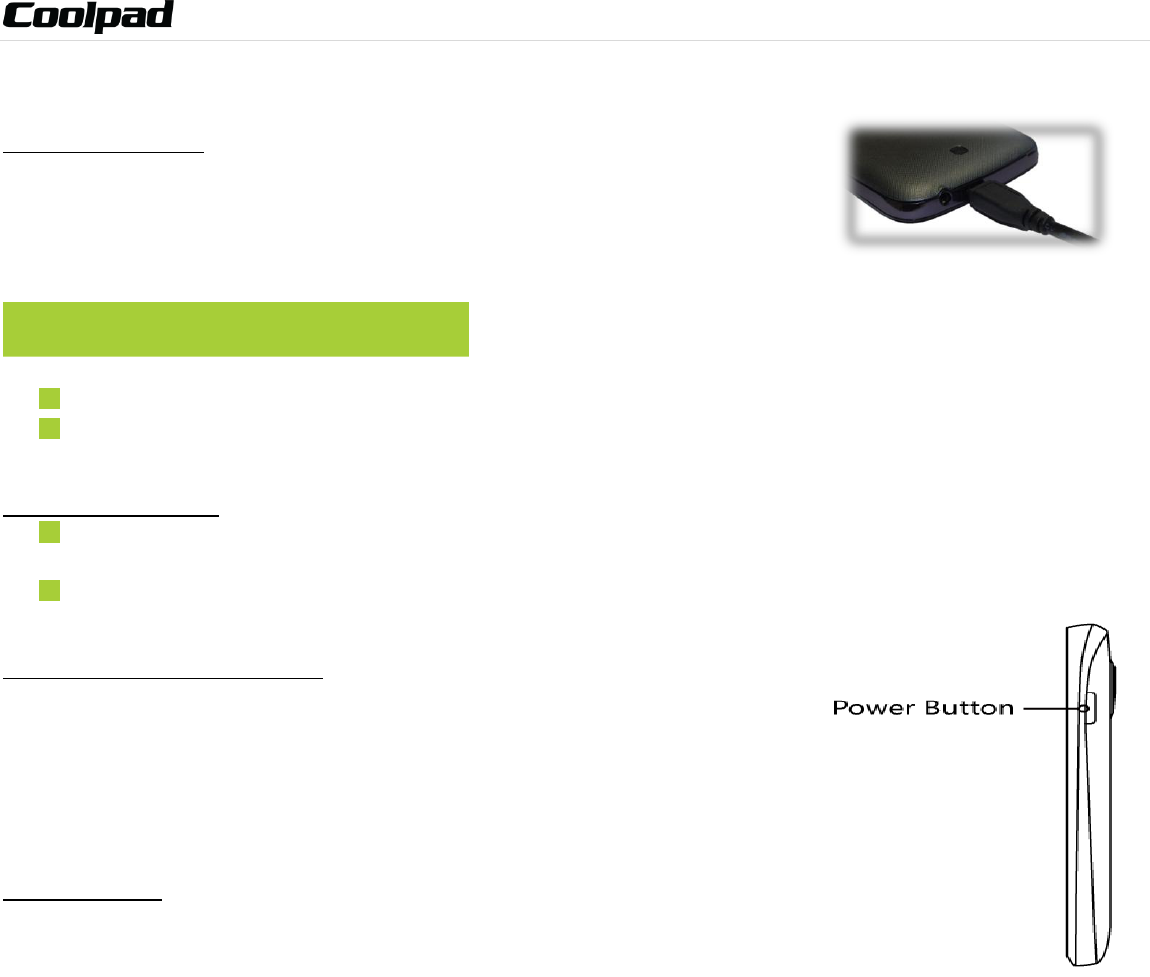
1. First, connect one end of the data cable to the charger port. This is located at
the bottom of your phone.
2. Connect the other end to the travel adapter.
3. Connect the travel adapter to an electrical outlet & fully charge your phone.
Use the travel adapter that accompanies your phone; using other adapters may damage your phone.
Charging your phone through a USB cable that is attached to a laptop takes more time than charging it with
the travel adapter.
Power phone on & off
The Power keyis located on the upper, right-hand side of your phone.Press and
hold the Power keyfor a few seconds to turn on your phone.
To turn off your phone, press and hold the Power key to enable the Menu
pop-up, and then select Power Off.
Touch screen & typing directions
1. Tap selected icon or other items in order to select or activate them.
2. For typing a message, select Messageicon at bottom of your phone and the
keypad will appear.
3. For Swype-typing, which can be an easier method of typing by swiping, select
Yes at prompt asking whether you’d like to use Swype Technology.
4. Otherwise, type as normal for messaging, and also for Google searches.
Other touch tips
Touch & continuously hold an object on your phone screen without lifting
your finger, you can then reorganize your apps layout or drag apps to the
home screen .
To drag something, touch & hold an object without lifting your finger, then move your finger on the screen
until you reach the object.
Slide or swipe by quickly gliding your finger across the surface of the screen without pausing. Lift your finger
before spelling a new word or name.
To zoom in/enlarge, double-tap by tapping two times on a screen object (such as Google Maps). Tap again
two times to zoom out.
Some apps allow you to zoom in & out by placingtwo fingers on the screen, pinching them towards each
other or spreading them apart to zoom in or out, respectively.
Note: Your phone has a built-in SIM card.
P a g e | 8
8
2. More basics
How your phone looks
1. Back Key: Return to your prior screen.
2. Home Key: Opens home.
3. Menu Key: Pull up setting menus.
4. Close or open recent apps: holding down the home key opens a list of your recent apps.Tap an app to open it or
remove an app from the list by swiping left or right.
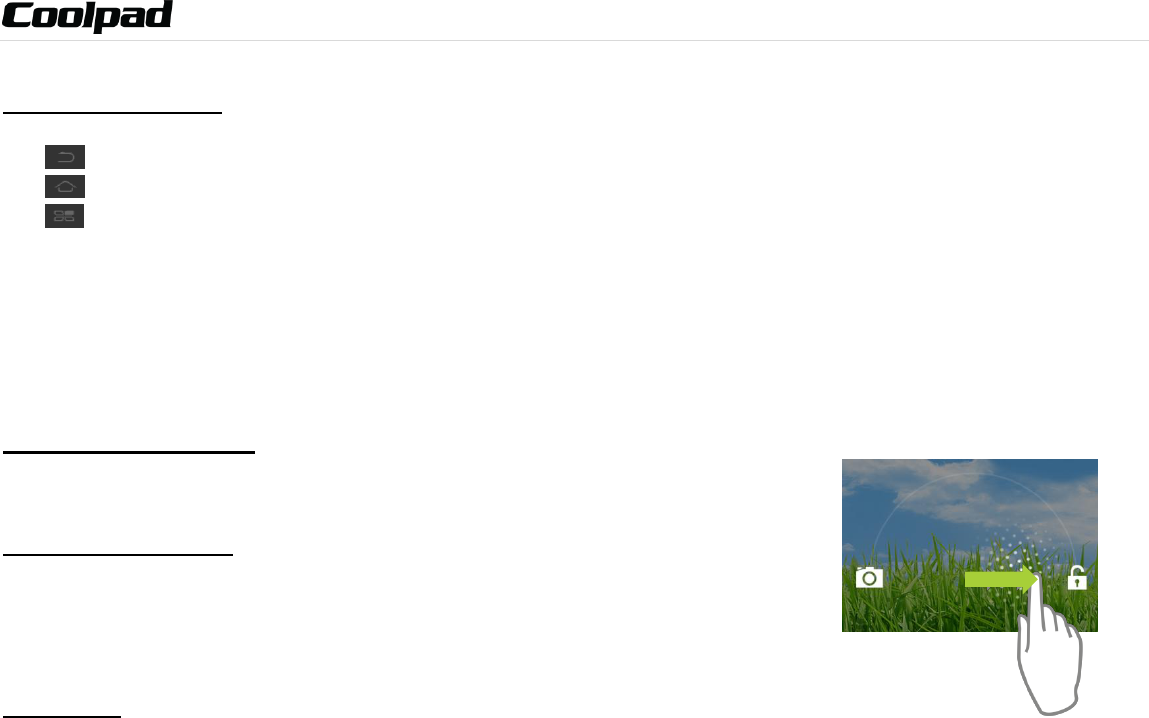
Screen-lock security options
1. To lock your phone, press the Power key (on the phone’s right side) briefly, and let go.
2. To unlock, press Power key on, let go & slide the Padlock icon to the right.
Modifying phone sounds
Go to Settings>Device>Soundto modify your phone’s notification sounds.
Adjust Volume by pressing buttons on the side of your phone.
Changing other settings
To modify your phone’s Brightness or Font size, go to Settings> Device>Display
To Customize wallpaper
Go to Settings>Device> Display> Wallpaper
Screenshots
1. To take a screenshot, focus on the image so it displays on your phone screen.
2. Press the Power key&Volume Down keys at the same time.
3. The image will be auto-saved in your phone’s Gallery.
P a g e | 9
9
3. Phone apps made simple
Making a call
Tap the Phone icon on your Home or All Apps screen to make a call.
Calls can also be made from the Phone app or any other widgets or apps that contain your
contact information, by simply tapping the phone number.
Once you are in the Phone app, there are three tabs at the top. Tap any one of them for
making calls.
The Call log icon displays your recent calls. Tap a number to return the call.
The Contacts icon displays frequently called numbers along with your contacts. Tap to dial.
Touch the red Phone icon at the bottom of your phone to hang up.
Answering& redirecting calls
1. The Incoming Call screen pops up when a call is coming in, along with the caller ID & other information you’ve
entered in your Contact Book.
2. Any missed calls are logged in the Call log, along with a notification.
3. Press the Volume Down key on side of phone to mute the ringer.
4. There are various options for when a call comes in. To answer a call, slide the Unlock key over to the answering
key on the right.
You may:
Answer the call
Start talking to the caller
Send to voicemail
Send a message by opening quick text responses & then tap one of them.
Exploring the call log
The Call log contains your history of calls received, missed or made.
Tapping the number will reveal more information about the call.
Tapping the phone icon beside the number returns the call.
Tap to send a text message.
Tap the People icon for contact info.
Tap to add New Contact.
To clear your Call log, tap Menu >Clear Call History.
Checking your voicemail
Have a new voicemail? The Voicemail icon will pop up on your screen.
Read your voicemail by swiping to reveal notifications.
Voicemail notification shows number of unread messages & a number to dial.
Check with your carrier to find out the default voicemail dial in number for your phone.
Note: To modify these standard text responses, tap
Menu > Settings > Quick responses.
P a g e | 10
10
4. Texting & keyboard use
Entering & editing text
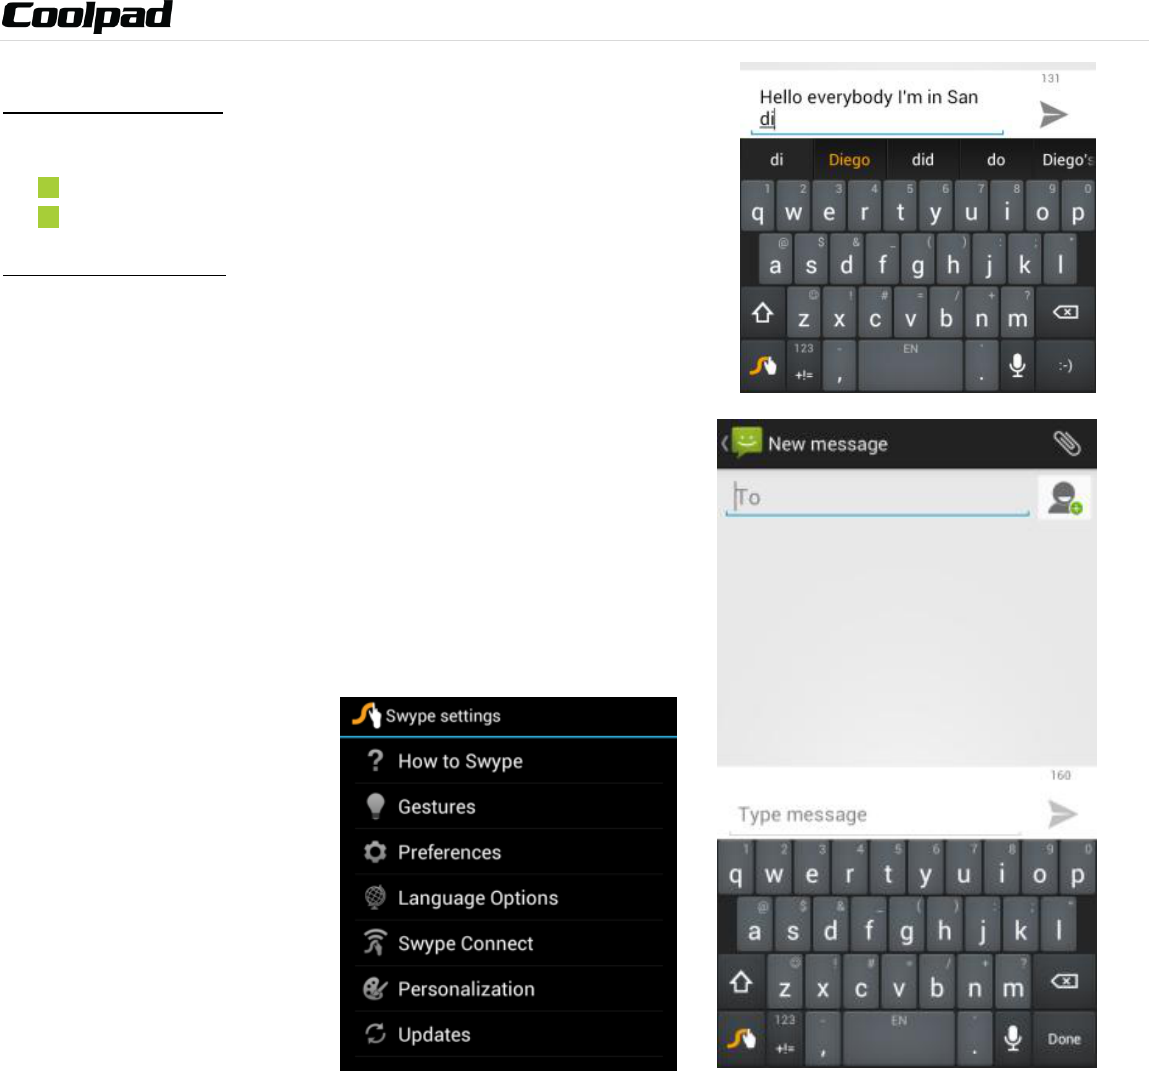
Enter text by using the screen’s keyboard. To open your phone’s
keyboard, simply tap where you want to type.
Otherwise, some apps will open the keyboard for you!
To close the keyboard, tap the Back key below the keyboard.
Next-word suggestions
1. Tap where you want to type text.
2. Begin typing a word. Choose one of the words displayed above
the keyboard.
3. If you don’t want to use those words, type the next word
without using the space bar.
4. Your phone will continue to present word choices while you
type.
5. To turn Next-word suggestions on or off, go to Settings >
Personal > Language & input > Keyboard& input methods >
Android keyboard > Settings> Advanced settings.
6. Check the box adjacent to Next-word suggestions.
P a g e | 11
11
5. Customizing & using your Coolpad FloTM Phone Apps
Customizing your Home screen
1. Go to the Home screen where you want to position an app.
2. Tap the All Apps icon .
3. Swipe right to locate your app (or widget), then touch it until the Home screen comes up.
4. After sliding the app into place, lift your finger.
To move an app (or widget icon) to a different place on a Home screen, touch & hold the icon, and then slide
your finger to its new position.
To move between Home screens, swipe toward the edge of the screen. Move an icon out of the way by
sliding slowly into it & lifting your finger. The icon will then fall into the new spot.
Contact Book
The Contact Book easily saves all of your important contact information including contact names, numbers
and email addresses.
It also supports an assortment of other communication operations.
To search your Contacts, tap the Search key in Contact List, enter search characters in the search box & the
Coolpad system will automatically reveal matching results.
To add a New Contact, tap Add Contact on the Contact List & select the storage location of the New Contact.
Type the contact information in Edit Contact& save New Contact in your Contact List.
Setting up & using Gmail
1. Tap the Gmail icon for reading and composing emails.
2. To open it, tap the Gmail icon on a Home or All Apps screen.Here Gmail has various
uses. For instance, utilize your Gmail account for signing in to all Google apps & services,
including, but not limited to:
Calendar
People, keeping track of Contacts
Google Drive
Getting familiar with your Email App:
1. Tap the icons and menu along the top of the screen to archive, delete,
label, or enable other message actions.
2. Swipe left or right to read prior or new email conversations.
3. Check the box next to a message in order to select it.
4. Tap the menu & icons at the top of your phone screen to manage your
messages.
5. Enter your current email address, or add a new one, followed by your
password.
6. Press & hold the email account for a pop-up menu to customize your Email
Settings.
7. Upon turning on your phone & signing into a Google account, current
contacts from that account are auto-synced with your People app.
Controlling your calendar
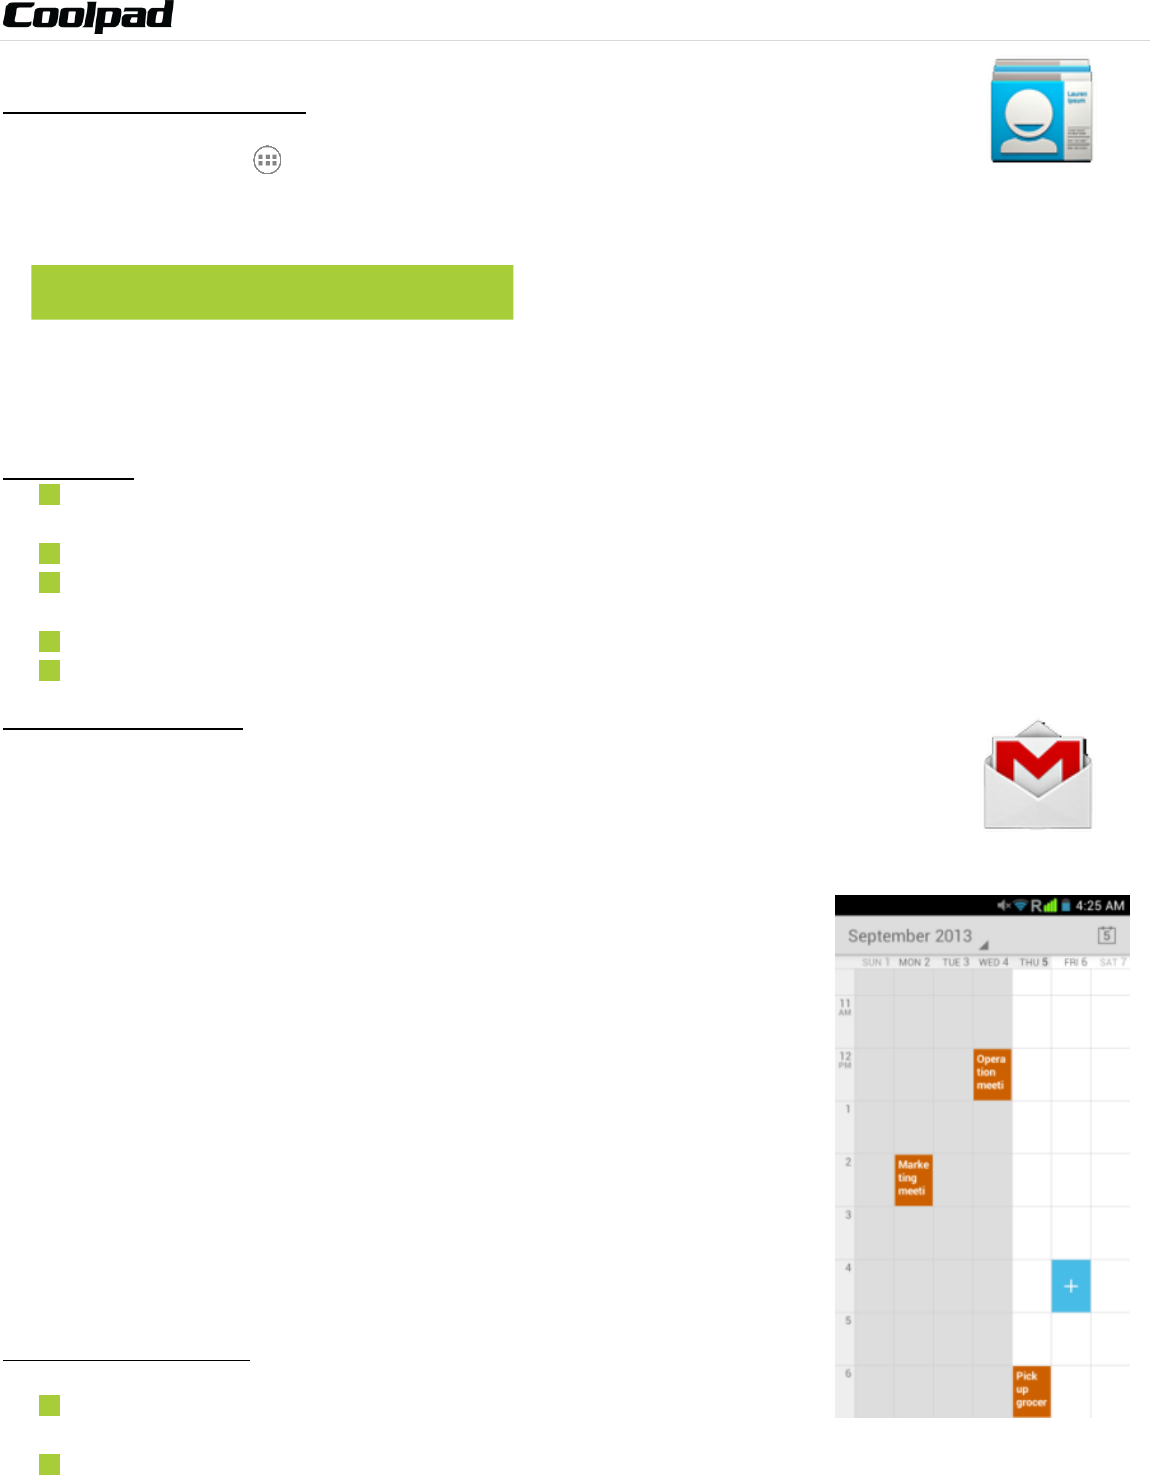
To open your calendar, tap the Calendar icon on a Home or All Apps screen.
If you have synced your Gmail account, the first time you open the Calendar
app on your phone, it will show your current calendar events.
To modify the Calendar view, choose Day, Week, Month or Agenda from the top of the screen by tapping on
the month/year.
Note: If you are using Microsoft Exchange,
that contact info can also be synced with your
People app.
P a g e | 12
12
Edit or view event details by tapping an Event.
Tap desired icon(s) across the top of the screen, or Menu to search or generate new events, return to today,
or adjust calendar settings.
To invite people to a new event, tap the Calendar event from the Calendar app & tap Email guests.
When an event notification appears, swipe down on the notification shade, swipe to enlarge, & then tap
Email guests.
Operating the alarm
For powering alarm On/Off, tap alarm & swipe to the left.
>Tap Time, which will take you to Set Time.
>Once your alarm is set, you may add a label to it & choose your Ringtone (or Vibrate) by
selecting within the drop-down menu under Set Alarm.
Managing your downloads
Tap the Downloads icon on the All Apps screen.
To enjoy music, movies, etc., from Google PlayStore, Google servers stream your favorites from Google
servers while you’re playing them.
Although they are not designed to occupy phone space, you can pin (aka download) books, movies, and other
media in order to access everything offline.
You can also download files from Gmail or other areas.
Going to the Downloads app, tap an item to open it.
Tap headings for earlier downloads to view them.
Simply check what you’d like to share by tapping the Share icon& choosing a sharing method from the
drop-down menu.
Check any downloads that you want to delete, & then tap the Trash icon.
Tap Sort by size or Sort by date at the bottom of your phone.
If you are connecting your phone to a PC or laptop, view the Download directory for available files contained
in the Downloads app. Here you may copy files as well.
P a g e | 13
13
6. Phone set-up and phone management
Privacy settings & accounts
These settings control your phone’s Google Search privacy features & search-related confidentiality selections for
your Google account.
Menu > Settings >Accounts>Search> Privacy & accounts.
From your phone’s main Settings app:
Settings > Accounts > Google > Search.
Tap the Google Search setting to learn more.
Managing location history
1. Open Google Maps settings in order to turn on/off Location settings & Location reporting.
2. Google Location settings enable location access to be turned on/off.
Managing sound, screen & sleep settings
Sound settings: Go to Settings > Device > Sound > Volumes.
Swipe the slider for volume levels on videos, Music, games, & other media.
Or you can always press the volume control up/down on the left side of your phone.
Screen settings: Go to Settings > Device > Display > Brightness.
Sleep settings: Go to Settings > Device > Display > Sleep. Tap one of the options to select.
Ringtone settings: Go to Settings > Device > Sound > Phone ringtone (or select Vibrate when ringing).
Notifications
On the left of your phone, status icons will pop up displaying which apps have sent you notifications.
For finding notifications, use two fingers to pull the notification shade down from the top of your phone
screen, or swipe up, then to the right.
The Quick Settings menu reveals your settings for Bluetooth, Wi-Fi, etc.
To access Quick Settings, pull down the menu from the top, right side of your phone’sscreen with three
fingers.
Airplane mode
Airplane mode is ideal for in-flight phone status, where no signal or Wi-Fi is connected.
Settings > Wireless & Networks > More…> Airplane Mode
P a g e | 14
14
7. Wireless network settings
Turning on Wi-Fi
At initial phone set-up, Wi-Fi is turned on automatically.
1. To turn Wi-Fi on/off, go to Settings > Wireless & networks > Wi-Fi.
2. Swipe the Wi-Fi switch to On for enabling your phone to scan for available Wi-Fi
networks. It will show the network(s).
3. Tap desired network name to connect, entering your password if necessary.
Modifying network settings
To modify a network’s settings, press & hold a particular network name in order to change
the network’s settings.
Adding on a Wi-Fi network
1. A Wi-Fi network may be added so that your phone will recognize it along with any of its security credentials,
and then it will auto-connect.
2. Always add a Wi-Fi network if the network name is not transmitted (SSID), or when you are out of range.
3. Tap the Plus icon on the top of your phone’s screen.
4. Enter the SSID network name.
5. Tap Save. Your phone will auto-connect to this network whenever you return to its range.
Setting Wi-Fi advanced options
Go to Wi-Fi Settings screen, tap Menu > Advanced.
You will receive Wi-Fi notifications for available networks in your status bar. To disregard notifications,
uncheck this option.
To save your phone’s data usage, your phone will remain connected to Wi-Fi when your screen sleeps.
P a g e | 15
15
8. Connect to Bluetooth
Bluetooth has the capacity to connect several mobile devices at once, enabling superior
synchronization while reversing challenges and problems that would otherwise occur. Use
Bluetooth to maximize your Flo Coolpad ’s awesome phone capabilities & functions!
Powering Bluetooth on/off
Tap Settings > Wireless & networks> Bluetooth and then slide the switch for Bluetooth to on (or
off).
Changing your phone’s Bluetooth name
Your phone contains a random Bluetooth name which will be visible to other Bluetooth devices during connection
attempts. By changing the Bluetooth name, it will be more identifiable.
1. Go to Settings > Wireless & networks, and be certain Bluetooth is turned on.
2. Tap Bluetooth.
3. Within the Bluetooth screen, tapMenu >Rename phone.
4. Now enter a new name & tap Rename.
“Pairing” your phone with a Bluetooth device
When initially using a new Bluetooth device, it will be necessary to “pair” it with your phone, which is crucial in order
to connect.
Now both devices save the connected record and will auto-connect for you next time.
If the device to pair with isn’t contained on the list, confirm that it is turned on and that it is set to be detectable.
1. Go to Settings > Wireless & networks and ensure Bluetooth is turned on.
2. Tap Bluetooth. Your phone will begin seeking for nearby Bluetooth devices.
3. If your phone stops scanning before your Bluetooth device is ready, tap Search for devices.
4. Within the list, tap the ID of the Bluetooth device so as to pair with it. Follow the instructions to complete
the pairing.
5. If necessary, enter a regular passcode such as 0000 or 1234. Likewise, consult the documentation that came
with the device.
Connecting to a Bluetooth device
Now that your phone is paired with a Bluetooth device, it can be connected to it manually.
1. Go to Settings > Wireless & networks > Bluetooth, ensuring that Bluetooth is turned on.
2. Within the devices list, tap a paired and unconnected device.
3. The list will indicate that the device and the phone are connected.
“Un-pairing” or aligning a Bluetooth device
Some Bluetooth devices have multiple profiles. Profiles can include the ability to transmit your conversations, play
music in stereo, or transfer files or other data.
You can select which profiles you want to use with your phone. You can also change the name of the Bluetooth
device as it appears on your phone.
1. Under Settings > Wireless & networks> Bluetooth, ensure that Bluetooth is turned on.
2. Within Bluetooth settings, tap the Settings icon next to the connected Bluetooth device for which you are
configuring.
3. You will now be offered the choices to either change the name, un-pair it or select profiles.
4. When you’re done, tap the Back key.
Monitoring your phone’s data usage
Although subject to your device and wireless plan, extra fees may be incurred when your data usage surpasses your
plan’s limit.
Therefore, it is imperative to monitor the data you’ve uploaded or downloaded on to your phone.
Do this by going to Settings > Wireless & networks > Data usage.
P a g e | 16
16
9. Creating & sharing videos, pictures
Creating a video
1. To capture a video, simply tap the Camera icon from your Home screen.
2. Next, tap the Video Camera icon on the lower portion of your screen.
3. Now tap the red record key while using the screen in order to see your video while
you’re recording it.
4. Tap the red key once again to stop recording.
Taking a photo
1. To snap a picture, tap the Cameraicon.
2. Tap the Camera icon once again on the lower part of your phone.
3. Focus on your subject by looking through your phone screen.
4. Press the blue key to take a picture.
Sharing a video or photo
1. To share a video or photo, first be sure to name it.
2. Then go to Apps > Gallery.
3. Tap your selected video & Share icon to the right of the video title/name.
4. From the drop-down options, select your method of sharing by tapping on it.
5. Tap Gallery to view and manage all of your videos and pictures.
It really is that easy! Your new Coolpad FloTM makes it that way.
P a g e | 17
17
10. Data usage settings
Manage your data usage settings
Here data usage settings for your new Coolpad FloTM are described, but they are carrier-specific.
The following instructions will assist in tracing data usage, which may or may not help avoid possible additional
charges.
1. Go to Settings > Data usage > Slide Mobile data toOn.
2. Here you will see a graph. The white lines that are vertically displayed present a time period within the data
usage phase.
3. Touch and drag the white lines in order to change a data usage time period.
4. Your actual data usage is shown underneath the graph.
Setting a data usage limit warning
Touch and drag the orange line on its right side to the point where you wish to receive a data usage warning
notification.
Setting your data usage limits
1. Go to Settings > Data usage > Slide Mobile data to On.
2. Activate the red line at the top of the graph by checking Set mobile data limit.
3. Touch and drag the red line on its right side to the point where you wish to set the limit. Your data will
automatically switch off when your usage limit has been reached.
4. Various phone features will not work correctly and a notification will pop up at this time.
Note: Be sure to check with your carrier for further information.
P a g e | 18
18
11. Google Play Store
Google Play Store is all-in-one entertainment point with music, movies, books and apps on the
web.
Accessing Play Store
1. To access your Play Store app, tap the Play Store icon in your Favorites tray on your
Home screen.
2. By tapping the Menu icon in any section, My Apps, My Music, etc., will pop up which will display your
content for that part of Google Play.
3. Your Google Play content can be retrieved this way (from the Play Store app) even if you have acquired it
through another phone.
4. Sign in to play.google.com to access your entertainment from any location.
Google Play Settings
1. Modify your Google Play settings by choosing the option you want from the Menu in the top right corner.
2. The Google Play settings screen enables you to:
Control game & app updates’ notifications.
Clear search history.
Manage user controls.
Filter Android apps based on maturity level or that require a PIN in order to purchase.
Tap Content filtering.
Set or change PIN.
P a g e | 19
19
12. USB File Transfers
By using a USB cable, you may transfer pictures, music, and other data files from your 4G Flo Coolpad on to
your PC or laptop, & vice versa.
For transferring files to Mac OS X, the Android File Transfer application can be utilized. (Refer to
instructions below.)
Windows transfer
1. First, connect your phone to the computer’s USB port. Its USB storage drive will show on the computer
screen.
2. Begin copying files between your phone & the computer.
3. When you finish, eject the phone from within Windows before unplugging the USB cable.
Mac OS transfer
1. Install Android File Transfer http://www.android.com/filetransferand follow the directions. Double-click for
first-time use. (Auto-connect will occur thereafter.)
2. Connect your phone to the computer using a USB cable.
3. The Android File Transfer will begin, including a window pop-up showing your phone contents & other
pertinent information.
4. Here you can open & close folders, create new folders, & drag files.
5. Disconnect the USB cable upon completion.
P a g e | 20
20
13. Optimize your phone’s Battery life
Battery settings
Prolong your phone battery life by turning off apps that aren’t being used or aren’t needed.
Go to Settings > Device > Battery.
Here you may monitor how apps, other data and your phone system all consume battery power.
Turn off Wi-Fi, Bluetooth or GPS with the Settings app.
For the GPS setting, go to Settings > Personal > Location services.
Turn off Navigation or Maps when not in use.
Dim your phone’s screen brightness: Settings > Device > Display.
Consider turning off auto-sync for all apps. Go to Settings > Accounts > Google. account-name.
Assessing battery level and usage, Go to Settings > Device > Battery.
Battery usage for each app is displayed near the bottom of your phone screen.
Get more details by tapping an app.For some apps, you may modify power usage settings, or halt the app
entirely.
Note: If auto-sync is turned off, you must manually sync to check emails, and
notifications will no longer pop up.
Note: If you stop some apps or services completely, your phone may not operate correctly.
The battery status & battery levels are indicated at the top of your phone screen.
P a g e | 21
21
14. Coolpad Flo specs & hardware
Specifications
Dimensions
5.28 x 2.64 x 0.40 inches
Style
Bar
Antenna
Built-in
SIM Card
Micro SIM
Network Mode
WCDMA
Camera
Front camera: VGA; Rear camera: 5MP
Earphone Jack
Standard American earphone jack
Screen Parameters
Type
Dimensions
Resolution
FWVGA
4.5 inches
854 X 480
Accessories
Battery
Battery Type
Lithium Ion Polymer Rechargeable Battery
Rated Capacity
1800mAh
Nominal Voltage
4.2V
Prompt: The battery capacity changes with battery upgrade.
List of Accessories
No.
Name
Quantity
1
Phone
1
2
Battery
1
3
Travel Charger
1
4
USB Charger Data Line
1
Prompt: The accessoryitems are as per the final transaction.
Please contact the dealer for further details.
Declaration of Hazardous Substances
Parts Name
Toxic or hazardous substances or elements
Plumbum
(Pb)
Mercury
(Hg)
Cadmium
(Cd)
Chromium VI
(Cr(VI))
Polybrominated
Biphenyls (PBB)
Polybrominated
Diphenyl Ethers
(PBDE)
PCB Board and
Accessories
×
○
○
○
○
○
Plastics
○
○
○
○
○
○
Metals
×
○
○
○
○
○
Battery
×
○
○
○
○
○
Other
×
○
○
○
○
○
○: indicates that the content of the toxic or hazardous substance in all homogeneous materials is within
the limit of the SJ/T11363-2006 standard.

P a g e | 22
22
×: indicates that the content of the toxic or hazardous substance in some homogeneous materials exceeds
the limit of the SJ/T11363-2006 standard.
The Environmentally Friendly Use Period of this product is 20 years, as shown by the symbol on
the left. The Environmentally Friendly Use Period of replaceable parts, such as battery, may be
different from that of the product. The Environmentally Friendly Use Period is valid only when the
product is operated under the conditions defined in this User Guide.

P a g e | 23
23
15. Net Monitor
The method to enter Net monitor: input *20060606# at dial pad, then the system enters Net monitor.
*20060606#
BT test mode setting
Functionality: to enter or exit Bluetooth test mode.
Operation: select to turn it on or off.
Offline log settings
Functionality: the user can turn offline log on, set log file directory, set buffer types, set log format, clear logcat
buffering area.
Operation: to input the setting parameter related to offline log at the user interface
Compatible test setting
Functionality: turn Compatible test setting on or off.
Operation: tap to turn it on or off.
Monkey test setting
Functionality: the user can choose to turn this functionality on or off.
Operation: tap to turn it on or off.
OTA server settings
Functionality: set OTA server settings.
Operation: tap OTA server settings, input the password and enter setting interface, and then you can set the relevant
function.
OTA test
Functionality: it is used to clear OTA preference, enable OTA auto update, disable OTA auto update and check OTA
new update.
Operation: the user can perform the above operations at the user interface.
Clear FPLMN
Functionality: the user can select that whether to clear the FPLMN list of UICC card or not.
Operation: tap to select done or cancel.
E911 GPS field test
Functionality: In the testing process, the user can select whether permit 912 as emergency number.
Operation: tap to turn it on or off.
SMS channel settings
Functionality: the user can select to set service channel or receiver channel.
Operation: tap to turn it on or off.
audio test setting
Functionality: the user can turn audio test setting on/off which depends on the user demand.
Operation: tap to turn it on or off.
view and modify SPC
Functionality: the user can view and modify SPC value.
Operation: to tap to enter the user interface and query or modify SPC value.
iot test
Functionality: the user can select to encrypt the conversation, query and modify SCI value.
Operation: tap to enter operation interface, you can turn on/off the encryption setting ofF the conversation, query
and modify SCI value.
FCC Regulations

P a g e | 24
24
This device complies with part 15 of the FCC Rules. Operation is subject to the following two conditions:
(1) This device may not cause harmful interference
(2) This device must accept any interference received, including interference that may cause undesired operation.
This device has been tested and found to comply with the limits for a Class B digital device, pursuant to Part 15
of the FCC Rules. These limits are designed to provide reasonable protection against harmful interference in a
residential installation. This equipment generates uses and can radiate radio frequency energy and, if not
installed and used in accordance with the instructions, may cause harmful interference to radio
communications. However, there is no guarantee that interference will not occur in a particular installation If
this equipment does cause harmful interference to radio or television reception, which can be determined by
turning the equipment off and on, the user is encouraged to try to correct the interference by one or more of
the following measures:
-Reorient or relocate the receiving antenna.
-Increase the separation between the equipment and receiver.
-Connect the equipment into an outlet on a circuit different from that to which the receiver is connected.
-Consult the dealer or an experienced radio/TV technician for help.
Changes or modifications not expressly approved by the party responsible for compliance could void the user‘s
authority to operate the equipment.
FCC RF Exposure Information and Statement:
The SAR limit of USA (FCC) is 1.6 W/kg averaged over one gram oftissue.Device types: Coolpad 7560T(FCC
ID:R38YL7560T) has also been tested against this SAR limit. The highest SAR value reported under this standard
during product certification for use at the ear is 0.975W/kg and on the body is 1.272W/kg.
HAC
This phone has been tested and rated for use with hearing aids for some of the wireless technologies that it
uses. However, there may be some newer wireless technologies used in this phone that have not been tested
yet for use with hearing aids.
It is important to try the different features of this phone thoroughly and in different locations, using your
hearing aid or cochlear implant, to determine if you hear any interfering noise.
Consult your service provider or the manufacturer of this phone for information on hearing aid compatibility. If
you have questions about return or exchangepolicies, consult your service provider or phone retailer.
Hearing-Aid Compatibility (HAC)
Regulations for Wireless Devices On July 10, 2003, the U.S. Federal Communications Commission (FCC)
Report and Order in WT Docket 01- 309 modified the exception of wireless phones under the Hearing Aid
Compatibility Act of 1988 (HAC Act) to require digital wireless phones be compatible with hearing-aids. The
intent of the HAC Act is to ensure reasonable access to telecommunications services for persons with hearing
disabilities. While some wireless phones are used near some hearing devices (hearing aids and cochlear
implants), users may detect a buzzing, humming, or whining noise. Some hearing devices are more immune
than others to this interference noise, and phones also vary in the amount of interference they generate. The
wireless telephone industry has developed a rating system for wireless phones, to assist hearing device users to
find phones that may be compatible with their hearing devices. Not all phones have been rated. Phones that
are rated have the rating on their box or a label located on the box. The ratings are not guarantees.
Results will vary depending on the user's hearing device and hearing loss. If your hearing device happens to be
vulnerable to interference, you may not be able to use a rated phone successfully.
Trying out the phone with your hearing device is the best way to evaluate it for your personal needs.
M-Ratings: Phones rated M3 or M4 meet FCC requirements and are likely to generate less interference to
hearing devices than phones that are not labeled. M4 is the better/higher of the two ratings.

P a g e | 25
25
T-Ratings: Phones rated T3 or T4 meet FCC requirements and are likely to generate less interference to hearing
devices than phones that are not labeled. T4 is the better/ higher of the two ratings. Hearing devices may also
be rated. Your hearing device manufacturer or hearing health professional may help you find this rating. Higher
ratings mean that the hearing device is relatively immune to interference noise. The hearing aid and wireless
phone rating values are then added together. A sum of 5 is considered acceptable for normal use. A sum of 6 is
considered for best use.
In the example to the above, if a hearing aid meets the M2 level rating and the wireless phone meets the M3
level rating, the sum of the two values equal M5.
This should provide the hearing aid user with “normal usage” while using their hearing aid with the particular
wireless phone. “Normal usage” in this context is defined as a signal quality that’s acceptable for normal
operation.
The M mark is intended to be synonymous with the U mark. The T mark is intended to be synonymous with the
UT mark. The M and T marks are recommended by the Alliance for Telecommunications Industries Solutions
(ATIS). The U and UT marks are referenced in Section 20.19 of the FCC Rules. The HAC rating and measurement
procedure are described in the American National Standards Institute (ANSI) C63.19 standard.
When you're talking on a cell phone, it's recommended that you turn the BT (Bluetooth) mode off for HAC.
IC Notice
This device complies with Industry Canada license-exempt RSS standard(s). Operation is subject to the following two
conditions:
1) this device may not cause interference, and
2) this device must accept any interference, including interference that may cause undesired operation of the
device.
Le présent appareil est conforme aux CNR d'Industrie Canada applicables aux appareils radio exempts de licence.
L'exploitation est autorisée aux deux conditions suivantes:
(1) l'appareil ne doit pas produire de brouillage, et
(2) l'utilisateur de l'appareil doit accepter tout brouillage radioélectrique subi, même si le brouillage est susceptible
d'en
This Class B digital apparatus complies with Canadian ICES-003.
Cet appareil numérique de la classe B est conforme à la norme NMB-003 du Canada.