Yulong Computer Telecommunication Scientific YL8166G2 Dual-SIM Dual-band GSM/GPRS 850/1900 Mobile Phone User Manual R38YL8166G2 Rev
Yulong Computer Telecommunication Scientific (Shenzhen) Co. LTD Dual-SIM Dual-band GSM/GPRS 850/1900 Mobile Phone R38YL8166G2 Rev
User Manual
1
Coolpad 8166G2
User Guide
2
Your Coolpad 8166G2 is a business assistant smart mobile phone supporting two GSM cards
online at the same time.
Besides basic features, such as making calls and sending text messages, this device owns
the following distinctive features:
z Easygoing wireless Internet access. Over a GPRS network, you can surf the
Internet, receive and send e-mail messages, and so on.
z Powerful business assistant. Convenient features such as calendar and tasks
enhance your efficiency in business activities.
z Combine communication and entertainment in one. Media play, camera and
several games can make you thoroughly relax in spare time.
z NOTE: This equipment has been tested and found to comply with the limits for a
Class B digital device, pursuant to Part 15 of the FCC Rules. These limits are
designed to provide reasonable protection against harmful interference in a
3
residential installation. This equipment generates, uses and can radiate radio
frequency energy and, if not installed and used in accordance with the
instructions, may cause harmful interference to radio communications.
However, there is no guarantee that interference will not occur in a particular
installation. If this equipment does cause harmful interference to radio or
television reception,33which can be determined by turning the equipment off
and on, the user is encouraged to try to correct the interference by one or more
of the following measures:
-- Reorient or relocate the receiving antenna.
-- Increase the separation between the equipment and receiver.
-- Connect the equipment into an outlet on a circuit different from that to which
4
the receiver is connected.
-- Consult the dealer or an experienced radio/TV technician for help.
z Caution: This device complies with Part15 of the FCC Rules. Operation is
subject to the following two conditions: (1) this device may not cause harmful
interference, and (2) this device must accept any interference received,
including interference that may cause undesired operation. Please follow the
correct procedure to switch off the device. Do not install or remove the battery
when switching on or charging the device, so as to avoid side effects such as
data loss.
z Caution: Any changes or modifications not expressly approved by the party
responsible for compliance could void the user's authority to operate the
5
equipment. Some electronic devices are susceptible to electromagnetic
interference sent by phone if inadequately shielded. Please use phone at least
20cm or as far as you can from TV set, radio and other automated office
equipment so as to avoid interference.
z Caution: Your wireless phone is a radio transmitter and receiver. It is designed
and manufactured not to exceed limits for exposure to radio frequency (RF)
energy set by the Federal Communications Commission (FCC) of the U.S.
Government. These limits are part of comprehensive guidelines and establish
permitted levels of RF energy for the general population. The guidelines are
based on standards that were developed by independent scientific
organizations through periodic and thorough evaluation of scientific studies.
6
The standards include a substantial safety margin designed to assure the safety
of all persons, regardless of age or health. The exposure standard for wireless
fixed phoned employs a unit of measurement known as the Specific Absorption
Rate, or SAR. The SAR limits set by the FCC are 1.6W/kg. Tests for SAR are
conducted using standard operating positions accepted by the FCC with the
phone transmitting as its highest certified power level in all
tested frequency bands. Although the SAR is determined at the highest certified
power level, the actual SAR level of the phone while operating can be well below
the maximum value. This is because the phone is designed to operate at
multiple power levels so as to use only the power required to reach the network.
7
In general, the closer you are to a wireless base station, the lower the output
power.
z The Highest SAR Values for this model phone when tested for use on the body
were 0.622mW/g.
z For body worn operation, this phone has been tested and meets FCC RF
exposure guidelines when used whit an accessory that contains no metal and
that positions the handset a minimum of 1.5cm from the body.
z Thank you very much for purchasing our products.
z Changes to product details are possible without prior notice. Application offering may
vary. All rights reserved.
Prompt
8
This guide is applicable to the Coolpad 8166G2 mobile phone. If descriptions in this guide
vary from the actual device, please refer to your handset for actuality.
Version: July 2007
Service Hotline: 86-755-83300198
1
Contents
1. GETTING STARTED..................................................................................................................................1
1.1 VIEWING YOUR DEVICE.........................................................................................................................1
1.2 SIM CARD...............................................................................................................................................4
1.3 BATTERY.................................................................................................................................................5
1.4 PRIVATE MODE.......................................................................................................................................6
2 BASIC OPERATIONS ................................................................................................................................9
SWITCHING THE DEVICE ON/OFF ...............................................................................................................9
INDICATORS ON THE STATUS BAR ...............................................................................................................9
2
INPUT METHODS.........................................................................................................................................13
3 CALL FUNCTIONS ...................................................................................................................................16
3.1 MAKING A CALL ....................................................................................................................................16
3.2 SPEED DIAL..........................................................................................................................................21
3.3 ANSWERING A CALL .............................................................................................................................22
3.4 FEATURES AVAILABLE DURING A CALL ...............................................................................................22
4 CALL LOG..................................................................................................................................................24
5 CONTACTS ................................................................................................................................................25
5.1 CREATING A CONTACT ON PHONE ......................................................................................................26
5.2 CONTACT AND GROUP.........................................................................................................................27
5.3 MAKING A CALL FROM CONTACTS ......................................................................................................27
5.4 QUICK LOCATION .................................................................................................................................28
3
5.5 COPYING CONTACTS ON SIM CARD TO PHONE ................................................................................29
5.6 COPYING CONTACTS ON PHONE TO SIM CARD................................................................................30
5.7 VIEWING ASSOCIATED INFORMATION OF A CONTACT........................................................................30
6 MESSAGES................................................................................................................................................32
6.1 WRITING AN SHORT MESSAGE ...........................................................................................................32
6.2 CREATING AN MMS MESSAGE ...........................................................................................................35
7 WEB.............................................................................................................................................................38
8 E-MAIL.........................................................................................................................................................40
MANAGING ACCOUNTS ..............................................................................................................................40
WRITING AN E-MAIL MESSAGE ..................................................................................................................41
SYSTEM SETTINGS.....................................................................................................................................42
REMOTE MANAGER....................................................................................................................................43
4
9 PDA..............................................................................................................................................................44
10 CALENDAR..............................................................................................................................................46
11 TASKS .......................................................................................................................................................47
12 OFFICE .....................................................................................................................................................48
13 MY FILES..................................................................................................................................................49
14 ALARM......................................................................................................................................................49
MULTIMEDIA.................................................................................................................................................51
15 COOLPAD PLAYER...............................................................................................................................51
PLAYING AN AUDIO-VISUAL FILE ...............................................................................................................52
USING PLAY LIST........................................................................................................................................52
5
16 CAMERA...................................................................................................................................................54
17 GAMES .....................................................................................................................................................56
18 NOTES ......................................................................................................................................................57
19 MEMOS.....................................................................................................................................................58
20 RINGTONES ............................................................................................................................................60
21 ALBUM......................................................................................................................................................61
22 RECORDER .............................................................................................................................................63
23 SETTINGS................................................................................................................................................64
24 CALL SETTINGS ....................................................................................................................................69
GENERAL ....................................................................................................................................................70
6
GSM1 & GSM2 .........................................................................................................................................71
25 DIAL-UP....................................................................................................................................................76
CREATING A CONNECTION .........................................................................................................................77
DIAL-UP CONNECTION ...............................................................................................................................79
VIRTUAL PRIVATE NETWORK .....................................................................................................................81
26 CONNECTIVITY ......................................................................................................................................84
27.1 ACTIVESYNC ......................................................................................................................................84
27.2 MODEM...............................................................................................................................................85
27.3 U-DISK ...............................................................................................................................................89
27 PROFILES................................................................................................................................................90
28 CALL FILTER...........................................................................................................................................92
7
29 BACKUP...................................................................................................................................................94
30 TOOLS ......................................................................................................................................................97
31 WAP...........................................................................................................................................................97
BROWSE WEB PAGES................................................................................................................................98
MAIN FORMS...............................................................................................................................................98
OPENING A WEB PAGE...............................................................................................................................99
APPENDIX I DUAL-GSM & DUAL-WORKING .................................................................................101
APPENDIX II TECHNICAL INFORMATION .......................................................................................102
APPENDIX III PHONE STANDARD EQUIPMENT LIST..................................................................106
APPENDIX Ⅳ TOXIC SUBSTANCES OR HARMFUL ELEMENTS STATEMENT......................108

1
1. Getting Started
1.1 Viewing Your Device
Your Coolpad 8166G2 is a dual SIM cards dual standby business-assistant smart phone. It
has not only basic communication function, but also powerful PDA function, which helps you enjoy
entertainment in your spare time.
Fig. 1-1

2
Table 1.1 Functions of Shortcut Keys
Key Application/Interface Functions
Press and hold it to go to the Call Log interface.
When an incoming call arrives Press it to answer the call.
In Call Log/Contacts Press it to dial the number that the cursor is
currently highlighting.
Call Key
Keypad Press it to dial the number.
During a call Press it to end the call.
In the text entry interface Press it to delete character(s).
In any application In view status, press it to exit the current window.
End Key
In standby/home screen Press it to switch between standby and home

3
screen.
in standby and home screen press briefly to call out the drop-down menu of
Select Profile
Function Key
In playback interface of
Coolpad Player Play video files in full screen
When an incoming call arrives Press it to turn off the buzzer.
Volume Keys During a call/ In playback
interface of Coolpad Player Press it to adjust the volume.
Power Key When LCD is on, Press it to turn LCD off. Or press it to activate your phone.
Shutter Key Enter Photo mode. Lock screen in playback interface of Coolpad Player.
4
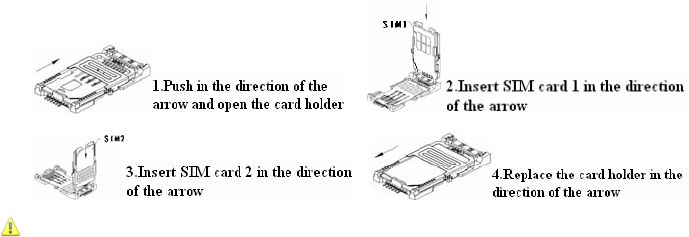
1.2 SIM card
Procedures for inserting a SIM card:
Caution
1. Switch off the device before replacing, inserting or removing SIM card; otherwise, a fault may
occur to the device;
2. Take care of SIM card. Do not bend or scratch it, nor exposure to static electricity or water.

5
1.3 Battery
1. Plug one end of the data cable into the USB of the charger, and then connect the charger
to a power outlet;
2. Plug another end into the I/O jack of the device;
3. Upon completion of charge, unplug the data cable from your device, and then disconnect
the charger from the power outlet.
Prompt
1. Your device can monitor and display information concerning the battery. Tap on the
status bar to display the power level.
2. When the battery is charging, if your device is ON, indicator is displayed on the status
bar; if your device is OFF, message “Charging” is displayed on the device screen.
3. When the power level is low, a prompt pops up, informing you to disable antenna. If the
battery charge is extremely low, the device will shut down automatically. Please charge the

6
battery in time.
4. You can charge the battery at any time, even if the device is off or switching on. Charging
upon switching on will not compromise the device performance.
5. You can not use a desktop charger and an USB cable to charge the battery at the same
time. (For USB jack, the output voltage is 5V and the current 250mA. It can be used to
charge any device that below 250mA, e.g. Bluetooth headset.)
Caution: Please follow the correct procedures to switch on/off the device. In order to avoid
loss of data, do not install or remove the battery when the battery is being charged or the device is
switching on.
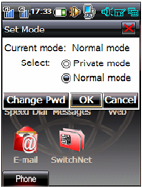
1.4 Private Mode
This device supports two modes: normal mode and private mode. In Private mode, you can
mark any data stored on the device, and even a whole folder in some module, as private. Private
data is invisible in Normal mode. If your device enters the standby state in Private mode, it
7
switches to Normal mode automatically when activated.
To switch to Private mode, follow the procedure below:
1. In any interface, use the stylus to scratch the screen from the top to the bottom
incessantly;
2. In the pop-up box, select Private Mode as the active mode;
3. Enter the correct private password;
4. Select the application you want to access, or change the password.

8
Caution: Folders marked as private can only be accessed in Private mode.
9
2 Basic Operations
Switching the Device On/Off
1. When the device is ON, press and hold the Power key until the Shut Down dialog box
appears, where you can select Shut Down to switch off the device or select
Disable/Enable Antenna to disable/enable the communication feature;
2. When the device is OFF, press and hold the Power key. Select the power-on mode
from the Please Select Mode dialog box according to your needs.
3. The Power key can also serve as the Inactivate/Activate key. To turn your display off,
just press the Power key briefly. Briefly press the Power key again to activate the
display.
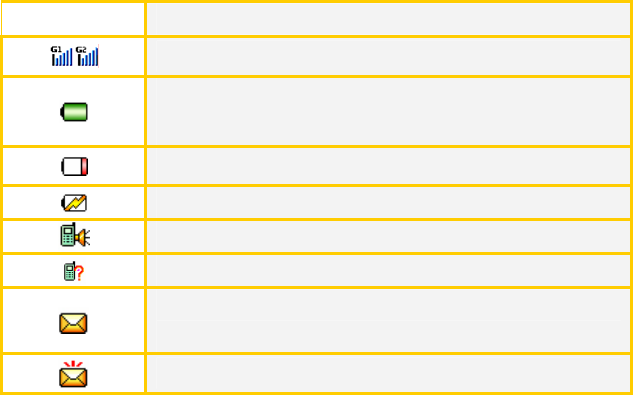
Indicators on the Status Bar
Indicators on the status bar are used to indicate various current working states of the device,
10
as shown in table below:
Indicators Function and Relative Operations
Indicates signal strength, tap it to view network status.
Battery is full.
Indicates power level. Tap it to view current power level.
The battery charge is low.
The battery is charging.
A call is in process.
You have missed calls. Tap it to view details of the missed call.
You have unread SMS messages. Tap it to view details of the
unread message.
Maximum of SMS messages on the SIM card reached.
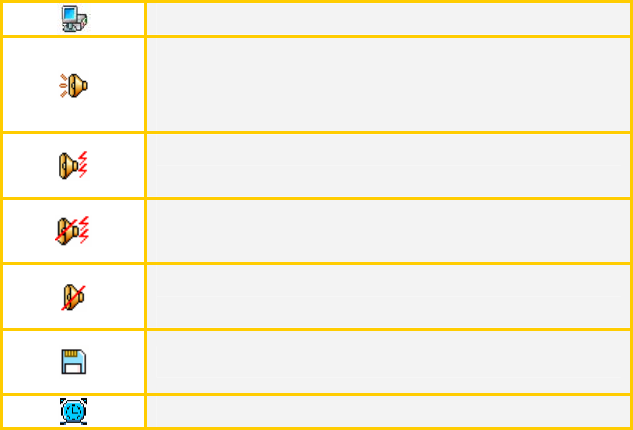
11
The device is connected to the PC or the internet.
The device rings only when an incoming call or a new message
arrives. Tap it to view the active profile, ring tone volume, vibration
and mute status.
The device both rings and vibrates when an incoming call or a
message arrives.
The device vibrates only when an incoming call or a message
arrives.
The device neither rings nor vibrates when an incoming call or a
message arrives.
There is a memory card inserted.
There is an alarm set for the event.

12
Slots are being detected.
Network register is in progress.
Indicates active profile. Tap it to pop up a drop-down menu, on
which you can switch profiles.
The active profile is Flight.
The active profile is Meeting.
The active profile is Outdoor.
The active profile is Quiet.
The active profile is VIP.
Tap it to show/hide the input panel.
Call an application when several applications are launched.

13
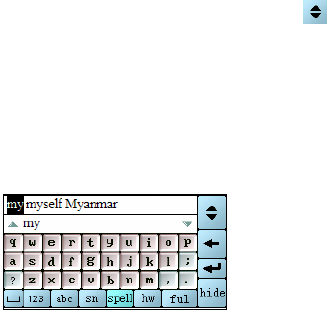
Input Methods
This device supports multiple convenient text input methods, which are available in all text
input/edit areas. Tap the input panel icon in the upper right corner of the screen. Then it
changes to .
z Handwriting input method
The following describes how to enter English letters in the handwriting input mode:
1. Write an English letter in the Graffiti area. Then, all candidates are displayed in the
candidate character list. Select the one you desired. If it is not included in the candidate
character list, then you need to rewrite.
2. Select ful to write letters in full-screen mode with all candidates displayed in the
candidate character list.
14
3. Tap your desired letter in the candidate character list and its related words are displayed
in the candidate character list. Tap the word you desired to enter it or write next letter
directly. If the one you desired is not included, tap to scroll through the list.
z Full screen handwriting input
This device supports full screen handwriting input. You can adjust the stoke width in
Settings>Input Panel.
z ABC and Abc input method (as shown in Fig. 2-1)
Fig. 2-1

15
Enter text with physical keyboard
Besides using stylus and virtual keyboard, you can enter text with the physical keyboard. To
use the physical keyboard, you need to tap to show the input panel first. Once input panel
shows, you can press the * key on the physical keyboard to switch among various input methods,
press the End key functions to delete characters and press the centre of 5-way joystick for
confirmation.
When the symbol, handwriting or full screen input mode is activated, keys 1-9 function to enter
numbers; when abc input mode is activated, keys 2-9 function to enter letters, and key 1 functions
to enter the various symbols.
Skills: press the * key on the physical keyboard to switch among various input methods.
16
3 Call Functions
3.1 Making a Call
You can make a call using one of several methods provided below:
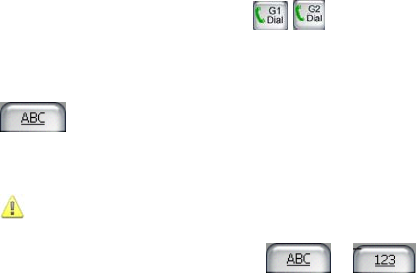
1. Input a number in the input field and then tap or .
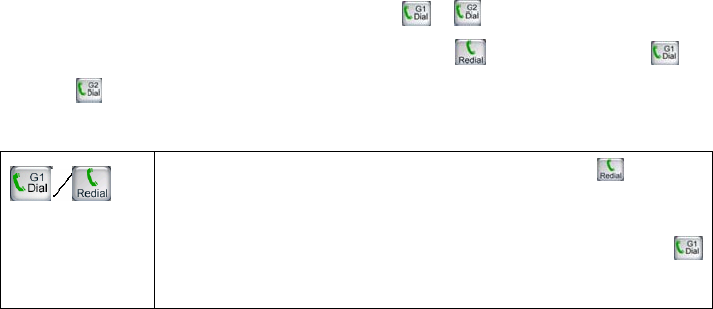
2. If you want to dial the last number you dialed, tap directly and then tap or
.
Table 1
Different displays of one button displayed in different cases. is used to
redial the most recent number you dialed after last power on. If you did not
make a call after last power on or the number-input field is not empty,
is displayed. You can directly tap it and make a call to the number you input.
17
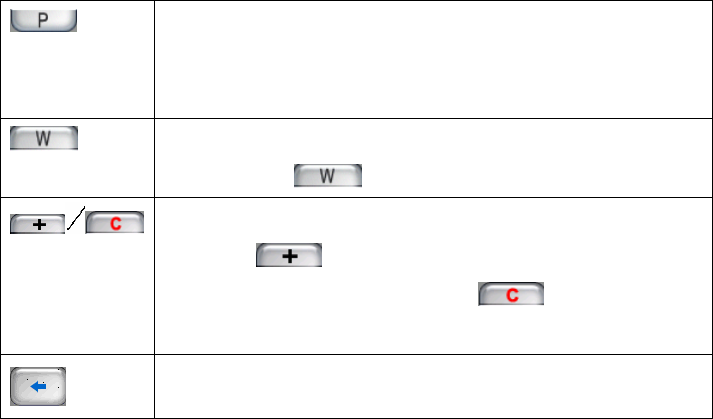
Delay: The remaining number following P is automatically dialed out 4
seconds later after the call is connected. You can input several Ps
continuously, and 4 seconds delayed for each P.
Pause: After the call is connected, the remaining number following W is sent
only when you tap .
Different display formats of one button in different cases. Usually it is
displayed as , used to input international long-distance number; if
tapped or input a number, it switches into , which can clear the
number in the input field upon one tap.
Delete numbers entered one by one.
18
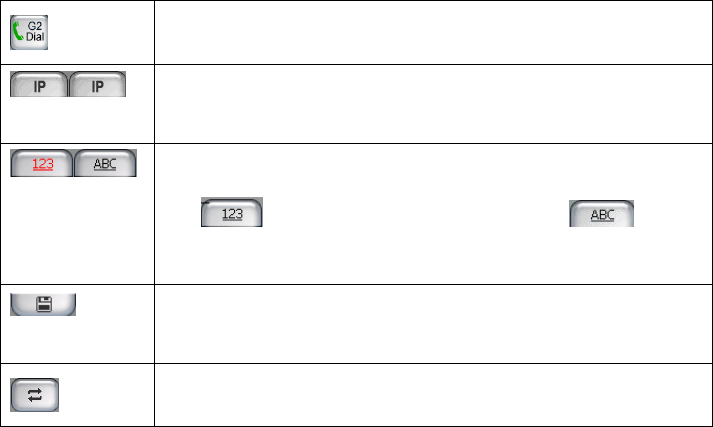
Designed for GSM2 card. You can tap it to dial the number you input.
IP dial: the left button is designed for GSM1 card and the right one for GSM2
card. Tap it and you can dial the number you input with IP number added.
When inputting a number, you can use any of them to find a contact number.
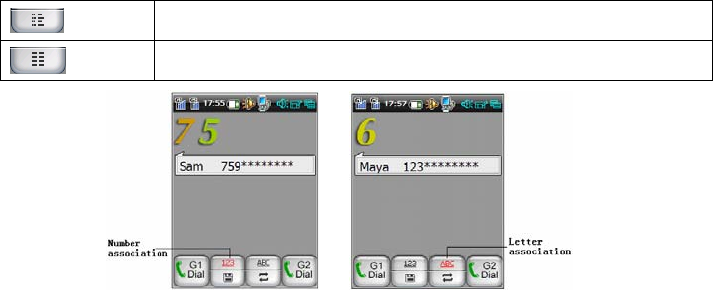
Key is used for number association find and for letter
association find.
Save the number input in the keypad to Contacts; during the call, save the
number input in the keypad to the temporary numbers of Call Log.
Switch between association keypad and non-association keypad
19
Switch to the Call Log interface
Switch to Speed Dial
Fig. 3-1 Fig. 3-2
If you only remember several consecutive digits of the number, you can enter them to find
matched entries by number association (as shown in Fig. 3-1).
20
When the desired contact appears in the contacts list in the course of inputting numbers, you
can use the up/down key of the 5-way joystick to move that entry. When that contact is in the input
field, you can press Call key or tap / to make a call to him/her.
If you remember the contact’s name, you can use letter association to find the contact. Tap
on the keypad and input the first letter of him/her name. For example, the initial of Maya,
M, is on number key 6 of keypad, as shown in Fig. 3-2.
Caution: if you enable data protection password for Contacts, the Verify Password
interface pops up when you tap or .
21
3.2 Speed Dial
Creating a Speed-Dial Entry
1. Tap a blank entry in the Speed Dial main view;
2. Enter related information, and then tap Save.
To create a shortcut to the file stored on your phone or memory card, select Add Shortcut.
Editing/Deleting a Speed-Dial Entry
1. In the Speed Dial main view, press and hold the speed-dial entry to be edited/deleted until
a shortcut menu pops up;
2. Select Delete from the pop-up menu to delete the entry.
3. Or select Edit to edit the entry.
Selecting Speed-Dial Mode
1. Directly tap an entry to dial the number from the preferred SIM card.
2. Press and hold an entry, and then select a dialing mode from the pop-up menu (GSM1_Dial,

22
GSM1_IP Dial, GSM2_Dial and GSM2_IP Dial). You can make a call by selecting a dialing
mode or press Call key on the physical keyboard.
Tip: For the speed-dial entry imported from Contacts, deleting it will not delete the
corresponding entry in Contacts.
3.3 Answering a Call
In the interface for answering a call, select Keypad and the interface switches to the keypad
application. Or select Handfree to answer the call handsfree. Tap to pop up a menu, from
which you can select Mute to turn off your microphone or select Hold to put the call on hold.
You can tap Record to record the call.
3.4 Features Available During a Call
z Using Contacts
23
During a call, tap , and then select Contacts from the pop-up menu to display the Contacts
interface.
Tips: During a call, is displayed in the status bar, indicating a call is in process.
z Three-Party Service
This device supports the three-party service. During a three-party conference call, you can
switch between calls, drop a party, hold a call and end calls by tapping the corresponding buttons.
Tips: The availability of this feature depends on the network system. Please contact your
service provider for contents supported.
z Dual-Standby Call Feature
On the premise that both of the two networks of the device are launched, if an incoming call to
network 2 arrives while the call to network 1 is in process, a second call window appears in the
main call interface. Then, you can select Answer to answer the new call. The first call is hung up

24
as you answer the second call. And current interface for the first call switches into other interface.
During a call, you can adjust the call volume by pressing the Volume keys on the left side
of the device. The volume you adjusted is regarded as the default volume next time the call is
connected.
4 Call Log
Call Log functions to log lists of outgoing and incoming calls, and to store messages up to
25
2000 records.
Operations Available in Call Log
1. On the Call Log main view, double tap an entry to display the Details interface;
2. On the Details interface, tap the phone number to show the shortcut menu. Then you can
perform operations by selecting corresponding options from the menu;
3. On the Call Log interface, tap the Dial button to call back the number contained in the
current entry. Tap Delete to delete the current entry or tap Message to send messages
to the number contained in the current entry;
4. On the Call Log interface, tap heading menu Call Log to pop up a drop-down menu.
Then you can perform operations by selecting corresponding options from the menu.
For example, you can select Find to find an entry; select Clear All to clear all entries or
select Enable Password to enable data protection password.
5 Contacts
The Contacts application is a tool storing contact information.
26
Tips: It is recommended that you store all the contact information on the device for
modifying or saving contact information better.
5.1 Creating a Contact on Phone
1. In the Contacts main view, tap the New button, and select Contact on Phone from the
pop-up menu.
2. Enter the information that you want to record in the input area, select options from the
drop-down list box, if available, and then tap Save.
3. Select to enter notes about the contact. For details on notes, refer to Section 24.1
“Creating a Note/Sketch”;
Tips: In the title bar, tap to display the basic info interface, tap or the Detail
button to enter detailed information such as the company, address and birthday of the contact.

27
5.2 Contact and Group
1. In the Contacts main view, select Contacts > Group > Add > Add to Group;
2. Tap in the right-upper corner of the title bar, and then select the contact range from
the drop-down list;
3. In the event of many contact entries, you can search for specified contact entries by
tapping ;
4. Select desired contact entries, or select all entries by tapping Sel.All. To cancel the
selection, just tap ClrAll;
5. Tap Add, and from the pop-up menu, select the group desired to add the entries to it.
5.3 Making a Call from Contacts
Method I: In the Contacts main view, select a contact entry, and then tap Dial
Method II: In the Contacts main view, press and hold a contact entry, and select a dialing

28
mode from the pop-up menu.
Method III:
1. Double tap a contact entry to display the details interface.
2. Press and hold the number to be dialed to display a pop-up menu. Then, select a dialing
mode from the pop-up menu: Edit & Dial, IP Dial (GSM1 or GSM2), and Dial (GSM1 or
GSM2). Tap it and make a call.
5.4 Quick Location
The device provides you with the quick location feature ( ), which allows you to find a
specific contact entry quickly.
You can find a contact entry by tapping initial letter(s) of his/her name on alphabetic keyboard
in the quick location window. You can also find contact entries by using the numeric location panel.
In any contact list interface, press any number key (1-9) to activate the numeric location panel. To

29
find a contact entry, just tap digits corresponding to the initial letters of the contact name.
Tips: The more detailed information you enter, the more quickly the contact is found.
5.5 Copying Contacts on SIM Card to Phone
1. In the Contacts main view, select Contacts > Copy > SIM to Phone, and then select a
contact group;
2. Tap Sel.All, and then tap Copy to copy all contact entries to the phone. Also, you can
select one or multiple entries, and then tap Copy, to copy the selected entries to the
phone one by one or by batch.
After you copy contact entries stored on the SIM card to the phone, system will automatically
create the From Card group, serving to store all information originally stored on the SIM card.
30
5.6 Copying Contacts on Phone to SIM Card
1. In the Contacts main view, select Contacts > Copy > Phone to SIM;
2. Tap Sel.All and then tap Copy, and select the card type to copy all contact entries to the
selected card. Also, you can select one or multiple entries, tap Copy, and then select
the card type to copy the selected entries to the selected SIM card one by one or by
batch.
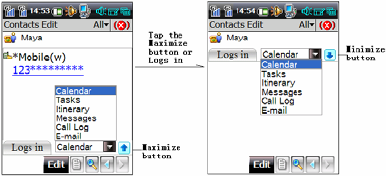
5.7 Viewing Associated Information of a Contact
In the Contacts main view, double tap a contact entry to display the details interface, as
shown in Fig. 5-1. In the drop-down list, select the information type that you want to view. Then,
the interface shown in Fig. 5-2 appears, which displays all information involved in the selected
type.
31
Fig.5-1 Fig. 5-2
32
6 Messages
6.1 Writing an Short Message
Tap New in the Messages main view, to display the New interface:
1. Directly enter a phone number in the input field or tap to select one from Contacts;
2. Enter contents: Enter the contents to be sent in the content box. The numbers in the title
bar show the number of characters you entered and the total number of characters that
can be entered;
3. Tap New > Quick Text to display the Quick Text interface, where you can select the
phrase that you want to insert into your message;
4. Tap or to send the message that you write just now. If it is sent
successfully, it is saved to the Sent automatically; if not, it is saved to the Outbox; Tap Save
33
to save this message, by default, to the Drafts.
z Create a custom folder
1. In the Messages main view, select Messages > Folder > New;
2. Enter a name for the folder;
3. Set filter rule: Directly enter a phone number in the input filed beside Contacts, or tap
Contacts to add multiple numbers or select numbers from Contacts. After creation,
messages from or to numbers that you specify will be saved to the custom folder
automatically.
4. To encrypt the folder, select the check option Enable password. You can mark this
custom folder as private in Private mode.
z Delete a custom folder
In the Messages main view, select Messages > Folder > Delete to clear the selected folder

34
Tips: You can only delete a custom folder. A system folder cannot be deleted.
Settings
In the Messages main view, select Messages > SMS Settings > General Settings, Cell
Broadcast or Special Settings, to display corresponding interface. Enter related information, and
tap OK, or tap Default to restore the default settings.
·Signature: If you enter a signature here, the signature is attached automatically every time
you edit a message.
·Delivery Report: You can enable or disable the prompt message shown after a message is
sent out.
If you are too busy to reply to a message, you can select Messages > SMS Settings >
Special Settings, tap the Other Settings tab. Check the option of Enable auto-reply, enter the

35
message to be sent, and tap OK. Then, when you have a message from a phone number stored in
Contacts, the message containing the preset text will be sent to the number automatically.
Tips: 1. For details on the SMSC number and voice mailbox number, please contact your
network service provider.
2. Tap and hold a message with your stylus and the short-cut menu will pop up.
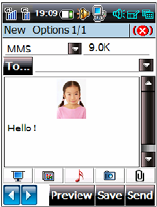
6.2 Creating an MMS Message
In the Messages main view, tap New to display the New interface, and select MMS in the
first drop-down list to show the following interface:
36
Fig.6-1
1. Directly enter a mobile number or an E-mail address in the input field or tap To to select
a recipient from Contacts;
2. Enter the subject of the MMS message; Insert images, texts or audio files as required;
3. Tap Preview to preview the MMS message; Tap Send to send the MMS message;
4. Tap Save. By default, the message is saved to the Drafts.
37
MMS Settings
In the Messages main view, tap Messages > MMS Settings in the title bar to show the
Settings interface. You can set corresponding function and tap OK to save you changes, or tap
Default to restore system default settings.

38
7 Web
The web browser application of this device allows you to surf the Internet at any time in any
place. With this device, you can access any WEB pages.
Tap to display the Net Connection interface. Please select the corresponding
connection according to your card type and tap Connect. Then, the system will access the
network automatically and open the homepage that you set.
¾ File: on its drop menu, there are Open, Save As, Work Offline and Close.
¾ Edit: on its drop menu, there are Cut, Copy, Paste, Select All and Find.
¾ View: on its drop menu, there are Text Size, Encoding, Go, Back, Forward, Stop,
Refresh and Internet Options.
¾ Favorites: on its drop menu, there are Add to Favorites, Organize Favorites and URL
List.
: Go to the previous directory
: Go to the next directory

39
: Return to the upper-level directory
: Stop downloading from the web page
: Refresh the web page
: Return to the homepage
: Search
Caution: Availability of Internet access depends upon whether your network carrier
provides this service, and whether you have subscribed to this service. For details, please contact
your network carrier. The option is unavailable temporarily if it is displayed in grey.
40
8 E-mail
With your device, you can send, receive, manage and sort e-mail messages conveniently. The
Coolpad 8166G2 e-mail system is compliant with not only the common POP3/SMTP protocols, but
also the IMAP protocol and simple HTTP Mail protocol.
Managing Accounts
To receive and send e-mail messages, you must have an e-mail address. You can access a
website to sign up for an e-mail address or use an existing one.
Creating an Account
1. If you select E-mail and have not set up your e-mail account, the interface for creating
an e-mail account is displayed;
2. If you have set up your account(s), to create a new one, select E-mail > Account
Manager in the E-mail main view, and then tap New.

41
3. In the Account Settings interface, enter corresponding information and then tap Save.
Tips: For information of POP3 and IMAP, please contact your service provider or check
out the corresponding website.
Account Manager
In the E-mail main view, select E-mail > Account Manager to display the interface for
managing account. All existing accounts are listed in the list area.
Buttons in this window include New, Delete and Set as Default, etc.
Tips: If you do not specify an account for sending an e-mail, by default, the e-mail
message is sent from the default account.
Writing an E-mail Message
In the E-mail main view, tap the New button, or double tap a folder under the account from
which you want to send the e-mail and then select New.
42
1. Enter a recipient’s address in the To field or tap To to select one from Contacts;
2. Enter one or multiple e-mail addresses to which you want to send the copy of the e-mail
in the Cc field. You can enter directly or select from Contacts as you do in step 1;
3. Enter the subject and contents; Then tap Sender Addr and select an e-mail account
from the pop-up menu, or directly tap Send to use the default account; Tap Save to
save the e-mail to the specified folder;
System Settings
1. Tap E-Mail > System Settings, and select a storage location. Then, the memory
space used by and available for E-Mail on that storage location is shown.
2. Enable data protection password and set your password.

43
Remote Manager
This feature allows you to conduct operations to e-mail messages stored on the server directly
before downloading them.
In the E-mail main view, tap E-Mail > Remote Manager or tap the Rmt Mgr button, to display
the interface for remote manager.
1. Tap in the title bar and select the account you want to manage from the drop-down
list;
2. Tap New Mail to retrieve headers of e-mail messages that are not retrieved from server;
3. Tap All Mail to retrieve headers of all e-mail messages from the server;
4. By default, the status of all headers is set to Ignore, which can be changed manually.
5. After setting the status of all headers to be handled, select Do to conduct corresponding
operations such as receiving, receiving and then deleting, and deleting headers

44
9 PDA
Itinerary
The itinerary application can help you to arrange plans like vehicle, hotel, meeting and
scheduled events, and remind you of upcoming event in time. If you have a calendar arrangement
during the period of this itinerary, a calendar icon will be displayed as well; tapping it you can view
the corresponding calendar arrangement. This application can also let you to notify the people
concerned via messages or e-mails.
Creating an Itinerary Entry
1. In the Itinerary main view (as shown in Fig.1), select New to enter the interface for
creating an itinerary.
Notes: Tap to edit itinerary notes. See “Notes” for details.
2. Enter corresponding information and choose Save.
3. Tap the icon of each sub-itinerary to enter the interface of corresponding template. Then,

45
you can fill in contents according to items listed.
There are two methods to select a vehicle:
1. In the interface of new itinerary, tap the vehicle icon to make selection.
2. In the interface of a concrete vehicle template, you can choose from the drop-down list of
vehicle field by tapping the down arrow.)
When filling in other sub-itinerary:
) Tap the blank area of time or time zone field can make settings to time or time zone.
) When choose the Send notice when alarm sounds option in the notification interface,
you can send messages or e-mails to the selected contacts manually or automatically.
: Vehicle : Hotel : Meeting : To-do : Project
46
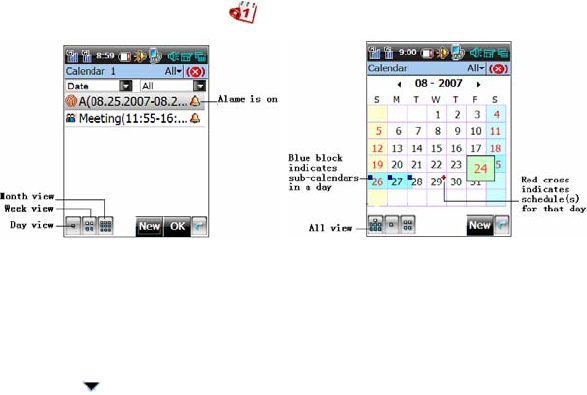
10 Calendar
On the PDA home screen, tap to enter the Calendar interface.
Creating a Scheduled Event
Tap New in any view interface to enter the editing interface, or tapping an interval or pressing
and dragging to select an area with the stylus in the day view or week view.
1. In the interface for adding a scheduled event, fill in the event information.
2. Tap in the title bar, and then select a folder for the event from the drop-down menu

47
displayed. See “Editing a Folder” in “Itinerary” for more information on creating a folder.
3. Tap to edit a remark. For details, please refer to “Notes”.
4. Save: Save the current settings when finished.
11 Tasks
On the PDA home screen, tap to display the Tasks main view. The descriptions of the
main view are as follows:
1. The figure in the title bar indicates the total number of tasks in the current interface and
the relative location of the selected task in the list.
2. You can browse tasks according to type or time by selecting options from the drop-down
list box.
Creating a Task
1. Tap New and enter detailed information.
48
2. Tap in the title bar, and choose a folder. See “Itinerary” for more information on
creating a folder.
3. Tap the icon to edit notes. See “Notes” for more information on tools available in this
interface.
4. Save: Save this task.
12 Office
On the PDA home screen, tap the icon to enter the office module. The Office application
module provides you with general tools such as PDF, PowerPoint, Word, Excel and WordPad.
With this feature, you can view or edit documents stored on the Micro SD card.
49
13 My Files
On the PDA home screen, tap the icon to display its main view. With the My Files
application, you can view, delete and send contents stored on this device and T-Flash card. You
can manage contents in the window using options available. In the title bar, tap File, Edit, view or
Go to pop up a drop down menu, then you can execute corresponding operation according to its
function options.
Caution: The option is unavailable temporarily if it is displayed in grey.
Instruction: To return to the upper-level directory, tap . You can view properties of a file
or folder by tapping after selecting it. To delete a folder, select a folder, and then tap .
14 Alarm
The alarm clock provides you with features of setting date and time, alarm clock, calendar,
stopwatch, timer and world time zone.
50
Date and Time: You can set three different date and time in different time zones. Tap the clock
tray, date display area or time zone display area can set the corresponding items.
Alarm: This device can support six alarm clocks at one time。
Calendar: Can select a day (1950-2050 A.D) to view.
Stopwatch: You can use it to account seconds. Tap Record to record lasting seconds.
Timer: You can set four timing which can process at the same time.
Time Zone: You can view the time difference for any time zone on the world.
51
Multimedia
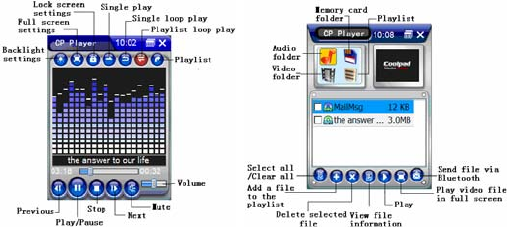
15 Coolpad Player
Coolpad Player supports both audio and video playing. With this feature, you can play not only
files in the format of MP3, WMA, AAC, WAV, but also MP4 and 3GP audio-visual files. This feature
enables your phone to be a real pocket multimedia audio-visual device.
Fig.15-1 Fig.15-2
52
Playing an Audio-Visual File
Please select CP Player > Open File in the title bar to play an audio-visual file. Then, you can
browse any file stored on the device from My Device list box. If you have inserted a Micro SD card
in your device, you can open any file stored on it that can be played by the player.
If lyrics (lrc format) are available for the MP3 file, and they are under the same directory with
the same file name (e.g. the corresponding lyrics of file abc.mp3 should be lrc.abc), lyrics will be
displayed simultaneously as the MP3 file is played.
The playing progress, and the duration of the file that is being played are displayed in the
course of playing. Moreover, you can perform operations by selecting corresponding operations
available in the window.
Using Play List
Select CP Player > Playlists in the title bar, to display the playlists window (as shown in

53
Fig.15-2). Select a file in some folder and tap to add your favorite audio-visual file into play list.
In the play list, tap the button to play the select file directly.
When play a video file in full screen, you can adjust the volume by dragging the 5-way joystick
to left or right side.
54
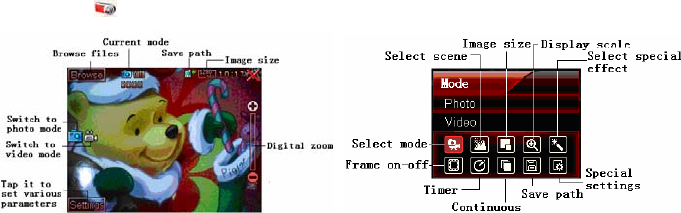
16 Camera
The Camera application supports video recording and taking a photo in full screen. With a 1.3
mega-pixel camera, the device can take static digital photos with a resolution of up to 1280 x 960.
You can tap or press the Shutter button to enable this application.
Fig. 16-1 Fig. 16-2
Main view
Tap the Settings button to pop up a shortcut box for setting options. Tap each shortcut icon to

55
pop up its concrete contents, and then you can make selection.
Taking a Photo
You can enter the shooting mode by default after enabling this application or selecting Photo
in the mode selection. After setting various parameters of your camera, focus on the subject and
press the Shutter button or press the center of 5-way joystick to complete shooting. The photo
taken is automatically saved to the storage location you selected. If you tap , a confirmation
prompt pops up, informing you of the deletion. Then, tap OK to delete the photo.
Making a Video Recording
To enter the video mode, select Video in Mode, or tap the video icon in the main view. During
the video recording, the progress is displayed by the time bar. Press the Shutter button to start
recording and press it again to stop. Select a storage location in the Save To option.

56
Skills: When taking photos, you can press the up\down of 5-way joystick to switch the
mode; press the left\right to set or browse view. The focal length can be adjusted by the volume
key.
Caution: Please select distance-view mode by the pole of camera lens.
17 Games
This device provides you the game GoBang, which helps you to relax fully in entertainment.
GoBang
Based on the traditional game settings, this game are enhanced to make the game more
flexible. In this game, the player can choose the color of the chessman, and retract a false move
during the game. You can find GoBang in Games on the Multimedia home screen.
Rule: The one who attains five chessmen in the same color in a row first wins.
Tips: After selecting chessman color, tap New to bring the selection into effect.
57
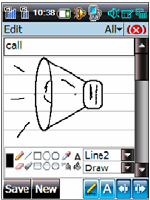
18 Notes
The Notes application is a graphic memo, just like a simple graphic editor. With this feature,
you can edit some simple graphics.
In the Notes main view, select an entry and tap the title bar Notes to pop up a drop down
menu. You batch delete, rename/move, set initial SN of auto-name and display properties for this
entry. You can also directly tap New, Delete and Find to execute corresponding operations.

58
19 Memos
With this feature, you can store daily memos information and create 100 memos at most.
1. Select Memos > Custom Category to create a new category; select Memos > Set to
enable data protection password;
2. In the Memos main view, press and hold an entry to pop up a menu, and then select
options from the menu to execute corresponding operations to the memo.
Prompt: When a category is deleted, all records under it are moved to the Others
category instead of being deleted.
Creating a new memo
You can access the interface for creating a memo using one of the following methods:
Method I:
1. Tap New in the Memos main view.
2. Enter the corresponding subject and content in the interface of creating a new memo.

59
3. Tap in the title bar and select a category for the memo.
4. Tap Save to finish creating a new memo.
Method II:
In the menu bar, tap Memos > New to display the interface for creating a new memo. Other
operations are the same as above.
Setting as Private
In the Private Mode, in the Memos main view, press and hold a memo entry to pop up a
menu, and then select the option Set as Private in the menu to mark the memo as private.

60
20 Ringtones
The Ringtones application allows you to store and listen to fair-sounding music. Descriptions
for window options are as follows:
Delete the selected ring Add a ring stored in external folder
to the user folder;
audition mute the ring
Send the selected ring by attaching it
to an e-mail or in other means
Play the selected ring
View information of the selected ring Stop playing the ring
61
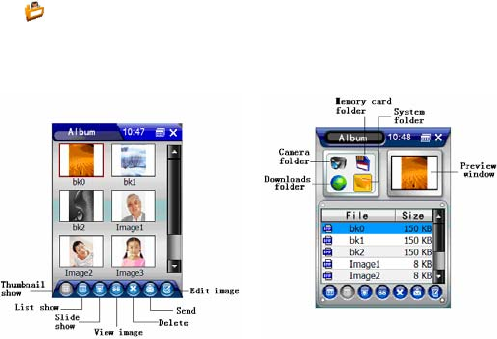
21 Album
Tap to display the Album main interface. The Album application has powerful image
processing functions such as manage and browse images, and supports interaction with such
modules as E-mail and Camera.
Main view
Tap Album in the title bar to pop up a drop-down list of Album, and then you can perform

62
operations such as setting as wallpaper, marking image and making settings for slide show and so
on.
Browsing Images: Supports thumbnail mode (as shown in Fig. 21-1), list mode (as shown in
Fig. 21-2) and slide show mode.
View Image: Descriptions of buttons available in the window are as follows:
: Previous image
: Next image
: Zoom in the image
: Zoom out the image
: Rotate left
: Rotate right
: Edit the image

63
22 Recorder
This application provides powerful recording feature for you. Tap to display the Recorder
main interface. With the function buttons, you can perform corresponding operations such as
recording, searching and deleting.
64
23 Settings
With this feature, you can set this phone according to your needs.
Tap the main menus Control Panel and View in the left upper corner. Select corresponding
options in the pop-up menu.
Backlight
With this feature, you can change backlight property, to set backlight time when using different
power supplies and to adjust the backlight intensity.
Calibrate Screen
With this feature, you can calibrate the handwriting location of phone touch-screen.
Pease follow instructions on the screen to execute calibration.
Data Password
You need to enter password when you access applications enabled data protection password
(The original password is null. Please reset your password in time). Please select the application
to enable the data protection password and tap OK.

65
Tap Set Pwd to enter the Set Password interface. Enter the old password, new password and
confirm the new password. Tap OK to save your change.
Prompt: This data protection password is applicable to all passwords used in all function
options.
Device Info
With this feature, you can set up the device information and view IEMI NO., hardware version,
software version and system version.
Input Panel
With this feature, you can change the current input panel options of your phone.
1. Select the currently used input method.
2. Tap Options to display the interface for setting input method.
3. Set the various options. Move the slider to adjust the stroke width.
4. Tap OK to save the information you have set. Tap Cancel to close the current window
without saving settings of the various parameters.

66
Caution: Setting of stroke width is only applicable to handwriting input in full screen.
Internet Options
General
·Start Page: Enter an URL address as the default start page of the Web browser.
·Search Page: Enter an URL address as the default search page of the Web browser.
·User Agent: Select the user agent of the Web browser.
·Cache Size: Enter the cache size available when a web page is opened.
·Clear Cache: Delete the contents stored in the cache of the browser.
·Clear History: Delete the URL address history records in the browser.
Connection
·Use LAN: Enable or disable LAN connection.
·Autodial: Select the dial-up connection used during the automatic dial-up.
·Access the Internet using a proxy server: Enable or disable the feature of Internet access
through proxy server.
67
·Address: Enter the address of the proxy server to be used.
·Port: Enter the port of the proxy server to be used.
·Bypass proxy server for local addresses: Enable or disable the feature of bypass proxy
server for local addresses.
Privacy
·First-Party Cookies: Select the processing mode of the first-party cookies.
·Third-Party Cookies: Select the processing mode of the third-party cookies.
·Always allow session cookies: Enable or disable session cookies.
Popups
Select options in the interface, and then enter or select the corresponding information to set
pop-ups feature.
Power
With this feature, you can view power properties of your phone and adjust auto suspension
time.

68
Power-on Password
With this feature, you can set or change the power-on password.
Caution: Please remember all passwords you have set. There is no way to retrieve the
password if you forgot it, which will result in loss of data on the phone.
Language
With this feature, you can select the language for display.
Remove Programs
With this feature, you can delete programs in the device.
Standby Screen
With this feature, you can set the options displayed on your standby screen. Tap Default to
restore the default configuration.
System
With this feature, you can view system information of this device and modify its memory
settings.
69
World Time
With this feature, you can change the date, time and time zone displayed on your phone.
24 Call Settings
With this feature, you can set corresponding options of GSM1 and GSM2 according to your
needs. Moreover, you can use network services. If you want to use these network services, please
contact your network service provider for their availabilities. If any, you can open or subscribe
70
these network services. Tap Call Settings to display the main view.
General
Auto answer
In the Call Settings main view, select the check box Auto answer to implement this feature.
To disable this feature, you can just cancel the selection of this check box.
Default network
You can set this option in the Call Settings main view. If selected, your phone will directly
activate communications module in the system’s default mode.
My Numbers
In the Call Settings main view, select My Numbers to display the interface for setting my
numbers. Enter the names and numbers, and tap OK to save your entry.
Keypad Style
In the Call Settings main view, select Keypad Style to set the keypad style.

71
GSM1 & GSM2
IP Number
This device permits you to preset an IP number. Thus, you only need to long press a phone
number and select IP Dial from the pop-up menu; or enter a phone number on the keypad and
then tap the IP key. Without entering the IP number manually, the system will automatically add the
IP number you set before the number to be dialed.
You can set IP number as follows:
In the GSM1 Settings or GSM2 Settings interface, tap IP Number to display the interface for
setting the IP number. Enter the IP number you want to use in the input filed, and then tap OK to
save the setup, or tap Cancel to cancel the operation and exit the current interface.
Prompt: This feature needs network support. For specific IP number, please contact your
network service provider.
Security
72
Select whether to use the security lock.
Set Power-on PIN code: The PIN code is supplied with the SIM card by your network service
provider.
To enable the power-on PIN code, you need to perform the following actions:
1. Tap Security. Then, the security setup interface appears.
2. Select the check box Enable PIN. Then, the interface for entering the PIN appears. Enter
the correct PIN code obtained from the network service provider, and then tap OK.
If the PIN code you entered is correct, the phone displays a prompt message of “Change PIN
lock status successful!” Once the power-on PIN code is enabled, you must enter the correct PIN
code before you can use features related to network communication, such as registering with the
network, making and receiving calls, sending and receiving messages and so on.

73
Prompt: To disable the power-on PIN code, cancel the selection of the check box
Power-on PIN. Before cancellation, you are prompted to enter the PIN code, and the power-on
PIN can be disabled only when you enter the correct PIN code.
Caution: The SIM card will be locked upon three times of wrong PIN entry. You need to
enter the PUK code to unlock it. For details, please contact your network service provider.
Fwd Call
This feature allows you to forward incoming calls according to the related setup.
Caution: Before setting the feature of Forward Call on your phone, you need to make an
application to your network service provider for this service.
Prompt: For specific service contents, please contact your network service provider.
Hide ID
This feature is available for your phone.
In the GSM1 or GSM2 interface of the Call Settings, tap Hide ID to display the Hide ID

74
interface. The system will get and display the corresponding service status from the network. Or
you can change the service status according to your needs.
Prompt: If the interface turns to be gray, please conform that you have enabled this service
and check the signal quality. For specific service contents, please contact your network
service provider.
Network
In the GSM1 or GSM2 Settings interface, tap Network to display the Network Setup
interface. Then, you can perform corresponding operations by following screen instructions.
Caution: For specific service contents, please contact your network service provider.
Call Wait
You can set call waiting. If you receive a call from the third party B while you are on a call with
party A, you can place the active call on hold and answer the call from party B. After you finish the

75
conversation with party B, you can continue the call with party A.
Setting call waiting for the GSM network: After you have subscribed to the service, tap the
corresponding button in the GSM1 or GSM2 Settings main interface to enable service, disable
service or check status.
Prompt: For specific service contents, please contact your network service provider.

76
25 Dial-up
With this feature, you can create a dial-up network connection.
Prompt: For specific information concerning username, password and phone number used in
dial-up connection, please contact the corresponding network service provider.
After you tapped the Dial-up icon on the Settings home screen, the following options are
available for the main menu in the interface:
·Connect: Start a dial-up connection.
·New: Create a dial-up connection.
·Advanced Settings: Set advanced adapter for a dial-up connection.
·Delete: Delete a dial-up connection.
·Rename: Rename a dial-up connection.
·Properties: Display properties of a dial-up connection.
Caution:Only there are new connections created and a certain connection is selected, the
77
Connect, Delete, Rename and Properties mentioned above are available. Otherwise, they
are in grey color and not available.
: Start a dial-up connection. : Delete a dial-up connection.
: view the properties of a dial-up connection.
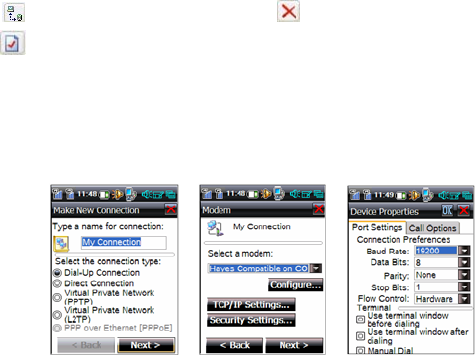
Creating a Connection
On the Connection interface, tap Connection in the main menu and then select New from
the pop-up menu, to display the interface shown in Fig. 25-1.
78
Fig. 25-1 Fig. 25-2 Fig. 25-3
1. Enter a name for the connection, select the connection type, and then tap Next to
display the Modem interface, as shown in Fig. 25-2.
2. After selecting the modem, you can view and change configurations of the modem. Tap
Configure to display the Device Properties interface, as shown in Fig. 25-3.
3. If you are setting GPRS Dial network,select the Call Options tab, and then enter
command in the input field below Special modem commands may be inserted into
the dial string.
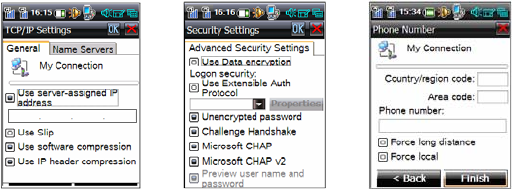
4. Tap TCP/IP Settings to display the TCP/IP Settings interface. Then, you can set
parameters of TCP/IP, as shown in Fig. 25-4.
5. Tap Security Settings to display the Security Settings interface, and then perform the
advanced security settings, as shown in Fig. 25-5.
6. Tap Next to display the Phone Number interface. Then, you can enter the phone
number for the dial-up connection, as shown in Fig. 25-6.
79
7. After setting, tap Finish to save the settings. Then, the new connection is displayed in
the Connection main view.
Fig. 25-4 Fig. 25-5 Fig. 25-6
Dial-up Connection
In the Connection main view, select a connection, or press and hold its icon to pop up a menu,
and then tap Connect in the menu.

80
After inputting the user name, password, domain and phone number, tap the Connect button
to connect to network. Upon successful connection, you can browse web pages or send and
retrieve Emails. Tap Hide to hide the status window. Tap Cancel to disconnect from the network.
For specific user name, user password, domain, and phone number, please contact your
network carrier.
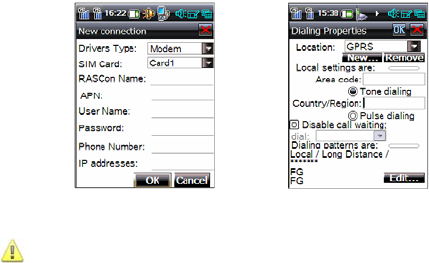
Creating a Connection (Shortcut)
Tap (New Connection) or press and hold to select New in the pop-up options. Enter
the corresponding information in the New connection interface and tap OK to finish it.
81
Fig. 25-7 Fig. 25-8
Caution: If it is you first time to use this feature, after you created a new connection, you
enter the Connection interface, tap Dial Properties and change the dial location to GPRS.
Virtual Private Network
Virtual private network (VPN) is defined as a temporarily secure connection via a public
network (commonly Internet). It is an extension to the intranet.
82
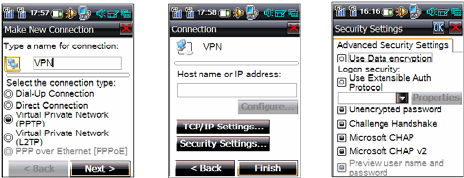
Creating a virtual network
Fig. 25-9 Fig. 25-10 Fig. 25-11
1. Select Virtual Private Network (PPTP) in Fig. 25-9. And then tap Next.
2. Enter the host name or IP address in Fig. 25-10.
3. Select Preview user name and password in the Security Settings as shown in Fig.
25-11. And then select OK to back, and tap Finish.
4. Now creating a virtual network connection is finished.
5. Open the Web. Do not disconnect from the network after you have opened a web page.
83
Return to main view to connect a virtual network. In the interface for entering network
password, enter your user name and password. Select OK. If the connection to virtual
network is successful, the screen will display Connected.
84
26 Connectivity
26.1 ActiveSync
Preparation for ActiveSync
Using the data synchronization application of this device, you can set up communication
between your mobile device and the synchronization program on the PC, and implement data
synchronization between the mobile device and the PC.
Data synchronization on this device is implemented through a USB cable. Before
synchronization, you should make sure that the mobile device is connected to the PC through the
USB cable correctly. The connection procedure is as follows:
Install the Coolpad Suite ActiveSync software on the CD packed with your phone.
Connect one connector of the USB cable packed with the mobile device to the USB port.
Confirm your mobile device has linked to PC through ActiveSync.
85
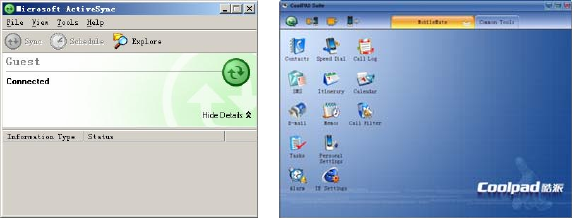
Run the Coolpad Suite ActiveSync software on PC, register a user account and login. Now
you can restore and synchronize the data backup. (ActiveSync program main interface)
Fig. 26-1 Fig. 26-2
26.2 Modem
Besides general features of a smart phone, this device can serve as an external wireless
modem of a PC. If the phone is connected to the PC through a data cable, you can connect to the

86
Internet using dial-up networking with your phone on the PC. Before that, you should install the
Wireless Modem Driver Program on the CD packed with your phone. Tap this program icon and
set according to prompts.
1. Tap to display the interface of the modem mode. Select Turn on modem. Connect
the phone to the computer with a USB data cable, getting ready for communication with
the computer.
2. Configure your computer according to the type of your SIM card. (For details, please
refer to descriptions in “How to Configure Your Computer”)
3. After configuring your computer correctly, you can connect to the Internet using dial-up
with your phone.
How to Configure Your Computer
When a connection is set up between the phone and your computer, you need to configure
the modem on your computer. Take Windows XP as an example:

87
Step 1: Add modem
1. Tap Connectivity. Tap to display the interface of the modem mode. Select a
network and connection mode. Here we select the USB. And then tap Turn on Modem.
When the Turn off Modem is displayed, please insert the USB data cable. The system
will prompt you that a new hardware is found, tap Next.
2. Select Auto Installation. Tap Next, the installation wizard will search automatically.
The system will pop up an installation warning in the process of installation. Tap Continue, it
will continue to install. After installation completed, it will pop up a prompt. Select Finish. Now you
successfully installed a modem on your PC.
Step 2: View and set the modem
1. Click Start > Control Panel and double tap Phone and Modem Options to pop up a list
box. The Coolpad Mobile USB Modem showed in this list box is just the modem you
88
installed in step 1.
2. Tap Properties and select Advanced. Enter the extra initialization command in Extra
Settings. Tap OK to finish the setting.
Step 3: Add dial-up connection
1. Double tap the My Network Places, select View network connection > Network
Task List from the Network Task List. Tap New Connection. It pops up New
Connection Wizard, then tap Next.
2. Select Connect to the Internet. Tap Next in the pop-up interface. Select Set up my
connection manually, then, tap Next.
3. Select Using Dial-up Modem Connection, and then tap Next.
4. Enter the name you want to connect in ISP Name, e.g. Phone connection. Tap Next.
5. Enter the number you want to dial up in Phone Number. Tap Next.
6. Enter the username and password. Tap Next.

89
7. Tap OK to finish the new connection.
8. Tap Dail-up in the pop-up Connection interface, the PC will connect it automatically. It
displays the Dialing interface till the connection is succeeded. After that, icon of
Connected is shown in the lower right corner of the task bar.
26.3 U-Disk
This feature implements the free storage and access between Micro SD card and the PC.
Insert a Micro SD card, and tap to display the interface of the U-Disk. Then, you can use
the Micro SD card in your phone as a U-Disk by following screen instructions.
Prompt: This feature is available only when a Micro SD card is inserted in the mobile device.

90
27 Profiles
Profiles Feature Volume
General All applications are available (except VIP list) Standard volume
Meeting All applications are available (except VIP list) Automatic mute, vibrate only.
Outdoor All applications are available (except VIP list) Enhanced volume, ring plus
vibration
Quiet All applications are available (except VIP list) Compared with General
mode, the volume is smaller.
Flight Communication features are disabled. Only PDA
features are available.
Standard volume
VIP Call Filter and VIP List are available. Standard volume
Prompt: Volumes of these modes listed above are system default values. You can set them
according to your needs and prefers.

91
Selecting Profiles
Tap the Profiles icon on the right upper corner of the main view. Select the mode
you want to use and tap OK. Now the Profiles icon in the main view turns to be the
corresponding icon you selected.
Tap the Profiles icon in the Settings main view, and then tap OK after setting various
values.
Prompt: If you don’t select a profile after turning on your mobile device, it will use the mode
last saved before turning off.
92
28 Call Filter
If you don’t want to receive some calls or messages from some phone numbers, you can add
these numbers to the blacklist. In all profiles, you can set a network strategy to numbers in the
blacklist for calls and messages sent in some period of time. Numbers outside of the blacklist are
the normal ring. If you want to receive calls and messages sent by some phone numbers only on
certain period of time, you can add these numbers to the VIP list. In the VIP mode, calls from
numbers outside of the VIP list are mute. The VIP list is valid in the VIP mode. This feature has two
default groups: the VIP list and the blacklist. Of course, you can create new groups. A custom
group is valid in non-VIP mode.
Main view
SMS content filter: Select the Set button after it to set the filter rules for receiving messages.

93
Enable group filter: Select the Set button in the main view to set call rules and SMS rules for
a specific group.
Adding a new group
In the main view of Call Filter, double tap a group to display its group member list interface.
Tap New to display the interface for adding a new contact. Add the name and phone number and
then tap Save. You can also import the contact number from the Contacts. From other
applications, press and hold a phone number to select it. In the pop-up menu, select Add to Call
Filter and select a network group to store it.
Caution: 1. A phone number can only belong to one group.
2. When you are adding a group number, the group name can be empty.
94
29 Backup
This device provides you with the feathers of Data Backup and Data Restoration.
Fig. 29-1 Fig. 29-2
Backup
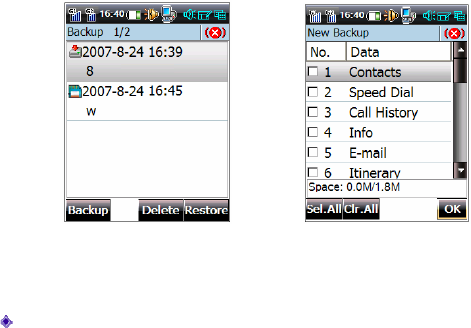
In the Backup main view, select Backup › New Backup.

95
Select the backup path (Phone or Memory card) and enter the subject for the backup.
Select Full Backup in the backup mode. And then the system begins to backup all data.
Select Custom Backup to back up the data you want to back up. In the Restore Data
list, select the items to be backed up. Tap the Backup button.
Tap Backup to pop up a list. Select Replace Original Backup. If you select to back up an
item which you have backed before, the data will be overwritten.
Prompt: If you select Phone as the storage location, the data to be backed up should be
small in size (usually smaller than 2M).The data is in the USERDATA folder. If you select
Memory Card as the storage location, you need to insert a Micro SD card so that the phone
can perform backup.

96
Caution: If you select Phone as the storage location, the data is backed up to the
USERDATA folder and it occupies some space which will affect performances of the whole
device or other application. So, we recommend you to select Memory Card.
Restore
Select the data backup to be restored in the Backup List of the Backup main
view. Tap Restore to pop up the Restore Data interface.
In the Restore Data interface, select the data backup to be restored and perform
corresponding operations.

97
30 Tools
The Tools application includes Calculator, Currency Converter and Unit Converter. You
are provided with various calculating methods such as general, scientific and basic calculating. In
the Currency Converter interface, you can convert currency conveniently and quickly. You can
also converse among length, acreage, bulk and cubage, avoirdupois and quality in Tools.
31 WAP
The WAP application of this device allows you to surf the Internet anywhere at any time.
Caution: Availability of Internet access depends upon whether your network carrier
provides this service, and whether you have subscribed to the service. For details,
please contact your network service provider.
98
Browse Web Pages
1. Tap the icon of WAP to pop up an interface. A window of Net Connection displays. Select the
corresponding options, and tap Connect. Then, the system will access the network
automatically, followed by the browser interface. Otherwise, it will prompt that there is no
response in server. Then, you should check whether the network connection settings are
correct or contact the network service provider.
2. If it connects successfully, the browser will automatically connect to the homepage website
that is set up in the phone.
3. At the browser page, you can scroll the screen, view service options and select a certain
service option to view information of the next page with scrollbar, keypad and other tools.
Main forms
Toolbar: The frequently used command menus are located in the toolbar. The available
options are shown as follows:
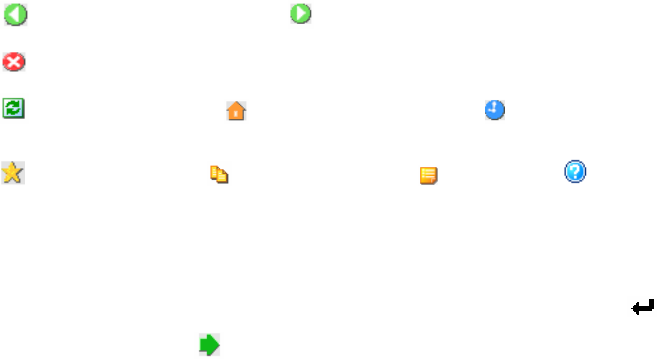
99
:Go to the previous web page :Go to the next web page
:Stop downloading and viewing the current web page
:Refresh the web page :Return to the Home Page :View the History
:View the Bookmark :Copy the text selected :Quick menu :Help
Opening a Web Page
You can open the web page you want to browse using one of the following methods:
1. Through the address field: Enter a URL in the address field directly, and then tap in
Input Panel or tap ;
2. Through Bookmark: Select Bookmark > URL Adress List in the title bar, and then
choose a URL address.
100
3. Through the history records: Tap besides the address field. Then, a drop-down list
appears, which lists the history websites that you have accessed recently. Select a
website entry to open the corresponding web page. Or tap the icon , and double tap
the webpage you want to open. Also, you can tap History in the Main Menu to open the
webpage. Open the homepage: Tap on the toolbar directly to open the preset
homepage.
4. Tap Go to URL in Advanced Function, then, enter the website of the webpage you
want to open. Tap OK to open it.
Tips:You can search your favorite WAP website via Internet.

101
Appendix I Dual-GSM & Dual-Working
With the CoolpadTM 8166G2 dual-GSM & dual-working phone, you can enjoy the convenience
of two SIM card and high-speed services of the GSM networks,
In the main view, tap the icon to start the application. With this application, you can
select your current SIM card and enjoy services of GSM1 and GSM2 networks freely.
In the Select Network main interface, select a network to set it as the primary network
(by default, all applications are performed on the primary network), and then tap OK.

102
Appendix II Technical Information
Basic specifications
Dimensions 116 mm × 54 mm × 21 mm
Weight About 150 g
Style Bar style
Antenna Built-in
SIM card Mini plug-in card
Network mode GSM, GSM
OS WinCE5.0
Processor TI OMAP730(200MHz)
Memory DOC MCP(128M Byte Flash+64M Byte SDRAM)
Built-in camera A 1.3 mega pixel manually macro shot camera
Interface USB interface

103
Display parameters
Type Transflective TFT
Size 2.4" QVGA LCD
Pixel 320 × 240
Color resolution 262,144 colors
Screen type Transparent resistance touch-screen
Backlight High bright white backlights
Main features supported(see actual product)
Input method English input
methods
Word, association, numbers, handwriting and
full-screen handwriting
Call log Maximum number
2000
Functions of viewing received calls, missed
calls and call duration are provided.

104
Contacts Maximum number
3000
The function of reminder in adding new
contacts is provided.
Messages Maximum number
2000,SMS and MMS in one
Group sending to 500 recipients is support.
Inbox, sent, drafts, outbox and trash is
provided.
Formats supported Common formats such as JPEG, GIF(static)
and BMP Image
(image viewer) Transmission mode Download and share data in multiple ways
such as data synchronization
Markup language HTML Browser
(WinCE built-
in browser) Image Common formats such as JPEG, GIF (static)
and BMP

105
Security SSL 2.0 and TLS 1.0
Receiving mail
server Supports POP3
Email
Sending mail server Supports SMTP
Content encoding Conforms to the MIME specifications
GPRS GPRS Modem
built-in
Surf the Internet anywhere at any time when
the modem and PC are connected.
Accessories
Name Lithium-ion polymer rechargeable battery
Model CPLD-18
Rated capacity 1500 mAh
Battery
Nominal voltage 3.7 V

106
Appendix III Phone Standard Equipment List
No. Name Quantity No. Name Quantity
1 Handset 1 11 Installation CD 1
2 Travel charger(LPS) 1 12 Stylus 2
3 Desktop charger 1 13 Feather cover 1
4 USB cable 1 14 Desiccant 2
5 Stereo headset 1 15 Qualified certificate 1
6 Battery (thin & thick) 2 16 256M micro SD card 1
7 User Guide 1 17 Mobile phone
authentication card
1
8 Quick Reference Guide
(inside the installation
CD)
1
18
Domestic network
service address
book
1

107
9
Extension application
guideline(inside the
installation CD)
1 19 Package box (Barcode
printed)
1
10 Warranty card 1

108
Appendix Ⅳ Toxic substances or harmful elements statement
According to the related regulations and requirements of Electronic Information Products
Pollution Control Measures in People’s Republic of China, Yulong classifies its handsets by items
to state the toxic substances or harmful elements in its handsets. The statement is as follow.
Toxic substances or harmful elements statement
Toxic substances or harmful elements
Items Pb H
g
Cd Cr
(
VI
)
PBB PBDE
Shell ○ ○ ○ ○ ○ ○
Printed circuit board
com
p
onents
X ○ ○ ○ ○ ○
Dis
p
la
y
screen X○ ○ ○ ○ ○
Data cable ○ ○ ○ ○ ○ ○
Char
g
er ○ ○ ○ ○ ○ ○
Batter
y
○ ○ ○ ○ ○ ○
Deskto
p
char
g
e
r
X○ ○ ○ ○ ○
othe
r
○ ○ ○ ○ ○ ○

109
O:Indicates that this hazardous substance contained in all homogeneous materials of this part is
below the limit requirement in SJ/T 11363-2006.
X:Indicates that this hazardous substance contained in at least one of the homogeneous materials
of this part is above the limit requirement in SJ/T 11363-2006.
All items with “x” are in line with the EU RoHS regulations.
Printed circuit board components *:Including Printed circuit board and its components, such as
capacitors, resistors, integrated circuits and connector.
It may not contain all the components listed above because of different modules, please refer to
your handset for actuality.
Electronic information products sold in the People's Republic of China must show the sign.
The figure in the sign is the environment-friendly use period in the normal use state.