Yuneec Technology ST10P Radio Controller User Manual ST10 Quick Start Guide V1 0 0422
Yuneec Technology Co., Limited Radio Controller ST10 Quick Start Guide V1 0 0422
Contents
- 1. User Manual (rev)
- 2. User manual(rev)
User Manual (rev)


1
BATTERY WARNINGS AND USAGE GUIDELINES
WARNING: Lithium Polymer (LiPo) baeries are significantly more
volale than alkaline, NiCd or NiMH baeries. All instrucons and
warnings must be followed exactly to prevent property damage and/or
serious injury as the mishandling of LiPo baeries can result in fire. By
handling, charging or using the included LiPo baery you assume all risks
associated with LiPo baeries. If you do not agree with these condions
please return the complete product in new, unused condion to the place
of purchase immediately.
• You must always charge the LiPo baery in a safe, well-venlated area
away from flammable materials.
• Never charge the LiPo baery unaended at any me. When charging
the baery you must always remain in constant observaon to monitor the
charging process and react immediately to any potenal problems that may
occur.
• Aer flying/discharging the LiPo baery you must allow it to cool to
ambient/room temperature before recharging.
• To charge the LiPo baery you must use only the included charger or a
suitably compable LiPo baery charger. Failure to do so may result in a
fire causing property damage and/or serious injury.
• If at any me the LiPo baery begins to balloon or swell, disconnue
charging or discharging immediately. Quickly and safely disconnect the
baery, then place it in a safe, open area away from flammable materials to
observe it for at least 15 minutes. Connuing to charge or discharge a
baery that has begun to balloon or swell can result in a fire. A baery that
has ballooned or swollen even a small amount must be removed from
service completely.
• Do not over-discharge the LiPo baery. Discharging the baery too low
can cause damage to the baery resulng in reduced power, flight duraon
or failure of the baery enrely. LiPo cells should not be discharged to
below 3.0V each under load.
• Store the LiPo baery at room temperature and in a dry area for best
results.
• When charging, transporng or temporarily storing the LiPo baery the
temperature range should be from approximately 40–120° F (5–49° C). Do
not store the baery or aircra in a hot garage, car or direct sunlight. If
stored in a hot garage or car the baery can be damaged or even catch fire.
• Never leave baeries, chargers and power supplies unaended during
use.
• Never aempt to charge low voltage, ballooned/swollen, damaged or wet
baeries.
• Never allow children under 14 years of age to charge baeries.
• Never charge a baery if any of the wire leads have been damaged or
shorted.
• Never aempt to disassemble the baery, charger or power supply.
• Never drop baeries, chargers or power supplies.
• Always inspect the baery, charger and power supply before charging.
• Always ensure correct polarity before connecng baeries, chargers and
power supplies.
• Always disconnect the baery aer charging.
• Always terminate all processes if the baery, charger or power supply
malfuncons.
IMPORTANT NOTE: It’s safer and beer for the longevity of the baery to
store it only parally charged for any length of me. Storing the baery
approximately 50% charged (which is around 3.85V per cell) is typically
best, however, it will take some careful management of the charge me and
the use of a volt meter to achieve this voltage. If you have the equipment
and skills to achieve the 50% charge level for storage it is recommended. If
not, simply be sure to not store the baery fully charged whenever
possible. In fact, as long as the baery will be stored at approximately room
temperature and for no more than a few weeks before the next use, it may
be best to store the baery in the discharged state aer the last flight (as
long as the baery was not over-discharged on the last flight).
CHARGING THE BATTERIES
WARNING: Lithium Ion (LiIon) and Lithium Polymer (LiPo) baeries are
significantly more volale than alkaline, NiCd or NiMH baeries. All
instrucons and warnings must be followed exactly to prevent property
damage and/or serious injury as the mishandling of LiIon/LiPo baeries
can result in fire. By handling, charging or using the included LiIon/LiPo
baeries you assume all risks associated with them. If you do not agree
with these condions please return the complete product in new, unused
condion to the place of purchase immediately.
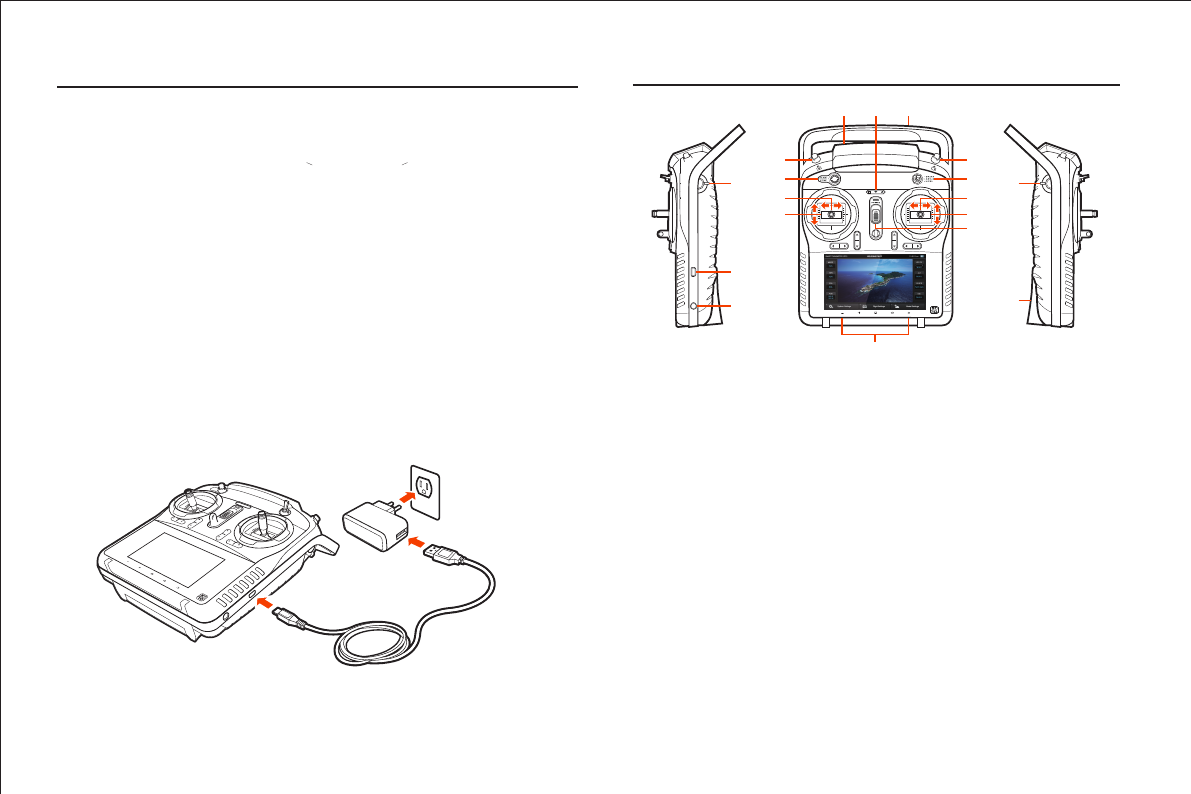
CHARGING THE LI-ION ST10+ BATTERY
You can charge the LiIon baery installed in the ST10+ from a 100-240V
AC outlet using the USB adapter/charger, or from a suitable USB power
source (2.0 amps max), with the USB to micro USB cable. While the ST10+
is powered off connect the cable to the USB adapter/charger, then plug it
into the USB connector/charging port on the right side. Aer approximate-
ly 30-45 seconds the LED indicator for the baery will blink blue while the
baery is charging, and will glow solid blue when the baery is fully
charged. It will take approximately 5.5 hours to charge a fully discharged
(not over-discharged ) baery.
NOTE: The AC plug type will vary depending on the region in which the
product was imported/purchased (AU = Australian; EU = European; UK =
United Kingdom; US = United States). 2
1
2
3
4
5
6
7
8 9 10
11
12
13
14
15
17
18
16
ST10+ OVERVIEW
1 Proporonal Control Rate Slider
2 USB Connector/Charging Port
3 Audio/Earphone Jack
4 Take Sll Photo Buon
5 Start/Stop Motors Buon
6 Rudder/Yaw Control (for Mode 2 and Mode 1)
7 Throle/Altude Control (for Mode 2)
Elevator/Pitch Control (for Mode 1)
8 5.8GHz Antenna (located inside the case)
9 Status Indicators (for ST10+ baery, 5.8GHz WiFi
and GPS)
10 2.4GHz Antenna (located inside the handle)
11 Start/Stop Video Recording Buon
12 Flight Mode Selecon Switch
13 Aileron/Roll Control (Mode 2 and Mode 1)
14 Elevator/Pitch Control (Mode 2)
Throle/Altude Control (Mode 1)
15 Power Switch
16 Volume and Navigaon Touch-Acvated Buons
(Volume Down/Volume Up/Menu/Home/Back)
17 CGO2+ Pitch Angle/Posion Control Slider
18 SD Card Slot (located under the baery)
3
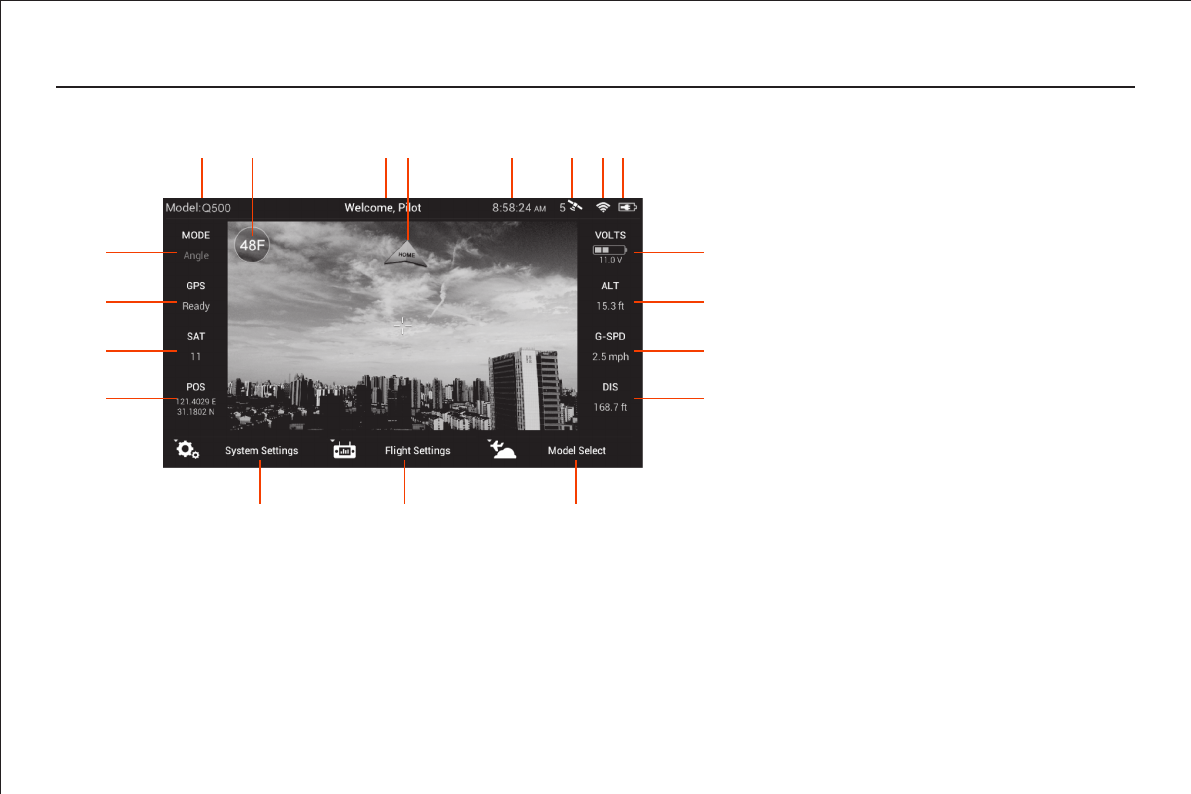
ST10+ DISPLAY
1 Model Name
2 Frames Per Second for Video Recording Buon
3 Status Informaon
4 Direcon to Home Point
5 Clock/Current Time
6 GPS Status and Number of Satellites for ST10+
7 5.8GHz WiFi Video Link Status
8 ST10+ Baery Charge Level Status Icon
9 Aircra Baery Voltage
10 Altude of Aircra (Above Ground Level)
11 Ground Speed of Aircra
12 Distance of Aircra from Home Point
13 Model Select Menu Buon
14 Flight Sengs Menu Buon
15 System Sengs Menu Buon
16 Latude/Longitude Posion of Aircra
17 Number of Satellites for Aircra
18 GPS Status for Aircra
19 Flight Mode of Aircra
The ST10+ is equipped with a touchscreen display that allows for changing various sengs and viewing real-me telemetry data and streaming video during
flight.
QUICK TIP: Double tap on the screen to increase the size of the video viewing area to full-screen and double tap again to return to the standard size).
WARNING: NEVER aempt to fly TYPHOON via First-Person View (FPV). There’s a slight ‘lag’ in the CGO2+ streaming video downlink to the ST10+, and
as a result the streaming video/FPV should only be used for aligning camera shots and not for flying! Aempng to fly via FPV can result in a crash that will
cause damage to the product, property and/or cause serious injury.
IMPORTANT NOTE: Streaming video from the CGO2+ to the ST10+ and to a separate phone/tablet (or another Yuneec transmier/personal ground
staon) at the same me is NOT recommended as it will result in a very significant lag in the video downlink.
9
10
11
12
19
18
17
16
1415 13
65213 4 87
dot next to the me length of the recording near the upper right-hand
corner on the screen of the ST10+.
TAKING PHOTOS AND RECORDING VIDEO
The ST10+ seamlessly integrates control of the CGO2+ so you can easily
take sll photos and start/stop video recording using the corresponding
buons located on top:
TO TAKE A STILL PHOTO
TO START/STOP RECORDING VIDEO
Press the buon located near the top
right corner of the ST10+. You’ll hear an
audible indicaon from the ST10+ each
me the recording starts/stops. And
while video is recording the LED indica-
tor on the front of the CGO2+ will flash
blue and green, and there will be a red
Press the buon located near the top
le corner of the ST10+. You’ll hear an
audible ‘shuer’ sound from the
ST10+ and the LED indicator on the
front of the CGO2+ will change from
glowing solid green to glowing solid
blue. It will take approximately 5
seconds to capture the photo and before you can take another sll photo.
IMPORTANT NOTE: You cannot take sll photos while recording video.
You MUST stop recording video in order to take sll photos.
IMPORTANT NOTE: You can choose to record video at 48, 50 (PAL) or 60
(NTSC) frames per second by tapping the corresponding buon near the
upper le-hand corner on the screen of the ST10+. And keep in mind that
the delay in the live video stream will be lowest at 48 and 50 as compared
to 60 frames per second.
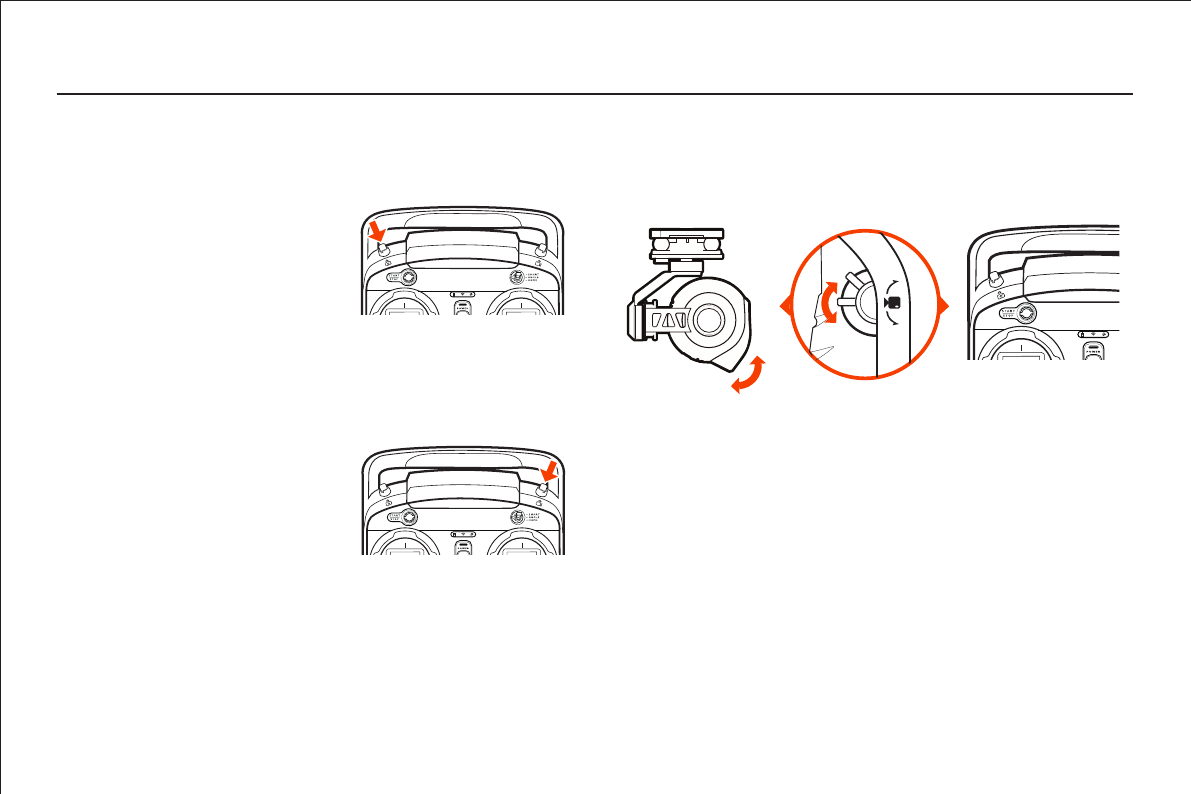
The slider located on the le side of the ST10+ allows you to set the
pitch/lt posion of the CGO2+ from approximately straight ahead (when
the slider is in the uppermost posion) to approximately straight down
(when the slider is in the lowermost posion). And you can easily set a
posion in between by adjusng the slider accordingly.
QUICK TIP: There’s an adjustable counterbalance located on the rear of
the CGO2+. This counterbalance has been adjusted at the factory to
provide the best balance and performance overall so typically it should
NOT need to be adjusted. However, if you find that the CGO2+ is making
any ‘buzzing’ sounds while powered on, carefully twist the counterbalance
in or out unl the sound stops in order to achieve the best balance, perfor-
mance and photo/video quality.
4
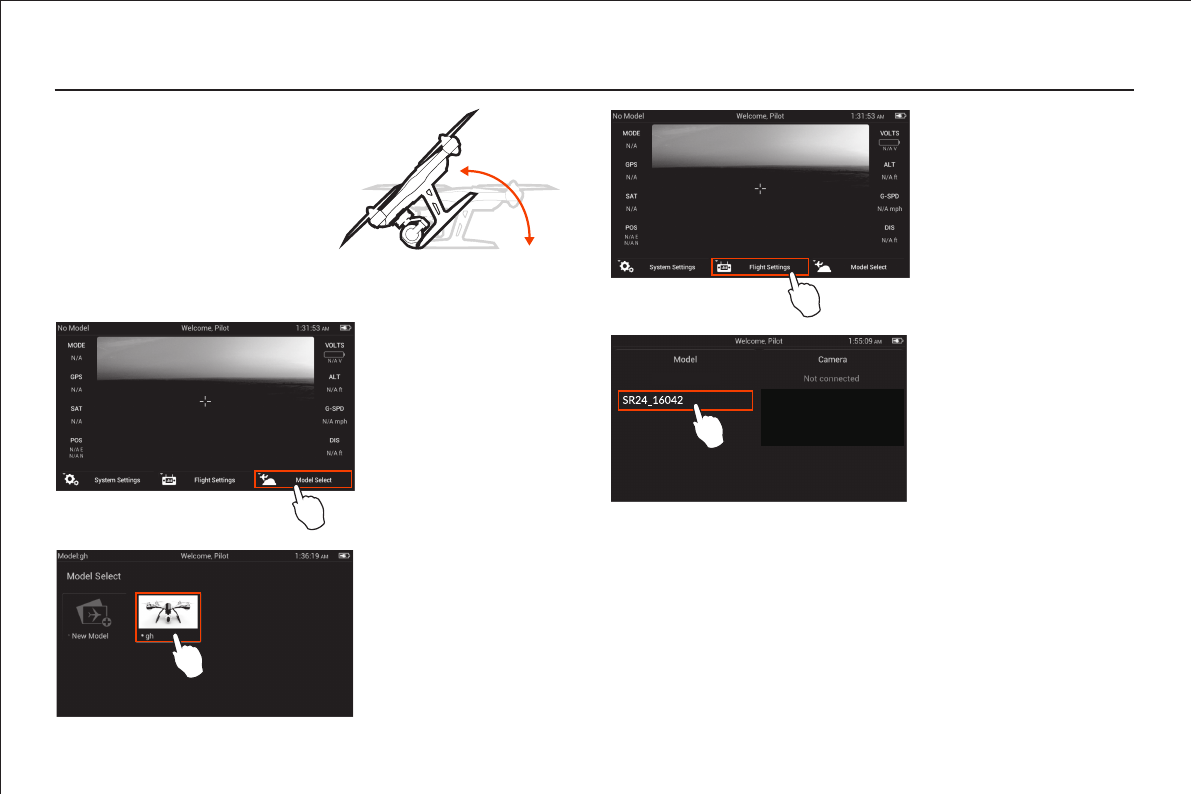
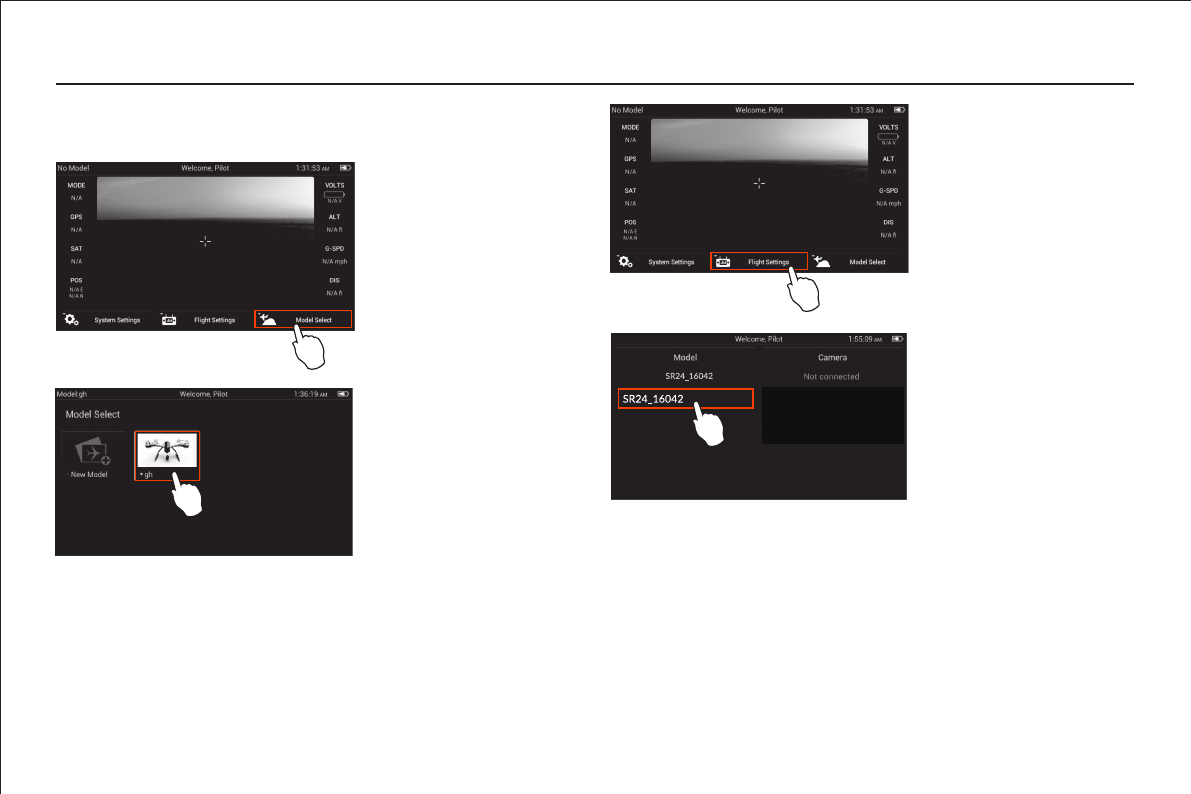
ST10+ AND RECEIVER BINDING
Step 1) Turn on TYPHOON, and
aer the Main LED Status Indicator
begins to flash blue rapidly, li the
back end upward approximately 45°
then back down to ‘level’ two (2)
mes to put the aircra/receiver into
bind mode. The Main LED Status
Indicator will begin to the flash
orange very rapidly when the
aircra/receiver are in bind mode.
2 x 45+°
Step 2) Turn on the ST10+,
and if required tap the
screen (outside of the pop
up status window) to
bypass the RC and WiFi
connecon process.
Step 3) Tap the ‘Model
Select’ buon, and if
required press ‘OK’ to
bypass any pop up
warnings/alerts.
Step 4) Select the exisng
model (for example:
‘TYPHOON’) you would
like to bind to (or create a
‘New Model’), and if
required press ‘OK’ to
bypass any pop up
warnings/alerts.
Step 5) Tap the ‘Flight
Sengs’ buon, and if
required press ‘OK’ to
bypass any pop up
warnings/alerts.
Step 6) Tap the ‘Bind’
buon and select the
‘SR24_XXXXX’ receiver
listed in the column under
‘Model’, then tap ‘OK’ aer
the connecon has been
established.
Step 7) Tap the ‘Back’
buon two (2) mes to
return to the main screen
and the model/receiver
should automacally
connect to the ST10+.
5
SR24_16042
ST10+ AND CGO2+ BINDING
Step 1) Turn on the ST10+, and if required tap the screen (outside of the
pop up status window) to bypass the RC and WiFi connecon process.
Step 5) if required tap the
screen (outside of the pop
up status window) to
bypass the RC and WiFi
connecon process, then
tap the ‘Flight Sengs’
buon and press ‘OK’ to
bypass any pop up
warnings/alerts.
Step 6) Tap the ‘Bind’
buon and select the
‘CGO2_XXXXXX’ camera
listed in the column under
‘Camera’, then enter the
password ‘1234567890’
when prompted and tap
‘OK’ aer the connecon
has b
Step 2) Tap the ‘Model
Select’ buon, and if
required press ‘OK’ to
bypass any pop up
warnings/alerts.
Step 3) Select the exisng
model (for example:
‘TYPHOON’) you would like
to bind to (or create a ‘New
Model’), and if required
press ‘OK’ to bypass any
pop up warnings/alerts.
Step 4) Turn on TYPHOON
and ensure that the CGO2+
is powered on.
6
CGO2_A10008

CERTIFICATION INFORMATION
7ST10+ Quickstart V1.0
FCC STATEMENT:
This equipment has been tested and found to comply with the limits for
Part 15 of the FCC rules. These limits are designed to provide reasonable
protecon against harmful interference in a residenal installaon. This
equipment generates, uses and can radiate radio frequency energy and, if
not installed and used in accordance with the instrucons, may cause
harmful interference to radio communicaons.
However, there is no guarantee that interference will not occur in a parcu-
lar installaon. If this equipment does cause harmful interference to radio
or television recepon, which can be determined by turning the equipment
off and on, the user is encouraged to try to correct the interference by one
or more of the following measures:
• Reorient or relocate the receiving antenna.
• Increase the separaon between the equipment and receiver.
• Connect the equipment to an outlet on a circuit different from that to
which the receiver is connected.
This device complies with part 15 of the FCC rules. Operaon is subject to
the following two condions:
(1) This device may not cause harmful interference, and (2) this device must
accept any interference received, including interference that may cause
undesired operaon.
NOTE: This equipment has been tested and found to comply with the limits
for a Class B digital device, pursuant to part 15 of the FCC Rules. These
limits are designed to provide reasonable protecon against harmful
interference in a residenal installaon. This equipment generates, uses
and can radiate radio frequency energy and, if not installed and used in
accordance with the instrucons, may cause harmful interference to radio
communicaons. However, there is no guarantee that interference will not
occur in a parcular installaon. If this equipment does cause harmful
interference to radio or television recepon, which can be determined by
turning the equipment off and on, the user is encouraged to try to correct
the interference by one or more of the following measures:
—Reorient or relocate the receiving antenna.
—Increase the separaon between the equipment and receiver.
—Connect the equipment into an outlet on a circuit different from that to
which the receiver is connected.
—Consult the dealer or an experienced radio/TV technician for help.
IC RADIATION EXPOSURE STATEMENT FOR CANADA
This device complies with Industry Canada licence-exempt RSS standard(s).
Operaon is subject to the following two condions: (1) this device may not
cause interference, and (2) this device must accept any interference, includ-
ing interference that may cause undesired operaon of the device.
Le présent appareil est conforme aux CNR d'Industrie Canada applicables
aux appareils radio exempts de licence. L'exploitaon est autorisée aux
deux condions suivantes : (1) l'appareil ne doit pas produire de brouillage,
et (2) l'ulisateur de l'appareil doit accepter tout brouillage radioélectrique
subi, même si le brouillage est suscepble d'en compromere le
fonconnement.
This equipment complies with IC RSS-102 radiaon exposure limit set forth
for an uncontrolled environment.
Cet équipement respecte les limites d’exposion aux rayonnements IC
définies pour un environnement non contrôlé.