Manual
1
11Mbps MiniUSB Wireless Adapter
Quick Installation Guide Version 1.0.0
I. Network Configuration
The 11Mbps MiniUSB Wireless Adapter is an IEEE802.11/802.11b-compliant USB Type DSSS
wireless LAN adapter. It fully supports wireless networking under Windows XP/2000/98/ME.
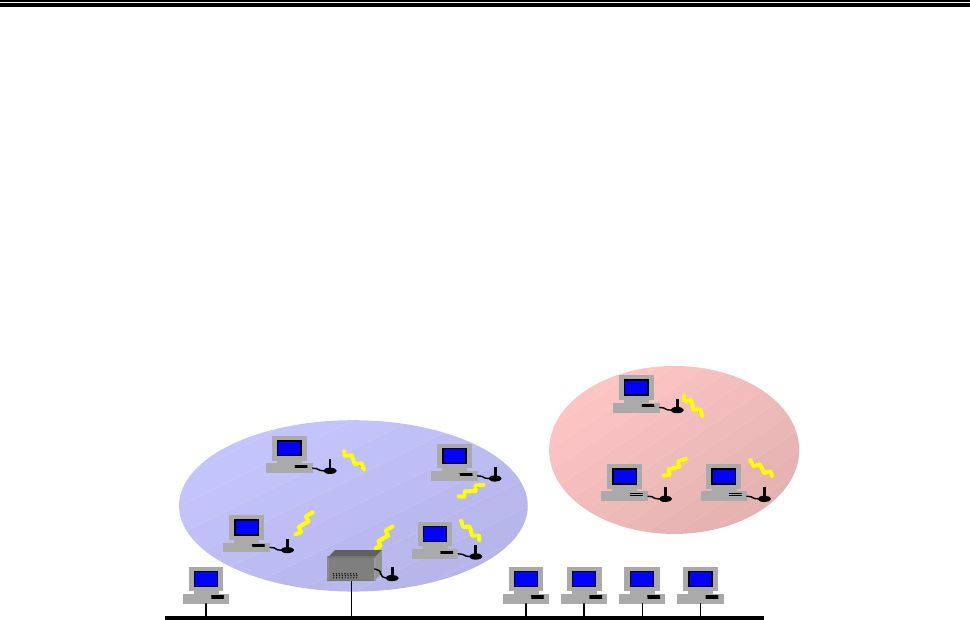
The 11Mbps MiniUSB Wireless Adapter can be operated in Infrastructure and Ad-Hoc network
configurations. Infrastructure mode allows 11Mbps MiniUSB Wireless Adapter users to join
an Extended Basic Service Set (i.e., connect to access point). Ad-Hoc mode allows 11Mbps
MiniUSB Wireless Adapter users to join a Basic Service Set (i.e., peer-to-peer mode, without
access point).
II. Package Content
The 11Mbps MiniUSB Wireless Adapter x 1
Quick Installation Guide x 1
Product CD-ROM or Floppy Diskette x 1
III. Installation of the 11Mbps MiniUSB Wireless Adapter under Windows XP
1. Insert the 11Mbps MiniUSB Wireless Adapter into the USB slot and start Windows.
Windows will auto-detect the MiniUSB Wireless Adapter and a “Found New Hardware
Wizard” window will show up.
2. Select “Install from a list or specific (Advanced)” and insert the Product CD-ROM or
floppy disk into the appropriate drive. Specify the location where the driver is placed.
Click on Next to install the driver.
3. The windows will find “ MiniUSB Wireless Adapter”. Click on Next to continue.
4. Click Finish to complete the installation.
Infrastructure
A
d-hoc
Wired
Wireless
A
ccess Point

2
Note: You are advised to always disable the Wireless MiniUSB Adapter prior to removing the
card from the PC Card slot. This will allow the Windows operating system to log off from
the network server, disable the driver properly and disconnect power to the PC Card slot.
Installation of the 11Mbps MiniUSB Wireless Adapter under Windows 2000
1. Insert the 11Mbps MiniUSB Wireless Adapter into the USB slot and start Windows.
Windows will auto-detect the MiniUSB Wireless Adapter and a “Found New Hardware
Wizard” window will show up. Click Next to proceed.
2. Select “Search for a suitable driver for my device (recommended)”. Insert the Product
CD-ROM or floppy disk into the appropriate drive. Specify the location where the driver
is placed. Click on Next to install the driver.
3. The windows will find “ MiniUSB Wireless Adapter”. Click on Next to continue.
4. Click Finish to complete the installation.
Installaton of the 11Mbps MiniUSB Wireless Adapter under Windows 98/ME
1. Insert the 11Mbps MiniUSB Wireless Adapter into the USB slot and start Windows.
Windows will auto-detect new hardware and will display a “Add New Hardware Wizard”
window.
2. Select “Search for a best driver for your device (recommended)”. Insert the Product
CD-ROM or floppy disk into the appropriate drive. Specify the location where the driver
is placed. Click on Next to install the driver.
3. The Windows will find “MiniUSB Wireless Adapter”. Click on Next to continue.
4. Once the [Please insert the disk labeled “Windows 98/ME CD-ROM”, and then click
OK] window appears, enter the path corresponding to the appropriate drives and click OK.
5. Click Finish to complete the installation. Restart Windows.
IV. Installation of the Wireless LAN Utility
1. Insert the Product CD-ROM or floppy disk again.
2. Go the utility folder and run setup.exe.
3. Follow the on-screen instructions to install the Wireless LAN Utility.
4. Upon completion, go to Program Files and run the Wireless LAN Utility. The utility
interface will then appear and at the same time its icon appears in the System Tray in the
bottom right corner of your task bar.
V. Usage of the Wireless LAN Utility
The Wireless LAN Utility consists of window with 5 items for you to monitor and configure
the 11Mbps MiniUSB Wireless Adapter: Configuration, Loop Back, AP Browser, Site
Survey and About.
3
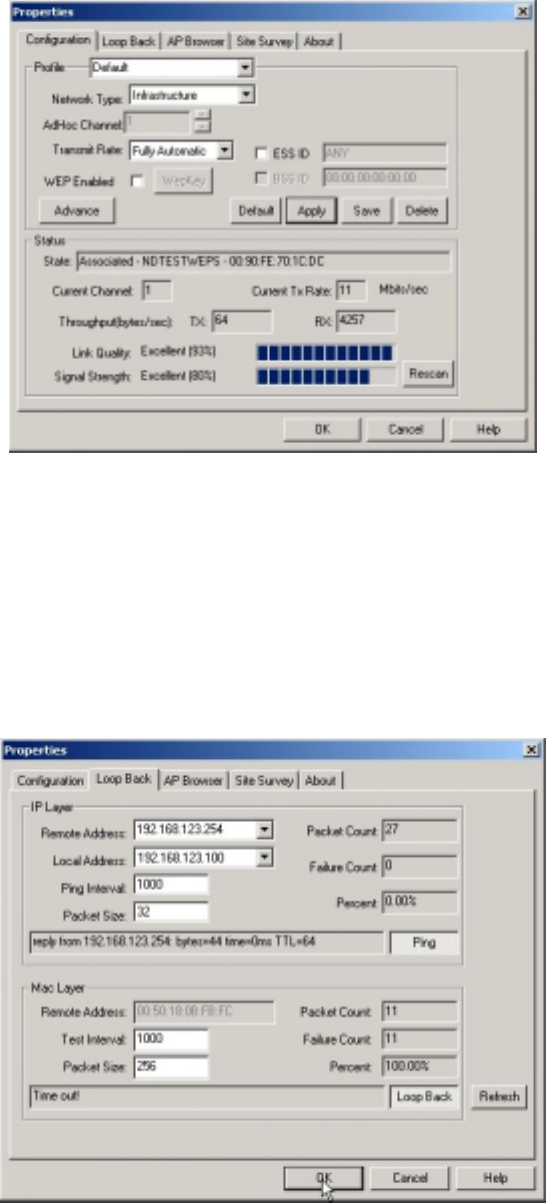
Configuration:
The Configuration item allows you to modify the configuration parameters for the 11Mbps
MiniUSB Wireless Adapter such as Profile, Network Type, Channel, Transmit Rate, ESSID,
WEP, RTS/CTS, Fragment Threshold, and Power Save mode. Furthermore, you may
monitor the current status of the MiniUSB Wireless Adapter such as State, Current Channel,
Current Tx Rate, Throughput, Link Quality and Signal Strength.
Look Back:
The Look Back tool helps you examine point-to-point data transmission quality between the
your MiniUSB Wireless Adapter and any work station on the network. By entering IP
address of the remote station, set ping interval and packet size, you may know whether
communication has been made successfully or not. Additionally, if you use the infrastructure
wireless LAN configuration, you may run the loopback test by click the Look back button to
verify the communication quality between your wireless station and Access Point.

4
AP Browser:
By clicking the Rescan button, the AP Browser can display all the Access Points around
working environment. Besides showing the ESSID of each Access Point, it also display
BSSID, Channel, Signal, Quality and Supported Rates. To join any of the displayed Access
Point, highlight the Access Point you desire to connect and then click the Join BSS or Join
ESS to join the group.
Site Survey:
When the Site Survey screen is displayed, the channel quality of all 14 radio channels will be
displayed. These channel quality measurements are shown on each gauge for the 14 radio
channels. The blue bar indicated the channel quality is clear and good. The higher the blue
bar is, the better quality you have (i.e., less interference). The yellow bar indicates the
channel quality is fair and the red bar indicates the channel is busy or having severe
interference.
5
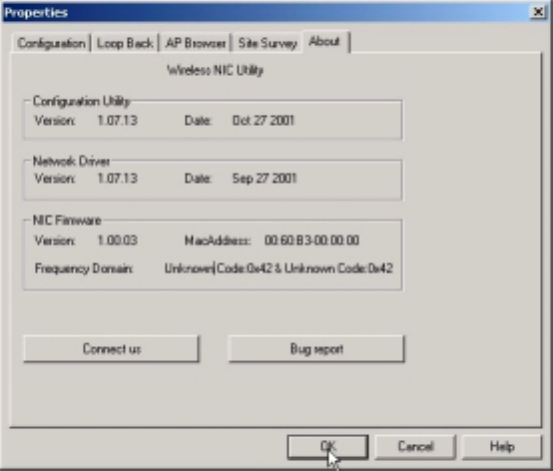
About:
The About item shows the versions the Wireless LAN Utility, driver, firmware and utility of
the 11Mbps MiniUSB Wireless Adapter. Also, the MAC address and frequency domain is
displayed.
Technical Support
You can find the most recent software and user documentation will be updated periodically on the
supplier Web site. If you have difficulty resolving the problem while installing or using the
11Mbps Wireless Micro Access Point, please contact the supplier for support.
6
FCC Information
This equipment generates, uses, and can radiate radio frequency energy and, if not installed and
used in accordance with the instruction manual, may cause harmful interference to radio
communication.
This Equipment has been tested and found to comply with the limits for a Class B digital device,
pursuant to Part 15 of the FCC rules. These limits are designed to provide reasonable protection
against
harmful interference in a residential installation. This equipment generates, uses and can radiate
radio
frequency energy and, if not installed and used in accordance with the instructions, may cause
harmful
interference to radio communications. However, there is no guarantee that interference will not
occur in
a particular installation. If this equipment does cause harmful interference to radio or television
reception, which can be determined by turning the equipment off and on, the user is encouraged to
try to
correct the interference by one or more of the following measures:
- Reorient or relocate the receiving antenna.
- Increase the separation between the equipment and receiver.
- Connect the equipment into an outlet on a circuit different from that to which the receiver is
connected.
- Consult the dealer or an experienced radio/TV technician for help.
The device complies with Part 15 of the FCC rules. Operation is subject to the following two
conditions:
(1) This device may not cause harmful interference, and
(2) this device must accept any interference received, including interference that may cause
undesired operation.
Operation of this equipment in residential area is likely to cause harmful interference in which case
the user will be required to correct the interference at this own expense.
The user should not modify or change this equipment without written approval from company name.
Modification could void authority to use this equipment.
For the safety reason, people should not work in a situation which RF Exposure limits be exceeded.
To prevent the situation happening, people who work with the antenna should be aware of the
following rules:
1. Install the antenna in a location where a distance of 20 cm from the antenna may be maintained.
2. While installing the antenna in the location, please do not turn on the power of wireless card.
7
3. While the device is working, please do not contact the antenna.
FCC RF Radiation Exposure Statement:
This equipment complies with FCC RF radiation exposure limits set forth for an uncontrolled
environment. This equipment should be installed and operated with a minimum distance of 20
centimeters between the radiator and your body.
This transmitter must not be co-located or operating in conjunction with any other antenna or
transmitter.
8
Limited Warranty Statement
This Warranty constitutes the sole and exclusive remedy of any buyer or reseller’s equipment and
the sole and exclusive liability of the supplier in connection with the products and is in lieu of all
other warranties, express, implied or statutory, including, but not limited to, any implied warranty of
merchantability of fitness for a particular use and all other obligations or liabilities of the supplier.
In no even will the supplier or any other party or person be liable to your or anyone else for any
damages, including lost profits, lost savings or other incidental or consequential damages, or
inability to use the software provided on the software media even if the supplier or the other party
person has been advised of the possibility of such damages.
The following are special terms applicable to your hardware warranty as well as services you may
use during part of the warranty period. Your formal Warranty Statement, including the warranty
applicable to our Wireless LAN products, appears in the Quick Installation Guide which
accompanies your products.
Duration of Hardware Warranty: One Year
Replacement, Repair or Refund Procedure for Hardware:
If your unit needs a repair or replacement, return it to your dealer/distributor in its original
packaging. When returning a defective product for Warranty, always include the following
documents:
The Warranty Repair Card
A copy of the invoice/proof of purchase, and
The RMA Report Form (To receive a Return Materials Authorization form (RMA), please
contact the party from whom you purchased the product).
Upon proof-of-purchase we shall, at its option, repair or replace the defective item at no cost to the
buyer.
This warranty is contingent upon proper use in the application for which the products are intended
and does not cover products which have been modified without the reseller’s approval or which
have been subjected to unusual physical or electrical demands or damaged in any way.

9
Please complete the information below and include it along with your products.
Name:
Title:
Company:
Telephone:
Fax:
Email:
City/State/Zipcode:
Country:
Product Name:
Serial Number:
MAC Address:
Invoice Date:
Product Description:
If you have any further questions, please contact your local authorized reseller for support.