Users Manual

XG-705A
Date of Issue: July. 19,2004
Technical Support
The firmware version of the IEEE 802.11g Wireless LAN USB Adapter is displayed on the
utility About window. Users could download the most recent software version from the
supplier’s web site or refer to the selling contact for the latest software information. If you
have difficulty solving the problem while installing or using the IEEE 802.11g Wireless
LAN USB Adapter, please contact the supplier for support.
About This Manual
IEEE 802.11g Wireless LAN USB Adapter User Manual is first published on July 2004.
The manual includes procedures for the setup of the IEEE 802.11g Wireless LAN USB
Adapter under Windows XP, Windows 2000, Windows 98SE or Windows ME. Take a
moment to read through this manual and familiarize yourself with wireless technology.

FCC Information
This device, IEEE 802.11g Wireless LAN USB Adapter, complies with Part 15 of the FCC Rules.
Operation is subject to the following two conditions: (1) this device may not cause harmful
interference, and (2) this device must accept any interference received; including interference
that may cause undesired operation.
Federal Communications Commission (FCC) Statement
This Equipment has been tested and found to comply with the limits for a Class B digital device,
pursuant to Part 15 of the FCC rules. These limits are designed to provide reasonable protection
against harmful interference in a residential installation. This equipment generates, uses and can
radiate radio frequency energy and, if not installed and used in accordance with the instructions,
may cause harmful interference to radio communications. However, there is no guarantee that
interference will not occur in a particular installation. If this equipment does cause harmful
interference to radio or television reception, which can be determined by turning the equipment
off and on, the user is encouraged to try to correct the interference by one or more of the
following measures:
- Reorient or relocate the receiving antenna.
- Increase the separation between the equipment and receiver.
- Connect the equipment into an outlet on a circuit different from that to which the receiver is
connected.
- Consult the dealer or an experienced radio/TV technician for help.
Warning: Changes or modifications to this unit not expressly approved by the party
responsible for compliance could void the user authority to operate the equipment.
Tested to comply with FCC standard. FOR HOME OR OFFICE USE.
FCC RF Radiation Exposure Statement:
1. This equipment complies with FCC RF radiation exposure limits set forth for an uncontrolled
environment, under 47 CFR 2.1093 paragraph (d)(2).
2. This Transmitter must not be co-located or operating in conjunction with any other antenna
or transmitter.
The IEEE 802.11g Wireless LAN USB Adapter has been tested to the FCC exposure
requirements (Specific Absorbtion Rate).
Table of Contents
Chapter1 About 802.11g Wireless LAN USB Adapter...............................................................1
1-1 Features and Benefits..........................................................................................1
1-2 Applications.........................................................................................................2
1-3 Product Kit ..........................................................................................................3
1-4 About IEEE 802.11g Wireless LAN USB Adapter LED Indicators....................3
Chapter 2 Getting Started.............................................................................................................4
2-1 Before Installation...............................................................................................4
2-2 Insert the IEEE 802.11g Wireless LAN USB Adapter ........................................4
Chapter 3 Install Driver for Windows.........................................................................................5
3-1 Set up IEEE 802.11g Wireless LAN USB Adapter for Windows XP...........5
3-2 Set up IEEE 802.11g Wireless LAN USB Adapter for Windows 2000 .............11
3-3 Set up IEEE 802.11g Wireless LAN USB Adapter for Windows 98SE/ ME.....15
Chapter 4 Configure the IEEE 802.11g Wireless LAN USB Adapter....................................19
4-1 Install the WLAN Utility....................................................................................19
4-2 Use the WLAN Utility........................................................................................ 22
Limited Warranty........................................................................................................35

-1-
Chapter1 About 802.11g Wireless LAN USB
Adapter
The IEEE 802.11g Wireless LAN USB Adapter is a standard USB adapter that fits into any
standard USB 2.0 and 1.1 slots in a notebook computer. Its 54Mbps data rate gives equivalent
Ethernet speed to access corporate network or the Internet in a wireless environment. When
installed, IEEE 802.11g Wireless LAN USB Adapter is able to communicate with any 802.11/b and
802.11g compliant products.
1-1 Features and Benefits
1. Fully IEEE 802.11g compatible.
2. Direct Sequence Spread Spectrum (DSSS) technology provides robust, interference-resistant
and secure wireless connection.
3. Supports 1, 2, 5.5 and 11 Mbps and up to 54Mbps data rate.
4. Working range up to 800 ft. in an open environment.
5. Seamless connectivity to wired Ethernet and PC network LAN’s augments existing
networks quickly and easily.
6. Greater flexibility to locate or move networked PCs.
7. Wireless connection without the cost of cabling.
8. Easy to install and user friendly, just Plug and Play.
9. Low power consumption.
10. Supports a variety of operating systems (Win98SE/ME/2000/XP)
11. Supports not only the 64-bit and 128-bits WEP encryption, as well as the Wi-Fi protected
Access (WPA).
12. Provides Window-based Diagnostic Tools, most notably, Site Survey and Link Quality Test.
13. Nitro and Nitro XM* (packet bursting), which can highly increase 11g efficiency.

-2-
1-2 Applications
The IEEE 802.11g Wireless LAN USB Adapter offers a fast, reliable, cost-effective solution for
wireless client access to the network in applications like these:
1. Remote access to corporate network information
E-mail, file transfer and terminal emulation.
2. Difficult-to-wire environments
Historical or old buildings, asbestos installations, and open area where wiring is difficult to
deploy.
3. Frequently changing environments
Retailers, manufacturers and those who frequently rearrange the workplace and change
location.
4. Temporary LANs for special projects or peak time
- Trade shows, exhibitions and construction sites where a temporary network will be
practical.
- Retailers, airline and shipping companies need additional workstations during peak period.
- Auditors requiring workgroups at customer sites.
5. Access to database for mobile workers
Doctors, nurses, retailers, accessing their database while being mobile in the hospital, retail
store or office campus.
6. SOHO (Small Office and Home Office) users
SOHO users need easy and quick installation of a small computer network.
7. High security connection
The secure wireless network can be installed quickly and provide flexibility.
-3-
1-3 Product Kit
The IEEE 802.11g Wireless LAN USB Adapter comes with the following items. Please go through
each item below. If any of listed items appears to be damaged or missing, please contact your local
dealer.
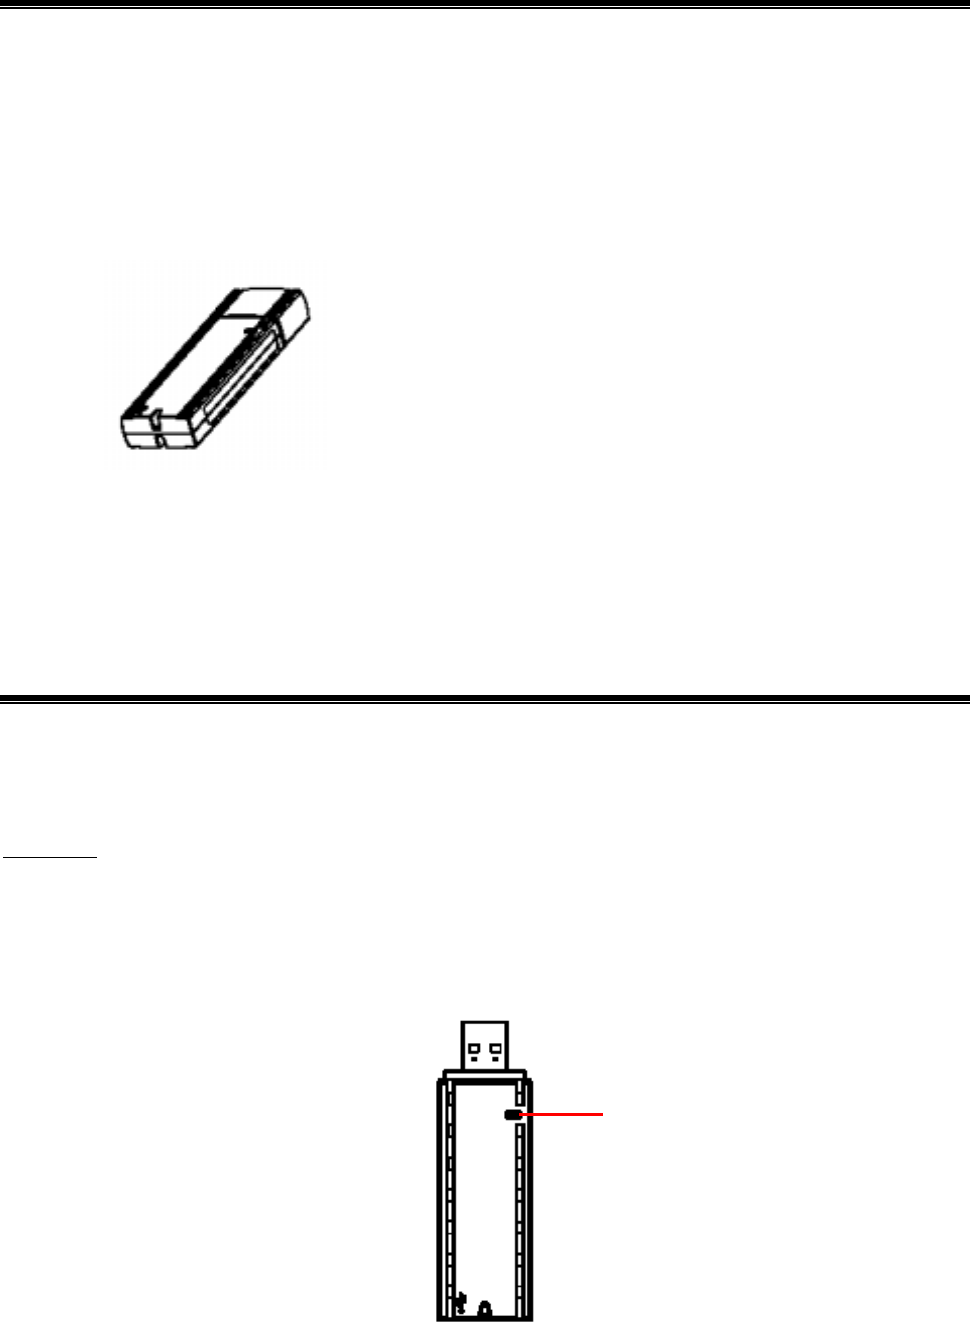
IEEE 802.11g Wireless LAN USB Adapter
IEEE 802.11g Wireless LAN USB Adapter………………….…………………….….… x 1
USB Cable…………………………………………………………………………..…… x1
USB Adapter Software and Documentation CD…………………………..……..…..….. x 1
USB Adapter Manual………….……..…………………..……………………………….x 1
1-4 About IEEE 802.11g Wireless LAN USB Adapter LED Indicators
The IEEE 802.11g Wireless LAN USB Adapter has one LED indicators. The behavior of the
indicators is described as below:
Link LED
Solid Blue – Connecting to the Access Point or Ad-Hoc wireless workstation and transmitting
data.
Blinking Blue –The IEEE 802.11g Wireless LAN USB Adapter is attempting to connect to the
Access Point or Ad-Hoc wireless workstation.
Lin
k
-4-
Chapter 2 Getting Started
This chapter describes the instructions that guide you through the proper installation of your IEEE
802.11g Wireless LAN USB Adapter for the Windows XP/2000/ME/98SE operating systems.
The complete installation of the IEEE 802.11g Wireless LAN USB Adapter consists of the
following steps:
STEP 1: Insert your IEEE 802.11g Wireless LAN USB Adapter into your notebook.
STEP 2: Install the corresponding driver and utility.
STEP 3: Set basic settings.
STEP 4: Finish Installation.
2-1 Before Installation
In addition to the items shipped with the client adapter, you will also need the following in order to
install the adapter:
1. A computer equipped with a USB slot, and a USB adapter and socket services compliant with
revision 1.1 and 2.0 of the USB specification.
2. Windows XP/2000/98SE/ME (with a Windows installation CD-ROM, diskettes for use during
installation)
3. Minimum 5 Mbps free disk space for installing driver and utility program.
2-2 Insert the IEEE 802.11g Wireless LAN USB Adapter
To install the IEEE 802.11g Wireless LAN USB Adapter, please do the following:
1. Find an available USB slot on your computer.
2. Insert the IEEE 802.11g Wireless LAN USB Adapter, with its label facing up, into the USB
slot on your computer.
CAUTION: Do not force the client adapter into the slot. Forcing it will damage both
the client adapter and the slot. If the client adapter does not go in easily, remove the
adapter and reinsert it.
-5-
Chapter 3 Install Driver for Windows
This section describes the installation of the IEEE 802.11g Wireless LAN USB Adapter driver for
the Windows 98SE/ME/2000 and Windows XP operating systems. The installation procedures for
Windows XP refer to 3-1 Set up IEEE 802.11g Wireless LAN USB Adapter for Windows XP; for
Windows 2000 please see 3-2 Set up IEEE 802.11g Wireless LAN USB Adapter for Windows
2000; for Windows 98SE/ME refer to 3-3 Set up IEEE 802.11g Wireless LAN USB Adapter for
Windows 98SE/ME.
Note: Before you start the installation, you are advised to keep the Windows CD-ROM
in case you might need certain system files.
3-1 Set up IEEE 802.11g Wireless LAN USB Adapter for Windows XP
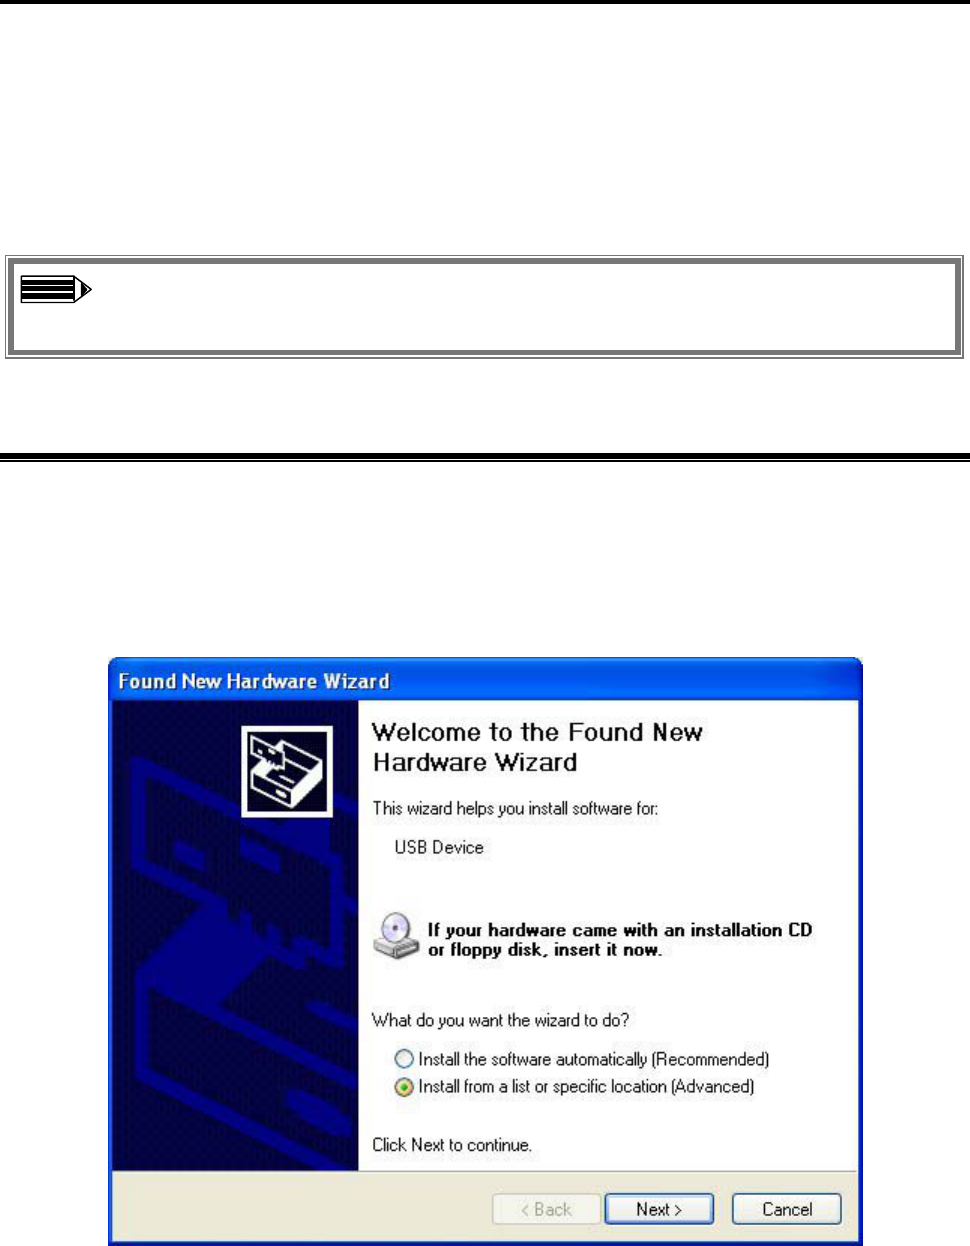
Step 1: After inserting the IEEE 802.11g Wireless LAN USB Adapter into the USB slot on your
notebook, the Windows will auto-detect the IEEE 802.11g Wireless LAN USB Adapter and a
“Found New Hardware Wizard” window will show up. Select “Install from a list or specific
location (Advanced)” and click Next to continue.
Step 2: Insert the Product CD-ROM into the CD-ROM drive. Check the “Search removable
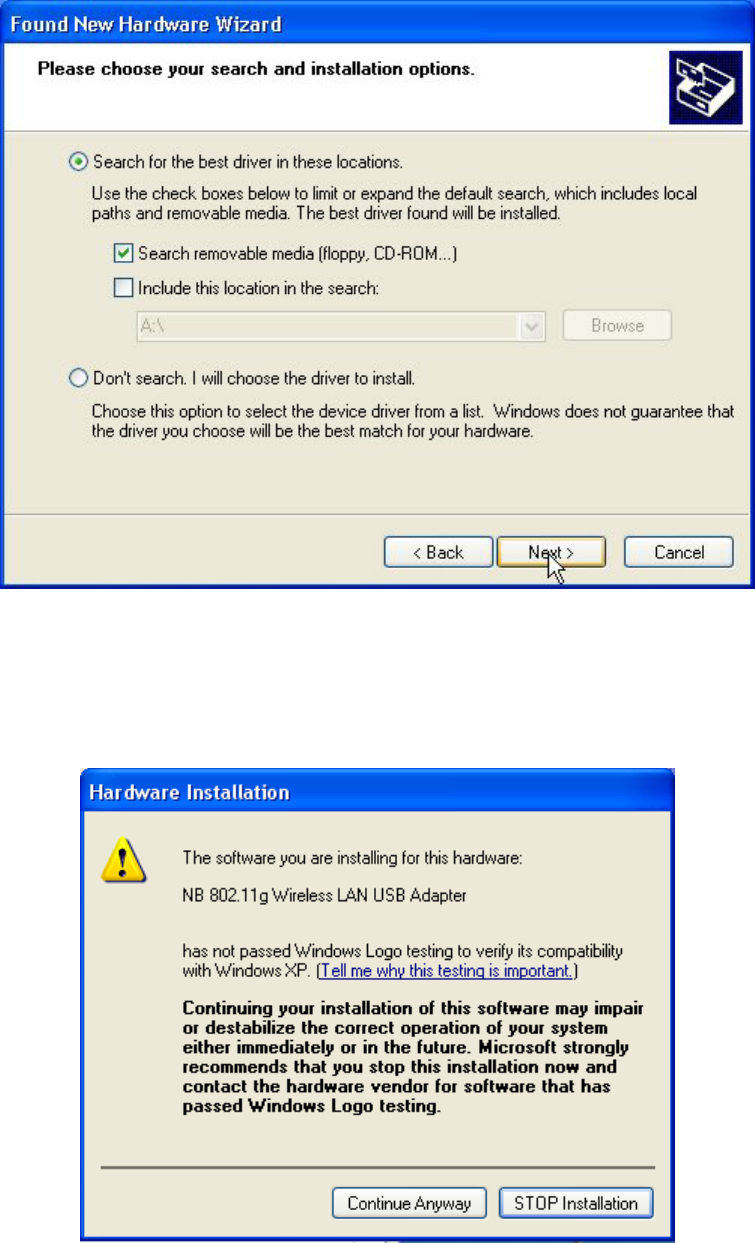
-6-
media (floppy, CD-ROM…)” check box and click on Next to install the driver.
Step 3: The windows will appear the message about the Network Control has not passed Windows
Logo testing to verify its compatibility with Windows XP. Click on Continue Anyway button to
continue installing
-7-
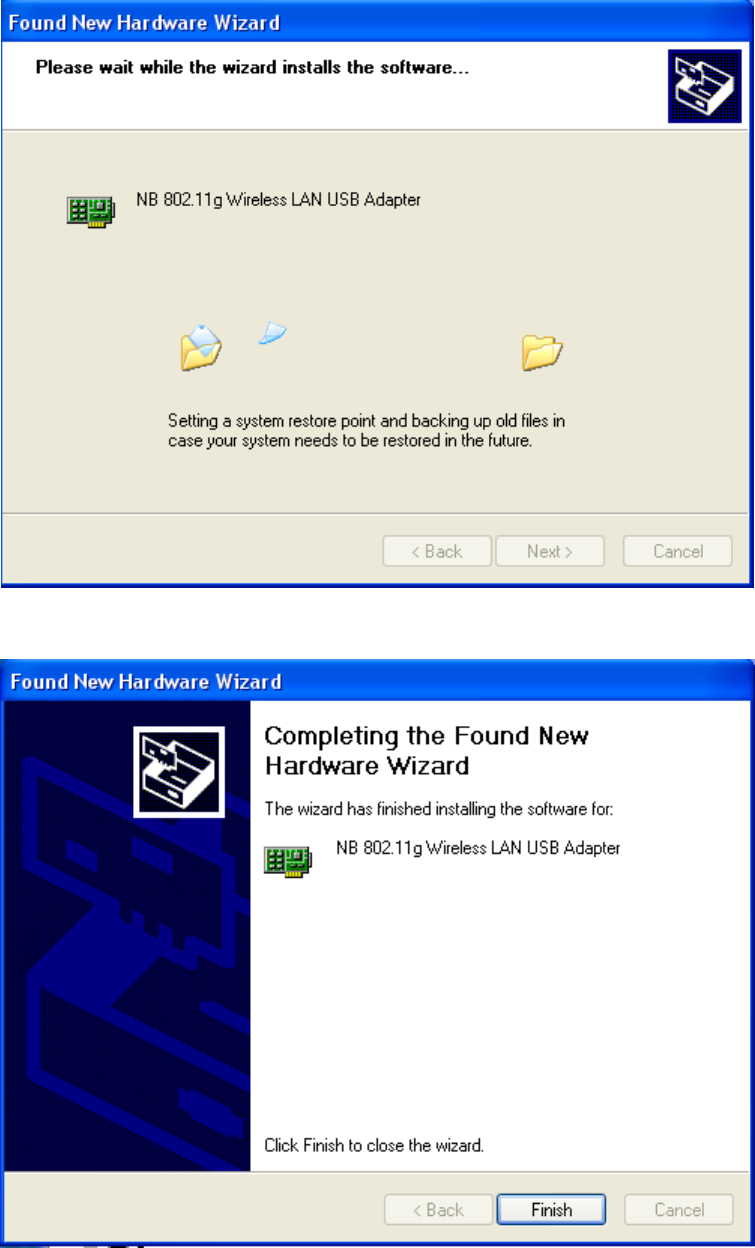
Step 4: The windows will find “NB 802.11g Wireless LAN USB Adapter” and start copying
corresponding files into the system. Click on Next to continue.
Step 5: Click Finish to complete the installation.
-8-
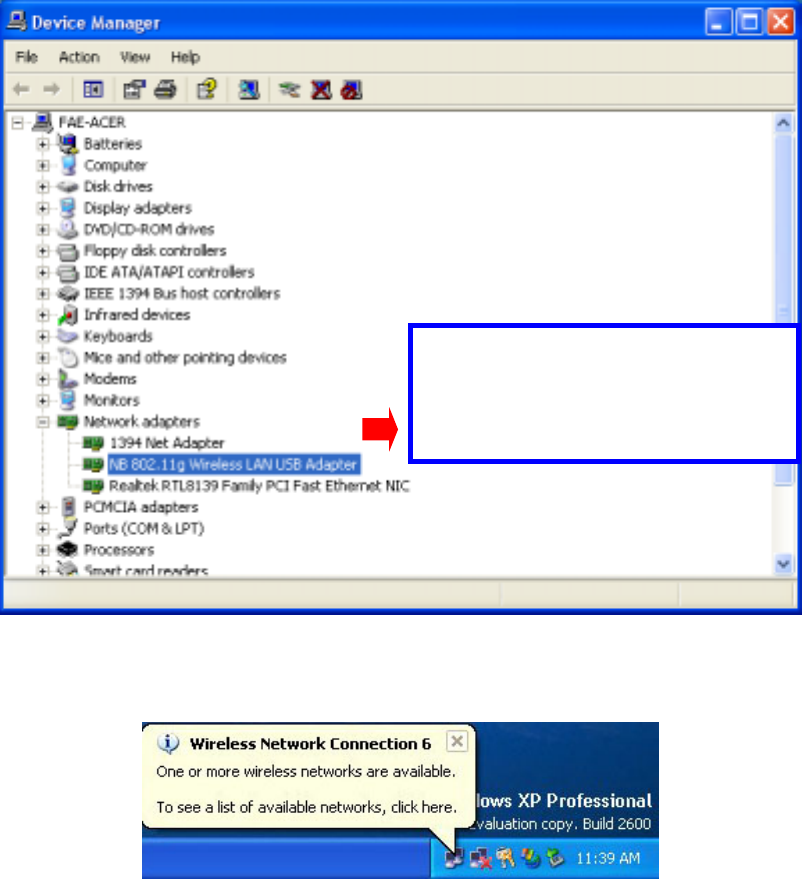
Step 6: Right click “My Computer”, select Properties, go to the Hardware tab and click the
Device Manager button to see if any exclamation mark appears next to the Network Adapter/NB
802.11g Wireless LAN USB Adapter. If no, your IEEE 802.11g Wireless LAN USB Adapter is
working well.
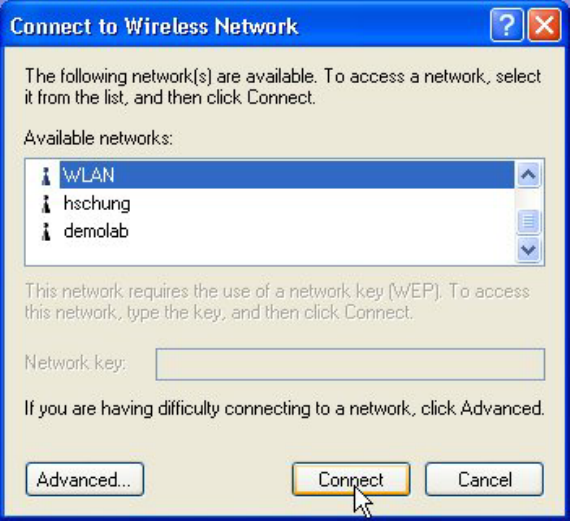
After installing the IEEE 802.11g Wireless LAN USB Adapter, the Windows XP will display a
“Wireless Network Connection # ” message.
Check if there is exclamation
mark next to the Wireless LAN
USB Adapter
-9-
Click on the message and the “Connect to Wireless Network” window will then appear
automatically. You may click on Connect button to allow users to connect to an available wireless
infrastructure network (Access Point). You may also click the Advanced… button to make
advanced configuration for the Wireless LAN USB Adapter, shown as below.
-10-
For more information on using the automatic wireless network configuration please refer to
Windows XP Help file.
However, the WLAN Utility, which comes with the IEEE 802.11g Wireless LAN USB Adapter,
provides you more tools to configure the IEEE 802.11g Wireless LAN USB Adapter and monitor
the wireless connection. For more information on installing and using the WLAN utility, please
refer to the following sections “Install the WLAN Utility” and “Use the WLAN Utility”.
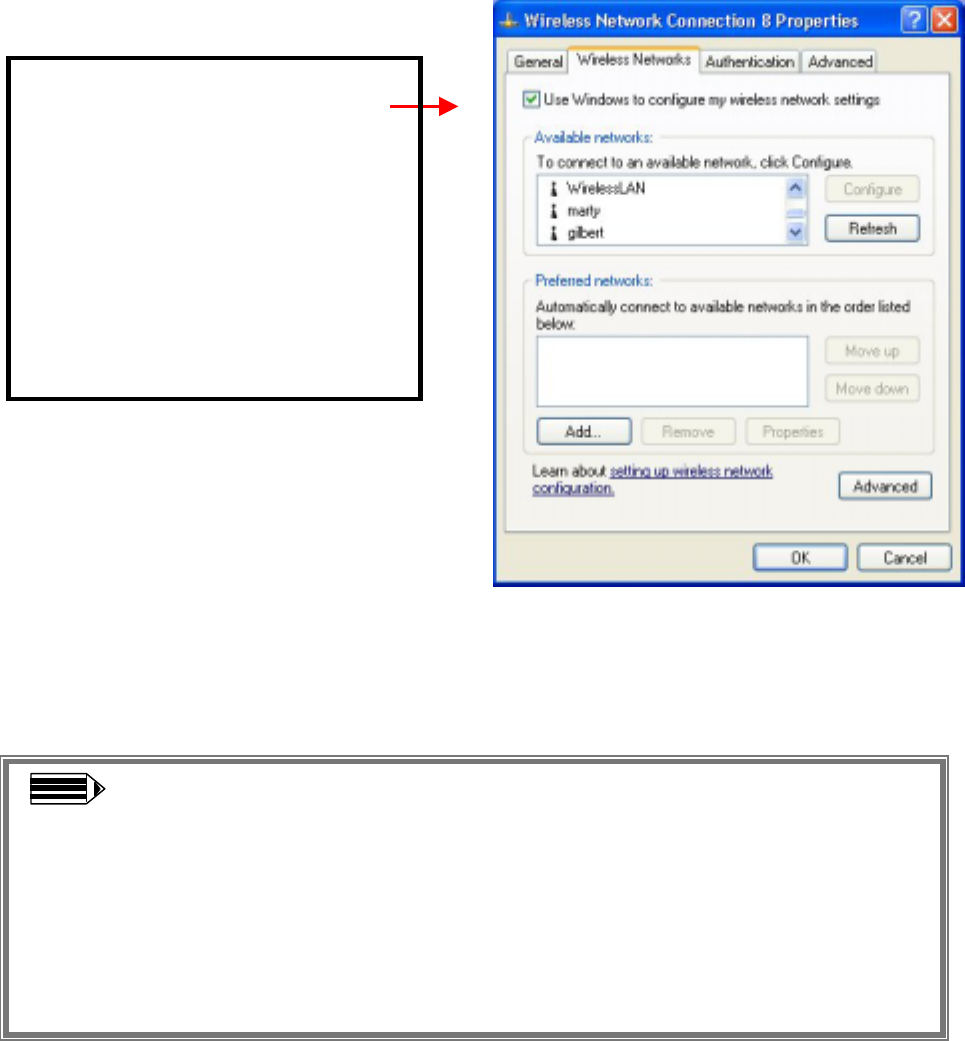
Note: To use the WLAN utility under Windows XP, you need to disable the
Automatic Wireless Network Configuration first. Steps are described as follows:
Right click the Network Connections icon. Select Properties.
Go to the Wireless Networks tab.
Uncheck the “Use Windows to configure my wireless network settings”
check box and click the OK button (see the above picture).
Warning: You must choose one
way to configure Wireless LAN
USB Adapter either of using our
WLAN Utility by un-checking
this check box or using Windows
XP Automatic Wireless Network
Configuration first by checking
this check box.
-11-
3-2 Set up IEEE 802.11g Wireless LAN USB Adapter for Windows 2000
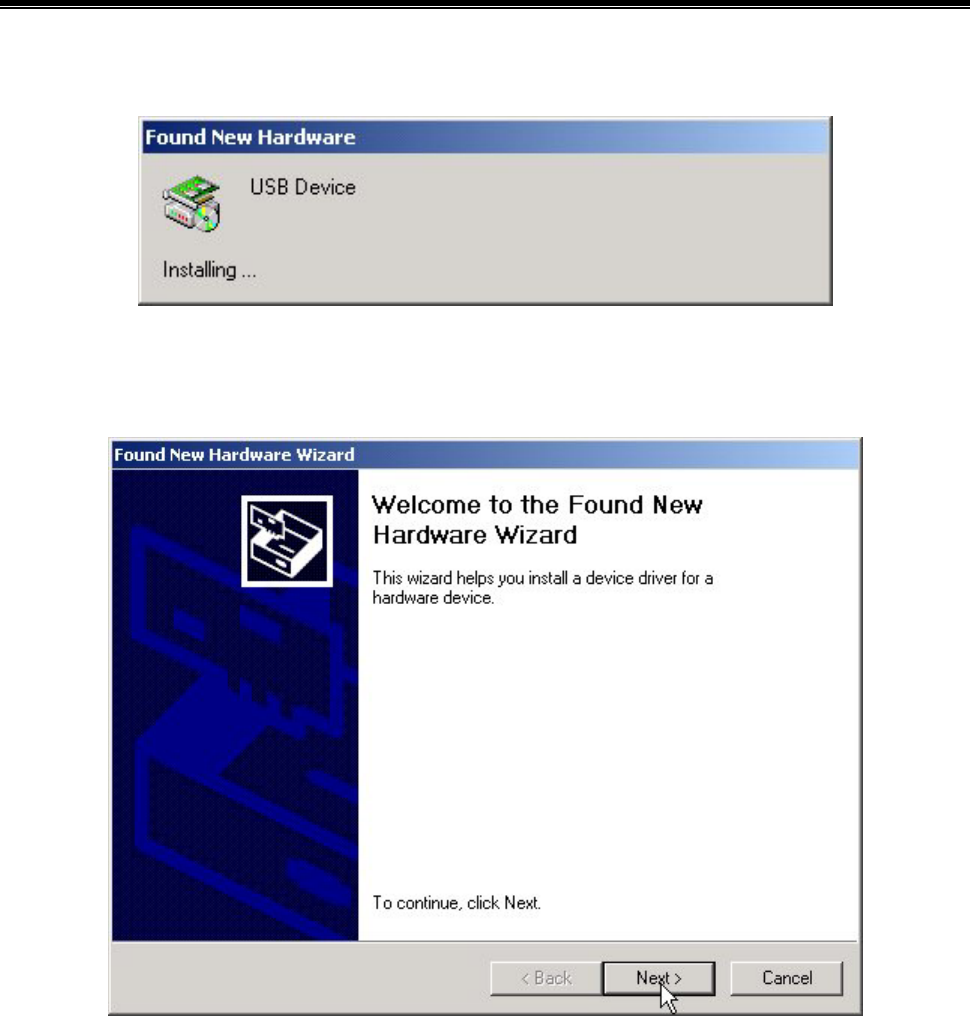
Step 1: After inserting the IEEE 802.11g Wireless LAN USB Adapter into the USB slot on your
computer, Windows will auto-detect the IEEE 802.11g Wireless LAN USB Adapter.
Step 2: A “Found New Hardware Wizard” window shows up. Click Next to proceed.
-12-
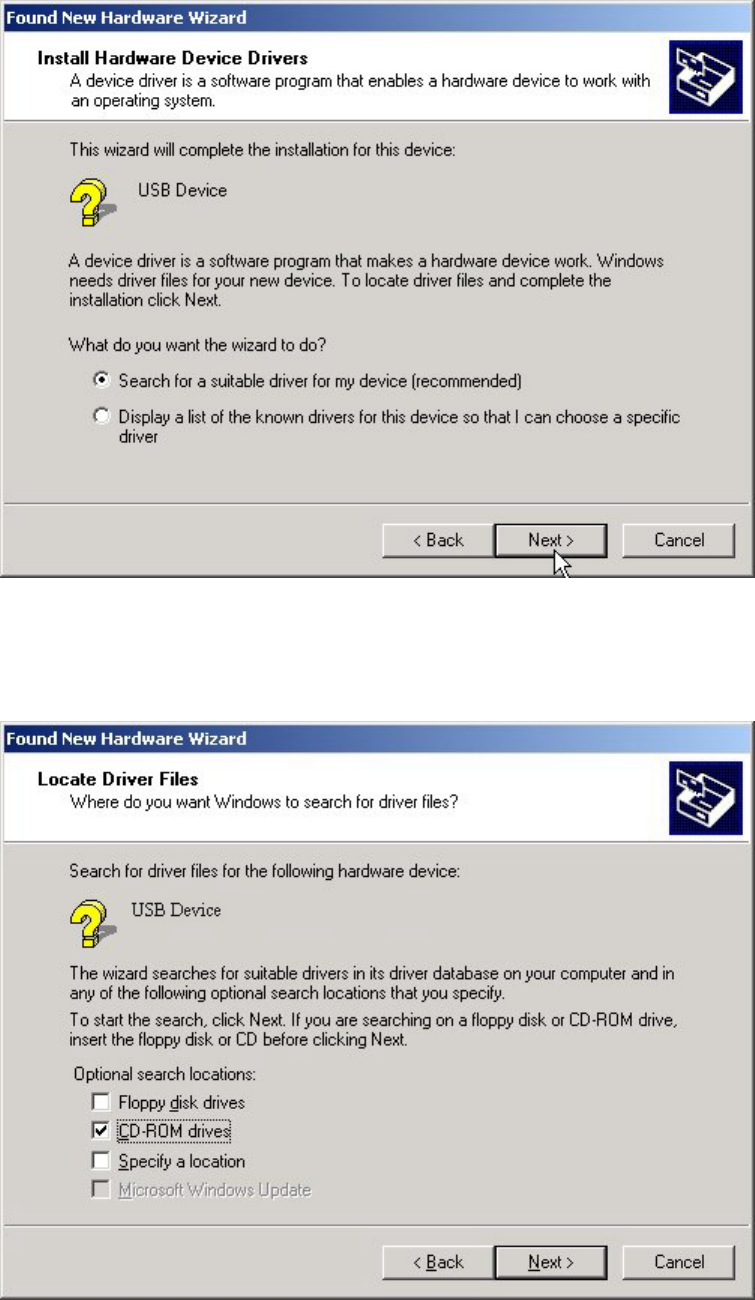
Step 3: Select “Search for a suitable driver for my device (recommended)” and click on Next
to continue.
Step 4: Insert the Product CD-ROM into the CD-ROM drive. Specify the location where the
driver is placed. Click on Next to install the driver.
-13-
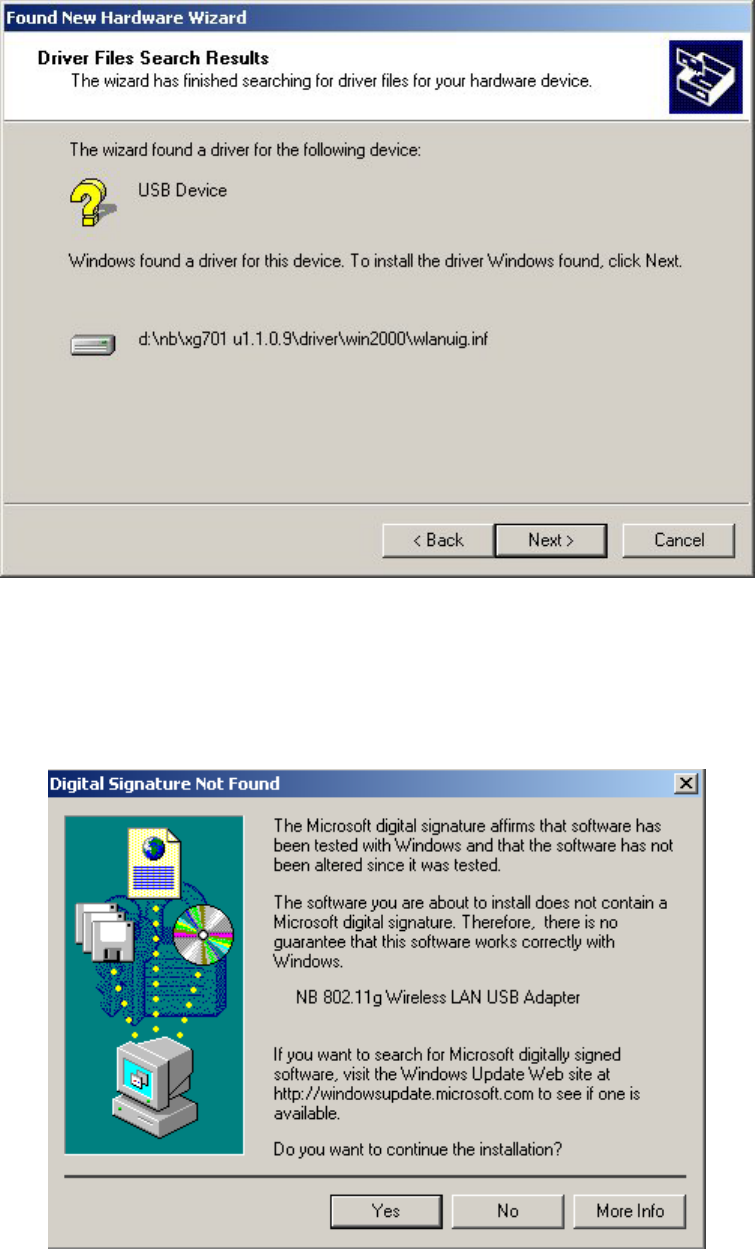
Step 5: The windows will find “USB Device”. Click on Next to continue.
Step 6: The windows will appear the message about the Microsoft digital signature affirms that
software has not been tested with Windows and that the software has not been altered since it was
tested. Click on Yes button to continue installing.
-14-
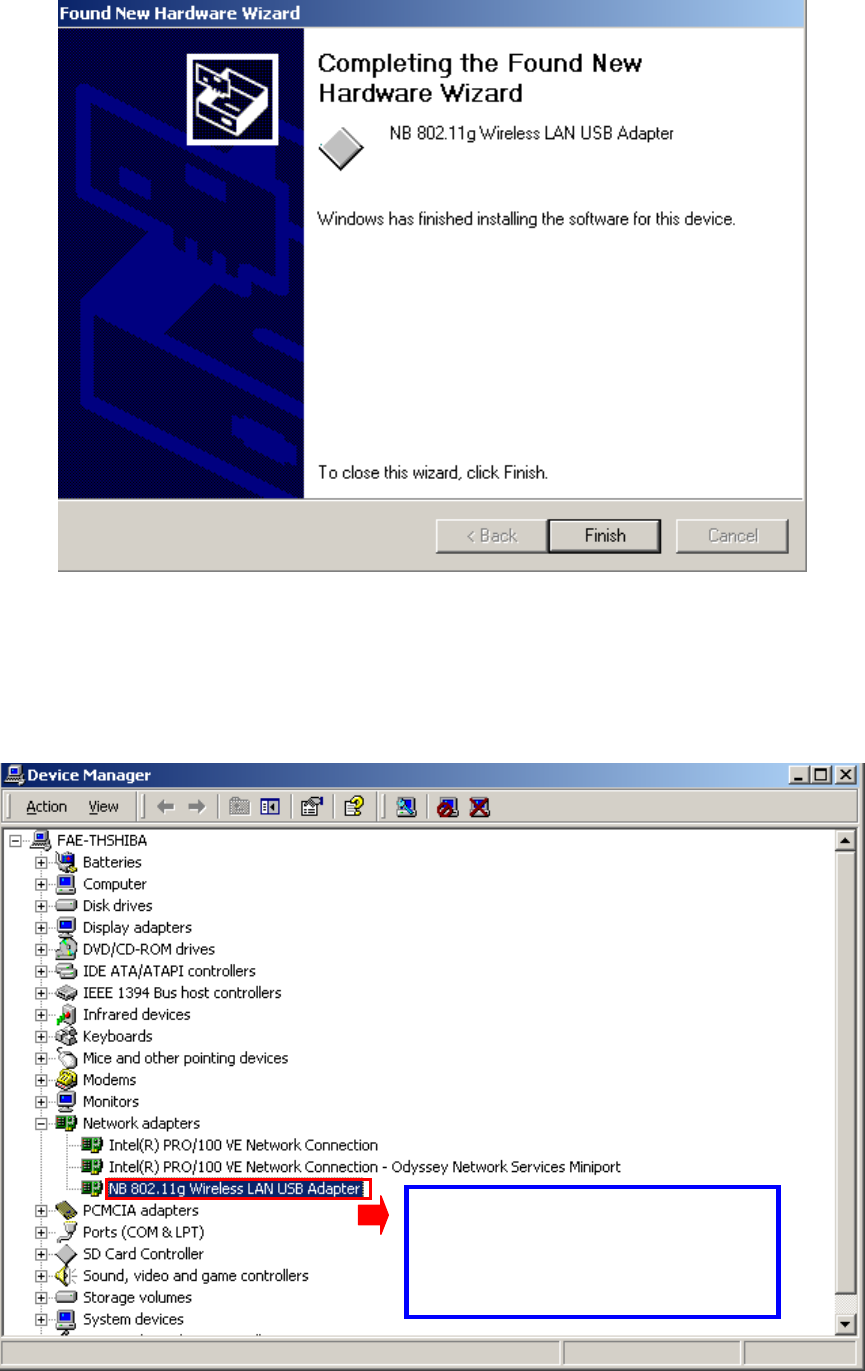
Step 7: Click Finish to complete the installation.
Step 8: Right click “My Computer”, select Properties, go to the Hardware tab and click the
Device Manager button to see if any exclamation mark appears next to the Network Adapter/NB
802.11g Wireless LAN USB Adapter. If no, your IEEE 802.11g Wireless LAN USB Adapter is
working well.
Check if there is exclamation
mark next to the Wireless
LAN USB Adapter
-15-
3-3 Set up IEEE 802.11g Wireless LAN USB Adapter for Windows
98SE/ ME
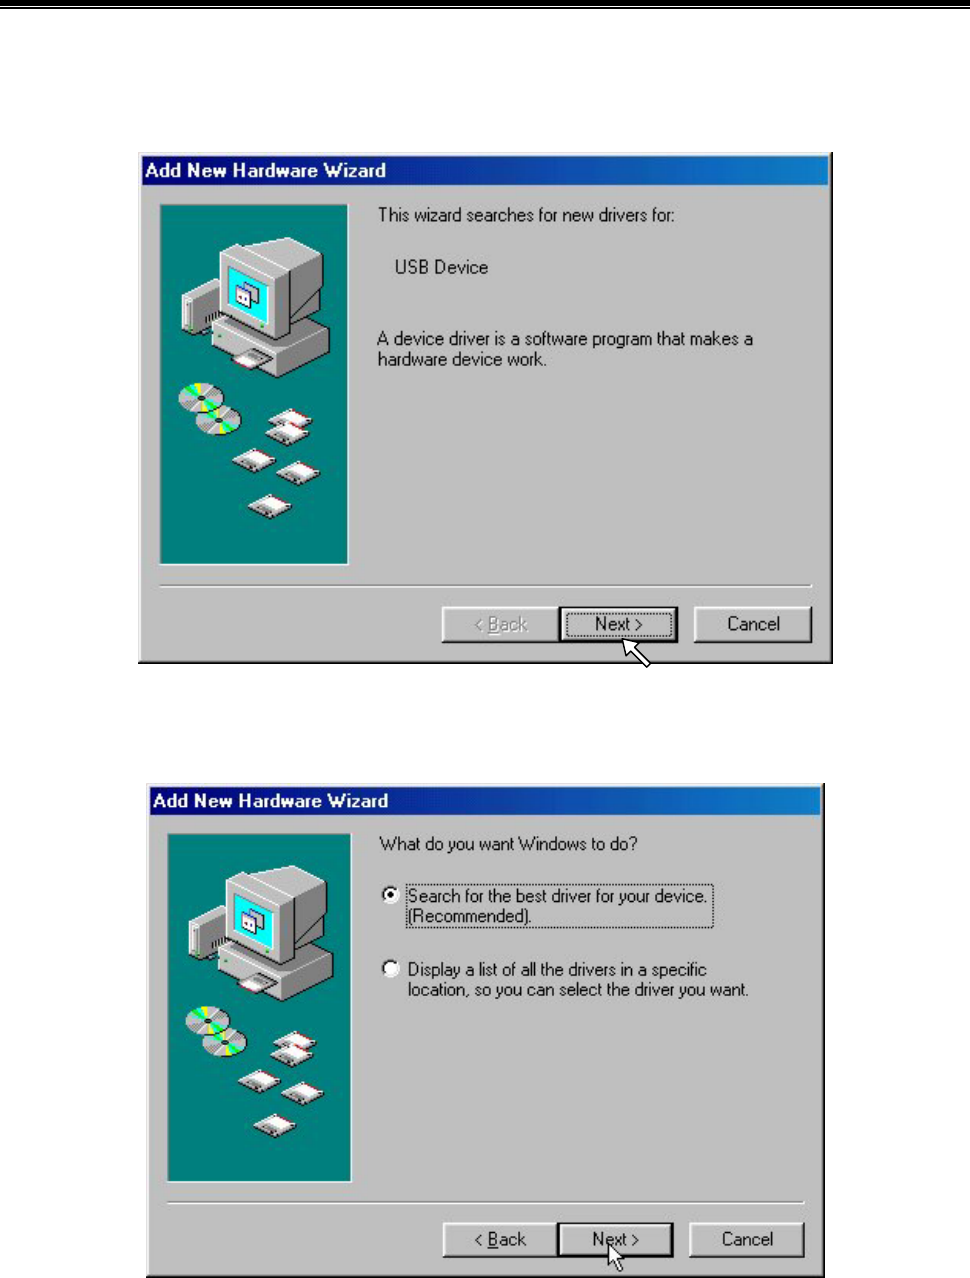
Step 1: After inserting the IEEE 802.11g Wireless LAN USB Adapter into the USB slot on your
computer, Windows will auto-detect new hardware and will display an “Add New Hardware
Wizard” window. Click Next to continue.
Step 2: Select “Search for the best driver for your device (Recommended)” and click Next to
proceed.
-16-
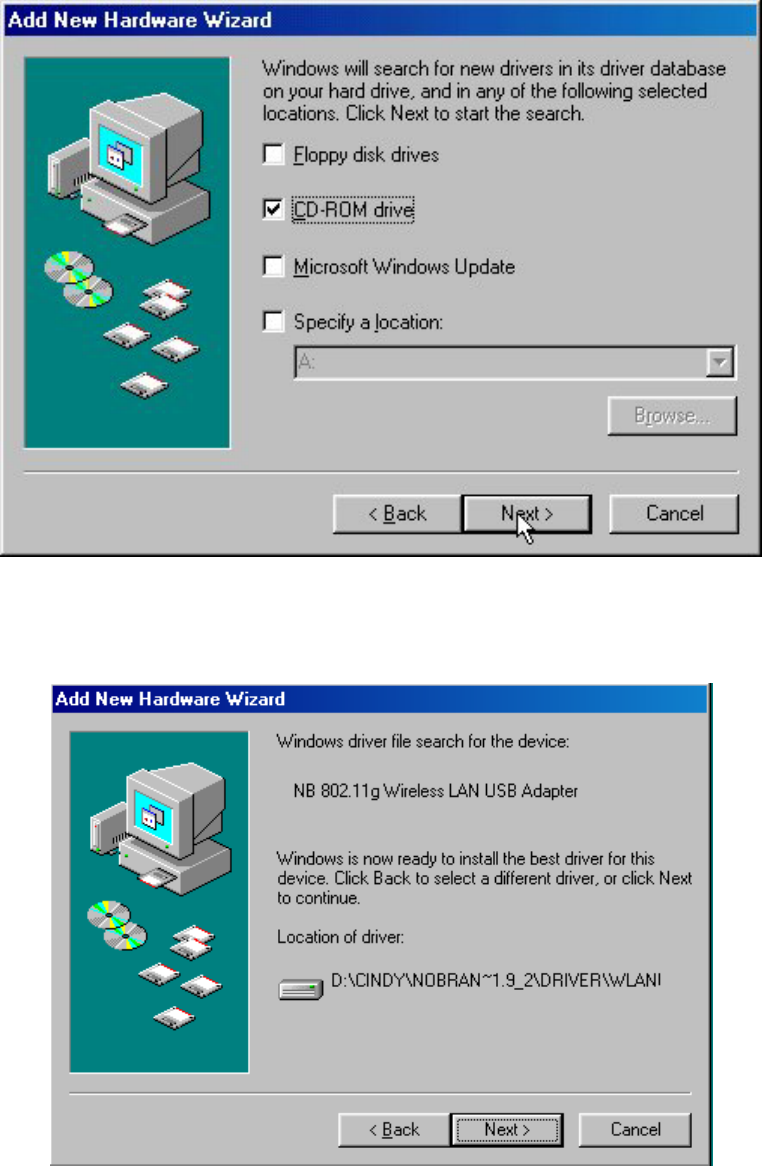
Step 3: Insert the Product CD-ROM into the CD-ROM drive. Select the “CD-ROM drive” check
box and click on Next to install the driver.
Step 4: The Windows will find “NB 802.11g Wireless LAN USB Adapter”. Click Next to
continue.
-17-
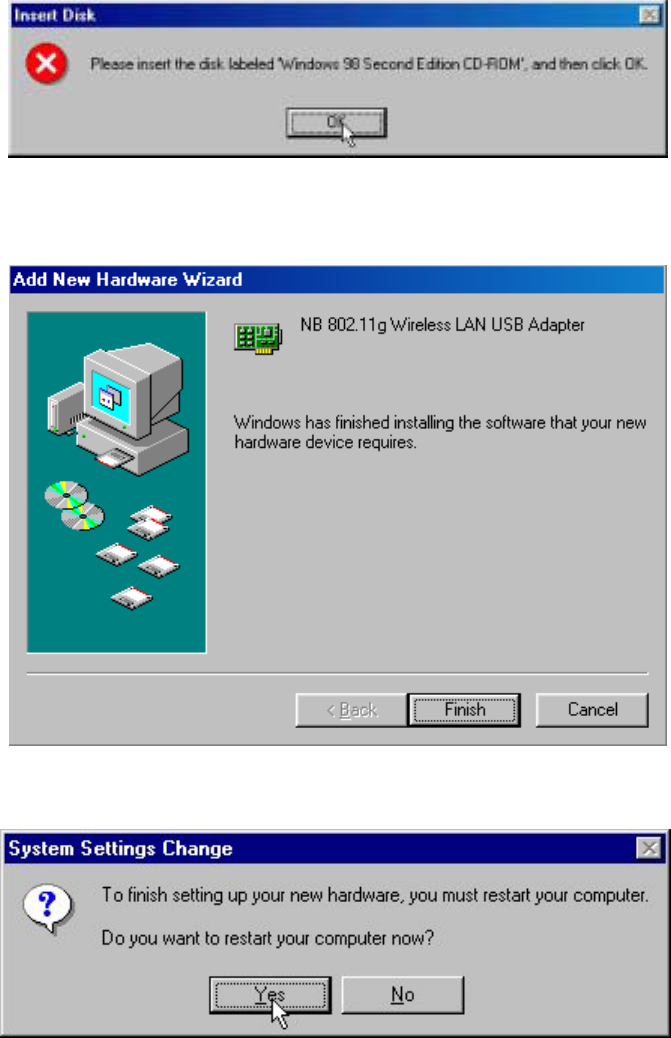
Step 5: Once the [Please insert the disk labeled “Windows 98 Second Edition CD-ROM”, and
then click OK] window appears, enter the path corresponding to the appropriate driver and click
OK. Usually these files can be found at C:\Windows or C:\Windows\system.
Step 6: Click Finish to complete the software installation.
Step 7: Restart the computer.
-18-
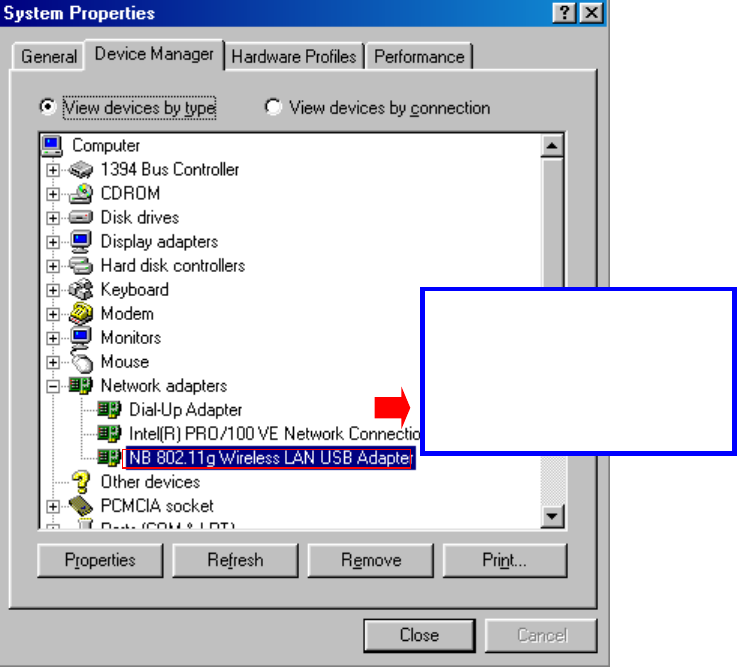
Step 8: Open Control Panel/System/Device Manager, and check Network Adapters to see if
exclamation mark appears next to the NB 802.11g Wireless LAN USB Adapter. If no, your IEEE
802.11g Wireless LAN USB Adapter is working well.
Check if there is
exclamation mark next
to the Wireless LAN USB
Adapter
-19-
Chapter 4 Configure the IEEE 802.11g Wireless
LAN USB Adapter
This chapter gives you assistance with detailed configuration for the IEEE 802.11g Wireless LAN
USB Adapter under Windows XP/2000/98SE/ME.
4-1 Install the WLAN Utility
To install the WLAN Utility, follow these steps:
Step 1: Insert the Product CD-ROM.
Step 2: Go to the utility folder and run setup.exe.
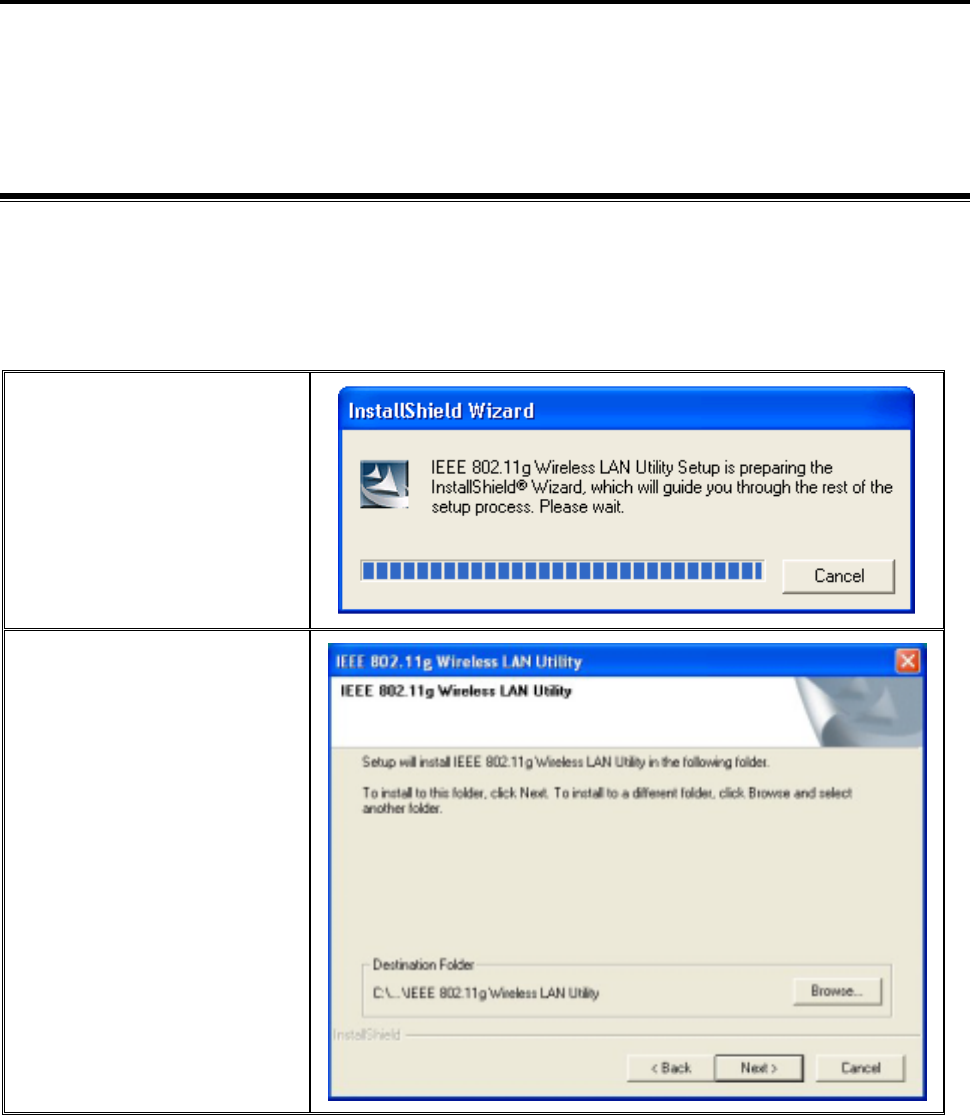
Step 3: The InstallShield Wizard will show up and guide you through the rest of the setup process.
Run the Setup Utility
Choose Destination
Location and click
Next to continue.
-20-
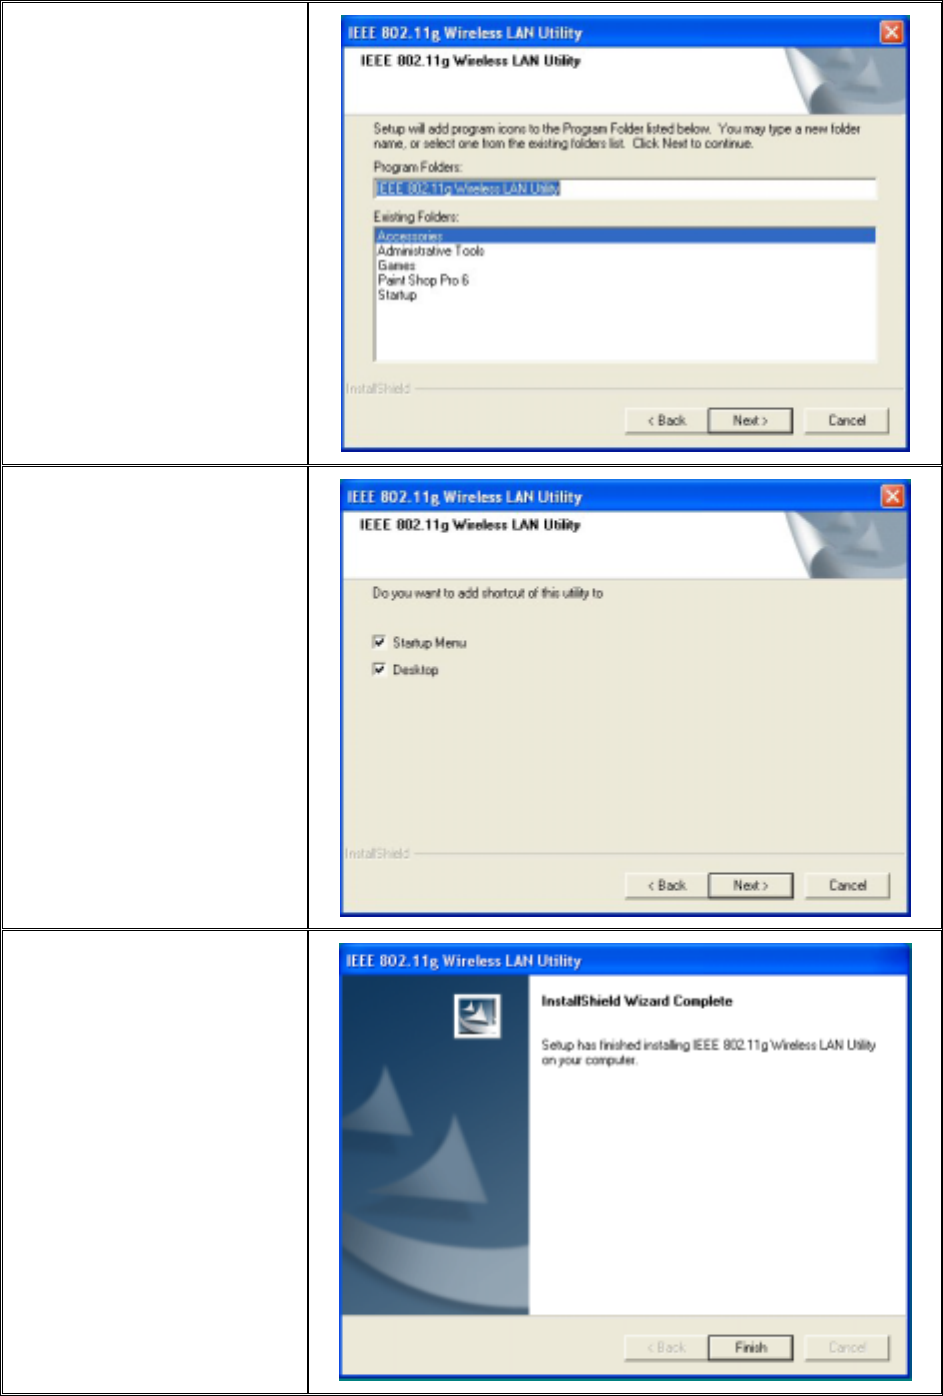
Select a program
folder and click Next.
You may add a
shortcut in the startup
folder as desired and
click Next.
Click on Finish to
complete the
installation
-21-
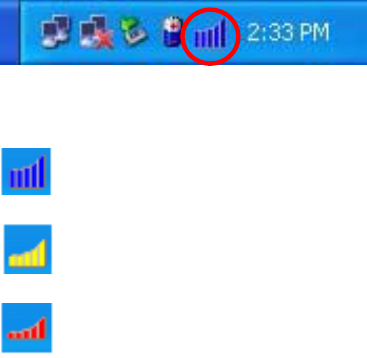
Upon completion, go to Program Files and run the WLAN Utility and its icon will appear in the
System Tray in the bottom right corner of your task bar. Clicking on the icon will open the
configuration window. When you minimize the window, the system tray icon will be loaded in the
System Tray again.
The color behind the system tray icon indicates the link status:
Blue indicates a good or excellent link.
Yellow indicates a usable but weak link.
Red indicates no or very poor link quality. When you minimize the window, the system tray
icon will be loaded in the System Tray again.
-22-
4-2 Use the WLAN Utility
The WLAN Utility enables you to make configuration changes and perform user-level diagnostics
on your IEEE 802.11g Wireless LAN USB Adapter in the Windows XP/2000/98SE/ME operating
system environments. The WLAN Utility consists of window with 3 items for you to monitor and
configure the IEEE 802.11g Wireless LAN USB Adapter: Configuration, Site Survey, and About.
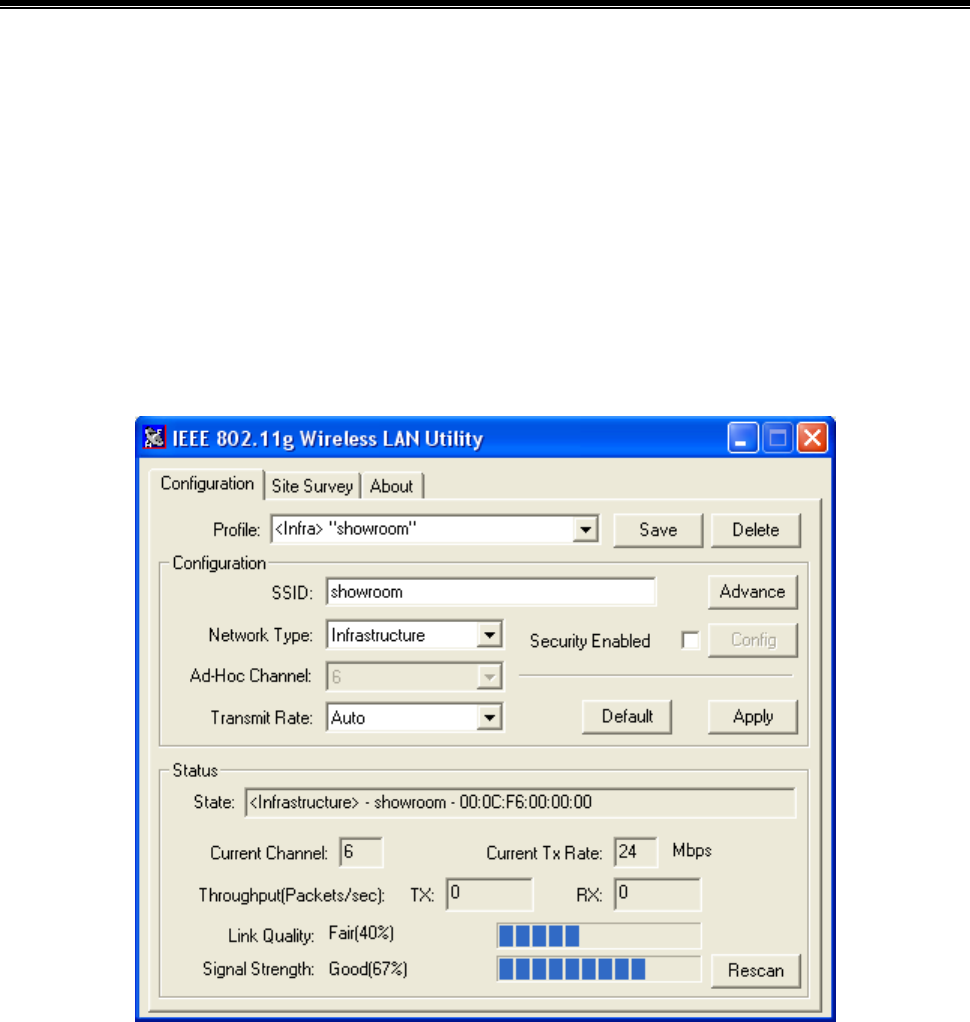
Configuration:
The Configuration item allows you to modify the configuration parameters for the IEEE 802.11g
Wireless LAN USB Adapter such as Profile, SSID, Network Type, Ad-Hoc Channel, Transmit
Rate, Security Enabled, RTS/CTS, Fragment Threshold, and Power Save mode. Furthermore,
you may monitor the current status of the IEEE 802.11g Wireless LAN USB Adapter such as State,
Current Channel, Current Tx Rate, Throughput, Link Quality and Signal Strength.

-23-
Profile
The Profile field allows you to set values for all parameters by selecting a previously defined
profile. To create the profile, go to the Profile field, type a profile name and set the corresponding
parameters. If one of the profiles is no longer used, you may remove it by clicking the Delete button.
After changing parameters, save the profile and click the Apply button to take effect. You can have
multiple profiles and modify the profile at any time.
Network Type
There are two network types for the IEEE 802.11g Wireless LAN USB Adapter to operate. If you
need to access company network or Internet via an Access Point, select “Infrastructure”. To set up
a group of wireless stations for file and printer sharing, select “ Ad-Hoc” (without Access Point).
For standard 802.11 Ad-Hoc, note that you may set wireless stations with the same ESS ID and the
same channel.
SSID
The SS ID is the unique ID used by Access Points and stations to identify a wireless LAN. Wireless
clients associating to any Access Point must have the same SSID. The default setting is ANY,
which allows your IEEE 802.11g Wireless LAN USB Adapter to automatically associate to any
Access Point (Infrastructure mode) in the vicinity of your wireless adapter. The ESS ID can be set
up to 32 characters and is case sensitive.
Transmit Rate
The IEEE 802.11g Wireless LAN USB Adapter provides various data rate options for you to select.
Data rates options include Fully Auto, 1 or 2 Mb, 5.5 Mb, 11 Mb and up to 54Mb in most
networking scenarios, you will see that the factory-set default “Auto” will prove the most efficient.
This setting will allow your IEEE 802.11g Wireless LAN USB Adapter to operate at the maximum
data rate. When the communications quality drops below a certain level, the Wireless LAN USB
Adapter will automatically switch to a lower data rate. Transmission at lower data speed is usually
more reliable. However, when the communications quality improves again, the Wireless LAN USB
Adapter will gradually increase the data rate again, until it has reached the highest available
transmit rate.
-24-
Security Enable
To protect against hacker entering your system and prevent unauthorized wireless station from
accessing data transmitted over the network, the WLAN Utility offers a sophisticated security
algorithm. To activate security enable, click the check box next to Security Enable.
A Privacy Configuration window will then appear.
-25-
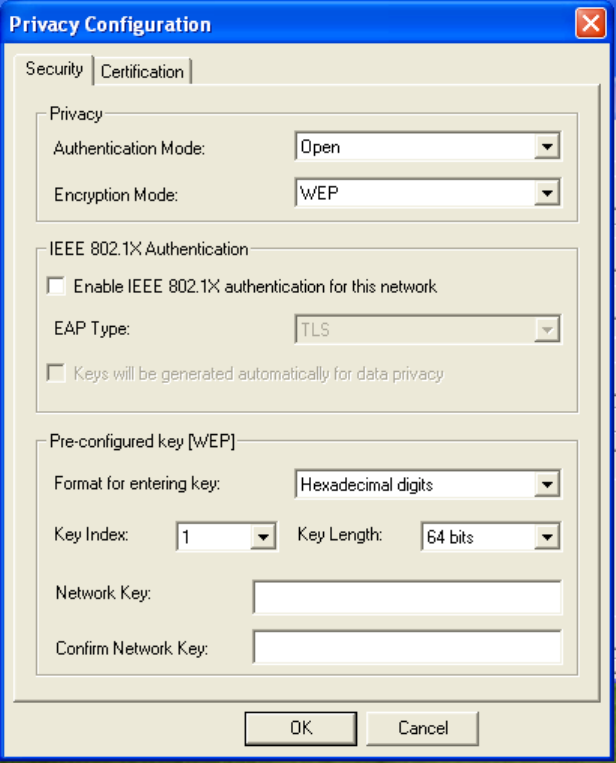
Privacy Configuration consists of specifying Security and Certification, as explained in the
following:
Security Tab
In order to join a network, networks may require an encryption key for association. You must
configure the Authentication Mode and Encryption Mode for your keys in the Privacy section of
this menu.
For Authentication Mode:
Open: Requires NO authentication, since it allows any device to join a network without performing
any security check.
Shared: Requires that the station and the access point use the same WEP key to authenticate. This
basically means that WEP must be enabled and configured on both the access point and the client
with a same key, showed as below:
-26-
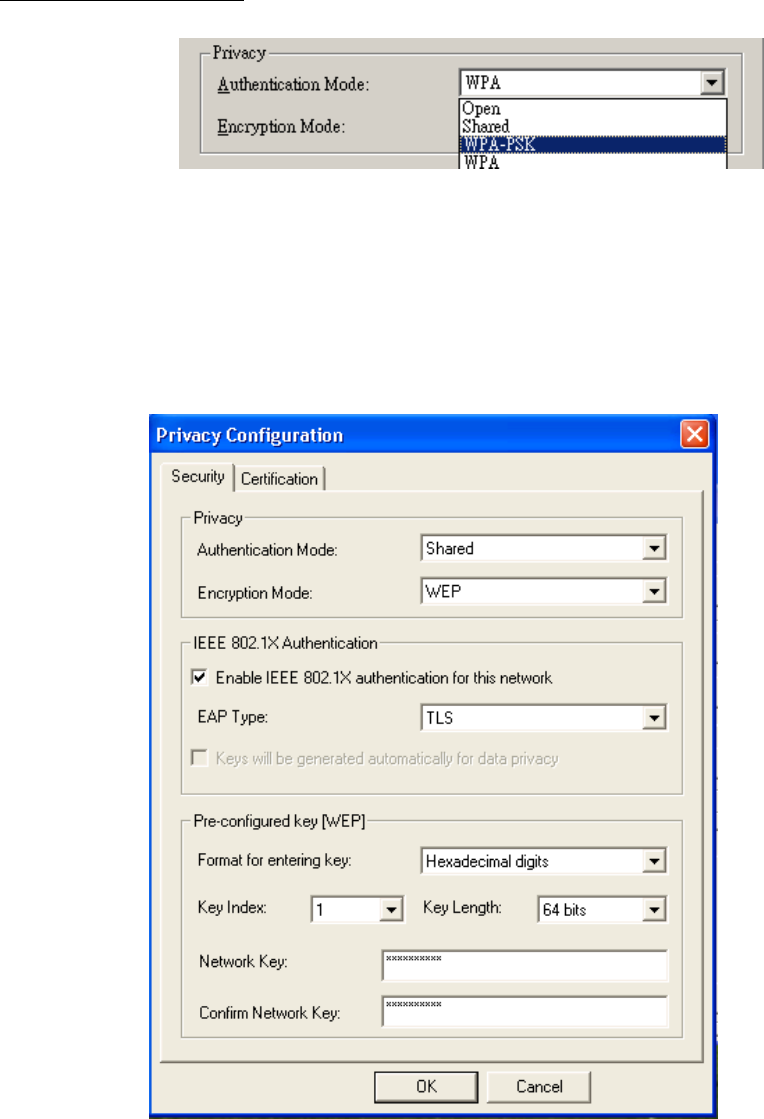
WPA-PSK: Allows you to gain access to a secured wireless network that the station and the access
point use the same pre-shared key to authenticate. You must type a mixture of numbers and letters
in the Pre-shared key [WPA] section of this menu. You may input either 8-63 ASCII characters or
64 HEX characters. Pre-shared key is usually used for SOHO authentication.
WPA: Allows you to gain access to a more secured wireless network that requires mutual
authentication between client and access point with a Radius authentication server. This product
supports various EAP types (TLS and PEAP), which require different credential authentication. In
order to access the wireless network, you must select EAP type your service provider supplied in
the section of IEEE802.11X Authentication.
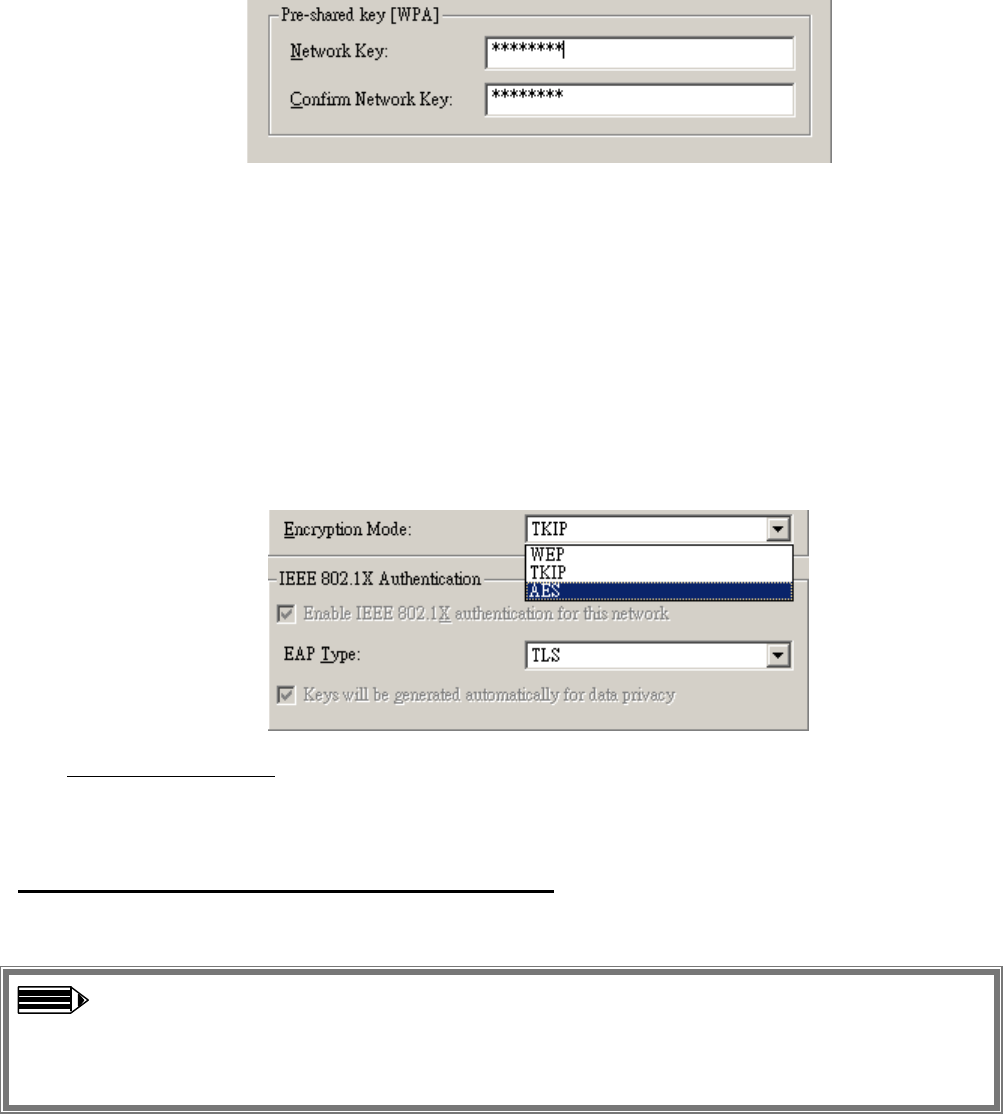
WPA consists of methods to strengthen data encryption (Wired Equivalent Privacy [WEP],
Temporal key integrity Protocol [TKIP], Advanced Encryption Standard [AES]) and to provide user
authentication (strong EAP type such as TLS, PEAP, LEAP).
Once you choose your Authentication Mode, you then need to select the Encryption Mode.
For Encryption Mode
WEP: Specify the encryption keys. There are two methods to set the WEP keys, as described
below:
Key will be generated automatically for data private
To create encryption keys automatically, click the Key will be generated automatically for data
private check box.
Note: This function is used in IEEE802.1X Authentication mode. Keys are dynamically
generated and distributed by the authentication server. Actually, you can obtain keys by
asking your service provider for further configuration and information to gain access to
the wireless network.
-27-
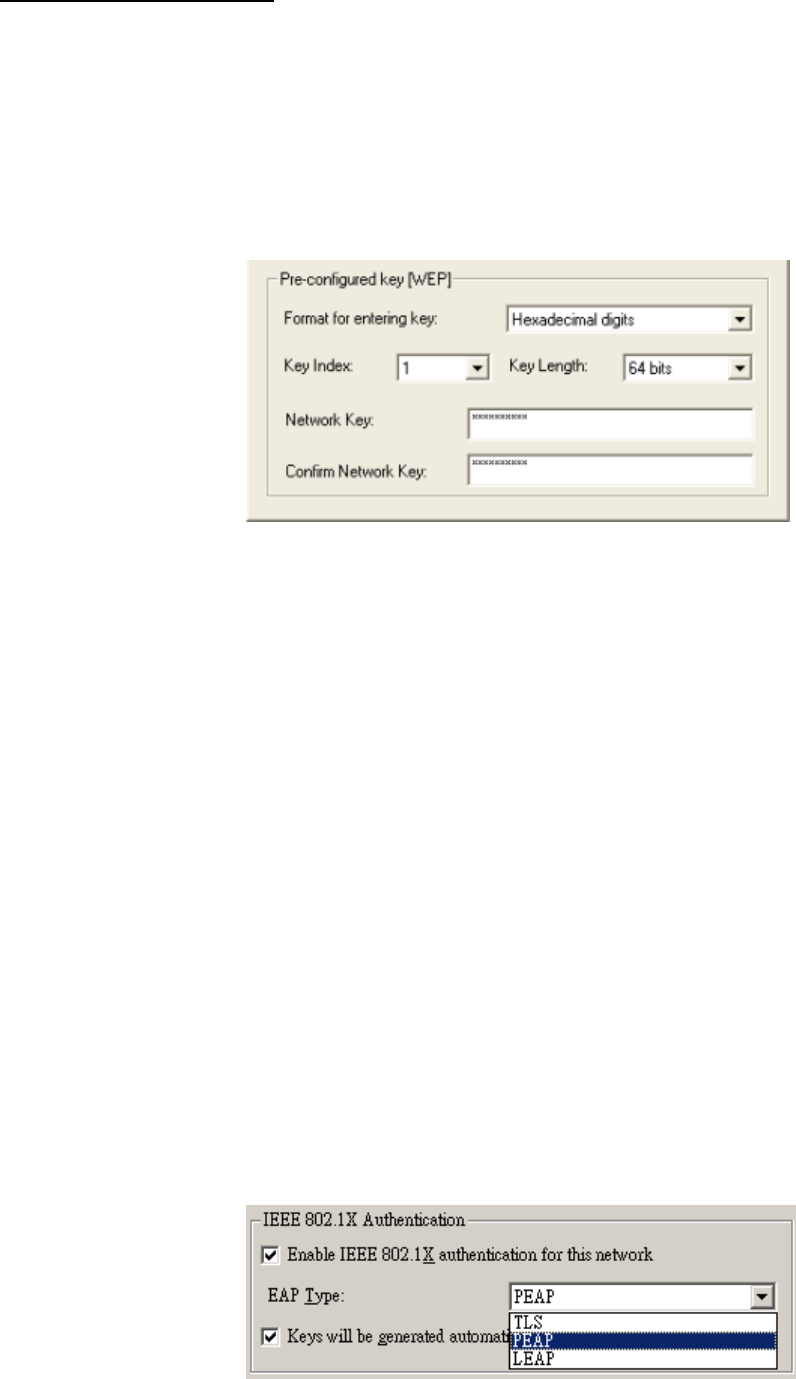
Pre-configured key [WEP]
You can also create encryption keys manually by pulling down the Key Length menu and select
either 64bit or 128bit encryption method in the Pre-configured key section of this menu.
For 64bit encryption you may choose:
Alphanumeric: entering 5 characters (case sensitive) ranging from “a-z”, “A-Z” and
“0-9” (e.g. MyKey).
Hexadecimal: entering 10 hexadecimal digits in the range of “A-F”, “a-f” and “0-9”
(e.g. 11AA22BB33, showed as below).
For 128bit encryption you may choose:
Alphanumeric: entering 13 characters (case sensitive) ranging from “a-z”, “A-Z” and
“0-9” (e.g. MyKey12345678).
Hexadecimal: entering 26 hexadecimal digits in the range of “A-F”, “a-f” and “0-9”
(e.g. 00112233445566778899AABBCC).
After you type, the utility uses an algorithm to generate 4 keys automatically. The Key index field
allows you specify which of the four keys you use to transmit data on your wireless LAN. You can
change the default key by clicking on the up or down arrow and make sure the default key is set up
exactly the same on the Wireless LAN stations as they are on the wireless Access Points.
After entering the WEP keys in the key field, click the OK button to make the setting take effect.
TKIP: A greatly enhanced wireless encryption scheme. Designed to enhance protection by most
popular WPA-capable devices. When TKIP is enabled, the key value will be generated
automatically for data private.
AES: A sophisticated wireless encryption scheme. Designed to increase the strength and
complexity of wireless encryption. When AES is enabled, the key value will be generated
automatically for data private.
If the Security you are configuring requires authentication, simply go to the IEEE802.1X
Authentication section of this menu to choose an EAP type.
-28-
Certification Tab
After you select the EAP type, you need to click Certification Tab to make advanced setting. The
following describes configuration of each available EAP type.
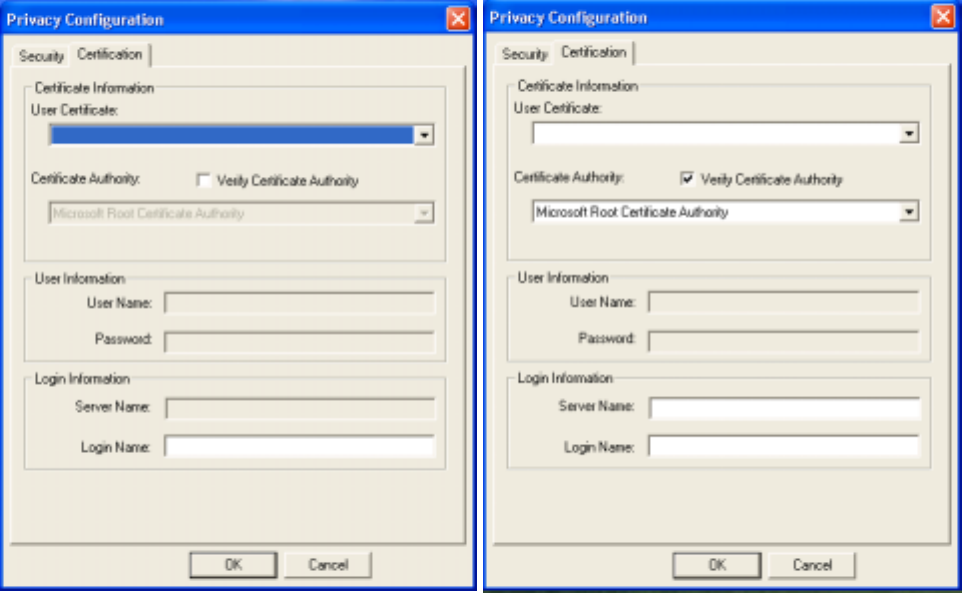
TLS: Clicking the Certification tab for TLS shows the following menu.
Figure 4.1 Figure 4.2
TLS requires the entry of Certificate Information and Login Information for mutual authentication.
This utility will auto-detect the Certificate Information and Server Name for you to configure TLS
easily. You only need to enter the Login Name in the Login information filed to authenticate
(Figure 4.1). If you desire to configure TLS manually, you can click the check box next to “Verify
Certificate Authority” and choose the usable selection in the following field using drop-down
menu (Figure 4.2):
User Certificated: select one of user certificates you have enrolled.
Certificate Authority: select one of certificate authorities you have registered.
Besides, you must enter Server Name and Login Name in the Login Information section of this
menu manually.
TLS is used to create a secure tunnel through which authentication and encryption keys can be
passed and require server and client side keys. To save the information you entered in the
appropriate field, click the OK button. Otherwise, click the Cancel button to close the menu. If you
want to return to select other EAP type, click the Security tab.
-29-
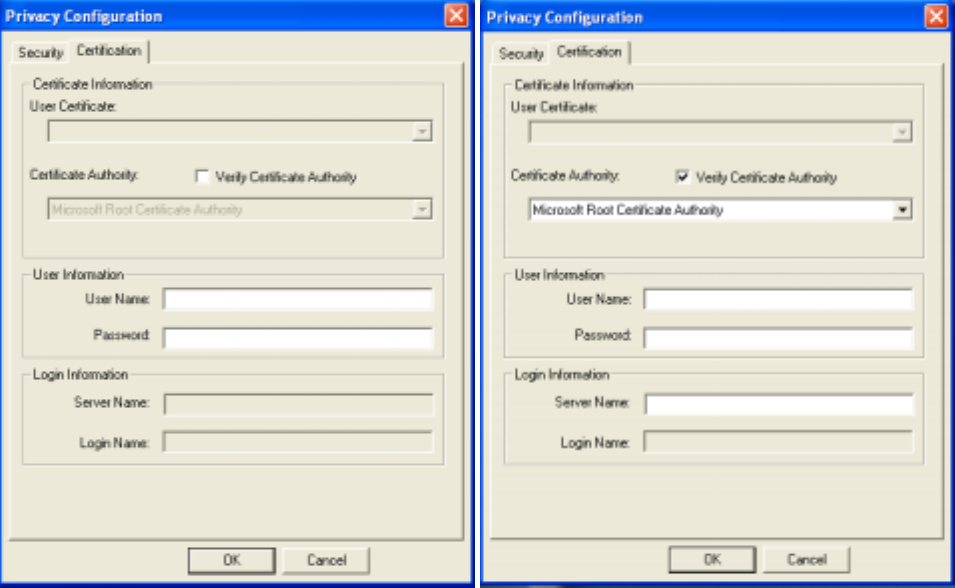
PEAP: Clicking the Certification tab for PEAP displays the following menu.
Figure 4.3 Figure 4.4
PEAP requires the use of Certificate Authority, User Information and Login Information. This
utility will automatically identify Certificate Authority and Login Information for users to configure
PEAP easily. You only need to enter User Name and Password in the User information filed to
authenticate (Figure 4.3). You also can set PEAP manually by clicking the check box next to
“Verify Certificate Authority” and highlight one of certificate authority to select it. Furthermore,
you need to input User Information and Server Name by entering this information in the appropriate
fields on your screen (Figure 4.4).
To save the information you entered in the appropriate field, click the OK button. Otherwise, click
the Cancel button to close the menu. If you want to return to select other EAP type, click the
Security tab.
-30-
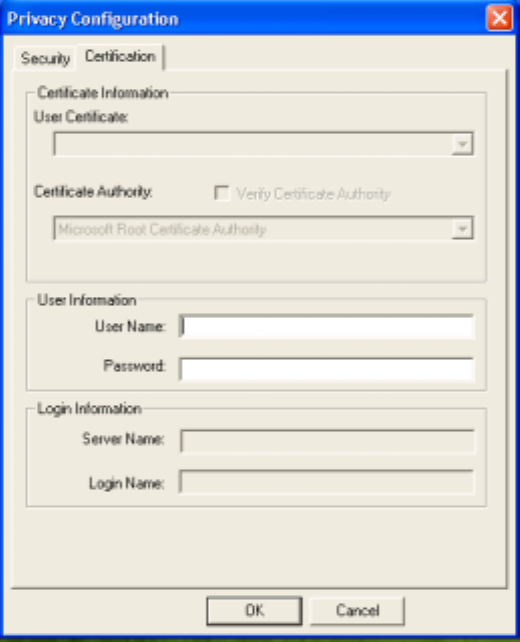
LEAP: Clicking the Certification tab for LEAP shows the following menu.
LEAP requires the mutual authentication between station and access points. You must present a
User Name and Password in the User Information field that will be verified by LEAP-capable
server. This mutual authentication ensures that only authorized users are allowed access to the
network.
To save the information you entered in the appropriate field, click the OK button. Otherwise, click
the Cancel button to close the menu. If you want to return to select other EAP type, click the
Security tab.
-31-
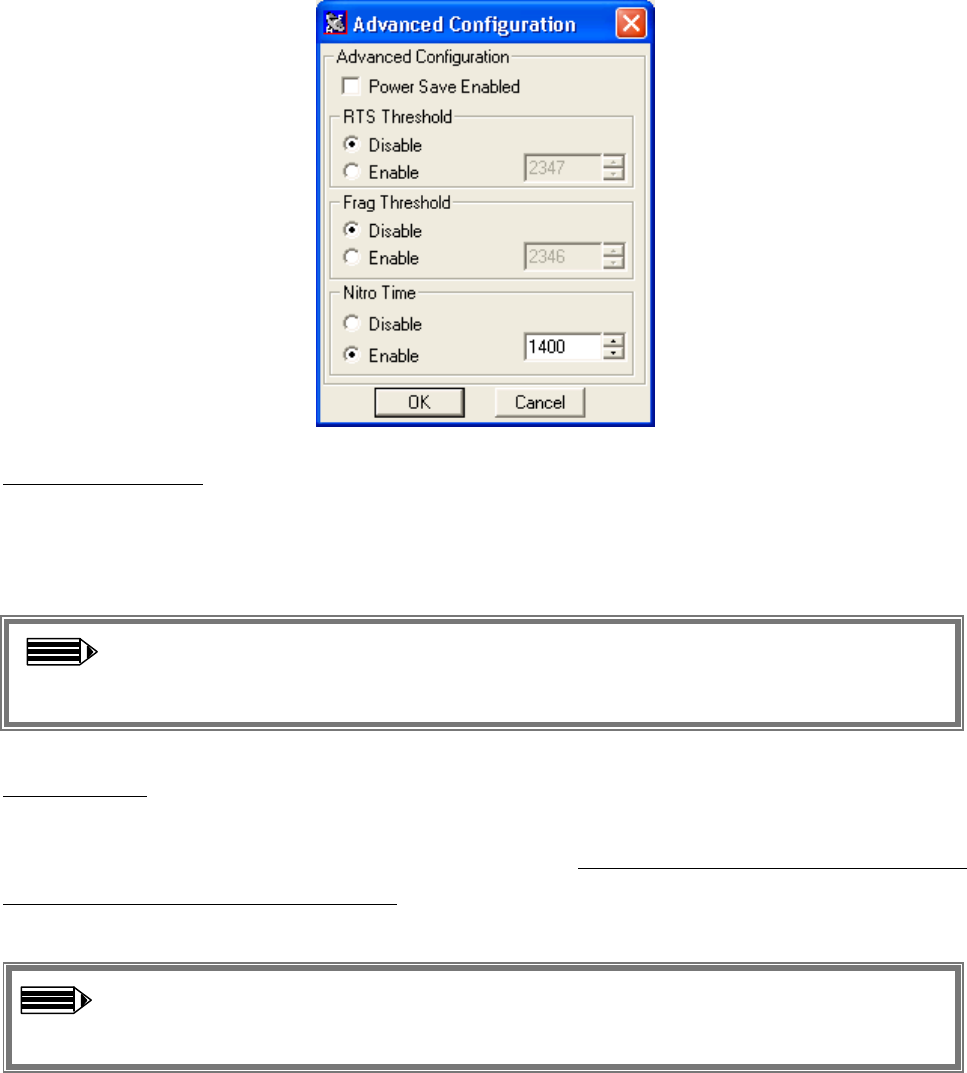
Advance
The WLAN Utility also offers the advanced configuration for user to set the IEEE 802.11g Wireless
LAN USB Adapter under certain network environment. These advanced options include Power
Save Enabled, RTS Threshold, Fragmentation Threshold and Nitro Time. To enable the advanced
configuration, go to the Configuration tab and click the Advance button.
Power Save Enabled
The Power Save option is designed to conserve battery life of you computer. When Power Save is
enabled, your IEEE 802.11g Wireless LAN USB Adapter will go into sleep mode to minimize
power consumption.
Note: When power saving mode is enabled, the Access Points you use need to
support power saving as well so that the communication can be established.
RTS Threshold
RTS Threshold is a mechanism implemented to prevent the “Hidden Node” problem. If the “Hidden
Node” problem is an issue, please specify the packet size. The RTS mechanism will be activated if
the data size exceeds the value you set. It is highly recommended that you set the value ranging
from 0 to 1500. The default value is Disable.
Note: Enabling RTS Threshold would cause redundant network overhead that could
negatively affect the throughput performance instead of providing a remedy.

-32-
Frag. Threshold
Fragmentation mechanism is used for improving the efficiency when high traffic flows along in
the wireless network. If your IEEE 802.11g Wireless LAN USB Adapter often transmits large
files in the wireless network, you can enable the Fragmentation Threshold by clicking the Enable
button and the mechanism will split the packet. The default value is 2346 (Disable).
Nitro time
The Wireless Utility provides Nitro technology, the fast wireless connectivity to enrich network
throughput and stability. This technology combines new speed enhancement to increase
throughput 40 times faster than 802.11b Wireless LAN products. Enables an automatic, secure,
high-speed link between wireless clients while maintaining communications with the AP. By
increasing the value, the IEEE 802.11g Wireless LAN USB Adapter will be able to logically
consume more bandwidth than legacy 11b product does. The default value is 1400.
-33-
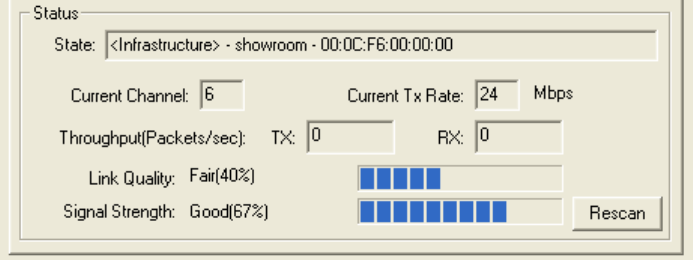
Status:
The Status field on the Configuration menu provides the following information.
State: When operating in Infrastructure mode, this field shows the MAC address of the Access
Point with which the IEEE 802.11g Wireless LAN USB Adapter is communicating. When
operating in Ad-Hoc mode, it shows the virtual MAC address used by computers participating in
the Ad-Hoc network.
Current Channel: Shows the channel on which the connection is made.
Current Tx Rate: Shows the highest transmit rate of the current association.
Throughput: Shows the short term transmit and receive throughput in bytes/second, and is
continuously updated.
Link Quality: Based on the quality of the received signal of the Access Point beacon. There are 5
states of link quality:
100%~80%: Excellent link.
80%~60%: Good link quality.
60%~40%: Fair link quality.
Under 40%: Poor or no connection.
Signal Strength: Based on the received signal strength measurement of the baseband processor of
the Beacon signal. Same as link quality, there are 5 states of signal strength:
100%~80%: Excellent signal strength.
80%~60%: Good signal strength.
60%~40%: Fair signal strength.
Under 40%: Poor or no signal strength.
You can click the Rescan button to force the radio to rescan all available channels. If your link
quality or signal strength is poor, rescanning can be used to push the radio off a weak Access Point
and search for a better link with another Access Point.

-34-
Site Survey:
By clicking the Rescan button, the AP Browser can display Access Points around the working
environment. Besides showing the ESSID of each Access Point, it also displays BSSID, Channel,
Capability, Signal, and Rates. To join any of the displayed Access Points, highlight the Access
Point you desire to connect and then click the Join button to associate to the AP.
About:
The About item shows the versions of the Wireless LAN Utility, and driver, firmware of the IEEE
802.11g Wireless LAN USB Adapter. Also, the MAC address and frequency domain are displayed.
-35-
Limited Warranty
This Warranty constitutes the sole and exclusive remedy of any buyer or reseller’s equipment and
the sole and exclusive liability of the supplier in connection with the products and is in lieu of all
other warranties, express, implied or statutory, including, but not limited to, any implied warranty
of merchantability of fitness for a particular use and all other obligations or liabilities of the
supplier.
In no even will the supplier or any other party or person be liable to your or anyone else for any
damages, including lost profits, lost savings or other incidental or consequential damages, or
inability to use the software provided on the software media even if the supplier or the other party
person has been advised of the possibility of such damages.
The following are special terms applicable to your hardware warranty as well as services you may
use during part of the warranty period. Your formal Warranty Statement, including the warranty
applicable to our Wireless LAN products, appears in the Quick Installation Guide that accompanies
your products.
Duration of Hardware Warranty: One Year
Replacement, Repair or Refund Procedure for Hardware:
If your unit needs a repair or replacement, return it to your dealer/distributor in its original
packaging. When returning a defective product for Warranty, always include the following
documents:
The Warranty Repair Adapter
A copy of the invoice/proof of purchase, and
The RMA Report Form (To receive a Return Materials Authorization form (RMA), please
contact the party from whom you purchased the product).
Upon proof-of-purchase we shall, at its option, repair or replace the defective item at no cost to the
buyer.
This warranty is contingent upon proper use in the application for which the products are intended
and does not cover products which have been modified without the reseller’s approval or which
have been subjected to unusual physical or electrical demands or damaged in any way.
-36-
Please complete the information below and include it along with your products.
Name:
Title:
Company:
Telephone:
Fax:
Email:
City/State/Zipcode:
Country:
Product Name:
Serial Number:
MAC Address:
Invoice Date:
Product Description:
If you have any further questions, please contact your local authorized reseller for support.