Z Com ZAC1023513 IEEE 802.11 a/n Wireless CPE User Manual 2
Z Com Inc IEEE 802.11 a/n Wireless CPE 2
Z Com >
Contents
- 1. User Manual 1
- 2. User Manual 2
User Manual 2
Chapter 5 Management Page 61
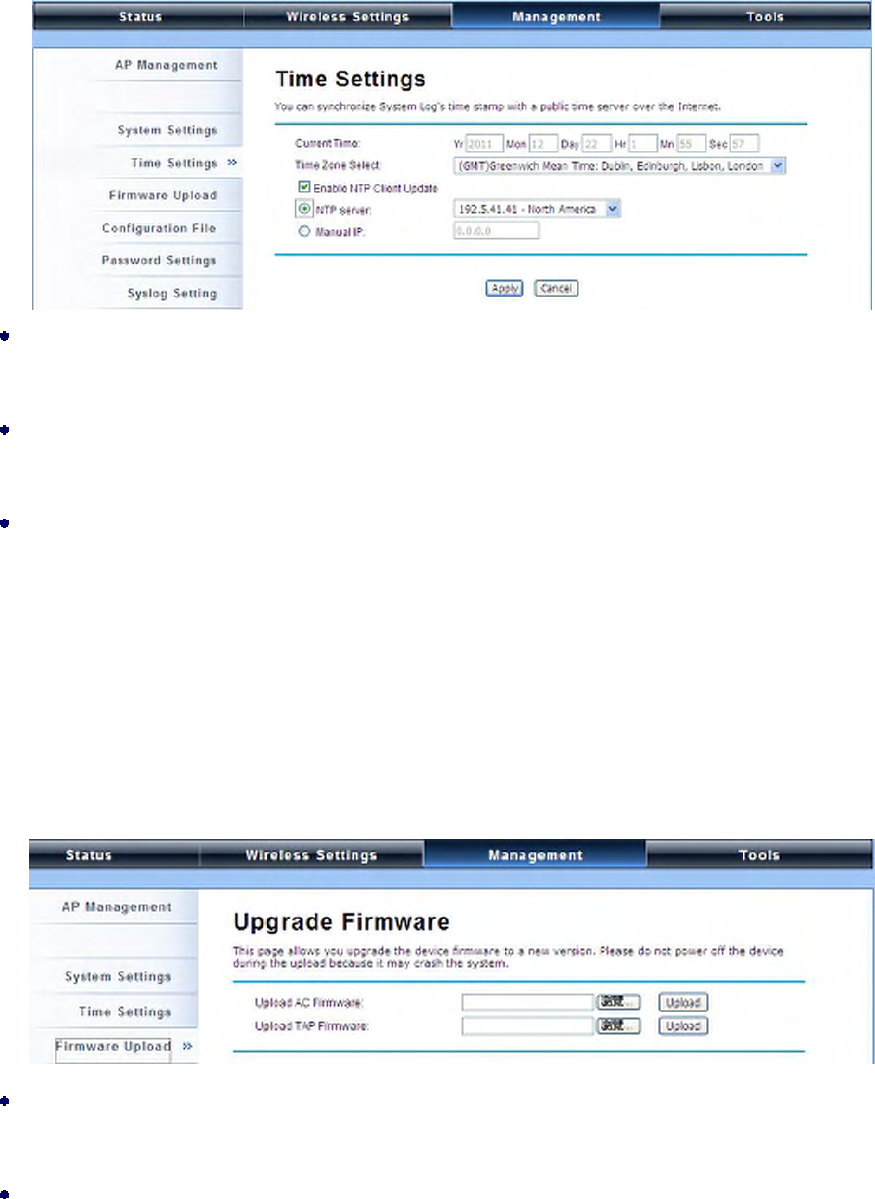
Time Settings
Compliant with NTP, the IEEE 802.11n ZAC Access Point is capable of keeping its time in complete
accord with the Internet time. To use this feature, check “Enable NTP Client Update” in advance.
Current Time
Display the present time in Yr, Mon, Day, Hr, Min and Sec.
Time Zone Select
Select the time zone from the dropdown list.
NTP Server
Select the time server from the “NTP Server” dropdown list. or manually input the IP address of
available time server into “Manual IP”.
Firmware Upgrade
Besides upgrading firmware for the ZAC Access Point in AC mode, it also provides firmware update for
the ZAC-managed APs.
Upload AC Firmware: Allows the network administrator to upgrade firmware for the ZAC Access
Point in AC mode.
Upload TAP Firmware: Before updating the firmware for the ZAC-managed APs, you need to
upload the firmware into the ZAC Access Point in AC mode that allows the virtual controller AP to do
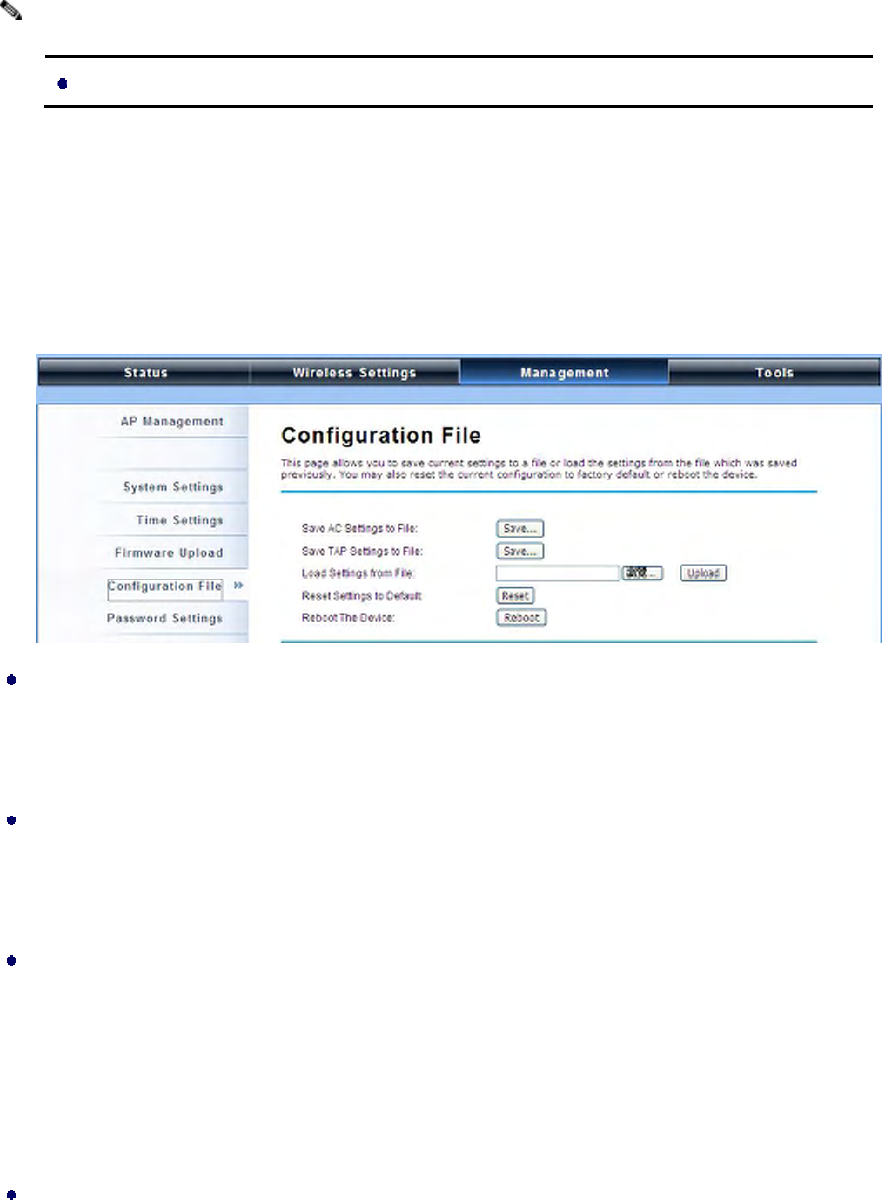
Chapter 5 Management Page 62
the firmware upgrade for ZAC-managed APs.
Do NOT cut the power off during upgrade, otherwise the system may crash!
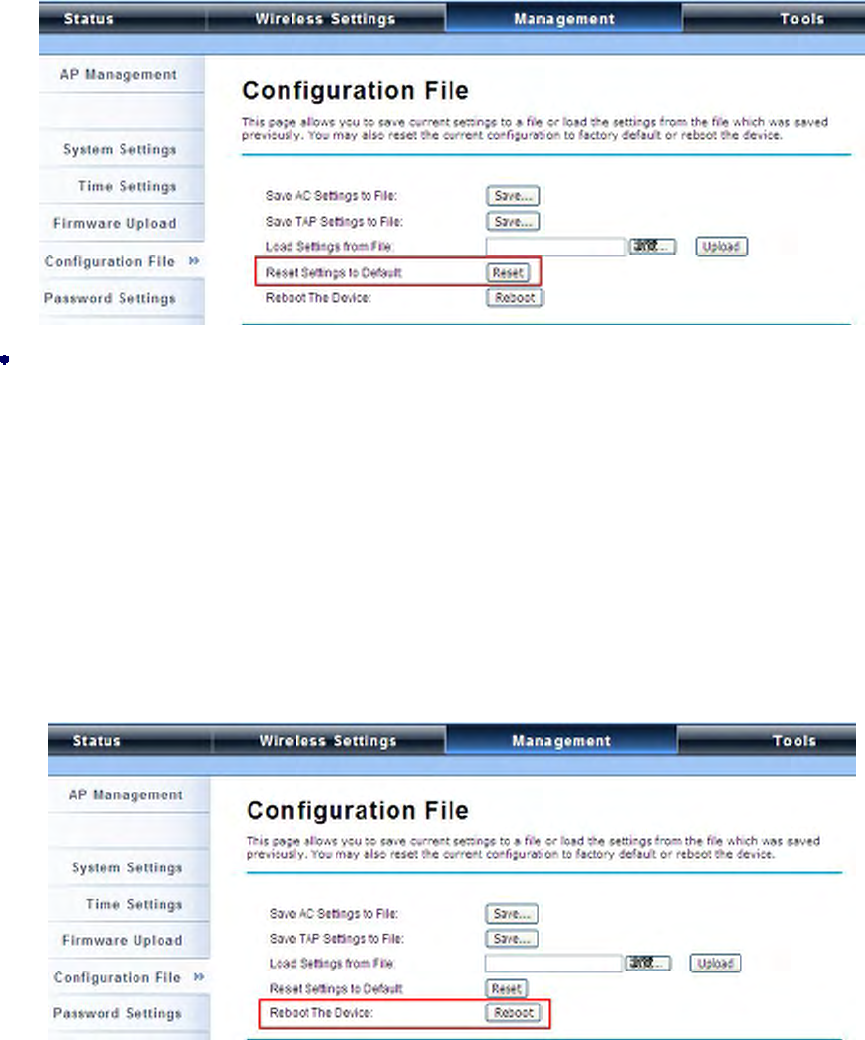
Backup/ Retrieve Settings
It is strongly recommended you back up configuration information in case of something unexpected. If
tragedy hits your device, you may have an access to restore the important files by the backup. All these
can be done by the local or remote computer.
Save AC Settings to File
Click Save to export the configuration file of ZAC Access Point in AC mode. Then the
configuration file ac.cfg will be generated and saved to the specified location.
Save TAP Settings to File
Click Save to export the configuration file of ZAC-managed AP. Then the configuration file tap.cfg
will be generated and saved to the specified location.
Load Settings from File
Import ac.cfg load into the ZAC Access Point in AC mode.
Restore Factory Default Settings
The IEEE 802.11n ZAC Access Point provides two ways to restore the factory default settings:
Restore factory default settings via Web
From Configuration File in Management, click Reset restore factory default settings.
Note:
Chapter 5 Management Page 63
Restore factory default settings via Reset Button
If software in ZAC Access Point is unexpectedly crashed and no longer reset the unit via Web, you
may do hardware reset via the reset button. Press and hold the button for at least 5 seconds and
then release it until the PWR LED gives a blink. The hardware reset will take about 2 minutes to
complete.
Reboot
You can software reboot your ZAC Access Point from Configuration File in Management as below:
Click “Reboot” and hit “Yes” upon the appeared prompt to start reboot process. This takes a few
minutes.
Chapter 5 Management Page 64
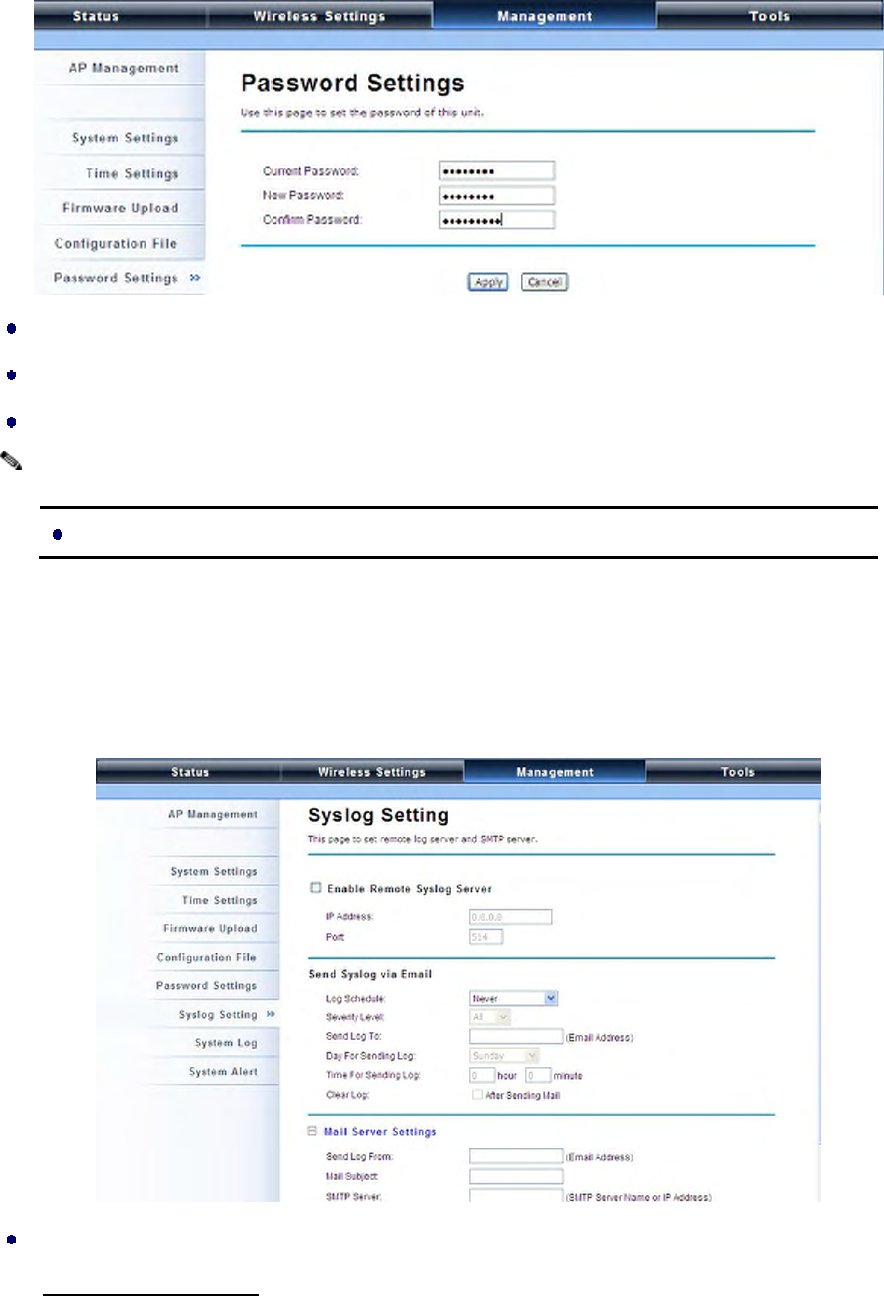
Password Settings
You can change the password for your IEEE 802.11n ZAC Access Point.
Current Password: Enter the current password.
New Password: Enter the new password.
Confirm Password: Enter the new password again for confirmation.
The password is case-sensitive and its length cannot exceed 19 characters!
Syslog Setting:
The ZAC Access Point provides remote syslog management by sending logs to an external syslog
server. The log can be also sent through Email.
Remote Syslog Server
Enable Remote Syslog: Enable to send log to remote syslog server.
Note:
Chapter 5 Management Page 65
IP Address: Specify the IP address of the remote server.
Port: Specify the port number of the remote server.
Send Syslog via Email
Log Schedule: Configure the frequency of logs being sent. 5 scheduling options are provided:
Never, Hourly, Daily, Weekly, and When log is full.
Severity Level: Choose All to send all the logs or Alert to send only the alert messages.
Send Log to: Specify the email address where you would like to send the log.
Day for Sending Log: When Weekly scheduling is selected, you may specify which week day to
send the log.
Time for Sending Log: Specify the time of the day to send the log.
Clear Log: To clear log after sending logs via email, check the After Sending Mail checkbox.
Mail Server Setting
Send Log From: Enter the email address of the mail server.
Mail Subject: Type a title to be presented in the subject line of the log email message.
SMTP Server: Enter the IP address of the SMTP sever.
SMTP Authentication: If you want to use SMTP authentication, check SMTP Authentication
checkbox and enter the user account and password.
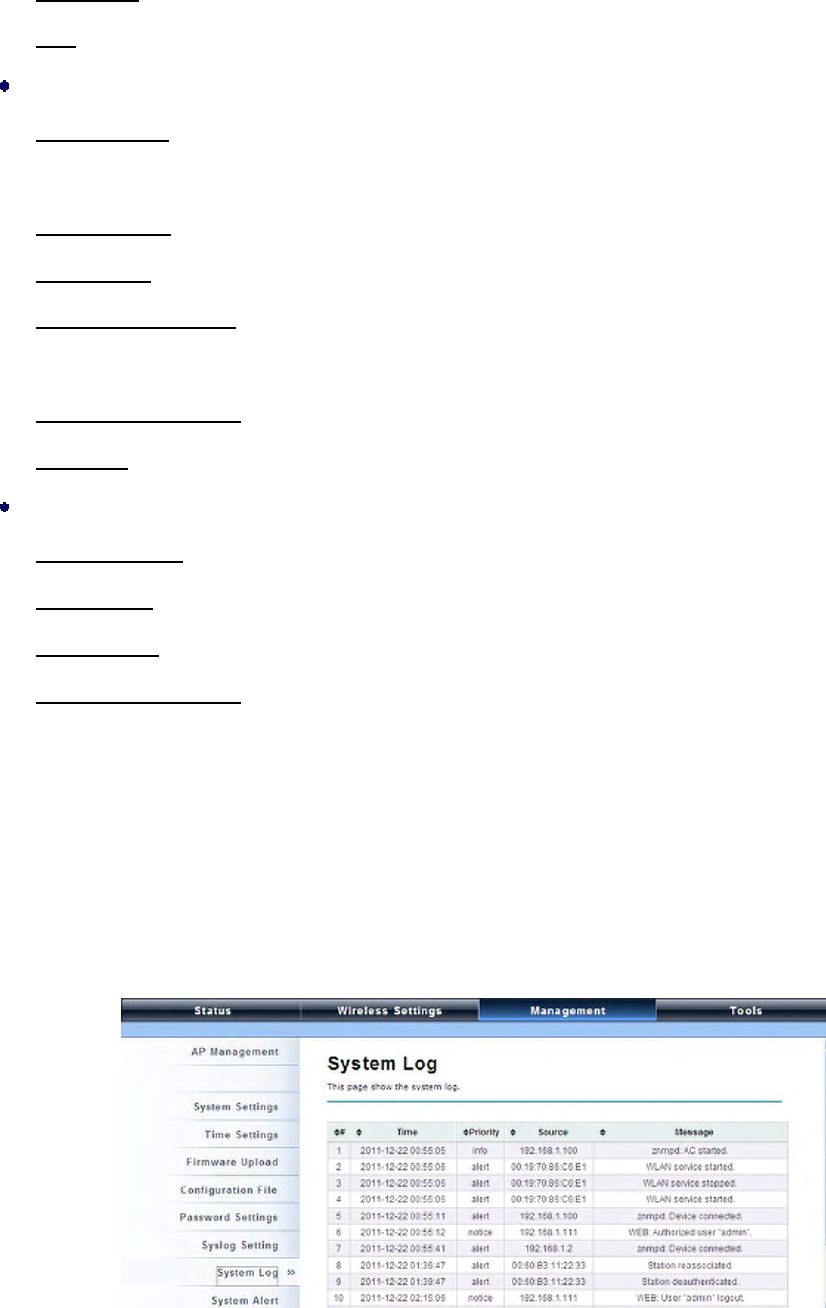
System Log:
System log record and display all logs and alert message in this page. Once the log entries are all used,
the log will wrap around and the old logs will be deleted. You may click Clear to delete logs manually
as well.
Chapter 5 Management Page 66
System Alert:
System alert record and events occurred on both ZAC Access Point in AC mode and ZAC-managed AP
in this page. Once the log entries are all used, the log will wrap around and the old logs will be deleted.
You may click Clear to delete logs manually as well.
Tools
The IEEE 802.11n ZAC Access Points provide two tools to test the link status with other ZAC-managed
Access Points or anyone on the network.
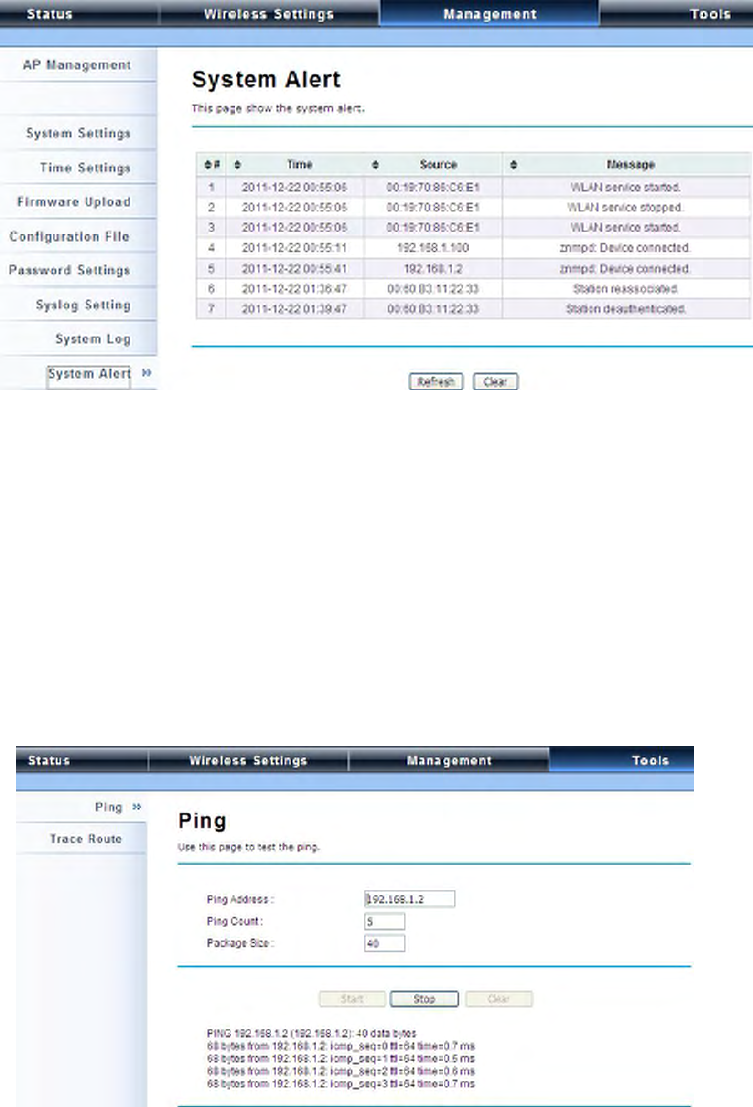
Ping
P. 67
Ping Address
Enter IP address of the remote destination.
Ping Count:
Enter the number of pings.
Packet Size:
Specify ping packet size.
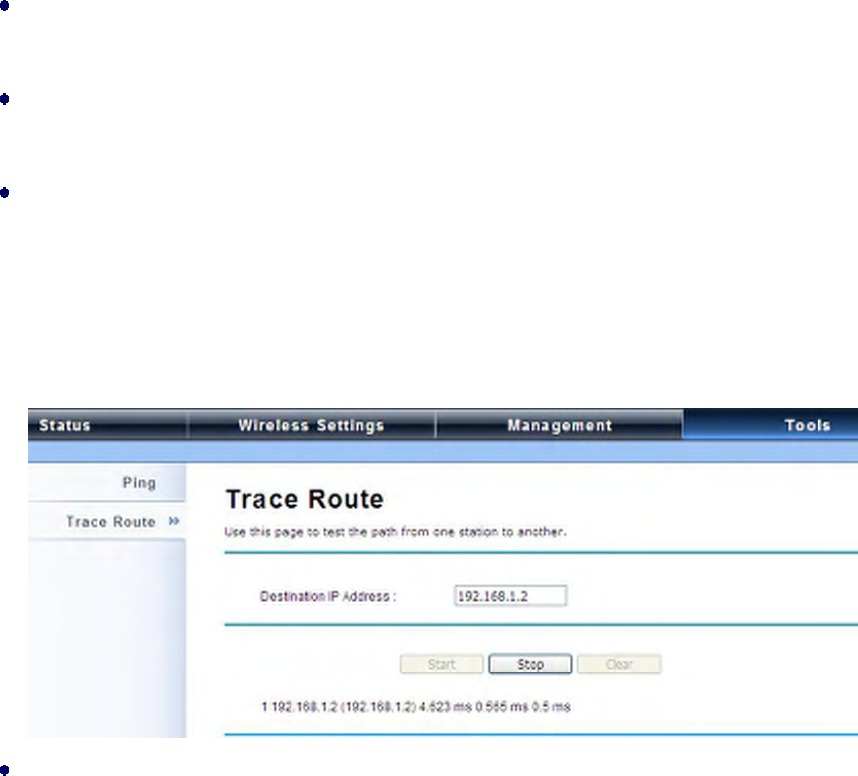
Trace Route
This tool is used to discover the routes that packets take when traveling to the destination destination.
Destination IP Address
Enter IP address of the remote destination and click Start to start.
P. 68
Thin AP Mode
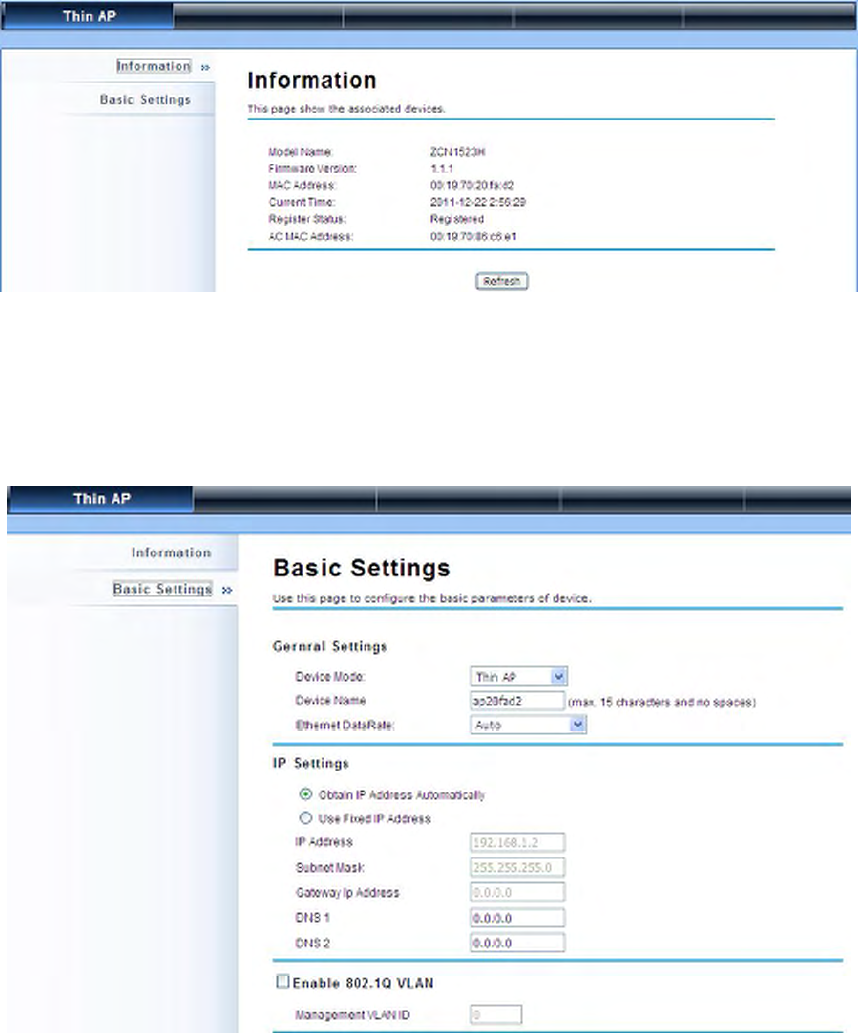
Information
You may see some ZAC-managed AP’s basic information such as model name, firmware version,
MAC address, current up time, registration status as well as MAC address.
Basic Settings
Allows you to configure device and IP settings for the ZAC-managed AP.

P. 69
General Settings:
Device Mode: Three modes are provided: AC+Thin AP, Thin AP, FAT AP. Select AC+Thin AP
to have the device act as virtual access controller to manage other ZAC-managed APs on your
network. Select “Thin AP” to have the ZAC Access Point managed by the ZAC AP in AC mode.
Select FAT AP to perform as a standalone AP, neither managing nor managed by other ZAC APs.
Device Name: Specify the device name, which is composed of no more than 15 characters with
(0-9), (A-Z), (a-z) or (-).
Ethernet Data Rate: Specify the transmission rate of data for Ethernet. Default is Auto.
IP Address Assignment:
Obtain IP Address Automatically: If a DHCP server exists in your network, you can check this
option, thus the IEEE 802.11n ZAC Access Pioint is able to obtain IP settings automatically from
the DHCP server.
Use Fixed IP Address: Check this option. You have to specify a static IP address, subnet mask,
default gateway and DNS server for the ZAC Access Point manually. Make sure the specified IP
address is unique on your network in order to prevent IP conflict.
Enable 802.1Q VLAN
To be able to access the web page of the ZAC-managed AP in the VLAN network, you need to
assign the VLAN management ID for the ZAC-managed AP. Note that the ID on the switch must
be identical of the AP’s VLAN ID. Check Enable 802.1Q VLAN checkbox to activate it.
Management VLAN ID: Enter the VLAN ID.
P. 70
FAT AP Mode
Status
View Basic Information
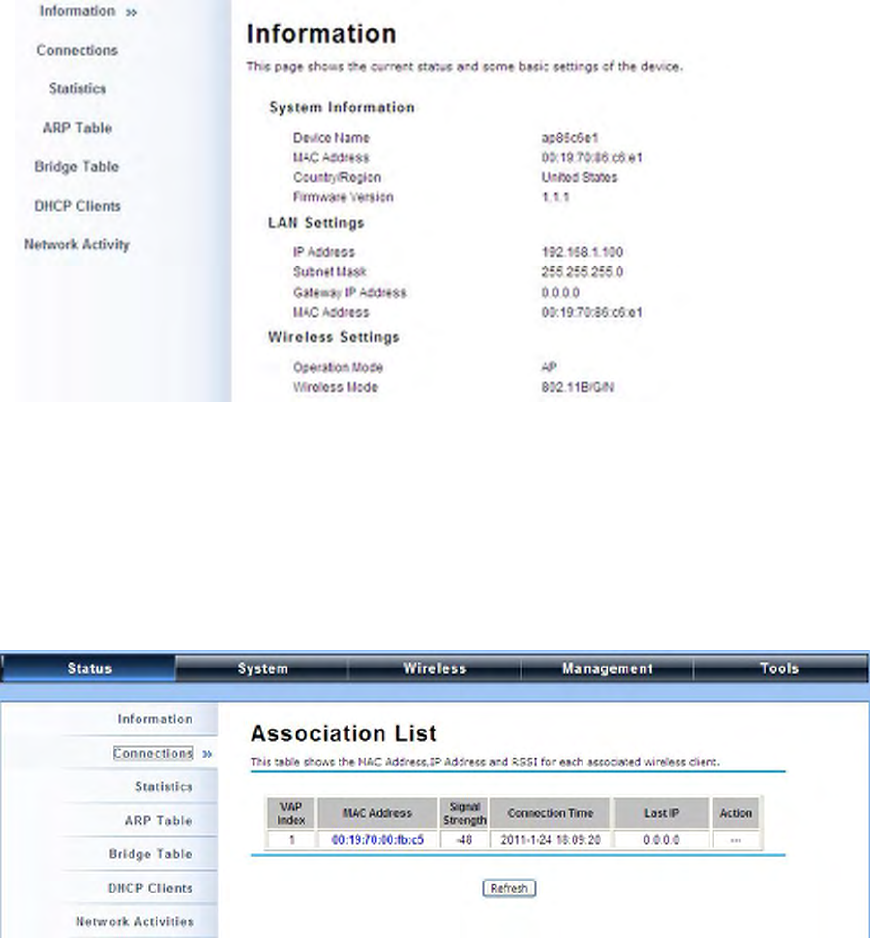
Open “Information” in “Status” to check the basic information of the ZAC Access Point, which is read
only. Information includes system information, LAN settings, wireless setting and interface status.
Click “Refresh” at the bottom to have the real-time information.
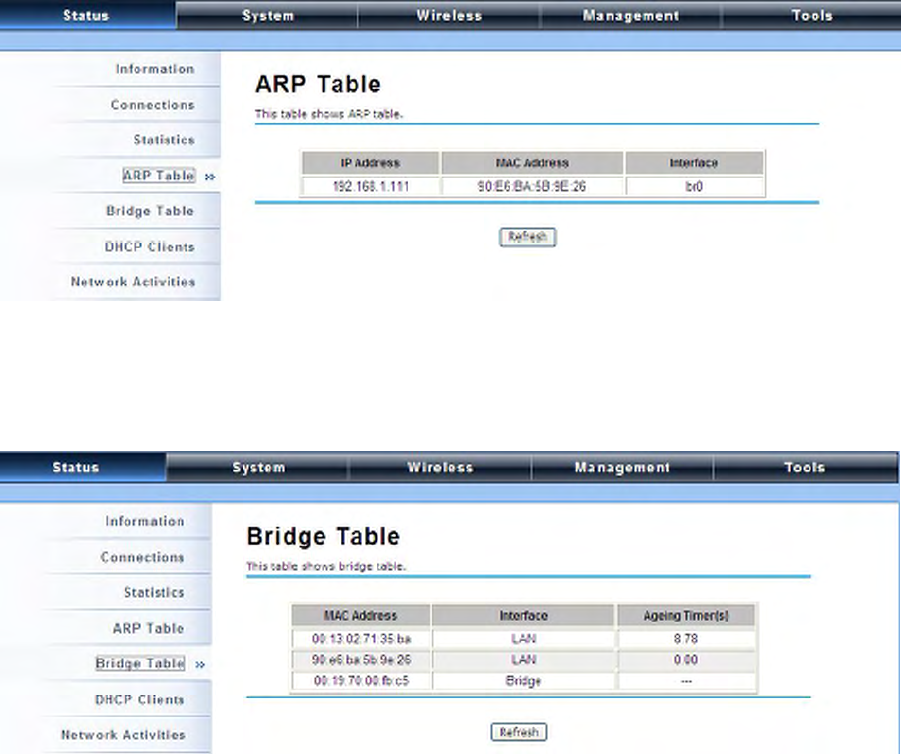
View Association List
Open “Connections” in “Status” to check the information of associated wireless devices such as MAC
address, signal strength, connection time, IP address, etc. All is read only. Click “Refresh” at the
bottom to update the current association list.
By clicking on the MAC address of the selected device on the web you may see more details including
P. 71
device name, connection time, signal strength, noise floor, ACK timeout, link quality, IP information,
current data rate, current TX/RX packets.
View Network Flow Statistics
Open “Statistics” in “Status” to check the data packets received on and transmitted from the wireless
and Ethernet ports. Click “Refresh” to view current statistics.
Poll Interval
Specify the refresh time interval in the box beside “Poll Interval” and click “Set Interval” to save
settings. “Stop” helps to stop the auto refresh of network flow statistics.
P. 72
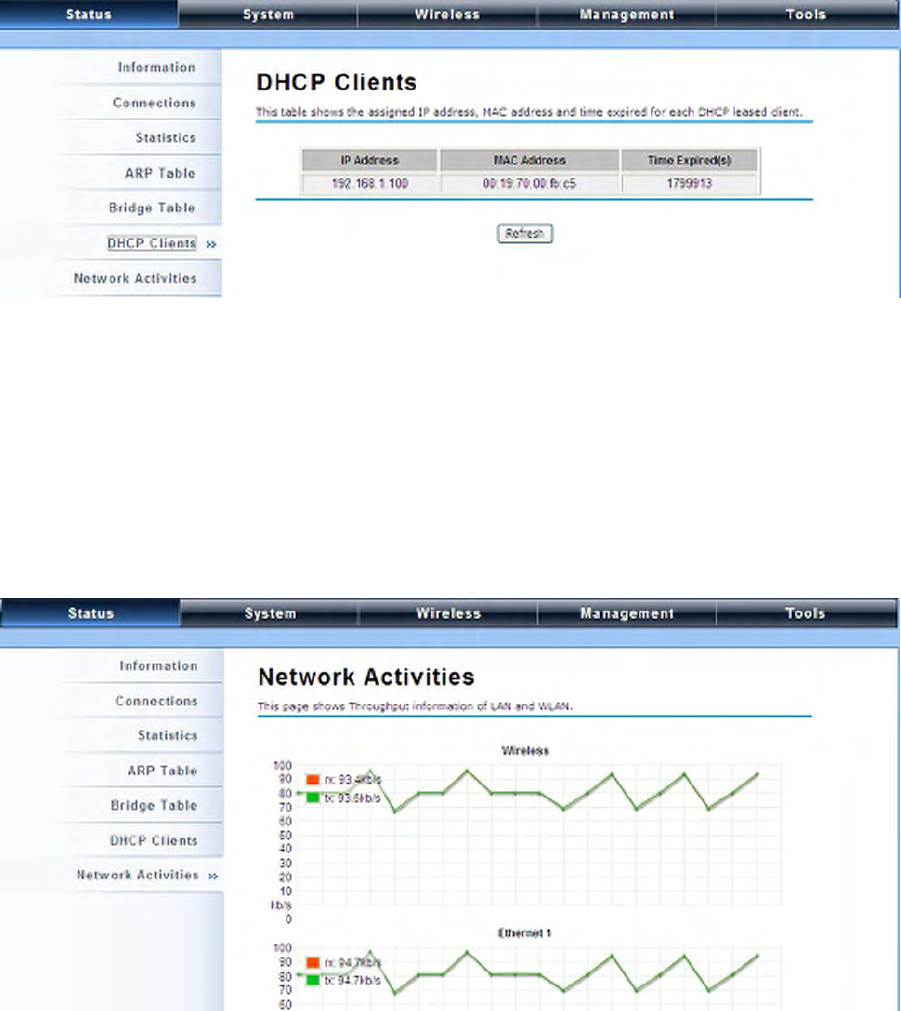
View ARP Table
Open “ARP Table” in “Status” as below. Click “Refresh” to view current table.
View Bridge Table
Open “Bridge Table” in “Status” as below. Click “Refresh” to view current connected status..
View Active DHCP Client Table
Open “DHCP Clients” in “Status” as below to check the assigned IP address, MAC address and time
expired for each DHCP leased client. Click “Refresh” to view current table.
P. 73
View Network Activities
The network activities allows you to monitor the current Wireless and Ethernet TX/RX data traffic in
graphical and numerical form on the Web of the Skyport. The chart scale and throughput dimension
(Bps, Kbps, Mbps) changes dynamically according to the mean throughput value. Throughput
statistics can be updated manually using the “Refresh” button.
P. 74
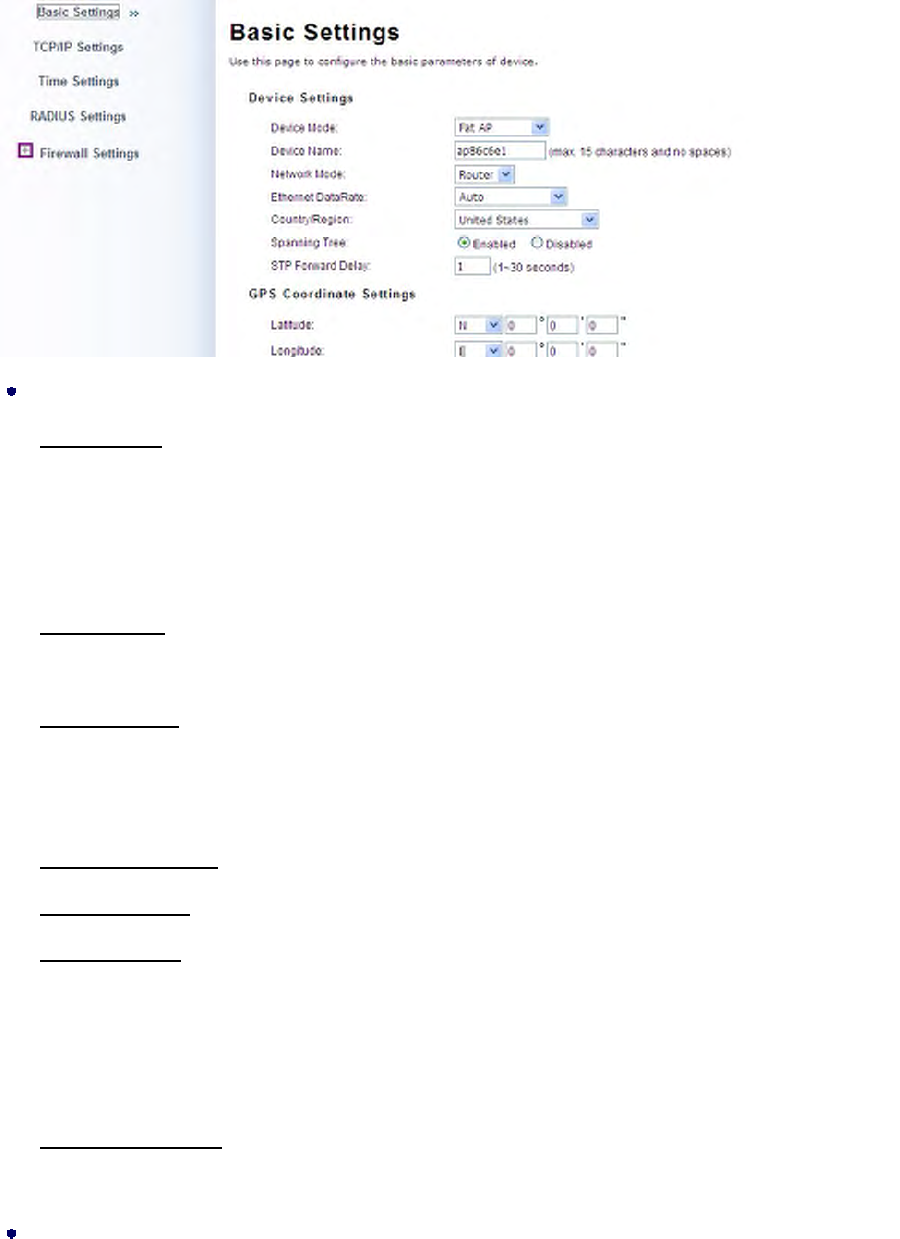
System
Basic System Settings
Device Settings
Device Mode: Three modes are provided: AC+Thin AP, Thin AP, FAT AP. Select AC+Thin AP
to have the device act as virtual access controller to manage other ZAC-managed APs on your
network. Select “Thin AP” to have the ZAC Access Point managed by the ZAC AP in AC mode.
Select FAT AP to perform as a standalone AP, neither managing nor managed by other ZAC APs.
Device Name: Specify the device name, which is composed of no more than 15 characters with
(0-9), (A-Z), (a-z) or (-).
Network Mode: Specify the network mode, including Bridge and Router. It is easy to configure
parameters in Bridge Mode; however, users must pay extra attention to the way they configure the
device when it is set to Router Mode. For details, please refer to TCP/IP Settings”.
Ethernet Data Rate: Specify the transmission rate of data for Ethernet. Default is Auto.
Country Region: For FCC domain, the default country is United States only.
Spanning Tree: Spanning Tree Protocol (STP) is a link management protocol for AP which
provides path redundancy while preventing loops in a network. STP allows only one active path
at a time between the access points but establish the redundant link as a backup if the initial link
fails.
STP Forward Delay: STP Forward Delay is the time spent in detecting and learning network tree
topology state before entering the forward state. Default time value is 1 sec.
GPS Coordinate Settings
P. 75
The GPS Coordinate Setting helps you mark the latitude and longitude of the ZAC Access Point.
Just enter the coordinates and click the Apply button.
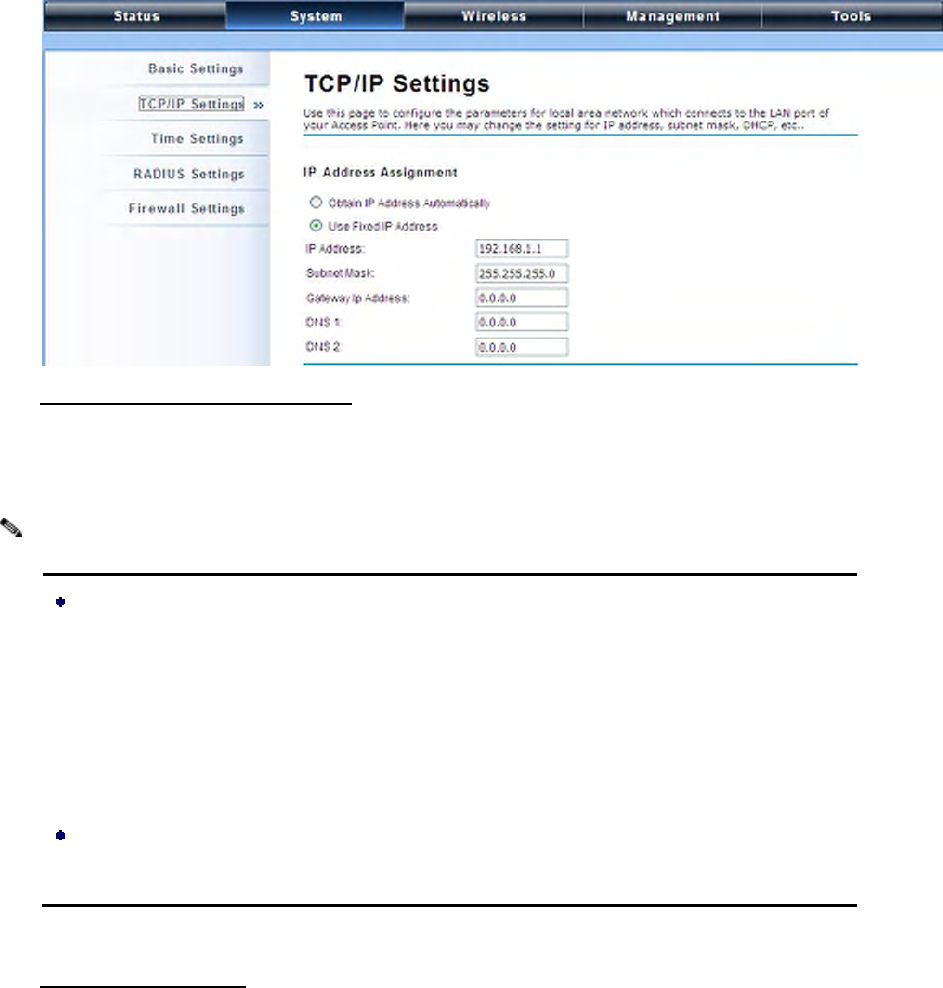
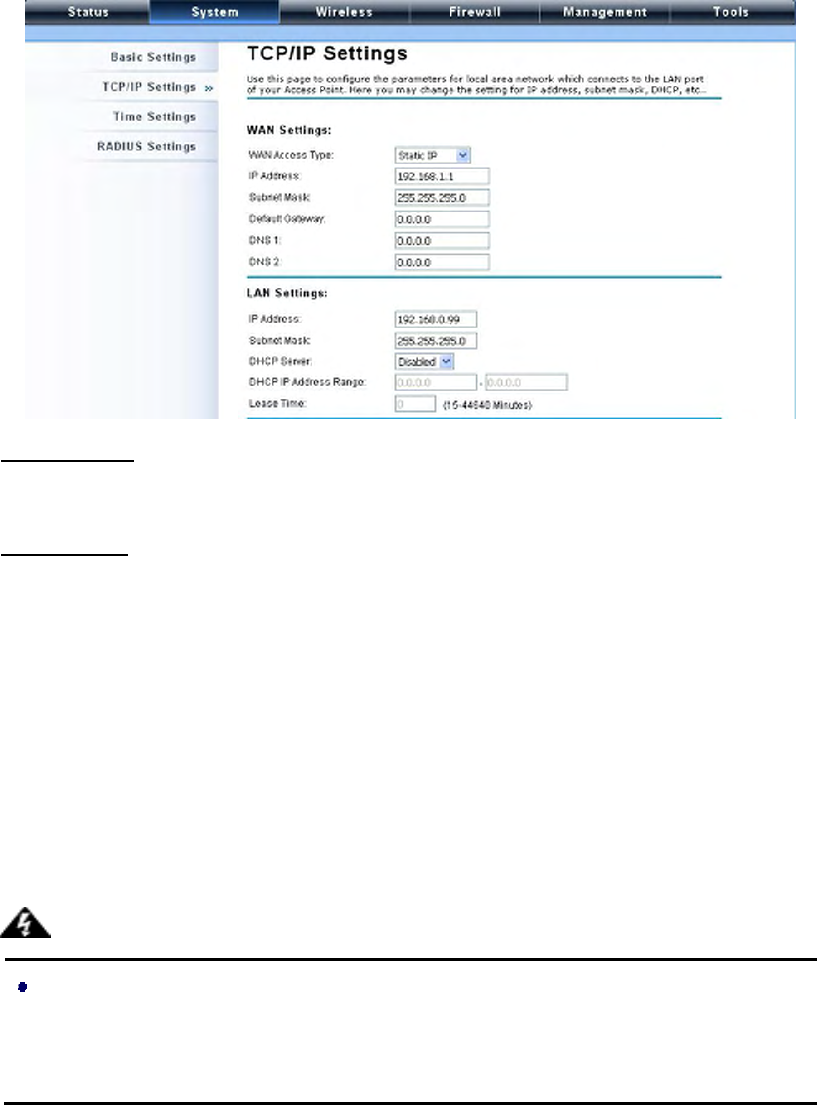
TCP/IP Settings
Open “TCP/IP Settings” in “System” as below to configure the parameters for LAN which connects to
the LAN port of the ZAC Access Point. In this page, users may change the settings for IP Address,
Subnet Mask, and DHCP Server.
Obtain IP Address Automatically: If a DHCP server exists in your network, you can check this
option, thus the IEEE 802.11n ZAC Access Point is able to obtain IP settings automatically from
that DHCP server.
When the IP address of the ZAC Access Point is changed, the clients on the network
often need to wait for a while or even reboot before they can access the new IP address.
For an immediate access to the bridge, please flush the netbios cache on the client
computer by running the “nbtstat –r” command before using the device name of the ZAC
Access Point to access its Web Management page.
In case the IEEE 802.11n ZAC Access Point is unable to obtain an IP address from a
valid DHCP server, it will fall back to default static IP address.
Use Fixed IP Address: Check this option. You have to specify a static IP address, subnet mask,
Note:
P. 76
default gateway and DNS server for the ZAC ACCESS POINT manually. Make sure the specified
IP address is unique on your network in order to prevent IP conflict.
If the IEEE 802.11n ZAC Access Point is configured as Router mode, you need to configure some
additional TCP/IP parameters for accessing the Internet.
WAN Settings: Specify the Internet access method to Static IP, DHCP or PPPOE. Users must
enter WAN IP Address, Subnet Mask, Gateway settings provided by your ISPs.
LAN Settings: When DHCP Server is disabled, users can specify IP address and subnet mask
for the ZAC ACCESS POINT manually. Make sure the specified IP address is unique on your
network in order to prevent IP conflict. When DHCP Server is enabled, users may specify DHCP
IP Address Range, DHCP Subnet Mask, DHCP Gateway and Lease Time (15-44640 minutes).
A DHCP relay agents is used to forward DHCP requests and replies between clients and servers
when they are not on the same physical subnet. To enable the DHCP relay agent, check the
“Enable DHCP Relay” checkbox and enter the IP address of the DHCP server.
In AP mode, the IEEE 802.11n ZAC Access Point must establish connection with
another wireless device before it is set to Router mode. To access the unit in Router
mode via wired port, please type the WAN IP address to enter the web page for WAN
Warning:
P. 77
is on wired port and LAN is on wireless port. Or, you can access device through the
wireless device connected with the ZAC AP.
In wireless client mode, users can access the ZAC Access Point via its wired port, for
WAN is on wireless port and LAN is on wired port when device is set to
Router mode.
Bridge mode and AP Repeater mode are similar to AP mode when device is set to
Router mode; WAN is on wired port and LAN is on wireless port. Thus users must also
connect the ZAC Access Point with another wireless device before it is set to Router
mode and access the ZAC Access Point via the connected wireless device.
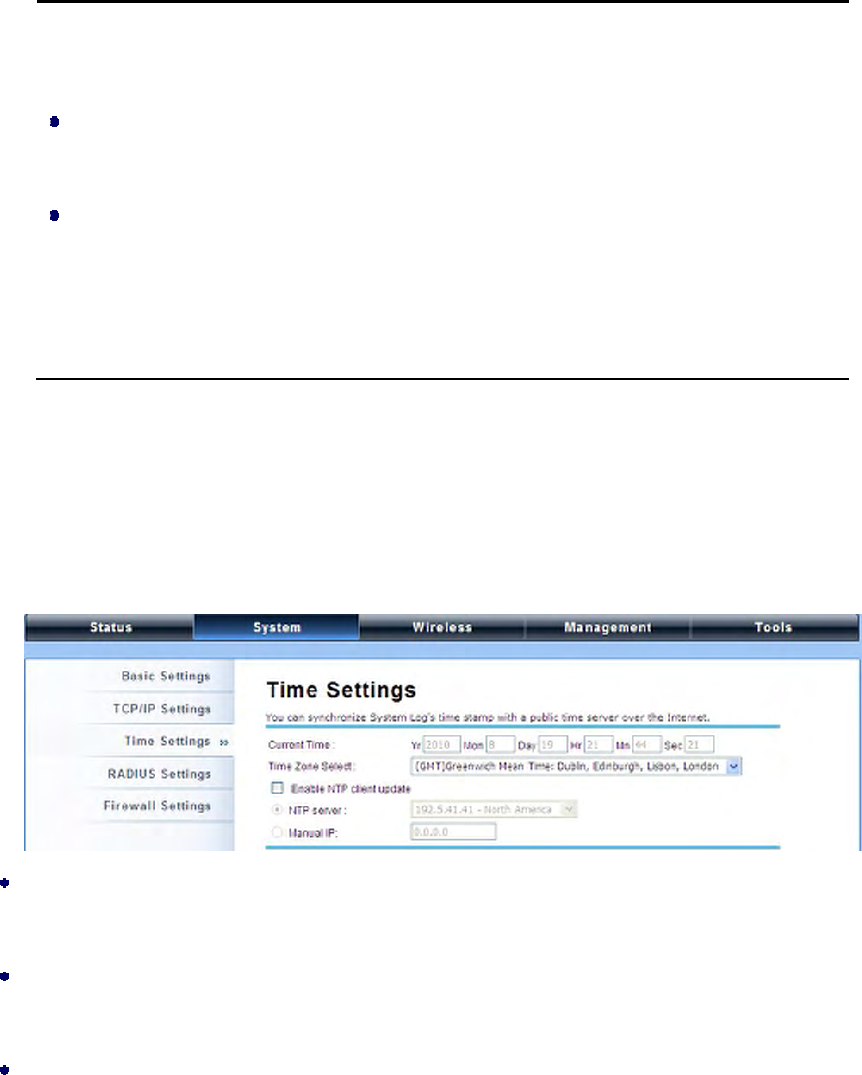
Time Settings
Compliant with NTP, the IEEE 802.11n ZAC Access Point is capable of keeping its time in accord with
the Internet time. To use this feature, check Enable NTP Client Update in advance.
Current Time
Display the present time in Yr, Mon, Day, Hr, Min and Sec.
Time Zone Select
Select the time zone from the dropdown list.
NTP Server
Select the time server from the “NTP Server” dropdown list. or manually input the IP address of
available time server into “Manual IP”.
P. 78
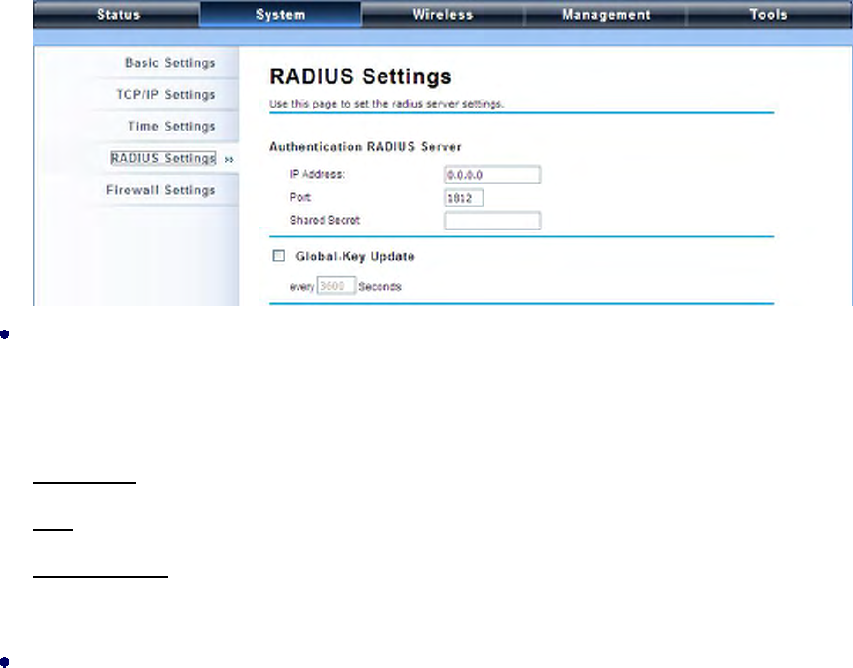
RADIUS Settings
RADIUS (Remote Authentication Dial-In User Service) is a server for remote user authentication and
accounting; playing a central role in the network in providing the capabilities of authenticating,
authorizing, accounting, auditing, alarming and etc. It allows an organization to maintain user profiles
in a central database that all remote servers can share. If 802.1X, WPA(2) is used, you need to
configure radius settings.
Open “RADIUS Settings” in “System” to make RADIUS configuration.
Authentication RADIUS Server
This is for RADIUS authentication. It can communicate with RADIUS through IP Address, Port and
Shared Secret.
IP Address: Enter the IP address of the Radius Server;
Port: Enter the port number of the Radius Server;
Shared Secret: This secret, which is composed of no more than 31 characters, is shared by the
IEEE 802.11n ZAC Access Point and RADIUS during authentication.
Global-Key Update
Check this option and specify the time interval between two global-key updates. Default is 3600
seconds.
P. 79
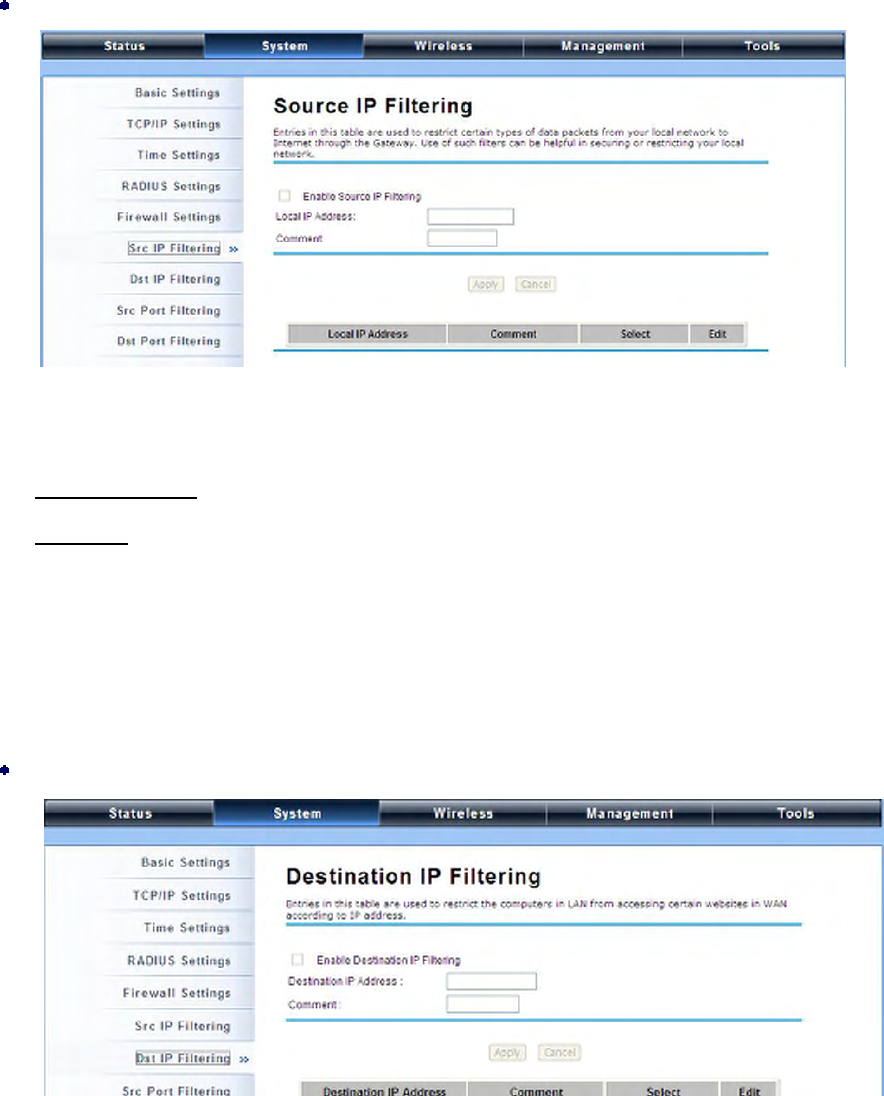
Firewall Settings
The firewall is a system or group of systems that enforce an access control policy between two
networks. It may also be defined as a mechanism used to protect a trusted network from an
un-trusted network. The IEEE 802.11n ZAC Access Point has capabilities of Source IP Filtering,
Destination IP Filtering, Source Port Filtering, Destination Port Filtering, Port Forwarding as well as
DMZ. This is available only under Router Mode.
Source IP Filtering:
You may create and activate a rule that filters a packet based on the source IP address from
your local network to Internet. Check “Enable Source IP Filtering” to activate rule.
Local IP Address: Enter the IP address you would like to restrict.
Comment: Make comments to record your filtering rule.
Click Apply and the IP address will be added in the list. To delete the IP address from filtering,
click Select checkbox of the designated IP address and click the Delete Selected button. You
may delete all the IP addresses in the list by clicking Delete All.
Destination IP Filtering:
P. 80
You may create and activate a rule that filters a packet based on the destination IP address to
restrict the local computers from accessing certain websites. Check “Enable Destination IP
Filtering” to activate rule.
Destination IP Address: Enter the IP address to be restricted.
Comment: Make comments to record your filtering rule.
Click Apply and the IP address will be added in the list. To delete the IP address from filtering,
click Select checkbox of the designated destination IP address and click the Delete Selected
button. You may delete all the IP addresses in the list by clicking Delete All.
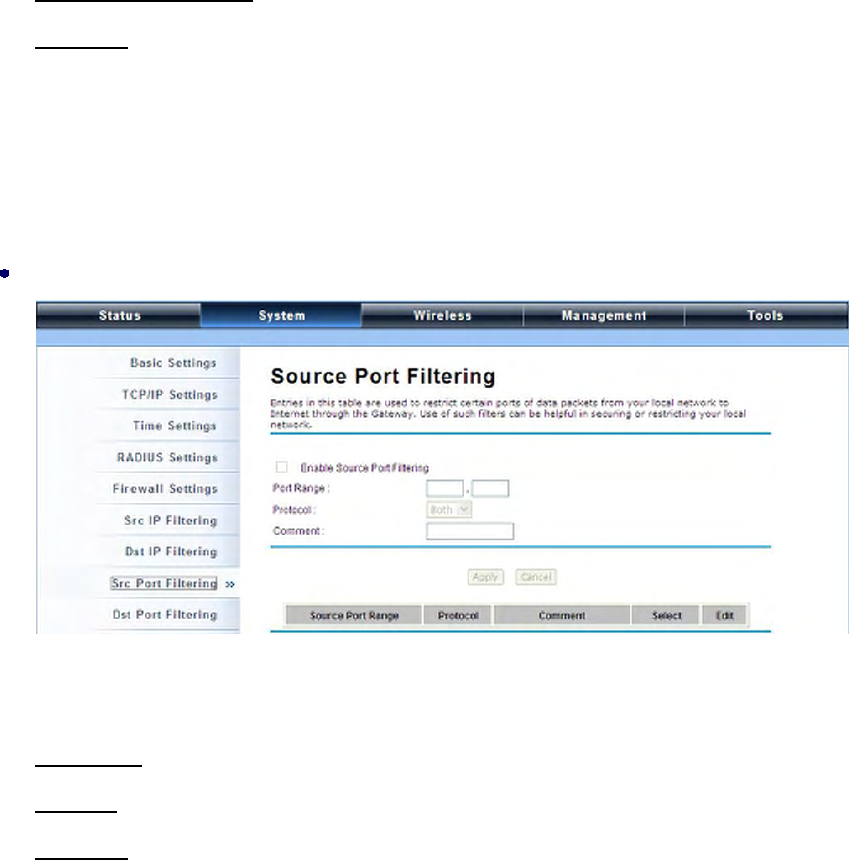
Source Port Filtering:
You may create and activate a rule that filters a packet based on the source port from your local
network to Internet. Check “Enable Source Port Filtering” to activate rule.
Port Range: Enter the port range you would like to restrict.
Protocol: Select port protocol: Both, TCP, UDP.
Comment: Make comments to record your filtering rule.
Click Apply and the IP address will be added in the list. To delete the restricted source ports,
click Select checkbox of the designated ports and click the Delete Selected button. You may
delete all the IP addresses in the list by clicking Delete All
P. 81
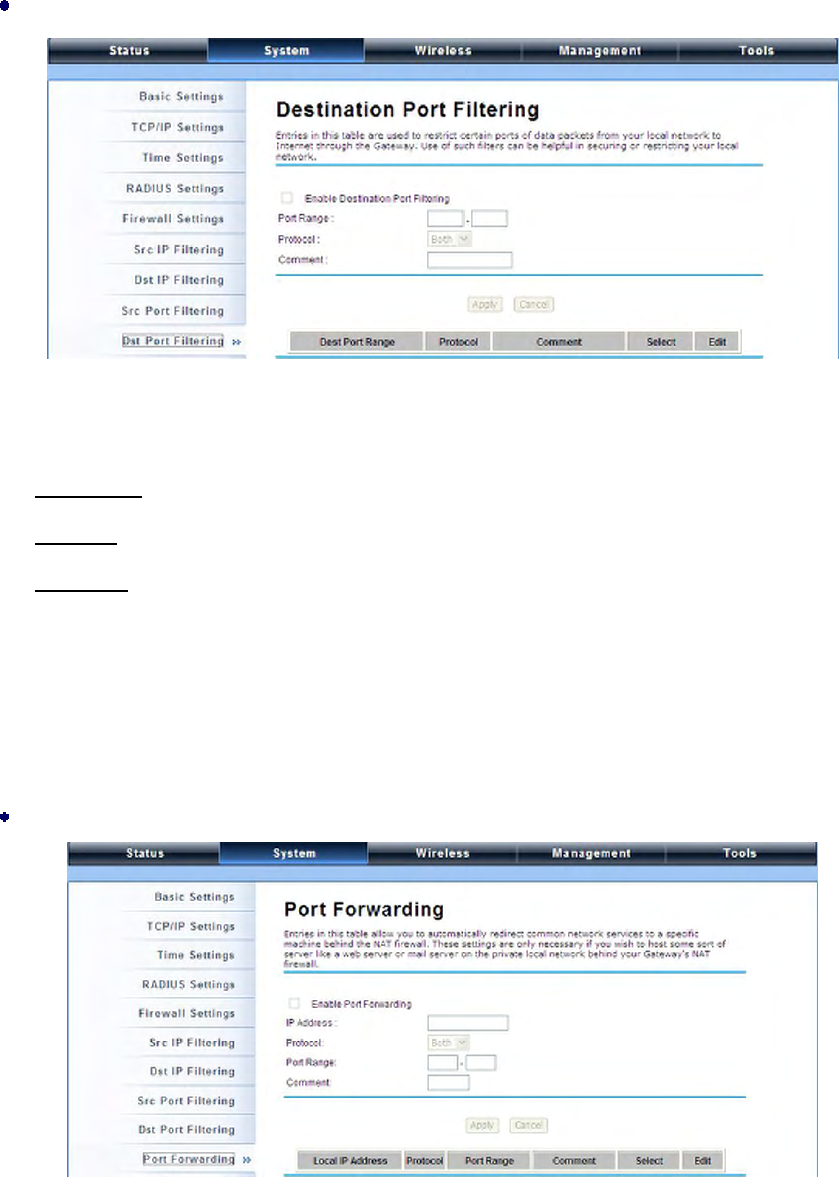
Destination Port Filtering:
You may create and activate a rule that filters a packet based on the destination port from your
local network to Internet. Check “Enable Destination Port Filtering” to activate rule.
Port Range: Enter the port range you would like to restrict.
Protocol: Select port protocol: Both, TCP, UDP.
Comment: Make comments to record your filtering rule.
Click Apply and the IP address will be added in the list. To delete the restricted destination ports,
click Select checkbox of the designated ports and click the Delete Selected button. You may
delete all the IP addresses in the list by clicking Delete All.
Port Forwarding:
The port forwarding allows you to automatically redirect common network services to a specific
machine behind the NAT firewall. These settings ne are only necessary if you wish to host some
sort of server like a web server or mail server on the private local network behind IEEE 802.11n
Wireless ZAC Access Point’s NAT firewall. Check the Enable Port Forwarding checkbox to
P. 82
activate port forwarding.
IP Address: Enter the IP address the local server.
Protocol: Select Both, UDP or TCP.
Port Range: Specify the port range.
Comment: Make comments to record the port forwarding rule.
UDP Pass Through
By check Enable UDP Pass through will allow all the UDPs packets to pass through the firewall.
Note that opening all the UDP ports will be very likely to expose the network to intruders
DMZ:
A Demilitarized Zone is used to provide Internet services without sacrificing unauthorized access to its
local private network. Typically, the DMZ host contains devices accessible to the Internet traffic, such
as Web (HTTP) servers, FTP servers, SMTP (e-mail) servers and DNS servers. To activate DMZ,
check the Enable DMZ checkbox.
DMZ Host IP Address: Enter the local host IP address.
P. 83
Wireless
Open “Basic Settings” in “Wireless” as below to make basic wireless configuration.
Disable Wireless LAN Interface
Check this option to disable WLAN interface, then the wireless module of IEEE 802.11n ZAC
Access Point will stop working and no wireless device can connect to it.
Operation Mode
Four operating modes are available in IEEE 802.11n ZAC Access Point when acts as a FAT AP.
AP: The IEEE 802.11n ZAC Access Point establishes a wireless coverage and receives
connectivity from other wireless devices.
Wireless Client: The IEEE 802.11n ZAC Access Point is able to connect to the AP and thus join
the wireless network around it.
Bridge: The IEEE 802.11n ZAC Access Point establishes wireless connectivity with other APs by
keying in remote MAC address. Please refer to the “WDS Settings” for detailed configuration.
AP Repeater: The IEEE 802.11n ZAC Access Point servers as AP and Bridge concurrently. In
other words, the IEEE 802.11n ZAC Access Point can provide connectivity services for CPEs
under Bridge mode.

P. 84
Wireless Network Name (SSID)
This wireless network name is shared among all associated devices in your wireless network.
Keep it identical on all those devices. Note that the SSID is case-sensitive and can not exceed
32 characters.
Broadcast SSID
Under AP mode, hiding network name is necessary when you are in a wireless environment that
may have potential risk. By disabling broadcast SSID, the STA can not scan and find IEEE
802.11n ZAC Access Point, so that malicious attack by some illegal STA could be avoided.
802.11 Mode
The IEEE 802.11n ZAC Access Point can communicate with wireless devices of 802.11b/g or
802.11b/g/n.
HT Protect
Enable HT (High Throughput) protect to ensure HT transmission with MAC mechanism. Under
802.11n mode, wireless client can be divided into HT STA and Non-HT STA, among which the
one with HT protect enabled gets higher throughput.
Frequency/Channel
Channel varies much as the available band differs from country to country.
Extension Channel
Only applicable to AP, AP Repeater, and 40MHz channel width) indicates the use of channel
bonding that allows the IEEE 802.11n ZAC Access Point to use two channels at once. Two
options are available: Upper Channel and Lower Channel.
Channel Mode
Four levels are available: 5MHz, 10MHz, 20MHz and 40MHz. The last one can enhance data
throughput, but it takes more bandwidth, thus it might cause potential interference. Maximum
Output Power (per chain):
Specify the signal transmission power. The higher the output power is, the wider the signal can
cover, but the power consumption will be greater accordingly. The output power will vary
depending on each country’s regulation.
Data Rate
Usually “Auto” is preferred. Under this rate, the IEEE 802.11n ZAC Access Point will

P. 85
automatically select the highest available rate to transmit. In some cases, however, like where
there is no great demand for speed, you can have a relatively-low transmit rate for compromise of
a long distance.
Extension Channel Protection Mode
This is to avoid conflict with other wireless network and boost the ability of your device to catch all
802.11g transmissions. However, it may decrease wireless network performance. Compared to
CTS-Self; the transmission amount of CTS-RTS is much lower.
Enable MAC Clone
Available only under wireless client mode, it hides the MAC address of the AP while displays the
one of associated wireless client or the MAC address designated manually.
Site Survey
Under wireless client mode, the IEEE 802.11n ZAC Access Point is able to perform site survey,
through which, information on the available access points will be detected.
Open “Basic Settings” in “Wireless”, by clicking the “Site Survey” button beside “Wireless
Mode” option, the wireless site survey window will pop up with a list of available AP in the vicinity.
Select the AP you would like to connect and click “Selected” to establish connection.
VAP Profile Settings
Available in AP mode, the IEEE 802.11n ZAC Access Point allows up to 16 virtual SSIDs on a single
BSSID and to configure different profile settings such as security and VLAN ID to each SSID. To create a
P. 86
virtual AP, you may check the Enable box of the profile and click on the profile (eg. Profile 2) to
configure wireless and security settings. Hit Apply to active the profile.
Basic Setting
Profile Name: Name of the VAP profile
Wireless Network Name: Enter the virtual SSID for the VAP
Broadcast SSID: In AP mode, hiding network name is necessary when you are in a wireless
environment that may have potential risk. By disabling broadcast SSID, the STA cannot scan and
find the IEEE 802.11n ZAC Access Point, so that malicious attack by some illegal STA could be
avoided.
Wireless Separation: Wireless separation is an ideal way to enhance the security of network

P. 87
transmission. Under the mode except wireless client mode, enable “Wireless Separation” can
prevent the communication among associated wireless clients.
WMM Support: WMM (Wi-Fi Multimedia) is a subset of 802.11e. It allows wireless communication
to define a priority limit on the basis of data type under AP mode only, thus those time-sensitive
data, like video/audio data, may own a higher priority than common one. To enable WMM, the
wireless client should also support it
Max. Station Number: By checking the “Max. Station Num” the ZAC Access Point will only allow
up to 32 wireless clients to associate with for better bandwidth for each client. By disabling the
checkbox the ZAC Access Point will allow up to 128 clients to connect, but it is likely to cause
network congestion or poor performance.
Security Setting:
To prevent unauthorized radios from accessing data transmitting over the connectivity, the IEEE
802.11a/n ZAC Access Point provides you with rock solid security settings.
Network Authentication
Open System: It allows any device to join the network without performing any security check.
Shared Key: Data encryption and key are required for wireless authentication (Not available in
Bridge/AP Repeater mode).
Legacy 802.1x: It provides the rights to access the wireless network and wired Ethernet. With
User and PC identity, centralized authentication as well as dynamic key management, it controls
the security risk of wireless network to the lowest. To serve the 802.1x, at least one EAP type
should be supported by the RADIUS Server, AP and wireless client.
WPA with RADIUS: Wi-Fi Protected Access (WPA) is a subset of the IEEE 802.11i standard.
With warrant (username, password and etc.) offered by user, this kind of authentication can be
realized with specific RADIUS server. This is the common way to be adopted in large enterprise
network.
WPA2 with RADIUS: WPA2 (IEEE 802.11i) is a wireless security standard that defines stronger
encryption, authentication and key management than WPA. If it is selected, AES encryption and
RADIUS server are required.
WPA&WPA2 with RADIUS: It provides options of WPA (TKIP) or WPA2 (AES) for the client. If it is
selected, the data encryption type must be TKIP + AES and the RADIUS server must be set.

P. 88
If Radius relevant authentication type is selected, please go to Wireless Radius
Settings for further radius server configuration.
WPA-PSK: It is a simplified WPA mode with no need for specific authentication server. In this
so-called WPA Pre-Shared Key, all you have to do is just pre-enter a key in each WLAN node and
this is the common way to be adopted in large and middle enterprise as well as residential
network.
WPA2-PSK: As a new version of WPA, only all the clients support WPA2, can it be available. If it is
selected, the data encryption can only be AES and the passphrase is required.
WPA-PSK&WPA2-PSK: Available in AP mode, it provides options of WPA (TKIP) or WPA2 (AES)
encryption for the client. If it is selected, the data encryption can only be TKIP + AES and the
passphrase is required.
Data Encryption
If data encryption is enabled, the key is required and only sharing the same key with other
wireless devices can the communication be established.
None: Available only when the authentication type is open system.
64 bits WEP: It is made up of 10 hexadecimal numbers.
128 bits WEP: It is made up of 26 hexadecimal numbers.
152 bits WEP: It is made up of 32 hexadecimal numbers.
TKIP: Temporal Key Integrity Protocol, which is a kind of dynamic encryption, is co-used with
WPA-PSK, etc.
AES: Advanced Encryption Standard, it is usually co-used with WPA2-PSK, WPA, WPA2, etc.
TKIP + AES: It allows for backwards compatibility with devices using TKIP.
We strongly recommend you enable wireless security on your network!
Only the same Authentication, Data Encryption and Key among the IEEE 802.11n
ZAC Access Point and wireless clients can the communication be established!
Note:
Note:
P. 89
VLAN
If your network uses VLANs, you can assign one SSID to a VLAN, and client devices using the SSID are
grouped in that VLAN.
To allow users on the VLAN to access the WEB page of the IEEE 802.11a/n ZAC Access Point, you need
to enable “Enable 802.1Q VLAN” and assign a management VLAN ID for your device. Make sure
the assigned management VLAN ID is identical to your network VLAN ID to avoid failures of accessing
the Web page of the IEEE 802.11n ZAC Access Point.
Advanced Settings
Open “Advanced Settings” in “Wireless” to make advanced wireless settings.
A-MPDU/A-MSDU Aggregation

P. 90
The data rate of your AP except wireless client mode could be enhanced greatly with this option
enabled; however, if your wireless clients don’t support A-MPDU/A-MSDU aggregation, it is not
recommended to enable it.
Short GI
Under 802.11n mode, enable it to obtain better data rate if there is no negative compatibility issue.

P. 91
RTS Threshold
The IEEE 802.11n ZAC Access Point sends RTS (Request to Send) frames to certain receiving
station and negotiates the sending of a data frame. After receiving an RTS, that STA responds
with a CTS (Clear to Send) frame to acknowledge the right to start transmission. The setting
range is 0 to 2346 in byte. Setting it too low may result in poor network performance. Leave it at
its default of 2346 is recommended.
Fragmentation Length
Specify the maximum size in byte for a packet before data is fragmented into multiple packets.
Setting it too low may result in poor network performance. Leave it at its default of 2346 is
recommended.
Beacon Interval
Specify the frequency interval to broadcast packets. Enter a value between 20 and 1024.
DTIM Interval
DTIM, which stands for Delivery Traffic Indication Message, is contained in the data packets. It is
for enhancing the wireless transmission efficiency. The default is set to 1. Enter a value between
1 and 255.
Preamble Type
It defines some details on the 802.11 physical layer. “Long” and “Auto” are available.
IGMP Snooping
Available in AP/Router mode, IGMP snooping is the process of listening to IGMP network traffic.
By enabling IGMP snooping, the AP will listen to IGMP membership reports, queries and leave
messages to identify the ports that are members of multicast groups. Multicast traffic will only be
forwarded to ports identified as members of the specific multicast group or groups.
RIFS
RIFS (Reduced Interframe Spacing) is a means of reducing overhead and thereby increasing
network efficiency.
Link Integration
Available under AP/Bridge/AP repeater mode, it monitors the connection on the Ethernet port by
checking “Enabled”. It can inform the associating wireless clients as soon as the disconnection
occurs.

P. 92
TDM Coordination
Stands for “Time-Division Multiplexing Technique”, this resource reservation control mechanisms
can avoid packet collisions and send the packets much more efficiently allowing for higher
effective throughput rates. This function is only available in AP/CPE mode. It is highly
recommended to enable TDM coordination when there are multiple CPEs needed to connect to
the AP in your application.
LAN2LAN CPE
LAN2LAN CPE mode enables packet forwarding at layer 2 level. It is fully transparent for all the
Layer2 protocols.
Space in Meter
To decrease the chances of data retransmission at long distance, the IEEE 802.11n ZAC Access
Point can automatically adjust proper ACK timeout value by specifying distance of the two nodes.
Flow Control
It allows the administrator to specify the incoming and outgoing traffic limit by checking “Enable
Traffic Shaping”. This is only available in Router mode.
We strongly recommend you leave most advanced settings at their defaults except
“Distance in Meters” adjusted the parameter for real distance; any modification on them
may negatively impact the performance of your wireless network.
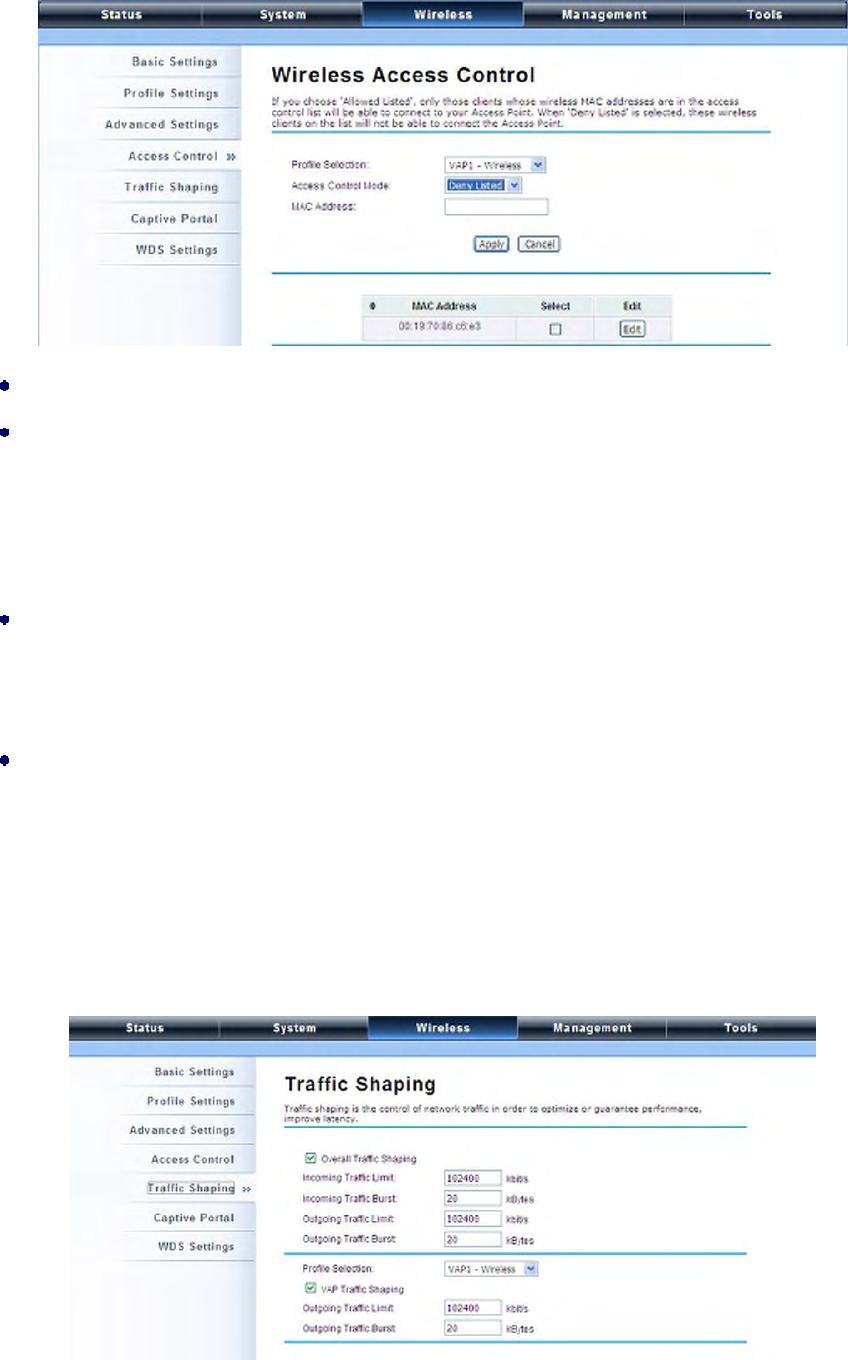
Access Control
The Access Control appoints the authority to wireless client on accessing IEEE 802.11n ZAC Access
Point, thus a further security mechanism is provided. This function is available only under AP/Router
mode.
Open “Access Control” in “Wireless Settings” as below.
Note:
P. 93
Profile Selection: Select the VAP network you would like to enable access control.
Access Control Mode
If you select “Allow Listed”, only those clients whose wireless MAC addresses are in the access
control list will be able to connect to your AP. While when “Deny Listed” is selected, those
wireless clients on the list will not be able to connect the AP.
MAC Address
Enter the MAC address of the wireless client that you would like to list into the access control list,
click “Apply” then it will be added into the table at the bottom.
Delete Selected/All
Check the box before one or more MAC addresses of wireless client(s) that you would like to
cancel, and click “Delete Selected” or “Delete All” to cancel that access control rule.
Traffic Shaping
It allows the administrator to manage the traffic flow to ensure optimal performance.

P. 94
Overall Traffic Shaping
Check this box to control the overall bandwidth of the ZAC Access Point.
Incoming Traffic Limit: To specify maximum incoming bandwidth to a certain rate in kbit/s.
Incoming Traffic Burst: To specify the buffer size for incoming traffic that can be sent within a
given unit of time. The suggested value is 20KBytes. You may just leave the default value there,
and then the connection will be bound to the traffic shaping rule at all times. You may decrease
it to smaller value if the incoming traffic limit is smaller.
Outgoing Traffic Limit: To limit the outbound traffic to a certain rate in kbit/s.
Outgoing Traffic Burst: To specify the buffer size for outbound traffic. The suggested value is
20KBytes. You may decrease it to smaller value if the outbound traffic limit is smaller.
VAP Traffic Shaping
Check this box to control the overall bandwidth for a specific VAP network.
Incoming Traffic Limit: To specify maximum incoming bandwidth to a certain rate in kbit/s.
Incoming Traffic Burst: To specify the buffer size for incoming traffic that can be sent within a
given unit of time. The suggested value is 20KBytes. You may just leave the default value there,
and then the connection will be bound to the traffic shaping rule at all times. You may decrease
it to smaller value if the incoming traffic limit is smaller.
Captive Portal
Captive portal is a management which allows WLAN users to easily and securely access the Internet.
Under Router mode, when captive portal is enabled, the IEEE 802.11n ZAC Access Point will redirect
the client to go to an authentication web page before browsing Internet web pages. Captive portals
are used on most Wi-Fi hotspots networks. Therefore, to use captive portal, you need to find the
service providers that have the additional services needed to make captive portal work.
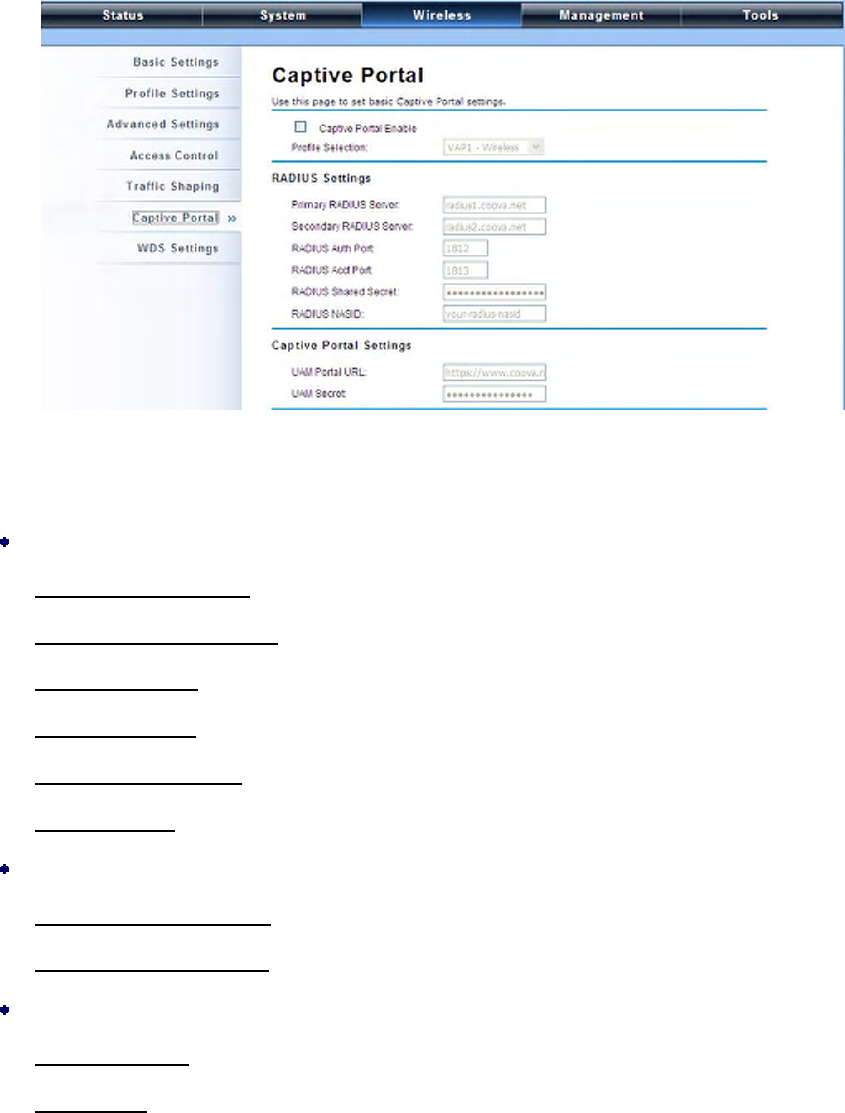
P. 95
To enable Captive Portal, check “Captive Portal” and select the VAP network needed for captive
portal.
Radius Settings
Primary Radius Server: Enter the name or IP address of the primary radius server
Secondary Radius Server: Enter the name or IP address of the primary radius server if any.
Radius Auth Port: Enter the port number for authentication
Radius Acct Port: Enter the port number for billing
Radius Shared Secret: Enter the secret key of the radius server
Radius NAS ID: Enter the name of the radius server if any
Radius Administrative-User:
Radius Admin Username: Enter the username of the Radius Administrator
Radius Admin Password: Enter the password of the Radius Administrator
Captive Portal
UAM Portal URL: Enter the address of the UAM portal server
UAM Secret: Enter the secret password between the redirect URL and the Hotspot.
P. 96
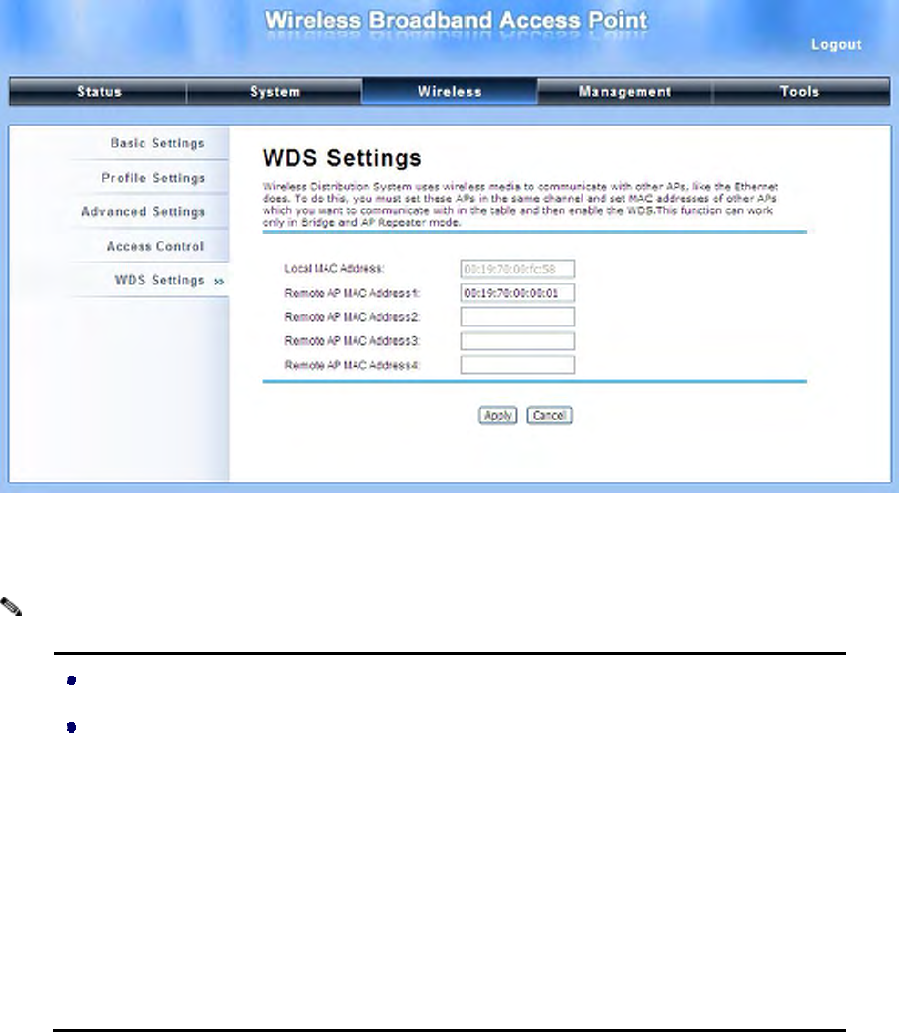
WDS Settings
Extend the range of your network without having to use cables to link the Access Points by using the
Wireless Distribution System (WDS): Simply put, you can link the Access Points wirelessly. Open
“WDS Settings” in “Wireless” as below:
Enter the MAC address of another AP you wirelessly want to connect to into the appropriate field and
click “Apply” to save settings.
WDS Settings is available only under Bridge and AP Repeater Mode.
Bridge uses the WDS protocol that is not defined as the standard thus compatibility
issues between equipment from different vendors may arise. Moreover, Tree or
Star shape network topology should be used in all WDS use-cases (i.e. if AP2 and
AP3 are specified as the WDS peers of AP1, AP2 should not be specified as the
WDS peer of AP3 and AP3 should not be specified as the WDS peer of AP2 in any
case). Mesh and Ring network topologies are not supported by WDS and should be
avoided in all the use cases.
Note:
P. 97
Management
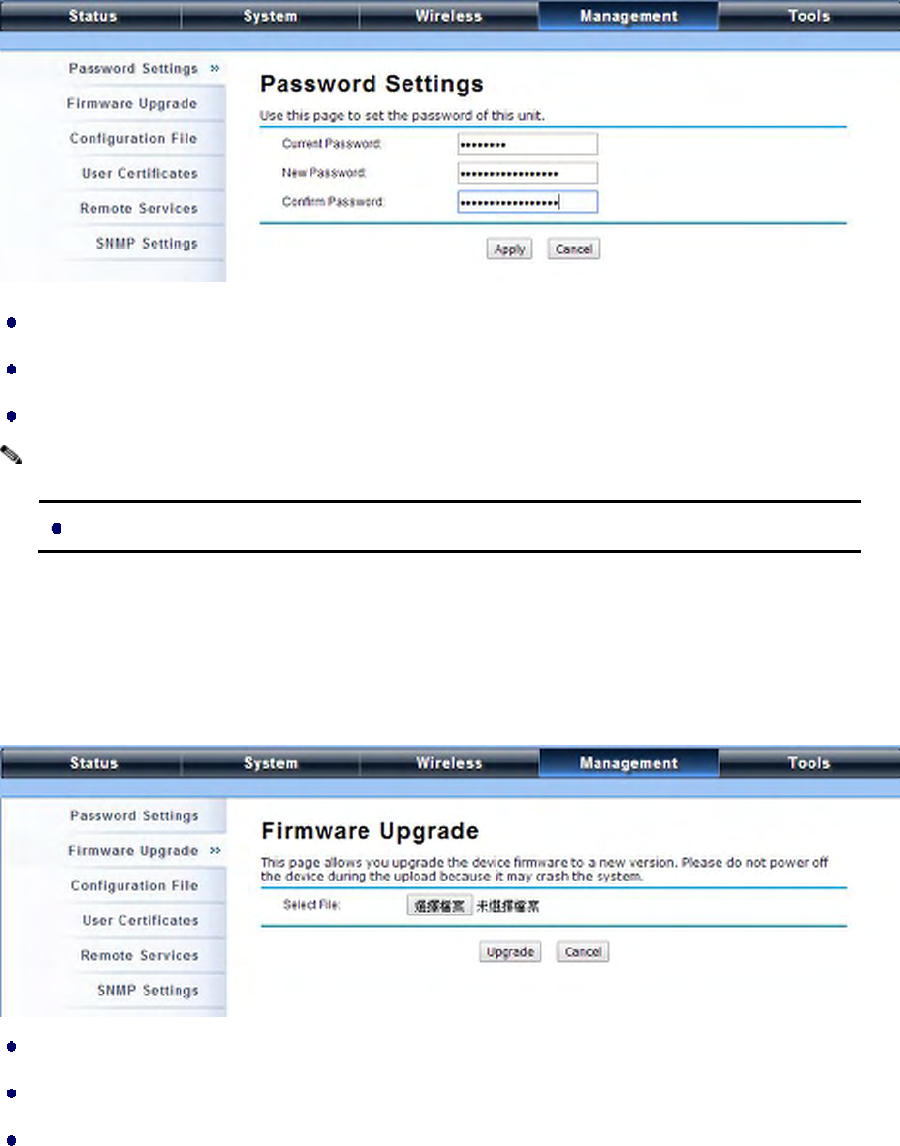
Password
From “Password Settings” in “Management”, you can change the password to manage your IEEE
802.11n ZAC Access Point.
Current Password: Enter the current password.
New Password: Enter the new password.
Confirm Password: Enter the new password again for confirmation.
The password is case-sensitive and its length cannot exceed 19 characters!
Upgrade Firmware
Open “Firmware Upload” in “Management” and follow the steps below to upgrade firmware locally or
remotely through IEEE 802.11n ZAC Access Point’s Web:
Click “Browse” to select the firmware file you would like to load;
Click “Upload” to start the upload process;
Wait a few minutes, the ZAC Access Point will reboot after successful upgrade.
Note:
P. 98
Do NOT cut the power off during upgrade, otherwise the system may crash!
Backup/ Retrieve Settings
It is strongly recommended you back up configuration information in case of something unexpected. If
tragedy hits your device, you may have an access to restore the important files by the backup. All
these can be done by the local or remote computer.
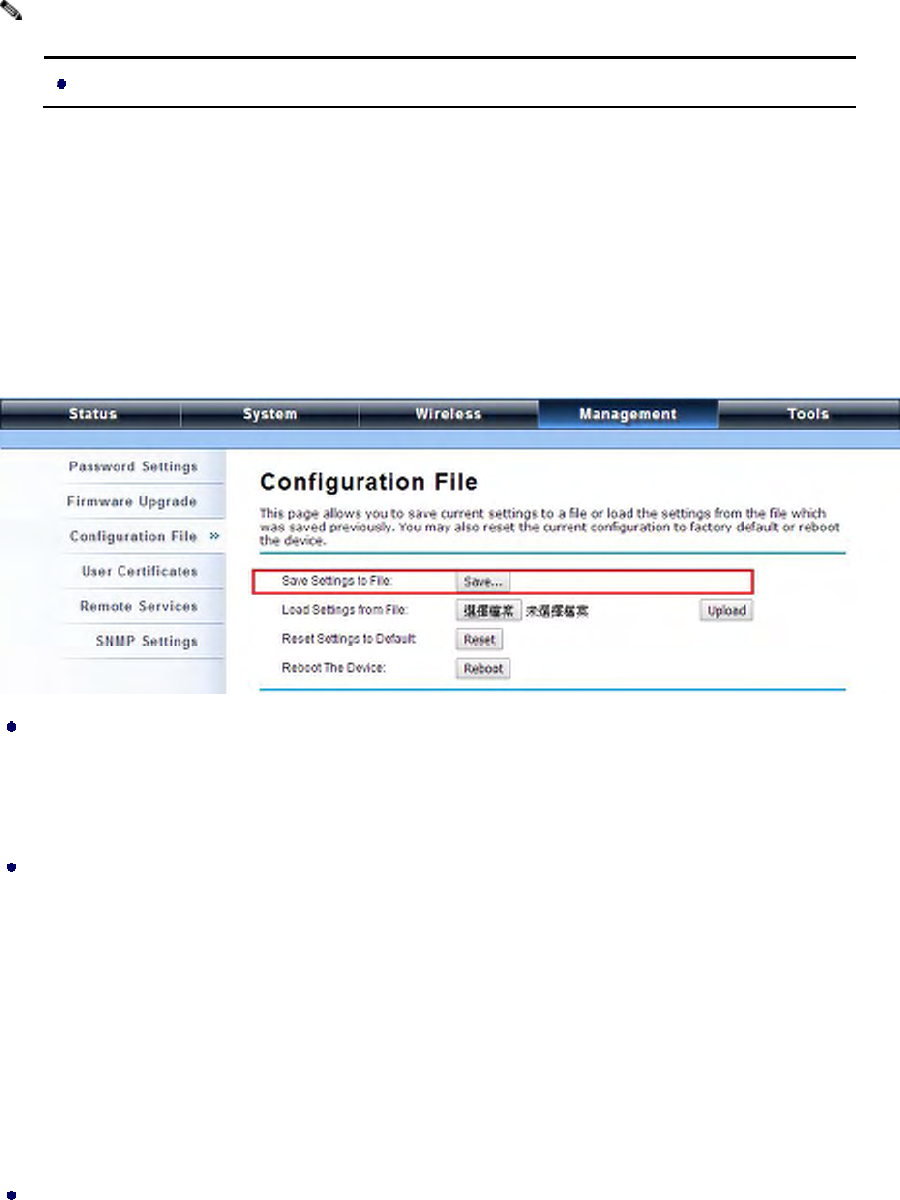
Open “Configuration File” in “Management” as below:
Save Setting to File
By clicking “Save”, a dialog box will pop up. Save it, then the configuration file ap.cfg will be
generated and saved to your local computer.
Load Settings from File
By clicking “Browse”, a file selection menu will appear, select the file you want to load, like ap.cfg;
Click “Upload” to load the file. After automatically rebooting, new settings are applied.
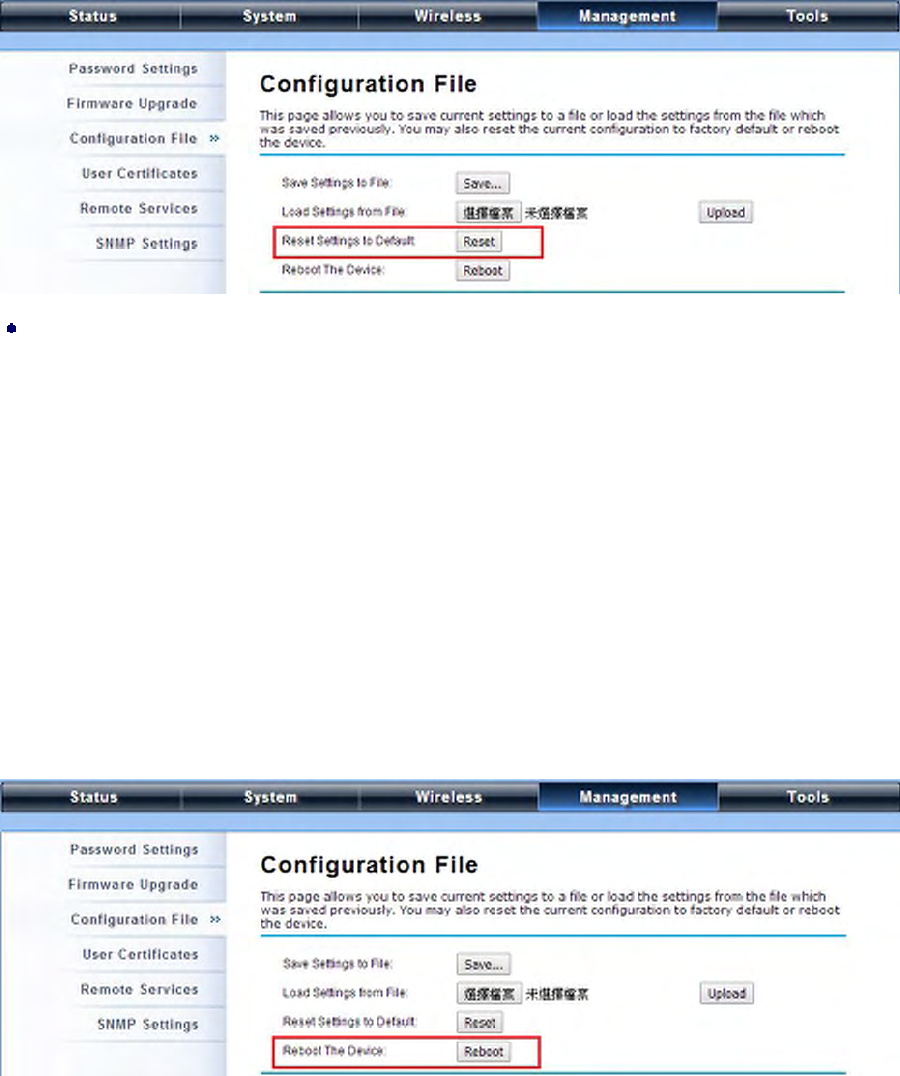
Restore Factory Default Settings
The IEEE 802.11n ZAC Access Point provides two ways to restore the factory default settings:
Restore factory default settings via Web
From “Configuration File”, clicking “Reset” will eliminate all current settings and reboot your
device, then default settings are applied.
Note:
P. 99
Restore factory default settings via Reset Button
If software in IEEE 802.11n ZAC Access Point is unexpectedly crashed and no longer reset the
unit via Web, you may do hardware reset via the reset button. Press and hold the button for at
least 5 seconds and then release it until the PWR LED gives a blink.
Reboot
You can reboot your IEEE 802.11n ZAC Access Point from “Configuration File” in “Management” as
below:
Click “Reboot” and hit “Yes” upon the appeared prompt to start reboot process. This takes a few
minutes.
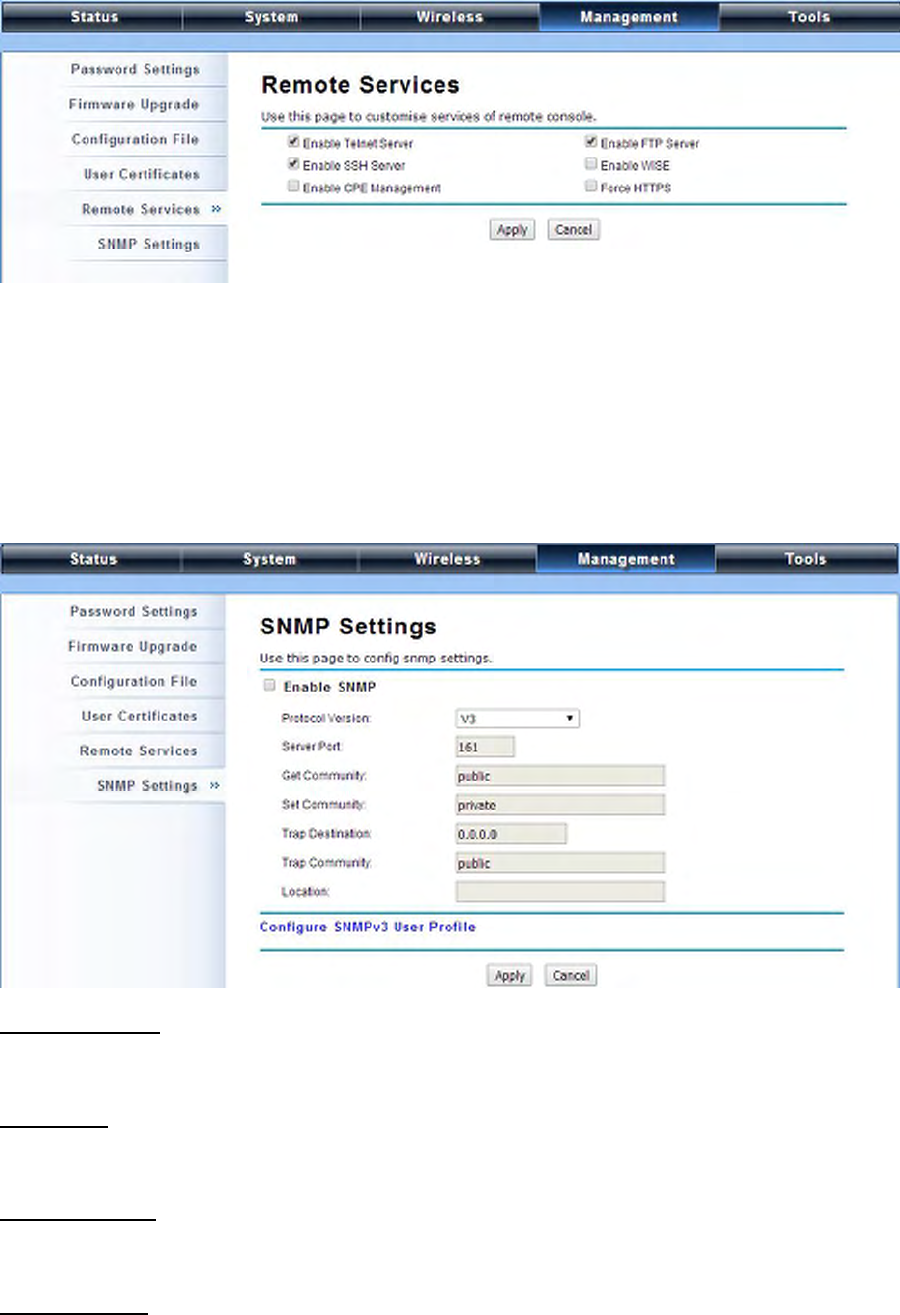
Remote Management
The IEEE 802.11n ZAC Access Point provides a variety of remotes managements including Telnet,
SNMP, FTP, SSH, HTTPS and exclusive WISE tool, making configuration more convenient and
secure.
P. 100
SNMP Management
The IEEE 802.11n ZAC Access Point supports SNMP for convenient remote management. Open
“SNMP Settings” in “Management” shown below. Set the SNMP parameters and obtain MIB file
before remote management.
Protocol Version: Select the SNMP version, and keep it identical on the IEEE 802.11n ZAC Access
Point and the SNMP manager. The IEEE 802.11n ZAC Access Point supports SNMP v2/v3.
Server Port: Change the server port for a service if needed; however you have to use the same port to
use that service for remote management.
Get Community: Specify the password for the incoming Get and GetNext requests from the
management station. By default, it is set to public and allows all requests.
Set Community: Specify the password for the incoming Set requests from the management station.
By default, it is set to private.

P. 101
Trap Destination: Specify the IP address of the station to send the SNMP traps to.
Trap Community: Specify the password sent with each trap to the manager. By default, it is set to
public and allows all requests.
Configure SNMPv3 User Profile
For SNMP protocol version 3, you can click “Configure SNMPv3 User Profile” in blue to set the
details of SNMPv3 user. Check “Enable SNMPv3 Admin/User” in advance and make further
configuration.
User Name: Specify a user name for the SNMPv3 administrator or user. Only the SNMP
commands carrying this user name are allowed to access the IEEE 802.11n ZAC Access Point.
Password: Specify a password for the SNMPv3 administrator or user. Only the SNMP commands
carrying this password are allowed to access the IEEE 802.11n Wireless ZAC Access Point.
Confirm Password: Input that password again to make sure it is your desired one.
Access Type: Select “Read Only” or “Read and Write” accordingly.
Authentication Protocol: Select an authentication algorithm. SHA authentication is stronger
than MD5 but is slower.
PriZACy Protocol: Specify the encryption method for SNMP communication. None and DES are
available. None means no encryption is applied. DES is a Data Encryption Standard that
applies a 58-bit key to each 64-bit block of data.
P. 102
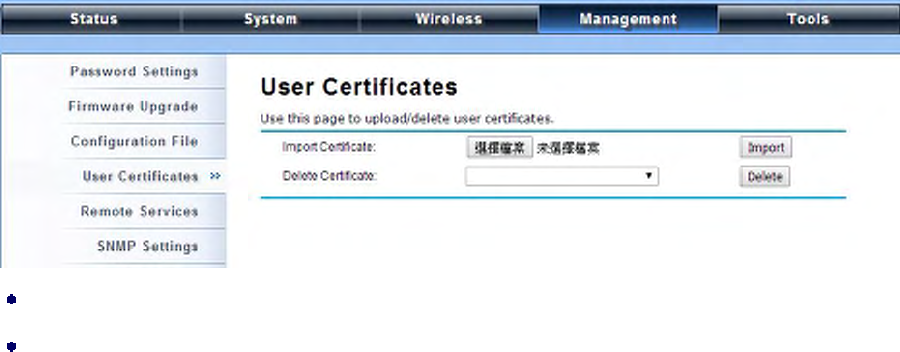
Certificate Settings
Under Wireless Client mode, when EAP-TLS is used, the RADIUS server must know which user
certificates to trust. The Server can trust all certificates issued by a given CA.
To import a user certificate, from Import User Certificates, click “Browse” and specify the location
where the user certificate is placed. Click “Import”.
Delete User Certificate: Delete the selected user certificate.
Import User Certificates: Imported the user certificate
P. 103
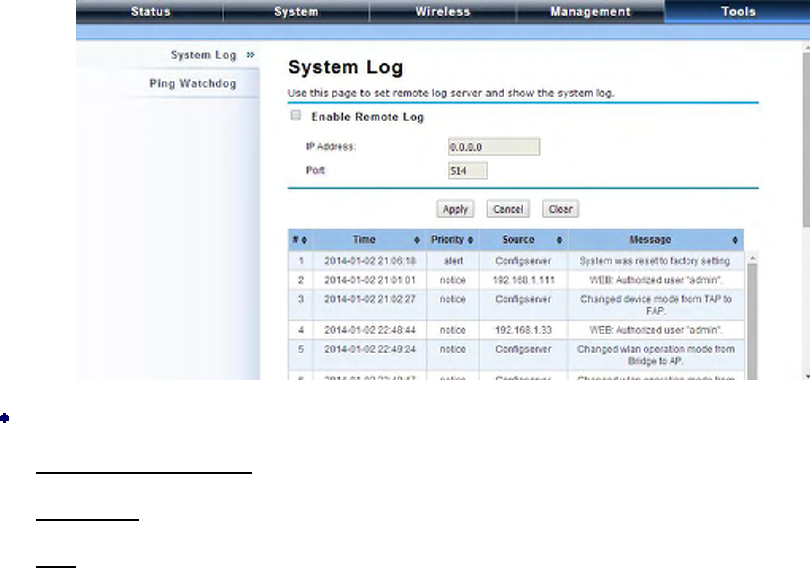
Tools
System Log
System log is used for recording events occurred on the IEEE 802.11n ZAC Access Point, including
station connection, disconnection, system reboot and etc.
Open “System Log” in “Tools” as below.
Remote Syslog Server
Enable Remote Syslog: Enable System log to alert remote server.
IP Address: Specify the IP address of the remote server.
Port: Specify the port number of the remote server.
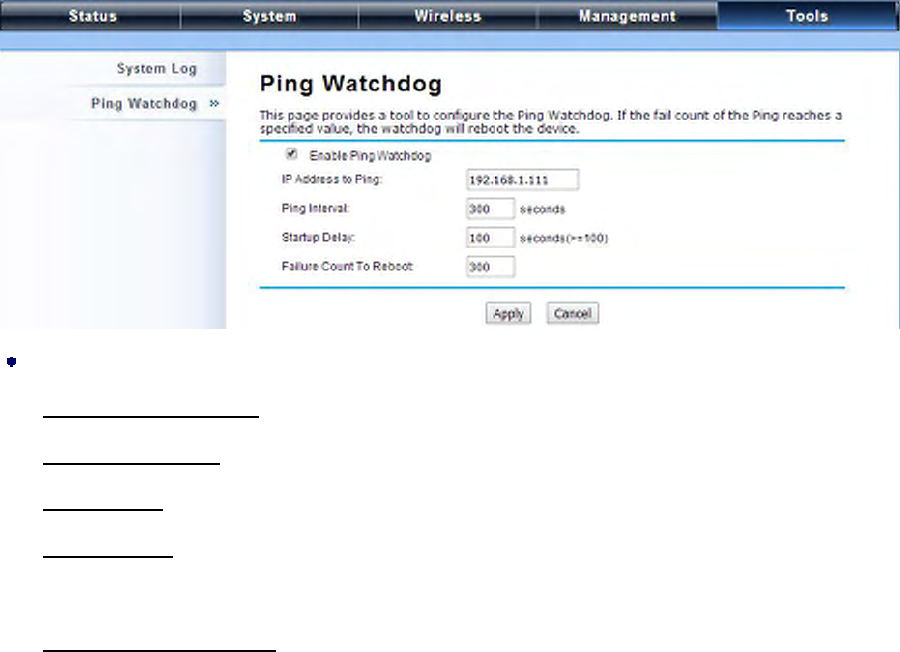
Ping Watch Dog
If you mess your connection up and cut off your ability the log in to the unit, the ping watchdog has a
chance to reboot due to loss of connectivity.
P. 104
Ping Watchdog
Enable Ping Watchdog: To activate ping watchdog, check this checkbox.
IP Address to Ping: Specify the IP address of the remote unit to ping.
Ping Interval: Specify the interval time to ping the remote unit.
Startup Delay: Specify the startup delay time to prevent reboot before the IEEE 802.11n ZAC
Access Point is fully initialized.
Failure Count To Reboot: If the ping timeout packets reached the value, the IEEE 802.11n ZAC
Access Point will reboot automatically.

P. 105
Appendix A. ASCII
WEP can be configured with a 64-bit, 128-bit or 152-bit Shared Key (hexadecimal number or ACSII).
As defined, hexadecimal number is represented by 0-9, A-F or a-f; ACSII is represented by 0-9, A-F,
a-f or punctuation. Each one consists of two-digit hexadecimal.
Table 1 ACSII
ASCII
Character
Hex
Equivalent
ASCII
Character
Hex
Equivalent
ASCII
Character
Hex
Equivalent
ASCII
Character
Hex
Equivalent
! 21 9 39 Q 51 i 69
" 22 : 3A R 52 j 6A
# 23 ; 3B S 53 k 6B
$ 24 < 3C T 54 l 6C
% 25 = 3D U 55 m 6D
& 26 > 3E V 56 n 6E
‘ 27 ? 3F W 57 o 6F
( 28 @ 40 X 58 p 70
) 29 A 41 Y 59 q 71
* 2A B 42 Z 5A r 72
+ 2B C 43 [ 5B s 73
, 2C D 44 \ 5C t 74
- 2D E 45 ] 5D u 75
. 2E F 46 ^ 5E v 76
/ 2F G 47 _ 5F w 77
0 30 H 48 ` 60 x 78
1 31 I 49 a 61 y 79
2 32 J 4A b 62 z 7A
3 33 K 4B c 63 { 7B
4 34 L 4C d 64 | 7C
5 35 M 4D e 65 } 7D
6 36 N 4E f 66 ~ 7E
7 37 O 4F g 67
8 38 P 50 h 68