Z Wave B00Djalaie Aeotec By Aeon Labs Doorwindow Sensor Dsb29 Zwus Instruction Manual Sensor_0908 User Door Window
B01Gk5D1Pe Aeotec By Aeon Labs Z-Wave Door Window Sensor Zw120 User Manual B01GK5D1PE_Aeotec_by_Aeon_Labs_Z-Wave_Door_Window_Sensor_ZW120_User_Manual B01GK5D1PE_Aeotec_by_Aeon_Labs_Z-Wave_Door_Window_Sensor_ZW120_User_Manual 20 docs
B00Djalaie Aeotec By Aeon Labs Z-Wave Doorwindow Sensor Dsb29-Zwus Instruction Manual B00DJALAIE_Aeotec_by_Aeon_Labs_Z-Wave_DoorWindow_Sensor_DSB29-ZWUS_Instruction_Manual B00DJALAIE_Aeotec_by_Aeon_Labs_Z-Wave_DoorWindow_Sensor_DSB29-ZWUS_Instruction_Manual 1 docs
B00Djalaie Aeotec By Aeon Labs Z-Wave Doorwindow Sensor Dsb29-Zwus Instruction Manual B00DJALAIE_Aeotec_by_Aeon_Labs_Z-Wave_DoorWindow_Sensor_DSB29-ZWUS_Instruction_Manual B00DJALAIE_Aeotec_by_Aeon_Labs_Z-Wave_DoorWindow_Sensor_DSB29-ZWUS_Instruction_Manual 151 docs
B00Ijjy1Q8 Aeotec By Aeon Labs Door Window Sensor Dsb04100-Zwus Manual B00IJJY1Q8_Aeotec_by_Aeon_Labs_Door_Window_Sensor_DSB04100-ZWUS_Manual B00IJJY1Q8_Aeotec_by_Aeon_Labs_Door_Window_Sensor_DSB04100-ZWUS_Manual 152 docs
B00Djalaie Aeotec By Aeon Labs Z-Wave Doorwindow Sensor Dsb29-Zwus Instruction Manual B00DJALAIE_Aeotec_by_Aeon_Labs_Z-Wave_DoorWindow_Sensor_DSB29-ZWUS_Instruction_Manual B00DJALAIE_Aeotec_by_Aeon_Labs_Z-Wave_DoorWindow_Sensor_DSB29-ZWUS_Instruction_Manual 15 docs
2017-03-21
User Manual: Z-Wave B00Djalaie Aeotec By Aeon Labs Z-Wave Doorwindow Sensor Dsb29-Zwus Instruction Manual B00DJALAIE_Aeotec_by_Aeon_Labs_Z-Wave_DoorWindow_Sensor_DSB29-ZWUS_Instruction_Manual 2 docs
Open the PDF directly: View PDF ![]() .
.
Page Count: 20
Aeon Labs Door/Window Sensor
(Z-Wave Magnetic Door/Window Contact Sensor)
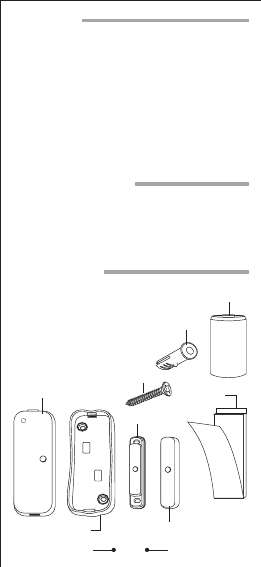
Sensor Unit
Bidirectional Mounting Plate
Magnet Unit
Magnet Unit
Outer Shell
Double-Sided
Mounting Tape
Screw Anchor
Screw
CR2 Battery
The Aeon Labs D/W Sensor is a battery-powered Z-Wave
magnetic door/window contact sensor. The D/W sensor will
send radio signals to up to 6 associated Z-Wave devices within
its own Z-Wave network when the main unit separates from the
smaller magnetic unit. Bidirectional mounting plate and push
button allows for easy end-user installation. The Aeon Labs
D/W Sensor also has tamper prevention and low-battery alerts.
By taking advantage of the Z-Wave mesh network, commands
can be routed to their destination via intermediatary “listening”
Z-Wave products. Products that are Z-Wave certified can be
used and communicate with other Z-Wave certified devices.
This product uses radio to wirelessly communicate data
between itself and other devices. Radio communication is
inherently not always 100% reliable, and as such, this product
should not be used in situations in which life and/or valuables
are solely dependant on its function.
• Sensor Unit – 1x
• Bidirectional Mounting Plate – 1x
• Magnet Unit – 1x
• Magnet Unit Outer Shell – 1x
• CR2 Battery – 1x
• Double-Sided Mounting Tape – 6x
• Screws – 4x
• Screw Anchors – 4x
1
lntroduction:
Important Disclaimers:
What’s Included:
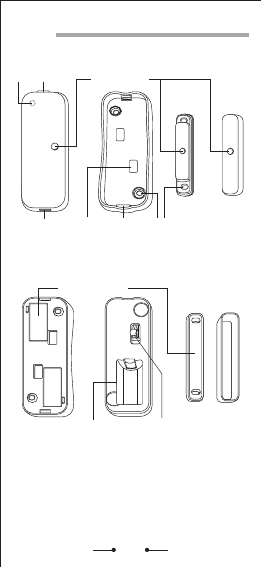
Double-Sided Mounting
Tape Sticking Area
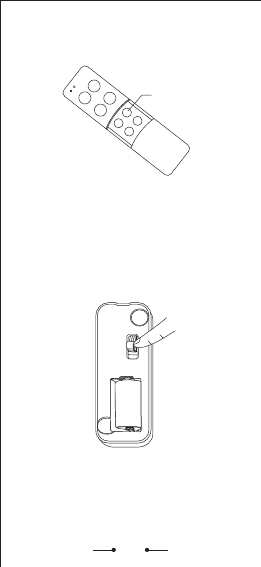
Security Tamper Switch
(Z-Wave Inclusion Button)
Battery Holder
2
Anatomy of the Aeon Labs Door/Window
Sensor:
LED Orientation DimplesLatch Button
Hitch Hole HitchSecurity Tamper
Switch Hole
Screw Holes
Magnet Unit
Magnet Unit
Outer Shell
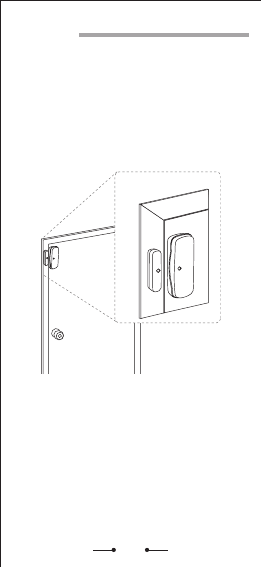
Note: The Aeon Labs D/W Sensor should be positioned
vertically against the door/window frame. This provides the
optimal radio communication distance to other Z-Wave
devices in a typical home.
Note: Radio products should not be mounted directly on or near
metal framing or other large metallic objects. Large metal
objects may weaken the radio signal transmitted.
Note: This product should only be placed indoors and away
from sources of water/moisture and other extreme weather
conditions.
1.1 The main sensor unit and magnet unit should be placed in a
manner such that when the door/window is closed, they are
within 2cm. from each other. By opening the door or window,
these two units should separate in proximity.
3
Aeon Labs Door/Window Sensor User
Instructions:
1. Mounting the Aeon Labs D/W Sensor to a
Wall, Door, or Window Frame

1.2 Screw the bidirectional mounting plate and the magnet unit
into the wall, door or window frame. Use the provided screw
anchors if attaching the Aeon Labs D/W Sensor to a soft
material (such as drywall).
Peel and attach the double-sided mounting tape to the back of
the bidirectional mounting plate and magnet unit to adhere to
the wall, door or window frame.
Note: Be sure to wipe clean the surface where the Aeon Labs
D/W Sensor will be mounted. Any dust and particles can
reduce the adhesion of double-sided mounting tape.
4
AND/OR
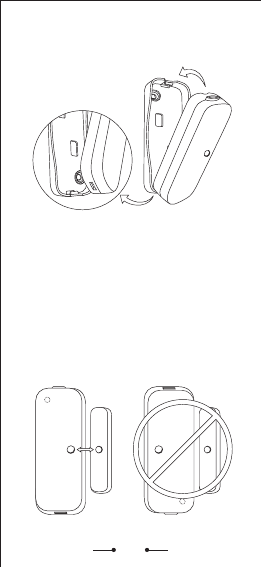
1.3 Hook the sensor into the bidirectional mounting plate by first
inserting the hitch of the bidirectional mounting plate into the
hitch hole of the sensor. Then press the other end of the sensor
into the bidirectional mounting plate until the units firmly click
together.
5
CORRECT WRONG
1.4 Ensure that the orientation dimples of the sensor unit and
the magnet unit are oriented towards each other. If they are
not, simply unhinge the sensor unit by depressing the latch
button (on the side) to separate the sensor from its bidirectional
mount and reinsert the sensor unit with it’s orientation dimple
towards the magnet unit.
Associate Learn
Include Remove
Include
2. Including the Aeon D/W Sensor into the
Z-Wave Network
The Aeon Labs D/W Sensor must first be included into an
existing Z-Wave network in order to function. After being
included to a Z-Wave network, the Aeon Labs D/W Sensor
will then be able to report it’s open/close state to gateway
automatically or control other Z-Wave devices such as lamps.
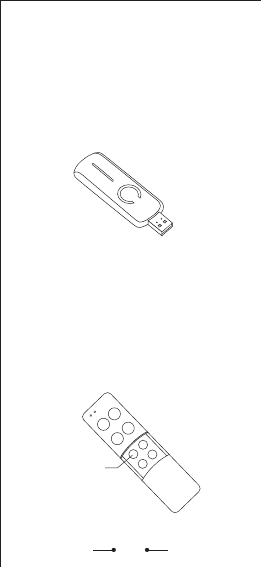
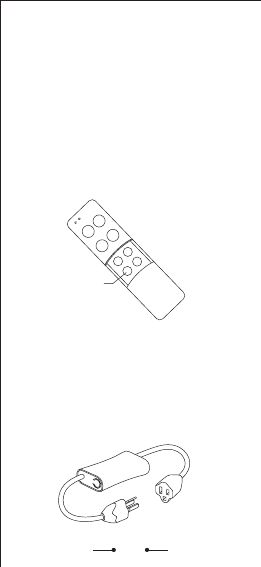
2.1 Press the button on the Aeon Labs Z-Stick to begin the
Z-Wave inclusion process.
OR
Press the button labeled “Include” on the Aeon Labs Minimote
to begin the Z-Wave inclusion process.
Note: To include the Aeon Labs D/W Sensor with other
controllers, please consult the operation manual for these
controllers on how to include Z-Wave products into an existing
network. For instructions on select partner gateways, visit
www.aeon-labs.com/support.
6
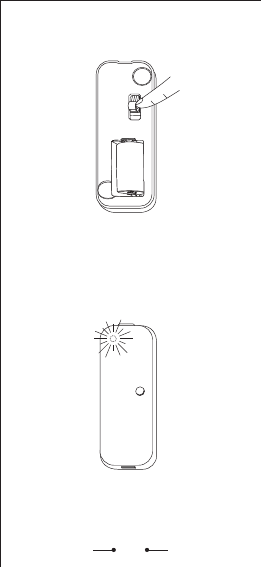
2.2 Press the security tamper switch located at the back of the
Aeon Labs D/Window Sensor to include it into your Z-Wave
network.
2.3 The Aeon Labs D/W Sensor will now stay awake for 10
minutes to receive any other network instructions from your
gateway or controller – The LED on the Aeon D/W Sensor
will be blinking while awake.
7
Note: The Aeon Labs D/W Sensor can only be taught to
communicate to devices within it’s own network.
3. Wake the Aeon Labs D/W Sensor for 10
Minutes
Troubleshooting: If the Aeon Labs D/W Sensor was not
included into any Z-Wave network, pressing the security switch
will illuminate the LED on the front of the Aeon Labs D/W
Sensor solid red for 5 seconds. If the Aeon Labs D/W Sensor
was successfully included to a Z-Wave network, the LED will
blink instead of staying solid.
The Aeon Labs D/W Sensor can be made to stay awake for 10
minutes by any of the following methods below. Once the
Aeon Labs D/W Sensor has been woken, the LED will blink
every few seconds indicating that it is now awake and ready to
receive Z-Wave network information and instructions.
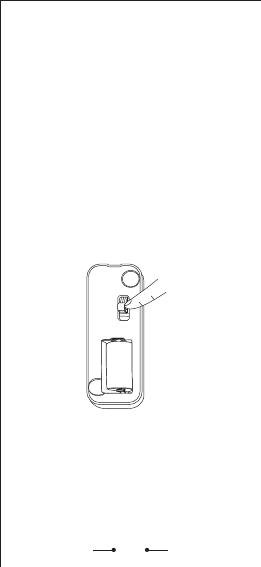
3.1 Firmly tap the security switch on the back of the Aeon Labs
D/W Sensor 3 times in quick succession.
3.2 Successfully include the Aeon Labs D/W Sensor into any
Z-Wave network.
8
9
4.2 Trigger the Aeon Labs D/W Sensor with the magnetic unit
3 times in quick succession.
4.3 Send a Z-Wave sleep command (Z-Wave Wake Up
Command Class) from your controller/gateway to the Aeon
Labs D/W Sensor.
4. Put the Aeon Labs D/W Sensor to Sleep
After Being Included into a Z-Wave Network
4.1 Firmly tap the security switch on the back of the Aeon Labs
D/W Sensor 3 times in quick succession.
The Aeon Labs D/W Sensor may be put to sleep by any of the
following methods below. Once the Aeon Labs D/W Sensor
has been put to sleep, the LED will no longer blink indicating
that it is now asleep and saving battery life.
10
5. Associating Z-Wave Lights/Switches/
Gateways to the Aeon Labs D/W Sensor
5.1 Press the button labeled “Associate” on the Aeon Labs
Minimote to begin the Z-Wave association process.
5.2 Press the Z-Wave button on the product you wish to be
controlled by the Aeon Labs D/W Sensor when triggered.
Note: To associate a Z-Wave device to the Aeon Labs D/W
Sensor using other controllers, please consult the operation
manual for these controllers on how to associate Z-Wave
products to the Aeon Labs D/W Sensor. For instructions on
select partner gateways, visit www.aeon-labs.com/support.
By associating the Aeon Labs D/W Sensor to Z-Wave devices,
it will be able to report it’s state to gateways, execute scenes
through the associated gateways and turn on/off associated
Z-Wave devices when it is triggered with its magnetic switch.
Note: If your Z-Wave gateway is a SUC/SIS type, there is no
need to follow the association process below to associate the
Aeon Labs D/W Sensor to your gateway. The Aeon Labs
D/W Sensor will do this automatically.
Associate Learn
Include Remove
Associate
11
5.3 Press the security tamper switch located at the back of the
Aeon Labs D/W Sensor to complete the association process.
Note: The Aeon Labs D/W Sensor can be associated to 6
devices total (1 device being a SUC/SIS gateway).
Troubleshooting: The Aeon Labs D/W Sensor must first be
part of your Z-Wave network in order to receive association
commands from another device in the same Z-Wave network.
12
6. Reporting an Alarm when Tampered
The Aeon Labs D/W Sensor has a built in security tamper
switch which will automatically alert (Z-Wave Alarm
Command Class) the associated gateway when the sensor is
removed from either the bidirectional mounting plate or pried
off the surface to which it was mounted.
7. Removing/Resetting the Aeon D/W Sensor
from your Z-Wave Network
Removing the Aeon Labs D/W Sensor from a Z-Wave network
resets the device to the default factory settings and removes all
previous saved associations.
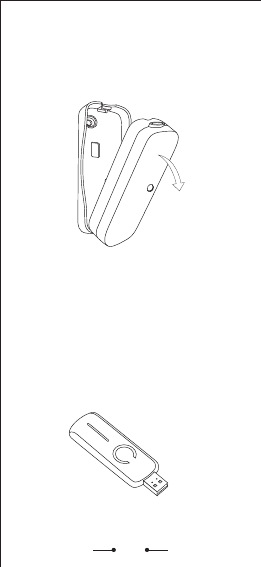
7.1 Hold the button on the Aeon Labs Z-Stick to begin the
Z-Wave removal process.
13
OR
Press the button labeled “Remove” on the Aeon Labs Minimote
Stick to begin the Z-Wave removal process.
Note: To remove the Aeon Labs D/W Sensor with other
controllers, please consult the operation manual for these
controllers on how to remove Z-Wave products from an existing
network. For instructions on select partner gateways, visit
www.aeon-labs.com/support.
7.2 Press the security tamper switch located at the back of the
Aeon Labs D/W Sensor to remove it from your Z-Wave
network.
Troubleshooting: If the Aeon Labs D/W Sensor was removed
from the Z-Wave network, pressing the security switch will
illuminate the LED on the front of the Aeon Labs D/W Sensor
solid red for 5 seconds. If the Aeon Labs D/W Sensor was not
successfully removed from the Z-Wave network, the LED will
blink instead of staying solid.
Associate Learn
Include Remove
Remove
14
8. Replacing Batteries
The Aeon Labs D/W Sensor has built in battery level detection.
It will automatically report it’s battery level (Z-Wave Battery
Command Class) to the associated gateway throughout it’s life
until the battery is fully drained and needs replacing. The
battery status will often be displayed in the user interface of the
gateway.
When used properly in an optimized Z-Wave network, the CR2
battery can last up to 2 years with regular usage.
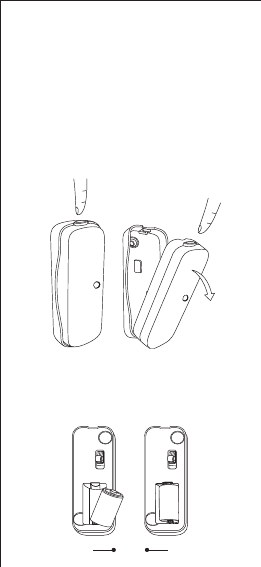
8.1 Unhook the sensor from the bidirectional mounting plate by
depressing the latch button (on the side) and pulling the sensor
body outward to separate the sensor from its bidirectional
mount.
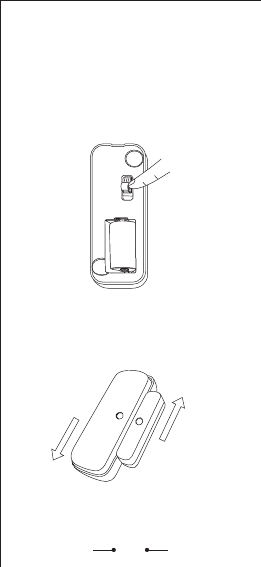
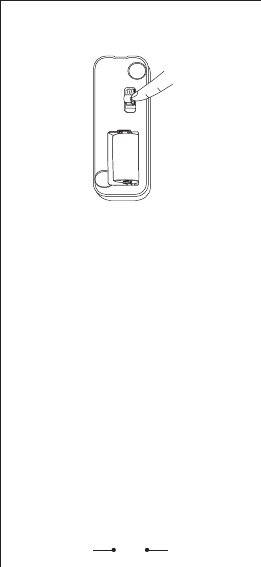
8.2 Insert the CR2 with the negative end first depressing the
battery spring.
• 2 year battery life with CR2 battery
• Maximum 100ft Z-Wave RF range (indoors)
• Operating Temperatures -35 to +85 °C
Technical Specifications
15
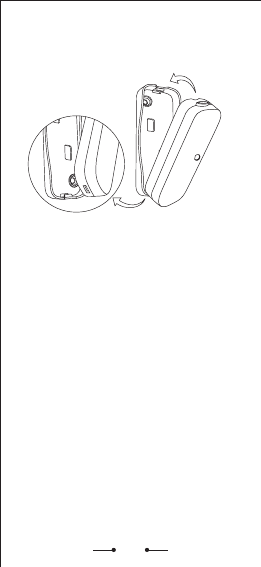
8.3 Hook the sensor into the bidirectional mounting plate by
first inserting the hitch of the bidirectional mounting plate into
the hitch hole of the sensor. Then push the other end of the
sensor into the bidirectional mounting plate until the units
firmly click together.
Recommendation: For networks which do not have a method to
display the battery level of the Aeon Labs D/W Sensor, it is
recommended that the sensor be tested occasionally to ensure
that the battery still hold enough charge to operate. Batteries
naturally lose their charge over time.

Warranty
Aeon Labs warrants to the original purchaser of Products that
for the Warranty Period (as defined below), the Products will be
free from material defects in materials and workmanship. The
foregoing warranty is subject to the proper installation,
operation and maintenance of the Products in accordance with
installation instructions and the operating manual supplied to
Customer. Warranty claims must be made by Customer in
writing within thirty (30) days of the manifestation of a
problem. Aeon Labs' sole obligation under the foregoing
warranty is, at Aeon Labs' option, to repair, replace or correct
any such defect that was present at the time of delivery, or to
remove the Products and to refund the purchase price to
Customer.
The "Warranty Period" begins on the date the Products is
delivered and continues for 12 months.
Any repairs under this warranty must be conducted by an
authorized Aeon Labs service representative and under Aeon
Labs’ RMA policy. Any repairs conducted by unauthorized
persons shall void this warranty.
Excluded from the warranty are problems due to accidents, acts
of God, civil or military authority, civil disturbance, war, strikes,
fires, other catastrophes, misuse, misapplication, storage
damage, negligence, electrical power problems, or modification
to the Products or its components.
Aeon Labs does not authorize any person or party to assume or
create for it any other obligation or liability in connection with
the Products except as set forth herein.
Aeon Labs will pass on to Customer all manufacturers’ Material
warranties to the extent that they are transferable, but will not
independently warrant any Material.
Customer must prepay shipping and transportation charges for
returned Products, and insure the shipment or accept the risk of
loss or damage during such shipment and transportation. Aeon
Labs will ship the repaired or replacement products to
Customer freight prepaid.
Customer shall indemnify, defend, and hold Aeon Labs and
Aeon Labs’ affiliates, shareholders, directors, officers,
employees, contractors, agents and other representatives
harmless from all demands, claims,
16

actions, causes of action, proceedings, suits, assessments, losses,
damages, liabilities, settlements, judgments, fines, penalties,
interest, costs and expenses (including fees and disbursements
of counsel) of every kind (i) based upon personal injury or
death or injury to property to the extent any of the foregoing is
proximately caused either by a defective product (including
strict liability in tort) or by the negligent or willful acts or
omissions of Customer or its officers, employees, subcontractors
or agents, and/or (ii) arising from or relating to any actual or
alleged infringement or misappropriation of any patent,
trademark, mask work, copyright, trade secret or any actual or
alleged violation of any other intellectual property rights arising
from or in connection with the products, except to the extent
that such infringement exists as a result of Aeon Labs
‘manufacturing processes.
IN NO EVENT SHALL AEON LABS BE LIABLE FOR ANY
INDIRECT, INCIDENTAL, PUNITIVE, SPECIAL OR
CONSEQUENTIAL DAMAGES, OR DAMAGES FOR LOSS
OF PROFITS, REVENUE, OR USE INCURRED BY
CUSTOMER OR ANY THIRD PARTY, WHETHER IN AN
ACTION IN CONTRACT, OR TORT, OR OTHERWISE
EVEN IF ADVISED OF THE POSSIBILITY OF SUCH
DAMAGES. AEON LABS’ LIABILITY AND
CUSTOMER’S EXCLUSIVE REMEDY FOR ANY CAUSE
OF ACTION ARISING IN CONNECTION WITH THIS
AGREEMENT OR THE SALE OR USE OF THE
PRODUCTS, WHETHER BASED ON NEGLIGENCE,
STRICT LIABILITY, BREACH OF WARRANTY, BREACH
OF AGREEMENT, OR EQUITABLE PRINCIPLES, IS
EXPRESSLY LIMITED TO, AT AEON LABS’ OPTION,
REPLACEMENT OF, OR REPAYMENT OF THE
PURCHASE PRICE FOR THAT PORTION OF PRODUCTS
WITH RESPECT TO WHICH DAMAGES ARE CLAIMED.
ALL CLAIMS OF ANY KIND ARISING IN CONNECTION
WITH THIS AGREEMENT OR THE SALE OR USE OF
PRODUCTS SHALL BE DEEMED WAIVED UNLESS
MADE IN WRITING WITHIN THIRTY (30) DAYS FROM
AEON LABS’S DELIVERY, OR THE DATE FIXED FOR
DELIVERY IN THE EVENT OF NONDELIVERY.
THE INDEMNITY AND WARRANTY IN ABOVE ARE
EXCLUSIVE AND IN LIEU OF ALL OTHER
INDEMNITIES OR WARRANTIES, WHETHER EXPRESS
OR IMPLIED, INCLUDING THE IMPLIED
WARRANTIES OF MERCHANTABILITY AND FITNESS
FOR A PARTICULAR PURPOSE.
17

This equipment has been tested and found to comply with the
limits for a Class B digital device, pursuant to part 15 of the
FCC Rules. These limits are designed to provide reasonable
protection against harmful interference in a residential
installation. This equipment generates, uses and can radiate
radio frequency energy and, if not installed and used in
accordance with the instructions, may cause harmful
interference to radio communications. However, there is no
guarantee that interference will not occur in a particular
installation. If this equipment does cause harmful interference
to radio or television reception, which can be determined by
turning the equipment off and on, the user is encouraged to try
to correct the interference by one or more of the following
measures:
• Reorient or relocate the receiving antenna.
• Increase the separation between the equipment and receiver.
• Connect the equipment into an outlet on a circuit different
from that to which the receiver is connected.
• Consult the dealer or an experienced radio/TV technician for
help.
This device complies with part 15 of the FCC Rules. Operation
is subject to the following two conditions: (1) These devices
may not cause harmful interference, and (2) these devices must
accept any interference received, including interference that
may cause undesired operation.
Unauthorized changes or modifications to this product could
void the user’s authority to operate the equipment.
Federal Communications Commission (FCC)
Statement – USA Products
18

Do not dispose of electrical appliances as unsorted municipal
waste, use separate collection facilities.
Contact your local government for information regarding the
collection systems available.
www.aeon-labs.com
Harmonizing the Smart Home.
Warning:
19
