Contents
- 1. user manual 1
- 2. user manual 2
user manual 2
Product
Overview
Hardware
Installation
Easy Access
EZvuu
Setting
Live View
Appendix
Table of
Contents
System
41
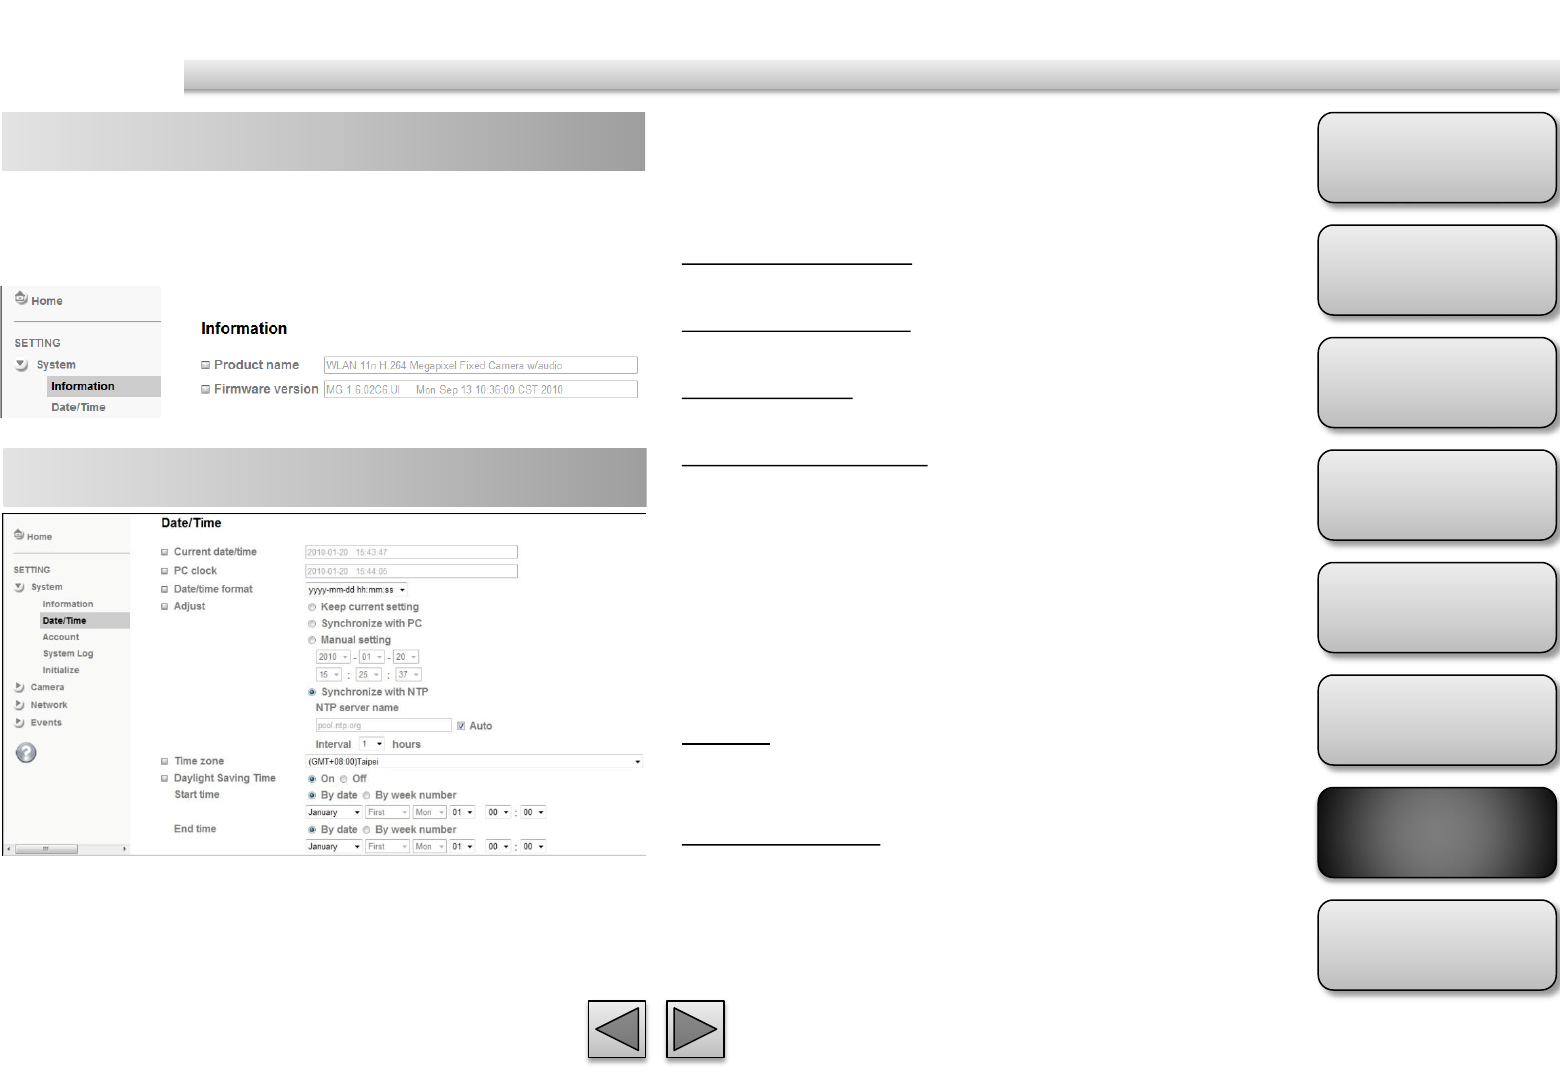
The Information page provides the product factory
information which includes Product Name,
Firmware Version and Web Version.
Information
Day/Time
Date / Time format
Pull down box to select different time display formats.
Adjust
Keep current setting
Keep the current date and time of this IP Camera.
Synchronize with PC
Keep the date and time the same PC.
Manual setting
Adjust manually the date and time of this IP Camera.
Synchronize with NTP
Specify the NTP server name and the Refresh Interval
to synchronize.
Time Zone
You can select the Time Zone.
Daylight Saving Time
There are two modes to choose for setting up
daylight saving time.
By Date
Set the start and end time by select month, day, hour,
and minute.
By Week Number
Set the start and end time by select month, week,
hour, and minute.
Current date / time
Display the current date and time of this IP Camera.
PC clock
Display the date and time of the monitoring PC clock.
Product
Overview
Hardware
Installation
Easy Access
EZvuu
Setting
Live View
Appendix
Table of
Contents
42
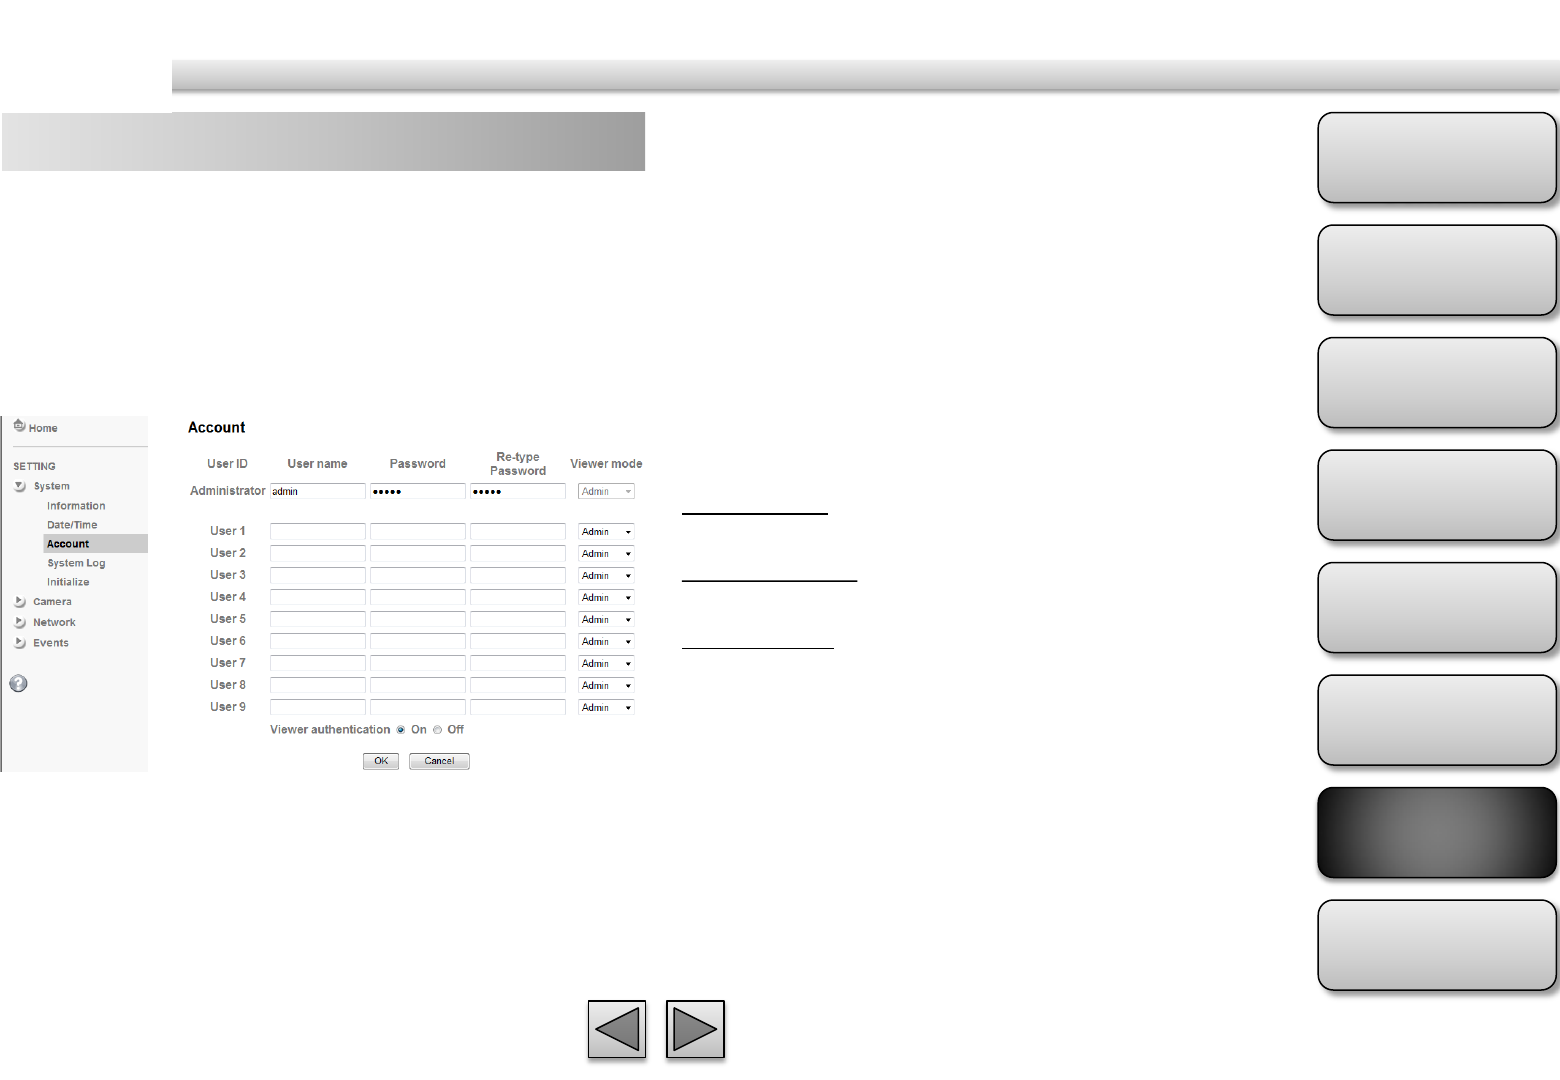
Account
The device fault account and password setting is
“admin / admin”. That means everyone who knows IP
address can access the device including all
configuration. It is necessary to assign a password if
the device is intended to be accessed by others.
User name
Set a user name between 4-16 characters.
Password
Set a password between 4-16 characters.
Re-type Password
Re-type the password to confirm.
Viewer Mode
Set the user mode among Admin, Operator, and
Viewer. Different viewer mode has different limits of
authority.
Admin mode
Has all authority of configuration.
Operator mode
View the Live View and Use Control Panel.
Viewer mode
View the Live View only.
Viewer Authentication
Allows any viewer direct access to Live View.
System
Product
Overview
Hardware
Installation
Easy Access
EZvuu
Setting
Live View
Appendix
Table of
Contents
43
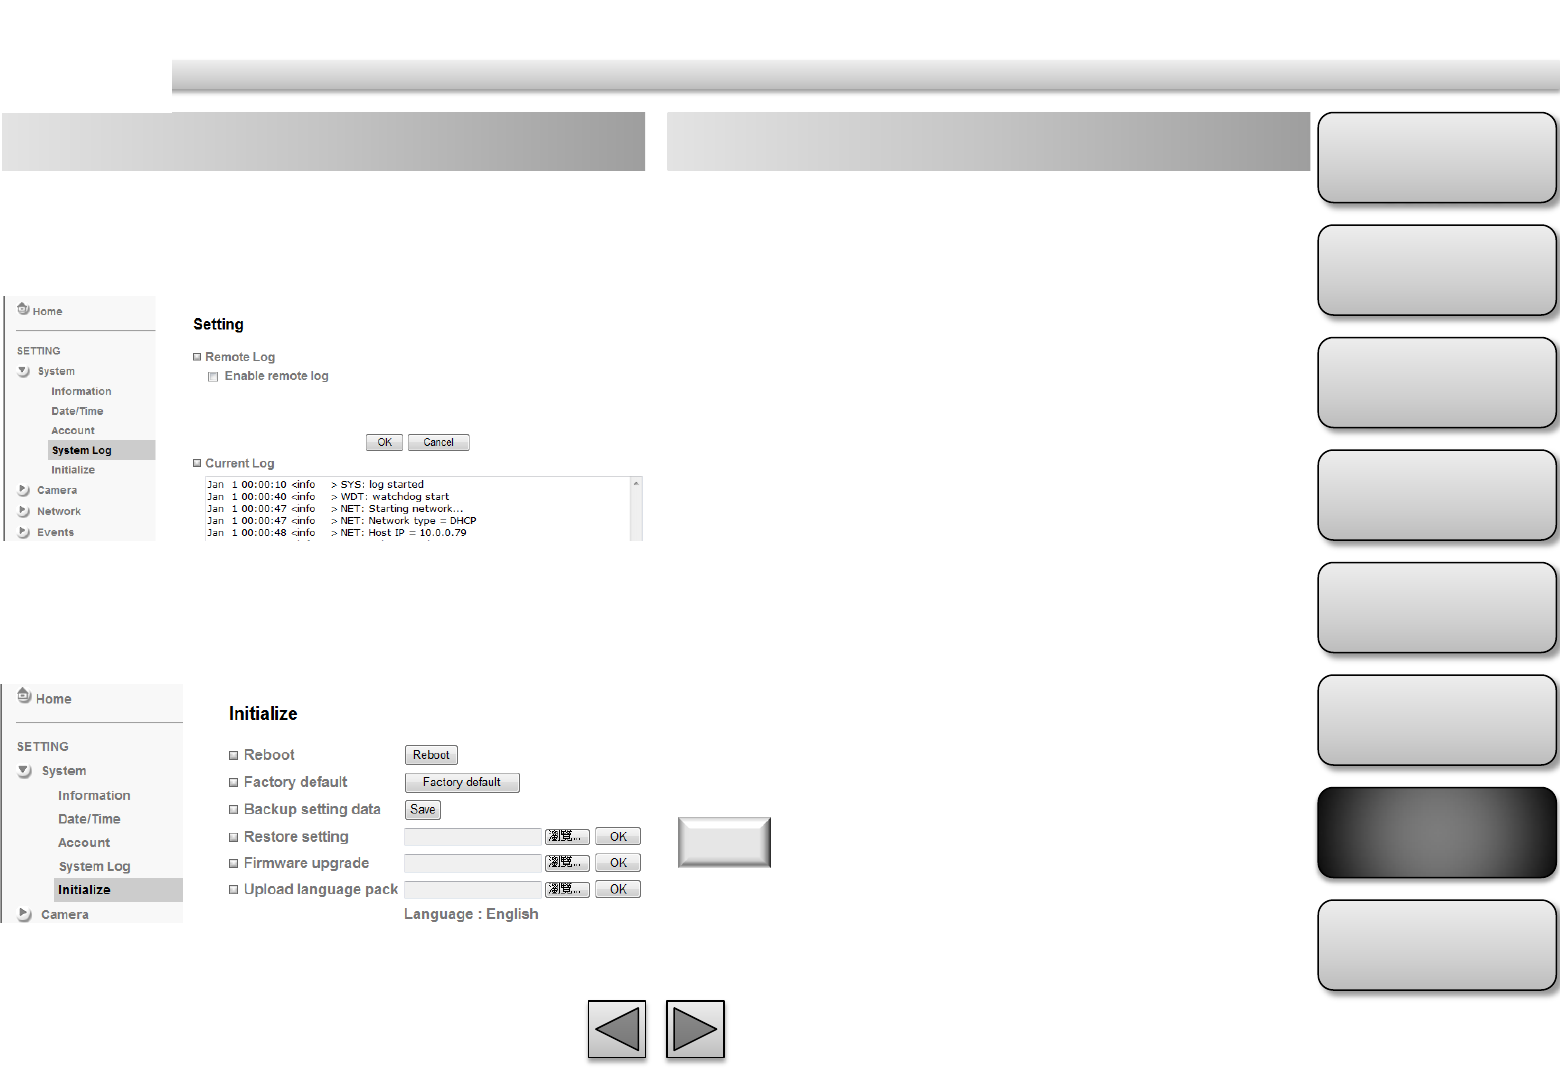
System Log
The System Log function allows users to review any
changes and events happened. The system starts
logging automatically after started.
Enable remote log
Enables user to send the log data to a specified log
server.
Initialize
Reboot
Reboot this IP Camera and it takes two minutes to
reboot this IP Camera.
Factory Default
Reset this IP Camera to the factory default setting..
Don't turn off this IP Camera until the device reboots.
Backup Setting
Backup the setting data of this IP Camera.
Restore Setting
Click “Browse” to restore setting and then restart
automatically.
Firmware Update
Click “Browse” to upgrade firmware.
Upload Language Pack
Upgrade the device language pack.
Use only upgrade files that are special for this IP Camera.
Otherwise problems may occur. Don't turn off the IP Camera
power or disconnect the network until the upgrading is
completed.
Note
System
Product
Overview
Hardware
Installation
Easy Access
EZvuu
Setting
Live View
Appendix
Table of
Contents
44
Camera
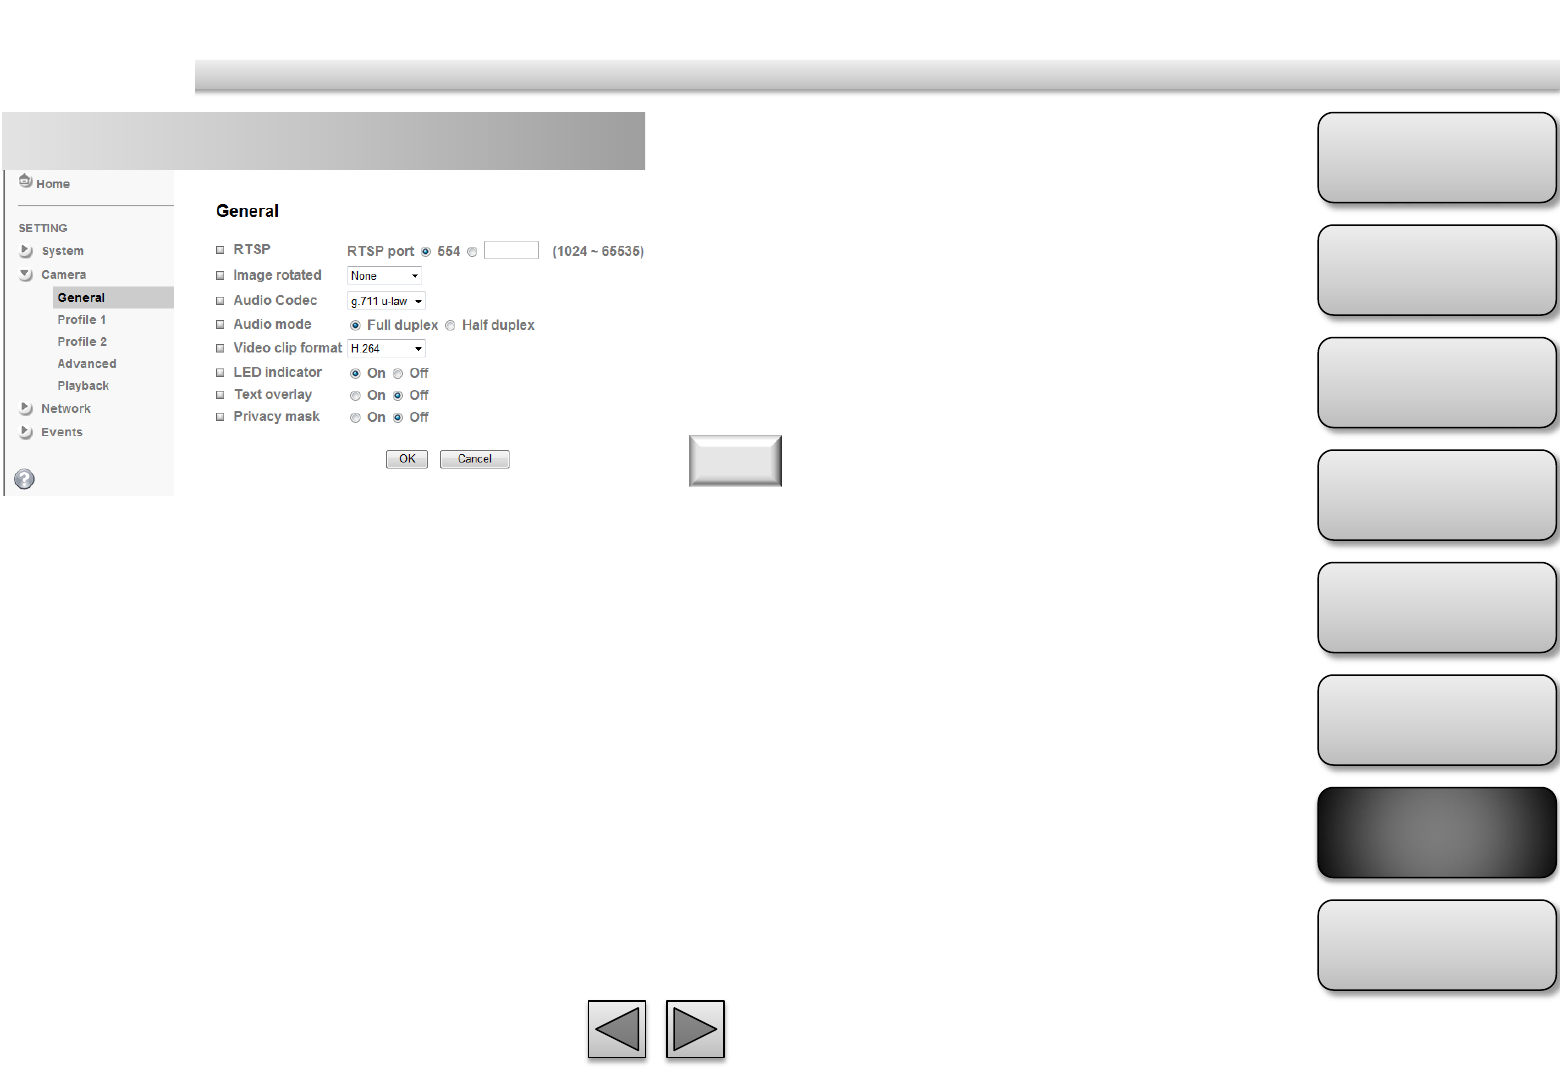
General LED Indicator
Turn on/off the LED indicator.
Text Overlay
You can see some information on the display screen
which includes Date / Time and user-defined text.
Also, you can change the background color.
Privacy Mask
You can cover a specific area of the video image.
RTSP (Real Time Streaming Protocol) is a protocol for use in
streaming media system which allows clients to remotely
control a streaming video server. RTSP is supports by most of
the media clients such as Real Player, QuickTime and VLC...etc.
Note
RTSP
Switch RTSP “On” or “Off.” The default value is 554.
Image Rotate
You can mirror or flip the display screen.
Audio Codec
Select one audio codec among G.711 U-law, G.711 A-
law and AMR Audio. Or select off to disable sound
reception.
Audio Mode
select Full duplex or Half duplex for your camera.
Video Clip Format
Select H.264 or MPEG-4 as recording compression
format.
Product
Overview
Hardware
Installation
Easy Access
EZvuu
Setting
Live View
Appendix
Table of
Contents
45
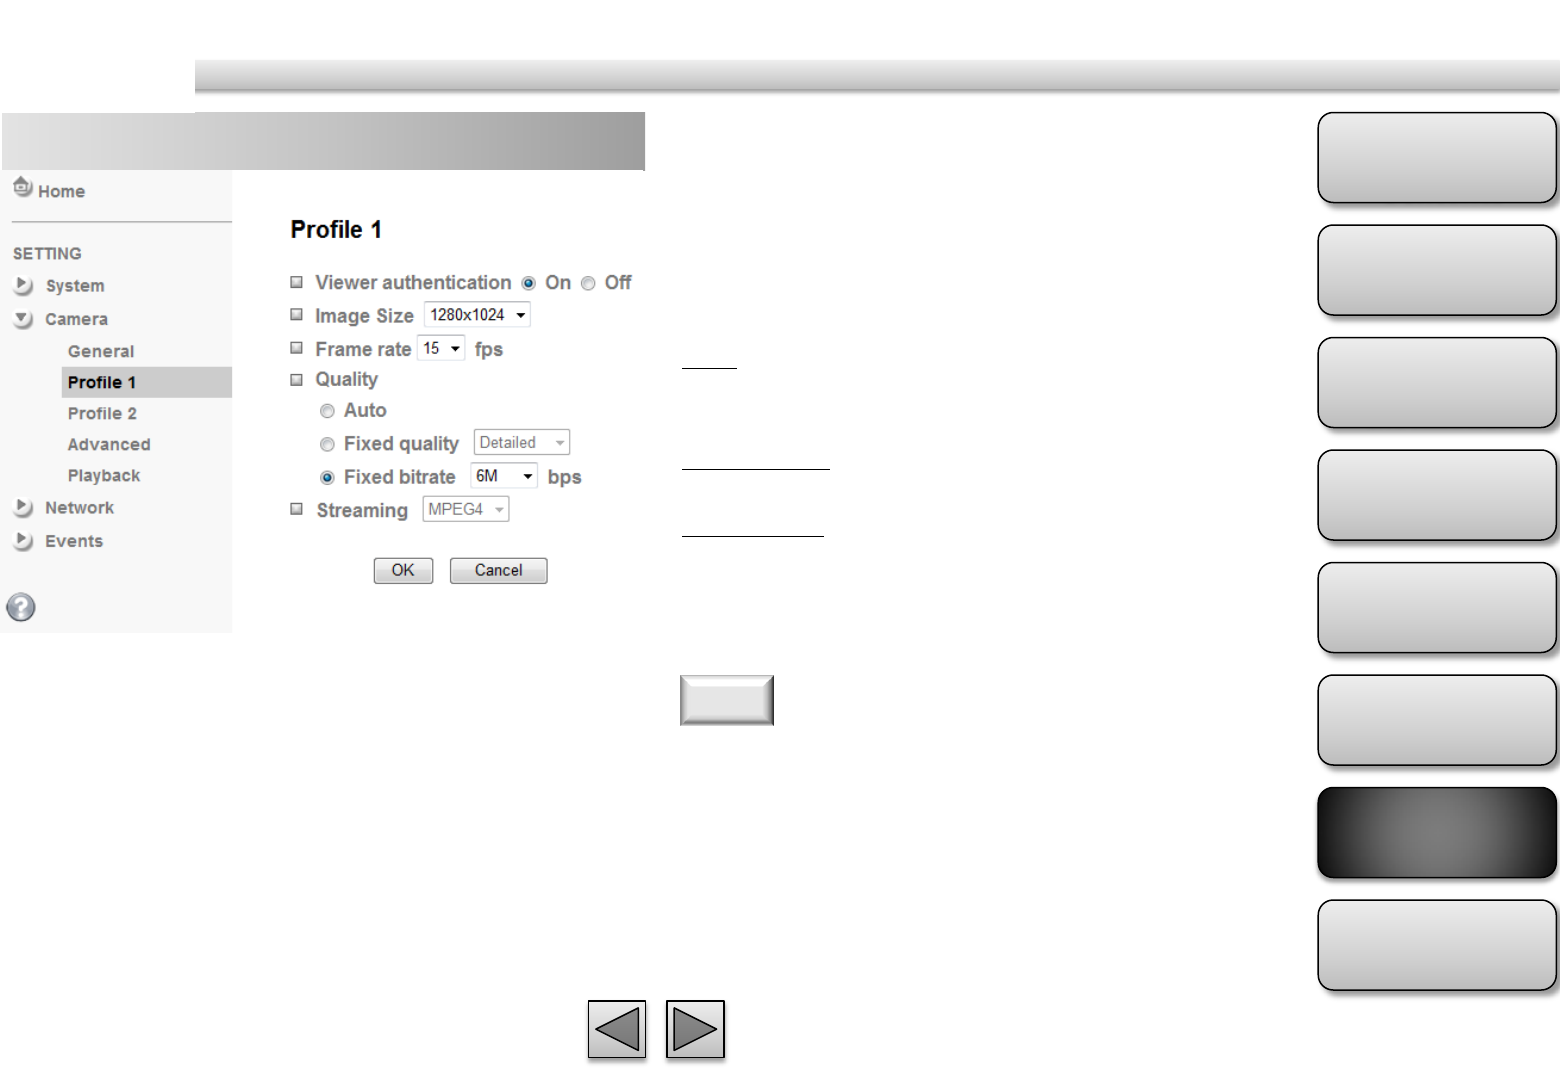
Profile 1 Image Size
Specify the image size from 1280x1024 to 320x240 of
profile 1.
Frame Rate
Set the frame rate of profile 1.
Quality
Auto
The quality and bitrate will be adjusted automatically
according to the frame rate.
Fixed Quality
You can select the value of quality.
Fixed Bitrate
Set the bitrate of profile 1 transmission for a line.
Streaming
The streaming of profile 1 is fixed MPEG4.
1. Concerning how to select the suitable image quality for
Fixed Quality or Fixed Bitrate, please refer to APPENDIX / A.
Frame-rate & Bitrate Table.
2. The frame rate is up to 15 fps at 1280x1024, and up to 30
fps at 640x480. However, if you would like choose frame
rate over 15 fps, the IMAGE SIZE of profile1 and profile 2
setting page has to been selected 320x240 or 640x480 at
the same time.
Note
Viewer Authentication
If the viewer authentication is On, the users will be
requested to key-in username and password when
viewing through RTSP.
Camera

Product
Overview
Hardware
Installation
Easy Access
EZvuu
Setting
Live View
Appendix
Table of
Contents
46
Profile 2
Camera
Image Size
Specify the image size from 1280x1024 to 320x240 of
profile 1.
Frame Rate
Set the frame rate of profile 1.
Quality
Auto
The quality and bitrate will be adjusted automatically
according to the frame rate.
Fixed Quality
You can select the value of quality.
Fixed Bitrate
Set the bitrate of profile 1 transmission for a line.
Streaming
Select H.264, MJPEG or 3GPP as streaming of profile
2.
1. Concerning how to select the suitable image quality for
Fixed Quality or Fixed Bitrate, please refer to APPENDIX / A.
Frame-rate & Bitrate Table.
2. The frame rate is up to 15 fps at 1280x1024, and up to 30
fps at 640x480. However, if you would like choose frame
rate over 15 fps, the IMAGE SIZE of profile1 and profile 2
setting page has to been selected 320x240 or 640x480 at
the same time.
Note
Viewer Authentication
If the viewer authentication is On, the users will be
requested to key-in username and password when
viewing through RTSP.
Product
Overview
Hardware
Installation
Easy Access
EZvuu
Setting
Live View
Appendix
Table of
Contents
47
Camera
Advanced
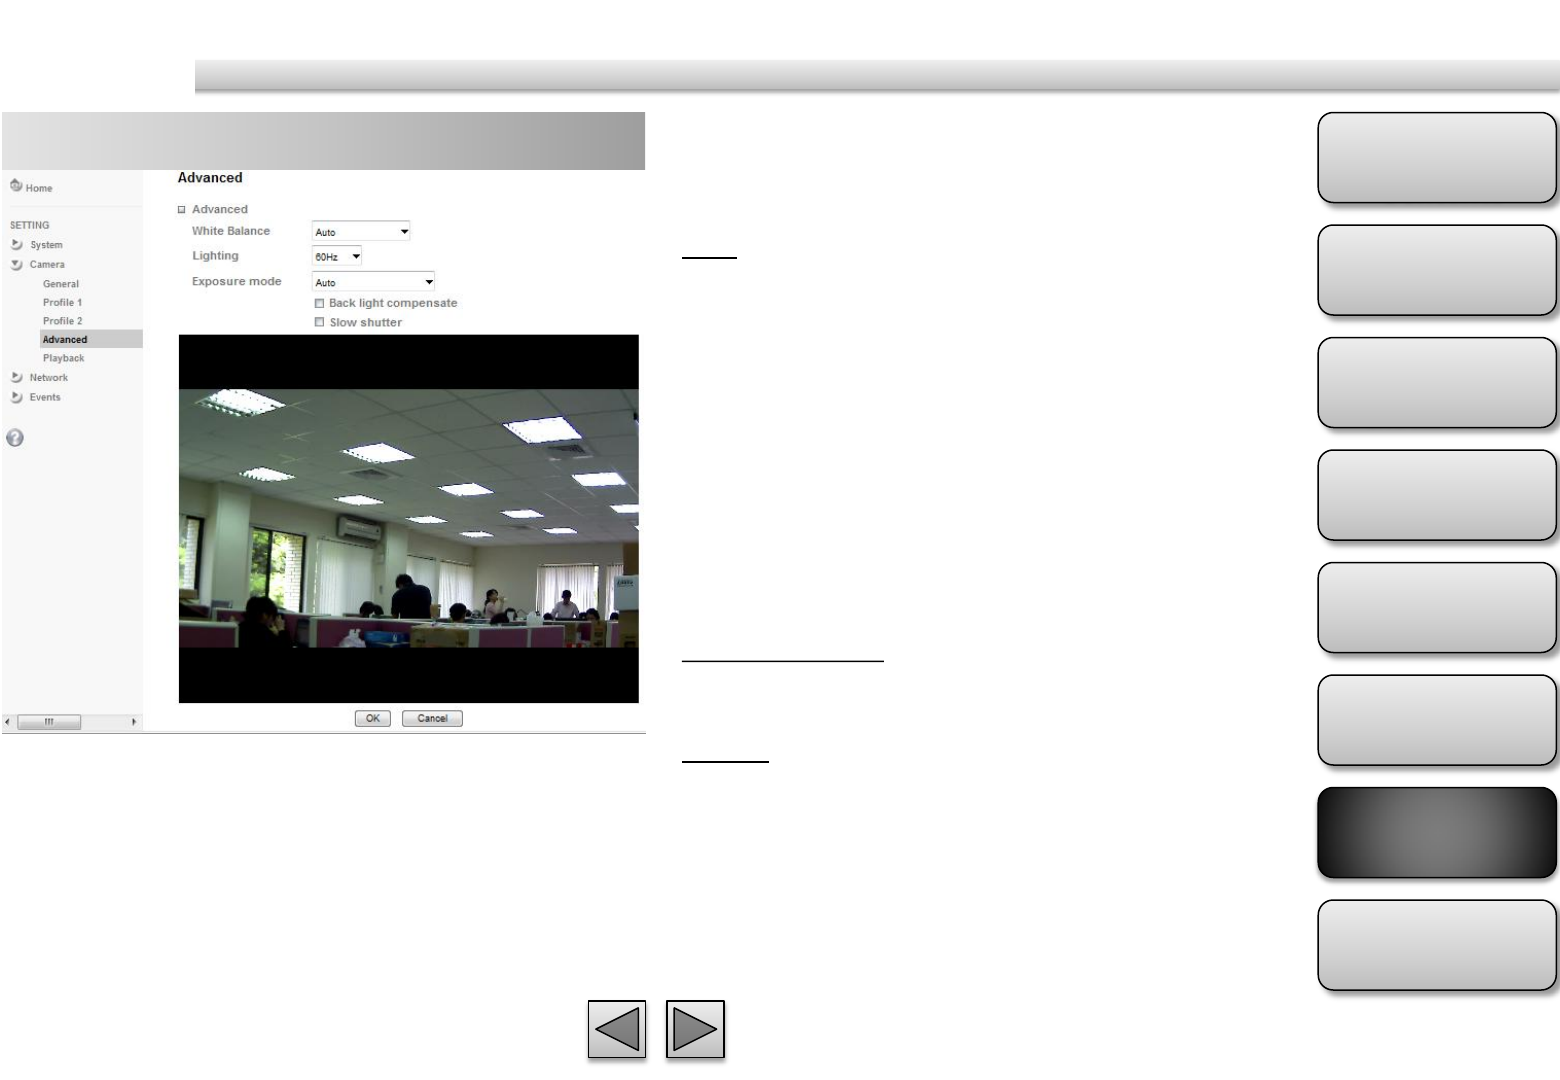
White Balance
Choose the white balance among Auto, Florescent,
Incandescent, Sunny and Cloudy.
Lighting
The default setting of lighting environment is Auto.
However, you may also choose 50 or 60 Hz upon the
lighting environment of your country.
Exposure Mode
Choose Auto, High Speed Mode or Manual upon the
capture environment.
Auto
Choose Auto and you have 2 options to adjust the
exposure condition.
Back light compensate:
Click it on and it helps avoid problems in situations
where the main subject ends up being too dark, such
as when shooting people or other subjects in front of
a bright background.
Slow shutter:
Click to adjust the shutter speed automatically and
helpful to capture the clear image when shooting in a
dark place.
High Speed Mode
Choose High Speed Mode to capture the motion
image of sports or high-speed phenomena.
Manual
Choose Manual to setup Shutter Speed and Gain.
Shutter Speed: The default value is 1/30 sec. and you
can select the value among 1/4, 1/6, 1/12, 1/30,
1/60, and 1/120 sec.
Gain: The default value is 2 and the value is
adjustable among 0~9.

Product
Overview
Hardware
Installation
Easy Access
EZvuu
Setting
Live View
Appendix
Table of
Contents
49
Network
Information
Display the MAC address of the device.
Use the following IP address
Select this when the fixed IP address is set.
IP address
Enter the IP address of the device.
Subnet mask
Enter the subnet mask.
Default gateway
Enter the default gateway.
Use the following DNS server address
Select this when you set the fixed address as the IP
address of DNS server.
Primary DNS server
Enter the IP address of the primary DNS server.
Secondary DNS server
Enter the IP address of the secondary DNS server, if
necessary.
HTTP port number
Select 80 (recommend)or enter a port number
between 1024 and 65535.
Obtain an IP address automatically (DHCP)
Select this while the IP address is assigned by the
DHCP server.
Obtain DNS server address automatically
Select this to obtain the address of DNS server
automatically.
Product
Overview
Hardware
Installation
Easy Access
EZvuu
Setting
Live View
Appendix
Table of
Contents
50
Network
EZvuu
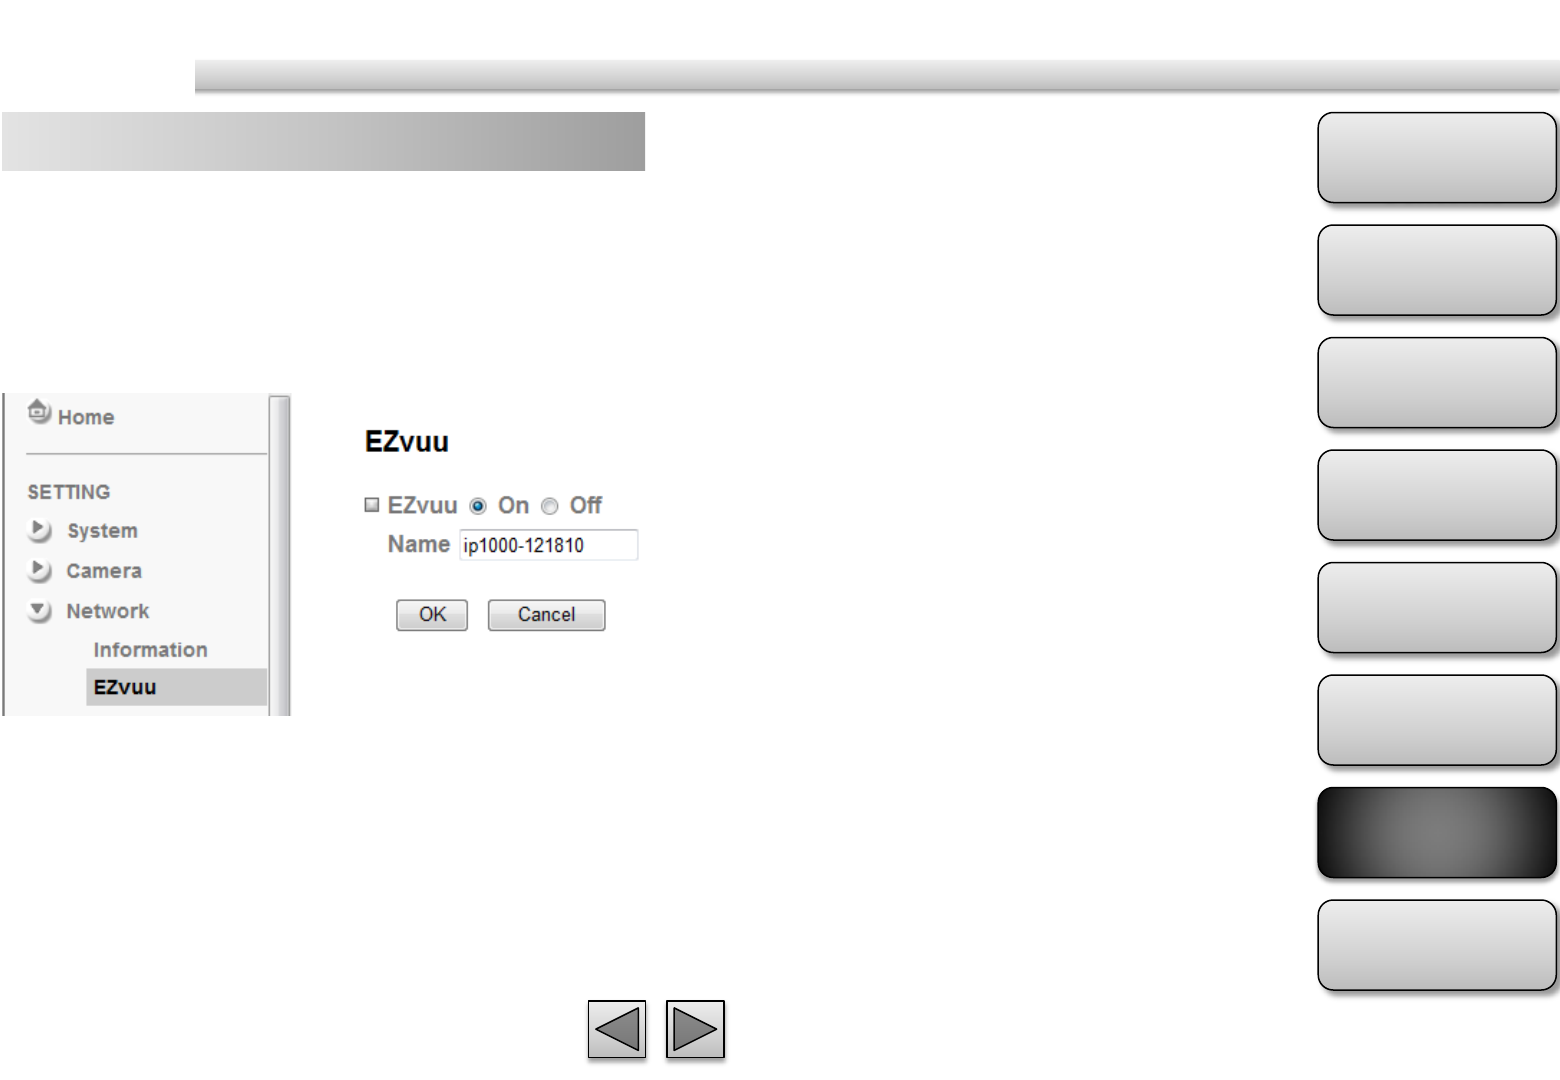
EZvuu, also known as zero-configuration networking,
enables automatic to find your devices on IP
networks. EZvuu uses Windows Live Messenger
protocols to allow devices to automatically
discovered without the need to enter IP addresses or
configure DNS servers.
Name
Show your device name on EZvuu.
Product
Overview
Hardware
Installation
Easy Access
EZvuu
Setting
Live View
Appendix
Table of
Contents
51
Network
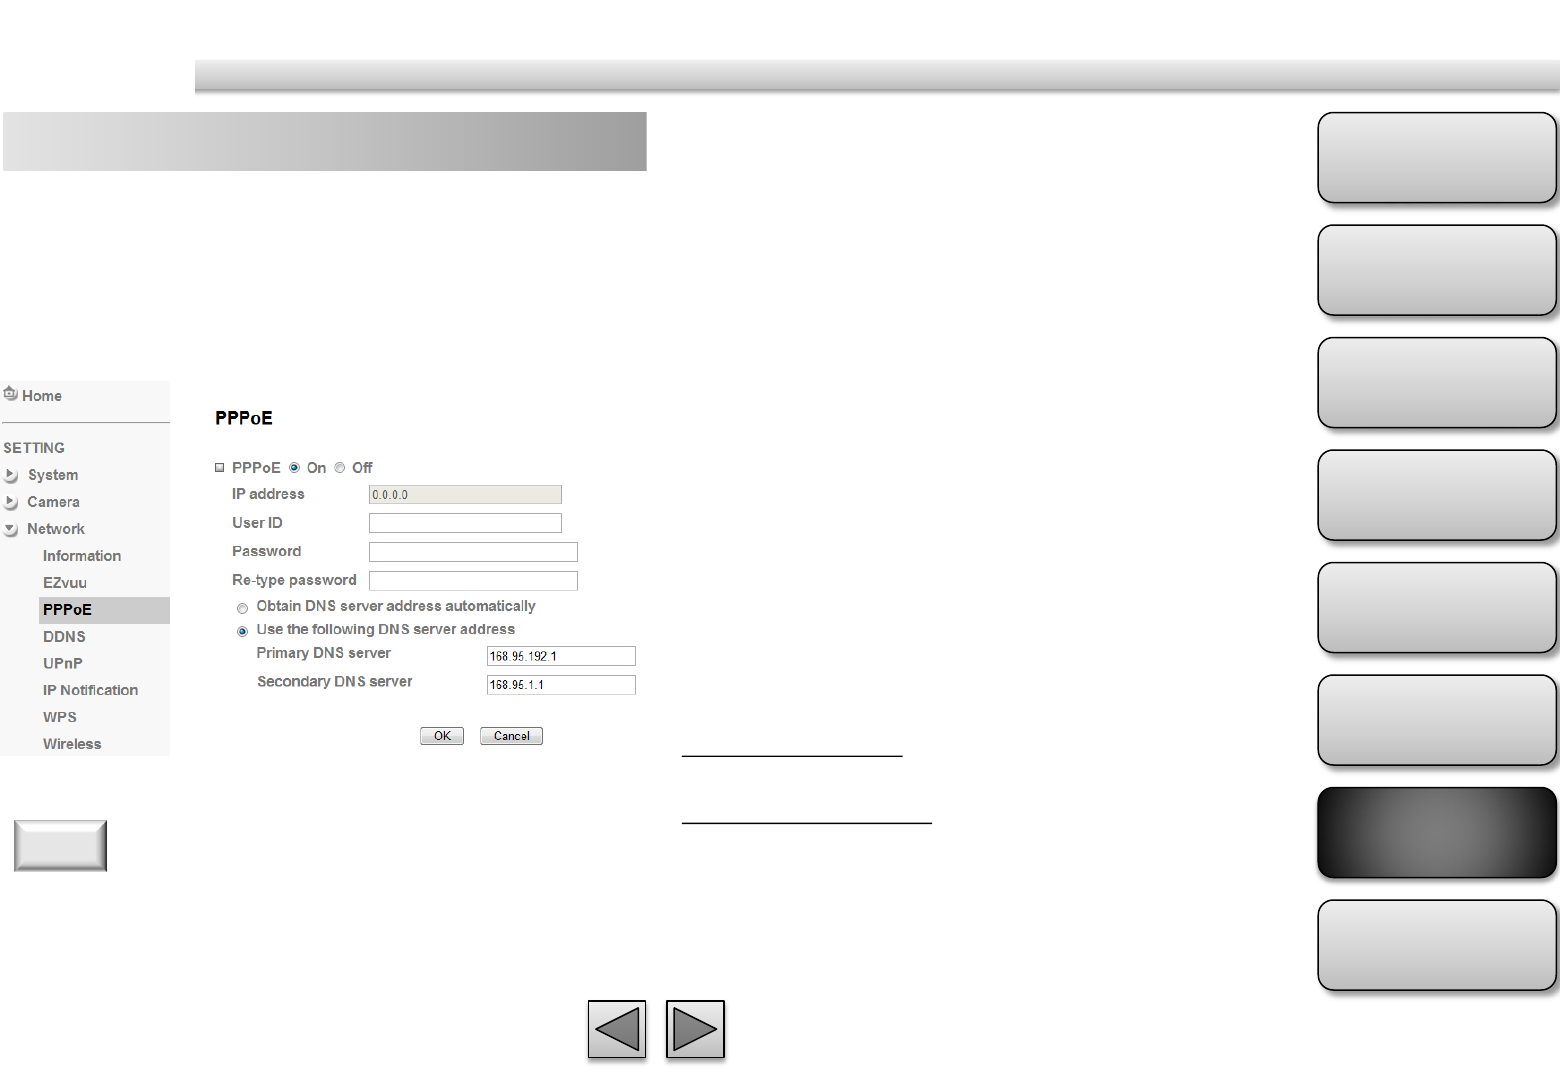
PPPoE IP Address
The IP address obtained at the PPPoE connecting with
network.
User ID
Enter the user ID for authentication necessary for
PPPoE connections.
Password
Enter the password for authentication necessary for
PPPoE connections.
Re-type Password
Re-type the password to confirm.
Obtain DNS server address automatically
Select this to obtain the address of DNS server
automatically.
Use the following DNS server address
Select this when you set the fixed address as the IP
address of DNS server.
Primary DNS server
Enter the IP address of the primary DNS server.
Secondary DNS server
Enter the IP address of the secondary DNS server.
If your ISP provides Dynamic IP with authentication
by username and password, type all PPPoE
information in this part. When you use the PPPoE
function, you need to turn on the DDNS or IP
Notification function at same time.
1. The IP Camera needs to be rebooted after it finishes
changing the network completely.
2. The IP Camera with Intelligent IP Installer can’t be founded
after turning on the PPPoE and reboot.
Note
Product
Overview
Hardware
Installation
Easy Access
EZvuu
Setting
Live View
Appendix
Table of
Contents
52
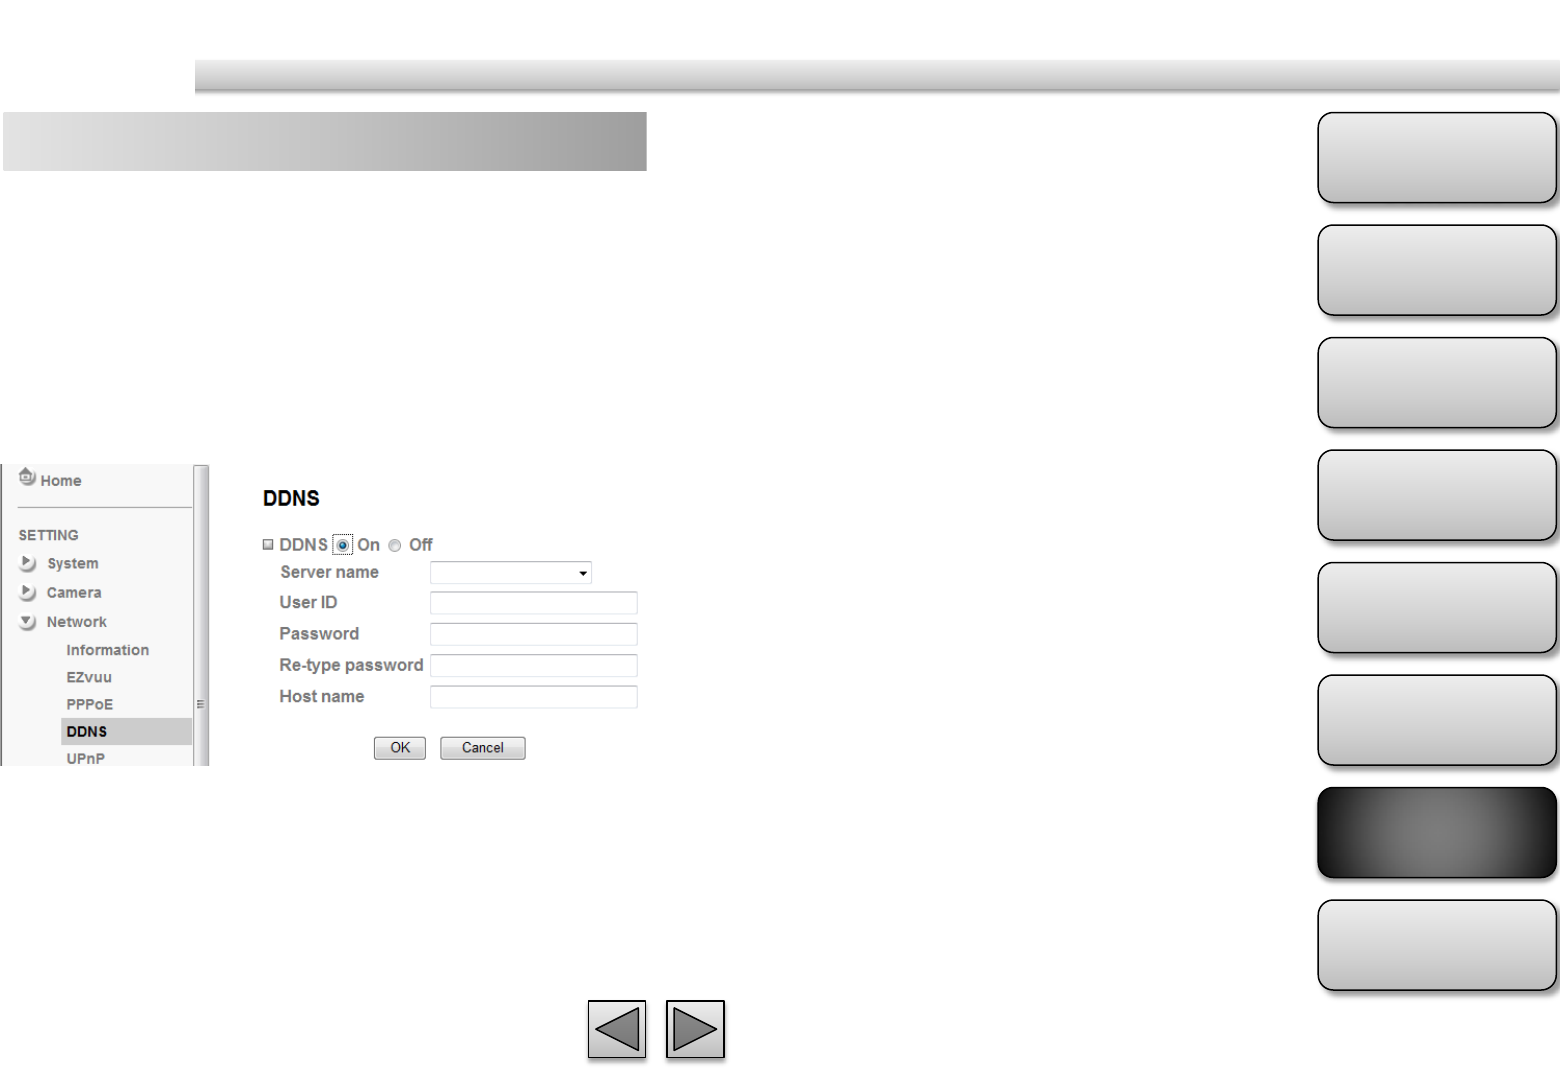
Network
DDNS Server name
Choose the DDNS Server from the list.
User ID
Enter the user ID for authentication necessary for
DDNS connections. Type it up to 64 characters.
Password
Enter the password for authentication necessary for
DDNS connections. Type it up to 32 characters.
Re-type password
Re-type the password to confirm.
Host name
Enter the host name that is registered to the DDNS
server.
DDNS is a system which allows the domain name data
held in a name server to be updated in real time. The
most common use for DDNS is allowing an internet
domain name to be assigned to a computer with a
varying / dynamic IP Address. This makes it possible
for other sites on the internet to establish connection
to the machine without needing to track the IP
Address themselves.
Product
Overview
Hardware
Installation
Easy Access
EZvuu
Setting
Live View
Appendix
Table of
Contents
53
Network
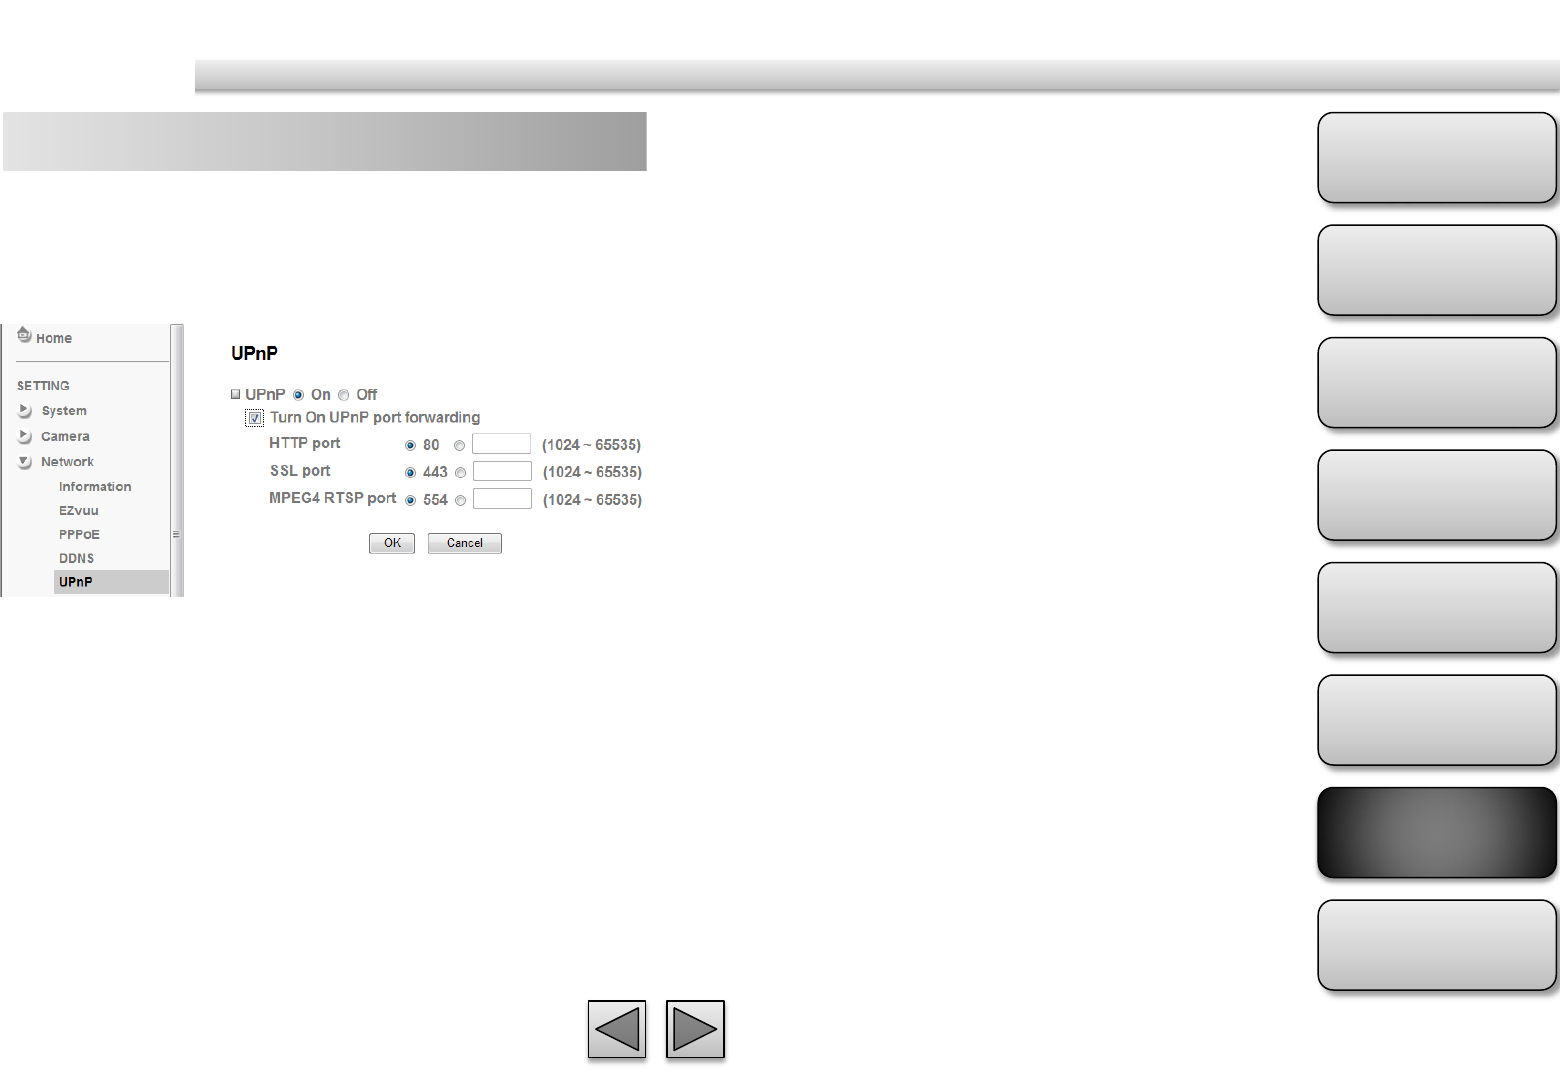
UPnP HTTP port
The default HTTP port is 80. Or the port number can
be entered, ranged from 1024 to 65535.
SSL port
The default SSL port is 443. Or the port number can
be entered, ranged from 1024 to 65535.
MPEG4 RTSP port
The default MPEG-4 RTSP Port is 554. Or the port
number can be entered, ranged from 1024 to 65535.
You can select UPnP function “On” or “Off”. If a
ROUTER is used to access to internet and it supports
UPnP IGD function, please turn on the UPnP Port
Forwarding function.
Product
Overview
Hardware
Installation
Easy Access
EZvuu
Setting
Live View
Appendix
Table of
Contents
54
Network
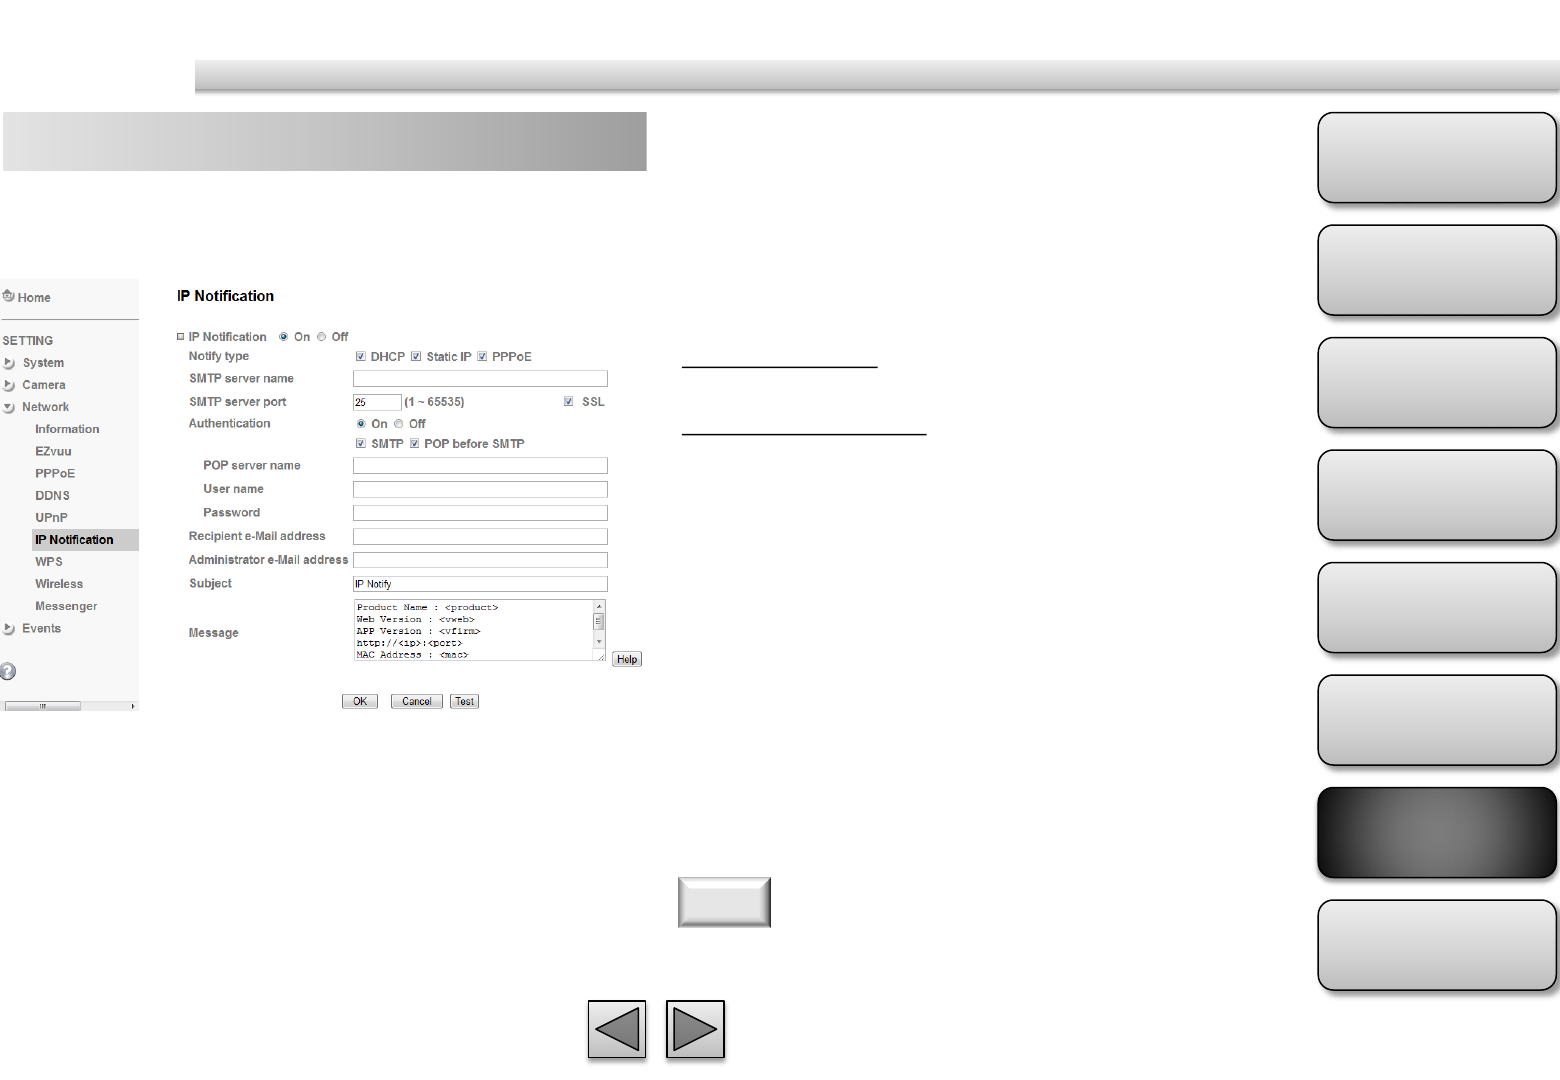
IP Notification SMTP
Select if SMTP authentication is necessary when an e-
mail is sent.
POP before SMTP
Select if POP before SMTP authentication is necessary
when an e-mail is sent.
POP server name
Type the POP server name of the user.
User name, Password
Type the user name and Password of the user.
Recipient e-mail address
Type up to 3 recipient e-Mail addresses.
Administrator e-mail address
This address is used for reply mail and sending system
messages from the SMTP server.
Subject
Type the subject/title of the e-Mail.
Message
Type the text of the E-mail. Default provides network
information including IP, Port, MAC, Model, Firmware
Version and Web Version.
When network notify type is set to “ON”, you can
send an e-mail notification of the completion of the
network setting.
If you use g-mail as your mail server, you should set 587 as
your port number and tick SSL box.
Note
Notify Type
Select the notify type
SMTP Server Name
Type the SMTP server name or the IP address
SMTP Server Port
Set port number of your mail server. The default
value is 25. Tick SSL box if the mail server you use has
security restriction.
Authentication
Required when you send an email.
Product
Overview
Hardware
Installation
Easy Access
EZvuu
Setting
Live View
Appendix
Table of
Contents
55
Network
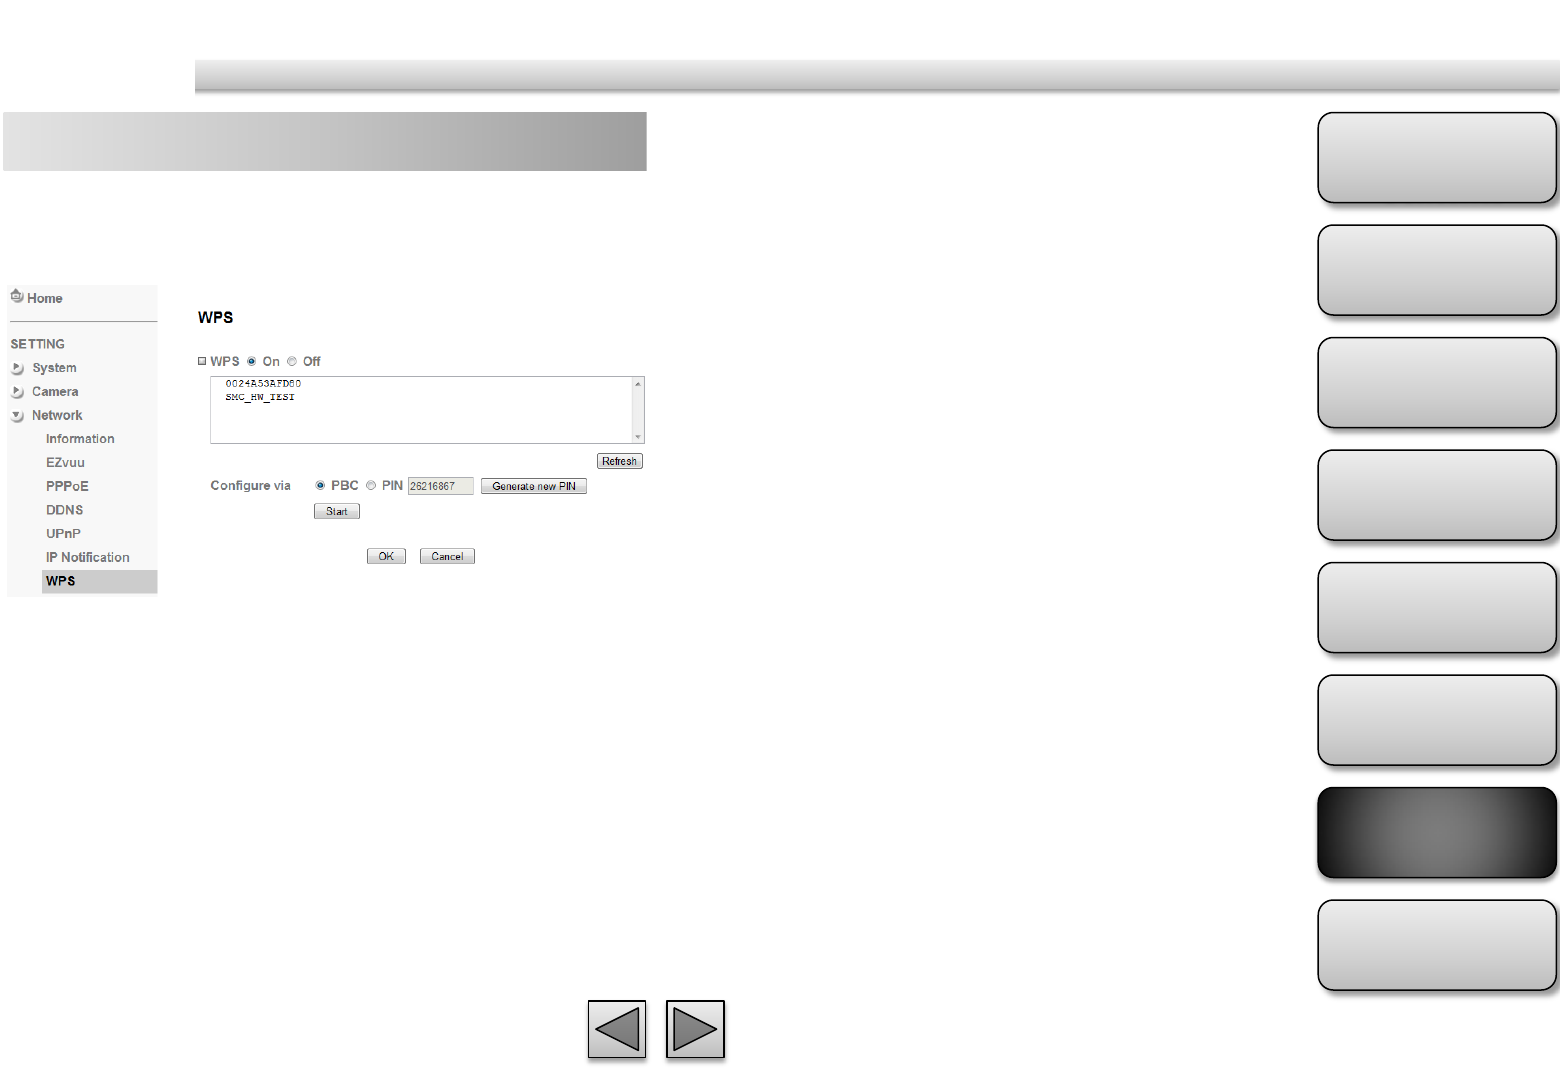
WPS WPS
Enable/disable the WPS function.
Configure via Push button
Click “Start”
Configure via Pin code
password for this msn account.
WPS (Wi-Fi Protected Setup ) also known as a
standard for easy and secure establishment of a
wireless home network.
Product
Overview
Hardware
Installation
Easy Access
EZvuu
Setting
Live View
Appendix
Table of
Contents
56
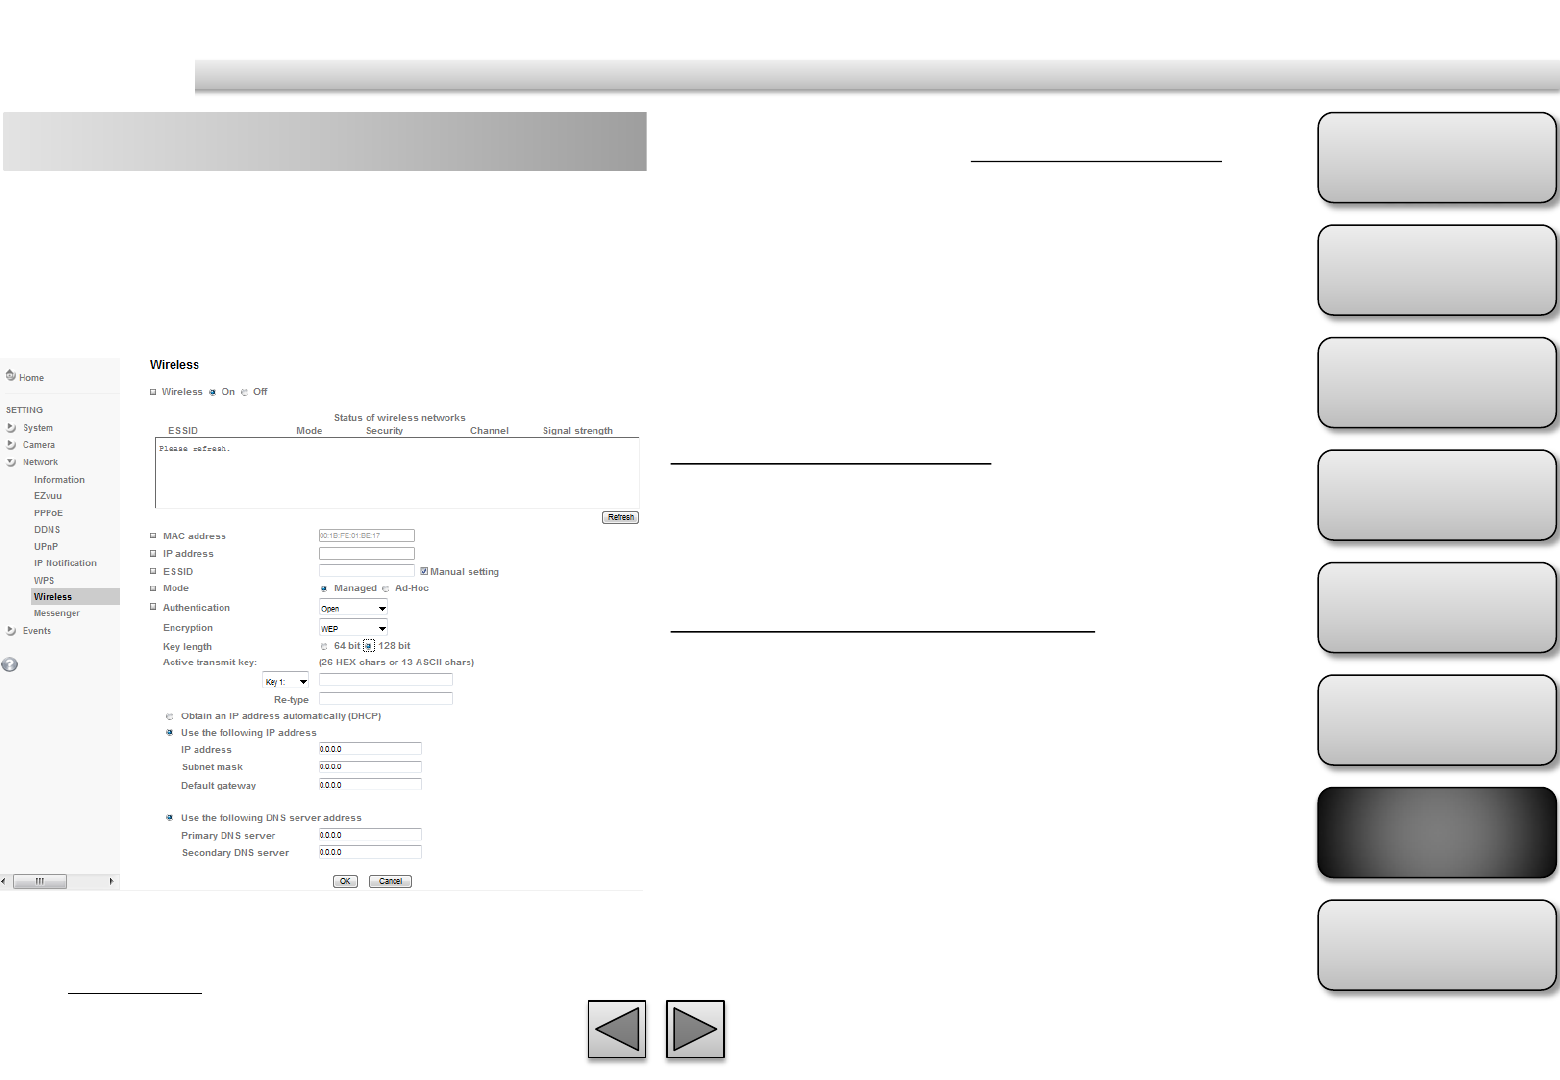
Network
Wireless 3. Enter password at active transmit key if
you need. If you don't know the setting of
the wireless AP, please ask your network
administrator.
4. Choose the option of Obtain an IP address
automatically (DHCP).
5. Choose the option of Obtain DNS server
address automatically.
Use the following IP address
Select this when the fixed IP address is set.
IP address: Enter the IP address of the device.
Subnet mask: Enter the subnet mask.
Default gateway: Enter the default gateway.
Use the following DNS server address
Select this when you set the fixed address as the IP
address of DNS server.
Primary DNS server: Enter the IP address of the
primary DNS server.
Secondary DNS server: Enter the IP address of the
secondary DNS server, if necessary.
6. Connect to the IP camera with wireless IP
address, then you can remove the
Ethernet connection.
The wireless network has to be set up by using cable
network connection. After setting the camera
correctly, the wireless function can work without
cable network connection. Please follow the setting
process below step by step:
1. See the wireless setting page. Then click
“Refresh”. All access points (AP) around
you will show up.
2. Select the AP you wish to connect.
Product
Overview
Hardware
Installation
Easy Access
EZvuu
Setting
Live View
Appendix
Table of
Contents
57
Network
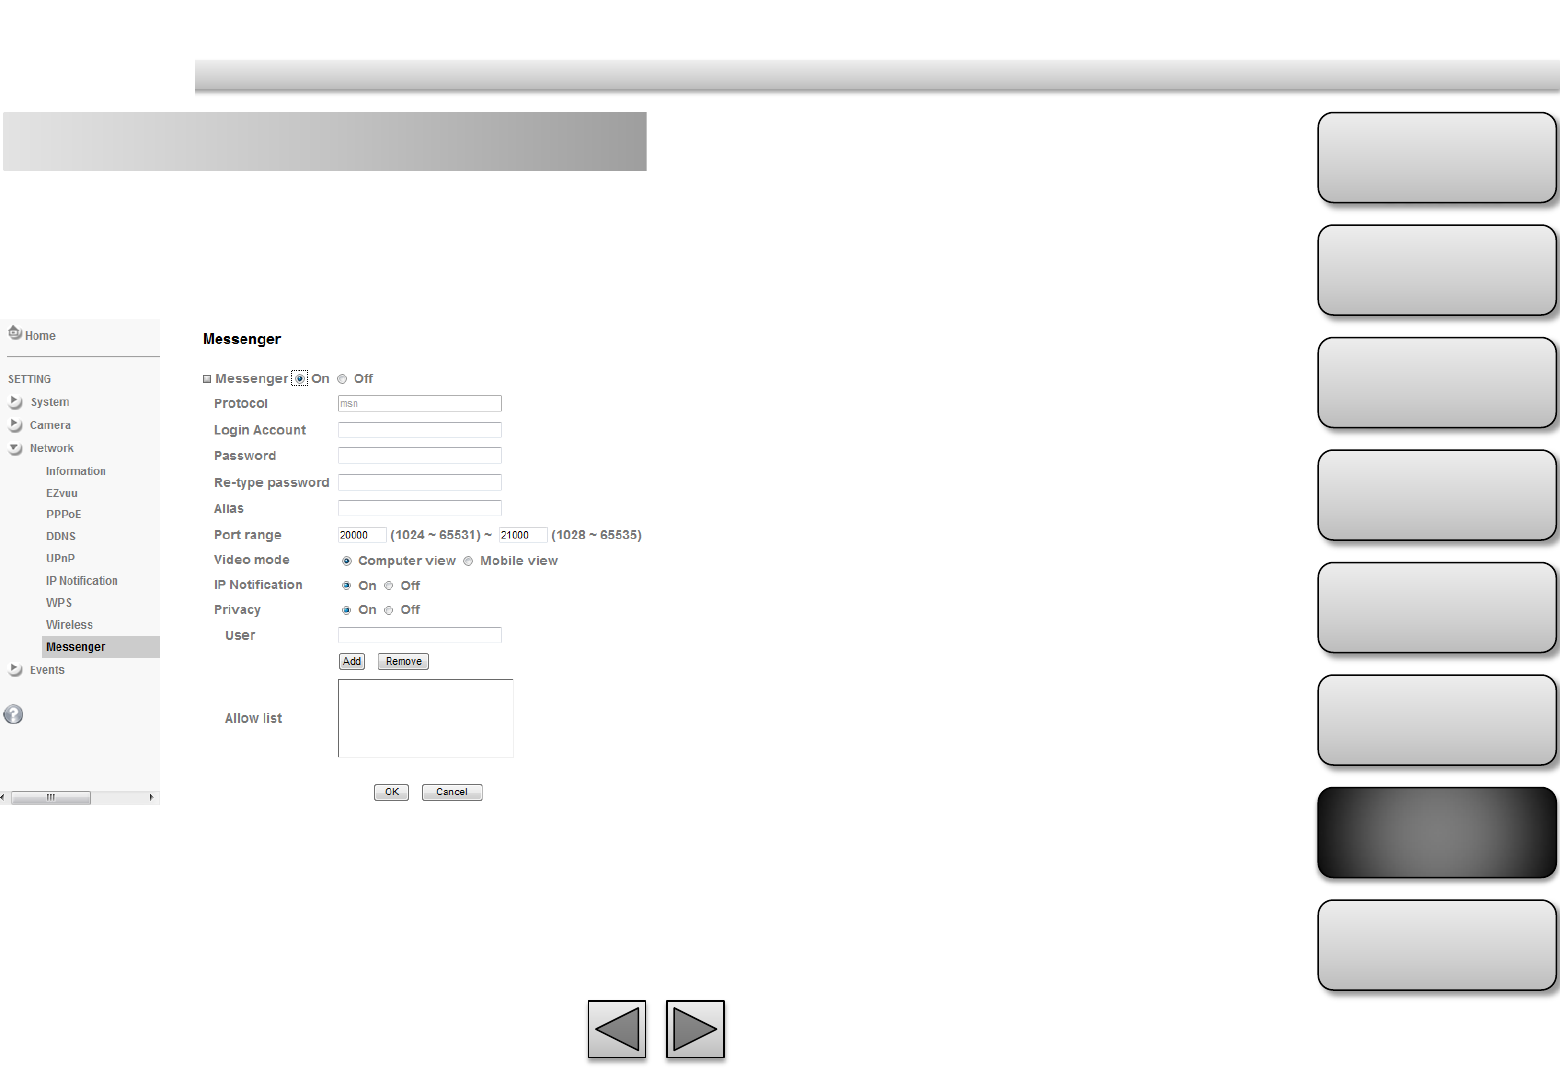
Messenger Protocol
support MSN only.
Login Account
Camera will use this account to login MSN server.
Password
password for this msn account.
Re-type password
re-type password to double confirm.
Alias
This alias will display on MSN nickname.
Port range
Select one port range for video transmission.
IP Notification
Switch the IP notification On / Off. If this feature
switches On, camera will send IP notification to the
users who are allowed.
Privacy
Switch privacy On / Off. When privacy turns on, only
those users in allowed list can access the camera.
User
Input to this blank to edit allow list.
Allow list
When privacy turns on, only those users in allow list
can access the camera.
If Messenger option is selected On, you can set out
the setting of MSN account. Messenger function
provide an easy-connect feature. User can easy to
know what camera’s private and public IP address is.
Product
Overview
Hardware
Installation
Easy Access
EZvuu
Setting
Live View
Appendix
Table of
Contents
58
Events
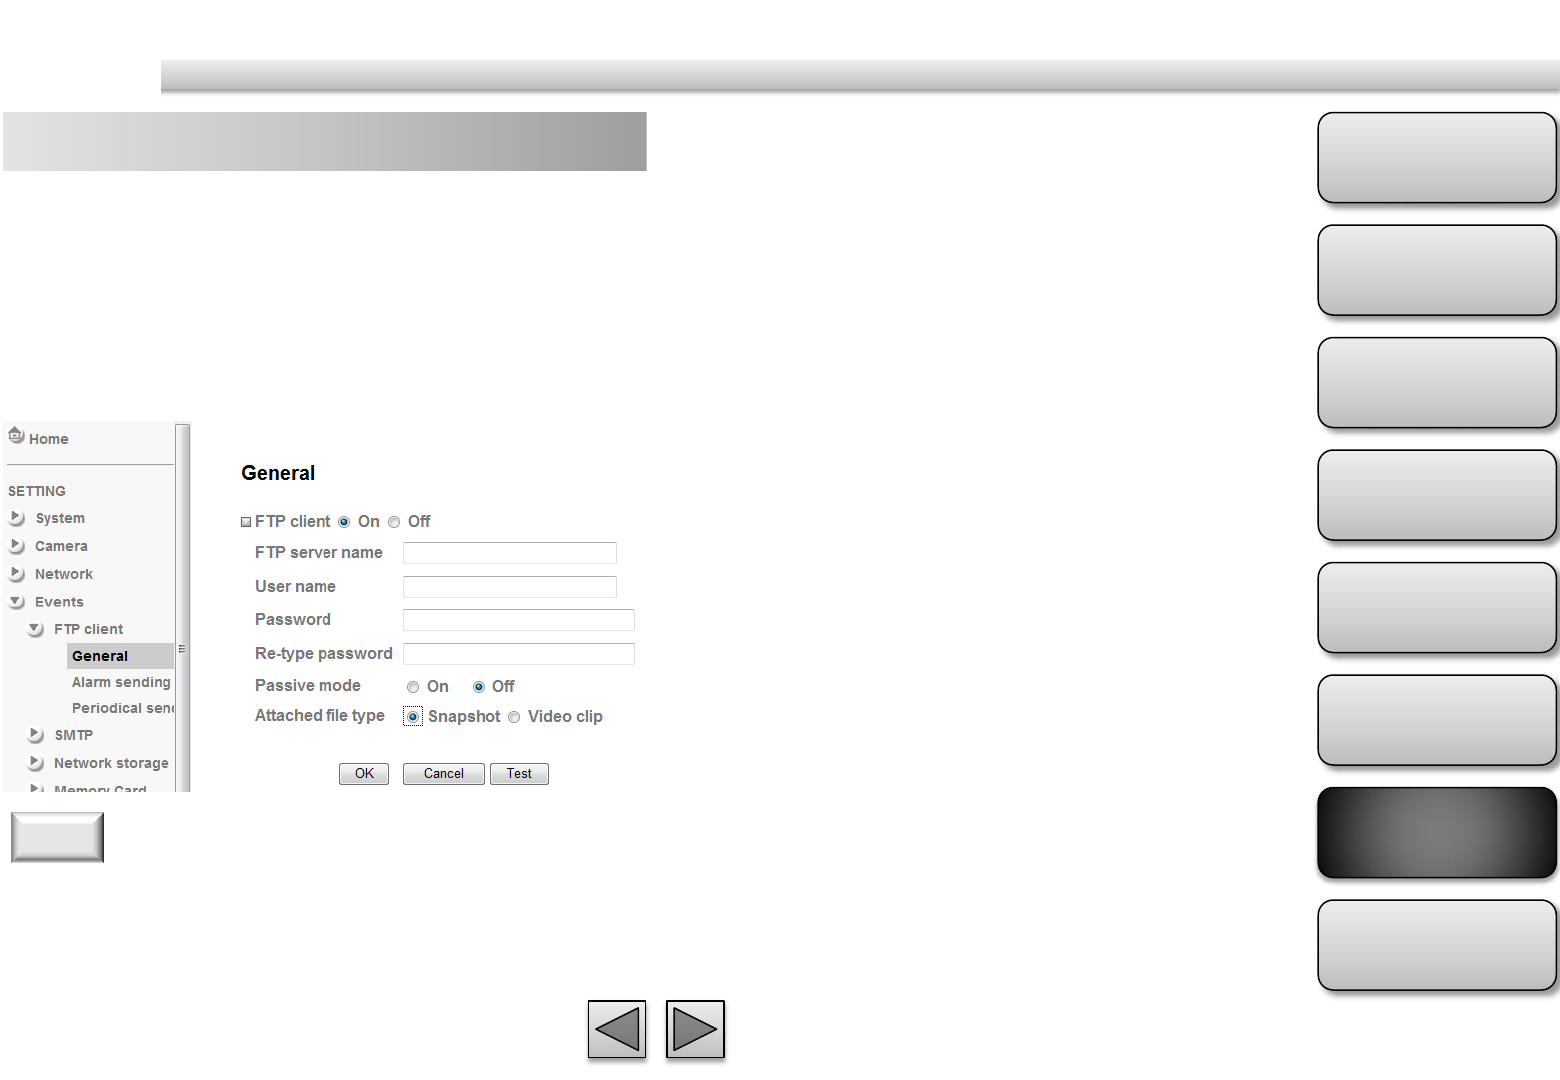
FTP Client – general FTP server name
Type the FTP server name to upload still images up to
64 characters, or the IP address of the FTP server.
User name
Type the user name for the FTP server.
Password
Type the password for the FTP server.
Retype password
To confirm the password, type the same characters as
you typed in the Password box.
Passive mode
Set whether you use the passive mode of FTP server
or not when connecting to FTP server. Select On to
connect to FTP server using the passive mode.
Attached File Type
You can choose snapshot or video clip for alarm
sending.
Test
After setting the FTP server information, you can tick
the test key to test if the connection between IP CAM
and FTP server works.
Use this menu to set up for capturing and sending
images to an FTP server. By using FTP client function,
you can send the image file which has been shot and
recorded linked with the built-in motion detection
function to FTP server. FTP client setting menu is
composed of two tabs, General, Alarm sending and
Periodical sending.
The frame rate and operability on the main viewer may
decrease while a file is being transmitted by the FTP client
function.
Note

Product
Overview
Hardware
Installation
Easy Access
EZvuu
Setting
Live View
Appendix
Table of
Contents
59
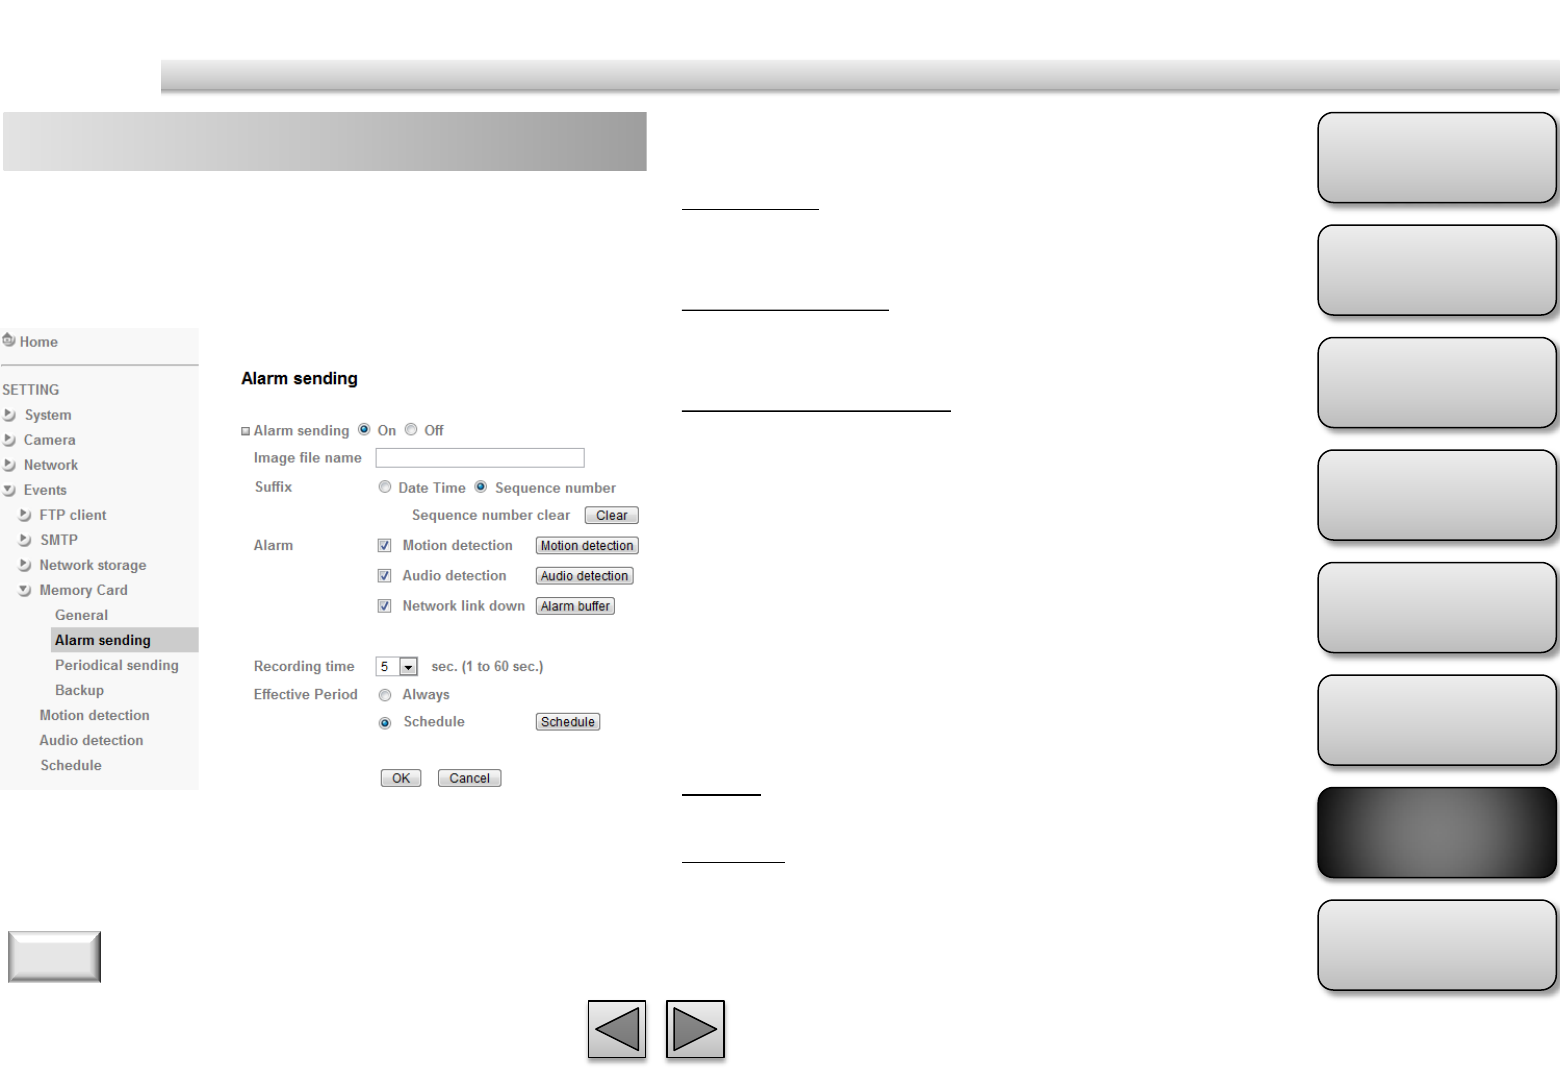
Events
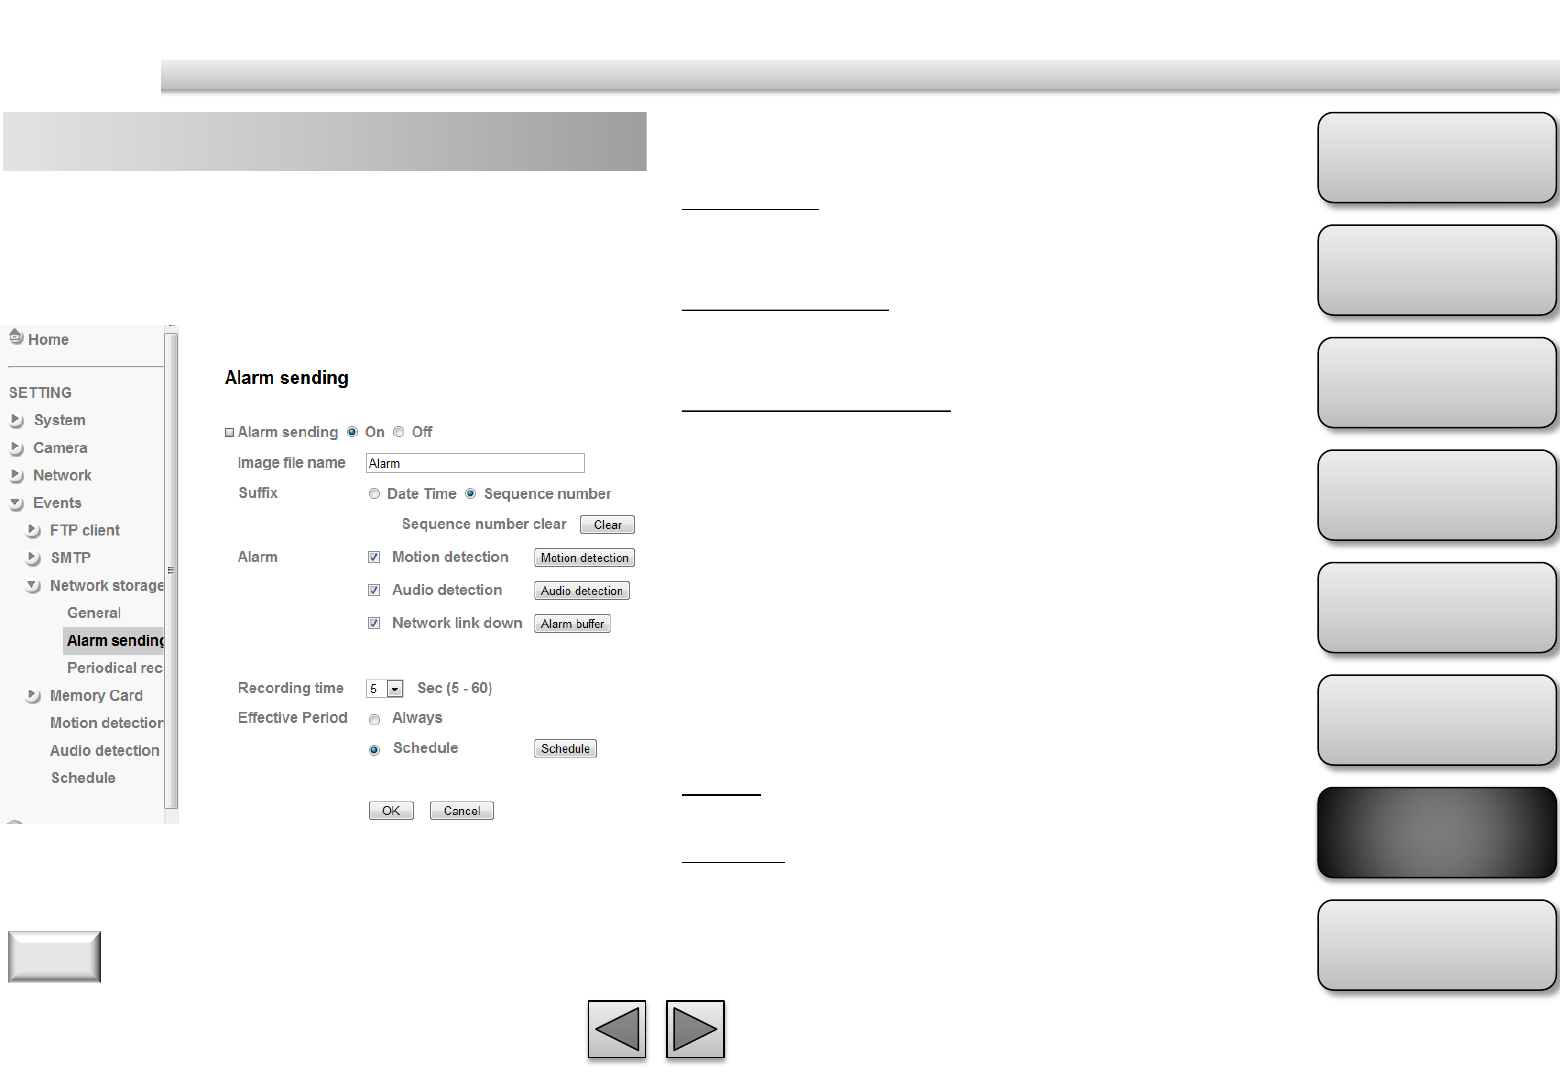
FTP Client – alarm sending Suffix
Select a suffix to add to the file name.
Date & time
The date & time suffix is added to the Image file
name.
Sequence number
The sequence number is added to the Image file
name.
Sequence number clear
Click Clear and the suffix of the sequence number
returns to 1.
Alarm
Select Motion Detection/Audio Detection/Network
Link Down function as a sensor.
Effective period
Set the period when the periodical sending is
effective.
Always
The periodical sending is always effective.
Schedule
You can specify the period when the periodical
sending is effective in the Schedule setting in the
other section.
Set to forward the image file to the specified FTP
server linked with the alarm detection by the built-in
motion detection function. Select On to send the
image file to FTP server linked with the alarm
detection.
Remote Path
Type the path to the destination in FTP.
Image File Name
Type the file name you want to assign to the images
when sending to the FTP server.
1. You can set motion detection at motion detection page.
2. You can set schedule function at schedule page.
Note
Product
Overview
Hardware
Installation
Easy Access
EZvuu
Setting
Live View
Appendix
Table of
Contents
60
Events
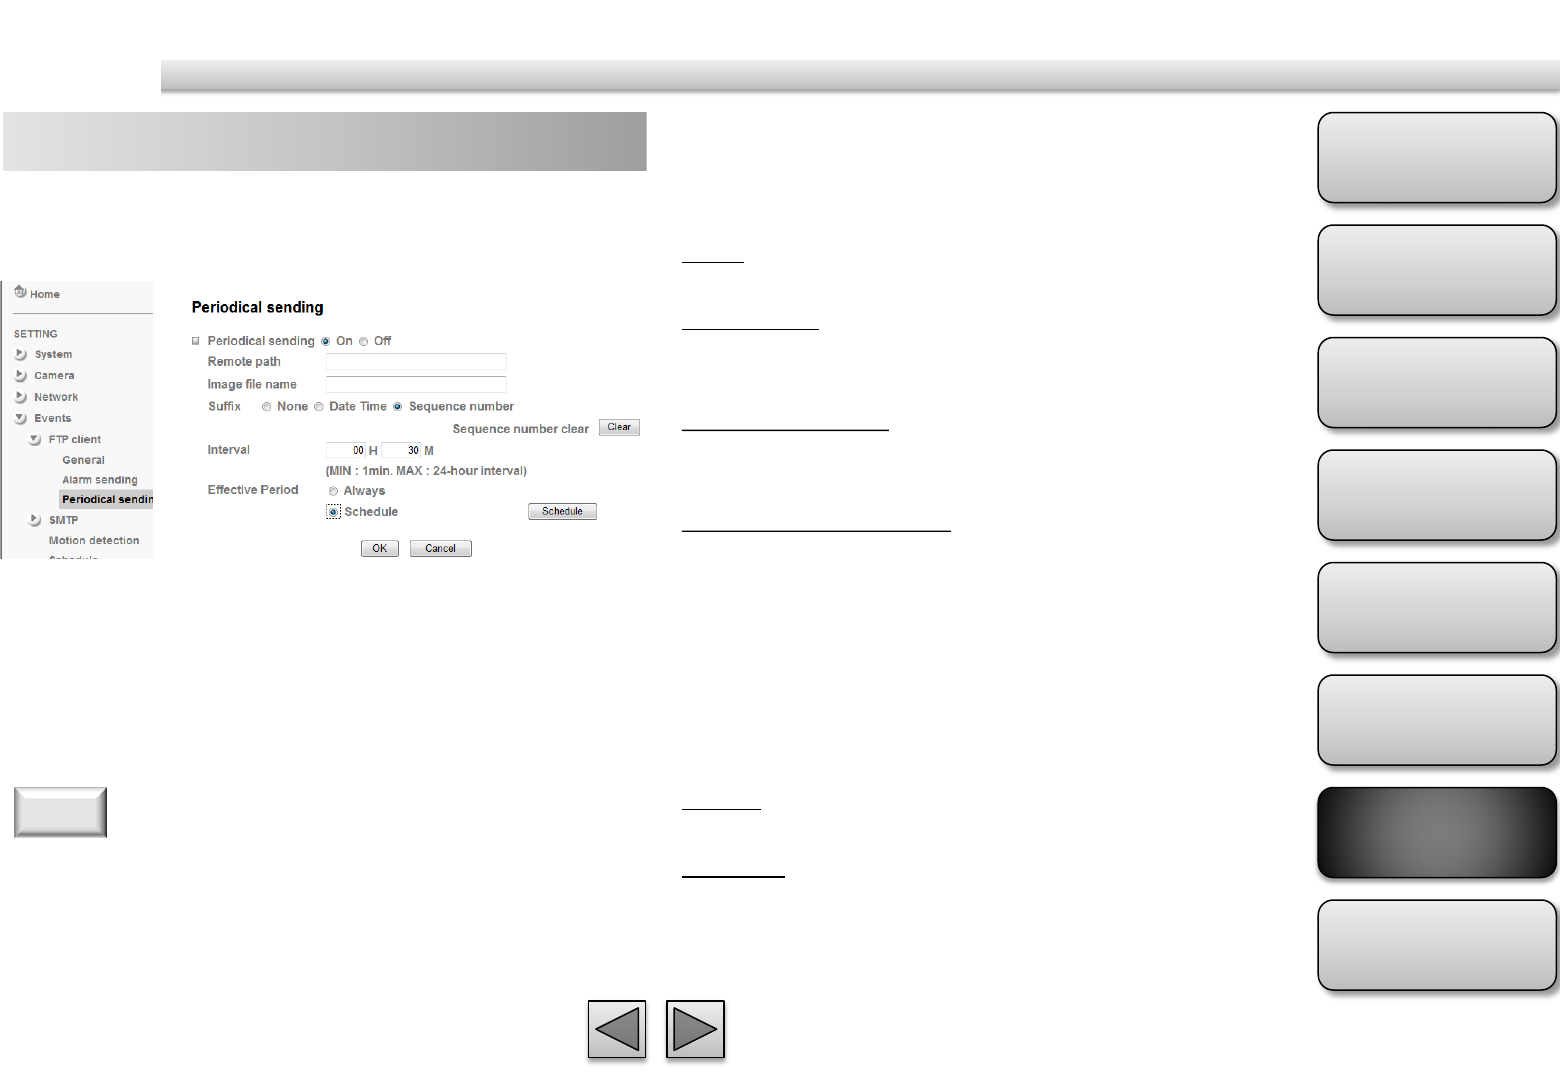
FTP Client – periodical sending Suffix
Select a suffix to be added to the file name sent by
SMTP.
None
The name of the sent file will be the Image file name.
Date & time
The date & time suffix is added to the Image file
name.
Sequence number
The sequence number is added to the Image file
name.
Sequence number clear
Click Clear and the suffix of the sequence number
returns to 1.
Interval
Set the periodical sending is effective interval.
Effective period
Set the period when the periodical sending is
effective.
Always
The periodical sending is always effective.
Schedule
You can specify the period when the periodical
sending is effective in the Schedule setting in the
other section.
You can set to send an image file to FTP server
periodically by selecting On to send the image file to
FTP server linked with setting period.
You can set schedule function at schedule page.
Note
Remote Path
Type the path to the destination in FTP.
Image File Name
Type the file name you want to assign to the images
when sending to the FTP server.
Product
Overview
Hardware
Installation
Easy Access
EZvuu
Setting
Live View
Appendix
Table of
Contents
61
Events
SMTP – general
You can send a mail with attached image file which
shot by external sensor input and motion detections
or shot periodically.
SMTP Server Name
Type the SMTP server name or the IP address
SMTP Server Port
Set port number of your mail server. The default
value is 25. Tick SSL box if the mail server you use has
security restriction.
Authentication
Required when you send an email.
SMTP
Select if SMTP authentication is necessary when an e-
mail is sent.
POP before SMTP
Select if POP before SMTP authentication is necessary
when an e-mail is sent.
POP server name
Type the POP server name of the user.
User name, Password
Type the user name and Password of the user.
Recipient e-mail address
Type up to 3 recipient e-Mail addresses.
Administrator e-mail address
This address is used for reply mail and sending system
messages from the SMTP server.
Attached File Type
Select snapshot or video clip for alarm sending.
Subject
Type the subject/title of the e-Mail.
Message
Type the text of the E-mail.
If you use g-mail as your mail server, you should set 587 as
your port number and tick SSL box.
Note
Product
Overview
Hardware
Installation
Easy Access
EZvuu
Setting
Live View
Appendix
Table of
Contents
62
Events
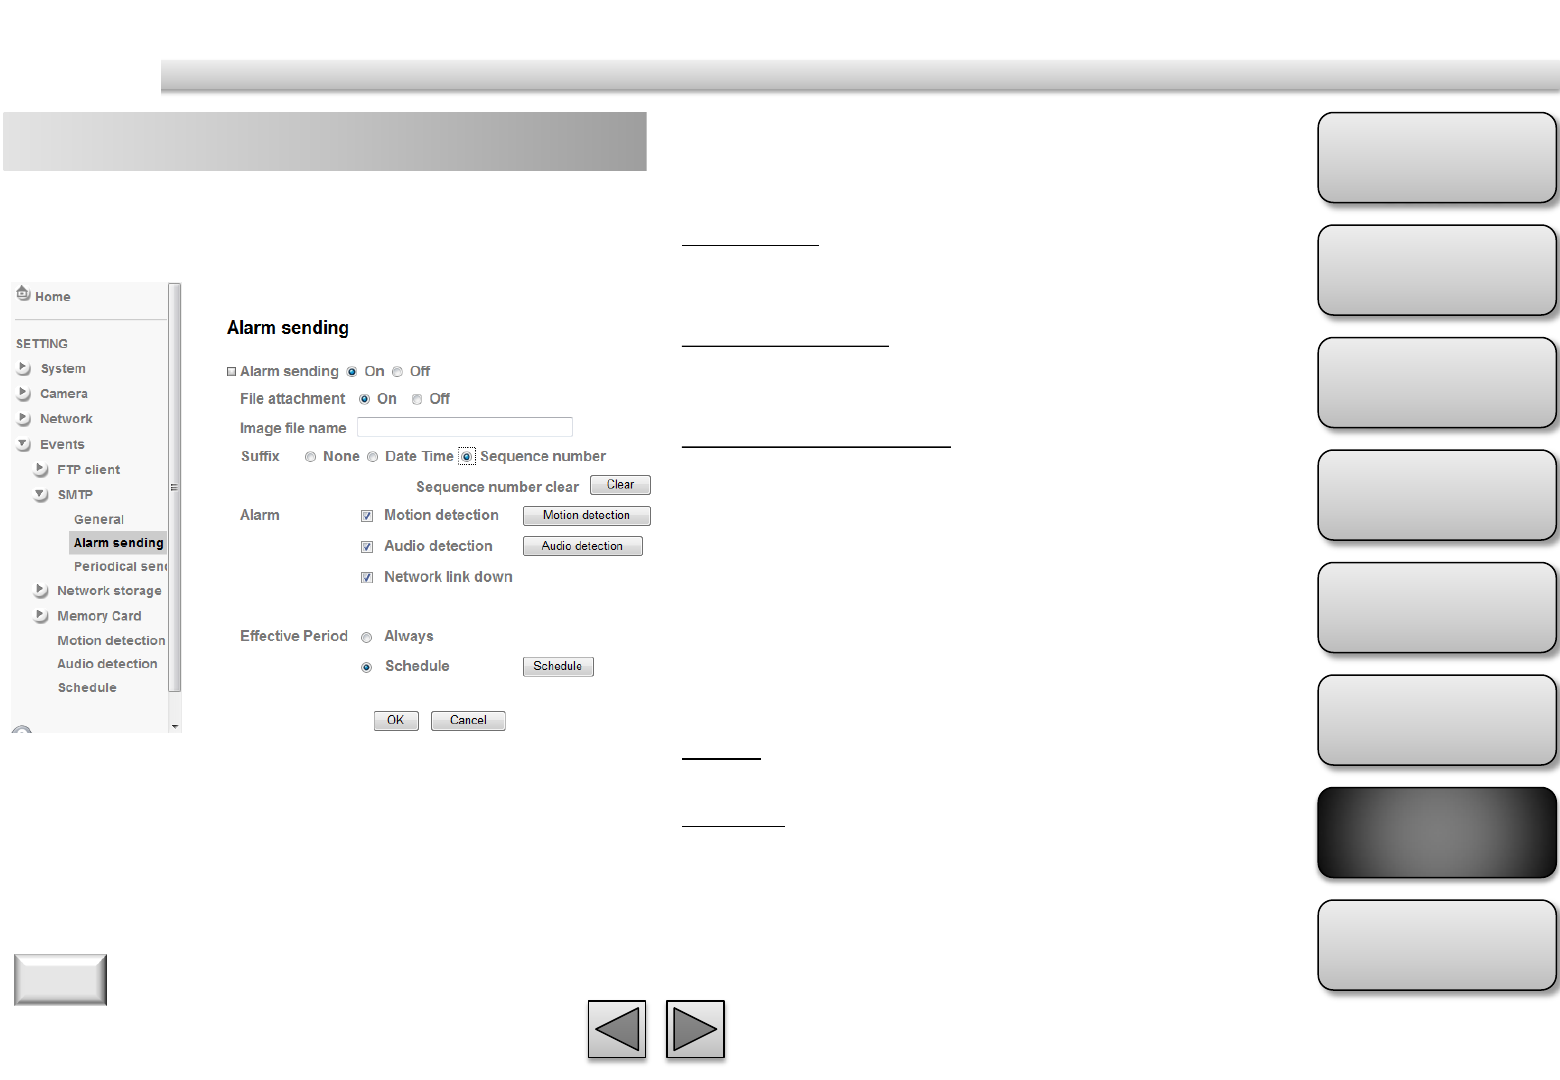
SMTP – alarm sending Suffix
Select a suffix to add to the file name.
Date & time
The date & time suffix is added to the Image file
name.
Sequence number
The sequence number is added to the Image file
name.
Sequence number clear
Click Clear and the suffix of the sequence number
returns to 1.
Alarm
Select Motion Detection/Audio Detection/Network
Link Down function as a sensor.
Effective period
Set the period when the periodical sending is
effective.
Always
The periodical sending is always effective.
Schedule
You can specify the period when the periodical
sending is effective in the Schedule setting in the
other section.
Set to send the mail with connection to the alarm
detection. Select On to send the image file to SMTP
server linked with the alarm detection.
File attachment
Set whether an image file is attached to the mail sent
or not.
Image File Name
Type the file name you want to assign to the images
when sending to the FTP server.
1. You can set motion detection at motion detection page.
2. You can set schedule function at schedule page.
Note

Product
Overview
Hardware
Installation
Easy Access
EZvuu
Setting
Live View
Appendix
Table of
Contents
63
Events
SMTP – periodical sending Suffix
Select a suffix to be added to the file name sent by
SMTP.
None
The name of the sent file will be the Image file name.
Date & time
The date & time suffix is added to the Image file
name.
Sequence number
The sequence number is added to the Image file
name.
Sequence number clear
Click Clear and the suffix of the sequence number
returns to 1.
Interval
Set the periodical sending is effective interval.
Effective period
Set the period when the periodical sending is
effective.
Always
The periodical sending is always effective.
Schedule
You can specify the period when the periodical
sending is effective in the Schedule setting in the
other section.
You can set to send an image file by SMTP server
periodically by selecting On to send the image file by
SMTP server linked with setting period.
Image file name
Type the file name of the image sent by SMTP up to
10 alphanumeric characters, - (hyphen) and _ (under
score).
You can set schedule function at schedule page.
Note
Product
Overview
Hardware
Installation
Easy Access
EZvuu
Setting
Live View
Appendix
Table of
Contents
64
Events
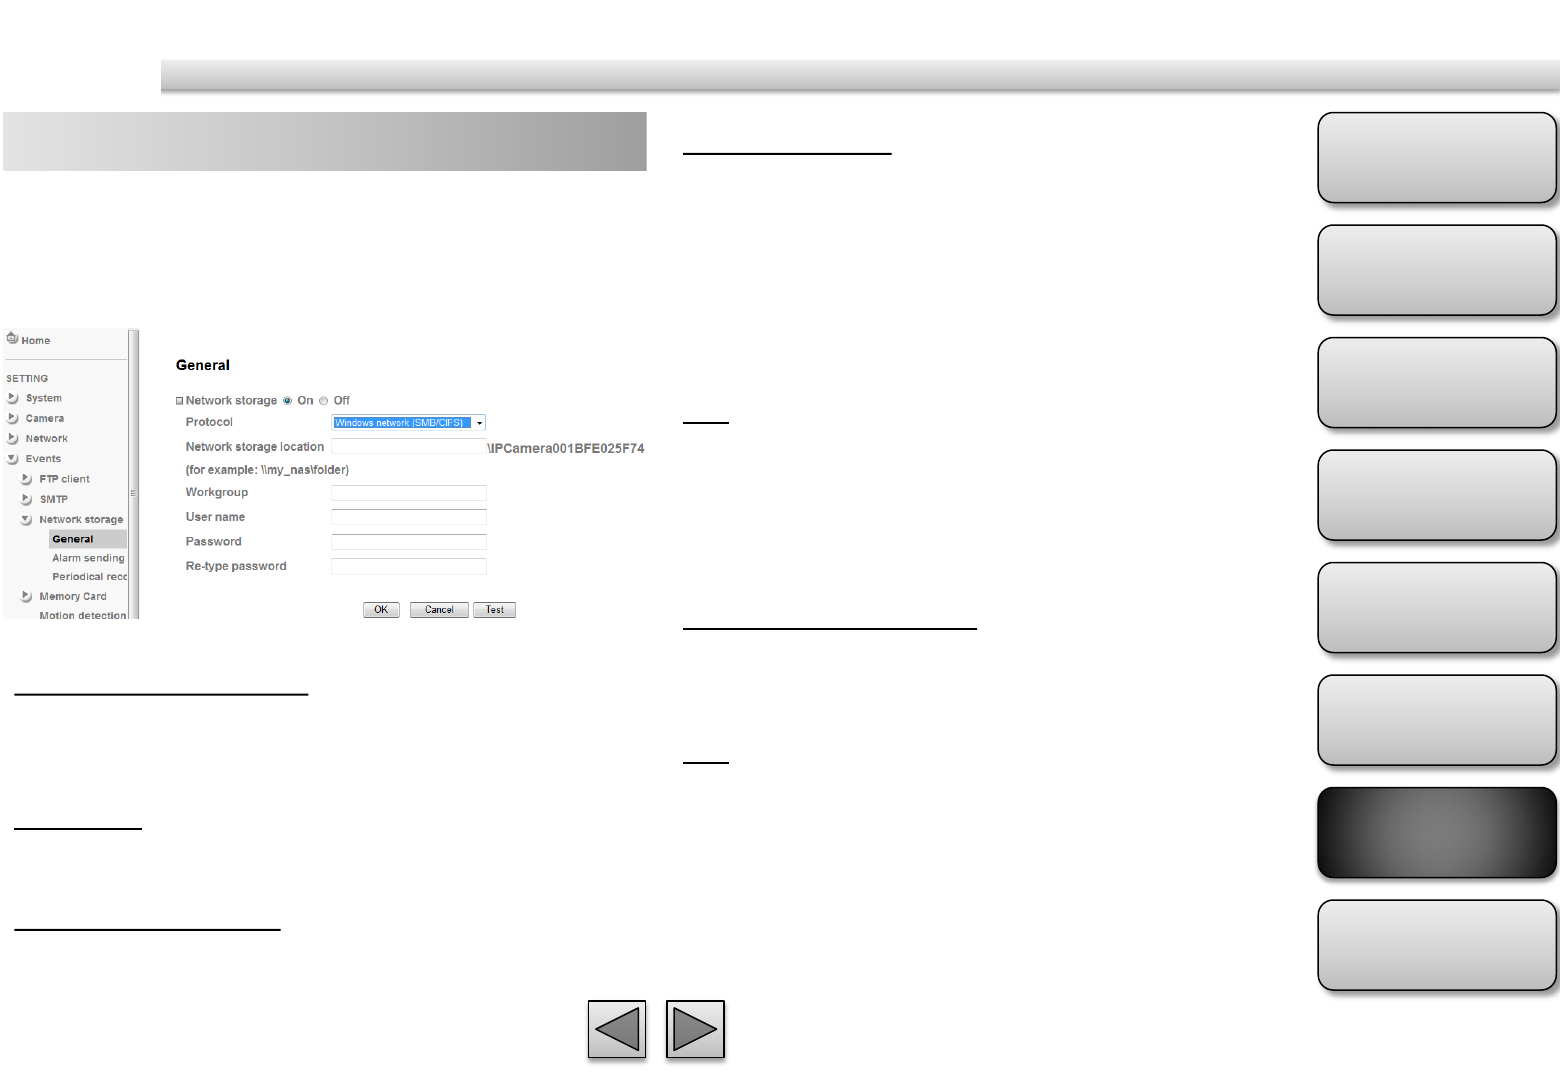
Network Storage – general Attached File Type
You can choose snapshot or video clip for alarm
sending. Select “Snapshot,” one snapshot will be
transmitted to the specified network storage location
while motion detection / audio detection / alarm
input triggered. Select “Video clip,” one video clip
which can be selected from 5 seconds to 60 seconds
will be transmitted.
Test
After setting the network storage location
information, you can tick the test key to test if the
connection between IP CAM and network storage
location works.
Protocol- Unix network (NFS):
Network Storage Location
Type the IP or name of specified computer and folder.
For example, //IP/folder name or my_nas:/folder
name.
Test
After setting the network storage location
information, you can tick the test key to test if the
connection between IP CAM and network storage
location works.
Select On if you would like to use the network storage
function. Then choose one protocol between
Windows network (SMB/CIFS) and Unix network
(NFS).
Protocol - Windows Network (SMB/CIFS):.
Network Storage Location
Type the IP or name of specified computer and folder.
For example, //IP/folder name or // my_nas/folder
name.
Workgroup
Type the name of workgroup which the operating
computer belongs.
User Name & Password
Type the name and password for workgroup.
Product
Overview
Hardware
Installation
Easy Access
EZvuu
Setting
Live View
Appendix
Table of
Contents
65
Events
Network Storage – alarm sending Suffix
Select a suffix to add to the file name.
Date & time
The date & time suffix is added to the Image file
name.
Sequence number
The sequence number is added to the Image file
name.
Sequence number clear
Click Clear and the suffix of the sequence number
returns to 1.
Alarm
Select Motion Detection/Audio Detection/Network
Link Down function as a sensor.
Recording Time
Select recording time from 5 to 60 minutes.
Effective period
Set the period when the periodical sending is
effective.
Always
The periodical sending is always effective.
Schedule
You can specify the period when the periodical
sending is effective in the Schedule setting in the
other section.
Set to transmit the snapshot or video clip file with
connection to the alarm detection. Select On to send
the file to network storage location linked with the
alarm detection.
Image File Name
Type the file name you want to assign to the images
when sending to the FTP server.
1. You can set motion detection at motion detection page.
2. You can set schedule function at schedule page.
Note
Product
Overview
Hardware
Installation
Easy Access
EZvuu
Setting
Live View
Appendix
Table of
Contents
66
Events
Network Storage – periodical sending Sequence number
The sequence number is added to the Image file
name.
Sequence number clear
Click Clear and the suffix of the sequence number
returns to 1.
File Size
The file size of image or video clip transmitted to the
network storage location can’t over 50MB.
Cyclic Time
The total amount of files transmitted to the network
storage location has to be in the range from 100 to
1024000MB.
Recording Time
Set the period when the periodical sending is
effective.
Always
The periodical sending is always effective.
Schedule
You can specify the period when the periodical
sending is effective in the Schedule setting in the
other section.
You can set to send an image file by SMTP server
periodically by selecting On to send the image file by
SMTP server linked with setting period.
Image file name
Type the file name of the image sent by SMTP up to
10 alphanumeric characters, - (hyphen) and _ (under
score).
Suffix
Select a suffix to be added to the file name sent by
SMTP.
Date & time
The date & time suffix is added to the Image file
name.
You can set schedule function at schedule page.
Note
Product
Overview
Hardware
Installation
Easy Access
EZvuu
Setting
Live View
Appendix
Table of
Contents
67
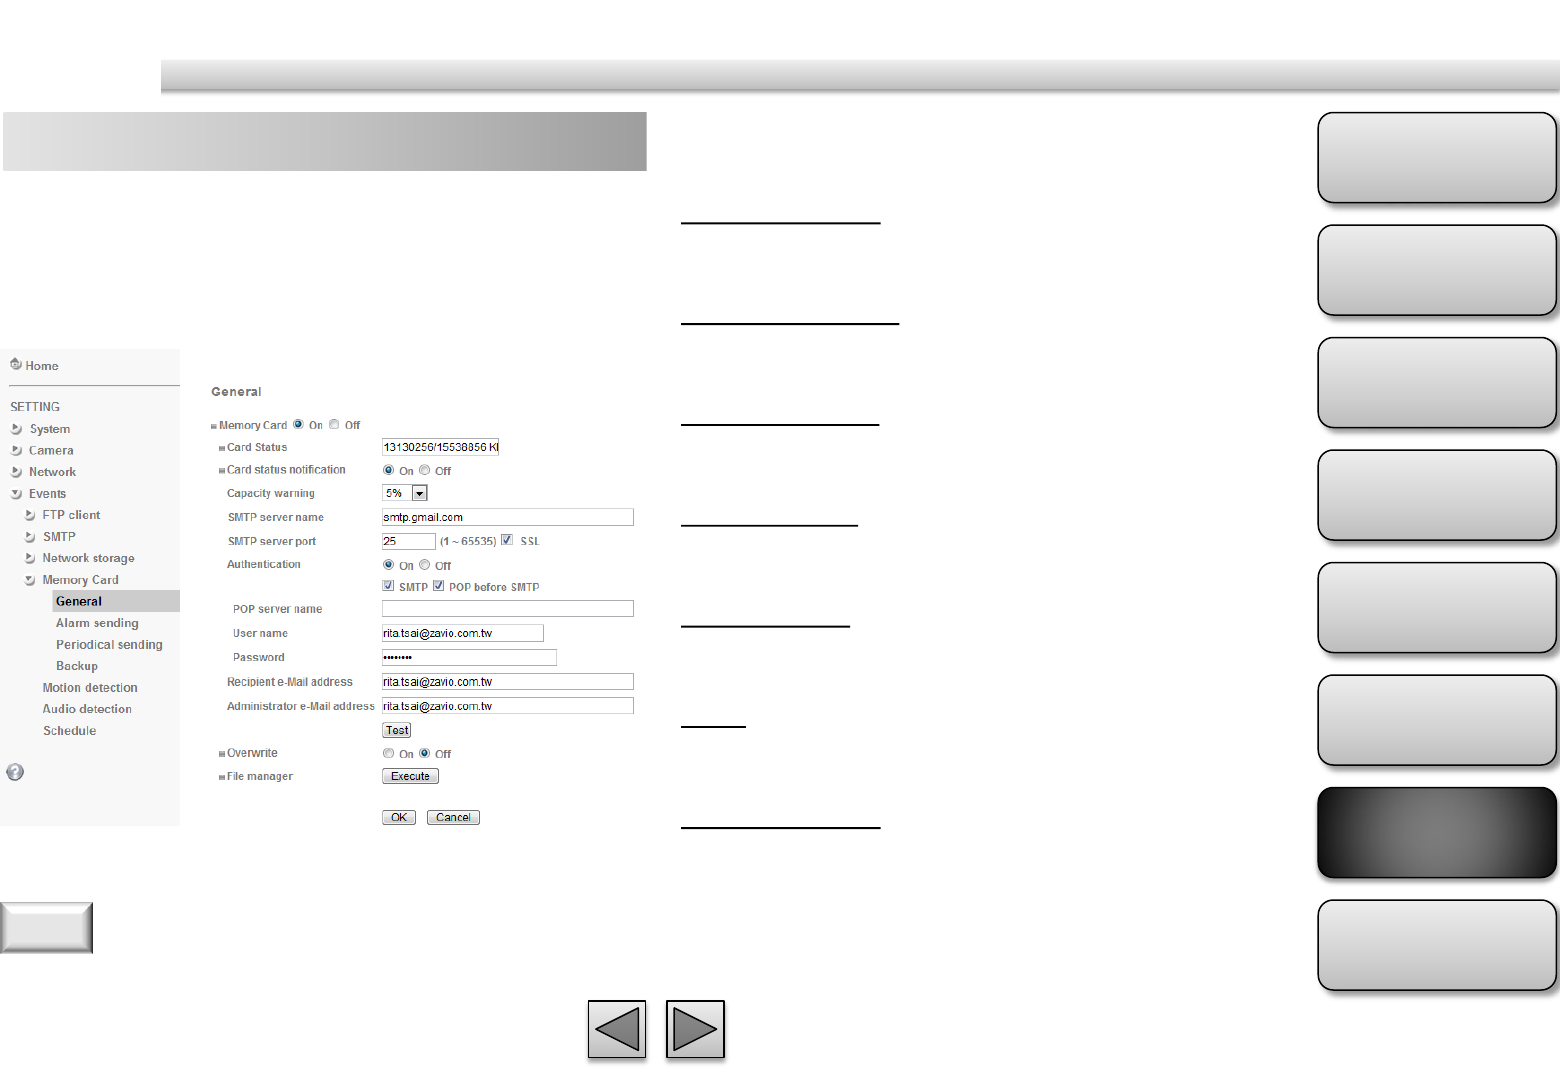
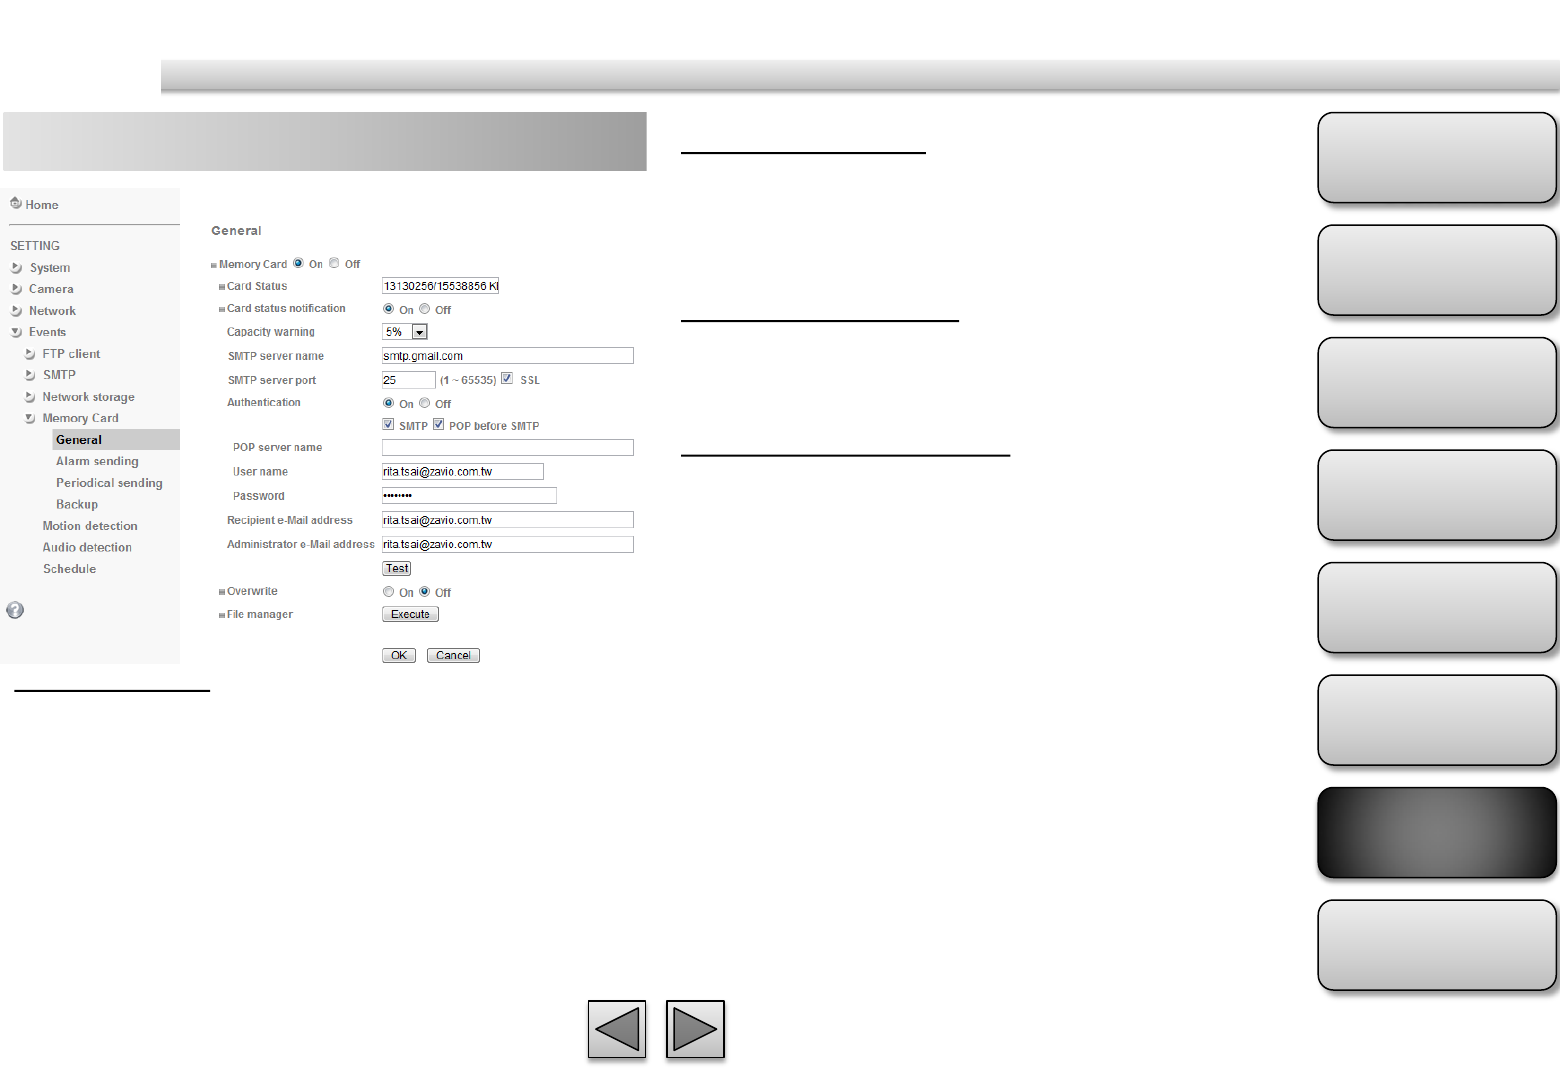
Events
Memory Card– general Card Status Notification
Select On to enable card status notification.
Capacity Warning
Select capacity warning when the space free is 5%,
10%, 25% or 50%.
SMTP Server Name
Type the SMTP server name up to 64 characters, or
the IP address of the SMTP server.
SMTP Server Port
You can set port number from 1~65535 according to
your mail server. The default value is 25.
Security Setting
Tick SSL box if the mail server you use has security
restriction.
Authentication
Select the authentication required when you send an
email.
SMTP
Select if SMTP authentication is necessary when an e-
mail is sent.
POP before SMTP
Select when POP before SMTP authentication is
necessary when an e-mail is sent.
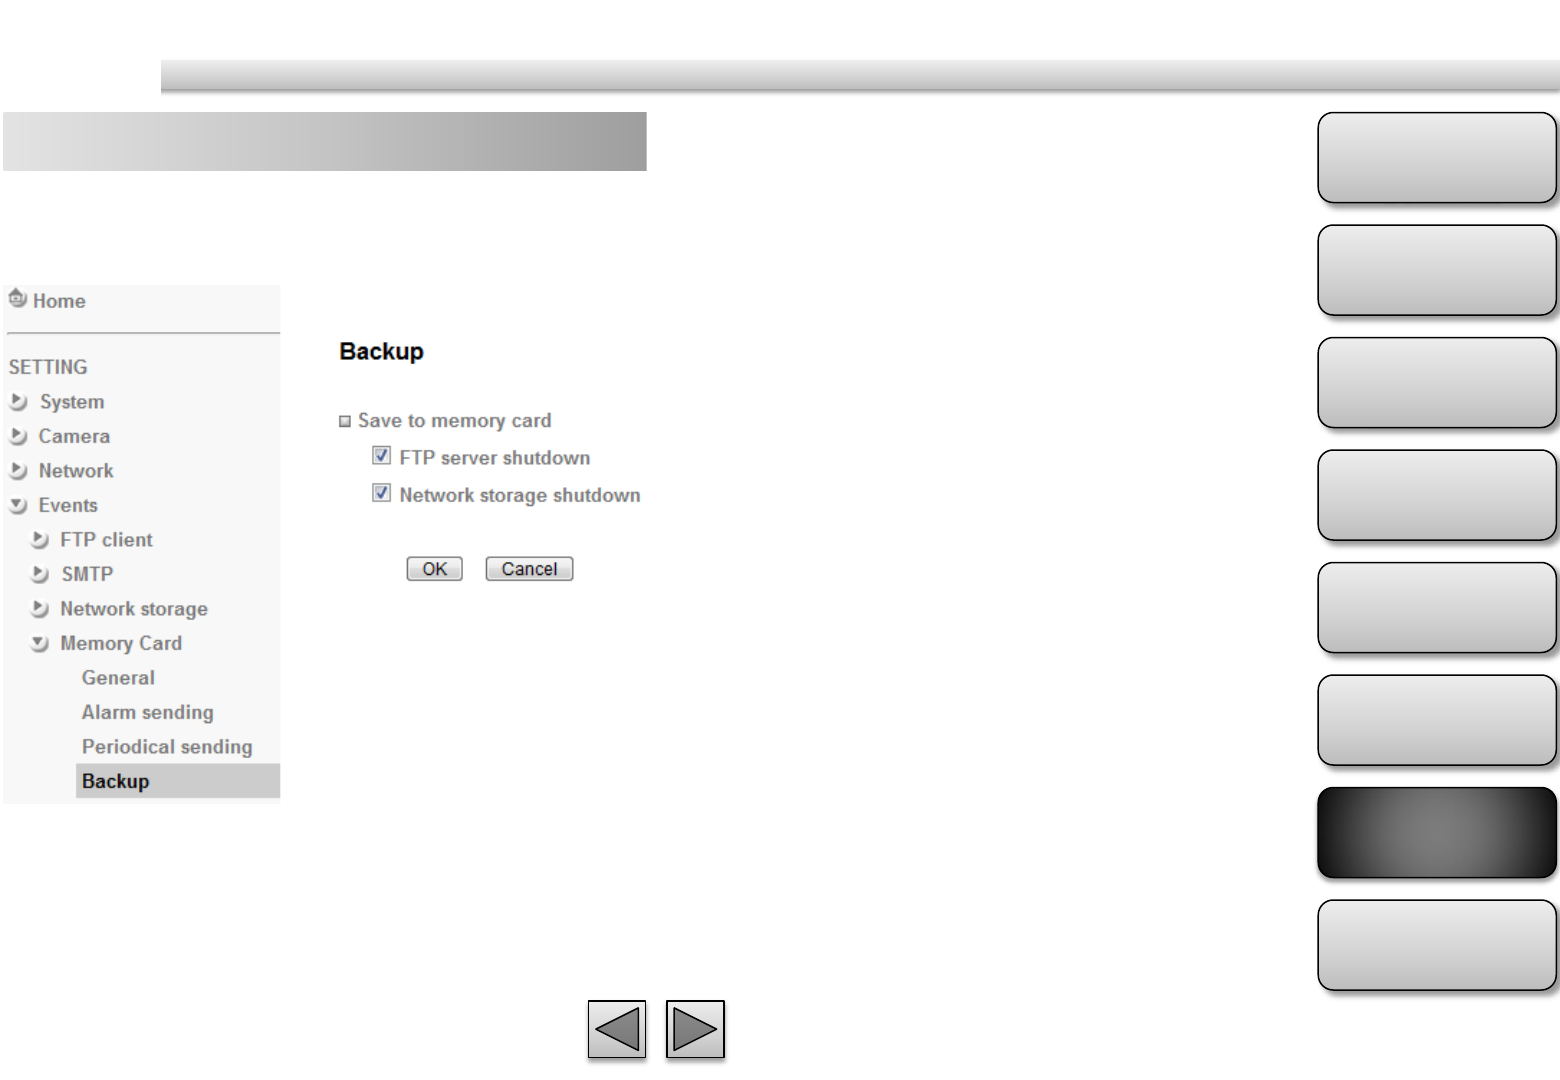
Memory card provides local storage function for
saving image files to the specified SD/SDHC card in
your camera. This function can be enabled only when
you insert SD/SDHC card to the camera and the
SD/SDHC card works well.
Card Status
Show the space free/total size of your memory card.
1. If you use g-mail as your mail server, you should set 25 as
your port number and tick SSL box.
2. When you set to On, be sure to select either or both
SMTP or / and POP before SMTP.
Note
Product
Overview
Hardware
Installation
Easy Access
EZvuu
Setting
Live View
Appendix
Table of
Contents
68
Events
Memory Card– general User name, Password
Type the user name and Password of the user who
has the mail account. This setting is necessary when
the SMTP server which sends e-mails performs
authentication.
Recipient e-mail address
Type the recipient e-Mail address up to 64 characters.
You can specify up to three recipient E-mail
addresses.
Administrator e-mail address
Type the Administrator e-Mail address up to 64
characters. This address is used for reply mail and
sending system messages from the
SMTP server.
Test
Click to test your SMTP setting works or not.
Overwrite
Select on to disable capacity warning and overwrite
your memory card when space free is not enough.
POP server name
It is necessary when the POP before SMTP is selected
in Authentication. Type the POP (receiving mail)
server name up to 64 characters, or type the IP
address of the POP server. This setting is necessary
when the SMTP server which sends e-mails performs
authentication using the POP user account.
Product
Overview
Hardware
Installation
Easy Access
EZvuu
Setting
Live View
Appendix
Table of
Contents
69
Events
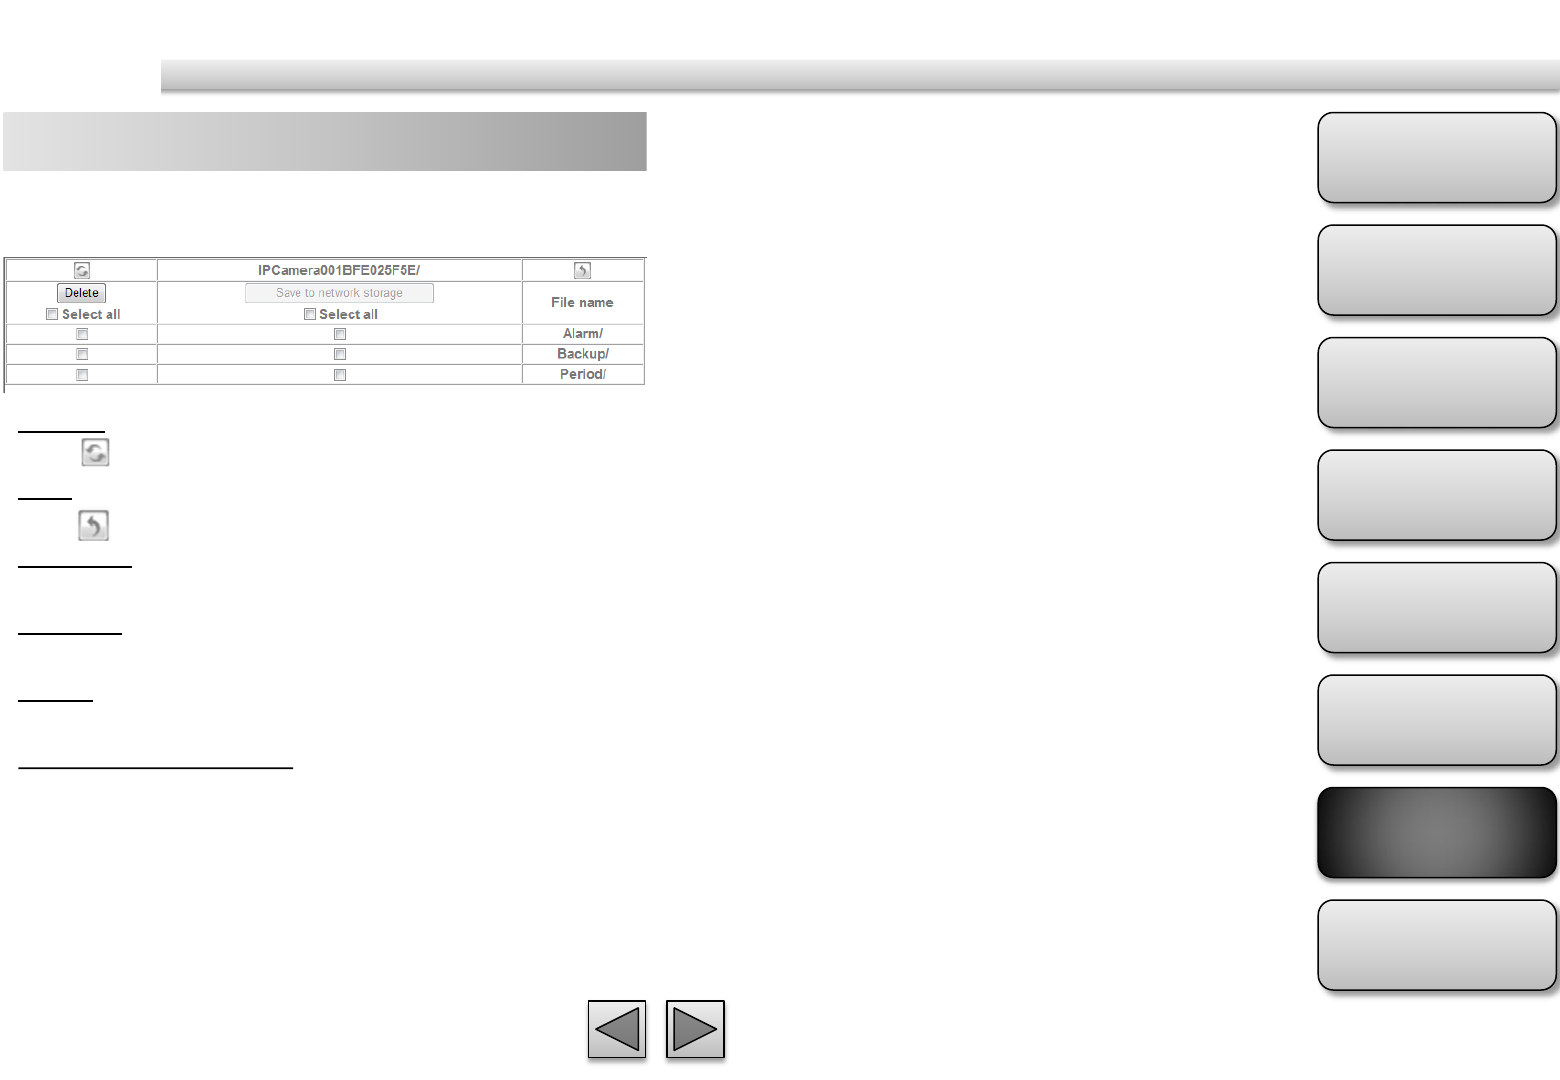
Memory Card– general
File Manager
click to manage your memory card.
Refresh
Click to refresh this page.
Back
Click to back folder.
File Name
Click the following file name to forward folder.
Select All
Select all to delete or save to network storage.
Delete
Delete selected folder or files.
Save to network storage
Save selected folder or files to configured network
storage.
Product
Overview
Hardware
Installation
Easy Access
EZvuu
Setting
Live View
Appendix
Table of
Contents
70
Events
Memory Card – alarm sending Suffix
Select a suffix to add to the file name.
Date & time
The date & time suffix is added to the Image file
name.
Sequence number
The sequence number is added to the Image file
name.
Sequence number clear
Click Clear and the suffix of the sequence number
returns to 1.
Alarm
Select Motion Detection/Audio Detection/Network
Link Down function as a sensor.
Recording Time
Select recording time from 5 to 60 minutes.
Effective period
Set the period when the periodical sending is
effective.
Always
The periodical sending is always effective.
Schedule
You can specify the period when the periodical
sending is effective in the Schedule setting in the
other section.
Set to transmit the snapshot or video clip file with
connection to the alarm detection. Select On to send
the file to memory card location linked with the alarm
detection.
Image File Name
Type the file name you want to assign to the images
when sending to the FTP server.
1. You can set motion detection at motion detection page.
2. You can set schedule function at schedule page.
Note
Product
Overview
Hardware
Installation
Easy Access
EZvuu
Setting
Live View
Appendix
Table of
Contents
71
Events
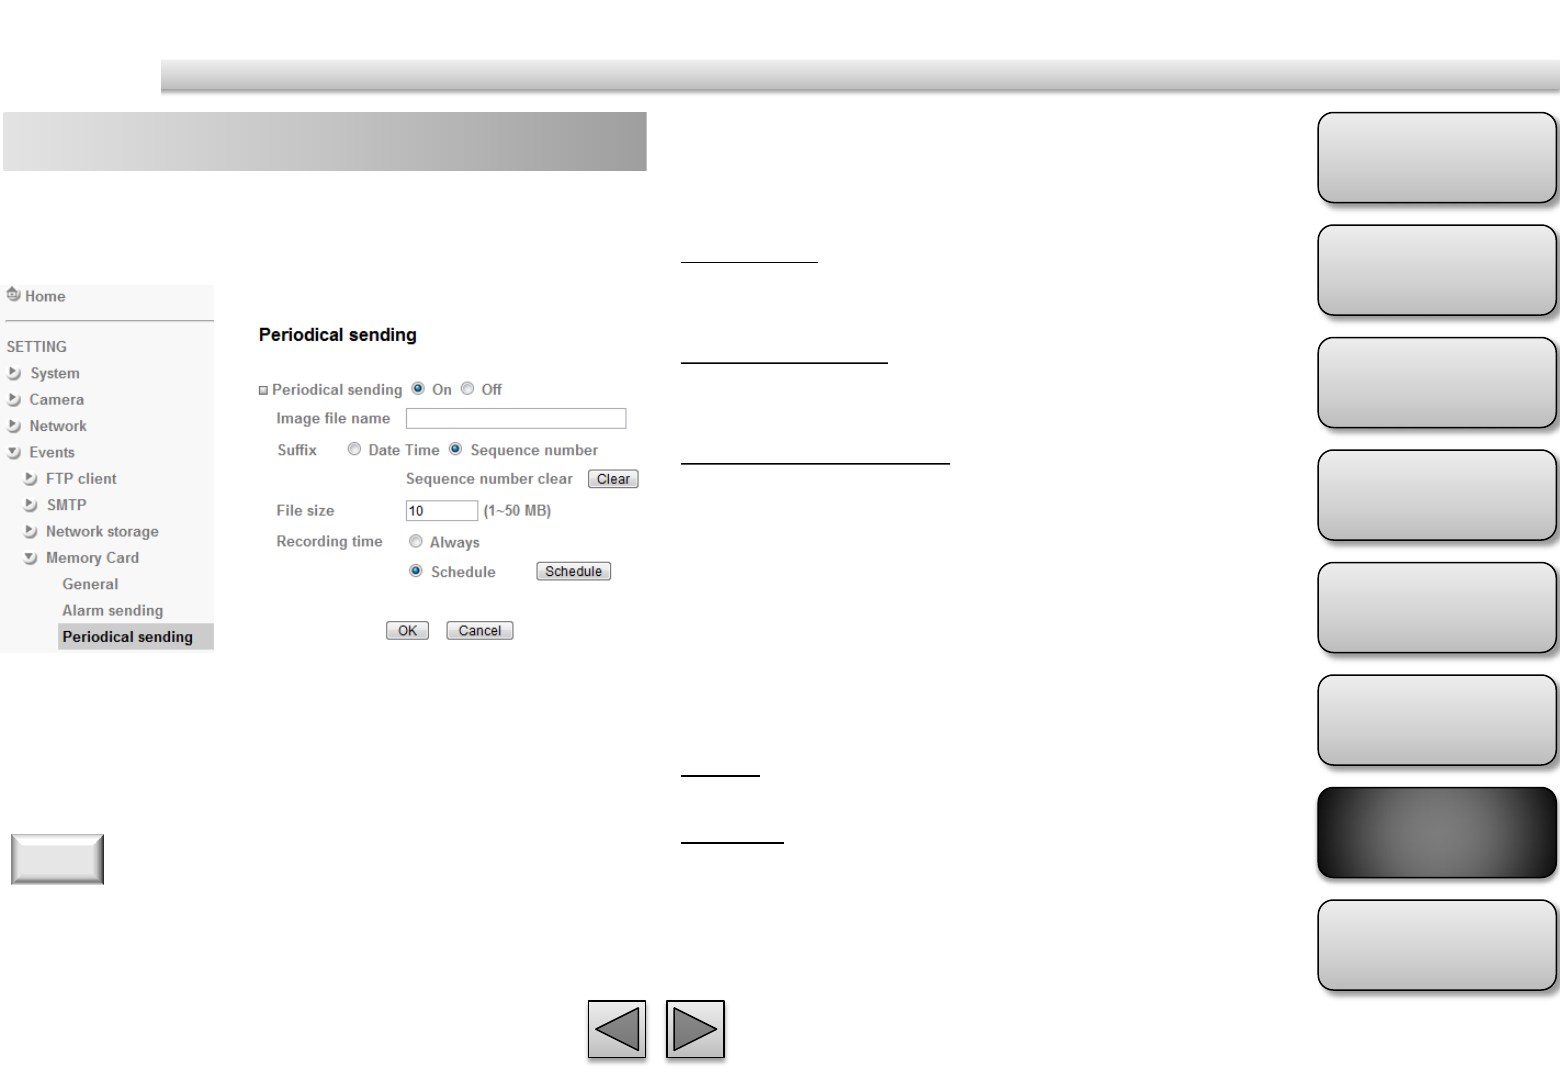
Memory Card – periodical sending Suffix
Select a suffix to be added to the file name sent by
SMTP.
Date & time
The date & time suffix is added to the Image file
name.
Sequence number
The sequence number is added to the Image file
name.
Sequence number clear
Click Clear and the suffix of the sequence number
returns to 1.
File Size
The file size of image or video clip transmitted to the
network storage location can’t over 50MB.
Recording Time
Set the period when the periodical sending is
effective.
Always
The periodical sending is always effective.
Schedule
You can specify the period when the periodical
sending is effective in the Schedule setting in the
other section.
You can set to send an image file by SMTP server
periodically by selecting On to send the image file by
SMTP server linked with setting period.
Image file name
Type the file name of the image sent by SMTP up to
10 alphanumeric characters, - (hyphen) and _ (under
score).
You can set schedule function at schedule page.
Note
Product
Overview
Hardware
Installation
Easy Access
EZvuu
Setting
Live View
Appendix
Table of
Contents
73
Events
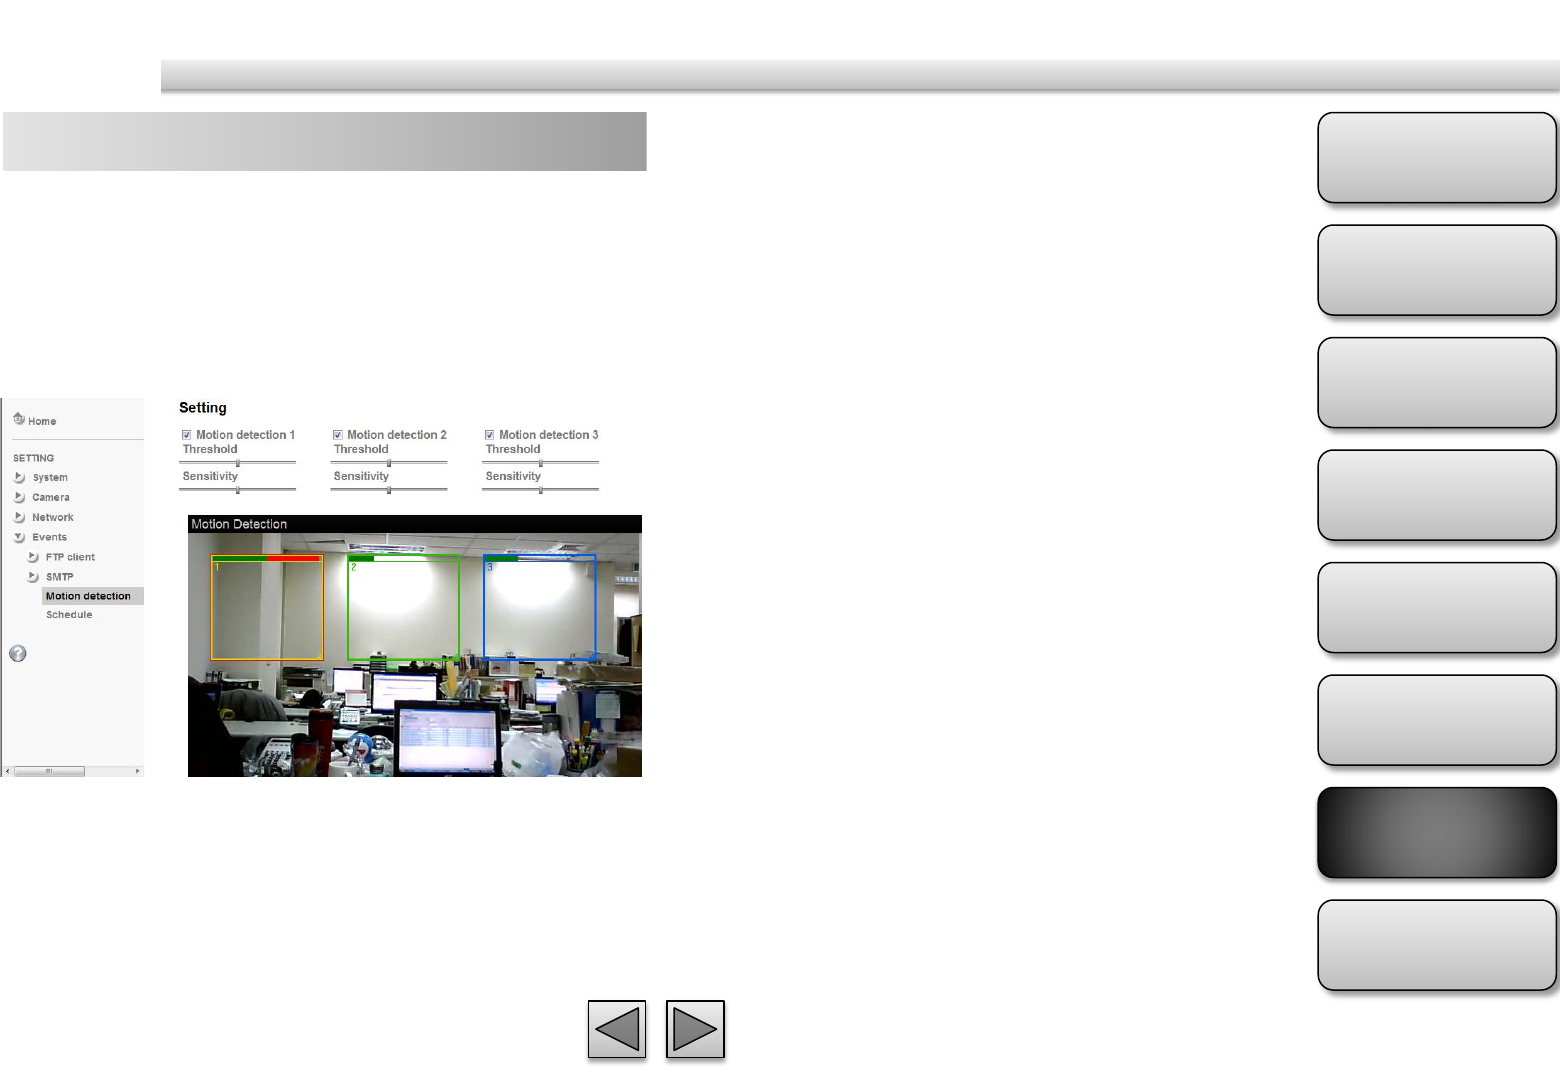
Motion Detection Threshold
It means the extent which the alarm will be triggered
Sensitivity
It means that how often the sensor will scan
the image different. The higher sensitivity it is and
the more frequently it scans.
Motion Detection 1, 2 and 3
Click it on for using Motion Detection 1,2 and 3
function as a sensor. You can adjust and move the
detecting zone by using mouse.
There are three Motion Detection functions as
sensors to set for different detecting zones. Each one
has Threshold and Sensitivity inputs which you can
adjust to specific zone sequentially. Motion Detection
function can support to FTP, SMTP and HTTP for
capturing and sending images.
Product
Overview
Hardware
Installation
Easy Access
EZvuu
Setting
Live View
Appendix
Table of
Contents
74
Events
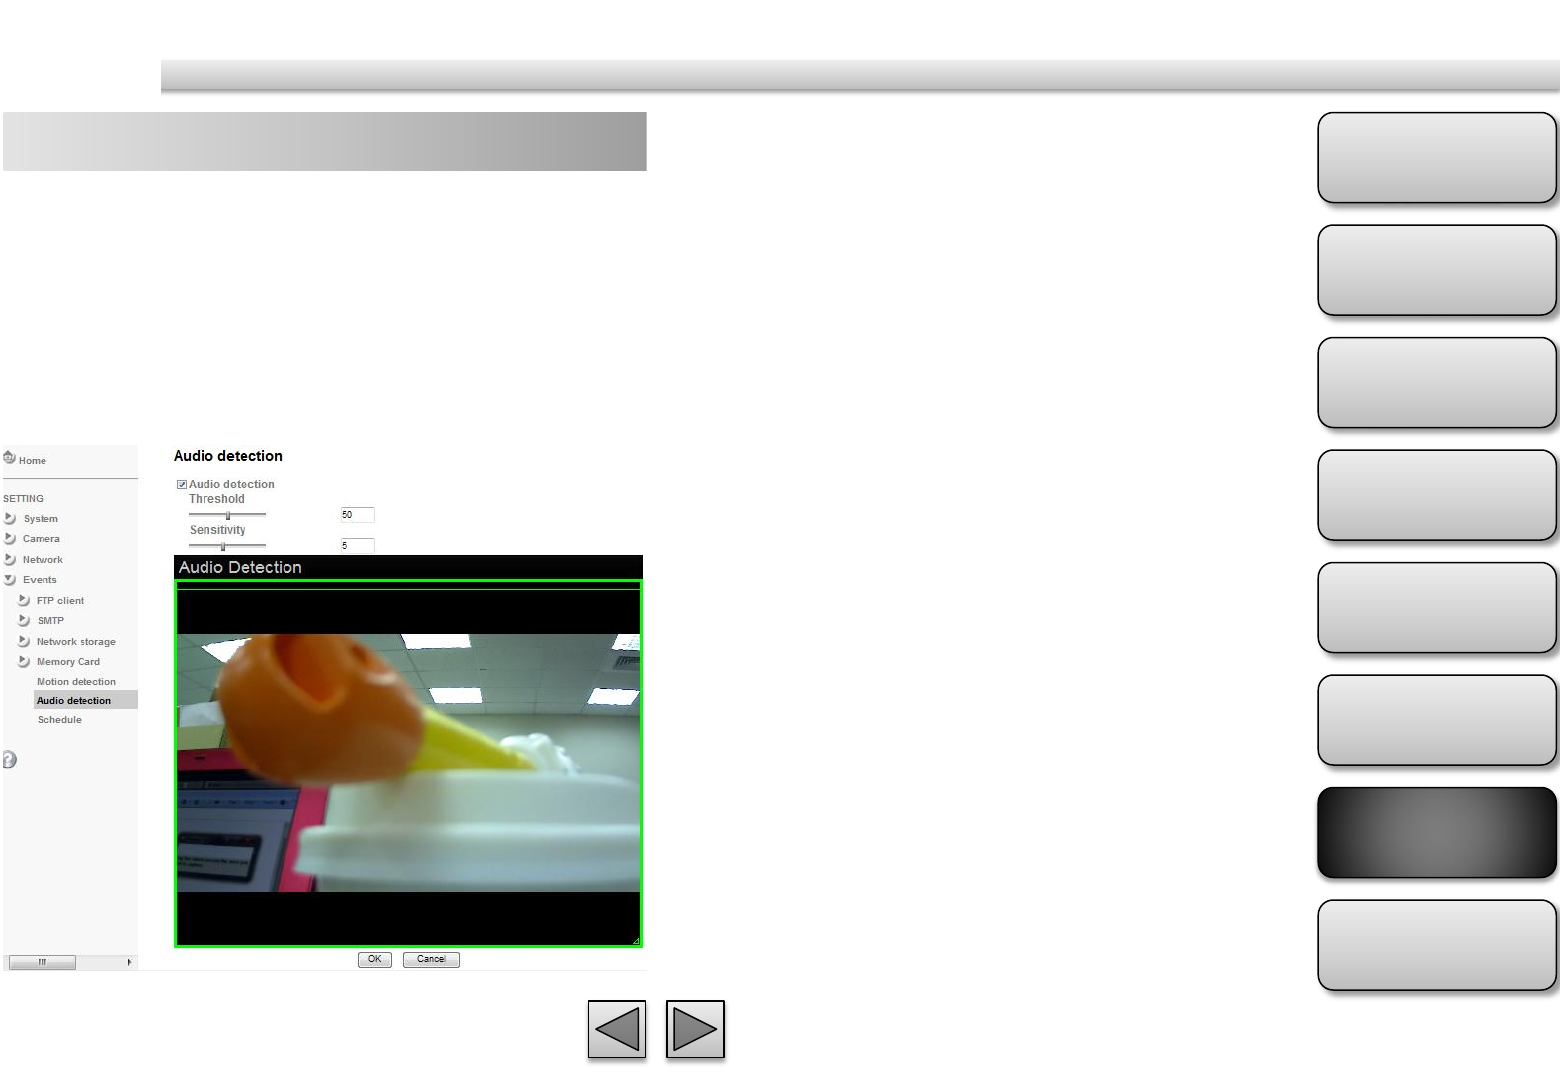
Audio Detection Threshold
It means the extent which the alarm will be triggered.
The default value is 50
and the value range is 0~100.
Sensitivity
It means that how often the sensor will scan the
image different. The higher
sensitivity it is and the more frequently it scans. The
default value is 5 and the value
range is 1~10.
The Audio detection has Threshold and Sensitivity
inputs which you can adjust sequentially. Audio
Detection function can support to FTP Client, SMTP,
Network Storage, Memory Card and so on.
Click it on for using Audio Detection function as a
sensor. You can set audio detection function at the
audio detection function screen.
Product
Overview
Hardware
Installation
Easy Access
EZvuu
Setting
Live View
Appendix
Table of
Contents
75
Events
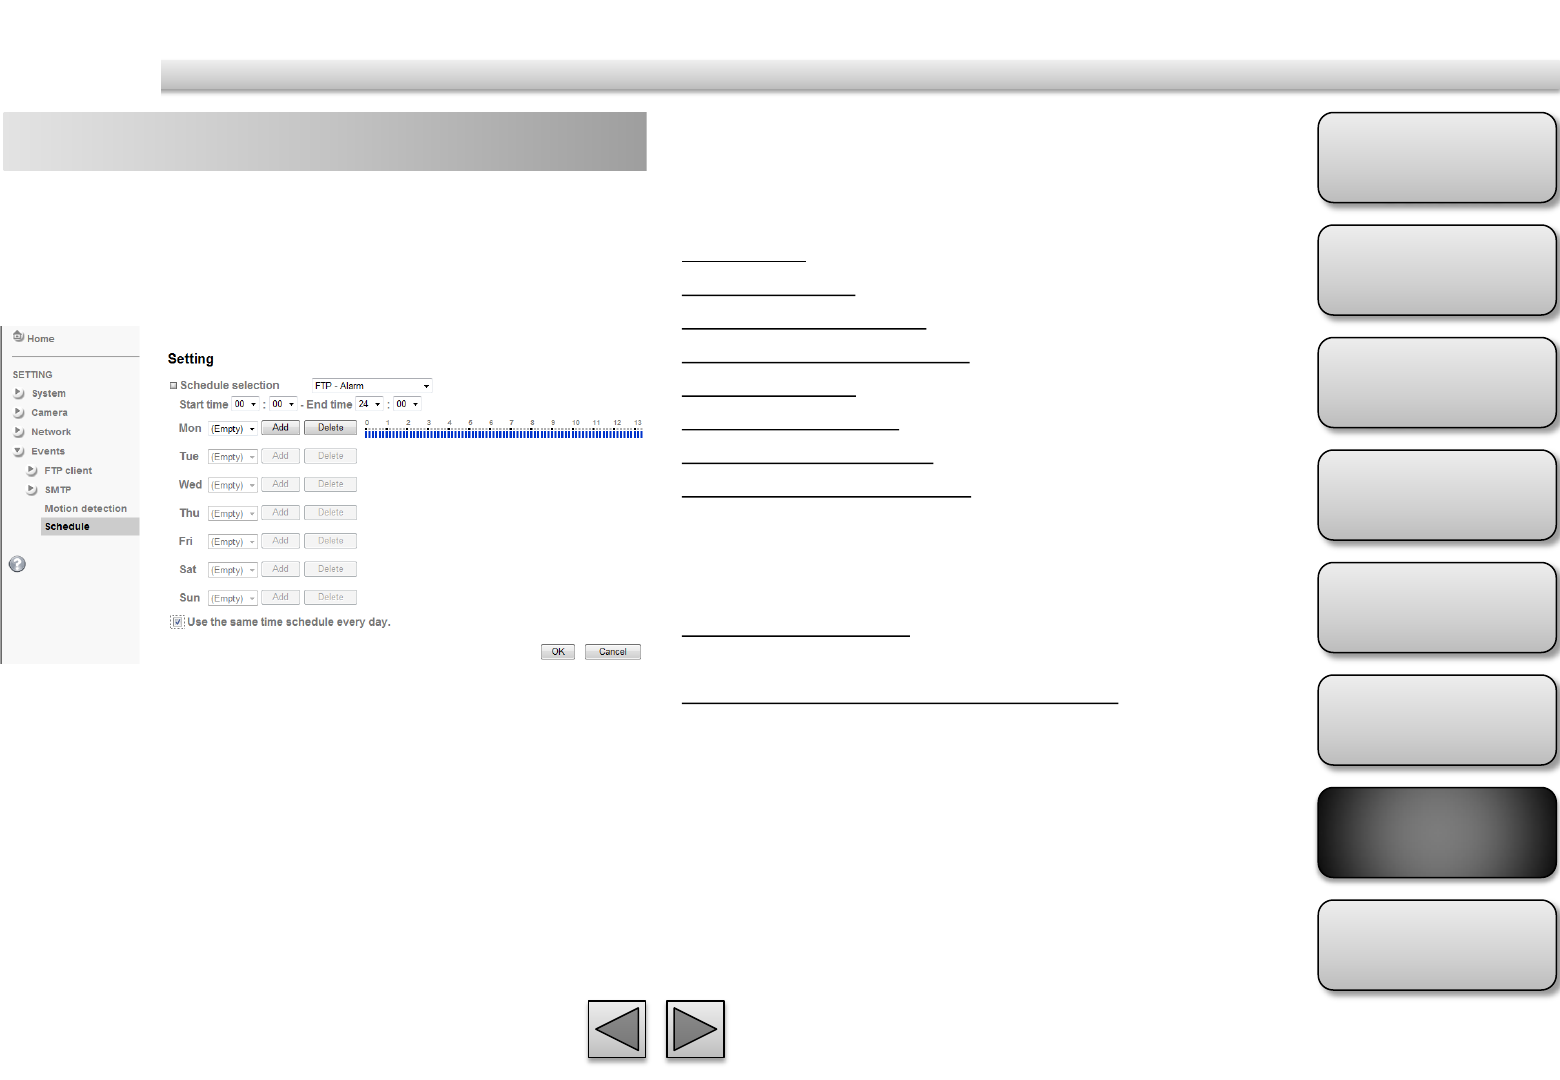
Schedule Schedule Selection
Select the list box to specify the schedule you want to
set.
FTP -Alarm
FTP - Periodical
e-Mail (SMTP) -Alarm
e-Mail (SMTP) -Periodical
Record – Alarm
Record – Periodical
Memory Card – Alarm
Memory Card - Periodical
Mon (Monday) to Sun (Sunday)
The time period on the right of the checked day is the
effective period of the schedule.
Start time, End time
Specify the Start time and the End time.
Use the same time schedule every day
When this is checked, the Start time and End time set
to Mon (Monday) are applied to all days. In this case,
the Start time and End time of the other days than
Mon (Monday) cannot be input.
This is the same menu as the setting menu which is
displayed when you click Schedule to set Effective
period and Schedule in FTP client setting menu and e-
Mail (SMTP) setting menu.
Product
Overview
Hardware
Installation
Easy Access
EZvuu
Setting
Live View
Appendix
Table of
Contents
78
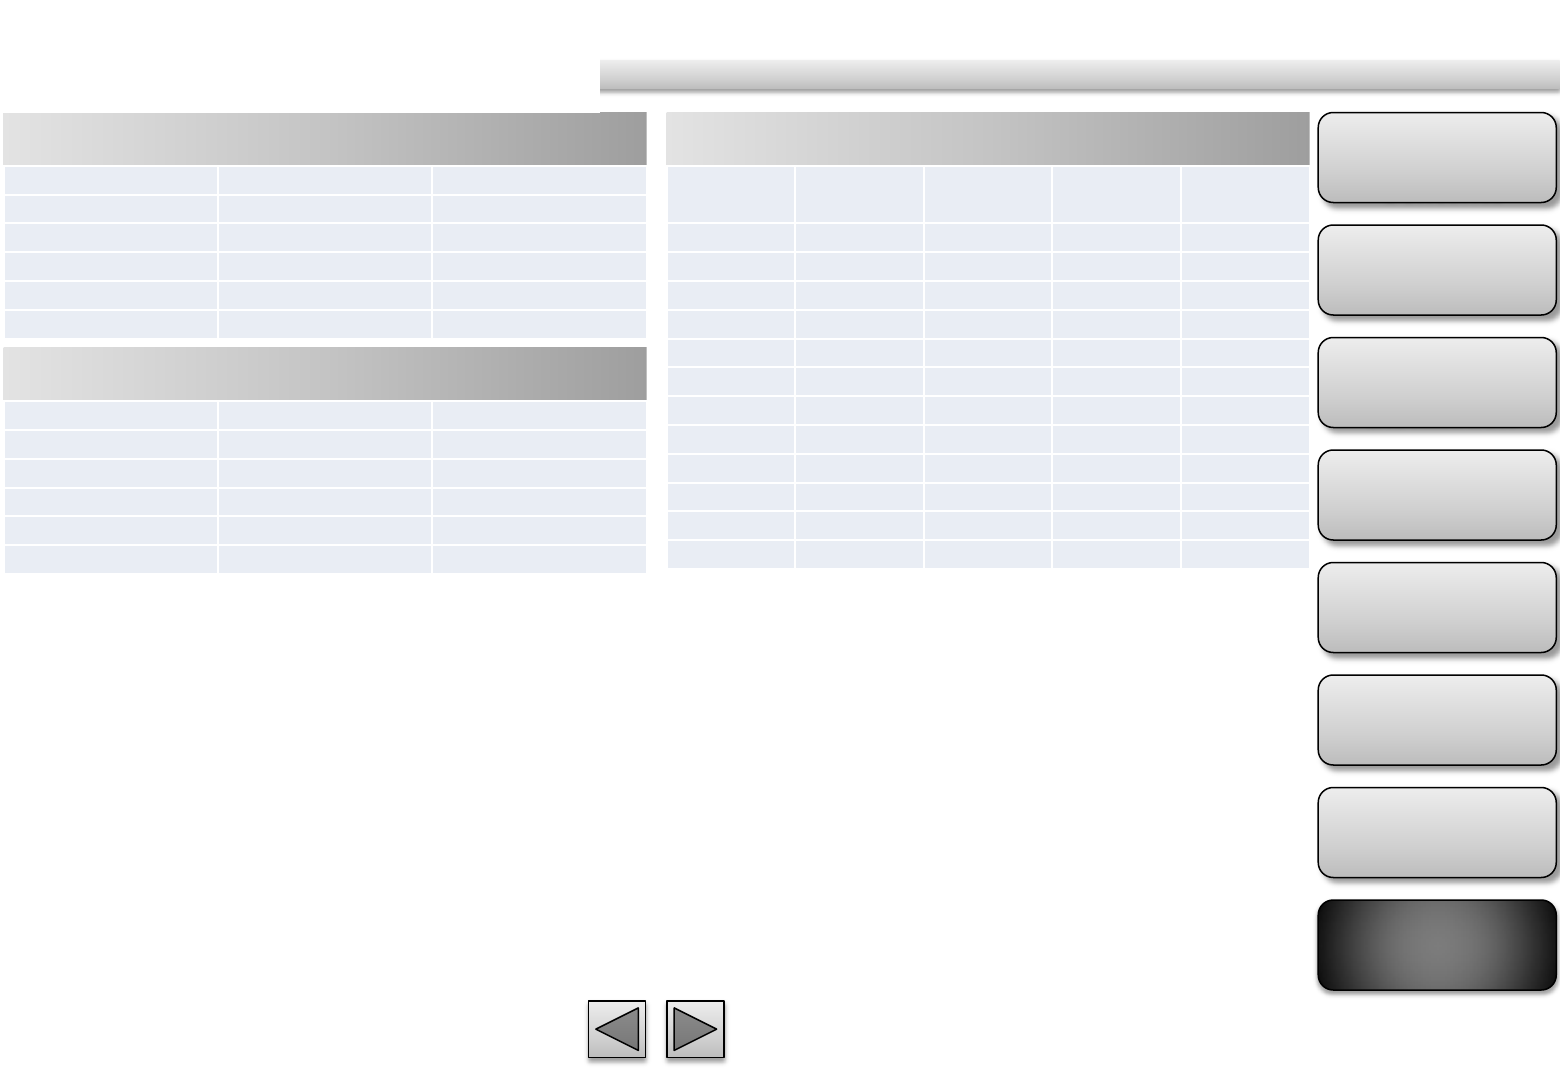
H.264 @ 15fps / Kbps
Frame Rate and Bitrate Table
Quality
1280*1024
1280*720
640*480 320*240
Excellent
1500 1200 180 50
Detailed
400 250 100 30
Good 250 100 80 20
Standard
100 60 50 15
Medium
80 50 40 10
H.264 @ 10fps / Kbps
Quality
1280*1024
1280*720
640*480 320*240
Excellent
1000 800 120 30
Detailed
280 100 70 20
Good 170 70 55 15
Standard
70 40 30 10
Medium
55 30 20 8
H.264 @ Kbps, fps
Image
-
Size
Bitrate
Setting
Frame
-
Rate
Setting
Current
Bitrate
Current
Frame
-
Rate
1280*1024
6144 15 6300 15
1280*1024
6144 10 6300 10
1280*1024
2048 15 2200 15
1280*1024
2048 10 2200 10
1280*1024
512 15 550 15
1280*1024
512 10 550 10
1280*720
6144 15 6300 15
1280*720
6144 10 6300 10
1280*720
2048 15 2200 15
1280*720
2048 10 2200 10
1280*720
512 15 550 15
1280*720
512 10 550 10
640*480 6144 15 6300 15
640*480 6144 10 6300 10
640*480 2048 15 2200 15
640*480 2048 10 2200 10
640*480 512 15 550 15
640*480 512 10 550 15
320*240 6144 15 5100 15
320*240 6144 10 3600 10
320*240 2048 15 2200 15
320*240 2048 10 2200 10
320*240 512 15 550 15
320*240 512 10 550 10
Product
Overview
Hardware
Installation
Easy Access
EZvuu
Setting
Live View
Appendix
Table of
Contents
79
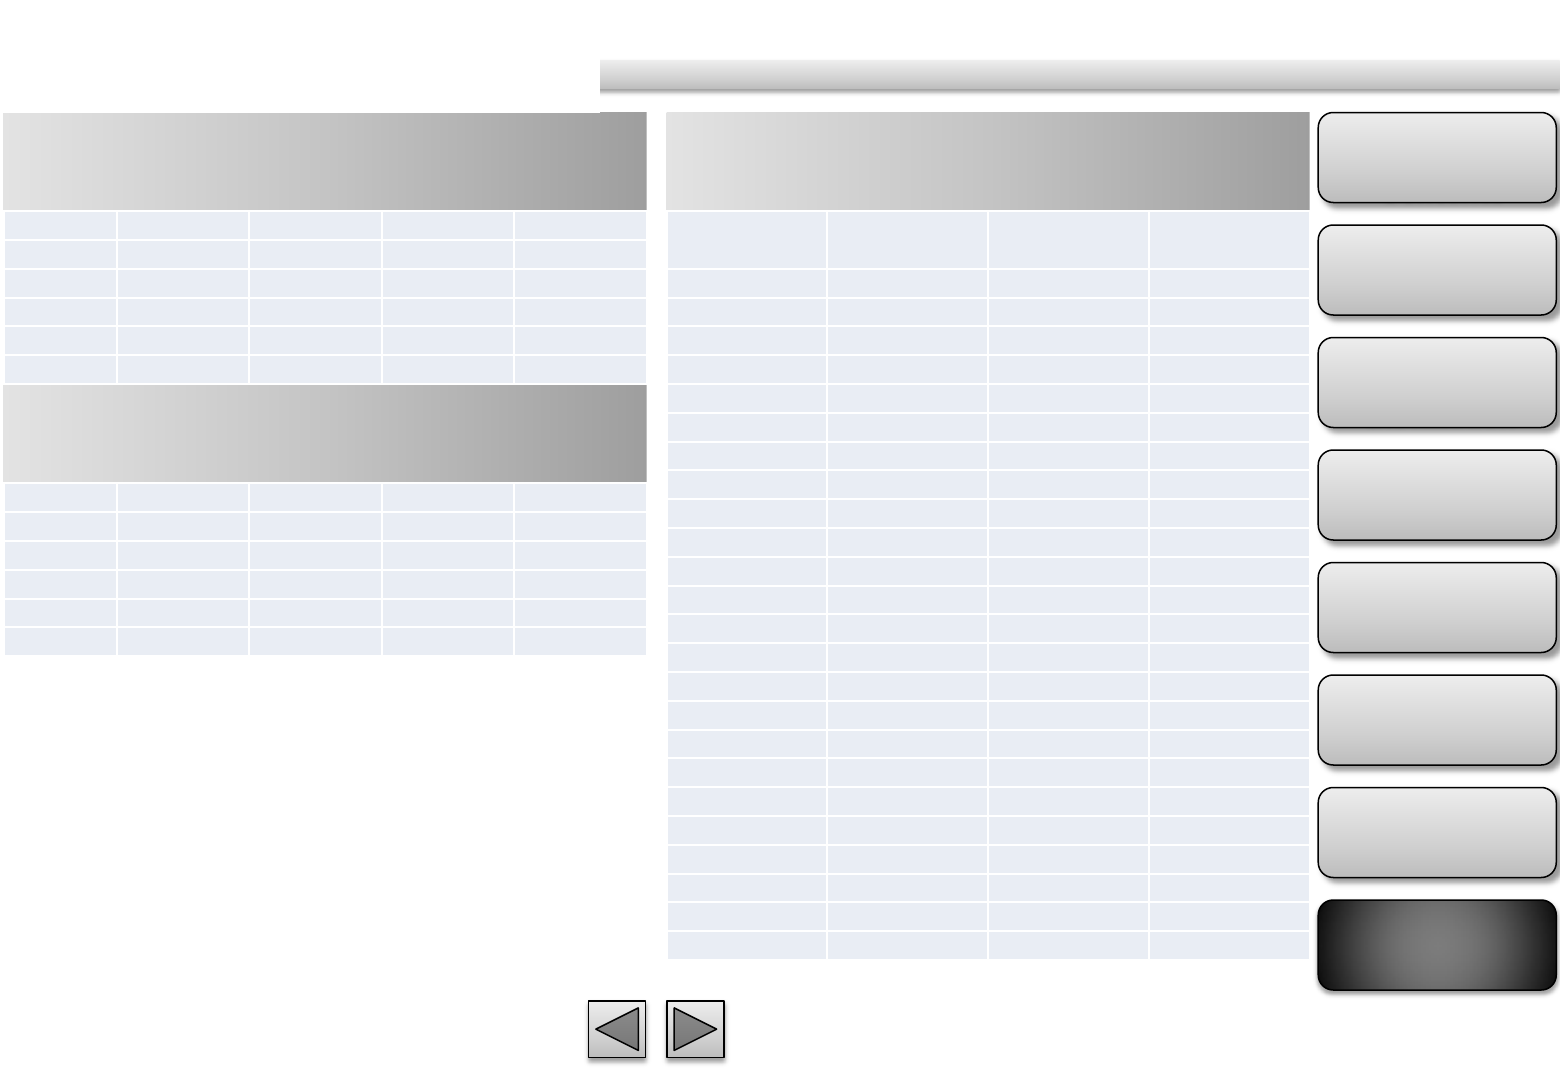
MPEG4 @ 15fps / Kbps
Frame Rate and Bitrate Table
MPEG4 @ 10fps / Kbps
MPEG4 @ Kbps, fps
Quality
1280*1024
1280*720
640*480 320*240
Excellent
2700 2000 300 100
Detailed
1100 800 200 80
Good 500 350 150 60
Standard
350 250 100 40
Medium
300 200 80 35
Quality
1280*1024
1280*720
640*480 320*240
Excellent
1800 1400 200 80
Detailed
800 550 120 60
Good 350 250 100 40
Standard
250 180 80 30
Medium
200 140 60 25
Image-Size
Quality
Setting
Frame
-
Rate
Setting
Current
Bitrate
Current
Frame
-
Rate
1280*1024
6144 15 5500 13
1280*1024
6144 10 6300 10
1280*1024
2048 15 2200 15
1280*1024
2048 10 2200 10
1280*1024
512 15 550 15
1280*1024
512 10 550 10
1280*720 6144 15 6300 15
1280*720 6144 10 6300 10
1280*720 2048 15 2200 15
1280*720 2048 10 2200 10
1280*720 512 15 550 15
1280*720 512 10 550 10
640*480 6144 15 6300 15
640*480 6144 10 6300 10
640*480 2048 15 2200 15
640*480 2048 10 2200 10
640*480 512 15 550 15
640*480 512 10 550 10
320*240 6144 15 2200 15
320*240 6144 10 1800 10
320*240 2048 15 2200 15
320*240 2048 10 1800 10
320*240 512 15 550 15
320*240 512 10 550 10

Product
Overview
Hardware
Installation
Easy Access
EZvuu
Setting
Live View
Appendix
Table of
Contents
80
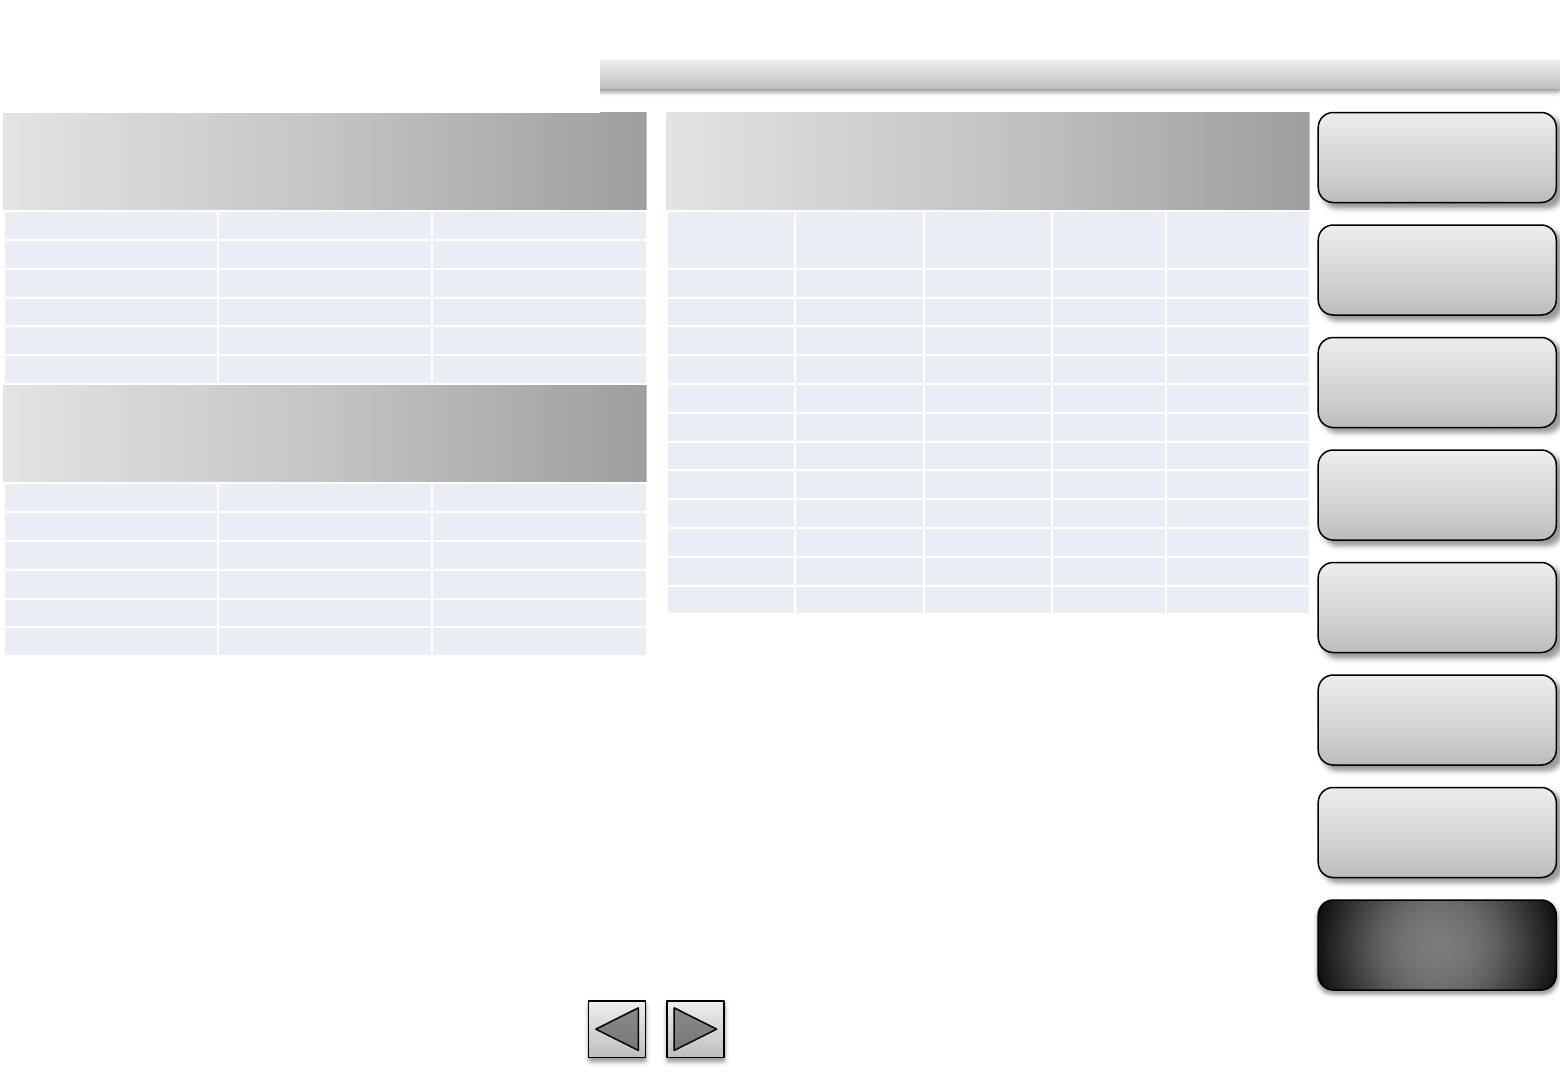
MJPEG @ 15fps / Kbps
Frame Rate and Bitrate Table
MJPEG @ 10fps / Kbps
MJPEG @ Kbps, fps
Quality
1280*1024
1280*720
640*480 320*240
Excellent
22000 16000 6000 2200
Detailed
12000 7000 3000 1200
Good 7000 5000 2500 1000
Standard
5500 4000 2000 800
Medium
4000 3000 1200 500
Quality
1280*1024
1280*720
640*480 320*240
Excellent
15000 11000 4000 1500
Detailed
8000 5000 2000 800
Good 5000 3500 1800 700
Standard
4000 3000 1500 600
Medium
3000 2000 800 350
Image-Size
Quality
Setting
Frame
-
Rate
Setting
Current
Bitrate
Current
Frame
-
Rate
1280*1024
Excellent 15 22000 15
1280*1024
Excellent 10 15000 10
1280*1024
Good 15 7000 15
1280*1024
Good 10 5000 10
1280*1024
Medium 15 4000 15
1280*1024
Medium 10 3000 10
1280*720 Excellent 15 16000 15
1280*720 Excellent 10 11000 10
1280*720 Good 15 5000 15
1280*720 Good 10 3500 10
1280*720 Medium 15 3000 15
1280*720 Medium 10 2000 10
640*480 Excellent 15 6000 15
640*480 Excellent 10 4000 10
640*480 Good 15 2500 15
640*480 Good 10 1800 10
640*480 Medium 15 1200 15
640*480 Medium 10 800 10
320*240 Excellent 15 2200 15
320*240 Excellent 10 1500 10
320*240 Good 15 1000 15
320*240 Good 10 700 10
320*240 Medium 15 500 15
320*240 Medium 10 350 10
Product
Overview
Hardware
Installation
Easy Access
EZvuu
Setting
Live View
Appendix
Table of
Contents
81
H.264 @ 30fps / Kbps
Frame Rate and Bitrate Table
H.264 @ 15fps / Kbps
H.264 @ Kbps, fps
Quality 640*480 320*240
Excellent 600 60
Detailed 120 40
Good 60 30
Standard 50 25
Medium 40 20
Quality 640*480 320*240
Excellent 400 40
Detailed 80 30
Good 40 25
Standard 30 20
Medium 25 15
Image
-
Size
Bitrate
Setting
Frame
-
Rate
Setting
Current
Bitrate
Current
Frame
-
Rate
640*480 6144 30 6300 30
640*480 6144 15 6300 15
640*480 2048 30 2200 30
640*480 2048 15 2200 15
640*480 512 30 550 30
640*480 512 15 550 15
320*240 6144 30 6300 30
320*240 6144 15 5500 15
320*240 2048 30 2200 30
320*240 2048 15 2200 15
320*240 512 30 550 30
320*240 512 15 550 15

Product
Overview
Hardware
Installation
Easy Access
EZvuu
Setting
Live View
Appendix
Table of
Contents
82
MPEG4 @ 30fps / Kbps
Frame Rate and Bitrate Table
MPEG4 @ 15fps / Kbps
MPEG4 @ Kbps, fps
Quality 640*480 320*240
Excellent 1000 120
Detailed 400 80
Good 200 60
Standard 150 50
Medium 120 40
Quality 640*480 320*240
Excellent 600 80
Detailed 250 50
Good 150 40
Standard 100 30
Medium 80 20
Image
-
Size
Bitrate
Setting
Frame
-
Rate
Setting
Current
Bitrate
Current
Frame
-
Rate
640*480 6144 30 6300 30
640*480 6144 15 6300 15
640*480 2048 30 2200 30
640*480 2048 15 2200 15
640*480 512 30 550 30
640*480 512 15 550 15
320*240 6144 30 5100 30
320*240 6144 15 2800 15
320*240 2048 30 2200 30
320*240 2048 15 2200 15
320*240 512 30 550 30
320*240 512 15 550 15
Product
Overview
Hardware
Installation
Easy Access
EZvuu
Setting
Live View
Appendix
Table of
Contents
83
MJPEG @ 30fps / Kbps
Frame Rate and Bitrate Table
MJPEG @ 15fps / Kbps
MJPEG @ Kbps, fps
Quality 640*480 320*240
Excellent 13000 4500
Detailed 6500 2500
Good 5000 2000
Standard 4000 1600
Medium 2500 1000
Quality 640*480 320*240
Excellent 7000 2500
Detailed 3500 1500
Good 2800 1200
Standard 2100 1000
Medium 1400 700
Image
-
Size
Bitrate
Setting
Frame
-
Rate
Setting
Current
Bitrate
Current
Frame
-
Rate
640*480 Excellent
30 13000 30
640*480 Excellent
15 7000 15
640*480 Good 30 5000 30
640*480 Good 15 2800 15
640*480 Medium 30 2500 30
640*480 Medium 15 1400 15
320*240 Excellent
30 4500 30
320*240 Excellent
15 2500 15
320*240 Good 30 2000 30
320*240 Good 15 1200 15
320*240 Medium 30 1000 30
320*240 Medium 15 700 15
Product
Overview
Hardware
Installation
Easy Access
EZvuu
Setting
Live View
Appendix
Table of
Contents
84
H.264 Storage Requirement GB / channel
/ day @ 15fps
Storage Requirement Table
H.264 Storage Requirement GB / channel
/ day @ 10fps
H.264 Storage Requirement GB / channel
/ day
Quality
1280*1024
1280*720
640*480 320*240
Excellent
50 45 10 4.2
Detailed
16.6 13 8.3 2.5
Good 13 8.3 6.7 1.7
Standard
8.3 5 4.2 1.3
Medium
6.7 4.2 3.4 1
Quality
1280*1024
1280*720
640*480 320*240
Excellent
45 22.5 6.7 2.5
Detailed
12.5 8.3 5.9 1.7
Good 8.3
5.9 4.6 1.3
Standard
5.9 3.4 2.5 1.3
Medium
4.5 2.5 2.1 0.7
Image-Size
Bitrate Setting
Frame-Rate
Setting
Storage
Requirement
1280*1024 6144 15 522.9
1280*1024 6144 10 522.9
1280*1024 2048 15 182.6
1280*1024 2048 10 182.6
1280*1024 512 15 45.7
1280*1024 512 10 45.7
1280*720 6144 15 522.9
1280*720 6144 10 522.9
1280*720 2048 15 182.6
1280*720 2048 10 182.6
1280*720 512 15 45.7
1280*720 512 10 45.7
640*480 6144 15 522.9
640*480 6144 10 522.9
640*480 2048 15 182.6
640*480 2048 10 182.6
640*480 512 15 45.7
640*480 512 10 45.7
320*240 6144 15 423.3
320*240 6144 10 298.8
320*240 2048 15 182.6
320*240 2048 10 182.6
320*240 512 15 45.7
320*240 512 10 45.7

Product
Overview
Hardware
Installation
Easy Access
EZvuu
Setting
Live View
Appendix
Table of
Contents
85
MPEG4 Storage Requirement GB /
channel / day @ 15fps
Storage Requirement Table
MPEG4 Storage Requirement GB /
channel / day @ 10fps
MPEG4 Storage Requirement GB /
channel / day
Quality
1280*1024
1280*720
640*480 320*240
Excellent
133 83 25 8.3
Detailed
58.1 42 17 6.7
Good 42 25 12.5 5
Standard
30 21 8.3 3.4
Medium
25 17 6.7 3
Quality
1280*1024
1280*720
640*480 320*240
Excellent
92 58.1 17 6.7
Detailed
42 30 10 5
Good 30 17 8.3 3.4
Standard
21 12.5 6.7 2.5
Medium
17 10 5 2
Image-Size
Quality Setting
Frame-Rate
Setting
Storage
Requirement
1280*1024 6144 15 431.6
1280*1024 6144 10 522.9
1280*1024 2048 15 182.6
1280*1024 2048 10 182.6
1280*1024 512 15 45.7
1280*1024 512 10 45.7
1280*720 6144 15 522.9
1280*720 6144 10 522.9
1280*720 2048 15 182.6
1280*720 2048 10 182.6
1280*720 512 15 45.7
1280*720 512 10 45.7
640*480 6144 15 522.9
640*480 6144 10 522.9
640*480 2048 15 182.6
640*480 2048 10 182.6
640*480 512 15 45.7
640*480 512 10 45.7
320*240 6144 15 182.6
320*240 6144 10 149.4
320*240 2048 15 182.6
320*240 2048 10 149.4
320*240 512 15 45.7
320*240 512 10 45.7

Product
Overview
Hardware
Installation
Easy Access
EZvuu
Setting
Live View
Appendix
Table of
Contents
86
H.264 Storage Requirement GB / channel
/ day @ 30fps
Storage Requirement Table
H.264 Storage Requirement GB / channel
/ day @ 15fps
H.264 Storage Requirement GB / channel
/ day
Quality 640*480 320*240
Excellent 21 5
Detailed 10 3.4
Good 5 2.5
Standard 4.2 2.1
Medium 3.4 1.7
Quality 640*480 320*240
Excellent 12.5 3.4
Detailed 6.7 2.5
Good 3.4 2.1
Standard 2.5 1.7
Medium 2.1 1.3
Image
-
Size
Bitrate
Setting
Frame
-
Rate
Setting
Current
Bitrate
Storage
Requirement
640*480 6144 30 6300 522.9
640*480 6144 15 6300 522.9
640*480 2048 30 2200 182.6
640*480 2048 15 2200 182.6
640*480 512 30 550 45.7
640*480 512 15 550 45.7
320*240 6144 30 6300 522.9
320*240 6144 15 5500 456.5
320*240 2048 30 2200 182.6
320*240 2048 15 2200 182.6
320*240 512 30 550 45.7
320*240 512 15 550 45.7
Product
Overview
Hardware
Installation
Easy Access
EZvuu
Setting
Live View
Appendix
Table of
Contents
87
MPEG4 Storage Requirement GB /
channel / day @ 30fps
Storage Requirement Table
MPEG4 Storage Requirement GB /
channel / day @ 15fps
MJPEG Storage Requirement GB /
channel / day
Quality 640*480 320*240
Excellent 50 10
Detailed 25 6.7
Good 16.7 5
Standard 12.5 4.2
Medium 10 3.4
Quality 640*480 320*240
Excellent 33.2 6.7
Detailed 16.7 4.2
Good 12.5 3.4
Standard 8.3 2.5
Medium 6.7 1.7
Image
-
Size
Bitrate
Setting
Frame
-
Rate
Setting
Current
Bitrate
Storage
Requirement
640*480 6144 30 6300 522.9
640*480 6144 15 6300 522.9
640*480 2048 30 2200 182.6
640*480 2048 15 2200 182.6
640*480 512 30 550 45.7
640*480 512 15 550 45.7
320*240 6144 30 5100 423.3
320*240 6144 15 2800 232.4
320*240 2048 30 2200 182.6
320*240 2048 15 2200 182.6
320*240 512 30 550 45.7
320*240 512 15 550 45.7