ZENITH Direct View Digital 27 To 40 TV Manual 97120025
User Manual: ZENITH ZENITH Direct View Digital 27 to 40 TV Manual ZENITH Direct View Digital 27 to 40 TV Owner's Manual, ZENITH Direct View Digital 27 to 40 TV installation guides
Open the PDF directly: View PDF ![]() .
.
Page Count: 44
Return the
Product
Regi,.;tration
Card andyour
TV could be.
FJI££!
WARNINGS
m
WARNING:
TO REDUCE THE RISK OF ELECTRIC SHOCK, DO NOT REMOVE COVER OR BACK. NO
,USER SERVICEABLE PARTS INSIDE. REFER TO QUALIFIED SERV] CE PERSONNEL
The lightning flash with arrowhead symbol within an'equilateral triangle is !r tend .edto alert the user
to the presence of uninsulated "dangerous voltage" within the product's enclosure that may be of
sufficient magnitude to constitute a risk of electric shock to persons.
The exclamation point within an equilateral triangle fs intended to alert the user to the prez;ence of
important operating and maintenance (servicing) instructions in the literature accompanying the
appliance.
SAFETY TIPS
Refer to the "Important Safety Instructions" section of this
operating guide for important safety considerations.
WARNING
TO PREVENT FIRE OR SHOCK HAZARDS, DO NOT
EXPOSE THIS PRODUCT TO RAIN OR MOISTURE.
NOTE TO CABLE TV SYSTEM
INSTALLER
This reminder is provided to call the cable TV system
installer's attention to Article 820-40.of the National
Electrical Code (U.S.A.). The code provides guidelines for
proper grounding and, in particular, specifies that.the cable
ground shall be.connected to the grounding system of the
building, as close to the point of the cable entry as practical.
POWER-CORD POLARIZATION
This product is equipped with a pola0"zed alternating-
current line plug (a plug having one blade wider than the other).
As a safety feature, this plug Will fit into the power-outlet
only one way. if you are unable to insert theplug fully into
the outlet, try reversing the plug. If the plug still fails to fit,
contact your electrician to replace your Obsolete outlet. Do
net defeat the safety pro-pose of the polarized plug.
Caution :" ; '
_, . .o . ,
To prevent electric shock, match'_cide blade of p!ug to
wide slot; fullyinsert. - _ ."
Attention
Pour _viter les chocs 61ectfiques, introduire la lame la plus
lalge de la fiche dans la borne correst)ondante de la orise et
pousserjusqu'au fond.
REGULA TORY INFORMA"I ION
This equipment has IE_.entested and found to comply with
the linfits for a Class B digital device, pursuant to Part 15
of the FCC Rules. These limits are designed to provide
reasonable protectiort against harmful interference in a
residential installatio a. This equipment generates, use.%and
can radiate radio frequency energy and[,if not installed and
used in accordance with the instructions, may cause
harmful interference to radio communications. However,
there is no guarantee that interference will not occur in a
particular installation. I[ this equipmerLt does cause harmful
interference to radio or television reception, which can be
deternfined by turning the equipment off and on, the user is
encouraged to try to cozrect the interference by one or more
of the following measmes:
•l_'.eorientOr relocale the receiving antenna.
• Increase the separation between the equipment and
receiver.
• Connect the extuipment into art outlet on a circuit
different from that to which the n_ceiver is connected.
• Consult 'the dealer or an experienced radioFF_"
technician.
CAI.rrION: Do not at_,_mptto modify this product in any
way without written authorization from Zenith Electronics
Corporation. Unauthorized modification could void the
user's authofi_ to Ol:eratethis producL.
This class B digi'tal apparatus meets all requirements of the
Canadian Interference42ausing Equipment Regulations.
"Ce appar'eil num6fiqu_: de la class b repecte toutes les
exigences du R_gulement sur le mat6nel brouillier du
Canada."
Z-fa/WARN2
Convriaht _Zenith E lectronics Comoration 19 97.
ii
q
IM RO R TAN T ISA ET #I N S TR U GTI O :>
mJ I I I _z
•Your product has been manufactured and tested with your safety in mind. However, improper use can result ih potential eleclri_tl
shock or fn'e h_izards. To avoid deleting the safeguards that'have been built into ydtu"new prodpct; pk_e read and Observe the :
following safety poin_ when installing and using your new product, and save them for futtire reference.
Observing the :_imple precautions discussed in thissection of the operating guide can help you get r_any years of enjoyment and
safe operation from your new product.
1. Read Instructions
Read all the safety and operating instructions
before operating the product.
2. Follow Instructions
Follow all operating and use instructions.
3. Retain Instructions
Keep the safety and operating instructions for
future reference.
4. Heed Warnings
Follow alI warnings on the product and in the
operating instructions.
.q. Cleaning
Unplug this product from the wall outlet before
cleaning. Do not use liquid cleaners or aerosol
cleaners. Use a damp cloth for cleaning.
6. Water and Moisture
Do not use this product near water -- for example,
near a bath tub, washbowl, kitchen sink, laundry
tub, in a wet basement, or near a swimming pool.
7. Accessories
Do not place this product on an unstable cart,
stand, tripod, bracket, or table. The product may
fall, causing serious injury to a child or adult, and
serious damage to the product. Use only'with a
cart, stand, tripod, bracket, or table recommended
by the manufacturer or sold with the product. Any
mounting of the product should follow the manufac-
turer's 'instructions, and should use a mounting
accessory recommended by the manufacturer.
8. Transporting Product
Move product and cart combinations with care.
Quick stops, excessive force, and uneven surfaces
may cause the product and cart combination to over-
turn.
PORTABLE CART WARNING
o
10.
11.
Attachments
Do not use attachments not recommended by the
product manufacturer as they may cau,;e hazards.
Ventilation,
Slots and openings in the ,'abinet must not be blocked
or covered. They are provided for ventilation, to
ensure reliable operation .-and to protect from over-
heating. Never block the openings by ]placing the
product on a bed, sofa, rug, or other similar surface.
This product should not be placed in abuilt-in
installation such as a bookcase or rack unless proper
ventilation is provided o.: the manufacturer's
instructions have been adhered to.
Power Sources
Operate this product only from the type of power
source indicated on the raarking label. If y_vuare
not sure of the type of power supply to your home,
consult your product de._ler or local power com-
pany. For products intended to operate from battery
power or other sources, "efer to the operating
instructions.
12. Line-Cord Polarizatiort
This product is equipped with a pola'rized alter.nat-
ing-current line plug (a plug having one blade
wider than the other). As a safety fea_ture, this plug
will fit into the power outlet only one way. If you
•are unable to insert the plug fully into the outlet,
try reversing the plug. If the plug still fails to fit,
contact your electrician to replace your obsolete
outlet. Do not defeat _:h<"safety purpose of the polar-
ized plug.
13. Power-Cord Protection
Route power-supply cords so that the;y are not
likely to be walked on or pinched by items placed
upon or against them. paying particular attention to
cords at plugs, convenience receptacles, and the
point where they exit from the product.
co,
",ILl]
IMP OR TAN SAFE U ON
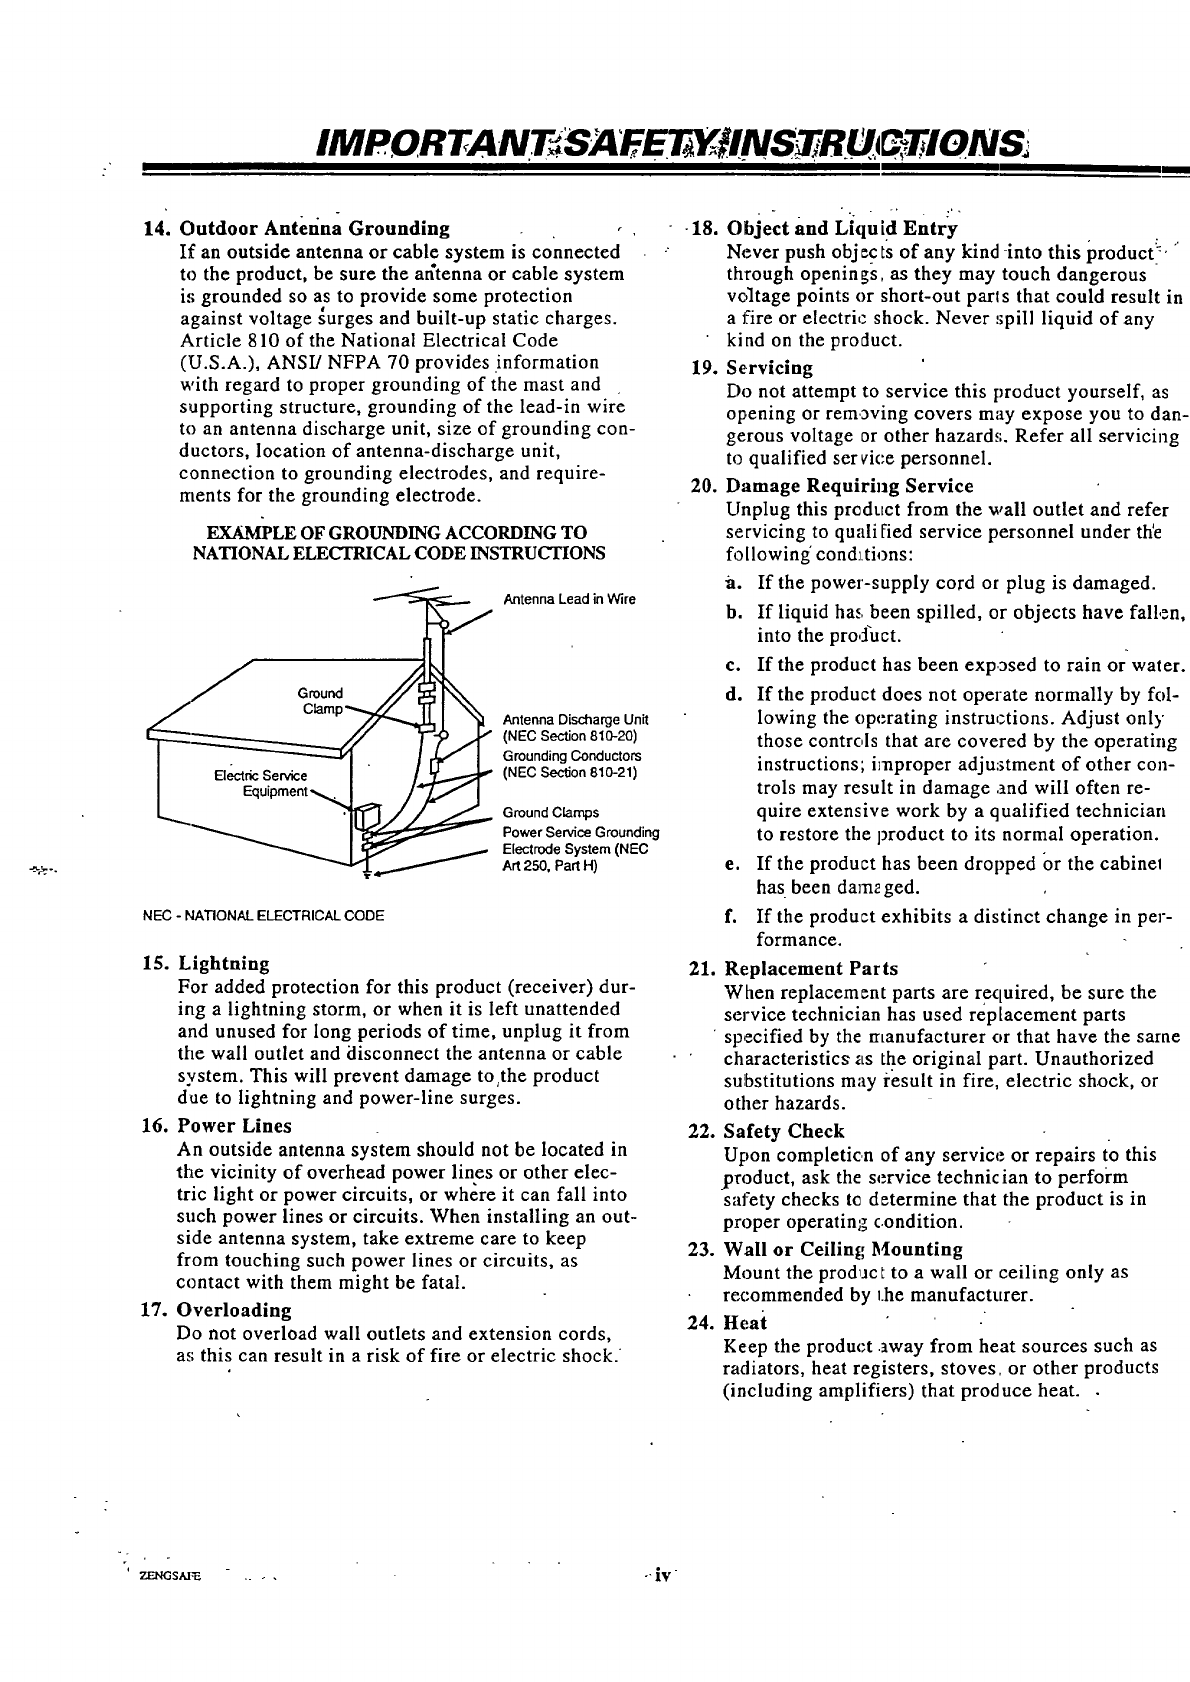
14. Outdoor Antefina Grounding
If an outside antenna or cable system is connected
to the product, be sure the ar_tenna or cable system
i_,;grounded so as to provide some protection
against voltage _urges and built-up static charges.
Article 810 of the National Electrical Code
(U.S.A.), ANSI/NFPA 70 provides information
with regard to proper grounding of the mast and
supporting structure, grounding of the lead-in wire
to an antenna discharge unit, size of grounding con-
ductors, location of antenna-discharge unit,
connection to grounding electrodes, and require-
ments for the grounding electrode.
EXAMPLE OF GROUNDINGACCORDING TO
NATIONAL ELECTRICAL CODEINSTRUCTIONS
Antenna Lead in Wire
Antenna Discharge Unit
(NEC Section 810-20)
Grounding Conductors
1El_-t_fic Service I/_ (NEC Section 810-21)
_'_'L_. _ '''*'*'*/ Ground C{amps
Power Service Grounding
Electrode System (NEC
Art 250, Part H)
NEC -NATIONAL ELECTRICAL CODE
15. Lightning
For added protection for this product (receiver) dur-
ing a lightning storm, or when it is left unattended
and unused for long periods of time, unplug it from
the wall outlet and disconnect the antenna or cable
system. This will prevent damage tothe product
due to lightning and power-line surges.
16. Power Lines
An outside antenna system should not be located in
the vicinity of overhead power lines or other elec-
tric light or power circuits, or where it can fall into
such power lines or circuits. When installing an out-
side antenna system, take extreme care to keep
from touching such power lines or circuits, as
contact with them might be fatal.
17. Overloading
Do not overload wall outlets and extension cords,
as this can result in a risk of fire or electric shock.
-18.
19.
20.
21.
22.
23.
24.
Object and Li,lui d Entry
Never push obj ec ts of any kind -into this product!" "
through openings, as they may touch dangerous
voltage points or short-out palls that could result in
afire or electric" shock. Never :;pill liquid of any
kind on the product.
Servicing
Do not attempt to service this product yourself, as
opening or rem3ving covers may expose you to dan-
gerous voltage or other hazard,;. Refer all servicing
to qualified ser vice personnel.
Damage Requiring Service
Unplug this prcdttct from the wall outlet and refer
servicing to quail fled service personnel under the
following' conditions:
a. If the power-supply cord or plug is damaged.
b. If liquid ha.,.been spilled, or objects have fallen,
into the prod'uct.
c. If the product has been exp3sed to rain or water.
d. If the product does not operate normally by fol-
lowing the operating instructions. Adjust only
those controls that are covered by the operating
instructions; improper adjustment of other con-
trols may result in damage .and will often re-
quire extensive work by a qualified technician
to restore the product to its normal operation.
e. If the product has been dropped or the cabinel
has been damzged.
f. If the product exhibits a distinct change in per-
formance.
Replacement Parts
When replacement parts are required, be sure the
service technician has used replacement parts
specified by the manufacturer or that have the same
characteristics as the original part. Unauthorized
substitutions may result in fire, electric shock, or
other hazards.
Safety Check
Upon completic.n of any service or repairs to this
product, ask the service technician to perform
safety checks tc determine that the product is in
proper operatin_ c.ondition.
Wall or Ceiling Mounting
Mount the prodact to a wall or ceiling only as
recommended by 1he manufacturer.
Heai
Keep the product away from heat sources such as
radiators, heat registers, stoves, or other products
(including amplifiers) that produce heat.
' ZI_IGSAI,_ .... -"iV
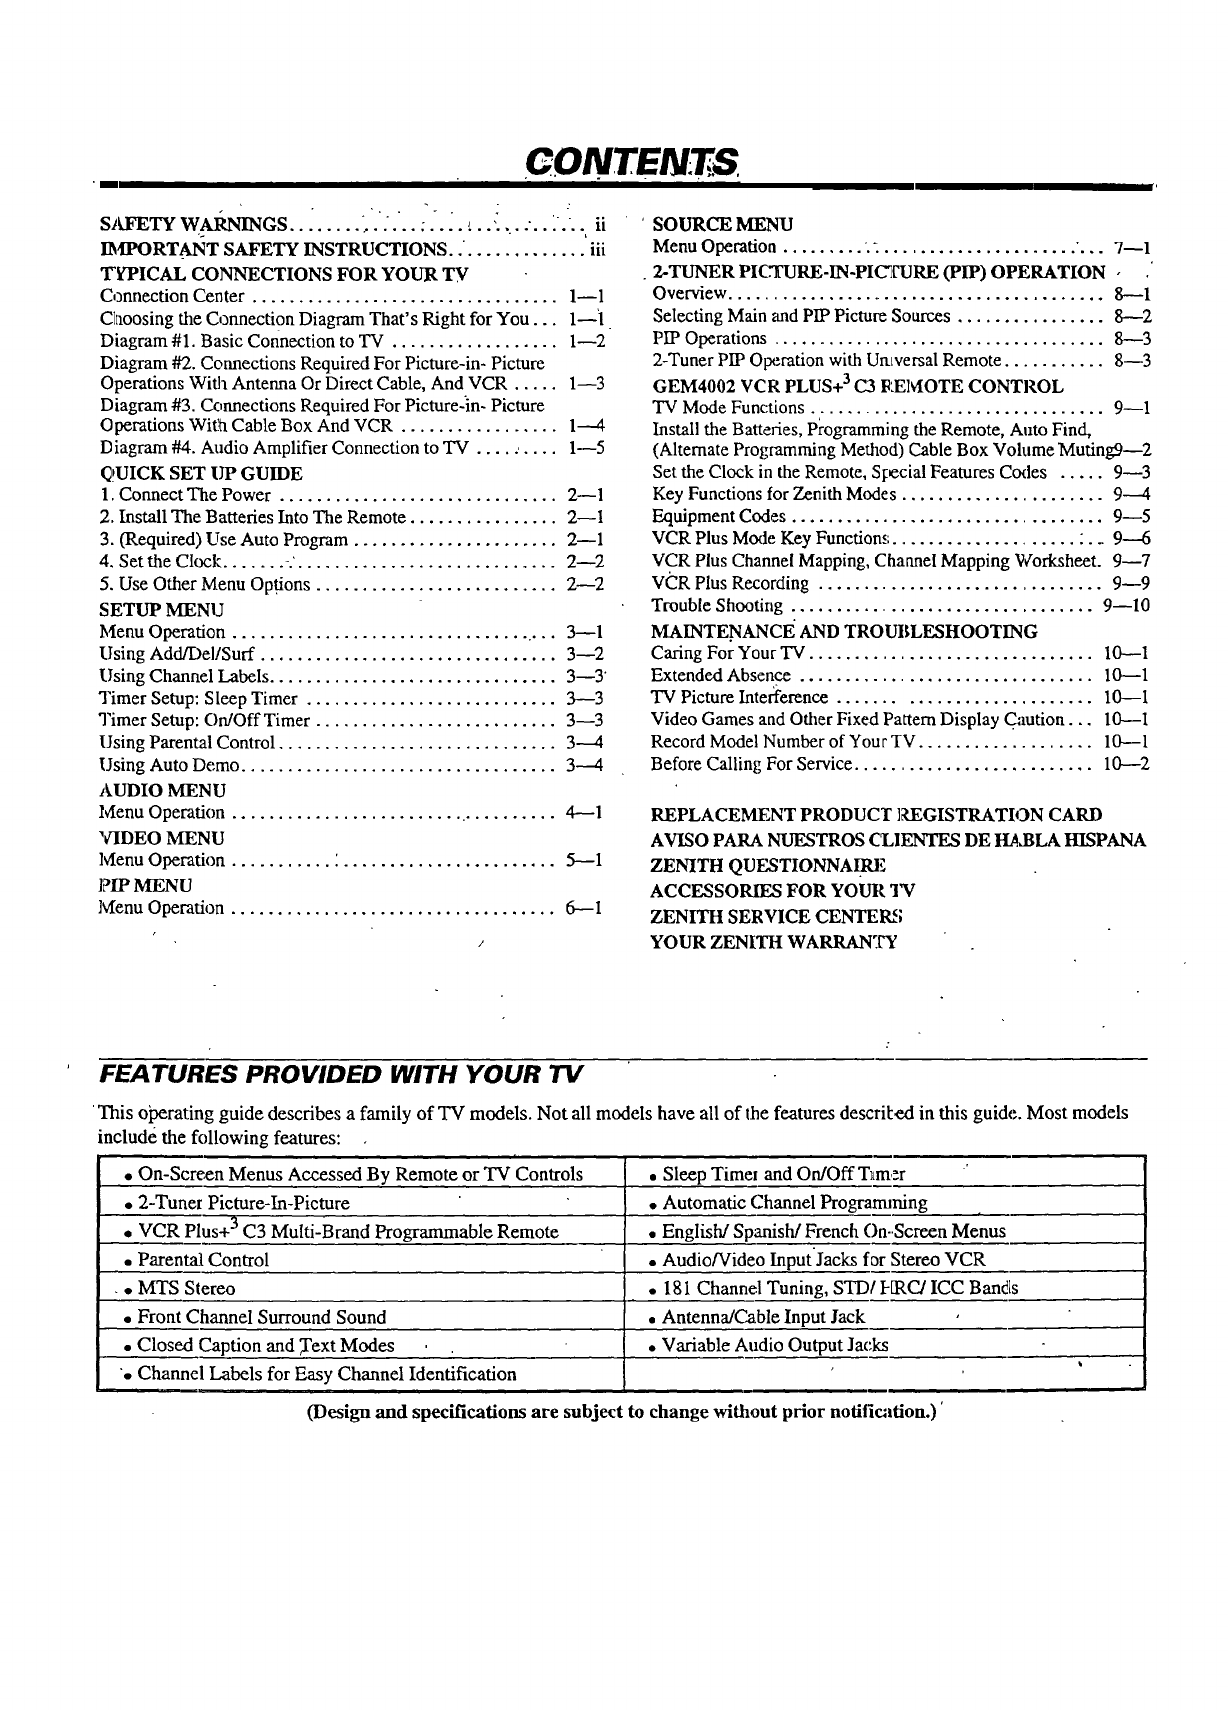
CONTEN:TS
- °. ."..:
SAFETY WARNINGS.. " - ," ,. :...... ii
IMPORTANT SAFETY INSTRUCTIONS ............... iii
TYPICAL CONNECTIONS FOR YOUR q[7€
Connection Center ................................. 1--1
Choosing the Connection Diagram That's Right for You... 1--'l
Diagram #1. Basic Connection to "IV .................. 1--2
Diagram #2. Connections Required For Picture-in- Picture
Operations With Antenna Or Direct Cable, And VCR ..... 1--3
Diagram #3. C_,nnections Required For Picture-in- Picture
Operations With Cable Box And VCR ................. 1----4
Diagram #4. Audio Amplifier Connection to TV .......... 1--5
QUICK SET UP GUIDE
1. Connect The Power .............................. 2--1
2. Install The Batteries Into The Remote ................ 2--1
3. (Required) Use Auto Program ...................... 2--1
4. Set the Clock ....... -.'............................ 2--2
5. Use Other Menu Options .......................... 2--2
SETUP MENU
Menu Operation .................................... 3--1
Using Add/DellSurf ................................ 3--2
Using Channel Labels ............................... 3--3"
Timer Setup: Sleep Timer ........................... 3--3
Timer Setup: OrdOff Timer .......................... 3--3
Using Parental Control .............................. 3---4
Using Auto De.me .................................. 3--4
AUDIO MENU
Menu Operatkm .......................... . ......... 4---1
VIDEO MENU
lvlenu Operation ........... '. ....................... 5---1
PIP MENU
Menu Operation ................................... 6--I
SOURCE MENU
Menu Operation ......... .- ..................... "... 7--1
2-TUNER PICTURE-IN-PICTURE (PIP) OPERATION -
Overview ......................................... 8--1
Selecting Main and PIP Picture Sources ................ 8----2
PIP Operations .................................... 8--3
2-Tuner PIP Operation with Umversal Remote ........... 8--3
GEM4002 VCR PLUS+ 3C3 RElVlOTE CONTROL
TV Mode Functions ................................ 9--1
Install the Batteries, Programming the Remote, Auto Find,
(Alternate Programming Method) Cable Box Volume Mufingg--2
Set the Clock in the Remote, Sl:ecial Features Codes ..... 9--3
Key Functions for Zenith Modes ...................... 9---4
Equipment Codes .................................. 9--5
VCR Plus Mode Key Function,; .................... :.. 9----6
VCR Plus Channel Mapping, Channel Mapping Worksheet. 9--7
VCR Plus Recording ............................... 9--9
Trouble Shooting ................................. 9--10
MAINTE.NANCE AND TROUBLESHOOTING
Caring For Your TV ............................... I0--1
Extended Absence ................................ 10---1
TV Picture Interference ........................... 10--I
Video Games and Other Fixed Pattern Display C;mtion... 10---1
Record Model Number of Your TV ................... 10--1
Before Calling For Service .......................... 10---2
REPLACEMENT PRODUC'r ]?,EGISTRATION CARD
AVISO PARA NUESTROS CT,IENTES DE I_,BLA HISPANA
ZENITH QUESTIONNA .IRE
ACCESSORIES FOR YOUR TV
ZENITH SERVICE CENTERS
YOUR ZENITH WARRANTY
FEATURES PROVIDED WITH YOUR TV
This otx:rating guide describes a family of TV models. Not all models have all of the features descrited in this guide. Most models
include the ff,llowing features:
f
•On-Screen Menus Accessed By Remote or TV Controls
• 2-Tuner Picture-In-Picture
• VCR Plus+ 3 C3 Multi-Brand Programmable Remote
•Parental Control
• MTS Stereo
• Front Channel Surround Sound
• Closed Caption and Text Modes
". Channel Labels for Easy Channel Identification
• Sleep Timer and On/Off T_m,:r '
• Automatic Channel Progranuning
• English/Spanish/French On-.Screen Menus
• Audio/Video InputJacks for Stereo VCR
• 181 Channel Tuning, STD/I-[RC/ICC Bands
•Antenna/Cable Input Jack
•Variable Audio Output Jacks
(Design and specifications are subject to change without prior notification.)'
PICAL*. CONNEC- .:T!ONS ;FOR YOUR I
_II I I
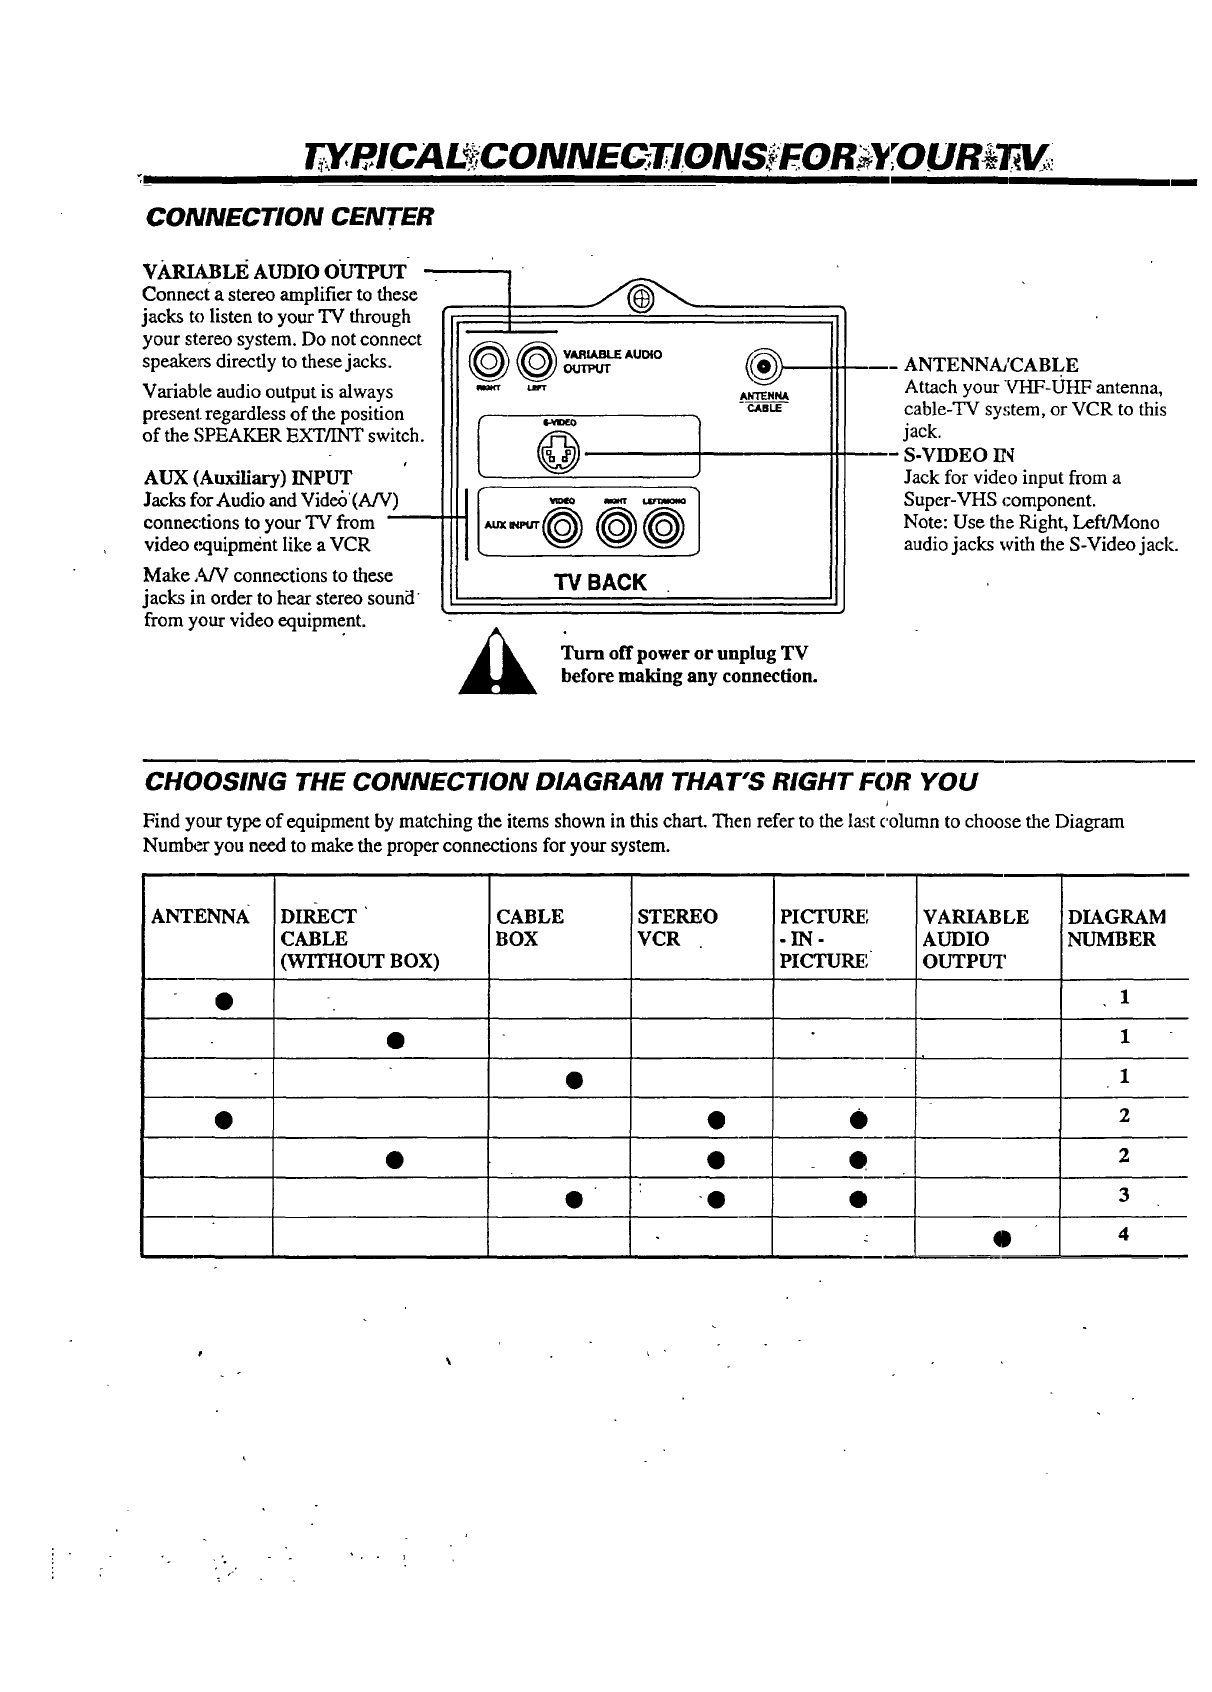
CONNECTION CENTER
Make ,_ connections to these
jacks in order to hear stereo sound
from your video equipment.
VARIABLEAUDIOOUTPUT
Connect a stereo amplifier to these
jacks to listen to your TV through
your stereo system. Do not connect
speakers directly to these jacks. _ O otmmrWeUmtEAut_o
Variable audio output is always "_
present, regardless of the position I
of the SPEAKER EXT/INT switch.
AUX (Auxiliary) INPUT
Jacks for Audio and Video'(A!V) _ ,-_
connex:tions to your TV from _ _rr@ @@
video (xtuipment like a VCR ..
TV BACK
@
ANTENNA
CABLE
Turn off power or unplug "IT
before making any connection.
--- ANTENNA/CABLE
Attach your VHF-tH-tF antenna,
cable-TV sy,;tem, or VCR to this
jack.
S-VIDEO IN
Jack for video input from a
Super-VHS component.
Note: Use the Right, Left/Mono
audio jacks with the S-Video jack.
CHOOSING THE CONNECTION DIAGRAM THAT'S RIGHT FOR YOU
/
Find your type of equipment by matching the items shown in this chart. Then refer to the la_;tcolumn to choose the Diagram
Number you need to make the proper connections for your system.
ANTENNA DIRECT ' CABLE STEREO VARIAB LE DIAGRAM
CABLE BOX VCR AUDIO NUMBER
(WITHOUT BOX) OUTPUT
PICTURE
-IN-
PICTURE
• G
"0 •
1
1
1
2
2
3
4
• o ,,°
m,'FYPICA ONN Q
I I I I I I
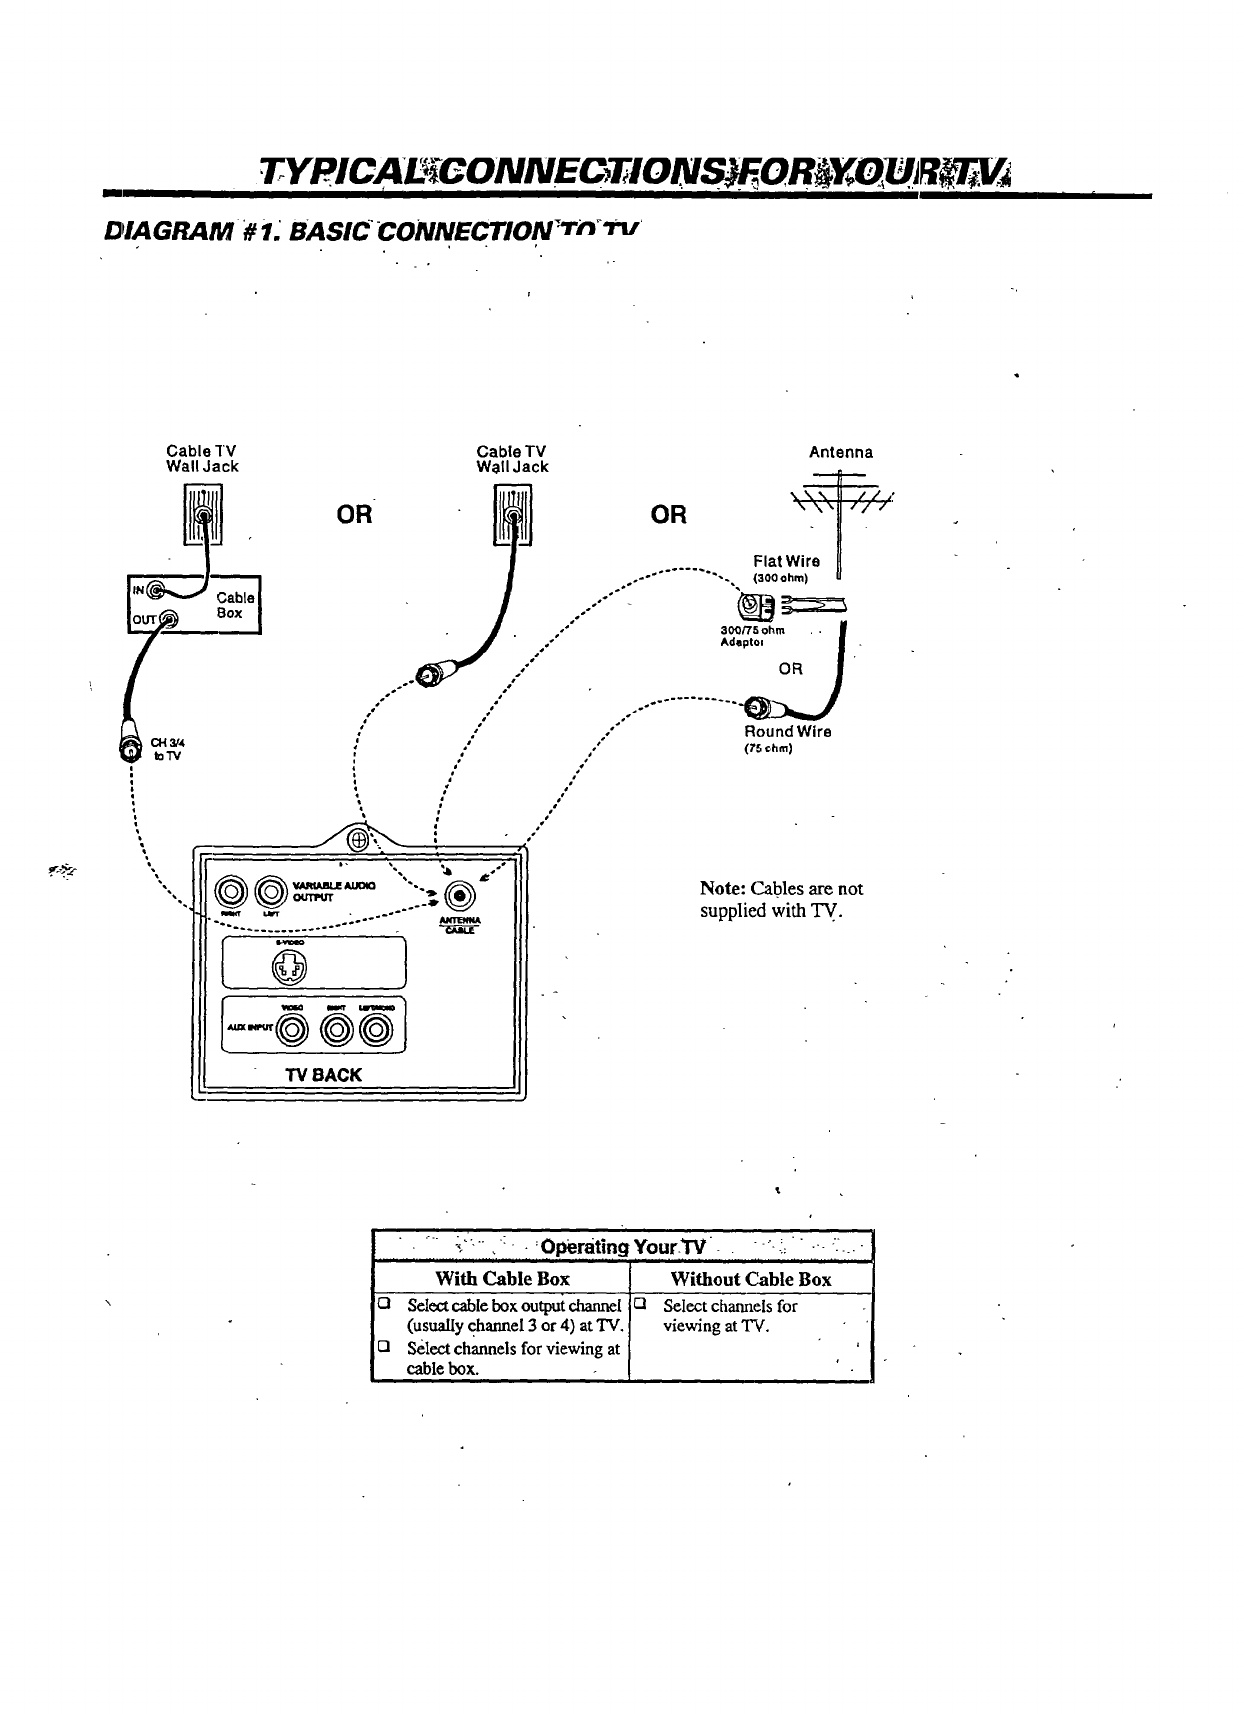
DIAGRAM # 1. BASICCONNECTION *_rn_'nf
If
Cable TV Cable TV Antenna
Wall Jack Wall Jack
CH3/4
IoTV
OR
TVBACK
_.\\t //',:
OR " \'U "/"
Flat Wire
-°" ° ...... "". {300 ohm) u
1-
300/75 ohm ,.
Adaptol I "
RoundWire
(75 _hm)
Note: Cables are not
supplied with TV.
..i. . '... -_ . :Operating YourTV -°-_: :;
With Cable Box
Cl Select cable box output channel
(usually channel 3or 4) at TV.
121 Select channels for viewing at
cable box.
Without Cable Box
Q Select channels for
viewing at TV.
! ICA r!!CONNE NS EORi O
'1
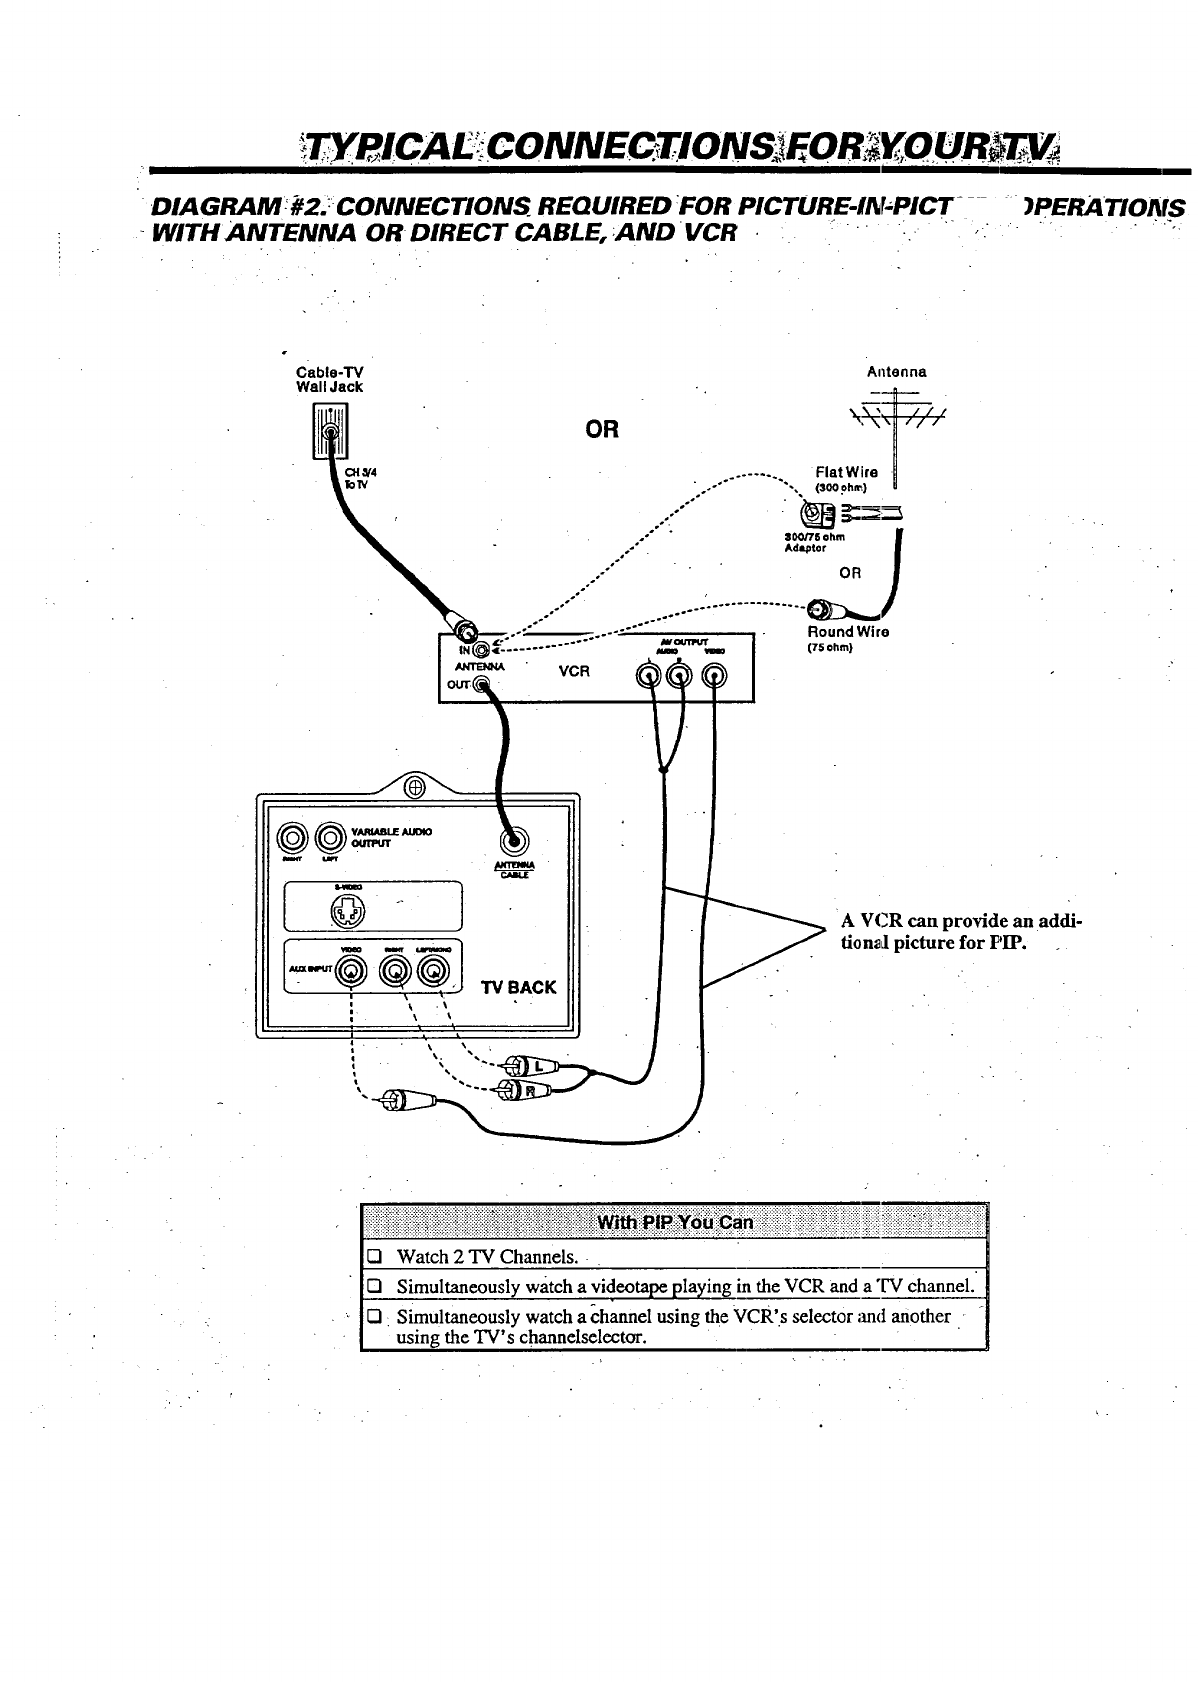
•DIAGRAMed/f2' __CONNECTIONS REQUIRED FOR PICTURE-IN;PICT .... )PERATIONS
"WITHANTENNA ORDIRECT CABLE, AND VCR :" : " " _ " "_'°
Cable-TV Antenna
Wall Jack
w LILT
I+-®®®l
: + TV BACK
OR
........ Flat Wire ._
..-" "'., (300 ohn_) --
:100/75 ohm If
Ad_ror I
,s"
." .°°°°°°°°'°* .............. .
"':'1_;'" ....... wmm,w I Round Wire
_I (75 ohm}
I
I
A VCR can provide an addi-
fion_l picture for HP. +
_ii!ii_ii!i_i_i_ii_ii!i_i_ii_i_iiii+iiii_+i_i_iiii_i+_++iii+ii+_++i+i++!_iii_i+_i_+i!i!ii+!i!_i_i_iiii!iii+ii_ii+i_!+!ii!ii!+!:i!iiii!!ii!ii+iiiiiiiiii+!!i+ii!iiii+iiiiill
[] Watch 2 TV Channels..
[] Simultaneously watch a videotape playing in the VCR and a "IV channel.'
[] Simultaneously watch a channel using the VCR's selector ,rodanother
using the TV's channelselector.
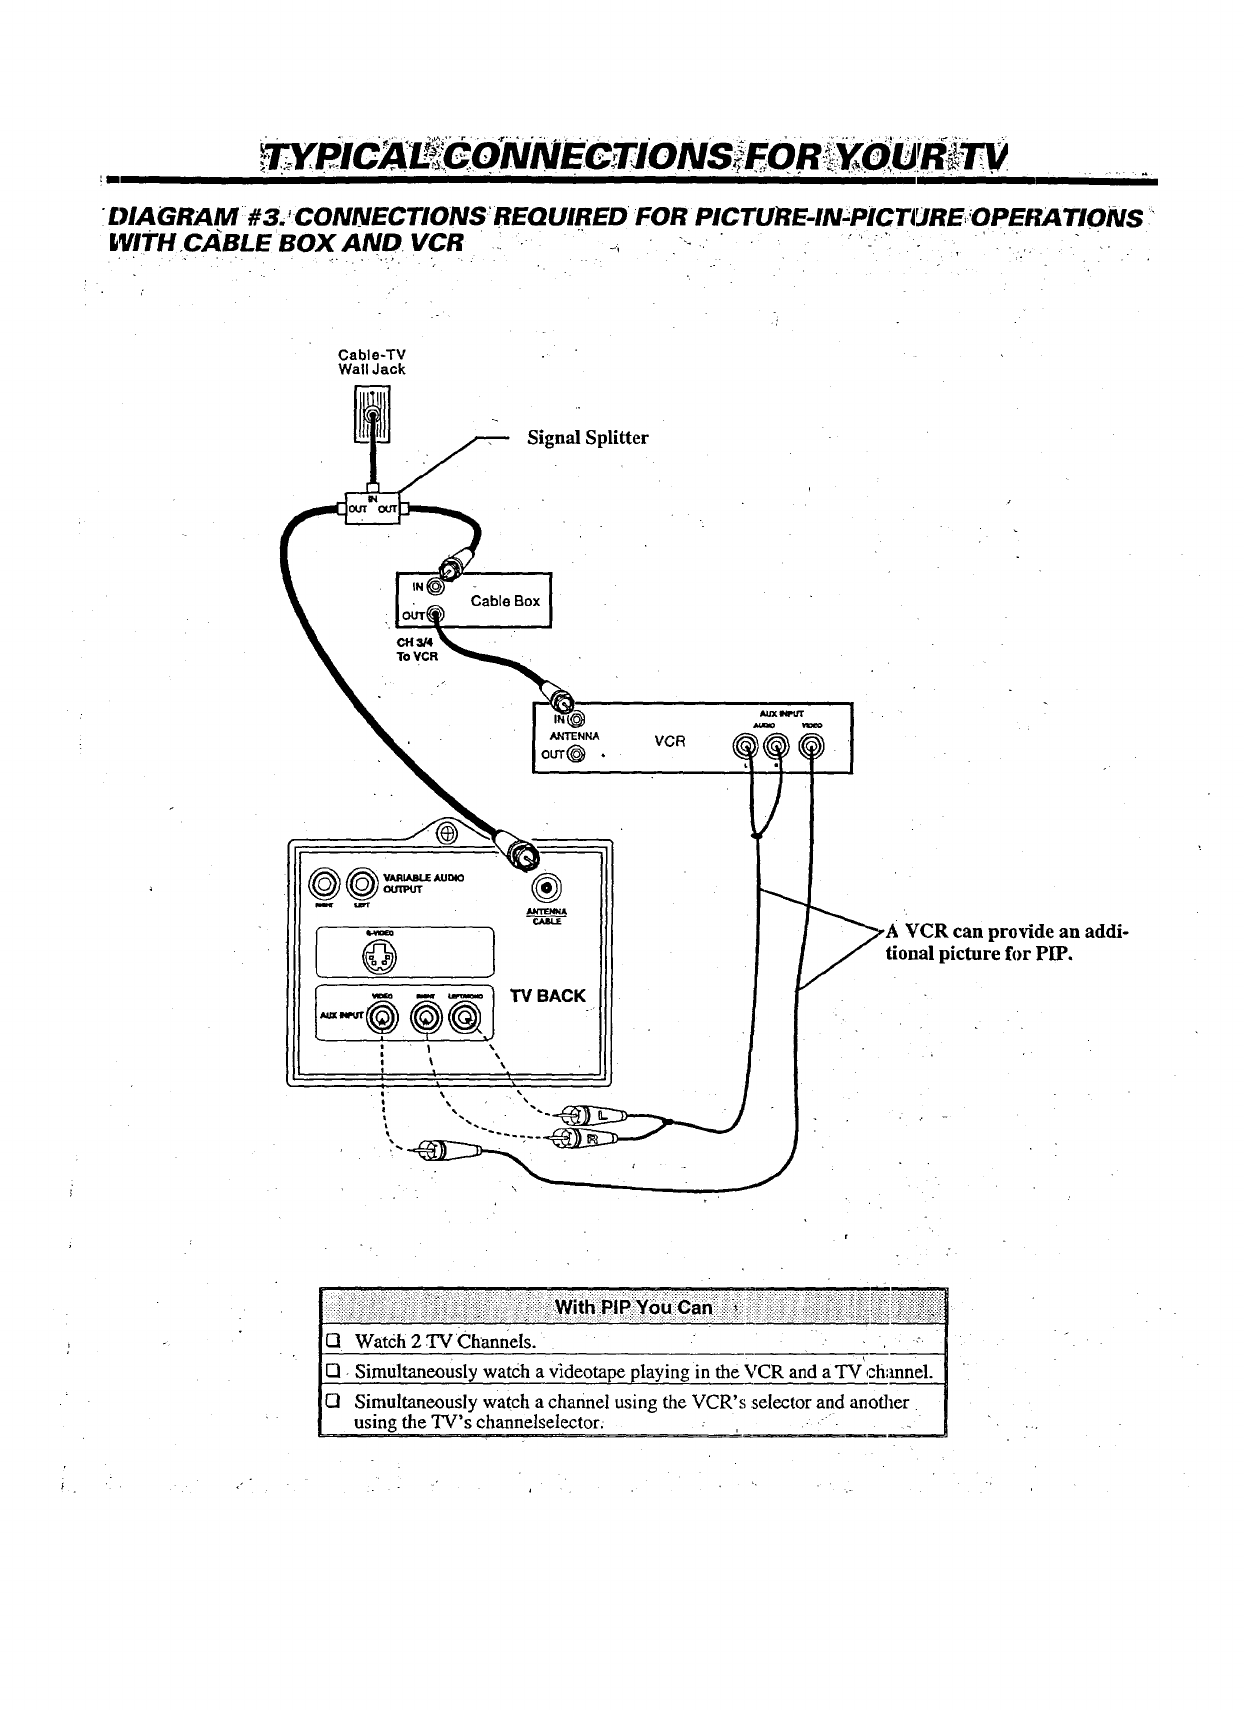
DIAGRAM # 3. "CONNECTIONS- REQUIRED FOR PICTURE-IN-PICTURE, OPERA"lIONS
WITH CABLE BOX AND VCR ii _ _- __ • .',
Cable-TV
Wall Jack
Signal Splitter
Ctl 3/4
ToVCR
Cable Box [
ANTENNA
OUT(_ •
_t'ENNA
¢.AILE VCR can provide an addi-
tional picture for PIP.
ii::,!iiiii'i_i!i!:,i_iii':iiiiiii:iii_iii_i:i_iliiiiiiii:iiii::i_i::i_iii!iii!iiiiiiii:iii:ii!:i:::',iiii:i!iii_i_i:ii!ii_Wii_'_i_i_i_i_oui__n_ii:_:ii_:_i!,::ii::_,ii:!i_!i_:i_!_i_i':i:_iiil,iiii',iii!iiii!i_iiiiii:!:,i!iii!ii!iiiiiiiii!':iiii'.iiiiiiiiii_i!iiiiiiiiiiii
Q Watch 2 TV Channels.
El Simultaneously watch a videotape playing in the VCR and aTV channel.
I:1 Simultaneously watch a channel using the VCR's :selector and another
using the TV's channelselector.
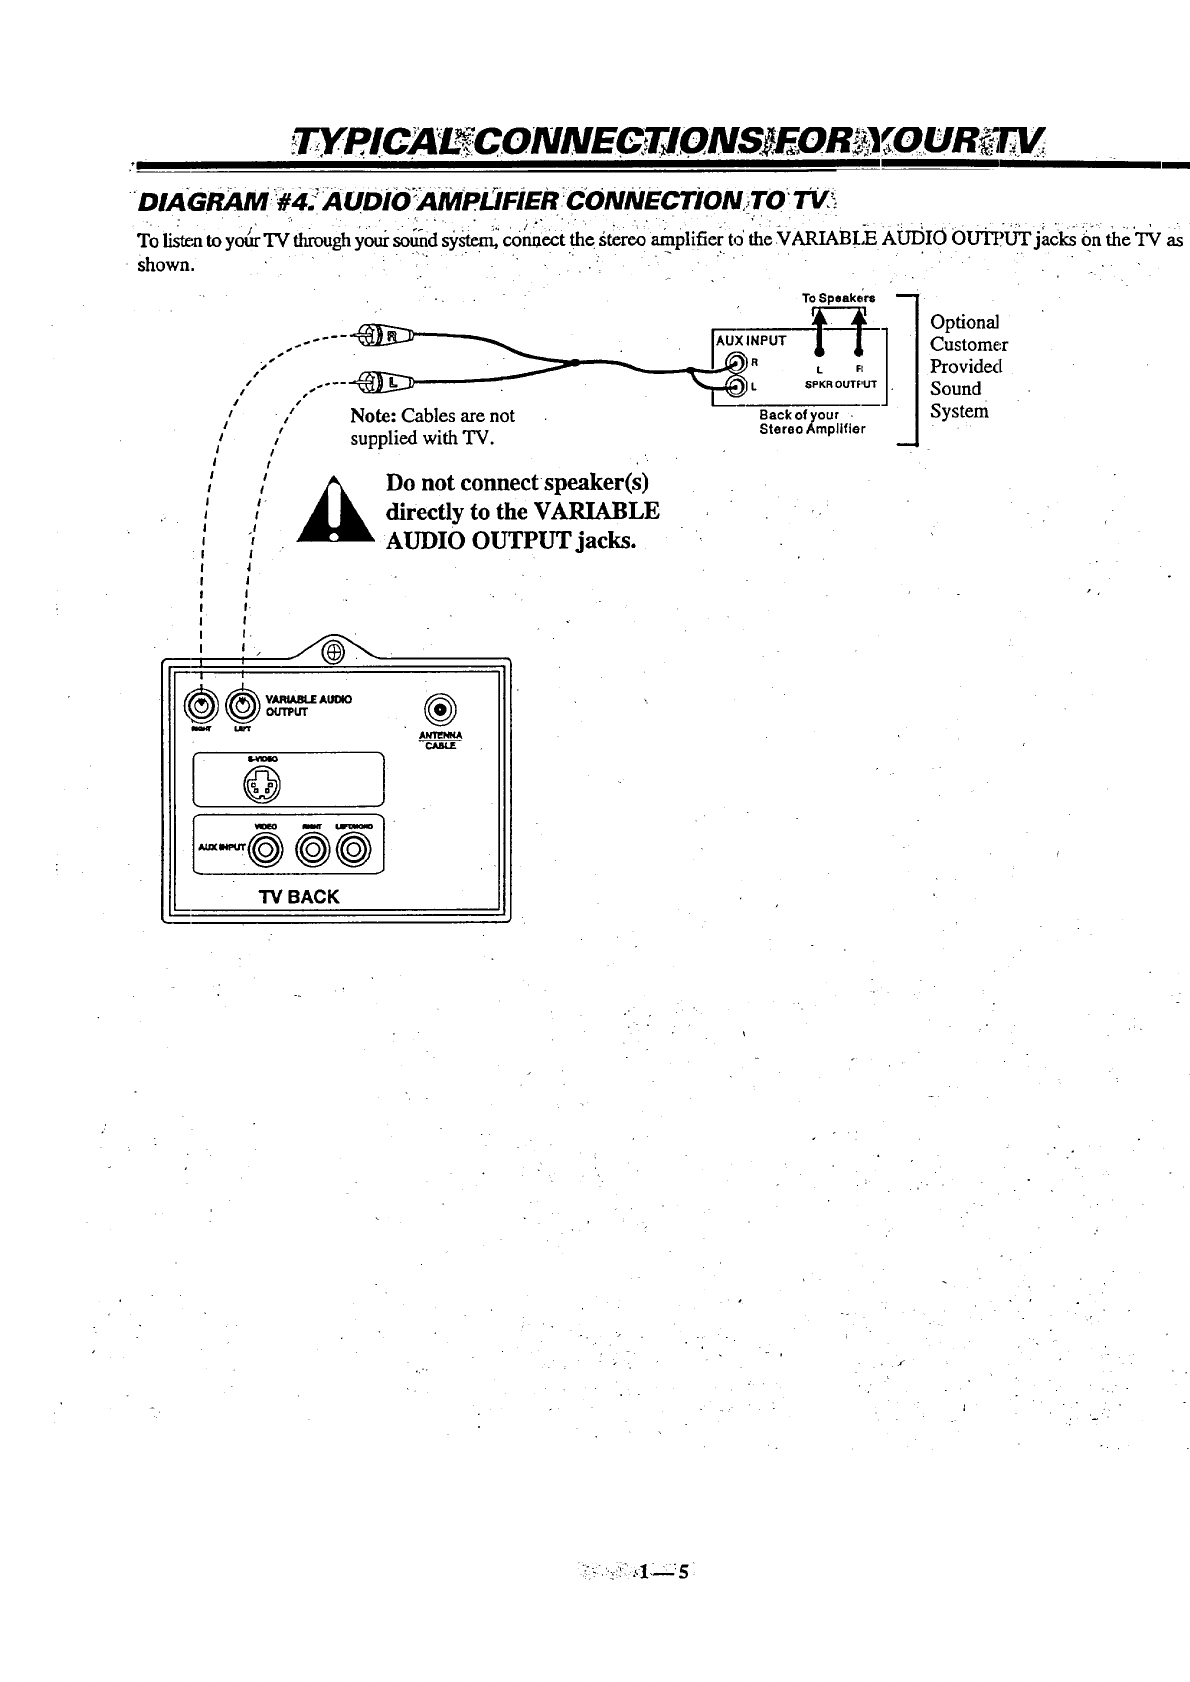
D IA GRAM)#4. AUDiO _AMPLI FiER :€ONNECTiON _TO TV _
To listen to yot_rTV through yoursold system,_connect the stereo amplifier t,5the 7VARIABLE AUDIO OU_'UT jacks 0n the TV as
shown. " ..... " " " :" " "
- To Speakers
"" " I R L FI
.'''-'_ _L SPKR OUTPUT
Note: Cables are not Back of your
Supplied with TV. stereo Amplifier
m
Optional
Customer
Providex[
Sound
System
Do not connectspeaker(s)
directly to the VARIABLE
AUDIO OUTPUT jacks.
I
wuaff
@
®
A_
TVBACK
..•.
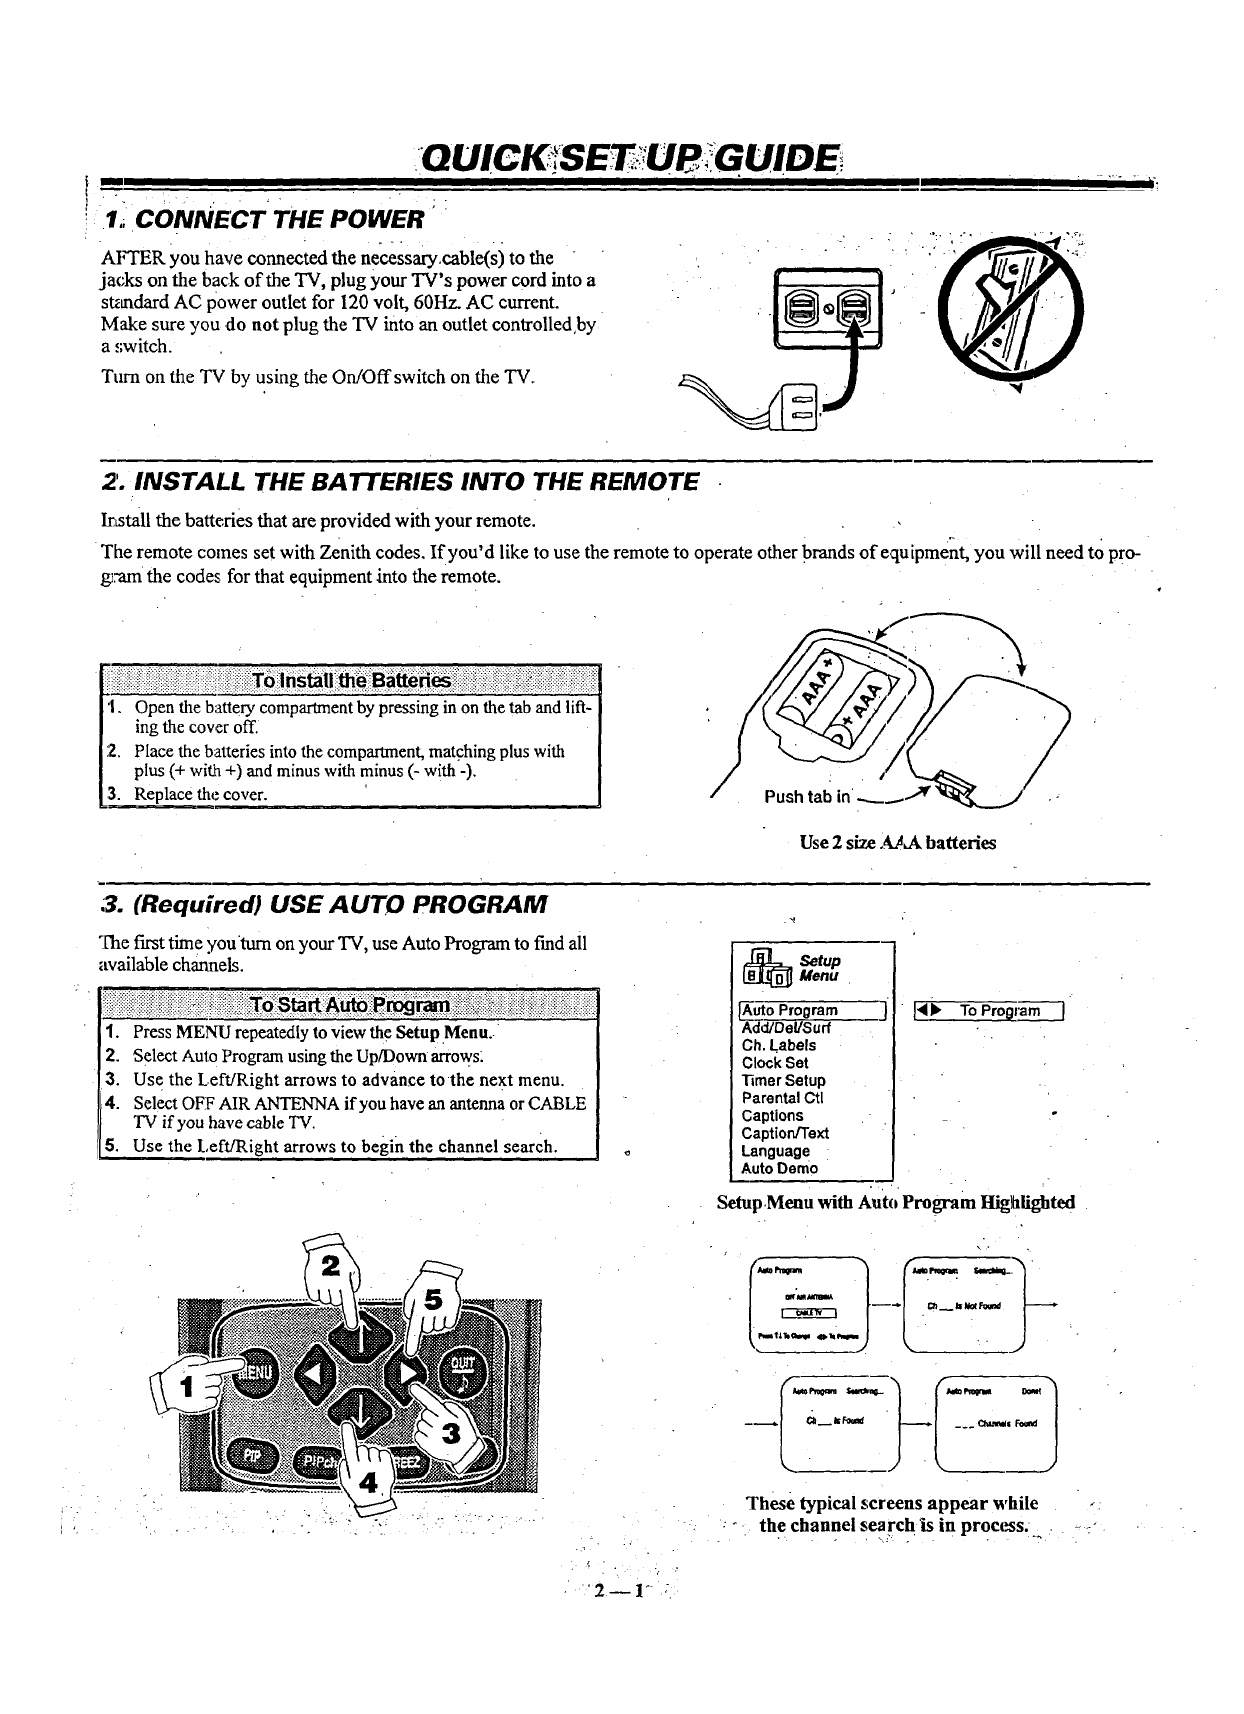
Iii CONNECT THE POWER _"
OUICKiSETU , GUIDE
AIrI'EK you have connected the n£_ssary,cable(sj to the
jacks on the back of the "IV, plug your TV's power cord into a
st_mdard AC power outlet for 120 volt, 60Hz. AC current.
Make sure you do not plug the TV into an outlet controlled,by
a switch.
Ttwn on the TV by using the On/Offswitch on the TV.
2. INSTALL THE BATTERIES INTO THE REMOTE
irLstall the batteries that are provided with your remote.
The remote comes set with Zenith codes. If you'd like to use the remote to operate other brands of equipment, you will need to pr °-
g;arn the codes for that equipment into the remote.
'1. Open the battery compartment by pressing in on the tab and lift-
ing the cover off.
2. Place the batteries into the compartment, matching plus with
plus (+ with +) and minus with minus (- with -),
3. Replace the cover. Push tab in
Use 2size AAA batteries
:3. (Required) USE AUTO PROGRAM
The first time youtum on your TV, use Auto Program to fred all
available channels.
1. Press MENU repeatedly to view the Setup .Menu.-
2. Select Auto Program using the Up/Down arrows:
3. Use the Left/Right arrows to advance to the next menu.
4. Select OFF AIR ANTENNA if you have an antenna or CABLE
TV if you have cable TV.
5. Use the Left/Right arrows to begin the channel search.
_etup
Menu
A_O Program
Add/Del/Surf
Ch.t,abels
ClockSet
TimerSetup
ParentalCtl
Captions
Caption/Text
Language
AutoDemo
Io ToProgmm
Setup,Menu with Auto Program Highlighted
-
-1
These typical screens appear while ,:
,:°the channel searchis in process. ..... -
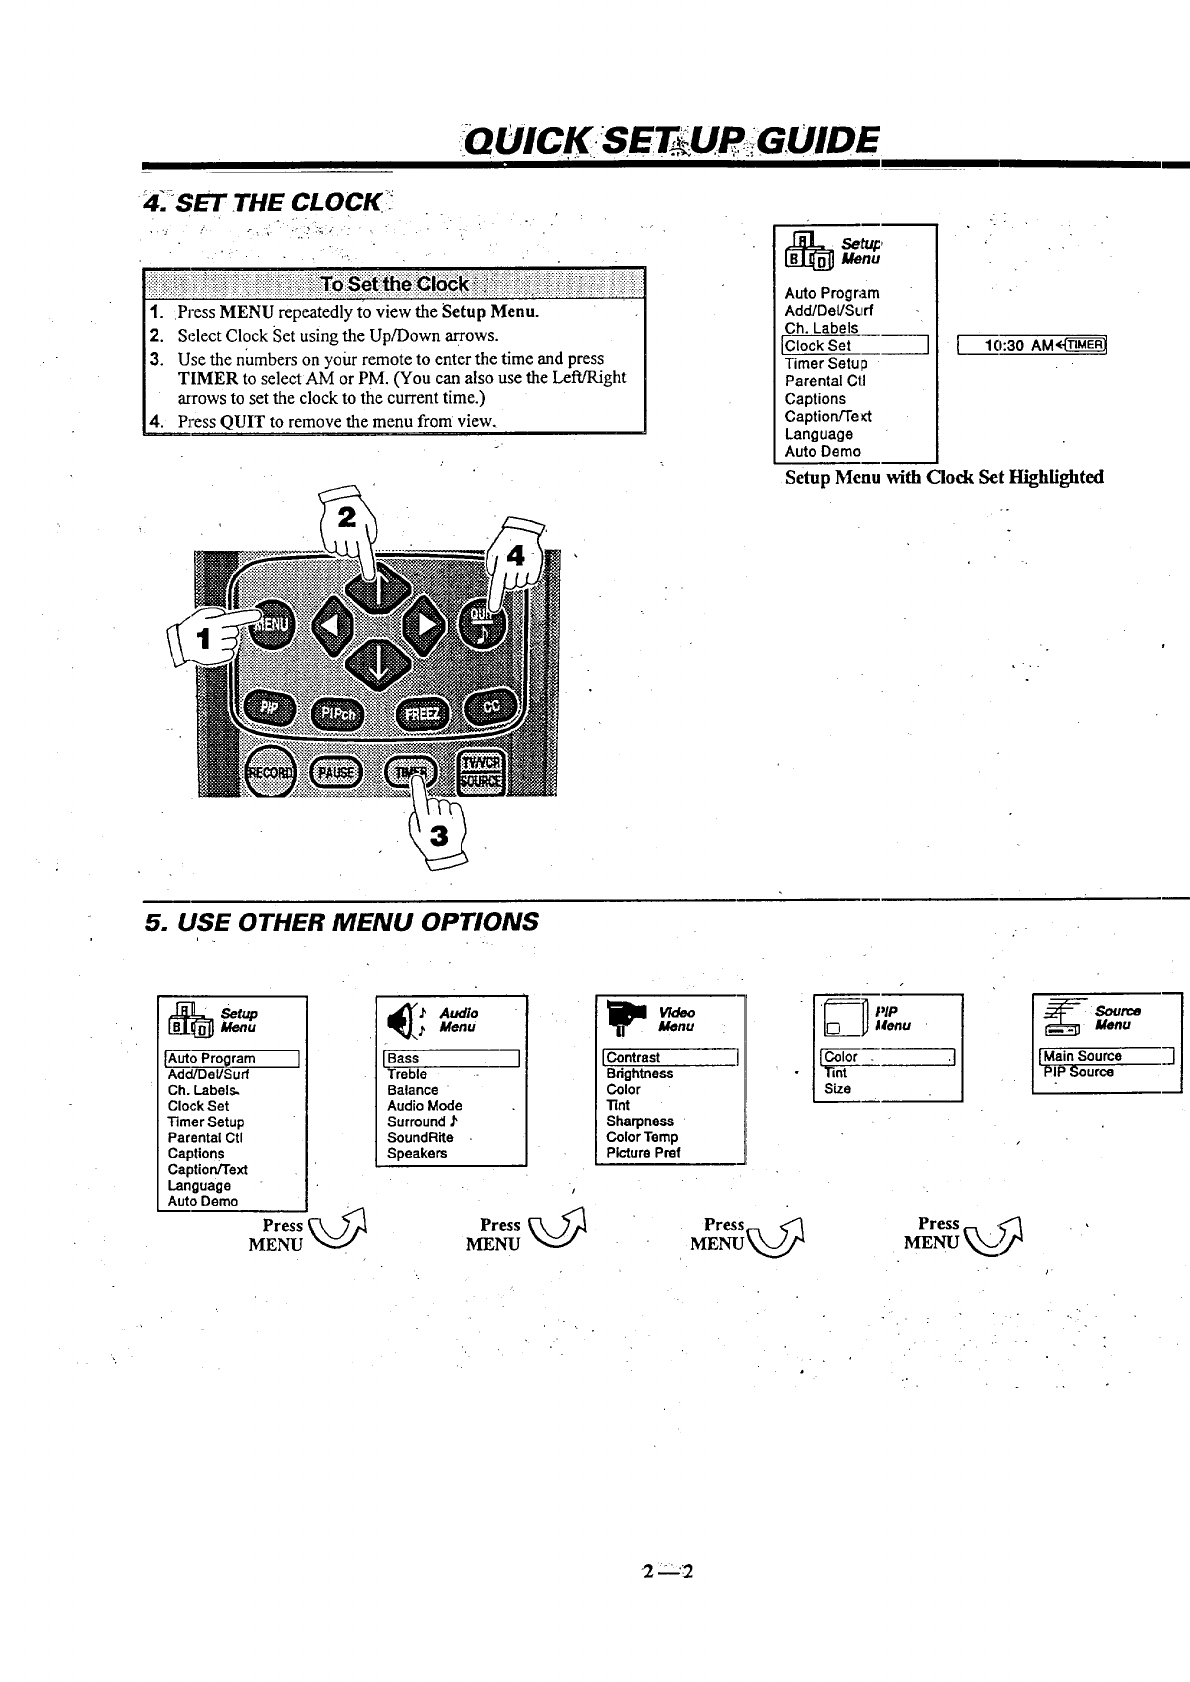
QUICK SE UP GUIDE
4.-SET THE CLOCK_ _
.... - :o):._. .
1. Press MENU repeatedly to view the Setup Menu.
2. Select Clock Set using the Up/Down arrows.
3. Use the numbers on your remote to enter the time and press
TIMER to select AM or PM. (You can also use the Left/Right
arrows to set the clock to the current time.)
4. Press QUIT to remove the menu from view.
[_ Setu_Menu
Auto Program
Add/DeVSurf
Ch. Labels
_;Iock Set
Timer Setu o
Parental Ctl
Captions
CaptionFl'e_t
Language
Auto Demo
][ lo:3oAM_
Setup Menu with Clock Set Highlighted
5. USE OTHER MENU OPTIONS
[_ Setup
Menu
A_o Program I
Add/Del/Surf
Ch. Labels.
Clock Set
Timer Setup
Parental Ctl
Captions
Caption/Text
Language
Auto Demo
Press
MENU
_ _ AudioMenu
Bass
Treble
Balance
Audio Mode
Surround J'
SoundRite
Speakers
"] [Contrast
Bdghtness
Color
Tint
Sharpness
Color Temp
Picture Pref
V/deoMenu
I
Press
MENU
Menu
| lint ISource
_:_ Menu
[Main Source
PIP Source
2n'_
im ii
MENU OPERA TiON,_I
)
[_ SetupMenu
A_oProgram J
Add/DeUSurf
Ch.Labels
ClockSet
TimerSetup
ParentalCtl
Captions
Cap'lion/Text
Language
AutoDemo
141_ To Program 1
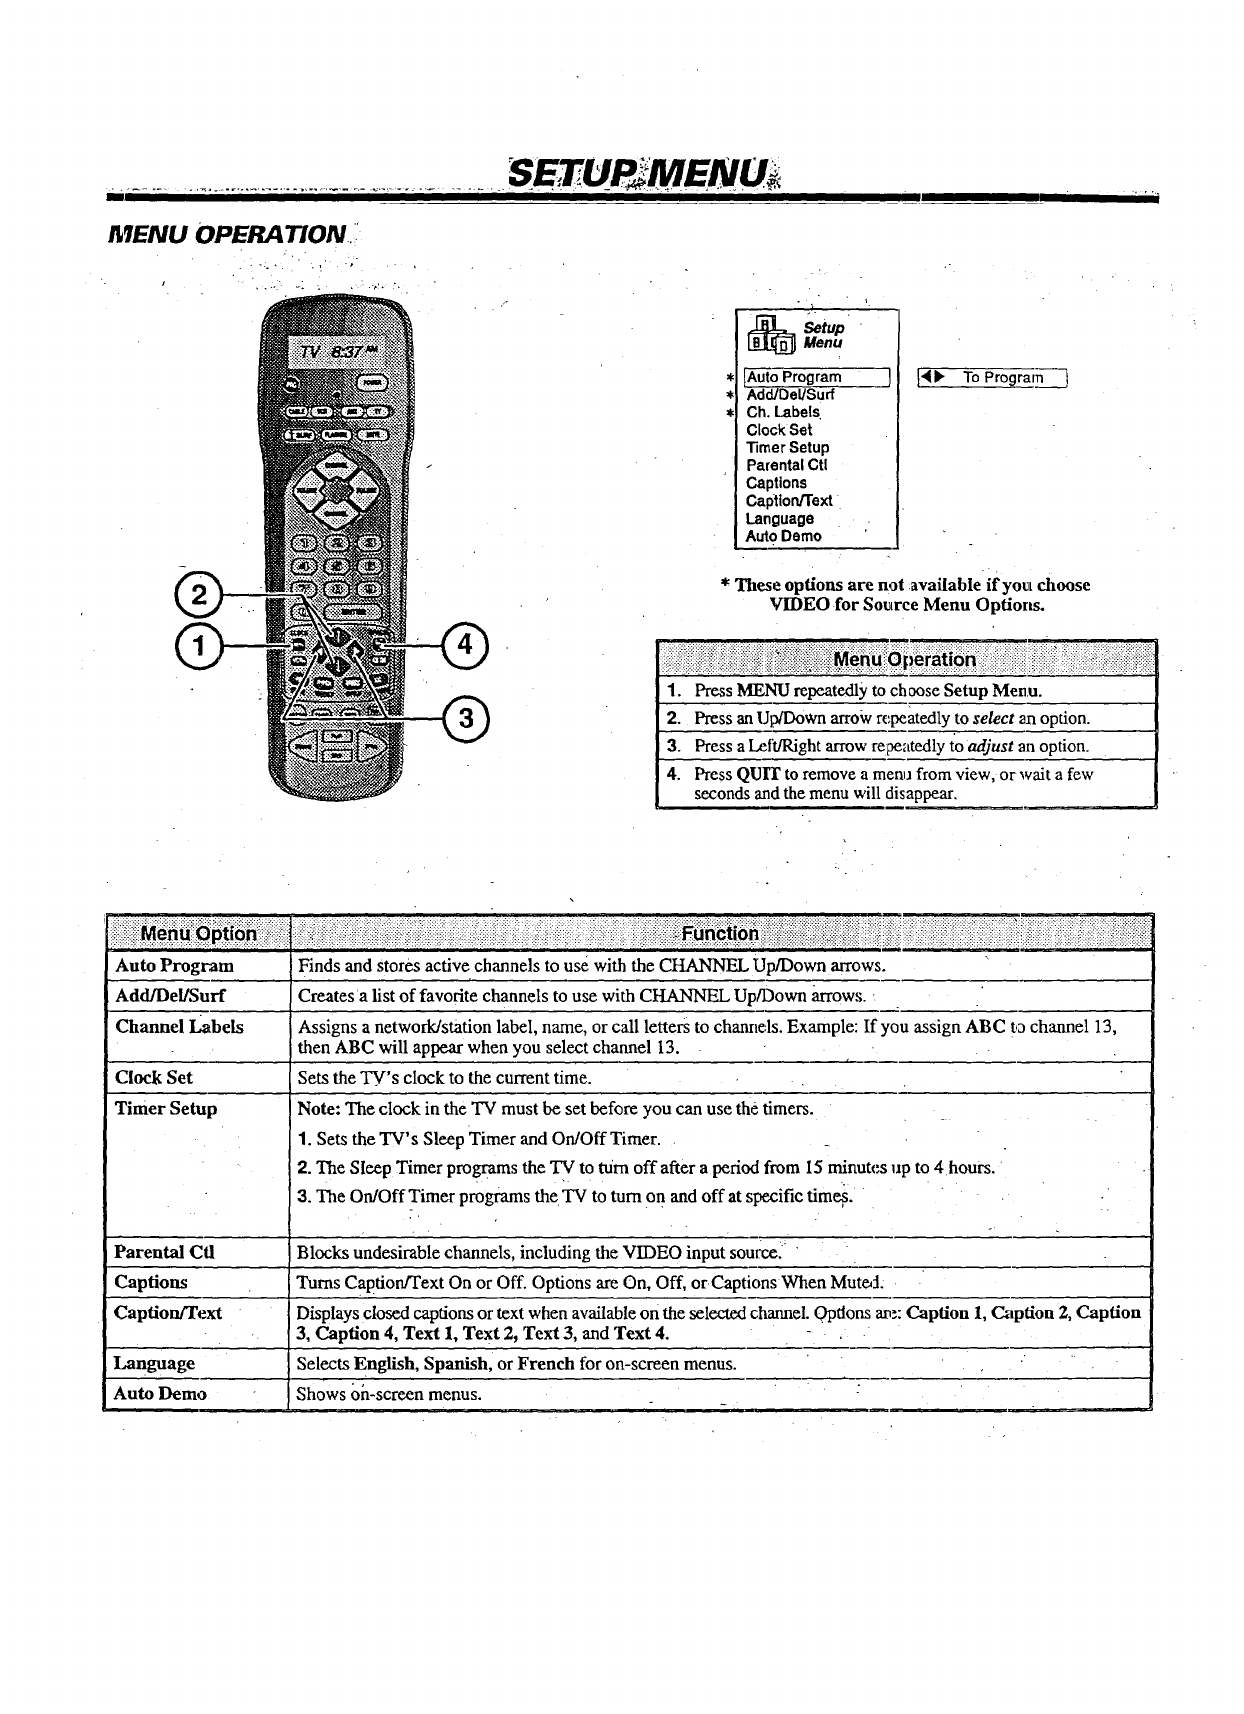
* These options are not available ifyouL choose
VIDEO for Source Menu Options.
:i-::_ii_i.:i?ii:!::-:iiil::.ii:i :::i:i:iii:i:i:i_:iii::iiiiii.i:_i_iii:iiii_ii:::i::::i:_:iiii:iii:iii ::::.:.: ._:i:.ii::_i:: . :i. :.: :-: " :::: i;i._ ii.i :iii :::::i-?!i:iii:_!i:_i_ii!:
1. Pros MENU repeate.dlyto choose Setup Menu.
2. PressanUp/Down arrow repeatex:l],yto sdect _nopdon.
3. Pressa L_{_Jght arrow re;_atedlyto adjust an opdon.
4. PressQUIT to remove a menufrom view, orwait a few
seconds and the menu will disappear.
Auto Program
Add/Del/Surf
Channel Labels
Clock Set
Timer Setup
Finds and stores active channels to use with the CHANNEL Up/Down arrows.
Creates a list of favorite channels to use with CHANNEL Up/Down arrows.
Assigns a network/station label, name, or call letters to channels. Example: If you assign ABC to channel 13,
then ABC will appear when you select channel 13. t____
Sets the TV's clock to the current time.
Note: The clock in the TV must be set before you can use the timers.
1. Sets the TV's Sleep Timer and On/Off Timer.
2. The Sleep Timer programs the TV to turn off after a period from 15 minutes up to 4 hours.
3. The On/Off Timer programs the TV to tum on and off at specific times.
Parental Ctl Blocks undesirable channels, including the VIDEO input source.:
Captions Turns CaPtion/Text On or Off. Options are On, Off, orCaptions When Mut_:l.
Caption/Text Displays closed capdons or text when available on the selected channeL 0Pdons a_:: Caption 1, C.aption 2, Caption
3, Caption 4, Text I, Text 2, Text 3, and Text 4.
Language Selects English, Spanish, or French for on-screen menus.
Auto Demo Shows on-screen menus.
S UR.MENU
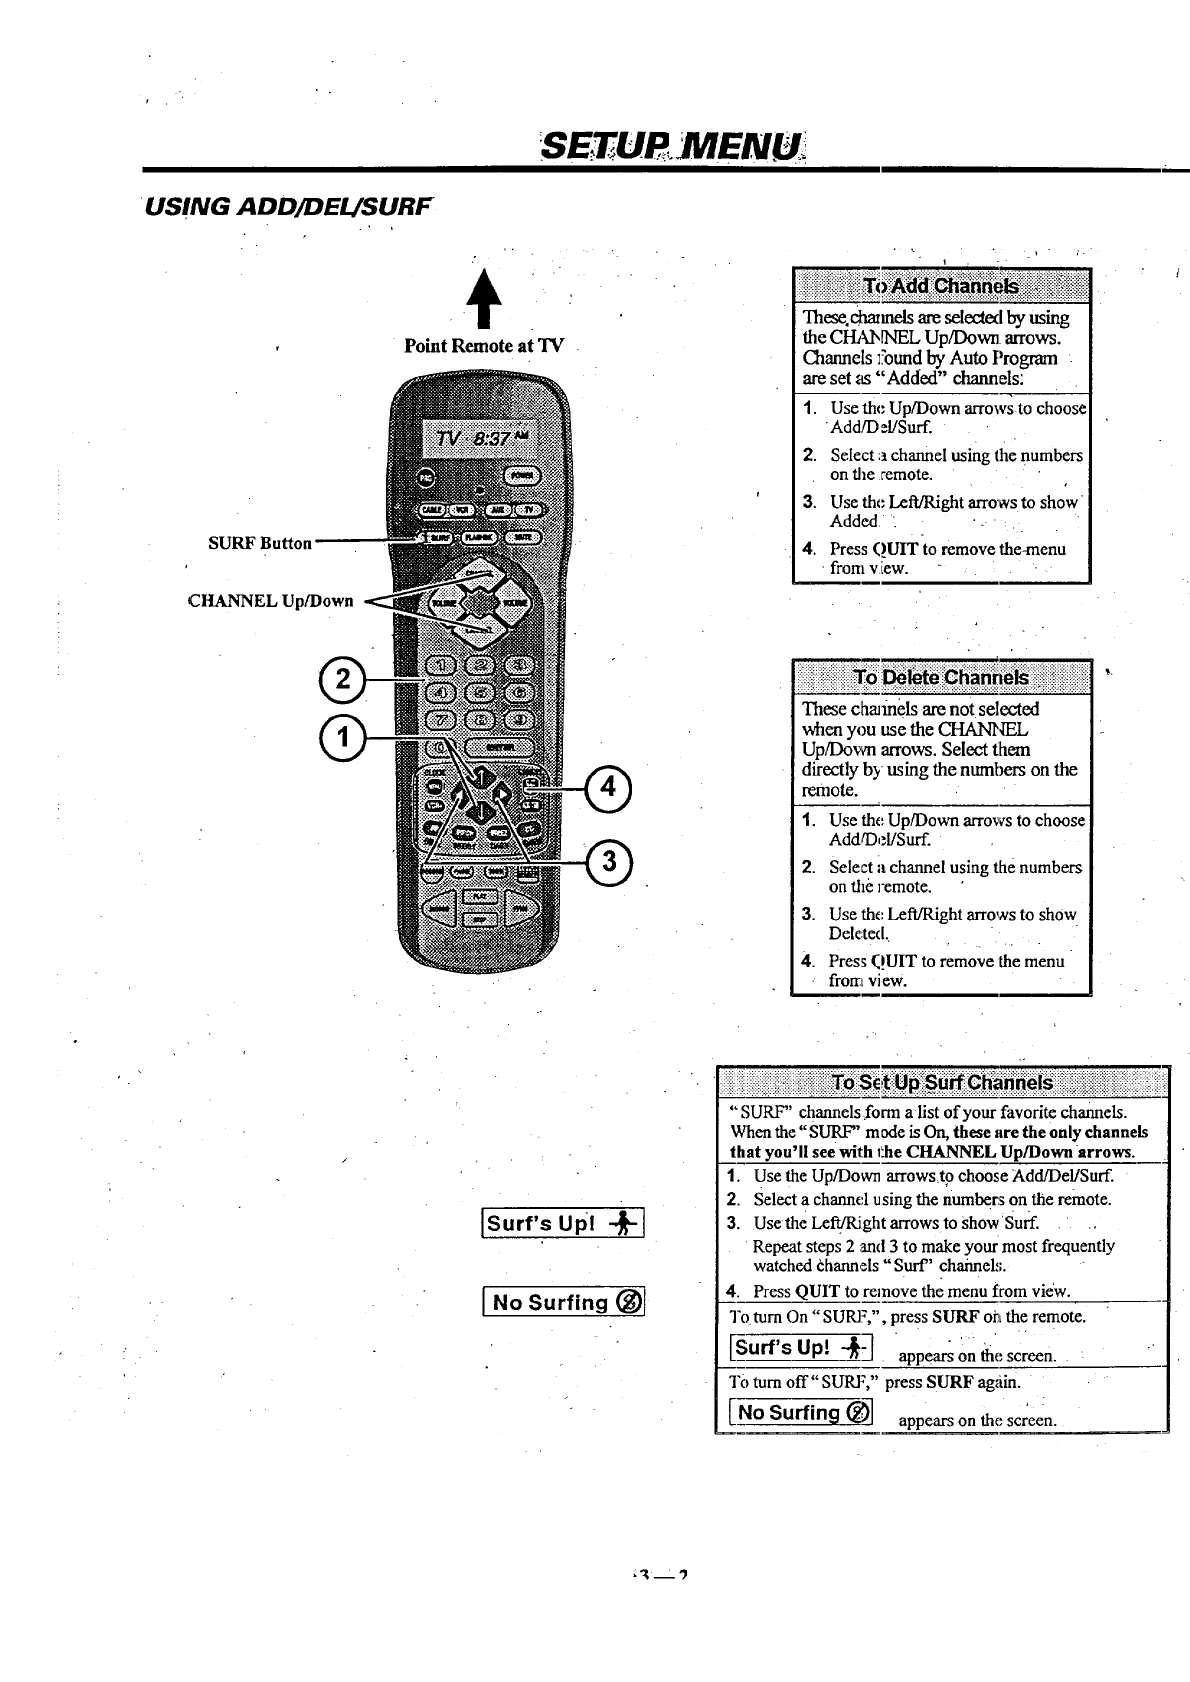
•USING ADDADEL/SURF
÷
Point Remote at TV
SURF Button --
i
These.chmmelsare selectedby using
the CI_kbINEL Up/Down arrows.
Channels l_'oundby Auto Program
areset as "Added" channels:
1.
2.
3.
4.
Use the Up/Down arrows to choose
Add/D :l/Surf.
Selecta channel using the numbers
on the remote.
Use the Left/Right arrows to show
Added ._
Press QUITto remove the-menu
-fromv tow.
CHANNEL Up/Down
"FnesechaJmelsarenot selected
when you use the CHANNEL
Up/Down arrows.Select them
directly by using the nurnbers on the
remote.
1.
2.
3.
4.
Use the Up/Down arrows to choose
AddfDel/Surf.
Select a channel using the numbers
on the remote.
Use the Left/Right arrows to show
Deleted.
Press QUIT to remove the menu
from view.
[Surf's up! --_-]
I no Surfing (_)1
"SURF" channels form alist of your favoritechannels.
Whenthe"SURF" made isOn, these are the only channels
that you'll see with 1L.heCHANNEL Up/Downarrows.
1. Use the Up/Down arrows t9 choose Add/Del/Surf.
2. Selecta channel using the numbers on the remote.
3. Usethe LefffRightarrows to Show'Surf.
Repeatsteps 2 and3to make your most frequently
watchedChannels"Surf" channel,,;.
4 PressQUIT to removethe menu from view.
To turn On "SURF,", press SURF oatthe remote.
[Surf's Up[ "_-] appears on the screen.
To rum off" SURF," press SURF again.
[No Surfin 9 _)-] appears on thescreen.
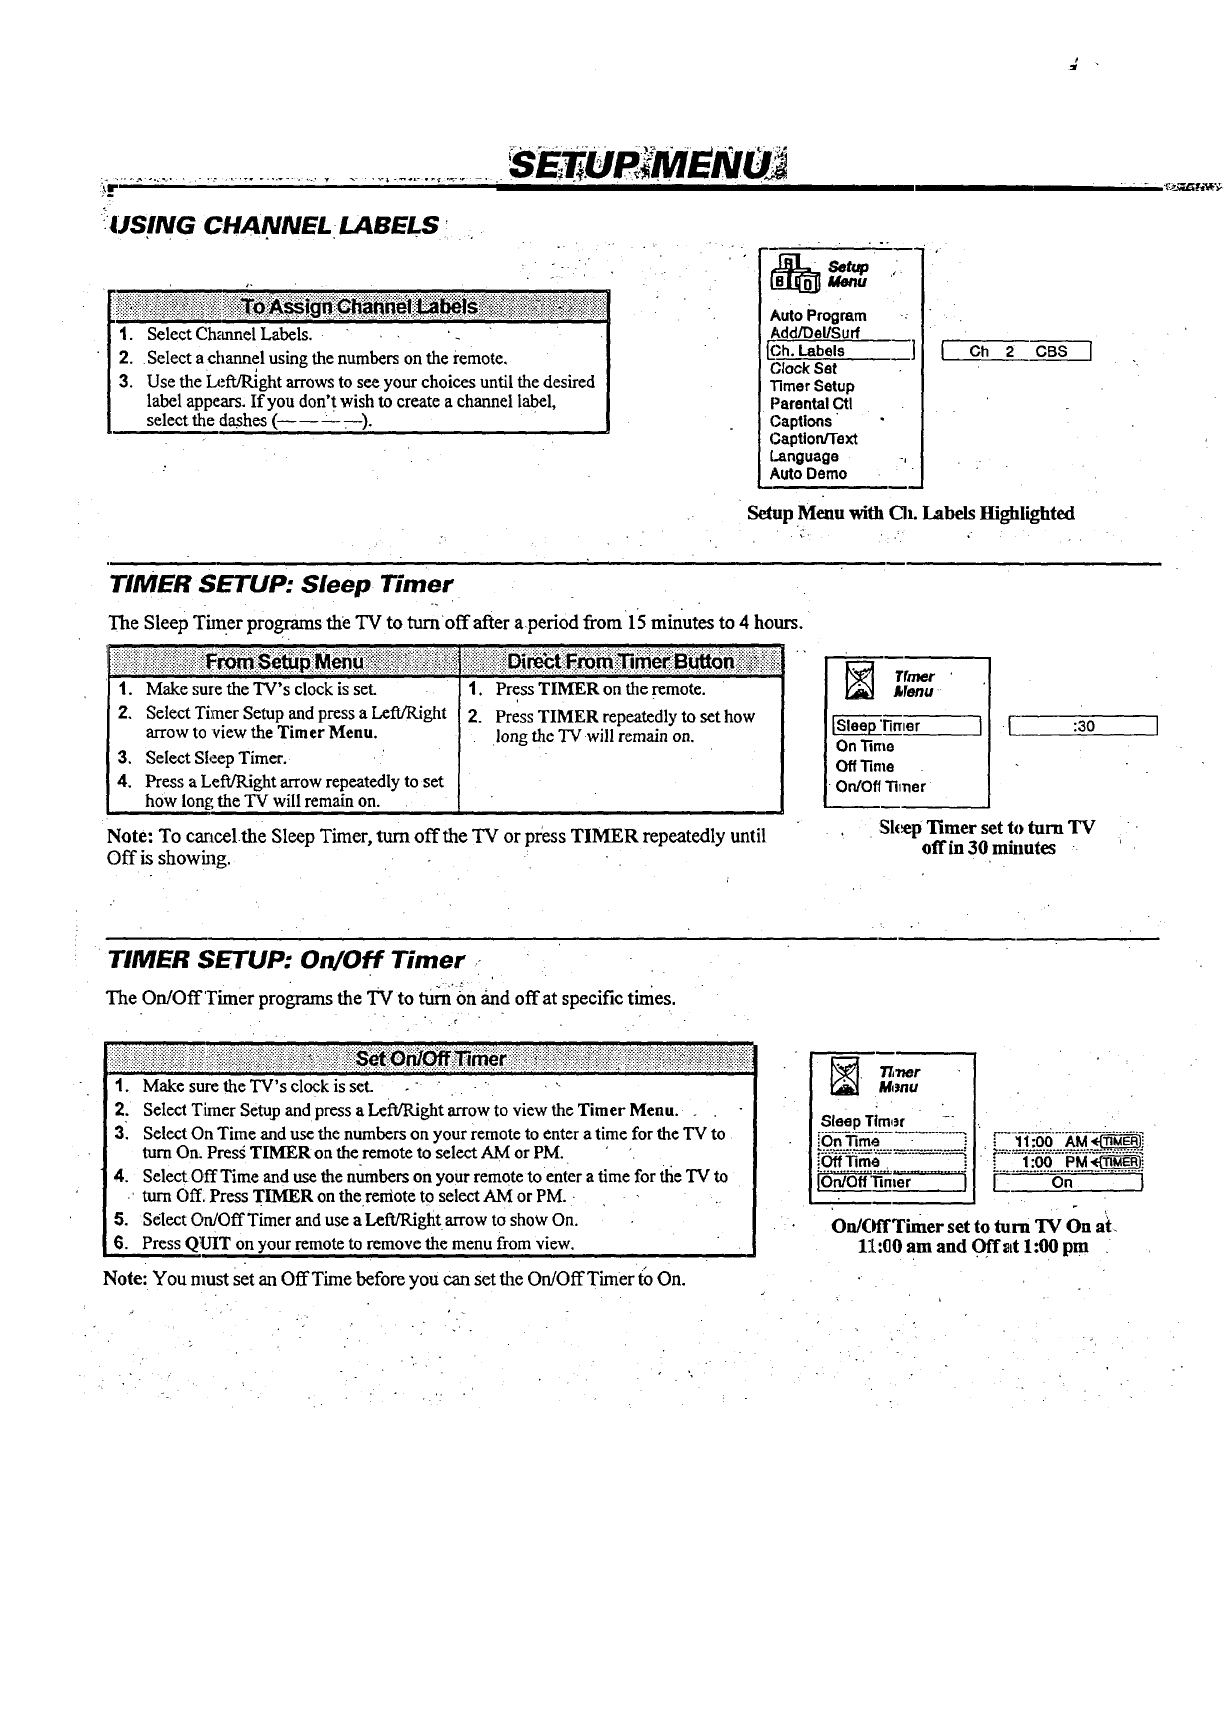
IUS!NG CHANNEL •LABELS; •
1. Select Ch_mnel Labels, •-
2. Select a channel using the numbers on the remote,
3. Use the L=WRight arrows to see your choices until the desired
label appears. If you don Rwish to create a channel label,
select the dashes (- .).
Auto Program
Add/DeliSurf
Ch. Labels ]
Clock Set
Timer Setup
Parental Ctl
Captions
Caption/Text
Language -,
Auto Demo
[Ch 2 CBS 1
Setup Menu with Ch. Labels Highlighted
TIMER SETUP: Sleep Timer
]'he Sleep Timer programs the TV to tumoffafter aperiod fi'om 15 m_utes to 4hours.
iiiii ii i ii ii i i ii iiiii!!i!ii! iiiiiiiiiiii i !i !ii ii!!iiiii!i i!iii!iii ! ii iiiii i iiiiii!iiii! iii
1. Make sure the TV's clock is set.
2. Select Timer Setup and press a Left/Right
arrow to view the Timer Menu.
3. Select Sleep Timer.
4. Press a LetVRight arrowrepeatedly to set
how long the TV will remain on.
Note: To cancelthe Sleep Timer, turn offthe TV or press TIMER repeatedly until
Off is showhlg.
1. Press TIMER on the remote.
2. Press TIMER repeatedly to set how
long the TV will remain on.
Trmer •
Menu
OnTime
Off "Rme
On/OffTimer
:30
:Sk_,pTimer set to turn TV
offin 30 mhmtes
TIMER SETUP: On/Off Timer
The On/OffTimer programs the TV to turnon _qd offat specific times.
1. Make sure the TV's clock is set. .
2. Select Timer Setup and press aLeR/Right arrow to view the Timer Menu.
31 Select On Time and use the numbers on your remote to enter a time for the TV to
turn On. Press TIMER on the remote to select AM or PM.
4. Select OffTime and use the nmnbers on your remote to enter a time for _e TV to
turn Off, Press TIMER on the remote to select AM or PM.
5. Select On/OffTimer and use aLert/Right arrow to show On,
6. Press QUIT on your remote to remove the menu from view,
Note: You nmst set an OffTime before you can set the On/OffTimer (o On.
._wer
Menu
SleepTimer --
_-.
iOn/Off_rner )
L..__5.._o9._.__j
[On ]
On/(fffTimer set to turn "IV On at.
11:(30am and Off at 1.'00 pm
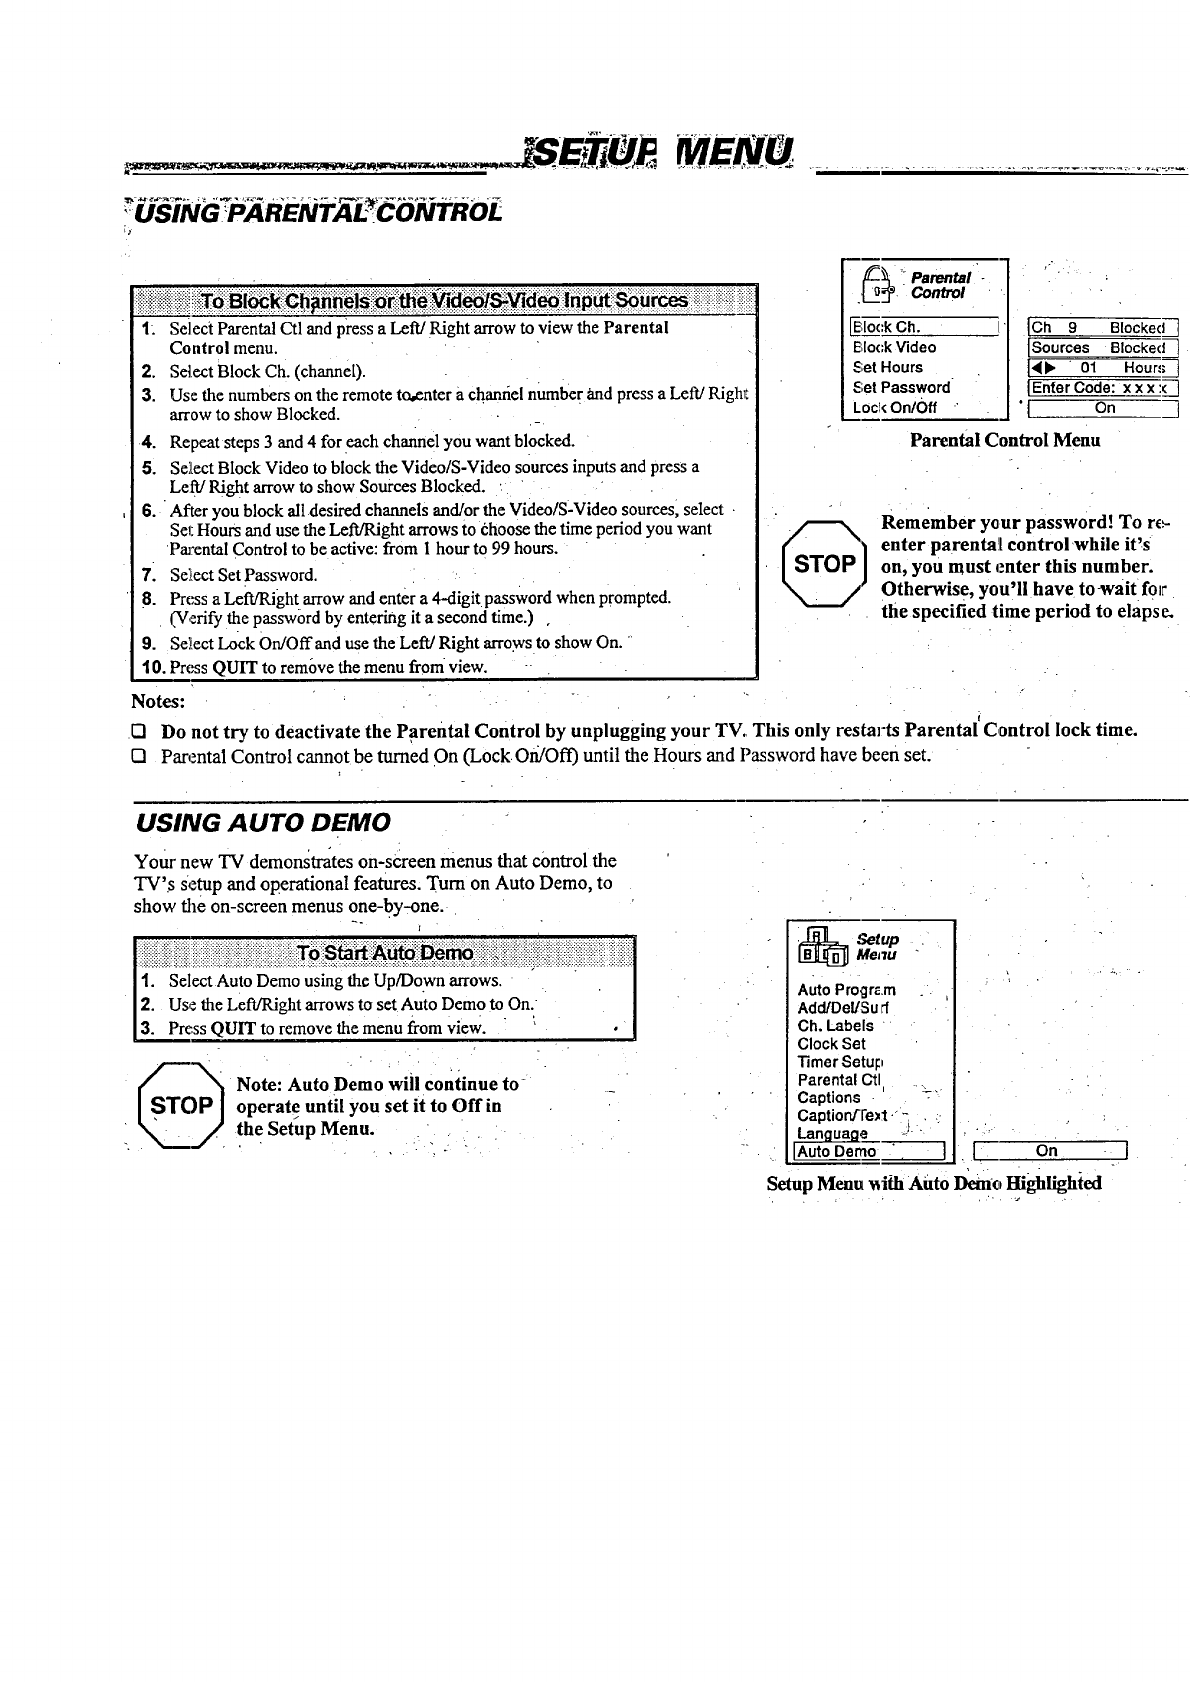
I: Select Parental Ctl and press aLeft/Right arrow to view the Parental
Control menu.
2. Select Block Ch• (channel).
3. Use the numbers on the remote to,enter a chanriel number and press a Left/Righl:
arrow to show Blocked.
4. Repeat steps 3 and 4 for each channel you want blocked.
5. Select Block Video to block the Video/S-Video sources inputs and press a
Left/Right arrow to show Sources Blocked.
6. After you block all desired channels and/or the Video/S-Video sources, select
Set Hours and use the Left/Right arrows to choose the time period you want
Parental Control to be active: from 1 hour to 99 hours.
71 Set,ect Set Password.
8. Press a Left/Righ t arrow and enter a 4-digit password when prompted.
(Verify the password by entering it a second time.) ,
9. Se},ectLock On/Offand use the Left/Right arrows to show On.
10. Press QUIT to remove the menu from view.
-arental -
.Control
[E,Io(:kCh.
E,lockVideo
5;et Hours
_;et Password
Loc!<On/0ff
ICh 9Blocked ]
[Sources Blocked]
I_ 01 Hour,';
IEnterCode: xxx :(-]
"1 On 3
Parental Control Menu
Remember yaur password! To rc.,-
enter parental control while it's
on, you must enter this number.
Otherwise, you'll have towait for
the specified time period to elapse.
Notes:
121 Do not try to deactivate the Parental Control by unplugging your TV. This only restarts Parental' Control lock time.
121 Parental Control cannot be turned On (Lock On/Off) until the Hours and Password have been set.
USING AUTO DEMO
Your new TV demonstrates on-screen menus that control the
TV's Setup and operational features. Turn on Auto Demo, to
show the on-screen menus one-by-one.
r
1. Select Auto Demo using the Up/Down arrows.
2. Use the Left/Right arrows to set Auto Dem 0to.On.
3. Press QUIT to remove the menu from view• ' .
S_OP_ Note: Auto Demo will continue to
operate until you set it to Off in
" !he Setup Menu.. •
_i_ "qetupMenu
AutoProgr_•m
Add/Del/Surf
Ch. Labels
ClockSet
TimerSetul:_
ParentalCtl .
Captions --"
Captiorffre_1• -
Lan_ua_L .- .... , 2
Auto Demo " J LOn I
Setup Menu _ifh Auto Demo Highlighied
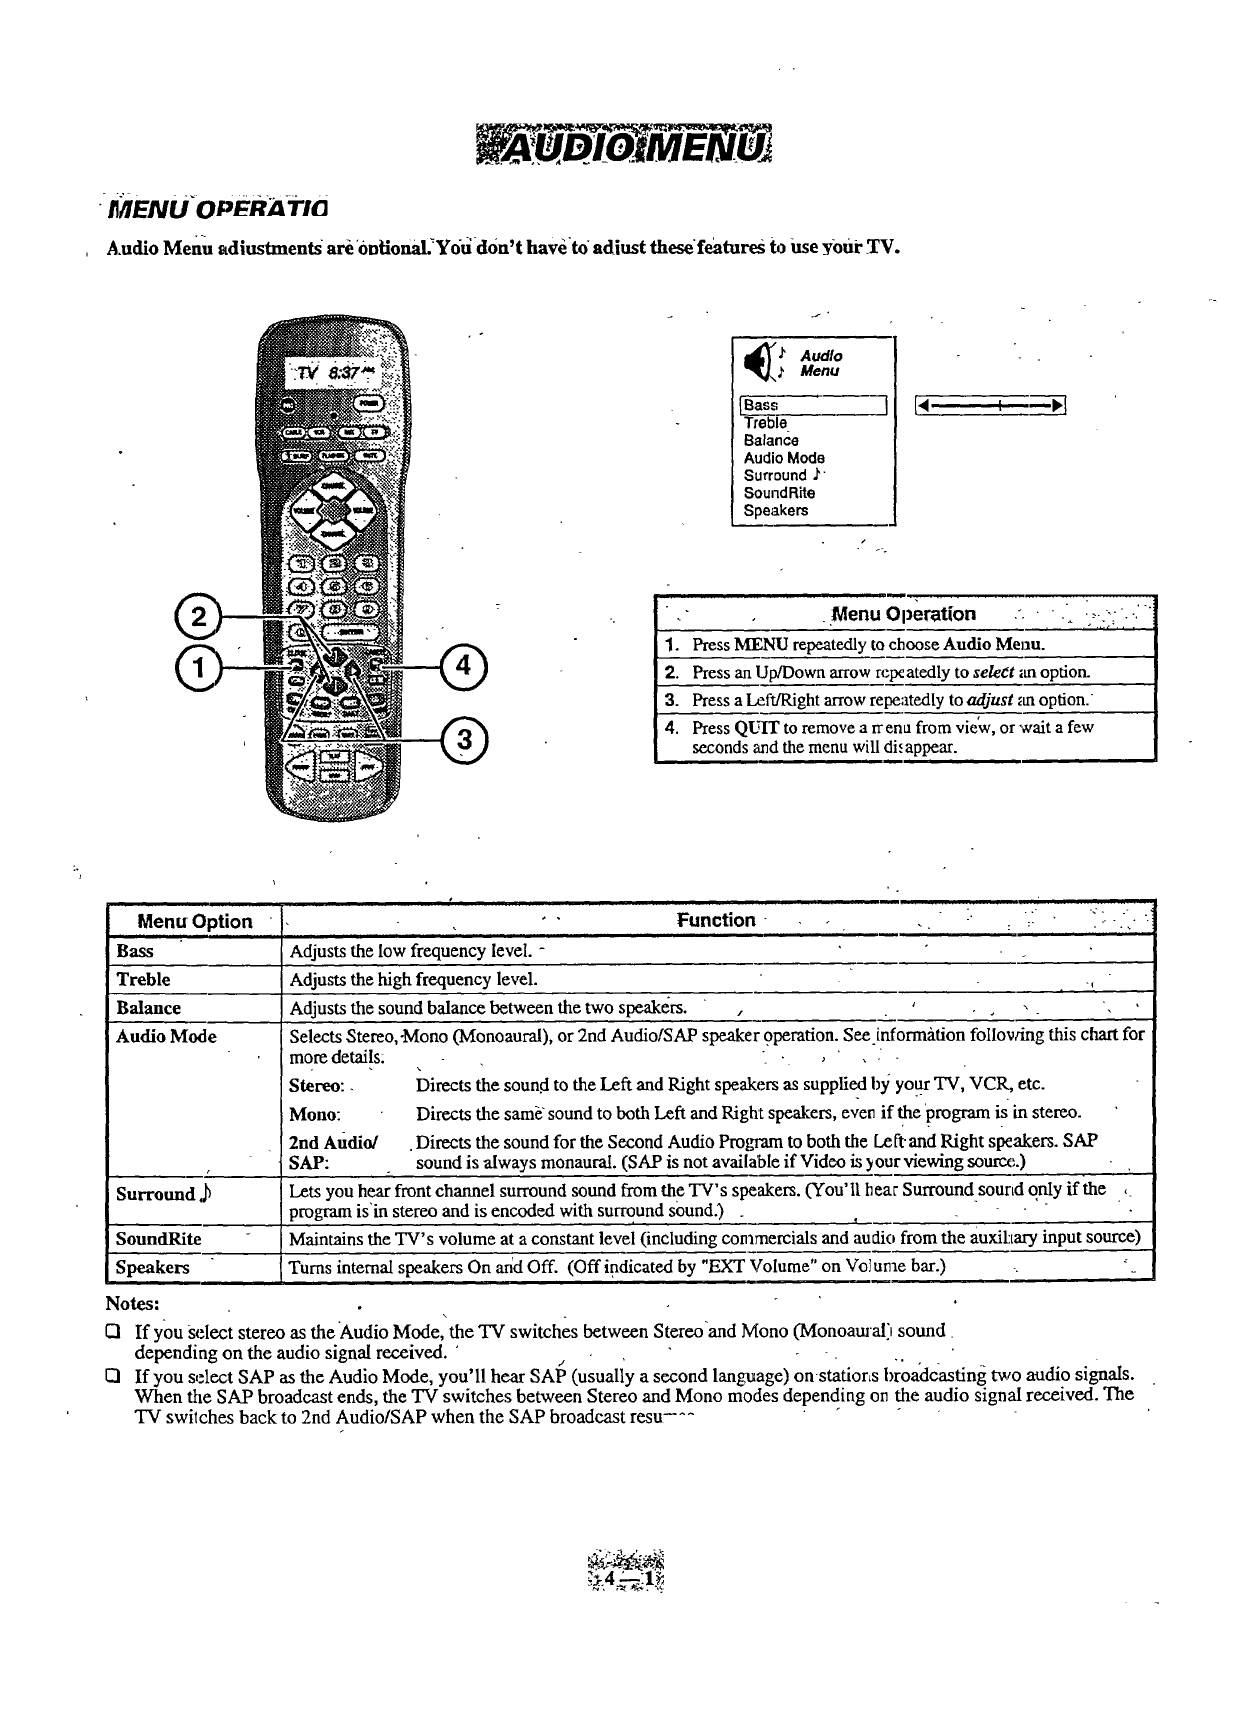
:II"/IENU OPER_A-Ti_
Audio Menu adiustmen_ are ontional.Yo_-don't haveto adiust these'features to Use _our TV.
.f
Menu
[Bass ]
Treble
Balan_e
Audio Mode
Surround J'
SoundRite
Speakers
®
• Menu Operation "- " -,---.-.
1. Press MENU repeatedly to choose Audio Menu.
2. Press an Up/Down arrow repeatedly to select _moption_
3. Press a Let_,ight arrow repeatedly to adjust _moption.
4. Press QU'IT to remove a rrena from vie'w, or wait a few
seconds and the menu will dh appear.
Menu Option Function
Bass
Treble
Balance
Audio Mode
Surround
SoundRite
Speakers
•°
-. " ::_ '" " " 'i
Adjusts the low frequency level. -
Adjusts the high frequency level.
Adjusts the sound balance between the two speakers. , ' ,
Selects Stereo,-Mono (Monoaural), or 2nd Audio/SAP speaker 9peration. See.informittion follovdng this chart for
more details: .,,,
Stereo:. Directs the soun.d to the Left and Right speakers as supplied b_;your'IV, VCR, etc.
Moun: Directs the sam__sound to both Left and Right speakers, even if the program is in stereo.
2nd Audio/ .Directs the sound for the Second Audio Program to both the Le ft.and Right speakers. SAP
SAP: sound is always monaural. (SAP is not available if Video is your viewing source.)
Lets you hear front channel surround sound from the TV's speakers. (You' I111ear Surround sourtd onl_y if the ,
program is'in stereo and is encoded with surround sound.) .
Maintains the TV's volume at a constant level (including commercials and audio from the auxihary input source)
i Turns internal speakers On arid Off. (Off indicated by "EXT Volume" on Volume bar.) .•
Notes: \
[:1 If you Select stereo as theAudio Mode, the "IV switches between Stereo'and Mono (Monoam'al) sound
depending on the audio signal received. ' -
El If you select SAP as the Audio Mode, you'll hear SAI _ (usually a second language) on statior_s broadcasting two audio signals.
When the SAP broadcast ends, the TV switches between Stereo and Mono modes depending on the audio signal received. The
TV switches back to 2nd Audio/SAP when the SAP broadcast resu, ^-
_-4_!._
VIDEO3MENU
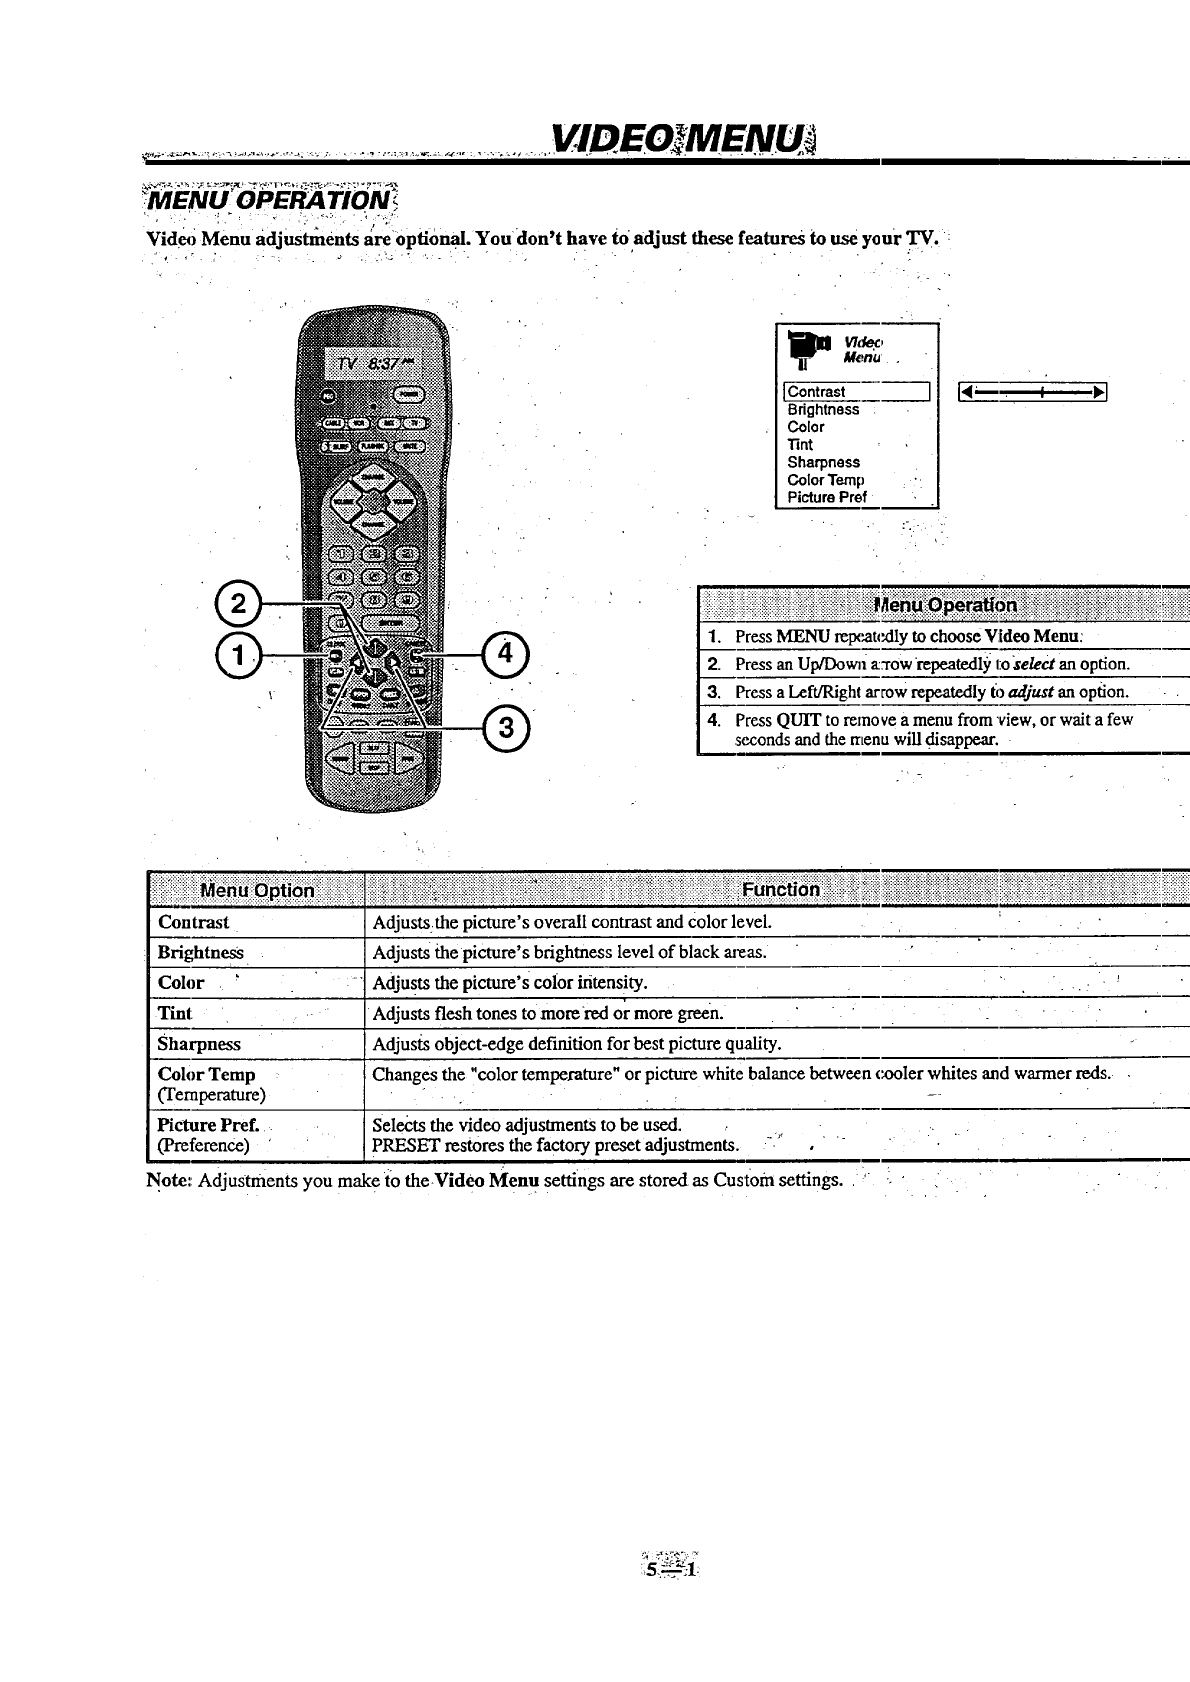
ENU OPERA TION !
Video Menu adjustments areopfional. Youdon't have to adjust these features to use your TV.
. _
I
_! _ V/de_,
Me.n_
IContrast ]
Brightness
Color
Tint
Sharpness
ColorTemp .-
PicturePref
:- .-
[,m a vl
i! !i ii!i i!i !i iiiiiiiiii!iiiii ! i ii iii ! !i!ii i!i r ii !! i i!iii ii ii!i!!iii i iiiiiiiiii i i iiiii i i! !i
1. Press MENU repeatedly tochooseVideo Menu:
2. Press an Up/Dora1 a:rOwrepeatedl), l:o_/_ctanoption.
3. Pressa Left/Rightarrow repeatedly t'oadjust an option.
4. PressQUIT to mxnovea menufrom 'view,or wait a few
seconds and the r_Lenawill disappear.
Contrast
Brightness
Color
Tint
Sharpness
Coh)r Temp
(Temperature)
Picture Pref.
(Preference)
Adjusts:the picture's overall contrast and Color level. -,
Adjusts thepicture's brightness level of black areas. ".
Adjusts the picture's color intensitY .... :-'
Adjusts flesh tones to more-red or more green. " : "
Adjusts object-edge definition for best picture quality.
Changes the "color temperature" or picture white balance between cx_oler whites and warmer reds. ,
Selects the video adjustments to be used .....
PRESET restores the factory preset adjustments. --.'" ,'- • '
Note:: AdjuStments you mak e i'o theVideo Men usettings are stored as Custom settings. ,_' [ • , 7
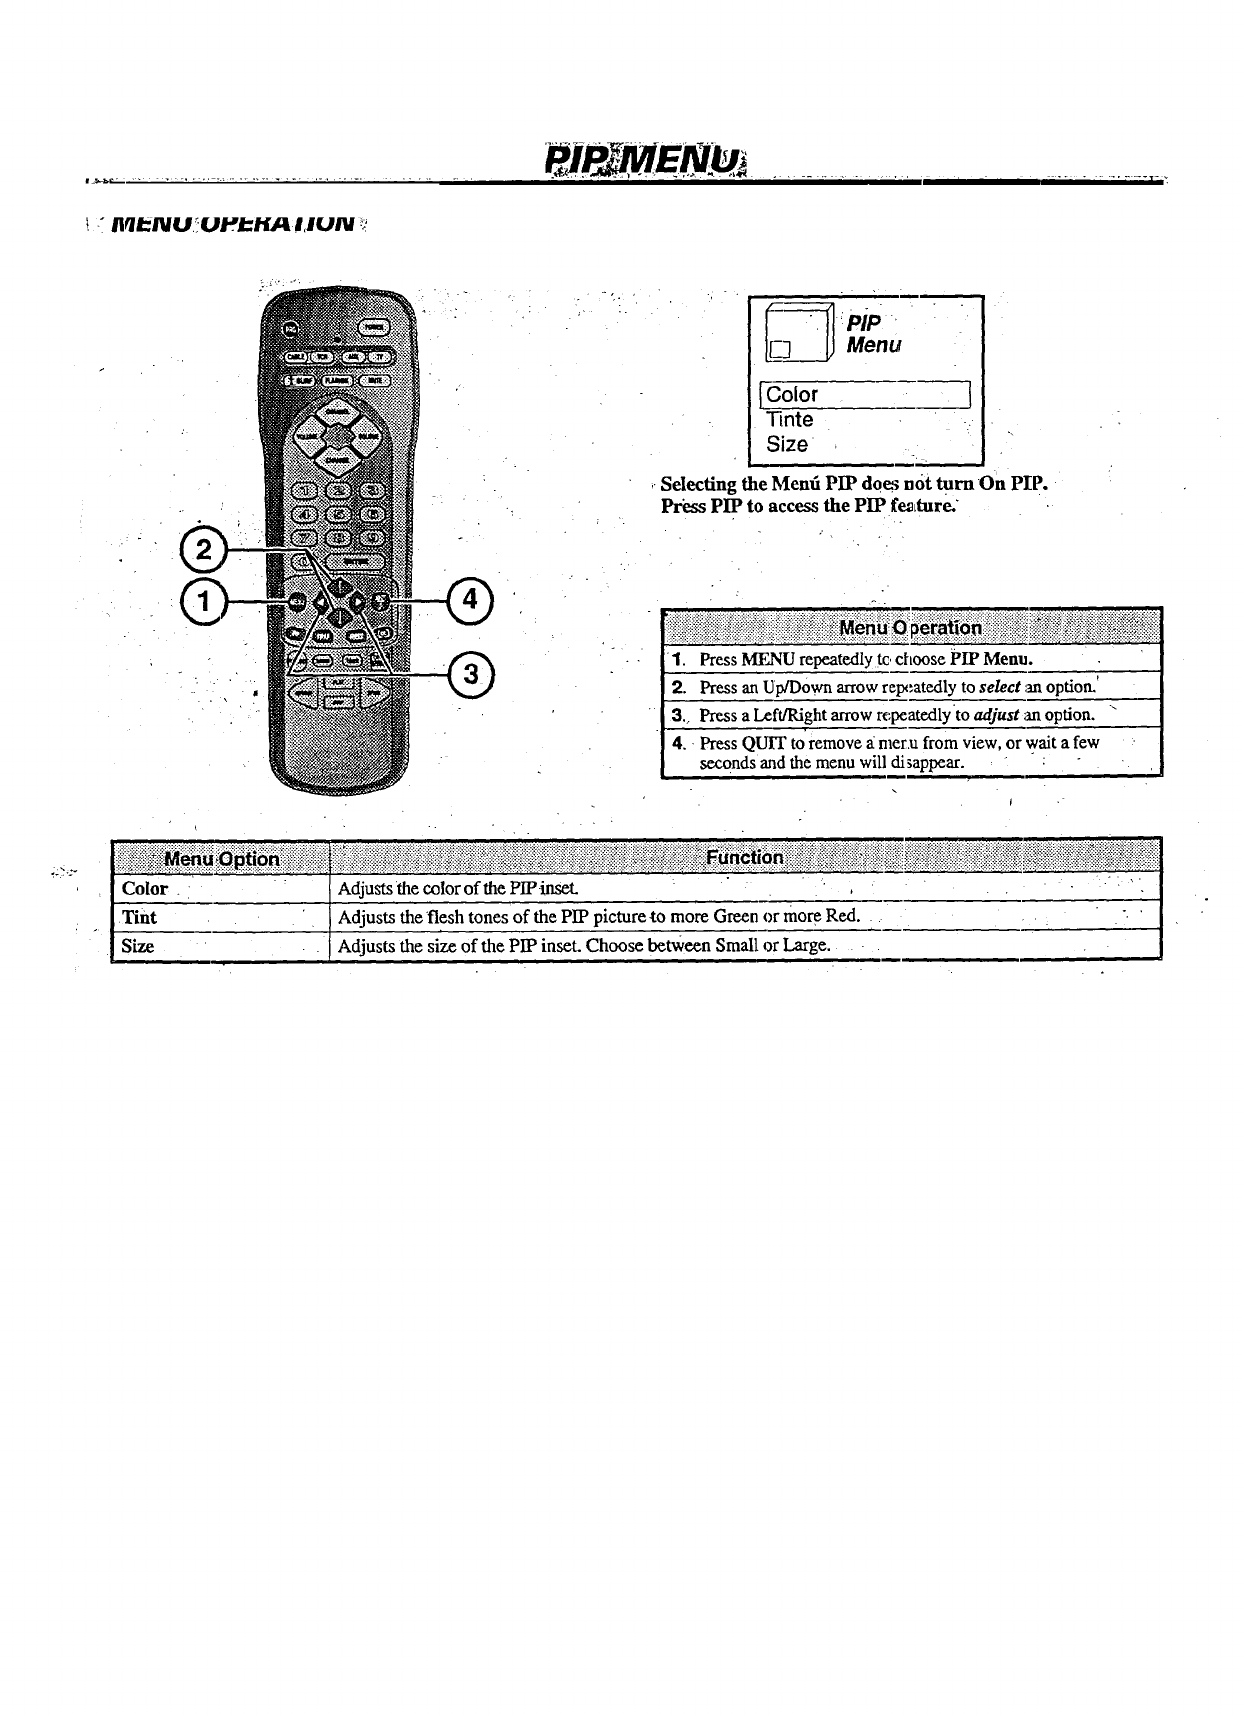
!: Iiqi-NU.!UPI_.i.,[d_I,IUN _!
Menu
[Color l
"iqnte
Size
Selecting the Mend PIP do_ not turnOn PIP.
Pr_ PIP to access the PIP fe_Lture:
_ .:.::.! :.:..:.:,:.....,:.....:.:...._.........,.. ,.:., _:.....::.., ::..:..:.:...:.., _:.:._:..:,::.::.:... : .................. :._..:::..::...:::..::..:.:.:..:.
_i_ii_i!ii_iii_iii_ii_iiiii_i_i!!iiiiiiiii_ii_iiiiiiii_ii_ii_ii_iii_i_!iii_!i_iiiii_!_iiiiiiiiM_._!_iiii!ii_i_ii!i_ii_i_i!_ii_ii_!_ii_i!!i_i_iii_i`ii_iiiiii!i!i!ii!_!ii_!iii_
•1, PressMF_TIrepeatedlyto choose PIP Menu.
2. Press an Up/Downarrowrep_;atedlyto select _moption.'
3.. Pressa Left/Rightarrowrc:peatedlytoadjust _moption. "
4. PressQUIT toremove a mer.ufromview, or wait a few
secondsandthemenu will di_appear.
_i_iii_ii!i!i!iii!i!i_i_i_iiiiiiiiiiiiiiii_!iiiii',i.................................._........................................................................................................_........................................................................................................_:':::::':"::_::::::•"':::::::'::_................_':::_::'_::_:::'::''.....
.:.:_..:_::..:.::....:.:...:::.•::::.:::..:.,...:.. .................................... _ ................ _......... ....., ...,.. [......:... :,..:.-:...::::.._::,._::...::: ,.:.:..:._..,:.<..::...:..:..::•...:...:. ......................... _..........
iilii_i_iiiiiiiiiiiiiiiiii!iiiiiiiii!iiiiiiii!ii!ii::ii!iiiiiii!_ii_!::ii!i::iiii::iiiii::ii_,i_!iiiii!!!ii!!_iiiiiii::iili!iiiiiiii::iiiii::i!i::iiiiii!ii::i_ii!iii_i_i!ii::iiii_i::ili_,!_i_ii::iiii_,i::!:J:!i!!ilili_ _c t:::::::::::::::::::::::::::::::::::::::::::::::::::::::::::::::::::::::::::::::::i:i!i:_i,_:!_:::::::::::::::::i:!::i::i:i:,i':i::ii':i::i::i_i::_i::ii_':!:::::::::::::::::::::::::::::::::::::::::::::::::::::::::::::::::::iii::_::i!iii_i_i__!i_i::i::!
Color . - "" Adjuststhe colorof the PIP-inSet. , . .
Tint Adjusts the •fleshtones of the PIP pictureto moreGreen or moreRed ..... .". '
Size 'Adjusts the size of the PIP inset. Choose between Small or Large.
IMENU _OPER_-TiON
°.
• ?
HI
I IM_'"Sour_: ] An_,_Cable
I PIP Source
uo.u [
Main Source iI " _. "
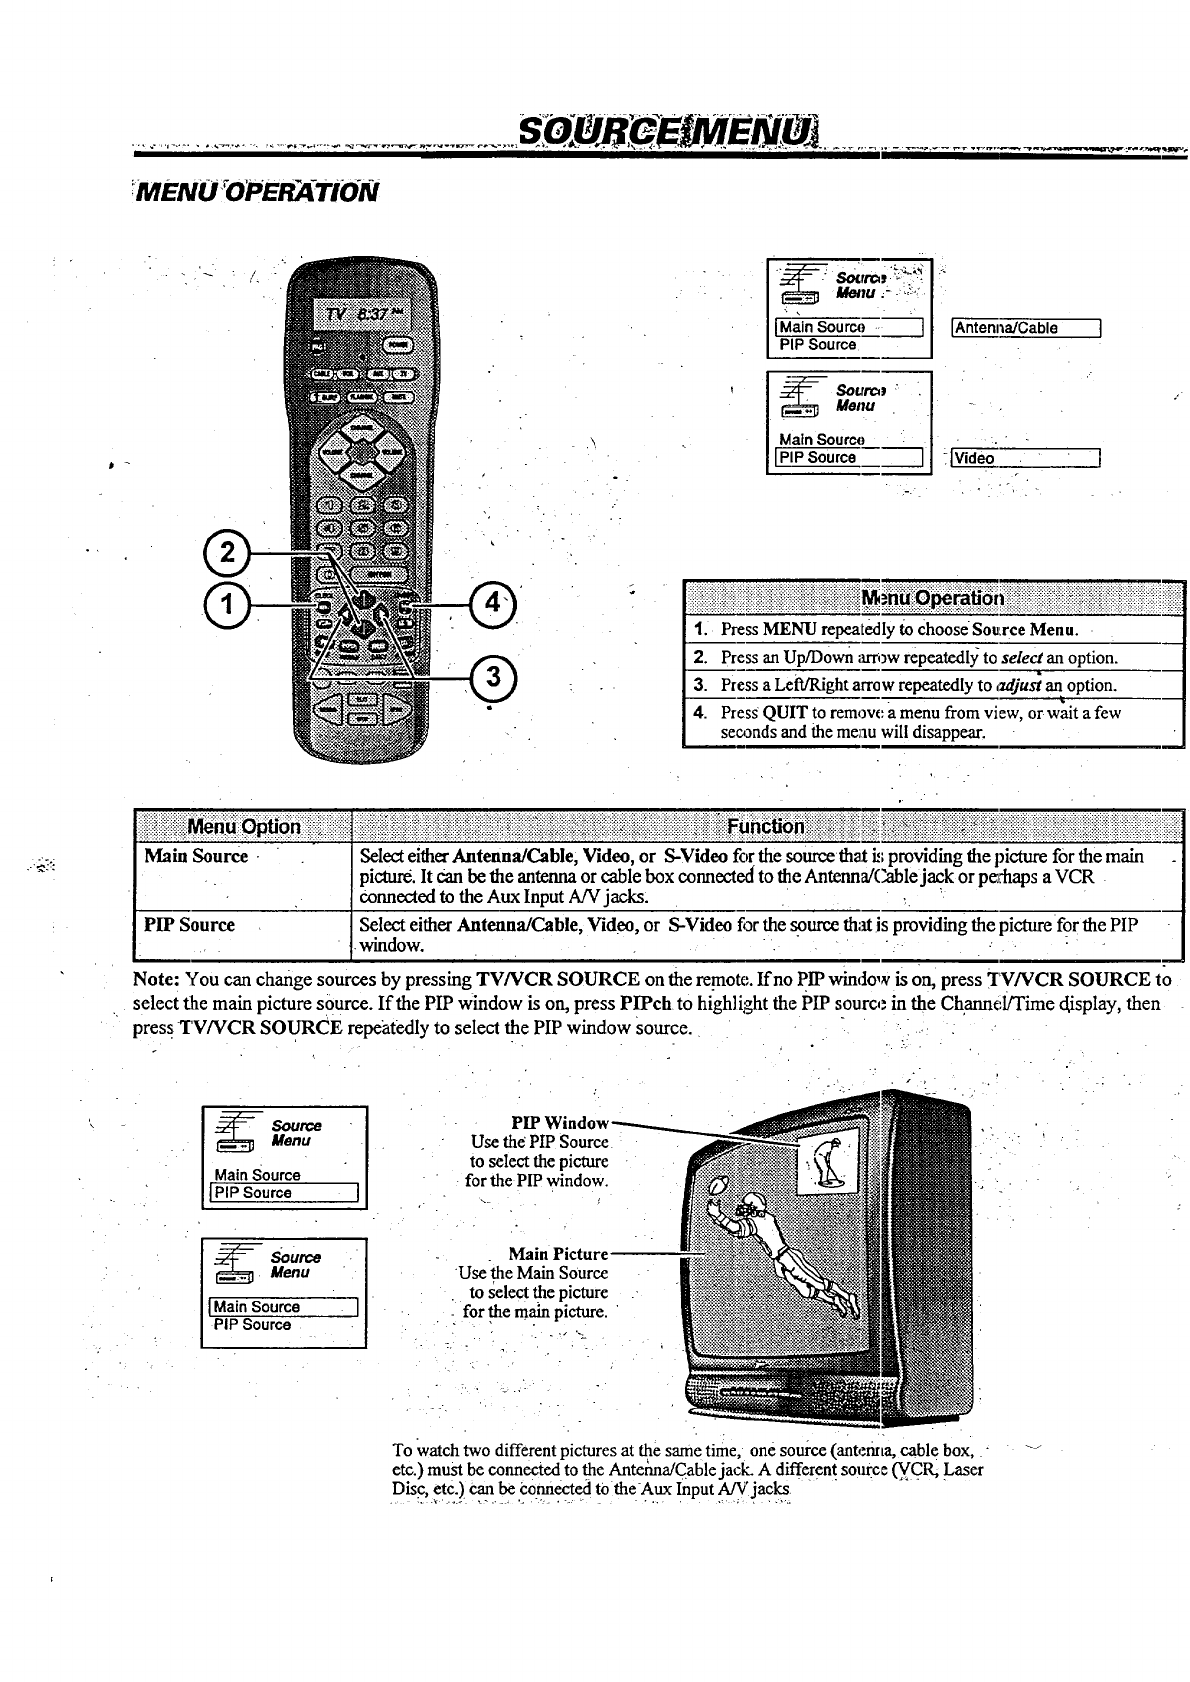
1. Press MENU repeatedly to ChooseSou:rceMenu.
2. Press an Up/D0wn;_rri_wrepeatedlyto select an option.
3. Press a LeWRightarrow repeatedly to _lju_ an option.
g
4. Press QUIT to remove a menu from view, or wait afew
seconds and the meau will disappear.
Main Source Selecteither Antenna/Cable, Video, or S-Video for the sourcethati.,_pmviding (he picture for the main
picture. It can be the antenna or cable box connected to the Antenna/Cable jack or pv_aps a VCR
connected to the Aux Input A!V jacks.
PIP Source Select either Antenna/Cable, Video, or S-Video fi_rthe source that is providing the picture for the PIP
•window.
Note: You can change sources by pressing TV/VCR SOURCE on the remote. If no PIP window is On,press TV/VCR SOURCE to
select the main picture source. If the PIP window is on, press PIPch to highlight the PIP source in the Channel/Time c[isplay,then
press TV/VCR SOURCE repeatedly to select the PIP window Source. "
" 3
ISource
_Menu
Main Source
IPIP Source ]
-SourceMenu
IMain Source
PIP Source
PIP_
Use the PIP Source
to select the picture
for the PIPwindow.
Main Picture
Use-the Main SOurce
to select the picture
for the mainpicture.
°•.. _ .,-
To Watchtwo different pictures at the same time, one source (antem,a, cable box,
etc.)must be connected tothe Antefina/Cablejack. A different source _(vcR, Laser
Disc,etc.) can be i_onnectedto the-Aux Input A/Vjacks
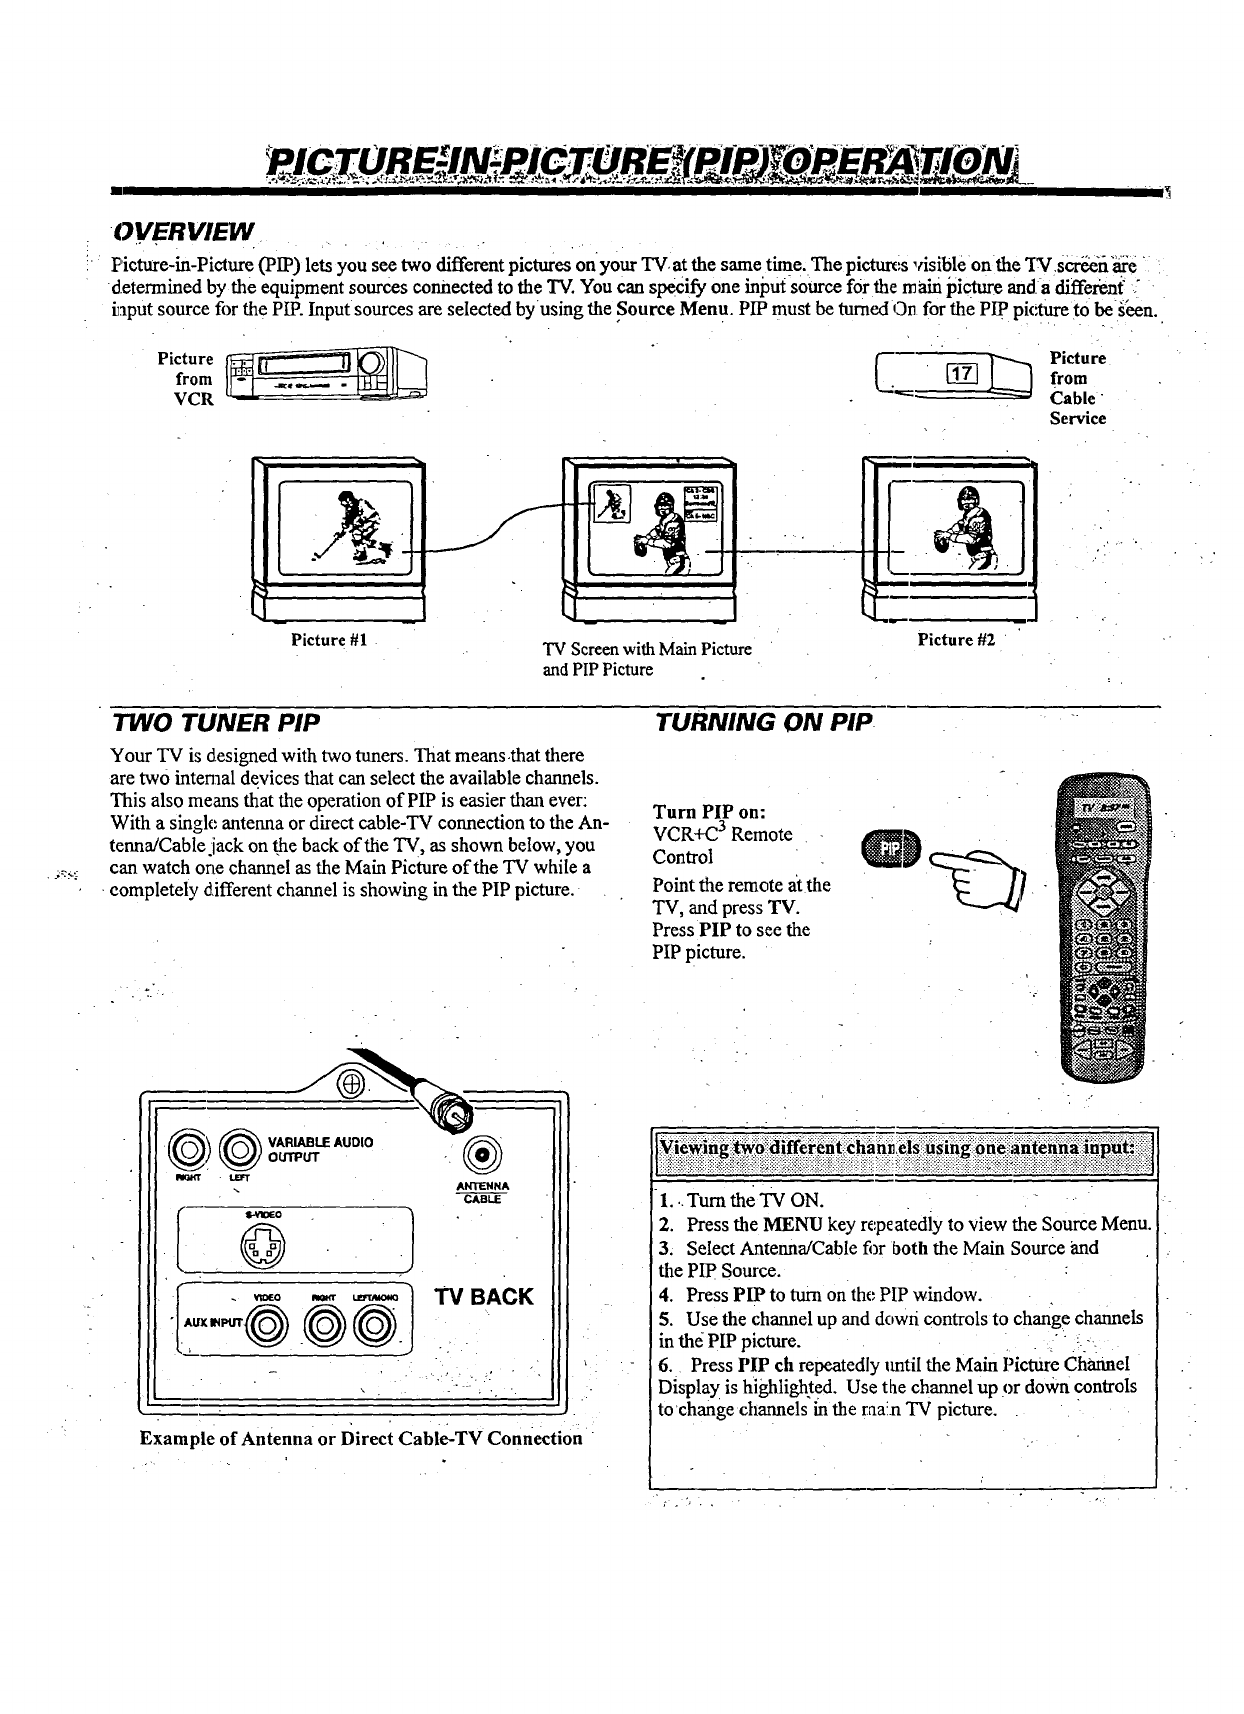
OVERVIEW
Picture-in-Picture (PIP) lets you see two different pictures on your TV, at the same time. The pictures visible on the "_r scr_fi'_e
determined by the equipment sources connected to the TV.You can specify one inj3m-source for the main picture anda diffe_nf "
_aput source for the PIP. Input sources are selected by using the Source Menu. PIP must be turned On for the PIP picture tObe g_n.
Picture_from _. [_ _Picturefrom
VCR 'Cable "
Service
Picture #1 TV Screen with Main Picture
and PIPPicture
1
Picture #2
TWO TUNER PIP
Your TV is designed with two tuners. That means.that there
are two internal devices that can select the available channels.
This also means that the operation of PIP is easier than ever:
With a single antenna or direct cable-TV connection to the An-
tenna/Cable jack on the back of the TV, as shown below, you
can watch one channel as the Main Picture of the TV while a
completely d,ifferent channel is showing in the PIP picture.
TURNING ON PIP
Turn PIP on:
VCR+C3Remote
Control
Point the remote at the
TV, and press TV.
Press PIP to see the
PIP picture.
{_ ARIABLE AUDIO
OUTPUT
RI_Tr LE]FT ®
ANTENNA
CABLE
Example of Antenna or Direct Cable-TV Connection
::_i_ii_:i_i!i_i:,!_iiii:_i_ii_i_iiii,:::::_ii_iiii_i_!-iili_i_iii_il::_:i_:,_:,ii::i_i_i!i::ii!i;ii_!::!ii!i!i_iiiii!i::::_:i::iii::i_::::i:_::_i;ii:i___i::i'.i:iii_i::i__:iii_ii!ii_::::i_ii_::_::::::_:::i::i_iiiii_i!ii::i_iiii_:::_i_i_i::i_ii::iiii_i::i_iiili_i_::ii::iiiiilliiiii_i_::::::ii_iii_i_iii_i_ii_i_:ili:_
-1... Turnthe TV ON.
2. Press the MENU key repeatedly to view the Source Menu.
3. Select Antenna/Cable fi_rboth the Main Source and
the PIP Source.
4. Press PIP to turn on the PIP window.
5. Use the channel up and dowri controls to change channels
in the PIP picture. " :-
6. Press PIP ch repeatedly tmtil the Main Picture channel
Display is highlighted. Use the channel up or down controls
to change ctlannels in the raa:n TV picture.
"1
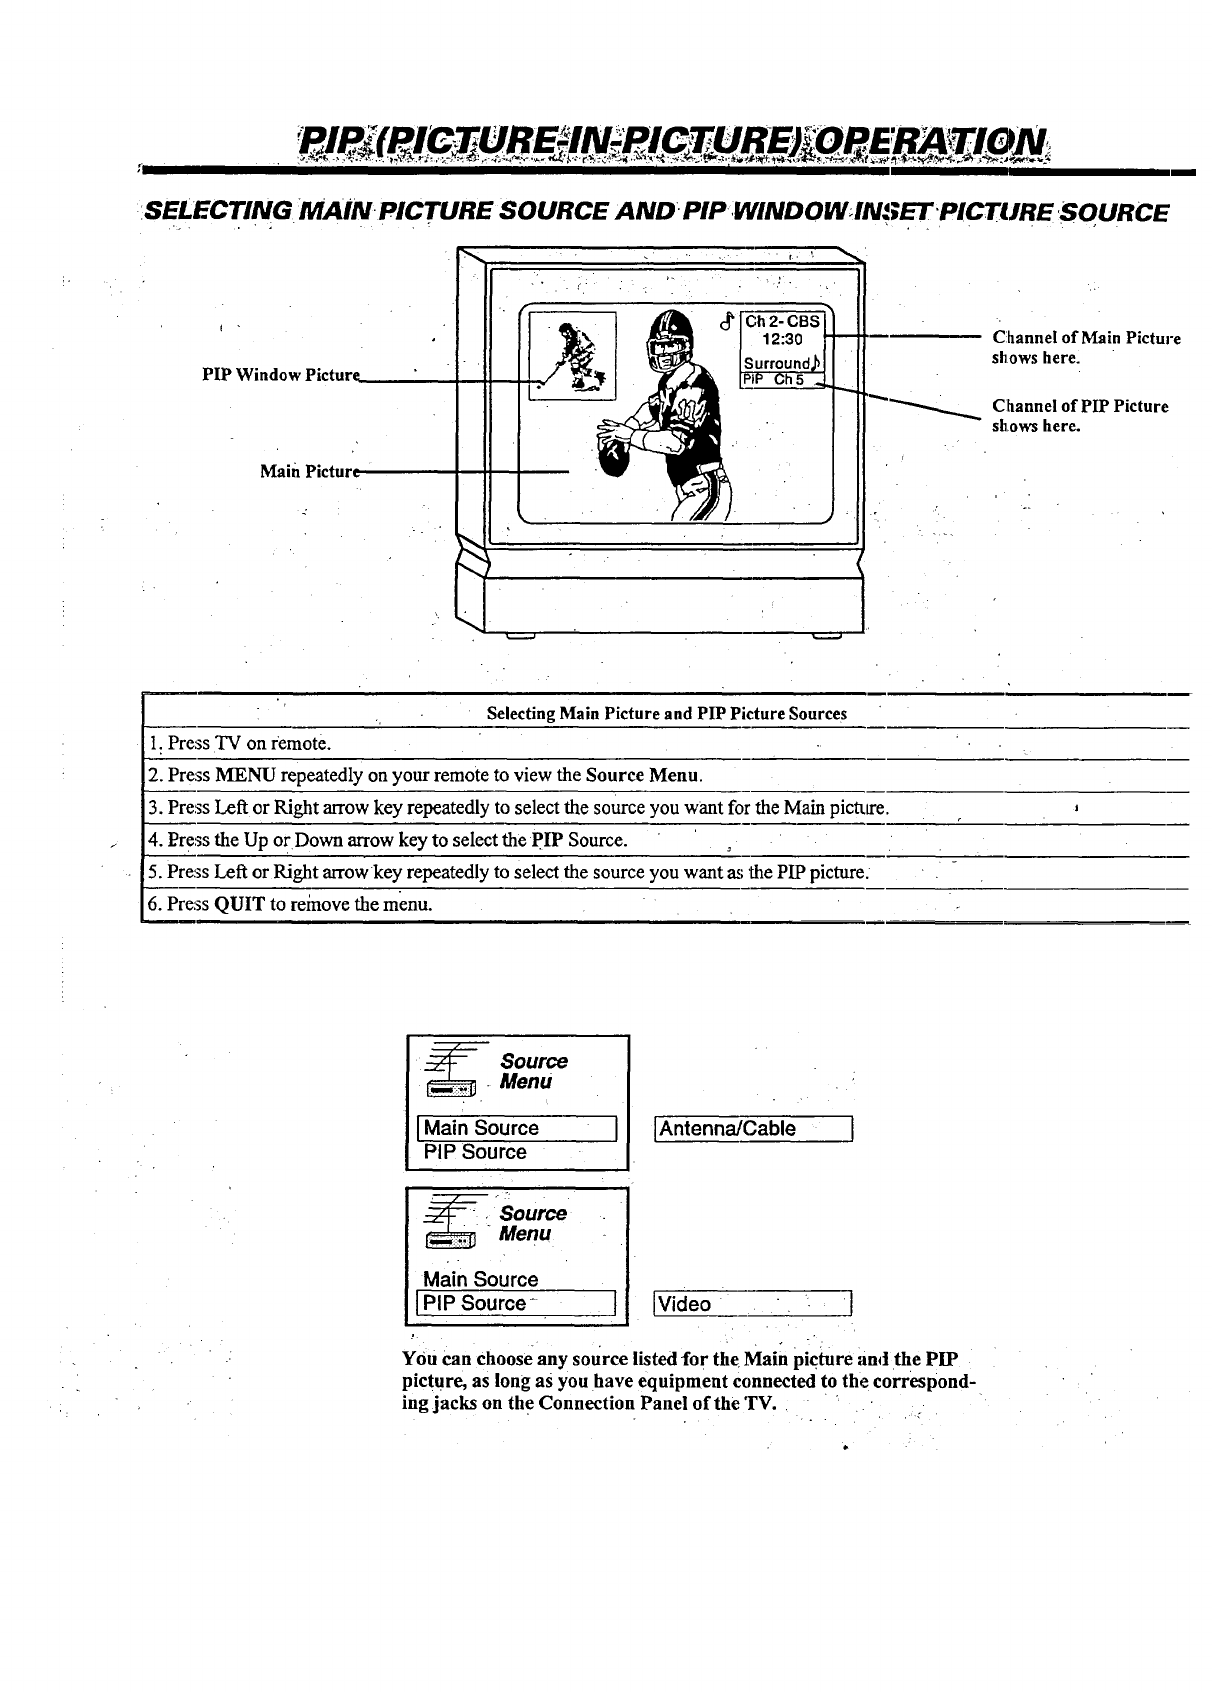
SELECTING MAIN PICTURE SOURCE AND" PIPWINDOW4NSET PICTURE,SOURCE
E
PIP Window Picture
Main Pictur_
Channel of Main Picture
shows here.
Channel of PIP Picture
shows here.
Selecting Main Picture and PIP PictureSources
1. Press TV on remote.
2. Press MENU repeatedly on your remote to view the Source Menu.
3. Press Left or Right arrow key repeatedly to select the source you want for the Main pictta'e.
4. Press the Up or Down arrow key to select the pIP Source.
5. Press Left or Right arrow key repeatedly to select the source you want as the PIP picture:
6. Press QUIT to reinove the menu.
i_. Source
Menu
I Main Source
PIP Source
Source"Menu
Main Source
I PIP Source-
,1.
,I
i
IAntennaJCable [
[Video •• [
YOUCanchoose any source listed for the Main picture and the PIP
picture, as long as you have equipment connected to the correspond-
ing jacks on the Connection Panel of the TV.
• . . . .
_i ........"....... i .............. ,............ ,............................................
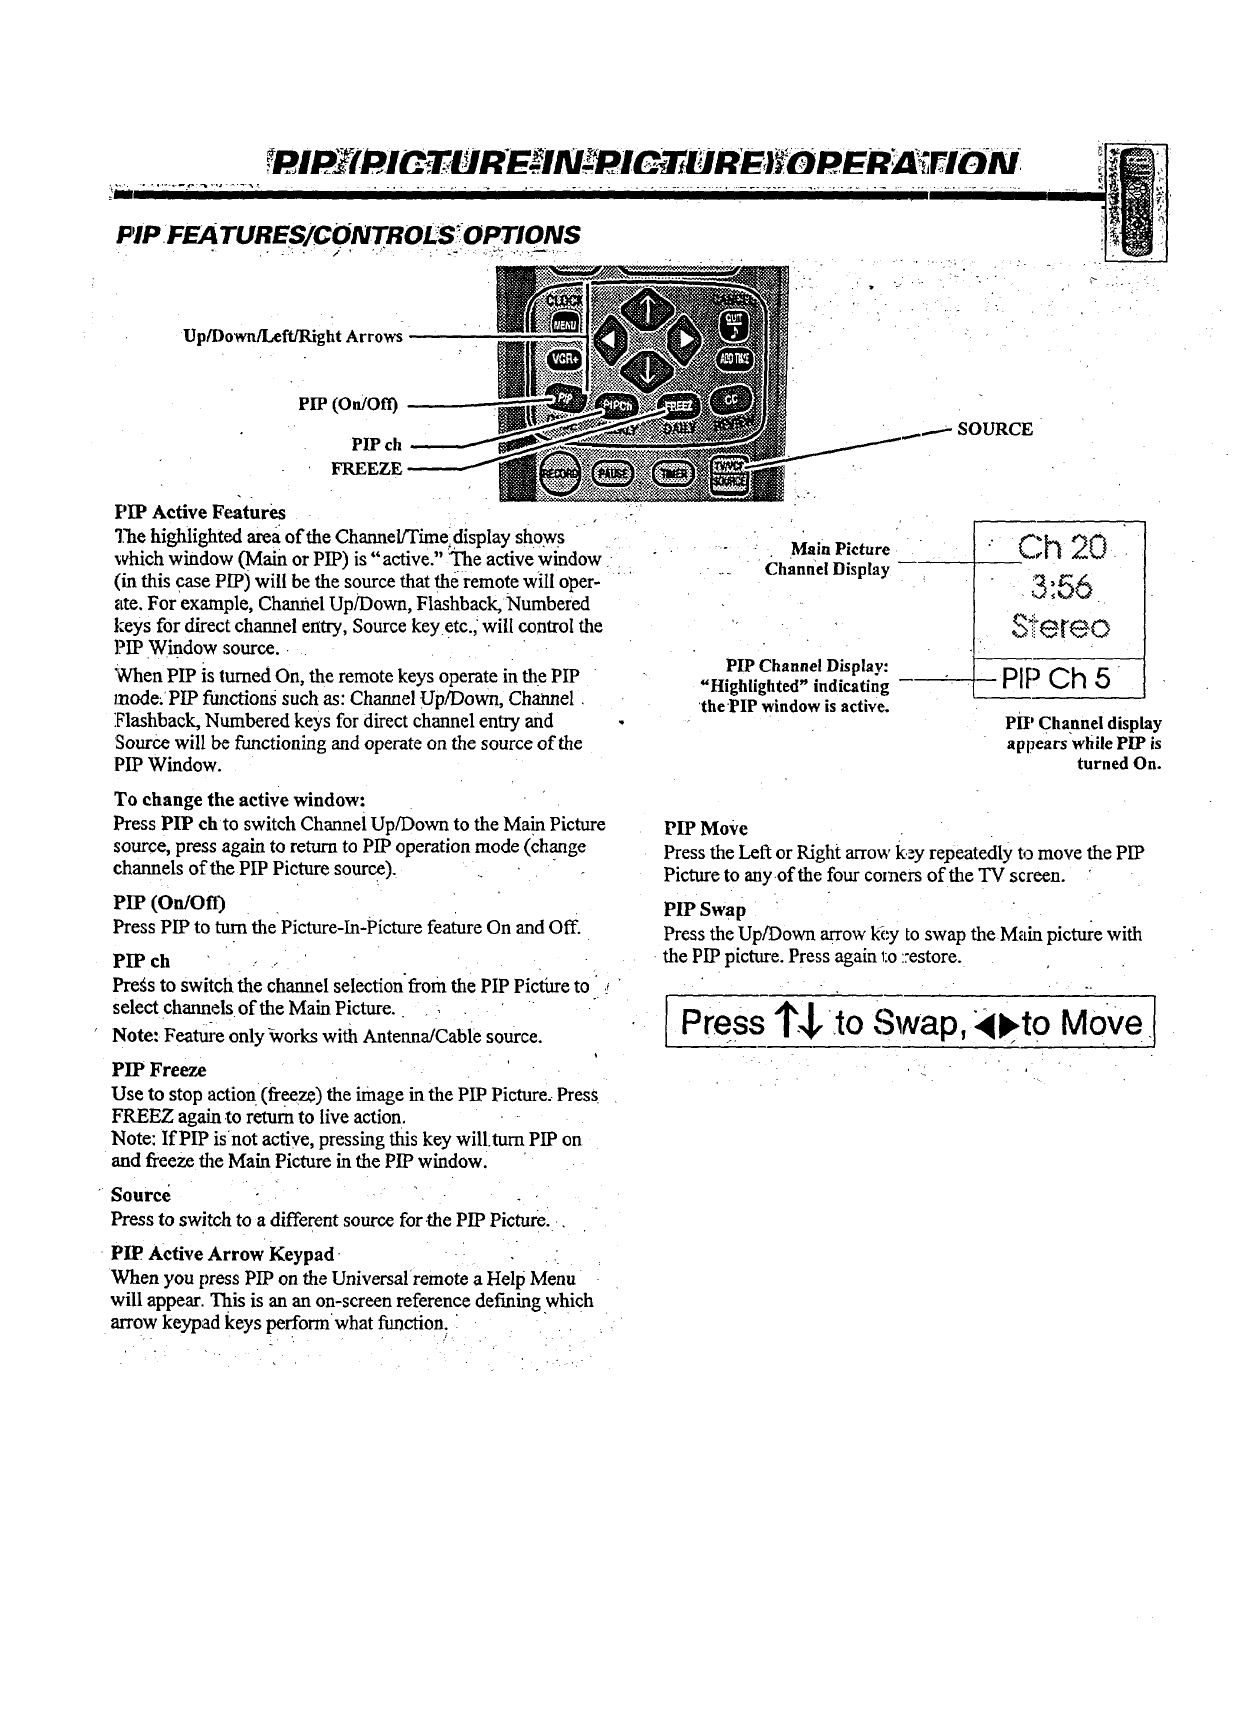
PIP FE A TUREs/CONTROLS! o :_,.!o_NS
Up/Down/LefffRight Arrows
Pie (On/Of0
PIP ch
FREEZE
• -_- ... .
SOURCE
PIP Active Features
The highlighted area of the Channel/Time display shows
which window (Main or PIP) is "active." The active window
(in this case PIP) will be the source that the remote will oper-
ate. For example, Chamiel Up/Down, Flashback, Numbered
keys for direct channel entry, Source keY.etc., will control the
PIP Window source.
When PIP is lmued On, the remote keys operate in the PIP
mode. PIP fimcfions such as: Channel Up/Down, Channel
Flashback, Numbered keys for direct channel entry and
'Sourcewill be functioning and operate on the source of the
PIP Window.
-- . Main Picture
_. ChannelDisplay
PIP Channel Display:
"Highlighted" indicating --
the PIP window is active.
•" Ch 20
3:56
Si ereo
PIP Ch 5
PH'Channel display
appears while PIP is
turned On.
To change the active window:
Press PIP ch to switch Channel Up/Down to the Main Picture
source, press again to return to PIP operation mode (change
channels of the PIP Picture source).
PIP (On/On)
Press PIP to turn the Picture-In-Picture feature On and Off.
PIP ch -.
Pregs to switch the channel selectionfrom the PIP Picture to
select channels of the Main Picture ....
Note: Featu1_ only _vorks with Antenna/Cable source.
PIP Freeze
Use to stop actiot_ (freeze) the image in the PIP Picture. Press
FREEZ again.to return to live action.
Note: If PIP isnot active, pressing this key will.turn PIP on
and freeze the Main Picture in the PIP window.
PIP Move
Press the Left or Right arrow key repeatedly to move the PIP
Picture to anyofthe four comers of the TV screen.
PIP Swap
Press the Up/Down arrow kL'y to swap the Main picture with
the PIP picture. Press again 1:o::estore.
[Press l"J,to Swap, Move I
Source
Press to switch to adifferent source for.the PIP Picture.
PIP Active Arrow Keypad ..
When you press PIP on the Universal remote a Help Menu
will appear. This is an an on-screen reference defining which
arrow keypad keys perform what function.
• . |.
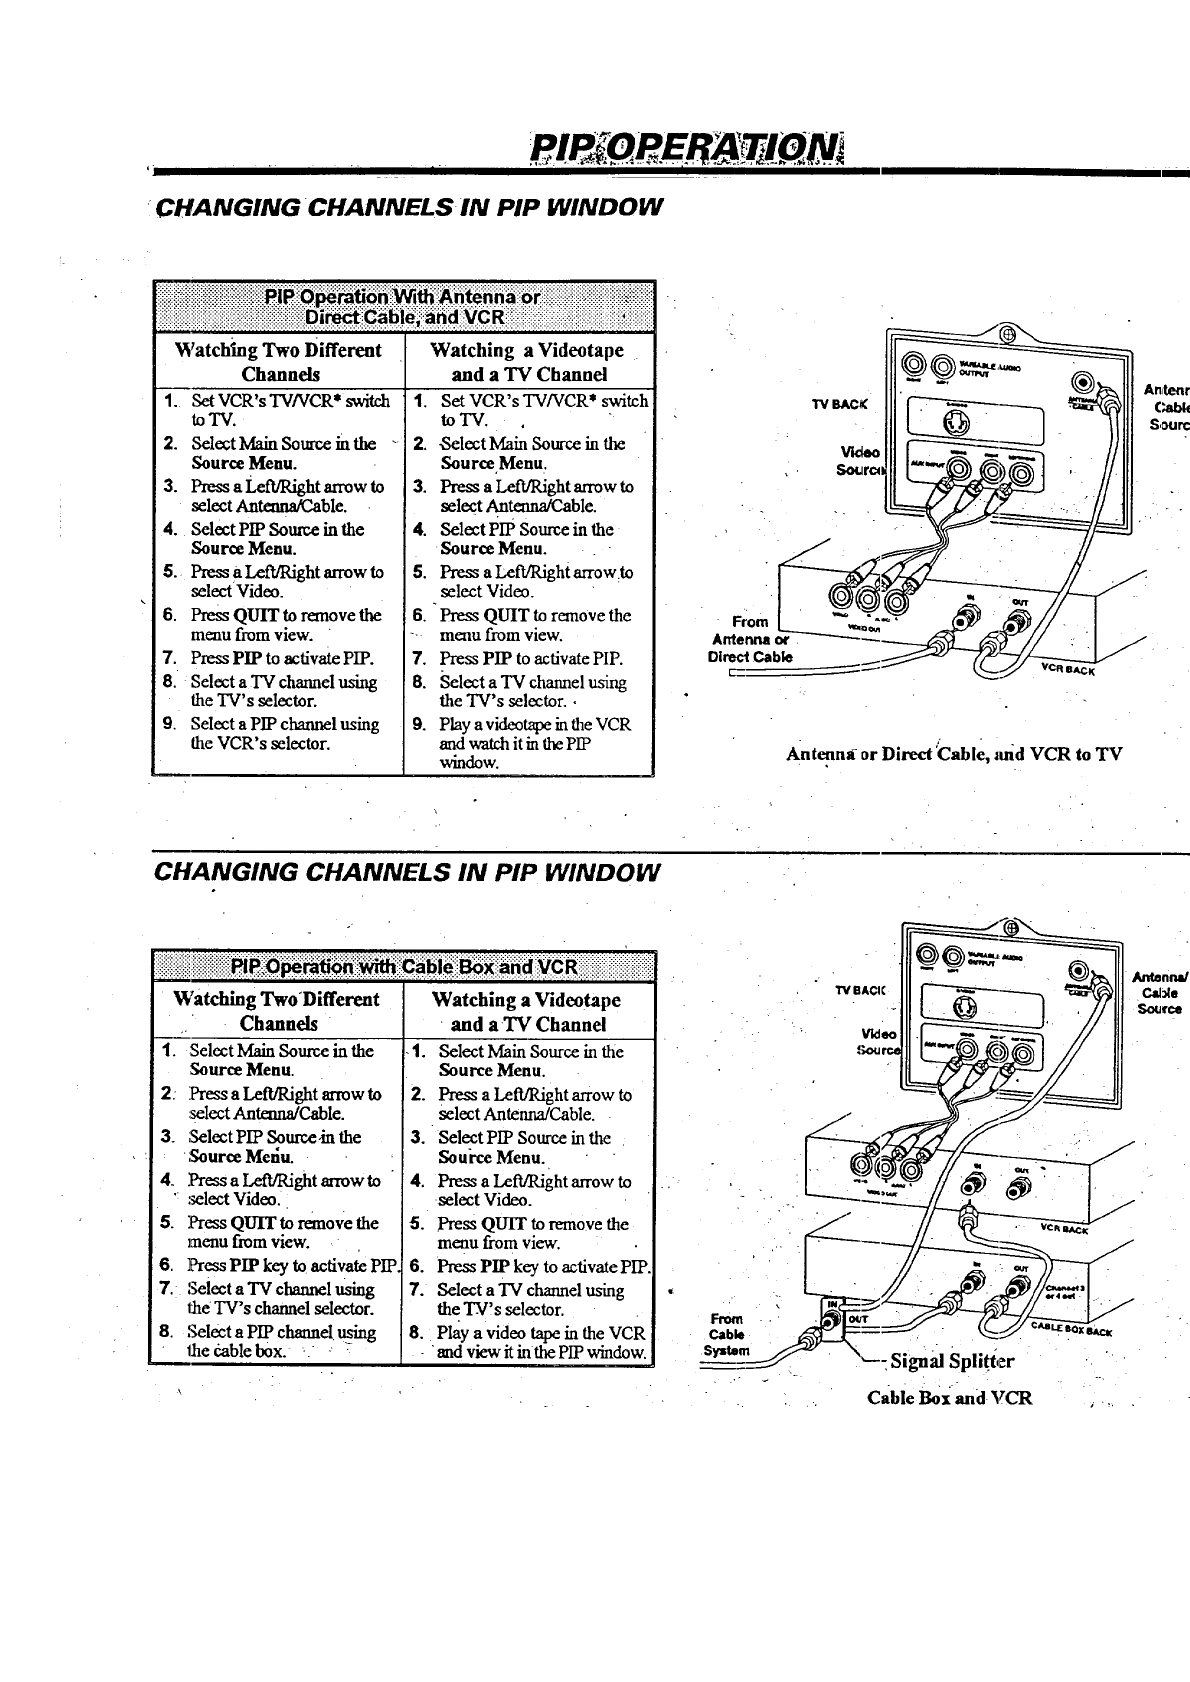
"CHANGINGCHANNELS IN PIP WINDOW
i ii iiii iiiiiiiii!i iiiii!ii!i! !! i ! i!i!!ii i i !i i : ii !iiiii:i ii iiiiiii !!i! !ii i i!i!iiii!i!! !!!
Watching Two Different
Channels
1. Set VCR's TV/VCR* switch
toTV.
2. Select Main source in the "
Source Menu.
3. Press aLeft/Right an_ow to
select Antenna/Cable.
4. Select PIP Source in the
Source Menu.
5. Press a Left/Right arrow to
select Video.
6. PressQUIT to remove the
menu from view.
7. Press PIP to activate PIP.
8. Select aTV channel using
the TV's selector.
9. Select a PIP ctmmmlusing
the VCR's selector.
Watching a Videotape
and a TV Channel
1. Set VCR'sTV/VCR* switch
toTV.
2..Select Main Source in the
Source Menu.
3. Press aLeft/Right arrow to
select Antenna/Cable.
4. Select PIP Source in the
Source Menu.
5. PressaLeft/Right arrow:to
select Video.
6. Press QUIT to remove the
- menu from view.
7. Press PIP to activate PIP.
8. Select a TV channel using
the TV's selector. •
9. Play a videotape in the VCR
and watch it in the PIP
window. Antenna or Direct'Cable, :rod VCR to TV
CHANGING CHANNELS IN PIP WINDOW
Watching TwoDifferent
Channels
1. ,Select Main Source in the
Source Menu.
2: Press a Left/Right arrow to
select Antenna/Cable.
3. SelectPIP Sourccm the
Source Menu. •
4. Press aI,eft/Right arrow to
" select Video.
5. Press QUIT to remove the
menu from view.
6. PressPIP key to activate PIP
7. Select a TV channelusing
the TV's channel selector.
8. Select a PIP channel u:_ing
the cable box. '. , •
Watching a Videotape
"and a-TV Channel
.1. Select Main Source in the
Source Menu.
2. Press a LeR/Right arrow to
select Antenna/Cable.
3. "Select PIPSource in the
So ui'ce Menu.
4. Press aLefffRight arrow to
•selectVideo.
5. PressQUIT to remove the
menu from view.
6. Press PIP key to activate PIP.
7. Select a'lV channel using
the TV's selector.
8. Hay a video tape in the VCR
-and view it in the pip window.
Fm_
Cab_
S_m •--: Signal Splitter
Cable Box and VCR
i II I
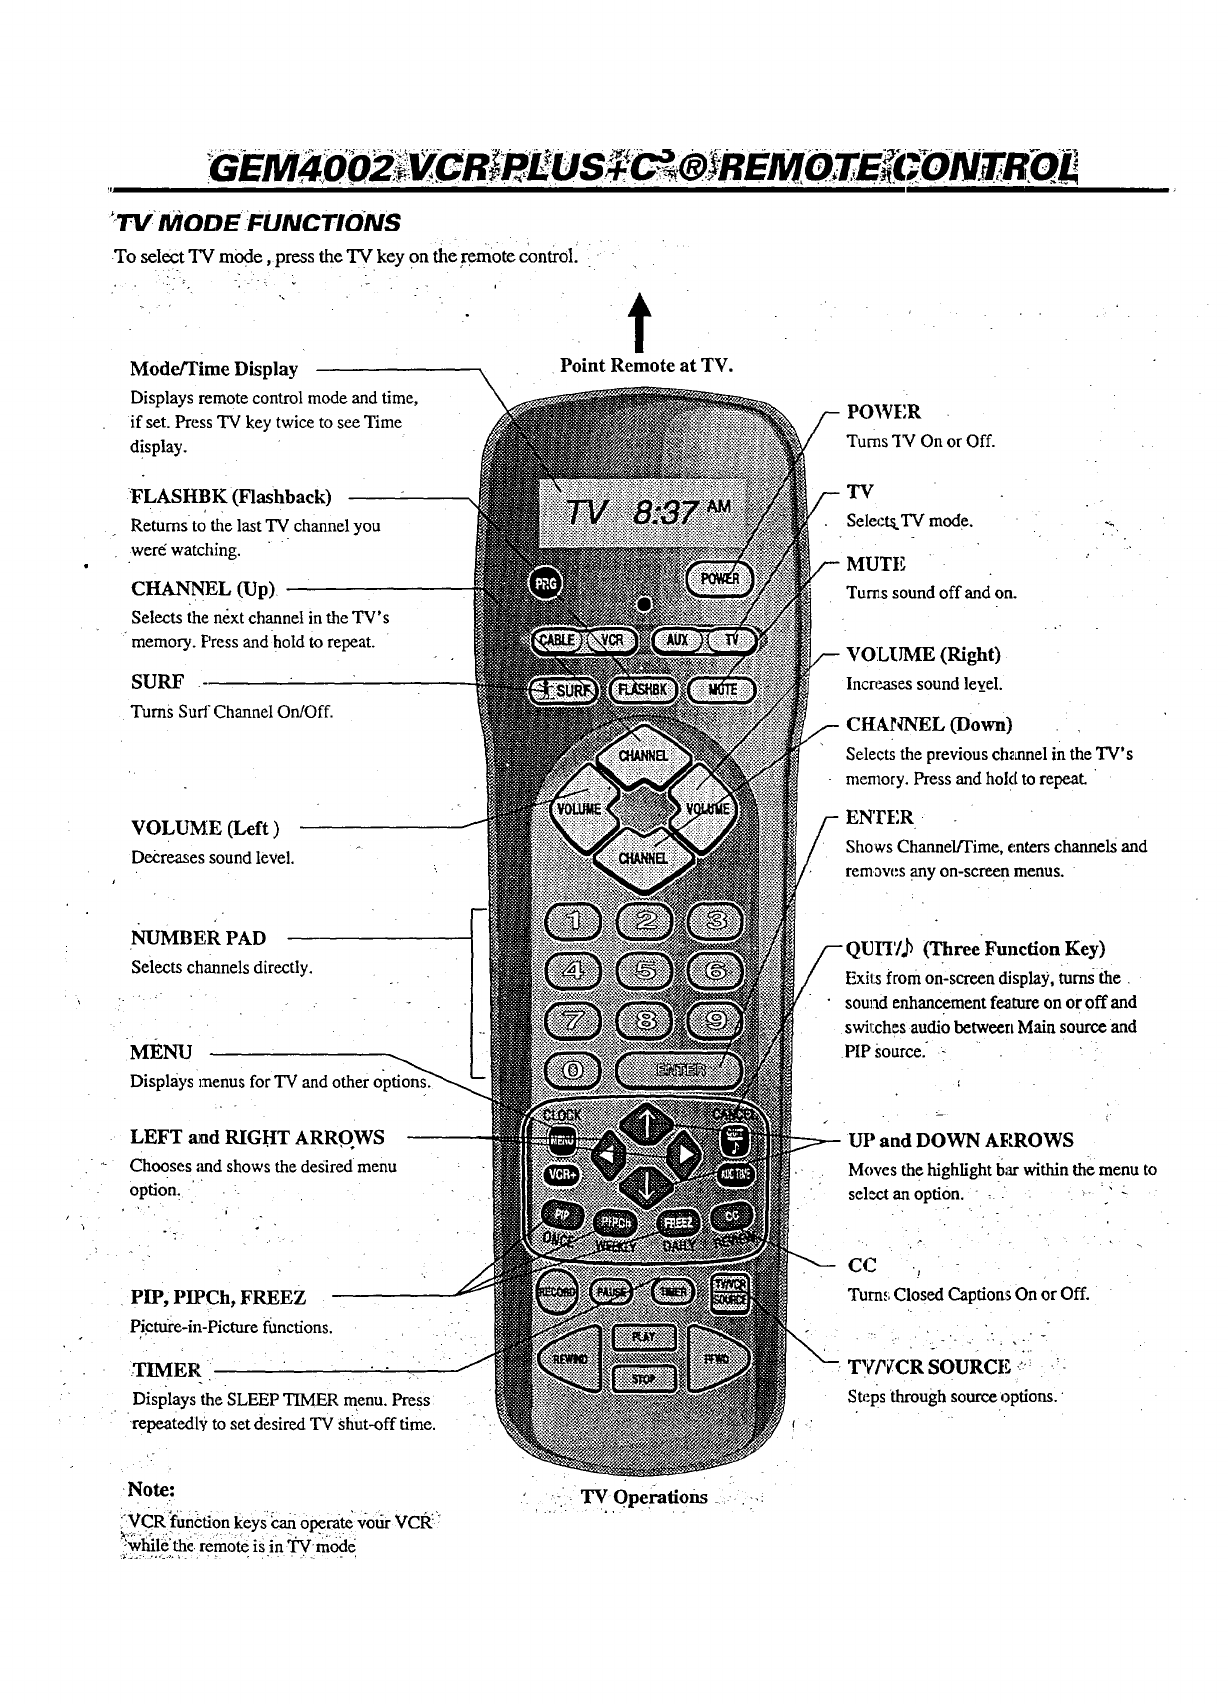
':'IY: MODE FLINCTIONS
.To select TV mode, press the TVkey On the_mote control. .
• . - .÷ I
?"
Mode/Time Display
Displays remote control mode and time,
if set. Press TV key twice to see Time
d!splay.
t
Point Remote at TV.
FLASHBK (Flashback)
Returns to the last TV channel you
were watching.
CHANNEL (Up)
Selects the next channel in the TV's
memory. F'ress andhold to repeat.
SURF
Turns Surf Channel On/Off.
VOLUME (Left)
D_reases sound level.
NUMBF, R PAD
Selects channels directly.
MENU
Displays menus for TV and other
LEFT and RIGHT ARRO.WS
Chooses and shows the desired menu
option:
PIP, PIPCh, FREEZ
Picture-in-Picturefnnctions.
TIMER
Displays the SLEEP TIMER menu. Press
repeatedl9 to set desired TV shut-off time.
POWFR
Turnsq"q On or Off.
TV
Selea:ts.TVmode.
MUTF.
Tun_ssound off and on.
/
VOLUME (Right)
Increases sound lev_el.
CHANNEL (Down)
Selects the previous ch_amel in the TV's
memory. Press and hold to repeat.
EN'FER
Shows Channel/Time, enters channels and
rem_w_s any on-screen menus.
QUYr/.b (ThreeFunction Key)
Exils from on-screen display, turns the
sound enhancement feature on or off and
swil:ches audio between Main source and
PIP source.
UP and DOWN AP,ROWS
Moves the highlight barwithin the menu to
sel*,ntan option. " -
CC ,
Turn.,.Closed CaptionsOn or Off.
_¢P/CR SOURCE .... _-
steps through source options.
Note:
"VCR f'unction keys'_zah opecate your VcR"
:while the. remote is in TVmode
"TV Operations .-.:
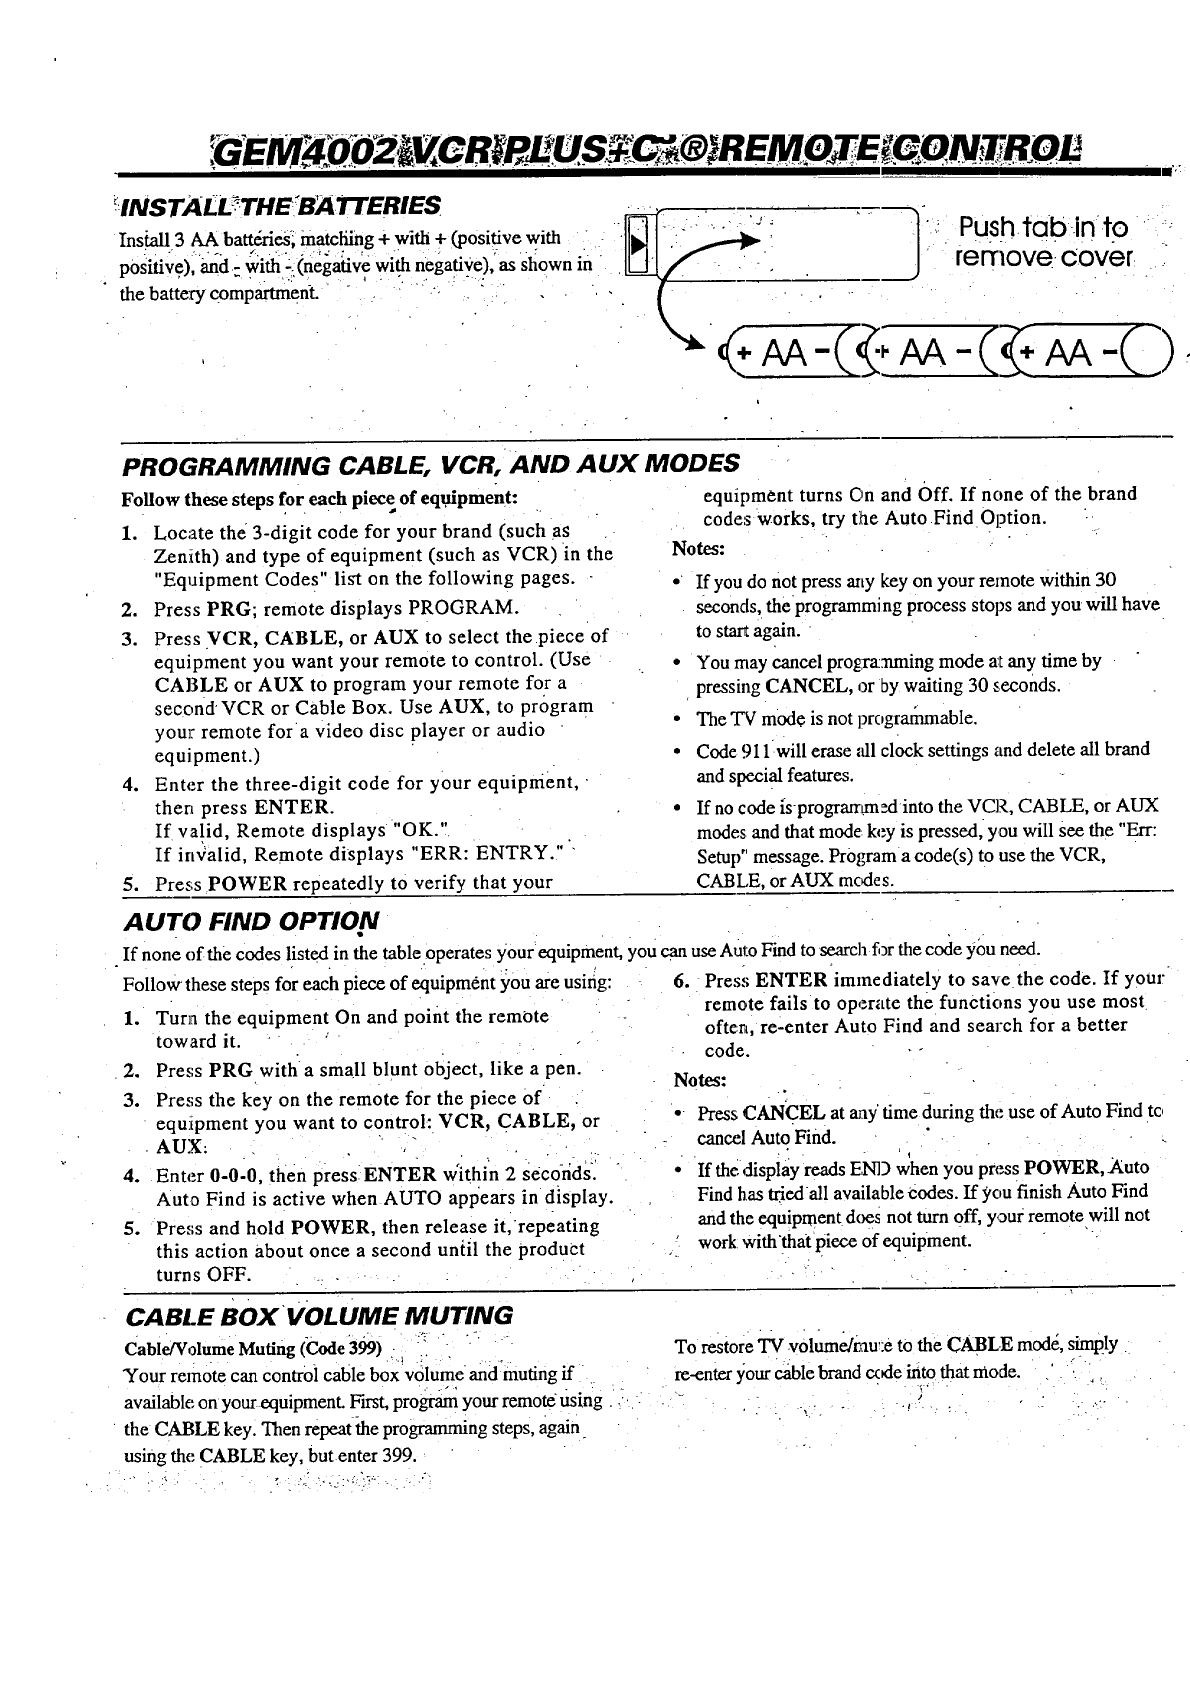
!!NSTALL_THE:BA TEERIES
Ins._all3 AA bat_'ries, matcliing + with + (positive with
p0sifive)i _d- with -.(negative with negative),' as Shown in
the battery compartment.
PROGRAMMING CABLE, VCR. AND AUX MODES
Follow these steps for each piece of equipment:
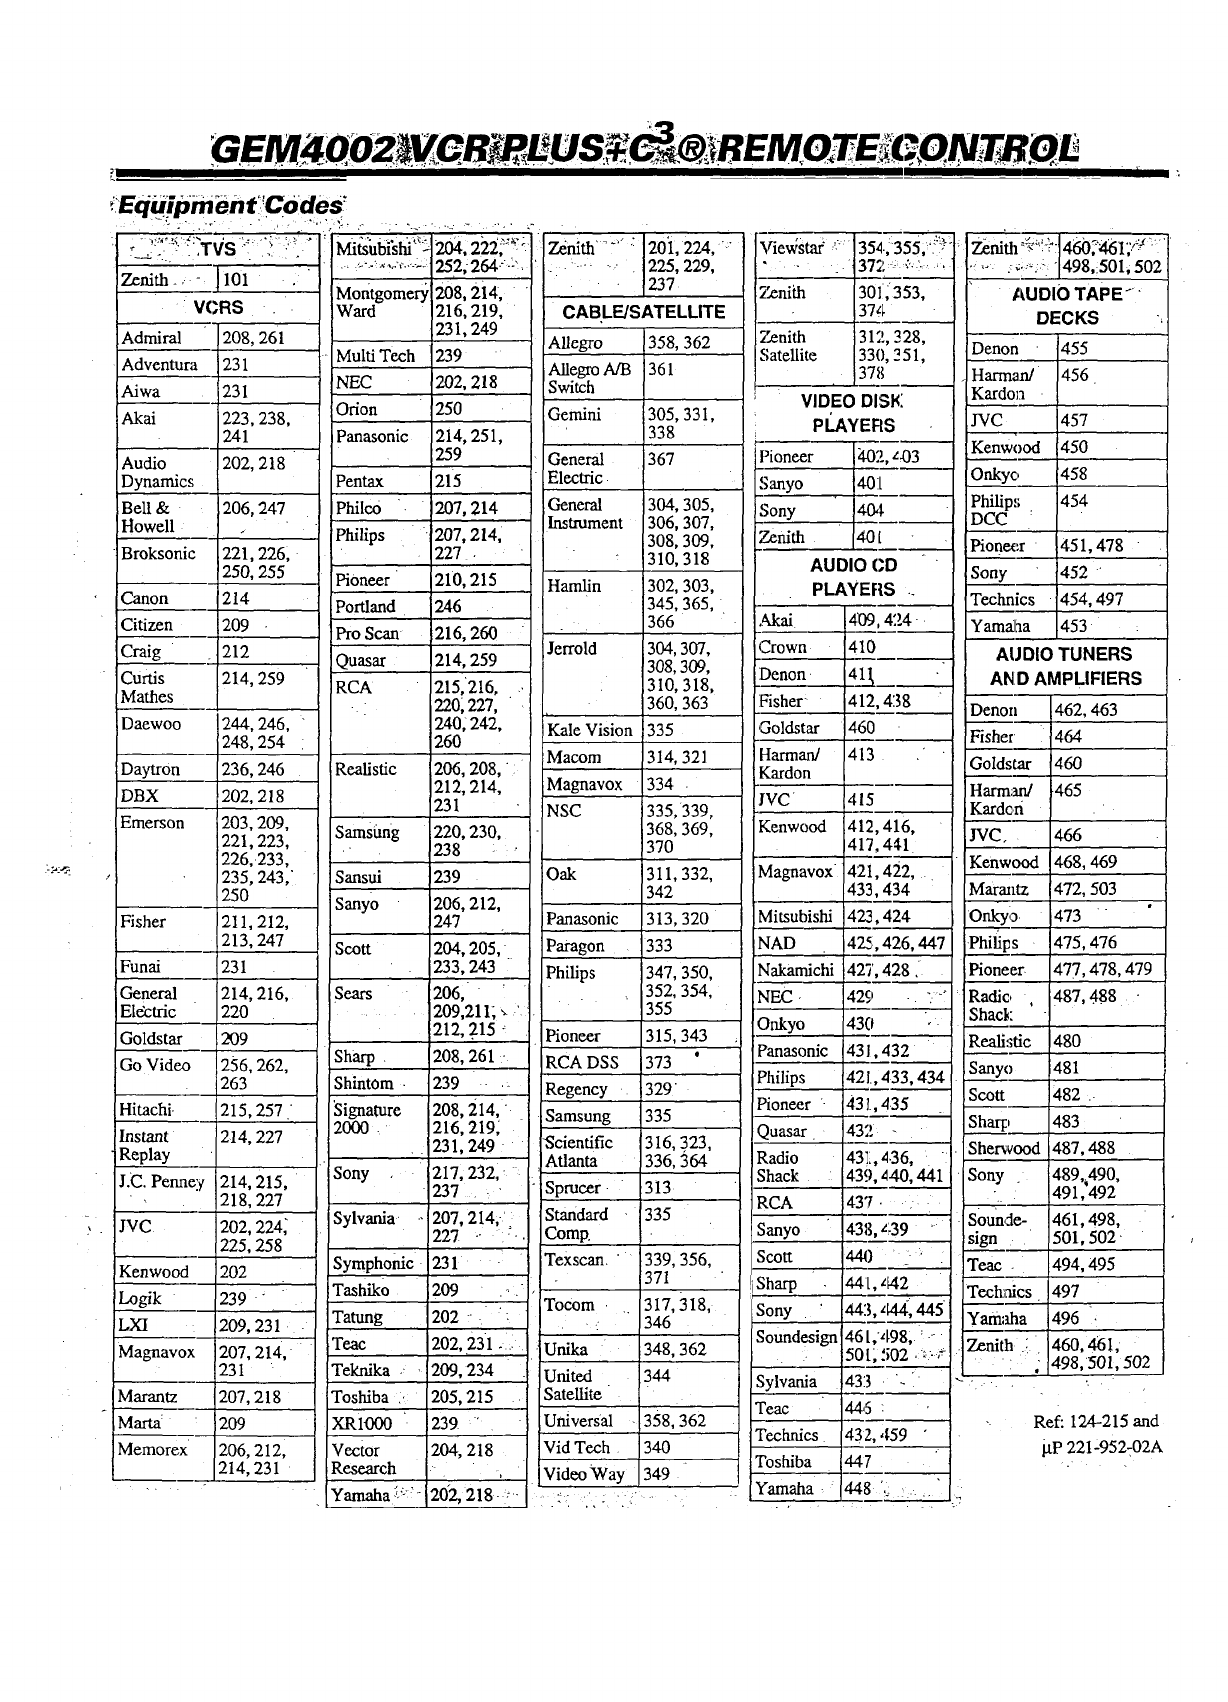
1. Locate the 3-digit code for your brand (such as
Zenith) and type of equipment (such as VCR) in the
"Equipment Codes" list on the following pages. -
2. Press PRG; remote displays PROGRAM.
3. Press VCR, CABLE, or AUX to select the piece of
equipment you want your remote to control. (Use
CABLE or AUX to program your remote for a
second VCR or Cable Box. Use AUX, to program
your remote for a video disc player or audio
equipment.)
4. Enter the three-digit code for your equipment, "
then press ENTER.
If valid, Remote displays "OK."
If invalid, Remote displays "ERR: ENTRY."
5. Press POWER repeatedly to verify that your
equipment turns On and Off. If none of the brand
codes works, try the Auto Find Option.
Notes:
• If you do not press arty key on your remote within 30
seconds, the programming process stops and you will have
to start again.
•You may cancel progr_ta-tmingmode at any time by
pressing CANCEL, or Dywaiting 30 seconds.
• The TV mode is not l?rogrammable.
• Code 911 will erase all clock settings and delete all brand
and special features.
•If no code [s-programm_into the VCR, CABLE, or AUX
modes and that mode key is pressed, you will see the "Err:
Setup °message. Pr0grama code(s) to use the VCR,
CABLE, or AUX modes.
AUTO FIND OPTION
If none of the codes listed in the table operates your equipment, you can use Auto Find to search fi3rthe code 3_0uneed.
Follow these steps for each piece of equipment you are usirig:
1. Turn the equipment On and point the remote
toward it.
2. Press PRG with a small blunt object, like a pen.
3. Press the key on the remote for the piece of
eqmpment you want to control: VCR, CABLE, or
AUX: .-. . . . -.
4. Enter 0-0-0, then press ENTER w'ithin 2 Seco-xidsi
Auto Find is active when AUTO appears in display.
5. Press and hold POWER, then release it,repeating
this action about once a second until the product
turns OFF .....
6. Press ENTER immediately to save the code. If your
remote fails to operate the functions you use most
often, re-enter Auto Find and search for a better
code. --
Notes:
•Press cANCEL at _ay' time during the use of Auto Find to
cancel AutoFind.
. 1
• If the display reads END when you press POWER, Auto
Find has triedall available Codes. If you finish Auto Find
and the equipment does not turn Off, your remote will not
work with "thatpiece of equipment.
CABLE BOxVOLUME MUTING
Cable!VolumeMuting(Code399)-._'_- " "
Your remotecancontrolcablebox volumeandmutingif
availableonyourequipment.First,progr_ yourremoteusing,:
theCABLE key.Thenrepeat_heprogrammingsteps,again
usingtheCABLE key,butenter399.
.'7 .. ,. . .,''.',:. .:
To restore TV -volume/mu_:eto the CABLE mode, simply
re-enter your cable brand code into that mode. , . .. ,.
%
'.- t_l
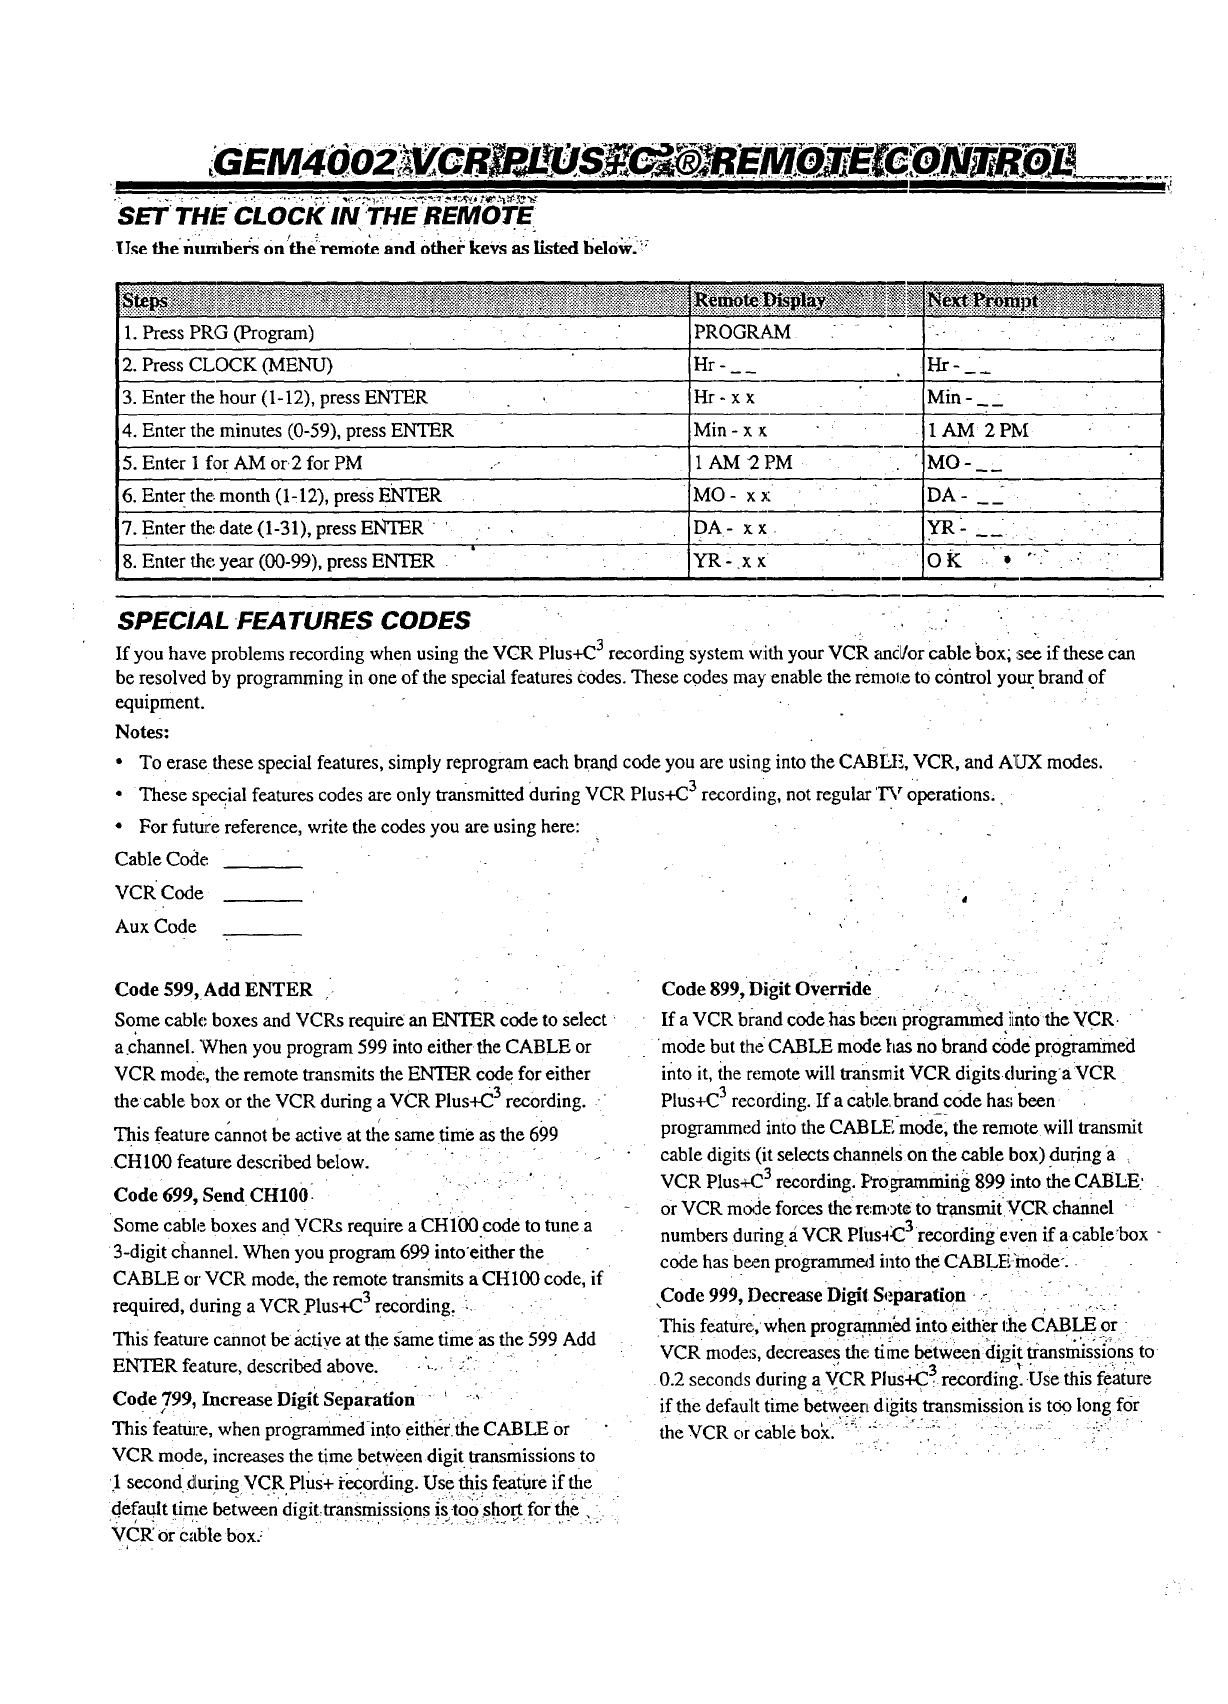
SET THECLOCKIN THE REMOTE
• - . r : ,- " • -
l T._,ethe numbers on the remote and Othei-keys as listed below-=
1. Press PRG (Program)
2. Press CLOCK (MENU)
3. Enter the hour (1-12), press ENTER
4. Enter the minutes (0-59), press ENTER
5. Enter 1 for AM or.2 for PM
6. Enter the..month (1-12), press ENTER
7. Enter the date (1-31), press ENTER
8. Enter the year (00-99), press ENTER
PROGRAM
Fir-
Hr-xx
Min - x
1 AM 2PM
MO - x x
DA- xx
YR-.xx
Hr-
Min -
1 AM 2 PM
°MO-
DA-
YR
oK * ""
SPECIAL FEATURES CODES ..
If you have problems recording when using the VCR Plus+C 3 recording system with your VCR and/or cable box; see if these can
be resolved by programming in one of the special features codes. These codes may enable the remote to control yo_ brand of
equipment.
Notes:
•To erase these special features, simply reprogram each brand code you are using into the CABLF., VCR, and A1UXmodes.
• These Sl:ecial features codes are only transmitted during VCR Plus+C 3 recording, not regular 'I_ roperations..
• For future reference, write the codes you are using here:
Cable Code
VCR Code
Aux Code
Code 599, Add ENTER
Some cable boxes and VCRs require an ENTER code to select
a channel. 'When you program 599 into either the CABLE or
VCR mode, the remote transmits the ENTER code for either
the cable box or the VCR during a VCR Plus+C 3 recording.
This feature cannot be active at the same time as the 699
CH100 feature described below.
Code 699, Send CH1001 "
Some cable boxes and VCRs require a CH100 code to tune a
3-digit channel. When you program 699 into'either the
CABLE or VCR mode, the remote transmits a CH100 code, if
required, during a VCR.Plus+C 3 recording, :
This feature cannot be active at the same time as the 599 Add
ENTER feature, described above. ,.... :
Code 799, Increase Digit Separation --"
This feature, when programmedinto either the CABLE or
VCR mode, increases the time between digit transmissions to
1 second during VCR Plus+ re,cording. Use this feature if the
default time between' _tigit:transmissi0ns {S-toolshog for the _,
VCR' or cable box..
. .-, ..•
Code 899, Digit Override
If a VCR brand code has been pmgramnied iintothe ¥CR
mode but theCABLE mode has no brand Code programmed
into it, the remote will transmit VCR digitsduringa VCR
Plus+C3recording. If acable, brand code has been
programmed into the CAB Ll:!-m0de_the remote will transmit
cable digits (it selects channels on the cable box) during a
VCR Plus-_23 recording, l:_'ogramming 899 into the CABLE'
or VCR rome forces therem,3teto transmit VCR channel
numbers during._iVCR Plusq_ 3recording even if a cable'box "
code has b_n progranuneAinto the CABLEinode:
,Code 999, Decrease Digii Separation - ""
This feature:,when progr_nnfed into either the CABLE or
VCR modes, decreases the time between digit transmissions to
• "" 3 " .I " ,- .
0.2 seconds during a VCR Plus+C. recording. Use this feature
if the default time betw._eend Lgitstransmission is too long for
theVCR or cable bok. ..... ;..... :"!:::-i -"-: i:-
GEM 40 0 U S EII/I TE :GON TB
I
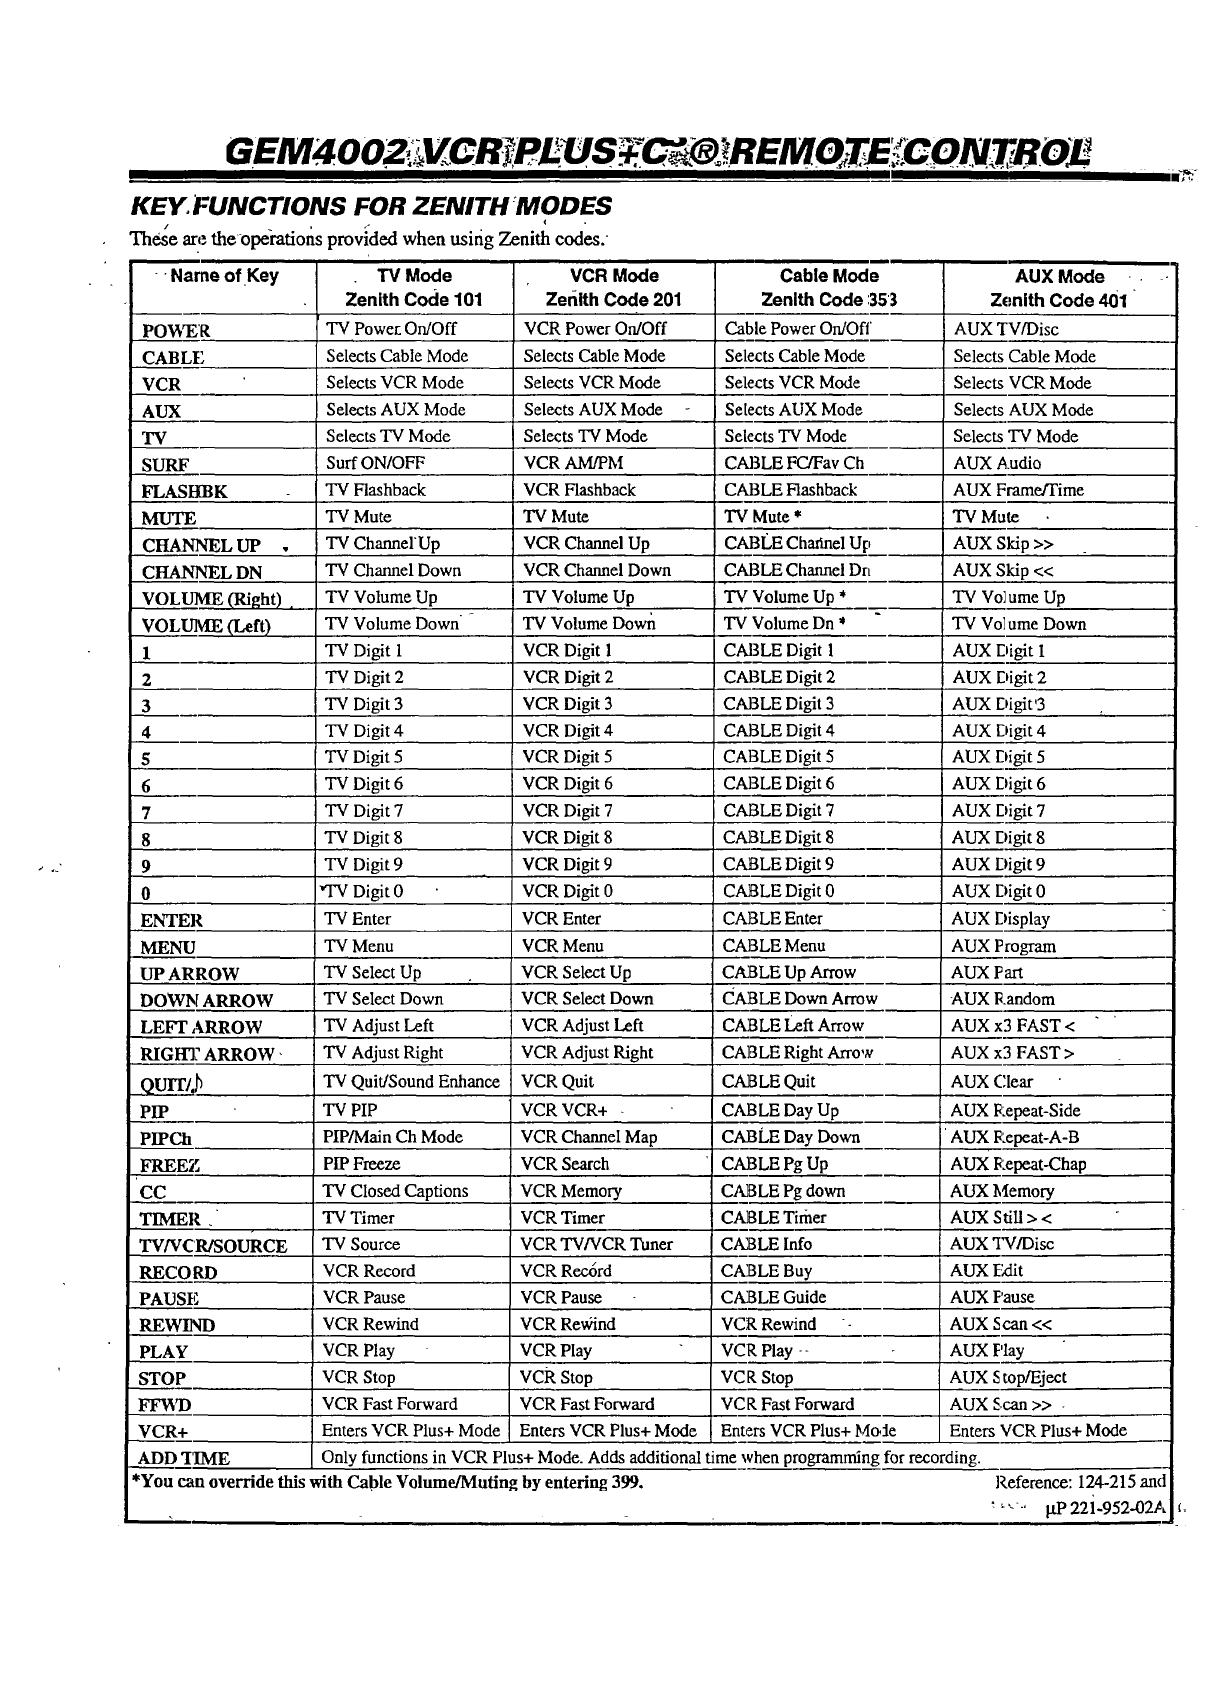
KEY FUNCTIONS FOR ZENITH_MODES
These are theoperations provided when usifig Zenith codes.
--Name of Key VCR Mode Cable Moc
Zeriith Code 201 Zenith Code :353
PO_T,R
CABLE
VCR
AUX
"IV
SURF
FLASHBK
MUTE
CHANNEL UP
CHANNEL DN
VOLUME (Right),
VOLUME (Left)
1
2
3
4
5
6
7
8
9
0
ENTER
MENU
UP ARROW
DOWN ARROW
LEFF ARROW
RIGIT]? ARROW"
Qvrr/.b
PIP
PIPCh
FREEZ
CC
TIMER .
aw/vcwso cr
.RECORD
PAUSE
REWIND
PLAY
STOP
FFWD
VCR+
"iV Mode
Zenith Code 101
TV Powe_ On/Off
Selects Cable Mode
Selects VCR Mode
Selects AUX Mode
Selects TV Mode
Surf ON/OFF
"IVFlashback
TV Mute
TV Charmer Up
TV Channel Down
TV Volume Up
TV Volume Down -
TV Digit 1
VCR Power On/Off
Selects Cable Mode
Selects VCR Mode
Selects AUX Mode
Selects TV Mode
VCR AM/PM
VCR Flashback
TV Mute
VCR Channel Up
VCR Channel Down
TV Volume Up
TV Volume Down
VCR Digit 1
Cable Power On/Of
Selects Cable Mode
Selects VCR Mode
Selects AUX Mode
Selects TV Mode
CABLE FC/Fav Ch
CABLE Flashback
TV Mute *
CABLE ChaPel U
CABLE Channel D]
Tv Volume Up *
TV Volume Dn *
CABLE Digit 1
TV Digit 2
TV Digit 3
TV Digit 4
TV Digit 5
TV Digit 6
TV Digit 7
TV Digit 8
TV Digit 9
*TV Digit 0
TV Enter
TV Menu
TV Select Up
TV Select Down
TV Adjust Left
TV Adjust Right
TV Quit/Sound Enhance
TV PIP
PIP/Main Ch Mode
PIP Freeze
VCR Digit 2
VCR Digit 3
VCR Digit 4
VCR Digit 5
VCR Digit 6
VCR Digit 7
VCR Digit 8
VCR Digit 9
VCR Digit 0
VCR Enter
VCR Menu
VCR Select Up
VCR Select Down
VCR Adjust Left
VCR Adjust Right
VCR Quit
VCR VCR+ .
VCR Channel Map
VCR Search
TV Closed Captions VCR Memory
TV Timer VCR Timer
TV Source VCR TV/VCR Tuner
VCR Record VCR Rec6rd
VCR Pause VCR Pause
VCR Rewind VCR Reffind
VCR Play VCR Play
VCR Stop VCR Stop
VCR Fast Forward VCR Fast Forward
Enters VCR Plus+ Mode Enters VCR Plus+ Mode
CABLE Digit 2
CABLE Digit 3
CABLE Digit 4
CABLE Digit 5
CABLE Digit 6
CABLE Digit 7
CABLE Digit 8
CABLE Digit 9
CABLE Digit 0
CABLE Enter
CABLE Menu
CABLE Up Arrow
CABLE Down Arm
CABLE Left Arrow
CAB LE Right Afro,
CABLE Quit
CABLE Day Up
CABLE Day Down
CABLE Pg Up
CABLE Pg down
CABLE Timer
CABLE lnfo
CABLE Buy
CABLE Guide
VCR Rewind -
VCR Play --
VCR Stop
VCR Fast Forward
Enters VCR Plus+ I_,
_..ADD'I_ME Only functions in VCR Plus+ Mode. Adds additional time when programml]
*You can override this with Cable Volume/Muting by entering 399.
AUX Mode
Zenith Code 401 "
AUX TV/Disc
Selects Cable Mode
Selects VCR Mode
Selects AUX Mode
Selects TV Mode
AUX Audio
AUX Frame/Time
TV Mute
AUX Skip >>
AUX Skip <<
TV Vo]ume Up
TV Vo]ume Down
AUX Digit I
AUX Digit 2
AUX Digit'3
AUX Digit 4
AUX Digit 5
AUX Digit 6
AUX Digit 7
AUX Digit 8
AUX Digit 9
AUX Digit 0
AUX Display
AUX Program
AUX Part
AUX Random
AUX x3 FAST <
AUX x3 FAST >
AUX (:lear
AUX Repeat-Side
['AUX Repeat-A-B
AUX Repeat-Chap
AUX Memory
AUX Still > <
AUX TWDisc
AUX [kilt
AUX F'ause
AUX Scan <<
AUX Play
AUX Stop/Eject
AUX Scan >> -
Enters VCR Plus+ Mode
for recording.
Reference: 124-215 and
__"-' l.tP 22i-952-02A
II I I [
Zenith_ ] 101
VCRS
Admiral 208,
Adventura 231
Aiwa 231
Akai 223,
241
Audio 202,
Dynamics
Bell & 206, 247
Howell
Broksonic 221,226,
250, 255
Canon 214
Citizen 209
Craig 212
Curtis 214, 259
Mathes
Daewoo 244, 246,
248, 254
Daytron 236, 246
DBX 202, 218
Emerson 203,209,
221,223,
226, •233,
235, 243,"
250
Fisher 211,212,
213, 247
261
238,
218
-"- ",..,"...... 252; 264:--"
Montgomery 208, 214,
Ward 216, 219,
23 I, 249
Multi Tech 239
NEC 202, 218
Orion 250
Panasonic 214, 251,
259
Pentax 215
Philco 207, 214
Philips 207, 214,
227 -
PiOneer 210, 215
Portland 246
Pro Scan 216, 260
Quasar 214, 259
RCA 215, 216,
220, 227,
240,242,
260
Realistic 206, 208,
212, 214,
231
Samstmg 220, 230,
238 .
Sansui 239
Sanyo 206, 212,
247
Scott 204, 205,
.....:120 ,224,-Zenith | -
........1 ,229,
CAB LF-./SATELLITE
Allegro 358, 362
Allegro A/B 361
Switch
Gemini 305,331,
338
General 367
Electric
General 304, 305,
Instrument 306, 307,
308,309,
310,318
Hamlin 302, 303,
345,365,
366
Jerrold 304, 307,
308, 309,
310,318,
360, 363
Kale Vision 335
Macom 314, 321
Magnavox 334 -
NSC 335, 339,
368, 369,
370
Oak 311,332,
342
Panasonic 313,320
Paragon 333
Vie_;Sta¢ _
zenith
372 = <.-
301_353,
374
Zenith 312, 328,
Satellite 33(},251,
378
VIDEO DISK
PLAYERS
Pioneer 3,0:},z__3
Sanyo 401
Sony 40,i -
Zenith 40i :
AUDIO CD
PLAYERS ._
,Mcai 409,424-
Crown 410
Denon
Fisher 412, 438
Goldstar 460
Harman/ 413 "
Kardon
JVC 415
Kenwood 412,416,
417, 4t-1
Magnavox 421,422,
433,434
Mitsubishi 423,424
NAD 425,426, 447
Denon " 455
Harman/ 456
Kardon
JVC 457
Kenwood 450
Onkyc) 458
Philip:; . 454
DCC
Pionecr • 451,478 "
Sony 452 "
Technics 454, 497
Yamaha 453 .
AUDIO TUNERS
AND AMPLIFIERS
Denon 462, 463
Fisher 464
Goldstar 460
Harm;m/ 465
Kardon
JVC. 466
IKenwood 468, 469
Marantz 472, 503
Onkyo 473 "
Phifips 475,476
Funai
General
Electric
Goldstar
Go Video
Hitachi.
Replay
J.C. Penne:¢
231
214, 216,
220
209
256, 262,
263
215,257
214, 227
214,215,
218,227
Sears
Sharp
Shintom .
Signature
2000
Sony
233, 243
206,
209,211,
212, 215
208, 261
239
208, 214,
216, 219;
.. 231,249
217, 232,
237
Philips 347, 350,
, 352, 354,
355
Pioneer 315, 343
RCA DSS 373 "
Regency 329 •
Samsung 335
316, 323,
Atlanta 336, 364
Sprucer 313
Nakamichi
NEC
Onkyo
Panasonic
Philips
Pioneer -
Quasar
Radio
Shack
RCA
427, 428.
429 -. :.
430
431,432
421., 433, 434
431,435
432
431, !.36, "
439, ,140, 441
437.
Pioneer. 477,478,479
Radio , 487,488
Shack
Realistic 480
Sanyo 481
Scott 482 ..
Sharp 483
She_vood 487,488
Sony 489,•490,
491,'492
S0unde- 461,498,
sign .. 501,502'
Teac .494,495
TecNNcs 497
Yamaha 496 •
Zenith :i 460,461,
• : : 498,50i,502
Kenwood
Look
LXI
Magnavox
Marantz
Marta
Memorex
202,224_
225,258
202
239 -
209,231
207,214,
231
207,218
209
206,212,
214,231
Sylvania
Symphonic
Tashiko
Tatung
Teac
Teknika
Toshiba ..
XRIO00
Vector
Research
Yamaha _.'>:"
207, 214;'
227 - :-.
231
209 ._.
202 " :
202, 231 ....
209, 234
205, 215
239 "
204, 218
Standard - 335
Comp.
Texscan " 339, 356,
371
Tocom 317, 318,
= 346
Unika 348, 362
United 344
Satellite
Universal 358, 362
Vid Tech 340
Video Way 349
.:i ..- .: "
Sanyo
Scott
Sharp
Sony
Soundesign
Sylvania
Teac
Technics
Toshiba
Yamaha
Ref: 124-215 and
gP 221-952-02A
|11
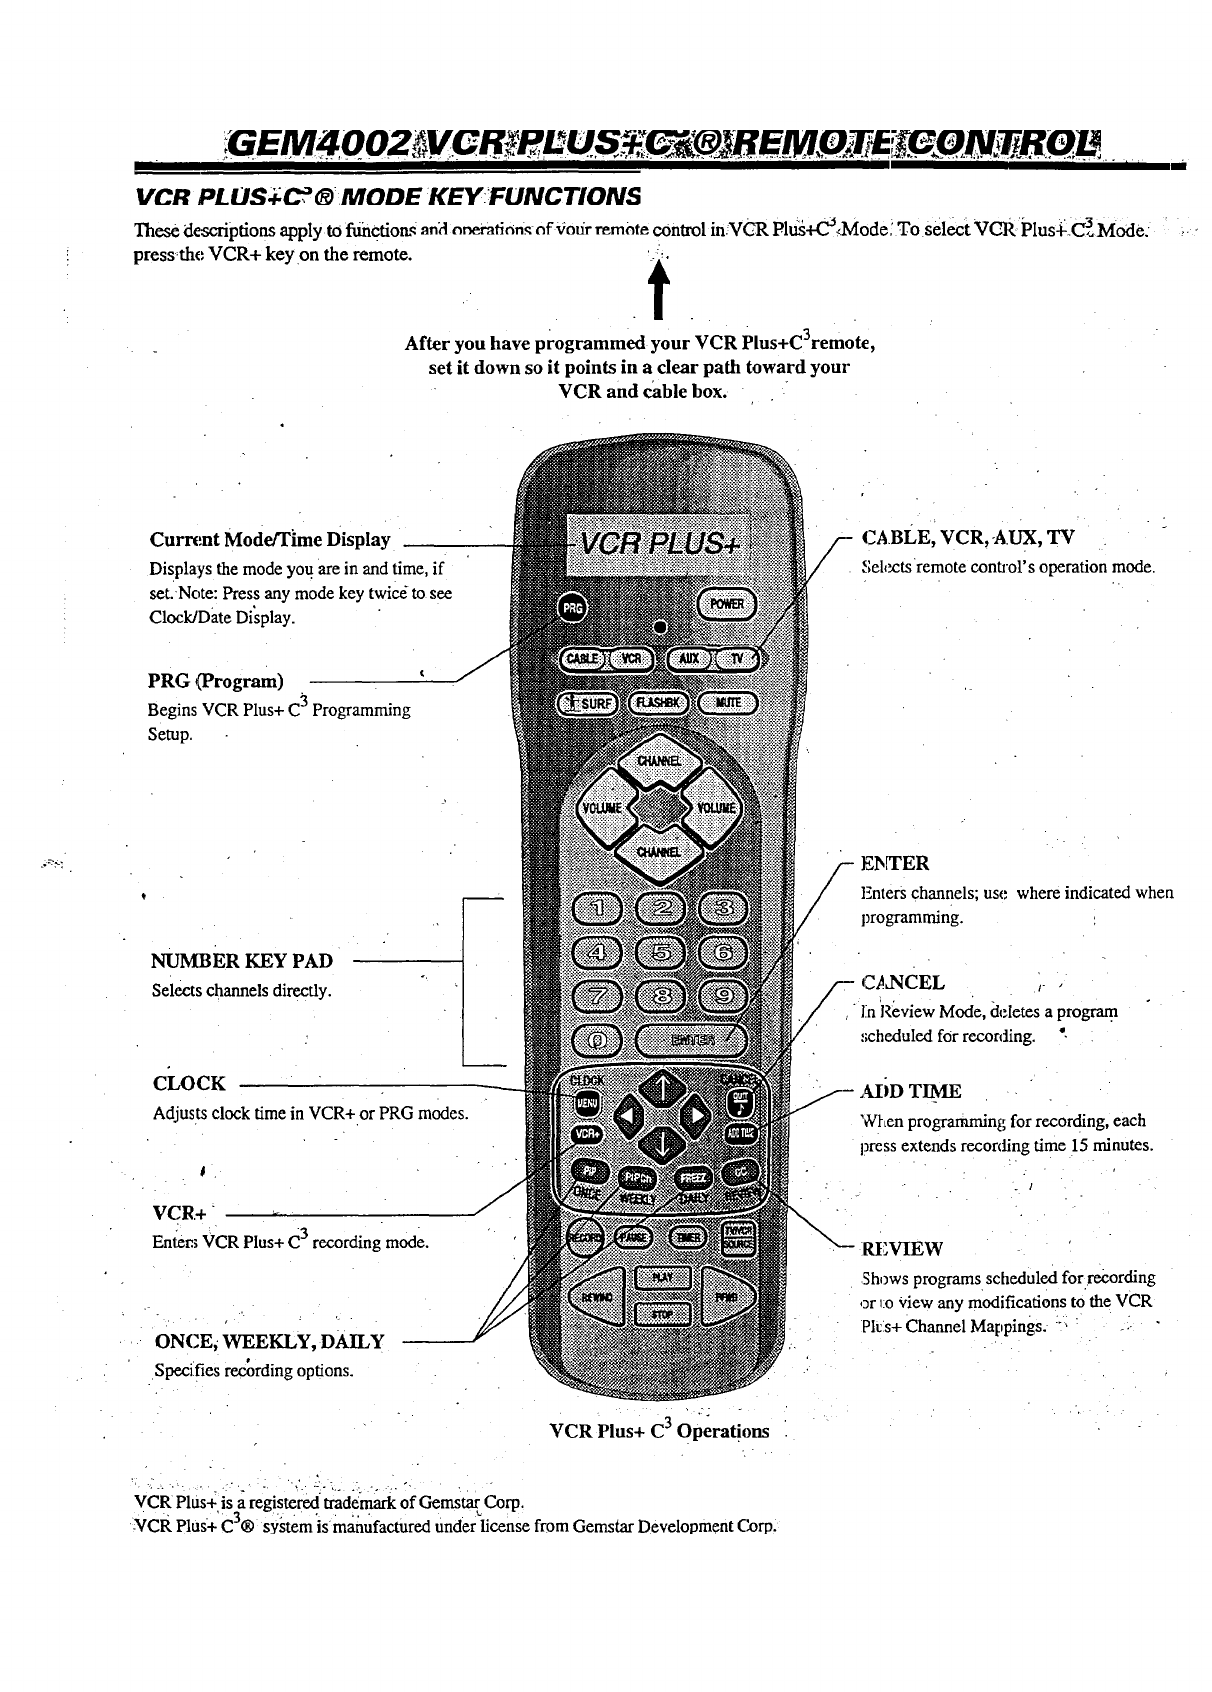
VCR PLUS:_C_ _MODE KEYFUNCTIONS
These de_-'ripfions apply to functions a,?l nneratinn_ of _iotir remote control in VCR Plu_+C°dVlode! To select _gCR Plusqi_C 3 Mode.
press_the VCR+ key on the remote. ' ;.
After you have programmed your VCR Plus+C3remote,
set it down so it points in a dear path toward your
VCR and cable box.
Current Mode/Time Display
DisPlays the mode you.are in and time, if
set.Note: Press any mode key twic_ to see
Clock/Date Display.
PRG (Program)
Begins VCR Plus+ C_ Programming
Setup.
NUMBER KEY PAD
Selects channelsdirectly.
CLOCK
Adjusts clock time in VCR+ or PRG modes.
VCR+
Enter.; VCR Plus+ € 3 recording mode.
ONCE, WEEKLY, DAILY
Specifies recording options.
VCR Plus+ C3 Operations
•?..
vcR Plus+is a register(xl _fade_ ofGemstarCorp.
-VCR Plus÷ C ® system is manufactured Under license from Gemstar Development Gorp.
cABLE, VCR, A.UX, TV
• Selectsremote conuol's operation mode.
/- ENTER
Enters channels; use where indicated when
programming.
CANCEL ,
]inReview Mode, deletes a program.
,;cheduled for recording. "-
ADD TIME
When programmingforrecording,each
press extends recording time 15 minutes.
Shows programs scheduled for.recording
or _o_¢iewany modifications to the VCR
?It:s+Channel Mappings. "-. "
G EM4 002 LUS #I iR EM :zT T;B OL _d
VCR.. - .PL'US:i" CHANNEL":MAPPING::__.:
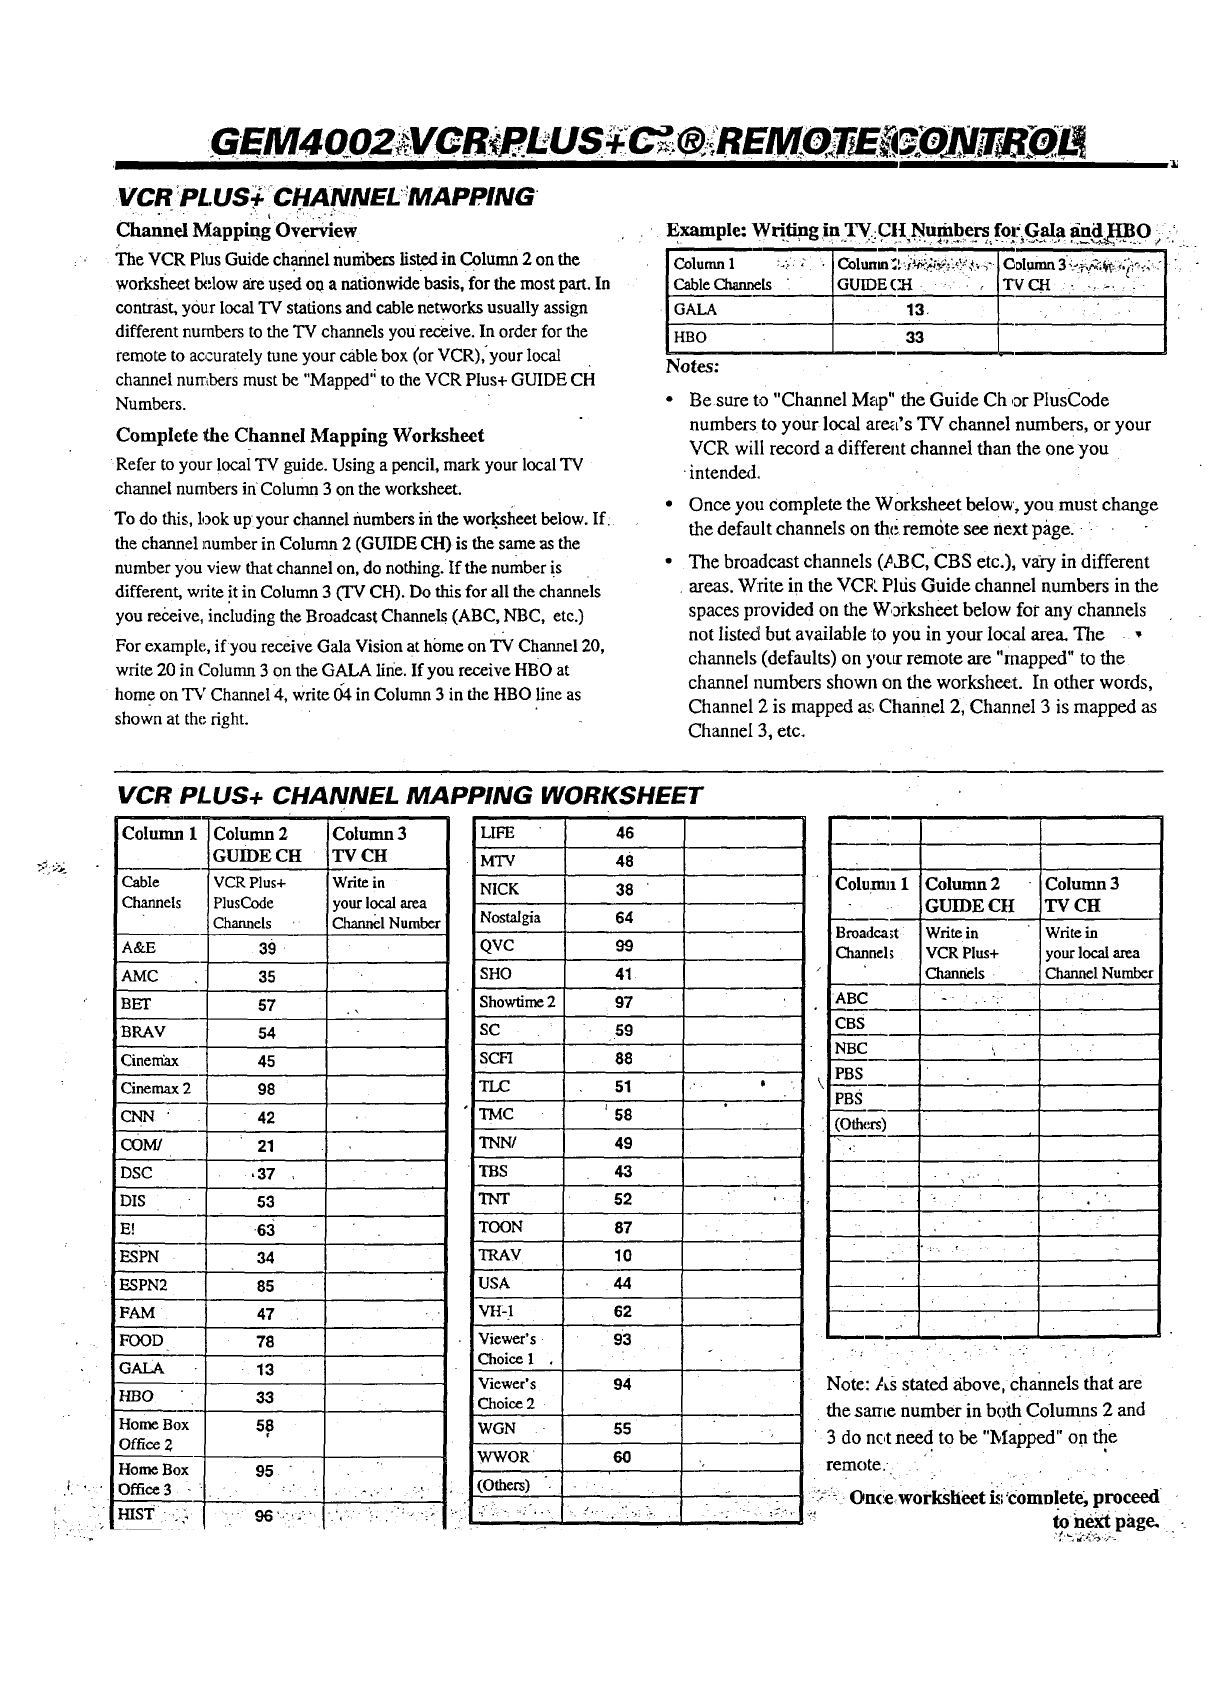
Channel Mapping Overview
The VCR Plus Guide channel nunibe_s listed.in Column 2 on the
worksheet below are u.sed on a nationwide basis, for the most part. In
contrast, your local TV stations and cable networks usually assign
different numbers to the TV channels you receive. In order for the
remote to accurately tune your cable box (or VCR),your loca!
channel numbers must be "Mapped '_to the VCR Plus+ GUIDE CH
Numbers.
Complete the Channel Mapping Worksheet
Refer to your local TV guide. Using a pencil, mark your local TV
channel numbers inColumn 3 on the worksheet.
To do this, look up your channel numbers in the wor.ksfieet below. If.
the channel number in Column 2 (GUIDE CH) is the same as the
number you view that channel on, do nothing. If the number is
different, write !tin Column 3 (TV CH). Do this for all the channels
you receive, including the Broadcast Channels (ABC, NBC, etc.)
For exampk;, if you receive Gala Vision at home on TV Channel 20,
write 20 in Column 3 on the GALA line. If you receive HBO at
home on "Ia/Channel 4, write 134in Column 3 in the HBO line as
shown at the right.
Example: Writing in TVCII Numbers for_Gala aniiI-IBO :
Cable Channels IGUIDE( " I ..... I
Notes:
Be sure to "Channel Map" the Guide Ch 3r PlusCode
numbers to your local area's TV channel numbers, or your
VCR will record adifferent channel than the one you
•intended.
Once you complete the Worksheet below, you must change
the default channels on the remote see next pi_ge.
The broadcast channels (,_d3C, CBS etc.), vary in different
areas. Write in the VCE Pltis Guide channel numbers in the
spaces provided on the Worksheet below for any channels
not listed but available to you in your local area The •
channels (defaults) on yotx remote are "rnapped" to the
channel numbers shown on the worksheet. In other words,
Channel 2 is mapped as Channel 2, Channel 3 is mapped as
Channel 3, etc.
VCR PLUS+ CHANNEL MAPPING WORKSHEET
Column 1 Column 2
GUIDE CH
Cable VCR Plus+
Channels PlusCode
Channels
A&E 39
AMC 35
BET 57
BRAV 54
Cinera_ 45
Cinemax298
CNN ' 42
co_ 21
DSC ,37
DIS " 53
E! 63
ESPN 34
ESPN2 85
FAM 47
FOOD 78
GALA - 13
H/30 33
Home Box 58
Office 2
Home Box
Office 3-
HIST •:
Column 3
"IV CH
Writein
yourlocalarea
ChannelNumber
95 "
:) "I - .>,- '-.
96 =':- . L ",.=-
LIFE 46
MTV 48
NICK 38
Nostalgia 64
QVC 99
SHO 41
Showfime297
SC 59
SCH 88
TLC 51
TMC t 58
TNN/ 49
TBS 43
TNT 52
TOON 87
TRAV 10
USA 44
VH:I 62
Viewer's 93
Choice 1
Viewer's 94
Choice 2
WGN . "55
WWOR 6O
(Others) ..
.. €_
•_ k _
,.l ', ",
Colu_z 1
Broadca;t
Channel;
ABC
CBS
NBC
PBS
PBS
(Others)
Column 2
GUIDE CtI
Writein
VCR Plus+
Channels
k
Column 3
TVCtt
Write in
your local area
ChannelNumber
."•
Note: As stated above, channels that are
the same number in both Columns 2 and
3 do not need to be "Mapped" on the
remote.
-:_:_- Onceworksheet is:€0mnlete, proceed
":" to-next page.
!V_pLUS_"-CHANNEL _MAPPING _(Continued) !
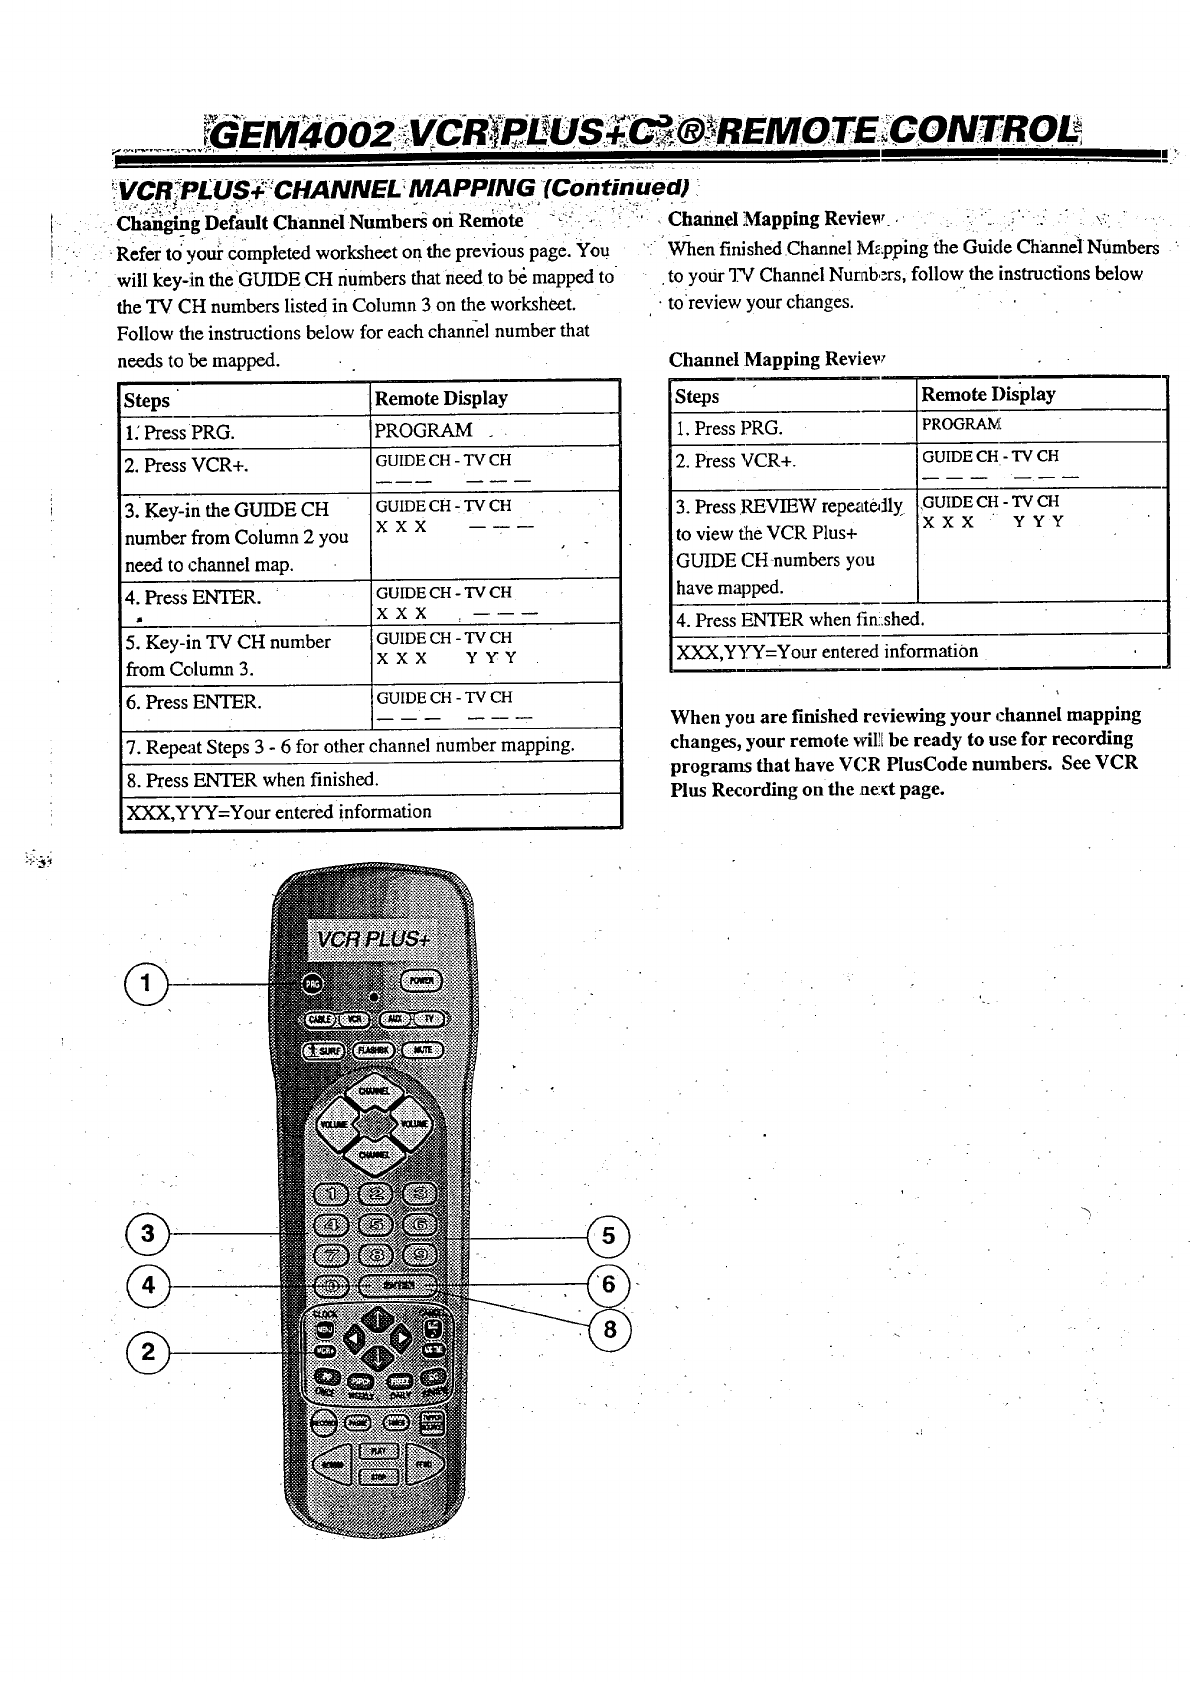
_Ch_gDefault Channel Number_ off Reniote "_: _ '_,_ , Channel Mapping Review . -' !'
Refer to youi completed worksheet on the previous page. You
will key-in the GUIDE CH numbers that need to bd mapped to
the TV CH numbers listed in Column 3 on the worksheet.
Follow the instructions below for each channel number that
needs to be mapped.
Steps Remote Display
1: Press PRG. PROGRAM
2. Press VCR+. GUIDE CH - "IV CH
3. Key-in the GUIDE CH
number from Column 2 you
need to channel map.
4. Press ENTER. "
5. Key-in TV CH number
from Column 3.
6. Press ENTER.
GUIDE CH - TV CH
XXX
GUIDE CH - TV CH
XXX
GUIDE CH - TV CH
XXX YY'Y
GUIDE CH - TV CH
7. Repeat Steps 3 - 6 for other channel number mapping.
8. Press ENTER when finished.
XXX,YY'Y=Your entered information
When finished Channel Mapping the Guide Channel Numbers
to your q?€"Channel Numbers, follow the instructions below
toreview your changes.
Channel Mapping Review
Steps Remote Dis'play
1. Press PRG. PROGRAN'_
2. Press VCR+. GUIDE CH - TV CH
3. Press REVIEW repeateAly
to view the VCR Plus+
GUIDE CH-numbers you
have mapped.
4. Press ENTER when fin:shed.
XXX,YYY=Your entered information
,GUIDE CH - TV CH
XXX YYY
When you are finished reviewing your _:hannel mapping
changes, your remote wil]tbe ready to use for recording
programs that have VCR PlusCode nmnbers. See VCR
Plus Recording on the next page.
m
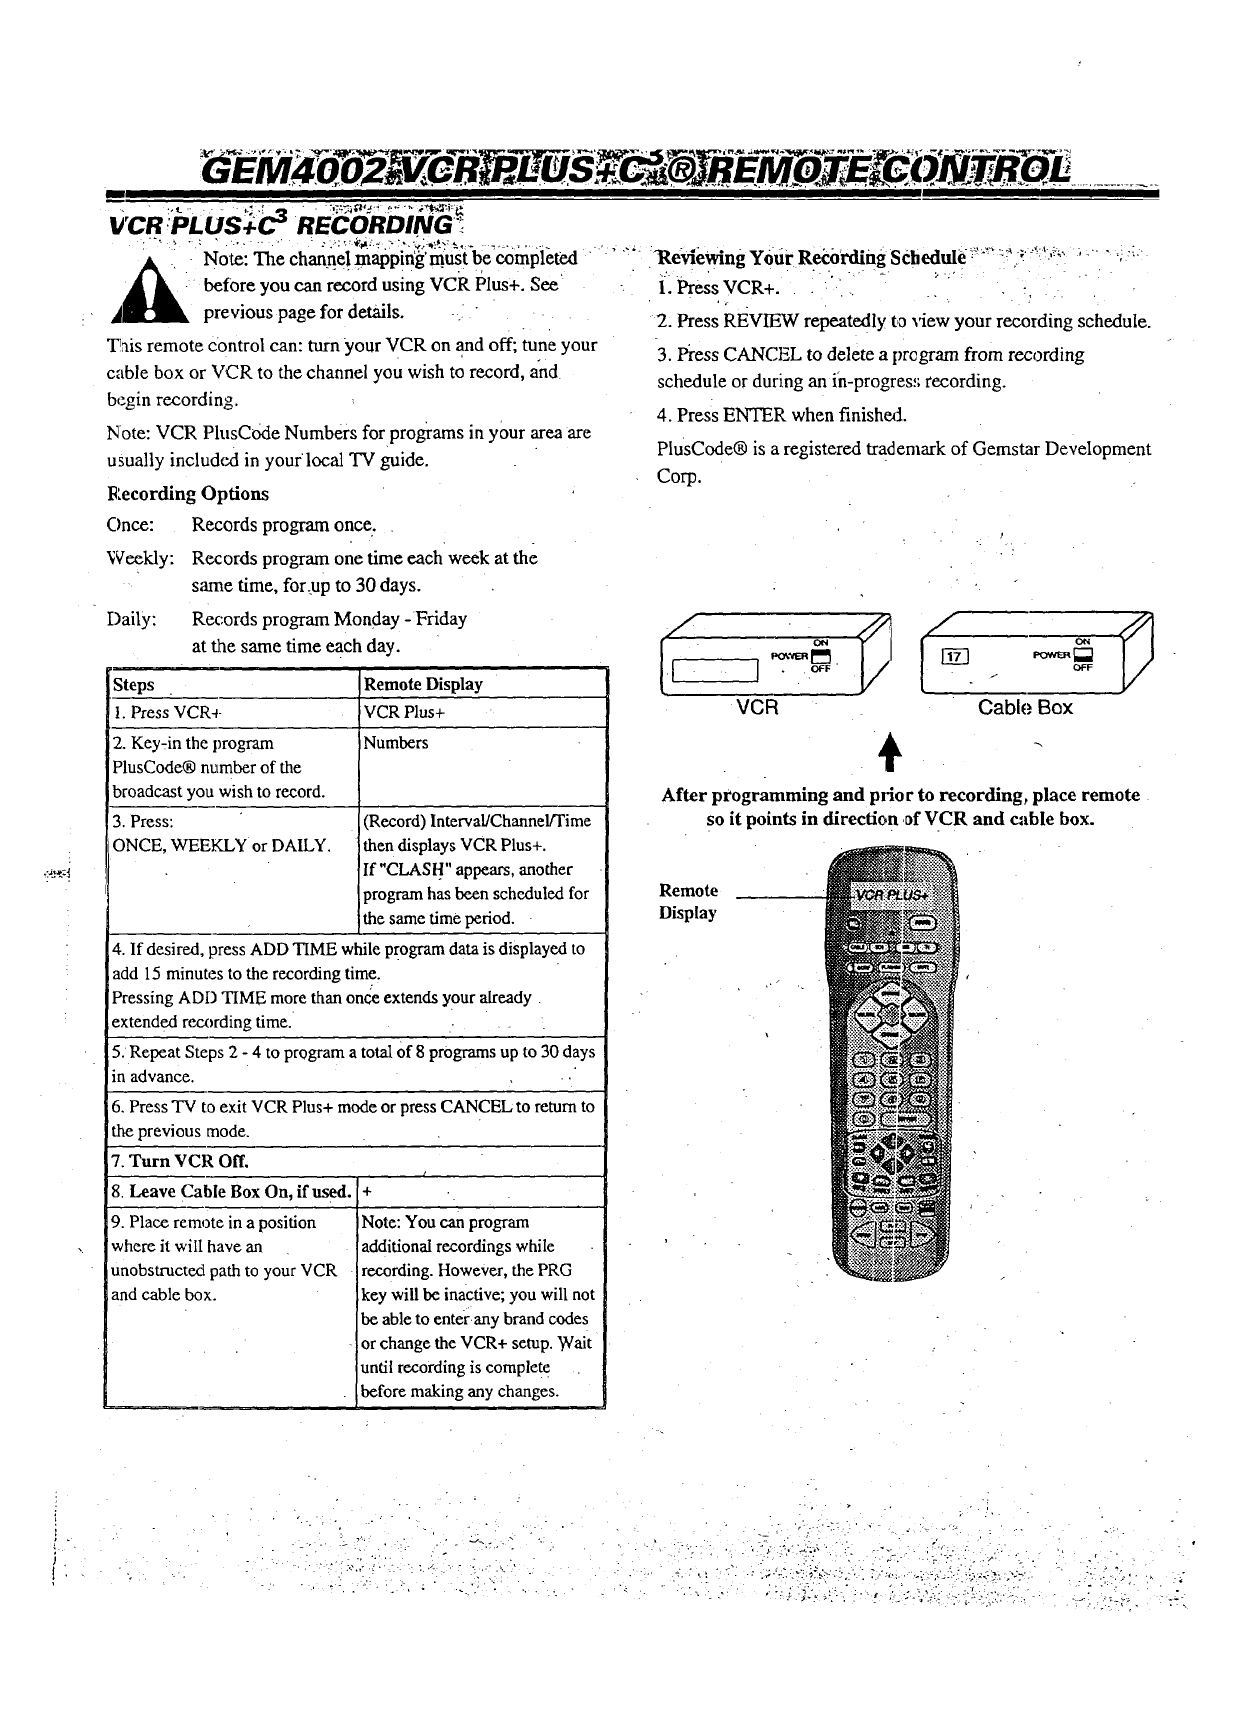
VCR :PLUS4.C ") RECORDING_
_kl channe! mappiffg' must be completed "' _' Reviewing Your Rei:oCding Scbedule:__" _:_.__ !.'_)?_' " ') :_-
.:. ,.- _.... •- _., ' , . .- ..
before you can record using VCR Plus+. See -. 1. Press VCR+... ...... :•
,d_ previous page for details. -. . 2, Press i_EvIEW repeatedly to ,_ew your recording schedule.
Tais remote control can: turn your VCR on and off; tune your
cable box or VCR to the channel you wish to record, and
begin recording.
Note: VCR PlusCode Numbers for programs in your area are
usually included in yourlocal TV guide.
l_:ecording Options
3. Pi'ess CANCEL to delete a prcgram from recording
schedule or during an in-progres,; recording.
4. Press ENTER when finisheA.
PlusCode® is a registered trademark of Gemstar Development
Corp.
Once:
Weekly:
Records program once.
Records program one time each week at the
same time, for.up to 30 days.
Daily: Records program Monday -Friday
at the same time each day.
Steps
I. Press VCR+
2. Key_in the program
PlusCode® number of the
broadcast you wish to record.
3. Press:
IONCE, WEEKLY or DAILY.
Remote Display
VCR Plus+
Numbers
(Record) Interval/Channel/Time
then displays VCR Plus+.
If "CLASH" appears, another
program has been scheduled for
the same time period.
4. If desired, press ADD TIME while program data is displayed to
add 15 minutes to the recording time.
Pressing ADD TIME more than once extends your already
extended re.cx_rdingtime. • ,.
5. Repeat Steps 2 - 4 to program a total Of 8 programs up to 30 days
in advance. ..
6. Press TV to exit VCR Plus+ mode or press CANCEL to return to
the previous mode.
7. Turn VCR Off.
8. Leave Cable Box On, if used.
9. Place remote in a position
where it will have an
unobstructed path to your VCR
and cable box.
/
-4- •
Note: You can program
additional recordings while
recording. However, the PRG
key will be inactive; you will not
be able to enter any brand codes
or change the VCR+ setup. Wait i
until recording is complete
before making any changes.
OFF OFF
VCR Cable Box
t'
After programming and plJor to recording, place remote
so it points in direction ,afVCR and cable box.
Remote
Display
-'. _ " ." ; - "_"- " " " ':- -' :, :Y4!:?'.":_ -'-__..- :' .... "....
! •
I
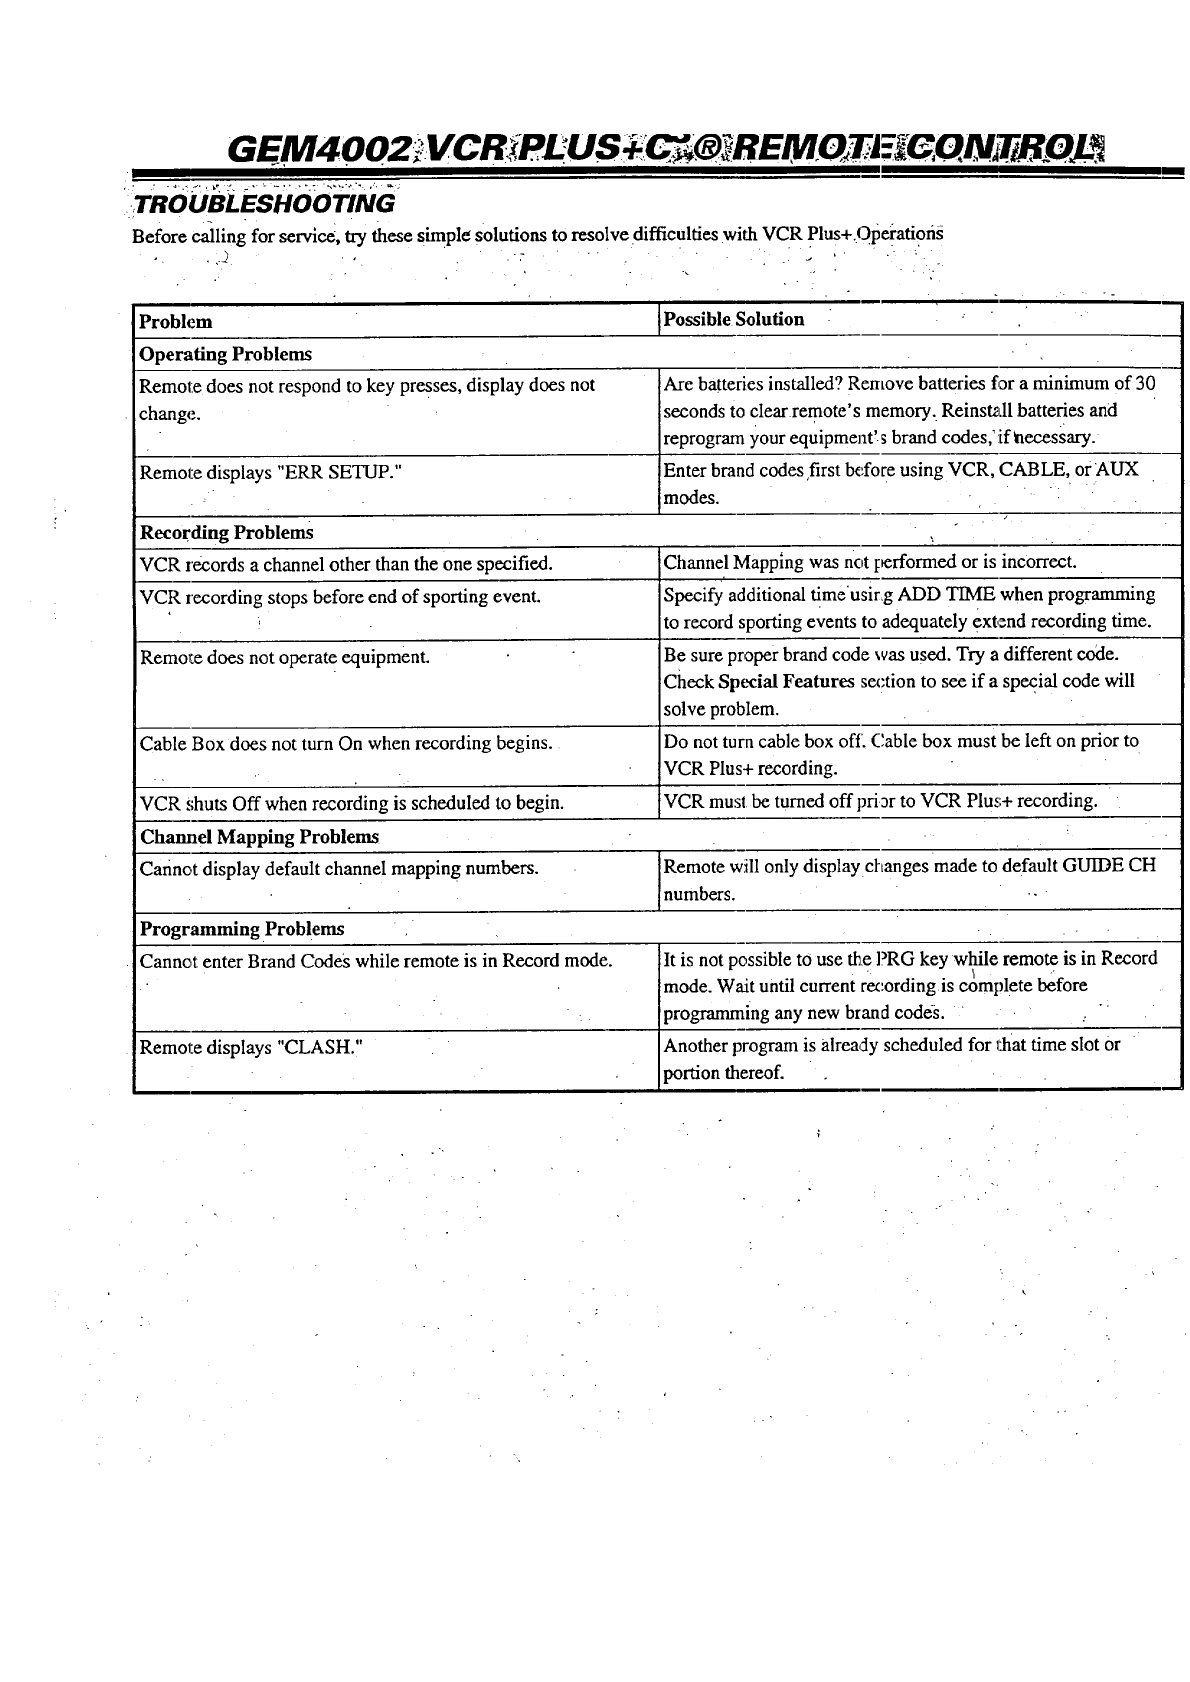
TROUBLESHOOTING
Before calling for service, try these simple solutions to resolve difficulties with VCR Plus+.Opei'atiofis
Problem JPossible Solution
Operating Problems
Remote does not respond to key presses, display does not Are batteries installed? Remove batteries for a minimum of 30
change, seconds to clear remote's memory_ Reinst_dl batteries and
reprogram your equipment'.s brand codes: ff_necessary.
Remote displays "ERR SETUP." Enter brand codes first before using VCR, CABLE, or AUX
"modes.
Recording Problems
VCR records a channel other than the one specified. Channel Mapping was not g,_rformed or is incorrect.
VCR recording stops before end of sporting event. Specify additional time'usirg ADD TIME when programming
, to record sporting events to adequately extend recording time.
Remor,e does not operate equipment. Be sure proper brand code was used. Try a different code.
Check Special Features section to see if a special code will
solve problem.
Cable Box does not turn On when recording begins. Do not turn cable box off. C,able box must be left on prior to
VCR Plus+ recording.
VCR shuts Off when recording is scheduled to begin. VCR mus! be turned off pri_r to VCR Plus+ recording.
Channel Mapping Problems
Cannot display default channel mapping numbers. Remote will only display changes made to default GUIDE CH
numbers.
Programming Problems
Cannot enter Brand CodeS while remote is in Record mode.
Remote displays "CLASH."
It is not possible to use Me PRG key while remote is in Record
mode. Wait until current rex:ording is complete before
programming any new brand codes. "
Another program is already scheduled for l_at time slot or
portion thereof.
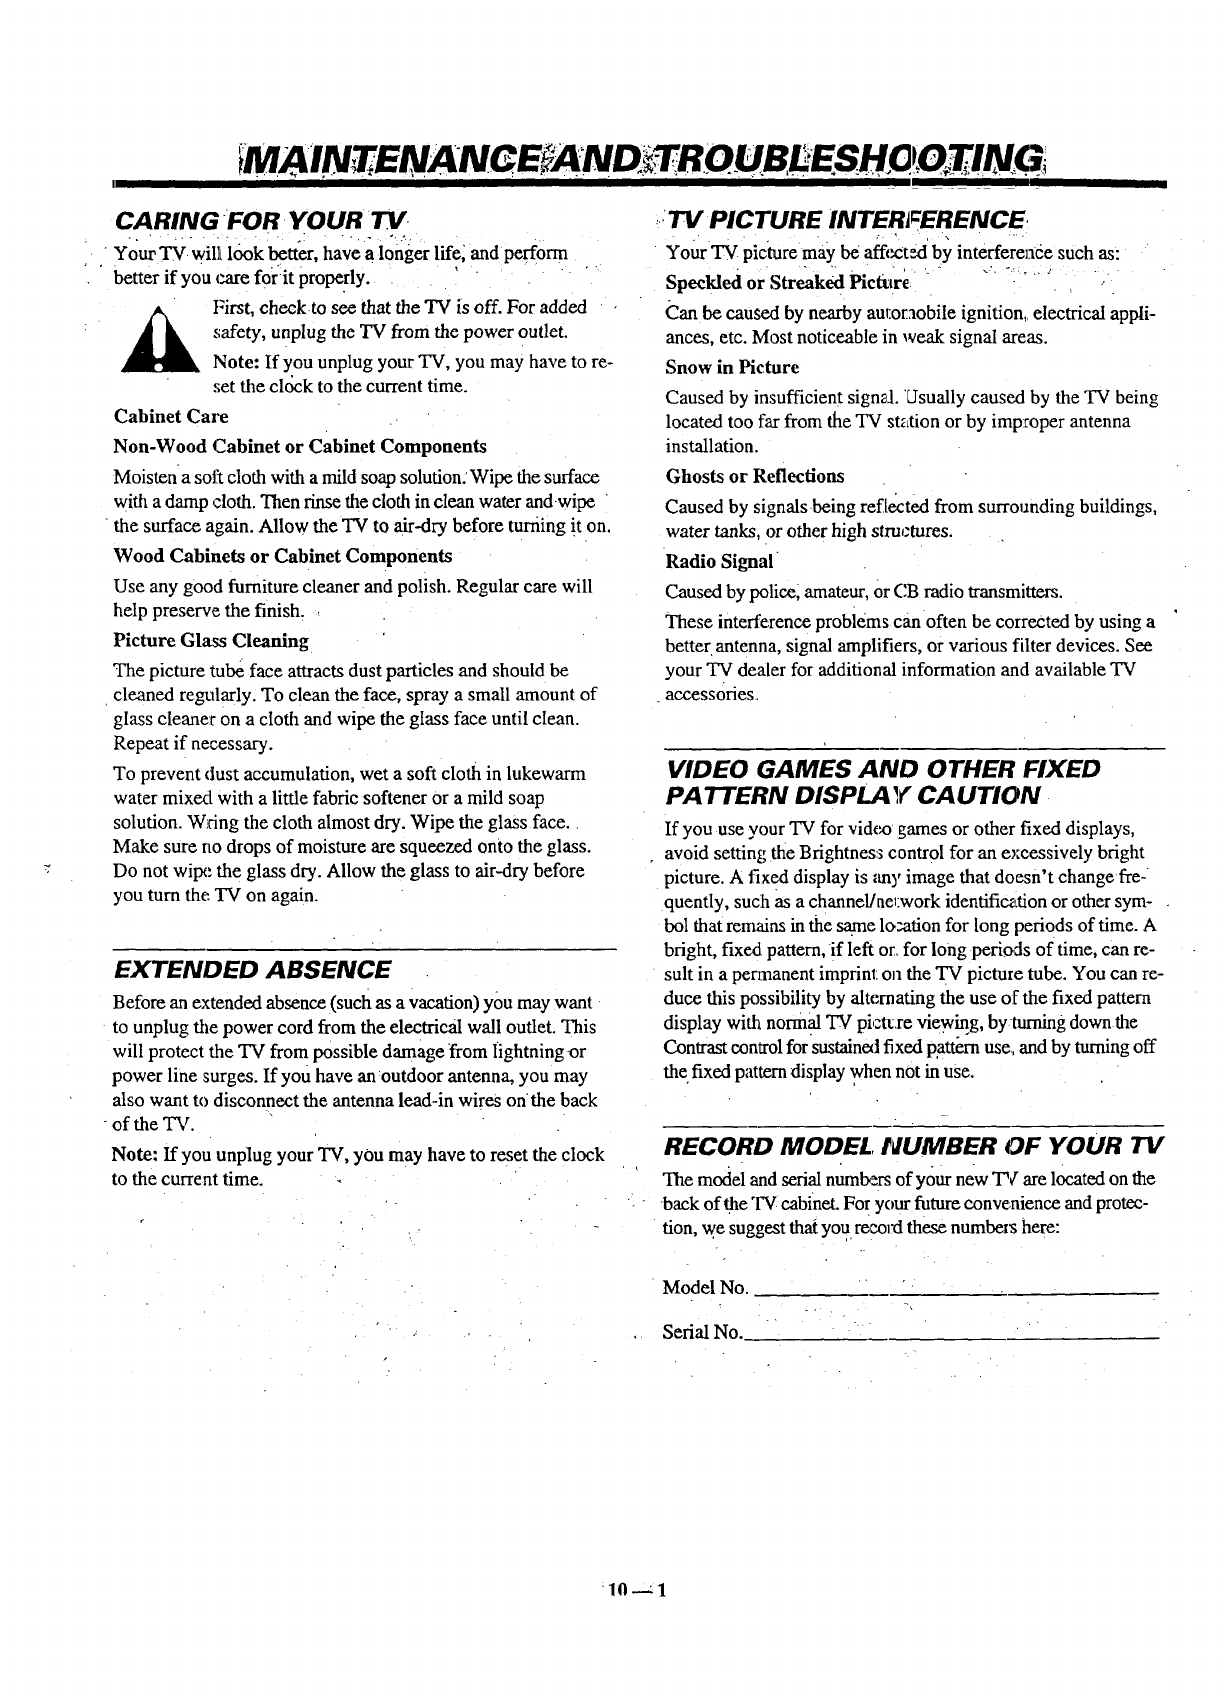
iMA I ENANGE TROUBL ESH, G T!NGi
I
CARING FOR YOUR TV
Your TV wil110ok better, have a longer life_and perform
better if you care forit properly, i
A irst, checkto see that the TV is off. For added
safety, unplug the TV from the power outlet.
Note: If you unplug your TV, you may have to re-
set the cR)ck to the current time.
Cabinet Care
Non-Wood Cabinet or Cabinet Components
Moisten asoft cloth with a mild soap solution:Wipe the surface
with a damp cloth. Then rinse the cloth in clean water and wipe
the surface again. Allow the TV to air-dry before turning !t on.
Wood Cabinets or Cabinet Components
Use any good furniture cleaner and polish. Regular care will
help preserve the finish. ,
Picture Glass Cleaning
The picture tube face attracts dust particles and should be
cleaned regularly. To clean the face, spray a small amount of
glass cleaner on a cloth and wipe the glass face until clean.
Repeat if necessary.
To prevent dust accumulation, wet a soft cloth in lukewarm
water mixext with a little fabric softener or a mild soap
solution. Wring the cloth almost dry. Wipe the glass face.
Make sure no drops of moisture are squeezed onto the glass.
Do not wilx'. the glass dry. Allow the glass to air-dry before
you turn the: TV on again.
EXTENDED ABSENCE
Before an extended absence (such as avacation) you may want
to unplug the power cord from the electrical wall outlet. This
will protect the TV from possible damage-from fightning or
power line surges. If you have an outdoor antenna, you may
also want to disconnect the antenna lead-in wires on the back
of the TV.
Note: If you unplug your TV, you may have to reset the clock
to the current time.
,:TV PICTURE INTERFERENCE
• Your TV picture may be affect_ by interferende such as:
Speckled or streaked Pictittr'e = "' ....": _ /
Can be caused by nearby autoraobile ignition, electrical appli-
ances, etc. Most noticeable in weak signal areas.
Snow in Picture
Caused by insufficient signal. LIsually caused by the TV being
located too far from the TV station or by imp_:oper antenna
installation.
Ghosts or Reflections
Caused by signals.being refitted from surrounding buildings,
water tanks, or other high structures. .
Radio Signal
Caused by police, amateur, OrCB radio transmitters.
These interference problems can often be corrected by using a
better antenna, signal amplifiers, or various filter devices. See
your "IV dealer for additional information and available TV
.accessories..
VIDEO GAMES AND OTHER FIXED
PATTERN DISPLA _,€"CAUTION•
If you use your TV for vidc_ games or other fixed displays,
avoid setting the Brightness control for an excessively bright
picture. A fixed display is any image that doesn't change fre-
quently, such as a channel/ae_:work identificzLtionor other sym-
bol that remains in the same k>aation for long periods of time. A
bright, fixed pattern, if left or, for long periods of time, can re-
sult in a permanent imprint: on the TV picture tube. You can re-
duce this possibility by alternating the use of the fixed pattern
display with normal TV pi,:ttxe view'rag, byturning down the
Contrast control for sustained fixed pattern use. and by turning off
the fixed pattern display when not in use.
RECORD MODEL, NUMBER OF YOUR TV
The model and serial numbers of your new TV are located on the
back of the "IV cabinet. Fo ryour future convenience and protec-
tion, '_(esuggest thai you reeolxlthese numbers here:
Model No.
Serial No._
:10---=1

BEFORE CALLING FOR'SERVICE
Making these simple checks before calling_for service;_you may save time and money.
. .....: :::: :..: .. :.......................... ..: :..
Picture OK. Poor sound. Re-orient antenna. Try anotkter channel possible station trouble.
Adjust Audio Menu options. Check for local interference. Is
antenna/cable connection loose?
I
Sound OK. Poor picture. Re-orient antenna. Try another channel possible station trouble.
Adjust Video Menu options. 'rrouble with cable-TV system? Is
antenna/cable connection Ioo.,e?
No picture or sound. Is TV on? Is there power in wall outlet? Is TV plugged in? Is
antenna hooked up? Is cable t,ooked up? Is the channel blocked by
the Parental Control? Trouble with cable-TV system? Check
auxiliary audio/video equipment. Check channel selection.
Picture blurred or distorted. Ghost in picture. Check antenna or cable hookup for broken wi,res. Try another
channel --- possible station trouble. Check for local interference.
Poor or no color. Is it a color program? Check _mtenna or cable hookup for broken
wires. Adjust Video Menu options. ,.
No sound. Volume setting may be too low. Check MU_E on remote. Check
Audio Mode in Audio Menu: Audio Mode may be set to SAP,
but no SAP signal is detected on the channel.
Cannot select certain channels. Add!DeVSurf of the Setup Menu may skip channels.
Are captions available? Is Caption 1, 2, 3, or .4selected using the
No clo_,;ed captions. Captionffext option of the Setup Menu?
Black box covers half of screen. Is text available? Is Text 1, 2, 3, or _ selected in the Caption/Text
option of the Setup Menu?
No picture or sound when you select Video source. Is audio/video source hooked tip properly? Axe all wires connected'_
to VIDEO 1N jacks on connection center?
Weak or no stereo sound Check Audio mode. Was stereo Sound present before you selected
when using a stereo VCR. Video source?
PIP window is black or lacks contrast when you Adjust pip Color and Tint settings in PIP Menu. Are all wireg
select Video for PIP inset, connected to VIDEO IN jack_; on connection center?
PIP window is "snowy" when using Antenna/Cable Is TV/VCR switch on the VCR in the TV po_iti0n?
for PIP and Video for main picture.
Complete picture loss when using Video for PIP Is TV/VCR switch on the VCR in the TV position?
and Antenna/Cable for main picture.
TV appears to remain on the same Channel when you use Check Add/Del/Surf in Setup Menu: Is only one Channel labeled
the Channel Up/Down arrows, as "Added?" If operating TV in Surf mode, is, 6nly.one Channel
labeled as "Surf?."
Remote does not work. Are batteries good? Is "IV turned On? Is TV plugg'ed in? ..
Auto Demo does not turn Off. Set Auto Demo to Off in _e Setup Menu.
Menu options cannot be changed or selected. Reset the TV by disconnecting the AC power cord from the power
outlet, wait a few minutes, then plug the TV back into the outlet.
Yon will have to reset the clo,:k to the curren_I time.
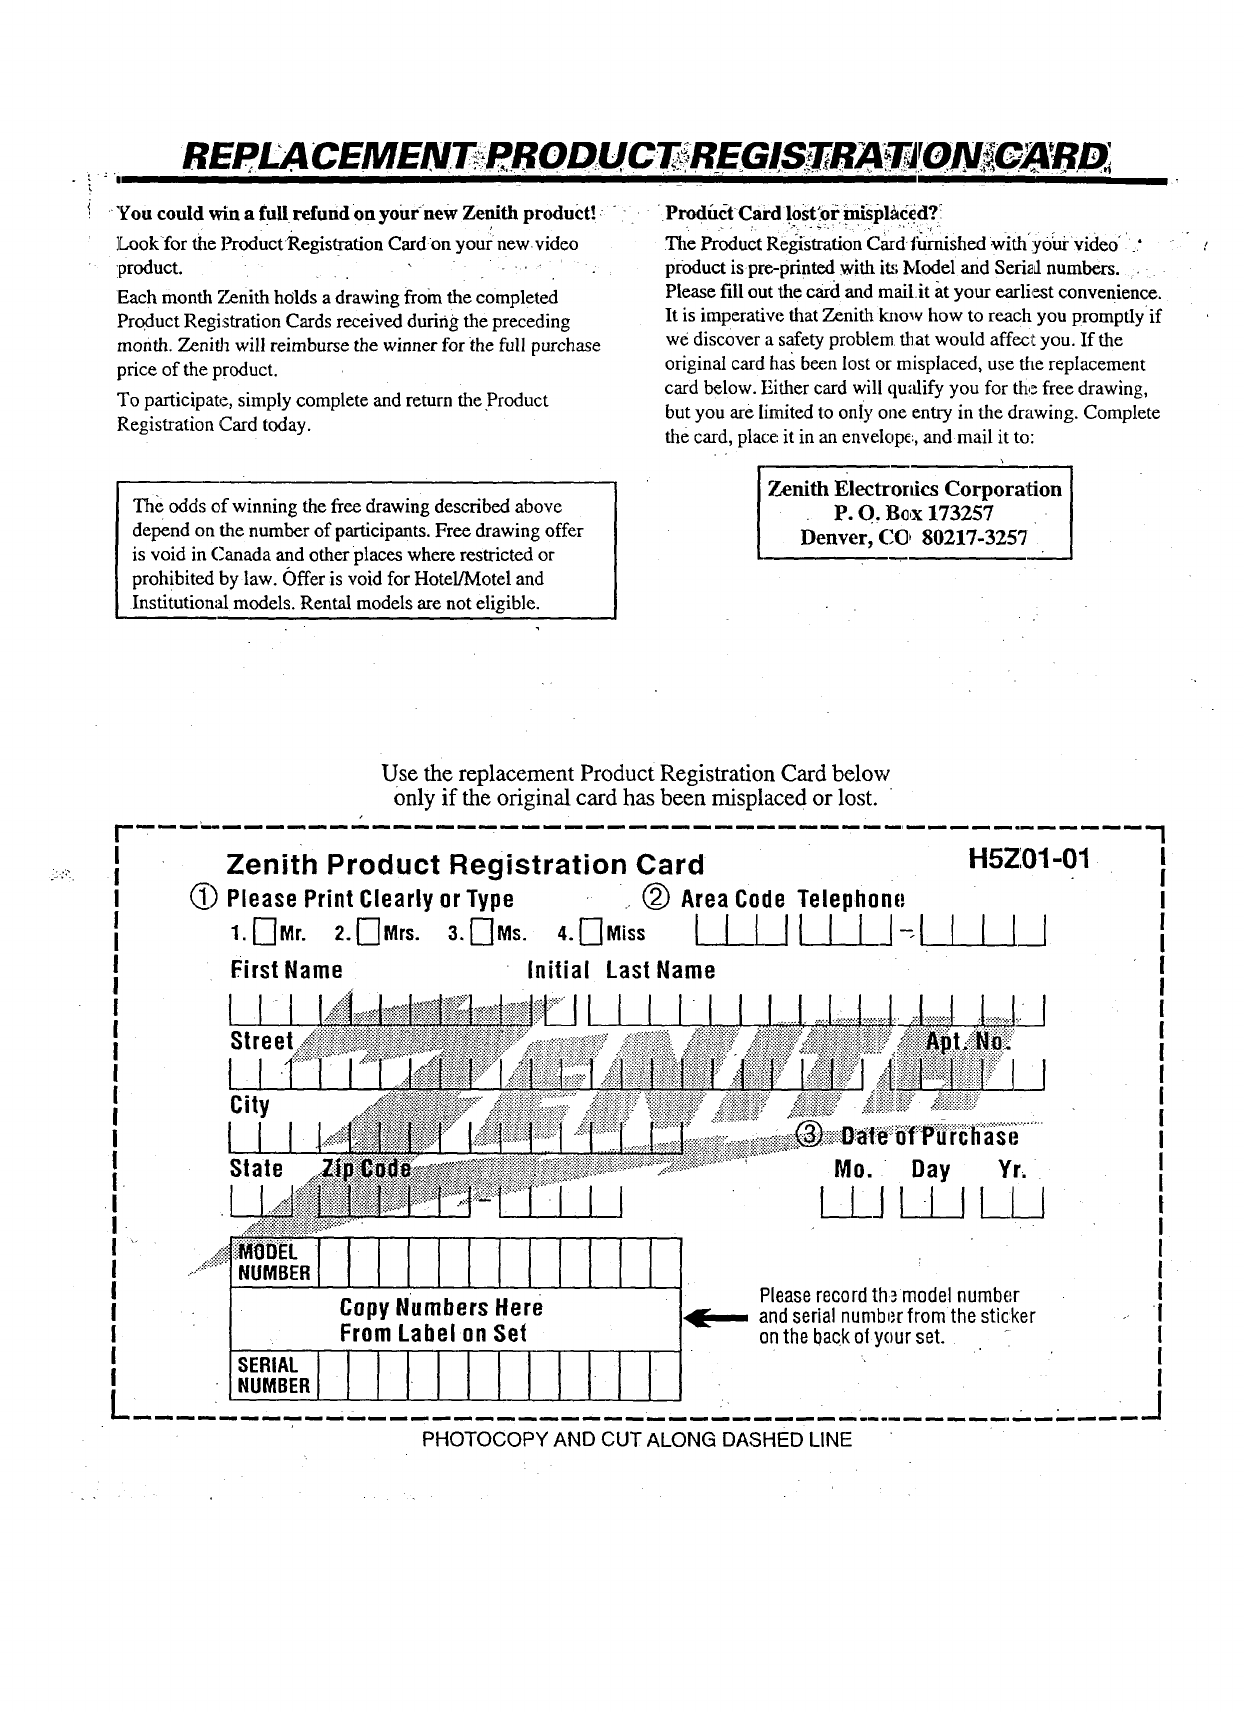
='1 REPI_ CEMENTRRODUCTR_TRA TJONi,,GARB_
"You could win afull refund on your new Zenith product!
Look for the ProductRegistradon Card On your new video
product.
Each month Zenith holds a drawing from the completed
Product Registration Cards received during the preceding
month. Zenith will reimburse the winner for the full purchase
price of the product.
To participate, simply complete and return the Product
Registration Card today.
•Product Card l.ost_ot=_pla_d? _.
The Product Registration Card furnished with y0_ video "
product is pre-printed with its !vlodel and Sealednumbers.
Please fill out the card and mail.it at your earli,_st convenience.
It is imperative that Zenith kalow how to reach you promptly if
we discover a safety problem that would affec'I you. If the
original card has been lost or misplaced, use the replacement
card below. Either card will qu,'dify you for the free drawing,
but you are limited to only one entry in the drawing. Complete
the card, place:it in an envelope.., and mail it to:
The odds of winning the free drawing described above
depend on the number of participants. Free drawing offer
is void in Canada and other places where restricted or
prohibited by law. Offer is void for Hotel/Motel and
Institutional models. Rental models are not eligible.
Zenith Electrordcs Corporation
P. O. Bc,x 173257
Denver, CO 8021%3257
Use the replacement Product Registration Card below
only if the original card has been misplaced or lost.
Zenith Product Registration Card
_) Please Print Clearly or Type (_) Area Code Telephone
1.[-]Mr. 2. F]Mrs. 3._]Ms. 4. F]Miss [II II [ I J-_l
First Name Initial Last Name
H5Z01-01
IIII
Street..
City
State
asi;
Mo. " Day Yr,
L_L_J_ LLJ
.................................llllllllIIIl
_;MODEL"
NUMBER
Copy Numbers Here
From Label on Set
.=,.I I I I I I I I I I I I.• .,
PHOTOCOPY AND CUT ALONG DASHED LINE
Pleaserecord th3 model number
,q[-,_-, and serial number from the sticker
on the backol your set.
I
I
I
I
I
I
I
I
I
I
!
I
I
I
I
I
I
I
I
I
I
I
I
I
I
I
!
AMISO RA N UES TR O S iCIJEN TES D E HA SPANA
.Zenith publicamuchos de sus manuales de instrucciones en
idioma espafiol. Si le in_'esa,pedir la yersi6n en espafiol de este
manual, llene el formulario provisto a continuaci6n, fotoc6pielo y
envfelo a la direcci6n indicada.
No todos los manuales de instrucciones est_n disponibles en
espafiol. Sin erabargo, podemos proporcionarle el manual que
corresponde a un modem similar a este, en el cual se describen
casi todas las caracterfsticas del producto que.usted utiliza.
El manual en espafiol es gratis.
Instrucciones:
1.. Llene el formulario propol_ionadoa contimmci6n con la
informaci6n solicitada.
2. Haga una fotocopia del fol:mulario de pedido y envfela a:
Service Literature Department
Zenith Electronics Corporation
1000 Milwaukee Avenue
_Glenview, ]L 60025-2493
Fotocopie la p_gina y corte la Ifnea punteado
Formulario de pedido de su manual de instrucciones (206-3227_"_
(Este formulario de pedido es solo v_ido para el producto descrito en este manual -^k_'GHLEVzJ
Ntimero de modelo: (lo encontrar_ en la parte posterior del aparato)
Ngmero de serial: (1o encontrar,5 en la parte posterior del aparato)
Dia de Compra: ! /
di_ rues afio
Nombre
Direcci6n Apartamento
Ciudad Estado C6digo postal
Pals
7SI'VCOUPS
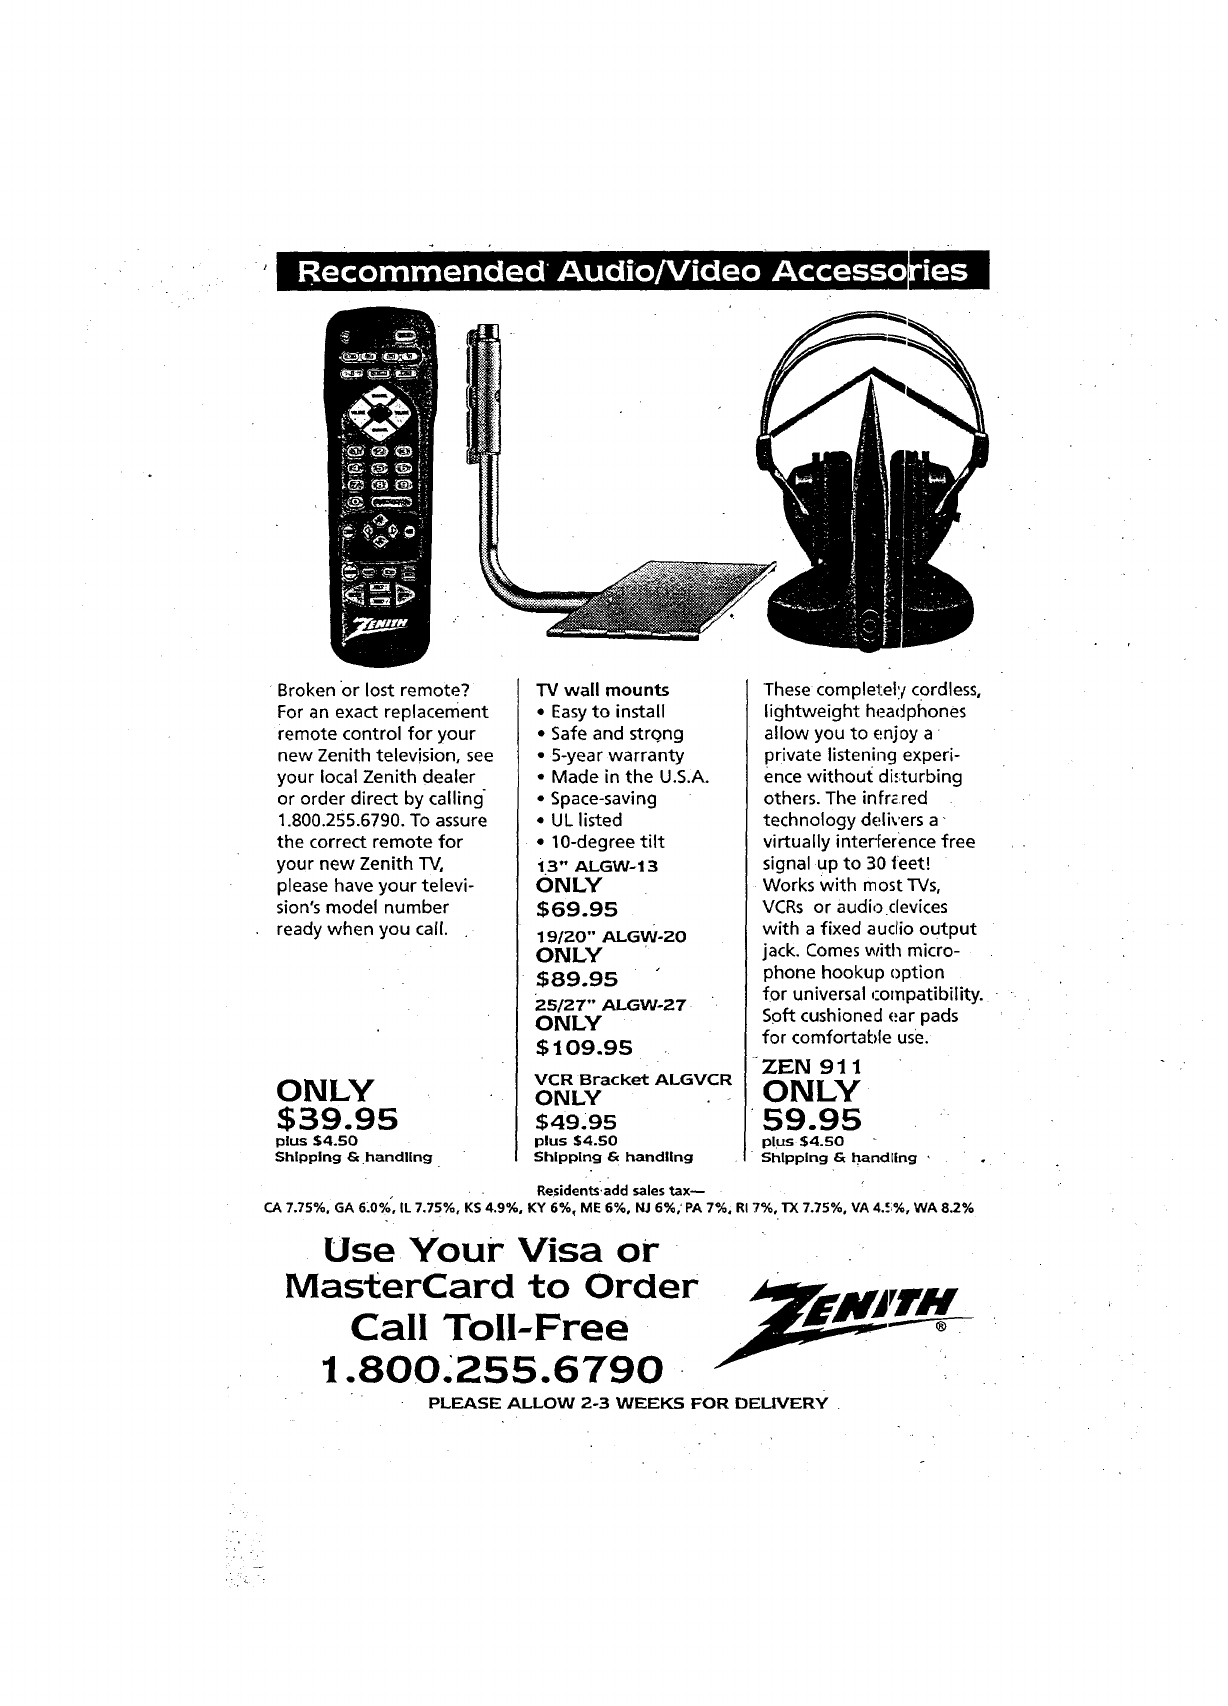
/
Broken or lost remote?
For an exact replacement
remote control for your
new Zenith television, see
your local Zenith dealer
or order direct by calling
1.800.255.6790. To assure
the correct remote for
your new Zenith TV,
please have your televi-
sion's model number
ready when you call.
ONLY
$39.95
plus $4.50
Shipping & handling
TV wall mounts
•Easyto install
• Safe and strong
• 5-year warranty
•Made in the U.S.A.
• Space-saving
•UL listed
• 10-degree tilt
13" ALGW- 13
ONLY
$69.95
19/20" ALGW-20
ONLY
$89.95
25/27" ALGWo27
ONLY
$109.95
VCR Bracket ALGVCR
ONLY
$49.95
plus $4.50
Shipping & handling
'These completel:l cordless,
lightweight headphones
allow you to enjoy a
private listening experi-
ence without disturbing
others. The infr_ red
technology delivers a"
virtually interference free
signal up to 30 leer!
Works with most TVs,
VCRs or audio clevices
with a fixed audio output
jack. Comes with micro-
phone hookup option
for universal ,:ompatibility.
Soft cushioned ear pads
for comfortable use.
ZEN 91 1
ONLY
59.95
plus $4.50
Shipping & handling ,
Residents:add sales tax--
CA 7.75%. GA 6:0% _, IL 7.75%, KS 4.9%, KY 6%, ME 6%, NJ 6%; PA 7%, RI 7%, 1)( 7.75%, VA 4..=;%,WA 8.2%
Use Your Visa or
lVlast_erCard to Order
Call Toll-Free
1.800.255.6790
PLEASE ALLOW 2-3 WEEKS FOR DELIVERY

i
HELP US HELP YOU
Z EN I TH_Q UE ST_A IRE
IIII I II
We want you to get the most out of your new Zenith product Thanks for taking a few moments to complete the follov_xtg question-
naire; we value your input!
=
.
4.
The operating guide is well-organized.
2. (can find the information I want. ['7 [-'q
54
The text is clearly written.
This operating guide is written in language that
I understand.
The examples are clear and useful.
Diagrams and illustrations are easy to follow.
The quality of this operating guide would influ-
ence whether I'd buy a Zenith product again;
I would recommend this product based on the
qualityof the operating guide.
Instructions are clear and helpful.
This operating guide meets my expectations.
.
.
o
: 8.
9.
1
Aorne DlaaOme
r-l F-I FI r-I 13
54321
131313
321
N rq rq [313
E 4 3 2 1
Fq [3 E] [3 I_
54321
D D _ D C]
64$21
I-I 13 FI I'! i-!
5 4 3 2 1
!-I I-I l-I [3 I-I
54321
13•Fi [3
"4 3 1
[313131-113
5 4 3 2 1
D I-I I"7
321
.... :. ., _-GH 206-3202
COMMENTS
Your romments help us determine if we should give greater emphasis to certain topics in the operating guide.
r_
li: i,,__ ii_1_•--
Use Tape To CIo_
Fold Along This Line Second.
NO POSTAGE
NECESSARY
IF MAILED
IN THE
UNITED STATES
i_
•BUSINESS REPLY MAIL
FIRST-CLASS MAIL PERMIT NO. 203 GLENVIEW, IL
POSTAGE WILL BE PAID BY ADDRESSEE
ZENITH ELECTRONICSCORPORATION
ATTN: TECHNICAL PUBLICATIONS
1000 MILWAUKEE AVE.
GLENVIEW, IL 60025-9852
I
I
I,II,,ll,,,Ih,,,,I,hhl,l,h,l,,I,,I,h,,I,h,li,I
Fold Along This Line Fix'st.
Name
First Last
Street
City
State Zip Code
Dayt.ime Telepho_ne -
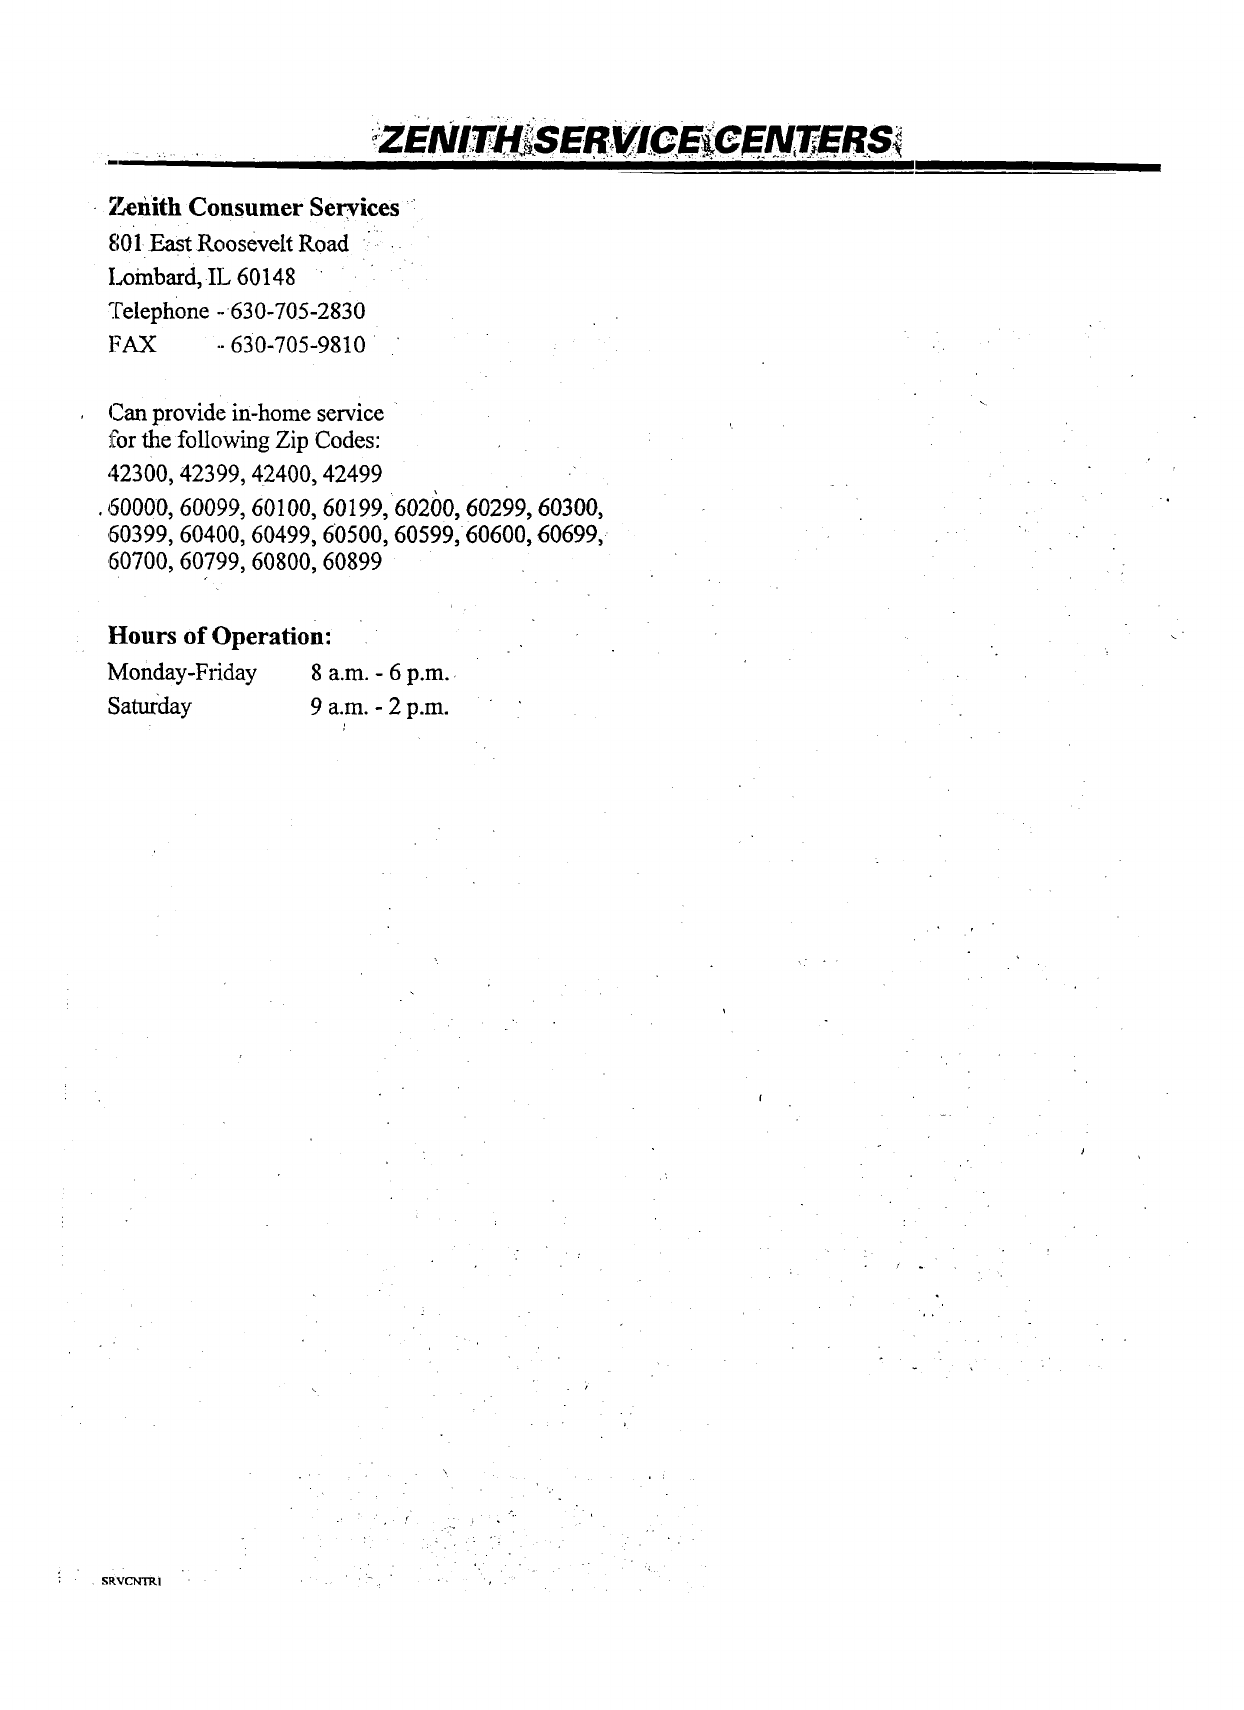
iZEN!T SER !GE GENTERS
]senith Consumer Services
801 East Roosevelt Road
Lombard, IL 60148
Telephone - 630-705-2830
FAX -. 630-705-9810
Canprovidein-homeservice
J_rthefollowingZip Codes:
42300,42399,42400,42499
60000,60099,60100,60199,60200,60299,60300,
60399,60400,60499,60500,60599,60600,60699,
60700,60799,60800,60899
Hours of Operation:
Monday-Friday 8 a.m. - 6 p.m.
Saturday 9 a.m.- 2 p.m.
i gRVOqTR1
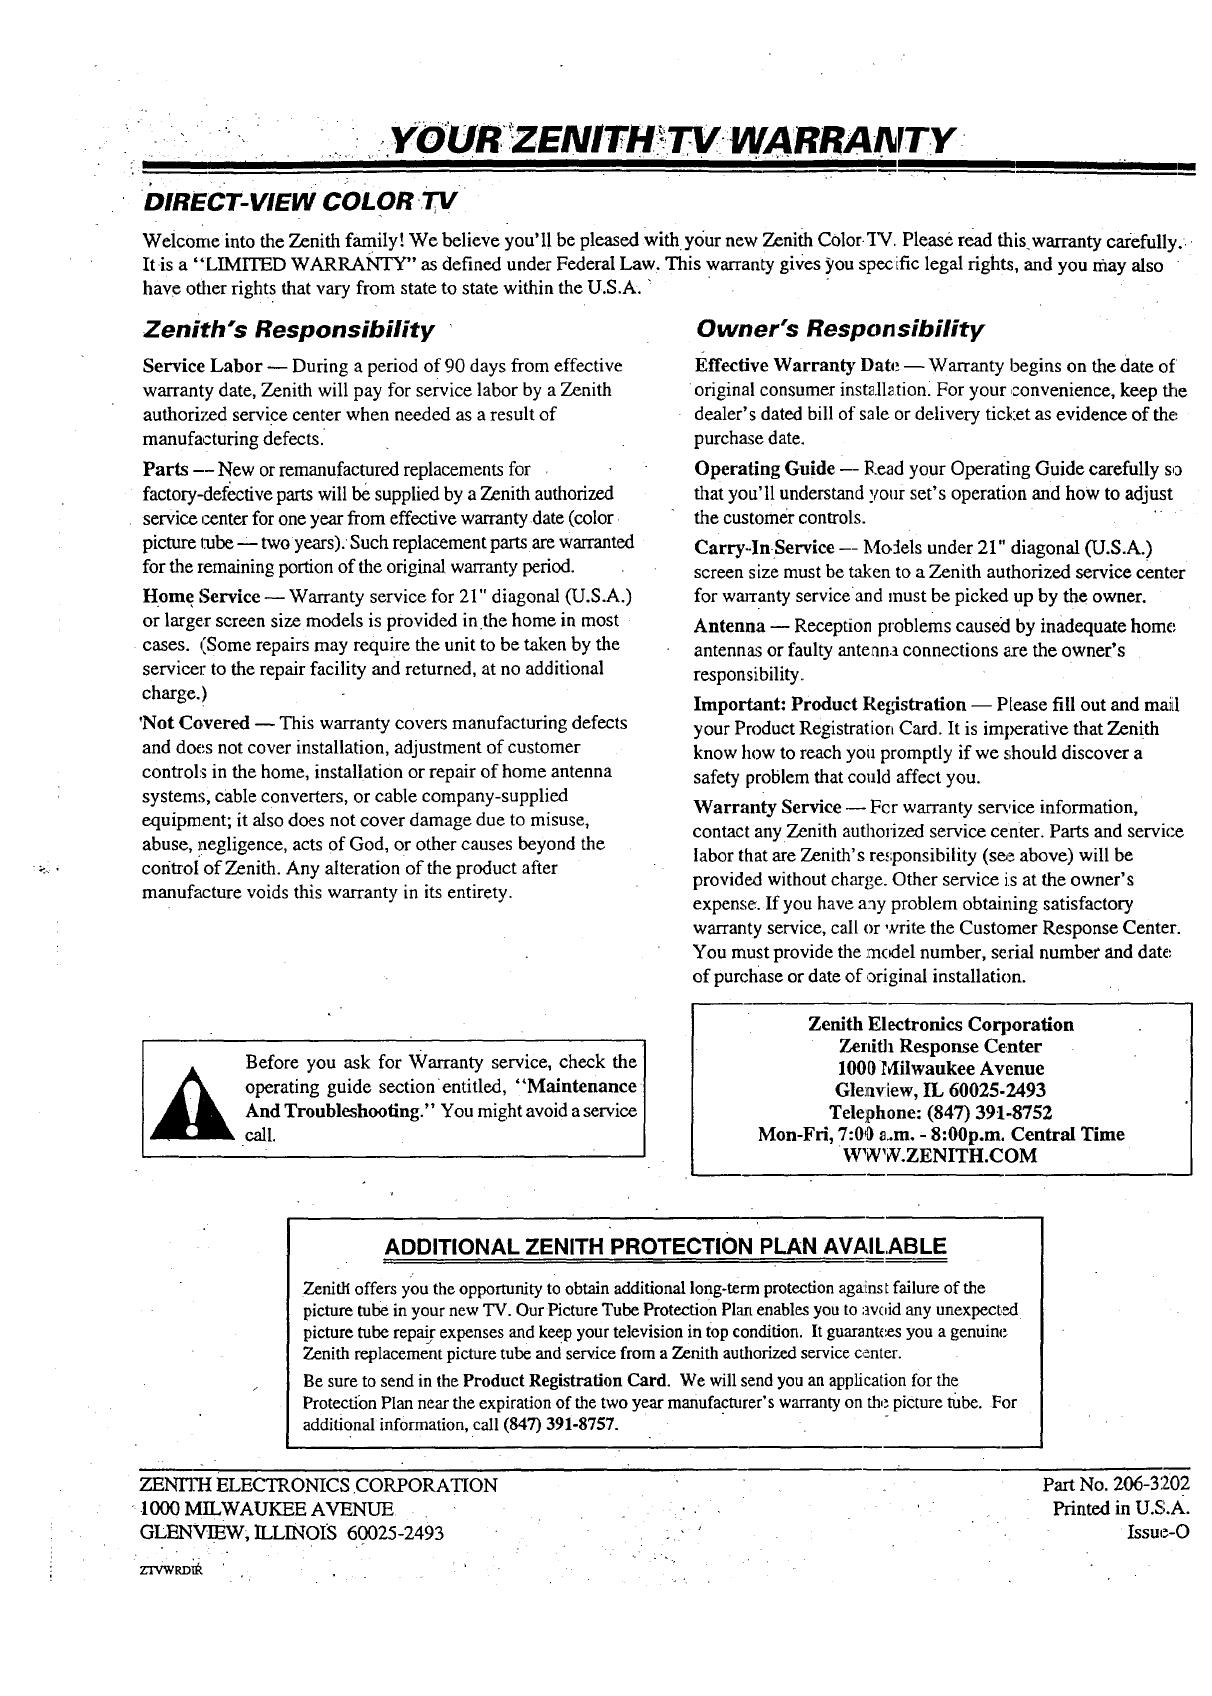
" • YOUR! ENITH , . WARRANTY
:1 I I I I " N
DIRECT-VIEW COLOR TV
Welcome into the Zenith family! We believe you'll be pleased Withyour new Zenith Color.TV. Please read thiswarranty carefully.
Itis a "LIMITED WARRANTY" as defined under Federal Law. This warranty gives _'ou specific legal fights, and you may also
have other rights that vary from state to state within the U.S.A. "
Zenith's Responsibility "
Service Labor -- During a period of 90 days from effective
warranty date, Zenith will pay for service labor by a Zenith
authoriz_..xtservice center when needed as a result of
manufacturing defects.
Parts -- New or remanufactured replacements for
factory-defe.ctive parts will be supplied by a Zenith authorized
service center for one year from effective warranty date (color
picture tube _ two years). Such replacement parts are warranted
for the remaining portion of the original warranty period.
Home Service --Warranty service for 21" diagonal (U.S.A.)
or larger screen size models is provided in .the home in most
cases. (Some repairs may require the unit to be taken by the
service]: to the repair facility and returned, at no additional
charge.)
'Not Covered -- This warranty covers manufacturing defects
and does not cover installation, adjustment of customer
controls in the home, installation or repair of home antenna
systems, cable converters, or cable company-supplied
equipment; it also does not cover damage due to misuse,
abuse, negligence, acts of God, or other causes beyond the
control of Zenith. Any alteration of the product after
manufacture voids this warranty in its entirety.
Owner's Responsibility
Effective Warranty Date. -- Warranty begins on the date of
original consumer inst_Jlationl For your convenience, keep the
dealer's dated bill of sale or delivery ticket as evidence of the,
purchase date.
Operating Guide -- Read your Operating Guide carefully so
that you'll understand your set's operation and how to adjust
the customer controls. '
Carry-ln-Serviee -- M_Sels under 21" diagonal (U.S.A.)
screen size must be taken to a Zenith authorized service center
for warranty serviceand must be picked up by the owner.
Antenna -- Reception p_'oblems caused by inadequate home
antennas or faulty antenna connections _xe the owner's
responsibility.
Important: Product Registration -- Please fill out and ma_il
your Product Registration Card. It is imperative that Zenith
know how to reach you promptly if we should discover a
safety problem that could affect you.
Warranty Service -- Fcr warranty service information,
contact anyzenith authorized service center. Parts and service
labor that are Zenith's re.,',ponsibility (s_ above) will be
provided without charge. Other service is at the owner's
expense. If you have a:3yproblem obtaining satisfactory
warranty service, call or write the Customer Response Center.
You must provide the mc_lel number, serial number and date
of purchase or date of,3riginal installation.
Before you ask for Warranty service, check the
_k operating guide section entitled, "Maintenance
And Troubleshooting." You might avoid aservice
call.
Zenith Electronics Corporation
Zenith Response Center
1000 Milwaukee Avenue
Glenview, IL 60025.2493
Telephone: (847) 39.1-8752
Mon-Fri, 7:00 _m. - 8:00p.m, Central Time
WWW.ZENITH.COM
ADDITIONAL ZENITH PROTECTION PLAN AVAILABLE
Zenith offersyou theopportunityto obtainadditionallong-term protectionag;tinstfailure of the
picture tube in your new TV. Our PictureTube Protection Plan enablesyou to avoid any unexpect,_
picture tube repair expenses and keep your television in top condition. It guarant<_syou a genuine
Zenith replacement picture tube and service from a Zenith authorizedservice c,_nter.
Be sure to send in the Product Registration Card. We will send you an application for the
Protection Plan near the expiration of the two year manufacturer's warrantyon the picture tube. For
additional information, call (847) 391-8757.
ZENr].7-I ELECTRONICS.CORPORATION
-lOOOMrr.wAtn E AVr Ntm
GLENVIEW, ILLINOIS 60025-2493
_
zrvw_
/
. [ "
Part No. 206-3202
Printed in U.s.A.
Issue-O
