ZENITH VCR Manual 98040512
User Manual: ZENITH ZENITH VCR Manual ZENITH VCR Owner's Manual, ZENITH VCR installation guides
Open the PDF directly: View PDF ![]() .
.
Page Count: 32
z e n i th]enter tai nment mach| nes
0
:eceived
)led
Ent_
LIS
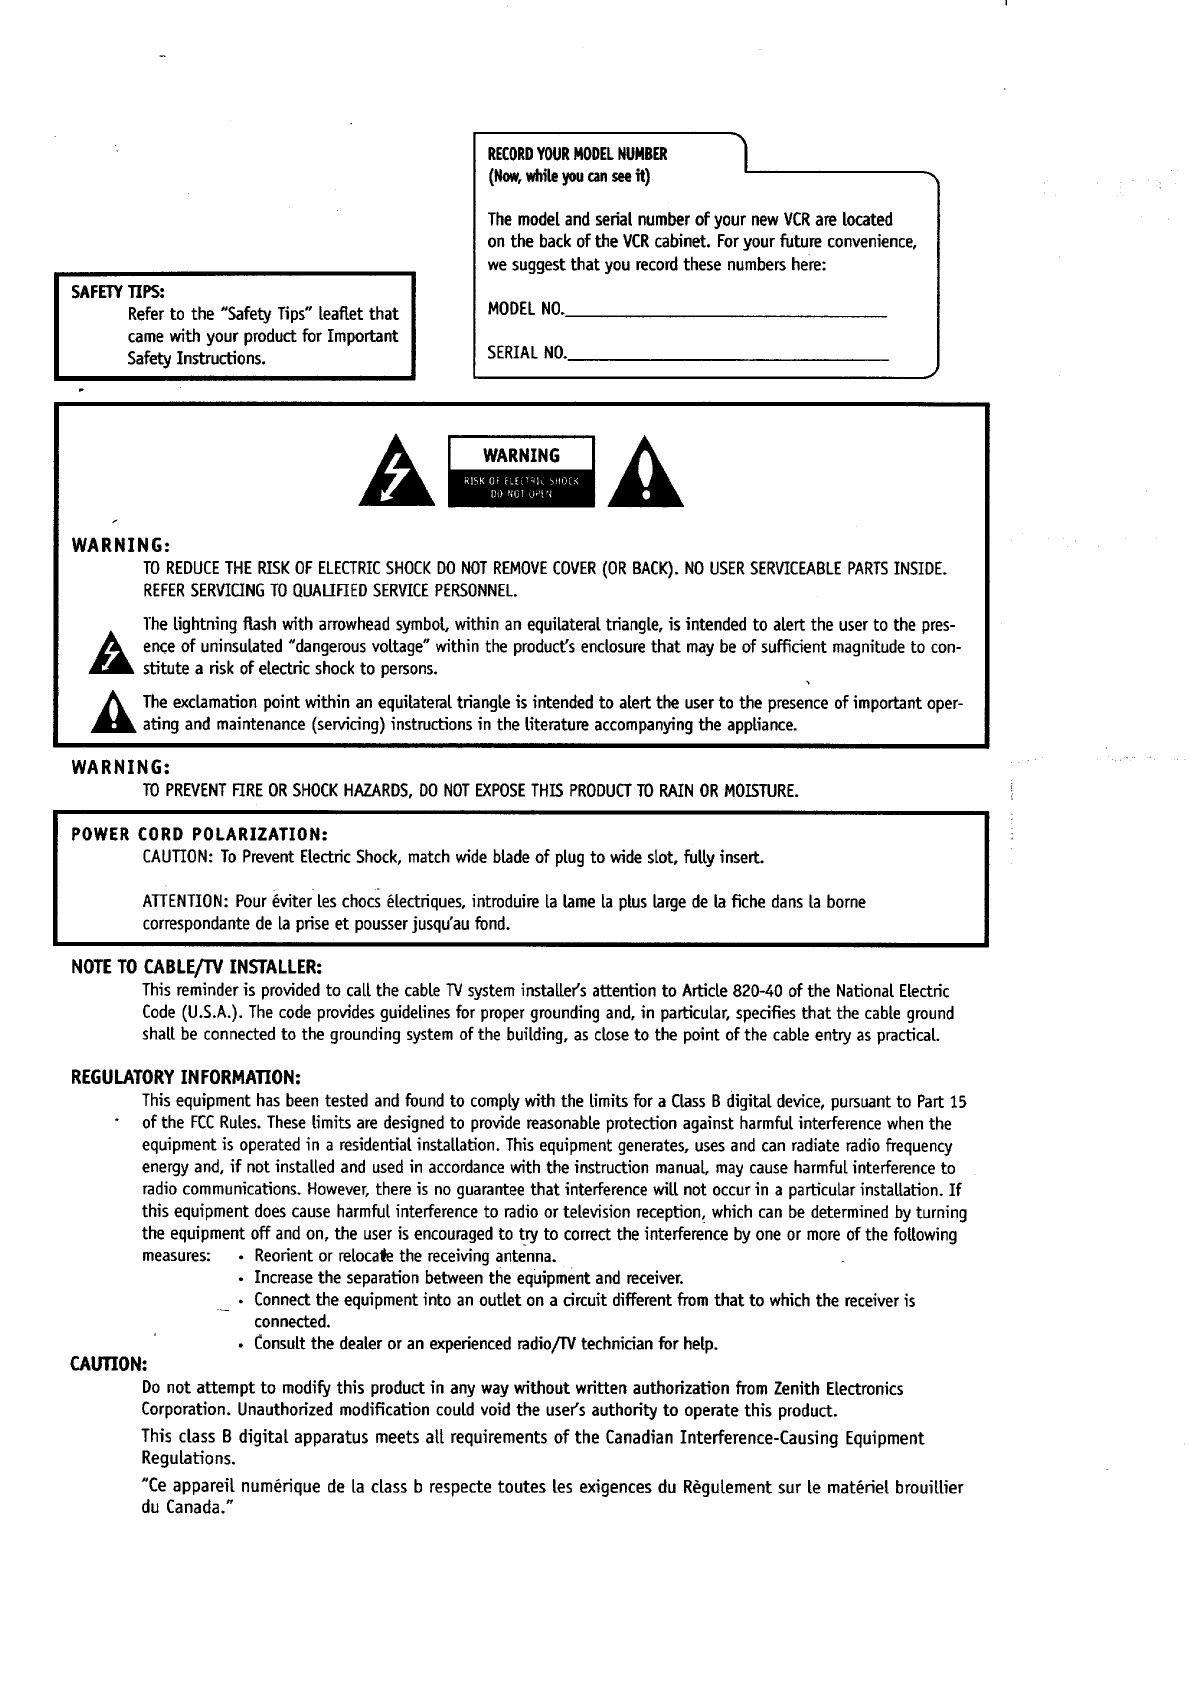
SAFETYTIPS: I
Referto the "SafetyTips"leaflet that
camewith your productfor Important
SafetyInstructions.
RECORDYOURMODELNUMBER /
(Now,whiteyoucanseeit) /
Themodelandserialnumberof your newVCRare located
on the backof the VCRcabinet.Foryourfuture convenience,
we suggestthat you recordthesenumbershere:
MODELNO.
SERIALNO.
WARNING
WARNING:
TO REDUCETHE RISKOF ELECTRICSHOCK DO NOT REMOVE COVER(OR BACK).NO USERSERVICEABLEPARTSINSIDE.
REFERSERVICINGTO QUALIFIEDSERVICEPERSONNEL.
TheLightningflashwitharrowheadsymbol,withinan equilateraltriangle,isintendedtoalerttheusertothepres-
A_IL enceofuninsuLated"dangerousvoltage"withintheproduct'senclosurethatmay be ofsufficientmagnitudetocon-
stitutea riskofelectricshockto persons.
_lL he exclamationpoint within an equilateraltriangle is intended to alertthe userto the presenceof important oper-
ating and maintenance(servicing) instructions in the Literature accompanyingthe appliance.
WARNING:
TO PREVENTFIREOR SHOCK HAZARDS,DO NOTEXPOSETHISPRODUCTTO RAINOR MOISTURE.
POWER CORD POLARIZATION:
CAUTION:To PreventElectricShock,matchwidebladeofplugto wideslot,fullyinsert.
AI-rENTION: Pour_viter+Leschocs_lectriques, introduire la lame Laplus large de la fiche dans Laborne
correspondantede [a prise et pousserjusqu'au fond.
NOTETO CABLE/1V INSTALLER:
This reminderis provided to callthe cableTVsysteminstallers attentionto Article 820-40 of the National Electric
Code(U.S.A.). Thecodeprovides guideLinesfor propergroundingand, in particular,specifiesthat the cableground
shallbe connected to the grounding systemof the building, as dose to the point of the cableentry aspractical.
REGULATORYINFORMATION:
Thisequipment has been tested andfoundto complywith the limits for aClassB digital device,pursuantto Part 15
of the FCCRules.TheseLimitsaredesignedto providereasonableprotectionagainstharmfulinterferencewhenthe
equipmentis operatedin aresidentialinsta[lation. This equipment generates,usesand canradiateradio frequency
energyand, if not insta[[edand usedin accordancewith the instructionmanual, may causeharmfulinterferenceto
radiocommunications.However,there is no guaranteethat interferencewill not occurin a particularinstallation.If
this equipmentdoescauseharmfulinterference to radio or television reception,which can be determinedby turning
the equipment off and on, the useris encouragedto try to correctthe interference by one or more of the following
measures: • Reorient or relocate the receiving antenna.
.Increasethe separationbetween the equipmentand receiver.
•Connectthe equipmentinto an outlet on a circuitdifferentfromthat to whichthe receiveris
connected.
• (_onsultthe dealeror an experiencedradio/TV technician for help.
CAUTION:
Do not attempt to modify this productin anywaywithout written authorizationfromZenith Electronics
Corporation. Unauthorizedmodification could void the user'sauthority to operatethis product.
This class B digital apparatus meets all requirements of the Canadian Interference-Causing Equipment
Regulations.
"Ce apparei[ num_rique de [a class b respecte toutes [es exigences du R_gulement sur te mat_rie| brouitlier
du Canada."

INSTALLATION I PAGE 3
FEATURES VRA412 VRA422
SpeakEZFunction X X
4-Heads (Special Video Effects) X X
Full Coad/Quick Start X X
Auto Head Cleaner XX
Audio System Monaural FiTSHi-Fi Stereo
Audio/Video (A/V) .lacks Monaural Stereo
Remote Control.MBR412 X X
Auto/ManualBand Select X X
Auto/ManualChannelSearch X X
Channel Capability (CATV&TV) 181 181
Record SpeedsSP/EP X X
Playback Speeds SP/LP/EP X X
Auto Playback System X X
Auto/Manual Digital Tracking X X
Instant Recording X X
Timer-Controlled Recording X X
Auto PLaybackTape Speed Adjust X X
Forward/Reverse Slow-Fiotion X X
Video (4-head VCR) Variable 1/10 to 1/32 Variable 1/10 to 1/32
Pause/StiU Video X X
Real-Time Tape Counter X X
Speed Search X X
CF!Skip X X
English/Spanish/FrenchMenus X , X
1-Year;8-EventTimer X X
LED ClockFrontPanelDisplay X X
Auto ClockSetSystem X X
Hook-up Cable(VCRto TV) _ X X
I. ModelVRA422 isusedforthe description,operation,and detailsprovidedinthisoperatingguide.
2.VCR designand specificationsaresubjectto change withoutpriornotice.
X = Featureis provided N/A = Feature is Not Available
Thispage
shows the fea-
tures of your
VCRand the
differences
betweenthe
models
J
J
PAGE4
f
Required
connections
for your VCR
IINSTALLATION
Connections Without a CaMe Box
Antenna
Rat Wire \\'_1 .'/J
(300 ohm)
Back Pane[ of Stereo VCR .-" ....
I/"* "300/75 ohm •
_"I Adaptor I
ANT(q ._l_l OR (Not provided) |
f-- R.AUDIO-L -T. VIDEO .-- _IN '_l-- .....
€I_OUT_IOUT_ I VHFIBHFICAT_ \ OR ----- _ableTVeTV
p,E_..l®,._,N® I_'_--_'I"Wall 3ack Back Panel of Typical rv
__A_O LJV_I_J_VHF%%, VHF/UHF_3ATV
with your VCR.
Tum off power or unplug VCR
before making any connections.
Connections With a Cable Box
_;Nm _BackPanel of Stereo VCR
I®ou, o ®IVHF/UHF/CATV
Back Panel of Typical TV
Back Pane[ of
Cable TV
Wall 3ackjTypical CabLe Box
_CABLE
-_o_, ,./ This cabLeis provided
with your VCR.
A Tum off power or unplug VCR
before making any connections.
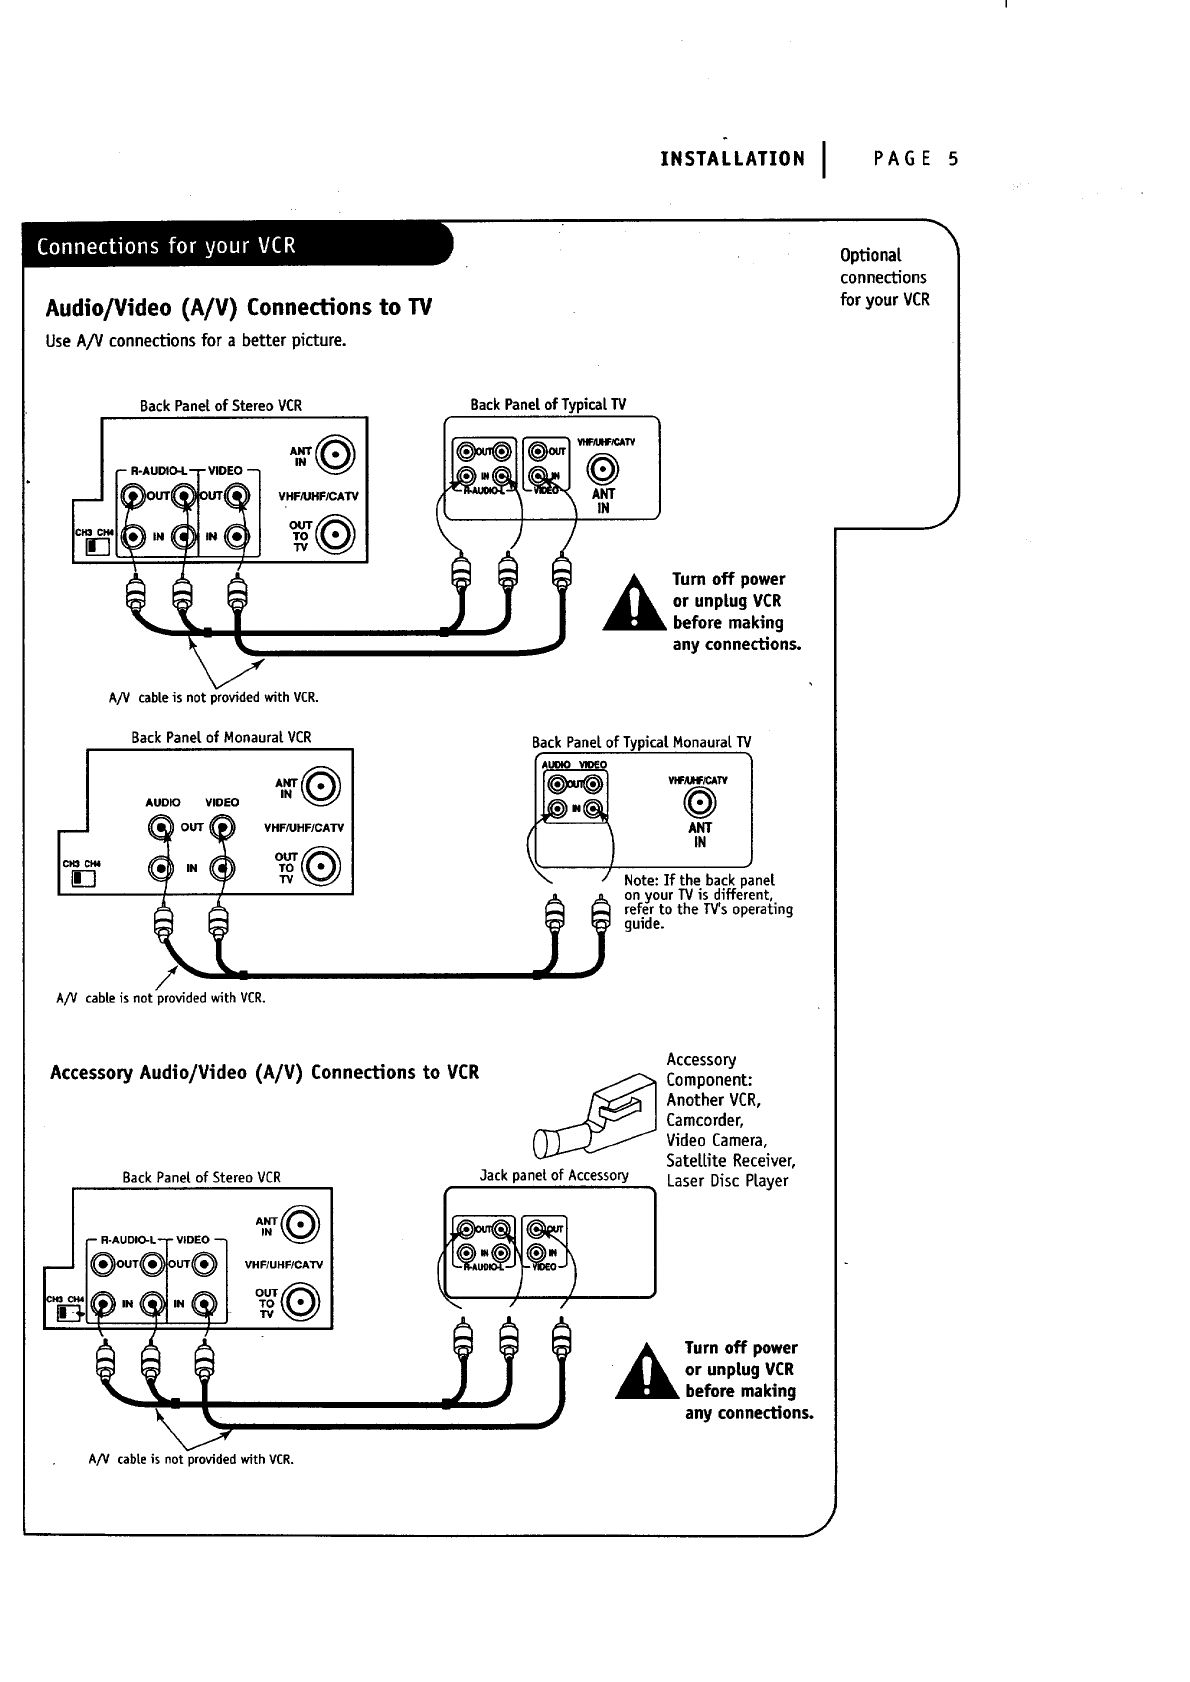
INSTALLATION I PAGE 5
Audio/Video (A/V) Connections to W
Use A/V connections for a better picture.
Optional
connections
for your VCR
Back Panel of StereoVCR
VHF/UHF/CAI'V
BackPanel of TypicalTV
4_Tum off power
or unplug VCR
before making
any connections.
J
A/V came is not provided with VCR.
Back Panelof MonauralVCR
VHF/UHF/CA'rY
BackPanelof TypicalAonauraLTV
Am"
IN
Note: If the back panel
on yourTV is different.
refer to the TV'soperating
guide.
A/V came is not provided with VCR.
AccessoryAudio/Video (A/V) Connections to VCR
BackPanel of StereoVCR Jack panelof Accessory
VHF/UHF/CATV
Accessory
Component:
Another VCR,
Camcorder,
Video Camera,
SateLUte Receiver,
Laser Disc PLayer
A urn off power
or unplug VCR
before making
any connections.
A/V cable is not provided with VCR.
J
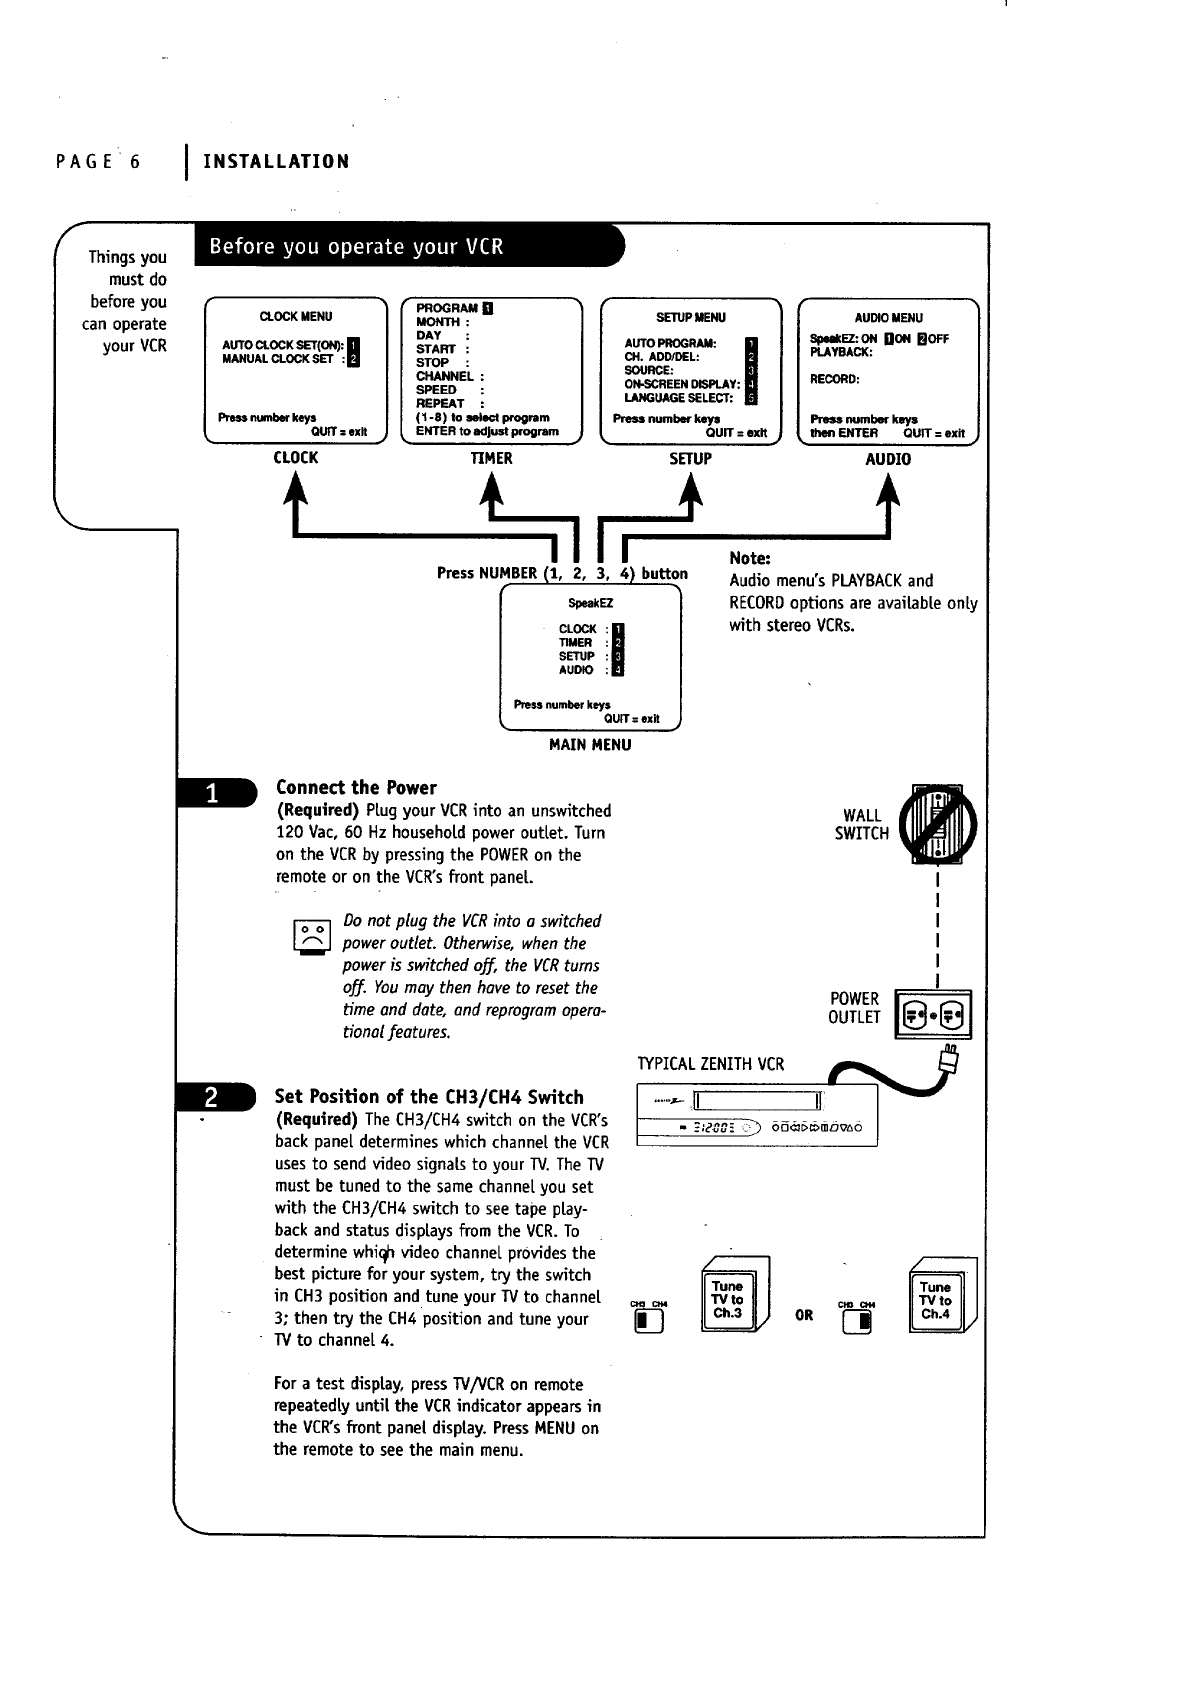
PAGE 6 INSTALLATION
f
Things you
must do
before you
can operate
your VCR
CLOCK MENU
AUTO CLOCK SET(ON): []
MANUAL CLOCK SET :N
Press number keys
QUIT =exit
CLOCK
PROGRAMIgl
MONTH:
DAY :
START :
STOP :
CHANNEL :
SPEED :
REPEAT
(1-8) toselectprogram
ENTER to adjust program
TIMER
SETUP MENU 1
AUTO PROGRAM:
CH. ADD/DEL:
SOURCE:
ON-SCREEN DISPLAY:
LANGUAGE SELECT:
Pressnumberkeys
QUIT= exit
SETUP
I I Note:
Press NUMBER (1, 2, 3, 4) button
SpeakEZ 1
CLOCK!I
TIMER
SETUP
AUDIO
Press number keys
QUIT : exit
MAIN MENU
IAUDIO MENU
S_kE2:ON D_ Bo_
PLAYBACK:
RECORD:
Press number keys
then ENTER QUIT: exit
AUDIO
Audio menu's PLAYBACKand
RECORDoptions are avaiLabLeonly
with stereo VCRs.
Connect the Power
(Required) PLugyour VCRinto an unswitched
120 Vac, 60 Hz householdpower outlet. Turn
on the VCRby pressingthe POWERonthe
remote or on the VCR'sfront paneL.
WALL
SWITCH
Do not plug the VCRinto aswitched
poweroutlet. Otherwise, when the
power is switched off, the VCRturns
off. Youmay then have to reset the
Hme and date, and reprogram opera-
tional features.
Set Position of the CH3/CH4 Switch
(Required) The CH3/CH4 switch on the VCR's
back panel determines which channel the VCR
uses to send video signals to your TV. The TV
must be tuned to the same channeL you set
with the CH3/CH4 switch to see tape pLay-
back and status displays from the VCR. To
determine whiqh video channel provides the
best picture for your system, try the switch
in CH3 position and tune your TV to channel
3; then try the CH4 position and tune your
TV to channel 4.
i÷÷1
OUTLET •
TYPICAL ZENITH VCR _ @
....... ,ll I[
For a test display, press TV/VCR on remote
repeatedly until the VCR indicator appears in
the VCR's front pane[ display. Press MENU on
the remote to see the main menu.
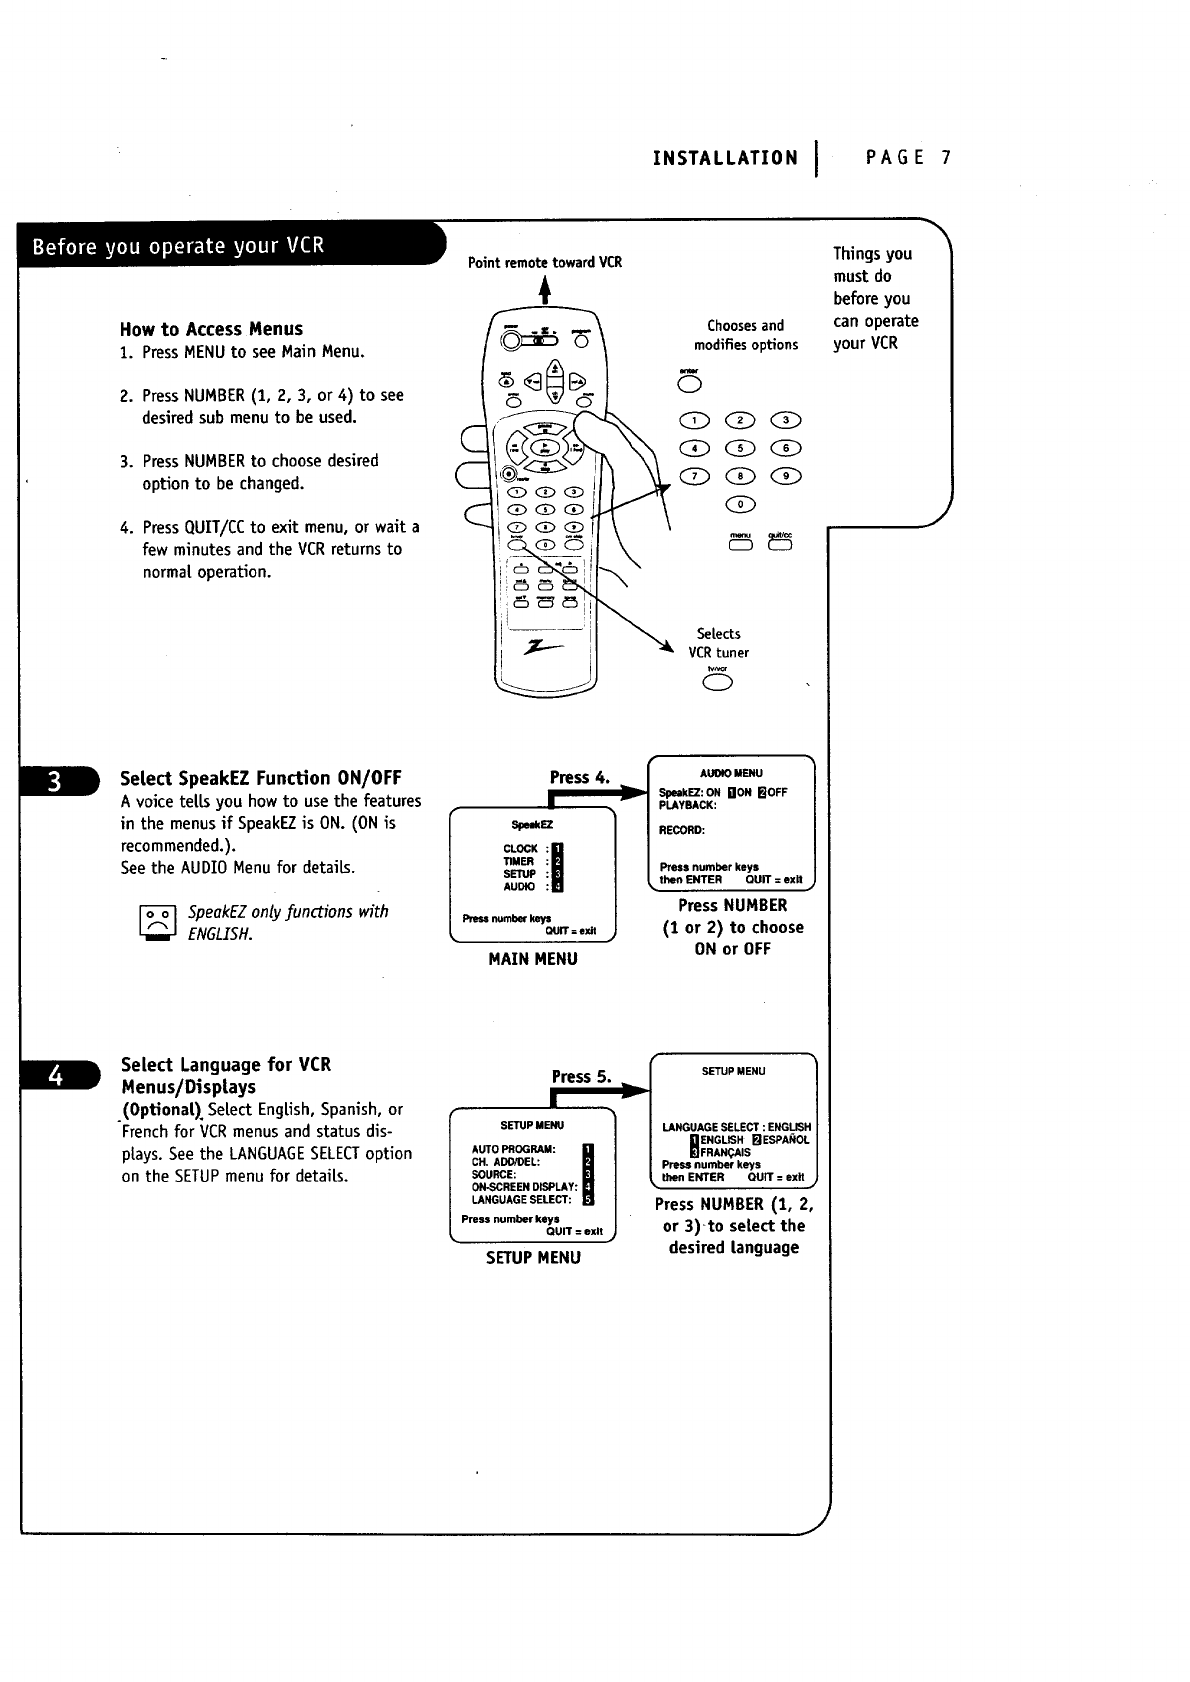
INSTALLATION IPAGE 7
Howto AccessMenus
1. PressMENUto seeMainMenu.
2. PressNUMBER(1, 2, 3, or 4) to see
desired sub menu to be used.
3. Press NUMBER to choose desired
option to be changed.
4. Press QUIT/CC to exit menu, or wait a
few minutes and the VCR returns to
normal operation.
Select SpeakEZ Function 0N/OFF
Avoice teLLsyou how to usethe features
in the menusif SpeakF_Zis 0N. (ON is
recommended.).
Seethe AUDIOMenu for details.
_peakEZ only functions with
EN6LISH.
SeLect Language for VCR
Menus/Displays
.(OpUonaL).Select English,Spanish,or
Frenchfor VCRmenusand status dis-
plays.Seethe LANGUAGESELECToption
on the SETUPmenufor detaiLs.
C
C
C
Point remote toward VCR
Press 4.
Iv
I-i,
CLOCK
TIMER
SETUP
AUDIO
Press number kmpJ
_n" =exit
MAIN MENU
Press 5.
ISETUP MENU _
AUTO PROGRAM:
CH. ADD/OEL:
SOURCE:
ON-SCREEN DISPLAY:
LANGUAGE SELECT:
Press number keys
QUIT = exit
SETUP MENU
Choosesand
modifiesoptions
(2>
(S>
Selects
VCRtuner
tv_
C)
IAUOIOMENU ]
SpsskEZ:ONNONROFF
PLAYBACK:
RECORD:
Press number keys
then ENTER QUIT = exit
Press NUMBER
(1 or 2) to choose
ON or OFF
ISETUP MENU
LANGUAGE SELECT : ENGUSI
nENGLISH _ ESPAI_IOL
[EJFRAN_,AIS
Press number keys
then ENTER QUIT = exit •
Press NUMBER (1, 2,
or 3)-to select the
desired Language
Thingsyou
must do
beforeyou
can operate
your VCR
J
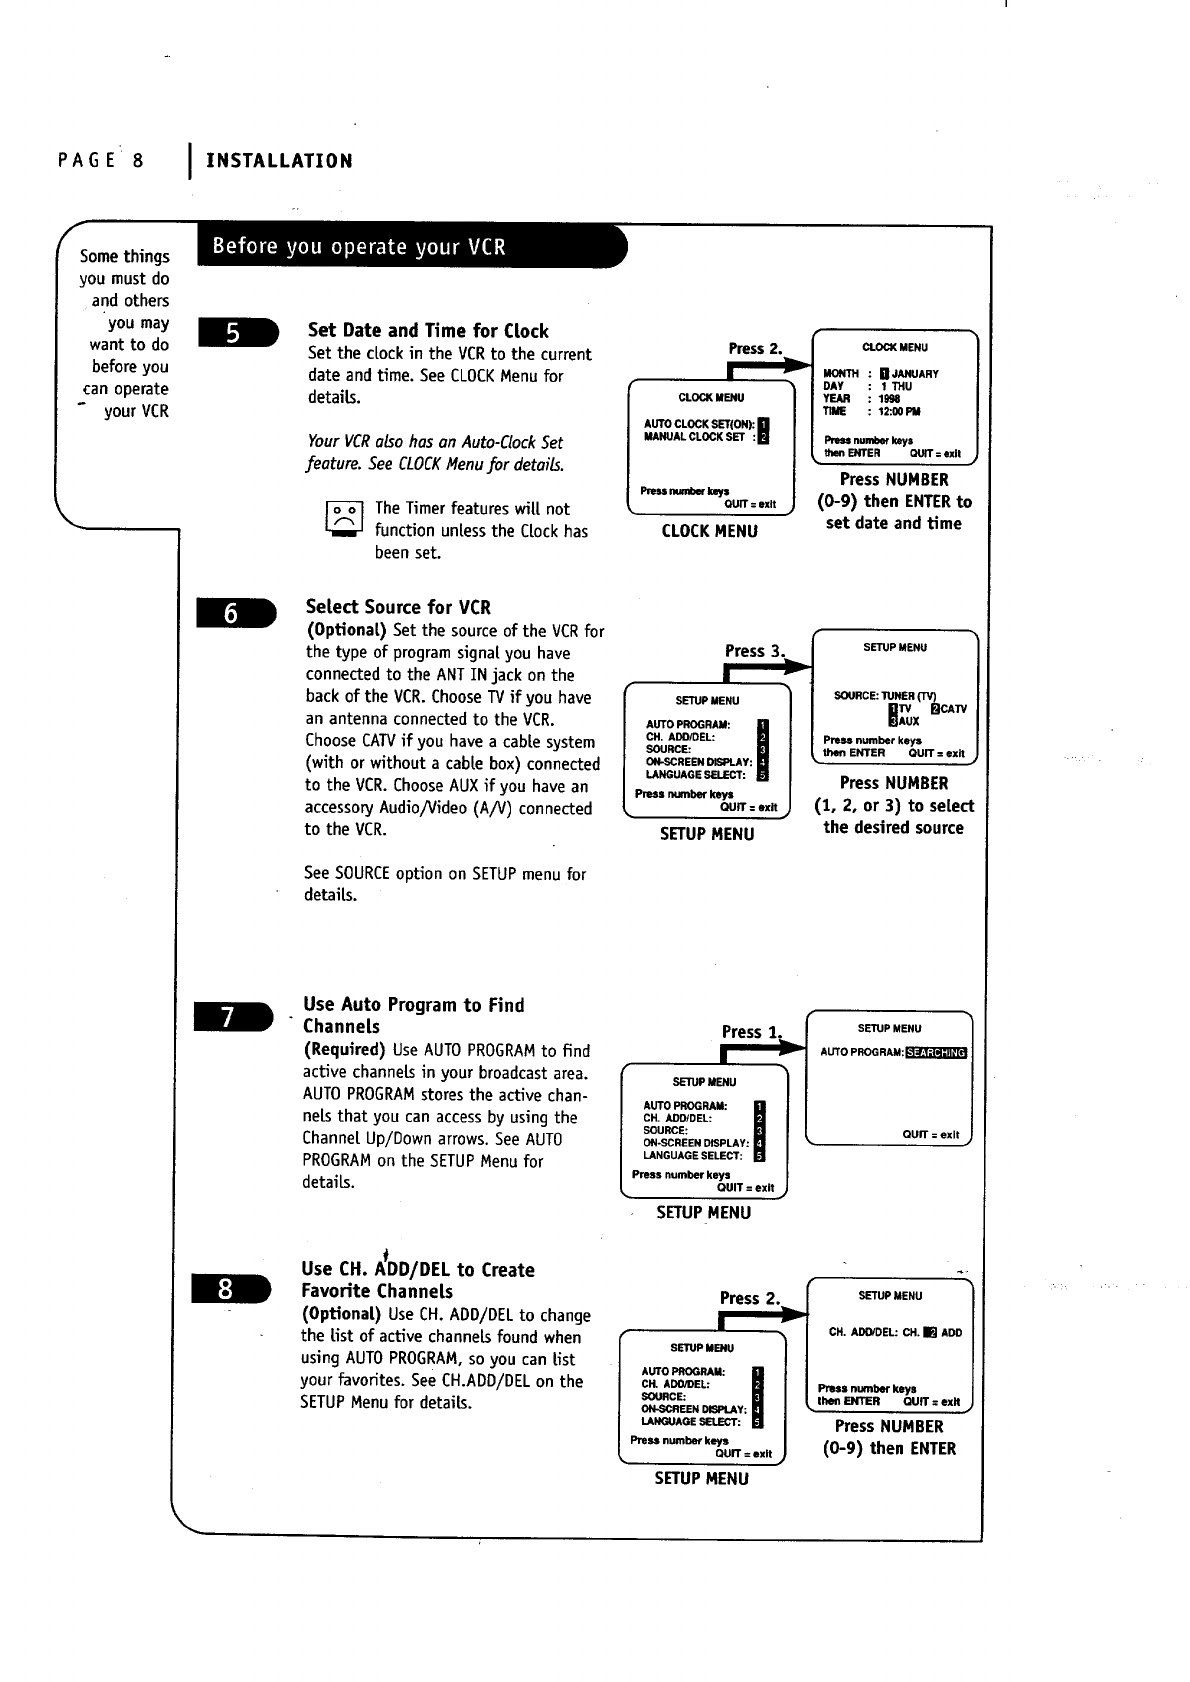
PAG E 8
f
Some things
you must do
and others
you may
want to do
before you
can operate
your VCR
I INSTALLATION
_.
Set Date and Time for Clock
Set the dock in the VCR to the current
date and time. See CLOCKMenu for
details.
YourVCRalsohas an Auto-ClockSet
feature. See CLOCKMenufor details.
The Timer features wit[ not
function unless the Clock has
been set.
Select Source for VCR
(Optiona[) Set the source of the VCR for
the type of program signal you have
connected to the ANT IN jack on the
back of the VCR. Choose TV if you have
an antenna connected to the VCR.
Choose CATVif you have a cable system
(with or without a cabte box) connected
to the VCR. Choose AUX if you have an
accessory Audio/Video (A/V) connected
to the VCR.
SeeSOURCEoption on SETUPmenu for
details.
Use Auto Program to Find
Channels
(Required) Use AUTO PROGRAMto find
active channels in your broadcast area.
AUTO PROGRAMstores the active chan-
nets that you can access by using the
Channe[ Up/Down arrows. See AUTO
PROGRAMon the SETUP Menu for
detaiLs.
Use CH. ADD/DEL to Create
Favorite Channels
(Optional) Use CH. ADD/DELto change
the Listof active channelsfound when
using AUTOPROGRAM,so you can list
your favorites. SeeCH.ADD/DELon the
SETUPMenufor details.
C
Press 2, | CLO(_ MENU
I_ //.om_ : BJA"UARY
/| DAY : 1 THU
CLOCKMENU 1/Y F.AR : 1998
AUTO CLOCK SET(ON): Im || "/ T1ME
12:00 PM
MANUALCLOCKSET :[] |Press numberkeys
then ENTER CIUIT = exit
Press NUMBER
_re...,,_ k_ I
QuiT=exitJ (0-9) then ENTER to
set date and time
CLOCK MENU
Press 3. SETUPMENU
SOURCE:TUNER('rv)
SETUPMENU
QUIT = exit
Press NUMBER
(1, a, or 3) to setect
the desired source
Press 1_
m "
SETUP MENU
AUTO PROGRAM:
CH. AOO(CIEL:
SOURCE:
ON-SCREEN DISPLAY:
LANGUAGESELECT:
Press n_n_bevkeys
QUIT = exit
SETUP MENU
ISETUP MENU 1
AUTO PROGRAM:I_ I
QUIT = exit J
II _CH. ADD/DEL: CH. [] ADD
IsE'ru,MENu 1
| AUTO PROGRAM: Lll |
i CH. ADO/DEL: /Press number keys |
| SOURCE: | tilth ENTER QUIT = exN .,)
| ON-SCREEN DISPLAy: |
l l Press NUMBER
/ P_""um_r k_r, / (0-9) then ENTER
Lourr:..It j
SETUP MENU
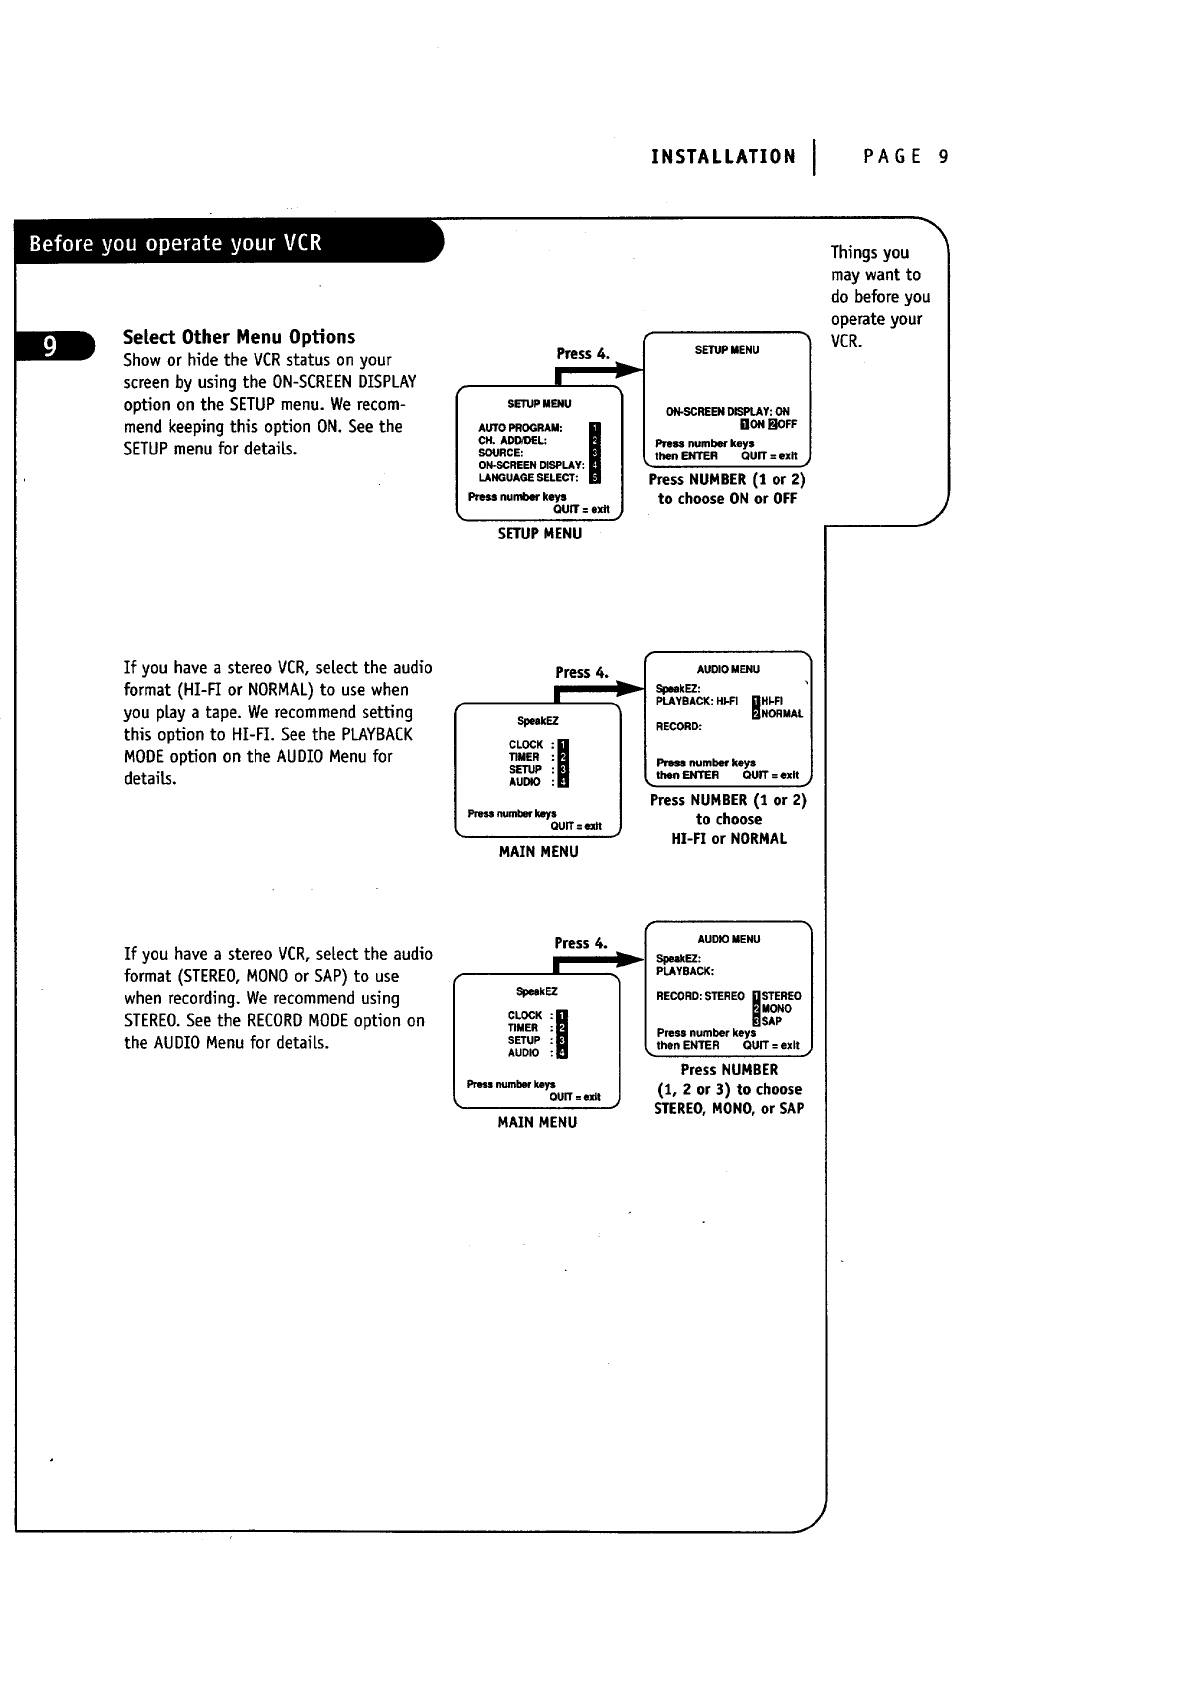
INSTALLATION I PAGE 9
Select Other Menu Options
Showor hidethe VCRstatus on your
screenby usingthe ON-SCREENDISPLAY
option on the SETUPmenu. Werecom-
mend keeping this option ON. Seethe
SETUP menu for detaiLs.
Ifyou havea stereoVCR,seLecttheaudio
format(HI-FIorNORMAL) to usewhen
you pLaya tape.We recommendsetting
thisoptionto HI-FI.See thePLAYBACK
MODE optionon theAUDIO Menu for
details.
Ifyou have a stereoVCR, selectthe audio
format (STEREO,MONO or SAP) to use
when recording.We recommend using
STEREO. See the RECORD MODE option on
the AUDIO Menu fordetails.
Press 4.I
m_
SETUP MENU
AUTO PROGRAM:
C1!. ADO/DeL:
SOURCE:
ON-SCREEN DISPLAY:
LANGUAGE SELECT:
Press number keys
QUIT: exit
SETUPMENU
-ISETUP MENU 1
ON-SCREEN DISPLAY:ON
/.ON _OFF /
|Press number keys |
_. thenENTER Qurr: ,xk J
PressNUMBER (1 or 2)
to choose ON or OFF
Press4.
|
SpeskEZ
CLOCK ii _
"rIMER
SETUP
AUDIO
Pressnumberkeys
QUIT: exit
MAIN MENU
AUDIO MENU
SpsskEZ:
PLAYBACK: HI-FI IBIHI-FI
_NORMAL
RECORD:
Press number keys
then ENTER QUIT = exit
Press NUMBER(1 or 2)
to choose
HI-FI or NORMAL
Press4.
|
CLOCK
TIMER
SETUP
AUDIO
Pressnurnber keys
OUIT = exit
MAIN MENU
fAUDIO MENU
"_ I SpakEZ:
_PLAYBACK:
| RECORD: STEREO nSTEREO
I BMoNo
/ Press number keysklSAP
then ENTER QUIT = exit ,_
PressNUMBER
(1, 2 or 3) to choose
STEREO,MON0, or SAP
Thingsyou
may want to
do beforeyou
operateyour
VCR.
J
J
I
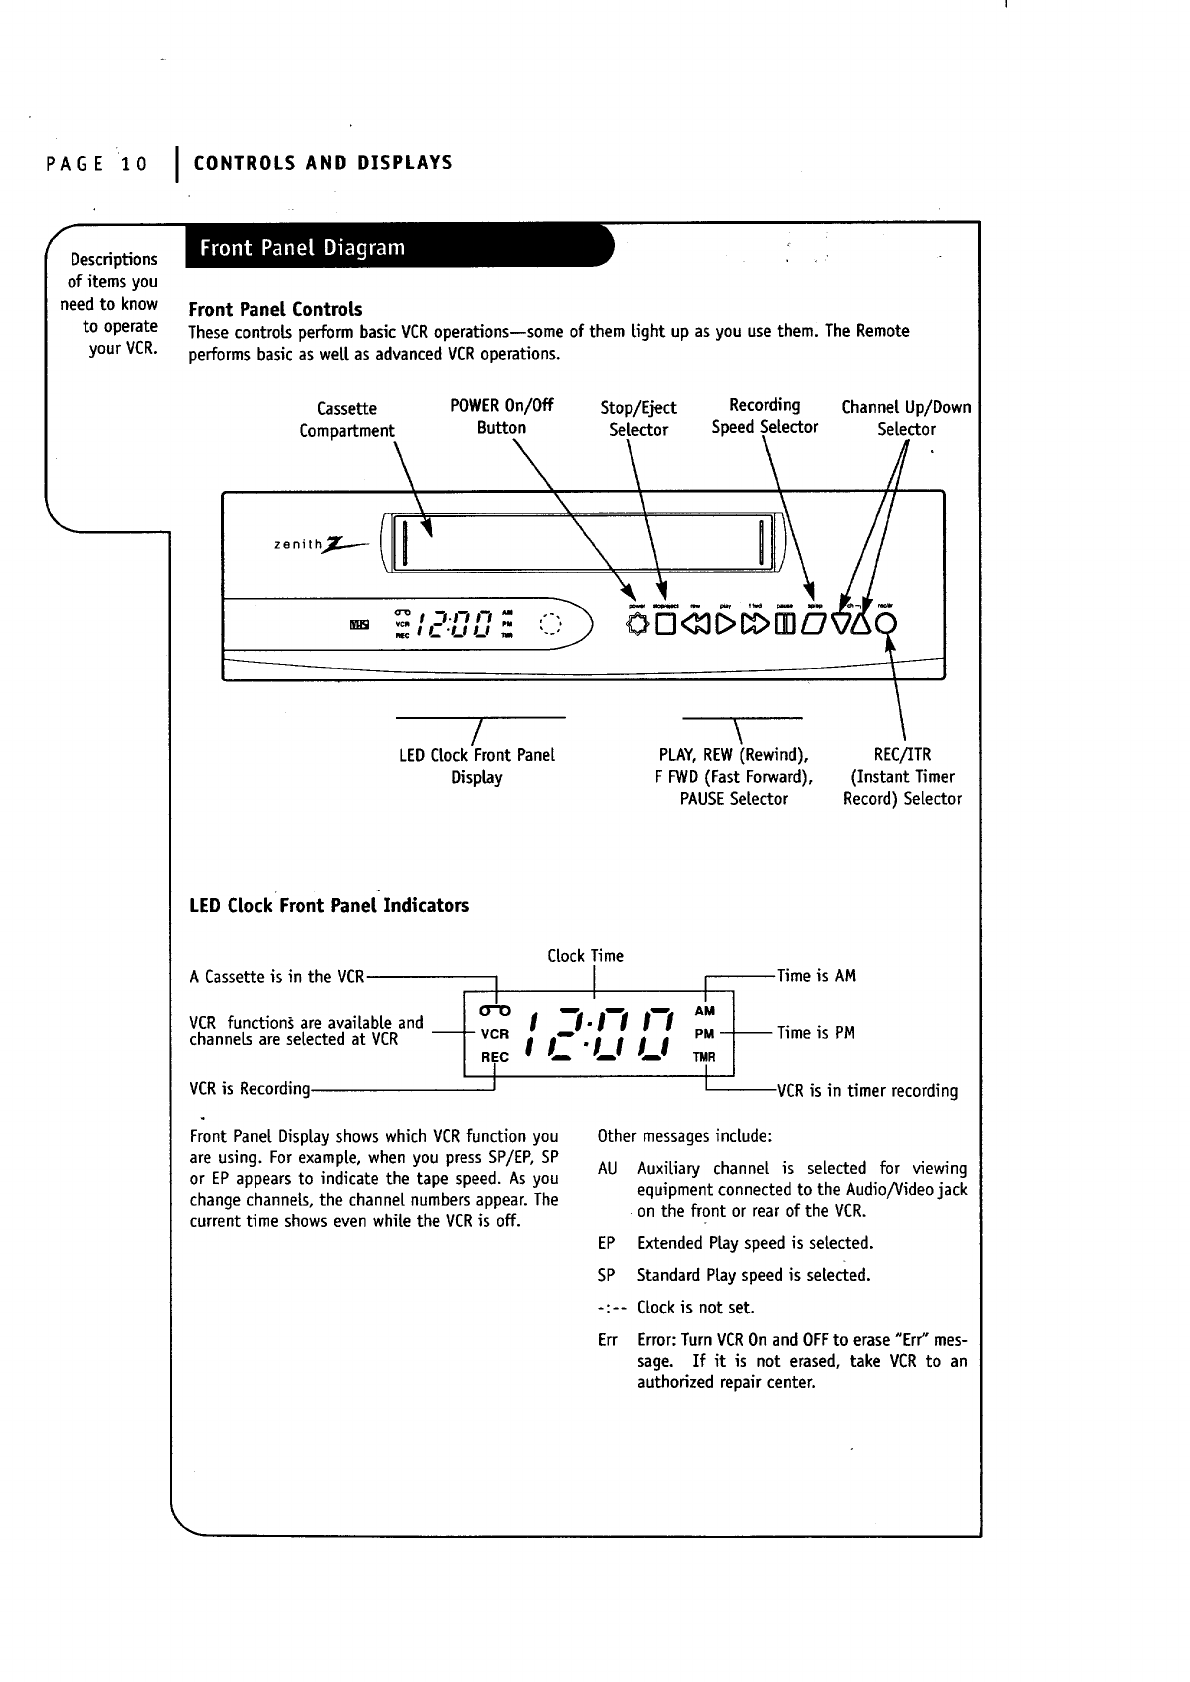
PAGE 10 CONTROLS AND DISPLAYS
f
Descriptions
of items you
need to know
to operate
your VCR.
Front Panel Controls
Thesecontrols performbasicVCRoperaUons--someof them light up asyou use them. The Remote
performsbasicaswell asadvancedVCRoperations.
Cassette
Compartment
zenith_
.= IC'U U
POWEROn/Off Stop/Eject Recording Channel Up/Down
Button Selector Speed Selector Selector
/\
LED Clock Front Panel PLAY, REW (Rewind), REC/ITR
Display F FWD (Fast Forward), (Instant Timer
PAUSESelector Record) Selector
LEDClock Front Panel Indicators
ACassette is in the VCR
//
VCR function_ are available and /__°__
channels are selected at VCR -- F:i:
VCR is Recording
Clock Time
I
[L"U t_l
AUiL-_Time is AM
PM -I Time is PM
TUL| VCRis in timer recording
Front Panel Display shows which VCR function you
are using. For example, when you press SP/EP, SP
or EP appears to indicate the tape speed. As you
change channels, the channel numbers appear. The
current time shows even while the VCR is off.
Other messages include:
AU Auxiliary channel is selected for viewing
equipment connected to the Audio/Video jack
on the front or rear of the VCR.
EP Extended Play speed is selected.
SP Standard Play speed is selected.
-:-- CLock is not set.
Err Error: Turn VCR On and OFF to erase "Err" mes-
sage. If it is not erased, take VCR to an
authorized repair center.
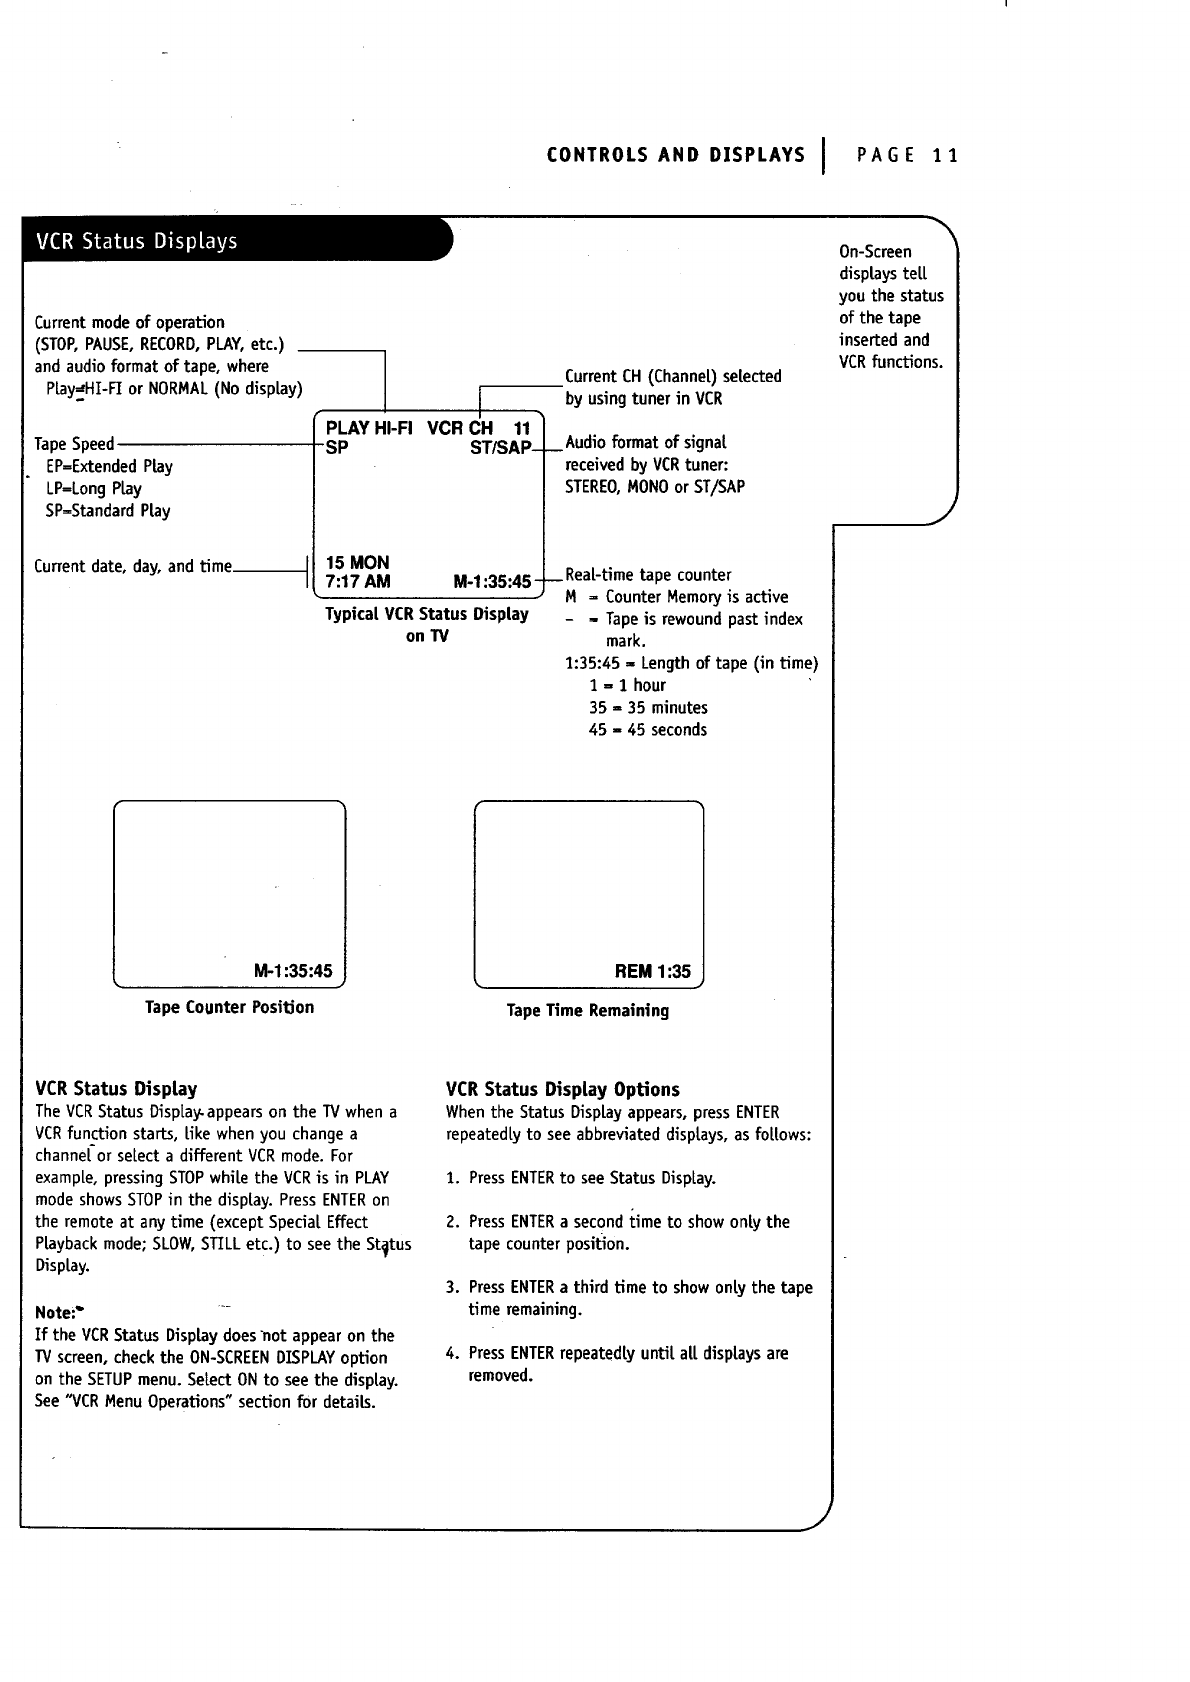
CONTROLS AND DISPLAYS IPA GE I 1
Current modeof operaUon
(STOP,PAUSE,RECORD,PLAY,etc.)
and audioformat of tape, where
PLay-HI-FI or NORMAL(No display)
TapeSpeed
EP=ExtendedPlay
LP=LongPlay
SP=StandardPlay
Current date, day, and Ume I
I•
PLAY HI-FI VCR CH 11
SP ST/SAP-
Current CH (ChanneDsetected
by usingtuner in VCR
15 MON
7:17 AM M-1:35:45-
Typical VCRStatus gisptay
on TV
Audio format of signat
receivedby VCRtuner:
STEREO,MONOor ST/SAP
_Rear-time tape counter
M = Counter Memory is active
- = Tapeis rewoundpastindex
mark.
1:35:45 =Length of tape (in Ume)
1=1 hour
35 = 35 minutes
45 =45 seconds
M-1:35:45
Tape Counter PosiUon
REM 1:35
TapeTime Remaining
VCR Status Disptay
The VCR Status Display-appears on the TV when a
VCR function starts, Eke when you change a
channei'or select a different VCR mode. For
example, pressing STOPwhile the VCR is in PLAY
mode shows STOP in the display. Press ENTER on
the remote at any time (except Special Effect
Ptayback mode; SLOW,STILL etc.) to see the Status
Display.
Note:" '-
If the VCRStatus Displaydoesnot appearon the
TVscreen,checkthe ON-SCREENDISPLAYoption
on the SETUPmenu.SetectONto seethe disp[ay.
See"VCRMenuOperations"sectionfor details.
VCR Status Display Options
Whenthe Status Displayappears,pressENTER
repeatedly to see abbreviateddisptays,as follows:
1. PressENTERto see StatusDisplay.
2. PressENTERa secondtime to show only the
tape counterposition.
3. PressENTERa third time to showonty the tape
time remaining.
4. PressENTERrepeatedtyuntit at[displaysare
removed.
On-Screen
displaystet[
you the status
of the tape
inserted and
VCRfunctions.
J
J
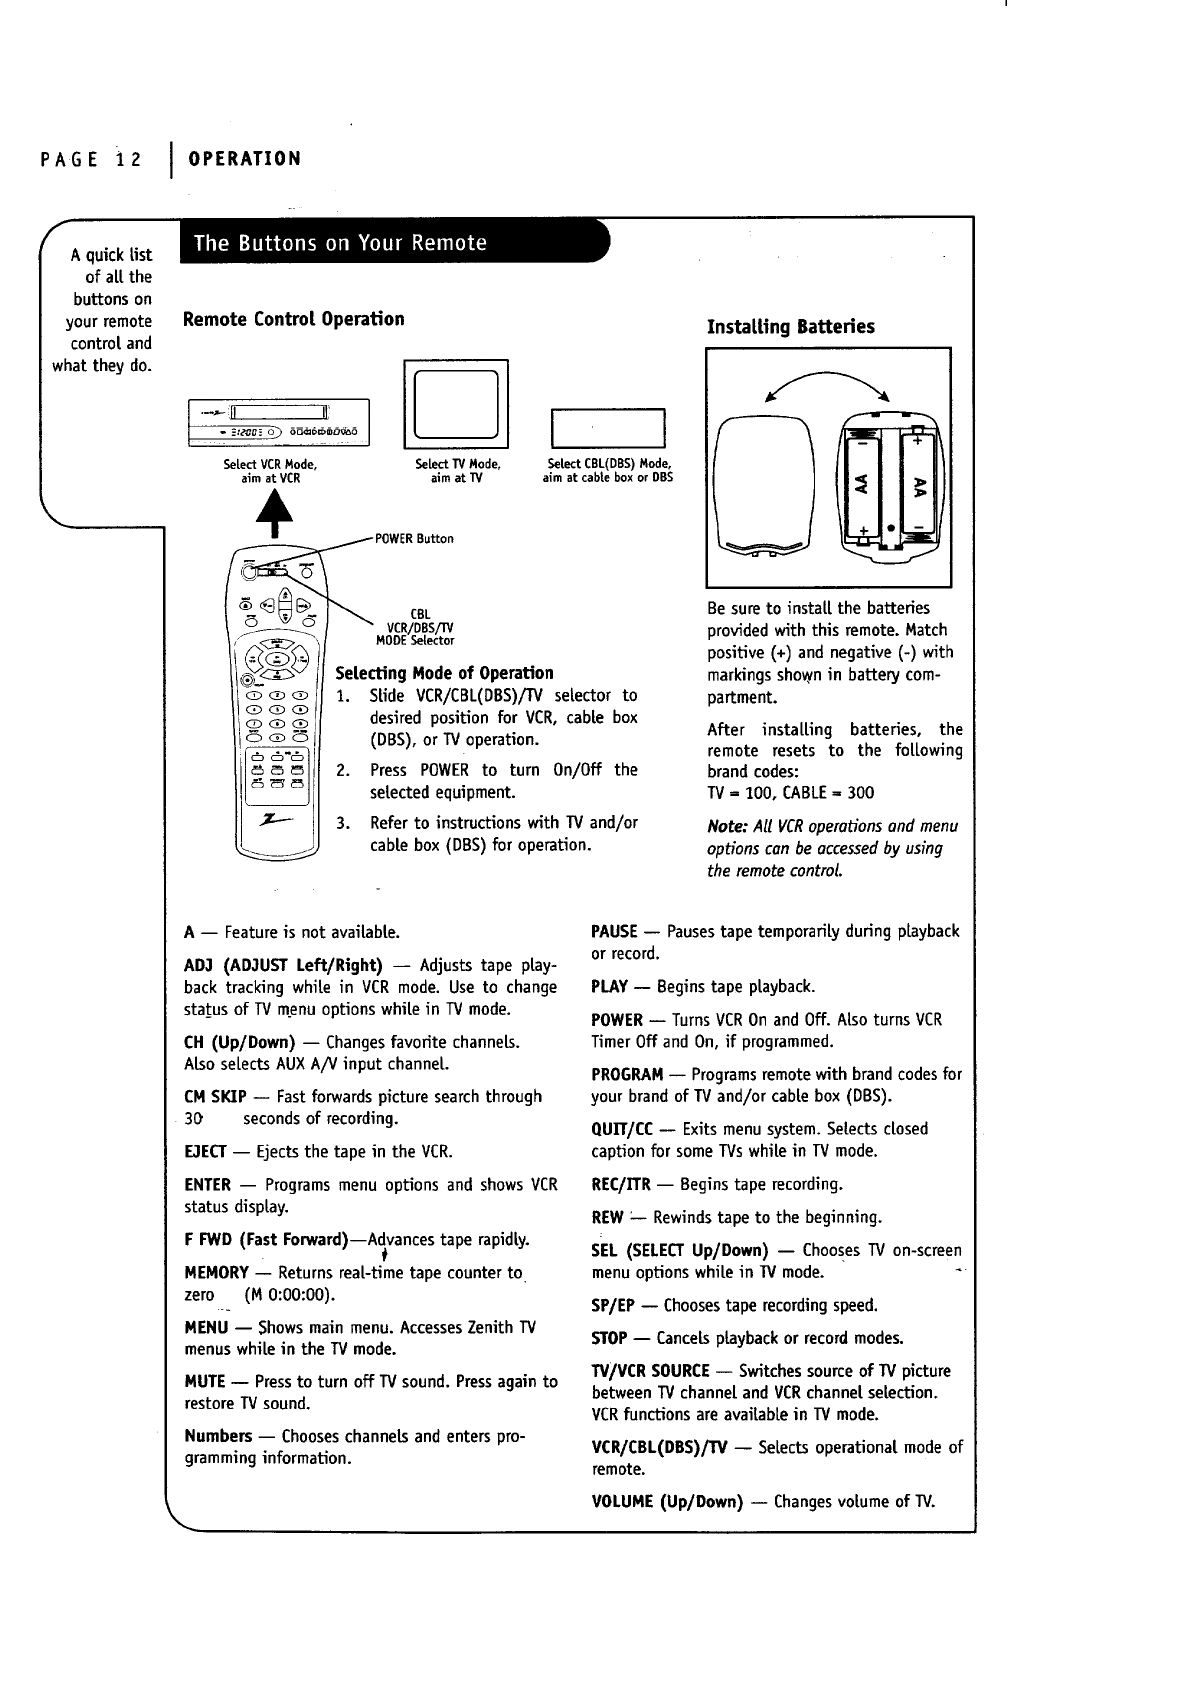
PAGE i2
f
A quick List
of at[the
buttons on
your remote
controland
what they do.
\
I OPERATION
Remote Contro[ Operation
Select VCRMode, Select CBL(DBS)Mode,
aim at VCR aim at cable box or DBS
{ Jl
SelectTV Mode,
aim at IV
÷
POWER Button
/"_ vcR/oBsm
A_A "_IMODE Selector
_<_ ]] Selecting Mode of Operation
<z><_ Q/J 1. SLide VCR/CBL(DBS)/IV selector to
I_o__ =_<_-I/ desired position for VCR, cable box
i_ o _ !l (DBS),orTV operation.
i_ll 2. Press POWERto turn On/Off the
!_[I selectedequipment.
I 113 Refer to instructionswith IV and/or
cable box (DBS)for operation.
InstaiUng Batteries
Be sureto instaLLthebatteries
providedwiththisremote.Match
positive(+)and negative(-)with
markingsshownin battenjcom-
partment.
After installing batteries, the
remote resets to the foLLowing
brand codes:
IV = 100, CABLE=300
Note: All VCRoperations and menu
options can be accessedby using
the remote control.
A -- Feature is not avaiLabLe.
AD3 (AD3UST Left/Right) -- Adjuststape play-
back tracking while in VCR mode. Use to change
sta_tusof TVmenu optionswhile in TV mode.
CH (Up/Down) -- ChangesfavoritechanneLs.
ALsoseLectsAUX AiV inputchanneL.
CM SKIP -- Fastforwardspicturesearchthrough
30 secondsofrecording.
E3ECT -- Ejects the tape in the VCR.
ENTER-- Programs menu options and showsVCR
status display.
F FIND (Fast Forward)--Advancestaperapidly.
t
MEMORY-- ReturnsreaL-timetape counter to
zero (M 0:00:00).
MENU -- Showsmain menu.AccessesZenith IV
menuswhite in the IV mode.
MUTE-- Pressto turn off IV sound.Pressagain to
restoreIV sound.
Numbers -- Chooses channeLs and enters pro-
gramming information.
PAUSE -- Pauses tape temporaFiLy during playback
or record.
PLAY -- Begins tape playback.
POWER -- Turns VCR On and Off. ALSoturns VCR
Timer Off and On, if programmed.
PROGRAM -- Programs remote with brand codes for
your brand of IV and/or cable box (DBS).
ouTr/cc -- Exits menu system. SeLects closed
caption for some Ivs while in IV mode.
REC/ITR -- Begins tape recording.
REW _- Rewinds tape to the beginning.
sEL (SELECT Up/Down) -- Chooses IV on-screen
menu options white in IV mode. 4
SP/EP -- Chooses tape recording speed.
STOP -- CanceLsplayback or record modes.
TV/VCR SOURCE -- Switches source of TV picture
between IV channel and VCR channel selection.
VCR functions are available in IV mode.
VCR/CBL(DBS)/TV -- Selects operational mode of
remote.
VOLUME (Up/Down) -- Changes volume of IV.
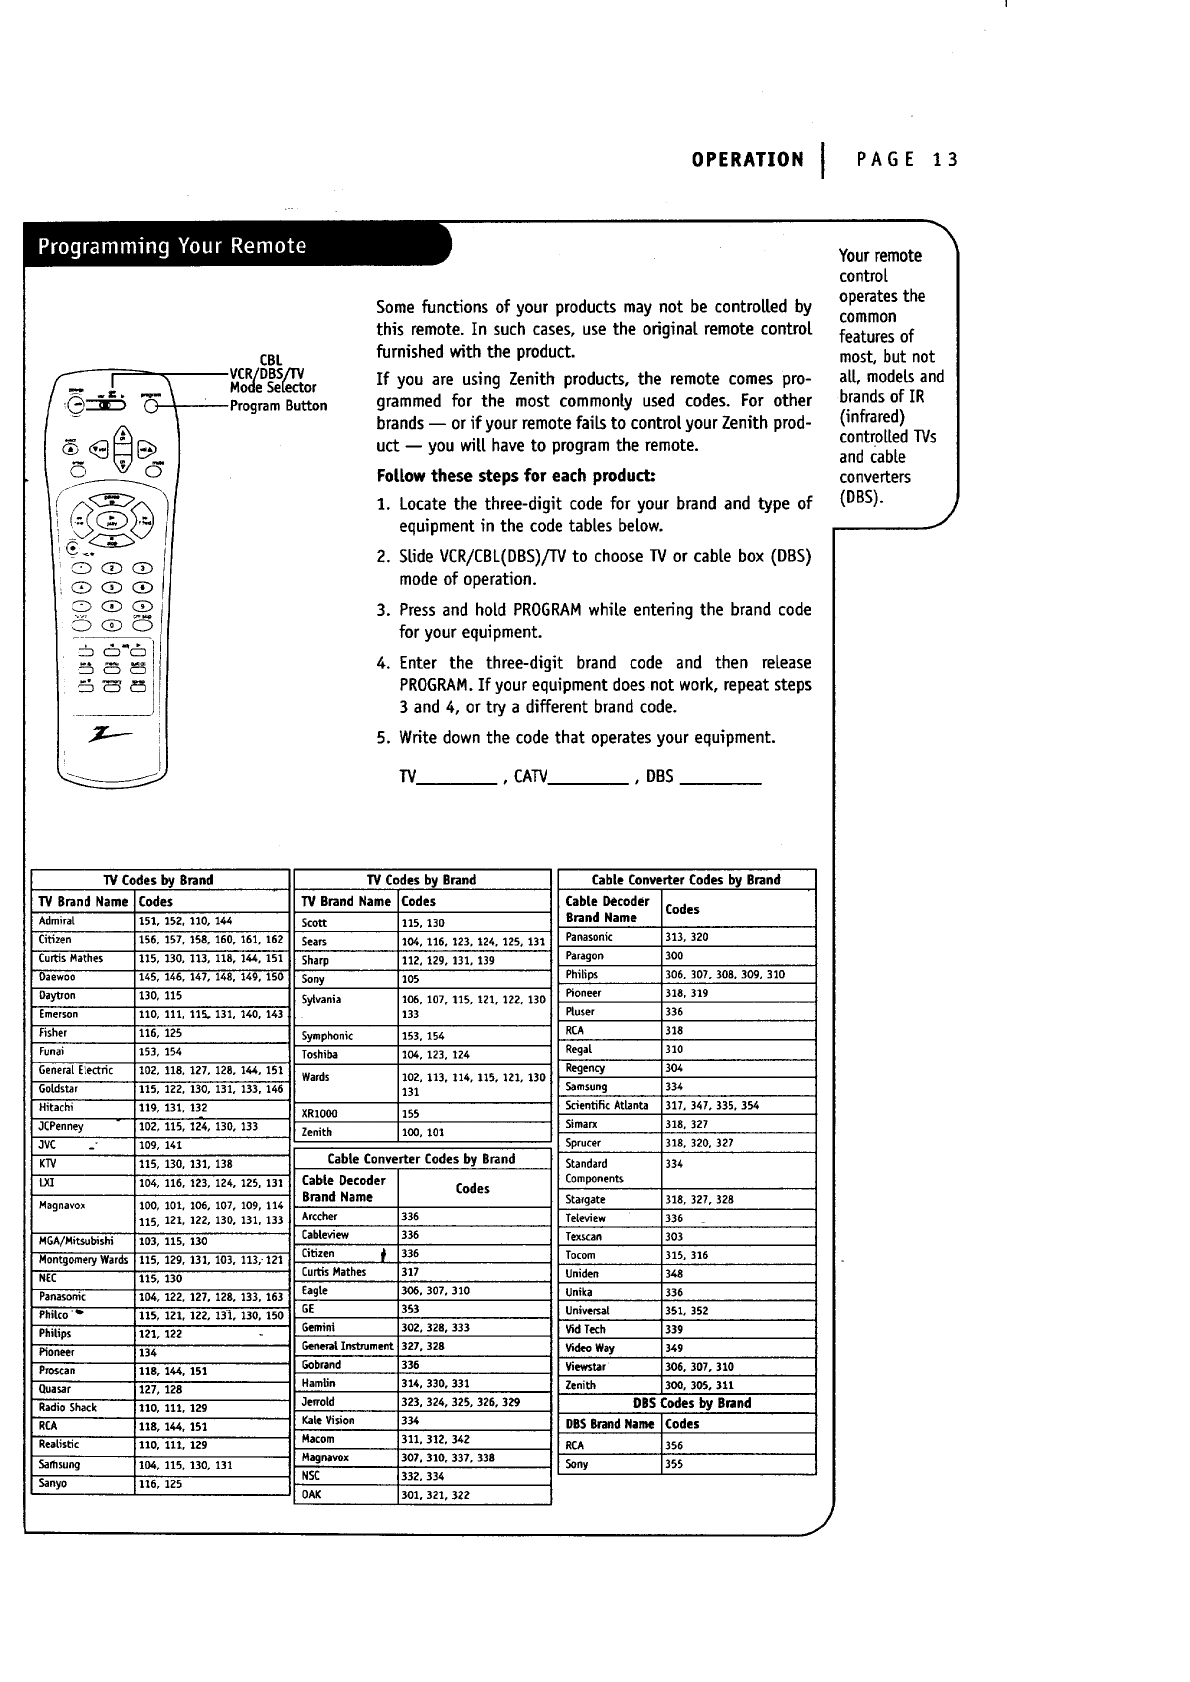
OPERATION I PAGE 13
CBL
VCR/DBS/TV
Mode Selector
'_--'_"_ --Program Button
@(D(D
_ CZ2) CZ2)
Somefunctions of your productsmay not be controlled by
this remote.In such cases,use the original remote control
furnished with the product.
If you are using Zenith products,the remote comes pro-
grammedfor the most commonly used codes. For other
brands-- or if your remotefaiLsto controlyourZenith prod-
uct -- you will haveto programthe remote.
Follow these stepsfor each product:
1. Locate the three-digit code for your brandand type of
equipmentin the code tab|es below.
2. SlideVCR/CBL(DBS)/IVto chooseIV or cable box (DBS)
modeof operation.
3. Pressand hold PROGRAMwhile entering the brand code
for yourequipment.
4. Enter the three-digit brand code and then release
PROGRAM.If yourequipmentdoesnot work,repeat steps
3 and4, ortry a different brandcode.
5. Write downthe code that operatesyour equipment.
IV ,CATV ,DBS
TV Codes by Brand TV Codes by Brand
TV Brand Name Codes TV Brand Name Codes
Admiral 151, 152,110, 144 Scott 115,130
Citizen 156, 157, 158,
Curtis Mathes 115, 130. 113,
Daewoo 145, 146. 147,
Daytzon 130, 115
Emerson 110, 111. 115.
Fisher 116, 125
Funai 153, 154
Genera[ Electric 102, 118. 127,
Goldstar 115, 122, 130,
Hitachi 119, 131, 132
3CPenney 102, 115, 12"4,
3VC 109, 141
KTV 115, 130, 131,
LXI 104, 116, 123,
Magnavox 100, 101, 106,
115, 121, 122,
MGA/Mitsublshi 103, 115, 130
Montgomery Wards 115, 129, 131,
NEC 115, 130
Panasonic 104, 122, 127,
Phi|co_ 115, 121, 122,
PhiUps 121, 122
Pioneer 134
Proscan 118, 144. 151
Quasar 127, 128
Radio Shack 110, 111,
RCA 118, 144,
Realistic 110, 111,
Sadlsung 104, 115.
Sanyo 116, 125
129
151
129
130, 131
160, 161, 162
118, 144, 151
148, 149, 150
131, 140, 143.
128, 144, 151
131, 133, 146
130, 133
138
124, 125, 131
107, 109, 114
130, 131, 133
103, 113;121
128, 133, 163
131, 130. 150
Sears
Sharp
Sony
SyLvania
Symphonic
Toshiba
Wards
XRIO00
Zenith
104, 116, 123, 124. 125, 131
112, 129, 131, 139
105
106, 107, 115, 121, 122, 130
133
153, 154
104, 123, 124
102, 113, 114, 115, 121, 130
131
155
100, 101
Cable Converter Codes by Brand
Cable Decoder Codes
Brand Name
Arccher 336
Cableview 336
Citizen t336
Curtis Mathes 317
Eagle 306, 307, 310
GE 353
Gemini 302, 328, 333
General.Instrument 327, 328
Gobrand 336
Hamlin 314,
3erroid 323,
Kate Vision 334
Macom 311, 312, 342
;4=9._vOx 307. 310, 337, 338
NSC 332, 334
n^v 301, 321, _
330, 331
324, 325, 326, 329
Cable Converter Codes by Brand
Cable Decoder
Brand Name
Panasonic
Paragon
PhiEps
Pioneer
Pluser
RCA
Regal
Regency
Samsun9
Scientific Atlanta
Simarx
Sprucer
Standard
Components
Stargate
Teieview
Texscan
Tocom
Uniden
Unika
Universal
Vid Tech
Video Way
View'star
Zenith
Codes
313, 320
300
306. 307, 308. 309, 310
318. 319
336
318
310
304
334
317, 347, 335, 354
318, 327
318, 320, 327
334
318, 327, 328
336
303
315, 316
348
336
351, 352
339
349
306. 307, 310
300, 305, 311
DBS Codes by Brand
DBSBrand Name Codes
RCA 356
Sony 355
J
Yourremote
controL
operatesthe
common
features of
most,but not
aU, modeLsand
brandsof IR
(infrared)
controlledTVs
andcable
converters
(DBS).
J
PAGE 14 I OPERATION
f
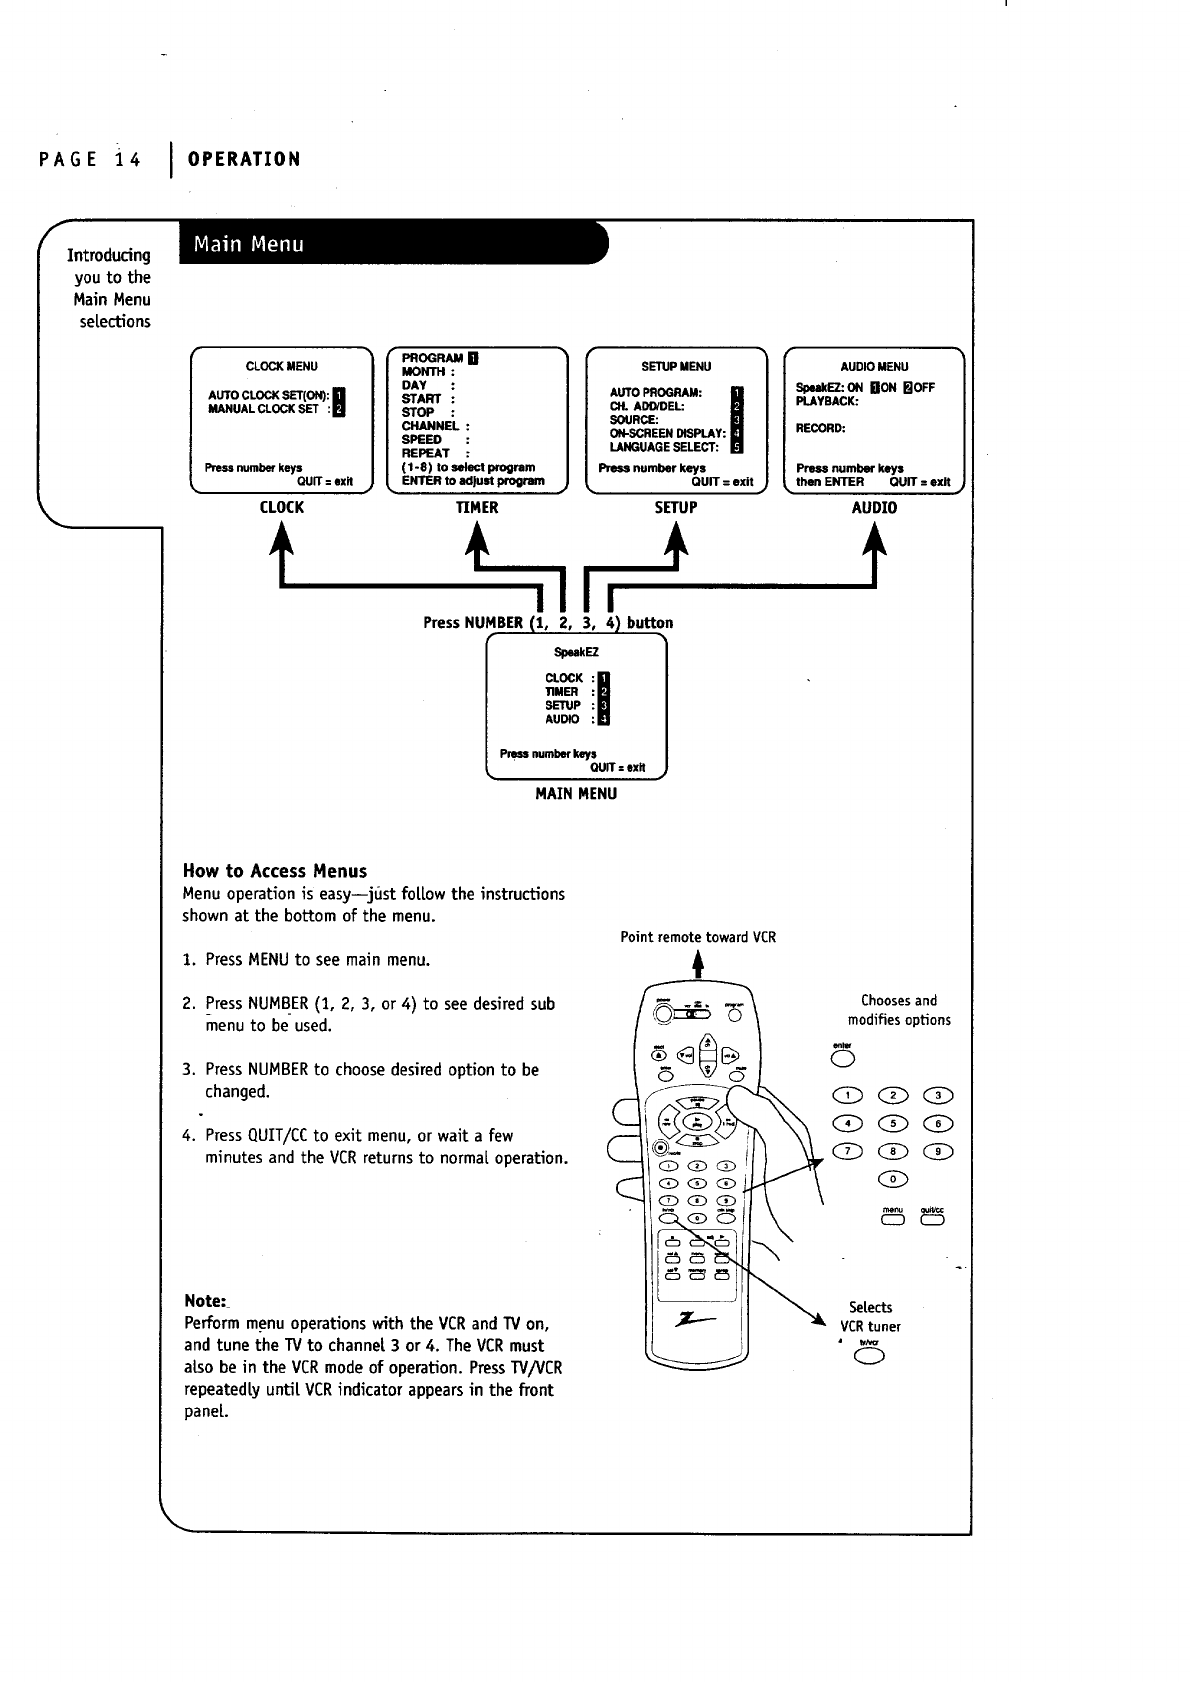
Introducing
you to the
Main Menu
selections
CLOCK MENU
AUTOCLOCKSET(ON):[]
MANUAL CLOCK SET :N
Press number keys
QUIT: exit
CLOCK
rPROGRAM []
MONTH :
DAY :
START :
STOP :
CHANNEL:
SPEED :
REPEAT :
(1-8) to select program
ENTER to adjust program
TIMER
ISETUP MENU 1
AUTO PROGRAM: []
CI'L ADD/DEL: []
SOURCE: []
ON-SCREEN DISPLAY: []
LANGUAGE SELECT: []
Press number keys
QUIT = exit
AUDIO MENU
Sp_EZ: ON []ON EIOFF
PLAYBACK:
RECORD:
Press number keys
then ENTER QUIT = exit
SETUP AUDIO
Press NUMBER (1, 2, 3, 4) button
[' TI
CLOCK
TIMER
AUDIO
Pressnumberkeys
QUIT=exit
MAIN MENU
How to Access Menus
Menu operation is easy--jt_st foLLowthe instructions
shown at the bottom of the menu.
1. Press MENU to see main menu.
2. Press NUMBER (1, 2, 3, or 4) to see desired sub
menu to be used.
3. Press NUMBER to choose desired option to be
changed.
4. Press QUIT/CC to exit menu, or wait a few
minutes and the VCR returns to normal operation.
Note:
Performmenuoperationswith the VCRand TV on,
and tune the TVto channe[ 3 or 4. The VCRmust
aLsobe in the VCRmode of operaUon.PressTV/VCR
repeatedlyunlit VCRindicator appearsin the front
pane[.
C
C
C
Point remote toward VCR
Choosesand
modifies opUons
Q
QQQ
menu
SeLects
VCRtuner
(D
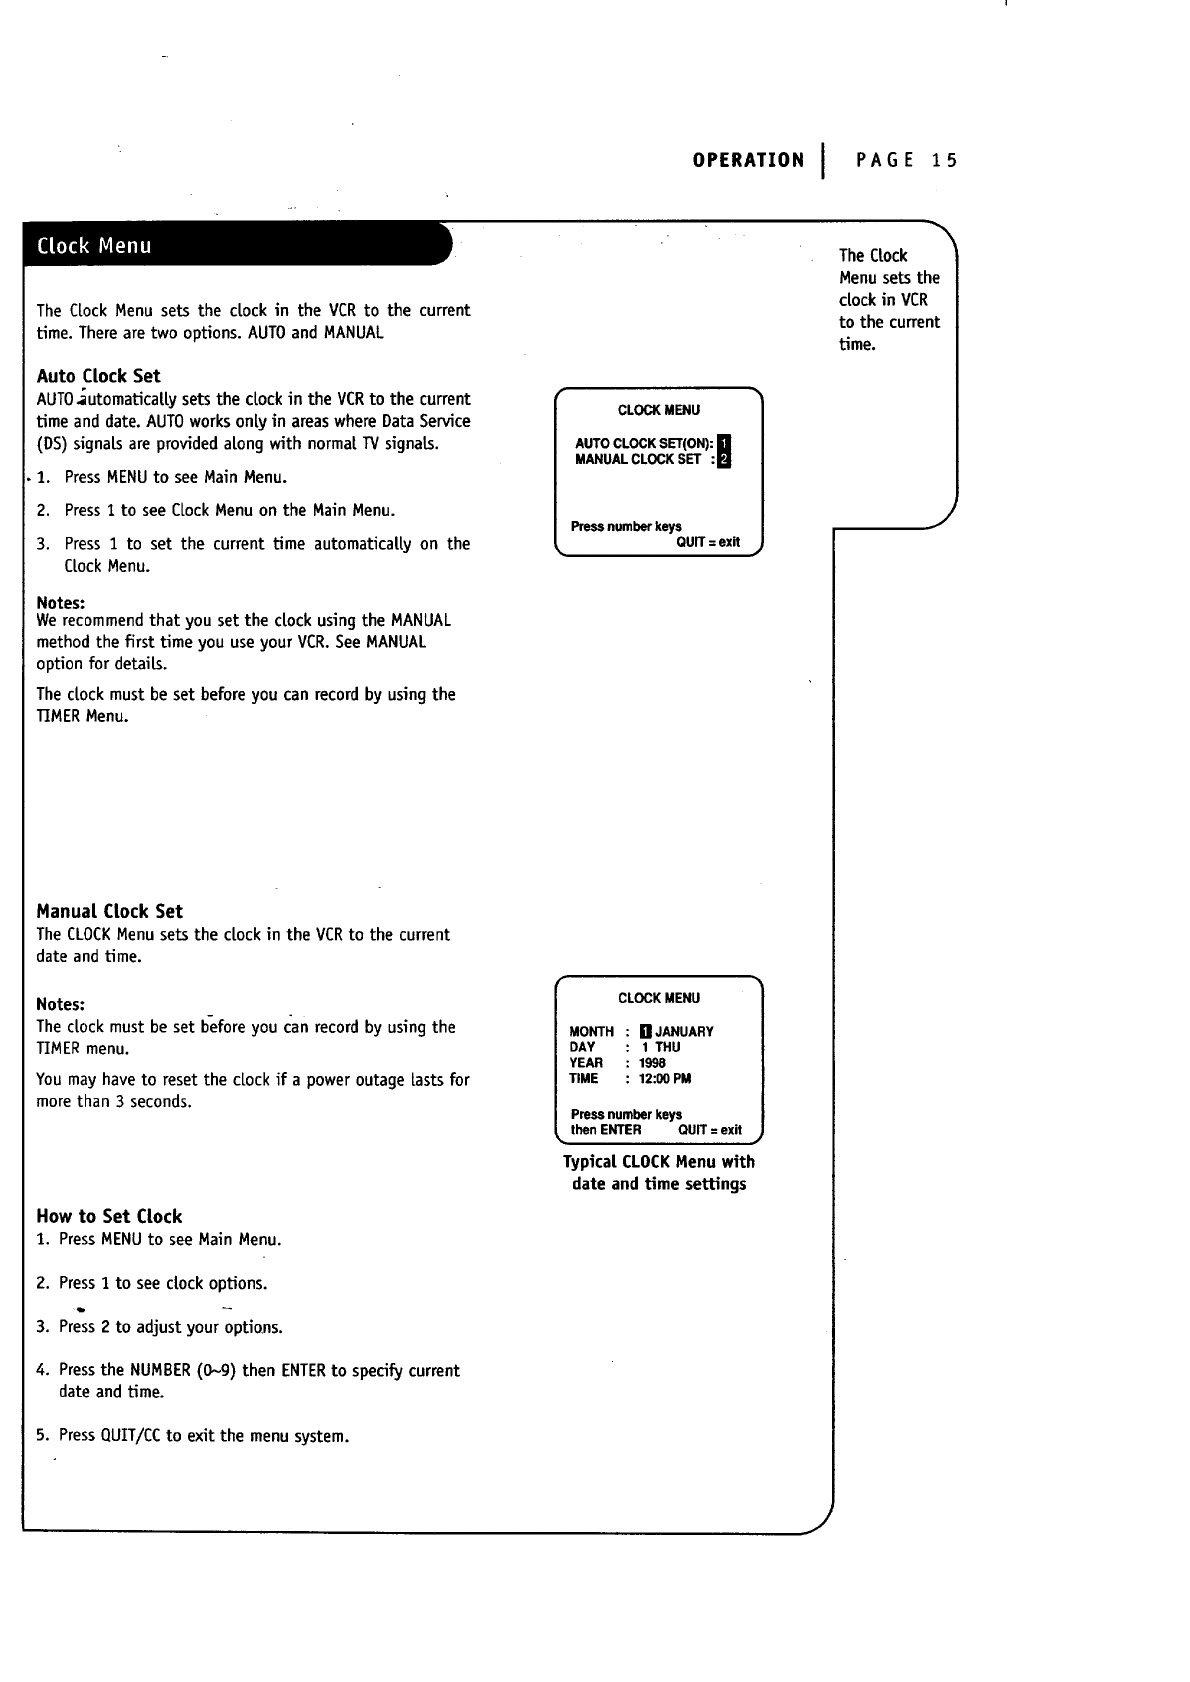
The CLockMenu sets the clock in the VCR to the current
time. There are two options. AUTO and MANUAL
Auto Clock Set
AUTO_utomatica|[ysets the clockin the VCRto the current
time and date. AUTOworksonly in areaswhereDataService
(DS) signalsare providedalongwith normalTVsignals.
1. PressMENUto see Main Menu.
2. Press 1to see CLockMenu on the Main Menu.
3. Press 1 to set the current time automatically on the
CLockMenu.
Notes:
We recommend that you set the dock using the MANUAL
method the first time you use your VCR. See MANUAL
option for details.
The dock must be set before you can record by using the
TIMER Menu.
Manual Clock Set
The CLOCKMenu sets the clock in the VCR to the current
date and time.
Notes:
The clock must be set before you can record by using the
TIMER menu.
You may have to reset the clock if a power outageLastsfor
more than 3 seconds.
How to Set Clock
1. PressMENUto see Main Menu.
2. Press1 to see dock options.
3. Press2 to adjustyour options.
4. Pressthe NUMBER(o--g) then ENTERto specifycurrent
date and time.
5. PressQUIT/CC to exitthe menu system.
OPERATION I PAGE 15
The CLock
Menu sets the
clock in VCR
to the current
time.
CLOCKMENU
AUTO CLOCK SET(ON):[]
MANUAL CLOCK SET :l_l
Press number keys
QUIT = exit j
%
CLOCK MENU
MONTH : O JANUARY
DAY : 1 THU
YEAR : 1998
TIME : 12:00 PM
Pressnumberkeys
_, thenENTER QUIT=exit
Typica[ CLOCK Menu with
date and time settings
J
J
I
PAGE 16 OPERATION
f
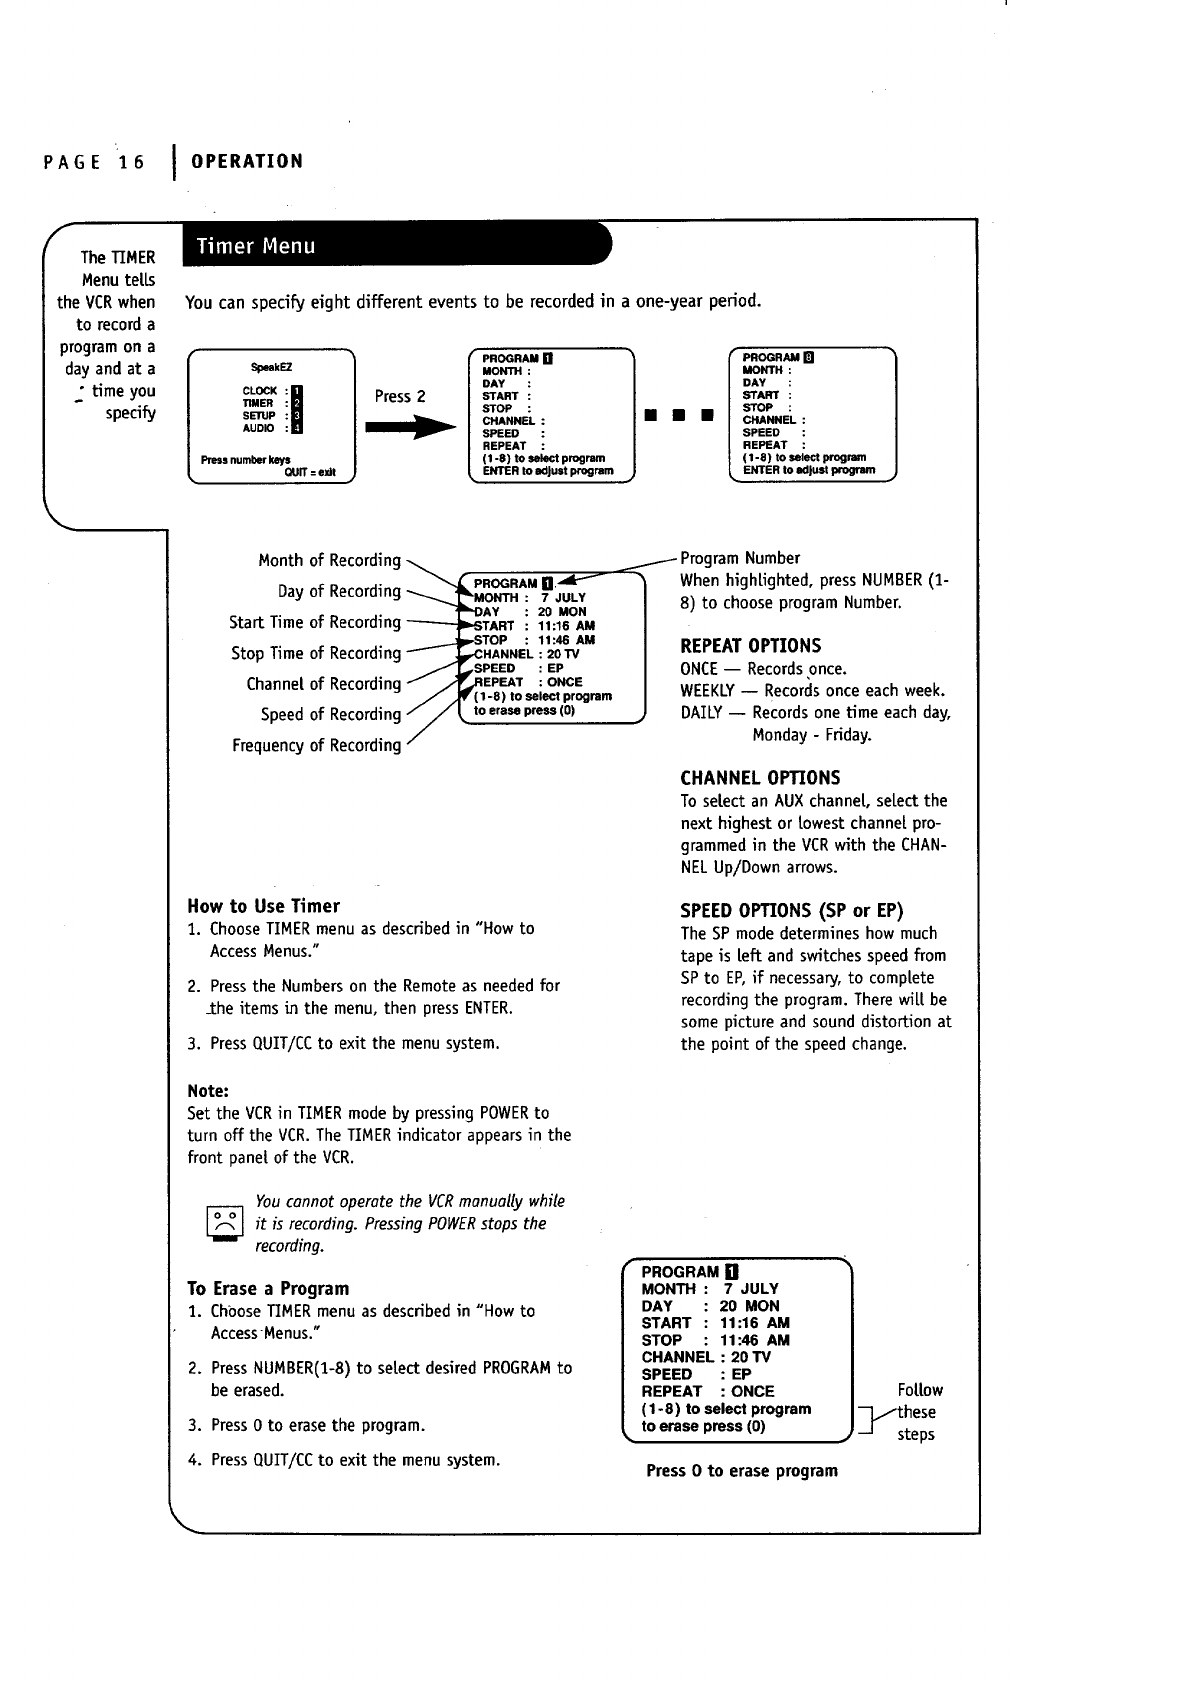
The TIMER
Menu teLLs
the VCR when
to record a
program on a
day and at a
•time you
specify
\
You can specify eight different events to be recorded in aone-year period.
SpeakEZ
C' Ki|
TIMER
SETUP
AUDIO
Press numberkeys
OUIT = exit
Press 2
IPROGRAM [] 1
MONTH :
DAY :
START :
STOP :
CHANNEL :
ISPEED :
IREPEAT :
|(1-8) to select progmm
|ENTER to adjust program
mmm
PROGRAM []
MONTH :
DAY :
START :
STOP :
CHANNEL :
SPEED :
REPEAT
(1-8) to select progra_
ENTER to ad|ust program
Month
Day
Start Time
Stop Time
ChanneL
Speed
Frequency
of Recording _ ._._ Program Number
PROGRAMn.._ "
of Recording_ "MONTH : 7 JULY
.__ =LDAY : 20 MON
of Recording I_START : 11:16 AM
of Recording ...._.._ IP-STOPITcHANNEL:11:46120"IvAM
of Recording _'_: _Pi_toTseie_tl_pCr_gram/_
of Recording//• to erasepress(0)
/
of Recording /
WhenhighLighted,press NUMBER(1-
8) to choose programNumber.
REPEAT OPTIONS
ONCE-- Recordsonce.
WEEKLY-- Recordsonceeach week.
DAILY-- Recordsonetime each day,
Monday - Friday.
CHANNEL OPTIONS
Toselect an AUXchanneL,seLectthe
next highest or Lowestchannel pro-
grammed in the VCRwith the CHAN-
NELUp/Down arrows.
How to Use Timer
1. ChooseTIMERmenuas described in "How to
AccessMenus."
2. Press the Numbers on the Remote as needed for
_the items in the menu, then press ENTER.
3. Press QUIT/CC to exit the menu system.
SPEED OPTIONS (SP or EP)
The SP mode determines how much
tape is Left and switches speed from
SP to EP, if necessary, to comp[ete
recording the program. There wi[L be
some picture and sound distortion at
the point of the speed change.
Note:
Set the VCRin TIMERmodeby pressing POWERto
turn off the VCR.TheTIMERindicator appears in the
front paneLof the VCR.
You cannot operate the VCRmanually while
it is POWER the
recording. Pressing stops
recording.
To Erase a Program
1. ChooseTIMERmenu as describedin "How to
AccessMenus."
2. PressNUMBER(I-8)toseLectdesiredPROGRAM to
be erased.
3. Press 0 to erase the program.
4. Press QUIT/CC to exit the menu system.
PROGRAM [] •
MONTH : 7 JULY
DAY : 20 MON
START : 11:16 AM
STOP : 11:46 AM
CHANNEL : 20 TV
SPEED : EP
REPEAT : ONCE
(1-8) to select program
to erase press (0)
Press 0 to erase program
Fottow
these
steps
AUTO PROGRAM
CH.ADD/DEL
SOURCE
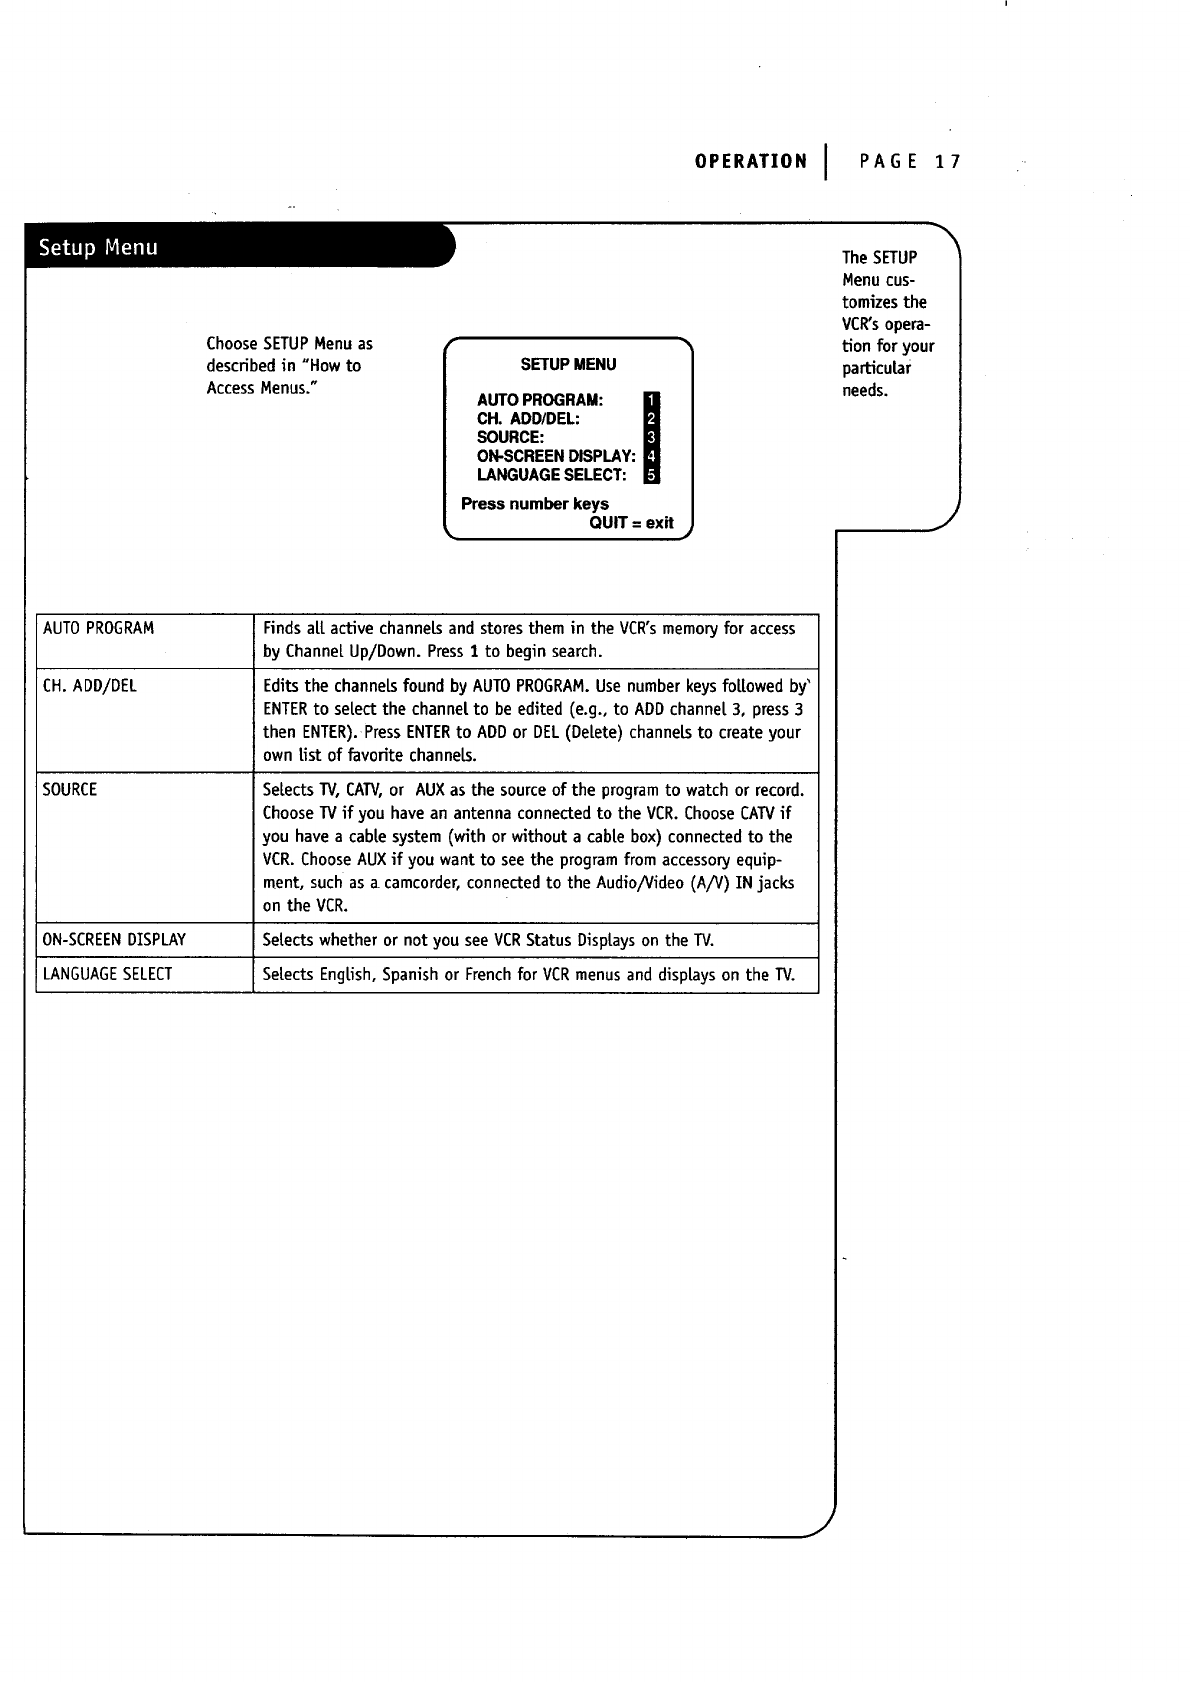
ChooseSETUPMenu as
describedin "How to
AccessMenus."
OPERATION IPAGE 17
SETUP MENU
AUTO PROGRAM:
CH. ADD/DEL:
SOURCE:
ON-SCREEN DISPLAY:
LANGUAGE SELECT:
Press number keys
QUIT = exit
FindsaLLactivechanneLsand storesthem intheVCR'smemory foraccess
by ChannelUp/Down. PressI to beginsearch.
EditsthechanneLsfoundby AUTO PROGRAM. Usenumber keysfoL|owedby'
ENTERto selectthechannelto be edited(e.g.,to ADD channel3,press3
thenENTER).PressENTERtoADD orDEL (DeLete)channeLsto createyour
own ListoffavoritechanneLs.
SeLectsTV, CATV,or AUXas the sourceof the program to watch or record.
ChooseTV if you have an antenna connectedto the VCR.ChooseCATVif
you have a cab|e system(with orwithout a cable box) connectedto the
VCR.ChooseAUXif you want to seethe programfrom accessoryequip-
ment, suchas a camcorder,connectedto the Audio/Video(A/V) IN jacks
on the VCR.
ON-SCREENDISPLAY SeLectswhetheror notyou seeVCR StatusDisplayson theTV.
LANGUAGE SELECT SeLectsEngLish,SpanishorFrenchforVCR menus and displayson theTV.
The SETUP
Menucus-
tomizes the
VCR'sopera-
tion for your
particular
needs.
J
J

PAGE18 IOPER^T,ON
A/_UDIO Menu's
PLAYBACK
andRECORD
optionsare
avaitabteonly
withstereo
VCRs.
The AUDIO Menu indicates
the audioformatused
when recordingor praying
a tape.ChooseAUDIO
Menu asdescribedin
"How to AccessMenus."
Press ENTER (and repeat)
to choose items in the
menu (some models).
AUDIO MENU
SpeakEZ:ON _ION IqOFF
PLAYBACK:
RECORD:
Press number keys
then ENTER QUIT = exit
SpeakEZ
PLAYBACK
RECORD
TurnsSpeakEZONor OFF.
A voice tetls you how to usethe features you setect in the menusif
SpeakEZis ON. (ON is recommended.)
SetectsHI-FIorNORMAL fortapeplayback.
HI-FI(HighFideLity)providesstereosound,ifpresenton thetape,to the
[eftand fightVCR AUDIO outputjackson thebackoftheVCR.
NORMAL providesmonauralsound,regardtessoftheaudioformatpresent
on thetape.
SetecttheSTEREO,MONO, orSAP forrecordinga program.
STEREOrecordssoundfromtheteftand fightaudiotracksinstereophonic
format.
MONO (Monaurat)recordssoundinmonauratformateveniftheprogramis
instereo.
SAP recordstheSecondAudioProgram(SAP)track,ifpresent,inaddition
to thestereoaudiotracks.SAP usuat|ycontainsaudioinanothertanguage.
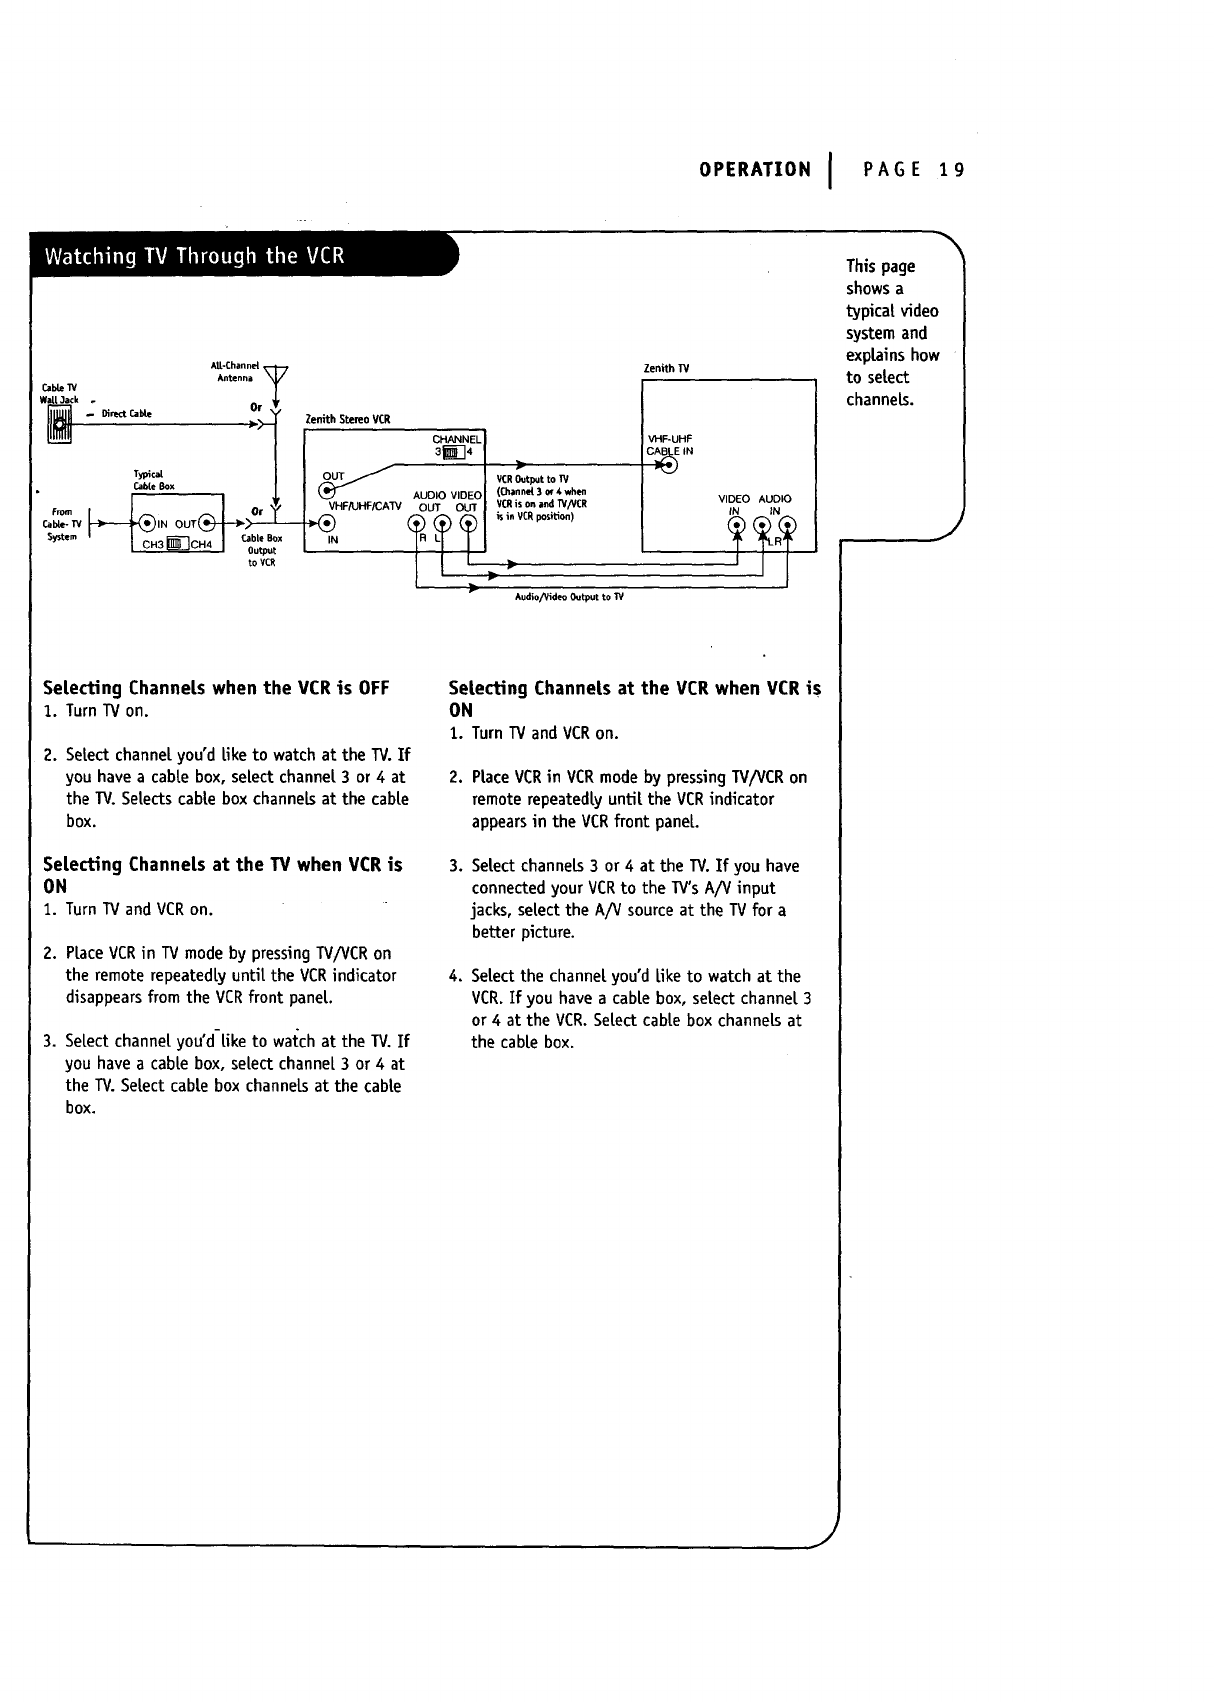
OPERATION I PAGE 19
W_¢k . Dire_ _b_
Tyl_C_-
Cl_e Box
CabLe-TV IN OUT
to VCR
ALL-Channel
Zenith Stereo VCR
F_HF/CKW
CHANNELI
I VCR Output to N
AUDIO VIDEO (Channd 3 e_ 4 wh_
OUT OUT |VCRis on and TV/VCR
Zenith TV
Audio/Video Output to TV
VHF-UHF
C_E IN
VIDEO AUDIO
IN IN
Setecting Channels when the VCR is OFF
1. TurnTV on.
2. SeLectchannel you'd Eketo watch at the TV.If
you have a cable box, select channel3or 4 at
the TV.SeLectscable boxchanneLsat the cable
box.
Selecting Channels at the TV when VCR is
ON
1. TurnTVand VCRon.
2. PLaceVCR in TV mode by pressing TV/VCR on
the remote repeatedly until the VCR indicator
disappears from the VCR front paneL.
3. SeLectchannelyou'd-Uke to watch at the TV.If
you have a cable box, seLectchannel3 or 4at
the TV.SeLectcable box channeLsat the cable
box.
Setecting Channe|s at the VCR when VCR iS
ON
1.Turn TVand VCRon.
2. PLaceVCR in VCR mode by pressing W/VCR on
remote repeatedly unUt the VCR indicator
appears in the VCR front paneL.
3. SeLectchanneLs 3 or 4 at the TV. If you have
connected your VCR to the TV's A/V input
jacks, select the A/V source at the 13/for a
better picture.
4, Se|ect the channel you'd Eketo watch at the
VCR.If you have a cable box, select channel 3
or 4 at the VCR.SeLectcable box channeLsat
the cable box.
This page
showsa
typical video
systemand
explainshow
to select
channeLs.
J
J

PAGE 20
f
Thispage
describeshow
toconnecta
camcorderto
your VCR.
I OPERATION
BackPanel of Stereo VCR
F_ RIdUDIO-L VIDEO AINNT(_
VHFIUHFICATV
A/V cable is not providedwith VCR.
Turn off power or unplug VCR
before making any connections.
Select AUX for Viewing an Audio/Video
source like a Camcorder
I. With TV and VCR on, place VCR in VCR mode by
pressingTV/VCR on the remote (and repeat)until
the VCR indicatorappears in the VCR'sfrontpaneL.
2. Select channel3 (or 4) on the TV. Note: If your TV
hasA/V jacks, you may get a better picture if you
connect your VCRthere. (Then, select the A/V
source on the TV.)
3. At the VCR, Channe[ Down Lower than the lowest
-channel (or Channel Up above the highest) to
select "AUX" Or, you may--
Choose the SETUP menu as described in "How to
Access Menus."
Press 3 for the SETUP menu's SOURCEitem.
Press 3 for AUX, then ENTER. (Press QUIT/CC to
exit.)
SETUP MENU
SOURCE:TUNER(TV)
NA_X IqCATV
Press number keys
then ENTER QUIT = exit j
Press 3 to se[ect AUX
SOURCE
TUNER
TV
CAW
AUX
Items in the Menu
Shows the _rogram source--W, CATV, or AUX--setected for the VCR to receive.
The VCR is using its Tuner to receive programs from an antenna or cab|e.
Selects programs for the VCR from a rooftop-type antenna.
SeLects programs for the VCR from Cable TV.
SeLects programs for the VCR from the R-AUDIO-L--VIDEO IN jacks (where you may have
connected your camcorder).
OPERATION IPAGE 21
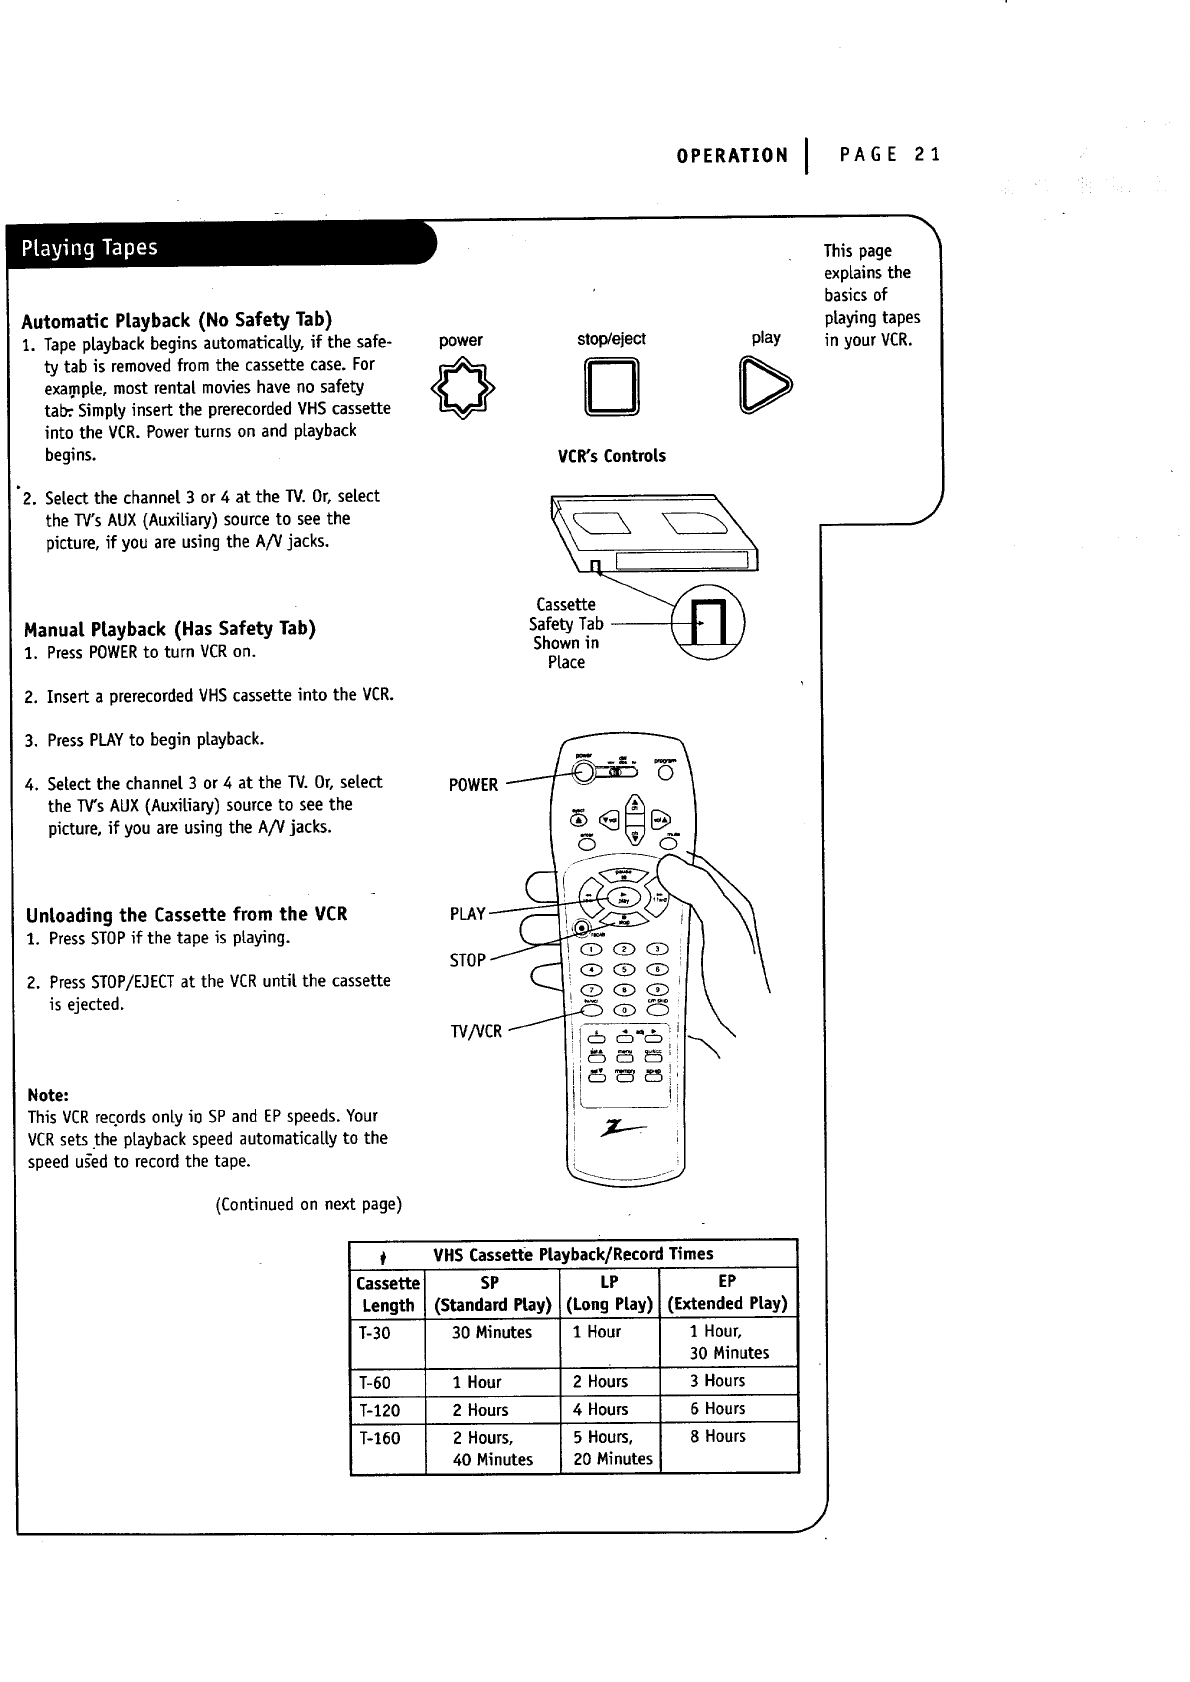
Automatic Playback (No Safety Tab)
1. Tape p[ayback begins automaticaLLy, if the safe-
ty tab is removed from the cassette case. For
example, most rental movies have no safety
ta_ Simp|y insert the prerecorded VHS cassette
into the VCR. Power turns on and playback
begins.
"2. SeLectthe channel 3 or 4 at the TV. Or,select
the TV'sAUX(AuxiLiary) sourceto see the
picture, if you are usingthe A/V jacks.
Manual PLayback (Has Safety Tab)
1. PressPOWERto turn VCRon.
2. Insert a prerecorded VHS cassette into the VCR.
3. Press PLAY to begin playback.
4. SeLectthe channel3 or 4 at the TV. Or, select
the TV'sAUX(AuxiLiary)sourceto see the
picture,if you are usingthe A/V jacks.
Un|oading the Cassette from the VCR
1. PressSTOPif the tape is playing.
2. PressSTOP/E3ECTat the VCRuntil the cassette
is ejected.
Note:
This VCRrecords only io SP and EPspeeds.Your
VCRsets the ptayback speedautomaticaLLyto the
speedused to record the tape.
(Continued on next page)
power
©stop/eject
[3
VCR's ControLs
play
POWER
TV/VCR
#VHS Cassette PLayback/Record Times
Cassette SP LP EP
Length (Standard PLay) (Long P|ay) (Extended PLay)
T-30 30 Minutes I Hour 1Hour,
30 Minutes
T-60 1Hour 2 Hours 3 Hours
T-120 2Hours 4 Hours 6Hours
T-160 2 Hours, 5 Hours, 8 Hours
40 Minutes 20 Minutes
This page
explains the
basics of
playing tapes
in your VCR.
J
J
PAGE 22
f
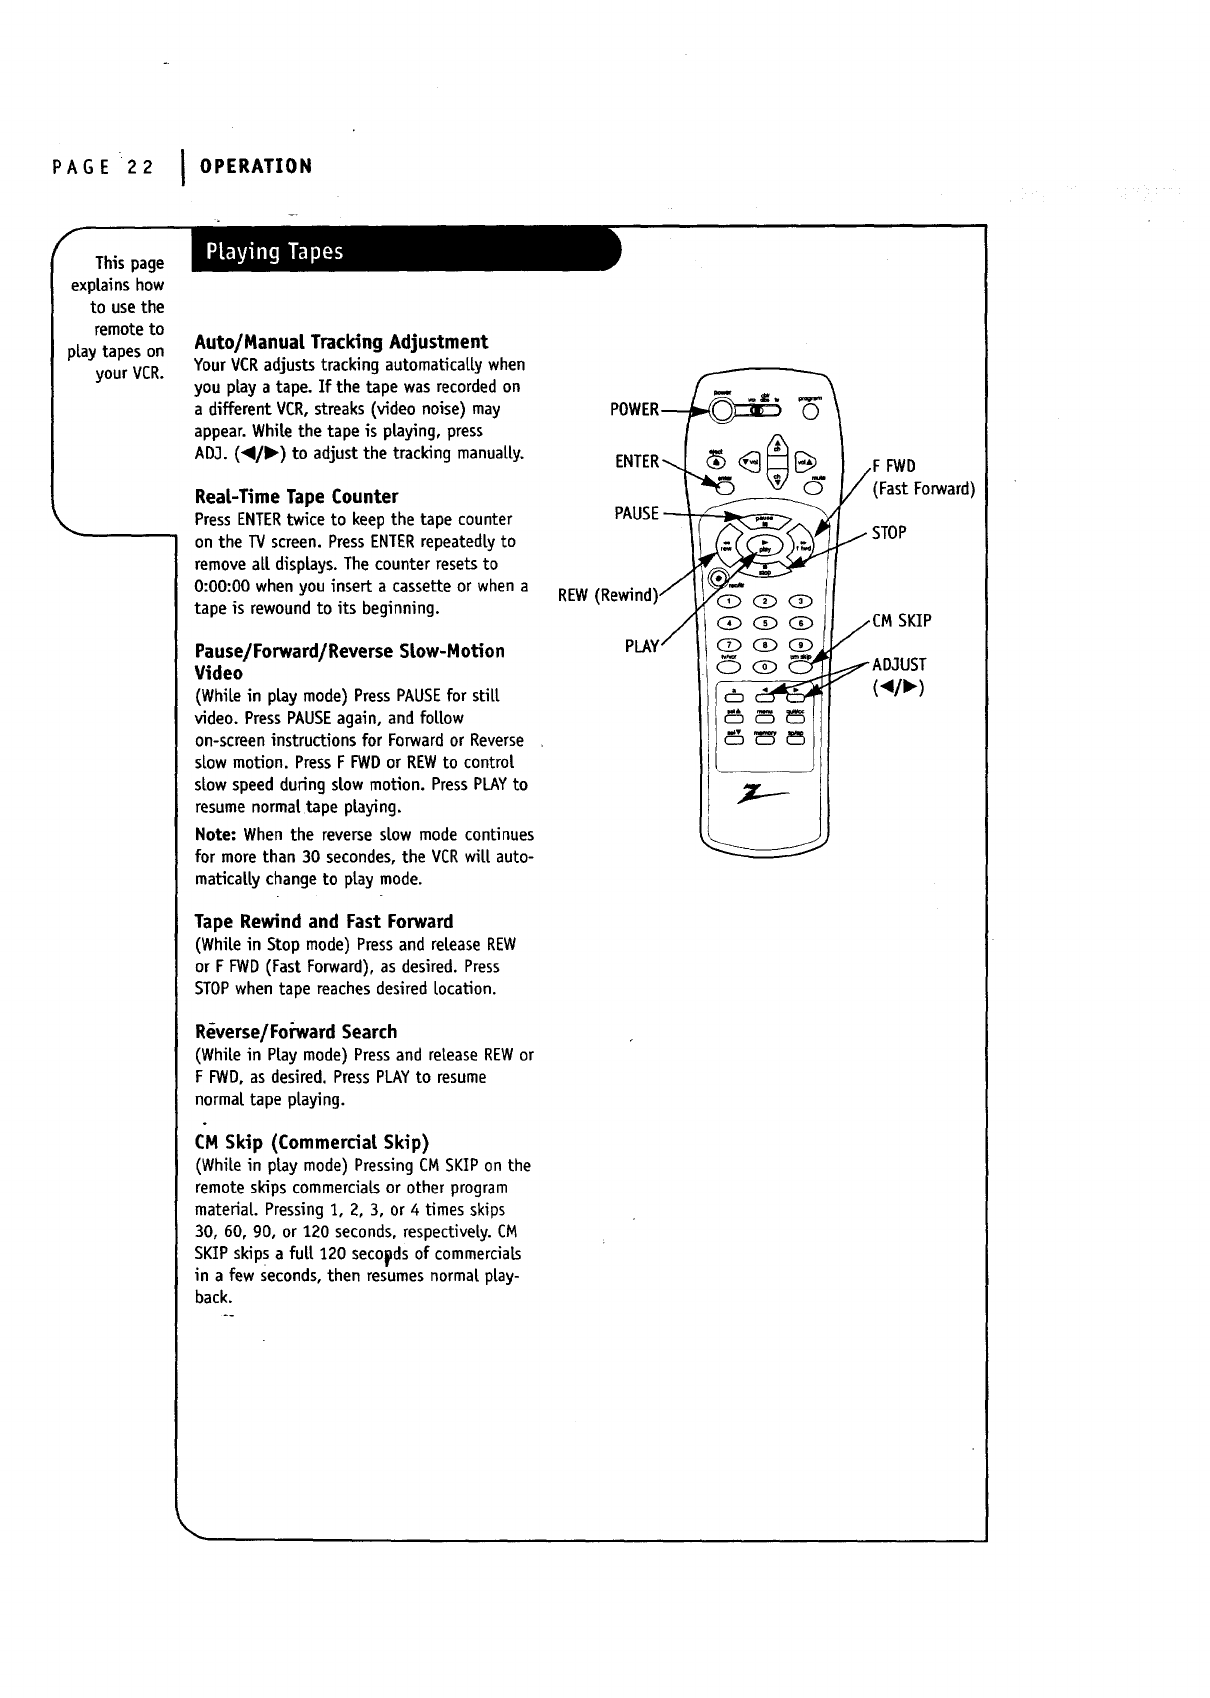
This page
explainshow
to use the
remote to
pLay tapeson
your VCR.
IOPERATION
Auto/Manual Tracking Adjustment
Your VCR adjusts tracking automaticaLLy when
you play a tape. If the tape was recorded on
a different VCR, streaks (video noise) may
appear. WhiLe the tape is playing, press
ADJ. (I/1_) to adjust the tracking manuaLLy.
Real-Time Tape Counter
Press ENTERtwice to keep the tape counter
on the TV screen. Press ENTER repeatedly to
remove aLLdisplays. The counter resets to
0:00:00 when you insert acassette or when a
tape is rewound to its beginning.
Pause/Forward/ReverseStow-MoUon
Video
(WhiLe in pLay mode) Press PAUSEfor still
video. Press PAUSEagain, and foLLow
on-screen instructions for Forward or Reverse
slow motion. Press F FWD or REW to control
slow speed during slow motion. Press PLAYto
resume normal tape playing.
Note: When the reverse slow mode continues
for more than 30 secondes, the VCR wilt auto-
maticaLLy change to play mode.
Tape Rewind and Fast Forward
(WhiLein Stop mode)Pressand releaseREW
or FFWD(Fast Forward),as desired. Press
STOPwhen tape reaches desiredLocation.
R_verse/FohvardSearch
(WhiLe in PLaymode) Press and release REWor
F FWD, as desired. Press PLAYto resume
normal tape playing.
CMSkip (Commercial Skip)
(WhiLe in play mode) Pressing CM SKIP on the
remote skips commercials or other program
materiaL. Pressing 1, 2, 3, or 4 times skips
30, 60, go, or 120 seconds, respectively. CM
SKIP skips afuLL 120 seconds of commercials
in afew seconds, then resumes normal play-
back.
REW(
©
FWD
(Fast Forward)
STOP
SKIP
"OPERATION IPAGE 23
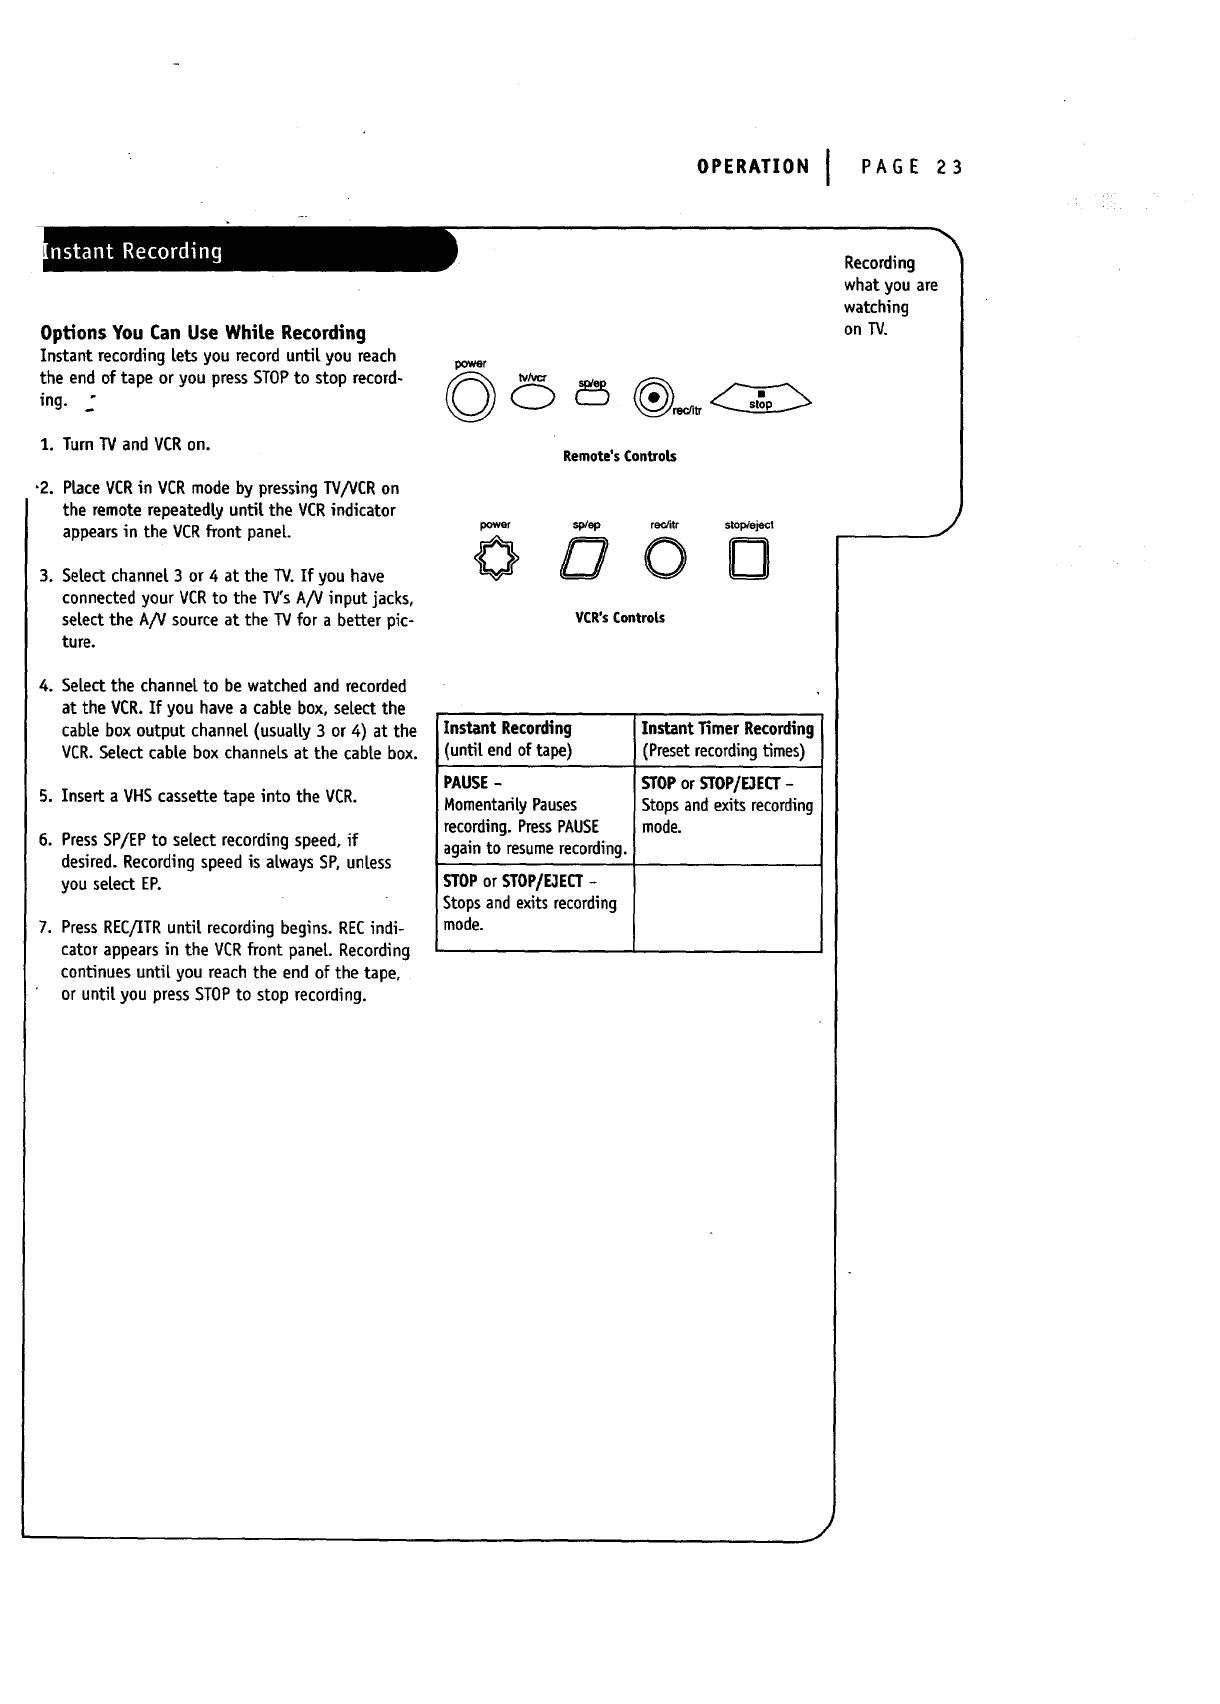
Options You Can Use White Recording
Instant recording Lets you record until you reach
the end of tape or you press STOPto stop record-
ing. -
1. TurnTV and VCRon.
-2. PLaceVCRin VCRmode by pressingTV/VCRon
the remoterepeatedlyuntil the VCRindicator
appearsin the VCRfront panel.
3. SeLect channel 3 or 4 at the TV. If you have
connected your VCR to the TV's A/V input jacks,
select the A/V source at the TV for a better pic-
tu re.
4. SeLectthe channelto be watchedand recorded
at the VCR.If you havea cable box, select the
cabLebox output channel (usua|ty3 or 4) at the
VCR.SeLectcable box channeLsat the cablebox.
5. Insert a VHS cassette tape into the VCR.
6. PressSP/EPto select recordingspeed, if
desired.Recordingspeed is always SP,unless
you select EP.
7. Press REC/ITR until recording begins. REC indi-
cator appears in the VCR front panel Recording
continues until you reach the end of the tape,
or until you press STOP to stop recording.
Ix_r
Remote's Controls
Recording
what you are
watching
on TV.
power sp/ep rec/itr stop/eject
0O0{3
VCR'sControLs
Instant Recording
until endof tape)
PAUSE-
Momentarily Pauses
recording. Press PAUSE
again to resume recording.
STOPor STOP/E3ECT-
Stopsand exitsrecording
mode.
Instant Timer Recording
(Presetrecordingtimes)
STOPorSTOP/E3ECT-
Stopsandexitsrecording
mode.
J
/
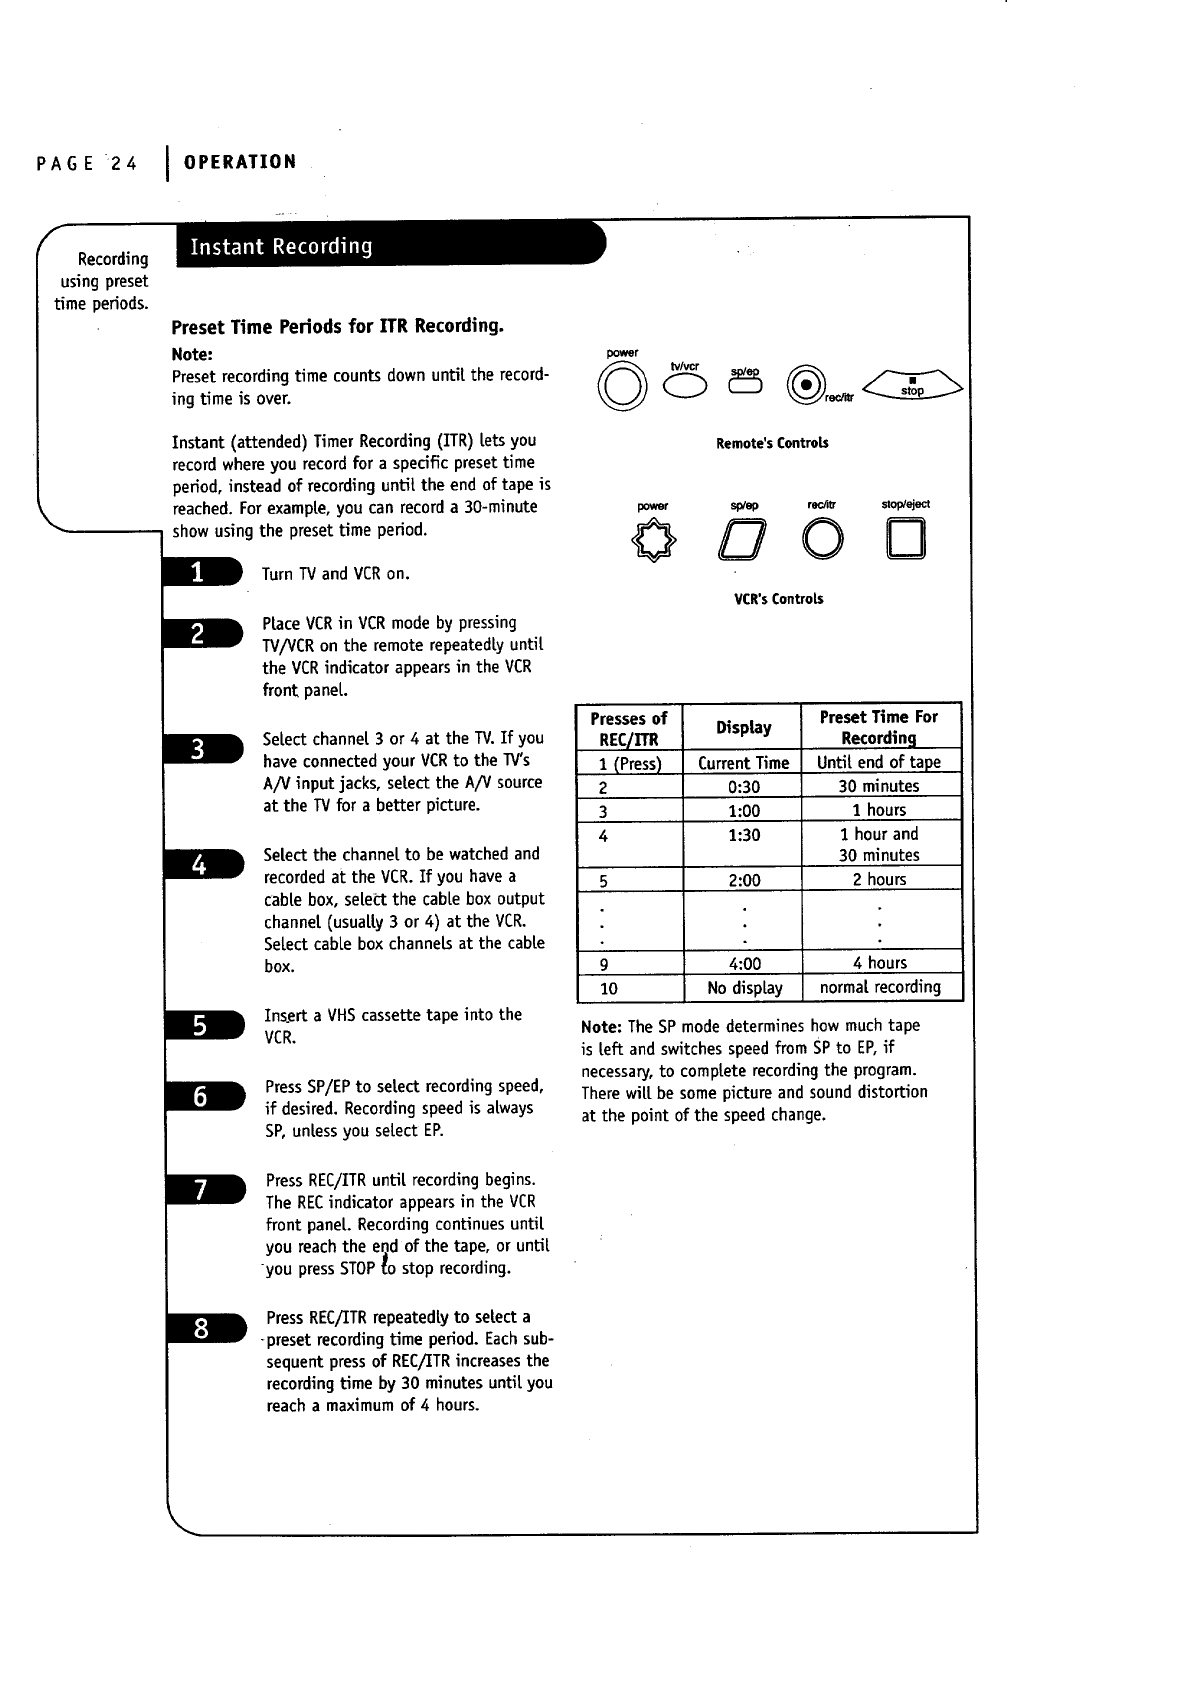
PAGE 24 I OPERATION
f
Recording
usingpreset
timeperiods.
Preset Time Periods for ITR Recording.
Note:
Preset recording time counts down until the record-
ing time is over.
Instant(attended)TimerRecording(ITR)letsyou
recordwhereyou recordfora specificpresettime
period,insteadofrecordinguntiltheend oftapeis
reached.Forexample,you can recorda30-minute
show usingthepresettimeperiod.
! •r
wTurnTV andVCR on.
Place VCRin VCRmode by pressing
TV/VCRon the remote repeatedly until
the VCRindicator appears in the VCR
front pane[.
Select channel3 or 4 at the TV.If you
have connectedyour VCRto the TV's
A/V input jacks, select the A/V source
at the TV for a better picture.
L
Select the channelto be watchedand
recorded at the VCR.If you have a
cable box, select the cable box output
channel (usually 3 or 4) at the VCR.
SeLectcabLebox channeLsat the cable
box.
Insert a VHScassette tape into the
VCR.
PressSP/EPto select recording speed,
if desired. Recordingspeed is always
SP,unless you select EP.
IB
PressREC/ITRuntil recording begins.
The RECindicator appears in the VCR
front pane[. Recording continues until
you reach the evd of the tape, or until
you press STOP_o stop recording.
PressREC/ITRrepeatedly to select a
-preset recording time period. Eachsub-
sequentpressof REC/_TRincreasesthe
recordingtime by 30 minutes until you
reach a maximumof 4hours.
©
Remote's Controls
power splep rec/_ stop/eject
000o
VCR'sControls
Pressesof
REC/
1(Press)
2
3
4
Display
Current Time
0:30
1:00
1:30
Preset Time For
Recording
Until end of tape
30 minutes
1hours
1 hour and
30 minutes
2hours
5 2:00
g 4:00 4 hours
10 No display norma[ recording
Note: The SP modedetermineshow much tape
is left and switches speedfrom SPto EP,if
necessary,to completerecording the program.
Therewill be some picture and sounddistortion
at the point of the speed change.
\
OPERATION IPAGE 25
Note:
If you have a cable box connected to your VCR,
you cannot record one show and watch another.
ChooSethe showyou wish to recordusingthe
VCR'schannelselector.Choosethe showyou wish
to watch using'the TV'schannelselector.
_Turn TV and VCR on.
Place VCR in VCR mode by pressing
TV/VCR on the remote repeatedlyuntil
the VCR indicatorappearsin the VCR
frontpanel.
Select channel 3 or 4 at the TV.If you
have connectedyour VCRto the TV's
A/V input jacks, select the AiV source
at the TV for a better picture.
Select the channelto be watchedand
recorded at the VCR.If you have a
cable box, select the cable boxoutput
channel(usualy 3 or4) at the VCR.
Select cable boxchannelsat the cable
box.
_nserta VHS cassettetapeintothe
VCR.
_ress SP/EP to select recording speed,
if desired. Recording speed is always
SP, unless you select EP.
PressREC/ITR untilrecordingbegins.
REC indicatorappearsin the VCR front
panel.Recordingcontinuesunfityou
reach the end of the tape, or untilyou
pressSTOP to stop recording.
Place VCR in TV mode by pressing
TV/VCR on remote to turn off VCR
indicator in the VCR front panel.
Selectthe showyou wishto watch
using the TV"s channelselector.
Note:
To return to the show you're recording, select
channel 3 or 4 at the TV. Place the VCR in the VCR
mode by pressing TV/VCR on the remote to show
the VCR indicator in the VCR's front panel.
power
Remote'sControLs
power sp/ep rec/itr stop/eject
0000
VCR'sControls
OpUons You Can Use While Recording ,
Instant Recording
(until end of tape)
PAUSE-
MomentariLypausesrecording.PressPAUSE
again to resume recording.
STOPor STOP/F.3ECT- Stopsand exits
recording mode.
Recordingone
showwhite
watching
another.
J
J
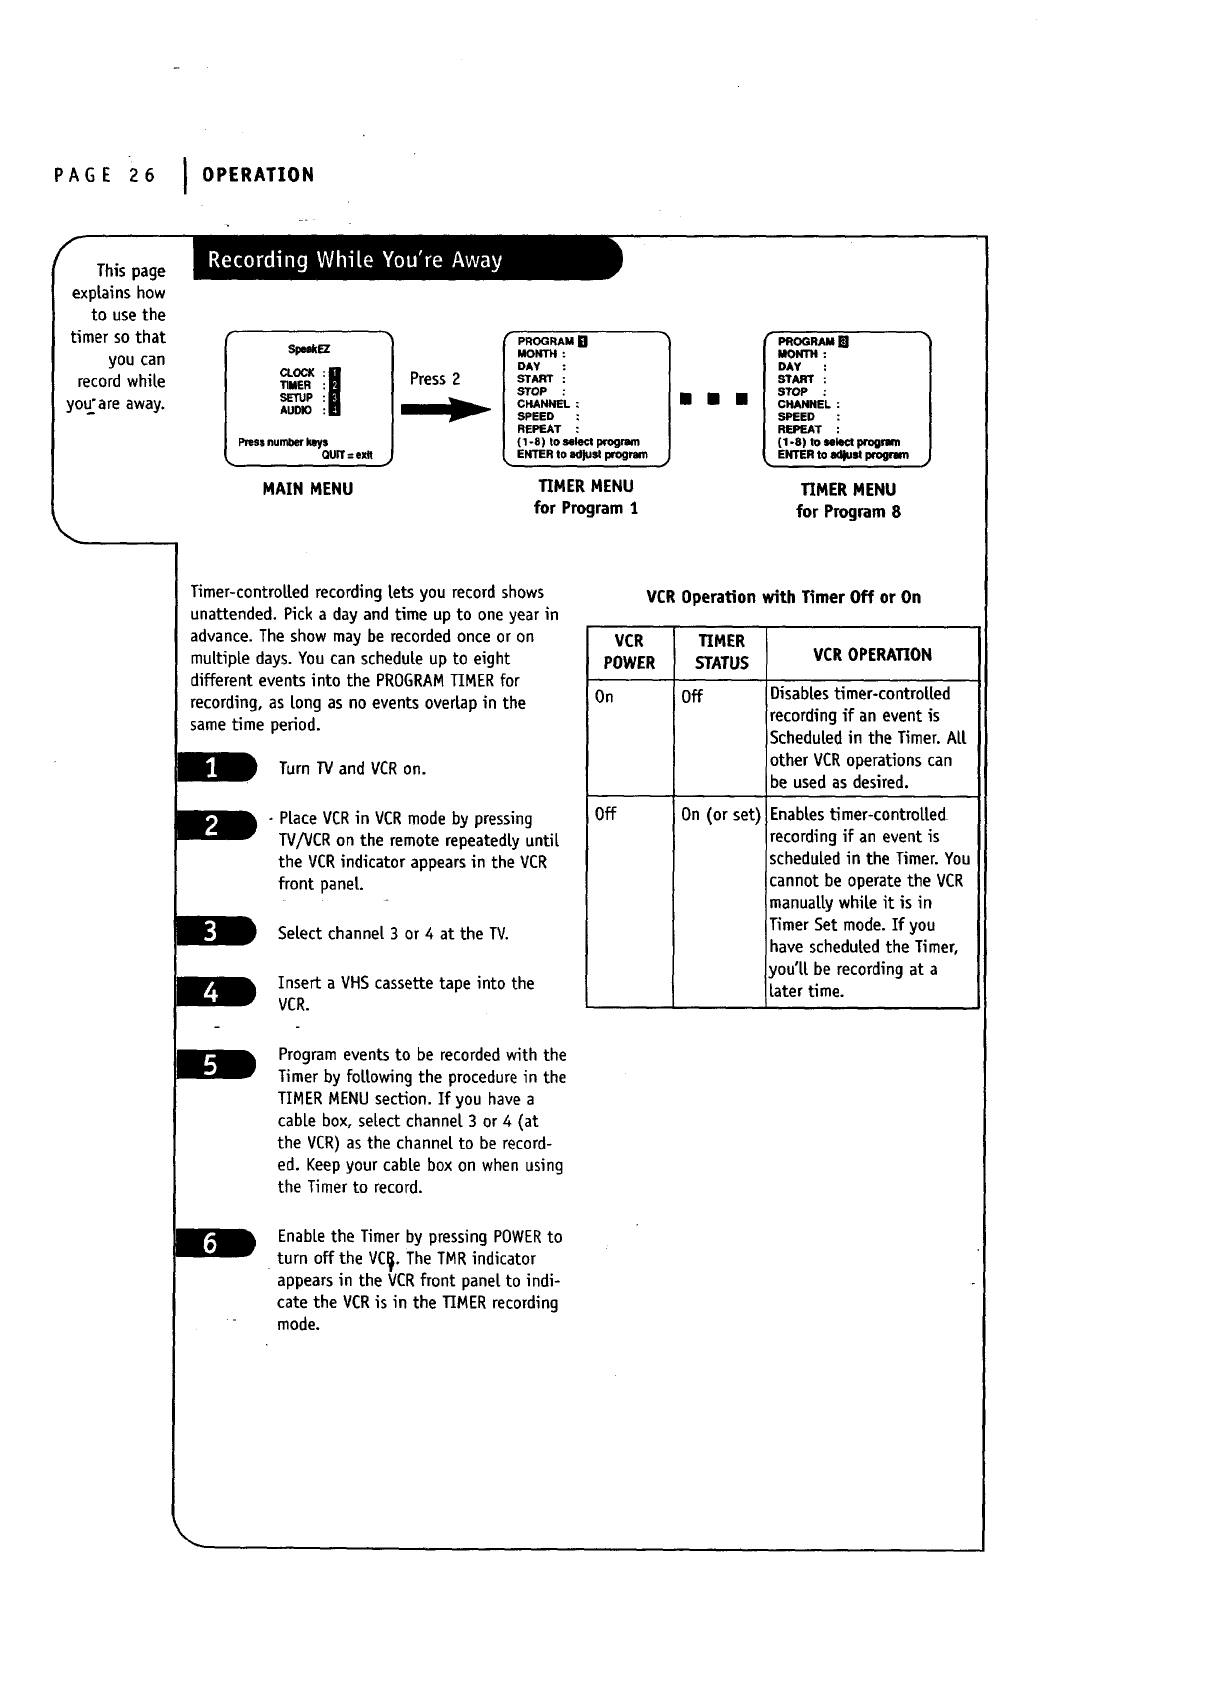
PAGE26 I OP RAT,O.
f
This page
explains how
to use the
timer so that
you can
record while
you'are away.
SI_EZ
T1MER
SETUP
AUI)_O
Pressnumberkeys
QUIT=exit
MAIN MENU
Press 2
f PRoo"A.a
MONTH :
DAY :
|START:
STOP :
|CHANNEL :
|SPEED :
| REPEAT :
| (1-8) to select Ixogram
_. ENTER to ad}uM program
TIMER MENU
for Program 1
eeOGRAMm
MONTH :
DAY :
START :
STOP :
CHANNEL :
SPEED :
REPEAT :
(1-8) to select program
ENTER to adjust program
TIMERMENU
for Program8
Timer-controlled recording lets you record shows
unattended. Pick a day and time up to one year in
advance. The show may be recorded once or on
multiple days. You can schedule up to eight
different events into the PROGRAMTIMER for
recording, as tong as no events overlap in the
same time period.
Turn TV and VCR on.
•PLace VCR in VCR mode by pressing
TV/VCR on the remote repeatedly until
the VCR indicator appears in the VCR
front panel.
Select channel 3 or 4 at the TV.
Insert a VHScassette tape into the
VZR.
Program events to be recorded with the
Timer by following the procedure in the
TIMER MENU section. If you have a
cable box, select channel 3 or 4 (at
the VCR) as the channel to be record-
ed. Keep your cable box on when using
the Timer to record.
VCROperation with Timer Off or On
VCR TIMER
POWER STATUS VCROPERATION
On Off
Off On (or set)
Disables timer-controued
recordingif an event is
Scheduledin the Timer. All
other VCRoperationscan
be used as desired.
Enablestimer-controlled
recording if an event is
scheduled in the Timer. You
cannot be operate the VCR
manually while it is in
Timer Set mode. If you
have scheduled the Timer,
you'll be recording at a
Later time.
Enablethe Timer by pressingPOWERto
turn off the VC_.The TMRindicator
appears in the VCRfront panel to indi-
cate the VCRis in the TIMERrecording
mode.
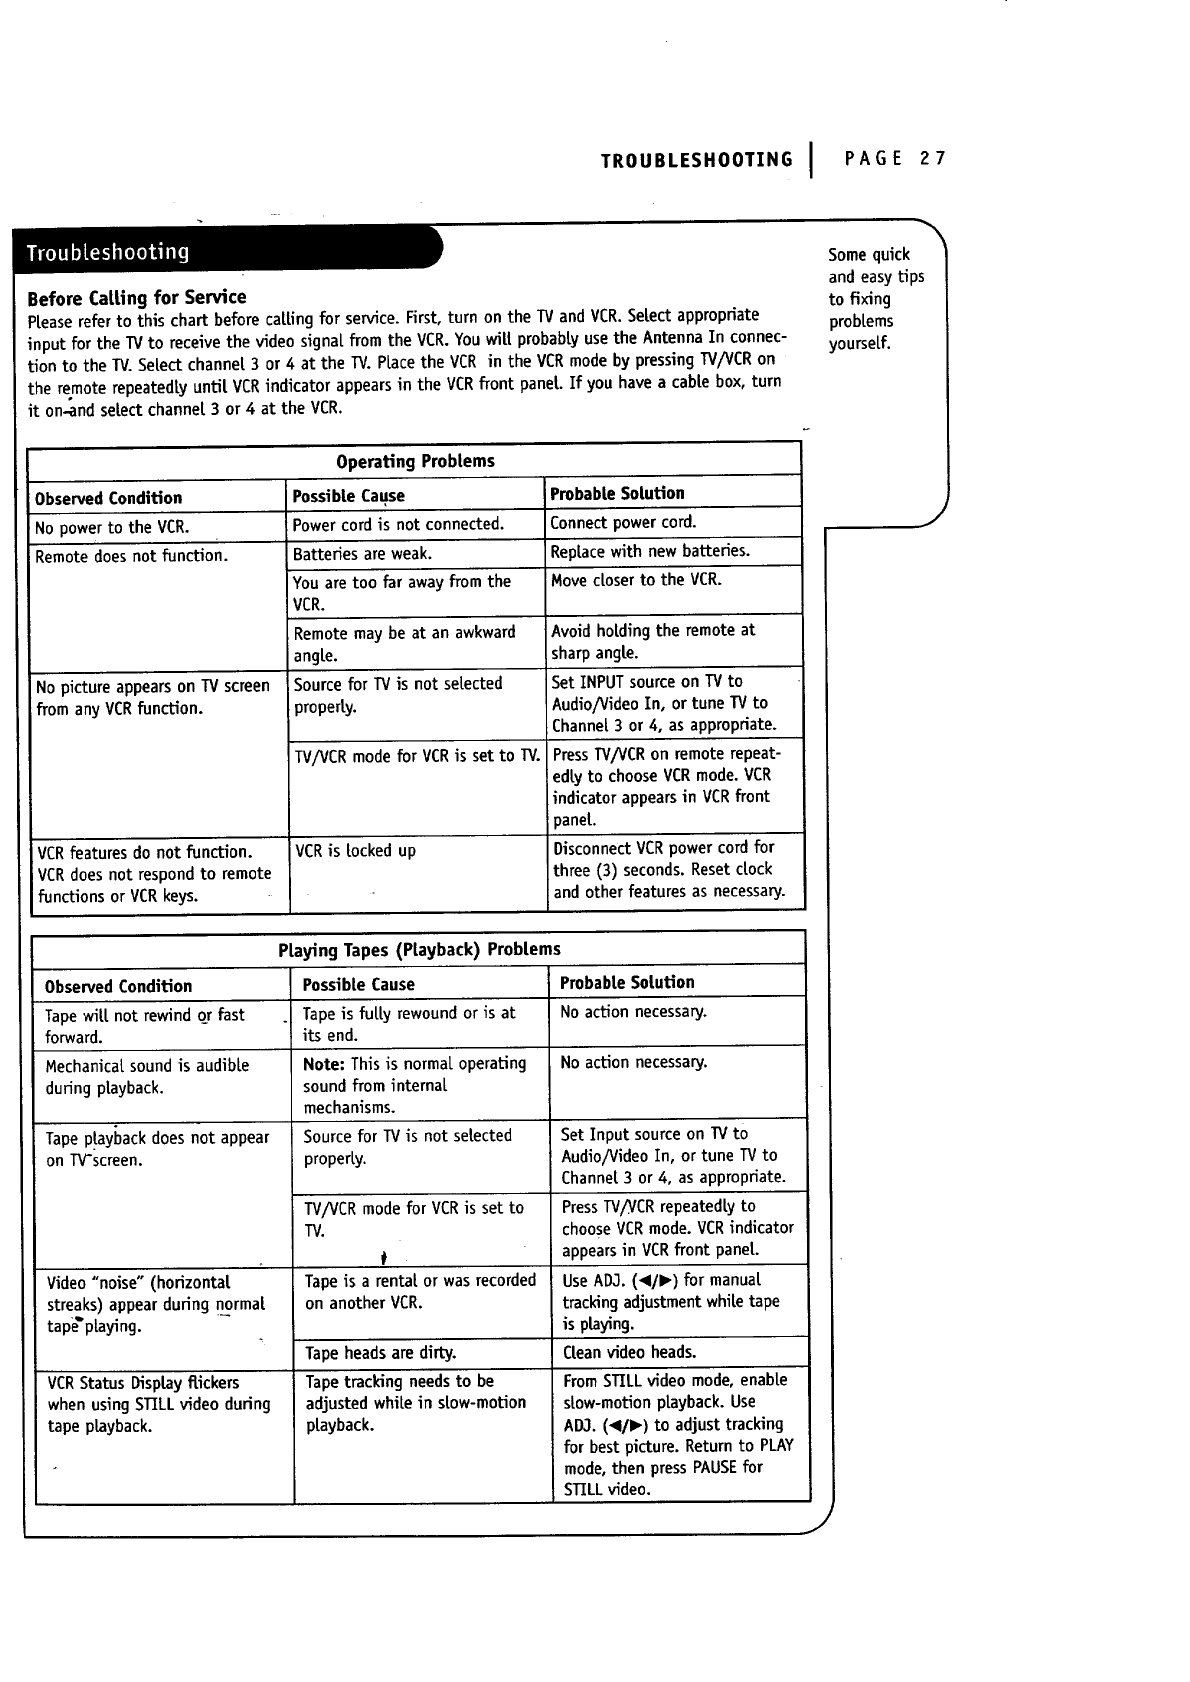
TROUBLESHOOTING I PAGE 27
Before Catting for Service
Pleaserefer to this chart beforecalling for service. First, turn on the TVand VCR.Select appropriate
input for the TVto receive the video signal from the VCR.Youwilt probably usethe AntennaIn connec-
tion to the TV.Select channel 3 or 4 at the TV.Placethe VCR in the VCRmode by pressing TV/VCRon
the remote repeatedly until VCRindicator appearsin the VCRfront panel If you have a cable box, turn
it on-and select channel 3 or 4 at the VCR.
Somequick
and easytips
to fixing
problems
yourself.
Operating Problems
ObservedCondition
No powerto the VCR.
Remotedoesnot function.
No picture appears on TV screen
from any VCR function.
Possible Cause
Power cord is not connected.
Batteries are weak.
You are too far away from the
VCR.
Remote may be at an awkward
angle.
Source forTV isnot selected
properly.
TV/VCR mode for VCR is set to W.
Probabte Sotution
Connect power cord.
Replace with new batteries.
Move closer to the VCR.
VCR featuresdo notfunction. VCR islockedup
VCR doesnotrespondto remote
functionsorVCR keys.
PlayingTapes (Playback)Problems
ObservedCondition Probab[eSotution
Tapewill not rewind o3fast No action necessary.
forward.
Mechanical sound is audible No action necessary.
duringplayback.
Avoidholdingtheremoteat
sharpangle.
SetINPUTsourceon TV to
Audio/VideoIn, ortune TVto
Channel3 or 4, asappropriate.
PressTV/VCRon remote repeat-
edtyto chooseVCRmode.VCR
indicatorappearsin VCRfront
panel.
Disconnect VCRpowercordfor
three (3) seconds.Resetclock
and otherfeaturesas necessary.
Tapep!ay_)ackdoes not appear
on TV'screen.
Video "noise" (horizon[at
streaks) appear during normal
tape" playing.
VCRStatus Displayflickers
when using STILLvideo during
tape playback.
Possib[e Cause
Tape is fuUy rewound or is at
its end.
Note: This is normal operating
sound from internal
mechanisms.
Source for TV is not selected
property.
TV/VCRmodefor VCRis set to
TV.
Tapeis arental or wasrecorded
on another VCR.
Tape headsare dirty.
Tapetrackingneedsto be
adjustedwhitein stow-motion
playback.
SetInputsourceon TV to
Audio/VideoIn,ortuneTV to
Channel3 or4,asappropriate.
PressTV/_CRrepeatedlyto
chooseVCR mode.VCR indicator
appearsinVCR frontpane[.
UseAD3.(41/I_)formanual
trackingadjustmentwhiletape
isplaying.
Cleanvideoheads.
FromSTILLvideomode,enable
stow-motionplayback.Use
AD3. (_/l_) to adjust tracking
for best picture. Returnto PLAY
mode,then pressPAUSEfor
STILLvideo.
J
J
PAGE 28
f-
Somequick
and easytips
to fixing
problems
yourself.
I TROUBLESHOOTING
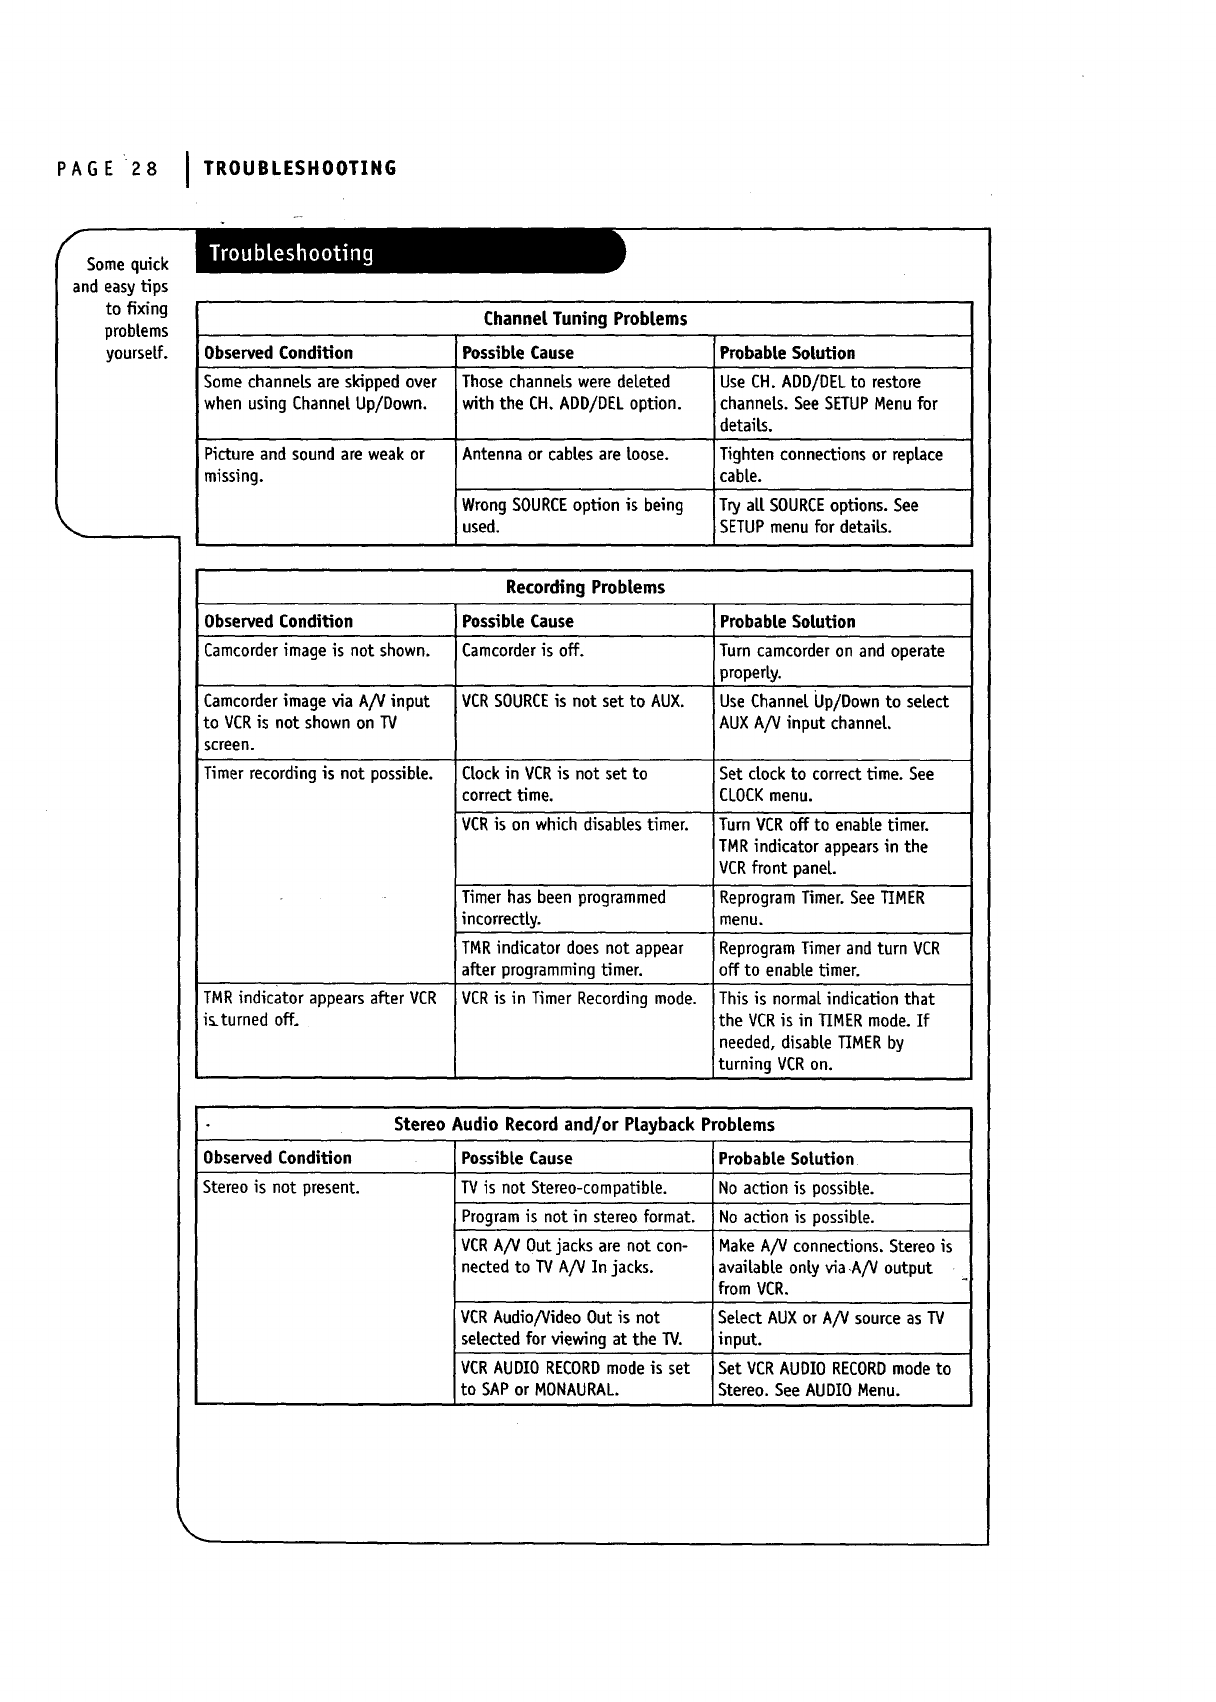
Channel Tuning Problems
ObservedCondition
Somechannels are skipped over
when using Channel Up/Down.
Picture and sound are weak or
missing.
Possible Cause
Those channels were deleted
with the CH, ADD/DEL option.
Antenna or cables are loose.
Wrong SOURCEoption is being
used.
Probable Solution
UseCH.ADD/DEL torestore
channels.SeeSETUP Menu for
details.
Tightenconnectionsor replace
cable.
TryallSOURCE options.See
_SETUPmenu fordetails.
Recording Problems
ObservedCondition PossibleCause Probable Solution
Camcorderimage is not shown. Camcorderis off. Turncamcorder on and operate
properly.
Camcorderimage via AiV input VCRSOURCEis not set to AUX. UseChannelUp/Down to select
to VCRis not shownon TV AUX A/V input channel.
screen.
Timerrecording is not possible. Clock in VCR is not set to
correct time.
VCR is on which disables timer.
Timerhasbeenprogrammed
incorrectly.
TMR indicatordoesnotappear
afterprogrammingtimer.
VCR isinTimerRecordingmode.TMRindicatorappears after VCR
i_turned off.
Stereo Audio Record and/or PLayback Problems
ObservedCondition Possible Cause Probable Solution
Stereo is not present.
Set clockto correcttime. See
CLOCKmenu.
TurnVCRoff to enable timer.
TMRindicator appearsin the
VCRfront panel.
ReprogramTimer. SeeTIMER
menu.
ReprogramTimerandturnVCR
offtoenabletimer.
Thisisnormalindicationthat
theVCR isinTIMER mode.If
needed,disableTIMERby
turningVCR on.
TV isnotStereo-compatible.
Programisnotinstereoformat.
VCR A/V Outjacksarenotcon-
nectedtoTV A/V Injacks.
No action is possible.
No action is possible.
Make A/V connections. Stereo is
available only via A/V output
from VCR.
VCRAudio/Video Out is not Select AUX or A/V sourceas TV
selectedfor viewing at the TV. input.
VCRAUDIORECORDmodeis set Set VCRAUDIO RECORDmodeto
to SAPor MONAURAL. Stereo.SeeAUDIOMenu.
TROUBLESHOOTING I PAGE 29
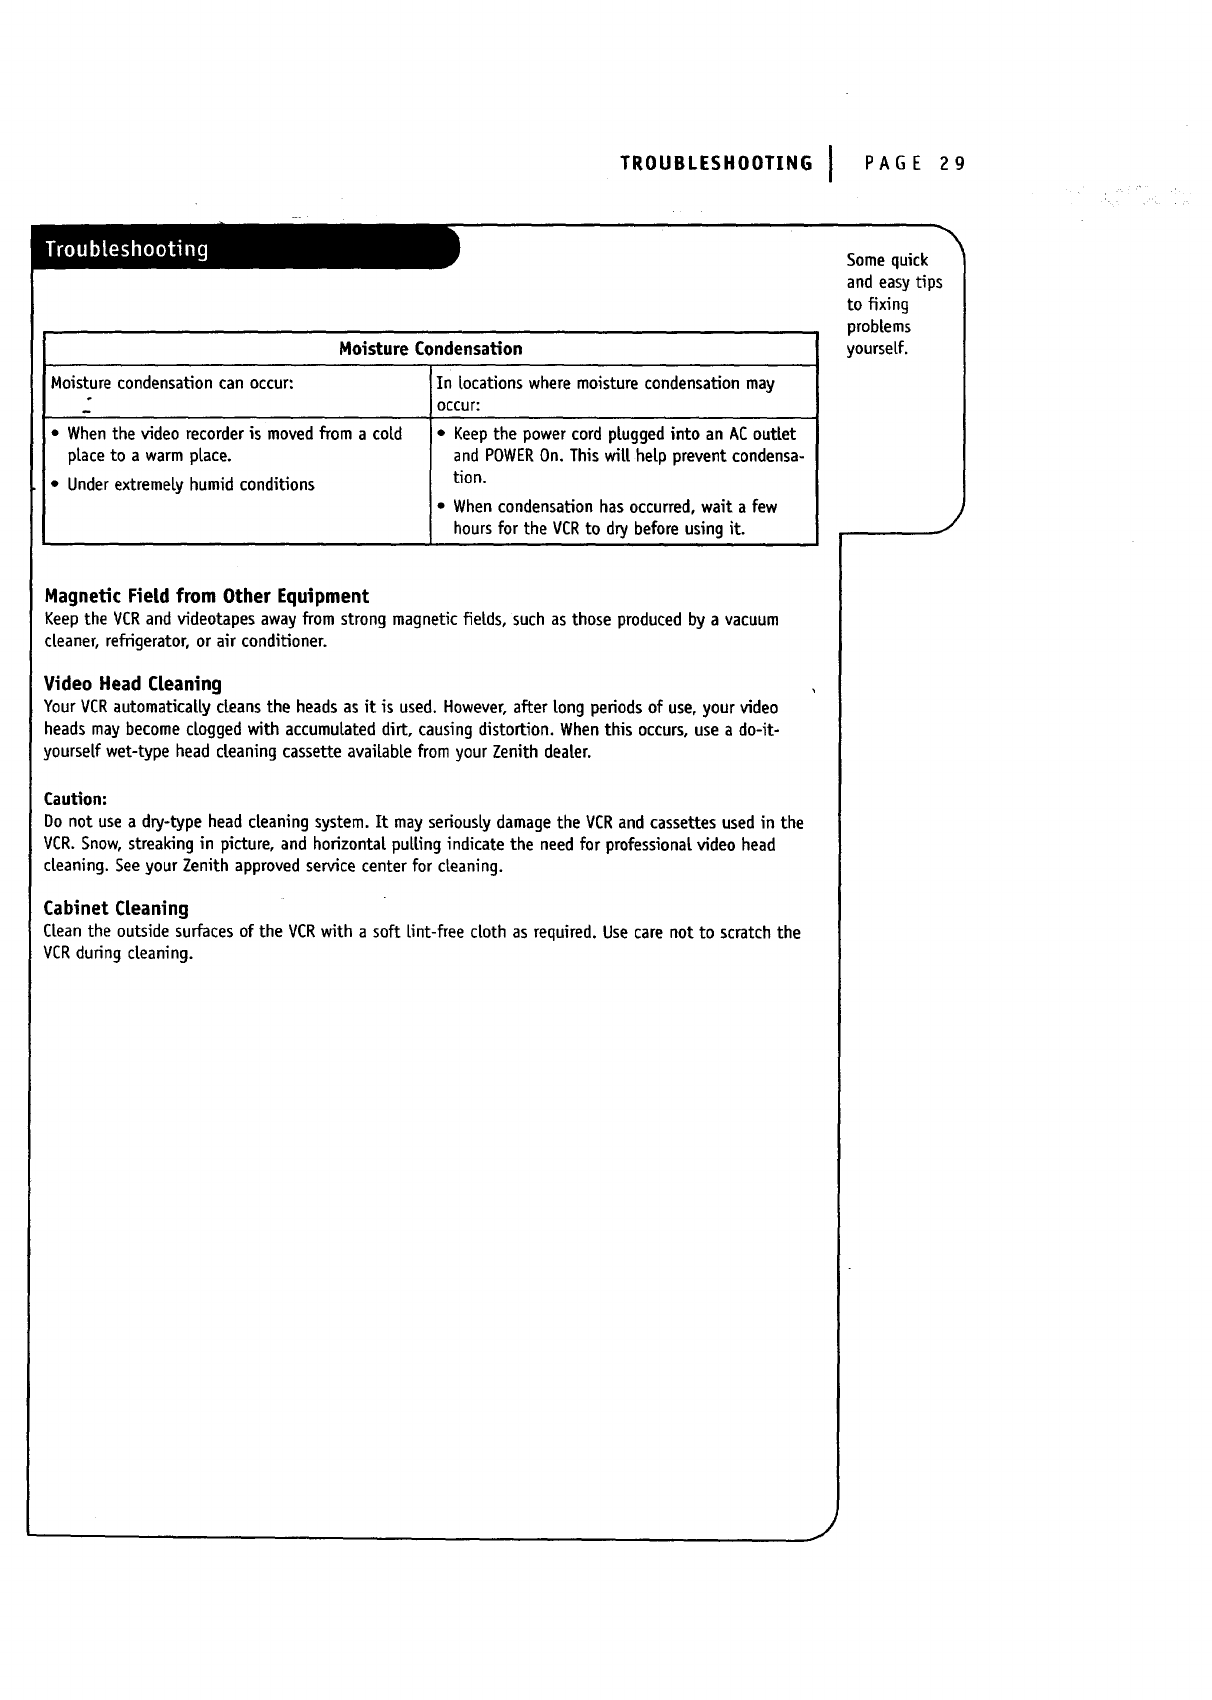
Moisture Condensation
In locations where moisture condensation may
OCCUr:
Moisture condensation can occur:
•When the video recorder is moved from a cold
place to a warm place.
•Under extremely humid conditions
• Keep the power cord plugged into an AC outlet
and POWEROn. This wit[ help prevent condensa-
tion.
• Whencondensation has occurred,wait a few
hours for the VCRto dry beforeusing it.
Somequick
and easy tips
to fixing
problems
yourself.
J
Magnetic FieLd from Other Equipment
Keep the VCR and videotapes away from strong magnetic fietds, such as those produced by avacuum
cleaner, refrigerator, or air conditioner.
Video Head Cleaning
Your VCR automatically cleans the heads as it is used. However, after tong periods of use, your video
heads may become dogged with accumulated dirt, causing distortion. When this occurs, use a do-it-
yourself wet-type head cteaning cassette avaiLabLefrom your Zenith dea|er.
Caution:
Do not use a dry-type head cteaning system. It may seriousLy damage the VCR and cassettes used in the
VCR. Snow, streaking in picture, and horizontal pulting indicate the need for professional video head
cteaning. See your Zenith approved service center for cleaning.
Cabinet CLeaning
CLeanthe outside surfaces of the VCR with a soft lint-free cloth as required. Use care not to scratch the
VCR during cteaning.
J
PAGE '30
f
Findwhat
you want
quickly.
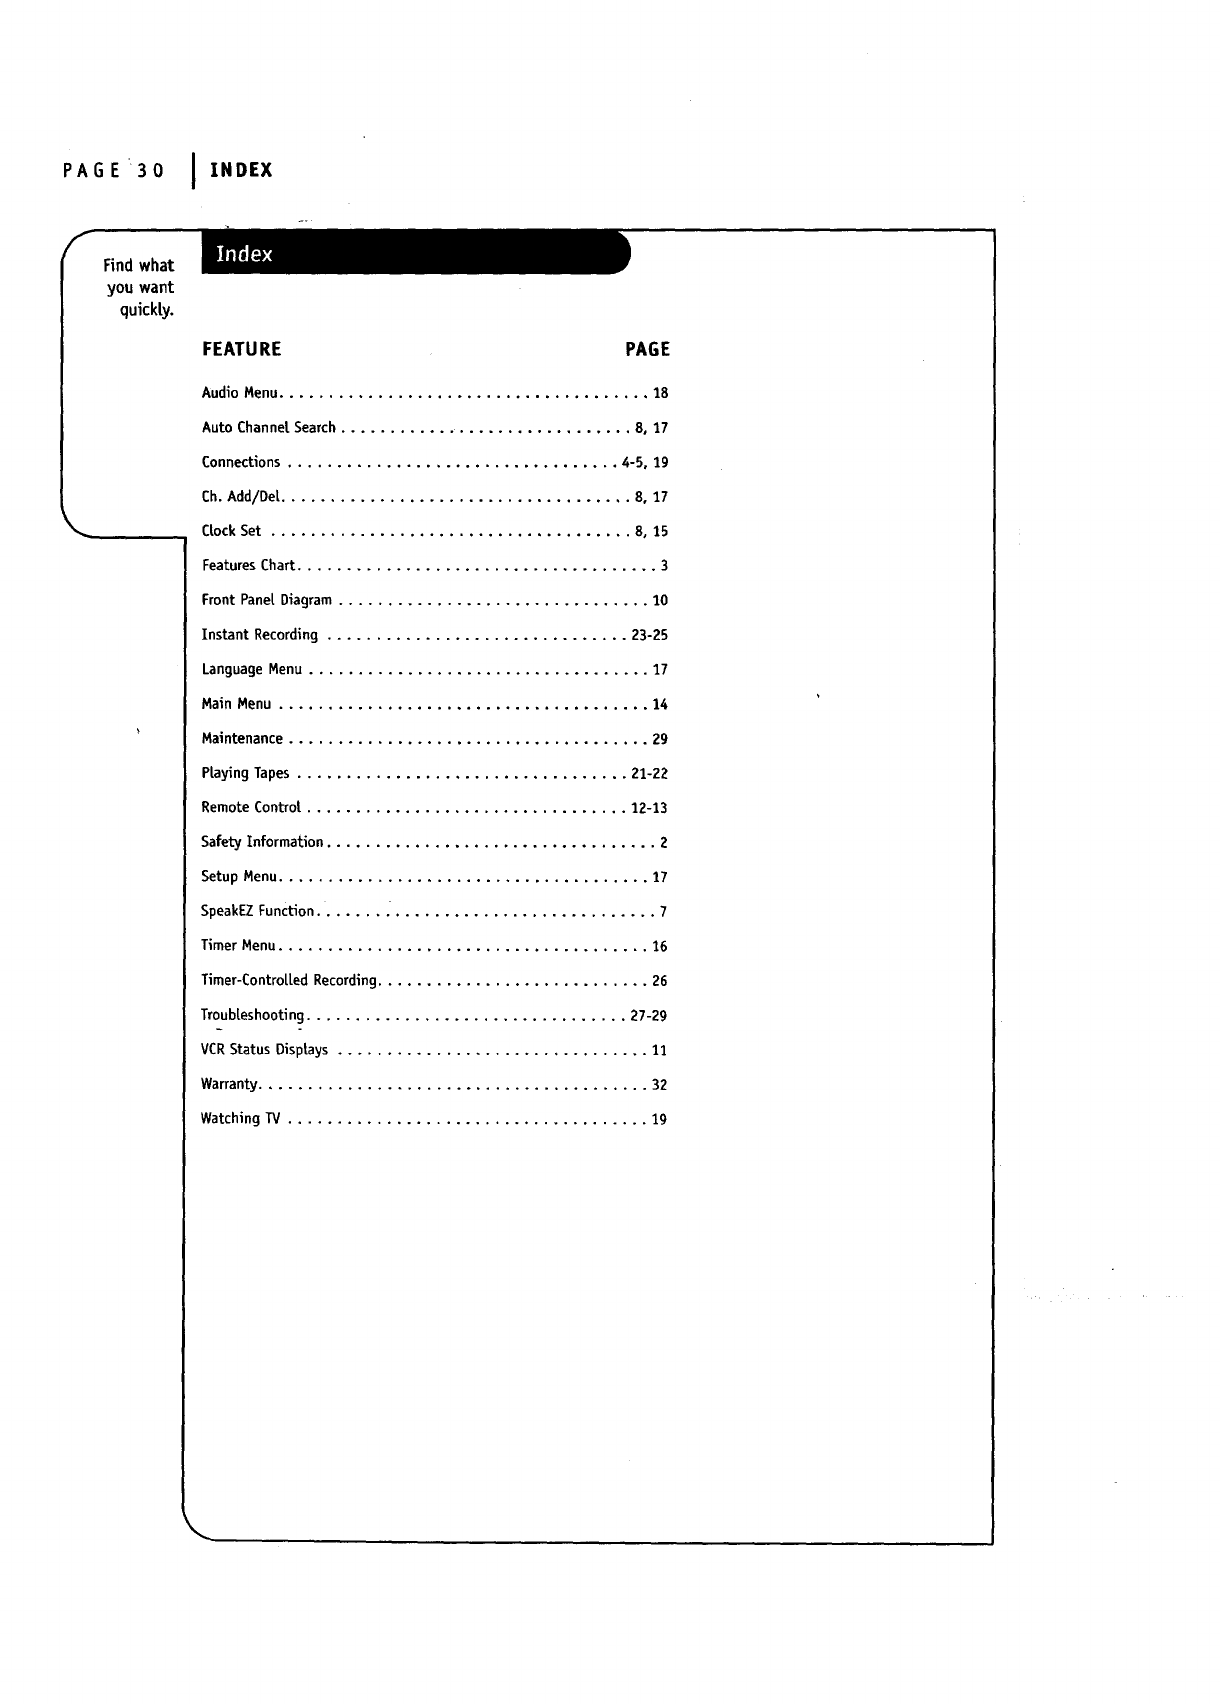
IINDEX
FEATU RE PAGE
Audio Menu ...................................... 18
Auto Channel. Search .............................. 8, 17
Connections .................................. 4-5, 19
Ch. Add/De[ .................................... 8, 17
Clock Set ..................................... 8, 15
Features Chart ..................................... 3
Front Pane[ Diagram ................................ 10
Instant Recording ............................... 23-25
Language Menu ................................... 17
Main Menu ...................................... 14
Maintenance ..................................... 29
Playing Tapes .................................. 21-22
Remote Control ................................. 12-13
Safety Information .................................. 2
Setup Menu ...................................... 17
SpeakEZ Function ................................... 7
Timer Menu ...................................... 16
Timer-Controlled Recording ............................ 26
Troubleshooting ................................. 27-29
VCR Status Displays ................................ 11
Warranty ........................................ 32
Watching TV ..................................... 19
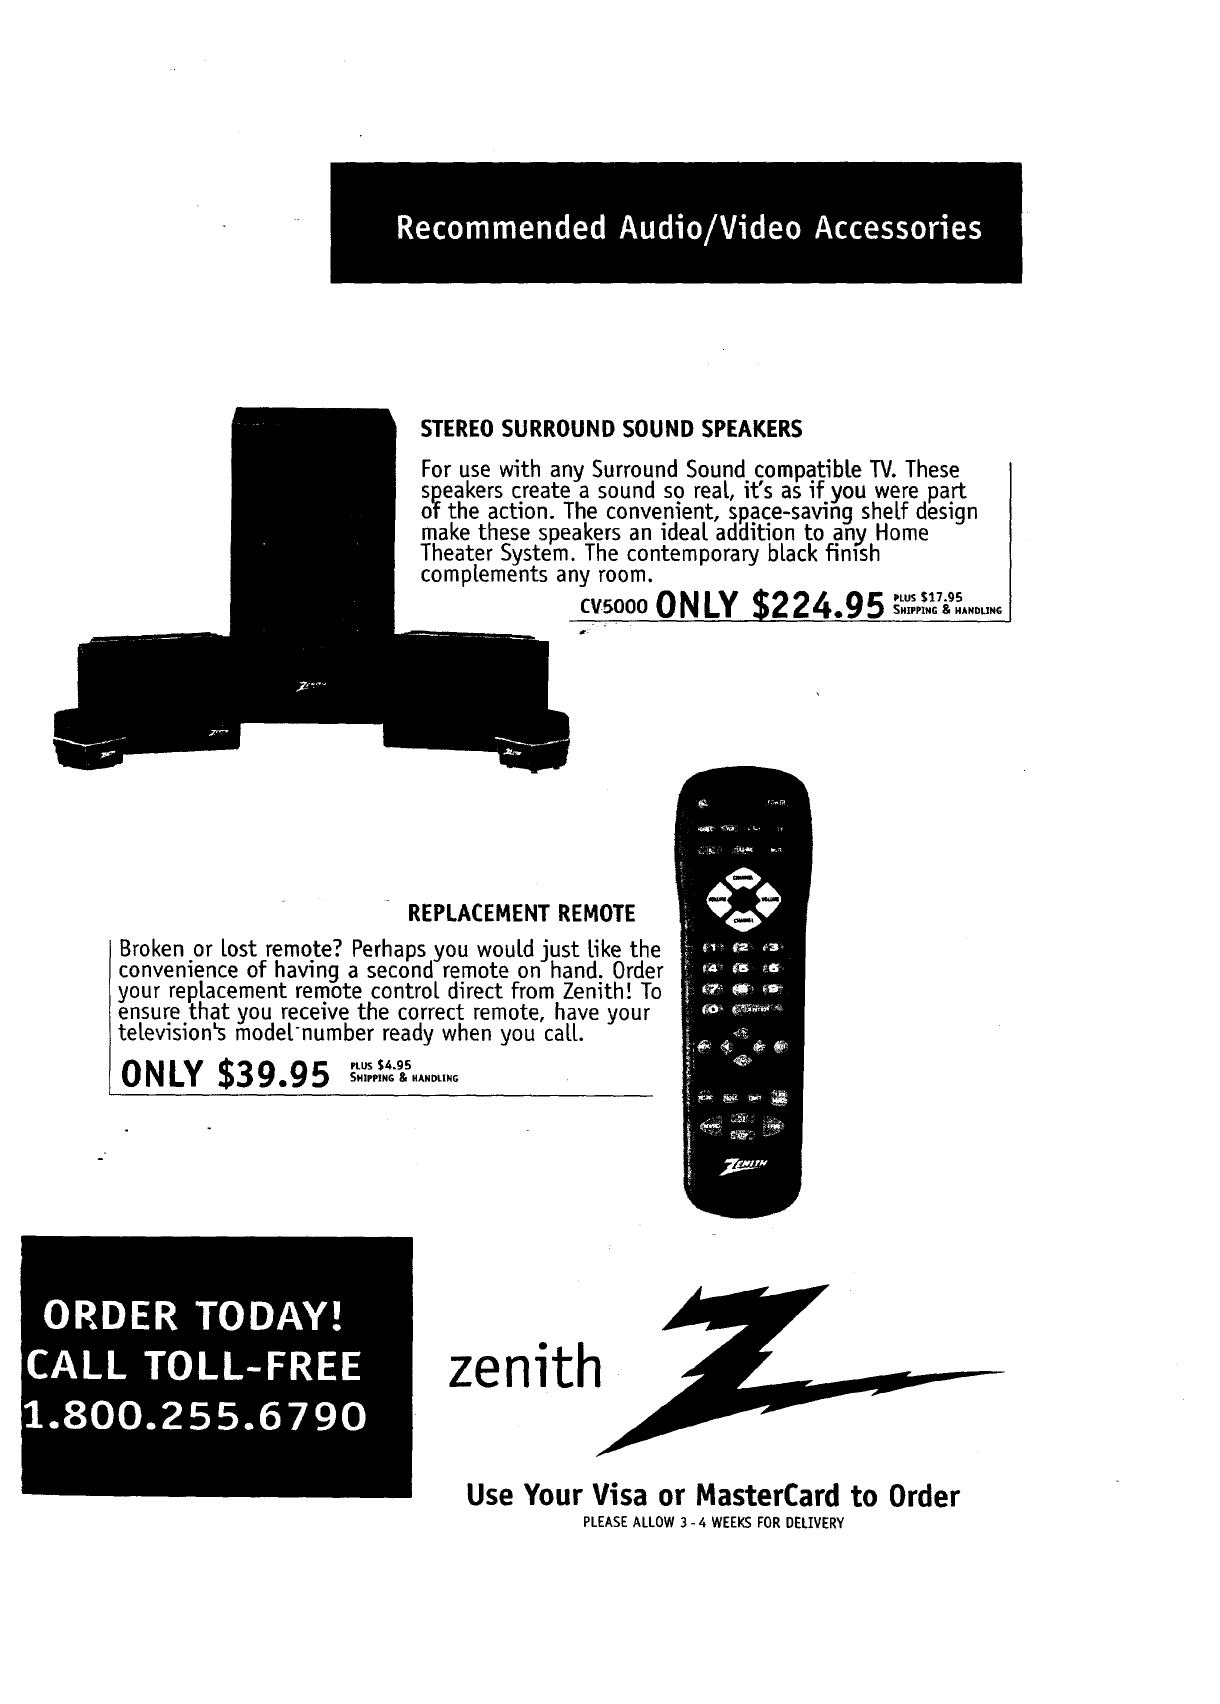
STEREO SURROUND SOUND SPEAKERS
For u.se with any Surround Sound compat_ibte TV. These
sp_e.akerscreate a sound so real, it sas if you were part
of the action. The convenient, sp.ace-saving shelf design
make these speakers an ideal addition to any Home
Theater System. The contemporary black fimsh
complements any room.
cvsoooONLY $224 95 'Lus$1"7"95•SHIPPING & HANDLING
m: "
REPLACEMENT REMOTE
Broken or Lost remote? Perhaps you wouLd just Like the
convenience of having a second remote on hand. Order
your rep.tacement remote control direct from.Zenith! To
ensure that you receive the correct remote, have your
teLevision_ model-number ready when you call
ONLY$39.95 i,LUS$4,95
SHIPPING J_ HANDLING
zenith --
Use Your Visa or MasterCard to Order
PLEASE ALLOW 3 - 4 WEEKS FOR DELIVERY
VIDEOCASSETTERECORDEROR PLAYER
Welcomeinto the Zenith family!We beEevethat you will be pleasedwith your newZenith EntertainmentMachine.Pleasereadthis war-
ranty carefuUy,it is a"LIMITED WARRANTY"as definedunder FederalLaw.This warrantygivesyou specificlegal rights,
andyou may also haveother rightsthat vary fromstate to state within the U.S.A.
ZENITH'S RESPONSIBILITY
Service Labor During a period of 90 days from effective warranty date, Zenith wiLt provide service labor by a Zenith authorized service center
when needed as determined by Zenith, as aresult of manufacturing defects.
Parts Newor remanufacturedreplacementsfor factory-defective parts wilt be suppbedby a Zenith authorized servicecenterfor one year from
effective warranty date. Suchreplacementparts are warrantedfor the remaining portion of the original warranty period.
Not Covered Thiswarranty coversmanufacturing defects anddoes not cover installation, adjustment of customercontrolsin the home,installationor
repairof homeantenna systems,cableconvertersor cablecompany-supp|iedequipment;it also does not coverdamagedue to misuse,
abuse, negligence,acts of God or other causesbeyondthe controlof Zenith. Anyalteration of the productafter manulacture voids this
warranty in its entirety.
OWNER'S RESPONSIBILITY
Effective Warranty Date Warranty begins on the date of original consumer purchase. For your convenience, keep the dealeCs dated bit[ of sale or a delivery ticket
as evidence of the purchase date.
Operating Guide Read your Operating Guide carefully so that you wilt understand the operation of your set and how tO adjust the customer controls.
Carry-In Service The video product must be taken to a U.S. or Canadian Zenith authorized service center for warranty service and must be picked up by
the owner.
1t/Set Performance It is the owner'sresponsibilityto maintain the TV receiverwith whichthe video product is used, and the associatedantenna system, in
proper operatingcondition..
Important
Warranty Service
ProductRegistration--Pleasefill out and mail your ProductRegistrationCard.It is imperative that Zenith knowhow to reach you
promptlyif we shoulddiscovera safety problemthat could affect you.
For warranty service information, contact any Zenith authorized service center. Parts and service labor that are Zenith's responsibiUty
(see above) will be provided without charge. Other service is at the owner's expense. If you have any problem in obtaining satisfactory
warranty service, call or write the Zenith Response Center. You must provide the model number, serial number and date of purchase or
date of original installation. Before you ask for warranty sewice, read "Maintenance And Troubleshooting" in your operating guide. You
might avoid a service call.
THIS WARRANTYIS IN LIEU OF ANY OTHERWARRANTY,EXPRESSOR IMPLIED, INCLUDING WITHOUT LIMITATION, ANY WARRANTY
OF NERCHANTABII_ITYOR FITNESS FORA PARTICULARPURPOSE,AND ZENITH SHALL NOT BE LIABLE FORANY CONSEQUENTIAL,
INDIRECT, OR INCIDENTAL DAMAGESOF ANY KIND, INCLUDING LOSTREVENUESOR PROFITSIN CONNECTIONWITH THE PRODUCT.
Zenith Electronics Corporation
Customer Service Department
1000 Milwaukee Avenue
Glenview, Illinois 60025-2493
Telephone: (847) 391-8752
Mon-Fri, 8:00 a.m. - 4:30 p.m. Central Time
ZENITH ELECTRONICS CORPORATION
1000 MILWAUKEE AVENUE
GLENVIEW, ILLINOIS 60025-2493
Zenith Part No. 206-3390
GS# 3835RM0024M
Printed in Korea
Issue O
