ZENITH VCR Manual L9060131
IQVB423 IQVB423 ZENITH VIDEO CASSETTE RECORDER - Manuals and Guides L9060131 View the owners manual for your ZENITH VIDEO CASSETTE RECORDER #IQVB423. Home:Electronics Parts:Zenith Parts:Zenith VIDEO CASSETTE RECORDER Manual
PLC7V96 L9060131
User Manual: ZENITH ZENITH VCR Manual ZENITH VCR Owner's Manual, ZENITH VCR installation guides
Open the PDF directly: View PDF ![]() .
.
Page Count: 40
machine number I 1QVB423
operating guide /warranty
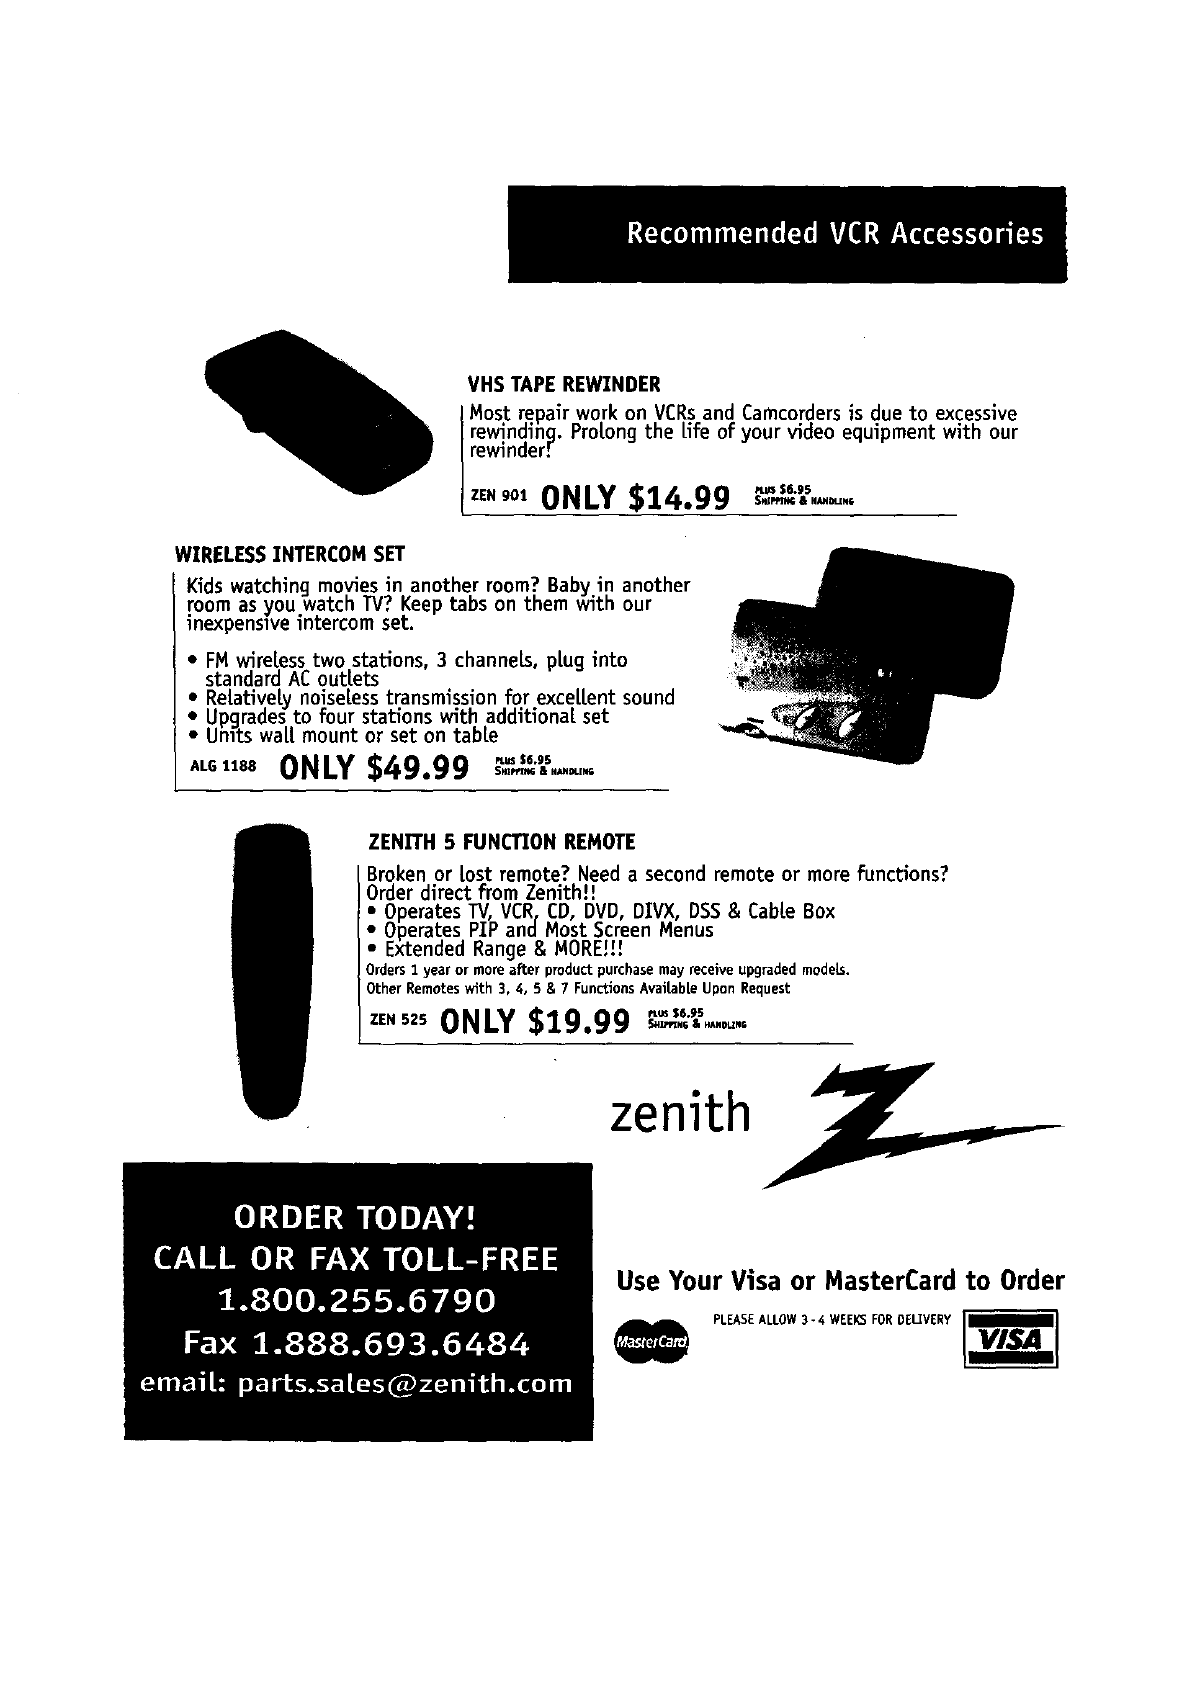
VHS TAPE REWINDER
Most repair work on VCRsand Camcorders is due to excessive
rewindinq. Prolong the life of your video equipment with our
I rewinder, r
ZEN 901 elm $6.95
[ ONLY $14.99 _,-,.u,
WZRELESSZNTERCOMSET
Kids watching movies in another room? Baby in another
room as you watch TV? .Keeptabs on them with our
inexpenswe intercom set.
• FM wireless two stations, 3 channels, plug into
standard ACoutlets
•ReLativeLynoiseless transmission for exceLLent sound
•Upgrades to four stations with additional set
•Units walt mount or set on table
ALG1188ONLY$49.99 SHIP_TJ_G&H_OI,&KG
ZEN]TH 5 FUNCTION REMOTE
Broken or Lostremote? Need a second remote or more functions?
Order direct from Zenith!!
•Operates TV, VCR, CD, DVD, DIVX, DSS&CabLeBox
•Operates PIP and Most Screen Menus
• Extended Range & MORE!!!
Orders 1year or more after product purchase may receive upgraded models.
Other Remoteswith 3, 4, 5& 7 FunctionsAvaiLabLeUponRequest
ZEN525 ONLY.,,., -o-.-
,_4L%_'[NG _1 FiAN_dJM_
zenith
Use Your Visa or MasterCard to Order
PLEASEALLOW3- 4WEEKSFORDEL!VERY 1VISA
l
RECORDYOURMODELNUMBER |
(Now,wlliie_canseeit) /
The model and serial number of your new VCRare Located
on the back of the VCRcabinet. Foryour future convenience,
we suggest that you record these numbershere:
MODEL NO.
SERIAL NO.
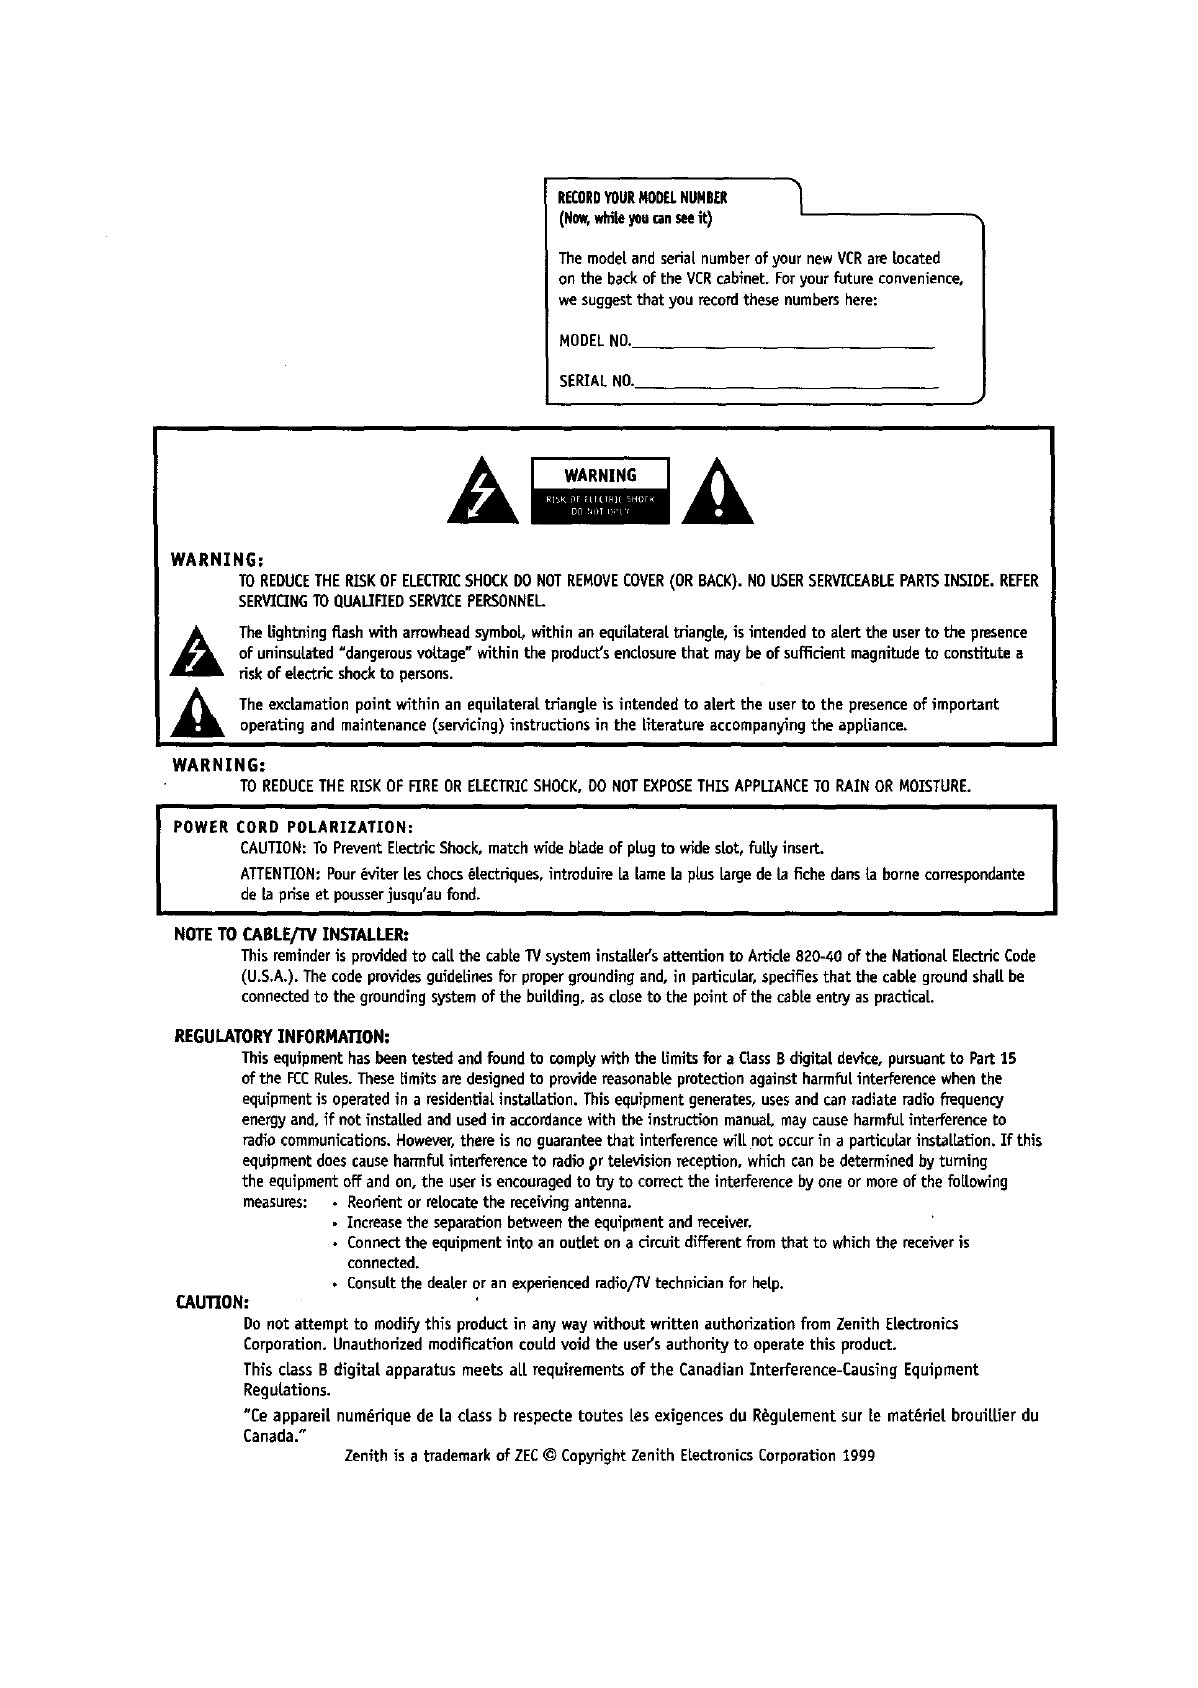
WARNING:
TOREDUCETHERISKOFELECTRICSHOCKDONOTREMOVECOVER(ORBACK).NOUSERSERVICEABLEPARTSINSIDE.REFER
SERVICINGTOQUALIFIEDSERVICEPERSONNEL
The Ughtnlng flash with arrowheadsymbol within an equiLateraLtriangle, is intended to alert the user to the presence
of unlnsuLated"dangerousvoltage" within the product'senclosurethat may be of sufficient magnitude to constitute a
risk of electric shockto persons.
The exclamationpointwithinan equiLateraLtriangleisintendedto alertthe userto the presenceof important
operatingand maintenance(servicing)instructionsinthe Literatureaccompanyingthe appi.iance.
WARNING:
TO REDUCETHE RISKOF FIREOR ELECTRICSHOCK,00 NOTEXPOSETHISAPPLIANCETO RAINOR MOISTURE.
I
POWER CORD POLARIZATION: I
CAUTION: To PreventELectricShock,matchwide bladeofplugtowide sLot,fuLLyinsert. {
ATTENTION: Pour(}viterLeschocs_[ectriques,introduireLalame [aplusLargede lafichedansLabornecorrespondante
de [apriseet pousserjusqu'aufond.
NOTE TO CABLE/TV INSTALLER:
This reminderis provided to caLLthe cabLeTVsystem instaLLers attention to ArticLe820-40 of the National ELectricCode
(U.S.A.). The code providesguidelines for proper grounding and, in particular, specifies that the cable groundsha{[be
connectedto the grounding systemof the building, as closeto the point of the cableentry as practicaL.
REGULATORYINFORMATION:
Thisequipmenthasbeentested andfoundto complywith theEmitsfor a QassBdigitaldevice,pursuantto Part15
of the FCCRuLes.TheseLimitsaredesignedto providereasonableprotectionagainstharmfulinterferencewhenthe
equipmentis operatedin aresidentialinste[lation. Thisequipmentgenerates,usesandcanradiate radiofrequency
energyand,if not instaLLedandusedirr accordancewith the instruction manual maycauseharmfulinterferenceto
radiocommunications.However,thereis noguaranteethat interferencewi|[ not occurin aparticuLariuata|Iation.If this
equipmentdoescauseharmfulinterferenceto radio.orte|evision reception,whichcanbedeterminedbyturning
the equipmentoff andon,the useris encouragedto try to correctthe interferencebyoneor moreof thefollowing
measures: • Reorientor relocatethe receivingantenna.
•Increasetheseparationbetweenthe equipmentandreceiver.
• Connectthe equipmentintoan outletona circuitdifferentfrom that to whichthe receiveris
connected.
•ConsuLtthedealeroranexperiencedradio/TVtechnicianfor help.
CAUTION:
Donot attemptto modiFjthis productin anywaywithoutwrittenauthorizationfrom ZenithELectronics
Corporation.Unauthorizedmodification could voidthe usersauthorityto operatethis product.
This cLassB digltatapparatusmeetsaLLrequirements of the CanadianInterference-Causing Equipment
Regulations.
"Ce apparell num_dque de la classb respecte toutes Lesexigencesdu R_gu[ementsur [e materiel broui[tierdu
Canada." Zenithis a trademarkof ZEC© CopyrightZenithELectronicsCorporationtgg9
SAFETY TIPS I PAGE 3
These simple precauUonswiLLheLp ensure that you get many years of safe enjoyment from your new product.
1. Read Instructions 11. Power Sources
Read all of the safety and operaUng instructions before
operating the product.
2. Retain Instructions
KeepaLLsafety and operaUng instructions for future
reference.
Operate product only from type of power source
indicated on marking [abeL.If you are not sure of the
type of power supply to your home, consultyour
product deaLeror Localpower company. For products
intended to operate from battery power or other
sources, refer to manuaL.
3. Heed Warnings
Follow warnings on the product and in the operating
guide.
4. Follow Instructions
Follow all operating and use instructions.
5. CLeaning
Unplugthis productfrom the walloutlet before
cleaning.Do not useLiquidcleanersoraerosolcleaners.
Usea dampclothfor cleaning.
6. Attachments
Donot useattachmentsnot recommendedby product
manufacturerasthey maycausehazards.
7. Water and Moisture
Do not use this product near water--for example, near
a bathtub, wash bowL,sink, or Laundrytub, in a wet
basement, or near a swimming pooL.
12.
13.
Line-Cord PoiadzaUon
Product is equipped with a polarized aLternating-
current fine plug (a plug having one blade wider than
the other). As a safety feature, this plug will fit into
power outLet onLyone way. If you're unabLeto insert
pLugfuLLyinto outlet, try reversing the plug. If pLug
stiLLfails to fit, contact an eLectrician to replace your
obsolete outlet. Do not defeat safety purpose of
poLarizedplug.
Power-Cord Protection
Route power-supply cords so
they are not LikeLyto be
waLkedon or pinched by items
placed upon or against them,
paying particular attention to
cordsat plugs, convenience
receptacLes,and the point
where they exit from product.
8. Accessodes
Do not place product on an unstable cart, stand,
tripod, bracket, or table. Product may faLL causing
seriousinjury to a child or adult, and serious damage
to the product. Use only with a cart, stand, tripod,
bracket, or table recommended by the manufacturer or
sold with the product. Any mounting of product should
foLLow manufacturer's instructions and should use a,
mounting accessory recommended by manufacturer.
g. Transporting Product
Hove product and cart combinations
with care. Quick stops, excessive
force, and uneven surfaces may cause
product and cart combination to
overturn. ®
10. VenU[ation
SLotsand openings in cabinet must not be blocked or
covered. They are provided for ventilation, to ensure
reLiabLeoperation, and to protect from overheating.
Never block openings by placing product on a bed,
sofa, rug, or other similar surface. Do not pLaceproduct
in buiLt-in instaLLationsuch as a bookcaseor rack
unLessproper ventilation is provided or manufacturer's
instructions have been adhered to.
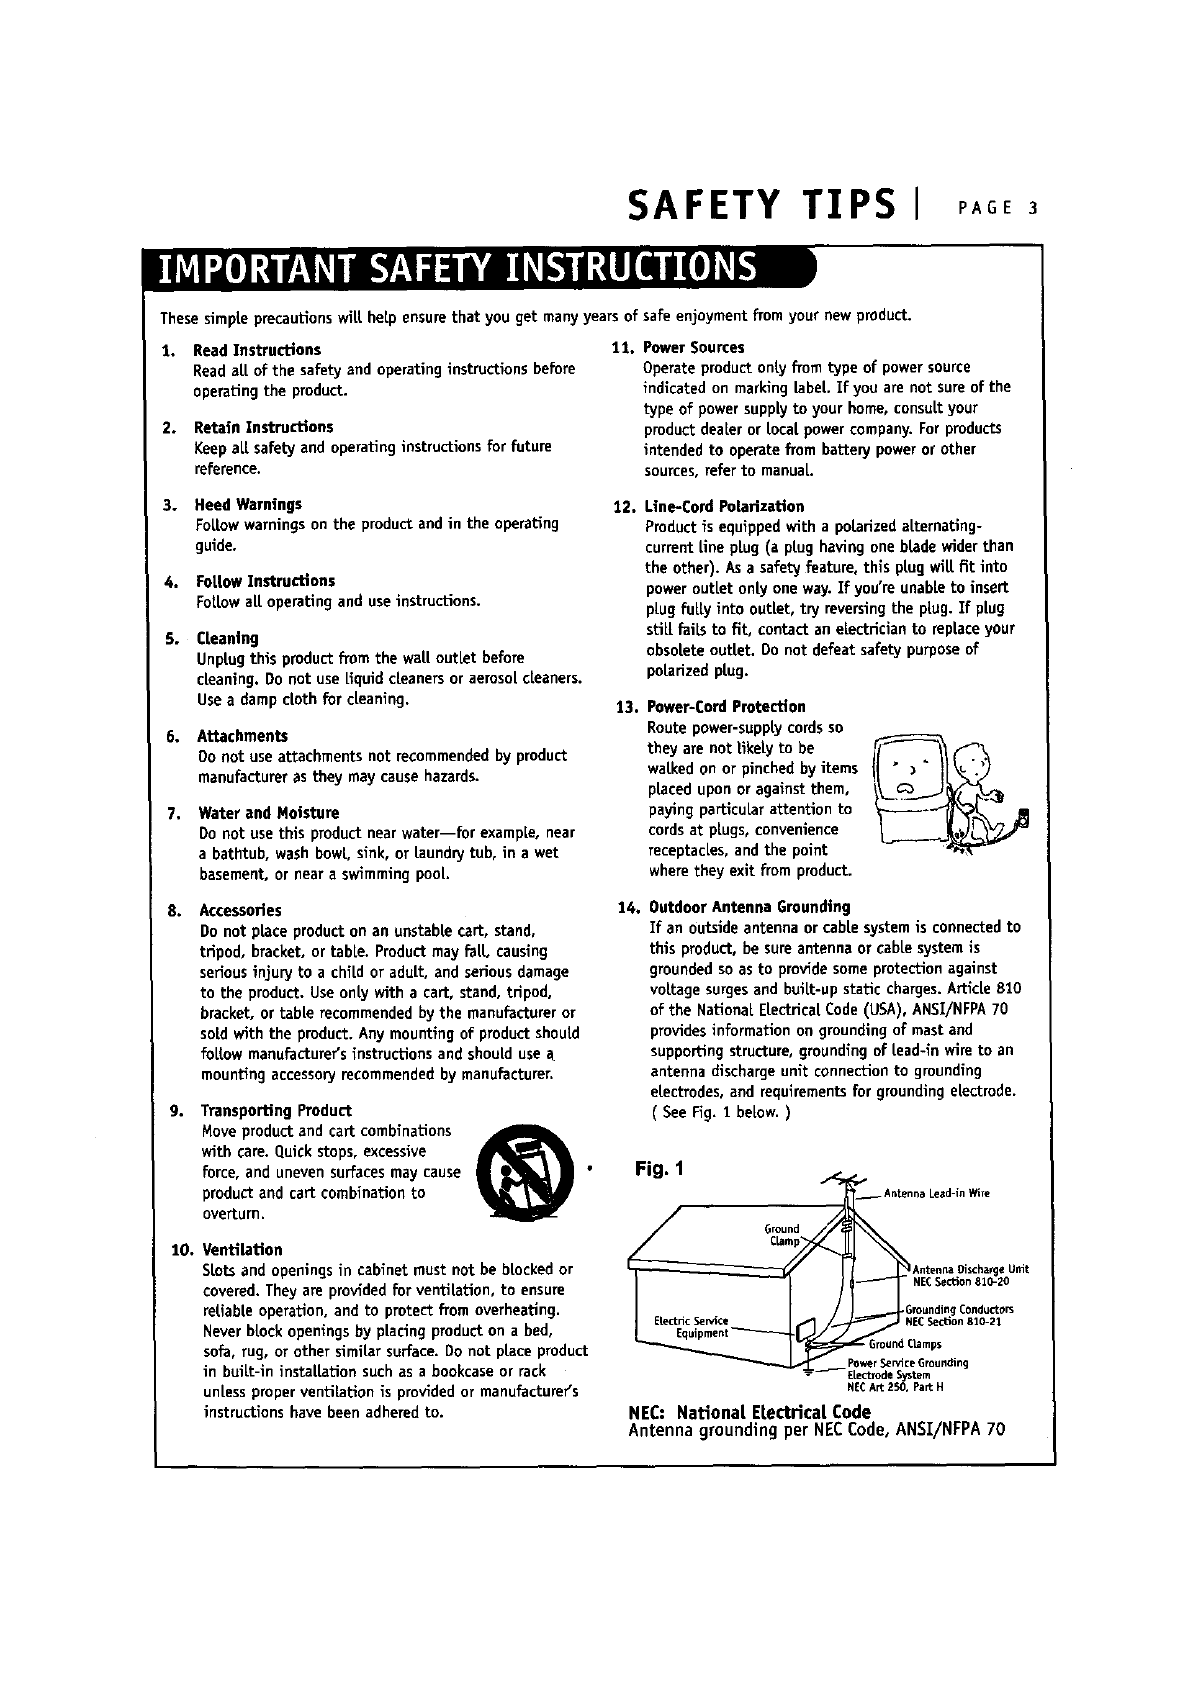
14. Outdoor Antenna Grounding
If an outside antenna or cable systemis connected to
this product, be sureantenna or cable system is
grounded so as to provide some protection against
voltage surgesand built-up static charges. Article 810
of the National ELectricalCode (USA), ANSI/NFPA 70
providesLnformation on grounding of mast and
supporting structure, grounding of Lead-in wire to an
antenna discharge unit connection to grounding
electrodes, and requirements for grounding electrode.
( See Fig. 1below. )
Fig. 1
Ground
Antenna Lead-in Wire
ntenr_a Oi_ha_e Unit
NECSection 811/-20
G_undin a Conducto_
NECSection Blo-21
tamps
_Power _ndce Grounding
ELectrode System
NECArt 2N1, Part H
NEC: National ELectrical.Code
Antenna grounding per NECCode, ANSI/NFPA 70
P,oE, l SAFETY TIPS
These simple precautions will help ensure that you get many years of safe enjoyment from your new product.
15. Lightning
For added protection for
this product during a
Lightningstorm, or when
product is Left unattended
and unused for Long
periods of time, unplug it
from the wall outlet and
disconnect antenna or
cable system. This wilt
prevent damage to product
due to Lightning and
power Linesurges.
16. Power Unes
An outside antenna system should not be Locatedin
the vicinity of overhead power tines or other electric
Lightor power circuits, or where it can fall into such
power tines or circuits. When installing an outside
antenna system, take extreme care to keep from
touching such power tines or circuits, as contact with
them mightbe fatal.
17. Overtoadlng
Do not overload wall outlets, extension cords or
integral convenience receptacles, as this can result in
risk of fire or electric shock.
18. Object and Liquid Entry
Never push objects of any kind into this product
through openings, as they may touch dangerous
voltage points or short-out parts that could result in
fire or electric shock. Never spill Liquidof any kind on
product.
19. Serv_dng
Do not attempt to service this product yourself, a_
opening or removing covers may expose you to
dangerous voltage or other hazards. Refer all servicing
to quaUfied service personnel,
20. Wall or CeiUng Mounting
Mount product to wall or ceiling only as recommended
by manufacturer.
21. Replacement Parts
When replacement part(s) are required, be sure service
technician has used replacement part(s) specified by
manufacturer or have same characteristics as origlna[
part(s). Unauthorized substitutions may result in fire,
electric shock, or other hazards.
22. Damage Requiring Service
Unplug this product from the watt outlet and refer
senlicing to qualified service personnel under these
conditions:
a. If power-supply cord or plug is damaged.
b. If Liquid hasbeen spilled or objects have fallen into
product.
c. If product has been exposed to rain or water,
d. If product doesn't operate normally by following
handbook instructions. Adjust only those controls
covered by handbook instructions; improper
adjustment of other controls may result in damage
and often requires extensive work by a qualified
technician to restore productto normal operation.
e. If product has been dropped or cabinet has been
damaged.
f. If product exhibits a distinct change in performance.
23. Heat
Keep product away
from heat sources
such as radiators,
heat registers, stoves,
or other products
(including ampEfiers)
that produce heat.
24. Safety Check
Upon completion of any service or repairs to this
product, ask service technician to perform safety
checks to determine that product is in proper operating
condition.
INSTALLATION I PAGE 5
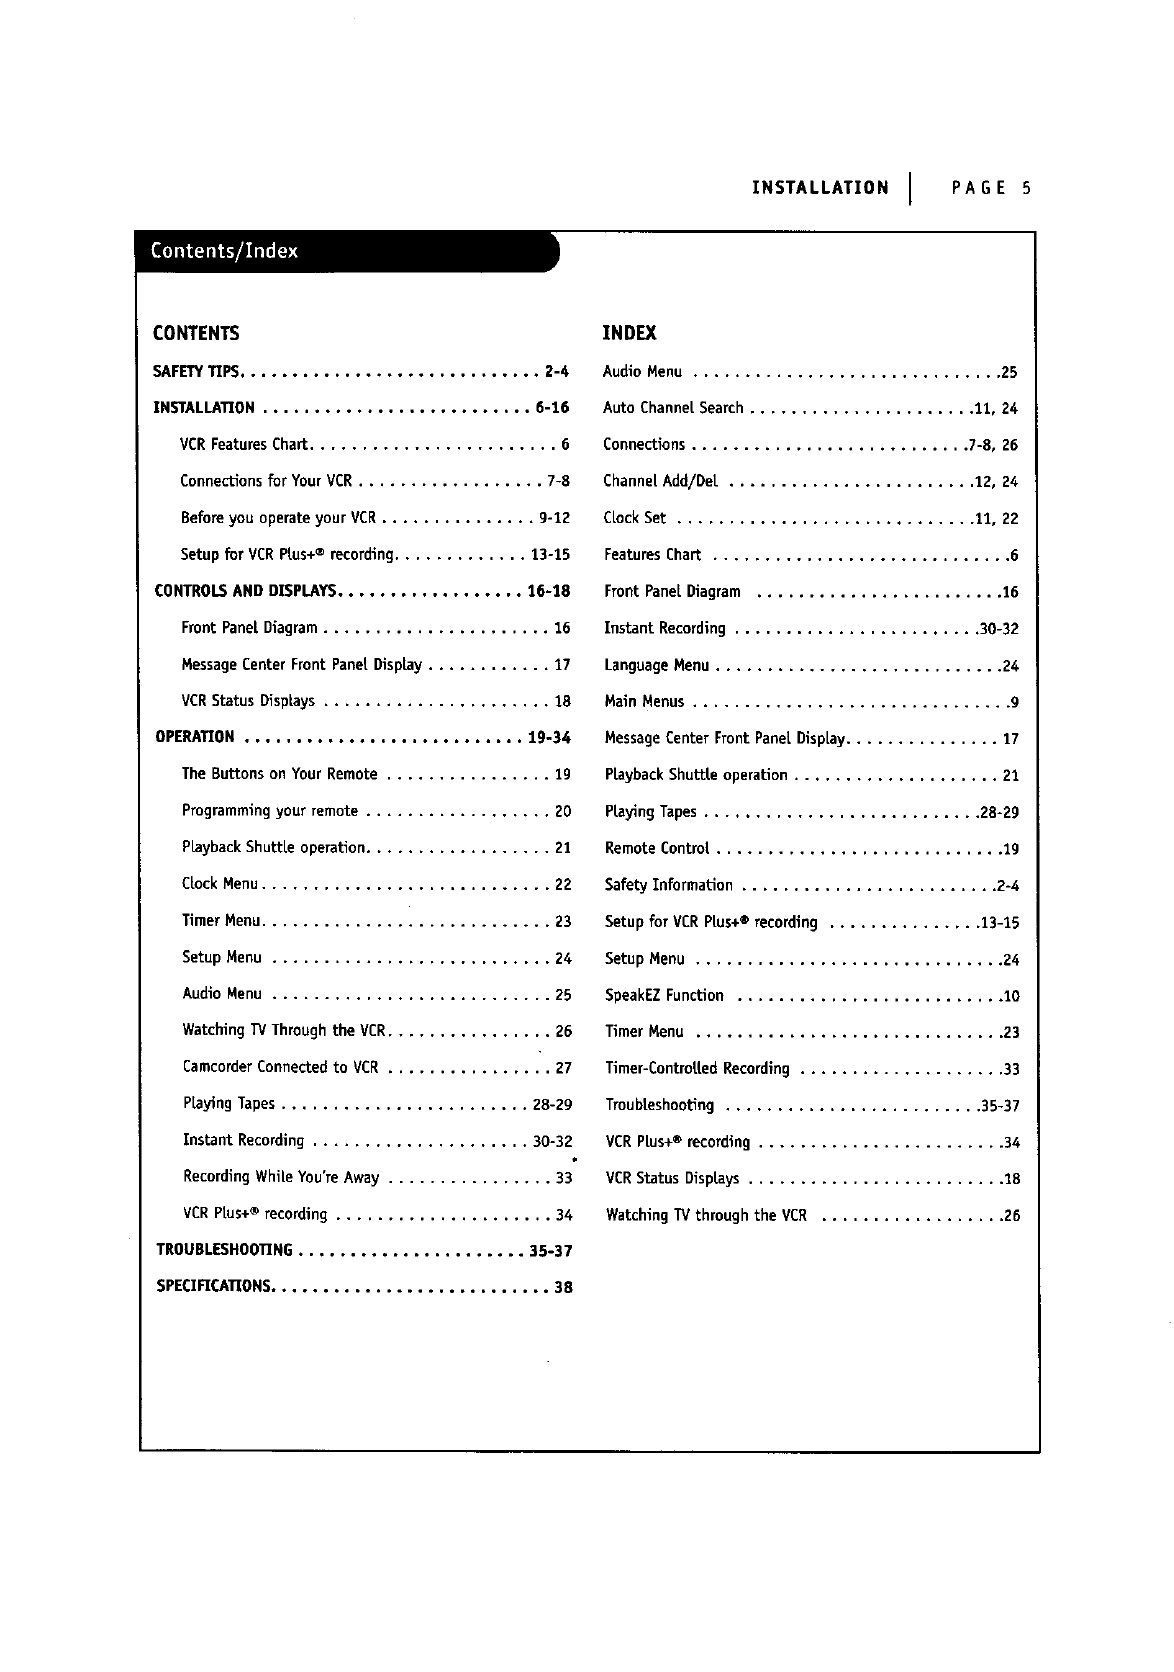
CONTENTS
SAFETYTIPS............................. 2-4
INSTALLATION .......................... 6-16
VCRFeatures Chart ........................ 6
Connections for Your VCR .................. 7-8
Before you operate your VCR ............... 9-12
Setup for VCR PLus+® recording............. 13-15
CONTROLSAND DISPLAYS.................. 16-18
Front PaneLDiagram ...................... 16
MessageCenter Front Panel DispLay............ 17
VCRStatus DispLays...................... 18
OPERATEON........................... 1g-34
The Buttons on Your Remote ................ lg
Programmingyour remote .................. 20
PLaybackShuttLe operation.................. 21
CLockMenu ............................ 22
Timer Menu ............................ 23
Setup Menu ........................... 24
Audio Menu ........................... 25
Watching _/Thmugh the VCR................ 26
Camcorder Connected to VCR ................ 27
PLayingTapes ........................ 28-29
Instant Recording ..................... 30-32
RecordingWhiLeYou're Away ................ 33"
VCR PLus+®recording ..................... 34
TROUBLESHOOTING...................... 35-37
SPECIFICATIONS........................... 38
INDEX
Audio Menu .............................. 25
Auto ChannelSearch...................... 11, 24
Connections........................... 7-8,26
ChannelAdd/Det ........................ 1_2,24
CLockSet ............................. 11,22
FeaturesChart ............................. 6
FrontPaneLDiagram ........................ 16
InstantRecording........................ 30-32
Language Menu ............................ 24
Main Menus ............................... g
Message CenterFrontPanel.DispLay............... 17
PlaybackShuttLeoperation.................... 21
PiayingTapes ........................... 28-29
Remote Control............................ Ig
SafetyInformation......................... 2-4
Setup for VCR PLus+®recording ............... 13-15
Setup Menu .............................. g4
SpeakEZ Function .......................... 10
Timer Menu .............................. 23
Timer-ControLLedRecording.................... 33
TroubLeshooting......................... 35-37
VCR PLus+® recording........................ 34
VCR StatusDisp[ays......................... 18
WatchingTV throughthe VCR .................. 26
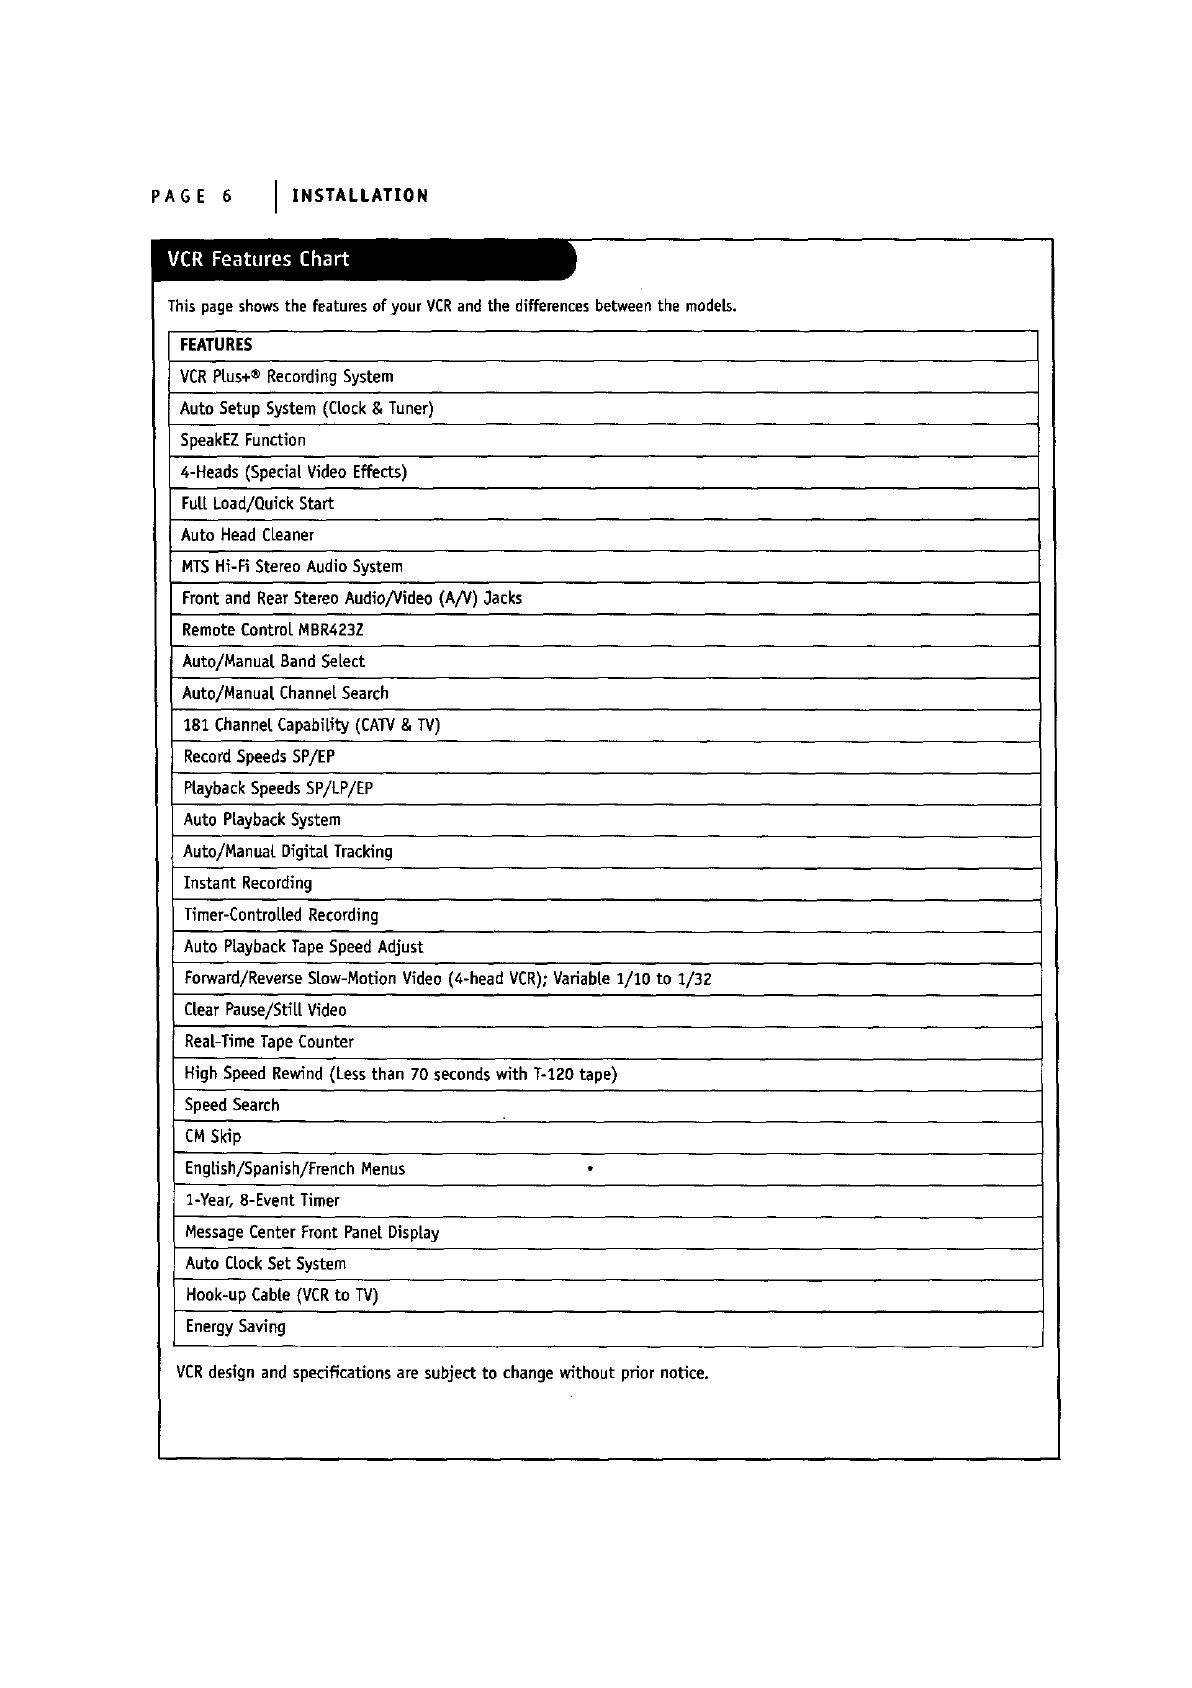
PAGE 6I INSTALLATION
This page shows the features of your VCRand the differences between the models.
FEATURES
VCRPLus+® Recording System
AutoSetup System (CLock& Tuner)
SpeakEZFunction
4-Heads (Special Video Effects)
FuLLLoad/Qulck Start
Auto Head CLeaner
MTSHi-Fi Stereo AudioSystem
Front and RearStereoAudlo/Video(A/V) 3acks
RemoteControl MBR423Z
Auto/Manual.Band SeLect
Auto/ManuaLChannel Search
181 Channel.CapabiLity(CAIV & TV)
RecordSpeedsSP/EP
PlaybackSpeedsSP/LP/EP
Auto Playback System
Auto/ManuaLDigital Tracking
Instant Recording
Timer-ControLLedRecording
Auto PlaybackTapeSpeedAdjust
Forward/ReverseStow-Motlon Video (4-head VCR);VariabLe1/10 to 1/32
CLearPause/StiLLVideo
ReaL-TimeTapeCounter
HighSpeed Rewind(Less than 70 secondswith T-120 tape)
SpeedSearch
CM Skip
EngLish/Spanlsh/FrenchMenus
l-Year,B-EventTimer
MessageCenterFrontPanelDispLay
AutoCLockSetSystem
Hook-upCabLe(VCRtoTV)
EnergySaving
VCR designand specificationsare subjectto change without priornotice.
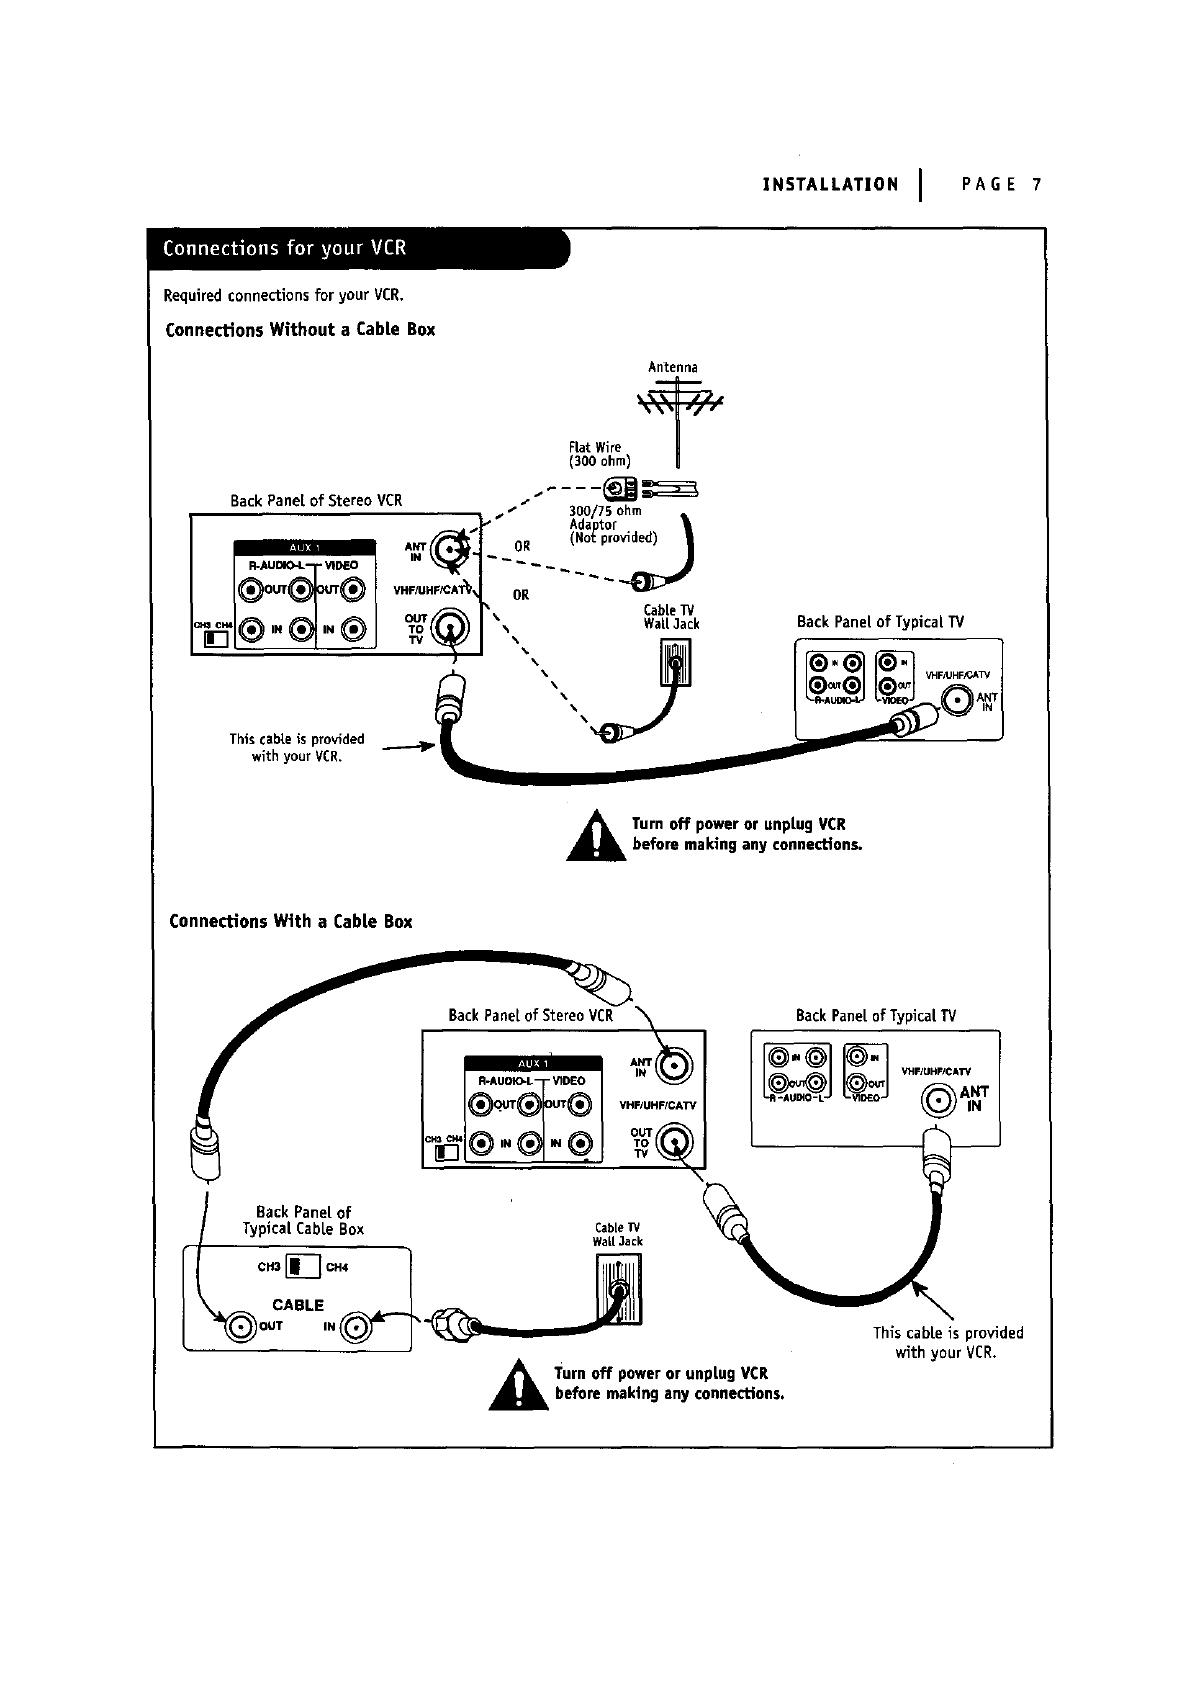
INSTALLATION IPAGE 7
Requiredconnectionsfor yourVCR,
Connections Without a CabLeBox
Back Panel of Stereo VCR
Antenna
Flat Wire
(300 ohm)
.....
300/75 ohm
Ada tot
OR (N°tPPr°
OR CabLeTV
Wall Jack Back Panel of Typical TV
This cable is provided
with your VCR.
,_ Turnoff poweror unpLugVCR
before making anyconnections.
ConnectionsWtth aCabLe Box
Back Panel of Stereo VCR "_
VHFIUHF/CATV
Back Pane[ of 'CableW
/Typical CabLeBox WaLt3ack
CABLE ,._.._ _L llll
_k Turn off power or unpLug VCRbefore making any connections.
Back Pane[of Typical TV
This cabte is provided
with your VCR.
PAGE 8 IINSTALLATION
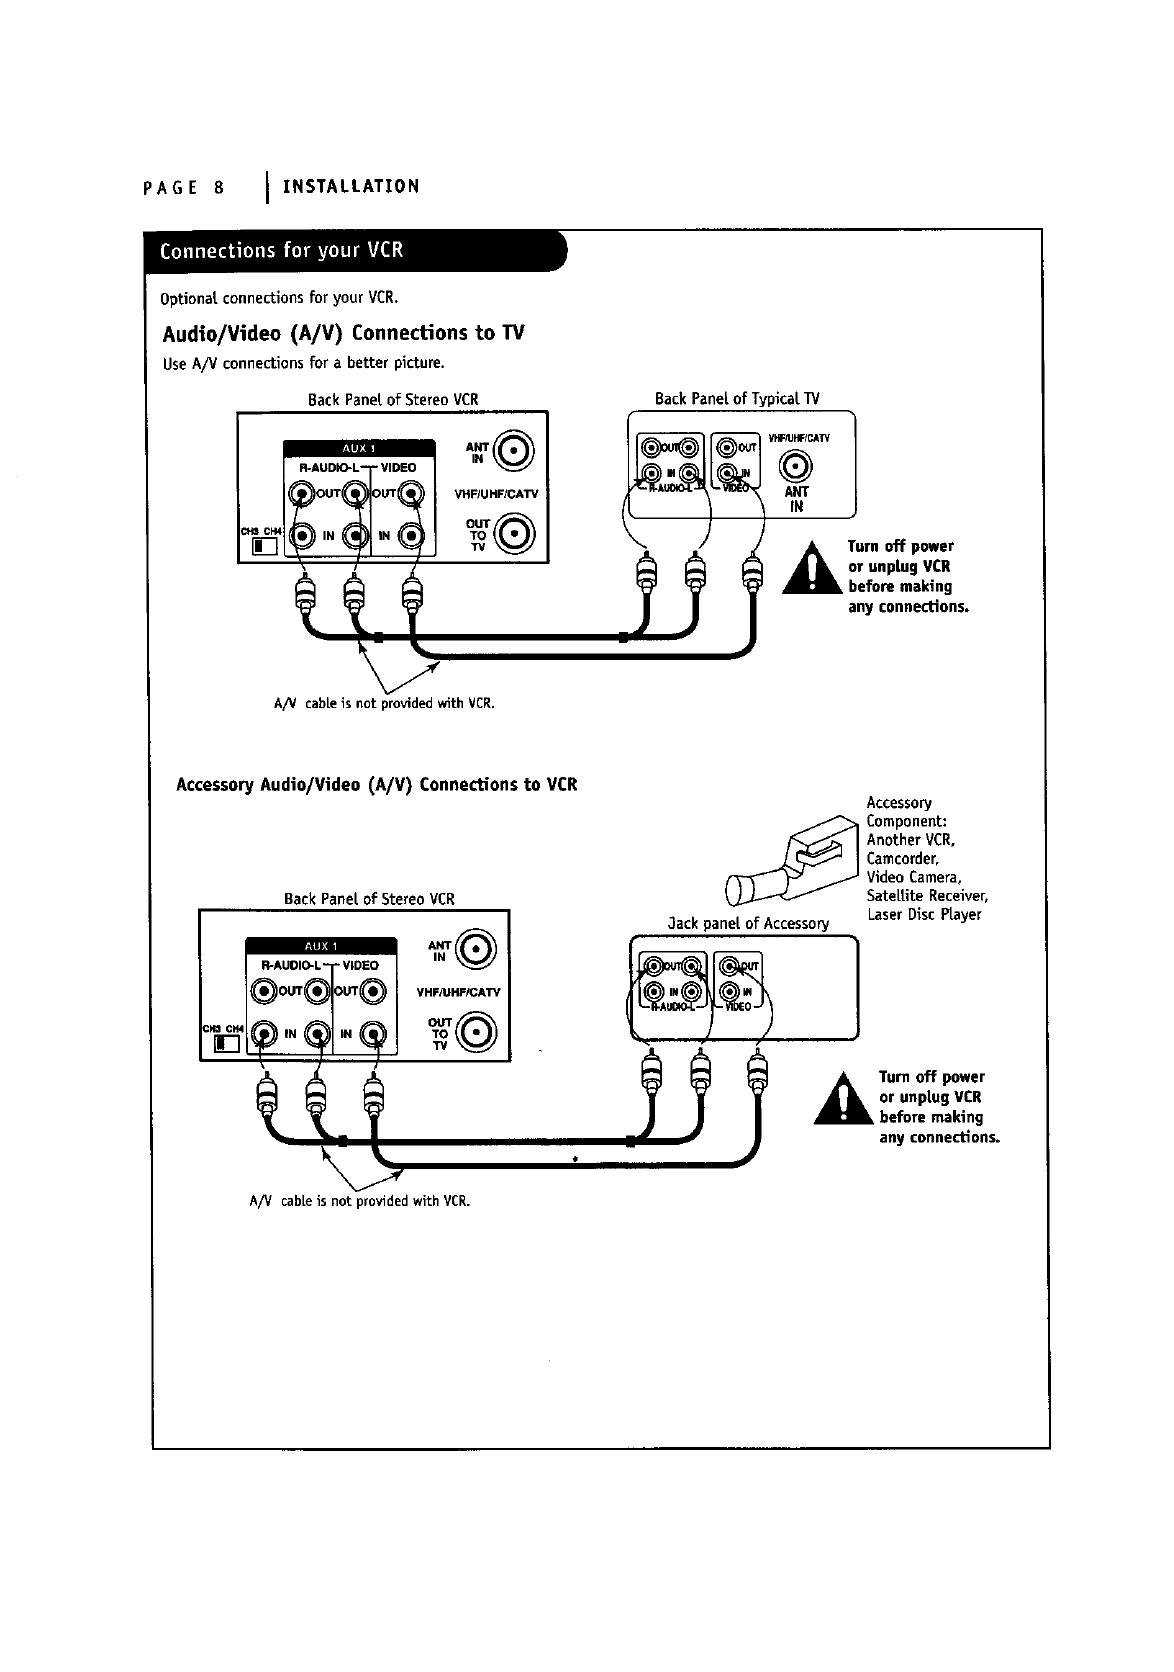
Optional connections for your VCR.
Audio/Video (A/V) Connections to TV
Use A/V connections for a better picture.
Back Pane[ of Stereo VCR
VHF/U HF/CATV
OUT
Back Panel of Typlcat _/
VH_/UHFICAT_'_ANTIN 1
Tum off power
or unplugVCR
before making
anyconnections.
A/V cable is not provided with VCR.
Accessory Audio/Video (A/V) Connections to VCR
Back Panet of Stereo VCR
VHF/UHF/CATV
Accessory
_ omponent:
AnotherVCR,
Camcorder,
Video Camera,
Sateltite Receiver,
Jack pane[ of Accessory Laser Disc player
,_Turnoffpower
or unplug VCR
before making
any connect'ions.
A/V cable is not provided with VCR.
INSTALLATION I PAGE g
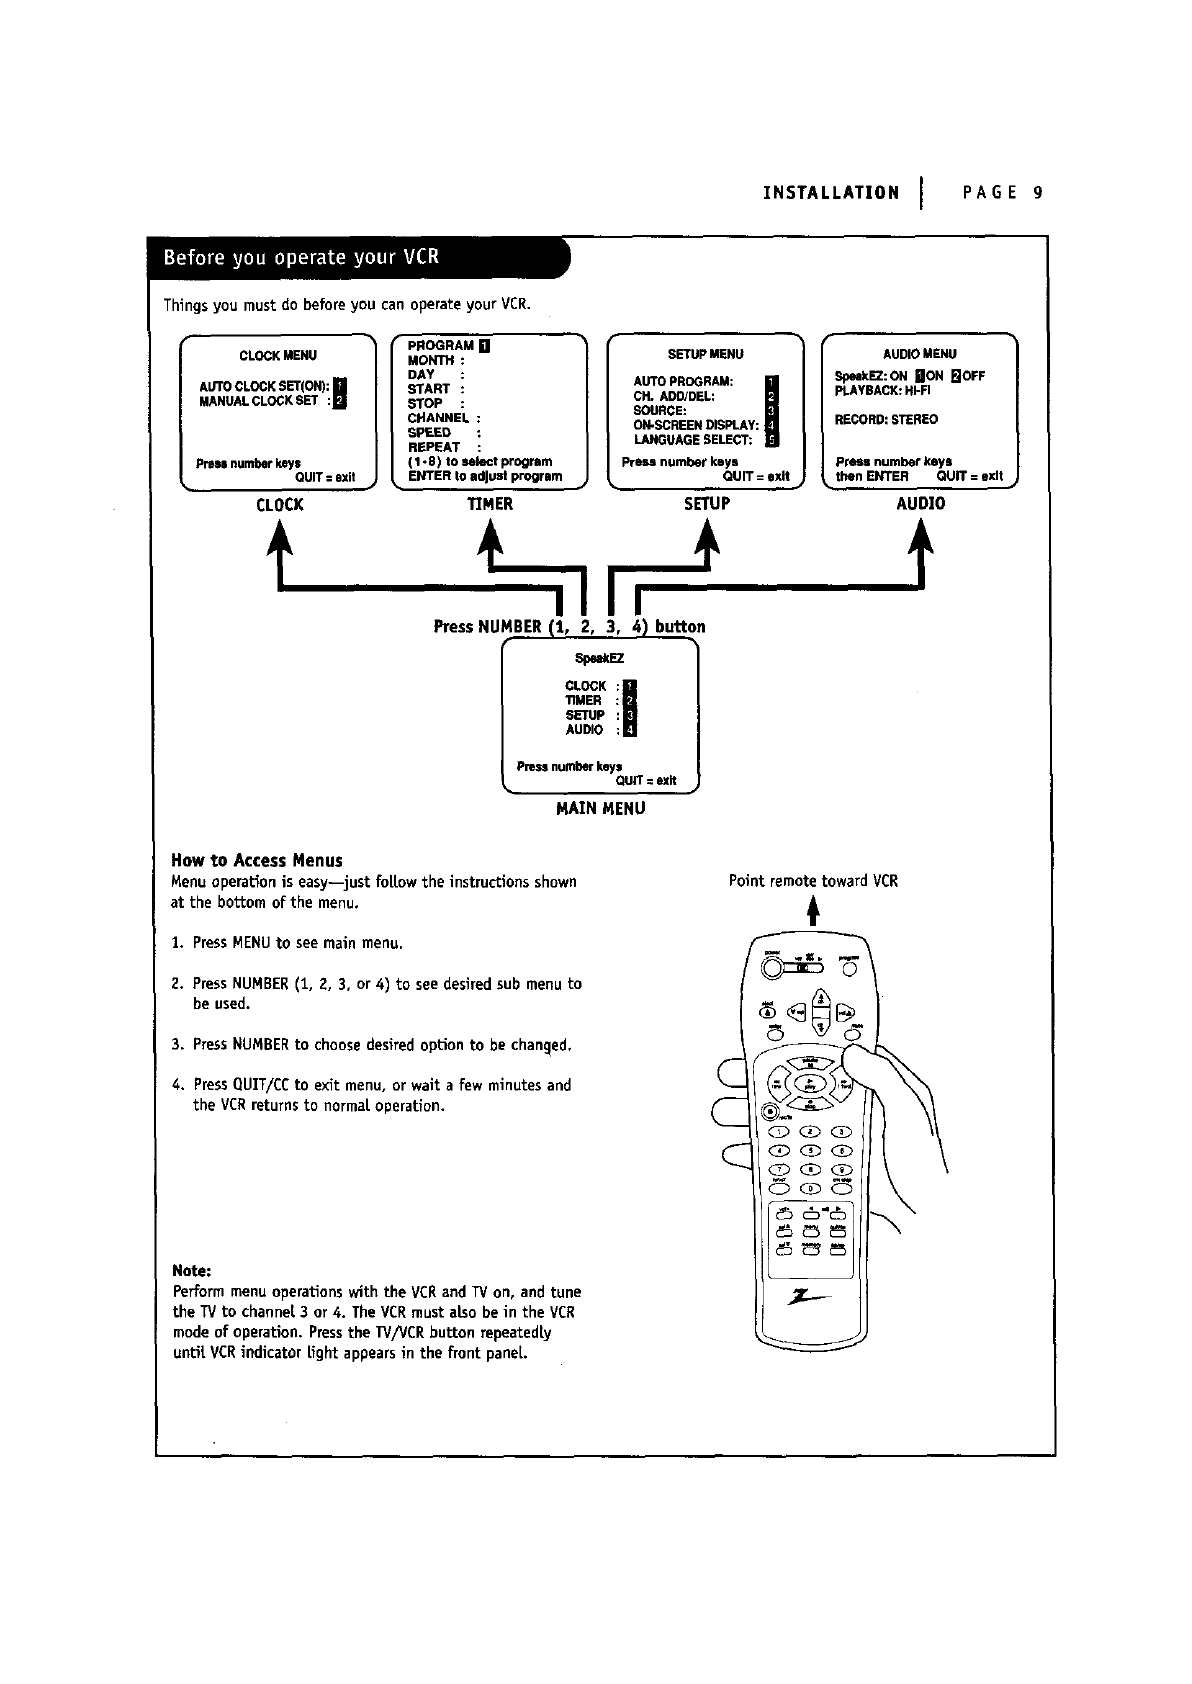
Things you must do before you can operate your VCR.
CLOCKMENU
AUTO CLOCKSET(ON):[]
MANUAL CLOCKSET :Ill
press numberkeys
QUIT= exit
rPROGRAM []
MONTH :
DAY
START ::
STOP :
CHANNEL :
SPEED :
REPEAT :
(1-8) to sek_t program
ENTER to adjust program
SETUPMENU
AUTO PROGRAM:
CH. ADD/DEL:
SOURCE:
ON.SCREENDISPLAy:
LAHGUAGESELECT:
Press number keys
QUIT = exit
CLOCK TIMER SETUP
AUDIOMENU
_kEZ:ON ilON _OFF
I_AYBACK: HI-R
RECORD:STEREO
press number keys
• _ then ENTER QUIT = exit
AUD]O
Press NUMBER(1, 2, 3, 4)button
Sp_EZ
CLOCK I
1TMER
SETUP
AUDIO
Pressnumber keys
QUIT = exR
MAIN MENU
How to Access Menus
Menu operaUon is easy--just fottow the instructions shown
at the bottom of the menu,
1. PressMENU to see main menu,
2. PressNUMBER(1, 2, 3, or 4) to see desired sub menu to
be used.
3. PressNUMBERto choose desired option to be changed,
4. PressQUIT/CC to exit menu, or wait a few minutes and
the VCR returnsto normat operation.
Point remote toward VCR
Note:
Perform menu operations with the VCR and TV on, and tune
the TVto channel 3 or 4. The VCRmust also be in the VCR
mode of operation. Pressthe W/VCR button mpeatedty
untit VCRindicator tight appears in the front panel
PAGE 10 I INSTALLATION
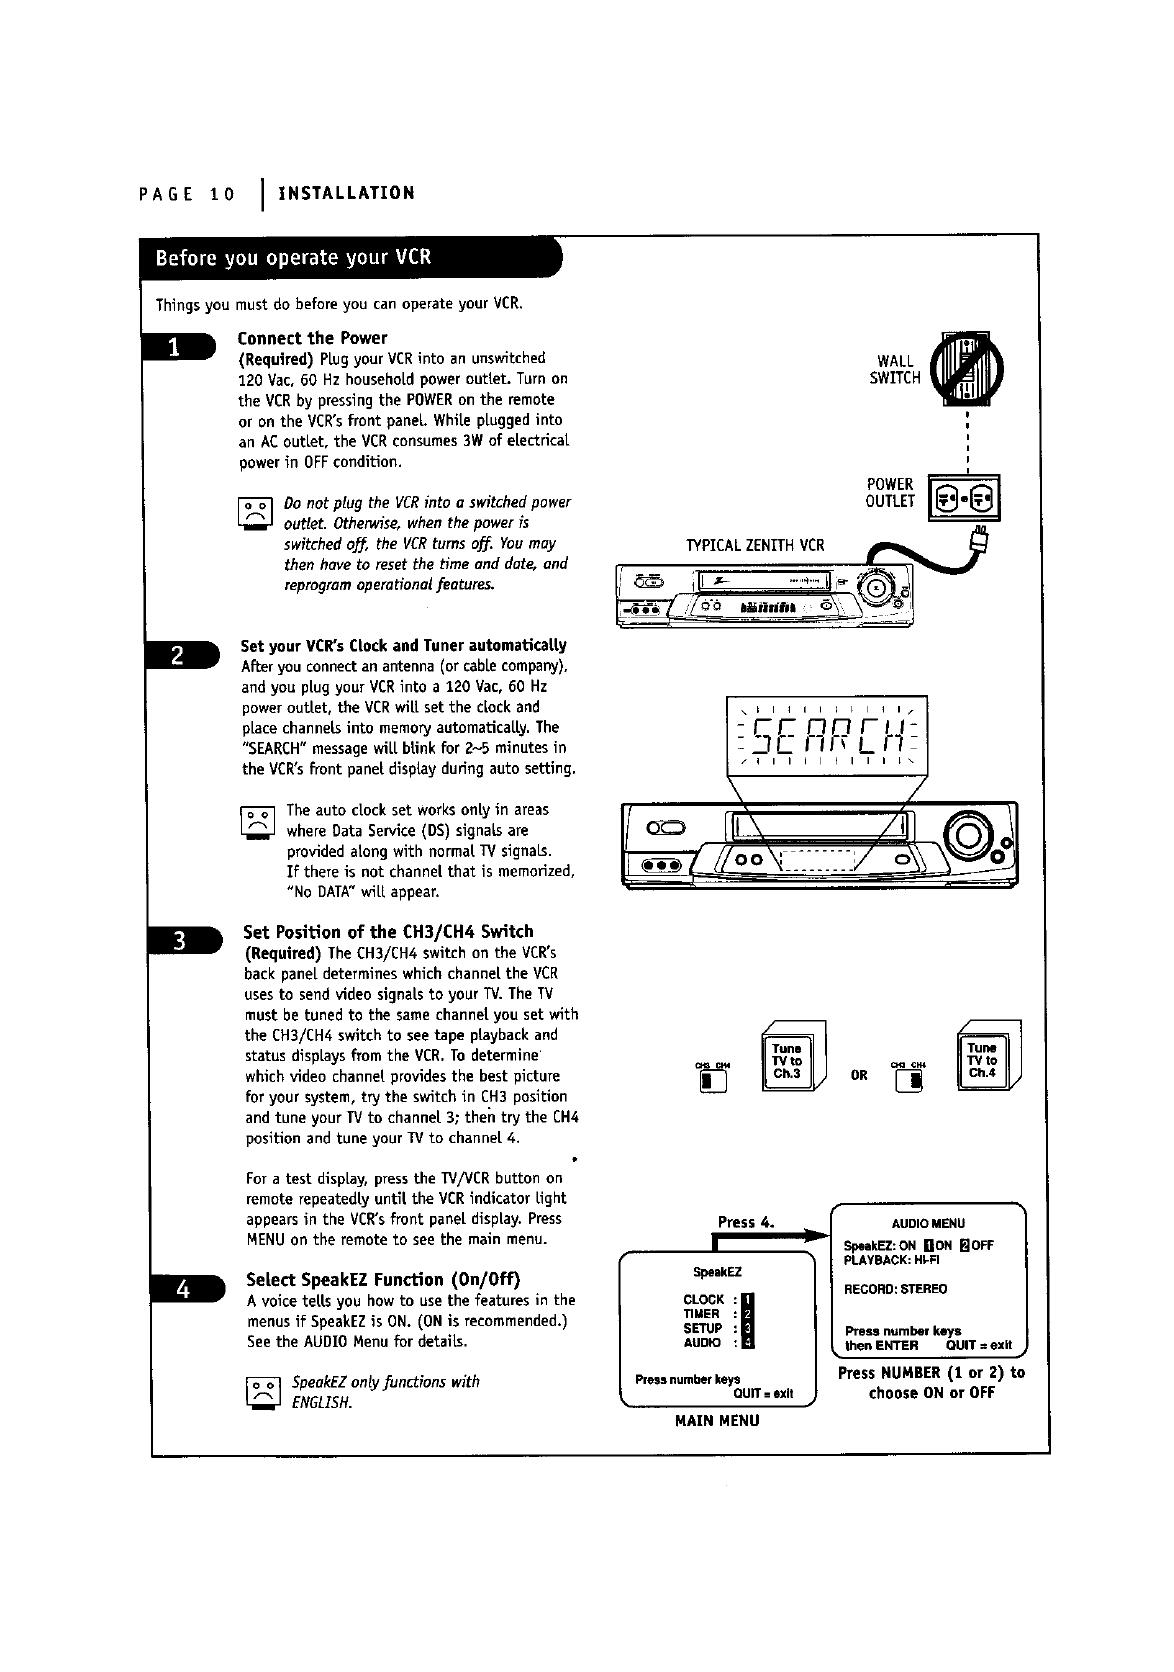
Things you must do before you can operate your VCR.
B
m
Connect the Power
(Required) PLugyour VCRinto an unswitched
120 Vac, 60 Hz household power outlet. Turn on
the VCR by pressingthe POWERon the remote
or on the VCR'sfront panel. White plugged into
an ACoutlet, the VCRconsumes3W of electrical
power in OFFcondition.
]Do not plug the VCRinto uswitched power
outlet. Otherwise, when the power is
switched o_, the VCRturns off.. You may
then have to reset the ttme and date, and
reprogram operational features.
Set your VCR'sClock and Tuner automatlcatty
After you connect an arrtenna (or cable company),
and you plug your VCRinto a120 Vac, 60 Hz
power outlet, the VCRwill set the clock and
place channels into memory automatically. The
"SEARCH"message will blink for 2-5 minutes in
the VCR'sfront panel display during auto setting.
]The auto clock set works only in areas
where Data Service (DS) signals are
provided along with normal W signals.
If there is not channel that is memorized,
"No DATA"wilt appear.
Set Position of the CH3/CH4 Switch
(Required) The CH3/CH4 switch on the VCR's
back panel determines which channel the VCR
usesto send video signals to your TV. The TV
must be tuned to the same channel you set with
the EH3/CH4 switch to see tape playback and
status displays from the VER. To determine
which video channel providesthe best picture
for your system, try the switch in CH3 position
and tune your TV to channel 3; then try the CH4
position and tune your TV to channel 4.
For a test display, press the TV/VCR button on
remote repeatedly until the VCR indicator light
appears in the VCR'sfront panel display. Press
MENU on the remote to see the main menu.
Select SpeakEZ Function (On/Off)
A voice tells you how to use the features in the
menusif SpeakEZis ON. (ON is recommended.)
See the AUDI0 Menu for details.
[] SpeakEZ onty functions with
ENGLISH.
WALL @
SWITCH
POWER r_
OUTLET
PICALZEN THVC.__________L
,, I
[] OR[]
Press 4.
SpeekEZ
CLOCK I
TIMER
SETUP
AUDIO
Press numberkeys
QUIT= exit
MAIN MENU
AUDIOMENU
SpeakEZ:ONNON I_IOFF
PLAYBACK:HI-FI
RECORD:STEREO
Pressnumberkeys
then ENTER QUIT=exit
Press NUMBER (t or 2) to
choose ON or OFF
INSTALLATION IPAGE 11
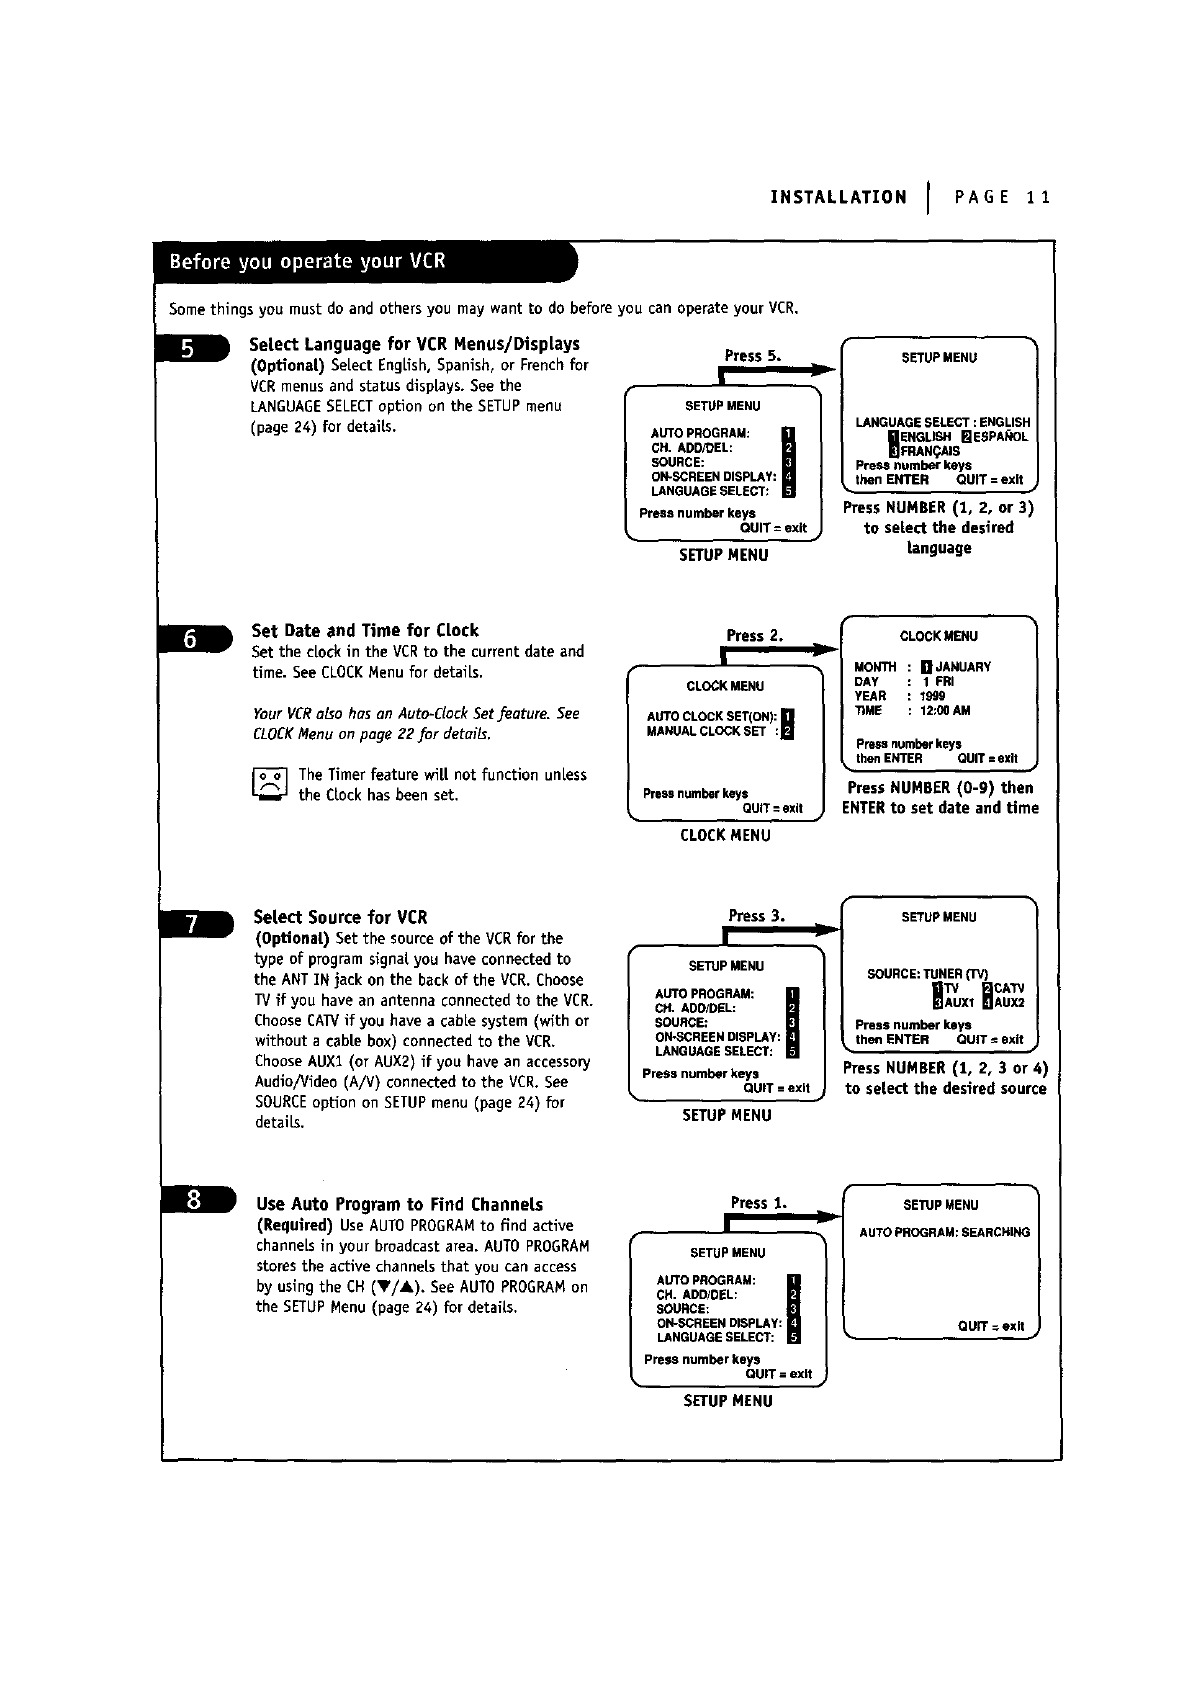
Some things you must do and others you may want to do before you can operate your VCR.
Setect Language for VCR Menus/Displays
(Optional) SeLect EngUsh, Spanish, or French for
VCRmenus and status dispLays.See the
LANGUAGESELECToption on the SETUPmenu
(page 24) for details.
Press 5.
SETUP MENU
AUTOPROGRAM:
CH.ADDfDEL:
SOURCE:
ON-SCREENDISPLAY:
LANGUAGESELECT:
Pressnumberkeys
QUIT=exit
SETUPMENU
SETUPMENU
LANGUAGESELECT:ENGLISI
_ENGUSH _ESPANOL
FRAN_tAIS
Pressnumberkeys
ti,_n EN_R QU_ =exit _
Press NUHBER (1, 2, or 3)
to select the desired
language
Set Date and Time for Clock
Set the clock in the VCRto the current date and
time. See CLOCKMenu for detaiLs.
Your VCRalso has on Auto-Clock Set feoture. See
CLOCKMenu on poge 22 _or details.
_]The Timer feature wilt not function unless
the CLockhas been set.
Press 2.
!
CLOCKMENU
AUTOCLOCKSET(ON): []
MANUALCLOCKSET :H
Pressnumber keys
QUIT=exit
CLOCKMENU
CLOCKMENU
MONTH [] JANUARY
DAY 1 FRI
YEAR 1999
TiME :12:00AM
Pressnumberkeys
thenENTER QUIT=exit
Press NUMBER (0-9) then
ENTERto set date and time
Select Source for VCR
(Optionat) Set the source of the VCRfor the
type of program signal you have connected to
the ANT IN jack on the back of the VER. Choose
TVif you have an antenna connected to the VCR.
Choose CAW if you have a cable system (with or
without acabte box) connected to the VCR,
ChooseAUXl (or AUX2) if you have an accessory
Audio/Video (A/V) connected to the VCR. See
SOURCEoption on SETUPmenu (page 24) for
details,
Press 3.
1
SETUPMENU
AUTOPROGRAM:
CH.ADDIDEL:
SOURCE:
ON%._CREENDISPLAY:
LANGUAGESELECT:
Pressnumberkeys
QUiT=exit
SETUPMENU
SETUPMENU
SOURCE:TUNER(TV}CAW
HAWUX,BAUX2
Pressnumberkeys
then ENTER QUIT¢ exit
Press NUMBER (1, 2, 3 or 4)
to select the desired source
Use Auto Program to Find Channets
(Required) Use AUTO PROGRAMto find active
channels in your broadcast area. AUTO PROGRAM
stores the active channels that you can access
by using the CH (T/_,), See AUTOPROGRAMon
the SETUPMenu (page Z4) for details.
Press 1.
I
SETUPMENU
AUTOPROGRAM:
CH.ADD/GEL:
SOURCE:
ON-SCREENDISPLAY:
LANGUAGESELECT:
Pressnumberkeys
QUIT=exit
SETUPMENU
SETUPMENU
Ji AUTOPROGRAM:SEARCHIN(
QUIT =exit
PAGE 12 I ZNSTALLATTON
Things you may want to do before you operate your VCR.
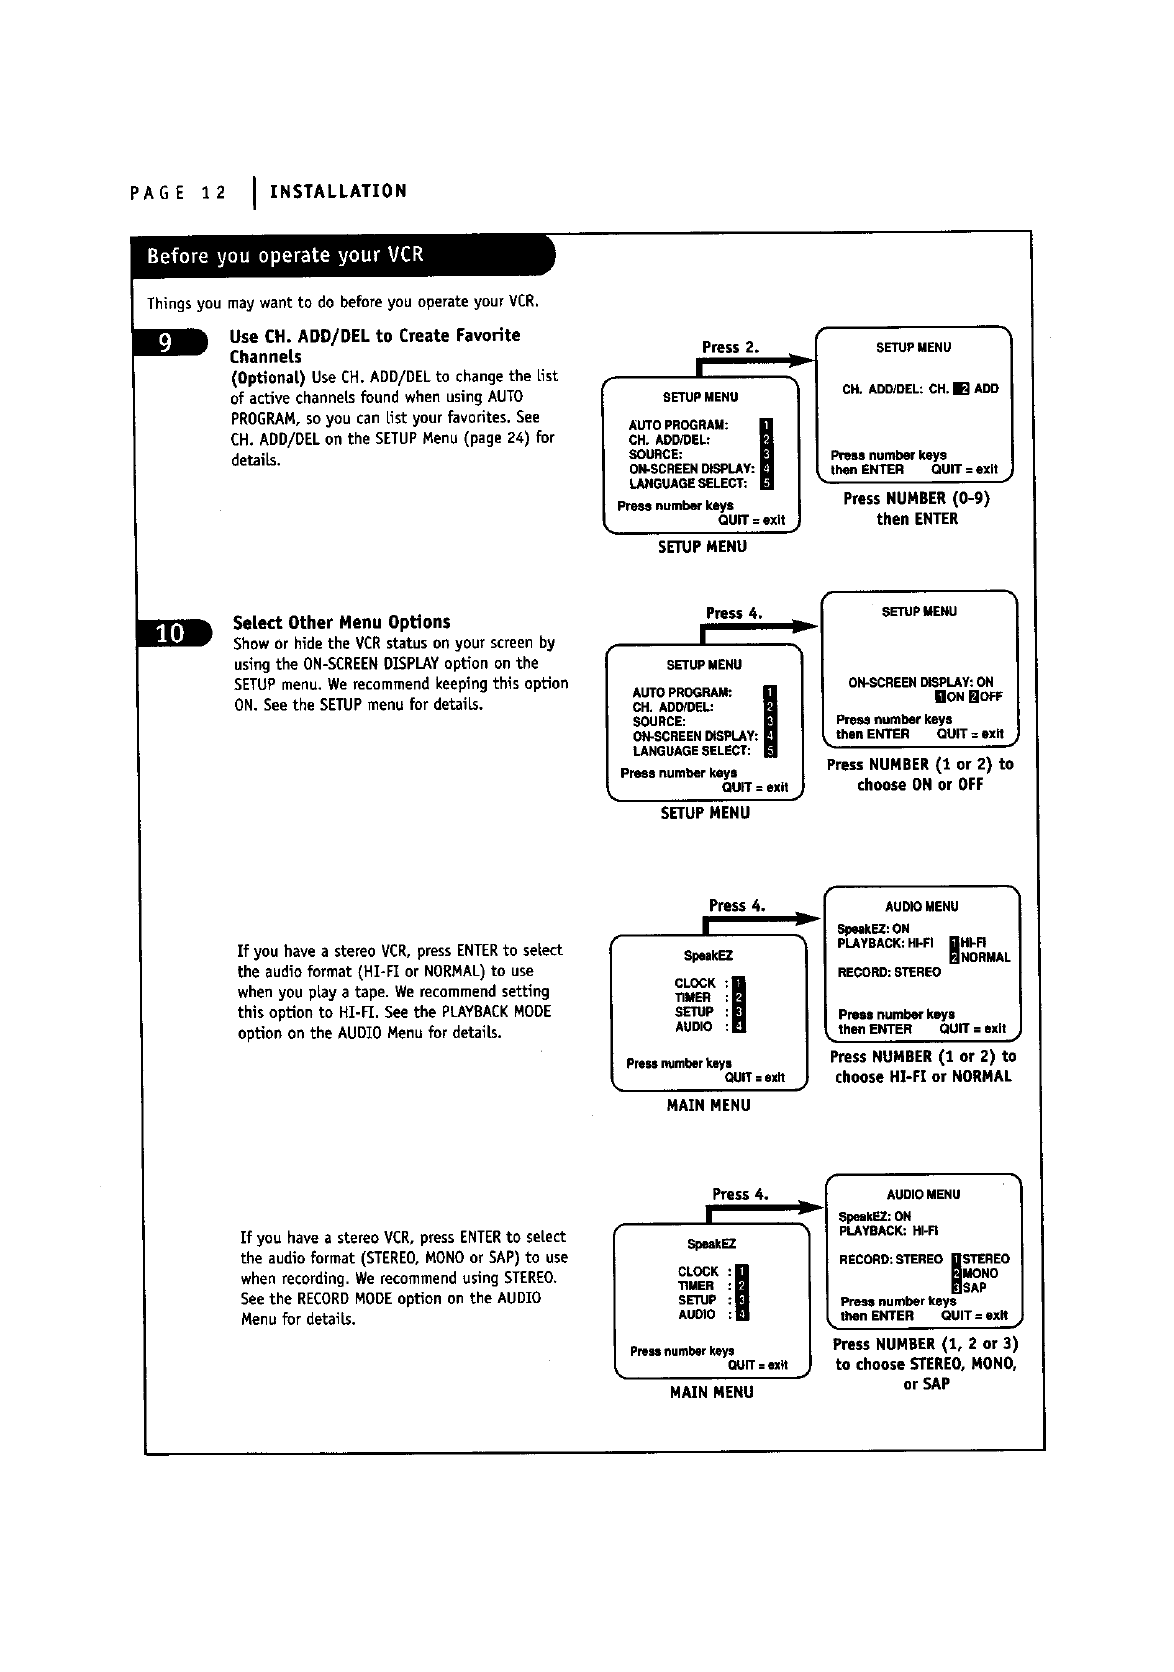
Use CH. ADD/DEL to Create Favorite
Channets
(Optional) Use CH. ADD/DELto change the List
of active channels found when using AUTO
PROGRAM,so you can Listyour favorites. See
CH. ADD/DEL on the SETUPMenu (page 24) for
details.
press 2.
SETUP MENU
AUTO PROGRAM:
CH. ADD/DEL:
SOURCE:
ON-SCREENDISPLAY:
LANGUAGESELECT:
Press number keys
QUiT = exit
SETUPMENU
SETUP MENU
CH.ADD/DEL:OH.[] ADD
Pressnumberkeys
thenENTER QUIT =exit
Press NUMBER (0-9)
then ENTER
BSelect Other Menu OpUons
Show or hide the VCR status on your screen by
using the ON-SCREENDISPLAYoption on the
SETUPmenu, We recommend keeping this opUon
ON. See the SETUPmenu for details.
Press 4.
I
SETUPMENU
AUTOPROGRAM:
CH.ADD/DEL:
SOURCE:
ON-SCREENDISPLAY:
LANGUAGESELECT:
Pressnumberkeys
QUIT=exit
SETUPMENU
SETUPMENU
ON-SCREENDISPLAY:ON
gON BOFF
Pressnumberkeys
thenENTER QUIT= exit
PressNUMBER(1 or 2) to
chooseONor OFF
If you have a stereo VCR, press ENTERto select
the audio format (HI-F1 or NORMAL)to use
when you play a tape. We recommend setting
this option to HI-F1. See the PLAYBACKMODE
option on the AUDIO Menu for details.
Press 4.
SpeakEZ
CLOCK :I
TIMER :
SETUP :
AUDIO :
Pressnumber keys
QUIT : exit
MAIN MENU
AUDIOMENU
DSpeakEZ:ON HI'FI
PLAYBACK:HkFI _NORMAI
RECORD:STEREO
Pm_ number keys
•thenENTER QUIT: exit •
Press NUMBER (1 or 2) to
choose HI-FI or NORMAL
If you have a stereo VCR, press ENTERto select
the audio format (STEREO,MONOor SAP) to use
when recording. We recommend using STEREO.
See the RECORDMODEoption on the AUDIO
Menu for details.
Press 4.
SpeakEZ
CLOCK I
TIMER
SETUP
AUDIO
Pressnumberkeys
QUIT=exit
MAIN MENU
AUDIO MENU
rSpeakEZ:ON
PLAYBACK:HI-FI
RECORD:STEREO_STEREOsApMONO
Prestonumberkeys
•thenENTER QUIT= exit •
Press NUMBER (!, 2 or 3)
to choose STEREO,MONO,
or SAP
INSTALLATION IPAGE 13
Before you can record programs with VCRPLus+®, you must teU this VCRthe PLusCodeTM channeLsfor your area.
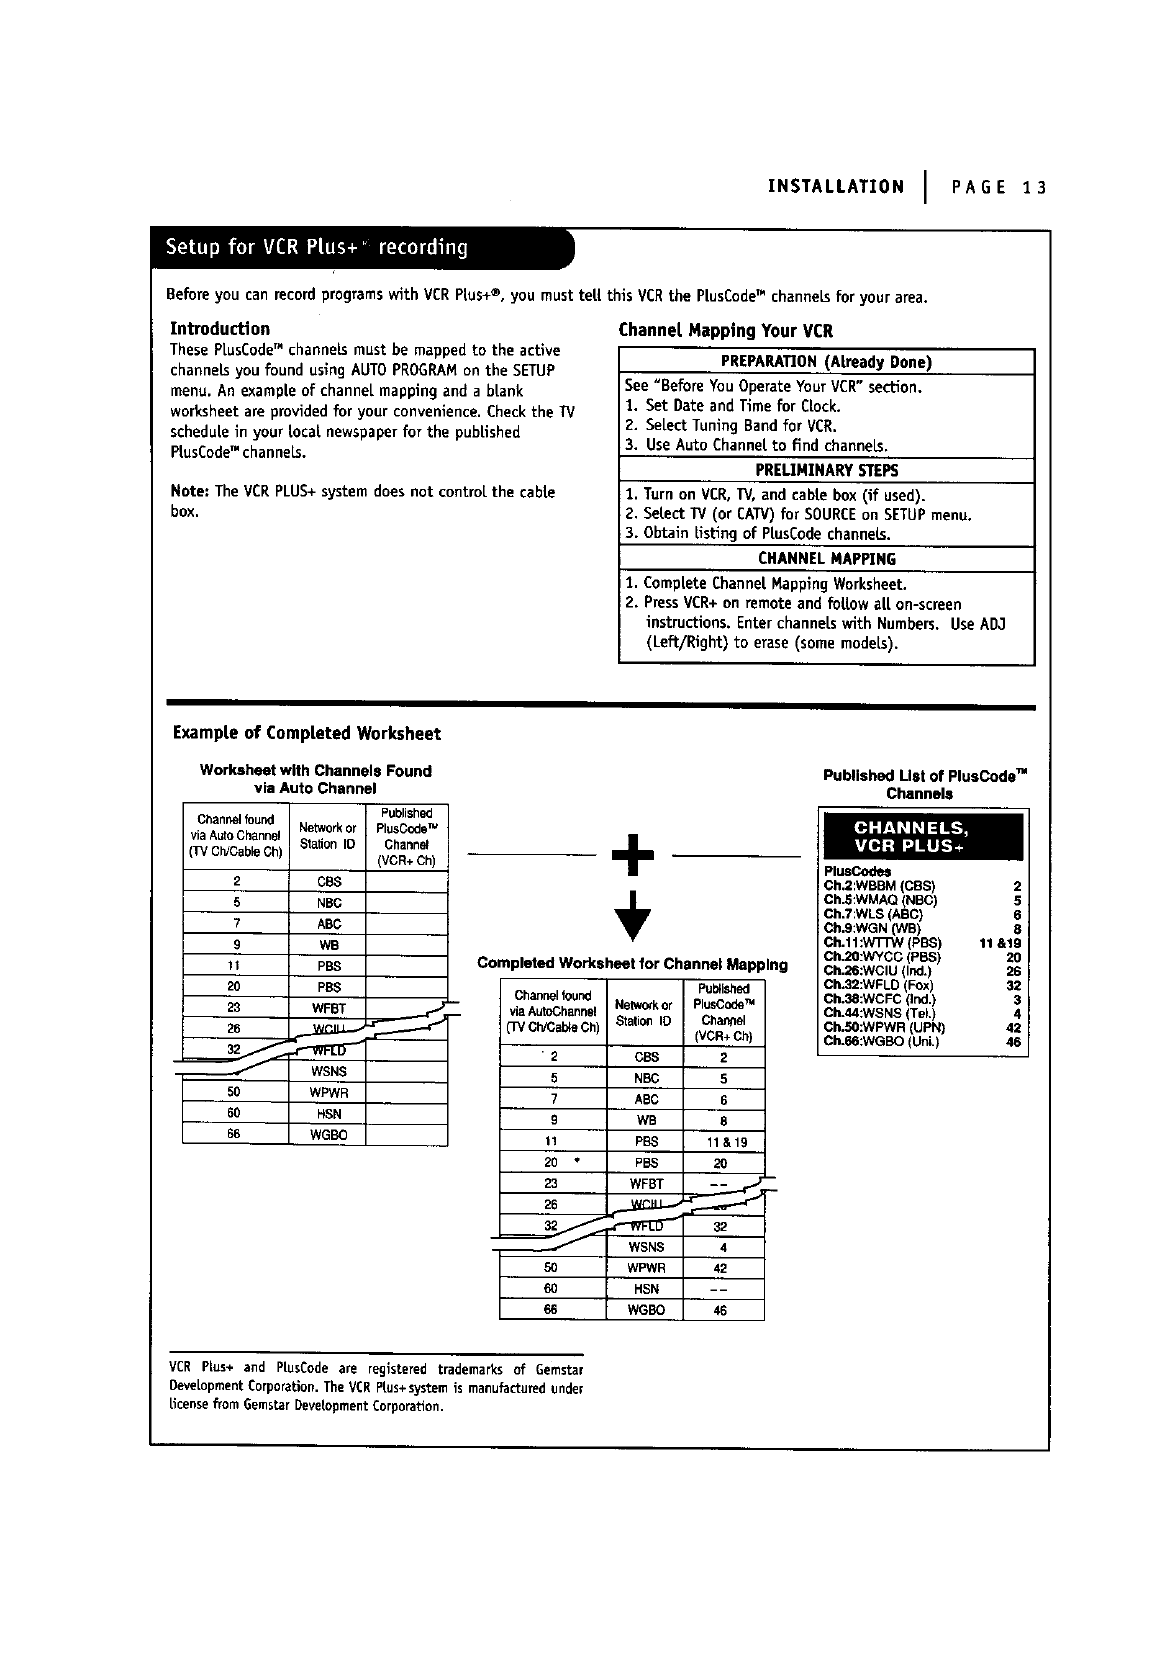
Introduction
These PtusCodeTM channels must be mapped to the active
channels you found using AUTO PROGRAMon the SETUP
menu. An example of channel mapping and ablank
worksheet are provided for your convenience. Checkthe TV
schedule in your Local newspaper for the published
PtusCode"channels.
Note: The VCRPLUS+system does not control the cable
box.
Channel Mapping Your VCR
PREPAHAT]ON(A|ready Done)
See "Before You Operate YourVCR"section.
1. Set Date and Time for CLock.
2. SeLectTuning Band for VCR.
3. Use Auto Channel to find channels.
PRELIHENARYSTEPS
1. Turn on VCR,W, and cable box (if used).
2. Select TV (or CAW) for SOURCEon SETUPmenu.
3. Obtain [isling of PLusCodechannels.
CHANNEL MAPPENG
1. CompLete Channel Mapping Worksheet.
2. PressVCR+on remote and follow aLLon-screen
instructions. Enterchannels with Numbers. Use AD3
(Left/Right) to erase (some models).
Example of Completed Worksheet
Worksheet with Channels Found
via Auto Channel
Channelfound Published
Networkor PlusCodeTM
viaAutoChannel StationID Channel
(TVCh/CableCh) (VCR+Ch)
2 CBS
5 NBC
7 ABC
9 WB
11 PBS
20 PBS
23 WFBT
WSNS
50 WPWR
60 HSN
66 WGBO
Completed Worksheet for Channel Mapping
Channelfound Pul_isedd
viaAutoChannelNutwed¢or PlusCodeTM
03/Ch/CabteCh) StationI0 Channel
(VCR+Ch)
•2CBS 2
5 NBC 5
7 ABC 6
9 WB 8
I1 PBS 11&19
20 •PBS 20
23 WFBT -- €.J
26
WSNS 4
50 WPWR 42
60 HSN - -
66 WGBO 46
Published List of PlusCodo"
Channels
PlusCodes
Ch,2:WBBM (CBS)
Ch.5:WMAQ (NBC) 2
Ch.7:WLS (ABC)
Ch,9:WGN 0NB) 6
Ch.11:W]TW (PBS) 11 &tg
Ch.20:WYCC (PBS) 20
Ch.26:WCIU (Ind.) 26
Ch.32:WFLD (Fox) 32
Oh.38:WCFC (ind.)
Ch.44:WSNS (Tel,) 43
Ch.50:WPWR (UPN) 42
Ch.66:WGBO (UnL) 46
VCR Plus+ and PlusCode are registered trademarks of Gemstar
Development Corporation. The VCR Plus+system is manufactured under
license from GemstarDevelopment Corporation.
PAGE 14 I INSTALLATION
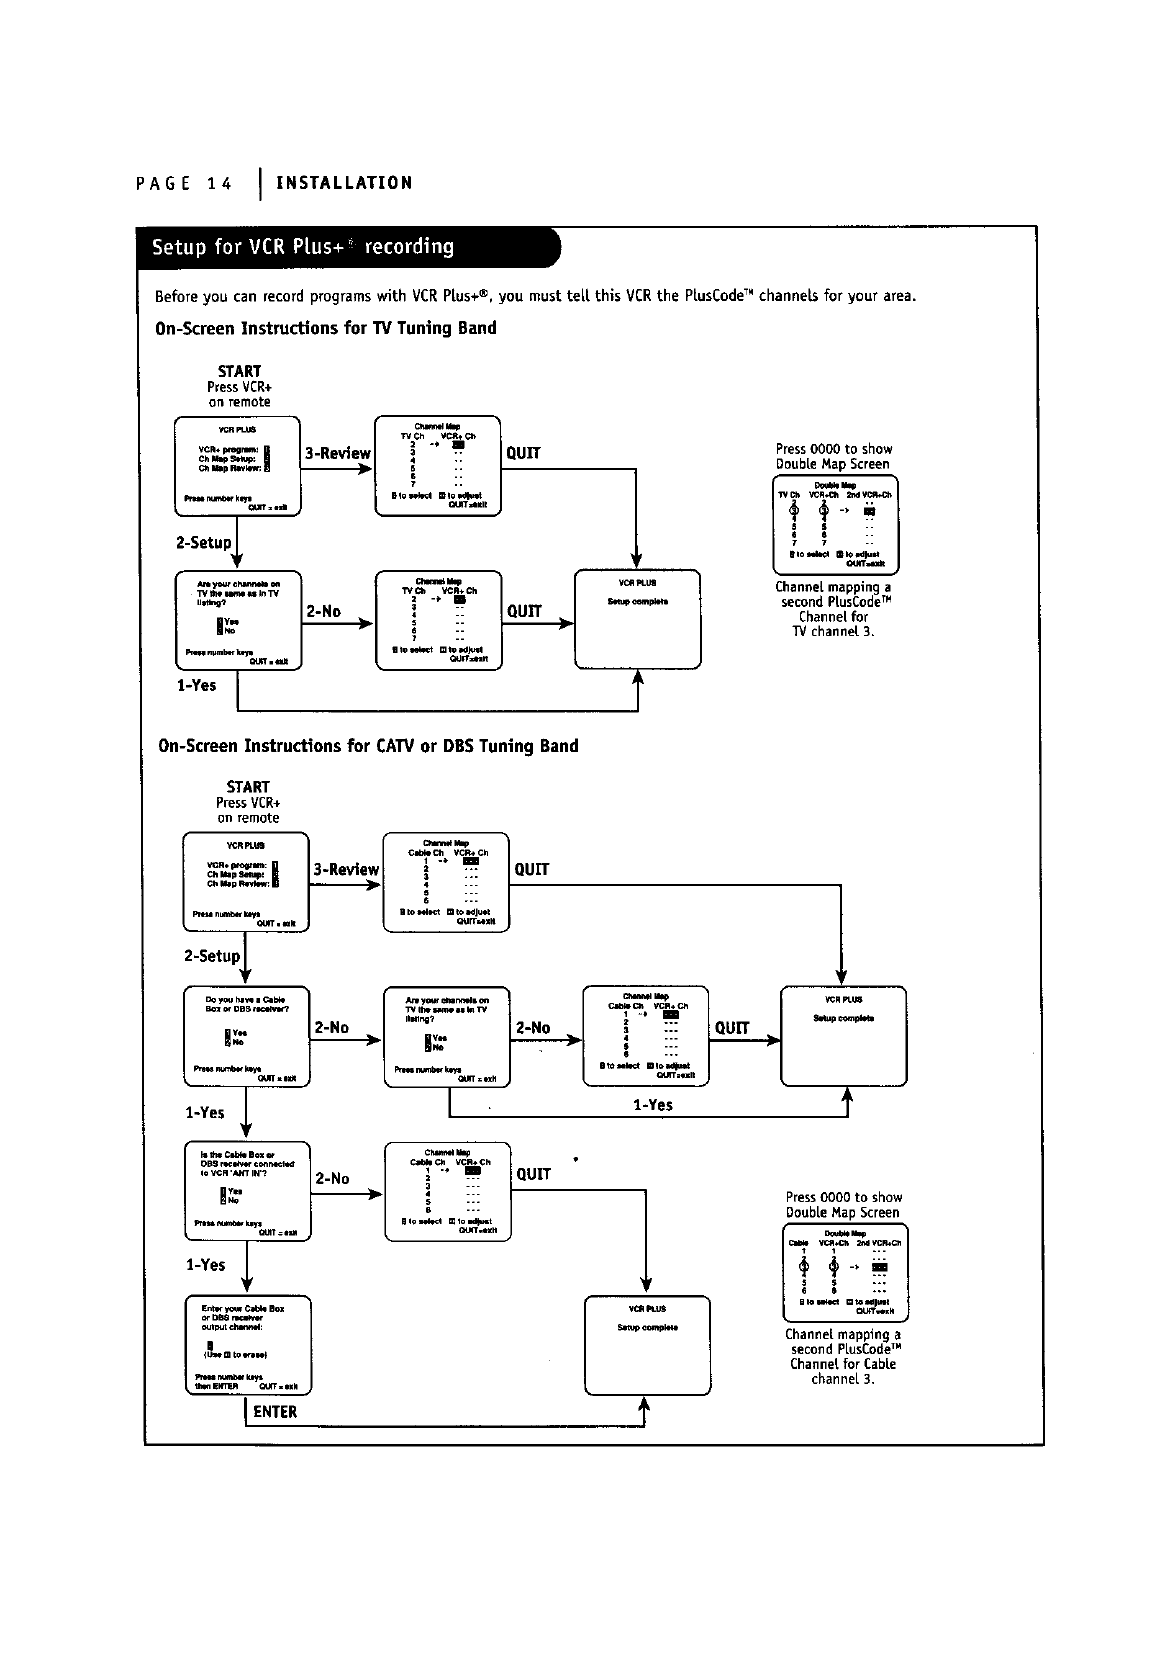
Beforeyou canrecordprogramswith VCRP{us+®, youmustte{| this VCRthe PtusCodeTM channelsfor your area.
0n-Screen Instructions for TV Tuning Band
START
PressVCR+
on remote
_R_ TVCh _ VCR_C_
c...ps._,_'_'_:_ -- QUIT
_numb_ k_Gu_ = ezI _11
2-Setup_
_up *_mlX_l
t
Press 0000 to show
DoubLeMap Screen
t"°"'_- J
Channel mapping a
second PlusCodeTM
Channel for
_/channel 3.
On-Screen Instructions for CATVor DBSTuning Band
START
PressVCR+
on remote
2-Setup_
aoz _OBS_
OH n_l_ ©onr,l¢l_:
Io VCR 'k*r_ IN'?
1-Yes _
IENTER
-'/
,QUIT
:iii
1
l
I 1....
Press 0000 to show
Double Nap Screen
{m:/
N
Channel mapping a
second P[usCodeTM
Channel for Cable
channel 3.
INSTALLATION IPAGE 15
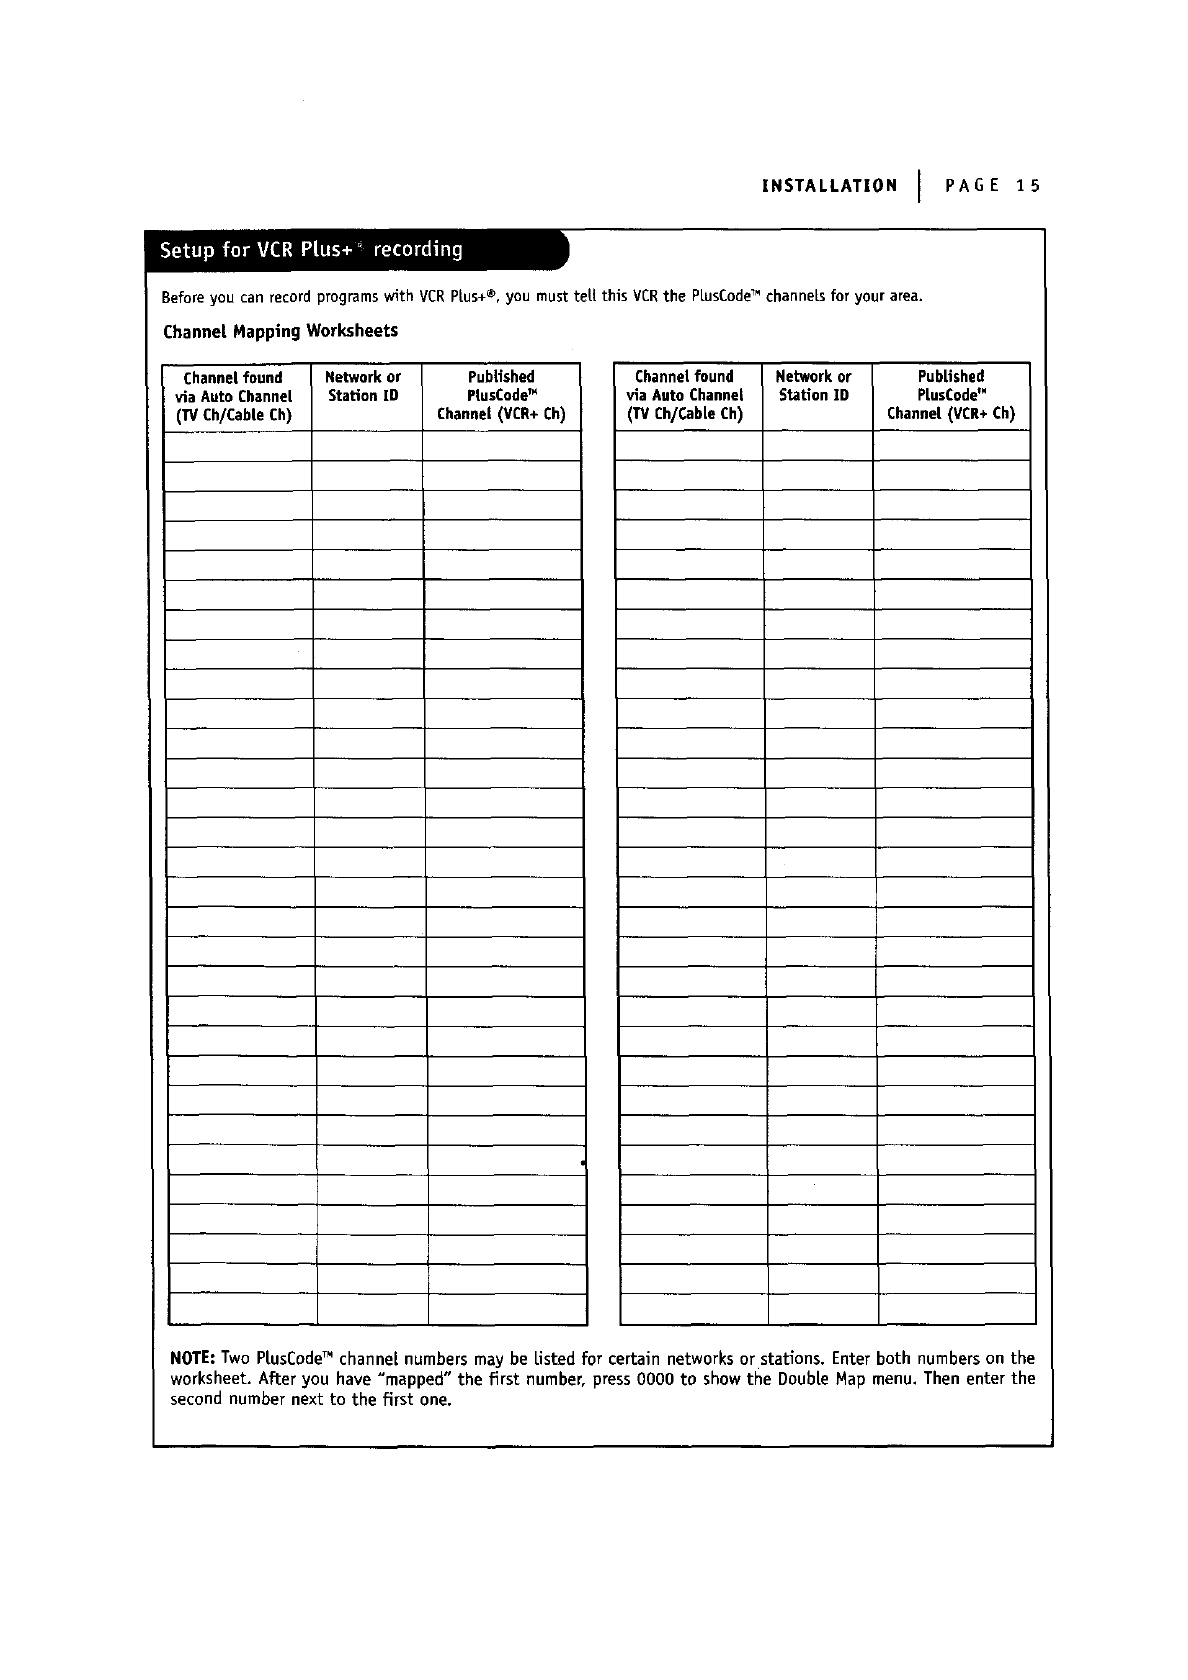
Beforeyou canrecordprogramswith VCRPLus+®,you musttell this VCRthe PLusCodeTM channelsfor your area.
Channel Mapping Worksheets
Channel found Network or Published
via Auto Channel Station ID PlusCodeTM
(TV Ch/Cable Ch) Channel (VCR+ Ch)
Channel found Network or
via Auto Channel Station ]D
('IV Ch/Cable Ch)
Published
PLusCodeTM
Channel (VCR+ Ch)
NOTE:Two PtusCodeTM channel numbers may be Listedfor certain networks or stations. Enter both numbers on the
worksheet. After you have "mapped" the first number, press 0000 to showthe Double Map menu. Then enter the
secondnumber next to the first one.

PAGE16 I CONTROLS AND DISPLAYS
Descriptions of items you need to know to operate your VCR.
Front Pane| Controts
These controls perform basicVCR operations. The Remote performs basic as wett as advanced VCR operations.
POWEROn/Off Stop/Eject Channei Up/Down Cassette PLAY
Button Selector Selector Compartment
/
•_°°,,_l,°,.,II
SHUTTLERing
7/
Audio/Video (A/V) Messagecenter REC/ITR
AuxiLiaryIn 3acks Front PaneLDispLay (Instant Timer
(AUX2) Record) Selector
PAUSE Recording
Speed SeLector
CONTROLS AND DISPLAYS I PAGE 17
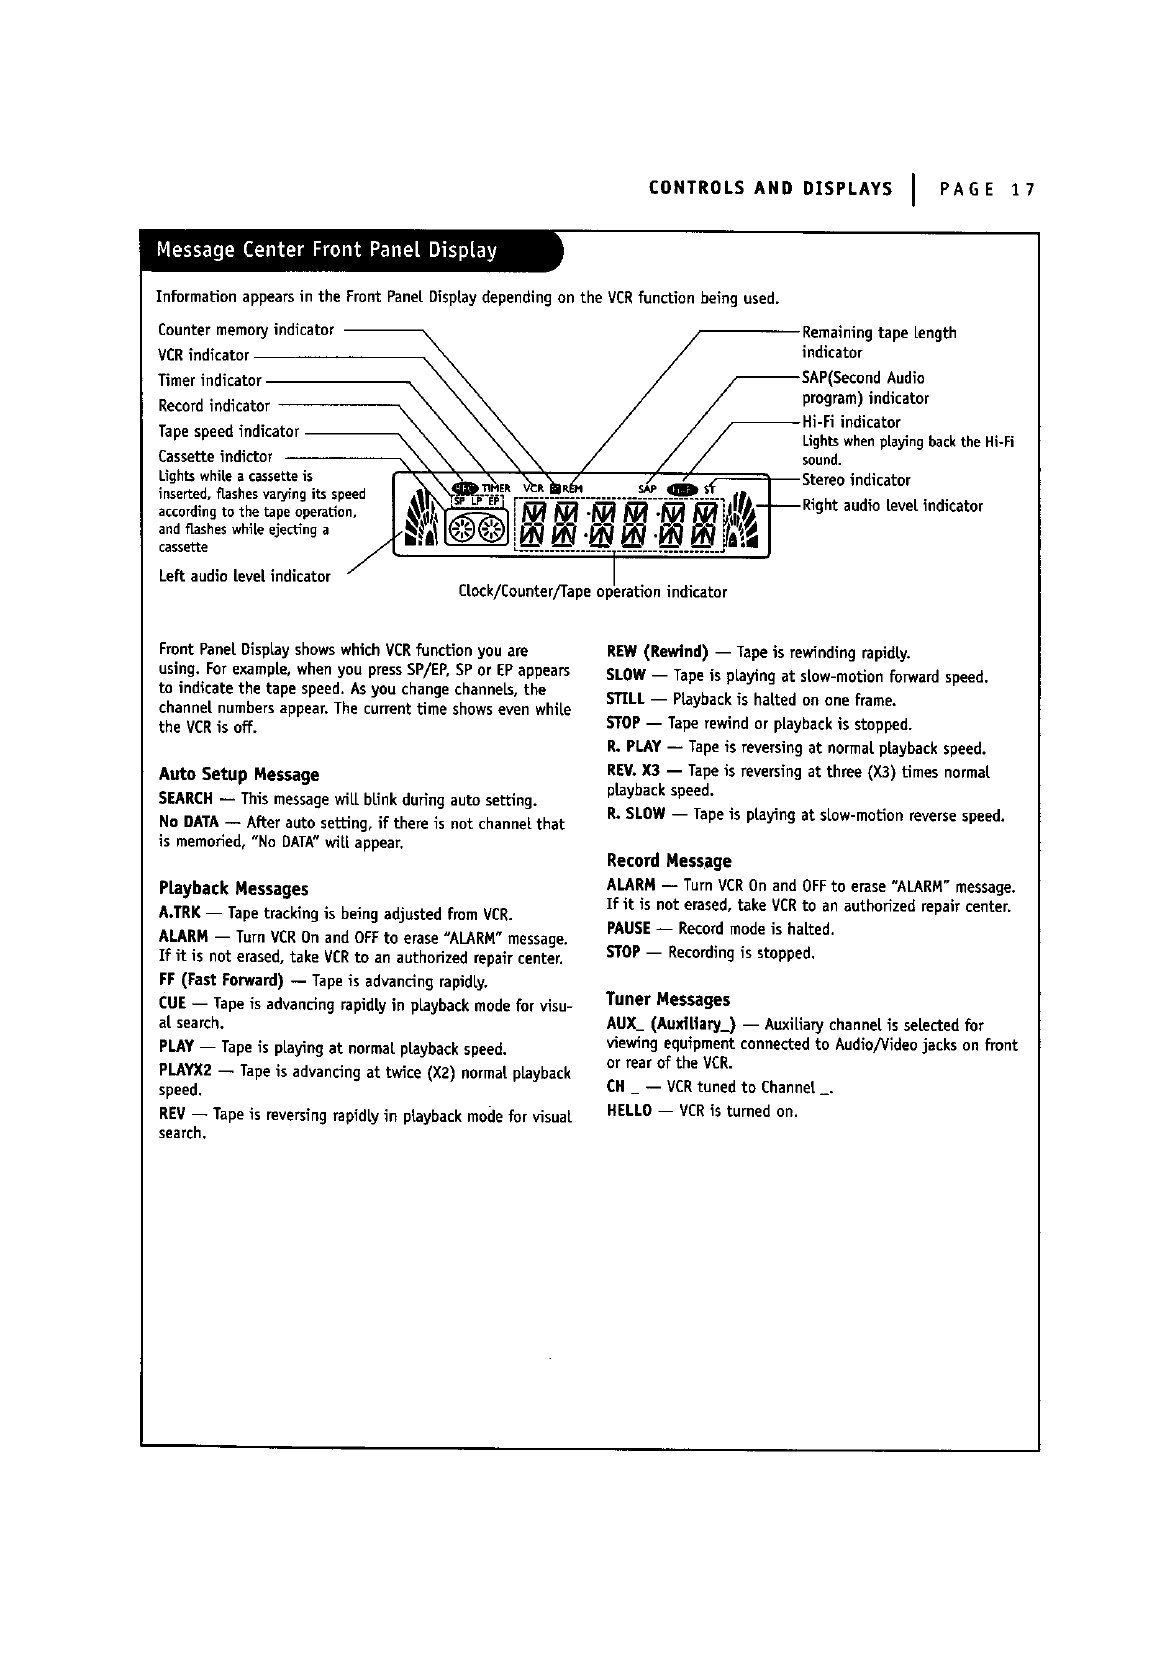
Informationappearsin the FrontPanelDispLaydependingon the VER functionbeing used.
Counter memory indicator
VCR indicator
Timerindicator
Record indicator
Tape speed indicator
Cassette indictor
Lights whi[ea cassette is
inserted, flashes va_ng its speed
according to the tape operaUon,
and flasheswhi[eejecting a
cassette
Left audio [eve[indicator
Remaining tape length
indicator
Audio
program) indicator
indicator
Lightswhenplayingback the Hi-Fi
sound.
[eve[indlcator
Front Pane[ DispLayshows which VCR function you are
using. For example, when you pressSP/EP, SP or EP appears
to indicate the tape speed. As you change channeLs,the
channeL numbers appear. The current time shows even while
the VCRis off.
Auto Setup Message
SEARCH-- This messagewiLLblink during auto setting.
No DATA-- After auto setting, if there is not channel that
is memoHed, "No DATA"will appear.
PLayback Messages
A.TRK -- Tapetracking is being adjusted from VCR.
ALARM -- Turn VCROn and OFFto erase "ALARM" message.
If it is not erased, take VCRto an authorized repair center.
FF (Fast Forward) -- Tape is advancing rapidLy.
CUE -- Tape is advancing rapidly in playback mode for visu-
aLsearch.
PLAY -- Tape is playing at normal playback speed.
PLAYX2 -- Tape is advancing at twice (X2) normal playback
speed.
REV -- Tape is reversing rapidLy in playback mo_Jefor visuaL
search.
REW (Rewind) -- Tape is rewinding rapidly.
SLOW -- Tape is playing at sLow-motionforward speed.
STILL -- PLaybackis halted on one frame.
STOP-- Tape rewind or pLaybackis stopped.
R. PLAY -- Tape is reversing at normaLplayback speed.
REV. X3 -- Tape is reversing at three (X3) times normal
playback speed.
R. SLOW-- Tapeis playing at sLow-motion reversespeed.
Record Message
ALARM -- Turn VCROn and OFFto erase "ALARM"message.
If it is not erased, take VERto an authorized repair center.
PAUSE-- Record mode is halted.
STOP-- Recording is stopped.
Tuner Messages
AUX_(Aux_Hary_)--AuxlUarychanneLis se_ctedfor
_ewing equlpmentconnected to Audio/Video jacks on front
or rear of the VCR.
CH_--VCR tuned to Channel.
HELLO--VER is turned on.
PAGE 18 ICONTROLS AND DISPLAYS
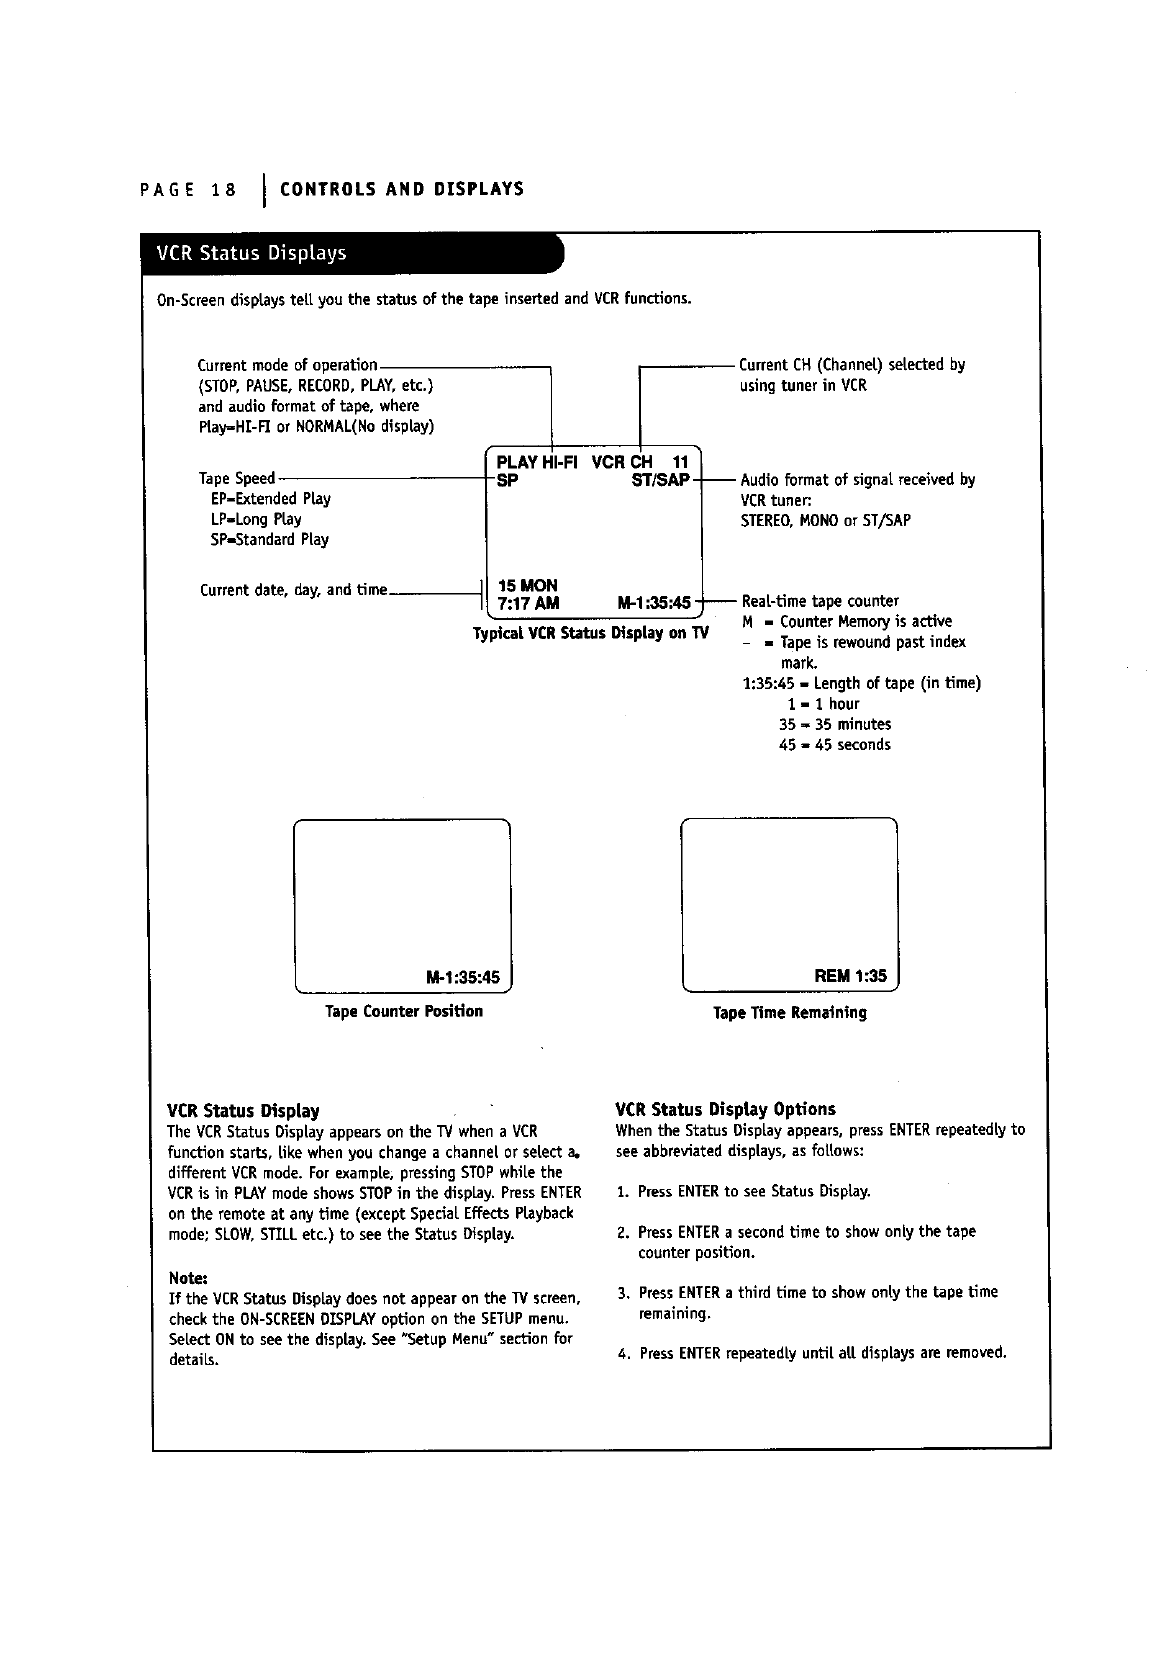
On-Screen displays teLLyou the status of the tape inserted and VCRfunctions.
Current mode of operation
(STOP,PAUSE,RECORD,PLAY,etc.)
and audio format of tape, where
Piay_HI-I_ or NORMAL(Nodisplay)
Tape Speed
EP-Extended PLay
LP-Long Play
SP-Standard Play
Current date, day, and Lime__
PLAY HI-FI VCR CH 11
-SP ST/SAP-
15 MON
7:17 AM M-1:35:45-
TypicalVCRStatus DispLayon TV
CurrentCH(ChanneL)selectedby
usingtunerin VCR
-- Audio format of signal received by
VCRtuner:
STEREO,MONOor ST/SAP
-- ReaL-tlmetape counter
M - CounterMemoryis active
- = Tapeis rewoundpastindex
mark.
1:35:45- Lengthof tape (in time)
1 - 1 hour
35 = 35 minutes
45 - 45 seconds
M-1:35:45
TapeCounter Posffion
REM 1:35
TapeTime Remaining
VCR Status Display
The VCRStatus DispLayappears on the TV when a VCR
function starts, Uke when you change achannet or setect a.
different VCR mode. For examp|e, pressing STOPwhila the
VCR is in PLAYmode shows STOPin the display. PressENTER
on the remote at any Lime (except SpeciaLEffects Playback
mode; SLOW,STZLLetc.) to see the Status Display,
Note:
If the VCR Status Display does not appear on the _/screen,
check the ON-SCREEN01SPLAYoption on the SETUPmenu.
SeLectONto see the display. See "Setup Menu" section for
details.
VCR Status DisptayOptions
When the Status Display appears, pressENTERrepeatedty to
see abbreviated disptays, as follows:
1. PressENTERto see SLaLusDisplay.
2. PressENTERa secondtime to show only the tape
counter position.
3. PressENTERa third Lime to showonty the tape time
remaining.
4. PressENTERrepeatedly until aLLdisplays are removed.
OPERATION ] PAGE 19
A quickListof aLLthe buttonson yourremotecontrolandwhatthey do.
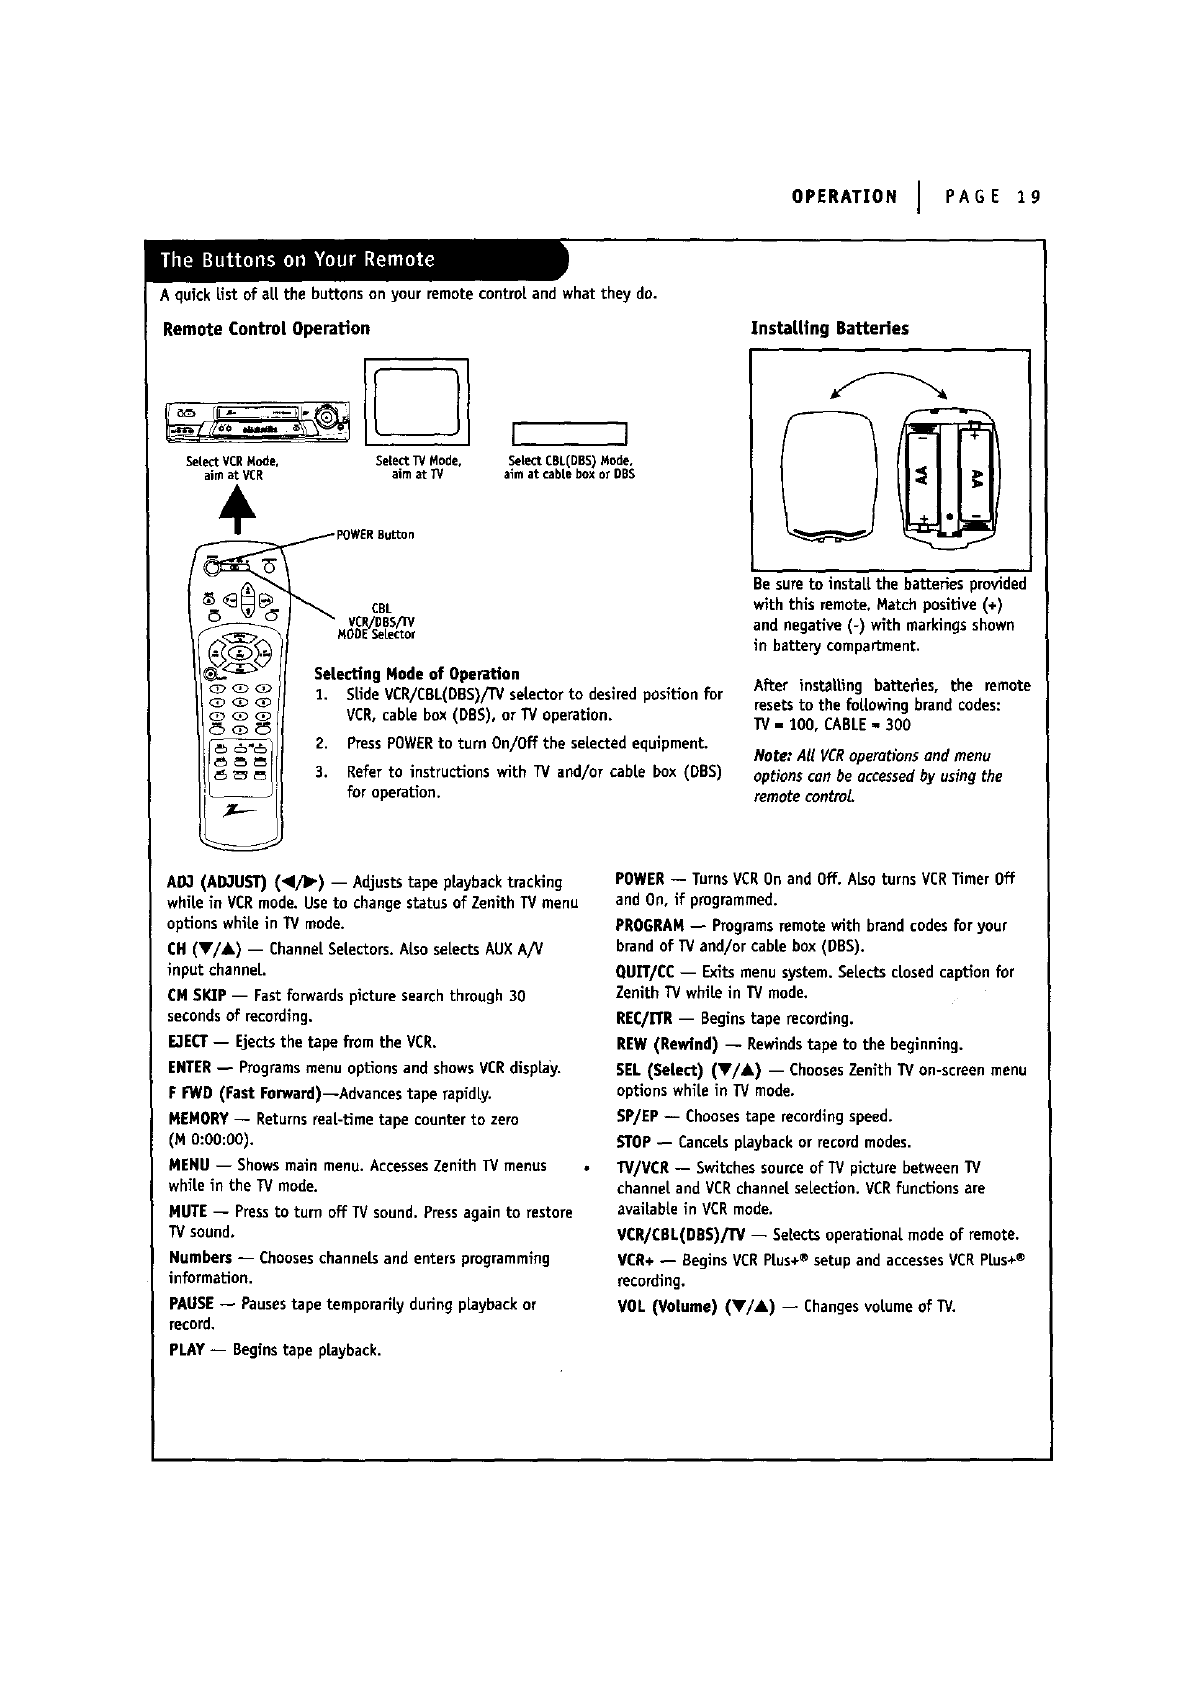
Remote Control Operation
II
SelectVCRNode, SelectCBL(DBS)Mode,
aimat VCR aimat cableboxor DBS
SelectTVMode,
aimat TV
CBL
SeLecting Mode of Operation
1. SLideVCR/CBL(DBS)/IV selector to desired posiUon for
VCR, cabLebox (DBS), or TV operaUon.
2. PressPOWERto turn On/Off the seLectedequipment.
3. Refer to instructions with TV and/or cabLe box (DBS)
for operation.
AO3 (AD3UST) (I/]_) -- Adjusts tape pLaybacktracking
whiLe in VCR mode. Use to change status of Zenith TV menu
options white in TV mode.
CH (V/A) -- ChanneLSetectors. ALSoseLectsAUX A/V
input channeL.
CM SKIP -- Fast forwards pLcturesearch through 30
seconds of recording.
E,1ECT-- Ejects the tape from the VCR.
ENTER-- Programs menu options and shows VCRdisplay.
FFWD (Fast Forward)--Advances tape rapidLy.
MEMORY -- Returns reaL-time tape counter to zero
(MO:OO:O0).
MENU -- Shows main menu. AccessesZenith IV menus
white in the TV mode.
MUTE -- Pressto turn off TV sound. Pressagain to restore
TV sound,
Numbers -- Chooseschannels and enters programming
information.
PAUSE-- Pausestape temporariLy during playback or
record,
PLAY -- Begins tape pLayback.
Instal, Ling Batteries
Be sure to instaLI.the batteries provided
with this remote, Match positive (+)
and negative (-) with markings shown
in battery compartment.
After installing batteries, the remote
resets to the foLLowingbrand codes:
IV - 100, CABLE- 300
Note," All VCRoperations ond menu
options con be occessed by using the
remote control.
POWER -- Turns VCROn and Off. ALsoturns VCRTimer Off
and On, if programmed.
PROGRAM-- Programsremote with brand codesfor your
brand of IV and/or cable box (DBS).
QUET/CC-- Exits menu system. SeLectsclosed caption for
Zenith TV white in TV mode,
REC/n'R -- Begins tape recording.
REW (Rewind) -- Rewinds tape to the beginning.
SEL (SeLect) (V/A) -- ChoosesZenith TV on-screen menu
options whiLe in TV mode.
BP/EP -- Choosestape recording speed.
STOP-- Cancels playback or record modes.
TV/VCR -- Switches sourceof IV picture between IV
channel and VCR channeLselection. VCRfunctions are
availabLe in VCRmode.
VCR/CBL(nBS)/IV -- SeLectsoperational, mode of remote.
VCR+ -- Begins VCRPLus+®setup and accessesVCR PLus+®
recording.
VOL (VoLume) (Y/A) -- Changes voLumeof IV.
PAGE 20 I OPERATION
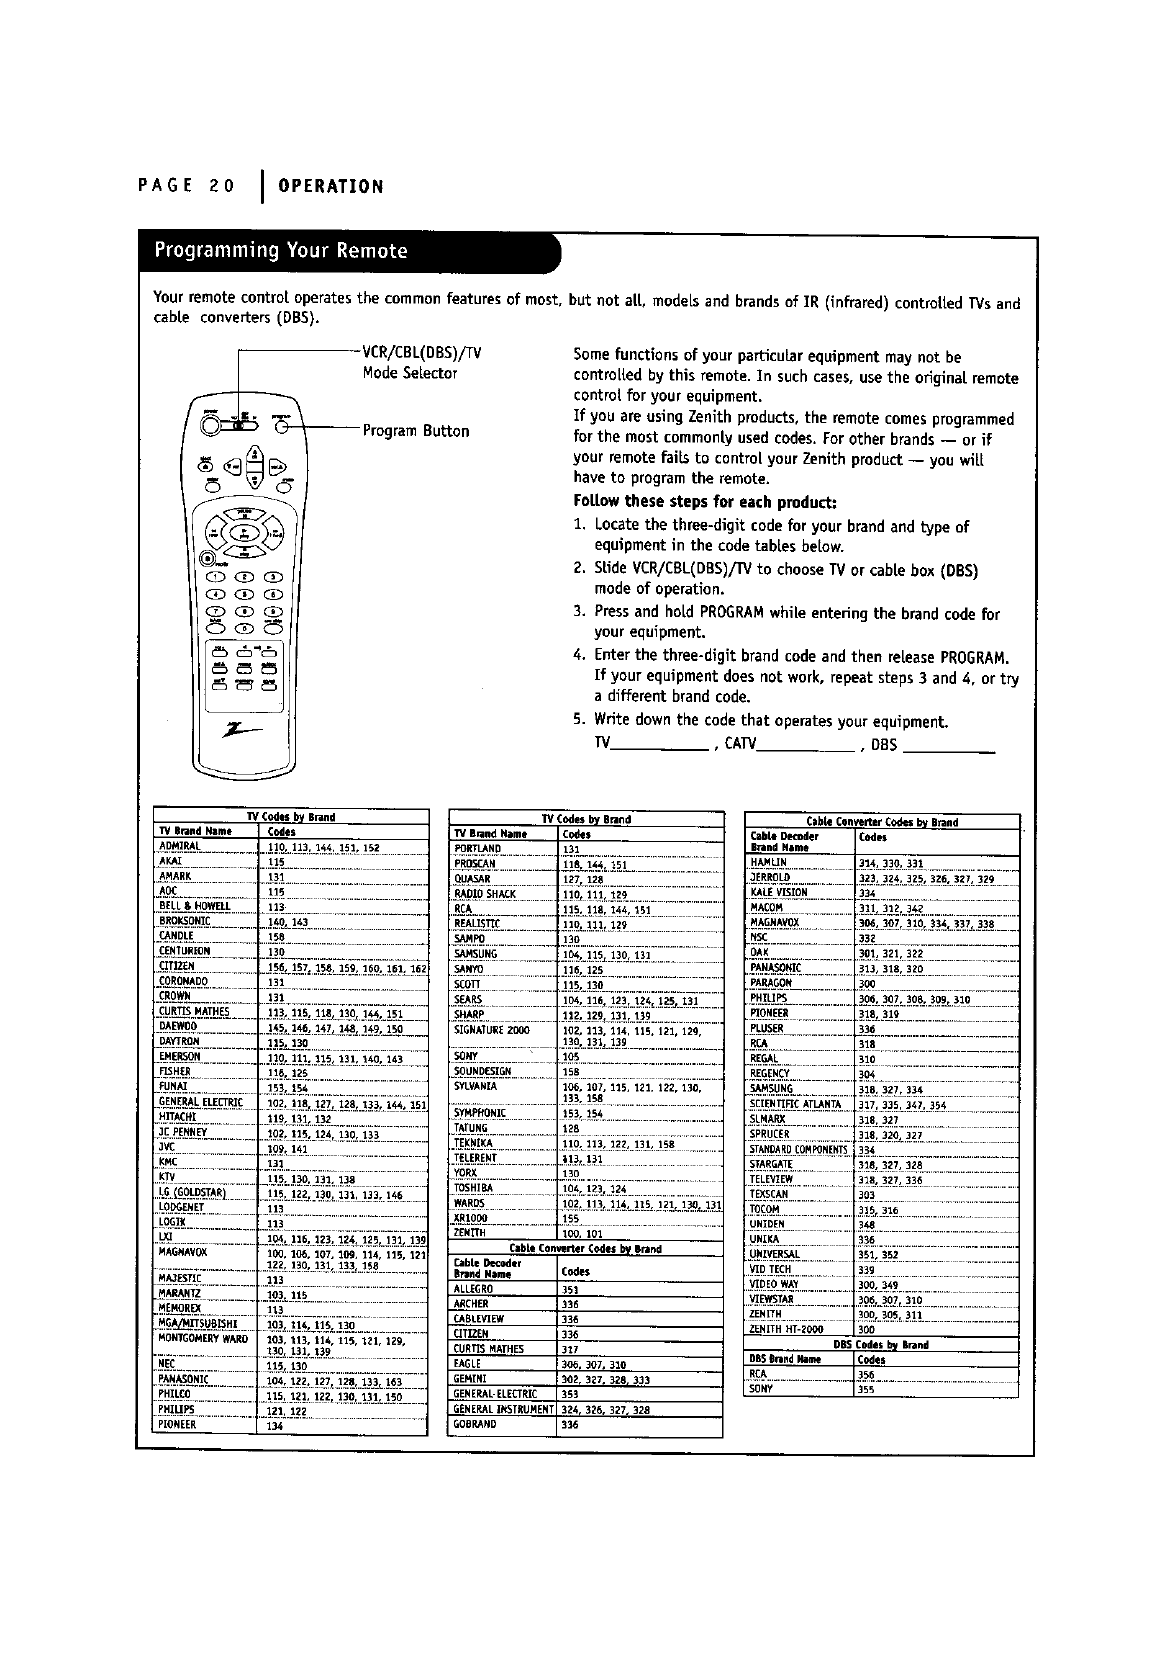
Your remote control operates the common features of most, but not art, models and brands of IR (infrared) controlled TVs and
came converters (DBS).
QO_
d5 c:b"_
VCR/CBL(DBS)/TV
Mode Selector
-- Program Button
Some functions of your particular equipment may not be
controlled by this remote. In such cases, use the odglna[ remote
control for your equipment.
If you are using Zenith products, the remote comes programmed
for the most common|y used codes. For other brands -- or if
your remote fails to control your Zenith product -- you will
have to program the remote.
Follow these steps for each product:
1. Locate the three-digit code for your brand and type of
equipment in the code tables below.
2. SLideVCR/EBL(DBS)/TVto choose TV or cable box (DBS)
mode of operation.
3. Pressand hold PROGRAMwhile entering the brand code for
your equipment.
4. Enter the three-digit brand code and then release PROGRAM.
If your equipment does not work, repeat steps 3 and 4, or try
a different brand code.
5. Write down the code that operates your equipment.
TV --, CAW --, OBS
TV Codesby Brand 11/Codesby Brand Cable ConverterCodesby Brand
TV BrandName Codes rV BrandName Codes Cable O,acoder Codes
ADMIRAL 110 113 144 151 152 PORTlaND 13 Brand Name
"A'KAI"......................... 115 ............................ p'_N" .................. 1"8--144='_5 .......................... HAMLIN 314 330 331
....................................................................................................................I..................................................I..........................................................................................
AMARK 131 3ERROLD 323, 324, 325 326 327 329
.h_ ...................... L_ .......................... i _OIOSH__....................11o 1_t_? ............ K*LEVmON _3+_..................................................
BELL& HOWELL 113 RCA MAEOM 311 312 34Z
115 118 144, 15 ar...............................................................
REALISTIC
CANDLE 158 .................................................
CENTURION 130 5AMSUNG 104 5_ 30 13
_ZEN ... 56_.1.5.7_.158, 159, 150, 151, 162 _ANYO ........................................................................ =115 125
CORONADO 131
....................... -_ = SCO_" 15 30
CROWN 131 ...............................................................
.......................s.......... _ = SEARS 1C4 116 123 124 125_ 13
_mo_................_]._]]i............................13o.13_.13_
._LRSO=N..............119_111lt_S_L_.._q.._4_..... so._....................._ ................................................
FL_H_R 15 12B • r _OUNDESIGN 158
FUNA] 153 _54 SYLVANIA 106, 107, 115, 121, 122, 130,
....................................GENERA L ELEL_R C 102 ....................................................18127 128 133 144 15 ................................ ,...........................................133, 158
......................... _ - - _ ......... SYMPHONIC 153 154
HITACHI 9, 131,132 .... ,...............................................
3C',_E-N_4_.............102 115 124 130..133= ..........TAYUNG 128
3VC ""'_];_;;;;i]]-109. 141 TEKNIKA 110 113 58 ................
KMC ..........................."131 ........................................T[LERENT ..................._13. 1}1 .............................
_v ............................i_i_ i_i;i_ ............................y.o_......................._3o............................................
_._-q_.o_._.*._I-11,i_ _ i_1_]i,(]] -_!_.............._o_._n2_ .......................
LODGENET 113 WARDS .102 113 114 115 12_:.I_... 3
....................................*........................................................XRIOO0 155
LOGI_ 113 ...................................*.........................................
L_ ....................... _,4 "116"_'23 y_'_ "1-_ 13g ZEN_'H 100, 101
................. , j_ .......................
MAGNAVOX 10_, 106, 107, 109, 114, 115, 121 _abL° Converter COdeS by Brand
.................................122 130 131 133 158 Cable Decoder
MA3ESTIE 113 ..................................... BrandName Codes
................................+.................................................ALLEGRO 351
_A_6N_[Z..............lO3.1_
"EMOR_ -_ ................AR_NER 3"
............................................... EABLEVIE W 336
MGA ITSUB_HI
......._ ...................103 114 1!_..._.30"......... CITIZEN 336
MONTGOMERY WARO 103, 113, 114, 115, 1_1, 129,
..............................130 131 139 ....... JiCURTIS MATHES 317
N.E.C.. 115, 130 EAGLE 306, 307, 310
PANASONIC 104 122 127 128 133_ 163 GEMINI 302, 327, 3281 333
PHI_FS= .................. 21, 122 GENERAL I_STRUMENT 324_ 326, 327, 328
PIONEER 134 GOBRAND 336
MAGNAVOX 306, 307, 310, 334, 337, 338
9._............................3Ol.32_3_ ..........................
PANASONIC 3,318,.320 .........................
PARAGON _0_....................................
P..HILI.PS......................30630.7...3.0._..._99±3i0.............
mONEER 31831g..................................
P.Lq.Sf_..................._}_....................................
.............................318 ......................................
REGAL _i_.....................................
S_MSU_G.................31B,3_.._ .......................
SLMARX.........................lS,._27.....................................
SF_RU.CER.......................18.370.,._Z........................
s['_-_L°cgMmN[_. _._4.....................................
STARGATE 318, 327, 328
_._w-................ ......
TEXSCAN.................303.............................................
TOCqM.............. 3_5,316...........................
9N!KA......................336.....................................................
qN_ERS_L .3_L_ _..........................................
V]D TECH..................33g ..................................................
_pEOWAY 3oo347.......................................
ZENITH 3o_..3qs!!1.......................
ZENITH HT-200_ 300
DBSCodesby Brand
DB5B_nd I_me Codes
RCA 356
_;_;.......................];_.....................................
OPERATION J PAGE 21
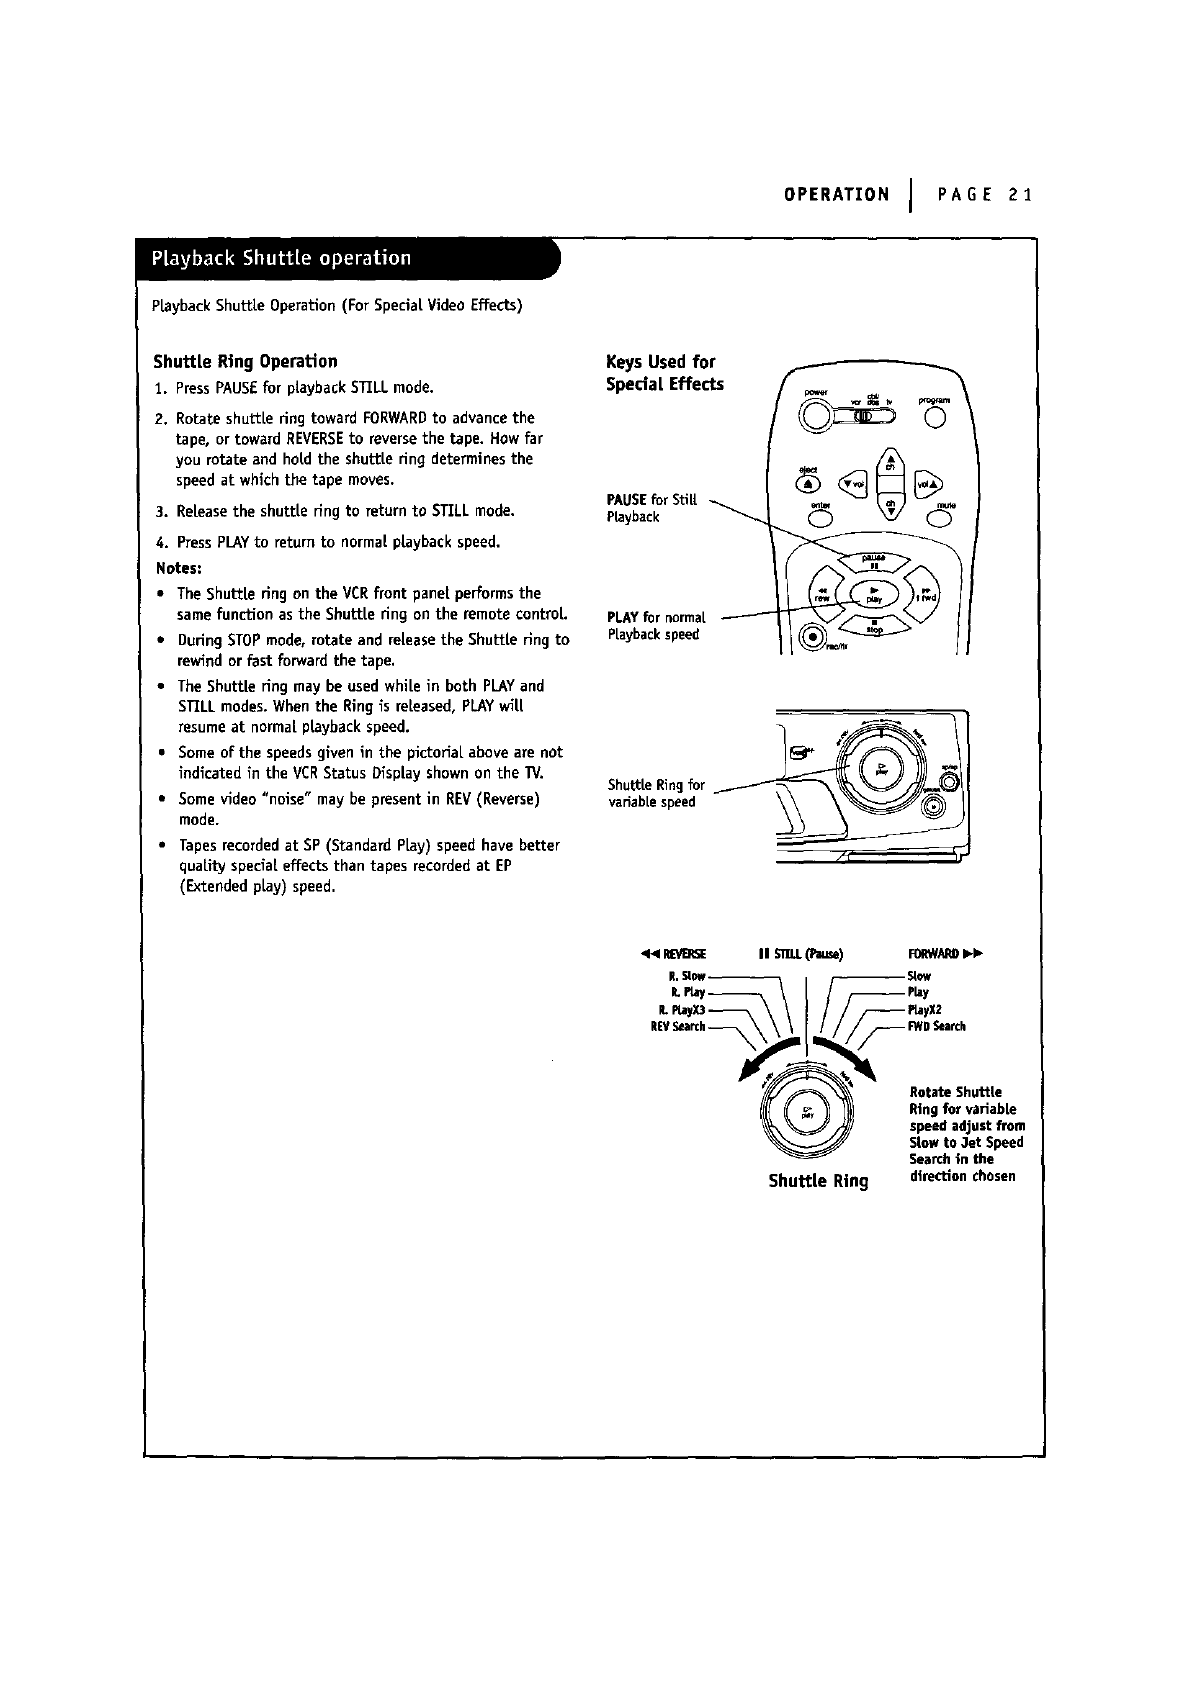
PLaybackShuttle Operation (For Special Video Effects)
ShuttLe Ring Operation
1. PressPAUSEfor playbackSTLLLmode.
2. Rotate shuttle ring toward FORWARDto advancethe
tape, or toward REVERSEto reversethe tape. How far
you rotate and hold the shuttle ring determines the
speed at which the tape moves.
3. Release the shuttle ring to return to STILL mode.
4. PressPLAy to return to normal playback speed.
Notes:
• The Shuttle ring on the VCRfront panel,performs the
same function as the Shuttle ring on the remote control.
•During STOPmode, rotate and release the Shuttle ring to
rewind or fast forward the tape.
•The Shuttle ffng may be used while in both PLAYand
STLLLmodes. When the Ring is released, PLAYwill
resume at normal playback speed.
•Some of the speedsgiven in the plctoffal above are not
indicated in the VERStatus Display shown on the TV.
•Some video "noise" may be present in REV(Reverse)
mode.
• Tapes recorded at SP (Standard PLay) speed have better
quality special effects than tapes recorded at EP
(Extended pLay) speed.
KeysUsedfor
Spedai Effects
PAUSE for StiU
Playback
PLAYfor normal
PLaybackspeed
ShuttleRingfor__/_//_.._
variablespeed
•_m'_SE mlSm.L(_) reRWARO_
L_yx3-_ \ \ ( / / /--P_yx2
REVSearch_ \ \ \ / / / /_FWDSearch
Rotate Shuttle
Y_( _ _ Ringfor variable
_, _ /speedadjust from
_j_ Slowto 3et Speed
Searchin the
Shuttle Ring direction chosen
PAGE 22 IOPERATION
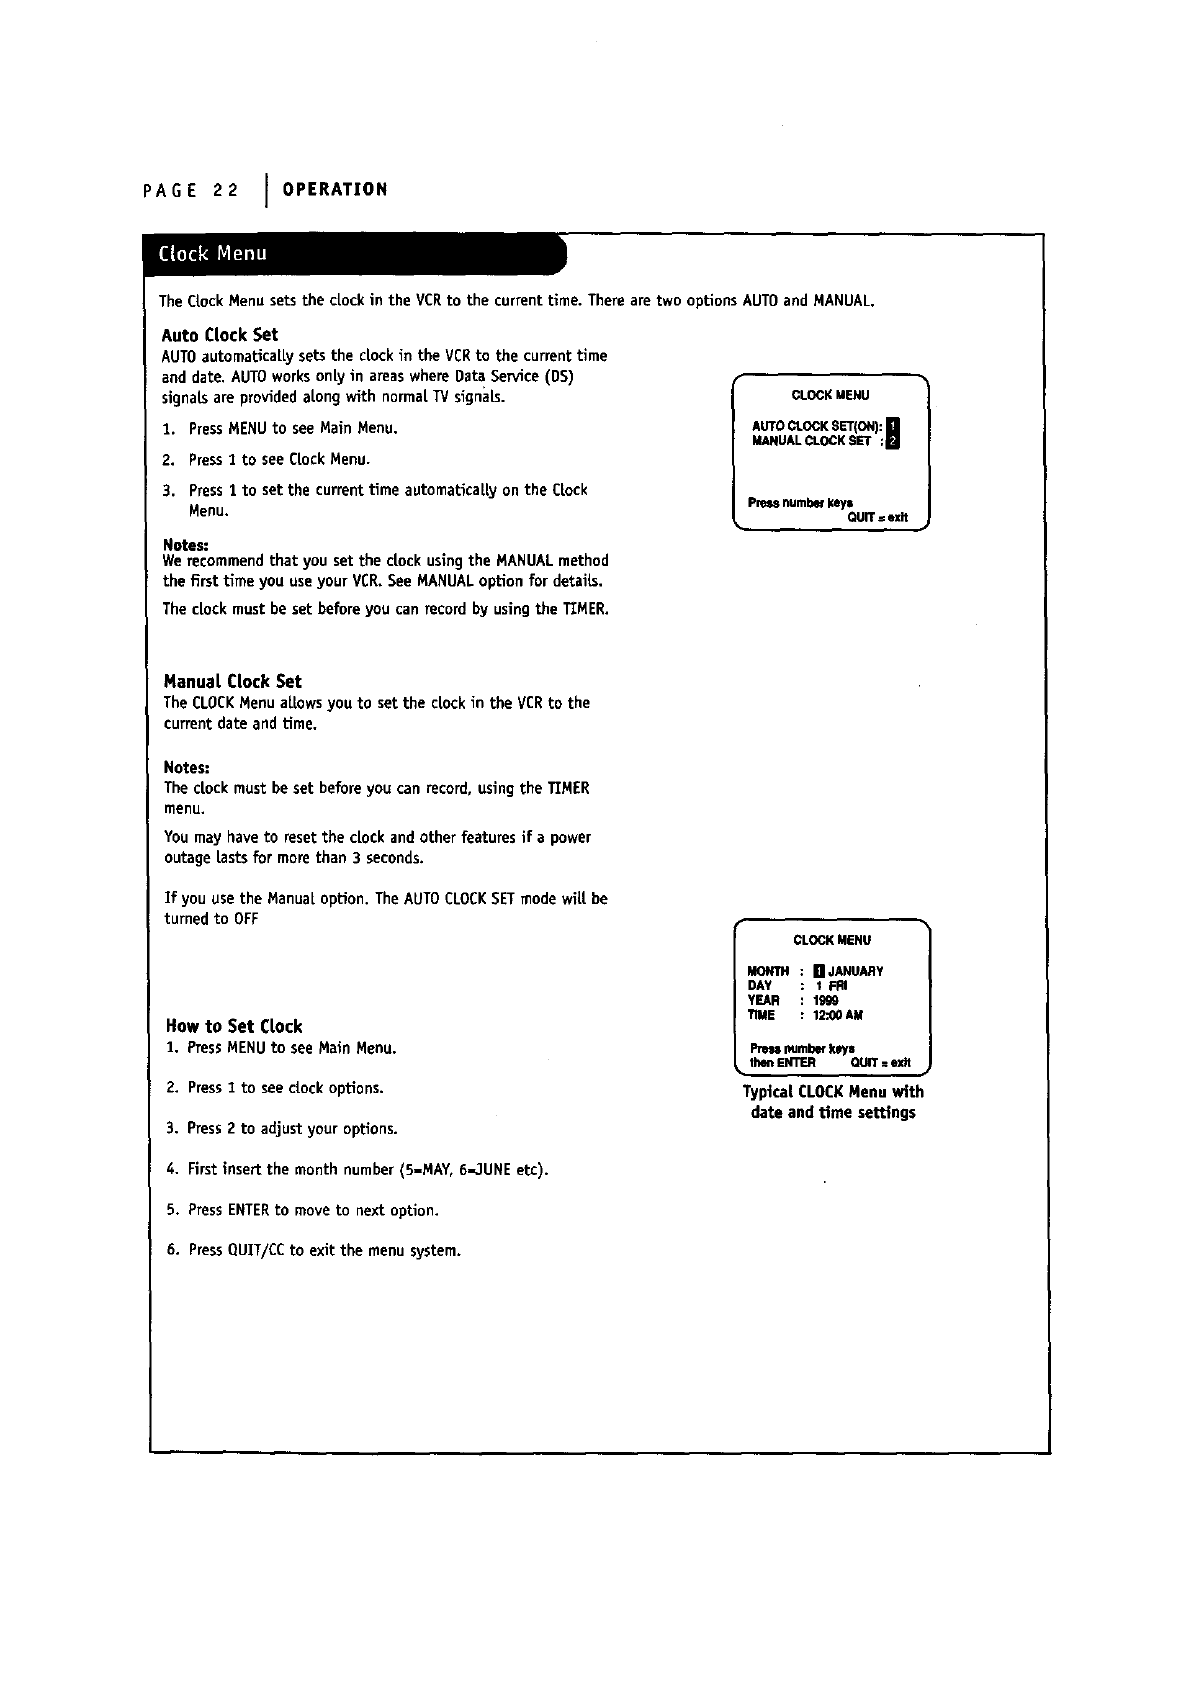
The Clock Menu sets the clock in the VCRto the current time. There are two options AUTOand MANUAL,
Auto Clock Set
AUTOautomaticallysetsthe clockin the VCRto the currenttime
anddate.AUTOworksonlyin areaswhereDataService(DS)
signalsareprovidedalongwith normalTVsignals.
1. PressMENU to see Main Menu.
2. Press1to see Clock Menu.
3. Press 1 to set the current time automatically on the Clock
Menu.
Notes:
We recommend that you set the clock using the MANUAL method
the first time you use your VCR. See MANUALoption for details.
The clock must be set before you can record by using the TIMER.
CL_KM_U
A_O_KS_ON):_
_NUAL_KS_ ;m
Pressnumber_ysQUIT=exit
Manual Clock Set
TheCLOCKMenuallowsyouto set the dock in the VCRto the
currentdate andtime.
Notes:
The clock must be set before you can record, using the TIMER
menu.
You may have to resetthe clockand otherfeaturesifa power
outagelastsformore than 3seconds.
Ifyou use the Manual option.The AUTO CLOCK SET mode wil[be
turnedto OFF
How to Set Clock
I. PressMENU to see Main Menu.
2. Press2to see dock options.
3. Press2 to adjustyour options.
4. Firstinsertthe month number (5-MAY,6-,IUNEetc).
5. PressENTER to move to nextoption.
CL_K MENU
MONTH [] JANUARY
DAY I FRI
YEAR lg_19
TIME 12,_0 AM
I_ numberkeys
thenENTER QUiT=exit
Typical CLOCKMenu with
date and Ume settings
6. Press QUIT/CC to exit the menu system.
OPERATION I PAGE 23
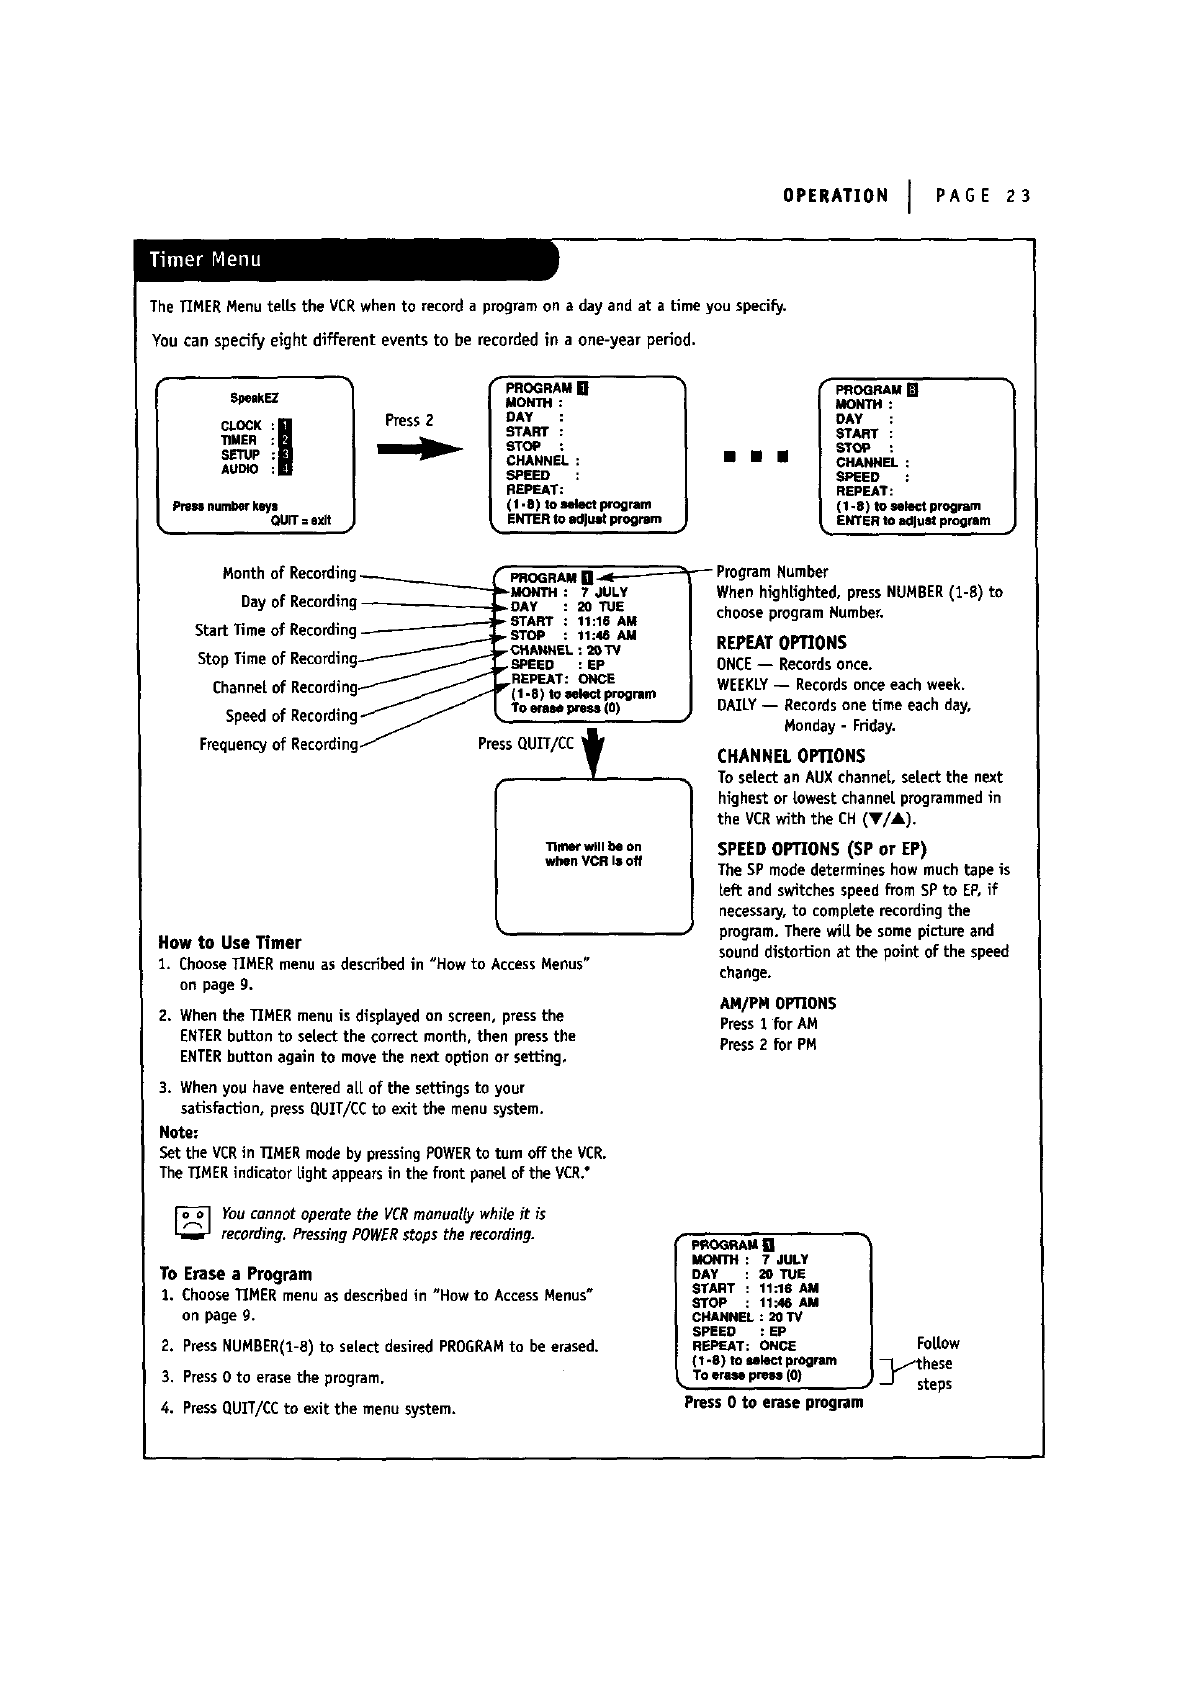
The TIMER Menu teLls the VCR when to record a program on a day and at a time you specify,
You can specify eight different events to be recorded in a one-year period.
SpeakEZ
CL Ki|
TIMER
SETUp
AUDIO
Pressnumberkey=
QUIT: exit
Press2
PROGRAM[]
MONTH
DAY
START
STOP
CHANNEL:
SPIELED :
REPEAT:
(1-8) to emlectprogram
ENTERto adJU=tprogi_Bm
mmm
_OGHAM[]
MONTH
DAY
START
STOP
CHANNEL:
SPEED :
REPEAT:
(1.e) toselectprogram
ENTERto adjustprogram
Month
Dayof Recording
StartTimeof Recording
StopTime
Channelof Recordir
Speedof Recordln_
Frequencyof Recordlnd
D
PressQUIT/CC 't
•lmer will be on
when VCR Is off
How to Use Timer
1. ChooseTIMERmenuas describedin "How to AccessMenus"
onpageg.
2. Whenthe TIMERmenuis displayedon screen,pressthe
ENTERbuttonto selectthe correct month, then pressthe
ENTERbuttonagain to movethe next optionor setting,
3. WhenyouhaveenteredaLLof the settingsto your
satisfaction,pressCIUIT/CCto exit the menusystem.
Note:
Setthe VERin TIMERmodebypressingPOWERto turnoffthe VCR.
TheTIMERindicatorLightappearsin the front pane[of theVCR.°
When hlghUghted, press NUMBER(1-8) to
choose program Number.
REPEAT OPTIONS
ONCE-- Recordsonce.
WEEKLY-- Recordsonce each week.
DAILY-- Records one Lime each day,
Monday - Friday.
CHANNELOPTIONS
ToseLectan AUXchanneL,selectthe next
highestor LowestchanneLprogrammedin
the VCRwith the CH(V/&).
SPEEDOPTIONS (SP or EP)
TheSPmodedetermineshowmuch tape is
[eft andswitchesspeedfromSPto EF,if
necessanJ,to compLeterecordingthe
program.TherewiLLbesomepictureand
sounddistortionat the point of the speed
change.
AM/PM OPTIONS
Press1for AM
Press 2 for PM
Youcannotoperatethe VCRmanuallywhileit is
recording.PressingPOWERstopstherecording.
To Erasea Program
1. ChooseTIMERmenuasdescribedin "Howto AccessMenus"
onpageg.
2. PressNUMBER(I-8)to seLectdesiredPROGRAMto be erased.
3. Press0 to erasethe program.
4, PressQUIT/CCto exit the menusystem.
pPa_G_AMB
MONTH: 7 JULY
DAY 20 TUE
START 11:16 AM
STOP 11".46AM
CHANNEL: 20TV
SPEED : EP
REPEAT: ONCE
(1 4) to_lect program
TOerm press(0)
Press 0 to erase program
FoLLow
_these steps
PAGE 24 ] OPERATION
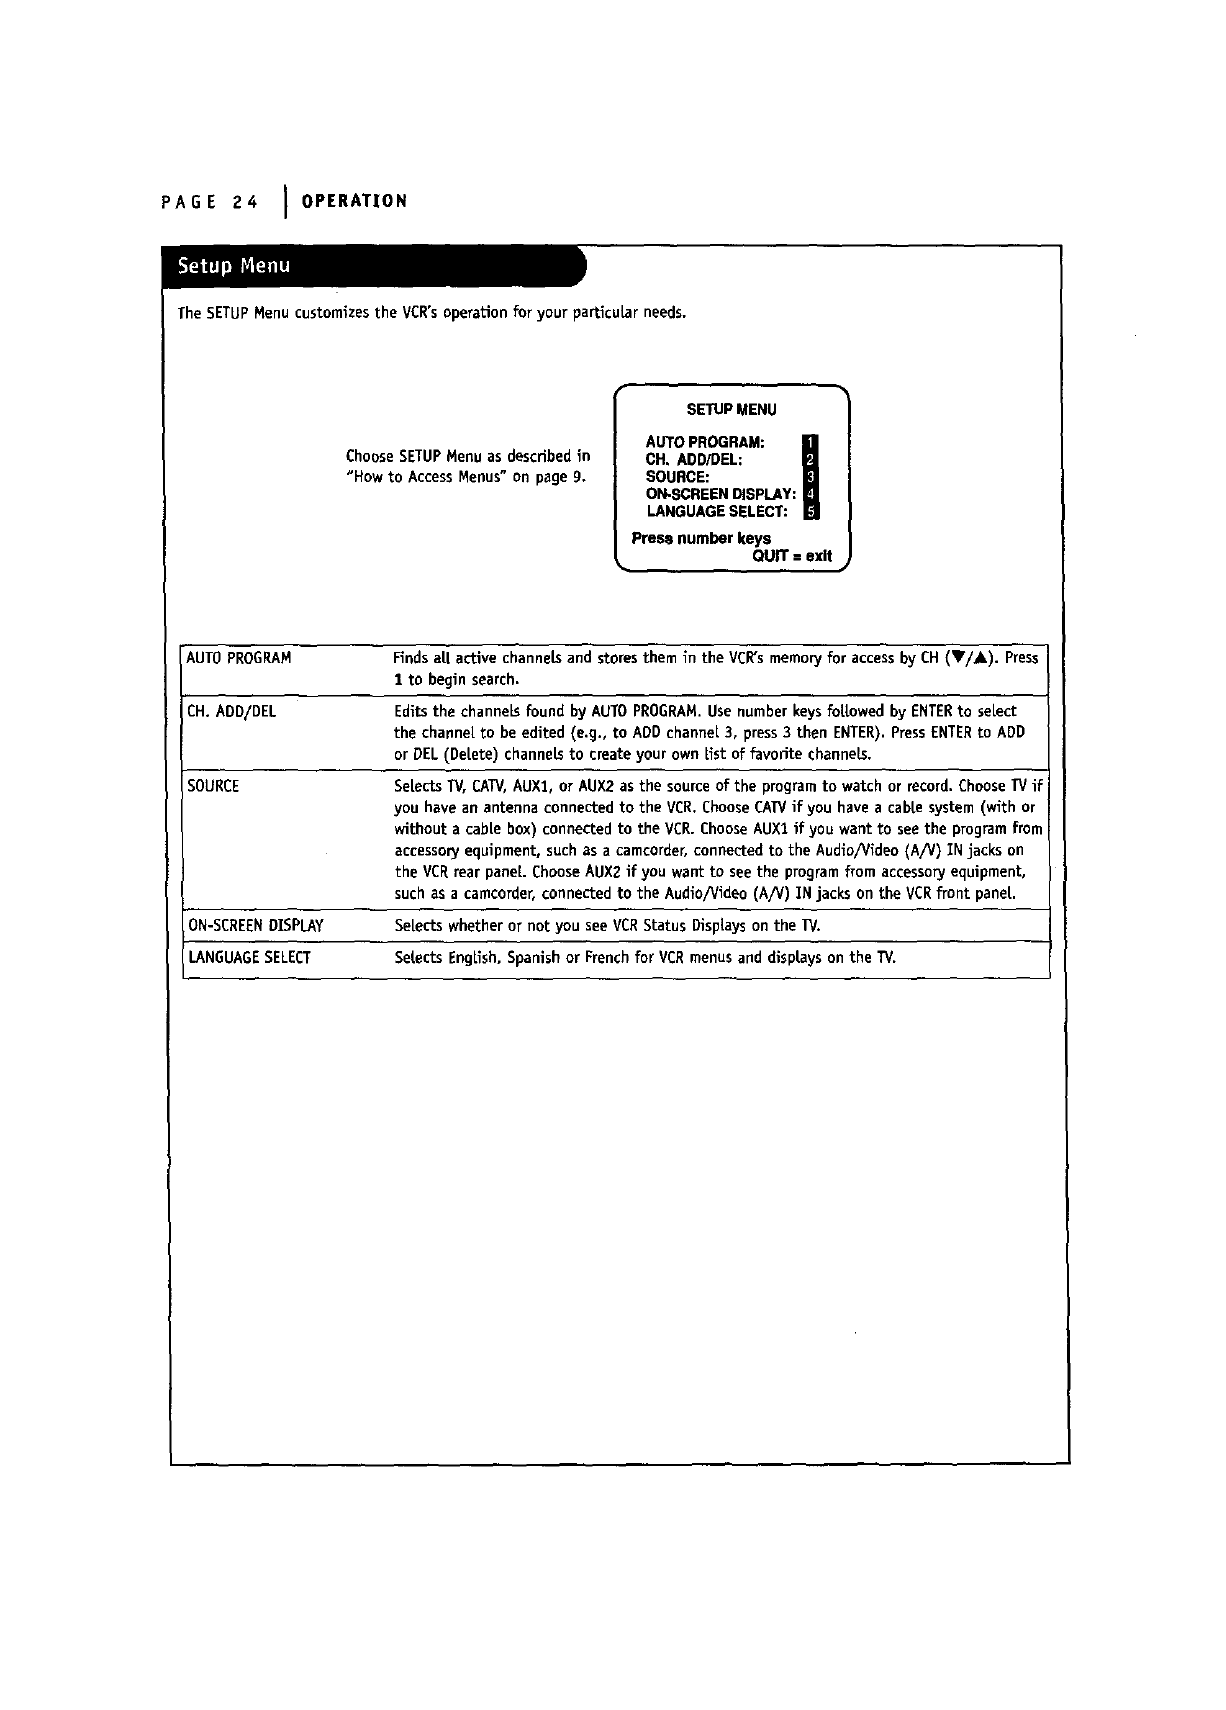
The SETUPMenu customizes the VCR'soperation for your particular needs.
Choose SETUPMenu as described in
"How to AccessMenus" on page 9.
SETUP MENU
AUTO PROGRAM:
CH, ADD/DEL:
SOURCE:
ON-SCREENDISPLAY:
LANGUAGESELECT:
press number keys
QUIT = exit
AUTO PROGRAM Finds all active channels and stores them in the VCR'smemory for access by CH (V/A). Press
1to begin search.
CH. ADD/DEL Edits the channels found by AUTO PROGRAM.Use number keys followed by ENTERto select
the channel to be edited (e.g., to ADD channel 3, press 3 then ENTER). PressENTERto ADD
or DEL (De|ete) channels to create your own List of favorite channels.
SOURCE Selects TV, CATV,AUX%,or AUX2 as the source of the program to watch or record. ChooseTV if
you have an antenna connected to the VCR. Choose CATVif you have a cable system (with or
without a cable box) connected to the VCR. Choose AUX1 if you want to see the program from
accessoryequipment, such as a camcorder, connected to the Audlo/Video (A/V) IN jacks on
the VCR rear panel. Choose AUX2 if you want to see the program from accessoryequipment,
such as a camcorder, connected to the Audlo/Video (A/V) IN jacks on the VCRfront pane{.
ON-SCREENDISPLAY Selects whether or not you see VCRStatus Displays on the 1_/.
LANGUAGESELECT Se{ects English, Spanish or Frenchfor VCR menus and disp|ays on the TV.
OPERATION IPAGE 25
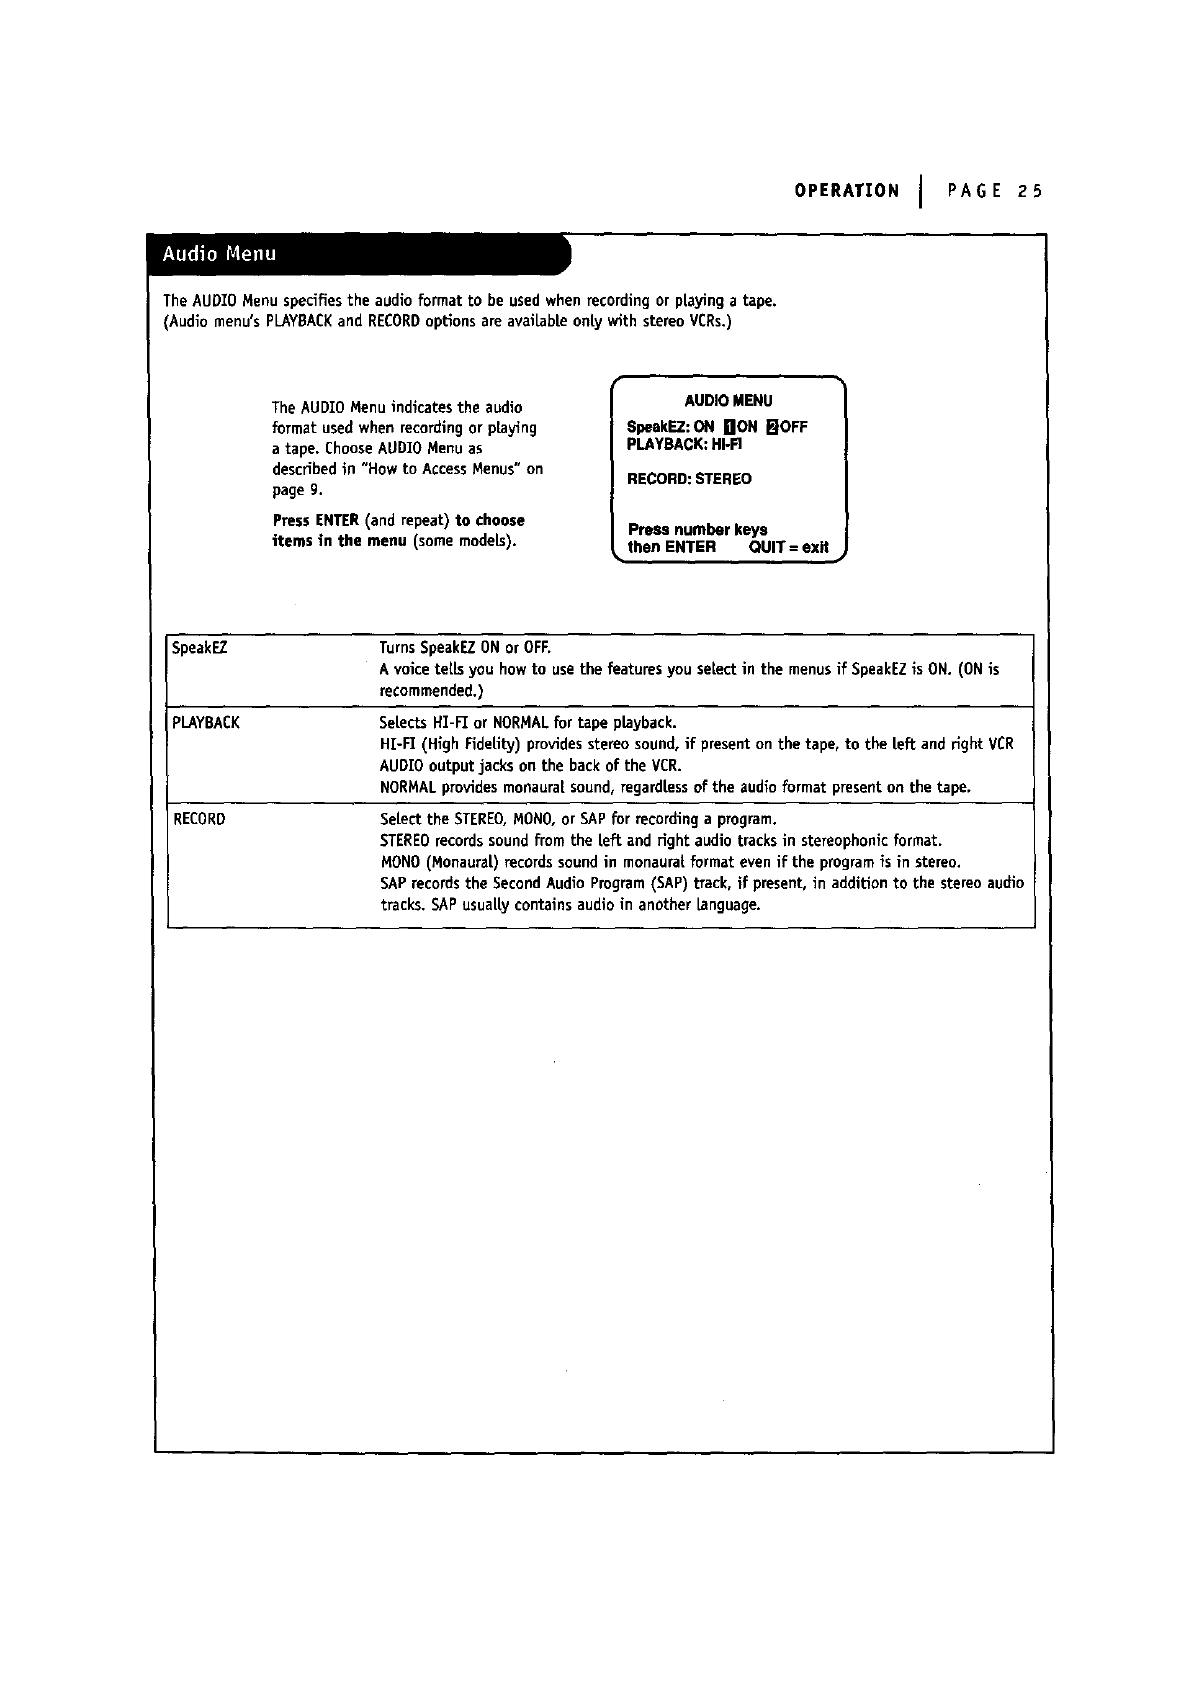
The AUDIO Menu specifies the audio format to be used when recording or playing a tape.
(Audio menu's PLAYBACKand RECORDoptions are available only with stereo VCRs.)
The AUDIO Menu indicates the audio
format used when recording or playing
atape. Choose AUDIO Menu as
described in "How to Access Menus" on
page g.
Press ENTER(and repeat) to choose
items in the menu (some models).
AUDIO MENU
_eakEZ:ON nON _IOFF
PLAYBACK:HI.FI
RECORD: STEREO
Press number keys
then ENTER QUIT = exit
SpeakEZ Turns SpeakEZON or OFF.
A voice tells you how to usethe features you select in the menus if SpeakEZis ON. (ON is
recommended.)
pLAYBACK Selects HT-FI or NORMALfor tape playback.
HI-FI (High FidelibJ) providesstereo sound, if present on the tape, to the left and fight VCR
AUDIO output jacks on the back of the VCR.
NORMALprovidesmonaura[ sound, regardlessof the audio format present on the tape.
RECORD Select the STEREO,MOHO,or SAPfor recording a program.
STEREOrecords sound from the left and fight audio tracks in stereophonic format.
MONO (Monaural) records soundin monaura{format even if the programis in stereo.
SAPrecords the SecondAudio Program (SAP) track, if present, in addition to the stereo audio
tracks. SAP usuai|y contains audio in another Language.
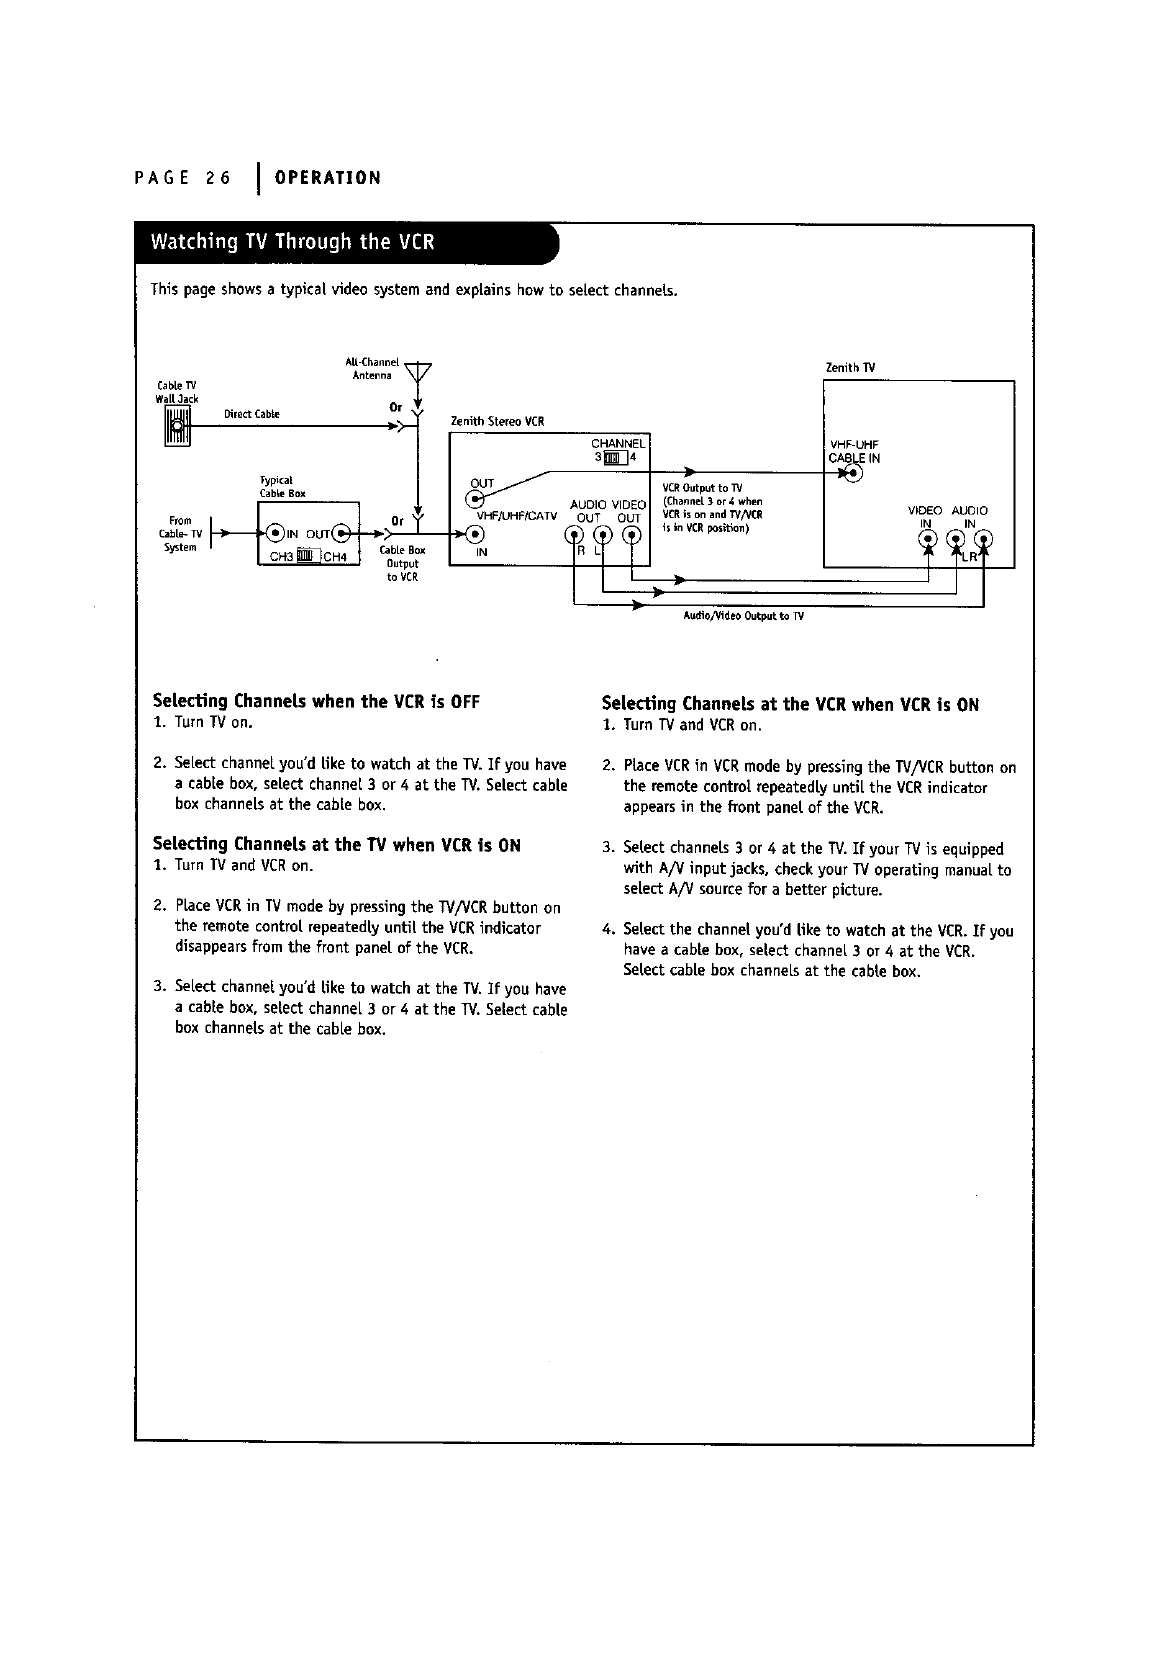
PAGE 2G I OPERATION
This page shows a typical video system and explains how to select channels.
Cable_/
WaLlJack
AE-Chann_
Antenna
Direct Cable OT
)__ Zenith Stereo VCR
CabLeBox AUDIO VIDEO
From Or _ VHF/UHF/CATV OUT OUT
Cabl_ TV IN OUT _ --
System, _ C_bulepBu;x
to VCR
Zenith]_*
VHF-UHF
C_E IN
>
VCROutput to _/
(Channel 3or 4 when
VCR is on and T_'/VCR
is in VCR position)
Au_o_id_ Out_t_W
V_DEO AUDIO
IN IN
Selecting Channels when the VCR is OFF
t. TurnTVon.
2. Select channel you'd Eke to watch at the TV. If you have
acable box, select channel 3 or 4 at the TV. Select cable
box channels at the cable box.
Selecting Channels at the TV when VCR is ON
1. TurnTVandVCRon.
2. place VCRin TV mode by pressing the W/VCR button on
the remote control repeatedly until the VCR indicator
disappears from the front pane[ of the VCR.
3. Select channel you'd like to watch at the TV. If you have
a cable box, select channel 3 or 4 at the 13/. Select cable
box channeLsat the cable box.
Selecting Channels at the VCR when VCRis ON
1. TurnTVandVCRon.
2. Place VCRin VCRmode by pressing the TV/VCR button on
the remote control repeatedly untiLthe VCR indicator
appears in the front panel of the VCR.
3. Select channels 3 or 4 at the 13/.If your TV is equipped
with A/V input jacks, check your TV operating manual to
select A/V source for a better picture.
4. Select the channel you'd like to watch at the VCR.Ifyou
have a cable box, select channel 3 or 4 at the VCR.
Select cable box channels at the cable box.
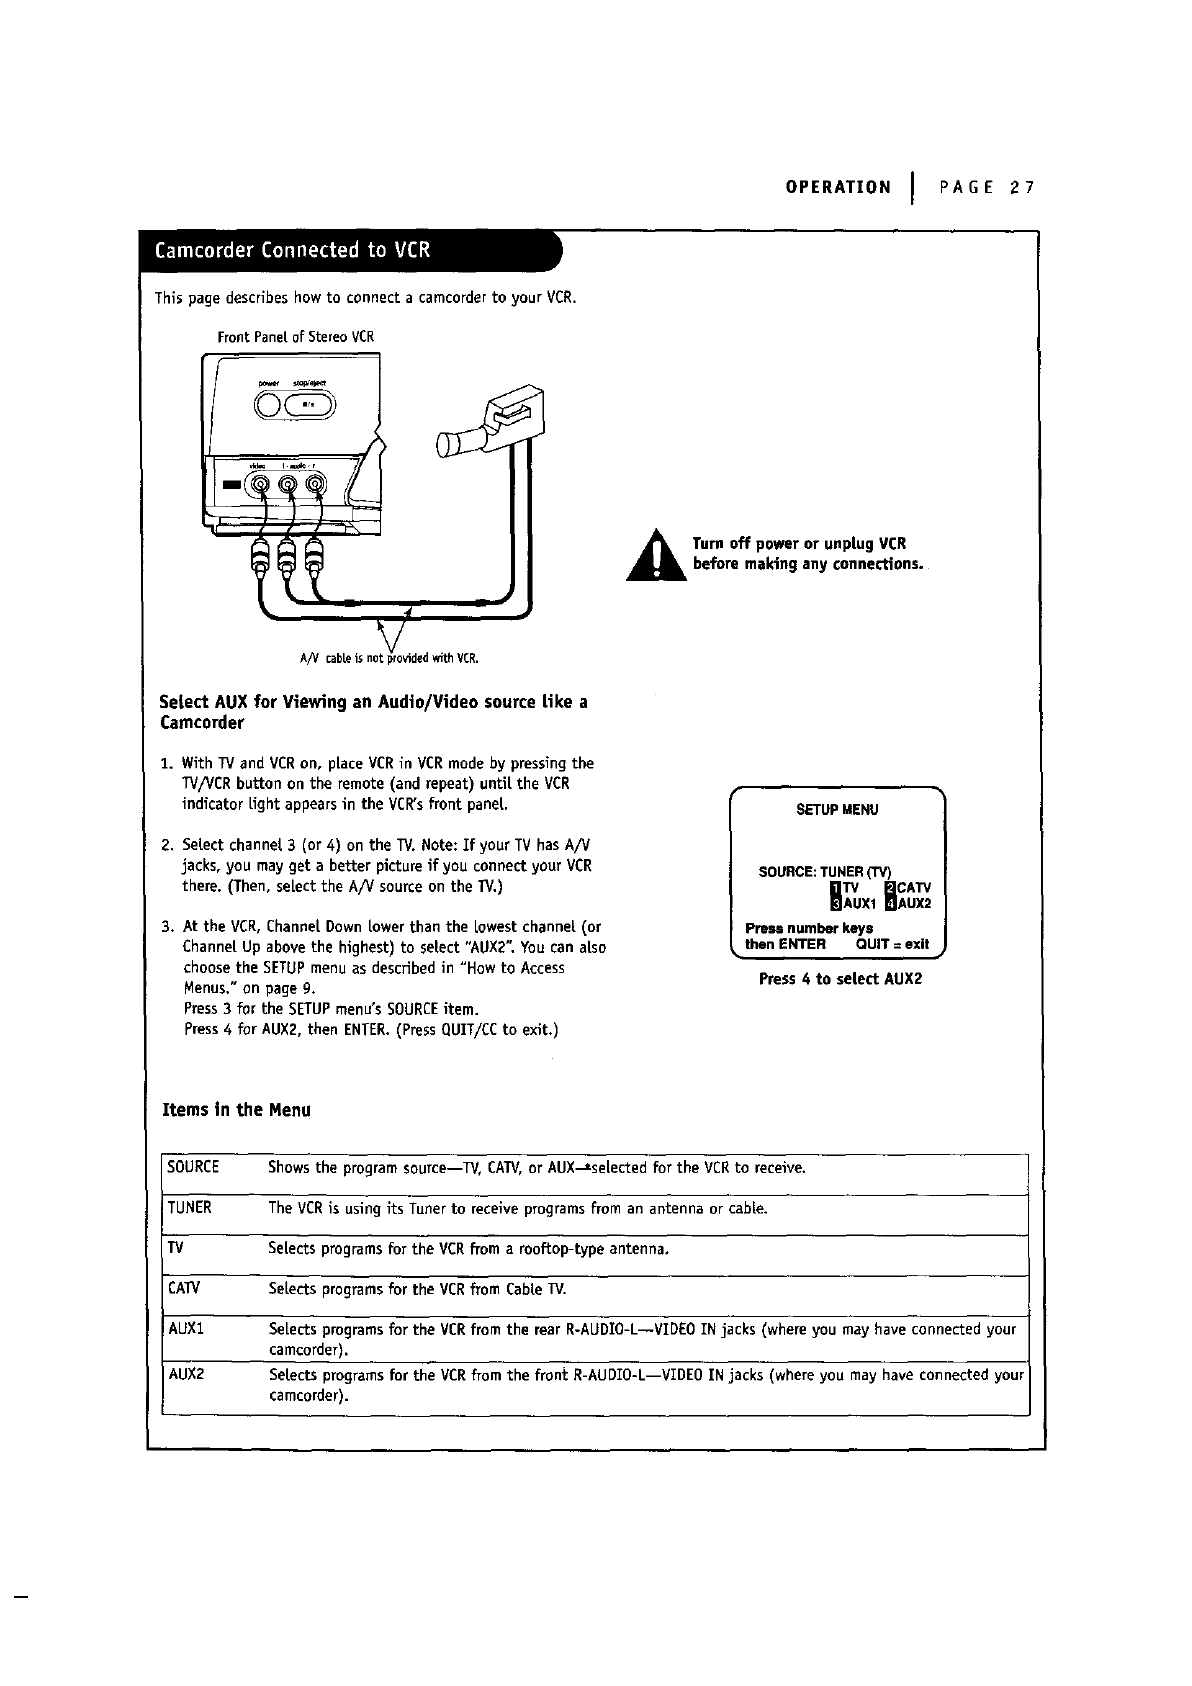
OPERATION IPAGE 27
This page describes how to connect a camcorderto your VCR.
FrontPaneLof StereoVCR
A/V cabals m tp_ided with VCR.
Setect AUX for Viewing an Audio/Video source like a
Camcorder
1. With TV and VCRon, pLaceVCRin VCR mode by pressingthe
TV/VCR button on the remote (and repeat) untiLthe VCR
indicator Lightappears in the VCR'sfront panel
2. SeLectchannel 3 (or 4) on the TV. Note: If your TV has A/V
jacks, you may get a better picture if you connect your VCR
there. (Then, seLectthe A/V source on the 1_/.)
3. At the VCR, Channel Down Lowerthan the Lowestchannel (or
Channel Up above the highest) to select "AUX2" You can also
choose the SETUPmenu as described in "How to Access
Menus." on page g.
Press3 for the SETUPmenu'sSOURCEitem.
Press4 for AUX2, then ENTER.(Press QUIT/CC to exit.)
Turn off power or unplug VDRbefore making any connections.
SETUP MENU
SOURCE:TUNER(TV) CATV
HA xtHAU
Press number keys l
_, then ENTER QUiT = exit
Press4 to select AUX2
Items in the Menu
SOURCE Showsthe program source--W, CATV,or AUX_se[ected for the VCRto receive.
TUNER The VCRis using its Tuner to receive programsfrom an antenna or cable.
TV SeLectsprograms for the VCR from a rooftop-type antenna.
CATV SeLects programsfor the VCR from CabLeTV.
AUX1 SeLects programsfor the VERfrom the rear R-AUDIO-L--VIDEO IN jacks (where you may have connected your
camcorder).
AUX2 Setectsprogramsforthe VCR from the frontR-AUDIO-L--VIDEOINjacks(whereyou may have connectedyour
camcorder).
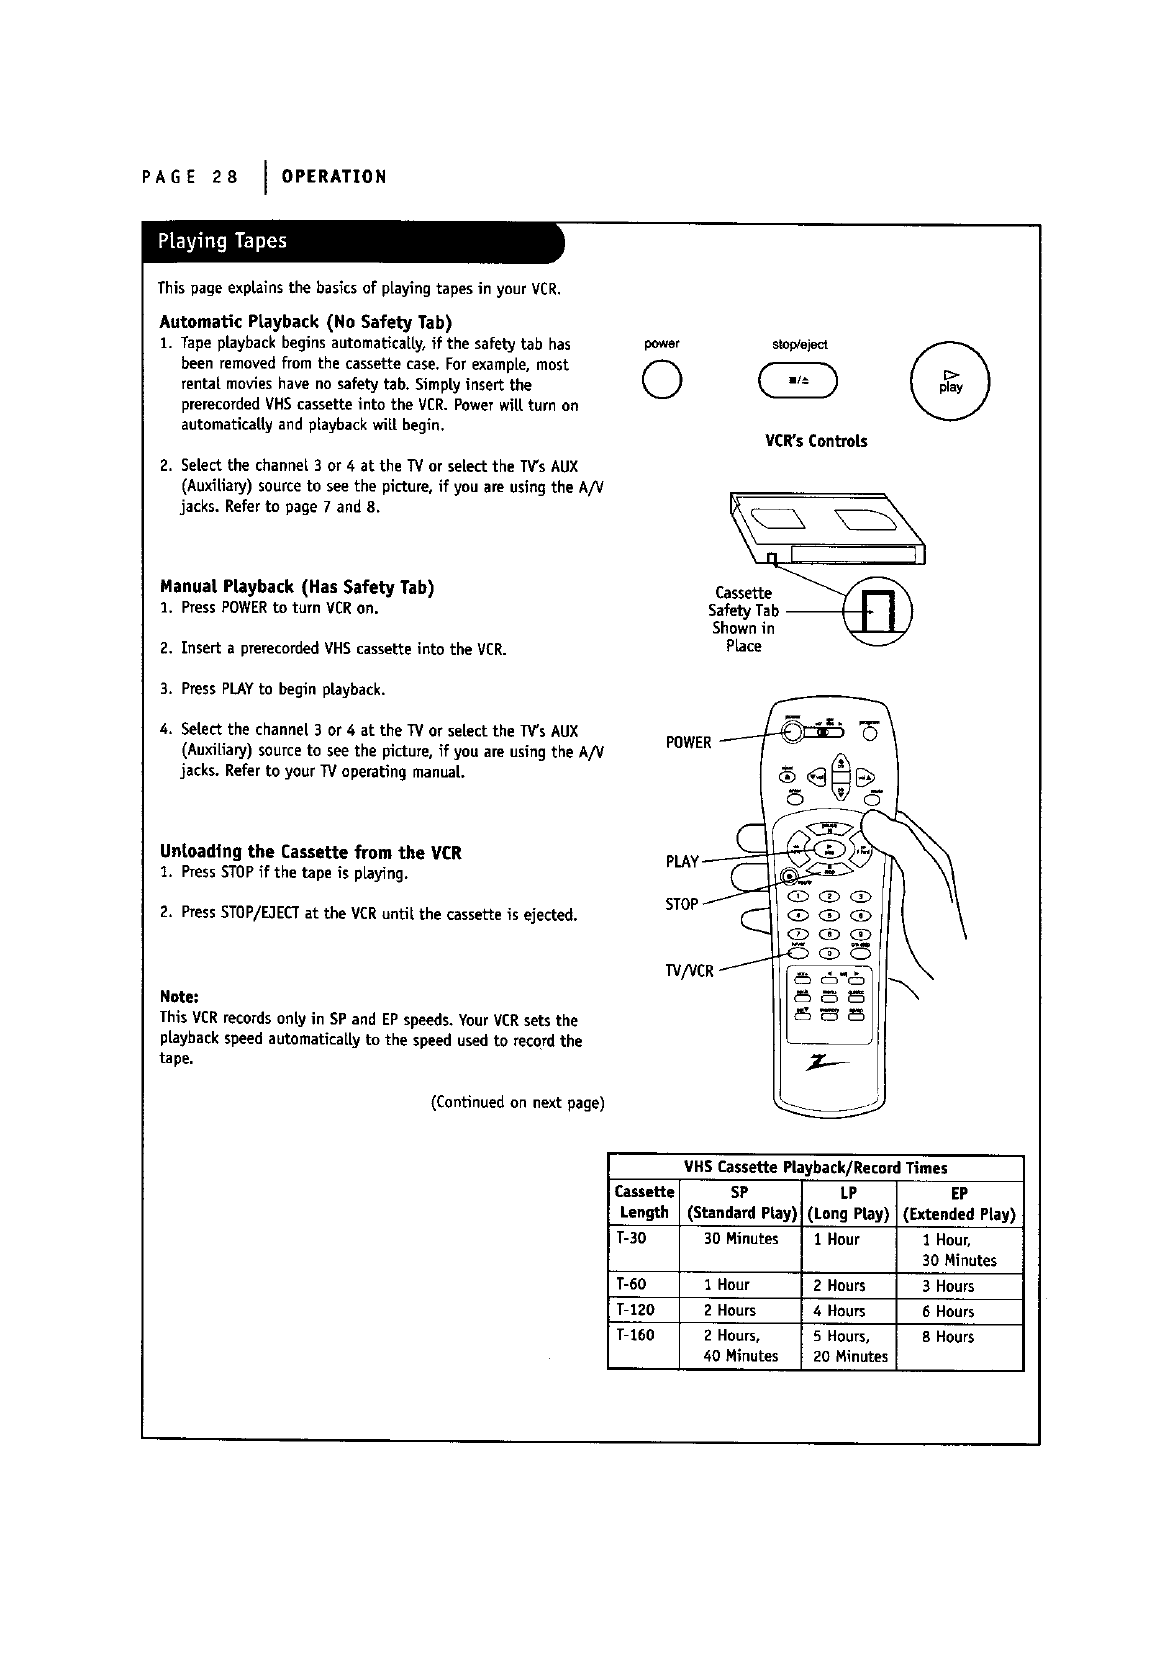
PAGE 28 IOPERATION
Thispage explainsthe basicsof playingtapesinyour VCR.
Automatic Playback (No Safety Tab)
1. Tape playback begins automatically, if the safety tab has
been removed from the cassette case, For example, most
rental movies have no safety tab. Simp|y insert the
prerecorded VHS cassette into the VCR. Power witt turn on
automaticatty and playback wilt begin.
2. Select the channel 3 or 4at the TV or select the TV'sAUX
(Auxiliary) sourceto see the picture, if you are using the A/V
jacks. Referto page 7 and 8.
Manual Playback (Has Safety Tab)
2. Press POWERto turn VCRon.
2. Insert a prerecorded VHS cassette into the VCR.
3. PressPLAYto begin playback.
4. Setect the channel 3 or 4at the TV or select the IV's AUX
(AuxiUary) source to see the picture, if you are using the A/V
jacks. Referto your TV operating manual.
Unloading the Cassette from the VCR
1. PressSTOPif the tape is playing.
2. PressSTOP/ElECTat theVCR untilthe cassetteisejected.
Note:
This VCRrecords only in SP and EPspeeds. YourVCR setsthe
playback speed automatically to the speed used to record the
tape.
(Continuedon nextpage)
powor
©
VCR's Controls
Cassette_
Saf_tyTab_IJ
Shownin ',_Jl_J-7/
Place
VHS Cassette Playback/Record Times
Cassette SP LP EP
Length (Standard Play) (Long Play) (Extended Play)
T-30 30 Minutes IHour 1Hour,
30 Minutes
T-60 1Hour 2 Hours 3 Hours
T-120 2Hours 4 Hours 6Hours
T-160 2Hours, 5 Hours, 8 Hours
40 Minutes 20 Minutes
OPERATION IPAGE 29
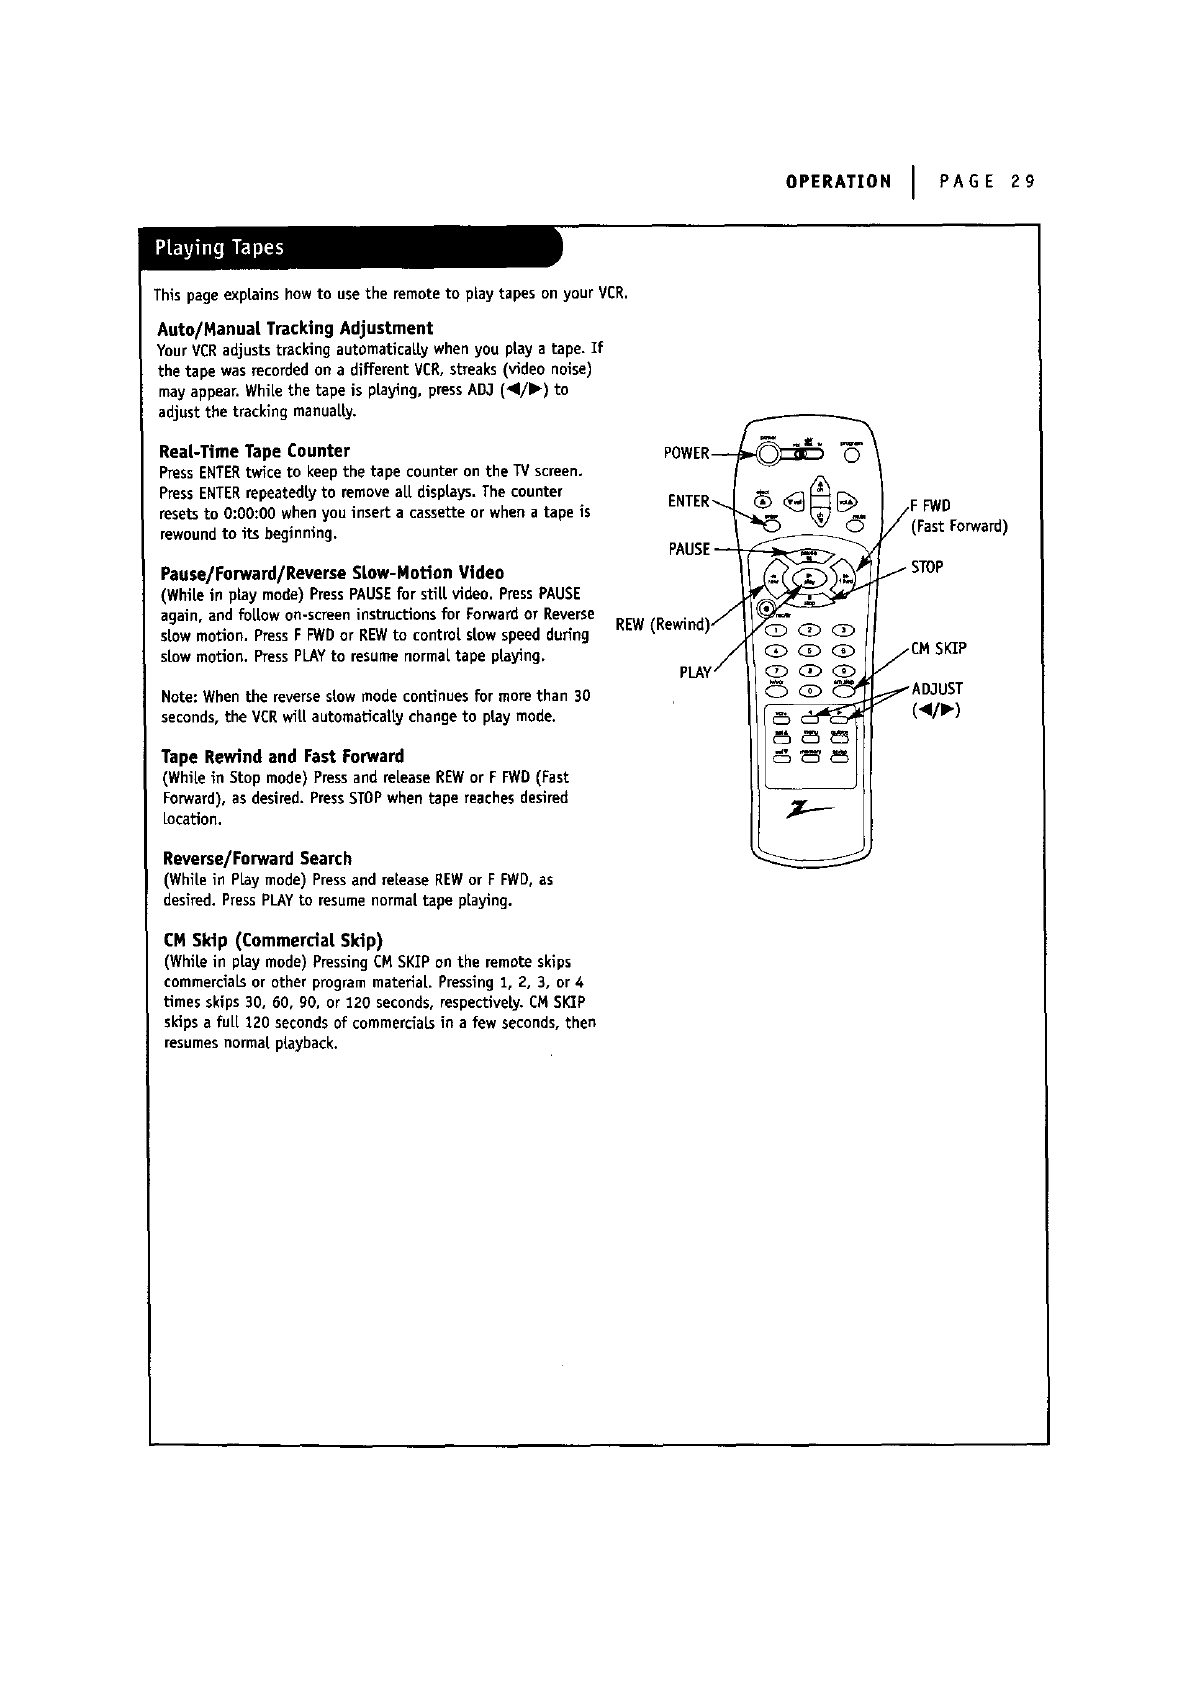
This page explains how to use the remote to play tapes on your VCR.
Auto/Manua[ Tracking Adjustment
Your VCRadjusts tracking automatically when you play a tape. If
the tape was recorded on a different VER, streaks (video noise)
may appear. White the tape is playing, press ADJ (,11/11-)to
adjust the tracking manuaLLy.
ReaL-Time Tape Counter
PressENTERtwice to keep the tape counter on the TV screen.
PressENTERrepeatedly to removealLdisplays. The counter
resets to 0:00:00 when you insert acassette or when atape is
rewoundto its beginning.
Pause/Forward/Reverse Stow-Motion Video
(WhiLein play mode) PressPAUSEfor stiLLvideo. PressPAUSE
again, and FOLLowon-screen instructions for Forward or Reverse
slow motion. PressF FWDor REWto controLstow speed duffng
stow motion. PressPLAYto resume normal tape playing.
Note: When the reverse stowmode continues for mine than 30
seconds, the VCRwilt automaticaffy change to play mode.
Tape Rewind and Fast Forward
(WhiLein Stop mode) Press and release REWor F FWD (Fast
Forward), as desired. PressSTOPwhen tape reaches desired
Location.
POWER_
REW(Rewind)/
pLAY (_ <_ (_.,
Reverse/Forward Search
(White in PLaymode) Press and release REWor F FWD, as
desired. PressPLAyto resume normal tape playing.
CM Skip (Commercial Skip)
(WhiLein playmode)PressingCMSKIPonthe remoteskips
commercialsorotherprogrammateriaL.Pressing1, 2, 3, or4
Umesskips30, 60, 90, or 120 seconds,respectively.EMSI_P
skipsa fuLl 120 secondsof commercialsin a few seconds,then
resumesnormalplayback.
F FWD
(Fast Forward)
.STOP
/CM SKIP
_AD,1UST
(_p,-)
PAGE 30 IOPERATION
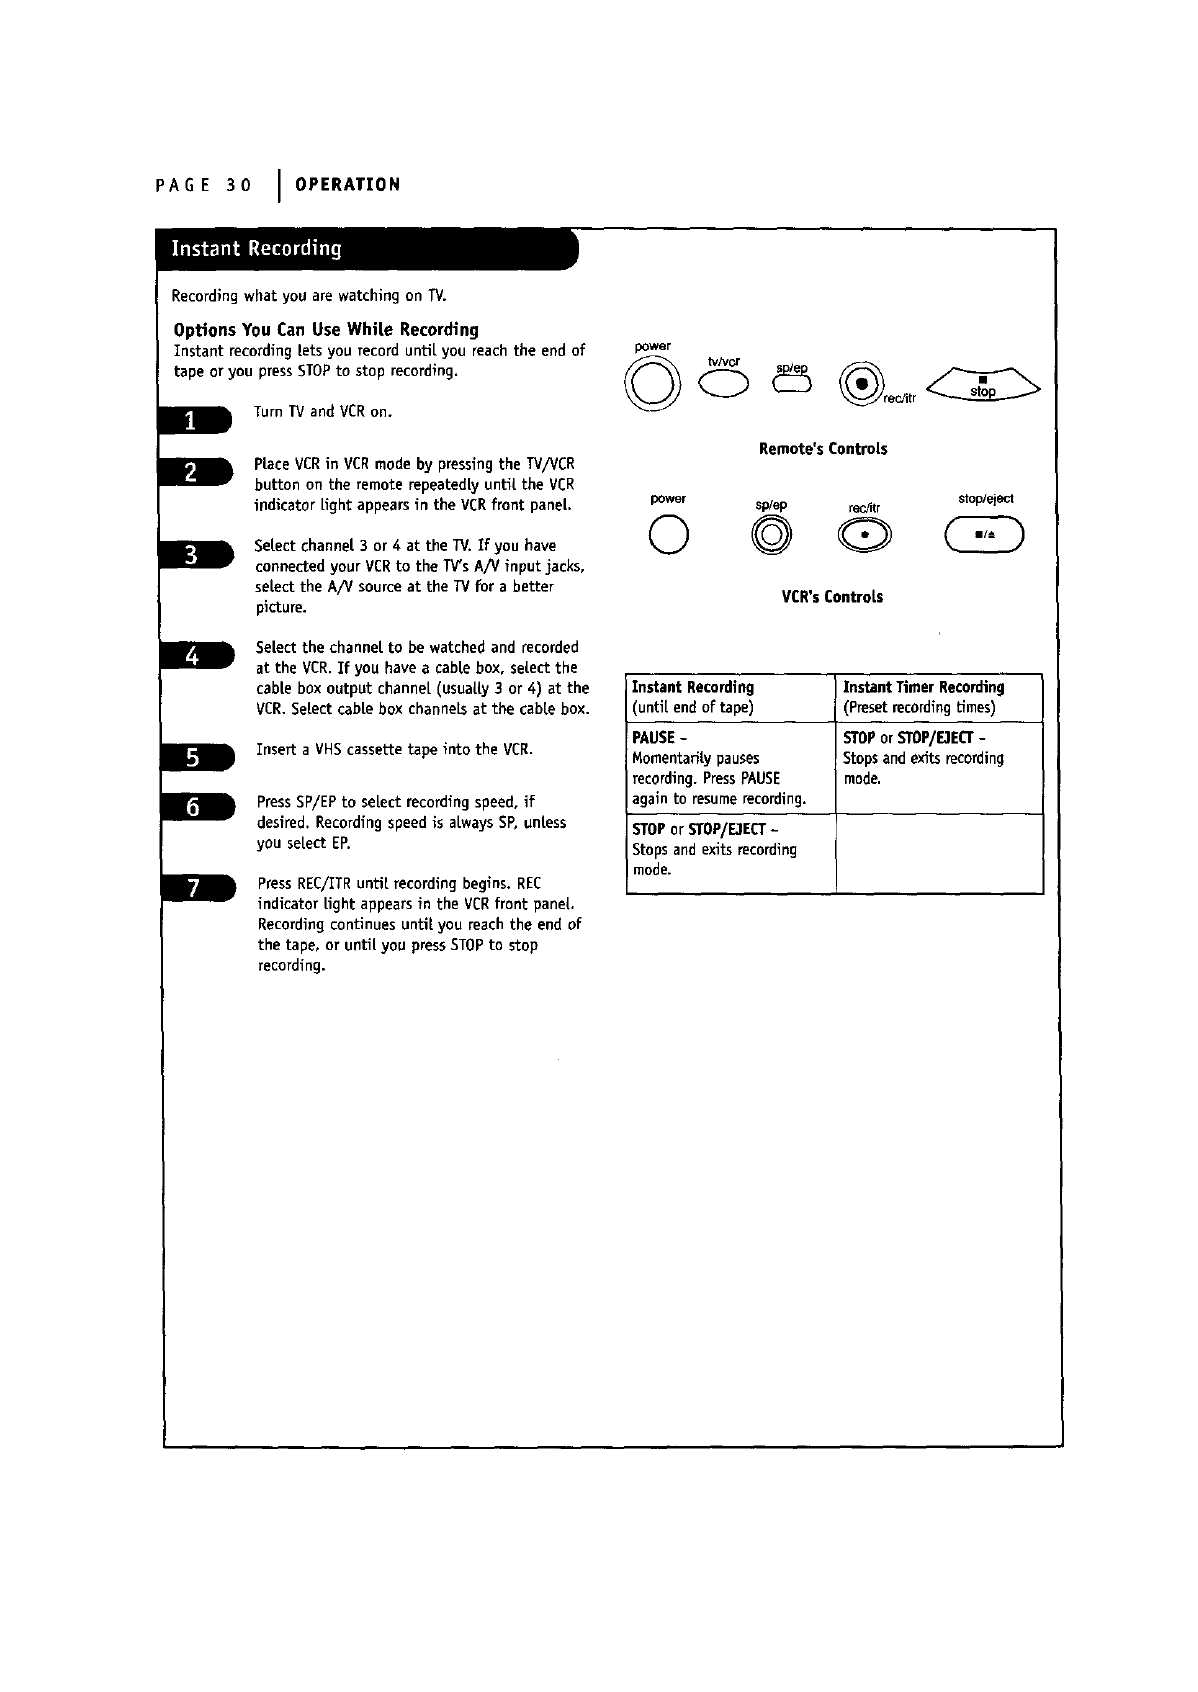
Recording what you are watching on TV.
Options You Can Use White Recording
Instant recording lets you record until you reach the end of
tape or you press STOPto stop recording.
Turn TV and VCR on.
Place VCRin VCRmode by pressing the TV/VCR
button on the remote repeatedly until the VCg
indicator light appears in the VCRfront panel.
Select channel 3 or 4 at the l_/. If you have
connected your VCRto the TV'sA/V input jacks,
se|ect the A/V source at the TV for a better
picture.
Select the channel to be watched and recorded
at the VCR.If you have a cable box, select the
cable box output channel (usually 3 or 4) at the
VCR.Select cable box channels at the cable box.
Insert a VHS cassette tape into the VCR.
PressSP/EP to select recording speed, if
desired. Recording speed is aLways SP, unless
you select EP.
PressREC/ITRuntilrecordingbegins.REC
indicatorLightappearsin the VCR frontpanel
Recordingcontinuesuntilyou reachthe end of
the tape,or untilyou pressSTOP to stop
recording.
power
Remote's ControLs
power sp/ep rec/itr stop/eject
© © Q
VCR's ControLs
Instant Recording I Instant Timer Recording
unti[ end of tape) (Preset recordingtimes)
PAUSE- STOPor STOP/E3ECT-
Momentarily pauses Stops and exits record ng
recording. Press PAUSE mode.
again to resumerecording.
STOPor STOP/DECT-
Stops and exits recording
mode.
OPERATION ] PAGE 31
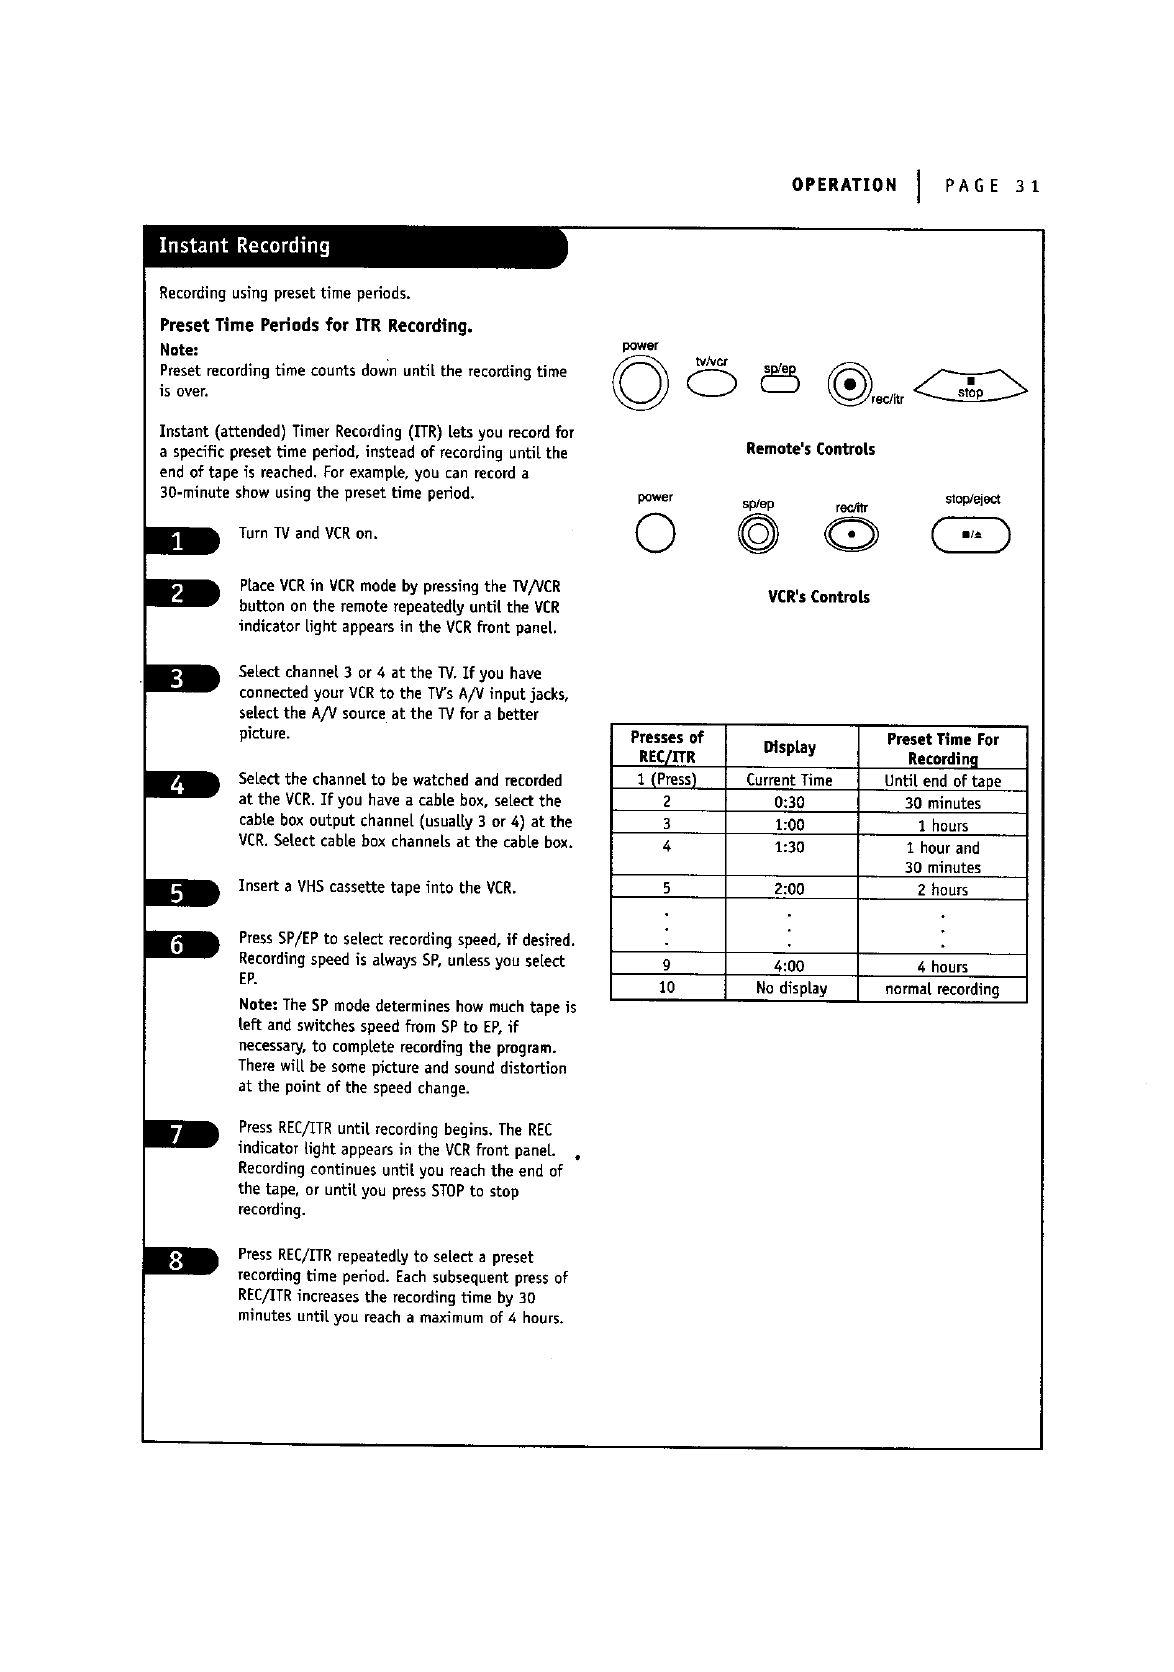
Recording using preset time periods.
Preset Time Periods for ITR Recording,
Note:
Preset recording time counts down until the recording time
is over,
Instant (attended) Timer Recording (ITR) Letsyou record for
aspecific preset time period, instead of recording until the
end of tape is reached. For exampLe, you can record a
30-minute show using the preset time period.
Turn lVand VCR on.
Place VCRin VCR mode by pressingthe IV/VCR
button on the remote repeatedly until the VCR
indicator light appears in the VCRfront pane|.
Select channel 3 or 4at the TV. If you have
connected your VCR to the TV's A/V input jacks,
select the A/V source at the TV for abetter
picture.
SeLect the channel to be watched and recorded
at the VCR. If you have acable box, setect the
cable box output channel (usuaLly3 or 4) at the
VCR. Setect cable box channels at the cable box.
Inserta VHS cassettetape intothe VCR.
BPress SP/EP to select recording speed, if desired.
Recording speed is always SP, unlessyou select
EP.
Note: The SP mode determines how much tape is
left and switches speed from SPto EP,if
necessary, to complete recording the program.
There will be some picture and sound distortion
at the point of the speed change.
PressREC/ITRuntilrecordingbegins.The REC
indicatortightappearsinthe VCR frontpanel. ,
Recordingcontinuesunti[you reachthe end of
thetape,oruntl[you pressSTOP to stop
recording.
PressREC/ITRrepeatedlyto selecta preset
recordingtime period.Each subsequentpressof
REC/ITRincreasesthe recordingtime by 30
minutesunti[you reacha maximum of4 hours.
pGwer
Remote's Controls
power sp/ep r_r stop/eject
© ©
VCR'sControls
Presses of
REqII"R
I (Press)
2
3
4
DispLay
Current Time
0:30
1:00
1:30
Preset Time For
Recording
Until end of tape
30 minutes
1 hours
1hour and
30 minutes
2hours5 2:00
g4:00 4 hours
10 No display normatrecording
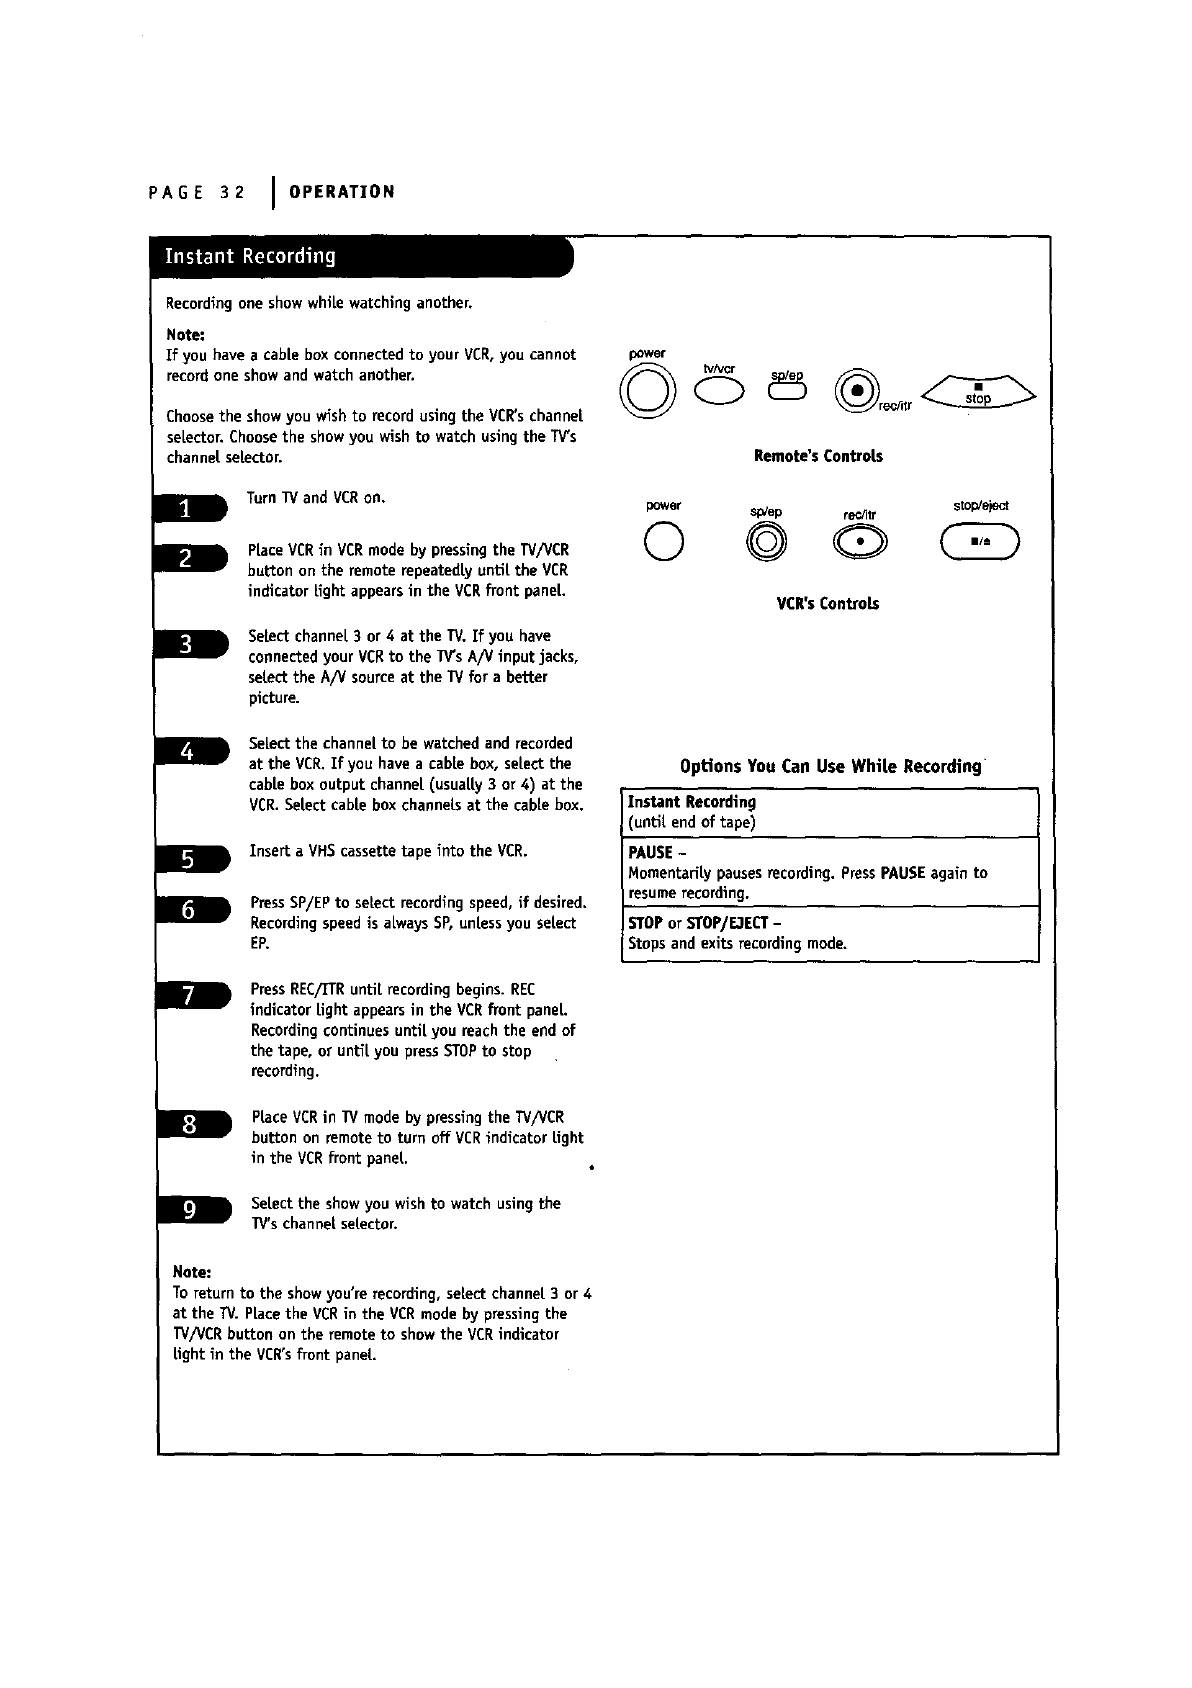
PAGE 32 I OPERATION
Recording one show while watching another.
Note:
If you have a cable box connected to your VCR,you cannot
record one show and watch another.
Choosethe showyou wish to record using the VER'schannel
selector. Choose the show you wish to watch using the TV's
channeLseLector.
TurnWand VCRon.
PLaceVCRin VCR mode by pressingthe TV/VCR
button on the remote repeatedly until the VCR
indicator Light appears in the VCRfront pane[.
SeLectchannel 3 or 4 at the TV. If you have
connected your VCRto the TV's A/V input jacks,
select the A/V source at the TV for a better
picture.
SeLectthe channelto be watchedandrecorded
at the VCR,If you havea cable box,selectthe
cableboxoutputchannel(usuaLLy3 or 4) at the
VCR.SeLectcableboxchannelsat the cablebox.
Insert a VHS cassette tape into the VCR.
m
Press SP/EP to select recording speed, if desired.
Recording speed is always SP,unless you select
EP.
PressREC/ZTRuntil recording begins. REC
indicator Lightappears in the VCRfront paneL.
RecordingconUnues until you reach the end of
the tape, or unU| you press STOPto stop
recording.
PLaceVCRin TVmode by pressingthe TV/VCR
button on remote to turn off VCR indicator Light
in the VCRfront paneL.
SeLectthe show you wish to watch using the
TV'schannel selector.
power
Rernote's Controls
power spiep recJitr stop!eject
© @ Q
VCR'sCon_ob
Options You Can Use While Recording
Instant Recording
until end of tape)
PAUSE-
MomentariLy pausesrecording. Press PAUSEagain to
resumerecording.
STOPor STOP/E3ECT-
Stops and exits recording mode.
Note:
To return to the showyou're recording, select channel 3 or 4
at the TV. PLacethe VCRin the VCR mode by pressing the
TV/VCR button on the remote to show the VCRindicator
Light in the VCR'sfront paneL.
OPERATION I PAGE 33
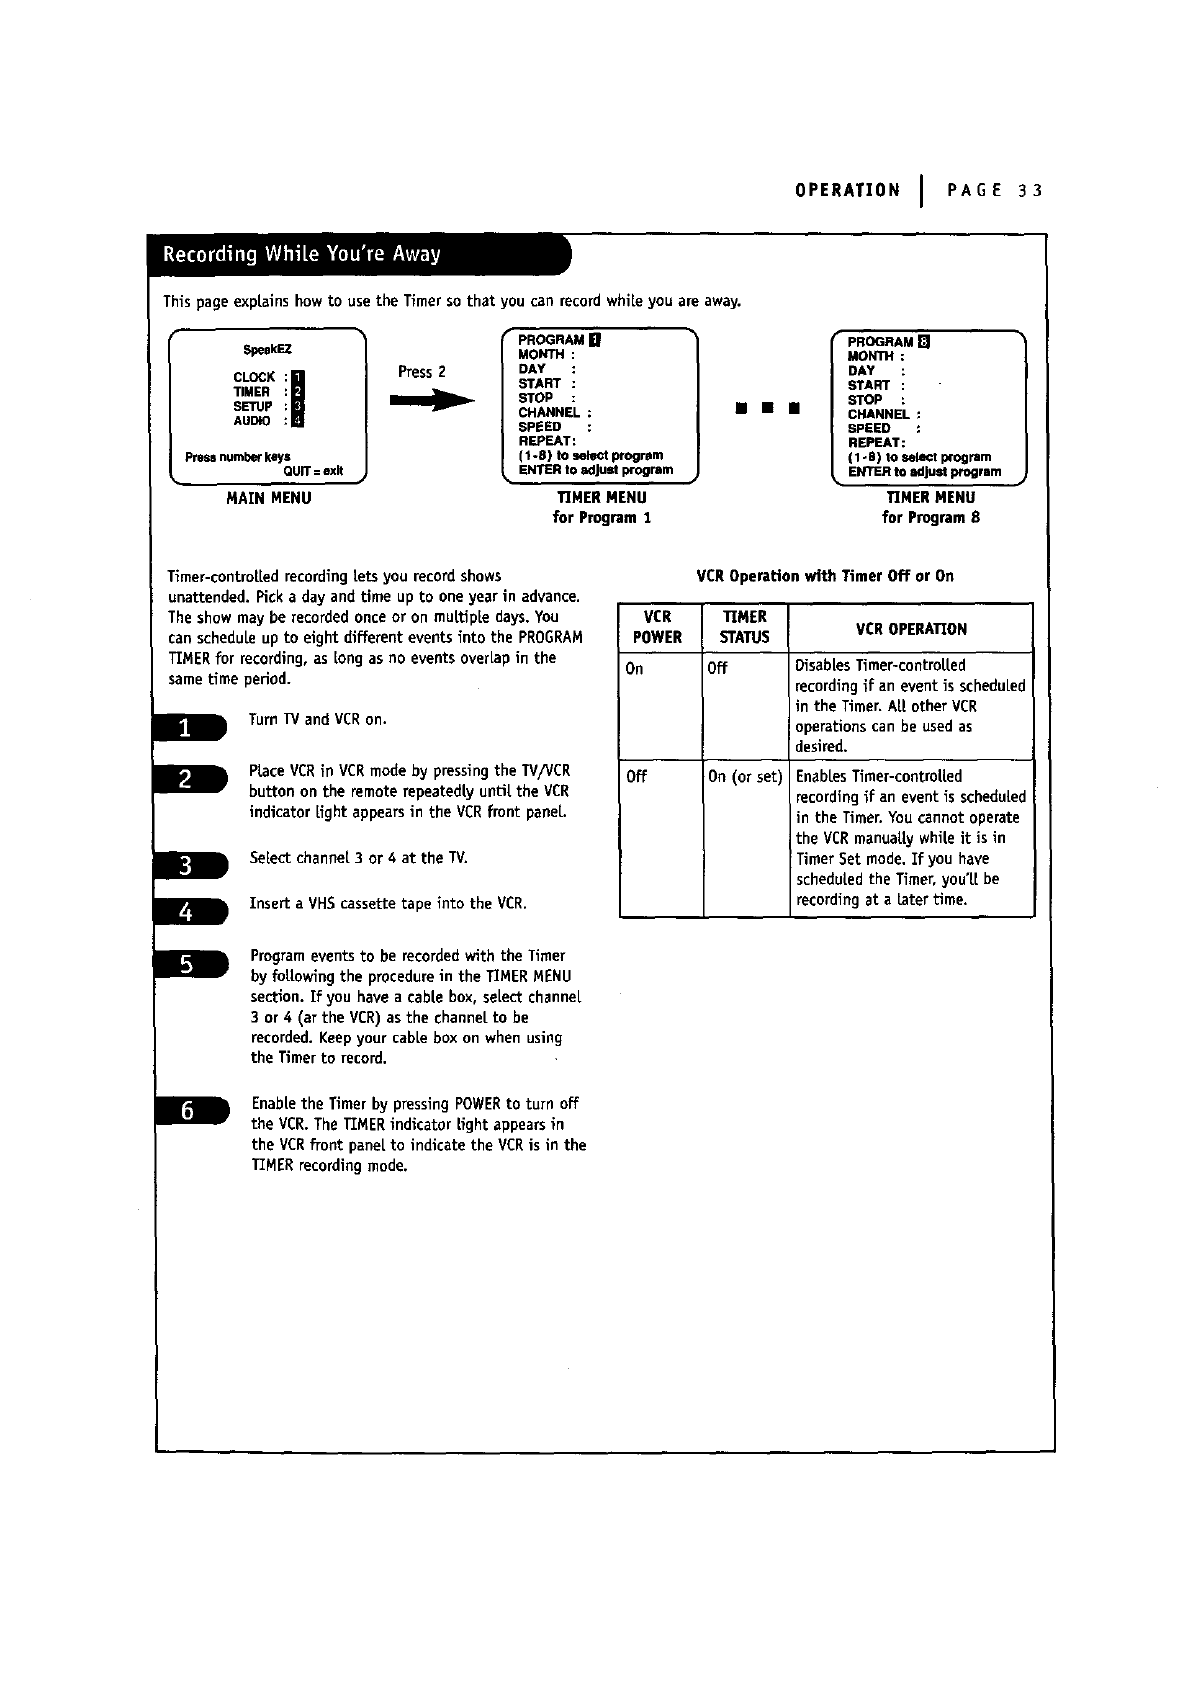
This page explains how to use the Timer so that you can record while you are away.
$peakEZ
CLOCK
TIMER
SETUp
AUDIO
press number keys
QUiT= exit
MAIN MENU
Press 2
PROGRAM []
MONTH
DAY
START
STOP
CHANNEL :
SPEED :
REPEAT:
(1-8) to select program
ENTER to adjust program
TIMER MENU
for Program I
mmmm
PROGRAM []
MONTH :
DAY
START
STOP
CHANNEL :
SPEED :
REPEAT:
(1-8) to select program
ENTER to adjust program
TIMER MENU
for Program 8
Timer-controLLedrecording Lets you record shows
unattended. Pick aday and time up to one year in advance.
The show may be recorded once or on muLtipLe days. You
can schedule up to eight different events into the PROGRAM
TIMER for recording, as Longas no events overLapin the
same time period.
Turn 13/and VCRon.
PLaceVCR inVCR mode by pressingthe TV/VCR
buttonon the remoterepeatedlyunUL theVCR
indicatorLightappearsin the VCR frontpaneL.
SeLectchannel 3 or 4at the IV.
Inserta VHS cassettetape intothe VCR.
VCROperationwith TimerOff or On
VCR I TIMER
POWER I STATUS
(
On IOff
off 1On (or set)
VCR OPERATION
DisabLesTimer-controLLed
recording if an event is scheduled
tin the Timer. ALLother VCR
Ioperations can be used as
desired.
EnabLesTimer-controLLed
recording if an event is scheduLed
in the Timer.You cannot operate
the VCR manuaLLywhile it is in
Timer Set mode. If you have
scheduled the Timer, you'LLbe
recording at a Later time.
Programeventsto be recordedwith theTimer
by fottowlngthe procedureinthe TIMER MENU
section.Ifyou have a cablebox,se[ectchannel
3 or4(atthe VCR) as the channelto be
recorded.Keep your cabLebox on when using
the Timerto record.
EnabLetheTimerbypressingPOWER toturnoff
theVCR.TheTIMERindicatorLightappearsin
theVCRfrontpaneltoindicatetheVCRisinthe
TIMERrecordingmode.
PAGE 34 I OPERATION
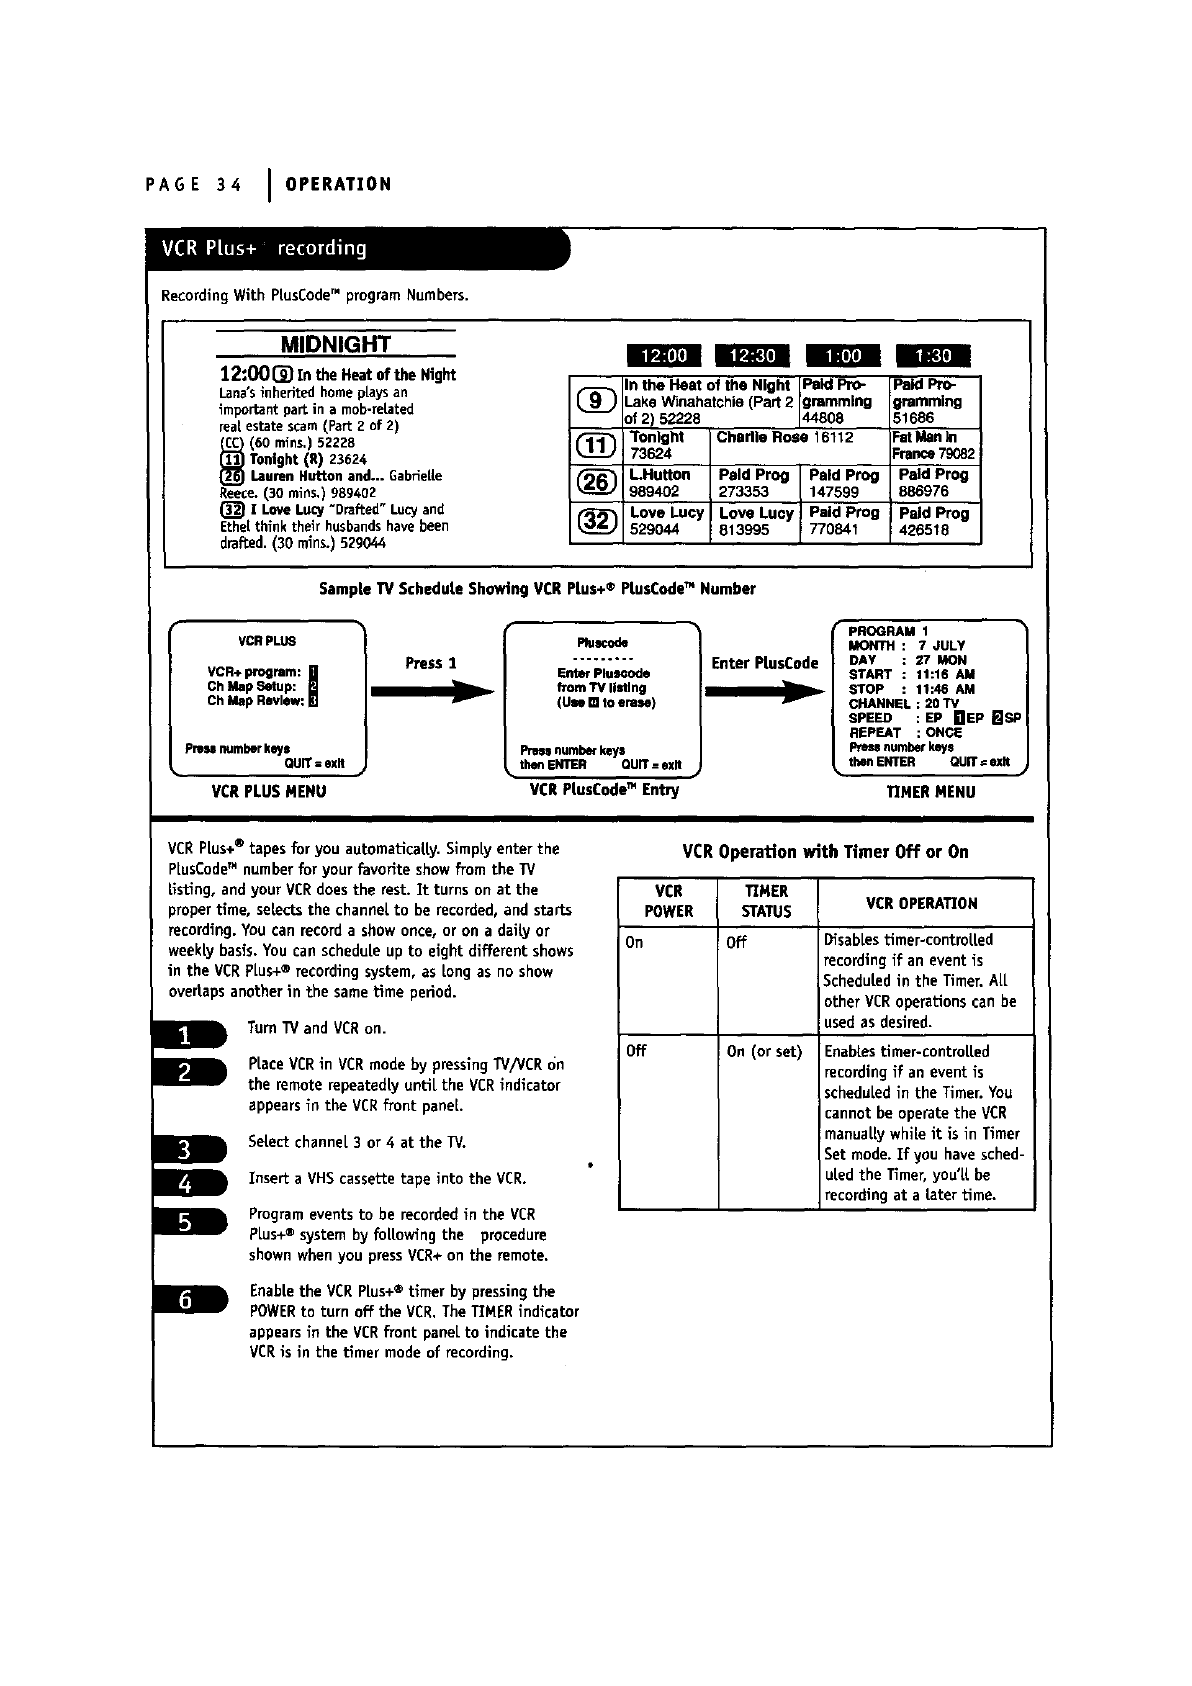
Recording With PiusCode" program Numbers.
MIDNIGHT
12:001_ In the Heat of the Night
Lana's inherited home plays an
important part in a mob-related
real estate seam (Part 2of 2)
(60 mins,) 52228
Tonight {R) 23624
Lauren Rutton and... GabrieUe
Reece. (30 mins,) 989402
(_ ! Love LUCy "Drafted" LuCy and
Ethe[ think their husbands have been
drafted. (30 rains.) 529044
mmlIm l
_) n the Heat of the Night Paid Pro- Paid Pro-
.ake Winahatchie (Pad 2 grammlng iremmlng
)f 2) 52228 44808 51686
(_ Tonight Chedle Rm e16112 FatManIn
73624 France79082
(_R"IJ LHutton Paid Prog Paid Prog Paid Prog
989402 273353 147599 886976
(_ Love Lucy Love Lucy ! Paid Prog Paid Prog
i
529044 813995 770841 426518
SampLe TV ScheduLe Showing VCR Plus+ ®PtusCodeTM Number
VCRPLU6
VCR+program: !
ChMap Rlwlew:
ChMap Setup:
pressnumberkeys
QUIT=exit
VCR PLUS MENU
Press I
v
Plu_ode
frontTVliStln9
(Uu [] toeras,e)
Pm_ numberkeys
•theftENTER QUIT=exit
VCR PLusCodeTM Entn
Enter PLusCode
PROGRAM 1 •
MONTH: 7JULY
DAY 27 MON
START 11:16 AM
STOP 11:46 AM
CHANNEL : 20 TV
SPEED : EP HEP mSP
REPEAT : ONCE
number keys
then ENTER QUIT= exit
TIMER MENU
VCR PLus+® tapes for you automaticaLLy.SimpLyenter the
PLusCode_Mnumber for your favorite show from the TV
Listing, and your VCR does the rest. Tt turns on at the
)roper time, selects the channel to be recorded, and starts
recording. You can record a show once, or on a daily or
weekly basis. You can schedule up to eight different shows
in the VCRPLus+®recording system, as Longas no show
overlaps another in the same time period.
Turn'Wand VCRon.
RaceVCRin VCRmodeby pressing/V/VCRon
the remoterepeatedlyuntiLthe VCRindicator
appearsin the VCRfront paneL.
SeLectchannel 3 or 4at the W.
Insert a VHS cassette tape into the VCR.
Program events to be recordedin the VCR
PLus+® system by foLLowing the procedure
shown when you press VCR+on the remote.
EnabLethe VCR PLus+® timer by pressing the
POWERto turn off the VCR. The TIMER indicator
appears in the VCRfront paneLto indicate the
VCR is in the timer mode of recording,
VCR Operation with Timer Off or On
VCR TEMER
POWER STATUS VCR OPERATION
On Off DisabLestimer-controLLed
recording if an event is
ScheduLedin the Timer. ALL
other VCRoperations can be
used as desired.
Off On (or set) EnabLestimer-controLLed
recording if an event is
scheduled in the Timer. You
cannot be operate the VCR
manuaLLywhile it is in Timer
Set mode. Ef you have sched-
uled the Timer, you'LLbe
recording at a tater time.
Ir -i
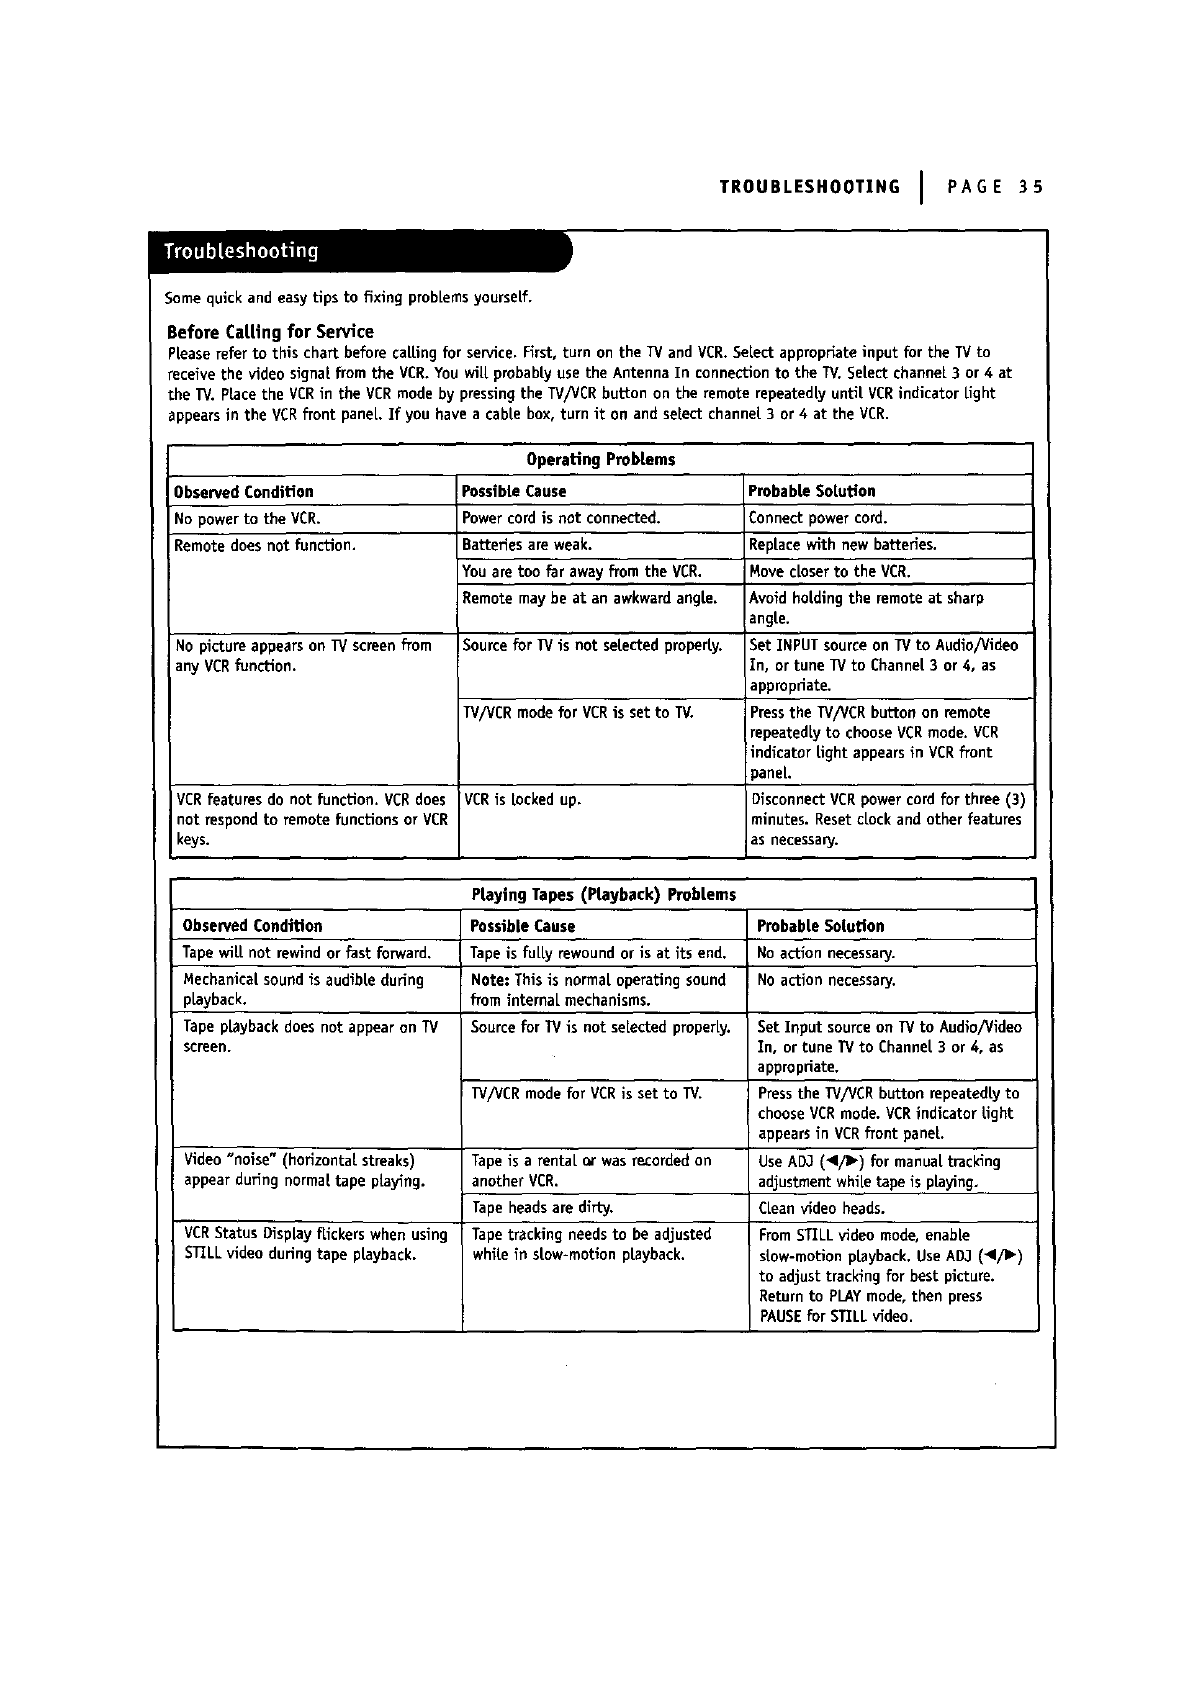
Somequickandeasy tips to fixing prob[emsyourself.
Before Catting for Service
TROUBLESHOOTING IPAGE 35
PLeaserefer to this chart before caLLingfor senlice. First, turn on the IV and VCR. Select appropriate input for the TV to
receive the video signal from the VCR. You will probably use the Antenna In connection to the W. Select channel 3 or 4at
the W. place the VCRin the VCR mode by pressingthe IV/VCR button on the remote repeatedly until VCRindicator Light
appears in the VCRfront panel. If you have a cable box, turn it on and select channel 3 or 4at the VCR.
Operating Probtems
Observed Condition Probable Solution
No power to the VCR. Connect power cord.
Remote does not function.
No picture appears on IV screen from
any VCRfunction.
VCRfeatures do not function. VCRdoes
not respond to remote functions or VCR
keys.
PossibLeCause
Powercord is not connected.
Batteries are weak.
Youare too far away from the VCR.
Remote may be at an awkward angle.
Source for TV is not selected properly.
TV/VCRmodefor VCRis setto W.
VCRis locked up.
Replacewithnew batteries.
Movecloserto the VCR.
Avoid holding the remote at sharp
angle.
Set INPUT source on TV to Audio/Video
in, or tune TV to Channel 3 or 4, as
appropriate.
Pressthe TV/VCR button on remote
repeatedly to chooseVCR mode. VCR
indicator light appears in VCRfront
)ane[.
DisconnectVCRpowercord for three(3)
minutes.ResetcLockandotherfeatures
as necessary.
PrayingTapes (Ptayback) Probtems
Observed Condition
Tape wilt not rewind or fast forward.
Mechanical sound is audible during
pLayback.
Tape pLaybackdoes not appear on TV
screen.
Video"noise" (horizontalstreaks)
appearduringnormaltape playing.
VCRStatus Display flickers when using
STILL video during tape playback.
Possible Cause
Tape is fuLLyrewound or is at its end.
!Note: This is normaLoperating sound
from internaL mechanisms.
Source for TV is not selected properly.
IV/VCR mode for VCRis set to TV.
Tape is arentaL or was recordedon
another VCR.
Tape heads are dirty.
Tape tracking needs to be adjusted
while in stow-motlon playback.
Probable Solution
No action necessary.
No action necessary.
Set Input sourceon lV to Audio/video
In, or tune IV to Channel 3 or 4, as
appropriate.
Pressthe IV/VCR button repeatedly to
choose VCRmode. VCRindicator light
appears in VCRfront paneL.
Use ADJ (_Ii_) for manuaLtracking
adjustment while tape is playing.
CLeanvideo heads.
From STILL video mode, enable
slow-motion playback. Use AD3 (,/1_)
to adjust tracking for best picture.
Return to PLAYmode, then press
PAUSEfor STILL video.
PAGE 36 I TROUBLESHOOTING
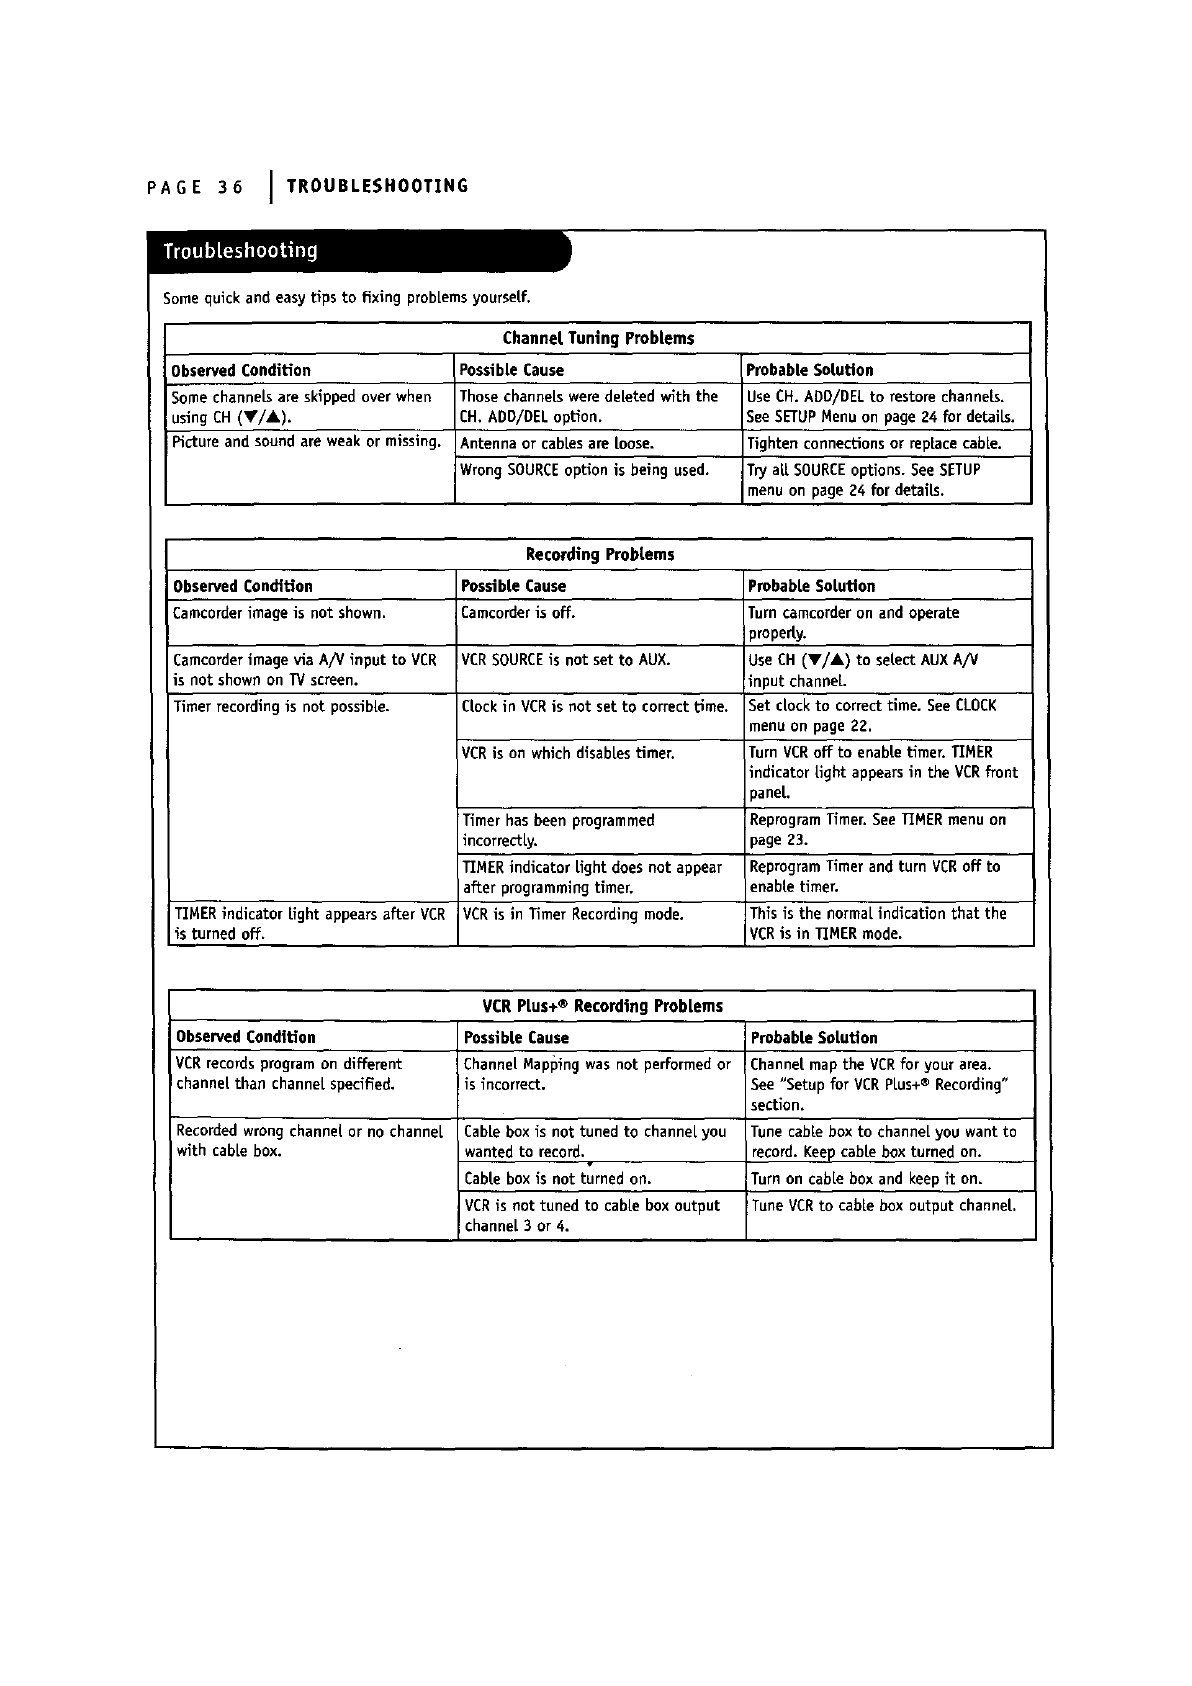
Some quick and easy tips to fixing problems yourseLf.
Observed Condition
Some channek are skipped over when
usingCH (V/A).
Pictureand sound areweak ormissing.
Channel Tuning Problems
Possible Cause
Those channeLswere deleted with the
CH. ADD/DEL option.
Antenna orcablesareLoose.
Wrong SOURCE optionisbeingused.
Probable Solution
Use CH. ADD/DELto restore channels.
See SETUPMenu on page 24 for details.
Tighten connections or replace cable.
Try aLLSOURCEoptions. See SETUP
menu on page g4 for details.
RecordingProblems
Observed Condition
Cameorder image is not shown.
Camcorderimage viaA/V input to VCR
isnot shown on TV screen.
Timer recordingisnot possible.
Possible Cause
Camcorder is off.
VCRSOURCEis not set to AUX.
CLockin VCRis not set to correct time.
VCR is on which disablestimer.
Timer has been programmed
mcorrectLy.
TIMER indicatorLightdoes not appear
afterprogrammingtimer.
VCR isinTimer Recordingmode.TIMER indicatorLightappearsafterVCR
isturnedoff.
VCR Plus+ ® Recording Problems
Observed Condition Possible Cause Probable Solution
VCR records program on different Channel Mapping was not performed or Channel map the VCR for your area.
channel than channel specified, is incorrect. See "Setup for VCR PLus+® Recording"
section.
Probable Solution
Turn camcorder on and operate
property.
Use CH (Y/&) to selectAUX A/V
inputchannel
Set cLockto correcttime.See CLOCK
menu on page 22.
TurnVCR offto enabietimer.TIMER
indicatorLightappearsinthe VCR front
paneL.
ReprograrnTimer.See TIMER menu on
}ageg3.
ReprogramTimer and turnVCR offto
enabLetimer,
Thisisthe normalindicationthatthe
VCR isinTIMER mode.
Recorded wrong channeL or no channeL
with cabLebox.
Cablebox isnottuned to channelyou
wanted to record.
CabLebox isnot turnedon,
VCR is not tuned to cabiebox output
channel3 or 4.
Tune cable box to channel you want to
record. Keep cabLebox turned on.
Turn on cable box and keep it on.
Tune VCR to cablebox outputchanneL.
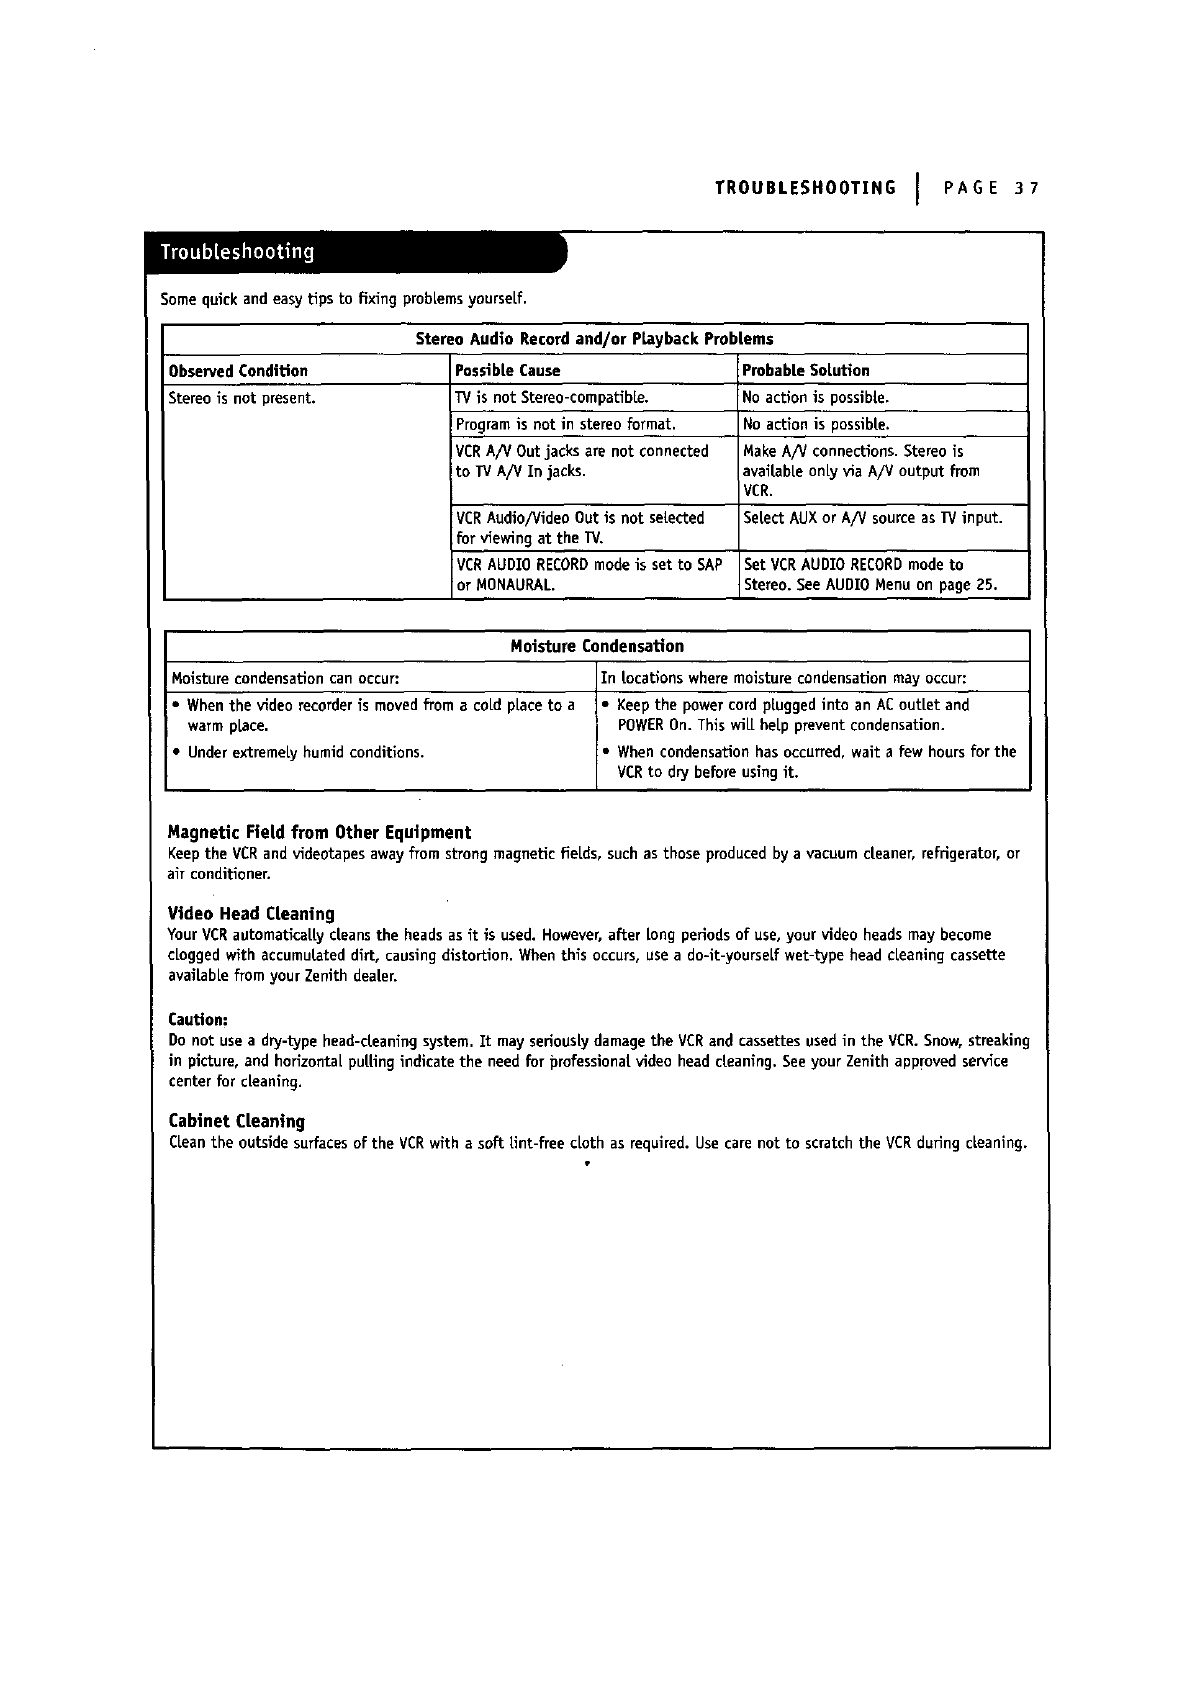
TROUBLESHOOTING I PAGE 37
Some quick and easy tips to fixing probLemsyourseLf.
Stereo Audio Record and/or P&ayback Prob[erns
Observed CondiUon
Stereo is not present.
Possible Cause
TV is not Stereo-compatible.
Program is not in stereo format.
VCR A/V Out jacks are not connected
to TV A/V In jacks.
VCRAudfo/Video Out is not selected
for viewing at the TV.
VCRAUDIO RECORDmode is set to SAP
or MONAURAL.
Probable SoLution
No action is possibLe.
No action is possible.
Make A/V connections. Stereo is
avaiLabLeonLyvia A/V output from
VCR.
SeLectAUX or A/V source as I_/input.
SetVCRAUDIORECORDmodeto
Stereo.SeeAUDIOMenuon page25.
Moisture Condensation
Moisture condensation can occur:
•When the video recorder is moved from a cold place to a
warm place.
•Under extremely humid conditions.
In locations where moisture condensation may occur:
• Keep the power cord pLugged into an AC outlet and
POWEROn. This wiLl help prevent condensation.
•When condensation has occurred,wait a few hours for the
VCR to d_Jbefore using it.
Magnetic Field from Other Equipment
Keepthe VCRand videotapes away from strong magnetic fields, such as those produced by a vacuum cleaner, refrigerator, or
air conditioner.
Video Head Cleaning
YourVCRautomaticallycleansthe headsasit is used.However,after Longperiodsof use,yourvideo headsmaybecome
cLoggedwithaccumuLateddirt, causingdistortion.Whenthis occurs,usea do-it-yourseLfwet-typeheadcleanlng cassette
availabLefromyourZenithdealer.
Caution:
Do not use a dry-type head-cteanlng system. It may seriously damage the VCRand cassettes used in the VCR. Snow, streaking
in picture, and horizontal pulling indicate the need for professfonal video head cleaning. See your Zenith approved service
center for cleaning.
Cabinet CLeaning
Cleanthe outsidesurfacesof the VCRwith a softLint-free clothas required.Usecarenotto scratchthe VCRduringcleaning.
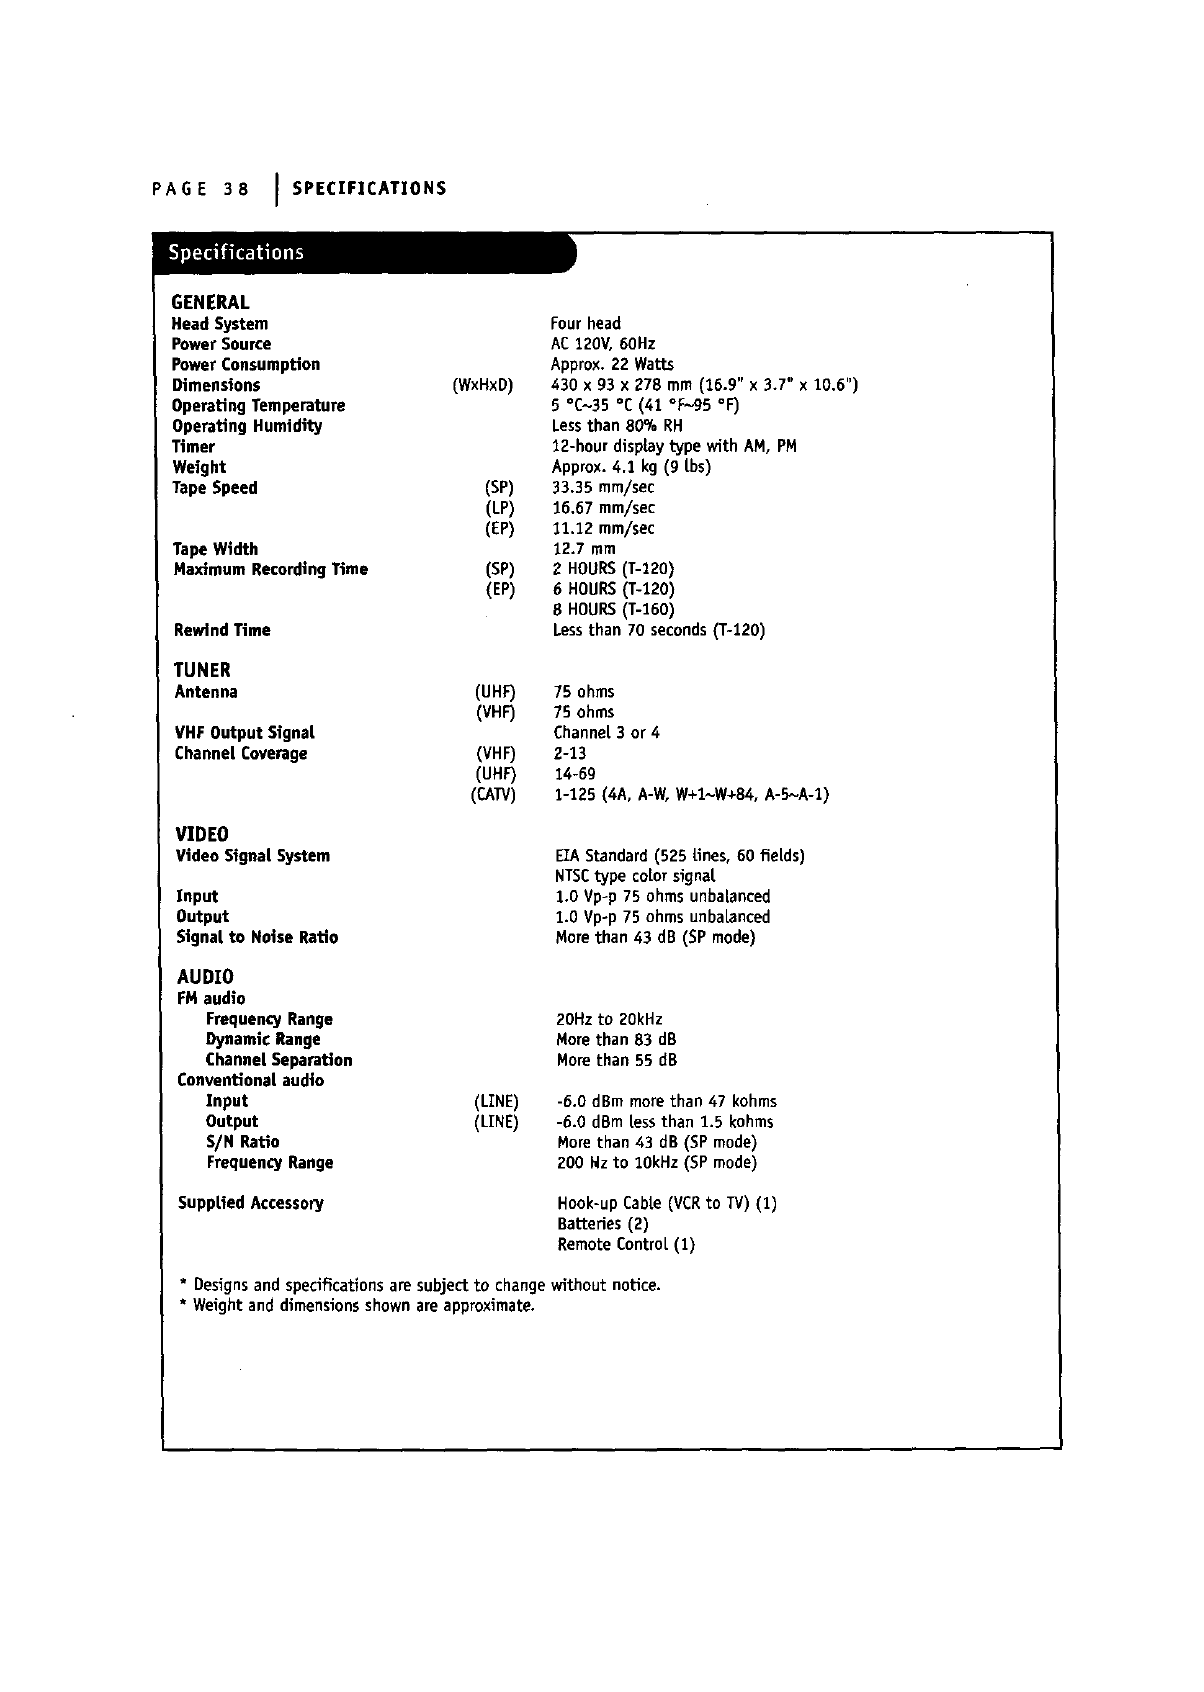
PAGE38 ISPECIFICATIONS
GENERAL
Head System
PowerSource
Power Consumption
Dimensions
OperatingTemperature
Operating Humidity
Timer
Weight
Tape Speed
Tape Width
Maximum RecordingTime
Rewind Time
Four head
AC 120V, 6OHz
Approx. 22 Watts
(WxHxD) 430 x 93 x278 mm (16.9" x3.7" x 10.6")
5 °C~35 °C (41 °F_95 °F)
Lessthan 80% RH
1E-hour display type with AM, PM
Approx. 4.1 kg (g [bs)
(SP) 33.35 mm/sec
(LP) 16.67 mm/sec
(EP) I1.12 mm/sec
12.7 mm
(SP) 2 HOURS (T-120)
(EP) 6HOURS (T-120)
8 HOURS (T-160)
Less than 7D seconds (T-120)
TUNER
Antenna
VHF Output Signal
Channel Coverage
(UHF) 75 ohms
(VHF) 75 ohms
ChanneL3 or4
(VHF) 2-13
(UHF) 14-59
(CAW) 1-125 (4A, A-W,W+l~W+84, A-5_A-1)
VIDEO
VideoSignalSystem
Input
Output
Stgnatto Noise Ratio
AUDIO
FM audio
FrequencyRange
Dynamic Range
Channel Separation
Conventional audio
Input
Output
S/N Ratio
FrequencyRange
EIAStandard(525_nes,60 fieLds)
NTSCtypecoLorsignal
1.0Vp-p75 ohms unbaLanced
1.0Vp-p75 ohms unba_nced
Morethan43 dB (SPmode)
(LINE)
(LINE)
20Hzto 2OkHz
Mom than83 dB
Morethan55 dB
-6.0dBm morethan47 kohms
-6.0dBm Lessthan1.5kohms
Morethan43 dB (SPmode)
200 Hz to 10kHz (SPmode)
SuppHed Accessory Hook-upCable(VCRto TV)(I)
Batteries(2)
RemoteControL(I)
*Designsandspecificationsaresubjectto changewithoutnotice.
*Weightand dimensionsshown areapproximate.
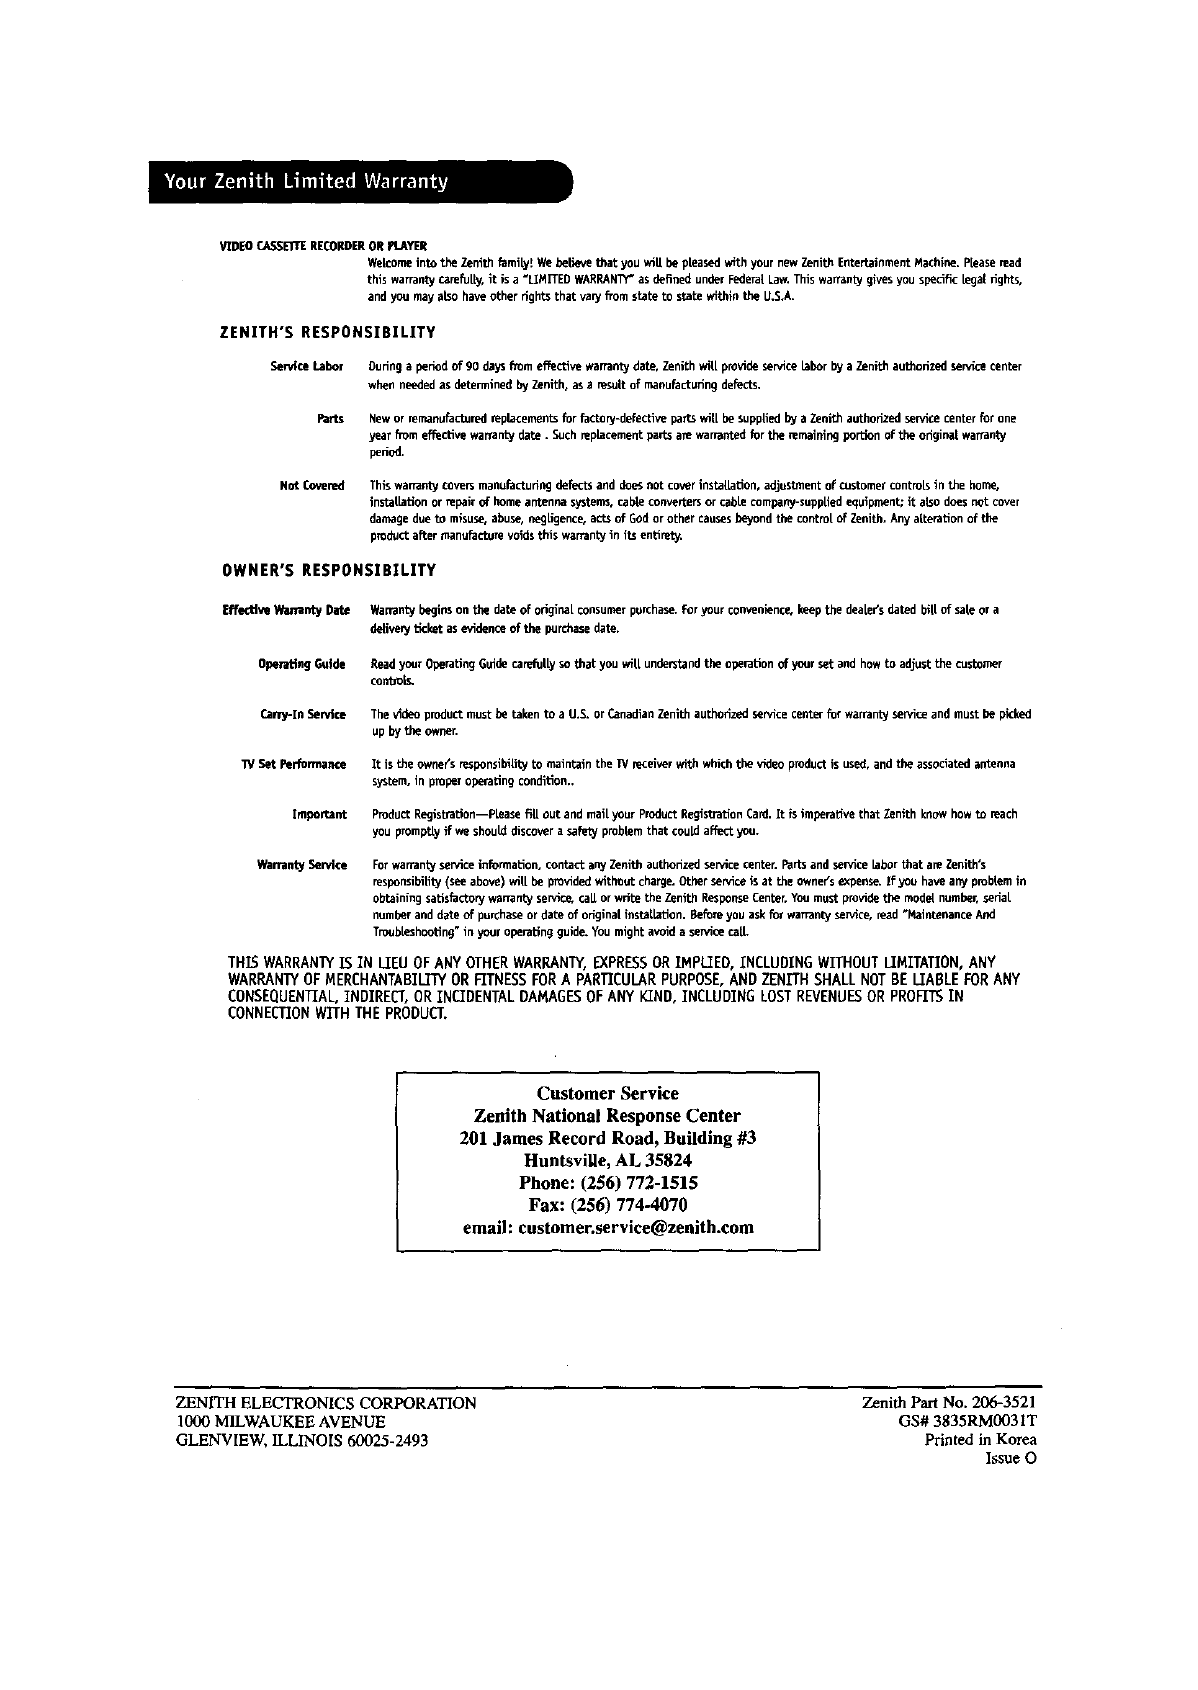
VIDEOP.+ASBe'_TERECORDERORIq.AYER
Welcomeintothe Zenithfamily!Weber_e that youwill bepteasedwith your new Zenith EntertainmentMachine.Pleaseread
this warrantycarefu_y, it is a"LIMITEDWARRAN'_as definedunder FederalLavmThis warrantygives youspedBeLegal6gh_,
and youmayalso haveother 6gh_ that varyFromstata to state within the U.S.A.
ZENITH'S RESPONSIBILITY
ServiceLabor Duringaperiodof 90 daysfromeffective warrantydate, Zenithwill provideservicelabor by a Zenith authorizedseevioecenter
whenneededas determined by Zenith, asa nasultof manufacturingdefects.
Parts Newor rernanufacLuredreplacementsfor facte ry-detectivepartsWIUbe suppliedby aZenith authorizedservicecenterfor one
yearfrom effective wanantydate. Suchreplacementparts anewarrantedfor the rernoinfa_jpurLion ofthe o6ginalwarranty
pu_od.
Not Covered ThiswarrantycoversmanufacturingdefacLsanddoesnotco'_r installation, adjustmentof t_stomer controlsin the borne,
fastoilafion or repair of homeantennasystem_,cabhi¢onverte_or eabl_ company-supp[tedequipment;it alsOdoes not cover
damagedue to misuse,abuse,negligence,actsof Godor other causesbeyondthe control of Zenith.AnyldteraLionof the
productafter manufacturevoids this warrantyin its entirety.
OWNER'S RESPONSIBILITY
EffectiveWarranty Date Wanantybeginson the date of originalconsumerpurchase.Foryourconvenience,keepthe dealdr'sdated bill of sateor a
deliveryticket asevidenceof the purchasedate.
OboratinoGuide ReadyourOperatingGuidecarofnt[ysothat you will understandtheoperationof yourset and howto adjustthe customer
conmlL_
Laely-llt Service Thevideoproductmustbe taken to a U.S. orCanadianZenith authorizedservicecenterfor warrantyserviceand mustbe picked
up bythe owner.
IV Set Performance It is the owne(srespunsihitityto maintainthe PCreceiverwith whichthe videoproductisused,andthe associatedantenna
system,in properoperatingcondition..
Important ProductRegistration--Pldasefill outand moi[yourproduct RegistrationCard.It fsimperativethat Zenith know howto reach
you promptly if we should discovera safetyproblemthat couldaffect you.
WarrantyServke Forwarrantyserviceinformation, contact anyZenith authorized sen,icecenten Fartsandsen_eelabor that am Zentih's
responsibility(see above)will be provided withoutcharg_ Othersen,ice is at the owne(s expense.If you have anypmbtemin
obtainingsatisfactory wanantyse_ice_call or write the Zenith ResponseCentanYoumust providethe modelnumber,se_l
numberanddateof purchaseor dataof original instldbCdon. Beforeyou askfar warrantysemite,mad"MaintenanceAnd
Troubleshooting"in your operatinggoide_Youmightavoida sen_cetall
THISWARRANTYISIN LIEUOF ANYOTHERWARRANTY,EXPRESSOR IMPLIED,INCLUDINGWITHOUTLIMITATION,ANY
WARRANTYOF MERCHANTABILITYOR FITNESSFORA PARTICULARPURPOSE,AND ZENITHSHALLNOTBE LIABLEFORANY
CONSEQUENTIAL,INDIRECT,OR INCIDENTALDAMAGESOFANY KIND,INCLUDINGLOSTREVENUESOR PROFITSIN
CONNECTIONWITHTHEPRODUCT.
Customer Service
Zenith National Response Center
201 James Record Road, Building #3
Huntsville, AL 35824
Phone: (256) 772-1515
Fax: (256) 774-4070
email: customer.service@zenith.corn
ZENITH ELECTRONICS CORPORATION
1000 MILWAUKEE AVENUE
GLENVIEW, ILLINOIS 60025-24-93
Zenith PartNo. 206-3521
GS#3835RM0031T
Printed in Korea
lssue O
