ZKTECO PRORFI Smart Access Control Terminal User Manual
ZKTECO CO., LTD. Smart Access Control Terminal
UserManual.wiki
>
ZKTECO
>
PRORFI User Manual
User Manual
Navigation menu
Upload a User Manual
Namespaces
Wiki Guide
HTML
PDF
Info
Views
User Manual
Discussion / Help
Navigation

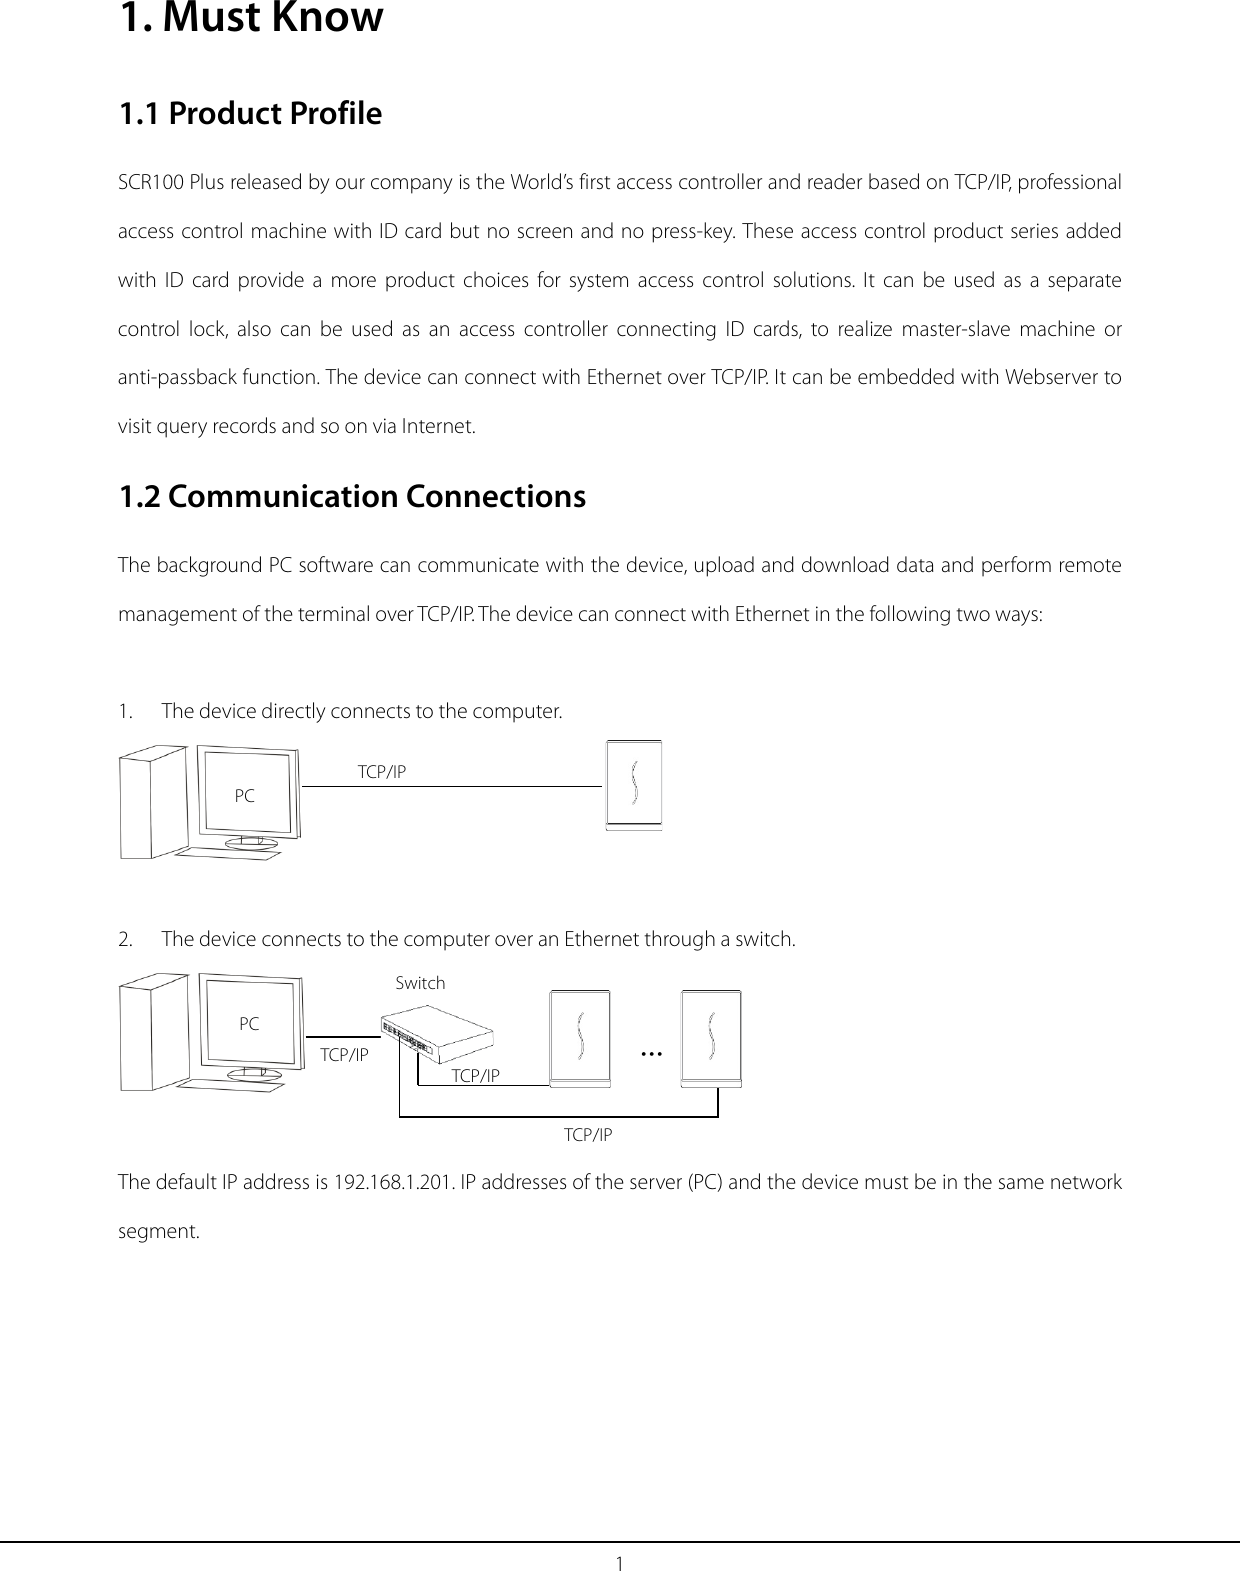
![2 2. Access Control Software Suppose the device has connected with PC well and the access control software has been installed already. On the desktop, double-click the ZKBiosecurity icon to enter the system. The user name of the super user is [admin], and the password is [admin], then click [login]. After the first login to the system, please reset the password in [Personnel Information]. 2.1 Adding a device Add Device by manually 1) Click [Access Device] > [Device] > [New] on the Action Menu, the following interface will be shown:](https://usermanual.wiki/ZKTECO/PRORFI/User-Guide-4084468-Page-5.png)
![3 Device Name: Any character, up to a combination of 50 characters. Communication type: TCP/IP. IP Address: Please enter the IP Address of the device, the default IP address is 192.168.1.201. Communication port: The default value is 4370. Communication Password: Any character, up to a combination of 8 characters (No blank). You need to input this field only when you add a new device with the communication password. It cannot be modified when you edit the device information except in [Modify communication password] operation. Note: You do not need to input this field if the device has no communication password, such as when it is a new factory device or just after the initialization. Icon Type: It will set the representation of the device. You can choose as per the kind of device; Door, Parking barrier, Flap Barrier. Control Panel Type: Standalone Device. Area: Specify areas of devices. After Area Setting, devices (doors) can be filtered by area upon Real-Time Monitoring. Add to Level: Automatically add the device to the selected level. The device cannot be automatically added to the selected level if the number of personnel exceeds 5000. You can add personnel after the device is successfully added. Clear Data in the Device when Adding: If this option is being ticked, after adding device, the system will clear all data in the device, except the event logs. If you add the device just for demonstration or testing of the system, there is no need to tick it. 2) After editing, click [OK], and the system will try connecting the current device: Note: When you add a new device to the system, the system will clear all user information, time zones, holidays, and access control levels settings (including access control group, anti-passback, interlock settings, linkage settings, etc.) from the device, except the events record in the device. Unless the information in the device is unusable, we recommend you not to delete the device in used, to avoid the loss of information. 3) One PC can connect with multiple devices, and the access control software in PC can manage multiple devices at the same time. If you want to add devices, please click [New]. If you want to delete devices, select devices and click [Delete]. For details, please refer to “ZKBiosecurity User Manual”.](https://usermanual.wiki/ZKTECO/PRORFI/User-Guide-4084468-Page-6.png)
![4 Add Device by Searching Access Controllers Search the device in the Ethernet. (1) Click [Access Device] > [Device] > [Search Device], to open the Search interface. (2) Click [Search], and it will prompt [Searching……]. (3) After searching, the list and total number of access controllers will be displayed. (4) Click on [Add] in the search list.](https://usermanual.wiki/ZKTECO/PRORFI/User-Guide-4084468-Page-7.png)
![5 2.1.1 Device Settings Includes that Modify IP Address, Close Auxiliary Output, Disable, Enable, Modify Communication Password, Synchronize Time, Upgrade Firmware, Get Logs From SD Card, Import Data From USB disk and so on. For more details, please refer to “ZKBiosecurity User Manual”. 2.2 Adding a user and a card 1) Click [Personnel] > [Person] > [New]: The fields are as follows: Personnel ID: An ID may consist of up to 9 characters, within the range of 1 to 79999999. It can be configured based on actual conditions. The Personnel No. contains only numbers by default but may also include letters. Notes: When configuring a personnel number, check whether the current device supports the maximum length and whether letters can be used in personnel ID. To edit the settings of the maximum number of characters of each personnel number and whether letters can also be used, please click [Personnel] > [Parameters]. Department: Select from the pull-down menu and click [OK]. If the department was not set previously, only one department named [Company Name] will appear. First Name/Last Name: The maximum number of character is 50. Card number: Assign a card number to the person for access control use. The max length is 10, and it should not](https://usermanual.wiki/ZKTECO/PRORFI/User-Guide-4084468-Page-8.png)
![6 be repeated. This can be done manually or by using card issuer. 2.3 Access Control Settings The access control system can set the opening levels of registered users, namely, allowing some personnel to open some doors by verification during a time period. Access Control System Management primarily includes Access Control Time Zones, Access Control Holiday, Door Settings, Access Levels, Personnel Access Levels, Real-Time Monitoring, and Reports, etc. Access control system parameters 255 time zones. Unlimited access levels. Three holiday types and 96 holidays total. Anti-passback function. Wiegand format. Interlock function. Linkage function. First-Card Normal Open function. Multi-Card Opening function. Remote door opening and closing. Real-time monitoring. For more details, please refer to “ZKBiosecurity User Manual”. 2.4 Upload and download For a PC corresponding to multiple devices, the user information in PC can be uploaded to multiple devices, and user information in multiple devices can be downloaded to this PC also. For the first time to use, after user information and ID cards are registered, user information can be uploaded from PC to device through . After the registered ID cards are punched on device successfully, attendance records will be generated in device. These attendance records can be downloaded from device to PC through [Reports].](https://usermanual.wiki/ZKTECO/PRORFI/User-Guide-4084468-Page-9.png)
![7 2.4.1 Sync All Data to Device 1) Click [Device Control] > [Synchronize All Data To Devices] in the Device page. 2) Click [Synchronize], the following interface will be shown. Note: The operation of Synchronize All Data is mainly to delete all data in the device first (except event record). Download all settings again, please keep the net connection stable and avoid power down situations, etc. If the device is](https://usermanual.wiki/ZKTECO/PRORFI/User-Guide-4084468-Page-10.png)
![8 working normally, please use this function with caution. Execute it in rare user situations to avoid impacting on normal use of the device. 2.4.2 Get Event Entries Click [Device Control] > [View and Get device Info] > [Get Transactions] to get transactions from the device into the system. Two options are provided for this operation: Get New Transactions and Get All Transactions. Get New Transactions: The system only gets new transactions since the last collected and recorded transaction. Repeated transactions will not be rewritten. Get All Transactions: The system will get transactions again. Repeated entries will not be shown twice. When the network status is healthy and the communication between the system and device is normal, the system will acquire transactions of the device in real-time and save them into the system database. However, when the network is interrupted or communication is interrupted for any reasons, and the transactions of the device have not been uploaded into the system in real-time, [Get Transactions] can be used to manually acquire transactions of the device. In addition, the system, by default, will automatically acquire transactions of the device at 00:00 on each day. You can view the statistics of relevant device data in [Report], including card verification information, door operation information, and normal punching information, etc. By default, the system displays latest three months transactions. Click [Reports] > [All Transactions] to view all transactions:](https://usermanual.wiki/ZKTECO/PRORFI/User-Guide-4084468-Page-11.png)
![9 Clear All Data: Click [Clear All Data] to pop up prompt and click [OK] to clear all transactions. Export: You can export all transactions in Excel, PDF, CSV format. Note: The device can restore up to 1 million of event entries. When the entries exceed this number, the device will automatically delete the oldest restored entries. 2.4.3 Get Personnel Data From Device Click [Device Control] > [View and Get device Info] > [Get Personnel Information] in the Device page. Renew the current information in the device. The final value will be displayed in the device list. 2.5 Monitor in real time Suppose a user with an ID card has been uploaded to device, when this card is punched on the device, the device will pass the verification (LED indicator light will turn green and be constant on for 2 seconds) and then generate an attendance record. In ZKBiosecurity Software, click [Access] > [Access Device] > [Real-Time Monitoring] to monitor the statuses, real-time events of doors and punching on device in real time. If you want to stop monitoring, please click [Stop Monitoring].](https://usermanual.wiki/ZKTECO/PRORFI/User-Guide-4084468-Page-12.png)