ZKTECO TL400B Fingerprint Lock User Manual
ZKTECO CO., LTD. Fingerprint Lock Users Manual
UserManual.wiki
>
ZKTECO
>
TL400B User Manual
Users Manual
Navigation menu
Upload a User Manual
Namespaces
Wiki Guide
HTML
PDF
Info
Views
User Manual
Discussion / Help
Navigation

![Connecting ZKBioBL with Lock 5 Connecting ZKBioBL with Lock Note: Please confirm that the Bluetooth function on the Phone device is turned on before using ZKBioBL to connect with the lock. 1. Turn on ZKBioBL and click [BLE Lock] on the main interface to enter the devices listing interface; the app will automatically search for surrounding Bluetooth devices. Note: 1. When lock is not yet connected, click the Unlock button on the main interface, “Please connect to the lock first” will be displayed. 2. Click or slide the finger down on the screen to refresh the “All Searched Locks” list. 3. The default device name of the lock equipped with Bluetooth is ZKBiolock. 4. Please do not operate the lock while connecting it with phone or the lock would stop working. If you face any issue with the lock, please take out the battery and re-insert it to restart.](https://usermanual.wiki/ZKTECO/TL400B/User-Guide-3681996-Page-7.png)
![6 2. After the app searches for the lock, click the lock for connection on the device list and enter the correct Bluetooth connection password (the default connection password is 000000), and click [OK]: Note: If a wrong connection password is input, “Connection failed” will be shown. Click [OK] to re-enter the password for matching.](https://usermanual.wiki/ZKTECO/TL400B/User-Guide-3681996-Page-8.png)
![Connecting ZKBioBL with Lock 7 After the device is connected to a lock, the LED green light of the fingerprint sensor will blink, and the app will return to the main interface automatically. You can see the connected devices list on the [BLE Lock] interface: Note: 1. The default privilege for ZKBioBL new users is “Invalid User”. Administrator requires to assign privileges for new users by using admin password. 2. After successfully connected with the lock, the app will generate a number for the user’s default name. The user number and name can be changed, but the number cannot be duplicated; it can only be an integer within 1~65534.](https://usermanual.wiki/ZKTECO/TL400B/User-Guide-3681996-Page-9.png)
![8 Setting Administrator After successfully connect the app with the lock, enter the [App Setting] interface and click [Supervisor password mode], and then enter the password (the default supervisor password is 12345678) and click [OK]. When entering the [Open] interface, the privilege has become “Administrator”:](https://usermanual.wiki/ZKTECO/TL400B/User-Guide-3681996-Page-10.png)
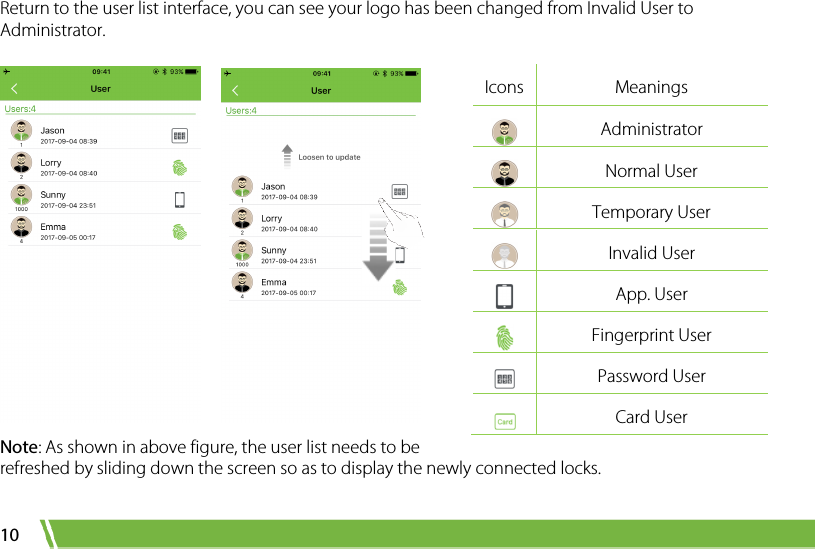
![Setting Administrator 9 Please note that the administrator is temporary at this stage; the user privilege is still Invalid User. You need to change privileges on the user information interface. Click the > at the top right corner, slide down the screen to refresh the user list, and select the user corresponding to your number and name on the user list. Choose Administrator privilege on the editing interface and then click [Save]:](https://usermanual.wiki/ZKTECO/TL400B/User-Guide-3681996-Page-11.png)
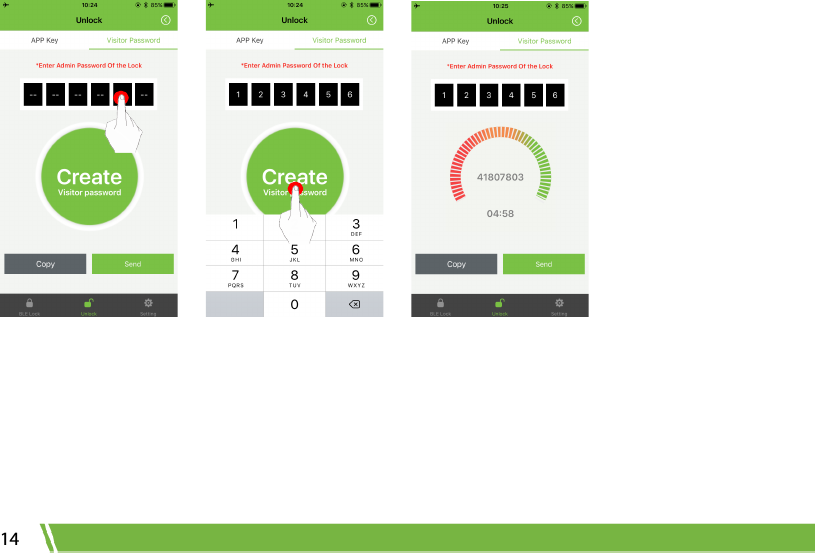
![Visitor Password 13 Visitor Password After setting administrator, enter the [Unlock] interface and click” Visitor password” to access the visitor password generation interface. Enter admin password of the lock, then click Create Visitor password button at the center, the visitor password is created done, and you can copy the code and send to others who are temporary users. Note: ·You must know the admin password. ·The visitor password is limited to use one time in 5 minutes. ·Lock match the time of phone that last connection, so the phone time must same with the lock before using this function.](https://usermanual.wiki/ZKTECO/TL400B/User-Guide-3681996-Page-15.png)
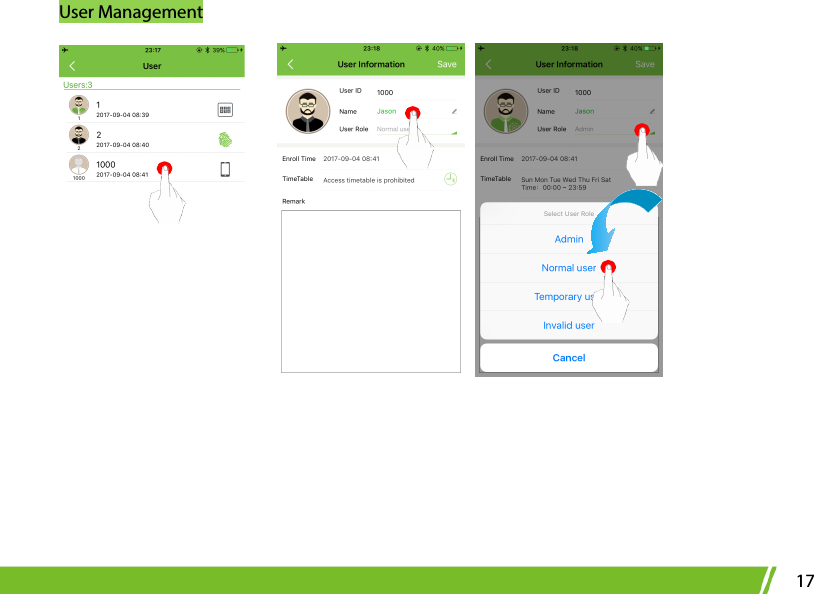
![16 User Management Users can be classified into four types according to the creating methods: 1. Fingerprint User: users directly registered in the lock. 2. Card User: users directly registered in the lock. 3. Password User: users directly registered in the lock. 4. Phone User: users created by app. Administrator can manage all users who registered in the lock and phone users. To change user information and privilege and to allocate time table 1. Administrator enters the [User] interface, refreshes the user list and then synchronizes the user information in the lock with the app. Click the to-be-edited user on the user list, and change user PIN, name privilege and time table on the user information interface; 2. Click [Save] after editing.](https://usermanual.wiki/ZKTECO/TL400B/User-Guide-3681996-Page-18.png)
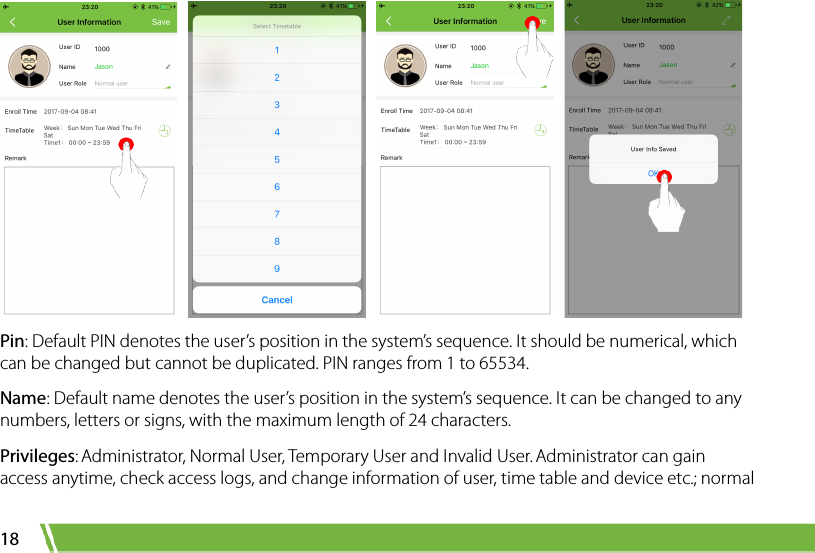
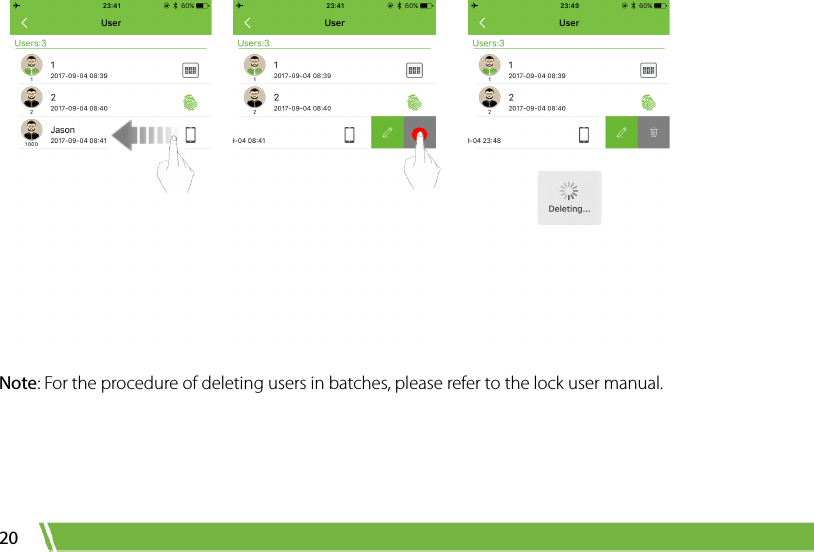
![User Management 19 user and temporary user can gain access anytime as well, but no other permissions are allowed; Invalid user cannot gain access anytime, no does he/she have other permissions. Registration Time: This denotes when the user registered on the lock or when the phone user was connected with the lock; it cannot be edited. Time table: The time table in which the user can gain access. In default setting, administrator uses Time table 1 ,invalid user uses Time table 2 and both two Time table are unchangeable; normal user and temporary user use Time table 3-12 and it is changeable; for more details, please refer to the Setting Time table below. Remarks: To add user remarks. Note: There is no correlation between phone user and lock user. For instance, when one person is both lock user and phone user, since these two types of user use different codings, 2 out of 100 user capacity are occupied. To Delete User Administrator enters the [User] interface, refreshes the user list and then synchronizes the user information in the lock with the app. Click the to-be-deleted user on the user list, and slide the screen to the left and click the delete button, so that all information of the user in the app and the lock are deleted.](https://usermanual.wiki/ZKTECO/TL400B/User-Guide-3681996-Page-21.png)
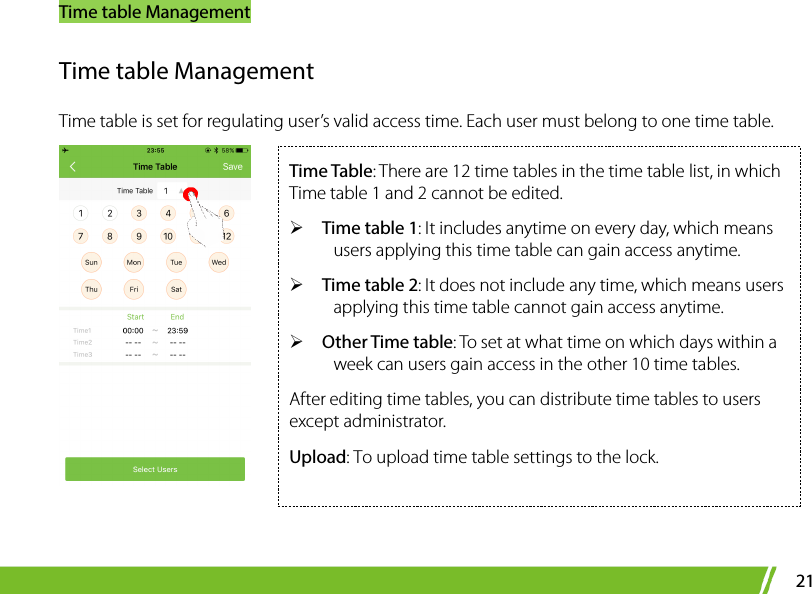
![22 To Edit Timetable 1. Click in the “Time Table”, and select any time table from the 10 editable time tables; 2. Choose on which day can users gain access (multiple selection is enabled), for example, select “Sun” and “Mon” for allowing users to unlock the door on Sunday and Monday; 3. Set the start time and end time for each day, and then click [Done].](https://usermanual.wiki/ZKTECO/TL400B/User-Guide-3681996-Page-24.png)
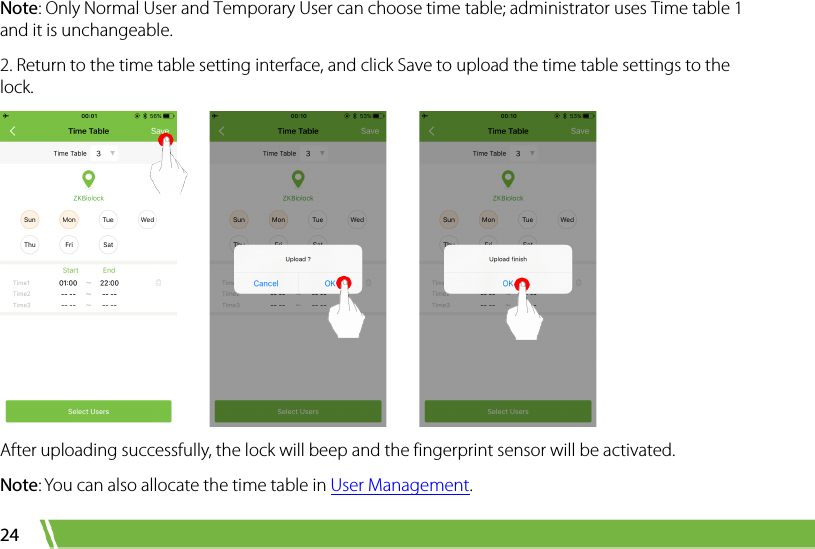
![Time table Management 23 To Allocate Timetable 1. Choose the edited time table and click [Select Users], and select the user who uses that time table on the user list (multiple selection is enabled);](https://usermanual.wiki/ZKTECO/TL400B/User-Guide-3681996-Page-25.png)
![Checking Access Record 25 Checking Access Record Administrator can check all access records after entering the [Records] interface; all access records within 7 days will be shown. It supports searching for records within 30 days by choosing the date manually. It also supports quick search for records of a user or within a time period by inputting user name or ID.](https://usermanual.wiki/ZKTECO/TL400B/User-Guide-3681996-Page-27.png)
![26 Device Management When administrator enters the [Setting] menu (as the below figure), he/she can change the Admin password of the app, Lock name, and Pairing password. He/she can set the always open mode. Note: A lock can only have one connection password. Once the password is changed, the connection password for all app users is also changed.](https://usermanual.wiki/ZKTECO/TL400B/User-Guide-3681996-Page-28.png)
![Device Management 27 Admin Password: The default supervisor password is 12345678. After changing the admin password, a new password needs to be entered in supervisor password verification. The password should be in 8 digits. Lock Name: Lock name, which is ZKBiolock as default. The lock name cannot be blanked; it supports at most 10 letters or numbers. After change, “Update Finish. BLE lock will disconnect soon!” will be displayed. The system will automatically search for devices after disconnection, and a device can be connected after returning to the [BLE Lock] interface. Paring Password: The default connection password is 000000. After connection password is changed, the system will request user to re-enter the password when logging in the app to connect with the lock. The password should be in 6 digits. Always Open Mode: This mode will enable the lock to open without identifying the validation, once the verification that is registered on the lock opens, this mode will be closed.](https://usermanual.wiki/ZKTECO/TL400B/User-Guide-3681996-Page-29.png)
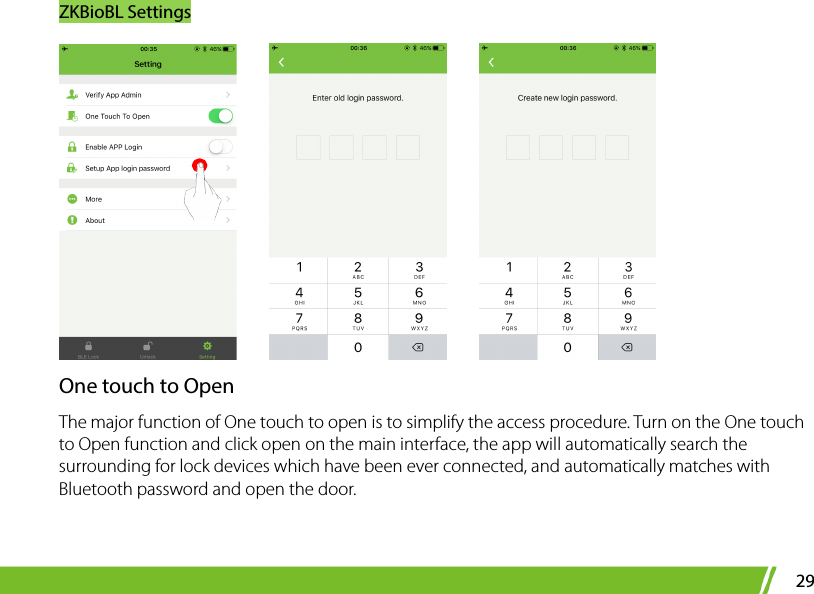
![28 ZKBioBL Settings Setting App Password After turning on and setting the app password, only after the password verification for turning on ZKBioBL succeeds can the user continues to use the app. Click [Setting] on the main interface and turn on the [Setup App login password], the system will then enter the password entering interface:](https://usermanual.wiki/ZKTECO/TL400B/User-Guide-3681996-Page-30.png)