ZMODO Technology I11133WT IP-CAM User Manual I11133WT Draft Final
ZMODO Technology Shenzhen Corp. Ltd. IP-CAM I11133WT Draft Final
Users Manual

Zmodo IP Camera
1 | Page
Technical Support
support@zmodo.com
1-217-903-5674
TABLE OF CONTENTS
Table of Contents ..................................................................1
1 Introduction........................................................................2
1.1 Safety Instructions……………………………………...2
1.2 Benefits…………………………………………………..3
1.3 Camera Specifications………………………………….4
1.4 Package Contents……………………………………….5
2. Camera Panels and Controls……………………………6
2.1 Camera Front Panel…………………………………….6
2.2 Camera Rear and Side Panels…………………………7
2.3 System Requirements…………………………………..8
3. Installation………………………………………………..9
3.1 Connecting to the Local Network…………………….9
3.2 Connecting to the Local Network-Continued……...10
4. Prompting ActiveX Controls………………………….11
4.1 Prompting ActiveX Controls-Continued…………...12
5. Logging into the IP Camera Locally………………….13
6. Enabling Wireless Communication…………………..14
7. Configuring the Remote Network…………………….15
7.1 Configuring the Remote Network -Continued…….16
8. Main Menu Interface Operation………………………17
8.1 Main Menu Interface Operation-Continued………..18
9. Backend Menu Operation……………………………...19
9.1.1 Device Info…………………………………………...19
9.1.2 Alias Settings………………………………………...19
9.1.3 Date and Time Settings……………………………..19
9.2.1 User Settings…………………………………………20
9.2.2 Multi-Device Settings……………………………….20
9.2.3 Basic Network Settings……………………………..20
9.3.1 ADSL Settings……………………………………….21
9.3.2 UPnP Settings………………………………………..21
9.3.3 DDNS Service Settings……………………………...21
9.3.4 Mail Service Settings………………………………..21
9.3.5 FTP Service Settings………………………………...21
9.4.1 Upgrade Device Firmware…………………………22
9.4.2 Backup and Restore Settings……………………….22
9.5.1 Restore Factory Settings……………………………23
9.5.2 Reboot Device……………………………………….23
9.5.3 Log……………………………………………………23
9.5.4 Back…………………………………………………...23
10. Appendices…………………………………………….24
WARRANTY: ..............................................................24
RETURN: .........................................................................
TECHNICAL SUPPORT:...............................................
LIMITATION OF LIABILITIES:....................................
CONSENT TO JURISDICTION: ...............................26
1 - INTRODUCTION

Zmodo IP Camera
2 | Page
Technical Support
support@zmodo.com
1-217-903-5674
1.1 SAFETY INSTRUCTIONS
1. Use the proper power source.
Do not use this product with a power source that
applies more than specified voltage (100-240V AC).
2. Never insert anything metallic into the camera.
Inserting metal object into the camera can be a
source of dangerous electric shock.
3. Do not operate in wet or dusty environment.
Avoid places like a damp basement or dusty
hallway.
4. Do not attempt to disassemble the camera.
You may be subjected to severe electrical shock if
you attempt to take apart the camera while the
camera is connected to its power source. If there are
any unusual sounds or smells coming from the
camera, unplug it immediately and contact
Customer Service.
5. Handle the camera carefully.
Dropping the camera on any hard surface may cause
a malfunction. If the camera does not work properly
due to physical damage, please contact Customer
Service for repair or exchange.
6. Apply to FCC Rule
1. This device complies with Part 15 of the FCC Rules.
Operation is subject to the following two conditions:
(1) This device may not cause harmful interference.
(2) This device must accept any interference received,
including interference that may cause undesired
operation.
2. Changes or modifications not expressly approved by
the party responsible for compliance could void the
user's authority to operate the equipment.
NOTE: This equipment has been tested and found to
comply with the limits for a Class B digital device,
pursuant to Part 15 of the FCC Rules. These limits are
designed to provide reasonable protection against
harmful interference in a residential installation.
This equipment generates uses and can radiate radio
frequency energy and, if not installed and used in
accordance with the instructions, may cause harmful
interference to radio communications. However, there is
no guarantee that interference will not occur in a
particular installation. If this equipment does cause
harmful interference to radio or television reception,
which can be determined by turning the equipment off
and on, the user is encouraged to try to correct the
interference by one or more of the following measures:
Reorient or relocate the receiving antenna.
Increase the separation between the equipment and
receiver.
Connect the e quipment into an outlet on a circuit
different from that to which the receiver is connected.
Consult the dealer or an experienced radio/TV
technician for help.
7. FCC Radiation Exposure Statement
This equipment complies with FCC radiation
exposure limits set forth for an uncontrolled
environment. This equipment should be installed
and operated with minimum distance 20cm
between the radiator & your body.

Zmodo IP Camera
3 | Page
Technical Support
support@zmodo.com
1-217-903-5674
1.2 - BENEFITS
Watch what’s going on as it happens in real time.
Save your recorded files and snapshots onto your
computer’s hard drive.
Backup and move your videos off-site with either a
USB flash drive or external hard drive.
Set up your camera to be accessed from any
Internet-connected computer. Friends, family, and
co-workers can be given permission, too. Double-
encoded bit network transmission keeps your video
secure.
Get notified of system events, motion detection, and
external alarm activation – by e-mail, too!
Download and install software on your mobile
phone to view your camera.
Pierce low-light conditions with Infrared LED light
(night vision) technology.
Display menus in your language with Multi-lingual
OSD (Operating System Display).
Configure your camera with a familiar look and feel
with graphical interface.
Connect wirelessly or hard-wired to your local
router for live local and remote internet viewing.
Utilize the audio talkback feature between the
camera’s built-in microphone & audio output to the
online viewing interface.
Store more videos on the camera and use less space
with AVI video compression format.
Determine playback clarity with resolution options
(320 x 240) or (640 x 480).

Zmodo IP Camera
4 | Page
Technical Support
support@zmodo.com
1-217-903-5674
1.3 – CAMERA SPECIFICATIONS
Model CM-I11133WT
Image Sensor CMOS
Display Resolution VGA (640 x 480), QVGA (320 x 240)
Lens 3.6mm
Minimum Illumination 0.1 Lux
Number of LED Bulbs 12 IR LEDs
IR Viewing Distance 33’
Web Server Built-In
Image Compression AVI
Image Frame Rate 15fps (VGA), 30fps (QVGA)
Mirror Images Vertical / Horizontal Flip
Ethernet One 10/100Mbps RJ-45
Supported Protocol TCP/IP,HTTP,ICMP,DHCP,FTP,SMTP,PPPoE
Wireless Standard IEEE 802.11b/g
Pan/Tilt Angle N/A
Alarm Input/Output N/A
Operating System Microsoft Windows XP/Vista/Windows 7. Internet Explorer 8.0 or above
Mobile Phone Supported on iPhone and Smart Phones using Phone Internet Browser
Power Supply DC 5V 2A
Operation Temperature -10° ~ 50°C (14F ~ 122F)
White Balance Auto
Backlight Balance Auto
Weatherproof No
S/N Ratio >48DB (AGC Off)
Supported Languages English, Español, Deutsch, 简体中文, Française

Zmodo IP Camera
5 | Page
Technical Support
support@zmodo.com
1-217-903-5674
1.4 PACKAGE CONTENTS
(1) Wireless Network IP Camera
(1) DC Power Supply
(1) Software CD for installing the IP Camera
(1) Mounting Bracket
(1) Antenna
(1) Network Cable
(1) User’s Manual
(1) Mounting Hardware
Zmodo IP Camera
6 | Page
Technical Support
support@zmodo.com
1-217-903-5674
2 – CAMERA PANELS AND CONTROLS
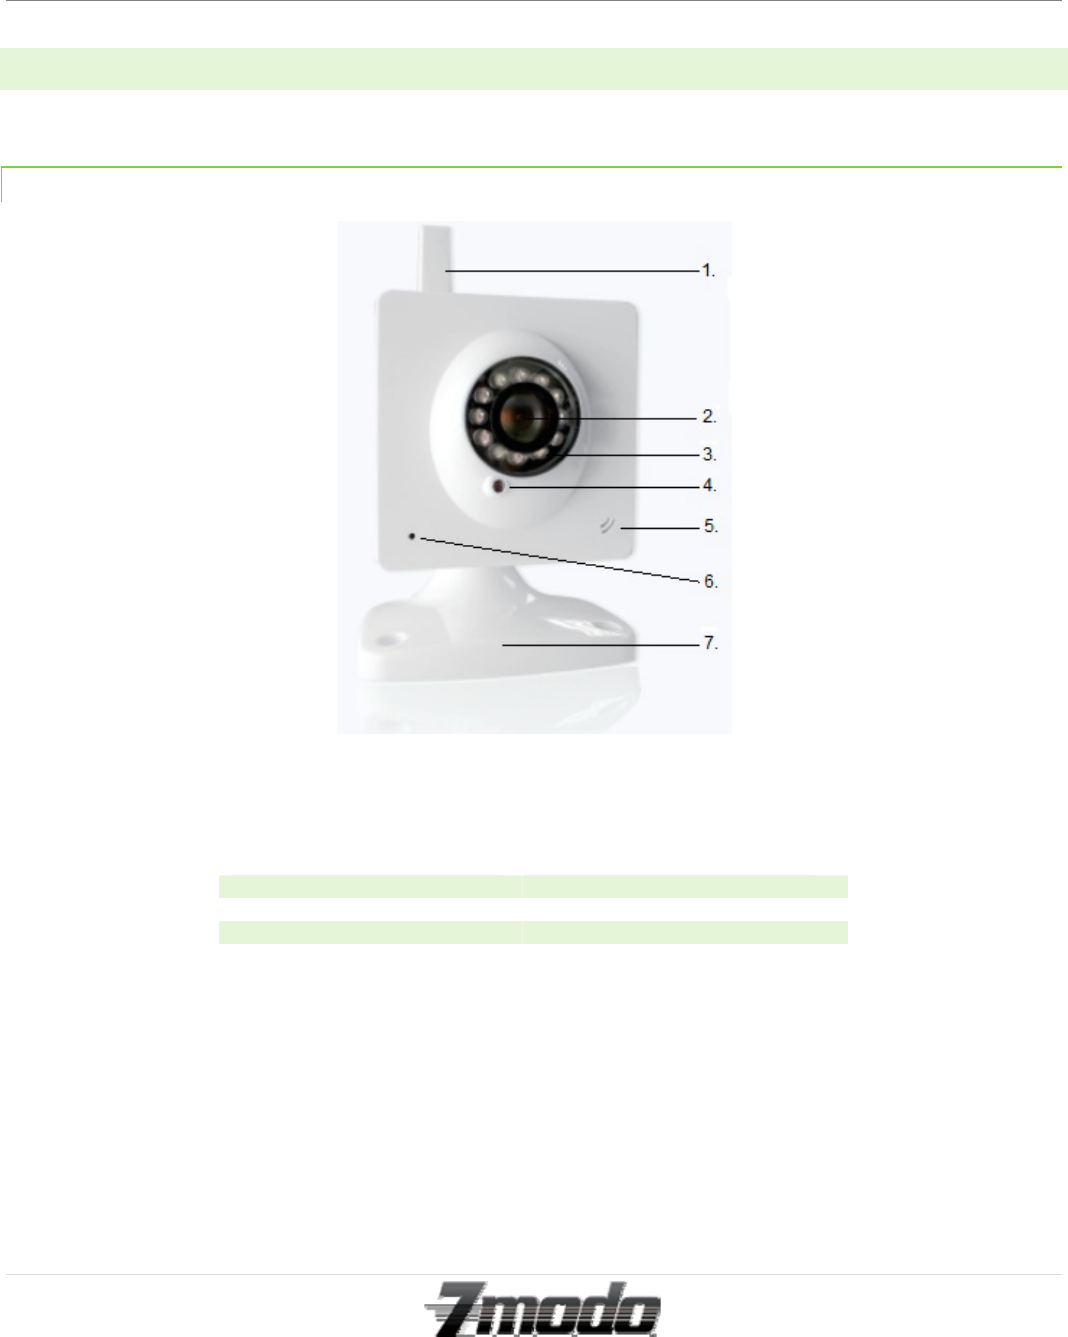
2.1 – IP CAMERA FRONT IMAGE
1. Built-in Antenna 6 Network Indicator Light
2 Lens 7. Mounting Bracket
3 Ring of LED Bulbs
4 Light Sensor
5 Microphone
Zmodo IP Camera
7 | Page
Technical Support
support@zmodo.com
1-217-903-5674
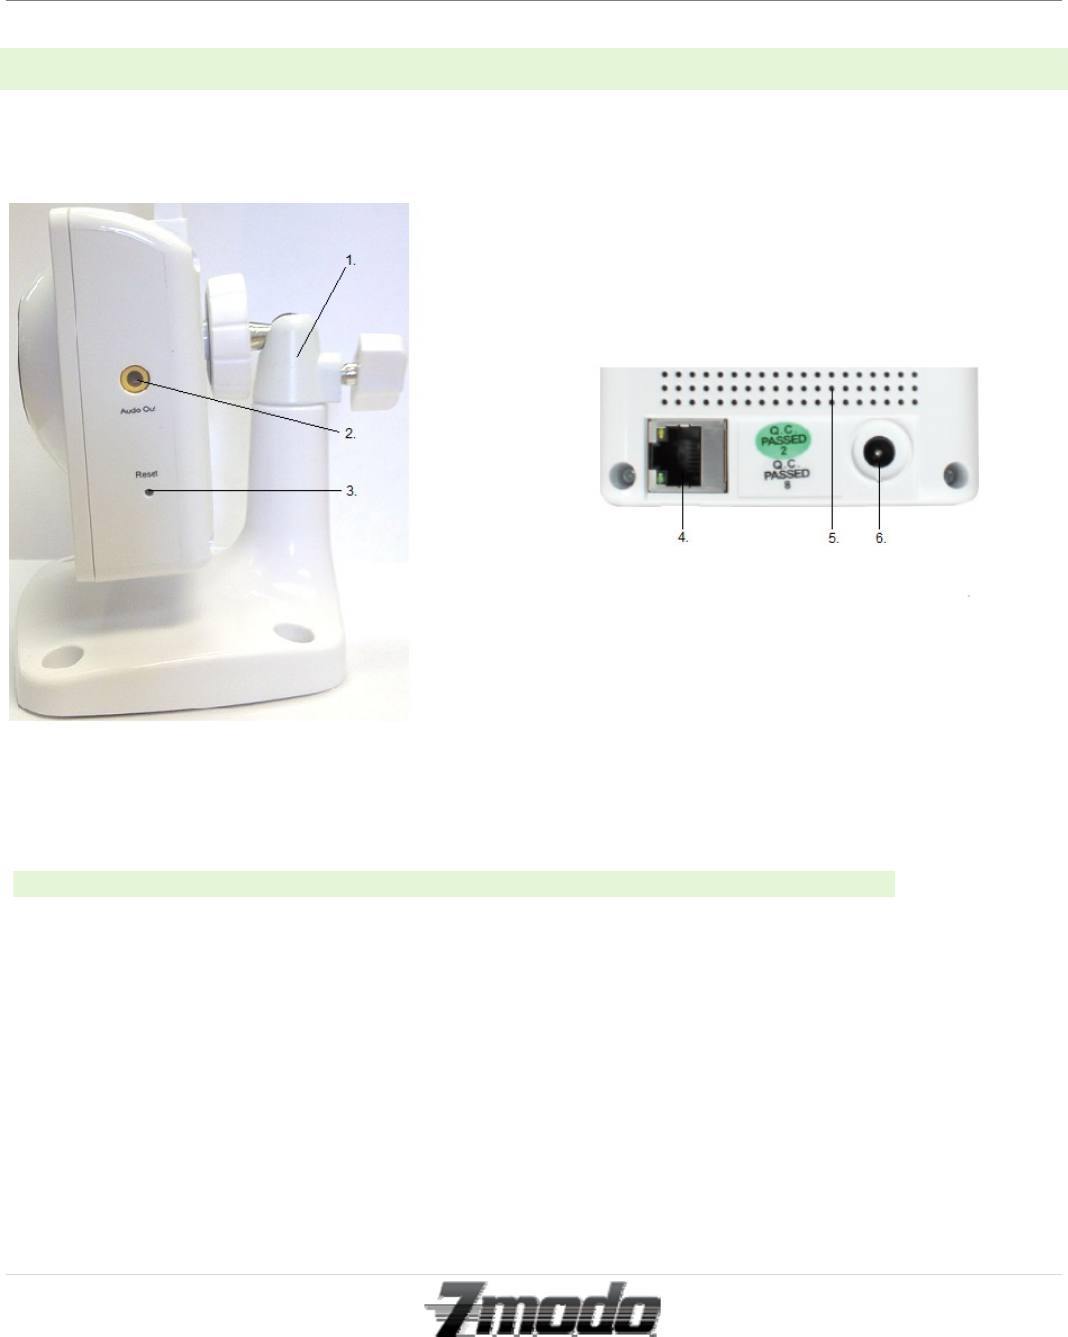
2.2 – IP CAMERA INPUT PANELS
Figure 2- 1: IP Camera Input Panel
This camera does not have built-in audio speaker. In order to listen to User-to-Camera audio, you must insert an
audio speaker device into the 3.5mm Audio Output port.
1. Mounting Bracket 2. 3.5mm Audio Output Port
3. Reset Button 4. LAN Input Port
5. 5V 2A DC Power Input Port

Zmodo IP Camera
8 | Page
Technical Support
support@zmodo.com
1-217-903-5674
2.3 – SYSTEM REQUIREMENTS
CPU: 2.06GHZ or above
Memory:
256M or above
Network Card:
10M or above
Display Card: 64M or above
Operating System:
Windows XP/Vista/Windows 7 (32 bit OR 64 bit)
Hard Disk Drive: No Maximum Storage Requirement
Internet Explorer: Version 5.0 or above
DirectX:
Version 8.0 or above
Audio Card: PC must have microphone and speaker connected and
configured for 2-Way audio play.
Network Protocol: TCP/IP, UDP, SMTP, PPPoE, Dynamic DNS, DNS Client,
SNTP, BOOTP, FTP, SNMP, Wifi (802.11 b/g)

Zmodo IP Camera
9 | Page
Technical Support
support@zmodo.com
1-217-903-5674
3 – INSTALLATION
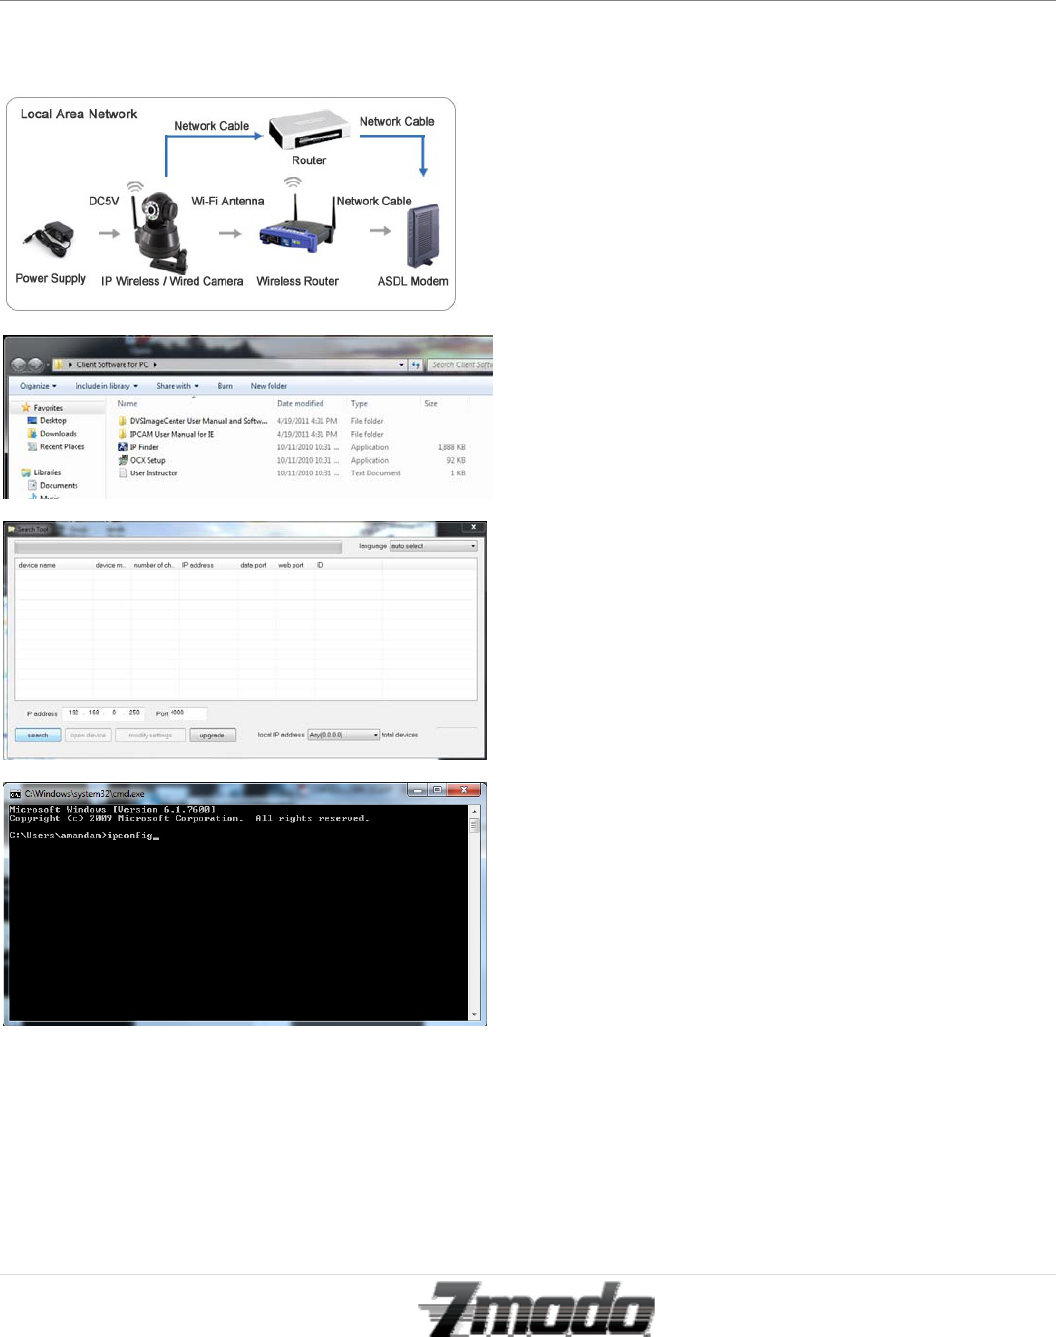
3.1 – CONNECTING YOUR CAMERA TO YOUR LOCAL NETWORK
When installing the camera to the local network for the
first time, the camera must be connected to an ethernet
input on your router so that your network can locate
your camera.
1. Power on the camera in close proximity to your
router.
2. Directly connect your camera to your router
using the Ethernet cable (included). If the yellow
and green indicator lights on the camera are
blinking, then your camera is successfully
communicating with your router.
3. Insert the software CD (included) into your PC.
4. Run the program labeled “OCX Setup” from the
file folder on the software CD.
5. After the “OCX Setup” program has installed,
install the “Search Tool.”
6. If the “Search Devices” icon does not appear on
your desktop, look in your program files for the
folder called “Search Devices.”
7. From the “Search Devices” folder, run the
Search Tool.
8. Click “Search” to find the IP Camera on your
router. (If you have several items on your router,
check the bottom of the camera for the factory IP
setting.)
9. Once you have located the camera on your
router, open the Command Prompt (cmd).
10. From the Command Prompt, type in ‘ipconfig’
then press Enter.
11. Write down the number that represents the
Default Gateway, then go back into the Search
Tool.
Zmodo IP Camera
10 | Page
Technical Support
support@zmodo.com
1-217-903-5674
Zmodo IP Camera
11 | Page
Technical Support
support@zmodo.com
1-217-903-5674
3.2 – CONNECTING YOUR CAMERA TO YOUR LOCAL NETWORK-CONTINUED
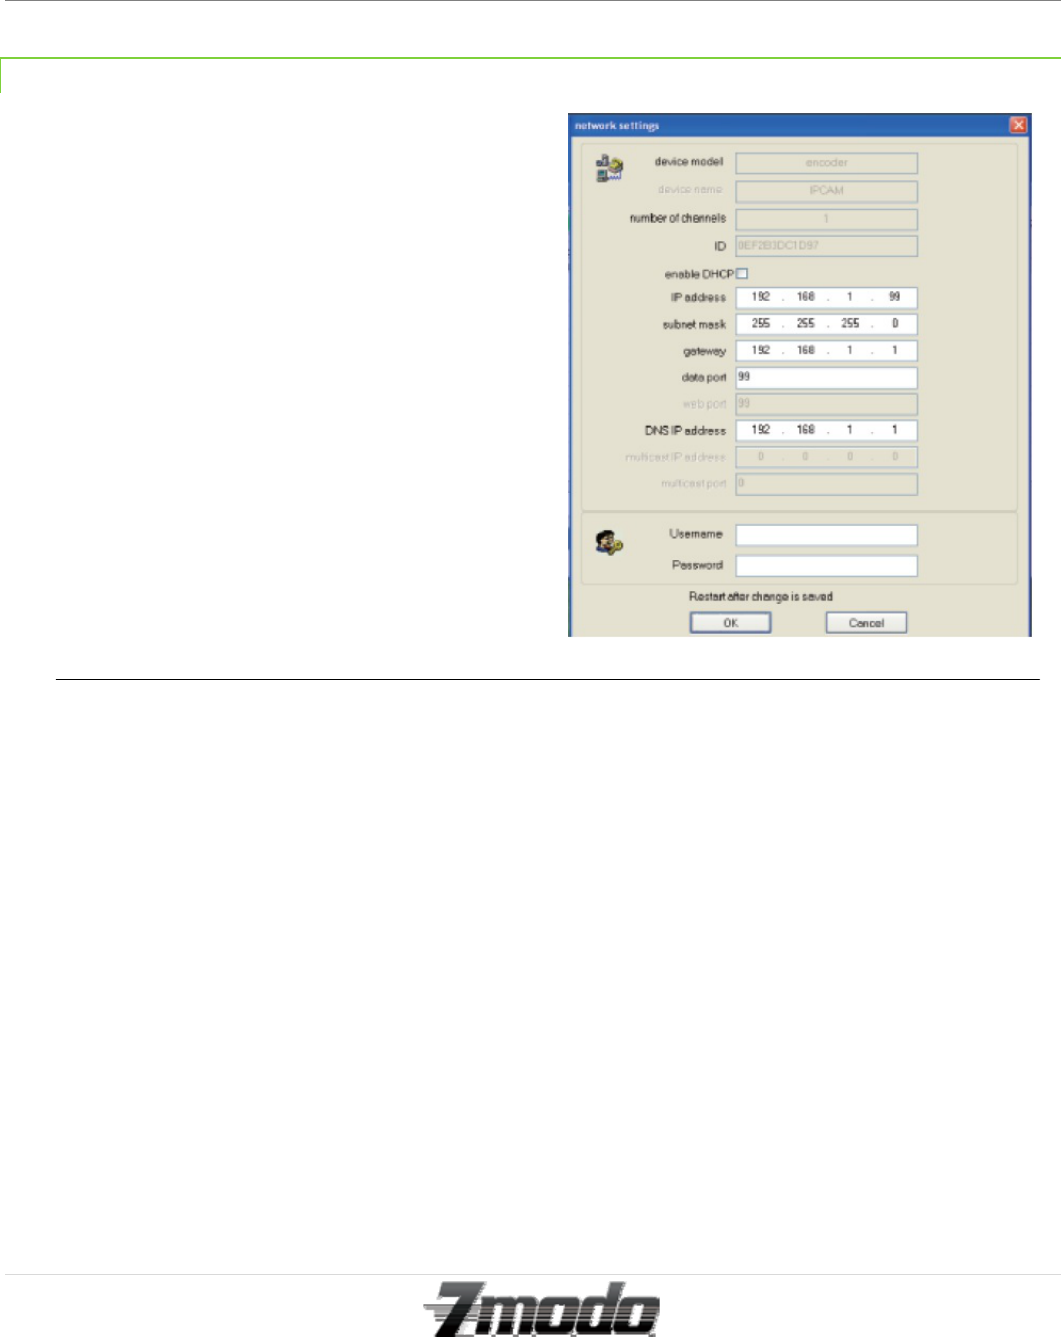
12. From the Search Tool, select your IP camera,
then click on Modify Settings.
13. Here, you will need to re-address your camera’s
IP address based off of your Default Gateway.
For example; if your Default Gateway is
192.168.1.1, you should change the last set of
values of your address from 1 to a larger value
such as 99. Therefore, your new address will
read “192.168.1.99” (The last set of values must
be lower than 254)
14. Next, change the Gateway and the DNS IP
address in the network settings to exactly match
your Default Gateway.
15. Now, change the Data Port to 80.
16. Last, enter the Username and Password. The
Username will be ‘admin’ and the Password
field will remain empty.
17. Last, click ‘OK’ and your camera will
automatically reboot as it saves all changes that
you have just made.
*The first time that you connect to your camera
either from your local network of from a remote
network, you will need to connect using an
Internet Explorer browser, and you must
prompt three necessary ActiveX Controls.
Please refer to Section 4 for ActiveX
configuration.
Zmodo IP Camera
12 | Page
Technical Support
support@zmodo.com
1-217-903-5674
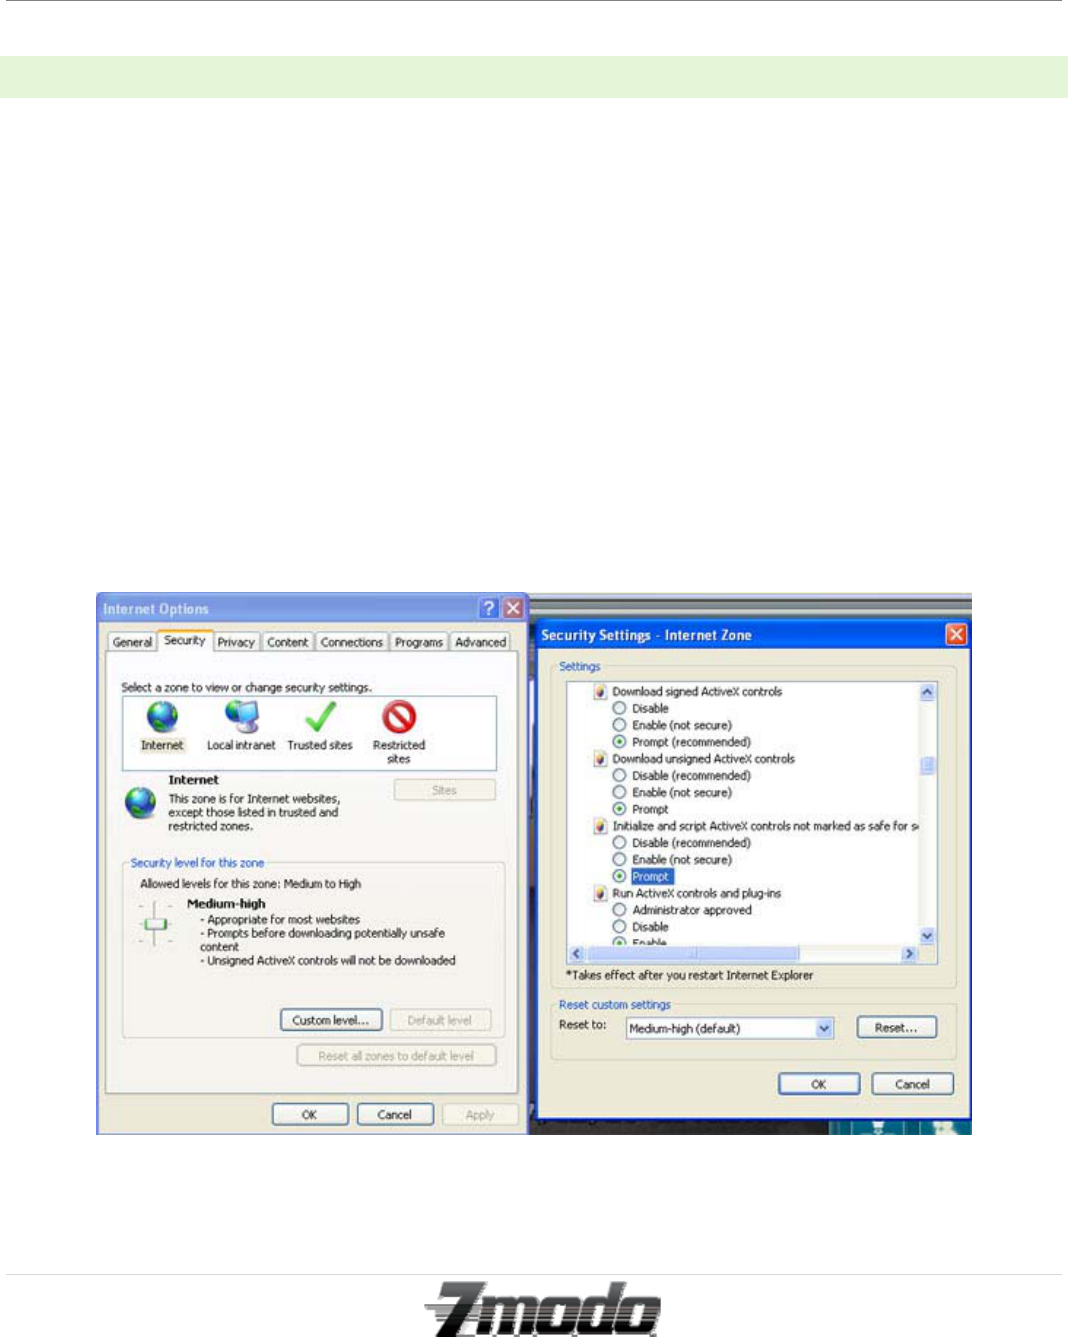
4– PROMPTING THE NECESSARY ACTIVEX CONTROLS
The first time you access your camera online from a new computer (including the LiveDemo), you will need
to prompt three necessary ActiveX controls.
1. From Internet Explorer click on "Tools" then select "Internet Options." Select the "Security" tab, and then click the
"Custom Level" button.
*If you are using either Windows Vista or Windows 7, please run Internet Explorer as Administrator.
Now, change the three following options to "Prompt":
---Download Signed ActiveX controls
---Download unsigned ActiveX controls
---Initialize and script ActiveX controls not marked as safe for scripting.
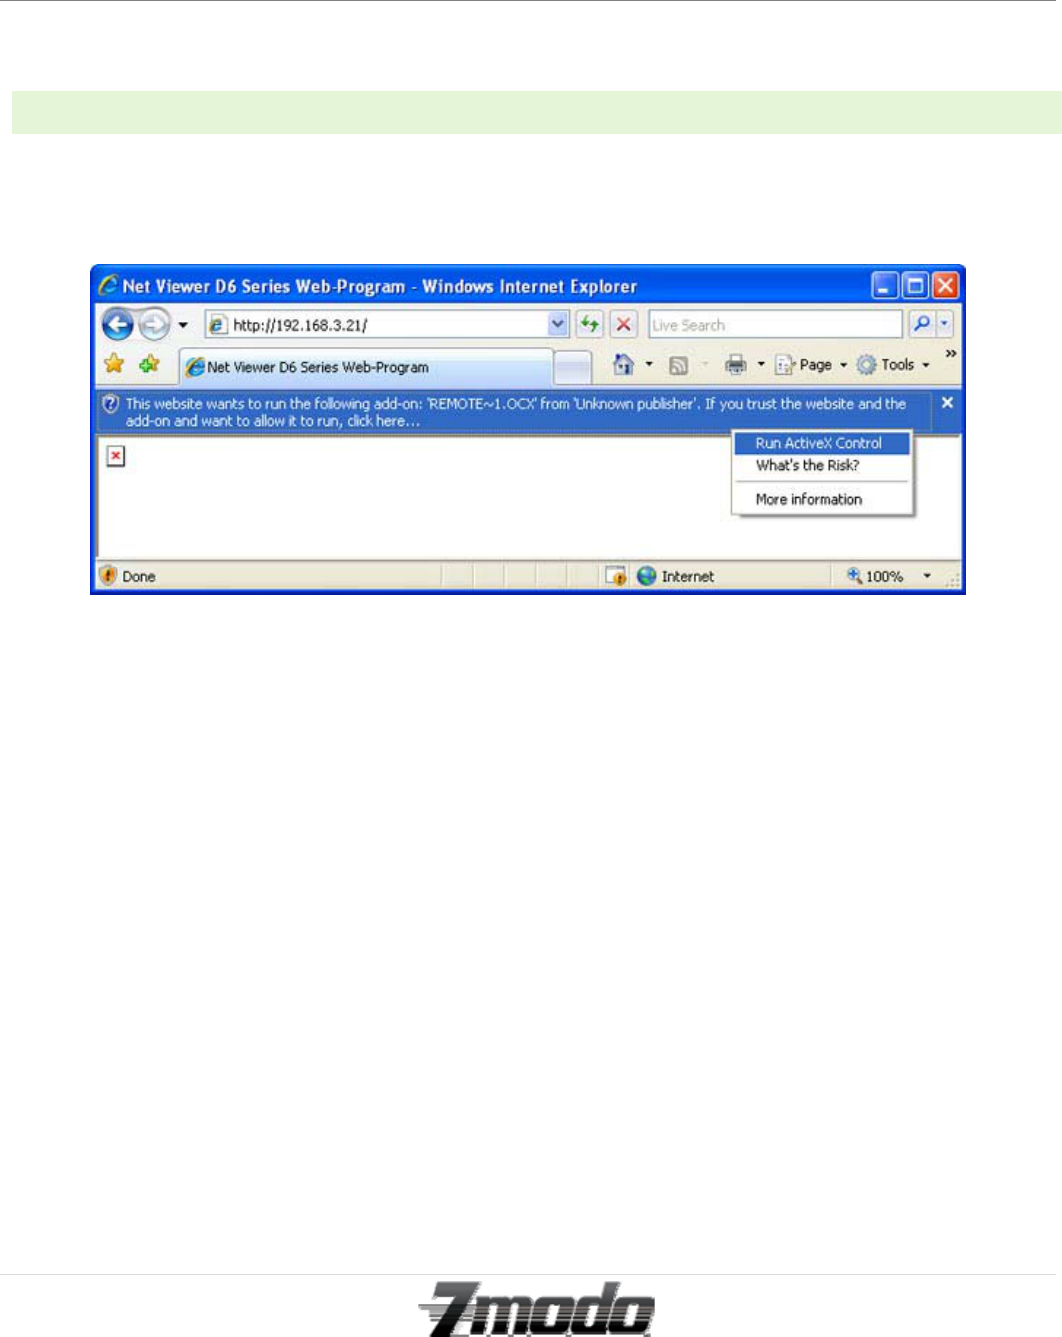
2. After all three Active X controls are prompted; please login to your camera’s IP address. If this is your first time
logging into your camera, you will type into an Internet Explorer browser 错误!超链接引用无效。 followed by
the IP address that you’ve entered into the IP address field of the network settings section. For example, the
address will look like this;
Zmodo IP Camera
13 | Page
Technical Support
support@zmodo.com
1-217-903-5674
http://192.168.1.99
4.1– PROMPTING THE NECESSARY ACTIVEX CONTROLS-CONTINUED
3. This will usually prompt you, or a bar may appear on the top of the page. If prompted, select run or install. Click on
the yellow bar to proceed.
*If you are using Internet Explorer version 9.0, this prompt bar will appear on the bottom of your browser instead
of at the top of your browser.
Zmodo IP Camera
14 | Page
Technical Support
support@zmodo.com
1-217-903-5674
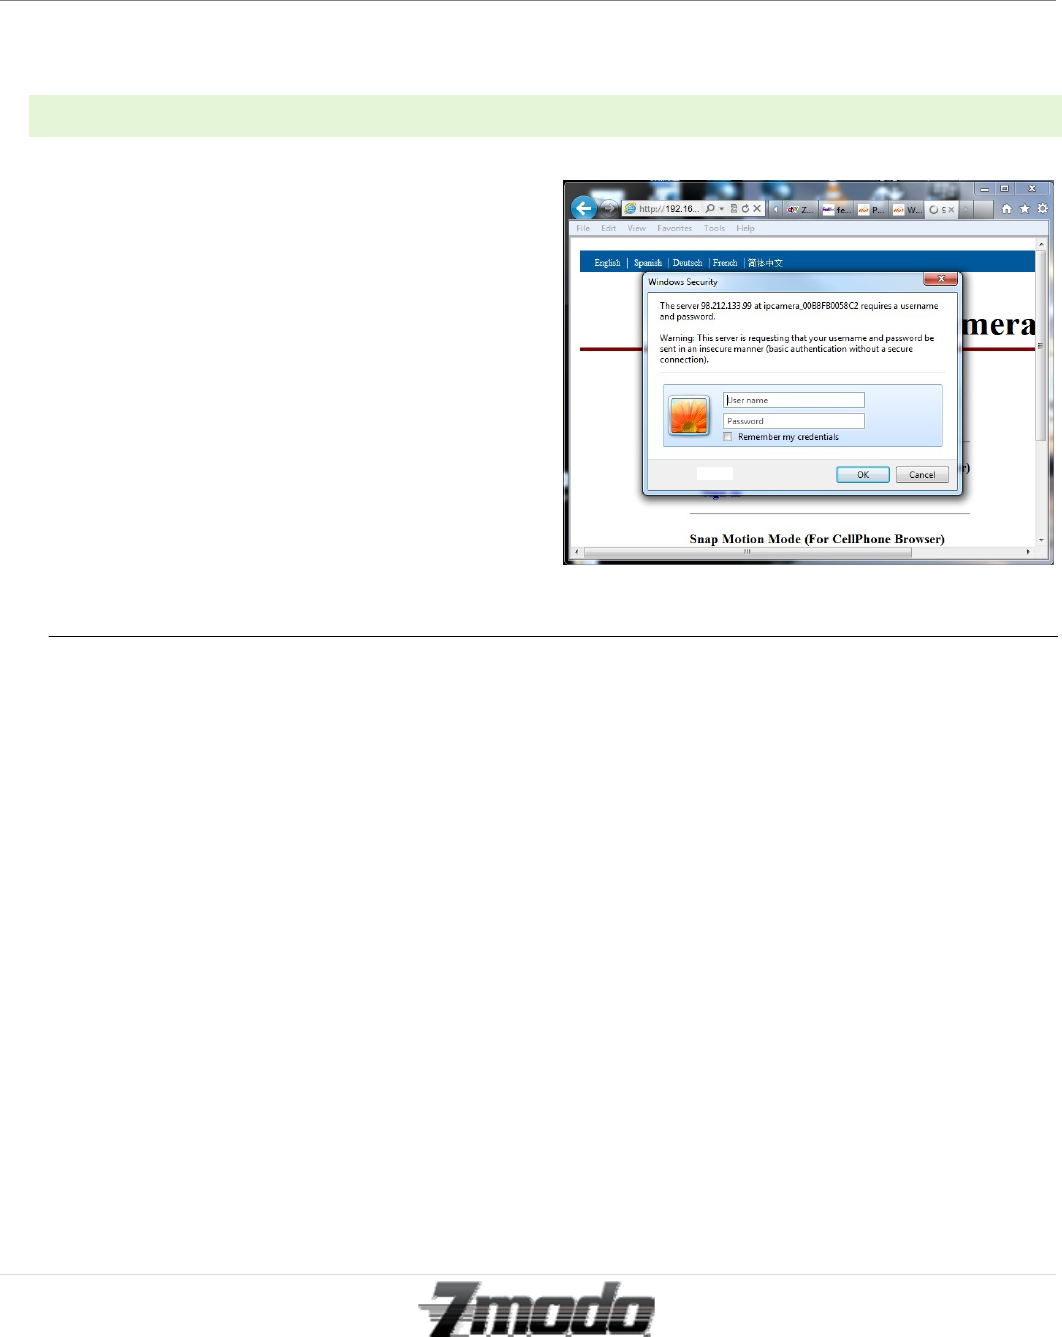
5 – LOGGING INTO YOUR CAMERA FROM A LOCAL INTERNET LOCATION
1. To access your camera from your local
connection, you will need to open an Internet
Explorer browser. In the browser, type 错误!超
链接引用无效。 followed by the IP address that
you’ve entered into the IP address field of the
network settings section. For example, the
address will look something like this;
http://192.168.1.99
2. A Windows Security pop-up will appear. In this
window, type ‘admin’ as the Username, and
leave the Password field empty.
3. Once the Username and Password are accepted,
chose the option to sign in using ActiveX Mode
(For IE Browser)
Zmodo IP Camera
15 | Page
Technical Support
support@zmodo.com
1-217-903-5674
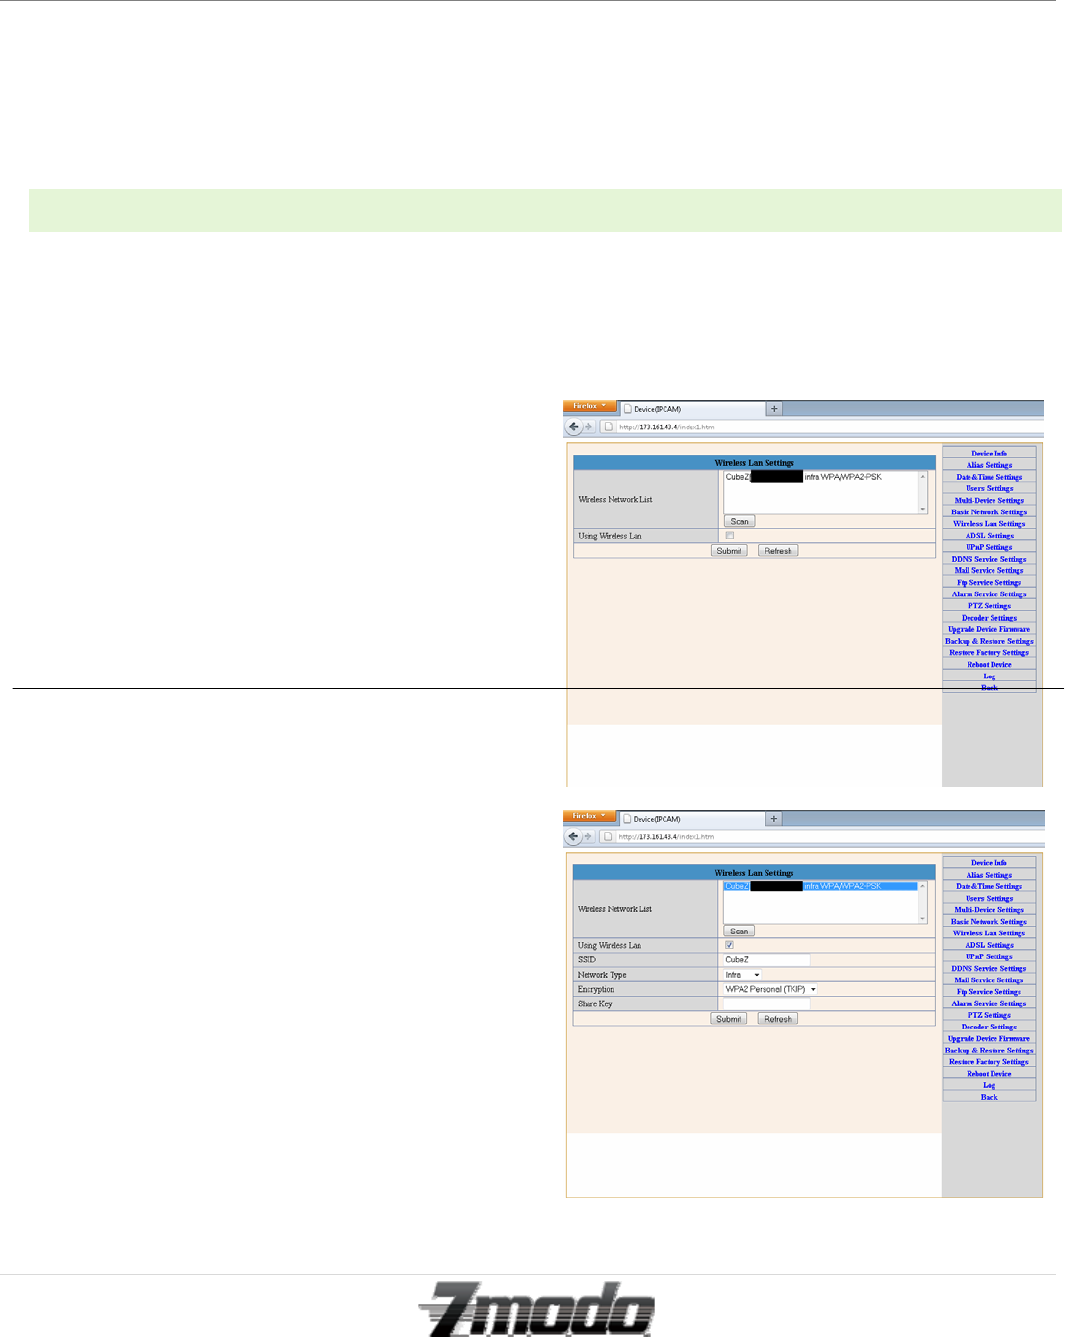
6 – ENABLING WIRELESS CONNECTION USING A WIRELESS ROUTER
1. While your camera is still connected directly to
your router with an Ethernet cable, go to the
Wireless Lan Settings section on your camera’s
menu.
2. Next, click ‘Scan’ to search for available wireless
networks.
3. Once you have selected your wireless network,
enter your wireless network’s password into the
“Shared Key” field.
4. After you click submit your camera should
automatically reboot to save these settings.
Please wait 30 seconds after your camera has
rebooted, then you may disconnect the Ethernet
cable that is connecting your camera to your
router.
5. Your camera should now be successfully
communicating wirelessly with your wireless
router.

Zmodo IP Camera
16 | Page
Technical Support
support@zmodo.com
1-217-903-5674
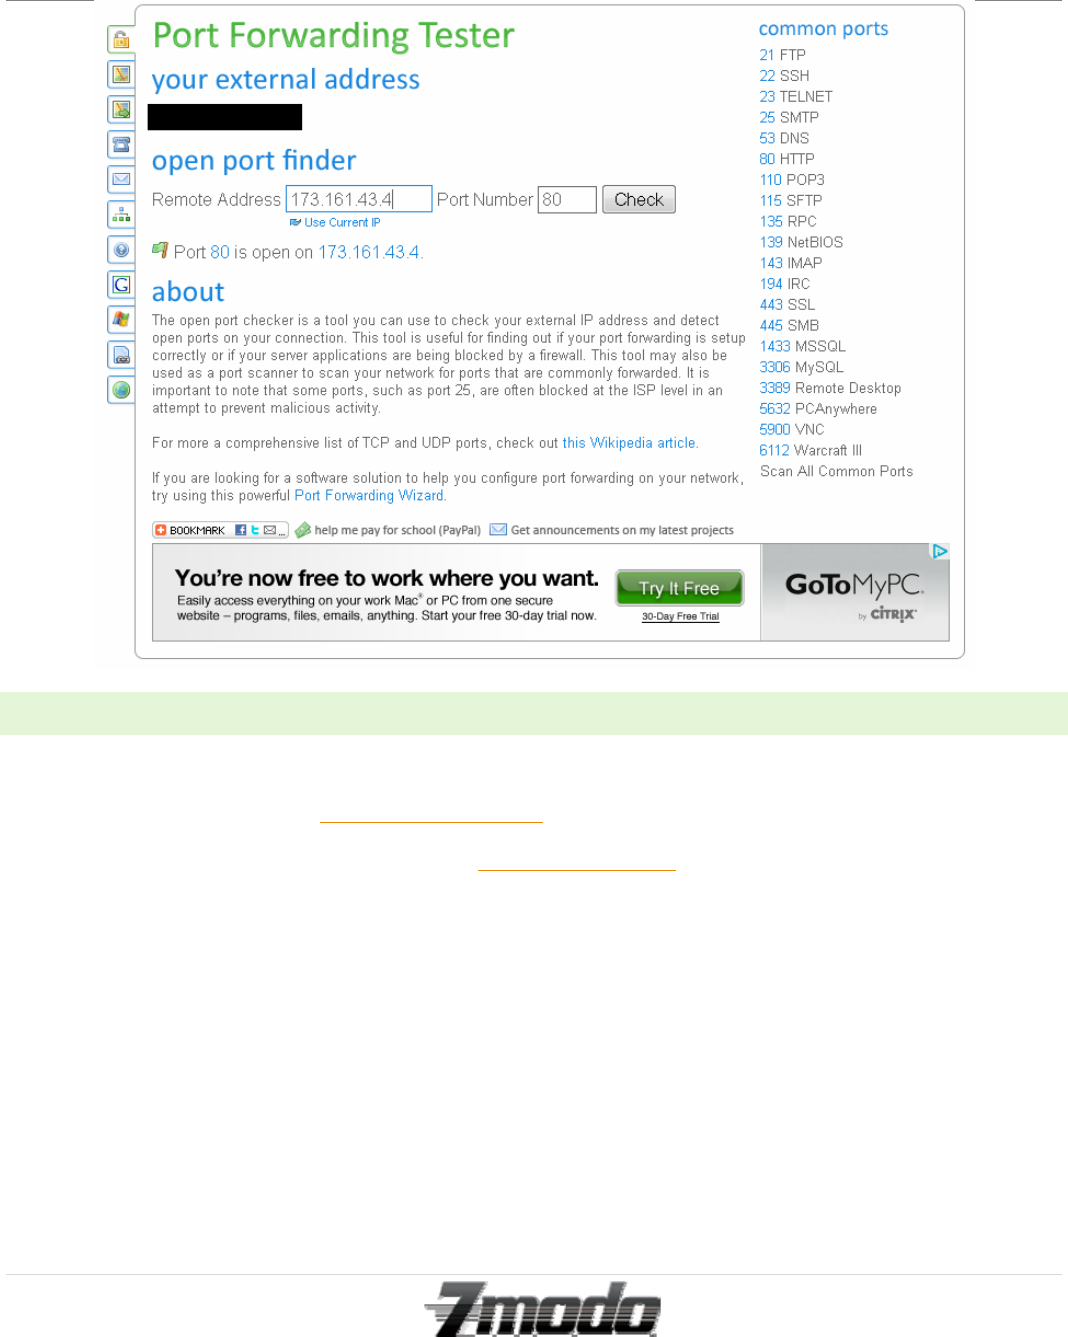
7 – CONFIGURING THE REMOTE ACCESS
Each manufacturer of routers handles Port Forwarding in a different way. For detailed, router specific instructions,
please visit www.portforward.com and find the model of your router. Then select ‘Default Guide’ for detailed
screenshots and use them to help you through the rest of these instructions.
1. Open Internet Explorer and type in the IP address of your Default Gateway, this opens the configuration page of
your router.
2. Next, create a Port Forwarding rule for the IP camera.
a. The port number to forward will be 80 if you have followed the manual thus far.
b. Your Router will ask for an IP address as well. Input the IP address of your IP camera.
3. After creating the Port Forwarding rule, visit http://www.yougetsignal.com/tools/open-ports/
a. Write down your external address, it will be used later.
b. In the box that says ‘Port Number’, type in the port number that you have created a Port Forwarding rule
for and click ‘Check’
c. If it says ‘port is open’ then you have set up Port Forwarding properly and you can now access your IP
camera from another location.
Zmodo IP Camera
17 | Page
Technical Support
support@zmodo.com
1-217-903-5674
7.1 – CONFIGURING THE REMOTE ACCESS-CONTINUED
1. When logging in from a computer that is connected to an outside network, open Internet Explorer.
2. In the Address Bar, type in http://yourexternaladdress
a. To find your external IP address, visit www.whatismyip.com while using to a computer that is connected
to the same router as your camera.
3. It will prompt you for a login just as it did when you were on the local network.
4. After you login, the camera will function just as it did on your local network.

Zmodo IP Camera
18 | Page
Technical Support
support@zmodo.com
1-217-903-5674
8 – MAIN MENU INTERFACE OPERATION
: This feature is not supported by the I11133WT : This feature is not supported by the I11133WT
: This feature is not supported by the I11133WT : This feature is not supported by the I11133WT
: This feature is not supported by the I11133WT : This setting changes the color of the OSD lettering
: This button flips the image vertically : This setting changes the image resolution
: This button flips the image horizontally : This setting changes the image frequency
Zmodo IP Camera
19 | Page
Technical Support
support@zmodo.com
1-217-903-5674
8.1 – MAIN MENU INTERFACE OPERATION-CONTINUED
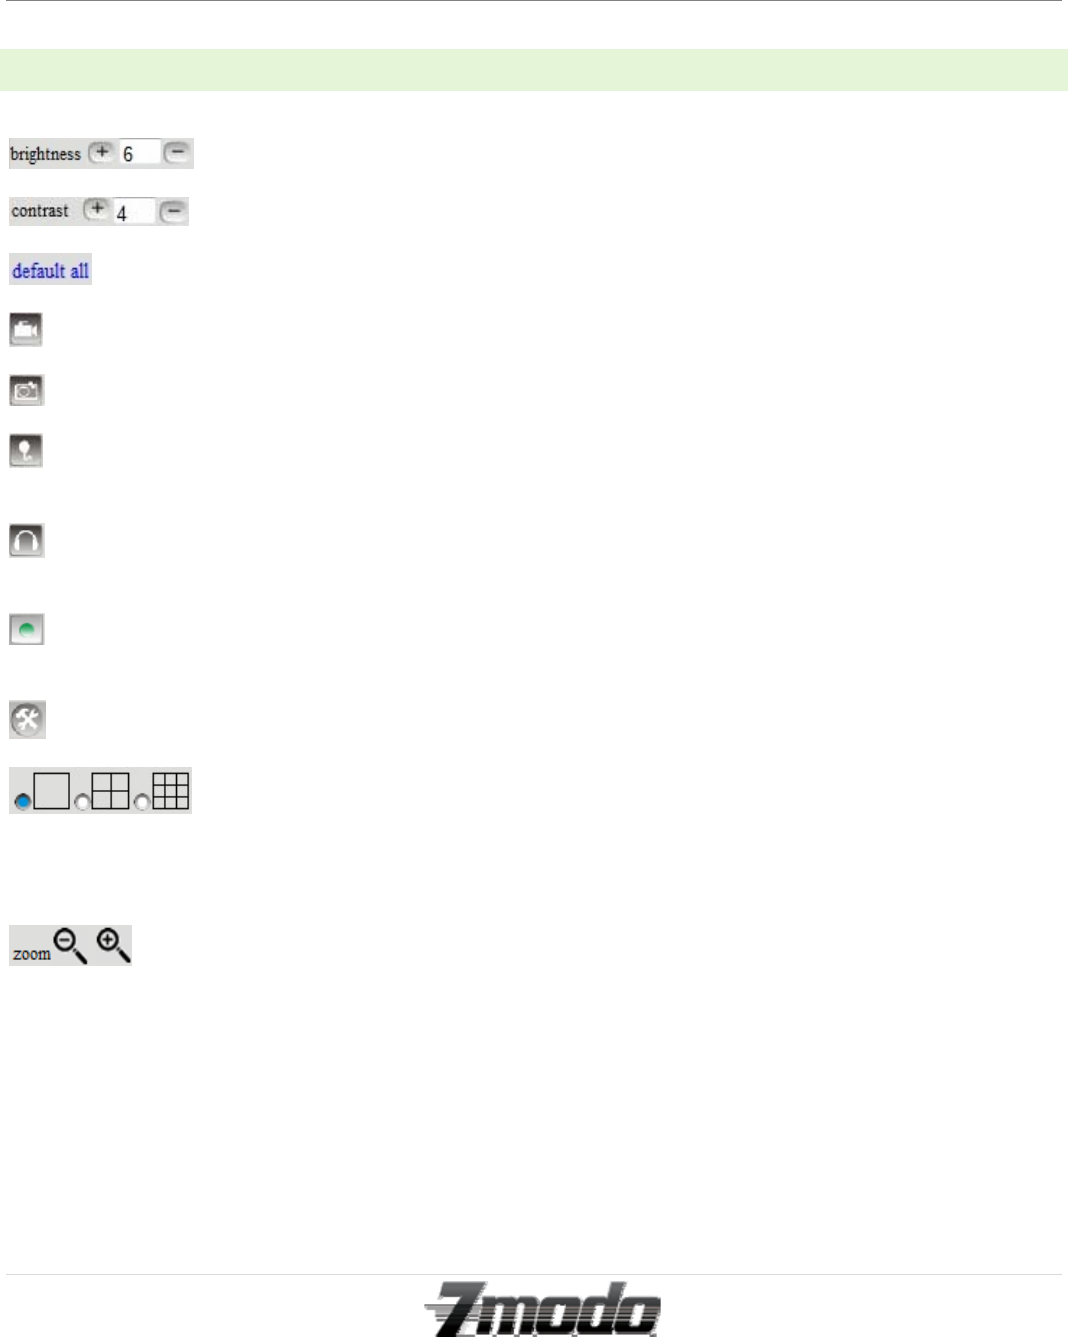
: This setting increases or decreases the image brightness
: This setting increases or decreases the image contrast
: This option resets all Main Menu options to factory default
: This option opens the camera’s recording functionality menu
: This option takes a snapshot of the current screen and saves the snapshot to the PC’s Hard Drive
: This option enables User-to-Camera audio. If the online user has a microphone connected and configured to the PC,
clicking this option will allow them to talk through the camera is the camera is connected to a speaker device.
: This option enables Camera-to-User audio. If the online user has speakers connected and configured to their PC,
clicking this option will allow them to hear audio from the location of the camera
: This option enables log detection. After the online user clicks this button, a log is entered into the camera’s Log
Data documenting the IP address of users who have accessed the IP camera
: This button opens the IP camera’s Backend Menu
: These options enable single view, quad screen view, or 9 screen view; this function serves no
purpose unless you have more than one camera connected and configured to your interface.
*Please refer to section 9.2.3 for adding additional cameras to your interface.
: This feature is not supported by the I11133WT
Zmodo IP Camera
20 | Page
Technical Support
support@zmodo.com
1-217-903-5674
9 – BACKEND MENU INTERFACE OPERATION
* The Backend Menu may only be accessed by the Administrator Group Login Profile.
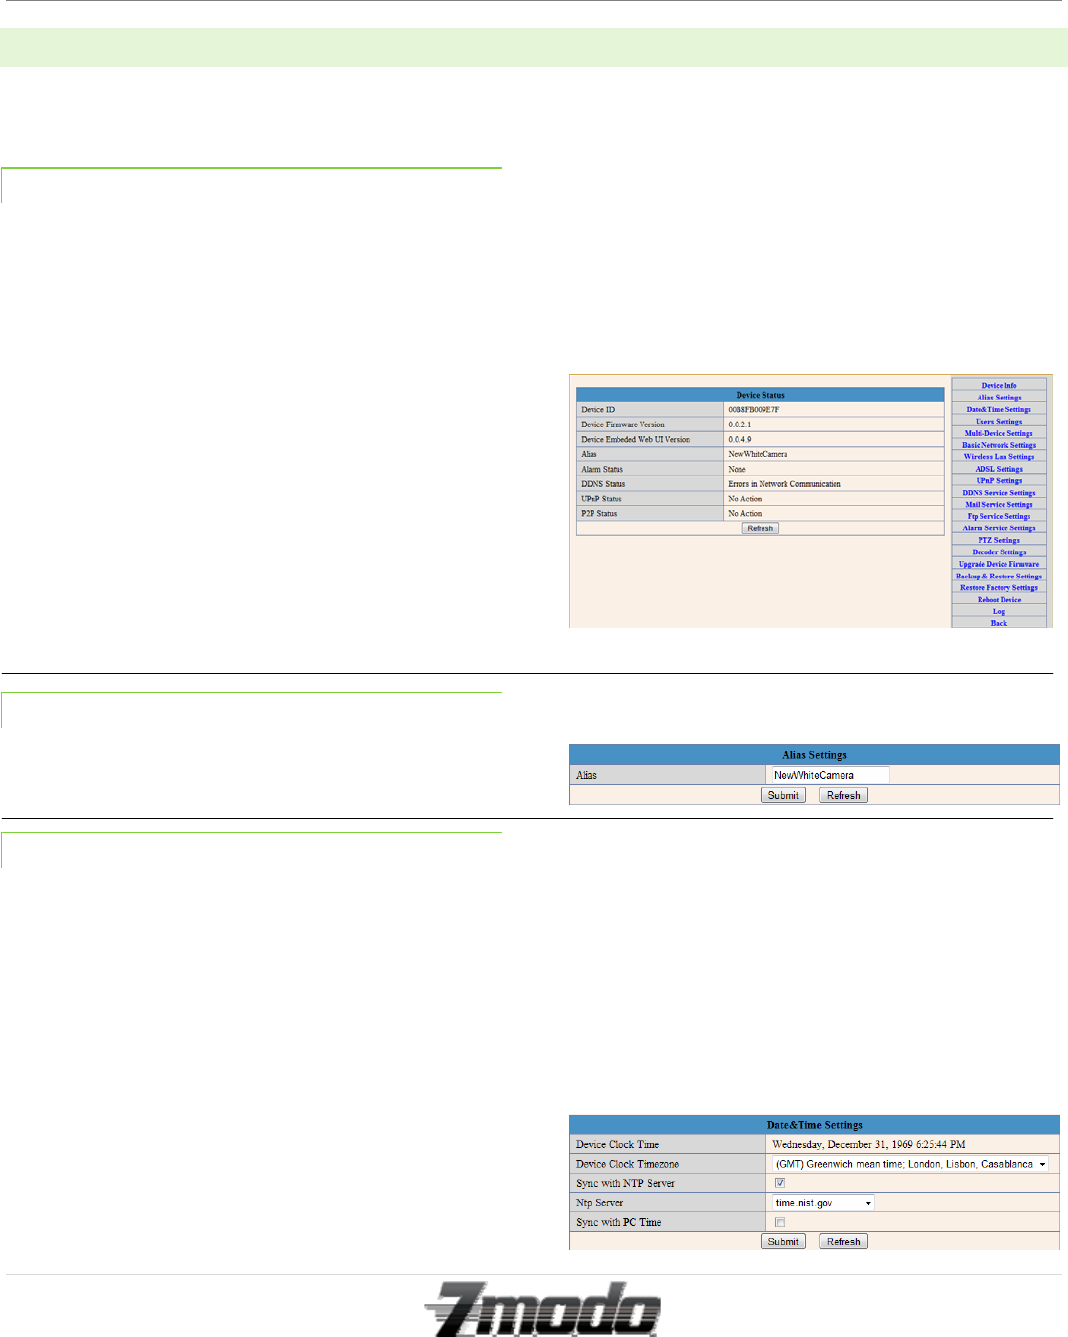
9.1.1 – DEVICE INFO
The device info screen displays the primary statuses; no
settings may be changed or altered from this screen. The
following statuses are displayed:
Device ID
Device Firmware Version
Device Embedded Web UI Version
Alias
Alarm Status
DDNS Status
UPNP Status
P2P Status
9.1.2 – ALIAS SETTINGS
From the Alias Settings menu, the user may change the
IP Camera’s alias.
9.1.3 – DATE AND TIME SETTINGS
From the Time and Date menu, you may adjust the time
zone settings.
The Device Clock Time will display the time setting that
the camera is currently synced to.
In the Device Clock Timezone section, you may choose
which time zone you prefer the IP camera to display.
Clicking the “Sync with NTP Server” will enable the
camera to sync with the selected NIST Internet Time
Service (NTP Server).
Clicking the “Sync with PC Time” will enable the
camera to display the exact same time as your PC.
Zmodo IP Camera
21 | Page
Technical Support
support@zmodo.com
1-217-903-5674
9.2 – BACKEND MENU INTERFACE OPERATION-CONTINUED
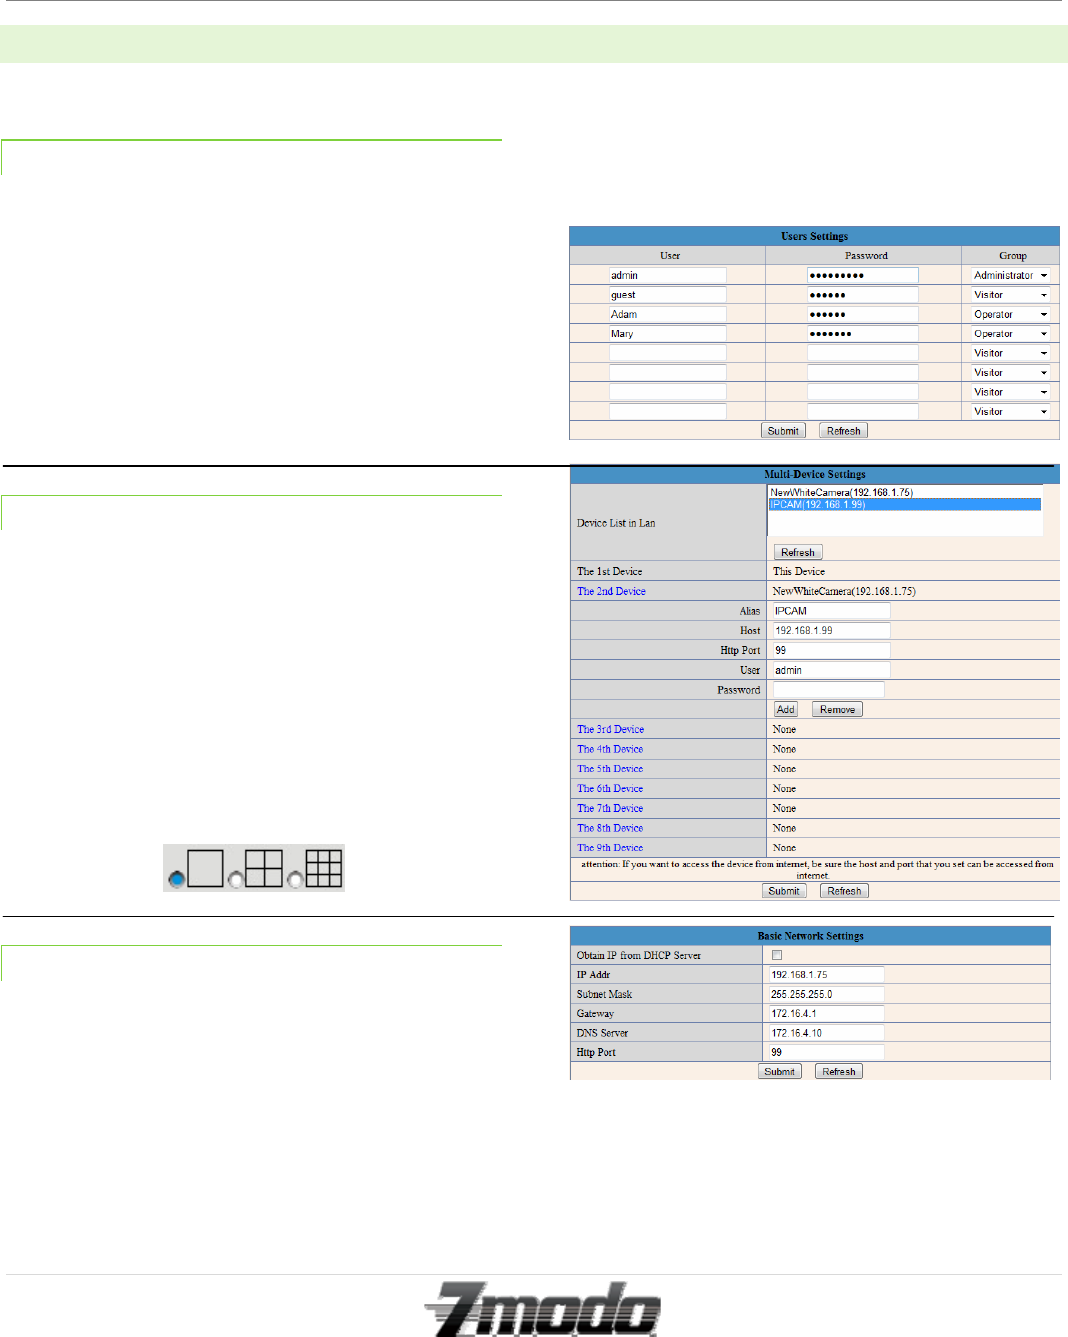
9.2.1 – USER SETTINGS
From this menu, the Administrator may create
additional login profiles with either Administrator
privileges, Operator privileges, or Visitor privileges.
Operator privileges allow the user to adjust settings
from the Main Menu interface, but not from the Backend
Menu Interface. Visitor privileges only allow the user to
view the camera’s live video feed.
The camera will reboot after any changes are made to
this menu.
9.2.2 – MULTI-DEVICE SETTINGS
From this menu, the user may add additional IP cameras
to this device interface.
To add additional cameras, either chose from the list of
available cameras in the “Device List in LAN” or
manually input the Host IP Address, HTTP Port, User, &
Password into the device fields. Then, click “Add.”
After you click “Submit,” all settings will save. You are
now able to view all available cameras from your Main
Menu Interface screen by clicking the following option;
9.2.3 – BASIC NETWORK SETTINGS
The Basic Network Settings screen displays the current
network settings; no settings may be changed or altered
from this screen which do not match the current settings.
*For Wireless LAN Settings instructions please refer to
Section 6 on Page 14.
Zmodo IP Camera
22 | Page
Technical Support
support@zmodo.com
1-217-903-5674
9.3 – BACKEND MENU INTERFACE OPERATION-CONTINUED
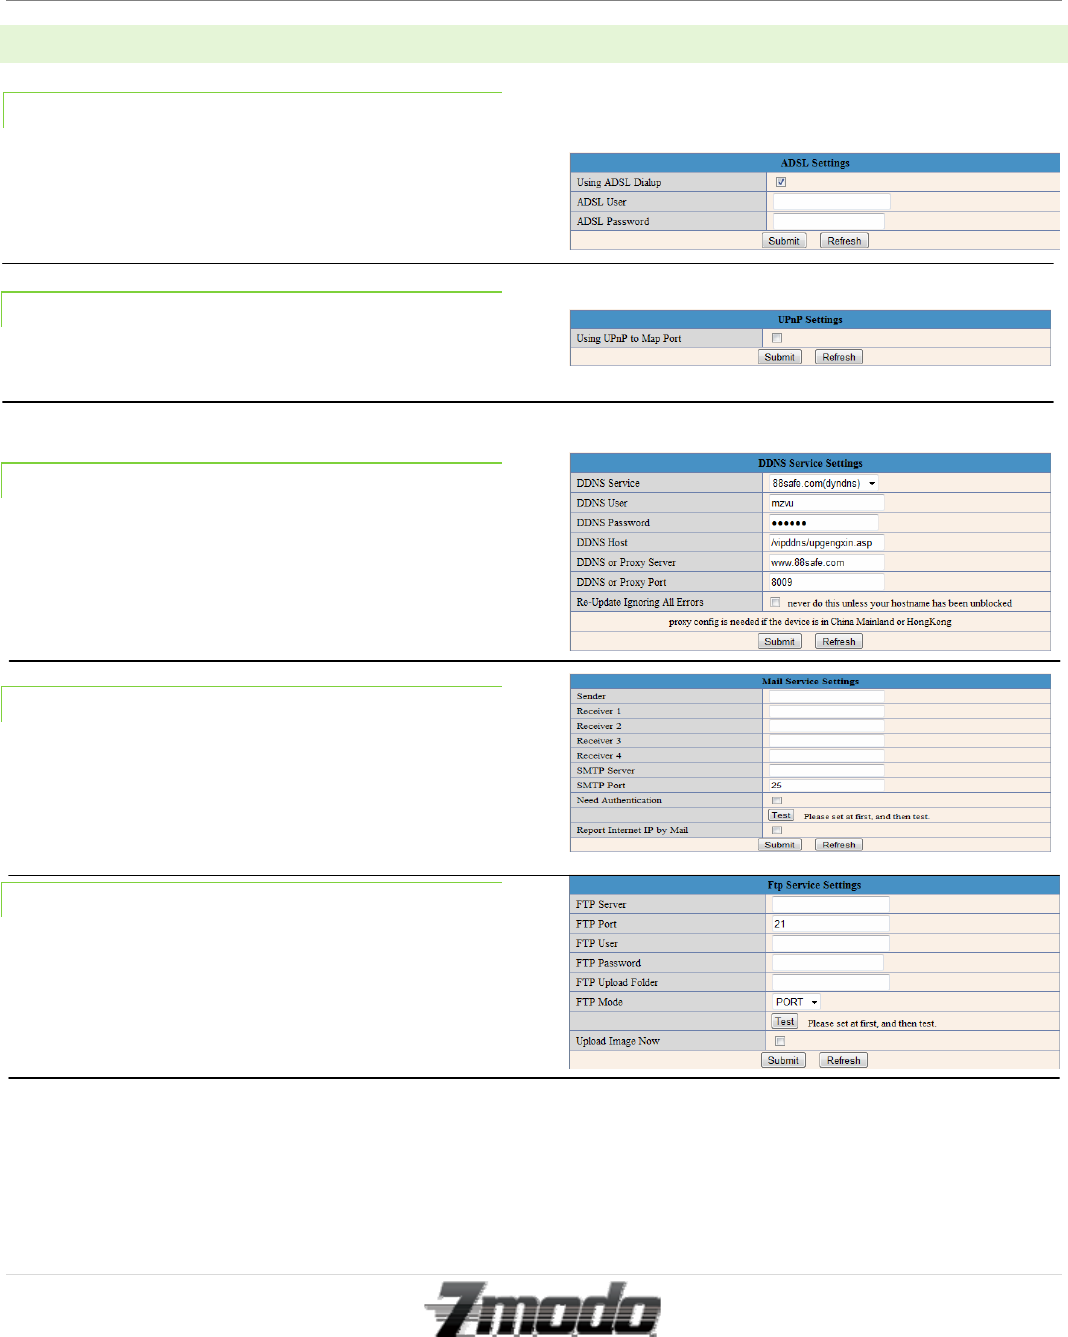
9.3.1 – ADSL SETTING
If your IP Camera is connected directly to an ADSL
internet connection, you may enter your ISP Username
and Password to connect to your ADSL server.
9.3.2 – UPNP SETTINGS
Clicking “Using UPnP to Map Port” will allow your
camera to enable Universal Plug and Play mapping.
9.3.3 – DDNS SERVICE SETTINGS
All settings on the DDNS Service Settings menu are
established by the manufacturer, and they enable the
camera to connect online through its assigned DDNS
server. These settings generally do not need to be
changed by the end user.
9.3.4 –MAIL SERVICE SETTINGS
The email server is owned and operated by the
manufacturer. Since this email server is updated rather
frequently, please contact Zmodo for the current email
server port and authentication.
9.3.5 –FTP SERVICE SETTINGS
The FTP menu allows the user to connect the IP camera
to their FTP (File Transfer Protocol) server. The user
must have access to a live FTP server in order for this
function to operate.
Zmodo IP Camera
23 | Page
Technical Support
support@zmodo.com
1-217-903-5674
9.4 – BACKEND MENU INTERFACE OPERATION-CONTINUED
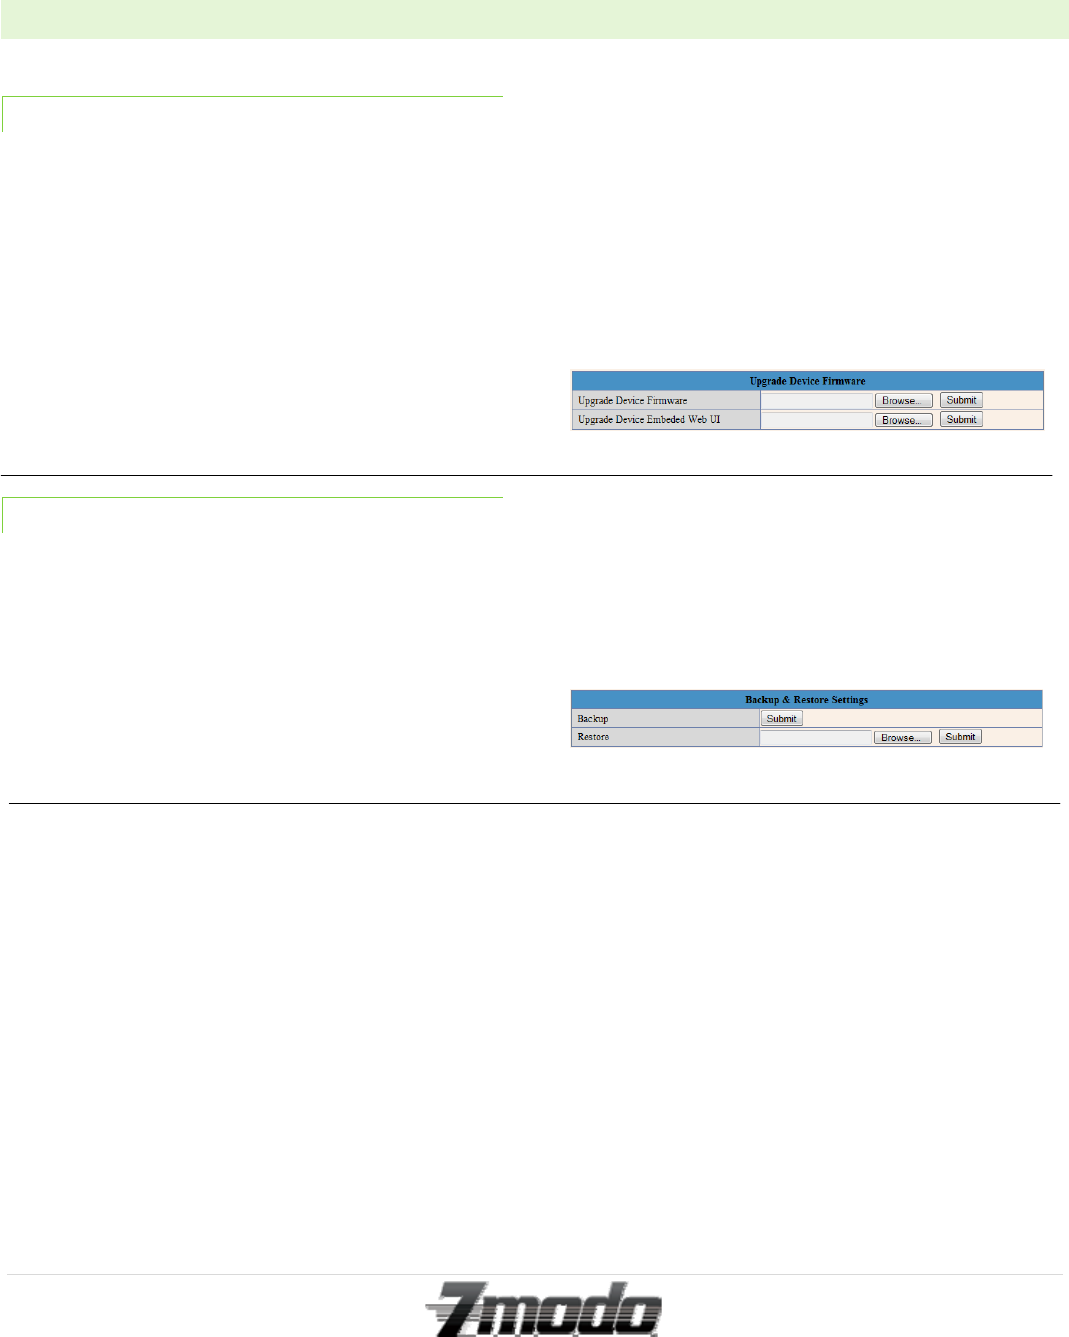
9.4.1 –UPGRADE DEVICE FIRMWARE
When the manufacturer releases a new IP Camera
software version, the user must obtain the new firmware
software and upload the software using this menu.
Make sure you only use a firmware update specifically
designed for the I11133WT before inputting its location
into the “Upgrade Device” field. Any other firmware
may permanently damage the camera.
Once you click “Submit” after inputting the firmware
location, your camera will reboot after a successful
firmware update.
9.4.2 –BACKUP AND RESTORE SETTINGS
Clicking “Submit” from the Backup field will prompt
you to save a current settings restore program to a
location on your current PC.
The Restore field allows you to choose a previously
saved restore program from your current PC. Once you
have input the location of a previously saved restore
setting, you may click “Submit” to apply the previously
saved system settings.
Zmodo IP Camera
24 | Page
Technical Support
support@zmodo.com
1-217-903-5674
9.5 – BACKEND MENU INTERFACE OPERATION-CONTINUED
9.5.1 –RESTORE FACTORY SETTINGS
Clicking this menu button will prompt you to restore all
settings back to factory default.
9.5.2 –REBOOT DEVICE
Clicking this menu button will prompt you to reboot the
IP camera.
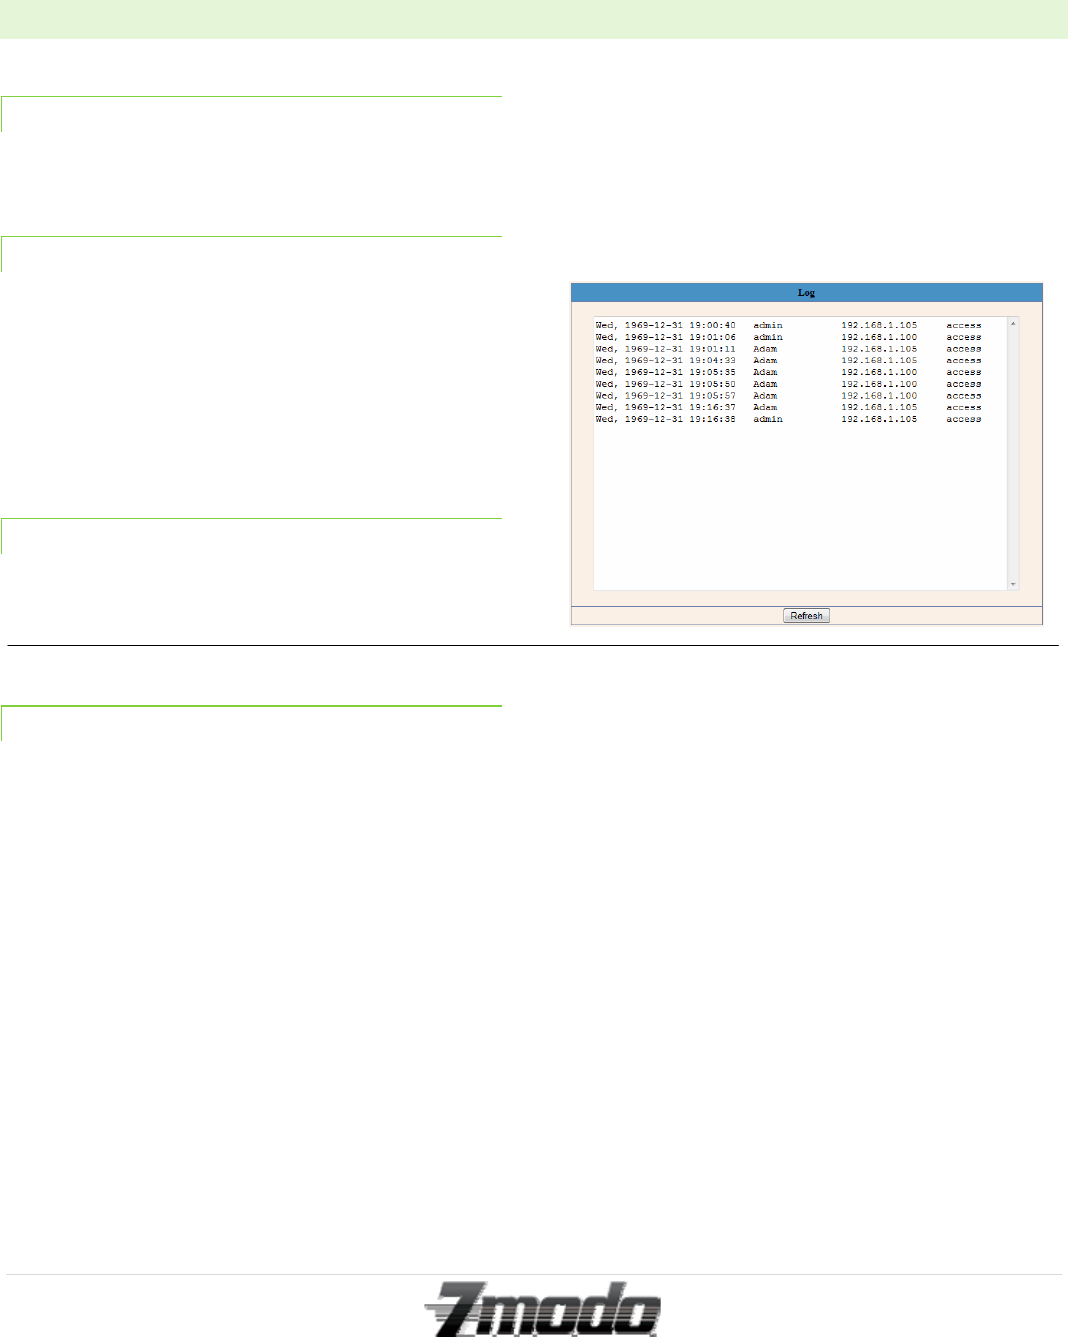
9.5.3 –LOG
This screen will display the IP address and Username of
all recent users who have accessed this IP camera.
9.5.4 –BACK
Clicking this menu button will direct the user back to the
Main Menu screen.

Zmodo IP Camera
25 | Page
Technical Support
support@zmodo.com
1-217-903-5674
10 – APPENDICES
WARRANTY:
All products carry a 1-year warranty unless otherwise
indicated. 3 year warranty plan is also available for
purchase. Zmodo will, at its sole discretion, replace or
repair any products found to be defective during their
warranty period. Zmodo will not honor any other
warranty, implied or otherwise, including those of
merchantability and fitness for a particular purpose.
RETURN:
Merchandise may be returned for a refund or exchange
for 30 days from day of receipt as long as the equipment
is still in "as new" condition. "As New" means that all
items must be undamaged and in their original cartons
and packaging along with all accessories and
documentation. Product must NOT be installed,
mounted, or configured. The product exterior must be
intact and unmarked. The original carton must be
unmarked. No postmarks or labels shall be on the
original box. There is no return on Clearance items.
Shipping costs are not refundable. No refund will be
issued after the first 30 days. During the first year,
defective products may be returned for
repair/replacement only.
A Return Merchandise Authorization (RMA) number
must be obtained by visiting Zmodo.net prior to the
return of any merchandise. Any products returned to us
without an RMA will be rejected and/or sent back to
you at your cost and expense. An RMA number is only
valid for 14 days. We will replace the item and ship it to
you at no charge. Zmodo will employ every resource it
has to ensure that your item is replaced promptly and
without hassle. We do not provide advanced
replacements for any product.
In the event the original equipment is discontinued or
cannot be obtained in a timely manner for
repair/replacement.com reserves the right to substitute
the equipment with alternative equipment.
TECHNICAL SUPPORT:
We value your business and have compiled extensive
documentation on various CCTV related subjects to
ensure successful implementation of your project. You
may download guides and tutorials, including setup and
configuration for PC-Based DVRs, standalone DVRs
cameras, etc by clicking here. We provide FREE lifetime
phone support if you need technical help with any
products you have purchased from us. We do not
provide free phone support to configure your network,
router, DSL and / or Cable Modem as each network is
unique. However, we do provide paid network support
at the rate of $80 per hour with a 30 minute minimum.
LIMITATION OF LIABILITIES:
Zmodo does not represent that the products and services
it sells may not be compromised or circumvented; that
the product will prevent any personal injury or property
loss by burglary, robbery, fire or otherwise; or that the
products or services will in all cases provide adequate
warning or protection. Customer understands that a
properly installed and maintained video monitoring
system may only reduce the risk of burglary or robbery,
but it is not insurance or a guaranty that such will not
occur or that there will be no personal injury or property
loss as a result. Consequently, Zmodo shall have no
liability for any personal injury, property damage or
other loss based on a claim that the products or services
failed to operate or give warning.
Neither Zmodo nor Zmodo's affiliates, employees, or
agents will be liable to customer or to any third party for
any direct, indirect, incidental, special, punitive,
consequential or other damages, losses, allegations,
claims, suits or other proceedings, expenses, liabilities or
costs (including legal fees) including loss of profits,
earnings, business opportunities or data, costs of
procurement of substitute goods or services or personal
injury (including death) resulting from, arising out of or
in connection with, directly or indirectly, customer use
of Zmodo's equipment, services, or installation activities
or customer reliance on any other use of the equipment
or services.

Zmodo IP Camera
26 | Page
Technical Support
support@zmodo.com
1-217-903-5674
10.1 – APPENDICES-CONTINUED
Installation of video surveillance equipment is
performed by third party independent contractors.
Zmodo may assist the customer in finding local
installers and help coordinate installation activities.
However, under no circumstances shall Zmodo be held
liable for damages to customer's property, building, and
personal injury, loss of profits, earnings and cost of
procurement of substitute goods arising out of or in
conjunction with installation activities. Any and all
customer's claims arising out of or in conjunction with
installation activities shall be directed to the third party
installer. It is the responsibility of the customer to ensure
that the installer has proper liability/insurance coverage
and/or properly licensed.
In no event shall Zmodo's total liability for any or all
breaches of warranty exceed the actual amount of
hardware purchased by the customer from Zmodo.
Zmodo will not be responsible for the loss of any
information/video. In the event of any loss in
connection with Zmodo's equipment failing, Zmodo's
sole remedy shall be the replacement of failed
equipment.
CONSENT TO JURISDICTION:
The customer agrees that all actions or proceedings
arising in connection with this Policy shall be tried and
litigated exclusively in the State and Federal courts
located in the County of Champaign, State of Illinois.
The aforementioned choice of venue is intended by the
parties to be mandatory and not permissive in nature,
thereby precluding the possibility of litigation between
the parties with respect to or arising out of this Policy in
any jurisdiction other than that specified above.