ZONDA de C V ZMTN620 GSM Mobile Phone User Manual T123
ZONDA Corporation, S.A. de C.V. GSM Mobile Phone T123
UserManual.wiki
>
ZONDA de C V
>
ZMTN620 User Manual
User Manual
Navigation menu
Upload a User Manual
Namespaces
Wiki Guide
HTML
PDF
Info
Views
User Manual
Discussion / Help
Navigation

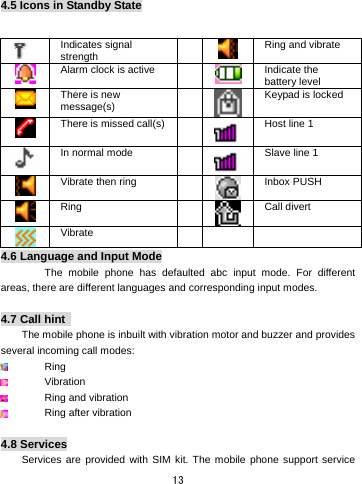
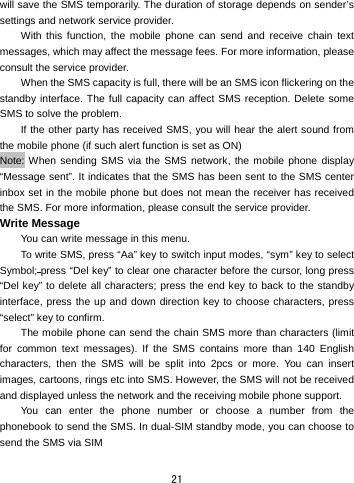
![24 call log, call time, call cost, SMS counter, counter etc. In missed calls, received calls and dialed calls function list, you can see the date and time of the call, edit or delete the phone number in the list, save the number to phonebook or send SMS to the number, etc. Note: SIM and contain 20 entries. Choose any entry from missed calls, received calls and dialed calls, press the Send key to dial the number directly. Call history Missed calls Last Call: With this function, you can view the last call time. Dialed calls: With function, you can view the duration of all dialed calls. Received calls: With the function, you can view the duration of all received calls. Reset all: With this function, you can clear all duration records of calls. Note: The actual call duration and service time in the bill of the service provider may be different from them, which depends on the network functions, accounting rounding and tax etc. Call Cost This needs the support of the network service provider. Last Call Cost: With this function, you can view the fees of the last call. Total Cost: With this function, you can view the fees of all calls. Reset Cost: With this function, you can clear all fee records. Max Cost: With this function, you can limit call fees in the specified pricing unit or currency unit. PIN2 code must be input to set call cost. Price Per Unit: This function needs network support. For more details, please consult the network operator. SIM text message Counter With this function, you can see and preset the number of sent messages and received messages. Call settings [SIM Card settings]](https://usermanual.wiki/ZONDA-de-C-V/ZMTN620/User-Guide-1374794-Page-24.png)
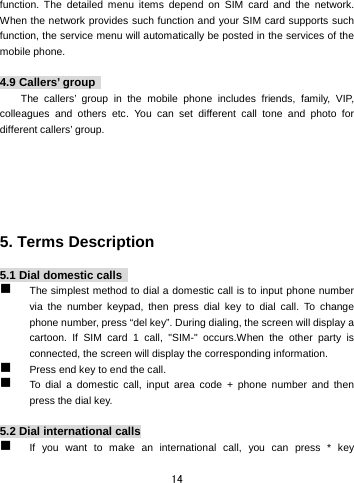
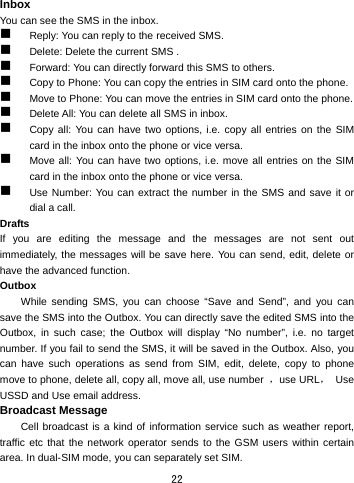
![26 Outgoing Calls: 1. All Calls: You can bar all outgoing calls. 2. International Calls: You can bar international calls. 3. International Calls Except To Home PLMN: When abroad, you can dial the calls of the current country and the original country (the service providers allows to do so). ¾ Incoming Calls: 1. All Calls: You can bar all incoming calls. 2. When Roaming: You can bar all calls except the calls of the local service area. Cancel All: You can cancel call barring settings and dial/receive calls normally. Change Barring Password: You can apply to the network to change the password for call barring. Line Switching: You can choose Line 1 or Line 2. Closed User Group: This function needs network support. Please consult the local operator for details. [Advance settings] Blacklist: You can set the blacklist as the phone guides. Auto Redial: You can set it as On or Off. After the first automatic redial fails, you can have at most ten times to connect a phone number. Call time Display: You can set whether to display call duration during call conversation. Call Time Reminder: You can set one alert tone or periodic alert tone for several round minutes during call conversation so that you can understand call time. You can turn off the alert tone. Auto quick end: You can set call duration. After the set time expires, the mobile phone will automatically end the call. Reject by SMS: You can have this function as choose it On/Off.](https://usermanual.wiki/ZONDA-de-C-V/ZMTN620/User-Guide-1374794-Page-26.png)

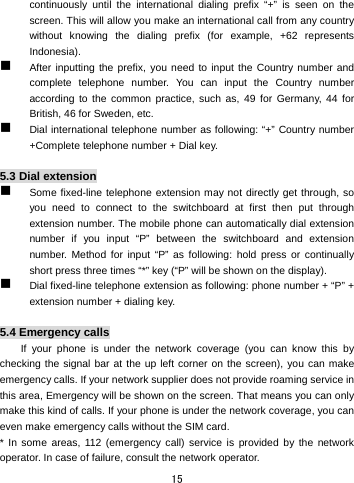
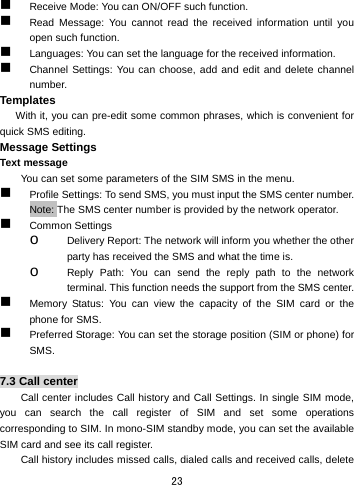
![33 searched channels into the list. Settings: You can set background play, loud speaker, record format, audio quality and record storage. Record: You can record new files. Append: You can have annex record for the files of the superior level (only for the record files in AMR). File list: the record files Schedule FM record You can schedule to record certain FM Radio channel at any time, so that you will not miss the program. Melody composer With this function, you can play the melody that you compose. Enter to the interface; you can enter the melody from 1-7 numbers key. After composing, you can choose the play speed, instrument as the phone guide. 7.6 File Manager You can manage Audio, Images and EBook. [Phone]-- The storage body is phone. [Open]: You can open Audio, Images and EBook Received Audio—Images Folder Open: You can see the current image. New folder: You can set the current file to a new folder. Rename: You can rename the files Delete: You can delete the current record. Sort by: You can rank files as per name, type, time and size or choose “None”. Images—Images Folder Open: You can see the current image.](https://usermanual.wiki/ZONDA-de-C-V/ZMTN620/User-Guide-1374794-Page-33.png)
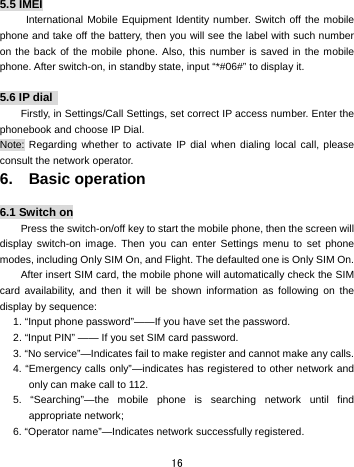
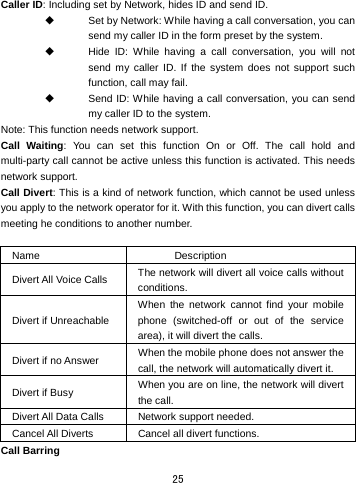
![36 Currency Converter To save exchange rate, press “OK”, then choose to set exchange rate. Choose one exchange rate from the displayed options. After that, press “OK” to confirm. Then the exchange rate will be saved in the memory until you enter a new one to replace it. To convert currency, enter the sum to be converted, press “OK” and then choose to local currency or foreign currency. World Clock Press the left and right direction keys to view the current time of every country corresponding to every time zone. Ebook reader In standby, choose [Menu/Extras/E-book Reader]. After e-book is activated, the e-book list will be displayed. If no e-book, click Options to have such submenus as Clean Up Bookshelf and Global Settings. If there are e-books, you can choose one e-book and press Options to have such submenus as Open E-book, Update, System Preset, Details, Delete, Delete All, Ranking, Execute System Preset and Help. Open E-book: Activate the current e-book and enter the reading menu. Clean up bookshelf: Global settings: You can set Font Style, Font Size, Scroll By, Auto Scroll, Scroll Speed, Full Screen, Encoding, alignment and Storage Priority. Book info: Display the detailed information about the current e-book. Delete: Delete the current e-book. Delete All files: Delete all e-books. Sort by: You can have such options as As per Name, As per Type, As per Time, As per Size or None to rank e-books. Apply global settings: You can execute the options for the preset system. Help: You can have some operation instructions. Use key 0 to go to book settings screen; use key 1 for help; use key 2 to add a bookmark;](https://usermanual.wiki/ZONDA-de-C-V/ZMTN620/User-Guide-1374794-Page-36.png)
![37 use key 3 to go to find screen; use key 4 to go to jump to screen; use key 5 to go to bookmark; use key 6 to find next; use key 7 to toggle the auto scroll; use key 8 to remove bookmark; use key 9 to toggle full screen mode. 7.8 Fun & Games [Games] This mobile phone provides three inbuilt games (puzzle). Please refer to the operation instructions attached to the games. Game settings ¾ BGM: On or off background audio. ¾ Sound effect: On or off audio. ¾ Vibration: On or off Vibration ¾ Volume: Up and Low Volume](https://usermanual.wiki/ZONDA-de-C-V/ZMTN620/User-Guide-1374794-Page-37.png)