ZTE D980 CDMA 1X Digital Mobile Phone User Manual USer Manual
ZTE Corporation CDMA 1X Digital Mobile Phone USer Manual
ZTE >
Contents
- 1. USer Manual
- 2. User Manual
USer Manual
ZTE-C D980
CDMA 1X Digital Mobile Phone
User Manual
Table of Contents
Before you get started ................................................................................1
Keeping your phone safe ........................................................................1
Safety warnings and precautions............................................................1
Parts Definition....................................................................................... 5
Onscreen icons ......................................................................................6
Inserting and removing a UIM card.........................................................7
Inserting and removing a memory card ..................................................7
Using and charging the battery .............................................................. 8
Installing the battery ..........................................................................8
Removing the battery .........................................................................8
Charging the battery ..........................................................................9
Turn On/Off or wake up your phone........................................................9
Main Menu Screen................................................................................ 10
Home Screen........................................................................................ 10
Lock/unlock the keypad ....................................................................... 11
Using the Touchscreen ......................................................................... 11
Adjusting the Volume............................................................................ 11
Functions.................................................................................................. 12
Making and receiving calls ................................................................... 12
Call history ........................................................................................... 13
Contacts............................................................................................... 13
Organiser ............................................................................................. 15
Calendar .......................................................................................... 15
Tasks................................................................................................ 15
Alarm ............................................................................................... 15
World clock ...................................................................................... 15
Messages ............................................................................................. 15
Write a new message........................................................................ 15
View messages................................................................................. 16
Message Settings............................................................................. 17
WAP ..................................................................................................... 17
File manager ........................................................................................ 18
Applications ......................................................................................... 18
Calculator ........................................................................................ 18
Unit converter .................................................................................. 18
Currency converter .......................................................................... 19
Stopwatch ........................................................................................ 19
Games .................................................................................................. 19
Multimedia ........................................................................................... 19
Camera ............................................................................................ 19
Gallery (Image viewer)...................................................................... 20
Video recorder ................................................................................. 20
Media Player .................................................................................... 20
Sound recorder ................................................................................ 21
FM Radio.......................................................................................... 21
Settings ................................................................................................22
Phone settings ................................................................................. 22
Call settings ..................................................................................... 22
Network Settings ..............................................................................23
Security Settings ..............................................................................23
Sound effects ................................................................................... 24
Screen calibration............................................................................ 24
Restore factory settings ...................................................................25
Profiles.................................................................................................25
Connectivity ......................................................................................... 25
Bluetooth®........................................................................................25
Input methods .......................................................................................... 27
Using the Virtual keyboard ................................................................... 27
Using the keyboard............................................................................... 28
Appendix .................................................................................................. 29
Clearance and maintenance.................................................................29
Health and Safety information .............................................................. 31
FCC regulations ............................................................................... 31
Declaration of RoHS Compliance .........................................................34
Disposal of your old phone ...................................................................34
Trouble Shooting ......................................................................................35

1
Before you get started
Keeping your phone safe
Don’t make it easy for thieves to steal or abuse your phone. Don’t
leave it lying around and set a PIN code that you change from time to
time.
If your phone is lost or stolen, tell your network provider straight away.
You’ll need to give them your phone’s IMEI – the identity number
you’ll find on the back of your mobile when you take out the battery.
Remember to make a note of it and keep in a safe place.
Safety warnings and precautions
Precautions for using your mobile phone
You don’t need a license to use your phone, but there are some laws
and precautions you need to follow.
On the road
z Take note of the local laws and regulations while driving. In the UK,
that means no chatting on your phone without a hands-free kit.
Out and about
z Your mobile phone can cause some electronic devices to
malfunction, so think twice before using it near a pacemaker or
other electronic medical devices, fire detectors and auto-control
equipment. For details on how your mobile phone can affect
electronic medical devices, ask the manufacturer or your local
distributor.
z Also be aware that using your mobile phone near TV sets, radios
2
and automated office equipment can interfere with signals.
In the air
z Turn off your mobile phone on any airplane where it’s forbidden
to use it. It can affect the normal operation of electronic devices.
In hospital
z Turn off your mobile phone in hospital where it’s forbidden to
use it.
When filling up
z Don’t use your mobile phone at the petrol station. And turn it off
anywhere near fuels or chemicals.
At the beach
z Keep your mobile phone away from water. If it gets wet, it could
overheat or cause electrical parts to leak or malfunction.
Near children
z Don’t let kids play with your mobile phone – it’s not a toy and
could cause an injury.
Explosion areas
z Follow relevant laws and regulations to the letter when they
concern turning off your mobile phone in or near explosion areas.
Antenna
z Do not use your mobile phone if your antenna is damaged – it
may cause you injury.
Original accessories
z There’s a good reason for using only original accessories or ones
authenticated by the manufacturer. Any others may affect the
mobile phone’s performance, violate your warranty provisions or

3
breach national regulations. They could even cause injury.
Emergency calls
z Turn on your phone, make sure you’re in a reception area, type in
the emergency number and press the Send key to dial.
Precautions for using the battery
z Store the battery in a cool, ventilated place away from direct sunlight.
z All batteries have a limited life – which becomes shorter and
shorter the more your recharge it. If charging fails several times,
it’s time for a replacement.
z Don’t just throw your worn-out battery in the bin. Dispose of it in
designated places according to specified regulations.
z Do not throw your worn-out batteries into fire. It will ignite or
explode.
z When you’re installing the battery, be gentle. Pressing too hard
can cause it to leak, overheat, explode or ignite.
z Do not disassemble or reassemble the battery. It may result in
leakage, overheating, explosion or fire.
z If the battery becomes hot, changes in color or gets deformed
during the course of use, charging or storage, stop using it
immediately and replace it.
z Keep the battery away from dampness to prevent overheating,
smoldering or erosion.
z Do not leave the battery in direct sunlight, in a car or other high-
temperature places, as this may result in leakage or overheating
– and could affect the battery’s performance and shorten its life.
z Do not keep charging the battery continuously over 24 hours.
Note: If the battery is damaged, avoid touching it. If your skin
comes into contact with any of the materials inside the battery,
flush it with lots of water and seek help from a doctor if necessary.

4
Precautions for using the charger
z Use the power voltage between 110VAC and 220VAC. Using
voltage beyond this range may cause leakage, fire or damage to
the phone and charger.
z Do not short-circuit the charger. It might cause electric shock,
smoldering or damage.
z Do not charge the battery in direct sunlight, near dampness,
dust, vibration, TV sets, or radios.
z Do not use the charger if the power cable is damaged. It might
cause fire or electric shock.
z Do not place water containers near the charger. If water or any
other kind of liquid splashes on the charger, immediately remove
the charger from the power socket to avoid overheating, fire,
electric shock or power failure.
z Do not disassemble or reassemble the charger. It might cause
injury, electric shock, fire or damage.
z Do not touch any charger, power cable or power socket with wet
hands. It might cause electric shock.
z Do not place heavy objects on top of power cables or refit power
cables. It might cause electric shock or fire.
z Remove the power plug from the socket before cleaning and
maintenance.
z Hold the charger rather than pull the power cable while
removing the plug from the socket. Failure to do say might cause
damage, electric shock or fire.
5
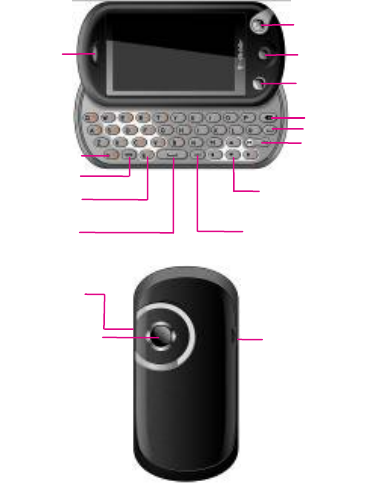
Parts Definition
Receiver
Send key
End/Power key
Space Key
Return key
Delete key
Fn key
Navigation keys
Menu key
SYM key
Caps lock key
Left soft key/Right
soft key
Control Key
USB port
Camera
Vol ume keys
6
Onscreen icons
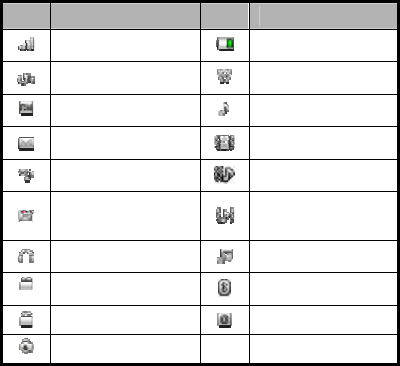
Icons Descriptions Icons Descriptions
Shows the phone’s
network signal strength Shows the phone’s
battery capacity
Call diverting The alarm clock is
active
The phone is under
roaming status The ringer is set to ring
You have unread
message(s) The ringer is set to
vibration
The ring tone is set to
Mute The ringer is set to
vibration then ring tone
You have voice mail
The ringer is set to
vibration and ring tone
together
A headset is connected
to the phone Audio player is on
The keypad is locked
Bluetooth
® connectivity
is on
The keypad is unlocked
You have email
The stopwatch is active
7
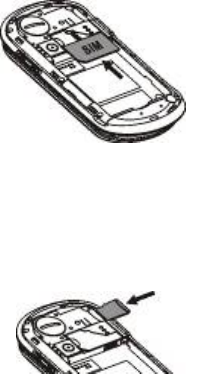
Inserting and removing a UIM card
You need to insert a valid UIM card into your phone before you can
make and receive calls. All your information regarding network
connection plus many of your contacts are saved on the UIM card. So
it makes sense to keep it safe from harm – don’t touch the metal
surface and keep it far away from electricity or magnetism.
1. Turn off your phone, remove the battery and disconnect any
external power sources.
2. Put your UIM card into the socket as shown in the figure.
3. Turn off your phone and remove the battery before taking out
your UIM card.
Inserting and removing a memory card
1. Remove the battery cover.
2. Insert the memory card into the slot as shown.
3. Before you take out the card, please open the battery cover and
press the card inward to unlock.
8
Using and charging the battery
There’s no need to charge the battery first – you can use it as soon as
you’ve removed the packaging. To help your battery live a long and
healthy life, exhaust it completely before fully recharging it for the first
three times.
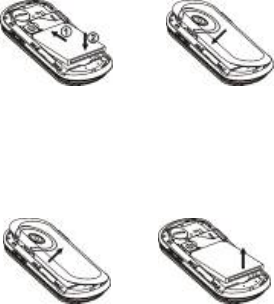
Installing the battery
1. Align the battery's contact points in the direction of the arrow
shown and insert the battery into the slot.
2. Put on the battery cover and press it gently until you hear a click.
Removing the battery
1. Make sure that your phone is switched off.
2. Remove the back cover.
3. Lift the battery up and remove it from the phone.

9
Charging the battery
1. Open the USB port cover at the left side of the phone and insert
the plug.
2. Connect the charger to an AC power socket. When the phone is
powered on and the battery is charging, the battery capacity bar
on the top-right corner of the screen will rise and fall. When the
phone is powered off and the battery is charging, you will still
see a charging indicator on the screen.
3. If the phone is used excessively without sufficient battery power,
the charging indicator will not appear on the screen immediately
and the phone might not be powered on until a few minutes after
the charging starts.
4. It usually takes about two-and-a-half hours to complete the
charging. During charging, it’s normal for the battery, phone and
charger to become warm.
5. Disconnect the charger from your phone and the socket once
the charging is completed.
Turn On/Off or wake up your phone
Hold the Power key to turn your phone on or off.
In Menu→Settings→Phone settings→Misc. settings→LCD
backlight, set the LCD backlight time. If the phone is not operated
within this time, the screen will turn black.
In the closed position from the home screen, you can also press the
Power key to turn off the backlight.
Press any key to wake up your phone.

10
Main Menu Screen
Press the Menu key to enter the main menu. Once at the main menu,
click the icon to select the function, press “Back” to return to the
previous menu, and press the Power key to return to the home screen.
In the open position (when you slide the keypad open), you can use
the navigations keys on the keyboard to move the cursor to the main
menu icons, and either press the icon on the touch screen to select it
or press the OK button on the keyboard.
Home Screen
Widget drawer
Slide your finger up
and down the widget
drawer to display more
function icons.
You can drag the
function icons from the
Widget drawer to the
home screen.
Home Screen
Shortcut tray
Slide your finger left or right over the
icons to view all icons. Click to
shortcut to some key functions. Touch
the icon and slide it to change the
order these shortcuts appear in the
shortcut tray.

11
Lock/unlock the keypad
Locking the keypad can prevent unintentional use.
In the closed position, you can hold down the Menu key to lock the
screen.
Menu Key
To unlock the screen, drag the arrow on the screen to the right and a
message will appear telling you the screen is unlocked.
In Menu→Settings→Security settings→Auto keypad lock, set
the auto keypad lock time. If the phone is not operated within this
time, the keypad will be locked.
Using the Touchscreen
Your phone supports touch screen functionality.
Slide your finger up or down on the screen to move the highlight
bar.
Tap on any application /function icon to open it.
Adjusting the Volume
When you’re on the phone, listening to songs or using other media,
you can press the volume keys on the right side of your phone to
adjust the audio volume.
Also, these volume keys can be used to control the volume of the
ringer when receiving a call.

12
Functions
Making and receiving calls
Basic way to make a call
From the home screen, press the icon to input the number and
press the Send key to dial.
Dial from Contacts
Go to Menu→ Contacts. Find the name of the person you want to
call, and press the Send key.
Make an emergency call
You can make emergency calls without the UIM card inserted so long
as you are in an area with network coverage.
Answer a call
Press the Send key.
End a call
Press the End key.
Call Options
During a call, you can select Options to enter the call options.
You can activate the speakerphone by tapping the H-Free button.
You can put a call on hold, make a new call, and use applications
such as Messaging & Contacts while you’re on a call.

13
Call history
All calls, dialed calls, received calls and missed calls are saved in Call
history. If the records are full, the earliest saved records will be
deleted.
Select Main Menu→Call History→Options to access the following
functions for a number in your call history:
View: View your call record details.
Call: Call the number in records again.
Send message: Send a message to the call record.
Save to Phonebook: Save the current number to Contacts.
Add to Blacklist: Add the current number to Blacklist.
Edit before call: Edit the number before you call.
Delete: Delete the current call record.
Delete all: Delete all your call records.
Advanced includes:
Call timers: Check the duration of a call.
Contacts
Add a new contact
Go to Menu→ Contacts, click to add a new contact. Press Done
to save.
Save a number to Contacts
You can save a number after you’ve made or received a phone call by
going to your Call History, highlighting the number and selecting
Options.

14
Quick search
To quickly search for a contact, enter the first letter of your desired
contact.
Deleting a contact
To delete a contact from your list, first select the name, then select
Options→ Delete.
Delete all contacts
If you want to delete all contacts in the UIM or Phone, please select
Options→ Phonebook settings→ Delete all contacts.
Copy or move contacts
You can copy or move the contacts from UIM to phone and phone to
UIM. You can also copy the records to file. Select Options→ Copy or
Move.
If you want to move or copy all contacts in UIM or phone, please
select Options→ Phonebook settings→ Copy contacts/Move
contacts.
Select several contacts
Select Options→ Mark several and then select the contacts you want
to mark. Once selected you can send a message to all marked
contacts or delete them.
Set preferred storage
Select Options→ Phonebook settings→ Preferred storage and then
select UIM, Phone or Both.
View memory status
Select Options→ Phonebook settings→ Memory status to check
the memory status on the phone and UIM.

15
Speed Dial
You can choose 8 phone numbers which can be dialed using the
keypad numbers 2-9. To speed dial, hold the numeric keys 2-9 to dial
the corresponding number. Select Options→ Phonebook
settings→ Speed dial to set the speed dial numbers.
Organiser
Calendar
When you enter “Calendar”, the current month will be displayed on
the screen and the current date will be marked by a background box
in a special colour.
Press the navigation keys on the keypad or click the direction arrows
on the touchscreen to browse the dates. The information on the
screen will change automatically.
Ta s k s
View things you’ve got to do and add new tasks.
Alarm
You can set up to five alarms. The alarms can be one time alarms or
repeating ones.
World clock
You can view the time in different cities.
Messages
Write a new message
1. Go to Main Menu→ Messaging→ Write SMS or MMS.
2. Enter the phone number of the recipient or add from
Contacts.
3. Write your message in the text field. For more information on

16
input method, see the ‘Input text’ section of this guide. The
default message type is SMS.
4. If you want to change to MMS, you can press Options and
choose Switch to MMS; or you can press Options and choose
Add picture, Add sound, Add video or Add subject to directly
insert multimedia contents to the message and it will switch to
MMS automatically.
5. You can select Options→ Slide options to add a new slide.
6. To send the message (when using the touch screen only), press
the icon to come out of the virtual keypad and then select
to send the message.
7. To send the message when using the keyboard you will see the
option to send icon at the bottom of the page .
8. If you want to save the MMS as a draft, select Options→ Save to
Drafts. If you are writing an SMS, select Options→ Save.
View messages
Upon receiving a message, the phone will alert you with a ringtone,
prompt, or a new message icon.
1. Press View to access your message Inbox and view the message.
You can also go to Inbox through the main menu to read the
message.
2. While the message is open, use Options to reply, delete, or
forward the message. You can also call back the sender.
By selecting messaging in the main menu, you can.
Select Inbox to view received messages.
Select Drafts to view unsent messages.
Select Outbox to view unsuccessfully sent and saved messages.
Select Sent messages to view successfully sent and saved
messages.
Select Archive to view archive messages.
Select Advanced to insert a text template, attachment, contact
number, contact name or bookmark.

17
Message Settings
Text me s sage
Profile settings: This is automatically set. Please contact your
network provider if this is not available.
Voicemail server: When you are unable to answer the call, you
can let the caller leave a message for you on voicemail to listen
to later. From the home screen, hold the “1” key to dial the
voicemail number. This service requires network support so
please make sure you apply for this it before use.
Common settings: You can set Delivery Report and Reply path
on or off. You can choose whether to save sent messages or not.
Memory status: View the UIM or Phone memory status.
Preferred storage: Set the preferred storage to UIM or Phone.
Preferred connection: Set the preferred connection to prefer
CDMA
Multimedia message
Profiles: Your handset is preloaded with the MMS profiles and
you can also add new ones.
Common settings: You can choose the settings related to
Compose, Sending, Retrieval, Preferred storage and Memory
status.
WAP
Your phone supports Wireless Application Protocol (WAP).
WAP lets you access information about news, weather forecasts,
airline flights and more.

18
You can use the services by pressing the icon at the bottom of
the home screen
Once you are at the T-Mobile home page, press Options for further
functions such as bookmarks, recent pages etc.
Note: WAP service requires network support. Please consult your
network operator for details on usability and quotation of WAP
services.
File manager
You can view all the files in the phone and memory card, create new
ones, rename, delete or sort by, etc. The files you download from the
internet will be stored in these folders.
Note: When you select Format, the data will be lost, so please be
careful with this function. Your phone supports Digital Rights
Management (DRM).
Applications
Calculator
Your phone provides a calculator to perform UIMple calculations. You
can add, subtract, multiply or divide, and select M+, M-, MR and MC
to perform relevant operations.
Unit converter
Your phone comes with a unit converter to convert weights and
lengths.

19
Currency converter
Your phone comes with basic functions for currency conversions.
Stopwatch
You can choose Split timing or Lap timing.
Games
Your phone is preset with two classic games. Enter the game and
view “Help” for more information on the rules of the game.
Multimedia
Your phone supports video and image, audio and DRM.
Camera
Tak i n g a Pho to
Go to Main Menu → Multimedia→ Camera to take a photo. Click the
icon to take the shot.
Configuring your camera
In camera mode, click the icon on the bottom left corner of the
screen to configure your camera. You can select the following
functions:
Switch to video recorder: Switch to record video mode.
Photos: Enter Album to view the photos you’ve just taken.
Camera settings: Set Shutter sound, EV, Contrast, Anti-flicker,
Delay timer and Cont. shot.
Image settings: Set Image size and Image quality.
White balance: Select Auto, Daylight, Tungsten, etc.

20
Scene mode: Select Auto or Night.
Effect settings: Select Normal, Grayscale, Sepia, etc.
Storage: Select Phone or Memory card.
Restore default: Restore to factory default settings.
Gallery (Image viewer)
Select “Gallery (Image viewer)” to view the photos you’ve taken or to
see the other pictures saved in “Album”.
Video recorder
Recording a video
Go to Main Menu→Multimedia→Video recorder to record a video.
Click the icon to start, click icon to pause, and click the
icon to finish recording.
Configuring your video recorder
Click the icon on the bottom left corner of the screen to configure
your video recorder:
Switch to camera: Switch to camera mode.
Camcorder settings: Set EV, Night mode and Anti-flicker.
Video settings: Set Video quality, Size limit reached, Time limit
reached, Record audio.
White balance: Select Auto, Daylight, Tungsten, etc.
Effect settings: Select Normal, Grayscale, Sepia, etc.
Storage: Select Phone or Memory card.
Restore default: Restore to default factory settings.
Media Player
You can listen to music stored in your phone or on the memory card.
21
In My playlists, you can edit your playlists, set storage, or make
personal settings.
To create a playlist, in My playlists, select Options→New, and then
set the list name. From the chosen list select Options→Add, and
select the files or folder, then the audio list will be loaded to your
named playlist.
Audio file formats supported: AMR-NB, AMR-WB+, WAV, AAC, AAC+,
MP3, MIDI.
Open the playlist and select Options→Play.
Note: Turn it down! For safety reasons, please select medium
volume when you’re listening to music.
Sound recorder
From Main Menu Multimedia→→Sound Recorder you can record
sounds. Click icon to record a sound clip. Press the ■ icon to save.
Click the icon for Options. Select Settings to set preferred storage,
file format and audio quality. Select List to listen to the sound clips
you have recorded.
FM Radio
Note: You can only listen to the radio when using a stereo
headset.
You can search for radio channels, listen to them, and save them on
your device. Note that the quality of the radio broadcast depends on
the coverage of the radio station in that particular area. When you
receive an incoming call while listening to the radio, the radio will
switch off.
From Main Menu→Multimedia→FM radio. Click the icon to view
the Options available to you:
Channel list: Edit up to 9 channels.
Manual input: Manually input a channel.

22
Auto search: Automatically searches for channels.
Settings: You can turn on Loudspeaker. You can set Record
format, Audio quality, Record storage
Record: Record the radio.
Append: Continue to record AMR files on the current file.
File list: Display the list of files.
Settings
Phone settings
Go to Main Menu→Settings→Phone Settings to perform the
following functions
Time and date: You can set home city, time and date, and format.
Schedule power on/off: Set auto power on and off time.
Language: Your phone is set to English.
Display: You can set Wallpaper, Screen saver, Main menu effect,
Show owner number and Screen switch effect.
Auto update of date and time
Flight mode: You can select to use flight mode. In flight mode, all
wireless functions are disabled.
Misc. settings: You can set the LCD backlight brightness and
time.
Call settings
Go to Main Menu→Settings→Call settings
Caller ID
You can choose from Set by network, Hide ID or Send ID. Please
contact your network provider for details.

23
Call waiting
If call waiting is activated, your phone will inform you if there is
another incoming call.
Call divert
This function allows you to divert incoming calls to another
designated number.
Note: This function requires network support, so please contact
your network provider for details.
Call barring
You can bar outgoing and incoming calls. Please contact your
network provider for details.
Advance settings
You can set Blacklist, Auto redial, Call time display, Call time reminder,
Auto quick end and Reject by SMS.
Network Settings
Go to Main Menu→Settings→Network Settings
You can set Network selection to Automatic or Manual. If you have
selected a network manually, you have to manually select again or
return to the Automatic mode to select a network when you switch to
the UIM card of another network.
Preferences allows you to select a Network from the list shown.
CDMA connection can be set to When needed or Always.
Security Settings
Go to Main Menu→Settings→Security Settings
UIM lock: If UIM Lock is currently set Off, select it again then
input a PIN code to turn it on. You need to input the correct PIN

24
code to unlock your UIM card when you turn on your mobile
phone next time.
Note: The PUK code is required to unlock the UIM card if you
have incorrectly input the PIN code three consecutive times. The
PIN code and the PUK code may be supplied along with the UIM
card. If not, contact the network provider.
Phone lock: Phone lock can prevent your mobile phone from
unauthorised use. Select On/Off to enable or disable the
protection.
Auto keypad lock: Select a time for auto keypad lock to activate
and the phone will automatically lock the keypad after the
chosen time set to prevent unintended use.
Change password: You can change the PIN, PIN2 and phone
password here.
Note: You may be required to input the phone lock code in some
of the security settings interfaces. The default lock code is 0000.
Go to Security settings→Change password→Phone password to
change the phone lock code.
Sound effects
Go to Main Menu→Settings→Sound effect
Set Audio effect and Bass enhancement.
Screen calibration
Go to Main Menu→Settings→Screen calibration
If you feel your phone doesn’t react properly to your touch on the
screen, you may need to calibrate the touch screen. You can fix this
using the screen calibration function.
Complete the calibration operation according to the screen prompts.
Touch the centre of the cross until the calibration is completed.
25
Restore factory settings
To Restore Factory Settings, you need to enter the correct phone lock
password and then press “OK”.
Profiles
Go to Main Menu→Profiles
You can select your preferred profile in this menu. The profile options
are: General, Vibrate, Outdoor, Indoor, Headset and Bluetooth. You
can customise the settings of each profile by selecting Options→
Customise. Here you can choose tone settings, volume, alert type,
ring type, extra tone and answer mode.
Note: The Headset mode can only be activated when the headset
is connected to the phone.
Connectivity
Bluetooth®
Bluetooth® lets you transfer data from your phone to other Bluetooth®
devices, and you can listen to music or talk hands-free with a
Bluetooth® Headset.
Just make sure the distance between your phone and other
Bluetooth® devices doesn’t exceed 10 metres.
The Bluetooth
®
word mark and logos are owned by the Bluetooth SIG,
Inc. and any use of such marks by ZTE Corporation is under license.
Other trademarks and trade names are the property of their
respective owners
Note: Your Bluetooth® connection may experience interference
caused by certain obstructions or other electronic devices
26
Turn Bluetooth® on or off on your phone
Go to Main Menu→Connectivity→Bluetooth®→Power to turn
Bluetooth® on or off.
Make your phone visible
Go to Bluetooth®→Visibility. You can choose to be visible or not.
When your phone is visible, and Bluetooth® is turned on, all other
Bluetooth®
enabled devices within range can detect your phone.
Create a Bluetooth® pairing
1. Go to Bluetooth®→My device→Search new device to search
and view other Bluetooth® enabled devices.
2. Select the desired device from the list and press Pair.
3. When your phone is connecting, your phone and the device it’s
pairing with must enter the same password to successfully
connect them both.
Note: Some devices such as Bluetooth® headsets might have the
fixed password “0000”. You need to input this password if your
phone prompts you to enable connection to the device.
Sending information via Bluetooth®
After a Bluetooth® pairing is complete, you can send information
such as contacts and audio files from your phone to another
Bluetooth® enabled device.
Connecting to a Bluetooth® headset
For hands-free phone conversations or to listen to music, you can use
a Bluetooth® headset.
Go to Bluetooth®→Search audio device to search for the Bluetooth®
headset.

27
Input methods
Using the Virtual keyboard
If the phone is in the closed position you can use the virtual keyboard
to input.
z Show virtual keyboard: Click any space when in a text input
area (i.e. writing a text message) to show the virtual keyboard.
z Hide virtual keyboard: Click icon.
z Change input method: Click Ctrl icon to change the input
method.
z Input Letters: In abc method, click the corresponding letters to
input your desired letter. Each key is used to input multiple
letters. Click the key quickly and repeatedly until your desired
letter appears.
z Input Words: In Smart abc method, click each key only once for
every letter. The word changes after each key stroke. When you
finish writing the word correctly, click the word to confirm. If the
word displayed on the screen is not what you want, click the
arrow to view other matching words, and then click the word to
confirm. Predictive text input is based on a built-in dictionary.
z Switch caps lock: Click icon.
z Input numbers: In 123 mode, click the corresponding numbers
on the screen to input your desired numbers.
z Input symbols: Click SYM to select the corresponding symbols
to input.
z Insert a space: Click 0 to input the space. It does not work in 123
mode.
z Delete Character: Click to delete the previous character

28
before the cursor.
z Delete all Characters: Hold to delete all characters.
z Move Cursor: Whilst in the text line, tap the cursor in the
direction you want to move to.
Using the keyboard
When the phone is in the open position (i.e. you have pulled out the
keyboard), you can use the keyboard to perform the following
functions whilst in an input text screen.
z Switch input method: Press the Ctrl key.
z Insert a space: Press the Space key.
z Delete: Press the Delete key to delete the text entered before the
cursor.
z Switch caps lock: Press the Caps lock key.
z Line feed: Press the Return key.
z Input letters and common symbols: There are two symbols on
the keys. In abc/Abc/ABC method, press the key to input the
symbol located on the lower part of the key; press the FN key
and then press the key to input the symbol located on the upper
part of the key; press the FN key twice and then press the key to
continuously input the symbol located on the upper part of the
key.
In Smart abc/Abc/ABC method, your phone predicts the word
as you enter it, so you only need to input the first few letters of
the word.
z Input numbers: In 123 mode, press the numeric keys to input
the corresponding numbers.
z Input symbols: During the text input, press SYM key to display
symbol lists, press the Navigation keys to select the symbol, and
press the Left Soft key ‘OK’ to confirm.

29
Appendix
Clearance and maintenance
Your phone is delicately designed, so please treat and maintain it
with care. The following maintenance tips might help you extend the
life of your phone.
1. Clean your phone, battery and charger with a soft dry cloth.
2. Do not clean your phone with alcohol, dilution agent or
benzene (or other liquors).
3. Clean the socket from time to time because a dusty
socket might cause disconnection, power failure, or even
charging failure.
4. Do not press the keys with needles, pen points or other
sharp objects – this might cause damage to the phone,
which in turn might mean the phone doesn’t work
properly.
5. Keep tiny metal objects like pins away from the phone
receiver. The phone speaker is magnetic and thus
magnetizes those metal objects, which may hurt people
or damage the phone.
6. Keep your mobile phone dry. Rain, moisture or any kind
of liquid containing minerals might corrupt the circuit.
7. Do not touch the phone with wet hands because this
might cause electric shock.
8. Don’t use or put your phone in a dusty or dirty environment,
as this might damage the phone’s precision components.
30
9. Don’t let your phone get too hot, as this might shorten the
life of electronic devices, damage the battery, twist or
melt some plastic parts.
10. Don’t let your phone get too cold, as water vapour can
form inside the phone, causing damage when it returns
to normal temperature.
11. Don’t put your phone in or on any heating devices
(microwave oven, toaster or radiator). Overheating might
result in an explosion.
12. Please send your phone to the nearest service centre for
inspection if there is anything wrong with it, the battery,
charger or accessories. The service centre staff will give
you all the help you need.
31
Health and Safety information
FCC regulations
z This mobile phone complies with part 15 of the FCC Rules.
Operation is subject to the following two conditions: (1) This
device may not cause harmful interference, and (2) this device
must accept any interference received, including interference that
may cause undesired operation.
z This mobile phone has been tested and found to comply with the
limits for a Class B digital device, pursuant to Part 15 of the FCC
Rules. These limits are designed to provide reasonable protection
against harmful interference in a residential installation. This
equipment generates, uses and can radiated radio frequency energy
and, if not installed and used in accordance with the instructions,
may cause harmful interference to radio communications. However,
there is no guarantee that interference will not occur in a particular
installation If this equipment does cause harmful interference to
radio or television reception, which can be determined by turning the
equipment off and on, the user is encouraged to try to correct the
interference by one or more of the following measures:
-Reorient or relocate the receiving antenna.
-Increase the separation between the equipment and receiver.
-Connect the equipment into an outlet on a circuit different from
that to which the receiver is connected.
-Consult the dealer or an experienced radio/TV technician for help.
Changes or modifications not expressly approved by the party
responsible for compliance could void the user‘s authority to operate
the equipment.
z The antenna(s) used for this transmitter must not be co-located or
operating in conjunction with any other antenna or transmitter.
32
4RF exposure information (SAR)
This mobile phone meets the government’s requirements for
exposure to radio waves.
This phone is designed and manufactured not to exceed the
emission limits for exposure to radio frequency (RF) energy set by the
Federal Communications Commission of the U.S. Government.
The exposure standard for wireless mobile phones employs a unit of
measurement known as the Specific Absorption Rate, or SAR. The
SAR limit set by the FCC is 1.6W/kg. *Tests for SAR are conducted
using standard operating positions accepted by the FCC with the
phone transmitting at its highest certified power level in all tested
frequency bands. Although the SAR is determined at the highest
certified power level, the actual SAR level of the phone while
operating can be well below the maximum value. This is because the
phone is designed to operate at multiple power levels so as to use
only the poser required to reach the network. In general, the closer
you are to a wireless base station antenna, the lower the power
output.
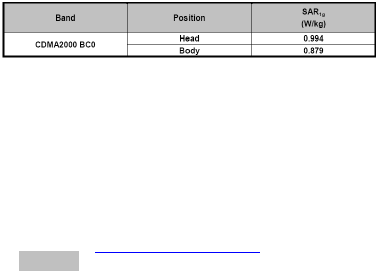
The highest SAR value for the model phone as reported to the FCC
when worn on the body, described in this user guide is
(Body-worn measurements differ among phone models, depending
upon available accessories and FCC requirements.)
While there may be differences between the SAR levels of various
phones and at various positions, they all meet the government
requirement.
The FCC has granted an Equipment Authorization for this model
phone with all reported SAR levels evaluated as in compliance with
the FCC RF exposure guidelines. SAR information on this model
phone is on file with the FCC and can be found under the Display
Grant section of http://www.fcc.gov/oet/fccid after searching on FCC
ID: Q78-D980.
33
For body worn operation, this phone has been tested and meets the
FCC RF exposure guidelines for use with an accessory that contains
no metal and the positions the handset a minimum of 1.5 cm from
the body. Use of other accessories may not ensure compliance with
FCC RF exposure guidelines. If you do no t use a body-worn
accessory and are not holding the phone at the ear, position the
handset a minimum of 1.5cm from your body when the phone is
switched on.
This device is compliance with SAR for general population
/uncontrolled exposure limits in ANSI/IEEE C95.1-1999 and had
been tested in accordance with the measurement methods and
procedures specified in OET Bulletin 65 Supplement C.

34
Declaration of RoHS Compliance
To minimise the environmental impact and take more responsibility
for the earth we live in, this document shall serve as formal
declaration that the ZTE-C D980 manufactured by ZTE
CORPORATION is in compliance with Directive 2002/95/EC of the
European Parliament -RoHS (Restriction of Hazardous Substances)
with respect to the following substances:
(1) Lead (Pb)
(2) Mercury (Hg)
(3) Cadmium (Cd)
(4) Hexavalent Chromium (Cr (VI))
(5) Polybrominated biphenyls (PBB’s)
(6) Polybrominated diphenyl ethers (PBDE’s)
(Compliance is evidenced by written declaration from our suppliers,
assuring that any potential trace contamination levels of the
substances listed above are below the maximum level set by EU
2002/95/EC, or are exempt due to their application.)
The ZTE-C D980 manufactured by ZTE CORPORATION, meets the
requirements of EU 2002/95/EC.
Disposal of your old phone
1. When this crossed-out wheeled bin symbol is attached to a
product it means the product is covered by the European
Directive 2002/96/CE.
2. All electrical and electronic products should be disposed of
separately from general household waste via designated
collection facilities appointed by the government or the local
authorities.
3. The correct disposal of your old phone will help prevent
potential negative consequences for the environment and
human health.
35
Trouble Shooting
Symptoms Possible Causes Solutions
Inadequate battery
capacity Charge the battery
Unable to turn on
the phone Poor contact Reinstall the battery
Automatic
power-off
Seriously poor
battery capacity Recharge the battery
Deceasing of battery
performance Replace the battery
Inadequate
standby time Poor network signal Turn off the phone as
the signal is poor
Poor network signal Move to other places
Unable to
connect to the
network Out of service area
Make sure your
phone is in network
service area
Call drop Poor network signal Move to other places
Does not ring
upon incoming
calls
Set to “Silent” or
minimum volume
Enter “My Profiles” to
set Non-silent
or check the ringing
volume
Prompt to input
PUK
UIM card locked due
continuously entering
an incorrect PIN code
three times
Contact your network
operator
Unable to view
some photos
Your phone doesn’t
support the photo
format, or the size of
photo is too big
Change the photo
format or size