user manual
1
MF28B
User Manual
ZTE CORPORATION
NO. 55, Hi-tech Road South, ShenZhen, P.R.China
Postcode: 518057
Tel: +86-755- 26779999
http://www.zte.com.cn
E-mail: mobile@zte.com.cn
2
LEGAL INFORMATION
Copyright © 2012 ZTE CORPORATION.
All rights reserved.
No part of this publication may be excerpted, reproduced, translated or utilized in any form or by
any means, electronic or mechanical, including photocopying and microfilm, without the prior
written permission of ZTE Corporation.
The manual is published by ZTE Corporation. We reserve the right to make modifications on print
errors or update specifications without prior notice.
Version No. : R1.0
Edition Time : 05-2012
3
Content
Welcome ............................................................................................................................... 4
Getting started ....................................................................................................................... 5
Appearance........................................................................................................................ 5
LED Indicator ............................................................................................................... 5
Interface Description ..................................................................................................... 6
Installation ......................................................................................................................... 6
Inserting (U)SIM Card .................................................................................................. 6
Connecting to Computer ............................................................................................... 7
Connecting to LAN1/WAN .......................................................................................... 7
Connecting with External Power .................................................................................. 7
Switching on Your Device ............................................................................................ 7
Power Supply .................................................................................................................... 8
Internet Access ...................................................................................................................... 9
Preparation ........................................................................................................................ 9
Establishing a connection between your device and the client ......................................... 9
Accessing the Internet ..................................................................................................... 10
Accessing the Internet by Bridge Mode ...................................................................... 10
Accessing the Internet by Cable Broadband ............................................................... 10
Accessing the Internet by LTE Gateway .................................................................... 10
Accessing the WebGUI Configuration Page .................................................................. 10
Login ............................................................................................................................... 11
Operation Mode .............................................................................................................. 12
WAN Connection ............................................................................................................ 13
In Cable Broadband mode........................................................................................... 13
In 4G Gateway mode .................................................................................................. 14
Settings ............................................................................................................................ 15
Network Select ............................................................................................................ 15
Wi-Fi Settings ............................................................................................................. 16
Firewall ....................................................................................................................... 18
Advanced .................................................................................................................... 22
Status ............................................................................................................................... 26
Usage of WPS ................................................................................................................. 26
Logout ............................................................................................................................. 27
U-Disk Master ................................................................................................................. 27
Troubleshooting .................................................................................................................. 28
Glossary .............................................................................................................................. 29
General Information ............................................................................................................ 30
Safety Precautions ........................................................................................................... 30
Cleaning and Maintaining ............................................................................................... 30
Limited Warranty ............................................................................................................ 32
Limitation of Liability ......................................................................................................... 32

4
Welcome
Thank you for choosing ZTE MF28B Router (hereinafter referred to as “unit” or “router”). To get the
most from your router and to keep it in the best condition, please read this manual carefully.
The pictures, symbols and contents in this manual are for your reference only. They might not be
completely identical with your router. ZTE operates a policy of continuous development. We reserve the
right to update the technical specifications in this manual at any time without prior notice.
5
Getting started
The router operates on the LTE/HSUPA/HSDPA/WCDMA network and supports data service.
Appearance
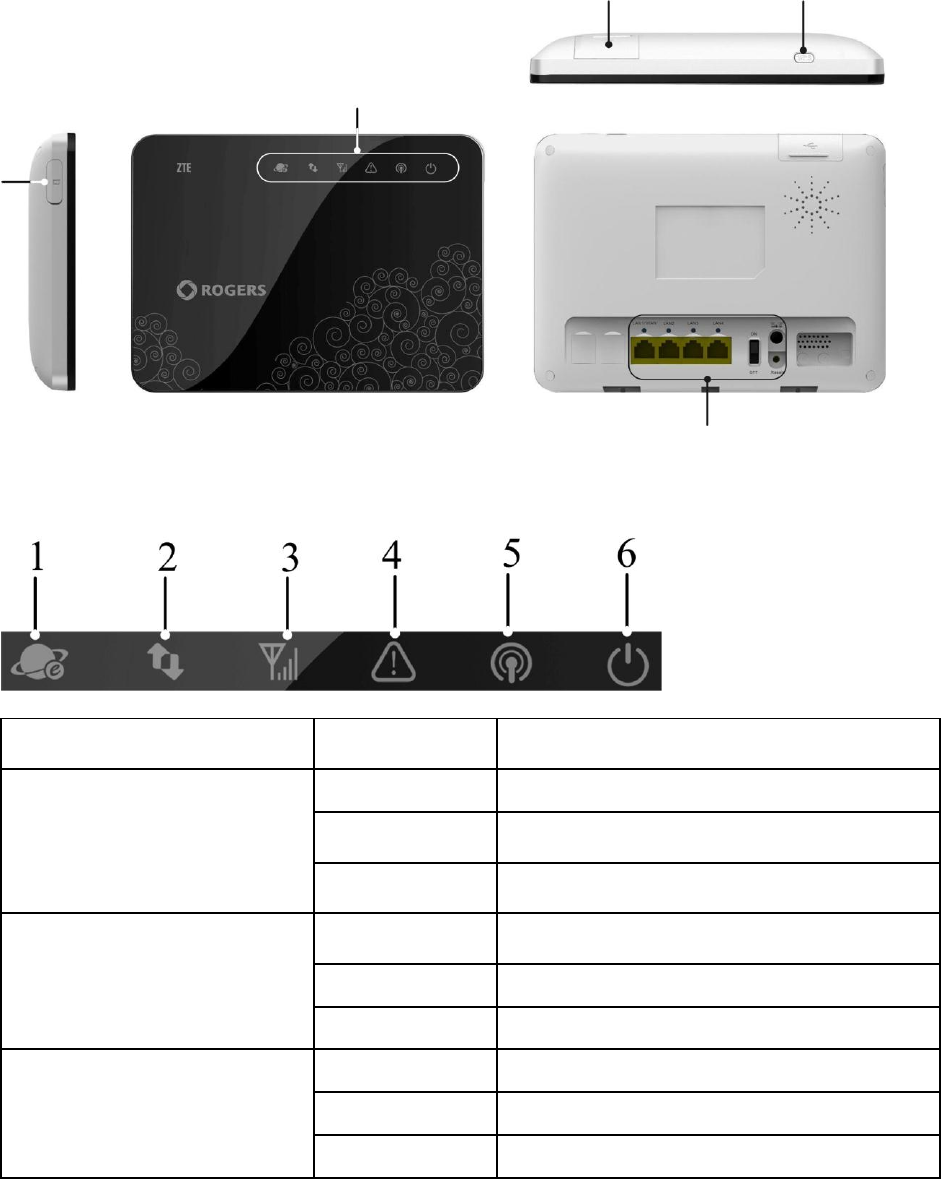
WPS button: Activate the PBC (Push Button Config) function.
LED Indicator
Indicator
State
Description
1 Network mode indication
Blue
Registered to 4G (LTE) network
Green
Registered to 3G network
OFF
Not Registered
2 WAN connection status
indication
Always ON
WAN connection established
Blinking
WAN connection establishing
OFF
WAN connection not established
3 WAN signal strength indication
Always ON
Signal strength is very good or good
Blinking
Signal strength is weak
OFF
No signal
USB Port
WPS Button
LED Indicators
(U)SIM Port
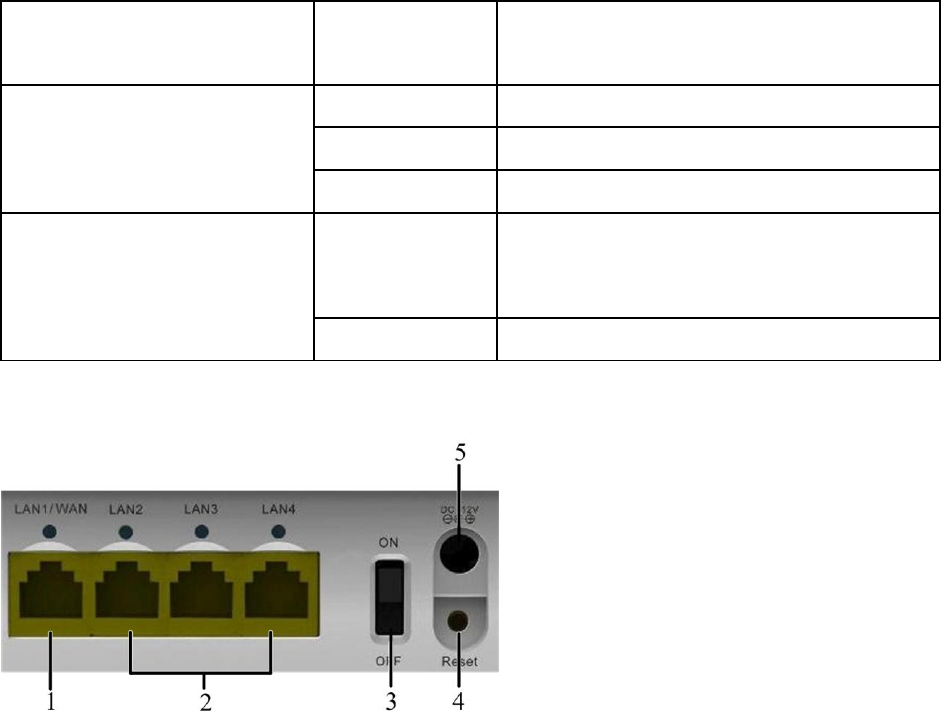
Interface
6
4 Error indication
Blinking
Error Status: No SIM card inserted, PIN enabled
without entering correct PIN code on Web UI, or
Incorrect SIM card inserted when SIM lock enabled
5 Wi-Fi indication
Always ON
WLAN works normally without data transmission
Blinking
WLAN works normally with data transmission
OFF
WLAN shut down
6 Power indication
Always ON
Green--Once device has been initialized and under
operational status
Red--Once power button is pushed and device is being
initialized
OFF
Once power button is pushed and device is powered off
Interface Description
1.LAN1/WAN: Ethernet connections to internet.
2. LAN2~LAN4: Ethernet connections to computer.
3. ON/OFF: Turn the router ON or OFF.
4. Reset: Restore the router to the factory default settings by holding for 7 seconds.
5. POWER Socket: Connect to the external power supply.
Installation
Inserting (U)SIM Card
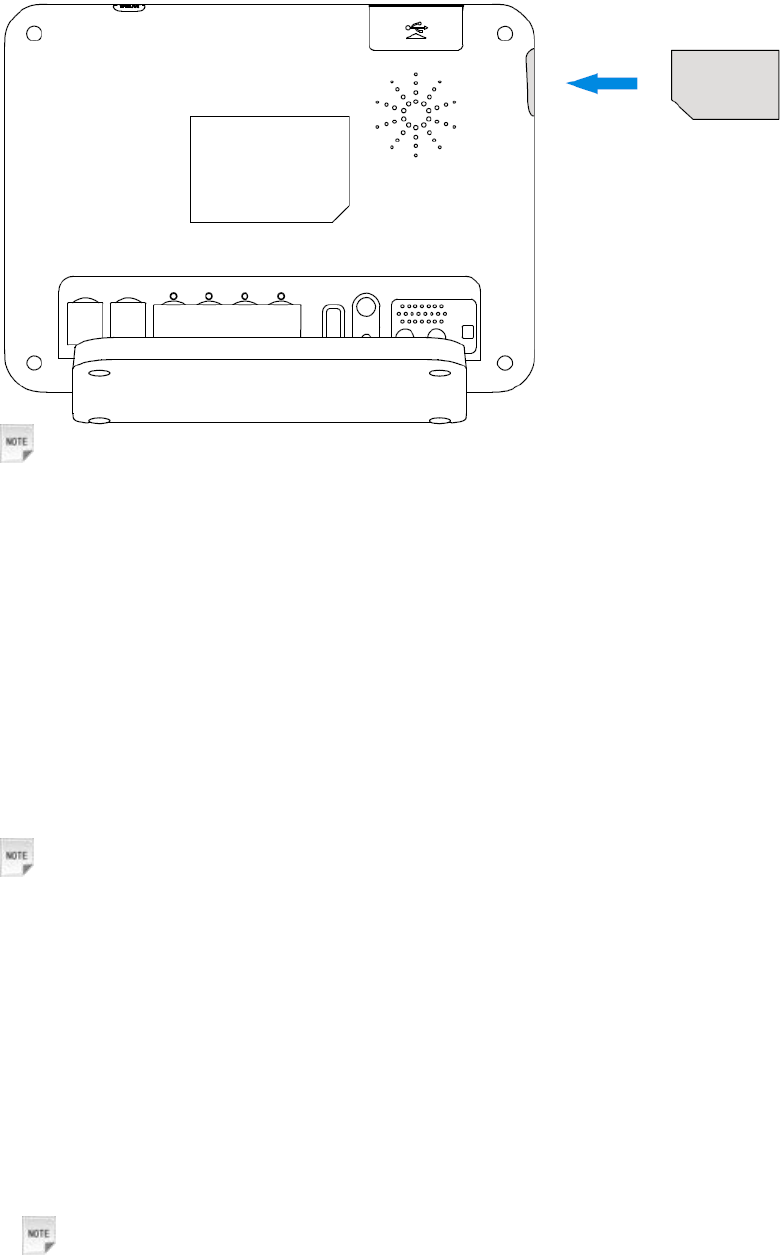
Open the protect cover of (U)SIM port Insert the (U)SIM card into the (U)SIM port.
7
Notes:
Please power off the router and remove the external power adapter before removing or inserting the
(U)SIM card. If not, the router or (U)SIM card may be damaged.
About (U)SIM Card
Avoid handling the (U)SIM card unnecessarily. Hold the card by the edges to prevent static damage. Keep
the (U)SIM card away from electrical and magnetic appliances.
If you cannot get service, make sure that:
• You are in an area which has network coverage.
• You are using the correct (U)SIM card.
Connecting to Computer
Connect your computer to the LAN interface with an Ethernet cable (RJ45).
Notes:
The router will adapt the Ethernet cable style (crossover or straight) automatically.
Connecting to LAN1/WAN
Connect WAN with an Ethernet cable (RJ45).
Connecting with External Power
Connect the external power adaptor to a standard power outlet. Insert the plug into the socket at the rear of
the router.
Switching on Your Device
1. Turn the power switch on to get started.
Notes:
Do not put anything on the top of the router. Do not lay routers to overlap each other when using.
2. Wait 1~2 minutes after turning the router on before you use the service. The 3G/4G network mode &
POWER indicator should be lit on.

8
Notes:
If the net mode indication LED is blinking constantly, try to move the router to another location. The
router takes 1~2 minutes to initialize, attach to the network and obtain an IP address.
Power Supply
For normal operation, connect the router to the external power adapter. In case of power failure or when
there is no available external power supply, the router will not work.
9
Internet Access
The router does not require any drivers, and it supports all operating systems with Ethernet LAN
capability, such as Windows XP, Vista, Windows 7, MAC OS X and Linux. The router supports at least
four computers surfing on internet using Ethernet cable at the same time.
Note: All the parameter settings in this chapter are just for your reference. Please contact your service
provider for detail.
Preparation
Establishing a connection between your device and the client
Via RJ45 Ethernet cable
1.Connect your device and the client with the RJ45 Ethernet cable.
2.Power on your device.
The connection between your device and the client will be established successfully a moment later.
Via Wi-Fi
1. Power on your device directly. It will take 1~2 minutes to initialize, and then Wi-Fi LED is blinking.
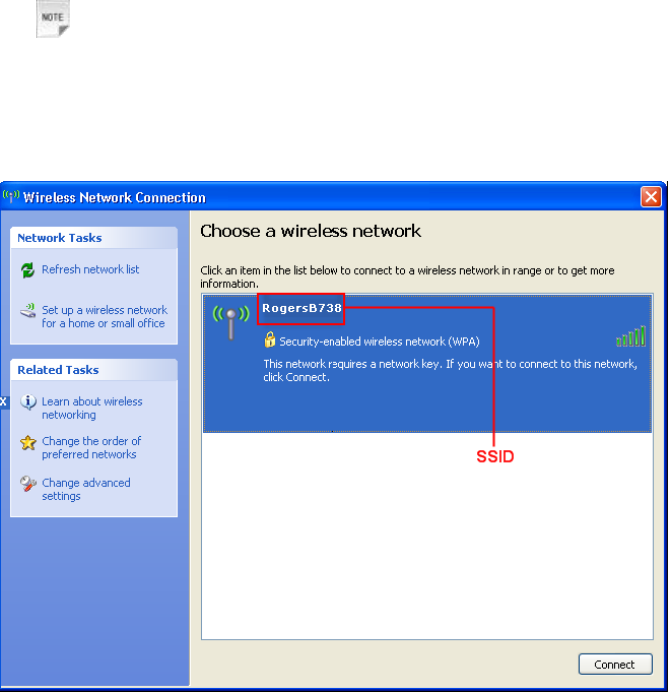
2. Use your normal Wi-Fi application on the client to search the available wireless network.
Notes: You need to check your Wireless Network Connection. Set the client to obtain an
IP address automatically in the Internet protocol (TCP/IP) properties, and the client will get
an IP address like”192.168.1.100”.
3. Select the SSID of your device, and then click Connect.

10
Notes:
Then there will be a pop-up window to require the password. You can connect the device with the
computer by RJ45 Ethernet cable, and then login the WebGUI to gain the SSID and password by selecting
Settings > Wi-Fi Settings > Security.
4. Wait a moment, the connection between your device and the client will be established
successfully.
Accessing the Internet
Before accessing the internet, make sure;
1. Switch on the device.
2. Establish a connection between your device and the client.
Accessing the Internet by Bridge Mode
1.Connect the device with LAN port.
2.Login the WebGUI and set the Operation Mode as Bridge mode.
Accessing the Internet by Cable Broadband
1.Connect the device with LAN1/WAN port.
2.Login the WebGUI and set the Operation Mode as Cable Broadband mode.
3.Set WAN Connection in WebGUI.
Accessing the Internet by LTE Gateway
Note: Please make sure that you have install (U)SIM card before you switch on the device.
1.Login the WebGUI and set the Operation Mode as 4G Gateway.
2. Set WAN Connection in WebGUI.
Accessing the WebGUI Configuration Page
1. Make sure the connection between your device and the client is correct.
2. Launch the internet browser and enter http://192.168.1.1 in the address bar.
Notes:
It is recommended that you use IE (7.0 or later), Firefox (3.0 or later), Opera (10.0 or later), Safari
(4.0 or later) or Chrome (10.0 or later).
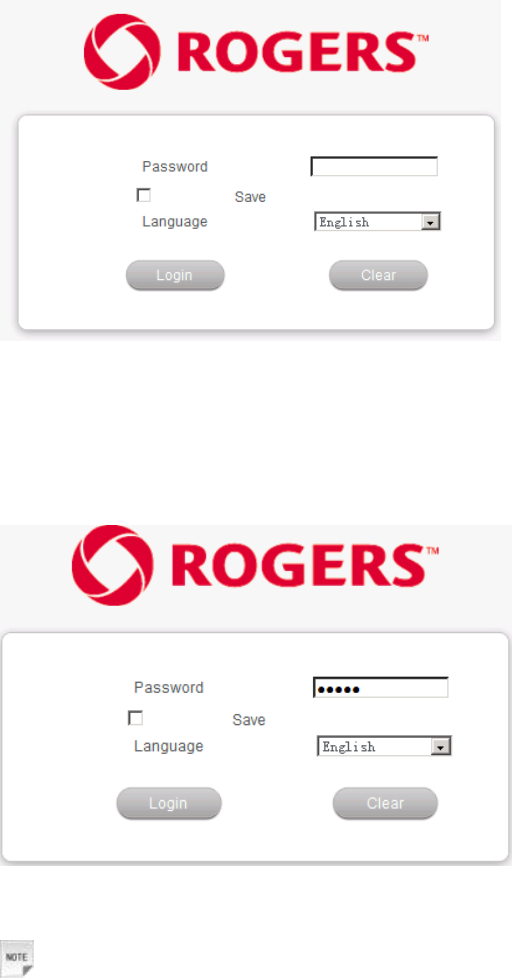
3.The login page appears as follows.
11
Login
In the Web GUI Configuration page, select the desired language and input the password (the default
Password is admin).
Click Login to log in the device.
Notes:
If you check Save after type in password, the device will save it. Next time when you want to login the
device with the same password, what you need to do is click Login.
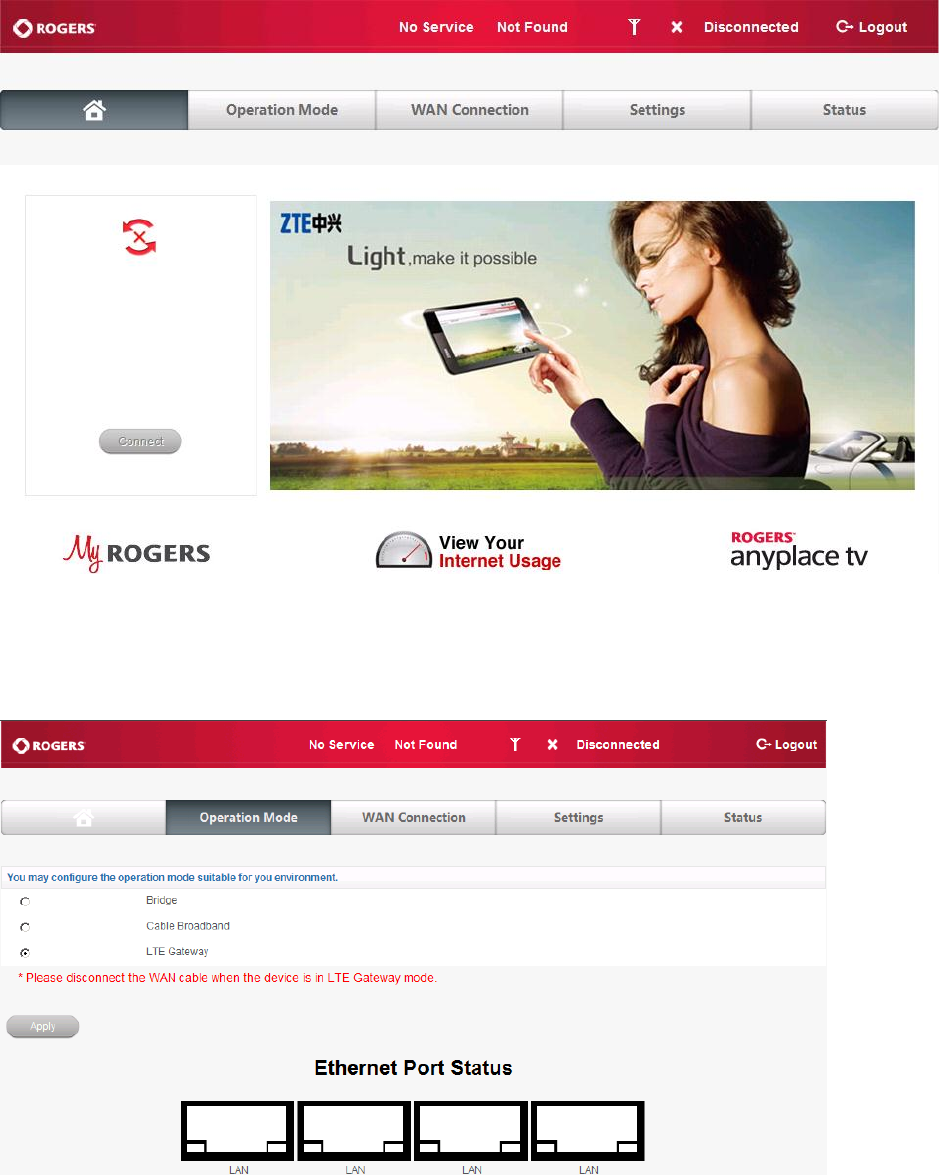
When you login, the following interface appears.
12
Operation Mode
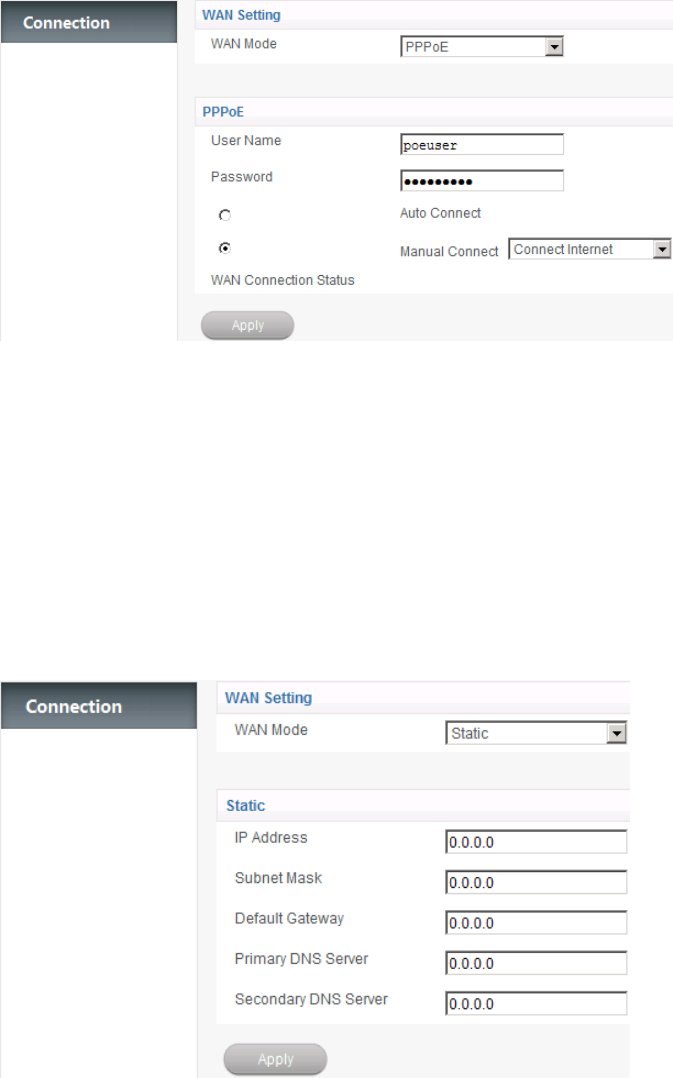
When you login the web GUI, you need to choose the operation mode to make the correct setting.
There are three operation modes:
• Bridge:Connect to Internet by Dial-up program on computer.
• Cable Broadband: Connect to Internet by WAN.
• LTE Gateway: Connect to Internet by (U)SIM.
13
Please choose the correct operation mode according to your actual network condition. For detailed
information, please contact network operator. Click Apply to finish the setting.
WAN Connection
In Cable Broadband mode
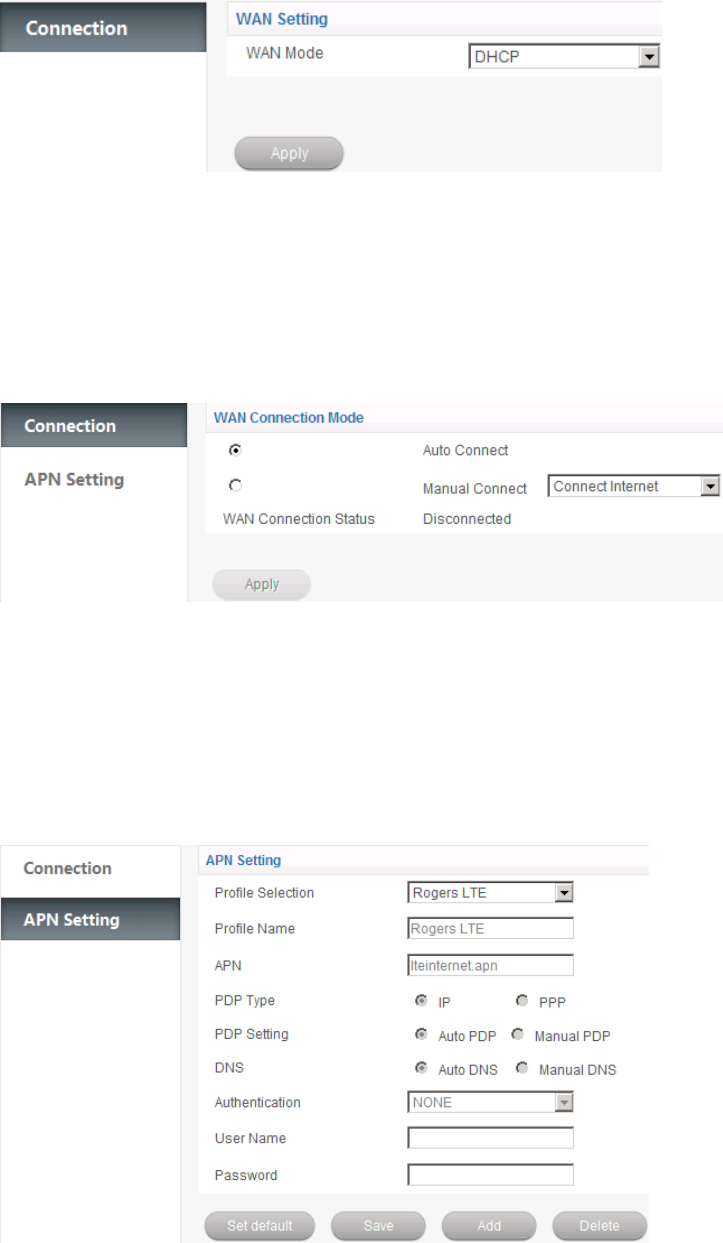
Click WAN Connection, you can configure how to connect to the Internet.
PPPoE
Select PPPoE,input the User Name and Password supplied by the network provider, and select the
Connect mode.
• Auto Connect: The router will automatically connect to WAN when it is powered on.
• Manual Connect: Connect to Internet or disconnect from Internet manually.
Click Apply to confirm your configuration, and then the figure will show in the wan connection status.
Static
Select Static to access the following interface:
Input the related parameters, and then click Apply to confirm your configuration.
14
DHCP
Select DHCP to access the following interface:
Click Apply to confirm your configuration.
In 4G Gateway mode
Dial Up
Click WAN Connection > Connection, you can configure how to connect to the Internet.
There are two connection modes:
• Auto Connect: The router will automatically connect to WAN when it is powered on.
• Manual Connect: Connect to Internet or disconnect from Internet manually.
Click Apply to confirm your configuration, and then the figure will show in the wan connection status.
APN Settings
Click WAN Connection > APN Setting, you can configure APN setting.
Profile Selection: Choose the desired profile name.

15
Profile Name: The name of the profile.
• APN: Access Point Name.
• PDP Type: Packet Data Protocol (PDP) Type IP is recommended unless service provider instructs
others.
• PDP Setting: PDP address mode. If a fixed IP address is given by your service provider, select Manual
PDP. Otherwise select the Auto PDP and the router will automatically obtain this parameter.
• DNS: If a fixed IP address is given by your service provider, then choose Manual DNS. Otherwise,
choose Auto DNS, and device will automatically obtain parameters.
• Authentication: Password Authentication Protocol (PAP) provides a simple method without encryption
for the peer to establish its identity using a 2-way handshake. Challenge-Handshake Authentication
Protocol (CHAP) is used to periodically verify the identity of the peer using a 3-way handshake.
• User Name: User name is used to obtain authentication from the ISP when the connection is established
• Password: Password is used to obtain authentication from the ISP when the connection is established.
Click Set default to set this profile as the default profile.
Settings
Note:
• Do not modify any settings unless instructed by your service provider.
• Please disconnect the device from the network before change the settings.
Network Select
This is only available in LTE gateway mode. Select Settings > Network Select, the Band Selection Mode
is shown in the following figure:
• Automatic: Device searches for available network.
• LTE Only: Device searches for LTE network only.
• 3G Only: Device searches for WCDMA network only.
Click Apply & Reboot to confirm your configuration.
16
Wi-Fi Settings
Station list
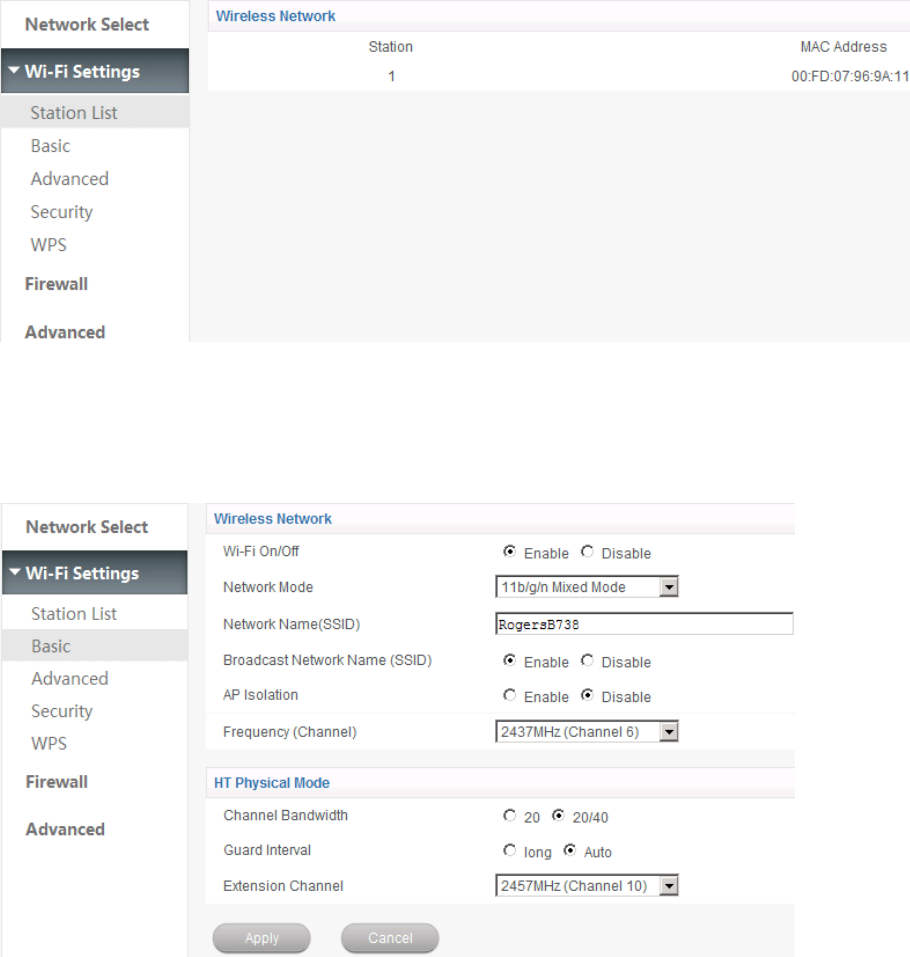
Select Settings > Wi-Fi Setting > Station List, the wireless network stations are shown in the following
figure:
Basic
Select Settings > Wi-Fi Setting > Basic, the wireless network basic parameters are shown in the
following figure:
• Wi-Fi On/Off: Enable/disable the Wi-Fi function.
• Network Mode: If all of the wireless devices connect with this router in the same transmission mode,
performance will be improved by choosing the appropriate wireless mode.
• Network Name (SSID): Service Set Identifier (SSID). Enter a string less than 32 characters as the name
for your wireless local area network (WLAN).
• Broadcast Network Name (SSID): Disable or Enable (Default) this function. If Enable is selected, the
router broadcasts the SSID, and other devices can detect and connect to it. Otherwise, other devices
cannot detect and connect to it, add the SSID manually to connect.

17
• AP Isolation: When Enabled is selected, each of your wireless clients will not be able to communicate
with each other. Otherwise, the wireless communication via WLAN is available.
• Frequency(Channel): Choose the appropriate channel to optimize the performance and coverage of
your wireless network.
•The HT physical Mode parameters are shown below:
• Channel Bandwidth: Set the HT physical channel bandwidth.
• Guard Interval: Guard interval is to introduce immunity to propagation delays, echoes and reflections,
to which digital data is normally very sensitive.
• Extension Channel: Set extension channel. Extension channel is also able to send and receive data.
Click Apply to confirm your configuration.
Advanced
Select Wi-Fi Setting > Advanced, the advanced wireless network parameters are shown in the following
figure:
• Beacon Interval: The router broadcasts beacon message to announce that it has buffered frames to
deliver. The default value is 100 (ms).Beacons are packets sent by an access point to synchronize a
wireless network. Specify a beacon interval value. is recommended.
• Data Beacon Rate(DTIM): A Delivery Traffic Indication Message(DTIM) informs next clients to listen
to broadcast and multicast messages.
• Fragment Threshold: This value should remain at its default value of 2346. If you experience a high
packet error rate, you may slightly increase your fragment threshold. Setting the fragment threshold too
low may result in poor performance.
• Short Preamble: The length of CRC block in the frames during the wireless communication.
Click Apply to confirm your configuration.
Security
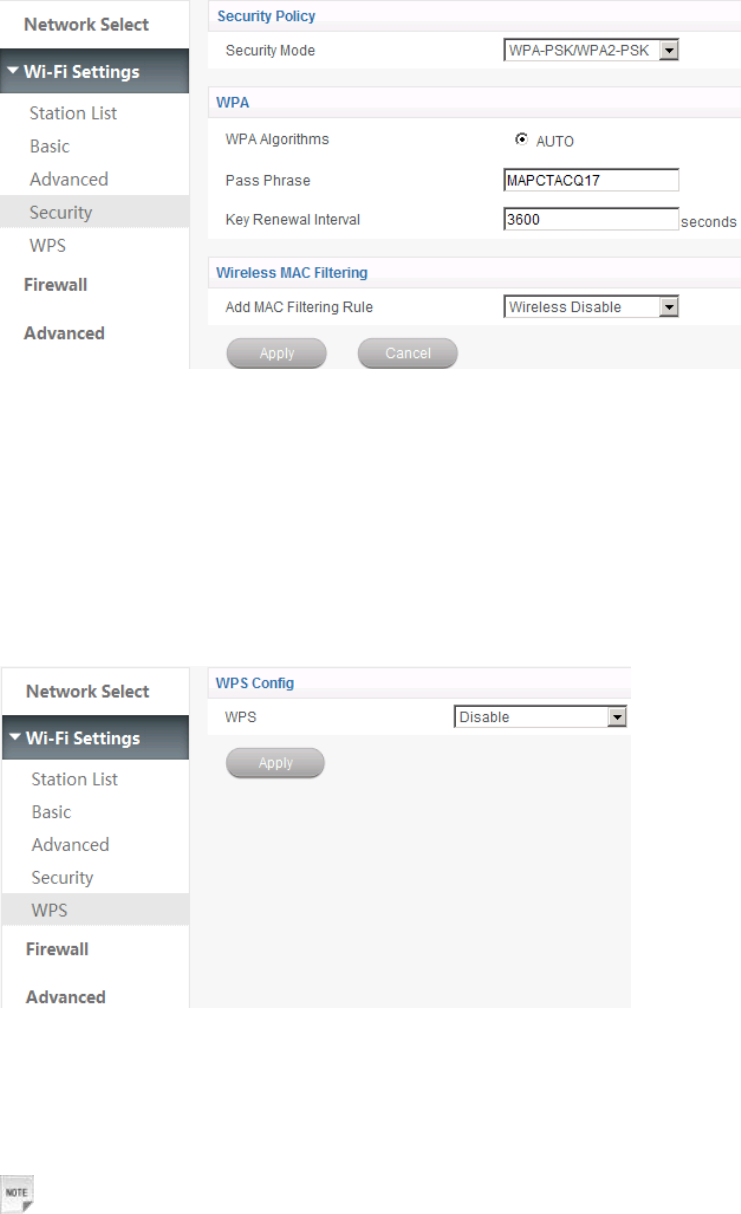
Select Wi-Fi Setting > Security, the Security parameters are shown in the following figure:
18
Unless one of these encryption modes is selected, wireless transmissions to and from your wireless
network can be easily intercepted and interpreted by unauthorized users.
The security modes are described below:
• Open: You can authenticate successfully with a SSID, whether it is valid or empty.
• WPA-PSK/WPA2-PSK: Apply both the WPA-PSK and WPA2-PSK scheme.
Click Apply to confirm your configuration.
WPS
Select Wi-Fi Setting > WPS, the WPS configuration is shown in the following figure:
Firewall
You can set up firewall rules to protect your network from virus, worm and malicious activity on the
Internet. This function is not available on Bridge mode.
Notes:
You can set the maximum 10 filtering items for MAC/IP/Port Filtering and Port Forwarding.
MAC/IP/Port Filtering
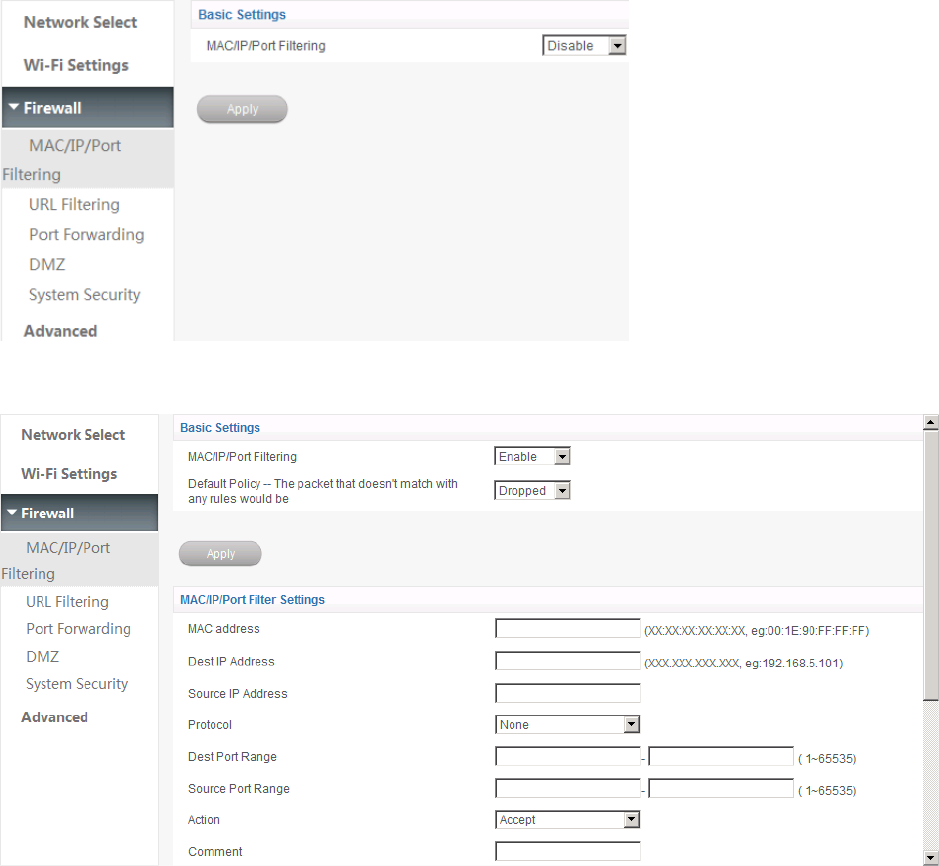
Select Settings > Firewall > Mac/IP/Port Filtering, the Mac/IP/Port Filtering is shown in the following
figure:
19
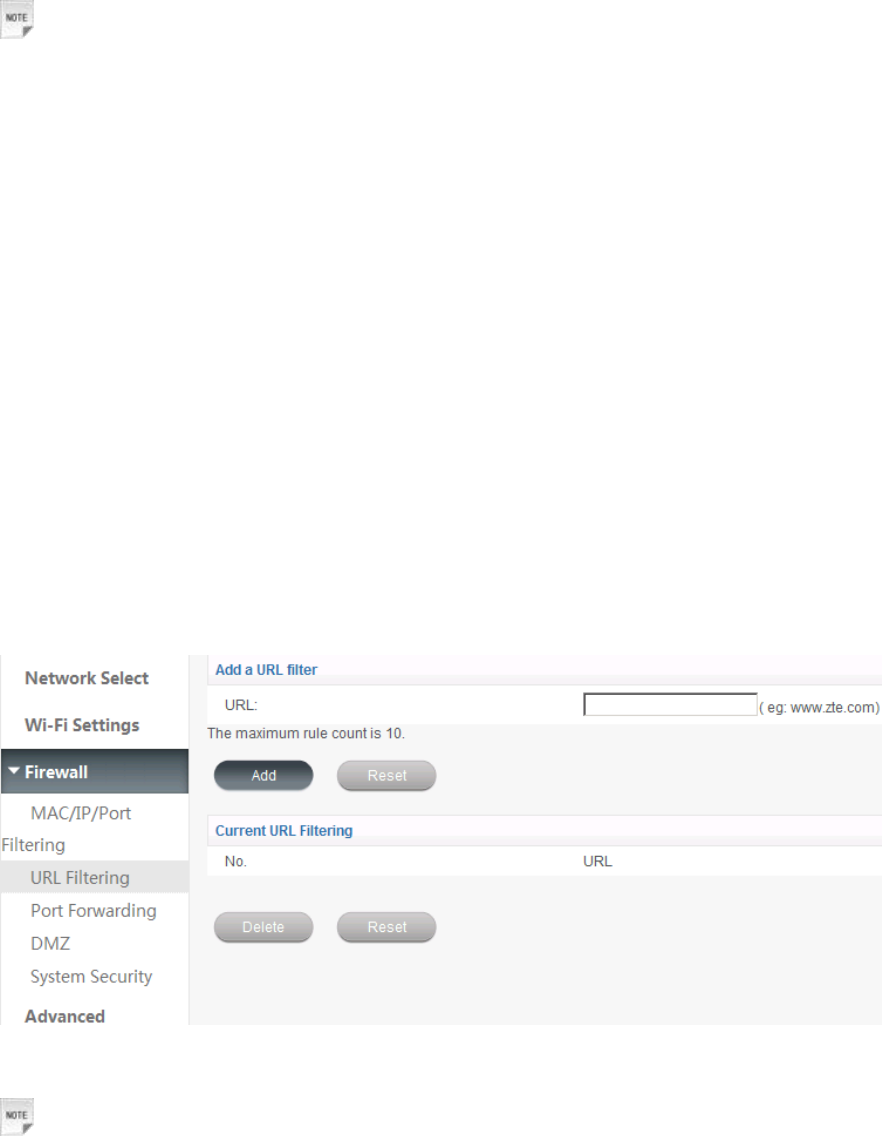
If you select Enable, the filter settings will appear:
• MAC address: Set the MAC address that will be filtered.
• Dest IP Address: Set the destination IP address that will be filtered.
• Source IP Address: Set the source IP address that will be filtered.
• Protocol: Set which protocol will be used for filtering.
• Dest Port Range: Set the destination port numbers that will be filtered
• Source Port Range: Set the source port numbers that will be filtered.
• Action: Set how to handle the packet if it matches with the rule.
• Comment: Type comment for the filter settings.
20
Notes:
Filtering rules are matched one by one, if met this provision, it will not continue to match the rules listed
below. The maximum rules counts 10.
Click Apply to confirm your configuration.
Click Delete to delete the rule which you selected.
Click Reset to clear what you select or input.
To add a new rule:
1. Select Enable in the Basic Settings area.
2. Click Apply.
3. Input the detailed information in the Mac/IP/Port Filtering Settings area.
4. Click Apply in the Mac/IP/Port Filtering Settings area.
URL Filtering
You can setup content filter to restrict the improper content access. Select Firewall > URL Filtering, the
URL Filtering is shown in the following figure:
Type URL address, and then click Add to add the URL address into the filtering list. The new URL
filtering item will be shown in the Current Webs URL Filters field.
Notes:
You can set the maximum 10 filtering items for URL.
Port Forwarding
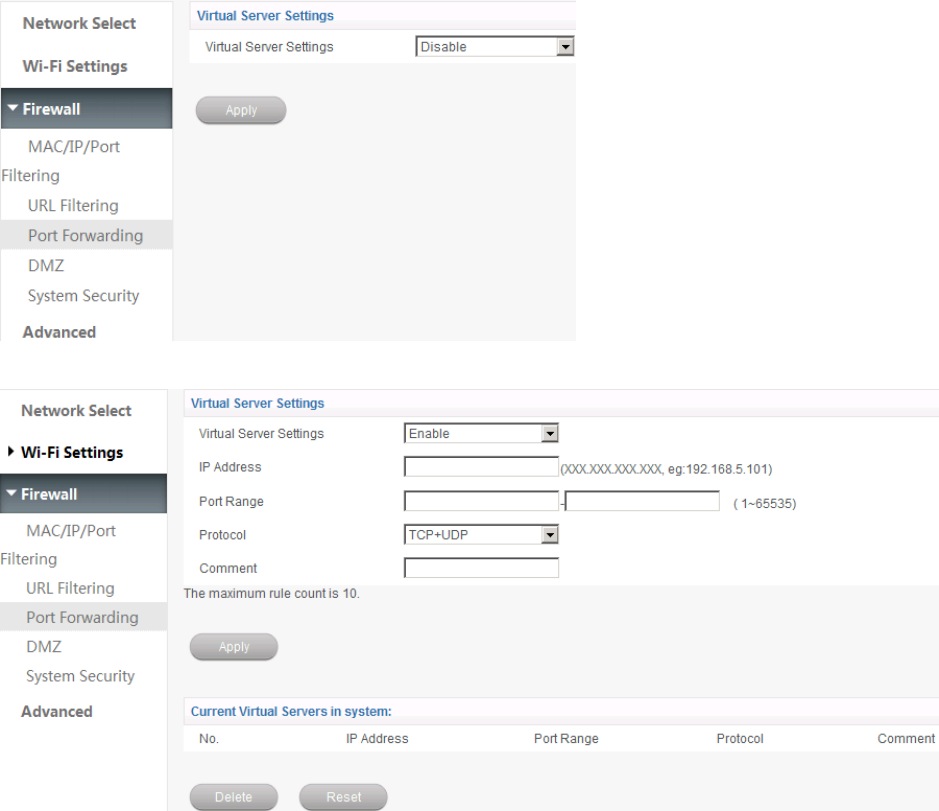
You can setup virtual servers to provide services on the Internet. Select Firewall > Port Forwarding, the
virtual server settings is shown in the following figure:
21
If you select Enable, the Virtual Server Settings will appear:
• IP Address: Set IP address for the virtual server.
• Port Range: Set port numbers for the virtual server.
• Protocol: Set protocol for the virtual server.
• Comment: Type comment for the virtual server settings.
Click Apply to confirm your configuration.
DMZ
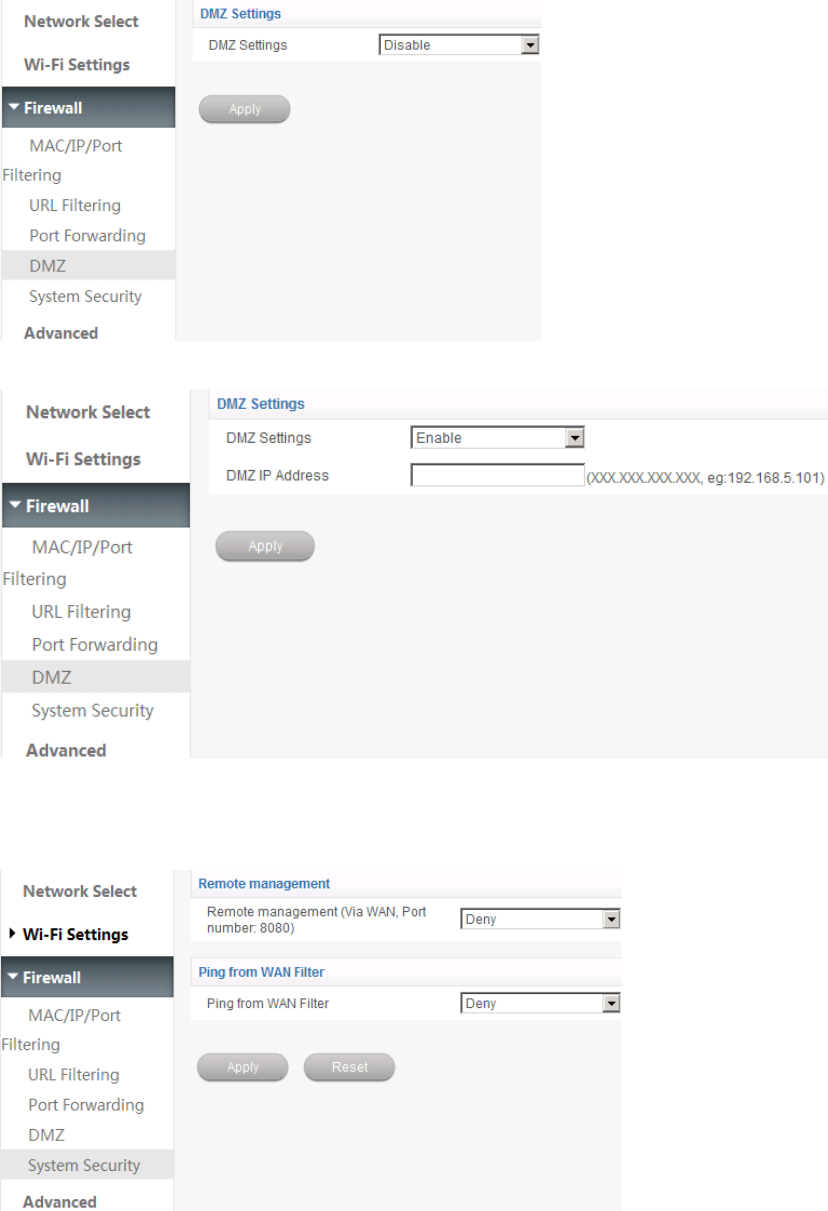
You can set up a De-militarized Zone(DMZ) to separate internal network with the Internet. Select
Firewall > DMZ, the DMZ setting is shown in the following figure:
22
If you select Enable, input the DMZ IP Address, and then click Apply to confirm your configuration.
System Security
You can configure system firewall to protect AP or router from being attacking. Select Firewall > System
Security, the system security setting is shown in the following figure:
Allow or Deny the remote management function, Allow or Deny ping from WAN filter on requirement,
and then click Apply.
Advanced
Management
23
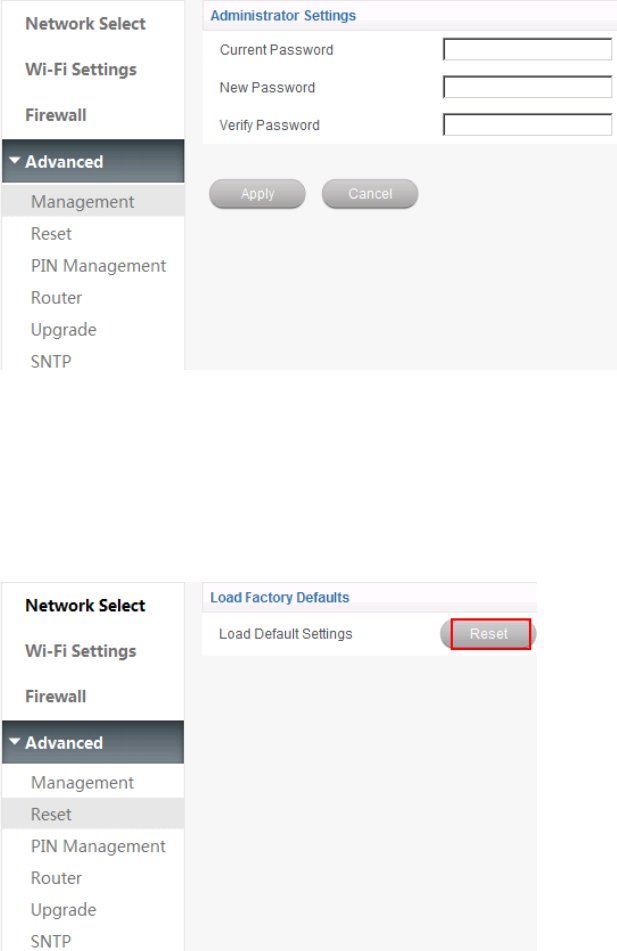
Select Settings > Advanced > Management, the administrator settings information is shown in the
following figure:
You can change the login password. Click Apply to confirm your configuration.
Restore
Select Settings > Advanced > Reset, click Reset to set all the settings to the factory default values, and
then the device will restart automatically.
PIN Manage
Note: This function is available only in LTE Gateway mode.
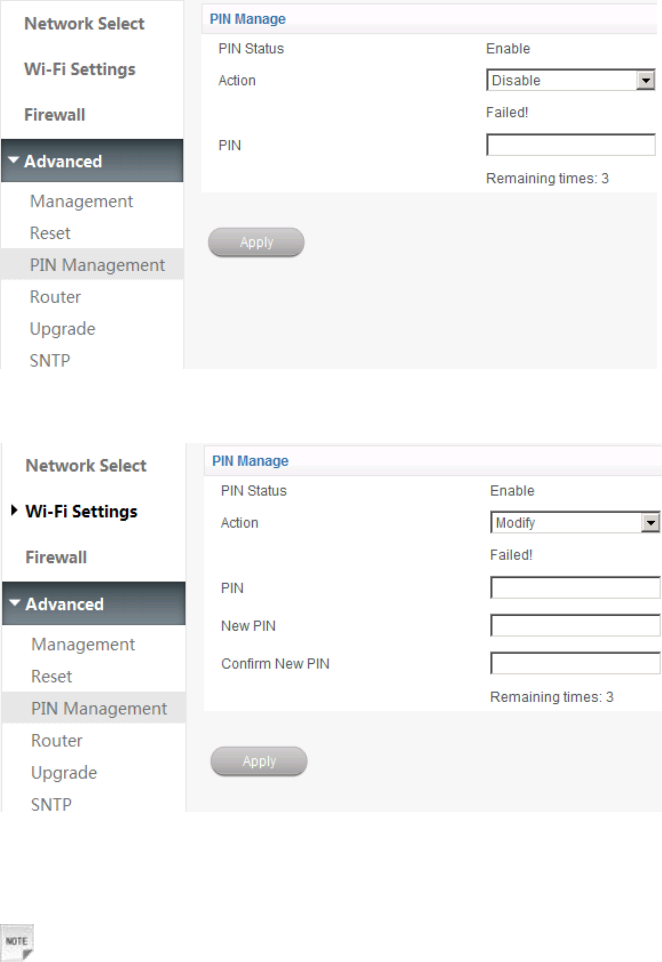
Select Settings > Advanced > PIN Management, the following page displays:
24
If you select Modify, the following page will display:
Input the old PIN code, and then input the new PIN code two times. Click Apply to confirm your
configuration.
Notes:
Consecutive inputting wrong PIN code for three times will cause locking of (U)SIM card. To unlock, you
need PUK code.
PIN code and PUK code may be offered together with the (U)SIM card. If not, please contact with
network operator. Please change default PIN code to your own as soon as possible.
Router
Note: This function is available in LTE Gateway mode and Cable Broadband mode.
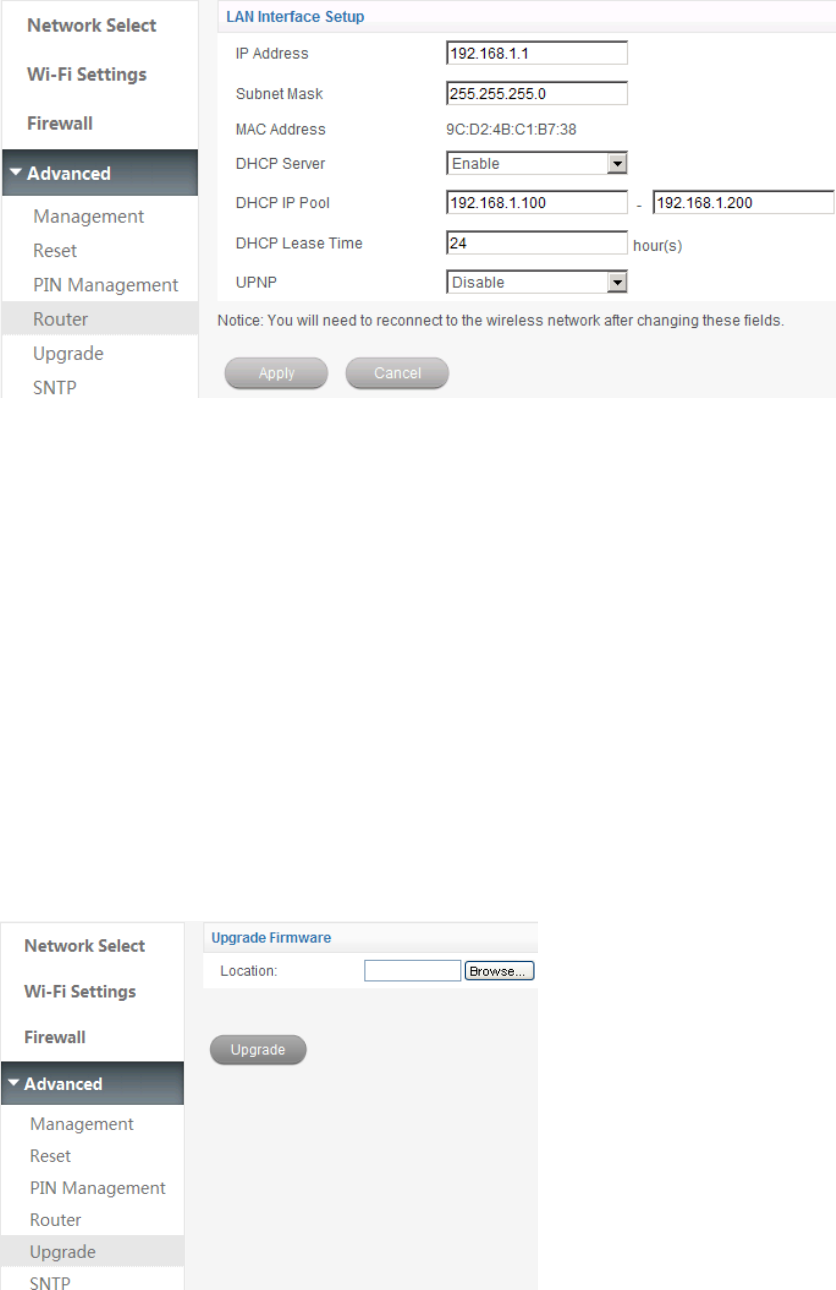
Select Settings > Advanced > Router, the router information is shown in the following figure:
25
• IP Address: IP address for LAN interface.
• Subnet Mask: Subnet mask for the IP address.
• MAC Address: MAC address for the LAN interface.
• DHCP Server: Enable or disable DHCP Server function.
• DHCP IP Pool: Allocate begin and end IP address for IP pool.
• DHCP Lease Time: Define how long the leased IP address will be expired, and will relocate new IP
address.
• UPNP: Enable/disable UPNP.
Click Apply to confirm your configuration.
Upgrade
Select Settings > Advanced > Upgrade to upgrade the software version of the router.
Click Browse... to locate the latest software version, and then click Upgrade.
SNTP
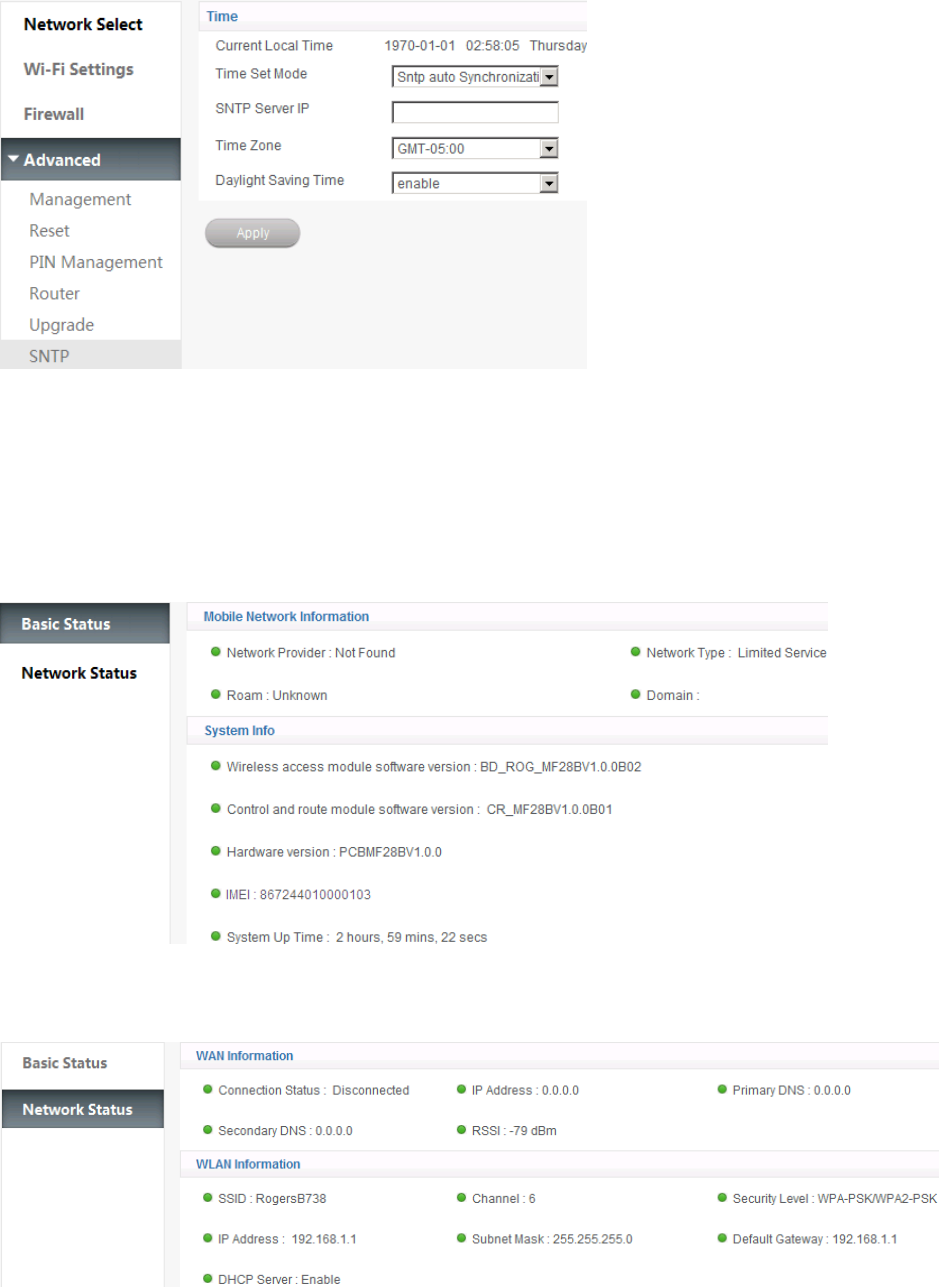
Select Settings > Advanced > SNTP to set the time of the router.
26
You can select Manual Set Time or SntP auto Synchronization, and then click Apply to confirm your
configuration..
Status
Basic Status
Select Status > Basic Status, the system information is shown in the following figure:
Network Status
Select Status > Network Status, the system information is shown in the following figure:
Usage of WPS
If your client device supports WPS, you need not to input the password manually after WPS has
27
been available. Please do the following:
1. Start up your device.
2. Launch the client device connected to your device.
3. Enable the WPS function of your device.
4. Enable the WPS function of the client.
Notes:
Enable the WPS function of the client within 2 minutes, otherwise reactivate WPS function.
For the detailed operations about the client, please refer to the client’s instruction.
Logout
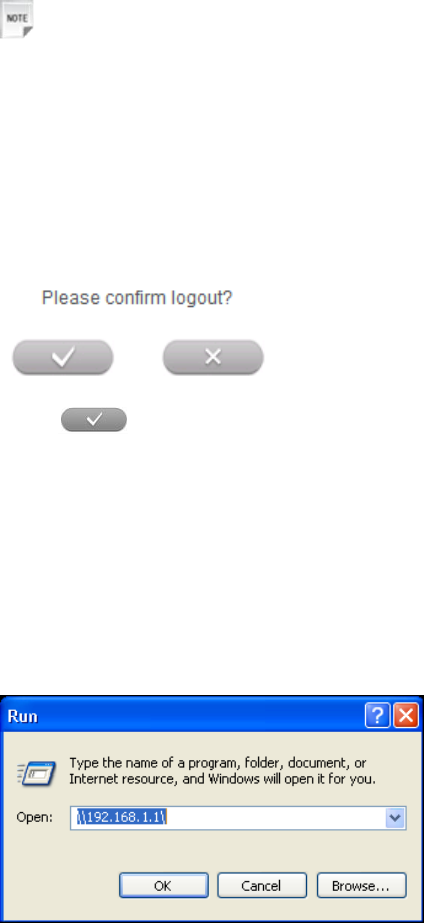
Select Logout, a pop-up window will appear as the following figure shown:
Click to logout the web page.
U-Disk Master
1. Start up your device.
2. Launch the client device connected to your device.
3. Connect the storage devices (i.e.USB disk) to the USB port of the device.
4. Select Start > Run of the computer.
5. Input \\192.168.1.1, and then click OK.
6.Input User Name and Password. The default User Name and Password are admin. Then you
can view storage devices.

28
Troubleshooting
Internet Related Problems
Symptoms
Possible Problems/ Solutions
I cannot access the internet at all.
Please check your configuration settings.
Please wait 1~ 2 minutes for the router to initialize.
Check your service indicator LED’s.
The download or upload speeds are very slow.
The speed is dependent on signal strength. Check your
signal strength and network type.
Others
Symptoms
Possible Problems/ Solutions
The RSSI signal indicator is always blinking or does not
light.
This indicates poor reception. Try moving the router to
another location near the window.
29
Glossary
3G: Third Generation.
4G: Fourth Generation.
APN: Access Point Name
DHCP: Dynamic Host Configuration Protocol.
DHCP Server: A server or service with a server that assigns IP addresses.
Firewall: A hardware or software boundary that protects a network or single computer from unwanted
outside traffic.
DNS: Domain Name System (or Service or Server)
Ethernet: A frame-based computer networking technology for local area networks (LANs)
HSDPA: High Speed Downlink Packet Access
HSUPA: High Speed Uplink Packet Access
IP: Internet Protocol
LAN: Local Area Network
LED: Light - emitting Diode
LTE: The UMTS Long Term Evolution
PDP: Packet Data Protocol
PIN: Personal Identification Number
Port Forwarding: A process that allows remote devices to connect to a specific computer within a private
LAN.
PUK: PIN Unlocking Key
RSSI: Radio Signal Strength Indicator
SSID: Service Set Identifier. The name assigned to a Wi-Fi network.
UPNP: Universal Plug and Play
(U)SIM: Subscriber Identification Module
WCDMA: Wideband CDMA (Code-Division Multiple Access)
WLAN: Wireless LAN
WPA-PSK: Wi-Fi Protected Access–PreShared Key
WPA/WPA2: Wi-Fi Protected Access. A security protocol for wireless 802.11 networks from the Wi-Fi
Alliance.

MF28B User Manual
Confidential and Proprietary Information of ZTE CORPORATION 30
General Information
Safety Precautions
• Some electronic devices may be susceptible to electromagnetic interference. Locate the router away from
TV set, radio and other electronic equipment to avoid electromagnetic interference.
• The router may interfere with medical devices like hearing aids and pacemakers. Consult a physician or
the manufacturer of the medical device before using the router.
• Please keep yourself at least 20 centimeters away from router.
• Do not use your router in dangerous environments such as oil terminals or chemical factories where there
are explosive gases or explosive products being processed.
• Please use original accessories or accessories that are authorized by ZTE. Unauthorized accessories may
affect the router performance, damage the router or cause danger to you.
• Do not attempt to dismantle the router. There are no user serviceable parts.
• Do not allow the router or accessories to come into contact with liquid or moisture at any time. Do not
immerse the router in any liquid.
• Do not place objects on top of the router. This may lead to overheating of the device.
• The device must be placed in ventilation environment for use.
• Do not expose the router to direct sunlight or store it in hot areas. High temperature can shorten the life
of electronic devices.
• Do not allow children to play with the router or charger.
• The router is for indoor use only. Do not use the router outside.
Cleaning and Maintaining
• Use an antistatic cloth to clean the router. Do not use chemical or abrasive cleanser as these could
damage the plastic case. Turn off your router before you clean it.
• Use the router within the temperature range of -10 ℃ ~ +55 ℃, and the storage temperature range is
-20 ℃ ~+60 ℃. The humidity range is 5%~95%.
• Do not use your router during a thunderstorm. Remove the mains power pack from the wall socket.
• Do not take out your (U)SIM card unnecessarily. The (U)SIM card may be easily lost or it can be
damaged by static electricity.
FCC Compliance
This device complies with part 15 of the FCC Rules. Operation is subject to the following two conditions:
(1) This device may not cause harmful interference, and (2) this device must accept any interference
received, including interference that may cause undesired operation.
Caution: Changes or modifications not expressly approved by the manufacturer could void the user’s
authority to operate the equipment.
NOTE: This equipment has been tested and found to comply with the limits for a Class B digital device,
pursuant to part 15 of the FCC Rules. These limits are designed to provide reasonable protection against
harmful interference in a residential installation. This equipment generates, uses and can radiate radio
frequency energy and, if not installed and used in accordance with the instructions, may cause harmful
interference to radio communications. However, there is no guarantee that interference will not occur in a
particular installation. If this equipment does cause harmful interference to radio or television reception,
which can be determined by turning the equipment off and on, the user is encouraged to try to correct the
interference by one or more of the following measures:
—Reorient or relocate the receiving antenna.

MF28B User Manual
Confidential and Proprietary Information of ZTE CORPORATION 31
—Increase the separation between the equipment and receiver.
—Connect the equipment into an outlet on a circuit different from that to which the receiver is connected.
—Consult the dealer or an experienced radio/ TV technician for help.
RF Exposure
This device meets the government’s requirements for exposure to radio waves.
This device is designed and manufactured not to exceed the emission limits for exposure to radio
frequency (RF) energy set by the Federal Communications Commission of the U.S. Government.
This device complies with FCC radiation exposure limits set forth for an uncontrolled
environment. In order to avoid the possibility of exceeding the FCC radio frequency exposure
limits, human proximity to the antenna shall not be less than 20cm (8 inches) during normal
operation.
The FCC grant can be found under the Display Grant section of http://www.fcc.gov/oet/fccid after
searching on FCC ID: Q78-MF28B.
IC
This radio transmitter (identify the device by certification number, or model number if Category II) has
been approved by Industry Canada to operate with the antenna types listed below with the maximum
permissible gain and required antenna impedance for each antenna type indicated. Antenna types not
included in this list, having a gain greater than the maximum gain indicated for that type,are strictly
prohibited for use with this device.
This device complies with Industry Canada license-exempt RSS standard(s). Operation is subject
to the following two conditions:
(1) this device may not cause interference, and
(2) this device must accept any interference, including interference that may cause undesired
operation of the device.
Le présent appareil est conforme aux CNR d'Industrie Canada applicables aux appareils radio
exempts de licence. L'exploitation est autorisée aux deux conditions suivantes:
(1) l'appareil ne doit pas produire de brouillage, et
(2) l'utilisateur de l'appareil doit accepter tout brouillage radioélectrique subi, même si le
brouillage est susceptible d'en
This Class B digital apparatus complies with Canadian ICES-003.
Cet appareil numérique de la classe B est conforme à la norme NMB-003 du Canada.
IC: 5200A-MF28B
IMPORTANT NOTE:
IC Radiation Exposure Statement
This EUT is compliance with general population/uncontrolled exposure limits in IC RSS-102.
This equipment should be installed and operated with minimum distance 20cm between the
radiator & your body.
Immediately following the above notice, the manufacturer shall provide a list of all antenna types
approved for use with the transmitter, indicating the maximum permission antenna gain(in dBi)and
required impedance for each.

MF28B User Manual
Confidential and Proprietary Information of ZTE CORPORATION 32
Limited Warranty
• This warranty does not apply to defects or errors in the Product caused by:
i. Reasonable Router Appearance Disfiguration.
ii. End User’s failure to follow ZTE’s installation, operation or maintenance instructions or procedures.
iii. End User’s mishandling, misuse, negligence, or improper installation, disassemble, storage,
servicing or operation of the Product.
iv. Modifications or repairs not made by ZTE or a ZTE-certified individual.
v. Power failures, surges, fire, flood, accident, actions of third parties or other events outside ZTE’s
reasonable control.
vi. Usage of products of third Parties, or usage in conjunction with third party products provided that
such defects is due to the combined usage.
vii. Any other cause beyond the range of normal usage for Products. End User shall have no right to
reject, return, or receive a refund for any Product from ZTE under the above-mentioned situations.
• This warranty is end user’s sole remedy and ZTE's sole liability for defective or nonconforming items,
and is in lieu of all other warranties, expressed, implied or statutory, including but not limited to the
implied warranties of merchantability and fitness for a particular purpose, unless otherwise required
under the mandatory provisions of the law.
Limitation of Liability
ZTE shall not be liable for any loss of profits or indirect, special, incidental or consequential damages
resulting from or arising out of or in connection with using of this product, whether or not ZTE had been
advised, knew or should have known of the possibility of such damages, including, but not limited to lost
profits, interruption of business, cost of capital, cost of substitute facilities or product, or any downtime
cost.