ZTE MF861 USB Data Card User Manual AirCard 781S User Guide
ZTE Corporation USB Data Card AirCard 781S User Guide
ZTE >
User manual
1
MF861
User Guide
2
Get Started ...................................................................................................... 3
Know Your Device................................................................................ 3
Status LED Indicator ............................................................................ 4
Connecting the MF861 to Your PC ...................................................... 4
Connect to the Internet.......................................................................... 5
Properly Remove the MF861 from Your Computer ............................. 6
Using Your MF861 ......................................................................................... 7
AT&T USB Modem Configuration Page ............................................. 7
View WAN Information ........................................................................ 7
Configure Data Network Options ......................................................... 8
Messages ............................................................................................... 9
View Details ........................................................................................ 10
Reset the MF861 ..................................................................................11
View Local Time and Time Zone ........................................................11
Advanced Settings ........................................................................................ 12
Configure APN details ........................................................................ 12
Enable MAC/ IP/Port Filtering ........................................................... 13
Enable DMZ ....................................................................................... 15
Configure SIM PIN............................................................................. 16
Replace the nano-SIM Card .......................................................................... 17
Warning and Notice ...................................................................................... 18
To the Owner ...................................................................................... 18
Using Your USB Modem .................................................................... 19
Specifications ................................................................................................ 20
Mechanical specifications ................................................................... 20
Supported RF bands ............................................................................ 20
Regulatory and Safety Information .............................................................. 21
To the Owner ...................................................................................... 21
Using Your Device .............................................................................. 22
RF Exposure Information (SAR) ........................................................ 22
FCC Compliance ................................................................................ 24
Warranty ........................................................................................................ 25
Consumer Limited Warranty .............................................................. 25
3
Get Started
This chapter provides an overview of the MF861 features, and
instructions on how to set up your MF861 and connect to the Internet.
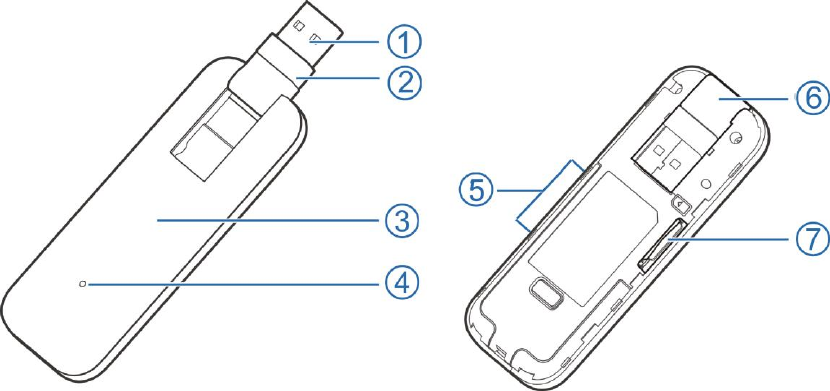
Know Your Device
Your MF861 enables you to connect at high speeds to the Internet and
access your email while you’re away from the office.
1. USB connector — connects to your computer through a type A USB port.
2. USB connector pivot— allows the USB Connector to rotate, making it easier
to connect to computers.
3. Front cover (removable) — covers the 4G LTE SIM card slot.
4. Indicator light — indicates the network and traffic status; it also indicates
when there is no SIM or a SIM error, and when a software update is in
progress.

4
5. External antenna connector — plugs in antenna if necessary.
6. USB folding hinge — folds the USB Connector into your MF861, and allows
the USB Connector to be extended and plugged into your computer.
7. (U)SIM card slot — insert the 4G LTE SIM card into the spring-loaded SIM
card slot.
Status LED Indicator
The LED indicates the device’s connection status:
Status
Description
Green Solid
Device is ready & cell connection is registered
Green Blinking
Device is powering up, Searching for network to start
Yellow Solid
No cell service due to the coverage
Yellow Blinking
FOTA upgrading or new SMS received
Red Solid
Failure state (No SIM, locked SIM, SIM error, PUK
error)
Red Blinking
FOTA failure
Connecting the MF861 to Your PC
1. Use your thumb to gently flip open the USB connector on your USB modem.
NOTE:
Be sure to avoid over-extending the USB connector past its resistance point.
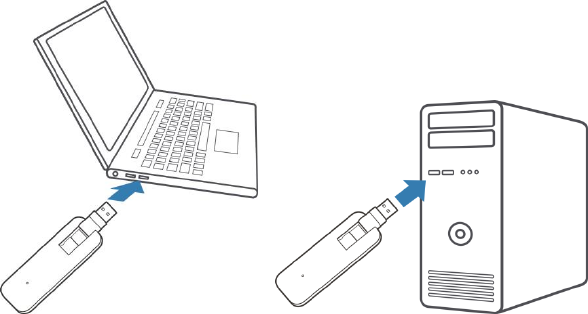
5
2. Hold the device along the side edges and gently insert it into your computer’s
USB port.
The operating system automatically detects and recognizes your device and
starts the installation wizard.
Connect to the Internet
To connect to the AT&T network:
After your MF861 successfully connected to your PC, the device automatically
connect to the network.
To disconnect from the AT&T network:
1. Launch the Internet browser and enter http://192.168.1.1 or
http://attusbmodem/ in the address bar.
2. Click Off next to Standard Data, and then click Apply.
6
Properly Remove the MF861 from Your Computer
Be sure to disconnect from the network and quit the AT&T USB Modem before
you remove the device from your computer.
The MF861 allows you to safely remove the device at any time when you are
not connected to the network.
1. Click Off next to Standard Data, and then click Apply in the Data Connection
section to disconnect from the network.
2. Exit and close the AT&T USB Modem.
3. Gently grip the MF861 on both sides and pull straight out to avoid damaging
the USB connectors.
7
Using Your MF861
This chapter describes the main features of the AT&T USB Modem configuration
page for managing your MF861.
AT&T USB Modem Configuration Page
Launch the Internet browser and enter http://192.168.1.1 or
http://attusbmodem/ in the address bar to log in the AT&T USB Modem
configuration page.
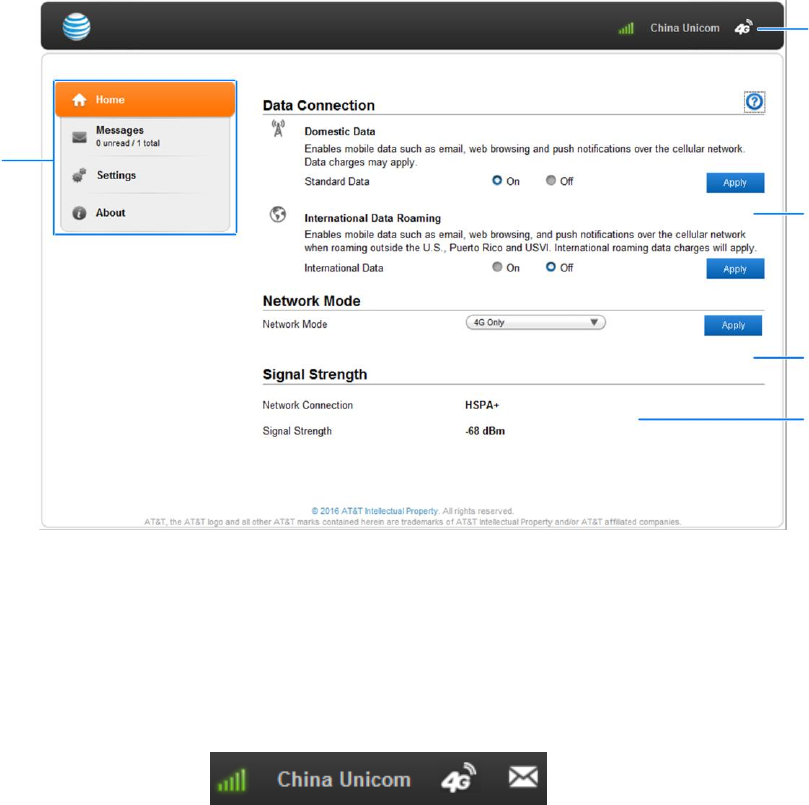
View WAN Information
At the top right of AT&T USB Modem configuration page, you can view network
information, such as the signal strength, operator, network mode, etc.
Status bar
Data connection
Network mode
Signal strength
Navigation menu
8
Configure Data Network Options
You can set network mode, and choose whether to allow the MF861 to be used
when roaming internationally, from the AT&T USB Modem configuration page.
1. Launch the Internet browser and enter http://192.168.1.1 or
http://attusbmodem/ in the address bar.
2. Select Home on the navigation menu on the left side.
3. Choose the appropriate option:
• To enable / disable mobile data, click On or Off next to Standard Data in Data
Connection section, and click Apply.
• To enable / disable international roaming, click On or Off next to International
Data in Data Connection section, and click Apply.
• To set network mode, click drop-down box beside Network mode and select
your prefer network mode, and then click Apply.
9
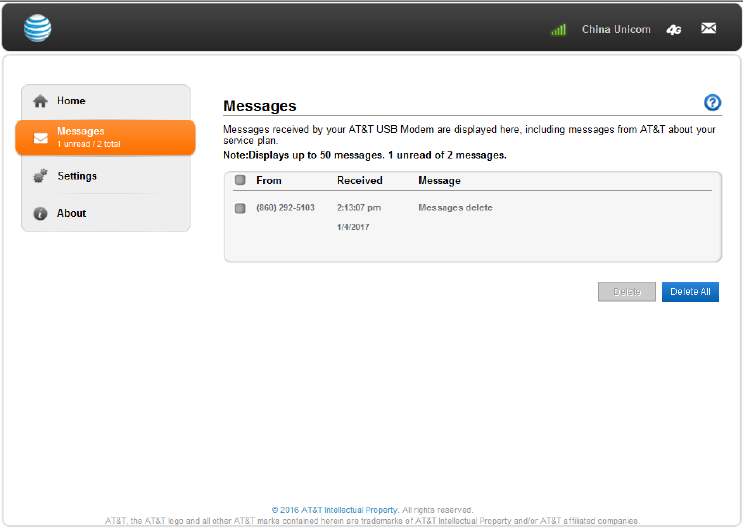
Messages
You can view SMS messages on the AT&T USB Modem configuration page.
To view or delete messages:
1. Launch the Internet browser and enter http://192.168.1.1 or
http://attusbmodem/ in the address bar.
2. Select Messages on the navigation menu on the left side. A list of messages
appears.
3. For any message in the list, click the message to read.
4. If you want to delete the message, click the checkbox in front of the message
and select Delete. You can also click Delete All to delete all messages.
10
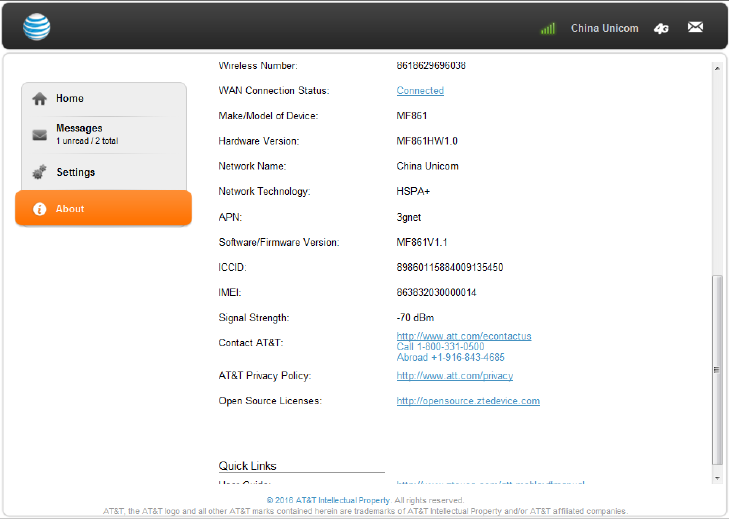
View Details
You can view details about your device such as the wireless number, hardware
version, and IMEI on the AT&T USB Modem configuration page.
1. Launch the Internet browser and enter http://192.168.1.1 or
http://attusbmodem/ in the address bar.
2. Select About on the navigation menu on the left side.

11
Reset the MF861
You can reset the MF861 to the factory setting on the AT&T USB Modem
configuration page.
NOTE:
If you reset the modem to factory settings, all of your customizations will be lost.
1. Launch the Internet browser and enter http://192.168.1.1 or
http://attusbmodem/ in the address bar.
2. Select Settings > Advanced > Device Reset.
3. Click Reset.
View Local Time and Time Zone
You can view the current local time and time zone on the AT&T USB Modem
configuration page.
1. Launch the Internet browser and enter http://192.168.1.1 or
http://attusbmodem/ in the address bar.
2. Select Settings > Advanced > Time/Date.

12
Advanced Settings
This chapter provides information on how to configure advanced settings for
various aspects of the device such as APN settings, firewall settings, SIM PIN,
etc.
NOTE:
Please disconnect the MF861 from the network before changing the settings.
Configure APN details
The APN is checked to determine the type of network connection to establish.
Your MF861 comes preconfigured with the APN (Access Point Name) for AT&T.
To add an APN for another network:
1. On the AT&T USB Modem configuration page.
2. Click Settings > Network.
3. Click Manual in the APN Settings section.
4. Click Add.
5. In the blank line, enter the profile name, APN (obtained from your carrier).
6. Select the PDP type.
7. Select the DNS mode. If set to Manual DNS, you need to enter Primary DNS
or Secondary DNS(optional).
8. Select the network Authentication mode. The options are:
13
· None (default)
· CHAP
· PAP
9. Enter the Username and Password.
10. Click Set Default .
To select the APN entry to use:
1. From the drop-down box beside Profile Selection, select the desired APN to
use.
2. Click Set Default.
To remove an APN entry:
Select the APN you want to remove, and click Delete.
Enable MAC/ IP/Port Filtering
You can enable or disable the MAC/IP/Port Filtering feature as needed to block
certain Internet traffic. If this setting is enabled, you can then choose whether
traffic is Accepted or Dropped by default.
To enable port filtering:
1. On the AT&T USB Modem configuration page .
2. Click Settings.
3. Click Firewall > MAC/IP/Port Filtering tab.
14
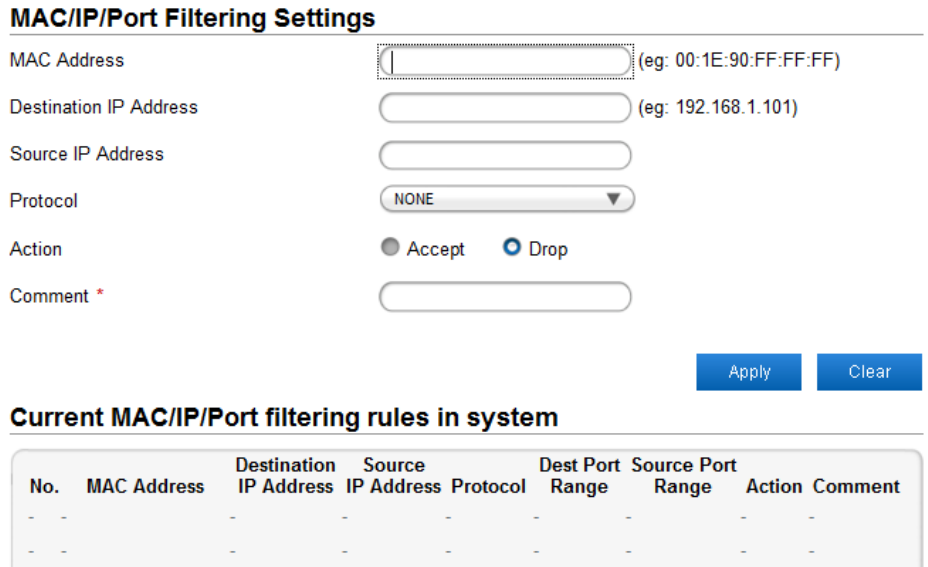
4. Enable MAC/IP/Port Filtering and select default policy.
5. Click Apply.
6. Check the applications you allow to access the Internet and click Apply.
Or click Add Custom Application to add application and the filter settings
will appear as shown below.
• MAC Address: Set the MAC address that will be filtered.
• Destination IP Address: Set the destination IP address that will be filtered.
• Source IP Address: Set the source IP address that will be filtered.
• Protocol: Set which protocol will be used for filtering.
• Action: Set how to handle the packet if it matches with the rule.
• Comment: Type comment for the filter settings.
15
To add a new Port filtering rule:
Input the detail information in the MAC/IP/Port Filtering Settings area and click
Apply to save the rule.
To delete a Port filtering rule:
Select a rule in Current MAC/IP/Port filtering rules in system area
and click Delete > Yes to delete it.
Enable DMZ
In a DMZ (demilitarized zone) network configuration, a computer runs outside the
firewall in the DMZ. This computer intercepts incoming Internet traffic, providing
an extra layer of protection for the rest of the network.
To enable DMZ and designate a computer to screen incoming traffic:
1. On the AT&T USB Modem configuration page.
2. Click Settings > Firewall > DMZ.
3. Select Enable next to DMZ Settings.
4. Click Apply.
16
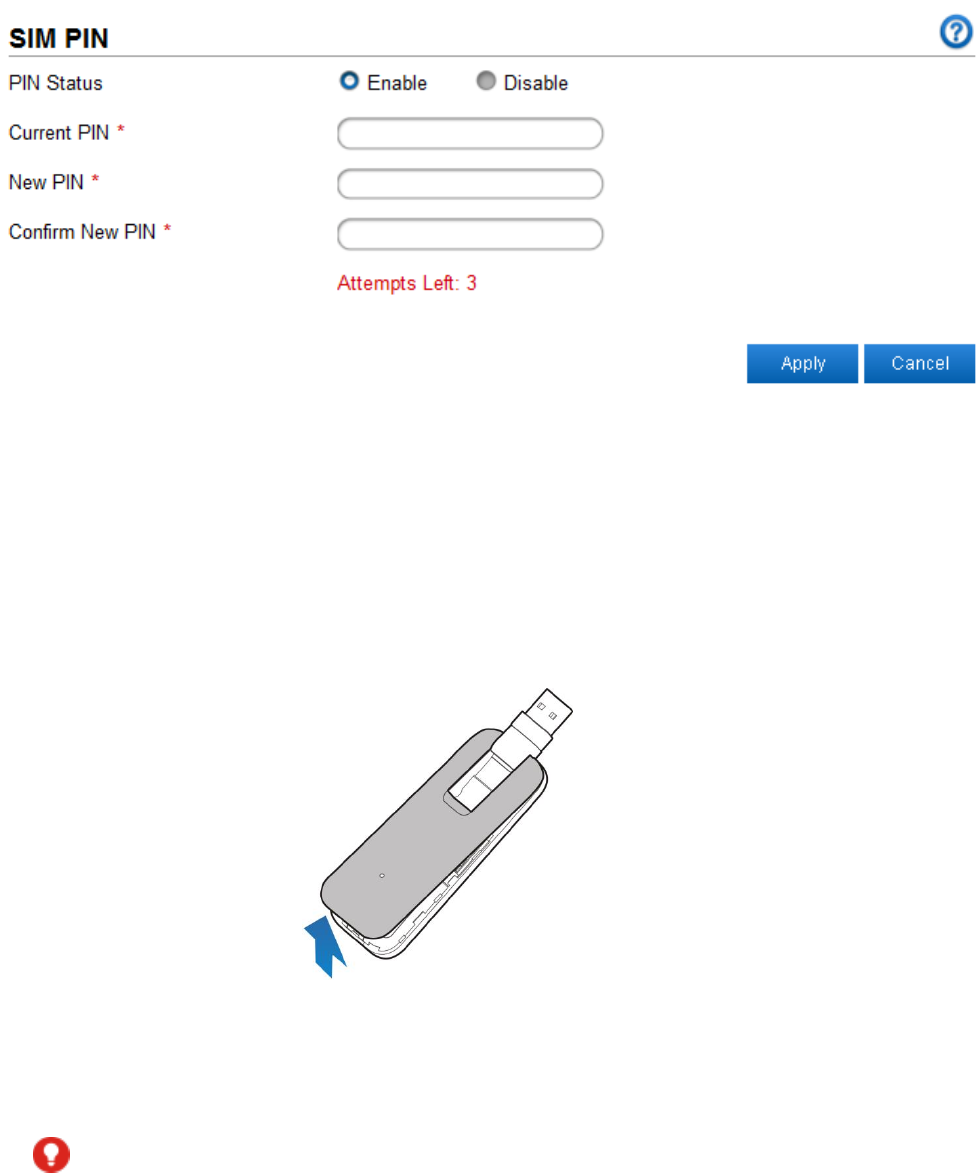
Configure SIM PIN
Enable SIM PIN:
1. On the AT&T USB Modem configuration page.
2. Click Settings > Advanced > SIM PIN.
3. Click Enable next to PIN Status.
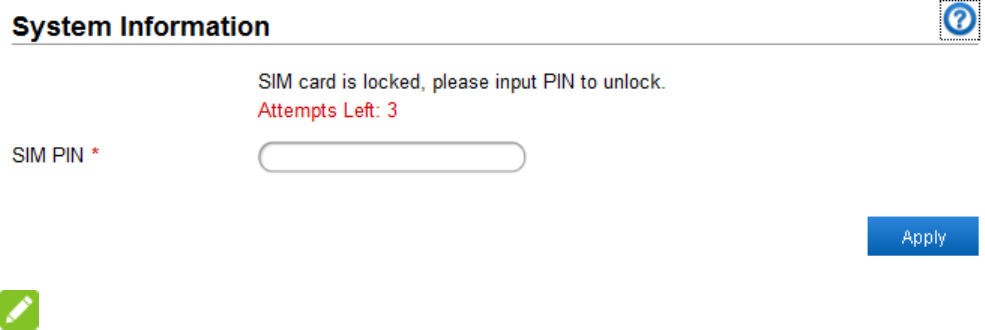
Verifying the PIN Code:
If the PIN code of your nano-SIM card is enabled, you will need to input the PIN
code when you log in at the first time.
NOTE:
The SIM card will be locked if you enter wrong PIN code consecutively for three
times.
If you want to modify the PIN Status, select Settings > Advanced > Change PIN
to do the actions.
17
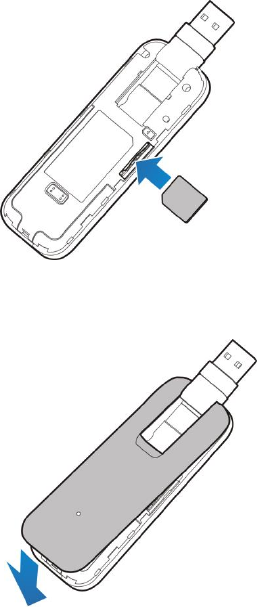
Replace the nano-SIM Card
Your MF861 comes with the nano-SIM card inserted. If you need to replace the
nano-SIM card:
1. Open the front cover and remove it.
2. Remove the existing nano-SIM card (if present ).
3. Install the nano-SIM card to the nano-SIM card slot.
WARNING!
To avoid damage to the phone, do not use any other kind of SIM cards, or any
18
non-standard nano-SIM card cut from a SIM card. You can get a standard
nano-SIM card from your service provider.
4. Replace the front cover.
Warning and Notice
To the Owner
If inadequately shielded, some electronic devices may be affected by the
electromagnetic interference caused by the modem, such as the electronic
system of vehicles. Consult the manufacturers of such devices before using
the modem if necessary.
Operating the modem may interfere with medical instruments such as hearing
aids and pacemakers. Always keep the modem more than 20 centimeters
19
away from such medical instruments when your modem is turned on. Turn
the modem off if necessary. Consult a physician or the manufacturers of
medical instruments before using the modem if necessary.
Be aware of the usage limitation when using the modem at places such as oil
warehouses or chemical factories, where there are explosive gases or
explosive products being processed. Turn off the modem if necessary.
Do not use electronic transmission devices in aircrafts, at petrol stations or in
hospitals. Observe and obey all warning signs, and turn off the modem in
these conditions.
Do not touch the inner antenna area unless it is necessary. Otherwise the
performance of the modern may be affected.
Keep the modem out of the reach of little children. The modem may cause an
injury if used as a toy.
When the modem is operating, do not touch the metallic parts. Failing to do
so may cause burns.
Using Your USB Modem
Use original accessories or accessories that are authorized. Using any
unauthorized accessories may affect the performance of the modem and
violate the related national regulations about telecom terminals.

20
Avoid using the modem near or inside metallic structures or establishments
that can emit electromagnetic waves, because signal reception may be
affected.
The modem is not waterproof. Keep the modem dry and store it in a shady
and cool place.
Do not use the modem immediately after a sudden temperature change. In
such case, dew may be generated inside and outside the modem, so do not
use it until it becomes dry.
Handle the modem carefully. Do not drop, bend or strike it. Otherwise the
modem may be damaged.
Only qualified personnel can dismantle and repair the modem.
Specifications
Mechanical specifications
Dimensions
97*33*16mm
Memory
256MB RAM; 512MB ROM
Supported RF bands
Technology
Bands
Cat 6 LTE
Band 2 / Band 4 / Band 5 / Band 12 / Band 29 / Band 30
2CA
Band 4+Band 29 / Band 2+Band 29/ Band 2+Band 12 /

21
Band 4+Band 12 / Band 2+Band 5 / Band 4+Band 5
HSPA
2100/850/900/1900
Regulatory and Safety Information
To the Owner
• Operating your device may interfere with medical devices such as hearing
aids and pacemakers. Please always keep them more than 20 centimeters
away from such medical devices when they are powered on. Stop using your
device if necessary. Consult a physician or the manufacturer of the medical
device before using your device.
• Be aware of the usage limitation when using your device at places such as oil
warehouses or chemical factories, where there are explosive gases or
explosive products being processed. Stop using your device if required.
• The use of electronic transmitting devices is forbidden in aircrafts, at petrol
stations and in hospitals. Please observe and obey all warning signs and
Stop using your device in these conditions.
• Store your device out of the reach of little children. Your device may cause
injury if used as a toy.
• Do not touch the metallic parts of your device. Otherwise it will affect your
device’s performance.
22
Using Your Device
• Please use original accessories or accessories that are authorized. Using
any unauthorized accessories may affect your device’s performance, and
violate related national regulations about telecom terminals.
• Avoid using your device near or inside metallic structures or establishments
that can emit electromagnetic waves. Otherwise it may influence signal
reception.
• Your device is not waterproof. Please keep it dry and store in a shady and
cool place.
• Do not use your device immediately after a sudden temperature change. In
such case, it will produce dew inside and outside your device, so don’t use it
until it becomes dry.
• Handle your device carefully. Do not drop, bend or strike it. Otherwise your
device will be damaged.
• No dismantling by non-professionals and only qualified technicians can
undertake repair work.
• Operating temperature range of-20°C ~ +70°C and humidity range of 5% ~
95% are recommended.
RF Exposure Information (SAR)
This device meets the government’s requirements for exposure to radio waves.
23
This device is designed and manufactured not to exceed the emission limits for
exposure to radio frequency (RF) energy set by the Federal Communications
Commission of the U.S. Government. The exposure standard for wireless device
employs a unit of measurement known as the Specific Absorption Rate, or SAR.
The SAR limit set by the FCC is 1.6W/kg. *Tests for SAR are conducted using
standard operating positions accepted by the FCC with the device transmitting at
its highest certified power level in all tested frequency bands. Although the SAR
is determined at the highest certified power level, the actual SAR level of the
device while operating can be well below the maximum value. This is because
the device is designed to operate at multiple power levels so as to use only the
poser required to reach the network. In general, the closer you are to a wireless
base station antenna, the lower the power output. SAR compliance has been
established in the host product(s) (laptop computers), tested at 5mm separation
distance to the human body, and tested with USB slot configurations including
Horizontal-UP, Horizontal-Down, Vertical-Front, Vertical-Back. This device can
be used in host product(s) with substantially similar physical dimensions,
construction, and electrical and RF characteristics. The highest SAR value,
tested per FCC RF exposure guidelines for USB dongle, as described in this
user guide, is 1.39 W/kg. The FCC has granted an Equipment Authorization for
this device with all reported SAR levels evaluated as in compliance with the FCC
RF exposure guidelines. SAR information on this device is on file with the FCC
24
and can be found under the Display Grant section of www.fcc.gov/oet/ea/fccid
after searching on FCC ID: SRQ-MF861
FCC Compliance
This device complies with part 15 of the FCC Rules. Operation is subject to the
following two conditions: (1) This device may not cause harmful interference, and
(2) this device must accept any interference received, including interference that
may cause undesired operation.
Caution: Changes or modifications not expressly approved by the manufacturer
could void the user’s authority to operate the equipment. This transmitter must
not be co-located or operating in conjunction with any other antenna or
transmitter.
This equipment has been tested and found to comply with the limits for a Class B
digital device, pursuant to part 15 of the FCC Rules. These limits are designed to
provide reasonable protection against harmful interference in a residential
installation. This equipment generates, uses, and can radiate radio frequency
energy and, if not installed and used in accordance with the instructions, may
cause harmful interference to radio communications. However, there is no
guarantee that interference will not occur in a particular installation. If this
equipment does cause harmful interference to radio or television reception,
which can be determined by turning the equipment off and on, the user is
25
encouraged to try to correct the interference by one or more of the following
measures:
• Reorient or relocate the receiving antenna.
• Increase the separation between the equipment and receiver.
• Connect the equipment into an outlet on a circuit different from that to which
the receiver is connected.
• Consult the dealer or an experienced radio/TV technician for help.
Warranty
Consumer Limited Warranty
ZTE (“Seller”) offers you a limited warranty that the enclosed product or products
(the “Product”) will be free from defects in material and workmanship for a period
that expires one year from the date of sale of the Product to you, provided that
you are the original end-user purchaser of the Product and provided that your
purchase was made from a supplier authorized by the Seller. Transfer or resale
of a Product will automatically terminate warranty coverage with respect to that
Product. This limited warranty is not transferable to any third party, including but
not limited to any subsequent purchaser or owner of the Product. This limited
warranty is applicable to end users in the United States.
26
Seller will, at its sole and absolute discretion, either repair or replace a Product
(which unit may use refurbished parts of similar quality and functionality) if found
by Seller to be defective in material or workmanship, or if Seller determines that it
is unable to repair or replace such Product, Seller will refund the purchase price
for such Product, provided that the subject Product (i) is returned to a Seller
authorized service center within the one year warranty period, and (ii) is
accompanied by a proof of purchase in the form of a bill of sale or receipted
invoice which evidences that the subject Product is within the one year warranty
period. After the one year warranty period, you must pay all shipping, parts and
labor charges. In the event that the product is deemed unrepairable or has been
removed from the list of products supported by the Seller, you will only be liable
for shipping and labor charges.
This limited warranty does not cover and is void with respect to the following: (i)
any Product which has been improperly installed, repaired, maintained or
modified; (ii) any Product which has been subjected to misuse (including any
Product used in conjunction with hardware electrically or mechanically
incompatible or used with accessories not approved by Seller), abuse, accident,
physical damage, abnormal operation, improper handling, neglect, exposure to
fire or liquid; (iii) any Product operated outside published maximum ratings; (iv)
cosmetic damage; (v) any Product on which warranty stickers or Product serial
numbers have been removed, altered, or rendered illegible; (vi) cost of
27
installation, removal or reinstallation; (vii) signal reception problems (unless
caused by defects in material and workmanship); (viii) damage the result of fire,
flood, acts of God or other acts which are not the fault of Seller and which the
Product is not specified to tolerate, including damage caused by mishandling,
shipping and blown fuses; (ix) consumables (such as fuses); or (x) any Product
which has been opened, repaired, modified or altered by anyone other than
Seller or a Seller authorized service center.
USE ONLY SELLER APPROVED ACCESSORIES WITH SELLER DEVICES.
USE OF ANY UNAUTHORIZED ACCESSORIES MAY BE DANGEROUS AND
WILL INVALIDATE THE DEVICE WARRANTY IF SAID ACCESSORIES CAUSE
DAMAGE OR A DEFECT TO THE DEVICE. SELLER SPECIFICALLY
DISCLAIMS LIABILITY FOR ANY AND ALL DIRECT, INDIRECT, SPECIAL,
GENERAL, PUNITIVE, EXEMPLARY,
AGGRAVATED, INCIDENTAL OR CONSEQUENTIAL DAMAGES, EVEN IF
ADVISED OF THE POSSIBILITY OF SUCH DAMAGES, WHETHER
FORESEEABLE OR UNFORESEEABLE OF ANY KIND WHATSOEVER,
INCLUDING BUT NOT LIMITED TO LOSS OF PROFITS, UNANTICIPATED
BENEFITS OR REVENUE, ANTICIPATED PROFITS ARISING OUT OF USE
OF OR INABILITY TO USE ANY PRODUCT (FOR EXAMPLE, WASTED
AIRTIME CHARGES DUE TO THE MALFUNCTION OF A PRODUCT) OR
CONTRIBUTION OR INDEMNITY IN RESPECT OF ANY CLAIM RELATED TO
28
A PRODUCT. REPAIR OR REPLACEMENT OF A DEFECTIVE PRODUCT OR
REFUND OF THE PURCHASE PRICE RELATING TO A DEFECTIVE
PRODUCT, AS PROVIDED UNDER THIS WARRANTY, ARE YOUR SOLE
AND EXCLUSIVE REMEDIES FOR BREACH OF THE LIMITED WARRANTY,
AND SUBJECT TO THIS WARRANTY, THE PRODUCTS ARE APPROVED
AND ACCEPTED BY YOU “AS IS”. SELLER MAKES NO OTHER
WARRANTIES, REPRESENTATIONS OR CONDITIONS OF ANY KIND, ORAL
OR WRITTEN, EXPRESS OR IMPLIED, STATUTORY OR OTHERWISE, WITH
RESPECT TO THE PRODUCTS, INCLUDING BUT NOT LIMITED TO ANY
IMPLIED WARRANTY OR CONDITION OF MERCHANTABILITY OR FITNESS
FOR A PARTICULAR PURPOSE OR AGAINST INFRINGEMENT OR ANY
IMPLIED WARRANTY OR CONDITION ARISING OUT OF TRADE USAGE OR
OUT OF A COURSE OF DEALING OR COURSE OF PERFORMANCE. NO
DEALER, DISTRIBUTOR, AGENT OR EMPLOYEE IS AUTHORIZED TO MAKE
ANY MODIFICATION OR ADDITION TO THIS WARRANTY.
Some jurisdictions do not allow the exclusion or limitation of incidental or
consequential damages, or allow limitations on how long an implied warranty
lasts, so the above limitations or exclusions may
not apply to you. This limited warranty gives you specific legal rights, and you
may also have other rights which vary from jurisdiction to jurisdiction.
For warranty service information, please call the following telephone number:
29
1-800-617-5065.
IMPORTANT:
Please provide warranty information (proof of purchase) to ZTE in order to
receive warranty service at no charge. If the warranty has expired on the device,
charges may apply.