ZTE MF923 LTE uFi User Manual AT T Z998 User Guide
ZTE Corporation LTE uFi AT T Z998 User Guide
UserManual.wiki
>
ZTE
>
MF923 User Manual
User manual
Navigation menu
Upload a User Manual
Namespaces
Wiki Guide
HTML
PDF
Info
Views
User Manual
Discussion / Help
Navigation

![c) Input the Wi-Fi network password, as it displays on the mobile hotspot screen. Launch your browser to surf the Internet.Connect Devices to Your Mobile Hotspot’s Wi-FiYou can connect up to 10 wireless devices such as smartphones, laptops, tablets, digital cameras, printers, gaming consoles, and digital picture frames to your mobile hotspot’s Wi-Fi network(s). (See Set Maximum Number of Connected Devices on page 18 for instructions on setting connections for the Main Wi-Fi and Guest Wi-Fi networks.)You can connect: 6l^gZaZhhYZk^XZidndjgL^";^cZildg`Wnine^c\i]ZL^";^password.6LEH"ZcVWaZYl^gZaZhhYZk^XZWnegZhh^c\i]Z^Xdcdci]Zmobile hotspot and the WPS button on the device.Note: You can also connect a single device directly to the hotspot using the USB cable. Connect a Wireless Device ManuallyTo connect a wireless device to your mobile hotspot’s Wi-Fi network, see Connect to the Internet on page 9.Connect a WPS-Enabled Wireless DeviceIf your client device supports WPS, you don’t have to input the password manually after WPS has been available. Please do the following:On the screen: On the home screen, tap WiFi > Main Wi-Fi Network/Guest Wi-Fi Network. Select WPS. Select Pair with Main Wi-Fi/Pair with Guest Wi-Fi. Press the WPS button on a device you want to connect to your mobile hotspot.Your mobile hotspot and the wireless device will communicate and establish the connection.1110 Get StartedGet StartedWPS is a secure way to connect to your hotspot,without entering the SSID password.To use WPS, your device must support WPS.Pair With Main Wi-Fi](https://usermanual.wiki/ZTE/MF923/User-Guide-2388184-Page-8.png)
![On the AT&T Mobile Hotspot Manager homepage: On your laptop (or other Wi-Fi device), log in to the AT&T Mobile Hotspot Manager homepage by visiting http://att.hotspot or http://192.168.0.1. The default login is attadmin. Click Settings on the navigation menu on the left side. Click Wi-Fi > Basic tab. Choose the WPS method you want to use: >[i]ZYZk^XZndjlVciidXdccZXi]VhVWPS button:Click WPS Push button, and then within 2 minutes (120 seconds) press the device’s WPS button. >[i]ZYZk^XZndjlVciidXdccZXi]VhVWPS PIN associated with it: Enter the device’s WPS PIN and click Enter WPS PIN. Your mobile hotspot and the wireless device will communicate and establish the connection.1312 Get StartedGet Started](https://usermanual.wiki/ZTE/MF923/User-Guide-2388184-Page-9.png)
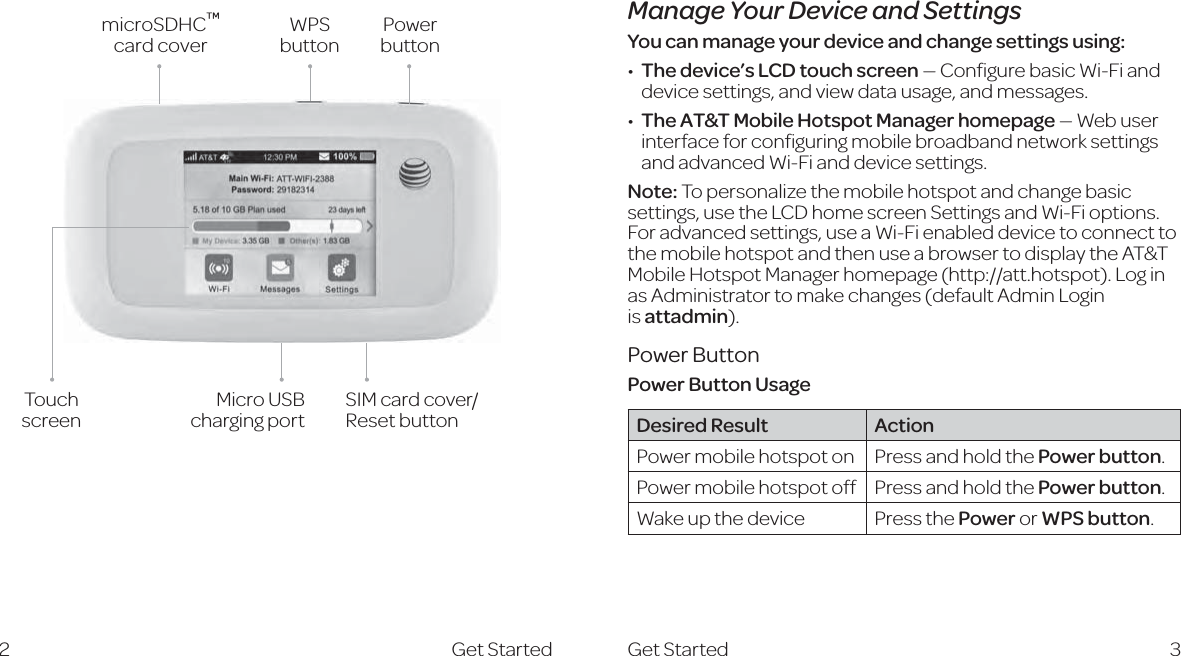
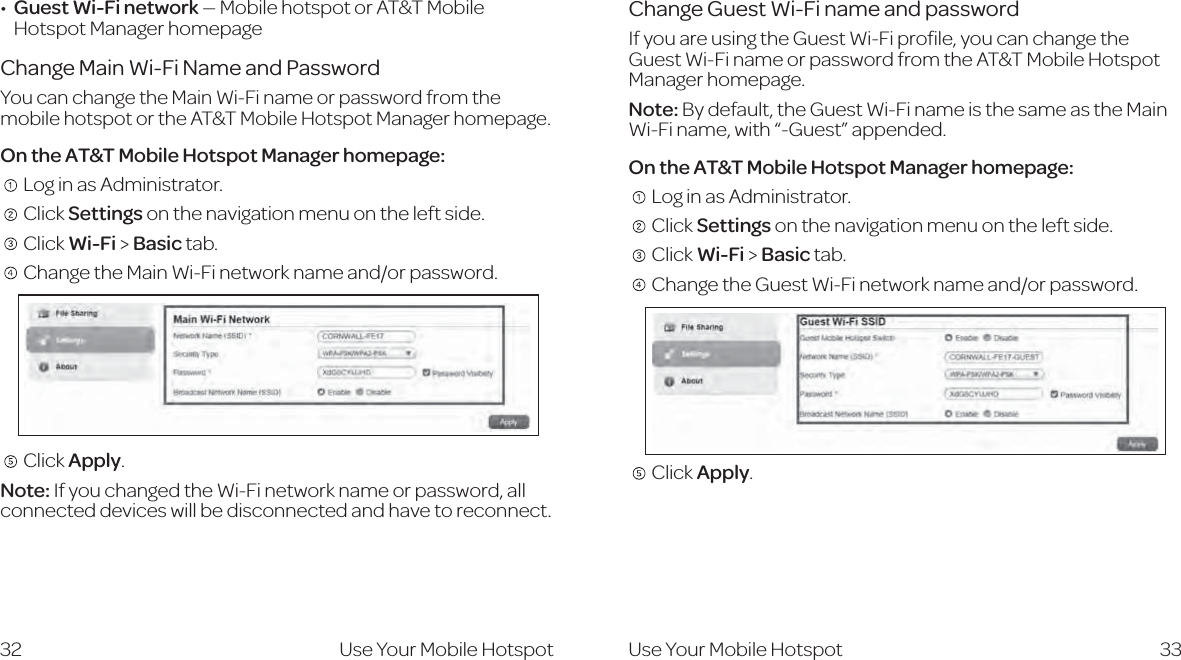
![Use Your Mobile HotspotThis chapter describes the main features of the touch screen and web interfaces for managing your mobile hotspot. AT&T Mobile Hotspot Manager HomepageYou must be logged in as Administrator to change settings and view detailed information. Default homepage URL — http://att.hotspot Default Administrator Login — attadmin To log in as Administrator: On the AT&T Mobile Hotspot Manager homepage, place your cursor in the Login field and type attadmin (the default Login). Click Login.Use Your Mobile HotspotSecurity CredentialsThe mobile hotspot uses three passwords:Wi-Fi password — Used to authenticate wireless devices (notebook, etc.) to your mobile hotspot network. It is: Jc^fjZidndjgYZk^XZ# 9^heaVnZYdci]ZbV^cbdW^aZ]dihediA89hXgZZc#>[ the screen is blank (a power-saving feature), press and quickly release the Power button to view the information on the screen. Eg^ciZYdcVaVWZadci]ZbdW^aZ]dihediYZ[VjaieVhhldgY# >[ndjlVciidX]Vc\Zi]ZL^";^eVhhldgY!hZZChange Wi-Fi Network Names and Passwords on page 31.Guest Wi-Fi Password — When enabled, temporary users can use this password to access the Guest Wi-Fi network. If you want to change the Wi-Fi password, see Change Wi-Fi Network Names and Passwords on page 31. Admin Login — Used to log into the AT&T Mobile Hotspot Manager homepage as Administrator. You must be logged in as Administrator to use certain features and to make changes to your mobile hotspot settings. The default Admin Login is attadmin. The Admin Login can be changed to 4–32 characters. You can change these passwords on the AT&T Mobile Hotspot Manager homepage http://att.hotspot.Use Your Mobile Hotspot 1514](https://usermanual.wiki/ZTE/MF923/User-Guide-2388184-Page-10.png)
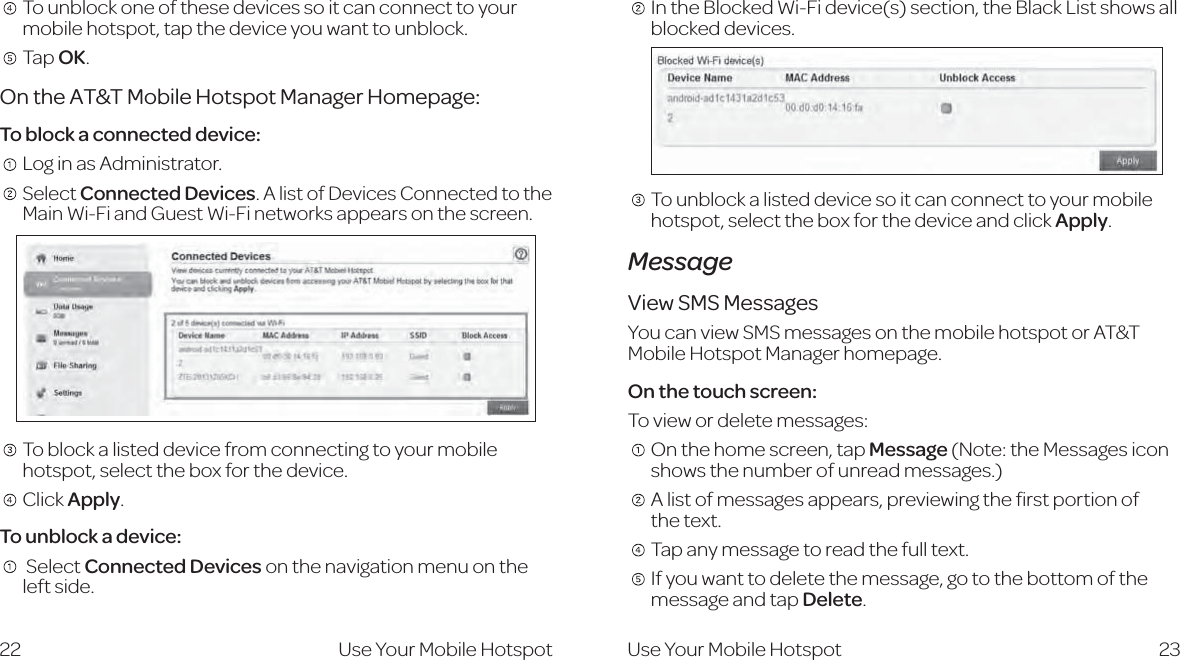
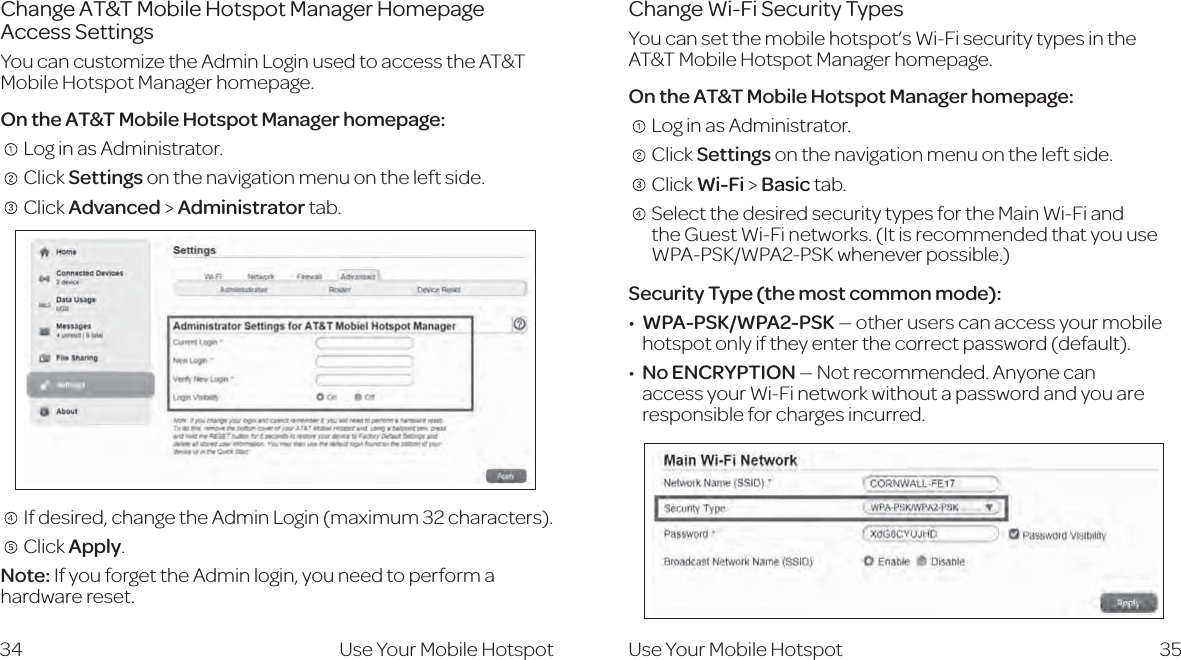
![Block/Unblock Devices Note: Whenever you block or unblock devices, the Wi-Fi radio resets to activate the new settings. Any devices connected to the mobile hotspot will be disconnected when the Wi-Fi radio resets. You can block a device that is currently connected to your mobile hotspot, and it will not be able to connect to your Wi-Fi unless you choose to unblock it. Some reasons that you may want to block a device include: Hidee^c\i]Zb[gdbdkZgjh^c\ndjgWVcYl^Yi]VcYedhh^Wanresulting in charges for overages on your plan). IZbedgVg^anWadX`^c\VX]^aY[gdbhjgÅc\i]Z>ciZgcZi#NdjXVcblock/unblock devices from the mobile hotspot or the AT&T Mobile Hotspot Manager homepage.On the touch screen: To block a connected device: From the home screen, tap WiFi. Tap Connected Devices. A list of devices connected to the Main Wi-Fi and Guest Wi-Fi networks appears. To block a listed device from connecting to your mobile hotspot, tap the device name. The device’s IP and Mac addresses appear.20 Tap Block. Tap OK. The mobile hotspot will reset and the blocked device will not be able to reconnect to access the Internet.To unblock a device: From the touch screen, tap WiFi. Tap Connected Devices. A list of devices connected to the Main Wi-Fi and Guest Wi-Fi networks appears. At the bottom of the list (swipe up if required), tap Block List. A list of blocked devices appears.21Use Your Mobile Hotspot Use Your Mobile Hotspot](https://usermanual.wiki/ZTE/MF923/User-Guide-2388184-Page-13.png)
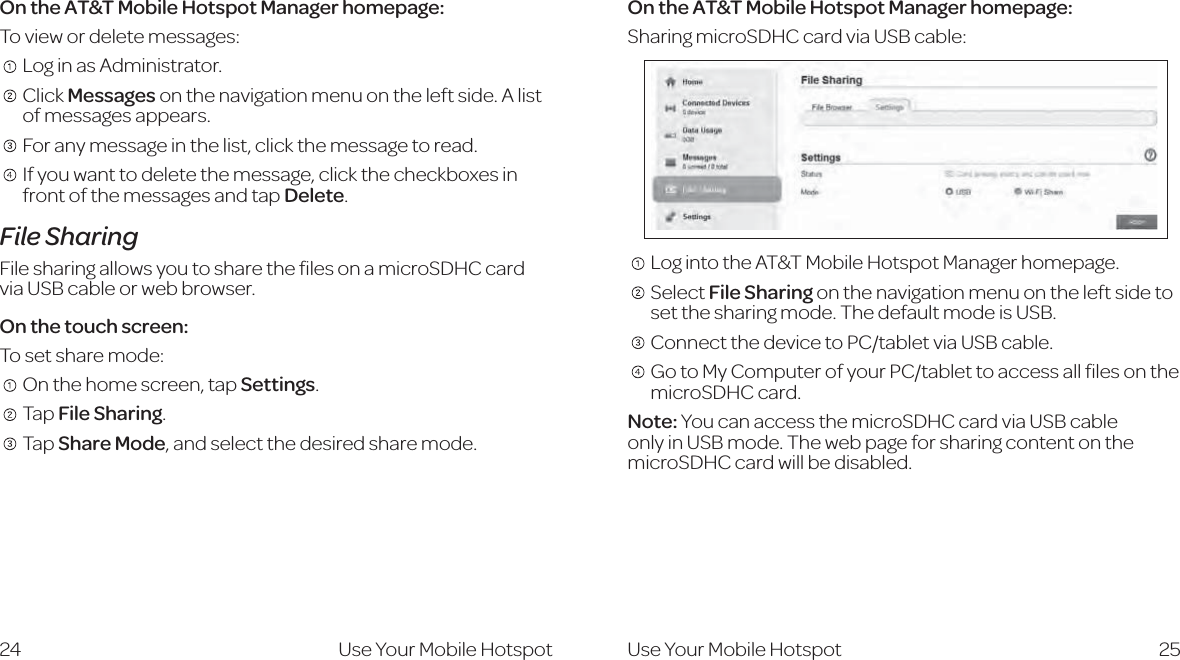
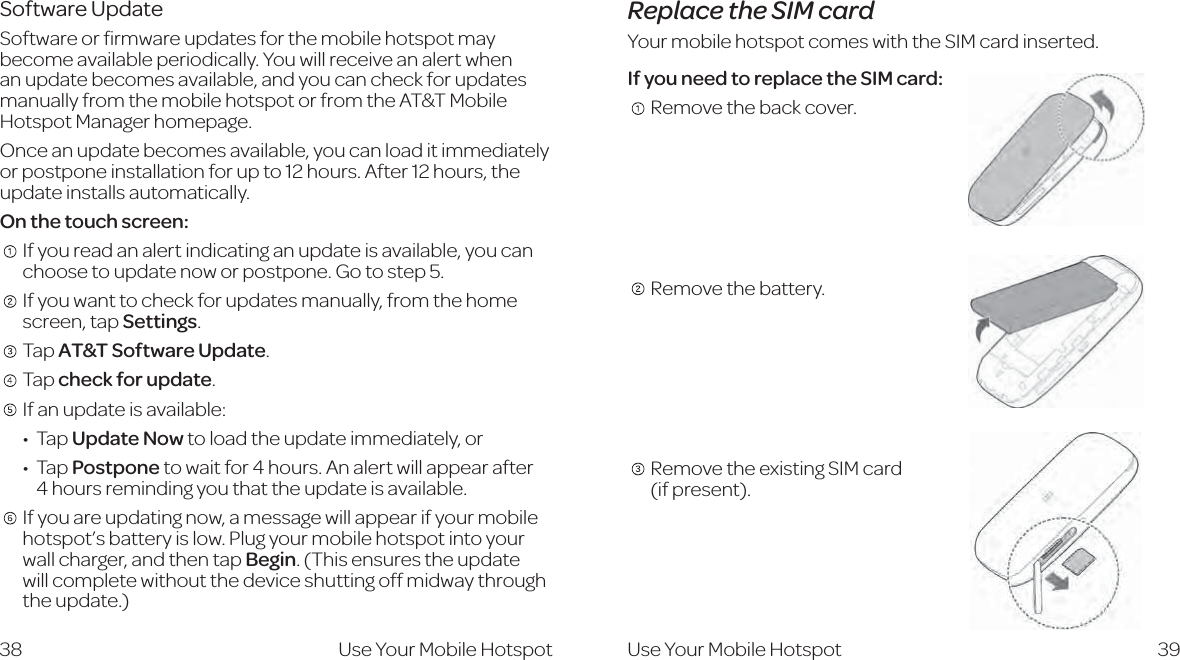
![Sharing microSDHC Card via Web Browser Select File Sharing > Settings and then the microSDHC card page is shown as the following figure. Select Wi-Fi Share mode. Select Enable to enable share settings. Set File to Share and Access Type. Click Apply to save the settings. Launch the browser on your PC/tablet/smartphone connected to the device via Wi-Fi and enter http://att.hotspot or http://192.168.0.1 in the address bar.27 Click Access the files on the SD Card on the login window to access the files on the microSDHC card.BatteryBattery LifeThe mobile hotspot is configured (by default) to optimize battery life. Battery life is affected by:HiVcYWni^bZ9ViVi]gdj\]ejiBdW^aZWgdVYWVcYh^\cVahigZc\i]i]ZWZiiZgi]Zh^\cVa!i]Zlonger the battery life)Wi-Fi RangeStandard — Longest battery lifeExtended Range — Enables you to have connected Wi-Fi devices further from your mobile hotspot and still connect to your Wi-Fi network, but battery life is shorter26 Use Your Mobile Hotspot Use Your Mobile Hotspot](https://usermanual.wiki/ZTE/MF923/User-Guide-2388184-Page-16.png)
![Click Apply. Reconnect your Wi-Fi devices, if necessary, using the new Wi-Fi credentials. See Connect to the Internet on page 9.Configure Data Network OptionsYou can choose the network types that your mobile hotspot can connect to, and choose whether to allow the mobile hotspot to be used when roaming internationally, from the mobile hotspot or the AT&T Mobile Hotspot Manager homepage.On the touch screen: From the home screen, tap Settings. Tap International Roaming. Choose the appropriate option: IdZcVWaZ$Y^hVWaZ^ciZgcVi^dcVagdVb^c\!iVei]ZOn/Off button next to International roaming to power international roaming on or off. Touch Search Network to search for all available networks. 36 Touch a network in the network list to register manually. You can also tap the On/Off button beside Select automatically to select preferred network automatically.View DetailsYou can view details about your device such as the wireless number, hardware version, and IMEI on the mobile hotspot or the AT&T Mobile Hotspot Manager homepage.On the touch screen: From the home screen, tap Settings. Tap About Your Device. Swipe the screen to scroll through the information.On the AT&T Mobile Hotspot Manager homepage: Log in as Administrator. Click About on the navigation menu on the left side.37Use Your Mobile Hotspot Use Your Mobile Hotspot](https://usermanual.wiki/ZTE/MF923/User-Guide-2388184-Page-21.png)
![Specifications50Regulatory and Safety InformationTo the OwnerHdbZZaZXigdc^XYZk^XZhVgZhjhXZei^WaZidZaZXigdbV\cZi^Xinterference sent by your device if inadequately shielded, such as the electronic system of vehicles. Please consult the manufacturer of your device before using if necessary.DeZgVi^c\ndjgYZk^XZbVn^ciZg[ZgZl^i]bZY^XVaYZk^XZhsuch as hearing aids and pacemakers. Please always keep them more than 20 centimeters away from such medical devices when they are powered on. Power your device off if necessary. Consult a physician or the manufacturer of the medical device before using your device.7ZVlVgZd[i]ZjhV\Za^b^iVi^dcl]Zcjh^c\ndjgYZk^XZat places such as oil warehouses or chemical factories, where there are explosive gases or explosive products being processed. Power off your device if required.I]ZjhZd[ZaZXigdc^XigVchb^ii^c\YZk^XZh^h[dgW^YYZc^caircrafts, at petrol stations and in hospitals. Please observe and obey all warning signs and power off your device in these conditions.9dcdiidjX]i]Z^ccZgVciZccVVgZV^[cdicZXZhhVgn#Otherwise it will affect your device’s performance.HidgZndjgYZk^XZdjid[i]ZgZVX]d[a^iiaZX]^aYgZc#NdjgYZk^XZmay cause injury if used as a toy.9dcdiidjX]i]ZbZiVaa^XeVgihd[ndjgYZk^XZhdVhidVkd^YVburn, when your device is working.Regulatory and Safety Information 51SpecificationsMechanical SpecificationsWeight 130 gDimensions 114 x 63 x 17 mmDisplay 2.4" QVGA TFT LCD 240 x 320 pixel Capacitive touch screenMemory 256 MB RAM/512 MB ROMBattery 2800 mAhSupported RF BandsTechnology BandsLTE Band 2 Band 4 Band 5 Band 17 Band 29UMTS/HSPA+ Band 1 Band 2 Band 5](https://usermanual.wiki/ZTE/MF923/User-Guide-2388184-Page-28.png)
![Regulatory and Safety InformationUsing Your DeviceEaZVhZjhZdg^\^cVaVXXZhhdg^ZhdgVXXZhhdg^Zhi]ViVgZauthorized. Using any unauthorized accessories may affect your device’s performance, and violate related national regulations about telecom terminals.6kd^Yjh^c\ndjgYZk^XZcZVgdg^ch^YZbZiVaa^XhigjXijgZhor establishments that can emit electromagnetic waves. Otherwise it may influence signal reception.NdjgYZk^XZ^hcdilViZgegdd[#EaZVhZ`ZZe^iYgnVcYhidgZ^cVshady and cool place.9dcdijhZndjgYZk^XZ^bbZY^ViZanV[iZgVhjYYZctemperature change. In such case, it will produce dew inside and outside your device, so don’t use it until it becomes dry.=VcYaZndjgYZk^XZXVgZ[jaan#9dcdiYgde!WZcYdghig^`Z^i#Otherwise your device will be damaged.CdY^hbVcia^c\Wncdc"egd[Zhh^dcVahVcYdcanfjVa^ÅZYtechnicians can undertake repair work.DeZgVi^c\iZbeZgVijgZgVc\Zd[%8s (*8VcY]jb^Y^ingVc\Zd[*s.*VgZgZXdbbZcYZY#Using Battery9dcdih]dgi"X^gXj^ii]ZWViiZgn!Vhi]^hXVcXVjhZZmXZhh^kZheat and fire.9dcdihidgZWViiZgn^c]diVgZVhdgY^hedhZd[^i^cVÅgZidavoid explosion.9dcdiY^hVhhZbWaZdgbdY^[ni]ZWViiZgn#53L]Zccdijh^c\i]ZWViiZgn[dgVadc\eZg^dY!gZbdkZ^i[gdbyour device and store it in a cool dry place.CZkZgjhZVcnX]Vg\ZgdgWViiZgnYVbV\ZYdgldgcdji#GZijgci]Zldgc"djiWViiZgnidi]Zegdk^YZgdgeji^i^ci]Zappointed recycle place. Do not dispose of the battery in the trash. WARNING! If the battery is broken, keep away from it. If it taints your skin, wash your skin with abundant fresh water and ask doctor for help if necessary.Radio Frequency (RF) EnergyThis device meets the government’s requirements for exposure to radio waves.This device is designed and manufactured not to exceed the emission limits for exposure to radio frequency (RF) energy set by the Federal Communications Commission of the U.S. Government:The exposure standard for wireless mobile devices employs a unit of measurement known as the Specific Absorption Rate, or SAR. The SAR limit set by the FCC is 1.6W/kg. *Tests for SAR are conducted using standard operating positions accepted by the FCC with the device transmitting at its highest certified power level in all tested frequency bands. Although the SAR is determined at the highest certified power level, the actual SAR level of the device while operating can be well below the maximum value. This is because the device is designed to operate at multiple power levels so as to use only the poser Regulatory and Safety Information52](https://usermanual.wiki/ZTE/MF923/User-Guide-2388184-Page-29.png)
![b) Do not modify or remanufacture, attempt to insert foreign objects into the battery, immerse or expose to water or other liquids, expose to fire, explosion or other hazard. c) Only use the battery for the system for which it is specified d) Only use the battery with a charging system that has been qualified with the system per CTIA Certification Requirements for Battery System Compliance to IEEE 1725. Use of an unqualified battery or charger may present a risk of fire, explosion, leakage, or other hazard. e) Do not short circuit a battery or allow metallic conductive objects to contact battery terminals. f) Replace the battery only with another battery that has been qualified with the system per this standard, IEEE-Std-1725. Use of an unqualified battery may present a risk of fire, explosion, leakage or other hazard. g) Promptly dispose of used batteries in accordance with local regulations h) Battery usage by children should be supervised. i) Avoid dropping the phone or battery. If the phone or battery is dropped, especially on a hard surface, and the user suspects damage, take it to a service center for inspection. j) Improper battery use may result in a fire, explosion or other hazard. For those host devices that utilize a USB port as a charging source, the host device's user manual shall include a statement that the phone shall only be connected to CTIA certifiedRegulatory and Safety Information56 Regulatory and Safety Information 57adapters, products that bear the USB-IF logo or products that have completed the USB-IF compliance program.Limited WarrantyI]^hlVggVcinYdZhcdiVeeanidYZ[ZXihdgZggdgh^ci]ZProduct caused by: i. Reasonable abrasion. ii. End User’s failure to follow ZTE’s installation, operation or maintenance instructions or procedures. iii. End User’s mishandling, misuse, negligence, or improper installation, disassembly, storage, servicing or operation of the Product. iv. Modifications or repairs not made by ZTE or a ZTE-certified individual. v. Power failures, surges, fire, flood, accidents, actions of third parties or other events outside ZTE’s reasonable control. vi. Usage of third-party products, or usage in conjunction with third-party products provided that such defects are due to the combined usage.vii. Any other cause beyond the range of normal usage intended for the Product. End User shall have no right to reject or return the Product, or receive a refund for the Product from ZTE under the above-mentioned situations.](https://usermanual.wiki/ZTE/MF923/User-Guide-2388184-Page-31.png)
![I]^hlVggVcin^h:cYJhZg½hhdaZgZbZYnVcYOI:½hhdaZa^VW^a^infor defective or nonconforming items, and is in lieu of all other warranties, expressed, implied or statutory, including but not limited to the implied warranties of merchantability and fitness for a particular purpose, unless otherwise required under the mandatory provisions of the law.Limitation of LiabilityZTE shall not be liable for any loss of profits or indirect, special, incidental or consequential damages resulting from or arising out of or in connection with using of this product, whether or not ZTE had been advised, knew or should have known of the possibility of such damages, including, but not limited to lost profits, interruption of business, cost of capital, cost of substitute facilities or product, or any downtime cost.58 Regulatory and Safety InformationNotesNotes 59](https://usermanual.wiki/ZTE/MF923/User-Guide-2388184-Page-32.png)