Contents
- 1. User Manual 1
- 2. User Manual 2
User Manual 1

第1页

第2页
第3页
GE
TTING
T
O
KNOW
Y
OUR
MOBILE
HOTSPOT
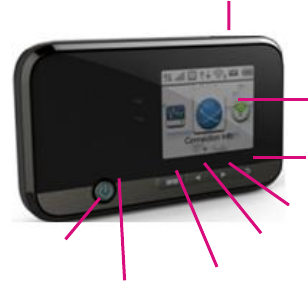
LCD Screen
Power key
Press and hold to
turn on/off.
Memory card slot
Charging&
USB port
Left key
Right key
Back key
Function key
Enter or select an
item.
第4页
’s 4G LTE network is not available everywhere. Please see coverage details at .com. Device
and screen images are simulated. Capable device is required to achieve 4G LTE speed.
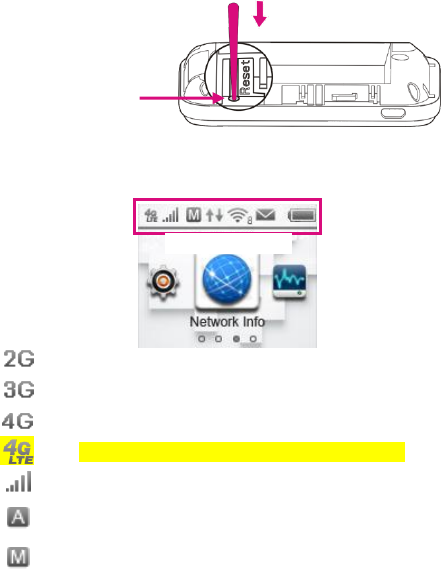
INDICAT
ORS
Indicates that your Mobile HotSpot is on ’s 2G network.
Indicates that your Mobile HotSpot is on ’s 3G network.
Indicates that your Mobile HotSpot is on ’s 4G network.
Indicates that your Mobile HotSpot is on ’s 4G LET network.
Network signal strength.
Indicates that your device will connect to the Internet
automatically.
Indicates that you need connect your device to the Internet by
hand.
Reset point
Trigger this point to
reset your device.
第5页
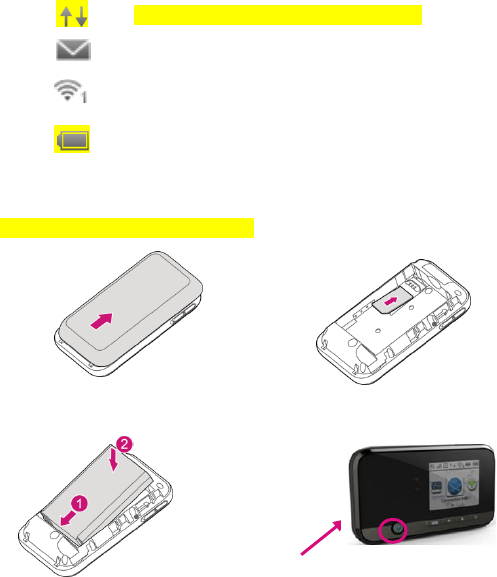
Indicates that your device is connected to the Internet.
New text message in your message Inbox. will periodically
send you notifications about your account.
Indicates how many devices are connected to the Mobile
HotSpot.
Battery power level. The indicator will flash when the battery is
almost exhausted. The indicator will show as filling when the
Mobile HotSpot is charging.
SE
T
UP
Y
OUR
SONIC 2.0
MOBILE
HOTSPOT
Remove back cover and battery. Install SIM card.
Install battery& power on.
Press and hold
to power on.
第6页
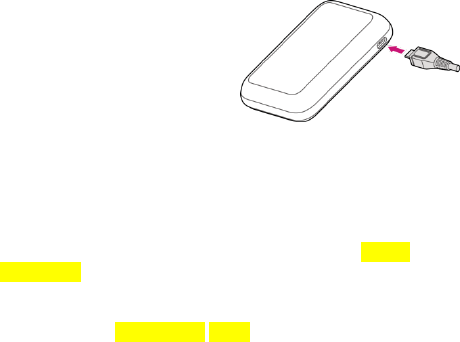
Charge your Mobile HotSpot
You can charge your Mobile HotSpot
using a wall outlet or by plugging
it in to your computer using the
USB cable.
CONNECT & GO
Connect
your
Wi-Fi
device
to
your
Sonic 2.0
Mobile HotSpot
1.
P
ower
on
your
Mobile
HotSpot.
2. On your computer or other Wi-Fi enabled device, search
for available Wi-Fi Networks and select the default Network
Name (SSID) for your Mobile HotSpot.
3.
Enter
the
default
password
and
click
OK
.
Note
:
The Default Network Name (SSID) and password are located
on the back of your Mobile HotSpot.
It may take up to a minute to establis
h
a
connection.
4. Open a web browser and go!

第7页
Important
Note:
Did
your
browser
take
you
to
a
Activation
P
age?
Ye
s
:
Simply
follow
the
on-screen
instr
uctions
to
set
up
your
No
Annual
Contract
service.
No
:
Y
our
service
is
already
active
and
you
are
ready
to
go!
Note: By activating service, you acknowledge that you have read, understand, and
agree to be bound by each of ’s Terms and Conditions and your Service
Agreement.
Managing Your Sonic 2.0 Hotspot
Access WebConnect
You can access WebConnect using a browser or by starting the WebConnect Companion, if you
have it installed on your computer.
To access WebConnect from your browser, do the following:
1. Connect to your hotspot device via Wi-Fi using the network connection software on
your computer. Provide the Wi-Fi network password, if requested.
2. Open a browser and enter http://mobile.hotspot in the address bar. The
WebConnect Login screen appears.
3. Enter your WebConnect administrator password in the field provided.
4. Select the Remember Password checkbox if you wish to bypass the login screen
in the future.
5. Click Log In. If you entered the correct password, the WebConnect Dashboard
screen appears.

第8页
To access WebConnect using the WebConnect Companion application, do the following:
1. Connect to your hotspot device via Wi-Fi using the network connection software on
your computer. Provide the Wi-Fi network password, if requested.
2. Start the WebConnect Companion application. The WebConnect
Companion’s icon appears in your system tray (Windows) or Menu bar (Mac).
3. Right-click the icon to display the menu.
4. Select the View WebConnect menu option. The WebConnect Companion
Login screen appears.
5. Enter your WebConnect administrator password in the field provided.
6. Select the Remember Password checkbox if you wish to bypass the login screen
in the future.
7. Click LOGIN. If you entered the correct password, the WebConnect Companion
Main screen appears.
8. Click the Full View button. The WebConnect Dashboard screen appears in a
browser window.
Change WebConnect Admin Password
1. Access WebConnect. The Dashboard screen appears.
2. Click Configuration in the navigation area to access the Configuration screen.
3. Select the Hotspot Settings tab on the Configuration screen.
4. Click Change Password in the Admin Password area. The Change Admin
Password dialog appears.
5. Enter your current password in the Password field.
6. Enter the new password in the New field.
7. Re-enter the new password in the Verify field.
8. Click Change. If everything is entered correctly, the Admin Password Changed
dialog appears indicating the password was successfully changed.
Change WebConnect Hotspot Network Name (SSID)
1. Access WebConnect. The Dashboard screen is displayed.

第9页
2. Click Configuration in the navigation area to access the Configuration screen.
3. Select the Hotspot Settings tab on the Configuration screen.
4. Change the name that appears in the Network Name (SSID) field in the Wi-Fi
Settings area.
5. Select or deselect the Broadcast network name checkbox to enable or disable
broadcasting the hotspot’s Network Name (SSID).
6. Click Save to save your changes to on the Hotspot Settings tab of the
Configuration screen.
Change WebConnect Hotspot Wi-Fi Password
1. Access WebConnect. The Dashboard screen is displayed.
2. Click Configuration in the navigation area to access the Configuration screen.
3. Select the Hotspot Settings tab on the Configuration screen.
4. Change the value that appears in the Password field in the Wi-Fi Settings area.
5. Click Save to save your changes to on the Hotspot Settings tab of the
Configuration screen.
第10 页
ADDITIONAL
INFORMA
TION
Wi-Fi
:
Devices
usi
ng
wireless
connections
may
be
vulnerable
to
unauthorized
attempts
to access
data
and
software
stored
on
the
device.
Plan
data
allotment
applies
to
use
by
connected devices
sharing
Wi-Fi.
Use
of
connected
devices
subject
to
terms
and
conditions.
Messaging/Data:
Y
ou
will
be
charged
for
all
messages
and
data
sent
by
or
to
you
through
the
network,
regardless
of
whether
or
not
data
is
received.
Character
length/file
size
of
messages/
attachments
may
be
limited.
is
not
liable
for
content
of
messages/attachments
or
for
any
failures,
delays
or
errors
in
any
generated
alerts
or
notifications.
Y
our
data
session, plan,
or
service
may
be
slowed,
suspended,
terminated,
or
restricted
if
you
use
your
service
in
a
way
that
interferes
with
or
impacts
our
network
or
ability
to
provide
quality
service
to
other users,
if
you
roam
for
a
significant
portion
of
your
usage,
or
if
you
use
a
disproportionate
amount of
bandwidth
during
a
billing
cycle.
Y
ou
may
not
use
your
plan
or
device
for
prohibited
uses.
P
ostpaid
Monthly Overage-Free Mobile Broadband Plans:
2
year
agreements
required.
Domestic
roaming
not
possible.
Roaming
charges
may
apply
to
use
via
non-
owned
Wi-Fi
networks.
International
use
requires
international
service
activation;
usage does
not
apply
to
Mobile
Broadband
Plan
megabyte
allotment;
international
rates
apply.
No Annual Contract Mobile Broadband Plans:
Does
not
require
a
commitment
to
a
long-term
contract.
P
ass
required
to
use
service.
Service
available
for
time
period
and/or
usage amount
provided
by
P
ass.
Service
does
not
include
voice,
messaging
or
Wi-Fi
services. Domestic
only;
no
international
or
domestic
roaming.
Devices
sold
for
use
on
service
are
to
be
activated
on
that
service,
not
transferred
for
resale,
modification,
or
export.
Coverage:
Service,
including
4G
coverage,
not
av
ailable
everywhere.
See
brochures
and
T
erms
and
Conditions
(including
arbitration
provision)
at
www
.
.com,
for
coverage maps,
rate
plan
information,
charges
for
features
and
services,
and
restrictions
and
details.
and
the
magenta
color
are
registered
trademarks
of
Deutsche
T
elekom
AG.
The
4G
Mobile
HotSpot
logo
is
a
trademark
of
USA
,
Inc.
© 2012
USA
,
Inc.
第11 页
ADDITIONAL
HELP
Mobile HotSpot URL: http://mobile.hotspot/
or IP address: 192.168.0.1.
From the HotSpot Admin page, click User Manual.