User manual
1
WiFi Ufi
MF97W
Quick Start Guide

2
LEGAL INFORMATION
Copyright © 2014 ZTE CORPORATION.
All rights reserved.
No part of this publication may be quoted, reproduced, translated or used
in any form or by any means, electronic or mechanical, including
photocopying and microfilm, without the prior written permission of ZTE
Corporation.
Notice
ZTE Corporation reserves the right to make modifications on print errors
or update specifications in this guide without prior notice.
We offer self-service for our smart terminal device users. Please visit the
ZTE official website (at www.ztedevice.com) for more information on
self-service and supported product models. Information on the website
takes precedence.
Visit http://www.ztedevice.com to download the user manual. Just click
Support > Manuals from the home page and then select your location,
product type, and name to search for related support information.
Disclaimer

3
ZTE Corporation expressly disclaims any liability for faults and damages
caused by unauthorized modifications of the software.
Images and screenshots used in this guide may differ from the actual
product. Content in this guide may differ from the actual product or
software.
Trademarks
ZTE and the ZTE logos are trademarks of the ZTE Corporation.
Google and Android are trademarks of Google, Inc.
The Bluetooth® trademark and logos are owned by the Bluetooth SIG, Inc.
and any use of such trademarks by ZTE Corporation is under license.
microSDHC Logo is a trademark of SD-3C, LLC.
is a trademark of SRS Labs, Inc. TruMedia technology is
incorporated under license from SRS Labs, Inc.
SRS TruMedia™, a feature-rich audio solution tuned specifically for
mobile devices, provides a cinema-like surround headphone performance
with deep, rich bass.
Other trademarks and trade names are the property of their respective
owners.
4
Version No.: R1.0
Edition Time: September 11, 2014
Manual No.:
5
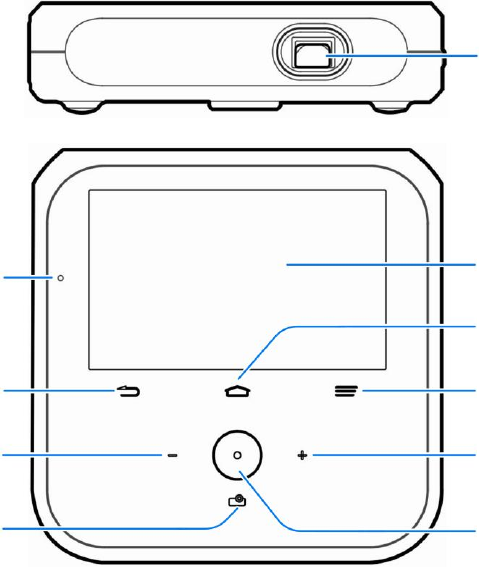
Getting to Know Your spro
Projection
Lens
Touch Screen
Indicator Light
Home Key
Menu Key
Back Key
Volume Up
Key
Volume Down
Key
Projection
Key
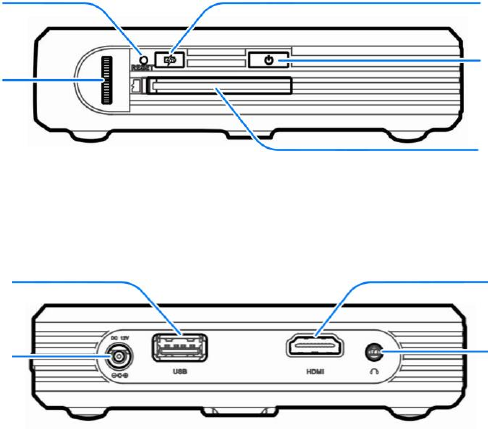
6
Sleep/Wake
Up Key
Power Bank
Key
Power Key
microSDHC
Card Slot Cover
Reset Key
Focus Wheel
HDMI Input
Port
USB Jack
Power Socket
Headset Jack

7
Kickstand
Ventilation
Holes
Speaker

8
Projection Lens
Project the display on a surface.
WARNING!
Do not look directly into the projection lens or point the lens toward people
or animals’ eyes when the projector is on as this may cause injury to the
eyes.
Back Key
Touch to go to the previous screen.
Home Key
Touch to return to the home screen from any application or screen.
Touch and hold to see recently used apps.
Menu Key
Touch to get the options for the current screen.
Volume Up/Down Key
Touch or hold to turn the volume up or down.
9
Sleep/Wake Up Key
Touch to turn off or on the screen display.
Projection Key
Touch to turn on or off the projector.
Power Key
Press and hold to enable silent mode or silent mode with vibration,
disable silent mode, power off or restart your spro.
Press to turn off or on the screen display.
Power Bank Key
Press and hold to turn on or off the Power Bank feature which allows you
to charge other devices through your spro.
Reset Key
You can force your spro to restart in situations when it stops responding or
won’t power off normally.
Using the tip of a pen or paperclip, press and hold the Reset Key until
your spro restarts.
Focus Wheel

10
Adjust the focus of the projector.
Ventilation Holes
Exhaust the hot air when the projector is on.
WARNING!
Do not place anything near the ventilation holes as this may cause internal
heat buildup. Do not place your hand near the ventilation holes as this
may cause injury.
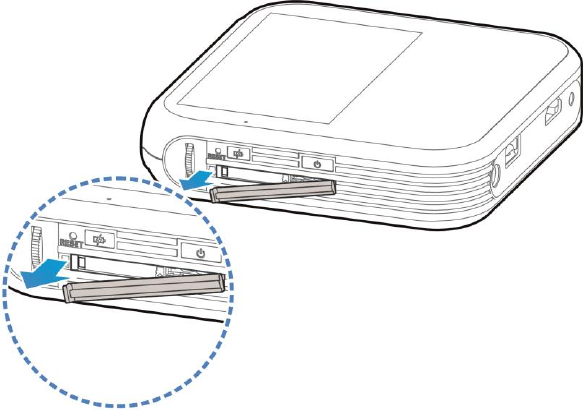
Installing the microSDHC™ Card (Not Included)
A microSDHC card can be installed or removed while the spro is turned on.
You need to unmount the microSDHC card before removing it.
1. Open the microSDHC card slot cover.
11
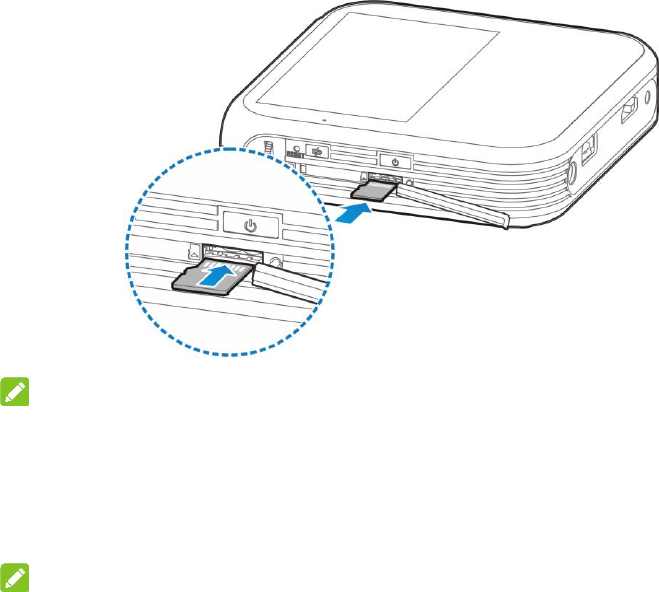
2. Hold the microSDHC card with the cut edge oriented as shown below.
Push the card into the card slot until it clicks into position. You may
hear a click when the card clicks into the slot.
12
NOTE:
Some applications may require a microSDHC card to work normally or
may store certain data on it. Therefore, it is recommended that you keep a
microSDHC card installed and not remove or replace it randomly.
3. Close the cover.
NOTE:
To remove the microSDHC card, open the card slot cover, push the card

13
so it clicks out, and then pull it completely out from the slot.
Charging the Battery
Your spro’s battery should have enough power for the spro to turn on. You
should fully charge the battery as soon as possible.
WARNING!
Use only ZTE-approved chargers and cables. The use of unapproved
accessories could damage your spro or cause the battery to explode.
CAUTION:
Do not remove or change the built-in rechargeable battery in your spro by
yourself. The battery can only be changed by ZTE or ZTE authorised
service provider.
1. Plug the AC adapter into the power socket on your spro.
2. Plug the AC adapter into an electrical outlet.
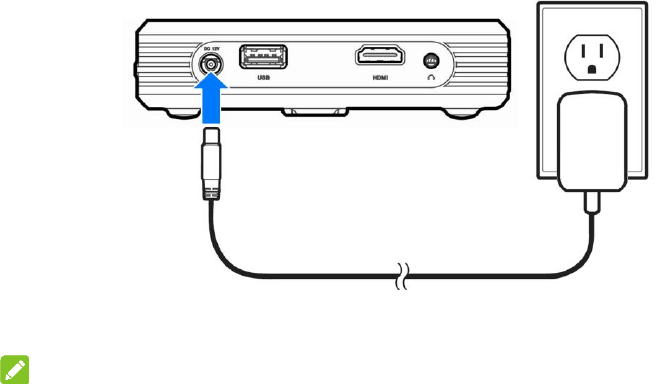
14
3. Disconnect the adapter when the battery is fully charged.
NOTE:
If the battery is extremely low, you may be unable to power on the spro
even when it is being charged. In this case, try again after charging the
spro for at least 20 minutes. Contact the customer service if you still
cannot power on the spro after prolonged charging.
Powering On/Off Your spro
Ensure that the battery is charged.

15
Press and hold the Power Key to turn on your spro.
To turn it off, press and hold the Power Key to open the options menu.
Touch Power off and then touch OK.
Restarting Your spro
If the screen freezes or takes too long to respond, try pressing and holding
the Power Key for about 10 seconds to restart the spro.
NOTE:
You can also press and hold the Reset Key using the tip of a pen or
paperclip until your spro restarts.
Waking Up Your spro
Your spro automatically goes into sleep mode when it is not in use for
some time. The display is turned off to save power and the keys are
locked to prevent accidental operations.
You can wake up your spro by turning on the display and unlocking the
keys.

16
1. Press the Power Key or touch the Sleep/Wake Up Key to turn the
screen on.
2. Touch and hold on the screen.
NOTE:
If you have set an unlock pattern, a PIN or a password for your spro, you’ll
need to draw the pattern, or enter the PIN/password to unlock your spro.
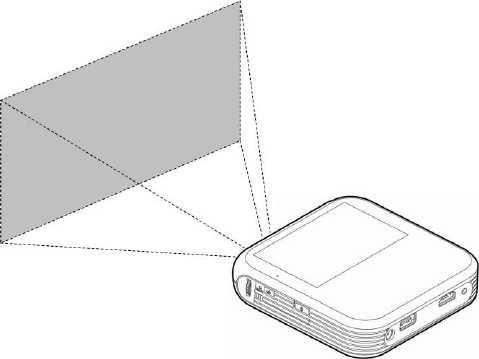
Turning On/Off the Projector
You can use the projector embedded in your spro to project the display
onto large surfaces.
Touch the Projection Key to turn the projector on or off.
17
Using the Touch Screen
Your spro’s touch screen enables you to control actions through a variety
of touch gestures.
Touch
When you want to type using the onscreen keyboard, select items on
the screen such as the application and settings icons, or press the
onscreen buttons, simply touch them with your finger.
18
Touch and Hold
To open the available options for an item (for example, a link in a web
page), touch and hold the item.
Swipe or Slide
To swipe or slide means to quickly drag your finger vertically or
horizontally across the screen.
Drag
To drag, press and hold your finger with some pressure before you
start to move your finger. While dragging, do not release your finger
until you have reached the target position.
Pinch
In some apps (such as Maps, Browser, and Gallery), you can zoom in
and out by placing two fingers on the screen at once and pinching
them together (to zoom out) or spreading them apart (to zoom in).
Rotate the screen
For most screens, you can automatically change the screen
orientation from landscape to portrait by turning the spro sideways.

19
Projecting a File saved in Your spro
You can project a file stored in your spro.
1. Touch the Projection Key to turn on the projector.
2. Open the file you want to project.
3. Adjust the projection distance and place the spro on a flat surface.
NOTE:
For best results, project onto a flat screen at a 90° angle to the floor.
4. Adjust the projector view. You can rotate the focus wheel to adjust the
focus.
When you want to finish the projection, touch the Projector Key to turn off
the projector.
Projecting an HDMI Source
You can project an HDMI source when connecting your spro to a laptop or
TV box.
1. Connect your spro with the laptop or TV box via an HDMI cable (not
included).
20
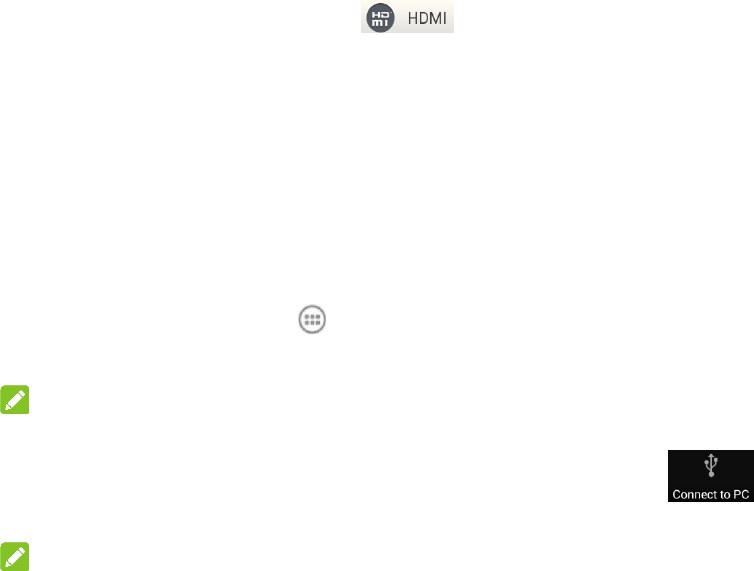
2. Touch the Projection Key to turn on the projector.
3. From the home screen, touch .
4. Operate your laptop or TV box to select the content you want to view.
Projecting a File Saved in Your USB Device
You can project a file stored on your USB device such as a USB flash
drive or portable hard drive.
1. Connect your spro with the USB device via the USB jack.
2. Touch the Projection Key to turn on the projector.
3. Touch the Home Key > > File Manager.
4. Touch USB DEVICE to open the file you want to project.
NOTE:
Before connecting your spro with the USB device, slide the status bar
down to open the notification panel and ensure that this option is
not highlighted.
NOTE:
Your spro only supports the portable hard drives with less than 2TB of

21
capacity.
Projecting a Source on Your Phone (Wi-Fi Display)
You can display the content of your phone on your spro with a wireless
link.
1. Touch the Projection Key to turn on the projector.
2. Touch the Home Key > > Miracast.
3. Open a Wi-Fi display application on the phone to scan for available
devices within range.
4. When you see the name of your spro displayed in the available
devices section, touch the name. The phone then automatically tries to
pair with your spro.
5. Touch Accept on your spro. After successful connection, the contents
in the phone will be displayed on the projector.
6. Choose the content you want to display.
Using Power Bank
The Power Bank feature allows you to charge other devices such as your

22
phone through your spro.
NOTE:
The projector and Power Bank cannot be enabled at the same time.
To charge other devices when powered on:
1. Connect your spro to your phone or other devices via a USB cable.
2. Press and hold the Power Bank Key until the icon appears in the
status bar.
3. When the charging completes, press and hold the Power Bank Key
until the icon disappears to turn off the Power Bank feature.
To charge other devices when powered off:
1. Connect your spro to your phone or other devices via a USB cable.
2. Press and hold the Power Bank Key until the indicator light turns
green and flashes.
3. When the charging completes, press and hold the Power Bank Key
until the indicator light turns off.

23
Connecting to Your Computer via USB
You can connect your spro to a computer with the supplied USB cable and
transfer music, pictures, and other files in both directions. Your spro stores
these files in the internal storage or on a removable microSDHC card.
1. Connect your spro to the computer using the supplied USB cable.
Insert the end of the cable into the USB jack of the spro and insert the
other end of the cable into an available USB port on your computer.
2. Slide the status bar down to open the notification panel and touch
to highlight it.
3. Open the notification panel and touch Connected as … or touch
the Home Key > Settings > Connect to PC.
4. Choose one of the following options:
Install driver: Install the driver needed for some USB connection
modes (such as MTP). You only need to install the driver on the
same PC once.
NOTE:
You can also install the driver on PC by running the executable file

24
in the new CD-ROM drive.
Connect to PC software: Install apps or manage data on your
spro via the PC software.
Media device (MTP): Transfer media files on Windows® or Mac®.
NOTE:
For Windows XP, please install the drivers and Media Player 11 (or
later version) when you use Media device (MTP) for the first time.
5. When you are done, disconnect your spro with the computer and touch
in the notification panel to disable it.
25
For Your Safety
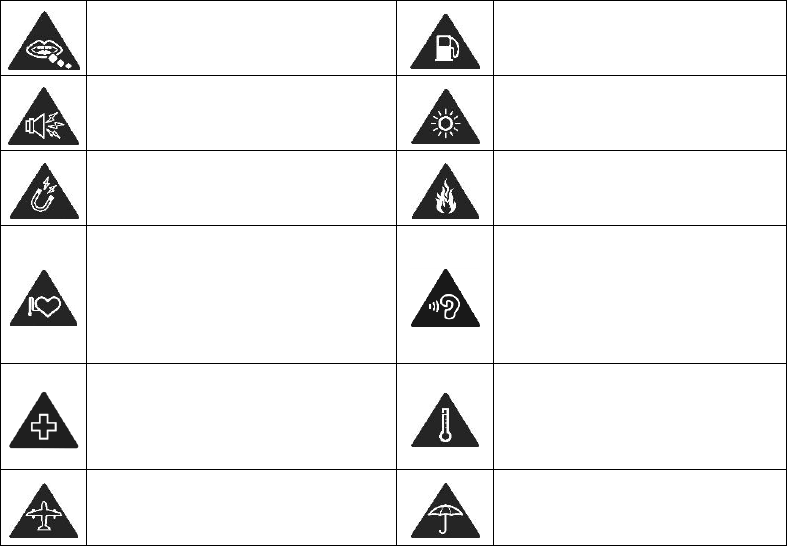
General Safety
Small parts may cause
choking.
Don’t use at gas stations.
Your device can produce a
loud sound.
Your device may produce
a bright or flashing light.
Avoid contact with anything
magnetic.
Don’t dispose of your
device in fire.
Keep away from
pacemakers and other
electronic medical devices.
To prevent possible
hearing damage, do not
listen at high volume levels
for long periods.
Turn off when asked to in
hospitals and medical
facilities.
Avoid extreme
temperatures.
Turn off when told to in
aircrafts and airports.
Avoid contact with liquids.
Keep your device dry.

26
Turn off when near explosive
materials or liquids.
Do not attempt to
disassemble your device.
Only use approved
accessories.
Radio Frequency (RF) Energy
This device is designed and manufactured not to exceed the emission
limits for exposure to radio frequency (RF) energy set by the Federal
Communications Commission of the United States.
During SAR testing, this device is set to transmit at its highest certified
power level in all tested frequency bands, and placed in positions that
simulate RF exposure in usage near the body with the separation of 10
mm. Although the SAR is determined at the highest certified power level,
the actual SAR level of the while operating can be well below the
maximum value. This is because the device is designed to operate at
multiple power levels so as to use only the power required to reach the
network. In general, the closer you are to a wireless base station
antenna, the lower the power output.

27
The exposure standard for wireless employs a unit of measurement
known as the Specific Absorption Rate, or SAR. The SAR limit set by the
FCC is 1.6W/kg.
Tests for SAR are conducted using standard operating positions accepted
by the FCC with the device transmitting at its highest certified power level
in all tested frequency bands.
The FCC has granted an Equipment Authorization for this model device
with all reported SAR levels evaluated as in compliance with the FCC RF
exposure guidelines. SAR information on this model device is on file with
the FCC and can be found under the Display Grant section of
www.fcc.gov/oet/ea/fccid after
searching on FCC ID: SRQ-MF97W.
For this device, the highest reported SAR value for near the body is 0.33
W/kg.
While there may be differences between the SAR levels of various
28
devices and at various positions, they all meet the government
requirement.
SAR compliance for body operation is based on a separation distance of
10 mm between the unit and the human body. Carry this device, at least
10 mm away from your body to ensure RF exposure level compliant or
lower to the reported level. To support body operation, choose the belt
clips or holsters, which do not contain metallic components, to maintain a
separation of 10 mm between this and your body.
FCC Compliance
This device complies with part 15 of the FCC Rules. Operation is subject
to the following two conditions: (1) This device may not cause harmful
interference, and (2) this device must accept any interference received,
including interference that may cause undesired operation.
CAUTION:
Changes or modifications not expressly approved by the manufacturer
could void the user’s authority to operate the equipment.
NOTE:
This equipment has been tested and found to comply with the limits for a
Class B digital device, pursuant to part 15 of the FCC Rules.
29
These limits are designed to provide reasonable protection against
harmful interference in a residential installation. This equipment generates,
uses and can radiate radio frequency energy and, if not installed and used
in accordance with the instructions, may cause harmful interference to
radio communications. However, there is no guarantee that interference
will not occur in a particular installation. If this equipment does cause
harmful interference to radio or television reception, which can be
determined by turning the equipment off and on, the user is encouraged to
try to correct the interference by one or more of the following measures:
Reorient or relocate the receiving antenna.
Increase the separation between the equipment and receiver.
Connect the equipment into an outlet on a circuit different from that to
which the receiver is connected.
Consult the dealer or an experienced radio/TV technician for help.
IC Notice
This device complies with Industry Canada license-exempt RSS
standard(s). Operation is subject to the following two conditions:
(1) this device may not cause interference, and
(2) this device must accept any interference, including interference that
may cause undesired operation of the device.
30
Le présent appareil est conforme aux CNR d'Industrie Canada
applicables aux appareils radio exempts de licence. L'exploitation est
autorisée aux deux conditions suivantes:
(1) l'appareil ne doit pas produire de brouillage, et
(2) l'utilisateur de l'appareil doit accepter tout brouillage radioélectrique
subi, même si le brouillage est susceptible d'en
This Class B digital apparatus complies with Canadian ICES-003.
Cet appareil numérique de la classe B est conforme à la norme NMB-003
du Canada.
IC: 5200E-MF97W
IC Radiation Exposure Statement
This EUT is compliance with SAR for general population/uncontrolled
exposure limits in IC RSS-102 and had been tested in accordance with
the measurement methods and procedures specified in IEEE 1528 and
IEC 62209. This equipment should be installed and operated with
minimum distance 1.0 cm between the radiator and your body. This
device and its antenna(s) must not be co-located or operating in
31
conjunction with any other antenna or transmitter.
Cet appareil est conforme aux limites d'exposition DAS incontrôlée pour la
population générale de la norme CNR-102 d'Industrie Canada et a été
testé en conformité avec les méthodes de mesure et procédures
spécifiées dans IEEE 1528 et IEC 62209. Cet appareil doit être installé et
utilisé avec une distance minimale de 1.0 cm entre l’émetteur et votre
corps. Cet appareil et sa ou ses antennes ne doivent pas être co-localisés
ou fonctionner en conjonction avec tout autre antenne ou transmetteur.
32
Distraction
Driving
Full attention must be given to driving at all times in order to reduce the
risk of an accident. Using this device while driving can cause distraction
and lead to an accident. You must comply with local laws and regulations
restricting the use of wireless devices while driving.
Operating Machinery
Full attention must be given to operating the machinery in order to reduce
the risk of an accident.
Product Handling
General Statement on Handling and Use
You alone are responsible for how you use your device and any
consequences of its use.
You must always switch off your device wherever the use of your device is
prohibited. Use of your device is subject to safety measures designed to
protect users and their environment.
Always treat your device and its accessories with care and keep it in a
clean and dust-free place.
33
Keep the screen and projection lens clean. Unclean screen or
projection lens may slow down the device’s reaction to your
operations or lower projection image quality.
Clean your device and its accessories with a soft material such as
cleaning cloth for eyeglass lenses. Do not use alcohol or other
corrosive substances for cleaning or allow them to get inside.
Do not expose your device or its accessories to open flames or lit
tobacco products.
Do not expose your device or its accessories to liquid, moisture or
high humidity.
Do not drop, throw or try to bend your device or its accessories.
Do not use harsh chemicals, cleaning solvents, or aerosols to clean
the device or its accessories.
Do not paint your device or its accessories.
Do not attempt to disassemble your device or its accessories, only
authorized personnel can do so.
Do not expose your device or its accessories to extreme temperatures,
minimum 23 ℉ and maximum 122 ℉ (minimum – 5 ℃ and maximum
+ 50 ℃).
Do not place your device inside or near heating equipments or high
34
pressure containers, such as water heaters, microwave ovens, or hot
cooking utensils. Otherwise, your device may be damaged.
Please check local regulations for disposal of electronic products.
Small Children
Do not leave your device and its accessories within the reach of small
children or allow them to play with it.
They could hurt themselves or others, or could accidentally damage the
device.
Your device contains small parts with sharp edges that may cause an
injury or may become detached and create a choking hazard.
Demagnetization
To avoid the risk of demagnetization, do not allow electronic devices or
magnetic media close to your device for a long time.
Air Bags
Do not place a device in the area over an air bag or in the air bag
deployment area as an airbag inflates with great force and serious injury
could result.
35
Seizures/Blackouts
The device can produce a bright or flashing light. A small percentage of
people may be susceptible to blackouts or seizures (even if they have
never had one before) when exposed to flashing lights or light patterns
such as when playing games or watching video. If you have experienced
seizures or blackouts or have a family history of such occurrences, please
consult a physician. To reduce the risk of blackouts or seizures, you can
use your device in a well lit room and take frequent breaks.
Repetitive Strain Injuries
To minimize the risk of Repetitive Strain Injury (RSI) when texting or
playing games with your device:
Do not grip the device too tightly.
Press the buttons lightly.
Use the special features which are designed to minimize the times of
pressing buttons, such as Predictive Text.
Take lots of breaks to stretch and relax.
Loud Noise
This device is capable of producing loud noises, which may damage your
hearing. Turn down the volume before using headphones, Bluetooth
36
stereo headsets or other audio devices.
Device Heating
Your device may become warm during charging and during normal use.
Electrical Safety
Accessories
Use only approved accessories.
Do not connect with incompatible products or accessories.
Faulty and Damaged Products
Do not attempt to disassemble the device or its accessory.
Only qualified personnel can service or repair the device or its accessory.
If your device or its accessory has been submerged in water, punctured,
or subjected to a severe fall, do not use it until you have taken it to be
checked at an authorized service center.
Radio Frequency Interference
General Statement on Interference
Care must be taken when using the device in close proximity to personal
medical devices, such as pacemakers and hearing aids.
37
Please consult your doctor and the device manufacturer to determine if
operation of your device may interfere with the operation of your medical
device.
Pacemakers
Pacemaker manufacturers recommend that a minimum separation of 15
cm be maintained between a wireless device and a pacemaker to avoid
potential interference with the pacemaker. To achieve this, do not use this
device near your pacemaker and do not carry it near the breast.
Hearing Aids
People with hearing aids or other cochlear implants may experience
interfering noises when using wireless devices or when one is nearby.
The level of interference will depend on the type of hearing device and the
distance from the interference source, increasing the separation between
them may reduce the interference. You may also consult your hearing aid
manufacturer to discuss alternatives.
Medical Equipment
Switch off your wireless device when requested to do so in hospitals,
clinics or health care facilities. These requests are designed to prevent
possible interference with sensitive medical equipment.
38
Aircraft
Switch off your wireless device whenever you are instructed to do so by
airport or airline staff.
Consult the airline staff about the use of wireless devices on board the
aircraft.
Interference in Vehicles
Please note that because of possible interference to electronic equipment,
some vehicle manufacturers forbid the use of your device in their vehicles.
Explosive Environments
Gas Stations and Explosive Atmospheres
In locations with potentially explosive atmospheres, obey all posted signs
to turn off wireless devices such as your device or other radio equipment.
Areas with potentially explosive atmospheres include fuelling areas, below
decks on boats, fuel or chemical transfer or storage facilities, areas where
the air contains chemicals or particles, such as grain, dust, or metal
powders.
Blasting Caps and Areas
Power off your device when in a blasting area or in areas posted power off
39
“two-way radios” or “electronic devices” to avoid interfering with blasting
operations.