User manual
1
MF985
User Guide

2
Copyright © 2017 ZTE CORPORATION.
All rights reserved.
No part of this publication may be quoted, reproduced, translated or used in
any form or by any means, electronic or mechanical, including photocopying
and microfilm, without the prior written permission of ZTE Corporation.
The manual is published by ZTE Corporation. We reserve the right to make
modifications on print errors or update specifications without prior notice.
microSDHC is a trademark of SD, 3C-LLC.
Version No. : V1.0
Edition Time: November 2017
3
Get Started ................................................................................................. 5
Know your device ................................................................................ 5
Manage your device and settings .......................................................... 6
Power Button ............................................................................... 6
LCD touch screen ......................................................................... 6
Status LED Indicator .................................................................... 7
Accessories .................................................................................. 8
Set up and connect to the Internet ........................................................ 8
Install the battery .......................................................................... 8
Connect to the Internet ................................................................. 9
Connect devices to your mobile hotspot’s Wi-Fi ........................ 10
Use Your Mobile Hotspot ......................................................................... 12
AT&T Wi-Fi Manager home page ...................................................... 12
Security credentials ............................................................................ 12
View your data usage ......................................................................... 13
Manage Wi-Fi .................................................................................... 14
View connected devices ............................................................. 14
Set maximum number of connected devices ............................... 14
Block / unblock devices ............................................................. 15
Message ............................................................................................. 17
View SMS messages .................................................................. 17
File Sharing ........................................................................................ 18
Battery ............................................................................................... 19
Battery life ................................................................................. 19
Extend battery life ...................................................................... 20
Recharge the battery ................................................................... 21
Security .............................................................................................. 22
Change Wi-Fi network names and passwords ............................. 22
Change AT&T Wi-Fi Manager home page access settings .......... 23
Change Wi-Fi security types ....................................................... 24
Configure data network options ......................................................... 25
View details ....................................................................................... 26
Software update .......................................................................... 26
Replace the SIM card ......................................................................... 27
Reset the mobile hotspot .................................................................... 28
Advanced Settings .................................................................................... 29
Manage Wi-Fi .................................................................................... 29
Set Wi-Fi network options .......................................................... 29
Change Advanced Settings ................................................................. 29
View WAN information .............................................................. 29
4
Enable port forwarding ............................................................... 30
Enable MAC/ IP/Port filtering .................................................... 30
Enable VPN passthrough ............................................................ 30
Configure APN details................................................................ 31
Enable DMZ ............................................................................... 31
Set Router options ...................................................................... 32
Troubleshooting ....................................................................................... 32
Specifications ............................................................................................ 32
Mechanical specifications .................................................................. 32
Supported RF bands ........................................................................... 33
Regulatory and Safety Information ........................................................ 33
To the Owner ..................................................................................... 33
Using Your Device ............................................................................. 34
Using Battery ..................................................................................... 34
Radio Frequency (RF) Energy ............................................................ 35
FCC Compliance ................................................................................ 35
CTIA Requirements ........................................................................... 36
Warranty .................................................................................................. 37
Limited Warranty ............................................................................... 37
How to Get Warranty Service ............................................................. 38
Other Warranty Programs ................................................................... 38
5
Get Started
This chapter provides an overview of the Mobile Hotspot features, and
instructions on how to set up your mobile hotspot and connect to the
Internet.
Know your device
Your mobile hotspot enables you to create a Wi-Fi network anywhere there is
cellular network coverage. You can use that Wi-Fi network to connect your laptop
and other Wi-Fi capable devices to your network provider’s mobile broadband
network and connect to the Internet. You can also use your mobile hotspot by
connecting it to your laptop with the USB cable to access the Internet.
Additional features include:
• Touch screen LCD interface — Configure basic Wi-Fi and display settings, view
data usage details, view system and network provider messages
• Wi-Fi Protected Setup (WPS) — A fast, easy way to connect WPS-enabled devices
to your Wi-Fi network
• Guest Wi-Fi — Set up a guest Wi-Fi network for temporary users, and use the main
network for trusted devices.
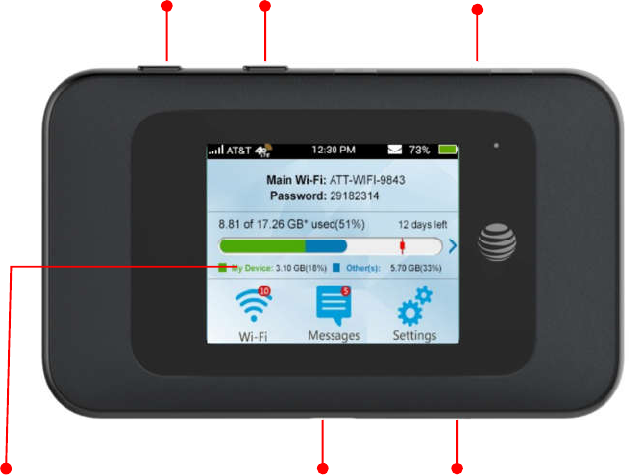
Power
button
Type-C USB
charging port
nano-SIM/micro
SDXC card slot
External
antenna
connector
WPS
button
Touch
screen
6
Manage your device and settings
You can manage your device and change settings using:
• The device’s LCD touch screen— Configure basic Wi-Fi and device settings, and view
data usage, and messages.
• The AT&T Wi-Fi Manager home page — Web user interface for configuring mobile
broadband network settings and advanced Wi-Fi and device settings.
1. Note: To personalize the mobile hotspot and change basic settings, use the LCD home
screen Settings and Wi-Fi options. For advanced settings, use a Wi-Fi enabled device
to connect to the mobile hotspot and then use a browser to display the AT&T Wi-Fi
Manager home page (http://attwifimanager/ or http://192.168.1.1) Log in as
Administrator to make changes. (default Admin Login is attadmin).
Power Button
Press and hold the Power button to power on/off the mobile hotspot. Press the Power
button to wake up the mobile hotspot.
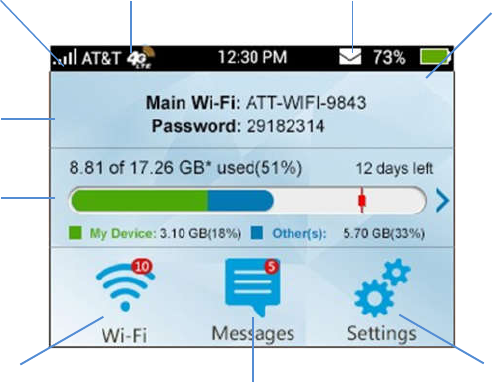
LCD touch screen
Icons on the LCD screen’s top row indicate the status of the mobile hotspot, and several
screen elements can be tapped or swiped to configure Wi-Fi and device settings, view
data usage details, and view carrier messages.
Tap for WPS, Guest Wi-Fi and
other options
Signal Strength Network Indicator New Message Battery
Wi-Fi Network name
& password
Tap for usage
details
Tap to view message Tap to change display, file
sharing mode and oter settings
7
LCD home screen elements
Icon Indication
Network signal strength.
Network type.
Wi-Fi network name and
Wi-Fi password
Used by Wi-Fi enabled devices to connect to the mobile
hotspot.
New message received.
Data usage for current billing period. Tap the data bar to
view detailed information.
Battery power indication.
Wi-Fi menu. Number indicates currently connected
devices. Tap to configure basic Wi-Fi settings.
Settings menu. Tap to configure basic device settings.
Tap to view carrier messages
Status LED Indicator
The LED indicates the device’s connection status.
LED Indicator Patterns
Color Indicator Status
Green Blink once When power on
Blinking Notifications
New SMS
Software update notification
Data usage notification
Steady Battery fully charged
Red Blinking Low battery
No SIM
SIM lock
SIM PIN/PUK enabled
Searching for network
No service
Limited service
Steady Charging
8
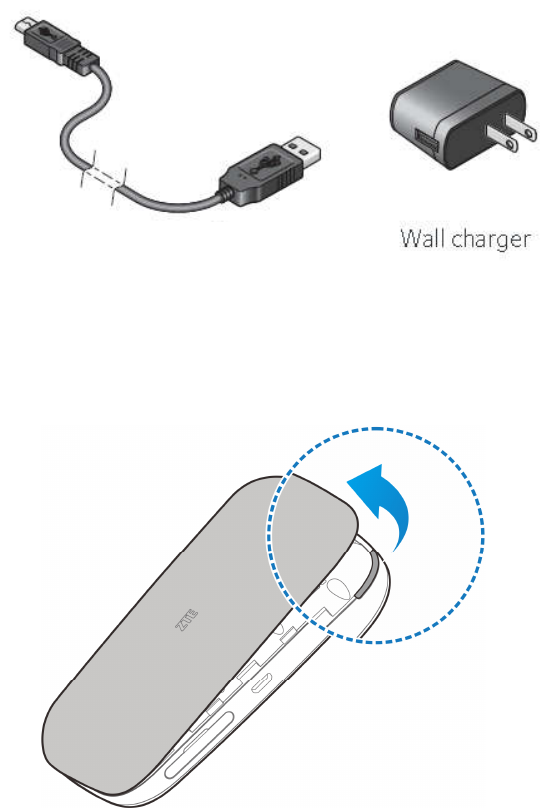
Accessories
• Type-C USB cable — Used mainly for recharging the battery, although you can also
use it to tether the mobile hotspot to your computer.
• Wall charger — Used with the USB cable to recharge the battery or to power the
mobile hotspot from a wall socket.
Set up and connect to the Internet
Install the battery
1. Remove the back cover.
2. Insert the battery as shown with the contacts located against the metal springs, and
press the battery down into the case.
Type-C USB cable

9
3. Replace the back cover.
Note: The battery comes partially-charged and ready to go. When the battery needs
recharging, follow the instructions in Recharge the battery on page 21.
Connect to the Internet
1. Power on your device directly.
Press and hold the Power Button until the screen turns on. Once powered up, the
mobile hotspot automatically searches for and connects to your network provider’s
mobile broadband network.
2. Connect your computer or other device to your network.
a) Use your normal Wi-Fi application on the client to search for the available
wireless network.
b) Select the Wi-Fi Network name displayed on the mobile hotspot screen, and then
click Connect.
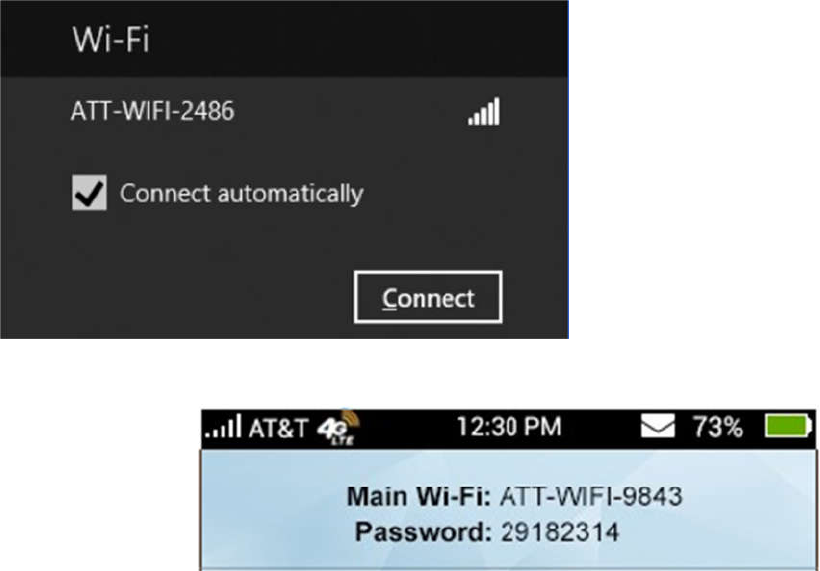
10
c) Input the Wi-Fi Network password, as it displays on the mobile hotspot screen.
3. Launch your browser to surf the Internet.
Connect devices to your mobile hotspot’s Wi-Fi
You can connect up to 10 wireless devices such as smart phones, laptops, tablets, digital
cameras, printers, gaming consoles, and digital picture frames to your mobile hotspot’s
Wi-Fi network(s). (See Set maximum number of connected devices on page 14 for
instructions on setting connections for the Main Wi-Fi and Guest Wi-Fi networks.)
You can connect:
• A wireless device to your Wi-Fi network by typing the Wi-Fi password
• A WPS-enabled wireless device by pressing the icon on the mobile hotspot and the
WPS Button on the device
Note: You can also connect a single device directly to the hotspot using the USB cable.
Connect a wireless device manually
To connect a wireless device to your mobile hotspot’s Wi-Fi network, see Connect to the
Internet on page 8.
Connect a WPS-enabled wireless device
If your wireless device supports WPS, you don’t have to input the password manually to
connect to the mobile hotspot.
On the Mobile hotspot:
1. Press and hold the WPS button on the mobile hotspot.
2. Select Pair with Main Wi-Fi or Pair with Guest Wi-Fi.
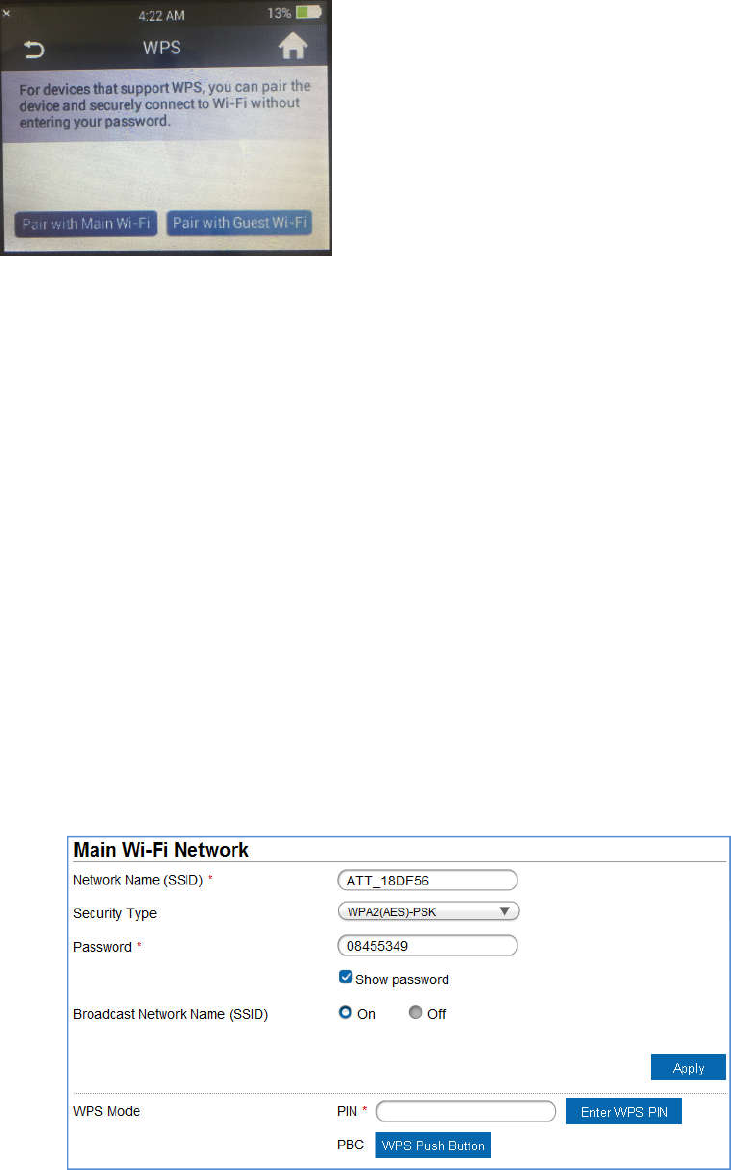
11
3. Press the WPS Button on a device you want to connect to your mobile hotspot.
Your mobile hotspot and the wireless device will communicate and establish the
connection.
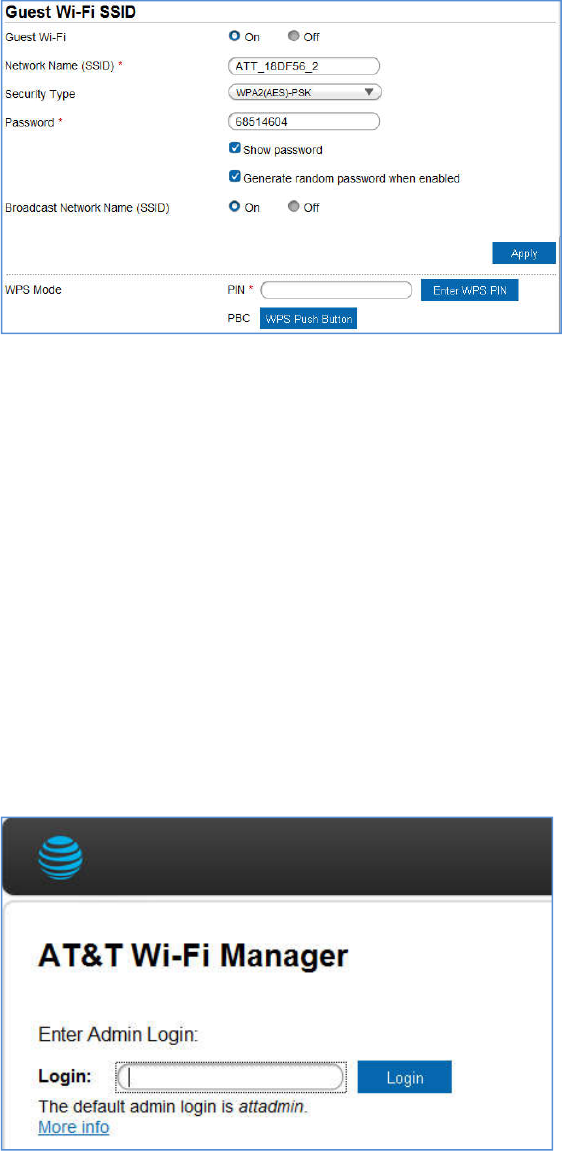
On the AT&T Wi-Fi Manager home page:
2. On your laptop (or other Wi-Fi device), log in to the AT&T Wi-Fi Manager home
page by visiting http://attwifimanager/ or http://192.168.1.1.
1. The default login is attadmin.
2. Click Settings on the navigation menu on the left side.
3. Click the Wi-Fi > Basic tab.
4. Check On option in Basic Settings info section, then click Apply.
5. Choose the WPS method you want to use:
· If the device you want to connect has a WPS button:
Click WPS Push Button, and then within two minutes (120 seconds) press the
device’s WPS button
· If the device you want to connect has a WPS PIN associated with it:
Enter the device’s WPS PIN and click Enter WPS PIN. Your mobile hotspot and
the wireless device will communicate and establish the connection.
12
Use Your Mobile Hotspot
This chapter describes the main features of the touch screen and web interfaces for
managing your mobile hotspot.
AT&T Wi-Fi Manager home page
You must be logged in as Administrator to change settings and view detailed
information.
• Default home page URL —http://attwifimanager/ or http://192.168.1.1.
• Default Administrator Login — attadmin
To log in as Administrator:
1. On the AT&T Wi-Fi Manager home page, place your cursor in the Login field and
type attadmin (the default Login).
2. Click Login.
Security credentials
The mobile hotspot uses three passwords:
13
• Wi-Fi password — Used to authenticate wireless devices (notebook, etc.) to your
mobile hotspot network. It is:
· Unique to your device.
· Displayed on the main mobile hotspot LCD screen. If the screen is blank (a
power-saving feature), press and quickly release the Power Button to view the
information on the screen.
· Printed on a label on the mobile hotspot (default password)
· If you want to change the Wi-Fi password, see Change Wi-Fi network names and
passwords on page 22.
•Guest Wi-Fi Password — When enabled, temporary users can use this password to
access the Guest Wi-Fi network. If you want to change the Wi-Fi password, see Change
Wi-Fi network names and passwords on page 22.
• Admin Login — Used to log into the AT&T Wi-Fi Manager home page as
Administrator. You must be logged in as Administrator to use certain features and to
make changes to your mobile hotspot settings. The default Admin Login is attadmin.
The Admin Login can be changed to 4–32 characters.
You can change these passwords on the AT&T Wi-Fi Manager home page
http://attwifimanager/ or http://192.168.1.1.
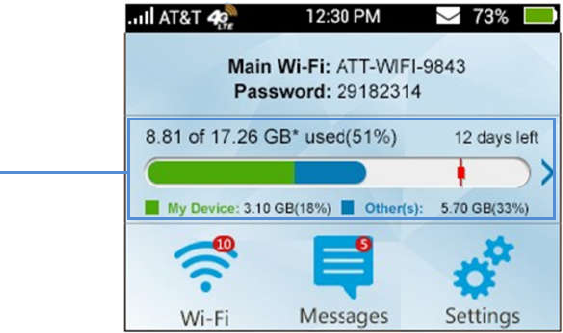
View your data usage
You can view estimates of your data usage (not accurate for billing purposes) on the
mobile hotspot and the AT&T Wi-Fi Manager home page.
To view detailed data usage information:
1. On the touch screen, tap the data usage bar. Detail billing information displays.
2. On the Data Usage screen, swipe down /up to view all of the details for:
My Device — View an estimate of your data usage.
Disclaimer — View a disclaimer about data usage.
Tap to view data
usage
14
You can also view data usage information on the AT&T Wi-Fi Manager home page
under Data Usage. Click Data Usage for more detailed information.
Manage Wi-Fi
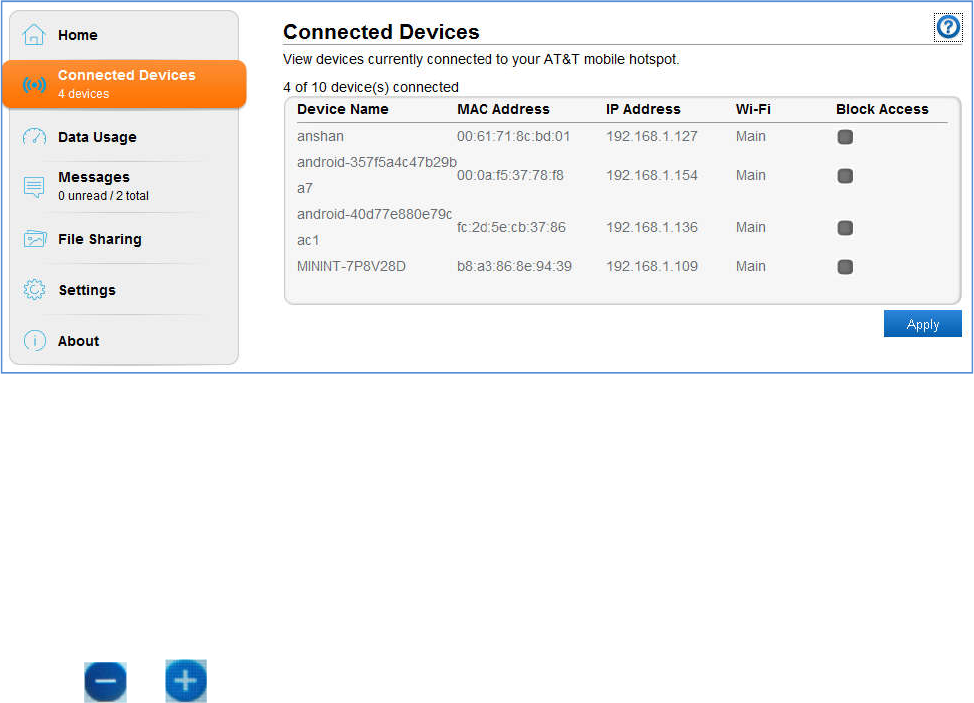
View connected devices
You can view a list of devices connected to your mobile hotspot on the mobile hotspot
or the AT&T Wi-Fi Manager home page.
On the touch screen:
1. From the touch screen, tap Wi-Fi.
2. Tap Connected Devices. A list of devices connected to the Main Wi-Fi and Guest
Wi-Fi networks appears.
3. To view the IP and MAC addresses of one of the devices, tap the device name.
On the AT&T Wi-Fi Manager home page:
1. Log in as Administrator.
2. Select Connected Devices in the left-side menu. A list of devices Connected to the
Main Wi-Fi and Guest Wi-Fi networks appears. You can view the IP and MAC
addresses of the devices.
Set maximum number of connected devices
You can connect up to 10 wireless devices to the mobile hotspot. These connections are
shared between the mobile hotspot’s Main and Guest Wi-Fi networks. You can
customize the distribution of devices from the mobile hotspot or the AT&T Moblie
Hotspot Manager home page.
On the touch screen:
1. From the home screen, tap Wi-Fi.
2. Tap Max Wi-Fi Devices.
3. Tap or to adjust the number of connections available for the Main or Guest
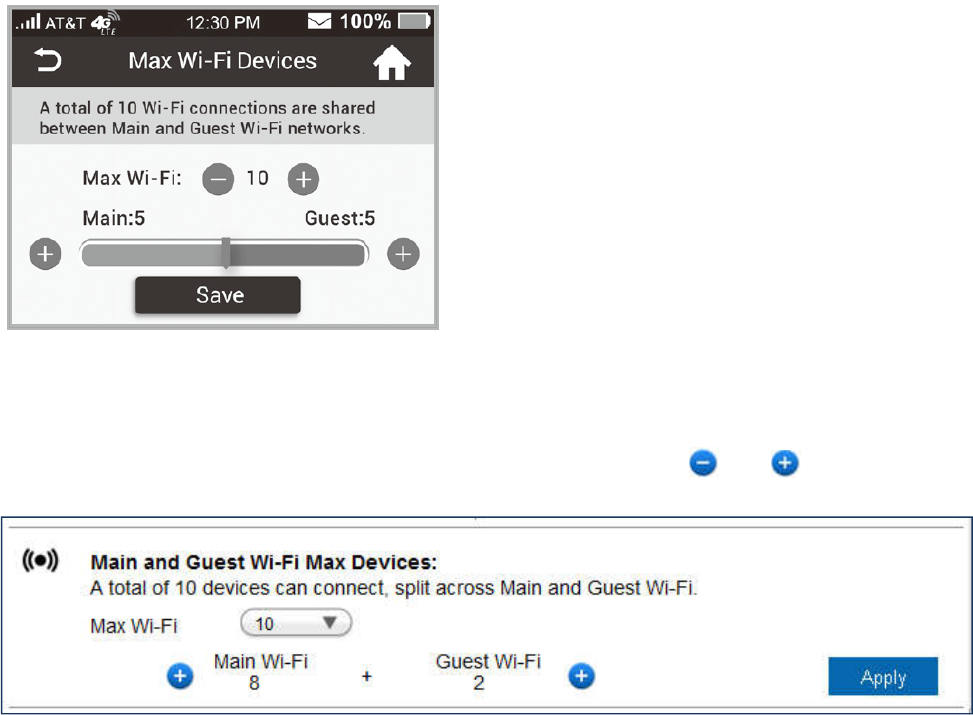
15
Wi-Fi networks.
On the AT&T Wi-Fi Manager home page
:
1. Log in as Administrator.
2. Click Home in the left-side menu.
3. In the Main and Guest Wi-Fi Max Devices section, select or to adjust the
number of connections available for the Main or Guest Wi-Fi networks.
5. Click Apply.
Block / unblock devices
Note: Whenever you block or unblock devices, the Wi-Fi radio resets to activate the new
settings. Any devices connected to the mobile hotspot will be disconnected when the
Wi-Fi radio resets.
You can block a device that is currently connected to your mobile hotspot and it will not
be able to connect to your Wi-Fi unless you choose to unblock it. Some reasons that you
may want to block a device include:
• Stopping them from overusing your bandwidth (and possibly resulting in charges for
overages on your plan)
• Temporarily blocking a child from surfing the Internet You can block / unblock
devices from the mobile hotspot or the AT&T Wi-Fi Manager home page.
On the touch screen:
To block a connected device:
1. From the home screen, tap Wi-Fi.
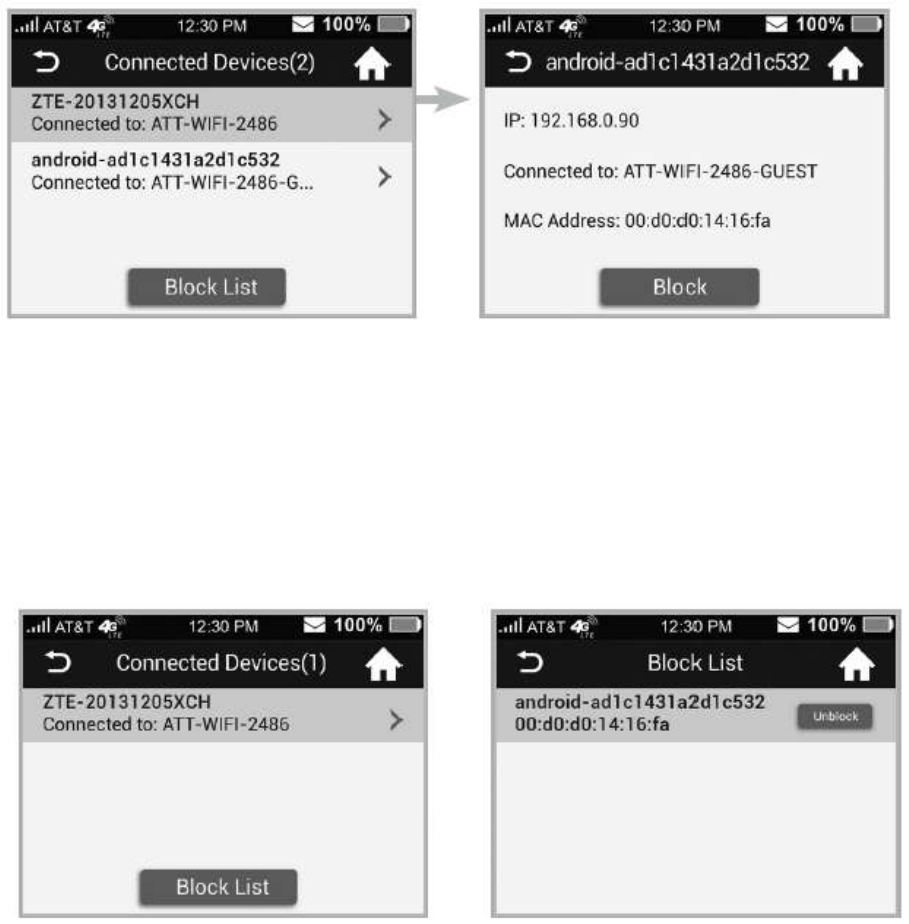
16
2. Tap Connected Devices. A list of devices connected to the Main Wi-Fi and Guest
Wi-Fi networks appears.
3. To block a listed device from connecting to your mobile hotspot, tap the device name.
The device’s IP and MAC addresses appear.
4. Tap Block.
5. Tap OK. The mobile hotspot will reset and the blocked device will not be able to
reconnect to access the Internet.
To unblock a device:
1. From the touch screen, tap Wi-Fi.
2. Tap Connected Devices. A list of devices connected to the Main Wi-Fi and Guest
Wi-Fi networks appears.
3. At the bottom of the list (swipe up if required), tap Block List. A list of blocked
devices appears.
4. To unblock one of these devices so it can connect to your mobile hotspot, tap the
device you want to unblock.
5. Tap OK.
On the AT&T Wi-Fi Manager home page:
To block a connected device:
1. Log in as Administrator.
2. Select Connected Devices. A list of Devices Connected to the Main Wi-Fi and Guest
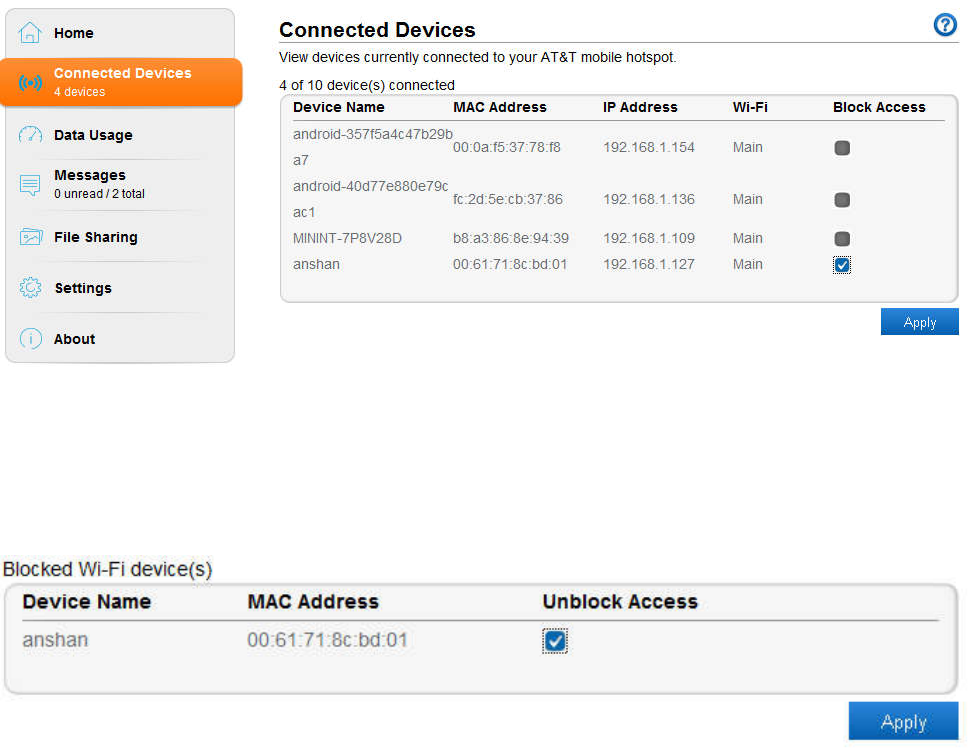
17
Wi-Fi networks appears on the screen.
3. To block a listed device from connecting to your mobile hotspot, select the box for
the device.
4. Click Apply.
To unblock a device:
1. Select Connected Devices in the left-side menu.
2. In the Blocked Wi-Fi device(s) section, the Black List shows all blocked devices.
3. To unblock a listed device so it can connect to your mobile hotspot, select the box for
the device and click Apply.
Message
View SMS messages
You can view SMS messages on the mobile hotspot or AT&T Moblie Hotspot Manager
home page.
On the touch screen:
To view or delete messages:
1. On the home screen, tap Message (Note: the Messages icon shows the number of
unread messages.)
2. A list of messages appears, previewing the first portion of the text.
18
4. Tap any message to read the full text.
5. If you want to delete the message, go to the bottom of the message and tap Delete.
On the AT&T Wi-Fi Manager home page:
To view or delete messages:
1. Log in as Administrator.
2. Click Messages in the left-side menu. A list of messages appears.
3. For any message in the list, click the message to read.
4. If you want to delete the message, click the checkboxes in front of the messages and
tap Delete.
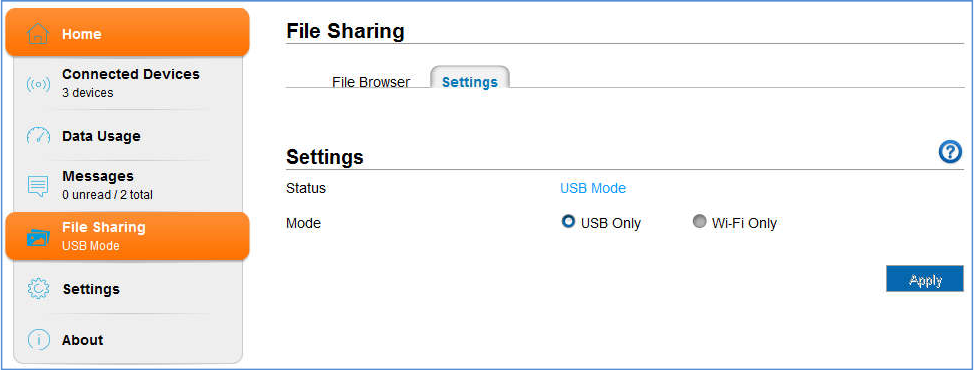
File Sharing
File sharing allows you to share the files in a SDHC card via USB cable or web browser.
On the touch screen:
To set share mode:
1. On the home screen, tap Settings.
2. Tap File Sharing.
3. Tap Share Mode, and select the desired share mode.
On the AT&T Wi-Fi Manager home page:
Sharing microSDHC Card via USB Cable
1. Log in to the AT&T Wi-Fi Manager home page.
2. Select File Sharing in the left side menu to set the sharing mode. The default mode
is USB.
3. Connect the device to PC/Tablet via USB cable.
4. Go to My Computer of your PC/Tablet to access all files in microSDHC card.
Note: You can access microSDHC card via USB cable only in USB mode. The web page
of sharing microSDHC card will be disabled.

19
Sharing microSDHC Card via Web Browser
1. Select File Sharing > Settings tab.
2. Select Wi-Fi Only mode.
3. Set Path to Share and Access Type.
4. Click Apply to save the settings.
5. Launch the browser on your PC/Tablet/Smart phone connected to the device via
Wi-Fi and enter http://attwifimanager/ or http://192.168.1.1 in the address bar.
6. Click Access the file on the SD Card on the login window to access the files in
microSDHC card.
Battery
Battery life
The mobile hotspot is configured (by default) to optimize battery life. Battery life is
affected by:
• Standby time
• Data throughput

20
• Mobile Broadband signal strength (the better the signal, the longer the battery life)
• Wi-Fi range:
·Long — Extends Wi-Fi range but decreases battery life.
·Medium — Balances Wi-Fi range and battery life.
·Short — Reduces Wi-Fi range but extends battery life.
There are several methods you can use to extend the battery life:
• Adjust Wi-Fi settings:
· Shorten the Wi-Fi range — If the devices you are connecting to your Wi-Fi network
are always near the mobile hotspot device, shorten the Wi-Fi range.
· Set the Wi-Fi Standby timer to a shorter period — Reduce the amount of time to
wait when no devices are connected to either Wi-Fi network before going into
standby mode (Wi-Fi radio turns off).
• Adjust display settings:
· Dim the screen — Reduce the LCD’s brightness level.
· Set the Display Timeout to a shorter period — Reduce the amount of time to wait
without the LCD being used before turning the screen blank.
Extend battery life
You can choose Wi-Fi and display settings on the mobile hotspot or the AT&T Wi-Fi
Manager home page to extend the mobile hotspot’s battery life.
On the mobile hotspot:
1. From the home screen, tap Wi-Fi.
2. Adjust these settings:
· Wi-Fi sleep mode —Select a shorter time period. The shorter the time, the longer
the battery life.
· Wi-Fi Range —Select Medium or Short.
3. Go back to the Settings screen, then tap Display.
4. Adjust these settings:
·Screen Brightness — Tap or to adjust the brightness.
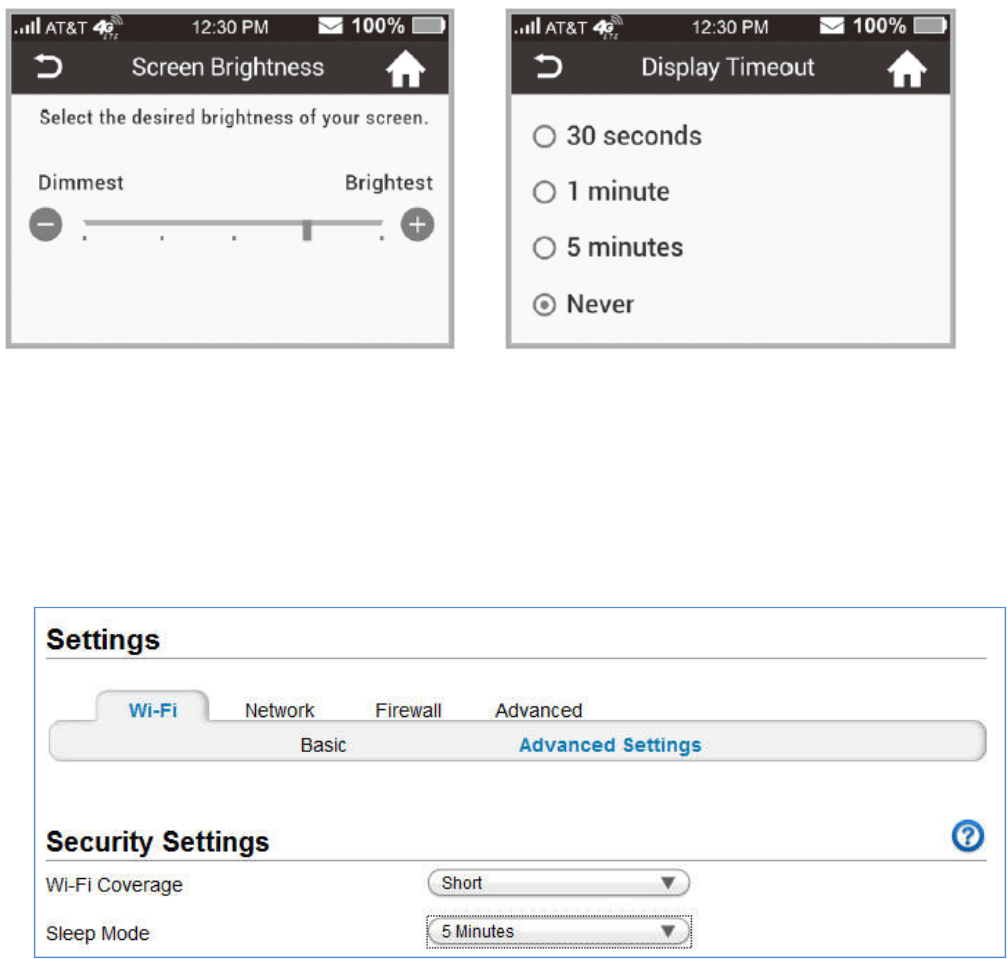
21
·Display Timeout — Select a shorter time period.
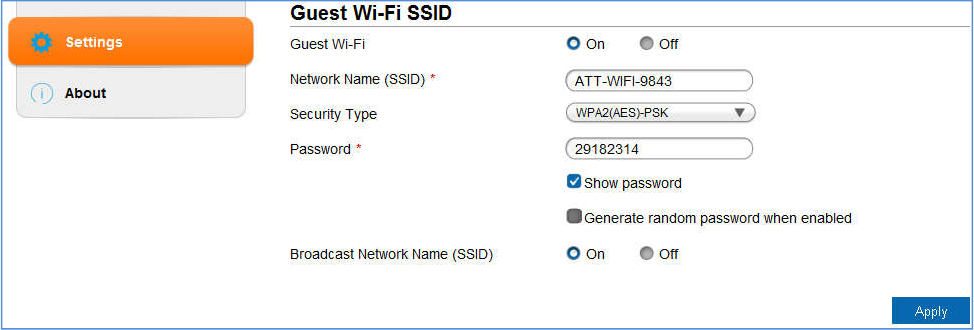
On the AT&T Wi-Fi Manager home page:
1. Log in as Administrator.
2. Click Settings in the left-side menu.
3. Click Wi-Fi > Advanced Settings tab.
5. Adjust these settings in Security Settings info section:
· Wi-Fi Coverage —From the drop-down box, select Short.
· Sleep mode — From the drop-down box, select a shorter time period.
Recharge the battery
The battery comes partially charged. You can recharge the battery from a wall socket or
from the USB port on your computer.
To recharge the battery from a wall socket (Fastest option):
1. Attach one end of the type-C USB cable to the mobile hotspot and attach the other
end to the wall charger (included)

22
2. Plug the wall charger into a wall socket.
To recharge the battery from the USB port on your computer:
Attach one end of the type-C USB cable to the mobile hotspot and plug the other end
into the USB port on your computer.
The battery icon on the LCD screen indicates when the battery is fully charged ( )
and an alert is displayed.
Security
Change Wi-Fi network names and passwords
You can customize the network names and passwords for the Main and Guest Wi-Fi
networks on the AT&T Wi-Fi Manager home page.
• Main Wi-Fi network — Mobile hotspot or AT&T Wi-Fi Manager home page • Guest
Wi-Fi network — Mobile hotspot or AT&T Wi-Fi Manager home page
Change Main Wi-Fi name and password
1. Log in as Administrator.
2. Click Settings in the left-side menu.
3. Click Wi-Fi > Basic tab.
4. Change the Main Wi-Fi network name and / or password.
5. Click Apply.
Note: If you changed the Wi-Fi network name or password, all connected devices
will be disconnected and have to reconnect.
23
Change Guest Wi-Fi name and password
If you are using the Guest Wi-Fi profile, you can change the Guest Wi-Fi name or
password from the AT&T Wi-Fi Manager home page..
Note: By default, the Guest Wi-Fi name is the same as the Main Wi-Fi name, with
“-Guest” appended.
1. Log in as Administrator.
2. Click Settings in the left-side menu.
3. Click Wi-Fi > Basic tab.
4. Change the Guest Wi-Fi network name and / or password.
5. Click Apply.
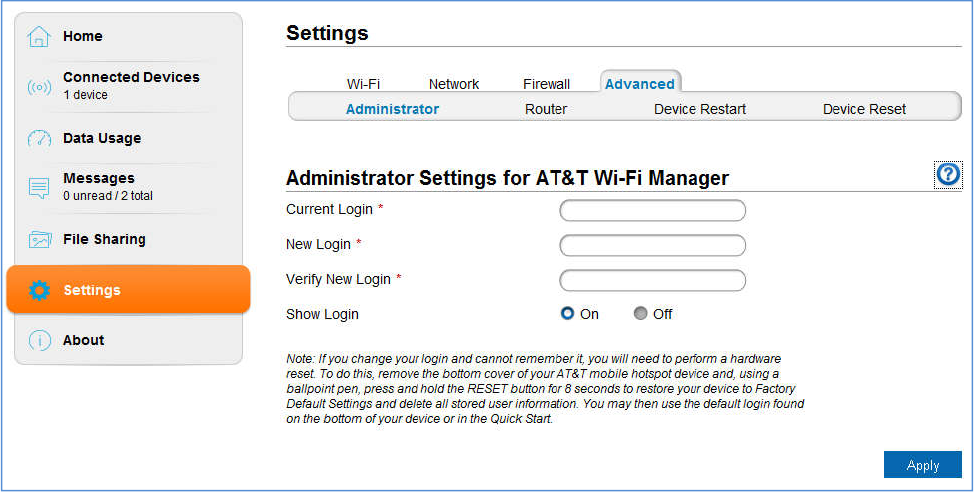
Change AT&T Wi-Fi Manager home page access settings
You can customize the Admin Login used to access it AT&T Wi-Fi Manager home page.
On the AT&T Wi-Fi Manager home page:
1. Log in as Administrator.
2. Click Settings in the left-side menu.
3. Click Advanced > Administrator tab.
24
5. If desired, change the Admin Login (maximum 32 characters).
6. Click Apply.
Note: If you forget the Admin login, you need to perform a hardware reset.
Change Wi-Fi security types
You can set the mobile hotspot’s Wi-Fi security types in the AT&T Wi-Fi Manager home
page.
1. Log in as Administrator.
2. Click Settings in the left-side menu.
3. Click Wi-Fi > Basic tab.
4. Select the desired security types for the Main Wi-Fi and the Guest Wi-Fi networks. It
is recommended that you use WPA(AES)-PSK whenever possible.
Security Type (the most common mode) :
• WPA2(AES)-PSK — Recommended. Other users can access your mobile hotspot
only if they enter the correct password.
• WPA-PSK/WPA2-PSK--Other users can access your mobile hotspot only if they enter
the correct password.
• OPEN--Not recommended. Anyone can access your Wi-Fi network without a
password and you are responsible for charges incurred.
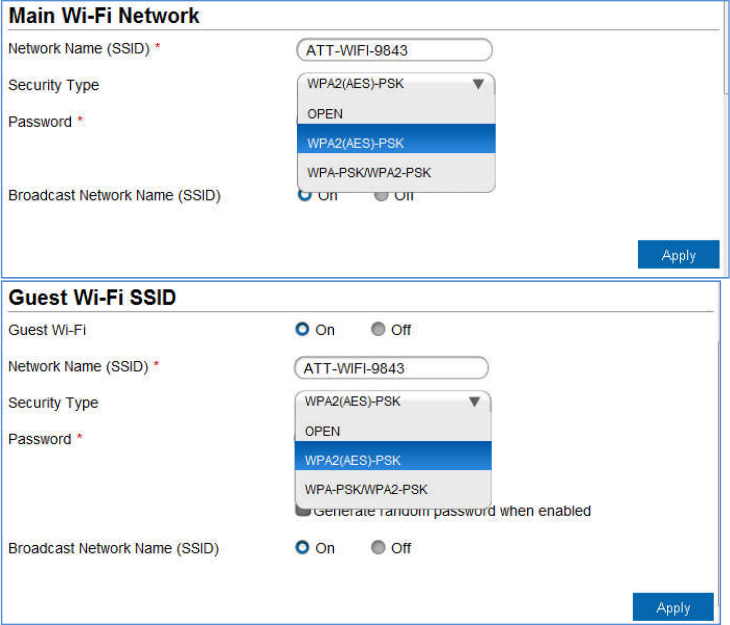
25
5. Click Apply.
6. Reconnect your Wi-Fi devices, if necessary, using the new Wi-Fi credentials. See
Connect to the Internet on page 14.
Configure data network options
You can choose the network types that your mobile hotspot can connect to, and choose
whether to allow the mobile hotspot to be used when roaming internationally.
On the mobile hotspot:
1. From the home screen, tap Settings.
2. Tap International Data Roaming.
3. To enable / disable international data roaming, tap the On / Off button next to
International Data to power international data roaming on or off.
On the AT&T Wi-Fi Manager home page:
1. Log in as Administrator.
2. Click Settings in the left-side menu.
3. Click Network > Connections tab.
4. Under International Data Roaming, select On.
5. Click Apply.
26
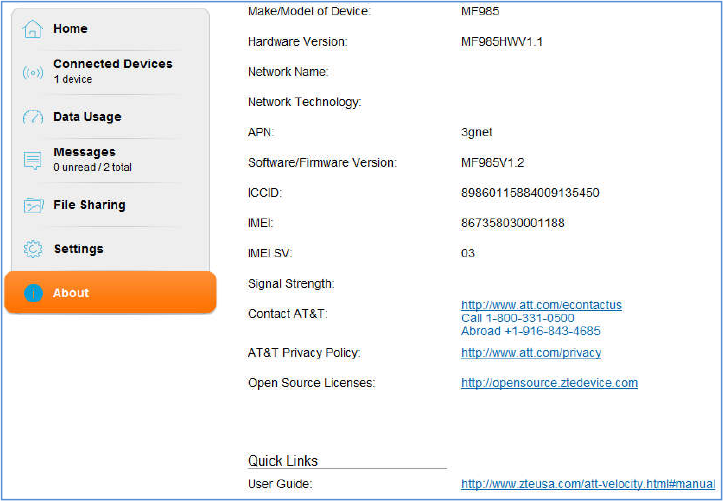
View details
You can view details about your device such as the wireless number, hardware version,
and IMEI on the mobile hotspot or the AT&T Wi-Fi Manager home page.
On the mobile hotspot:
1. From the home screen, tap Settings.
2. Tap About Your Device.
3. Swipe the screen to scroll through the information.
On the AT&T Wi-Fi Manager home page:
1. Log in as Administrator.
2. Click About in the left-side menu.
Software update
Software or firmware updates for the mobile hotspot may become available periodically.
You will receive an alert when an update becomes available, and you can check for
updates manually from the mobile hotspot or from the AT&T Wi-Fi Manager home
page.
Once an update becomes available, you can load it immediately or postpone installation
for up to 12 hours. After 12 hours, the update installs automatically.
On the mobile hotspot:
1. If you read an alert indicating an update is available, you can choose to update now or
postpone. Go to step 5.
2. If you want to check for updates manually, from the home screen, tap Settings.
3. Tap AT&T Software Update.
27
4. Tap check for update.
5. If an update is available, the software will be downloaded and provide 2 options if it
is not a critical update:
•Tap Reboot & install to load the update immediately, or
•Tap Remind me later to wait for 4 hours. An alert will appear after 4 hours reminding
you that the update is available.
6. If you are updating now, a message will appear if your mobile hotspot’s battery is low.
Plug your mobile hotspot into your wall charger, and then tap Begin. (This ensures the
update will complete without the device shutting off midway through the update.)
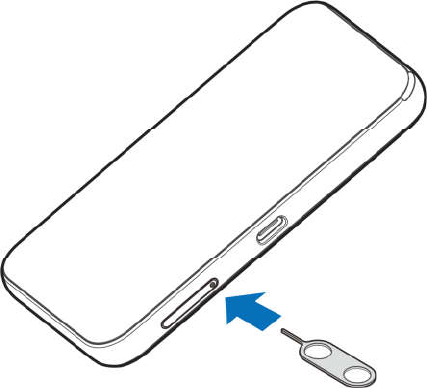
Replace the SIM card
Your mobile hotspot comes with the SIM card pre-installed.
If you need to replace the SIM card:
1. Power off your mobile hotspot and insert the tip of the tray eject tool into the hole
next to the card tray.
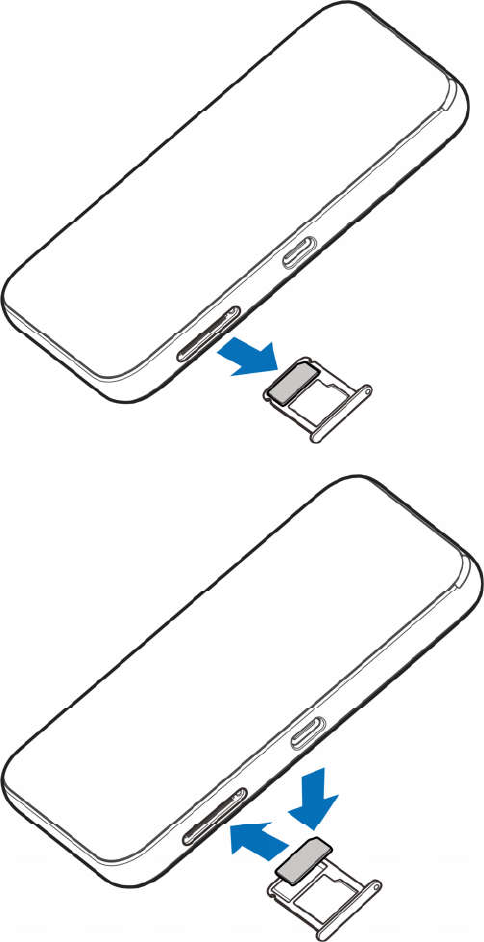
28
2. Pull the card tray out and remove the existing SIM card (if present)
4. Insert the SIM card and pull the card tray back.
Reset the mobile hotspot
You can reset the mobile hotspot to the factory setting on the mobile hotspot or the
AT&T Wi-Fi Manager home page. (This is useful if you have lost your Admin Login
for the AT&T Wi-Fi Manager home page.)
Note: If you reset the modem to factory settings, all of your customizations will be lost.
If you want to keep them, save them before doing the reset, then restore them afterward.
Note: When you reset the mobile hotspot, any currently connected devices will lose
access and will have to be reconnected after the mobile hotspot restarts.
29
On the mobile hotspot:
1. On the home screen, tap Settings.
2. Tap Factory Reset.
On the AT&T Wi-Fi Manager home page:
1. On the home page, click Settings in the left-side menu.
2. Click the Advanced > Device Reset tab.
3. Click Reset.
4. Click Yes.
5. After the device has reset, reconnect Wi-Fi devices.
Advanced Settings
This chapter provides information on how to configure advanced settings for various
aspects of the device such as Wi-Fi settings, WAN settings, router settings, etc.
Manage Wi-Fi
Set Wi-Fi network options
To configure the Wi-Fi network options:
1. On the AT&T Wi-Fi Manager home page, log in as Administrator.
2. Click Settings in the left-side menu.
3. Click Wi-Fi > Advanced Settings tab.
4. For the Main Wi-Fi and Guest Wi-Fi networks, select the desired options.
• Band Selection--The Wi-Fi band range used for the selected network. 2.4 GHz uses
less power and is longer ranged than 5 GHz, but 5 GHz can provide higher speeds with
less interference.
• Network Mode--The WLAN protocol being used. The recommended value depends
on the band range selected:
· 2.4 GHz--802.11 b/g/n
· 5 GHz--802.11 n only
• Frequency (Channel)--The Wi-Fi channel used. The recommended value is
Automatic, which chooses the channel that will provide the least interference.
5. Click Apply.
Change Advanced Settings
View WAN information
To view detailed network information, such as the active network, connection status,
signal strength, etc.:
1. On the AT&T Wi-Fi Manager home page, log in as Administrator.
2. Click About.
30
Enable port forwarding
If your computer hosts a server, you can enable port forwarding so that other users can
access the server.
To enable port forwarding:
1. On the AT&T Wi-Fi Manager home page, log in as Administrator.
2. Click Settings in the left-side menu.
3. Click Firewall > Port Forwarding tab.
4. Select Enable beside Port Forwarding Settings and click Apply. The Port Forwarding
list will appear.Incoming traffic is forwarded to specific ports and devices on your
network (using their local IP addresses).
5. Identify the ports to forward--Enter the port forwarding information (the IP address,
the Port range, the Protocol and the Comment), then click Apply.
Caution: Port forwarding creates a security risk. When not required, port forwarding
should be disabled.
Enable MAC/ IP/Port filtering
You can Enable or Disable the MAC/IP/Port Filtering feature as needed to block certain
Internet traffic. If this setting is enabled, you can then choose whether traffic is Accepted
or Dropped by default by selecting the appropriate option from the Default Policy
drop-down box.
To enable port filtering:
1. On the AT&T Wi-Fi Manager home page, log in as Administrator.
2. Click Settings on the navigation menu on the left side.
3. Click Firewall > MAC / IP / Port Filter tab.
4.Select Enable.
5. Select the Default Policy:
• Accepted– Internet traffic is allowed by default. Only traffic from the selected
applications will be blocked from accessing the internet. Traffic is identified by port
numbers. Some applications are pre-defined. You can define additional applications by
clicking the "Add Custom Application" button, but you need to know details of the
traffic used and generated by the applications you wish to define. In particular, you need
to know the port numbers and the protocol (TCP, UDP) used by outgoing traffic.
• Dropped – Internet traffic is blocked by default. Only traffic from the selected
pre-defined or custom applications are allowed to access the internet.
5. Click Apply.
Enable VPN passthrough
If you want to connect to a corporate network using VPN, you first need to enable VPN
connections (passthrough).
To enable VPN passthrough:
31
1. On the AT&T Wi-Fi Manager home page, log in as Administrator.
2. Click Settings in the left-side menu.
3. Click Advanced > Router tab.
4. In the VPN Passthrough section, select Enable beside VPN Passthrough, and click
Apply.
Configure APN details
The APN is checked to determine the type of network connection to establish.
Your mobile hotspot comes preconfigured with the APN (Access Point Name) for
AT&T.
To add an APN for another network:
1. On the AT&T Wi-Fi Manager home page, log in as Administrator.
2. Click Settings on the navigation menu on the left side.
3. Click the Network > APN tab.
4. Select Manual beside Mode, and click Add.
5. In the blank line, enter the profile name, APN (obtained from your carrier).
6. Select the network Authentication mode. The options are:
· None (default)
· CHAP
· PAP
7. Enter the Username and Password, if these are required for the wireless network.
8. Click Save.
To select the APN entry to use:
From the drop-down box beside Profile Selection, select the desired APN to use.
To remove an APN entry:
Select the APN you want to remove, and click Delete.
Enable DMZ
In a DMZ (demilitarized zone) network configuration, a computer runs outside the
firewall in the DMZ. This computer intercepts incoming Internet traffic, providing an
extra layer of protection for the rest of the network.
To enable DMZ and designate a computer to screen incoming traffic:
1. On the AT&T Wi-Fi Manager home page, log in as Administrator.
2. Click Settings on the navigation menu on the left side.
3. Click the Firewall > DMZ tab.
4. Select Enable beside DMZ Settings.
5. In the DMZ IP Address field, enter the IP address of the computer you want to have
in the DMZ.
6. Click Apply.

32
Set Router options
To set the mobile hotspot’s LAN options:
1. On the AT&T Wi-Fi Manager home page, log in as Administrator.
2. Click Settings on the navigation menu on the left side.
3. Click the Advanced > Router tab.
4. Enter the desired information in the each section.
If the DHCP Server is enabled, it automatically assigns an IP address to each device on
the network and manages their configuration information.
5. Click Apply.
Troubleshooting
Problem Suggested Solution
Cannot establish the
Wi-Fi connection
between your device
and client.
Refresh network list and select the correct SSID.
Check the IP address to make sure your client can obtain an
IP address automatically in the Internet protocol (TCP/IP)
properties.
Type the correct network key (Wi-Fi password) when you
connect to the device.
The client connected
to the device cannot
access the Internet.
Make sure your SIM card is available.
Change the location to find a place with good signal.
Contact your service provider.
Cannot visit the web
user interface
configuration page.
Enter the correct address. The default address is
http://192.168.1.1 or http://attwifimanager/
Only use one network adapter in your PC.
Do not use any proxy server.
About the password On
Home
screen to check the Main/ Guest Wi-Fi Network
password or check the label on the device to get them.
If you changed the password and forgot the new password,
you need to restore the device to the factory default settings.
Specifications
Mechanical specifications
Table 5-1: Mechanical specifications
Weight 130g
Dimensions 114x63x17mm
Display 2.4” QVGA TFT LCD
240x320 pixel

33
Capacitive touch screen
Memory 256MB RAM / 512MB ROM
Battery 2800mAh
Supported RF bands
Table 5-2: Supported RF bands
Technology Bands
LTE Band 2
Band 4
Band 5
Band 12
Band 14
Band 29
Band 30
Band 66
Band 71
UMTS/HSPA+ Band 2
Band 4
Band 5
Regulatory and Safety Information
To the Owner
•
Some electronic devices are susceptible to electromagnetic interference sent by your
device if inadequately shielded, such as the electronic system of vehicles. Please consult
the manufacturer of your device before using if necessary.
•
Operating your device may interfere with medical devices like hearing aids and
pacemakers. Please always keep them more than 20 centimeters away from such
medical devices when they are turned on. Turn your device off if necessary. Consult a
physician or the manufacturer of the medical device before using your device.
•
Be aware of the usage limitation when using your device at places such as oil
warehouses or chemical factories, where there are explosive gases or explosive products
being processed. Turn off your device if required.
•
The use of electronic transmitting devices is forbidden in aircrafts, at petrol stations
and in hospitals. Please observe and obey all warning signs and switch off your device
in these conditions.
•
Do not touch the inner antenna area if not necessary. Otherwise it will affect your
device’s performance.
•
Store your device out of the reach of little children. Your device may cause injury if
34
used as a toy.
•
Do not touch the metallic parts of your device so as to avoid a burn, when your device
is working.
Using Your Device
•
Please use original accessories or accessories that are authorized. Using any
unauthorized accessories may affect your device’s performance, and violate related
national regulations about telecom terminals.
•
Avoid using your device near or inside metallic structures or establishments that can
emit electromagnetic waves. Otherwise it may influence signal reception.
•
Your device is not waterproof. Please keep it dry and store in a shady and cool place.
•
Do not use your device immediately after a sudden temperature change. In such case, it
will produce dew inside and outside your device, so don’t use it until it becomes dry.
•
Handle your device carefully. Do not drop, bend or strike it. Otherwise your device will
be damaged.
•
No dismantling by non-professionals and only qualified technicians can undertake
repair work.
•
Operating temperature range of 0℃ ~ +35℃ and humidity range of 5% ~ 95% are
recommended.
•
Do not connect the charger while using the device for a long period. Failing to do so
will trigger the protection mechanism of the battery, and the battery will not be charged.
If you want to charge the battery, please reconnect the charger.
•
Do not connect the charger while using the device for a long period or use the device
and battery in non-operating temperature. Failing to do so will shorten battery life or
cause battery swelling or leakage. If the battery shows signs of swelling or leakage,
please stop use immediately.
Using Battery
•
Do not short-circuit the battery, as this can cause excessive heat and fire.
•
Do not store battery in hot areas or dispose of it in a fire to avoid explosion.
•
Do not disassemble or modify the battery.
•
When not using the battery for a long period, remove it from your device and store it in
a cool dry place.
•
Never use any charger or battery damaged or worn out.
•
Return the worn-out battery to the provider or put it in the appointed recycle place. Do
not dispose of the battery in the trash.
WARNING! If the battery is broken, keep away from it. If it taints your skin, wash your
skin with abundant fresh water and ask doctor for help if necessary.
35
Radio Frequency (RF) Energy
This device meets the government’s requirements for exposure to radio waves.
This device is designed and manufactured not to exceed the emission limits for exposure
to radio frequency (RF) energy set by the Federal Communications Commission of the
U.S. Government:
The exposure standard for wireless mobile devices employs a unit of measurement
known as the Specific Absorption Rate, or SAR. The SAR limit set by the FCC is 1.6
W/kg. *Tests for SAR are conducted using standard operating positions accepted by the
FCC with the device transmitting at its highest certified power level in all tested
frequency bands. Although the SAR is determined at the highest certified power level,
the actual SAR level of the device while operating can be well below the maximum
value. This is because the device is designed to operate at multiple power levels so as to
use only the poser required to reach the network. In general, the closer you are to a
wireless base station antenna, the lower the power output.
The highest SAR value for the device as reported to the FCC when tested for use at the
ear is 1.19 W/kg and when worn on the body, as described in this user guide, is
1.41 W/kg (Body-worn measurements differ among device models, depending upon
available enhancements and FCC requirements.)
While there may be differences between the SAR levels of various devices and at
various positions, they all meet the government requirement.
The FCC has granted an Equipment Authorization for this device with all reported SAR
levels evaluated as in compliance with the FCC RF exposure guidelines. SAR
information on this device is on file with the FCC and can be found under the Display
Grant section of http://www.fcc.gov/oet/ea/fccid/ after searching on:
FCC ID: SRQ-MF985
SAR compliance for body operation is based on a separation distance of 10 mm between
the unit and the human body. Carry this device, at least 10 mm away from your body to
ensure RF exposure level compliant or lower to the reported level.
FCC Compliance
This device complies with part 15 of the FCC Rules. Operation is subject to the
following two conditions: (1) This device may not cause harmful interference, and (2)
this device must accept any interference received, including interference that may cause
undesired operation.
Caution: Changes or modifications not expressly approved by the manufacturer could
void the user’s authority to operate the equipment.
Note: This equipment has been tested and found to comply with the limits for a Class B
digital device, pursuant to part
15 of the FCC Rules. These limits are designed to provide reasonable protection against
36
harmful interference in a residential installation. This equipment generates, uses and can
radiate radio frequency energy and, if not installed and used in accordance with the
instructions, may cause harmful interference to radio communications. However, there is
no guarantee that interference will not occur in a particular installation. If this equipment
does cause harmful interference to radio or television reception, which can be
determined by turning the equipment off and on, the user is encouraged to try to correct
the interference by one or more of the following measures:
Reorient or relocate the receiving antenna.
Increase the separation between the equipment and receiver.
Connect the equipment into an outlet on a circuit different from that to which the
receiver is connected.
Consult the dealer or an experienced radio/TV technician for help.
CTIA Requirements
a) Do not disassemble or open crush, bend or deform, puncture or shred
b) Do not modify or remanufacture, attempt to insert foreign objects into the battery,
immerse or expose to water or other liquids, expose to fire, explosion or other
hazard.
c) Only use the battery for the system for which it is specified
d) Only use the battery with a charging system that has been qualified with the system
per CTIA Certification Requirements for Battery System Compliance to IEEE 1725.
Use of an unqualified battery or charger may present a risk of fire, explosion,
leakage, or other hazard.
e) Do not short circuit a battery or allow metallic conductive objects to contact battery
terminals.
f) Replace the battery only with another battery that has been qualified with the system
per this standard, IEEE-Std-1725. Use of an unqualified battery may present a risk
of fire, explosion, leakage or other hazard.
g) Promptly dispose of used batteries in accordance with local regulations
h) Battery usage by children should be supervised
i) Avoid dropping the phone or battery. If the phone or battery is dropped, especially
on a hard surface, and the user suspects damage, take it to a service center for
inspection.
j) Improper battery use may result in a fire, explosion or other hazard.
For those host devices that utilize a USB port as a charging source, the host device's user
manual shall include a statement that the phone shall only be connected to CTIA
certified adapters, products that bear the USB-IF logo or products that have completed
the USB-IF compliance program.
37
Warranty
ZTE offers you a limited warranty that the enclosed subscriber unit and its enclosed
accessories will be free from defects in material and workmanship for a period that
expires one year from the date of sale of the Product to you, provided that you are the
original end-user purchaser of the Product and provided that your purchase was made
from a supplier authorized by the Seller. Transfer or resale of a Product will
automatically terminate warranty coverage with respect to that Product. This limited
warranty is not transferable to any third party, including but not limited to any
subsequent purchaser or owner of the Product. This limited warranty is applicable only
to end users in the United States.
a) This product or phone is warranted for 12 (twelve) months from date of purchase.
b) For warranty service information, please call ZTE service number (877) 817-1759
(Toll-free). The manufacturer’s website, http://www.zteusa.com, is also available for
assistance.
c) This warranty only applies if the product has been used in accordance with the
manufacturer’s instructions under normal use and with reasonable care.
d) What this warranty does not cover.
a) Defects or damages resulting from the misuse of this product.
b) Defects or damages from abnormal use, abnormal conditions, improper storage,
exposure to moisture, dampness or corrosive environments, unauthorized
modifications, unauthorized repair, neglect, rough handling, abuse, accident,
alteration, improper installation, incorrect voltage application, food or liquid
spoilage, acts of God.
c) Normal wear and tear.
d) If the Product has been opened, modified or repaired by anyone other than a
warranty service center or if it is repaired using unauthorized spare parts.
e) If the serial number or mobile accessory date code has been removed, erased,
defaced, altered, or are illegible in any way subject to sole judgment of ZTE.
Limited Warranty
TO THE EXTENT PERMITTED BY APPLICABLE LAW, THIS LIMITED
WARRANTY IS YOUR SOLE AND EXCLUSIVE REMEDY AGAINST ZTE AND
ZTE’S SOLE AND EXCLUSIVE LIABILITY IN RESPECT OF DEFECTS IN
PRODUCT. HOWEVER, THIS LIMITED WARRANTY SHALL NOT EXCLUDE
NOR LIMIT ANY OF YOUR LEGAL (STATUTORY) RIGHTS UNDER THE
APPLICABLE NATIONAL LAWS.
TO THE EXTENT PERMITTED BY APPLICABLE LAW ZTE DOES NOT ASSUME
ANY LIABILITY FOR LOSS OF OR DAMAGE TO OR CORRUPTION OF DATA,
FOR ANY LOSS OF PROFIT, LOSS OF USE OF PRODUCTS OR FUNCTIONALITY,
38
LOSS OF BUSINESS, LOSS OF REVENUES OR LOSS OF ANTICIPATED PROFIT,
INCREASED COSTS OR EXPENSES OR FOR ANY INDIRECT, OR SPECIAL OR
CONSEQUENTIAL LOSS OR DAMAGE.
TO THE EXTENT PERMITTED BY APPLICABLE LAW, ZTE’S LIABILITY SHALL
BE LIMITED TO THE PURCHASE VALUE OF THE PRODUCT. THE ABOVE
LIMITATIONS SHALL NOT APPLY TO DEATH OR PERSONAL INJURY CAUSED
BY DEFECT OF PRODUCT IN MATERIAL, DESIGN, AND WORKMANSHIP.
How to Get Warranty Service
To obtain warranty service, please call (877) 817-1759. Please have the following information
available when you send the device in for repair:
A valid Proof of Purchase
Return address
Daytime phone number or fax number
Model #
MEI # (Look for the 15-digit IMEI # behind the battery of the device)
Complete description of the problem
Transportation prepaid
Other Warranty Programs
You may have other warranty programs with your purchase, such as warranty exchange.
If so, please refer to equipment package or the original point of sale.