Contents
- 1. user manual 1
- 2. user manual 2
user manual 1

User Guide
Vodafone Mobile Wi-Fi
R203-Z
Designed
by Vodafone

Welcome
to the world of mobile communications
1 Welcome
2 Device overview
3 Getting started: Step 1
4 Getting started: Step 2
5 Mobile Wi-Fi web UI
application screen
6 Current network panel
7 Mobile Wi-Fi view
8 Storage view
9 SMS view
10 Account view
11 Device status screen
icons
12 Hints and tips
17 Glossary

1
The Vodafone Mobile Wi-Fi R203-Z creates a personal portable
Wi-Fi zone which allows several Wi-Fi enabled devices (for
example PCs, Apple® iPhone, iPad or iPod touch, or mobile
gaming devices such as Nintendo® DSi, Android devices
including the Samsung® Galaxy Tab) to share a secure mobile
internet connection.
The device is battery, mains or USB powered, and this fl exibility
allows the device to be positioned for best mobile coverage
and then share this coverage between several devices via Wi-Fi.
Note: you will get better Wi-Fi performance when the device is
being charged compared to when it is running from the battery.
Advanced confi guration using a cable or Wi-Fi
To perform advanced confi guration of the device browse to the
web UI http://VodafoneMobile.wifi or http://192.168.0.1 from a
computer running Microsoft® Windows® 7 (SP1 recommended),
Windows Vista™ (SP2 recommended), or Windows® XP (SP3
recommended), a computer running Linux (Wi-Fi confi guration
only, not cable), or an Apple Mac running Mac OS® X 10.5 (Intel®),
10.6 or 10.7 (all with latest updates).
Advanced confi guration for iPhone / iPad / iPod Touch /
smartphone / tablet users
Apple device users should use the Safari browser to browse to
the web UI http://VodafoneMobile.wifi or http://192.168.0.1 , or
download the Vodafone Mobile Wi-Fi Monitor app. Smartphone
and tablet users can check the device status by downloading the
Vodafone Mobile Wi-Fi Monitor app from the App Store in iTunes
or the Android Market / Google Play. See Page 16 for sample app
screenshots.
Welcome
System
requirements
To use the Vodafone
Mobile Wi-Fi R203-Z
you need a device
with Wi-Fi capability.
2
Status Display
End User Licence Agreement (EULA)
Please ensure that you have read and accepted the software
EULA for your country before using the Vodafone Mobile Wi-Fi
application or device. The EULA is available here:
www.support.vodafone.com/VodafoneMobileWiFi/R203-Z
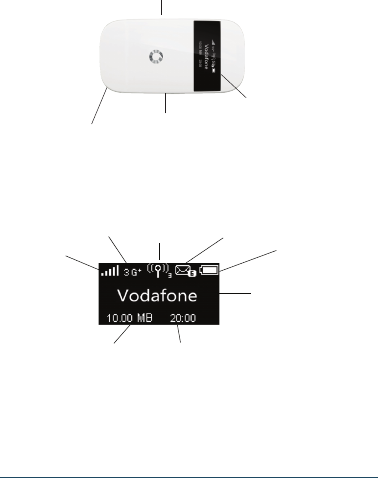
Device overview
Tip:
To save power the
display is dimmed
after 10 seconds and
switched off after a
further 5 seconds.
The screen can be
displayed by briefly
touching the power
on/off button.
The screen will
also be displayed
whenever the
status of the device
changes.
Wi-Fi status
and number
of users
Unread
messages
Network
signal
Micro USB
slot
Power
on/off
Status
display
Back cover
release
Battery
Network
operator or
additional
information
Connect duration
Upload & download
data volume
Bearer
3
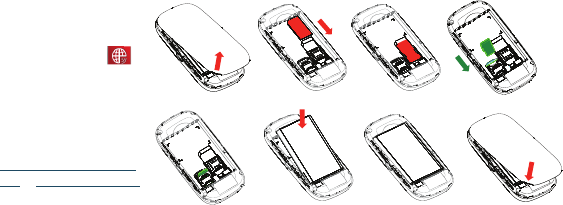
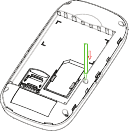
To prepare the Vodafone Mobile Wi-Fi R203-Z, you need to 1.
insert your SIM (and MicroSDHC card if you are using one for
fi le storage and sharing) and battery before use.
Unclip the back of the device and insert the SIM as shown. 2.
If using a MicroSD card then insert as shown, and insert
the battery. Before replacing the back cover please make a
note of your Wi-Fi security details. These are a secure Wi-Fi
network key and a Wi-Fi network name (SSID). The Key and
the SSID are unique to your device and can be found on a
label on the inside of the back cover.
The device is now ready to use - plug it into the mains or your 3.
PC. The battery will be charged in the background. Make sure
the device is fully charged (approximately 3 hours) before
using it in battery mode.
Getting
started:
Step 1 of 2
Note: Once setup
is complete, when
connected to the R203-Z
via USB (and you have
installed the software
onto your PC) you can
access the R203-Z
configuration screen by
clicking on the Mobile
Wi-Fi desktop icon .
Alternatively, if you
are connected over
Wi-Fi, you can enter the
following addresses into
your browser:
http://VodafoneMobile.
wifi or http://192.168.0.1
You may want to save
these addresses as
favourites in your
browser so you can
access the Mobile Wi-Fi
web UI application
screen easily.
SIM card
MicroSD
card
(if used)
Battery

4
Switch on the device by pressing and holding the power 4.
button for 3 seconds. The device will go through its start-up
sequence, and will automatically connect to the network
unless a PIN code is required. Check the display for connection
status.
Use the normal Wi-Fi application on your computer or device 5.
to connect. Select the Mobile Wi-Fi network from the list of
available Wi-Fi networks, click Connect and enter the WPA2
password (secure Wi-Fi network key) noted earlier.
Congratulations – you now have internet access via Vodafone
Mobile Wi-Fi.
When you are connected to the Vodafone Mobile Wi-Fi R203-Z 6.
via Wi-Fi or a USB cable, you can access the Vodafone Mobile
Wi-Fi confi guration screen by clicking on the Mobile Wi-Fi
desktop icon (if you have installed via USB), or by typing
either http://VodafoneMobile.wifi or http://192.168.0.1 into
your web browser. You can change settings and check the
device and network status from this browser page.
Getting
started:
Step 2 of 2
Tip:
A double tap of the
power key will show
the current Wi-Fi
network name and
Wi-Fi network key on
the device display.
The Vodafone
Mobile Wi-Fi R203-Z
will automatically
connect to the Mobile
Broadband network
when it is powered on.
If required, this
default automatic
network connection
can be changed to a
manual connection
via the web UI of the
device.
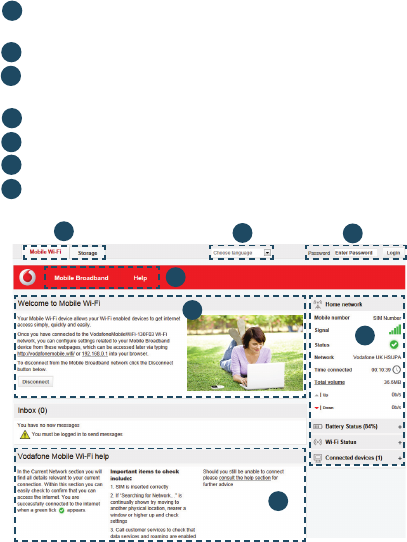
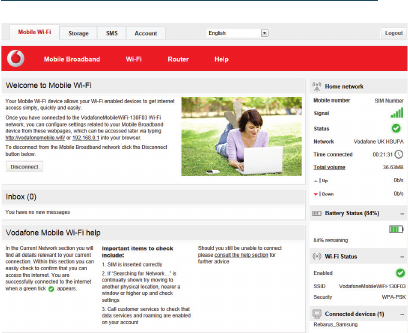
5
Note: Every window in
the Mobile Wi-Fi web
UI application has this
same standard layout.
Context-sensitive help
for each window is
always available at the
bottom of the window.
Sometimes an
additional Menu bar
will appear on the left
of the window.
Navigation tabs: Select Mobile Wi-Fi, Storage, SMS or
Account view
Navigation bar: Select an area within each view
Current network panel: Status of mobile broadband network
connection, battery and Wi-Fi status and connected devices
Content area: Content for current area
Context help: Context-sensitive help for current area
Language selection: Defaults to browser language
Login/Logout: For advanced confi guration options. Default
password is ‘admin’
Mobile Wi-Fi
web UI
application
screen
4
5
6
7
3
1
2
4
5
3
6
1
2
7
6
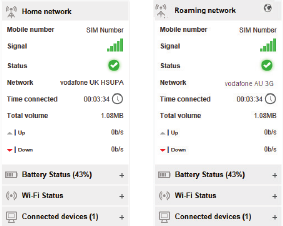
The Current network panel appears on the right-hand side of
every screen within the Vodafone Mobile Wi-Fi web UI application,
with additional panels for battery, Wi-Fi and connected device
status below. ‘Roaming network’ is shown at the top of the panel
when you are roaming on another operator‘s network, or ‘Home
network’.
Mobile number – Shown if permitted by your network operator
Signal – More bars indicates better mobile broadband network
signal. For best performance position the device so 3 or more
bars are displayed with 3G/HSUPA coverage in the Network fi eld
Status – Tick when’ connected to network; Cross when not
connected
Network – Name and bearer of currently connected network
Time connected – For current connection to network
Total volume – Approximate cumulative data usage
Up / Down – Approximate connection speed: ‘Up’ to the network
from your computer, and ‘Down’ from the network.
Current
network
panel
Note: In addition to
the Current network
panel, there are
drop-down panels
for Battery status
(percentage charge
/ battery time
remaining), Wi-Fi
status and Connected
devices (devices
currently connected
to the Vodafone
Mobile Wi-Fi R203-Z).
7
The Mobile Wi-Fi view has four options on the Navigation bar
covering device confi guration: Mobile Broadband, Wi-Fi, Router,
and Help.
For an explanation on using these features either read the
context-sensitive help on the relevant page, or consult the
Advanced Confi guration Guide, available here:
www.support.vodafone.com/VodafoneMobileWiFi/R203-Z
IMPORTANT
We recommend that
you ensure that the
Wi-Fi security settings
meet your personal
requirements.
To change the admin
password, enter ‘admin’
into the Password box
and click Login. Select
Router on the Navigation
bar, then Router Settings
from the left hand Menu
bar.
To modify the SSID
and secure network
key, select Wi-Fi on the
Navigation bar, then
Security from the left
hand Menu bar.
Mobile Wi-Fi
view
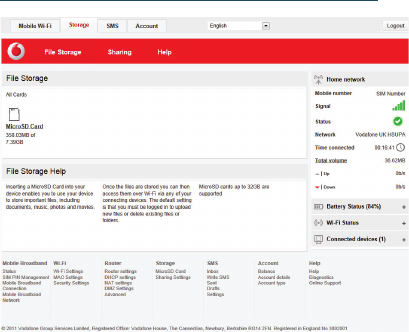
8
Storage view Storage allows you to use the Mobile Wi-Fi R203-Z to upload and
download fi les to the device, using it as a centralised storage
hub for sharing fi les with other users or devices using the device.
The Storage view has three options on the Navigation bar
covering storage settings: File Storage, Sharing, and Help.
For an explanation on using these features either read the
context-sensitive help on the relevant page, or consult the
Advanced Confi guration Guide, available here:
www.support.vodafone.com/VodafoneMobileWiFi/R203-Z
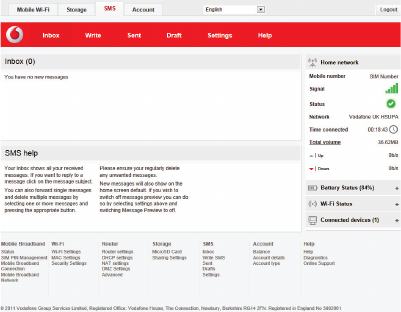
9
The SMS view has six options on the Navigation bar covering
all messaging functions: Inbox, Write, Sent, Draft, Settings and
Help.
By default the Vodafone Mobile Wi-Fi device will re-direct
your browsing session to the Mobile Wi-Fi web UI application
screen when new SMS messages are received. This setting can
be changed via the message preview option within the SMS
Settings area.
SMS view
Note: When you select
the checkbox in the
title bar of the Inbox,
Sent folder or Draft
folder, all messages in
that folder are selected.
This is useful if you
want to delete multiple
messages. It is not
possible to forward
multiple messages.
In the Settings area you
can select or de-select
the SMS preview in the
Mobile Wi-Fi view.
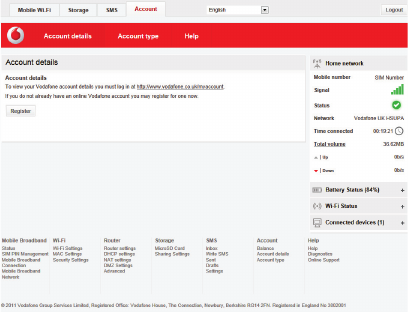
10
Note: The options
that are displayed on
the Navigation bar
are dependent on the
account type selected.
Account view The Account view has three options on the Navigation bar:
Account details, Account type and Help.
Your account type should be determined automatically by the
Vodafone Mobile Wi-Fi device to match the inserted SIM card.
Depending on the network operator, prepaid users may have
the option to top-up their account and check their prepaid
balance via this view.

11
Note: A double tap
of the power key will
show the current Wi-Fi
network name and
Wi-Fi network key on
the device display.
The device contains a
reset button inside the
battery compartment.
The reset button will
set the device back
to the initial factory
default settings.
This includes the
reset of the security
settings back to their
original settings, which
is useful should the
secure Wi-Fi network
key be forgotten.
Device status
screen icons
The device status screen is constantly updated with the current
status of the device and network connection. If the screen
is not displayed while the Vodafone Mobile Wi-Fi R203-Z is
powered on (the display is dimmed after 10 seconds and
switched off after a further 5 seconds to save power), briefl y
touch the power on/off button and the screen will be displayed.
Sample icons and their meanings:
Network signal:
connecting to network
excellent signal (not connected)
excellent signal (connected)
unable to connect
Wi-Fi status and number of users:
3 users connected
Unread messages:
2 unread SMS
Battery:
fully charged
discharged

12
Hints
and tips
The application won’t install on Windows
If the software does not install, or the install progress bar keeps
looping
From the Windows Start menu, select Settings>Control –
Panel>System>Hardware>Device Manager
Expand ‘Universal Serial Bus Controllers’ –
Right-click ‘USB Mass Storage Device’ and select ‘Uninstall’ –
If your devices are not reloaded, select ‘Scan for Hardware –
changes’ from the ‘Action’ menu.
Cannot open Mobile Wi-Fi web UI application window
The following things may prevent you from opening the
Vodafone Mobile Wi-Fi web UI application window by double-
clicking the desktop icon (if you have installed via a USB
connection) or entering the address http://VodafoneMobile.wifi
or http://192.168.0.1 into your web browser:
Your computer already has a connection via an ethernet LAN –
cable
Your computer already has a connection via a different Wi-Fi –
network. You must be connected to the R203-Z via Wi-Fi or via
USB cable to access the application window
You may be using a VPN (Virtual Private Network). –
Unplugging the LAN cable, exiting your VPN, and checking that
you are connected to the Vodafone Mobile Wi-Fi SSID / network
may solve the problem.

13
Hints
and tips
No network can be found
Change your physical location: in a building, move closer to a –
window, move higher up, or go outside
Ensure the device is registered to the mobile broadband –
network by checking the R203-Z device display or by opening
the Mobile Wi-Fi web UI application window and checking the
device is connected (indicated via the green tick)
Select the Settings heading on the Navigation bar –
If the device is searching for a network then ensuring the device –
is set to 3G Preferred in the network settings section may help
If you are roaming then click ‘Search’ to search for available –
networks
See if you can connect to one of the networks listed –
Click ‘Save’ to save your change –
Contact Support, and check that data services and roaming are –
enabled on your account.
No connection can be opened (1)
Type – http://VodafoneMobile.wifi or http://192.168.0.1 into
your browser, and check the device status (Mobile Wi-Fi>Mobile
Broadband tab, Help on Settings bar, and select Diagnostics
from the menu)
This may indicate the source of the problem. You should see a –
green tick in the networks panel to indicate that the device is
connected to the mobile broadband network.
Note: If you can see the
application window in
your browser, you can
find more hints and tips
in the Help area.
Selecting the Help
option on the
Navigation bar in
any view, and then
‘Diagnostics’ in the
Menu bar, may help you
to identify a problem.
This area also shows
information that may
be required if you need
to contact Support at
your mobile network
operator.
Select ‘Support’ from
the Menu bar for more
information and local
support contact details.
14
Hints
and tips
No connection can be opened (2)
Wait a few minutes and try to connect again. This is most often –
a temporary problem. If the problem persists, please try the
steps below
Close the application window and then re-open it –
Re-start your Vodafone Mobile Wi-Fi device and connecting –
devices
Open the Mobile Wi-Fi web UI application window –
Select the Account tab –
Select the Account type heading in the Navigation bar –
Check that the type of account you have with your mobile –
network operator is selected in the drop-down menu
Check the device is set to automatically connect to the –
network. In roaming, the device is setup to not automatically
connect to the network. The device should prompt you to
connect to the network via the application window.
Select the Settings heading on the Navigation bar –
Select the Network entry in the Menu bar on the left –
Check which option is selected. If the option is set to a –
‘Preferred’ option, set it to an ‘Only’ option
Click ‘Save’ to save your change –
If you are using a VPN (Virtual Private Network), contact the –
administrator of your VPN.
Note: If you want to
re-install the software
from the Mobile Wi-Fi
device, you need
to first delete the
Vodafone Mobile Wi-Fi
Service software from
your computer.
– From the Windows
Start menu, select
Settings>Control
Panel> Add or
Remove Programs
(XP) or Programs and
Features (Windows 7)
– Remove the
Vodafone Mobile
Wi-Fi Service
– Re-attach your
Mobile Wi-Fi device
to your computer
using the USB cable
and the software will
re-install.
15
Hints
and tips
Resetting the device back to factory values
Remove the back cover –
Locate the reset button –
While the device is switched on, insert the end of a paper clip –
into the reset button hole, press the button with the clip and
hold down until the Vodafone logo appears on the device
screen (approximately 5 seconds)
Release the button, and re-attach the back cover –
The device will now be reset to factory settings, including –
SSID, passwords and Wi-Fi security settings.
16
Hints
and tips
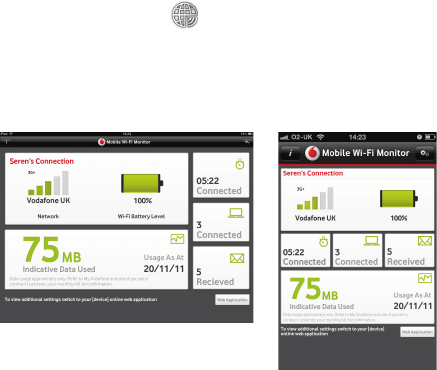
Using the Vodafone Mobile Wi-Fi Monitor app on iPhone,
iPad, iPod Touch, smartphone, tablet
Download the Vodafone Mobile Wi-Fi Monitor app from the App –
Store in iTunes or the Android Market / Google Play
Click on the app icon –
Sample monitor screens show below. –
Tablet / iPad iPhone / smartphone
17
Bearer Communication method used for data transport over the mobile
network, eg. 3G Broadband, HSPA, 3G, etc.
EDGE An enhancement to the GPRS bearer offering higher speeds,
although not as fast as 3G Broadband.
GPRS The General Packet Radio Service is a bearer offering higher data
speeds than GSM, on which it is based.
GSM Global System for Mobile Communication.
Home network The network of the mobile operator who provided your SIM.
HSPA High-Speed Packet Access bearer, enhancing 3G, including both
HSUPA (Uplink) and HSDPA (Downlink).
HSPA+ Enhanced HSPA network offering faster speeds.
HSUPA High-Speed Uplink Packet Access bearer.
3G The third-generation mobile phone service, as UMTS (Universal
Mobile Telecommunications System) is also known, is a bearer
providing higher data speeds.
3G broadband The latest enhancement to the 3G bearer.
Roaming You can use your mobile device on any other mobile network
that has a roaming agreement with your operator, whether in
your country or abroad.
SIM Your Subscriber Identity Module is the postage-stamp-sized chip
that you will have received together with your mobile contract.
Your SIM has gold contacts on one side.
WPA2 An alternative name for the Wi-Fi network key. For Mac users the
term ‘WPA2 personal’ is used.
Glossary
Product Code:
R203-Z Mobile Wi-Fi User Guide 01/12_en_GB
© Vodafone 2012. Vodafone
and the Vodafone logos are
trade marks of the Vodafone
Group. Any product or
company names mentioned
herein may be the trade marks
of their respective owners.
The term Mobile Broadband together with the
‘birds’ design is a trademark of GSMC Limited.