ZTE V72C 1X/EVDO Tablet User Manual User Guide
ZTE Corporation 1X/EVDO Tablet User Guide
UserManual.wiki
>
ZTE
>
V72C User Manual
>
User Guide
Contents
1.
User Guide
2.
UserMan
User Guide
Navigation menu
Upload a User Manual
Namespaces
Wiki Guide
HTML
PDF
Info
Views
User Manual
Discussion / Help
Navigation
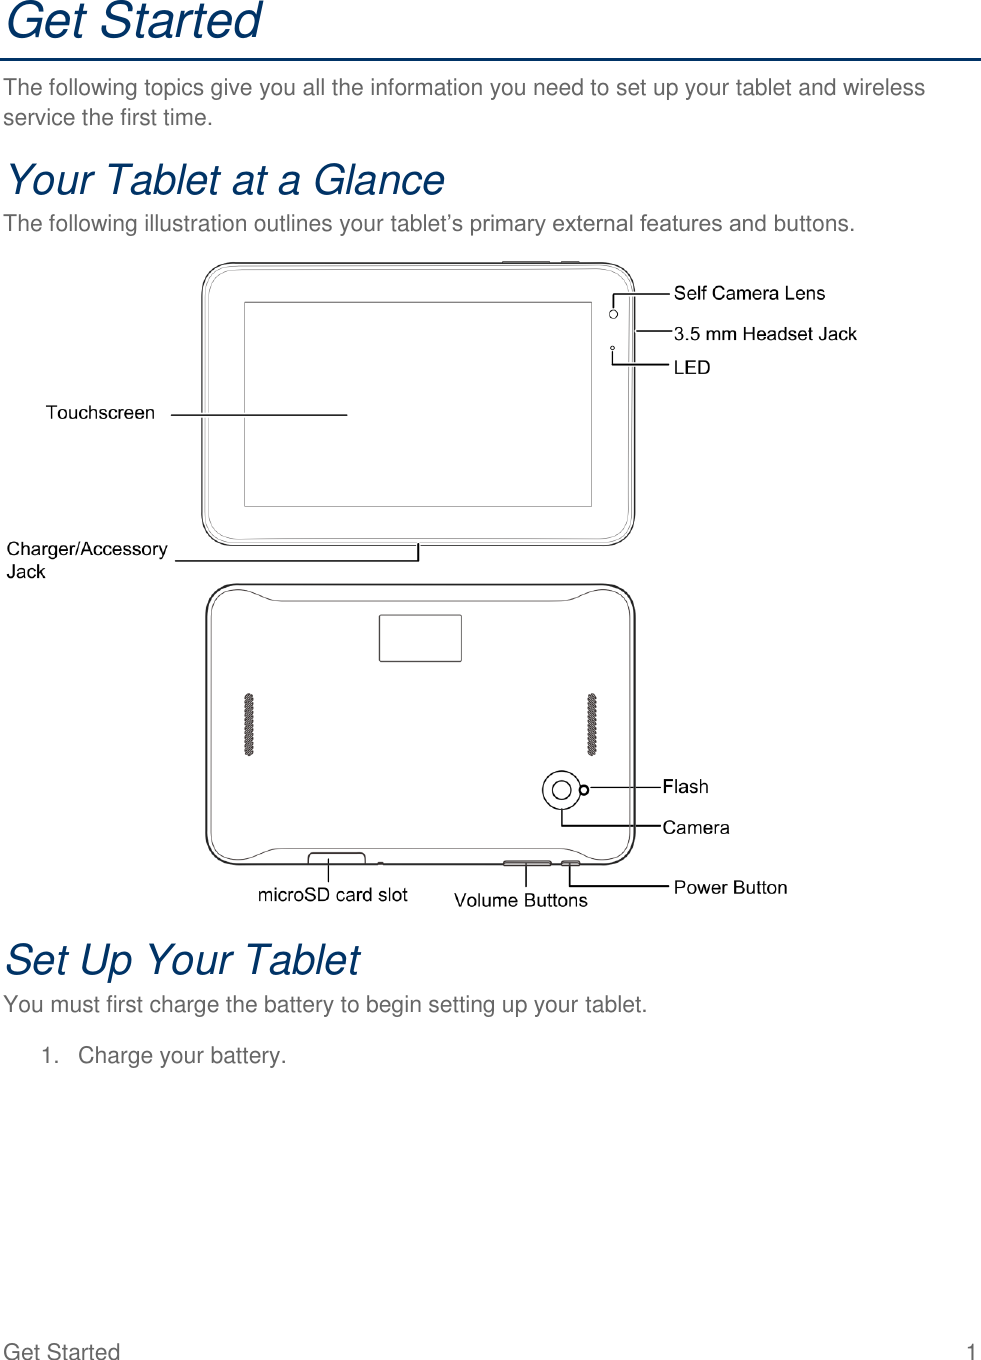
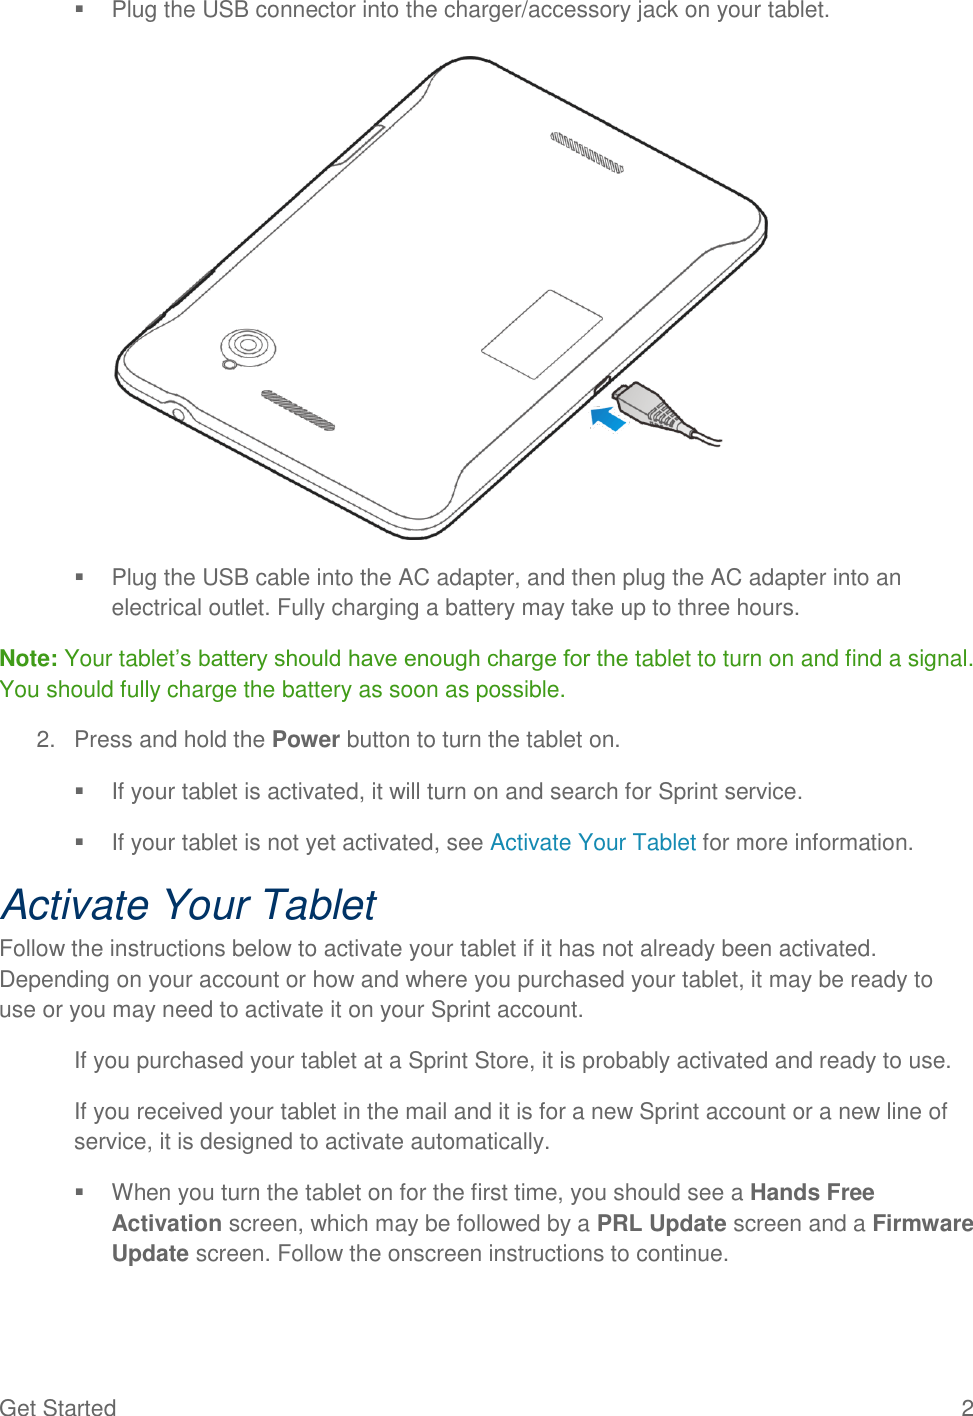
![V72C User Guide [UG template version 13a]](https://usermanual.wiki/ZTE/V72C.User-Guide/User-Guide-2246265-Page-1.png)


![Accounts 28 [account name]: Change the email account settings such as the name, signature, notification, and server settings. 4. Touch to save your changes. Delete an Email Account If you no longer want an email account on your tablet, you can delete it through the mail settings menu. 1. Touch > > Email. 2. Touch > Settings. 3. Touch the account you want to delete, and then touch Remove account. 4. Touch OK to confirm the deletion. Add the Email Widget Add the Mail widget to view your POP3/IMAP or Exchange ActiveSync email messages on a Home screen. 1. Touch > > WIDGETS. 2. Touch and hold the Email widget and drag it to an empty space on the home screen. 3. If there are more than one email account, touch the one whose inbox you want to see in the widget. Social Networking Accounts Stay in touch on the go with all your social networking accounts. Post updates on Facebook and Twitter, review your LinkedIn contacts, see what everyone’s talking about from YouTube, and more. Facebook Post updates, read what your friends are up to, upload pictures and check-ins, and more with on-the-go Facebook access. Install the Facebook App on Your Tablet Before you use Facebook on your tablet, you must download and install the app from the Google Play Store app. 1. Touch > > Play Store.](https://usermanual.wiki/ZTE/V72C.User-Guide/User-Guide-2246265-Page-36.png)


![Apps and Entertainment 39 4. Touch Add to queue or Delete. Sprint Music Plus With Sprint Music Plus and the Music Store, Ringtone Store, and Ringback Tone Store, you can purchase, download, and play music, ringtones, and ringback tones for your tablet. Install the Sprint Music Plus App on Your Tablet Before you use Sprint Music Plus on your tablet, you must download and install the app from the Google Play Store app. 1. Touch > > Play Store. 2. Touch the Search icon and search for "sprint music plus". 3. Touch Sprint Music Plus from the results list. 4. Touch INSTALL, and then touch ACCEPT. 5. When the download has completed, touch OPEN. To open the app from the home screen, touch > Sprint Music Plus. Access Sprint Music Plus 1. Touch > > Sprint > Sprint Music Plus. 2. The first time you launch the app, tap Accept to accept the Terms and Conditions. 3. Touch My Library, select a category, and touch a song to begin playback. Touch the onscreen navigation tools to skip ahead or rewind. Touch at any time to see additional options. To stop playback and exit the application, touch [menu] > More > Exit. Google Play Movies & TV App The Google Play Movies & TV app lets you connect to Google Play, download a movie or TV show, and then watch it instantly. Choose from thousands of movies and TV shows, including new releases and HD titles, and stream them on your Android tablet. Previously rented or purchased titles are automatically added to your library across your tablets or other Android devices. For more information about Google Play Movies & TV, visit play.google.com/about/movies. 1. Touch > > Play Movies & TV.](https://usermanual.wiki/ZTE/V72C.User-Guide/User-Guide-2246265-Page-47.png)


![Settings 101 Corporate, Email, Google, ect. 3. Enter your account information and touch Next. Depending on the account type, you may need to enter an email address or user address, password, domain name, or other information. For Corporate Sync accounts, contact your server administrator to determine what information you will need. 4. Touch Next when you are finished. Manage Existing Accounts 1. Touch > > Settings > [account type]. Touch a field to edit its settings. Touch the account, and touch > Remove account to delete the account from your tablet. 2. Touch when you are finished. Date & Time Settings Use the Date & Time settings menu either to automatically use the network-provided date and time or manually set these values, as well as select time and date format options. 1. Touch > > Settings > Date and time. 2. Check Automatic date & time to use the network provided date and time or uncheck it and touch Set date, and Set time to configure. 3. Check Automatic time zone to use network provided time zone or uncheck it and touch Select time zone to select a proper one from the list. 4. Touch the Use 24-hour format box if you want to change the time format. 5. Touch Choose date format to select the one you prefer. Accessibility Settings The Accessibility menu lets you enable and manage accessibility-related applications. ■ Touch > > Settings > Accessibility. TalkBack: When TalkBack is on, your device provides spoken feedback to help blind and low-vision users.](https://usermanual.wiki/ZTE/V72C.User-Guide/User-Guide-2246265-Page-109.png)