User manual
LTE Indoor CPE
User Guide
FCC ID: SRQ-WF821
Index
1GettingStarted..........................................................................................................................5
1.1WelcometotheCPE..................................................................................................5
1.2ComputerConfigurationRequirements....................................................................5
1.3LoggingIntotheWebManagementPage................................................................5
2Overview...................................................................................................................................7
2.1ViewingtheSystemInformation...............................................................................7
2.2ViewingtheVersionInformation..............................................................................7
2.3ViewingCPUUsage...................................................................................................8
2.4ViewingMemoryUsage............................................................................................8
2.5Viewing4GStatus.....................................................................................................8
2.6ViewingLANStatus...................................................................................................9
2.7ViewingWi‐FiStatus.................................................................................................9
2.8ViewingWANStatus...............................................................................................10
2.9ViewingThroughputStatistics................................................................................10
2.10ViewingDeviceList.................................................................................................11
3Network...................................................................................................................................11
3.1WANSettings...........................................................................................................11
3.1.1WANInterface.................................................................................................11
3.1.2NetworkMode................................................................................................12
3.2LTESettings..............................................................................................................12
3.2.1ViewingModuleInformation..........................................................................12
3.2.2LTESetting.......................................................................................................13
3.2.3ConnectMethodSetting.................................................................................14
3.3APNManagement...................................................................................................17
3.3.1APNSettingsinNATmode..............................................................................17
3.3.2APNlist............................................................................................................18
3.4PINManagement....................................................................................................19
3.4.1ViewingtheStatusoftheUSIMCard..............................................................19
3.4.2EnablingPINVerification.................................................................................19
3.4.3DisablingPINVerification................................................................................20
3.4.4VerifyingthePIN..............................................................................................20
3.4.5ChangingthePIN.............................................................................................20
3.4.6SettingAutomaticVerificationofthePIN.......................................................20
3.4.7VerifyingthePUK............................................................................................21
3.5LANSetting..............................................................................................................21
3.5.1SettingLANHostParameters..........................................................................21
3.5.2ConfigurationtheDHCPServer.......................................................................22
3.5.3BundledAddressList.......................................................................................22
3.6DMZSettings...........................................................................................................24
3.7StaticRoute.............................................................................................................24
3.7.1AddStaticRoute..............................................................................................24
3.7.2ModifyStaticRoute.........................................................................................25
3.7.3DeleteStaticRoute..........................................................................................25
4Wi‐Fi........................................................................................................................................26
4.1WLANSetting..........................................................................................................26
4.1.1SettingGeneralParameters.............................................................................26
4.1.2WPSSettings...................................................................................................27
4.2SettingSSIDProfile..................................................................................................27
4.3AccessManagement...............................................................................................29
4.3.1SettingtheAccessPolicy.................................................................................29
4.3.2ManagingtheWi‐FiAccessList.......................................................................29
4.4WDS.........................................................................................................................30
5Security...................................................................................................................................31
5.1MACFiltering..........................................................................................................31
5.1.1EnablingMACFilter.........................................................................................32
5.1.2DisablingMACFilter........................................................................................32
5.1.3SettingAllowaccessnetworkwithintherules................................................32
5.1.4SettingDenyaccessnetworkwithintherules................................................33
5.1.5AddingMACFilteringrule...............................................................................33
5.1.6ModifyingMACFilteringrule..........................................................................34
5.1.7DeletingMACFilteringrule.............................................................................34
5.2IPFiltering...............................................................................................................35
5.2.1EnablingIPFiltering.........................................................................................35
5.2.2DisablingIPFiltering........................................................................................35
5.2.3SettingAllowaccessnetworkoutsidetherules..............................................36
5.2.4SettingDenyaccessnetworkoutsidetherules...............................................36
5.2.5AddingIPFilteringrule....................................................................................36
5.2.6ModifyingIPFilteringrule...............................................................................37
5.2.7DeletingIPFilteringrule..................................................................................38
5.3URLFiltering............................................................................................................38
5.3.1EnablingURLFiltering.....................................................................................38
5.3.2DisablingURLFiltering....................................................................................39
5.3.3AddingURLFilteringlist..................................................................................39
5.3.4ModifyURLFilteringlist..................................................................................39
5.3.5DeletingURLFilteringlist................................................................................40
5.4PortForwarding.......................................................................................................40
5.4.1AddingPortForwardingrule...........................................................................40
5.4.2ModifyingPortForwardingrule......................................................................41
5.4.3DeletingPortForwardingrule.........................................................................42
5.5UPnP........................................................................................................................42
6VPNSetting.............................................................................................................................43
7VOIP.........................................................................................................................................43
7.1ViewVOIPInformation...........................................................................................44
7.2ConfiguringSIPServer.............................................................................................44
7.3ConfiguringSIPAccount..........................................................................................45
8System.....................................................................................................................................46
8.1Maintenance...........................................................................................................46
8.1.1Reboot.............................................................................................................46
8.1.2Reset................................................................................................................47
8.1.3BackupConfigurationFile...............................................................................47
8.1.4UploadConfigurationFile...............................................................................47
8.2VersionManager.....................................................................................................48
8.2.1ViewingVersionInfo.......................................................................................48
8.2.2VersionUpgrade..............................................................................................48
8.3TR069......................................................................................................................49
8.4Date&Time............................................................................................................50
8.5DDNS.......................................................................................................................52
8.6Diagnosis.................................................................................................................53
8.6.1Ping..................................................................................................................53
8.6.2Traceroute.......................................................................................................54
8.7Syslog.......................................................................................................................55
8.7.1Local................................................................................................................55
8.7.2Network...........................................................................................................56
8.8Account...................................................................................................................57
8.9RemoteWEBAccess................................................................................................58
8.10Logout.....................................................................................................................59
9FAQs........................................................................................................................................59

1 GettingStarted
1.1 WelcometotheCPE
Inthisdocument,theLTE(LongTermEvolution)IndoorCPE(customerpremisesequipment)
willbereplacedbytheCPE.Carefullyreadthefollowingsafetysymbolstohelpyouuseyour
CPEsafelyandcorrectly:
Additionalinformation
Optionalmethodsorshortcutsforanaction
Potentialproblemsorconventionsthatneedtobespecified
1.2 ComputerConfigurationRequirements
Foroptimumperformance,makesureyourcomputermeetsthefollowingrequirements.
ItemRequirement
CPUPentium500MHzorhigher
Memory128MBRAMorhigher
Harddisk50MBavailablespace
Operatingsystem
Microsoft:WindowsXP,WindowsVista,Windows7orhigher
Mac: Mac OS X10.5 or hi
g
her
Displayresolution1024x768pixelsorhigher
Browser
InternetExplorer7.0orlater
Firefox3.6orlater
Opera10orlater
Safari5orlater
Chrome9orlater
1.3 LoggingIntotheWebManagementPage
UseabrowsertologintothewebmanagementpagetoconfigureandmanagetheCPE.
ThefollowingproceduredescribeshowtouseacomputerrunningWindowsXPandInternet
Explorer7.0tologintothewebmanagementpageoftheCPE.
1. ConnecttheCPEproperly.
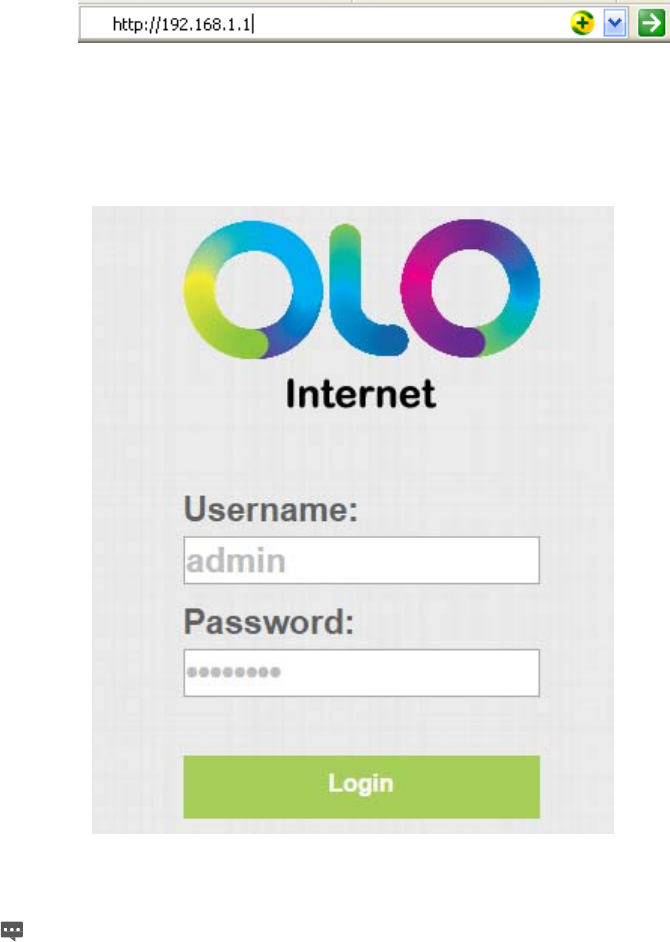
2. LaunchInternetExplorer,enterhttp://192.168.1.1intheaddressbar,andpressEnter.As
showninFigure1‐1.
Figure1‐1
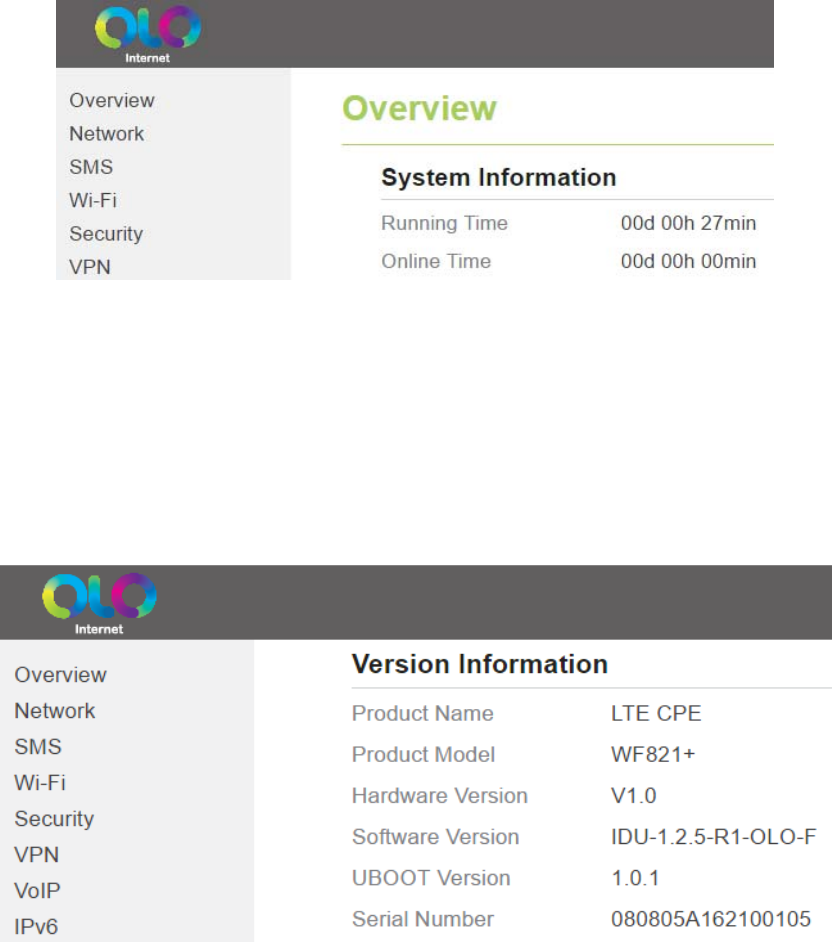
3. Entertheusernameandpassword,andclickLogIn.
Youcanlogintothewebmanagementpageafterthepasswordisverified.AsshowninFigure1‐2.
Figure1‐2
Thedefaultusernameisadminandthedefaultpasswordisolo@peru.
ToprotectyourCPEfromunauthorizedaccess,changethepasswordafteryour
firstlogin.
TheCPEsupportsdiagnosticfunction.Ifyouencounterproblems,please
contactcustomerserviceforthespecificusingmethod.
Toensureyourdatasafety,itisrecommendedthatyouturnonthefirewall,and
conserveyourloginandFTPpasswordcarefully.
2 Overview
2.1 ViewingtheSystemInformation
ToviewtheSystemInformation,performthefollowingsteps:
1. ChooseOverview;
2. IntheSystemInformationarea,viewthesystemstatus,suchasRunningtimeandOnline
time.AsshowninFigure2‐1.
Figure2‐1
2.2 ViewingtheVersionInformation
ToviewtheVersionInformation,performthefollowingsteps:
1. ChooseOverview;
2. IntheVersionInformationarea,viewtheversioninformation,suchasProductname,
Softwareversion,UBootversionandsoon.AsshowninFigure2‐2.
Figure2‐2
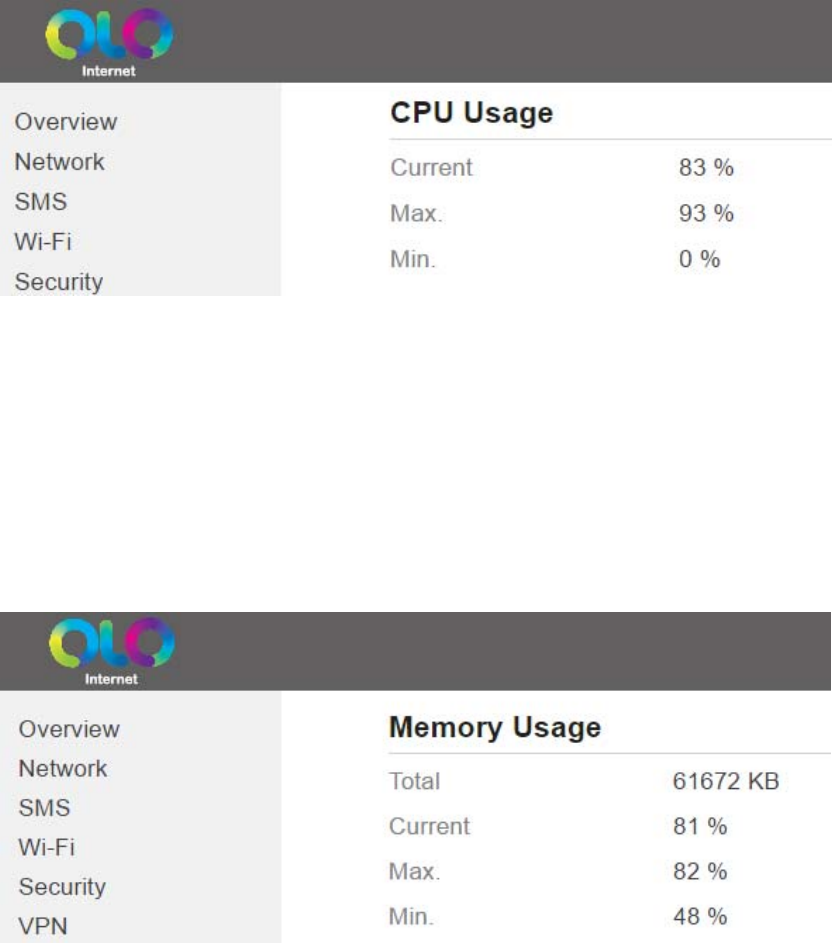
2.3 ViewingCPUUsage
ToviewtheCPUusage,performthefollowingsteps:
1. ChooseOverview;
2. IntheCPUUsagearea,viewtheCPUusageinformation,suchasCurrentCPUusage,Max
CPUusage,MinCPUusage.AsshowninFigure2‐3.
Figure2‐3
2.4 ViewingMemoryUsage
Toviewthememoryusage,performthefollowingsteps:
1. ChooseOverview;
2. IntheMemoryUsagearea,viewthememoryusageinformation,suchasTotalmemory,
Currentmemoryusage,MaxmemoryusageandMinmemoryusage.AsshowninFigure
2‐4.
Figure2‐4
2.5 Viewing4GStatus
Toviewthe4Gstatus,performthefollowingsteps:
1. ChooseOverview;
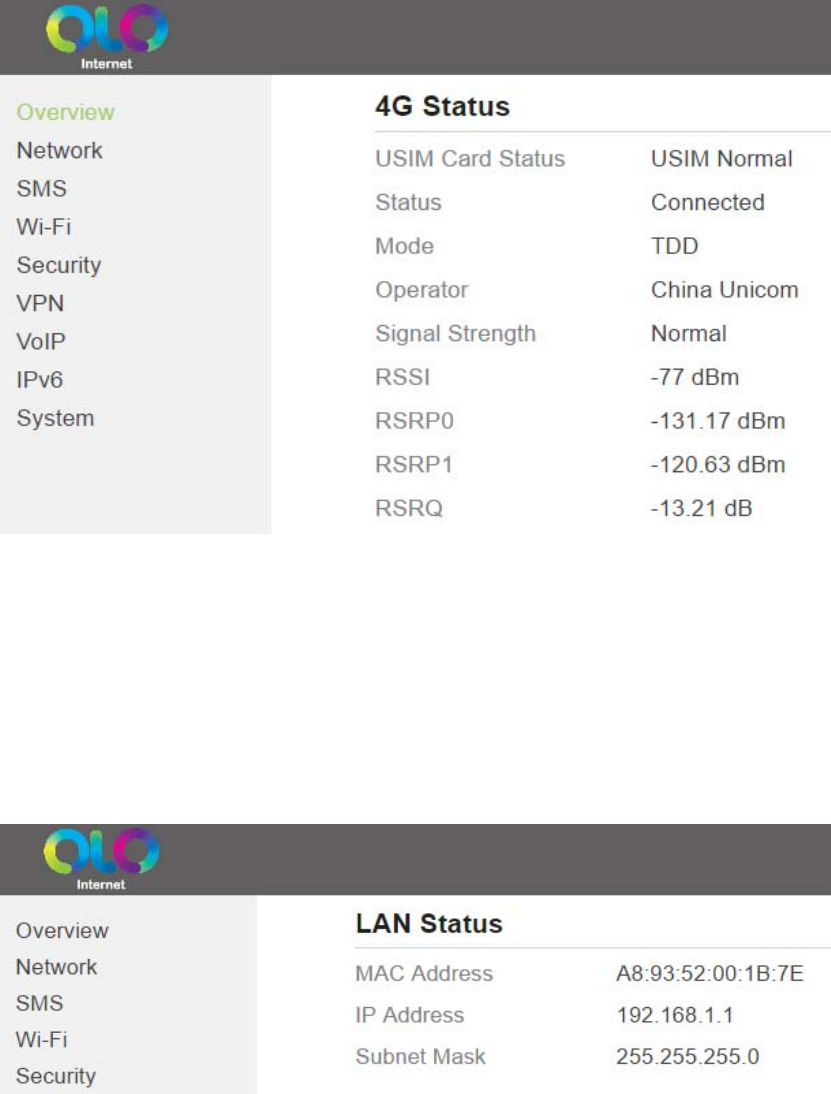
2. Inthe4GStatusarea,viewtheinformationaboutUSIMcardstatus,Connectstatus,
Operator,CurrentMobileNetwork,Signalqualityandsoon.AsshowninFigure2‐5.
Figure2‐5
2.6 ViewingLANStatus
ToviewtheLANstatus,performthefollowingsteps:
1. ChooseOverview;
2. IntheLANStatusarea,viewtheLANstatus,suchasMacaddress,IPaddressandSubnet
mask.AsshowninFigure2‐6.
Figure2‐6
2.7 ViewingWi‐FiStatus
ToviewtheWi‐Fistatus,performthefollowingsteps:
1. ChooseOverview;
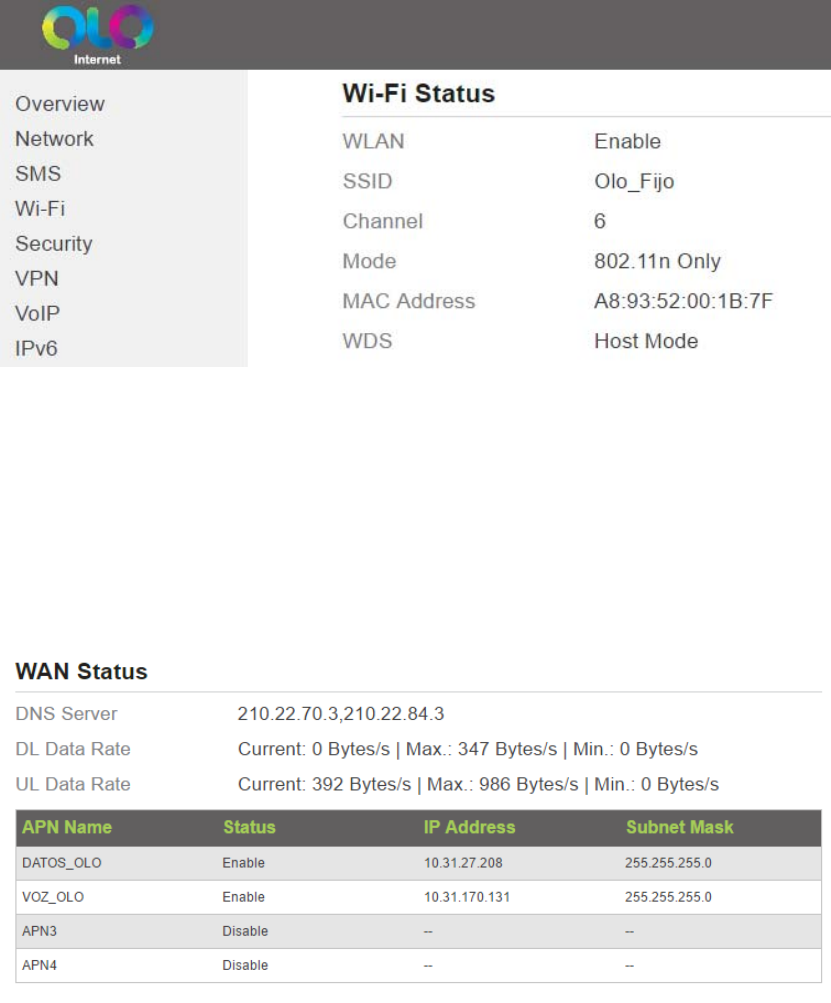
2. IntheWi‐FiStatusarea,viewtheinformationaboutWi‐Fistatus,SSID,ChanelNO.,MAC
addressandWDSstatus.AsshowninFigure2‐7.
Figure2‐7
2.8 ViewingWANStatus
ToviewtheWANstatus,performthefollowingsteps:
1. ChooseOverview;
2. IntheWANStatusarea,viewthewanstatus,suchastheDNS,Currentdatarateandthe
APNstatus.AsshowninFigure2‐8.
Figure2‐8
2.9 ViewingThroughputStatistics
Toviewthethroughputstatistics,performthefollowingsteps:
1. ChooseOverview;
2. IntheThroughputStatisticsarea,viewthethroughputstatistics,suchasWANthroughput
andLANthroughput.AsshowninFigure2‐9.
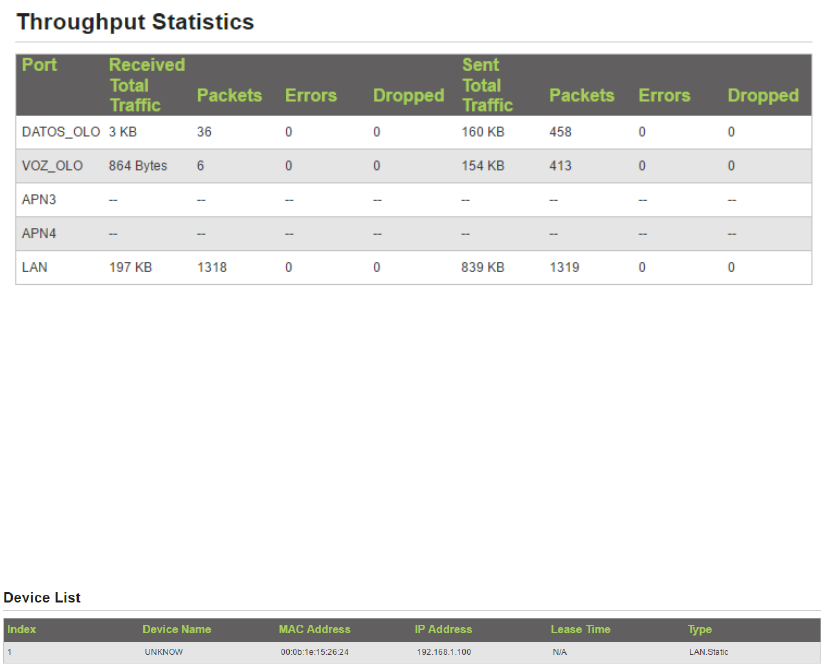
Figure2‐9
2.10 ViewingDeviceList
Toviewthedevicelist,performthefollowingsteps:
1. ChooseOverview;
2. IntheDeviceListarea,viewthedeviceinformationwhichconnecttotheCPE,suchas
Devicename,Macaddress,IPaddressandLeasetime.AsshowninFigure2‐10.
Figure2‐10
3 Network
3.1 WANSettings
3.1.1 WANInterface
TosettheWANinterface,performthefollowingsteps:
1. ChooseNetwork>WANSettings;
2. IntheNetworkModearea,selectaninterfacebetweenLTEandEthernet;
3. ClickSubmit.AsshowninFigure3‐1.
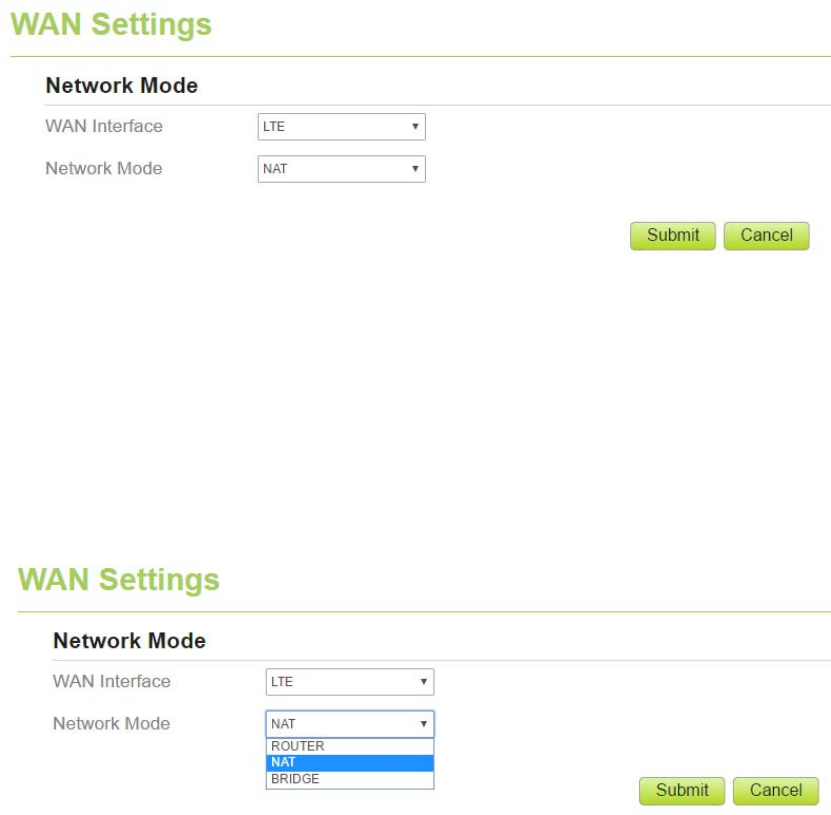
Figure3‐1
3.1.2 NetworkMode
Tosetthenetworkmode,performthefollowingsteps:
1. ChooseNetwork>WANSettings;
2. IntheNetworkModearea,selectamodebetweenBRIDGEandNAT;
3. ClickSubmit.AsshowninFigure3‐2.
Figure3‐2
3.2 LT E Settings
3.2.1 ViewingModuleInformation
Toviewthemobilemoduleinformation,performthefollowingsteps:
1. ChooseNetwork>LTESettings;
2. IntheModuleInformationarea,youcanviewtheinformationaboutthemodule,suchas
modulemodel,moduleversion,IMEI.AsshowninFigure3‐3.
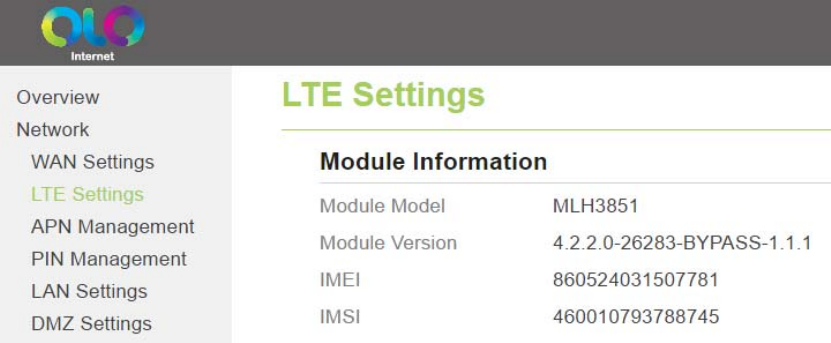
Figure3‐3
3.2.2 LTESetting
TosettheLTEnetwork,performthefollowingsteps:
1. ChooseNetwork>LTESettings;
2. IntheSettingarea,youcansettheconfigurationofLTEnetwork;
3. IntheLTESettingsarea,youcanviewtheLTEnetworkconnectstatus,suchasFrequency,
RSSI,RSRP,RSRQ,CINR,SINR,CellIDandsoon.AsshowninFigure3‐5.

Figure3‐5
3.2.3 ConnectMethodSetting
Tosettheconnectmethod,performthefollowingsteps:
1. ChooseNetwork>LTESettings;
2. IntheSettingarea,SelectaconnectmethodbetweenAutoandManual.AsshowninFigure
3‐6.
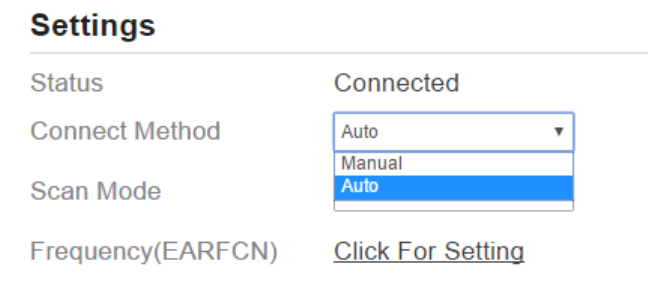
Figure3‐6
3.2.3.1 Auto Connect LTE Network
TosettheCPEautomaticallyconnecttotheinternet,performthefollowingsteps:
1. ChooseNetwork>LTESettings;
2. IntheSettingarea,settheconnectmethodasAuto,whentheLTEnetworkisready,theCPE
willbeconnectedautomaticity.AsshowninFigure3‐7.
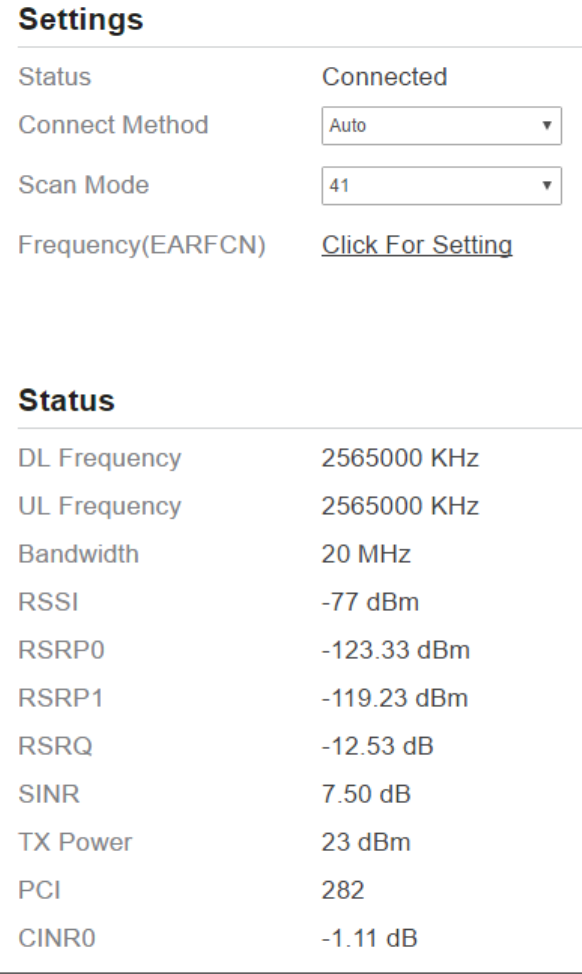
Figure3‐7
3.2.3.2 Manual Connect Mobile Network
Tosetthemobilenetworkmanualconnecttotheinternet,performthefollowingsteps:
1. ChooseNetwork>LTESettings;
2. IntheSettingarea,settheconnectmethodasManual,whentheLTEnetworkisready,you
cansettheCPEconnecttotheLTEnetworkordisconnectfromtheLTEnetwork.Asshownin
Figure3‐8.
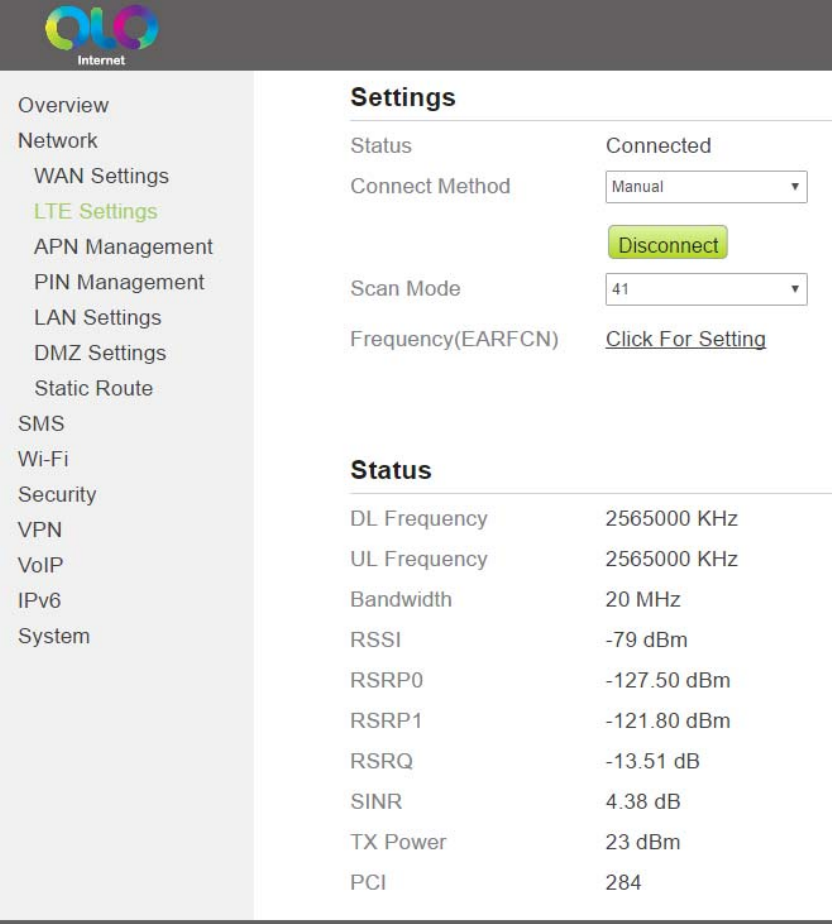
Figure3‐8
3.3 APNManagement
3.3.1 APNSettingsinNATmode
TosetandmanageAPNinNATmode,performthefollowingsteps:
1. ChooseNetwork>APNManagement.
2. IntheAPNManagementarea,youcansettheAPN.
3. ChooseaAPNnumberwhichyouwanttoset.
4. IntheAPNSettingareayoucansettheAPNparameters,suchasenableordisabletheapn,
apnname,username,passwordandsoon.
5. IfyouwantsetaAPNasdefaultgateway,youshouldcheckthatisenabled.
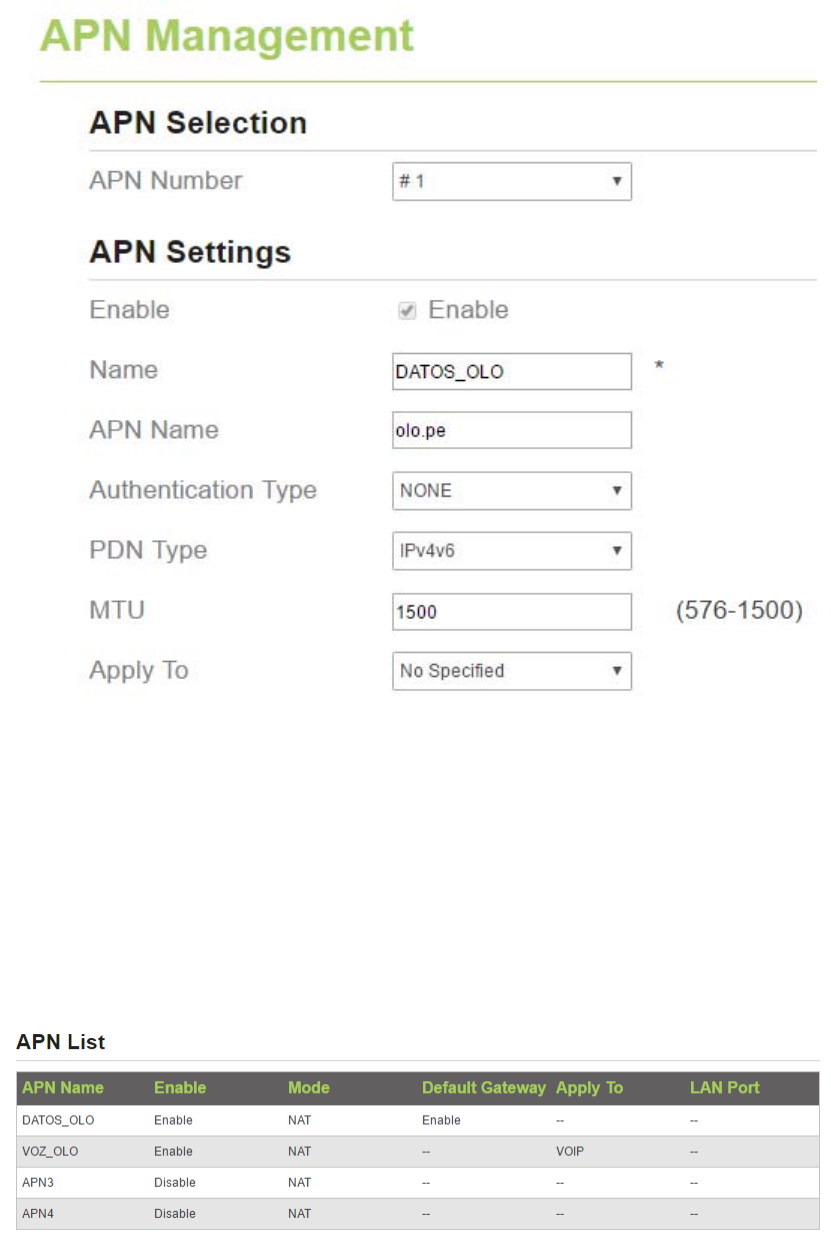
6. SelectaAPNtypefromthedrop‐downlist,suchasVoIP,TR069orVoIP+TR069.
7. ClickSubmit.AsshowninFigure3‐9.
Figure3‐9
3.3.2 APNlist
ToviewtheAPNlist,performthefollowingsteps:
1. ChooseNetwork>APNManagement.
2. IntheAPNlistareayoucanviewtheAPNlist.Asshowninthefigure3‐11.
Figure3‐11
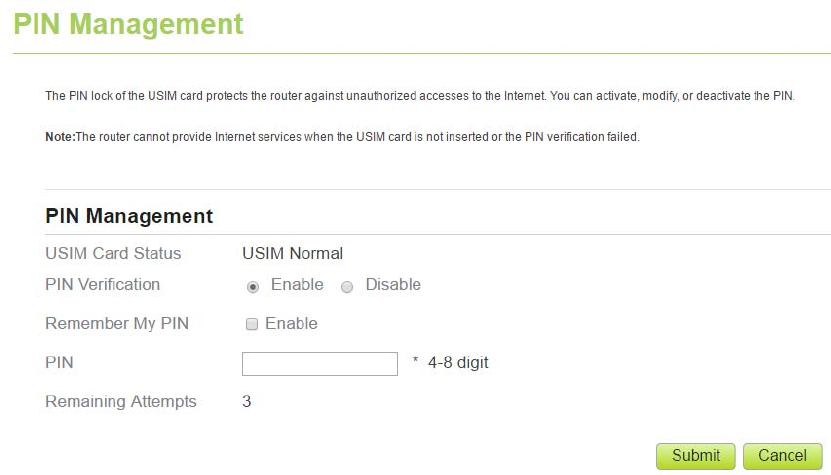
3.4 PINManagement
TomanagethePIN,youcanperformthefollowingoperationsonthePINManagementpage:
1. EnableordisablethePINverification.
2. VerifythePIN.
3. ChangethePIN.
4. SetautomaticverificationofthePIN.AsshowninFigure3‐12.
Figure3‐12
3.4.1 ViewingtheStatusoftheUSIMCard
ToviewthestatusoftheUSIMcard,performthefollowingsteps:
1. ChooseNetwork>PINManagement.
2. ViewthestatusoftheUSIMcardintheUSIMcardstatusfield.
3.4.2 EnablingPINVerification
ToenablePINverification,performthefollowingsteps:
1. ChooseNetwork>PINManagement.
2. SetPINverificationtoEnable.
3. EnterthePIN(4to8digits)intheEnterPINbox.
4. ClickSubmit.
3.4.3 DisablingPINVerification
TodisablePINverification,performthefollowingsteps:
1. ChooseNetwork>PINManagement.
2. SetPINverificationtoDisable.
3. EnterthePIN(4to8digits)intheEnterPINbox.
4. ClickSubmit.
3.4.4 VerifyingthePIN
IfPINverificationisenabledbutthePINisnotverified,theverificationisrequired.Toverifythe
PIN,performthefollowingsteps:
1. ChooseNetwork>PINManagement.
2. EnterthePIN(4to8digits)inthePINbox.
3. ClickSubmit.
3.4.5 ChangingthePIN
ThePINcanbechangedonlywhenPINverificationisenabledandthePINisverified.
TochangethePIN,performthefollowingsteps:
1. ChooseNetwork>PINManagement.
2. SetPINverificationtoEnable.
3. SetChangePINtoEnable.
4. EnterthecurrentPIN(4to8digits)inthePINbox.
5. EnteranewPIN(4to8digits)intheNewPINbox.
6. RepeatthenewPINintheConfirmPINbox.
7. ClickSubmit.
3.4.6 SettingAutomaticVerificationofthePIN
YoucanenableordisableautomaticverificationofthePIN.Ifautomaticverificationisenabled,
theCPEautomaticallyverifiesthePINafterrestarting.Thisfunctioncanbeenabledonlywhen
PINverificationisenabledandthePINisverified.
ToenableautomaticverificationofthePIN,performthefollowingsteps:
1. ChooseNetwork>PINManagement.
2. SetPinverificationtoEnable.
3. SetRemembermyPINtoEnable.
4. ClickSubmit.
3.4.7 VerifyingthePUK
IfPINverificationisenabledandthePINfailstobeverifiedforthreeconsecutivetimes,the
PINwillbelocked.Inthiscase,youneedtoverifythePUKandchangethePINtounlockit.
ToverifythePUK,performthefollowingsteps:
1. ChooseNetwork>PINManagement.
2. EnterthePUKinthePUKbox.
3. EnteranewPINintheNewPINbox.
4. RepeatthenewPINintheConfirmPINbox.
5. ClickSubmit.
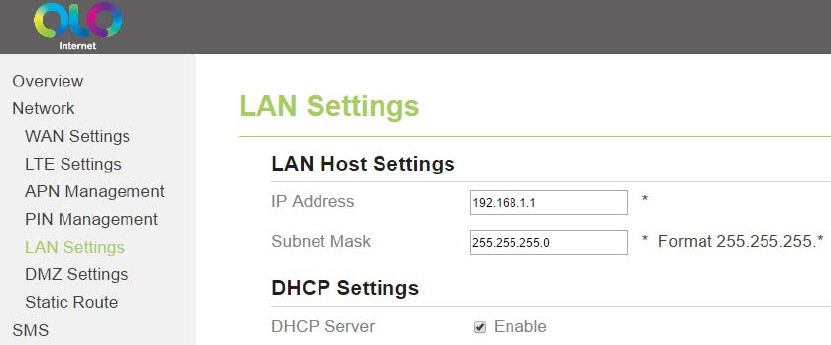
3.5 LANSetting
3.5.1 SettingLANHostParameters
Bydefault,theIPaddressis192.168.1.1withasubnetmaskof255.255.255.0.Youcanchange
thehostIPaddresstoanotherindividualIPaddressthatiseasytoremember.MakesurethatIP
addressisuniqueonyournetwork.IfyouchangetheIPaddressoftheCPE,youneedtoaccess
thewebmanagementpagewiththenewIPaddress.
TochangetheIPaddressoftheCPE,performthefollowingsteps:
1. ChooseNetworkSetting>LANSettings.
2. IntheLANHostSettingsarea,setIPaddressandsubnetmask.
3. IntheDHCPSettingarea,settheDHCPservertoEnable.
4. ClickSubmit.AsshowninFigure3‐13.
Figure3‐13
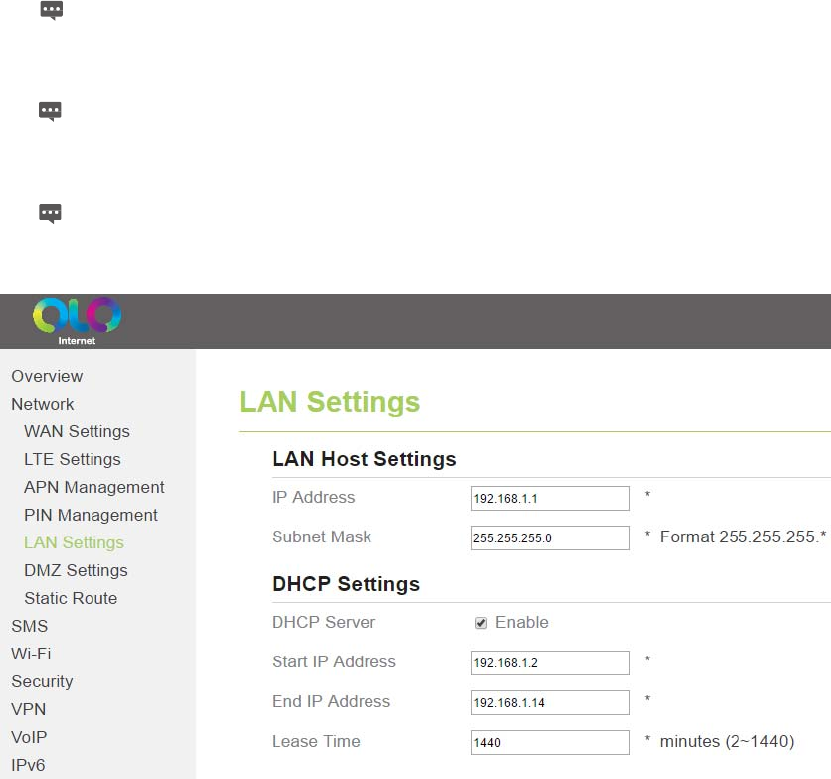
3.5.2 ConfigurationtheDHCPServer
DHCPenablesindividualclientstoautomaticallyobtainTCP/IPconfigurationwhentheserver
powerson.YoucanconfiguretheCPEasaDHCPserverordisableit.Whenconfiguredasa
DHCPserver,theCPEautomaticallyprovidestheTCP/IPconfigurationfortheLANclientsthat
supportDHCPclientcapabilities.IfDHCPserverservicesaredisabled,youmusthaveanother
DHCPserveronyourLAN,oreachclientmustbemanuallyconfigured.
ToconfigureDHCPsettings,performthefollowingsteps:
1. ChooseNetworkSetting>LANSettings.
2. SettheDHCPservertoEnable.
3. SetStartIPaddress.
ThisIPaddressmustbedifferentfromtheIPaddresssetontheLANHostSettingsarea,
buttheymustbeonthesamenetworksegment.
4. SetEndIPaddress.
ThisIPaddressmustbedifferentfromtheIPaddresssetontheLANHostSettingsarea,
buttheymustbeonthesamenetworksegment.
5. SetLeasetime.
Leasetimecanbesetto1to10,080minutes.Itisrecommendedtoretainthe
defaultvalue.
6. ClickSubmit.AsshowninFigure3‐14.
Figure3‐14
3.5.3 BundledAddressList
YoucanbindanIPaddresstoadevicebasedonitsMACaddress.Thedevicewillreceivethe
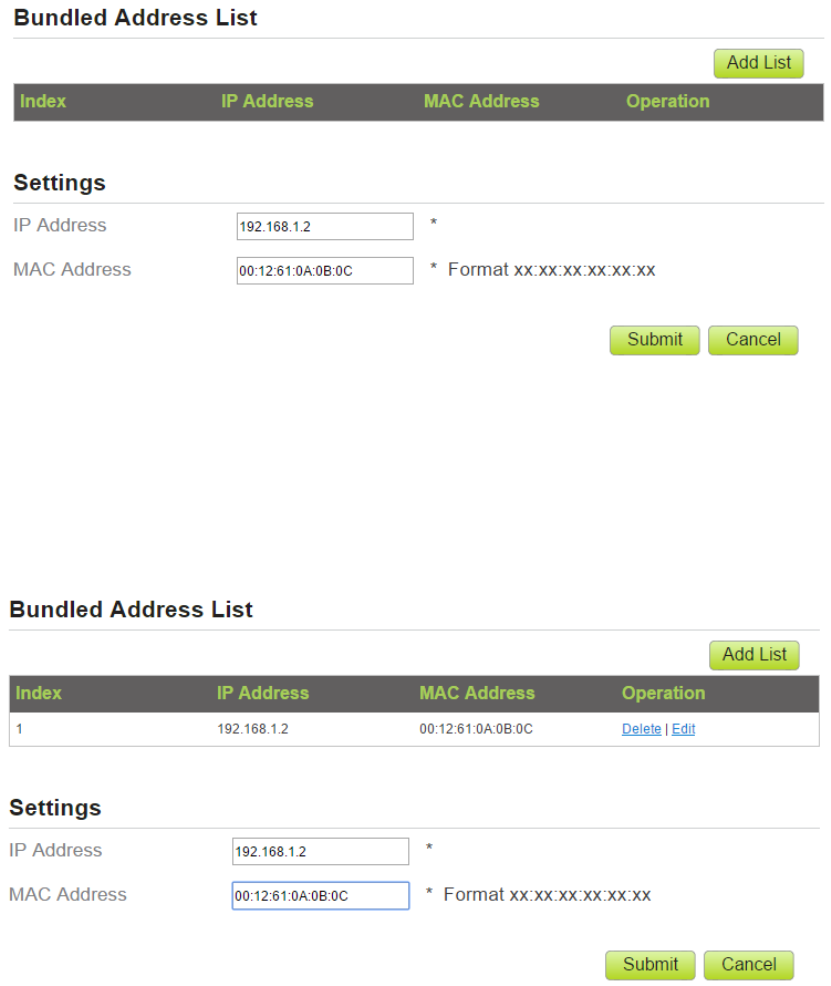
sameIPaddresseachtimeitaccessestheDHCPserver.Forexample,youcanbindanIPaddress
toanFTPserverontheLAN.
Toaddanitemtothesetuplist,performthefollowingsteps:
1. ChooseNetworkSetting>LANSettings.
2. ClickAddlist.
3. SettheMACaddressandIPAddress.
4. ClickSubmit.AsshowninFigure3‐15.
Figure3‐15
Tomodifyaniteminthesetuplist,performthefollowingsteps:
1. ChooseNetworkSetting>LANSettings.
2. Choosetheitemtobemodified,andclickEdit.
3. SettheMACaddressandIPAddress.
4. ClickSubmit.AsshowninFigure3‐16.
Figure3‐16
Todeleteaniteminthesetuplist,performthefollowingsteps:
1. ChooseNetworkSetting>LANSettings.
2. Choosetheitemtobedeleted,andclickDelete.
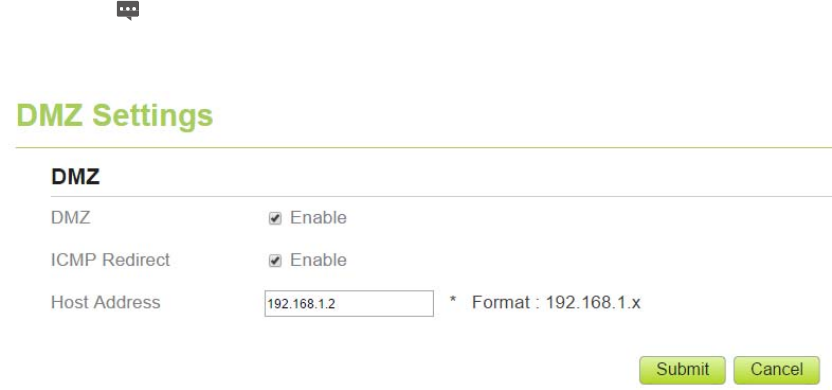
3.6 DMZSettings
Ifthedemilitarizedzone(DMZ)isenabled,thepacketssentfromtheWANaredirectlysentto
aspecifiedIPaddressontheLANbeforebeingdiscardedbythefirewall.
TosetDMZ,performthefollowingsteps:
1. ChooseNetworkSetting>DMZSettings.
2. SetDMZtoEnable.
3. (Optional)SetICMPRedirecttoEnable.
4. SetHostaddress.
ThisIPaddressmustbedifferentfromtheIPaddresssetontheLANHost
Settingspage,buttheymustbeonthesamenetworksegment.
5. ClickSubmit.AsshowninFigure3‐17.
Figure3‐17
3.7 StaticRoute
3.7.1 AddStaticRoute
Toaddastaticroute,performthefollowingsteps:
1. ChooseNetworkSetting>StaticRoute.
2. ClickAddlist.
3. SettheDestIPaddressandSubnetmask.
4. SelectanInterfacefromthedrop‐downlist.
5. IfyouselectLANastheinterface,youneedsetaGateway.
6. ClickSubmit.AsshowninFigure3‐18.
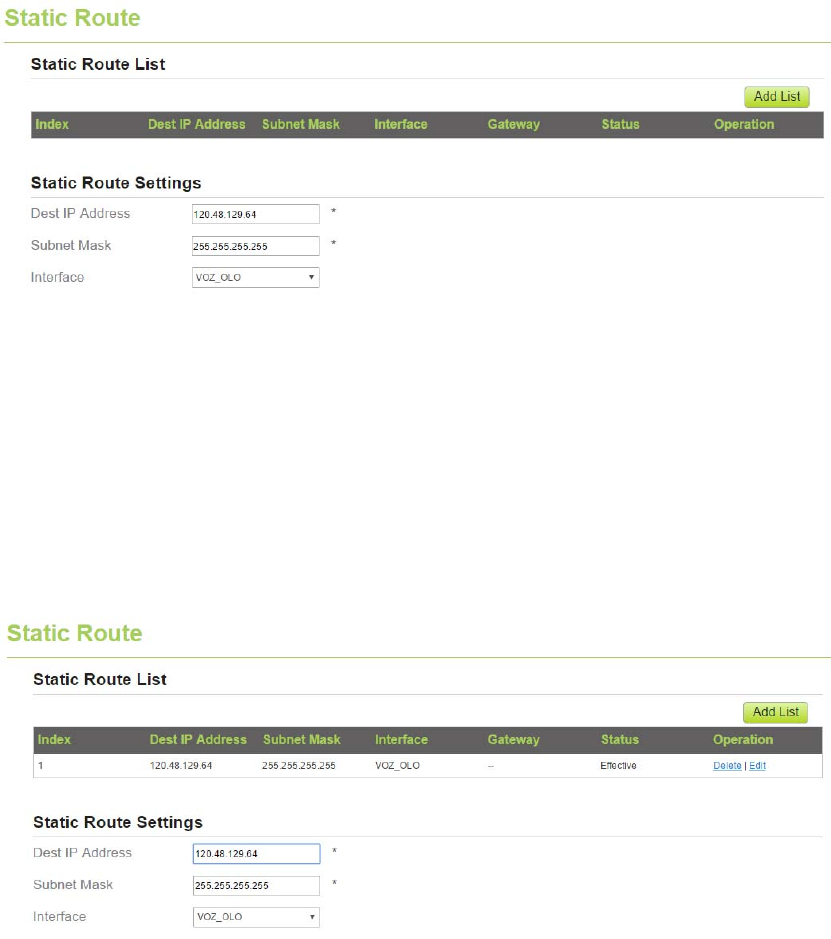
Figure3‐18
3.7.2 ModifyStaticRoute
Tomodifyanaccessrestrictionrule,performthefollowingsteps:
1. ChooseSecurity>StaticRoute.
2. Choosetheitemtobemodified,andclickEdit.
3. Repeatsteps3through5inthepreviousprocedure.
4. ClickSubmit.AsshowninFigure3‐19.
Figure3‐19
3.7.3 DeleteStaticRoute
Todeleteastaticroute,performthefollowingsteps:
1. ChooseSecurity>StaticRoute.
2. Choosetheitemtobedeleted,andclickDelete.
4 Wi‐Fi
4.1 WLANSetting
ThisfunctionenablesyoutoconfiguretheWi‐Fiparameters.
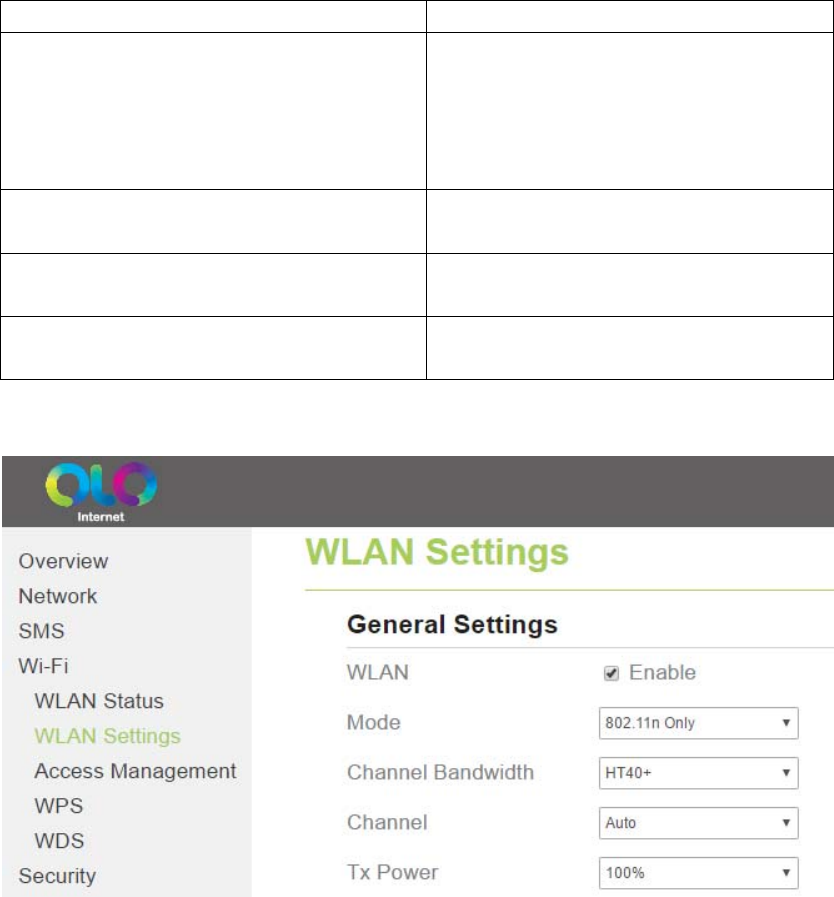
4.1.1 SettingGeneralParameters
ToconfigurethegeneralWi‐Fisettings,performthefollowingsteps:
1. ChooseWi‐Fi>Wi‐FiSettings.
2. IntheGeneralSettingsarea,setWLANtoEnable.
3. SetModetooneofthevaluesdescribedinthefollowingtable:
ParameterValueDescription
802.11b/g/nTheWi‐FiclientcanconnecttotheCPEin
802.11b,802.11g,or802.11nmode.Ifthe
clientconnectstotheCPEin802.11nmode,
theAdvancedEncryptionStandard(AES)
encryption mode is required.
802.11b/gTheWi‐FiclientcanconnecttotheCPEin
802.11bor802.11gmode.
802.11bTheWi‐FiclientcanconnecttotheCPEin
802.11bmode.
802.11gTheWi‐FiclientcanconnecttotheCPEin
802.11gmode.
4. SettheChannelNo.from1to11.
5. ClickSubmit.AsshowninFigure4‐1.

Figure4‐1
4.1.2 WPSSettings
Wi‐FiProtectedSetup(WPS)enablesyoutosimplyaddawirelessclienttothenetwork
withoutneedingtospecificallyconfigurethewirelesssettings,suchastheSSID,security
modeandpassphrase.YoucanuseeithertheWPSbuttonorPINtoaddthewirelessclient.
ToconfigureWi‐FiWPSsettings,performthefollowingsteps:
1. ChooseWi‐Fi>WPSSettings.
2. SetWPStoEnable.
3. ClickSubmit.AsshowninFigure4‐2.
Figure4‐2
4.2 SettingSSIDProfile
AfteryouconfiguretheCPEontheSSIDProfilepage,theWi‐FiclientconnectstotheCPE
basedonpresetrules,improvingaccesssecurity.
ToconfiguretheCPEontheSSIDProfilepage,performthefollowingsteps:
1. ChooseWi‐Fi>Wi‐FiSettings.
2. SetSSID.
TheSSIDcancontain1to32ASCIIcharacters.Itcannotbeemptyandthelastcharacter
cannotbeablankcharacter.Inaddition,theSSIDcannotcontainthefollowingspecial
characters:/'="\&
TheWi‐FiclientconnectstotheCPEusingthefoundSSID.
3. SetMaximumnumberofdevices.
ThisparameterindicatesthemaximumnumberofWi‐FiclientsthatconnecttotheCPE.
Amaximumof32clientscanconnecttotheCPE.
4. SetHideSSIDbroadcasttoEnable.
IftheSSIDishidden,theclientcannotdetecttheCPE'sWi‐Fiinformation.
5. SetAPisolationtoEnable.
TheclientscanconnecttotheCPEbutcannotcommunicatewitheachother.
6. SetSecurity.
IfSecurityissettoNONE(notrecommended),Wi‐FiclientsdirectlyconnecttotheCPE.
Thissecuritylevelislow.
IfSecurityissettoWEP,Wi‐FiclientsconnecttotheCPEinweb‐basedencryption
mode.
IfSecurityissettoWPA‐PSK,Wi‐FiclientsconnecttotheCPEinWPA‐PSKencryption
mode.
IfSecurityissettoWPA2‐PSK,Wi‐FiclientsconnecttotheCPEinWPA2‐PSKencryption

mode.Thismodeisrecommendedbecauseithasahighsecuritylevel.
IfSecurityissettoWPA‐PSK&WPA2‐PSK,Wi‐FiclientsconnecttotheCPEin
WPA‐PSK&WPA2‐PSKencryptionmode.
7. Settheencryptionmode.
If…SetstoDescription
WEPAuthenticationmode Sharedauthentication:Theclient
connectstotheCPEinshared
authenticationmode.
Openauthentication:Theclientconnects
totheCPEinopenauthenticationmode.
Both:TheclientconnectstotheCPEin
sharedoropenauthenticationmode.
Encryptionpassword
length
128bit:Only13ASCIIcharactersor26hex
characterscanbeenteredintheKey1to
Key4boxes.
64bit:Only5ASCIIcharactersor10hex
characterscanbeenteredintheKey1to
Key4boxes.
Current
passwordindex
Thisvaluecanbesetto1,2,3,or4.Afterakey
indexisselected,thecorrespondingkeytakes
effect.
WPA‐PSKWPA‐PSKOnly8to63ASCIIcharactersor8to64hex
characterscanbeentered.
WPAencryptionThisvaluecanbesettoTKIP+AES,AES,or
TKIP.
WPA2‐PSK(reco
mmended)
WPA‐PSKOnly8to63ASCIIcharactersor8to64hex
characterscanbeentered.
WPAencryptionThisvaluecanbesettoTKIP+AES,AES,or
TKIP.
WPA‐PSK&
WPA2‐PSK
WPA‐PSKOnly8to63ASCIIcharactersor8to64hex
characterscanbeentered.
WPAencryptionThisvaluecanbesettoTKIP+AES,AES,or
TKIP.
8. ClickSubmit.AsshowninFigure4‐3.
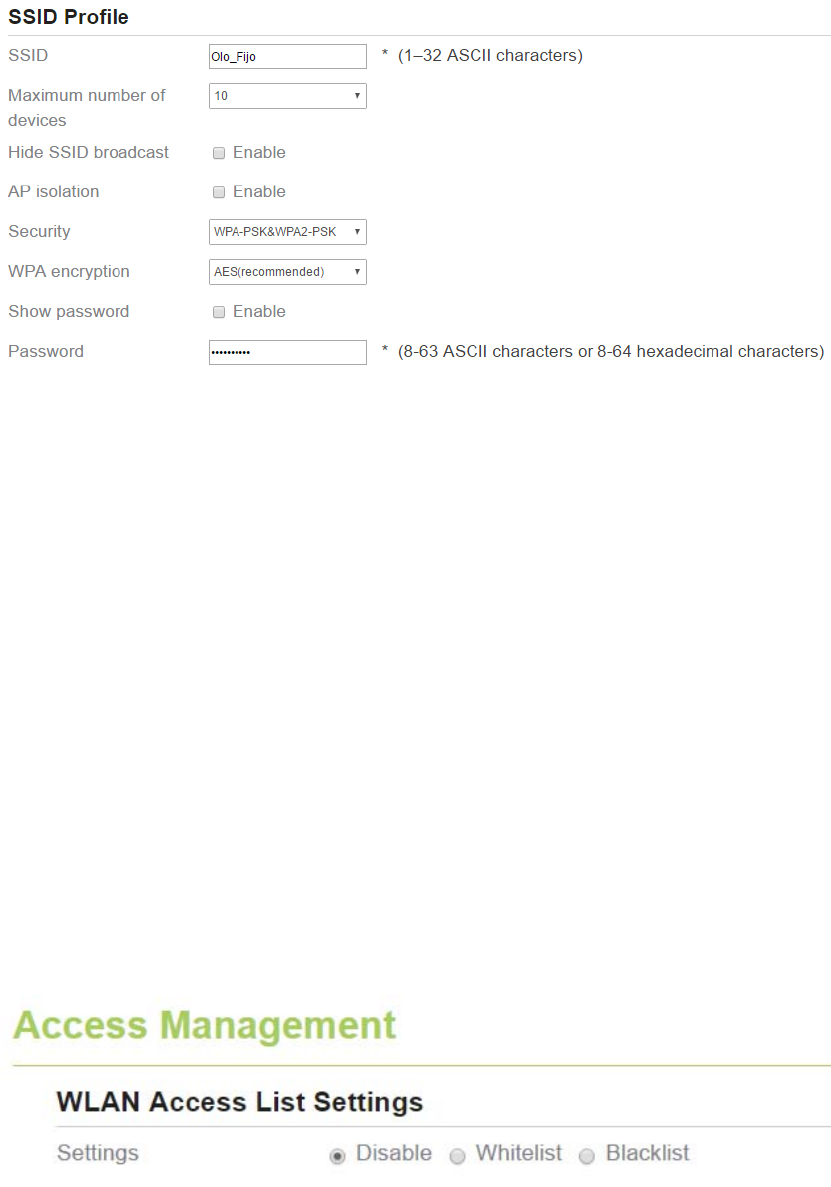
Figure4‐3
4.3 AccessManagement
4.3.1 SettingtheAccessPolicy
ThisfunctionenablesyoutosetaccessrestrictionpoliciesforeachSSIDtomanageaccessto
theCPE.
ToconfigureWi‐FiMACcontrolsettings,performthefollowingsteps:
1. ChooseWi‐Fi>AccessManagement.
2. IntheWLANAccessListSettingsarea,setAccessPolicy.
TheaccesspolicycanbesettoDisable,BlacklistorWhitelist.
IfSSID'sMACAccessissettoDisable,accessrestrictionsdonottakeeffect.
IfSSID'sMACAccessissettoBlacklist,onlythedevicesthatarenotintheblacklist
canconnecttotheCPE.
IfSSID'sMACAccessissettoWhitelist,onlythedevicesinthewhitelistcan
connecttotheCPE.
3. ClickSubmit.AsshowninFigure4‐4.
Figure4‐4
4.3.2 ManagingtheWi‐FiAccessList
ThisfunctionenablesyoutosettheSSIDaccesspoliciesbasedonMACaddresses.
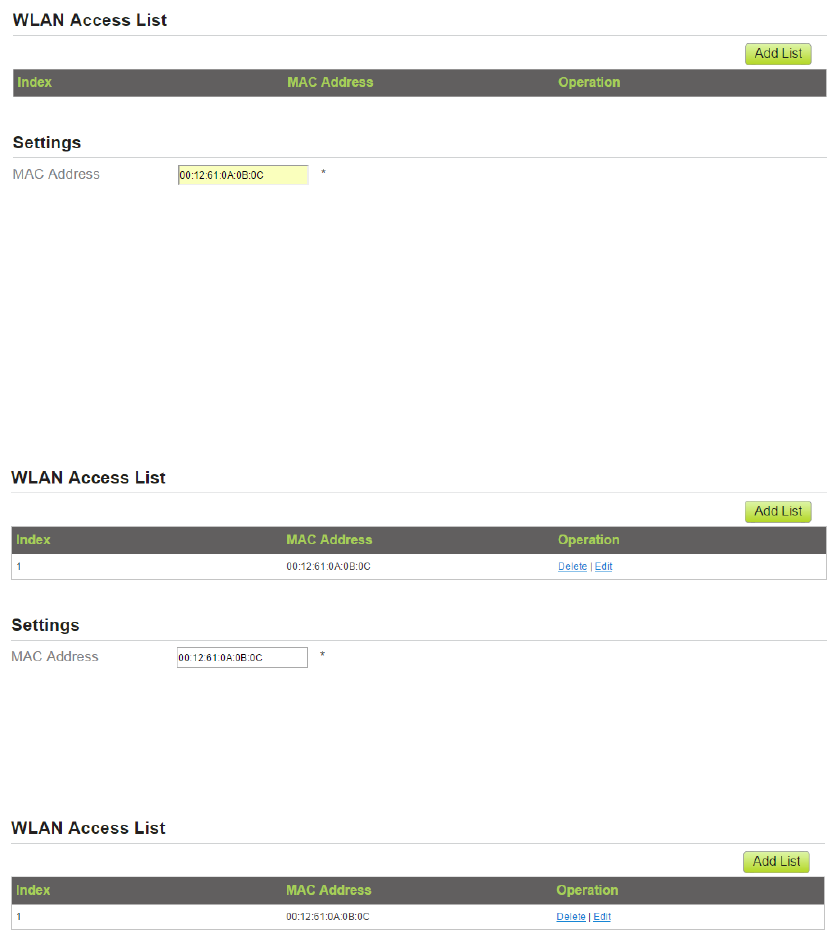
ToaddanitemtotheWi‐Fiaccesslist,performthefollowingsteps:
1. ChooseWi‐Fi>AccessManagement.
2. ClickAdd.
3. SetMACaddress.
4. ClickSubmit.AsshowninFigure4‐5.
Figure4‐5
TomodifyanitemintheWi‐Fiaccesslist,performthefollowingsteps:
1. ChooseWi‐Fi>AccessManagement.
2. ClickEditMACList.
3. Choosetheitemtobemodified,andclickEdit.
4. SetMACaddress.
5. SetoneoftheSSIDtoEnabletomaketheMACaddresstakeeffectfortheSSID.
6. ClickSubmit.AsshowninFigure4‐6.
Figure4‐6
TodeleteanitemfromtheWi‐Fiaccesslist,performthefollowingsteps:
1. ChooseWi‐Fi>AccessManagement.
2. Choosetheitemtobedeleted,andclickDelete.AsshowninFigure4‐7.
Figure4‐7
4.4 WDS
TheCPEsupportsthewirelessdistributionsystem(WDS).AllWi‐FidevicesinaWDSmustbe
configuredtousethesameradiochannel,encryptionmode,SSID,andencryptionkey.You
cansettheWDSencryptionmodetoNONEorWPA/WPA2.IfyousettheWDSencryption
modetoNONE,theWi‐FiclientscanuseNONEorWEPencryptionmode.IfyousettheWDS
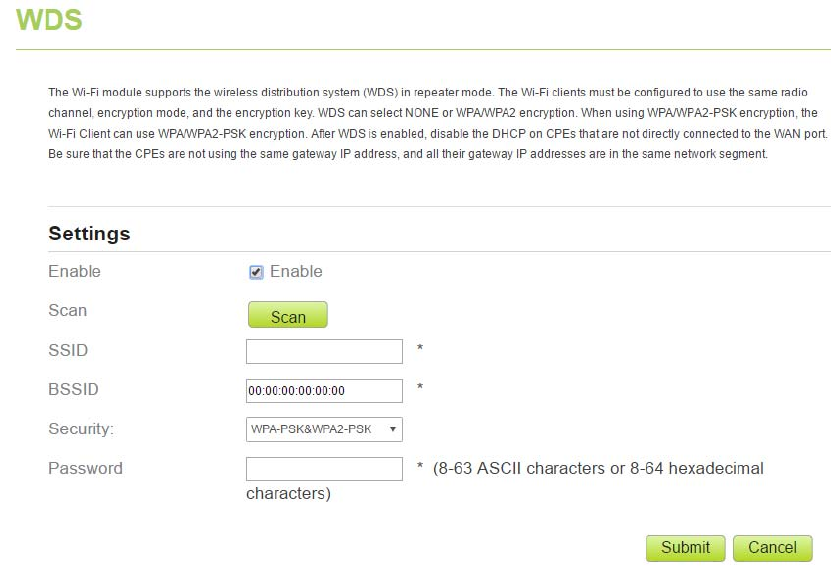
encryptionmodetoWPA/WPA2‐PSK,theWi‐FiclientscanuseWPA/WPA2‐PSKencryption
mode.AfterWDSisenabled,disableDHCPonCPEsthatarenotdirectlyconnectedtothe
WANport.
IfWDSisenabled,theWPSfunctionwillnottakeeffect.IfthechannelissettoAuto,you
needtosetthechannel.
ToconfiguretheWDS,performthefollowingsteps:
1. ChooseWi‐Fi>WDS.
2. SetWDStoEnable.
3. SetWDSModeasRepeaterMode;
4. ClickScan.
Fromthesearchresults,choosetheSSIDofthenetworkingdevice.
5. SetSecurity.
WPA‐PSKcancontain8to63ASCIIcharactersor64hexcharacters.
6. ClickSubmit.AsshowninFigure4‐8.
Figure4‐8
5 Security
5.1 MACFiltering
ThispageenablesyoutoconfiguretheMACaddressfilteringrules.
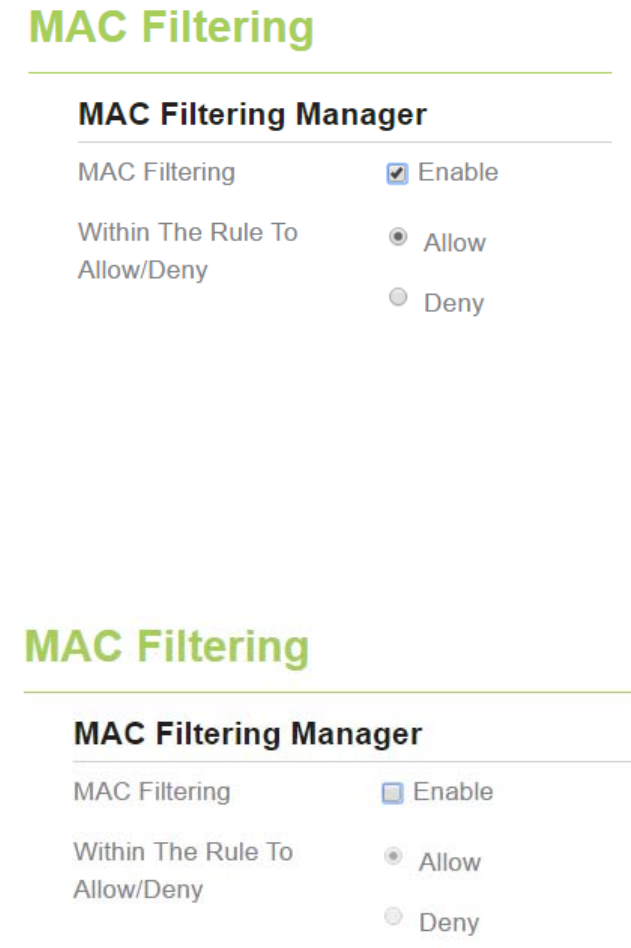
5.1.1 EnablingMACFilter
ToenableMACaddressfilter,performthefollowingsteps:
1. ChooseSecurity>MACFiltering
2. SetMACfilteringtoEnable.
3. ClickSubmit.AsshowninFigure5‐1.
Figure5‐1
5.1.2 DisablingMACFilter
TodisableMACaddressfilter,performthefollowingsteps:
1. ChooseSecurity>MACFiltering
2. SetMACfilteringtoDisable.
3. ClickSubmit.AsshowninFigure5‐2.
Figure5‐2
5.1.3 SettingAllowaccessnetworkwithintherules
Tosetallowaccessnetworkwithintherules,performthefollowingsteps:
1. ChooseSecurity>MACFiltering.
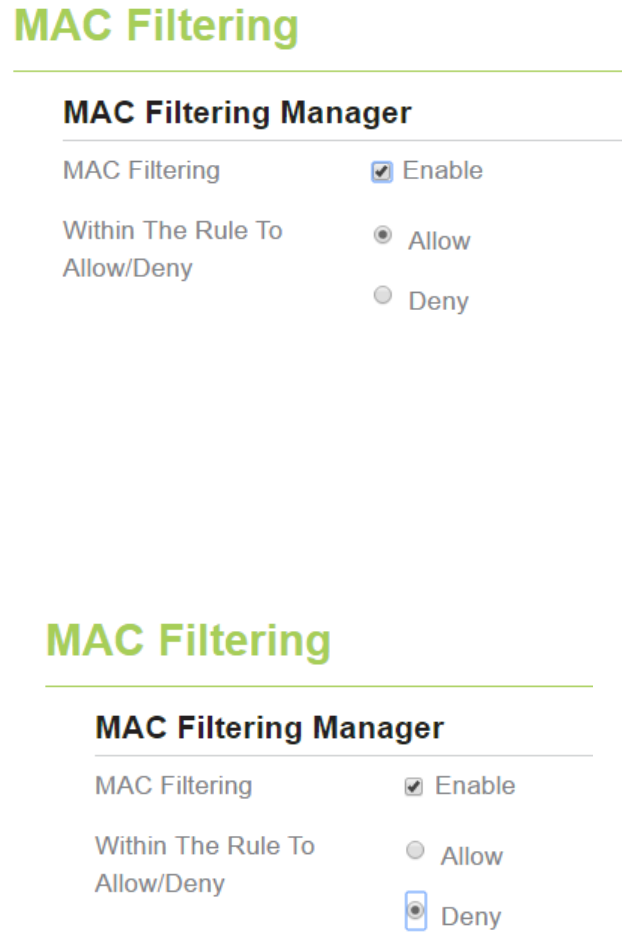
2. SetAllowaccessnetworkwithintherules.
3. ClickSubmit.AsshowninFigure5‐3.
Figure5‐3
5.1.4 SettingDenyaccessnetworkwithintherules
Tosetdenyaccessnetworkwithintherules,performthefollowingsteps:
1. ChooseSecurity>MACFiltering.
2. SetDenyaccessnetworkwithintherules.
3. ClickSubmit.AsshowninFigure5‐4.
Figure5‐4
5.1.5 AddingMACFilteringrule
ToaddaMACfilteringrule,performthefollowingsteps:
1. ChooseSecurity>MACFiltering.
2. ClickAddlist.
3. SetMACaddress.
4. ClickSubmit.AsshowninFigure5‐5.
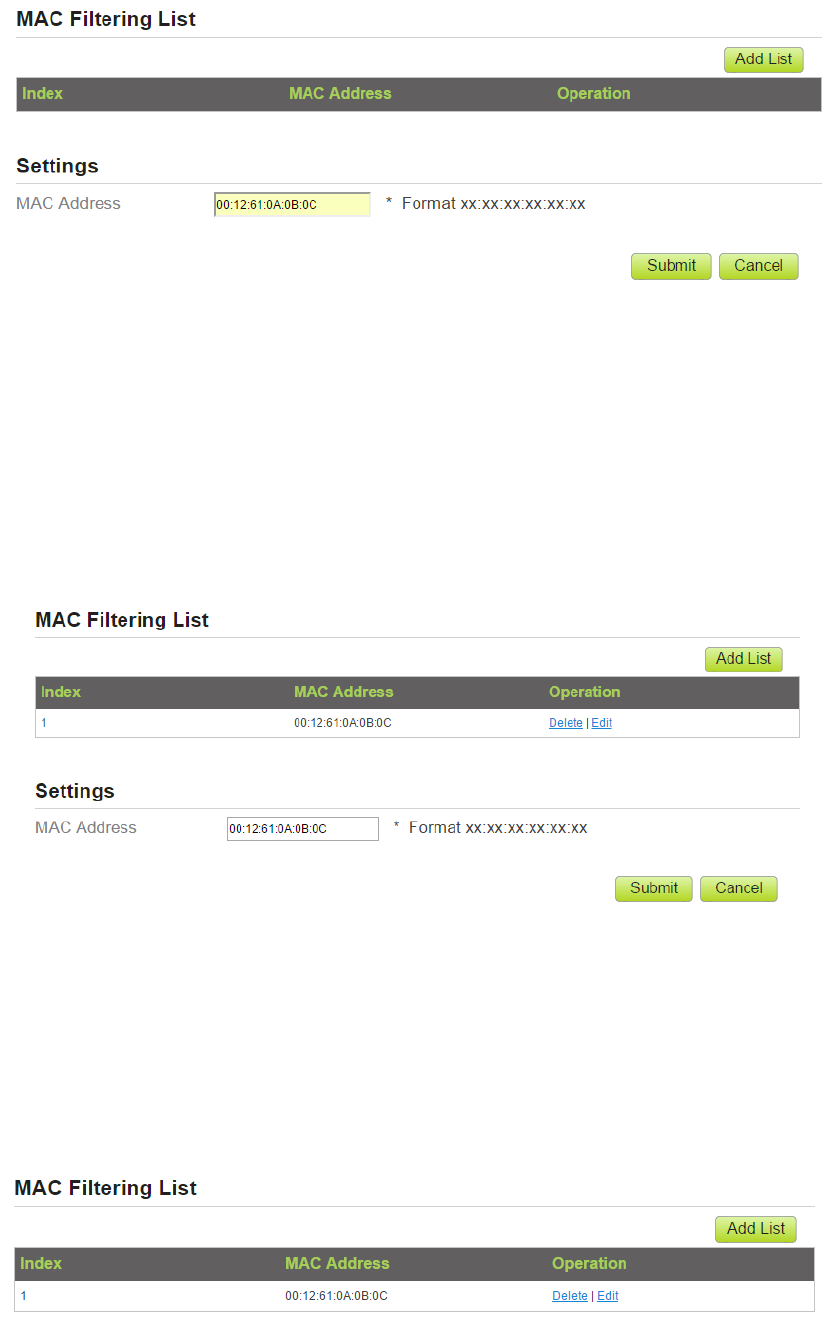
Figure5‐5
5.1.6 ModifyingMACFilteringrule
TomodifyaMACaddressrule,performthefollowingsteps:
1. ChooseSecurity>MACFiltering.
2. Choosetheruletobemodified,andclickEdit.
3. SetMACaddress.
4. ClickSubmit.AsshowninFigure5‐6.
Figure5‐6
5.1.7 DeletingMACFilteringrule
TodeleteaMACaddressfilterrule,performthefollowingsteps:
1. ChooseSecurity>MACFiltering.
2. Choosetheruletobedeleted,andclickDelete.AsshowninFigure5‐7.
Figure5‐7
5.2 IPFiltering
DataisfilteredbyIPaddress.ThispageenablesyoutoconfiguretheIPaddressfilteringrules.
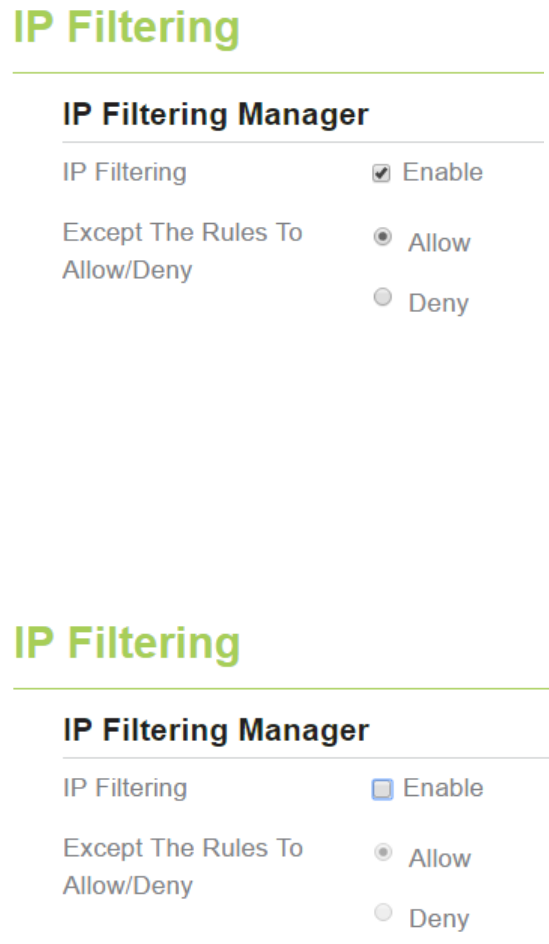
5.2.1 EnablingIPFiltering
ToenableIPFiltering,performthefollowingsteps:
1. ChooseSecurity>IPFiltering.
2. SetIPFilteringEnable.
3. ClickSubmit.AsshowninFigure5‐8.
Figure5‐8
5.2.2 DisablingIPFiltering
TodisableIPFiltering,performthefollowingsteps:
1. ChooseSecurity>IPFiltering.
2. SetIPFilteringDisable.
3. ClickSubmit.AsshowninFigure5‐9.
Figure5‐9
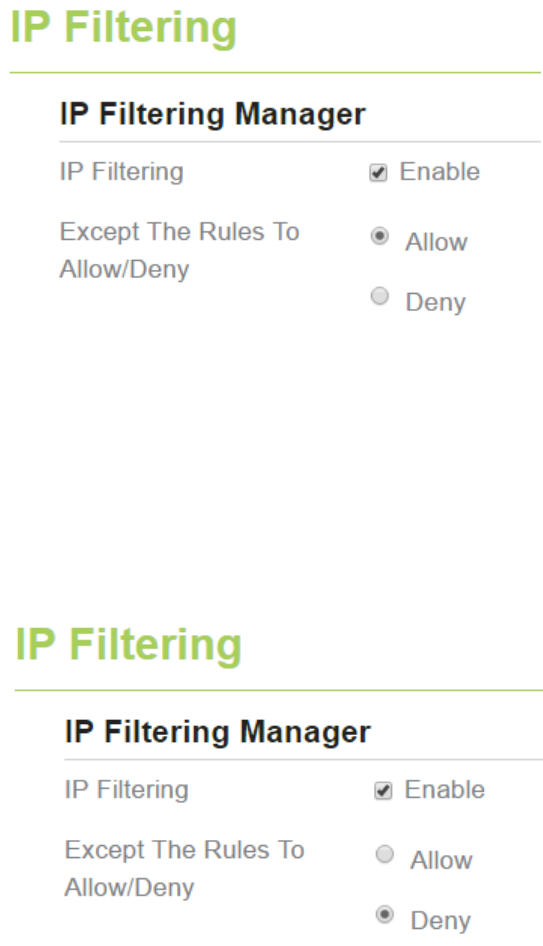
5.2.3 SettingAllowaccessnetworkoutsidetherules
Tosetallowaccessnetwork,performthefollowingsteps:
1. ChooseSecurity>IPFiltering.
2. SetAllowaccessnetworkoutsidetherules.
3. ClickSubmit.AsshowninFigure5‐10.
Figure5‐10
5.2.4 SettingDenyaccessnetworkoutsidetherules
Tosetallowaccessnetwork,performthefollowingsteps:
1. ChooseSecurity>IPFiltering.
2. SetDenyaccessnetworkoutsidetherules.
3. ClickSubmit.AsshowninFigure5‐11.
Figure5‐11
5.2.5 AddingIPFilteringrule
AddanIPaddressfilteringrule,performthefollowingsteps:
1. ChooseSecurity>IPFiltering.
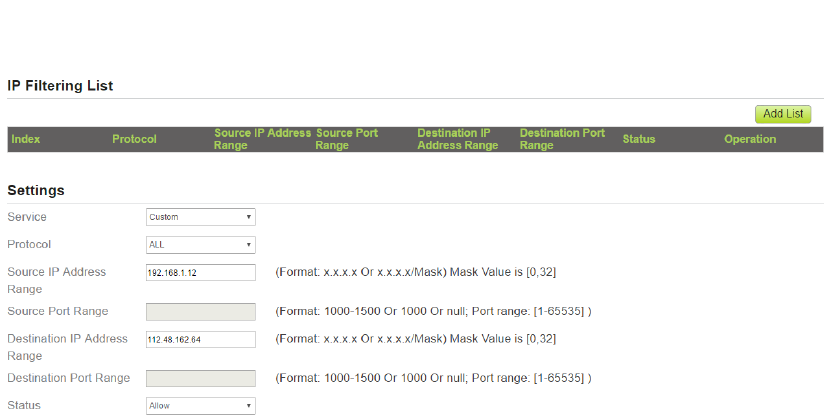
2. ClickAddlist.
3. SetService.
4. SetProtocol.
5. IntheSourceIPAddressRangebox,enterthesourceIPaddressorIPaddresssegmentto
befiltered.
6. IntheSourceportrangebox,enterthesourceportorportsegmenttobefiltered.
7. IntheDestinationIPAddressRangebox,enterthedestinationIPaddressorIPaddress
segmenttobefiltered.
8. IntheDestinationportRangebox,enterthedestinationportorportsegmenttobe
filtered.
9. IntheStatusbox,chooseastatustherulewillbeexecuted.
10. ClickSubmit.AsshowninFigure5‐12.
Figure5‐12
5.2.6 ModifyingIPFilteringrule
TomodifyanIPfilteringrule,performthefollowingsteps:
1. ChooseSecurity>IPFiltering.
2. Choosetheruletobemodified,andclickEdit.
3. Repeatsteps3through9inthepreviousprocedure.
4. ClickSubmit.AsshowninFigure5‐13.
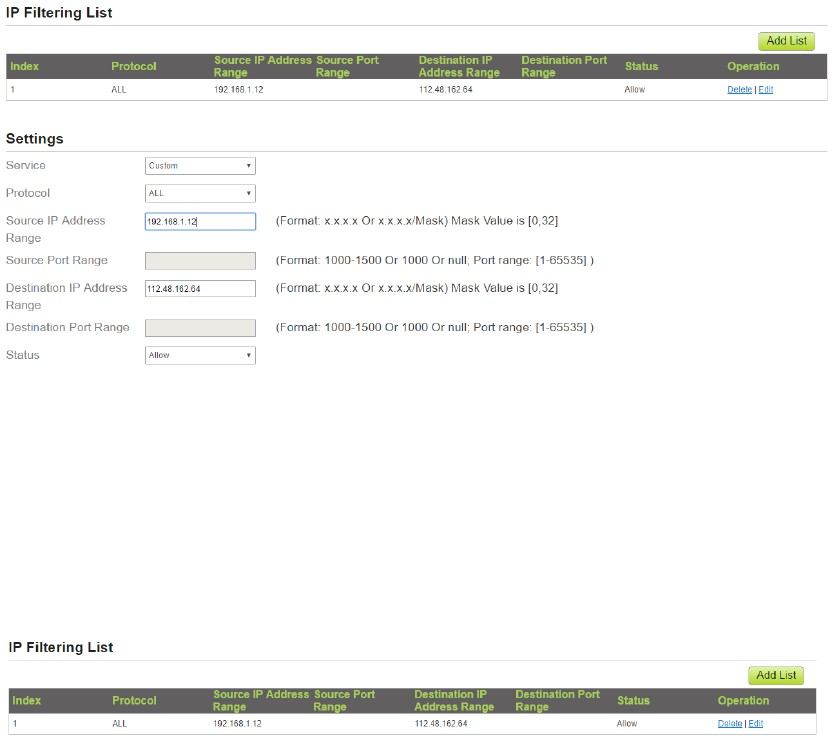
Figure5‐13
5.2.7 DeletingIPFilteringrule
TodeleteanIPaddressfilteringrule,performthefollowingsteps:
1. ChooseSecurity>IPFiltering.
2. Choosetheruletobedeleted,andclickDelete.AsshowninFigure5‐14.
Figure5‐14
5.3 URLFiltering
Dataisfilteredbyuniformresourcelocator(URL).ThispageenablesyoutoconfigureURLfiltering
rules.
5.3.1 EnablingURLFiltering
ToenableURLFiltering,performthefollowingsteps:
3. ChooseSecurity>URLFiltering.
4. SetURLFilteringtoEnable.
5. ClickSubmit.AsshowninFigure5‐15.
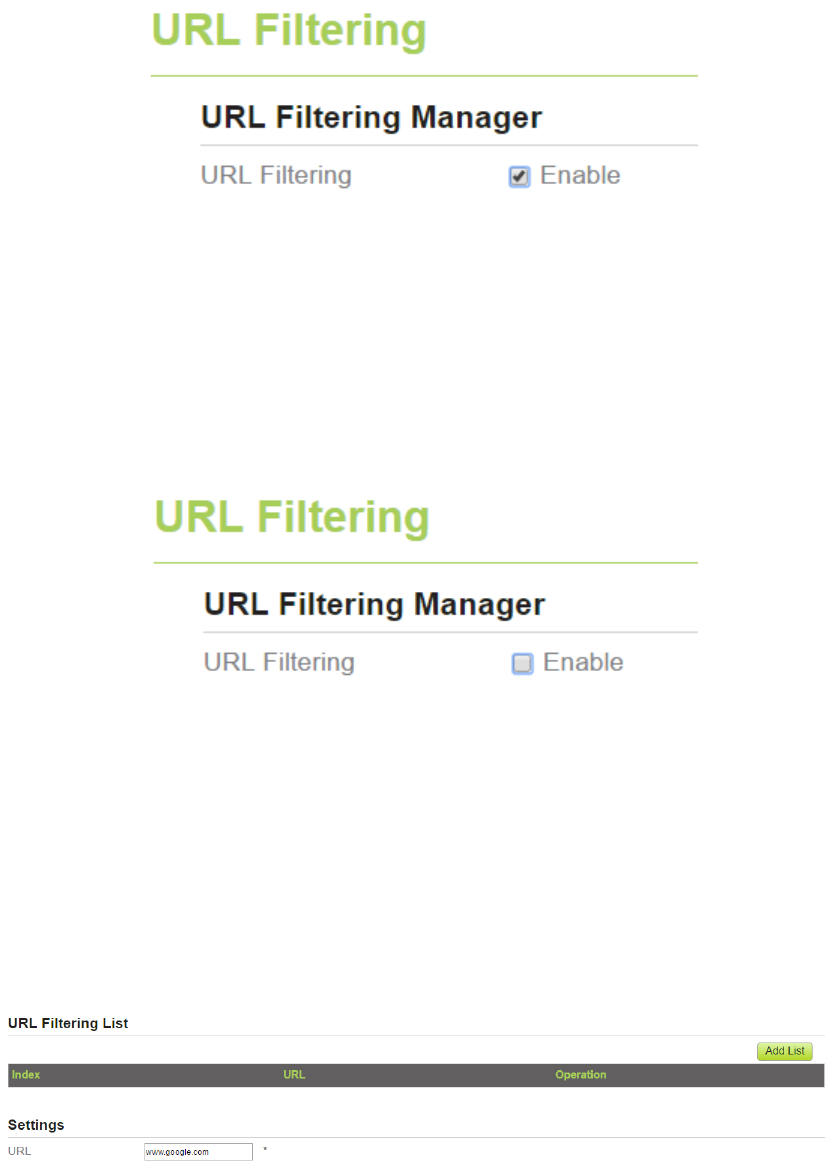
Figure5‐15
5.3.2 DisablingURLFiltering
TodisableURLFiltering,performthefollowingsteps:
1. ChooseSecurity>URLFiltering.
2. SetURLFilteringtoDisable.
3. ClickSubmit.AsshowninFigure5‐16.
Figure5‐16
5.3.3 AddingURLFilteringlist
ToaddaURLfilteringlist,performthefollowingsteps:
1. ChooseSecurity>URLFiltering.
2. ClickAddlist.
3. SetURL.
4. ClickSubmit.AsshowninFigure5‐17.
Figure5‐17
5.3.4 ModifyURLFilteringlist
TomodifyaURLfilteringrule,performthefollowingsteps:
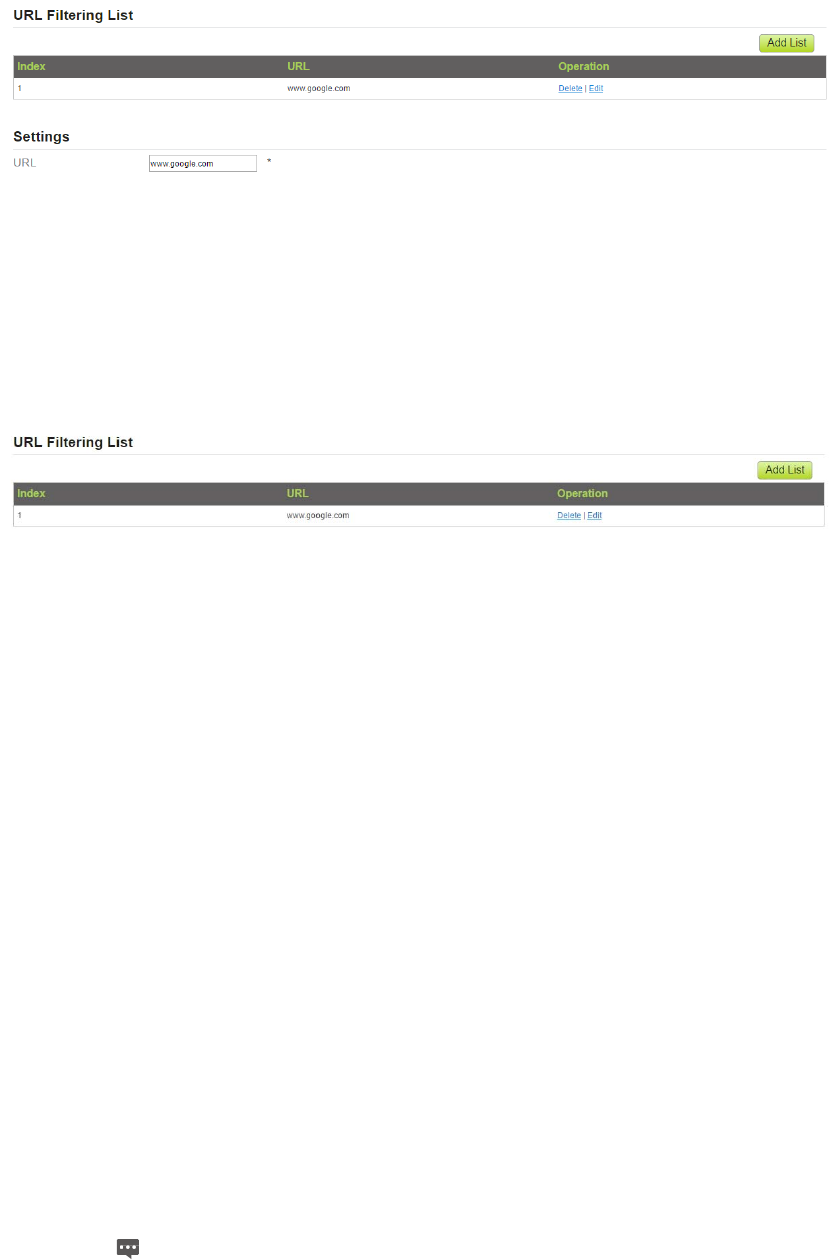
1. ChooseSecurity>URLFiltering.
2. Choosetheruletobemodified,andclickEdit.
3. SetURLaddress.
4. ClickSubmit.AsshowninFigure5‐18.
Figure5‐18
5.3.5 DeletingURLFilteringlist
TodeleteaURLlist,performthefollowingsteps:
1. ChooseSecurity>URLFiltering.
2. Choosetheitemtobedeleted,andclickDelete.AsshowninFigure5‐19.
Figure5‐19
5.4 PortForwarding
Whennetworkaddresstranslation(NAT)isenabledontheCPE,onlytheIPaddressontheWAN
sideisopentotheInternet.IfacomputerontheLANisenabledtoprovideservicesforthe
Internet(forexample,workasanFTPserver),portforwardingisrequiredsothatallaccessesto
theexternalserverportfromtheInternetareredirectedtotheserverontheLAN.
5.4.1 AddingPortForwardingrule
Toaddaportforwardingrule,performthefollowingsteps:
1. ChooseSecurity>PortForwarding.
2. ClickAddlist.
3. SetService.
4. SetProtocol.
5. SetRemoteportrange.
Theportnumberrangesfrom1to65535.
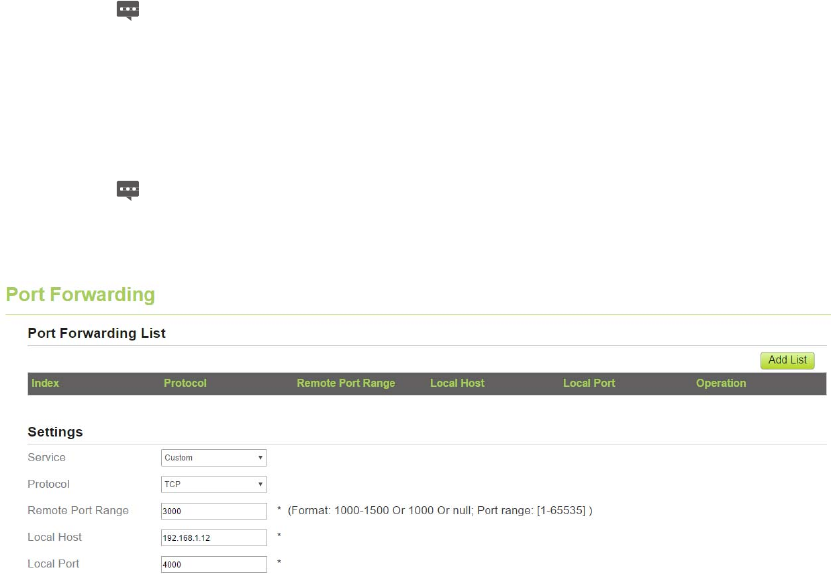
6. SetLocalhost.
ThisIPaddressmustbedifferentfromtheIPaddressthatissetonthe
LANHostSettingspage,buttheymustbeonthesamenetwork
segment.
7. SetLocalport.
Theportnumberrangesfrom1to65535.
8. ClickSubmit.AsshowninFigure5‐20.
Figure5‐20
5.4.2 ModifyingPortForwardingrule
Tomodifyaportforwardingrule,performthefollowingsteps:
1. ChooseSecurity>PortForwarding.
2. Choosetheitemtobemodified,andclickEdit.
3. Repeatsteps3through7inthepreviousprocedure.
4. ClickSubmit.AsshowninFigure5‐21.
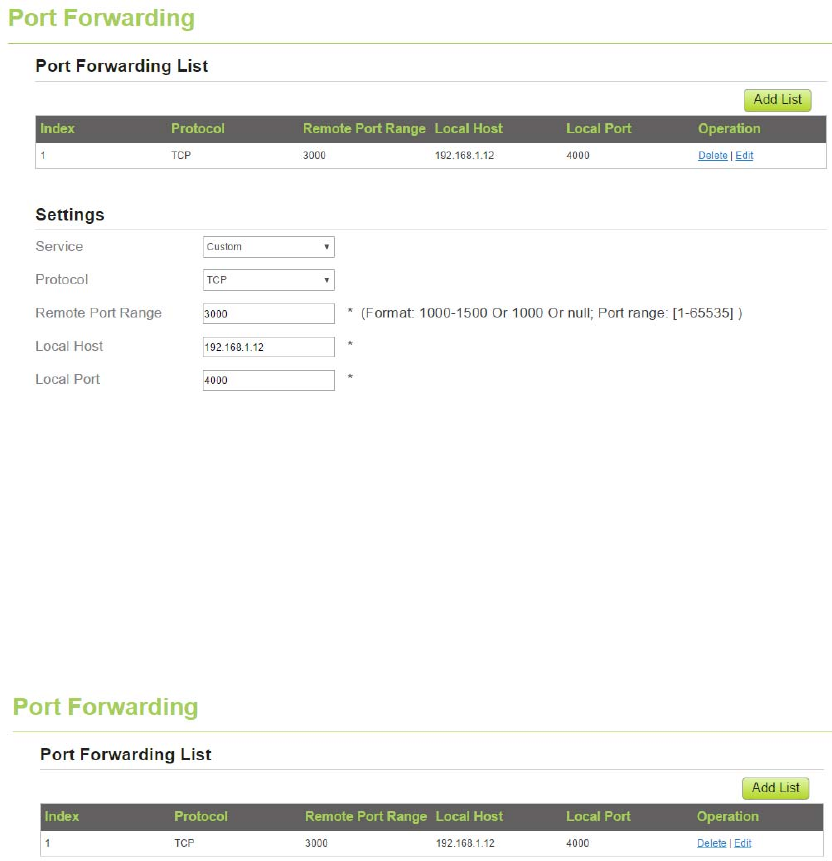
Figure5‐21
5.4.3 DeletingPortForwardingrule
Todeleteaportforwardingrule,performthefollowingsteps:
1. ChooseSecurity>PortForwarding.
2. Choosetheitemtobedeleted,andclickDelete.AsshowninFigure5‐22.
Figure5‐22
5.5 UPnP
Onthispage,youcanenableordisabletheUniversalPlugandPlay(UPnP)function.
ToenableUPnP,performthefollowingsteps:
1. ChooseSecurity>UPnP.
2. SetUPnPtoEnable.
3. ClickSubmit.AsshowninFigure5‐23.

Figure5‐23
6 VPNSetting
Thisfunctionenablesyoutoconnectthevirtualprivatenetwork(VPN).
ToconnecttheVPN,performthefollowingsteps:
1. ChooseVPNSetting.
2. IntheVPNSettingarea,enableVPN.
3. SelectaprotocolfromProtocoldrop‐downlist.
4. EnterUsernameandPassword.
5. ClickSubmit.
6. YoucanviewthestatusinVPNStatusarea.AsshowninFigure6‐1.
Figure6‐1
7 VOIP
TheCPEsupportsvoiceservicesbasedontheSessionInitiationProtocol(SIP)andenablesvoice
serviceinterworkingbetweentheInternetandPublicSwitchedTelephoneNetworks(PSTNs).
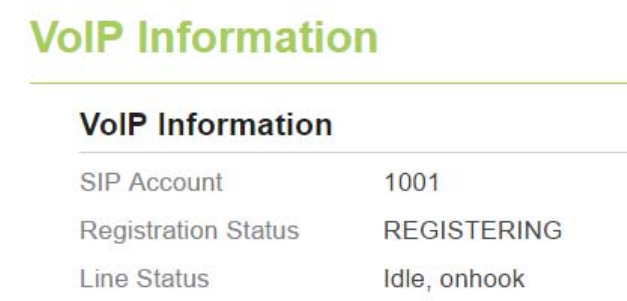
7.1 ViewVOIPInformation
ToviewVOIPinformation,performthefollowingsteps:
1. ChooseVOIP>VOIPInformation;
2. ViewtheVOIPinformation,suchastheSIPaccountandstatusoftheSIPregistrationserver.
AsshowninFigure7‐1.
Figure7‐1
7.2 ConfiguringSIPServer
TosettheSIPserverparameters,performthefollowingsteps:
1. ChooseVOIP>SIPServer;
2. IntheUserAgentportbox,entertheportoftheSIPaccountprovidedbyyourservice
provider.
3. IntheSIPserverdomainnamebox,enterthedomainnameoftheSIPserver.
4. IntheProxyserveraddressbox,entertheaddressoftheproxyserverprovidedbyyour
serviceprovider,forexample,192.168.1.10.
5. IntheProxyserverportbox,entertheportoftheproxyserverprovidedbyyourservice
provider,forexample,5060.Thevaluerangesfrom1to65535.
6. IntheRegistrationserveraddressbox,entertheaddressoftheregistrationserver
providedbyyourserviceprovider,forexample,192.168.1.11.
7. IntheRegistrationserverportbox,entertheportoftheregistrationserverprovidedby
yourserviceprovider,forexample,5060.Thevaluerangesfrom1to65535.
8. ClickSubmit.AsshowninFigure7‐2.
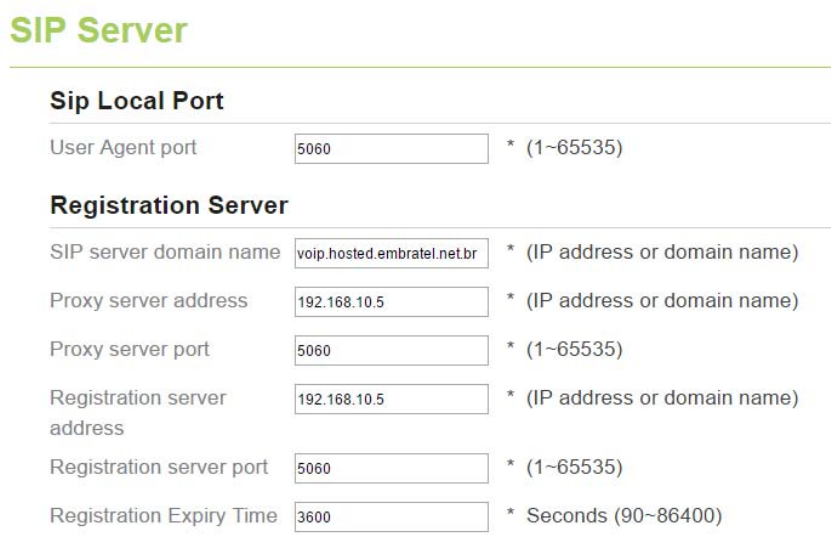
Figure7‐2
7.3 ConfiguringSIPAccount
BeforeconfiguringSIPaccounts,makesurethattheregistrationserverhasbeenproperly
configured.
ToconfigureSIPaccount,performthefollowingsteps:
1. ChooseVoIP>SIPAccount.
2. SetSIPAccountEnable.
3. IntheUsernameandPasswordboxes,entertheusernameandpasswordoftheSIP
accountprovidedbyyourserviceprovider.
4. InthePhoneNumberbox,entertheSIPPhonenumberprovidedbyyourservice
provider.
5. IntheDisplayNamebox,enterthedisplaynameprovidedbyyourserviceprovider.
6. IntheCodecPriorityarea,setthecodecpriority.
7. ClickSubmit.AsshowninFigure7‐3.
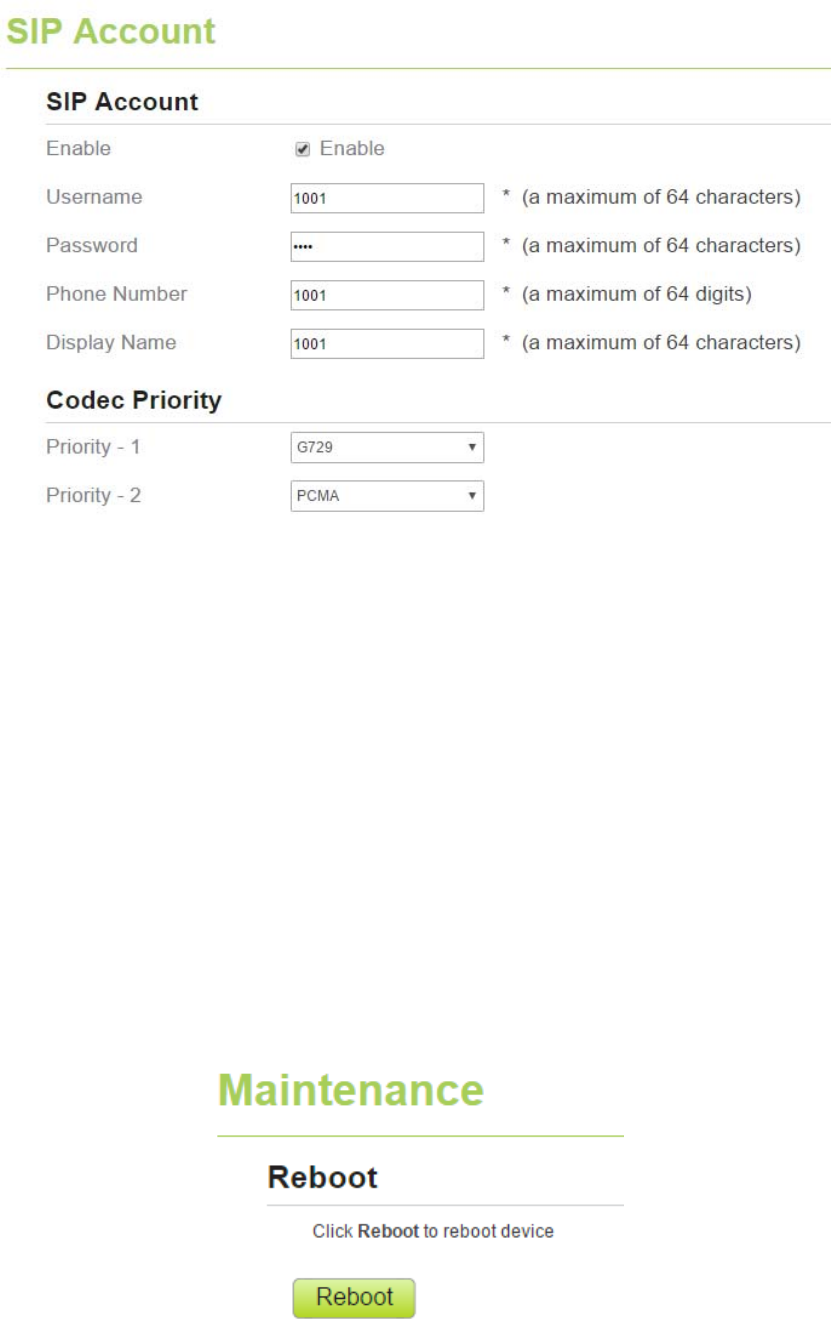
Figure7‐3
8 System
8.1 Maintenance
8.1.1 Reboot
ThisfunctionenablesyoutoreboottheCPE.SettingstakeeffectonlyaftertheCPEreboot.To
reboottheCPE,performthefollowingsteps:
1. ChooseSystem>Maintenance.
2. ClickReboot.AsshowninFigure8‐1.
TheCPEthenrestarts.
Figure8‐1
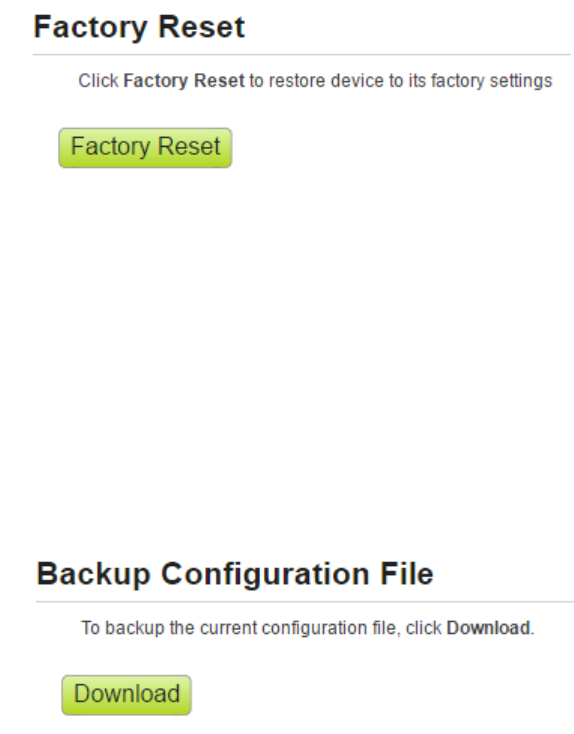
8.1.2 Reset
ThisfunctionenablesyoutorestoretheCPEtoitsdefaultsettings.
TorestoretheCPE,performthefollowingsteps:
1. ChooseSystem>Maintenance.
2. ClickReset.AsshowninFigure8‐2.
TheCPEisthenrestoredtoitsdefaultsettings.
Figure8‐2
8.1.3 BackupConfigurationFile
Youcandownloadtheexistingconfigurationfiletobackitup.Todoso:
1. ChooseSystem>Maintenance.
2. ClickDownloadontheMaintenancepage.
3. Inthedisplayeddialogbox,selectthesavepathandnameoftheconfigurationfiletobe
backedup.
4. ClickSave.AsshowninFigure8‐3.
Theprocedureforfiledownloadingmayvarywiththebrowseryouareusing.
Figure8‐3
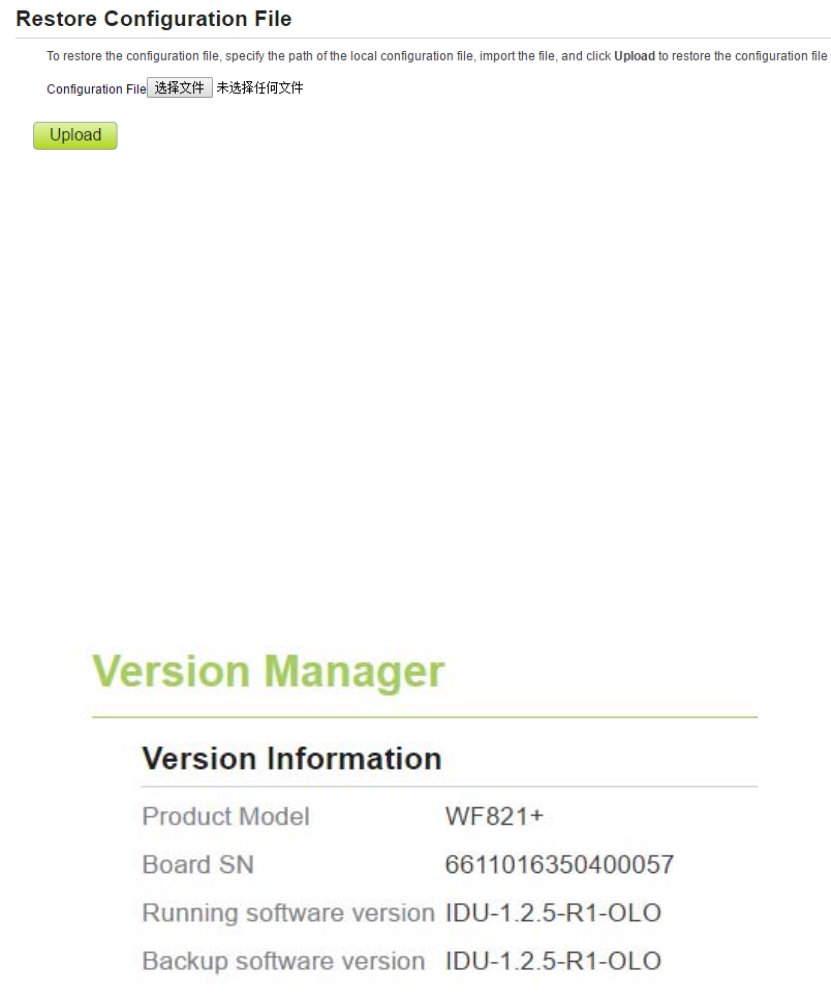
8.1.4 UploadConfigurationFile
YoucanuploadabackedupconfigurationfiletorestoretheCPE.Todoso:
1. ChooseSystem>Maintenance.
2. ClickBrowseontheMaintenancepage.
3. Inthedisplayeddialogbox,selectthebackedupconfigurationfile.
4. ClickOpen.
5. Thedialogboxchoses.IntheboxtoberightofConfigurationfile,thesavepathandname
ofthebackedupconfigurationfilearedisplayed.
6. ClickUpload.AsshowninFigure8‐4.
TheCPEuploadsthebackedupconfigurationfile.TheCPEthenautomaticallyrestarts.
Figure8‐4
8.2 VersionManager
ThisfunctionenablesyoutoupgradethesoftwareversionoftheCPEtothelatestversion.Itis
recommendedthatyouupgradethesoftwarebecausethenewversion,certainbugshavebeen
fixedandthesystemstabilityisusuallyimproved.
8.2.1 ViewingVersionInfo
Toviewtheversioninfo,performthefollowingsteps:
1. ChooseSystem>VersionManager.
2. IntheVersionInfoarea,youcanviewtheproductnameandsoftwareversion.Asshownin
Figure8‐5.
Figure8‐5
8.2.2 VersionUpgrade
Toperformanupgradesuccessfully,connecttheCPEtoyourcomputerthroughanetworkcable,
savetheupgradefileonthecomputer,andmakesuretheCPEisnotconnectedtoanythingother
thanapoweradapterandthecomputer.
Toperformanupgrade,performthefollowingsteps:
1. ChooseSystem>VersionManager.
2. IntheVersionUpgradearea,clickBrowse.Inthedisplayeddialogbox,selectthetarget
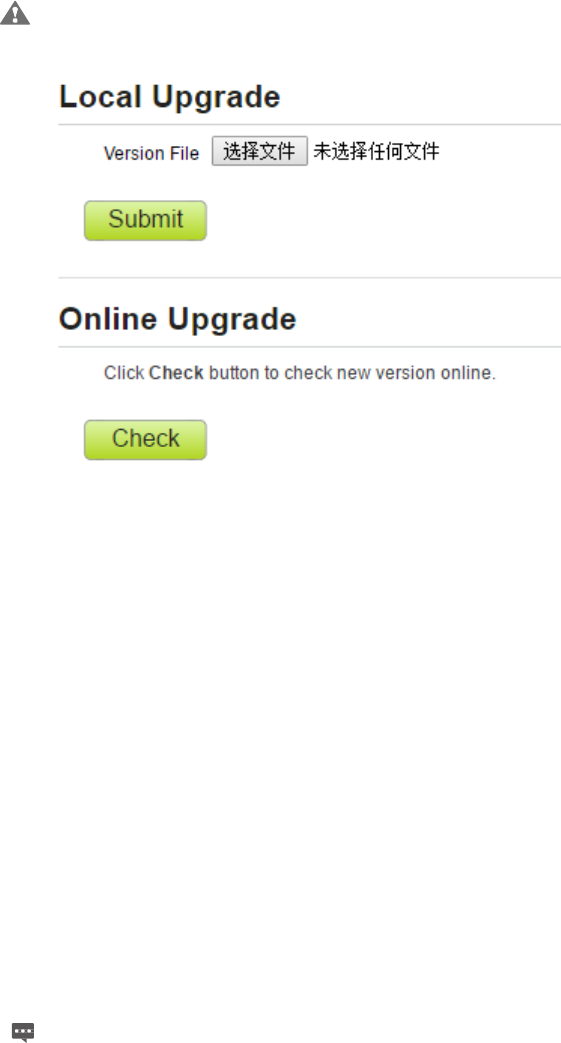
softwareversionfile.
3. ClickOpen.Thedialogboxchoses.Thesavepathandnameofthetargetsoftwareversion
filearedisplayedintheUpdatefilefield.
4. ClickSubmit.
5. Thesoftwareupgradestarts.Aftertheupgrade,theCPEautomaticallyrestartsandrunsthe
newsoftwareversion.AsshowninFigure8‐6.
Duringanupgrade,donotpowerofftheCPEordisconnectitfromthe
computer.
Figure8‐6
8.3 TR069
TR‐069isastandardforcommunicationbetweenCPEsandtheauto‐configurationserver(ACS).
IfyourserviceproviderusestheTR069automaticserviceprovisionfunction,theACS
automaticallyprovidestheCPEparameters.IfyousettheACSparametersonboththeCPEand
ACS,thenetworkparametersontheCPEareautomaticallysetusingtheTR‐069function,and
youdonotneedtosetotherparametersontheCPE.
ToconfiguretheCPEtoimplementtheTR‐069function,performthefollowingsteps:
1. ChooseSystem>TR‐069Settings.
2. SetacsURLsource.Therearetwomethods,suchasURLandDHCP.
3. IntheACSURLbox,entertheACSURLaddress.
4. EnterACSusernameandpasswordfortheCPEauthentication.
TousetheCPEtoaccesstheACS,youmustprovideausernameand
passwordforauthentication.Theusernameandthepasswordmustbe
thesameasthosedefinedontheACS.
5. IfyousetPeriodicinformtoEnable,setPeriodicinforminterval.
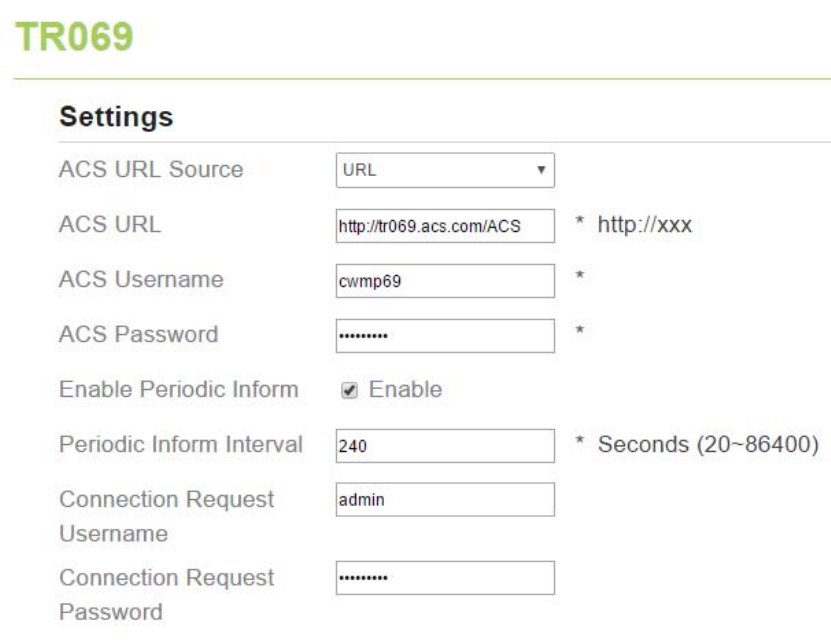
6. Setconnectionrequestusernameandpassword.
7. ClickSubmit.AsshowninFigure8‐8.
Figure8‐7
8.4 Date&Time
Youcansetthesystemtimemanuallyorsynchronizeitwiththenetwork.IfyouselectSync
fromnetwork,theCPEregularlysynchronizesthetimewiththespecifiedNetworkTime
Protocol(NTP)server.Ifyouenabledaylightsavingtime(DST),theCPEalsoadjuststhesystem
timeforDST.
Tosetthedateandtime,performthefollowingsteps:
1. ChooseSystem>Date&Time.
2. SelectSetmanually.
3. SetLocaltimeorclickSynctoautomaticallyfillinthecurrentlocalsystemtime.
4. ClickSubmit.AsshowninFigure8‐9.
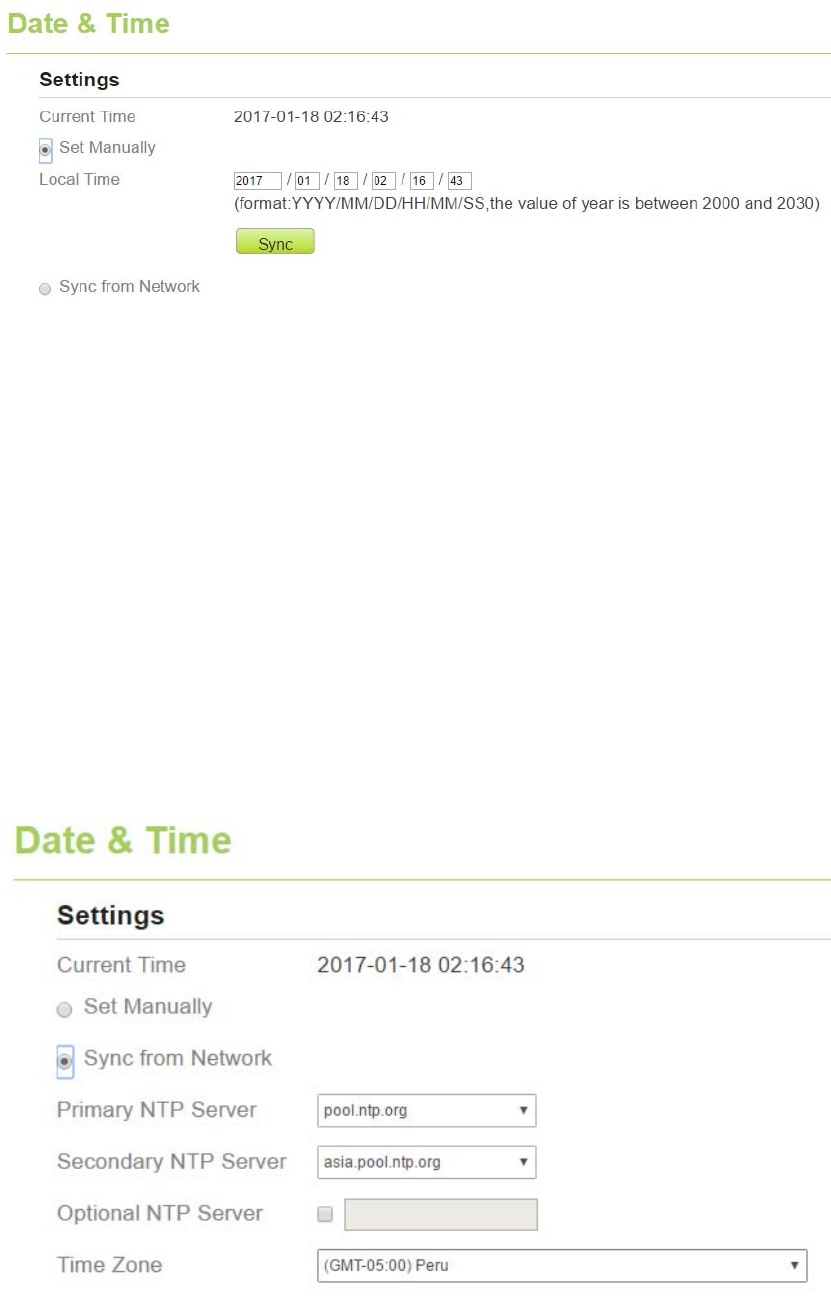
Figure8‐8
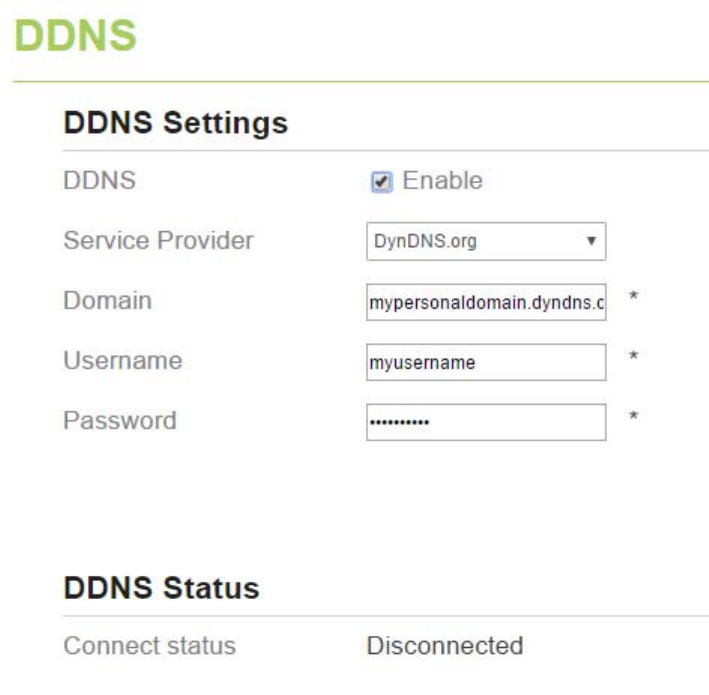
Tosynchronizethetimewiththenetwork,performthefollowingsteps:
1. ChooseSystem>Date&Time.
2. SelectSyncfromnetwork.
3. FromthePrimaryNTPserverdrop‐downlist,selectaserverastheprimaryserverfortime
synchronization.
4. FromtheSecondaryNTPserverdrop‐downlist,selectaserverastheIPaddressofthe
secondaryserverfortimesynchronization.
5. Ifyoudon’twanttouseotherNTPserver,youneedtoenableOptionalntpserver,andseta
serverIPaddress.
6. SetTimezone.
7. ClickSubmit.AsshowninFigure8‐10.
Figure8‐9
8.5 DDNS
DynamicDomainNameServer(DDNS)serviceisusedtomaptheuser'sdynamicIPaddresstoa
fixedDNSservice.
ToconfigureDDNSsettings,performthefollowingsteps:
1. ChooseSystem>DDNS.
2. SetDDNStoEnable.
3. InServiceprovider,chooseDynDNS.orgororay.com.
4. EnterDomainnameandHostname.Forexample,ifthedomainnameprovidedbyyour
serviceprovideristest.customtest.dyndns.org,entercustomtest.dyndns.orgasDomain
name,andtestasHostname.
5. EnterUsernameandPassword.
6. ClickSubmit.AsshowninFigure8‐12.
Figure8‐10

8.6 Diagnosis
IftheCPEisnotfunctioningcorrectly,youcanusethediagnosistoolsontheDiagnosispageto
preliminarilyidentifytheproblemsothatactionscanbetakentosolveit.
8.6.1 Ping
IftheCPEfailstoaccesstheInternet,runthepingcommandtopreliminarilyidentifythe
problem.Todoso:
1. ChooseSystem>Diagnosis.
2. IntheMethodarea,selectPing.
3. EnterthedomainnameintheTargetIPordomainfield,forexample,www.google.com.
4. SetPacketsizeandTimeout.
5. SetCount.
6. ClickPing.AsshowninFigure8‐13.
Waituntilthepingcommandisexecuted.TheexecutionresultsaredisplayedintheResultsbox.
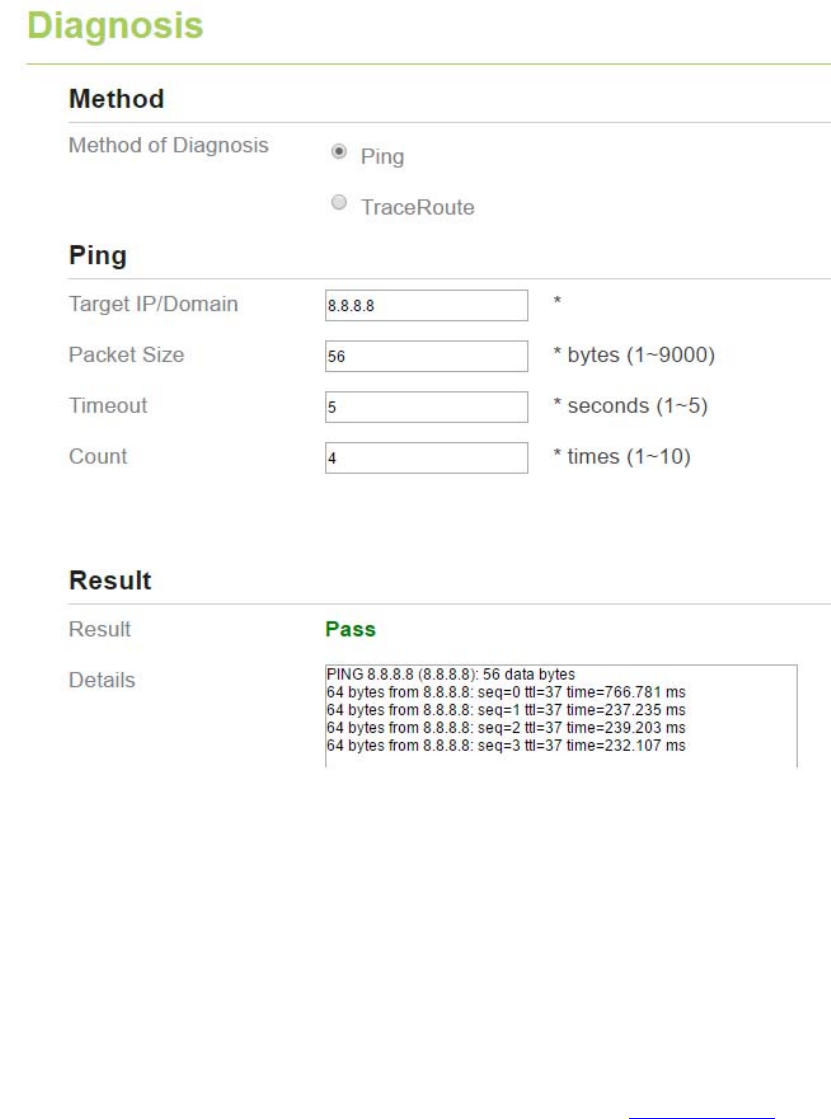
Figure8‐11
8.6.2 Traceroute
IftheCPEfailstoaccesstheInternet,runtheTraceroutecommandtopreliminarilyidentifythe
problem.Todoso:
1. ChooseSystem>Diagnosis.
2. IntheMethodarea,selectTraceroute.
3. EnterthedomainnameintheTargetIPordomainfield.Forexample,www.google.com.
4. SetMaximumhopsadTimeout.
5. ClickTraceroute.AsshowninFigure8‐14.
Waituntilthetracerouecommandisexecuted.Theexecutionresultsaredisplayedinthe
Resultsbox.
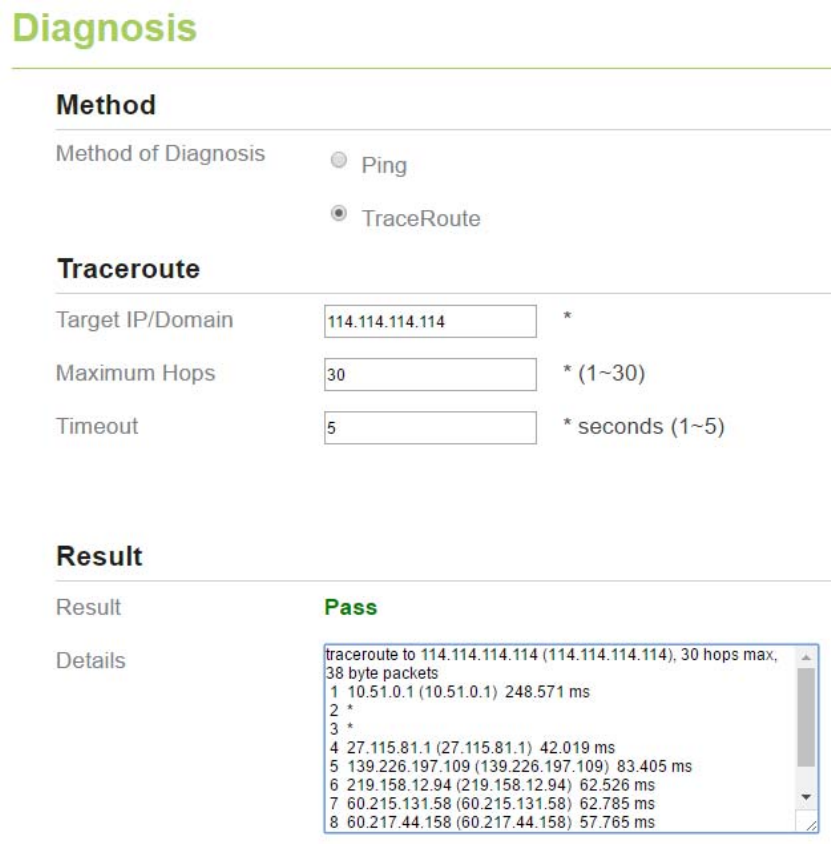
Figure8‐12
8.7 Syslog
Thesyslogrecorduseroperationsandkeyrunningevents.
8.7.1 Local
Tosetthesyslogtolocal,performthefollowingsteps:
1. ChooseSystem>Syslog.
2. IntheSettingarea,setthemethodtoLocal.
3. IntheLeveldrop‐downlist,selectaloglevel.
4. ClickSubmit.AsshowninFigure8‐15.
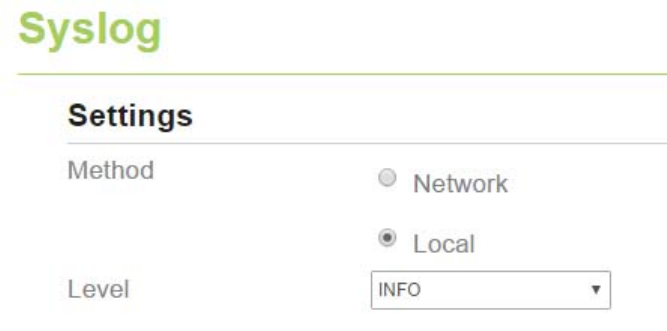
Figure8‐13
Viewinglocalsyslog
Toviewthelocalsyslog,performthefollowingsteps:
1. IntheKeywordbox,setakeyword.
2. ClickPull,theresultboxwilldisplay.
8.7.2 Network
Tosetthesyslogtonetwork,performthefollowingsteps:
1. ChooseSystem>Syslog.
2. IntheSettingarea,setthemethodtoNetwork.
3. IntheLeveldrop‐downlist,selectaloglevel.
4. IntheForwardIPaddressbox,setaIPaddress.
5. ClickSubmit.AsshowninFigure8‐16.
Thesyslogwilltransmittosomeclienttodisplaythroughnetwork.
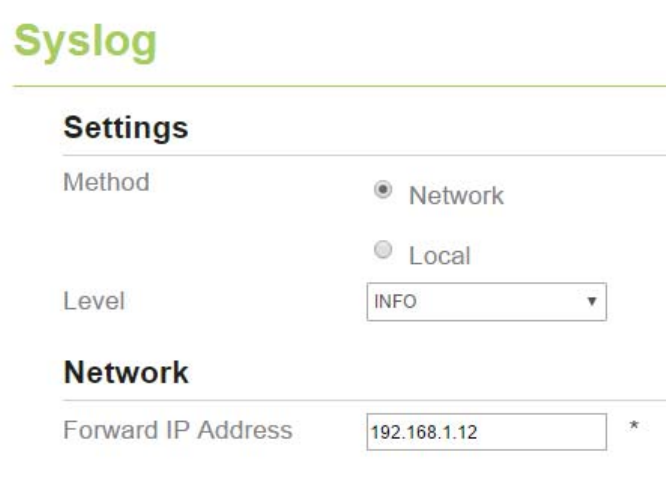
Figure8‐14
8.8 Account
Thisfunctionenablesyoutochangetheloginpasswordoftheuser.Afterthepasswordchanges,
enterthenewpasswordthenexttimeyoulogin.
Tochangethepassword,performthefollowingsteps:
1. ChooseSystem>Account.
2. Selecttheusername,ifyouwanttochangethepasswordofnormaluser,youneedtoset
EnableUserenable.
3. Enterthecurrentpassword,setanewpassword,andconfirmthenewpassword.
4. NewpasswordandConfirmpasswordmustcontain5to15characters.
5. ClickSubmit.AsshowninFigure8‐17.
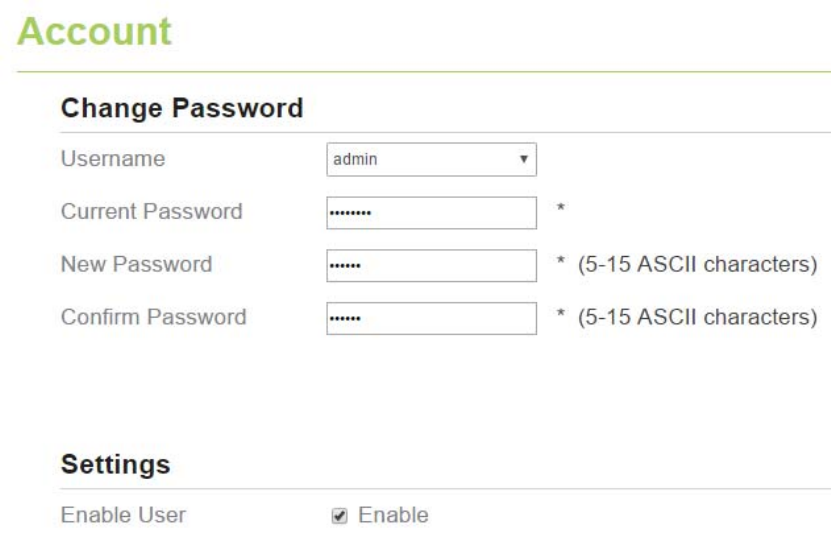
Figure8‐15
8.9 RemoteWEBAccess
ToconfiguretheparametersofWEB,performthefollowingsteps:
1. ChooseSystem>RemoteWEBAccess.
2. SetHTTPenable.IfyousetHTTPdisable,youwillcan’tloginthewebmanagementpage
withtheHTTPprotocolfromWANside.
3. SetHTTPport.Ifyouwanttochangetheloginport,youcansetanewportinthebox,the
defaultHTTPportis80.
4. SetHTTPSenable.IfyouwanttologinthewebmanagementpagewiththeHTTPSprotocol
fromWANside,youneedtoenabletheHTTPS.
5. IfyouwanttologinthewebmanagementpageformtheWAN,youneedtoEnable
AllowingloginfromWAN.
6. SettheHTTPSport.
7. ClickSubmit.AsshowninFigure8‐18.
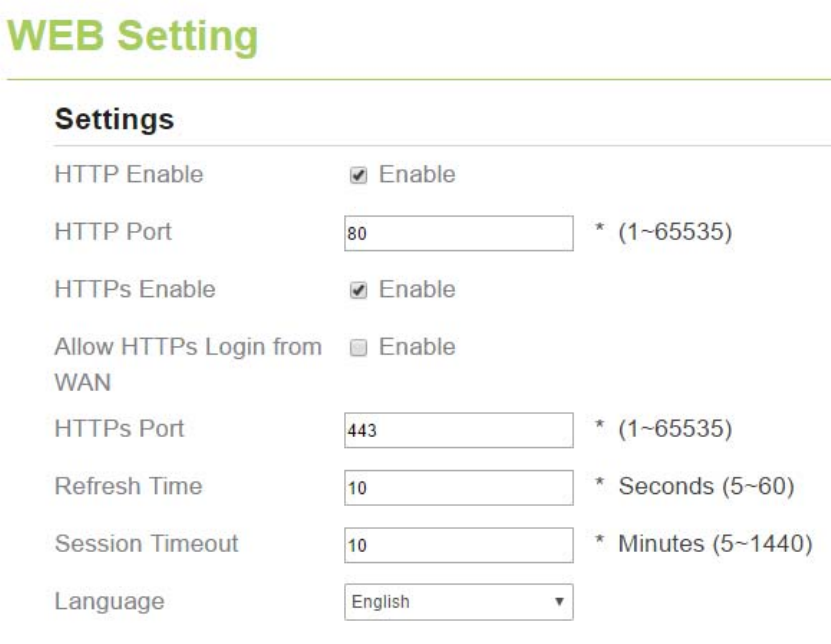
Figure8‐16
8.10 Logout
Tologoutthewebmanagementpage,performthefollowingsteps:
1. ChooseSystemandclickLogout
2. Itwillbacktotheloginpage.
9 FAQs
ThePOWERindicatordoesnotturnon.
MakesurethatthepowercableisconnectedproperlyandtheCPEispoweredon.
MakesurethatthepoweradapteriscompatiblewiththeCPE.
FailstoLogintothewebmanagementpage.
MakesurethattheCPEisstarted.
VerifythattheCPEiscorrectlyconnectedtothecomputerthroughanetworkcable.Ifthe
problempersists,contactauthorizedlocalservicesuppliers.
TheCPEfailstosearchforthewirelessnetwork.
Checkthatthepoweradapterisconnectedproperly.
CheckthattheCPEisplacedinanopenareathatisfarawayfromobstructions,suchas
concreteorwoodenwalls.
CheckthattheCPEisplacedfarawayfromhouseholdelectricalappliancesthatgenerate
strongelectromagneticfield,suchasmicrowaveovens,refrigerators,andsatellitedishes.
Iftheproblempersists,contactauthorizedlocalservicesuppliers.
ThepoweradapteroftheCPEisoverheated.
TheCPEwillbeoverheatedafterbeingusedforalongtime.Therefore,powerofftheCPE
whenyouarenotusingit.
CheckthattheCPEisproperlyventilatedandshieldedfromdirectsunlight.
Theparametersarerestoredtodefaultvalues.
IftheCPEpowersoffunexpectedlywhilebeingconfigured,theparametersmayberestored
tothedefaultsettings.
Afterconfiguringtheparameters,downloadtheconfigurationfiletoquicklyrestoretheCPE
tothedesiredsettings.
FCC Regulations
Thisdevicecomplieswithpart15oftheFCCRules.Operationissubjecttothefollowing
twoconditions:(1)Thisdevicemaynotcauseharmfulinterference,and(2)thisdevice
mustacceptanyinterferencereceived,includinginterferencethatmaycauseundesired
operation.
ThisequipmenthasbeentestedandfoundtocomplywiththelimitsforaClassBdigital
device,pursuanttopart15oftheFCCRules.Theselimitsaredesignedtoprovide
reasonableprotectionagainstharmfulinterferenceinaresidentialinstallation.This
equipmentgenerates,usesandcanradiateradiofrequencyenergyand,ifnotinstalled
andusedinaccordancewiththeinstructions,maycauseharmfulinterferencetoradio
communications.However,thereisnoguaranteethatinterferencewillnotoccurina
particularinstallation.Ifthisequipmentdoescauseharmfulinterferencetoradioor
televisionreception,whichcanbedeterminedbyturningtheequipmentoffandon,the
userisencouragedtotrytocorrecttheinterferencebyoneormoreofthefollowing
measures:
—Reorientorrelocatethereceivingantenna.
—Increasetheseparationbetweentheequipmentandreceiver.
—Connecttheequipmentintoanoutletonacircuitdifferentfromthattowhichthe
receiverisconnected.
—Consultthedealeroranexperiencedradio/TVtechnicianforhelp.
Caution:
Changesormodificationsnotexpresslyapprovedbythemanufacturercouldvoidtheuser’s
authoritytooperatetheequipment.
ThisequipmentcomplieswiththeFCCRFradiationexposurelimitssetforthforanuncontrolled
environment.Thisequipmentshouldbeinstalledandoperatedwithaminimumdistanceof20cm
betweentheradiatorandanypartofyourbody.Theantennasmustnotbeco‐locatedwithother
transmitterantennas.
Thedevicecanonlyoperateindoor,andcannotoperateinoutdoorcondition.