ZTE X992 CDMA 1X DIGITAL MOBILE PHONE User Manual
ZTE Corporation CDMA 1X DIGITAL MOBILE PHONE Users Manual
ZTE >
Users Manual

X992
CDMA 1X Digital Mobile
Phone
Manual De Usuario
Copyright © 2009 by ZTE Corporation
All rights reserved.
No part of this publication may be excerpted, reproduced, translated or utilized in any
form or by any means, electronic or mechanical, including photocopying and microfilm,
without the prior written permission of ZTE Corporation.
The manual is published by ZTE Corporation. We reserve the right to make
modifications on print errors or update specifications without prior notice. The
information on the package is only for your reference. Images are for you reference only.
Please check the product model before purchasing.
ZTE Corporation
ZTE Plaza, Keji Road South, Hi-tech Industrial Park, Nanshan District, Shenzhen, P.R.China
Zip Code: 518057 Http://www.zte.com.cn Service Hotline: +86-755-26779999
E-mail: mobile@zte.com.cn Manual No.079584500xxx

1
Contents
Know your Phone ................................................. 3
Key Instruction ..................................................... 4
Interface Icons ...................................................... 7
Insert and Extract UIM Card ............................... 8
Remove and Install the Battery............................. 9
Charge the Battery ............................................. 10
Power on/ off Your Phone ................................... 10
Make and Answer a Call .................................... 11
Menu Tree ........................................................... 11
Voice Mail ........................................................... 13
Text Input ............................................................ 13
Message .............................................................. 14
Menu Functions .................................................. 14
Phone Lock ......................................................... 18
PIN Code and PUK Code ................................... 18
Warning and Maintenance ................................. 19

3
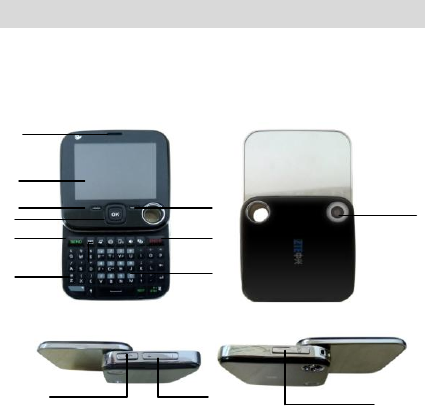
Know your Phone
LCD Screen
Left Soft key
Right Soft Key
Send Key
End Key
Number Key
OK Key
Camera
USB Port
Volume Key
T-Flash
Receiver
QWERTY Key area
4
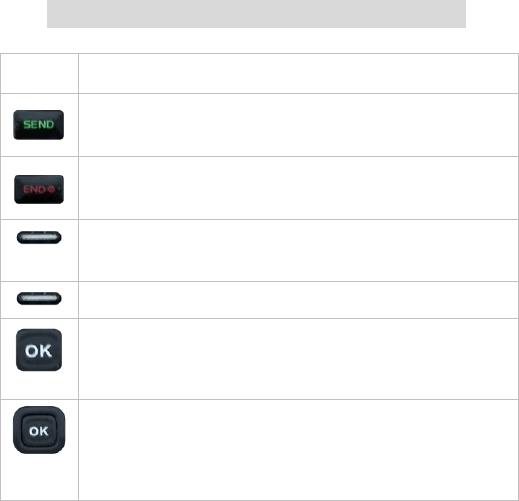
Key Instruction
Key
Function Description
Make or answer a call.
Press Send key in standby mode to enter all recent calls list.
Press Send key two times directly to redial the last number.
End an active call or reject a call.
Long press to Power on/Power off.
Exit from any interface to standby mode.
Enter main Menu in standby mode.
Confirm the commands and options selected as OK key.
Switch to the options of left bottom submenu.
Erase character(s) while editing.
Cancel or stop operation, exit to previous window.
Enter main Menu in standby mode.
Press OK key to confirm the commands and options selected.
Confirm the character chosen while character inputting.
Switch to Play and Pause in audio player.
Up/Down Key
Scroll the cursor up and down.
Used as selection key up and down for keying in commands and
selecting options shown on the display.
In standby mode, press Down key to enter Messages Inbox
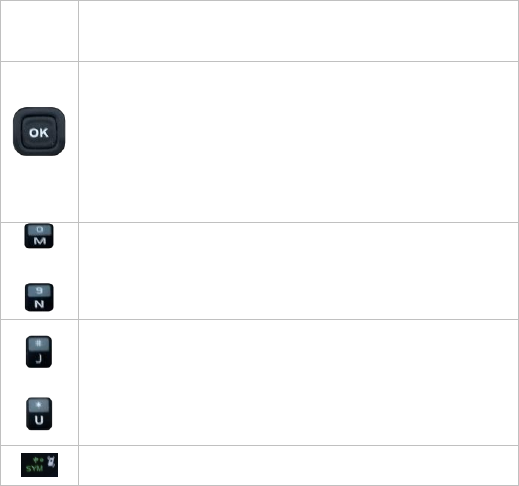
5
menu , press Up key to enter Shortcuts menu.
Adjust volume in conversation.
Used as direction key in games.
Left /Right key
Scroll the cursor left and right.
Used as selection key to scroll cursor left and right for keying in
commands and selecting options shown on the display.
In standby mode, press Left key to enter Neo Application menu,
press Right key to Neo Navigation.
Adjust volume in conversation.
Used as direction key in games.
~
Key in numbers or characters.
Make a Speed Dial call (2-9); and hold 1 key to enter Voice Mail
defaultly.
# key:
Hold # key in standby mode to switch the silent and general
mode.
* key:
Hold * key in standby mode to lock phone‟s keypad.
Enter the symbols selection interface when editing

6
Switch input method when editing
7
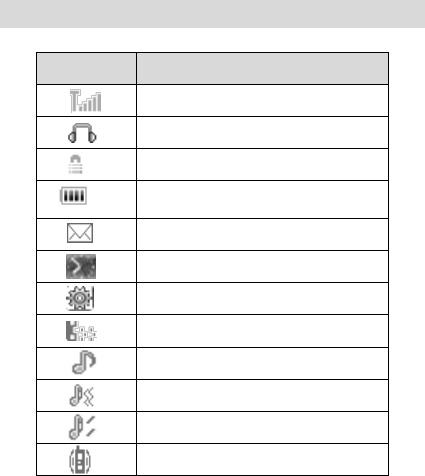
Interface Icons
Icon
Indication
Signal strength
Earphone in use
Keypad locked
Power indicator
New message
Unread alarm
Unread schedule
Missed calls indicator
Ring for incoming call
Ring before vibration for incoming call
Ring + Vibration for incoming call
Vibration for incoming call
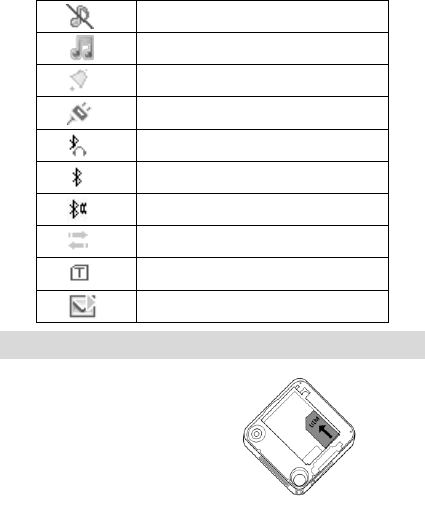
8
Silence for incoming call
Music&FM background
Alarm
USB mode
Connecting Bluetooth Earphones
Bluetooth Open
Bluetooth Transmission
Push message
T-flash Card inserted
New MMS
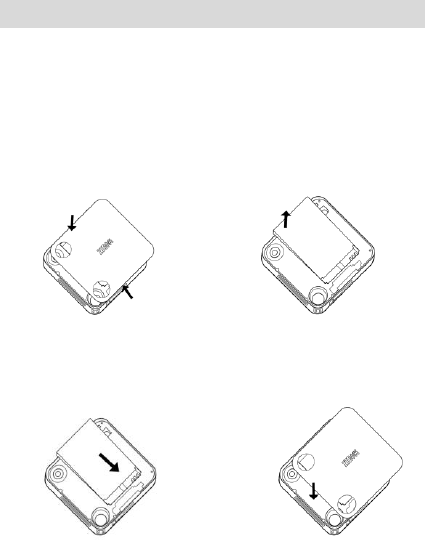
Insert and Extract UIM Card
Power off the phone, remove
the battery and other external
power.
Insert UIM card into UIM card
slot in the phone, or remove
UIM card out of slot, as shown
in picture .
9
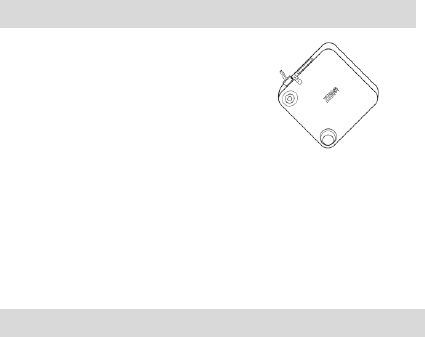
Remove and Install the Battery
The attached Li-ion battery along with the phone can be used after
unpacking. For the first three times, please use up the power and charge it
fully for a new battery to perform well.
Remove: (1) Put finger on the top finger grip in back-cover, and then slide
the back-cover of the phone down to release and remove. (2) Put finger
on the finger grip, and then lift up the battery to remove the battery.
Install: (1) Replace the battery into the battery slot, to be noted that the
lower end of the battery firstly inserted. (2) Put the back-cover of the
phone flatly upon the body of phone. Push the back-cover of the phone to
lock the cover into its place.
10
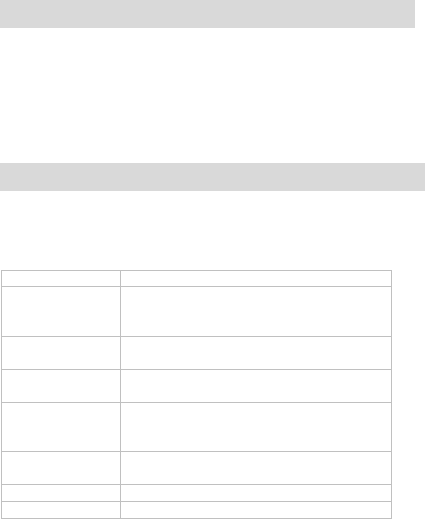
Charge the Battery
Plug out rubber away from the jack
on the side of the handset and
connect the lead from the charger
to the socket on the side of the
phone. (Note: The side with arrow
should be upright while connecting).
Connect the charger to a standard wall AC socket.
When the charging animation on the screen stops, the charging is
completed. The charging takes usually up to 2~3 hours. During
charging, it is a normal phenomenon that the battery, phone and
charger may get hot.
After the completion of charging, disconnect the charger from the
phone and AC socket.
Power on/ off Your Phone
Please hold End key to power on/off the phone. The phone will
automatically search for the network.
Besides sending and receiving calls in standby mode, you can also
do:
Press OK key to enter main Menu.
Press Left select key to enter main Menu.
Press Right select key to enter Contacts menu.
Press Up key to enter Shortcuts menu.
Press Down key to enter Messages inbox menu.
Press Left key to enter Neo Application menu.

11
Press Right key to User Neo Navigation menu.
Press Send key to enter Call history list.
Hold * key to lock the keypad.
Hold # key to switch the silent and general mode.
Note: To “press” key in this manual means to press the key and
release it. To “hold” key means to keep pressing the key for two seconds
or more.
Make and Answer a Call
Make a call
Enter the phone number
Press Send key to make the call.
Press End key to end the call.
Answer a call
Press Send key to answer the call.
Press End key to end the call.
Menu Tree
1. Settings
1.1 Phone Setup
1.2 Display Setup
1.3 Call Setup
1.4 Security Setup
1.5 Restore Factory Settings
1.6 Connect Settings
1.7 Show Version
2. Call History
2.1 Missed Calls
7. Amusement
7.1 Snake
7.2 Russia Block
8. Contacts
8.1 All Contacts
8.2 Search Entry
8.3 Add New Entry
8.4 Delete
8.5 Caller Group
8.6 Memory Status
12
2.2 Received Calls
2.3 Dialed Calls
2.4 Delete Log
2.5 Call Time
3. My File
3.1 Card
3.2 Music
3.3 Picture
3.4 Video
3.5 Other
4. Multimedia
4.1 Video Player
4.2 Audio Player
4.3 Voice Recorder
4.4 FM
5. Neo Application
6. Camera
6.1 Mode Select
6.2 Base Option
6.3 Photo Browse
6.4 Frame Options
6.5 Default Config
6.6 Switch to Camcorder
8.7 Create All.vcf
9. User Profiles
9.1 General
9.2 Meeting
9.3 Outdoors
9.4 Indoors
9.5 Silence
10. Neo Navigation
11. Messages
11.1 SMS
11.1.1 Write Message
11.1.2 My Movilnet Space
11.1.3 Inbox
11.1.4 Outbox
11.1.5 Sentbox
11.1.6 Draftbox
11.1.7 Setting
11.1.8 Delete
11.1.9 Templates
11.1.10 Voice Mail
11.2 MMS
12. Tools
12.1 Alarm
12.2 Calculator
12.3 Stopwatch
12.4 World time
12.5 Calendar
12.6 Notepad
13
Voice Mail
Before using Voice Mail box, please consult with service provider to
confirm that the voice mailbox has been activated.
The system automatically sends a message to your phone informing
a new voice message. Select Connect to Voice to read the message and
then dial voice mail box number to listen to your voice message.
Select Edit Number to set the voice mail number.
Text Input
Your phone offers text input modes: Multitap Input (Abc/abc/ABC),
Numbers Input (123), eHiText Input (ES/es), and Symbol Input (Symbols).
Operation
Method
Input Letters
Multitap Input—“Abc/abc/ABC” press
corresponding letter key till the letter
appears.
Input Words
EHiText Input—“ES/es”, press any key
once to key in any word.
Input Digits
Numbers Input—“123”, press digit key
once.
Input Symbol
Symbols Input —Press SYM key to enter
the symbols mode and press
corresponding digit key.
Input Space
Press “_” key, except for being in
numbers mode.
Erase Character
Press Right select key.
Move cursor left
Press Left/Right key.
14
or right
Move cursor up
or down
Press Up/Down key.
Change input
mode
Press NEXT key to select another text
mode.
Capitalization
Press NEXT key to switch between
capitalization and lowercase.
Message
1. Select Messages in Main Menu.
2. Select Write Message to write and edit message text.
3. Select Option and press OK key to Send message or Save message
in Outbox. The maximum of receivers not exceed 10 persons.
Select Inbox to view messages received.
Select Outbox to view the sent and saved messages.
Select Settings to set the messages‟ functions.
Menu Functions
Hereinafter are brief instructions on menu functions of the phone.
Function
Selection
Description
Send SMS
Menu→Messages→SMS→Write
Message
Send SMS to other mobile
phones‟ number. The message
could be send to multi-receivers.
Send MMS
Menu→Messages→MMS→Write
Send MMS to other mobile

15
Message
phones‟ number. The message
could be send to multi-receivers.
Read
message
Menu→Messages→Inbox/Outbox
Read messages in Inbox/Outbox.
Voice mail
Menu→Messages→Voice Mail
Set the voice mail No. and dialing
voice mail number, you could
listen to voice message.
Message
Setting
Menu→Messages→Setting
Set SMS save position, report
status, expire,message priority
and view memory status.
Templates
message
Menu→Messages→Templates
Some common used messages
preformatted in phone.
Add
contact
Menu→Phonebook→Add new entry
Add a new entry in phonebook in
phone or UIM card.
Find
contact
Menu→Phonebook→Search entry
Search for a phonebook entry.
View
record
Menu→Phonebook→All Contacts
View the corresponding records in
all lists.
Edit group
Menu→Phonebook→Caller Group
Rename the group name and
select the ringer for the group.
Memory
status
Menu→Phonebook→Memory Status
Number of entries saved and
maximum number of entries
capacity in phone and UIM card.
Vcard
Menu→Phonebook→Create All.vcf
Create phonebook in .vcf format.
Call history
Menu→CallHistory→ Missed
/Received/ Dialed Calls
View and dial recent calls.
Call time
Menu→Call History→Call time
View and reset call duration of
calls

16
Ring
volume
Menu→User
profiles→option→Volume Setup
Set phone‟s ring/earpiece/key
beep volume
Ring tone
Menu→User profiles→option→Tone
Setup
Set the phone‟s ring tone for
incoming Caller
Ring/Alarm/Power on/Power
off/SMS/Key
Alert type
Menu→User profiles→option→Alert
type
Set alert type of the phone.
Wall Paper
set
Menu→Settings→Display
Setup →Wallpaper
Set wall papers as background in
idle state.
Backlight
Menu→Settings→Display
Setup→LCD Backlight
Set backlight duration.
Brightness
Menu→Settings→Display
Setup→Brightness
Adjust Brightness.
Themes
Menu→Settings→Display
Setup→Themes
Set Themes in idle state
Language
Menu→Settings→Phone
Setup→Language
Select language available.
Speed Dial
Menu→Settings→Phone
Setup→Speed Dial
View the speed dial list. In
standby mode, key in speed dial
number and send, or hold the
number key to dial the
corresponding call.
Greeting
Menu→Settings→Phone
Setup→Greeting
Set greeting.
Dedicated
Key
Menu→Settings→Phone
Setup→Dedicated Key
Set Dedicated Key function.
Shortcuts
Menu→Settings→Phone
Set functions in shortcuts menu.

17
Setup→Shortcuts
Auto
Answer
Menu→Settings→Call
Setting→Auto Answer
Answer incoming call
automatically when earpiece
inserted.
Time
Reminder
Menu→Settings→Call Setup→Time
Reminder
Phone alert for optional time
reminding
Call
Forwarding
Menu→Settings→Call
Setup→ Call Divert
Forward an incoming call to a
designated number.
Call waiting
Menu→Settings→Call Setup
→Call Waiting
Answer the second call, hold the
first call.
Call
restriction
Menu→Settings→Call
Setup→Black List
Restrict calls in list.
UIM Lock
Menu→Settings→Security
Setup→UIM Lock
Set or change the UIM lock.
Handset
Lock
Menu→Settings→Security
Setup→Phone Lock
Set or change the handset lock.
Keypad
Lock
Menu→Settings→Security
Setup→Keypad Lock
Set or change the keypad lock.
Call History
Lock
Menu→Settings→Security
Setup→Call History Lock
Set or change the call history
lock.
Restore
setting
Menu→Settings→Security
Setup→
Restore Factory Settings
Restore factory default.
Version
Query
Menu→Settings→Show Version
Show the SW Version and
SID/NID
USB
Connection
Menu→Settings→Connect
Setting→Startup USB Connection
Enable the USB connection when
USB is connected with PC.
Bluetooth
Menu→Settings→Connect
Enable the Bluetooth connection

18
Setting→Bluetooth
and do some Bluetooth settings
and operations.
Calendar
Menu→Tools→Calendar
View calendar and make
schedule events.
Alarm
clock
Menu→Tools→Alarm
Set alarm alert time.
Calculator
Menu→Tools→Calculator
Execute basic math calculation.
World Time
Menu→Tools→World Time
View world time.
Notepad
Menu→Tools→Notepad
View/edit/delete notepad.
Stopwatch
Menu→Tools→Stopwatch
Stopwatch timing.
Phone Lock
Phone lock could prevent your phone from illegal use. The default handset
password is 1234. Please change it to your own phone password as soon
as possible.
PIN Code and PUK Code
PIN Code: PIN code could prevent your UIM card from illegal use. When
PIN lock is on, you should enter the PIN code when opening the handset
again.
PUK Code: Consecutive inputting wrong PIN code for three times can
cause locking of UIM card. To unlock, you need PUK code.

19
Note: PIN code and PUK code may be offered together with the UIM card.
If not, please contact with network operator. Please change default PIN
code to your own as soon as possible.
Warning and Maintenance
• Keep the phone out of the reach of little children. The phone may cause
injury if used as a toy.
• Please use original accessories or accessories that are authorized by the
manufacturer.
• Please keep the phone dry and store in shady and cool place.
• Do not expose your mobile phone to direct sunlight or store it in hot areas.
High temperatures can shorten the life of electronic devices.
• Prevent liquid from seeping into your phone.
• Do not drop or harshly treat the phone. Rough handling can break
internal circuit boards.
• Do not connect the phone with other unauthorized peripheral equipments.
Do not attempt to dismantle the mobile phone and battery by yourself.
• Power off your phone before you clean the phone. Please use clean
fabric that is anti-static to clean your phone.
• As your mobile phone can produce electromagnetic field, do not use the
phone near electrical appliances.
• Do not charge the mobile phone without battery.
• Beware of the usage limitation when using a mobile phone at places
such as oil warehouses or chemical factories.
• The user is cautioned that changes or modifications not expressly
approved by the manufacturer could void the user‟s authority to operate
the equipment.

20
Warranty Terms
The warranty does not apply to defects or errors in the product caused by:
(a) Reasonable abrasion.
(b) Misuse including mishandling, physical damage, improper installation,
unauthorized disassembly of the product.
(c) Water or any other liquid damage.
(d) Any unauthorized repair or modification.
(e) Power surges, lightning damage, fire, flood or other events outside
ZTE‟s reasonable control.
(f) Use of the product with any unauthorized third party products such as
generic chargers.
(g) Any other cause beyond the range of normal usage for products.
End user shall have no right to reject, return, or receive a refund for any
product from ZTE under the above-mentioned situations.
This warranty is end user‟s sole remedy and ZTE‟s sole liability for
defective or nonconforming items, and is in lieu of all other warranties,
expressed, implied or statutory, including but not limited to the implied
warranties of merchantability and fitness for a particular purpose, unless
otherwise required under the mandatory provisions of the law.
Limitation of Liability
ZTE shall not be liable for any loss of profits or indirect, special, incidental
or consequential damages resulting from or arising out of or in connection

21
with using this product, whether or not ZTE had been advised, knew or
should have known the possibility of such damages.
FCC Regulations:
This mobile phone complies with part 15 of the FCC Rules. Operation is
subject to the following two conditions: (1) This device may not cause
harmful interference, and (2) this device must accept any interference
received, including interference that may cause undesired operation.
This mobile phone has been tested and found to comply with the limits
for a Class B digital device, pursuant to Part 15 of the FCC Rules. These
limits are designed to provide reasonable protection against harmful
interference in a residential installation. This equipment generates, uses
and can radiated radio frequency energy and, if not installed and used in
accordance with the instructions, may cause harmful interference to radio
22
communications. However, there is no guarantee that interference will not
occur in a particular installation If this equipment does cause harmful
interference to radio or television reception, which can be determined by
turning the equipment off and on, the user is encouraged to try to correct
the interference by one or more of the following measures:
-Reorient or relocate the receiving antenna.
-Increase the separation between the equipment and receiver.
-Connect the equipment into an outlet on a circuit different from that to
which the receiver is connected.
-Consult the dealer or an experienced radio/TV technician for help.
Changes or modifications not expressly approved by the party responsible
for compliance could void the user„s authority to operate the equipment.

23
The antenna(s) used for this transmitter must not be co-located or
operating in conjunction with any other antenna or transmitter.
RF Exposure Information (SAR)
This model phone meets the government‟s requirements for exposure to
radio waves.
This phone is designed and manufactured not to exceed the emission
limits for exposure to radio frequency (RF) energy set by the Federal
Communications Commission of the U.S. Government.
The exposure standard for wireless mobile phones employs a unit of
measurement known as the Specific Absorption Rate, or SAR. The SAR
limit set by the FCC is 1.6W/kg. *Tests for SAR are conducted using
standard operating positions accepted by the FCC with the phone
transmitting at its highest certified power level in all tested frequency
24
bands. Although the SAR is determined at the highest certified power
level, the actual SAR level of the phone while operating can be well below
the maximum value. This is because the phone is designed to operate at
multiple power levels so as to use only the poser required to reach the
network. In general, the closer you are to a wireless base station
antenna, the lower the power output.
The highest SAR value for the model phone as reported to the FCC when
tested for use at the ear is 0.911 W/kg and when worn on the body, as
described in this user guide, is 0.626 W/kg (Body-worn measurements
differ among phone models, depending upon available enhancements and
FCC requirements.)
While there may be differences between the SAR levels of various phones
and at various positions, they all meet the government requirement.

25
The FCC has granted an Equipment Authorization for this model phone
with all reported SAR levels evaluated as in compliance with the FCC RF
exposure guidelines. SAR information on this model phone is on file with
the FCC and can be found under the Display Grant section of
http://www.fcc.gov/oet/fccid after searching on FCC ID: Q78-X992.
For body worn operation, this phone has been tested and meets the FCC
RF exposure guidelines for use with an accessory that contains no metal
and the positions the handset a minimum of 1.5 cm from the body. Use
of other enhancements may not ensure compliance with FCC RF
exposure guidelines. If you do no t use a body-worn accessory and are
not holding the phone at the ear, position the handset a minimum of 1.5
cm from your body when the phone is switched on.