ZTE AT&T Wireless Home Phone And Internet User Guide Z700A ATT UG EN 2 7839
User Manual: ZTE AT&T Home Base™ | ZTE USA
Open the PDF directly: View PDF ![]() .
.
Page Count: 33

User Guide
AT&T Wireless Home Phone
and Internet
AT&T Home Base™
Welcome to AT&T
Thank you for purchasing the AT&T Home Base (Model: Z700A). To get the
most from your new device, check out our videos and interactive tutorials at
att.com/homebasesupport.
i
ii
Contents
Getting Started ............................................................................................................................................1
In the Box .................................................................................................................................................... 1
Getting to Know Your Device .......................................................................................................... 2
How It Works ........................................................................................................................................... 4
Device Installation ............................................................................................................................... 4
Voicemail ................................................................................................................................................. 11
Setup .................................................................................................................................................. 11
Message Waiting ............................................................................................................................11
Retrieving Messages ....................................................................................................................11
Remote Retrieval ...........................................................................................................................11
Transferring a Phone Number ......................................................................................................12
AT&T Home Base Manager ............................................................................................................12
Using Your Device ................................................................................................................................... 14
Calling ....................................................................................................................................................... 14
Making Calls .................................................................................................................................... 14
Three-Way Calling ....................................................................................................................... 14
Call Waiting ..................................................................................................................................... 14
Call Forwarding ..............................................................................................................................15
Call Log ..............................................................................................................................................15
Internet Access ................................................................................................................................... 16
Connect Other Devices ........................................................................................................... 16
Changing Wi-Fi Network Name and Password ..............................................................17
Important Messages ................................................................................................................... 17
Managing Connected Devices ...............................................................................................17
iii
Checking Your Voice and Data Usage ...................................................................................... 18
Helpful Tips ...........................................................................................................................................20
Home Answering Machines ...................................................................................................20
Adjusting Volume .........................................................................................................................21
Powering On/Off ...........................................................................................................................21
TTY Support ...................................................................................................................................21
Important Information ........................................................................................................................ 22
E911 Service ........................................................................................................................................... 22
Power Outages .................................................................................................................................... 22
Back-up Battery .................................................................................................................................. 22
Device Compatibility ........................................................................................................................23
In-Home Wiring ...................................................................................................................................23
Frequently Asked Questions .......................................................................................................... 24
Troubleshooting ..................................................................................................................................... 27
General ................................................................................................................................................... 27
Phone ...................................................................................................................................................... 28
Internet .................................................................................................................................................... 31
Device Configuration ...........................................................................................................................34
Wi-Fi Settings ....................................................................................................................................... 34
Basic ................................................................................................................................................. 34
Connections ................................................................................................................................. 35
Security ........................................................................................................................................... 36
WPS ................................................................................................................................................... 37
Network .................................................................................................................................................. 38
Connections ................................................................................................................................. 38
APN .................................................................................................................................................... 39
iv
Firewall .................................................................................................................................................... 41
Mac/IP/Port Filtering ................................................................................................................. 41
Port Forwarding .......................................................................................................................... 43
DMZ ................................................................................................................................................... 44
Advanced .............................................................................................................................................. 45
Administrator ............................................................................................................................... 45
Router .............................................................................................................................................. 46
Time/Date ...................................................................................................................................... 47
Device Reset ................................................................................................................................. 47
Specifications .......................................................................................................................................... 48
Safety Instructions ............................................................................................................................... 49
Radio Frequency (RF) Energy ......................................................................................................... 50
FCC Regulations ...................................................................................................................................... 51
RF Exposure Information .................................................................................................................. 52
CTIA ................................................................................................................................................................ 53
Warranty ..................................................................................................................................................... 54
How to Get Warranty Service .......................................................................................................55
Other Warranty Programs..............................................................................................................55
v

vi
Getting Started
In the Box
The package contains the following items:
The AT&T Home Base
Phone Cable
(Optional)
Back-up
Battery
Power Cord
Also Included
Quick Start
AT&T Wireless Home Phone
and Internet
AT&T Home Base™
Quick Start
User Guide
AT&T Wireless Home Phone
and Internet
AT&T Home Base™
User Guide
1
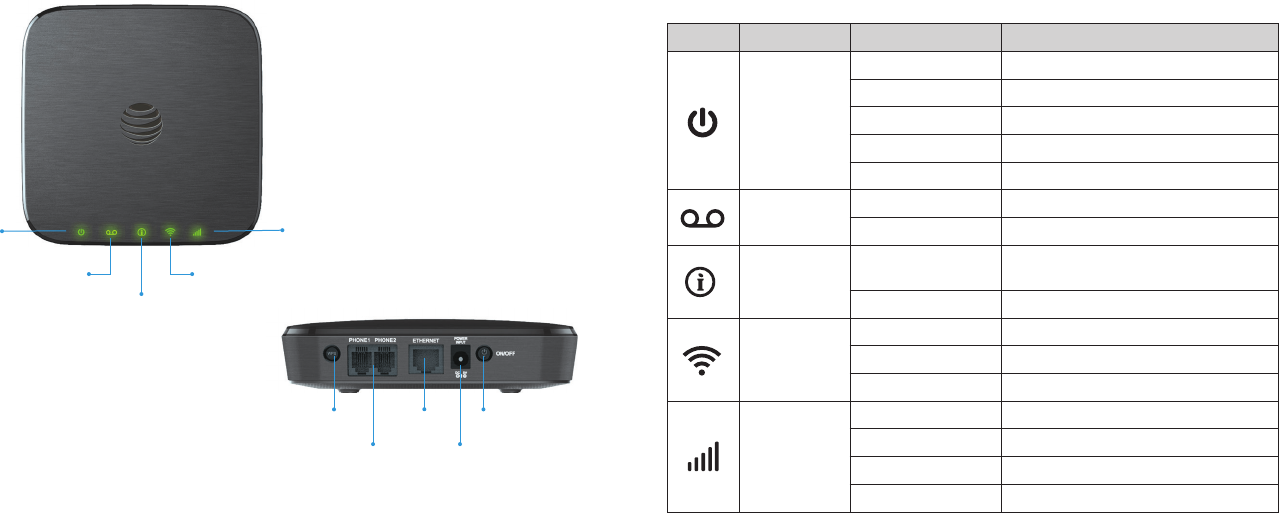
Getting to Know Your Device
Power
Voicemail
Information
(See “AT&T Home Base
Manager” on page 12)
Wi-Fi
Signal Strength
WPS*
* Allows WPS-enabled devices to be connected via Wi-Fi without typing a Wi-Fi password.
For detailed instructions, please refer to page 16.
Telephone
Ports
Ethernet
Power
Input
On/Off
2
LED Indicators
The table below describes possible states for each of the LED indicators.
Key Icon Name Indicator Status
Power
Green solid On
Green blinking Battery: More than 50%
Yellow blinking Battery: 20 – 50%
Red blinking Battery: Less than 20%
Off No power
Voicemail Green blinking New voicemail
Off No new voicemail
Information Green blinking Check the AT&T Home Base
Manager – see messages
Off No unread messages
Wi-Fi
Green solid Wi-Fi on
Green flickering Data transferring
Off Wi-Fi off
Signal
Strength
Green solid Strong signal
Yellow solid Moderate signal
Red solid No service
Red blinking Check SIM
3
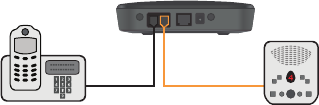
How It Works
The AT&T Home Base uses the AT&T cellular network to provide phone service to
your cordless or corded home phone(s) and Internet access to your computer
and Wi-Fi enabled devices. Place it anywhere in your home where you have a
strong wireless signal. It does not require the use of a home phone wall jack like
traditional home phone service.
The AT&T Home Base provides many calling services, such as voicemail, Caller
Number ID, Call Waiting, Call Forwarding, and Three-way Calling for your home
phone(s). It also includes a back-up battery in case of a power outage.
Device Installation
Before You Begin
The AT&T Home Base works exclusively with the AT&T
cellular network and DOES
NOT use your home phone wall jacks.
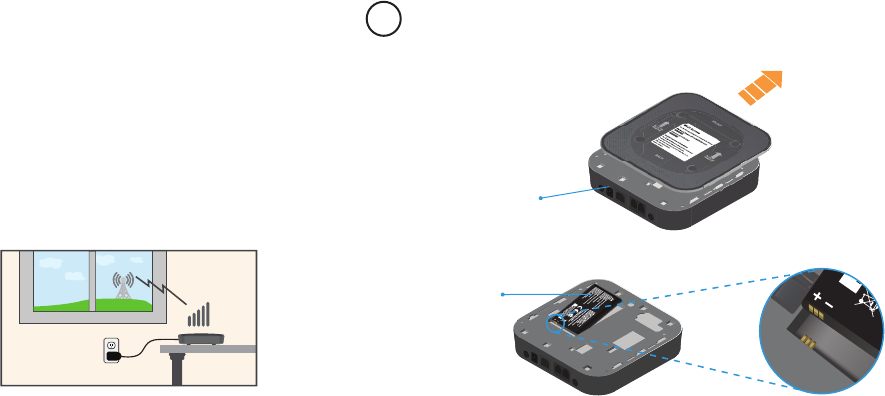
Your device should be located:
• Where you have a strong signal from a cell
tower, typically near a window or outside
wall. Signal strength may vary in different
parts of your home.
• Near an electrical wall outlet.
• In the general area where you’ll be using
your home phone, computer, or Wi-Fi enabled devices.
Select which phone and computer/Wi-Fi
enabled
device you will use with the
AT&T Home Base:
• A cordless phone system with multiple handsets should be used to place
phones throughout your home.
• If using an existing phone, unplug it from the wall jack.
• For Internet access, you may connect up to 10 devices via Wi-Fi and one
via Ethernet simultaneously.
4
STEP 1: Set Up Your Device
Install the Back-up Battery
1. Remove the bottom of the device by pushing the entire cover
in the direction of the arrow.
Ports
2. Insert the back-up battery.
Battery
3. Replace the cover.
NOTES:
• The back-up battery is intended for backup purposes only and may take
approximately eighteen (18) hours to fully charge.
• Charge time may be impacted by environmental factors and the back-
up battery will stop charging when the ambient temperature is outside of
the temperature range allowed for charging (32°F - 131°F).
5
A
CCheck the Wireless Signal
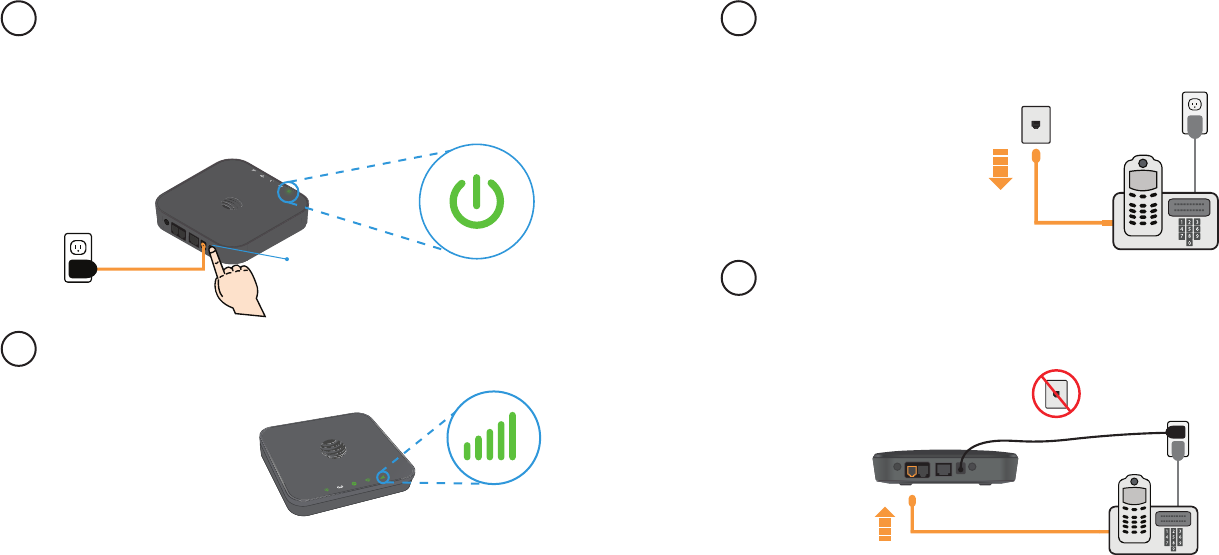
Wait a few seconds for the signal strength light to turn on, while your device
connects to the cellular network.
Confirm signal strength
light is green for optimal
performance. Yellow
indicates a moderate
signal and may
be sufficient.
NOTE: If you do not see a green light, you may want to choose another
location in your home, such as near a window or outside wall.
STEP 1: Set Up Your Device (continued)
BTurn on Your Device
1. Plug the power cord into an electrical wall outlet.
2. Connect the other end of the power cord into the Power Input port on
the back of your AT&T Home Base.
3. Press and hold down the round On/Off button for 3 full seconds until the
power light stays solid green.
On/Off
Hold 3 seconds
6
STEP 2: Connect Your Phone
Unplug your Phone from the Wall Jack
The AT&T Home Base is not used with your home phone wall jack.
NOTE: If you have a cordless phone, keep it plugged into a power outlet.
BConnect your Phone to the Device
Plug your phone into the “Phone 1” port on the AT&T Home Base, using your
existing phone cable or the included phone cable.
NOTE: Do not plug the AT&T Home Base or your phones into your wall jacks.
7
Signal
Strength
A
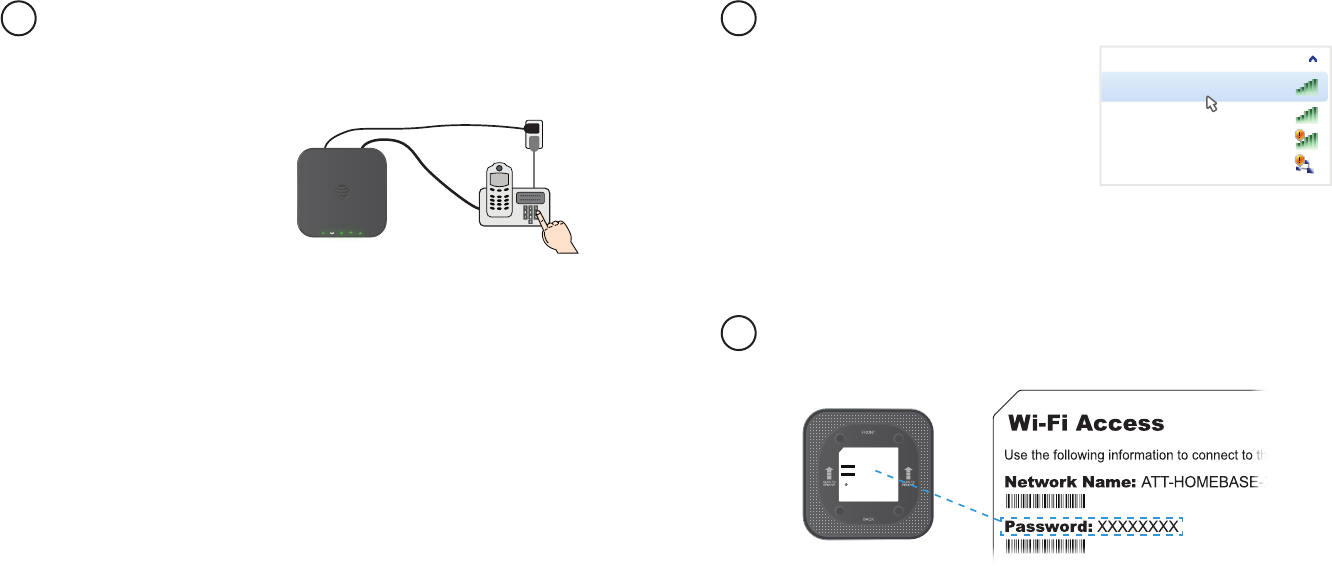
Use the following information to connect to the Internet:
Network Name: ATT-
HOMEBASE-XXXX
Password:
XXXXXXXX
Wi-Fi Access
Helpful service information:
The light will blink green when you have an important
message from AT&T about your service plan.
On any device connected to the AT&T Home Base, go to:
URL: http://att.homebase
Login: attadmin
STEP 2: Connect Your Phone (continued)
Place a Test Call
Place a test call from your connected home phone. Make sure to
dial the 10-digit phone number, including area code.
For best results, place the cordless phone base at least 12 inches
from the AT&T Home Base.
Important Phone Tips
• Voicemail is included with your service. Dial “1” to set up and access. If
you choose to use an answering machine instead, set it to fewer than
four (4) rings.
• To place phones throughout your home, use a cordless phone system
with multiple handsets. Wall jacks are not used with the AT&T Home Base.
• The “Phone 2” port can be used to connect an additional phone or
standalone answering machine. It uses the same phone number as the
“Phone 1” port.
• Your AT&T Home Base does not support incoming/outgoing fax service
or home alarm systems.
• Your AT&T Home Base does not support rotary or pulse-dialing phones.
Details on using voicemail and transferring a landline phone number can be
found on pages 11-12.
8
STEP 3: Connect to the Internet
Select Your Internet Connection
To Connect via Wi-Fi:
1. Open the Wi-Fi network manager on
your computer or Wi-Fi enabled device.
2. Find and select the AT&T Home Base
Wi-Fi network name (SSID)
(e.g., ATT-HOMEBASE-XXXX).
Wi-Fi Networks
ATT-HOMEBASE-XXXX
Other Network
Guest WiFi
Free Public WiFi
To Connect via Ethernet:
Use an Ethernet cable (not included) to connect your computer or other
device to the Ethernet port on the back of your AT&T Home Base. Go to
att.net (or your favorite website) to confirm your Internet connection.
Skip Steps 3B and 3C.
To connect via WPS, see page 16.
BEnter Wi-Fi Network Password
When prompted, enter the Wi-Fi password found on the bottom of the
AT&T Home Base.
9
CA

STEP 3: Connect to the Internet (continued)
CConfirm Internet Connection
Go to att.net (or your favorite website) to confirm your Internet connection.
When your device is transmitting to and from the Internet, the Wi-Fi light will
flicker green.
Important Internet Tips
• To check your data usage or manage your account, go to att.com/myatt.
• To customize your device settings, view important messages about your AT&T
service plan, and check your data usage, use the AT&T Home Base Manager.
On any device connected to the AT&T Home Base, enter http://att.homebase
directly into your browser address field and use “attadmin” as your login.
• To setup a free AT&T email account, go to att.net/signup and select Start Now.
10
Voicemail
Your AT&T Home Base comes with standard wireless voicemail. Follow the steps
below to setup and use your voicemail.
Setup
Dial 1 on any home phone connected to the AT&T Home Base and wait four (4)
seconds to connect to your AT&T wireless voicemail. Simply follow the voice
prompts to complete setup. To enable remote voicemail retrieval and for added
security be sure to create a password during setup.
For more help on setting up your AT&T voicemail, go to att.com/voicemailsetup.
Message Waiting
There are two indicators for a new message waiting: 1) the voicemail icon; and
2) an intermittent dial tone.
The voicemail icon on your AT&T Home Base blinks when a voicemail
message is waiting. You will also hear an intermittent dial tone on any connected
phone handset before placing a call.
Retrieving Messages
To retrieve voice messages, dial 1 on any home phone connected to the AT&T
Home Base and wait four (4) seconds to connect to your AT&T wireless voicemail
box. Simply follow the voice prompts to listen to and manage your messages.
(Alternately, you may dial your 10-digit home phone number to access your
voicemail box.)
Remote Retrieval
To retrieve voicemail messages from a phone not connected to the AT&T Home
Base, dial
the number associated with your AT&T Home Base service. When
voicemail picks up, press *.
You will then be prompted to enter your password.
Simply follow the prompts to listen to and manage your voicemail messages.
11

Transferring a Phone Number
Transferring a landline phone number to your AT&T Home Base can take about
four (4) days. Outgoing calls can be made immediately using your AT&T Home
Base, however incoming calls (including 911) will continue through your old service
until the transfer is complete. Keep a phone connected to your wall jack or prior
service to continue to receive incoming calls until the transfer is complete. To
check the status of your transfer, visit att.com/port.
AT&T Home Base Manager
The AT&T Home Base Manager allows you to easily manage your AT&T Home
Base. You can:
• Customize settings
• Change your Wi-Fi network name and password
• Check signal strength, data usage, and important messages from AT&T
• Get help and information
To access the AT&T Home Base Manager, first connect to your AT&T Home Base.
In your browser address field, enter http://att.homebase and log in using
“attadmin” (Note: You can customize the login that is used to access the
AT&T Home Base Manager by going to Settings > Advanced > Administrator).
12
The AT&T Home Base Manager includes a navigation panel on the left side of the
screen, which contains the following sections:
• Home – displays general device information and help.
• Connected Devices – view devices currently connected to your AT&T Home
Base and block/unblock devices from connecting.
• Data Used – check your billing month-to-date data usage and days remaining in
your billing cycle.
• Call Log – view incoming, outgoing, and missed calls placed to and from your
AT&T Home Base.
• Messages – view messages from AT&T about your service plan (See Important
Messages on page 17).
• Settings – customize your device’s Wi-Fi and security settings (See Device
Configuration on page 34).
• About Your Home Base – get details regarding current device status and
information.
• AT&T Software Update – view software updates that are delivered
automatically over the AT&T cellular network.
13
Using Your Device
Calling
Making Calls
Using a phone connected to your AT&T Home Base, place and receive calls as you
normally would. The AT&T Home Base supports both cordless and corded phone
dialing methods.
Note: Make sure to dial the 10-digit phone number, including area code.
Three-Way Calling
While on an existing call, press the Flash (or Phone/Talk) key on your phone to put
the first party on hold. When you hear a dial tone, dial the second party’s number
(wait up to four [4] seconds). When the second party answers, press the Flash (or
Phone/Talk) key again to complete the three-way connection. If the second party
does not answer, press the Flash (or Phone/Talk) key to end the connection and
return to the first party.
Note: If your phone does not have a Flash (or Phone/Talk) key, use the off-hook
mechanism supported by your phone instead
.
Call Waiting
You will hear two tones if someone calls while you are already on a call.
To hold the current call and accept the waiting call, press the Flash (or Phone/
Talk) key. You can press the Flash (or Phone/Talk) key anytime to switch back
and forth between calls.
To clear the current call and accept the waiting call, enter “1“ and press the Flash
(or Phone/Talk) key.
To reject (User Busy) the waiting call, enter “0“ and press the Flash (or Phone/
Talk) key.
14
Notes:
• Your AT&T Home Base comes with standard three-way calling and call
waiting. Operation of these features will vary depending on your home phone
equipment.
• If your phone does not have a Flash (or Phone/Talk) key, then use the off-hook
mechanism supported by your phone.
Call Forwarding
To forward all calls, dial:
1. *21*
2. The 10-digit number to which you wish to forward your calls
3. # key
(Example: *21*1234567890# forwards your calls to the phone number
123-456-7890)
Please wait at least three (3) seconds and you hear a confirmation tone for the
forwarding to complete before hanging up.
To un-forward calls, dial #21#, please wait at least three (3) seconds and you hear
a confirmation tone for the un-forwarding to complete before hanging up.
Note:
Applicable wireless minute plan rates apply to forwarded calls.
Call Log
You can view incoming and outgoing calls placed to and from your AT&T Home
Base at att.com/myatt, or on the AT&T Home Base Manager. To view call details
on the AT&T Home Base Manager, enter http://att.homebase directly into your
browser address field on any device that is connected to your AT&T Home Base.
Log in using “attadmin” (or your customized login) and go to Call Log.
15
Internet Access
Connect Other Devices
You can connect up to 10 Wi-Fi enabled devices simultaneously to your AT&T
Home Base, including smartphones, tablets, laptops, etc.
1. Open the Wi-Fi network manager on your Wi-Fi enabled device.
2. Find and select the Wi-Fi network name (SSID) ATT-HOMEBASE-XXXX.
3. When prompted, enter the Wi-Fi password found on the bottom of the
AT&T Home Base.
Connect WPS devices
Wi-Fi Protected Setup (WPS) allows WPS-enabled devices to be connected to a
Wi-Fi network without having to type a Wi-Fi password.
1. With the AT&T Home Base powered on, press and hold the WPS button
for one (1) second.
2. Within two (2) minutes, press the WPS button on the wireless device you
want to connect.
3. Your AT&T Home Base and the wireless device will communicate and
establish the connection.
Connect via Ethernet
To connect via Ethernet, plug one end of your Ethernet cable into the Ethernet
port on your computer and the other end into the Ethernet port on the back of
the AT&T Home Base.
16
Changing Wi-Fi Network Name and Password
You can customize your AT&T Home Base Wi-Fi network name (SSID) and
password using the AT&T Home Base Manager. On any device that is connected
to the AT&T Home Base, enter http://att.homebase directly into your browser
address field and log in using “attadmin” (or your customized login). Go to
Settings > Wi-Fi > Basic to change your network name and Settings > Wi-Fi >
Security to change your password.
Note:
You will need to reconnect all Wi-Fi devices using the new information.
Important Messages
Your AT&T Home Base is able to receive important messages from AT&T regarding
new software updates and your service plan. You are not able to respond or reply
to these messages.
To view your messages, use any device that is connected to the AT&T Home Base
and enter http://att.homebase directly into your browser address field. Log in
using “attadmin” (or your customized login), and go to Messages.
Managing Connected Devices
You can view devices currently connected to your AT&T Home Base and block
and unblock devices using the AT&T Home Base Manager. On any device that is
connected to the AT&T Home Base, enter http://att.homebase directly into your
browser address field. Log in using “attadmin” (or your customized login), and go
to Connected Devices.
17
18 19
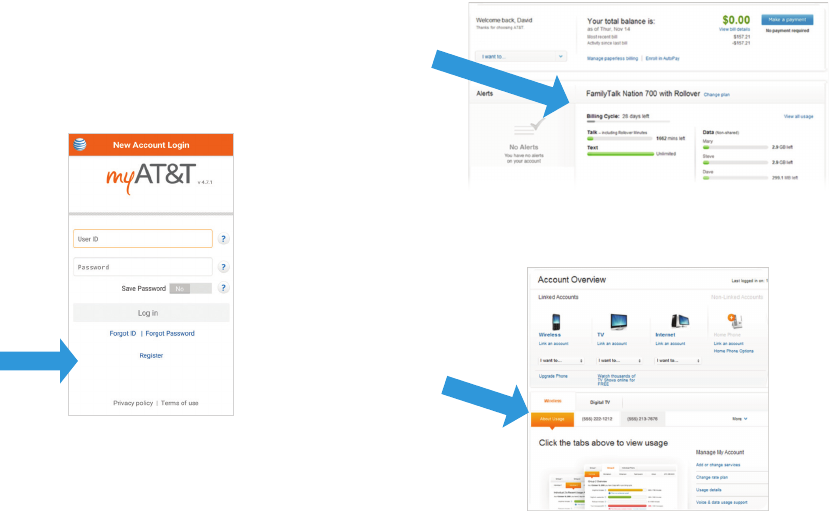
Checking Your Voice and Data Usage
You can check your voice and data plan usage for your current billing cycle by
either downloading the free myAT&T™ app to your smartphone or visiting
att.com/myatt on your computer.
To download the myAT&T app, visit your device app store (Google Play, Apple App
Store, Windows Store) or go to att.com/myattapp from your smartphone. Once
downloaded, you will need to log in to manage your account and review usage
details. Data and messaging rates may apply.
If you go to att.com/myatt on your computer, you will need to log in to manage
your account and review usage details.
If you don’t already have a User ID and password,
select Register.
Then, you will need to follow these steps:
1. Select Wireless/Wireless Home Phone as the
account type and enter the requested information.
2 If you receive a validation code, enter it. Or, enter
the password for the account if requested.
3. If prompted, indicate whether you are the account
owner, meaning your name is on the bill.Or, if you
don’t own the account, provide the account
information to gain access.
4. Create your User ID and Password.
5. Agree to the Terms & Conditions.
Once you have logged on to your account, your voice and data usage will
be displayed.
If you only have wireless service with AT&T, a summary of your usage will be
displayed on the home screen (see below):
If you have multiple services with AT&T, you will need to select Wireless and then
the tab with your AT&T Home Base phone number to view usage details.
If you did not provide an email address for email notifications when you purchased
your AT&T Home Base, you can do so at att.com/myatt. Once you have logged
on to your account, go to Profile and enter a valid email address. You will receive
email notifications when you are approaching your data plan limit or if you have
exceeded your data plan limit. If you have a limited voice plan, you will also receive
notifications as you are approaching your voice plan limit or if you have exceeded
your voice plan limit.
You can also use the AT&T Home Base Manager to check your data plan usage
and view data usage notifications. On any device that is connected to your AT&T
Home Base, enter http://att.homebase directly into your browser address field.
Log in using “attadmin” (or your customized login). To check your data usage
and the days remaining in your billing cycle, go to Data Used. To view data usage
notifications, go to Messages. The “i” light on your AT&T Home Base will blink green
when you have a new notification.
Note: Actual billed usage can be higher than the estimated data usage displayed in
the usage meter.
Helpful Tips
Home Answering Machines
If you choose to use your home answering machine instead of the voicemail
provided by your AT&T Home Base, you will need to set your answering machine
to pick up calls before network voicemail, which is fewer than four (4) rings. If you
have a standalone answering machine, you can connect it to the “Phone 2” port on
the back of your AT&T Home Base.
20
Alternatively, you can call AT&T Customer Service at 1-800-331-0500 to turn off
the network voicemail feature.
Adjusting Volume
Use your home phone’s volume adjustment if available. Alternatively, the volume
of the AT&T Home Base can be adjusted. Six volume levels are available (level 1
to level 6) with the default setting at level 3. While on a call, press ** to decrease
volume or press ## to increase volume. Each time ** or ## is pressed, the volume
level is decreased or increased one volume level.
To exit Volume Setting Mode, press any other key or wait five (5) seconds.
Powering On/Off
The On/Off button is used to turn your AT&T Home Base on or off.
When powered off,
the AT&T Home Base will no longer send or receive calls, but it will continue to
charge
the back-up battery if still connected to the wall outlet.
To turn on your AT&T Home Base, press and hold the On/Off button for three (3)
seconds until the power light stays solid green, if connected to a power supply (it
will blink green if on back-up battery). To turn off your AT&T Home Base, press and
hold the On/Off button for three (3) seconds until all the lights turn off.
TTY Support
TTY (Text Telephony) and TDD (Telecommunications Device for the Deaf) are
supported by the AT&T Home Base. In order to use the TTY network, you must
have a TTY-compatible phone and be in TTY mode. Note that most digital wireless
devices are TTY-compatible.
Dial *983*889*n# to set the TTY mode.
• n = 0: TTY off mode. The standard voice speaking mode and listening mode.
This is the default setting.
• n = 1: TTY full mode. Transmit and receive the TTY characters.
• n = 2:
VCO mode. Receive TTY characters but transmit by speaking into the
speaker.
• n = 3:
HCO mode. Transmit TTY characters but receive by listening to the re
ceiver.
21
To test the condition of your back-up battery, make sure the AT&T Home Base
is powered on. Unplug the AT&T Home Base from the wall power outlet. If the
Power LED immediately starts blinking red, then the back-up battery may need
to be replaced. If the AT&T Home Base does not remain on (no LEDs are lit)
once unplugged from the wall power outlet, then the back-up battery needs to
be replaced.
It is recommended that you test your back-up battery charge at least once per
year and replace if necessary.
To order a replacement back-up battery and for cost and warranty information,
visit att.com and search Home Base battery.
Device Compatibility
The AT&T Home Base is not compatible with wireless messaging services, home
security systems, fax service, medical alert systems, medical monitoring systems,
credit card machines, IP/PBX Phone systems, or dial-up Internet service. May not
be compatible with your DVR/Satellite systems; please check with your provider.
DSL customers should contact their provider before transferring a phone number
to ensure uninterrupted DSL Internet service.
The AT&T Home Base cannot be used to make 500, 700, 900, 976, 0+ collect,
operator-assisted, or dial-around calls (e.g. 1010-XXXX).
In-Home Wiring
Interconnecting to home telephone wiring is not necessary, but is possible;
however, it is not recommended unless you possess sufficient knowledge of
electrical systems. Use with home wiring requires the physical disconnection from
other services, including the landline coming into your home. Use of a qualified
licensed electrician is highly recommended. Improper installation may result in
phone equipment damage or even a fire.
23
22
E911 Service
For emergency calls, you may have to provide your location address to the 911
operator.
Power Outages
The AT&T Home Base has a back-up battery in the event of a power outage
with talk time of approximately 100 minutes and standby time of approximately
18 hours depending on environmental factors. In the event of a power outage
(commercial power no longer being available), the AT&T Home Base will
automatically begin using the back-up battery, provided there is sufficient battery
charge left. If there is no battery charge at the time of the power outage, the device
will not be operable.
To make calls using your back-up battery, you must plug a corded phone or
landline phone into the “Phone 1” or “Phone 2” port on the AT&T Home Base.
The AT&T Home Base will disable Wi-Fi to conserve power while using the back-
up battery when there are no devices connected. To re-enable Wi-Fi while using
the back-up battery, press the On/Off button for one (1) second. Or, if power is
available, plug the AT&T Home Base into an electrical wall outlet.
If you experience a power outage and your back-up battery is fully depleted, it will
be necessary to restart your device when power is restored by pressing and holding
the On/Off button for three (3) seconds until the power light stays solid green.
Back-up Battery
A new back-up battery should last for approximately 5 years, but the life of
any back-up battery can be adversely affected by environmental conditions
like moisture and heat. To get the longest service from your back-up battery,
do not place the AT&T Home Base in direct sunlight or in wet or extremely
cold environments.
Important Information
Frequently Asked Questions
What kind of phone do I need to work with the AT&T Home Base?
Most standard touch-tone phones may be used. Rotary phones are not
supported. Cordless phone systems provide the most flexibility and allow you to
easily place additional handsets throughout your home. Cordless phone systems
still need to be plugged into a power outlet. A standard corded phone can be used
if you just need one phone in your home.
During a power outage, a standard corded phone which doesn’t require electrical
power is needed.
How do I install my AT&T Home Base?
Refer to pages 4-10 of this guide for the most common installation methods.
Other helpful information:
• Installation near a window or outside wall is strongly recommended to ensure the
strongest possible wireless signal in order to maximize voice/data performance.
• If the AT&T Home Base signal strength indicator does not display high signal
strength (Green) or voice/data performance is unacceptable, you may need to
relocate the device to another part of the home with a stronger wireless signal.
Will my AT&T Home Base work in areas with no or low wireless signal strength?
A strong wireless signal (Green) is recommended for optimal performance.
A moderate signal (Yellow) may be sufficient. If you do not see a green light, you
may want to choose an alternate location.
Does the AT&T Home Base support both voice and data?
Yes, you can use your AT&T Home Base for both voice and data, as long as you
subscribe to AT&T Wireless Home Phone and Wireless Home Internet plans for
the Home Base.
24
Why don’t I see the name of the caller on caller ID?
The AT&T Home Base, similar to other wireless devices, supports calling number
identification.
However, contact names stored on your cordless home phone may display for
incoming calls
.
Can I move my AT&T Home Base and use it in another location?
Yes, you can use your device anywhere in the U.S. where AT&T is authorized to
provide wireless services. All you need is a power outlet and strong AT&T
wireless signal.
When I dial a seven-digit number using the AT&T Home Base, I get a message
that the number cannot be completed as dialed. Does the AT&T Home Base
support seven-digit dialing?
The AT&T Home Base requires 10-digit dialing for domestic calls in most areas.
Can I make international calls with my AT&T Home Base?
Yes. To add international calling to your account, please call 611 from your
connected phone, or 1-800-331-0500.
Can I use my AT&T Home Base internationally?
No. Use is limited to the United States, Puerto Rico, and U.S. Virgin Islands.
What is the warranty on the AT&T Home Base?
The AT&T Home Base has a 12-month limited warranty. For details, see page 54.
I can’t make or receive calls with my AT&T Home Base. What should I do?
Please follow the troubleshooting steps in this User Guide. If further assistance
is required, call 1-800-331-0500.
25

How many devices can I connect to my AT&T Home Base?
There are two phone ports to connect your phone or answering machine. For
data, you can connect up to 10 devices via Wi-Fi simultaneously and one device
via Ethernet.
How can I check my data speed?
You can check your data speed by visiting att.com/speedtest.
Will connecting additional devices affect my data speed?
Yes, active use of multiple devices will decrease your data speeds.
Can I change my Wi-Fi network name and password?
Yes, you can change your Wi-Fi network name and password using the AT&T Home
Base Manager. From any connected device, enter http://att.homebase directly
into your browser address field and log in using “attadmin” (or your customized
login). Go to Settings > Wi-Fi > Basic to change your network name and Settings >
Wi-Fi > Security to change your password.
How do I know how much data I’ve used?
To check your data plan usage for your current billing cycle, go to att.com/myatt.
You can also view your data usage and the days remaining in your billing cycle
using the AT&T Home Base Manager. From any connected device, enter http://att.
homebase directly into your browser address field and log in using “attadmin” (or
your customized login), and go to Data Used.
Once I’ve reached the maximum amount of data in my plan, can I continue to
use my AT&T Home Base for data?
Yes, but overage charges will apply. To upgrade your data plan, visit att.com/myatt.
26
Troubleshooting
General
Problem Possible Solution
None of the LEDs
are illuminated
• Make sure there is AC power to the AT&T Home Base.
Do not connect to an AC outlet controlled by a wall
switch.
• Press and hold the On/Off button on the back of the
AT&T Home Base for three (3) seconds until the Power
light stays solid green.
Red signal strength
indicator
• Move your device to another area with sufficient
network signal (Green or Yellow Signal Strength light).
Blinking Red signal
strength indicator
• SIM is missing or not installed properly.
1) Remove the bottom of the device and back-up
battery.
2) Locate the SIM card slot and insert the SIM card
into the slot until secure. The SIM card will click
and lock in place when properly installed in the
correct orientation.
• SIM card may be invalid or damaged and need to
be replaced. For a replacement SIM card, take your
AT&T Home Base to your local AT&T store. Or, call
AT&T Customer Care at 1-800-331-0500.
SIM Card doesn’t
work in my mobile
device
•
The SIM card provided with your AT&T Home Base is
intended for use only in your specific AT&T Home Base
and cannot be used in a mobile handset.
27

Phone
Problem Possible Solution
No dial tone • Make sure there is AC power to the AT&T Home Base.
Do not connect to an AC outlet controlled by a wall
switch.
• Make sure your AT&T Home Base is powered on.
Press and hold the On/Off button on the back of your
device for three (3) seconds until the Power light stays
solid green.
• Make sure your cordless phone has power and is
connected properly to the AT&T Home Base.
• Move the AT&T Home Base to an area with sufficient
network signal (Green or Yellow Signal Strength light).
Caller Number ID
only
• Like all wireless services, only the calling number is
displayed with Caller ID.
• Your home phone may support the display of names
stored in its contacts memory.
My answering
machine won’t
pick up calls
•
Set your answering machine settings to pick up calls
before network voicemail, which is approximately four
(4) rings.
•
Or, you can have network voicemail removed from your
account by calling AT&T Customer Care. Dial 611 from
your connected phone or 1-800-331-0500.
28
Phone
Problem Possible Solution
Poor voice quality
•
Use the phone cable included with the AT&T Home Base.
• Make sure all connections are firmly in place.
• Move your AT&T Home Base to an area with sufficient
network signal (Green or Yellow Signal Strength light).
• Increase the distance away from other electronic
devices and the AT&T Home Base (including cordless
base stations, Wi-Fi routers, and cell phones).
• Move the AT&T Home Base near a window with a clear
unobstructed view of the sky and remove any objects
that may be obstructing the wireless signal.
• Make sure the home phone that is connected to the
AT&T Home Base is of good quality and in good
working order.
• Voice quality may degrade with a low battery charge.
Connect to an AC power source to recharge when
power is available.
Message Waiting
indicator on my
home phone
doesn’t light
• The AT&T Home Base does not support this
functionality with your home phone.
• The AT&T Home Base has a dedicated voicemail light
that will blink when you have a new voice message; you
will also hear an intermittent dial tone when you pick up
your handset.
29

Phone
Problem Possible Solution
I hear an
intermittent
dial tone
• You will hear an intermittent dial tone when you have a
new voicemail message waiting.
• Dial 1 from your home phone that is connected to the
AT&T Home Base to listen to your voice messages.
My phone doesn’t
ring when a call
comes in
• If you recently transferred your landline phone number,
you will continue to receive incoming calls on your
previous service until the transfer is complete. To check
transfer status, visit att.com/port.
• Make sure your AT&T Home Base is NOT connected to
your in-home phone wiring.
• Make sure your home phone is powered on and
connected to the AT&T Home Base.
• Your AT&T Home Base number may be set to Call
Forward. Dial #21# to un-forward calls.
I hear a constant
low frequency tone
(not dial tone)
when I try to place
a call
• Hang up your home phone to restore dial tone.
30
Internet
Problem Possible Solution
Can’t access
the Internet
• Make sure your AT&T Home Base is powered on. Press and
hold the On/Off button on the back of your device for three
(3) seconds until the Power light stays solid green.
• For Wi-Fi: Make sure your AT&T Home Base is located in the
general area of your Wi-Fi enabled device(s). Check that your
device is connected to the AT&T Home Base Wi-Fi network
(ATT-HOMEBASE-XXXX) and you are using the correct Wi-Fi
Password. For Ethernet: Make sure the Ethernet cable is
securely inserted into the Ethernet port on the back of the
AT&T Home Base and your computer (or other device).
• Move the AT&T Home Base to an area with sufficient network
signal (Green or Yellow Signal Strength light).
• Make sure the Wi-Fi light is on. If not, restart your AT&T Home
Base. Press and hold the On/Off button for three (3) seconds
until all lights turn off. Then, press and hold the On/Off button
for three (3) seconds until the power light stays solid green.
• Check the following on the AT&T Home Base Manager
(http://att.homebase):
• Under Settings > Wi-Fi > Basic: “Wi-Fi Broadcast” is set
to “On”
• Under Settings > Network > APN: Profile selection is set
to “ATT Nextgenphone”
• Under Settings > Firewall > Mac/IP/Port Filtering: Check
that the IP and MAC address of your device are not blocked
by the firewall.
31

Internet
Problem Possible Solution
Download or
upload speeds
are slow
• Check your speed at att.com/speedtest.
• Check your signal strength light. If not green or yellow,
choose an alternate location.
• Other connected devices may be transferring a large
amount of data. To view and block other connected
devices, go to the AT&T Home Base Manager
(http://att.homebase) under Connected Devices.
• A phone call in progress may slow down the data speed.
• Check your wireless network connection using the AT&T
Home Base Manager (http://att.homebase). 4G LTE
offers the fastest data speeds and if available, the AT&T
Home Base should be located in a covered area.
The AT&T Home
Base Network
does not appear
in the wireless
network list
• Make sure the AT&T Home Base is powered on. Power
light should be solid green if connected to a power
outlet (or blinking green if on back-up battery).
• Refresh the network list on the device you are trying to
connect.
• Restart your AT&T Home Base: Press and hold the On/
Off button for three (3) seconds until all lights turn off.
Then, press and hold the On/Off button for three (3)
seconds until the power light stays solid green.
32
Internet
Problem Possible Solution
Can’t connect
to my AT&T
Home Base
•
Check that you are connecting to your AT&T Home Base
Wi-Fi network name (SSID) (e.g. ATT-HOMEBASE-XXXX).
If connected via Ethernet, make sure the Ethernet cables
are firmly attached.
•
Make sure you entered the correct Wi-Fi password
found on the bottom of your device or your customized
password, if you changed it.
Can’t access the
AT&T Home Base
Manager
• Make sure you are trying to access on a device that is
currently connected to your AT&T Home Base either via
Wi-Fi or Ethernet connection.
• Make sure you have entered the correct URL
(http://att.homebase or http://192.168.0.1) directly into
your browser address field on your connected device.
• Make sure you have entered the correct login, either
“attadmin” or your customized login. If you changed the
login and forgot it, you will need to restore the device to
the factory default settings. Remove the bottom cover
of your device and using a ballpoint pen, press and hold
the RESET button for five (5) seconds. You may then log
in using the default login “attadmin.”
33
Device Configuration
You can manage your AT&T Home Base settings using the AT&T Home Base Manager.
To access, first connect to your AT&T Home Base and enter http://att.homebase
directly into your browser address field. Log in using “attadmin” (or your customized
login).
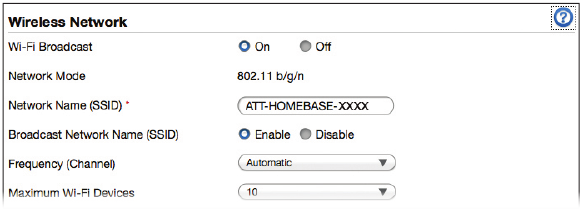
Wi-Fi Settings
You can manage your AT&T Home Base Wi-Fi Settings under Settings > Wi-Fi.
Wi-Fi - Basic
Wi-Fi Broadcast: Enable or disable Wi-Fi connectivity.
Network Mode: Indicates which mode is active for connecting via Wi-Fi. The
default is 802.11b/g/n Mixed Mode.
Network Name (SSID): Shows the Wi-Fi network name (SSID), which is broadcast
by the device to allow Wi-Fi enabled devices to identify and connect to it. You can
change the Network Name by typing the desired name directly into the text box.
Broadcast Network Name (SSID): If this setting is enabled, the AT&T Home Base
appears in the list of available Wi-Fi networks on your Wi-Fi enabled devices. If
disabled, the network will not appear.
34
Frequency (Channel): This should be left onAutomaticunless you need to
choose a particular channel for your environment.
Maximum Wi-Fi Devices: Specify how many devices can simultaneously connect
to the AT&T Home Base.
Be sure to click “Apply” after you’ve made changes.
Wi-Fi - Connections
View devices that are currently connected to your AT&T Home Base and block and
unblock devices from having access.
The following information is displayed for each connected device:
Device Name: If you have assigned a name to the connected device, the
assigned name will appear. If the device name is unavailable, you will need to
refer to the MAC Address to identify your device.
MAC Address: A unique network identifier for the connected device.
IP Address: IP address of the connected device.
Block a Device: Checking the “Block Access” box and clicking “Apply” disconnects
the connected device and prevents it from re-connecting to the AT&T Home Base.
The blocked device will then appear in the Blocked Wi-Fi devices list.
Blocked Wi-Fi Devices List: Lists any devices you have blocked from having
access to your AT&T Home Base. Note that since these devices are not currently
connected and are blocked from connecting, they do not have an IP address.
Instead, they are identified by their MAC Address.
Unblock: Checking the “Unblock Access” box and clicking “Apply” unblocks a
previously blocked device, freeing it to connect to the AT&T Home Base again. The
unblocked device is deleted from the Blocked Wi-Fi devices list and will reappear
in the Connected Devices list when it connects.
35
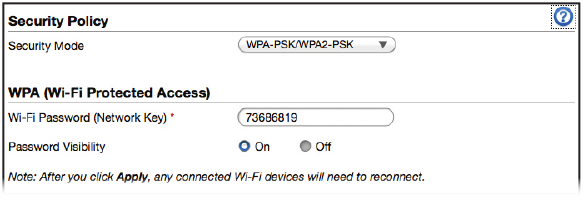
Wi-Fi - Security
Security settings will apply to all connected devices. If you change these settings,
existing connected devices may lose their connection.
Security Mode: Select the desired Wi-Fi security option.
WPA-PSK/WPA2-PSKis the latest and most secure method and should be
used if possible.No encryptionallows other people to monitor your Wi-Fi
traffic and use your data plan to access the Internet. If at all possible, its use
should be avoided.
Wi-Fi Password (Network Key): If WPA-PSK/WPA2-PSK was selected in the
Security Mode field, a Wi-Fi password is displayed. This password will need to be
entered on any device needing to connect to the AT&T Home Base via Wi-Fi. You
can change the Wi-Fi password by typing a new password directly into the text box.
Password Visibility: If this setting is enabled (On), the Wi-Fi password is readable
on the screen. If disabled (Off), the password appears as ••••••••.
36
Wi-Fi - WPS
WPS, or Wi-Fi Protected Setup, is a standard that allows easy establishment of
a secure wireless home network. This feature is set to Enable by default. If you
change these settings, existing connected devices may lose their connection.
WPS: You may Enable or Disable WPS by selecting the desired option and clicking
“Apply.” When enabled, the following secondary options will appear:
WPS Mode: You may select either PIN or PBC (Push-Button Connection) by
selecting the desired option and clicking “Apply.”
PIN: If selected, you will need to specify a 4-digit or 8-digit PIN that other
devices will require to connect via this method. Enter the desired PIN
in the “Client PIN” field, then click “Apply.”
PBC: If selected, this will act in the same way as manually pushing the
WPS button on the back of the AT&T Home Base. Within two (2) minutes,
you will need to activate WPS on the device you wish to connect to the
AT&T Home Base via a physical or virtual button in order to complete the
connection process.
Note: Refer to your connecting device’s documentation for specific information
on how to complete the WPS process on the desired device.
37

Network
These settings affect the connection to the mobile (wide area) network or WAN.
Network - Connections
The AT&T Home Base automatically selects the optimal mobile network.
Mobile Data: You can set whether to enable or disable data access on your
AT&T Home Base.
Standard Data: Enables mobile data such as email and web browsing over
the cellular network. Data charges may apply.
Enhanced 4G LTE Services: Enables enhanced voice and communications
over the cellular network (where available). Data charges may apply. The
default setting is “On” and should not be changed unless you are instructed
to do so by AT&T Customer Care Service for troubleshooting purposes.
Signal Strength: Indicates the type of network connection the AT&T Home Base
is currently using. There is also a Signal Strength value based on current conditions.
38
Network - APN
This APN is pre-configured to access the AT&T network. You should not change
the APN unless you have a corporate account (with your own APN). If you need
to manually add an APN, click Add, fill in the appropriate information described
below, click Save, and when selected in Profile Selection, you can click Set
Default to make it the default APN used by the AT&T Home Base.
Profile Selection: The default profile is the AT&T network, ATT Nextgenphone,
and cannot be edited.
Profile Name: The desired name used to select your custom APN from the
Profile Selection drop down list.
APN: The APN associated with the selected profile. Enter the appropriate
APN here.
DNS: Select Auto DNS or Manual DNS. Use this setting to enable or disable the
Manual DNS feature. If enabled, provide the following data:
Primary DNS: Enter the IP address of the desired primary DNS. This address
is required if you select theManual DNS check box.
Secondary DNS: Enter the IP address of the desired secondary DNS. This
address is optional and may be left blank if desired.
39
Network - APN (continued)
Authentication: Select the option specified by your service provider:
• None
• CHAP
• PAP
User Name: If the Authentication isNone, this can be left blank. Otherwise, enter
the value specified by your service provider.
Password: If the Authentication isNone, this can be left blank. Otherwise, enter
the value specified by your service provider.
Set Default: After choosing one of the saved profiles from the Profile Selection
dropdown, click “Set Default” to set it as your default APN used whenever AT&T
Home Base powers on.
Save: Any changes made to the currently selected profile (except the default
ATT Nextgenphone APN profile) can be saved.
Add: Click this button to create a new profile in the dropdown called “Add new”
which you can then modify and save.
Delete: Deletes the currently selected profile. A dialog box will pop up allowing
you to confirm or cancel deleting the selected profile.
40
Firewall
A firewall protects your connected devices against malicious incoming traffic
from the Internet. The firewall cannot be disabled, but the following settings
are available.
Firewall - MAC/IP/Port Filtering
You can Enable or Disable the MAC/IP/Port Filtering feature as needed to block
certain Internet traffic. If this setting is enabled, you can then choose whether
traffic is Accepted or Dropped by default by selecting the appropriate option
from the Default Policy dropdown.
Default Policy:
Accepted: Internet traffic is allowed by default. Only traffic from the selected
applications will be blocked from accessing the Internet. Traffic is identified
by port numbers. Some applications are pre-defined. You can define
additional applications by clicking the “Add Custom Application” button, but
you need to know details of the traffic used and generated by the applications
you wish to define. In particular, you need to know the port numbers and the
protocol (TCP, UDP) used by outgoing traffic.
Dropped: Internet traffic is blocked by default. Only traffic from the selected
pre-defined or custom applications are allowed to access the Internet.
Applications: Use these check boxes to deny or allow access to the Internet for
each application, as an exception to the selected Default Policy of accepting or
dropping Internet traffic.
41
Firewall - MAC/IP/Port Filtering (continued)
Custom Applications: This feature allows you to define your own applications.
Once defined, these applications can be enabled and disabled the same way as
pre-defined applications. To define an application, you need to know the ports and
protocol (TCP, UDP) used by the application for outgoing traffic. To start, click the
Add Custom Applicationbutton, then provide the following data:
MAC Address: A network identifier unique to each device’s hardware.
Destination IP Address: The internal IP address where traffic will be
filtered to.
Source IP Address: The source IP address that traffic will be filtered from.
Protocol: You can select from None/TCP/UDP/ICMP as the traffic type you
would like to filter.
Destination Port Range: The range of ports that traffic will be filtered to.
Enter the beginning and end of the port range for each application.
– For a single port, enter the port number in both fields.
– For a port range, enter the beginning of the range in thefirstfield and the
end of the range in thesecondfield.
Source Port Range: The range of ports that traffic will be filtered from.
Action: Selecting Drop or Accept will determine if the rule will allow or block
traffic based on the criteria specified.
Comment: Here you will need to add a name or description to the rule in
order to click “Apply” to save and implement the rule.
42
Firewall - Port Forwarding
Port Forwarding allows for specific external ports on the AT&T Home Base to be
mapped to specific ports on a specific device on the internal network. You can
have a maximum of 10 Port Forwarding/Virtual Server rules in the system.
You can enable or disable Port Forwarding to allow certain devices to act as virtual
servers within the internal AT&T Home Base network.
If you select Enable, the Virtual Server Settings will appear:
IP Address: Enter the internal IP address (i.e. 192.168.1.101) that you would like
traffic from a specific external port directed to internally.
Port Range: Enter the starting and ending port numbers that will be directed
to the internal device.
Protocol: You may pick TCP, UDP, or TCP+UDP traffic types to be directed.
Comment: Enter a comment or label to be saved with this custom port
forwarding rule.
Be sure to click “Apply” to confirm your configuration.
43
Firewall - DMZ
The DMZ, or De-Militarized Zone, is a selected internal IP address of a device that
allows full access and connectivity from outside traffic, through the firewall, to a
specific internal device without being filtered or blocked by the AT&T Home Base.
DMZ Settings: You may choose to enable or disable the DMZ setting here.
DMZ is set to Disable by default.
DMZ IP Address: Enter the internal IP address of the desired device that will be
directly accessible from outside the firewall.
44
Advanced
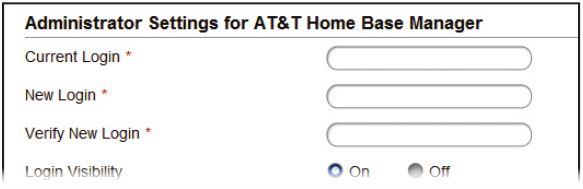
Advanced - Administrator
This page allows you to change the default login (attadmin) that is used to access
the AT&T Home Base Manager.
Current Login: Enter the current login for the AT&T Home Base Manager in this
field. The default login is “attadmin.”
New Login: Enter the new login, using only letters, numbers, and standard
punctuation symbols. The password must be at least four (4) characters long. The
maximum length is 32 characters.
Verify New Login: Re-enter the new login in this field, then click “Apply.”
Note: Once you change the default login, there is no way to retrieve the new
login. You must reset the AT&T Home Base to its factory settings to restore the
login to the default login “attadmin.” Remove the bottom cover of your AT&T
Home Base and using a ballpoint pen, press and hold the RESET button for
five (5) seconds.
Login Visibility: If this setting is enabled (On), the Login is readable on the screen.
If disabled (Off), the Login appears as •••.
45
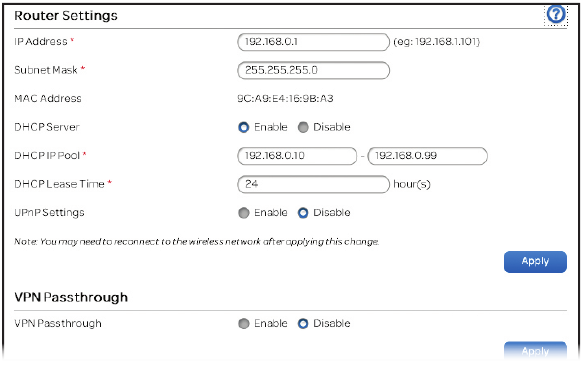
Advanced – Router
IP Address: The IP address for this device as seen from the local network.
IP Address: The IP address for this device, as seen from the local network. This
is set to a default value.
Subnet Mask: The default value 255.255.255.0 is standard for small (class “C”)
networks.
MAC Address: The MAC Address is a network identifier. This read-only field
displays the MAC Address for the Wi-Fi interface on this device.
DHCP Server: This option is set to Enable by default. The DHCP server allocates
an IP address to each Connected Device.
DHCP IP Pool: This is the IP address range used by the DHCP server. This indicates
the range of IP addresses which may be allocated to connected devices.
46
DHCP Lease Time: This specifies the time period (in hours) for how long each
device is assigned an internal IP address.
UPnP: Universal Plug and Play (UPnP) is a set of networking protocols that permits
networked devices to discover each other’s presence on the network. The default
value for this setting is Disable.
VPN Passthrough: This feature allows VPN client software on connected devices
to connect through this device to remote VPN servers. Normally, this option
should be set to Enabled.
Advanced – Time/Date
Current Local Time: Displays the current date and time on the device.
Time Set Mode: Select from Manual Set Time or SNTP Auto Synchronization to
determine how the AT&T Home Base determines local time.
Manual Set Time – Selecting this option will allow you to manually set the
Month, Day, Year, Hour, Minute, and AM/PM parameters for your local time.
Click “Apply” for changes to take effect.
SNTP Auto Synchronization – SNTP, or Simple Network Time Protocol, is
used to allow synchronization of the date and time between your device and
the system time on the network. You can pick up to three SNTP Servers you
want your device to synchronize with, including specifying a server not listed
by selecting “Other” from the dropdown and typing in the server address. You
can also set the Time Zone and Daylight Saving Time status.
Advanced – Device Reset
This screen provides the ability to reset all settings to the factory default values
and restart the device.
Device Reset: Click theResetbutton to reset all settings to their factory default
values. This causes a restart, and changes the current Wi-Fi settings if they do
not match the factory default values. In this case, all connected devices need to
reconnect using the default Wi-Fi settings.
Restart Device: Click theRestartbutton to power off and restart the device.
47

Specifications
Dimensions (W×D×H)
5.43" (W) × 5.43" (D) × 1.18" (H)
Weight
11.6 oz. (including back-up battery)
Back-up Battery
1,500 mAh
Talk time
approximately 100 minutes
Standby time
approximately 18 hours
Note: The value of the talk time or standby time varies with the actual environment.
48
Safety Instructions
• Some electronic devices may be susceptible to electromagnetic interference.
Locate the router away from TV set, radio and other electronic equipment to
avoid electromagnetic interference.
• The router may interfere with medical devices like hearing aids and pacemakers.
Consult a physician or the manufacturer of the medical device before using
the router.
• Please keep yourself at least eight (8) inches away from router.
• Do not use your router in dangerous environments such as oil terminals or
chemical factories where there are explosive gases or explosive products
being processed.
• Please use original accessories or accessories that are authorized by ZTE.
Unauthorized accessories may affect the router performance, damage the
router or cause danger to you.
• Do not attempt to dismantle the router. There are no user serviceable parts.
• Do not allow the router or accessories to come into contact with liquid or
moisture at any time. Do not immerse the router in any liquid.
• Do not place objects on top of the router. This may lead to overheating of the
device.
• The device must be placed in ventilated environment for use.
• Do not expose the router to direct sunlight or store it in hot areas. High
temperature can shorten the life of electronic devices.
• Do not allow children to play with the router or charger.
• Keep the length of the cable between the router and the phone less than
11 yards.
• The router is for indoor use only. Do not use the router outside. Do not connect
telephone extensions which run outside of the building. These can result in
lightning damage to your unit.
49
Radio Frequency (RF) Energy
This device meets the government’s requirements for exposure to radio waves.
This device is designed and manufactured not to exceed the emission limits for
exposure to radio frequency (RF) energy set by the Federal Communications
Commission of the U.S. Government:
The exposure standard for wireless mobile devices employs a unit of
measurement known as the Specific Absorption Rate, or SAR. The SAR limit set
by the FCC is 1.6 W/kg.*
While there may be differences between the SAR levels of various devices and at
various positions, they all meet the government requirement.
The FCC has granted an Equipment Authorization for this device with all reported
SAR levels evaluated as in compliance with the FCC RF exposure guidelines. SAR
information on this device is on file with the FCC and can be found under the
Display Grant section of http://www.fcc.gov/oet/ea/fccid/ after searching
FCC ID: Q78-Z700.
* Tests for SAR are conducted using standard operating positions accepted by the FCC with
the device transmitting at its highest certified power level in all tested frequency bands.
Although the SAR is determined at the highest certified power level, the actual SAR level of
the device while operating can be well below the maximum value. This is because the device
is designed to operate at multiple power levels so as to use only the power required to reach
the network. In general, the closer you are to a wireless base station antenna, the lower the
power output.
50
FCC Regulations
This device complies with part 15 of the FCC Rules. Operation is subject to the
following two conditions: (1) This device may not cause harmful interference, and
(2) this device must accept any interference received, including interference that
may cause undesired operation.
This device has been tested and found to comply with the limits for a Class B
digital device, pursuant to Part 15 of the FCC Rules. These limits are designed
to provide reasonable protection against harmful interference in a residential
installation. This equipment generates, uses and can radiate radio frequency
energy and, if not installed and used in accordance with the instructions, may
cause harmful interference to radio communications. However, there is no
guarantee that interference will not occur in a particular installation. If this
equipment does cause harmful interference to radio or television reception, which
can be determined by turning the equipment off and on, the user is encouraged to
try to correct the interference by one or more of the following measures:
• Reorient or relocate the receiving antenna.
• Increase the separation between the equipment and receiver.
• Connect the equipment into an outlet on a circuit different from that to which
the receiver is connected.
• Consult the dealer or an experienced radio/TV technician for help.
Changes or modifications not expressly approved by the party responsible for
compliance could void the user‘s authority to operate the equipment.
51
RF Exposure Information
This device meets the government’s requirements for exposure to radio waves.
This device is designed and manufactured not to exceed the emission limits for
exposure to radio frequency (RF) energy set by the Federal Communications
Commission of the U.S. Government.
This device complies with FCC radiation exposure limits set forth for an
uncontrolled environment.
52
CTIA
• Do not disassemble or open, crush, bend or deform, puncture or shred.
• Do not modify or remanufacture, attempt to insert foreign objects into the
battery, immerse or expose to water or other liquids, expose to fire, explosion or
other hazard.
• Only use the battery for the system for which it is specified.
• Only use the battery with a charging system that has been qualified with the
system per CTIA Certification Requirements for Battery System Compliance
to IEEE 1725. Use of an unqualified battery or charger may present a risk of fire,
explosion, leakage, or other hazard.
• Do not short circuit a battery or allow metallic conductive objects to contact
battery terminals.
• Replace the battery only with another battery that has been qualified with the
system per this standard, IEEE-Std-1725. Use of an unqualified battery may
present a risk of fire, explosion, leakage, or other hazard.
• Promptly dispose of used batteries in accordance with local regulations
• Battery usage by children should be supervised.
• Avoid dropping the phone or battery. If the phone or battery is dropped,
especially on a hard surface, and the user suspects damage, take it to a service
center for inspection.
• Improper battery use may result in a fire, explosion, or other hazard.
For those host devices that utilize a USB port as a charging source, the host
device’s user manual shall include a statement that the phone shall only be
connected to CTIA certified adapters, products that bear the USB-IF logo or
products that have completed the USB-IF compliance program.
53

Warranty
ZTE offers you a limited warranty that the enclosed subscriber unit and its
enclosed accessories will be free from defects in material and workmanship for
a period that expires one (1) year from the date of sale of the Product to you,
provided that you are the original end-user purchaser of the Product and provided
that your purchase was made from a supplier authorized by the Seller. Transfer or
resale of a Product will automatically terminate warranty coverage with respect to
that Product. This limited warranty is not transferable to any third party, including
but not limited to any subsequent purchaser or owner of the Product. This limited
warranty is applicable only to end users in the United States.
This product or phone is warranted for 12 months from date of purchase.
For warranty service information, please call ZTE service number (877) 817-1759
(toll-free). The manufacturer’s website, http://www.zteusa.com, is also
available for assistance.
This warranty only applies if the product has been used in accordance with the
manufacturer’s instructions under normal use and with reasonable care.
What this warranty does not cover:
a) Defects or damages resulting from the misuse of this product.
b) Defects or damages from abnormal use, abnormal conditions, improper
storage, exposure to moisture, dampness or corrosive environments,
unauthorized modifications, unauthorized repair, neglect, rough handling,
abuse, accident, alteration, improper installation, incorrect voltage
application, food or liquid spoilage, acts of God.
c) Normal wear and tear.
d) If the Product has been opened, modified or repaired by anyone other than
a warranty service center or if it is repaired using unauthorized spare parts.
e) If the serial number or mobile accessory date code has been removed,
erased, defaced, altered, or are illegible in any way subject to sole judgment
of ZTE.
54
LIMITED WARRANTY
TO THE EXTENT PERMITTED BY APPLICABLE LAW, THIS LIMITED WARRANTY
IS YOUR SOLE AND EXCLUSIVE REMEDY AGAINST ZTE AND ZTE’S SOLE AND
EXCLUSIVE LIABILITY IN RESPECT OF DEFECTS IN PRODUCT. HOWEVER, THIS
LIMITED WARRANTY SHALL NOT EXCLUDE NOR LIMIT ANY OF YOUR LEGAL
(STATUTORY) RIGHTS UNDER THE APPLICABLE NATIONAL LAWS.
TO THE EXTENT PERMITTED BY APPLICABLE LAW ZTE DOES NOT ASSUME ANY
LIABILITY FOR LOSS OF OR DAMAGE TO OR CORRUPTION OF DATA, FOR ANY
LOSS OF PROFIT, LOSS OF USE OF PRODUCTS OR FUNCTIONALITY, LOSS OF
BUSINESS, LOSS OF REVENUES OR LOSS OF ANTICIPATED PROFIT, INCREASED
COSTS OR EXPENSES OR FOR ANY INDIRECT, OR SPECIAL OR CONSEQUENTIAL
LOSS OR DAMAGE. TO THE EXTENT PERMITTED BY APPLICABLE LAW, ZTE’S
LIABILITY SHALL BE LIMITED TO THE PURCHASE VALUE OF THE PRODUCT.
THE ABOVE LIMITATIONS SHALL NOT APPLY TO DEATH OR PERSONAL INJURY
CAUSED BY DEFECT OF PRODUCT IN MATERIAL, DESIGN, AND WORKMANSHIP.
How to Get Warranty Service
To obtain warranty service, please call (877) 817-1759. Please have the following
information available when you send the device in for repair:
• A valid Proof of Purchase
• Return address
• Daytime phone number or fax number
• Model #
• IMEI # (Look for the 15-digit IMEI # behind the back-up battery of the device.)
• Complete description of the problem
• Transportation prepaid
Other Warranty Programs
You may have other warranty programs with your purchase, such as warranty
exchange. If so, please refer to equipment package or the original point of sale.
55
AT&T Home Base™ (“Home Base”) is a mobile device. It may be used in the U.S. with home phone
equipment, computers, and other Wi-Fi compatible devices. For emergency calls, provide your
location address to the 911 operator. Home Base has a back-up battery in the event of a power
outage. However, a cordless phone connected to the Home Base will not operate (including
911) during a power outage. To use back-up battery power, you must plug a corded phone into
the Home Base. Corded or other landline phone equipment and Internet capable devices (e.g.
PCs, tablets) not provided with service. Provides voice and wireless data service. Not compatible
with wireless messaging services, security systems, fax services, medical alert and monitoring
systems, credit card machines, IP/PBX Phone systems, or dial-up Internet service. May not be
compatible with DVR/Satellite systems; please check with your provider. DSL customers should
contact their provider before transferring a phone number to ensure uninterrupted DSL Internet
service. Home Base sold for use on the AT&T wireless network and cannot be activated on other
carriers’ wireless networks.
Service provided by AT&T Mobility. © 2016 AT&T Intellectual Property. All rights reserved. AT&T,
the AT&T logo and all other AT&T marks contained herein are trademarks of AT&T Intellectual
Property and/or AT&T affiliated companies. All other marks contained herein are the property of
their respective owners.
Portions Copyright © 2016 ZTE CORPORATION.
All rights reserved.
No part of this publication may be excerpted, reproduced, translated or utilized in any form or by
any means, electronic or mechanical, including photocopying and microfilm, without the prior
written permission of ZTE Corporation.
The manual is published by ZTE Corporation. We reserve the right to make modifications on print
errors or update specifications without prior notice.
Version No. : R1.0
Edition Time: 2016.4
Manual No. : 081704100557
