ZTE Z836F WCDMA/LTE Multi-mode Digital Mobile Phone User Manual ZTE T22
ZTE Corporation WCDMA/LTE Multi-mode Digital Mobile Phone ZTE T22
ZTE >
User manual

1
User Manual

2
About This Manual
Thank you for choosing this ZTE mobile device. In order to keep
your device in its best condition, please read this manual and
keep it for future reference.
Copyright
Copyright © 2017 ZTE CORPORATION.
All rights reserved.
No part of this publication may be quoted, reproduced, translated
or used in any form or by any means, electronic or mechanical,
including photocopying and microfilm, without the prior written
permission of ZTE Corporation.
Notice
ZTE Corporation reserves the right to make modifications on print
errors or update specifications in this guide without prior notice.
This manual has been designed with the utmost care to ensure
the accuracy of its content. However, all statements, information
and recommendations contained therein do not constitute a
warranty of any kind, either expressed or implied. Please refer to
For Your Safety to be sure to use your phone properly and safely.
We offer self-service for our smartphone users. Please visit the
ZTE official website (at www.ztedevices.ca) for more information
on self-service and supported product models. Information on the
website takes precedence.
Disclaimer
ZTE Corporation expressly disclaims any liability for faults and
damages caused by unauthorized modifications of the software.

3
Images and screenshots used in this manual may differ from the
actual product. Content in this manual may differ from the actual
product or software.
Trademarks
ZTE and the ZTE logos are trademarks of ZTE Corporation.
Google and Android are trademarks of Google, Inc.
The Bluetooth® trademark and logos are owned by the Bluetooth
SIG, Inc. and any use of such trademarks by ZTE Corporation is
under license.
microSDHC Logo is a trademark of SD-3C, LLC.
Qualcomm® Snapdragon™ processors are products of
Qualcomm Technologies, Inc. Qualcomm and Snapdragon are
trademarks of Qualcomm Incorporated, registered in the United
States and other countries. Used with permission.
Other trademarks and trade names are the property of their
respective owners.
Version No.: R1.0
Edition Time: January 12, 2017

4
Contents
Getting Started ....................................................... 11
Getting to Know Your Phone ............................................ 11
Knowing the Keys ............................................................ 13
Installing the nano-SIM Card and Battery ......................... 13
Installing the microSDHC™ Card (Not Included) .............. 16
Charging the Battery ........................................................ 17
Extending the Battery Life ................................................ 19
Powering On/Off .............................................................. 19
Setting Up for the First Time ............................................ 20
Locking/Unlocking the Screen and Keys ............................ 20
Using the Touch Screen ................................................... 21
Getting to Know the Home Screen ................................... 24
Personalizing.......................................................... 27
Changing the System Language ...................................... 27
Setting the Date and Time................................................ 27
Changing Ringtone and Notification Sound ...................... 28
Turning On/Off System Sounds ........................................ 28
Adjusting Volume ............................................................. 29
Switching to Silent or Vibration Mode ............................... 29
Using Do Not Disturb Mode ............................................. 30
Applying New Wallpapers ................................................ 31
Setting the Theme ........................................................... 32
Changing Screen Brightness ........................................... 32
5
Setting the Home Screen Transition Effect ....................... 32
Protecting Your Phone With Screen Locks ........................ 33
Protecting Your Phone With Screen Pinning ..................... 34
Knowing the Basics ............................................... 36
Monitoring the Phone Status ............................................ 36
Managing Notifications ..................................................... 37
Managing Shortcuts and Widgets ..................................... 40
Organizing With Folders ................................................... 41
Rearranging the Primary Shortcuts ................................... 42
Entering Text .................................................................... 42
Editing Text ...................................................................... 52
Opening and Switching Apps ............................................ 53
Uninstalling or Disabling an App ....................................... 53
Connecting to Networks and Devices .................. 55
Connecting to Mobile Networks ........................................ 55
Connecting to Wi-Fi .......................................................... 57
Using Wi-Fi Direct® .......................................................... 61
Connecting to Bluetooth Devices ...................................... 61
Connecting to Your Computer via USB ............................. 64
Using the microSDHC Card as Portable or Device Storage
........................................................................................ 66
Sharing Your Mobile Data Connection .............................. 70
Connecting to Virtual Private Networks ............................. 72
Phone Calls ............................................................ 74
6
Placing and Ending Calls ................................................. 74
Answering or Rejecting Calls ........................................... 75
Working With the Call History ........................................... 76
Calling Your Contacts ....................................................... 77
Checking Voicemail ......................................................... 77
Using Options During a Call ............................................. 78
Managing Multi-party Calls ............................................... 79
Adjusting Your Call Settings ............................................. 80
Contacts .................................................................. 87
Checking Contact Details ................................................. 87
Adding a New Contact ..................................................... 87
Setting Up Your Own Profile ............................................. 88
Importing, Exporting, and Sharing Contacts ..................... 88
Working With Favorite Contacts ....................................... 89
Working With Groups ....................................................... 90
Searching for a Contact ................................................... 92
Editing Contacts............................................................... 92
Web Accounts ........................................................ 94
Adding or Removing Accounts ......................................... 94
Configuring Account Sync ................................................ 95
Email ....................................................................... 97
Setting Up the First Email Account ................................... 97
Checking Your Emails ...................................................... 97
Writing and Sending an Email .......................................... 98
7
Responding to an Email ................................................... 99
Adding and Editing Email Accounts ................................ 100
Changing General Email Settings ................................... 101
Messaging ............................................................ 102
Opening the Messaging Screen ..................................... 102
Sending a Message ....................................................... 102
Replying to a Message ................................................... 103
Forwarding a Message ................................................... 104
Copying a Message ....................................................... 104
Deleting Messages or Threads ....................................... 104
Changing Message Settings ........................................... 105
Calendar ............................................................... 106
Viewing Your Calendars and Events ............................... 106
Creating an Event .......................................................... 107
Editing, Deleting or Sharing an Event ............................. 108
Changing Calendar Settings ........................................... 108
Web Browser ........................................................ 109
Opening the Browser ..................................................... 109
Using Multiple Browser Tabs .......................................... 110
Downloading Files .......................................................... 110
Using Bookmarks ........................................................... 111
Clearing Browsing Data .................................................. 112
Changing Browser Settings ............................................ 112
Camera ................................................................. 113
8
Capturing a Photo .......................................................... 113
Using Different Camera Modes ...................................... 115
Recording a Video ......................................................... 117
Customizing Camera/Camcorder Settings ...................... 118
Gallery ................................................................... 120
Opening Gallery ............................................................. 120
Working With Albums ..................................................... 120
Working With Pictures .................................................... 121
Retouching Your Pictures ............................................... 122
Making a GIF Picture or a Collage ................................. 124
Playing Videos ............................................................... 125
Music ..................................................................... 126
Copying Music Files to Your Phone ................................ 126
Viewing Your Music Library ............................................ 127
Setting a Song as the Default Ringtone ........................... 127
Playing Music ................................................................ 128
Managing Playlists ......................................................... 129
Video Player ......................................................... 130
Opening the Video Library ............................................. 130
Playing and Controlling Videos ...................................... 130
Managing Video Files .................................................... 131
FM Radio ............................................................... 133
Scanning and Saving Channels ..................................... 133
Listening to FM Radio .................................................... 133
9
Editing a Saved Channel ................................................ 134
Other Options and Settings ............................................ 134
More Apps and Features ..................................... 136
Backup & Restore .......................................................... 136
Calculator ...................................................................... 136
Clock ............................................................................. 136
Downloads ..................................................................... 138
File Manager .................................................................. 138
Sound Recorder ............................................................. 139
Google Apps .................................................................. 140
Settings ................................................................ 142
Wireless and Networks ................................................... 142
Personal ........................................................................ 144
Device ........................................................................... 149
Accounts ........................................................................ 153
System........................................................................... 154
Upgrading the Phone Software .......................... 155
Troubleshooting ................................................... 156
For Your Safety .................................................... 160
General Safety ............................................................... 160
Radio Frequency (RF) Energy ........................................ 161
FCC Compliance ............................................................ 163
IC Notice ........................................................................ 164
10
Hearing Aid Compatibility (HAC) Regulations for Mobile
Phones .......................................................................... 166
Distraction ..................................................................... 168
Product Handling ........................................................... 168
Electrical Safety ............................................................. 172
Radio Frequency Interference ........................................ 173
Explosive Environments ................................................. 175
11
Getting Started
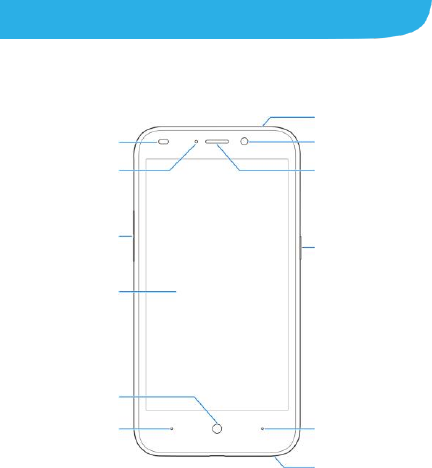
Getting to Know Your Phone
Volume key
Proximity &
light sensor
Light indicator
Touch screen
Home key
Back key
Auxiliary
microphone
Front camera
Earpiece
Power key
Recent
apps key
Main
microphone
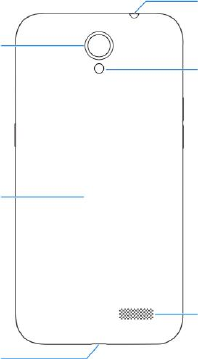
12
Headset
jack
Flash
Speaker
Back
camera
Back
cover
Charging/
micro-USB jack

13
Knowing the Keys
Key
Function
Power key
Press and hold to turn on or off airplane
mode, restart, or power off.
Press to turn off or on the screen display.
Volume key
Press or hold either end of the key to turn the
volume up or down.
Home key
Touch to return to the home screen from any
application or screen.
Touch and hold to use Google Search or Now
on Tap.
Back key
Touch to go to the previous screen.
Recent apps key
Touch to see recently used apps.
NOTE:
The positions of the Back key and the Recent apps key are
interchangeable through Settings > Navigation key.
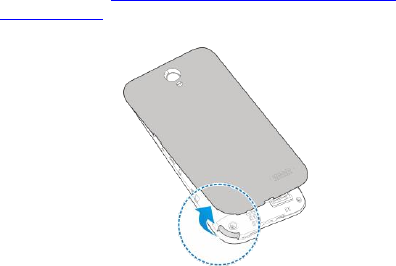
Installing the nano-SIM Card and
Battery
Power off your phone and remove the battery before installing or
removing the nano-SIM card. And power off your phone before
removing or replacing the battery.
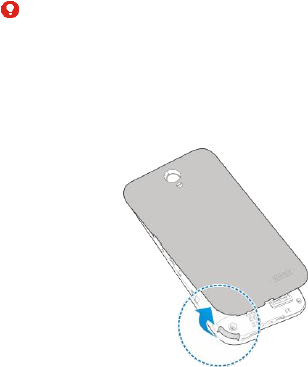
14
WARNING!
To avoid damage to the phone, do not use any other kind of SIM
cards, or any non-standard nano-SIM card cut from a SIM card.
You can get a standard nano-SIM card from your service
provider.
1. Insert your fingernail into the slot at the bottom left of the back
cover and lift it up gently.
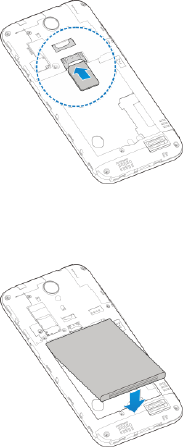
2. Hold the nano-SIM card with the cut corner oriented as shown
and slip it into the card holder.
15
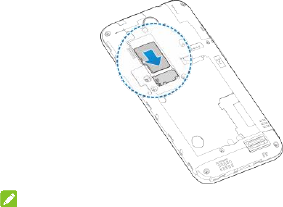
3. Insert the battery by aligning the metal contacts on the battery
with the metal contacts in the battery compartment. Gently
push down on the battery until it clicks into place.
4. Align the back cover with the back of the phone and press the
cover back into place. Ensure that all the tabs are secure and
there are no gaps around the cover.
16
Installing the microSDHC™ Card (Not
Included)
A microSDHC card can be installed or removed while the phone
is turned on. You need to unmount the microSDHC card before
removing it (see Using the microSDHC Card as Portable or
Device Storage).
1. Remove the back cover.
2. Hold your microSDHC card with the metal contacts facing
down and slide it in.
17
NOTE:
Some applications may require a microSDHC card to work
normally or may store certain data on it. Therefore, it is
recommended that you keep a microSDHC card installed and
not remove or replace it randomly.
3. Replace the back cover.
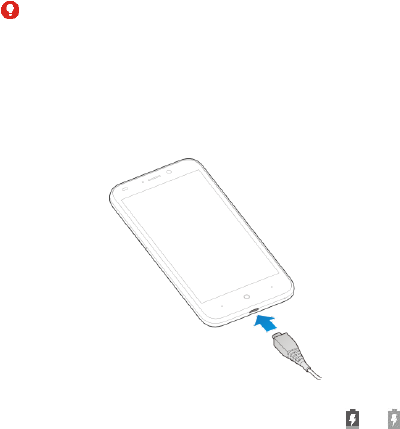
Charging the Battery
Your phone’s battery should have enough power for the phone to
turn on, find a signal, and make a few calls. You should fully
charge the battery as soon as possible.
If the battery is low, there will be a pop-up message on the
screen. As you charge your phone, the screen will tell you the
exact battery level each time you wake up your phone.
18
WARNING!
Use only ZTE-approved chargers and cables. The use of
unapproved accessories could damage your phone or cause the
battery to explode.
1. Connect the adapter to the charging/micro-USB jack. Ensure
that the adapter is inserted with the correct orientation. Do not
use force.
2. Connect the charger to a standard AC power outlet. If the
phone is on, you’ll see a charging icon, such as or ,
appear on the status bar.
3. Disconnect the charger when the battery is fully charged.

19
NOTE:
If the battery is extremely low, you may be unable to power on
the phone even when it is being charged. In this case, try again
after charging the phone for at least 20 minutes. Contact the
customer service if you still cannot power on the phone after
prolonged charging.
Extending the Battery Life
Active applications, screen brightness levels, Bluetooth and Wi-Fi
usage and GPS functionality can drain your battery. You can
follow the helpful tips below to conserve your battery power:
Use the Battery saver feature in Settings.
Reduce the screen backlight time.
Lower the screen brightness.
Turn Wi-Fi, Bluetooth and auto-sync off when not in use.
Disable the GPS function when not in use. Most applications
using this function will periodically query the GPS satellites for
your current location, and each query drains your battery.
Powering On/Off
Press and hold the Power key to turn on your phone.
To power off, press and hold the Power key and touch Power
off.

20
Setting Up for the First Time
When you first power on your phone after you purchase it or
reset it to factory settings (see Backup and Reset), you need to
do some settings before using it.
Touch the language field to select a language. Then touch
and follow the prompts to set up Wi-Fi, name, device protection,
Google services and other options.
Locking/Unlocking the Screen and Keys
Your phone allows you to quickly lock the screen and keys (put
the phone to sleep mode) when not in use and to turn the screen
back on and unlock it when you need it.
To lock the screen and keys:
To quickly turn the screen off and lock the keys, press the Power
key.
NOTE:
To save battery power, the phone automatically turns off the
screen after some time of inactivity. You will still be able to
receive messages and calls while the phone screen is off.
To unlock the screen and keys:
1. Press the Power key to turn the screen on.
2. Touch and hold a blank area of the screen.
- or -
Touch and hold to open the Camera app.

21
- or -
Touch and hold to use Google voice search.
- or -
Double-tap a notification to open the related app.
NOTE:
If you have set a pattern, a PIN or a password for your phone
(see Protecting Your Phone With Screen Locks), touch and hold
on the screen and draw the pattern or enter the PIN or password
to unlock your phone.
Using the Touch Screen
Your phone’s touch screen enables you to control actions
through a variety of touch gestures.
Touch
When you want to type using the onscreen keyboard, select
items on the screen such as the application and settings
icons, or press the onscreen buttons, simply touch them with
your finger.

22
Touch and Hold
To open the available options for an item (for example, a
message or link in a web page), touch and hold the item.
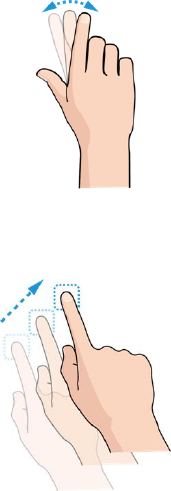
Swipe or Slide
To swipe or slide means to quickly drag your finger vertically
or horizontally across the screen.
23
Drag
To drag, press and hold your finger with some pressure
before you start to move your finger. While dragging, do not
release your finger until you have reached the target position.
Pinch
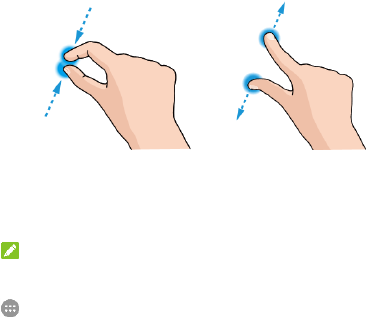
24
In some apps (such as Maps, web browser, and Gallery), you
can zoom in and out by placing two fingers on the screen at
once and pinching them together (to zoom out) or spreading
them apart (to zoom in).
Rotate the screen
For most screens, you can automatically change the screen
orientation from portrait to landscape by turning the phone
sideways.
NOTE:
The auto-rotate feature needs to be enabled for the screen
orientation to automatically change. Touch the Home key >
> Settings > Display and switch on Auto-rotate screen.
You can also access the screen rotation control by sliding
down the status bar twice and touch Auto-rotate/Portrait.
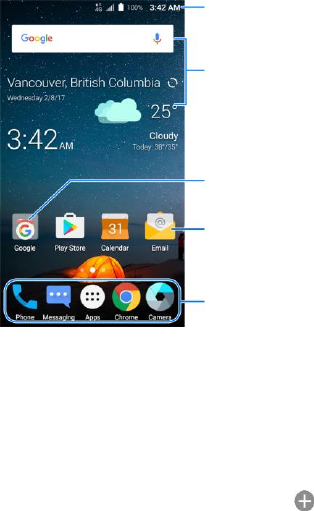
Getting to Know the Home Screen
The home screen is the starting point for your phone’s
applications, functions, and menus. You can customize your
home screen by adding shortcuts, folders, widgets, and more.
25
Extended Home Screen Panels
Your home screen is extendable, providing more space for
shortcuts, widgets, and more. Simply swipe left or right on the
home screen to see the extended panels. You can add or remove
home screen panels or adjust their order.
To add a new home screen panel:
1. Touch and hold a blank area of the home screen.
2. Slide the home screen thumbnails left and touch .
Primary shortcuts
Status bar
Widgets
Folder
Shortcut

26
To delete a home screen panel:
1. Touch and hold an empty area of the home screen.
2. Slide left or right to view the home screen thumbnails.
3. Touch on the top right corner of a thumbnail.
4. Touch OK. The items on the panel will also be removed.
NOTE:
When there is only one home screen panel, you cannot delete it
any more.
To adjust the order of a home screen panel:
1. Touch and hold an empty area of the home screen and slide
left or right to view the home screen thumbnails.
2. Touch and hold a thumbnail and drag it left or right to the
place you need.
NOTE:
Touch at the bottom of a home screen thumbnail to set it as
the main home screen.

27
Personalizing
Changing the System Language
1. Touch the Home key > > Settings > Language &
input > Language.
2. Select the language you need.
Setting the Date and Time
1. Touch the Home key > > Settings > Date & time.
2. Set the date, time, time zone, and time format.
To adjust the date and time automatically, switch on
Automatic date & time.
To adjust the date and time manually, switch off
Automatic date & time and touch Set date / Set time to
change the date and time.
To adjust the time zone automatically, switch on
Automatic time zone.
To adjust the time zone manually, switch off Automatic
time zone and touch Select time zone to set the correct
time zone.
To adjust the format of time, switch on or off Use 24-hour
format.

28
Changing Ringtone and Notification
Sound
You can customize the default incoming call ringtone and the
default notification sound.
1. Touch the Home key > > Settings > Sound &
notification.
2. Touch Phone ringtone or Default notification ringtone.
3. Scroll through the list and select the ringtone you want to use.
4. Touch OK.
NOTES:
Many applications have their own notification sound settings.
See Set a Ringtone for a Contact for how to assign a special
ringtone to an individual contact.
When selecting ringtones or sounds, touch the MUSIC or
RECORDINGS tab to select an audio file saved on the phone
or the storage card.
Turning On/Off System Sounds
1. Touch the Home key > > Settings > Sound &
notification > Other sounds.
2. Switch on or off Dial pad tones, Screen locking sounds,
Charging sounds, Touch sounds, or Vibrate on touch.

29
Adjusting Volume
1. Touch the Home key > > Settings > Sound &
notification.
2. Drag the sliders below Media volume, Alarm volume, Ring
volume, and Notification volume to adjust the volume for
each type of audio.
NOTE:
You can adjust the media volume when a media application is in
use by pressing the Volume key. If no media application is active,
press the Volume key to adjust ring volume (or the earpiece
volume during a call) or touch to adjust other types of
volume.
Switching to Silent or Vibration Mode
You can set the phone to silent or vibration mode by using one of
the following methods.
Press the Volume key when no media application is active to
show the volume management window. Drag the ringtone
volume slider to the left or keep pressing the lower end of the
Volume key to switch the phone to vibration mode. Press the
key again in vibration mode to switch the phone to silent
mode.
Swipe down from the top of the screen to open the notification
panel and drag the panel downwards. Touch Sound, Vibrate
or Silent to switch the phone to vibration/silent mode or turn
sound on.

30
Touch the Home key > > Settings > Sound &
notification > Notification mode and select Vibrate or Mute
to switch to vibration or silent mode.
Touch the Home key > > Settings > Sound &
notification > Do not disturb, touch Do not disturb and
select Always. Touch Disturb rules and select Total silence
to switch the phone to silent mode.
Using Do Not Disturb Mode
You can limit interruptions with Do not disturb mode. This mode
silences your phone so that it doesn’t make sounds or vibrate
when you don’t want it to.
To turn on Do not disturb mode:
1. Touch the Home key > > Settings > Sound &
notification > Do not disturb > Do not disturb.
2. Touch Always or Scheduled as you need.
Touch Always to turn on the Do not disturb feature
immediately, which keeps on until you turn it off.
Touch Scheduled to if you want the feature turned on and
off automatically during specific periods.
3. If you select Scheduled, touch Days, Start time, and End
time to specify the periods during which Do not disturb is on.
4. Touch Disturb rules and select Priority only, Alarms only,
or Total silence depending on whether you want to allow
exceptions. You can customize the exceptions when Priority
only is selected.

31
To set exceptions for Do not disturb mode:
You can set reminders, certain calls and messages as exceptions
when Do not disturb mode is on and Priority only is selected as
the disturb rule, so these ringtones, sounds and vibration are not
turned off.
1. Touch the Home key > > Settings > Sound &
notification > Do not disturb.
2. Touch the switches next to the items you want to allow. Touch
Messages or Calls and set who can alert you of their
messages or calls.
NOTE:
To set exceptions based on apps, touch the Home key > >
Settings > Sound & notification > App notifications. Select an
app and switch on Treat as priority.
Applying New Wallpapers
You can set the wallpaper for the home screen and lock screen.
1. Touch the Home key > > Settings > Display >
Wallpaper.
2. Touch Gallery, Live Wallpapers, Photos, or Wallpapers
and select an image or an animation.
NOTE:
In addition, you can touch and hold an empty area of the home
screen and select the Wallpapers tab. Then select a built-in
image, a live wallpaper, or an image from your Gallery.

32
Setting the Theme
1. Touch and hold an empty place on the home screen.
2. In the window that appears at the bottom, touch Themes.
3. Select a theme you like.
Changing Screen Brightness
1. Touch the Home key > > Settings > Display >
Brightness level.
2. Drag the slider to manually adjust the screen brightness.
NOTE:
Your phone can automatically adjust the screen brightness for
available light. Touch Adaptive brightness in the Display
settings screen to turn the feature on or off.
Setting the Home Screen Transition
Effect
1. Touch and hold an empty place on the home screen.
2. In the window that appears at the bottom, touch Effects.
3. Pick an effect and the phone will demonstrate how it works.
Touch other effects until you find the favorite one.

33
Protecting Your Phone With Screen
Locks
You can protect your phone by creating a screen lock. When it is
enabled, you need to touch and hold the screen, draw a pattern
or enter a numeric PIN or password to unlock the phone’s screen
and keys.
1. Touch the Home key > > Settings > Security > Screen
lock.
2. Touch None, Long press, Pattern, PIN or Password.
Touch None to disable the screen lock.
Touch Long press to enable screen lock and allow
unlocking with a ‘touch and hold’ gesture. You can unlock
the screen by touching and holding an empty area on the
lock screen.
Touch Pattern to draw and redraw a pattern that you
must draw to unlock the screen.
Touch PIN or Password to set a numeric PIN or a
password that you must enter to unlock the screen.
3. For Pattern, PIN, or Password, select whether to use secure
start-up and how you would like notifications and their
contents to show when the phone is locked, then touch
DONE.
NOTE:
Remember the pattern, PIN or password you set. Otherwise, you
will have to upgrade the phone software or contact customer
service to use the phone. See Upgrading the Phone Software.

34
Protecting Your Phone With Screen
Pinning
You can use the screen pinning feature to keep an app in view,
so others cannot switch to other apps or access your personal
information.
Turn On Screen Pinning
1. Touch the Home key > > Settings > Security > Screen
pinning.
2. Touch the On/Off switch.
3. For added security, touch Lock device when unpinning,
select a security option, and follow on-screen instructions if
you do not already have a pattern, PIN, or password set up.
Pin a Screen
1. Ensure that screen pinning is turned on.
2. Open the app you want to keep in view.
3. Touch the Recent apps key.
4. If there are many app tabs, swipe up to find on the
front-most tab.
5. Touch .
Unpin the Screen
To unpin the screen and return to normal use, touch and hold the
Recent apps key.
35
If you have asked for the unlock pattern, PIN or password before
unpinning the screen, touch and hold the lock screen and draw
the pattern or enter the PIN/password.
36
Knowing the Basics
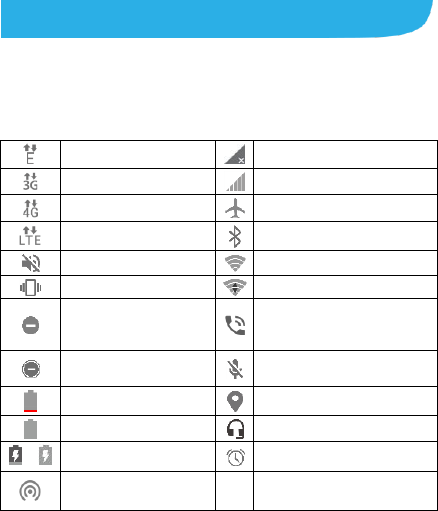
Monitoring the Phone Status
The status bar at the top of the home screen provides phone and
service status icons on the right side. Below are some of the
icons you may see.
EDGE/2G connected
No signal
3G connected
Signal strength
4G connected
Airplane mode
LTE connected
Bluetooth® on
Silent mode
Connected to a Wi-Fi® network
Vibration mode
Wi-Fi in use
Do not disturb mode
(Priority only or Alarms
only)
Speakerphone on
Do not disturb mode
(Total silence)
Phone microphone off
Battery low
GPS on
Battery full
Wired headset connected
/
Battery charging
Alarm set
Portable Wi-Fi hotspot
on
37
Managing Notifications
Notification Icons
The status bar at the top of the home screen provides notification
icons on the left. Below are some of the icons you may see.
The notifications depend on the apps installed and you can touch
and drag the status bar down to see more information.
/
New SMS/MMS
Upcoming event
New message(s) from
the Email app
New Wi-Fi network
detected
/
New message(s) from
the Gmail™ app
Downloading data
Missed call
Sending data
Call in progress
USB connected
Call on hold
Play Store updates
available
/
Song playing
Open/Close the Notification Panel
Notifications report the arrival of new messages, calendar
events, and alarms, as well as ongoing events, such as when
you are playing music. You can open the notification panel to
view the details of notifications.

38
To open the notification panel, swipe your finger down on the
home screen or from the top of the screen.
To close the notification panel, swipe your finger up from the
bottom of the screen or touch the Back key.
Respond to or Remove a Notification
In the notification panel, you can respond to a notification or
remove the notifications. The notification panel also supports
expandable notifications that let you perform additional actions
right from the notification itself.
To respond to a notification, just touch it.
Slide down with one finger to expand certain notifications.
You can also swipe two fingers vertically or pinch-zoom to
expand or collapse certain notifications.
To remove a notification, swipe it left or right.
To remove all notifications, touch below all the
notifications.
To manage notifications you have received, touch and hold a
notification to identify the application that created it. You can
then touch and turn on or off the following settings (some
options may not be available for all applications).
Block all: Hide future notifications from this app.
Treat as priority: Show notifications from this app when
Do not disturb rule is set to Priority only.
Allow peeking: Allow this app to show certain
notifications briefly in the current screen.

39
Hide sensitive content: Hide content in this app's
notifications when the phone is locked.
NOTE:
If you block notifications for an app, you may miss its important
alerts and updates. The notifications of some apps cannot be
blocked.
Use Quick Settings
The Quick Settings make it convenient to view or change the
most common settings for your phone.
Swipe down with two fingers from the top of the screen, or open
the notification panel and drag the panel downwards to find the
following Quick Settings on the screen.
Do not disturb / Priority only / Alarms only / Total silence:
Touch to open the Do not disturb menu.
Sound/Vibrate/Silent: Touch to switch between sound,
vibration, and mute. See Switching to Silent or Vibration Mode.
Airplane mode: Touch to turn on or off airplane mode.
Auto-rotate/Portrait: Touch to turn on or off the auto-rotate
screen feature.
Flashlight: Touch to turn on or off the flash.
Hotspot: Touch to turn on or off the Wi-Fi hotspot feature.
Touch and hold to open the Wi-Fi hotspot menu in Settings.
See Share Your Mobile Data Connection as a Wi-Fi Hotspot.
Bluetooth: Touch to turn on or off Bluetooth. Touch and hold
to open the Bluetooth menu in Settings. See Connecting to
Bluetooth Devices.
40
Wi-Fi: Touch to turn on or off Wi-Fi. Touch and hold to open
the Wi-Fi menu in Settings. See Connecting to Wi-Fi.
Data: Touch to turn on or off mobile data service over the
mobile network. Touch and hold to open the Data usage
menu in Settings.
Location: Touch to turn on or off location services. Touch and
hold to open the Location menu in Settings. See Location.
Brightness: Uncheck AUTO and drag the brightness slider
to adjust the screen brightness.
NOTE:
In the Quick Settings screen, touch at the top to get to the
Settings menu; touch to view your own contact profile in the
Contacts app; touch to change positions of the Quick Setting
icons.
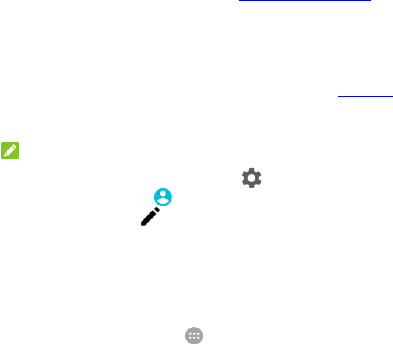
Managing Shortcuts and Widgets
Add Shortcuts and Widgets
1. Touch the Home key > .
- or -
To add widgets, touch and hold an empty area of the home
screen and select Widgets.
2. Slide up or down to browse through available applications, or
left or right to find the widget you need.
3. Touch and hold a widget or an application icon and drag it to
a home screen panel.

41
Move Shortcuts or Widgets
1. Touch and hold a shortcut or widget on the home screen.
2. Drag it to the place you need.
Remove Shortcuts or Widgets
1. Touch and hold a shortcut or widget on the home screen.
2. Drag it to to remove it.
Adjust Widget Size
1. Touch and hold a widget on the home screen and then
release it.
2. An outline appears around the widget. Drag the outline to
resize the widget.
NOTE:
Not all widgets can be resized.
Organizing With Folders
You can create folders on the home screen and add several
shortcuts to a folder.
You can move or remove folders the same way as moving or
removing shortcuts.
1. Touch and hold a shortcut on the home screen and drag it to
at the top left.
2. Release the shortcut. A new folder will be created and the
shortcut is added into the folder.

42
3. To add more shortcuts into the folder, touch and hold each
shortcut and drag it over the folder before releasing it.
NOTES:
Touch the folder and then touch the name field to rename the
folder.
Drag the folder to to delete the folder and replace its
shortcuts on the home screen.
Rearranging the Primary Shortcuts
The home screen includes a customizable primary shortcuts area
at the bottom visible from all home screens. You can keep at
most four items in the primary shortcuts area. Drag shortcuts or
folders in or out of the area to rearrange it.
Entering Text
You can enter text using the onscreen keyboard. Some apps
open it automatically. In others, you open it by touching where
you want to type. Touch the Back key to hide the onscreen
keyboard. You can also enter text by speaking with the Google
voice typing feature.

43
Enable or Disable Input Methods
1. Touch the Home key > > Settings > Language &
input > Current Keyboard.
2. Touch CHOOSE KEYBOARDS at the bottom.
3. Slide the switches beside the input methods to enable or
disable them.
Change Input Methods
1. When you use the onscreen keyboard to enter text, open the
notification panel and touch (Change keyboard).
2. Select the input method you need.
NOTE:
The icon appears only when more than one keyboard
input method is installed and enabled.
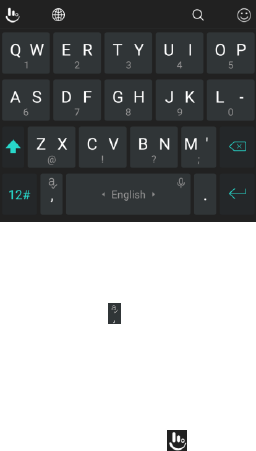
Google Keyboard
The Google Keyboard provides a layout similar to a desktop
computer keyboard. When screen auto-rotation is enabled, turn
the phone sideways and the keyboard will change from portrait to
landscape. The landscape keyboard is not supported in all
applications.
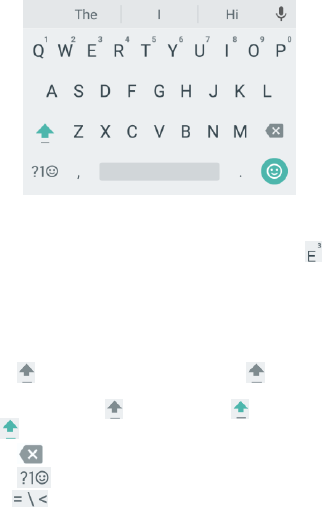
44
Touch the alphabetic keys to enter letters. Touch and hold
some specific keys to enter associated accented letters or
numbers. For example, to enter È, touch and hold and
the available accented letters and number 3 appear. Then
slide to choose È.
As you enter a word, candidates appear above the keyboard.
Touch to select the correct one; touch and hold to see more
possible options.
Touch to use uppercase. Double-tap to lock
uppercase. This key also changes to indicate the current
case you are using: for lowercase, for uppercase,
and when locked in uppercase.
Touch to delete the text before the cursor.
Touch to select numbers and symbols. You can then
touch to find more.

45
Touch to enter miniature icons, such as expressions,
horoscopes, and animals.
Touch to use Google voice typing.
Touch and hold to change the input language or set up
the Google Keyboard.
Touch and hold and slide right to change the keyboard
position for one-hand use.
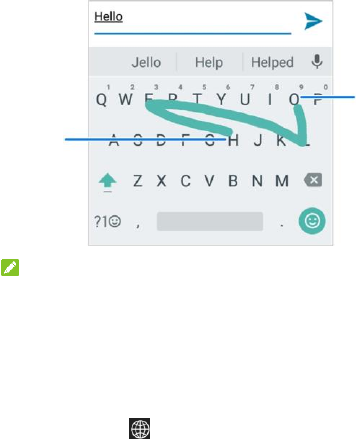
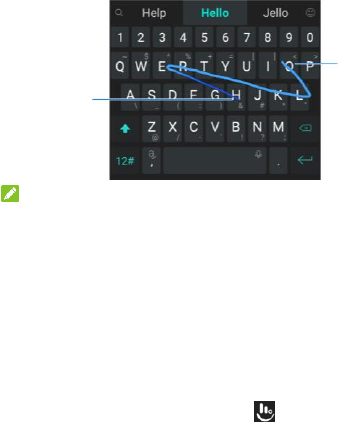
Gesture Typing
The Google Keyboard supports the gesture typing feature. Use
this feature to input a word by sliding through the letters.
To enable and use gesture typing:
1. Touch and hold on the Google Keyboard and then touch
Google Keyboard settings.
2. Touch Gesture typing and then touch Enable gesture
typing if this feature is turned off.
3. Move your finger from letter to letter on the keyboard to trace
a word without lifting the finger until you reach the end of the
word.
46
NOTES:
Touch when you want to. If you want to enter a single letter,
go ahead and touch.
Lift your finger at the end of the word. A space is added
automatically when you begin to input the next word.
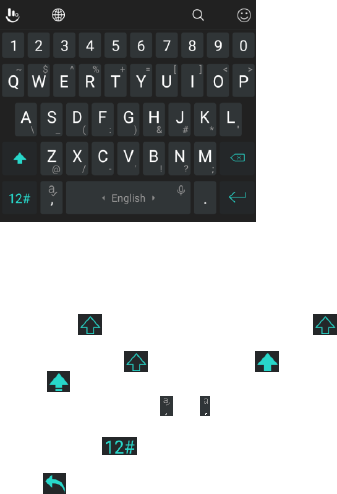
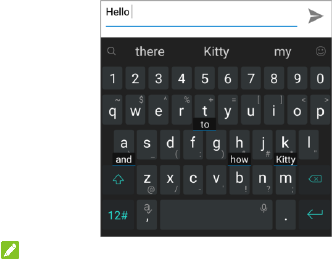
TouchPal Keyboard
TouchPal Keyboard offers three layouts: FULL, PHONEPAD and
T+. You can touch to select a layout or an input language.
You can also use Curve® and Wave™ to speed up text input by
moving your finger from letter to letter or word from word without
lifting the finger.
Start of
the word
End of the
word
47
The FULL Layout
The FULL layout offers an input experience similar to a computer
keyboard.
The alphabetic keys: Touch the keys to enter letters. Touch a
key and slide if necessary to choose more characters.
The shift key: Touch to use uppercase. Double-tap
to lock uppercase. This key also changes to indicate the
current case you are using: for lowercase, for
uppercase, and when locked in uppercase.
Word prediction: Touch and hold or and tap the
prediction switch to turn on or off prediction.
Pre-defined texts: Touch to enter digits, symbols, and
other pre-defined texts. You can touch the arrow keys to turn
pages, or touch to go back to the alphabetic keys. Slide up

48
on the space key or touch to enter Emoji and emoticons.
The delete key: Touch to delete text before the cursor.
You can also slide left on the key to delete an entire word.
More options: Touch to access additional functions of
TouchPal, use voice input, edit text, change keyboard themes,
and more.
The PHONEPAD Layout
The layout in this mode is similar to a phonepad.
Touch an alphabetic key repeatedly until the desired letter
appears. You can also touch and hold the key and slide left or
right to choose the letter or number you need.
If word prediction is enabled ( ), just touch the keys once and
choose the right word.
49
The T+ Layout
Touch to enter the left letter on the key; double-tap or flick right to
enter the right letter/symbol on the key. You can also touch and
hold a key and slide left or right to choose more letters and
symbols.
If word prediction is enabled ( ), just touch the keys and choose
the right word.
Curve Word Gesture
Curve allows you to enter text by moving your finger on the
screen from letter to letter to enter each word.
To enable and use Curve:
1. On the TouchPal keyboard, touch > Settings > Smart
input and check Curve® - Word gesture.
2. Touch the Back key to return to the text field. Open the
TouchPal keyboard and switch to the Full layout.
50
3. Move your finger from letter to letter on the keyboard to trace
a word without lifting the finger, until you reach the end of the
word.
NOTES:
Curve is only available in the Full layout.
Touch when you want to. If you want to enter a single letter,
go ahead and touch.
Lift your finger at the end of the word. A space is added
automatically when you begin to trace the next word.
Wave Sentence Gesture
Wave allows you to enter words by dragging candidate words to
the space key.
To enable and use Wave:
1. On the TouchPal keyboard, touch > Settings > Smart
input and check Wave™ - Sentence gesture.
End of
the word
Start of
the word
51
2. Touch the Back key to return to the text field. Open the
TouchPal keyboard and switch to the Full layout.
3. Touch or use Curve to enter the first word. As the first word
appears on the text field, candidate words appear on the
keyboard for you to choose from as the following word.
4. Drag the correct candidate word to the space key to add the
word to the text field. If no candidate word is correct, you can
go on enter the words normally.
NOTE:
Wave is only available in the Full layout.

52
Google Voice Typing
Google Voice typing uses the Google voice recognition service to
convert speech to text.
1. Touch on the Google keyboard or > on the
TouchPal keyboard to access the Google voice typing feature.
2. When you see the microphone image, speak what you want
to type.
3. You can continue entering text to keep it or to delete it.
NOTE:
Say "comma," "period," "question mark," "exclamation mark," or
"exclamation point" to enter punctuation.
Editing Text
Move the insertion point: Touch where you want to type.
The cursor blinks in the new position, and a tab appears
below it. Drag the tab to move the cursor.
Select text: Touch and hold or double-tap within the text.
The nearest word highlights, with a tab at each end of the
selection. Drag the tabs to change the selection.
Cut or copy: Select the text you want to manipulate. Then
touch the CUT or COPY to cut or copy the text to the clipboard.
Replace text with the clipboard text: Select the text you
want to replace. Then touch PASTE.

53
Insert clipboard text to the text field: Touch and hold the
tab below the cursor and then select PASTE.
Opening and Switching Apps
Open an App
1. Touch the Home key > .
2. Slide up or down on the screen and touch an app to open it.
Switch Between Recently Opened Apps
1. Touch the Recent apps key. The apps you’ve used recently
are displayed in a series of tabs. Slide up and down to see all
the tabs.
2. Touch a tab to open that app.
NOTE:
You can swipe a tab sideways or touch X on the tab to remove it
from the screen. Touch Clear all to remove all tabs.
Uninstalling or Disabling an App
1. Touch the Home key > to open the application list screen.
2. Touch and hold an application icon and drag the icon to
(Uninstall) or (Disable) at the top of the screen.
3. Touch OK to uninstall or disable the app.

54
NOTES:
Pre-installed apps cannot be uninstalled, and not all apps can
be disabled.
To find the disabled applications, touch the Home key > >
Settings > Apps. You can then touch the disabled application
and touch ENABLE to restore it.

55
Connecting to Networks and
Devices
Connecting to Mobile Networks
Control Mobile Data Use
To enable or disable data access:
1. Touch the Home key > > Settings > Cellular network.
2. Touch the Mobile Data switch to enable or disable mobile
data use.
To get data services when roaming:
1. Touch the Home key > > Settings > Cellular network.
2. Touch the Data roaming switch if it is turned off.
NOTE:
Data roaming may incur significant roaming charges.
Select Network Type
1. Touch the Home key > > Settings > Cellular network >
Preferred network type.
2. Touch the type of networks you prefer to connect to.
56
Set Access Point Names
To connect to the Internet you can use the default Access Point
Names (APN). And if you want to add a new APN, please contact
the service provider to get the necessary information.
1. Touch the Home key > > Settings > Cellular network.
2. Touch Access Point Names.
3. Touch .
4. Touch each item to enter the information you get from your
service provider.
5. Touch > Save to complete.
NOTE:
To set the APN to default settings, touch > Reset to default.
Select Network Operator
1. Touch the Home key > > Settings > Cellular network.
2. Touch Network operators.
3. Touch Search networks to search for all available networks
and select one to register manually. You can also touch
Choose automatically to select preferred network
automatically.

57
Connecting to Wi-Fi
Wi-Fi is a wireless networking technology that can provide
Internet access at distances of up to 300 feet, depending on the
Wi-Fi router and your surroundings.
Turn Wi-Fi On and Connect to a Wi-Fi Network
1. Touch the Home key > > Settings > Wi-Fi.
2. Slide the Wi-Fi switch to the On position to turn on Wi-Fi.
3. Touch a network name to connect to it.
4. If the network is secured, enter the password and touch
CONNECT.
NOTE:
Your phone automatically connects to previously used Wi-Fi
networks when they are in range.
Get Notified of Open Networks
1. Touch the Home key > > Settings > Wi-Fi.
2. Slide the Wi-Fi switch to the On position.
3. Touch > Advanced.
4. Slide the Network notification switch.
When Wi-Fi is on, you receive notifications in the status bar when
your phone detects an open Wi-Fi network. Switch off this option
to turn off notifications.

58
Add a Wi-Fi Network
You can add a Wi-Fi network if the network does not broadcast its
name (SSID), or add a Wi-Fi network when you are out of range.
To connect to a secured network, you first need to get the
security details from the network's administrator.
1. Touch the Home key > > Settings > Wi-Fi.
2. Slide the Wi-Fi switch to the On position.
3. Touch > Add network.
4. Enter the network SSID (name). If necessary, enter security
or other network configuration details.
5. Touch SAVE.
Connect to a WPS Network
Wi-Fi Protected Setup (WPS) is a feature that makes it easy to
add your phone to the access points which support WPS.
You can use one of the following methods to connect your phone
to a wireless network using WPS.
Method one: WPS button (Recommended)
1. Touch the Home key > > Settings > Wi-Fi.
2. Slide the Wi-Fi switch to the On position.
3. Touch > Advanced > WPS Push Button.
4. Press the WPS button on the access point and the access
point will recognize your phone and add it to the network.

59
Method two: PIN number
1. Touch the Home key > > Settings > Wi-Fi.
2. Slide the Wi-Fi switch to the On position.
3. Touch > Advanced > WPS Pin Entry.
4. The WPS PIN number displays on the screen. Enter the PIN
number into the access point's setup page.
After entering the PIN number, your phone automatically finds
the access point and configures the connection.
NOTE:
For detailed information about the WPS feature of the access
point, please refer to its user documents.
Forget a Wi-Fi Network
You can make your phone forget about the details of a Wi-Fi
network that you added - for example, if you don’t want the phone
to connect to it automatically or if it is a network that you no
longer use.
1. Touch the Home key > > Settings > Wi-Fi.
2. Slide the Wi-Fi switch to the On position.
3. Touch > Saved networks.
4. Touch the Wi-Fi network name and then touch FORGET.

60
Adjust Advanced Wi-Fi Settings
1. Touch the Home key > > Settings > Wi-Fi.
2. Touch > Advanced to adjust the following settings.
Network notification: Get notifications in the status bar
when Wi-Fi is on and an open network is available.
Scanning always available: Let Google’s location
service and other apps scan for networks, even when
Wi-Fi is off.
Keep Wi-Fi on during sleep: Set whether to keep Wi-Fi
on in sleep mode.
Install certificates: Install certificates needed for
connecting to certain Wi-Fi networks.
Wi-Fi Direct: Use the Wi-Fi Direct feature. See Using
Wi-Fi Direct®.
WPS Push Button: Connect to a WPS network via the
push button method.
WPS Pin Entry: Connect to a WPS network via the
phone PIN method.
MAC address: Check the MAC address.
IP address: Check the phone’s IP address.

61
Using Wi-Fi Direct®
Wi-Fi Direct allows Wi-Fi devices to share files and data directly
by connecting to each other without the need for wireless access
points (hotspots). Your phone supports Wi-Fi Direct, but you may
need to install third-party applications to share data through Wi-Fi
Direct.
To connect via Wi-Fi Direct:
1. Touch the Home key > > Settings > Wi-Fi.
2. If Wi-Fi is off, slide the Wi-Fi switch to the On position.
3. Touch > Advanced > Wi-Fi Direct. Your phone will search
for other devices enabled with Wi-Fi Direct connections.
4. Touch a device name below Peer devices and select
CONNECT to connect with it.
The other device will receive a connection prompt and need
to accept the request for connection. Both devices may need
to enter a common PIN.
5. Once connected the device is displayed as “Connected” in
the Peer devices list.
Connecting to Bluetooth Devices
Bluetooth is a short-range wireless communication technology.
Phones or other devices with Bluetooth capabilities can
exchange information wirelessly within a distance of about 30
feet. The Bluetooth devices must be paired before the
communication is performed.

62
Turn Bluetooth On/Off
1. Touch the Home key > > Settings > Bluetooth.
2. Slide the Bluetooth switch to the On or Off position.
When Bluetooth is on, the icon appears in the status bar.
Change the Device Name
1. Touch the Home key > > Settings > Bluetooth.
2. Slide the Bluetooth switch to the On position if Bluetooth is off.
3. Touch > Rename this device.
4. Edit the name and touch RENAME.
Pair With Another Bluetooth Device
1. Touch the Home key > > Settings > Bluetooth.
2. Slide the Bluetooth switch to the On position if Bluetooth is off.
Your phone automatically scans for and displays the IDs of all
available Bluetooth devices in range. You could touch >
Refresh if you want to scan again.
3. Touch the device you want to pair with.
4. Confirm that the Bluetooth passkeys are the same between
the two devices and touch PAIR. Alternately, enter a
Bluetooth passkey and touch PAIR.
Pairing is successfully completed when the other device
accepts the connection or the same passkey is entered.

63
NOTE:
The Bluetooth passkey may be fixed for certain devices, such as
headsets and hands-free car kits. You can try entering 0000 or
1234 (the most common passkeys), or refer to the documents for
that device.
Forget (Unpair With) a Bluetooth Device
You can make your phone forget its pairing connection with
another Bluetooth device. To connect to the device again, you
need to search it and enter or confirm a passkey again.
1. Touch the Home key > > Settings > Bluetooth and
ensure that Bluetooth is turned on.
2. In the list of paired devices, touch the icon beside the
Bluetooth device you want to forget.
3. Touch FORGET.
Send Data via Bluetooth
1. Open the appropriate application and select the file or item
you want to share.
2. Select the option for sharing via Bluetooth. The method may
vary by application and data type.
3. Touch a Bluetooth device the phone has paired with or wait
for it to search for new devices and touch one of them.

64
Receive Data via Bluetooth
1. Turn Bluetooth on before trying to receive data via Bluetooth.
2. Flick down the status bar and touch .
3. Touch ACCEPT to start receiving the data.
Received files are stored automatically in a dedicated folder
(Bluetooth, for instance) in the phone storage or microSDHC
directory. You can access them with the File Manager app.
NOTE:
Received contacts (vCard files) are automatically imported to
your contact list.
Connecting to Your Computer via USB
You can connect your phone to a computer with a USB cable and
transfer music, pictures, and other files in both directions. Your
phone stores these files in its internal storage or on a removable
microSDHC card.
If you are using USB tethering, you must turn that off before you
can use USB to transfer files between your phone and computer.
Connect Your Phone to a Computer via USB
1. Connect your phone to the PC with a USB cable.
2. Open the notification panel and touch .
3. Choose one of the following options:
Charge only: Charge your phone via USB.

65
Install driver: Install the driver needed for some USB
connection modes (such as MTP). You only need to install
the driver on the same PC once.
NOTE:
You can also install the driver on PC by running the
executable file in the new CD-ROM drive.
Media device (MTP): Transfer files on Windows® PC or
Mac®.
NOTE:
For Windows XP, please install the drivers and Media
Player 11 (or later version) when you use Media device
(MTP) for the first time.
Camera (PTP): Transfer photos using camera software.
NOTE:
To make your phone connect to the computer automatically using
the selected connection type, check Don’t ask me again.
Connect With Windows Media® Player
You can sync music, picture, and video files from the computer to
your phone via Windows Media Player on the computer.
1. Connect the phone with your computer via USB and choose
Media device (MTP).
2. Open Windows Media Player and synchronize music, picture,
and video files.

66
Disconnect Your Phone From the Computer
To disconnect the phone from the computer, simply unplug the
USB cable when you’re finished.
Using the microSDHC Card as Portable
or Device Storage
You can use your microSDHC card as portable storage when
there's already content such as your media and other files so that
you don't lose them.
If your microSDHC card is new or doesn't have content you want
to keep, you can also set it up as an extension of the device
storage, and this requires formatting that prevents the
microSDHC card from working with other devices.
CAUTION:
As part of the device storage, the microSDHC card may have
data on it that is necessary for some apps to function normally.
Therefore, do not remove or replace the card randomly.
Set Up the microSDHC Card as Portable
Storage
When you install a microSDHC card that has not been used on
your phone before, the phone will mount the card as portable
storage by default.

67
To remove the microSDHC card from your phone:
If you need to remove the microSDHC card used as portable
storage while the phone is on, you must unmount it first.
1. Touch > Settings > Storage.
2. Touch next to the card name in the Portable storage
section.
3. When the screen prompts the card is safely ejected, you can
now remove it from the phone.
To erase and format the microSDHC card:
1. Touch > Settings > Storage.
2. Touch the card name in the Portable storage section.
3. Touch Format.
4. Touch ERASE & FORMAT.
CAUTION:
The formatting procedure erases all the data on the microSDHC
card, after which the files CANNOT be retrieved.
Set Up the microSDHC Card as Device
Storage
If your microSDHC card is new or doesn't have content you want
to keep, you can format the card and use it as part of the device
storage. If you move the microSDHC card to another device, it’ll
be formatted before it can be used.

68
1. Touch > Settings > Storage.
2. Touch the card name in the Portable storage section.
3. Touch Format as internal.
4. Touch ERASE & FORMAT.
CAUTION:
The formatting procedure erases all the data on the
microSDHC card, after which the files CANNOT be retrieved.
5. The phone will prompt you to move your photos, files and
other data from the phone to the microSDHC card. Select
Move now or Move later and touch NEXT. Follow the
onscreen instructions to continue.
6. Touch DONE.
To move data between the phone and the microSDHC card:
With the microSDHC card as part of the device storage, you can
move your photos, files and other data between the phone and
the card any time.
1. Touch > Settings > Storage.
2. Touch Phone or the microSDHC card name.
3. Touch Migrate data.
4. Touch MOVE.
NOTE:
Whenever you move data between the phone and the
microSDHC card, the destination is used to save new apps and
personal data (such as photos and videos) and only the
destination is accessible from a computer.

69
To remove the microSDHC card from your phone:
If you need to remove the microSDHC card used as device
storage while the phone is on, you must unmount it first.
1. Touch > Settings > Storage.
2. Touch your card name below Device storage.
3. Touch Eject.
NOTE:
Before ejecting the card, ensure that you have moved data
and apps to the phone.
4. Touch EJECT > OK.
5. When the screen prompts the card is safely ejected, you can
now remove it from the phone.
To reformat the microSDHC card as portable storage:
If you no longer want to use your microSDHC card as device
storage, you can reformat the card as portable storage.
NOTE:
Before the formatting, ensure that you have moved data and
apps to the phone.
1. Touch > Settings > Storage.
2. Touch your card name below Device storage.
3. Touch Format as portable.
4. Touch FORMAT.
CAUTION:
The formatting procedure erases all the data on the microSDHC
card, after which the files CANNOT be retrieved.

70
Sharing Your Mobile Data Connection
You can share your phone’s data capabilities through tethering or
by activating the Wi-Fi hotspot feature to create a mobile hotspot.
Share Your Mobile Data Connection via USB
You can access the Internet on your computer via the USB
tethering feature of your phone. The feature needs data
connection on a mobile network and may result in data charges.
NOTE:
You cannot transfer files between your phone and your computer
via USB while the phone is USB tethered.
1. Connect your phone to your computer with a USB cable.
2. Touch the Home key > > Settings > More.
3. Switch on USB tethering. A new network connection will be
created on your computer.
NOTE:
To stop sharing your data connection, switch off USB tethering
or disconnect the USB cable.
Share Your Mobile Data Connection as a
Wi-Fi Hotspot
You can share your phone’s data connection with other devices
by turning your phone into a portable Wi-Fi hotspot. The feature
needs data connection on a mobile network and may result in
data charges.

71
NOTE:
When the portable Wi-Fi hotspot feature is enabled, you cannot
use your phone’s Wi-Fi capability to access the Internet. You still
remain connected to the Internet via your mobile data network.
1. Touch the Home key > > Settings > Wi-Fi hotspot.
2. Slide the switch to the On position.
After a moment, the phone starts broadcasting its Wi-Fi
network name (SSID).
3. On another device, locate your phone via Wi-Fi and connect
with it to start using the phone’s mobile data.
NOTE:
To stop sharing your data connection, slide the switch to the Off
position.
Set Your Wi-Fi Hotspot
You can change the name of your portable Wi-Fi hotspot (SSID),
secure it with a password, and set other options.
1. Touch the Home key > > Settings.
2. Touch Wi-Fi hotspot and set the following options.
Configure:
- Network name: Enter or edit the network name that
other devices see when scanning for Wi-Fi networks.
- Channel: To avoid interference with other Wi-Fi
networks, try using a different channel.
- Security: Choose a security option, Open (not

72
recommended) or WPA2 PSK (other users can
access your Wi-Fi hotspot only if they enter the correct
password). When you select WPA2 PSK, touch the
Password field to edit the security password.
- Broadcast network name (SSID): Check to
broadcast or uncheck to hide your network name
(SSID). If the broadcast is disabled, other users need
to get your network SSID to find the Wi-Fi hotspot.
Manage users: Block or unblock users, or set the
maximum number of devices that can connect to the
hotspot simultaneously.
Sleep policy: Set hotspot sleep policy and notification.
Connecting to Virtual Private Networks
Virtual private networks (VPNs) allow you to connect to the
resources inside a secured local network. VPNs are commonly
deployed by corporations, schools, and other institutions to let
people access local network resources when not on campus, or
when connected to a wireless network.
Depending on the type of VPN you are using, you may be
required to enter your login credentials or install security
certificates before you can connect to your VPN. You can get this
information from your network administrator.
Add a VPN
1. Touch the Home key > > Settings > More > VPN.

73
2. Touch at the top right corner and fill in the information
provided by your network administrator.
3. Touch SAVE.
The VPN is added to the list on the VPN screen.
NOTE:
You must set a lock PIN or password before using VPN.
Connect to a VPN
1. Touch the Home key > > Settings > More > VPN.
2. Touch the VPN that you want to connect to.
3. When prompted, enter any requested credentials, and then
touch CONNECT.
Modify a VPN
1. Touch the Home key > > Settings > More > VPN.
2. Touch next to the VPN that you want to modify.
3. Edit the VPN settings you want.
4. Touch SAVE.
74
Phone Calls
You can place calls from the Phone app, the Contacts app, or
other apps or widgets that display contact information. Wherever
you see a phone number, you can usually touch it to dial.
Placing and Ending Calls
Place a Call by Dialing
1. Touch the Home key > .
2. If the dialpad is closed, touch to display it.
3. Enter the phone number or the contact name with the dialpad.
Touch to delete incorrect digits.
NOTE:
As you enter the phone number or the contact name, your
phone searches for matching information in your contacts or
call history. If you see the number and contact you want to
call, touch it to place the call immediately.
4. Touch below the keypad to dial.
NOTE:
To make an international call, touch and hold the 0 key to enter
the plus (+) symbol. Next, enter the country code, followed by the
city/area code and then the phone number.
NOTE:
To redial the last call you made, just touch to when the
phone number field is empty to enter the number automatically.
75
End a Call
During a call, touch on the screen.
Answering or Rejecting Calls
When you receive a phone call, the incoming call screen opens,
displaying the caller ID or the information about the caller that
you've entered in the Contacts app. You can answer or reject the
call, or reject it with a text message.
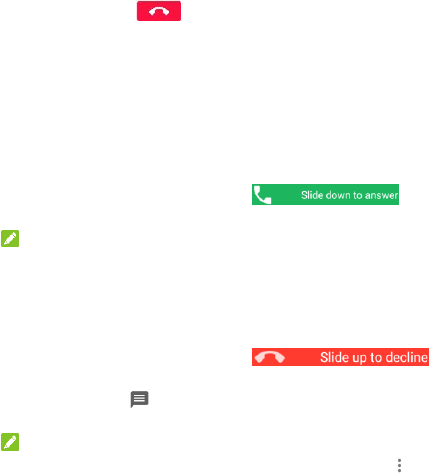
Answer a Call
When you receive a phone call, slide
down to answer the call.
NOTE:
To silence the ringer before answering the call, you can press the
Volume key, the Power key, the Home key, the Back key, or the
Recent apps key.
Reject a Call
When you receive a phone call, slide
up to reject the call.
You can also slide up to reject the call and select a preset
text message or write one to send to the caller.
NOTE:
To edit the text response from within the Phone app, touch >
Settings > Quick responses.

76
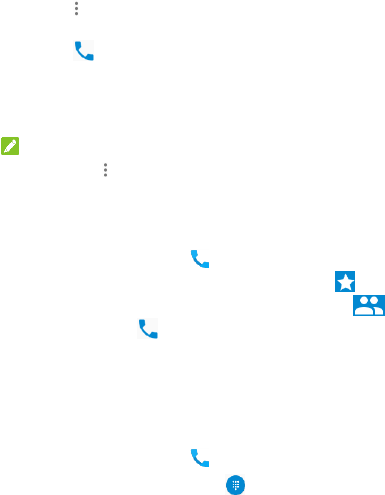
Working With the Call History
The call history is a list of all the calls you've placed, received, or
missed. It provides a convenient way to redial a number, return a
call, or add a number to your contacts.
To open the call history, you can touch the Home key > >
> Call History.
Place a Call From the Call History
1. Open the call history.
2. Touch a listing for more information about the call, or touch
beside it to call back.
NOTE:
You can touch MISSED, OUTGOING, or INCOMING to filter the
records by call type.
Add a Number From Call History as a Contact
1. Open the call history.
2. Touch a listing for more information about the call.
3. To add the number to an existing contact, touch Add to
contact and select a contact in the list. To add a new contact,
touch Create new contact. See Adding a New Contact.
Take Other Actions on a Call History Entry
Open the call history, touch a listing and select Call details to
view detailed call information.
Touch to delete the entry.
77
Touch > Edit before call to edit the number in the dialer
before calling it.
Touch to call the number.
Touch the contact icon in front of the number to open the
contact information tab from the bottom of the screen. You
can send a message, call back, edit the contact, add the
contact to favorites, or add the number to contacts.
NOTE:
You can touch > Clear call history in the call history screen to
delete all history records.
Calling Your Contacts
1. Touch the Home key > . Your favorite contacts and
frequently called contacts are displayed in the tab.
2. Touch a contact to place the call, or touch the tab
and then touch beside a contact to make a call.
Checking Voicemail
If you have set the phone to divert calls to voicemail, callers can
leave voicemail messages when they cannot reach you. Here’s
how to check the messages they left.
1. Touch the Home key > .
2. If the dialpad is closed, touch to display it.
78
3. Touch and hold the 1 key in the dialer. If prompted, enter your
voicemail password.
4. Follow the voice prompts to listen to and manage your
voicemail messages.
NOTE:
See Set Voicemail for how to set your voicemail service. For
detailed information, please contact the service provider.
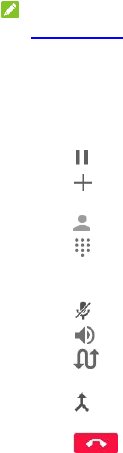
Using Options During a Call
During a call, you will see a number of onscreen options. Touch
an option to select it.
Touch to put the call on hold.
Touch to make another call separately from the first call,
which is put on hold.
Touch to go to Contacts.
Touch to switch to the keypad when you need to enter a
code (for example, the PIN for your voicemail or bank account)
during the call.
Touch to mute or unmute your microphone.
Touch to turn on or off the speakerphone.
Touch to put the caller you are speaking to on hold, and
switch to the other call that has been put on hold.
Touch to merge the separate calls into a single
conference call.
Touch to end the current call.
79
WARNING!
Because of higher volume levels, do not place the phone near
your ear during speakerphone use.
Managing Multi-party Calls
When the call waiting and three-way call features are available,
you can switch between two calls or set up a conference call.
NOTE:
The call waiting and three-way call features need network
support and may result in additional charges. Please contact your
service provider for more information.
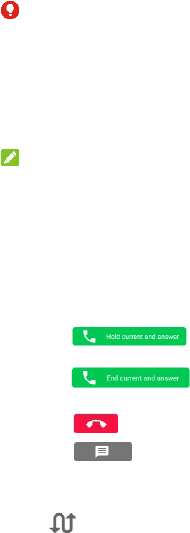
Switch Between Current Calls
When you’re on a call and another call comes in, your phone
screen informs you and displays the caller ID.
To respond to an incoming call while you’re on a call:
Touch to answer the call. (This puts the first
caller on hold and answers the second call.)
Touch to end the current call and answer
the incoming call.
Touch to reject the second call.
Touch to reject the second call and select a preset
text message or write one to send to the caller.
To switch between two calls:
Touch to switch back to the other call.

80
Set Up a Conference Call
With this feature, you can talk to two people at the same time.
1. Place the first call.
2. Once you have established the connection, touch and dial
the second number. (This puts the first caller on hold.)
3. When you’re connected to the second party, touch .
If one of the people you called hangs up during your call, you and
the remaining caller stay connected. If you initiated the call and
are the first to hang up, all callers are disconnected.
To end the conference call, touch .
Adjusting Your Call Settings
Set Contact Display Options
You can set the order of the contacts displayed in tab of
the Phone app.
1. Touch the Home key > > > Settings > Display
options.
2. Touch Sort by or Name format to set the order of the
contacts and the format of the contact names.

81
Set Sound and Vibration
Set the sound and vibration for incoming calls as well as dialpad
sounds.
1. Touch the Home key > > > Settings > Sounds and
vibration.
2. Touch the option you want to configure.
Touch Phone ringtone to select the ringtone for incoming
call notification.
Check Also vibrate for calls to enable vibration for
incoming call notification.
Check Dialpad tones to play sounds when you touch the
dialpad keys.
NOTE:
You can set the vibration pattern for incoming call notification.
Touch the Home key > > > Settings > Call settings >
Vibrate pattern and select one.
Edit Quick Response to Rejected Callers
1. Touch the Home key > > > Settings > Quick
responses.
2. Touch a text message to edit it.

82
Set Voicemail
1. Touch the Home key > > > Settings > Call settings >
Voicemail.
2. Configure voicemail settings.
Touch Service to select the voicemail service provider.
Your carrier is the default.
Touch Setup > Voicemail number to edit the voicemail
number.
Touch Ringtone to select the notification sound for new
voicemails.
Check Vibrate to enable vibration for notification.
Use Fixed Dialing Numbers
Fixed Dialing Numbers (FDN) allows you to restrict outgoing calls
to a limited set of phone numbers.
1. Touch the Home key > > > Settings > Call settings >
Fixed Dialing Numbers.
2. Set the following options.
Enable FDN: Input the PIN2 code to enable the FDN
feature.
Change PIN2: Change the PIN2 code for FDN access.
FDN list: Manage the FDN list.
NOTE:
The PIN2 code is provided by your carrier. Entering an incorrect
PIN2 code more times than allowed can get your nano-SIM card
locked. Contact the service provider for assistance.

83
Set TTY Mode
Your phone is a TTY compatible device. A TTY device can allow
people who have hearing or speech disabilities to communicate
by telephone. Simply connect the TTY device to the phone’s
headset jack.
Select a TTY mode for your phone to work with a TTY device, or
turn TTY off.
1. Touch the Home key > > > Settings > Call settings >
TTY mode.
2. Select one of the following options. Consult your
teletypewriter manufacturer’s manual if necessary.
TTY Off: Users who can hear and talk can disable TTY
support.
TTY Full: Users who cannot talk or hear may use this mode
to send and receive text messages through a TTY device.
TTY HCO: Users who can hear, but cannot talk, may use
this mode to listen to conversation of the other party, and
respond via text messages.
TTY VCO: Users who can talk, but cannot hear, may use
this mode to talk through the phone and receive
responses via text messages.
Set Hearing Aids
Your phone supports the Hearing Aid Compatibility (HAC)
function. When you turn on the hearing aid compatibility and use
a hearing aid with a telecoil to answer the phone, it will help you
hear more clearly during the phone call.

84
1. Touch the Home key > > > Settings > Call settings.
2. Check Hearing aids to turn on hearing aid compatibility.
CAUTION:
Do not turn on the Hearing aids option unless you use a hearing
aid with a telecoil. Using this setting without a hearing aid or with
a hearing aid without a telecoil may be harmful to your hearing.
Set Duration Display On Ended Calls
You can set the phone to display the call duration when you end
each call.
1. Touch the Home key > > > Settings > Call settings.
2. Check Display duration to turn on this feature.
Set Speed Dials
You can touch and hold the 1 ~ 9 keys from the dialer to call the
corresponding speed dial number.
The number key 1 is reserved to speed dial your voicemail.
To assign a speed dial key:
1. Touch the Home key > > > Settings > Call settings >
Speed dial.
2. Touch a speed dial key.
3. Enter a phone number or select one from the contact list.
4. Touch OK.

85
Set Vibration for Call Connection
You can set the phone to vibration when an outgoing call is
answered.
1. Touch the Home key > > > Settings > Call settings.
2. Check Vibrate when call is answered.
Forward Incoming Calls
Call forwarding feature allows you to forward your incoming calls
to another phone number.
1. Touch the Home key > > > Settings > Call settings.
2. Touch Call forwarding.
3. Touch an available option (Always, When busy, When
unanswered, or When unreachable) to enable it.
Bar Certain Calls
Call barring feature allows you to forbid certain types of calls from
your phone.
1. Touch the Home key > > > Settings > Call settings >
Call barring.
2. Set the restriction of specific types of calls from your phone.
Set Caller ID and Call Waiting
1. Touch the Home key > > > Settings > Call settings >
Additional settings.
2. Touch Caller ID to choose whether your number is displayed

86
when someone receives your outgoing call. Or check Call
waiting to get notified of incoming calls during a call.
NOTE:
Please contact the service provider to check whether the caller
ID and call waiting features are available.
87
Contacts
You can add contacts on your phone and synchronize them with
the contacts in your Google account or other accounts that
support contact syncing.
To see your contacts, touch the Home key > Contacts. From
there, you can touch the tabs on the top of the screen to quickly
switch to contact groups or favorite contacts.
Checking Contact Details
1. Touch the Home key > Contacts to access your contact list.
2. Scroll through the list to view all your contacts.
3. Touch a contact to view its details.
NOTE:
If you have a lot of contacts stored, drag the slider on the right
side of the screen to quickly locate the contact you want.
Adding a New Contact
1. Touch the Home key > Contacts.
2. Touch to add a new contact.
3. Enter the contact name, phone number, and email address.
4. If necessary, touch More Fields to add other information. If
you have added a sync account, you can choose where the
contact will be saved.
5. Touch to save the contact.

88
Setting Up Your Own Profile
You can create your own name card in your phone.
1. Touch the Home key > Contacts.
2. Touch Set up my profile.
If a profile has already been set up, touch the existing profile
below ME and touch .
3. Edit your profile information. Touch More Fields to add more
details if you want.
4. Touch to save.
Importing, Exporting, and Sharing
Contacts
You can import/export contacts from/to the phone storage and
microSDHC card. This is especially useful when you need to
transfer contacts between different devices. You can also quickly
share contacts using Bluetooth, Google Drive, Email, Gmail,
Messaging, etc.
Import Contacts From the Phone Storage
1. Touch the Home key > Contacts.
2. Touch > Import/Export > Import from storage.
3. If you have added contact accounts other than the phone,
select an account in which to save the contacts.
4. Select the vCard file(s) and touch OK.

89
Export Contacts to the Phone Storage
1. Touch the Home key > Contacts.
2. Touch > Import/Export > Export contacts > Export to
storage.
3. The phone will prompt you with the name of the vCard file and
the directory in which the file will be saved. Touch OK to
create the file.
Share Contacts
1. Touch the Home key > Contacts.
2. Touch > Multi-Select.
3. Touch the contacts you want to share and then touch .
4. Choose how to share the contacts. Options depend on the
applications and services installed.
Working With Favorite Contacts
You can add the contacts you use frequently to FAVORITES so
that you can find them quickly.
Add a Contact to Favorites
1. Touch the Home key > Contacts.
2. Touch a contact and then touch at the top.

90
Remove a Contact From Favorites
1. Touch the Home key > Contacts > FAVORITES tab.
2. Touch a favorite contact and then touch at the top.
Working With Groups
View Your Contact Groups
1. Touch the Home key > Contacts and touch the GROUPS
tab.
2. Scroll through the list to view the preset groups and any
groups you have created.
3. Touch a group to view its members.
NOTE:
To send a message or an email to all or some of the group
members, touch the group and then touch > Send Group
message or Send Group email.
Set Up a New Group
1. Touch the Home key > Contacts and touch the GROUPS tab.
2. Touch to create a new group.
3. If you have added contact accounts other than the phone,
select an account for the new group.
4. Touch the Group’s name field and enter the group name.

91
5. Touch Add member and select the contacts you wish to be
the group members.
6. If necessary, touch Default below RINGTONE and
NOTIFICATION RINGTONE to set a special ringtone for
incoming calls and messages from the group members, and
then touch OK.
7. Touch .
Delete a Group
1. Touch the Home key > Contacts and touch the GROUPS tab.
2. Touch a group and then touch > Delete Group.
3. Touch OK to disband the group. The contacts in the group
will not be deleted.
Edit a Group
1. Touch the Home key > Contacts and touch the GROUPS
tab.
2. Touch a group and then touch > Edit.
3. Touch the group name to edit it, or touch the field below
MEMBER, RINGTONE, or NOTIFICATION RINGTONE to
add more members or change the ringtones.
NOTE:
To remove group members, touch a group and then touch >
Multi-Select and select the members you would like to remove.
Then touch > OK.

92
Searching for a Contact
1. Touch the Home key > Contacts.
2. Touch at the top of the screen.
3. Input the contact name or any information the contact has to
search for it. The contacts matched will be listed.
Editing Contacts
Edit Contact Details
1. Touch the Home key > Contacts.
2. Touch a contact you need to edit and then touch .
3. Edit the contact and touch .
Set a Ringtone for a Contact
Assign a special ringtone to a contact, so you know who is
calling when you hear the ringtone.
1. Touch the Home key > Contacts.
2. Touch a contact you want to set a ringtone for and then
touch > Set ringtone.
3. Select a ringtone and touch OK.

93
Join Duplicate Contacts
As your phone synchronizes with multiple online accounts, you
may see duplicate entries for the same contact. You can merge
all the separate information of a contact into one entry in the
contacts list.
1. Touch the Home key > Contacts.
2. Touch a contact to display the contact’s details.
3. Touch > > Join.
4. Touch the duplicate contacts whose information you want to
join with the first entry.
5. Touch .
The information from the second contact is added to the first, and
the second contact is no longer displayed in the contacts list.
You can repeat these steps to join another contact to the main
contact.
Separate Contact Information
If contact information from different sources was joined in error,
you can separate the information back into individual contacts on
your phone.
1. Touch the Home key > Contacts.
2. Touch a joint contact you want to separate.
3. Touch > > Separate.
4. Touch OK.

94
Web Accounts
Adding or Removing Accounts
You can add multiple Google accounts and Microsoft Exchange
ActiveSync® accounts. You may also add other kinds of
accounts depending on the apps installed on your phone.
Add an Account
1. Touch the Home key > > Settings > Accounts > Add
account.
2. Touch the type of account you want to add.
3. Follow the onscreen steps to enter the information about the
account. Most accounts require a username and password,
but the details may vary. You may also need to obtain some
information from IT support or your system administrator.
When the account is successfully added, it is displayed in the
Accounts menu in Settings.
Remove an Account
Removing an account will delete it and all information associated
with it from your phone, such as emails and contacts.
1. Touch the Home key > > Settings > Accounts.
2. Touch the account category and then touch the account.
3. Touch > Remove account > REMOVE ACCOUNT.

95
Configuring Account Sync
Configure Auto Sync Setting
1. Touch the Home key > > Settings > Accounts.
2. Touch and check or uncheck Auto-sync data.
When automatic sync is turned on, changes you make
to information on your phone or on the web are
automatically synced with each other.
When automatic sync is turned off, you need to sync
manually to collect emails, updates, or other recent
information.
Sync Manually
When auto-sync is turned off, you can sync account data
manually.
1. Touch the Home key > > Settings > Accounts.
2. Touch the account category and then the account you want
to sync.
3. Touch > Sync now.

96
Change an Account’s Sync Settings
1. Touch the Home key > > Settings > Accounts.
2. Touch the account category and then the account. The
Sync screen appears, showing a list of information the
account can sync.
3. When auto-sync is enabled, switch on or off the items as
you need. The types of information that are switched on will
be kept in auto-sync. When auto-sync is disabled, touch a
listing to sync that type of information between the phone
and the web.

97
Email
Touch in the home screen and select Email. Use it to
receive and send emails from your webmail or other accounts,
using POP3 or IMAP, or access your Exchange ActiveSync
account for your corporate email needs.
Setting Up the First Email Account
1. Touch the Home key > Email.
2. Select an email server, enter the email address and
password.
3. Touch NEXT to let the phone retrieve the network parameters
automatically.
NOTE:
You can also enter these details manually by touching
MANUAL SETUP or if automatic setup fails.
4. Follow the on-screen instructions to finish the setup.
Your phone will show the inbox of the email account and start to
download email messages.
Checking Your Emails
Your phone can automatically check for new emails at the
interval you set when setting up the account.

98
You can also check new emails manually by dragging down on
the message list.
To check earlier emails for your IMAP or POP3 accounts, swipe
upwards to the bottom of the message list and touch LOAD
MORE.
You can adjust how often your account downloads new email
by touching > Settings > name of the account > Sync
frequency.
Writing and Sending an Email
1. Open your email Inbox and touch .
2. If you have more than one email account added on the
phone, touch the sender line to select the account you want
to use for sending the message.
3. Enter a contact name or email address in the To field.
Separate each recipient with a comma. You can also touch
+ to select recipients from your contacts or history.
NOTE:
To send a carbon copy or blind carbon copy to other
recipients, touch to open the Cc/Bcc field and enter the
contact names or email addresses.
4. Enter the email subject and compose the email text.
5. Touch to add images, videos and other types of files as
attachments.
6. Touch at the top right of the screen to send the message.

99
Responding to an Email
You can reply to or forward a message that you receive. You
can also delete messages and manage them in other ways.
Reply to or Forward an Email
1. Open the email you want to reply to or forward from the Inbox.
2. Do the following as you need:
To reply to the sender, touch .
To reply to the sender and all recipients of the original
email, touch .
To forward the email to someone else, touch .
3. Edit your message and touch .
Mark an Email
You can mark an email as read or unread.
While reading a message, touch > Mark unread.
While in a message list (for instance, the Inbox), touch the
sender images before the messages and touch .
Delete an Email
You can delete an email from its folder. You can also delete a
batch of emails.
While reading a message, touch > Delete.
While in a message list (for instance, the Inbox), touch the
sender images before the messages and touch .

100
Delete an Email Account
1. From your inbox, touch > Settings.
2. Touch the account you want to delete.
3. Swipe to the bottom of the screen and touch Remove
account.
4. Touch OK to confirm. All email messages in the account will
be deleted.
Adding and Editing Email Accounts
Add an Email Account
After setting up your first email account (see Setting Up the
First Email Account), you can add more email accounts and
manage them separately.
1. Open Email to get the Inbox screen.
2. Touch > Settings.
3. Touch Add account.
4. Follow the prompts to set up the account as you did with the
first one.
NOTE:
You can also add accounts from the Settings app. See Add an
Account.

101
Edit an Email Account
You can change a number of settings for an account, including
how often you check for email, how you’re notified of new mails,
your email signature, and details about the servers the account
uses to send and receive mails.
1. Open Email to get the Inbox screen.
2. Touch > Settings and touch the account whose
settings you want to change.
3. Make the changes and touch the Back key when you finish.
Changing General Email Settings
General settings apply to all email accounts you add.
1. Open Email to get the Inbox screen.
2. Touch > Settings > General settings.
3. Make the changes and touch the Back key when you finish.
102
Messaging
You can use Messaging to exchange text messages (SMS) and
multimedia messages (MMS).
Opening the Messaging Screen
Touch the Home key > Messaging.
The Messaging screen opens, where you can create a new
message, search for messages, or open an ongoing message
thread.
Touch to write a new text or multimedia message.
Touch to search for a message using keywords.
Touch an existing message thread to open the conversation
you’ve had with a certain number.
Sending a Message
1. On the Messaging screen, touch at the bottom.
2. Add recipients by one of the following ways.
Touch the To field and manually enter the recipient’s
number or the contact name. If the phone presents a few
suggestions, touch the one you want to add.
Select recipients from your contacts or call log by
touching .

103
3. Touch the Type message field and enter the message text.
4. If you want to send a multimedia message, touch to
attach a file or create a slideshow to the message.
5. Touch or SEND.
NOTES:
You can also include email addresses as recipients for a
multimedia message.
Do not add any attachment if you want to send a text
message. Otherwise you will be charged for a multimedia
message.
Replying to a Message
Messages you receive are appended to existing threads of the
same number. If the new message comes from a new number,
a new thread is created.
1. On the Messaging screen, touch the thread that has the
message you want to reply to.
2. Type your reply in the text box at the bottom. You can touch
if you want to reply with an MMS.
3. Touch or SEND.

104
Forwarding a Message
1. On the Messaging screen, touch the thread that has the
message you want to forward.
2. Touch the message and then touch Forward in the menu
that opens.
3. Enter a recipient for the message and edit the content if you
want.
4. Touch or SEND.
Copying a Message
You can copy text messages from the nano-SIM card to the
phone.
1. On the Messaging screen, touch > Settings > Manage
SIM card messages.
2. Touch and hold a message and then touch Copy to phone
memory.
Deleting Messages or Threads
Delete Messages in a Thread
1. On the Messaging screen, touch a thread.
2. Touch > Multi-Select.
3. Check the boxes of the messages you want to delete.
4. Touch > OK.

105
Delete Message Threads
1. On the Messaging screen, touch and hold a thread you
want to delete.
2. If there are more threads you want to delete, touch them
one by one.
3. Touch > OK.
Changing Message Settings
Touch > Settings in the Messaging screen to change the
messaging settings.

106
Calendar
Calendar on the phone works with the web-based Google
Calendar™ service for creating and managing events,
meetings and appointments. It also works with the Microsoft
Exchange ActiveSync calendar once you sign into your
Exchange account on the phone.
To open Calendar, touch Calendar in the home screen.
Viewing Your Calendars and Events
Select Visible Calendars
1. Open the Calendar app.
2. Touch > Calendars to display.
3. Touch the calendars to check the ones you want to see or
uncheck the ones you’d like to hide.
Events from hidden calendars are not shown in the Calendar app.
Change Calendar Views
You can view your calendars in different forms. The app offers
four view types: Month, Week, Day, and Agenda.
To change calendar views, touch the current time at the top left
and select the view you prefer.
In Week or Day view, swipe horizontally to see previous and
future weeks or days.

107
In Month view, swipe vertically to see past and future
months.
In Agenda view, swipe vertically to see all your events.
When you are viewing past or future days, weeks, or
months, touch at the top right to quickly switch to today.
The number in the icon changes with the actual date.
Touch > Go to and touch a desired date to switch to in
calendar.
View Event Details
In Agenda, Day, or Week view, touch an event to view its details.
In Month view, touch a day to display events on that day. Then
touch an event to view its details.
Creating an Event
1. In any Calendar view, touch at the bottom.
You can also touch a spot in Day or Week view twice to add
an event to that time slot.
2. Enter the event name, location, description, start time, and
end time. Touch MORE to add more information, such as
reminders, repetition, time zone, and account.
NOTE:
Different accounts may present different event details that
you can fill in.
3. Touch DONE.

108
Editing, Deleting or Sharing an Event
1. Find the event you want to edit, delete, or share.
2. Open its details screen (see View Event Details in this
chapter).
3. Do one of the following as you need.
To edit the event, touch . Touch DONE to save your
changes.
To delete the event, touch > OK.
To share the event, touch and choose how to share.
Changing Calendar Settings
To change the calendar settings, open a calendar view (Day,
Week, Month, or Agenda), and touch > Settings. You can
change General settings, which apply to all accounts, or other
settings that only apply to specific accounts.
For General settings, choose options for Calendar view
setting and Notification & reminders settings. You can
choose to show the week number, set the day of the week
the calendar starts on, and use home time zone when you
travel. Also you can choose event reminder settings such as
notification sound, vibration, default reminder time, and
more.
To create a calendar account, touch to create an
Exchange or Google account.

109
Web Browser
Use Chrome to view web pages and search for information.
Opening the Browser
Touch the Home key > Google folder > Chrome to launch the
web browser.
You can also open the browser by touching a web link - for
example, in an email or a text message.
1. Open the Chrome app.
2. Touch the address box at the top.
3. Enter the address (URL) of a web page or enter terms you
want to search for.
4. Touch a URL or search suggestion or touch Go / on the
keyboard to open the web page or search results.
NOTE:
Touch the Back key or > to go to the previous or the next
web page, or touch to stop loading a web page.

110
Using Multiple Browser Tabs
You can open several web pages at the same time (one page in
each tab) and switch between them freely.
To open a new browser tab:
Touch > New tab. A new browser tab opens.
To switch between tabs:
1. Touch . Thumbnails of opened tabs appear.
2. Swipe to find the thumbnail you need and touch it to open
the tab.
NOTE:
Swipe a title horizontally or touch its to close the tab.
Downloading Files
1. Touch and hold an image or a link to a file or to another web
page.
2. In the menu that opens, touch Save image or Save link.
The downloaded files are saved to your phone. You can view or
open them in the Downloads app.

111
Using Bookmarks
Add a Bookmark
1. Open the web page that you want to bookmark.
2. Touch > . The URL of the web page is added to your
bookmarks.
3. If necessary, touch EDIT, which briefly appears at the
bottom, or touch > to edit the bookmark name, folder,
or URL. Touch to save and exit.
Open a Bookmark
1. Touch > Bookmarks.
2. Touch the bookmark you want to open.
Edit a Bookmark
1. Touch > Bookmarks.
2. Touch next to the bookmark you want to edit and select
Edit.
3. Edit the name or the URL of the bookmark in the fields, or
change the folder to contain the bookmark if needed.
4. Touch to save and exit.

112
Remove a Bookmark
1. Touch > Bookmarks.
2. Touch next to the bookmark you want to remove and
select Delete.
Clearing Browsing Data
1. Touch > Settings > Privacy > Clear browsing data.
2. Touch the Clear data from the field to select the time period
you want to clear.
3. Check the data type you want to clear: Browsing history,
Cookies and site data, Cached images and files, Saved
passwords, or Autofill form data.
4. Touch CLEAR DATA.
NOTE:
You can touch > New incognito tab to use the incognito
feature, with which your browsing data won’t be saved on your
phone.
Changing Browser Settings
You can configure a number of settings to customize the way
you browse the web, including several that you can use to
control your privacy.
To open the browser settings screen, touch > Settings.
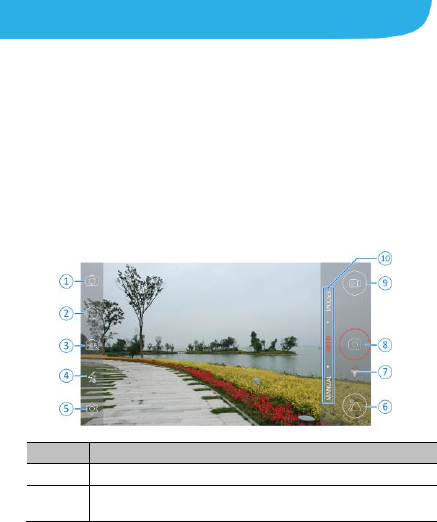
113
Camera
You can use your phone to take photos and record videos.
Photos and videos are stored on the phone’s internal storage or
the microSDHC card. You can copy them to your computer or
access them in the Gallery app.
Capturing a Photo
1. Touch the Home key > Camera.
2. Aim the camera at the subject and make any necessary
adjustment. Auto camera mode is used by default.
Number
Function
1
Switch between the front and back cameras.
2
Set a time delay before the camera takes a picture
automatically after you touch the shutter icon.
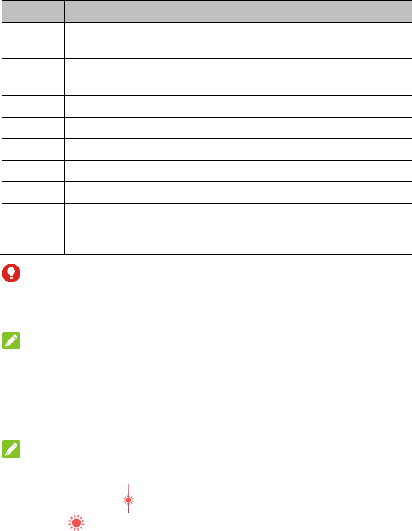
114
Number
Function
3
Turn on or off the High-Dynamic Range (HDR) feature, only
available for the back camera.
4
Change the flash setting, only available for the back
camera.
5
Change the camera settings.
6
View pictures and videos you have taken.
7
Select a filter effect.
8
Capture a picture.
9
Start video recording.
10
Switch among AUTO, MANUAL, and other modes
(PANORAMA, MULTI EXPOSURE, and INTERVAL), only
available for the back camera.
WARNING!
Keep a safe distance when using the flash. Do not point the
flash towards the eyes of people or animals.
NOTE:
You can spread or pinch your fingers on the screen to zoom
in or out before taking pictures.
3. Touch the area where you want the camera to focus, or
leave the camera to autofocus on the center of the image.
NOTE:
In Auto camera mode, when you touch the screen to focus,
the exposure bar appears beside the focus point. You
can drag up or down to adjust the exposure.

115
4. Lightly touch or press the Volume key to take a photo.
NOTE:
When you use the front camera, you can also touch to
adjust smile detection setting.
Using Different Camera Modes
Choose from three different camera modes (MANUAL, AUTO,
and MODES) for different options while taking photos.
NOTES:
AUTO mode is the default setting for the camera.
MODES are only available on the back camera.
Use Manual Camera Mode
You can use manual camera mode to adjust more camera
options for your photo such as ISO, white balance, exposure, etc.
1. Touch the Home key > Camera.
2. Touch MANUAL.
3. Aim the camera at the subject and you can make the
following adjustments.
Drag to any area on the screen that you want to
focus on.
Drag to any area on the screen where you want the
camera to meter exposure so as to adjust the photo
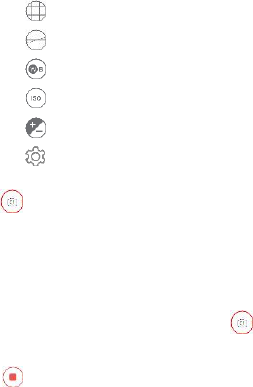
116
brightness.
Touch to show the grid or the golden spiral, or hide it.
Touch to enable or disable the gradienter.
Touch to adjust white balance.
Touch to adjust ISO.
Touch to adjust overall exposure.
Touch > Picture size to set the image size for your
photo.
4. Touch or press the Volume key to take the photo.
Use Panorama Mode
1. Touch the Home key > Camera.
2. Touch MODES > PANORAMA.
3. Aim the camera at the subject and touch .
4. Move the camera right or left to capture a panorama shot.
5. Touch to save the photo.
Use Multi-exposure Mode
1. Touch the Home key > Camera.
2. Touch MODES > MULTI EXPOSURE.
3. Swipe left to choose a photo option to blend multiple photos
117
into one image.
4. Follow the on-screen instruction.
Use Interval Mode
1. Touch the Home key > Camera.
2. Touch MODES > INTERVAL.
3. Slide the time interval bar to set the time interval.
4. Touch to start taking burst shots at the time interval you
set.
5. Touch to stop.
Recording a Video
1. Touch the Home key > Camera.
2. Aim the camera at the subject and make any necessary
adjustment. You can touch any area on the screen that you
want the camcorder to focus on before and during
recording.
NOTE:
You can spread or pinch on the screen to zoom in or out
before recording.
3. Touch to start and to stop recording. You can also
touch to pause the recording.
NOTE:

118
When recording is in progress, touch to save the frame
as a separate photo.
Customizing Camera/Camcorder
Settings
Before capturing a photo or a video, you can touch to open
the following camera and video setting options.
NOTE:
Some camera and video options will change in different camera
modes.
CAMERA
Picture size: Set the image size for your photo.
Full screen: Set the viewfinder screen as full screen
when the back camera is used.
Point-and-shoot: Available for the front camera. When
this feature is enabled, you can touch the viewfinder
screen to take a photo using the front camera.
Shutter tone: Turn on or off the shutter tone.
Geo-tagging: Select whether to store the GPS location in
your captured photos and videos.
Storage location: Change the storage location for
captured photos and videos.
Restore defaults: Restore default camera and video
settings.
119
VIDEO
Video quality: Set the quality up to 1080P for your video.
Time lapse: Set the time interval between each frame
when recording time lapse videos using the back camera.
Focus lock when recording: Select whether to lock the
focus point when recording videos using the back camera.
Geo-tagging: Select whether to store the GPS location in
your captured photos and videos.
Storage location: Change the storage location for
captured photos and videos.
Restore defaults: Restore default camera and video
settings.

120
Gallery
Opening Gallery
Touch the Home key > > Gallery to view albums of your
pictures and videos.
Working With Albums
When you open Gallery, all pictures and videos on your phone
are displayed in a number of albums.
To view album contents:
Touch an album to view the pictures and videos it contains.
To share albums, pictures, or videos:
1. Touch and hold an album to select it or touch and hold an
item after you open an album to select a picture or a video.
2. Touch more items that you want to share.
3. Touch and select how you want to share the items.
To delete albums, pictures, or videos:
1. Touch and hold an album to select it or touch and hold an
item after you open an album to select a picture or a video.
2. Touch more items that you want to delete.
3. Touch > OK.
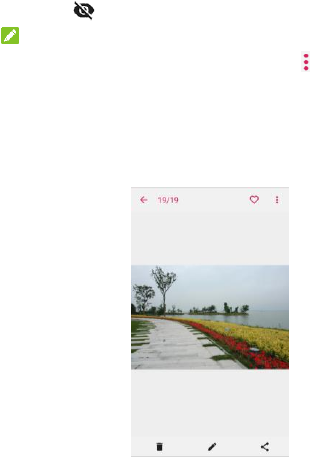
121
To hide albums:
1. Touch and hold an album to select it.
2. Touch more albums that you want to hide.
3. Touch > OK.
NOTE:
To show the hidden albums again, touch > Settings >
Manage hidden albums. Touch the albums you want to
restore and touch Show at the bottom.
Working With Pictures
Touch a picture in an album to view the picture in full screen.
122
When viewing a picture in full screen, the following features are
available.
Swipe horizontally to see other pictures or videos in the
album.
Pinch a picture or video to make it smaller. You'll then see a
filmstrip-style view of all your pictures and videos in a row.
Swipe left or right to scan through them all.
NOTE:
You can delete a picture or video by swiping it up in the
filmstrip view.
Double-tap the picture, or pinch two fingers together or
spread them apart to zoom out or in.
Touch , or to share, edit or delete the picture.
Touch to set the picture as wallpaper or contact photo,
rotate or rename the picture, browse the album contents in a
slideshow, print the picture, or check file details.
NOTE:
Some options may not be available for certain albums or
pictures.
Retouching Your Pictures
You can edit any photos you took and some other pictures in
Gallery. The changed picture is saved in the same album as
the original image, which is not affected.
123
1. Touch > Photo Editor while viewing a picture in full
screen to open the Editor interface.
NOTE:
You can also choose to edit the picture with Photos. Some
editing tools need to be downloaded.
2. Touch an edit option along the bottom of the screen and edit
the picture.
Filter
Apply filters, old photo and blur effects.
Modify
Crop, rotate, or flip (mirror) the picture.
Adjust
Adjust exposure, saturation, hue, sharpness, and other
color options.
Doodle
Select a color and draw anything, add text, or apply
mosaic on the picture.
Decoration
Decorate the picture with a frame, or decorate people in
the picture with comical moustaches, eye glasses, hats
and more.
3. Touch to keep the change or touch to cancel it.
4. Touch to save the new picture.
NOTE:
Touch in the Photo Editor screen to see the edits you have
made and undo or redo them.
124
Making a GIF Picture or a Collage
You can put together a few pictures in the same album to make
an animated GIF picture or a collage of pictures.
1. Open the Gallery app and touch > GIF maker or
Collage maker.
2. Touch an album.
3. Touch the pictures you need.
To make a GIF, touch 2 to 50 pictures in the order or
reverse to the order that you want them to appear in the
GIF.
To make a collage, touch 2 to 9 pictures.
The pictures you touched are displayed along the bottom.
Touch to remove the pictures you do not need.
4. Touch NEXT. The GIF or collage is displayed.
5. Touch the options along the bottom to adjust the final
picture.
For GIF, you can adjust the speed, play order, image size,
and more.
For collage, touch TEMPLATE, FREE, or COLLAGE and
then select a border, shading or style.
6. When you are satisfied with the final picture, touch to
save the GIF or touch to save the collage.
The picture is saved to the zte_editor folder in your phone
storage or the microSDHC card.

125
Playing Videos
1. Touch an album in the gallery and then touch the thumbnail
of a video.
2. Touch at the center to start playing. Touch the video to
view the playback controls.

126
Music
Touch the Home key > > Music to play audio files stored
on your phone. Music supports a wide variety of audio formats,
so it can play music you purchase from online stores, music you
copy from your CD collection, and so on.
Copying Music Files to Your Phone
Before using Music, you need to copy or download audio files to
your phone.
Copy From a Computer
1. Connect your phone and the computer with a USB cable.
2. Touch Media device (MTP) as the connection mode. See
Connect Your Phone to a Computer via USB.
3. Copy the music files from the PC and paste them to the
phone storage or the microSDHC card.
Download From the Internet
You can download music files when browsing web pages. See
Downloading Files.
Receive via Bluetooth
You can receive music files from other devices via Bluetooth.
See Receive Data via Bluetooth.

127
Viewing Your Music Library
Touch the Home key > > Music to open the Music app.
There you can touch All Songs to view all your audio files, or
touch Artists, Albums, or Folders to view by categorized lists
of artists, albums, and folders. You can also touch Favorites or
Recently Played to find songs, or view all your playlists in the
Playlists section.
NOTE:
If an audio file is being played, its name and player controls are
displayed at the bottom of the screen. Touch the area to open the
playback screen.
Setting a Song as the Default Ringtone
The song will be used as the ringtone for all incoming calls,
except those from contacts to whom you have assigned special
ringtones (see Set a Ringtone for a Contact).
1. Touch the Home key > > Music > All Songs to see the
music library.
NOTE:
If you are in the playback screen, swipe downwards to
return to the music library.
2. Touch next to a song in any list.
3. In the menu that opens, touch Set as ringtone.
4. Touch Phone Ringtone or Notification Ringtone.
128
NOTE:
If the song is being played and you’re in the playback screen,
you can touch > Set as ringtone and select Phone
Ringtone or Notification Ringtone.
Playing Music
Touch a song in the music library to listen to it. Touch the
bottom of the screen to open the following playback screen.
129
Number
Function
1
Return to the music library.
2
Album artwork. Swipe left or right to switch to the next or
previous song.
3
View information of the current track.
4
Turn on or off shuffle.
5
Playback control: Skip songs or pause and resume playback.
Drag the progress bar to jump to any part of the track.
6
Toggle repeat mode: repeating the current song, repeating all
songs, or sequential.
7
Add the track to the Favorites playlist.
8
View the current playlist.
9
Access additional options.
Managing Playlists
Create playlists to organize your music files into sets of songs,
so that you can play the songs you like in the order you prefer.
Touch > Add to playlist next to a song to add it to a
playlist or create a new playlist.
Touch > Delete/Rename next to a playlist to delete or
rename the playlist.
Touch a playlist to view its content. To delete a song, touch
> Remove next to the song you want to remove.

130
Video Player
Use the Video Player app to manage your video library and
watch videos.
Opening the Video Library
Touch in the home screen and select Video Player to view
your video library, where your video files are displayed.
Swipe up or down to find the video you want. You can also
touch to search for video files, or touch > View by or
Sort by to change the display mode or sort the list.
Playing and Controlling Videos
Touch a video in the video library to play it. Touch the screen to
show the playback controls. You can control the video and
audio or carry out other operations.
Touch the play/pause button at the bottom to pause or
resume the playback.
Slide horizontally on the screen to rewind or fast forward.
Slide vertically on the right or left part of the screen to adjust
volume or brightness.
Touch or to skip to the previous or the next video.
Touch or to change the video ratio.

131
Touch to rotate the video.
Touch to hide the control panel.
Touch to play the video in a small window and continue
with other tasks on the phone.
Touch to capture a screenshot.
Touch to share, trim or delete the video, or configure
player settings.
Managing Video Files
Delete Video Clips
1. In the video library, touch and hold a video.
2. Check other videos you want to delete.
3. Touch > OK.
Share a Video Clip
1. Touch and hold a video in the video library.
2. In the menu that opens, touch and select how you want
to share it.

132
Trim a Video Clip
1. Touch a video to start playing it.
2. Touch > Trim.
3. Drag the two tabs on the progress bar to select the portion
you want to keep.
If necessary, touch to preview the selected portion.
4. Stop the preview or when it ends, touch . The trimmed
video is saved as a new video file.
133
FM Radio
With the FM radio, you can search for radio channels, listen to
them, and save them on your phone. Note that the quality of the
radio broadcast depends on the coverage of the radio station in
your area. The wired headset works as an antenna, so always
connect the headset when using the radio. When you receive
an incoming call while listening to the radio, the radio will be
turned off.
Scanning and Saving Channels
1. Plug in a wired headset and touch the Home key > >
FM Radio.
2. Touch > Scan. Your phone scans for available channels
and saves them to the All channels list.
NOTE:
When you open the FM Radio app for the first time, it will
automatically scan for channels and show the All channels list.
You can also touch > All channels to view the list.
Listening to FM Radio
1. Touch the Home key > > FM Radio while the headset
is connected.
2. Touch > All channels and select a channel.
134
You can also drag the frequency panel left or right, touch + or -,
or touch or to switch to other channels.
NOTES:
Touch to add the channel to favorites. Favorite
channels are put on the FM Radio main screen. Slide
up to view all favorite channels.
You can save at most 16 channels to favorites.
Touch to listen to the radio through the phone speaker.
Editing a Saved Channel
1. Open the FM Radio app and touch > All channels to
display the list of saved channels.
2. Touch and hold a channel and select Rename or Delete, or
touch the star to the right of a channel to add it to favorites.
Other Options and Settings
To turn off FM radio automatically:
Touch > Timing turn off and select the time you want to turn
off the radio.
A count-down clock appears above the frequency and the radio
is turned off when the clock counts down to 0:00.

135
To turn off FM radio immediately:
Touch the switch at the top of the screen.
To set your radio region:
FM radio frequency ranges differ in different regions.
Touch > FM frequency range to select the range you need.
NOTE:
If you change the frequency range, previously saved channels
are not shown until you switch back to the original frequency
range.

136
More Apps and Features
Backup & Restore
Touch the Home key > > Backup & Restore. You can back
up your user data, such as messages and installed applications,
to the microSDHC card or phone storage regularly. If the data get
lost, restore it from the card or storage.
Touch > Help to view detailed guide.
Calculator
Touch the Home key > > Calculator to use the phone’s
convenient built-in calculator for some basic as well as advanced
mathematical equations.
NOTE:
Slide left while holding the phone upright, or hold the phone on its
side, to access advanced buttons.
Clock
Touch the Home key > > Clock. The Clock app allows you
to check local time in places around the world, set alarms, and
use timers.
137
Set a New Alarm
1. Touch the tab in the Clock app.
2. Touch an existing alarm to configure it, or touch at the
bottom of the screen to create a new alarm.
3. Set up the alarm options, such as time, alarm days, snooze,
and alarm ringtone.
4. Touch SAVE to save and exit.
NOTES:
To enable or disable existing alarms directly, just touch the
switches on the right side.
Touch in the tab to configure alarm settings,
including ringtone volume and duration, vibration, volume
crescendo, and alarm in silent mode.
Check World Time
Touch the tab in the Clock app to check local time around
the world.
Touch at the bottom to add a new city or country.
Use the Stopwatch and Countdown
Touch the or tab in the Clock app to use the stopwatch
or the countdown timer.
Stopwatch allows you to record lap times (100 laps at most),
while countdown allows you to set a time and count down to zero.

138
Downloads
The Downloads app keeps a record of the files you have
downloaded using apps such as Chrome.
Touch the Home key > > Downloads to check the record.
Touch a file to open it with the appropriate applications.
Touch and hold a file to delete or share it.
File Manager
Quickly access all of your images, videos, audio clips, and other
types of files on your phone storage.
Touch the Home key > > File Manager.
Touch CATEGORY at the top left to find the file you need by
category.
Touch LOCAL at the top right to browse folders and files.
Touch and hold an item to access option icons such as Copy,
Move, Share, or Delete.
To copy or move an item, navigate to a new location and
touch PASTE.
Touch + or > New folder to create a new folder in the
current directory.
Touch to search for files.

139
Touch > View by or Sort by to change the view of the list
or the order of the items in the list.
Touch > Multi-Select to select multiple items for deletion,
sharing, copying, moving, or compression.
Touch > Show hidden files to display hidden system files
and folders.
Touch > Exit to exit the File Manager app.
Sound Recorder
Sound Recorder enables you to record voice memos and
listen to them whenever you like.
Record a Voice Memo
1. Touch > > Sound Recorder.
2. Touch the HQ icon to turn on or off high quality recording.
3. Touch to start recording. During recording, you can
touch / to pause or continue the recording.
4. Touch to stop recording. The memo is automatically
saved.
Play a Voice Memo
To play a memo you just recorded:
Touch .

140
To play any saved memo:
1. Touch at the top right of the screen to see all
recordings.
2. Touch the title of a memo to play it.
NOTE:
Touch next to a memo to delete, rename, share, trim it,
check file information, add a tag, or set it as your phone
ringtone or notification ringtone.
Google Apps
Open the Google apps to use Google services. Some apps are
put in the Google folder on the home screen.
NOTE:
Some contents or Google services may not be available in
certain regions.
Chrome: Use the Chrome app to browse the Internet and
get your bookmarks, browsing history, and more synced
with your Google account.
Drive: Store files on Google servers for free after you sign
in to your Google account. You can access them on your
computers, your phones and other devices, share them, or
collaborate with others.
Gmail: Send and receive emails via your Gmail account or
other personal email accounts.
141
Google: Use Google search or get information when you
need it with Google Now.
Hangouts: Chat with Google+ friends or send text or
multimedia messages.
Keep: Create, share, and collaborate notes quickly and
easily.
Maps: Find your place and find your way in the world.
Photos: Manage photos on the phone and your Google
account.
Play Movies & TV: Purchase, download and watch the
latest and your favorite movies and TV shows.
Play Music: Play music on the phone and on your Google
account.
Play Store: Buy and download apps, games, and other
content from the Google Play Store.
Voice Search: Search for information with your voice.
YouTube: Watch video clips from YouTube.com, or upload
your own and share with the world.
142
Settings
Touch the Home key > > Settings. The Settings app
contains most of the tools for customizing and configuring your
phone.
Wireless and Networks
Wi-Fi
Touch the Home key > > Settings > Wi-Fi. You can turn
Wi-Fi on or off and configure your Wi-Fi connections. See
Connecting to Wi-Fi and Using Wi-Fi Direct.
Bluetooth
Touch the Home key > > Settings > Bluetooth. You can
turn Bluetooth on or off and configure your Bluetooth
connections. See Connecting to Bluetooth Devices.
Cellular Network
Touch the Home key > > Settings > Cellular network. You
can control mobile data, data roaming, network type, network
operator, and APNs. See Connecting to Mobile Networks.
143
Wi-Fi Hotspot
Touch the Home key > > Settings > Wi-Fi hotspot. By
using Wi-Fi hotspot, your phone can be used as an Internet
access point, which allows devices to connect via Wi-Fi. See
Share Your Mobile Data Connection as a Wi-Fi Hotspot.
Data Usage
Touch the Home key > > Settings > Data usage to
manage mobile data use.
Touch the Mobile data or Set cellular data limit switches to
turn on or off mobile data or mobile data limit.
You can check how much data has been used during the time
cycle you set, set mobile data limit and warning, see what apps
have been using mobile data, or restrict background data for
individual apps.
NOTE:
The data usage is measured by your phone, and your carrier’s
data usage accounting may differ.
Airplane Mode
Touch the Home key > > Settings > More and slide the
switch beside Airplane mode to turn airplane mode on or off.
All the phone’s radios that transmit voice or data are turned off
when airplane mode is on.

144
VPN
Touch the Home key > > Settings > More > VPN to set up
and connect to virtual private networks. See Connecting to
Virtual Private Networks.
Default SMS App
Touch the Home key > > Settings > More > Default SMS
app to choose the preferred application for sending and
receiving messages.
USB Tethering
Touch the Home key > > Settings > More > USB
tethering to share your phone’s mobile data connection with a
PCs via USB so that you can access the Internet on the PC
using the phone. See Share Your Mobile Data Connection via
USB.
Personal
Display
Touch the Home key > > Settings > Display to configure
the following options.
Brightness level: Set the brightness of the display.
Adaptive brightness: Automatically adjust screen
brightness.

145
Wallpaper: Select a background image for the home
screen.
Sleep: Set the length of time of inactivity before the screen
turns off automatically.
Daydream: Manage the Daydream function. When
Daydream is enabled, photos or animations will be
displayed as a screensaver.
Font size: Set the font size of the text on the screen.
Auto-rotate screen: Select whether the screen contents
should rotate when the phone is rotated.
Pulse notification light: The indicator light beneath the
Home key flashes to notify you of missed calls, new
messages, and other events.
Navigation key light duration: This feature lets you control
the backlight of the touch keys (the Home key, Back key,
and Recent apps key). Choose one option to set the
backlight duration.
Sound & Notification
Touch the Home key > > Settings > Sound & notification.
You can adjust different types of volume (see Adjusting
Volume), toggle sound, vibration and mute (see Switching to
Silent or Vibration Mode and Using Do Not Disturb Mode), set
up ringtone and notification sound (see Changing Ringtone and
Notification Sound), or select system sounds (see Turning
On/Off System Sounds).

146
Security
Touch the Home key > > Settings > Security to configure
options that help keep your phone and data safe.
Screen lock: Disable the screen lock or enable it with long
press, pattern, PIN, or password. See Protecting Your
Phone With Screen Locks.
Make pattern visible: Show the pattern as you draw it. This
option is available when unlock pattern is set.
Automatically lock: Set the time needed for the lock
protection to be activated after the screen turns off. This
option is available when unlock pattern, PIN or password is
set.
Power button instantly locks: Lock protection is activated
immediately when you press the Power key. This option is
available when unlock pattern, PIN or password is set.
Lock screen message: Set text to be displayed on the lock
screen.
Smart Lock: Keep the phone unlocked when connected to
trusted devices, in trusted places, or unlocked by trusted
faces or voice, or unlocked when your phone is being
carried on the body.
NOTE:
You need to sign in to your Google account on the phone to
use the Smart Lock feature.
Encrypt phone: The encrypt phone feature is enabled by
default. When you set a screen lock (Pattern, PIN, or

147
Password), you can use the feature to enable secure
start-up.
Set up SIM card lock:
Lock SIM card: Activate or deactivate the PIN lock to
require PIN before accessing the nano-SIM card.
Change SIM PIN: Change the PIN used to access the
nano-SIM card.
NOTE:
Put all your confidential passwords in a safe place for future
use. If you enter the wrong SIM PIN more times than
allowed, your nano-SIM card will be locked and you cannot
access the mobile phone network. Contact your operator for
a PIN Unlock Key (PUK) to restore the nano-SIM card.
Make passwords visible: Display passwords as you enter
them.
Device administrators: View or deactivate apps you have
authorized to be device administrators.
Unknown sources: Check this option to permit installation
of apps from sources other than the Play Store.
Storage type: Check the credential storage type.
Trusted credentials: Display trusted CA certificates.
Install from SD card: Install certificates from the storage.
Clear credentials: Delete all certificates.
Trust agents: View or deactivate trust agents.
Screen pinning: Keep a screen of your choice in view, so

148
that others cannot switch to other apps and access your
personal information. See Protecting Your Phone With
Screen Pinning.
Apps with usage access: Turn on or off some apps’
access to your phone usage information.
Navigation Key
Touch the Home key > > Settings > Navigation key. You
can exchange the location of the Recent apps key and the
Back key.
Date & Time
Touch the Home key > > Settings > Date & time to set
date, time, time zone, and time format. See Setting the Date
and Time.
Language & Input
Touch the Home key > > Settings > Language & input to
configure options related to system language, input methods,
speech input and output as well as mouse/trackpad input.
Language: Select a language for your system.
Spell checker: Use Google Spell Checker to check for
spelling errors when entering text.
Personal dictionary: Add new words to the phone’s
dictionary or remove words from the dictionary. The words
you add are used for spelling check and word suggestion.

149
Keyboard & input methods: Configure text input settings.
Text-to-speech output:
Preferred engine: Select the speech synthesis engine
you want to use or change its settings.
Speech rate: Select how quickly you want the
synthesizer to speak.
Pitch: Adjust the tone of spoken text.
Listen to an example: Play a brief sample of the
speech synthesizer, using your current settings.
Default language status: Check whether the
text-to-speech output feature supports the current
system language.
Pointer speed: Select how fast the pointer/mouse should
scroll when you connect the phone to a trackpad or mouse
accessory.
Google
Touch the Home key > > Settings > Google to easily
manage settings for Google apps and features. You can set the
options for Google account and services.
Device
Location
Touch the Home key > > Settings > Location to manage

150
location services, which help your phone and apps determine
your location. To use location-related applications, such as
finding your location on Google Maps, you must have location
services turned on on your phone.
1. Slide the switch at the top to turn location services on or off.
2. When location is enabled, touch Mode to select location
sources you want to use.
High accuracy: Get accurate location using GPS,
Bluetooth, and Wi-Fi as well as mobile networks.
Battery saving: Use only Wi-Fi, Bluetooth, and mobile
networks to get your approximate location. This will drain
less power from your battery than using GPS.
Device only: Use GPS to pinpoint your location.
In the Location menu, touch Accelerated location or Google
Location History to use Qualcomm® IZat™ hardware
accelerated location to determine your location or configure
Google location options.
Storage
Touch the Home key > > Settings > Storage to view the
memory information of the phone storage and the microSDHC
card.
You can touch Save location to choose the default location for
new data, such as photos captured, and voice recorded.
Touch Phone > Used space to get a detailed breakdown of
space usage by type. Touch a data type to see more
information or delete the files you do not need.

151
For more information about using the microSDHC card, see
Using the microSDHC Card as Portable or Device Storage.
Battery
Touch the Home key > > Settings > Battery to view the
battery level, check what has been using the battery, and
optimize battery use.
Touch an app or service to adjust its settings in order to
save battery life. For example, touch Screen > Reduce the
screen brightness and/or screen timeout to change
screen brightness and sleep.
Touch > Battery optimization. Battery optimization
helps prolong battery standby time when you're not using
the phone. If there are apps that you don't want battery
optimization enabled, you can turn the feature off in those
apps. Just touch Not optimized > All apps, touch the app
name and then touch Don’t optimize > DONE.
Touch > Battery saver. You can turn on or off the Battery
saver or configure it to turn on automatically in order to
reduce battery use and improve battery life.
Apps
Touch the Home key > > Settings > Apps to see apps
installed on your phone and manage them.
Touch an app to see its information. The following options may
be available:
FORCE STOP: Stop the app.

152
UNINSTALL: Uninstall the app.
DISABLE/ENABLE: Disable or enable the app.
Storage: Check its storage information, clear its data or cache.
Data usage: Check how much data has been used by the
app during the time cycle you set and restrict background
data for the app.
Permissions: Check or change the app permissions.
Notifications: Manage the app notifications in the
notification panel and the lock screen. You can set the
priority, sensitivity, and more.
Open by default: Check the app’s supported links and set
whether to open the links in the app, and clear the app’s
defaults.
Battery: Check the battery use details of the app since last
full charge.
Memory: Check how much memory has been used by the
app.
NOTE:
Not all options are available for the apps.
Memory
Touch the Home key > > Settings > Memory to monitor
the average memory use and performance of your phone. You
can also check which apps use the most memory.

153
Connect to PC
Touch the Home key > > Settings > Connect to PC to
select your USB connection type between your phone and PC.
See Connecting to Your Computer via USB.
Backup and Reset
Touch the Home key > > Settings > Backup & reset to
manage data backup and restoration options, and to reset the
network setting or the phone to factory status.
Back up my data: Back up app data, Wi-Fi passwords, and
other settings to Google servers after you sign in to your
Google account.
Backup account: Set the Google account that the data is
backed up to.
Automatic restore: Restore previously backed up settings
and data when you reinstall an app.
Network settings reset: Reset all network settings
including Wi-Fi, mobile data and Bluetooth.
Factory data reset: Reset your phone to factory default
settings. All your data in the internal storage will be erased
during the process.
Accounts
Touch the Home key > > Settings > Accounts to manage
your web accounts and synchronization. Touch Add account to

154
sign in to or create accounts on your phone.
Touch an account type to see that type of accounts you have
added and adjust the accounts settings.
System
Accessibility
Touch the Home key > > Settings > Accessibility to
configure accessibility plug-ins and services on your phone,
such as using Color inversion or Large text for users with
sight problems.
Printing
Touch the Home key > > Settings > Printing to manage
Google Cloud Print service or other printer plug-ins installed
from the Google Play Store or your printer manufacturer.
About Phone
Touch the Home key > > Settings > About phone to view
important phone information and legal information. You can
also touch System updates to check for system updates and
install them when they become available.

155
Upgrading the Phone Software
There are several ways to upgrade your phone software:
Use the online upgrade tool for mobile terminal products.
Use the one-press upgrade package offered by your mobile
service provider.
Use your PC to download an upgrade package to your
microSDHC card and install it to your phone from the card.
NOTE:
Visit the ZTE official handset service support website
(http://www.ztedevice.com/support) and click your country or
region to learn more about the above upgrade methods, as well
as which phones and methods are supported.
156
Troubleshooting
If you encounter problems while using the phone, or if it
performs abnormally, you can refer to the chart below. If your
particular problem cannot be resolved using the information in
the chart, contact the dealer where you purchased the phone.
Problem
Possible causes
Possible solution
Poor reception
The network signal is too
weak at your current location,
for example, in a basement
or near a tall building,
because wireless
transmissions cannot
effectively reach it.
Move to a location where
the network signal can be
properly received.
The network is busy at the
current time (for example,
during peak times, there
may be too much network
traffic to handle additional
calls).
Avoid using the phone at
such times, or try again after
waiting a short time.
You are too far away from a
base station for your service
provider.
You can request a service
area map from your service
provider.
Echo or noise
The network link quality is
poor on the part of your
service provider.
End the call and dial again.
You may be switched to a
better-quality network link or
phone line.

157
Problem
Possible causes
Possible solution
The local telephone line
quality is poor.
End the call and dial again.
You may be switched to a
better-quality network link or
phone line.
Unable to
select certain
features
Your service provider does
not support these features,
or you have not applied for
services that provide these
features.
Contact your service
provider.
Cannot charge
the battery
The battery or battery
charger is damaged.
Contact the dealer.
The phone’s temperature is
below 0 °C or higher than
45 °C.
Adjust the battery charging
environment to avoid
extremes of temperature.
The contact between the
battery and charger is poor.
Check all connectors to
ensure that all connections
have been properly made.
Shortened
standby time
The standby time is related
to your service provider
system configuration. The
same phone used with
different service providers’
systems will not provide
exactly the same length of
standby time.
If you are located in an area
where signaling is weak,
temporarily power off the
phone.
The battery is depleted. In
high temperature
environments, battery life
will be shortened.
Contact the dealer to
change a new battery.

158
Problem
Possible causes
Possible solution
If you are not able to
connect to the network, the
phone will continue to send
out signals as it attempts to
locate a base station. Doing
so consumes battery power
and will consequently
shorten standby time.
Change your location to one
where the network is
accessible, or temporarily
turn off your phone.
Cannot turn
your phone on
Battery power has been
depleted.
Recharge the phone’s
battery.
nano-SIM card
error
The nano-SIM card
malfunctions or is damaged.
Take the nano-SIM card to
your service provider for
testing.
The nano-SIM card is
inserted improperly.
Insert the nano-SIM card
properly.
There is debris on the
nano-SIM card contacts.
Use a soft, dry cloth to clean
the nano-SIM card contacts.
Unable to
connect to the
network
The nano-SIM card is
invalid.
Contact your service
provider.
You are not within the
network’s service area.
Check the service area with
your service provider.
The signal is poor.
Move to an open space, or if
you are inside a building,
move closer to a window.
Cannot make
outgoing calls
You have activated the
Fixed dialing numbers
feature.
Disable this feature. See
Use Fixed Dialing Numbers.

159
Problem
Possible causes
Possible solution
PIN Code
blocked
You have entered an
incorrect PIN code three
consecutive times.
Contact your service
provider. If the service
provider provides the
nano-SIM card’s PUK code,
use the PUK code to unlock
the nano-SIM card.
Phone
crashes,
reboots,
freeze, or
cannot be
powered on
Some third-party software is
not compatible with your
phone.
Uninstall the software that
may cause the problem.
Upgrade the phone
software.
Reset the phone to factory
status.
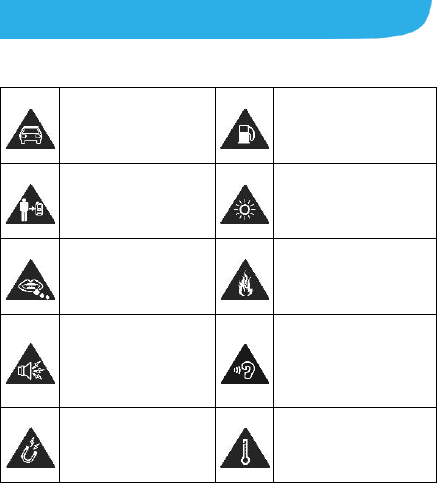
160
For Your Safety
General Safety
Don’t make or receive
handheld calls while
driving. Never text
while driving.
Don’t use at gas
stations.
Keep your phone at
least 10 mm away
from your ear or body
while making calls.
Your phone may
produce a bright or
flashing light.
Small parts may cause
choking.
Don’t dispose of your
phone in fire.
Your phone can
produce a loud sound.
To prevent possible
hearing damage, do
not listen at high
volume levels for long
periods.
Avoid contact with
anything magnetic.
Avoid extreme
temperatures.
161
Keep away from
pacemakers and other
electronic medical
devices.
Avoid contact with
liquids. Keep your
phone dry.
Turn off when asked to
in hospitals and
medical facilities.
Do not take your phone
apart.
Turn off when told to in
aircrafts and airports.
Only use approved
accessories.
Turn off when near
explosive materials or
liquids.
Don’t rely on your
phone for emergency
communications.
Radio Frequency (RF) Energy
This phone is designed and manufactured not to exceed the
emission limits for exposure to radio frequency (RF) energy set
by the Federal Communications Commission of the United States
and Innovation, Science and Economic Development Canada of
Canada.
During SAR testing, this device is set to transmit at its highest
certified power level in all tested frequency bands, and placed in
positions that simulate RF exposure in usage against the head
with no separation, and near the body with the separation of 10

162
mm. Although the SAR is determined at the highest certified
power level, the actual SAR level of the device while operating
can be well below the maximum value. This is because the
phone is designed to operate at multiple power levels so as to
use only the power required to reach the network. In general, the
closer you are to a wireless base station antenna, the lower the
power output.
The exposure standard for wireless devices employing a unit of
measurement is known as the Specific Absorption Rate, or
SAR. The SAR limit set by the FCC is 1.6 W/kg and 1.6 W/kg by
Innovation, Science and Economic Development Canada.
This device is in compliance with SAR for general population
/uncontrolled exposure limits in ANSI/IEEE C95.1-1992 and
Canada RSS 102 and had been tested in accordance with the
measurement methods and procedures specified in IEEE1528
and Canada RSS 102. This device has been tested and meets
the FCC and IC RF exposure guidelines when tested with the
device directly contacted to the body.
The FCC has granted an Equipment Authorization for this model
phone with all reported SAR levels evaluated as in compliance
with the FCC RF exposure guidelines. SAR information on this
model phone is on file with the FCC and can be found under the
Display Grant section of www.fcc.gov/oet/ea/fccid after searching
on FCC ID: SRQ-Z836F.
For this device, the highest reported SAR value for usage against
the head is 0.93 W/kg, for usage near the body is 1.19 W/kg.
While there may be differences between the SAR levels of
various phones and at various positions, they all meet the
government requirement.
163
SAR compliance for body-worn operation is based on a
separation distance of 10 mm between the unit and the human
body. Carry this device at least 10 mm away from your body to
ensure RF exposure level compliant or lower to the reported level.
To support body-worn operation, choose the belt clips or holsters
that do not contain metallic components to maintain a separation
of 10 mm between this device and your body.
RF exposure compliance with any body-worn accessory, which
contains metal, was not tested and certified, and using such
body-worn accessory should be avoided.
FCC Compliance
This mobile phone complies with part 15 of the FCC Rules.
Operation is subject to the following two conditions: (1) This
device may not cause harmful interference, and (2) this device
must accept any interference received, including interference that
may cause undesired operation.
This mobile phone has been tested and found to comply with the
limits for a Class B digital device, pursuant to Part 15 of the FCC
Rules. These limits are designed to provide reasonable
protection against harmful interference in a residential installation.
This equipment generates, uses and can radiate radio frequency
energy and, if not installed and used in accordance with the
instructions, may cause harmful interference to radio
communications. However, there is no guarantee that
interference will not occur in a particular installation. If this
equipment does cause harmful interference to radio or television
reception, which can be determined by turning the equipment off

164
and on, the user is encouraged to try to correct the interference
by one or more of the following measures:
Reorient or relocate the receiving antenna.
Increase the separation between the equipment and receiver.
Connect the equipment into an outlet on a circuit different
from that to which the receiver is connected.
Consult the dealer or an experienced radio/TV technician for
help.
CAUTION:
Changes or modifications not expressly approved by the party
responsible for compliance could void the user’s authority to
operate the equipment.
ISED Notice
This device complies with Innovation, Science and Economic
Development Canada license-exempt RSS standard(s).
Operation is subject to the following two conditions:
(1) this device may not cause interference, and
(2) this device must accept any interference, including
interference that may cause undesired operation of the device.
Le présent appareil est conforme aux CNR Innovation,
Sciences et Développement économique Canada applicables
aux appareils radio exempts de licence. L'exploitation est
autorisée aux deux conditions suivantes:
165
(1) l'appareil ne doit pas produire de brouillage, et
(2) l'utilisateur de l'appareil doit accepter tout brouillage
radioélectrique subi, même si le brouillage est susceptible d'en
This Class B digital apparatus complies with Canadian ICES-003.
Cet appareil numérique de la classe B est conforme à la norme
NMB-003 du Canada.
IC: 5200E-Z836F
ISED Radiation Exposure Statement
This EUT is compliance with SAR for general
population/uncontrolled exposure limits in ISED RSS-102 and
had been tested in accordance with the measurement methods
and procedures specified in IEEE 1528 and IEC 62209. This
equipment should be installed and operated with minimum
distance 1.0 cm between the radiator and your body. This device
and its antenna(s) must not be co-located or operating in
conjunction with any other antenna or transmitter.
Cet appareil est conforme aux limites d'exposition DAS
incontrôlée pour la population générale de la norme CNR-102
d'Industrie Canada et a été testé en conformité avec les
méthodes de mesure et procédures spécifiées dans IEEE 1528
et IEC 62209. Cet appareil doit être installé et utilisé avec une
distance minimale de 1.0 cm entre l’émetteur et votre corps. Cet
166
appareil et sa ou ses antennes ne doivent pas être co-localisés
ou fonctionner en conjonction avec tout autre antenne ou
transmetteur.
Hearing Aid Compatibility (HAC)
Regulations for Mobile Phones
In 2003, the FCC adopted rules to make digital wireless telephones
compatible with hearing aids and cochlear implants. Although
analog wireless phones do not usually cause interference with
hearing aids or cochlear implants, digital wireless phones
sometimes do because of electromagnetic energy emitted by the
phone's antenna, backlight, or other components. Your phone is
compliant with FCC HAC regulations (ANSI C63.19- 2011). While
some wireless phones are used near some hearing devices
(hearing aids and cochlear implants), users may detect a buzzing,
humming, or whining noise. Some hearing devices are more
immune than others to this interference noise and phones also vary
in the amount of interference they generate. The wireless
telephone industry has developed a rating system for wireless
phones to assist hearing device users in finding phones that may
be compatible with their hearing devices. Not all phones have been
rated. Phones that are rated have the rating on their box or a label
located on the box. The ratings are not guarantees. Results will
vary depending on the user's hearing device and hearing loss. If
your hearing device happens to be vulnerable to interference, you
may not be able to use a rated phone successfully. Trying out the
phone with your hearing device is the best way to evaluate it for
your personal needs.
167
This phone has been tested and rated for use with hearing aids
for some of the wireless technologies that it uses. However, there
may be some newer wireless technologies used in this phone
that have not been tested yet for use with hearing aids. It is
important to try the different features of this phone thoroughly and
in different locations, using your hearing aid or cochlear implant,
to determine if you hear any interfering noise. Consult your
service provider or the manufacturer of this phone for information
on hearing aid compatibility. If you have questions about return or
exchange policies, consult your service provider or phone retailer.
M-Ratings: Phones rated M3 or M4 meet FCC requirements and
are likely to generate less interference to hearing devices than
phones that are not labeled. M4 is the better/higher of the two
ratings.
T-Ratings: Phones rated T3 or T4 meet FCC requirements and
are likely to be more usable with a hearing device’s telecoil (“T
Switch” or “Telephone Switch”) than unrated phones. T4 is the
better/higher of the two ratings. (Note that not all hearing devices
have telecoils in them.)
Your phone meets the M4/T3 level rating.
Hearing devices may also be rated. Your hearing device
manufacturer or hearing health professional may help you find
this rating. For more information about FCC Hearing Aid
Compatibility, please go to http://www.fcc.gov/cgb/dro.
168
Distraction
Driving
Full attention must be given to driving at all times in order to
reduce the risk of an accident. Using a phone while driving (even
with a hands free kit) can cause distraction and lead to an
accident. You must comply with local laws and regulations
restricting the use of wireless devices while driving.
Operating Machinery
Full attention must be given to operating machinery in order to
reduce the risk of an accident.
Product Handling
General Statement on Handling and Use
You alone are responsible for how you use your phone and any
consequences of its use.
You must always turn off your phone wherever the use of a
phone is prohibited. Use of your phone is subject to safety
measures designed to protect users and their environment.
Always treat your phone and its accessories with care and
keep it in a clean and dust-free place.
Keep the screen and camera lens clean. Unclean screen or
camera lens may slow down the phone's reaction to your
169
operations or lower image quality.
Clean the device and its accessories with a soft material such
as cleaning cloth for eyeglass lenses. Do not use alcohol or
other corrosive substances for cleaning or allow them to get
inside.
Do not expose your phone or its accessories to open flames
or lit tobacco products.
Do not expose your phone or its accessories to liquid,
moisture or high humidity.
Do not drop, throw or try to bend your phone or its accessories.
Do not paint your phone or its accessories.
Do not attempt to disassemble your phone or its accessories.
Only authorized personnel can do so.
Do not expose or use your phone or its accessories in an
environment with or that can reach extreme temperatures,
minimum - [5] and maximum + [50] degrees Celsius.
Do not place your phone inside or near heating equipments or
high pressure containers, such as water heaters, microwave
ovens, or hot cooking utensils. Otherwise, your phone may be
damaged.
Please check local regulations for disposal of electronic
products.
Do not carry your phone in your back pocket as it could break
when you sit down.
170
Small Children
Do not leave your phone and its accessories within the reach of
small children or allow them to play with it. They could hurt
themselves or others, or could accidentally damage the phone.
Your phone contains small parts with sharp edges that may cause
an injury or may become detached and create a choking hazard.
Demagnetization
To avoid the risk of demagnetization, do not allow electronic
devices or magnetic media to be close to your phone for a long
time.
Electrostatic Discharge (ESD)
Do not touch the metal connectors on the nano-SIM card and the
microSDHC card.
Antenna
Do not touch the antenna unnecessarily.
Normal Use Position
When placing or receiving a phone call, hold your phone to your
ear, with the bottom towards your mouth.
Air Bags
Do not place a phone in the area over an air bag or in the air bag
deployment area as an airbag inflates with great force and
171
serious injury could result.
Store the phone safely before driving your vehicle.
Seizures/Blackouts
The phone can produce a bright or flashing light. A small
percentage of people may be susceptible to blackouts or
seizures (even if they have never had one before) when exposed
to flashing lights or light patterns such as when playing games or
watching video. If you have experienced seizures or blackouts or
have a family history of such occurrences, please consult a
physician. To reduce the risk of blackouts or seizures, you can
use your phone in a well-lit room and take frequent breaks.
Repetitive Stress Injuries
To minimize the risk of Repetitive Strain Injury (RSI) when texting
or playing games with your phone:
Do not grip the phone too tightly.
Press the buttons lightly.
Use the special features that are designed to minimize the
times of pressing buttons, such as Message Templates and
Predictive Text.
Take many breaks to stretch and relax.
Emergency Calls
This phone, like any wireless phone, operates using radio signals,
which cannot guarantee connection in all conditions. Therefore,
172
you must never rely solely on any wireless phone for emergency
communications.
Loud Noise
This phone is capable of producing loud noises, which may
damage your hearing. Turn down the volume before using
headphones, Bluetooth stereo headsets or other audio devices.
Phone Heating
Your phone may become warm during charging and during
normal use.
Electrical Safety
Accessories
Use only approved accessories. Do not connect with
incompatible products or accessories.
Take care not to touch or allow metal objects, such as coins or
key rings, to contact or short-circuit in the battery terminals.
Never puncture the surface of the battery with sharp objects.
Connection to a Car
Seek professional advice when connecting a phone interface to
the vehicle electrical system.
173
Faulty and Damaged Products
Do not attempt to disassemble the phone or its accessories. Only
qualified personnel can service or repair the phone or its
accessories.
If your phone (or its accessories) has been submerged in water,
punctured, or subjected to a severe fall, do not use it until you
have taken it to be checked at an authorized service center.
Radio Frequency Interference
General Statement on Interference
Care must be taken when using the phone in close proximity to
personal medical devices, such as pacemakers and hearing aids.
Please consult your doctor and the device manufacturers to
determine if the operation of your phone may interfere with the
operation of your medical devices.
Pacemakers
Pacemaker manufacturers recommend that a minimum
separation of 15 cm be maintained between a mobile phone and
a pacemaker to avoid potential interference with the pacemaker.
To achieve this, use the phone on the opposite ear to your
pacemaker and do not carry it in a breast pocket.
Hearing Aids
People with hearing aids or other cochlear implants may
174
experience interfering noises when using wireless devices or
when one is nearby.
The level of interference will depend on the type of hearing
device and the distance from the interference source. Increasing
the separation between them may reduce the interference. You
may also consult your hearing aid manufacturer to discuss
alternatives.
Medical Devices
Please consult your doctor and the device manufacturer to
determine if operation of your phone may interfere with the
operation of your medical device.
Hospitals
Turn off your wireless device when requested to do so in
hospitals, clinics or health care facilities. These requests are
designed to prevent possible interference with sensitive medical
equipment.
Aircraft
Turn off your wireless device whenever you are instructed to do
so by airport or airline staff.
Consult the airline staff about the use of wireless devices
onboard the aircraft. If your device offers a ‘flight mode’, this must
be enabled prior to boarding an aircraft.
175
Interference in Cars
Please note that because of possible interference with electronic
equipment, some vehicle manufacturers forbid the use of mobile
phones in their vehicles unless a hands-free kit with an external
antenna is included in the installation.
Explosive Environments
Gas Stations and Explosive Atmospheres
In locations with potentially explosive atmospheres, obey all
posted signs to turn off wireless devices such as your phone or
other radio equipment.
Areas with potentially explosive atmospheres include fueling
areas, below decks on boats, fuel or chemical transfer or storage
facilities, and areas where the air contains chemicals or particles,
such as grain, dust, or metal powders.
Blasting Caps and Areas
Power off your mobile phone or wireless device when in a
blasting area or in areas posted power off “two-way radios” or
“electronic devices” to avoid interfering with blasting operations.