ZTE Z855 LTE/WCDMA/GSM (GPRS) Multi-Mode Digital Mobile Phone User Manual
ZTE Corporation LTE/WCDMA/GSM (GPRS) Multi-Mode Digital Mobile Phone
UserManual.wiki
>
ZTE
>
Z855 User Manual
User manual
Navigation menu
Upload a User Manual
Namespaces
Wiki Guide
HTML
PDF
Info
Views
User Manual
Discussion / Help
Navigation


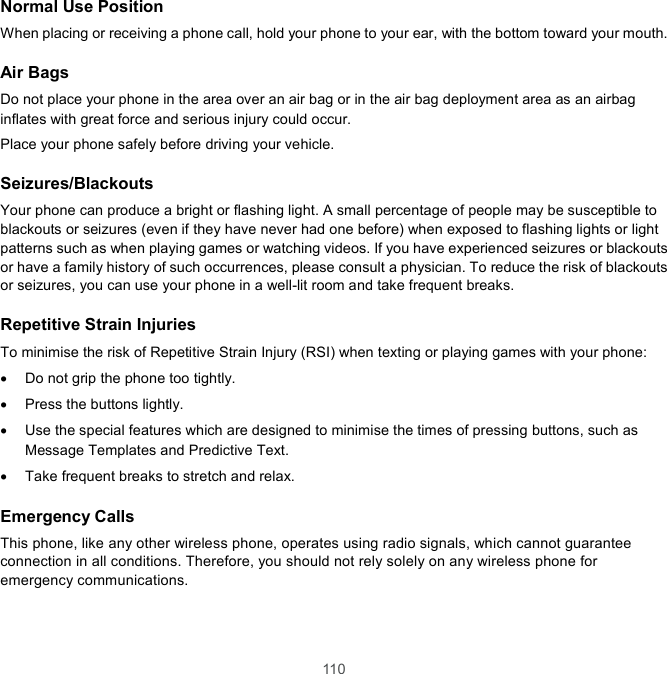
![45 Phone Calls You can place calls from the Phone app, the Contacts app, or other apps or widgets that display contact information. Wherever you see a phone number, you can usually touch it to dial. Placing and Ending Calls Place a Call by Dialing 1. Touch the Home key > . 2. Touch and enter the phone number or the contact name with the dialpad. Touch to delete incorrect digits. NOTE: As you enter the phone number or the contact name, your phone searches for matching information in your contacts. If you see the number and contact you want to call, touch it to place the call immediately. 3. Touch below the keypad to dial. You can also touch the search box at the top of the Phone app screen and enter the phone number or contact name you want to call. Touch the matching contact or Call [number] to place the call. NOTE: To make an international call, touch and hold the 0 key to enter the plus (+) symbol. Next, enter the country code, followed by the city/area code and then the phone number. NOTE: To redial the last call you made, just touch the Home key > > > and touch again. End a Call During a call, touch on the screen.](https://usermanual.wiki/ZTE/Z855/User-Guide-3575904-Page-45.png)

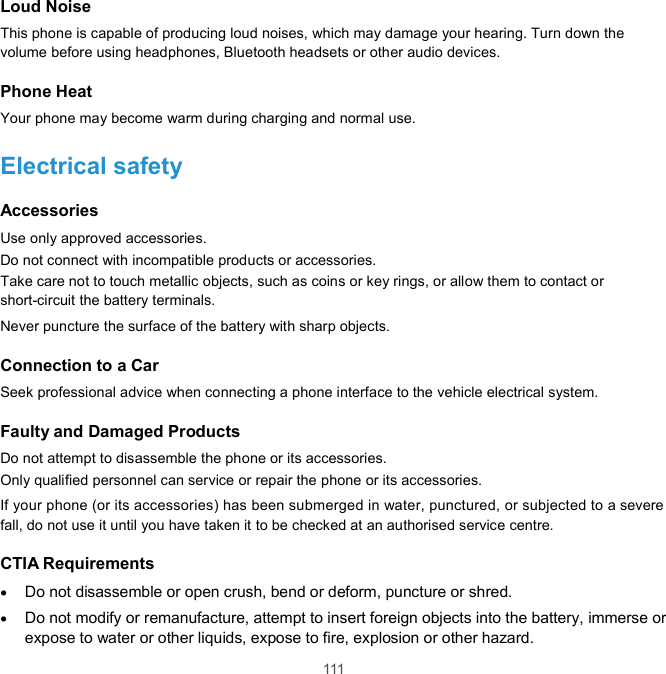
![66 Messaging You can use Messaging to exchange text messages (SMS) and multimedia messages (MMS). Opening the Messaging Screen Touch the Home key > . The Messaging screen opens, where you can create a new message, search for messages, delete messages, or open an ongoing message thread. Touch to write a new text or multimedia message. Touch to search for a message using keywords. Touch an existing message thread to open the conversation you’ve had with a certain number. Sending a Message 1. On the Messaging screen, touch at the bottom. 2. Fill in one or more recipients. You can: Enter the phone number or contact name directly in the "To" field. Touch Send to [number] or a match from your contacts displayed below the "To" field to add the number or contact as the recipient. NOTE: While entering the recipient, touch and to switch between the numeric and the full keyboard. Select a contact from FREQUENTS or ALL CONTACTS. NOTE: If you add two or more recipients, the message may be sent as a group MMS where everyone can reply and see each other's messages. 3. Touch the Send message field and enter the message text. - or - Touch and then touch and hold to send a voice message. 4. If you want to send a multimedia message, touch .](https://usermanual.wiki/ZTE/Z855/User-Guide-3575904-Page-66.png)

![109 Do not attempt to disassemble your phone or its accessories, only authorised personnel can do so. Do not expose or use your phone or its accessories in an environment with or that can reach extreme temperatures, minimum - [5] and maximum + [50] degrees Celsius. Do not place your phone inside or near heating equipment or high pressure containers, such as water heaters, microwave ovens, or hot cooking utensils. Otherwise, your phone may be damaged. Please check local regulations for disposal of electronic products. Do not carry your phone in your back pocket as it could break when you sit down. It is recommended to use you device in good radio conditions to decrease the amount of radiation received. You might be in bad radio conditions in places such as trains, cars or parking. Before using your mobile phone, it is also recommended to check the receipt of indications of your network operator. Small Children Do not leave your phone and its accessories within the reach of small children or allow them to play with it. They could hurt themselves or others, or could accidentally damage the phone. Your phone contains small parts with sharp edges that may cause an injury or may become detached and create a choking hazard. Demagnetization To avoid the risk of demagnetization, do not allow electronic devices or magnetic media close to your phone for a long time. Electrostatic Discharge (ESD) Do not touch the metallic connectors of the nano-SIM card. Antenna Do not touch the antenna unnecessarily.](https://usermanual.wiki/ZTE/Z855/User-Guide-3575904-Page-109.png)