ZTE ZTEA2017U WCDMA/CDMA/LTE Multi-Mode Digital Mobile Phone User Manual ZTE T81
ZTE Corporation WCDMA/CDMA/LTE Multi-Mode Digital Mobile Phone ZTE T81
ZTE >
Contents
- 1. User manual
- 2. Users Manual
User manual
1
ZTE Axon 7
Quick Start Guide

2
LEGAL INFORMATION
Copyright © 2016 ZTE CORPORATION.
All rights reserved.
No part of this publication may be quoted, reproduced, translated
or used in any form or by any means, electronic or mechanical,
including photocopying and microfilm, without the prior written
permission of ZTE Corporation.
Notice
ZTE Corporation reserves the right to make modifications on print
errors or update specifications in this guide without prior notice.
We offer self-service for our smart terminal device users. Please
visit the ZTE official website (at www.ztedevice.com) for more
information on self-service and supported product models.
Information on the website takes precedence.
Visit http://www.ztedevice.com to download the user manual. Just
click Support > Manuals from the home page and then select your
location, product type, and name to search for related support
information.
Disclaimer
ZTE Corporation expressly disclaims any liability for faults and
damages caused by unauthorized modifications of the software.
Images and screenshots used in this guide may differ from the
actual product. Content in this guide may differ from the actual
product or software.
Trademarks
ZTE and the ZTE logos are trademarks of ZTE Corporation.
Google and Android are trademarks of Google, Inc.
The Bluetooth® trademark and logos are owned by the Bluetooth
SIG, Inc. and any use of such trademarks by ZTE Corporation is
under license.
microSDHC Logo is a trademark of SD-3C, LLC.
Other trademarks and trade names are the property of their
3
respective owners.
Version No.: R1.0
Edition Time : March 31, 2016
4
Getting to Know Your Phone
Explore the premium features and refined design of Axon Pro at
zteusa.com/axon 7
. For more detailed information regarding your
Axon phone, please download the complete User Manual of
instructions and safety information at
zteusa.com/axon 7#manual
.
5
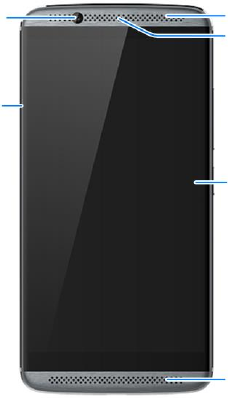
Earpiece
Touch Screen
Front Camera
Speaker
nano-SIM /
microSDHC
card tray
Speaker
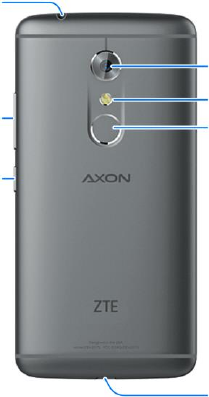
6
Charging/ USB
Type-C
Headset Jack
Power Key
Back Camera
Volume Key
Flash
Fingerprint
sensor
7
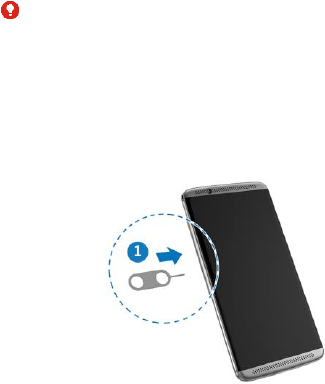
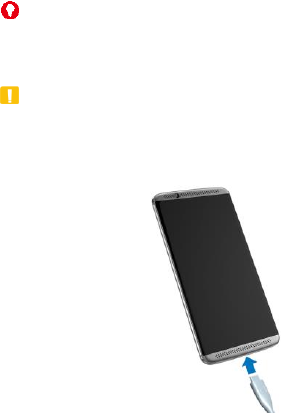
Installing the nano-SIM Card(s) and the
microSDHC™ Card
WARNING!
To avoid damage to the phone, do not use any other kind of
SIM cards, or any non-standard nano-SIM card cut from a SIM
card. You can get a standard nano-SIM card from your service
provider.
1. Insert the tip of the tray eject tool (included in the information
envelope inside the box) into the hole next to the
nano-SIM/microSDHC card tray and pull out the card tray.
8
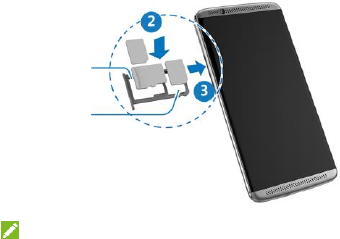
2. Place the nano-SIM/microSDHC card (not included) on the
tray with the gold-colored contacts facing down, and then
carefully slide the tray back into place.
NOTE:
4G LTE words in both nano-SIM card slots individually, but not
simultaneously. If one slot works as 4G LTE, the other slot can
only word as 2G.
microSDHC
card tray
nano-SIM
card tray 1
nano-SIM
card tary 2
9
Charging the Battery
Your phone’s battery should have enough power for the phone to
turn on, find a signal, and make a few calls. You should fully charge
the battery as soon as possible.
WARNING!
Use only ZTE-approved chargers and cables. The use of
unapproved accessories could damage your phone or cause
the battery to explode.
CAUTION:
Do not change the built-in rechargeable battery in your phone by
yourself. The battery can only be changed by ZTE or ZTE
authorised service provider.

10
NOTE:
If the battery is extremely low, you may be unable to power on
the phone even when it is being charged. In this case, try again
after charging the phone for at least 20 minutes. Contact the
customer service if you still cannot power on the phone after
prolonged charging.
NOTE:
If the screen freezes or takes too long to respond, try pressing
and holding the Power key for about 10 seconds to restart the
phone.
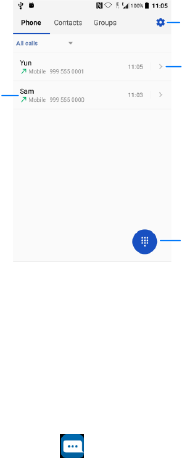
Making a Call
With several convenient options for making a call, keeping in
touch with friends, family, and coworkers is quick and easy.
From the home screen, touch .
NOTE:
You can also touch the dialpad and enter the phone number or
contact name you want to call. Touch the matching contact or
Call [number] to place the call.
11
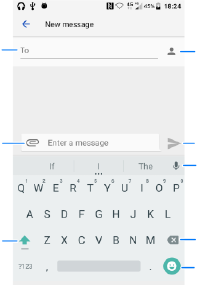
Sending a Message
Everyday life means staying connected through text, image, and
video messaging.
From the home screen, touch to send an SMS or MMS to
another mobile device.
Access settings
and other options
Opens the dial
pad Touch and
hold the 1 key to
check voicemail
Call a recently
dialed number
Check the details
12
Send your message
Dictate your
message
Opens your
contacts list
Touch to delete
Insert emoticons
Change to upper
or lowercase
letters
Attach a file
Add a contact
13
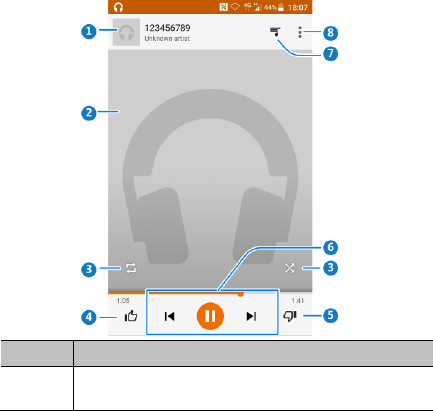
Playing Music
From the home screen, touch Google > Play Music to find
the song you want to play.
Number
Function
1
Song and artist information. Touch or drag down to
return to the music library.
14
2
Album artwork (if available). Slide left/right to switch to
the next/previous song in the playlist.
3
Use shuffle or repeat.
4
Give the song a thumbs-up.
5
Give the song a thumbs-down.
6
Playback control. Skip songs, pause and resume
playback, Drag the progress bar to jump to any part of
the song.
7
Touch to see the current playlist (queue).
8
Get more options.
15
Voice Recorder
Use Voice Recorder to record audio that can be shared with
others via email, text messaging, and more, or set the recording
as a ringtone for notifications on the phone.
From the home screen, touch Multimedia > Voice Recorder.
When recording, you can pause and resume by touching the
appropriate icon. Once you stop the recording, you can delete,
playback, or share the recording. Playback reveals additional
options such as trimming the clip or setting it as a ringtone.
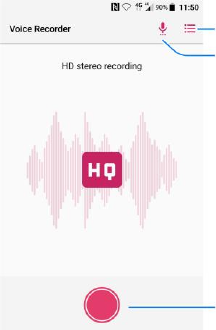
16
List of all
recordings
Select more
formats
Touch to record
17
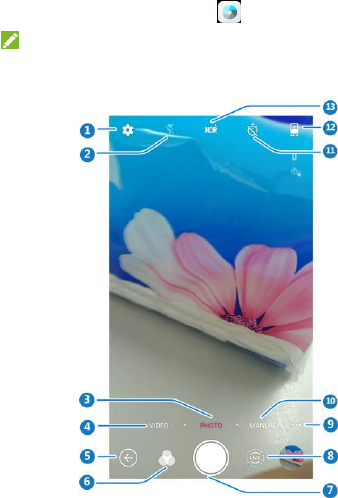
Taking a Photo
From the home screen, touch .
NOTE:
You can pinch or spread on the screen or press the Volume
Key to capture a photo.
18
Number
Function
1
Change the camera settings.
2
Change flash mode (only available for the back
camera).
3
Switch to photo mode (only available for the back
camera).
4
Switch to video mode.
5
Touch to return the last screen.
6
Set more filter mode.
7
Capture a photo.
8
Switch to live camera mode.
9
Switch to use panorama, blur, multi-exposure, long
exposure, timelapse, slow motion or special effects
(only available for the back camera).
10
Switch to Manual camera mode (only available for
the back camera).
11
Set a time delay before the camera takes a picture
automatically after you touch the shutter icon, or
turn off this feature.
12
Switch between the front and the back camera.
13
Switch to HDR mode.

19
WARNING!
Keep a safe distance when using the flash. Do not point
the flash toward people or animals’ eyes.
FCC Regulations:
This mobile phone complies with part 15 of the FCC Rules.
Operation is subject to the following two conditions: (1)
This device may not cause harmful interference, and (2)
this device must accept any interference received,
including interference that may cause undesired operation.
This mobile phone has been tested and found to comply
with the limits for a Class B digital device, pursuant to Part
15 of the FCC Rules. These limits are designed to provide
reasonable protection against harmful interference in a
residential installation. This equipment generates, uses
and can radiated radio frequency energy and, if not
installed and used in accordance with the instructions, may
cause harmful interference to radio communications.
However, there is no guarantee that interference will not
occur in a particular installation If this equipment does
cause harmful interference to radio or television reception,
which can be determined by turning the equipment off and
on, the user is encouraged to try to correct the interference
by one or more of the following measures:
-Reorient or relocate the receiving antenna.
20
-Increase the separation between the equipment and
receiver.
-Connect the equipment into an outlet on a circuit different
from that to which the receiver is connected.
-Consult the dealer or an experienced radio/TV technician
for help.
FCC Note:
Caution: Changes or modifications not expressly approved
by the party responsible for compliance could void the
user‘s authority to operate the equipment.
RF Exposure Information (SAR)
This phone is designed and manufactured not to exceed
the emission limits for exposure to radio frequency (RF)
energy set by the Federal Communications Commission of
the United States.
During SAR testing, this device was set to transmit at its
highest certified power level in all tested frequency bands,
and placed in positions that simulate RF exposure in usage
against the head with no separation, and near the body
with the separation of 10 mm. Although the SAR is
determined at the highest certified power level, the actual
21
SAR level of the device while operating can be well below
the maximum value. This is because the phone is
designed to operate at multiple power levels so as to use
only the power required to reach the network. In general,
the closer you are to a wireless base station antenna, the
lower the power output.
The exposure standard for wireless devices employing a
unit of measurement is known as the Specific Absorption
Rate, or SAR.
The SAR limit set by the FCC is 1.6W/kg.
This device is complied with SAR for general population
/uncontrolled exposure limits in ANSI/IEEE C95.1-1992
and had been tested in accordance with the measurement
methods and procedures specified in IEEE1528.
The FCC has granted an Equipment Authorization for this
model phone with all reported SAR levels evaluated as in
compliance with the FCC RF exposure guidelines. SAR
information on this model phone is on file with the FCC and
can be found under the Display Grant section of
www.fcc.gov/oet/ea/fccid after searching on
FCC ID: SRQ-ZTEA2017U.
22
For this device, the highest reported SAR value for usage
against the head is 1.19 W/kg, for usage near the body is
1.17 W/kg.
While there may be differences between the SAR levels of
various phones and at various positions, they all meet the
government requirements.
SAR compliance for body-worn operation is based on a
separation distance of 10 mm between the unit and the
human body. Carry this device at least 10 mm away from
your body to ensure RF exposure level compliant or lower
to the reported level. To support body-worn operation,
choose the belt clips or holsters, which do not contain
metallic components, to maintain a separation of 10
mm between this device and your body.
RF exposure compliance with any body-worn accessory,
which contains metal, was not tested and certified, and use
such body-worn accessory should be avoided.
Hearing Aid Compatibility (HAC)
regulations for Mobile phones
In 2003, the FCC adopted rules to make digital wireless
telephones compatible with hearing aids and cochlear
23
implants. Although analog wireless phones do not usually
cause interference with hearing aids or cochlear implants,
digital wireless phones sometimes do because of
electromagnetic energy emitted by the phone's antenna,
backlight, or other components. Your phone is compliant
with FCC HAC regulations (ANSI C63.19- 2011). While
some wireless phones are used near some hearing
devices (hearing aids and cochlear implants), users may
detect a buzzing, humming, or whining noise. Some
hearing devices are more immune than others to this
interference noise and phones also vary in the amount of
interference they generate. The wireless telephone
industry has developed a rating system for wireless
phones to assist hearing device users in finding phones
that may be compatible with their hearing devices. Not all
phones have been rated. Phones that are rated have the
rating on their box or a label located on the box. The
ratings are not guarantees. Results will vary depending on
the user's hearing device and hearing loss. If your hearing
device happens to be vulnerable to interference, you may
not be able to use a rated phone successfully. Trying out
the phone with your hearing device is the best way to
evaluate it for your personal needs.
This phone has been tested and rated for use with hearing
aids for some of the wireless technologies that it uses.
However, there may be some newer wireless technologies
24
used in this phone that have not been tested yet for use
with hearing aids. It is important to try the different features
of this phone thoroughly and in different locations, using
your hearing aid or cochlear implant, to determine if you
hear any interfering noise. Consult your service provider or
the manufacturer of this phone for information on hearing
aid compatibility. If you have questions about return or
exchange policies, consult your service provider or phone
retailer.
M-Ratings: Phones rated M3 or M4 meet FCC
requirements and are likely to generate less interference to
hearing devices than phones that are not labeled. M4 is the
better/higher of the two ratings.
T-Ratings: Phones rated T3 or T4 meet FCC requirements
and are likely to be more usable with a hearing device’s
telecoil (“T Switch” or “Telephone Switch”) than unrated
phones. T4 is the better/ higher of the two ratings. (Note
that not all hearing devices have telecoils in them.)
Your phone meets the M3/T3 level rating.
Hearing devices may also be rated. Your hearing device
manufacturer or hearing health professional may help you
find this rating. For more information about FCC Hearing
Aid Compatibility, please go to http://www.fcc.gov/cgb/dro.