ZTE ZTEBLADEA321 LTE/WCDMA/GSM (GPRS) Multi-Mode Digital Mobile Phone User Manual SRQ ZTEBLADEA321 x
ZTE Corporation LTE/WCDMA/GSM (GPRS) Multi-Mode Digital Mobile Phone SRQ ZTEBLADEA321 x
ZTE >
Users Manual

ZTE
B
Us
e
1
B
LADE
A
e
r Manu
a
A
321
a
l

About
T
Thank you
your devic
e
keep it for
f
Copyrig
h
Copyright
All rights
r
No part of
t
or used in
a
including p
h
permission
Notice
ZTE Corpo
errors or u
p
notice.This
ensure the
information
constitute
a
Please ref
e
properly a
n
We offer s
e
visit the ZT
information
Informatio
n
T
his Manual
for choosing thi
s
e
in its best cond
f
uture reference.
h
t
© 2017 ZTE C
O
r
eserved.
t
his publication
m
a
ny form or by a
n
h
otocopying and
of ZTE Corpora
t
ration reserves t
h
p
date specificati
o
manual has be
e
accuracy of its
c
and recommen
d
a
warranty of an
y
e
r to For Your S
a
n
d safely.
e
lf-service for ou
r
E official websit
e
on self-service
a
n
on the website
t
2
s
ZTE mobile de
v
ition, please rea
d
O
RPORATION
m
ay be quoted, r
e
n
y means, elect
r
microfilm, with
o
t
ion.
h
e right to make
o
ns in this guide
e
n designed with
c
ontent. Howeve
r
d
ations containe
d
y
kind, either ex
p
a
fety to be sure t
o
r
smart terminal
d
e
(at www.ztede
v
a
nd supported p
r
t
akes preceden
c
v
ice. In order to
k
d
this manual an
e
produced, tran
s
r
onic or mechani
c
o
ut the prior writt
e
modifications o
n
without prior
the utmost care
r
, all statements,
d
therein do not
p
ressed or implie
d
o
use your phon
e
d
evice users. Pl
e
v
ice.com) for mo
r
r
oduct models.
c
e.
k
eep
d
s
lated
c
al,
e
n
n
print
to
d
.
e
e
ase
r
e

3
Disclaimer
ZTE Corporation expressly disclaims any liability for faults and
damages caused by unauthorized modifications of the software.
Images and screenshots used in this manual may differ from the
actual product. Content in this manual may differ from the actual
product or software.
Trademarks
ZTE and the ZTE logos are trademarks of the ZTE Corporation.
Google and Android are trademarks of Google, Inc.
The Bluetooth® trademark and logos are owned by the Bluetooth
SIG, Inc. and any use of such trademarks by ZTE Corporation is
under license.
microSDXC logo is a trademark of SD-3C, LLC.
Qualcomm® Snapdragon™ processors are products of
Qualcomm Technologies, Inc.
Qualcomm and Snapdragon are trademarks of Qualcomm
Incorporated, registered in the United States and other countries.
Used with permission.
Other trademarks and trade names are the property of their
respective owners.
4
Version No.: R1.0
Edition Time:July4, 2017

Cont
e
Getting
Getti
Kno
w
Insta
Cha
r
Pow
e
Setti
n
Lock
Usin
g
Getti
Conne
c
Con
n
Turn
i
Con
n
Shar
Con
n
Phone
C
Placi
Ans
w
Call
S
Contac
t
Addi
n
Wor
k
e
nts
Started .......
.
ng to Know You
r
w
ing the Keys ....
lling the nano-S
I
r
ging the Battery
e
ring On/Off ......
n
g Up for the Fir
s
ing/Unlocking th
e
g
the Touch Scr
e
ng Around Your
c
ting to Netw
n
ecting to Mobil
e
i
ng Wi-Fi On an
d
n
ecting to Blueto
ing Your Mobile
n
ecting to Virtual
C
alls ............
.
ng and Ending
C
w
ering or Rejecti
n
S
ettings.............
t
s .................
.
n
g a New Conta
c
k
ing With Favorit
e
5
.
.....................
r
Phone ..............
..........................
I
M Card and mic
..........................
..........................
s
t Time ..............
e
Screen and K
e
e
en .....................
P
hone ...............
orks and De
v
e
Networks .........
d
Connecting to
a
o
th® Devices .....
D
ata Connectio
n
Private Networ
k
.
.....................
C
alls ...................
n
g Calls .............
..........................
.
.....................
c
t .......................
e
Contacts ........
.....................
.
.........................
.
.........................
.
roSDXC card ....
.
.........................
.
.........................
.
.........................
.
e
ys ....................
.
.........................
.
.........................
.
v
ices .............
.
.........................
.
a
Wi-Fi Network
.
.........................
.
n
........................
.
k
s.......................
.
.....................
.
.........................
.
.........................
.
.........................
.
.....................
.
.........................
.
.........................
.
.
...... 8
.
........ 8
.
...... 10
.
...... 10
.
...... 14
.
...... 16
.
...... 16
.
...... 16
.
...... 17
.
...... 18
.
.... 22
.
...... 22
.
...... 24
.
...... 24
.
...... 25
.
...... 27
.
.... 29
.
...... 29
.
...... 30
.
...... 31
.
.... 32
.
...... 32
.
...... 32
6
Messaging .............................................................. 34
Opening the Messaging Screen ........................................ 34
Sending a Message ........................................................... 34
Replying to a Message ...................................................... 35
Changing Message Settings .............................................. 35
Using Multimedia Apps ......................................... 36
Capturing a Photo With Your Camera ............................... 36
Recording a Video With Your Camera ............................... 36
Listening to Your FM Radio ............................................... 37
Playing Your Music ............................................................ 38
Opening Your Gallery ........................................................ 38
Making Voice Memos ........................................................ 38
Using Your Google Applications .......................... 40
Gmail ................................................................................. 40
Google Play™ Store .......................................................... 40
Other Applications ................................................. 41
Calendar ............................................................................ 41
Clock ................................................................................. 41
Downloads ......................................................................... 41
File Manager ..................................................................... 42
Settings ............................................................................. 42
Wireless and Networks ...................................................... 42
Customized Features ........................................................ 44
Device ............................................................................... 44
Personal ............................................................................ 47
7
System ............................................................................... 48
Troubleshooting ..................................................... 50
For Your Safety ...................................................... 54
General Safety ................................................................... 54
FCC RF Exposure Information (SAR) ................................ 55
FCC Regulations ............................................................... 57
Distraction .......................................................................... 58
Product Handling ............................................................... 58
Electrical Safety ................................................................. 63
Radio Frequency Interference ........................................... 64
Explosive Environments .................................................... 65
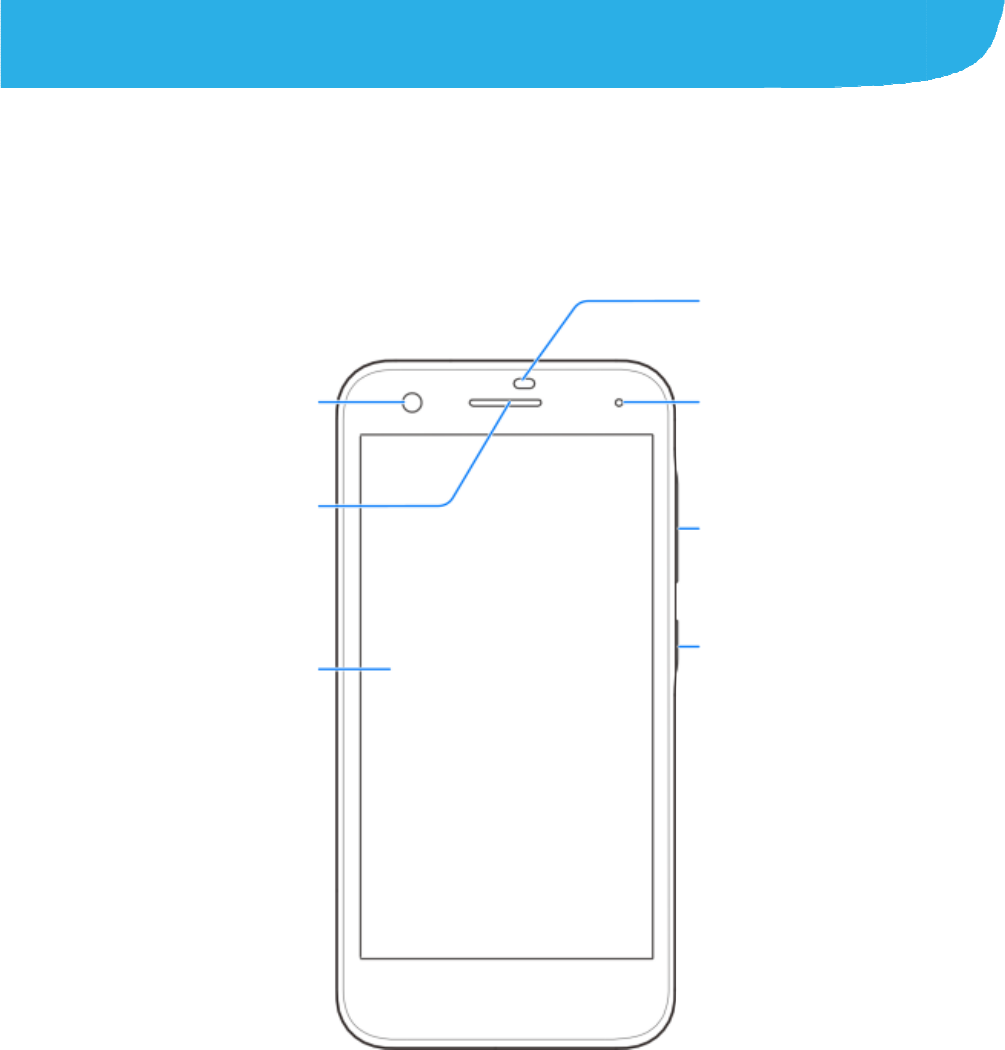
Gettin
Gettin
g
Tou
c
Fro
n
g Starte
d
g
to Know
c
h screen
n
t camera
Earpiece
8
d
Your Pho
n
n
e
Volume key
Power key
Indicator light
Proximity &
light sensor
9
Headset jack
Back flash
Charging/
micro-USB jack
Speaker
Back camera
Main microphone
Auxiliary
microphone
Knowi
n
Key
Power key
Home key
Recent apps
Back key
Volume key
NOTE:
The positio
interchang
e
keys.
Installi
micro
S
Power off
y
card and t
h
WARN
I
To avoid d
a
cards, or a
n
You can g
e
provider.
n
g the Ke
y
Function
Press a
n
airplane
Press t
o
Touch t
o
applicati
Touch a
key Touch to se
e
Touch to go
Press or hol
d
ns of the Recen
t
e
able through S
e
ng the na
n
S
DXC card
y
our phone befor
h
e microSDXC c
a
I
NG!
a
mage to the ph
o
n
y non-standard
e
t a standard na
n
10
y
s
n
d hold toselect ph
o
mode, power off o
o
turn off or on the
s
o
return to the hom
e
on or screen.
nd hold to use Go
o
e
the recently used
to the previous sc
r
d
either end to turn
t
apps key and
t
e
ttings > Featur
e
n
o-SIM Ca
e installing or re
m
a
rd.
o
ne, do not use
a
nano-SIM card
c
n
o-SIM card fro
m
o
ne modes, turn o
n
r restart your phon
e
s
creen display.
e
screen from any
o
gle Search.
apps.
r
een.
the volume up or
d
t
he Back key ar
e
e
s > Navigatio
n
rd and
m
oving the nan
o
a
ny other kind o
f
c
ut from a SIM c
a
m
your service
n
/off
e
.
d
own.
e
n
o
-SIM
f
SIM
a
rd.
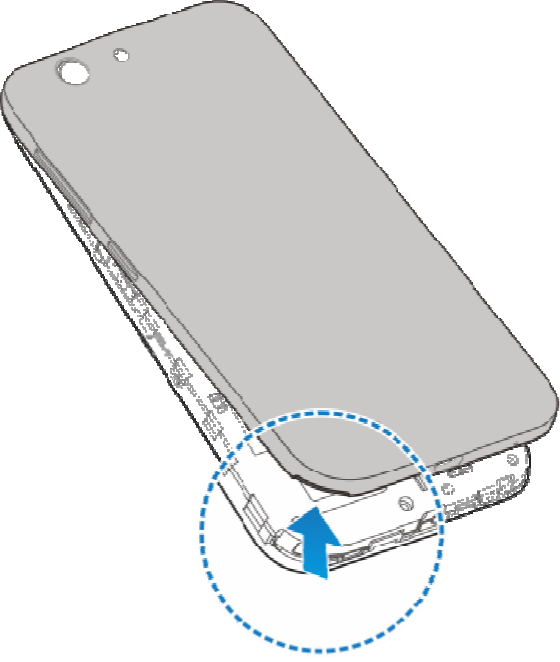
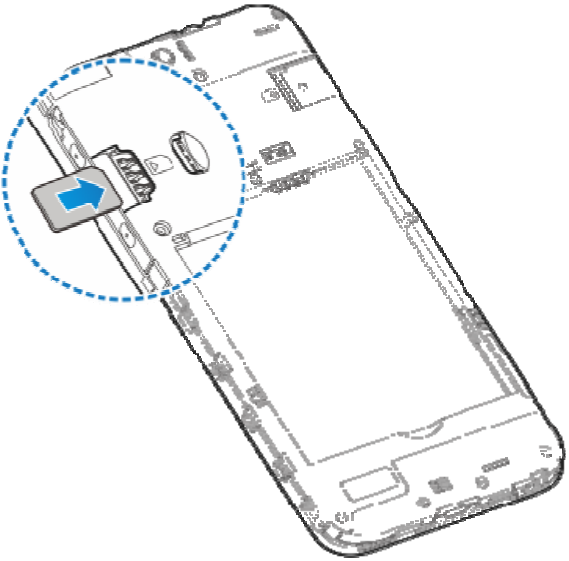
1. Place
lift an
d
2. Hold
t
show
n
your finger in th
e
d
remove the co
v
t
he nano-SIM ca
n
and slip it into
t
11
e
slot at the bott
o
v
er.
rd with their cut
c
t
he card holder.
o
m of the back
c
c
orner oriented
a
c
over to
a
s
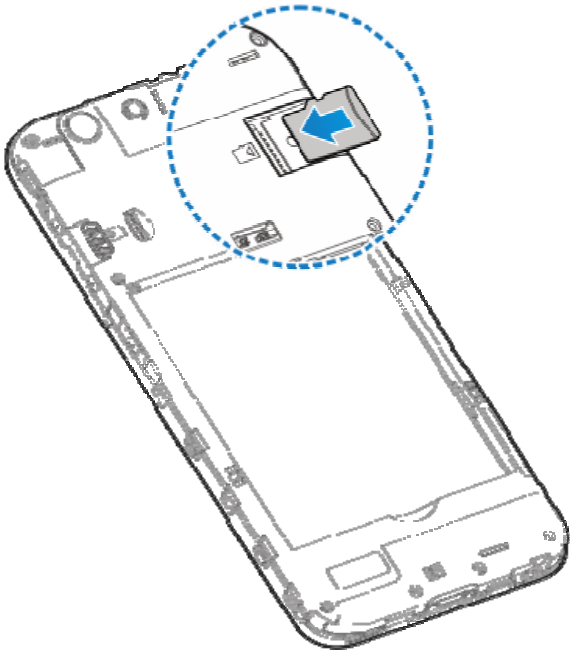
3. Hold y
o
down a
n
o
ur microSDXC
c
n
d slide it into th
e
12
c
ard with the me
t
e
microSDXC c
a
t
al contacts facin
a
rd slot.
g
4. Insert
batte
r
down
the battery by a
r
y and those in t
h
on the battery u
n
13
ligning the gold
e
h
e battery comp
a
n
til it clicks into
p
e
n contacts on th
a
rtment. Gently
p
p
lace.
e
p
ush
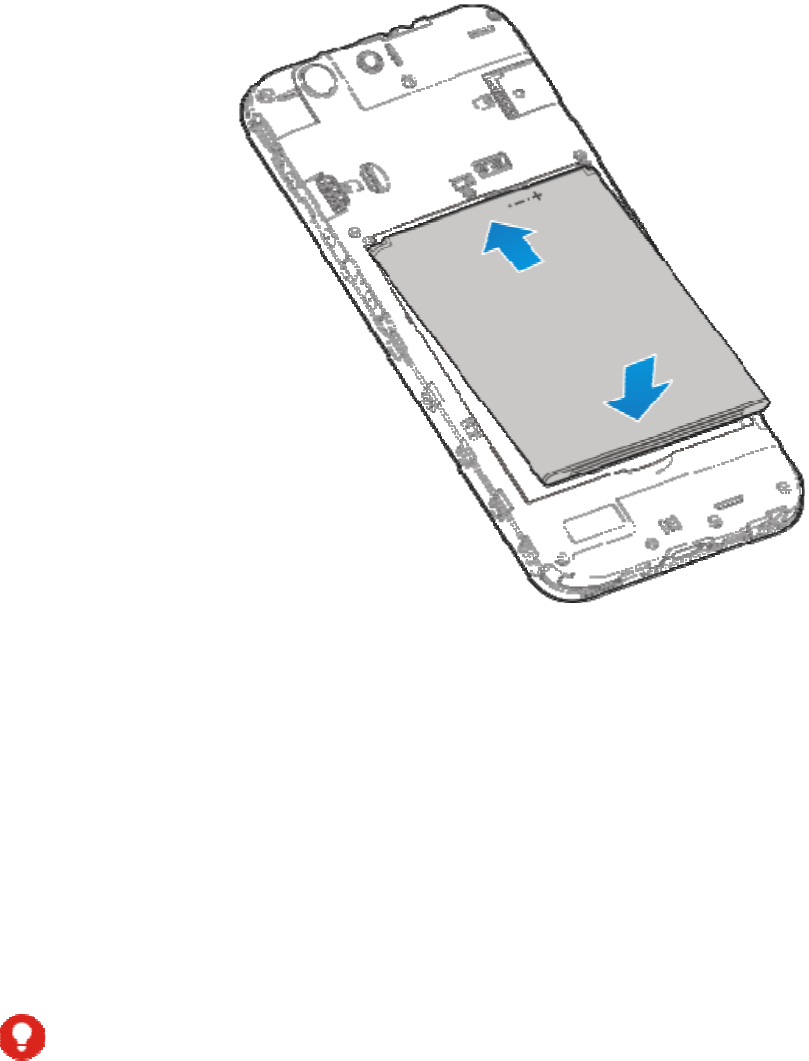
5. Replac
e
Chargi
Your phon
e
turn on, fin
d
charge the
If the batte
r
screen.
WARN
I
Use only Z
T
unapprove
d
battery to
e
e
the back cover
ng the Ba
t
e
’s battery shoul
d
d
a signal, and
m
battery as soon
r
y is low, there
w
I
NG!
T
E-approved ch
a
d
accessories c
o
e
xplode.
14
.
t
tery
d
have enough
p
m
ake a few calls.
as possible.
w
ill be a pop-up
m
a
rgers and cabl
e
o
uld damage you
p
ower for the ph
o
You should full
y
m
essage on the
e
s. The use of
r phone or caus
e
o
ne to
y
e
the
1. Conn
e
adapt
e
the c
o
2. Conn
e
phon
e
appe
a
3. Disco
NOT
E
If the bat
t
the phon
e
after cha
r
customer
prolonge
d
e
ct the adapter t
o
e
r is inserted wit
o
nnector into the
e
ct the charger t
o
e
is on, you’ll se
e
a
r on the status
b
nnect the charg
e
E
:
t
ery is extremely
e
even when it i
s
r
ging the phone
f
service if you st
d
charging.
15
o
the charging
ja
h the correct ori
e
charging jack.
o
a standard AC
e
a charging icon
b
ar.
e
r when the batt
e
low, you may b
e
being charged.
f
or at least 20 mi
ill cannot power
a
ck. Ensure that
t
e
ntation. Do not
f
power outlet. If
t
, such as or
e
ry is fully charg
e
e
unable to pow
e
In this case, try
a
nutes. Contact
on the phone af
t
t
he
f
orce
t
he
,
e
d.
e
r on
a
gain
t
er
16
Powering On/Off
Press and hold the Power key to turn on your phone.
To power off, press and hold the Power key to open the
options menu. Touch Power off.
Setting Up for the First Time
When you first power on your phone after you purchase it or
reset it to factory settings, you need to do some settings before
using it.
Touch the language field to select the language you want to use.
Then follow the prompts to set up Wi-Fi, Google services, and
other options.
Locking/Unlocking the Screen and
Keys
Your phone allows you to quickly lock the screen and keys (put
the phone into sleep mode) when not in use and to turn the
screen back on and unlock it when you need it.
To lock the screen and keys:
To quickly turn the screen off and lock the keys, press the Power
key.

NOT
E
To save
b
screen a
ft
receive
m
To unloc
1. Press
2. Swip
e
-or-
Swip
e
-or-
Swip
e
-or-
Touc
h
app.
Usin
g
Your pho
n
variety of
Touc
h
When
onscr
e
press
E
:
b
attery power, th
ft
er some time o
f
m
essages and ca
k the screen a
n
the Power key
t
e
up on the scre
e
e
right to op
e
e
left to ope
n
h
a notification t
w
g
the Touc
h
n
e’s touch scree
touch gestures.
h
you want to typ
e
e
en items such
a
onscreen butto
n
17
e phone automa
f
inactivity. You
w
lls while the pho
n
d keys:
t
o turn the scree
e
n.
e
n the Phone ap
p
n
the Camera ap
w
ice consecutivel
h
Screen
n lets you contr
o
e
using the ons
c
a
s application an
n
s, simply touch
t
tically turns off t
h
w
ill still be able t
o
ne screen is off.
n on.
p
.
p.
y to open the rel
o
l actions throug
h
c
reen keyboard,
s
d settings icons,
t
hem with your fi
h
e
o
ated
h
a
s
elect
or
nger.
18
Touch and Hold
To open the available options for an item (for example, a
message or link in a web page), touch and hold the item.
Swipe or Slide
To swipe or slide means to quickly drag your finger vertically
or horizontally across the screen.
Drag
To drag, press and hold your finger with some pressure
before you start to move your finger. While dragging, do not
release your finger until you have reached the target position.
Pinch
In some apps (such as Maps, and Gallery), you can zoom in
and out by placing two fingers on the screen at once and
pinching them together (to zoom out) or spreading them apart
(to zoom in).
Rotate the screen
For most screens, you can automatically change the screen
orientation from portrait to landscape by turning the phone
sideways.
Getting Around Your Phone
Home Screen
The home screen is the starting point for your phone’s
applications, functions, and menus. You can customize your
home screen by adding folders, widgets, and more.

To exten
Your ho
m
shortcuts
on the sc
r
To choo
s
1. Touc
h
touch
2. Slide
the w
a
Som
e
NOT
E
In additio
n
Settings
screen
w
built-in st
a
it, and us
e
To remo
v
1. Touc
h
2. Touc
h
3. Drag
i
4. If the
N
O
Som
e
d Home Scree
n
m
e screen is exte
, folders, widget
s
r
een to see the
e
s
e your wallpa
p
h
and hold an e
m
Customize lau
n
left or right on th
a
llpaper. You ca
n
e
cropping may b
E
:
n
, you can touc
h
>Themes & wa
l
w
allpaper or Loc
a
tic wallpaper, o
r
e
it as the wallp
a
v
e items from y
h
the Home key
h
and hold the it
e
i
t to to dele
t
item is an applic
a
O
TE:
e
preinstalled ap
p
19
n
ndable, providin
g
s
, and more. Si
m
e
xtended panels
.
p
er
m
pty place on th
e
n
cher >Wallpap
e wallpaper tab
t
n
also touch Gal
l
e needed for G
a
h
the Homekey,
s
l
lpapers> Wall
p
k screen wallp
a
r
touch Gallery t
a
per.
our Home Scre
e
to return to the
e
m you want to
e it.
a
tion, touch OK
p
s cannot be uni
n
g
more space fo
r
m
ply swipe left or
.
e
home screen a
n
er.
t
o select an ima
g
l
ery to choose a
a
llery images.
s
lide screen to t
o
p
apers, touch H
o
a
per and select
a
o select a pictur
e
e
n
Home Screen.
delete.
to uninstall it.
n
stalled.
r
right
n
d then
g
e as
picture.
o
uch
o
me
a
e
, crop
Status an
d
Your phon
e
simple ico
n
/
/
To open/c
l
Notification
and alarm
s
configured
notification
d
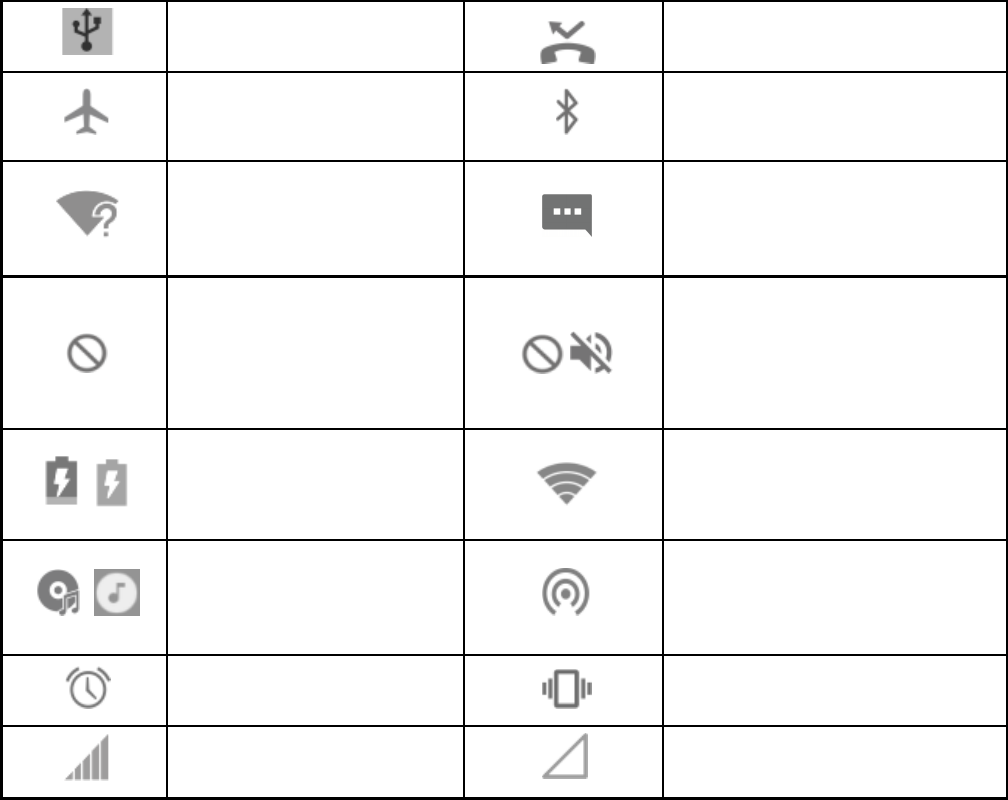
Notification Ic
o
e
will tell you ex
a
n
s. Here’s what t
h
USB tethering on
Airplane mode
New Wi-Fi networ
k
detected
Do not disturb
modeon(Priority
only)
Battery charge
Song playing
Alarm set
Signal strength
l
ose the notific
a
s report the arri
v
, as well as ong
o
your phone as
a
panel to view th
e
20
o
ns
a
ctly what’s goin
g
h
ey mean.
M
B
k
N
D
m
T
C
n
P
o
V
N
a
tion panel
v
al of new mess
a
o
ing events, suc
h
Wi-Fi hotspot.
Y
e
details of notifi
g
on by showing
M
issed call
B
luetooth icon
N
ew message
D
o not disturb
m
odeon(
A
larms on
T
otal silence)
C
onnected to a Wi
-
n
etwork
P
ortable Wi-Fi hot
s
o
n
V
ibration on
N
o signal
a
ges, calendar e
v
h
as when you'v
e
Y
ou can open th
e
cations.
you
lyor
-
Fi
®
s
pot is
v
ents,
e
e
21
To open the notification panel, swipe your finger down from
the top of the screen.
To close the notification panel, swipe your finger up on the
screen or touch the Back key.

Conn
e
Devic
e
Conne
c
Control
You can u
s
card.
To enable
1. Touch
t
Settin
g
2. In the
C
data.
To get dat
a
1. Touch
t
Settin
g
2. Touch
t
NOTE
Data roami
Select
P
1. Touch
t
Cellula
2. Touch
P
e
cting to
e
s
c
ting to M
o
Mobile Dat
a
s
e or disable the
or disable data
he Home key, s
l
g
s >More > Data
C
ellular section,
t
a
services whe
n
he Home key, s
l
g
s > Cellular ne
t
he switch next t
o
:
ng may incur si
g
P
referred N
e
he Home key, s
l
r networks.
P
referred netw
o
22
Network
s
o
bile Net
w
a
Use
mobile data ser
v
access:
l
ide on the scre
e
usage.
t
ouch the switch
n
roaming:
l
ide on the scre
e
t
works.
o
Data roaming
g
nificant roaming
e
twork Type
l
ide on the scre
e
o
rk type.
s
and
w
orks
v
ice of the nano-
S
e
n and touch
next to Cellula
r
e
n and touch
and touch OK.
charges.
e
n and Settings
>
S
IM
r
>

3. Selec
t
conn
e
Set Ac
To conne
Names (
A
the servi
c
1. Touc
h
touch
S
2. Touc
h
3. Touc
h
servi
c
4. Touc
h
NOT
E
To set th
e
Select
1. Touc
h
Setti
n
2. Touc
h
netw
o
3. Touc
h
You can
a
network
a
t
the network ty
p
e
ct with.
cess Point
N
ct to the Interne
t
A
PN). And if you
c
e provider to ge
t
h
the Home key,
S
ettings >Cellu
h
Access Point
N
h
each item to e
n
c
e provider.
h
>Save to com
p
E
:
e
APN to default
Network O
p
h
the Home key,
n
gs >Cellular n
e
h
Network oper
a
o
rks.
h
a network in th
e
a
lso touch Choo
a
utomatically.
23
p
e you would pre
N
ames
t
you can use th
e
want to add a n
e
t
the necessary i
slide on the scr
e
lar networks.
N
ames > .
n
ter the informati
o
p
lete.
settings, touch
p
erator
slide on the scr
e
e
tworks.
a
tors to search f
o
e
network list to
r
se automatical
l
fer the phone to
e
default Access
e
w APN, please
c
nformation.
e
en and
o
n you get from
>Reset to def
a
e
en and touch
o
r all available
r
egister manuall
y
l
y to select prefe
Point
c
ontact
your
a
ult.
y
.
rred

Turnin
g
Wi-Fi
N
1. Touch
t
Wi-Fi.
2. Slide th
3. Touch
a
4. If the n
e
Conne
c
NOTE:
Your phon
e
networks
w
Conne
c
Bluetooth®
Phones or
o
exchange i
meters (32
.
the commu
1. Touch
t
Bluet
o
2. Slide th
When Blue
g
Wi-Fi O
n
N
etwork
t
he Home key, s
eswitch next to
W
a
network name
t
e
twork is secure
d
c
t.
e
automatically c
w
hen they are in
r
c
ting to B
l
is a short-range
o
ther devices wi
t
n
formation wirel
e
.
8 feet). The Blu
e
nication is perfo
r
he Home key, s
l
o
oth.
eswitch next to
B
tooth is on, the
24
n
and Con
n
lide on the scre
e
W
i-Fito turn on
W
t
o connect to it.
d
, enter the pas
s
onnects to previ
o
r
ange.
l
uetooth®
D
wireless comm
u
t
h Bluetooth cap
e
ssly within a di
s
e
tooth devices
m
r
med.
l
ide on the scre
e
B
luetooth to tur
n
icon appears
n
ecting to
e
n andtouchSett
W
i-Fi.
s
word and touch
o
usly used Wi-F
i
D
evices
u
nication technol
o
abilities can
s
tance of about 1
m
ust be paired b
e
e
n and touchSett
n
on or off Bluet
o
in the status ba
r
a
ings >
i
o
gy.
0
e
fore
ings >
o
oth.
r
.

Shari
n
You can
s
by activa
t
hotspot.
Share
Y
You can
a
tethering
connecti
o
NOT
E
You can
n
via USB
w
1. Conn
e
2. Touc
h
Setti
n
3. Switc
h
creat
e
NOT
E
To stop s
or discon
n
Share
Y
Blueto
If your co
you can
c
with your
n
g Your M
o
s
hare your phon
e
t
ing the mobile h
o
Y
our Mobil
e
a
ccess the Inter
n
feature of your
p
o
n on a mobile n
e
E
:
n
ot transfer files
b
w
hile the phone
i
e
ct your phone t
o
h
the Home key,
n
gs > More.
h
onUSB tetheri
e
d on your comp
E
:
haring your data
n
ect the USB ca
Y
our Mobil
e
oth
mputer can obta
c
onfigure your p
h
computer.
25
o
bile Data
e
’s data capabili
t
o
tspot feature to
e
Data Con
n
n
et on your com
p
p
hone. The featu
e
twork and may
b
etween your ph
o
i
s USB tethered.
o
your computer
slide on the scr
e
ng. A new netw
o
uter.
connection, swi
t
ble.
e
Data Con
n
in an Internet co
h
one to share its
Connecti
o
t
ies through teth
e
create a portabl
e
n
ection via
U
p
uter via the US
B
re needs data
result in data ch
a
o
ne and your co
with a USB cabl
e
en and touch
o
rk connection
w
t
ch offUSB teth
e
n
ection via
nnection via Blu
e
mobile data con
n
o
n
e
ring or
e
Wi-Fi
U
SB
B
a
rges.
mputer
e.
w
ill be
e
ring
e
tooth,
n
ection

1. Pair yo
u
2. Config
u
Blueto
o
docum
e
3. Touch
t
More.
4. Switch
o
sharing
NOTE:
To stop sh
a
tethering.
Share
Y
Wi-Fi H
o
You can s
h
by turning
y
needs dat
a
data charg
e
NOTE:
When the
p
use your p
h
remain con
1. Touch
t
touchS
e
2. Switch
o
u
r phone with yo
u
re your comput
e
o
th. For more inf
o
e
nts.
t
he Home key, s
o
nBluetooth te
t
your phone's d
a
a
ring your data
c
Yo
ur Mobile
D
o
tspot
h
are your phone’
s
y
our phone into
a
a
connection on
a
e
s.
p
ortable Wi-Fi h
o
h
one’s Wi-Fi ca
p
nected to the In
t
he Home key, s
l
e
ttings>Wi-Fi h
o
o
n Wi-Fi hotsp
o
26
ur computer via
e
r to obtain its n
e
o
rmation, please
lide on the scre
e
hering. Your co
m
a
ta connection.
c
onnection, switc
D
ata Conn
e
s
data connectio
a
portable Wi-Fi
a
mobile networ
k
o
tspot feature is
e
p
ability to access
t
ernet via your m
l
ide on the scre
e
o
tspot
o
t.
Bluetooth.
e
twork connectio
n
see your comp
u
e
n and touchSet
t
m
puter is now
h offBluetooth
e
ction as a
n with other dev
i
hotspot. The fea
k
and may result
e
nabled, you ca
n
the Internet. Yo
u
obile data netw
o
e
n and
n
via
u
ter's
t
ings>
i
ces
ture
in
n
not
u
still
o
rk.

After
a
netw
o
3. On a
n
with it
NOT
E
To stop s
Conn
e
Virtual pr
i
resource
s
deployed
people a
c
when co
n
Dependi
n
required
t
certificat
e
informati
o
Add a
V
1. Touc
h
More
>
2. Touc
h
your
n
3. Touc
h
The VPN
a
moment, the p
o
rk name (SSID)
n
other device, lo
c
to start using th
e
E
:
haring your data
e
cting to
V
i
vate networks (
V
s
inside a secur
e
by corporations
,
c
cess local netw
o
n
nected to a wire
n
g on the type of
t
o enter your log
i
e
s before you ca
n
o
n from your net
w
V
PN
h
the Home key,
>
VPN.
h
Add VPN prof
i
n
etwork administ
h
Save.
is added to the
l
27
hone starts broa
.
c
ate your phone
e
phone’s mobil
e
connection, swi
t
V
irtual Pri
v
V
PNs) allow you
e
d local network.
,
schools, and ot
o
rk resources w
h
less network.
VPN you are us
i
n credentials or
n
connect to you
r
w
ork administrat
o
slide on the scr
e
i
le and fill in the
i
rator.
l
ist on the VPN
s
dcasting its Wi-
F
via Wi-Fi and c
o
e
data.
t
ch off Wi-Fi ho
t
v
ate Netw
o
to connect to th
e
VPNs are com
m
her institutions t
o
h
en not on camp
ing, you may be
install security
r
VPN. You can
g
o
r.
e
en and touchS
e
i
nformation prov
i
s
creen.
F
i
o
nnect
t
spot.
o
rks
e
m
only
o
let
us, or
g
et this
e
ttings>
i
ded by

28
NOTE:
You must set a lock PIN or password before using VPN.
Connect to a VPN
1. Touch the Home key, slide on the screen and touchSettings>
More> VPN.
2. Touch the VPN that you want to connect to.
3. When prompted, enter any requested credentials, and then
touch Connect.
Modify a VPN
1. Touch the Home key, slide on the screen and touchSettings>
More> VPN.
2. Touch and hold the VPN that you want to modify.
3. Edit the VPN settings you want.
4. Touch Save.
Pho
n
You can
p
other ap
p
you see
a
Placi
n
Place
a
1. Touc
h
2. Touc
h
Touc
h
N
O
As yo
matc
h
place
numb
e
3. Touc
h
NO
T
To m
a
enter
follow
To re
d
the p
h
auto
m
n
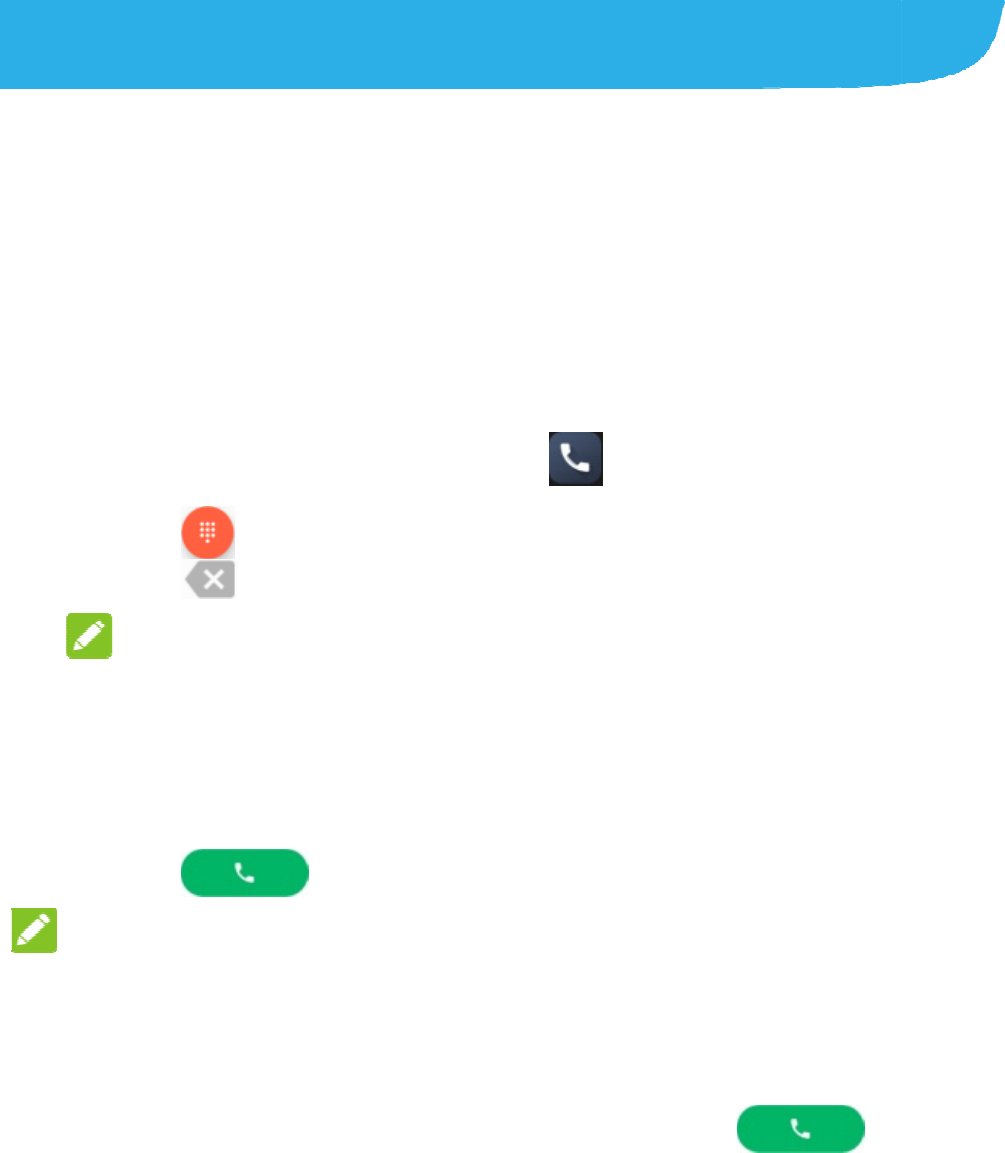
e Calls
p
lace calls from
t
p
s or widgets tha
t
a
phone number,
n
g and En
d
a
Call by Di
a
h
the Home key
a
h
and ente
r
h
to delete
O
TE:
u enter digits, y
o
h
. If you see the
n
the call immedi
a
e
r.
h
belo
w
T
ES:
a
ke an internatio
the plus (+) sym
ed by the city/ar
e
d
ial the last call
y
h
one number fiel
d
m
atically.
29
t
he Phone app,
t
t
display contact
you can usuall
y
d
ing Calls
a
ling
a
nd touch .
r
the phone num
b
incorrect digits.
o
ur phone searc
h
n
umber you wan
a
tely without ent
e
w
the keypad to
d
nal call, touch a
n
bol. Next, enter
t
e
a code and the
n
y
ou made, just t
o
d
is empty to en
t
t
he Contacts ap
p
information. Wh
y
touch it to dial.
b
er with the dial
p
h
es for contacts
t
t to dial, touch it
e
ring the rest of t
d
ial.
n
d hold the 0 ke
y
t
he country cod
e
n
the phone nu
m
o
uch t
o
t
er the number
p
, or
erever
p
ad.
t
hat
to
he
y
to
e
,
m
ber.
o
when

30
End a Call
During a call, touch on the screen.
Answering or Rejecting Calls
When you receive a phone call, the incoming call screen opens,
displaying the caller ID or the information about the caller that
you've entered in theContacts app. You can answer or reject the
call, or reject it with a text message.
Answer a Call
To answer an incoming call:
When the screen is locked,slide down.
When the screen is unlocked, touch at the top.
NOTE:
To silence the ringer before answering the call, you can press the
Volume key.
Reject a Call
To reject an incoming call:
When the screen is locked, slide up.
When the screen is unlocked, touch at the top.
You can also touch to reject the call and select a preset text
message or write one to send to the caller.

31
Call Settings
Touch the Home key > > >Call settings >Carrier
settings.
Voicemail: Touch to configure voicemail settings.
Fixed Dialing Numbers: Fixed Dialing Numbers (FDN)
allows you to restrict outgoing calls to a limited set of phone
numbers.
Call forwarding: Call forwarding feature allows you to
forward your incoming calls to another phone number.
Additional settings: Check Call waiting to get notified of
incoming calls during a call.

Conta
You can p
u
the contact
support co
n
To see you
r
and touch
Addin
g
1. Touch
2. Choos
e
on the
p
added
o
3. Enter t
h
and ot
h
4. Touch
S
Worki
n
Add a
C
You can a
d
you can fin
d
cts
u
t contacts on yo
s in your Googl
e
n
tact syncing.
r
contacts, touc
h
.
g
a New C
o
to add a n
e
e
where to save t
h
p
hone, the nano-
S
o
n the phone.
h
e contact nam
e
h
er information.
S
ave.
n
g With Fa
v
C
ontact to F
a
d
d the contacts y
d
them quickly.
32
ur phone and sy
e
account or oth
e
h
the Home key,
o
ntact
e
w contact.
h
e contact. You
c
S
IM card, or a w
e
e
, phone numbe
r
v
orite Co
n
a
vorites
ou use frequentl
nchronize them
w
e
r accounts that
slide on the scr
e
c
an save the con
t
e
b account you h
r
s, email addres
s
n
tacts
y to favorites so
w
ith
e
en
t
act
a
ve
s
es,
that

Touch a
c
the top.
Remo
v
Touch a
f
c
ontact that sav
e
v
e a Contac
t
f
avorite contact
a
33
e
d on the phone
a
t
From Fav
o
a
nd then touch
a
nd then touch
o
rites
at the top.
at
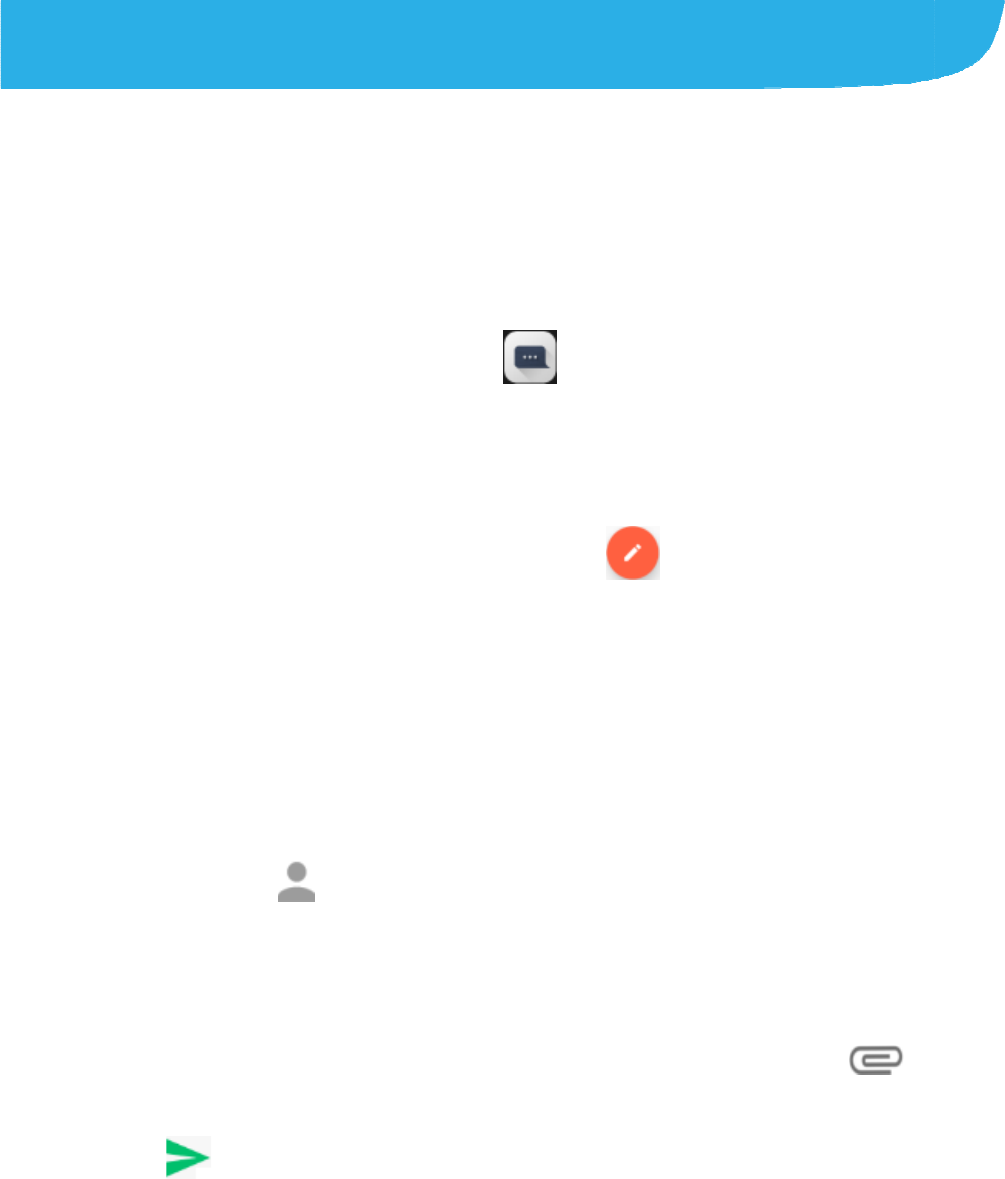
Mess
a
You can us
multimedia
Openi
n
Touchthe
H
Sendi
n
1. On the
2. Add re
c
To u
c
nu
m
few
Sel
e
tou
c
3. Touch t
h
text.
4. If you
w
add a s
5. Touch
a
ging
e Messaging to
e
messages (MM
S
n
g the Me
s
H
ome keyand to
u
n
g a Mess
a
Messaging scr
e
c
ipients by one o
f
c
h the To field a
n
m
be
r
or the cont
a
suggestions, to
u
e
ct recipients fro
m
c
hing .
h
e Enter ames
s
w
ant to send a m
u
ubject or attach
a
.
34
e
xchange text m
S
).
s
saging S
c
u
ch .
a
ge
e
en, touch a
t
f
the following w
a
n
d manually ent
e
a
ct name. If the
p
u
ch the one you
w
m
your contacts
s
age field and e
n
u
ltimedia messa
g
a
file to the mes
s
essages (SMS)
a
c
reen
t
the bottom.
a
ys.
e
r the recipient’s
p
hone presents
a
w
ant to add.
or call log by
n
ter the messag
e
g
e, touch t
o
s
age.
a
nd
a
e
o

35
NOTE:
You can also include email addresses as recipients for a
multimedia message.
Replying to a Message
Messages you receive are appended to existing threads of the
same number. If the new message comes from a new number,
a new thread is created.
1. On the Messaging screen, touch the thread that has the
message you want to reply to.
2. Type your reply in the text box at the bottom. You can touch
if you want to reply with an MMS.
3. Touch .
Changing Message Settings
Touch > Settings in the Messaging screen to change the
messaging settings.
Using
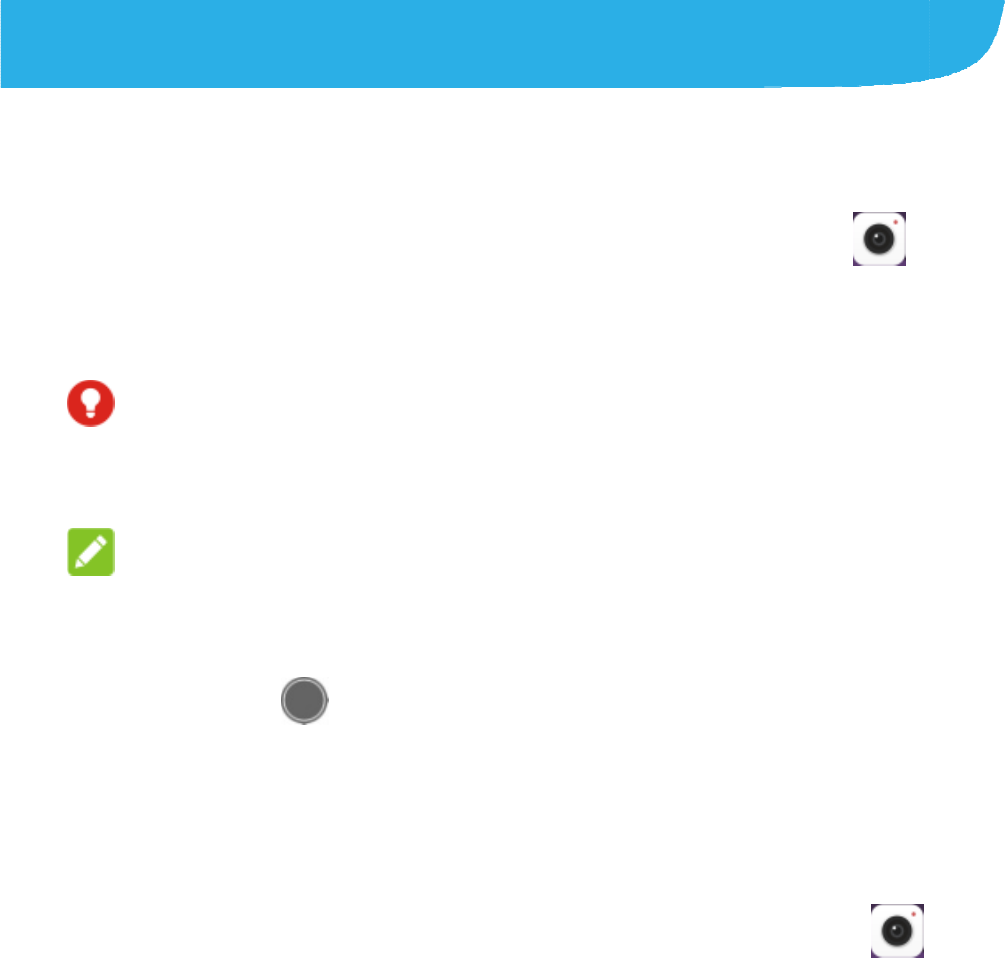
Captu
r
1. Toucht
h
2. Aim th
e
adjust
m
WA
R
Keep a
flash to
w
NO
T
You ca
n
before
t
3. Lightly
t
take a
p
Recor
d
1. Toucht
h
2. Touch
V
lapse v
i
TIME-L
3. Aim th
e
Multime
d
r
ing a Pho
t
h
e Home key, sl
i
e
camera at the
s
m
ent.
R
NING!
safe distance w
h
w
ards the eyes
o
T
E:
n
spread or pinc
h
t
aking pictures.
t
ouch . The
V
p
hoto.
d
ing a Vid
e
h
e Home key, sl
i
V
IDEO if you wa
n
i
deo, switch to t
h
APSE.
e
camera at the
s
36
d
ia Apps
t
o With Yo
i
de on the scree
n
s
ubject and mak
e
h
en using the fla
o
f people or ani
m
h
on the screen t
V
olume key can
e
o With Y
o
i
de on the scree
n
n
t to capture avi
d
h
e back camera
a
s
ubject.
ur Camer
a
n
and touch .
e
any necessary
sh. Do not point
m
als.
o zoom in or out
also be used to
o
ur Camer
a
n
and touch
.
d
eo. To capture t
a
nd touch …>
a
the
a
.
ime
37
NOTE:
You can spread or pinch on the screen to zoom in or out
before and during recording.
4. Touch to start recording a video clip, or touch to
record a time lapse video.
NOTE:
While the recording is in progress, touch to pause the
recording. When you record a time-lapse video, touch
to save the frame as a separate photo.
5. Touch or to stop recording.
Listening to Your FM Radio
With the FM Radio, you can search for radio channels, listen to
them, and collect them to your phone. Note that the quality of the
radio broadcast depends on the coverage of the radio station in
your area. The wired headset works as an antenna, so always
connect the headset when using the radio.
1. Plug your headset into your phone.
2. Touch the Home key and slide on the screen to select FM
Radio.

38
Playing Your Music
Music supports a wide variety of audio formats, so it can play
music you purchase from online stores, music you copy from
your CD collection, and so on.
1. Touch the Home key, slide screen to touch Music to open
the Music Screen.
2. Touch a song in any list.
3. Adjust the volume with Volume key.
Opening Your Gallery
Touch the Home key and slide on the screen to select Gallery to
view albums of your pictures and videos. You can also do some
basic editing of your pictures – such as setting them as wallpaper
or contact photo, and sharing with friends.
Making Voice Memos
Recorder enables you to record voice memos and listen to them
whenever you like.
To record voice memo:
1. Touch the Home key and slide on the screen to select
Recorder.
2. Touch to start recording. During recording, you can do
the following:
Touch / to pause or continue the recording.

39
Touch to add time tags to the recording.
3. Touch Done to stop recording.
4. Edit the file name and touch Done to save the recording.
If you don’t want to save the memo after recording it, touch
Delete to delete it.
To play any saved memo:
1. Touch at the top right of the screen to see all
recordings.
2. Touch the title of a memo to play it.

Using
Signing in
t
Calendar,
a
you don’t h
Gmail
Gmail is a
w
sign in to y
o
synchroniz
automatica
This is ho
w
To open G
m
Googl
e
Touch the
H
books, mo
v
NOTE:
The conte
n
your regio
n
Your G
o
t
o your Google
A
a
nd Contacts be
t
ave an account,
w
eb-based emai
o
ur Google acc
o
ation settings, t
h
lly synchronized
w
to enter Gmail:
m
ail by touching
e
Play™ S
t
H
ome key > Pla
y
v
ies, apps, and
d
n
t you can acces
s
n
and your servic
40
ogle Ap
p
A
ccount lets yo
u
t
ween your pho
n
you can easily
c
l service that’s c
o
o
unt. Depending
h
e Gmail on you
with your Gmail
the Home key
>
t
ore
y
Store. You ca
n
d
ownload them t
o
s
in Google Play
e provider.
p
lication
s
u
synchronize G
m
n
e and the web.
A
c
reate one.
o
nfigured when
y
on your
r phone can be
account on the
w
>
Google> Gma
n
buy or rent mu
s
o
your phone.
Store depends
o
s
m
ail,
A
nd if
y
ou
w
eb.
i
l.
s
ic,
o
n

Othe
r
Calen
Calendar
Calendar
meetings
Exchang
e
Exchang
e
To o pe n
C
to select
C
Cloc
k
Touch th
e
The Cloc
the world
,
Down
The Dow
downloa
d
or Chro
m
To u c h th
e
System
M
r
Applica
da
r
on the phone w
o
™ service for cr
e
and appointme
n
e
ActiveSync cal
e
e
account on the
C
alendar, touch
t
C
alendar.
k
e
Home key and
k app allows yo
u
,
set alarms, an
d
loads
nloads app kee
p
d
ing or have do
w
m
e.
e
Home key an
d
M
anagement>D
o
41
tions
o
rks with the we
b
e
ating and mana
n
ts. It also works
e
ndar once you
s
phone.
t
he Home key a
n
slide on the scr
e
u
to check local
t
d
use timers.
p
s a record of th
e
w
nloaded using a
p
d
slide on the s
c
o
wnloads to ch
e
b
-based Google
ging events,
with the Micros
o
s
ign into your
n
d slide on the s
c
e
en to selectClo
c
t
ime in places ar
o
e
files you are
p
ps such as Br
o
c
reen to select
e
ck the record.
o
ft
c
reen
c
k.
o
und
o
wser
42
File Manager
Quickly access all of your images, videos, audio clips, and
other types of files on your phone storage.
Touch the Home key and slide on the screen to select System
Management>FileManager. You can touch a file category to
find the file you need, or touchPhone or SD Card to browse
folders and files on the phone storage, or the microSDXC card.
Settings
The Settings app contains most of the tools for customizing
and configuring your phone.
Wireless and Networks
Wi-Fi
Touch the Home key and slide on the screen to select
Settings > Wi-Fi. You can turn Wi-Fi on or off and configure
your Wi-Fi connections.
Bluetooth
Touch the Home key and slide on the screen to select
Settings > Bluetooth. You can turn Bluetooth on or off and
configure your Bluetooth connections.

43
Tethering and Portable Hotspot
Touch the Home key and slide on the screen to select Settings>
More to share your phone’s mobile data connection with PCs or
other devices via USB or Bluetooth.
Data Usage
Touch the Home key and slide on the screen to select
Settings > More > Data usage to manage mobile data use.
Touch the switches beside Cellular data to turn on or off mobile
data.
NOTE:
The data usage is measured by your phone, and your carrier’s
data usage accounting may differ.
Airplane Mode
Touch the Home key and slide on the screen to select
Settings > More and slide the switch beside Airplane mode to
turn airplane mode on or off.All the phone’s radios that transmit
voice or data are turned off when airplane mode is on.
VPN
Touch the Home key and slide on the screen to select
Settings > More > VPN to set up and connect to virtual private
networks.
44
Customized Features
Themes & Wallpapers
Touch the Home key and slide on the screen to select
Settings > Themes & wallpapers. You can select a different
theme for the phone display, or change the home/lock screen
wallpaper.
Navigation Keys
Touch the Home key and slide on the screen to select
Settings > Features > Navigation keys. You can exchange
the location of the Recentapps key and the Back key.
Device
Display
Touch the Home key and slide on the screen to select
Settings > Display to configure the following options.
Sound
Touch the Home key and slide on the screen to select
Settings > Sound.

Notific
Touch th
e
Settings
Power
Touch th
e
Settings
what has
saving m
o
Apps
Touch th
e
Settings
manage
t
Defaul
t
Touch th
e
Settings
certain o
p
default m
e
the defau
ations
e
Home key and
> Notifications
Manager
e
Home key and
> Power mana
g
been using the
b
o
des.
e
Home key and
> Apps to see
a
t
hem.
t
Apps
e
Home key and
> Default apps
p
eration. For ex
a
e
ssaging app. T
o
lt settings.
45
slide on the scr
e
to control the di
s
slide on the scr
e
g
er to view the b
a
b
attery, and ena
b
slide on the scr
e
a
pps installed on
slide on the scr
e
to set the defaul
a
mple, you can s
e
o
uch > Restor
e
e
en to select
s
play of notificati
e
en to select
a
ttery level, che
c
b
le different batt
e
e
en to select
your phone and
e
en to select
t application for
e
t Messaging as
e
defaults to ret
u
ons.
c
k
e
ry
the
u
rn to
46
Storage
Touch the Home key and slide on the screen to select
Settings > Advanced settings >Storage to view the memory
information of the internal phone storage and the microSDXC
card.
Touch Phone memoryto get a detailed breakdown of space
usage by type. Touch a data type to see more information or
delete the files you do not need.
Memory
Touch the Home key and slide on the screen to select
Settings >Advanced settings >Memory to monitor the
average memory use and performance of your phone. You can
also check which apps use the most memory.
Connect to PC
Touch the Home key and slide on the screen to select
Settings > Advanced settings > Connect to PC to select your
USB connection type between your phone and PC.
Scheduled Power On/Off
Touch the Home key and slide on the screen to select
Settings > Advanced settings > Scheduled power on/off to
set the day and time when the phone automatically powers on
or off. You can also touch the switches on the right to turn the
features on or off.
47
Personal
Location
Touch the Home key and slide on the screen to select
Settings >Advanced settings > Location to manage location
services, which help your phone and apps determine your
location. To use location-related applications, such as finding
your location on Google Maps, you must have location services
turned on on your phone.
Security
Touch the Home key and slide on the screen to select
Settings > Security to configure options that help keep your
phone and data safe.
Accounts
Touch the Home key and slide on the screen to select
Settings > Accounts to manage your web accounts and
synchronization. Touch Add account to sign in to or create
accounts on your phone.
Touch an account type to see that type of accounts you have
added and adjust the accounts settings.
48
Google
Touch the Home key and slide on the screen to select
Settings > Google to easily manage settings for Google apps
and features. You can set the options for Google account and
services.
Languages& Input
Touch the Home key and slide on the screen to select
Settings > Advanced settings > Languages & input to
configure options related to system language, input methods,
speech input and output as well as mouse/trackpad input.
Backup and Reset
Touch the Home key and slide on the screen to select
Settings >Advanced settings > Backup & reset to manage
data backup and restoration options, and to reset the network
setting or the phone to factory status.
System
Date & Time
Touch the Home key and slide on the screen to select
Settings > Advanced settings > Date & time to set date, time,
time zone, time format and more.
49
Updates
Touch the Home key and slide on the screen to select
Settings > System Update to check, download and install
system updates.
Accessibility
Touch the Home key and slide on the screen to select
Settings > Advanced settings > Accessibility to configure
accessibility plug-ins and services on your phone, such as
using Color inversion or Color correction for users with sight
problems.
Printing
Touch the Home key and slide on the screen to select
Settings > Advanced settings > Printing to manage Google
Cloud Print service or other printer plug-ins installed from the
Google Play Store or your printer manufacturer.
About Phone
Touch the Home key and slide on the screen to select
Settings > About phone to view important phone information
and legal information.
Troub
If you enco
performs a
b
particular
p
the chart,
c
Problem
Poor recepti
o
Echo or noi
s
leshooti
n
unter problems
w
b
normally, you c
a
p
roblem cannot b
c
ontact the deale
Possible cau
s
o
n The network si
weak at your c
u
location, for ex
basement or n
e
building, beca
u
transmissions
c
effectively rea
c
The network is
current time (f
o
during peak ti
m
may be too m
u
traffic to handl
e
calls).
You are too far
base station fo
provider.
s
e Poor network li
the part of you
r
provider.
50
n
g
w
hile using the
p
a
n refer to the c
h
e resolved usin
g
r where you pur
c
s
es Pos
g
nal is too
u
rrent
a
mple, in a
e
ar a tall
u
se wireless
c
annot
c
h it.
Mo
v
the
n
pro
p
busy at the
o
r example,
m
es, there
u
ch network
e
additional
A
vo
i
suc
h
wait
away from a
r your service
You
are
a
pro
v
nk quality on
r
service
End
You
bett
e
pho
n
p
hone, or if it
h
art below. If yo
u
g
the information
c
hased the phon
sible solution
v
e to a location wh
e
n
etwork signal can
p
erly received.
i
d using the phone
h
times, or try agai
n
ing a short time.
can request a ser
v
a
map from your se
v
ider.
the call and dial a
g
may be switched t
o
e
r-quality network l
n
e line.
u
r
in
e.
e
re
be
at
n
after
v
ice
rvice
g
ain.
o
a
ink or

51
Problem Possible causes Possible solution
Poor local telephone line
quality.
End the call and dial again.
You may be switched to a
better-quality network link or
phone line.
Unable to
select certain
features
Your service provider does
not support these features,
or you have not applied for
services that provide these
features.
Contact your service
provider.
Battery not
charging
The battery or battery
charger is damaged.
Contact the dealer.
The phone’s temperature is
below 0°C or higher than
45°C.
Adjust the battery charging
environment to avoid
extremes of temperature.
Poor contact between the
battery and charger.
Check all connectors to
ensure that all connections
have been properly made.
Shortened
standby time
The standby time is related
to your service provider
system configuration. The
same phone used with
different service providers’
systems will not provide
exactly the same length of
standby time.
If you are located in an area
where signaling is weak,
temporarily power off the
phone.
The battery is depleted. In
hightemperature
environments, battery life
will be shortened.
Use a new battery.

52
Problem Possible causes Possible solution
If you are not able to
connect to the network, the
phone will continue to send
out signals as it attempts to
locate a base station. Doing
so consumes battery power
and will consequently
shorten standby time.
Change your location to one
where the network is
accessible, or temporarily
turn off your phone.
Cannot turn
your phone on
Battery power has been
depleted.
Recharge the phone’s
battery.
nano-SIM card
error
nano-SIM card malfunction
or damage.
Take the nano-SIM card to
your service provider for
testing.
nano-SIM card inserted
improperly.
Insert the nano-SIM card
properly.
Debris on the nano-SIM
card contacts.
Use a soft, dry cloth to clean
the nano-SIM card contacts.
Unable to
connect to the
network
nano-SIM card invalid. Contact your service
provider.
You are not within the
network’s service area.
Check the service area with
your service provider.
Poor signal. Move to an open space, or if
you are inside a building,
move closer to a window.
You have activated the
Fixed dial numbers
feature.
Disable this feature.

53
Problem Possible causes Possible solution
PIN Code
blocked
You have entered an
incorrect PIN code three
consecutive times.
Contact your service
provider. If the service
provider provides the
nano-SIM card’s PUK code,
use the PUK code to unlock
the nano-SIM card.
Phone
crashes,
reboots,
freeze, or
cannot be
powered on
Some third-party software is
not compatible with your
phone.
Reset the phone to factory
status.
Uninstall the software that
may cause the problem.
Upgrade the phone
software.
For Y
o
Gener
a
D
o
ha
dri
dri
K
e
10
bo
S
m
ch
Y
o
a l
Av
an
K
e
pa
el
e
de
Tu
ho
fa
c
o
ur Safet
y
a
l Safety
o
n’t make or receiv
e
ndheld calls while
ving. Never text w
h
ving.
e
ep your phone at l
e
mm away from yo
u
dy while making c
a
m
all parts may cau
s
oking.
o
ur phone can prod
u
oud sound.
v
oid contact with
ything magnetic.
e
ep away from
cemakers and oth
e
e
ctronic medical
vices.
rn off when asked
t
spitals and medica
c
ilities.
54
y
e
h
ile Do
e
ast
u
r
a
lls.
Yo
u
bri
g
s
e Do
ph
o
u
ce
To
he
a
list
for
ca
u
ph
o
lou
A
v
o
te
m
e
r
A
v
o
Ke
t
o in
l Do
ap
a
n’t use at gas stati
o
u
r phone may prod
g
ht or flashing light
n’t dispose of your
o
ne in fire.
prevent possible
a
ring damage, do
n
en at high volume
l
long periods.
Exer
c
u
tion when holding y
o
o
ne near your ear w
h
dspeaker is in use.
o
id extreme
m
peratures.
o
id contact with liq
u
ep your phone dry.
n’t take your phon
e
a
rt.
o
ns.
uce a
.
n
ot
l
evels
c
ise
o
ur
ile the
u
ids.
e

55
Turn off when told to in
aircrafts and airports.
Only use approved
accessories.
Turn off when near
explosive materials or
liquids.
Don’t rely on your phone
for emergency
communications.
FCC RF Exposure Information (SAR)
This phone is designed and manufactured not to exceed the
emission limits for exposure to radio frequency (RF) energy set
by the Federal Communications Commission of the United
States.
During SAR testing, this device was set to transmit at its highest
certified power level in all tested frequency bands, and placed
in positions that simulate RF exposure in usage against the
head with no separation, and near the body with the separation
of 10 mm. Although the SAR is determined at the highest
certified power level, the actual SAR level of the device while
operating can be well below the maximum value.This is
because the phone is designed to operate at multiple power
levels so as to use only the power required to reach the network.
In general, the closer you are to a wireless base station
antenna, the lower the power output.
The exposure standard for wireless devices employs a unit of
measurement known as the Specific Absorption Rate, or
SAR.The SAR limit set by the FCC is 1.6W/kg.

56
This device is complied with SAR for general population
/uncontrolled exposure limits in ANSI/IEEE C95.1-1992 and
had been tested in accordance with the measurement methods
and procedures specified in IEEE1528.
The FCC has granted an Equipment Authorization for this
model phone with all reported SAR levels evaluated as in
compliance with the FCC RF exposure guidelines.SAR
information on this model phone is on file with the FCC and can
be found under the Display Grant section of
www.fcc.gov/oet/ea/fccid after searching on FCC
ID:SRQ-ZTEBLADEA321. The FCC ID also can be found on
the device when you touch the Home key > Settings > About
phone > Regulatory information.
For this device, the highest reported SAR value for usage against
the head is 0.634W/kg, for usage near the body is 1.322W/kg.
While there may be differences between the SAR levels of
various phones and at various positions, they all meet the
government requirement.
SAR compliance for body-worn operation is based on a
separation distance of 10 mm between the unit and the human
body.Carry this device at least 10 mm away from your body to
ensure RF exposure level compliant or lower to the reported
level. To support body-worn operation, choose the belt clips or
holsters that do notcontain metallic components to maintain a
separation of 10 mmbetween this deviceand your body.
RFexposure compliance with any body-worn accessory that
contains metal was not tested nor certified, and using such
body-worn accessory should be avoided.
57
FCC Regulations
This mobile phone complies with part 15 of the FCC Rules.
Operation is subject to the following two conditions: (1) This
device may not cause harmful interference, and (2) this device
must accept any interference received, including interference
that may cause undesired operation.
This mobile phone has been tested and found to comply with the
limits for a Class B digital device, pursuant to Part 15 of the FCC
Rules. These limits are designed to provide reasonable
protection against harmful interference in a residential installation.
This equipment generates, uses and can radiate radio frequency
energy and, if not installed and used in accordance with the
instructions, may cause harmful interference to radio
communications. However, there is no guarantee that
interference will not occur in a particular installation. If this
equipment does cause harmful interference to radio or television
reception, which can be determined by turning the equipment off
and on, the user is encouraged to try to correct the interference
by one or more of the following measures:
Reorient or relocate the receiving antenna.
Increase the separation between the equipment and receiver.
Connect the equipment into an outlet on a circuit different
from that to which the receiver is connected.
Consult the dealer or an experienced radio/TV technician for
help.

58
CAUTION:
Changes or modifications not expressly approved by the party
responsible for compliance could void the user’s authority to
operate the equipment.
Distraction
Driving
Full attention must be given to driving at all times in order to
reduce the risk of an accident. Using a phone while driving (even
with a hands free kit) can cause distraction and lead to an
accident. You must comply with local laws and regulations
restricting the use of wireless devices while driving.
Operating Machinery
Full attention must be given to operating machinery in order to
reduce the risk of an accident.
Product Handling
General Statement on Handling and Use
You alone are responsible for how you use your phone and any
consequences of its use.
You must always turn off your phone wherever the use of a
phone is prohibited. Use of your phone is subject to safety
measures designed to protect users and their environment.
59
Always treat your phone and its accessories with care and
keep it in a clean and dust-free place.
Keep the screen and camera lens clean. Unclean screen or
camera lens may slow down the phone's reaction to your
operations or lower image quality.
Clean the device and its accessories with a soft material such
as cleaning cloth for eyeglass lenses. Do not use alcohol or
other corrosive substances for cleaning or allow them to get
inside.
Do not expose your phone or its accessories to open flames
or lit tobacco products.
Do not expose your phone or its accessories to liquid,
moisture or high humidity.
Do not drop, throw or try to bend your phone or its
accessories.
Do not paint your phone or its accessories.
Do not attempt to disassemble your phone or its accessories.
Only authorized personnel can do so.
Do not expose or use your phone or its accessories in a
environment with or that can reach extreme temperatures,
minimum - [5] and maximum + [50] degrees Celsius.
Do not place your phone inside or near heating equipments or
high pressure containers, such as water heaters, microwave
ovens, or hot cooking utensils. Otherwise, your phone may be
damaged.
60
Please check local regulations for disposal of electronic
products.
Do not carry your phone in your back pocket as it could break
when you sit down.
Small Children
Do not leave your phone and its accessories within the reach of
small children or allow them to play with it.
They could hurt themselves or others, or could accidentally
damage the phone.
Your phone contains small parts with sharp edges that may
cause an injury or may become detached and create a choking
hazard.
Demagnetization
To avoid the risk of demagnetization, do not allow electronic
devices or magnetic media to be close to your phone for a long
time.
Electrostatic Discharge (ESD)
Do not touch the nano-SIM card’s metal connectors.
61
Antenna
Do not touch the antenna unnecessarily.
Normal Use Position
When placing or receiving a phone call, hold your phone to your
ear, with the bottom towards your mouth.
Air Bags
Do not place a phone in the area over an air bag or in the air bag
deployment area as an airbag inflates with great force and
serious injury could result.
Store the phone safely before driving your vehicle.
Seizures/Blackouts
The phone can produce a bright or flashing light. A small
percentage of people may be susceptible to blackouts or
seizures (even if they have never had one before) when exposed
to flashing lights or light patterns such as when playing games or
watching video. If you have experienced seizures or blackouts or
have a family history of such occurrences, please consult a
physician.
62
Repetitive Strain Injuries
To minimize the risk of Repetitive Strain Injury (RSI) when texting
or playing games with your phone:
Do not grip the phone too tightly.
Press the buttons lightly.
Use the special features which are designed to minimize the
times of pressing buttons, such as Message Templates and
Predictive Text.
Take many breaks to stretch and relax.
Emergency Calls
This phone, like any wireless phone, operates using radio signals,
which cannot guarantee connection in all conditions. Therefore,
you must never rely solely on any wireless phone for emergency
communications.
Loud Noise
This phone is capable of producing loud noises, which may
damage your hearing. Turn down the volume before using
headphones, Bluetooth stereo headsets or other audio devices.
Phone Heating
Your phone may become warm during charging and during
normal use.
63
Electrical Safety
Accessories
Use only approved accessories.
Do not connect with incompatible products or accessories.
Take care not to touch or allow metal objects, such as coins or
key rings, to contact or short-circuit in the battery terminals.
Never puncture the surface of the battery with sharp objects.
Connection to a Car
Seek professional advice when connecting a phone interface to
the vehicle electrical system.
Faulty and Damaged Products
Do not attempt to disassemble the phone or its accessories.
Only qualified personnel can service or repair the phone or its
accessories.
If your phone (or its accessories) has been submerged in water,
punctured, or subjected to a severe fall, do not use it until you
have taken it to be checked at an authorized service center.
64
Radio Frequency Interference
General Statement on Interference
Care must be taken when using the phone in close proximity to
personal medical devices, such as pacemakers and hearing aids.
Pacemakers
Pacemaker manufacturers recommend that a minimum
separation of 15 cm be maintained between a mobile phone and
a pacemaker to avoid potential interference with the pacemaker.
To achieve this, use the phone on the opposite ear to your
pacemaker and do not carry it in a breast pocket.
Hearing Aids
People with hearing aids or other cochlear implants may
experience interfering noises when using wireless devices or
when one is nearby.
The level of interference will depend on the type of hearing device
and the distance from the interference source. Increasing the
separation between them may reduce the interference. You may
also consult your hearing aid manufacturer to discuss alternatives.
Medical Devices
Please consult your doctor and the device manufacturer to
determine if operation of your phone may interfere with the
operation of your medical device.
65
Hospitals
Turn off your wireless device when requested to do so in hospitals,
clinics or health care facilities. These requests are designed to
prevent possible interference with sensitive medical equipment.
Aircraft
Turn off your wireless device whenever you are instructed to do
so by airport or airline staff.
Consult the airline staff about the use of wireless devices
onboard the aircraft. If your device offers a ‘flight mode’, this must
be enabled prior to boarding an aircraft.
Interference in Cars
Please note that because of possible interference with electronic
equipment, some vehicle manufacturers forbid the use of mobile
phones in their vehicles unless a hands-free kit with an external
antenna is included in the installation.
Explosive Environments
Gas Stations and Explosive Atmospheres
In locations with potentially explosive atmospheres, obey all
posted signs to turn off wireless devices such as your phone or
other radio equipment.
66
Areas with potentially explosive atmospheres include fueling
areas, below decks on boats, fuel or chemical transfer or storage
facilities, and areas where the air contains chemicals or particles,
such as grain, dust, or metal powders.
Blasting Caps and Areas
Power off your mobile phone or wireless device when in a
blasting area or in areas posted power off “two-way radios” or
“electronic devices” to avoid interfering with blasting operations.