ZTE ZTEBLADEC342 WCDMA/GSM (GPRS) Dual-Mode Digital Mobile Phone User Manual UserMan
ZTE Corporation WCDMA/GSM (GPRS) Dual-Mode Digital Mobile Phone UserMan
ZTE >
UserMan

ZTE Blade C342
User Manual
Getting Started
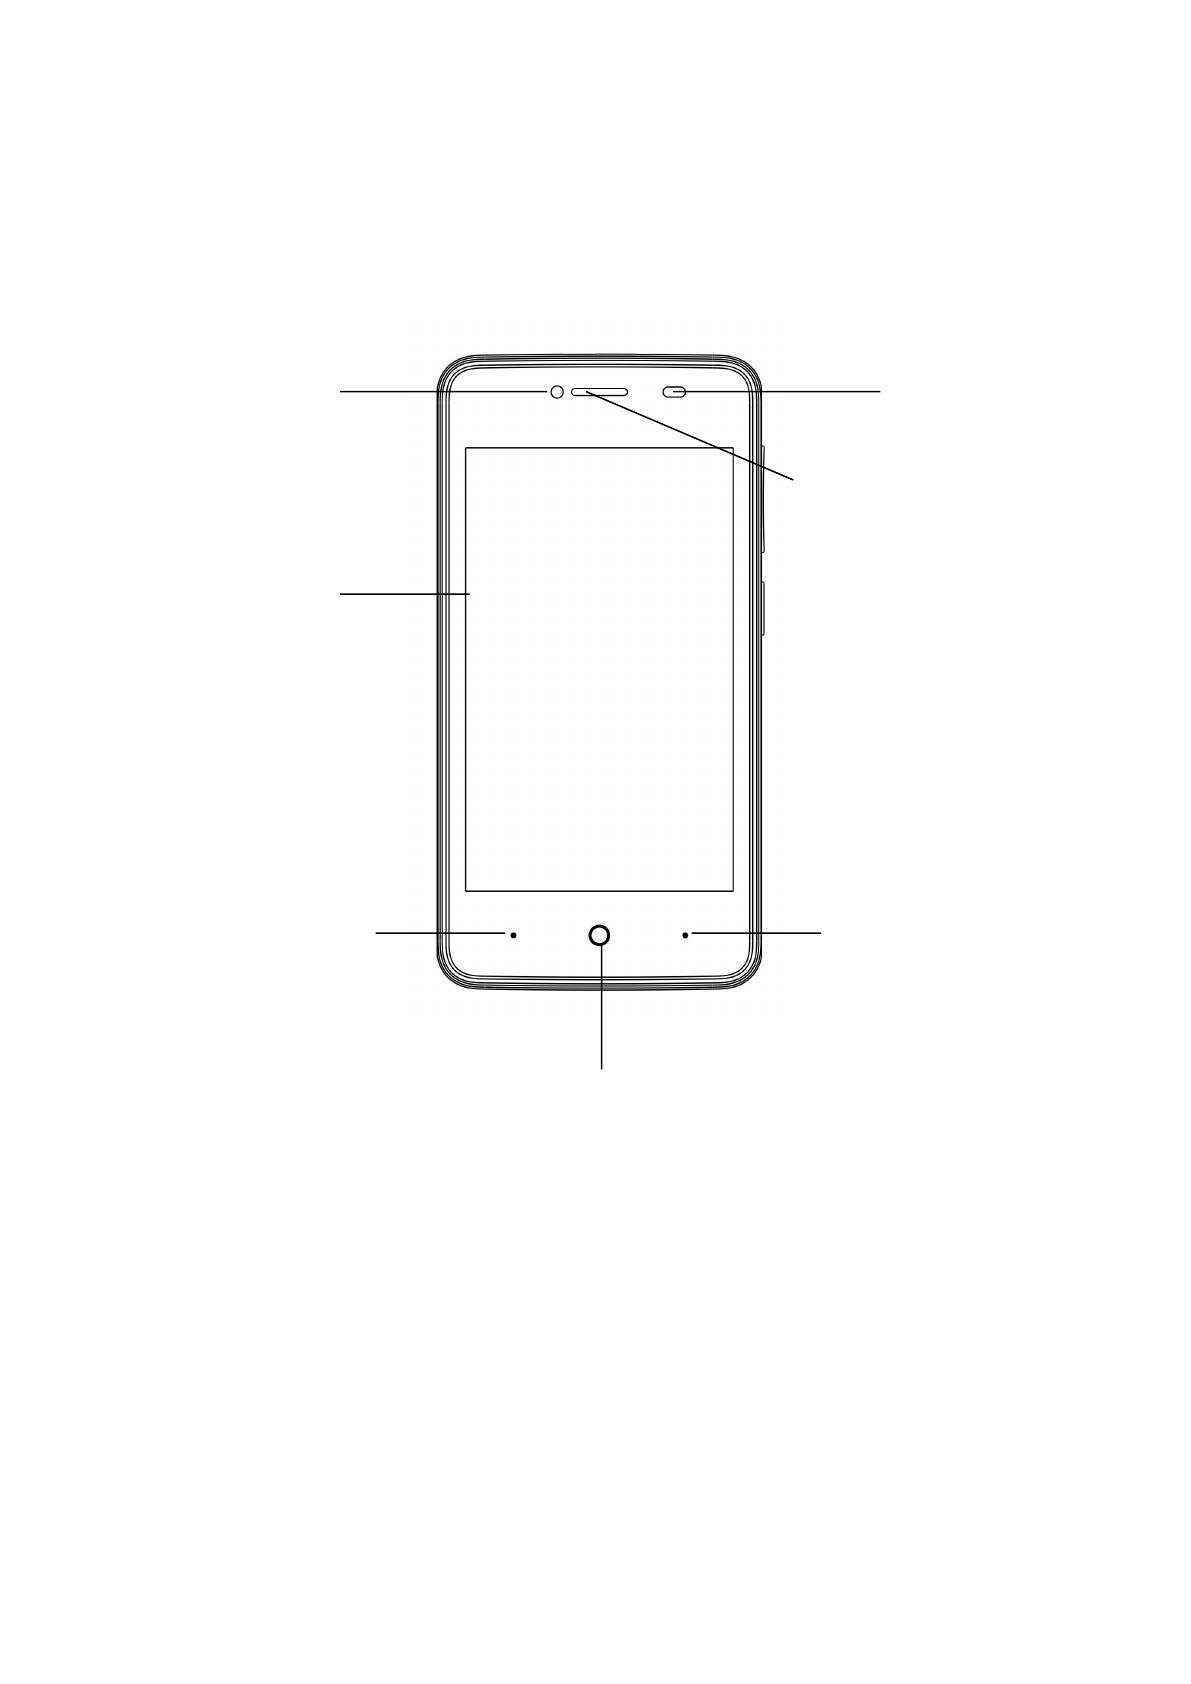
Overview
Front camera
Earpiece
Touch Screen
Menu Key
Back Key
Home Key
Distance
Sensor
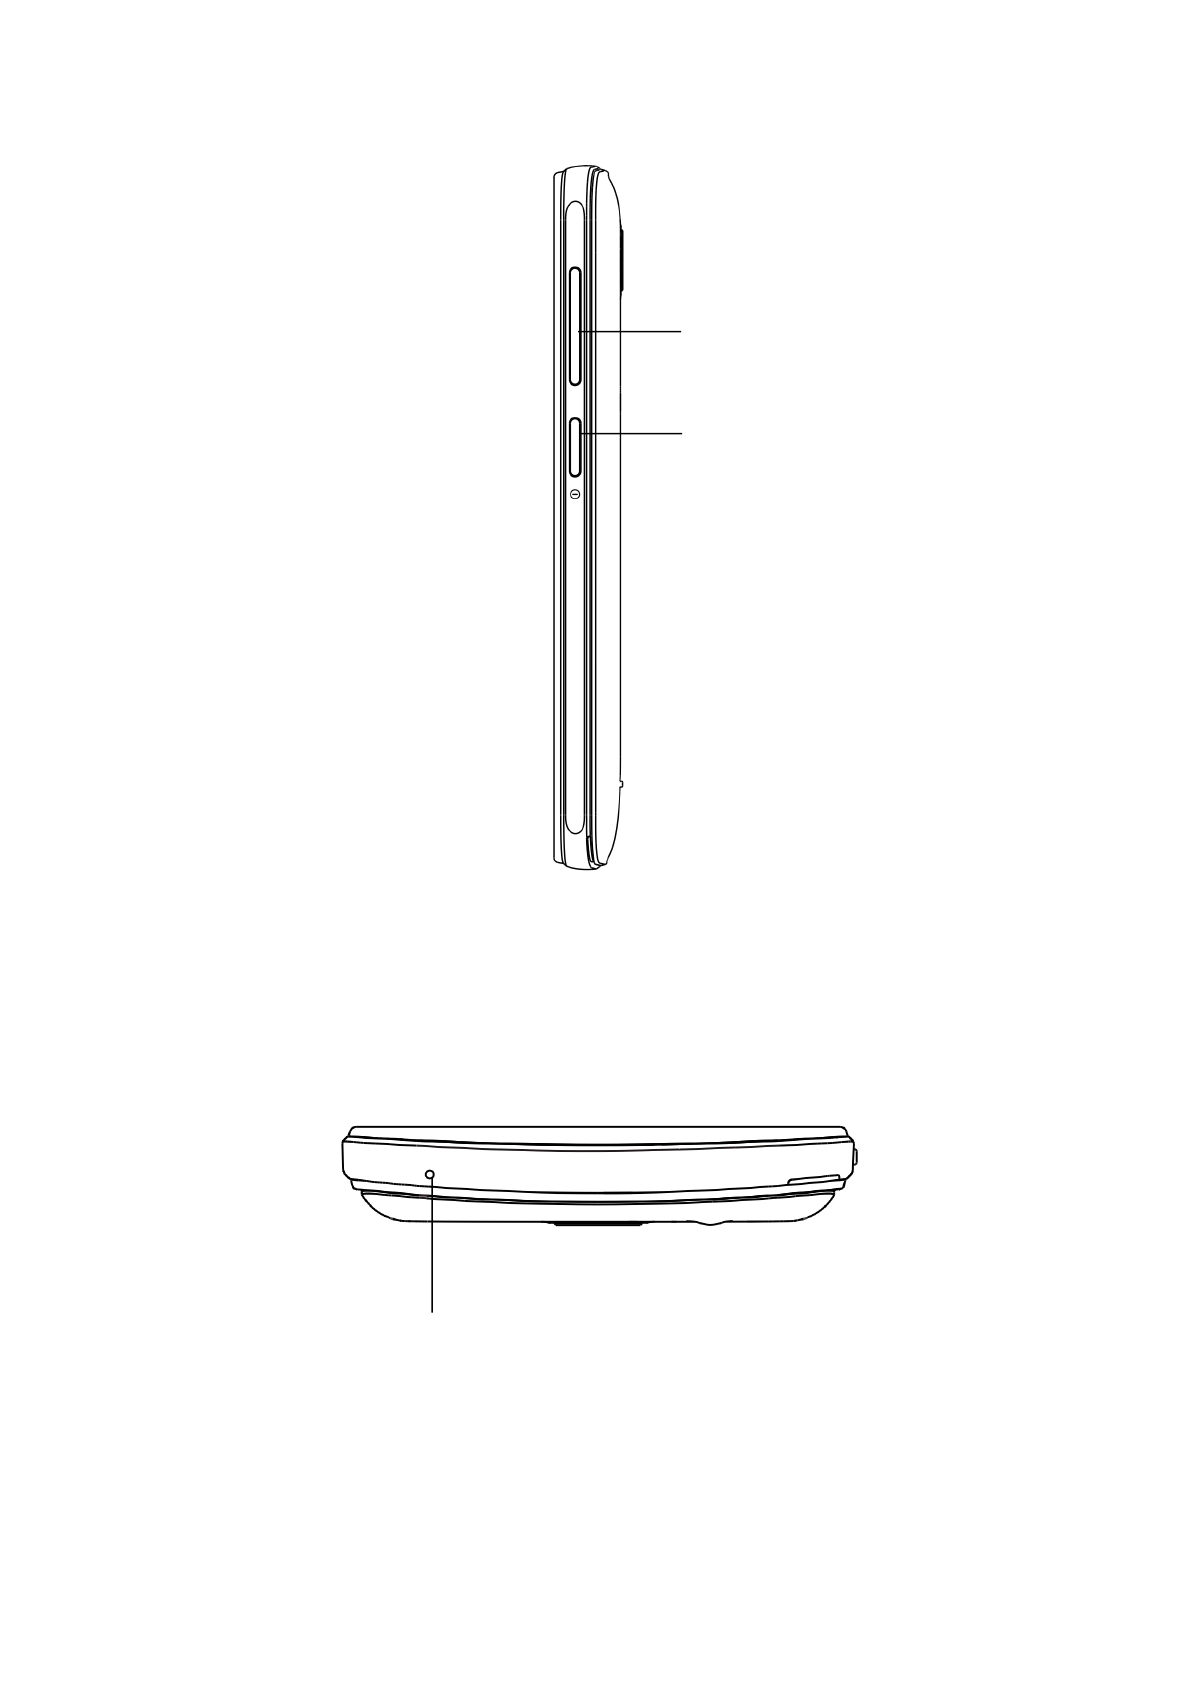
Volume Key
Power Key
Microphone
Headset Jack
Charging/USB Jack
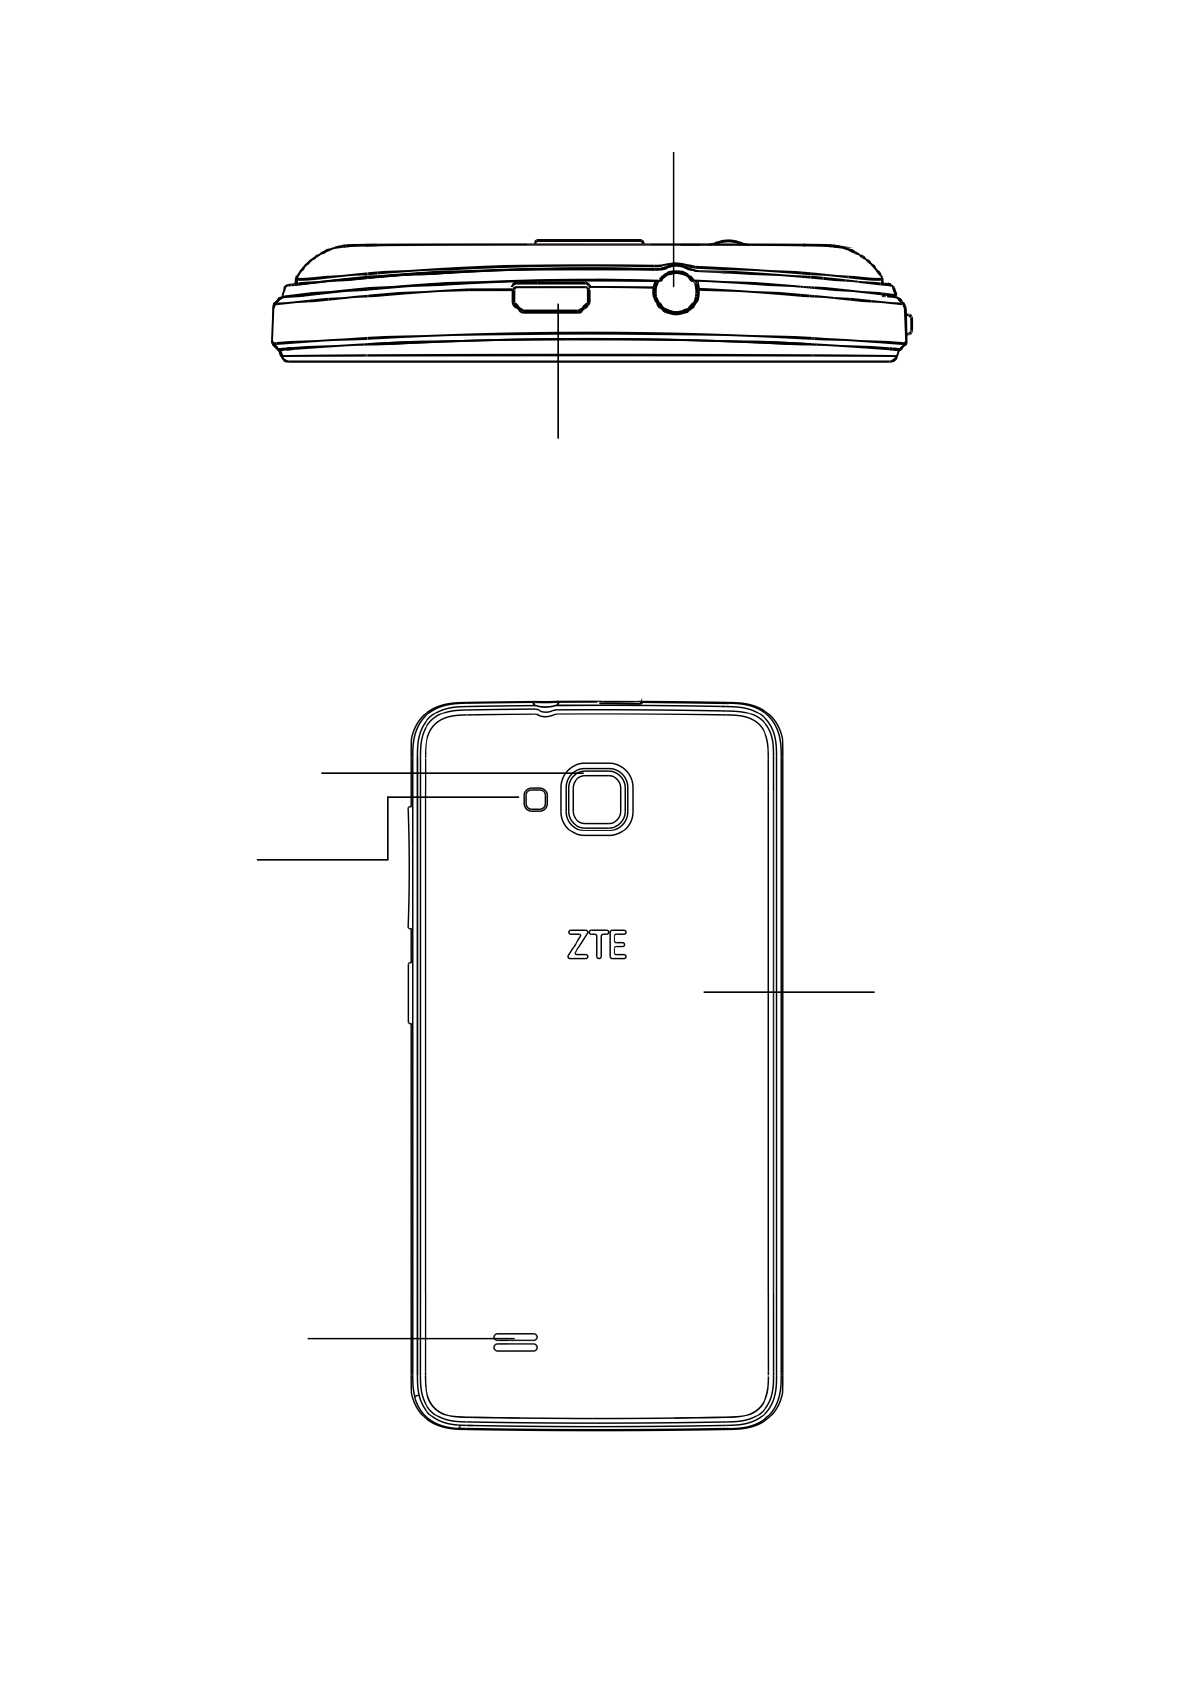
Camera
Flash
Back Cover
Speaker
Keys Explained
Key
Function
Power Key
Hold to turn on or off Silent, Vibrate,
standard or Airplane mode, or to restart
or power off.
Press to switch your phone to Sleep
mode.
Press to wake up your phone.
Home Key
Press to return to the Home Screen from
any application or screen.
Hold to see Google search.
Menu Key
Press to get the options for the current
screen.
Hold to see recently used applications.
Back Key
Press to go to the previous screen.
Volume Keys
Press or hold to turn the volume up or
down
Switching Your Phone On/Off
Make sure the SIM card is in your device and the battery
is charged.
Hold Power Key to switch on your phone.
To switch it off, hold Power Key to get the phone options.
Select Power off, and then tap OK.
Setting Up Your Phone for the First Time
When you first power on your phone after you purchase it
or reset it to factory settings,you need to do some
settings before using it.
Reset to Factory Settings: Tap Menu Key in the standby
mode, then select SETTINGS > My device> Language &

input > Language to change the language you want to
use, if needed.
Switching to Sleep Mode
To save battery power, Sleep Mode suspends your device
to a low-power-consumption state while the display is off.
Your device also goes into Sleep Mode by itself when the
display is automatically turned off after a certain period of
time.
You can start sleep mode by pressing the Power Key.
Waking Up Your Phone
1. Press Power Key to activate your screen display.
2. Long press icon to unlock.
NOTE: If you have set an unlock pattern, PIN or password
for your phone, you’ll need to draw the pattern or enter
the PIN/password to unlock your screen.
Touch Control
You can use finger gestures to control your phone. The
controls on your touch-screen change dynamically
depending on the tasks you’re performing.
1. Tap the buttons, icons, or applications to select items
or to open applications.
2. Flick the screen to scroll up, down, left or right.
3. Drag to move particular items across the screen.
4. Double-tap the screen or pinching two fingers on the
screen apart/together to zoom in/out the screen.
NOTE: You can view the phone screen in portrait or
landscape orientation simply by holding it upright or
turning it on its side. Not all screens are viewable in
landscape.

Home Screen
In the Home screen, besides the shortcut icon is
displayed, you can also set your own wallpaper, add the
widgets or application shortcuts you need, or remove
them as you like.
Extended Home Screen
The Home Screen extends beyond the screen width,
giving you loads more space to add more stuff. Simply
slide your finger to the left or right.
Choosing Your Wallpaper
1. Press the Home Key to return to the Home Screen.
2. Tap the Menu Key and select CUSTOMIZE
DESKTOP >Set idle wallpaper.
3. Choose the image or animation you want to use as the
wallpaper. Some cropping may be needed for Gallery
images.
4. Tap Set wallpaper.
Adding Items to Your Home Screen
1. Press Home Key > tap to enter the main menu
Application Program Interface
2. In the list of applications, touch and hold the icon until
the main screen appears, move the application icon to the
idle position, release the finger.
Removing Items from Your Home Screen
1. Press the Home Key to return to the Home Screen.
2. Tap and hold the item you want to delete until the
Remove icon appears on the top of the screen.
3. Drag the item to the Remove icon and release your
finger when the item turns red.
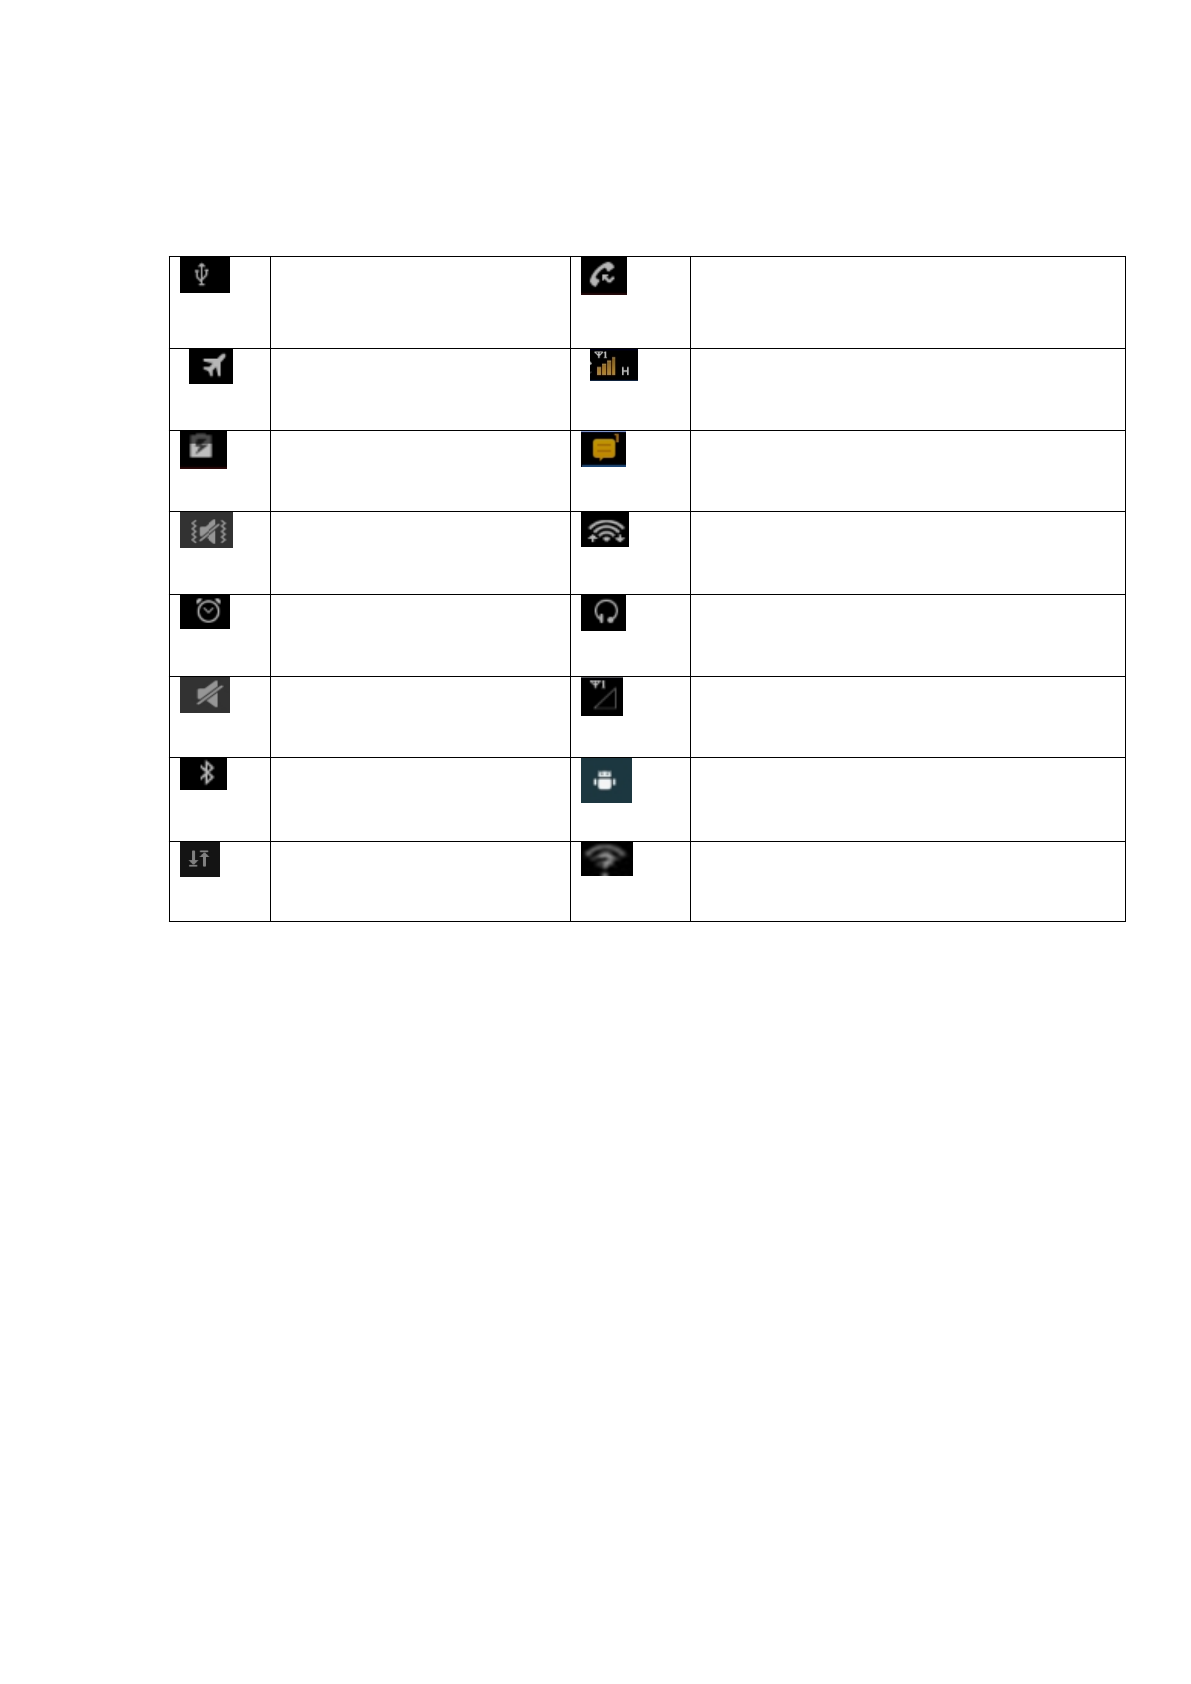
Status and Notification Icons
Here is what simple icons mean.
USB connected
Missed call
Airplane mode
Signal strength
Battery charge
New message
Meeting mode
Wi-Fi network
Alarm set
Earphone insert
Silent mode
Signal searching
Bluetooth icon
USB debugging connected
Data Conn off
New Wi-Finetwork detected
Using the Notification Panel
Flick the status bar downwards from across the top of the
screen to open the Notification Panel, where you can see
your calendar events, new Messages and so on. Tap to
open the shortcuts panel from notification panel. To hide
the panel, tap on the bottom of the panel, drag up.
Open Recently-Used Applications
1. Press and hold the Menu Key from any screen. The
phone will display the applications you used recently.
2. Tap the application you want to open.
3. Slide the application away to end it.
Making Calls
There are many ways to make a call with your phone. And
They all are easy to do.
Calling from the Phone
1. Press Home key > tap > Phone on the Home
Screen.
2. Enter the number you want to call on the dial pad.
Tap to delete wrong digits.
3. Tap the dial icon .
4. Select SIM card 1 or SIM card 2 to dial.
Calling from Your Contacts
1. Press Home key > tap > Contacts .
2. Slide your finger to scroll the contacts list and tap the
contact name you want to call, when the contact details
appear, tap icon; choose the SIM card to dial.
3. You can search for a contact by
tapping on the screen.
Calling from Your Call Log
1. If you have opened the dialer, touch the call log tab to
open the call records, respectively touch all, dialed,
received, missed call button to display a list of the
corresponding call records.
2. Tap dial icon on the right side of the record.
Calling from a Text Message
If a text message contains a phone number that you
want to call, you can make the call while viewing the
text message.
1. Press Home key > tap > Messaging .
2. Tap the conversation and then find the message that
contains the phone number you need.
3. Tap the number; the phone will list the options.
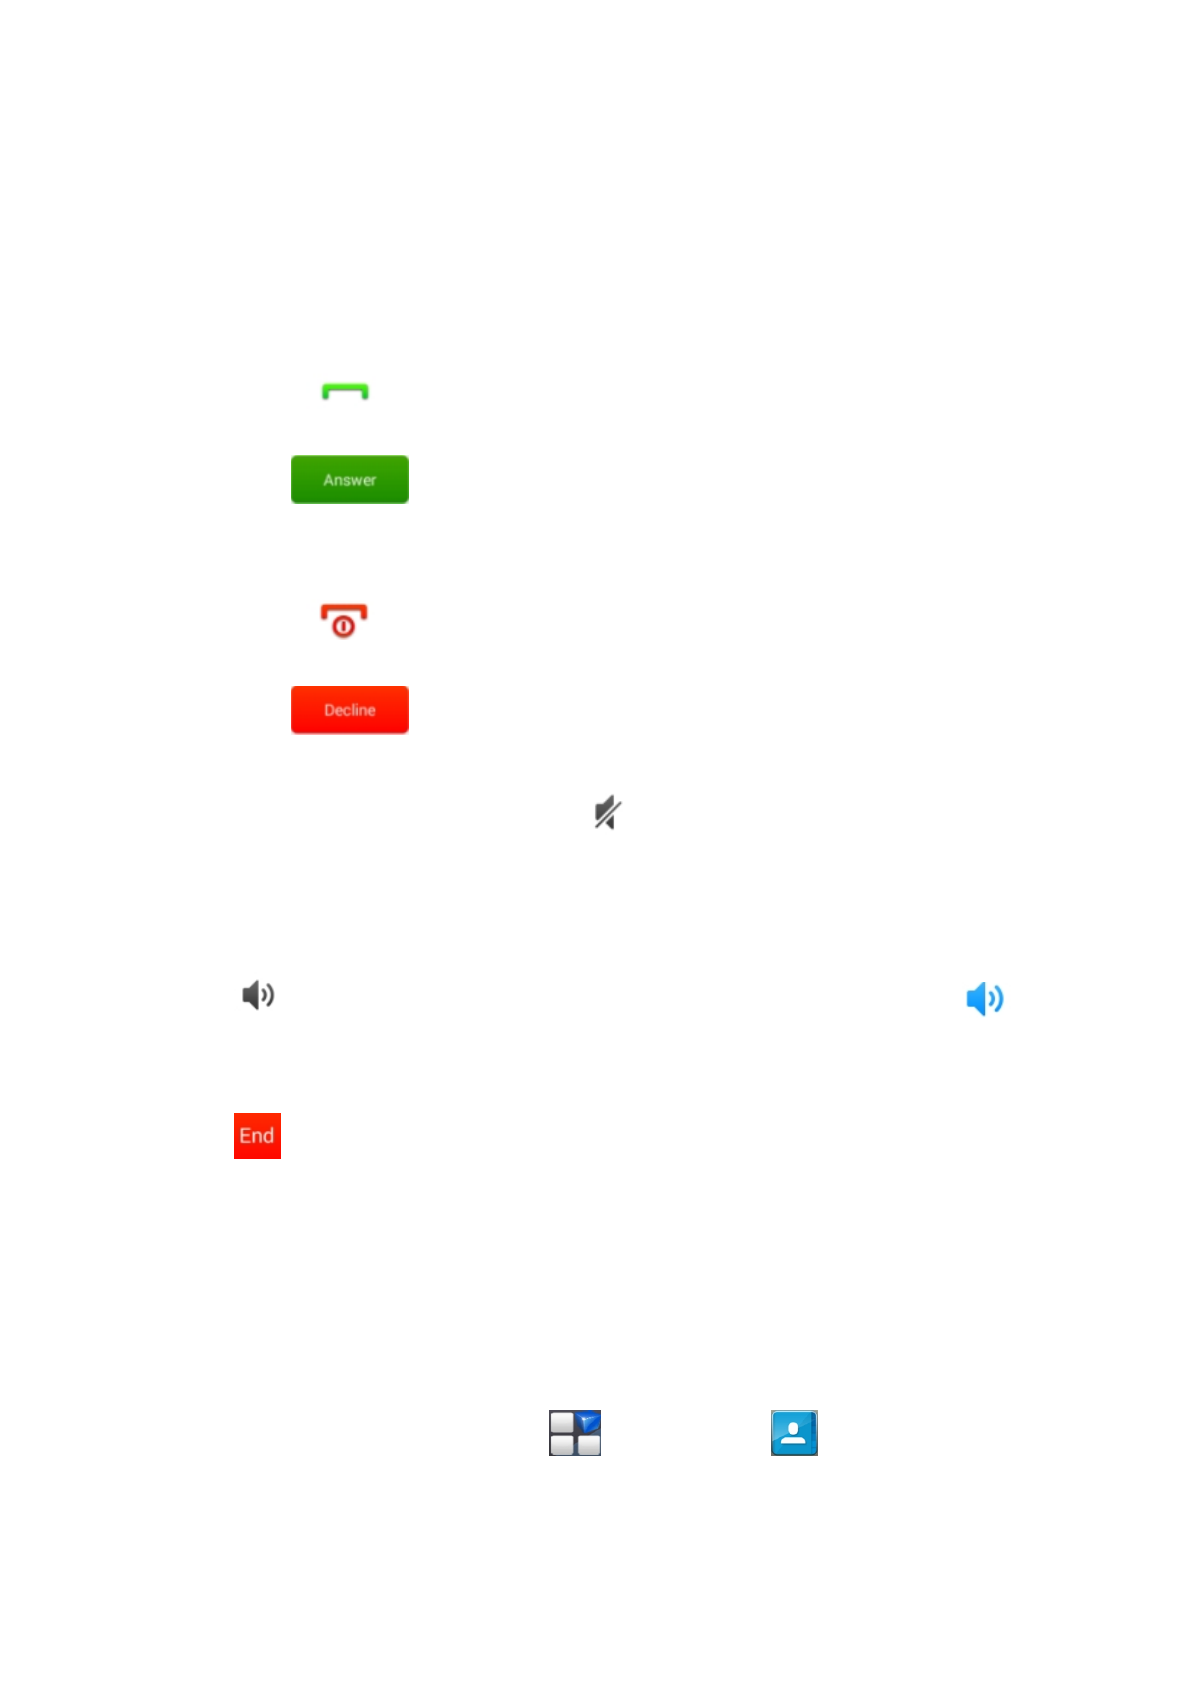
Receiving Calls
Answering a Call
1. Lock screen to answer the call
Drag the icon down to answer the call.
2. Non lock screen to answer the call
Tap the icon to answer the call
Rejecting a Call
1. Lock screen to answer the call
Drag the icon down to reject the call.
2. Non lock screen to answer the call
Tap the icon to answer the call
Muting a Call
During a call, you can mute your microphone so that
the person you are speaking to cannot hear you, but you
can still hear them.
Turning the Speakerphone On/Off
Tap during a call to turn the speakerphone on. Tap
again to turn off the speakerphone.
Ending a Call
Tap to finish a call.
Contacts
You can add contacts on your phone and synchronize
them with the contacts in your Google account or other
accounts that support contact syncing.
Press the Home key > tab > Contacts .
Creating a Contact
1. Tap from the Contacts Screen.
2. Choose the storage location to save the contact.
3. Enter the contact name, phone numbers, and other
information, and then save it.
Searching for a Contact
1. Tap on the Contacts Screen.
2. Input the contact name you want to search for.
The contacts matched will be listed.
Messaging
Your SMS (text message) and MMS (multimedia
messaging service) are combined into one menu in Home
Key > tap > Messaging .
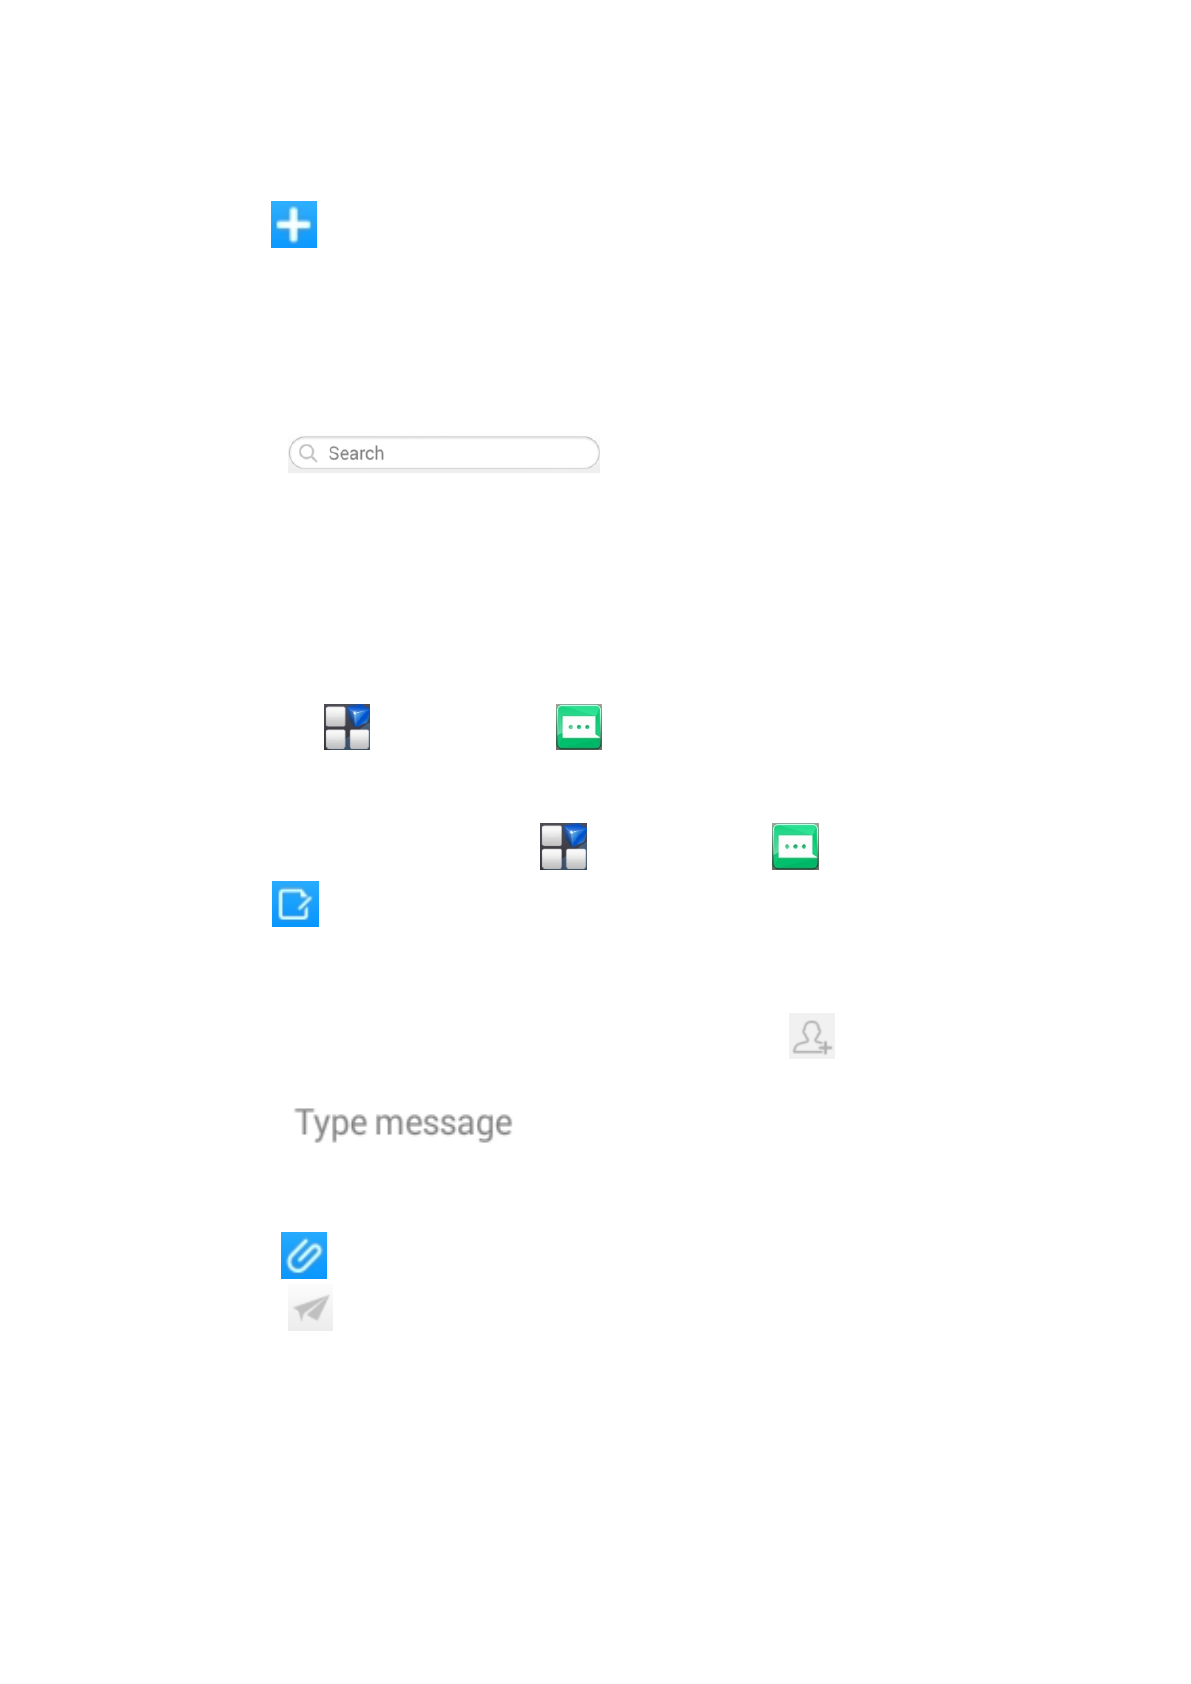
Sending a Message
1. Press Home key > tap > Messaging .
2. Tap to create new message.
3. Enter the recipient’s number or name. As you type,
matching contacts will appear. Tap a suggested contact
to add as a recipient. You can also tap to select
recipients from the Contacts.
4. Tap and type your message.
Tap Menu Key to insert common phrases or contacts.
If you are sending an MMS, tap Menu Key to add a subject,
or tap to attach pictures, videos, audio, or slideshow.
5. Tap to send your message.
NOTE: Add an attachment to text message and it will be
converted into an MMS automatically. Likewise if you
remove all attachments and the subject from an MMS, it’ll
automatically become a text message.
Message Settings
The phone’s message settings are pre-configured for you
to use immediately. From message screen, tap the Menu
Key > Settings to change.
NOTE: From SMS/MMS Settings screen tap Menu
Key >Restore default settings to change the message
settings back to the original.
Touch Input Settings
Choose the touch input settings by tapping >
Settings > My device > Language & input from Home
Screen.
In the KEYBOARD & INPUT METHODS section, you can
choose the settings that you need.
Getting Connected to theInternet
Your phone’s impressive networking capabilities allow
you to access the Internet or your corporate network with
ease.
You can use default connection settings to connect to the
Internet via your mobile network, or Wi-Fi.
The network connection can be enabled /disabled
manually.
Press Home key > tap > Settings > Network >
Network Management > Choose a network to connect
prior.
Adding a New NetworkConnection
To get connected via your mobile network you need a
data plan with your service provider. Also if the networks
settings are not pre-configured on your phone, please
contact your provider to get the necessary information.
You can view settings by pressing Home key > tap >
Settings > Network > More > Mobile networks > choose
Card 1 or Card 2 > Access Point Names.
Turning On Wi-Fi
Wi-Fi provides wireless Internet access over distances of
up to about 300 feet.
1. Press Home key > tap > Settings.
2. Click next to the Wi-Fi menu to turn it on,
click you can turn off the Wi-Fi function.
Connecting to a Wi-Fi Network
1. Press Home key > tap > Settings > Network > Wi-Fi.
2. When the Wi-Fi is on, the Wi-Fi access points, or
“hotspots”, that your phone has detected are displayed
with their names and security settings.
3. Tap an access point to connect to it.
NOTE: If security features are implemented, you’ll
need to enter a password.
Checking the Wi-Fi Network Status
You can check the Wi-Fi network by looking at the
icon in the status bar.
Tethering & portable hotspot
Share your phone’s data connection via USB or as a
portable Wi-Fi hotspot.
Enabling USB tethering
TIPS: The PC accesses the Internet via the phone’s
mobile network. Therefore, set up the networks
connection correctly before you try to use the phone as a
modem.
Plug the USB cable into your phone and tick the USB
tethering check box.
Disabling USB tethering
Drop the status bar, touch USB connected and clear the
USB tethering check box.
You can also just pull out the USB cable.
Enabling the Wi-Fi Hotspot
You can use the phone as a portable WLAN router, to
share your phone’s internet connection with one or more
PC or other devices.
NOTE:
When the portable Wi-Fi hotspot function is enabled, you
cannot use your phone’s applications to access the
internet via its Wi-Fi connection.
You can configure the Wi-Fi hotspot as follows:
1. Press Home Key > tap > Settings > Network >
More > Tethering & portable hotspot > portable wi-fi
hotspot, Click to turn it on.
2. Tap Set up Wi-Fi hotspot to set up & manage portable
Wi-Fi hotspot.
Disabling the Wi-Fi Hotspot
Press Home Key > tap > Settings> Network >
More > Tethering & portable hotspot > portable wi-fi
hotspot and click you can turn off the Wi-Fi
hotspot to turn it off.
Browsing the Internet
You can use your phone to get on the Internet via a
network or Wi-Fi connection.
Press Home Key > tap > Browser.
There are different ways to open web pages:
Tap the address bar to enter the website you want to
browse. Then tap go on the touch keyboard.

Tap Menu Key > Bookmarks or History and select a
bookmark or history to open.
Browsing Options
When you browse the Web, you can also do the
following:
Press Menu Key > Exit to exit.
Press Menu Key > Bookmarks or History and select a
bookmark or history to open.
Press Menu Key > Settings to configure browser
settings.
Using Bookmarks
If you know the Web address, you can manually add
bookmarks. To bookmark a web page, open it and tap
Menu Key > Save to bookmarks. Give the bookmark a
name and save it.
Editing a Bookmark
1. Open a Browser window.
2. Tap Menu Key > Bookmarks
3. Select an item you want to edit and hold on it until the
shortcut menu pops up.
4. Select Edit bookmark.
5. Edit the Label or Address, and then tap OK to save it.
Deleting a Bookmark
1. Open a Browser window.
2. Tap Menu Key > Bookmarks.
3. Select an item you want to delete and hold on it until
the Shortcut menu pops up.
4. Select Delete bookmark and tap OK to confirm.
Changing Browser Settings
Tap the Menu Key > Settings from a browser window to
change browser settings.
Bluetooth
Bluetooth is a short-range wireless communication
technology. Phones or other devices with Bluetooth
capabilities can exchange information wirelessly within a
distance of about 10 meters. The Bluetooth devices must
be paired before the communication is performed.
1. Press Home Key > tap > Settings.
2. Click next to the Bluetooth menu to turn it on,
When Bluetooth is on, the icon will appear in the
status bar.
3. Tap Bluetooth. Your phone will show all visible
Bluetooth devices in range.
4. Tap the device you want to pair with and operate
according to the message prompt. When both devices
to be paired accept the connection, the pairing is
completed.
TIPS: Tap your device name to make your phone
discoverable if other devices try to pair with your phone.
Taking Pictures with Your Camera
Your phone has camera function. Open it by pressing
Home Key > tap > Camera.
Tap to take a picture. To view it, just tap the picture
in the left corner of the screen.
Listening to Your FM Radio
With the FM Radio, you can search for radio channels,
listen to them, and save them on your phone. Note that
the quality of the radio broadcast depends on the
coverage of the radio station in your area. The wired
headset works as n antenna, so always connect the
headset when using the radio.
To tune in, plug your headset into your phone. Press
Home key > tap > FM Radio.
Playing Your Music
You can play digital audio files from your phone’s memory
card in Music. Before playing music, you need to copy
music files to memory card location.
1. Press Home Key >tap > Music to open the Music
Screen.
2. Click the Music category label > music files to start
playing.
3. Adjust the volume with Volume Keys.
Opening Your Gallery
Press Home Key > tap > Gallery. You can use Gallery
to view pictures. You can also do some basic editing of
your pictures, such as setting them as wallpaper or
contact photo, and sharing with friends.
Making Voice Memos
Sound Recorder enables you to record your voice memos.
1. Press Home Key > tap > Sound Recorder.
2. Tap to start recording.
3. Tap to save recording.
4. Tap to open the recording file list.
5. Save the voice recording after stop, or tap Cancel to
delete the recording.
Sorting your Phone Settings
Setting Date and Time
1. Press Home key > tap > Settings > My device> Date
& time
2. Tick the Automatic Date & time tick the check box
to turn it on, or clear the check box to turn it off if
you want to set the time and date by yourself.
3. Set date, time and change the other options.
Display Settings
Press Home key > tap > Settings > My device >
Display, you can adjust the display settings as you like:
Brightness: Adjust brightness of the screen.
Wallpaper: Set the wallpaper of the phone.
Auto-rotate screen: Rotate the screen display as you
rotate the phone.
Sleep: Set the delay for the screen to automatically
turn off.
Audio Profiles Settings
By pressing Home Key > tap > Settings > My
device >Audio profiles. When you choose the General
mode, you can adjust the sound settings, such as
ringtones, volume and vibrate.
Language Settings
You can change the language of your phone system in
two simple steps.
1. Press Home key > tap > Settings > My device >
Language & input > Language.
2. Select a language from the list given.
Switching Networks
1. Press Home key> tap > Settings >Network> More >
Mobile networks > choose a SIM card>Network
operators.
2. Tap Search Networks to register manually, or tap
Choose automatically.
Security Settings
Here’s how to protect your phone and SIM card from
unauthorized use.
Protecting Your Phone with a Pattern
Creating Your Screen Unlock Pattern
1. Press Home key > tap > Settings >Personal>
Security > Screen lock > Pattern.
2. Drag your finger to connect at least four dots, draw the
pattern.
3. Touch Continue.
4. Redraw your pattern to confirm.
Unlocking the Screen with Your Pattern
1. Press Power Key to wake up the screen.
2. Draw the pattern you set to unlock the screen.
If you make a mistake, your phone will ask you to try
again.
Protecting Your Phone with a PIN or Password
Creating a PIN or Password
1. Press Home key > tap > Settings >Personal>
Security > Screen lock.
2. Tap PIN or Password.
3. According to the instruction to complete your PIN or
password settings.
Unlocking the Screen with Your PIN or Password
1. Press Power Key to wake up the phone.
2. Enter the PIN or password you set.
Disabling Screen Unlock Security
If you have created an unlock pattern, PIN or password,
you can disable it.
1. Press Home key > tap > Settings >
Personal>Security > Screen lock.
2. Draw the screen unlock pattern or enter your PIN/
password you have created if required.
3. Tap None.
Protecting Your SIM Card with a PIN
Every SIM card comes with a PIN. The initial PIN is
provided by your mobile phone carrier. It’s best to lock

your SIM card as soon as you can.
1. Press Home key > tap > Settings >Personal>
Security > Set up SIM card lock.
2. Select SIM card 1 or SIM card 2.
3. Tick the Lock SIM card check box.
4. Enter the PIN you’ve been given and tap OK.
TIPS: If you enter the wrong SIM PIN more times than
allowed, your SIM card will be locked and you cannot
access the mobile phone network. Contact your operator
for a PIN Unlock Key (PUK) to restore the SIM card.
Changing Your SIM PIN
You can change the PIN you’ve been given to one easier
for you to remember and harder for others to guess.
1. Press Home key > tap > Settings >Personal>
Security > Set up SIM card lock.
2. Make sure you already tick the Lock SIM card check
box.
3. Tap Change SIM PIN.
Managing Your Device Memory
Press Home Key > tap > Settings > More>Storage.
You can view the space information of the SD card and
the phone storage.
Unmount SD card: You can unmount the SD card to safely
remove it.
Erase SD card: Erase all data on the SD card.
Privacy: Reset to Factory Settings
Press Home key > tap > Settings > Personal>Backup
& reset > Factory data reset > Reset phone > Erase
everything.
WARNING: All your personal information and downloaded
applications on your phone will be erased after the
resetting.
Applications
Press Home Key > tap > Settings >More> Apps.
Installing an Application
You can install a non-Marketing application if you have
allowed the installation of it. Make sure that you select an
application developed for your device and processor type
before installing it.
1. Copy the application file to the SD card and install the
card on your phone.
2. Press Home key > tap > File Manager, and open the
folder where the application file is.
3. Tap the file to start installation.
4. Read the installation instructions that come with the
application and follow it to complete the setup.
NOTE: please take your handset as the standard.
Removing an Application
1. Press Home key > tap > Settings >More> Apps.
2. Select the application you want to delete.
3. Tap Uninstall and OK to confirm.
Moving an Application
You can move the applications downloaded or installed
on your phone to the memory card when the phone
memory is full. You can also move applications to your
phone if the memory card is getting full.
NOTE: Not all applications can be move to your phone or
memory card.
1. Press Home key > tap > Settings > More>Apps.
2. Click the application you want to move on the
DOWNLOADED tab.
3. Tab Move to SD card/Move to phone as you need.
Managing Other Settings
Text-to-speech Output
You can set the text-to-speech and voice recognition
options by pressing Home Key > tap > Settings >My
device>Language & input > Text-to-speech output.
Accessibility
You can configure accessibility options for
accessibility-related applications by pressing Home Key >
tap > Settings >More> Accessibility.
Other Applications
Clock
Press Home key > tap > Clock, you can view the clock
and set the alarm.
Tap the bottom of the screen icon can be switched to the
countdown and stopwatch functions from the clock
interface.
Calculator
You can use the phone directly perform simple
mathematical calculations.
1. Press Home Key > Tap > Calculator.
2. Click the button corresponding with the calculator
display, perform basic arithmetic.
TIPS: Tap Menu Key > Advanced panel to use scientific
calculation.
FCC ID
This device complies with Part 15 of the FCC Rules.
Operation is subject to the following two conditions: (1)
this device may not cause harmful interference, and (2)

this device must accept any interference received,
including interference that may cause undesired
operation.
Caution: The user is cautioned that changes or
modifications not expressly approved by the party
responsible for compliance could void the user's authority
to operate the equipment.
The device complies with the RF specifications when the
device is used near your ear or at a distance of 1.0 cm
from your body. Ensure that the device accessories such
as a device case and a device holster are not composed of
metal components. Keep your device 1.0 cm away from
your body to meet the requirement earlier mentioned.
This device meets guidelines for exposure to radio waves.
Your device is a low-power radio transmitter and receiver.
As recommended by international guidelines, the device
is designed not to exceed the limits for exposure to radio
waves.
These guidelines were developed by the independent
scientific organization International Commission on
Non-Ionizing Radiation Protection (ICNIRP) and include
safety measures designed to ensure safety for all users,
regardless of age and health.
The Specific Absorption Rate (SAR) is the unit of
measurement for the amount of radio frequency energy
absorbed by the body when using a device. The SAR
value is determined at the highest certified power level in
laboratory conditions, but the actual SAR level of the
device when being operated can be well below the value.
This is because the device is designed to use the
minimum power required to reach the network.
The SAR limit adopted by USA and Canada is 1.6
watts/kilogram (W/kg) averaged over one gram of tissue.
The highest SAR value reported to the FCC and IC for this
device type when tested for use at the ear is 0.910 W/kg,

and when properly worn on the body is 1.284 W/kg.
North America edition is limited using channel 1-11. This
limited operation can be only set by software and was
done before the product down from the product line. All
the products for North America marketing were
embedded this limited before shipping. Customers have
no way to choose the channel 12 & 13.
ZTE Uses the inner tool Web GUI to perform this limited
operation and set method is as below: The US code to set
in wifi advanced options will county code set to the United
States,click “apply” button,and then back to the wifi
basic page,Channel show for 1- 11. Limited by local law
regulations, version for North America does not have
region selection option."
Note: This equipment has been tested and found to
comply with the limits for a Class B digital device,
pursuant to part 15 of the FCC Rules. These limits are
designed to provide reasonable protection against
harmful interference in a residential installation. This
equipment generates, uses and can radiate radio
frequency energy and, if not installed and used in
accordance with the instructions, may cause harmful
interference to radio communications. However, there is
no guarantee that interference will not occur in a
particular installation. If this equipment does cause
harmful interference to radio or television reception,
which can be determined by turning
the equipment off and on, the user is encouraged to try to
correct the interference by one or more of the following
measures:
—Reorient or relocate the receiving antenna.
—Increase the separation between the equipment and
receiver.
—Connect the equipment into an outlet on a circuit

different from that to which the receiver is connected.
—Consult the dealer or an experienced radio/TV
technician for help.