User Manual

H520
CDMA/GSM Dual-Mode Handset
User Manual

Copyright © 2007 by ZTE Corporation
All rights reserved.
No part of this publication may be excerpted, reproduced,
translated or utilized in any form or by any means, electronic or
mechanical, including photocopying and microfilm, without the prior
written permission of ZTE Corporation.
The manual is published by ZTE Corporation. We reserve the right
to make modifications on print errors or update specifications without
prior notice.
Edition: 1st edition, Sep. 2007
Version No.: Release 1.0*
Edition Time: Sep. 2007
Manual No.: 056584500xxx

1
Content
1 General Information.....................................................7
1.1 Welcome...............................................................................7
1.2 Security.................................................................................7
1.3 Safety Warnings ...........................................................8
1.4 Limit Warranty....................................................................12
1.5 Limitation of Liability.........................................................13
1.6 Declaration..........................................................................14
2 Know Your Phone.......................................................15
2.1 Keypad................................................................................15
2.2 Instruction of Interface Icon.................................................18
2.3 Technical Parameters...........................................................19
2.4 Battery................................................................................19
2.4.1 Remove and Installation of Battery...............................20
2.4.2 Charging the Battery.....................................................21
2.5 Connecting to the Network...................................................23
3 Basic Operations.........................................................24
3.1 Making a Call......................................................................24
3.2 Answering a Call.................................................................26
3.2.1 Handset Autoanwer......................................................26

2
3.2.2 Setting Any Key Answer...............................................26
3.2.4 Incoming Call Silence..................................................27
3.3 In Conversation...................................................................27
3.3.1 Silence in Conversation................................................27
3.3.2 Adjusting Volume in Conversation................................27
3.3.3 Selecting Options in Conversation................................27
3.4 Menu Functions...................................................................28
4 Names..........................................................................29
4.1 Finding Records..................................................................29
4.2 Adding New Record............................................................29
4.3 Viewing Records.................................................................31
4.4 Erasing Records...................................................................31
4.4.1 Erasing a Record..........................................................31
4.4.2 Erasing All Contacts.....................................................31
4.5 Editing Name of the Contacts...............................................31
4.6 Editing Phone Number.........................................................32
4.7 Selecting Group...................................................................32
4.8 Setting Number Type...........................................................32
4.9 Setting Speed Dial...............................................................33
4.10 Viewing and Making Speed Dial........................................33
4.11 Memory Status...................................................................34
5 Messages.....................................................................35

3
5.1 Sending a New Message......................................................35
5.2 Sending Messages...............................................................36
5.3 Receiving Incoming Call while Editing Message..................36
5.4 Reading Message.................................................................36
5.5 Viewing OutBox..................................................................37
5.6 Erasing Messages................................................................37
5.6.1 Erasing a Message........................................................38
5.6.2 Erasing All Messages....................................................38
5.7 Reading and Setting Voice Mail...........................................38
5.8 Message Settings.................................................................39
5.9.1 Saving Sent Message....................................................39
5.9.2 Automatically Erasing Inbox.........................................39
5.9.3 Preformatted Messages.................................................39
5.9.4 Messages Alert.............................................................40
5.9.5 Delivery Acknowledging..............................................40
5.9.6 Msg Priority.................................................................40
5.9.7 Memory Status of Messages.........................................40
6 Call History.................................................................42
6.1 Viewing Recent Calls...........................................................42
6.2 Erasing Recent Calls List.....................................................43
6.3 Call Timers..........................................................................43
7 Settings........................................................................45

4
7.1 Sound..................................................................................45
7.1.1 Volume........................................................................45
7.1.2 Ring of Incoming Call..................................................45
7.1.3 SMS Ring....................................................................46
7.1.4 Ring of Power On/Off..................................................46
7.1.5 Alert Type....................................................................46
7.1.6 Key Beep.....................................................................47
7.2 Display................................................................................47
7.1.1 Selecting Wall Paper.....................................................47
7.2.2 Set Backlighting...........................................................47
7.2.3 Adjusting Brightness....................................................48
7.2.4 Adjusting Contrast........................................................48
7.2.5 Selecting Language......................................................48
7.2.6 Setting Time.................................................................48
7.2.7 Setting Time Format.....................................................49
7.3 Call Settings........................................................................49
7.3.1 Setting Headset Autoanswer..........................................49
7.3.2 Setting Any Key Answer...............................................49
7.3.3 Voice Privacy...............................................................50
7.3.4 Alert.............................................................................50
7.3.5 Call Waiting.................................................................50
7.3.6 Call Forwarding...........................................................51
7.3.7 Fire Proof.....................................................................52
7.3.8 IP Setting.....................................................................53

5
7.4 Security Settings..................................................................53
7.4.1 Setting Phone Lock......................................................54
7.4.2 Restoring.....................................................................54
7.5 Extras..................................................................................54
7.6 Network Setting...................................................................55
8 Toolkit.........................................................................56
8.1 Radio..................................................................................56
8.2 Calendar..............................................................................57
8.3 Alarm..................................................................................57
8.4 Calculator............................................................................57
8.5 Voice Memo........................................................................58
8.5.1 Recording in Normal....................................................58
8.5.2 Recording in Conversation............................................59
8.5.3 Recording with Incoming Call/Message........................59
8.7 Stopwatch...........................................................................60
8.8 World Time.........................................................................60
8.9 Sales Service.......................................................................61
9 Games.........................................................................62
9.1 Brick Attack....................................................................62
9.2 Push Box........................................................................62
10 Text Input...................................................................63
10.1 Multitap Input....................................................................64

6
10.2 Numbers Input...................................................................64
10.3 eHiText Input....................................................................64
10.4 Symbols Input...................................................................65
11 Troubleshooting..........................................................66

7
1 General Information
1.1 Welcome
Thank you for choosing ZTE H520 CDMA GSM Dual-Mode
Handset.
To guarantee the mobile phone always in its best condition, please
read this manual carefully and keep it for future use.
The pictures, symbols and contents in this manual are just for your
reference. They might not be completely identical with your phone.
Please subject to the real object. ZTE operates a policy of continuous
development and reserves the right to update and modify the technical
specifications in this document at any time without prior notice.
1.2 Security
n If your mobile phone is lost or stolen, please report to your service
provider or agencies of banning the use of your lost phone, which
will protect you from economic losses resulted from unauthorized
use.
You need to provide the phone’s ESN number labeled. You can
see ESN number after removing the battery. Please keep ESN
number for future use.
8
1.3 Safety Warnings
To the Owner
n Some electronic devices are susceptible to electromagnetic
interference sent by mobile phone if inadequately shielded, such
as electronic system of vehicles. Please consult the manufacturer
on the device before using the phone if necessary.
n Operating of mobile phone may interfere with medical devices like
hearing aides and pacemakers. Please always keep the mobile
phone more than 20 centimeters away from such medical devices
when the phone is powered on.
n The phone with internal antenna has been tested for compliance
with FCC RF Exposure (SAR) limits and is complied with FCC RF
exposure compliance requirements.:
Head Body
Max.SAR Measured
(1g) 1.56W/kg
(At Left-Cheek 384 Channel)
0.718W/ kg
(At Body 1013 Channel)
n Do not carry the mobile phone in the breast pocket. Power the
mobile phone off if necessary. Consult a physician or the
manufacturer on the medical device before using the phone.
n Be aware of the usage limitation when using a mobile phone at
places such as oil warehouses or chemical factories, where there
are explosive gases or explosive products being processed,
because even if your phone is in standby mode, it still transmits

9
radio frequency (RF) energy. Therefore, power off your phone if
required.
n Pay attention to traffic safety. Do not use your mobile phone while
driving. Park before making or answering a call.
n Store the phone out of the reach of little children. The phone may
cause injury if used as a toy.
n The phone has been tested and found to comply with the limits for
a Class B digital device, pursuant to part 15 of the FCC Rules.
These limits are designed to provide reasonable protection against
harmful interference in a residential installation.
The phone generates, uses and can radiate radio frequency
energy and, if not installed and used in accordance with the
instructions, may cause harmful interference to radio
communications. However, there is no guarantee that interference
will not occur in a particular installation. If the phone does cause
harmful interference to radio or television reception, which can be
determined by turning the equipment off and on, the user is
encouraged to try to correct the interference by one or more of the
following measures:
—Reorient or relocate the receiving antenna.
—Increase the separation between the equipment and receiver.
—Connect the equipment into an outlet on a circuit different from
that to which the receiver is connected.
—Consult the dealer or an experienced radio/ TV technician for

10
help.
Mobile Phone
n Please use original accessories or accessories that are
authorized by the manufacturer. Using any unauthorized
accessories may affect your mobile phone’s performance, and
violate related national regulations about telecom terminals, or
even endanger your body
n If you want to clean your phone, please use clean fabric that is a
bit wet or anti-static. Do not use harsh chemical cleaning solvents
or strong detergents to clean it. Turn off your phone before you
clean it.
n As your mobile phone can produce electromagnetic field, do not
place it near magnetic items such as computer disks.
n Using the phone near electrical appliances such as TV, telephone,
radio and personal computer can cause interference, which
affects the function of the phone.
n Do not expose your mobile phone to direct sunlight or store it in
hot areas. High temperatures can shorten the life of electronic
devices.
n Prevent liquid from leaking into your phone.
n Do not drop, knock or harshly treat your phone. Rough handling
can break internal circuit boards.
n Do not connect the phone with other unauthorized peripheral
equipments.
11
n Do not attempt to disassemble the mobile phone and battery by
yourself. Changes and modifications made to the phone without
the approval of manufacturer could void your authority to operate
this phone.
n Do not charge the mobile phone without battery.
n On occasion of emergent calling, keep your phone in status of
power on and in area of service. On the condition of standby,
press the key to enter emergency phone number, and then press
Send key to make a phone call.
Battery Using
The battery and the phone are separately deposited in the package
and packed in well condition. Please make use of the battery carefully
following the instructions.
n Do not short-circuit the battery, as this can cause excessive heat
and fire.
n Do not store battery in hot areas or dispose of it in a fire to avoid
explosion.
n Never use any charger or battery damaged or worn out.
n Return the wear-out battery to the provider or put it in the
appointed recycle place. Do not put it in familial rubbish.
Warning: If the battery is broken, keep away from content. If it
taints your skin, wash your skin with abundant fresh water and
ask doctor for help if necessary.

12
Safety and General Using in Vehicles
n Before making or answering a call, you should pay attention to
the local laws about using wireless mobile phones and take them
into account in practical use.
n Safety airbag, brake, speed control system and oil eject system
shouldn’t be affected by wireless transmitting. If you do meet
problems above, please contact your automobile provider.
n Please power off your mobile phone when refueling your
automobile, and so do the place where duplex wireless
equipments are banned. Don’t put your phone together with
flammable or explosive items, as inner spark may cause fire.
In Aircraft
n Follow the restrictions in aircraft. Wireless devices can cause
interference in aircraft.
n Please power off your mobile phone before taking off till landing. In
order to protect airplane’s communication system from
interference, it is never allowed to use mobile phone when it is in
flight. Using mobile phone before the plane taking off should get
aircrew’s permission according to safety regulations.
1.4 Limit Warranty
The warranty does not apply to defects or errors in the product
caused by:

13
(a) Reasonable abrasion.
(b) Misuse including mishandling, physical damage, improper
installation, unauthorized disassembly of the product.
(c) Water or any other liquid damage.
(d) Any unauthorized repair or modification.
(e) Power surges, lightning damage, fire, flood or other events
outside ZTE’s reasonable control.
(f) Use of the product with any unauthorized third party
products such as generic chargers.
(g) Any other cause beyond the range of normal usage for
products.
End User shall have no right to reject, return, or receive a
refund for any product from ZTE under the above-mentioned
situations.
This warranty is end user’s sole remedy and ZTE’s sole liability
for defective or nonconforming items, and is in lieu of all other
warranties, expressed, implied or statutory, including but not
limited to the implied warranties of merchantability and fitness for a
particular purpose, unless otherwise required under the mandatory
provisions of the law.
1.5 Limitation of Liability
ZTE shall not be liable for any loss of profits or indirect, special,
incidental or consequential damages resulting from or arising out of or

14
in connection with using this product, whether or not ZTE had been
advised, knew or should have known the possibility of such damages.
1.6 Declaration
We,ZTE Corporation, declared that the product is installed with
battery separately in the box.The FCC ID label is placed on the mobile
phone clearly visible to all persons at the time of purchase.
15
2 Know Your Phone
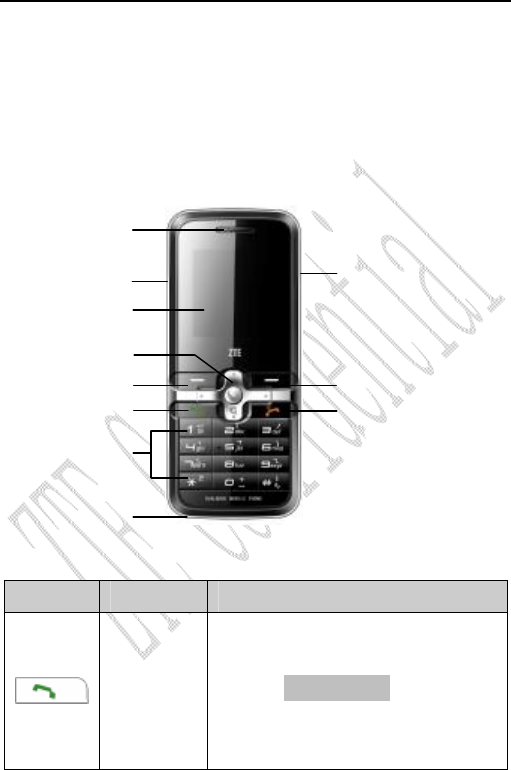
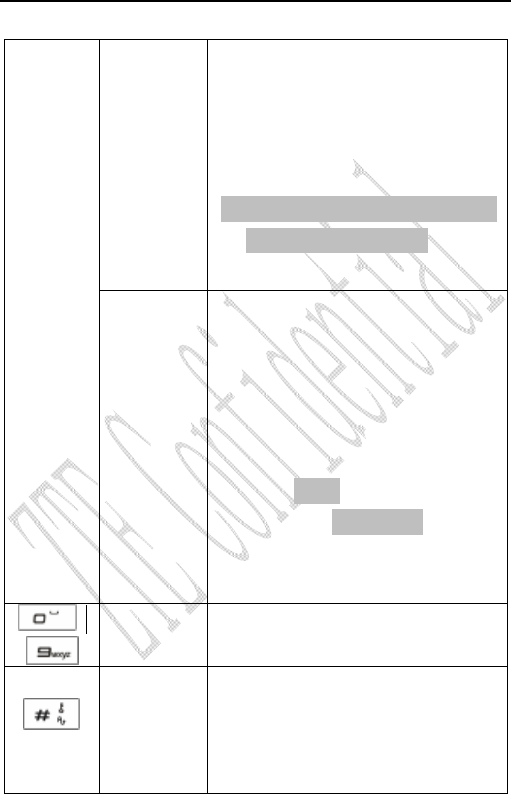
2.1 Keypad
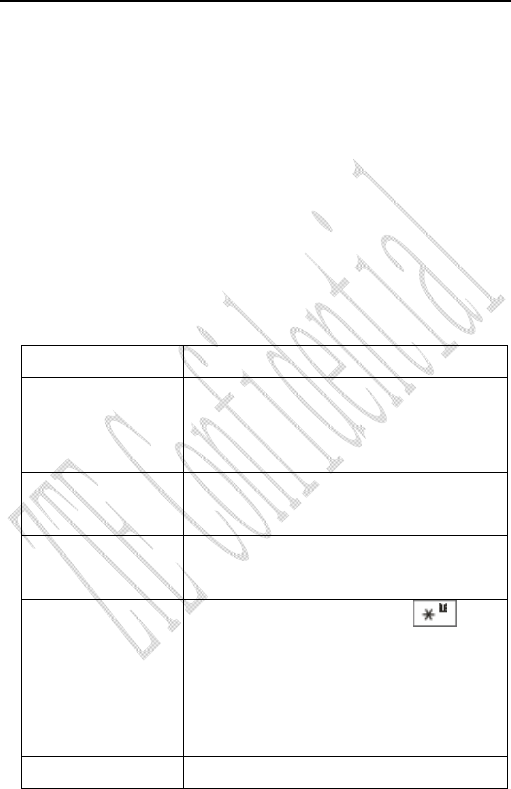
Key Tip Function Description
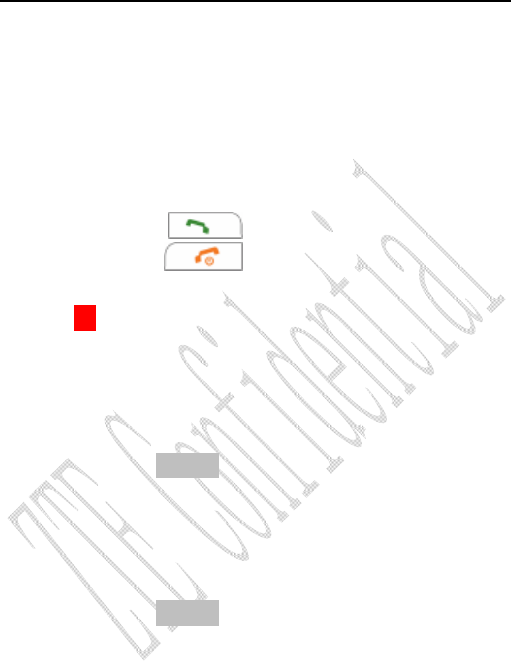
Send key
u Make or answer a call.
u Press Send key in standby mode to
enter recent All Calls list.
u Press Send key two times directly
to redial the last number.
Charger connector
Earphone
LCD screen
4-way scroll key
Left select key
Send key
0~9 Number key
Microphone
End key
Right select
Earphone
16
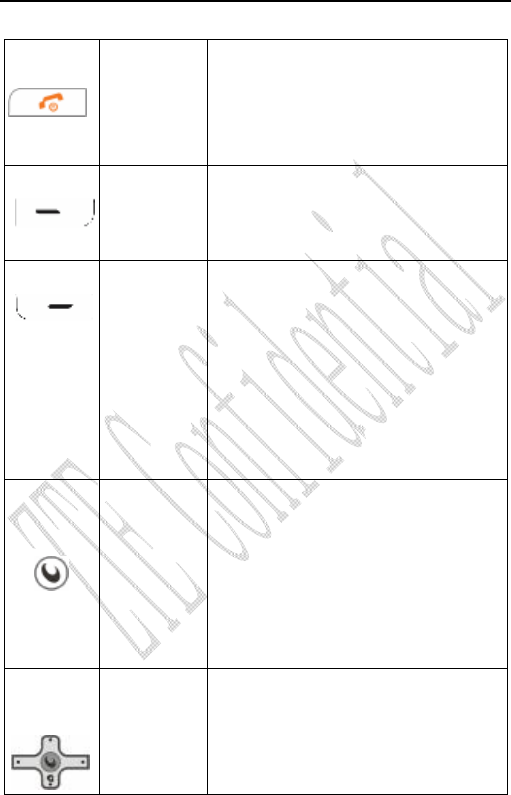
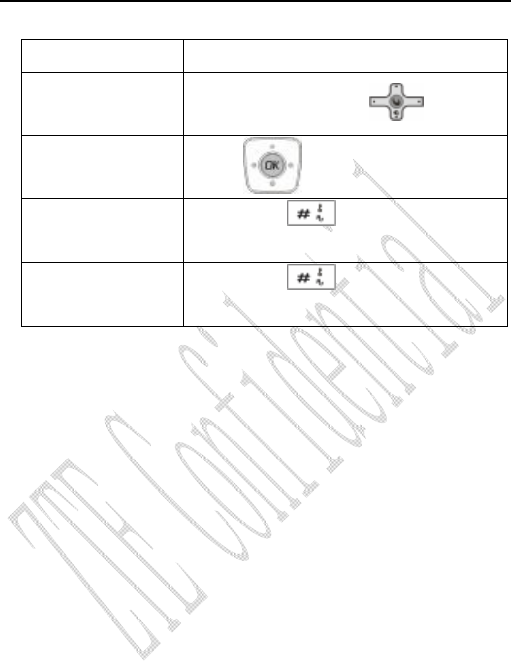
End key
u End an active call or reject a call.
u Power on/power off.
u Exit from any interface to standby
mode.
Left select
key
u Enter main Menu in standby mode.
u Switch to the options of left bottom
submenu.
Right select
key
u Enter Names menu in standby
mode.
u Switch to the options of right bottom
submenu.
u Erase character(s) while editing.
Cancel operation, eixt to previous
pop-up window.
OK key
u Confirm the commands and options
selected.
u Confirm the character chosen while
character inputting.
u Press OK key in standby mode to
enter MobileShip menu.
Up/Down
key
(Scroll key)
u Scroll the cursor up and down.
u Used as selection key up and down
for keying in commands and
selecting options shown on the
17
display.
u In standby mode, hold Up key to
set Silence All;
u Press Up key to enter Messages
menu.
u Press Down key to switch between
GSM and CDMA network.
u Used as direction key in games
Left/Right
key
(Scroll key)
u Scroll the cursor left and right.
u Used as selection key to scroll
cursor left and right for keying in
commands and selecting options
shown on the display.
u In standby mode, press Left key to
enter Toolkit menu, press Right
key to view Sound menu.
u Adjust volume in conversation.
u Used as direction key in games.
~
0~9
Number key
u Key in numbers or characters.
u Make a Speed Dial call.
*key, #key
# key:
u Hold # key in standby mode to lock
phone’s keypad.
u Press # key to select text mode.
18
* key:
u Hold * key in standby mode to
enable/disable vibration.
u Press * key once to enter Symbols
mode when edit text.
Note: To “press” the key in this manual means to press the key and
release it. To “hold” the key means to keep pressing the key for two
seconds or more.
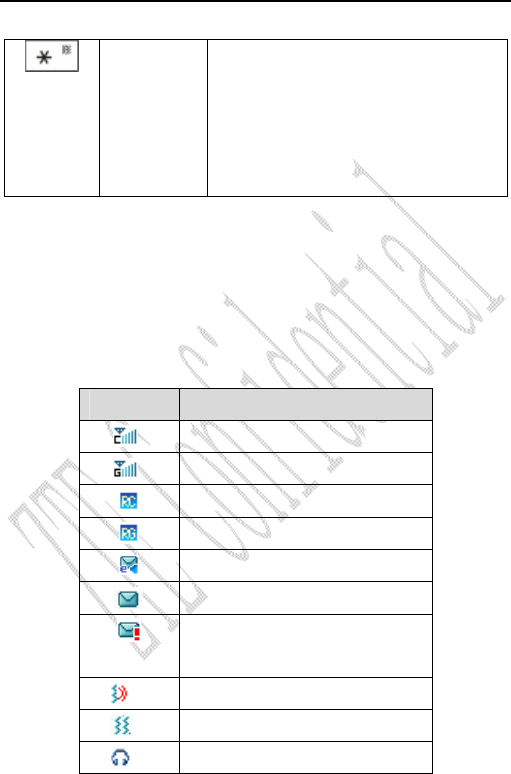
2.2 Instruction of Interface Icon
Icon Indication
CDMA signal strength
GSM signal strength
CDMA roaming
GSM roaming
New voice mail
New message (idle screen)
New message (SMS message
screen)
Ring + Vibration
Vibration
Earphone in use
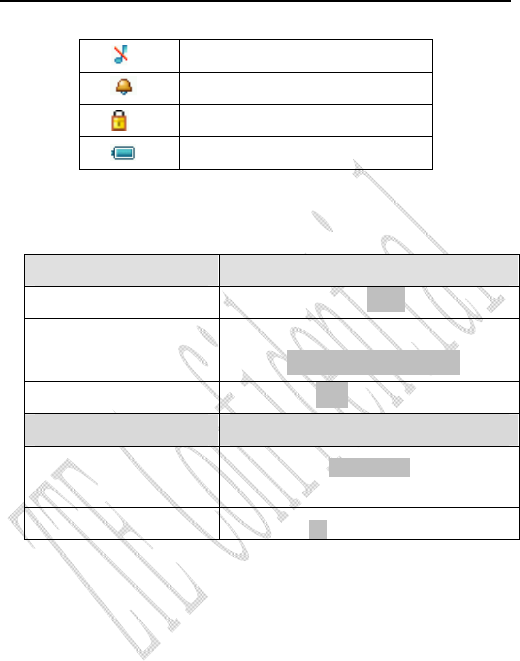
19
Silence All
Alarm
Keypad locked
Power indicator
2.3 Technical Parameters
Handset
Type ZTE H520
Dimensions (Width×Height×Thickness)
46mm×105mm×16 mm
Weight About 82g(Battery Included)
Battery
Continuous standby
time About 150h
(Subject to Network)
Continuous talk time About 3h (Subject to Network)
Note: Please refer to the real phone for other relative parameters
of the battery and charger.
2.4 Battery
The attached Li-ion battery along with the phone can be used after
unpacking. For the first three times, please use up the power and
charge it fully for a new battery to perform well.
20
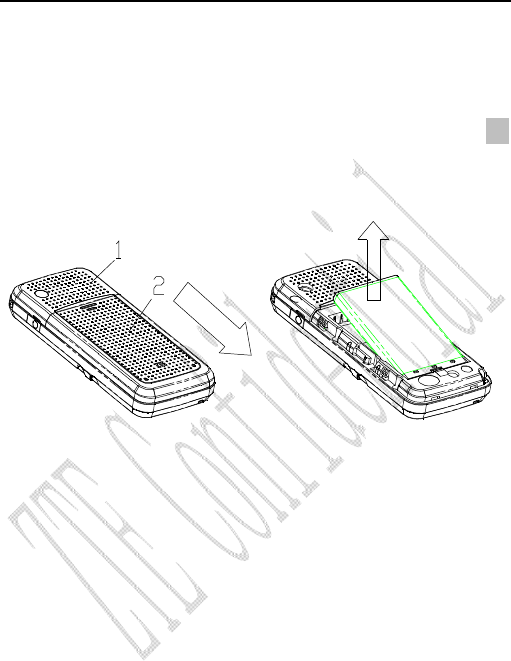
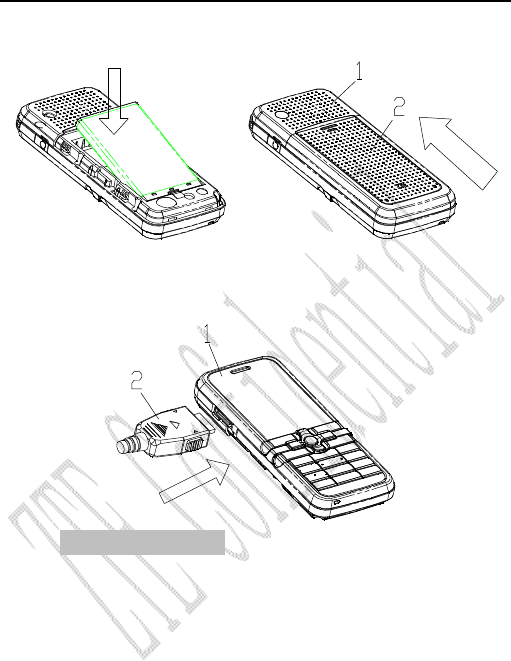
2.4.1 Remove and Installation of Battery
u Remove:(1) Press and push the back-cover of the phone down to
release and remove it off the phone. (2) Put finger on the top
finger grips, and then lift up the battery from the finger grips to
remove the battery.
u Installation:(1) Replace the battery into the battery slot, to be
noted that the lower end of the battery firstly inserted. (2) Put the
back-cover of the phone flatly upon the body of phone. Direct the
back cover towards the locking catches on the both sides of the
phone and push the back-cover of the phone upward to lock the
cover into its place.
21
2.4.2 Charging the Battery
u Plug out rubber away from the jack on the bottom of the
handset and connect the lead from the charger to the socket on
the bottom of the phone. (Note: The side with arrow should be
upright while connecting).
u Connect the charger to a standard wall AC socket.
u Meanwhile, the charging indicator in up-right corner of the
display flops cyclically, indicating the charging is going. In
power-off mode while charging, the display only shows the

22
charge indicator. If the battery is completely flat in storage or
used up, it may take for a while before the charging indicator
appears on the display or any calls can be made.
u When the charging indicator on the screen stops flopping, the
charging is completed. The charging takes usually up to 2~3
hours (6~8.hours suggested for the first three times) In the
process of charging, it is a normal phenomenon that the battery,
phone and charger get into hot accordingly.
u After the completion of charging, disconnect the charger from
the phone and AC socket.
Note:
n When it is in charge, place the phone on condition of good
ventilation and temperature between -5℃~+45℃. Ensure to
use the charger offered by the manufacturer. Using unauthorized
charger may cause danger and violate the authorization of the
phone and the guarantee article.
n When the phone is automatically switched off or indicates the
alarm information of power shortage, please charge the battery in
time.
n The duration time of the standby status or conversation of the
phone is based on ideal working environment. In practice, the
working time of battery varies with network condition, working
environment and application methods.

23
2.5 Connecting to the Network
Press and hold End key to power on/off the phone.The phone
automatically searches the network available and in state of standby
mode.
Besides sending and receiving calls, you can also do:
u Press Left select key to enter main Menu.
u Press Right select key to enter Names menu.
u Hold # key to lock phone’s keypad.
u Hold * key to enable/disable viration mode.
u Press OK key in standby mode to enter MobileShip menu.
u Hold Up key to set the phone in Silence All.
u Press Up key to enter Messages menu.
u Press Down key to switch between GSM and CDMA network.
u Press Left key to enter Toolkit menu.
u Press Right key to enter Sound menu.
u Press Send key to enter recent All Calls list.
Note: In state of key lock, to make use of phone, unlocking code
should be input prompted by phone on the display.

24
3 Basic Operations
3.1 Making a Call
Please ensure that you are in the place where the signal can be
received. Examine network signal strength icon on the screen.
The more the indication bars, the stronger the intensity of receiving
signal is. If there is no bar, please move to the place where the intensity
of receiving signal is better. Sometimes, you only need to change the
direction.
u Making a National Call
Press Number key to key in phone number, and add area code
when making a long distance call (no need to add area code
when dialing local number in some area). Press Send key to
call out. Press End key to end the call and conversation.
u Making an International Call
Enter the country code, area code (without the leading 0) and
the complete telephone number you want to dial, press Send
key to call out.
Before the country code, hold “0” key to enter the international
prefix “+” (the character “+” replaces the international access
code) or key in international prefix e.g. “00” of international call
directly.

25
u Making Recent Calls
All calls you recently dialed, received or missed are saved in
your phone. All numbers are grouped as Missed Calls,
Received Calls and Dialed Calls. When the list is full, the oldest
number will be erased automatically when new record is
coming.
You can check the list as follows:
² In standby mode, press Send key to view All Recent Calls.
² The number listed in can be directly dialed by pressing
Send key.
u Making Pause Calls
You can make use of pause call to dial an extension or voice
service call.
E.g. Key in phone number, press OK key to select “P” on the
display (character “P” added accordingly), and then key in number
afterwards. Press Send key to dial the first number, when connected,
press Send key again to dial the second number automatically. “P” can
be used for not once only.
Country code + Area code + Telephone number
0086 755 26770000
26
3.2 Answering a Call
When a call is incoming in standby mode, the phone will offer
corresponding ringer or vibration to prompt according to your settings.
With the number already saved in Names, the phone also shows the
name of caller meanwhile.
• Press Send key to answer an incoming call.
• Press End key to end a call and the call duration is
temporarily displayed.
See “7.3 Call Setting” or refer to other ways of answering calls for
your option as follows.
3.2.1 Handset Autoanwer
You can set handset to answer an incoming call automaticlly.
• Select Menu→ Settings→ Call Setting→ Auto Answer.
• Select On/Off, and press OK key. The phone can be connected
in 5 seconds.
3.2.2 Setting Any Key Answer
• Select Menu→ Settings→ Call Setting→ One-Touch.
• Select On/Off, and press OK key.
An incoming call can be answered by pressing any key except End
key, Left /Right select key.

27
3.2.4 Incoming Call Silence
• When a call is coming, press Right select key to select
Mute/Unmute the ringer tone.
• This function silences the current incoming call only. The phone
will ring normally as next call coming.
3.3 In Conversation
3.3.1 Silence in Conversation
During conversation, you can select Option (Names or Messages)
or Mute displayed. Select Mute to let the other party temporarily not
hear your voice; Select Unmute back to normal. You can also enter
Names or Messages during a conversation.
3.3.2 Adjusting Volume in Conversation
Press Left/Right key to adjust volume of Earpiece during a call.
3.3.3 Selecting Options in Conversation
During a call, press Left/Right select key and OK key to select
options of Mute/Unmute, Option (Names, Messages), etc.
² Select Mute/Unmute to let the other party temporarily can
or can not hear your voice;
² Select Option for selection in Menu, such as Names
Messages, with no worry about the ending of conversation.

28
3.4 Menu Functions
u Main Menu Function:
i. In standby mode, press Left select key to enter main Menu. Scroll
Up/Down or Left/Right key through the menu and select
functions according to the prompt on the screen.
ii. If the menu contains submenus and further submenus, select
options and submenu you want according to the prompt on the
screen.
iii. Press OK key or Right select key to set or return to the previous
menu. Press End key to exit to standby mode.
u Bottom Menu Function:
If options are displayed on the bottom of the screen, press
Left/Right select key and then OK key to select. Press OK key
or Right select key to set or exit.
The functions of phone are mainly grouped in main Menu: Names,
Messages, Call History, Settings, Toolkit and Games.
Please refer to the text hereinafter in this manual in detail.
Note: The picture used in this manual are with small icons.

29
4 Names
You can save contacts in phone. Each contact in phone’s memory
has three phone numbers.
4.1 Finding Records
You can search for a name or number in Names in pop-up window.
1. Select Menu → Names.
2. Select one contact record and choose Search in Option. You
can key in the first characters of the name you are searching for to view
contact directly in All List.
3. Press Up/Down key to scroll though the corresponding name(s)
and records in the list. Scroll to the name you want, and press OK key
to view the details or select Option.
All the contacts will be list by the letter of the name. If no contact in
the list, “No Record” will be displayed.
4.2 Adding New Record
n Save to Phone:

30
1. Select Menu→Names.
2. Select one contact record and choose Add New Entry in
Option and then select saving contact in Phone. Add
Name/Group/Home Number/Mobile Number/Work Number of
the contact. See “10. Text Input” more instructions for writing
text and character.
4. After the completion of writing, press Left select key or OK key
to save the contact.
5. Scroll to the just-added phone contact to reedit, press Left
select key or OK key to to do further operation:
² Edit: Edit the contact.
² Delete: Delete the contact.
² Make a call: Make a call to this contact.
² Send Message: Send message to this number.
² Set Speed Dial: Assign a speed dial number to the phone
number.
² Make IP call: Make an IP call if IP number set already (Set
IP access number in Settings).
Note: In standby mode, key in phone number, press Left select
key to save.
If you save the same number again, the phone prompts to remind
you this number is already exist.

31
4.3 Viewing Records
1. Select Menu→Names.
2. Select one contact and View details of the information.
Note: When there is no storage record in Contacts, it will indicate
“No item”.
4.4 Erasing Records
4.4.1 Erasing a Record
1. Select Menu →Names.
2. Scroll to the record you want to erase and press Left select key.
3. Select Delete in Option.
4. Press Left select key. “Confirm to delete?” indicated on the
display.
6. Press Left select key to select Ok.
4.4.2 Erasing All Contacts
You can also Delete All the records in Contacts.
4.5 Editing Name of the Contacts
1. Select Menu→Names.
2. Scroll to the record you want to edit and press OK key.
4. Select Option to Edit name, and press Left select key or OK
key.
5. Press Right select key to erase character of the current name,

32
and rewrite the name.
6. Select Save, “Succeed to save”appears on the display.
4.6 Editing Phone Number
1. Select Menu→Names.
2. Scroll to the record you want to edit and press OK key.
4. Select Option to Edit number, and press Left select key or OK
key.
5. Press Right select key and press number key to erase and key
in digit of phone number.
6. Select Save. “Succeed to save” appears on the display.
4.7 Selecting Group
You can group the stored records into Names.
1. Select Menu→Names.
2. Select one record listed in phone’s memory, and press Left
select key or OK key.
3. Select Edit group of Family, Friend, Colleague and press Left
select key or OK key to save. Also you can select ring from the list set
already in phone or download ring by yourself.
4.8 Setting Number Type
1. Select Menu→Names.
2. Select one contact record and choose Edit in Option and the
number type of the contact as Home Number/Mobile Number/Work

33
Number
3. Press Left select key or OK key to save.
4.9 Setting Speed Dial
In standby state, you can make a Speed Dial of stored number by
keying in one digit (1-9).
1. Select Menu→Names.
2. Select one contact record and choose View details in Option
and Set speed dial.
3. Press Left select key or OK key and select an Empty slot in
list.
4. Press Left select key or OK key. “Succeed to save” appears on
the display.
4.10 Viewing and Making Speed Dial
Viewing:
Select Menu→Names.
Select one contact record and choose Other options and View
speed dial list.
Dialing:
When you select one phone number in the speed dial list, you can
press Send Key to dial. You can also make a call by entering speed
dial number in the standby mode.
Method 1: Enter speed dial number, press Send Key to dial.
Method 2: Directly hold the Speed Dial Number digit key. If the

34
Speed Dial Number is one-digit, directly hold the digit key. If the Speed
Dial Number is two-digit, press first digit key and then hold the second
one. For example: If the Speed Dial Number is 25, you should press 2
key firstly, and then hold 5 key, thus it can dial directly.
Note: Some handset may not support method 1. Some handset
support only one-digit speed dial number, some support both one-digit
and two-digit speed dial number.
4.11 Memory Status
1. Select Menu→Names.
2. Select one contact record and choose Other options and
Capacity.
3. View the number of saved entries and maximum number of
entries saved in phone.
For example: Phone: 8/500, indicating that 500 records entries in
Max., out of which eight have be saved in phone.

35
5 Messages
This is introduction of how to send, receive and erase the
messages in your phone.
Note:The function introduced hereinafter may differ with different
service offered in your area. Please consult with your service provider
for more detailed information.
5.1 Sending a New Message
Please consult with the service provider to support the network
service of sending message. You can only send message to the mobile
phone which can receive message.
1. Select Menu→ Messages→ New SMS.
2. Write message text. See “10. Text Input” more instructions for
writing text and character.
3. Input the recipients’ Phone Number or press Left select key to
select in Names. Press OK key to
- Send Message: Send message.
- Save: Save the message in Outbox.

36
Note: The SMS centers of some cities and regions do not support
messages longer than 160 characters. The phone can support 480
English characters max. for SMS length.
5.2 Sending Messages
You can send messages to grouped mobile phone which can
receive message meanwhile.
1. Select Menu→Messages→New SMS.
2. Write message text.
3. Select any receiver in Contacts or key in the numbers to add to
SMS groups separated with semicolon by pressing # key. All the phone
numbers displayed listed in pop-up window can be reedited. The
maximum of receivers not exceed 10 persons.
3. Press Left select key or OK key to send the message.
5.3 Receiving Incoming Call while Editing Message
• If you do not want to receive the incoming call, press End key.
• If you want to receive the incoming call, press Send key. After
finishing receiving call, you can continue to edit the message and send.
5.4 Reading Message
On receipt of a new message, the phone prompts you by vibration
or ringer (up to the setting of silence or ringer in Settings). The display
indicates “Message” and press OK key to view. New message is

37
automatically saved in phone. A character on display indicates the
memory for message is reaching full. Erase old messages to keep
space for new messages.
1.Select Menu→ Messages→ Inbox.
2. Scroll to the message you want to read.
3. Press OK key to read message. You can press Up/Down key
to scroll the pages. Or press Left select key directly to Delete or
Delete all the message(s) in Inbox.
4. After reading, press Left select key to do the options:
-Forward: Forward the message to other recipients.
-Delete:Delete the message.
-Voice call:Call back to the message sender.
-Extract:Extract the number in the message and save in Names.
-Reply: Reply message to sender.
5.5 Viewing OutBox
1. Select Menu→ Messages→ Outbox.
2. Scroll Message List.
3. Press OK key to read message. Or press Left select key
directly to Delete or Delete all the message(s) in Outbox.
4. Press Right select key to return to the list. Select other options
to Forward, Delete, Send the message.
5.6 Erasing Messages
Delete and erase old messages to release space for phone’s SMS

38
memory. You can select erasing messages when sending or reading
messages, erase messages one by one or all in Inbox, Outbox.
5.6.1 Erasing a Message
1. Select Menu→ Messages.
2. Select messages location: Inbox, Outbox.
3. Press Up/down key to select to-be-erased messages.
4. Press Left select key directly to Delete the message in Inbox or
Outbox.Select Delete to erase messages. “Delete?” appears.
5. Select Ok to erase this message.
5.6.2 Erasing All Messages
1. Select Menu→ Messages.
2. Select to-be-erased messages in Inbox, Outbox.
3. Press Left select key directly to Delete all the message(s) in
Inbox or Outbox.
5.7 Reading and Setting Voice Mail
Before using Voice Mailbox, please consult with network provider
to confirm that the function of voice mail box has been activated. After
your successful setting, network will automatically transfer divert
incoming call(s) to your voice mail box, and send message(s) to your
phone.
Select Check Voicemail to read the message and then dial voice
mail box number to listen to the leaving message following guide

39
prompt.
Select Setting No. to set the voice mail number. To read your
voice mail, dial the voice mail box number in standby mode.
Note: The function needs network support.
5.8 Message Settings
You can set your message box before you use it, such as, Auto
Save, Auto Delete, Set Idiom, Alert Setting, Delivery Ack, Msg
Priority, and Memory Status.
5.9.1 Saving Sent Message
1. Select Menu→ Messages→Msg Settings→ Auto Save.
2. Select On or Off for your phone can or can not automatically
save sent message.
5.9.2 Automatically Erasing Inbox
Set erasing the last read message in Inbox automatically when
Inbox is full.
1. Select Menu→ Message→Msg Settings→ Auto Delete.
2. Select On or Off and press OK key
5.9.3 Preformatted Messages
The phone has a group of some common built-in phrases and
sentences, such as, “I’m busy now, call you later”, “Please call me
immediately.” etc.

40
1. Select Menu→ Messages→Msg Settings → Set Idom.
2. Select the message listed in and. Press Left select key or OK
key to view.
4. Press Left select key or Ok key to edit, send message, see “5.1
Sending a new message” in detail.
5.9.4 Messages Alert
1. Select Menu→ Messages→ Msg Settings→ Alert Setting.
2. Select the mode of alert as Once or Cyclic when receive a
message.
5.9.5 Delivery Acknowledging
1. Select Menu→ Messages→Msg Settings→ Delivery Ack.
2. Select On or Off for your phone can or can not automatically
receive message from network informing you whether you have sent
message successfully.
5.9.6 Msg Priority
1. Select Menu→ Messages→ Msg Settings→Msg Priority.
2. Select Normal, Interactive, Urgent, Emergency for sending
message.
5.9.7 Memory Status of Messages
1. Select Menu→ Messages→Msg Settings→Memory Status.
2. Press Left select key or Ok key to view the number of saved

41
messages and maximum number of messages saved in phone.
For example: Phone: 8/50, indicating that 50 records entries in
Max., out of which 8 have be saved in phone.

42
6 Call History
6.1 Viewing Recent Calls
Information of All Calls, Received Calls, Dialed Calls, Missed
Calls, Clear all, Call timers including name, phone number, and call
time and conversation duration is saved in the Call History.
1. Select Menu→Call History.
2. Select All Calls, Missed Calls, Received Calls, Dialed Calls.
3. Press Left select key or OK key. Select one entry of the
records and press Left select key or OK key.
4. Select option:
- Call Information:Indicate number and conversation duration.
- Save:Save the number in mobile phone’s Names.
- Delete:Erase the number from the list of Call History.
- Clear all:Erase all the number from the list of Call History.
- Call the number:Call the number.

43
- SMS:Send message to this number.
- IP:Send a IP call if already set.
- Black List:Add this number to the Black List.
6.2 Erasing Recent Calls List
You can erase all the Recent Calls in the menu of Call History.
1. Select Menu→Call History.
2. Select All Calls, Missed Calls, Received Calls, Dialed Calls.
3. Press Left select key or OK key. Select one entry of the
records and press Left select key or OK key.
4. Select Clear all to delete all the numbers from the list.
6.3 Call Timers
Your phone can record call time of dialing and answering call.
1. Select Menu→ Settings→ Call Timers.
2. Select an option on display and press OK key.
CDMA:
-Cdma Incoming Calls:Indicate call time of all answered call in
CDMA network. The timer can be reset.
-Cdma Outgoing Calls:Indicate call time of all dialed call in
CDMA network. The timer can be reset.
-Cdma All Calls:Indicate call time of all dialed and answered call
in CDMA network. The timer can be reset.
GSM:
-Gsm Incoming Calls:Indicate call time of all answered call in

44
GSM network. The timer can be reset.
-Gsm Outgoing Calls:Indicate call time of all dialed call in GSM
network. The timer can be reset.
-Gsm All Calls:Indicate call time of all dialed and answered call
in GSM network. The timer can be reset.
3. Select Reset to clear data, the timer is set to zero.
45
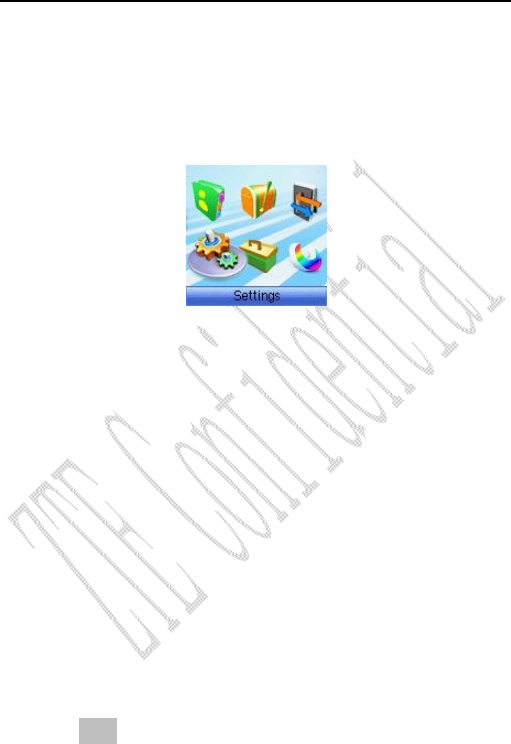
7 Settings
In main Menu pop-up window, select Settings to enter into.
Your phone has different functions in Settings g to meet your
requirement. They are: Sound, Display, Call Setting, Security,
Extras, and Network.
7.1 Sound
7.1.1 Volume
You can adjust the volume of Ringer, earpiece and key beep.
1. Select Menu→ Settings→ Sound→ Volume.
2.Select the volume of Ringer (When earpiece is inserted, it is
earpiece Ringer), Earpiece or Key Beep.
3. Press Left/ Right key to adjust volume. Press OK key.
7.1.2 Ring of Incoming Call
ZTE H520 offers various Ringers of incoming call for your
selection.

46
1. Select Menu→Settings→ Sound→ Ring→ Ring Type.
2. Press Up/Down key to scroll to your selection in Preset Ring,
DownLoad Ring or Record Ring press OK key.
7.1.3 SMS Ring
You have a choice of various ringing tones for message in phone.
1. Select Menu→Settings→ Sound→Ring→ SMS Ring.
2. Press Up/Down key to scroll to select and press OK key.
7.1.4 Ring of Power On/Off
You can make a choice of various ringing tones when power on/off
the phone.
1. Select Menu→Settings→ Sound→Ring.
2. Select Power On Ring or Power Off Ring and set the phone in
Silence or ring when you power on/off the phone.
7.1.5 Alert Type
You can select alert type for an incoming call, earpiece and
message.
1. Select Menu→Settings→ Sound→ Alert type.
2. Select an option in list:
-Ring +Vibra:Set mobile phone in vibration and continuous
Ringer case to prompt incoming call.
-Ring: Set Mobile phone in Ringer case to prompt.
-Vibra: Set mobile phone in vibration case to prompt.

47
-Silence All:Set mobile phone in silent case to prompt.
7.1.6 Key Beep
Set phone beep sound or not when you press keys.
1. Select Menu→Settings→ Sound→ Key Beep.
2. Select an option:
-Off: Not utter sound when press keys.
-Standard:Utter a fixed- length DTMF tone in short when press
keys.
-Long: Utter DTMF tone even longer when press keys.
7.2 Display
7.1.1 Selecting Wall Paper
You can select different wallpaper as background of standby.
1. Select Menu→ Settings→ Display→ Wall Paper Set.
2. Press Up/Down key to scroll to your selection in Preset
Wallpaper, DownLoad Wallpaper press OK key.
7.2.2 Set Backlighting
During a call or pressing keys, the display lights on. You can set
lighting duration and type.
1. Select Menu→Settings→ Display →Backlight.
2. Select an option in pop-up window:
-10 Sec:Keep backlighting for 10 seconds after last pressing.

48
-30 Sec:Keep backlighting for 30 seconds after last pressing.
3. Press Left select key or OK key to confirm.
Note:In conversation, backlighting consumes the power quickly
and shortens continues conversation and standby time.
7.2.3 Adjusting Brightness
1. Select Menu→ Settings → Display→ Brightness.
2. Press Left/Right key to adjust brightness, and press Left select
key or OK key to confirm.
7.2.4 Adjusting Contrast
1. Select Menu→Settings→ Display→ Contrast
2. Press Left/Right key to adjust contrast, and press Left select
key or OK key.
7.2.5 Selecting Language
1. Select Menu→Settings→Display→Language.
2. Select Chinese or English which is available, and press Left
select key or OK key.
7.2.6 Setting Time
1. Select Menu→Settings→Display→Time→Time Setting.
2. Press Left/Right/Up/Down key and number key to set time, and
press Left select key or OK key.

49
7.2.7 Setting Time Format
1. Select Menu→Settings→Display→Time→Time Format.
2. Select AM/PM or 24 HR, and press Left select key or OK key.
7.3 Call Settings
When network supports Call Setting, you can use network
services of call waiting and call forwarding.
Note:All these functions are network services. Please consult with
network service provider to get corresponding service application.
7.3.1 Setting Headset Autoanswer
When mobile phone connects with earpiece (buy separately), you
can set earpiece to answer automatically incoming call.
1. Select Menu→Settings→Call Setting→ Auto Answer.
2. Select Off/On to activate or deactivate automatic answering.
3. Press Left select key or OK key.
7.3.2 Setting Any Key Answer
• Select Menu→Settings→ Call Setting→ One-Touch.
• Select On/Off, and press OK key.
An incoming call can be answered by pressing any key except End
key, Left /Right select key.

50
7.3.3 Voice Privacy
Set as Enhanced to enable voice encryption (need network
support). Set as Standard to disable this function.
7.3.4 Alert
You can select On or Off to set the alert.
1. Select Menu→Settings→Call Setting→Alert.
2. Select an option on display and press Left select key or OK
key.
-Service:When there are service available.
-Remind Minute:During a call, ten seconds ahead of every
minute, alert.
-Missed Call: When there are missed calls, alert.
-Roaming: When roam in active and handoff between service
areas or states occurs, alert.
For the function mentioned above, select On to operate; select Off
to cancel alert.
7.3.5 Call Waiting
During a call, use Call Waiting to answer the waiting call prompted
by the network; Or dial another call meanwhile putting the first call on
hold. These calls can be shifted while you have calls in conversation.
Call Waiting lets you enjoy three-party conversation without
missing call.

51
1. Select Menu→ Settings→ Call Setting→Supp.Services→
Call Waiting.
2. Select Option:
- Enabled: To activate the Call Waiting function. The network will
notify you of an incoming call while you have a call in progress. You can
press Send key to get through the waiting call and switch one call to
another.
- Disabled: To cancel the Call Waiting function.
7.3.6 Call Forwarding
Use Call Forwarding to forward the incoming call to a designated
phone number. After setting of call forwarding, phone will automatically
dial network to set the function in active.
1. Select Menu→ Settings→ Call Settings→Supp.Services→
Call Forwarding.
2. Set type of Call Forwarding, press OK key.
-ALL(Divert unconditionally): All is diverted in all conditions.
-Busy(Divert when busy): When the phone is busy, divert.
-No Answer(Divert when no answer): When there is no
answer, divert.
-Busy/No Answer: When the phone is busy or there is no
answer, divert. The service provider offers.
3. Select Enabled to:
² Enter Number to which the phone will forward and press

52
Left select key or OK key. E.g. To forward incoming call to
12345678, input: 12345678, press Left select key or OK key
and confirm.
4. Select Disabled to disable Call Forwarding function.
5. Press End key to exit to previous pop-up window.
7.3.7 Fire Proof
You can set Incoming calls bar in Fire Proof submenu including
Friend List, Black List, Current Settings.
u Friend List
All the contacts will be listed by the letter of the name.
1. Key in phone number to Add new contact directly, or select from
Names.
2. Select options or scroll to one contact listed and select options:
² Add: Add new contact in Friend List.
² Edit: Edit this contact in Friend List.
² Delete: Delete this contact in Friend List.
² Clear all: Delete all the contacts in Friend List. If there is no
contact in the list, “List Empty” will be displayed.
u Black List
All the contacts will be listed by the letter of the name.
1. Key in phone number to Add new contact directly, or select from
Names.
2. Select options or scroll to one contact listed and select options:

53
² Add: Add another new contact in Black List.
² Edit: Edit this contact in Black List.
² Delete: Delete this contact in Black List.
² Clear all: Delete all the contacts in Black List. If there is no
contact in the list, “List Empty” will be displayed
u Current Settings
You can set barring applications as follows:
² Bar Black List: Only bar numbers listed in Black List.
² Bar All Except Friend List: Only numbers listed in Friend
List are not blocked.
² Cancel All: Cancel barring setting.
² Bar All: Bar all incoming calls.
7.3.8 IP Setting
Set IP access number in CDMA/GSM network for making a call with
IP number prefix automaticly.
7.4 Security Settings
Introduction to phone’s security options preventing others to avoid
illegal use or acquire your phone’s personal information. Please input
right phone Password code to enter.
Note:The default phone password is 0000, please change it to
your own password as soon as possible.

54
7.4.1 Setting Phone Lock
1. Select Menu→ Settings→ Security.
2. Input your phone password, press OK key.
3. Move to Handset Lock, set On,Off or Change Lock, press Left
select key or OK key.
7.4.2 Restoring
Your phone offers factory default phone setting. You may modify
some options when you use phone. You can also Restore Factory
Default to renew some modified options to the origin.
1. Select Menu→ Settings→ Security.
2. Input your phone password, press Left select key or OK key.
3. Select Restore Settings.
4. Select Ok to revert to confirm resetting or restoring factory
default or select Cancel to exit.
Note: Restoring the phone do not influence your phone password,
Call History, Names, Inbox and Outbox.
Some setting, e.g. alarm, cannot be restored.
7.5 Extras
7.5.1 Auto Key Guard
1. Select Menu→ Settings→ Extras →Key Guard to set phones’
key lock and time.
2. Select an option in pop-up window:

55
-Off:Deactivate the function of phones’ key lock.
-30 S auto-guard:Phones’ key locked automatically 30 seconds
after the last key pressing.
-2 M auto-guard:Phones’ key locked automatically 2 minutes
after the last key pressing.
3. Press Left select key or OK key to confirm.
Note:
- Hold # key to lock the keypad directly in standby mode.
- In state of key lock, to make use of phone, unlocking code
prompted by phone on the display should be input.
7.5.2 Gsm Modual Status
1. Select Menu→ Settings→ Extras →Gsm Modual Status.
2. View the current Gsm modual status as Gsm Modual Not
Ready or Gsm Modual Ready.
7.6 Network Setting
Make a choice of the network mode for CDMA or GSM as
Automatic or Home only.

56
8 Toolkit
Extra offers some tools, such as, Radio, Calendar, Alarm Clock,
Calculator, Voice Memo, Stopwatch World Time, and Sales
Service.
8.1 Radio
ZTE H520 supports Radio function.
1. Select Menu→Toolkit→ Radio.
2. Insert earphone and then the phone notify on the display “Radio
On!”, so the radio is activated.
3. Select any of the Option as follows:
² Save Channel: Input Channel Name and select one
channel from Channel List.
² Auto Tuning: Press Up/Down key to search automatically
the channel available.
² Manual Tuning: Press Up/Down key to search manually
the channel available.
² Set Frequency: Set certain frequency as default for a
specific channel. Press Up/Down key to shift between integer and
fraction, and press Left/Right key to move the cursor and input digit
number of frequency.
Note: Be sure of erasing original digit number of frequency before

57
your new inputting.
² Rename: Reedit the channel name.
² Set Volume: Press Up/Down key to adjust the volume of
earphone.
8.2 Calendar
1. Select Menu→Toolkit→ Calendar.
2. Press Left/Right key or Up/Down key to select exact date you
want to view in pop-up calendar window.
3. Press Left select key or OK key to view in details.
8.3 Alarm
Set alarm alert at a certain time. Alarm alerts only when the
phone is in power on.
1. Select Menu→Toolkit→ Alarm clock.
2. Select Normal or Auto off in Set alarm to set the style of
alarming as normal way or powering off the phone automaticaly.
Select Alarms List to view the settings. Select Set rest day to
set the date of alarm.
3. When alarm rings, select OK to stop alarming.
8.4 Calculator
Use calculator to execute basic math calculation.
1. Select Menu→Toolkit→ Calculator.
2. Key in digits. And press Left/Right key to scroll to the symbol
58
you want, press OK key.
÷ Division Sign
- Subtraction Sign
= Equal Sign
+ Plus Sign
x Multiply Sign
. Decimal Point
± Change digit to positive number or
negative
Press Right select key to erase digit one by one and exit to
previous window, press End key to exit to standby mode.
Note:This calculator has a limited accuracy and is designed for
simple calculations.
8.5 Voice Memo
ZTE H520 supports Voice Memo function either in or not in
conversation with a capacity of saving 5 pcs records in max. When
there is no space in Voice Memo or Voice Memo is full, the phone
prompts.
8.5.1 Recording in Normal
1. Select Menu→Toolkit→ Voice Memo.
2. Scroll Up/Down key to select:
² Record – When you are not in conversation, select Start

59
to begin a new Recording, or Stop/ Pause recording.
² Record List – Play or Delete the record listed and named
by date and time.
² Memory Space – Check memory used already out of
record capacity.
Note: The record saved in normal (not in conversation) will be
listed in Settings→ Sound→ Ringer Type as a kind of ringer
tone.You can select it or not as you like as ring of the phone. The
record can not be deleted as if it is activated as the ringer, unless you
cancel the record as the ring of the phone.
8.5.2 Recording in Conversation
When you are in conversation, select Record to pop-up window
of Voice Memo and select Start to begin a new Recording, or Stop,
Pause/Resume recording, without ending the call.
The phone exits back to the calling interface when the recording is
finished. The record will be saved automatically when the call is ended
without finishing recording, and exit back to interface of ending call.
8.5.3 Recording with Incoming Call/Message
² With Incoming Call
While recording in state of non-conversation, receive a call
will stop recording. The record of phone will be saved
automatically and return to call interface.

60
² With Message
While recording in state of non-conversation, receive a
message won’t stop recording. The phone prompts message alert
without display message interface.
² With Others
- Alarm: Prompts later.
- Alert: Prompts later.
-Power off automatically while recording: Save record
automatically.
Note: In state of non-conversation, record voice via MIC; In state of
conversation, record voice via earpiece.
8.7 Stopwatch
1. Select Menu→Toolkit→ Stopwatch.
2. Select Start to make stopwatch timing.
3. Select Stop to stop timing.
4. Select Reset to clear the time record.
8.8 World Time
1. Select Menu→Toolkit→World Time.
2. Press UP/Down or Left/Right key to move the location on the
map, meanwhile the time of the city can be shown accordingly.
3. Or select local city or query other time in Option to view the
time of the city selected directly.

61
8.9 Sales Service
ZTE H520 has specific Sales Service Number fixed in the phone
for you easy to dial.

62
9 Games
Extra offers two games: Brick attack and Push Box .
9.1 Brick Attack
In this game, paddle the bar to rebound the ball and attack bricks
with skill. And then enter next stage.
1. Select Menu→ Extra→ Games→ Brick attack.
2. Press Left select key or OK key, the display shows greeting
and play guide.
3.Select Newgame to start, press Left/Right key to move the
paddle bar left/right. Press Right select key to pause the game..
4. As passing a stage, select Continue to play again, select Next
Stage to enter next stage.
9.2 Push Box
In this game, pushing boxes with skill and locating them to stated
locations. And then enter next stage.
1. Select Menu→ Extra→ Games→ Push Box.
2. Press OK key, the display shows greeting and play guide.
3.Select New Game to start,select Stage and key in stage level.
Press OK key to start.
4. As passing a stage, select Replay to replay again, select Next
Stage to enter next stage.
63
10 Text Input
Your phone offers text input modes: Multitap Input (abc/ABC),
Numbers Input (123), eHiText Input (eng), and Symbol Input (Symbols).
Input mode includes capital letter and lowercase mode.
You can key in letters, digits, characters and symbols when writing
text or editing contact record information in Names or Messages etc.,
following the common instruction in hereinafter table.
Operation Method
Input Letters Multitap Input—“abc/ABC”, press
corresponding letter key till the letter
appears.
Input Words eHiText Input—“eng”, press any key once
to key in any word.
Input Digits Numbers Input—“123”, press digit key
once.
Input Symbol Symbols Input —Press * key to
enter the symbols mode and press
corresponding digit key. Or press “1” key
till the symbol (common symbols) appears
except for Numbers Input mode.
Input Space Press “0” key, except for being in numbers
64
mode.
Erase Character
Press Right select key .
Move cursor left or
right Press Left/Right key.
Change input mode
Press # key to select another text
mode.
Capitalization Press # key to switch between
capitalization (ABC) and lowercase (abc).
10.1 Multitap Input
Select Multitap Input (abc/ABC) — Each key stands for multiple
letters. Press key till your letter appears. When the cursor moves, enter
the next letter.
10.2 Numbers Input
Select Numbers Input (123) — Press the corresponding key once
to input the number. In Numbers input mode, you can not enter space.
10.3 eHiText Input
Select eHiText Input (eng) — Predictive word input is based on a
built-in dictionary.
One letter asks for pressing only once.
Press the digit key corresponding to the letters once till the word
appears on the screen.

65
If the word displayed is not the word you want, press Up/Down key
to look for another matching word. Then press OK key to confirm.
10.4 Symbols Input
- Press 1 key to input till the symbol appears. Most
common punctuation marks and special characters are available
except for Numbers Input mode.
Or select Symbols mode by pressing * key :
- Press Up/Down key to page down. And press digit key to enter
corresponding symbol.

66
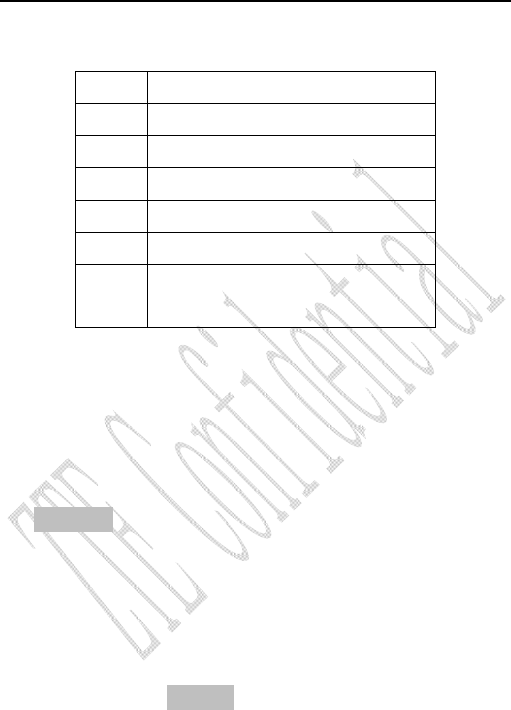
11 Troubleshooting
If your phone appears following phenomenon in the process of
application, please read following relative information at first. If the
problems still can not be solved, please contact with the distributor or
service provider.
Problem Check Point
No key beep on pressing keys. Please check the setting of Key
Beep in Settings.
When there is an incoming call,
the prompt ringer not rings.
Please check the setting of sound
Alert Type and ringer Volume in
Settings.
No prompt tone at alarm time. Please check relative sound
setting (Alert Type and ringer
Volume in Settings).
Messages cannot be sent. Please check the signal of
network.