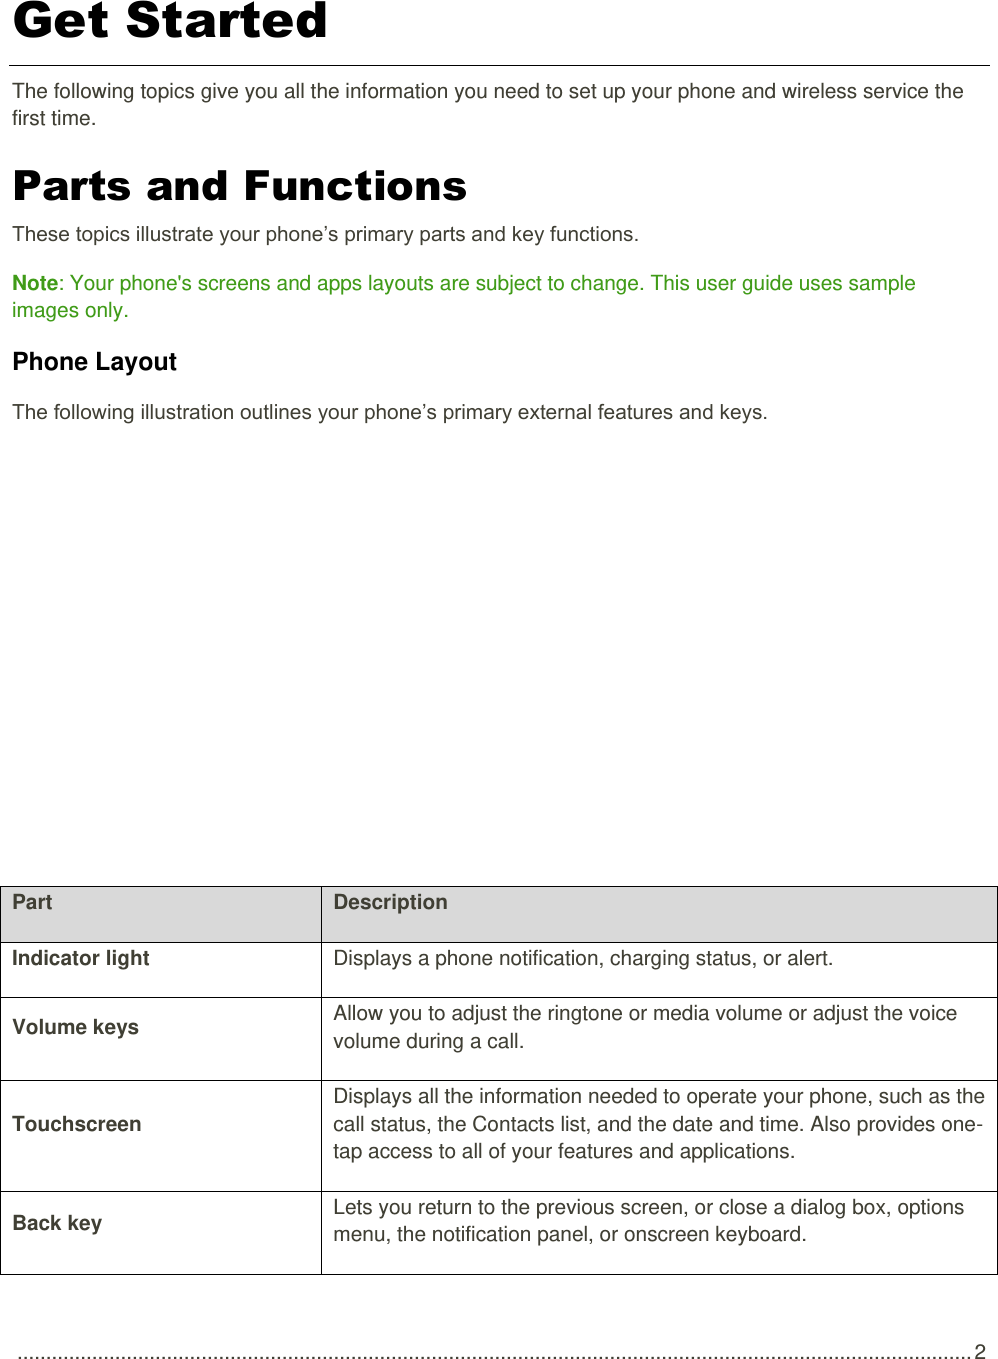
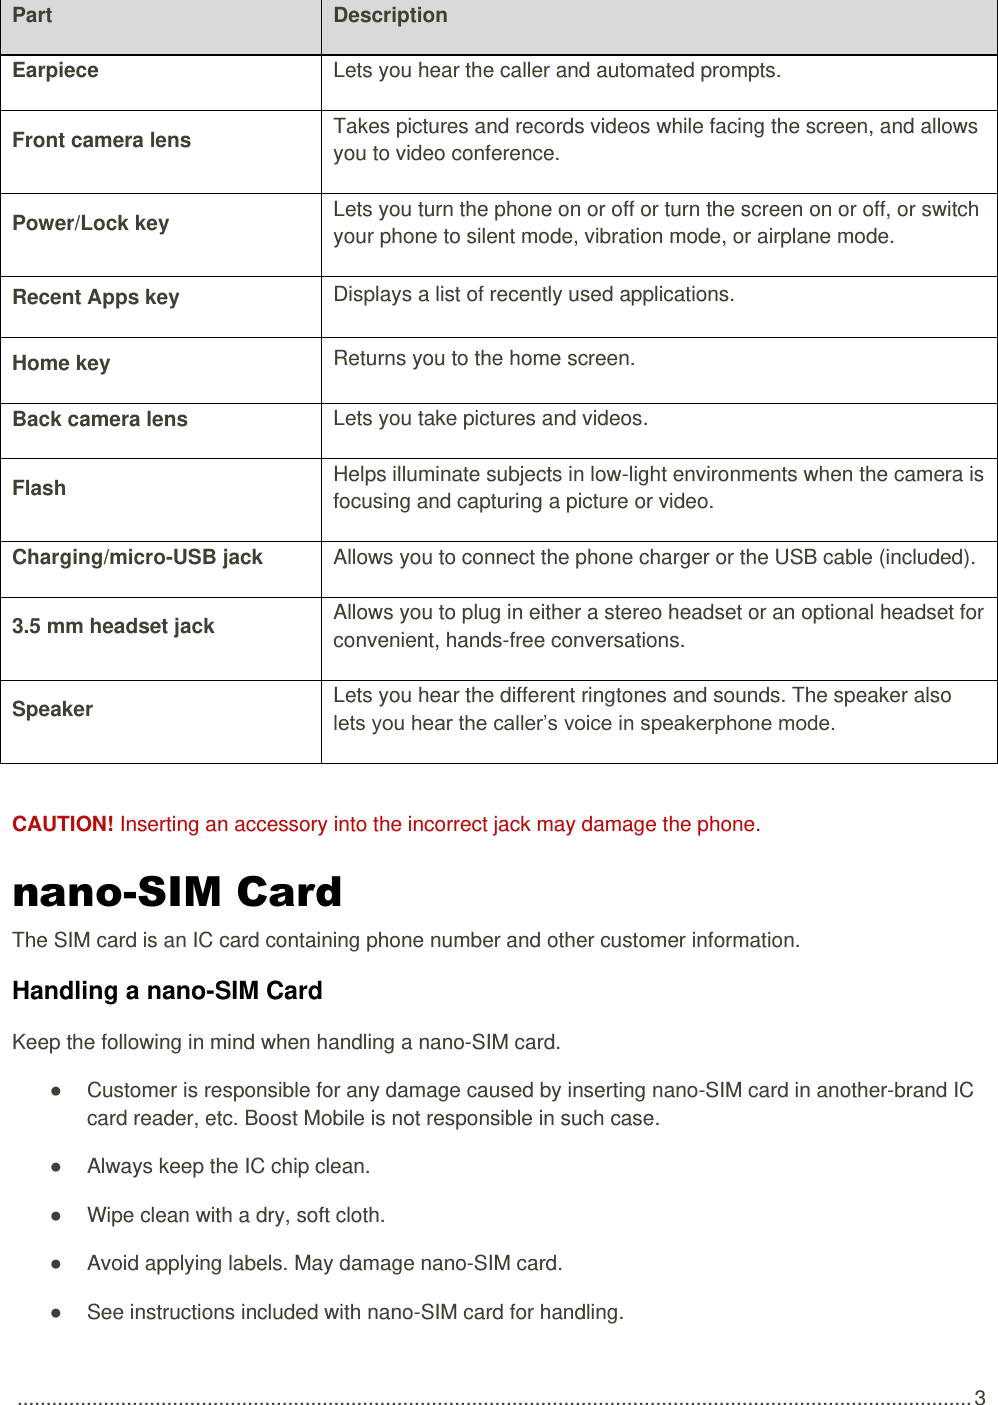
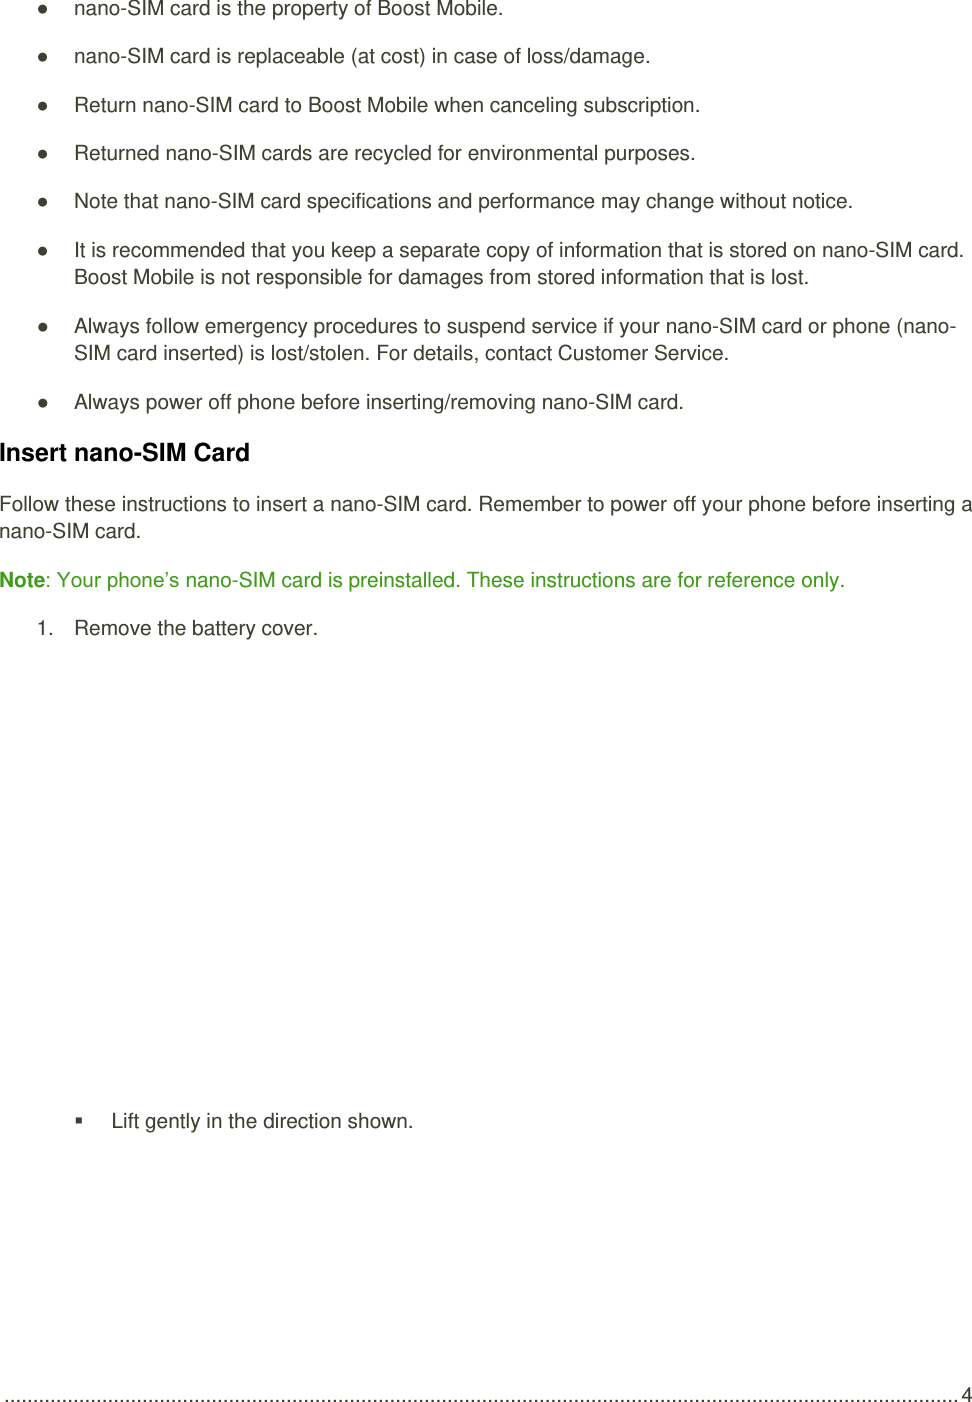
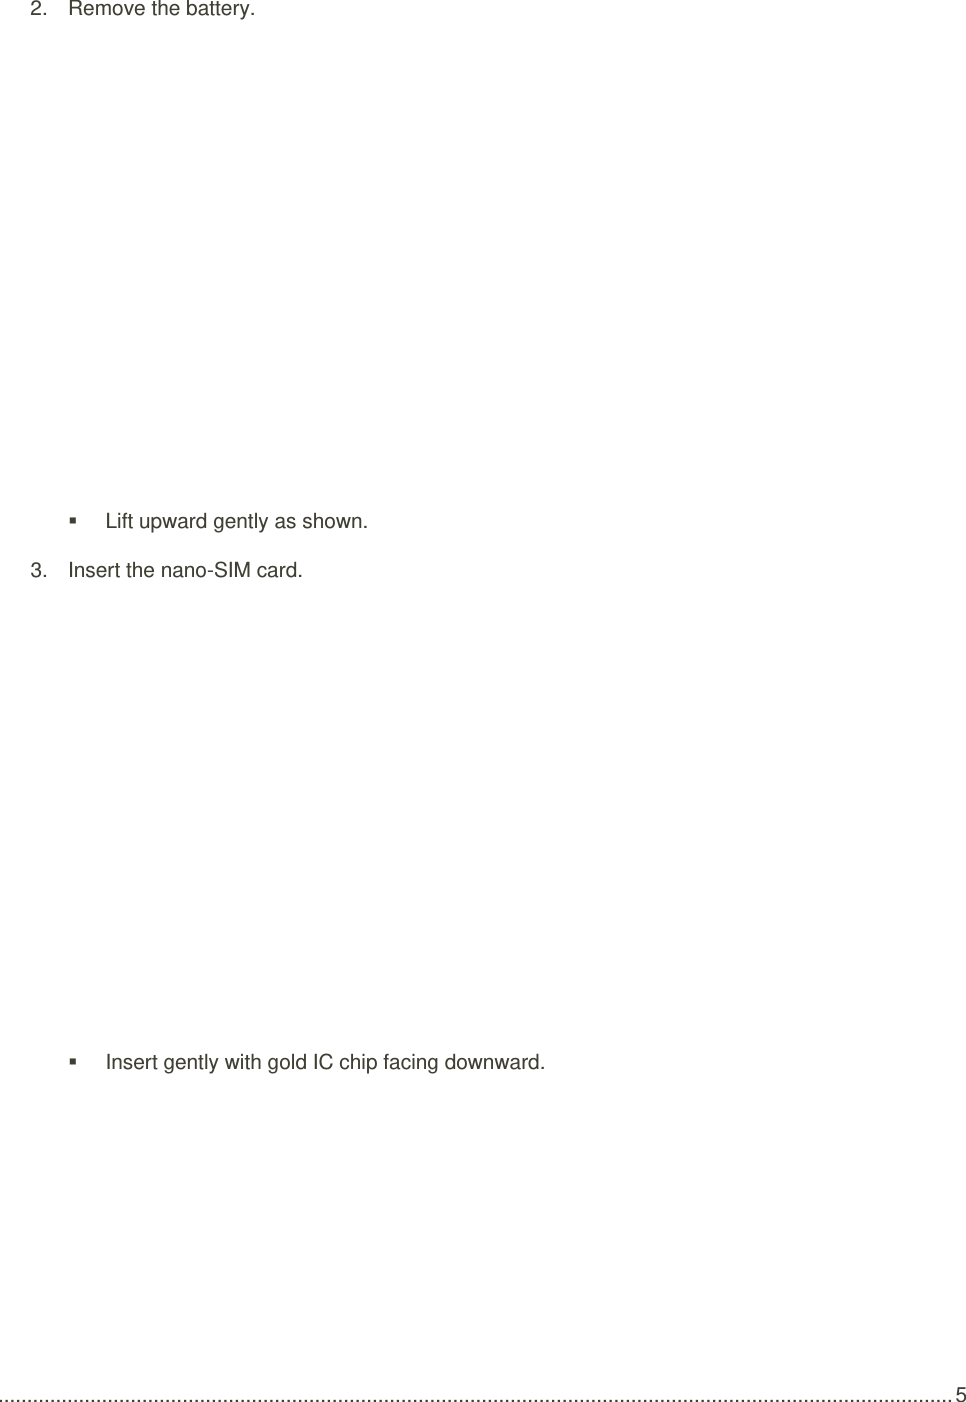
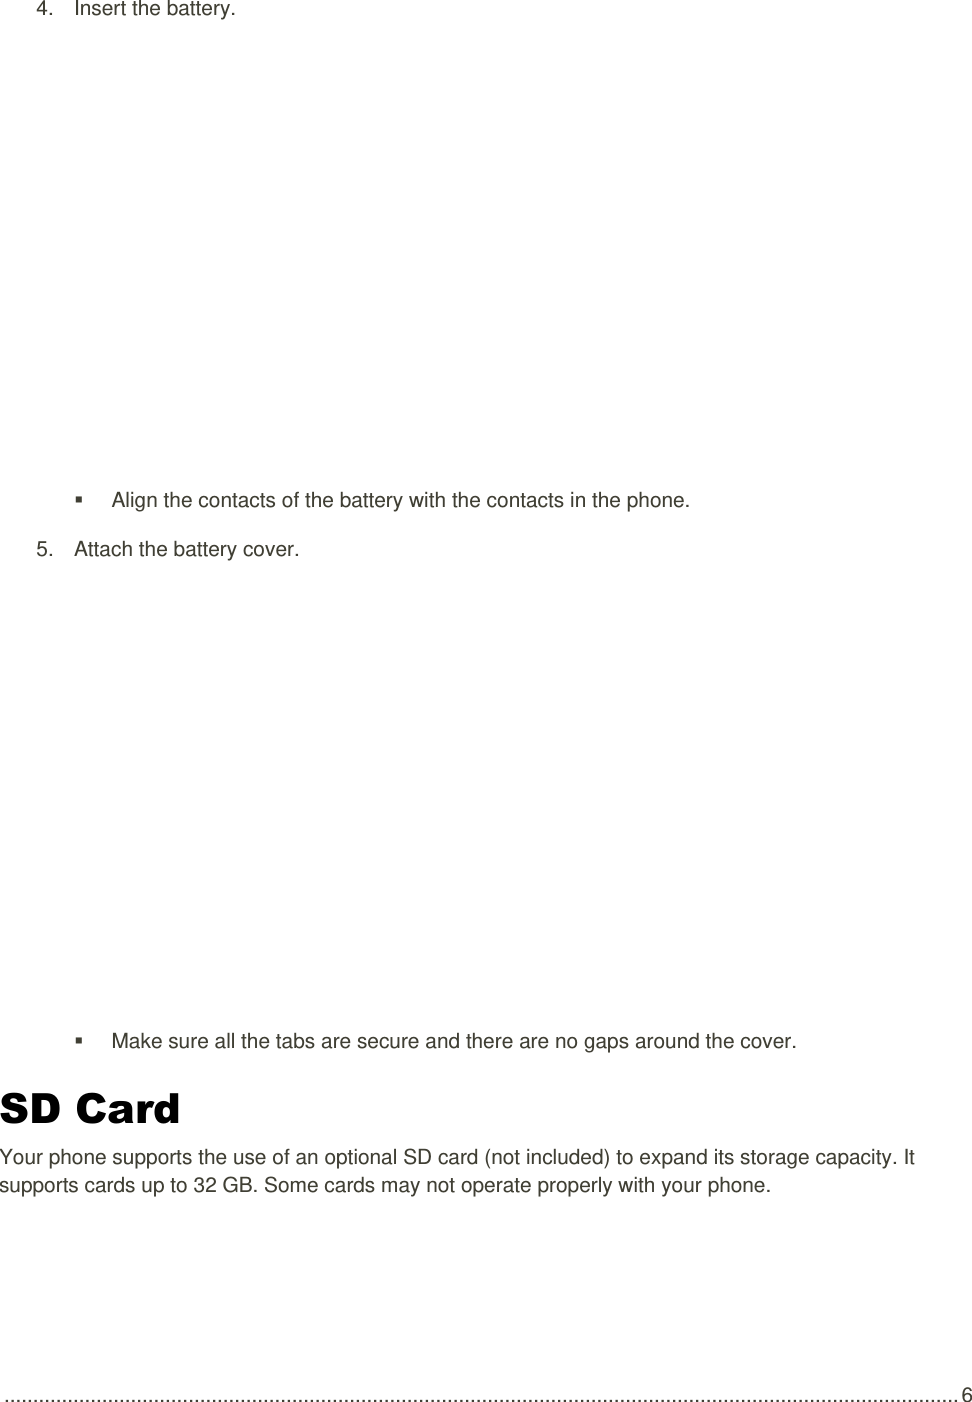
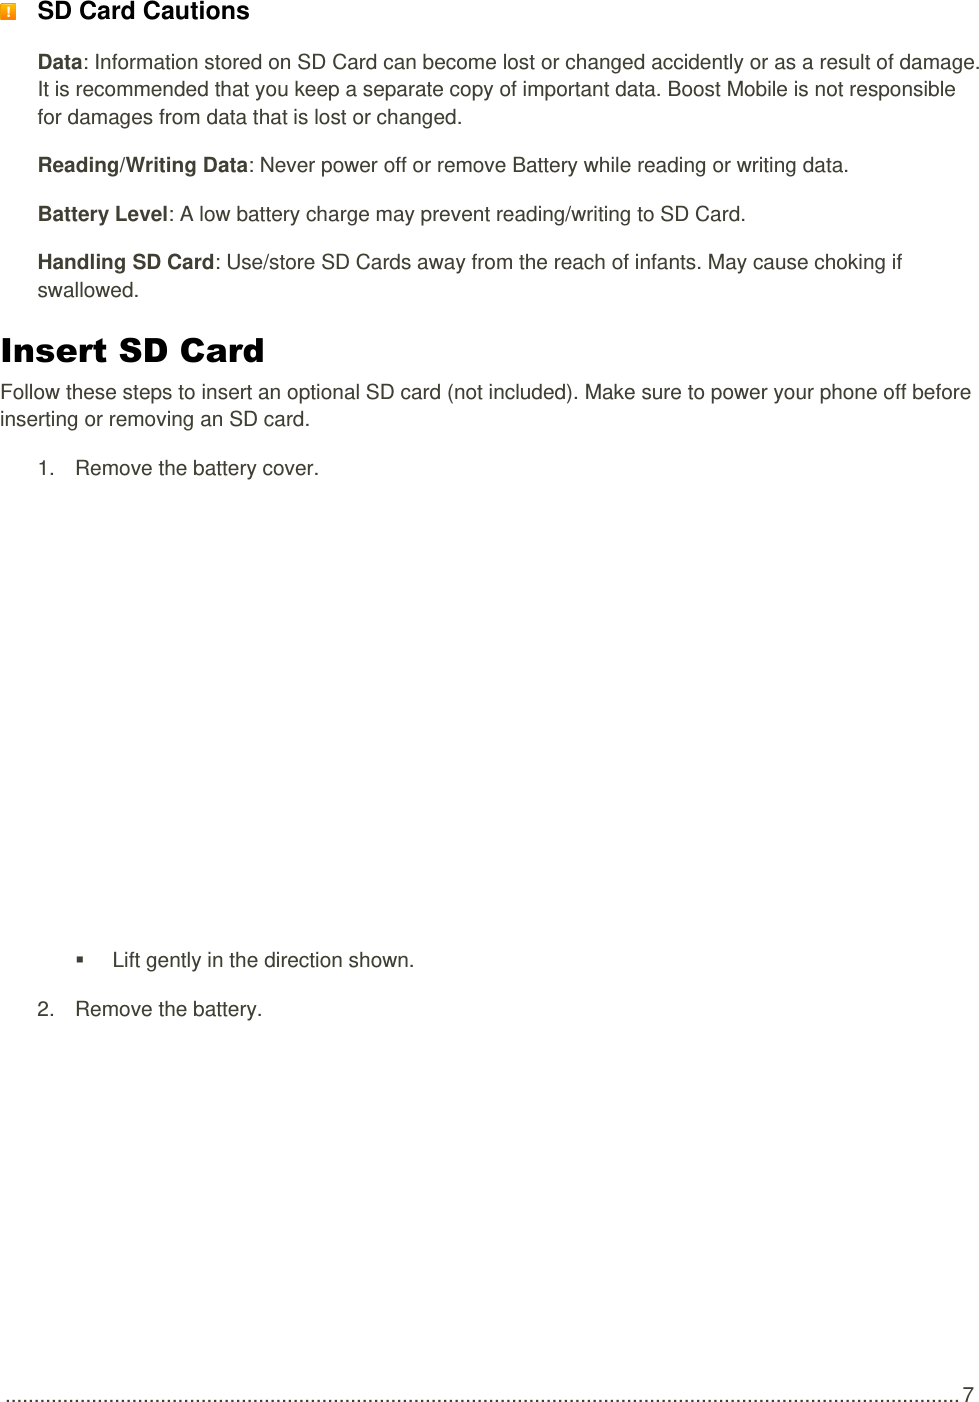
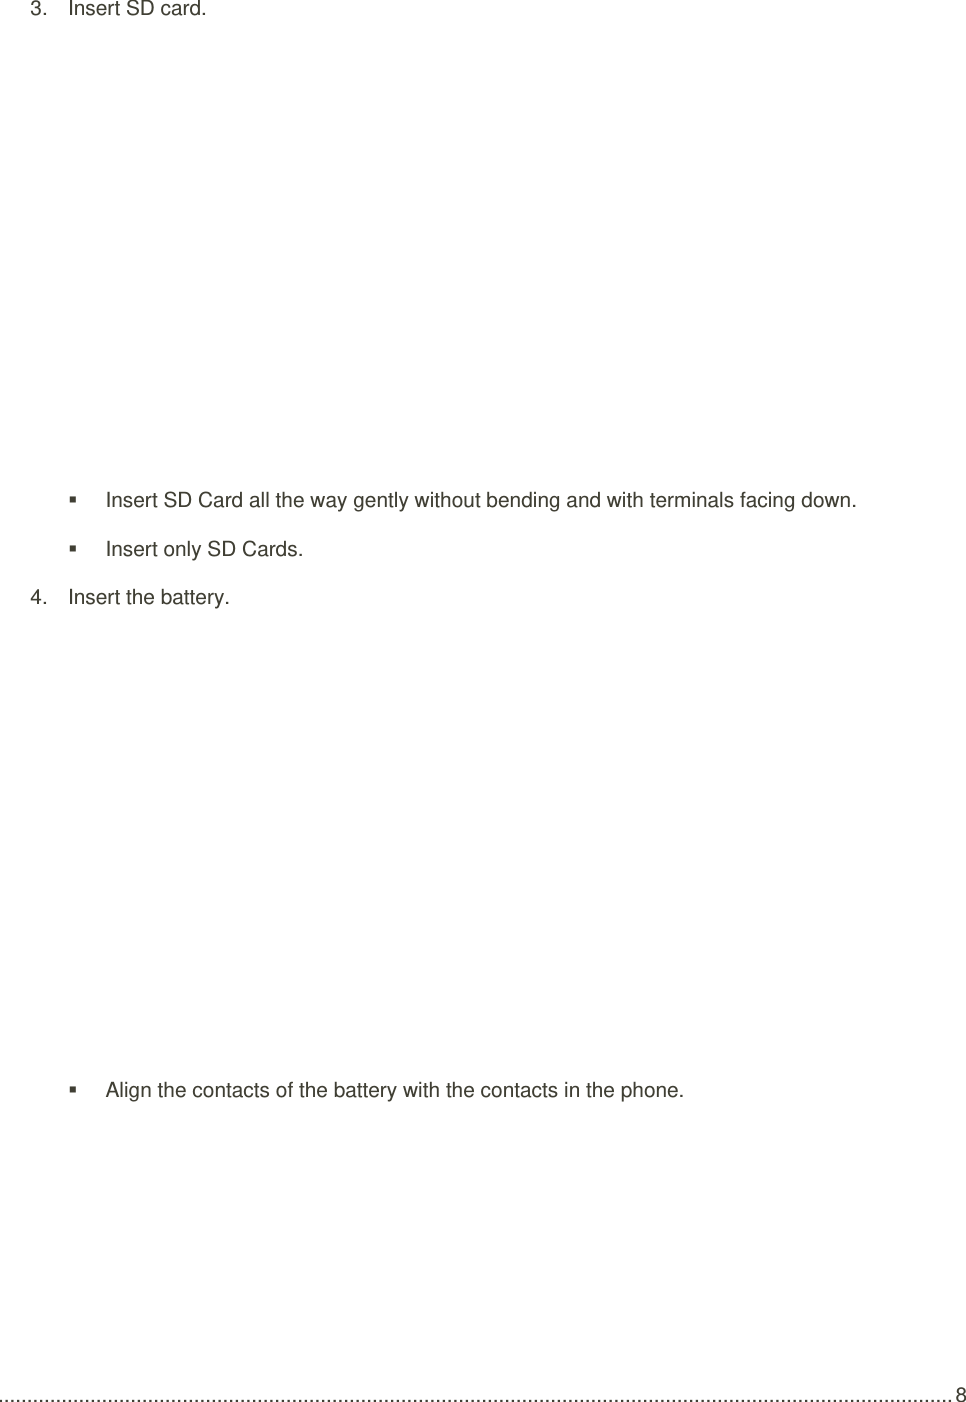
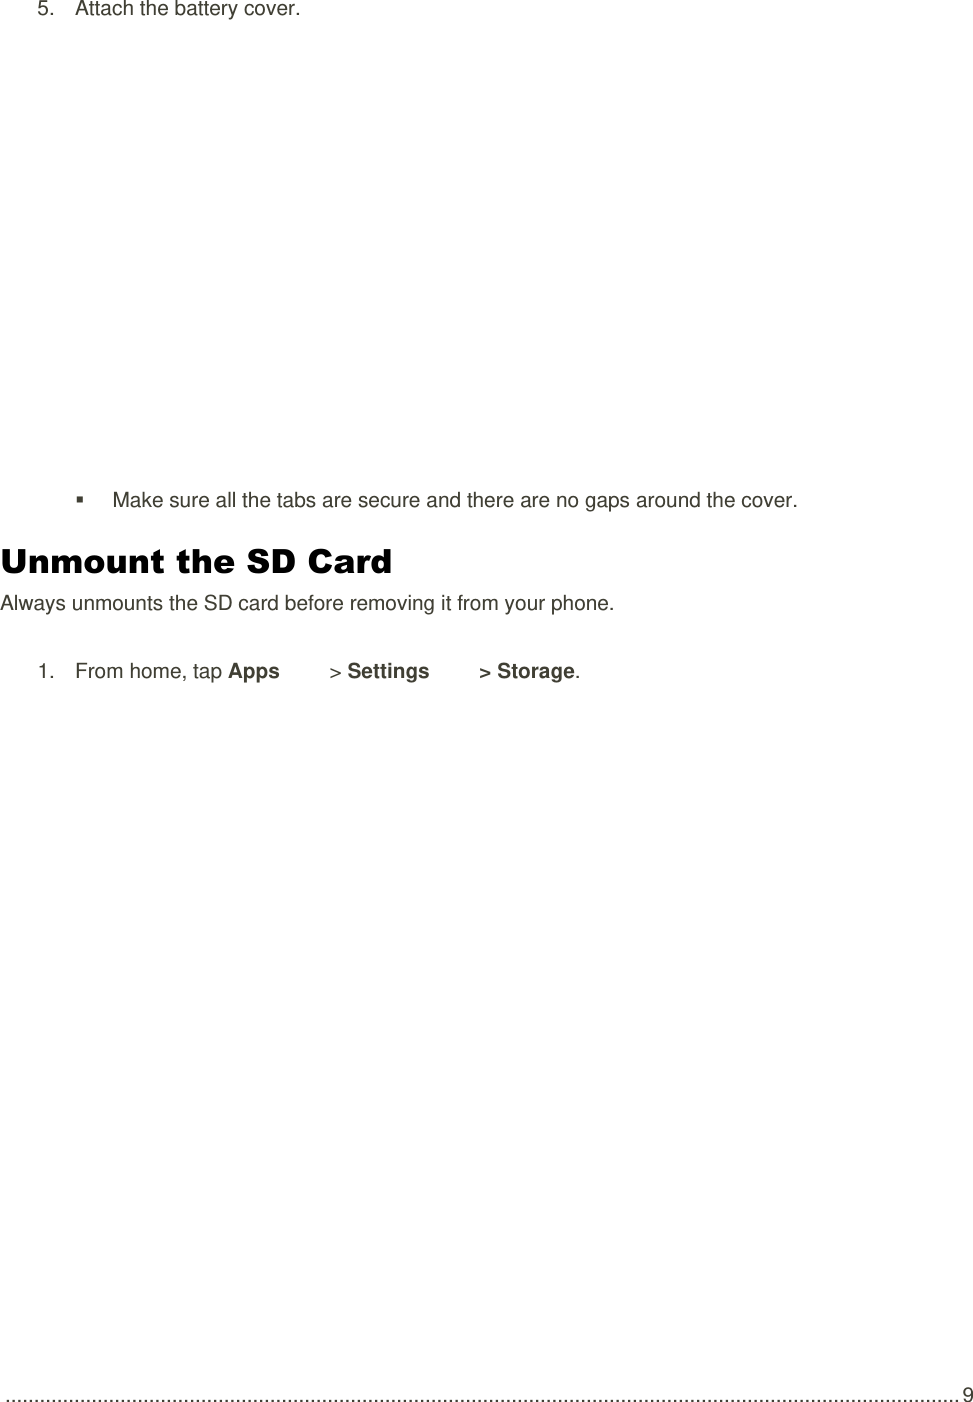
ZTE ZTEN9132 LTE/CDMA Mutil-Mode Digital Mobile Phone User Manual

ZTE Corporation LTE/CDMA Mutil-Mode Digital Mobile Phone

Contents

User manual

  User Guide    [UG template version 15b]  [boost_zte_N9132_ug_en_091115_d4]
TOC  i Table of Contents Introduction ................................................................................................................................................... 1 About the User Guide ........................................................................................................................... 1 Get Started .................................................................................................................................................... 2 Parts and Functions .............................................................................................................................. 2 nano-SIM Card ...................................................................................................................................... 3 SD Card ................................................................................................................................................ 6 Insert SD Card .............................................................................................................................. 7 Unmount the SD Card ................................................................................................................... 9 Remove SD Card ........................................................................................................................ 10 Format SD Card .......................................................................................................................... 11 Battery Use ......................................................................................................................................... 13 Insert the Battery ......................................................................................................................... 13 Remove the Battery .................................................................................................................... 15 Charge the Battery ...................................................................................................................... 16 Turn Your Phone On and Off .............................................................................................................. 17 Use the Touchscreen .......................................................................................................................... 18 Activation and Service ........................................................................................................................ 21 Complete the Setup Screens .............................................................................................................. 22 Basic Operations ......................................................................................................................................... 24 Basics .................................................................................................................................................. 24 Home Screen and Applications (Apps) List ................................................................................ 24 Phone Settings Menu .................................................................................................................. 26 Portrait and Landscape Screen Orientation ................................................................................ 26 Capture Screenshots .................................................................................................................. 27 Applications ......................................................................................................................................... 28 Launch Applications .................................................................................................................... 28 Apps List ..................................................................................................................................... 29 Phone Number .................................................................................................................................... 32 Airplane Mode ..................................................................................................................................... 32 Enter Text ............................................................................................................................................ 33 Touchscreen Keyboards ............................................................................................................. 33 Google Keyboard ........................................................................................................................ 34
TOC ii Swype ......................................................................................................................................... 35 TouchPal X.................................................................................................................................. 37 Tips for Editing Text .................................................................................................................... 40 Google Account ................................................................................................................................... 40 Create a Google Account ............................................................................................................ 41 Sign In to Your Google Account ................................................................................................. 42 Google Play Store ............................................................................................................................... 45 Find and Install an App ............................................................................................................... 46 Request a Refund for a Paid App ............................................................................................... 47 Update an App ............................................................................................................................ 47 Uninstall an App .......................................................................................................................... 51 Get Help with Google Play .......................................................................................................... 52 Lock and Unlock Your Screen ............................................................................................................ 52 Update Your Phone............................................................................................................................. 53 Update Your Phone Software ..................................................................................................... 53 Update Your Profile ..................................................................................................................... 55 Update Your PRL ........................................................................................................................ 56 Your Phone Interface .................................................................................................................................. 57 Home Screen Basics........................................................................................................................... 57 Home Screen Layout .................................................................................................................. 57 Extended Home Screens ............................................................................................................ 58 Status Bar and Notification Panel ....................................................................................................... 59 Status Bar ................................................................................................................................... 59 Notification Panel ........................................................................................................................ 62 Customize the Home Screen .............................................................................................................. 63 Change the Wallpaper ................................................................................................................ 63 Add Shortcuts to the Home Screen ............................................................................................ 64 Add Widgets to the Home Screen .............................................................................................. 65 Add Folders to the Home Screen ............................................................................................... 65 Phone App .................................................................................................................................................. 67 Place and Answer Calls ...................................................................................................................... 67 Call Using the Phone Dialer ........................................................................................................ 67 Call Emergency Numbers ........................................................................................................... 69 Answer Phone Calls .................................................................................................................... 70 In-Call Screen Layout and Operations ........................................................................................ 74
TOC iii Place a Call from Contacts ......................................................................................................... 76 Call from Call Logs ...................................................................................................................... 77 Optional Services ................................................................................................................................ 78 Voicemail Setup .......................................................................................................................... 78 Visual Voicemail .......................................................................................................................... 79 Set Up Visual Voicemail .............................................................................................................. 79 Review Visual Voicemail ............................................................................................................. 80 Listen to Multiple Voicemail Messages ....................................................................................... 81 Visual Voicemail Options ............................................................................................................ 82 Configure Visual Voicemail Settings ........................................................................................... 83 Caller ID Blocking ....................................................................................................................... 86 Call Waiting ................................................................................................................................. 86 Call Forwarding ........................................................................................................................... 87 Call Settings ........................................................................................................................................ 88 Contacts ...................................................................................................................................................... 90 Add a Contact ..................................................................................................................................... 90 View Contacts ..................................................................................................................................... 92 Contacts Screen Layout ...................................................................................................................... 93 Edit a Contact ...................................................................................................................................... 95 Delete a Contact ................................................................................................................................. 96 Share a Contact .................................................................................................................................. 96 Import Contacts ................................................................................................................................... 98 Back Up Contacts ............................................................................................................................... 99 Messaging and Internet ............................................................................................................................. 100 Text and Multimedia Messaging ....................................................................................................... 100 Send a Text Message ............................................................................................................... 100 Send a Multimedia Message (MMS) ......................................................................................... 101 Save and Resume a Draft Message ......................................................................................... 103 New Messages Notification ....................................................................................................... 104 Manage Message Conversations ............................................................................................. 104 Text and MMS Options ............................................................................................................. 106 Gmail ................................................................................................................................................. 107 Create and Send a Gmail Message .......................................................................................... 107 Check Received Gmail Messages ............................................................................................ 109 Use Gmail Labels ...................................................................................................................... 109
TOC iv Archive Gmail Threads ............................................................................................................. 111 Mute Gmail Threads ................................................................................................................. 112 Delete Gmail Threads ............................................................................................................... 113 Search Gmail Messages ........................................................................................................... 114 Report Spam or Phishing Gmail ............................................................................................... 116 Add Another Google (Gmail) Account ...................................................................................... 116 Switching between Gmail Accounts .......................................................................................... 119 Email ................................................................................................................................................. 120 Set Up an Email Account .......................................................................................................... 120 Add an Email Account ............................................................................................................... 121 Add an Exchange ActiveSync Account ..................................................................................... 123 Compose and Send Email ........................................................................................................ 124 Open Email Messages .............................................................................................................. 125 Delete an Email Account ........................................................................................................... 126 Manage Your Email Inbox ......................................................................................................... 127 Exchange ActiveSync Email Features ...................................................................................... 128 Browser ............................................................................................................................................. 129 Use the Browser ....................................................................................................................... 130 Add a Bookmark ....................................................................................................................... 131 View Browser History ................................................................................................................ 133 Open New Browser Tabs .......................................................................................................... 134 Browser Settings ....................................................................................................................... 135 Get Chrome Support ................................................................................................................. 136 Camera and Video .................................................................................................................................... 138 Take Pictures and Record Videos .................................................................................................... 138 Take a Picture ........................................................................................................................... 138 Record Videos .......................................................................................................................... 139 View Pictures and Videos Using Gallery .......................................................................................... 140 Edit Pictures ...................................................................................................................................... 141 Share Pictures and Videos ............................................................................................................... 146 Send Pictures or Videos by Email ............................................................................................ 146 Send a Picture or Video by Multimedia Message ..................................................................... 148 Send Pictures or Videos Using Bluetooth ................................................................................. 150 Share Pictures or Videos via Additional Apps or Social Media ................................................ 152 Share Videos on YouTube ........................................................................................................ 154
TOC  v Switch Cameras ................................................................................................................................ 156 Camera Modes .................................................................................................................................. 156 Camera Settings ............................................................................................................................... 157 Useful Apps and Features ......................................................................................................................... 159 Calculator .......................................................................................................................................... 159 Calendar ............................................................................................................................................ 159 Add an Event to the Calendar ................................................................................................... 159 View Calendar Events ............................................................................................................... 161 Sync Calendars ......................................................................................................................... 162 Synchronize an Exchange ActiveSync Calendar ...................................................................... 163 Clock ................................................................................................................................................. 164 Set Alarms ................................................................................................................................. 165 Additional Clock Features ......................................................................................................... 166 Facebook .......................................................................................................................................... 166 Install the Facebook App on Your Phone ................................................................................. 167 Use Facebook ........................................................................................................................... 168 File Manager ..................................................................................................................................... 168 Google Search .................................................................................................................................. 168 Google Voice Search ........................................................................................................................ 169 Google+ ............................................................................................................................................. 170 Hangouts ........................................................................................................................................... 171 Google Maps ..................................................................................................................................... 173 Music Player ...................................................................................................................................... 175 Listen to Music Using the Music Player .................................................................................... 175 The Playback Screen ................................................................................................................ 176 Create a Playlist ........................................................................................................................ 177 Manage Playlists ....................................................................................................................... 178 Manage Songs in a Playlist ....................................................................................................... 179 Set a Song as Ringtone ............................................................................................................ 179 Google Play Music App ..................................................................................................................... 180 Play Music with Google Play ..................................................................................................... 180 Google Play Music Screen Layout ............................................................................................ 182 Create Playlists in Google Play Music ...................................................................................... 183 Sound Recorder ................................................................................................................................ 185 Voice Dialer ....................................................................................................................................... 186
TOC vi Twitter ............................................................................................................................................... 186 Install the Twitter App on Your Phone ...................................................................................... 186 Tweet on Twitter ....................................................................................................................... 187 LinkedIn ............................................................................................................................................. 187 Install the LinkedIn App on Your Phone ................................................................................... 187 Sign In to Your LinkedIn Account ............................................................................................. 187 YouTube ............................................................................................................................................ 188 View YouTube Videos ............................................................................................................... 188 Post a Video to YouTube .......................................................................................................... 188 Google Wallet .................................................................................................................................... 188 Connectivity ............................................................................................................................................... 190 Transfer Files between Your Phone and a Computer ...................................................................... 190 Wi-Fi .................................................................................................................................................. 191 Turn Wi-Fi On and Connect to a Wireless Network .................................................................. 191 Wi-Fi Settings ............................................................................................................................ 192 Disconnect Wi-Fi ....................................................................................................................... 193 Wi-Fi Direct ............................................................................................................................... 194 Mobile Hotspot .......................................................................................................................... 196 Tethering ........................................................................................................................................... 196 Bluetooth ........................................................................................................................................... 197 Bluetooth Information ................................................................................................................ 197 Enable the Bluetooth Feature ................................................................................................... 197 Pair Bluetooth Devices .............................................................................................................. 198 Connect to a Paired Bluetooth Device ...................................................................................... 199 Send Information Using Bluetooth ............................................................................................ 199 Receive Data via Bluetooth ....................................................................................................... 200 Settings ..................................................................................................................................................... 202 Airplane Mode ................................................................................................................................... 202 Wi-Fi Settings Menu .......................................................................................................................... 203 Bluetooth Settings ............................................................................................................................. 205 Mobile Networks Settings ................................................................................................................. 206 Data Usage Settings ......................................................................................................................... 206 Mobile Hotspot Settings .................................................................................................................... 207 More Settings .................................................................................................................................... 209 Virtual Private Networks (VPN) ......................................................................................................... 209
TOC  vii Prepare Your Phone for VPN Connection ................................................................................ 209 Set Up Secure Credential Storage ........................................................................................... 209 Add a VPN Connection ............................................................................................................. 210 Connect to or Disconnect from a VPN ...................................................................................... 210 Default SMS App Settings ................................................................................................................ 212 Bluetooth Tethering Setting .............................................................................................................. 212 Sound & Notifications Settings .......................................................................................................... 212 Display Settings ................................................................................................................................ 213 Date & Time Settings ........................................................................................................................ 214 Language & Input Settings ................................................................................................................ 215 Storage Settings ................................................................................................................................ 217 Battery Settings ................................................................................................................................. 217 App Settings ...................................................................................................................................... 218 Connect to PC Settings ..................................................................................................................... 218 Navigation Key Setting ...................................................................................................................... 219 Location Access Settings .................................................................................................................. 219 Security Settings ............................................................................................................................... 220 Backup & Reset ................................................................................................................................ 221 Accounts ........................................................................................................................................... 224 Accessibility Settings......................................................................................................................... 225 Printing .............................................................................................................................................. 226 Connect Your Printer to Your Google Account ......................................................................... 226 Use Cloud Print on Your Phone ................................................................................................ 227 Activate This Device .......................................................................................................................... 228 System Updates ................................................................................................................................ 229 About Phone ..................................................................................................................................... 229 For Assistance .......................................................................................................................................... 231 Troubleshooting ................................................................................................................................ 231 Specifications .................................................................................................................................... 232 Boost Account Information and Help ................................................................................................ 233 Manage Your Account .............................................................................................................. 233 Re-Boost ................................................................................................................................... 234 Index .......................................................................................................................................................... 235
 ...................................................................................................................................................................... 1 Introduction The following topics describe the basics of using this guide and your new phone. About the User Guide Thank you for purchasing your new ZTE PRESTIGE. The following topics explain how best to use this guide to get the most out of your phone. Before Using Your Phone Read the Get Started guide and Important Information booklet that were packaged with your phone thoroughly for proper usage. Accessible services may be limited by subscription contract conditions. Descriptions in the User Guide Note that most descriptions in this guide are based on your phone's setup at the time of purchase. Unless otherwise noted, instructions begin from the phone's home screen, which is displayed by touching the Home key  . Some operation descriptions may be simplified. Screenshots and Key Labels Screenshots and other illustrations in this user guide may appear differently on your phone. Key labels in the user guide are simplified for description purposes and differ from your phone's display. Other Notations In the user guide, the phone may be referred to either as "phone," "device," or "handset." A microSD™ or microSDHC™ card is referred to as an "SD Card" or a "memory card."
 ...................................................................................................................................................................... 2 Get Started The following topics give you all the information you need to set up your phone and wireless service the first time. Parts and Functions These topics illustrate your phone’s primary parts and key functions. Note: Your phone's screens and apps layouts are subject to change. This user guide uses sample images only. Phone Layout  The following illustration outlines your phone’s primary external features and keys.      Part Description Indicator light Displays a phone notification, charging status, or alert. Volume keys Allow you to adjust the ringtone or media volume or adjust the voice volume during a call. Touchscreen Displays all the information needed to operate your phone, such as the call status, the Contacts list, and the date and time. Also provides one-tap access to all of your features and applications. Back key   Lets you return to the previous screen, or close a dialog box, options menu, the notification panel, or onscreen keyboard.
 ...................................................................................................................................................................... 3 Part Description Earpiece Lets you hear the caller and automated prompts. Front camera lens Takes pictures and records videos while facing the screen, and allows you to video conference. Power/Lock key Lets you turn the phone on or off or turn the screen on or off, or switch your phone to silent mode, vibration mode, or airplane mode. Recent Apps key   Displays a list of recently used applications. Home key   Returns you to the home screen.  Back camera lens Lets you take pictures and videos. Flash Helps illuminate subjects in low-light environments when the camera is focusing and capturing a picture or video. Charging/micro-USB jack Allows you to connect the phone charger or the USB cable (included).  3.5 mm headset jack Allows you to plug in either a stereo headset or an optional headset for convenient, hands-free conversations.  Speaker Lets you hear the different ringtones and sounds. The speaker also lets you hear the caller’s voice in speakerphone mode.  CAUTION! Inserting an accessory into the incorrect jack may damage the phone. nano-SIM Card The SIM card is an IC card containing phone number and other customer information. Handling a nano-SIM Card Keep the following in mind when handling a nano-SIM card. ●  Customer is responsible for any damage caused by inserting nano-SIM card in another-brand IC card reader, etc. Boost Mobile is not responsible in such case. ●  Always keep the IC chip clean. ●  Wipe clean with a dry, soft cloth. ●  Avoid applying labels. May damage nano-SIM card. ●  See instructions included with nano-SIM card for handling.
 ...................................................................................................................................................................... 4 ● nano-SIM card is the property of Boost Mobile. ● nano-SIM card is replaceable (at cost) in case of loss/damage. ●  Return nano-SIM card to Boost Mobile when canceling subscription. ●  Returned nano-SIM cards are recycled for environmental purposes. ●  Note that nano-SIM card specifications and performance may change without notice. ●  It is recommended that you keep a separate copy of information that is stored on nano-SIM card. Boost Mobile is not responsible for damages from stored information that is lost. ●  Always follow emergency procedures to suspend service if your nano-SIM card or phone (nano-SIM card inserted) is lost/stolen. For details, contact Customer Service. ●  Always power off phone before inserting/removing nano-SIM card. Insert nano-SIM Card Follow these instructions to insert a nano-SIM card. Remember to power off your phone before inserting a nano-SIM card. Note: Your phone’s nano-SIM card is preinstalled. These instructions are for reference only. 1.  Remove the battery cover.     Lift gently in the direction shown.
 ...................................................................................................................................................................... 5 2.  Remove the battery.     Lift upward gently as shown. 3.  Insert the nano-SIM card.     Insert gently with gold IC chip facing downward.
 ...................................................................................................................................................................... 6 4.  Insert the battery.     Align the contacts of the battery with the contacts in the phone. 5.  Attach the battery cover.     Make sure all the tabs are secure and there are no gaps around the cover. SD Card Your phone supports the use of an optional SD card (not included) to expand its storage capacity. It supports cards up to 32 GB. Some cards may not operate properly with your phone.
 ...................................................................................................................................................................... 7  SD Card Cautions Data: Information stored on SD Card can become lost or changed accidently or as a result of damage. It is recommended that you keep a separate copy of important data. Boost Mobile is not responsible for damages from data that is lost or changed. Reading/Writing Data: Never power off or remove Battery while reading or writing data. Battery Level: A low battery charge may prevent reading/writing to SD Card. Handling SD Card: Use/store SD Cards away from the reach of infants. May cause choking if swallowed. Insert SD Card Follow these steps to insert an optional SD card (not included). Make sure to power your phone off before inserting or removing an SD card. 1.  Remove the battery cover.     Lift gently in the direction shown. 2.  Remove the battery.
 ...................................................................................................................................................................... 8 3.  Insert SD card.     Insert SD Card all the way gently without bending and with terminals facing down.   Insert only SD Cards. 4.  Insert the battery.     Align the contacts of the battery with the contacts in the phone.
 ...................................................................................................................................................................... 9 5.  Attach the battery cover.     Make sure all the tabs are secure and there are no gaps around the cover. Unmount the SD Card Always unmounts the SD card before removing it from your phone. 1.  From home, tap Apps   > Settings   > Storage.
 .................................................................................................................................................................... 10 2.  Tap Unmount SD Card > OK.        The menu option name changes from Unmount SD Card to Mount SD Card. The card is now unmounted. Remove SD Card Follow these instructions to remove an SD card. Always power the phone off before inserting or removing an SD card. 1.  Remove the battery cover.
 .................................................................................................................................................................... 11   Lift gently in the direction shown. 2.  Remove the battery. 3.  Remove SD card. 4.  Insert the battery.     Align the contacts of the battery with the contacts in the phone. 5.  Attach the battery cover.     Make sure all the tabs are secure and there are no gaps around the cover. Format SD Card When you insert an optional SD card for the first time, it is recommended that you format it on your phone.
 .................................................................................................................................................................... 12 1.  From home, tap Apps   > Settings   > Storage.   2.  Tap Erase SD Card.
 .................................................................................................................................................................... 13 3.  Tap ERASE SD CARD, and then tap ERASE EVERYTHING to confirm.        All data on the SD card is erased, and the card is formatted for use on your phone . Battery Use The following topics explain how to insert and remove your phone’s battery.  Battery Cautions Storage: Avoid storing or leaving battery with no charge remaining. Saved information and settings may become lost or changed, or battery may become unusable. Charge once every six months before storing or leaving unused for a long period. Bulges: Depending on use, bulges may appear near end of battery life. This does not affect safety. Replacing Battery: The battery is a consumable item. It needs to be replaced if operating time shortens noticeably. Purchase a new battery. Cleaning: Clean soiled terminals between battery and phone with a clean, dry cotton swab. Soiled terminals can result in a poor connection and prevent charging, etc. Insert the Battery Follow these instructions to insert your phone’s battery safely and properly.
 .................................................................................................................................................................... 14 1.  Remove the battery cover.     Lift gently in the direction shown. 2.  Insert the battery.     Align the contacts of the battery with the contacts in the phone.
 .................................................................................................................................................................... 15 3.  Attach the battery cover.     Make sure all the tabs are secure and there are no gaps around the cover. Remove the Battery Follow these instructions to remove your phone’s battery. Always power the phone off before removing the battery. 1.  Remove the battery cover.     Lift gently in the direction shown.
 .................................................................................................................................................................... 16 2.  Remove the battery.       Lift upward gently as shown. Charge the Battery Follow these instructions to charge your phone’s battery using either the included AC adapter or via a USB connection on your computer. Charge Using the AC Adapter 1.  Plug the USB connector into the charging/micro-USB jack on the bottom of your phone.   2.  Plug the other end of the USB cable into the AC adapter. 3.  Plug the AC adapter into an electrical outlet.
 .................................................................................................................................................................... 17   The indicator light illuminates when charging starts. The light goes off when the battery is fully charged. Fully charging a battery may take up to three hours. 4.  After charging, disconnect the phone from the charger.    Unplug the AC adapter from the outlet, and remove the USB cable from the phone and the AC adapter. Charge Using a PC Connection Before using a PC connection to charge your phone, ensure that the computer is turned on. Depending on the type of connection, your phone’s battery may not charge. 1.  Insert the small end of the USB cord into the charger/accessory jack on the bottom of your phone.   2.  Insert the large end of the USB cord into an external USB port on your computer. 3.  After charging, remove the USB cable from both the phone and the computer. Turn Your Phone On and Off The instructions below explain how to turn your phone on and off. Turn Your Phone On ■ Press and hold the Power/Lock key.   Your phone will power on. Depending on the settings, you may see the lock screen.   The first time you turn the phone on, you will see the startup screens. See Complete the Setup Screens for details.   If your phone is not yet activated, see Activation and Service for more information.
 .................................................................................................................................................................... 18 Turn Your Phone Off 1.  Press and hold the Power/Lock key to display the device options menu.    2.  Tap Power off to turn the phone off.    Your phone will power off. Your screen remains blank while your phone is off (unless the battery is charging). Use the Touchscreen Your phone’s touchscreen lets you control actions through a variety of touch gestures. Tap  When you want to type using the onscreen keyboard, select items onscreen such as application and settings icons, or press onscreen buttons, simply tap or touch them with your finger.   Touch and Hold To open the available options for an item (for example, a contact or link in a Web page), touch and hold the item.
 .................................................................................................................................................................... 19   Swipe or Slide To swipe or slide means to quickly drag your finger vertically or horizontally across the screen.   Drag To drag, press and hold your finger with some pressure before you start to move your finger. While dragging, do not release your finger until you have reached the target position.   Flick Flicking the screen is similar to swiping, except that you need to swipe your finger in light, quick strokes. This finger gesture is always in a vertical direction, such as when flicking the contacts or message list.
 .................................................................................................................................................................... 20   Rotate For most screens, you can automatically change the screen orientation from portrait to landscape by turning the phone sideways. When entering text, you can turn the phone sideways to bring up a bigger keyboard. See Touchscreen Keyboards for more details.   Note: The Auto-rotate check box needs to be selected for the screen orientation to automatically change. From home, tap Apps   > Settings   > Display > Auto-rotate screen. Tip: You can also access the screen rotation setting from the notification panel. Pull down the status bar and tap Screen rotation to select or deselect the option. Pinch and Spread “Pinch” the screen using your thumb and forefinger to zoom out or “spread” the screen to zoom in when viewing a picture or a Web page. (Move fingers inward to zoom out and outward to zoom in.)
 .................................................................................................................................................................... 21       Activation and Service Before using your phone, you must set up your service with Boost Mobile. You will need your phone’s serial number (MEID), printed on a sticker inside the battery compartment. For more information about your Boost Mobile account, see Boost Account Information and Help. Create Your Account and Pick Your Plan Set up your Boost Mobile account. 1. From your computer, visit boostmobile.com/activate. 2. Enter your phone’s MEID and click start activation process.  Your phone’s MEID (serial number) is printed on the sticker located on the back of your phone in the battery compartment. This number can also be found on the bottom panel of the phone’s package. 3.  Follow the remaining instructions to choose your plan and select a payment method. 4. Follow the activation instructions below and you’ll be able to start using your phone. Note: You can also activate by phone by calling 1-888-BOOST-4U (1-888-266-7848) from any other phone. Activate Your Phone After setting up your account on boostmobile.com, simply turn your device on. Your device is designed to activate automatically. If you are swapping from another Boost Mobile device to a new one, be sure to turn off the old device before swapping the serial number (MEID). Once the MEID swap is complete, turn on the new device and the programming information will be pushed to your device automatically. You can also start the activation process manually. ■ From home, tap Apps   > Settings   > Activate this device.
 .................................................................................................................................................................... 22 Complete the Setup Screens The setup screens help you set up certain features and preferences on your phone. Once your phone has been turned on, you can then complete the setup process. Note: You may be able to complete the setup screens before your phone has been activated on your account. 1.  On the Talkback screen, activate the Talkback feature by tapping the center of the screen if you have sight problems, or tap Accessibility to explore other accessibility features.       If you have no accessibility problem with the phone, tap Next. 2.  On the Language screen, select a language for your phone display and tap Next.
 .................................................................................................................................................................... 23 3.  On the Why use Wi-Fi screen, tap Next.  4.  On the Select Wi-Fi screen, tap a Wi-Fi network to connect with it or tap SKIP > SKIP ANYWAY to finish the setup process.       Your phone is now set up for use. If you skipped any part of the setup, you can access additional options through the Apps screen or through Settings.
 .................................................................................................................................................................... 24 Basic Operations The following topics outline basic features and operations of your phone. Basics The following topics offer an overview of your phone’s basic operations. Home Screen and Applications (Apps) List Most of your phone’s operations originate from the home screen or the apps list. 1.  From any screen press the Home key   to display the home screen. 2.  Tap Apps   to display the apps list.      For information about using the home screen, see Home Screen Basics. Select Options and Navigate Screens Tap icons, onscreen keys, and other items to open or activate the assigned function. For example, to open Calculator, tap the Home key to get to the home screen and then tap Apps   > Calculator  .
 .................................................................................................................................................................... 25       ■ Tap Back   to return to the previous screen. Recent Applications You can display a list of recently used applications using the Recent Apps key. ■ Tap Recent Apps   to view a list of recently used applications.
 .................................................................................................................................................................... 26 Phone Settings Menu You can customize your phone’s settings and options through the Settings menu. ■ From home, tap Apps   > Settings  .  – or –  Pull down the status bar and tap   >  .    For more information, see Settings. Portrait and Landscape Screen Orientation The default orientation for your phone’s screen is portrait (vertical), but many apps will change to landscape orientation (widescreen) when you rotate the phone sideways.
 .................................................................................................................................................................... 27  Note: Not all screens will adjust for landscape orientation. Turn Screen Rotation On or Off  1.  Pull down the status bar to display the quick settings menu.  2.  Tap Auto Rotate   to turn the option on or off.     You may need to scroll left or right to see the Screen rotation option.    If the Auto Rotate option is not available, tap EDIT to display the full options list.  Note: You can also set the rotation option from the main settings menu. From home, tap Apps   > Settings   > Display  > Auto-rotate screen. Capture Screenshots You can use your phone’s power and home keys to capture screenshots. ■ Press and hold the Power/Lock key and Volume Down key at the same time to capture a screenshot of the current screen.  The current screenshot will be captured and stored in the Screenshots album in the phone’s Gallery. From home, tap Apps   > Gallery  .
 .................................................................................................................................................................... 28 Applications The following topics describe how to access the applications (apps) list and launch apps on your phone. Launch Applications All installed apps can be accessed and launched from the apps list. 1.  From home, tap Apps  .       The apps list opens. 2.  Tap an app icon to launch the corresponding application.
 .................................................................................................................................................................... 29  Apps List  The apps list expands to include any apps you download and install on your phone. The following table outlines the primary apps that have been preinstalled on your phone. App Function/Service  Boost Zone Manage your Boost account and get support, news, apps, and more right from your phone. Browser Browse the Internet and get your bookmarks, browsing history.  Calculator   Perform basic and advanced mathematical equations and calculate tips.  Calendar Organize your time and reminds you of important events.  Camera Take and share pictures and videos.  Chrome Browse the Internet and get your bookmarks, browsing history, and more synced with your Google Account.
 .................................................................................................................................................................... 30 App Function/Service Clock Set alarms, view time in time zones around the world, use stopwatch, or set a time and count down to zero.  Contacts Store and manage contacts saved in your phone as well as contacts synchronized with your web accounts and computer.  Downloads Check the record of files you have downloaded using apps such as Browser or Email.  Drive Store and share files on Google servers for free after you sign in to your Google Account.  Email Send and receive emails from your webmail accounts or your corporate email accounts.  File Manager View and manage files stored on your phone's internal storage and your SD card as well as a USB device when they are available.  Gadget Guardian Protect your phone from malware and spyware, back up your data, and locate your phone when it's missing.  Gallery View and manage pictures and videos on your phone.  Gmail Send and receive emails from your POP3 and IMAP email accounts as well as your Google Accounts.  Google Use Google search or get information when you need it with Google Now.  Google Settings Manage some settings related to Google applications.  Google+ Socialize with friends on the Google+ online community.  Hangouts Chat with Google+ friends or send text or multimedia messages.  Maps Find your place on the map and find your way in the world.  Messaging Exchange text messages (SMS) and multimedia messages (MMS).  Music Play audio files stored on your phone.
 .................................................................................................................................................................... 31 App Function/Service  Phone Place and receive calls and use voicemail.  Photos Manage photos on the phone and your Google Account.  Play Books Buy and read the electronic version of new bestsellers and classics.  Play Games Buy and play games from the Google Play Store. Share your gaming experience and progress with your friends.  Play Movies & TV Purchase, download and watch the latest and your favorite movies and TV shows.  Play Music Play music on the phone and on your Google Account.  Play Newsstand Purchase and read newspapers and magazines.  Play Store Buy and download apps, games, and other content from the Google Play Store.  Settings Customize and configure your phone.  Sound Recorder Record voice memos and listen to them whenever you like.  Video Player Play and management video files on your phone.  Voice Dialer Use speech recognition technologies to dial a phone number, open menus, or launch phone functions.  Voice Search Use Google search by voice.  Voicemail Use Visual Voicemail to check and manage your voicemail messages.  YouTube Watch video clips from YouTube.com, or upload your own and share with the world.
 .................................................................................................................................................................... 32 Phone Number Follow the instructions below to display your phone’s wireless phone number. 1.  From home, tap Apps   > Settings   > About phone. 2.  Tap Status.         You will see the number listed under My phone number. Airplane Mode Airplane mode turns off all functions that emit or receive signals, while leaving your phone on so you can use apps that don’t require a signal or data. To turn on airplane mode: 1.  Press and hold the Power/Lock key to display the device options menu.
 .................................................................................................................................................................... 33 2.  Tap Airplane mode.     Your phone is now in airplane mode. You will see the airplane mode icon   in the status bar. Tip: You can also access airplane mode through the status bar menu. Pull down the status bar and tap . Tap Airplane. To turn off airplane mode: 1.  Press and hold the Power/Lock key to display the device options menu.  2.  Tap Airplane mode.   Your phone’s wireless connection features are now restored. Tip: You can also access airplane mode through the status bar menu. Pull down the status bar and tap . Tap Airplane. Enter Text  You can type on your phone using one of the available touchscreen keyboards or Google voice typing. Touchscreen Keyboards  Your phone offers you a choice of three touchscreen keyboards for entering text. The keyboard appear automatically onscreen when you tap a text entry field, and they can be used in either portrait or landscape mode.  The methods available include: ● Google keyboard lets you use a traditional QWERTY setup to enter text. Additional options expand your ability to enter text faster and more accurately. See Google Keyboard for details. ● Swype lets you enter letters and words in one continuous motion by swiping your finger across the letters. See Swype for details. ● TouchPal X lets you use Curve® to speed up text input by replacing key-tapping gesture with a tracing gesture where you move your finger from letter to letter without lifting the finger until you reach the end of each word. See TouchPal X for details.
 .................................................................................................................................................................... 34 Note: Keyboard layouts and options may change depending on where you’re using them. For example, if you’re entering text to do a Web search, a search icon may be available instead of an enter key. To change the input method: 1.  Tap a text entry field, so that a keyboard displays on the screen. 2.  Slide the status bar down and tap Change keyboard. 3.  Select an available input method. Note: If you cannot find the input keyboard that has been installed, it may have been disabled. To enable it, from the home screen, tap Apps   > Settings   > Language & input > Current Keyboard > CHOOSE KEYBOARDS and tap the input keyboard that is disabled. Google Keyboard   The Google keyboard offers a traditional QWERTY keyboard setup for entering text by tapping keys (like on a computer), along with enhancements and options that allow you to enter text faster and more accurately, such as continuous key input, personalized usage dictionaries, and more. Use Android Keyboard  ●  Tap the alphabetic keys to enter letters. Touch and hold some specific keys to enter associated accented letters or numbers. For example, to enter È, touch and hold   and the available accented letters and number 3 appear. Then slide to choose È. ●  As you enter a word, candidates appear above the keyboard. Tap to select the correct one; touch and hold to see more possible options. ●  Tap   to use uppercase. Double-tap    to lock uppercase. This key also changes to indicate the current case you are using:   for lowercase,   for uppercase, and   when locked in uppercase. ●  Tap   to delete the text before the cursor.
 .................................................................................................................................................................... 35 ●  Tap   to select numbers and symbols. You can then tap   to find more. ●  Tap    to enter miniature icons, such as expressions, horoscopes, and animals. ●  Tap    to use Google voice typing. ●  Touch and hold   to change the input languages or set up the Google keyboard. Use Gesture Typing The Google keyboard supports the gesture typing feature. You use this feature to input a word by sliding through the letters. To enable and use gesture typing: 1.  Touch and hold   on the Google keyboard and then tap Google Keyboard Settings. 2.  Tap Gesture Typing and then tap Enable gesture typing if this feature is turned off. 3.  Move your finger from letter to letter on the keyboard to trace a word without lifting the finger until you reach the end of the word.  Swype  The Swype™ keyboard lets you enter words by drawing a path from letter to letter in one continuous motion. When you lift your finger after the last letter of a word, a space is automatically added.
 .................................................................................................................................................................... 36 Use Swype  ●  Tap the alphabetic keys to enter letters. Touch and hold specific keys to enter associated accented letters, symbols, or numbers. For example, to enter Ţ, touch and hold   to open available characters and numbers. Slide to choose Ţ and release. ●  Tap   to use uppercase. Tap   twice to lock uppercase. This key also indicates the current case:   for lowercase,   for uppercase, and   when locked in uppercase. ●  Tap   to enter a space. Touch and hold this key to open a pop-up menu for language selection. ●  Tap   to select numbers and symbols. Tap   to find more symbols. Tap   to go back to enter letters. ●  Touch and hold   or   and then slide to choose different keyboards. You can select keyboards layouts suitable for left hand, right hand or two hands, open a phone keypad to enter numbers and certain symbols, open a pop-up menu to choose emoticons, or open a text editing panel where you can select, copy, and paste text. ● Tap   to enter a smile symbol. Hold  or  to open an emoticon list. ●  Tap   to delete a character before the cursor. Touch and hold    to delete words one by one before the cursor. ●  Tap   to use Google voice typing. ●  Touch and hold   to open the Swype settings. To enter text via Swype: Move your finger from letter to letter to trace a word without lifting the finger until you reach the end of the word.
 .................................................................................................................................................................... 37 The following example shows how to enter the word "here". Put your finger on "h" and slide to "e", "r", and back to "e". When complete, lift your finger off the screen and the matched words are displayed.  Tips for using Swype Text Input: ●  To enter double letters, scribble slightly or make a loop on the letter. For example, to get the "ll" in "hello", scribble (or make a loop) on the "l" key. ●  Lift your finger at the end of the word. A space is added automatically when you "Swype" the next word. For more information about using Swype and its additional capabilities, including using voice entry and personalizing your Swype dictionary, touch and hold   from the Swype keyboard display and then tap How to Swype. You can also visit swype.com for more information. TouchPal X TouchPal X Keyboard offers three layouts including T26, T12 and T+. You can tap   to select a layout or an input language. You can also use Curve® to speed up text input by replacing the key tapping operation with a tracing gesture where you move your finger from letter to letter without lifting the finger until you reach the end of the word. The T26 Layout  The T26 layout offers an input experience similar to a computer keyboard.
 .................................................................................................................................................................... 38 ● The alphabetic keys: Tap the keys to enter letters. Touch and hold a key and slide to choose more characters. ● The capital key: Tap   to use uppercase. Double-tap   to lock uppercase. This key also changes to indicate the current case you are using:   for lowercase,   for uppercase, and  when locked in uppercase. ● Word prediction: Slide left or right on the space key to turn on or off prediction, as indicated by  and  . ● Language and layout: Tap   to select an input language or a keyboard layout. ● Pre-defined texts: Tap   to enter digits and symbols. You can tap the arrow keys to turn pages, or tap   to go back to the alphabetic keys. Touch and hold   or slide up on the space key to enter Emoji and emoticons. ● The delete key: Tap    to delete text before the cursor. You can also slide left on the key to delete a whole word. ● Voice input: Tap   and speak through the microphone. ● Edit text: Tap   to open text editing options. You can move the cursor, select, copy, cut, paste, or delete text. ● More options: Tap   to access the quick settings of TouchPal X keyboard, change the keyboard theme, and more. ● Close the keyboard: Tap  . You can tap the text field again to show the keyboard. The T12 Layout The layout is similar to a phone pad in T12 mode.
 .................................................................................................................................................................... 39 Tap an alphabetic key repeatedly until the desired letter appears. You can also touch and hold the key and slide left or right to choose the letter or number you need. If word prediction is enabled ( ), just tap the keys once and choose the right word. The T+ Layout  Tap to enter the left letter on the key. Double-tap or flick right to enter the right letter/symbol on the key. You can also touch and hold a key and slide left or right to choose more letters and symbols. If word prediction is enabled ( ), just tap the keys and choose the right word. Curve Word Gesture Curve allows you to enter text by moving your finger on the screen from letter to letter to enter each word. To enable and use Curve: 1.  On the TouchPal X keyboard, tap   > Settings and check Curve - Word gesture. 2.  If prompted, tap OK to switch to the T26 layout. 3.  Move your finger from letter to letter on the keyboard to trace a word without lifting the finger until you reach the end of the word. Note: Curve is only available in the T26 layout.
 .................................................................................................................................................................... 40 Tip: Tap when you want to. If you want to enter a single letter, go ahead and tap the key. Tip: Lift your finger at the end of the word. A space is added automatically when you begin to trace the next word. Tips for Editing Text  Your phone gives you many options to make entering text easier, including copying, cutting, and pasting text, customizing the user dictionary, using predictive text, and more. ●  To move the insertion point, tap where you want to type. The cursor blinks in the new position, and a tab appears below it. Drag the tab to move the cursor. ●  To select text, touch and hold or double-tap the text. The nearest word is selected, with a tab at both ends of the selection. Drag the tabs to change the selection. To cancel the selection, simply tap the text field. ●  To cut or copy text, select the text you want to manipulate. Then tap   (cut) or   (copy) in portrait mode. ●  To replace text with the clipboard text, select the text you want to replace. Then tap PASTE or  .   ●  You can customize your personal dictionary for word suggestion and spell check. From home, tap Apps   > Settings   > Language & input > Personal dictionary. Then select a language and tap the Add (+) icon to add a new word. ●  Many input methods have predictive text features of their own. You may need to configure them separately. For example, when using the TouchPal X keyboard, slide left or right on the space key to turn on or off prediction, as indicated by   and  .. For Swype, you can tap Apps  from home and select Settings   > Language & input > Swype > Settings and configure prediction options like Auto-correction and Next word prediction. Google Account You will need a Google Account to access several phone features such as Gmail, Google Maps, Hangouts, and the Google Play applications. Before you are able to access Google applications, you must enter your account information. These applications sync between your phone and your online Google Account.
 .................................................................................................................................................................... 41  Google Account Cautions Be sure not to forget your Google Account ID or password. Create a Google Account If you do not already have a Google Account, you can create one online or using your phone. Note: You can also create and sign into your Google/Gmail account through your phone’s Setup application. Note: Although you need a Gmail account to use certain features of your phone, such as Google Play, you do not need to use Gmail as the default account for your phone. Create a Google Account Online 1.  From a computer, launch a Web browser and navigate to google.com. 2.  On the main page, click Sign-in > Create an account. 3.  Follow the onscreen prompts to create your free account. 4.  Look for an email from Google in the email box you provided, and respond to the email to confirm and activate your new account. Create a Google Account Using Your Phone 1.  From home, tap Apps   > Settings   > Accounts > Add account.
 .................................................................................................................................................................... 42 2.  Tap Google and then tap Or create a new account.    3.  Follow the prompts to set up your account. Tap Next to proceed between steps, which may include:   Enter your First name and Last name.    Enter a desired Username.   Enter and reenter a password.    Create a security question and answer, enter a secondary email address to help you recover your password if you ever lose it.    On the Finish account screen, select your Web history and additional Google Play options.   Enter the letters from the Authenticating screen.    After your phone connects with the Google servers, select the items you would like to sync with your phone and then tap Sync now.  4.  Tap Finish setup.    You are signed in to your Google Account, and your phone will synchronize the selected items. Note: When setting up a new Google Account, either on your phone or online, you will be prompted to add a secondary email address. Enter a second Gmail address or any other email address from which you currently send and receive email. This address is used to authenticate your account should you ever encounter problems or forget your password. It is strongly encouraged for Android users so you can regain access to Google services and purchases on your phone. Sign In to Your Google Account If you have a Google Account but have not yet signed in with your phone, follow these instructions to sign in to your Google Account.
 .................................................................................................................................................................... 43 1.  From home, tap Apps   > Settings   > Accounts > Add account > Google.  2.  Enter your Gmail address and then tap Next.      3.  Enter your password and then tap Next.  4.  After your phone connects with the Google servers, tap ACCEPT > to agree to Google privacy policy and terms of service.
 .................................................................................................................................................................... 44   5.  On the Google services screen, select your Google service options and tap NEXT >.   6.  Select Add credit or debit card or Redeem and tap NEXT > to set up your billing or gift card information for purchasing apps, games, movies, and books in the Google Play Store app from your phone. You can also select Remind me later and tap NEXT >.
 .................................................................................................................................................................... 45     You are signed in to your Google Account. Google Play Store  Google Play™ is the place to go to find new Android apps, books, movies, and music for your phone. Choose from a wide variety of free and paid content ranging from productivity apps and games to bestselling books and blockbuster movies and music. When you find what you want, you can easily download and install it on your phone. To access the Google Play store app, you must first connect to the Internet using your phone’s Wi-Fi or mobile data connection and sign in to your Google Account. See Browser and Sign In to Your Google Account for details.  Installing Applications Many different kinds of applications can be installed on your phone from Google Play (provided by Google Inc.). Boost Mobile is not responsible in any way for user-installed applications (quality, reliability, legality, fitness for a purpose, credibility, accuracy, etc.) or resulting malfunctions (viruses, etc.). Important: Our policies often do not apply to third-party applications. Third-party applications may access your personal information or require us to disclose your customer information to the third-party application provider. To find out how a third-party application will collect, access, use, or disclose your personal information, check the application provider’s policies, which can usually be found on their website. If you aren’t comfortable with the third-party application’s policies, don’t use the application.
 .................................................................................................................................................................... 46 Find and Install an App When you install apps from Google Play app and use them on your phone, they may require access to your personal information (such as your location, contact data, and more) or access to certain functions or settings of your phone. Download and install only apps that you trust. 1.  From home, tap Apps   > Play Store .  2.  When you open the Google Play store app for the first time, the Terms of Service window will appear. Tap ACCEPT to continue.     3.  Browse through the categories (Apps, Games, Movies & TV, Music, Books, or Newsstand), find an item you're interested in, and tap the name.
 .................................................................................................................................................................... 47   Browse through featured apps. Scroll through the list of featured apps when you open Google Play.   Search for an app. Tap   on the Google Play home screen, enter the name or type of app you’re looking for, and then tap the search key on the keyboard. 4.  Tap an app to read a description about the app and user reviews. 5.  Tap INSTALL (for free applications) or the price (for paid applications). Note: If you have not already done so, you will need to set up a payment method to purchase paid apps from Google Play. 6.  The subsequent screen notifies you whether the app will require access to your personal information or access to certain functions or settings of your phone. If you agree to the conditions, tap ACCEPT (for free apps) or ACCEPT and then BUY (for paid apps) to begin downloading and installing the app.   If you have not already set up a payment method, tap CONTINUE and then follow the prompts to arrange payment and complete the purchase.   The selected app is downloaded and installed on your phone. Warning: Read the notification carefully! Be especially cautious with applications that have access to many functions or a significant amount of your data. Once you tap OK on this screen, you are responsible for the results of using this item on your phone.  Purchasing Applications Purchase apps at your own risk. Boost Mobile is not responsible for any harm to you or third parties resulting from the use of purchased applications. Request a Refund for a Paid App If you are not satisfied with an app, you can ask for a refund within 15 minutes of the purchase. Your credit card is not charged and the app is uninstalled from your phone. If you change your mind, you can install the app again, but you can’t request a refund a second time. 1.  From home, tap Apps   > Play Store  . 2.  Tap Menu   > My Apps. 3.  Tap the app to uninstall for a refund. The details screen for the app opens. 4.  Tap REFUND, and then tap UNINSTALL. Your app is uninstalled and the charge is canceled. Update an App  Depending on your settings, many apps will update automatically, or you can update apps directly from the Play Store app.
 .................................................................................................................................................................... 48 Update an App Directly 1.  From home, tap Apps   > Play Store .  2.  Tap Menu   > My Apps.
 .................................................................................................................................................................... 49 3. Tap the app you want to update, and then tap UPDATE > ACCEPT.        The app update is downloaded and installed. Set Automatic App Updates 1.  From home, tap Apps   > Play Store .
 .................................................................................................................................................................... 50 2.  Tap Menu   > My Apps.    3.  Tap the app you want to set for auto-update, and then tap   and check Auto-update.
 .................................................................................................................................................................... 51   The app is set to update automatically whenever an update becomes available. Note: Automatic updates are unavailable for some apps. Uninstall an App You can uninstall any app that you have downloaded and installed from Google Play. 1.  From home, tap Apps   > Play Store .  2.  Tap Menu   > My Apps.
 .................................................................................................................................................................... 52 3.  On the Installed screen, tap the app you want to uninstall, and then tap UNINSTALL> OK.      The app is uninstalled and removed from your phone. . Get Help with Google Play The Google Play store app offers an online help option if you have questions or want to know more about the app. 1.  From home, tap Apps   > Play Store .  2.  Tap Menu   > Help & Feedback.   The Web browser will take you to the Google Play Help Web page, where you will find comprehensive, categorized information about Google Play. Lock and Unlock Your Screen Your phone allows you to quickly turn the screen off when not in use and to turn it back on and unlock it when you need it. Turn the Screen Off When Not in Use ■ To quickly turn the screen off, press the Power/Lock key. Pressing the Power/Lock key again or receiving an incoming call will turn on your phone screen and show the lock screen.
 .................................................................................................................................................................... 53 To save battery power, the phone automatically turns off the screen after a certain period of time when you leave it idle. You will still be able to receive messages and calls while the phone’s screen is off. Note: For information on how to adjust the time before the screen turns off, see Display Settings.  Turn the Screen On and Unlock It 1.  To turn the screen on, press the Power/Lock key.    The lock screen appears. 2.  Touch and hold an empty area of the screen to unlock it.   The screen is unlocked.   If you have set up a screen lock, you will be prompted to draw the pattern or enter the password or PIN. See Security Settings. Update Your Phone From time to time, updates may become available for your phone. You can download and apply updates through the Settings > System Update menu.  Software Update Cautions During update: The phone cannot be used until the software update is complete. It may take time to update your phone’s software. Signal during update: Update your phone where signal reception is good, and do not change location during the update process. Make sure the battery is adequately charged before beginning an update. A weak signal or low battery during an update may cause the update to fail. An update failure may disable the phone. Other functions during update: Other phone functions cannot be used during a software update. Update Your Phone Software You can update your phone's software using the System Update option. Before Updating Your Phone Updating your phone may result in a loss of saved data depending on the condition of your phone (malfunctioning, damaged, water seepage, etc.). You must back up all critical information before updating your phone firmware. Back Up All Data Prior to Update To back up your Gmail information: 1.  From home, tap Apps   > Settings   > Accounts > Google.
 .................................................................................................................................................................... 54 2.  Tap your Google Account to open the Sync screen.   If the Auto-sync data option is on, check the items you want to keep in sync.   If the Auto-sync data option is off, tap the items you want to synchronize to back up related data. To back up your Exchange Mail information: 1.  From home, tap Apps   > Settings   > Accounts > Corporate.  2.  Tap your corporate account to open the Sync screen.   If the Auto-sync data option is on, check the items you want to keep in sync.   If the Auto-sync data option is off, tap the items you want to synchronize to back up related data. To back up stored text messages: 1.  From home, tap Messaging  . 2.  Select the text message from the list to view the message thread. 3.  Tap a portion of the text message from the string. The Message options context menu appears. Note: You can back up stored text messages by forwarding them to your own phone number. Open the messages after you have updated your firmware. 4.  Tap Forward. 5.  Enter your phone number and tap  . To back up your Google apps: 1.  From home, tap Play Store  . 2.  Tap Menu   > My apps > ALL tab.  3.  Scroll through the list of previously downloaded Google apps and choose those you wish to reinstall. 4.  Follow the onscreen instructions. Note: Your Google app purchases are reloaded remotely and can be re-installed after the update is applied.  As an added precaution, to preserve any data on your SD card, please unmount it from your phone prior to starting the update process. From home, tap Apps   > Settings   > Storage > Unmount SD card.
 .................................................................................................................................................................... 55 Update Your Phone’s Software Once you have backed up all your data, use the Update now option to update your phone’s software. 1.  From home, tap Apps   > Settings   > System updates.   2.  Tap Update Firmware.       Your phone automatically downloads and installs any available updates. You may be required to power your phone off and back on to complete the software upgrade. Alternatively, you can access system updates through the notification panel. 1.  Locate the System Update Available icon ( ) in notifications. 2.  Pull down the status bar. 3.  Tap   to open the System Updates screen. 4.  Follow the onscreen instructions to restart and install the update. Confirm Your Current Phone Software 1.  From home, tap Apps   > Settings    > About device.  2.  Locate the Software version read-only field.  Update Your Profile  This option allows you to automatically update your online user profile information. If you choose to change your user name and select a new one online, you must then update the user name on your phone.
 .................................................................................................................................................................... 56 1.  From home, tap Apps   > Settings    > System updates > Update Profile.  2.  Follow the onscreen instructions.   The phone will download and install the profile update and you will see a confirmation when complete. Note: If your data services or account syncing ever seems to go out unexpectedly, use this feature to reconnect with the network. Update Your PRL  This option allows you to download and update the PRL (preferred roaming list) automatically. 1.  From home, tap Apps   > Settings    > System updates > Update PRL.    2.  Follow the onscreen instructions.   The phone will download and install the PRL update and you will see a confirmation when complete.
 .................................................................................................................................................................... 57 Your Phone Interface The following topics describe how to use and customize your phone’s home screen, understand the status bar, and use the notification panel. Home Screen Basics The home screen is the starting point for your phone’s applications, functions, and menus. You can customize your home screen by adding application icons, shortcuts, folders, widgets, and more.  Home Screen Layout Your home screen extends beyond the initial screen. Swipe the screen left or right to display additional screens.   Item Description Status bar   The status bar displays icons to notify you of your phone’s status (on the right side) and notifications (on the left side). Widget   Widgets are self-contained onscreen apps that reside on your phone’s home screen.
 .................................................................................................................................................................... 58 Item Description Application icons   Application icons are shortcuts to favorite applications. You can add and remove these shortcuts as you wish. Folder You can group shortcuts on the home screen into folders for convenient access. Primary shortcuts   Primary shortcuts are application shortcuts that appear in the same location on all of your phone’s home screens. These are customizable except for the Applications (Apps) shortcut, which remains static. Applications (Apps) list key   Tap to open the applications (apps) list. The apps list key is a primary shortcut available from all home screens.  Note: Your phone’s home screens cycle through so that you can keep swiping in one direction and make it back to the main home screen. The small circles above the primary shortcuts let you know your current screen position. Tip: Press Home key   to return to the main home screen from any other screen.  Extended Home Screens In addition to the main home screen, your phone features extended home screens to provide more space for adding icons, widgets, and more. Press Home key   to display the main home screen and then slide the screen right or left to move from the main screen to an extended screen. There are up to eight and at least two extended screens available in addition to the main home screen. ●  If you are not already using the maximum number of screens for your phone, you can add more screens when adding a shortcut or widget to the home screen. See Add Shortcuts to the Home Screen and Add Widgets to the Home Screen. ●  If there are more than two extended screens and you remove all contents from one screen, the empty screen is deleted automatically. ●  While on an extended screen, tap the Home key   to return to the main home screen. To delete or set the home screens:
 .................................................................................................................................................................... 59 ■ From any home screen, touch and hold an empty area to display thumbnail images of all screens.      To delete a home screen, tap   on the corner of its thumbnail and select OK.   To set a home screen as the main home screen, tap   at the bottom of its thumbnail.   To change the order of the screens, touch and hold a thumbnail and drag it left or right to a new position. Status Bar and Notification Panel Your phone’s status and notifications are available at a glance at the top of the screen. Status Bar The status bar at the top of the home screen provides phone and service status information on the right side and notification alerts on the left. To view the notification panel or access the quick settings menu, pull down the status bar from the top of the screen. Status Bar Layout
 .................................................................................................................................................................... 60 Main Notification Icons Icon Notification  New text message  New multimedia message   New messages from the Email app  /   New messages from the Gmail app  Missed call  New voicemail  New Hangout message  Upcoming event  USB connection  Call in progress  Downloading or receiving data  Uploading or sending data  Open Wi-Fi network detected  Wired headset connected  /   Music playing  Updates available from the Google Play Store  SD card unmounted and safe to remove
 .................................................................................................................................................................... 61  Main Status Icons Icon Status  Bluetooth® active  GPS active  Wi-Fi® active  Wi-Fi transferring data  Signal strength  3G network available  Enhanced 4G LTE network available  /   Using mobile data  Airplane mode  Alarm set  Battery full  Battery low  Battery charging  Priority mode  Silent mode  Vibration mode
 .................................................................................................................................................................... 62 Icon Status  Speakerphone on  Microphone off  Notification Panel Your phone’s notifications appear at the left side of the status bar, and you can access the full notification panel by pulling down the status bar. From there, you can check notifications, download updates, open messaging apps, use the quick settings menu, and more. Open the Notification Panel ■ Pull down the status bar. (Slide your finger down from the top of the screen.)      The notification panel opens. To check notifications, tap an item in the list. Close the Notification Panel ■ Slide the notification panel up. (Slide your finger up from the bottom of the screen.)  – or –
 .................................................................................................................................................................... 63  Tap Back   to close the notification panel. Notification Panel Layout The notification panel gives you access both to notifications and the quick settings menu.   Customize the Home Screen Learn how to set the wallpaper and add, move, or remove shortcuts, widgets, and folders from the home screen. Operations for Rearranging the Home Screen ● Moving Widgets and Icons: From home, touch and hold an item and then drag it to the desired location. ● Deleting Widgets and Icons: From home, touch and hold an item and then drag it to Delete  . ● Displaying the Home Screen Menu: From home, touch and hold an empty space to display the home screen menu. Menu options include Wallpapers, Widgets, and Home screen settings, and you also have the option to add or remove home screens. Change the Wallpaper  Select and assign your phone’s background wallpaper.
 .................................................................................................................................................................... 64 1.  From home, touch and hold an empty space, and then tap Wallpapers.       You can also access the wallpaper menu through settings. From home, tap Apps   > Settings   > Display > Wallpaper. 2.  Tap an option to select the wallpaper. 3.  If necessary, tap Set wallpaper.   The wallpaper is set. Note: If you select Gallery, you will need to select an album and a picture. Once selected, use the crop tool to resize and position the image and then tap  . Add Shortcuts to the Home Screen You can add shortcuts for quick access to favorite apps from the home screen. 1.  From home, tap Apps  .   The Apps list opens. 2.  Touch and hold an app icon.   The icon will disengage and you will see thumbnails of your home screens.
 .................................................................................................................................................................... 65 3.  Drag the icon to an empty location on one of the home screens.   The shortcut is added to the home screen. Add Widgets to the Home Screen You can add widgets to your phone’s home screen. Widgets are self-contained apps that display on a home screen. Unlike a shortcut, the Widget works like as an onscreen application. There are all kinds of widgets, including links to a specific contact, Internet bookmarks, Facebook® status windows, Gmail and email accounts, and many others. 1.  From home, touch and hold an empty space, and then tap Widgets.   2.  Touch and hold a widget icon.    The icon will disengage and float with your finger. 3.  Drag the icon to an empty location on one of the home screens. Note: If there are less than eight extended home screens, you can add a new extended home screen while you add a widget. Just drag the widget icon to the right edge of the screen and drop it after you reach the right-most screen.   The widget is added to the home screen. Add Folders to the Home Screen You can group home screen shortcuts into folders for convenient access.
 .................................................................................................................................................................... 66 1.  From home, touch and hold a shortcut you want to place in a folder, and then drag it to Folder .   2.  Type a name for the folder and tap OK.   A new folder is created. 3.  To add more app shortcuts to the folder, touch and hold a shortcut and drag it on top of the new folder.   The new shortcut is added to the folder. Change Folder Names Once you have added folders, you can change the name easily from the folder display. 1.  From home, tap the folder to open it, and then tap the folder name.  2.  Type a new name and then tap Done.
 .................................................................................................................................................................... 67 Phone App The following topics outline the use of your device’s phone app to place and receive calls, use voicemail, set up and manage contacts, and more. Place and Answer Calls The following topics describe how to directly dial calls, how to answer incoming calls, and how to use the in-call screen options. Adjust In-Call Volume ■ Adjusting Call Volume: Press the Volume Up/Down keys during the call. Troubleshooting Question: Difficulty during call. Answer 1: It may not be possible to make a call properly in a noisy location. Answer 2: When calling using Speaker, check the call volume. Raising the call volume may make calling difficult. Question: Sound pops momentarily during a call. Answer: Are you changing location while calling? Sound pops when signal is weak and the phone switches to a different area.  Emergency Call Cautions Emergency calls are restricted in Airplane mode. Call Using the Phone Dialer The most “traditional” way to place a call is by using the phone’s dialer screen.
 .................................................................................................................................................................... 68 1.  From home, tap Phone    >    to display the dialer screen.     The dialer screen opens.
 .................................................................................................................................................................... 69 2.  Tap the number keys on the keypad to enter the phone number.      As you enter digits, Smart Dial searches for contacts that match. If you see the number you want to dial, tap it to place the call immediately without entering the rest of the number. 3.  Tap  to call the number.   The phone dials the number. The call begins when the other party answers. 4.  To end the call, tap  .   The call ends. Troubleshooting Question: Call does not connect. Answer 1: Was the number dialed using the area code? If not, try dialing using the full 10-digit number including the area code. Answer 2: Are you in an area with poor wireless coverage? Try calling again from another area. Call Emergency Numbers You can place calls to 9-1-1 even if the phone’s screen is locked or your account is restricted. To call the 9-1-1 emergency number when the phone’s screen is locked with a screen lock:
 .................................................................................................................................................................... 70 1.  From the lock screen, touch and hold Emergency call (ICE). 2.  Tap    next to 911.   As long as you are in an area covered by wireless service, the emergency call is placed. To call the 9-1-1 emergency number normally or when your account is restricted: 1.  Unlock the screen. For more information, see Lock and Unlock Your Screen. 2.  From home, tap Phone   >  . 3.  Dial 9-1-1 and then tap   .   As long as you are in an area covered by wireless service, the emergency call is placed. Enhanced 9-1-1 (E 9-1-1) Information This phone features an embedded Global Positioning System (GPS) chip necessary for utilizing E 9-1-1 emergency location services where available. When you place an emergency 9-1-1 call, the GPS feature of your phone seeks information to calculate your approximate location. Depending on several variables, including availability and access to satellite signals, it may take up to 30 seconds or more to determine and report your approximate location. Important: Always report your location to the 9-1-1 operator when placing an emergency call. Some designated emergency call takers, known as Public Safety Answering Points (PSAPs), may not be equipped to receive GPS location information from your phone. Answer Phone Calls The following information lets you know how to answer incoming calls, mute the ringer on incoming calls, reject incoming calls, and more. When you receive a phone call from a contact, the Incoming call screen appears and displays the caller ID icon, name, and phone number of the calling party. When you receive a phone call from someone who is not stored in People, only the default caller ID icon and phone number appear on the Incoming call screen. Note: If your phone is turned off, all calls automatically go to voicemail.
 .................................................................................................................................................................... 71 Answer an Incoming Call 1.  When a call arrives, drag   down to answer it.     The call begins.
 .................................................................................................................................................................... 72 2.  To end the call, tap  .     The call ends. Mute the Ringing Sound To mute the ringer without rejecting the call, you can do any of the following: ●  Press the Volume keys. ●  Place the phone face down on a level surface.
 .................................................................................................................................................................... 73 Reject an Incoming Call ■ When a call arrives, drag   up to reject it.     The ringtone or vibration will stop and call will be sent directly to voicemail. Reject a Call and Send a Text Message You can reject an incoming call and automatically send a text message to the caller.
 .................................................................................................................................................................... 74 1.  When a call arrives, drag   up from the bottom of the screen.     The ringtone or vibration will stop and you will see a list of preset text messages. 2.   Tap one of the messages to send it to the caller.      The selected message will be delivered to the caller.   You can edit the reject messages through the Call settings menu. From the phone app, tap Menu   > Settings > General settings > Quick responses and tap a message to edit. In-Call Screen Layout and Operations While you’re on a call, you will see a number of onscreen options.
 .................................................................................................................................................................... 75 In-Call Screen Layout Tap More to display all available options. Tap options to activate them during a call.      ● Add call: Tap to make another call separately from the current call, which is put on hold. When both calls are connected, you can tap Merge calls to join the two calls into a conference call. ● Message: Open the Messaging app and view your text and multimedia messages. ● Contacts: Open the Contacts app and view your contacts list. ● Dialpad: Toggle the appearance of the onscreen keypad. You can use it during a call to enter additional numbers, such as an extension, account number or password. ● Mute: Mute the microphone during an active call. Tap again to unmute the microphone. ● Speaker: Route the phone’s audio through the speaker (On) or through the earpiece (Off).    Activate Speaker to route the phone’s audio through the speaker. (You can adjust the speaker volume using the Volume Buttons.)    Deactivate Speaker to use the phone’s earpiece. Warning: Because of higher volume levels, do not place the phone near your ear during speakerphone use. ● End call: Tap   to end the current call.
 .................................................................................................................................................................... 76 Place a Call from Contacts You can place phone calls directly from entries in your Contacts list. 1.  From home, tap Phone   to display the phone app.  2.  Tap CONTACTS to display the Contacts list.      The contacts list appears.
 .................................................................................................................................................................... 77 3.  Tap a contact.    4.  Tap the number you want to call.   The phone dials the number. The call begins when the other party answers. 5.  To end the call, tap   .   The call ends. Tip: You can also place a call directly from the Contacts list. Tap   next to the entry you want to call to place a call to the entry’s default number. Call from Call Logs The Call logs list lets you quickly place calls to recent incoming, outgoing, or missed numbers. 1.  From home, tap Phone   to display the phone app.  2.  Tap RECENT CALLS to display the recent call history. Tip: To view the complete call history, scroll to the bottom of RECENT CALLS and tap View full call history. 3.  Tap   next to an entry to call the number.
 .................................................................................................................................................................... 78   The phone dials the number. The call begins when the other party answers.   For additional options, tap the name or number. 4.  To end the call, tap  .   The call ends. Optional Services The following topics outline additional voice-related services available with your phone, including call services, voicemail, and more. Voicemail Setup  You should set up your voicemail and personal greeting as soon as your phone is activated. Always use a password to protect against unauthorized access. Your phone automatically transfers all unanswered calls to your voicemail, even if your phone is in use or turned off. 1.  From home, tap Phone   >   to display the dialer screen.   2.  Touch and hold   to dial your voicemail number.   Your phone dials the voicemail access number. 3.  Follow the system prompts to:   Create your password.   Record your name announcement.   Record your greeting.
 .................................................................................................................................................................... 79 Important: Voicemail Password – It is strongly recommended that you create a password when setting up your voicemail to protect against unauthorized access. Without a password, anyone who has access to your phone is able to access your voicemail messages. Visual Voicemail  Visual Voicemail gives you a quick and easy way to access your voicemail. Now you can find exactly the message you are looking for without having to listen to every voicemail message first. This feature periodically goes out to your voicemail, and gathers the caller information from all of the current voicemails. It then populates a list with the caller name and number, along with the length of time and priority level of the voicemail message.  Set Up Visual Voicemail  Setting up Visual Voicemail follows many of the same procedures as setting up traditional voicemail. You should set up your voicemail and personal greeting as soon as your phone is activated. Your phone automatically transfers all unanswered calls to your voicemail, even if your phone is in use or turned off. Note: To set up your traditional voicemail box, see Voicemail Setup. 1.  From home, tap Apps   > Voicemail .     You’ll see a Personalize your voicemail prompt. 2.  Tap Personalize now and follow the system prompts to:   Create a password (part of standard voicemail).   Record your name announcement.   Record your greeting. 3.  Tap the Welcome to Voicemail message on the screen to play a brief explanation of the voicemail services.
 .................................................................................................................................................................... 80   Important: Voicemail Password – It is strongly recommended that you create a password when setting up your voicemail to protect against unauthorized access. Without a password, anyone who has access to your phone is able to access your voicemail messages. Review Visual Voicemail  Visual Voicemail lets you easily access and select which messages you want to review.
 .................................................................................................................................................................... 81 1.  From home, tap Apps   > Voicemail .      You will see the voicemail inbox. 2.  Tap a message to review it. Tip: There are several icons at the bottom of the review screen for maintenance, storage, messaging, and other options. For an explanation of all your options, tap Menu   > Help > Messaging > Receiving Messages > Message Playback. Listen to Multiple Voicemail Messages  When you are done listening to a voicemail message you can easily access other voicemail messages without returning to the main voicemail screen. 1.  Listen to the current voicemail message.
 .................................................................................................................................................................... 82 2.  Swipe your finger left or right to display the next or previous message.      The next or previous message is displayed. You can tap   to play it. You can navigate through voicemail messages as frequently as you'd like. You can even move to the next or previous message before you're finished listening to the current one. Visual Voicemail Options  Your visual voicemail options appear as icons at the bottom of the voicemail review screen.
 .................................................................................................................................................................... 83 1.  From home, tap Apps   > Voicemail .    2.  Tap a message to review it. The following options are available while reviewing a voicemail message:   Call to call the sender.   Share to share the message. Options depend on the application installed..   Delete to delete the voice message.   Reply to reply to the message.  Tap   > Archive to archive the current message. You can find it in the Archive box. Note: Not all options are available for all messages. Configure Visual Voicemail Settings  The Visual Voicemail settings menu lets you access settings for notifications, pictures, greetings, and more.
 .................................................................................................................................................................... 84 1.  From home, tap Apps   > Voicemail .    2.  Tap Menu   > Settings.
 .................................................................................................................................................................... 85   You will see the voicemail settings menu. 3.  Select an option to change its settings.    Avatar   Display   Help   Preferences   Sound   Updates   About Voicemail Change Your Main Greeting via the Voicemail Menu Your main greeting can be changed directly via the Visual Voicemail system. This direct access saves you from having to navigate within the voicemail menu. 1.  From home, tap Apps   > Voicemail .    2.  Tap Menu   > Settings > Preferences > Personalize voicemail. 3.  Tap OK to connect to the voicemail system. Follow the prompts to change your current greeting.
 .................................................................................................................................................................... 86 Edit the Display Name via the Voicemail Menu From your Visual Voicemail menu, you can quickly change the name or number attached to your voice messages. 1.  From home, tap Apps   > Voicemail  . 2.  Tap Menu   > Settings > Display >  Display name. 3.  Tap the existing identification field and enter a new identifying name or number (used to identify you to recipients of your voice messages). 4.  Tap OK to save your information. Caller ID Blocking  Caller ID identifies a caller before you answer the phone by displaying the number of the incoming call. If you do not want your number displayed when you make a call, follow these steps. 1.  From home, tap Phone   >   . 2.  Tap       . 3.  Enter a phone number. 4.  Tap  .  Your caller information will not appear on the recipient’s phone. To permanently block your number, call Boost Customer Service. Call Waiting  When you’re on a call, Call Waiting alerts you to incoming calls by sounding two beeps. Your phone’s screen informs you that another call is coming in and displays the caller’s phone number (if it is available). To respond to an incoming call while you’re on a call:
 .................................................................................................................................................................... 87 ■ Tap Answer. (This puts the first caller on hold and answers the second call.)   To switch back to the first caller: ■ Tap More >   Flash. Note: For those calls where you don’t want to be interrupted, you can temporarily disable Call Waiting by pressing      before placing your call. Call Waiting is automatically reactivated once you end the call. Call Forwarding  Call Forwarding lets you forward all your incoming calls to another phone number – even when your phone is turned off. You can continue to make calls from your phone when you have activated Call Forwarding. Note: You are charged a higher rate for calls you have forwarded. To activate Call Forwarding: 1.  From home, tap Phone   >   . 2.  Tap       3.  Enter the area code and phone number to which you want your calls forwarded. 4.  Tap  .
 .................................................................................................................................................................... 88   You will hear a tone to confirm the activation of Call Forwarding. All calls to your wireless number will be forwarded to the designated phone number. To deactivate Call Forwarding: 1.  From home, tap Phone    >  . 2.  Tap      . 3.  Tap  .    You will hear a tone to confirm the deactivation. Call Settings Your phone’s Call Settings menu lets you configure your voicemail options and a number of other settings for the phone application. Call Settings Options Use the Call Settings menu to adjust the following settings: Setting Description Contact display options Set up the way contacts are displayed and sorted in the contacts list in the Phone app. Sounds and vibrate Set up the default ringtone for incoming calls and enable/disable vibration or keypad tones. Quick responses Edit the text messages that you can quickly send to rejected callers. Phone account settings Manage Internet calling accounts and set Internet calling options. Voicemail Adjust your voicemail settings. TTY mode Select a TTY mode for your phone to work with a teletypewriter. Hearing aids Turn on or off hearing aids compatibility. Noise reduction Reduce background noise during calls. Speed dial Set speed dialing keys. DTMF tones Set the length of Dual-Tone Multi-Frequency signal tones. Call ended operation tips Get operation tips when you end a call.
 .................................................................................................................................................................... 89 Setting Description Voice privacy Use enhanced privacy mode. Plus code dialing setting Enable plus code dialing and set international dialing code.
 .................................................................................................................................................................... 90 Contacts The Contacts application lets you store and manage contacts from a variety of sources, including contacts you enter and save directly in your phone as well as contacts synchronized with your Google Account, your PC, compatible email programs (including Exchange Server), and your Facebook friends.  Contacts Cautions Information saved in Contacts may be lost or changed if the battery is removed for a long period or left uncharged. Accident or malfunction may also cause loss or change to information. It is recommended that you keep a separate copy of contacts and other important information. Boost Mobile is not responsible for any damages from lost or changed contacts. Add a Contact You can add contacts from your phone’s Phone application. Enter details such as name, phone numbers, email addresses, mailing addresses, and more. 1.  From home, tap Apps > Contacts  .   You will see the Contacts list. 2.  Tap   to add a contact.   The Add Contact screen appears. 3.  If you have multiple account types associated with your phone, select a contact type.   Select Google if you want to save contacts to your Google Account; these will be synced automatically with your Google Account online.    Select Phone-only, unsynced contact as the sync account if you want your contacts on your phone only; they will not be synced with your Google Account. 4.  Use the keyboard to enter as much information as you want.    Contact photo: Tap   to assign a picture to the contact.   Name   Phone   Email   Address   Ringtone
 .................................................................................................................................................................... 91   Notification ringtone   Special dates   Groups   Add another field: Tap ADD ANOTHER FIELD to include additional information such as IM address, Notes, Nickname, Website, etc. Note: To select a type (label) for a phone number, email address, or postal address (such as Mobile, Home, Work, etc.), tap the type to the left of the field and select the appropriate type. Note: To add more phone numbers, email addresses, etc., tap   on the right side of the entry field. 5.  When you have finished adding information, tap   on the top left.   The contact is added. Save a Phone Number You can save a phone number to Contacts directly from the phone keypad. 1.  From home, tap Phone    >  . 2.  Enter a phone number and tap Add to contacts.
 .................................................................................................................................................................... 92 3.  To add the number to an existing contact, scroll the contact list and tap the contact. To add a new contact, tap  .   For an existing contact, tap the contact name and select a number type for the new number.   For a new contact, enter the name and any additional information. 4.  Tap  .   The contact is added. View Contacts View a contact’s details by displaying a contact entry. 1.  From home, tap Apps   > Contacts  .       You will see the Contacts list.
 .................................................................................................................................................................... 93 2.  Tap a contact to view its details.    The contact’s detailed listing appears. Contacts Screen Layout The following illustration show’s your Contacts app layout and describes the various features.
 .................................................................................................................................................................... 94  Item Description Groups tab Show contact groups. Favorites tab Show favorite contacts. Contacts tab Show all contacts. Contact Tap to show contact’s details. Scroll Scroll the contacts list by letter. Call  Place a call to the contact. Add new Add a new contact. Search Search contacts. More options Get more contacts options.
 .................................................................................................................................................................... 95 Edit a Contact Once you’ve added a contact, you can add or edit any of the information in the entry, assign a caller ID picture, customize with a unique ringtone, and more. 1.  From home, tap Apps   > Contacts .    You will see the Contacts list. 2.  Tap a contact to view its details.    The contact’s detailed listing appears. 3.  Tap Edit  . 4.  Tap any field you want to change or add. See Add a Contact. 5.  Add or edit the information, and then tap  .   Your changes are saved to the contact entry. Note: To select a type (label) for a phone number, email address, or postal address (such as Mobile, Home, Work, etc.), tap the type to the left of the field. Note: To add more phone numbers, email addresses, etc., tap Add new below the entry field.
 .................................................................................................................................................................... 96 Delete a Contact You can delete a contact from the contacts details page. 1.  From home, tap Apps   > Contacts .    You will see the Contacts list. 2.  Tap a contact to view its details.     The contact’s detailed listing appears. 3.  Tap Menu   > Delete. 4.  Tap OK.    The contact is deleted. Tip: You can also touch and hold the contact from the contact list and then tap   > OK. Share a Contact  You can quickly share contacts using Bluetooth, email, Gmail, or text messaging. 1.  From home, tap Apps   > Contacts .
 .................................................................................................................................................................... 97   You will see the Contacts list. 2.  Tap a contact to display it, and then tap Menu   > Share.    You will see the Share contact via menu. Scroll up to see all the options. 3.  In the Share contact via menu, select a method:    Messaging to send the information in a multimedia message. Select a contact or enter a wireless phone number or email address, enter any additional information, and then tap   or SEND. For more information on messaging, see Send a Multimedia Message (MMS).  Bluetooth to send the information via Bluetooth. See Bluetooth for information on pairing and sending via Bluetooth.  Drive to upload the information as vCard file to Google Drive.  Email/Gmail to send the information as an attachment. Address the message, add a subject and a message, and then tap  . See Compose and Send Email and Create and Send a Gmail Message for details.  WiFi Direct to send the information via Wi-Fi Direct. See Wi-Fi Direct for information on paring and sending via Wi-Fi Direct.  4.  Complete the required steps as prompted for the selected method.   The selected contact will be shared.
 .................................................................................................................................................................... 98 Import Contacts Your phone offers a couple of options for importing contacts from installed SD memory cards or external devices via USB. Before Importing Contacts from an SD Card You will need to have installed an SD card with previously backed up contacts information into your phone before you can import contacts. See SD Card for SD card information. Import Contacts from an SD Card or USB Storage 1.  From home, tap Apps   > Contacts .    You will see the Contacts list. 2.  Tap Menu   > Import/Export.     You will see the Import/Export contacts menu. 3.  Tap Import from storage.  4.  Select an account for the imported contacts. 5.  Follow the onscreen instructions to complete the import.   The contacts are imported and stored in the selected account.
 .................................................................................................................................................................... 99 Back Up Contacts If you are saving contacts to an account that does not automatically back them up via the Cloud, you can manually back them up to an optional installed SD Card for re-import if needed. Before Backing Up Contacts to an SD Card You will need to have installed an SD card with previously backed up contacts information into your phone before you can back up your contacts. See SD Card for SD card information. Back Up Contacts to Your SD Card 1.  From home, tap Apps   > Contacts .    You will see the Contacts list. 2.  Tap Menu   > Import/Export.     You will see the Import/Export contacts menu. 3.  Tap Export to storage. 4.  The phone will prompt you with the name and the directory of the vCard file. Tap OK to create the file.   The contacts are exported and saved to the installed SD card or the phone storage.
 .................................................................................................................................................................. 100 Messaging and Internet With wireless service and your phone’s messaging and data capabilities, you have the opportunity to share information through many different channels and accounts, including Gmail (Google), personal and corporate email, text and multimedia messaging, social networking accounts, and Hangouts. Text and Multimedia Messaging  With text messaging (SMS), you can send and receive instant text messages between your wireless phone and another messaging-ready phone. Multimedia messages, or MMS, can contain text and pictures, recorded voice, audio or video files, picture slideshows, contact cards (vCard), or appointments (vCalendar). See your service plan for applicable charges for messaging. Send a Text Message   Quickly compose and send text messages on your phone. 1.  From home, tap Apps   > Messages  . 2.  On the Messaging screen, tap  .    The New message screen opens. 3.  Fill in one or more recipients. You can:   Enter phone numbers directly in the To field. If you’re sending the message to several phone numbers, tap Next or the return key on the keyboard after entering each number. As you enter information, any matching phone numbers from your contacts list are displayed. Tap a match to enter that number or address directly.   Tap the   icon, and then select the contacts to whom you want to send the message. You can also select from call log, favorite contacts, or contact groups as recipients. When you have selected all the message recipients, tap OK.   Enter the first few letters of the recipient's name to display a matching list of names from your stored contacts. Tap a match to add the recipient.
 .................................................................................................................................................................. 101 4. Tap the “Type message” box and then start composing your message.   Note: A counter appears above the Send button ( ) to tell you how many characters you have entered and how many characters are left. Once you go over the 160-character limit, a new message is created but automatically joined into one when received. 5.  When done, tap Send   to send the text message. Send a Multimedia Message (MMS)   When you need to add a little more to a text message, you can send a multimedia message (MMS) with pictures, voice recordings, audio or video files, contact cards (vCard), or appointments (vCalendar). 1.  From home, tap    > Messages  . 2.  On the Messaging screen, tap  . The New message screen opens.   Enter phone numbers directly in the To field. If you’re sending the message to several phone numbers, tap Next or the return key on the keyboard after entering each number. As you enter information, any matching phone numbers from your contacts list are displayed. Tap a match to enter that number or address directly.   Tap the   icon, and then select the contacts to whom you want to send the message. You can also select from call log, favorite contacts, or contact groups as recipients. When you have selected all the message recipients, tap OK.
 .................................................................................................................................................................. 102   Enter the first few letters of the recipient's name to display a matching list of names from your stored contacts. Tap a match to add the recipient. Note: You can add a subject line by tapping Menu   > Add subject. 3. Tap the “Type message” box, and then start composing your message. 4.  Tap  . 5.  In the Attach window, select from the following file attachments:  Picture: Select a picture to attach to your MMS.  Capture picture: Open the camera and take a photo to attach to your MMS.  Video: Select a video clip to attach to your MMS.  Capture video: Open the camcorder and shoot a video clip to attach to your MMS.  Audio: Select an audio file to attach to your MMS.  Record audio: Open Sound Recorder and record an audio file to attach to your MMS.  Slideshow: See "Create a Slideshow" for details.  Files: Open File Manager and select a file to attach to your MMS.  Insert contacts: Select a contact entry and add it to your MMS as a vCard attachment. 6.  To make changes to your attachment, tap REPLACE or REMOVE. 7.  Tap Send   to send the MMS message. Create a Slideshow In a multimedia message, you can add slides, each containing a picture, video, or audio. 1. In the multimedia message you’re composing, tap   > Slideshow. 2.  On the Edit slideshow screen, tap Slide 1. Note: You can tap Add slide to add more slides. 3.  To compose your slideshow, do any of the following:  Add a picture: Tap ADD PICTURE,   > Add picture or Capture picture.  Add a video: Tap Menu   > Add video or Capture video. (You cannot add both a picture and a video on the same slide.)
 .................................................................................................................................................................. 103  Add music or a voice recording: Tap Menu   > Add music and then tap Audio or Record audio.  Add a caption: Tap the “Type message, or leave blank” box.  Add some preset text: Tap Menu   > Quick Text.  Insert a smiley to the caption: Tap Menu   > Insert smiley.  Set text layout: Tap Menu   > Layout.  Preview your slide: Tap Menu   > Preview.  Remove the caption on the slide: Tap Menu   > Remove text.  Set duration for a slide: Tap Menu   > Duration.  Add a new slide: Tap Menu   > Add slide.  View the next or previous slide: Tap   or  . 4.  When you have finished composing the multimedia message, tap SEND. Tip: To compose a slideshow, you can also simply attach multiple items separately to the MMS message. Tap   and select a file type, location, and file and then repeat it for additional slides. Your phone will automatically compile a slideshow. Save and Resume a Draft Message  While composing a text or multimedia message, tap Back key   to automatically save your message as a draft. To resume composing the message: 1.  From home, tap    > Messages  . 2.  On the Messaging screen, the draft messages are marked with a red word "Draft" next to them. You can also tap Menu   > Drafts to view them. 3.  Tap the message to resume editing it. 4.  When you finish editing the message, tap  .
 .................................................................................................................................................................. 104 New Messages Notification  Depending on your notification settings, the phone will play a ringtone, vibrate, or display the message briefly in the status bar when you receive a new text or multimedia message. To change the notification for new text and multimedia messages, see Text and MMS Options for details. A new message icon ( / ) also appears in the notifications area of the status bar to notify you of a new text or multimedia message. The Messages application icon (if shown on the home screen) also displays the number of new messages  . ■ To open the message, pull down the status bar to open the notification panel. Tap the new message to open and read it. For information on reading and replying to messages see Manage Message Conversations. Manage Message Conversations  Text and multimedia messages that are sent to and received from a contact (or a number) are grouped into conversations or message threads in the Messaging screen. Text or MMS conversations let you see exchanged messages (similar to a chat program) with a contact on the screen. Read a Text Message ■ Do one of the following:   On the Messaging screen, tap the text message or conversation to open and read it.   If you have a new message notification, pull down the status bar to open the notification panel. Tap the new message to open and read it. To return to the Messaging screen from a conversation, tap Back key. Note: To view the details of a particular message, in the conversation, touch and hold the message to open the options menu, and then tap View message details. Note: If a message contains a link to a Web page, tap the message and then tap the link to open it in the Web browser. Note: If a message contains a phone number, tap the message and then tap the phone number to dial the number or add it to your contacts. View a Multimedia Message (MMS) 1.  From home, tap   > Messages  . 2.  On the Messaging screen, tap a multimedia message or conversation to open it. 3.  Tap the attachment to open it.   If the attachment is a vCard contact, it is imported to your phone’s contacts list. For more information, see Contacts.
 .................................................................................................................................................................. 105   If the attachment is a vCalendar file, you can choose the calendar where you want to save the event. For information on using Calendar, see Calendar. 4.  To save the attachment to device memory or an SD card, touch and hold the sender’s name or number, and then tap Save on the options menu. Note: When Auto-retrieve in MMS settings is disabled, only the message header is downloaded. To download the entire message, tap the Download button at the right side of the message. For details, see Text and MMS Options. Note: If you are concerned about the size of your data downloads, check the multimedia message size before you download it. Reply to a Message 1.  From home, tap    > Messages  . 2.  On the Messaging screen, tap a conversation to open it. 3.  Tap the text box at the bottom of the screen, enter your reply message, and then tap  . Note: To reply to a text message with a multimedia message, open the text message, tap   or Menu   > Add subject. The text message is automatically converted into a multimedia message. Protect (Lock) a Message You can lock a message so that it will not be deleted even if you delete the other messages in the conversation. 1.  From home, tap  > Messages  . 2.  On the Messaging screen, tap a conversation. 3.  Touch and hold the message that you want to lock.  4.  Tap Lock on the options menu. A lock icon is displayed at the right hand side of the message. Delete Conversations 1.  From home, tap  > Messages  . 2.  On the Messaging screen, tap the conversation that you want to delete. 3.  Tap Menu   > Delete thread.  4.  When prompted to confirm, tap OK. Any locked messages in the thread will not be deleted unless you select the Delete locked messages check box.
 .................................................................................................................................................................. 106 Delete a Single Message 1.  While viewing a conversation, touch and hold the message that you want to delete.    If the message is locked, tap Unlock on the options menu and hold the message to display the options menu again. 2.  Tap Delete on the options menu.  3.  When prompted to confirm, tap OK. View Contact Information from a Message When you have received a message from someone in your stored contacts, you can tap the contact’s picture or icon in the conversation to open a menu of options. Depending on the stored contact information, you can view the contact details, place a phone call or send an email message to the contact, and more. Text and MMS Options  The messages settings menu lets you control options for your text and MMS messages including message limits, size settings, and notifications. 1.  From home, tap    > Messages  . 2.  On the Messaging screen, tap Menu   > Settings. You can set the following: SMS Enabled ■ Change your default app for SMS and MMS. Tap Default SMS app and select Hangouts or Messaging. Storage Settings ● Delete old messages: Automatically delete older messages, except for locked messages, when the set limits are reached. ● Text message limit: Choose the maximum number of text messages to store in each conversation. ● Multimedia message limit: Choose the maximum number of MMS messages to store in each conversation. Text (SMS) Message Settings ■ SMS Reassembly: Automatically reassemble segmented long SMS. Multimedia (MMS) Message Settings ● Auto-retrieve: Select this option to automatically retrieve all your multimedia messages completely. When selected, the multimedia message header plus the message body and
 .................................................................................................................................................................. 107 attachments will automatically download to your phone. If you clear this check box, only the multimedia message header will be retrieved and shown in your Messaging screen. ● Group messaging: Use MMS to send a single message when there are multiple recipients. ● Roaming auto-retrieve: Automatically retrieve messages while roaming. Display Settings ■ Bubble and background: Choose the pattern of the dialog balloons and background displayed in every conversation. Notification Settings ● Notifications: Select this option if you want to receive a notification in the status bar when a new text or multimedia message arrives. ● Select ringtone: Select a ringtone that is specific to new text and multimedia messages. Note that the ringtone briefly plays when selected. ● Vibrate: Select this option if you want the phone to vibrate when a new text or multimedia message arrives. Signature Settings ● Edit signature: Edit the signature for outgoing messages. ● Add signature: Select this option if you want to attach the signature to all outgoing messages. WAP Push Switch ■ Enable wap push receiving: Check this option if you want to receive WAP push messages. Emergency Alerts ■ Receive emergency alerts: Tap this option and check the threat levels that you want to receive alerts for. Gmail Use Google’s Gmail service and your Google Account to send, receive, and manage your Gmail messages. Before using Gmail, you must register a Google (Gmail) Account on your phone. See Google Account for details.  Gmail Cautions Gmail is handled as email from a PC. Restricting email from PCs on your phone prevents your phone from receiving Gmail. Create and Send a Gmail Message Use your phone to create and send Gmail messages.
 .................................................................................................................................................................. 108 1.  From home, tap Apps   > Gmail . If prompted, tap TAKE ME TO GMAIL.   The Gmail inbox opens. 2.  In the inbox, tap Compose .    The Gmail composition window opens. 3.  Enter the message recipient(s), subject, and message, and then tap Send  .       The Gmail message is sent. Gmail Composition Options ● Adding Cc/Bcc: In the mail composition window, tap   on the "To" line, and then add recipients. ● Attaching Pictures or Videos: In the mail composition window, tap   > Attach file or Insert from Drive. Locate and then tap the picture or video you want to attach. ● Save as a Draft (Send Later): While composing your message, tap Menu   > Save draft. The message is saved as a draft for later. ● Delete Mail Being Composed: In the mail composition window, tap Menu   > Discard > DISCARD.
 .................................................................................................................................................................. 109 Note: To view your draft email messages, at the top left of the inbox, tap   > Drafts. Note: To view your sent messages, at the top left of the inbox, tap   > Sent. Check Received Gmail Messages Your phone allows you to access, read, and reply to all your Gmail messages. Open New Gmail Messages When new Gmail arrives, you will see   /   in the status bar. 1.  Pull down the status bar to display the notification panel.  2.  Tap the new message from the notification panel.   The new Gmail message opens.   If you have two or more new Gmail messages, tapping the notification opens the Gmail inbox. Open Gmail Messages You can also read and reply to all your Gmail messages from the Gmail inbox. 1.  From home, tap Apps   > Gmail .    The Gmail inbox opens. 2.  Tap the message thread you want to view.     The message thread opens, with the newest message displayed. Options when Reviewing Gmail Messages ● Replying to Gmail Messages: With the Gmail message open, tap Reply  , compose your reply message, and tap Send  .   To reply to all, tap Options   > Reply all. ● Forwarding Gmail Messages: With the Gmail message open, tap Options   > Forward, enter a recipient and an additional message, and tap Send . Use Gmail Labels Gmail saves all mail in one box, but you can add labels that allow you to sort your Gmail conversation threads. For example, when a new thread starts with a received mail, the label "Inbox" is automatically added to the thread. By then adding the label "travel," all threads with "travel" are shown in a list. 1.  From home, tap Apps   > Gmail .
 .................................................................................................................................................................. 110   The inbox opens. 2.  Touch and hold a conversation thread to add a checkmark to it, and then tap Options   > Move to.
 .................................................................................................................................................................. 111 3.  Tap a label for the thread.     The thread is added to the selected label. Archive Gmail Threads Remove sent and received Gmail threads so they do not appear in the inbox. When replies arrive for archived threads, they appear in the inbox again. 1.  From home, tap Apps   > Gmail .    The inbox opens.
 .................................................................................................................................................................. 112 2.  Swipe a conversation thread from left to right or from right to left out of the list.     The thread is now archived. Mute Gmail Threads If registered on a mailing list, there will be threads with always-continuing conversations. For long threads that are not important, mute the threads and they will no longer appear in the inbox. When mail arrives that includes user's address as a recipient or in Cc, mail will again appear in the inbox. 1.  From home, tap Apps   > Gmail  .   The inbox opens.
 .................................................................................................................................................................. 113 2.  Touch and hold a conversation thread to add a checkmark to it, and then tap Options   > Mute.     The thread is now hidden. Delete Gmail Threads If you no longer wish to keep a Gmail conversation thread, you can simply delete it from the inbox. 1.  From home, tap Apps   > Gmail .    The inbox opens.
 .................................................................................................................................................................. 114 2.  Touch and hold a conversation thread to add a checkmark to it, and then tap  .     The thread is deleted. Search Gmail Messages If you need to find a specific message or message thread, you can search Gmail from the inbox. 1.  From home, tap Apps   > Gmail .    The inbox opens. 2.  Tap  .
 .................................................................................................................................................................. 115  3.  Enter your search text and tap the search key on the keyboard..    The search results appear. Tap a message or thread from the list to display it.
 .................................................................................................................................................................. 116 Report Spam or Phishing Gmail You can report spam or phishing Gmail messages from your phone’s Gmail inbox. 1.  From home, tap Apps   > Gmail      The inbox opens. 2.  Touch and hold a conversation thread to add a checkmark to it, and then tap Options   > Report spam or Report phishing.      The selected message is reported as spam or phishing Gmail. Add Another Google (Gmail) Account If you have multiple Gmail accounts you wish to view on your phone, you can add them from the Settings > Accounts menu. 1.  From home, tap Apps   > Settings   > Accounts > Add account.
 .................................................................................................................................................................. 117 2.  Enter your existing Google Account username or email, and then tap NEXT.   3.  Enter your password, and then tap NEXT >.   4.  After your phone connects with the Google servers, tap ACCEPT to agree to Google privacy policy and terms of service.
 .................................................................................................................................................................. 118   5.  On the Google services screen, select your Google service options and tap NEXT.
 .................................................................................................................................................................. 119 6.  Select Add credit or debit card or Redeem and tap NEXT > to set up your billing or gift card information for purchasing apps, games, movies, and books in the Google Play Store app from your phone. You can also select Remind me later and tap NEXT >.     You are signed in to your Google Account, and you can access both of your Gmail accounts from the Gmail app. Switching between Gmail Accounts If you have more than one Gmail account set up, you can switch between them in the Gmail app. 1.  From home, tap Apps   > Gmail .    The inbox opens.
 .................................................................................................................................................................. 120 2.  Tap  .      3.  Tap the account you want to view from the list at the top of the menu.   The selected account inbox is displayed. Email Use the Email application to send and receive email from your webmail or other accounts, using POP3 or IMAP, or access your Exchange ActiveSync account for your corporate email needs. Set Up an Email Account  Your phone supports several types of email accounts and allows you to have multiple email accounts set up at one time. Before setting up an email account, make sure you have the username (user ID), password, server name, etc., so you can get set up successfully. 1.  From home, tap Apps   > Email  .   A popup window for adding an account appears if no email account has been previously set up. 2.  Follow the onscreen instructions to set up your email account.   The email account is set up and you will begin receiving email.
 .................................................................................................................................................................. 121 Add an Email Account  You can add several types of personal email accounts, such as POP3 and IMAP accounts, on your phone. Add an Email Account from the Email App You can add email accounts directly from the email app, even if you have another email account set up. 1.  From home, tap Apps   > Email .    The email inbox opens. 2.  Tap Menu   > Settings.   3.  Tap ADD ACCOUNT.   4.  Follow the onscreen instructions to complete the account setup.   The email account is added and you will begin receiving email for the account. Add an Email Account from the Settings Menu You can also set up email accounts from the Settings > Accounts menu. 1.  From home, tap Apps   > Settings   > Accounts > Add account > Email.  2.  Select an email server. Tap Others if the server you use is not listed.
 .................................................................................................................................................................. 122 3.  Enter the Email address and Password for the email account and then tap Next.     Tapping Next prompts your phone to attempt a "regular" email setup and test the incoming and outgoing servers.    If you have custom settings you need to configure, tap Manual setup and enter your settings. These may include mail type, user name, password, server, security type, etc. 4.  Select your sync settings and then tap Next.
 .................................................................................................................................................................. 123 5.  Enter an account name and a display name and tap Next to complete setup.     The email account is set up and you will begin receiving email for the account. Important: If the account type you want to set up is not in the phone database, you will be asked to enter more details. You should get all pertinent information for the email account, such as incoming and outgoing server settings, before you proceed. Add an Exchange ActiveSync Account  If you synchronize your phone with your Exchange ActiveSync account, you can read, manage, and send email in the same easy way as with a POP3/IMAP account. However, you can also access some powerful Exchange features.  Important: Before setting up a Microsoft Exchange ActiveSync Account, contact your company’s Exchange Server administrator for required account settings information. 1.  From home, tap Apps   > Settings   > Accounts > Add account > Corporate.
 .................................................................................................................................................................. 124 2.  Enter the Email address and Password for the email account and then tap Manual setup.       Tapping Next prompts your phone to attempt an automatic setup and test the incoming and outgoing servers.  If the automatic setup fails, you need to enter your settings. These may include domain\username, password, server, security type, etc. 3.  Follow the onscreen prompts to configure options for the account. Then tap Next. 4.  Enter an account name and tap Next to complete setup.   Your corporate email account is set up and you will begin receiving email for the account. Compose and Send Email Compose and send email using any account you have set up on your phone. Increase your productivity by attaching files such as pictures, videos, or documents to your email messages. 1.  From home, tap Apps   > Email  .   The email inbox opens.   If you want to switch to a different email account, tap the account name at the top of the screen and select another account. 2.  Tap Compose .
 .................................................................................................................................................................. 125   The email composition window opens. 3.  Enter the message recipient(s), subject and message.   4.  Tap     The email message is sent. Open Email Messages You can open and read email messages directly from the email inbox. Reading and replying to email on your phone is as simple as on your computer. 1.  From home, tap Apps   > Email .    The email inbox opens. 2.  Tap the message you want to view.   The email message opens. Tip: Tap the account name at the top left of the screen to switch to a different email account. 3.  Tap Reply   or Reply all   to reply to the message. Options when Reviewing Email Messages ● Resetting Message as Unread: Tap the check box on the left side of a read message and then tap Mark as unread  . ● Deleting Email: Tap the check box on the left side of a message or messages and then tap Delete .  ● Syncing Accounts Manually: Sync sent and received email messages manually at any time regardless of the automatic sync settings. Switch to the account inbox you want to sync and then drag the message list downwards.
 .................................................................................................................................................................. 126 ● Replying to Email Messages: With an email message open, tap Reply   or Reply all , compose your reply message, and tap Send . ● Forwarding Email Messages: With the email message open, tap Forward  , enter a recipient and an additional message, and tap Send  . Delete an Email Account You can delete an email account from your phone if you no longer wish to receive messages for the account on your phone. 1.  From home, tap Apps   > Email .    The email inbox opens. 2.  Tap Menu   > Settings.
 .................................................................................................................................................................. 127 3.  Tap the account you want to delete and scroll to the bottom of menu in the new screen.   4.  Tap Remove account. 5.  Tap OK to confirm.     The account is deleted from your phone Manage Your Email Inbox  Your email inbox provides management options for viewing, sorting, and deleting your email messages. View Your Email Inbox 1.  From home, tap Apps   > Email .    The email inbox opens.
 .................................................................................................................................................................. 128 2.  Tap the email account at the top of the screen to select a different inbox, or tap Combined view to see all your email inboxes at once. Refresh an Email Account Whatever your automatic synchronization settings are, you can also synchronize your sent and received email messages manually at any time. ■ While viewing the account you want to synchronize, drag the message list downwards. Sort Email Messages 1.  On the email account inbox, tap Menu   > Display sort & filter. 2.  Tap the left drop-down menu at the top of the email list to sort email messages by date received, subject, sender, or size.  – or –  Tap the right drop-down menu to filter the inbox by priority, attachments, or read/unread status. Delete an Email Message 1.  On the email account inbox, touch and hold the message you want to delete. 2.  At the bottom of the screen, tap Delete   > OK. Delete Multiple Email Messages 1.  On the email account inbox, tap the check box next to the messages you want to delete. 2.  Tap Delete   > OK. Exchange ActiveSync Email Features  Set options for your corporate Exchange ActiveSync email messages, including synchronization options, flagging messages, out-of-office messages, meeting requests, and message priority. Synchronize Exchange ActiveSync Email You can set Exchange ActiveSync to automatically check for new Exchange ActiveSync email messages. 1.  From home, tap Apps   > Email   2.  Tap Menu   > Settings. 3.  Tap the name of the Exchange ActiveSync account. 4.  Tap Inbox check frequency and choose the option you want.
 .................................................................................................................................................................. 129 Flag Email Messages For an Exchange ActiveSync account, you can flag email messages to help you keep track of them. 1.  From home, tap Apps   > Email  . 2.  On the inbox screen, tap the message you want to view. Tip: Tap your current email account at the top left to switch to a different email account. 3.  Tap Menu   > Toggle flag and select a flag option (Set flag, Complete flag, or Clear flag). Set Out of Office Status You can set your Out of Office status and auto-reply message right from your phone. 1.  From home, tap Apps   > Email  . 2.  Tap Menu   > Settings and tap the Exchange ActiveSync account name. 3.  Tap Out of Office. 4.  Check Use out of office settings. 5.  Check Send automatic replies during this time period and set the time range when you will be out of the office. 6.  Enter the auto-reply message for senders inside your organization. You can also choose to send a message to all senders outside your organization or senders in your contact list. 7.  Tap SAVE. Set Email Message Priority You can set the priority for an email message you send with your Exchange ActiveSync account. 1.  While composing the message, tap Menu   > Show priority.   A priority line appears below the email subject. 2.  Select the priority for the message. You can select High, Normal, or Low. Browser Your phone’s Chrome browser gives you full access to both mobile and traditional websites on the go, using 3G, 4G, or Wi-Fi data connections.
 .................................................................................................................................................................. 130 SSL/TLS SSL (Secure Sockets Layer) and TLS (Transport Layer Security) are protocols for encrypting sent/received data. While in a screen connected by SSL/TLS, data is encrypted to safely send/receive private information, credit card numbers, corporate secrets, etc., and provide protection against online threats (eavesdropping, falsification, impersonation, etc.).  SSL/TLS Cautions When opening a secured page, users must decide as their responsibility whether or not to open the page with use of SSL/TLS. Boost Mobile and the applicable Certification Authorities make no guarantees whatsoever to users regarding security of SSL/TLS. Use the Browser Launching the browser is as easy as tapping an icon. 1.  From home, tap Chrome  .   The Chrome browser opens.   You can also launch the browser by tapping a URL in a text message, email message, or Gmail message. 2.  Tap the address bar at the top and enter search words (for a Google search) or a Web address (URL).     The search results appear or a Web page opens. Browser Use Options ● Refreshing the Web Page: With the web page displayed, tap Menu  >  . ● Going Forward to the Next Page: Tap Menu   >  . ● Returning to the Last Page: Tap the Back key. ● Opening a New Browser Tab: With at least one browser tab opened, tap Menu   > New tab. ● Opening a New Incognito Browser Tab: Tap Menu   > New incognito tab.
 .................................................................................................................................................................. 131 ● Switching Browser Tabs: Tap the Recent Apps key. Opened browser tabs are displayed together with recently opened apps as a series of cards. Tap a card that corresponds to a browser tab to open the tab. ● Viewing Recently Opened Tabs: Tap Menu   > Recent tabs. Recently closed browser tabs are displayed. If you have signed in to your Google Account on the phone and other devices, you can also view Chrome browser tabs you have opened on those devices. ● Viewing Browsing History: Tap Menu   > History. ● Sharing the Web Page URL: Tap Menu   > Share… and select an app or service for sharing. ● Printing the Web Page Wirelessly: Tap Menu   > Print…. ● Searching within a Web Page: With a Web page displayed, tap Menu   > Find in page, and enter your search text. ● Adding a Shortcut of the Web Page to the home screen: With the web page displayed, tap Menu   > Add to homescreen. Edit the title of the shortcut and tap ADD. ● Opening Desktop Sites: If a mobile version of the web site is loaded, you can tap Menu   and check Request desktop site to switch the desktop version of the web site. Add a Bookmark Bookmark favorite sites using the browser menu options. 1.  From home, tap Chrome  .   The browser opens.
 .................................................................................................................................................................. 132 2.  Navigate to the Web page you want to bookmark, and tap Menu   >  .     The add bookmark window opens. 3.  Check or change the bookmark name, URL, folder, and then tap Save.     The Web page is added to bookmarks. Bookmark Options ● Editing Bookmarks: From the browser, tap Menu   > Bookmarks, touch and hold a bookmark, tap Edit bookmark, edit the bookmark, and then tap Save.
 .................................................................................................................................................................. 133 ● Deleting Bookmarks: From the browser, tap Menu   > Bookmarks, touch and hold a bookmark, tap Delete bookmark. ● Open the Bookmarked Web Page in a New Browser Tab: From the browser, tap Menu   > Bookmarks, touch and hold a bookmark, tap Open in new tab. ● Open the Bookmarked Web Page in an Incognito Browser Tab: From the browser, tap Menu  > Bookmarks, touch and hold a bookmark, tap Open in incognito tab. View Browser History Use the browser menu options to view your browsing history. 1.  From home, tap Chrome  .   The browser opens. 2.  Tap Menu   > History.     The History window opens.
 .................................................................................................................................................................. 134 3.  Tap the History tab and then tap an entry.     The Web page opens. Open New Browser Tabs Use tabbed browsing to switch between websites quickly and easily. 1.  From home, tap Chrome  .   The browser opens.
 .................................................................................................................................................................. 135 2.  After you open a web page, tap Menu   > New tab.     A new tab appears.   To switch tabs, tap the Recent Apps key. Browser Settings Customize your experience with the Internet through the browser settings menu. 1.  From home, tap Chrome  .   The browser opens.
 .................................................................................................................................................................. 136 2.  Tap Menu   > Settings, and customize your Chrome browser settings.     Your browser settings are saved. Get Chrome Support Find on-phone help with Chrome if you want to learn more. 1.  From home, tap Chrome .    The browser opens.
 .................................................................................................................................................................. 137 2.  Tap Menu   > Help & feedback.     A Web page will open displaying Google help for Chrome. Tip: For more information, from your computer, visit: google.com/intl/en/chrome/browser/mobile/.
 .................................................................................................................................................................. 138 Camera and Video You can use the camera or video camera to take and share pictures and videos. Your phone comes with a 13 megapixel back camera with an autofocus feature a front-facing camera that let you capture sharp pictures and videos. Take Pictures and Record Videos The following topics teach you how to take pictures and record videos with your phone’s camera. Capturing Pictures/Videos ● File Format for Pictures: File format for pictures is JPEG. ● File Format for Videos: File format for videos is MPEG4.  Camera Cautions If Lens Becomes Dirty: Fingerprints/smudges on lens prevent capturing of clear still images/videos. Wipe lens with a soft cloth beforehand. Avoid Exposure to Direct Sunlight: Be careful not to expose lens to direct sunlight for long periods. May discolor color filter and affect color of images.  Flash Warning Do not shine the flash close to eyes. Do not look directly at the flash when shining. Do not shine the flash at other people's eyes. May affect eyesight, etc. Take a Picture You can take high-resolution pictures using your phone’s camera. Note: If you have an SD card installed, pictures and videos are stored to the SD card. If no card is installed, pictures and videos are saved to your phone’s memory. 1.  From home, tap Apps   > Camera  .   The camera viewfinder appears. 2.  Before taking the picture, you can zoom in on your subject.   To zoom in, "spread" the screen with your thumb and finger or press the Volume Up key.   To zoom out, "pinch" the screen or press the Volume Down key. 3.  Frame your subject on the screen and configure other necessary settings. See Viewfinder Screen for details.
 .................................................................................................................................................................. 139   Tip: Hold the phone vertically when taking portrait shots or hold the phone horizontally when taking landscape shots. 4.  You can either let the camera autofocus on the center of the screen, or you can tap another area of the screen that you want to focus on. 5.  Tap    to take the picture. 6.  Tap the thumbnail at the corner of the screen and choose what you want to do with the picture you've just taken. Record Videos Record high-quality videos using your phone’s video camera. Note: If you have an SD card installed, pictures and videos are stored to the SD card. If no card is installed, pictures and videos are saved to your phone’s memory. 1.  From home, tap Apps   > Camera  .   The camera viewfinder appears. 2.  Frame your subject on the screen. You can tap any area of the Viewfinder screen that you want the camera to focus on before and during recording. 3.  Tap   to start recording video. The recording duration appears. Tip: During recording, you can pinch or spread on the screen or press the Volume Buttons to zoom in or out. You can also tap   to take a picture.   Video recording begins.
 .................................................................................................................................................................. 140 4.  Tap   to pause recording. Tap   to continue recording.   5.  Tap   to stop recording.   The camera stops recording and the video is captured and saved to your phone or SD card. View Pictures and Videos Using Gallery Using the Gallery application, you can view pictures and watch videos that you’ve taken with your phone’s camera, downloaded, or copied onto your storage card or phone memory. You can also take a look at your pictures and your friends’ pictures that are on your social networks (Facebook and Flickr only). For pictures that are on your storage card or phone memory, you can do basic editing such as rotating and cropping. You can also easily assign a picture as your contact picture or wallpaper and share pictures with your friends. View Pictures and Videos You can access and view all your stored pictures and videos from your phone’s Gallery. 1.  From home, tap Apps   > Gallery  .   The album list opens. 2.  Tap an album (such as Camera).   The list of pictures and videos for the album opens.   To select another album, tap Back key to return to the Albums view. 3.  Tap an image to view the picture or video.   The picture or video snapshot opens and displays in full screen.   Tap   to play the video.
 .................................................................................................................................................................. 141   When viewing pictures or videos in full screen, you can tap the screen to display a series of options and choose what to do with the picture or video. Pictures and Videos: Review Screen After capturing a picture or video, from the camera screen, tap the thumbnail image at the bottom right corner of the screen to see the item in the review screen. From there, you can access options such as save, view, send, or delete the picture or video. Pictures and Videos: Options while Viewing ● Zoom In or Out on a Picture or Video: Tap the screen twice or pinch the screen to zoom in or out on a picture or video. ● Viewing Videos: Use the onscreen controls to play, pause, or stop the video playback. After selecting an album from the Albums tab, you can browse through the pictures and videos of that album. Tap a picture or video to view it in full screen. By default, the pictures and videos in an album are displayed in grid view. Note: When viewing pictures, you can touch and hold on a picture or video to open a selection menu and choose what to do with the picture or video. Edit Pictures Whether you’re browsing pictures in filmstrip or grid view in the Gallery application, you can touch and hold on a picture to open a selection menu and choose to delete the picture, rotate or crop it, and more. Rotate and Save a Picture 1.  From home, tap Apps   > Gallery .    The album list opens.
 .................................................................................................................................................................. 142 2.  Tap an album (such as Camera).       The list of pictures and videos for the album opens. 3.  Tap the picture you want to rotate.
 .................................................................................................................................................................. 143 4.  Tap   or   to rotate the picture counter-clockwise or clockwise.     The picture is rotated and its file is updated. Crop a Picture 1.  From home, tap Apps   > Gallery .    The album list opens.
 .................................................................................................................................................................. 144 2.  Tap an album (such as Camera).      The list of pictures and videos for the album opens. 3.  Tap the picture you want to crop.
 .................................................................................................................................................................. 145 4.  Tap Menu   > Edit.      The Photo Editor screen appears.
 .................................................................................................................................................................. 146 5.  Tap an edit option along the bottom of the screen and edit the picture.   Tip: Slide the bottom options left or right to find all the options. 6.  Tap   to keep the change or   to cancel it. 7.  Tap   to save the new picture. Note: Tap   in the Photo Editor screen to see the edits you have made and undo or redo them.   The new picture is saved as a new file in the same album as the original picture. The original picture remains unedited. Share Pictures and Videos The Gallery application lets you send pictures and videos using email or multimedia messages. You can share pictures on your social networks (such as Facebook, Flickr, Picasa, and Twitter) and share videos on YouTube. You can also send them to another phone or your computer using Bluetooth. Send Pictures or Videos by Email You can send several pictures, videos, or both in an email or Gmail message. They are added as file attachments in your email. For more information about using email and Gmail, see Compose and Send Email or Create and Send a Gmail Message.
 .................................................................................................................................................................. 147 1.  From home, tap Apps   > Gallery .    The album list opens. 2.  Tap an album (such as Camera).     The list of pictures and videos for the album opens. 3.  Touch and hold a thumbnail of the picture or video you want to share.   To select multiple items, tap all the items you want to include.
 .................................................................................................................................................................. 148 4.  Tap Menu   > Share > Email or Gmail.     Follow onscreen prompts to complete and send the message. Note: If you have multiple email accounts, the default email account will be used. To change the account, tap the sender address displayed above the recipients' line and select the desired email account. Send a Picture or Video by Multimedia Message Multimedia Messaging (MMS) lets you send pictures and videos using your phone’s messaging app. Although you can send several pictures or videos in a multimedia message, it may be better to just send one at a time, especially if the files are large in size. 1.  From home, tap Apps   > Gallery .    The album list opens.
 .................................................................................................................................................................. 149 2.  Tap an album (such as Camera).       The list of pictures and videos for the album opens. 3.  Tap the album that contains the pictures or videos you want to share. 4.  Tap the pictures or videos you want to share.   To select multiple items, touch and hold an image to turn on multiple select. Tap all the items you want to include.
 .................................................................................................................................................................. 150 5.  Tap Menu   > Share > Messaging.        Follow the onscreen prompts to complete and send the message. For more information about sending multimedia messages, see Send a Multimedia Message (MMS). Send Pictures or Videos Using Bluetooth You can select several pictures, videos, or both and send them to someone’s phone or your computer using Bluetooth. 1.  From home, tap Apps   > Gallery .    The album list opens.
 .................................................................................................................................................................. 151 2.  Tap an album (such as Camera).       The list of pictures and videos for the album opens. 3.  Tap the album that contains the pictures or videos you want to share. 4.  Tap the pictures or videos you want to share.   To select multiple items, touch and hold an image to turn on multiple select. Tap all the items you want to include.
 .................................................................................................................................................................. 152 5.  Tap Menu   > Share > Bluetooth.       Follow the onscreen prompts to complete and send the files. For more information, see Bluetooth. Share Pictures or Videos via Additional Apps or Social Media  From Gallery, you can share your pictures and videos from a variety of apps and social media sites, such as Facebook, Google+, Hangouts, Instagram, Flickr, Picasa, and more. Available apps will vary depending on what you have installed on your phone. 1.  From home, tap Apps   > Gallery .    The album list opens.
 .................................................................................................................................................................. 153 2.  Tap an album (such as Camera).     The list of pictures and videos for the album opens. 3.  Tap the album that contains the pictures or videos you want to share. 4.  Tap the pictures or videos you want to share.   To select multiple items, touch and hold an image to turn on multiple select. Tap all the items you want to include.
 .................................................................................................................................................................. 154 5.  Tap Menu   > Share and then tap the app you want to use.    6.  Follow the prompts to complete and post or share your pictures or videos.   The upload is completed.   For confirmation, check the status bar for the upload information. Share Videos on YouTube  You can share your videos by uploading them to YouTube™. Before you do this, you must create a YouTube account and sign in to that account on your phone. 1.  From home, tap Apps   > Gallery .     The album list opens.
 .................................................................................................................................................................. 155 2.  Tap an album (such as Camera).      The list of pictures and videos for the album opens. 3.  Tap the album that contains the videos you want to share. 4.  Tap the videos you want to share.   To select multiple videos, touch and hold an image to turn on multiple select. Tap all the videos you want to include.
 .................................................................................................................................................................. 156 5.  Tap Menu   > Share > YouTube.     6.  Enter the prompted information, such as description and tags, and select a privacy option. 7.  Tap Upload.   The upload is completed. Switch Cameras You can switch between the front and back camera lenses. 1.  From home, tap Apps   > Camera  .    The camera viewfinder appears. 2.  Tap   to switch between the front and back camera lenses. Camera Modes Your phone lets you use different types of camera modes. 1.  From home, tap Apps   > Camera .    The camera viewfinder appears.
 .................................................................................................................................................................. 157 2.  When the back camera lens is used, tap PRO to switch to professional mode where you can configure some advanced professional options, or tap FUN and select a mode. When the front-facing camera is used, tap BEAUTY to capture beauty shots or tap EFFECT to apply a filter to your picture.     The camera switches mode. Camera Settings You can configure your camera’s settings to fit any situation and event. 1.  From home, tap Apps   > Camera  .   The camera viewfinder appears. 2.  Tap Settings  .      The camera settings menu opens. 3.  Select your desired settings.
 .................................................................................................................................................................. 158   The settings are applied.   Settable items differ depending on the camera type in use.
 .................................................................................................................................................................. 159 Useful Apps and Features The following topics detail many of your phone’s tools and features such as news services, maps and navigation, calendar, clock, social networking apps, music, memos, and more. Calculator Your phone’s convenient built-in calculator lets you perform basic mathematical equations.  1.  From home, tap Apps   > Calculator  .   The calculator app launches. 2.  Tap onscreen keys for calculations.    Calculation results appear. Calendar Use Calendar to create and manage events, meetings, and appointments. Your Calendar helps organize your time and reminds you of important events. Depending on your synchronization settings, your phone’s Calendar stays in sync with your Calendar on the Web, Exchange ActiveSync calendar, Google Calendar, and Outlook calendar. In order to sync with your Google calendar, you must sign in to a Google account on your phone. See Google Account. Calendar Operations ● View Today’s Calendar: From the Calendar, tap . ● Change Calendar View: From the Calendar, tap Year, Month, Week, Day, List, or Task to change the current view. ● View Next/Previous Month (Month View): From the Calendar, flick the screen up or down. ● View Next/Previous Week (Week View): From the Calendar, flick the screen left or right. ● View Next/Previous Day (Day View): From the Calendar, flick the screen left or right. ● View the Next/Previous Time Period (Day/Week View): From the Calendar, flick the screen up or down. Add an Event to the Calendar Add events to your calendar directly from the Calendar application.
 .................................................................................................................................................................. 160 1.  From home, tap Apps   > Calendar  .   The Calendar app opens. 2.  Tap Add .    The add event window opens. 3.   Enter an event title, start date/time, end date/time, etc., and then tap SAVE.     The event is added to your calendar. Selecting a Calendar If you have more than one calendar, tap the field above the event name line to select a calendar in which to add events: ●  Select My calendar to create an event that will appear only on your phone. ●  Select your Google Account to create a Google Calendar event. If you have several Google Calendars on the Web, select one in which to add your event.   You can create multiple Google Calendars only in Google Calendar on the Web. After creating them in Google Calendar on the Web, you’ll be able to see them in the Calendar application on your phone. For more information about creating and managing multiple Google Calendars, visit the Google website: calendar.google.com.
 .................................................................................................................................................................. 161 ●  If you have synchronized your phone with an Exchange ActiveSync account or Outlook on your computer, you can also select these calendars.  ●  Select your Outlook Account to create an Outlook Calendar event to sync with your computer. ●  Select your Exchange ActiveSync Account to create an Exchange ActiveSync calendar event. View Calendar Events You can display the Calendar in daily, weekly, monthly, or agenda view. To change the Calendar view, tap the Year, Month, Week, Day, Agenda, or Task tabs along the side. 1.  From home, tap Apps   > Calendar  .   The Calendar app opens. 2.  Tap an event. If you are in month view, tap a date first.     The event details appear.   In event details, tap   to edit the event.   In event details, tap Delete   to delete the event.
 .................................................................................................................................................................. 162 Sync Calendars You can select which calendars you’d like to sync on your phone, along with what types of information you want to sync. 1.  From home, tap Apps   > Calendar  .   The Calendar app opens. 2.  Tap Menu   > Calendars to display.   3.  Tap CALENDARS TO SYNC at the bottom.
 .................................................................................................................................................................. 163 4.  Select sync options by adding or removing check marks from the items.   5.  Tap OK.   The sync settings have been updated. Synchronize an Exchange ActiveSync Calendar  If you have set up a Microsoft Exchange ActiveSync account on your phone, you can also synchronize Exchange ActiveSync calendar events on your phone. Calendar events on your Exchange ActiveSync will also show in Calendar if you chose to synchronize with the Exchange ActiveSync Server.
 .................................................................................................................................................................. 164 1.  From home, tap Apps   > Settings   > Corporate.    If Corporate doesn’t appear under Accounts in the Settings menu, you do not have an Exchange ActiveSync account configured on the phone. For information about adding an account, see Add an Exchange ActiveSync Account. 2.  If your Exchange ActiveSync account is set for synchronization, you will see a Sync icon  . Clock Your phone has a clock app that lets you set alarms, view time in time zones around the world, use a stopwatch, set a timer, and use your phone as a desk clock. Check the Time You can check the phone any time on your phone. The current time displays in the upper right corner of the status bar. Many widgets and lock screens also display the time and provide options for how time is displayed. Set the Date and Time Your phone automatically receives the current date and time from the wireless network. You can set the date by hand by overriding the default setting. 1.  From home, tap Apps   > Settings   > Date & time.
 .................................................................................................................................................................. 165 2.  Clear the check mark next to Automatic date & time and Automatic time zone, and then set the date, time, and time zone as desired.   The date, time, and time zone will reflect your new settings. Set Alarms Set multiple alarms using your phone’s Clock app. 1.  From home, tap Apps   > Clock  .   The Clock appears. 2.  Tap the Alarm tab  and then tap  .   3.  Set the alarm options, including time, days, repeat pattern, alarm type, alarm tone, and volume, and then tap SAVE.    The alarm is set. Phone at Alarm Time ●  At the set alarm time, the phone sounds the alarm and/or vibrates. ●  Stopping an alarm: When the alarm sounds, drag   to the right to dismiss it.
 .................................................................................................................................................................. 166 Additional Clock Features Your phone’s clock app provides additional useful features including world clock, stopwatch, and timer functions. All features are available from the clock app display. ■ From home, tap Apps   > Clock  .     The Clock appears. World Clock The world clock lets you keep track of the current time in multiple cities around the globe. 1.  From the clock app, tap World Clock  . 2.  Tap Add City   and select a city. 3.  Repeat to add multiple cities. Stopwatch The stopwatch lets you time events down to the hundredth of a second. 1.  From the clock app, tap Stopwatch  . 2.  Tap Start   to begin timing. 3.  Tap Record   to record lap time and total time. Note: The stopwatch can record 20 laps at a time. 4.  Tap Pause   to pause timing. If you want to reset the stopwatch to zero, tap Record  . Timer The timer provides a countdown timer for up to 99 hours, 59 minutes, and 59 seconds. 1.  From the clock app, tap Timer  . 2.  Use the keypad to set the length of the timer. 3.  Tap START to begin the timer. Facebook Post updates, read what your friends are up to, upload pictures and check-ins, and more with on-the-go Facebook access.
 .................................................................................................................................................................. 167 Install the Facebook App on Your Phone Before you use Facebook on your phone, you must download and install the app. 1.  From home, tap Apps   > Facebook  . 2.  Tap DOWNLOAD. 3.  Tap ACCEPT AND INSTALL.   The app will be downloaded and installed on your phone.   To open the app from the home screen, tap Apps   > Facebook  . Sign in to Your Facebook Account from Account Settings 1.  From home, tap Apps   > Settings   > Accounts > Add account. 2.  Tap Facebook.   3.  Enter your email/phone number and password and tap LOG IN.   Your Facebook account is added to your phone.
 .................................................................................................................................................................. 168 Use Facebook Once you’ve downloaded the app and signed in, you can post and read updates, upload pictures, tag locations, and more, all from your phone. 1.  From home, tap Apps   > Facebook  .   The Facebook app launches.  If this is the first time you’ve used Facebook on your phone, enter your Facebook ID and password and tap LOG IN to sign in to an existing account, or tap Sign Up for Facebook to set up a new Facebook account.  2.  Tap Status and type an update, tap Photo and upload a picture from the gallery, tap Check In to share your location, “Like” and comment on friends’ posts, and more. File Manager File Manager allows you to view and manage files stored on your phone's internal storage and your SD card as well as a USB device when they are available. 1.  From home, tap Apps   > File Manager  . 2.  Find the file you need by category in the Category   tab, or tap Phone , SD Card  , or USB Device   to browse folders and files on the phone's internal storage, the SD card or the USB device connected to the phone.   Tap folders and files to access stored items.   Touch and hold an item to access option icons such as Copy, Move, Share, Delete, and more.   To copy or move an item, navigate to a new location and tap PASTE.   Tap   to create a new folder in the current directory. Google Search Use the Google app to search and find information saved on your phone and the Internet. 1.  From home, tap the Google search bar or tap Apps   > Google  .   The Search window opens.   If confirmation appears, follow onscreen instructions.   If a description for Google Now appears, tap Next and read information. Enable Google Now on the last page if you want to use the feature.
 .................................................................................................................................................................. 169 2.  Type your search keywords and tap the search key on the keyboard.   Search results appear.   To search by voice, tap   in the search bar and speak your search terms. Google Search Operations ● Changing Search Information: From home, tap Apps   > Google Settings   > Search & Now > Phone search and select where to search. ● Using or Canceling Google Now: Google Now automatically searches for information based on search keywords used, your current location, etc., and presents search results in the search screen. Google Now also informs users of scheduled events.    To enable or disable Google Now, from home, tap Apps   > Google Settings   > Search & Now > Now cards and tap the Show cards slider.  To use all of Google Now’s functions, ensure that Google Location History are turned on in your location settings. From home, tap Apps   > Google Settings   > Location > Google Location History and select your options. Google Voice Search Use your voice to search instead of typing, with Google Voice Search. 1.  From home, tap Apps   > Voice Search  .   The Voice Search window opens. 2.  Speak your search terms     Search results appear.
 .................................................................................................................................................................. 170 Google+ Google+ makes connecting on the Web more like connecting in the real world. Share your thoughts, links, and photos with the right circle. Get everyone on the same page with fast and simple group chat. Note: For detailed information about Google+, open Google+ and tap   > Help to view the online instructions. Sign In and Use Google+ 1.  From home, tap the Google search bar or tap Apps   > Google+  . 2.  If prompted, select your Google Account, or tap Add account to sign in to Google+ with another Google Account. 3.  If prompted, set up your public Google Profile and then follow the onscreen prompts to continue. Note: You won't see this step if you've already set up your profile on another device. 4.  Get started with Google+. You can use the following features:  Check out new posts: Tap   near the top right corner and select Home to see posts people have shared with you, a circle or community you are in, or everyone. You can filter the posts displayed by tapping   and selecting a circle under Circles, a community under Communities, a hot topic below Explore, What's Hot, or Nearby.  Write a post: Tap   to write a post. You can select the people or circles you want to share the post with, and add pictures, you location, URLs, a survey, or your mood in the post.  Manage your social calendar: Tap   and select Events to add events, invite people, and then share photos in real time from the event by enabling Party Mode.  See friends' locations on a map: Tap   and select Locations at the bottom of the screen. You'll see a map that shows everyone who shares their location with you. Tap a photo of a person to display their location details.  Check out photos of you: Tap   and select Photos at the bottom of the screen to open the Photos app. Then tap   at the top left and select Photos of you.  Manage your friends and circles: Tap   to find people and add them to your circles.  Search for people, pages, and photos: Tap   and then tap  . Enter the information you want to search for.  Manage your own information: Tap your photo avatar and name at the top left to view and edit your basic information, view your posts and photos.
 .................................................................................................................................................................. 171 Sign Out of Google+ If you are already signed in to the app, you can sign out by following these steps. 1.  From home, tap the Google search bar or tap Apps   > Google+  . 2.  Tap   > Settings and then tap your account. 3.  Tap Sign out. Hangouts Hangouts is Google's instant messaging service. Use to communicate with other Hangout users, and also use video calling. Log in to a Google Account beforehand (see Google Account). Using Hangouts 1.  From home, tap Apps   > Hangouts  .   The Hangouts app will open. 2.  Tap Add   to start a new Hangout.   3.  Type a name, email, number, or circle, or select a contact from the list.
 .................................................................................................................................................................. 172 4.  Type a message and tap Send  , or tap   or   to make a voice call or start a video chat.     If a friend is not in a Hangout, you will see a message. Tap INVITE to invite them to join the Hangout. Hangouts Operations ● Deleting a Chat: In the chats tab   of the Hangouts window, touch and hold a chat and then tap Delete  > DELETE. ● Ending a Video Chat: In the video chat window, tap  . ● Disabling Chat History: If you don’t want to keep chat history, in the chat window, tap Menu   > Turn history off. ● Delete Chat History: To delete all your chat history, in the chat window, tap Menu   > Delete > DELETE. Note: You can use Hangouts as your phone’s default messaging app, or as a standalone IM app. If you set Hangouts as the default messaging app, the Messages app will be disabled. For more information, see Default SMS App Settings.
 .................................................................................................................................................................. 173 Google Maps Use the Google Maps app to determine your location, find directions, browse local buSignsinesses and attractions, rate and review places, and more. Enable Location Services on Your Phone Before using any location-based services, you must enable your phone’s location feature. For information about setting your phone’s location options, see Location Access Settings.  View Maps of Specified Places Use Google Maps to locate and map a specific address or destination. 1.  From home, tap Apps   > Maps  .   Google Maps opens.   If prompted, follow the onscreen instructions to accept terms of use. 2.  Tap the search box at the top.
 .................................................................................................................................................................. 174 3.  Enter an address, city, facility name, etc., and then tap a candidate in the results list.   Note: If your search term is specific enough, the map will automatically pan to that location.   The information card for the specific location opens. You can find out its address, open hours, street view, people's review, how to get there, give the place a call, save it to your Google Account, and more.   Slide the card down to view the place on the map. Google Maps Operations ● Viewing Current Location: From the Maps app, tap  . ● Obtain Useful Area Information for Current Location: From the Maps app, tap  . When your location is found, tap   at the bottom of the screen and, in the new screen, select a type of business or attraction to browse related locations. You can then tap a location to view detailed information and find out how to get there. ● View Traffic Information, Aerial Photos, Etc., in Maps: From the Maps app, tap Menu   and then tap Traffic, Satellite, Google Earth, etc.  ● Check Route to Destination: From the Maps app, tap  , select a method of transport (car, public transit, or on foot), and then enter your current location and your destination.
 .................................................................................................................................................................. 175   Route candidates appear in a list. Tap one to get more information. ● Check Detailed Operation for Maps: From the Maps app, tap Menu   > Help. Music Player Your phone's built-in music player app lets you listen to and organize music files you have loaded into your phone's memory or SD card. Note: For information about loading music onto your phone, see Transfer Files Between Your Phone and a Computer. Listen to Music Using the Music Player The Music app allows you to play music files in your phone's storages. 1.  From home, tap Apps   > Music  .   The music library opens. Your music files are cataloged, according to the information stored in the files. 2.  Tap All Songs, Playlists, Favorites, Artists, Albums, or Folders to browse your music. You can also tap a song in the RECENT PLAY list to select songs you recently played.   3.  Tap a song to start playing in the music player. Note: Adjust the volume with the Volume keys.
 .................................................................................................................................................................. 176 The Playback Screen When you tap a song in the music library, the music player immediately starts to play it and its name and the player controls are displayed at the bottom of  the screen. Tap the area to open the playback screen, where you can have more control over the player.  ● Track title: Display track name, artist, and album information. ● Back: Return to the music library. ● Album cover: Display the cover art of the album when it is available. Swipe left to see lyrics (if available) and right the current playlist. ● Track information: Display the detailed information of the song and the file. ● Dolby Audio: Toggle Dolby Audio effects. ● Repeat: Toggle repeat mode (no repeat, repeat the current track, or repeat the current playlist). ● Playback control: Skip songs or pause and resume playback. Drag the progress bar to jump to any part of the track. ● Shuffle: Turn on or off shuffle. ● Favorite: Add the track to the Favorites playlist. Tap again to remove the track from the list. ● Share: Share the song. ● Options: Access additional options.
 .................................................................................................................................................................. 177 Create a Playlist Music playlists help your organize your music files. 1.  From home, tap Apps   > Music  .   The music library opens. Your music files are cataloged, according to the information stored in the files. 2.  Find the music file you want to put in a playlist. Tap   next to the song to open a list of options.   3.  Tap Add to > New playlist +. 4.  Enter the playlist name and tap SAVE.
 .................................................................................................................................................................. 178 Manage Playlists You can rename or delete your music playlists. 1.  From home, tap Apps   > Music  .   The music library opens. Your music files are cataloged, according to the information stored in the files. 2.  Tap Playlists to view all music playlists.   3.  Tap   next to the playlist you want to manipulate to open the options menu.   4.  Tap Rename or Delete.
 .................................................................................................................................................................. 179 Manage Songs in a Playlist You can add more songs to a playlist or remove some tracks from a playlist. 1.  From home, tap Apps   > Music  .   The music library opens. Your music files are cataloged, according to the information stored in the files. 2.  Tap Playlists to view all music playlists.   3.  Tap a playlist to open its content. 4.  Tap   > Add Songs and select the music you want to add before tapping  .  – or –  Tap   next to the song you want to remove and select Remove from playlist. Set a Song as Ringtone You can set a song or audio file as your default ringtone. This will not change the ringtone you have assigned individually to specific contacts (see Add a Contact and Edit a Contact). 1.  From home, tap Apps   > Music  .
 .................................................................................................................................................................. 180   The music library opens. Your music files are cataloged, according to the information stored in the files. 2.  Find the music file you want to use as the default ringtone. Tap   next to the song to open a list of options.   3.  Tap Set as ringtone. Tip: You can also set a song as the default ringtone in the playback screen. Just tap   > Set as ringtone. Google Play Music App The Google Play Music app lets you browse, shop, and play back songs purchased from Google Play as well as songs you have loaded from your own music library. The music you choose is automatically stored in your Google Play Music library and instantly ready to play via streaming or download. For more information about Google Play Music, visit play.google.com/about/music. Note: For information about loading music onto your phone, see Transfer Files Between Your Phone and a Computer. Play Music with Google Play Use the Google Play Music app to listen to all your music on your phone. 1.  From home, tap Apps   > Play Music  .
 .................................................................................................................................................................. 181   The Play Music app opens. Note: If you have signed in to your Google Account, the first time Play Music launches, you may follow the prompts to get unlimited Play Music All Access service or opt for free standard service. 2.  Tap a recommendation in the Listen Now screen, or tap   > My Library or Playlists to view all the music or playlists. To change views of your library, swipe left or right.   3.  Tap a song to play it. The song title and player control appears at the bottom of the screen. You can touch it or drag it up to display the player screen.
 .................................................................................................................................................................. 182     The song begins playing. Google Play Music Screen Layout The following diagram outlines the main features of the Play Music app player screen.
 .................................................................................................................................................................. 183 Feature Description Song and artist Shows the names of the song and the artist. Tap the area to close the player screen and return to the music library. Album image Displays the album artwork (if available). Swipe left or right to switch to the next or previous song in  the current playlist. Play/Pause Tap to resume or pause the player. Repeat Tap to switch repeat modes. You can repeat the current song, the current playlist, or turn off repeat. Previous song Tap to restart the current song; tap twice to switch to the previous song in the playlist. Next song Tap to switch to the next song in the playlist. Shuffle Tap to turn on or off shuffle. Progress bar Shows the progress of the current song. Drag or tap it to jump to any part of song. Rate Give the song a thumbs-up or thumbs-down. Current playlist Tap to display the current music list (queue). Options Tap to access more player options. Create Playlists in Google Play Music Organize music into playlists to fit every occasion. 1.  From home, tap Apps   > Play Music  .   The Play Music app opens. 2.  Tap   > My Library to view all the music files.
 .................................................................................................................................................................. 184 3.  Tap   next to a song and select Add to playlist.   4.  Tap New playlist. Enter a playlist name and description and tap CREATE PLAYLIST.      The playlist is created. 5.  Tap the Back Key  to return to the library view and select another song or album. 6.  Tap    next to the song or album and then tap Add to playlist > <playlist name>.   The song or album is added to the playlist. Repeat to add more items to the playlist. Adding Currently Playing Music to a Playlist ■ From the player view, tap   > Add to playlist > <playlist name>.
 .................................................................................................................................................................. 185   The music is added to the playlist. Sound Recorder You can use Sound Recorder to record voice memos. Record and Play a Voice Memo 1.  From home, tap Apps   > Sound Recorder  . 2.  Tap   to start recording.     During recording, you can do the following: •  Tap   /   to pause or continue the recording. •  Tap   to cancel the recording. 3.  Tap   to stop the recording. The memo is automatically saved. 4.  Tap   to play the voice recording. If you are not satisfied with it, tap   to delete. Note: To find all your voice memos, tap   at the top right of the screen.
 .................................................................................................................................................................. 186 Voice Dialer Voice Dialer is speech recognition software. You can use it to dial a phone number in your contacts, open menus or launch phone functions. 1.  From home, tap Apps   > Voice Dialer  . 2.  When you see "listening", follow the onscreen examples to speak "Call…", "Dial…", or "Open…" to make phone calls or open phone menus and applications.   Twitter Tweet (post messages) and view other people's tweets on Twitter. Login may be required to use Twitter. For details on Twitter, visit twitter.com. Install the Twitter App on Your Phone Before you can use Twitter on your phone, you have to download and install the app from Google Play.  1.  From home, tap Apps   > Play Store  . 2.  Tap   and search for "twitter". 3.  Tap Twitter from the results list. 4.  Tap INSTALL, and then tap ACCEPT.   The app will be downloaded and installed on your phone. 5.  When the download has completed, tap OPEN.
 .................................................................................................................................................................. 187   To open the app from the home screen, tap Apps   > Twitter  . Tweet on Twitter Read Twitter feeds, follow your friends, and tweet your own updates right from your phone. 1.  From home, tap Apps   > Twitter  .   The Twitter app launches.  If this is the first time you’ve used Twitter on your phone, tap Log in to sign in to an existing account, or tap Sign up to set up a new Twitter account.  2. Tap the “What’s happening?” text box, type a tweet, and tap TWEET.   The tweet is sent and appears on your Twitter feed. LinkedIn Find and connect with members worldwide, read the latest industry news, keep up-todate you're your groups, and more with on-the-go LinkedIn access. Install the LinkedIn App on Your Phone Before you use LinkedIn on your phone, you must download and install the app from the Google Play Store app. 1.  From home, tap Apps   > Play Store  . 2.  Tap   and search for "linkedin". 3.  Tap LinkedIn from the results list. 4.  Tap INSTALL, and then tap ACCEPT.   The app will be downloaded and installed on your phone. 5.  When the download has completed, tap OPEN.   To open the app from the home screen, tap Apps   > LinkedIn  . Sign In to Your LinkedIn Account Once you've downloaded and installed the LinkedIn app, sign in to your account. 1.  From home, tap Apps   > LinkedIn
 .................................................................................................................................................................. 188 2.  Follow the onscreen prompts to enter your LinkedIn username and password to sign in. You can also create a new LinkedIn account. YouTube View videos uploaded to YouTube and upload your own videos to your YouTube account. View YouTube Videos You can use the YouTube app to view videos on YouTube even if you aren’t signed in to a YouTube account. 1.  From home, tap Apps   > YouTube  .   The YouTube app launches.  If you’re prompted to provide confirmation to use the site, follow the onscreen instructions to continue.  2.  Search through the YouTube channels and tap a video you want to see.   The video plays on your phone screen.   Tap the screen to pause or resume play while watching. Post a Video to YouTube You can post videos to your YouTube account from your phone. Before posting, you must set up a YouTube account and sign in to it on your phone. 1.  From home, tap Apps   > YouTube  .   The YouTube app launches. 2.  Tap Options   > Uploads >  .   The Open from menu appears. 3.  Select a video to upload.   Enter a title, description, and tags, and select a privacy setting. 4.  Tap  .   The video is uploaded to your YouTube channel. Google Wallet You must have a Google Wallet account associated with your Google Account to purchase items from the Google Play Store app.
 .................................................................................................................................................................. 189 To create a Google Wallet account, do one of the following: ■ On your computer, go to google.com/wallet to create a Google Wallet account. – or – ■ The first time you use your phone to buy an item from Google Play, you’re prompted to enter your billing information to set up a Google Wallet account. Warning: When you’ve used Google Wallet once to purchase an application from the Google Play Store app, the phone remembers your password, so you don’t need to enter it the next time. For this reason, you should secure your phone to prevent others from using it without your permission. (For more information, see Security Settings.)
 .................................................................................................................................................................. 190 Connectivity The following topics address your phone’s connectivity options, including USB file transfer and tethering, Wi-Fi, Bluetooth, IR connectivity, and more. Transfer Files between Your Phone and a Computer You can use the supplied USB cable to connect your phone directly to your computer and transfer music, pictures, and other content files.  For example, if you have a music album stored on your computer that you want to listen to on your phone with any of the music apps, just attach your phone to the computer and copy the files to the music folder. File Transfer Tips ●  If you want to save data to an SD card on your phone, make sure the SD card is installed and active. See SD Card. ●  Avoid removing the battery or SD card while transferring data. ●  Data exchange may use the methods outlined in the following table: Method Description Media Device (MTP) Connect your phone as a media device and transfer between your phone and PC files such as pictures, videos, and music. Camera (PTP) Connect your phone as a camera and use camera software on your PC to transfer picture and video files from phone to PC.  Transfer Files between the Phone and a Computer 1.  Connect your phone to your computer using the supplied USB/charging cable.   Insert the smaller end of the cable to the charger/accessory jack at the bottom of the phone.   Insert the USB end of the cable into an available USB port on your computer. You may need to remove the USB cable from the charging head to access it.  2.  When   appears in the notifications area, drag the status bar down to display the notifications panel. 3.  Select either Media device (MTP) or Camera (PTP).
 .................................................................................................................................................................. 191   The files on your phone can now be accessed via your computer.   For most transfers, you'll want to use Media device (MTP).   To change the option, tap   in the notifications panel to open the Connect to PC window, and then tap the desired option.  4.  On your computer, navigate to the detected device (such as through the My Computer menu) and open it. 5.  If available, select a drive (SD Card for SD card, Phone for internal phone storage). 6.  Select a folder (for example, Music for songs and albums) and copy files to it from your computer. 7.  When you are done, disconnect your phone from your computer.   The transferred files are now saved to your phone or SD card. Wi-Fi Wi-Fi provides wireless Internet access over distances of up to 300 feet. To use your phone’s Wi-Fi, you need access to a wireless access point or “hotspot.” The availability and range of the Wi-Fi signal depends on a number of factors, including infrastructure and other objects through which the signal passes. Turn Wi-Fi On and Connect to a Wireless Network Use the wireless and networks setting menu to enable your phone’s Wi-Fi radio and connect to an available Wi-Fi network. 1.  From home, tap Apps   > Settings   > Wi-Fi.    The Wi-Fi settings menu appears. 2.  Tap the Wi-Fi slider to turn Wi-Fi on.    Wi-Fi is enabled. You will see the names and security settings of in-range Wi-Fi networks.   To disable Wi-Fi, tap the slider again. 3.  Tap a Wi-Fi network to connect, enter the password (if it’s not an open network), and then tap CONNECT.
 .................................................................................................................................................................. 192     Your phone is connected to the Wi-Fi network. You will see ( ) in the status bar.   The password, for a household wireless LAN router, is sometimes found on a sticker on the router (WEP, WPA, KEY, etc.). Contact the router manufacturer for information. For password for a public wireless LAN, check with user's service provider.   Entering a password is not required if an access point is not security protected. Note: The next time your phone connects to a previously accessed secured wireless network, you will not be prompted to enter the password again, unless you reset your phone to its factory default settings or you instruct the phone to forget the network. Note: Wi-Fi networks are self-discoverable, which means no additional steps are required for your phone to connect to a Wi-Fi network. It may be necessary to provide a user name and password for certain closed wireless networks. Wi-Fi Settings Use the Wi-Fi settings menu to manually set your Wi-Fi connection options. 1.  From home, tap Apps   > Settings   > Wi-Fi.    The Wi-Fi settings menu appears. 2.  Tap the Wi-Fi slider to turn Wi-Fi on.
 .................................................................................................................................................................. 193  Wi-Fi is enabled. You will see the names and security settings of in-range Wi-Fi networks.   To disable Wi-Fi, tap the slider again. 3.  Tap Menu   > Advanced.     The advanced Wi-Fi settings menu appears. 4.  Configure your Wi-Fi settings.     Your Wi-Fi settings changes are saved. Disconnect Wi-Fi You may wish to disconnect from a connected Wi-Fi network without turning Wi-Fi off.
 .................................................................................................................................................................. 194 1.  From home, tap Apps   > Settings   > Wi-Fi   The Wi-Fi settings menu appears. 2.  Tap the name of the connected access point and then tap FORGET.    Wi-Fi is disconnected.   After disconnecting from an access point, you may need to re-enter the password to reconnect. Wi-Fi Direct Use Wi-Fi Direct to connect directly to other Wi-Fi Direct devices simply via Wi-Fi, without an access point or via the Internet. 1.  From home, tap Apps   > Settings   > Wi-Fi   The Wi-Fi settings menu appears. 2.  Tap the Wi-Fi slider to turn Wi-Fi on.   Wi-Fi is enabled. You will see the names and security settings of in-range Wi-Fi networks.
 .................................................................................................................................................................. 195 3.  Tap Menu   > Advanced > Wi-Fi Direct.     The Wi-Fi Direct settings menu appears.  Wi-Fi Direct and Wi-Fi are unavailable at the same time. 4.  Tap a device with which to connect below Peer devices and tap CONNECT.   5.  Accept the connection on the other device.   The phone is connected via Wi-Fi Direct.   If a connection is not accepted after a certain period, the connection request is cancelled.   To stop a connection, tap the connected device and tap DISCONNECT.
 .................................................................................................................................................................. 196 Mobile Hotspot Hotspot allows you to turn your phone into a Wi-Fi hotspot. When this feature is turned on, you can share your phone's mobile data services via Wi-Fi with other Wi-Fi enabled devices. The feature works best when used in conjunction with 4G data services (although 3G service can also be used).  Important: Use of the Hotspot feature requires an additional subscription. Sign on to your account at boostmobile.com or access your account via Boost Zone (tap Apps > Boost Zone  ) to learn more. Note: Turning on Hotspot on will disable your phone's connection to other Wi-Fi networks. Set Up Mobile Hotspot 1.  From home, tap Apps   > Settings  .  2.  Tap Mobile Hotspot.   The Hotspot window opens. 3.  Tap the slider to turn Hotspot on.    Hotspot is enabled.    To disable Hotspot, tap the slider again. Note: The best way to keep using the phone as a hotspot is to have it connected to a power supply. Important: Write down the passkey (password) for this communication (shown onscreen). Connect to Mobile Hotspot 1.  Enable Wi-Fi (wireless) functionality on your target device (laptop, media device, etc.). 2.  Scan for Wi-Fi networks from the device and select your phone hotspot from the network list.   The default name for your phone hotspot is N9132_XXXXXX. You can change the name by tapping   > Configuration from the Mobile Hotspot screen. 3.  Select this phone and follow your onscreen instructions to enter the passkey (provided on the Hotspot page).  The device is connected via your phone’s Hotspot. 4.  Launch your Web browser to confirm you have an Internet connection. Tethering  Use Tethering to share your device’s Internet connection with a computer that connects to your device via USB cable, or by Bluetooth.
 .................................................................................................................................................................. 197 1.  From home, tap Apps   > Settings  .   2.  Tap More > Bluetooth tethering.   Bluetooth tethering is turned on, and your phone’s Internet connection can be shared with a connected Bluetooth device.   For information on pairing and connecting with Bluetooth devices, see Pair Bluetooth Devices and Connect to a Paired Bluetooth Device. Bluetooth Bluetooth® is a short-range communications technology that allows you to connect wirelessly to a number of Bluetooth devices, such as headsets and hands-free car kits, and Bluetooth-enabled handhelds, computers, printers, and wireless phones. The Bluetooth communication range is usually approximately 30 feet. Bluetooth Hints Question: Can’t use Bluetooth? Answer: Is your phone in airplane mode? Bluetooth is unavailable in airplane mode.  Bluetooth Function Cautions Information may not appear correctly on connected devices depending on the transferred data. Bluetooth Information Bluetooth is a technology that enables wireless connection with PCs, Bluetooth devices with hands-free features, etc. Function Description Audio output Listen to music, etc., wirelessly. Hands-free calls Call hands-free, using Bluetooth-capable hands-free devices and headsets. Data exchange Exchange data with Bluetooth devices.  Enable the Bluetooth Feature Use the settings menu to enable or disable your phone’s Bluetooth capabilities. ●  Wireless connection to all Bluetooth® functions is not guaranteed for the phone. ●  The phone may not connect properly depending on the other device. ●  Noise may be experienced with wireless calls and hands-free calls depending on the conditions.
 .................................................................................................................................................................. 198 To enable Bluetooth 1.  From home, tap Apps   > Settings  .  2.  Tap Bluetooth.   The Bluetooth settings open. 3.  Tap the slider to turn Bluetooth on.    Bluetooth is enabled.    To disable Bluetooth, tap the slider again. Tip: You can also turn Bluetooth on or off with the toggle menu in the notification panel. Pull down the status bar to display the notification panel and then tap Bluetooth to turn Bluetooth on or off. Note: Turn off Bluetooth when not in use to conserve battery power, or in places where using a wireless phone is prohibited, such as aboard an aircraft and in hospitals. Pair Bluetooth Devices Search for and pair nearby Bluetooth devices. Registered Bluetooth® devices can be connected simply. ■ Enable the Bluetooth function on the Bluetooth devices being paired beforehand. To pair Bluetooth devices: 1.  From home, tap Apps   > Settings  .  2.  Tap Bluetooth.   The Bluetooth settings open.   Nearby devices appear in the “Available devices” list.   If a target device is not detected, tap Scan to search again. 3. Tap a device from the “Available devices” list, and follow the onscreen instructions to pair with the device.   The Bluetooth device is paired to your phone.   Methods to accept a Bluetooth connection differ depending on the devices used. Unpairing from a Paired Device 1.  From the Bluetooth settings menu, tap Settings   next to the paired device you wish to unpair.   2.  Tap Unpair.
 .................................................................................................................................................................. 199   The device is unpaired from your phone. To make another connection with the device, you will need to pair again. Connect to a Paired Bluetooth Device You can listen to music over a Bluetooth stereo headset, or have hands-free conversations using a compatible Bluetooth headset or car kit. It’s the same procedure to set up stereo audio and hands-free devices. 1.  From home, tap Apps   > Settings  .  2.  Tap Bluetooth.   The Bluetooth settings open.   Paired Bluetooth devices appear in the “Paired devices” list. 3. Tap a device from the “Paired devices” list.   Your phone connects to the paired device. The pairing and connection status is displayed below the device’s name in the Bluetooth devices section. When the device is connected to your phone, the Bluetooth paired icon   is displayed in the status bar. Depending on the type of device you have connected, you can then start using the headset or car kit to listen to music or make and receive phone calls. Note: Due to different specifications and features of other Bluetooth-compatible devices, display and operations may be different, and functions such as transfer or exchange may not be possible with all Bluetooth-compatible devices. Send Information Using Bluetooth You can use Bluetooth to transfer information between your phone and another Bluetooth-enabled device such as a phone or notebook computer.  Types of Data You Can Send via Bluetooth You can send the following types of information, depending on the device you are sending to: ●  Images and videos ●  Calendar events ●  Contacts ●  Audio files In the instructions below, Contacts data is being used as an example.
 .................................................................................................................................................................. 200 Sending Contacts Data via Bluetooth 1.  From home, tap Contacts  .   You will see the Contacts list. 2.  Tap a contact to send. 3.  Tap Menu   > Share > Bluetooth.   4.  Tap a paired device to receive the data.   The contact information is sent.   If you see a message to confirm, follow the onscreen instructions. Receive Data via Bluetooth Your phone is capable of receiving a wide variety of file types with Bluetooth, including pictures, music tracks, and documents such as PDFs. 1.  When another device attempts to send a file to your phone via Bluetooth, you will see a request to accept the file. 2.  When another device attempts to send a file to your phone via Bluetooth, you will see a request to accept the file in the status bar.   3.  Drag the status bar down to display the notifications panel and then tap the Bluetooth share notification. 4.  Tap ACCEPT.     The file is sent to your phone.   When your phone receives a file, you will see a notification. To open the file immediately, drag the status bar down to display the notifications panel, and then tap the notification.
 .................................................................................................................................................................. 201   When you open a received file, what happens next depends on the file type: •  Media files and documents are usually opened directly in a compatible application. For example, if you open a music track, it starts playing in a music app you choose. •  For a vCalendar file, tap OK and the vCalendar event is imported to your local calendar account. (For more information on using the Calendar, see Calendar.) •  For a vCard contact file, all contacts in the file will be imported to your phone contacts automatically.
 .................................................................................................................................................................. 202 Settings The following topics provide an overview of items you can change using your phone’s Settings menus. The settings menu is grouped into the following categories, all of which are available through the main settings screen. ● WIRELESS & NETWORKS menu options include Airplane mode, Wi-Fi, Bluetooth, Mobile networks, Data usage, Mobile hotspot and More. ● DEVICE menu options comprise Sound & notifications, Display, Date & time, Language & input, Storage, Battery, Apps, Users, and Connect to PC. ● PERSONAL settings include Navigation key, Location, Security, Backup & reset, and Accounts. ● SYSTEM menu options include Accessibility, Printing, Activate this device, System updates, and About phone. Airplane Mode Airplane mode allows you to use many of your phone's features, such as Gallery, Camera, and Music, when you are on an airplane or in any other area where making or receiving calls or data is prohibited. When you set your phone to Airplane mode, it cannot send or receive any calls or access online information. To quickly turn Airplane mode on or off: ■ Press and hold the Power Button, and then tap Airplane mode.     When in airplane mode, the status bar will display  . To turn Airplane mode on or off in Settings: 1.  From home, tap Apps   > Settings  .
 .................................................................................................................................................................. 203 2.  Tap the Airplane mode slider. When in airplane mode, the status bar will display  . Wi-Fi Settings Menu The Wi-Fi settings menu lets you turn Wi-Fi on or off, set up and connect to available Wi-Fi networks, and configure advanced Wi-Fi options. For more information about Wi-Fi settings, see Wi-Fi. 1.  From home, tap Apps   > Settings    2.  Tap Wi-Fi.   The Wi-Fi settings menu appears. 3.  Tap the Wi-Fi slider to turn Wi-Fi on.   Wi-Fi is enabled. You will see the names and security settings of in-range Wi-Fi networks.   To disable Wi-Fi, tap the slider again. 4.  Tap a Wi-Fi network, enter the password, and tap CONNECT    Your phone is connected to the selected Wi-Fi network.   The password, for a household wireless LAN router, is sometimes found on a sticker on the router (WEP, WPA, KEY, etc.). Contact the router manufacturer for information. For password for a public wireless LAN, check with user's service provider.   Entering a password is not required if an access point is not security protected.
 .................................................................................................................................................................. 204 Advanced Wi-Fi Settings The advanced Wi-Fi settings menu lets you set up and manage wireless access points. ● Enable Notification when Open Networks Are Available: From Wi-Fi settings, tap Menu   > Advanced and tap the Network notification slider.   The setting is available when Wi-Fi is turned on.   Tap Network notification to turn the option on or off. ● Allow Some Services to Scan for Networks even when Wi-Fi is Off: From Wi-Fi settings, tap Menu   > Advanced and tap the Scanning always available slider.   Tap Scanning always available to turn the option on or off. ● Set Timing for Pausing a Connection: From Wi-Fi settings, tap Menu   > Advanced > Keep Wi-Fi on during sleep and then select a setting. ● Install Certificates for Secured Wi-Fi Networks: From Wi-Fi settings, tap Menu   > Advanced > Install certificates and then select the file to install. ● Use Wi-Fi Direct: From Wi-Fi settings, tap Menu   > Advanced > Wi-Fi Direct.   The setting is available when Wi-Fi is turned on.  For more information, see Wi-Fi Direct. ● Use WPS to Connect to a Wi-Fi Network: From Wi-Fi settings, tap Menu   > Advanced > WPS Push Button or WPS Pin Entry.   The settings are available when Wi-Fi is turned on.   If you tap WPS Push Button, press the WPS button on the access point and the access point will recognize your phone and add it to the network.   If you tap WPS Pin Entry, enter the PIN number displayed on the phone into the access point's setup page. Your phone automatically finds the access point and configures the connection. Note: For detailed information about the WPS feature of the access point, please refer to its user documents. ● Check MAC Address: From Wi-Fi settings, tap Menu   > Advanced.   MAC Address appears below “MAC address.” ● Check IP Address: From Wi-Fi settings, tap Menu   > Advanced.  IP Address appears below “IP address.”
 .................................................................................................................................................................. 205 Bluetooth Settings Your phone’s Bluetooth® capabilities let you use wireless headsets, send and receive pictures and files, and more. For details on your phone’s Bluetooth usage, see Bluetooth.  1.  From home, tap Apps   > Settings  .  2.  Tap Bluetooth.     The Bluetooth settings open. Bluetooth Settings Operations ● Enable Bluetooth: In Bluetooth settings, tap the slider at the top of the menu.   Alternately, drag the status bar down to display the notifications panel and then tap Bluetooth to turn Bluetooth on or off. ● Pairing Bluetooth Devices: Make sure the other devices are set to be discovered. From Bluetooth settings, tap the device name in “Available devices” and follow the onscreen instructions.   Depending on the device, you may be required to enter or accept a passkey.   If the target device does not appear, tap Menu   > Refresh to search again.   This setting is available when Bluetooth is enabled. ● Change the Name of a Paired Device: From Bluetooth settings, tap Settings   next to a paired device name, tap the current name, enter a new name, and tap OK.   Emoji cannot be used in a device name.   This setting is available when Bluetooth is enabled. ● Cancelling Pairing: From Bluetooth settings, tap Settings   next to a paired device name, and then tap FORGET.   This setting is available when Bluetooth is enabled. ● Enable Service from Paired Device: From Bluetooth settings, tap Settings   next to a paired device name, and then tap the listing under Use for.   If a confirmation prompt appears, follow the onscreen instructions.   This setting is available when Bluetooth is enabled.   This setting is available when the paired device is providing a service.
 .................................................................................................................................................................. 206 ● Search for Other Devices: From Bluetooth settings, tap Menu   > Refresh.   This setting is available when Bluetooth is enabled. ● Check Files Received via Bluetooth Transfer: From Bluetooth settings, tap Menu   > Show received files, and follow the onscreen instructions. Mobile Networks Settings The Mobile networks options let you enable your phone's mobile data access and set your preferred network mode. Enable Data Services 1.  From home, tap Apps   > Settings   > Mobile networks. 2.  Tap Data Enabled to enable or disable data services over the mobile network. Note: Certain data service request may require additional time to process. While your phone is loading the requested service, the touchscreen may appear unresponsive when in fact it is functioning properly. Allow your phone some time to process your data usage request. Switch Network Mode 1.  From home, tap Apps   > Settings   > Mobile networks > Preferred network type. 2.  Tap LTE/CDMA or CDMA. Data Usage Settings The data usage menu lets you view your phone’s mobile and Wi-Fi data usage, set data limits, restrict hotspot usage, and more. 1.  From home, tap Apps   > Settings  .  2.  Tap Data usage.   The data usage window opens. Data Usage Settings Operations ● Enable Mobile Data: In Data usage window, tap the Mobile data slider to enable or disable the service.   If a confirmation appears, follow the onscreen instructions. ● Enable Restrictions on Mobile Data Usage: From the Data usage window, tap Set mobile data limit to enable restriction and tap OK to confirm.
 .................................................................................................................................................................. 207   With restriction turned on, drag the horizontal Limit slider up or down to set the data usage limit and data warning amount.   This setting is available when Mobile data is enabled. ● Set Date for Resetting Data Usage: To set the data usage measuring cycle, from the Data usage window, tap the box above the data usage graph, tap Change cycle, set a reset date, and tap SET.    This setting is available when Mobile data is enabled. ● Check Data Usage for Each Application: To see how your data is being used, slide the vertical white bars in the graph to set a usage period, and then tap an app name to see its usage for the period. ● Enable Restriction on Mobile Data in Background: From the Data usage window, tap Menu   > Restrict background data.   This setting stops some apps and services from working unless your phone is connected to a Wi-Fi network.   If a confirmation appears, tap OK. ● View Both Mobile Data and Wi-Fi Usage: From the Data usage window, tap Menu   > Show Wi-Fi.    Tap Menu   > Hide Wi-Fi to disable the feature.   When the feature is on, you will see a CELLULAR tab and a WI-FI tab at the top of the Data usage window. Tap WI-FI to view your phone’s Wi-Fi data usage. Mobile Hotspot Settings Use the settings menu to configure your hotspot settings, which allow you to share your phone’s data service with multiple Wi-Fi capable devices. 1.  From home, tap Apps   > Settings   > Mobile Hotspot.   The Mobile hotspot window opens. 2.  Tap the slider to turn Mobile hotspot on.   Mobile Hotspot is enabled.    To disable Mobile Hotspot, tap the slider again. Advanced Mobile Hotspot Settings The Mobile hotspot settings menu lets you configure advanced options.
 .................................................................................................................................................................. 208 ● Set Network SSID: From the Mobile hotspot window, tap Menu   > Configuration, tap the Network name field to edit the name for your hotspot, and then tap SAVE. ● Set Hotspot Security: From the Mobile hotspot window, tap Menu   > Configuration, tap the Security line and select a security settings option, and then tap SAVE.   If you select WPA2 PSK, tap the Password field to edit the password. ● Set Hotspot Password: From the Mobile hotspot window, tap Menu   > Configuration, tap the Password field and enter a password, and then tap SAVE. ● Set Hotspot Visibility: From the Mobile hotspot window, tap Menu   > Configuration, tap the Broadcast SSID line. Select Enable if you want the hotspot to be searchable, or select Disable if you want to hotspot to be undetectable. Then tap SAVE. ● Set Hotspot Channel: From the Mobile hotspot window, tap Menu   > Configuration, tap the Channel line, select a channel, and then tap SAVE.   Use a different channel may help you avoid interference with other Wi-Fi networks. ● Set Allowed Devices: To select which devices are allowed to connect to mobile hotspot, In Mobile hotspot window, tap Menu   > Manage Users > Allowed Devices > ADD NEW, enter a device name and MAC address, and then tap SAVE.   To remove allowed devices, tap DELETE, select the devices and then tap REMOVE.   In the Allowed Devices screen, uncheck Allow all devices if you want only devices in the list to connect to the hotspot. ● Set Maximum Connections: To set the maximum number of devices that can connect to the hotspot simultaneously, in Mobile hotspot window, tap Menu   > Manage Users > Max connection and tap a number. ● Set Hotspot Sleep Settings: From the Mobile hotspot window, tap Menu   > Advanced, and configure the following options.   Hotspot sleep policy: Set the wait time before Mobile hotspot turns off when there is no connected device.  Hotspot notification: Check this option to display a notification in the status bar when the sleep policy turns off the hotspot.  Data service dependency: Check this option to turn off Mobile hotspot when mobile data service is unavailable. ● Set Local Area Network (LAN) Settings: From the Mobile hotspot window, tap Menu   > Advanced, configure your options in the LAN settings section.
 .................................................................................................................................................................. 209 More Settings The more settings menu provides access to additional wireless and network options, such as default messaging app, mobile networks, VPN, roaming and more. More Settings Options Setting Description VPN Manage Virtual Private Network (VPN). Default SMS app Set the default app for SMS/MMS. Bluetooth tethering Turn on or off the Bluetooth tethering feature.  Access More Settings Options 1.  From home, tap Apps   > Settings  .  2.  Tap More settings.   3.  Set items.   Your settings are saved and implemented. Virtual Private Networks (VPN)  From your phone, you can add, set up, and manage virtual private networks (VPNs) that allow you to connect and access resources inside a secured local network, such as your corporate network. Prepare Your Phone for VPN Connection Depending on the type of VPN you are using at work, you may be required to enter your login credentials or install security certificates before you can connect to your company’s local network. You can get this information from your network administrator. Before you can initiate a VPN connection, your phone must first establish a Wi-Fi or data connection. For information about setting up and using these connections on your phone, see Browser and Turn Wi-Fi On and Connect to a Wireless Network. Set Up Secure Credential Storage If your network administrator instructs you to download and install security certificates, you must first set up the phone’s secure credential storage. 1.  From home, tap Apps   > Settings   > Security > Install from SD card.
 .................................................................................................................................................................. 210 2.  Select the certificate file you need to install. Only certificates that you have not installed are displayed. 3.  If prompted, enter the certificate password and tap OK. 4.  Enter a name for the certificate and tap OK. Note: If you have not set a PIN or password for your phone, you are prompted to set one up. Add a VPN Connection Use the Wireless & networks settings menu to add a VPN connection to your phone. 1.  From home, tap Apps   > Settings   > More > VPN.   The VPN settings window appears. 2.  Tap  , and then enter the information for the VPN you want to add.     Information may include Name, Type, Server address, PPP encryption (MPPE), and advanced options.   Set up all options according to the security details you have obtained from your network administrator. 3.  Tap SAVE.   Your VPN is added to the VPNs section of the VPN settings window. Connect to or Disconnect from a VPN Once you have set up a VPN connection, connecting and disconnecting from the VPN is easy.
 .................................................................................................................................................................. 211 Access the VPN Settings Window ■ From home, tap Apps   > Settings   > More > VPN.   The VPN settings window appears. Connect to a VPN 1.  From the VPNs section of the VPN setting window, tap the VPN that you want to connect to.   2.  When prompted, enter your login credentials, and then tap CONNECT.      You will connect to the selected VPN.    When you are connected, a VPN connected icon appears in the notification area. 3.  Open the Web browser to access resources such as intranet sites on your corporate network. Disconnect from a VPN 1.  Drag the status bar down to open the notifications panel. 2.  Tap the VPN connection to return to the VPN settings window. 3.  Tap the VPN connection to disconnect from it.    Your phone disconnects from the VPN.
 .................................................................................................................................................................. 212   When your phone has disconnected from the VPN, you will see a VPN disconnected icon in the notification area of the status bar. Default SMS App Settings If you have multiple messaging apps installed on your phone, you can choose the app your phone uses for messaging. The app you select here will be used when you choose Messaging in other apps, such as when sharing items like pictures or video. 1.  From home, tap Apps   > Settings   > More > Default SMS app. 2.  Choose a messaging app.     The default SMS app is set. Note: If you choose a default SMS app other than Messaging (for example, Google Hangouts), you will not be able to use the Messaging app unless you restore it as the default SMS app. Bluetooth Tethering Setting Bluetooth tethering allows you to share your phone's mobile data connection with other devices via Bluetooth. For details on Bluetooth tethering, see Bluetooth Tethering Settings. From home, tap Apps   > Settings   > More and then tap Bluetooth tethering to turn the feature on or off. Sound & Notifications Settings The Sound & notifications settings menu lets you control your phone’s audio, from ringtones and alerts to tap tones and notifications. Sound and Notifications Settings Overview The sound & notifications settings menu allows you to configure the following options:
 .................................................................................................................................................................. 213 Sound Setting Description Volume Set volume for media, alarm, ringtone, and notification. Interruptions Set interruption mode for calls and notifications. Phone ringtone  Set your phone’s default ringtone. Default notification ringtone Set the default tone for phone notifications. Vibrate pattern Set the pattern of vibration when vibration is enabled for notifications. Other sounds Manage system sounds including dial pad tones, screen lock sounds, touch sounds, vibration on touch, and emergency tone. Notification mode Select the sound mode of notification. When device is locked Set the appearance of notification content on the lock screen. App notifications Set the priority and sensitivity of your apps. Notifications from priority apps are allowed in priority interruptions mode; while you can hide notifications from sensitive apps on the lock screen. Some apps also allow you to block all of their notifications. Notification access Manage the authority of individual apps to access notifications.  Access Sound Settings 1.  From home, tap Apps   > Settings   > Sound & notification. 2.  Set your sound & notifications options.   Your settings are saved and applied. Display Settings Use the phone's display settings menu to adjust items such as wallpaper, brightness, screen timeout, and more. Display Settings Overview The display settings menu allows you to configure the following options:
 .................................................................................................................................................................. 214 Display Setting Description Brightness level Set the screen brightness. Adaptive brightness Set whether to automatically adjust the screen brightness for available light. Wallpaper Set a wallpaper. Auto-rotate screen Set whether to allow the screen to rotate the display with the phone orientation, where applicable. Sleep Set a screen timeout duration before it automatically turns off. Note: Longer durations discharge the battery more quickly. Daydream Manage the Daydream function. When Daydream is enabled, photos or animations will be displayed as a screensaver. Font size Set font size for display. Pulse notification light Set whether to flash the light beneath the Home Key   to notify you of missed calls, new messages, and other events. Accelerometer Calibration Calibrate the phone's accelerometer when you detect any error during use. Navigation key light duration Control the back light duration of the Home Key  , the Back Key , and the Recent Apps Key  .  Access Display Settings 1.  From home, tap Apps   > Settings  .  2.  Tap Display. 3.  Set your display options.   Your display settings are saved and applied. Date & Time Settings Use the Date & Time settings menu either to automatically use the network-provided date and time or manually set these values, as well as select time and date format options.
 .................................................................................................................................................................. 215 Date and Time Overview The following Date and time options may be configured:  Date and Time Option Description Automatic date & time Set the date and time automatically via the connected mobile network. Automatic time zone Set the time zone automatically via the connected mobile network. Set date Set the date manually (only available when Automatic date & time option is disabled). Set time Set the time manually (only available when Automatic date & time option is disabled). Select time zone Set the time zone manually (only when Automatic time zone is disabled). Use 24-hour format Enable or disable 24-hour format. Choose date format Set the date display format.  Access Date and Time Options 1.  From home, tap Apps   > Settings   > Date & time. 2.  Set available date and time options.   Your date and time settings are applied and saved. Language & Input Settings Your phone’s language & input settings let you select a language for the phone’s menus and keyboards, select and configure keyboard settings, configure speech input settings, and set your phone’s mouse/trackpad options. Language and Input Settings Overview You can set the following options in the Language and input settings menu:  Language and Input Setting Description Language Set the language for your display and menus.
 .................................................................................................................................................................. 216 Language and Input Setting Description Spell checker Turn on or off the feature and configure Google Spell Checker options to check for spelling errors when entering text. Personal dictionary Add words to a personal phone dictionary to improve word suggestion and spell check when entering text. Current Keyboard Set the default method for entering text and enable/disable installed input methods. Google Keyboard Set Google Keyboard options. Swype Set Swype keyboard options. TouchPal X Set TouchPal X keyboard options. Voice input Select and configure voice input services. Text-to-speech output Set text-to-speech options. Pointer speed Set the speed of the pointer for a mouse/trackpad.  Access Language and Input Setting Options 1.  From home, tap Apps   > Settings   > Language & input.   The Language and input settings menu opens. 2.  Set options.   The language and input settings are applied and saved. Language and Input Options Some of the language and input options are detailed below. ● Set the Display Language: From the Language & input settings menu, tap Language and then tap a language to assign it. ● Set Input Method: From the Language & input setting menu, tap Current Keyboard and then tap an input method. ● Set Google Keyboard Options: From the Language & input settings menu, tap Google Keyboard and configure your keyboard options.
 .................................................................................................................................................................. 217 ● Set Output for Text-to-Speech Output: From the Language & input settings menu, tap Text-to-speech output, tap a settings option, and follow the onscreen instructions. ● Set Speed of Pointer for Mouse/Trackpad: From the Language & input settings menu, tap Pointer speed, drag the bar to adjust the speed, and tap OK. Storage Settings The storage settings menu lets you manage internal storage on your phone and provides menu choices for an optional SD card (not included). Storage Settings Overview The storage settings menu allows you to configure the following options: Storage Setting Description Save location Set the default location for new data, such as files downloaded, photos captured, and voice recorded. Total space View the total space/free space in your phone memory and in an optional installed SD card. Unmount SD card If an optional SD card is installed, tap to unmount the card to allow for safe removal. Mount SD card If an optional SD card is installed, tap to mount the card and make it available for use. Erase SD card If an optional SD card is installed, tap to erase all data stored on the card and prepare it for use by your phone.  Access Storage Settings 1.  From home, tap Apps   > Settings  .  2.  Tap Storage.    3.  Check or tap items.   Review your storage settings. Battery Settings Monitor your phone’s battery usage through this settings menu. View which functions are consuming your battery’s charge and at what percentage.
 .................................................................................................................................................................. 218 1.  From home, tap Apps   > Settings  .  2.  Tap Battery. 3.  Tap items to view details.    Check your battery condition and access additional options. App Settings Check installed applications and running applications.  Apps Settings Overview Items that can be checked in the Apps settings menu are the following.  Apps Setting Description Downloaded Check downloaded apps. Running Check running apps. All Check all apps.  Access Apps Settings 1.  From home, tap Apps   > Settings   > Apps. 2.  Tap items to view details.    Check your application settings condition and access additional options.   Depending on the app and its location, you may be able to force the app closed, uninstall or disable the app, clear cache and data, move the app between phone and SD card, and more. Connect to PC Settings The Connect to PC settings menu lets you select the USB connection type between your phone and PC. For more information, see Transfer Files Between Your Phone and a Computer. Access Connect to PC Settings 1.  From home, tap Apps   > Settings   > Connect to PC. 2.  Tap one USB connection type.
 .................................................................................................................................................................. 219 Note: Uncheck Don't ask me again to be prompted to select a connection type each time you connect the phone to a PC. Navigation Key Setting The Navigation key setting menu allows you to exchange the positions of the Back Key   and the Recent Apps Key  . To swap the positions of the two keys: 1.  From home, tap Apps   > Settings   > Navigation key. 2.  Tap an option. Location Access Settings Your Location Services settings menu lets you select how your phone determines its location (using the wireless networks, GPS satellites, both, or neither).  Location Settings Overview Your Location settings menu allows you to configure the following options.  Location Setting Description Mode Select a locating method: High accuracy, Power saving, or GPS only Place Add favorite locations for use with location-enabled features Location tagging Allow specific apps to tag your location automatically  Enable Location Services Before using any features that require location assistance, you must enable your phone’s location services. 1.  From home, tap Apps   > Settings  .  2.  Tap Location.   3.  Tap the setting to toggle Location on.   Your phone’s location services are enabled.   If you see a confirmation, follow the onscreen instructions to connect.
 .................................................................................................................................................................. 220 Access Location Settings 1.  From home, tap Apps   > Settings  .  2.  Tap Location. 3.  Configure the desired settings.    Your location settings are applied and saved. Security Settings The Security settings menus let you set encryption options, password visibility, administrator settings, and credential storage options. Security Settings Overview Many security settings are dependent on Screen lock settings, SIM lock settings, etc. The following table outlines the settings available through the Security settings menu:  Security Setting Description Screen lock Protect your phone with a screen lock that you must enter to use the phone. Owner info Set the text that you may display on the lock screen. Smart Lock Keep the phone unlocked when connected to trusted devices, in trusted places, unlocked by trusted faces or voices, or as long as you keep holding or carrying the device. Note: You need to sign in to your Google Account on the phone to use this feature. Encrypt phone  Encrypt all data on your phone. Encrypt SD card Encrypt the data on an optional installed SD card. Make passwords visible Toggle to show or hide passwords when entering form data. Device administrators View or turn off device administrators. Unknown sources Allow or deny installation of apps from sources other than the Google Play Store app. Storage type Check the credential storage type. Trusted credentials Display trusted CA certificates.
 .................................................................................................................................................................. 221 Security Setting Description Install from SD card Install certificates from the phone storage or an optional installed SD card. Clear credentials Clear the credential storage and delete all certificates. Trust agents View or deactivate trust agents. Screen pinning Keep a screen of your choice in view, so that others cannot switch to other apps and access your personal information. Apps with usage access Turn on or off some apps’ access to your phone usage information.  Access Security Settings Before using any features that require location assistance, you must enable your phone’s location services. 1.  From home, tap Apps   > Settings   > Security.    The Security settings menu opens. 2.  Set your security options.   Your security settings are applied and saved.  Backup & Reset Your phone’s Backup & reset menu lets you back up your phone’s data and settings to Google servers before resetting your phone to the original factory settings. The Factory data reset erases all data from the phone’s application storage, including: ●  Your Google Account ●  All other email and social networking accounts ●  System and application data and settings ●  Downloaded applications Backup and Reset Overview The following options are available in the Backup and reset menu:
 .................................................................................................................................................................. 222 Backup and Reset Option Description Back up my data Enable backup for application data, Wi-Fi passwords, and other settings to Google servers. Backup account Select the account used to back up data. Automatic restore When reinstalling an application, backed up settings and data will be restored. Factory data reset Reset all settings and delete all data on phone.  ●  Performing a factory data reset erases all data on the phone. It is recommended that you back up important data before performing a factory data reset. ●  Erased information cannot be restored. Only erase data after you are sure you have saved everything you need. Access Backup and Reset Options 1.  From home, tap Apps   > Settings   > Backup & reset.   The Backup and reset menu opens. 2.  Set options.   The backup and reset settings are applied and saved.  If you’re performing a Factory Data Reset, follow the prompts to confirm the data removal. The phone will erase all data and reboot. Factory Data Reset Tip: Before performing a factory data reset on your phone, you may want to unmount the SD card to avoid losing any data you may have stored on it. From home, tap Apps   > Settings   > Storage > Unmount SD card to unmount the storage card.
 .................................................................................................................................................................. 223 1.  From the Backup and reset menu, tap Factory data reset.   2.  Read the factory data reset information page and tap RESET PHONE.
 .................................................................................................................................................................. 224 3.  Tap ERASE EVERYTHING.      Your phone will power down and reset itself, which may take up to 10 minutes.   Once the phone has reset, it will run through the Setup Screens again. See Complete the Setup Screens to start over.  Accounts The Accounts settings menu lets you add and manage all your email, social networking, and picture and video sharing accounts. Set Up a New Account 1.  From home, tap Apps   > Settings  .  2.  Tap Accounts > Add account.   An Add account window appears. 3.  Tap an account type and then follow the onscreen instructions to add the required account information, and then tap Done.   The account is added to the accounts list. Manage Existing Accounts 1.  From home, tap Apps   > Settings  .  2.  Tap an account type displayed below Accounts.
 .................................................................................................................................................................. 225 3.  Tap an account in the category.     The account settings menu appears. 4.  Select your account settings.   The account options are updated. Accessibility Settings The accessibility menu lets you enable and manage accessibility-related applications. Accessibility Settings Overview The following accessibility options may be configured:  Accessibility Option Description TalkBack Set the TalkBack service to help blind or low-vision users access the phone. Switch Access Set Switch Access to allow you to control the phone using configurable key combinations. Magnification gestures Set whether to allow zooming in and out the screen content by triple-tapping the screen. Large text Set whether to enlarge the text on the screen. High contrast text Set whether to display onscreen text with higher contrast. Color correction Set whether to correct color on the screen for color-blind users. Text-to-speech output Set text-to-speech options. Notification reminder Set whether to remind you of notifications.
 .................................................................................................................................................................. 226 Accessibility Option Description Captions Set the language, text size, and style for the captions. Audio Type Set the type of the phone's audio output. Sound Balance Set the sound volume balance. Physical key vibrating Set whether to let the phone vibrate when you press the physical buttons (the Power Button and the Volume Buttons). Touch & hold delay Adjust the delay required for the phone to notice your "touch & hold" gesture (for example, when you want to move an app to the home screen). Power button ends call When enabled, you can press the Power Button to end phone calls without turning the screen off. Auto-rotate screen Set whether to allow the screen to rotate the display with the phone orientation, where applicable. Speak passwords Get spoken feedback while typing passwords. Accessibility shortcut When this feature is enabled, you can quickly enable accessibility features following the steps prompted on the Accessibility shortcut screen.  Access Accessibility Options 1.  From home, tap Apps   > Settings  .  2.  Tap Accessibility. 3.  Set available accessibility options.   Your accessibility settings are applied and saved. Printing The Printing menu lets you configure Google's Cloud Print service. You can connect your printer to your Google Account and then add the printer on your phone in the Printing menu. After that, you can send documents, pictures, emails, or web pages from your phone to the printer wirelessly and have them printed out. Connect Your Printer to Your Google Account How you connect your printer to your Google Account depends on the type of your printer.
 .................................................................................................................................................................. 227 For traditional printers, follow the steps below. 1.  Connect the printer to your computer and install necessary software so that the printer is ready for printing. 2.  Open the Chrome Web browser on the computer and go to the Settings page. 3.  Click Add printers and follow the prompts to add the printer to your Google Account. You need to sign in to your Google Account in Chrome. For Cloud Ready Printers, you can connect it to the Internet and register it to your Google Account directly without using a computer. Use Cloud Print on Your Phone To use Google Cloud Print on your phone, you must sign in to your Google Account. If you haven't added a printer on the phone or haven't turned on the Cloud Print feature, tap Apps   > Settings   > Printing > Cloud Print from home to enable this function or add a printer registered to your Google Account. 1.  Open a file on the phone and select the option for print. For example, open a web page with the Chrome app and tap Menu   > Print….   2.  Select a printer you have added to the phone or tap   > All printers… to add a printer right away.
 .................................................................................................................................................................. 228   3.  Configure other print job options, such as number of copies, color, and paper size. 4.  Tap Print   to send the print job wireless to your printer through Google Servers. Note: Instead of selecting a printer, you can also choose to save the file to Google Drive or as a PDF file. Activate This Device  The activate this device menu lets you activate a new phone or use additional self-service options such as checking the status of an in-service phone. 1.  From home, tap Apps   > Settings  .  2.  Tap Activate this device.   The Device Self Service menu appears. 3.  Follow the onscreen prompts to activate your phone or review your summary.   Your phone activates. If already activated on an account, you will see a usage and plan summary.
 .................................................................................................................................................................. 229 System Updates The System updates menu lets you update your PRL (preferred roaming list), your user profile, your Android software, and your phone firmware. 1.  From home, tap Apps   > Settings  . 2.  Tap System updates and select an option and follow the prompts to complete the update.   For complete system update information, see Update Your Phone. About Phone The about phone menu lets you access important phone information, search for and apply updates, and view legal and safety information. About Phone Overview The following About Phone items may be reviewed or set:  About Phone Item Description Status Check your phone’s status. Legal information Check open source license information, Google legal document, etc. 4G settings Check the 4G LTE network provider and your IP address. Model number Check the phone’s model number. Android version Check the Android version number. Baseband version Check the phone’s baseband version. Kernel version Check the phone’s kernel version. SW Version Check the current phone software version. HW Version Check the current phone hardware version.  Access About Phone Options 1.  From home, tap Apps   > Settings  .  2.  Tap About Phone.
 .................................................................................................................................................................. 230 3.  Select or view available options.   Your phone information is displayed.
 .................................................................................................................................................................. 231 For Assistance The following topics address areas of support for your phone, including troubleshooting, specifications, account information, warranty information, and customer service contact information. Troubleshooting Check the questions and answers below for troubleshooting solutions for common phone issues. Check Here First Question: Phone freezes/operation is unstable. Answer: Turn the phone on again. If you are unable to turn the phone off, remove and replace the Battery, and then turn the phone on again. Data that was being edited is erased after your phone is powered on again. Question: Operation is unstable after a new application was installed. Answer: The newly installed application may be the cause. Uninstall the application in Safe mode. See Uninstall an App. To turn the phone on in Safe mode:   Press and hold the Power/Lock key > touch and hold Power off, read the disclaimer for safe mode, and then tap OK. •  After turning the phone on in Safe mode, "Safe Mode" appears at lower left. •  After restarting in Safe mode, your phone can be powered on as usual. •  Before turning the phone on in Safe mode, it is recommended that you back up important data. •  By powering the phone on in Safe mode, added widgets may be deleted. Question: Cannot use phone, mail, or Internet. Answer 1: Check whether you are where signal is weak or out of service area. Answer 2: Power the phone on again. Answer 3: Is the phone in Airplane mode? To check that Airplane mode is canceled:   From home, tap Apps   > Settings   > Airplane mode. Answer 4: Is data communication disabled? To check that data communication is enabled:   From home, tap Apps   > Settings   > Data usage > Mobile data.
 .................................................................................................................................................................. 232 Answer 5: Is a disabled access point set? To reset to initial settings:   From home, tap Apps   > Settings   > Mobile networks  > Access Point Names > More > Reset to default. Question: Battery level goes down quickly. Answer: Are you where signal is weak or have been out of service area for a long period? Calling where signal is weak or being out of service area uses a lot of Battery. Question: Cannot install applications. Answer: Applications cannot be installed with only a little free space on the phone or SD card. To check free space, see Storage Settings. Applications not supported by your phone cannot be installed. Question: Cannot unlock screen. Answer: Power the phone on again. If you are unable to turn the phone off, remove and replace the Battery, and then power the phone on again. Data that was being edited is erased after the phone is powered on again. Specifications The following tables list your phone’s and battery’s specifications. Phone Specifications Item Description Weight Handset alone: Approx. 119g Battery installed: Approx. 163.5g Continuous Talk Time 3G: Approx. 870 minutes GSM: Approx. 810 minutes Continuous Standby Time 3G: Approx. 3120 minutes GSM: Approx. 3000 minutes Charging Time Approx. 240 minutes Dimensions Approx. 145.5 x 72.9 x 10.3 mm Maximum Output 3G: 0.25W GSM: 2W
 .................................................................................................................................................................. 233 Item Description Communication Speed CDMA: Up to 3.1 Mbps downlink/up to 1.8 Mbps uplink WCDMA: Up to 21 Mbps downlink/up to 5.7 Mbps uplink  LTE: Up to 100 Mbps downlink/up to 50 Mbps uplink  Battery Specifications  Item Description Voltage 3.8V Type Lithium-ion Capacity 2300mAh Dimensions (W x H x D) Approx. 5.0 x 53.8 x 73 mm  Boost Account Information and Help  Find out about managing your account online and on your phone, buying additional minutes for your plan, and getting help. For more information about your Boost Mobile account, as well as other Boost Mobile services, visit us at: boostmobile.com. Manage Your Account  Access information about your account. You can: ●  Check your minutes. ● Re-Boost® (add money to your account). ●  Change plans. ●  And more. From Your Phone Access account information and other self-service tools from Boost Zone. ■ From home, tap Apps   > Boost Zone  . You can also dial directly for access to certain information:
 .................................................................................................................................................................. 234 ●  Dial         (#BAL) to check account balance.  ●  Dial         (#ADD) to make a payment.  ●  Dial         to launch BoostZone or call Boost Customer Care (depending on your Settings) to get answers to other questions.  From Your Computer ■ Visit boostmobile.com, click My Account, and log in with your wireless phone number and account PIN. From Any Other Phone ■ Boost Customer Care: 1-888-BOOST-4U (1-888-266-7848).  Re-Boost  Boost Mobile makes it easy to add money to your account. You decide exactly how and where you want to pay. Keep your account active by using your phone and adding money to your account. Pay with Cash Find an Authorized Re-Boost Retailer near you. Pick up a Re-Boost Card or recharge for as low as $10 at the register, where available. Pay Anytime with a Credit/Debit Card Dial          (#ADD) to add money from your phone or visit My Account at boostmobile.com to do it online. Securely register your credit/debit card with Boost for more convenient one-time payments or to set up easy Auto Re-Boost payments. Set Up Worry-Free Payments with Auto Re-BoostSM It’s the easiest way to make sure your account stays on and active. Use a credit card, debit card or bank account—whatever’s best for you. Visit boostmobile.com/reboost to get the details on all your Re-Boost options.
Index  235 Index Accessibility, 225 Accessory Port, 3 Accounts Add new, 224 Manage, 224 Settings, 224 Activation, 21, 228 Airplane Mode, 32 Alarm, 165 Android Keyboard, 34 Answer a Call, 71 Apps Find and install, 46 Request refunds, 47 Uninstall, 51 Update, 47 Apps Settings, 218 Back Key, 2 Back Up Phone, 221 Battery Settings, 217 Bluetooth Connect, 199 Receive information, 200 Send information, 199 Settings, 205 Share pictures and videos, 150 Turn on or off, 197 Bookmark, 131 Browser Bookmark, 131 History, 133 Launch connection, 130 Settings, 135 Tabs, 134 Calculator, 159 Calendar, 159 Add event, 159 Sync Exchange ActiveSync calendar, 163 View events, 161 Call Forwarding, 87 Call Logs Make call from, 77 Call Waiting, 86 Caller ID, 86 Camera, 138 Settings, 156 Take a picture, 138 Car Kit Connect, 199 Charger Port, 3 Clock Alarm, 165 Stopwatch, 166 Timer, 166 World Clock, 166 Contacts, 90 Add contact, 90 Delete, 96 Edit, 95 Import, 98 Make call from, 76 Save a phone number, 91 Share, 96 View, 92 Credentials, 220 Data Usage Settings, 206 Date & Time, 214 Device Administrators, 220 Drag, 19 Editing Text, 40 Email Add account, 121 Add Exchange ActiveSync account, 123 Compose and send, 124 Delete account, 126 Manage inbox, 127 Send Gmail, 107 Setup, 120 Share pictures, 146 View and reply, 125 Emergency Numbers, 69 Encrypt phone, 220 Encrypt SD Card, 220 Enhanced 9-1-1 (E 9-1-1), 70 Enter Text, 33 Exchange ActiveSync Add account, 123
Index  236 Features, 128 Extended Home Screen, 58 Facebook, 166 Share pictures and videos, 152 Factory Data Reset, 222 Files Transfer between phone and computer, 190 Flash, 3 Flick, 19 Flickr Share pictures, 152 Folders, 65 Font Size, 214 Gallery, 140 View pictures and videos, 140 Gmail Archive threads, 111 Create account, 41 Delete threads, 112, 113 Labels, 109 Mute threads, 112 New messages, 109 Read and reply, 109 Read messages, 109 Report phishing, 116 Report spam, 116 Search, 114 Send message, 107 Share pictures, 146 Switch accounts, 119 Google Create account, 41 Hangouts, 171 Sign in, 42 Voice search, 169 Google Keyboard, 216 Google Maps, 173 Google Play Find and install apps, 46 Help, 52 Store, 45 Google Play Music, 180 Google Wallet, 188 GPS Satellites, 219 Hangouts, 171 Headset Connect, 199 Headset Jack, 3 Home Screen, 57 Add Folders, 65 Add Shortcuts, 64 Add Widgets, 65 Customize, 63 Extended, 58 Hotspot, 196 Settings, 207 Import Contacts, 98 Incoming Call Answer, 71 Reject, 73 Input Settings, 215 Internet, 100 Keyboard Android keyboard, 34 Default settings, 216 Swype, 35 TouchPal X, 37 Touchscreen, 33 Language, 215 Language Settings, 215 LinkedIn, 187 Location GPS satellites, 219 Wireless networks, 219 Location Services, 219 Lock Key, 3 Maps, 173 Memory, 217 Messaging, 100 microSD Card Encrypt, 220 Format, 217 Mount, 217 Unmount, 217 MMS Options, 106 Send messages, 101 Mobile Hotspot, 196 Multimedia Messaging Share pictures and videos, 148 Music Google Play Music, 180 Notification Icons, 60 Notification Panel, 62 Notifications, 60 Phone Dialer, 67
Index  237 Phone Calls, 67 Answer, 70 Emergency numbers, 69 Using Call Logs, 77 Using contacts, 76 Using phone keypad, 67 Phone Layout (illustration), 2 Phone Number Save to contacts, 91 Phone Status, 229 Phone Update PRL, 56 Profile, 55 Software, 53 Picasa Share pictures, 152 Pictures Crop, 143 Rotate, 141 Share via Bluetooth, 150 Share via email, 146 Share via Facebook, 152 Share via Flickr, 152 Share via messaging, 148 Take with camera, 138 View, 140 Picures Share via Picasa, 152 Pinch, 20 Play Music, 180 Play Store, 45 Find and install apps, 46 Pointer Speed, 216 Power Key, 3 Power Off, 18 Power On, 17 PRL Update, 56 Reject Incoming Call, 73 Ringtone, 213 Rotate, 20 Save a Phone Number, 91 SD card Format, 217 SD Card Encrypt, 220 Mount, 217 Unmount, 217 Secure Credential Storage, 209 Security Settings, 220 Settings, 202 Setup Screens, 22 Share Contacts, 96 Sleep, 214 Slide, 19 Sound Settings, 212 Speaker, 3 Spread, 20 Status Bar, 59 Status Icons, 61 Stopwatch, 166 Storage Settings, 217 Swipe, 19 Swype, 35 Settings, 216 Synchronize Exchange ActiveSync, 128 Tap, 18 Tethering, 196 Text Editing, 40 Text Entry, 33 Text Messaging Conversations, 104 Draft messages, 103 Notifications, 104 Options, 106 Send messages, 100 Text-to-Speech, 216 Timer, 166 Touch, 18 Touch and Hold, 18 TouchPal X, 37 Touchscreen Keyboard, 33 Turn off, 52 Turn on, 53 Turn Device Off, 18 Turn Device On, 17 Twitter, 186 Typing, 33 Video Camera Record video, 139 Videos Record, 139 Share via Bluetooth, 150 Share via Facebook, 152 Share via messaging, 148
Index  238 Share via YouTube, 154 View, 140 Visual Voicemail, 79 Listen to multiple messages, 81 Options, 82 Review, 80 Set up, 79 Settings, 83 Voice Search, 169 Voicemail Display name, 86 Greeting, 85 Setup, 78 Volume, 213 Key, 2 VPN, 209 Add connection, 210 Connect or disconnect, 210 Prepare for connection, 209 Secure credential storage, 209 Wallpaper, 63, 214 Web Launch connection, 130 Widgets, 65 Wi-Fi, 191 Settings, 203 Turn on and connect, 191 World Clock, 166 YouTube, 188 Share videos, 154 Zoom, 20

Navigation menu