Contents
- 1. user_manual
- 2. User_Manaul
user_manual
Thank you for purchasing this mobile. For the best performance, we recommend
that you read the manual carefully.
R570
Quick Start Guide

Chapter 1 Phone overview
Main Display 160*128px
Phonebook capacity SIM according to cardʼs type; 100 in the mobile
Hands free Supported
SMS Supported
Incoming number Display Supported
Alarm clock/Calendar Supported
System Used GSM900+DCS1800
Camera/ video record Supported
MP3/Recorder Supported
Call waiting Supported
USB Mode/Memory Card Supported (Micro-SD card) up to 16GB

Chapter 2 Key Instruction
Key Name Function Description
Menu key 1. To enter the main menu in idle mode
2. To answer a call
Send key 1. Make or answer a call
2. Press Send key in standby mode to show the entire call log.
Left soft key 1. To enter Menu in idle mode.
2. To execute the operation in left bottom of display
Right soft key 1.To enter phonebooks in idle mode
2. To execute the operation in right bottom of display
End key
1. End an active call or reject a call
2. Hold this key to power on/off
3. Exit form any interface to idle mode
Navigation keys
1. Scroll the cursor up/down/left/right
2. Up key for user-defined shortcuts
3. Down key for Alarm
4. Left key for User profiles
5. Right key for Message
Number keys
1. Enter numbers or characters while editing text
2. Press 0 key to insert a space while editing message, excluding the
number input mode
1.Hold 0 key to turn on, turn off the flashlight
2.Press 1 key to insert common symbols while editing text, excluding the
numbers input mode
#key / *key 1.Press # key to change the input mode while editing text
2.Press * key to display the symbols window in the text input mode
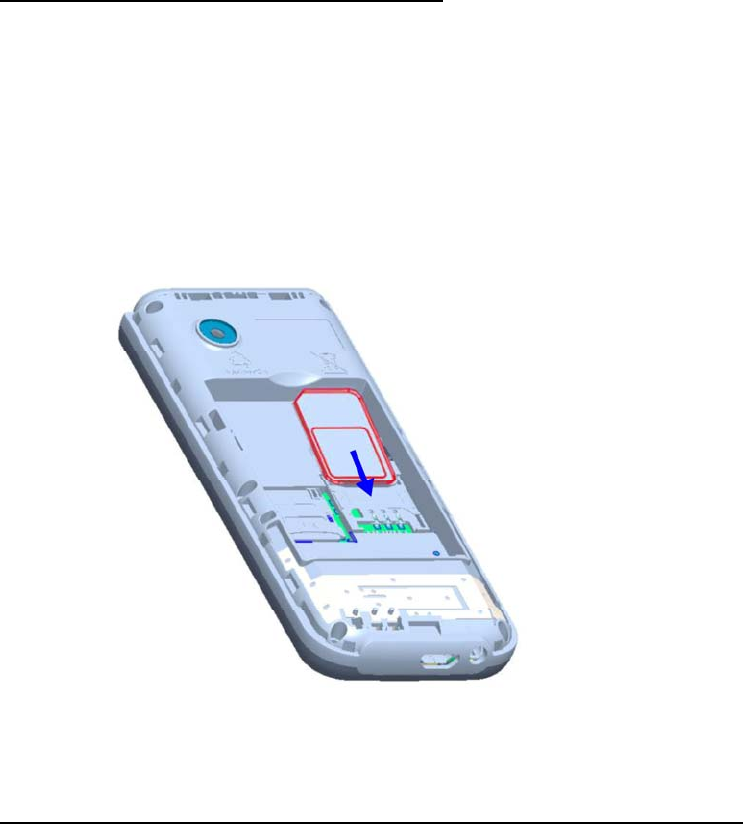
Chapter 3 Insert SIM card
1. Power off the phone and remove the external power.
2. Take off the back cover and remove the battery of the phone.
3. Insert SIM card into the slot in the phone.
Chapter 4 Install and Remove the battery
The attached Li-ion battery can be used after unpacking. For the first
three times, please use the charger to charge fully for new battery
activation completely.
Install the battery
1. Put the battery in the battery compartment; note that the metal end
of the battery should be firstly inserted.
2. Put on the back cover.

Remove the Battery
1. Take off the back cover.
2. Lift up the battery from the finger slot to remove the battery.
Chapter 5 Power on/Off your phone
1. Hold the End key to power on the phone. The phone will
automatically search for the network.
2. When the phone is powered on, hold the End key to power off the
phone.
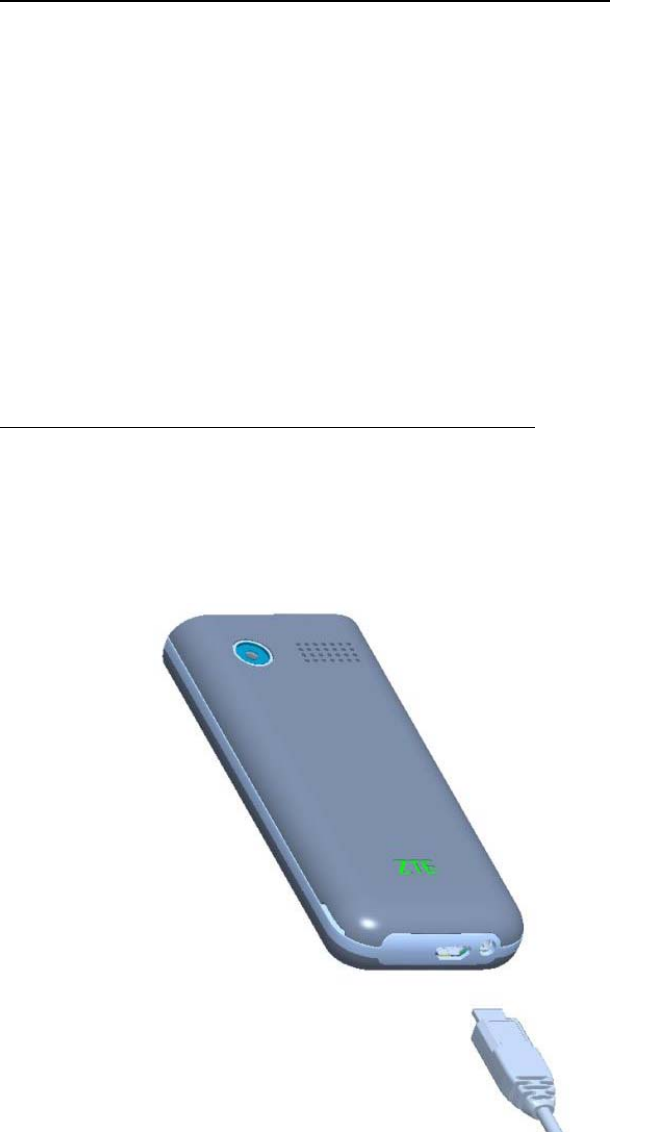
Chapter 6 Charging Your Phone
1. Connect the phone charger to the wall socket/outlet.
2. Connect the charger to the device.
3. After charging completely (battery indicator shows fully), disconnect
the charger from the device.

Chapter 7 Interface Icons
Icon Description
GSM system signal strength
Profiles-General
Bluetooth
New message
Power indicator
Alarm
Chapter 8 Messages
Messaging is a service provided by your network provider; you may
need to apply to your network operator before sending and receiving
messages.
Write message:
[Text message]
You create SMS messages in this menu. You can:
Please click on the # key to switch the current input method.
Please click on the * key punctuation into the symbol.
Your phone supports the texts messaging function. If the message
content is too long meaning more than the allowed 160 characters, it
will be divided into two or more text messages.
In the options menu you can select the following:
Send to:Edit the recipient, and then choose to send, edit recipient,
remove the recipient, remove all the recipients, or save to the
Drafts.
Input method:You can use this menu to set the required input
method and to insert symbols.
Insert template: You can insert common language in a text
message.
Advanced: In this submenu you can insert number or insert name.
Save: The edited message can be saved to the draft box through
this menu.
Inbox
Select Inbox to view message received
Click the options you can:
View: check the received SMS
Reply: reply the sender via text message.
Call sender: You can call the sender's phone number
Forward: Forwards the original message or modified message to others
selected or inputted contacts.
Delete: deletes the current message.
Delete all: delete all messages in the inbox.
Mark several: You can SMS bulk delete, copy, move.
Advanced: SMS can batch Copy, move and Use number, Use USSD, Use
URL.
Drafts
View the draft you saved.
Outbox
View the unsent message.
Sent messages
View the sent message.
View: check the received SMS
Forward: Forwards the original message or modified message to others
selected or inputted contacts.
Delete: deletes the current message.
Delete all: delete all messages in the inbox.
Mark several: You can SMS bulk delete, copy, move.

Advanced: SMS can batch Copy, move and Use number, Use USSD, Use
URL.
SMS templates
You can insert common language in a text message.
SMS settings
Set the message configuration and can be view the memory information
of message box.
SMSCnumberoriginNumberretrievedfromSIM
SMS‐TypeText
SMS–ValidityperiodThedefault6hours
SMS–ReadreceiptsOff
Chapter 9 Phonebook
When you enter phonebook press up/down key to select quick search,
Search Contact, Add New Contact, Delete, phonebook Settings etc.
Press soft right key to enter phonebook in standby mode. Select a
number, then you can view, send message, call, edit, delete, copy, Add
to Blacklist, Mark several and phonebook settings.
For each telephone recording, press the "Options" button, you can do
the following:
View: View the content of the telephone records.

Send SMS: to select contacts to send text messages.
Call: You can call the selected contact phone.
Edit: Edit the article calls.
Delete: delete the clause phone records from the phone book.
Copy: You can copy the phone records to the phone / SIM card, or copy
records SIM card to the phone / SIM card.
Add to Blacklist:The contacts can be added to the blacklist
Mark several: You can mark off mass text messages and delete records
marked contacts operation; wherein a tag number to send text
messages to send up to 20 contacts.
Phonebook settings: You can view the storage capacity of the phone
book, phone book inside the batch number to delete, copy and move.
Chapter 10 Call logs
Call history
1. Missed calls: Display the missed calls about the latest time and date,
callerʼs number and calling times.
2. Dialed calls: Display the dialed calls about the latest time and date,
callerʼs number and calling times.
3. Received Calls: Display the answered calls about the latest time and
date, callerʼs number and calling times.

[View]: See the current record.
[Call]: Call the current number.
[Send text messages]: send text messages to the current record.
[Save to phonebook]: save the phone number to phonebook.
[Add to Blacklist]: Add the current to the blacklist.
[Edit before call]: on the current record for editing.
[Delete]: choose to delete the current record.
4. All Calls:With this feature, you can check recent missed calls, he had
to answer the phone, dial the phone records had 20 words each record.
After entering this function, press the up or down navigation key to
select a phone number. Press the OK button to view the content of the
telephone records.
5. Delete call logs: Respectively delete dialed calls, missed calls,
received calls, phone records of all calls.
6. Call timers: You can view all of talk time.
Call settings
Call transfer and call waiting and other functions can be set in the menu.
[Call waiting]:Select the functions of open, close or inquire call
waiting.
[Call divert]:Choose to open, close or enquire the call forwarding
function.

[Call barring]:You can set Outgoing calls, Incoming calls and
Cancel all constraints
[Line switching]:You can choose Line1 or Line2.
[Advanced Setting]:Set Blacklist, Auto redial, Auto Call Record,
Call time display, Call time reminder, Reject by SMS, Vibrate
when connect and Answer mode
2. Advance settings
1. [Blacklist]:
[Reject number in blacklist]: choose open or close this function
[Blacklist numbers]: Insert the blacklist number
2. [Auto redials]: Choose whether automatic redial will be
implemented when the called party is in the busy or have no
response.
3. [Auto Call Recording]: Switch on or off the function of auto
recording
4. [Call time display]: Set the Call time display
5. [Call time reminder]: Set the Call time reminder
6. [Answer mode]: Choose answer mode, you can choose “Any key”
or “Auto answer when headset mode”.

Chapter 11 Settings
User Profiles
Your mobile provides several situation modes: General, Silent, Meeting
and Outdoor.
1、Activate
Select a mode (except for Headset need plug in earphone), press the
left software into select "activate" button, each scene mode (except for
silent mode) can edit the look content
2、Customize
[Alert type]: Set alert type
[Ring type]:Set ring type
[Ringtone ]:Set ring for incoming calls
[Ringtone volume]: Set the volume of incoming ring
[Message]: Set message ring
[Message volume]: SMS tone volume settings
[Keypad]: Set up the keypad tone
[Keystone volume]: Set the volume of Keystone
[System alert]: Setting the alarm system is turned on
3、Reset
Restore the User profiles settings to default.
Phone settings
1. Time and date
◆ Set home city: Choose the home city.
◆ Set time/date: Set the date and time.
◆ Set format: Choose the time and date format.
◆ Update with time zone: You can choose to open or close, the time will
be different according to the time zone is changed after opening.
◆ Auto update time: After opening date will be automatically updated.
2. Language
Display Language for your mobile. The mobile phone in the English
language by default
3. Pref. input method
Set the Pref. input method.
4. Display
◆ Wallpaper:Set the stand-by wallpaper.

◆ Auto keypad lock :choose the keypad lock for off、15secs、30secs、
1min、5mins
◆ Power On display:Set switch-on animation.
◆ Power Off display:Set switch-off animation.
◆ Show date and time: Activate or deactivate displaying time and date
in the stand-by screen.
5. Dedicated keys
You can select shortcuts inside menus.
6. Flight mode
In the “phone setting”-“fight mode” Choose the Flight Mode or Normal
mode.
7. Misc. settings
Set the time limit for the back light of main screen to be off when there
is no operation.
Security settings
SIM security:
Asked to enter the SIM card PIN code. After entering the correct before
setting. If the SIM card is set to ON, each time you boot, you need to
enter the PIN code, when entered incorrectly three times, it is required
to enter your PUK (Personal Unblocking Key). PUK code is used to unlock
and change the locked PIN code. If the PUK code is not provided or is
lost, please contact your network operator.
Mobile Security Settings:
Use the phone lock operation; enter the password when opening or
closing operation of the phone lock when the phone is turned off, you
will be asked to enter the phone password at boot time. Phone
password is 4 to 8 digits. The default password is “1122”.
Change the password.
Privacy protection:After setting the privacy protection into different
menus are required to enter a password
Network settings:
Network -> mode selection: 2G only.
Connectivity
1. Activate or deactivate the Bluetooth.
[Power] Activate the Bluetooth function.
[Visibility] Activate /Deactivate this function.
[My devices] Display the connected Bluetooth.
[Search audio device] Display the Bluetooth earphone and other
device, and search the equipment.
[My name] View the Bluetooth name and can be edit the Bluetooth
name.
[Advanced]
◆Audio path: To "Leave in phone" or "Forward to Bluetooth." Note:
Due to this Bluetooth headset has the voice channel switching function,
so when set to "remain in the mobile phone", click the multi-function
Bluetooth headset button can also be connected to telephones, voice,
but remain in the mobile phone side. Please refer to the specific
operational guidelines of the Bluetooth headset, and recommended
that users use standard headphones.
◆Storage: To preserve choice in the mobile phone or memory card to
receive the document.
My address:Can be view the Bluetooth address.
2. Data accounts
Can account name, packet data connection point, user name, password,
authentication type, SIM card options for editing and selection, you can
also make advanced settings.

Restore factory settings
Input password recovery to before they leave the factory, the initial
password is "1122".
Chapter 12 Multimedia
Camera
Open the camera via down key; Take the picture via menu key.
1. Switch to video recorder:You can switch between camera and
camcorder.
2. Photos:View the photos that you saved.
3. Camera setting:Set related parameters of the camera.
4. Image settings:Set the size and quality of the photos.
5. Effect settings:Set the special effects of photos.
6. Storage: You can choose to save photos taken on your phone or T
card.
7.Restore default:Restore the camera settings to default.
Image viewer
View or modify photos saved in the album.
1. View: View the selected images.
2. Send: you can send the image by Bluetooth.
3. Use as: use the phone as wallpaper in the Options.

4. Rename: Rename the current picture.
5. Delete: Delete the picture.
6. Storage: Select the position where image will be saved. Setting it in
the Audio player Options.
7. Image information: Can be view the image information.
Video recorder
On the video interface, press up and down navigation keys to tune the
focal length.
Note: Because the mobile memory capacity is limited, a T-flash card
has to be inserted before you can save the video.
1.Switch to video recorder:You can switch between camera and
camcorder.
2.Camcorder settings:Set the related parameters for the video
camera.
3.Video settings:Set related parameters for the video clip.
4. Storage: Select the position where video clips will be saved.
Video player
Play user has recorded / downloaded video files; select a video
according to the Options menu has the following functions:
1. Play: play a selected video file.

2. Send: send to other mobile by via Bluetooth.
3. Rename: change the file or folder name.
4. Delete: delete the file.
5. Storage: Select the position where video clips will be saved.
Audio player
Play user has recorded / downloaded Audio files; select an Audio
according to the Options menu has the following functions:
1. Play: play a selected video file.
2. Refresh list: You can refresh the list.
3. Settings: Set the file to read the location of the playback mode,
settings such as whether to open the background play.
Sound recorder
1. New record
Start recording.
2. List
View the recording of .avi files.
[Play]:Play a selected record.
[Rename]:Rename a selected record. Note:Renaming a record
which has been set as incoming ring will make the settings back to
defaults.

[Delete]:Delete a selected record.
[Use as]:Use the record as Ringtone.
[Send]:Send the record by BT.
3. Settings
Choose the Audio quality in the Settings.
Note:The recording time depends on the memory capacity of the
mobile.
Chapter 13 Organizer
Calculator
The cell phone support continuous four mixed arithmetic operation and
the operation is simple, practical and convenient.
Torch
You can open, close the flashlight.
You can open and close the torch in the idle interface through holding
the key ”0”.
Calendar
To access the Calendar, press the left soft key. The first row displays
year and month; the second row displays week; the middle part
displays dates for a specific month; and the last row displays the two

soft keys. In the calendar mode, view the previous week by pressing the
up navigation key and the next week by pressing the down navigation
key; View the previous day by pressing the left navigation key and the
next day by pressing the right navigation key. The selected date is
displayed in deep color.
Tasks
You can add things to do in there recently, and which can modify the
task reminder tones, modify the contents of the task, delete tasks and
other operations.
Alarm
You can set5alarm times with this mobile. For each of them, you can set
the alarm status to be open or not, set the alarm time and alarm
frequency (once, daily or on several self-defined dates).
World clock
You can view the current time in different countries.
Chapter 14 File manager
It provides you the functions such as browsing media files, checking
storage space and formatting function.

When browsing the media files, you can operate the selected files such
as play, send, use as, new folder, rename, delete, mark several, copy,
move, delete all files, details.
Chapter 15 Bowser
You can use the browser separately Browser, Facebook and other
services.
Chapter 16 FM radio
This phone support the FM radio function.
[Channel list]: Set up the channel list and frequency.
[Manual input]: In put the frequency by manual.
[Auto search]: choose the “yes” then auto searching the channels.
[Settings]: Activate or inactivate the background and the speaker.

Chapter 17 Safety Information General Care
If you want to clean your phone, please use clean fabric that is a bit
wet or anti-static. Do not use harsh chemical cleaning solvents or
strong detergents to clean it. Turn off your phone before you clean
it.
As your device can produce electromagnetic field, do not place it
near magnetic items such as computer disks.
Using the phone near electrical appliances such as TV, telephone,
radio and personal computer can cause interference, which affects
the function of the phone.
Do not expose your device to direct sunlight or store it in hot areas.
High temperatures can shorten the life of electronic devices.
Prevent liquid from leaking into your phone.
Do not drop, knock or harshly treat your phone. Rough handling
can break internal circuit boards.
Do not charge the device without battery.
Do not short-circuit the battery, as this can cause excessive heat and
fire.
Do not store battery in hot areas or dispose of it in a fire to avoid
explosion.
Store the phone out of the reach of little children. The phone may
cause injury if used as a toy.
Be aware of the usage limitation when using a mobile phone at
places such as oil warehouses or chemical factories, where there are
explosive gases or explosive products being processed, because
even if your phone is in standby mode, it still transmits radio
frequency (RF) energy; therefore power off your phone if required.
Do not touch the antenna while calling. Otherwise it will affect the
quality of calling and waste battery energy. The damaged antenna
will cause slight burn while touching your skin.
Do not put other things on the terminal to avoid overlaying radiator.
Keep the antenna free from obstructions and position the antenna
straight up. This will ensure best call quality.

General Guidelines
If your device is lost or stolen, please report to your service
provider or agencies of banning the use of your lost phone, which
will protect you from economic losses resulted from unauthorized
use. You need to provide the phoneʼs ESN/MEID number labeled.
You can see IMEI number after removing the battery. Please keep
ESN/MEID number for future use.
To protect your device from illegal use, please take the security
measures as follows:
Set phone code of the phone.
Take it with you as you can.

Road Safety
Pay attention to traffic safety.
Do not use your device while driving.

Hospital Safety
Some electronic devices are susceptible to electromagnetic
interference sent by phone if inadequately shielded. Please use
phone at least 20 cm or as far away as you can from TV set, radio
and other automated office equipment so as to avoid
electromagnetic interference.
Operating this device may interfere with medical equipment like
hearing aid and pacemaker. Please always keep the device more
than 20 centimeters away from such medical devices when the
phone is powered on. Do not carry the device in the breast pocket.
Power the device off if necessary. Consult a physician or the
manufacturer of the medical equipment before using the device.

Emergency Service
On occasion of emergent calling, keep your phone in status of
power on and in area of service. On the condition of standby, press
the key to enter emergency phone number, and then press Call Key
to make a phone call.

Third Party Equipment
Please use original accessories or accessories that are authorized
by the manufacturer. Using any unauthorized accessories may
affect your devicesʼ performance, and violate related national
regulations about telecom terminals, or even endanger your body.
Do not connect the phone with other unauthorized peripheral
equipment.
Do not attempt to disassemble the device and battery by yourself.
Non-expert handling of the devices may damage them.

Vehicles Equipped with an Airbag
Before making or answering a call, you should pay attention to the
local laws about using wireless mobile phones and take them into
account in practical use.
Safety airbag, brake, speed control system and oil eject system
shouldnʼt be affected by wireless transmitting. If you do meet
problems above, please contact your automobile provider.
Please power off your device when refueling your automobile, and
so do the place where duplex wireless equipment is banned. Donʼt
put your phone together with flammable or explosive items, as
inner spark may cause fire.

Aircraft Safety
Follow the restrictions in aircraft. Wireless devices can cause
interference in aircraft.
Please power off your device before taking on till landing. In order
to protect airplaneʼs communication system from interference, it is
never allowed to use a mobile type device when it is in flight. Using
a mobile phone before the plane taking off should get aircrewʼs
permission according to safety regulations.

FCC Warning
§ 15.19 Labeling requirements.
This device complies with part 15 of the FCC Rules. Operation is subject to the following two
conditions: (1) This device may not cause harmful interference, and (2) this device must
accept any interference received, including interference that may cause undesired operation.
§ 15.105 Information to the user.
Note: This equipment has been tested and found to comply with the limits for a Class B digital
device, pursuant to part 15 of the FCC Rules. These limits are designed to provide reasonable
protection against harmful interference in a residential installation. This equipment generates
uses and can radiate radio frequency energy and, if not installed and used in accordance with
the instructions, may cause harmful interference to radio communications. However, there is
no guarantee that interference will not occur in a particular installation. If this equipment does
cause harmful interference to radio or television reception, which can be determined by turning
the equipment off and on, the user is encouraged to try to correct the interference by one or
more of the following measures:
-Reorient or relocate the receiving antenna.
-Increase the separation between the equipment and receiver.
-Connect the equipment into an outlet on a circuit different from that to which the receiver is
connected.
-Consult the dealer or an experienced radio/TV technician for help.
§ 15.21 Information to user.
Any Changes or modifications not expressly approved by the party responsible for compliance
could void the user's authority to operate the equipment.
SAR Body-worn Operation
This device was tested for typical body-worn operations. To comply with RF exposure
requirements, a minimum separation distance of 1.5 cm must be maintained between the
user’s body and the handset, including the antenna. Third-party belt-clips, holsters, and similar
accessories used by this device should not contain any metallic components. Body-worn
accessories that do not meet these requirements may not comply with RF exposure
requirements and should be avoided. Use only the supplied or an approved antenna.