ZTE ZTETXTSTER CDMA 1X-EVDO Digital Mobile Phone User Manual D92 0721release
ZTE Corporation CDMA 1X-EVDO Digital Mobile Phone D92 0721release
ZTE >
Users Manual
ZTE Corporation
txtster CDMA 1X EVDO Mobile
Phone
User Manual
2
Copyright © 2008 by ZTE Corporation
All rights reserved.
No part of this publication may be excerpted, reproduced, translated, or
utilized in any form or by any means, electronic or mechanical, including
photocopying and microfilm, without the prior written permission of ZTE
Corporation.
ZTE Corporation operates a policy of continuous development. ZTE
Corporation reserves the right to make changes and improvements to any of
the products described in this document without prior notice.
Release: R1.0
Manual number:
June 20th, 2008
Limited Warranty
We, at ZTE, undertake to repair/replace any defective
components/subsystems of this product, subject to the warranty terms given
below.
3
The warranty period will be 12 months from the date of purchase and
defects arising out of defective material and/or poor workmanship will be
rectified free of cost to the original end user during the said period.
The limited warranty extends only to the original end user of the product
and is not assignable or transferable to any subsequent purchaser/end
user.
The defective unit along with the warranty card/sales receipt or a TELUS
warranty validation certificate must be brought or sent to the TELUS
dealer by the buyer at his/her own expense, during normal working
hours.
Any defect arising due to misuse of the unit or normal wear and tear will
not be covered by this warranty. This includes all plastic surfaces and all
other externally exposed parts that are scratched or damaged due to
normal customer use.
The warranty is void if the unit is tampered with, altered or repaired by
unauthorized persons. Any use of non-approved accessories shall void
the warranty.
The warranty is void if the serial number of the unit is deleted, defaced
or altered rendering it difficult to identify the instrument.
There are no customer serviceable parts inside the unit and therefore
the unit should not be opened by the user or any person other than the
authorized service personnel. The warranty is void if the warranty seal
on the unit is broken.
Damages caused to the unit, by power fluctuations, accidents, lightning
or any other acts of God are not covered by this warranty.
Whether defective items or components are to be replaced or repaired
shall be left to the sole discretion of ZTE. In case of replacement of a
part, the defective part removed from the unit becomes the property of
ZTE.
EXCLUSION OF LIABILITY:
4
NO OTHER EXPRESS WARRANTY IS APPLICABLE TO THIS PRODUCT.
THE DURATION OF ANY IMPLIED WARRANTIES, INCLUDING THE
IMPLIED WARRANTY OF MERCHANTABILITY, ZTE IS LIMITED TO THE
DURATION OF THE EXPRESS WARRANTY HEREIN. ZTE SHALL NOT BE
LIABLE FOR THE LOSS OF THE USE OF THE PRODUCT,
INCONVENIENCE, LOSS OR ANY OTHER DAMAGES, DIRECT OR
CONSEQUENTIAL, ARISING OUT OF THE USE OF, OR INABILITY TO
USE, THIS PRODUCT OR FOR ANY BREACH OF ANY EXPRESS OR
IMPLIED WARRANTY, INCLUDING THE IMPLIED WARRANTY OF
MERCHANTABILITY APPLICABLE TO THIS PRODUCT.
HOW TO GET WARRANTY SERVICE:
To obtain warranty service, contact or return to your original place of
purchase, or you may call ZTE directly via the following telephone number
from anywhere in Canada:
1-866-ZTE-3838 (1-866-983-3838)
5
Contents
1. For your safety.......................................................................
.
General Care ...........................................................................................................
General Safety .........................................................................................................
Aircraft Safety ..........................................................................................................
Hospital Safety.........................................................................................................
Road Safety .............................................................................................................
Vehicles Equipped With an Air Bag .........................................................................
Third Party Equipment .............................................................................................
Efficient Use.............................................................................................................
Radio Frequency (RF) Energy .................................................................................
Emergency Services ................................................................................................
Certification Information ...........................................................................................
FCC Regulations......................................................................................................
Copyright Notice ......................................................................................................
2. Introduction...........................................................................
.
Overview ..................................................................................................................
What’s included........................................................................................................
txtster Technical Specifications................................................................................
Phone at a glance ....................................................................................................
Music Remote Control .............................................................................................
Key Definitions .........................................................................................................
FASTAPTM Shortcut Key Definitions ........................................................................
Create your own FastapTM Shortcut Keys............................................................
Indicators and Icons.................................................................................................
3. Getting Started......................................................................
.
Battery......................................................................................................................
Installing the Battery ............................................................................................
6
Charging the Battery .............................................................................................
Removing the Battery............................................................................................
Memory Card.............................................................................................................
Inserting the MicroSD Memory Card.....................................................................
Removing the MicroSD Memory Card ..................................................................
Powering On/Off your Phone ....................................................................................
Unlocking Your Phone ..............................................................................................
Connecting to the Network ........................................................................................
4. Basic Operations....................................................................
.
Making Voice Calls....................................................................................................
Using the Keypad..................................................................................................
Using the Contacts list ..........................................................................................
Using the last number dialed.................................................................................
Using a number from the Call History ...................................................................
Using your FASTAPTM keypad ..............................................................................
Using Letter Dialing...............................................................................................
Using Speed Dials.................................................................................................
Using Voice Dials ..................................................................................................
Answering Voice Calls...............................................................................................
In-Call Features.........................................................................................................
Three-Way Call .........................................................................................................
Call Waiting ...............................................................................................................
5. Entering Text..........................................................................
.
Key Functions............................................................................................................
Text Input Modes.......................................................................................................
6. Contacts .................................................................................
.
List Entries.................................................................................................................
New Entry..................................................................................................................
Groups.......................................................................................................................
7
Voice Dials ...............................................................................................................
Speed Dials..............................................................................................................
7. Call History............................................................................
.
All Calls ....................................................................................................................
Incoming Calls .........................................................................................................
Outgoing Calls .........................................................................................................
Missed Calls.............................................................................................................
Call Timers...............................................................................................................
8. Messaging..............................................................................
.
Voice Mail ................................................................................................................
Text and Multimedia.................................................................................................
Send New ............................................................................................................
Inbox ....................................................................................................................
Outbox .................................................................................................................
Drafts ...................................................................................................................
Sent......................................................................................................................
Saved...................................................................................................................
Templates ............................................................................................................
Settings ................................................................................................................
Memory Info .........................................................................................................
E-mail.......................................................................................................................
IM & Chat .................................................................................................................
Web Alerts ...............................................................................................................
Short Codes .............................................................................................................
9. Wireless Web .........................................................................
.
10. Music & Media.......................................................................
.
TELUS Mobile Music ...............................................................................................
TV & Radio...............................................................................................................
8
Ringtones ..................................................................................................................
Wallpapers ................................................................................................................
Videos .......................................................................................................................
Camera......................................................................................................................
My Albums.................................................................................................................
Memory Info ..............................................................................................................
11. Search.....................................................................................
.
12. Games.....................................................................................
.
Downloading games..................................................................................................
Playing games...........................................................................................................
13. Tools & Apps ..........................................................................
.
Get New ....................................................................................................................
Downloaded Apps .....................................................................................................
GPS Services............................................................................................................
Calculator ..................................................................................................................
Alarm Clock ...............................................................................................................
Scheduler ..................................................................................................................
EZ Tip Calculator.......................................................................................................
World Clock ...............................................................................................................
Voice Memo ..............................................................................................................
14. Settings ..................................................................................
.
Sound ........................................................................................................................
Display/Keypad .........................................................................................................
Games/Tools.............................................................................................................
Bluetooth ...................................................................................................................
GPS...........................................................................................................................
Others........................................................................................................................
System ......................................................................................................................
9
Airplane Mode ON/OFF ...........................................................................................
15. Support ..................................................................................
.
Telephone Support ..................................................................................................
Online Help ..............................................................................................................
16. Troubleshooting ....................................................................
.
17. Glossary.................................................................................
.
18. Index......................................................................................
.
1. For your safety
General Care
Your handset contains delicate electronic circuitry, magnets and battery
systems. You should treat it with care and give particular attention to the
following points:
Do not allow the handset, battery or accessories to come into contact
with liquids or moisture at any time. Do not immerse it in any liquid.
Do not place the handset alongside computer disks, credit cards, travel
cards or other magnetic media. The information contained on the disks
or cards may be affected by the handset.
Do not place anything inside the folded handset.
Do not paint the handset.
Do not leave the handset or battery in places where the temperature
could exceed 60˚C, e.g. on a car dashboard or a windowsill, behind
glass in direct sunlight, etc.
Do not remove the handset battery while the handset is switched on.
Take care not to allow metal objects, such as coins or key rings to
contact or short circuit the battery terminals.
Do not dispose of battery packs in fire. The handset’s Li-ION batteries
may be safely disposed of at a Li-ION recycling point.
Do not put the handset’s battery in your mouth, as battery electrolytes
may be toxic if swallowed.
Do not attempt to dismantle the handset or any of its accessories.
This equipment is fitted with an internal battery that can only be replaced
by a qualified service engineer.
Only use the battery with a charging system that has been qualified with
the system per this standard. Use of an unqualified battery or charger
may present a risk of fire, explosion, leakage, or other hazard。
Do not disassemble or open, crush, bend or deform, puncture, or shred.
Do not short circuit a battery or allow metallic or conductive objects to
contact the battery terminals.
11
Promptly dispose of used batteries in accordance with local regulations.
Improper battery use may result in a fire, explosion, or other hazard.
There is risk of explosion if the battery is replaced with an incorrect
battery type. Dispose of the used battery in accordance with the
manufacturer’s instructions.
Do not put a battery into a microwave oven, dryer or high-pressure
container.
Do not contact battery directly into an electric outlet or cigarette lighter
charger. Use only authorized charger units.
Do not pierce the battery with a sharp object such as a needle.
When the battery is thrown away, be sure it is non-conducting by
applying vinyl tape to the (+) and (-) terminals.
Do not disassemble or modify the battery.
Do not drop, throw, or subject the handset to rough treatment.
Stop using the battery if abnormal heat, odour, discolouration,
deformation, or abnormal condition is detected during use, charge or
storage.
In the unlikely event of a battery leak, tare care to keep the battery
discharge away from your eyes and skin. If the leakage does come into
contact with the eyes or skin, flush thoroughly with clean water and
consult with a doctor.
Do not use with a damaged or deformed battery.
Do not solder the battery directly.
Remove the battery whose life cycle has expired from equipment
immediately.
The earpiece may become warm during normal use. Also, the handset
itself may become warm while the battery is being charged.
When a handset is in vibration mode, the vibration may cause the
txtster handset to move.
Be careful not to place the handset near heat sources (such as a heater)
or too close to the edge of the table.
12
Use a damp or anti-static cloth to clean the handset. Do not use an
ordinary dry cloth or electrostatic cloth. Do not use chemical or abrasive
cleaners as these could damage the casing.
Third party equipment: The use of third party equipment, cables, or
accessories, not made or authorized by ZTE, may invalidate the
warranty of your phone and also adversely affect the phone’s safety and
operation.
Remember to make backup copies of all important data on your handset.
Remember to recycle: The cardboard packing supplied with this handset is
ideal for recycling.
General Safety
In some countries national law prohibits private copying of copyrighted
material. Check the national legislation of the applicable country
concerning the use of such material.
Many jurisdictions have laws and regulations about taking pictures in
public or private areas regarding the processing and further use of such
pictures. ZTE encourages its customers to obey all laws and to honour
the personal rights of others.
Check the roaming agreement availability with your network operator.
The use of mobile phones is not allowed in some radiation sensitive
areas, such as hospitals, research centers, and airplanes. The user is
responsible to power-off the device. If there is any uncertainty, the
battery shall be removed.
Observe any signs that indicate to power off your handset, such as those
near gas stations, or explosives and power off the handset/device upon
them.
If you have a heart condition, be careful with the setting of call vibration
or tone volume.
Do not allow children to play with the handset, charger or batteries.
Do not use the handset where blasting is in progress.
13
The operation of some medical electronic devices, such as hearing aids
and pacemakers, may be affected if a handset is used next to them.
Observe any Caution signs and the manufacturer’s recommendations.
Take care not to put your phone in the back pocket of your pants and
then sit on the phone. Also, do not put your phone at the bottom of a
bag where it may be subject to excessive weight or pressure and this
may damage the LCD and camera lens and cause them to malfunction.
Your phone contains metal, which may cause you to develop an itch,
rash or eczema depending on your physical condition.
Do not leave the battery pack empty or disconnected for a long period of
time. Otherwise some data may be erased.
Aircraft Safety
Switch off your phone or activate the airplane mode when inside or near
an aircraft. Use of handsets in an aircraft may be dangerous to the
operation of the aircraft and may disrupt the cellular network. Failure to
observe this instruction may lead to suspension or denial of phone
service to the offender, or legal action, or both.
Airplane mode allows you to use many of your phone’s features, such
as games, calculator, voice memos, and many others when you are in
an airplane or other area where RF signals may cause interference. In
the airplane mode, you are prohibited from making or receiving
voice/data calls, however you may still make calls to your local
emergency number.
To enable the airplane mode, select Menu→Settings from the standby mode.
Highlight Airplane Mode: OFF and press the OK key to enable Airplane
Mode.
Hospital Safety
Switch off your phone and remove its battery in areas where handset
use is prohibited.
Follow the instructions given by any respective medical facility regarding
the use of cellular handsets on their premises.
14
Road Safety
You must exercise proper control of your vehicle at all times. Give your
full attention to driving.
Observe all of the recommendations contained in your local traffic safety
documentation.
Pull off the road and park before making or answering a call, if driving
conditions require so. Check if local laws and/or regulations restrict the
use of cellular phones while driving.
You must not stop on the hard shoulder of a motorway to answer or
make a call, except in emergency situations.
Switch off your handset at a refuelling point, such as a gas station, even
if you are not refuelling your own car.
Do not store or carry flammable or explosive materials in the same
compartment as the handset.
Electronic systems in vehicle, such as anti-lock brakes, speed control
and fuel injection systems are not normally affected by radio
transmissions. The manufacturer of such equipment may advise if it is
adequately shielded from radio transmissions. If you suspect vehicle
problems caused by the radio transmitter in handset, consult your dealer
and do not switch on the handset until your handset has been checked
by a qualified technician.
Vehicles Equipped With an Air Bag
An airbag inflates with great force. Do NOT place objects, including either
installed or portable wireless equipment, in the area over the airbag or in the
airbag deployment area. If in-vehicle wireless equipment is improperly
installed and the airbag inflates, serious injury could result.
Third Party Equipment
The use of third party equipment, cables or accessories, not made or
authorized by ZTE, may invalidate the warranty of the handset and also

15
adversely affect the handset’s operation. For example, use only the ZTE
charger supplied with the handset.
Efficient Use
For optimum performance with minimum power consumption, do NOT cover
the antenna area (below the mouthpiece of your phone) with your hand.
Covering the antenna affects the call quality, may cause the handset to
operate at higher power levels than needed, and may shorten talk and
standby times.
Radio Frequency (RF) Energy
Your handset is a low-power radio transmitter and receiver. When it is turned
on, it intermittently receives and transmits Radio Frequency (RF) energy in
radio waves to handle and control the power level at which the handset
transmits.
Emergency Services
To make an emergency call in any country:
1. Ensure your handset is on and in service.
2. Press the End key as many times as needed to clear the display and
ready the device for calls.
3. Enter a local emergency number.
4. Press the Send key to dial the number. Follow instructions received and
do not end the call until told to do so.
Note: Tell the operator which service you require: Police, Ambulance, Fire truck,
Coastguard or Mountain Rescue Service. Give your position, and if
possible, remain stationary and maintain contact. Due to the nature of the
cellular system, the connection of emergency calls cannot be guaranteed.
You should never rely on any wireless device for essential communication
like medical emergencies.
16
Certification Information
*Specific Absorption Rate (SAR) for wireless phone:
THIS MODEL PHONE MEETS THE GOVERNMENT’S REQUIREMENTS
FOR EXPOSURE TO RADIO WAVES.
Your wireless phone is a radio transmitter and receiver. It is designed and
manufactured not to exceed the emission limits for exposure to radio
frequency (RF) energy set by the Federal Communications Commission of
the U.S Government. These limits are part of comprehensive guidelines and
establish permitted levels of RF energy for the general population. The
guidelines are based on standards that were developed by independent
scientific studies. The standards include a substantial safety margin designed
to assure the safety of all persons, regardless of age and health.
The exposure standard for wireless mobile phones employs a unit of
measurement known as the Specific Absorption Rate, or SAR. The SAR limit
set by the FCC is 1.6W/kg. *Tests for SAR are conducted using standard
operating positions accepted by the FCC with the phone transmitting at its
highest certified power level in all tested frequency bands. Although the SAR
is determined at the highest certified power level, the actual SAR level of the
phone while operating can be well below the maximum value. This is
because the phone is designed to operate at multiple power levels so as to
use only the power required to reach the network. In general, the closer you
are to wireless base station antenna, the lower the power output.
Before a phone model is available for sale to the public in the public, it must
be tested and certified to the FCC that it does not exceed the limit established
by the government-adopted requirement for safe exposure. The tests are
17
performed in positions and locations (for example, at the ear and worn on the
body) as required by the FCC for each model.
The highest SAR values, as reported to the FCC for this model phone, when
tested for use at the ear are 1.22w/kg for Cellular 850MHz and 1.17w/kg for
PCS 1900MHz. And when worn on the body, are 0.838w/kg for Cellular
850MHz and 1.14w/kg for PCS 1900MHz. (Body-worn measurements differ
among phone models, depending upon available accessories and FCC
requirements.)
While there may be differences between the SAR levels of various phones
and at various positions, they all meet the government requirement. For
body-worn operation, this model has been tested and meets the FCC RF
exposure guidelines when used with the ZTE accessories supplied or
designated for this product. Use of other accessories may not ensure
compliance with FCC RF exposure guidelines. While there may be
differences between the SAR levels of various phones and at various
positions. In all cases, products are designed to be within the guidelines.
FCC has granted an Equipment Authorization for this model phone with all
reported SAR levels evaluated as in compliance with the FCC RF exposure
guidelines. Additional information on Specific Absorption Rates (SAR) can be
found on the Cellular Telecommunications & Internet Association (CTIA) web
site: http://www.phonefacts.net or the Canadian Wireless
Telecommunications Association (CWTA) web site: http://www.cwta.ca.
In the United States and Canada, the SAR limit for mobile phones used by
the public is 1.6watts/kg (w/kg) average over one gram of tissue. The
18
standard incorporates a substantial margin of safety to give additional
protection for the public and to account for any variations in measurements.
*UL Certified Travel Adaptor:
The travel adaptor for this phone passed the UL60950, safety requirements.
Please follow the safety guidelines when using the Adaptor.
FCC Regulations
This device complies with part 15 of the FCC Rules. Operation is subject to
the following two conditions: (1) This device may not cause harmful
interference, and (2) this device must accept any interference received,
including interference that may cause undesired operation.
This device has been tested and found to comply with the limits for a Class B
digital device, pursuant to Part 15 of the FCC Rules. These limits are
designed to provide reasonable protection against harmful interference in a
residential installation. This equipment generates, uses and can radiated
radio frequency energy and, if not installed and used in accordance with the
instructions, may cause harmful interference to radio communications.
However, there is no guarantee that interference will not occur in a particular
installation If this equipment does cause harmful interference to radio or
television reception, which can be determined by turning the equipment off
and on, the user is encouraged to try to correct the interference by one or
more of the following measures:
-Reorient or relocate the receiving antenna.
19
-Increase the separation between the equipment and receiver.
-Connect the equipment into an outlet on a circuit different from that to which
the receiver is connected.
-Consult the dealer or an experienced radio/TV technician for help.
Changes or modifications not expressly approved by the party responsible for
compliance could void the user‘s authority to operate the equipment.
Copyright Notice
The video/audio recordings you make/download are protected by copyright
laws. They are for personal use only and must NOT be otherwise used
without the permission of the copyright owner.
2. Introduction
Overview
Thank you for purchasing of the ZTE txtster Mobile Phone. The txtster is
capable of making voice calls and data connections to CDMA 1x and high-
speed EVDO networks. This phone provides many functions which are
practical for daily use, including a camera, MP3 player, video recorder,
wireless internet browser, etc. It can also be connected to a PC for use as a
data modem and paired with Bluetooth wireless devices and accessories.
With the FASTAPTM keypad, you can access applications with dedicated
hotkeys, and enter text quickly for E-mail, Instant Messaging, Short Message
Service (SMS) and Multimedia Messaging Service (MMS).
To guarantee this mobile phone is always in its best condition, read this
manual carefully and keep it for future reference. To ensure your safety, read
the section For Your Safety thoroughly before using this handset for the first
time.
What’s included
Your txtster Mobile Phone package contains the following components.
Check the box carefully to ensure all items are present.
txtster Handset
Battery and Battery Door
Stereo Headphones with in-line music remote control
User Manual
AC Power Adapter
We, ZTE Corporation, declare that the product is packaged with battery
separately in the box. The FCC ID label is placed on the mobile phone
clearly visible to all persons at the time of purchase.

21
txtster Technical Specifications
Handset Type txtster
Keypad FASTAPTM
Dimensions (W x L x H) 50.4 mm x 101.5 mm x 21.2 mm
Weight 105.25g (including battery)
Continuous Standby Time 140 hours max. (subject to network
conditions)
Continuous Talk Time 2 hours min. (subject to network conditions)
Charge Time Approximately 3 hours
AC Charger Input 100-240V, 50/60Hz, 200mA
AC Charger Output 5.0V, 700mA max.
22
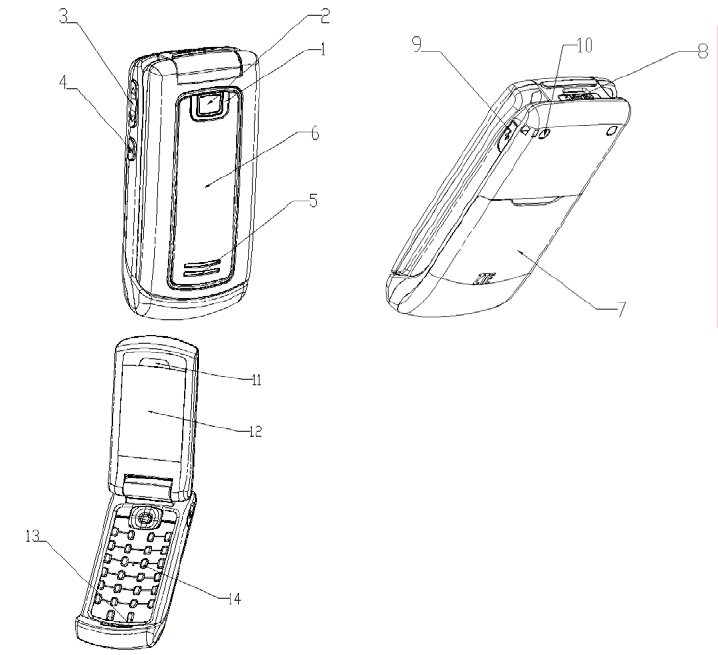
Phone at a glance
[1] Camera Lens
[2] Camera Flash
[3] Volume Key
[4] Camera Key
[5] Loudspeaker
[6] Outer Display
[7] Battery Door
[8] MicroSD Memory Card Slot
[9] USB Charger/Headset Port
[10] Strap Holder
[11] Earpiece
[12] Inner Main Display
[13] Microphone
[14] Keypad
23
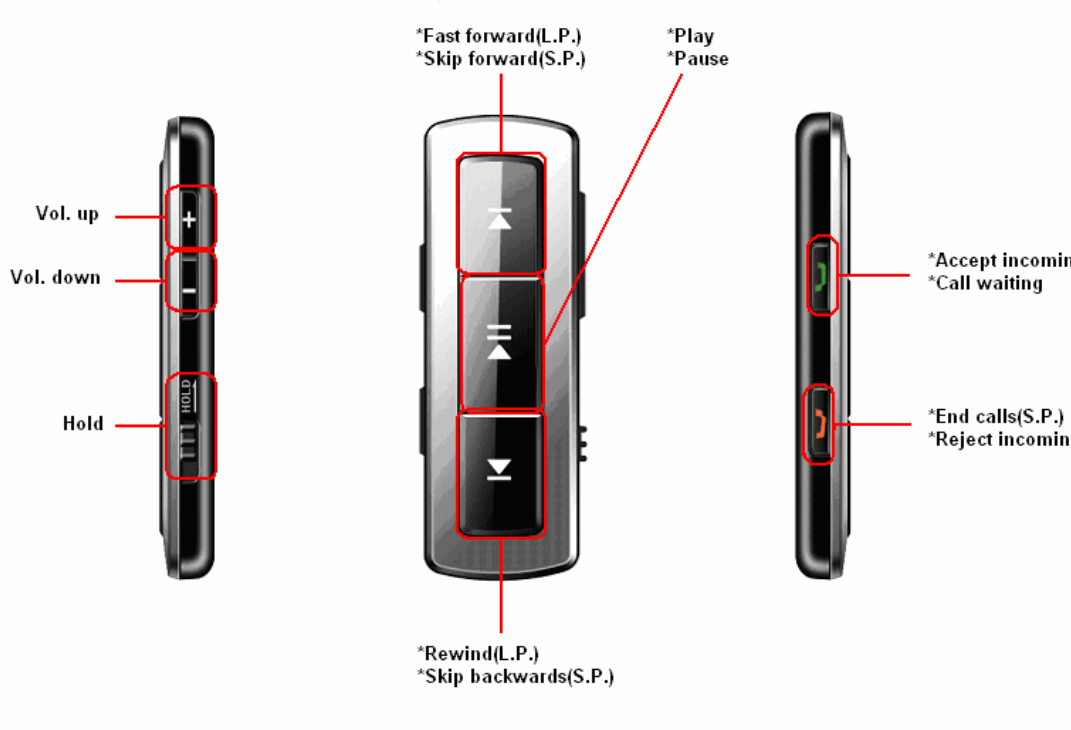
Music Remote Control
Your handset includes a music remote control to control music and voice call
functions while the handset is closed. You can connect the music control box
to your handset. The music control box is shown as the following picture.
Supported functions
Left Side Keys
Hold: This key could lock the functions of the remote control keypad to
avoid accidental key pressing. The remote control can still accept incoming
calls or switch between call waiting parties by the Send key when Hold is
on.
24
Vol. up / Vol. down: Adjusts the volume during calls or while playing
music
Front Keys
Play / Pause
Fast forward (long press) / Skip forward (short press)
Rewind (long press) / Skip backwards (short press)
Right side keys
Send: Accept incoming calls and switch between calls with a short press.
End: End calls and reject incoming calls with a short-press.
Tip: Hold the play key to launch the TELUS mobile music player.
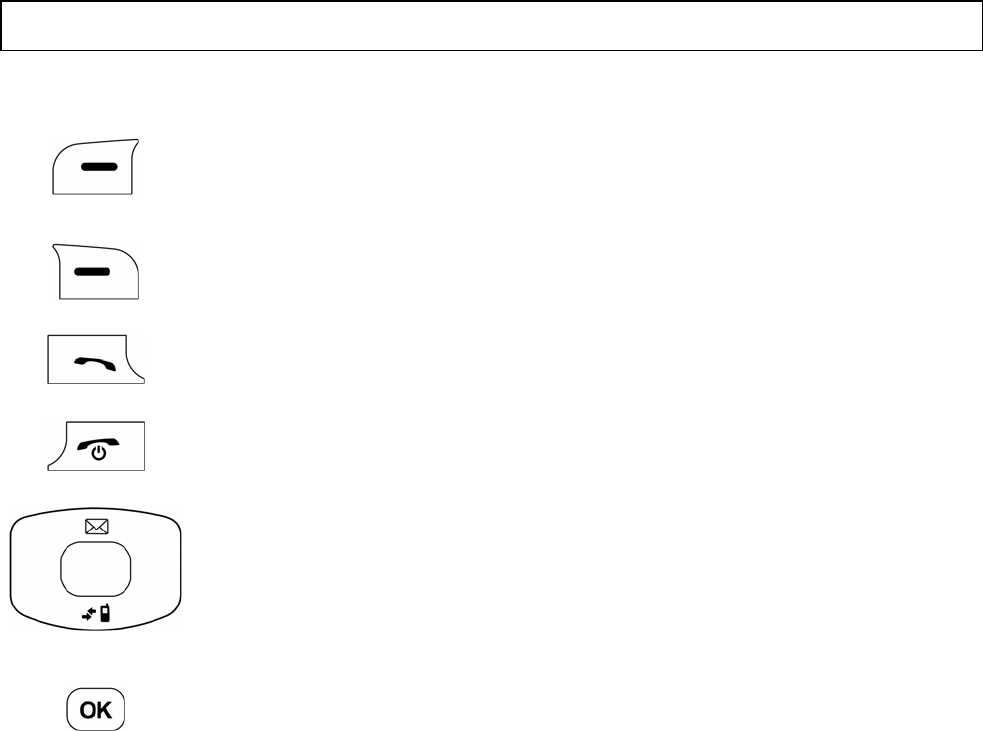
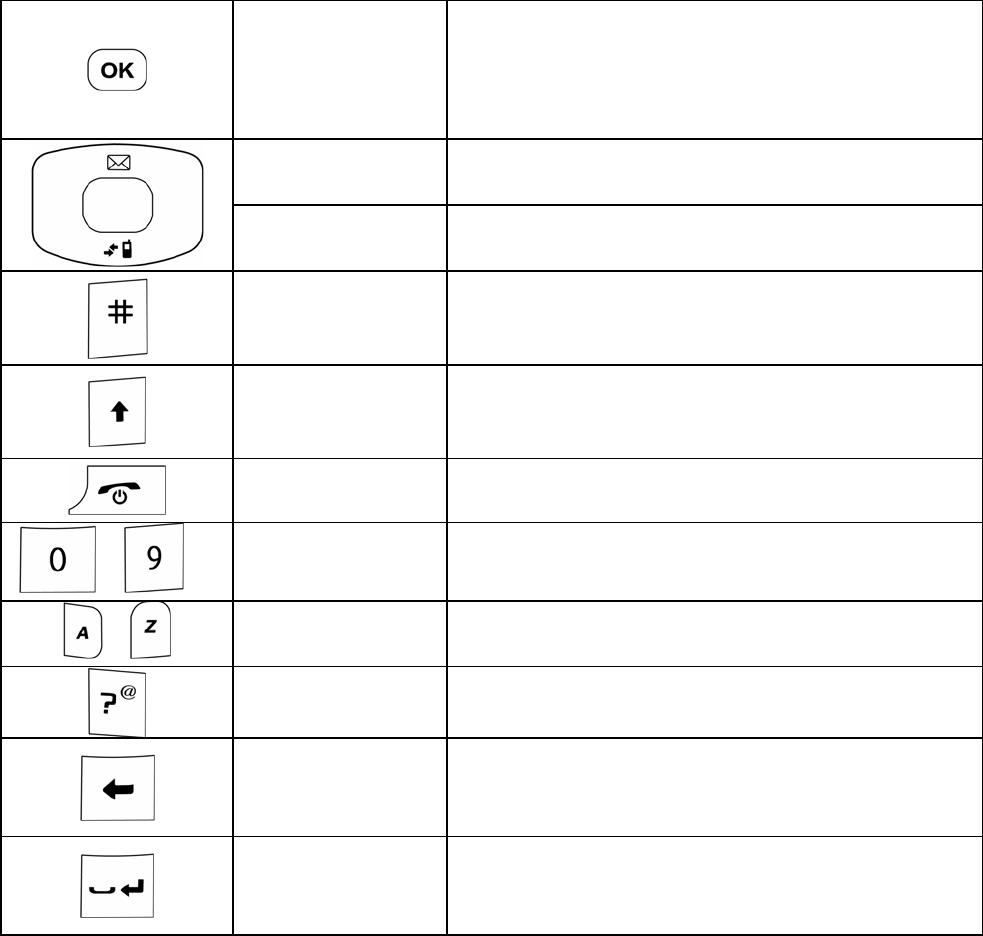
Key Definitions
Left Soft Key – Execute prompts that appear in the lower-
left corner of the screen, directly above the key. These
prompts change according to the screen content.
Right Soft Key – Execute prompts that appear in the
lower-right corner of the screen, directly above the key.
These prompts change according to the screen content.
Send Key – Make and answer calls. This key displays the
outgoing call logs when pressed in standby mode.
End Key – Ends calls and closes applications. Holding this
key down for more than 3 seconds in standby mode will
power off the handset.
Navigation Keys - These keys allow for navigation
through menu options. Use for quick access to Messaging
(up), Wireless Web (left), Messenger (IM) (right) and All
Calls History (down) when in standby mode.
OK Key – Confirm actions and makes selections. This key
also executes prompts that appear on the lower-middle key
on the screen, which are directly above the key. These
prompts change according to screen content.

25
~
0-9 Number Keys – These keys are used for entering
numbers, speed dialing, and selecting options when
navigating menus.
# and * Keys – These keys have different functions,
depending on the mode or function menu.
~ A – Z Keys – Input alphabetical characters
Camera Key – Holding this key for 1 second will launch
the camera function, when the flip is open. This key
captures images once the phone is in the camera
application.
Volume Key – Adjust volume during the call. Short
pressing this key from the standby mode changes the
master volume by one step, and long pressing adjusts the
master volume by multiple steps.
Symbol Key – Input the symbols on the key. Holding this
key for 3 seconds will open a list of all available symbols.
Shift Key – Switch between uppercase and lowercase
lettering.
Blank Key – Input a blank when entering text. Holding this
key for 3 seconds or double click the key will create a new
line.
Back Key – Delete characters during text entry. This key
returns to the previous page during menu navigation and
web browsing.
Speaker Key – Activate and de-activates the
speakerphone function during voice calls.
Music Key – Activate the TELUS mobile music application
for downloading and listening to music files.

26
FASTAPTM Shortcut Key Definitions
The letter keys on your FASTAPTM handset allow you to quickly and
conveniently access a variety of applications directly from standby mode. To
access an application, simply press and hold the desired shortcut key. After
approximately 2 seconds the application will launch automatically. The
following is a listing of pre-defined shortcut keys.
A Apps NEmpty
B Bluetooth OEmpty
C Calendar PMy Music List
D Downloads QEmpty
E E-mail RRingtones
F Empty SSearch
G Games TTV
H Call History UEmpty
I Windows Live Messenger VVideos
J Empty WWireless Web
K Empty XRadio
L GPS YEmpty
M New Message ZInbox
Create your own FastapTM Shortcut Keys
You are able to assign a shortcut to your favourite and most frequently used
application, service and phone feature, as well as contact from your Contacts
list.
To create a new shortcut or modify an existing one:
1. Press New on the left soft key from standby mode and select Shortcut.
2. Highlight the desired shortcut letter and press Select.
3. A list will appear with all the functions available for the shortcut key.
Scroll to the function you want to assign to the key, and press OK to
confirm.
27
After setting the shortcut, you can access the assigned application it by
holding the corresponding key in standby mode.
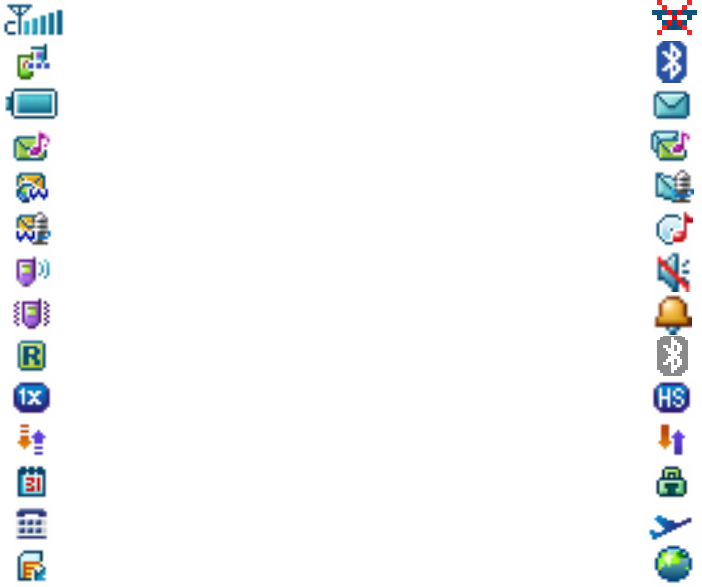
Indicators and Icons
Signal strength indicator No service available
Call in progress Bluetooth headset is avail
a
Battery status indicator New SMS indicator
New MMS message indicator New MMS and SMS indic
a
New web message indicator New voice message indic
a
New voice and web message indicator Music player indicator
Ringer is On Ringer is Off
Vibration alert mode Alarm indicator
Roaming indicator Bluetooth service indicato
r
1X data service indicator EVDO data service indica
t
Data communication in progress Data communication dorm
Schedule SSL-2
TTY Airplane mode is active
Removable memory card GPS service available ico
n
3. Getting Started
This chapter outlines the steps required to set up your phone. Follow the
procedure below to get started.
Battery
Always switch off the power and disconnect the charger before removing the
battery. Avoid touching electronic components on the battery and inside the
battery compartment.
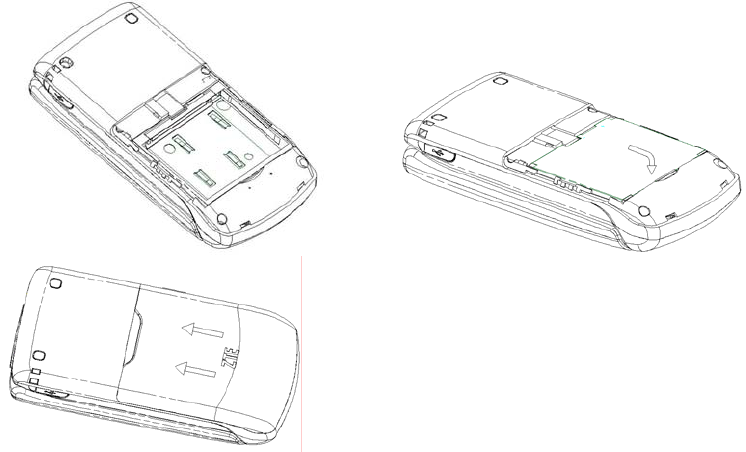
Installing the Battery
(1) (2) (3)
1. Insert the top of the battery under the plastic retainer clip. The + and –
terminals on the battery should line up with the metallic contacts in the
battery compartment.

29
2. Push down on the bottom section of the battery until it clicks into place.
It should be aligned with the bottom of the phone.
3. Replace the battery door so that it covers the entire battery. Slide the
cover upwards until it locks into position. Make sure the battery door is
secure.
Charging the Battery
Your phone is powered by a rechargeable battery. The battery is not fully
charged when you purchase your phone, but there may be enough power in
the battery to turn the phone on. Charge the battery with the procedure
indicated below.
Note: For maximum battery performance, it is recommended that you completely
charge the battery before using the phone for the first time. A new battery’s
full performance is achieved only after three complete charge and
discharge cycles.
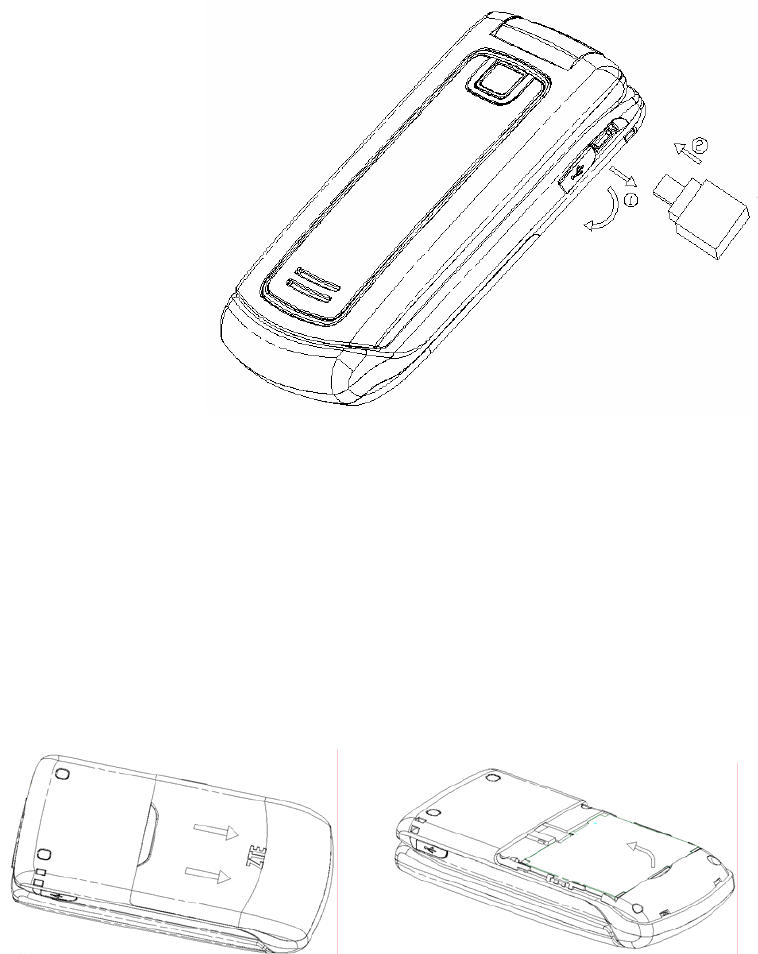
1. Plug the charger into a standard AC outlet.
2. Pull the rubber USB cover away from the USB port and rotate it 90
degrees.
3. Insert the charger’s USB adapter into the USB port. Ensure that the
adapter is inserted with the correct orientation. Do not force the
connector into the USB port.
30
Removing the Battery
If for any reason you need to remove your phone’s battery, follow the
procedure indicated below:
1. Slide the back cover toward the bottom of the phone and lift off the
battery door.
2. Lift the bottom of the battery away from the handset using the finger grip
slot located at the bottom of the battery.
3. Remove the battery from the housing.
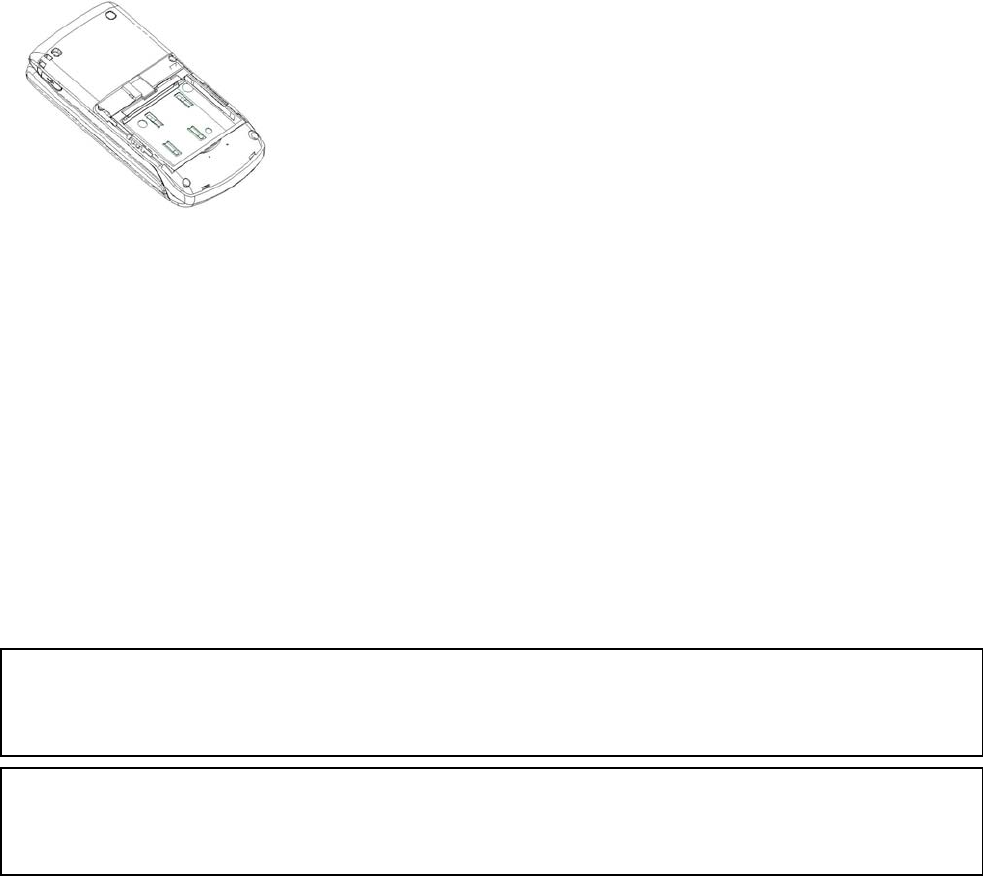
31
(1) (2) (3)
Memory Card
Your phone allows you to use a MicroSD memory card to expand the phone’s
available memory space. This digital card allows you to easily exchange
images, music and voice data quickly between SD compatible devices.
Inserting the MicroSD Memory Card
1. Open the rubber MicroSD access door located on the top of the phone
and rotate it 90 degrees.
2. Firmly insert the MicroSD card into the slot until it clicks into place.
3. Close the rubber memory card access door.
Warning: Only use ZTE approved memory cards for this device. Any use of non-
approved memory cards may cause loss of data or damage to your
phone.
Note: Make sure your battery is fully charged before using your memory card.
Your data may become corrupted or unusable if the battery dies while
reading or writing to the memory card.
Removing the MicroSD Memory Card
1. Open the rubber MicroSD access door located on the top of the phone
and rotate it 90 degrees.
2. Push the memory card downwards to release it from the slot.
3. Pull the memory card completely out of the MicroSD slot on the handset.
4. Close the rubber memory card access door.

32
Note: Do not remove the memory card while reading or writing to the card. Doing
so may cause data corruption on the card or phone. If possible, insert and
remove the memory card while the phone is powered off.
Powering On/Off your Phone
To power on the phone, press and hold the End key for at least 3 seconds. If
the handset lock code has been activated, the phone will prompt to enter the
code. The default password is 1234. Once you have activated your handset,
the lock code will be the last 4 digits of your phone number.
To power off the phone, press and hold the End key for at least 3 seconds
from standby mode.
Warning: Do not power the phone on when wireless phone use is prohibited, or
when it may cause interference or danger.
Unlocking Your Phone
By setting the handset lock code, you can protect your phone against
unauthorized use. To unlock the phone, enter the handset lock code and then
press the OK key.
Note: If you forget your handset lock code, contact your service provider.
Connecting to the Network
After your phone is unlocked, it will automatically search for the network.

4. Basic Operations
Making Voice Calls
Note: Your phone has an internal antenna located below the mouthpiece. Do not tou
c
the area around the antenna unnecessarily when the phone is powered on. Doi
n
so may affect call quality and power consumption.
Using the Keypad
1. Enter a phone number including the full area code by using the numeric
keypad. If an incorrect character is entered, use the Back key to delete
the digit. Holding the Back key will erase all digits before the cursor.
2. Press the Send key to make the voice call.
3. Press the End key to end the call, or to cancel the call attempt.
Note: To make an emergency call, enter the emergency number and press the
Send key. If possible, remain stationary and keep the line connected.
Using the Contacts list
You can also make a call by choosing a record from your Contacts. To make
a call from the contact list:
1. In the standby mode, press Contacts to display your contact list.
2. Scroll to the desired entry and press the Send key to make a call. If
there are multiple numbers for a contact, scroll to the desired number
and press OK.
3. Press the End key to end the call, or to cancel the call attempt.
Using the last number dialed
Your phone can re-dial the last number that was called. To dial the last
number:

34
1. Press the Send key from standby mode. This will display a list of
outgoing calls that have been placed by the phone.
2. Press the Send key again to dial the first entry.
3. Press the End key to end the call, or to cancel the call attempt.
Using a number from the Call History
Generally, all calls you have made or received are saved in a list on the
phone. All numbers are grouped into Outgoing Calls, Incoming Calls, and
Missed Calls. To dial a number from your call history:
1. Select Menu→Call History from standby mode.
2. Navigate through the menu and press OK to select Incoming, Outgoing
or Missed calls.
3. Select the phone number you want to dial from the list and press the
Send key to place the call.
4. Press the End key to end the call, or to cancel the call attempt.
Using your FASTAPTM keypad
Your phone has a FASTAPTM keypad that allows you to place calls by
entering a name from your contact list. To make a call with the FASTAPTM
keypad:
1. In standby mode, use the letter and space keys to enter the full name of
the contact you wish to call.
2. Press the Send key. The phone will automatically search through your
contacts and select the contact you entered. If there are multiple
numbers associated to the contact, use the Up/Down keys to select the
desired number.
3. Press the Send key again to dial the highlighted number.
4. Press the End key to end the call, or to cancel the call attempt.
Note: The FASTAPTM keypad only supports English alphabetical characters and
spaces. French and other special characters are not recognized by the
FASTAPTM keypad. The first character of the contact name cannot be a
space.

35
Using Letter Dialing
With FASTAPTM you can dial a phone number using number and letter keys.
1. For example, using the FastapTM keypad type 1-800-OCANADA and
press Send.
2. Watch the phone screen closely: The phone automatically converts the
letters to the correct numbers.
Using Speed Dials
Your phone is capable of storing 9 Speed Dial numbers that can be quickly
dialed from standby mode. Among the 9 numbers the 1 is assigned to Voice
Mail function. To use the Speed Dialing feature:
1. Press and hold the number key for the Speed Dial entry you would like
to call. The call will be connected automatically.
2. Press the End key to end the call, or to cancel the call attempt.
Note: If you have not already assigned a Speed Dial to the selected key, the
phone will prompt that no Speed Dial has been assigned. You may click
Yes to add a Speed Dial immediately. For more information on creating
Speed Dials, refer to section 6 in this manual.
Using Voice Dials
Your phone is capable of dialing phone numbers based on your voice
commands. To dial a contact using your voice:
1. Press and hold the Send Key from standby mode.
2. When prompted, say the name of the desired contact.
3. The phone will locate the contact associated to your voice entry and
display it on the screen. Press Yes to call the contact.
4. Press the End key to end the call, or to cancel the call attempt.
Note: See section 6 – Voice Dials, for more information and instructions on
adding voice tags to contacts.

36
Answering Voice Calls
When you receive a call, the ringtone, illumination or vibration function will be
activated, depending on your current settings. If the Caller ID function has
been activated by the caller, the caller’s phone number will be displayed. If
the calling party selects that their phone number is hidden, your phone will
show that the phone number has been withheld.
You can answer a call by opening the flip. Press the End key or close the
phone’s flip to disconnect from a call.
Note: You may change the default setting for answering incoming calls. Navigate
to Menu→ Settings→ Others→Call Setup→Call Answer to enable
answering with the Send key or any key.
If your phone is connected to the stereo headphones with music remote
controls, or a compatible Bluetooth headset, you can answer the call by
pressing the Send/End key, or by opening the flip.
To reject a call, you can press Reject, located on the Right Soft Key. You can
also disable the ringer by pressing Silent that is located on the Left Soft key.
In-Call Features
Volume
The earpiece volume can be changed by selecting Volume, located on the
OK Key. The Up/Down Keys on the navigation key can then be used to
increase/decrease the volume. You can also use the volume keys located on
the side of the phone to adjust the volume level.
Mute
You can mute your voice during the call by pressing Mute, located on the
right soft key. Pressing Unmute will allow the caller to hear your voice again.
Speakerphone

37
Your phone has a speakerphone function that allows you to talk hands-free
with the use of the phone’s external speakers. To use the speakerphone,
press the Speaker Key on the keypad. Press the Speaker Key again to
return to the standard call mode.
Advanced Features
To enter the advanced in-call features, press Options located on the left soft
key. You may select the following from this menu:
1. Call the Third Party: Call another number to activate the 3-way calling
feature.
2. Message: Switch to the Message interface during a call.
3. Contacts: Switch to the Contacts interface during a call.
4. DTMF Off/On: Enable and disable sending DTMF tones. This feature is
used to send numbers for communicating with automated voice systems,
such as telephone banking.
Note: The 3-way calling feature requires network support and may result in
additional charges. Contact your service provider for more information.
Three-Way Call
Your phone has a three-way calling feature, which enables you to have
conference calls with two parties. You can activate this function by following
the procedure below:
1. Once a voice call has been established with Party A, press Options and
select Call the Third Party.
2. The dialing window will appear. Enter the phone number of Party B and
press Send.
3. When the Party B answers the call, you will be connected with Party B
only. Party A will remain on hold.
4. To activate the three-way call, press the Send Key again. You will be
able to converse with both parties simultaneously.
5. Press the Send Key again to end the call with the Party B. You may
press the End key to end both calls.
38
Call Waiting
Your phone can accept phone calls while another call is active. You can
manage the phone’s call waiting feature as follows:
1. If you receive a call during an active conversation, the phone will prompt
that there is an incoming call and allow you to accept or reject the call.
2. Press Yes on the left soft key to accept the call.
3. After accepting the call, you will be connected with the second caller,
while the first party is put on hold. You may switch between callers by
pressing the Send Key again, or by selecting Options→Swap.
4. Press the End Key to disconnect from the active caller.
Note: When the End Key is pressed both the active and holding user will be
disconnected. If the holding user remains on the call your phone will ring
again. You may accept or reject the call.
5. Entering Text
Your phone has a FASTAPTM keypad which provides a convenient way to
enter words, letters, punctuation, symbols and numbers in a variety of phone
screens, such as messaging, contacts, scheduler and many more.
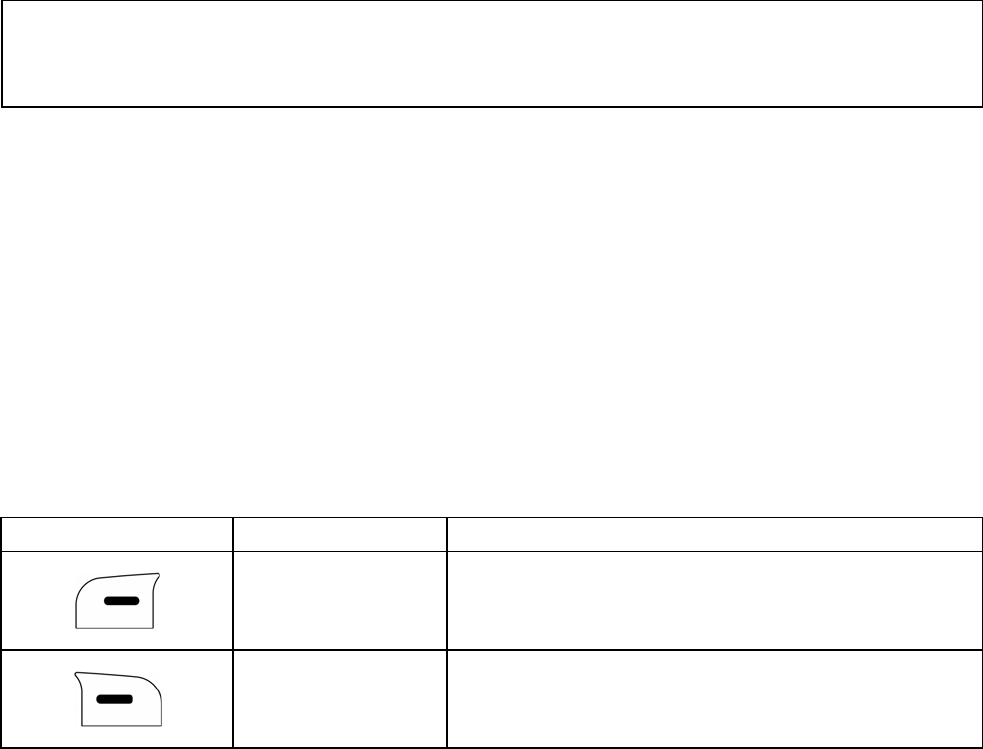
Key Functions
Key Function Description
Left soft key
Execute prompts that appear in the
lower-left corner of the screen, directly
above the key.
Right soft key
Execute prompts that appear in the
lower-right corner of the screen, directly
above the key
39
OK key
Confirm actions and makes selections.
This key also executes prompts that
appear on the lower-middle button on
the screen, directly above the key.
Up/Down
keys
Move the cursor up and down during
text editing
Left/Right
keys
Move the cursor left and right during
text editing
# key Switch between eZiEnglish and
standard text entry modes
Shift key Switch between uppercase and
lowercase lettering
End key Exit
~ 0-9 keys Enter characters 0-9
~ A-Z keys Enter characters A-Z
Symbol key Input symbols
Back key
Delete the previous character during
text editing. Long pressing the Back
key erases all text.
Blank key
Input a blank character. Holding the key
for 3 seconds or double click the key
will create a new line.
Text Input Modes
During text entry, press the # key to switch between standard text entry and
the eZiEnglish mode for predictive text entry. You may press the Shift Key to

40
switch between uppercase and lowercase lettering. The current mode is
indicated in the top-right section of the display.
Display Symbol Text Entry Mode
Lowercase Alpha mode
Uppercase Alpha mode
Lowercase eZiEnglish predictive text mode
Uppercase eZiEnglish predictive text mode
Alpha Mode
In Alpha(abc) mode, the alphabet keys from A to Z are used to enter text. To
enter symbols, press the Symbol key.
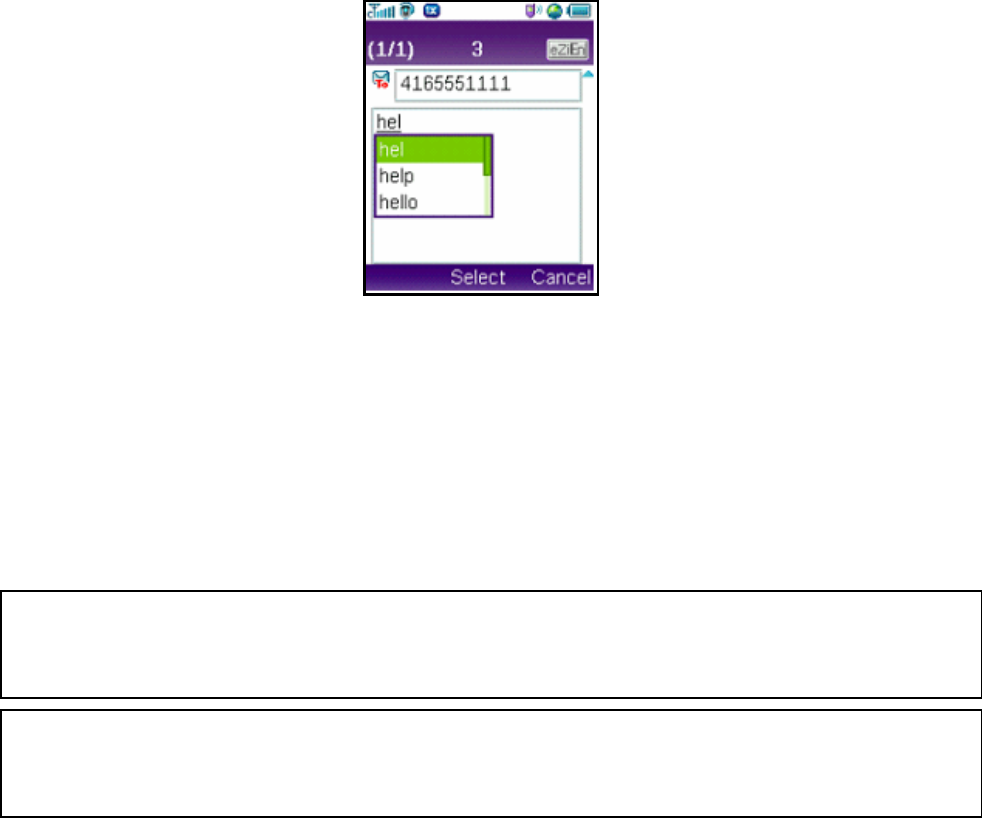
eZiEnglish Mode
eZiEnglish mode is based on eZiType™, a professional text input product for
advanced mobile e-mail handsets. With eZiType, business users can write
fast, professional communications with confidence as there is no need to
manually spot and correct typos. Key features are:
full word prediction – save key presses during text entry
auto-correction – correct common misspellings and keyboard difficulties
passive learning of user vocabulary – remember new words and slang
easily
next word prediction - predict words from past writing patterns
phrase prediction - save common word groups for speedy typing
To write a desired word, begin entering letters with the keys A to Z. After part
of the word has been entered, a dropdown list will be displayed with the most
commonly used words containing the letters you have input.
41
As you enter more letters, the words in the predictive dictionary will be
modified to reflect your current text. At any time, you may scroll down the list
with the Up/Down keys and select a desired word by pressing Select. The
complete word will be displayed in the editing window.
To switch to uppercase or lowercase lettering, press the Shift key. You may
press the Symbol key to enter punctuation.
Note: When composing sentences, after a period is entered a blank will be
inserted and the first letter of the new sentence will be capitalized
automatically.
Note: You may enter French characters in both àbc and eZiFrench mode when
your handset language is set to French. To change to French navigate to
Menu→ Settings→Others→Language and select Français.
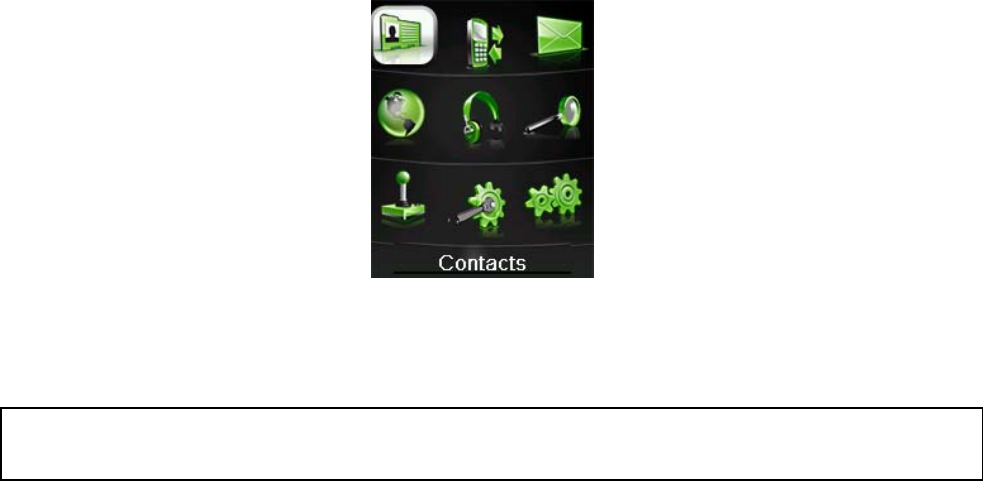
6. Contacts
Your phone has an address book capable of storing 500 contacts containing
phone numbers, E-mail addresses, URLs and many other fields. To enter the
contacts list from the standby mode, select Menu→Contacts.
This menu allows you to save and manage contact address information. In
Contacts, you can add a new address, or search saved contact addresses by
name. You can also add a personal ringtone or photo to a contact card.
Note: To quickly access the Contacts menu, press the right soft key named
Contacts from standby mode.
List Entries
Select List Entries to view the listing of all contacts stored on your phone. You
may scroll up or down the list using the Up/Down Keys, and press OK to
view the desired contact information. Pressing Options will display the
following pop-up menu:
1. New Entry: Add a new contact.
2. Send Message: Send a message to the contact.
3. Send Bus. Card: Send the name, numbers and e-mail addresses of the
record via Bluetooth to another Bluetooth compatible mobile phone.
4. Add Digits: Switch to number input mode to modify the selected
number before dialing.
43
5. Dial 1+Number: Add 1 as a prefix for long distance dialing, and make a
call to the number.
6. Delete: Delete the selected record.
7. Groups: Display the groups interface.
8. Set Speed Dial: Assign the current number to one of the Speed Dial
dialing keys. Speed dialing allows you to press and hold a number key
in standby mode to call the stored phone number.
9. Delete All: Delete all records.
0. Memory Info: View the amount of Used, Available and Total records
information.
You may also search for a contact from the List Entries screen. Use the
FASTAPTM keypad to type the name of the desired contact. Your input will be
displayed at the bottom of the contact list. The phone will automatically scroll
to the name that most closely matches your input.
Press the Back key to exit the List Entries menu.
New Entry
The New Entry menu allows you to add a new contact record. The following
information can be stored for each contact:
Name: Contact name.
Mobile: Mobile phone number.
Home: Home phone number.
Office: Office phone number.
E-mail1/E-mail2: E-mail addresses.
Short Code: Short code number for SMS/MMS addressing.
Address: Business or home address.
URL: Webpage address for the contact.
Groups: Contact group (ie. Family, Business, VIP, etc.)
Ringtone: Ringtone to be played when receiving calls from the contact.
Image: Image to be displayed when receiving calls from the contact.

44
Notes: Other information about the contact.
Press the OK key to save the contact information. Press the Back key to exit
from the New Entry interface.
Note: You may enter any of the contact information above; however, the Name
and one phone number or one E-mail address must be entered in order to
save the contact.
Groups
The Groups menu allows you to add contacts to any of the five caller groups.
The default groups are Family, Business, Friends, VIP and Unclassified. If the
contact isn’t appointed to any group, the contact will automatically be stored
in the unclassified group. The following are available from the Groups menu:
Edit: Rename the selected group
Send: Switch to the contacts list for the desired group. You can mark
recipients from the group to whom you can send an MMS or SMS
message.
Select: Switch to the contacts list of the current group
Voice Dials
The Voice Dials menu allows you to view the list of numbers programmed
with voice dialing, or add a voice command to a number already stored in
your contacts. The Options presents the following selections:
1. New Entry: Add a new Voice Dial to a contact
2. Re-Record: Record the Voice Dial entry again
3. Delete: Delete the selected voice tag
4. Delete All: Delete all voice tags
Shortcut: In standby mode, press and hold the Send key to activate the voice
dialing option. The phone will prompt for you to say the name that you
wish to dial.
45
Speed Dials
The Speed Dials menu allows you to view the current list of speed dials and
add new entries. Use the Up/Down Keys to navigate to a desired Speed Dial
number.
For Speed Dial numbers that are already assigned, click View to see the
contact name and phone number. You may also select Dial to call the contact,
or Clear to remove the contact from the speed dials list.
To add a new Speed Dial, navigate an empty Speed Dial number and press
List. The contact list will be displayed. Navigate to the desired contact and
press the OK key to add the contact to the Speed Dial list.

7. Call History
Your phone has a call log feature that automatically stores information about
incoming, outgoing and missed calls. To enter the call log from standby mode,
select Menu→Call History.
You may navigate though the Calls History interface with the Up/Down key
and press Select to view the information below:
All Calls
List calls of all incoming, outgoing and missed calls.
Incoming Calls
Display calls received by the phone.
Outgoing Calls
Display calls made from the phone.
Missed Calls
Display calls received but not answered.
After selecting one of the call logs above, a listing of all calls in that category
will be displayed. You may use the Up/Down Keys to select a desired entry.
Press View to get information about the call, such as the phone number,

47
name, call time and date. The Save allows you to create or update contact
information for the selected caller.
Press Options to choose any of the following features:
Dial: Make a voice call to the number.
Send Message: Send a MMS or SMS message to the number.
Add Digits: Switch to number input mode to modify the selected
number before dialing.
Dial 1+Number: Add 1 as a prefix for long distance dialing, and dial the
number.
Delete: Delete the selected record.
Delete All: Delete all records.
Call Timers
The Call Timers feature allows you to view the approximate duration of your
calls, as well as data transferred and data connection time. The following
information is available in the Call Timers interface:
Last Call: Duration of the last call made or received by the phone.
Recent Calls: Total duration of all calls made or received since last
resetting the call timer. You can reset Recent Calls by selecting Reset
on the right soft key.
Lifetime: Total duration of all calls made or received in the phone’s
lifetime. This value is not cleared when the Reset is selected.
Data Transferred: Total data bytes uploaded and downloaded by the
phone.
Connection Time: Total time spent transferring data.
Note: The call timers are not intended for billing purposes. The actual invoice for
calls and service provider may vary depending on network features,
rounding off for billing, rates and so forth.
You can reset the information such as Last call, Recent calls, Data
transferred and Connection Time by selecting Reset on the right soft key.

8. Messaging
Your phone is capable of creating and receiving text, multimedia, voice and
E-mail messages. With your FASTAPTM keypad, you are able to quickly write,
read and respond to messages in a variety of applications. To enter the
messaging interface from standby mode, select Menu→Messaging.
Your phone has the following messaging options:
1. Voice Mail: Access your Voice Mail box to check voice messages.
2. Text and Multimedia: Compose and send text and multimedia
messages to other cellular phones capable of receiving these messages.
3. E-mail: Access the E-mail client to view and write E-mail messages.
4. IM & Chat: Send and receive instant messages at any time from your
mobile device, allowing you to chat with internet messenger users.
5. Web Alerts: View and launch Web Alerts.
6. Short Codes: Access pre-configured Short Codes. Contact your service
provider for more details about Short Codes.
Voice Mail
When the Voice Mail function is available, all unanswered calls to your phone
can be transferred to your voice mailbox, even if your phone is in-use or
powered off. You should set up your voice mailbox and personal greeting as

49
soon as your phone is activated. For more information, Contact your service
provider.
To check your voice mailbox, select Call from the Voice Mail interface. The
phone will automatically place a voice call to the Voice Mail center. You may
clear the new Voice Mail indicator by pressing the Reset, located on the right
soft key.
Shortcut: To quickly access your voice mailbox from standby mode, press and
hold the 1 key. Your phone will automatically place a voice call to the
Voice Mail center.
Text and Multimedia
Your phone is capable of sending and receiving SMS and MMS messages to
other mobile phones in your local area and around the world. The following
selections can be chosen from the Text and Multimedia interface:
Send New
The Send New selection is used to create and send a message with the
composer. To create a message, enter a phone number or E-mail address in
the To field. You may directly enter the recipient’s number using the keypad.
After entering one number or address, you may press the DOWN Key to
enter additional addresses.
You may also add recipients from your contact list by pressing
Options→Contacts. Use the Up/Down Keys to highlight the desired contact,
and press the Mark→Select to select the contact. You may scroll down to
select multiple recipients. After the desired numbers have been selected,
press OK to add the recipients to the message.
Note: You may send an SMS to a maximum of 10 recipients, and an MMS to a
maximum of 30 recipients, inclusive of the To, Cc and Bcc fields. These
fields can each contain a maximum of 10 numbers.

50
When you have finished entering all recipients, press the DOWN key twice to
move the cursor to the lower window for creating your message text. For
more information about text entry, Refer to Section 5 – Entering Text.
Press Send to send the message. You can also save your message at any
time by selecting Options→Save to Drafts.
Note: The maximum size of an MMS message is 1M, and it may contain:
1. text, audio and photos
2. text and video
The subject can include at most 40 characters, and if the message is an
SMS, the subject will be included as part of the message body.
Your phone allows you to perform a variety of other functions within the
messaging window. Select Options to access the following features:
1. Insert: Your phone also allows you to add pictures, audio clips or videos
to your message. From the messaging composition screen, select Insert
to display the following options:
Photos: Add an image from the folder lists.
Sounds: Add an audio clip from the folder lists.
Videos: Add a video from the folder lists.
New Photo: Start the camera to take a photo and insert it into the
message.
New Sound: Start the sound recorder to create a new audio file,
and insert it into the message.
New Video: Start the camcorder to create a new video file, and
insert it into the message.
2. Slide: Enter the slide interface.
Add Slide: Switch to the slide interface. Press the OK key to add a
new slide.
Delete Slide: Delete the current slide.
Previous Slide: View the previous slide.

51
Next Slide: View the next slide, when more than one slides have
been added.
Slide Timing: Set the duration (in seconds) for each slide.
Note: When editing an MMS message, you can add at most 2 slides to the
message.
3. Preview: Preview the message.
4. Erase Item: Erase the selected photos, sounds or videos item from the
message.
5. Cc/Bcc/Sub: View and enter the cc/bcc recipients and subject text.
After inputting the desired information, press Done to save.
6. Save to Drafts: Save the message to the Drafts folder.
7. Quick Text: Quick Text messages are used to enter common
responses to questions from a pre-defined dictionary. Select Quick Text,
locate a desired phrase and press OK to add the text to the current
message. For more information about Quick Text, Refer to Settings -
Quick Text in Messaging.
8. Signature: Input your pre-defined signature. See Settings – Signature in
Messaging for information on how to create a customized signature.
9. My Words: Switch to the My Words interface to add previously saved
words to the message.
Inbox
The Inbox folder contains all of your received text and multimedia messages.
From this folder you can review your received messages, reply or forward
messages to another recipient. To access the inbox from standby mode,
select Menu→Messaging→Text and Multimedia→Inbox.
Reading a message
1. Use the Up/Down keys to select the desired message.
2. Press View..
3. If the message is an SMS message, it will be displayed on the screen
immediately.

52
4. If the message is an MMS message, an MMS notification will be
displayed. See Downloading an MMS message below for downloading
instructions.
Downloading an MMS message
1. Press the Get to download the message.
2. The message will download and you will be returned to the Inbox.
3. Highlight the downloaded message and press View. The message will
be displayed on the screen.
4. You may press Reply to respond to the original recipient.
Press Options in the view message interface, you can access the following
features:
1. Use Highlighted Object: Save the highlighted object to file, or set it as
a ringtone, wallpaper, contact, etc.
2. Delete: Delete the message.
3. Forward: Forward the message to another recipient.
4. Reply All: Reply to all the recipients of the original message.
5. Extract Attachments: Downloads attachments sent with MMS
messages (MMS only).
6. Message Details: View the details of the message, such as the size,
date, etc (MMS only).
7. Move to Saved: Move the message to the Saved folder.
8. Use Sender’s Number: Allows using the callback for the following:
New Contact: Save the number as a contact.
Update Contact: Add the number to an existing contact.
Voice Call: Dial a voice call to the sender.
Note: When using the Use Highlighted Object feature on an E-mail address,
you can save it to your contact list or send an E-mail to the address. You
can save a URL to your bookmarks, or access the URL immediately. If a
video file is attached, it can only be saved.

53
Replying to a message
1. Highlight the desired message and press Reply or View→Reply.
2. Compose your reply message. For more information about creating
messages, Refer to Send New.
Note: When replying to a message, the To: field will automatically be filled with
the original sender’s number. The Cc and Bcc fields will be blank. The
message type (SMS or MMS) will depend on the content of the message.
Inbox Options
To select your inbox options, press Options located on the left soft key. The
following selections are available:
1. Delete: Delete the selected message.
2. Delete All: Delete all messages in the Inbox.
3. Forward: Forward a copy of the message to another recipient.
4. Reply All: Reply to the sender and all recipients of the highlighted
message (MMS only).
5. Messages Details: Display information about the message such as
date, time, size, priority, etc. (MMS only).
6. Move to Saved: Allow you to move the message to the Saved folder.
7. Get: Download the new MMS (This function is available only with Push
message unread).
8. Reject: Discard to read the new MMS (This function is available only
with Push message unread).
Note: The functions Reply All and Message Details are only available for MMS
messages. The Get and Reject features are only necessary if the MMS
message is not automatically downloaded by the phone. To change the
MMS download options, Refer to the section Text and Multimedia –
Settings – Auto Download.
54
Outbox
The Outbox folder contains all messages that are waiting to be sent, or were
unsuccessfully sent during the last attempt. From this folder you can edit or
re-send your messages.
To edit a message before sending, press the Edit. This will display the
composer interface where you can edit your message. Select Send from this
screen to send the message.
You can also send a message directly from the Outbox by pressing Send
located on the Right soft key.
Pressing Options will display the following options:
1. Delete: Delete the highlighted message.
2. Delete All: Delete all messages in the Outbox.
3. Message Details: Display information about the message such as date,
time, size, priority, etc. (This function is available only with MMS).
Drafts
The Drafts folder contains drafts, unfinished or unsent text and multimedia
messages. From this folder you can complete and re-send your messages.
Select Edit to open the message, and press Send in the composer to send
the message.
You may delete a highlighted message by pressing Delete located on the
right soft key. All drafts can be deleted by selecting Del.all on the left soft key.
Sent
The Sent folder contains messages that have been successfully sent by your
phone. Press Edit to open the composer interface to edit or re-send your
message. You may also select Delete to delete the selected messages from
the Sent box.
55
Press Options on the left soft key to choose the following:
1. Forward: Send the message to a different recipient
2. Delete All: Delete all messages in the Sent folder
3. Message Details: View information about the message, such as the
date and time sent, size, etc. This feature is available only with MMS.
Saved
The Saved folder contains saved text and multimedia messages. From this
folder you can edit and resend your messages. The messages that are saved
in this folder will not be deleted automatically.
You can view a saved message by highlighting the desired message and
selecting View. You can also reply to messages by pressing Reply located
on the right soft key.
Pressing Options will display the followings:
1. Delete: Delete the highlighted message.
2. Delete All: Delete all messages in the Saved folder.
3. Forward: Forward the selected message to another recipient.
4. Reply All: Reply to the sender and all recipients of the highlighted
message.
5. Message Details: View information about the message, such as the
date and time sent, size, etc. This feature is only available for MMS
messages.
Templates
The Templates folder contains predefined templates for text and multimedia
messages. To compose a new template:
1. From standby mode, select Menu→Messaging→Text and
Multimedia→Templates.
2. Press New if this is your first template. Otherwise, press Options→New
to compose a new template.
3. Enter the recipient number and message, if desired.
56
4. Select Options→Save as Template to save the template for future use.
After saving a template, you can use it to create future messages by entering
the Templates menu and selecting Edit. Add the necessary information to the
template and press the Send to send the message. For more messaging
options, refer to Send New.
From the templates list, press Options on the left soft key to choose the
following:
New: Add one new template to this folder.
Delete All: Delete all templates in the template folder.
Message Details: View information about the template message,
such as the date and time created, size, etc. This feature is only
available for MMS messages.
Settings
There are several options associated with your text and multimedia
messages. This menu allows you to customize the options to fit your
preferences. From the standby mode, select Menu→Messages→Text and
Multimedia→Settings to access the settings menu. The following options
are available:
1. Message
Save to Sent Box: Sets whether messages are saved to the Sent
folder.
Prompt: Prompts you to save a copy of the outgoing message.
Do Not Save: Sent messages are not saved in the Sent box
Auto Save: Sent messages are automatically stored in the Sent
box.
Auto Delete Inbox: Select whether messages are automatically
deleted after being read when inbox is full.
On: Automatically delete read messages.
Off: Do not delete read messages.
Default Entry Mode: Set the default entry mode.
57
eZiEnglish: Text entry with a predictive dictionary.
Alpha: Each character is typed individually.
Auto Download: Set the preference for downloading MMS
messages.
On: Download the MMS automatically.
Off: Manually download the attachment when viewing the MMS.
Message Priority: Change the message priority between Low,
Normal and High.
Delivery Report: Enable and disable the delivery report.
Read Report: Select whether read reports are requested for MMS
messages.
Callback: Set the callback number that is sent along with SMS and
MMS messages.
Signature: Allow you to input and save your message signature.
The saved signature is appended to all outgoing messages.
2. Quick Text
The Quick Text is a list of phrases that are commonly used in short
messages. To view or edit the phrase, press Edit. For more information
on adding Quick Text to your message, refer to Send New.
Memory Info
The Memory Info menu displays the amount of memory available for text and
multimedia messages. Press the OK key to exit from the menu.
E-mail
Your phone is pre-loaded with My Email. To learn more about this service
please visit www.telusmobility.com/email. To access your E-mail:
1. From standby mode, select Menu→Messaging→E-mail.
2. Select My Email to launch the E-mail application and follow the on-
screen instructions.
3. You may search for additional E-mail clients by selecting Get New.
Contact your service provider for more information.

58
Shortcut: You can quickly access My Email by long pressing the E key from
standby mode.
IM & Chat
The IM & Chat menu allows you to access applications that allow sending
and receiving instant messages at any time. To access the instant
messenger feature:
1. From standby mode, select Menu→Messaging→IM & Chat.
2. Select Messenger to launch the IM application and follow the on-screen
instructions.
3. You may search for additional IM clients by selecting Get New. Contact
your service provider for more information.
Shortcut: You can quickly access Messenger (IM) by long pressing the M key
from standby mode.
Web Alerts
Your phone is capable of receiving Web Alerts from online providers. For
more details, contact your service provider. To access your Web Alerts:
1. From standby mode, select Menu→Messaging→Web Alerts.
2. Follow the on-screen instructions.
Short Codes
Your phone is capable of accessing pre-configured Short Codes. For more
details on Short Codes, contact your service provider.

9. Wireless Web
The browser feature on your phone allows you to view internet content. You
can view specially designed versions of popular websites which include
sports, weather, news, stock quotes and many others. As well, you can
download ringtones, wallpaper, and games from your service provider. You
can access the browser by selecting Menu→Wireless Web from standby
mode.
Note: Wireless web is a network service. Rates and pricing vary according to the
application. For more information, contact your service provider.
Your phone may have some bookmarks loaded for sites not affiliated with
TELUS. TELUS does not warrant or endorse those sites. If you choose to
access them, you should take the same precautions for security or content,
as you would with any other internet site.
Launching and Navigating the Browser
From standby mode, select Menu→Wireless Web to access the browser
application. You will be connected to the service provider’s homepage
automatically. You may press the Options key to access the browser
submenu. The following selections are available in the Options menu:
1. Home: Go to the homepage.
60
2. Forward: Go back and reload the web page from where the Back key
was last pressed.
3. Go To URL: Switch to the URL screen where web addresses can be
input.
4. Bookmarks: All previously accessed addresses can be saved as
bookmarks on your phone. This function allows you to view and edit
frequently accessed sites.
Open Bookmarks: Access the bookmark list and organize
favourites.
Mark Site: Add a bookmark for the current site.
5. History: Browse previously viewed web addresses.
6. Snapshots: Allow you to manage your snapshots.
View Snapshots: View previously saved snapshots.
Take Snapshots: Take a snapshot of the current web page.
7. Use URL: Provide URL related options.
Send Link: Send a message with the current URL.
Show URL: Show the current URL.
8. Search: Search via the search engine defined by your service provider.
9. Advanced: View the advanced menu for the Browser.
Restart Browser: Clear the cache memory and reload the browser.
Multimedia: Allow setting preferences for display pictures and
background music.
Clear: Allow clearing of the stored cookies, cache, history and
autofill.
Scroll Mode: Settings for the scroll mode and scroll speed of web
pages.
Send Referrer: Enable or disable adding the referrer field into the
HTTP request header.
Connection Timeout: Set the duration of the connection timeout.
Key Press Timeout: Set the duration of the key press timeout.
Security: Set the security options.
0. About: Show the version of the Browser.
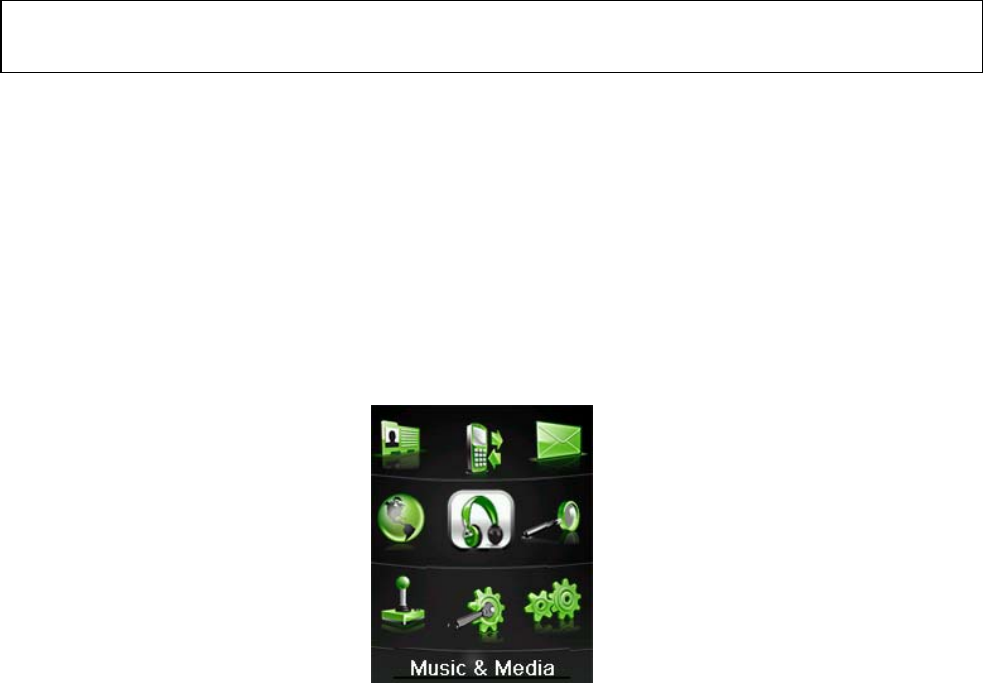
61
Note: To go to the previous page while browsing the internet, press the Back
Key located on the keypad.
10. Music & Media
Your phone has the capability of playing multimedia content such as video,
radio and downloadable music. You can also capture and view images and
movies on your phone. This functionality is all accessible through the Music &
Media menu. To access Music & Media, select Menu→Music & Media from
standby mode.
The selections below are all accessible through the Music & Media menu.
TELUS Mobile Music
The TELUS mobile music player lets you play music you have downloaded
from your service provider or loaded from your PC to your microSD memory
card. The phone can play tunes and songs in the formats of MID, ACC,
ACC+ and MP3. To learn more about TELUS mobile music please visit
www.telusmobility.com/music. The following options are available in the
TELUS mobile music menu:
1. Music Player: Allow you to listen to your stored music and download
new songs from the online store. Music Player allows you access the
following:

62
My Vault: Display a list of songs downloaded to your vault using
your mobile music subscription
Play: Play tracks in your playlist
Settings: Control the settings of TELUS mobile music, such as
display, languages, etc.
Shop: Go to the shop page and download new music tracks
Song Library: Display the list of music on your phone
2. My Music List: Display a listing of the music files you have on the
phone
TV & Radio
The TV & Radio selection allows you to access and enjoy the service
provider’s content such as TELUS mobile radio. To access the TV & Radio
section from standby mode, select Menu→Music & Media→TV & Radio.
Downloading Applications
If you haven’t downloaded any applications, highlight Get New and press Go.
You will be able to download the content using the browser. Follow the on-
screen instructions to install the application.
Note: Fees may apply for downloading or using the TV & Radio content. Check
with your service provider for more information.
Running Applications
Once the application is installed, select Menu→Music & Media→TV &
Radio. Highlight the desired application in the list and press the OK key.
Follow the on-screen instructions for running the application.
Ringtones
The Ringtones selection allows you to download and manage previously
downloaded ringtones. To access your Ringtones from standby mode, select
Menu→Music & Media→Ringtones.
63
Downloading Ringtones
To download new ringtones, highlight Get New and press the OK key. The
web browser will launch and locate the TELUS ringtone web page. Follow the
on-screen instructions to download a ringtone.
Managing your Ringtones
After you have downloaded ringtones, you can manage your ringtones by
highlighting the desired ringtone and pressing Options. The following options
are available:
1. Play: Play the highlighted ringtone.
2. Delete: Delete the highlighted ringtone.
3. Options: Display the additional options listed below.
File Info: Allow you to view the file information
Delete All: Delete all the downloaded music
Wallpapers
Your phone is able to download new wallpaper, or set a desired picture as
the background image. It supports images in the format of JPG, PNG and
GIF. To access the Wallpaper menu from standby mode, select
Menu→Music & Media→Wallpapers.
Downloading Wallpaper
To download new wallpaper, highlight Get New and press the OK key. The
web browser will launch and locate the TELUS wallpaper web page. Follow
the on-screen instructions to download wallpaper.
Managing your Wallpapers
After you have downloaded wallpaper, you can manage your wallpaper by
64
highlighting the desired wallpaper and pressing the Options. The following
options are available:
1. View: View the highlighted entry
2. Delete: Delete the highlighted wallpaper
3. Options: Display the additional options listed below:
Set as: Set the selected picture as wallpaper
File Info: Allow you to view the file information.
Delete All: Delete all the images in the wallpaper folder
Videos
The video function allows you to download and manage your video files. The
phone can play videos in the formats of MP4, 3GPP and 3GPP2. To access
the Video menu, select Menu→Music & Media→Videos from standby mode.
Downloading Videos
To download new videos, highlight Get New and click the OK key. The web
browser will launch and locate the TELUS video web page. Follow the on-
screen instructions to download a video.
Managing your Videos
After you have downloaded some videos, you can manage them by
highlighting the desired entry and pressing the Options soft key. The
following options are available:
1. Play: Play the selected video
2. Delete: Delete the highlighted video
3. Options: Display the additional options listed below:
File Info: Allow you view the file information.
Delete All: Delete all the videos in the video folder

65
Camera
The Camera function allows you to take pictures and videos right from your
phone. To access your camera, select Menu→Music & Media→Camera
from standby mode.
Shortcut: You can quickly access the Camera application by long pressing the
Camera key located on the left side of the phone.
Take pictures and videos
To capture an image, press Capture located on the middle soft key. You may
also press the Camera Key on the left side of the phone.
You can use the right and left navigation keys to view your image settings
while shooting. Use the UP and DOWN keys to adjust the level for each of
the following settings:
1. Brightness: Adjust the brightness level of the image
2. Contrast: Adjust the contrast of the image
3. Zoom: Adjust the zoom level
4. Effect: Change the effect between normal, black & white and sepia
For more shooting options, select Options to display the following:
1. Camera Flash: Turn the camera flash on or off
2. Self Timer: Set the self timer to be off, 5s, 10s, or 15s
3. Image Size: Choose between image sizes of 1280x960, 1024x768,
640x480, 320x240, 176x144, 160x120
4. Image Quality: Select Super Fine, Fine or Standard image quality
5. White Balance: Choose auto, sunny, cloudy, incandescent, and
fluorescent
6. Shutter Sound: Select the shutter sound
7. Save to: Select to save to the Handset or External memory

66
8. Video Camera: Switch to video recording mode. Press OK to start
recording.
Note: You can shoot videos with lighting by switching to video recording mode,
and then turning on the camera flash.
Viewing your image album
You can view your previously taken images and video by selecting Album
located on the right soft key. For more information on your album options, see
the Photo Album and Video Album sections.
Note: Your camera flash has a limited life span. If the camera flash does not
work, it may be near the end of its lifespan. Replace the flash with a new
one of the same type.
My Albums
The My Albums folder is a convenient way to organize all the music, images
and video on your handset. To access the My Albums folder from standby
mode, select Menu→Music & Media→My albums. In this folder you will be
able to access the Sound Album, Photo Album, Video Album, Online Album
and the External MicroSD Memory.
Sound album
The Sound Album folder allows you to view and organize the sound files that
are stored on your phone. The following folders are available:
Sounds
You can play tracks by highlighting the desired file and pressing Play. You
can select Mark to highlight a group of songs simultaneously. Pressing
Options will provide access to the following functions:
Send: Send the selected sound via MMS or Bluetooth
Upload: Upload the selected sound
Copy: Copy the current sound file to the MicroSD card
Move: Move the selected sound file to the MicroSD card
67
Delete: Delete the selected file
Delete All: Delete all saved sound files
Rename: Rename the highlighted file
File Info: View details about the sound file
Mark All Files: Mark all the sound files
MMS
The MMS folder displays all of the sound clips that have been received in
MMS messages. Refer to the Sound Album section for more information
about managing your MMS sound files.
Transferred
The transferred folder displays all of the sound clips that have been copied
or moved from the MicroSD card. Refer to the Sound Album section for
more information about managing your Transferred sound files.
Photo Album
The Photo Album folder allows you to view and organize the photos that are
stored on your phone. The following folders are available:
Photos
You can view a full-screen image of the selected thumbnail selecting View.
You may also use Mark to select several pictures. The Options provides
the following picture functions:
Send: Send the selected photo via MMS or Bluetooth
Upload: Upload the selected photo
Set as: Set the highlighted picture as wallpaper or a contact image
Copy: Copy the current picture file to the MicroSD card
Move: Move the selected picture file to the MicroSD card
Delete: Delete the selected file
Delete All: Delete all saved picture files
Rename: Rename the highlighted file
File Info: View details about the photo
68
Mark All Files: Mark all photos
MMS
The MMS folder displays all of the photos that have been received in MMS
messages. Refer to the Photo Album section for more information about
managing your MMS photos.
Transferred
The transferred folder displays all of the photos that have been copied or
moved from the MicroSD card. Refer to the Photo Album section for more
information about managing your Transferred photos.
Video Album
The Video Album folder allows you to view and organize the video files that
are stored on your phone. The following folders are available:
Videos
You can play your video files by selecting a desired file and pressing Play.
You may also use Mark to select several videos simultaneously. The
Options provides the following video functions:
Send: Send the selected video via MMS or Bluetooth
Upload: Upload the selected video
Copy: Copy the current video to the MicroSD card
Move: Move the selected video to the MicroSD card
Delete: Delete the selected file
Delete All: Delete all saved videos
Rename: Rename the highlighted file
File Info: View details about the selected video
Mark All Files: Mark all videos
MMS
The MMS folder displays all of the videos that have been received in MMS
messages. Refer to the Video Album section for more information about
managing your MMS video files.
69
Transferred
The transferred folder displays all of the videos that have been copied or
moved from the MicroSD card. Refer to the Video Album section for more
information about managing your transferred video files.
Online Album
The Online Album selection launches the browser application to view your
files stored online.
External Memory
The External Memory selection displays the Picture, Video and Sound files
that are located on the MicroSD card.
Memory Info
The Memory Info selection allows you to view the details about the space
used and available memory. To view the memory information from standby
mode, select Menu→Music & Media→Memory Info.

70
11. Search
Your phone has a shopping menu that allows you to purchase music,
ringtones, images, videos, games and a variety of applications. To access the
search menu, select Menu→Search from standby mode.
Your web browser will launch automatically. Follow the on-screen instructions
to download the desired files

12. Games
Your phone is capable of playing a variety of games that are available
through your service provider. You can download games and store them on
your phone for future use. To access the Games folder from standby mode,
select Menu→Games.
Downloading games
To download games from your service provider, select Get New located at
the top of the games list. This will launch the browser and take you to the
download page. Follow the on-screen instructions to find and download
games.
Playing games
The games that have already been downloaded will be displayed in the
games list. Scroll down the list and press OK to launch the game. Press
Options to display the following game options:
1. Delete: Delete the selected game
2. Properties: View information about the game
3. Permissions: View and modify various security features for the
selected game
72

13. Tools & Apps
The Tools menu provides helpful software applications to assist with daily
tasks, such as a calculator, scheduler, voice memos, world clock, GPS
services and many others. To access the Tools folder, select Menu→Tools
& Apps from standby mode.
Get New
The Get New selection allows you to download new tools and applications
from your service provider. From standby mode, select Menu→Tools &
Apps→Get new to access this feature. The browser will launch and take you
to the download menu. Follow the on-screen instructions to download the
applications.
Downloaded Apps
The Downloaded Apps section displays all the applications that have been
downloaded to the phone. To access this feature from standby mode, select
Menu→Tools & Apps→Downloaded Apps.

74
GPS Services
With GPS services, you can download new location based service
applications that use your phone’s Global Positioning System (GPS) features.
Your handset also comes pre-loaded with TELUS Navigator, which provides
audible turn-by-turn driving directions directly from your phone. To learn more
about TELUS Navigator, please visit www.telusmobility.com/navigator. To
access the GPS Services menu from standby mode, select Menu→Tools &
Apps→GPS Services.
Downloading new applications
To download new location based applications, select Get New from the menu.
Your browser will launch automatically and direct you to the application
download section. Follow the on-screen instructions to download applications.
Running applications
After your application has been successfully installed, you may scroll down
the GPS services list and press the OK key to launch the highlighted
application. The following options are available by pressing Options:
1. Properties: View information about the application
2. Permissions: View and modify various security features for the
selected application
Calculator
Your mobile phone comes with a built-in calculator capable of performing
addition, subtraction, multiplication and division. To access the calculator
from standby mode, select Menu→Tools & Apps→Calculator.
1. Enter a number with the keypad
2. If necessary, press the right soft key to insert a decimal point
3. Use the scroll key to select a mathematical function
Up key: add
75
Down key: subtract
Left key: multiply
Right key: divide
4. Enter the next number with the keypad
5. Press OK to view the result
Alarm Clock
The alarm function allows you to set up multiple separate alarms. To access
the alarm clock function, select Menu→Tools & Apps→Alarm clock from
standby mode.
Adding an alarm
To add an alarm, highlight the desired alarm and press the OK key. You may
set the alarm options described below:
Type: Set the type between Daily, Workday, Weekly and Once
Date: Select the date. This feature is only available for Weekly or Once
alarm types.
Time: Enter the time for the alarm in HH:MM am/pm format.
Ringtone: Set the alarm sound as on or off.
Ring Type: Select the ringtone that will be played when the alarm
sounds. This feature is hidden if the Ringtone is set to off.
Status: Enable or disable the alarm
Remark: Enter a comment about the alarm
You can save the alarm by pressing the OK key.
Alarm options
To access the alarm settings, press Options located on the left soft key. The
following options are available:
1. Edit Alarm: Edit the highlighted alarm entry
76
2. Set Rest Days: Set the days that the alarm is enabled. Highlight the day
and press Mark to set the rest day, or Unmark to remove the rest day.
Press OK to save the settings.
3. Delete All: Delete all the preset alarms.
Scheduler
The scheduler allows you to conveniently access and modify your agenda.
Simply store your appointment with a reminder and your phone will alert you
on the time and date selected. You can access the scheduler by selecting
Menu→Tools & Apps→Scheduler.
Adding an appointment
To add an appointment to the scheduler, press Add located on the right soft
key. You may select to add a Meeting, Memo or Anniversary from the list.
Viewing an appointment
When you open your scheduler, it will automatically navigate to the current
date. You may click the left and right navigation keys to highlight a different
date, and select OK to view appointments on that date. To view the details of
an appointment, highlight the desired appointment and press View. This will
display various parameters such as the time, date, subject and location.
Scheduler Options
To access the scheduler settings, press Options located on the left soft key.
The following options are available:
1. Monthly View: Provides an overview of the selected month
2. Go to Date: Input a date and press OK to jump to the specified date
3. Delete: Delete the selected entry
4. Delete All: Delete all appointments on the selected date
5. Settings: Set the alarm tone and default calendar view (Monthly or Day
view)
77
6. Memory Info: Displays the number of used, available and total calendar
entries
EZ Tip Calculator
The EZ tip calculator function allows you to quickly and easily calculate the tip
amount based on the tip rate and bill. You can access the EZ Tip Calculator
from standby mode by selecting Menu→Tools & Apps→EZ Tip Calculator.
To calculate a tip:
1. Enter the Bill amount. Press Decimal to enter a decimal point.
2. Enter the Tip percentage.
3. Press OK.
4. The Tip and Total will be displayed.
You may press the Reset to clear the bill and tip amount.
World Clock
The world clock displays the time in twenty-four different time zones around
the world, together with one or more cities, states, regions or countries in
each time zone. To access the World Clock, select Menu→Tools &
Apps→World Clock from standby mode. Press the left and right navigation
keys to display different time zones.
You may press DST to enable or disable daylight savings time. The Cities
sets the default time zone for the phone.
Voice Memo
You can use your phone to record brief memos to remind yourself of
important events, phone numbers or other information. To access the voice
memo from standby mode, select Menu→Tools & Apps→Voice Memo.
Recording a Voice Memo
78
You may press the Record to record a memo. Once the recording has
started, press the Stop to end the memo. After the recording is complete, you
may press Discard to delete, or Save to store the memo for future reference.
Press Options to display the following features:
1. Send: Send the voice memo via MMS message
2. Play: Play the voice memo
Listen to a Voice Memo
To listen to a previously recorded voice memo, press Album located on the
right soft key. A listing of audio clips will be displayed. Navigate to the desired
entry and press Play to listen to the clip.

14. Settings
The settings menu allows you to customize your phone’s display, sound, and
various other settings based on your preferences. In the standby mode,
select Menu→Settings to access the settings menu.
Various phone settings are available within the Settings menu. Highlight the
desired selection and press OK key to view or change the current settings.
Sound
The sound menu allows you to change the sound properties of your phone.
Ringers
Many different ringers are available to help you identify incoming calls and
messages. You can assign ringtones to individual contact entries and types
of calls or messages.
1. Voice Calls: Change the voice call options
Caller ID: Edit the ringtone for calls with caller ID tags
Unknown Calls: Set the ringtone from blocked or restricted phone
numbers
Roaming: Select a ringtone to be played while your phone is
roaming
80
2. Messages:
Voice Mail: Select the Voice Mail indicator sound
Text and Multimedia: Set the tone for new text and multimedia
messages
Web Alerts: Choose the indicator for new web alerts
2-Min reminder: Set the reminder time for new messages
Keypad
The keypad menu allows you to change the volume and length of keypad
tones.
Tone: Set the tone for keypad presses
DTMF Length: Set the duration for Dual-Tone Multi-Frequency inputs
Volume
The Volume menu sets the mode and volume options for the ringer and
earpiece.
Meeting/Silent Mode: Enable or disable silent mode
Master: Change the master volume level between off, vibrate only, level
1-4, or level 4 + vibrate
Earpiece: Set the volume for the earpiece of the wired headset
accessory
Power On/Off
The Power On/Off setting allows you to enable or disable the music played
during power on/off of the handset.
Alerts
The alerts menu allows you to change the sound settings for various alerts on
your phone. To access the alerts menu, select
Menu→Settings→Sound→Alerts from standby mode. The following
settings are available:
Service Change: Enable or disable the service change alert
81
Minute Beep: Enable or disable the beep played before the calling time
is about to achieve one minute or multi-minutes
Call Connect: Enable or disable the tone played when a call is
connected successfully.
Call Lost: Enable or disable the tone played when a call is lost
No Service: Enable or disable the no service tone
Display/Keypad
The display settings allow you to customize your mobile phone’s display
screen. To access the display settings from standby mode, select
Menu→Settings→Display/Kaypad. The following settings can be changed
via the display menu:
Banner: Change the banner name displayed in standby mode
Wallpaper: Select the background image for standby mode
Backlight: Set the screen and keypad backlight to be always on, always
off, 7 seconds, 15 seconds or 30 seconds.
Keypad Brightness: Set the keypad light level from level 1 to level 5 or
set the light off.
Clock Format: Change the format of the clock between Small Digital
and Big Digital
Menu Style: Choose between icon or list menu style
Dialing Font: Select the size of the dialing font
Games/Tools
The Games/Tools menu allows you to set various options that control the
phone’s behaviour when playing games or applications. To access the
Games/Tools menu from standby mode, select
Menu→Settings→Games/Tools. The following settings can be edited from
this menu:

82
1. Backlight Settings: Set the backlight duration to be 7 seconds, 15
seconds, always on, or always off while applications are running.
2. Volume: Set the volume level for applications.
3. Notifications: Enable or disable notifications for voice mail, messages
or web alerts while applications are running.
4. Memory Info: View information about the phones available, used and
total memory
Bluetooth
Your phone is capable of connecting to a variety of Bluetooth wireless
accessories. You may create and store 20 pairings within the phone and
connect to one device at a time. The approximate range for Bluetooth
wireless technology is up to 30 feet (10 meters). Your phone has the
following Bluetooth profiles:
Profile Description Feature Connecting Devic
e
HSP Headset
Profile
The HSP profile allows you to
use a Bluetooth wireless
headset to make calls with your
phone.
Bluetooth wireless
headset
HFP Hands-free
Profile
HFP allows you to connect with
a HFP enabled car-kit for
hands-free conversations.
Bluetooth hands-fr
e
car kit or other HFP
capable devices
DUN Dial-up
Networking
Profile
The DUN profile allows you to
use your handset as a wireless
modem for Bluetooth enabled
computers or laptops.
Refer to 'PC Connection.
Bluetooth enabled
laptop or PC
OPP Object Push
Profile
OPP allows you to send images,
video, music and phonebook
entries (in v-card format) to
other OPP-capable devices.
Bluetooth capable
handset

83
A2DP Advanced
Audio
Distribution
Profile
A2DP allows you to connect
with wireless stereo headsets,
for use while listening to music
on your handset.
Bluetooth stereo
wireless headset
AVRCP Audio/Video
Remote
Control Profile
This profile allows you to control
the phone’s music player with
remote control keys located on
a AVRCP supported headset.
Bluetooth stereo
wireless headset
w
remote control
The Bluetooth menu allows you to search for Bluetooth wireless devices, and
manage devices that have already been paired with your phone. To access
the Bluetooth menu from standby mode, select Menu→Settings→Bluetooth.
The following options are available:
Bluetooth Manager: Manage the Bluetooth settings below
Power: Enable or Disable the Bluetooth support
Discoverable Mode: Disable or enable discoverable mode for 60
seconds. Turn discoverable mode on for 60 seconds to allow other
devices to find your handset.
Device Name: Set the Bluetooth device name for your phone. This
name will appear on other Bluetooth devices when your phone is
located.
Address: Identifies the address for your handset
Device Type: Shows your Bluetooth device type
Supported Profiles: Allows you to view a listing of the Bluetooth
profiles supported by the handset.
Bluetooth Devices: This menu allows you to manage the Bluetooth
devices that have been, or currently are paired to your handset.
Search Again: To provide user the UI to search Bluetooth device
again.
Device Info: To provide user the UI to view the device information,
such as name, address, and profiles supported.
Pairing with a new Bluetooth device
84
To pair with a new Bluetooth device from this menu:
1. Press Search to find a new compatible device
2. If Bluetooth power is set to off, you will be prompted to turn the power on.
Press Yes to enable Bluetooth.
3. The device will appear in the Bluetooth Devices menu once it has been
located. Highlight the desired device and press Pair.
4. The phone will prompt you for the pass key. Consult the Bluetooth
accessory instruction manual for the correct pass key. Enter the pass
key and press the OK key.
5. Once connected, you will see the device listed in the paired Devices
menu, and the Bluetooth icon will appear on the status bar.
GPS
You phone’s GPS features enable service provides to locate your position in
emergencies, or for other services to request your position. You may change
the following settings:
GPS Status: Sets your GPS status to be On, or Emergency only. The
Emergency only setting allows the network to check your location only in
emergency situations. If you would like other services to have access to
your location, set the GPS status to be On. Setting the GPS Status to
On will enable the GPS privacy settings below.
GPS Privacy: You can set your privacy to be By Permission, Restricted
or Unrestricted.
Others
The Others menu provides additional phone settings.
Shortcuts
The Shortcuts menu allows you to assign a shortcut to your favorite and most
frequently used applications. After setting the shortcut, you can access the
assigned application it by holding the corresponding key in standby mode. To
modify a shortcut:
1. Select Menu→Settings→Others→Shortcuts from standby mode
85
2. Highlight the desired shortcut letter and press Select.
3. A list will appear with all the functions available for the shortcut key.
Scroll to the function you want to assign to the key, and press OK to
confirm.
Call Setup
The call setup menu allows you to change the answering features on your
phone. To access the call setup menu from standby mode, select
Menu→Settings→Others→Call Setup. The following settings are available:
Call Answer: Select among answering when the flip is opened,
pressing the send key to answer, or pressing any key to answer.
Auto Answer: Set the auto-answer settings to Off, 2 seconds, 4
seconds or 8 seconds. This feature is intended for use when your
phone is connected to an optional hands-free headset.
Auto Redial: Enable or disable the auto-redial feature. This feature
automatically redials a call after an unsuccessful call.
Language
Your phone can display text in English or French. To change the language
settings, select Menu→Settings→Others→Language from standby mode.
Changes the language settings change all menus and message settings. Use
the Up and Down keys to select between English and French. Press OK to
select the highlighted language.
TTY Mode
Your handset is a TTY compatible device. Simply connect the TTY equipment
to the USB jack with the ZTE TTY-to-USB connector. To access the phone’s
TTY settings, select Menu→Settings→Others→TTY mode. Use the Up
and Down keys to choose among the following settings:
TTY Full: Users who cannot talk or hear may use this setting to send
and receive text messages through TTY equipment.
TTY+Talk: Users who can talk, but cannot hear, may use this setting to
speak through the phone and receive responses via text message
86
TTY+Hear: Users who can hear, but cannot speak, may use this setting
to listen to conversation of the other party, and respond via text
message.
TTY Off: Users who can hear and speak may use this setting to disable
TTY support.
Connecting to TTY Equipment
1. Connect the cable from the TTY device into the ZTE TTY-to-USB
connector.
2. Plug the USB connector into the jack on the right side of the phone.
3. Enter the TTY Mode menu and select the desired TTY Mode (shown
above).
4. After setting the TTY mode, check the LCD screen on the phone for the
TTY icon
5. Connect the TTY equipment to the power source and turn it on.
6. Make a phone connection to the desired number.
7. When a connection is made, use the TTY equipment to send a text
message, or speak (for TTY+Talk mode).
8. The voice or text message from the other party will be heard or
displayed on the TTY equipment, depending on the TTY mode selected.
PC Connection
The PC Connection setting allows you to select the data port when the
handset is used as a modem for internet connections. You can access the
PC Connection settings menu by selecting Menu→Settings→Others→PC
connection from standby mode. Use the Up and Down keys to select
between USB and Bluetooth.
Memory Info
The Memory Info menu allows you to view information about the phone’s
available and used memory.

87
System
The System menu provides you with specific information about the phone
and network properties. To access the System menu from standby mode,
select Menu→Settings→System. The following options are available:
Phone Info
1. My Number: Display the phone’s mobile number
2. SW Version: View the software, hardware, PRL and Browser versions
of the phone
3. Serving System: Display the current CDMA channel and System ID
(SID)
4. Icon Glossary: A list and description of all icons displayed on the
phone’s status bar
System
Set Mode: Select between Automatic or Home Only modes. Use
automatic to allow roaming onto other service provider’s network, or use
home only to disable this feature.
Note: Additional fees may apply when roaming on another network.
Set NAM: Your phone has the capability of storing 2 different phone
numbers. Use this setting to select the current Number Assignment
Module (NAM). Contact your service provider for more information about
the NAM.
Call Guard: Enable or disable the call guard.
Security
The security menu allows you to lock your phone electronically. To access
the Security menu, select Menu→Settings→System→Security from
standby mode.
Note: You will need to enter the phone lock code to enter this menu. The default
code is the last 4 digits of your telephone number.
88
The following options are available:
1. Lock Phone: Choose among Unlock, Lock and On Power Up. In Lock
mode, the phone is only able to receive calls or make emergency calls.
The On Power-Up setting will automatically lock your phone when it is
powered on.
2. Change Lock: This menu allows you to change the phone’s lock pass
code. To change your code:
Select Menu→Settings→System→Security from standby mode,
after enter the current lock code, and choose Change Lock.
When prompted, enter your old 4 digit lock code.
Input the new code (1 to 8 characters).
Input the new code again to confirm.
3. Reset Defaults: This selection restores the default security settings.
Airplane Mode ON/OFF
Airplane Mode allows you to use many of your phone’s features, such as
games, calculator, voice memos, and many others when you are in an
airplane or other area where RF signals may cause interference. In airplane
mode, you are prohibited from making or receiving voice/data calls, however
you may still make calls to your local emergency number.
Enabling Airplane Mode
To enable Airplane Mode, select Menu→Settings from standby mode.
Highlight Airplane Mode: OFF and press Select.
Disabling Airplane Mode
To disable Airplane Mode, select Menu→Settings from standby mode.
Highlight Airplane Mode: ON and press Select.

89
15. Support
Telephone Support
If you have any difficulty installing or using your new txtster Mobile Phone,
Contact TELUS’ toll-free customer support line at 1-866-558-2273. The call
centre is open from 8 a.m. to 10 p.m. (EST) Monday to Friday and from 9 a.m.
to 8 p.m. (EST) Saturdays and Sundays.
Online Help
The txtster has extensive online help, which includes documentation,
answers to frequently asked questions (FAQ) and a knowledge base. Visit
the ZTE Canada webpage at www.ztecanada.com for more information.
16. Troubleshooting
Fail to power on the phone
Check whether the battery has adequate capacity to power on.
The phone has auto powered off
The battery capacity is quite low, please charge the battery.
No key tone when pressing the keys
Key tone is not the necessary setting in main function. You can set key tone
settings via the path Menu→Settings→Sound→ Keypad.
No incoming ringtone when receiving a call
Check whether the phone is set to Silent Mode or the phone volume is turned
off by the Volume key.
Can not send a message
Check the status of the network.
Can not auto answer an incoming call by the headset
Check whether Auto Answer is on in the call setup settings, via the path
Menu→Settings→Others→Call Setup.
To dial an emergency call
You can still dial an emergency call, even if the keypad is locked. Please
enter the call number directly and press the Send Key.
Can not connect to the network
Check whether the phone is in the CDMA network service area or move other
places to try again.
Can not receive a new message
91
Check whether the network condition is ok, and then check whether the Inbox
is full. If you turn off the Auto Delete Inbox function, you may not receive new
messages when the inbox is in full status. You should delete some messages
and change the settings.
Can not establish Three-Way Call
Check the network condition and whether you have applied this service from
your network provider.

17. Glossary
Abbreviation Description
1X-EVDO 1x - Evolution Data Only
A2DP Advanced Audio Distribution Profile
AC Alternating Current
AVRCP Audio/Video Remote Control Profile
CDMA Code Division Multiple Access
DST Daylight Savings Time
DTMF Dual-Tone Multi-Frequency
DUN Dial-up Networking Profile
HFP Hands-free Profile
HSP Headset Profile
GPS Global Positioning System
IM Instant Messenger
MMS Multimedia Message Service
NAM Number Assignment Module
OPP Object Push Profile
RF Radio Frequency
SD Secure Digital
SID System Identifier
SMS Short Message Service
SW Software
TTY Teletype
URL Uniform Resource Locator
USB Universal Serial Bus
VIP Very Important Person
18. Index
A
Aircraft Safety 13
Answering Voice Calls 34
Alarm Clock 73
Airplane Mode ON/OFF 86
B
93
Battery 27
Installing the Battery 27
Charging the Battery 27
Removing the Battery 28
Bluetooth 80
C
Create FastapTM Shortcut Keys 25
Connecting to the Network 30
Call Waiting 36
Call Timers 46
Camera 64
Calculator 72
D
Downloading games 70
Downloaded Apps 71
Display/Keypad 79
F
FASTAPTM Shortcut Key Definitions 25
G
General Care 10
General Safety 12
Groups 43
Get New 71
GPS Services 71
Games/Tools 79
GPS 82
H
Hospital Safety 13
I
Indicators and Icons 26
In-Call Features 35
Incoming Calls 45
IM & Chat 57
K
Key Definitions 23
Key Functions 37
L
List Entry 41
M
Music Remote Control 21
Supported functions 22
Memory Card 29
Inserting the MicroSD Card 29
Removing the MicroSD Card 29
Making Voice Calls 31
Using the Keypad 31
Using the Contacts list 31
Using the last number dialed 32
Using a number in Call History 32
Using your FASTAPTM keypad 32
Using Letter Dialing 33
Using Speed Dials 33
Using Voice Dials 33
Missed Calls 45
My Albums 65
Memory Info 56
N
New Entry 42
O
Overview 19
Others 82
Online Help 87
94
P
Phone at a glance 20
Powering On/Off your Phone 30
Playing games 70
R
Road Safety 13
Radio Frequency (RF) Energy 16
Ringtones 61
S
Supported functions 22
Speed Dials 44
Settings 77
Short Codes 57
Scheduler 74
Sound 77
System 85
T
Third Party Equipment 14
Three-Way Call 36
Text Input Modes 38
Text and Multimedia 48
Send New 48
Inbox 50
Outbox 53
Drafts 53
Sent 53
Saved 54
Templates 54
Settings 55
Memory Info 56
TELUS Mobile Music 60
TV & Radio 61
Telephone Support 87
U
Unlocking Your Phone
30
V
Vehicles Equipped With an Air Bag 14
Voice Dials 43
Voice Mail 47
Videos 63
Voice Memo 76
W
What's included 19
Web Alerts 57
Wallpapers 62
World Clock 75
Z
txtster Technical Specifications 20